BlackBerry R957M-2-5 Stand-alone, Wireless, Data Communications Handhel User Manual bbug
BlackBerry Limited Stand-alone, Wireless, Data Communications Handhel bbug
user manual

User’s Guide
Proton
Model R957M-2-5

Proton User’s Guide, Version 2.0
Last revised 09/10/99
Part Number: MAT-02172-001 Rev. 002
At the time of printing, documentation complies with: Operating Sys-
tem 1.4.78 and Applications version 1.6.0 and Desktop: version 1.6.0.
© 1997-1999 Research In Motion Limited. All rights reserved.
RIM, Research In Motion and the RIM logo are trademarks of Research
In Motion Limited. RIM, Research In Motion – Registered, U.S. Patent
and Trademark Office.
Mobitex is a trademark of the Swedish Telecommunications Adminis-
tration. Windows 95/98, Exchange, and Outlook are either trademarks
or registered trademarks of Microsoft Corporation.
All other brands, product names, company names, trademarks, and ser-
vice marks used herein are the property of their respective owners.
Warning: This document is for the use of licensed users only. Any unau-
thorized copying, distribution or disclosure of information is a violation
of copyright laws.
While every effort has been made to ensure technical accuracy, informa-
tion in this document is subject to change without notice and does not
represent a commitment on the part of Research In Motion Limited.
Research In Motion Limited
295 Phillip Street
Waterloo, Ontario
Canada N2L 3W8
Tel. (519) 888-7465
Fax (519) 888-6906
Web site: www.rim.net
Email: info@rim.net
Printed In Canada KM0999/user'sguide0899

FCC compliance statement (USA)
FCC Class B Part 15
This device complies with Part 15 of the FCC Rules. Operation is
subject to the following two conditions:
• This device may not cause harmful interference, and
• This device must accept any interference received, including
interference that may cause undesired operation.
This equipment has been tested and found to comply with the limits
for a Class B digital device, pursuant to Part 15 of the FCC Rules.
These limits are designed to provide reasonable protection against
harmful interference in a residential installation. This equipment
generates, uses and can radiate radio frequency energy and, if not
installed and used in accordance with the manufacturer’s
instructions, may cause interference harmful to radio
communications.
There is no guarantee, however, that interference will not occur in a
particular installation. If this equipment does cause harmful
interference to radio or television reception, which can be
determined by turning the equipment off and on, the user is
encouraged to try to correct the interference by one or more of the
following measures:
• Reorient or relocate the receiving antenna.
• Increase the separation between the equipment and receiver.
• Connect the equipment into an outlet on a circuit different from
that to which the receiver is connected.
WARNING Changes or modifications to this unit not expressly
approved by the party responsible for compliance could
void the user’s authority to operate this equipment.

• Consult the dealer or an experienced radio/TV technician for
help.
Industry Canada Certification
This device complies with Industry Canada RSS 119, under
certification number Pending.
IC Class B compliance
This device complies with the Class B limits for radio noise
emissions as set out in the interference-causing equipment standard
entitled “Digital Apparatus,” ICES-003 of Industry Canada.

Contents
FCC compliance statement (USA) ...............................................iii
Industry Canada Certification .....................................................iv
Important safety information ..................................................ix
Welcome ......................................................................................xi
About this guide ...........................................................................xiii
Customer support ........................................................................xiv
Introduction .................................................................................1
Contents of your package ...............................................................1
The Proton solution .........................................................................2
Wireless service instructions ..........................................................2
Proton components ..........................................................................3
LCD components .............................................................................9
Getting started ..........................................................................15
Activating your Proton .................................................................15
Turning on the radio ......................................................................16
Registering with the network .......................................................17
Quick start setup ............................................................................18
Setting the alarm ............................................................................19
Sending a message .........................................................................21
Reading a message .........................................................................24
Using password protection ..........................................................25
Composing & sending messages ...........................................31
Sending a message to multiple contacts .....................................31
Sending messages to other Protons .............................................32
Customizing the auto signature ...................................................34
Receiving confirmation of a message ..........................................34
Attaching Address Book entries ..................................................35
Setting message options ................................................................36
Using AutoText to compose a message ......................................37
Automatic formatting ....................................................................41
Inserting symbols ...........................................................................42
Receiving & reading messages ..............................................45

Received message options ............................................................45
Receiving long messages ..............................................................47
Managing file attachments ...........................................................47
Opening an Address Book attachment .......................................48
Adding attachments to your Address Book ..............................49
Managing messages .................................................................51
Message status ................................................................................51
Searching messages ......................................................................52
Saving and recalling search terms ...............................................54
Saving messages .............................................................................54
Deleting messages ..........................................................................57
Resending a message .....................................................................59
Marking a message as unread ......................................................60
Using the Address Book ..........................................................61
Customizing Address Book options ...........................................61
Adding address entries .................................................................63
Searching address entries ............................................................66
Viewing address entries ................................................................66
Editing address entries ..................................................................67
Deleting address entries ................................................................68
Managing tasks and appointments .......................................69
Using the Tasks function ..............................................................69
Using the Calendar function ........................................................74
Using the MemoPad and Calculator .....................................81
Using the MemoPad function ......................................................81
Using the Calculator function ......................................................84
Customizing your Proton’s options ......................................87
Customizing Proton options ........................................................87
Proton options ................................................................................88
Connecting to your PC ..................................................................96
Frequently asked questions ....................................................99
Alarm ...............................................................................................99
Battery ..............................................................................................99
Home screen .................................................................................100
LCD screen ....................................................................................100

Messages ........................................................................................101
Punctuation ...................................................................................103
Resetting the Proton ....................................................................104
Advanced user’s tips ..............................................................107
Tips for navigating .......................................................................107
Tips for selecting ..........................................................................110
Tips for editing .............................................................................110
Specifications ..........................................................................115
Index .........................................................................................119


Important safet
y
information
Remember to follow any special regulations governing the use of
the Proton and always switch it off in areas where radio devices are
forbidden, or when it may cause interference or danger. Any safety
laws and regulations pertaining to the use of cell phones and two-
way radios will likely apply to your use of the Proton. We
encourage you to follow such laws and regulations at all times. In
particular, please observe all restrictions on the use of radio
equipment in fuel depots (fuel storage and distribution areas),
chemical plants, where blasting operations are in progress or in any
other area in which restrictions on radio transmissions are imposed.
The Proton is not an FAA-approved electronic device for use on
aircraft. Switch off the Proton when in an aircraft. The effect of the
use of the Proton in an aircraft is unknown. Such use may affect
aircraft instrumentation, communication and performance, may
disrupt the network, and may be illegal.
Operation of any radio transmitting equipment, including the
Proton, may interfere with the functionality of inadequately
protected medical devices, including pacemakers. Consult a
physician or the manufacturer of the medical device if you have any
questions. Additionally, the effect of the radio signals from the
Proton on other electronic systems, including those in your car
(such as electronic fuel-injection systems, electronic anti-skid
braking systems, and electronic cruise-control systems) is unknown
and malfunction of these systems may result.
Avoid using the Proton in any environment requiring your full
attention, such as when driving a vehicle. Do not use the cradle
provided in the Proton package as a means of storing your Proton
while in a vehicle. When using a cradle, make sure that it is a cradle
that RIM has supplied for that particular use of your Proton. Do not
use any cradle, charging unit or any other accessory that is not
manufactured or supplied by RIM or an authorized RIM accessories

supplier. Use of any accessory that is not supplied or approved for
use by RIM is not permitted.
Use only those battery types specified in this User’s Guide. The use
of any other may disable the Proton and may be dangerous.
Discard the Proton properly. As the unit contains a lithium ion cell,
neither the Proton nor the lithium ion cell (nor the AA battery)
should be disposed of in fire. Dispose of the Proton containing the
lithium ion cell in accordance with the laws and regulations in your
area governing disposal of such cell types. Similarly, dispose of AA
batteries in a responsible manner. Contact RIM if you have any
questions concerning disposal of the Proton, the lithium ion cell, or
the AA battery.
Failure to observe all these instructions will void the Limited
Warranty, and may lead to suspension or denial of services to the
offender, or legal action, or both.
Welcome
Proton is a mobile email solution that includes the Proton, Proton
cradle, Proton Desktop Software, and flat-rate airtime on a
nationwide wireless data network. The Proton is a powerful
handheld computer with a full-featured Address Book,
Appointment Calendar, Task List, MemoPad, and Calculator. The
cradle and desktop software allow you to synchronize with popular
desktop Personal Information Management (PIM) software. Unlike
other handheld products, the Proton includes an integrated wireless
modem and a nationwide wireless data network keeps the Proton
always connected to your desktop email.
The pocket-sized Proton features a 31-key QWERTY keyboard, a 6-
line or 8-line, custom graphic LCD, and a unique trackwheel so that
you can communicate easily via email.
Get ready to experience the power of messaging with your Proton
using functions such as:
Messages
Receive, read, reply to, compose, forward,
save, and delete messages.
Compose
Create and send messages to Internet
email addresses and to other Protons.
Saved Messages
Store any important messages for future
viewing.
Search Messages
Locate messages in seconds with the pow-
erful search and database tools.
Proton — User’s Guide
Welcome
xii
Address Book
Store your personal directory of contact
information, such as multiple phone, fax
numbers, and email addresses. Enter and
store notes for individual contacts. Search
the database to find specific contacts.
Calendar
Keep track of appointments using the cal-
endar view or the agenda view.
Tasks
Add, edit, and delete tasks and mark tasks
as complete.
Alarm
Set the alarm on the Proton to sound
daily.
MemoPad
Use the MemoPad to keep track of com-
pose, edit, and delete important notes.
Calculator
Perform basic mathematical operations
using the Proton’s calculator.
Options
Customize the way the Proton notifies
you of new messages; set the password;
add, edit, and delete AutoText entries; set
the current date; and program the auto-
matic on/off feature.
Lock
Lock the Proton with a password security
screen so that only you can access it. This
function is only visible on the functions
list after you have set a password.
Welcome
Proton — User’s Guide
xiii
About this guide
This guide provides information for operating the Proton.
A summary of all key combinations begins on page 6.
Chapter 10, ‘Frequently asked questions,’ includes commonly asked
questions about the Proton. Consult this section for help with any
questions you may have while using the Proton.
To meet your specific needs, the Proton offers different ways of
performing the same function (i.e., you can choose to use the
trackwheel or an assigned key sequence to perform tasks.) Only the
most basic procedure is represented throughout the guide. Chapter
11, ‘Advanced user’s tips,’ contains a chart of tips that can be helpful
when using the Proton. As you become more comfortable using the
Proton, consult this section to improve your efficiency in
performing tasks.
Turn Radio On/
Turn Radio Off
Turn the Proton’s radio off when it may
interfere with other radio communica-
tions, such as during a flight. Turn on the
radio again to send and receive messages.
Power Off
Turn off the Proton at night or on week-
ends.
Note Notes will appear in this format and contain additional
information to help you perform the task bein
g
described.
Tip Tips provide information about performin
g
tasks and offer
different options to perform tasks.

Proton — User’s Guide
Welcome
xiv
The images that represent the Proton’s various LCD screen displays
throughout this guide show a 6-line display option. The Proton also
has an 8-line display option.
For your convenience, important information and a summary of tips
can be found in the Proton Quick Reference Card included in your
Proton package.
Customer support
For customer support:
• U.S. and Canada : 1-877-BLK-BERRY
• Email: support@blackberry.net
• Web: www.blackberry.net

1
Introduction
You are about to experience the freedom of mobility and the power
of staying in touch. With the Proton Solution, you can enjoy
constant connectivity to your email, wherever you are. You can
send, read, and respond to important messages, as well as update
contact lists and calendar items, all from a wearable Proton.
This guide explains how to get started with the Proton, and
provides tips for composing messages quickly and easily. Detailed
descriptions of and instructions for the Proton’s operational
functions are included, as well as answers to many frequently asked
questions. Before you do anything else, please check to make sure
that your Proton package is complete.
Contents of your package
Your Proton package should contain all of the following:
•Proton
• Cradle and charger
• Holster (belt clip)
•This User’s Guide
• Proton Quick Reference Card
• Proton Desktop Software Installation & Getting Started Guide
• Installation CD-ROM
If something from this package is missing or not working properly,
contact the point of purchase.
Proton — User’s Guide
Introduction — The Proton solution
2
The Proton solution
The Proton, Proton Desktop Software, and flat-rate airtime on a
nationwide wireless data network work together to provide a link to
your desktop email. Email that arrives at the desktop is instantly
relayed to the Proton. Email originating on the Proton is transmitted
to your desktop where the Proton Desktop Redirector mails it on
your behalf. The mail appears to originate from your desktop
because it actually does! There is little difference between mail
composed on your PC mail program and on the Proton.
See the Proton Desktop Manager and Proton Desktop Redirector
online help within the software for more information on the Proton
Desktop Software and all its capabilities.
Wireless service instructions
Your access number – Personal Identification Number (PIN) – on
the wireless data network and the Proton’s serial number are
located on the back of the Proton. You can also find your PIN
number in the screen of the function. See page 94 for
more information on the screen.

Introduction — Proton components
Proton — User’s Guide
3
Proton components
Figure 1: Proton
The Proton consists of the following components and accessories:
LCD screen
The LCD screen displays your messages, contacts’ addresses, and
configuration information. You can also review information about
your Proton’s status on the LCD screen such as signal strength.
The LCD backlight is activated when you press the ALT key three
times successively.

Proton — User’s Guide
Introduction — Proton components
4
Holster (belt clip)
A holster, equipped with a belt clip, accompanies the Proton. While
in the holster, the Proton is protected and wearable. You can
configure the Proton to perform different types of message
notification depending on whether it is in or out of the holster.
When you receive a new message and remove the Proton from the
holster within five seconds, notification (beeping and/or vibrating)
stops and the most recently received message will be open. If you
pull the Proton out of the holster and quickly replace it, notification
stops but the message will remain marked unread. See page 18 for
information on setting message notification options.
Cradle and charger
Once the Proton Desktop Software has been installed, the Proton
cradle allows you to synchronize your desktop with the Proton.
When you place the Proton in the cradle, messages can be
reconciled and your Personal Information Management (PIM)
applications can be synchronized. (PIM applications include the
Address Book, Calendar, MemoPad, and Tasks functions.) For
example, all messages that you have either read at your desktop or
on the Proton, will be marked as read in both places. With the
Proton in the cradle, you can also backup and restore information
and load new applications on to the Proton. See the Proton Desktop
Software Installation & Getting Started Guide for more information
on the cradle and the capabilities of the Proton Desktop Software.

Introduction — Proton components
Proton — User’s Guide
5
Serial port
The Proton can be connected to your PC through its serial port.
Once the desktop software is properly installed and the cradle is
connected to your PC, simply place the Proton in the cradle. See
page 96 of this guide or refer to the Proton Desktop Manager online
help for information on how to connect the cradle to your PC.
Keyboard and trackwheel
The curved, 31-key QWERTY keyboard is easily operable and
provides access to numeric characters, a symbols library,
punctuation, and special characters using the ALT key in
combination with other keys. Use your thumbs to type messages
easily. Use the trackwheel by rolling it or pressing (clicking) it.
Before you begin, acquaint yourself with the Proton keyboard, key
functions, and trackwheel. See the key assignment chart beginning
on page 6 for information.
A trackwheel that clicks!
The trackwheel on the Proton has a unique feature that aids your
task performance, it clicks! Simply click (press down) the
trackwheel to turn on the Proton, navigate between screens, select
menu options, compose and send messages, configure the Proton
settings, and more.
When you press the trackwheel with your thumb, you invoke
actions comparable to those achieved by the clicking function of a
mouse used with your PC. See how quick and easy it is to navigate
through the Proton’s functions and compose and send your
messages by clicking!

Proton — User’s Guide
Introduction — Proton components
6
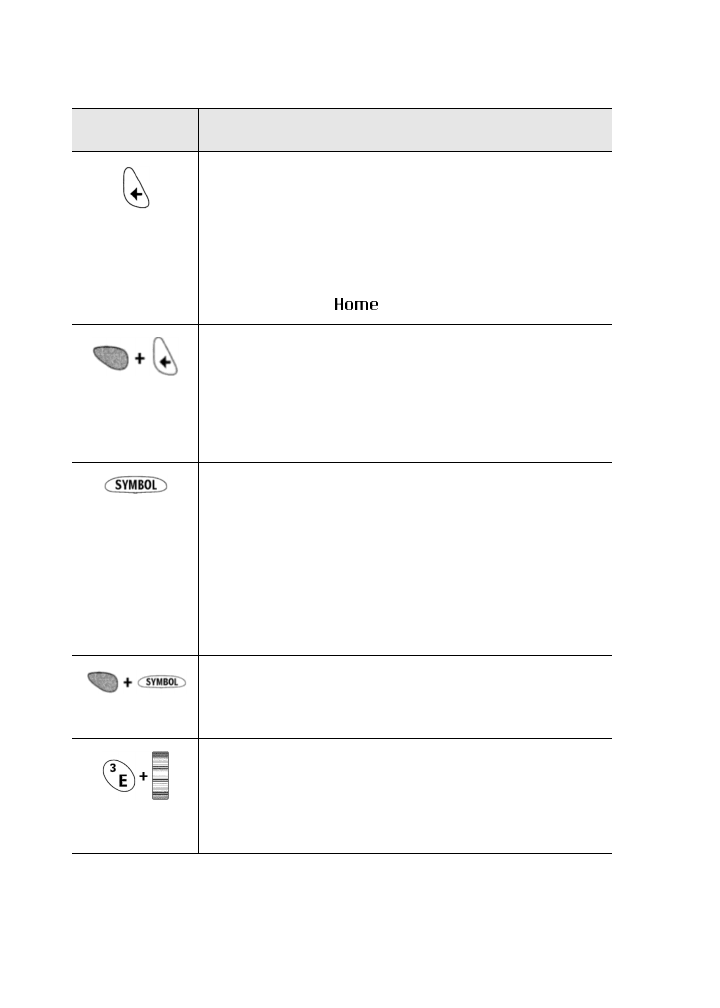
Key assignment chart
Key Description
TRACKWHEEL
• Roll the trackwheel with your thumb to
scroll up and down through screen lines,
fields, and menu items.
• Click (press down) the trackwheel with your
thumb to invoke actions similar to the click
function of a mouse used with your PC.
ALT key
•The orange
ALT key activates the numeric
and symbol characters, printed in orange
above the alphabetic keys.
• Press the ALT key once to affect the next char-
acter you type. Press and hold the ALT key
while you type to affect all characters.
• Press the ALT key three times to invoke back-
lighting.
An ‘A’ icon appears in the top right corner of
your screen when the ALT key is active.
• Press the ALT key while you roll the track-
wheel to move the cursor horizontally
across screen lines.
• Press the ALT key while you roll the track-
wheel to toggle through field option set-
tings.

Introduction — Proton components
Proton — User’s Guide
7
• Press SHIFT+ALT to activate num lock mode.
Press SHIFT or ALT again to return to normal
case mode.
An ‘N’ icon appears in the top right corner of
your screen when num lock mode is activated.
SHIFT key
• Press the SHIFT key once so that the next
letter you type is capitalized.
• Press and hold the SHIFT key while you type
so that all letters are capitalized.
An ‘up arrow’ icon appears in the top right
corner of your screen when the SHIFT key is
active.
• Press
ALT+SHIFT to activate caps lock mode.
Press SHIFT again to return to lower case
mode.
ENTER key
•The
ENTER key functions as a regular car-
riage return, by moving your cursor to a
new line. It also acts in the same manner as a
double click of your PC’s mouse.
• The key also functions as a regular ENTER
key by invoking the highlighted item.
Instead of clicking the trackwheel, press the
ENTER key to perform your task.
Key Description
Proton — User’s Guide
Introduction — Proton components
8
BACKSPACE
key
•The
BACKSPACE key enables you to move
backwards and delete characters.
• The key also enables you to hide a menu,
similar to a typical ESC key.
• Press the BACKSPACE key repeatedly to
invoke the screen.
• Press ALT+BACKSPACE while composing a
message to delete the highlighted character
only.
• Press ALT + BACKSPACE in the Messages list
to delete the highlighted message.
SPACE key
•The
SPACE key inserts a space between
characters while you type.
• Press the SPACE key to insert the ‘@’ and ‘.’
characters in an Email field.
• Press the SPACE key to edit field options
(e.g., Notify options and Date/Time
options).
• Press ALT+SPACE to display the Symbols
screen from which you can view, select, and
insert the symbol you need.
• Press and hold a letter while rolling the
trackwheel to insert international characters.
Various letters have international characters
associated with them.
Key Description

Introduction — LCD components
Proton — User’s Guide
9
LCD components
The Proton’s LCD screen is composed of function screens and
menus. These screens and menus also display several icons to
indicate Proton and message status. Other icons provide
navigational aid.
Proton function screens
All functions are represented on the LCD screen in a functions
list. When you select an icon and click it, the function screen opens.
See page 10 for details on the screen.
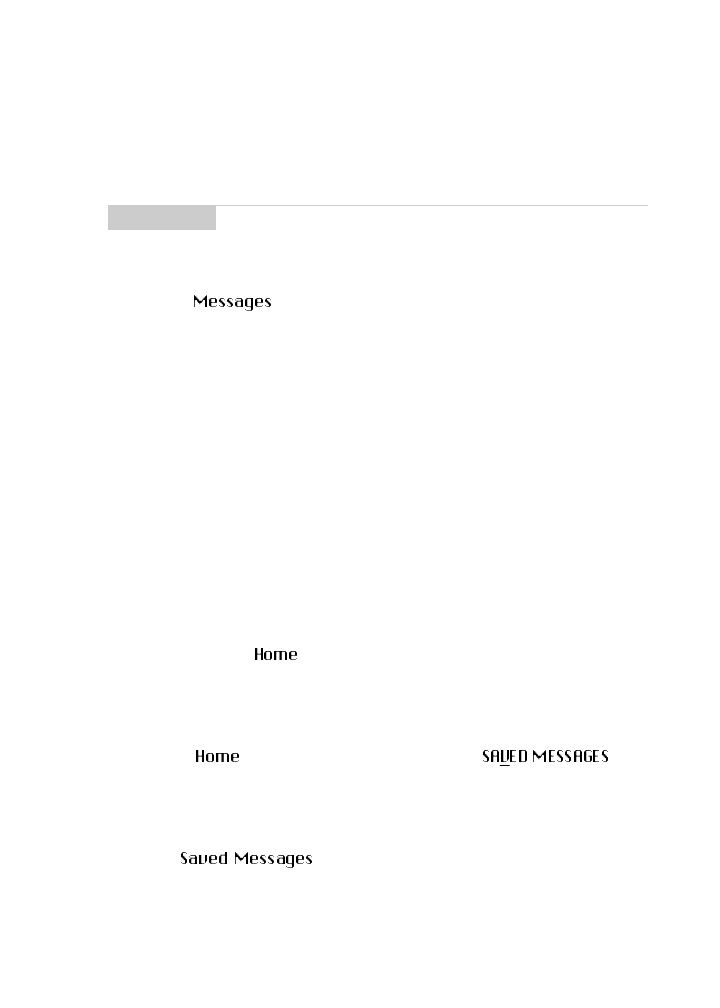
Home screen
The functions on your Proton are: Messages, Compose, Saved
Messages, Search Messages, Address Book, Calendar, Tasks, Alarm,
MemoPad, Calculator, Options, Lock, Turn Radio Off / Turn Radio
On, and Power Off.
In the Messages, Saved Messages, and the Address Book function
screens, you can access the Compose function.
In the Messages and Saved Messages screens, you can access the
Search Messages function.
Function menus
Menus provide a list of operational choices for the current function.
You can view a function screen’s menu by clicking the trackwheel;
the menu appears on top and covers approximately half of the
screen’s width.
Proton — User’s Guide
Introduction — LCD components
10
Address Book function menu
Backli
g
htin
g
• Press the ALT key three times to illuminate the LCD screen.
• Backlighting is disabled after 10 seconds if you do not press a
key or move the trackwheel.
Graphical
g
uide
Home screen components
The screen appears when you power on your Proton.
Home screen display
In any of the function screens, press the BACKSPACE key to return to
this screen.
The following icons appear on the Proton’s LCD screen in a
functions list. They display the functions available on the Proton.
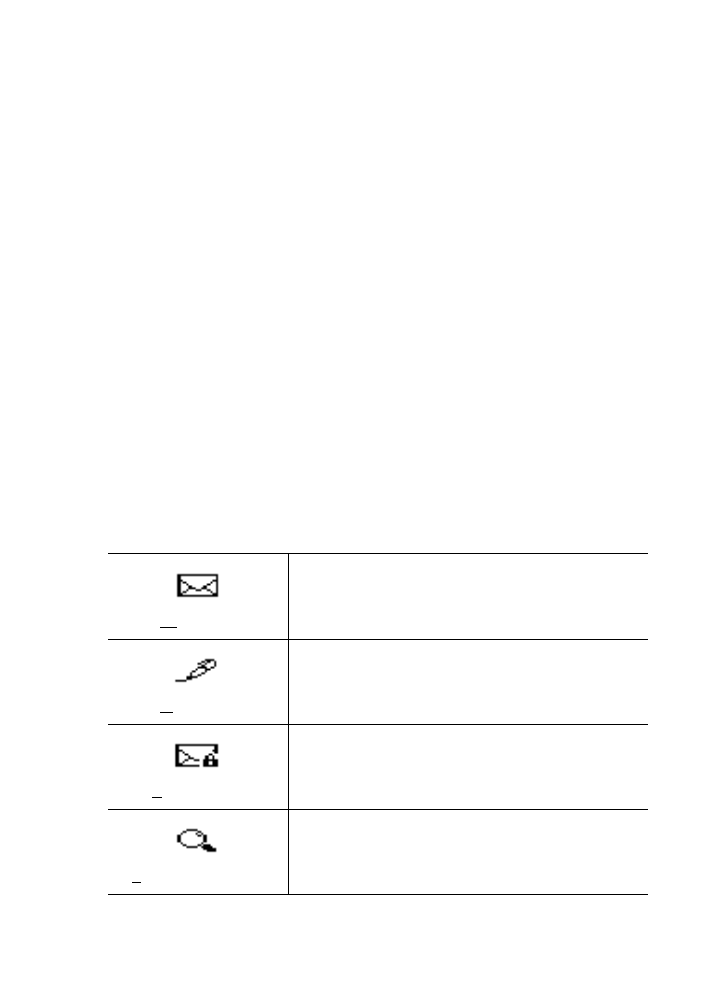
Icon Description
Messages
Compose
Saved Messages
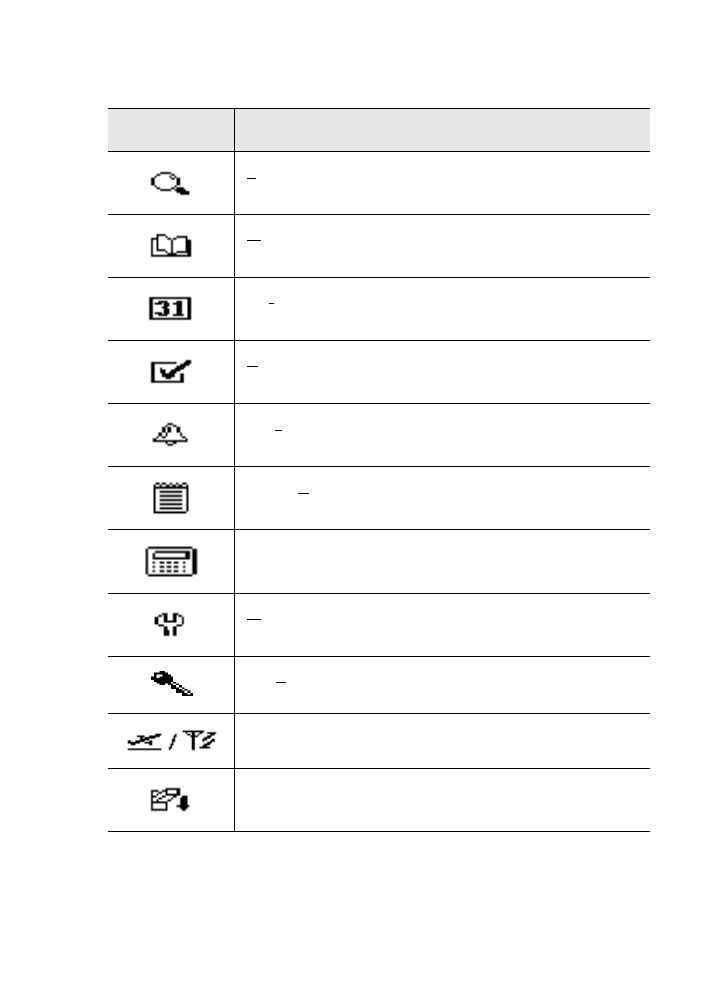
Introduction — LCD components
Proton — User’s Guide
11
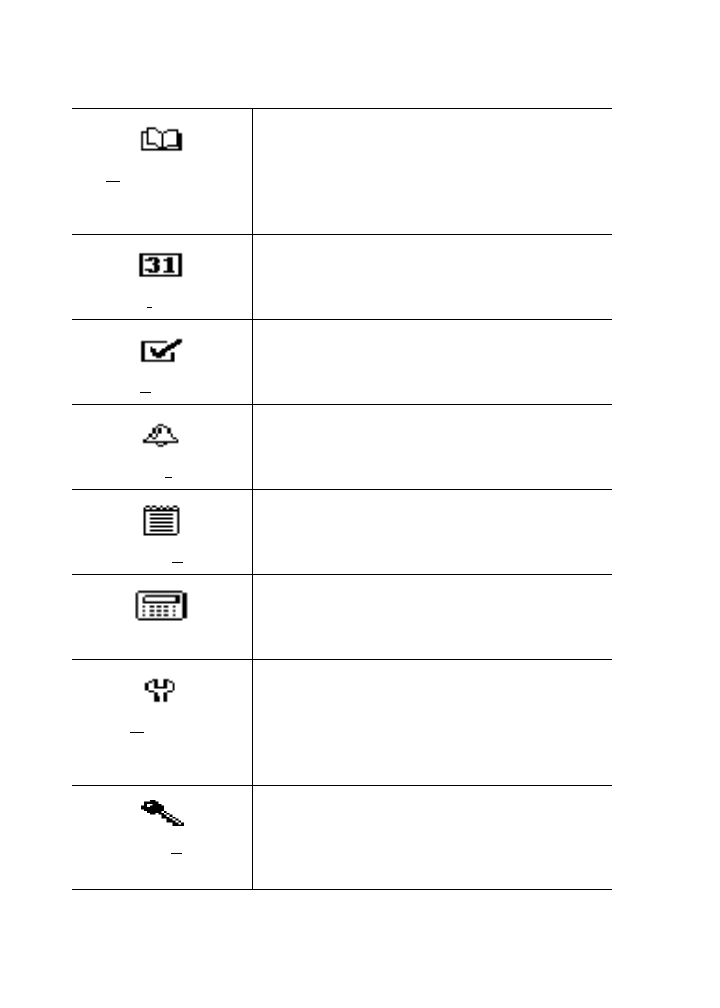
Search Messages
Address Book
Calendar
Tasks
Alarm
MemoPad
Calculator
Options
Lock
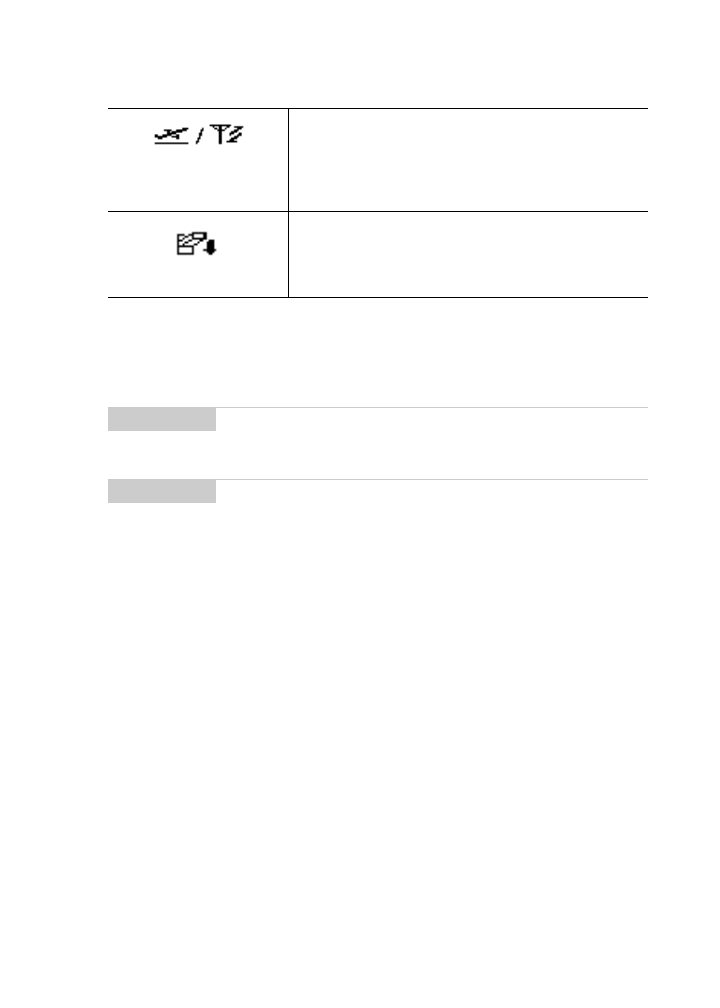
Turn Radio Off / Turn Radio On
Power Off
Icon Description
Proton — User’s Guide
Introduction — LCD components
12
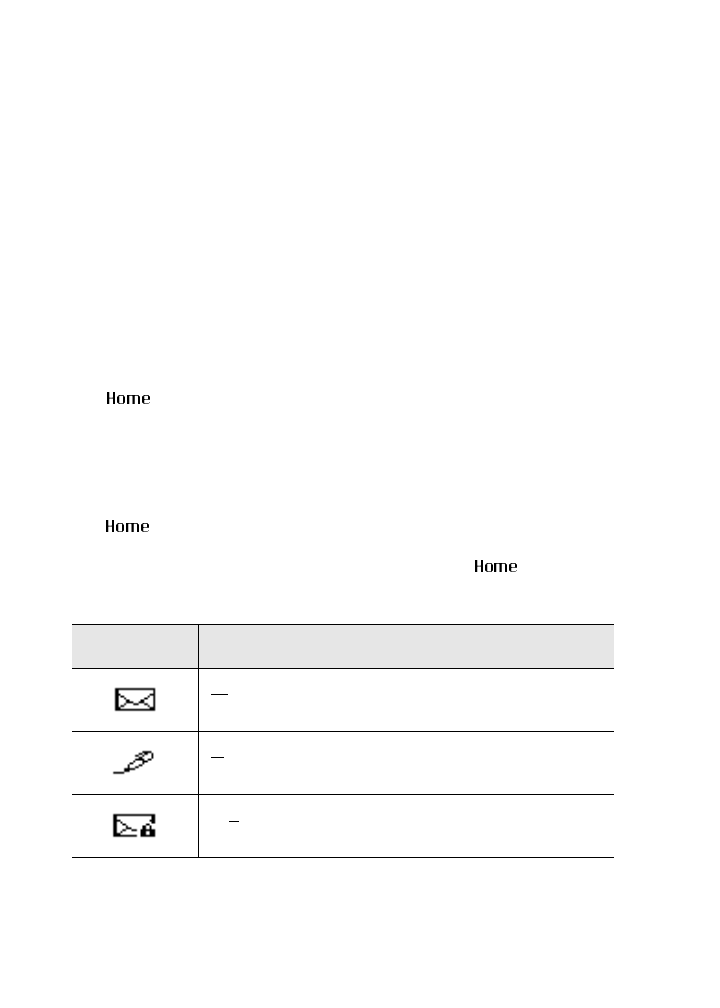
Proton status icons
These icons appear on the Proton’s LCD screen to indicate battery
power, coverage levels, and modes.
Icon Description
Battery power indicator
Coverage level indicator
Packets are being sent
Packets are being received
ALT key mode is activated
SHIFT key mode is activated
NUM lock mode is activated
Unopened messages waiting
Introduction — LCD components
Proton — User’s Guide
13
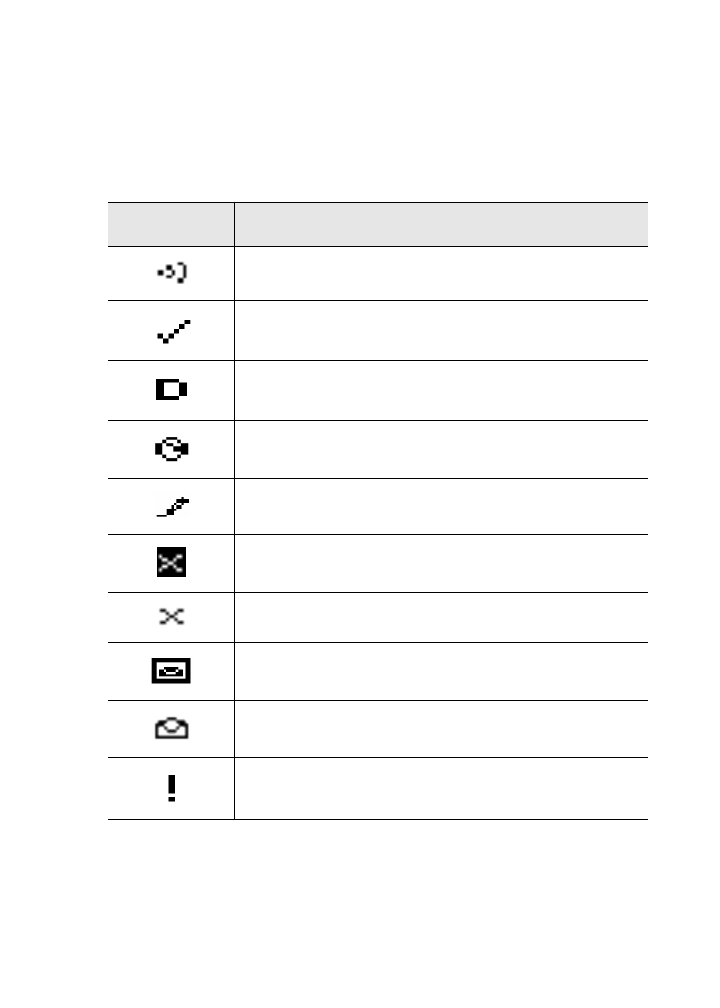
Message status icons
These icons appear on the Proton’s LCD screen to indicate the status
of sending, sent, and received messages.
Icon Description
Message is being sent.
Message has been sent out to the network.
Message that was sent to another Proton PIN
number has been delivered.
Message pending (will be sent later)
Composed message has been saved (not sent yet)
Unread message transmission error
Message returned, message transmission error
New, unread message has been received.
Message has been read.
Status of message is high.

Proton — User’s Guide
Introduction — LCD components
14
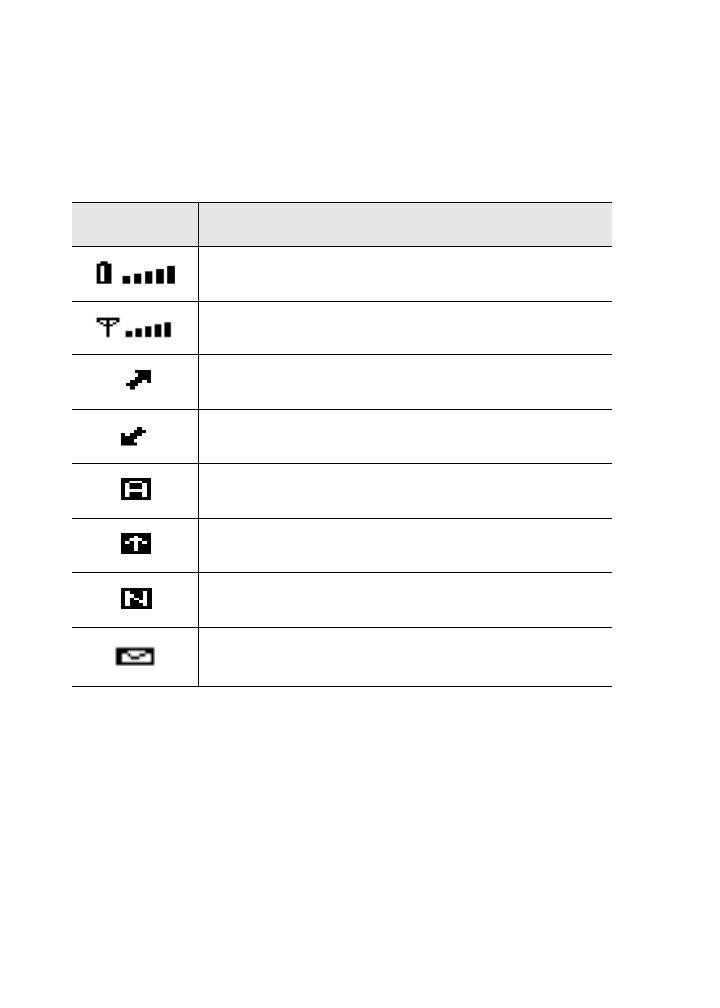
Navigational icons
These icons appear on the Proton’s LCD screen to indicate positions
within fields, lists, menus, and screens.
Icon Description
Indicates the cursor position
You are at the bottom of a menu or screen; scroll
the trackwheel up to view more items.
You are at the top of a menu or screen; scroll the
trackwheel down to view more items.
You can scroll the trackwheel up or down to
view more screen or menu items.
You can scroll the trackwheel left or right to con-
tinue viewing icons on the functions list.

2
Getting started
You should follow these steps to get started successfully with your
Proton.
• Activate the Proton.
• Turn on the radio.
• Ensure you are registered with the wireless data network.
• Ensure that the Proton is connected to your email program
using the Proton Desktop Software. (See the Proton Desktop
Software Installation & Quick Reference Guide for more infor-
mation.)
• Set the notification options and other customizable options.
After you have completed these steps, you can send and receive
messages.
Activating your Proton
1. Press down on the trackwheel to turn on the Proton. The
screen appears.
2. Using the trackwheel, scroll to highlight an icon. The name of
the function represented by the highlighted icon will appear at
the bottom of the display.

Proton — User’s Guide
Getting started — Turning on the radio
16
3. Access the function you want by clicking the trackwheel. The
function’s screen will appear.
Turning off the Proton
To turn off the Proton, from the screen, scroll to and click
the icon.
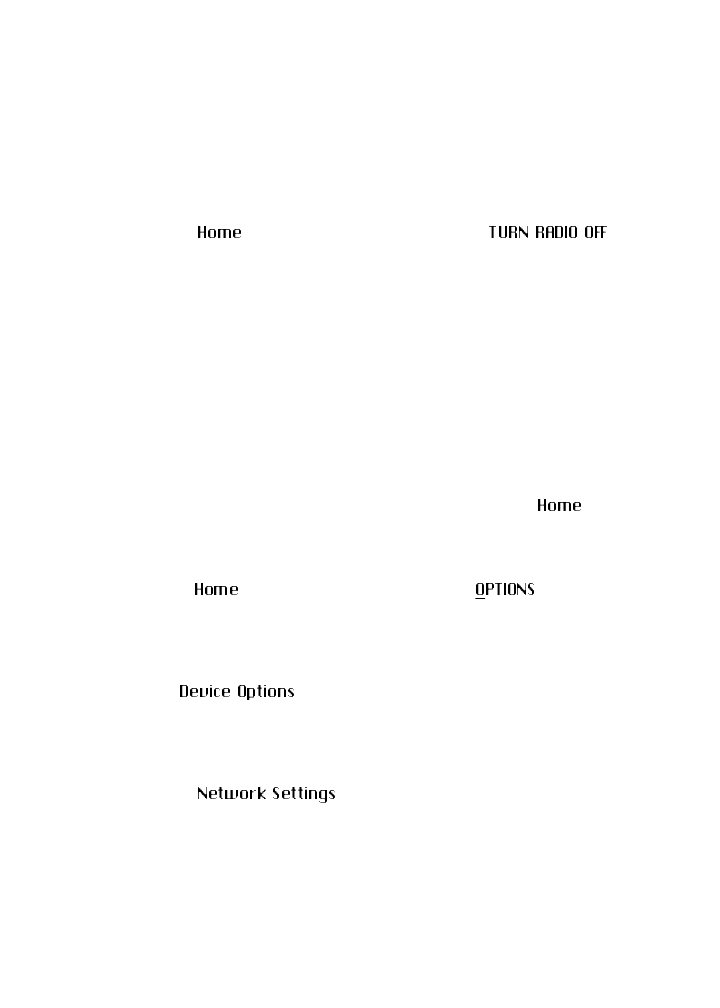
Turning on the radio
When you first receive your Proton, the radio will be turned off. You
must turn on the radio before you can send and receive messages.
In the screen, scroll to and click the icon in
the functions list.
The antenna icon changes to an airplane icon.
There will be two messages in your Messages list when you first
receive your Proton. These are Welcome messages that tell you how
to use your Proton and some of its features.
Tip The name of the function will appear at the bottom of the
screen, under the functions list. Press the underlined letter
in the name of the function to access the function directly,
without usin
g
the trackwheel.
Getting started — Registering with the network
Proton — User’s Guide
17
To turn off the radio
It is especially important to remember to turn off your Proton’s
radio when on an airplane, or at times when it may interfere with
other radio transmissions.
In the screen, scroll to and click the icon
on the functions list.
The airplane icon changes to an antenna icon. The Proton’s radio
will be turned off and coverage will be registered as ‘OFF’.
Registering with the network
When you first turn on the radio, the Welcome messages will be
sent to the Proton, provided that you are properly registered with
the network and are within coverage (as indicated by the bars
beside the antenna icon in the top right corner of the screen).
In rare cases, you may need to manually register your Proton if the
Welcome messages do not arrive.
1. In the screen, scroll to and click the icon on the
functions list.
2. The screen appears. Scroll to and click Network
Settings.
3. In the screen, ensure that the Roaming: field
is set to your country (U.S. or Canada) and that the Radio:
field is set to On. Verify that the Status: field is set to Active.

Proton — User’s Guide
Getting started — Quick start setup
18
4. Click to view the menu. Scroll to and click Register Now.
The messages should appear in your Messages list. See page 24 for
information on how to open a message to read it.
Quick start setup
The Proton has many features that you can customize to suit your
specific needs. Once you have followed the other steps to get started
with your Proton, you should customize how you’d like the Proton
to notify you of new messages and set any of the other Proton
options. See page 88 for details on all of these options.
To set message notification options
You can customize the way the Proton notifies you of a new, unread
message.
Note If the Status: field in the screen is not
set to Active, contact Proton customer support.
You must also re-re
g
ister your Proton each time you load
new applications usin
g
the Proton Desktop Mana
g
er Appli-
cation Loader tool. See the Proton Desktop Mana
g
er online
help for more information on the Application Loader.
Note You can manually set the date and time on the Proton.
However, if you have installed and confi
g
ured the Proton
Desktop Software and have synchronized it with your Pro-
ton, the date and time will be set automatically. See the Pro-
ton Desktop Mana
g
er Installation & Gettin
g
Started Guide
or the Proton Desktop Mana
g
er online help for information
on synchronizin
g
to set the date and time.
You can also set the Auto On/Off feature to confi
g
ure when
you want the Proton to turn on and off automatically.

Getting started — Setting the alarm
Proton — User’s Guide
19
1. In the screen, scroll to and click the icon on the
functions list.
2. The screen appears. Scroll to and click Notify.
3. Scroll to the field you want to change and click to view the
menu. Scroll to and click Change Option.
4. The following dialog box appears. Roll the trackwheel to
change options. Click the trackwheel when you have changed
the option’s setting to your preference.
5. Click the trackwheel to view the menu. Scroll to and click Save
Options.
You return to the screen.
Setting the alarm
The Proton has an function that you can set to tone at the
same time every day. Select from six different tone settings and
three volume levels.
1. In the screen, scroll to and click the icon on the
functions list.

Proton — User’s Guide
Getting started — Setting the alarm
20
2. The screen appears. Scroll to the field you want to
change then click to view the menu. Scroll to and click Change
Option.
3. The following dialog box appears. Roll the trackwheel to
change options. Click the trackwheel when you have changed
the setting to your preference.
4. Click the trackwheel to view the menu. Scroll to and click Save
Options.
Alarm entry fields
The screen contains the following entry fields:
Time: Set the time at which you want the alarm to sound. The
default is 12:00 AM.
Alarm On/Off: Select whether or not you want the alarm to
sound. The default is Off.
Tune: Select the tune you wish to hear when the alarm sounds.
The default is Tune 3. You can preview the available tunes by
selecting one.
Note Pressin
g
any key will silence the alarm, but the alarm is not
disabled. The Proton will sound at the set time a
g
ain even if
it has been silenced. To disable the alarm, set the Alarm
On/Off: field to Off.

Getting started — Sending a message
Proton — User’s Guide
21
Volume: Select the volume at which you wish to hear the alarm.
Your options are: Low, Medium, and High. The default is Low.
Sending a message
Once you have properly configured the Proton, and as long as you
are wirelessly connected to and running the Proton Desktop
Software, you are ready to send messages.
To compose and send a message
You can send a message to an existing contact or add a new contact
while composing your message. (You can also send a message
directly to another Proton without using email. See page 32 for
information.)
1. In the screen, scroll to and click the icon on the
functions list.
2. The screen appears. Do one of the following:
• Either scroll to a name or search by typing the first letters of a
name.
or
• Click the trackwheel to view the menu; scroll to and click New
Address. (For this exercise, choose New Address.)
3. The screen appears. Enter your contact’s address
information and press ENTER after each field.
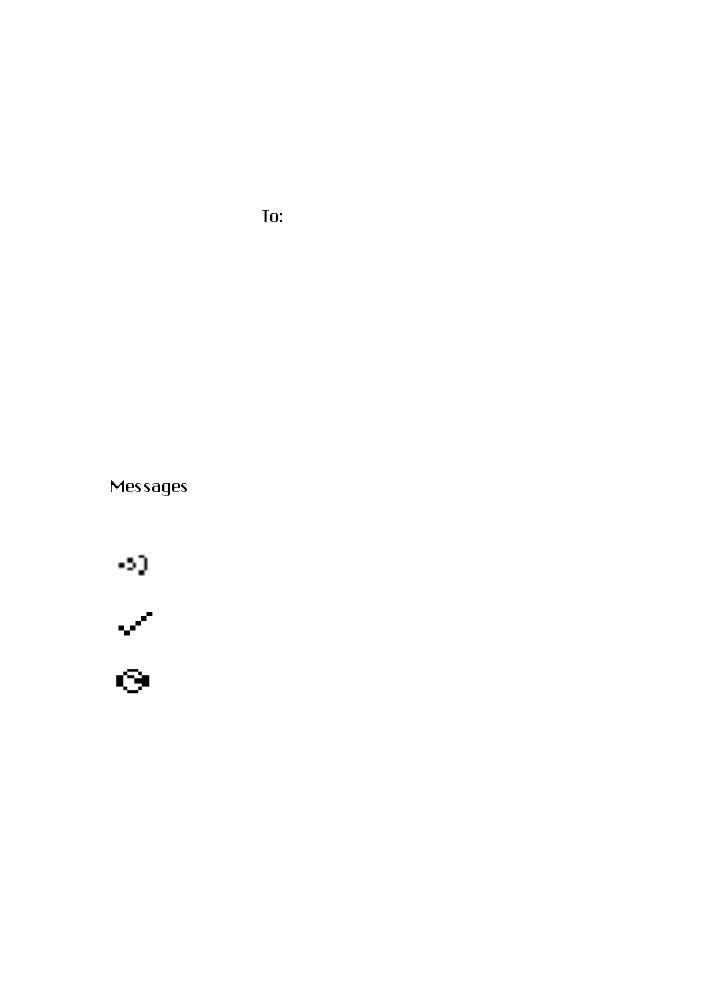
Proton — User’s Guide
Getting started — Sending a message
22
4. Click the trackwheel to view the menu. Select Save Address by
clicking again.
5. You return to the screen with your new contact selected.
Click the trackwheel to view the menu where you can select a
send method. (For this exercise, choose Use Email.)
6. Type a subject line and press ENTER to begin typing your mes-
sage. When you are finished composing your message, click the
trackwheel to view the menu; select Send Message by clicking
again.
The screen appears. You will see one of the following
icons to the left of the message header to indicate message status.
Message is being sent.
Message has been sent out to the network.
Message is pending (will be sent later). This icon
would appear if, for example, you were out of a
coverage area or the network was busy.

Getting started — Sending a message
Proton — User’s Guide
23
To send a one-time message
This send option is a short-cut method. The address will NOT be
saved in your Address Book.
1. In the screen, scroll to and click the icon on the
functions list.
2. The screen appears. Scroll to [Use Once] and click to view
the menu where you can select a send method. (For this exer-
cise, choose Use Email.)
3. The screen appears and you can type your con-
tact’s email address. Click the trackwheel to view the menu and
select Continue by clicking again.
4. Type a subject and press ENTER to begin typing your message.
When you are ready to send the message, click the trackwheel
to view the menu and click Send Message.
The screen appears and you can view the sent message’s
status.
Note You can also compose a message while in the
, or screens. Click the track-
wheel to view the menu. Scroll to and click Compose
Message. Follow steps 2-6 above to compose and send
your messa
g
e.

Proton — User’s Guide
Getting started — Reading a message
24
See Chapter 3, “Composing & sending messages” on page 31 for
detailed information on formatting and composing messages.
Reading a message
When the Proton receives a new message, it will provide one of the
following notification types: no notification, beep, beep and vibrate,
or vibrate only.
1. In the screen, scroll to a message header with an
unread message icon beside it. Click the trackwheel to view the
menu and select Open Message by clicking again.
2. The new message appears on your screen. To see more infor-
mation for a given open message, use the trackwheel and roll
up above the body of the message. Here you will find the mes-
sage header, the sent time, and the address fields. Scroll down
to read the entire message.
3. Click the trackwheel to view the menu and select your next
option. You can reply to, forward, save, or delete the open mes-
sage, read the previous message, read the next unread message,
or mark the message as unread. See page 45 for more informa-
tion on all your received message options.
Getting started — Using password protection
Proton — User’s Guide
25
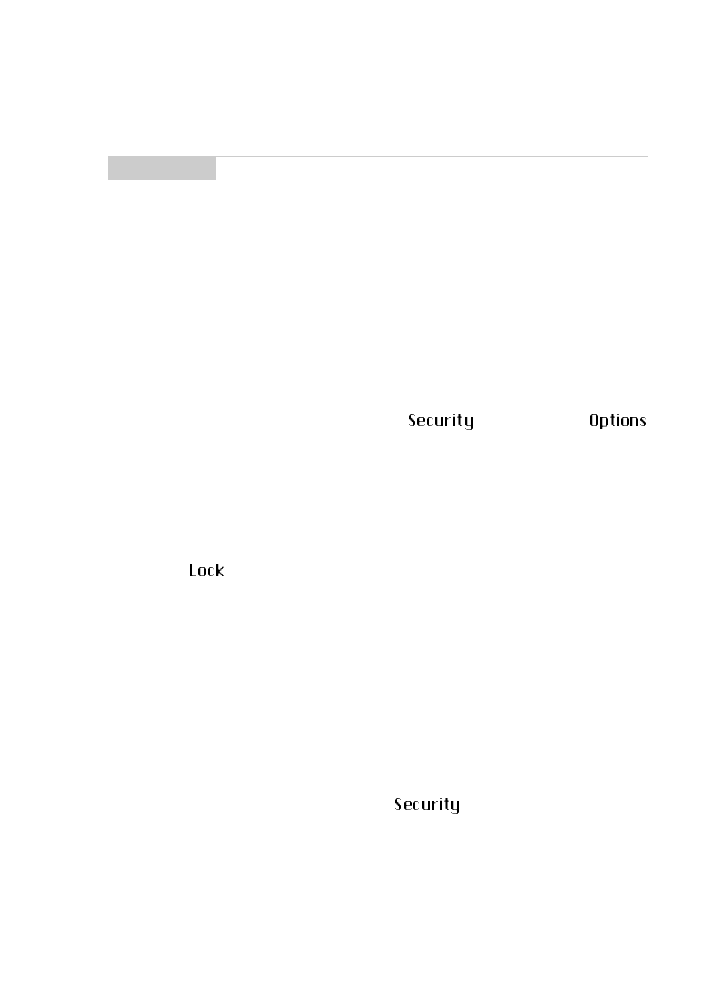
Using password protection
The Proton has a password security feature. Once you set the
password for your Proton and the password security screen turns
on, no one can access it unless the password is entered.
When you set your password in the screen of the
function, you can also specify the length of time that the Proton is
idle before the password security screen appears. Once the Proton is
left idle for that amount of time, you will need to enter your
password to access the Proton.
You can also manually invoke the password security screen by
using the function. This function will lock the Proton and no
one can access it without entering the password. You should lock
your Proton if you leave it unattended.
Once the password is enabled, you will need to enter it when
connecting the Proton to your PC for use with the Proton Desktop
Manager. With the Proton in the cradle, you must type your
password and press the ENTER key before you can access the Proton
Desktop Manager tools.
If you do not want the password security screen to appear, you
must disable your password in the screen. See page 27 for
details.
Note When you slide the Proton out of the holster within 5 sec-
onds of notification, the notification stops and the most
recently received message is already open. If you pull the
Proton out of the holster and quickly replace it, notification
stops but the message will remain marked unread.

Proton — User’s Guide
Getting started — Using password protection
26
Password security screen
To enable password protection
You should set a password so that no one can access your Proton
without knowing the password.
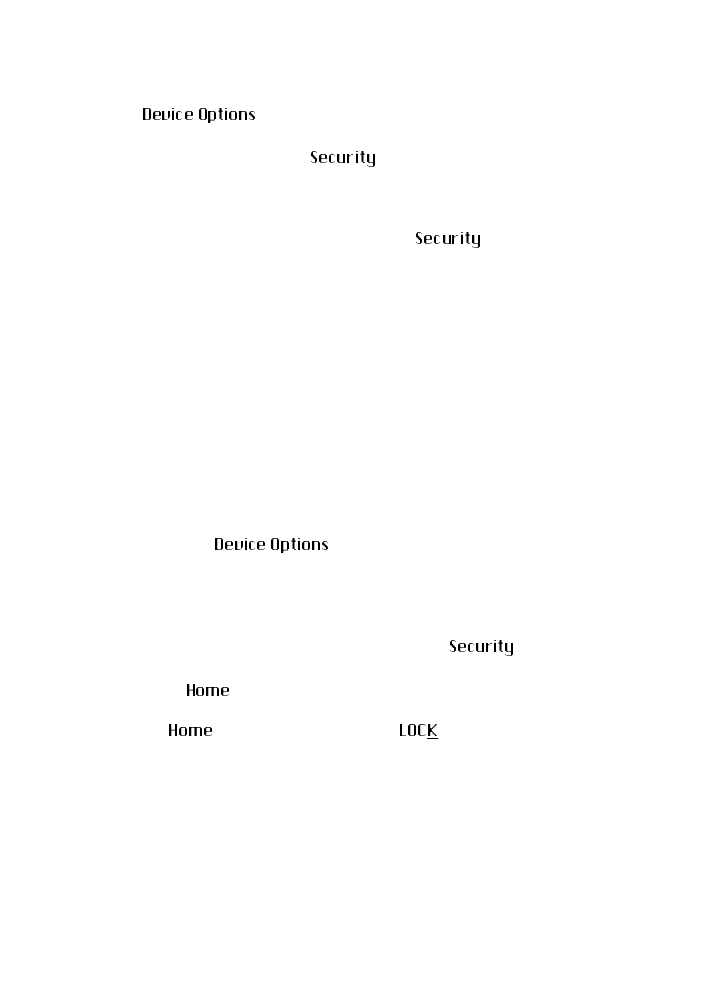
1. In the screen, scroll to and click the icon on the
functions list.
2. The screen appears. Scroll to and click Security.
3. The screen appears. While in the Password: field, click
the trackwheel to view the menu. Select Change Option by
clicking again.
4. A dialog box appears. Roll the trackwheel to change the Pass-
word: field to Enabled. Once you select Enabled and click the
trackwheel, you will be prompted to enter a minimum 4 charac-
ter password as illustrated in the following screen. When you
are finished, press ENTER. You will have to enter your password
again to verify it.
Note If you have entered information in the screen of the
function, it will appear on the password security
screen.
You should backup any information on your Proton that
mi
g
ht not have ori
g
inated from your PC. If an incorrect
password is entered 10 times, all information could be
erased from the Proton for security reasons. See the Proton
Desktop Mana
g
er online help for more information on the
Backup/Restore tool.

Getting started — Using password protection
Proton — User’s Guide
27
5. In the Security Timeout: field, set how much idle time should
pass before the password security screen will appear. Click to
view the menu, select Change Option, and set the amount of
idle time in the dialog box which appears. Click the trackwheel
once you have set this field to your preference.
6. Click the trackwheel to view the menu. Scroll to and click Save
Options.
You return to the screen.
To disable password protection
Once you disable your password, the password security screen will
no longer be displayed.
1. In the screen, scroll to and click the icon on the
functions list.
Note Once you have set a password, you need to enter it to
access the screen a
g
ain. In addition, if you power
off the Proton with the password security screen still
enabled, you will need to enter the password once you
power on the Proton a
g
ain.
Once the password is set, you can access the icon on
the functions list in the screen. See pa
g
e 28 for infor-
mation on the function.
Proton — User’s Guide
Getting started — Using password protection
28
2. The screen appears. Scroll to and click Security.
The following dialog box appears. Type your password and
press ENTER to access the screen.
3. While in the Password: field of the screen, click to
view the screen’s menu. Scroll to and click Change Option.
4. The following dialog box will appear. Scroll to and click Dis-
abled.
5. Click the trackwheel to view the menu. Scroll to and click Save
Options.
You return to the screen where the password feature
is disabled on the Proton.
To lock the Proton
Once you have enabled your password in the screen, you
can lock the Proton when it is unattended. An icon of a key will
appear on the screen.
In the screen, scroll to the icon and click. The
password security screen will appear and you will need your
password to access the Proton.

Getting started — Using password protection
Proton — User’s Guide
29
Note The information you entered in the screen of the
Proton options will appear on the password security screen.
If you did not enter any information, default Proton informa-
tion appears. See pa
g
e 92 for more information on the
screen.

3
Composing & sending
messages
In the first two chapters, ‘Introduction’ and ‘Getting started,’ you
learned about your Proton’s main components as well as the general
procedures required for sending and reading messages using the
Proton.
Now, find out all about the different features the Proton offers for
advanced composing and sending capabilities.
Sending a message to multiple
contacts
You can send a message to more than one recipient and choose
whether recipients are addressed directly (to:), carbon copied (cc:),
or blind carbon copied (bcc:). See the instructions on 83 for details
on how to add contacts to your Address Book.
To send a message to multiple contacts
You can use Add To:, Add Cc:, and Add Bcc: to add recipients to
your messages.
1. In the screen (after selecting a main recipient and a send
method), click the trackwheel to view the menu. Click either
Add To:, Add Cc:, or Add Bcc:. (For this exercise, select Add
Cc:.)

Proton — User’s Guide
Composing & sending messages — Sending messages to other Protons
32
2. The screen appears with a list of all your contacts’ names.
Scroll to a name. (Alternatively, you can type the first letters of
your contact’s name to start a search and then scroll to the
name.) Click the trackwheel to view the menu, then scroll to
and click Continue.
3. You return to the screen where the additional recipient is
added to your message. Type your subject in the Subject: field
and press ENTER to begin composing your message.
4. When you have finished composing your message, click to
view the menu. Scroll to and click Send Message.
Sending messages to other Pro-
tons
A PIN is a number that the wireless data network service uses to
identify each Proton on the network; it is similar to a phone number.
Note When you add another recipient to your message, the same
send method must also be chosen for all. If both a PIN
number and an email address are entered for the contact
you’ve chosen, the same send method as the main
recipient is chosen as the default.

Composing & sending messages — Sending messages to other Protons
Proton — User’s Guide
33
If you know the PIN of another Proton, you can use that number to
send a message to that peer Proton.
1. In the screen, scroll to and click the icon on the
functions list.
2. The screen appears. Scroll to and click an existing contact’s
name for which you have a PIN included in the contact’s infor-
mation. Click the trackwheel to view the menu. Scroll to and
click Use PIN.
3. The screen appears. Type a subject line and press ENTER to
begin composing your message.
4. Once you have finished composing your message, click the
trackwheel to view the menu. Scroll to and click Send Message.
You return to the screen where a checkmark will appear
to indicate that the message has been sent. The checkmark will
change to a “D” when the message has been delivered to the user’s
Proton. If you are sending a message to more than one PIN number,
Note Messages sent to a PIN do not go through your desktop.
They will not appear in the Inbox or in the Sent Items list.

Proton — User’s Guide
Composing & sending messages — Customizing the auto signature
34
the checkmark will change to a “D” when the message has been
delivered to all the recipients’ handhelds.
Customizing the auto signature
Once you successfully install the Proton Desktop Software, an
automatic signature is included on all email messages sent from
your Proton. The default text is “Sent from my Proton Wireless
(www.BlackBerry.net)”. You can customize this text in the
Redirector Configuration tool of the Proton Desktop Software. See
the software’s online help for more information on how to change
the signature.
Receiving confirmation of a mes-
sage
When you send a message to another Proton user, you receive
confirmation automatically if you send the message to that person’s
Note To find your PIN number, check the information in the
screen of the function. You can also find out
your PIN number by placin
g
your Proton in the cradle and
runnin
g
the Proton Desktop Software. See the Proton Desk-
top Software Installation & Gettin
g
Started Guide or the
Proton Desktop Mana
g
er online help for more information.
You can also send a messa
g
e to a Proton usin
g
a one-time
PIN number. See pa
g
e 23 for information. Substitute Use
Email with Use PIN.
Note The auto si
g
nature is only included on messa
g
es which use
email as the send method. Messa
g
es that use the PIN send
method will not have an auto si
g
nature attached to them.
To disable the auto si
g
nature, clear the text in the
Redirector Confi
g
uration tool of the Proton Desktop Soft-
ware.

Composing & sending messages — Attaching Address Book entries
Proton — User’s Guide
35
PIN number. You can also receive confirmation when sending a
message by email.
1. Begin composing your message by selecting the recipients of
the message. (See page 21 for information.) In the Subject:
field, type <confirm>, followed by your subject.
2. Compose the message and then send it. When the message has
been delivered to the recipient’s Proton, you will receive a new
message indicating that your sent message has arrived.
Attaching Address Book entries
You can send an Address Book entry as an attachment in a email or
PIN message to another Proton user.
1. While you are composing your message, click the trackwheel to
view the menu. Scroll to and click Attach Address.
2. The screen appears, containing a list of all your con-
tacts’ names. Scroll to a name and click to view the menu. Scroll
to and click Use Address.
Note You will have to access the screen to insert
the an
g
le brackets in the subject line. See pa
g
e 42 for more
information.

Proton — User’s Guide
Composing & sending messages — Setting message options
36
3. You return to the screen and you can see that your message
now contains an Address Book attachment.
4. Click the trackwheel to view the menu. Scroll to and click Send
Message.
See page 63 for information on how to add a new entry to your
Address Book.
Setting message options
You can change the message options for all message types -
received, saved, and sent. You can configure the Messages list to
show the time the message was sent or received, to show the name
of the sender or the recipient, and to confirm or not confirm before
deleting a message.
1. In the screen, click the trackwheel to view the menu.
Scroll to and click Options.
2. The screen appears. Click to view the
menu. Scroll to and click Change Option.
3. The following dialog box appears. Roll the trackwheel to
change options. Click the trackwheel once you have changed
the option’s setting to your preference.

Composing & sending messages — Using AutoText to compose a message
Proton — User’s Guide
37
4. When you have made the required changes to the fields, click to
view the menu. Scroll to and click Save Options.
You return to the screen.
Using AutoText to compose a mes-
sage
The Proton’s AutoText function automatically replaces text you
type with pre-programmed text. You can increase how quickly you
compose messages by using AutoText. By configuring the AutoText
entries and adding new ones for your specific needs, you can use
AutoText to:
• Automatically correct commonly misspelled words.
• Automatically replace abbreviations and acronyms with com-
plete words.
• Automatically enter commonly-used strings of words into a
message by typing only one keyword.
• Automatically insert punctuation and symbols into your mes-
sage without using the ALT key or symbols library.
Note You can also change the message options from the
screen.
Note There are several shortcuts built into the AutoText function
for inserting marcos into messages. These shortcuts
include inserting the time, date, etc. See page 112 for more
information.

Proton — User’s Guide
Composing & sending messages — Using AutoText to compose a message
38
How AutoText works
1. While typing a message in the screen, type the text ‘hte’.
The text ‘hte’ is a default AutoText entry that tells the Proton
to automatically replace the text with the correctly spelled word
‘the’.
2. As soon as you press the SPACE key, notice what happens to the
text ‘hte’:
To add a new AutoText entry
You may want to customize your AutoText database by adding
specific AutoText entries.
1. In the screen, scroll to and click the icon on the
functions list.
2. The screen appears. Scroll to and click AutoText.
3. The screen appears with a list of default AutoText
entries. Click to view the screen’s menu. Scroll to and click New
Item.
4. You will be prompted with two fields: When I type: (for the
keyword) and Replace it with: (for what should appear
instead).

Composing & sending messages — Using AutoText to compose a message
Proton — User’s Guide
39
5. After you have entered information in both fields, click the
trackwheel and select Save Item by clicking again.
You can test your new entry by typing the abbreviation while you
compose your message.
To edit an AutoText entry
You may wish to change a pre-programmed AutoText entry to suit
your needs.
1. In the screen, choose the entry you would like to edit.
With the entry selected, click the trackwheel to view the menu.
Scroll to and click Edit Item.
2. The screen appears. Press ALT while you roll the
trackwheel to move left and right across the screen. Type your
changes to the current entry.
3. Click the trackwheel to view the menu. Scroll to and click Save
Item.
Note In the Replace it with: field, you can insert a macro.
Click to view the menu, scroll to and click Insert Macro.
Select one of the macros that appears. See page 112 for a
list of these macros.
Proton — User’s Guide
Composing & sending messages — Using AutoText to compose a message
40
You will return to the screen where you can view your
recent changes.
To delete an AutoText entry
If you do not wish to keep an AutoText entry (either a default entry
or one that you added), you can delete it.
1. In the screen, scroll to the entry you would like to
delete. With the entry selected, click the trackwheel to view the
menu. Scroll to and click Delete Item.
2. A dialog box appears asking if you want to delete the entry.
Scroll to and click Yes.
You return to the screen and you can see that the entry is
no longer included in the list.
To perform an AutoText search
Rather than scrolling through your list of AutoText entries, you can
perform a search to find an entry quickly.
1. In the screen, type the first letter or first few letters of
the entry you would like to find. For this example, type the let-
ter ‘t’. (The screen header will display the word Find:, fol-
lowed by the letter ‘t’.)
Note You can also edit AutoText entries from the screen with
the main recipient selected. Click to view the menu. Scroll
to and click Edit AutoText.
You can also edit AutoText entries from the Backup/Restore
tool in the Proton Desktop Mana
g
er. See the Proton Desk-
top Mana
g
er online help for more information.

Composing & sending messages — Automatic formatting
Proton — User’s Guide
41
2. Click the trackwheel to choose to edit or delete the entry.
Automatic formatting
The Proton’s built-in formatting capabilities extend beyond the
AutoText function to reduce your typing time dramatically.
Auto capitalization
As you compose a message, you do not have to worry about
pressing the SHIFT key to capitalize words — the Proton has 2
methods of performing capitalization for you!
• Begin typing; you will see that the first letter you type capital-
izes itself automatically and that every letter following a period
becomes capitalized too. The Proton recognizes the beginning
of a new sentence and does the work for you.
• If you want any subsequent characters to be capitalized, press
and hold the character key until it becomes capitalized. You
must have Key Rate set to either Slow or Fast for this feature to
work (i.e., Key Rate must be enabled). See page 93 for more
information on the Screen/Keyboard options.
Auto punctuation
You can automatically insert a period at the end of a sentence or
word by pressing the SPACE key twice. You will also notice that the
next letter typed is capitalized.
Email field in Address Entry screen
You can type an email address in the Email field of the
screen without touching the ALT key!

Proton — User’s Guide
Composing & sending messages — Inserting symbols
42
Begin typing an email address; instead of pressing ALT+L to access
the ‘@’ sign, simply press the SPACE key. You will see the ‘@’ sign
appear. When you press the SPACE key again, a ‘.’ character appears.
To insert a blank space into the Email field, press BACKSPACE and
then press SPACE again. A blank space appears in the field. The next
time you press the SPACE key, the ‘@’ sign appears.
Number fields in Address Book screens
You can type numbers in the PIN, Work, Home, Mobile, Pager, and
Fax fields of the and screens without
pressing the ALT key.
Begin typing a number in one of these fields and instead of pressing
the ALT key to access numeric keys, simply press the associated
character key. For example, to display the number ‘4’, press the ‘R’
key. These fields support all numeric characters and the ‘-‘, ‘+’, ‘x’
and ‘.’ characters without pressing the ALT key.
Number lock
You can activate number lock (num lock) mode to type numbers
without holding down the ALT key. Press the SHIFT key then press
the ALT key. Num lock mode is activated and you can enter numbers
in any screen. Press SHIFT or ALT again to turn off num lock mode.
Inserting symbols
Enhance your messages by inserting symbols from the Proton’s
symbols library.
1. In the screen, press ALT+SPACE to view the
screen.
Note You can insert symbols into screens other than (such as
the , , and screens)
by followin
g
these steps.

Composing & sending messages — Inserting symbols
Proton — User’s Guide
43
2. Use the trackwheel to scroll to the symbol you would like to
insert into your message, then click to insert the symbol.
3. You return to your message in the screen and you can see
that your symbol choice has been inserted. Continue compos-
ing.
Tip You can also insert international characters into your
messa
g
es. Roll the trackwheel as you press and hold a
letter with associated international characters to scroll
throu
g
h the available characters. Release the letter once
you find the one you want.

4
Receiving & reading
messages
In this chapter, learn about your options for received messages, how
to access more of a long message, and how to open file and Address
Book attachments.
When you receive a new message, the Proton will display visual
notification on the screen and will provide other notification,
depending on how you have set your notification options.
Received message options
Once you have read a new message, click the trackwheel to view
your options. The following menu appears:
Received message menu
You can click Reply to Message or you can scroll up or down to
view the following options:
Mark Unread – Marks the current message as unread. If you
synchronize with your desktop using the Proton Desktop Software,
the message will remain as marked unread on your desktop and on
your Proton.

Proton — User’s Guide
Receiving & reading messages — Received message options
46
Save Message — Save the open message. A copy of the message
will be placed in the screen. See page 54 for more
information on how to save messages.
Reply to Message — Send a reply to the sender of the open
message. By default, this option is selected.
Reply to All – Reply to all recipients of the message.
Forward Message — Forward (send) the open message to another
contact. If an attachment is included with a message, it will be
forwarded with the message.
Reply with Text — Send a reply to the sender of the open
message. The text of the original message appears below your reply.
All of the original message is sent, even if it was truncated on your
Proton.
Reply to All with Text – Send a reply to all recipients and
include the text of the original message as part of the reply.
Delete Message —Delete the open message.
Next Unread — Close the current message and open the next
unread message.
Previous Message - Close the current message and open the
previous message in the list.
Next Message - Close the current message and open the next
message in the list.
Note If you are usin
g
Microsoft Outlook as your email pro
g
ram
and you reply to a received messa
g
e usin
g
your Proton, the
correspoindin
g
messa
g
e in your corporate Inbox will be
marked as read and replied to. If you forward a messa
g
e,
the correspondin
g
messa
g
e will be marked as read and for-
warded.

Receiving & reading messages — Receiving long messages
Proton — User’s Guide
47
Receiving long messages
Occasionally, the message you receive may be longer than what the
network can transmit. In this case, the maximum amount of data
allowed is sent to your Proton and the remainder is stored in your
corporate email Inbox. You can access the rest of your message by
following this procedure:
1. Open the message. At the end of the message, you will see More
available. The remaining number of bytes in the message is
also listed.
2. Click to view the menu. Scroll to and click More.
3. Once you have selected More you can remain in the message
and the remaining part of the message will appear at the end
when it arrives. You can also return to the Messages list and
you will be notified when the Proton receives the remaining
part of the message. (For this exercise, return to the Messages
list.)
4. The message will be marked unread. In the Messages list, scroll
to the unread message and open it by pressing the ENTER key.
Press G to resume reading the message where you last left off.
Managing file attachments
If you have received a message on your Proton that originally had a
file attached, you can send this message to someone else who can

Proton — User’s Guide
Receiving & reading messages — Opening an Address Book attachment
48
open the file attachment. The original message (with the attached
file) is forwarded through your corporate email Inbox.
1. Open a received message that has a file attachment. The name
of the attachment and the size of the file will appear at the end
of the message.
2. Click the trackwheel to view the menu. Scroll to and click For-
ward Message to send the message, including the file attach-
ment, to someone who can open the file on their desktop.
You return to the Messages list where you can view the sent
message’s status.
Opening an Address Book attach-
ment
You can open attachments which are in the form of Address Book
entries. If you have received a message with an Address Book
attachment, follow this procedure to open the attachment on your
Proton:
1. Open a received message and read it. Scroll to the end of the
message; if there is an Address Book attachment for you to
open, you will see the following:
2. Position the cursor on the attachment and click the trackwheel
to view the menu. Click Open Attachment.

Receiving & reading messages — Adding attachments to your Address
Proton — User’s Guide
49
3. The screen opens and you can view the
information.
4. Click the trackwheel to view the menu and click Cancel.
You return to the open message.
Adding attachments to your
Address Book
You can add the Address Book attachment to your list of contacts.
1. Open an Address Book attachment and view it.
2. Click the trackwheel to view the menu. Scroll to and click Save
Address.
The attachment is added to your Address Book.
5
Managing messages
Chapters 3 and 4 discuss the features and functions that the Proton
provides for sending and receiving messages. Now, find out how
you can organize, customize, and search the messages screens to
access new and stored messages in seconds.
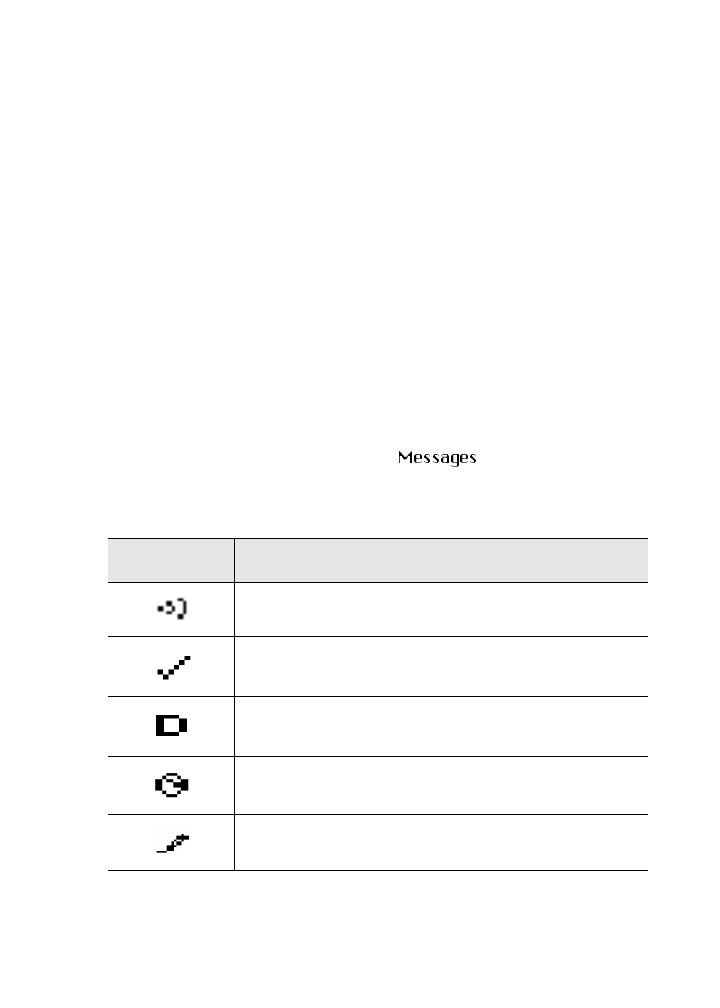
Message status
A number of different icons in the screen represent the
status of each message in the list. The following table contains a
description of each message status icon.
Icon Description
Message is being sent.
Message has been sent out to the network.
Message that was sent to another Proton PIN
number has been delivered.
Message pending (will be sent later)
Composed message has been saved (not sent yet)

Proton — User’s Guide
Managing messages — Searching messages
52
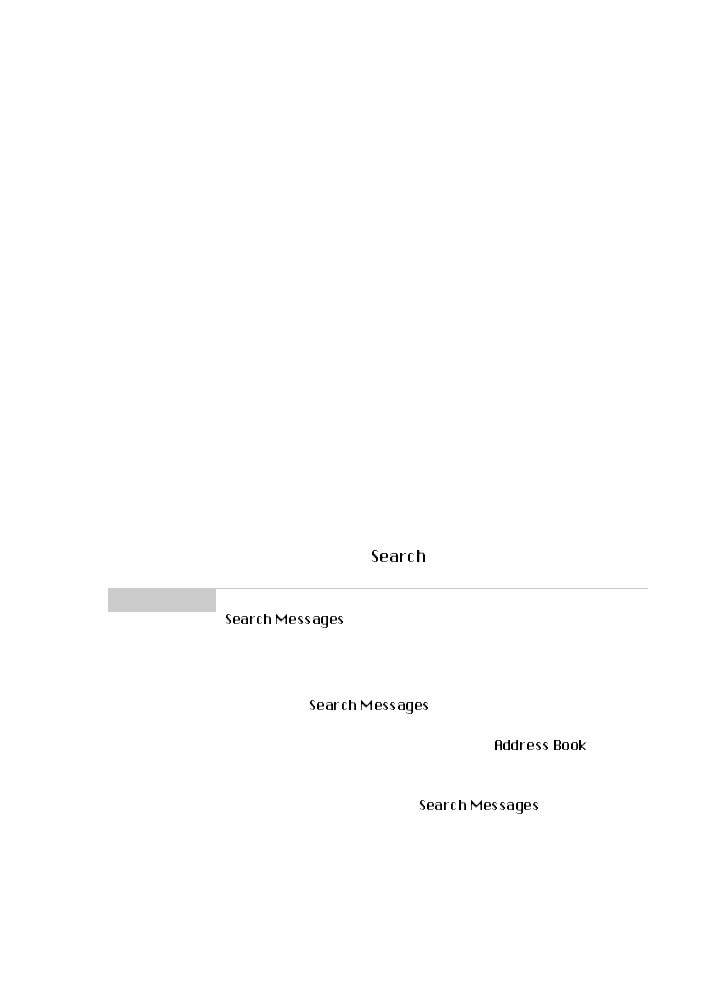
Searching messages
Use the powerful search function to locate messages and Address
Book entries in seconds.
1. In the screen, scroll to and click the icon
on the functions list.
2. The screen appears. Enter the keywords that
you would like to search for.
Unread message transmission error
Message returned, message transmission error
New, unread message has been received.
Message has been read.
Status of message is high.
Note Saved messa
g
es appear in the Search list with a lock icon
beside them.
You can also search for messa
g
es while in the
and screens.
Icon Description
Managing messages — Searching messages
Proton — User’s Guide
53
3. In the Search List: field, you can configure the Proton to
search all messages, the saved messages, or the Messages list. In
the Show: field, you determine how you want the search results
to appear. You can show all messages, only the sent messages,
or only the received messages that match your search criteria.
While in either of these fields, click the trackwheel to view the
menu, then click Change Option.
4. The following dialog box appears. Roll the trackwheel to
change options. Click the trackwheel when you have changed
the option’s setting to your preference.
5. Click the trackwheel to view the menu. Scroll to and click
Search Messages.
Your results are displayed in the screen.
Note When you enter text in the Subject: or Message: field, the
function will search for phrases containin
g
these characters in the subject line and the body of your
messa
g
es.
You can search for a name stored in your Address Book
while in the function. With your cursor in
the Name: field, click the trackwheel to view the menu.
Scroll to and click Select Name. The screen
appears where you can select the name to search for. Click
the trackwheel to view the menu. Scroll to and click Use
Address. You return to the screen with
your selected name in the Name: field.

Proton — User’s Guide
Managing messages — Saving and recalling search terms
54
Saving and recalling search terms
You can save the terms of your search and recall them the next time
you want to perform a similar search.
1. Outline the terms of your search by setting the options in the
fields of the screen.
2. Click the trackwheel to view the screen’s menu. Scroll to and
click Save Search. The terms of your search will be saved.
3. If you make a change to your search terms but want to recall
the last saved terms, click the trackwheel to view the menu.
Scroll to and click Recall Search.
The settings will revert to the saved search.
Saving messages
Save important messages by copying them to a separate list. The
function helps to manage the size of your Messages
list.
Note You can only save the criteria of one search at a time.
Managing messages — Saving messages
Proton — User’s Guide
55
To store a received or sent message
You may wish to save a received or sent message. By saving
messages, you can access the messages in the future.
1. In the screen, scroll to a received or sent message and
click to view the menu. Scroll to and click Open Message.
2. Click the trackwheel to view the menu. Scroll to and click Save
Message.
3. The dialog Copying to Saved Folder flashes on the screen.
The message has been copied to your Saved Messages list but
also remains in the Messages list. Return to the Messages list by
clicking the trackwheel, scrolling to and clicking Close.
4. Return to the screen by clicking to view the menu, scroll-
ing to and clicking Close.
5. In the screen, scroll to and click the icon
in the functions list.
6. The screen appears and you can see that the
message has been copied to this folder.
Note An icon in front of the messa
g
e header indicates messa
g
e
status (i.e. sent, received, etc.). See 65 for an explanation
of each icon.

Proton — User’s Guide
Managing messages — Saving messages
56
Now that the message has been saved, return to the
screen to delete the message. See page 57 for more information on
deleting messages.
To save a message while composing
You may wish to save a message that you have not finished
composing so that you may complete and send it at a later time.
1. While composing in the screen, click the trackwheel to view
the menu. Scroll to and click Save Message.
2. The screen appears. An icon beside the message indi-
cates that the message is saved but has not been sent. (The mes-
sage has been saved in the screen. It has not been
saved in the area.)
3. To resume composing, scroll to the saved message and click to
view the menu. Scroll to and click Open Message.
4. The saved message opens and you can resume composing.
5. When you’ve finished composing, click the trackwheel to view
the menu. Choose to save again or to send the message.

Managing messages — Deleting messages
Proton — User’s Guide
57
Deleting messages
Although the Proton has ample memory for storing messages, you
should delete unnecessary messages in order to manage the list
more efficiently.
To delete an open message
You can delete a message while it is open without returning to the
screen.
1. While the message is open, click the trackwheel to view the
menu. Scroll to and click Delete Message.
2. The following dialog box appears, asking if you want to delete
the message. Click Yes.
You return to the screen and you can see that the message
is no longer included in the list.
Note The messa
g
e you save while composin
g
is saved in your
Messa
g
es list, not in the Saved Messa
g
es area.
Note If the Proton’s memory is full and you receive new mes-
sa
g
es, the Proton will delete the oldest messa
g
es in the
Messa
g
es list to accomodate new ones. Saved messa
g
es
are not deleted.

Proton — User’s Guide
Managing messages — Deleting messages
58
To delete a message from the Messages list
You can delete a message from the screen without having
to open it. This procedure also applies for deleting messages from
the screen.
1. In the screen, scroll to the message that you want to
delete and click to view the menu. Scroll to and click Delete
Message.
2. The following dialog box appears, asking if you want to delete
the message. Click Yes.
The message is no longer included in the Messages list.
To delete multiple messages.
You can delete more than one message by selecting a date field.
1. In the screen, scroll to a date field.
2. With the date field highlighted, click to view the menu. Scroll to
and click Delete Prior.
Note If you request more of a messa
g
e, you should not delete
that messa
g
e until you have received all the information.
See pa
g
e 47 for more information on receivin
g
lon
g
mes-
sa
g
es.
Managing messages — Resending a message
Proton — User’s Guide
59
3. The following dialog box appears. Click Yes to delete all mes-
sages sent or received on that date as well as all messages sent
or received prior to that date.
You return to the screen and you can see that the
messages have been removed from the list
Resending a message
If, for some reason, your message is not sent properly on the first
attempt, you can resend the message.
1. In the screen, scroll to the message which you want
to resend and click to view the menu. Select Open Message by
clicking again.
2. The text of the message will appear. Click to view the menu.
Scroll to and click Resend Message.
You return to the screen and your message will be sent
again.
Note Scroll to the top of the ori
g
inal messa
g
e to find out why the
messa
g
e did not send properly. See the Proton Desktop
Mana
g
er and Proton Desktop Redirector online help for
explanations of possible error messa
g
es.

Proton — User’s Guide
Managing messages — Marking a message as unread
60
Marking a message as unread
You can mark important messages as unread. When you
synchronize your Proton with the Proton Desktop Software, the
messages will remain as marked unread on both your desktop and
your Proton.
1. Scroll to a previously read message to highlight it. Click to view
the menu.
2. Scroll to and click Mark Unread.
The message will be marked as unread.
Note You can also mark messa
g
es as unread in an open
messa
g
e by clickin
g
to view the menu, scrollin
g
to and
clickin
g
Mark Unread.
If you mark a messa
g
e as unread on your Proton which has
already been read on your desktop, and you synchronize
your Proton and your PC, the messa
g
e will be marked as
read on both your Proton and your desktop.

6
Using the Address Book
The Proton contains an Address Book for storing the address
information of each person or company you might want to contact.
The Address Book allows you to keep a customized record of email
addresses, mailing addresses, titles, and pager, fax, business, and
home phone numbers. It also stores personal information such as
any notes you’d like to associate with a specific contact. You can
also include PIN numbers for contacts with Proton. Add as many
different contacts as you like!
Customizing Address Book options
To customize your Address Book options
In your Address Book options, you can decide how you want to sort
the addresses in your Address Book, whether or not you want
confirmation of deleted addresses, and whether or not you want to
allow duplicate names.
1. In the screen, scroll to and click the icon on
the functions list.
2. The screen appears. Click to view the menu.
Scroll to and click Options

Proton — User’s Guide
Using the Address Book — Customizing Address Book options
62
3. The screen appears, displaying the fol-
lowing three options:
4. Scroll to the option you want to change, then click to view the
menu. Scroll to and click Change Option.
5. The following dialog box appears. Roll the trackwheel to
change options. Click the trackwheel once you have changed
the option’s setting to your preference.
6. Click the trackwheel to view the menu. Scroll to and click Save
Options.
You return to the screen.
Sort By Select how you want to sort the addresses
in your Address Book. The default is
First Name.
Confirm
Address
Delete
Select whether or not you want to confirm
the deleting of an Address Book entry
each time. By default, this is set to Yes.
Allow
Duplicate
Names
Select whether or not you want to allow
more than one entry for the same name.
By default this field is set to Yes.
Note You can also access the Address Book options in the
screen when composin
g
a messa
g
e.
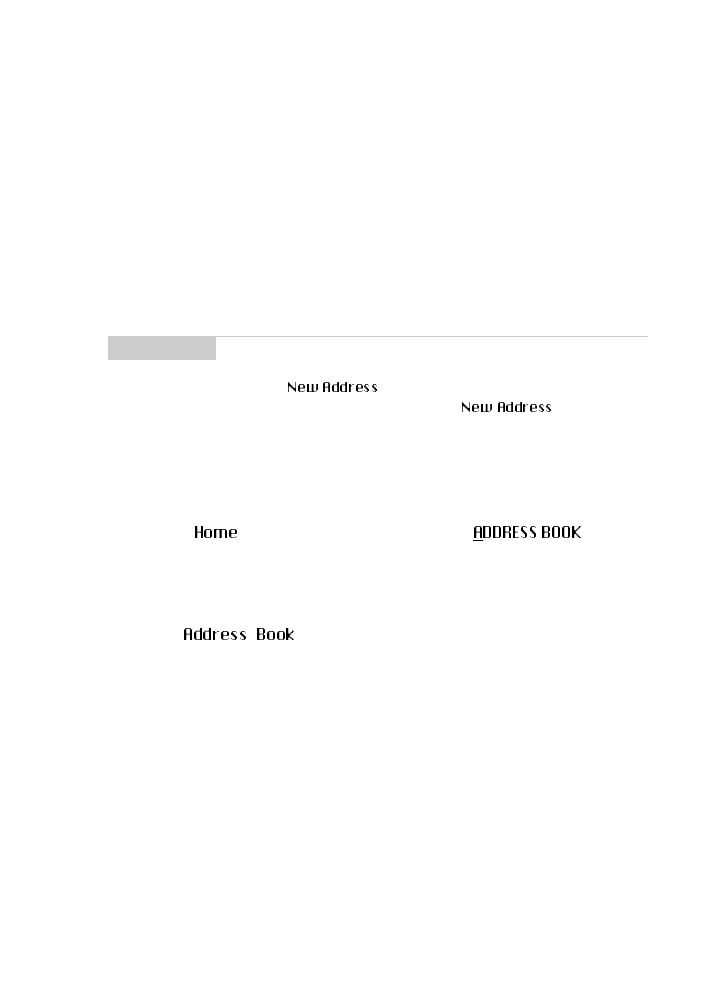
Using the Address Book — Adding address entries
Proton — User’s Guide
63
Adding address entries
You can add entries to the Address Book to suit your needs.
To add an Address Book entry
You can add address entries to your Address Book to create a
contact database.
1. In the screen, scroll to and click the icon on
the functions list.
2. The screen appears. Click to view the menu.
Scroll to and click New Address.
3. Type your contact’s information and press ENTER after each
field. You can also type your contact’s full name in the First:
or Last: field and press the ENTER key. The first name will
appear in the First: field and the last name will appear in the
Last: field.
Note You can have up to 3 email address for the same Address
Book entry. To add more than one email address, click to
view the menu, scroll to and click Add Email.
An additional field appears in the screen and
you are able to add the second email address. When you
compose a messa
g
e to the contact with multiple email
addresses and select the email send method, you will be
prompted to select which address to use.

Proton — User’s Guide
Using the Address Book — Adding address entries
64
4. To save your contact information, click to view the menu. Scroll
to and click Save Address.
An alphabetical listing of all your contacts’ names appears with
your new contact’s name inserted in order.
Address Book entry fields
The screen has the following entry fields:
First Name: Enter your contact’s first name. This field accepts
alpha-numeric and symbol characters.
Last Name: Enter your contact’s last name. This field accepts
alpha-numeric and symbol characters.
Email: Enter your contact’s email address. This field supports
alpha-numeric and symbol characters. Pressing the space bar once
invokes the ‘@’ sign; pressing the SPACE key again invokes a ‘.’
(period). If you continue to press the SPACE key, you can continue to
insert periods. To insert a blank space, press the BACKSPACE key and
then the SPACE key again.
PIN: Enter your contact’s PIN number. This number, unique to
each Proton, is assigned by the wireless data network service and
allows you to send a message to another Proton without using an
email address. You do not need the ALT key to enter numbers in this
field.
Title: Enter the title of your contact’s position.
Tip Instead of adding all your contacts manually to your Proton,
you can import them from your PC. See the Proton Desktop
Manager online help for more information.

Using the Address Book — Adding address entries
Proton — User’s Guide
65
Company: Enter the name of the company for which your contact
works.
Work: Enter your contact’s business phone number. This field
supports numeric characters and the ‘–‘, ‘+’, ‘x’ and ‘.’ characters
without having to hold down the ALT key. You can also access the
symbols library to use parentheses.
Home: Enter your contact’s home phone number. This field
supports numeric characters and the ‘–‘, ‘+’, ‘x’ and ‘.’ characters
without having to hold down the ALT key. You can also access the
symbols library to use parentheses.
Mobile: Enter your contact’s mobile phone number. This field
supports numeric characters and the ‘–‘, ‘+’, ‘x’ and ‘.’ characters
without having to hold down the ALT key. You can also access the
symbols library to use parentheses.
Pager: Enter your contact’s pager number. This field supports
numeric characters and the ‘–‘, ‘+’, ‘x’ and ‘.’ characters without
having to hold down the ALT key. You can also access the symbols
library to use parentheses.
Fax: Enter your contact’s fax number. This field supports numeric
characters and the ‘–‘, ‘+’, ‘x’ and ‘.’ characters without having to
hold down the ALT key. You can also access the symbols library to
use parentheses.
Address: Enter your contact’s street address. There are 2 fields for
long addresses.
City: Enter your contact’s city.
State/Prov: Enter your contact’s state or province.
ZIP/Postal Code: Enter your contact’s zip code or postal code.
Country: Enter your contact’s country.

Proton — User’s Guide
Using the Address Book — Searching address entries
66
Notes: Enter any reference notes you would like to keep about
your contacts. This field supports alpha-numeric and symbol
characters. Press the ENTER key for a new line.
Searching address entries
The Proton’s powerful search tool enables you to go directly to a
specific contact so you do not have to scroll through a lengthy
address list.
1. Type the first letter or letters of the name of the contact you
want to find. The letter or letters you type appear in the screen
header, preceded by the word Find:.
2. To return to your complete list of contacts, click to view the
menu. Scroll to and click View All.
Viewing address entries
You can view the information for a specific contact in the form of an
on-screen business card.
1. In the screen, highlight the name of the contact
whose information you want to view. Click to view the menu.
Scroll to and click View Address.
Note The example above illustrates that the Proton searches the
First, Last, and Company names of contacts to find the first
instance of a match. The more letters you type for your
search, the fewer matches there will be.

Using the Address Book — Editing address entries
Proton — User’s Guide
67
2. A virtual business card appears listing all the information
you’ve entered for this contact.
Editing address entries
You can edit the information in any of the fields of an address entry.
Some Address Book fields are limited to numeric characters and
only a few alpha characters.
1. From the screen, select the Address Book entry
you want to edit and click to view the menu. Scroll to and click
Edit Address.
2. The screen appears. Use the trackwheel to move
from field to field. Press the ALT key as you roll to scroll hori-
zontally through the text to make your edits.
3. When you have made all the changes to the address entry
fields, click to view the menu. Select Save Address by clicking
again.
Tip Press the first letter of the field name. The cursor will move
to that field. For example, if you press ‘F’ in this screen, you
move to the Fax field.
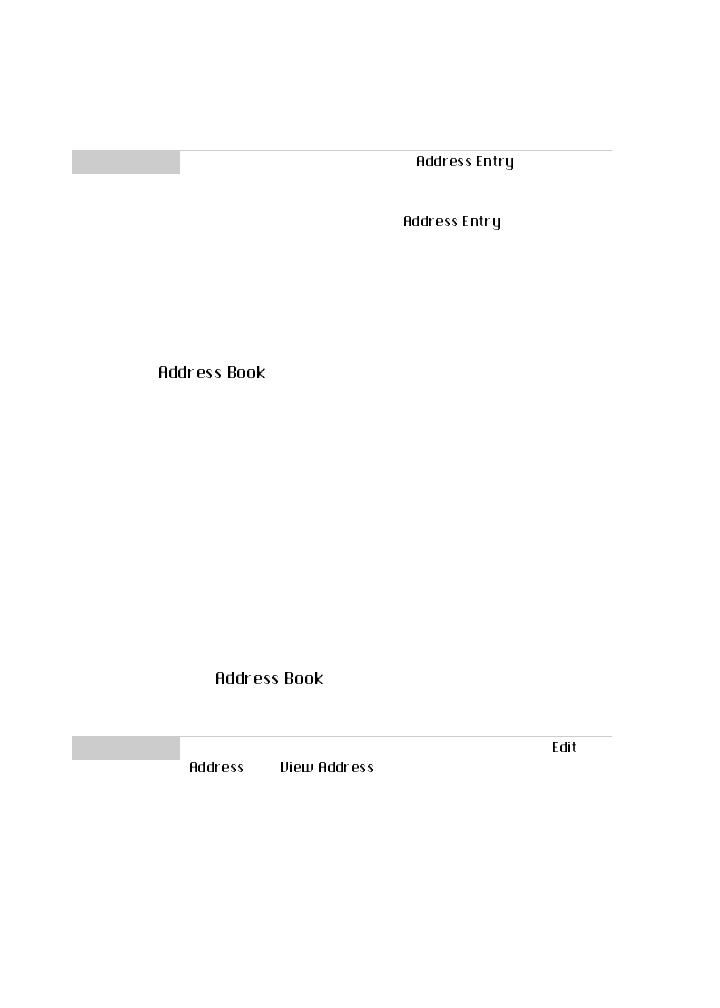
Proton — User’s Guide
Using the Address Book — Deleting address entries
68
Deleting address entries
You can delete old addresses from your Address Book to save
memory space.
1. In the screen, scroll to the contact you want to
delete.
2. Click to view the menu, then scroll to and click Delete
Address.
3. The following dialog box appears asking if you want to delete
the address. Select Yes by clicking the trackwheel.
You return to the screen and the entry is no longer in
your contact list.
Note Click the trackwheel to view the menu. From
this menu you can clear fields and add Email fields. Simply
scroll to choose the field and click to clear or add. You will
see the field(s) affected in the screen.
Note You can also delete Address Book entries from the
and screens.
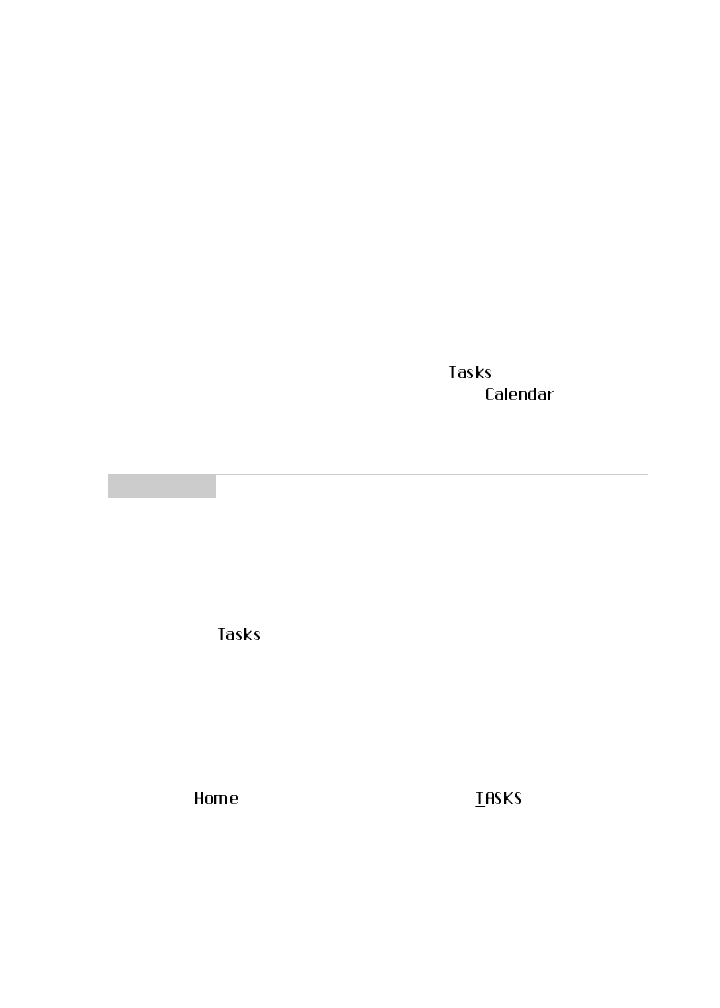
7
Managing tasks and
appointments
The Proton contains two functions to help you manage and
schedule appointments and tasks. Use the function to make a
list of tasks that need to be completed. Use the function to
keep track of appointments and events, including the duration of
the appointment, the location, and any additional notes.
Using the Tasks function
The Proton’s function allows you to keep a list of important
tasks that need to be accomplished. Tasks can be sorted by priority,
due date, or subject.
To add tasks
You can add tasks to your Task list to keep the list up to date.
1. In the screen, scroll to and click the icon on the
functions list.
Note You can copy Task and Calendar entries from your PC to
your Proton. See the Proton Desktop Mana
g
er online help
for more information on synchronizin
g
your Tasks and Cal-
endar entries.

Proton — User’s Guide
Managing tasks and appointments — Using the Tasks function
70
2. The screen appears. Click the trackwheel to view the
menu. Scroll to and click New Task.
3. The screen appears, where you can type the informa-
tion for the task. Press ENTER after each field.
4. Click to view the menu then select Save Task by clicking again.
Your new task will be listed in the screen, with one of
following three icons beside it, depending on the task’s status.
Tasks entry fields
The screen will contain the following entry fields:
Task: Enter the subject of the task.
Icon Description
The task has been completed.
The task has been deferred or is waiting.
The task has not been started or is in progress.
Managing tasks and appointments — Using the Tasks function
Proton — User’s Guide
71
Status: Choose the status of the task. Your options are Not
Started, In Progress,
Completed,
Waiting, and Deferred. The
default is Not Started.
Priority: Choose the priority of the task. Your options are
Normal,
Low, and High. The default is Normal.
Due: Select when the task is due to be completed. Your options are
None or By Date. If you select None, no due date will be recorded for
this task. If you select By Date, you can enter the date on which this
task is due.
Notes: Enter any reference notes you would like to keep about the
task.
To view and edit tasks
You can view a task entry in the screen. If necessary, you
can change any information in that screen.
1. In the screen, scroll to and click the icon on the
functions list. The screen appears, displaying a descrip-
tion for each task.
2. Click the trackwheel to view the menu, then select Open Task
by clicking again.
3. The screen appears with all the details of the task
listed. Edit the task by changing the fields in this screen.
4. Once you have finished viewing or editing the fields in this
screen, click to view the menu. Scroll to and select Save Task.

Proton — User’s Guide
Managing tasks and appointments — Using the Tasks function
72
You return to the screen.
To delete tasks
You can delete tasks from the Task list when they have been
completed or when you no longer need to reference them.
1. In the screen, scroll to the task you want to delete.
2. Click to view the menu then scroll to and click Delete Task.
3. The following dialog box will appear, asking if you want to
delete the task. Click Yes.
You return to the screen where the task is no longer in the list.
Note You can also delete all completed tasks by scrollin
g
to and
clickin
g
Delete Completed.

Managing tasks and appointments — Using the Tasks function
Proton — User’s Guide
73
To change a task’s status
Once a task’s status has changed, you can reflect this change in the
Task list. You can mark a completed task as “In Progress” and an in
progress task as “Completed.”
1. In the screen, select the task for which you want to
change the status.
2. Click to view the menu. Depending on the task’s current status,
scroll to and click either Mark Completed or Mark In
Progress. (For this exercise, choose Mark Completed.)
The task’s status is changed.
To set tasks’ options
You can modify the options for how your Task list is organized.
1. In the screen, click to view the menu. Scroll to and click
Options.
Note You can only chan
g
e the status of a completed task to in
pro
g
ress. You can mark a task as completed if it is marked
as deferred, waitin
g
, not started, or in pro
g
ress. To chan
g
e
a task to another status other than completed or in
pro
g
ress, edit the task. See 95 for information on editin
g
tasks.
Tip Press M to chan
g
e the task’s status without viewin
g
the
menu.

Proton — User’s Guide
Managing tasks and appointments — Using the Calendar function
74
2. The screen appears. In the Sort By: field, select
how your tasks should be sorted. Choose from Subject, Due
Date, Status, or Priority. In the Confirm Task Delete field,
select whether or not you want to confirm deleting a task.
While in either of these fields, click to view the menu, then
select Change Option.
3. The following dialog box appears. Roll the trackwheel to
change options. Click the trackwheel when you have changed
the option’s setting to your preference.
4. When you have made the required changes, click to view the
menu. Scroll to and click Save Options.
You return to the screen.
Using the Calendar function
The Proton’s function displays appointments and events
in either Agenda view or Calendar view. The Calendar view
displays a calendar with icons on the dates with appointments. The
Agenda view looks similar to the setup of the screen and
displays the date of the appointment, the start time, and a
description.
To switch from Calendar view to Agenda view
The default view for this function is Agenda view. If you change it
and exit the function, the view you switch to becomes the default
view the next time you access the function.
Managing tasks and appointments — Using the Calendar function
Proton — User’s Guide
75
1. In the screen, scroll to and click the icon on the
functions list.
2. The screen appears in Agenda view on the most
recent date that has an appointment scheduled. Click to view
the menu. Scroll to and click Display Calendar.
3. The full month will be displayed with a black box highlighting
today’s date. A smaller box will appear to the left of any days
that have appointments scheduled. For appointments before
noon, the box is displayed in the upper left corner. For appoint-
ments after noon, the box is displayed in the lower left corner.
To add new appointments
The following instructions outline how you can add appointments
from Agenda view. This procedure also applies for adding
appointments in Calendar view.
1. In the screen, scroll to and click the icon on the
functions list.
Tip Press S to switch between views quickly.
In Calendar view, scroll to a date and press the ENTER key.
You will see the appointments for the day, in A
g
enda view.
(If there are no appointments, you will see the appointments
for the day closest to the day you’ve selected.) Press the
BACKSPACE key to return to Calendar view. Scroll to
another date to view more appointments.

Proton — User’s Guide
Managing tasks and appointments — Using the Calendar function
76
2. The screen appears. Click the trackwheel to view the
menu. Scroll to and click New Appointment.
3. The screen appears. Use the trackwheel to
move from field to field, adding information for the appoint-
ment. Press ENTER to go to the next field.
4. To save the information, click to view the menu. Scroll to and
click Save Appointment.
You return to the screen.
Appointment entry fields
The screen contains the following entry fields:
Subject: Enter the subject of the appointment.
Note To add a reminder to this appointment, in the Reminder:
field, select how early you want to be notified of the appoint-
ment. Scroll through your options or type the first number of
the length of time to set. If you choose to be notified, your
appointment will have an alarm icon beside it in the
screen.
If you have set a reminder for your appointment but do not
want to be notified of regular messages, turn on Priority
Message notification in the screen. You will continue
to be notified of the pendin
g
appointment since appoint-
ments are considered priority messa
g
es. See pa
g
e 91 for
information on the screen.

Managing tasks and appointments — Using the Calendar function
Proton — User’s Guide
77
Location: Enter the location where the appointment is to be held.
Date: Enter the date of the appointment. The default is today’s
date.
Start Time: Enter the beginning time of the appointment. The
default is the current time, rounded to the nearest 15 minutes.
End Time: Enter the ending time of the appointment. The default
is the current time, rounded to the nearest 15 minutes.
Reminder: Choose whether or not you want to be notified of the
appointment. If you want a reminder, choose how early you wish to
be notified of the appointment. The default is 15 minutes before the
start time.
Notes: Enter any reference notes you want associated with this
appointment.
To view and edit appointment entries
If you are in Calendar view, you must switch to Agenda view before
you can view or edit the details of an appointment.
1. In the screen, ensure that you are in Agenda view.
Select the appointment that you want to view or edit. Click to
view the menu. Scroll to and click Open Appointment.
2. The screen appears with all the details of the
appointment listed. Edit the information in the Subject: and
Location: fields. Scroll to the Date:, Start Time:, End Time:,
or Reminder: field. Click to view the menu, then click Change
Option.

Proton — User’s Guide
Managing tasks and appointments — Using the Calendar function
78
3. The following dialog box appears. Roll the trackwheel to
change options. Click the trackwheel once you have changed
the option’s setting to your preference.
4. Click the trackwheel to view the menu, then select Save
Appointment by clicking again.
You return to the screen.
To view today’s appointments
In the screen, you can view the appointments you have
scheduled for the current date.
In the screen, click the trackwheel to view the menu.
Scroll to and click Today.
You will move to today’s date in the list of appointments.
To delete appointment entries
You can delete appointments from your Calendar after the
appointment has passed.
Note If there are no appointments scheduled, you will see the
appointments for the day closest to the day you’ve selected.
Note Appointments which are more than 30 days old are auto-
matically deleted.

Managing tasks and appointments — Using the Calendar function
Proton — User’s Guide
79
To delete appointment entries
You can delete individual appointment entries in Agenda view.
1. In the screen, scroll to the appointment you want to
delete.
2. Click the trackwheel to view the menu. Scroll to and click
Delete Appointment.
3. The following dialog box appears, asking if you want to delete
the appointment. Click Yes.
You return to the screen where the appointment is no
longer in the list.
To delete multiple appointment entries
You can delete more than one appointment at a time.
1. In Agenda view of the screen, scroll to a date field.
2. With the date field highlighted, click the trackwheel to view the
menu. Scroll to and click Delete Prior.
3. The following dialog box appears. Click Yes to delete all
appointments prior to that date.

Proton — User’s Guide
Managing tasks and appointments — Using the Calendar function
80
You return to the screen and you can see that the
appointments have been removed from the list
Note If you want to delete multiple appointments in Calendar
view, hi
g
hli
g
ht a date with appointments and click to view
the menu. Scroll to and click Delete Appointments. All
appointments for the day will be deleted.

8
Using the MemoPad and
Calculator
The Proton contains a MemoPad to help you organize important
memos. A Calculator function is also included, which allows you to
perform simple mathematical operations.
Using the MemoPad function
You can use the function to add, edit, view, and delete
memos.
To add memos
You can add memos to your Proton wherever you are.
1. In the screen, scroll to and click the icon on the
functions list.
2. The screen appears. Click to view the menu. Scroll to
and click New Memo.
3. Type a title for your memo and press ENTER. Then type the
body of the memo.

Proton — User’s Guide
Using the MemoPad and Calculator — Using the MemoPad function
82
4. Once you have finished composing the memo, click to view the
menu. Scroll to and click Save.
You return to the screen where your new memo is
inserted in the list in correct alphabetical order.
To view memos
You can view the memos you have created in the screen.
In the screen, highlight the name of the memo which
you want to view. Click to view the menu. Scroll to and click
View Memo.
The full memo appears on your screen.
To edit memos
You can edit your memos if necessary.
1. In the screen, select the memo you want to edit and
click to view the menu. Scroll to and click Edit Memo.
2. The screen appears. Press the ALT key as you roll to scroll
horizontally through the text to make your edits.
Note You can edit a memo you are viewing by clicking to view the
menu. Scroll to and click Edit Memo.

Using the MemoPad and Calculator — Using the MemoPad function
Proton — User’s Guide
83
3. When you have finished making changes to your memo, click
to view the menu. Select Save by clicking again.
To delete memos
You can delete old memos to save memory space.
1. In the screen, scroll to the memo you want to delete.
2. Click to view the menu, then scroll to and click Delete Memo.
3. The following dialog box appears asking if you want to delete
the memo. Select Yes by clicking the trackwheel.
You return to the screen and the memo is no longer in the
list.
Note You can clear the Title: field and the entire body of the
messa
g
e. Scroll to the field you want to clear (either the
Title: field or the body of the messa
g
e) and click to view
the menu. Scroll to and click Clear Field. The field is
erased and you can add new text.
Note You can delete memos in the screen only.
Proton — User’s Guide
Using the MemoPad and Calculator — Using the Calculator function
84
Using the Calculator function
Use the Proton’s calculator to perform simple mathematical
operations.
1. In the screen, scroll to and click the icon on
the functions list.
2. The screen appears. Use the keyboard to enter the
first number of the mathematical calculation. Roll the track-
wheel to the operator you want and click.
3. Enter the next number of the mathematical calculation. Roll the
trackwheel to the equal sign and click. The result of the calcula-
tion appears.
Tip You can type numbers and mathematical operators in the
Calculator without pressin
g
the ALT key.
Note You can add, recall, and clear the calculator’s memory if
you want to save the result of a particular calculation.
Pressin
g
ENTER will perform the same action as scrollin
g
to
and clickin
g
the equal si
g
n on the Proton’s calculator dis-
play.
Press C or the BACKSPACE key to clear the Proton’s calcu-
lator display.

Using the MemoPad and Calculator — Using the Calculator function
Proton — User’s Guide
85
To exit the calculator
To exit the calculator, scroll to ‘EXIT’ and click the trackwheel. You
can also continue to press the BACKSPACE key to exit.
Note You cannot scroll to EXIT and press ENTER to exit the calcu-
lator. Pressing ENTER will perform the last mathematical
calculation again.

9
Customizing your Proton’s
options
In Chapter 2, ‘Getting started,’ you found the procedure for setting
message notification options. Refer to this chapter to learn how to
make the most of the Proton by customizing all of the options to suit
your specific needs.
Customizing Proton options
You can customize any of the Proton’s options by following this
general procedure:
1. In the screen, scroll to and click the icon on the
functions list.
2. The screen appears. Scroll to the option you
want to change and click the trackwheel.
3. Scroll to the field you want to change and click to view the
menu. Scroll to and click Change Option.
Note In the screen, return to the screen by
scrollin
g
to and clickin
g
[Return to Home screen] at the
top of the options list.
Proton — User’s Guide
Customizing your Proton’s options — Proton options
88
4. A dialog box appears. Roll the trackwheel to change options.
Click the trackwheel once you have changed the option’s set-
ting to your preference.
5. Click to view the menu, then scroll to and click Save Options.
You return to the screen.
Proton options
The following pages list the Proton’s options and provide page
references for further information.
About
The screen contains Proton copyright information. You
cannot change the information in this screen. Press BACKSPACE twice
to return to the screen.
Auto On/Off
Use the automatic on/off feature to maximize battery life and still
maintain optimal, extended messaging performance.
Weekday On: Enables you to set the Proton to turn on
automatically at a specific time throughout the week
Note Both Weekday and Weekend options have an Enable/
Disable field. You must set this field to Enable in order for
the Proton to turn on and off automatically.

Customizing your Proton’s options — Proton options
Proton — User’s Guide
89
Weekday Off:
Enables you to set the Proton to turn off
automatically at a specific time throughout the week
Weekend On:
Enables you to set the Proton to turn on
automatically at a specific time on the weekend
Weekend Off:
Enables you to set the Proton to turn off
automatically at a specific time on the weekend
AutoText
The
screen contains a list of all current AutoText entries.
You can add, edit, and delete entries as you wish. See 50 for
information on how to change AutoText entries.
Date/Time
Set the date and time so that your messages contain the correct time
stamp.
Time Zone:
Select your time zone. The Proton will automatically
adjust the time depending on the time zone. The default is the
Eastern (-5)
time zone.
Daylight Savings:
Select whether or not you want daylight
savings to be adjusted automatically. By default, the Proton is set to
adjust for daylight savings (
Support
). The setting only needs to be
set once. It should only be set to
Ignore
if you live in a state or
province that does not recognize daylight savings. When this setting
is set to
Support
, the Proton will automatically adjust the time on
the proper date.
Note You can also automatically set the date and time by syn-
chronizin
g
your Proton with your PC. See the Proton Desk-
top Mana
g
er online help for more information.

Proton — User’s Guide
Customizing your Proton’s options — Proton options
90
Time: Set the current time.
Format: Select a 12 hour or 24 hour clock (the default is 12 HR).
Date: Set the current date.
Message Services
Email Service: Choose the default message service information
entry that applies to this session of email redirection. Any new
messages will be sent to the message service selected when the
message is sent. You should delete any obsolete message service
information entries in this field. The message service information
entry provided when you first receive your Proton is Desktop.
Network Settings
Roaming: Choose the country you are in - either Canada or the
United States. For Canadian subscribers, the default is Canada. For
American subscribers, the default is U.S.
Note The information that you input into the Time, Format, and
Date fields will appear on the Proton’s screen and on
the password security screen.
Note The messa
g
e service information entry provided should be
correct in most cases. We recommend a
g
ainst chan
g
in
g
this field.
Note It is possible to
g
et a Proton service that allows you to
switch dynamically between both Canada and the United
States. It is, however, more expensive for cross-border
roamin
g
. Talk to your Proton Service Representative for
more information.

Customizing your Proton’s options — Proton options
Proton — User’s Guide
91
Radio: Turn the Proton’s radio on or off. In certain situations,
such as travelling by plane, it is important to turn off the radio in
your Proton to prevent radio frequency interference. See 20 for a
shortcut for turning off your radio.
Status: Shows the status of the network. You cannot change this
field. It is set to either Pending or Active, depending on what the
Roaming field is set to.
Notify
You can set the Proton message notification to tone/vibrate, vibrate,
tone, or none. See page 18 for information on how to set the notify
options.
In Holster: Customize the way the Proton notifies you of a new
message while it is in the holster. Choose from: Tone, Vibrate,
Vibrate+Tone, or None. The default notification setting is
Vibrate+Tone.
Out of Holster: Customize the way the Proton notifies you of a
new message when it is out of the holster. Choose from: Tone,
Vibrate, Vibrate+Tone, or None. The default notification setting is
Tone.
Tune: Select 1 of 6 tunes which you want to be played to notify you
of a new, received message. The default is set to Tune 1. The tunes
will be played as you scroll through the options.
Note You can re-re
g
ister with the network in the
screen. Click to view the menu, scroll to and click Register
Now.

Proton — User’s Guide
Customizing your Proton’s options — Proton options
92
Volume: Select the volume of your notification tune. Choose from
Low, Medium, High, Escalating, or Off.
Number of Beeps: Select the number of beeps the Proton should
make before notification stops. Choose from 1 to 5 beeps.
Priority Only: Select whether or not you want to be notified of
all messages or only those with a high priority. Choose from either
Yes or No.
Owner
This information is shown on the password security screen. If no
owner information is entered, default Proton information appears
on the password security screen.
Name: Enter your name.
Information: Enter any extra information you want to be
included about the Proton.
Note Escalatin
g
volume indicates that the Proton should start
with quiet notification and pro
g
ress to louder notification.
Note Appointments are considered hi
g
h priority. If you set this
field to Yes, you will be notified of appointments with
reminders, even if you have turn off other notification.
The priority of messa
g
es forwarded to your Proton is
dependent upon the filter rules in the Proton Desktop Man-
a
g
er. See the Proton Desktop Software Installation & Get-
tin
g
Started Guide or the Proton Desktop Mana
g
er online
help for more information on filters.
Customizing your Proton’s options — Proton options
Proton — User’s Guide
93
Screen/Keyboard
In the screen you can change the LCD screen
appearance by adjusting contrast levels, changing the number of
lines displayed on the screen, and changing the key rate and tone.
Screen Contrast: Adjust the screen’s contrast.
Screen Size: Set the number of lines you want visible on the
screen. Your choices are either 6 or 8 lines. The default display is 6
line.
Key Tone: Set the key tone if you want the Proton to emit a tone
each time a key is pressed. By default, the key tone is set to Off.
Key Rate: Set the speed (Slow, Fast, or Off) at which your cursor
moves whenever the BACKSPACE, ENTER, or SPACE key is pressed
and held. The default setting is Slow.
Security
If you have enabled the password feature in the screen, you
will have to enter it to access the Proton after the password security
screen appears. You will also need the password to re-access the
screen. See page 26 for information on how to set your
password.
Password: Choose whether or not you want to enable a password
on the Proton. The default is Disabled.
Note For all other keys, the Key Rate setting controls an auto
capitalization feature. With Key Rate set to either Slow or
Fast (i.e. Key Rate must be enabled), you can press and
hold a key to capitalize it.

Proton — User’s Guide
Customizing your Proton’s options — Proton options
94
Security Timeout:
Set the duration of time (in minutes) that the
Proton is idle before the password security screen appears. The
default setting is
2 min
.
Status
The
screen provides information about the Proton and the
network over which it operates. You cannot change the information
that is displayed.
Signal:
Indicates the strength of the Proton’s signal over the
wireless data network.
Battery:
Indicates the percentage of the remaining battery life.
Memory Free:
Indicates the amount, in bytes, of available RAM on
the Proton.
File Free:
Indicates the amount, in bytes, of available flash file
storage space that can be used to store messages, address entries,
and AutoText entries.
PIN:
This is the Proton’s address number. Other Proton users can
use this address number to send messages directly to you.
ESN:
This is the Proton’s serial number.
O/S:
Indicates the version of the Operating System.
Ribbon:
Indicates the version of the functions list on the
screen.
UI:
Indicates the version of the User Interface.
AutoText:
Indicates the version of the AutoText feature.
Customizing your Proton’s options — Proton options
Proton — User’s Guide
95
Serial Db Access: Indicates the version of the Backup and
Restore protocol DLL.
MemoPad: Indicates the version of the function.
Crypto SK: Indicates what version of the encryption key is active.
Message List: Indicates the version of the function.
Database: Indicates the version of the Database DLL.
Address Book: Indicates the version of the
function.
Calendar: Indicates the version of the and
function.

Proton — User’s Guide
Customizing your Proton’s options — Connecting to your PC
96
Connecting to your PC
You can connect the Proton to your PC to backup and restore data,
synchronize applications, and reconcile email. Connecting the
Proton to a computer for transferring data requires the cradle and
the Proton Desktop Software. These items are included in your
Proton package.
To connect the Proton to your PC
1. Ensure that you have properly installed the Proton Desktop
Software. Please refer to the Proton Desktop Software Installa-
tion & Getting Started Guide for more information on the
installation procedure.
2. Insert the end of the cradle cable into a COM port on the back of
your PC computer. (If you do not know the number of the
COM port that the cradle is plugged into, the Proton Desktop
Manager can detect it for you. If another device is already con-
nected to the serial port, it must be disabled before detection
can occur. See the Proton Desktop Manager online help for
more information.)
3. Secure the Proton in the cradle by inserting the connector port
on the bottom edge of the Proton into the connector prongs of
the cradle. Then click the top of the Proton into the cradle.
Connecting the cradle to the PC
4. Refer to the Proton Desktop Software Installation & Getting
Started Guide or the Proton Desktop Manager and Proton
Note When connectin
g
the Proton to the PC, use only the cradle
provided by Research In Motion Limited.

Customizing your Proton’s options — Connecting to your PC
Proton — User’s Guide
97
Desktop Redirector online help for more information on all the
capabilities of the software.
Information on the desktop and on the Proton can be reconciled and
synchronized. For example, if you mark a task as complete on the
Proton and you put it in the cradle and synchronize your data, the
task is marked as complete on your desktop. Similarly, if you add a
new appointment to your desktop calendar and synchronize, the
new appointment will be added to the Proton’s calendar.
Removing the Proton from the cradle
To remove the Proton from the cradle, brace the bottom of the cradle
with your thumb and gently pull the top of the Proton towards you.
Note If the password is enabled, you must enter it before you can
connect to the desktop, See pa
g
e 25 for more information
on the password.

10
Frequently asked questions
This chapter includes answers to some common questions about the
Proton.
Alarm
Why is my alarm not sounding when I’ve set the time?
• Ensure that you have enabled the alarm by setting the Alarm
On/Off field to ‘On’. See page 19 for information on setting this
field. When the alarm is set, a bell icon appears on the
screen.
Battery
Why is my battery running down quickly?
There are several reasons why your battery may run down quickly.
Following these suggestions will help you get the most out of your
battery.
• Use vibrate notification option because it requires less power
than tone notification. See page 91 for information on the notifi-
cation options of the Proton.
• Avoid using the Proton for long messages. The reply with text
feature also makes your messages longer, draining the battery
faster.

Proton — User’s Guide
Frequently asked questions — Home screen
100
• Avoid using the backlighting feature because it requires a lot of
power.
• Turn off your Proton’s radio when you are not reading mail or
when receiving your mail is not urgent. This can save a large
amount of the battery’s power.
• Use the filter rules included in the Proton Desktop Manager.
See the Proton Desktop Manager online help for information on
filter rules.
• If you are sending the same message to more than one person,
use multiple recipients in one message rather than transmitting
the same message more than once. See page 31 for information
on composing a message to multiple recipients.
Home screen
How can I return to the Home screen?
The screen that displays the functions list and the date and time is
called the screen.
• Press the BACKSPACE key repeatedly until you return to the
screen. See page 107 for more information on other short-
cuts. (This shortcut applies for all screens except for the
screen when you are composing a message. You cannot use the
BACKSPACE key to escape from this screen.)
• Select Close from an application’s menu or, in the
screen, scroll to and click [Return to Home screen].
LCD screen
What can I do if my LCD screen seems faint?
• Check the contrast under the screen. See page 87
for information on how to set options.

Frequently asked questions — Messages
Proton — User’s Guide
101
• Activate backlighting by pressing the ALT key 3 times. See
page 10 for information on the Proton’s backlighting.
The backlighting on my display screen keeps disappearing.
• The LCD backlighting will turn off after 10 seconds if you have
not pressed a key or the trackwheel.
Messages
Why did I have two messages in my Inbox before I turned on
the radio?
• These two messages were Welcome messages to help you learn
how to use the Proton for the first time.
Why are my messages not being sent out?
• You can tell that messages have not been sent because they
have a clock icon beside them.
• Check that the Proton’s radio modem has been turned on, and
that you are within range of network coverage. See 20 for infor-
mation on how to turn on the radio.
•Check the screen to ensure that your Proton
has been activated on the network. If the Status: field in this
screen is Pending, call 1-877-BLK-BERRY to have your Proton
activated.
• You can manually attempt another transmission of your mes-
sage by resending it. As long as there is a clock icon beside the
message when you resend it, another attempt is made to trans-
mit the original message. A copy is not sent. See page 59 for
more information on how to resend messages.
Why am I not receiving all my messages?
There are several reasons why email may not be forwarded to your
Proton.

Proton — User’s Guide
Frequently asked questions — Messages
102
•Is your PC turned on? If you are using the Proton Desktop Redi-
rector to forward your email, your desktop computer must be
on any time you want to receive messages on your Proton. If
your company is using the Proton Enterprise Server to forward
your email, you do not need to leave your PC turned on.
•Is the Proton Desktop Redirector running? If you are using the
Proton Desktop Redirector to forward your email, verify that it
is running; its icon should be in the Windows System Tray on
your PC. If your company is using the Proton Enterprise Server
to forward your email, check the Proton Desktop Redirector for
possible error messages. See the Proton Desktop Redirector
online help included with the software for information.
•Is your Proton in the cradle connected to your PC? If the Proton is
in the cradle and you selected the option not to forward mes-
sages when the Proton is in the cradle, you will not receive any
messages on your Proton. Take the Proton out of the cradle to
find out if the messages are forwarding properly.
•Have you created Microsoft Exchange Inbox assistant rules? If
you have set up Inbox assistant rules that move new messages
from the Inbox to another folder, they will not be forwarded to
your Proton because the Inbox assistant moves them before
they are forwarded to your Proton.
•Have you set filter rules? Check the filters in the Redirector Con-
figuration tool to make sure the messages you want to receive
are being forwarded. See the Proton Desktop Manager online
help for information on these filters.
•Have you set the order of the filters? If a new filter applies to a
subset of the messages of an existing filter, the new one should
be at the top of the list.
What should I do if a message is returned?
You can tell that messages have been returned because they have an
‘x’ beside them.

Frequently asked questions — Punctuation
Proton — User’s Guide
103
• Open the message and scroll to the top. The Message Status
field indicates why the message was returned. Follow the
instructions included there. See the Proton Desktop Redirector
online help for more information and a list of possible error
messages.
• If the returned message was moved or deleted on your desktop,
forwarding or replying to the message will fail. Resend the
message. The copy of the message on the Proton is used and the
message is successfully transmitted. See page 59 for informa-
tion on how to resend messages.
I am not being notified when new messages arrive, even
though I have set the Proton to notify me.
• Ensure that the volume setting of the notification options is set
to either Low, Medium, High, or Escalating, rather than Off.
With the volume set to off, the beeper will not sound when new
messages arrive.
• Ensure that the Priority Only setting in your notification
options is not set to No. With this field set to Yes, you will only
be notified of high priority messages, rather than all messages.
See page 91 for more information on the notification options.
Punctuation
Where can I find the period (.) and other punctuation marks on
my keyboard?
• The quickest way to type a period (.) is to press the SPACE key
twice at the end of a sentence. The next letter is automatically
capitalized.
• Pressing the ALT key and an associated primary key allows you
to access the most commonly used punctuation marks. You will
see the punctuation mark printed in orange above the primary
key on the keyboard. See page 6 for information on the ALT key
and other key functions.

Proton — User’s Guide
Frequently asked questions — Resetting the Proton
104
• Other punctuation marks are included in the symbols library
which is accessed by pressing ALT + SPACE. See page 42 for
information on how to insert a symbol.
• You can also insert international characters into your messages.
Roll the trackwheel as you press and hold a letter with associ-
ated international characters to scroll through the available
characters. Release the letter once you find the one you want.
Resetting the Proton
On rare occasions, the Proton may report an internal Proton error
message, instructing you to press ‘R’ to reset. Doing so will return
the Proton to normal operation after a few minutes. Try sending
yourself a message and check that all the information has been
properly restored in the screen.
There is also a tiny hole located on the back of the Proton below the
bottom label. You can access it to reset the Proton. Normally, you
will not need to use this button. However, if the Proton ‘locks up’
(no longer responds when you press keys or use the trackwheel)
you may choose to use this method to reset the Proton. A fine-
tipped instrument, such as a paper clip, can be inserted into this
hole to press the reset button, restarting and restoring the Proton to
normal operation.
Messages and other information stored on the Proton will not be
lost. If you were in the process of composing a message, however,
the message will be lost.
Resetting your Proton will not lose the connection with your PC.
After you reset your Proton, synchronize with the Proton Desktop
Note You can also reset the Proton by simultaneously pressing
the ALT + SHIFT + BACKSPACE keys.

Frequently asked questions — Resetting the Proton
Proton — User’s Guide
105
Manager to ensure that all information has been restored. See the
Proton Desktop Manager online help for more information.
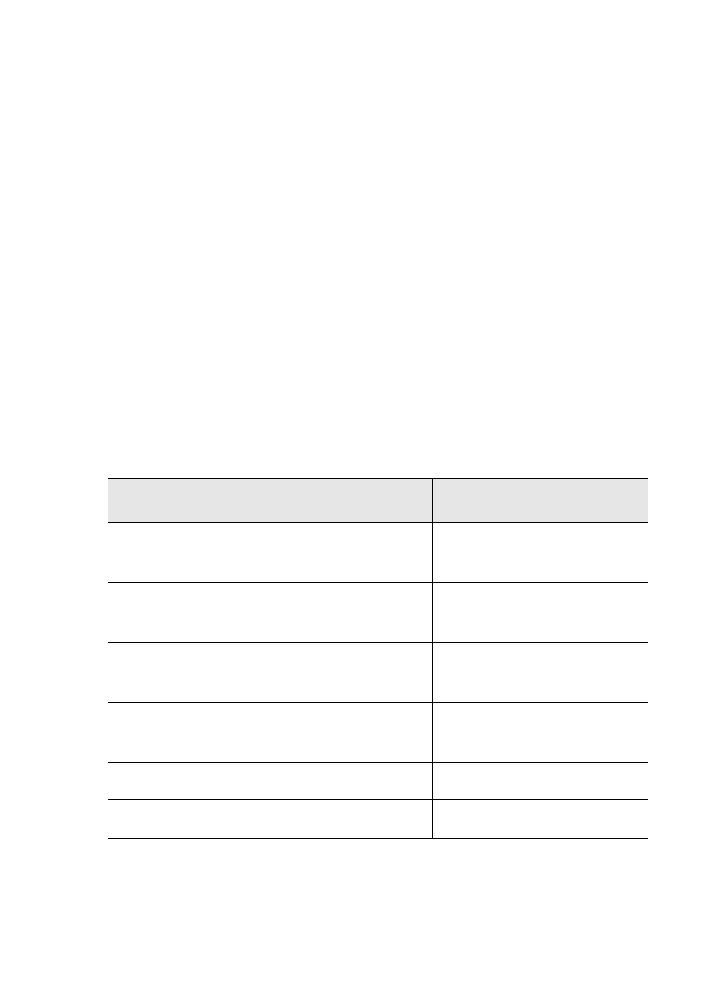
11
Advanced user’s tips
This chapter is intended for advanced users. It contains several tips
and shortcuts you can use on the Proton to increase the speed and
efficiency of using your Proton.
Tips for navigating
General tips
If you want to... press/type...
Go to the top message, task, or
appointment in a list T
Go to the bottom message, task, or
appointment in a list B
Go to an item in an options list,
menu, or choice list the first letter of the item
Scroll horizontally in any field where
you can enter or view text ALT + TRACKWHEEL
Page up in an open message ALT + ENTER
Page down in an open message ENTER

Proton — User’s Guide
Advanced user’s tips — Tips for navigating
108
Message tips
Scroll a screen at a time in the
, , , or
screens
ALT + TRACKWHEEL
Find a specific contact in the
or screens the first letters of the
name or the initials sep-
arated b
y
a space
Exit a menu, dialog, or list screen BACKSPACE
Create a new message, appointment,
or task in the ,
, , or functions
C
Activate the LCD backlighting ALT ke
y
three times
If you want to... press/type...
Return to the last cursor position if
you choose to close a message before
you’ve finished reading
G
Go to the next message in the list N
Go to the previous message in the list P
Go to the next unread message in the
list U
Go to the list of saved messages while
in the screen or
screen
V
If you want to... press/type...

Advanced user’s tips — Tips for navigating
Proton — User’s Guide
109
Tasks and Calendar tips
Go to the list of messages while in the
screen or
screen
M
Start a search for a message in the
and
screens
S
If you want to... press/type...
Mark an in progress task as com-
pleted or a completed task as in
progress
M
Switch between calendar and agenda
view in the Calendar screen S
Go to Today in calendar view of the
screen T
Go to the next day or month in the
screen N
Go to the previous day in the
screen P
If you want to... press/type...
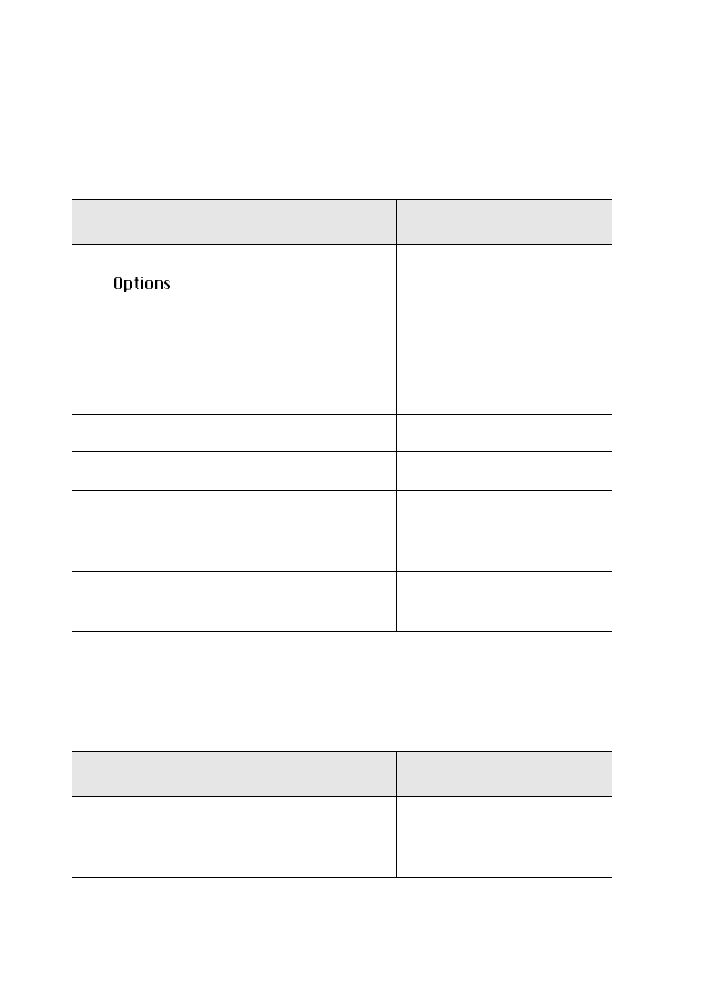
Proton — User’s Guide
Advanced user’s tips — Tips for selecting
110
Tips for selecting
General tips
Tips for editing
General tips
If you want to... press/type...
Change options in any screen within
the function SPACE
ALT while rollin
g
the
trackwheel
the first letters/numbers
of
y
our selection
Select Yes in a pop-up dialog box Y
Select No in a pop-up dialog box N
Select Cancel in a pop-up dialog box C
BACKSPACE
Open the highlighted item in any list
or menu ENTER
If you want to... press/type...
Delete the highlighted character,
message, address, appointment, or
autotext entry
ALT + BACKSPACE

Advanced user’s tips — Tips for editing
Proton — User’s Guide
111
Turn on and off caps lock mode in
any screen where you can enter text ALT + SHIFT
press SHIFT a
g
ain to
turn off
Turn on and off num lock mode in
any screen SHIFT + ALT
press SHIFT or ALT a
g
ain
to turn off
Capitalize a letter (with Key Rate
enabled) hold the letter
Insert international characters hold the appopriate
character and roll the
trackwheel
Insert a period and capitalize the next
letter SPACE twice
Open the screen ALT + SPACE
Insert a symbol (while in the
screen) scroll to the s
y
mbol and
click
press the associated
letter below the s
y
mbol
y
ou need
If you want to... press/type...

Proton — User’s Guide
Advanced user’s tips — Tips for editing
112
Address Book and Messages tips
Calendar tips
AutoText tips
Use these special AutoText entries to enter common phrases and
punctuation marks.
If you want to... press/type...
Delete all messages prior to and
including the highlighted date ALT + BACKSPACE with a
date field hi
g
hli
g
hted
Insert the “@” and “.” characters in an
Email field SPACE
If you want to... press/type...
Delete all appointments prior to the
highlighted date ALT + BACKSPACE, with a
date field hi
g
hli
g
hted in
a
g
enda view
Insert numbers in the Phone and Fax
fields without using the ALT key the associated ke
y
on
the ke
y
board while in
the field
If you want to... press/type...
Enter an open angle bracket br + SPACE
Enter the current date ld + SPACE
Enter the current time lt + SPACE
Enter a close angle bracket rb + SPACE

Advanced user’s tips — Tips for editing
Proton — User’s Guide
113
While entering a new AutoText entry, you can use a macro to
represent the text you want to insert or the action to perform. You
can enter one of the following macros: short date, long date, short
time, long time, backspace, delete, or the % character.

12
Specifications
Mechanical Properties
Display and control features
Weight: 5oz
Size (LXWXH): 34.6”X3.1”X0.70”
Memory: 5 MByte Flash memory
0.5 MB SRAM
Display: Full graphic LCD with backlighting,
160 x 160 pixel viewing area
Controls: Thumb-operated trackwheel; PC-style
keyboard
Message
Notification: Red LED indicator plus an audible
beeper, mechanical vibrator, and on-
screen notification -- configurable by
user
Other features: Real-time clock; audible alarm;
AutoText and address book updates
Ports: RS-232 compatible serial port at oper-
ating speeds up to 115 200 baud

Proton — User’s Guide
Specifications
116
Power
Temperature
Radio specifications
Frequency
Regulatory compliance
Battery: Rechargeable lithium polymer cell
Operating: 0°C to +50°C
Storage: -20°C to +65°C
Relative
Humidity: 5-95% Non-condensing
Network
Support 900 MHz Mobitex networks
Interface
Protocols: MASC (Mobitex Asynchronous Commu-
nications) protocol; RAP (RIM’s Radio
Access Protocol).
Transmitting: 896 to 902 MHz, 12.5 kHz Channels
Receiving: 935 to 941 MHz, 12.5 kHz Channels
Complies with: FCC part 15, 90 PENDING
Industry Canada RSS 119, PENDING

BlackBerry Handheld — User’s Guide
Index
A
About
hot keys, xiii
this guide, xiii
Activating
your handheld, 15
Adding
address entries, 63
Address Book
adding attachments from messages, 49
adding entries, 63
attaching entries to messages, 35
customizing options, 61
deleting entries, 68
description of, xii
editing entries, 67
editing tips, 112
entry fields, 64
opening attachments in messages, 48
searching for entries, 66
viewing entries, 66
Advanced user’s tips, 107
Agenda, 74
Alarm
description of, xii
FAQs, 99
setting, 19
Appointments, managing, 69
Attaching an Address Book entry to messages, 35

Attachments
adding to your Address Book, 49
opening Address Book attachments, 48
receiving, 47
Auto signature, customizing, 34
Automatic formatting, 42
capitalization, 41
email fields, 41
number fields, 42
number lock, 42
punctuation, 42
Automatic On/Off, description of, 88
AutoText
adding new entries, 38
deleting entries, 40
description of, 38
editing entries, 39
editing tips, 112
searching for entries, 40
using to compose messages, 37
B
Backing up data, 96
Backlighting, 10
BlackBerry
Address Book, 61
composing and sending messages, 31
customizing your handheld’s options, 87
description, 2
FAQs, 99
getting started, 15
introduction, 9
managing messages, 51

BlackBerry Handheld — User’s Guide
managing tasks and appointments, 69
package contents, 1
receiving and reading messages, 45
using MemoPad and Calculator, 81
C
Calculator
description of, xii
exiting, 85
using, 81, 84
Calendar
adding appointments, 75
appointment entry fields, 76
deleting appointments, 78
deleting multiple entries, 79
description of, xii
editing appointments, 77
shortcuts, 109
switching to Agenda view, 74
using, 74
viewing appointments, 77
viewing today's appointments, 78
Changing
address entries, 67
appointments, 77
AutoText entries, 39
task status, 73
tasks, 71
Chart of hot keys, 6
Components
handheld, 3
LCD screen, 9
Compose, description of, xi

Composing
messages, 31
saving messages while composing, 56
using AutoText, 37
Confirmation of messages, 34
Connecting to a PC, 96
Contents
of package, 1
Cradle
connecting handheld to PC, 96
description of, 4
Customer support, xiv
Customizing
Address Book options, 61
auto signature, 34
handheld options, 87
message options, 36
D
Date, setting, 89
Deleting
Address Book entries, 68
appointments, 78
AutoText entries, 40
memos, 83
messages, 58
messages from the Messages screen, 58
multiple appointments, 79
multiple messages, 58
open messages, 57
tasks, 72
Description
Address Book, xii

BlackBerry Handheld — User’s Guide
Alarm, xii
AutoText, 38
BlackBerry solution, 2
Calculator, xii
Calendar, xii
Compose, xi
cradle, 4
functions, xi
handheld options, 95
holster, 4
icons, 10
LCD screen, 3
Lock, xii
MemoPad, xii
message status icons, 51
Messages, xi
Options, xii
Power On/Off, xiii
Saved Messages, xi
Search Messages, xi
serial port, 5
Task List, xii
task status icons, 70
Turn Radio On/Off, xiii
Disabling
alarm, 19
handheld options, 87
password protection, 27
password security screen, 27
E
Editing
Address Book entries, 67
appointment entries, 77

AutoText entries, 39
memos, 82
task status, 73
tasks, 71
tips, 107
Email
reconciling, 96
Enabling
alarm, 19
handheld options, 87
password security, 26
F
FCC compliance, iv
File attachment, receiving, 47
Finding your PIN, 2
Formatting
automatic capitalization, 41
automatic punctuation, 42
email fields, 41
messages automatically, 42
number fields, 42
number lock, 42
Frequently asked questions, 99
alarm, 99
Home screen, 100
LCD screen, 100
messages, 103
punctuation, 103
Functions, xi
icons, 10
menus, 9
screens, 9

BlackBerry Handheld — User’s Guide
G
Getting
confirmation of messages, 34
started, 15
technical support, xiv
H
Handheld
activating, 15
components, 3
connecting to your PC, 96
cradle, 4
customizing options, 87
holster, 4
LCD screen, 3
locking, 28
quick setup, 18
resetting, 104
serial port, 5
status icons, 12
turning off, 16
Handheld options
About, 88
Auto On/Off, 88
AutoText, 89
Date/Time, 89
description of, 95
Email Service, 90
Network Settings, 90
Notify, 91
Owner, 92
Screen/Keyboard, 93
Security, 93

Status, 94
Holster, description of, 4
Home screen, 10
FAQs, 100
icons, 10
Hot keys, 6
I
Icons
description of, 10
handheld status, 12
message status, 13, 51
navigational, 14
task status, 70
Including Address Book entries in messages, 35
Industry Canada, certification, iv
Inserting symbols, 42
Introduction, 9
K
Key assignment chart, 6
Keyboard
hot keys, 6
L
LCD screen
backlighting, 10
components, 9
description of, 3
FAQs, 100

BlackBerry Handheld — User’s Guide
function menus, 9
function screens, 9
graphics, 14
Lockusing, 28
Lock, description of, xii
M
Managing
appointments, 69
messages, 51
tasks, 69
Marking messages as unread, 60
MemoPad
adding memos, 81
deleting memos, 83
description of, xii
editing memos, 82
using, 81
viewing memos, 82
Menus, 9
Message
reading, 24
Messages
attaching Address Book entries, 35
automatic capitalization, 41
automatic punctuation, 42
customizing auto signature, 34
deleting, 58
deleting from the Messages screen, 58
deleting multiple messages, 58
deleting open messages, 57
description of, xi

editing tips, 112
FAQs, 103
formatting automatically, 42
managing, 51
marking as unread, 60
opening Address Book attachments, 48
options for received messages, 45
reading, 24, 45
receiving, 45
receiving confirmation, 34
resending, 59
saving, 56
saving attachments in your Address Book, 49
saving while composing, 56
searching, 52
sending one-time, 23
sending to multiple contacts, 31
sending to other handhelds, 32
setting notification options, 18
setting options, 36
shortcuts, 108
status icons, 13
using AutoText, 37
N
Navigational icons, 14
Network, registering, 17
Newaddress entries, 63
appointments, 75
AutoText entries, 38
Num lock, 42

BlackBerry Handheld — User’s Guide
O
One-time message, sending, 23
Opening
Address Book attachment, 48
file attachments, 47
Options
customizing for the Address Book, 61
customizing for your handheld, 87
description of, xii
received messages, 45
setting for messages, 36
setting for tasks, 73
P
Password
using, 25
Password security screen, 28
disabling, 27
enabling, 26
PC, connecting to your handheld, 96
Personal Identification Number (PIN)
finding, 2, 94
sending messages to other handhelds, 32
Power On/Off, description of, xiii
Punctuation FAQs, 103
Q
Quick start setup, 18
notification options, 18

R
Radio
turning off, 17
turning on, 16
Reading, messages, 24, 45
Recalling search terms, 54
Received messages
options, 45
saving, 54
Receiving
Address Book attachments, 48
confirmation of messages, 34
file attachments, 47
messages, 45
Reconciling email, 96
Registering with the network, 17
Removing
address entries, 68
appointments, 78
AutoText entries, 40
handheld from cradle, 97
messages, 58
messages from the Messages screen, 58
multiple appointment entries, 79
multiple messages, 58
open messages, 57
tasks, 72
Resending messages, 59
Resetting the handheld, 104

BlackBerry Handheld — User’s Guide
S
Safety information, x
Saved Messages, description of, xi
Saving
Address Book attachments, 49
address entries, 63
messages, 56
messages while composing, 56
received messages, 54
search terms, 54
sent messages, 54
Screens, 9
Search Messages, description of, xi
Search terms
recalling, 54
saving, 54
Searching
address entries, 66
AutoText entries, 40
messages, 52
Security
disabling password protection, 27
enabling password protection, 26
locking the handheld, 28
using password protection, 25
Send message status icons, 13
Sending
messages, 31
messages to multiple contacts, 31
messages to other handhelds, 32
Sent messages, saving, 54
Serial port, description of, 5

Setting
Address Book options, 61
alarm, 19
date, 89
handheld options, 87
message notification options, 18
message options, 36
password security screen, 28
task options, 73
time, 89
Setup for your handheld, 18
Switching from Calendar to Agenda view, 74
Symbols, inserting, 42
Synchronizing data, 96
T
Tasks
adding, 69
changing status, 73
deleting, 72
description of, xii
editing, 71
entry fields, 70
icons, 70
managing, 69
setting options, 73
shortcuts, 109
using, 69
viewing, 71
Technical support, xiv
Time, setting, 89
Tips, 107
advanced users, 107

BlackBerry Handheld — User’s Guide
editing, 107
editing address entries, 112
editing AutoText, 112
editing Calendar, 112
editing messages, 112
navigating messages, 108
navigating Tasks and Calendar, 109
selecting, 110
Tips for editing
autotext, 112
calendar, 112
general, 110
Transferring data, 96
Troubleshooting, 99
Turn Radio On/Off, description of, xiii
Turning on the radio, 16
Turning on/off
handheld, 15, 16
radio, 16, 17
U
Unread messages, marking, 60
Using
Address Book, 61
AutoText, 38
AutoText to compose a message, 37
Calculator, 84
Calendar, 74
Lock, 28
MemoPad, 81
Tasks, 69

V
Viewing
address entries, 66
appointments, 77
memos, 82
tasks, 71
today's appointments, 78
W
Welcome, xi