Blaupunkt Europe CT945 Car DVD PLAYER User Manual USER S MANUAL
Blaupunkt Europe GmbH Car DVD PLAYER USER S MANUAL
Users Manual
Enjoy it.
MULTIMEDIA NAVIGATION
CAPE TOWN 945/940
Bedienungsanleitung
Operating instructions
Notice d'utilisation
Istruzioni d'uso
Bedieningshandleiding
Bruksanvisning
Manual de instrucciones
Instruções de serviço
Betjeningsvejledning
Käyttöohjeet
Instrukcja obsługi
Návod k obsluze
01_CapeTown_de.indd 1 09.10.14 11:45
30
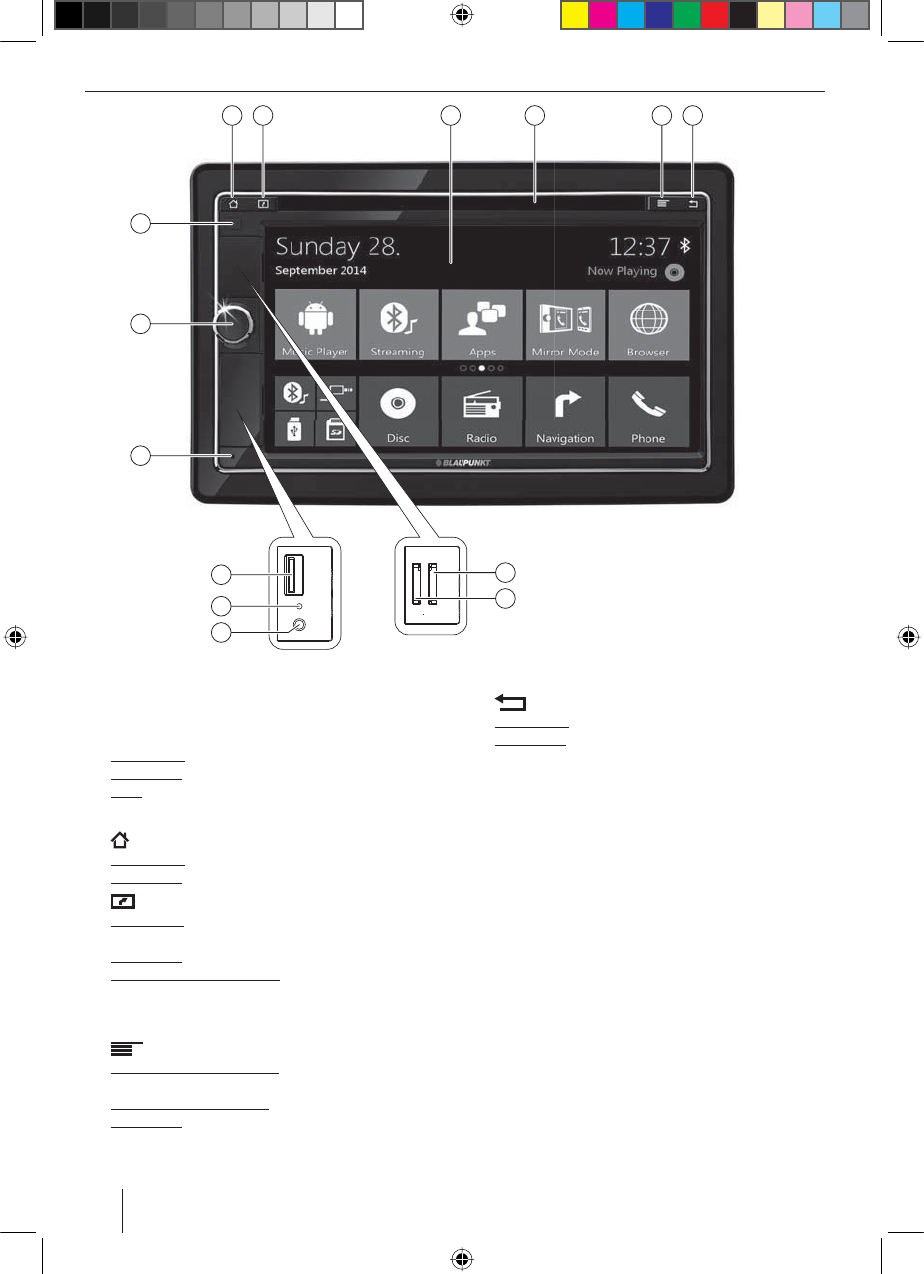
Controls – Device
1
Rotary/pushbutton
Switching on the device
In operation:
Short press: Mutes audio source
Long press: Switches o device
Turn: Adjusts volume
2
Infrared receiver for remote control
3
button (Home)
Short press: Calls up the main menu
Long press: Displays active apps
4
button (Navigation/Eject)
Short press: Start navigation or switch between navi-
gation and current audio source
Long press: Ejects a DVD/CD
Long press in mirror mode: Exit mirror mode
5
Touchscreen user interface
6
DVD/CD drive
7
button
Short press in main menu: Shortcut for background
settings and calls up Settings menu
Short press in active app: Calls up options
Long press: Function for current Android app (if avail-
able)
8
button (back)
Short press: Returns to previous screen
Long press: Calls up brightness settings for display
9
microSD card reader for media (under the cover)
:
microSD card reader for navigation data (under the
cover)
;
USB-1 socket (under the cover)
<
Reset button (under the cover)
Restoring factory settings
Note:
All personal settings will be deleted!
=
AUX-IN-1 socket (under the cover)
>
Internal microphone
02_CapeTown_gb.indd 30 09.10.14 11:47

31
ENGLISH
Controls – Remote control
?
SRC button
Switching between radio, navigation and available
media sources
@
/ EJECT button
Ejecting a DVD/CD
A
INFO button
For DVD playback: Displays track/chapter number as
well as shows/hides current playing time
B
MENU button
For DVD playback: Opens DVD menu/returns to play-
back
C
ZOOM button
For DVD playback: Selects zoom level 1-3, deacti-
vates zoom
D
PIC button
Opening display brightness setting
E
button
For DVD playback: Starts slow motion
F
button
For DVD playback: Ends playback
G
button
Short press in main menu: Shortcut for background
settings and opens Settings menu
Short press in active app: Opens options
Long press: Function for current Android app (if avail-
able)
H
button
Short press: Opens main menu
Long press: Displays active apps
I
button
Pausing/continuing media playback
J
button
Open Settings menu
K
button
Answering a call
L
button
Ending/rejecting a phone call
M
Number buttons 0 - 9
On keyboard: Number input
Number "0" for media playback: Sets repeat title
(not for Bluetooth® streaming)
N
# / button
For media playback: Sets random track playback
(not for Bluetooth® streaming)
On phone keypad: Enters "#" character
O
* / button
Short press:
Radio: Scans stored stations
DAB: Scans stations
Media: Scans tracks
On phone keypad: Enters "*" character
Long press:
Radio: Scans stations of current waveband
P
button
Decreasing the volume
Q
OK button
Conrming a selection
R
button
Increasing the volume
S
/ : buttons
In main menu: Toggles between app lines
In settings menus: Selects menu entry
In displays: Toggles between display areas
/ buttons:
In main menu: Selects an app button
In settings menus: Changes setting
In displays: Selects button
Note:
Conrm a selection with OK
P
in each case.
T
button
Muting the device/cancelling mute
02_CapeTown_gb.indd 31 09.10.14 11:48

32
Controls – Remote control | Contents
Safety notes .............................................................. 33
Symbols used ........................................................................ 33
Road safety............................................................................. 33
General safety notes ........................................................... 34
Declaration of conformity................................................. 34
Cleaning notes.......................................................... 34
Disposal notes........................................................... 34
Scope of delivery ...................................................... 34
Software update....................................................... 34
Placing the device in operation............................... 35
Switching on/o................................................................... 35
Volume..................................................................................... 35
Operation .................................................................. 35
Touchscreen........................................................................... 35
Navigation in menus........................................................... 36
Settings in menus ................................................................ 36
Keyboard input..................................................................... 36
Android status bar and menu ......................................... 36
Main menu ................................................................ 37
Opening main menu .......................................................... 37
The main menu display ..................................................... 37
Customizing the main menu........................................... 38
Sound settings.......................................................... 39
Opening sound settings.................................................... 39
The equalizer display 1 ...................................................... 39
The equalizer display 2 ...................................................... 39
System settings......................................................... 40
Opening system settings .................................................. 40
The Settings display............................................................ 40
External devices and data carriers.......................... 41
Basic information................................................................. 41
DVD/CD mode ...................................................................... 42
USB data carrier .................................................................... 42
microSDHC cards ................................................................. 42
Audio/video playback of iPod/iPhone ......................... 42
Bluetooth® sources.............................................................. 43
Radio.......................................................................... 44
Starting radio playback...................................................... 44
Radio display ......................................................................... 44
Options menu ....................................................................... 44
DAB/DAB+ (CAPE TOWN 945 only) .................. 45
Starting DAB playback ....................................................... 45
DAB display............................................................................ 45
Options menu ....................................................................... 46
U
/ button
Short press:
Radio: Changes frequency in increments
DAB: Selects previous/next station
Media: Selects previous/next track
Long press:
Fast searching
V
button
Short press: Returns to previous screen
Long press: Calls up brightness settings for display
W
button
Deletes last keyboard entry
X
button
For DVD playback: Repeats individual section
Y
GOTO button
For radio playback: Selects frequency
For media/DVD playback: Selects track/chapter number
Z
ANGLE button
For DVD playback: Selects camera viewing angle
(if alternative camera viewing angle is available)
[
SUBTITLE button
For DVD playback: Selects subtitle language
\
AUDIO button
For DVD playback: Selects playback language
]
/ POWER button
Switching the device on/o
Contents
02_CapeTown_gb.indd 32 09.10.14 11:48
33
ENGLISH
Contents | Safety notes
Safety notes
The car sound system was manufactured according to
the state of the art and established safety guidelines.
Even so, dangers may occur if you do not observe the
safety notes in these instructions.
These instructions are intended to familiarise you with
the most important functions. Detailed information can
be found on the Internet under www.blaupunkt.com.
tRead these instructions carefully and completely be-
fore using the car sound system.
tKeep the instructions at a location so that they are
always accessible to all users.
tAlways pass on the car sound system to third parties
together with these instructions.
In addition, observe the instructions of the devices used
in conjunction with this car sound system.
Symbols used
These instructions employ the following symbols:
DANGER!
Warns about injuries
CAUTION!
Warns about damages to the DVD/CD drive
DANGER!
Warns about high volume
The CE mark conrms the compliance with EU
directives.
쏅Identies a sequencing step
tIdenties a listing
Road safety
Observe the following notes about road safety:
DANGER!
Risk of road safety by using the device
while driving.
The use of device functions while driving may divert your
attention from the trac situation and lead to serious ac-
cidents!
Particularly the use of the following functions signicant-
ly impacts your attention as the operator of the vehicle:
tNavigation (making settings, such as address entry)
tVideo playback
tInternet use (e.g. via the "Browser" app)
tUse of a connected smartphone via mirror mode
Media/DVD playback................................................ 46
Starting media playback ................................................... 46
Media display ........................................................................ 46
Media browser for media type and folder .................. 47
Media browser for title information.............................. 48
Options menu ....................................................................... 48
Calling........................................................................ 49
Opening the phone............................................................. 49
The keyboard display ......................................................... 49
The list of calls....................................................................... 50
Phone book and list of favourites.................................. 50
The Options menu............................................................... 50
Incoming/outgoing call..................................................... 50
Smartphone mirror mode........................................ 51
Connecting a smartphone................................................ 51
Starting mirror mode.......................................................... 51
Navigation................................................................. 51
Loading navigation data................................................... 51
Download of map data and options............................. 51
Starting the navigation...................................................... 51
First use.................................................................................... 52
Navigation menu ................................................................. 52
Entering a destination........................................................ 52
Planning a route................................................................... 53
Keyboard input..................................................................... 53
Map views............................................................................... 53
Navigation settings ............................................................. 55
Additional options............................................................... 55
Rear Seat Entertainment (RSE) ................................ 56
Showing device display on external monitor......... 56
Steering wheel-mounted controls (SWC) ............... 56
WLAN......................................................................... 57
Establishing a WLAN connection ................................... 57
Setting up a mobile WLAN hotspot .............................. 57
DVB-T (CAPE TOWN 945 only)......................... 57
Starting DVB-T playback.................................................... 57
Useful information ................................................... 57
Warranty.................................................................................. 57
Service...................................................................................... 57
Technical data........................................................... 57
Connection diagram .............................................. 338
Appendix................................................................. 339
02_CapeTown_gb.indd 33 09.10.14 11:48

34
Refrain from these functions and all additional functions
that will divert your attention from the trac situation
and from operating the vehicle while driving.
To use these functions, stop at a suitable location and op-
erate your device while the vehicle is standing.
tUse your device in such a way that you can always
safely control your vehicle. In case of doubt, stop
at a suitable location and operate your device while
the vehicle is standing. As the driver, you may not
use the applications that will distract you from trac
(depending on the scope of functions of the device,
e.g. viewing videos, entering a destination).
tFollow the driving recommendations during the
route guidance only if you are not violating any
trac regulations! Trac signs and trac regula-
tions have always priority over driving recommenda-
tions.
tAlways listen at a moderate volume to protect
your hearing and to be able to hear acoustic warn-
ing signals (e.g. police sirens). During mute phases
(e.g. when changing the audio source), changing the
volume is not audible. Do not increase the volume
during this mute phase.
General safety notes
Observe the following note to protect yourself against
injuries:
Do not modify or open the device. The device contains
a Class 1 laser that can cause injuries to your eyes.
Use as directed
This car sound system is intended for installation and
operation in a vehicle with 12 V vehicle system voltage
and must be installed in a DIN slot. Observe the output
limits of the device. Repairs and installation, if necessary,
should be performed by a specialist.
Installation instructions
You may only install the car sound system yourself if you
are experienced in installing car sound systems and are
very familiar with the electrical system of the vehicle. For
this purpose, observe the connection diagram at the end
of these instructions.
Declaration of conformity
The Blaupunkt Technology GmbH declares that the de-
vice complies with the basic requirements and the other
relevant regulations of the directive 1999/5/EC.
The declaration of conformity can be found on the Inter-
net under www.blaupunkt.com.
Cleaning notes
Solvents, cleaning and scouring agents as well as dash-
board spray and plastics care product may contain in-
gredients that will damage the surface of the car sound
system.
Use only a dry or slightly moistened cloth for cleaning the
car sound system.
Disposal notes
Do not dispose of your old unit in the household
trash!
Use the return and collection systems available to dis-
pose of the old device, the remote control and exhausted
batteries.
Scope of delivery
The scope of delivery includes:
tCar sound system
tRemote control (incl. battery)
tTMC tuner (only for devices with Europe navigation)
tmicroSD card with navigation data in the microSD
card slot (only for devices with navigation)
tGPS antenna
tWLAN USB stick
tExternal Bluetooth microphone
tOperating instructions
tSupport frame
tSmall parts set
tInstallation material
tConnecting cable
Software update
Under www.blaupunkt.com, you will nd the latest
software for your device, including instructions for the
software update.
Software updates are located at:
http://www.blaupunkt.com/en/servicesupport/
car-audio/downloads/updates/
Safety notes | Cleaning notes | Disposal notes | Scope of delivery | Software update
02_CapeTown_gb.indd 34 09.10.14 11:48

35
ENGLISH
Placing the device in operation
Caution!
Transport securing screws
Ensure that the transport securing screws at the top side
of the device are removed before the startup of the de-
vice.
Switching on/o
Switching on/o with the rotary/pushbutton
쏅For switch-on, press the rotary/pushbutton
1
.
쏅For switch-o, hold the rotary/pushbutton
1
pressed for more than 2 seconds.
Switching on/o via vehicle ignition
If the car sound system is connected with the vehicle
ignition and it was switched o with the rotary/pushbut-
ton
1
, it is switched on or o with the ignition.
Note:
When switching the device on/o using the ignition,
you can use the Fast Boot function (see chapter "Sys-
tem settings", option General). Fast Boot shortens the
system start of the device to a few seconds.
When enabling Fast Boot, selects the maximum time
period that may pass between switching o the
device and restarting it with fast system start. After
the time period expires, the regular system start is
executed upon switching it on again.
Volume
Adjusting the volume
You can adjust the volume in increments from 0 (o) to
100 (maximum).
쏅Turn the rotary/pushbutton
1
to change the
volume.
Muting the car sound system (Mute)
쏅Briey press the rotary/pushbutton
1
to mute the
device or to reactivate the previous volume.
Operation
Touchscreen
Important note:
Do not use any pointed or hard objects, such as ball
point pens or fountain pens, to operate the touch-
screen.
The device features a capacitive touchscreen that pro-
vides a remote control and device buttons (see the sec-
tion "Controls" at the beginning of these instructions)
and allows operating the device.
Note:
Tap on the "Night Display" app to switch o the dis-
play (the touchscreen goes dark). Tapping on the
touchscreen is sucient to return to the current
display.
The "Night Display" app can be reached by tapping
on "Apps" in the main menu.
Tapping
To activate a control, e.g. a button, a slight touching of
the display surface is sucient. You do not have to exert
any pressure on the display surface.
tShort tap:
A short tap on the display surface is sucient for
activating most of the controls.
tLong tap:
Some functions require a long tap. Rest your nger-
tip on the display surface for approximately 1 second.
Swiping/scrolling
Some functions require swiping across the display
surface, e.g.
tscrolling in lists,
tadjusting sliders.
Tap on the display surface and rest your nger on the
surface. Next, move your nger over the surface.
Zooming
When displaying maps (navigation) and images, you can
enlarge or reduce the view (zoom):
Tap on the area of the map display with two ngers and
rest your ngers on the surface. Move your two ngers
closer together (zoom out/reduce) or further apart
(zoom in/enlarge).
Placing the device in operation | Operation
02_CapeTown_gb.indd 35 09.10.14 11:48

36
Navigation in menus
Changing to the main menu
쏅Press the [ ] button.
or:
쏅Touch the [ ] button.
Note:
Repeatedly pressing the [ ] button will also re-
turn you to the main menu.
Changing to the previous screen or the higher-level
menu
쏅Press the [ ] button.
or:
쏅Touch the [ ] button.
or:
쏅Touch the [ ] button.
Settings in menus
Activating/deactivating options
쏅To activate or deactivate options, tap on the corre-
sponding menu entry or symbol.
Activated: - - -
Deactivated: - - -
Control
Certain settings can be made using a slider.
쏅Tap on the desired point of the slider or swipe along
the slider.
Conrming a setting
In some cases, settings made have to be conrmed rst
before they become active.
쏅Touch the [ ] button.
Additional settings
Some options oer additional settings.
쏅Touch the [ ] button to open the settings menu.
Keyboard input
A keyboard is displayed for entering text or numeric
values:
1 2
37 4568
Notes:
tThe navigation app uses its own keyboard (see the
chapter "Navigation").
tFor entries that allow only certain characters, such
as numbers, a special keyboard may be opened.
The keyboard oers dierent options:
1
Input display
2
Conrm input
3
Delete last input
4
Short press: Conrms input
Long press: Discards input
5
Short press: Inputs characters
Long press: Displays special characters for selection
6
Short press: Inputs characters
Long press: Displays keyboard settings
7
For text input: Changes between capital and non-
capital letters
For number/character input: Changes to additional
special characters or returns
8
Set keyboard to text or number and character input
Android status bar and menu
The Android status bar displays, e.g. Android messages,
running Android apps and WLAN, Bluetooth and mobile
radio status:
In regular operation, the Android status bar is hidden and
displayed only in navigation mode.
Displaying the Android status bar
쏅Tap on the time display on the top right corner of the
display.
Operation
02_CapeTown_gb.indd 36 09.10.14 11:48
37
ENGLISH
Note:
The Android status bar is automatically hidden again
after approx. 10 seconds.
Expanding the Android status bar
쏅Tap on the displayed status bar and swipe down.
The Android menu opens and allows, e.g., access to
the settings of active apps.
Note:
The Android menu is automatically hidden again
after approx. 5 seconds.
Main menu
Opening main menu
쏅Press the [ ] button.
Note:
The display of many apps also features a button for
changing to the main menu.
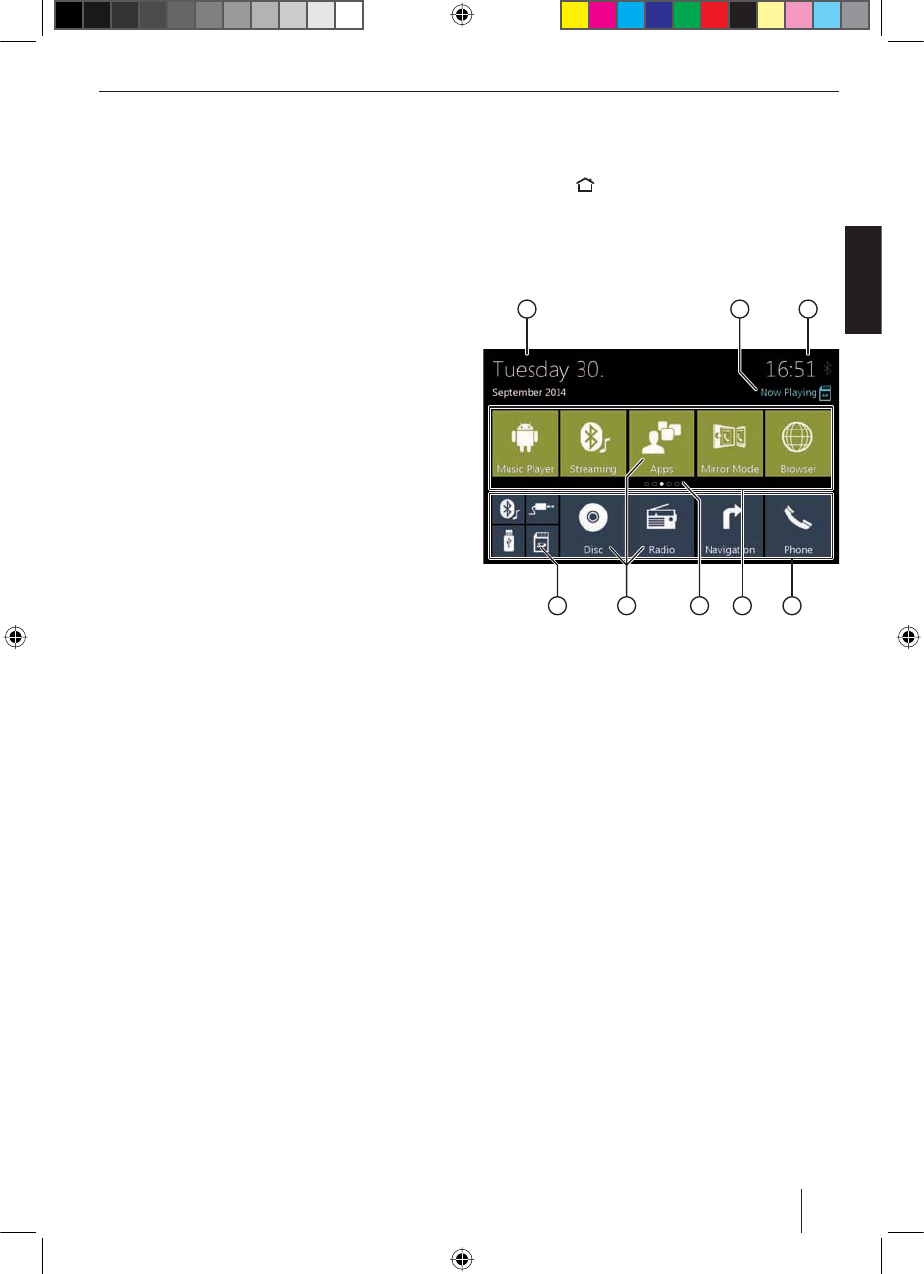
The main menu display
1 2 3
5 4678
The main menu features the following areas and displays:
1
Date
2
Current audio/video source
3
Time/Bluetooth™ status
4
App main line:
This line contains the buttons for up to 5 apps.
Note:
You can determine which apps appear on the app
main line (see the section "Customizing the main
menu").
Tip:
Place the buttons for the apps you use most
frequently on the app main line.
5
Expanded app line
This line contains the buttons for up to 25 apps.
Swipe to the right or left on the line to scroll through
the 5 areas of the line.
Note:
You can determine which apps appear on the
expanded app line (see the section "Customizing the
main menu").
Tip:
Place the buttons for the apps you use occasionally
on the expanded app line.
Operation | Main menu
02_CapeTown_gb.indd 37 09.10.14 11:48

38
When opening the main menu, the previously select-
ed area of the expanded app line is displayed.
6
Area display
Displays which area of the expanded app line is
currently selected.
7
App buttons
Tap on a button to start the app.
8
Combined app button (folder button)
These buttons combine up to 6 buttons of dierent
apps.
Tap on the combined button to display the individual
buttons of the apps. Next, tap on an individual but-
ton to start the app.
Notes:
tYou can set up your own combined app buttons
(see the section "Moving an app in the main
menu").
tYou can nd additional pre-installed apps by tap-
ping on "Apps" in the main menu.
tYou can nd a pre-installed App Store under
"Apps" in the main menu.
Customizing the main menu
Deleting an app from the main menu
Note:
A deleted app can be added again in the main menu
at any time (see the section "Adding an app").
The Apps button cannot be deleted from the main
menu. All the apps available on the device can be
found under Apps.
쏅Tap on the button and rest the ngertip on the
display surface.
The button moves to the foreground and the cross
for deletion is shown.
쏅Drag the button onto the cross for deletion and hold
you ngertip in place until the button changes to red.
쏅Remove your ngertip from the display.
The button has been deleted.
Moving an app in the main menu
You can move an app within an app line or between the
two app lines.
Note:
You can move an app only onto a free space in the
main menu.
Exception: You can move an app within the app Main
line or within the visible area of the expanded app
line. The other apps are automatically rearranged.
쏅Tap on the button and rest the ngertip on the
display surface.
The button moves to the foreground and the cross
for deletion is shown.
쏅Drag the button to the desired position.
Notes:
tTo move an app into a non-visible area of the ex-
panded app line, drag the button to the outside
edge of the expanded app line and wait until you
scrolled to the desired area of the app line.
tYou can group up to 6 dierent apps in a com-
bined app button. To do so, drag the button of an
app onto the button of another app or onto an
already existing combined app button.
tYou can detach an app from a combined app but-
ton by dragging its button out and moving it onto
a free space of an app line or onto the cross for
deletion. The last app in a combined app button
automatically appears again as a regular button.
쏅Remove your ngertip from the display.
The button has been moved.
Adding an app
쏅In the main menu, tap on the Apps button.
The available apps are displayed on several screens.
쏅If necessary, swipe to the right or left until the screen
with the desired app appears.
쏅Tap on the button of the app and rest the ngertip on
the display surface.
The button moves to the foreground and the main
menu is shown.
쏅Drag the button to the desired position.
쏅Remove your ngertip from the display.
The button has been added.
Note:
For more information about placing buttons, see the
section "Moving an app in the main menu".
Main menu
02_CapeTown_gb.indd 38 09.10.14 11:48
39
ENGLISH
Sound settings
Opening sound settings
쏅In the main menu, select the Equalizer app (see the
chapter "Main menu").
Note:
You can also open the equalizer or balance/fader set-
tings from within the options menu of other apps.
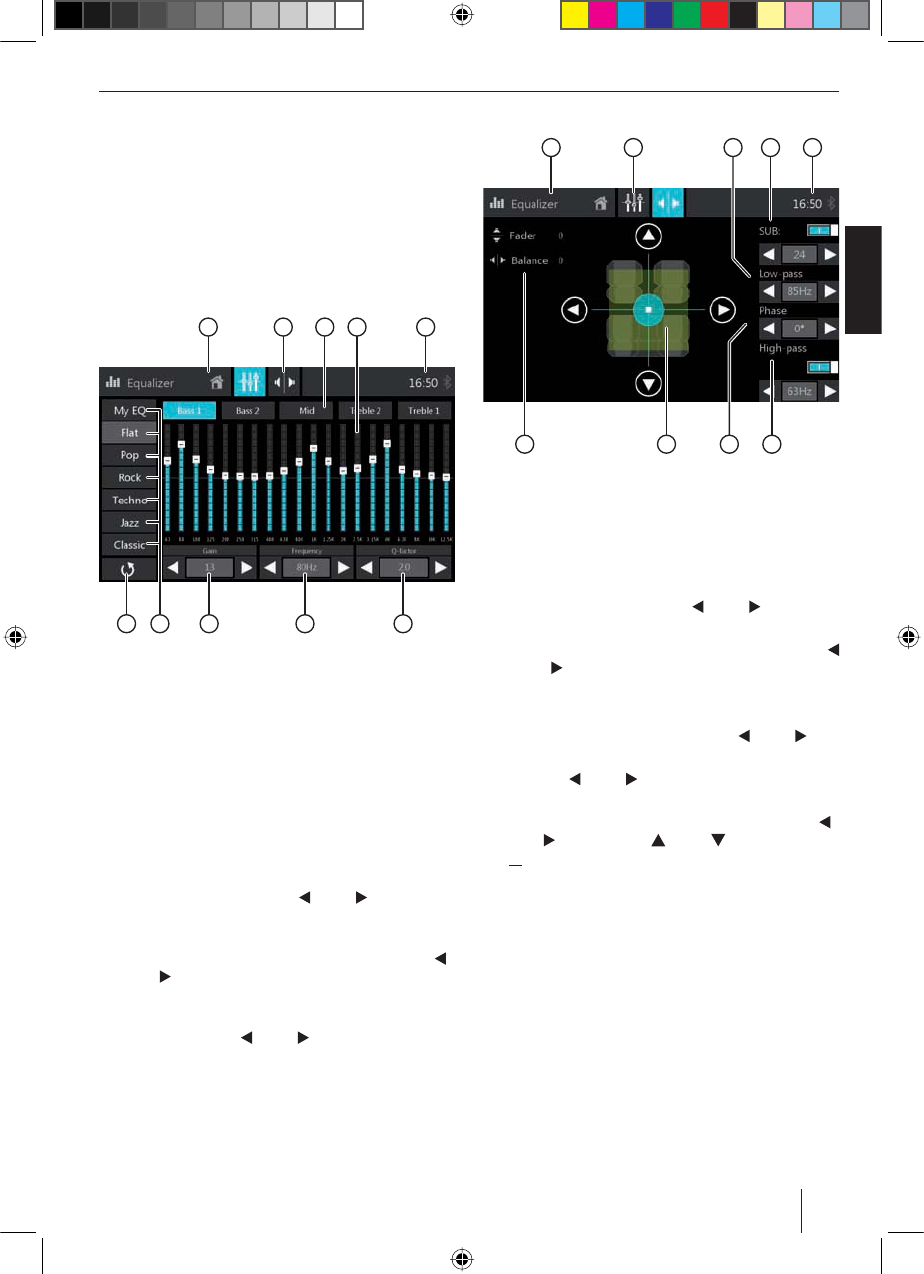
The equalizer display 1
1 2 53 4
67810 9
The equalizer display 1 features the following functions
and displays:
1
Change to the main menu
2
Change to the equalizer display 2 (see the following
section)
3
Select frequency band for adjustment (see items
6
,
7
and
8
).
4
Frequency band display
5
Time/Bluetooth™ status
6
Q-factor setting:
Set the quality factor Q for the selected frequency
band
3
with the buttons [ ] and [ ].
7
Frequency setting:
Select the centre frequency to be set within the
selected frequency band
3
with the buttons [ ]
and [ ].
8
Level setting:
Adjust the level for the selected centre frequency
7
with the buttons [ ] and [ ].
9
Equalizer presettings: Tap on a presetting to select it.
:
Reset equalizer to the preset values.
The equalizer display 2
1 2 53 4
9 8 67
The equalizer display 2 features the following functions
and displays:
1
Change to the main menu
2
Change to the equalizer display 1 (see the previous
section)
3
With activated subwoofer
4
: Set the low-pass
frequency with the buttons [ ] and [ ]
4
Activating/deactivating the subwoofer and, if acti-
vated, set the subwoofer level with the buttons [
] and [ ]
5
Time/Bluetooth™ status
6
Activating/deactivating high-pass and, if activated,
set the frequency with the buttons [ ] and [ ]
7
With activated subwoofer
4
: Set the phase with the
buttons [ ] and [ ]
8
Adjusting balance and fader:
Shift the volume distribution with the buttons [ ]
and [ ] (balance) or [ ] and [ ] (fader),
or:
Tap on a point in the displayed passenger compart-
ment to directly adjust the corresponding volume
distribution.
9
Current balance and fader value
Sound settings
02_CapeTown_gb.indd 39 09.10.14 11:48

40
System settings
Opening system settings
쏅In the main menu, select the Settings app (see the
chapter "Main menu").
The Settings display
1 4 53
6
2
Note:
Scroll through the list, if necessary, to access the
desired setting.
The settings display features the following functions and
displays:
1
Change to the main menu
2
Menu items
3
Currently selected menu item
4
Name of the current menu or submenu
5
Time/Bluetooth™ status
6
Submenu items
The Settings menu features the following menu and
submenu items:
tGeneral: Performing general device settings:
– Selecting a radio region (reception area)
– Setting the automatic screen switch-o
– Fast-boot settings
– Activating/deactivating playback mix of system
apps and own apps
– Setting the scanning time
– Selecting the power-on volume
– Switching the conrmation beep on/o
tActivating/deactivating WLAN
– Selecting a WLAN
tActivating/deactivating Bluetooth
– Device management
– Phone book synchronisation
– Phone book sorting
– Activating/deactivating automatic phone book
synchronisation
– Activating/deactivating automatic connection
– Activating/deactivating automatic call answering
– Entering/changing the pairing code
– Activating/deactivating the external microphone
– Activating/deactivating twin connect (2 cell
phones can be connected simultaneously)
tWireless & networks: Setting up a mobile WLAN
hotspot
tInput level: Adjusting the audio level for apps with
audio output
tDisplay: Making display settings:
– Selecting a colour scheme
– Activating/deactivating automatic dimmer
– Adjusting brightness
– Adjusting the display background
tLanguage & entry: Making settings for the system
language and entry:
– System language as well as spell-checking and
dictionary
– Selecting the default keyboard
– Text-to-voice output
– Pointer speed of external mouse/touchpad
tVideo: Making video settings:
– Setting the colour system for input and output
– Setting the playback of the back-up camera image
– Setting the mode for the rear A/V input
– DivX registration and deactivation
tDVD classication: Making language and parental
controls settings for DVD playback
tMemory: Managing the memory of the device and
connected data carriers
tApps: Managing installed apps
tLocation services: Making settings for the use of
location data
tSafety: Making safety settings:
– Activating/deactivating anti-theft protection
– Changing the code for anti-theft protection (basic
setting: 0000)
– Showing passwords
– Android device administrator and app settings
– Managing certicates
System settings
02_CapeTown_gb.indd 40 09.10.14 11:48

41
ENGLISH
tAccounts: Setting up and managing Internet and
e-mail accounts for:
– E-mail
– Microsoft Exchange
tBackup & restore: Backing up and deleting data and
settings on the device:
– Deleting personal data (e.g. telephone data such
as phone book entries and call lists, accounts, sys-
tem and app data)
– Restoring factory settings
tDate & time: Making settings for date and time:
– Activating/deactivating automatic time and date
setting via GPS
– Manual time and date setting as well as time zone
selection
tSoftware version: Displaying information about the
current software of the device
External devices and data carriers
Basic information
Playable data carriers and media
tDVD/VCD/CDDA
tDVD/CD-R/RWs
tUSB data carriers
tmicroSDHC cards
tMP3 or WMA les, movies and images
Notes:
tTo ensure proper functioning, use only CDs with
the Compact-Disc logo and DVDs with the DVD
logo.
tBlaupunkt cannot guarantee the awless func-
tion of copy-protected DVDs/CDs and all DVD/CD
blanks, USB data carriers and microSD cards avail-
able on the market.
tThe playback of movies and images on the device
display is allowed only while the vehicle is stand-
ing and the hand brake is applied. The "PARKING"
cable must be connected with the hand brake
connection of the vehicle (see Connection dia-
gram at the end of these instructions). The movie
playback on an external monitor (Rear Seat Enter-
tainment) is also possible while driving.
Note the following information when preparing an MP3/
WMA data carrier:
tDVD/CD formats: DVD/CD-R/RW, Ø: 12 cm
tDVD/CD data formats: ISO 9669 Level 1 and 2, Joliet
tCD burn speed: Max. 16x (recommended)
tUSB format/le system: FAT/FAT16/FAT32/NTFS
tmicroSD card le system: FAT/FAT16/FAT32
tFile extension of audio les:
– .MP3 for MP3 les
– .WMA for WMA les
tWMA les only without Digital Rights Management
(DRM) and created with Windows Media® Player
version 8 or later
tMP3 ID3 tags: Version 1 and 2
tBitrate for creating audio les:
– MP3: 32 to 320 kbps
– WMA: 32 to 192 kbps
tMaximum number of les and directories:
– Up to 40,000 les (dep. on the le/directory struc-
ture)
System settings | External devices and data carriers
02_CapeTown_gb.indd 41 09.10.14 11:48

42
DVD/CD mode
Inserting a DVD/CD
Risk of severe damage to the DVD/CD drive!
Noncircular contoured DVDs/CDs and DVDs/
CDs with a diameter of 8 cm (mini DVDs/CDs)
must not be used.
We accept no responsibility for any damage to the drive
that may occur as a result of the use of unsuitable DVDs/
CDs.
쏅Insert the DVD/CD with its printed side up into the
DVD/CD tray (
6
in the section "Controls") until you
feel a slight resistance.
The DVD/CD is automatically drawn in and playback
starts.
Note:
You must not hinder or assist the drive as it automati-
cally draws in the DVD/CD.
Ejecting a DVD/CD
쏅Long press of the button (
4
in the section "Con-
trols") to eject an inserted DVD/CD.
Note:
You must not hinder or assist the drive as it ejects
the DVD/CD.
USB data carrier
This device features four USB ports:
tUSB1 port under the cover at the front of the device
tUSB2 and USB3 port at the rear of the device
tUSB RSE (Rear Seat Entertainment) port at the rear
of the device
Notes:
tUse the USB-1/2/3 ports for USB data carriers with
media contents.
tUse the USB-2 or 3 port for the supplied WLAN
USB stick.
tUse the USB RSE port for USB data carriers with
media contents for the playback via the Rear Seat
Entertainment.
tDivX is supported only by the USB RSE port, not by
the USB-1/2/3 ports.
Connecting a USB data carrier to the front of the
device
쏅Open the cover underneath the rotary/pushbutton.
쏅Insert the USB data carrier in the USB socket (
;
in
the section "Controls").
The device automatically switches to USB mode. The
data are read, the playback starts with the rst media
le recognized by the device.
Removing a USB data carrier
쏅Turn o the car sound system.
쏅Disconnect the USB data carrier.
microSDHC cards
This device features a microSDHC card reader under
the cover at the front of the device (
9
in the section
"Controls").
Inserting a microSDHC card
쏅Open the cover underneath the rotary/pushbutton.
쏅Insert the microSDHC card with its labelled side to
the right (contacts to the left) and its contacts rst
into the card reader until it clicks into place.
The device automatically switches to microSDHC
mode. The data are read, the playback starts with the
rst media le recognized by the device.
Removing a microSDHC card
쏅If necessary, open the cover .
쏅Push on the microSDHC card until it disengages.
쏅Pull the microSDHC card out of the card reader.
Audio/video playback of iPod/iPhone
You can use the device to control the music and video
playback of numerous iPod and iPhone models.
The device features three USB ports for audio playback
of iPod or iPhone:
tUSB1 port under the cover at the front of the device
tUSB2 and USB3 port at the rear of the device
For video playback, it is also necessary to connect to one
of these A/V ports:
tA/V In 1 under the cover at the front of the device
tA/V In 2 at the rear of the device
Notes:
tMobile devices at the USB ports are automatically
loaded.
tA list of compatible iPod and iPhone models is lo-
cated at the end of these instructions. Blaupunkt
cannot guarantee the awless function of other
iPod and iPhone models.
External devices and data carriers
02_CapeTown_gb.indd 42 09.10.14 11:48
43
ENGLISH
Bluetooth® sources
The Bluetooth® function allows registering cell phones
and media playback devices with the car sound system.
When you register a cell phone with the car sound sys-
tem, you can make phone calls with the built-in hands-
free function. You can access the lists of dialled numbers
and the phone book of the registered cell phone.
If the connected Bluetooth® device supports the func-
tions A2DP and AVRCP, you can play the music via the car
sound system and control the playback.
Connecting a Bluetooth® device for the rst time
Note:
If necessary, switch on Bluetooth® on your external
Bluetooth® device rst and ensure that it is visible.
쏅In the main menu, select the Settings app (see the
chapter "Main menu").
쏅Select the Bluetooth option.
Note:
If necessary, switch on Bluetooth® rst.
쏅Select the Devices Management entry.
쏅Tap on Add device.
Your device is being recognised and appears in the
device list under its Bluetooth® name.
Note:
If your Bluetooth® device does not appear in the de-
vice list, you have to establish the connection from
your Bluetooth® device:
tThe device is recognised as "CAPE TOWN" by your
Bluetooth® device.
tWhen establishing the connection, use the
Bluetooth® PIN of the device. If necessary, rst
dene the Bluetooth® PIN in the Bluetooth menu
under the Pairing Code option.
쏅Tap on the entry of the device in the device list.
쏅If necessary, enter the Bluetooth PIN on your external
Bluetooth® device.
The external Bluetooth® device is being connected
and is available.
Note:
You can change the Bluetooth® PIN in the Bluetooth
menu under the Pairing Code option.
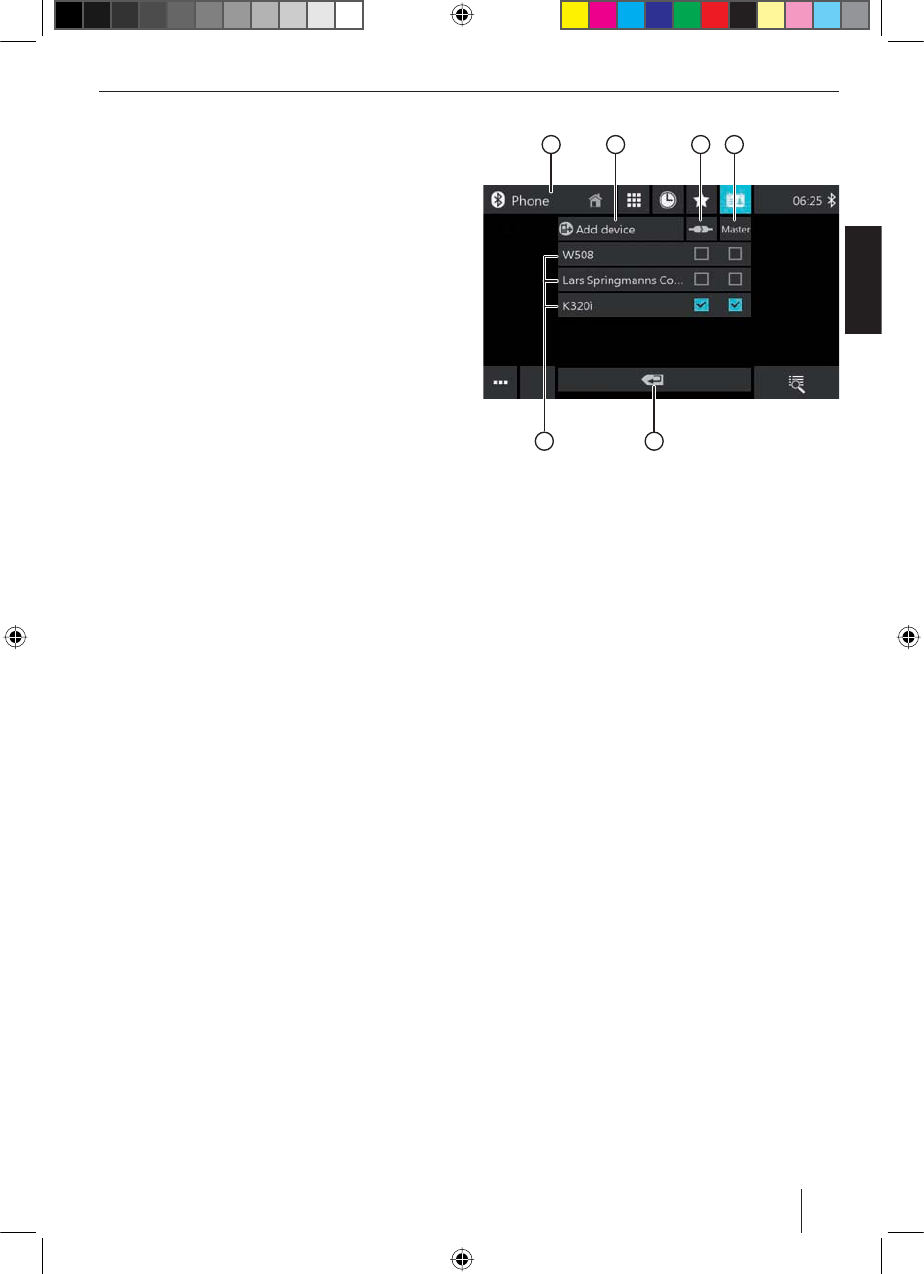
Managing Bluetooth® devices
쏅In the main menu, select the Settings app (see the
chapter "Main menu").
쏅Select the Bluetooth option.
Note:
If necessary, switch on Bluetooth® rst.
쏅Select the Devices Management entry.
56
1 432
1
Change to the Settings menu
2
Add device (see previous section)
Note:
You can register up to three Bluetooth® devices.
3
Connect the registered device
Tap on this option in the entry of the desired device
to connect it.
4
Select master telephone (for Twin Connect)
Tap on this option in the entry of the desired device
to select it as master.
Notes:
tOnly the master telephone is used for outgoing
calls.
tYou can access only the phone book of the master
telephone.
tYou can select the other connected telephone as
master at any time.
5
Change to higher-level menu
6
List of registered devices
To unregister a device, tap on its entry and then on
the cross for deletion. After your conrmation, the
device is being unregistered.
Audio playback of Android smartphone
With the Blaupunkt Android Music Player app, you can
control the music playback from an Android smartphone
connected via Bluetooth®, e.g. by conveniently selecting
tracks using existing categories.
Note:
The Music Player app is already pre-installed on
the device. In addition, the Music Player App Series
900 app must be installed on your smartphone.
It can be downloaded on the Internet from
www.blaupunkt.com.
External devices and data carriers
02_CapeTown_gb.indd 43 09.10.14 11:48
44
Radio
Note:
This car sound system is set to the reception area
Europe at the factory. You can set a dierent recep-
tion area (see the chapter "System settings", General/
Radio region option).
Starting radio playback
쏅In the main menu, select the radio app (see the chap-
ter "Main menu").
The radio display opens (see the next section) and
playback starts.
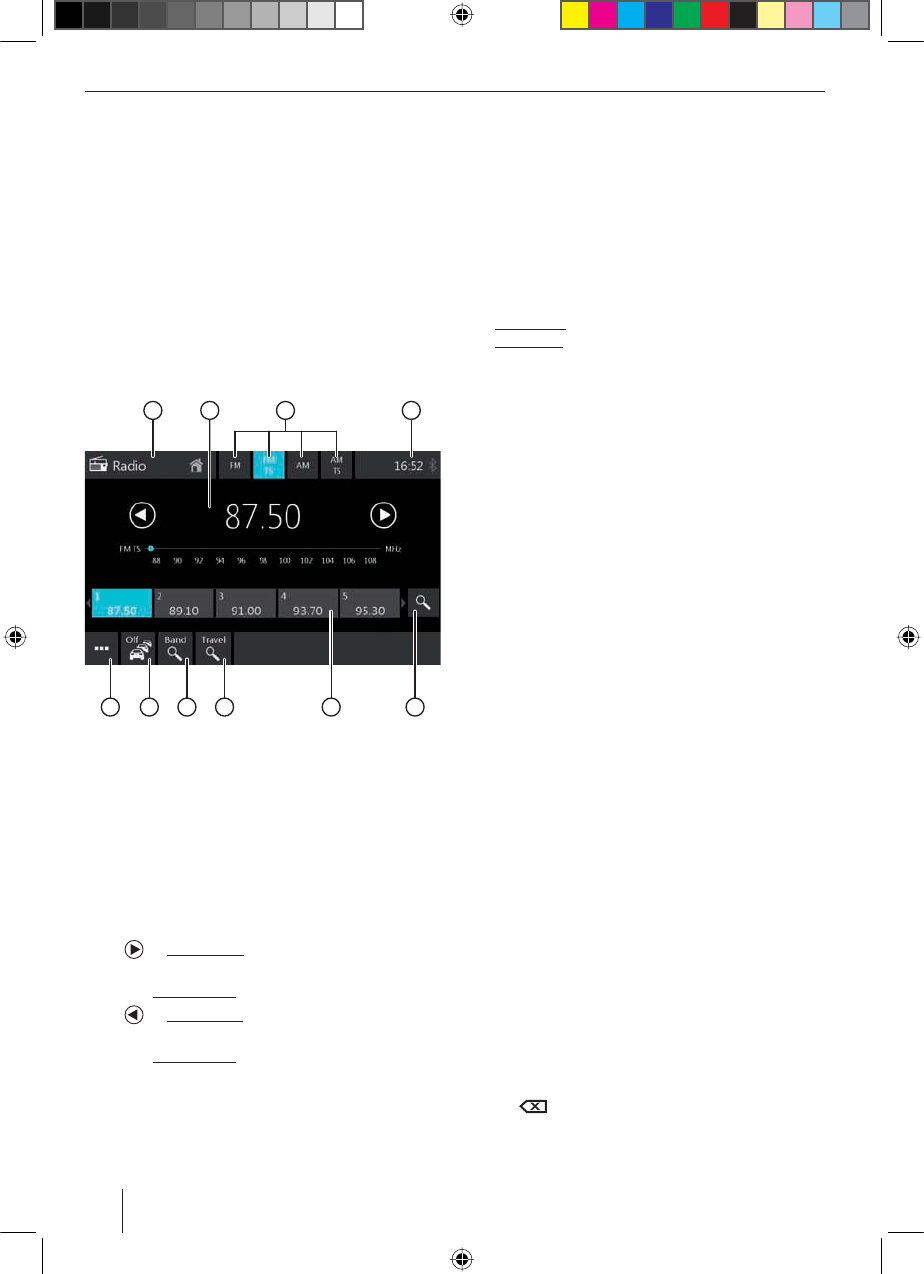
Radio display
1 2 43
9 8 7 5610
The radio display features the following functions and
displays:
1
Change to the main menu
2
Station info area:
tCurrent frequency/station name/radio text
tCurrent memory bank
tFrequency scale
Note:
Tap on the frequency scale or swipe across the
frequency scale to change the frequency.
[]Short press: Increases the frequency in
increments
Long press: Starts ascending seek tuning
[]Short press: Decreases the frequency in
increments
Long press: Starts descending seek tuning
3
Selecting the waveband/memory bank
Note:
Reception area Europe only: If the AM memory
bank is selected, another tap on AM changes to
the LW waveband. Tap on LW again to return to
the AM waveband.
4
Time/Bluetooth™ status
5
Scanning stored stations of the current memory
bank
6
Memory locations of the current memory bank
Short press: Calls up the stored station
Long press: Saves the set station
Note:
Every memory bank features 10 memory locations,
whereas the memory bank FMTS (Travelstore) oers
8 memory locations. Swipe across the list of memory
locations to scroll to additional memory locations.
7
Starting the Travelstore function
The 8 strongest stations in the current waveband are
automatically stored.
Note:
This function is available only for the memory banks
FMT and AMT.
8
Scanning stations of the current waveband
9
Switching priority for trac announcements on/o
Notes:
tThis function is only available for the FM wave-
band.
tThe volume for switched-through trac an-
nouncements can be adjusted with the volume
control during an announcement. The most
recently adjusted volume is stored.
:
Opening/closing the options menu (see the next
section)
Options menu
The options menu features the following functions and
settings:
General:
tEqualizer: Makes equalizer settings and sets volume
distribution
Note:
For further details, read the chapter "Sound settings".
For the FM waveband:
tFrequency Input: Jumps to a frequency.
Keyboard options:
–OK: Conrms the entry
–[ ]: Deletes the last entry
–Cancel: Cancels the entry
Radio
02_CapeTown_gb.indd 44 09.10.14 11:48
45
ENGLISH
tLocal: Switches local reception on/o.
With local reception, only the stations with the
strongest reception are returned.
tRDS Alternative Frequency (Europe only): Switches
RDS AF on/o.
If RDS AF is activated, the device automatically
changes to the strongest frequency of the set station.
tRDS Regional (Europe only): Switches RDS regional
mode on/o.
If regional mode is activated, the device changes
only to the alternative frequencies of the set station
that broadcast the same regional programme.
tRDS Time (Europe only): Switches RDS time on/o.
With RDS CT activated, the time of the device is
automatically set via the received RDS signal.
tPTY List (Europe,USA only): Opens a list of pro-
gramme types
Tap on the desired programme type to restrict
reception to the corresponding stations.
tHi-Cut Filter: Switches the Hi-cut lter for improving
playback on/o
For the AM waveband:
tEnter Frequency: Jumps to a frequency.
Keyboard options:
–OK: Conrms the entry
–[ ]: Deletes the last entry
–Cancel: Cancels the entry
tLocal: Switches local reception on/o.
With local reception, only the stations with the
strongest reception are returned.
Radio | DAB/DAB+
DAB/DAB+ (CAPE TOWN 945 only)
The device can be used for DAB playback.
Note:
For the DAB playback, the optional Blaupunkt DAB+
Tuner Box 945 must be connected.
Starting DAB playback
쏅In the main menu, select the DAB app (see the chap-
ter "Main menu").
The DAB display opens (see the next section) and
playback starts.
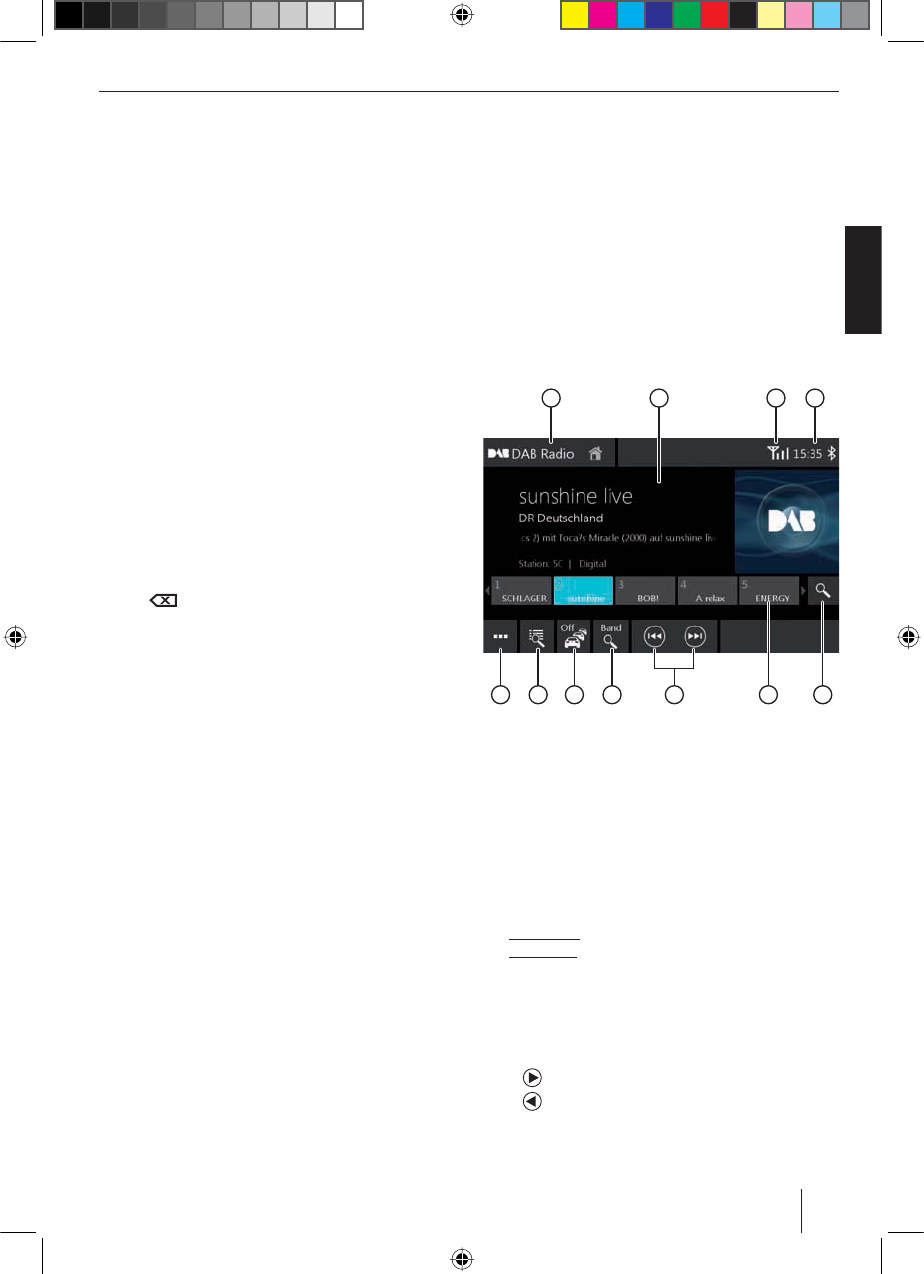
DAB display
1 2 43
11 10 9 8 567
The DAB display features the following functions and
displays:
1
Change to the main menu
2
Station info area (current station name/additional
DAB info)
3
DAB reception status
4
Time/Bluetooth™ status
5
Scanning stored stations
6
Memory locations
Short press: Calls up the stored station
Long press: Saves the set station
Notes:
30 memory locations are available. Swipe across the
list of memory locations to scroll to additional mem-
ory locations.
7
Selecting a station:
[]Changes to the next station
[]Changes to the previous station
8
Scanning all receivable stations
9
Switching priority for trac announcements on/o
02_CapeTown_gb.indd 45 09.10.14 11:48
46
:
Short press: Opens the ensemble list
Long press: Opens the programme list
Notes:
tThe ensemble list is created and stored during the
initial startup of the DAB+ Tuner Box. As a result,
all ensembles of your reception area are available
to you.
tIf you leave your original reception area, update
the ensemble list as necessary (see the section
"Options menu", "Services Update" option).
tIf you do not want to completely replace the en-
semble list of your original reception area, use the
manual ensemble search to access a receivable
ensemble (see the section "Options menu", "Man-
ual ensemble search" option).
tStored stations are retained even after updating
the ensemble list or after a manual ensemble
search.
;
Opening/closing the options menu (see the next sec-
tion)
Options menu
The options menu features the following functions and
settings:
General:
tEqualizer: Makes equalizer settings and sets volume
distribution
Note:
For further details, read the chapter "Sound settings".
For DAB reception:
tManual Ensemble Search: Search for receivable
ensembles that may not have been stored in the en-
semble list
tService Link FM: Activating/deactivating the DAB
FM link. If a station can be received via DAB and FM,
the type of reception with the best reception is set in
each case with activated DAB FM link.
tServices Update: Updating ensemble and station
list
tL-Band: Activating/deactivating reception of the
DAB L-band
tPTY List: Opening a list of programme types
Tap on the desired programme type to purposefully
use only the corresponding stations.
DAB/DAB+ | Media/DVD playback
Media/DVD playback
This chapter describes the playback of media on con-
nected devices and data carriers (DVD, VCD, CDDA, CD-
ROM,USB, SDHC, SD, iPod, Android Music Player, Blue-
tooth™ Streaming, A/V).
DANGER!
Risk of road safety due to video playback.
The use of the video playback can divert your
attention from the trac situation and lead to serious ac-
cidents!
Do not use video playback while driving. To use it, stop
at a suitable location and operate your device while the
vehicle is standing.
Notes:
tFor connecting or inserting devices and data carri-
ers, please read the chapter "External devices and
data carriers".
tNot all media, devices or connection types
support all options.
Starting media playback
쏅In the main menu, select the desired data carrier or
the device (see the chapter "Main menu").
The media display opens (see the next section) and
playback starts or the media browser opens (see the
section "Media browser").
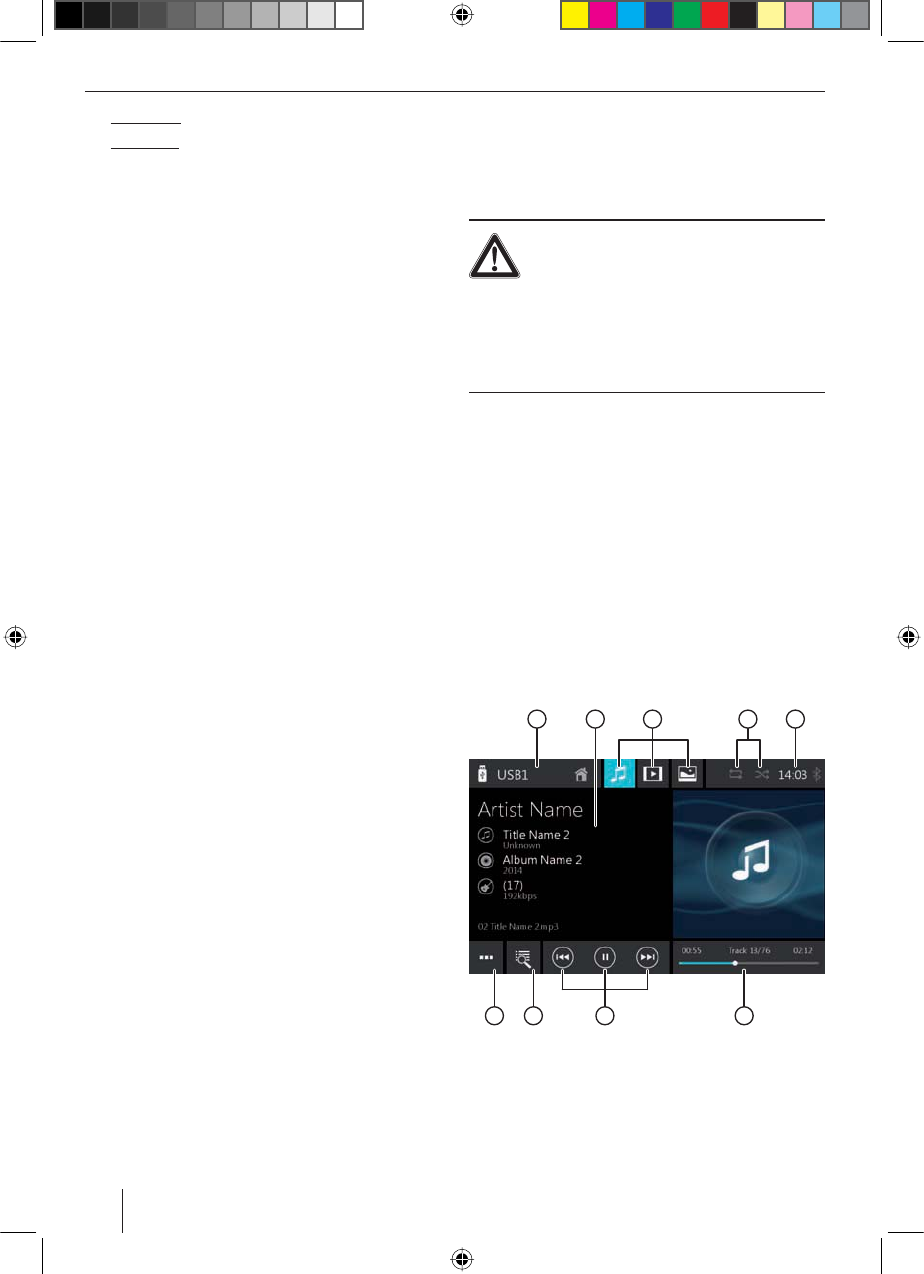
Media display
1 2 53 4
78 69
The Media display features the following functions and
displays:
1
Current media source
Changing to the main menu
02_CapeTown_gb.indd 46 09.10.14 11:48
47
ENGLISH
Media/DVD playback
2
Track info area:
For audio playback: Track information such as name
of track, artist and cover art (not for A/V)
For video/image/DVD playback: Image playback
Notes:
tTrack information (ID3 tags) must be provided by
the connected data carrier or device.
tFor image playback, the menu bars are automati-
cally hidden after approx. 3 seconds. To show the
menu bars again, tap on the display.
3
Changing the media type
(for USB/SDHC/SD/CD-ROM):
[ ] Audio track
[]Video title
[]Images
When changing the media type, the media browser
is automatically opened (see the next section).
4
Setting repeat title/random track playback
(not for DVD/BT streaming/ A/V):
[ ] Repeat title o
[]Repeat all tracks of current selection (for
iPod only)
[]Repeat all tracks of the folder
[]Repeat current track
[]Random track playback o
[]Random track playback on (if necessary,
only within the currently repeated tracks)
5
Time/Bluetooth™ status
6
Playback process (not for image playback):
tCurrent track number/number of tracks
tCurrent time
tTotal time
tProgress bar
Note:
Tap on the progress bar or swipe across the
progress bar to go to a dierent position in the
current playback.
7
Controlling playback:
[ ] Short press: Changes to the next track/DVD
chapter
Press and hold: Fast searching forward
[]Interrupting/continuing playback
[]Short press: Changes to the previous track/
DVD chapter
Press and hold: Fast searching reverse
8
Track selection
tFor USB/SDHC/SD/CD-ROM:
Short press: Opens media browser for media
type and folder (see the next section)
Long press (not for CD-ROM): Opens media
browser for title information (see the section
"Media browser for track information")
tFor audio CD: Track selection
tFor DVD: Opens DVD menu
tFor iPod/Android Music Player: Opens media
browser for track information (see the section
"Media browser for track information")
9
Opening/closing the options menu (see the section
"Options menu")
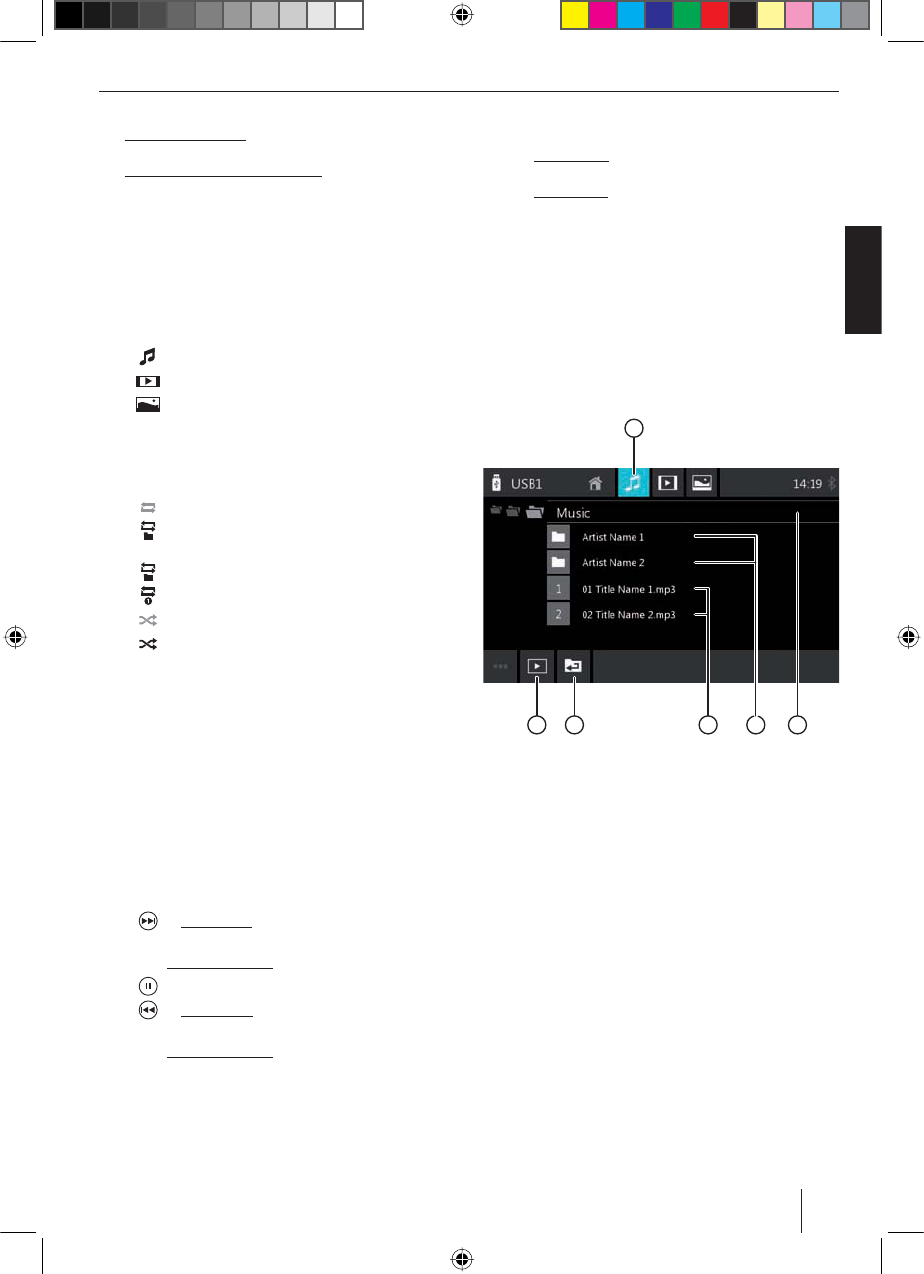
Media browser for media type and folder
1
6 5 234
The media browser for media type and folder features
the following functions and displays:
1
Current media type
2
Name of current folder
3
Opening subfolder
4
Starting a track
5
Changing to higher-level folder
6
Closing the media browser
02_CapeTown_gb.indd 47 09.10.14 11:48
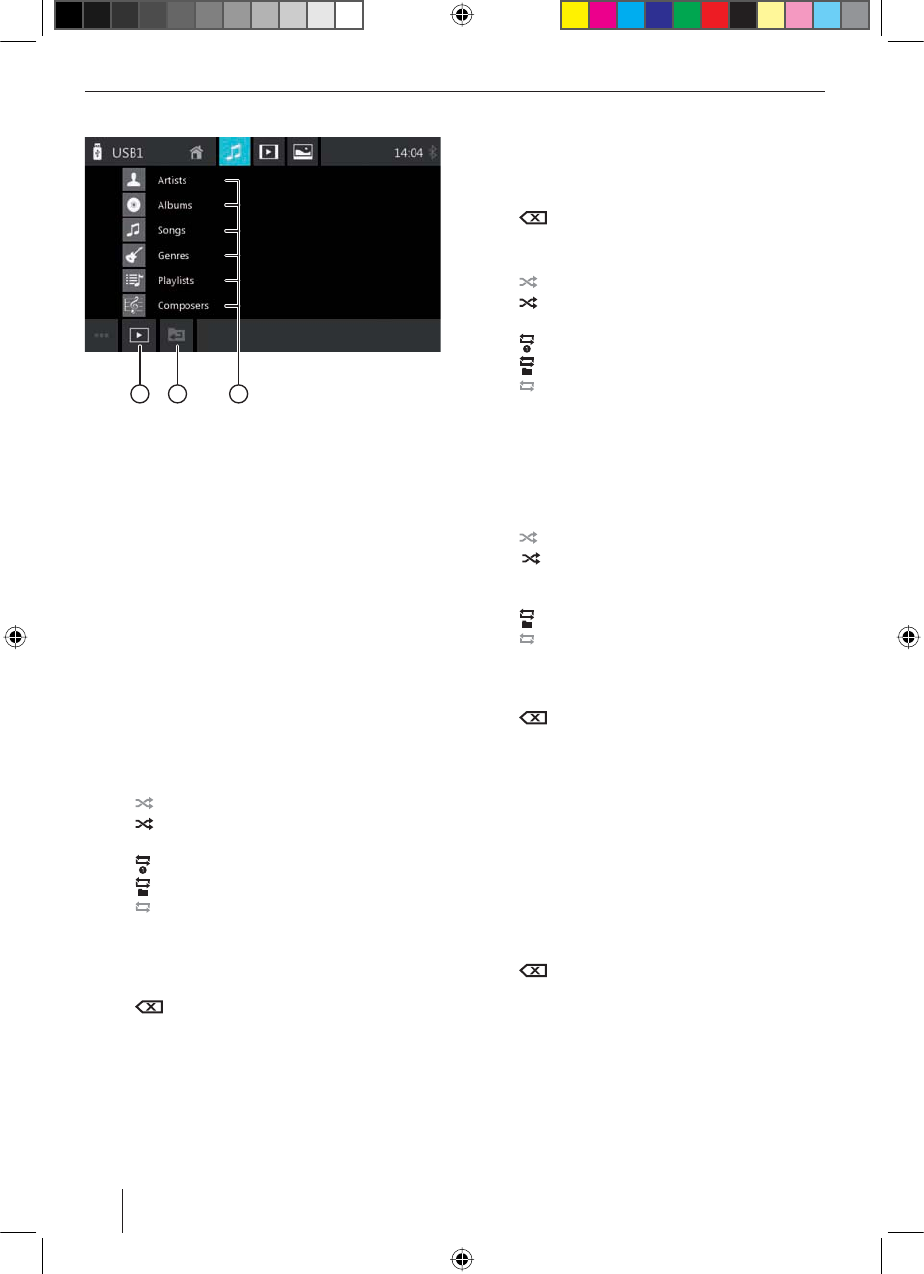
48
Media browser for title information
3 2 1
The media browser for title information features the
following functions and displays:
1
Available selection categories or corresponding
tracks
2
Changing to higher-level category
3
Closing the media browser
Options menu
The options menu features the following functions and
settings:
General:
tEqualizer: Makes equalizer settings and sets volume
distribution
Note:
For further details, read the chapter "Sound settings".
For audio playback from data carriers:
tMix: Changes between these options:
–[]Random track playback o
–[]Randomly play all tracks
tRepeat: Changes between these options:
–[]Repeat current track
–[]Repeat all tracks of the folder
–[]Repeat title o
tScan: Scans tracks
tKeyboard: Selects a track based on its track number.
Keyboard options:
–OK: Conrms the entry
–[ ]: Deletes the last entry
–Cancel: Cancels the entry
tTag selection: Activates/deactivates additional track
information (composer, year of release, bitrate)
For video playback from data carriers:
tFormat: Selects image format for playback
tKeyboard: Selects a title based on its title number.
Keyboard options:
–OK: Conrms the entry
–[ ]: Deletes the last entry
–Cancel: Cancels the entry
tMix: Changes between these options:
–[ ] Random track playback o
–[]Randomly play all tracks
tRepeat: Changes between these options:
–[]Repeat current track
–[]Repeat all tracks
–[]Repeat title o
For image playback from data carriers:
tRotate left: Rotates the image counterclockwise
tRotate right: Rotates the image clockwise
tSlideshow Settings: Denes settings for the slide
show
tMix: Changes between these options:
–[]Random image playback o
–[]Randomly play all images of the current
folder
tRepeat: Changes between these options:
–[]Repeat all titles of the folder
–[]Repeat title o
tKeyboard: Selects image based on its number.
Keyboard options:
–OK: Conrms the entry
–[ ]: Deletes the last entry
–Cancel: Cancels the entry
tZoom +: Zooms in
tZoom –: Zooms out
For DVD playback:
tFormat: Selects image format for playback
tSubtitle: Activates/deactivates display of subtitles
tInfo: Activates/deactivates display of title and chap-
ter number as well as current time
tGo to: Jumps to a title or chapter of the DVD.
Keyboard options:
–OK: Conrms the entry
–[ ]: Deletes the last entry
–Chapter/title: Toggles between title and chapter
selection
tViewing angle: Selects alternative perspective of the
current playback (only if provided by the DVD for the
current scene)
tVideo language: Changes the playback language
Media/DVD playback
02_CapeTown_gb.indd 48 09.10.14 11:48

49
ENGLISH
Media/DVD playback | Calling
tRepeat: Changes between the following options:
–Repeat Chapter
–Repeat Title
–Repeat O
tRepeat A-B: Repeats an individual section:
–Repeat A-: Marks the starting point of the section
–Repeat A-B: Marks the endpoint of the section
(repeat starts)
–Repeat A-B o: Exits repeat
For Bluetooth™ streaming:
tBluetooth Settings: Opens Bluetooth™ settings (see
the chapter "Bluetooth™ settings")
tDevice List: Opens Bluetooth device list (see the
chapter "Bluetooth™ settings")
tConnect Audio Streaming: Establishes a streaming
connection to the connected Bluetooth™ device
Calling
Opening the phone
쏅In the main menu, select the Phone app (see the
chapter "Main menu").
The keyboard display
1 2 3 4 5 6
910 8 711
The keyboard display features the following functions
and displays:
General functions of the phone displays:
1
Changing to the main menu
2
Changing to the keyboard display
3
Changing to the list of calls
4
Changing to the list of favourites
5
Changing to the phone book
6
Time/Bluetooth™ status
;
Opening/closing the options menu (see the section
"Options menu")
Keyboard functions:
7
Correction key for deleting the entry
8
Keyboard for number input
9
Dial key for dialing the number entered
:
Activating voice dialing
02_CapeTown_gb.indd 49 09.10.14 11:48
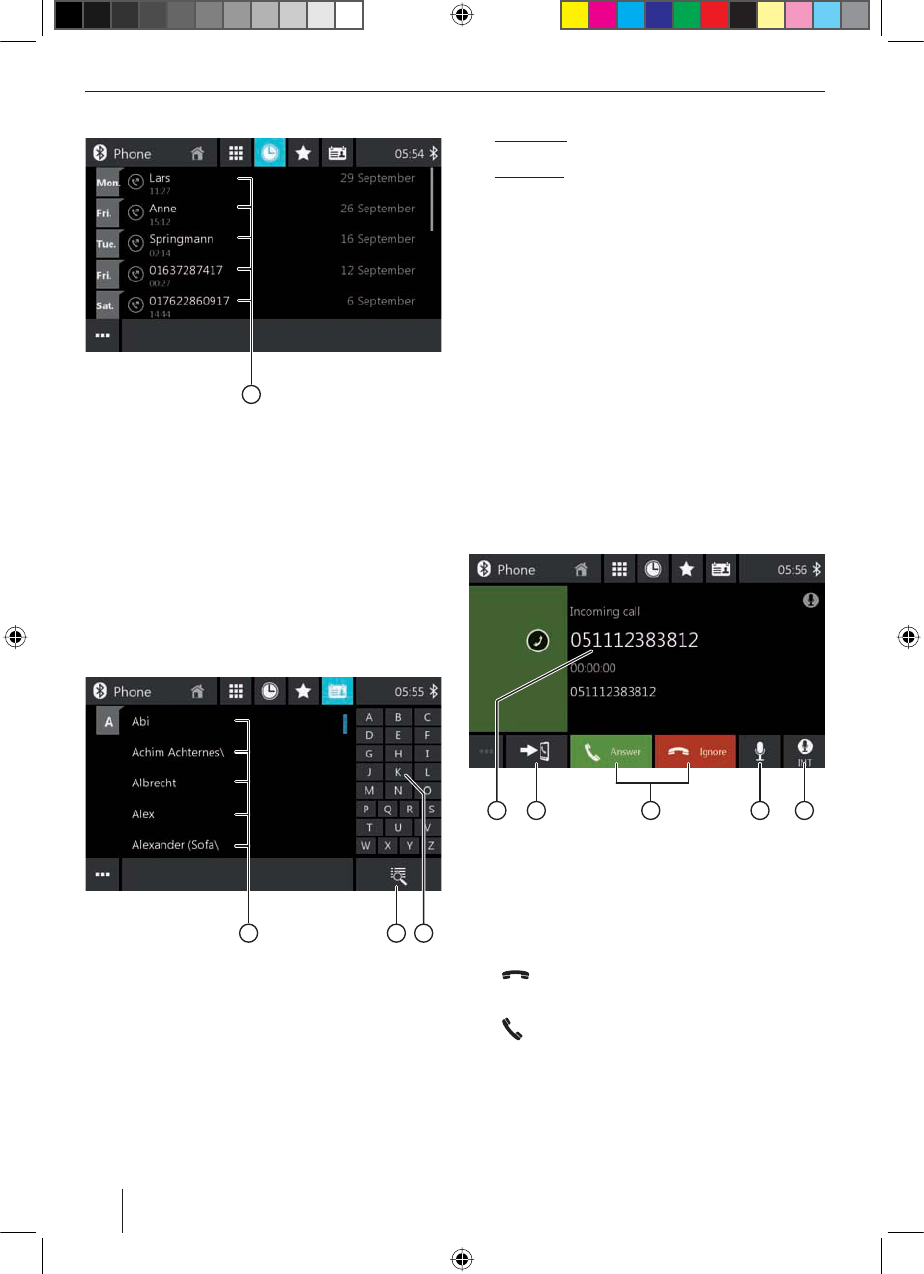
50
The list of calls
1
The list of calls features the following functions and dis-
plays:
1
List of the most recently called numbers/contacts
with date and time of the call
Tap on an entry to call the number/contact.
Phone book and list of favourites
Note:
The phone book contains all the contacts from the
phone book of your cell phone.
The list of favourites contains only the contacts
which you selected as favourite in the phone book
at the device.
2 13
The phone book or list of favourites features the follow-
ing functions and displays:
1
Letter menu: Jumping to the selected starting letter
in the list of contacts
2
Opening a keyboard for name search in the list of
contacts
3
Entries of the list of contacts
Short press: Calls number/contact or displays num-
bers (if several numbers are available)
Long press (in the phone book only): Adds number/
contact to the list of favourites
The Options menu
The options menu features the following functions and
settings:
tBluetooth Setting: Opens Bluetooth™ settings (see
the chapter "Bluetooth™ settings")
tDevice List: Opens Bluetooth device list (see the
chapter "Bluetooth™ settings")
tPhone Book Sync: Copies contacts from the phone
book of the cell phone to the device/updates
contacts on the device
Note:
You can automatically synchronise the device phone
book with the phone book of the cell phone (see
the chapter "System settings", Bluetooth/Auto Phone
Book Sync option).
Incoming/outgoing call
2 145 3
An incoming call provides the following functions and
displays:
1
Switching between internal (INT) and external (EXT)
microphone
2
Muting the microphone
3
Call/phone call handling:
[ ] Rejecting a call (for incoming call)
Cancelling a call (for outgoing call)
Ending a phone call (for ongoing call)
[ ] Answering a call (for incoming call)
4
Switching a phone call between device and cell
phone
5
Caller info
– Contact name/caller number (if available)
– Call duration
Calling
02_CapeTown_gb.indd 50 09.10.14 11:48
51
ENGLISH
Smartphone mirror mode
In mirror mode, the display of your smartphone is mir-
rored to the device display. This allows you to use all
the functions of your smartphone display via the touch-
screen of the device.
DANGER!
Risk of road safety by using the mirror
mode while driving.
The use of the mirror mode while driving may divert your
attention from the trac situation and lead to serious
accidents!
Do not use this function while driving. To use this func-
tion, stop at a suitable location and operate your device
while the vehicle is standing.
Notes:
tThe smartphone must be connected with the
device via HDMI (with a suitable connecting cable)
and also via Bluetooth®.
tFor a suitable HDMI connecting cable, see the ac-
cessories programme of your smartphone manu-
facturer.
tNot every smartphone supports mirror mode.
A basic requirement is the support of the
Bluetooth prole HID (Human Interface Device) as
well as an MHL output for Android smartphones.
A list of compatible smartphones is located under
www.blaupunkt.com.
Connecting a smartphone
쏅In the main menu (if necessary under Apps), select
the AuxIn app.
쏅Select the type of your smartphone (Android/iP-
hone).
쏅Follow the displayed instructions.
Starting mirror mode
쏅In the main menu (if necessary under Apps), select
the Mirror Mode app and conrm the trac safety
note.
The smartphone display is shown on the display.
Navigation
Note:
Only for devices with navigation software.
DANGER!
Risk of road safety by using the navigation.
The use of the navigation can divert your
attention from the trac situation and lead to serious
accidents!
Do not make any settings while driving. To use it (e.g. for
entering a destination address), stop at a suitable loca-
tion and operate your device while the vehicle is stand-
ing.
The navigation data used can be incomplete or obsolete
or, for some other reasons, not match the actual trac
routing. Always observe the actual trac routing and
signpost information when following a planned route.
Loading navigation data
The navigation software and map data are located on a
microSD card. For devices with navigation, the device is
delivered with a microSD card in the microSD card slot. To
be able to use the navigation, the microSD card must be
inserted in the card slot.
Download of map data and options
To ensure that you have the latest version of the map
data when you purchase the device, you have 30 days
from the rst GPS positioning to use the Toolbox (cur-
rently only for Microsoft Windows® PCs, download from
www.naviextras.com) to download the latest version of
the map data once and free of charge to the standard mi-
croSD card. You can always purchase map material from
this site at a later time. Some options or functions of the
navigation software can be used via Toolbox only after
purchasing additional equipment packages (e.g. TMC
Pro/Pay TMC).
Important note:
If the microSD card is lost or damaged, the naviga-
tion map license associated with the card will be lost.
In this case, the license must be purchased anew with
a new microSD card.
Starting the navigation
쏅In the main menu, select the Navigation app (see the
chapter "Main menu").
Smartphone Mirror mode | Navigation
02_CapeTown_gb.indd 51 09.10.14 11:48
52
First use
If you are using the navigation for the rst time, the setup
wizard is automatically started. With the help of the setup
wizard, you can, e.g., set the language of the navigation,
allow or reject the transfer of GPS data and make dier-
ent basic settings of the navigation.
As soon as you made the desired settings in the setup
wizard and conrmed them, the navigation menu opens
(see the next section).
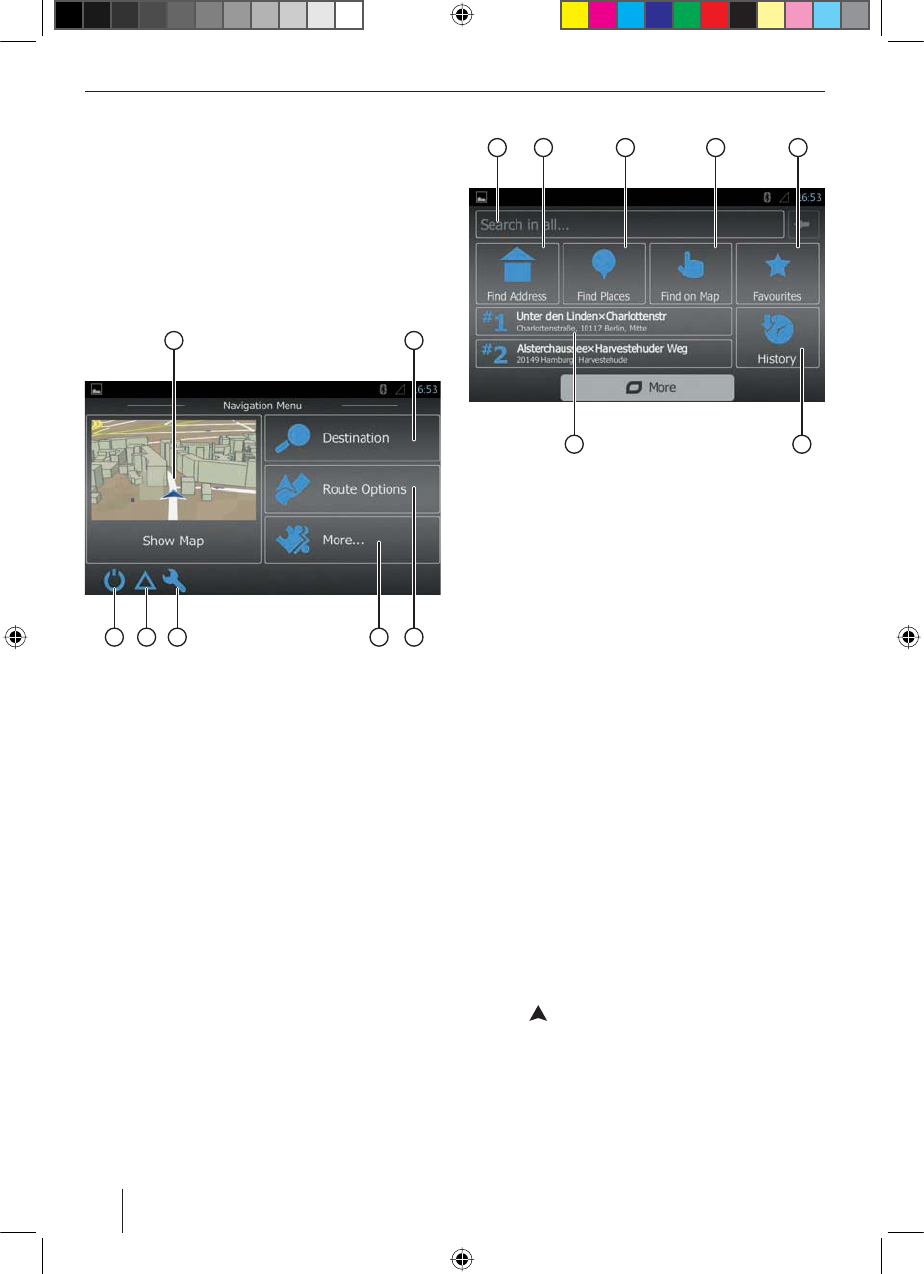
Navigation menu
1 2
67 5 34
The navigation menu features the following functions
and displays:
1
Changing to the map view
2
Entering/selecting a destination (see the section
"Entering a destination")
3
Creating a route with possible interim destinations
or editing/deleting a planned route (see the section
"Planning a route")
4
Opening a menu for additional options (see the
section "Additional options")
5
Opening the menu for navigation settings
6
Displaying TMC trac announcements
7
Exiting the navigation
Entering a destination
1 2 3 4 5
7 6
The destination menu features the following functions
and displays:
1
Finding a destination based on keywords. The key-
word can be, e.g. part of a street name, a point of
interest category or a point of interest.
Note:
The destination is searched in the vicinity of a
location (by default your current position). Tap on
Change to select a dierent location.
2
Finding an address
3
Finding a point of interest
Options:
tFast retrieval: Lists all points of interest in your
vicinity
tCustomised search: Find points of interest in a
city, nearby or – for a planned route – on the way
or close to the destination.
tPetrol stations, restaurants, car parks or over-
nighting in your vicinity or – for a planned route
– on the way or close to the destination.
4
Find on map: Tap on the map to determine a place of
destination.
Note:
Options for the map display:
tSwipe: Moving the map section
t[ + ] / [ – ]: Zooming in/out
t[ ]: Moving the map section back over your
current position
5
Selecting a destination from your favourites
6
Selecting a destination from the last destinations
7
Direct access to the last two destinations
Navigation
02_CapeTown_gb.indd 52 09.10.14 11:48

53
ENGLISH
Planning a route
1 2 3
45
The route menu features the following functions and
displays:
1
Information about the current route
2
Creating a route or – for a planned route – changing
a route
3
Displaying a planned route and route information in
the map overview
Note:
Options for the map display:
tSwipe: Moving the map section
t[ + ] / [ – ]: Zooming in/out
t[ ]: Displaying the entire route in the map sec-
tion
4
Deleting a planned route
5
Avoiding certain sections of a planned route
Options:
tAvoiding special sections: Excluding special sec-
tions (such as certain motorway sections or toll
roads) from the planned route
tAvoid sections ahead: Excluding the section
ahead of you, up to 50 km long, from the planned
route
tAvoid certain street: Excluding a certain street
from the planned route
tRestore original route: Allow all previously
excluded sections again for the route planning
Keyboard input
A keyboard is displayed for entering text or numeric
values:
1 2
36 45
The keyboard oers dierent options:
1
Input display
2
Deleting last input
3
Showing special characters
4
Conrming input
5
Showing keyboard settings
6
Toggling between uppercase and lowercase
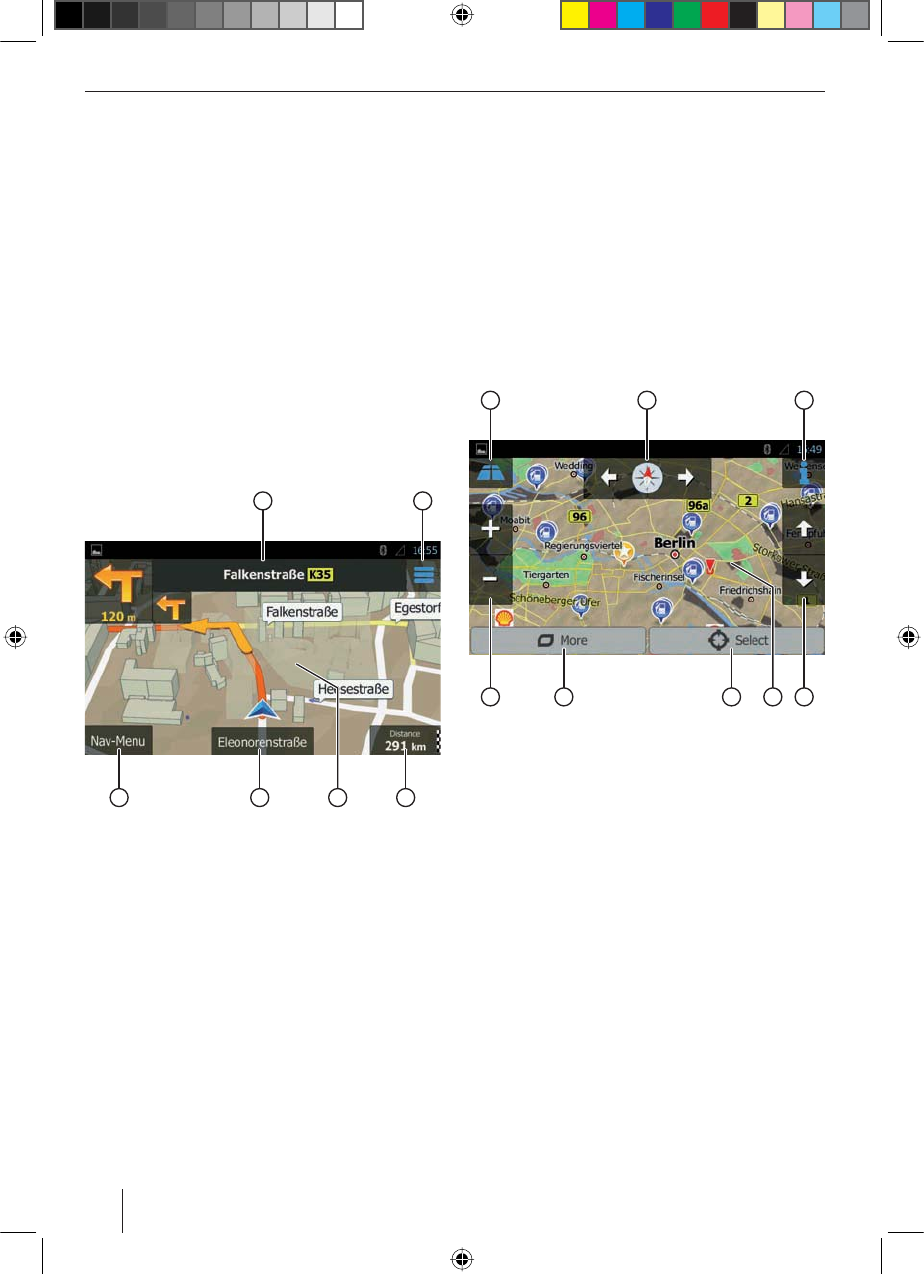
Map views
Without planned route
1 2
356 4
This map view features the following functions and displays:
1
House numbers at your current position
Displaying GPS information about the current posi-
tion
Navigation
02_CapeTown_gb.indd 53 09.10.14 11:48
54
2
Opening the quick access menu
Note:
The quick access menu allows direct access to certain
functions. You can customise the entries of the quick
access menu (see the section "Navigation settings",
"Customising quick access" option).
3
Information about the current position, time and
vehicle status
Showing/hiding information
Note:
You can select the displayed information yourself
(see the section "Navigation settings", "Settings for
visual instructions" option).
4
Tapping on the map to determine a destination on
the map
5
Name of current street
6
Opening the navigation menu
With planned route
1 2
356 4
This map view features the following functions and dis-
plays:
1
Name of the next street on the route
2
Opening the quick access menu
Note:
The quick access menu allows direct access to certain
functions. You can customise the entries of the quick
access menu (see the section "Navigation settings",
"Customising quick access" option).
3
Information about the current route and position
Showing/hiding information
Note:
You can select the displayed information yourself
(see the section "Navigation settings", "Settings for
visual instructions" option).
4
Tapping on the map to determine a destination on
the map
Note:
For a planned route, you have the following options:
tReplacing the existing destination with a new
destination.
tPlanning the new destination as interim destina-
tion of the route.
tPlanning the new destination as nal destination
of the route.
5
Name of current street
6
Opening the navigation menu
Determining the destination on the map
21 3
4678 5
This map view features the following functions and
displays:
1
Toggling 2D/3D map view
2
Changing the map orientation
3
Displaying address and GPS information about the
current cursor position
4
For 3D map view only: Changing the tilt of the 3D
map view
5
Tapping on the map to reposition the cursor
6
Accepting the current cursor position as destination
7
Showing additional options:
tPoints of interest in the vicinity of the cursor
tSave as favourite
tShow cursor position
8
Zoom in/out
Navigation
02_CapeTown_gb.indd 54 09.10.14 11:48

55
ENGLISH
Navigation settings
The menu for navigation settings features the following
functions and settings:
tAudio and warnings: Settings for navigation an-
nouncements and warnings (e.g. of speed limits,
warning points such as sites of serious accidents and
school zones and referenced to trac signs, e.g. for
curves and intersections)
tCustomise quick access: Dening entries of the
quick access menu
tManaging driving times (truck version only): Den-
ing driving times and breaks as well as correspond-
ing notications
tTrac: Adjusting TMC settings and use of earlier
trac data (e.g. concerning trac jams)
tRoute Settings: Settings for the route planning (e.g.
type of vehicle, navigation mode, route planning
method and types of sections to avoid)
tUser Proles: Changing and renaming user prole
Note:
The user prole is based on your individual settings.
You can create up to four dierent proles. When
changing to a dierent prole, the application is re-
started. If this prole has not been used previously,
the conguration wizard is called up at the start of
the application.
tMap Settings: General settings for the map view
tSettings for Visual Instructions: Settings for the
display of information in the map view
tDisplay: Settings for menu animations and daylight/
nighttime mode of the display
tRegional: Settings for the programme language as
well as units of measure and formats
tTrip Overview: Settings for storing trips and routes
tProtocol Storage: Settings for storing and transfer-
ring user and GPS data
tConguration Wizard: Starting the conguration
wizard
tReset to Default: Deleting individual settings and
restoring the factory settings
Additional options
The menu for additional options features the following
functions and settings:
tUpdates and Extras: Information about updates
and extras for the navigation application
tSunrise and Sunset: World map with day/night
boundaries and your current position
tTrip Overview: Displaying stored trips and routes
tCountry Info: Displaying country-specic informa-
tion, e.g. about speed limits and additional trac
regulations
tHelp: Playing the demo of a planned route for a sam-
ple city and displaying software information
Navigation
02_CapeTown_gb.indd 55 09.10.14 11:48

56
Rear Seat Entertainment (RSE)
The device features audio and video outputs for the rear
area of the vehicle to which two external monitors and
headphones, e.g. via suitable jacks, can be connected.
The following sources are available for the Rear Seat
Entertainment:
tDisc
tUSB RSE (rear side)
tA/V In 1
tA/V In 2
tDVB-T (with optional accessories)
쏅Select the desired source in the main menu and start
playback.
쏅In the main menu (if necessary under Apps), select
the Rear Zone app.
쏅Under Rear Zone, select the previously started source.
The playback now also takes place in the rear area
of the vehicle.
Note:
During the RSE playback, you can select a dierent
source for the front area of the vehicle in the main
menu. The RSE playback of the originally selected
source continues unimpeded.
쏅To exit the RSE, select the Rear Zone app again and
tap on Rear O.
Showing device display on
external monitor
If the installation position of the device is not optimal for
viewing displays (e.g. for using the navigation), you can
output the device display on an external monitor.
쏅In the main menu (if necessary under Apps), select
the Rear Zone app.
To switch the playback on an external monitor on or o,
쏅tap on Front Display.
Note:
As long as the playback on an external monitor is
switched on, you cannot use the Rear Seat Entertain-
ment.
Steering wheel-mounted controls
(SWC)
Up to 8 functions of the device can be operated via
existing steering wheel-mounted controls. This requires
assigning the desired functions to the buttons of the
steering wheel-mounted controls.
Note:
The SWC function operates with analogue control
signals (passive resistive matrix). Depending on the
vehicle type, you may require an additional interface.
쏅In the main menu (if necessary under Apps), select
the SWC app.
In the rst step, assign the desired functions to up to 8
placeholders:
쏅Select one of the placeholders 1 - 8.
쏅Select a function for this placeholder.
An assigned placeholder is identied by a check
mark. A selected function is identied by the number
of the placeholder.
쏅Repeat these steps for every additional function to
be assigned to the steering wheel-mounted controls.
In the next step, assign the assigned placeholders to the
buttons of the steering wheel-mounted controls:
쏅Tap on Learn.
Placeholder 1 and the assigned function are
displayed.
쏅Press a button of the remote control for approx. 1
second.
The displayed function is assigned to the button
being pressed.
쏅Tap on [ ] to assign the next function.
Note:
Tap on [ ] to return to a previous function and, if
necessary to reassign it.
Rear Seat Entertainment | Showing device display on external monitor | Steering wheel-mounted controls
02_CapeTown_gb.indd 56 09.10.14 11:48

57
ENGLISH
WLAN
The device can be connected with a network via WLAN.
In addition, the device can be used a mobile WLAN hot-
spot.
Note:
If the device s connected with the Internet via WLAN,
you can used Internet-based services and apps, e.g.
the preinstalled App Store and the "Browser" app.
Both are located in the main menu under "Apps".
Establishing a WLAN connection
쏅Activate WLAN in the system settings (see the chap-
ter "System settings", "WLAN" menu item).
쏅Under the "WLAN" menu item, select the WLAN net-
work with which you want to connect the device, and
enter the required password as necessary.
Setting up a mobile WLAN hotspot
쏅In the system settings, select the "Wireless & net-
works" menu item.
쏅Select the "Tethering & Mobile Hotspot" submenu.
쏅Enable the "Mobile WLAN Hotspot" option.
쏅Select the "WLAN hotspot" menu item to specify the
network ID (SSID), security protocol and password for
the WLAN hotspot.
DVB-T (CAPE TOWN 945 only)
The device can be used for DVB-T playback.
Note:
For the DVB-T playback, the optional Blaupunkt
DVB-T Tuner Box 945 must be connected.
Starting DVB-T playback
쏅In the main menu, select the DVB-T app (see the
chapter "Main menu").
Note:
For its operation, see the operating instructions of
Blaupunkt DVB-T Tuner Box 945.
Useful information
Warranty
We provide a manufacturer's warranty for products
bought within the European Union. For devices pur-
chased outside the European Union, the warranty terms
issued by our respective responsible domestic agency
are valid. The warranty terms can be called up from
www.blaupunkt.com.
Service
If you ever need to use a repair service, you will nd
information about service partners in your country under
www.blaupunkt.com.
Technical data
Operating system Android 4.1.1
Voltage supply
Operating voltage: 10.5 – 14.4 V
Current consumption
In operation: < 10 A
In fast boot mode: ~ 12 mA
10 sec. after switch-o: < 5 mA
Subject to technical changes!
WLAN | DVB-T | Useful information | Technical data
02_CapeTown_gb.indd 57 09.10.14 11:48
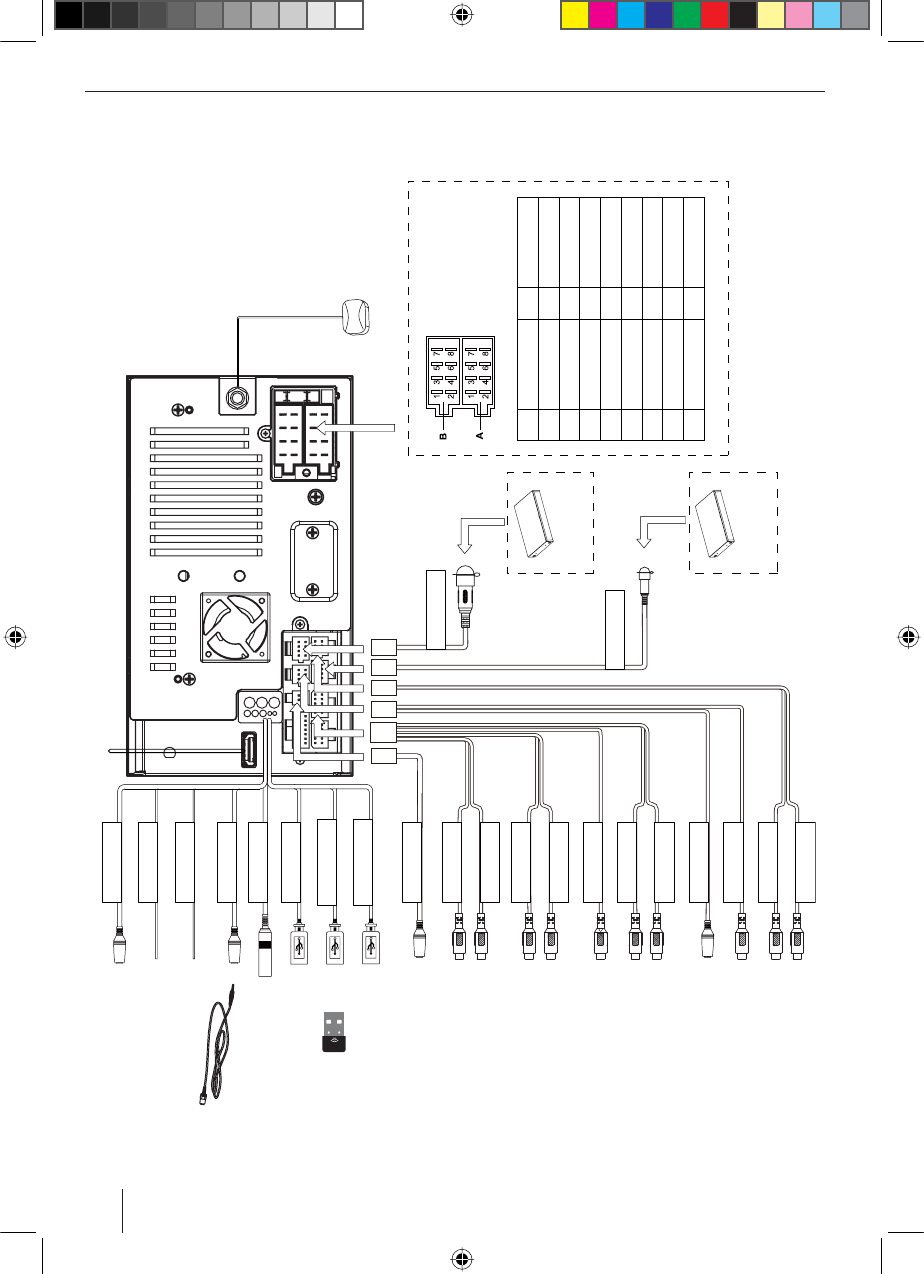
338
Microphone
PIN PART A
1NC
2NC
3NC
4ACC
5 P.ANT
6 Illumination
7Battery +12V
8GND
PIN PART B
1 Rear R+
2 Rear R-
3 Front R+
4 Front R-
5 Front L+
6 Front L-
7 Rear L+
8 Rear L-
GPS ANTENNA
Black
Black
Black
Black
Black
Orange
Pink
Black HDMI
PARKING
REVERSE
SWC
MICROPHONE
RADIO ANT
USB RSE
USB3: MEDIA/3G/WIFI
USB2: MEDIA/3G/WIFI
Red
White
Blue
White
Yellow
Black
Red
White
Red
White
Green
White
(optional)
(optional,
CAPE TOWN 945 only)
(optional,
CAPE TOWN 945 only)
Blue
Purple
Brown
Blaupunkt Accessory
DVB-T Tuner Box 945
(optional)
Blaupunkt Accessory
DAB+ Tuner Box 945
(optional)
TMC
DVB-T BUS
DAB BUS
FRONT OUT R
FRONT OUT L
REAR OUT R
SUB WOOFER
REAR OUT L
REAR ZONE R
CAMERA VIDEO
AV IN
Yellow
Yellow
VIDEO OUT 2
VIDEO OUT 1
Gray
REAR ZONE L
WLAN-USB-Stick
Connection Diagram
12_CapeTown_cz.indd 338 09.10.14 12:03
339
ČESKY
Supported iPod/iPhone devices
Our product can support below listed iPod/iPhone gen-
erations:
tiPhone 5S
tiPhone 5C
tiPhone 5
tiPhone 4S
tiPhone 4
tiPod touch (5th generation)
tiPod nano (7th generation)
"Made for iPod" and "Made for iPhone" mean that an elec-
tronic accessory has been designed to connect specically
to iPod, iPhone respectively, and has been certi ed by the
developer to meet Apple performance standards.
Apple is not responsible for the operation of this device
or its compliance with safety and regulatory standards.
Please note that the use of this accessory with iPod, iPhone
may a ect wireless performance.
iPhone, iPod are trademarks of Apple Inc., registered in the
U.S. and other countries.
DivX®, DivX Certied® and associated logos are trademarks
of DivX, LLC and are used under license.
Covered by one or more of the following U.S. patents:
7,295,673; 7,460,668; 7,515,710; 7,519,274
This DivX Certi ed® device has passed rigorous testing to
ensure it plays DivX® video.
To play purchased DivX movies, rst register your device
at vod.divx.com. Find your registration code in the DivX
VOD section of your device setup menu.
DivX Certied® devices have been tested for high-quality
DivX® (.divx, .avi) video playback. When you see the DivX
logo, you know you have the freedom to play your favorite
DivX movies. DivX video can include advanced playback
features such as multiple subtitle and audio tracks. Enjoy
your favorite videos—from content you create to videos
you discover online—with DivX Certied devices.
Windows® und Windows Media® are registered trade-
marks of the Microsoft Corporation in the U.S.A. and/or
other countries.
This product is protected by certain intellectual property
rights of Microsoft. Use or distribution of such technology
outside of this product is prohibited without a license
from Microsoft.
The Bluetooth® word mark and logos are registered trade-
marks owned by Bluetooth SIG, Inc.
The Parrot trademarks and logo are registered trademarks
of Parrot S.A.
Manufactured under license from Dolby
Laboratories.
"Dolby" and the double-D symbol are trademarks of
Dolby Laboratories.
FCC Statement
1. This device complies with Part 15 of the FCC Rules.
Operation is subject to the following two conditions:
(1) This device may not cause harmful interference.
(2) This device must accept any interference received, in-
cluding interference that may cause undesired operation.
2. Changes or modi cations not expressly approved by
the party responsible for compliance could void the user's
authority to operate the equipment.
NOTE: This equipment has been tested and found to com-
ply with the limits for a Class B digital device, pursuant to
Part 15 of the FCC Rules. These limits are designed to pro-
vide reasonable protection against harmful interference in
a residential installation.
This equipment generates uses and can radiate radio fre-
quency energy and, if not installed and used in accordance
with the instructions, may cause harmful interference to
radio communications. However, there is no guarantee
that interference will not occur in a particular installation.
If this equipment does cause harmful interference to radio
or television reception, which can be determined by turn-
ing the equipment o and on, the user is encouraged to
try to correct the interference by one or more of the fol-
lowing measures:
tReorient or relocate the receiving antenna.
tIncrease the separation between the equipment and
receiver.
tConnect the equipment into an outlet on a circuit die-
rent from that to which the receiver is connected.
tConsult the dealer or an experienced radio/TV techni-
cian for help.
FCC Radiation Exposure Statement
This equipment complies with FCC radiation exposure limits
set forth for an uncontrolled environment. This equipment
should be installed and operated with minimum distance of
20 centimeters between the radiator and your body.
Industry Canada Statement
English: This device complies with Industry Canada li-
cence exempt RSS standard(s). Operation is subject to the
following two conditions: (1) this device may not cause
interference, and (2) this device must accept any interfer-
ence, including interference that may cause undesired
operation of the device.
Français : Le présent appareil est conforme aux CNR
d'Industrie Canada applicables aux appareils radio ex-
empts de licence. L'exploitation est autorisée aux deux
conditions suivantes : (1) l'appareil ne doit pas produire
de brouillage, et (2) l'utilisateur de l'appareil doit accepter
tout brouillage radioélectrique subi, même si le brouillage
est susceptible d'en compromettre le fonctionnement.
© 2014 All rights reserved by Blaupunkt. This material may
be reproduced, copied or distributed for personal use only.
Appendix
12_CapeTown_cz.indd 339 09.10.14 12:03

Blaupunkt Technology GmbH
Robert-Bosch-Straße 200
D-31139 Hildesheim
http://www.blaupunkt.com
5 101 030 021
10/14 de, gb, fr, it, nl, sw, es, pt, dk, sf, pl, cz
12_CapeTown_cz.indd 340 09.10.14 12:03