Blaupunkt Europe SANANTO640 Car DVD PLAYER User Manual Manual
Blaupunkt Europe GmbH Car DVD PLAYER Manual
UserManual.wiki
>
Blaupunkt Europe
>
SANANTO640 User Manual
Manual
Navigation menu
Upload a User Manual
Namespaces
Wiki Guide
HTML
PDF
Info
Views
User Manual
Discussion / Help
Navigation

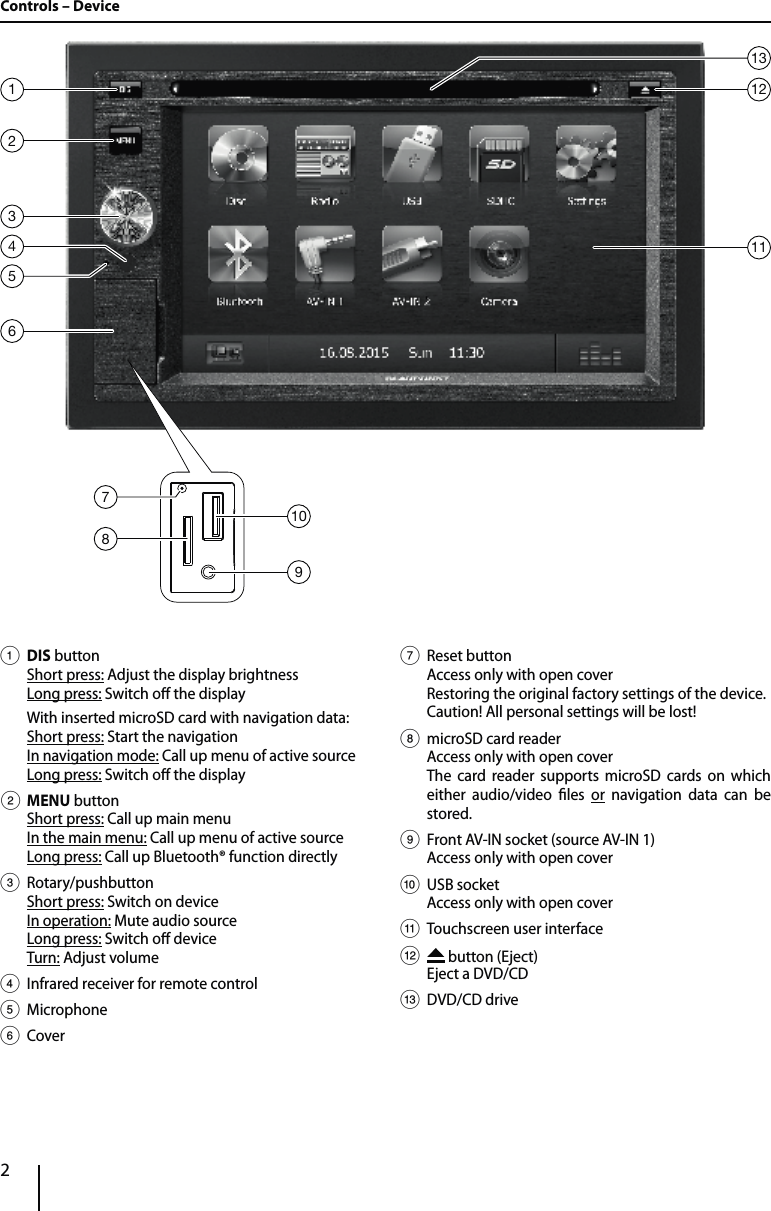
![13USB data carrierThis device features a USB port under the cover at the front of the device.Connecting a USB data carrier uOpen the cover 6 underneath the rotary/pushbut-ton. uInsert the USB data carrier in the USB socket :.The device automatically switches to USB mode. The data are read, the playback starts with the rst media le recognized by the device.Removing the USB data carrier uTurn o the car sound system. uDisconnect the USB data carrier.microSDHC cardsThis device features an microSDHC card slot under the cover at the front of the device.Inserting the microSDHC card uOpen the cover 6 underneath the rotary/pushbut-ton. uInsert the microSDHC card with its labelled side to the left (attened corner to the top) and its contacts rst into the card slot8 until it clicks into place.The device automatically switches to microSDHC mode. The data are read, the playback starts with the rst media le recognized by the device.Removing the microSDHC card uIf necessary, open the cover 6. uPush on the microSDHC card until it disengages. uPull the microSDHC card out of the card slot 8.iPod/iPhone via USBYou can connect numerous iPod® and iPhone® models to the car sound system via the USB port and control the audio playback from the car sound system.Note:A list of compatible iPod® and iPhone® models is lo-cated at the end of these instructions. Blaupunkt can-not guarantee the awless function of other iPod® and iPhone® models. Use a suitable adapter cable to connect your iPod® or iPhone® with the USB port of the car sound system. uOpen the cover 6 underneath the rotary/pushbut-ton. uInsert the USB plug of the adapter cable into the USB socket of the device.The device automatically switches to USB mode. The data are read, the playback starts with the rst media le on the iPod®/iPhone® recognized by the device.DVD movie playbackThe car sound system can play video DVDs and VCDs. Af-ter inserting the DVD, the playback starts automatically. The DVD menu is displayed. You can navigate in the DVD menu by touching the corre-sponding buttons in the DVD menu on the touchscreen. After starting the movie via the menu of the DVD, the movie is displayed. The playback menu for DVDs is hidden. uBriey touch the touchscreen once to display the playback menu again.The playback menu is shown.[ ] Pause playback, call up DVD menu.[ ] Select previous chapter.[ / ] Interrupt playback and continue playback.[ ] Select next chapter.[ ] Call up keypad for direct selection of titles, chapters or playing time.[ ] Show additional operating options. uTap on to display additional operating op-tions of the playback menu.[ ] Hide additional operating options.[ ] Display equalizer.[ ] Dene range for repeat function.[ ] Select playback language (only if supported by the DVD).[ ] Show subtitles (only if supported by the DVD).[ ] Switch repeat function for title, chapter or area A-B on/o.[ ] Adjust image.DVD/CD/USB/microSDHC/iPod media playback](https://usermanual.wiki/Blaupunkt-Europe/SANANTO640/User-Guide-2677826-Page-13.png)
![14Audio playback from DVD/CD, USB, microSDHC or iPod/iPhoneThe principles of the audio playback (MP3/WMA) from data carriers or iPod®/iPhone® are identical for all sources. uSelect the desired source via the main menu.The device changes to the desired source and the playback starts.If the playback does not start with the audio playback, upress the button to change to the folder/file list. uPress the button to display all the folders and files of the data carrier (not in iPod®/iPhone® mode).- Or - uPress the button to display all the audio les of the data carrier.[ ] Scroll through the list page by page. [ ] Scroll through the list page by page.[ ] Change to next higher folder level.[ ] Open selected folder or start titles. - Or -Briey tap twice (double-click) on the name of the folder/track. The folder is opened/the track is started.[ ] Exit the folder/le list. After starting a title, the playback menu is displayed.[ ] Display the folder/le list.[ ] Short press: Title selection. Long press: Fast searching.[ / ] Interrupt playback and continue playback.[ ] Short press: Title selection. Long press: Fast searching.[ ] Show additional operating options. uTap on to display additional operating op-tions of the playback menu.[ ] Hide additional operating options.[ ] Display keypad to directly enter the number of the desired title.Audio playback from DVD/CD, USB or microSDHC:[ ] Start and end REPEAT function.The REPEAT mode changes each time the button is pressed.Display REPEAT modeRepeat current trackRepeat current folderRepeat all tracks of data carrierRepeat title o[ ] Start MIX random track play and end it again.If the MIX function is switched on, the symbol is displayed in white.The MIX mode depends on the selected REPEAT function.REPEAT mode displayMIX modeNo random track play Mixing tracks of the current folderMixing tracks of the data carrierDVD/CD/USB/microSDHC/iPod media playback](https://usermanual.wiki/Blaupunkt-Europe/SANANTO640/User-Guide-2677826-Page-14.png)
![15Audio playback from iPod®/iPhone®:[ ] Start and end REPEAT function.The REPEAT mode changes each time the button is pressed.Display REPEAT modeRepeat current trackRepeat current selectionRepeat title o[ ] Start MIX random track play and end it again.The MIX mode changes each time the button is pressed.Display MIX modeMixing tracks of the current selectionMixing tracks of the current albumRandom track playback oNote:The random track play of tracks depends on the iPod®/iPhone® model used. [ ] Display equalizer.Video playback from DVD/CD, USB or microSDHC uSelect the desired source via the main menu.The device changes to the desired source and the playback starts.If the playback does not start with the video playback, upress the button to change to the folder/file list. uPress the button to display all the folders and files of the data carrier.- Or - uPress the button to display all the video les of the data carrier.Note:Folders and videos are selected and started as de-scribed under audio playback.If you selected a movie, the playback is started. During the movie playback, the playback menu is hidden. uBriey touch the touchscreen once to display the playback menu again.The playback menu is shown.[ ] Display the folder/le list.[ ] Select previous movie.[ / ] Interrupt playback and continue playback.[ ] Select next movie.[ ] Call up keypad for direct selection of movie or playing time.[ ] Show additional operating options. uTap on to display additional operating op-tions of the playback menu.[ ] Hide additional operating options.[ ] Display equalizer.[ ] Switch repeat function for movie or folder on/o.[ ] Adjust image.[ ] Select playback language (only if supported by the movie).[ ] Show subtitles (only if supported by the movie).DVD/CD/USB/microSDHC/iPod media playback](https://usermanual.wiki/Blaupunkt-Europe/SANANTO640/User-Guide-2677826-Page-15.png)
![16Note:You can play back video les stored on an iPod®/ iPhone® with this device. For this purpose, the iPod®/iPhone® must be connected with the device using a special cable (USB - AV) that is commercially avail-able.Image playback from DVD/CD, USB or audioSDHC uSelect the desired source via the main menu.The device changes to the desired source and the playback starts.If the playback does not start with the image playback, upress the button to change to the folder/file list. uPress the button to display all the folders and files of the data carrier.- Or - uPress the button to display all the images of the data carrier.Note:Folders and images are selected and started as de-scribed under audio playback.Bluetooth modeThe Bluetooth® function allows registering cell phones and media playback devices with the car sound system. When you register a cell phone with the car sound sys-tem, you can make phone calls with the built-in hands-free function. You can access the lists of dialled numbers and the phone book of the registered cell phone.If the connected Bluetooth® device supports the func-tions A2DP and AVRCP, you can play the music via the car sound system and control the playback. During a call, the music playback is interrupted and continued again after the call. If a cell phone is registered via Bluetooth® and a call is re-ceived during the playback of another source, the source playback is interrupted and the call menu is displayed.Starting Bluetooth mode uIn the main menu, press on Bluetooth .- Or - uPress the MENU button 2 for approx. 2 seconds. The Bluetooth® menu is displayed. It contains the list of known Bluetooth® devices. Other audio sources are switched o.[ ] Add new Bluetooth® device.[ ] Display options menu. uPress the Connect button of the Bluetooth® de-vice with which you want to establish a connection.When the device is in range, the connection is estab-lished and the menu for the device is displayed. uPress the Delete button if you want to delete the Bluetooth® device from the list.Registering Bluetooth devicesIf you want to register a device with the car sound system for the rst time, proceed as follows: uEnsure that Bluetooth® is activated at the car sound system and at your Bluetooth® device. uIn the options menu of the Bluetooth® mode, enter a pairing code (see Bluetooth® settings). uSearch for new devices/connections on your Blue-tooth® device. uThe car sound system appears as "BP 640" in the list of Bluetooth® devices. uEstablish the connection; you may have to enter the pairing code that was previously entered on the car sound system.The connection is being established and the menu for the registered device is displayed.Note:If a telephone is connected with the car sound sys-tem, the Bluetooth® icon is displayed at the top right edge of the display in all audio/video sources.DVD/CD/USB/microSDHC/iPod media playback | Bluetooth mode](https://usermanual.wiki/Blaupunkt-Europe/SANANTO640/User-Guide-2677826-Page-16.png)
![17Telephone modeIf you connected a phone with the car sound system via Bluetooth®, the following menu appears.[ ] Display the phone menu.[ ] Display the playback menu of Bluetooth® streaming. [ ] Display the playback menu of app control. [ ] Disconnect connection with current device.[ ] Call up the phone book.[ ] Call up caller lists. [ ] Display options menu. uEnter a phone number with the keypad and press the button. - Or - uSelect a contact/number via the caller lists or phone book and press the Dial button in the pop-up window.The connection is being established.If a call is coming in, the call menu is displayed.[ ] Reject a call.[ ] Answer a call.Audio playback via Bluetooth streamingIf an audio streaming device is connected with the car sound system via Bluetooth®, you can play back the mu-sic via the car sound system and control the playback. uPress the button to change to the audio play-back.[ ] Display the phone menu.[ ] Display the playback menu of Bluetooth® streaming. [ ] Display the playback menu of app control. [ ] Disconnect connection with current device.[ ] Short press: Title selection. Long press: Fast searching.[ ] Interrupt playback and continue playback.[ ] Short press: Title selection. Long press: Fast searching.[ ] Display equalizer.Audio playback via app control (Android cell phone)With the "Blaupunkt Android Player Multimedia Series" app, music les stored on an Android cell phone can be divided into certain categories with the help of ID3 tag information. This allows you to quickly and conveniently select and play back music tracks across dierent catego-ries. For this purpose, the app must be installed on the Android cell phone. The "Blaupunkt Android Player Mul-timedia Series" app can be downloaded on the Internet from www.blaupunkt.com. Note:The audio playback via "Blaupunkt Android Player Multimedia Series" app is available only for Android cell phones with operating system Android 2.3 and higher. In addition, the cell phone must support the Bluetooth® proles SPP (Serial Port Prole) and A2DP (Advanced Audio Distribution Prole).Bluetooth mode](https://usermanual.wiki/Blaupunkt-Europe/SANANTO640/User-Guide-2677826-Page-17.png)
![18 uPress the button to change to the audio play-back.[ ] Display the phone menu.[ ] Display the playback menu of Bluetooth® streaming. [ ] Display the playback menu of app control. [ ] Display category lists.[ ] Short press: Title selection. Long press: Fast searching.[ / ] Interrupt playback and continue playback.[ ] Short press: Title selection. Long press: Fast searching.[ ] Switch repeat function on/o.[ ] Switch random playback on/o.Bluetooth settingsIn the options menu for Bluetooth®, you can make the basic settings for the Bluetooth® mode. uPress the button. The options menu is displayed.Bluetooth – Bluetooth® can be switched on or o.Auto connect – If "Auto Connect" is activated, the device automatically connects with known Blue-tooth® devices as soon as they are in range.Auto answer – If "Auto Answer" is activated, incom-ing phone calls are automatically answered.Bluetooth mode | Pandora® mode Microphone – Select the microphone to be used for the hands-free system via Bluetooth®.Pairing code – Many Bluetooth® devices request the pairing code before establishing the connection. You can dene it here.Phone book sync – To be able to access the phone book of a connected telephone, you must rst syn-chronise it via this menu entry. uPress to exit the options menu. Pandora® mode (available only in the US, Australia and New Zealand)Requirements Control for Pandora® requires: tAn iPhone device or an Android device with a reliable data connection, or an iPod touch that is connected to wireless internet. tThe Pandora® app installed on the iPhone/iPod de-vice or on the Android device. tAn active account with Pandora®. Sign up at www.pandora.com. tThe USB sync cable that came with your iPhone/iPod device. tUsing an Android device it is necessary to establish a connection to the car sound system via Bluetooth®. Notes: tPandora® is available only in the US, Australia and New Zealand. tRefer to www.pandora.com/everywhere/mobile for devices compatible with the Pandora® mobile application. tPandora® is an internet service, carrier and data charges may apply. tSome Pandora® functionality cannot be operated from this car sound system. tFor issues using the Pandora® application, please contact Pandora at pandora-support@pandora.com tStations must be created in your account prior to connecting your iPhone/iPod or Android device to the car sound system. Connecting the iPod/iPhone device uOpen the cover 6 underneath the rotary/pushbut-ton. uConnect the iPhone/iPod device with the USB port : of the car sound system, using the USB sync cable included with your iPhone/iPod device.](https://usermanual.wiki/Blaupunkt-Europe/SANANTO640/User-Guide-2677826-Page-18.png)
![19Pandora® modeConnecting the Android device uConnect the Android device to the car sound system via Bluetooth®.Starting the Pandora® modeNote:To use the Pandora® mode, rst set "Pandora" in the general settings to "On". Then the Pandora source can be selected in the main menu. uLaunch the Pandora® application on your iPhone/iPod or Android device. uIn the main menu, press the [ Pandora ] button to switch to the Pandora® mode.Note:If both an iPhone/iPod device and an Android device are connected to the car sound system, a selection screen appears to select one of the devices.The playback menu is displayed. [ ] Display station list.[ / ] Interrupt playback and continue playback.[ ] Skip to the next track, subject to the skip limit.[ ] Tell Pandora® you like the track currently playing, and Pandora® will play more tracks like it.[ ] Tell Pandora® not to play this track. Pandora® will skip to the next track. If the skip limit has been reached, Pandora will continue to play but your feedback will be recorded.[ ] Bookmark an artist.[ ] Bookmark a track.[ ] Shue songs from all of your stations.Station list menuThe station list menu allows you to search for music by stations you created. uIn the playback menu, press the button.The station list menu is displayed.[ ] Scroll through the list page by page. [ ] Scroll through the list page by page.[ ] Exit the station list menu. [ ] List the stations by date. Tap on the name of the station to choose that sta-tion .Pandora® Error MessagesMessage DisplayedCause Corrective ActionBookMark Track ErrorSoftware Error The track could not be bookmarked, please try again in a moment.BookMark Artist ErrorSoftware Error The song could not be bookmarked, please try again in a moment.Thumbs Up / Down Error "Error Track Rating"Software Error Song feedback could not be sent, please try again in a moment.No Active Station ErrorSoftware Error This account has no stations in it. Please visit Pandora.com and login to your account and add stations.Skip Limit ReachedSoftware Error Please note that Pandora® limits skips to a maximum of six skips per hour](https://usermanual.wiki/Blaupunkt-Europe/SANANTO640/User-Guide-2677826-Page-19.png)
![21Note:With the [ Reset ] button, you can reset the custom-ised setting again. - Or - uPress the Flat button for a linear sound playback. uPress the Loudness button to switch increasing the bass at low volume on or o. uNext, press . The setting is stored, the current source is displayed again.Note:In addition, you have the option to adjust the equal-izer by using only three frequency bands. In the equalizer menu, press the button and make the setting as described before. Basic settingsIn the settings menu, you can adjust the basic settings for the dierent functions of the device to your require-ments. uIn the main menu, press the [ Settings ] button.The settings menu is displayed, the General sub-menu is activated. uCall up the submenus with the buttons in the lower area of the settings menu.GeneralThe following settings are possible:Radio region – Select the reception region for the radio reception.FM HICUT – Switches the Hicut lter for improving play-back on/o.Blackout – If this value is set, the display of the radio is completely switched o after 10 or 20 sec. without use.Dimmer mode – Adjust the display brightnessOFF timer – Setting the switch-o time. To protect the vehicle battery, the device is automatically switched o after the set time period if the vehicle ignition is switched o.Beep – Switch conrmation beep on/oTFT calibration – The touchscreen can be calibrated here.SWC – The buttons of a connected steering wheel con-trol can be congured here.Rear AV-IN mode – If you connect a back-up camera with audio signal to the AV-input at the rear of the de-vice, you can play the camera tone via the loudspeakers of the car sound system. To do so, enable "Camera mode". Pandora – Pandora® can be switched on or o here (Pandora® is available only in the US, Australia and New Zealand).Software version – Display of the current software ver-sion.Load factory settings – Resets all personalised settings. VideoThe following settings are possible:Set password – Dene a password if you want to use the parental controls. Rating level – The rating of DVDs can be dened here. If set to "Adult", all movies can be played back. If a pass-word was congured, the rating level can be changed only with the passwordSoundThe following settings are possible:Subwoofer – Switch subwoofer on/oSubwoofer lter – Make the setting according to the subwoofer used (settings: 80/120/160 Hz). Dynamic sound – Switch dynamic bass on/oTimeThe following settings are possible:Date – Set the dateClock mode – Selection between 12 and 24-h modeTime – Set the timeAuto clock – Switch automatic clock setting on or o with the time data transmitted via RDS. LanguageThe following settings are possible:OSD – Language for the user interface of the device.DVD audio – The audio playback of DVDs is started in the language dened here.DVD subtitle – The subtitles of DVDs are shown in the language dened here.DVD menu – The DVD menu is displayed in the language dened here.Sound settings | Basic settings](https://usermanual.wiki/Blaupunkt-Europe/SANANTO640/User-Guide-2677826-Page-21.png)