Blue Bamboo CT100 RFID DEVICE User Manual
Blue Bamboo (HK) Limited RFID DEVICE Users Manual
Users Manual
Blue Bamboo
CT100 Contactless Terminal User Guide
CT100

CT100 Contactless Terminal User Guide
2
BLUE BAMBOO
Date: Aug 25, 2009
Version: 1.0
BLUE BAMBOO
Headquarters
Blue Bamboo Transaction Systems (Shanghai) Co., Ltd.
6 Floor, Huishan Technology Park, No. 3333 Changning Road,
Shanghai, P.R. China 200336
Tel: +86 21 5219 0333
Fax:+86 21 5219 0603
www.bluebamboo.com
Copyright © 2009 BLUE BAMBOO
All rights reserved.
No part of this publication may be copied, distributed, stored in a retrieval system, translated into any human or
computer language, transmitted, in any form or by any means, without the prior written consent of BLUE
BAMBOO. All other brand names and trademarks in this guide are the property of Blue Bamboo.
Information in this document is subject to change without notice

CT100 Terminal User Guide
Trademark:
© Blue Bamboo. All rights reserved. Blue Bamboo, the Blue Bamboo logo and brand name are trademarks of
Blue Bamboo registered in the United States.
Certifications:
The production has been approved by CE, FCC and CCC
The Li-ion battery has been approved by UN.DOT and CE
The power adapter has been approved by CCC, TUV GS, UL, CE and FCC
SAR statement:
CT100 terminal which this declaration relates is conformity with the article C95.1-1999 of essential requirements
and other relevant requirements of the ANSI.
Caution:
Changes or modifications not expressly approved by the party responsible for compliance could void the user’s
authority to operate the equipment.
FCC statement:
This device complies with part 15 of the FCC Rules. Operation is subject to the following two conditions: (1) This
device may not cause harmful interference, and (2) this device must accept any interference
received, including interference that may cause undesired operation.
This equipment has been tested and found to comply with the limits for a Class B digital device, pursuant to part
15 of the FCC Rules. These limits are designed to provide reasonable protection against harmful interference in
a residential installation. This equipment generates uses and can radiate radio frequency energy and, if not
in-stalled and used in accordance with the instructions, may cause harmful interference to radio
communications. However, there is no guarantee that interference will not occur in a particular installation. If this
equipment does cause harmful interference to radio or television reception, which can be determined by turning
the equipment off and on, the user is encouraged to try to correct the interference by one or more of the
following measures: —Reorient or relocate the receiving antenna.
—Increase the separation between the equipment and receiver.
—Connect the equipment into an outlet on a circuit different from that to which the receiver is connected.
—Consult the dealer or an experienced radio/ TV technician for help.

CT100 Terminal User Guide
- 4 -
www.bluebamboo.com
Table of Contents
Introduction............................................................................................................................................................. 5
1 Operating Environment and Safety..................................................................................................................... 5
Environment....................................................................................................................................................... 5
Safety Concerns................................................................................................................................................. 5
2 CT100 Contactless Terminal Operation.............................................................................................................. 6
2.1 Unpack the Unit Carton................................................................................................................................ 6
2.2 Terminal Features........................................................................................................................................ 6
2.3 Power the Terminal...................................................................................................................................... 9
2.3.1 By Using an AC Power Adapter ........................................................................................................... 9
2.3.2 By Using an USB Cable ....................................................................................................................... 9
2.4 Battery........................................................................................................................................................ 10
2.4.1 Installation........................................................................................................................................... 10
2.4.2 Charging the Battery........................................................................................................................... 10
2.4.2.1 By Using an AC Power Adapter..................................................................................................... 10
2.4.2.2 By Using an USB Cable................................................................................................................. 10
2.5 SAM Card Installation ................................................................................................................................ 11
2.6 USB Dongle Installation ............................................................................................................................. 12
2.7 Contactless Card Reader Transactions..................................................................................................... 12
3 Maintenance...................................................................................................................................................... 13
3.1 Terminal ..................................................................................................................................................... 13
3.2 Card Readers............................................................................................................................................. 13
4 Troubleshooting................................................................................................................................................. 13
4.1 Terminal Does Not Start ............................................................................................................................ 13
4.2 Terminal Display Does Not Show Correct or Readable Information ......................................................... 14
4.3 Battery Will Not Charge ............................................................................................................................. 14
4.4 Terminal Does Not Process Transactions ................................................................................................. 14
4.5 Keypad Does Not Respond ....................................................................................................................... 15
5 Service and Support.......................................................................................................................................... 15
6 Specifications .................................................................................................................................................... 15
6.1 Power Requirements.................................................................................................................................. 15
6.2 Environmental ............................................................................................................................................ 15
6.3 CT100 Terminal Dimensions and Weight .................................................................................................. 15
7 Accessories and Documentation....................................................................................................................... 15
7.1 Accessories................................................................................................................................................ 16
Introduction
This guide describes how to set up and install a CT100 Contactless terminal. It also includes information on how
to
− Protect the terminal from adverse environmental conditions
− Install and maintain the battery
− Establish communications connections through an USB dongle
1 Operating Environment and Safety
This section provides tips on using and protecting your terminal.
The CT100 Contactless Terminal is a portable terminal for performing transactions remotely. Since it is a
portable unit, location is not a factor. However, follow the rules established in the environment and safety
sections.
Environment
− Do not leave the terminal in a non-climate-controlled vehicle. The CT100 Contactless terminal is highly
sensitive to temperature extremes. Subjecting the terminal to temperatures outside the stated operating
range can void your warranty
− Do not use the CT100 Contactless terminal where there is moisture or high humidity, chemicals or oils,
or excessive heat or dust
− Avoid electrical appliances or other devices that emit excessive voltage fluctuations or electrical noise
(for example, air conditioners, electric motors, neon signs, high-frequency or magnetic security devices,
or computer equipment)
− Keep the CT100 Contactless terminal away from anything that radiates heat, such as a stove or motor
− Damage to the unit from exposure to sun, rain, or dust may void your warranty
− Do not use the CT100 Contactless terminal near water, including bathtubs, basins, kitchen sinks or
laundry tubs, in a wet basement, or near swimming pools.
Safety Concerns
The following guidelines help to ensure your safety and the safety of others:
− Do not connect the power and phone cables across a walkway or high traffic area
− Avoid using the CT100 Contactless terminal during electrical storms.
− If using the CT100 Contactless terminal while charging the battery, ensure that the unit is placed close
enough to a power outlet so that the power adapter readily reaches the unit.
− Don’t disassemble the CT100 Contactless terminal, or the AC adapter. Only qualified technicians may
service these devices.
− Do not plug the power pack into an outdoor outlet.
− Do not short-circuit, disassemble, crush, or puncture the battery.
− Do not expose the battery, AC adaptors or CT100 Contactless terminals to fire or water.
2 CT100 Contactless Terminal Operation
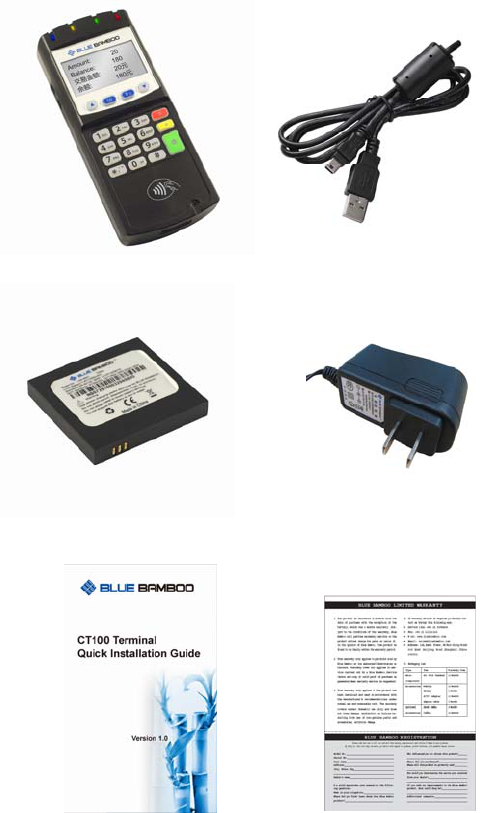
2.1 Unpack the Unit Carton
Open the unit carton and carefully inspect the contents for possible tampering or unit damage. The carton
contents include:
(Figure 1) CT100 Contactless Terminal Unit Carton Components
2.2 Terminal Features
Features of the CT100 Contactless terminal are shown as in Figure 2 and Figure 3:
CT100 Terminal USB Cable
Battery Power Ada
p
ter
Quick Installation
Guide Warranty Card
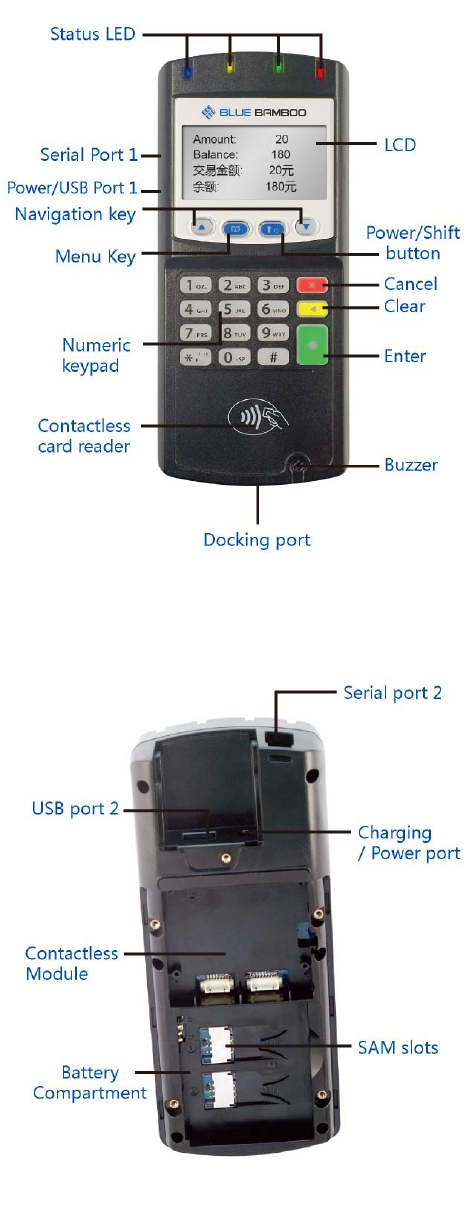
(Figure 2) CT100 Contactless Terminal Front
(Figure 3) CT100 Contactless Terminal Back
¾ The Status LED Indicators – These Indicators are placed above the display. From left to right, They
are tri-color, yellow, green, red Indicators
Functions:
a. Tri-color LED (Left most LED)
When the terminal is powered by the AC Power supply directly without battery, the Tri-color LED will indicate
red all the time. When the terminal is powered by the battery, or the battery is charging, the Tri-color LED will
indicate as below:
Tri-Color LED status description (Left most LED)
Charging Green
Charge Error Red
Charge Done
Power On
Blue
Note: The charge status takes the first priority, this LED will indicate charge status first even when the terminal
is on. The LED will be blue to indicate power on status and the charge done status. There is “charge done”
information showed on LCD when it’s power on.
b. Yellow Color Indicator
c. Green Color Indicator
d. Red Color Indicator
¾ 2-navigation key – These are the navigation key to help the user select the correct menu option.
¾ Menu Key– Displays the main menu for that application.
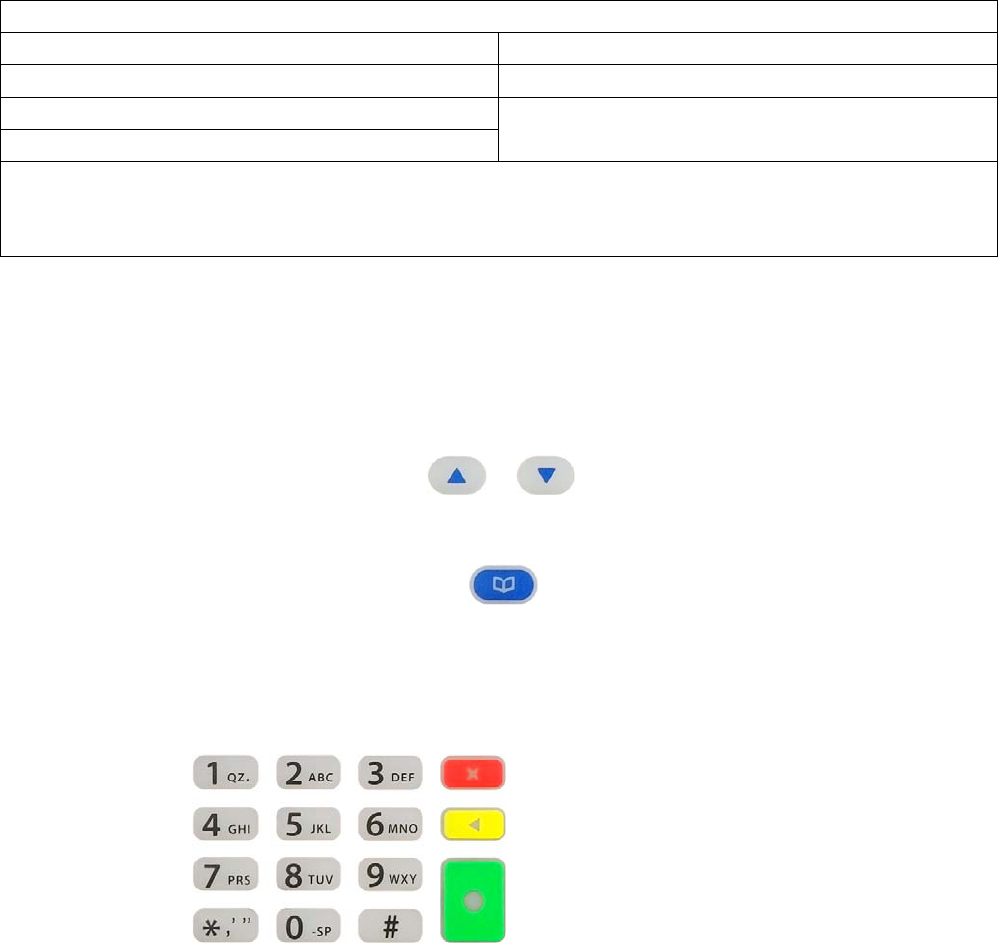
¾ Alphanumeric keys are in Telco style
− 1 qz
− 2 abc
− 3 def
− 4 ghi
− 5 jkl
− 6 mno
− 7 prs
− 8 tuv
− 9 wxy
− 0 -sp
− *, ’ ”
− #
(Figure 4) Keypad Placement
¾ The LCD Display
¾ Power/Shift Button
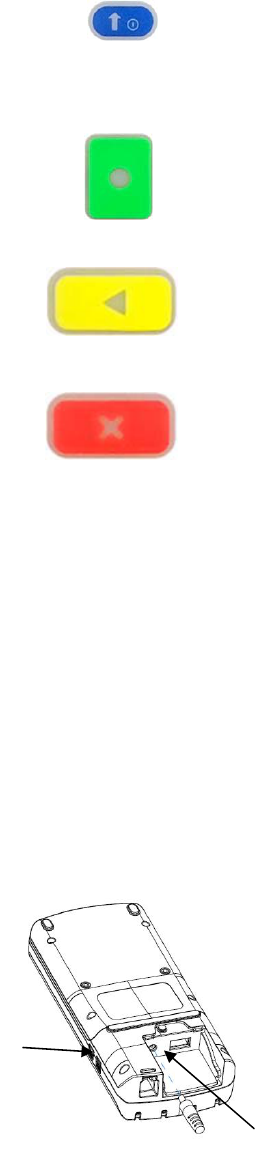
¾ Three Color-coded-function keys
− Enter – This is the green key with a round label.
− Clear – This is the yellow key with a triangle label.
− Cancel – This is the red key with an “X” label.
¾ Docking Port – The terminal can be connected with Docking Station via this port
2.3 Power the Terminal
2.3.1 By Using an AC Power Adapter
− Plug the Power Adapter into the wall outlet, and then connect the power adapter to the unit via
Charging/Power port.
− After connecting with the power supply, Tri-color LED on the terminal will indicate red.
2.3.2 By Using an USB Cable
− Plug the USB cable into the USB port on the left side of the terminal, and then connect the other side of
the cable to the PC.
− After connecting with the PC, Tri-color LED on the terminal will indicate red.
(Figure 5) Plug in CT100 Terminal Adapter Cable/USB Cable
USB Port
Power Ada
p
ter

2.4 Battery
The CT100 Contactless terminal can also be powered by a Li-ion battery. The internal logic of the battery
prevents both overcharging and undercharging (a fault condition in which the battery level goes well below the
minimum acceptable charge and the battery becomes unusable).
Note:
Conserve battery power by turning the CT100 Contactless terminal off when not in use. If the terminal will not be
used for several days, remove the battery from the terminal, as it continues to discharge even when the terminal
is turned off.
2.4.1 Installation
The battery will be shipped with the terminal together inside the unit carton. The battery can be installed in a slot
on the back of the terminal, as shown in Figure 6.
a. Remove terminal and battery from unit carton
b. Turn the terminal over
c. Remove the set screws and the cover
d. Install the battery into the slot and tighten the screws
(Figure 6) Install the battery
2.4.2 Charging the Battery
There are two methods to charge the battery by using a CT100 terminal.
2.4.2.1 By Using an AC Power Adapter
− Plug the Power Adapter into the wall outlet, and then connect the power adapter to the unit.
− After connecting with the power supply, Tri-Color LED will turn green to indicate that the unit is charging.
The battery can be fully charged about 3 hours. Then the Tri-color LED will turn blue.
2.4.2.2 By Using an USB Cable
− Plug the USB cable into the USB port on the left side of the terminal, and then connect the other side of
the cable to the PC.
− After connecting with PC, Tri-Color LED will turn green to indicate that the unit is charging. The battery
Set Screws
Battery
Set Screws
can be fully charged about 5 hours. Then the Tri-color LED will turn blue.
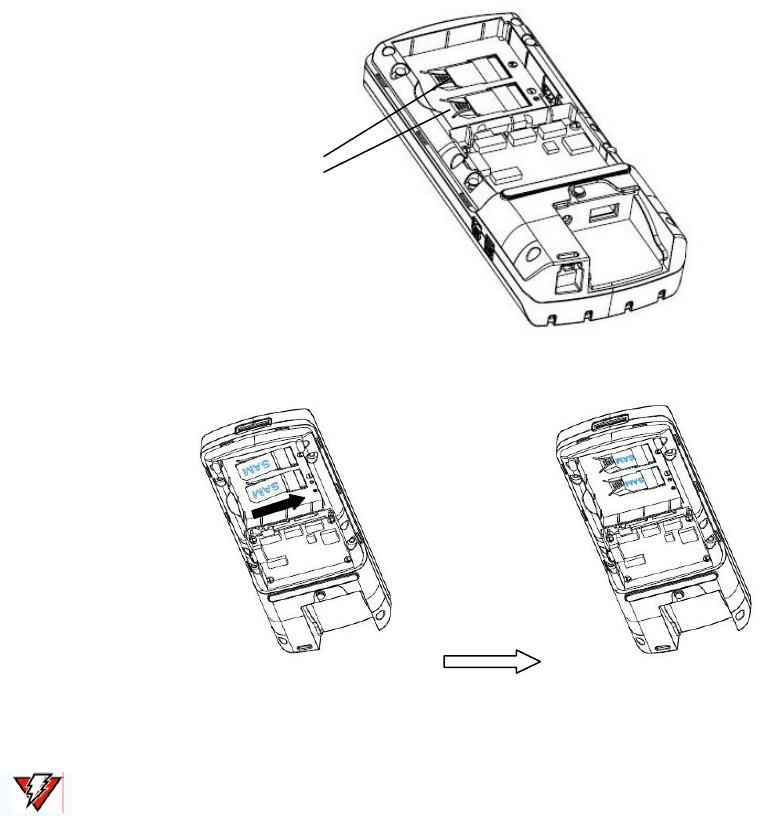
2.5 SAM Card Installation
When you first receive the CT100 terminal, you may need to install a Secure Access Module (SAM) card. The
following procedure describes SAM card installation:
a. Turn the terminal over. Remove the set screws and the cover. The SAM slot is located beneath the
battery, as seen in Figure 7
b. Insert the SAM card in the slots with the electronic chip facing down and the cut-out corner on the
bottom. (Figure 8)
c. Place the cover and insert the set screws
(Figure 7)
(Figure 8) Insert SAM card
CAUTION:
Observe standard precautions for handling electrostatic sensitive devices.
Electrostatic discharges can damage this equipment. Wearing an anti-static wrist strap grounded to a metal
surface is recommended.
SAM slots
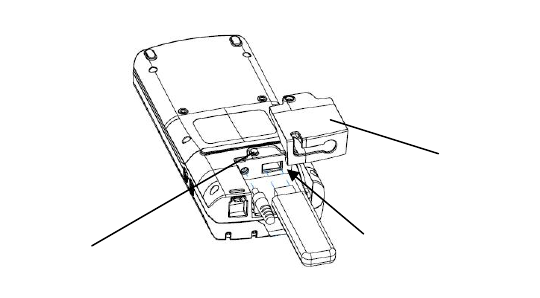
2.6 USB Dongle Installation
CT100 can use an USB dongle to communicate with other devices through a wireless connection. Use the
following procedure to install or change the USB dongle in the CT100 terminal:
a. Turn the terminal over so that you are facing the back of the terminal
b. Remove the set screw and the dongle cover
c. Insert the communication dongle into the terminal’s USB port. (Figure 9)
d. Insert the dongle cover into the slot.
e. Use the screws to lock the dongle cover into place.
(Figure 9) Install USB Dongle
Note:
Blue Bamboo does not provide USB dongle as an accessory with the CT100 Contactless terminal, but the user
can integrate certain types of certified USB dongle (such as GPRS, Bluetooth, etc) provided by other
manufacturers with the terminal to transmit the data with other devices through wireless connection.
2.7 Contactless Card Reader Transactions
To conduct a contactless card reader transaction:
a. Position the contactless card and ensure the card face towards the card reader within 3
centimeters. Tap the card above the card reader for several seconds.
b. Remove the card when the buzzer beeps, the transaction information will be displayed on the
screen. Premature removal voids the transaction.
Set Screw
Dongle Cover
USB Port

(Figure 10) Tap card
3 Maintenance
3.1 Terminal
− For normal dirt, use a clean cloth slightly dampened with water and a drop or two of mild soap. For
stubborn stains, use alcohol or an alcohol-based cleaner
− Never use thinner, acetone, trichloroethylene, or key tone-based solvents — these chemicals can
deteriorate plastic or rubber parts
− Do not spray cleaners or other solutions directly onto the keypad or display
3.2 Card Readers
− The contactless card readers require no regular maintenance. For card reader service, contact your
distributor or service provider.
CAUTION: Do not attempt to clean the card readers. Doing so may void your warranty.
4 Troubleshooting
Blue Bamboo follows stringent quality control standards in the manufacturing of CT100 terminals. Each unit that
leaves the factory receives numerous tests to ensure quality and reliable operation. However, if you encounter a
problem in operation, read this section for possible causes and solutions. If the problem persists or if it is not
described below, contact your local Blue Bamboo representative for assistance.
CAUTION: Do not, under any circumstance, attempt to disassemble the terminal. If a terminal has been
disassembled it will void the warranty.
4.1 Terminal Does Not Start
− When the terminal is powered by the AC power directly without battery, please ensure that the Adapter
Contactless
card reader
or the USB cable is correctly connected.
− When the terminal is powered by the battery, please ensure that the battery charge state is not below
the critically low level
− Recharge or replace the battery
− Make sure that you press the power on/off key for approximately 2 seconds, until the unit lights up
4.2 Terminal Display Does Not Show Correct or Readable Information
− Shut off and restart the terminal
− Recharge or replace the battery
− If the problem persists, contact your local Blue Bamboo representative for assistance
4.3 Battery Will Not Charge
− The battery must initially receive a full charge and then full discharge to calibrate its full charge capacity.
This operation is performed at manufacture.
− Conserve battery power by turning the CT100 terminal off when not in use. If the terminal is not to be
used for several days, remove the battery from the terminal as it continues to discharge even when the
terminal is turned off
− The CT100 terminal will notify the user when the battery charge is sufficiently low and may automatically
shut off if the battery reaches a critically low state. If the battery is used until it is completely dead, it may
take several recharge attempts to reset the safety circuit when charging. To check that the safety circuit
has been reset, simply turn on the terminal. If it turns on, it was reset, or if it does not turn on reconnect
the power adapter and begin charging again
4.4 Terminal Does Not Process Transactions
There are several possible reasons why the CT100 terminal may not be processing transactions. Use the
following steps to troubleshoot failures:
• Check the contactless card reader
− Perform a test transaction using several different contactless cards to ensure the problem is not a
defective card
− Ensure that you are taping cards properly. The chip on the card should above and face toward the card
reader within 3 cm.
• Check the signal strength on-screen
− Indicator displays at least one bar to indicate connectivity to radio network
− Check antenna connection and orientation
− Ensure that the radio has been activated by your service provider
• Check the telephone line
− Connect to a working telephone and check for a dial tone. If there is no dial tone, replace the telephone
cable
− If the problem appears to be with the telephone line, check with the party you are trying to call to see if
their system is operational. If they are not experiencing difficulties with their line, contact the telephone
company and have your line checked
− If the telephone line works, contact your local Blue bamboo representative for assistance

4.5 Keypad Does Not Respond
− Check the display panel. If it displays the wrong characters or nothing at all when you press a key, follow
the steps outlined in section 4.2
− If pressing a function key does not perform the expected action, refer to the user documentation for that
application to ensure you are entering data correctly.
− If the problem persists, contact your local Blue Bamboo representative for assistance
5 Service and Support
− For the CT100 terminal, contact your local Blue Bamboo representative or service provider.
− Visit the CT100 online store at www.bluebamboo.com
6 Specifications
This section provides information on the power requirements and environmental conditions to which the units
can be subjected, as well as the unit dimensions.
6.1 Power Requirements
The external AC/DC power adapter has the following requirements:
− Construction: adapter with a power cord to the outlet that can be country specific for the plug and a
DC power cord to the CT100
− Input voltage: 100 – 240VAC, 50/60 Hz
− Output voltage: 9V DC
− Output current: 1000 mA
− Safety: certifications by country
6.2 Environmental
Temperature:
− Storage: -20Co to 70Co
− Operating: With Battery: 0Co to 45 Co ; Without Battery: -20Co to 60Co
Humidity:
− Storage 10% to 90% RH, non-condensing
− Operating: 5% to 95% RH, non-condensing
6.3 CT100 Terminal Dimensions and Weight
Weight (kg) Dimension
CT100 Terminal 0.318 (with battery) 80mm (L)x179mm(W)x36mm(H)
CT100 Unit Carton
7 Accessories and Documentation
This section lists accessories and documentation available for the CT100 terminal.
7.1 Accessories
Support for 2 SAM cards
SDK (Software Development Kit)
Docking Station
Carrying case
Dongle Cover