Blue Maestro 2 Bluetooth Sensor and Logger User Manual
Blue Maestro Limited Bluetooth Sensor and Logger
User Manual
TEMPERATURE, HUMIDITY & DEW POINT
BLUETOOTH SENSOR AND LOGGER
USER GUIDE
Version 1.20
October 2017

Temperature, Humidity & Dew Point Bluetooth Sensor and Logger
User Guide 1.20
BLUE MAESTRO’S STANDARD LICENSE AND DISCLAIMER
Copyright ©2017 Blue Maestro Limited. All Rights Reserved. The copyright in the software to which this document relates and in this
document belong exclusively to Blue Maestro Limited and no permission to use, copy, modify, and distribute this software or this doc-
umentation is permitted unless with the express prior written authorisation of Blue Maestro Limited. The license to use the software
to which this document relates is granted so long as such software resides in hardware provided by Blue Maestro Limited.
No claims, representations or warranties, whether expressed or implied, including but not limited to warranties of merchantability,
fitness for a particular purpose, of title, or of non-infringement of third party rights, are made by Blue Maestro as to the safety, reliabil-
ity, durability or performance of Blue Maestro’s products. Blue Maestro is not responsible for any liabilities resulting from negligence,
misuse, modification, or alterations to the product by the user. Furthermore, Blue Maestro accepts no liability whatsoever for the
safety, reliability, durability or performance of any of its products. IN NO EVENT, REGARDLESS OF CAUSE, SHALL BLUE MAESTRO BE
LIABLE FOR ANY INDIRECT, SPECIAL, INCIDENTAL, PUNITIVE OR CONSEQUENTIAL DAMAGES OF ANY KIND, WHETHER ARISING UN-
DER BREACH OF CONTRACT, TORT (INCLUDING NEGLIGENCE), STRICT LIABILITY OR OTHERWISE, AND WHETHER BASED ON THIS
AGREEMENT OR OTHERWISE, EVEN IF ADVISED OF THE POSSIBILITY OF SUCH DAMAGES.
User assumes responsibility for correct operation of the product and any software associated with it. User assumes responsibility for
determining the suitability of the product to the user’s needs, for configuring and using the product to meet those needs, and for the
proper placement/location of the product in the environment it is being used. User assumes responsibility for verifying and interpret-
ing results obtained from product use.
BLUE MAESTRO RESERVES THE RIGHT TO REVISE ITS STANDARD LICENSE AND DISCLAIMER WITHOUT NOTICE AT ANY TIME.
FCC COMPLIANCE STATEMENT
THIS DEVICE COMPLIES WITH PART 15 OF THE FCC RULES. OPERATION IS SUBJECT TO THE FOLLOWING TWO CONDITIONS: (1) THIS
DEVICE MAY NOT CAUSE HARMFUL INTERFERENCE, AND (2) THIS DEVICE MUST ACCEPT ANY INTERFERENCE RECEIVED, INCLUD-
ING INTERFERENCE THAT MAY CAUSE UNDESIRED OPERATION.
CAUTION: Changes or modifications not expressly approved by the party responsible for compliance could void the user’s authority to
operate the equipment.
NOTE: This equipment has been tested and found to comply with the limits for a Class B digital device, pursuant to part 15 of the FCC
Rules. These limits are designed to provide reasonable protection against harmful interference in a residential installation. This equip-
ment generates, uses and can radiate radio frequency energy and, if not installed and used in accordance with the instructions, may
cause harmful interference to radio communications. However, there is no guarantee that interference will not occur in a particular
installation. If this equipment does cause harmful interference to radio or television reception, which can be determined by turning
the equipment off and on, the user is encouraged to try to correct the interference by one or more of the following measures:
—Reorient or relocate the receiving antenna.
—Increase the separation between the equipment and receiver.
—Connect the equipment into an outlet on a circuit different from that to which the receiver is connected.
—Consult the dealer or an experienced radio/TV technician for help.

Temperature, Humidity & Dew Point Bluetooth Sensor and Logger
User Guide 1.20
1. Quick start
1.1 Download the free iOS or Android App: Tempo Utility App 4
1.2 Turning the Device on 4
1.3 Turning the Device off 4
1.4 Changing the battery 4
1.5 Automated Test Mode 5
2. Features of the iOS app 6
3. Commands of the iOS app 8
3.1 Name Change 9
3.2 Logging Interval 9
3.3 Sensor Interval 9
3.4 Reference Date 10
3.5 Alarm 1 Set and Alarm 2 Set 11
3.6 Clear Alarms 11
3.7 Airplane Mode 12
3.8 Transmit Power 12
3.9 Clear Stored Data 12
3.10 Reset Device 12
3.11 Change ºC/ºF 13
3.12 Lock/Unlock Device 13
3.13 Calibrate Temperature/Calibrate Humidity 14
3.14 Disable Button 14
3.15 Set Class ID 14
3.16 Set Advertising Frequency 14
3.17 Command Console 15
4. Process for setting up the device 16
5. Process for extracting logged data 17

Temperature, Humidity & Dew Point Bluetooth Sensor and Logger
User Guide 1.20
1. Quick start
1.1 Download the free iOS or Android App: Tempo Utility App
To get the links to the latest apps, please visit www.bluemaestro.com/support
1.2 Turning the Device on
The soft touch colour rubber on top of the Device is a button. Depress gently to turn it on. The LED
indicator will blink three times when it is turned on. The LED indicator will blink once if it is already on.
Please note it should not be depressed with excessive force, since this may damage the Device. When
the Device is turned on it will immediately begin logging temperature, humidity and dew point.
1.3 Turning the Device off
The Device can be turned by depressing the button and holding it down for a period of 5 seconds. It will
blink rapidly to indicate it is turning off.
1.4 Changing the battery
When the time comes, the battery can be changed by removing the two small philips 00 screws and
removing the back battery cover. The Device takes a coin cell CR2032. It should be inserted so that the
+ side is facing outwards. The back battery cover may have small padding elements on the inside of it. If
this is the case, ensure the padding elements remain in place when putting the battery cover back on.
You will know when the battery is properly inserted since it will blink three times and then once every
time the button is pushed. If the Device blinks three times every time the button is pushed this is an
indication the battery is not making a good connection with the battery connectors and will need to be
reseated.
Soft touch button
Removable battery
cover
Sensor vents and
location of LED
Temperature, Humidity & Dew Point Bluetooth Sensor and Logger
User Guide 1.20
1.5 Automated test mode
A feature of the Device is its automated test mode (“Test Mode”) . This will put the Device into test settings
that can allow the accuracy and reliability of the Device to be tested without having to manually set up
the Device in the app. Test Mode can be entered into by pressing the button 3 times in quick succession.
On entering Test Mode the device will blink slowly 5 times.
In Test Mode:
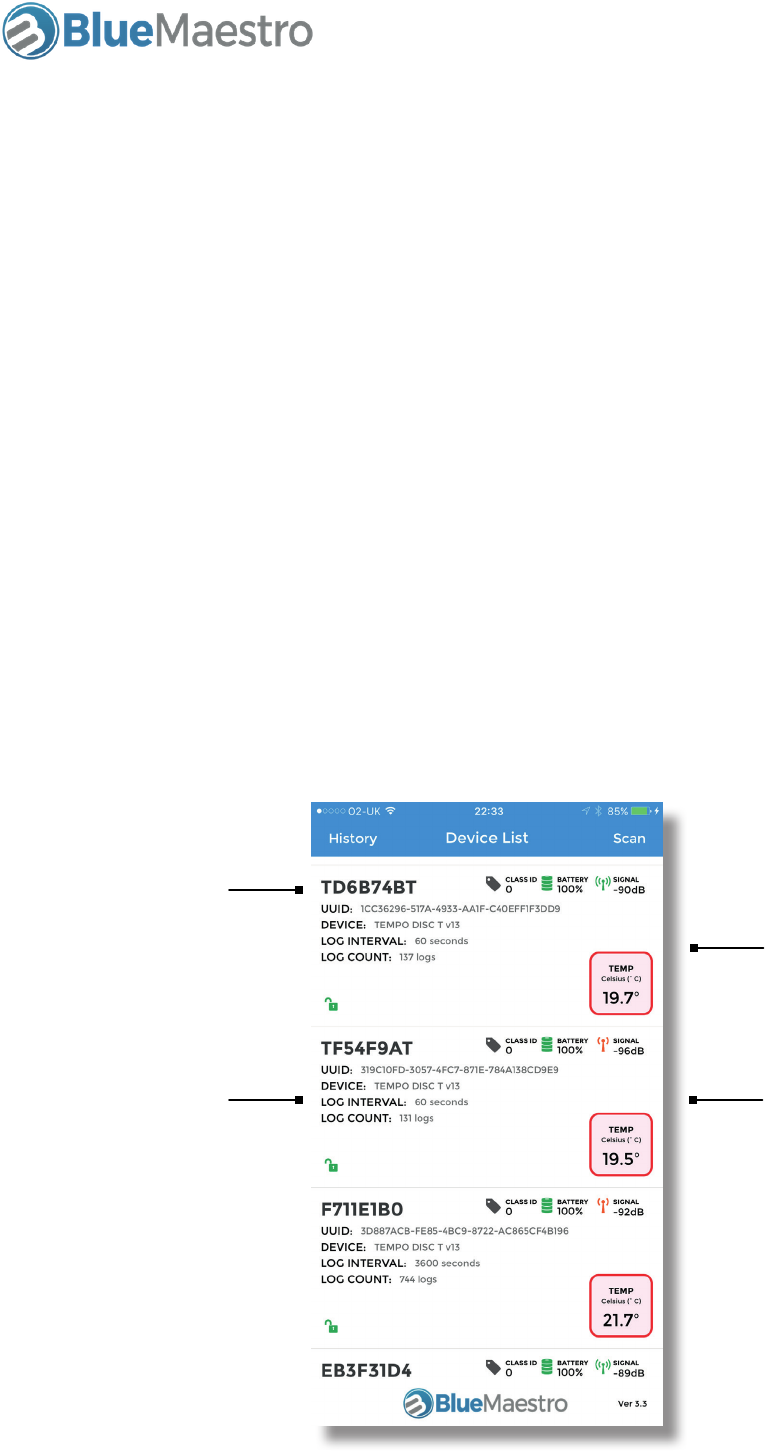
1. The Device name will have a “T” and the start and end of its MAC address name
2. The Device’s logging interval will be set to 60 seconds
3. Any previous data prior to entering Test Mode will be deleteted
4. After 24 hours continuous operations the Device will blink to indicate that it has logged 24 hours
of data
5. The data can be viewed/downloaded as normal
6. On pressing the button three times again, the Deviec will be taken out of Test Mode.
Device in Test Mode
Device in Test Mode
Name with “T” at
start and end
Log interval of 60
seconds
Temperature, Humidity & Dew Point Bluetooth Sensor and Logger
User Guide 1.20
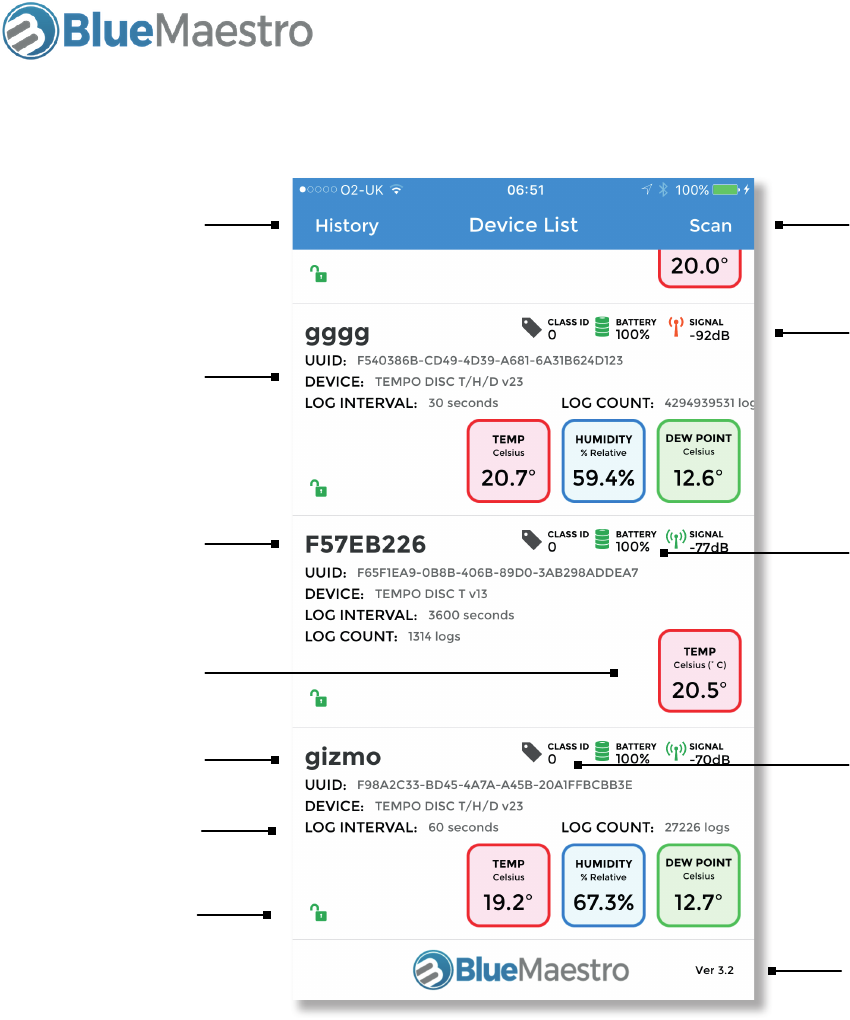
2. Features of the iOS app
User assigned
name of Device
Shows stored data
for Devices
Model of Device
Logging Interval
Whether the De-
vice is locked from
tampering
Default name
of the Device (8
characters of MAC
address)
Current sensor
readings
Radio strength of
Device in dB
Refreshes scan
results
Battery level
User assigned
Class ID number
Current version
of the App
The Device List screen will list all Blue Maestro Bluetooth Devices within range. It will also show key val-
ues for the Devices, such as radio strength, current values, logging interval and how many logs the Device
holds.
When a Device’s button is pressed, the background of the Device cell in the Device List will turn grey for
approximately 10 seconds. The Class ID will also become 255 during this time. This feature is designed to
enable a Device to be identified in the app physically.
If a Device’s cell is left swiped, it will expose a button “blink” that if pressed will cause the LED on the De-
vice to blink. This feature is designed to enable the Device to be identified from inside the app.
The battery level is in % of volts. 100% means voltage is approximately 3 volts. The battery will need to
be changed if the voltage drops below 2 volts or approximately 70%. As a safety precaution to prevent
the RAM of the Device from being corrupted, if the battery drops below 70% the Device will power down
until the battery is replaced.
Temperature, Humidity & Dew Point Bluetooth Sensor and Logger
User Guide 1.20
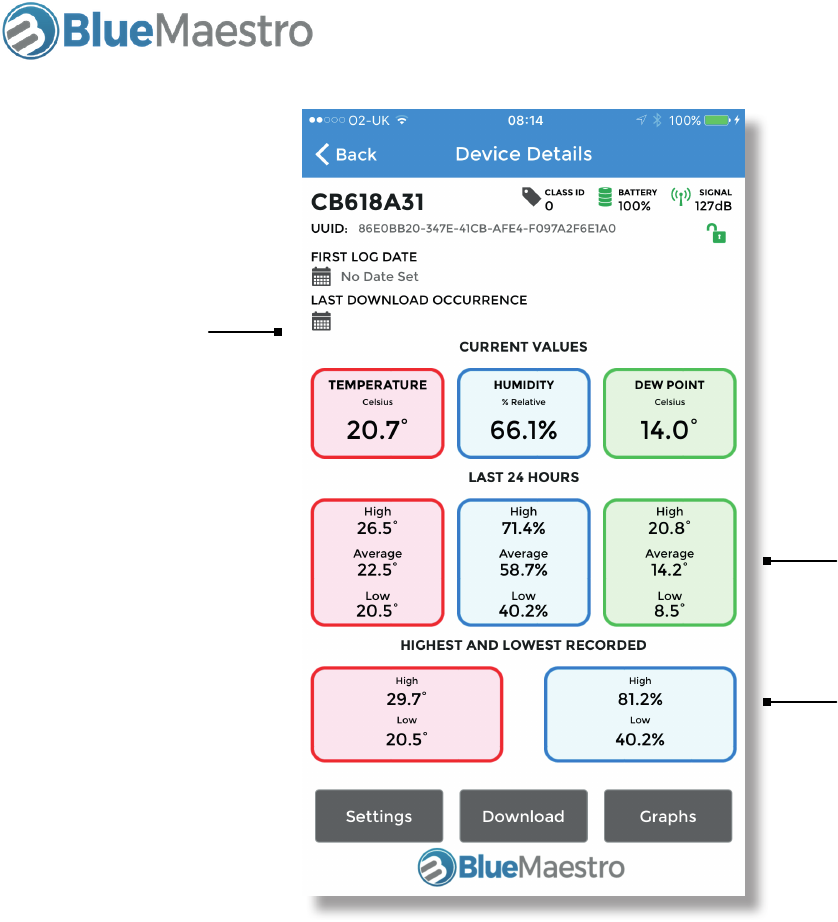
Metrics for logged
data over the last
24 hours (only
shown if the
logging interval
is greater than 15
minutes)
Metrics for logged
data since logging
began
Time and date of
last download
The Device Details screen will provide further information in relation to a particular Device. The Current
Values are the current readings of the sensors. The historic metrics are derived from logged data. It may
be that the Current Values appear to exceed or be lower than historic metrics simply because the Current
Values are only logged every Logging Interval.
The First Log Date is the same as the Reference Date and is the time and date of the first log. This then
sets the timestamp reference for each and every logged value stored in the Device. If there is no Refer-
ence Date then on a Download the app will try to work out the Reference Date but this can be inaccu-
rate. It is advisable that a User sets the Reference Date as a first step in setting up the Device. IMPOR-
TANT: Changing the Reference Date will cause stored sensor data to be deleted and logging to restart.
Temperature, Humidity & Dew Point Bluetooth Sensor and Logger
User Guide 1.20
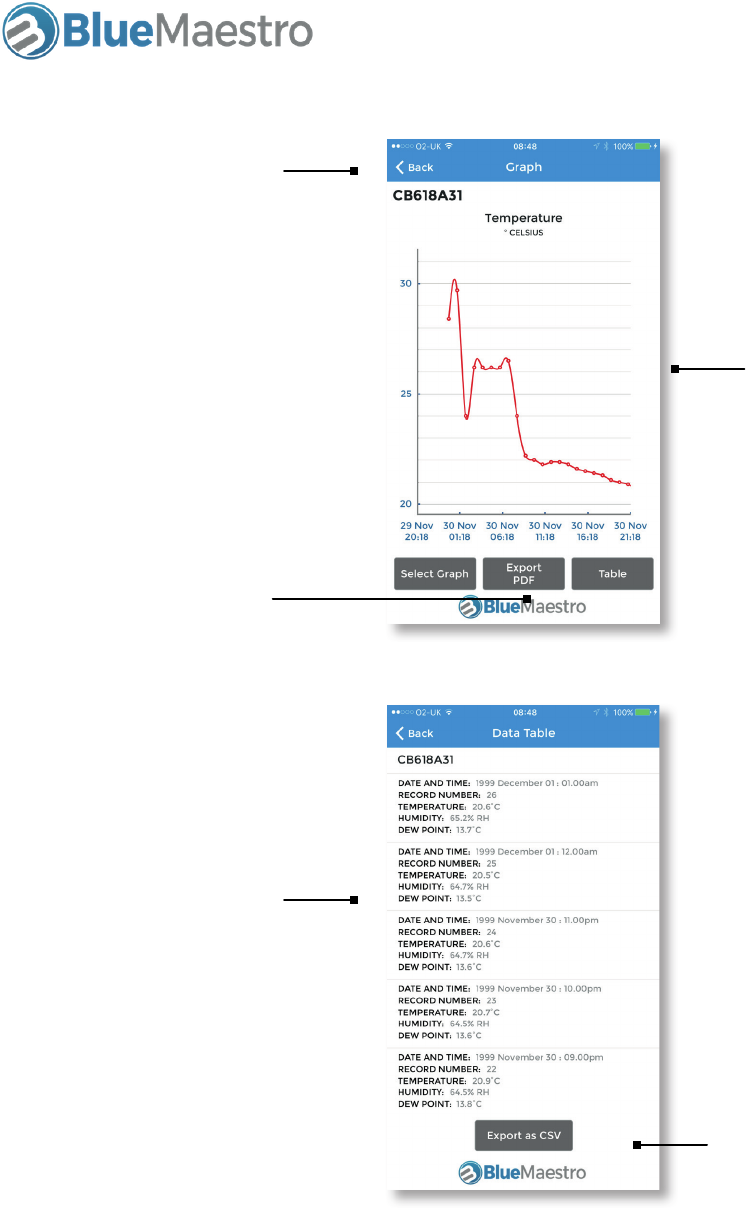
Scrollable, pincha-
ble and zoomable
graph
Back to Device Details
screen
A pdf image of the
graph can be export-
ed to a chosen email
address
Data can be displayed
in a table showing the
timestamp and value
of each log
Data can be exported
as an .CSV spread-
sheet that can be
opened in Excel to a
chosen email address
Once data has been downloaded from the Device into the iOS smartphone or tablet, the logged data can
be graphed or viewed as a table. Both the graphs and the data table can be exported directly from the
iOS smartphone or tablet via email to an email address.
Temperature, Humidity & Dew Point Bluetooth Sensor and Logger
User Guide 1.20
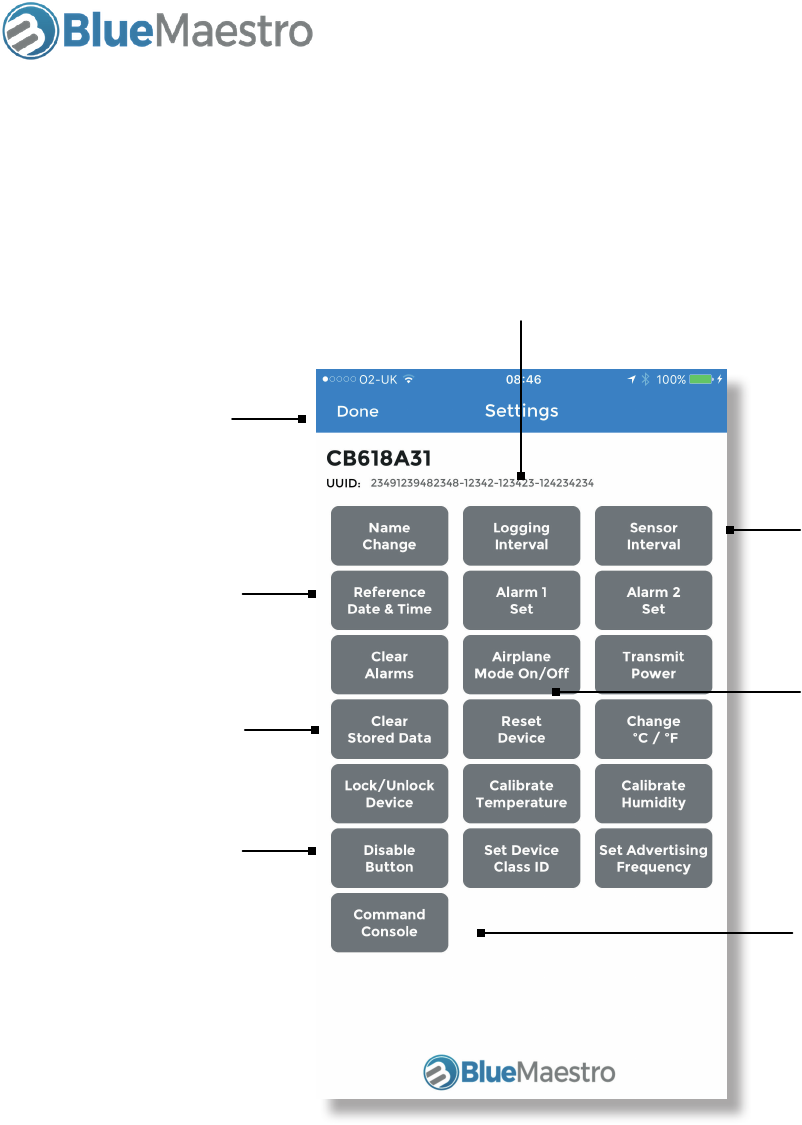
Sets the frequency
the current values are
updated
Sets the logging
frequency. NOTE:
Changing this deletes
the stored logs and
logging starts again
In Airplane Mode the
Device continues to
log but radio transmis-
sions are suspended
until the button is
pushed.
This clears stored logs,
alarm information and
telemetrics, but does
not clear other set-
tings
This disables the
button so the Device
cannot be turned off
accidentally
The Command Con-
sole enables other
forms of direct com-
munication with the
Device
Sets the Reference
Date for logging.
NOTE: Changing this
deletes stored logs
and logging starts
again
Goes back to Device
Details screen
3. Commands of the iOS app
Each of these commands will be explained more fully in the following sections.
Temperature, Humidity & Dew Point Bluetooth Sensor and Logger
User Guide 1.20
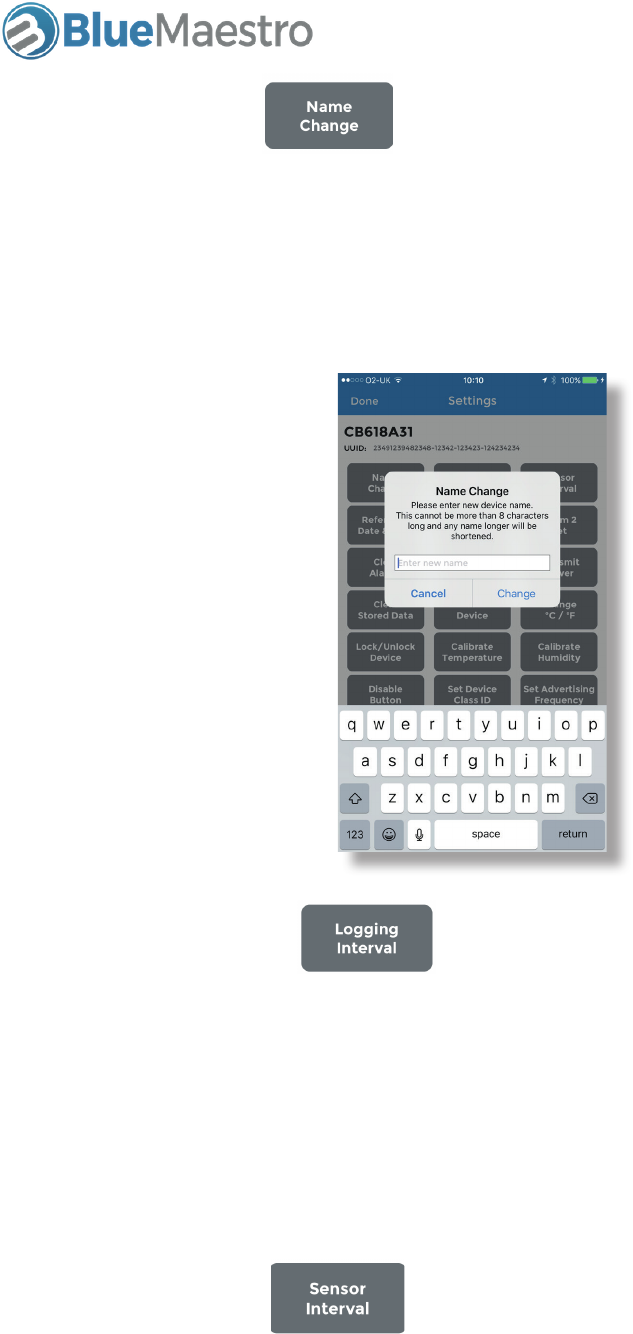
3.1 Name Change
The default name of the Device is the first 8 digits of its MAC address, which can also be found on a stick-
er on the back cover of the Device. This can be changed to any other name not exceeding 8 characters
in length. Any characters in excess of the 8 limit will be omitted.
The Device’s name will appear in the advertisement packet of the Device itself. That is to say the name
is not local to the iOS smartphone/tablet, it is actually embedded in the Device and will be seen by all
users.
3.2 Logging Interval
The logging interval determines the frequency of logging. The minimum value is 60 seconds (or 1 min-
ute) and the maximum value is 24 hours. The value should be entered in as seconds.
Changing the logging interval deletes any stored logs and logging restarts. This is due to any change
in the logging interval potentially compromising the integrity of the timestamps for the logs since the
timestamps are calculated on the assumption each log has the same time interval from the Reference
Date.
3.3 Sensor Interval
This sets the frequency the sensor is polled for displaying the current sensor readings. It does not affect
the Logging Interval. Changing this does not delete any stored logs. The default is 20 seconds.
NOTE: Shortening the sensor interval can have a negative impact on battery life.
Temperature, Humidity & Dew Point Bluetooth Sensor and Logger
User Guide 1.20
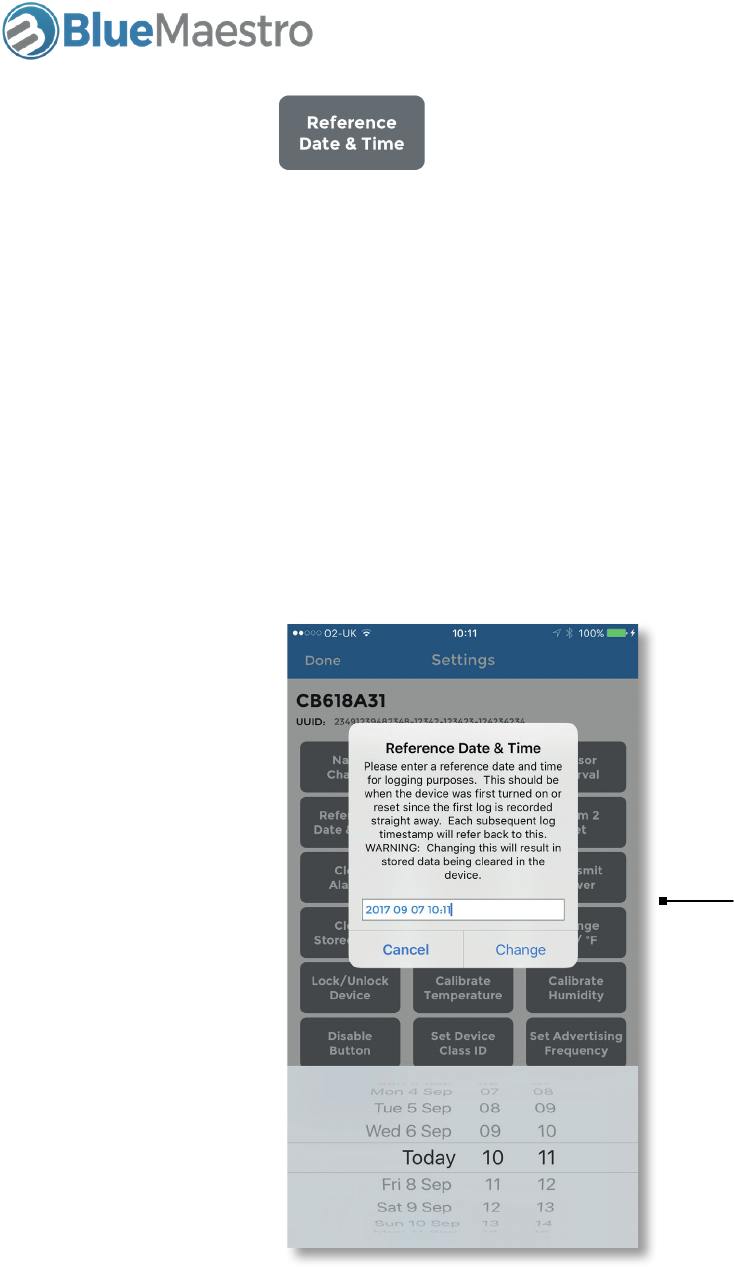
3.4 Reference Date
The Device uses a real time clock to log each reading at the Logging Interval. The Reference Date and
Time is the time and date of the first log which is then used to calculate the time and date of each subse-
quent log. Reference Date and Time is entered as a 10 digit number and represents the time of the first
log to the minute.
For example to enter 11.42pm on Thursday 7 September 2017 the 10 digit number would be:
1709072342.
It is advisable when setting up the Device for a logging task, one of the first steps is to set the Reference
Date and Time.
NOTE: Changing the Reference Date and Time will delete the stored data and logging will begin again.
In the iOS App the
Reference Date and
Time able to be en-
tered in a more user
friendly format than
typing in 10 digits
since the app will con-
vert the current date
and time into the 10
digit number for you
Temperature, Humidity & Dew Point Bluetooth Sensor and Logger
User Guide 1.20
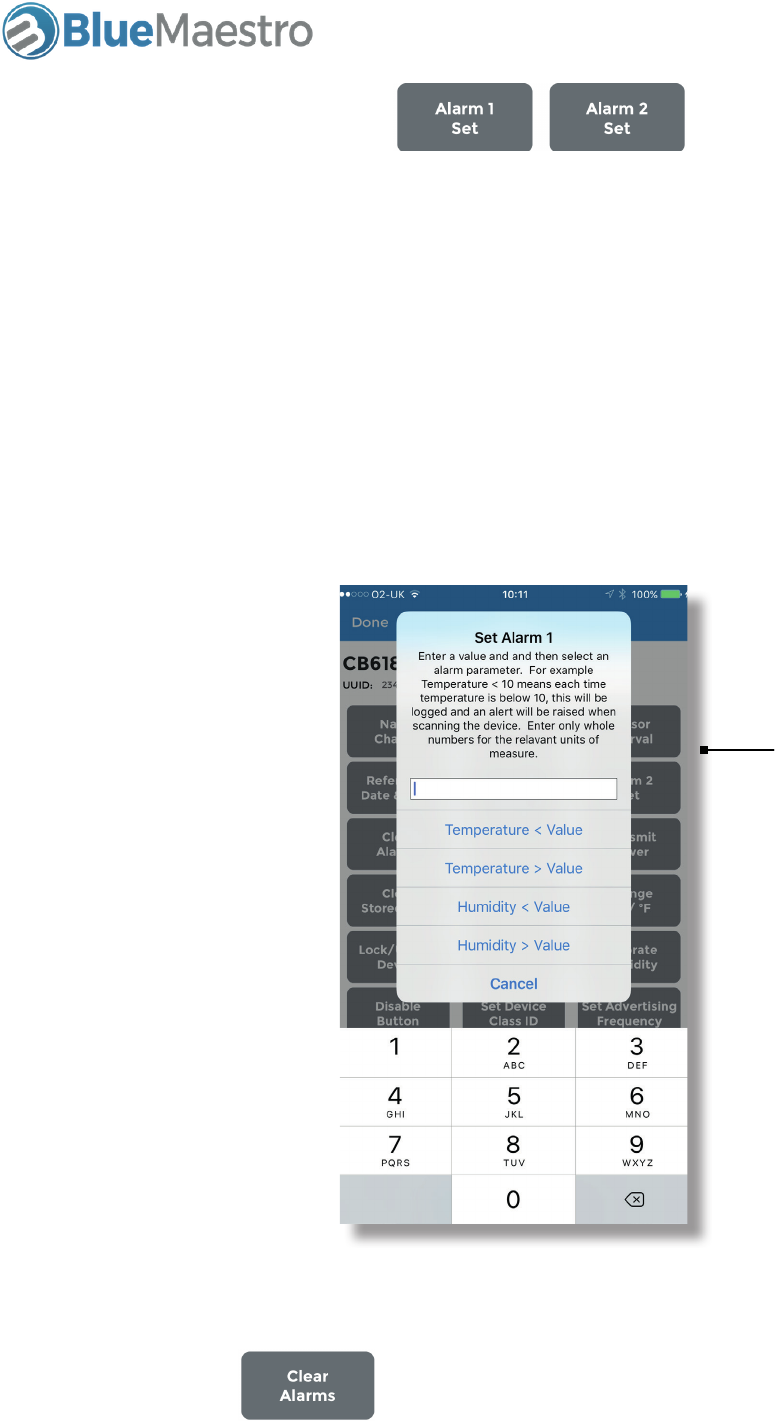
3.5 Alarm 1 Set and Alarm 2 Set
The Device is able to keep track of temperature or threshold breaches in real time by a user setting either
or both Alarm 1 and Alarm 2.
If either or both of these alarms are set, at each Logging Interval if the temperature or humidity being
logged breaches any of the alarms a flag is raised in the advertisement packets being transmitted by the
Device and when the Device is scanned by the app a red triangle with a number next to it representing
the count of how many times the temperature or humidity has breached the set values will appear in the
Device List screen.
The breach count maximum is 255, and any further breaches beyond this number will not be counted.
The alarms are set by entering the threshold number as a whole unit (no decimal points) in the relevant
units of measure then selecting whether the breach will occur if the metric is above or below this num-
ber.
Enter the threshold
number FIRST before
selecting whether
the threshold is > or <
than. This number is
a whole number (no
decimal points).
If this is left blank then
the relevant alarm will
be turned off
NOTE: The alarms apply on a forward logging basis only. That is to say that if an alarm is set and there is
already logged data breaching the alarm stored in the Device, there will be no warning indicator shown.
3.6 Clear Alarms
This will clear the alarms and turn them off.
Temperature, Humidity & Dew Point Bluetooth Sensor and Logger
User Guide 1.20
3.7 Airplane Mode
To comply with U.S. FAA and international carrier regulations, the Devices have an Airplane Mode that will
allow them to continue logging but prevent them from radio transmitting. This works by toggling Air-
plane Mode On or Off.
When Airplane Mode is On the Device will continue transmitting for 60 seconds and will then go to sleep
but will continue to log data and keep track of alarm information and telemetrics. If the Device’s button
is pushed during this time the Device will transmit for 60 seconds before going back to sleep. To take
the Device out of Airplane Mode it is necessary to cause the Device to transmit since the app is unable to
communicate with the Device if its radio is asleep.
Not only does Airplane Mode allow the Device to continue logging while in flight, Airplane Mode can also
be set when it is necessary or desirable to extend the battery life of the Device on long journeys (such as
when logging sea journeys). In Airplane Mode the Device consumes substantially less power since the
radio consumes most of the power of the Device. Therefore if it is not necessary for the Device to continu-
ously transmit consider putting it in Airplane Mode to conserve battery.
TIP: Airplane Mode can extend the battery life of the Device and over 2 years of logging is possible with
just a CR2032 coin cell. Consider putting the Device in Airplane Mode if it is not necessary for the Device
to continuously transmit.
3.8 Transmit Power
This allows the transmission power of the Device to be changed to conserve battery life. The default set-
ting is +4dB which is the maximum. Choose from one of the other settings (either 0dB and -4dB). Please
note reducing the transmission power can affect the operational range of the Device.
3.9 Clear Stored Data
This clears any stored logs, the alarms and any telemetric data stored in the Device. It does not change
other settings such as the Name, Reference Date and Time and the Logging Interval.
3.10 Reset Device
This performs a factory reset of the Device and is the same as a long button push performed on the Device
itself.
Temperature, Humidity & Dew Point Bluetooth Sensor and Logger
User Guide 1.20
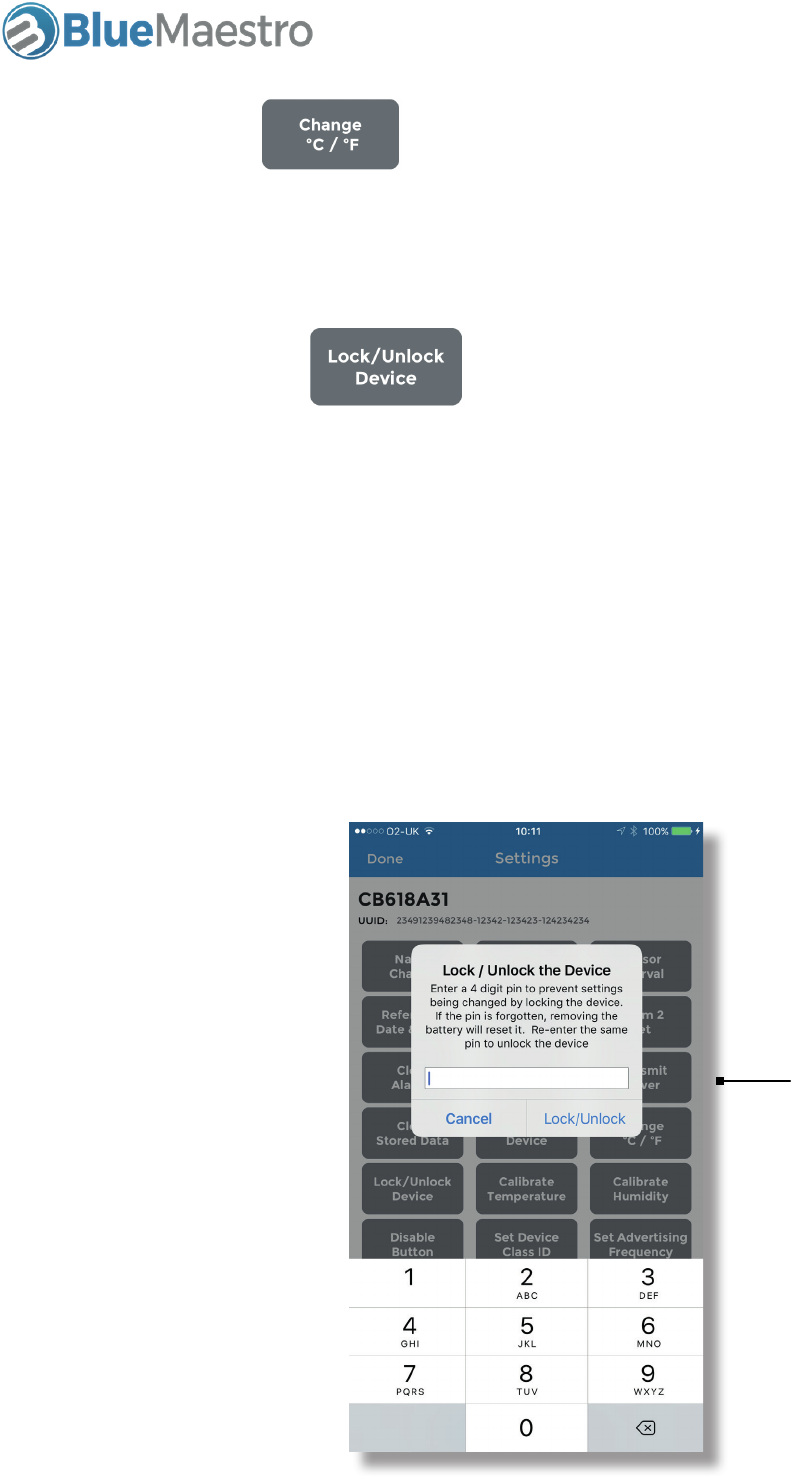
3.12 Lock/Unlock Device
The Device can be locked by apply a 4 digit pin. This may be necessary or desirable where the Device is
able to be accessed by third parties who may have sufficient knowledge to be able to change settings
within the Device or delete stored data. By locking the Device, the Device will not respond to any com-
mands until the 4 digit pin is entered again.
When the Device is locked a small red locked padlock image will appear in the Device List and Device
Details screen.
To unlock the Device re-enter the 4 digit pin. To lock the Device once more enter a 4 digit pin again.
NOTE: Do not lose or forget the pin since it will not be possible to unlock the Device unless a full reset of
the Device occurs.
3.11 Change ºC/ºF
This changes to the units of measure for temperature and dew point in the Device. Any other user of the
Device will also see the units of measure change.
Enter a 4 digit pin to
lock the Device. Enter
the same 4 digit pin to
unlock the Device
Temperature, Humidity & Dew Point Bluetooth Sensor and Logger
User Guide 1.20
3.13 Calibrate Temperature/Calibrate Humidity
It is possible to enter a calibration offset within the Device for either or both of temperature and humidity.
Enter the offset (adding - if the offset is a negative number) and pressing Enter.
The Device carries its calibration so every user of the Device will see the calibrated values. On a reset of the
Device any calibration values are reduced to zero and are effectively removed.
3.14 Disable Button
The Disable Button feature ensures the Device cannot be accidentally rest by a long button push. This
may be necessary or desirable with the Device can be physically reached by third parties or there is a risk
of pressure being exerted on the Device.
3.15 Set Class ID
This enables a Device to be set with a Class ID representing a number between 0 and 254. This can be
used for identifying groups of Devices where the Device name is not sufficient to identify which group a
Device belongs to.
When the Device’s button is pushed, or it is powered up such as on a change of battery, the Class ID will
temporarily become 255 and the cell of the Device in the Device List will turn grey. This enables the De-
vice to be easily identified in the app by pressing its button.
3.16 Set Advertising Frequency
A Device’s advertising (radio transmission) frequency can be changed to extend the battery life or to make
the Device more responsive to commands.
NOTE: Shortening a Device’s advertising frequency can have a detrimental affect on its battery life.
Temperature, Humidity & Dew Point Bluetooth Sensor and Logger
User Guide 1.20
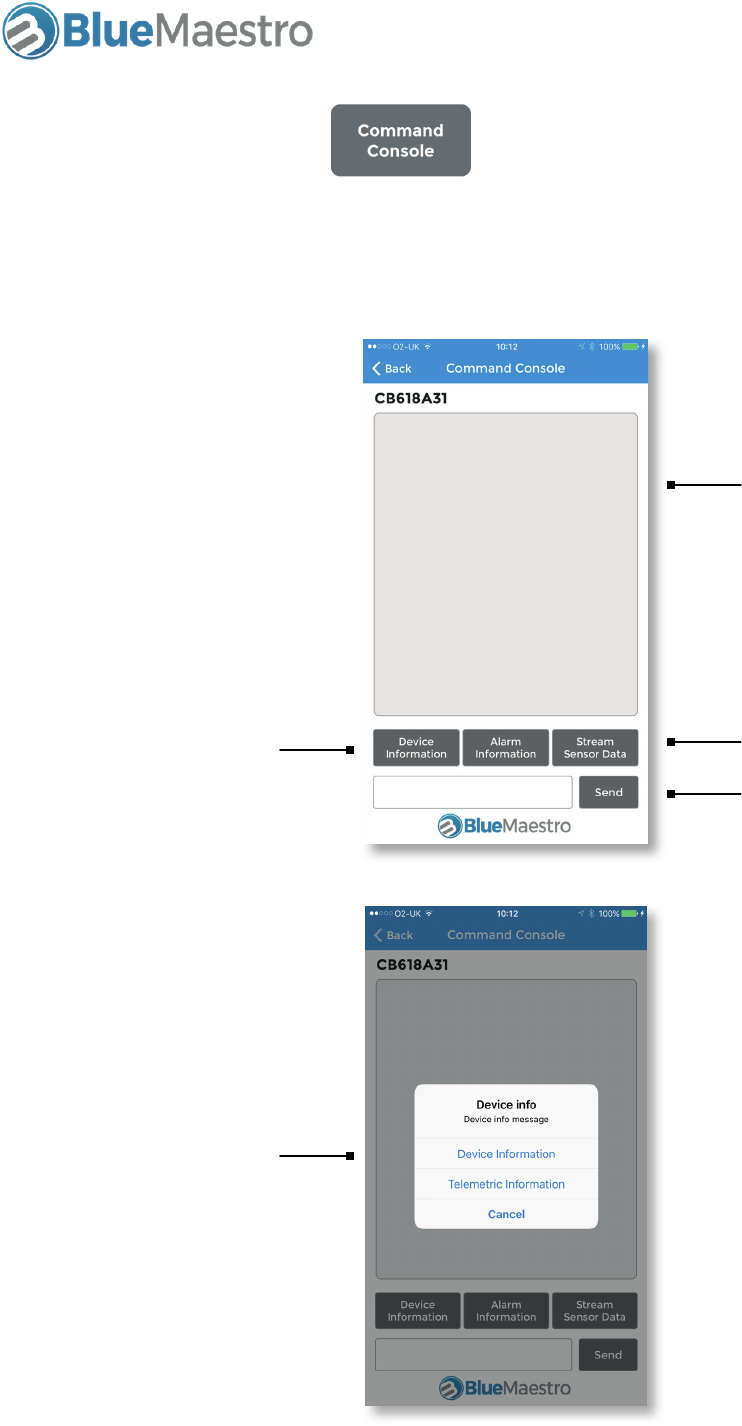
3.17 Command Console
The Command Console provides a method of issuing commands and extracting further information direct-
ly from the Device. Please refer to the relevant API and Command Guide for a list of commands that can
be issued directly to the Device.
Output area for feed-
back from the Device
Device Information/
Alarm Information can
be obtained directly
from the Device
When selecting Device
Information, you can
further select Device
or Telemetric Informa-
tion. This will display
things like Memory
Size, Firmware Version
Number, Run Time,
averages, highs and
lows etc.
Area for inputting
commands
It is possible to put the
Device into streaming
mode for 30 seconds
Temperature, Humidity & Dew Point Bluetooth Sensor and Logger
User Guide 1.20
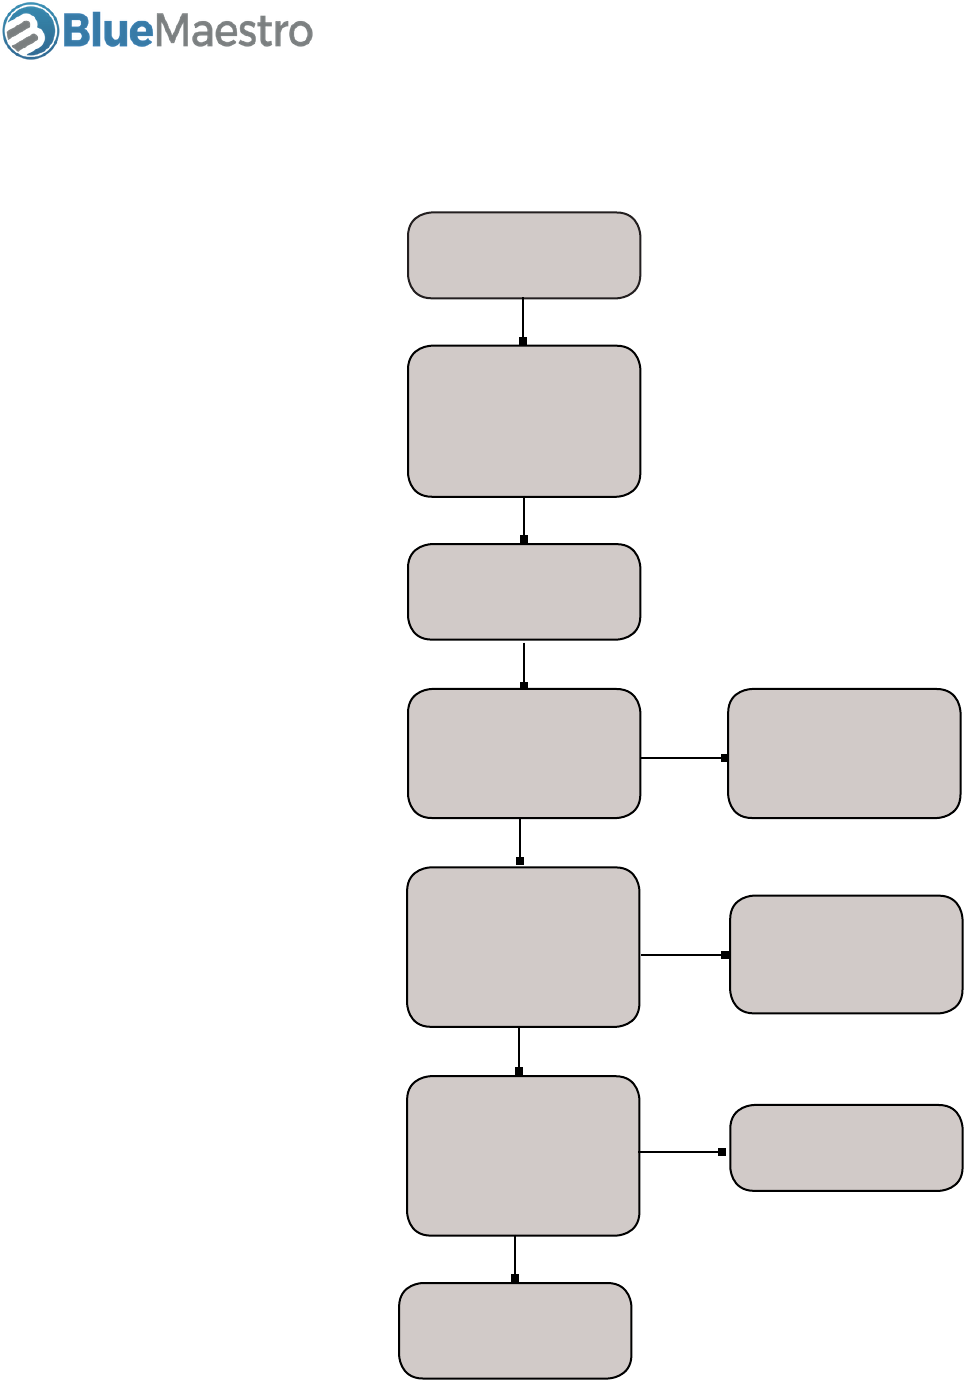
3. Process for setting up the Device
Turn Device On
Set Desired Logging
Interval and other
Settings
Set Reference Date
Could button be inad-
vertently pushed?
Will the Data Logger
be travelling in
the air?
Could third parties
tamper with settings in
the Device?
Turn on Airplane
Mode
Lock the Device
Disable
button
YES
Logging commences
from now
A long button push could
reset the Device, consider
disabling the button if this could
happen inadvertently
If accompanying air cargo put
the logger into airplane mode.
To interact with the Device push
the button to cause the Device to
temporarily advertise
(Note disabling the button does
not prevent a button push caus-
ing the Device to advertise in
airplane mode).
If third parties could tamper with
settings or delete the Device, lock
the Device.
YES
YES
Set up complete
Temperature, Humidity & Dew Point Bluetooth Sensor and Logger
User Guide 1.20
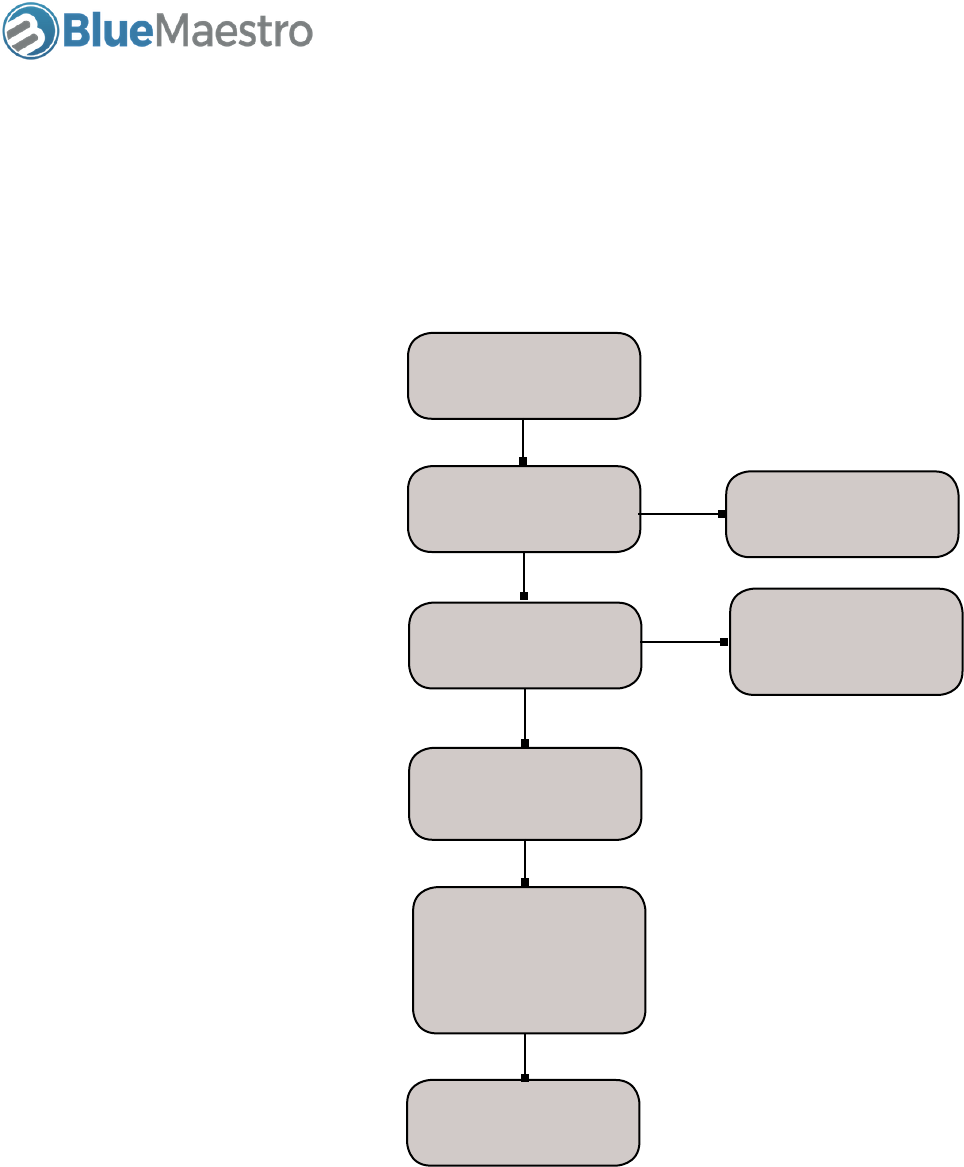
4. Process for extracting data from the Device
Push Button
Is Device Locked
Download data
Is airplane mode on?
Extraction complete
Consider taking out of
airplane mode
Unlock the Device
View data as Table and
select “Export as CSV”
to an email address
YES
YES
If the device is locked, it will not
be possible to extract logged
data, therefore it needs to be
unlocked first
Does the device blink once? If so
Device is operational. If not then
either LED has been turned off
or battery is flat and will need to
be changed before data can be
extracted
If button has been disabled
consider enabling it so the device
can be turned off to save battery
after its logging job