Blue Ocean Innovation 406SDR07 Misting Unit w/ Remote (433.9MHz Tx) User Manual
Blue Ocean Innovation Limited Misting Unit w/ Remote (433.9MHz Tx)
User Manual
©Outdoor Solutions, Inc. ©Outdoor Solutions, Inc.
SKEETER DEFEATER™ Dispenser
Instruction Manual and Tips for Best Use
The SKEETER DEFEATER is an innovative Mosquito Defense Unit
that incorporates breakthrough spray technology into a simple and
affordable model that anyone can set up and use.
The SKEETER DEFEATER boasts an automated DUSK/DAWN® sensor
to kill mosquitoes easily, automatically and hands-free. By combining
this amazing patent-pending technology with the proven contact
insecticide found in the Cylinder Refi ll Unit (sold seperately), you’ll help
make your yard mosquito-free.
For additional resources, tips and information regarding mosquitoes
and your SKEETER DEFEATER, visit SkeeterDefeater.com.
Defend Your Yard!
Quick-Start Guide listed on backcover.
Contents
Overview and Important Information ....................................pp. 2-3
Initial Set-Up ........................................................................pp. 4-6
Battery Installation .........................................................p. 4
Cylinder Refi ll Unit (CRU) installation ...............................p. 5
3-Way Power Switch Location and Use .........................p. 6
Activating the Spray Sequence ............................................p. 7
Proper Dispenser Placement & Usage Tips ..........................p. 8
Understanding the CRU and Indicator Light .........................pp. 9-10
Tips and Facts for Optimal Use ............................................p. 11
Warranty and Appendices ....................................................pp. 12-15
16
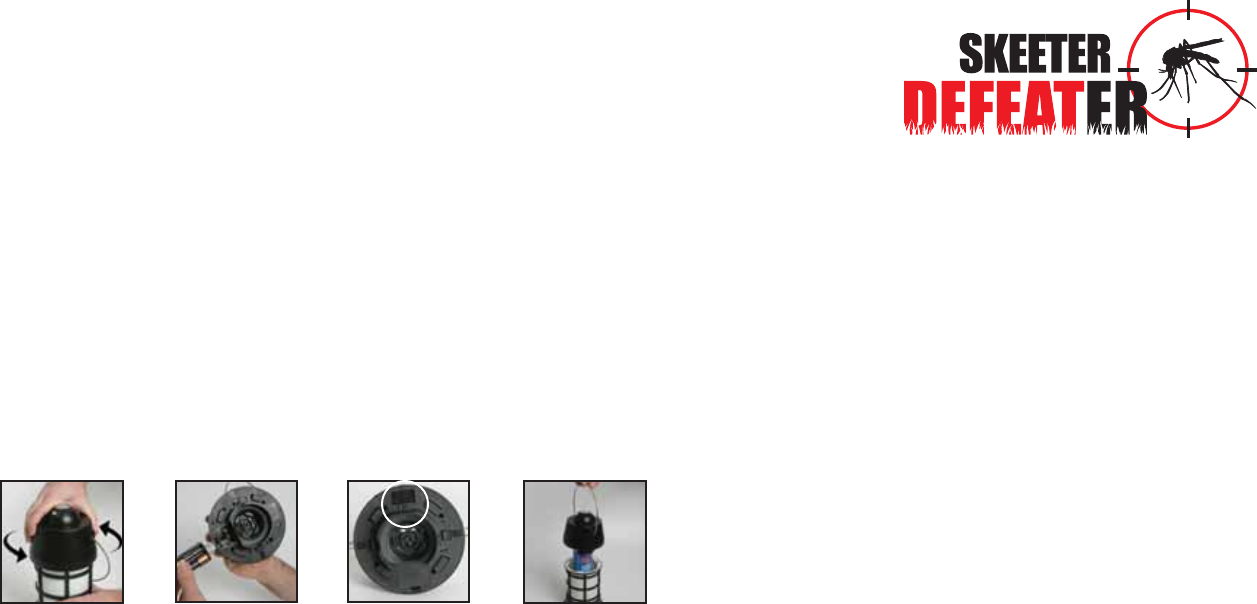
Easy Four-Step Dispenser Set Up
Defend Your Yard!
Step 1: Twist the Spray Head and remove from Dispenser Base
Step 2: Insert the batteries and Cylinder Refi ll Unit (batteries sold
separately)
Step 3: Select power setting (DUSK/DAWN® + Remote, Remote
Only, or Off)
Step 4: Attach Spray Head and place Skeeter Defeater
Dispenser appropriately in your yard, according to the
directions on the CRU label
Protect your outdoor oasis; use the Skeeter Defeater™ . . .
• Out on the patio, porch, or gazebo
• Prior to playing in your backyard
• When camping, hunting, or fi shing
• Prior to working outdoors
• Before cooking or grilling outside
Read the entire Skeeter Defeater Cylinder Refi ll Unit label before
installing and using the Skeeter Defeater Dispenser.
Want more details, including access to Skeeter Defeater promotions and
mosquito-related information? Visit SkeeterDefeater.com.
1. 2. 3. 4.
Learn more at SkeeterDefeater.com Learn more at SkeeterDefeater.com
TM
OM712
Learn more at SkeeterDefeater.comLearn more at SkeeterDefeater.com
©Outdoor Solutions, Inc. ©Outdoor Solutions, Inc.
Overview and Important Information
Included in your package
1. One Skeeter Defeater™ Dispenser
2. One Skeeter Defeater Remote Control
3. One Instruction Manual
4. One Warranty Registration Card (Fill this out and return
for access to special promotions; you can also register at
SkeeterDefeater.com)
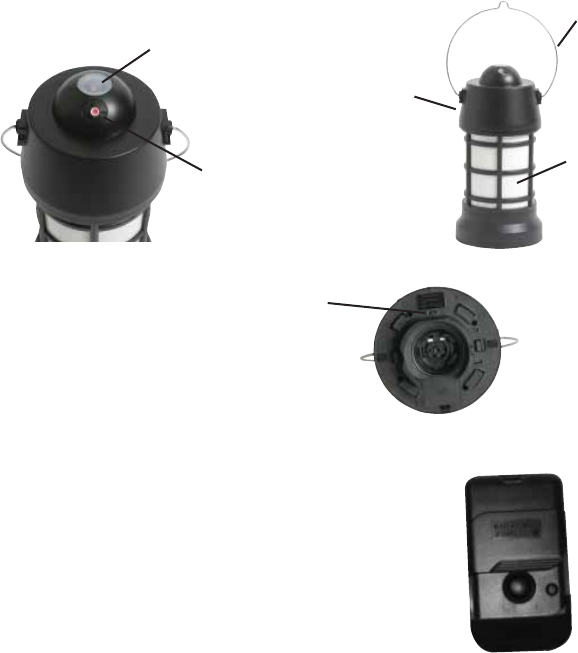
Skeeter Defeater Dispenser
Skeeter Defeater Remote Control
2
Spray Head
Indicator Light &
DUSK/DAWN® sensor
Nozzle
Hanger
Base
Power Switch
15
Warranty Information
LIMITED ONE YEAR WARRANTY
The Skeeter Defeater Dispenser is warranted to the original consumer for
one year from date of purchase against defects in material and workmanship.
Transportation costs made necessary for returns will be covered as part of this
warranty. To complete your warranty registration, go to SkeeterDefeater.com,
click on Register My Skeeter Defeater, and follow the steps. You may also fi ll
out the form on page 14 of this manual and mail to the address given, or call us
at (888) 895-BUZZ (2899).
WHAT IS NOT COVERED
Damages caused by abuse, modifi cation, or failure to perform normal
maintenance. CONSEQUENTIAL DAMAGES, INCIDENTAL DAMAGES, OR
INCIDENTAL EXPENSES, INCLUDING DAMAGE TO PROPERTY. SOME
STATES DO NOT ALLOW THE EXCLUSION OR LIMITATION OF INCIDENTAL
OR CONSEQUENTIAL DAMAGES, SO THE ABOVE LIMITATION OR
EXCLUSION MAY NOT APPLY TO YOU.
To the extent any provision of this warranty is prohibited by Federal, state, or
municipal law, which cannot be preempted , it shall not be applicable. This
warranty gives you specifi c legal rights, and you may also have other rights that
vary from state to state and country to country.
www.SkeeterDefeater.com
The Skeeter Defeater is a product manufactured and distributed by ...
Outdoor Solutions, Inc.
2500 Carl Rd.
Irving, TX 75062
Declaration of Conformity:
Certifi cation: Outdoor Solutions, Inc. certifi es this instrument was inspected and tested thoroughly,
and met its published specifi cations when shipped.
Manufacturer’s Name: Outdoor Solutions, Inc.
Manufacturer’s Address: 2500 Carl Road.
Irving, TX 75062
Contact Phone Number: 888.895.2899
Declares that product listed conforms to the requirements of the following Directives
Name: Skeeter Defeater Model: 406-SD07
Part 15 of FCC rules Certifi ed by JDI
Learn more at SkeeterDefeater.comLearn more at SkeeterDefeater.com
©Outdoor Solutions, Inc. ©Outdoor Solutions, Inc.
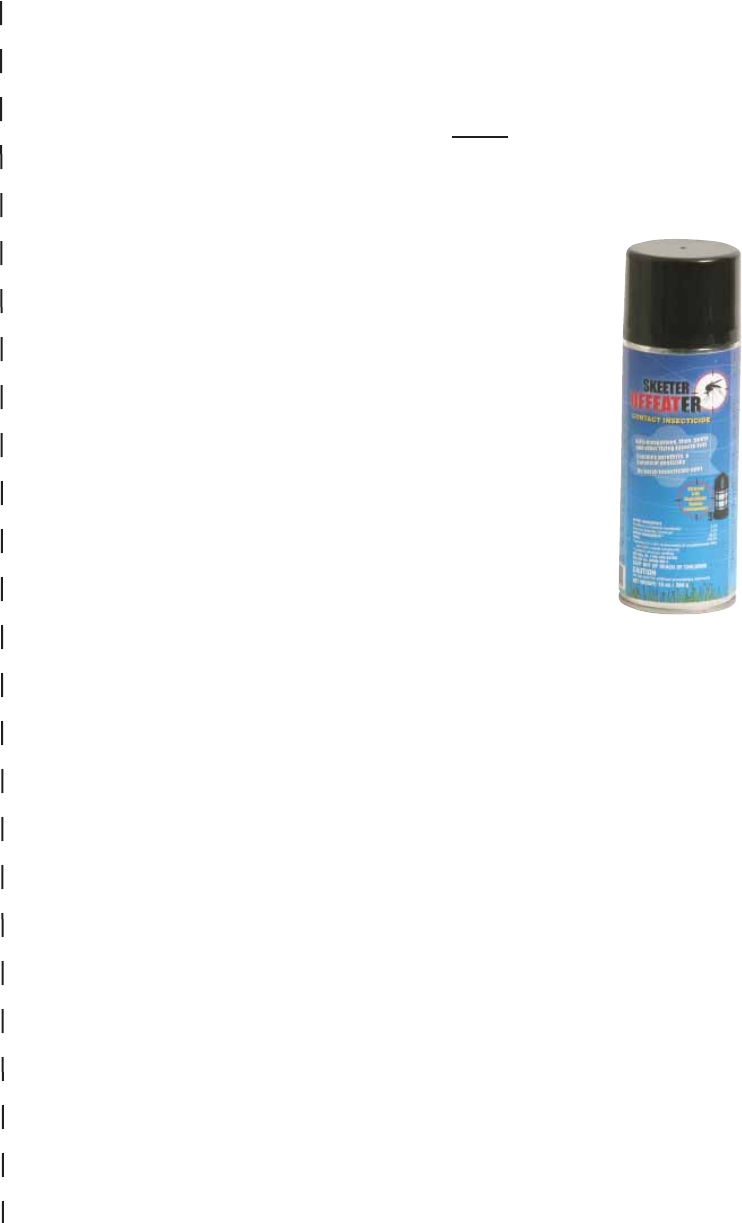
These items are not included
in your package
1. Skeeter Defeater Cylinder Refi ll Unit
(CRU): The CRU contains the botanical
contact insecticide that is sprayed from the
Dispenser. One CRU contains 66 sprays of
insecticide when used with the Dispenser
(lasts 33 days when Dispenser is used as
directed twice a day). You may also use the
CRU as a hand-held insecticide by placing
the spray button on the top of the cylinder.
See CRU label for additional uses and
directions. You may purchase replacement
CRUs anywhere the Skeeter Defeater is sold,
including online at SkeeterDefeater.com.
2. Four AA Batteries: The Dispenser requires
power from four AA batteries.
Warning
Read this instruction manual before using the Skeeter Defeater
Dispenser or installing the Cylinder Refi ll Unit (CRU).
Read the CRU label BEFORE using the insecticide and follow the
precautions and use directions accordingly.
Use the Dispenser only when pests are present, and always place
Dispenser out of reach of children or pets.
Do not spray when people, pets, or food are near the Dispenser
and could potentially be contacted by the spray.
Avoid eye contact. Stand clear of the direct line of the spray head.
3
14
Warranty Registration Form
Name: ________________________ ____________________________
(First) (Last)
Email: _________________________________________
Home address: ___________________________________________________
(Street)
__________________________ _____ ________
(City) (State) (Zip)
Date of Purchase: _____________________
Where did you purchase your Skeeter Defeater? __________________________
What price did you pay for the Dispenser? _______________________________
How many Cylinder Refill Units did you purchase? ____ At what price? _______
Learn more at SkeeterDefeater.comLearn more at SkeeterDefeater.com
©Outdoor Solutions, Inc. ©Outdoor Solutions, Inc.
Initial Set Up
One reason people love the Skeeter Defeater™ is because it’s
so easy to set up and maintain. Follow the instructions below to
quickly have your Skeeter Defeater defending your yard.
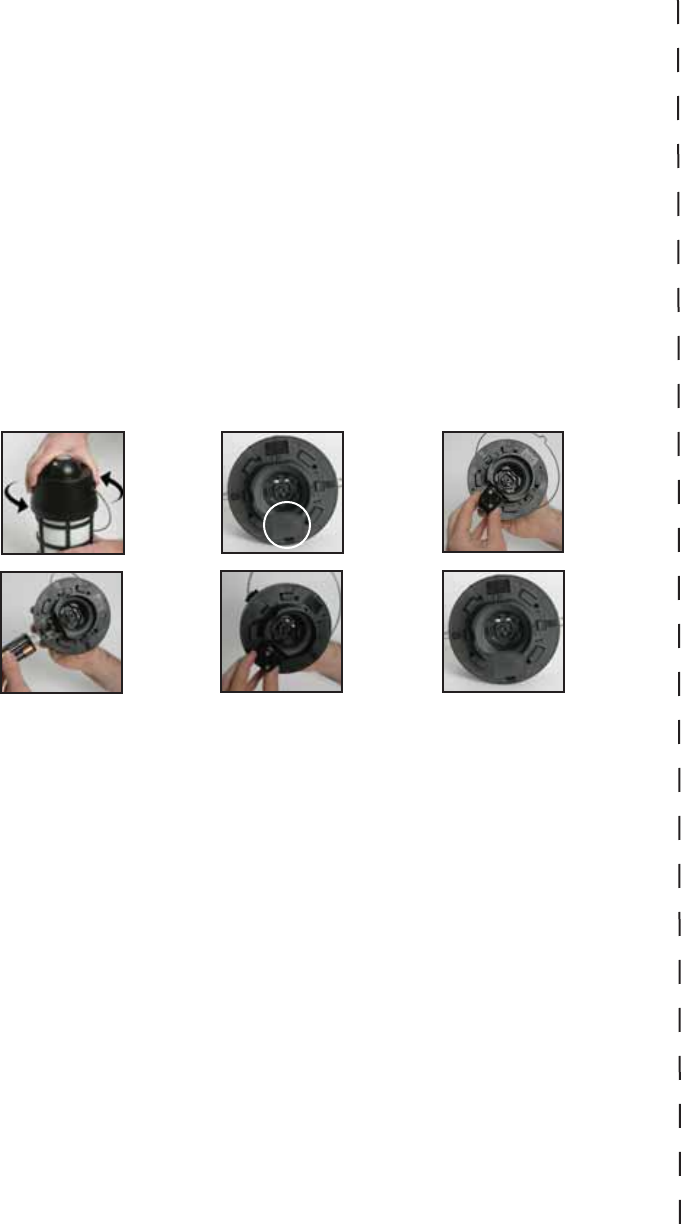
Battery Installation
The Skeeter Defeater Dispenser requires 4 AA batteries, which are sold
separately. These batteries last approximately two months before they
need to be replaced.
1. Twist the Spray Head of Dispenser counter-clockwise to remove
from the Base.
2. Locate the Battery Chamber on the underside of the Spray Head.
3. Release the tab to the Battery Chamber Door and remove it.
4. Remove the Battery Holder from the Battery Chamber by pushing
the Holder outward to unlock it from the Chamber.
5. Insert 4 AA batteries into the Battery Holder, paying close attention
for proper connections. Be sure to align the positive (+) and negative
(-) connections properly.
6. Insert the Battery Holder back into the Battery Chamber, and verify
that the springs on the Battery Holder are touching the metal plates
at the bottom of the Battery Chamber.
7. Lock the Battery Chamber Door back into place.
4
1. 2. 3-4.
5. 6. 7.
13
Register Your Skeeter Defeater ASAP!
By registering your Skeeter Defeater, you can take advantage
of the Limited One-Year Warranty, plus receive promotions and
specials reserved only for our current customers.
The quickest way to register your Skeeter Defeater is online
at SkeeterDefeater.com. Just click on “Register My Skeeter
Defeater” and follow the next steps. You may also call us at
1.888.895.BUZZ (2899).
As a third option, you can fi ll out the form on the back of this
page, cut out of the Skeeter Defeater Instruction Manual, and mail
to this address:
Skeeter Defeater Registration
2500 Carl Rd.
Irving, TX 75062
Learn more at SkeeterDefeater.comLearn more at SkeeterDefeater.com
©Outdoor Solutions, Inc. ©Outdoor Solutions, Inc.
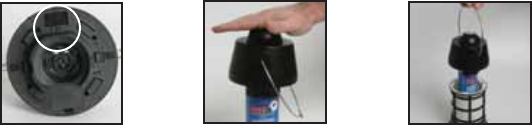
Initial Set Up (cont.)
Installation of CRU (sold separately)
The Skeeter Defeater Dispenser must be used exclusively with
the Skeeter Defeater Cylinder Refi ll Unit (CRU), which is sold
separately. The CRU contains pyrethrin, a botanical insecticide
that kills mosquitoes on contact. For more information on
pyrethrin, visit SkeeterDefeater.com. Learn more about the CRU
on page 9 of this manual.
WARNING:
The Skeeter Defeater Dispenser is designed to be used only with a
Skeeter Defeater CRU. Attempting to install any other pesticide aerosol
may cause damage to the Dispenser and may release all the contents of
the aerosol in one spray.
1. With the Spray Head still detached from the Base, remove the cap
and spray nozzle from the CRU and place the CRU upright on a fl at
surface outdoors.
2. Be sure the Power Setting on the Spray Head is set to “Off.”
3. With the Nozzle pointing away from you, place the Spray Head on
top of the CRU and press down fi rmly on the top of the unit with the
palm of one hand (pictured) until the CRU snaps into place.
4. Move the 3-way Power Switch to the desired operation setting (see
page 6 for more details).
5. Line up the arrow on the top lip of the Base with the OPEN arrow
on the bottom lip of the Spray Head and then twist the Spray Head
clockwise to align arrows in the CLOSE position.
5
2. 3. 5.
12
Appendix A – Skeeter Defeater Dispenser
This device complies with Part 15 of the FCC Rules. Operation is subject to the following two conditions:
(1) This device may not cause harmful interference, and (2) This device must accept any interference
received, including interference that may cause undesired operation.
Warning: Changes or modifi cations to this unit not expressly approved by the party responsible for
compliance could void the user’s authority to operate the equipment
NOTE: This equipment has been tested and found to comply with the limits for a Class B digital device,
pursuant to Part 15 of the FCC Rules. These limits are designed to provide reasonable protection against
harmful interference in a residential installation. This equipment generates, uses and can radiate radio
frequency energy and, if not installed and used in accordance with the instructions, may cause harmful
interference to radio communications.
However, there is no guarantee that interference will not occur in a particular installation. If this equipment
does cause harmful intereference to radio or television reception, which can be determined by turning
the equipment off and on, the user is encouraged to try to correct the intereference by one or more of
the following measures:
• Reorient or relocate the receiving antenna.
• Increase the separation between the equipment and receiver.
• Connect the equipment into an outlet on a circuit different from that to which the receiver is
connected.
• Consult the dealer or an experienced radio/TV technician for help.
Appendix B - Skeeter Defeater Remote Control
Warning: Changes or modifi cations to this unit not expressly approved by the party responsible for
compliance could void the user’s authority to operate the equipment
NOTE: This equipment has been tested and found to comply with the limits for a Class B digital device,
pursuant to Part 15 of the FCC Rules. These limits are designed to provide reasonable protection against
harmful interference in a residential installation. This equipment generates, uses and can radiate radio
frequency energy and, if not installed and used in accordance with the instructions, may cause harmful
interference to radio communications.
However, there is no guarantee that interference will not occur in a particular installation. If this equipment
does cause harmful interference to radio or television reception, which can be determined by turning the
equipment off and on, the user is encouraged to try to correct the interference by one or more of the
following measures:
• Reorient or relocate the receiving antenna.
• Increase the separation between the equipment and receiver.
• Connect the equipment into an outlet on a circuit different from that to which the receiver is
connected.
• Consult the dealer or an experienced radio/TV technician for help.
Learn more at SkeeterDefeater.comLearn more at SkeeterDefeater.com
©Outdoor Solutions, Inc. ©Outdoor Solutions, Inc.
6
Initial Set Up (cont.)
3-Way Power Switch and Use
The Skeeter Defeater™ Dispenser offers three power settings for
complete control and customization as you desire.
1. OFF (Center Position) – Set the Dispenser to the “OFF”
position whenever mosquitoes are not present, or when winds
exceed or may exceed 5 miles per hour (mosquitoes stay
sheltered when winds are higher than 5 miles per hour), or
whenever people, pets or food are present.
2. REMOTE ONLY (Left Position) – The Indicator Light will
blink once when the Power Switch is set to this position.
The Remote Control (included) allows you to initiate the
spray sequence from up to 50 feet away from the Dispenser,
whether you’re indoors or outdoors. One Remote Control
will work on multiple Skeeter Defeater Dispensers. To initiate,
press the button on the Remote Control. The Remote Control
light will stay lit for four seconds as it sends a signal to the
Dispenser.
3. DUSK/DAWN® + REMOTE (Right Position) –
The Indicator Light will blink twice when set to this
position. Mosquitoes are most active at dusk and dawn.
The DUSK/DAWN Sensor on the top of the Spray Head
detects dusk and dawn every day without the need to set
any timers or clocks, initiating the spray sequence. In this
setting, you can also still use the Remote Control for additional
protection (up to two additional sprays a day/four total).
Note: In order to conserve battery power, the Dispenser only powers on every
six seconds to check for a signal. Therefore, it may take up to 10 seconds
for a signal from the remote to initiate the Dispenser spray sequence.
The Dispenser may only be used when pests are present. Do not
spray the insecticide more than four times per day.
Tips and Facts to Optimize the Use of
Your Skeeter Defeater™
Tips for optimizing the use of your Skeeter Defeater Mosquito
Defense Unit:
1. Observe how the Dispenser sprays, and adjust its placement for the best
coverage in your yard specifi cally.
2. Be aware of wind conditions. Mosquitoes generally cannot be in the open
when winds are higher than 5 mph. For best coverage, position the Nozzle
on the Dispenser to spray downwind.
3. The Skeeter Defeater is portable and easy to maintain – it’s a great item to
take camping and to use on patios and decks.
4. When used as directed, the Skeeter Defeater operates for less than 50
cents a day.
5. Weather conditions that cause unusually dark skies (such as storms) can
sometimes trick the DUSK/DAWN® Sensor. The sensor measures the light
for 10 minutes at a time to help minimize this issue, but it is still possible for
dark skies to initiate the sensor and for the Dispenser to release the spray
at a time other than dusk or dawn. It is recommended to turn the unit off
when such situations arise.
6. The expected battery life for the Remote Control is two years. When you
need to replace your Remote Control, you can purchase a new one at
SkeeterDefeater.com.
7. Dispenser batteries last for approximately two months when used regularly.
It is suggested to change batteries every other time you replace the CRU.
8. The Skeeter Defeater works best as part of an integrated pest
management program. Don’t entice mosquitoes to come to your yard
– drain standing water on a regular basis.
9. Place the unit in direct sunlight for optimal usage. If you want to treat
shaded areas, remember to place the Dispenser in open sunlight and point
toward the shaded area; do not place the Dispenser in the shaded area.
10. Always point the nozzle away from you when replacing the CRU, and be
sure the Dispenser is turned off.
11
Learn more at SkeeterDefeater.comLearn more at SkeeterDefeater.com
©Outdoor Solutions, Inc. ©Outdoor Solutions, Inc.
To remove the CRU from the Dispenser . . . .
1. Turn the Spray Head counter-clockwise and detach from the Base.
2. Turn the Power Switch to OFF (Center).
3. With the Spray Head still attached to the CRU, locate the release
tabs on the bottom of the Spray Head and then place the CRU on a
fl at surface.
4. Pull the release tabs with your forefi ngers, and use your other fi ngers
to pull away the CRU.
5. Install your new CRU using the steps found on page 5. Dispose of
your emptied CRU according to the directions on the product label.
Understanding the Indicator Light
The Dispenser uses the Indicator Light to inform you of three key
messages.
1. Power On Indication: the Indicator Light will blink once when the
Power Switch is set to Remote Only (left), and twice when set to
DUSK/DAWN® + Remote (right).
2. The Indicator Light will blink progressively faster for 6 seconds prior
to the Dispenser spraying, and will remain lit while spraying.
3. The Indicator Light will blink once every 4 seconds to indicate a low
level of insecticide left in your current CRU.
The DUSK/DAWN Sensor is also located in the same area as the
Indicator Light, on top of the Spray Head.
The Spray Sequence
Once the batteries and CRU are installed, and the power setting is
chosen, place your Skeeter Defeater Dispenser appropriately in your
yard for maximum effectiveness (see page 8 for further direction).
When you initiate the spray sequence (either via Remote Control or
DUSK/DAWN Sensor), the Indicator Light will blink increasingly faster
for six seconds. The Nozzle will then spray the insecticide from the
Dispenser for four seconds, and the Indicator Light will remain lit during
this time. You will see the spray in the air for a short period before it
disappears from site. Rest assured that the insecticide is still working
and spreading throughout your yard (even behind the Dispenser) up to
300 square feet even though you can’t see it.
7
10
1. 2. 3-4.
300 sq ft
300 sq ft
Understanding the Cylinder Refi ll Unit
(CRU) (cont.)

Learn more at SkeeterDefeater.comLearn more at SkeeterDefeater.com
©Outdoor Solutions, Inc. ©Outdoor Solutions, Inc.
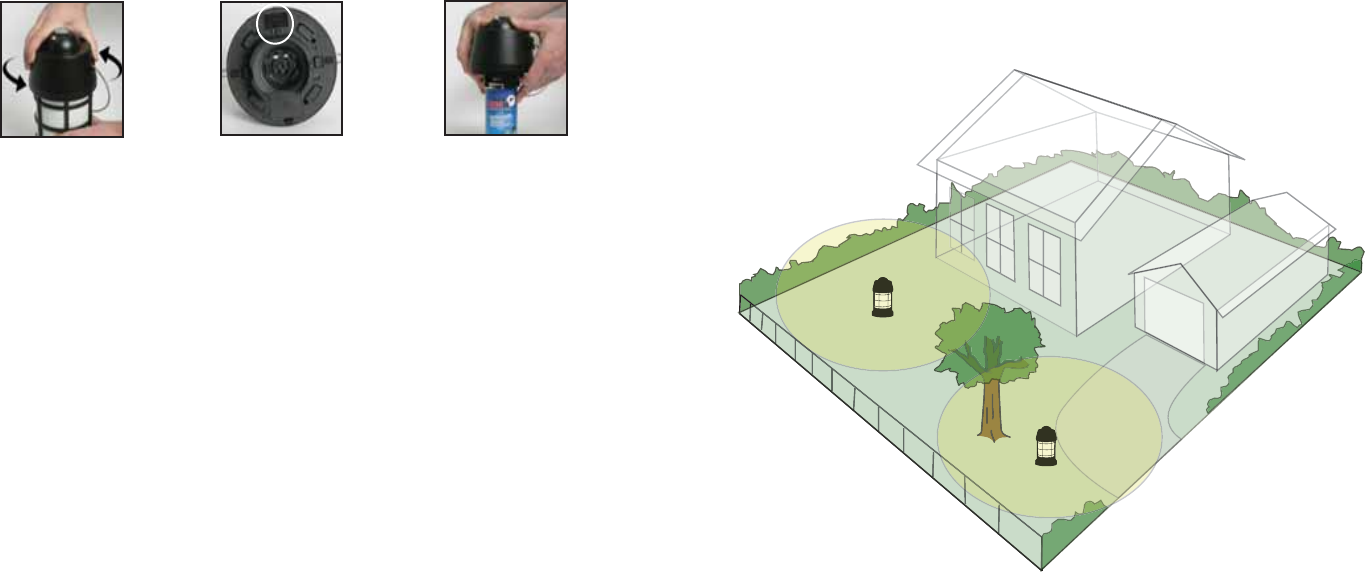
Proper Dispenser Placement
The Skeeter Defeater™ works very well in
most outdoor settings. Hang the Dispenser
six feet above the ground, out of reach of
children and pets, or place on a sturdy fl at
surface fi ve to six feet above the ground.
The Skeeter Defeater Dispenser hangs easily
from shepherd’s hooks, fence posts, awnings
and other similar hardware. And because it
has a fl at base, you can also set the Skeeter
Defeater Dispenser on high ledges, columns
and other high surfaces.
Important: when Dispenser is set to “DUSK/DAWN + Remote”
power setting, the unit must be placed in direct sunlight to
perform at an optimal level.
The DUSK/DAWN® Sensor is a highly advanced device that measures
even the smallest changes in light. By placing the unit in direct sunlight,
you allow for the Dispenser to receive the best possible information
when determining dusk and dawn each day. With this in mind, it is best
to not place the Dispenser in heavily shaded areas.
Direct the Nozzle to spray toward the target area, and away from
swimming pools, water bodies, and eating and cooking areas. One
Skeeter Defeater Dispenser effectively treats up to 300 sq ft. Even
though the Skeeter Defeater sprays in one direction, the insecticide will
disperse and actually cover 360 degrees around the Dispenser when
used in proper weather conditions. The diagram on page 7 shows a
typical yard and the possible coverage areas for one Skeeter Defeater
Dispenser. Multiple Dispensers may be used to treat an entire outdoor
area (and can be controlled by a single Remote Control), but do not use
more than one Dispenser for every 300 square feet of space. To reduce
wind exposure, some people point the Skeeter Defeater toward their
house, and then allow the insecticide to rebound off the walls and cover
additional areas in the yard.
89
Understanding the Cylinder Refi ll Unit
(CRU)
The Cylinder Refi ll Unit (CRU) serves as the “ammo”
for your Skeeter Defeater™ Dispenser, and is
sold separately. It contains pyrethrin, a botanical
insecticide that kills mosquitoes on contact. The
CRU is designed to work exclusively with
the Skeeter Defeater Dispenser; no other
insecticide containers will fi t into the Spray
Head of the Skeeter Defeater and work
properly. The CRU comes with a spray button
and can be used apart from the Dispenser to spray
outdoor areas by hand. It is necessary to remove
this spray button before inserting the CRU into the
Dispenser.
Replacing the CRU
The CRU will last for approximately 66 sprays when used with the
Dispenser. If you spray the Dispenser twice a day (dusk and dawn),
the CRU will last 33 days. The Indicator Light will blink once every four
seconds once the unit has been sprayed 54 times to notify you of the
upcoming need for a replacement CRU. You can purchase additional
CRUs where you purchased your Dispenser, at various retail outlets and
online at SkeeterDefeater.com.
Note: The internal counter found in the Dispenser counts sprays since last
powering on the unit. Therefore, if you turn off the power of the Dispenser
and then turn it back on without changing the CRU, the counter will be set
to zero. In this instance, the Indicator Light would not blink at the right time
to let you know your CRU is almost empty.