Bluetake Technology BT400G22003520 BLUETOOTH HEADSET User Manual BT400GII 9x9 p65
Bluetake Technology Co., Ltd. BLUETOOTH HEADSET BT400GII 9x9 p65
MANUAL

BT400GII
Bluetooth Headset
Quick Start-Up
www.bluetake.com
2
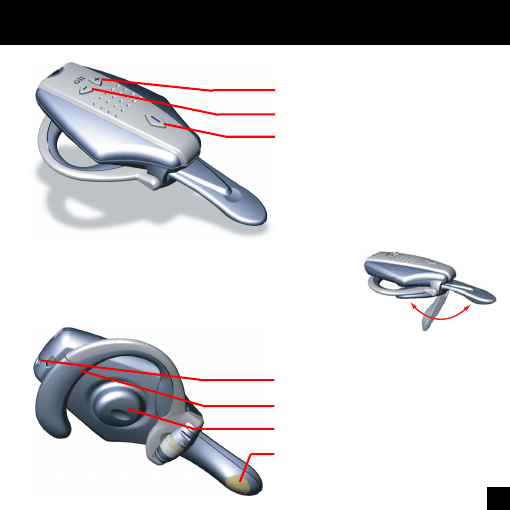
- Overview of BT400GII -
DC POWER IN
Earhook
Speaker
Microphone
Open / Close the microphone
The microphone can be
closed when the headset
doesn’t use.
“Volume Up” button
“Volume Down” button
“Power/Talk/Pairing”
button
3
1.
2.
3.
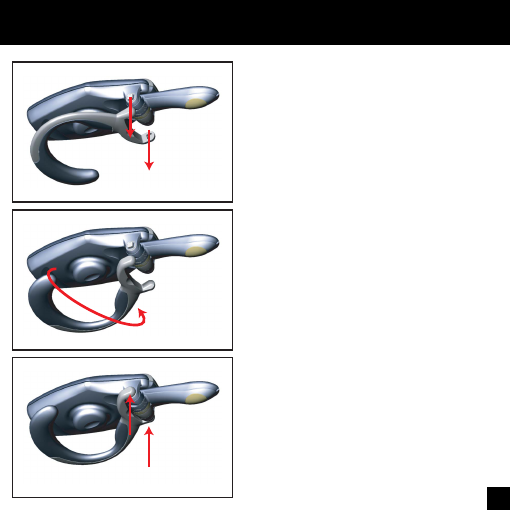
- Changing the earhook -
The BT400GII Bluetooth headset
can be worn on either ear. Please
carry out the following steps to
shift the earhook for wearing it on
the other ear.
1. Carefully remove the earhook
from the headset
2. Change the direction of the
earhook as shown in diagram
2.
3. Carefully replace the earhook
on the headset.

4
- Turning the headset ON/OFF -
To turn your headset ON:
Press and hold the button for 3 seconds, and then the
speaker will emit two high tones. When the power is on, the
LED in the button starts to flash blue.
(Note: The headset will go to pairing mode if you press and
hold the button for 5 seconds from OFF status)
To turn your headset OFF:
Press and hold the button for 3 seconds, and then the
speaker will emit two high tones. When the power is off, the
LED in the button stops flashing.
5
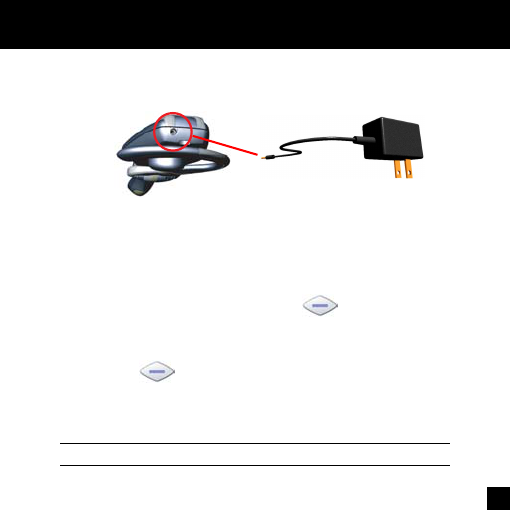
- Charging the battery -
Before using BT400GII you will have to charge the battery for
approximate 3 hours to ensure a fully charged battery.
1. Plug the AC power adapter into the DC POWER IN socket
situated at the back of the headset.
2. Plug the AC power adapter’s plug into an electrical wall
outlet.
3. When charging, the LED in the button is on and re-
mains lit until charging is complete.
4. Charge the headset for approximate 3 hours or until the
LED in the button extinguishes.
5. Remove the AC adapter from the headset’s AC power
jack.
DC POWER IN
Notice: The headset doesn’t work while it’s charging.

6
- Pairing to a Bluetooth phone -
Please follow the instruction below to pair the headset with a
Bluetooth cell phone:
1. Ensure the headset is OFF.
2. Press and hold the button for approximately 5 seconds
until the headset LED starts to flash with blue and red.
3. Release the button when the LED is flashing, the status
indicates that the headset is in pairing mode and waiting to
pair with another Bluetooth device.
4. Follow the operating instructions for your Bluetooth phone to
start a pairing process.
What is Bluetooth pairing?
Before using your headset for the first time, you must pair it
with a particular Bluetooth cell phone previously. “Pairing” pro-
cess creates a unique wireless link between two devices. Once
paired, the communication between two devices do not need
any authentication or authorization anymore.

7
5. Your phone’s display will indicate that it found one or more
Bluetooth devices, the “Bluetake Headset” should be in-
cluded in the list, please select it for pairing.
6. The phone’s display then prompt you for a pairing passkey
or PIN, please enter four zeros “0000”.
7. When the pairing process is finished successfully, the headset
LED will return to normal status of flashing blue only.
8. Your phone’s display may ask you whether you want to change
the headset’s name, you can replace the “Bluetake Headset”
with any you may prefer.

8
- Answering/Ending a call -
Answering a call.
After being paired with your cell phone, the headset is now
ready to recevie incoming calls without handling the phone.
When there’s an incoming call, both the cell phone and the
headset will ring simultaneously. Upon hearing the ring tones
through the headset’s speaker you can answer the incoming
call by pressing button and then speaking normally.
Ending a call.
You can use either of the ways to end a call:
1. Press the headset’s button to end a call.
2. Press the phone’s keypad to end a call.

9
- Making a call -
There are two ways to make calls:
1. Using the phone’s keypad:
As general usage, dial the phone number you want to call
by pressing the phone’s keypad. You may also hear the
dialing tones through the headset.
2. Using the Voice Dialing through the headset:
What is voice dialing?
Voice dialing is a feature on some Bluetooth phones which al-
lows you make calls by saying the name of the person you
want to call. The phone compares your voice with your previ-
ous recording (called a voice tag). If they match then the phone
will automatically dial the corresponding phone number. Not all
Bluetooth phones support voice dialing, please refer to your
phone’s spec to make sure whether your phone supports this
feature.

10
The headset does not have a keyboard so it’s necessary to
use voice dialing to make calls. To do this you have to record
voice tags for the contacts in your phone address book.
If your phone supports voice dialing function, you can use
this feature with the headset easily. Note that the voice dial-
ing on your phone must be enabled and the voice tags must
have been recorded previously. (Please refer to your phone’s
instruction on recording and storing voice tags)
a. Briefly press the button once.
b. After the tone, say the name of the person you want to
call.
c. The phone number will be dialed automatically by phone
after recognizing the correct voice tag.
11
- Appendix I -
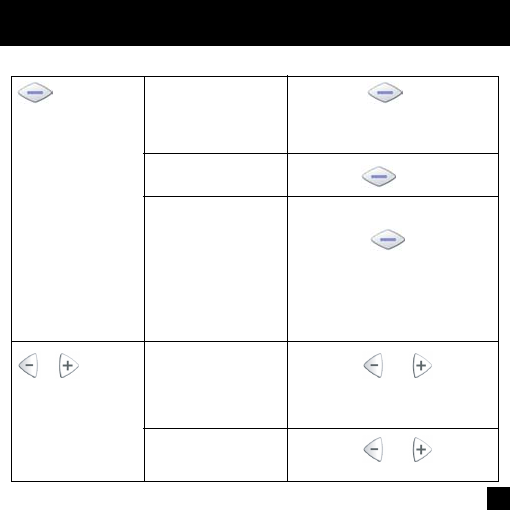
Button Function
button Turn ON/OFF Press the button for
3 seconds until the blue
LED flashes five times.
Anwser/End calls
Press the button once
Pairing When the headset is off,
press the button to
turn on and keep it pressed
for about 5 seconds until
the LED flashes blue and
red alternately.
/ button Volume control Press the or button
repeatedly until you reach
your desired level.
Mute / Unmute Press the or button
for about 2 seconds.

12
Audio Tone
Turn On Two high tones
Turn Off Two low tones
Pairing mode Two high tones
Incoming call A ring tone at 2 seconds interval
Mute Repeated two low beeps at a 3 seconds inter-
val
Unmute A single beep
Battery low Starts when the talk time is left about 3~5
minutes. At a 16 seconds interval.
- Appendix II -
FCC Notices
This device complies with part 15 of the FCC rules. Operation is
subject to the following two conditions:
(1)This device may not cause harmful interference, and
(2)This device must accept any interference received, including
interference that may cause undesired operation .
FCC RF Exposure requirements
This device and its antenna(s) must not be co-located or
operation in conjunction with any other antenna or transmitter.”
NOTE: THE MANUFACTURER IS NOT RESPONSIBLE FOR
ANY RADIO OR TV INTERFERENCE CAUSED BY
UNAUTHORIZED MODIFICATIONS TO THIS EQUIPMENT.
SUCH MODIFICATIONS COULD VOID THE USER'S
AUTHORITY TO OPERATE THE EQUIPMENT.