Bluetake Technology BT400G52004810 Bluetooth Headset User Manual
Bluetake Technology Co., Ltd. Bluetooth Headset Users Manual
UserManual.wiki
>
Bluetake Technology
>
BT400G52004810 User Manual
Users Manual
Navigation menu
Upload a User Manual
Namespaces
Wiki Guide
HTML
PDF
Info
Views
User Manual
Discussion / Help
Navigation
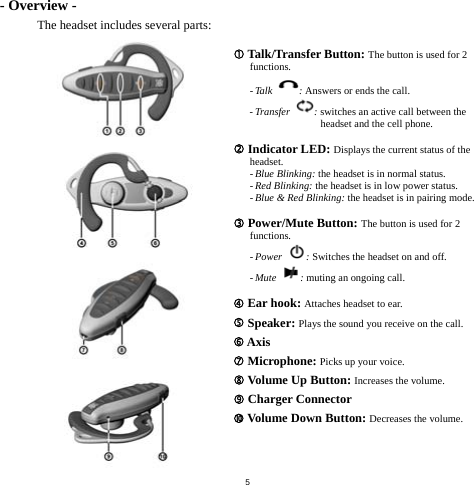
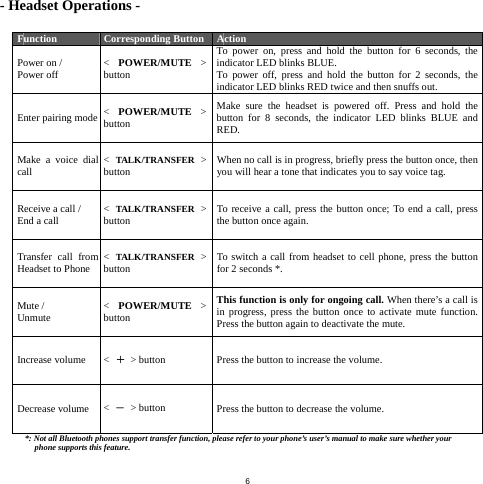
![11- Another Ear Use - The ear hook wear can be easily changed for another ear by below four steps: Step 1 & Step 2 : Hold the side of ear hook that is close to the axis of the headset, and then revolve the ear hook to 90 degrees twice. The ear hook will give out a clear sound while it’s in 90 degrees position. Step 3 & Step 4 : Rotate the ear hook to another side of the headset. - Using Your Headset - [ Answering a call ] After being paired to your phone, the headset is now ready to receive incoming calls without handling the phone. When there’s an incoming call, both the cell phone and the headset will ring simultaneously. Upon hearing the ring tones through the headset’s speaker you can answer the incoming call by pressing < TALK/TRANSFER > button and then speaking normally. [ Ending a call ] You can use either of the ways to end a call: 1. Press the headset’s < TALK/TRANSFER > button to end a call. 2. Press the phone’s keypad to end a call(Please consult your phone user’s manual).](https://usermanual.wiki/Bluetake-Technology/BT400G52004810/User-Guide-490474-Page-11.png)
![12NOTICE! Not all Bluetooth phones support voice dialing, please refer to your phone’s user’s manual to make sure whether your phone supports this feature. NOTICE! Not all Bluetooth phones support voice dialing, please refer to your phone’s user manual to make sure whether your cell phone supports voice dialing. [ Making a call ] There are two ways to make a call: 1. Using the phone’s keypad: As general usage, dial the phone number you want to call by pressing the phone’s designated keypad. You may also hear the dialing tones through the headset. 2. Using the Voice Dialing through the headset: What is voice dialing? Voice dialing is a feature on some Bluetooth phones which allows you make calls by saying the name of the person you want to call. The phone compares your voice with your previous recording (called a voice tag). If they match then the phone will automatically dial the corresponding phone number. [ Voice dialing ] The headset does not have a keyboard so it’s convenient to use voice dialing function to make calls. To do this you have to record voice tags for the contacts in your phone address book. If your phone supports voice function, you can use this feature with the headset easily. Note that the voice dialing on your phone must be enabled and the voice tags must have been recorded previously. (Please refer to your phone’s instruction on voice recording and storing voice tags.) 1. Briefly press the < TALK/TRANSFER > button once. 2. After the tone, say the name of the person you want to call. The phone number will be dialed automatically by phone after recognizing the correct voice tag.](https://usermanual.wiki/Bluetake-Technology/BT400G52004810/User-Guide-490474-Page-12.png)
![13NOTICE! Not all Bluetooth phones support transfer function, please refer to your phone’s user’s manual to make sure whether your phone supports this feature. [ Mute ] This function is available for ongoing call only. To activate mute function: Press the < POWER/MUTE > button once while there’s an ongoing call is in progress. To deactivate mute function: Press the < POWER/MUTE > button to release the mute. [ Transfer ] To activate transfer function: Press the < TALK/TRANSFER > button for 2 seconds to switch the current call from headset to cell phone. [ Multi-Pairing ] BT400 G5 supports a particular function “Multi-Pairing”. It allows the headset to be paired with several Bluetooth devices but connected to only one device at a time. The only one basis for multi-pairing is that the last paired device has the highest priority than others.](https://usermanual.wiki/Bluetake-Technology/BT400G52004810/User-Guide-490474-Page-13.png)