Bluetake Technology BT420HP2004512 Bluetooth HiFi Sports Headphone User Manual BT420 UserManual EN
Bluetake Technology Co., Ltd. Bluetooth HiFi Sports Headphone BT420 UserManual EN
User Manual

FCC INFORMATION
The Federal Communication Commission Radio Frequency interference Statement includes the
following paragraph
The equipment has been tested and found to comply with the limits for a class B Digital Device,
pursuant to part 15 of the FCC Rules. These limits are designed to provide reasonable protection
against harmful interference in a residential installation. This equipment generates uses and can
radiate radio frequency energy and, if mot installed and used in accordance with the instruction, may
cause harmful interference to radio communication. However, there is no grantee that interference
will not occur in a particular installation. If this equipment dose cause try to correct the interference by
one or more of the following measures:
- Reorient or relocate the receiving antenna
- Increase the separation between the equipment and receiver.
- Connect the equipment into an outlet on a circuit different from that to which the receiver is
connected
- Consult the dealer or an experienced radio/TV technician for help.
The user should not modify or change this equipment without written approval from Bluetake
Technology Co., Ltd. Modification could void authority to use this equipment.

English
- 1 -
Contents
General Information ………………………………………………………………………………….. 2
- Hardware introduction ……………………………………………………….….………………………… 2
- Foldable behind-the-neck band ..……..……………………………………..…..………………………… 2
- Foldable Microphone …………………………………......................……………..……………………… 2
- Supplied accessories …………………………………………………………………………..……………3
- Stick or band the audio dongle with music player………………………………………………….………3
- Safety information …………………………………………………………………....………………………3
Application …………………………………………………………………………..……..……………….4
Preparations …………………………………………………………………..……….…………………5
- Power connection and charging the battery ………………………………………………….……………5
- Replacing the headphone cover …………………………………………………………..………………5
Operation ………………………………………………………………………..…………………………6
- Turning the Headphone and Audio Dongle …..…………………………….……………….………… 6
- Pairing …………………………………………………………………………….……………….………… 6
+ Pairing to the Audio Dongle …………………………………………………………………….……… 6
+ Pairing to the mobile phone ………………………………………………………………………………7
Playing the music ……………………………………………………………………..………………… 7
- Connecting with Mobile ………………………………………………………….…………..…………… 8
+ Making a call ……………………………………………………………………….……….…………...… 8
+ Answering a call …………………………………………………………………….……….…………… 8
+ Ending a call ……………………………………………………………………………….……………… 8
Incoming ring or outgoing call when listen the music ……………………………………. 8
Appendix I ………………………………………………………………………………………..…………49
Appendix II ………………………………………………………………………………………..…………49
Specifications ………………………………………………………………………………..…………50
English
- 2 -
General Information
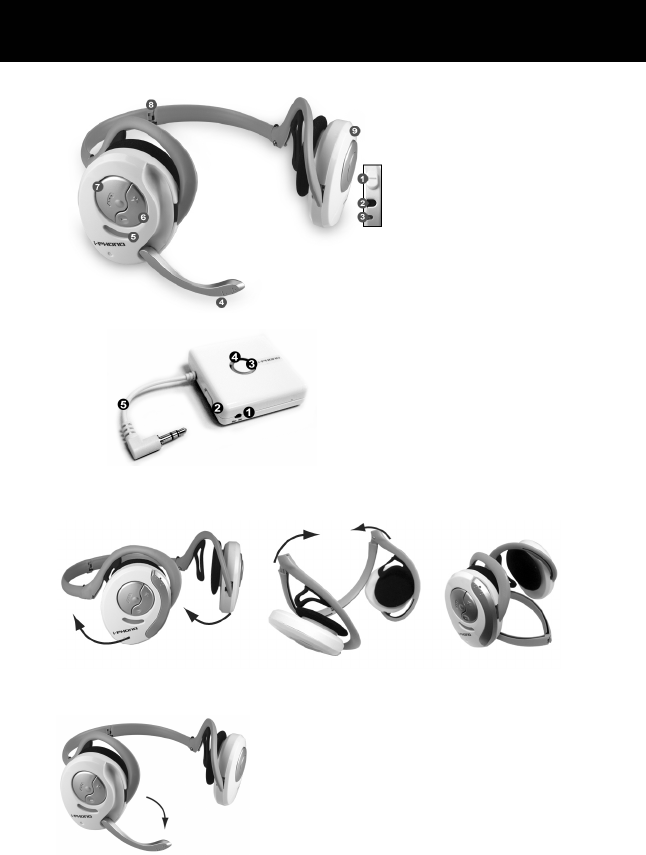
Hardware introduction
Headphone
1. Power switch
2. DC jack
3. Charging LED
4. Foldable Microphone
5. Status LED
6. +/- Volume button
7. Talk / Pairing button
8. Behind-the-neck band
9. Color plate
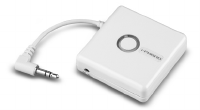
Audio Dongle
1. Power jack
2. Power switch
3. Pairing button
4. Indicator LED
5. Hi-Fi Audio-in cable
Foldable behind-the-neck band
Foldable behind-the-neck band beside is available for carrying and storing.
Foldable Microphone
The microphone can be folded up easily when you don't in the communication.

English
- 3 -
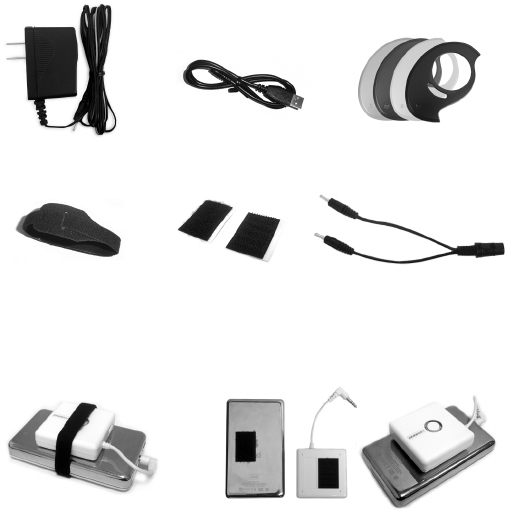
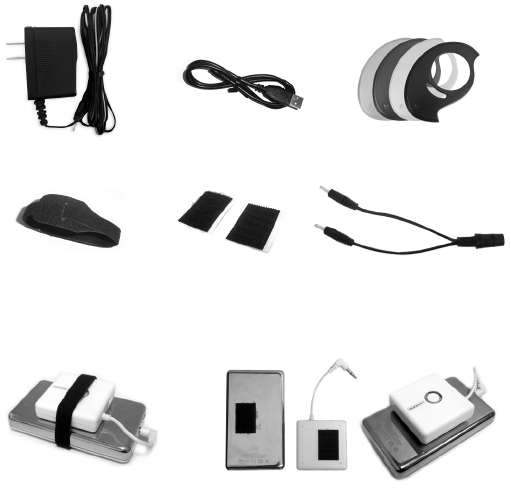
Supplied accessories
5V 500mA AC adapter x 1 USB charging cable x 1 Color plate x 4
Magicband x 1 Magic tape x 1 1-to-2 adapter connector x 1
Stick or band the audio dongle with music player
As the figure, you may stick or band audio dongle with music player with you prefer.
Safety information
1. Don’t use the headphone and Audio Dongle in Emergency system, Hospital and Airplane.
2. Keep away from the strong radio system to make sure the single quality.
English
- 4 -
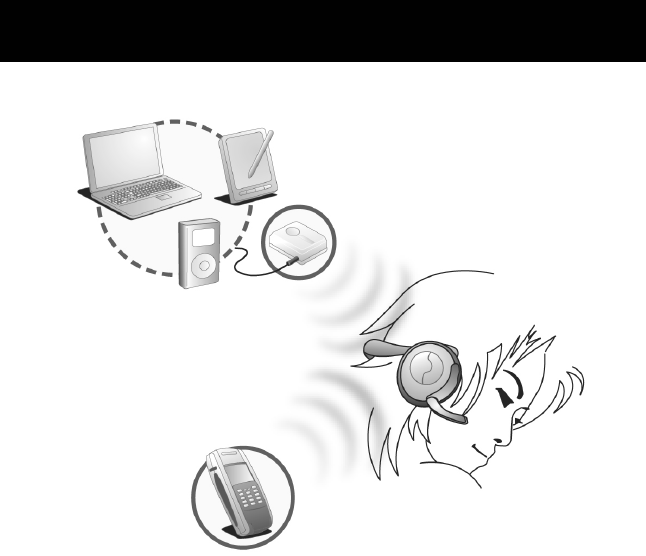
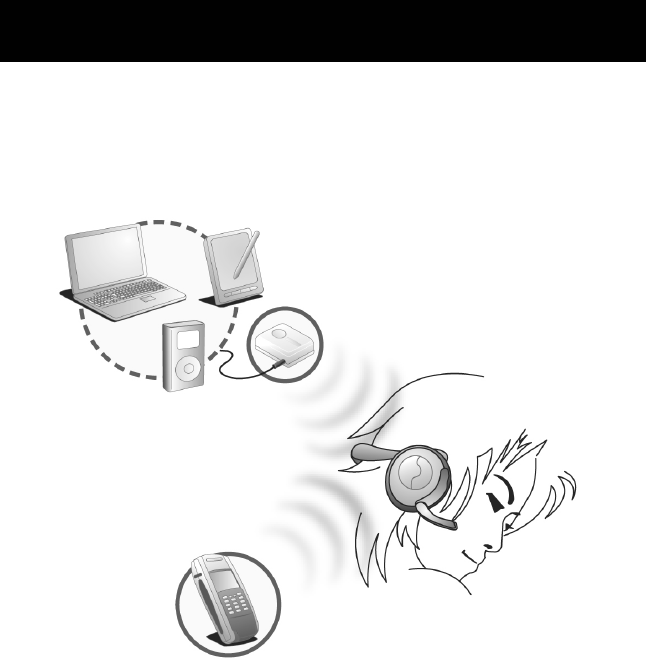
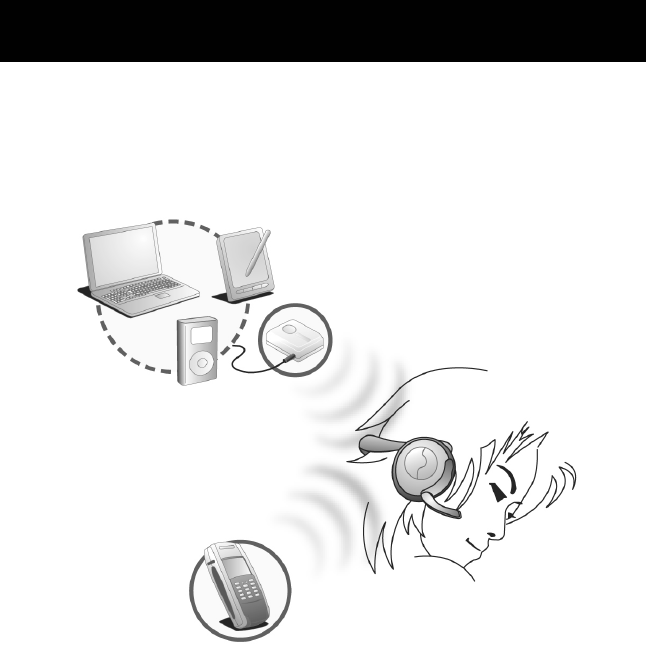
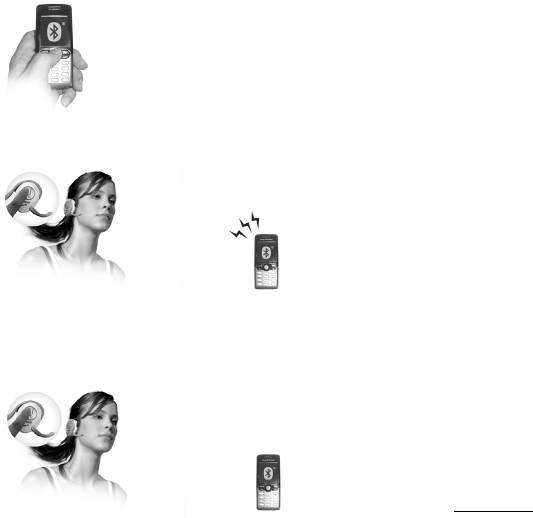
Application
With the Advanced Audio Distribution
Profile (A2DP), the i-PHONO BT430
Bluetooth Hi-Fi Audio Dongle enables
your audio device to transfer the stereo
audio signal cordlessly to the i-PHONO
BT420 Bluetooth Hi-Fi Sports
Head
p
hone.
BT430-installed audio device
BT420
Bluetooth Hi-Fi S
p
orts Head
p
hone
Just plug the built-in standard 3.5mm
(1/8 inch) stereo audio plug of the
i-PHONO BT430 Bluetooth Hi-Fi
Audio Dongle into the audio out jack
of your audio device such as a
walkman, MP3 / MD / CD player,
Pocket PC, Tablet PC etc.
Whilst enjoying music, you can receive or
make a phone calls easily through the
built-in foldable microphone and the
embedded innovative “auto switching”
technology of the i-PHONO BT420
Bluetooth Hi-Fi Sports Headphone.
.
Bluetooth-enabled mobile
p
hone

English
- 5 -
Preparations
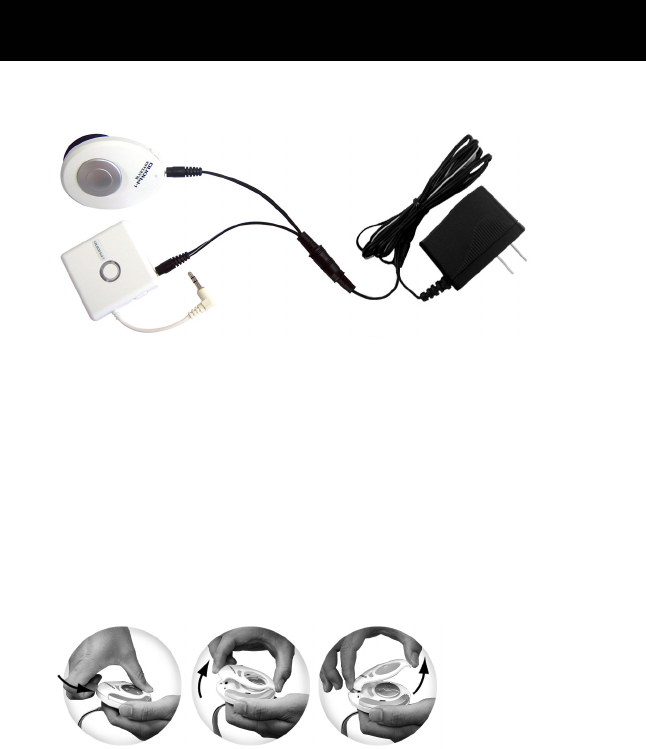
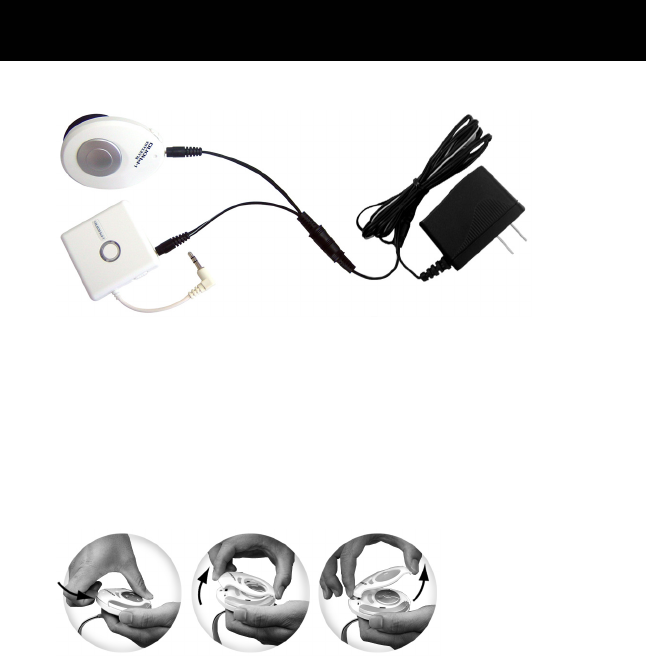
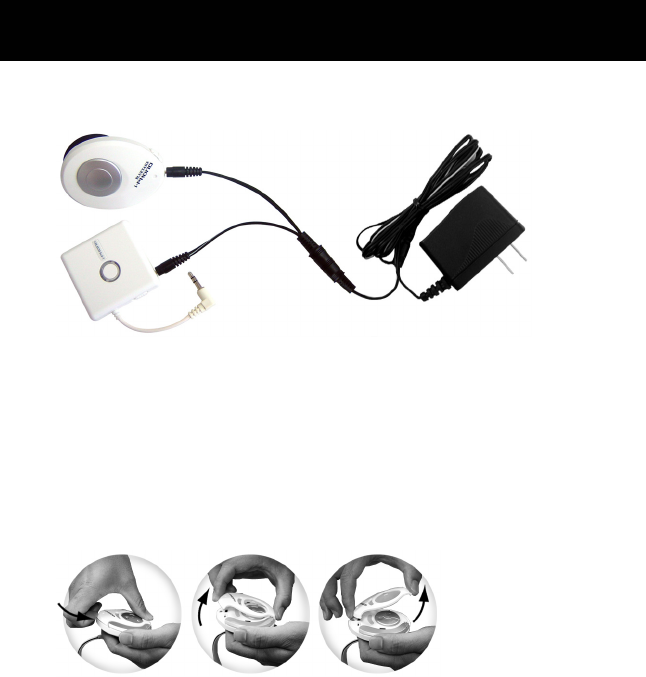
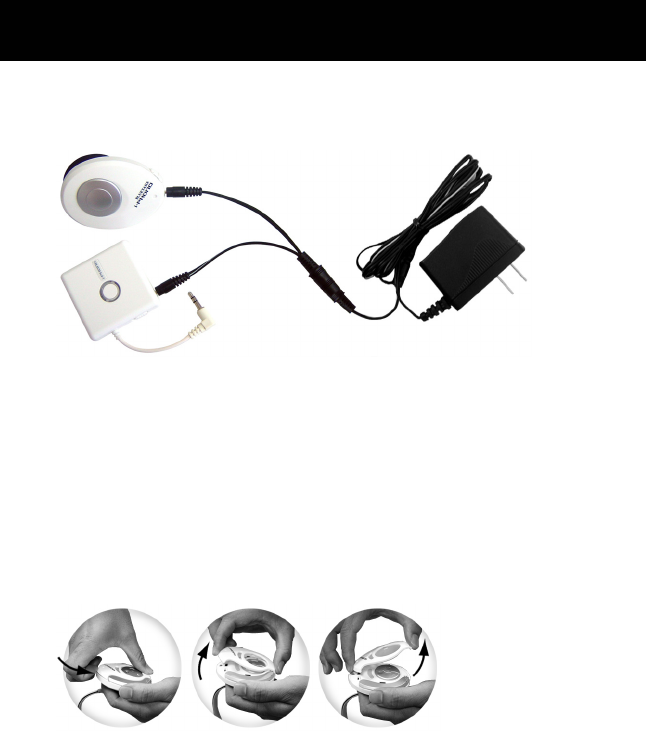
Power connection and Charging the Battery
Before connecting the AC adapter to the outlet, please ensure local power line voltage suits for AC
Adapter.
1. Plug the AC adapter to the DC jack situated at bottom of Headphone and Audio dongle.
2. Plug the AC adapter’s Plug into the outlet.
3. The LED indication is light red when charging in Headphone and Audio Dongle.
4. The LED indication turns Green in Headphone and Blue in Audio Dongle after the battery is fully
charged.
5. Remove the AC adapter from the headphone and Audio Dongle.
P.S. Before using Headphone and Audio Dongle you will have to charge the battery for approximate 5 hours to ensure a
fully charged battery.
Replacing the Headphone Cover
Follow the direction to remove the cover as the fig1 and fig2. Please carefully remove the cover from
headphone

English
- 6 -
Operation
Turning the Headphone and Audio Dongle ON/OFF
ON OFF ON OFF
Sliding the switch to turn on or turn off the power.
P.S. For optimizing the power saving, please turn off the headphone and audio dongle when they’re not in use.
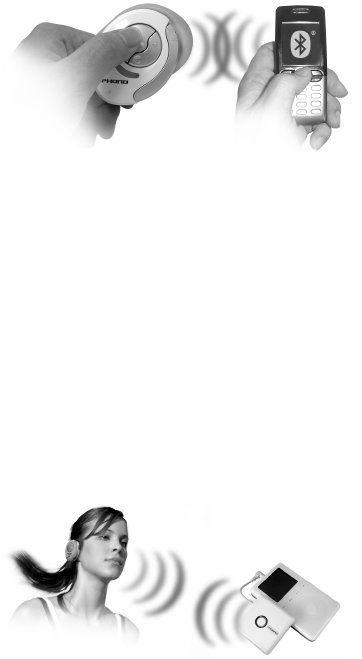
Pairing
Before using your headphone and audio Dongle first time or Bluetooth mobile phone, you have to
pair headphone with Audio Dongle or Bluetooth mobile phone. “Pairing” process creates a unique
wireless link between two devices. Once paired, the communication between two devices does not
need any authentication or authorization anymore.
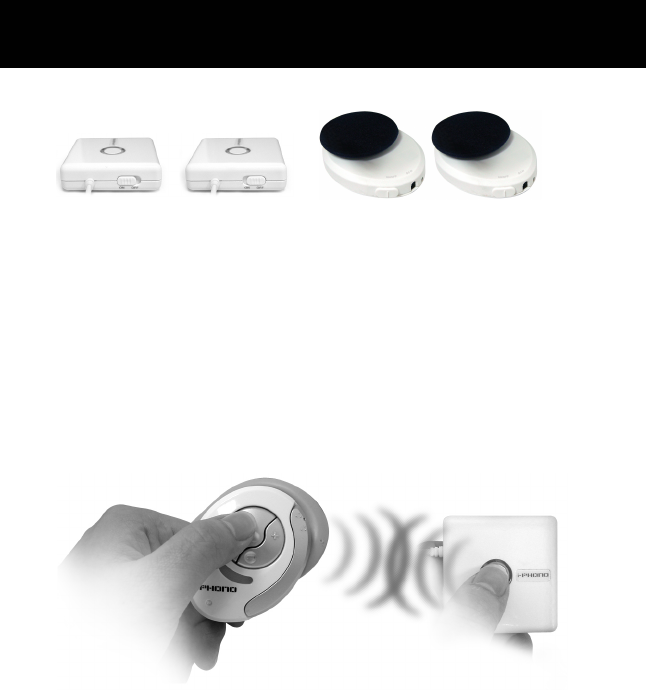
Pair to Audio Dongle
Please follow the below instruction to pair the headphone and audio dongle :
1. Press and hold the pairing button on headphone or audio dongle for 2-3sec until the LED starts to
flash with blue and red.
2. Release the pairing button after the LED is flashing, the status indicates the headphone or audio
dongle is in pairing mode.
3. After 2-3 sec the LED stops flash Blue and red. That mean the pairing process is done. The
headphone and audio will return to normal status of flashing blue only.

English
- 7 -
Please follow the below instruction to pair the headphone with a Bluetooth mobile phone:
1. Press and hold the pairing Button for 2-3 sec until the headphone LED starts to flash with blue and
red.
2. Release the pairing button after the LED is flashing, the status indicates that the headphone is in
pairing mode and waiting to pair with another Bluetooth device.
3. Follow the operating instructions for your Bluetooth phone to start a pairing process.
4. The phone’s display will indicate that it found one or more Bluetooth devices, the “i-PHONO”
should be included in the list, please select it for pairing.
5. The phone’s display then prompts you for a pairing passkey or PIN, Please enter four zero “0000”.
6. When the pairing process is finished successfully, the headphone LED will return to normal status
of flashing blue only.
7. Your phone’s display may ask you whether you want to change the headphone’s name. You can
replace the “i-PHONO” with any you prefer.
Playing the music
Before playing the music, please ensure the headphone has already been paired with audio dongle
Plug the audio dongle’s HiFi connecter into MP3 player, walkman or CD payer. Turn on the audio
dongle, headphone and music player. Play the music in music player side. And then you will hear the
music from headphone.
p.s. If you want to stop hearing the music from headphone, you can press the pairing button on audio dongle. And then
the audio dongle doesn’t send any signals to headphone. Press the pairing button again to return the music.

English
- 8 -
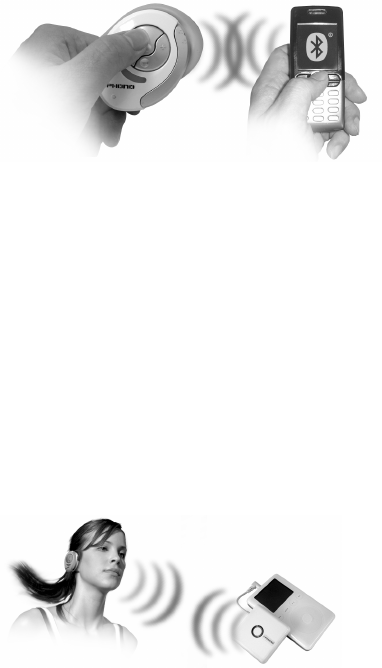
Connecting with Mobile
Before using this function, please ensure the headphone has already been paired with mobile phone
Making a call
Use the phone’s keypad. As general usage, dial the phone number you want to call by pressing the
phone’s keypad.
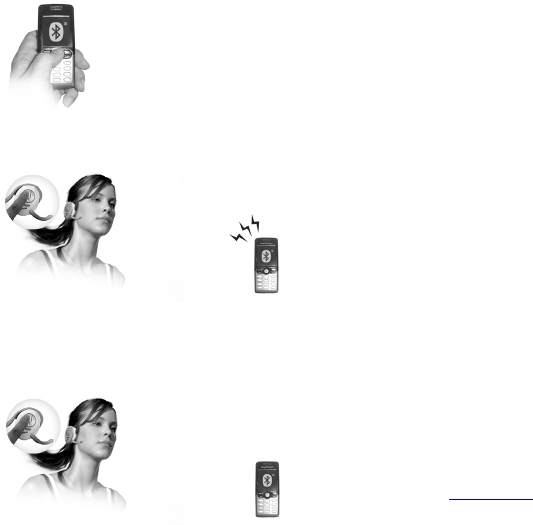
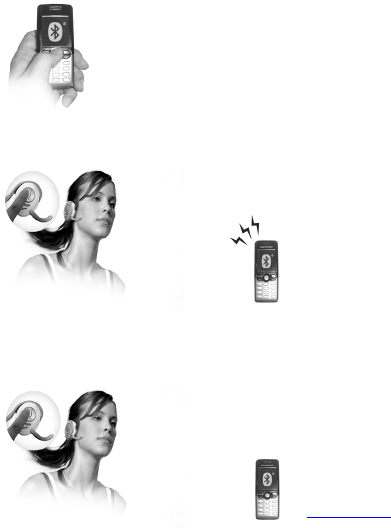
Answering a call
After being paired with your mobile phone,
the headset is now ready to receive
incoming calls without handling the phone.
When there’s an incoming call, both the
mobile phone and the headphone will ring
simultaneously. Upon hearing the ring tones
through the headphone’s speaker you can
answer the incoming call by pressing the
pairing button and the speaking normally.
Ending a call
You can use either of the ways to end a call:
1. Press for 3 sec the headphone’s pairing
button to end a call.
2. Press the phone’s keypad to end a call.
p.s. It may different operational process for some of
the mobile phone, Please visit our wed site
www.bluetake.com. The headphone’s ring tone may
not available for some of the mobile phone.
Incoming ring or outgoing call when listen the music
Whenever enjoying music, you can receive or make a call by“auto switching” function. Once you
have an incoming or outgoing phone call, you can hear the ring tone from the headphone. Then
follow the process as communication with Mobile phone. The music will return after ended a call.

Français
- 9 -
Table des matières
Informations générales …………………………………………………........................................... 9
- Présentation du matériel ………………………………….……………………...................................… 10
- Bandeau derrière la nuque pliable ……………………………………..................……………………... 10
- Microphone pliable …………………………………………….……….................................…...……… 10
- Accessoires fournis …………………………........................………………………………..…………… 11
- Brancher ou attacher l'adaptateur audio au lecteur de musique ….......…………................………… 11
- Informations de sécurité …………………………………....................…………..……………………… 11
Applications ……………………………………………...............................………..……………....... 12
Préparation ……………………………………………………......................................................… 13
- Brancher l'alimentation et charger la batterie ………..................................………….….…………… 13
- Remplacer le couvercle de l'oreillette ….................................………………………..……………… 13
Fonctionnement ……………...................................………………………..………………………… 14
- Allumer l'oreillette et l'adaptateur audio ………......................................………………..………… 14
- Apparier ……….....................................……………………………………………………….………… 14
+ Appariement à l'adaptateur audio …………....................................………………………………… 14
+ Appariement au portable ………......................................…………………………………………… 14
Lire de la musique ……….............................................…………………………………………… 15
- Se connecter au portable …….....................................…………………………………..…………… 16
+ Passer un appel ……………………………………………………………….....................…………… 16
+ Répondre à un appel …………......................................……………………………….…………… 16
+ Terminer un appel ……………………………………………………………….……........................… 16
Sonnerie entrante ou appel sortant en écoutant de la musique ….......................…… 16

Français
- 10 -
Informations générales
Présentation du matériel
Oreillette
1. Interrupteur d'alimentation
2. Prise courant continu
3. LED témoin de chargement
4. Microphone pliable
5. LED témoin d'état
6. Bouton de volume +/-
7. Bouton Parler/Apparier
8. Bandeau derrière la nuque
9. Plaque de couleur
Adaptateur audio
1. Prise d'alimentation
2. Power switch
3. Bouton d'appariement
4. LED témoin
5. Câble d'entrée audio hi-fi
Bandeau derrière la nuque pliable
Le bandeau pliable derrière la nuque est conçu pour le transport et le rangement.
Microphone pliable
Le microphone peut être plié facilement quand vous n'êtes pas en communication.
Français
- 11 -
Accessoires fournis
Transformateur secteur 5V 500mA x 1 Câble d'alimentation USB x 1 Couvercle x 4
Bandeau magique x 1 Scotch magique x 1 Adaptateur pour connecteur 1 vers 2 x 1
Brancher ou attacher l'adaptateur audio au lecteur de musique
Comme indiqué sur la figure, vous pouvez brancher ou attacher l'adaptateur audio au lecteur de
musique que vous préférez.
Informations de sécurité
1. N'utilisez pas l'oreillette et l'adaptateur audio dans un système d'urgence, dans un hôpital ou un
avion.
2. Gardez à l'écart des systèmes radio puissants pour maintenir la qualité du signal.

Français
- 12 -
Applications
Avec son profil de Distribution audio
avancée (A2DP), l'Adaptateur audio
hi-fi Bluetooth i-PHONO BT430
permet à votre appareil audio de
transmettre sans fil le signal audio
stéréo vers l'Oreillette sport hi-fi
Bluetooth i-PHONO BT420.
Appareil audio avec le BT430 installé
BT420
Oreillette s
p
ort hi-fi Bluetooth
Brancher la prise audio stéréo standard
3,5mm (1/8 pouces) intégrée de
l'Adaptateur audio hi-fi Bluetooth
i-PHONO BT430 dans la prise de sortie
audio de votre appareil audio tel qu'un
baladeur, un lecteur MP3 / MD / CD, un
Pocket PC ou un Tablet PC, etc.
Pendant que vous écoutez votre
musique, vous pouvez facilement
recevoir ou passer des appels
téléphoniques avec le microphone
pliable intégré et la nouvelle
technologie intégrée de “basculage
automatique.” de l'Oreillette sport hi-fi
Bluetooth i-PHONO BT420..
Téléphone portable
com
p
atible Bluetooth

Français
- 13 -
Préparation
Brancher l'alimentation et charger la batterie
Avant de brancher le transformateur secteur dans une prise murale, vérifiez que la tension du
secteur convient au transformateur secteur.
1. Branchez le transformateur secteur dans la prise cc en bas de l'oreillette et de l'adaptateur audio.
2. Branchez le transformateur secteur dans une prise murale.
3. La LED témoin est rouge pendant le chargement de l'oreillette et de l'adaptateur audio.
4. Le LED témoin devient verte pour l'oreillette et bleue pour l'adaptateur audio quand la batterie est
pleine.
5. Débranchez le transformateur secteur de l'oreillette et de l'adaptateur audio.
P.S. Avant d'utiliser l'oreillette et l'adaptateur audio, vous devez charger la batterie pendant environ 5 heures pour garantir
un chargement complet de la batterie.
Remplacer le couvercle de l'oreillette
Suivez les instructions des figures 1 et 2 pour retirer le couvercle. Retirez soigneusement le
couvercle de l'oreillette.

Français
- 14 -
Fonctionnement
Allumer et éteindre l'oreillette et l'adaptateur audio
ON OFF ON OFF
Faites glisser l'interrupteur pour allumer ou éteindre l'alimentation.
P.S. Pour optimiser les économies d'énergie, éteignez les écouteurs et l'adaptateur audio quand vous ne les utilisez pas.
Apparier
Avant d'utiliser votre oreillette avec l'adaptateur audio ou un portable Bluetooth pour la première fois,
vous devez apparier l'oreillette avec l'adaptateur audio ou le portable Bluetooth. "L'appariement" crée
un lien sans fil unique entre les deux appareils. Une fois appariés, la communication entre les deux
appareils ne nécessite plus aucune authentification ou autorisation.
Appariement à l'adaptateur audio
Suivez les instructions ci-dessous pour apparier l'oreillette à l'adaptateur audio :
1. Appuyez sur le bouton d'appariement de l'oreillette ou de l'adaptateur audio pendant 2 à 3
secondes jusqu'à ce que la LED témoin commence à clignoter rouge et bleu.
2. Relâchez le bouton d'appariement pendant que la LED témoin clignote, le témoin indique que
l'oreillette ou l'adaptateur audio sont en mode d'appariement.
3. Après 2 à 3 secondes, la LED témoin arrête de clignoter bleu et rouge. Cela signifie que le
processus d'appariement est terminé. L'oreillette et l'adaptateur audio retourneront à leur état
normal de clignoter en bleu seulement.

Français
- 15 -
Suivez les instructions ci-dessous pour apparier l'oreillette à un téléphone portable
Bluetooth :
1. Appuyez sur le bouton d'appariement de l'oreillette pendant 2 à 3 secondes jusqu'à ce que la LED
témoin commence à clignoter rouge et bleu.
2. Relâchez le bouton d'appariement pendant que la LED témoin clignote, le témoin indique que
l'oreillette est en mode d'appariement et attend de s'apparier avec un autre appareil Bluetooth.
3. Suivez les instructions d'utilisation de votre téléphone Bluetooth pour lancer le processus
d'appariement.
4. L'affichage du téléphone indiquera qu'il a trouvé un ou plusieurs périphériques Bluetooth,
“l'i-PHONO” devrait être inclus dans la liste, choisissez-la pour appariement.
5. L'affichage du téléphone vous demandera de saisir un code secret ou PIN. Entrez quatre zéros
“0000”.
6. Quand le processus d'appariement est réussi, la LED témoin de l'oreillette devrait retourner à son
état normal de ne clignoter qu'en bleu.
7. L'affichage de votre téléphone peut vous demander si vous voulez changer le nom de l'oreillette.
Vous pouvez remplacer “i-PHONO” par le nom que vous préférez.
Lire de la musique
Avant de lire de la musique, vérifiez que l'oreillette a déjà été apparié avec l'adaptateur audio
Branchez le connecteur hi-fi de l'adaptateur audio dans le lecteur MP3, le baladeur ou le lecteur de
CD. Allumez l'adaptateur audio, l'oreillette et le lecteur de musique. Lisez la musique sur le lecteur de
musique et vous entendrez la musique dans l'oreillette.
p.s. Si vous voulez arrêter d'écouter de la musique dans l'oreillette, vous pouvez appuyer sur le bouton d'appariement de
l'adaptateur audio. L'adaptateur audio n'enverra plus de signaux à l'oreillette. Appuyez à nouveau sur le bouton
d'appariement pour ramener la musique.
Français
- 16 -
Se connecter au portable
Avant d'utiliser cette fonction, vérifiez que l'oreillette a déjà été apparié avec le téléphone portable
Passer un appel
Utilisez le clavier du téléphone. De manière générale, composez le numéro que vous voulez appeler
en appuyant sur le clavier du téléphone.
Répondre à un appel
Après avoir été apparié avec votre
téléphone portable, l'oreillette est
maintenant prête à recevoir des appels
entrants sans toucher au téléphone.
Quand un appel arrive, le téléphone et
l'oreillette sonneront simultanément.
lorsque vous entendez la sonnerie dans le
haut-parleur du téléphone, vous pouvez
répondre à l'appel entrant en appuyant sur
le bouton d'appariement et en parlant
normalement.
Terminer un appel
Vous pouvez terminer un appel de deux manières :
1. Appuyez sur le bouton d'appariement
pendant 3 secondes pour terminer un
appel.
2. Appuyez sur le clavier du téléphone
pour terminer l'appel.
p.s. Le processus peut varier selon le téléphone
portable, visitez notre site web www.bluetake.com.
La sonnerie dans l'oreillette peut ne pas être
disponible sur certains téléphones portables.
Sonnerie entrante ou appel sortant en écoutant de la musique
Pendant que vous écoutez votre musique, vous pouvez facilement recevoir ou passer des appels
téléphoniques avec la fonction de "basculage automatique." Quand vous avez un appel entrant ou
sortant, vous pouvez entendre la sonnerie d'appel dans l'oreillette. Suivez le processus de
communication de votre téléphone portable. La musique reviendra à la fin de l'appel.

Deutsch
- 17 -
Inhalt
Allgemeine Informationen ………………............................……………….………..……………..18
- Hardwareeinführung …………………………...........................…….……….….………..………………18
- Zusammenfaltbares Band zum Tragen am Hals...………………...............................……………...…18
- Zusammenklappbares Mikrofon ………………………………….……….……....................………...…18
- Mitgeliefertes Zubehör ……………………………………………….……..….....................………….…19
- Befestigen oder Verbinden des Audio-Dongles mit dem Musik-Player .……..................……….……19
- Sicherheitshinweise ………………………………………….......………...................................….……19
Anwendung……………………………………………………..………...................................……….20
Vorbereitungen……………………………………………….…………..................................….……21
- Netzanschluss und Aufladen der Batterie ……………….………………….….….................…….……21
- Ersetzen der Kopfhörerabdeckung ………….………………….….................................................…21
Inbetriebnahme……………………………………..……………..…..................................…….……22
- Ein- und Ausschalten (ON/OFF) des Kopfhörers und des Dongles …....…......................………22
- Paarbildung…………………………………………………..……………..…..................................…22
+ Paarbildung zum Audio-Dongle …………………………………….……….................................……22
+ Paarbildung zum Mobiltelefon ……………………………..………………..................................……22
Abspielen der Musik..…………………………………………….………...........................…………23
- Verbindung mit dem Mobiltelefon …..…………………..………….……...……….....................……24
+ Einen Anruf tätigen ……………………………………..…………….….….….......................…………24
+ Einen Anruf beantworten ………………………….………………….….….….........................………24
+ Einen Anruf beenden …………………………………………………..………..............................……24
Ankommender oder abgehender Anruf während dem Musikhören ...................... 24

Deutsch
- 18 -
Allgemeine Informationen
Hardwareeinführung
Kopfhörer
1. Netzschalter
2. Gleichstrombuchse
3. Auflade-LED
4. Faltbares Mikrofon
5. Status-LED
6. +/- Lautstärketaste
7. Sprech- / Paarungstaste
8. Band für das Tragen hinter dem Nacken
9. Farbige Platte
Audio-Dongle
1. Netzbuchse
2. Netzschalter (Power)
3. Paarungstaste
4. Anzeige-LED
5. Hi-Fi Audio-Eingangskabel
Zusammenfaltbares Band zum Tragen am Hals
Zusammenfaltbares Band zum Tragen und Aufbewahren.
Zusammenklappbares Mikrofon
Bei der Nichtbenutzung kann das Mikrofon auf einfache Weise zusammengeklappt werden.

Deutsch
- 19 -
Mitgeliefertes Zubehör
1 X 5 V-, 500-mA-AC-Adapter 1x USB-Ladekabel 4 x Farbige Platte
1 x Magicband 1 X Magic-Band 1 x Verbindungsadapter 1 zu 2
Befestigen oder Verbinden des Audio-Dongles mit dem Musik-Player
Wie abgebildet kann der Audio-Dongle wie gewünscht an den Musik-Player befestigt oder mit diesem
verbunden werden.
Sicherheitshinweise
1. Benutzen Sie den Kopfhörer und den Audio-Dongle nicht in Krankenhäusern und im Flugzeug.
2. Halten Sie die Geräte von starken Funksystemen fern, um die beste Qualität zu gewährleisten.
Deutsch
- 20 -
Anwendung
Mit dem erweiterten Audioverteilungsprofil
(A2DP) ermöglicht es der i-PHONO BT430
Bluetooth Hi-Fi Audio-Dongle Ihrem
Audiogerät, die Stereo-Audiosignale
kabellos an den i-PHONO BT420 Bluetooth
Hi-Fi S
p
orts-Ko
p
fhörer zu übertra
g
en.
BT430-installiertes Audiogerät
BT420
Bluetooth HiFi S
p
orts-Ko
p
fhöre
r
Einfach den eingebauten 3,5mm (1/8
Zoll) Stereo-Audio-Stecker des
i-PHONO BT430 Bluetooth I-FI Audio
Dongle in den Audioausgang Ihres
Audiogeräts wie z.B. einen Walkman,
MP3-, MD-, CD-Spieler, Pocket PC
oder Tablet PC stecken.
Beim Musikhören können Sie mit dem
eingebauten, zusammenklappbaren
Mikrofon und dank der eingebetteten,
innovativen “Auto Swiching”-Technologie
des i-PHONO BT420 Bluetooth Hi-Fi
Sports-Kopfhörers die Anrufe auf einfache
Weise em
p
fan
g
en oder täti
g
en..
Mobiltelefon
,
das Bluetooth ermö
g
licht
Deutsch
- 21 -
Vorbereitungen
Anschluss an das Stromnetz und Aufladen der Batterie
Vor dem Anschließen des AC-Adapters an die Netzsteckdose stellen Sie sicher, dass die örtliche
Leitungsspannung für die Stromversorgung für diesen AC-Adapter geeignet ist.
1. Den AC-Adapter mit der Gleichstrom-Buchse auf der Unterseite des Kopfhörers und
Audio-Dongles verbinden.
2. Den Stecker des AC-Adapters an die Netzsteckdose anschließen.
3. Die LED-Anzeigediode leuchtet rot, wenn der Kopfhörer und Audio-Dongle geladen wird.
4. Die LED-Anzeigediode wechselt auf grün, nachdem die Batterie des Kopfhörer und Audio-Dongles
voll aufgeladen sind.
5. Den AC-Adapter vom Kopfhörer und Audio-Dongle abtrennen.
Hinweis: Vor der Benutzung des Kopfhörers und des Audio-Dongles müssen Sie die Batterie zuerst ungefähr fünf
Stunden aufladen, um eine voll aufgeladene Batterie zur Verfügung zu haben.
Die Abdeckung wieder am Kopfhörer anbringen
Zum Entfernen der Abdeckung folgen Sie der Anleitung wie in Abb. 1 und Abb. 2 zu sehen ist.
Nehmen Sie die Abdeckung vorsichtig vom Kopfhörer ab.
Deutsch
- 22 -
Inbetriebnahme
Ein- und Ausschalten (ON/OFF) des Kopfhörers und des Audio-Dongles
ON OFF ON OFF
Mit dem Schalter wird das Gerät ein- oder ausgeschaltet.
Hinweis: Um das Stromsparen zu optimieren, schalten Sie bei Nichtbenutzung den Kopfhörer und den Audio-Donlge aus.
Paarbildung
Vor der ersten Inbetriebnahme des Kopfhörers und des Audio-Dongles oder des
Bluetooth-Mobiltelefons muss zwischen dem Kopfhörer und dem Audio-Dongle oder dem
Bluetooth-Mobiltelefon eine Paarbildung durchgeführt werden. Mit diesem “Paarbildungsvorgang”
wird eine spezielle kabellose Verbindung zwischen zwei Geräten hergestellt. Nach einer solchen
Paarbildung wird für die Verbindung zwischen diesen beiden Geräten keine Authentifizierung oder
Berechtigung benötigt.
Paarbildung zum Audio-Dongle
Für die Paarbildung des Kopfhörers mit dem Audio-Dongle befolgen Sie die unten
angegebenen Anweisungen :
1. Halten Sie die Paarbildungstaste auf dem Kopfhörer oder Audio-Dongle für 2 bis 3 Sekunden
gedrückt, bis die LED-Anzeigediode blau und rot zu blinken beginnt.
2. Beim Blinken der LED-Anzeigediode lassen Sie die Paarbildungstaste los. Der Status zeigt an,
dass der Kopfhörer und der Audio-Dongle im Paarbildungsmodus sind.
3. Nach 2 bis 3 Sekunden hört das Blinken der blauen und roten LED-Anzeigediode auf. Dies
bedeutet, dass der Paarbildungsvorgang abgeschlossen ist. Der Kopfhörer und der Audio-Dongle
kehren in den Normalstatus zurück, wobei die LED-Anzeigediode nur blau blinkt.
Deutsch
- 23 -
Für die Paarbildung des Kopfhörers mit einem Bluetooth-Mobiltelefon befolgen Sie die unten
angegebenen Anweisungen :
1. Halten Sie die Paarbildungstaste für 2 bis 3 Sekunden gedrückt, bis die LED-Anzeigediode des
Kopfhörers blau und rot blinkt.
2. Beim Blinken der LED-Anzeigediode lassen Sie die Paarbildungstaste los. Der Status zeigt an,
dass der Kopfhörer sich im Paarbildungsmodus befindet und auf eine Paarbildung mit einem
anderen Bluetooth-Gerät wartet.
3. Befolgen Sie die Bedienungsanleitung Ihres Bluetooth-Telefons, um mit dem Paarbildungsvorgang
zu beginnen.
4. Im Display des Telefons wird angezeigt, dass ein oder mehrere Bluetooth-Geräte gefunden
wurden. Der “i-PHONO” sollte auf der Liste ebenfalls aufgeführt sein. Wählen Sie ihn für die
Paarbildung aus.
5. Das Display des Telefons fragt nach einem Passwort oder einer PIN für die Paarbildung. Geben
Sie vier Nullen “0000” ein.
6. Nach dem erfolgreichen Paarbildungsvorgang kehrt die LED-Anzeigediode in den Normalstatus
zurück und blinkt nur blau.
7. Im Display des Telefons werden Sie gefragt, ob Sie den Namen des Kopfhörers ändern möchten.
Anstelle des Namens “i-PHONO” können Sie einen beliebigen anderen Namen eingeben.
Abspielen der Musik
Vor dem Abspielen der Musik stellen Sie sicher, dass die Paarbildung des Kopfhörers mit dem
Audio-Dongle bereits ausgeführt wurde.
Schließen Sie den HiFi-Anschlussstecker des Audio-Dongles an den MP3-Player, Walkman oder
CD-Spieler an. Schalten Sie den Audio-Dongle, den Kopfhörer und den Musik-Player ein. Spielen Sie
die Musik mit dem Musik-Player ab. Danach hören Sie die Musik vom Kopfhörer.
Hinweis: Falls Sie die Musik vom Kopfhörer ausschalten möchten, drücken Sie die Paarbildungstaste auf dem
Audio-Dongle. Danach sendet der Audio-Dongle keine Signale an den Kopfhörer mehr. Um die Musik weiter abzuspielen
drücken Sie die Paarbildungstaste erneut.
Deutsch
- 24 -
Verbindung mit einem Mobiltelefon
Vor der Anwendung dieser Funktion stellen Sie bitte sicher, dass die Paarbildung des Kopfhörers mit
dem Mobiltelefon bereits vorhanden ist.
Einen Anruf tätigen
Benutzen Sie das Tastenfeld des Telefons. Wählen Sie wie üblich die gewünschte Telefonnummer
mit den Tasten auf diesem Tastenfeld.
Einen Anruf beantworten
Nach der Paarbildung mit Ihrem
Mobiltelefon ist der Kopfhörer für
ankommende Anrufe bereit, ohne dass Sie
dabei das Telefon in der Hand halten
müssen. Bei einem ankommenden Anruf
klingeln das Mobiltelefon und der
Kopfhörer gleichzeitig. Beim Ertönen des
Klingelzeichens vom Lautsprecher des
Kopfhörers können Sie den ankommenden
Anruf durch Drücken der
Paarbildungstaste und normales Sprechen
beantworten.
Einen Anruf beenden
Zum Beenden eines Anrufs wenden Sie eine der folgenden beiden Methoden an:
1. Drücken Sie für drei Sekunden die
Paarungstaste des Kopfhörers, um ein
Gespräch zu beenden.
2. Drücken Sie die Taste auf dem
Tastenfeld des Telefons, um den Anruf zu
beenden.
Hinweis: Einige Mobiltelefone funktionieren auf
eine andere Weise. Besuchen Sie unsere Webseite:
www.bluetake.com. Auch der Klingelton des
Kopfhörers steht eventuell für einige der
Mobiltelefone nicht zur Verfügung.
Ankommender oder abgehender Anruf während dem Musikhören
Beim Musikhören können Sie einen Anruf mit der “Auto Switching”-Funktion beantworten oder
tätigen. Bei einem ankommenden oder abgehenden Anruf hören Sie das Klingelzeichen des
Kopfhörers. Danach dem Vorgang für die Kommunikation mit dem Mobiltelefon folgen. Nach dem
Beenden eines Anrufs wird die Musik wieder ertönen.

Italiano
- 25 -
Contenuti
Informazioni generali…………………………………………….…………………………………..…..26
- Introduzione all’hardware……………………………………….…………………………………………….26
- Banda posteriore pieghevole...………………………………..……………….……………….……………26
- Microfono pieghevole……………………………………………..…….............................……….............26
- Accessori supplementari……………………………………...…………..….............................………27
- Connetere Dongle audio al lettore musicale………………..………………....................................……27
- Informazioni sulla sicurezza……………………………………………..……...................................……27
Applicazioni ………………………………………………….....……........................................……….28
Preparazione ………………………………………………………………………………………………29
- Collegare alla corrente e caricare la batteria …………………………....…….....................….…………29
- Rimettere la copertura della cuffia ………………………………………....……..…….....................……29
Operazioni……………………………………………………………..…...............................……………30
- Accendere Cuffie e Dongle Audio ………………………….....…......…...............................…………30
- Collegamenti…………………………………………………………….....……........................…………30
+Collegamento a Dongle audio ………………………………………………............…….............………30
+ Collegamento al cellulare………………………………………………………........................…………30
Ascoltare musica…………………………………………………………….…………………….………31
- Connessione al cellulare…………………………………………………..…..……………………………32
+ Effettuare una chiamata……………………………………………………………………………………32
+ Rispondere a una chiamata…………………………………………………….…....……………………32
+ Terminare una chiamata….……………………………………………………..........……...............……32
Ricevere o effettuare una chiamata mentre si ascolta musica……......................………32

Italiano
- 26 -
Informazioni generali
Introduzione all’hardware
Cuffia
1. Interruttore
2. presa DC
3. LED di carica
4. Microfono pieghevole
5. LED di stato
6. tasto volume +/-
7. Tasto Parla / Abbina
8. Fascia da applicare dietro al collo
9. Placca colorata
Dongle audio
1. Spinotto per la corrente
2. Interruttore per la corrente
3. Tasto abbinamento
4. LED Indicatore
5. Cavo Hi-Fi Audio-in
Banda posteriore pieghevole
La banda posteriore pieghevole è disponibile per il trasporto e per i momenti di inutilizzo
Microfono pieghevole
Il microfono può essere ripiegato più facilmente se non si sta chiamando.

Italiano
- 27 -
Accessori supplementari
Caricabatteria 5V 500m A AC x 1 Cavo carica USB x 1 Placche colorate x 4
Fascia magica x 1 Magic Tape x 1 Connettore adattatore 1-a-2 x 1
Unire o collegare il Dongle audio al lettore musicale
Come si vede nella figura, è possibile collegare o unire il Dongle audio al lettore musicale che si
preferisce.
Informazioni per la sicurezza
1. Non usare le cuffie e il Dongle audio in un sistema d’emergenza, in ospedale e in aereo.
2. Tenersi lontani da sistemi radio forti per assicurare la qualità dei singoli componenti.

Italiano
- 28 -
Applicazioni
Con Advanced Audio Distribution Profile
(A2DP), l’Hi-Fi Dongle audio i-PHONO
BT430 Bluetooth permette al vostro
dispositivo audio di trasferire il segnale
audio stereo senza fili alla cuffia i-PHONO
BT420 Bluetooth Hi-Fi S
p
orts.
Dis
p
ositivo audio BT430
BT420
Cuffia Bluetooth Hi-Fi S
p
orts
È sufficiente inserire lo spinotto
standard 3.5mm (1/8 inch) audio
stereo di i-PHONO BT430 Bluetooth
Hi-Fi Dongle audio nella presa del
vostro dispositivo audio (walkman,
lettore MP3/MD/CD, computer fisso o
portatile ecc.)
Mentre vi godete la musica, potete
ricevere o effettuare telefonate
semplicemente con il microfono
interno ripiegabile e con l’interna e
innovativa tecnologia “auto switching”
della cuffia i-PHONO BT420 Bluetooth
Hi-Fi Sports.
.
Cellulare abilitato al sistema
Bluetooth
Italiano
- 29 -
Preparazione
Collegare alla corrente e caricare la batteria
Prima di collegare il caricabatteria AC alla presa, assicurarsi che il voltaggio del locale sia adeguato.
1. Inserire il caricabatteria AC nello spinotto DC situato alla base di cuffiette e Dongle audio.
2. Inserire lo spinotto del caricabatteria AC nella presa della corrente.
3. Quando cuffiette e Dongle audio è in carica il LED indicatore emette una luce rossa.
4. Il LED indicatore diventa verde per la cuffia e blu per il Dongle audio quando la batteria è
completamente carica.
5. Rimuovere il caricabatteria AC dalla cuffia e dal Dongle audio.
P.S. Prima di utilizzare la cuffia e Audio Dongle è necessario mettere in carica la batteria per circa 5 ore per assicurare
una carica completa.
Rimettere la copertura alle cuffie
Seguire le indicazioni della fig. 1 e della fig. 2. Rimuovere la copertura delicatamente.

Italiano
- 30 -
Operazioni
Accendere e spegnere cuffie e Dongle audio
ON OFF ON OFF
Spostare l’interruttore per accendere e spegnere l’apparecchio.
P.S. Per ottimizzare il risparmio energetico, spegnere l’auricolare e la chiave audio quando non li si usa.
Collegare
Prima di usare cuffie e il Dongle audio o il cellulare Bluetooth per la prima volta, è necessario
collegare le cuffie con il Dongle audio o con il cellulare Bluetooth. Questo procedimento di “unione”
crea un unico collegamento wireless tra i due dispositivi. Una volta effettuato questo passaggio, la
comunicazione tra i due dispostivi non necessita di ulteriori autentificazioni o autorizzazioni.
Collegare al Dongle audio
Seguire le seguenti istruzioni per collegare cuffie e Dongle audio
1. Tenere premuto per 2-3 secondi il tasto di collegamento sulle cuffie o sul Dongle audio fino a che il
LED comincia a emettere una luce lampeggiante blu e rossa.
2. Rilasciare il tasto dopo che il LED comincia a lampeggiare, status che indica che l’apparecchio è in
modalità di collegamento.
3. Dopo 2-3 secondi il LED smette di lampeggiare. Ciò indica che il processo è concluso. Quando la
luce emessa è soltanto blu, l’apparecchio è tornato allo status normale.

Italiano
- 31 -
Seguire le seguenti istruzioni per collegare le cuffie al cellulare Bluetooth:
1. Tenere premuto per 2-3 secondi il tasto di collegamento fino a che il LED delle cuffie comincia a
emettere una luce lampeggiante blu e rossa.
2. Rilasciare il tasto dopo che il LED comincia a lampeggiare, status che indica che le cuffie sono in
modalità di collegamento e in attesa di essere collegate a un altro dispositivo Bluetooth.
3. Seguire le istruzioni seguenti per iniziare un processo di collegamento per il vostro telefono
Bluetooth.
4. Sul display del telefono compaiono il dispositivo o i dispositivi Bluetooth rilevati. Nella lista
dev’essere incluso il dispositivo “i-PHONO”, che va selezionato per il processo di collegamento.
5. Successivamente il display indica la necessità di inserire una password o un PIN. Inserire quattro
zeri (0000).
6. Quando il procedimento è concluso positivamente, il LED delle cuffie ritorna allo status normale o
lampeggia solamente la luce blu.
7. Il display chiederà se si vuole cambiare il nome delle cuffie. È possibile sostituire il nome
“i-PHONO” con qualsiasi altro.
Ascoltare musica
Prima di ascoltare musica, assicurarsi che le cuffie siano state collegate al Dongle audio.
Inserire il connettore del Dongle audio Hi-Fi nel lettore MP3 (walkman o CD). Accendere il Dongle
audio, le cuffie e il lettore musicale. La musica si sentirà nelle cuffie.
p.s. Se si vuole smettere di sentire musica dalle cuffie, premere il tasto di collegamento del Dongle audio, che a questo
punto non manderà più alcun segnale alle cuffie. Premere nuovamente il tasto per sentire nuovamente la musica.

Italiano
- 32 -
Connessione al cellulare
Prima di utilizzare questa funzione, assicurarsi che le cuffie siano state collegate al cellulare.
Effettuare una chiamata
Usare la tastiera numerica del telefono. Selezionare il numero che si desidera chiamare con la
tastiera numerica del telefono.
Rispondere a una chiamata
Dopo aver effettuato il collegamento con il
cellulare, Il sistema delle cuffie è pronto
per ricevere chiamate senza dover
maneggiare il telefono. Quando c’è una
chiamata in arrivo, il cellulare e le cuffie
suonano simultaneamente. Dopo aver
sentito lo squillo della chiamata si può
rispondere utilizzando il microfono delle
cuffie premendo il tasto di collegamento e
parlando normalmente.
Terminare una chiamata
Si possono utilizzare due modalità per terminare una chiamata:
1. Premere per 3 secondi Il tasto di
abbinamento dell’auricolare per terminare
la chiamata.
2. Premere la tastiera numerica del
telefono.
p.s. Per ulteriori informazioni e per modalità diverse,
contattate il nostro sito web www.bluetake.com. In
alcuni modelli può non essere presente il suono
della cuffia.
Chiamata in entrata / chiamata in uscita mentre si ascolta musica
Mentre si gusta la musica, è possibile ricevere o effettuare una chiamata con la funzione “auto
switching”. Ricevendo o effettuando una chiamata, si possono sentire i suoni attraverso la cuffia. La
comunicazione avverrà come con un cellulare. La musica ricomincerà al termine della chiamata.

Español
- 33 -
Contenidos
Información General………………………………………………..........…………………………..34
- Introducción de Hardware……………………………………………………….….………………………34
- Banda plegable detrás del cuello.……..…………………………………………..………………………34
- Micrófono Plegable…..……………………………………....................………..………………………34
- Accesorios suministrados……………………………………………………………………..……………35
- Pegue o ate el adaptador de audio con el reproductor de música……………....…..………….……35
- Información de seguridad…………………………………………………………....……………………35
Aplicación …………………………………………………………………………..……..……………….36
Preparación…………………………………………..............................……..……….…………………37
- Conexión de la alimentación y cargando la batería……………………………….......…….…………37
- Cambiando la tapa del auricular …………………………………………..……………….……………37
Funcionamiento…………………………………………………………………..…………………………38
- Encendiendo el Auricular y el Adaptador de Audio…………………………………….….…………38
- Emparejando…………………………………………………………………….……………….…………38
+ Emparejando el Adaptador de Audio…………………………………………….……………………38
+ Emparejando con el teléfono movil……………………………………………….……………………39
Reproduciendo música…………………………………………………………………..………………39
- Conectando con el Móvil ………………………………………………………….…………..……………40
+ Realizando una llamada………………………………………………………….……….……………40
+ Respondiendo una llamada……………………………………………………….……….……………40
+ Finalizando una llamada………………………………………………..………………….……………40
Timbre entrante o llamada saliente al estar escuchando música…………………...40

Español
- 34 -
Información General
Introducción de Hardware
Auricular
1. Interruptor de Encendido
2. Enchufe CC
3. LED de carga
4. Micrófono plegable
5. LED de Estado
6. Botón de volumen +/-
7. Botón Hablar / Emparejamiento
8. Banda por detrás del cuello
9. Tapa de color
Adaptador de Audio
1. Enchufe de Alimentación
2. Interruptor de alimentación
3. Botón de emparejamiento
4. LED indicador
5. Cable de entrada de Audio Hi-Fi
Banda plegable por detrás del cuello
Además la banda plegable por detrás del cuello está disponible para transporte o almacenamiento
Micrófono Plegable
El micrófono puede ser plegado fácilmente cuando no esté en una comunicación

Español
- 35 -
Accesorios suministrados
Adaptador CA 5V 500mA x 1 Cable cargador USB x 1 Tapas de colores x 4
Cinta Mágica x 1 Cinta mágica x 1 Adaptador conector 1-to-2 x 1
Pegue o ate el adaptador de audio con el reproductor de música
Como en la imagen, puede pegar o atar el adaptador de audio con el reproductor de música según
prefiera.
Información de Seguridad
1. No use el auricular y el Adaptador de Audio en sistemas de Emergencia, Hospitales y Aviones.
2. Mantener fuera de sistemas de radio fuertes para asegurarse de la calidad de la señal.
Español
- 36 -
Aplicación
Con el perfil de Distribución de Audio
Avanzado (A2DP), el Adaptador de
Audio Hi-Fi Bluetooth i-PHONO BT430
permite a su dispositivo de auido
transferir la señal estéreo de audio sin
cables a los Auriculares Deportivos
Hi-Fi Bluetooth i-Phono BT420.
BT430-dispositivo de audio
instalado
Auriculares Deportivos Hi-Fi
Bluetooth i-Phono BT420.
Simplemente enchufe la clavija
estéreo estándar 3.5 mm (1/8
pulgadas) integrada del Adaptador de
Audio Hi-Fi Bluetooth i-PHONO BT430
al enchufe de salida de audio de su
dispositivo como un walkman, MP3 /
Reproductor CD, Pocket PC, Tablet
PC, etc.
Al disfrutar de música, puede recibir o
realizar llamadas de teléfono
fácilmente a través del micrófono
plegable integrado y la tecnología
innovadora “auto cambio” incluida de
los Auriculares Deportivos Hi-Fi
Bluetooth i-Phono BT420.
.
Teléfono móvil habilitado para
Bluetooth
Español
- 37 -
Preparación
Conexión de alimentación y Cargando la Batería
Antes de conectar el adaptador CA a la toma, por favor asegúrese de que el voltaje de las lineas
eléctricas locales coincide con el Adaptador CA.
1. Enchufe el adaptador CA al enchufe CC situado en el fondo del Auricular y Adaptador de Audio.
2. Enchufe el Enclufe del adaptador CA a la toma.
3. El indicador LED se pone rojo al cargar el Auricular y el Adaptador de Audio.
4. El indicador LED se pone Verde en el Auricular y Azul en el Adaptador de Audio después de que la
batería esté totalmente cargada.
5. Quite el adaptador CA del auricular y del Adaptador de Audio.
P.S. Antes de usar el Auricular y el Adaptador de Audio deberá cargar la batería durante aproximadamente 5 horas para
asegurarse de que la batería esta completamente cargada.
Cambiando la Tapa del Auricular
Siga la dirección para quitar la tapa como en fig1 y fig2. Por favor quite la tapa del auricular con
cuidado.

Español
- 38 -
Funcionamiento
ENCENDIENDO/APAGANDO el auricular y el adaptador de Audio.
ON OFF ON OFF
Deslizando el interruptor para encender o apagar la alimentación.
P.S. Para optimizar el ahorro de energía, por favor apague el auricular y el adaptador de audio cuando no estén en uso.
Emparejando
Antes de usar su auricular y Adaptador de audio por primera vez o un teléfono móvil Bluetooth, tiene
que emparejar el auricular con el Adaptador de Audio o teléfono móvil Bluetooth. El proceso de
“Emparejamiento” crea una union inalámbrica única entre los dos dispositivos. Una vez emparejados,
la comunicación entre los dos dispositivos no necesita ninguna autentificación o autorización nunca
más.
Emparejar al Adaptador de Audio
Por favor siga las instrucciones de abajo para emparejar el auricular y el adaptador de audio:
1. Presione y mantenga el botón de emparejamiento en el auricular o adaptador de audio durante
2-3seg hasta que el LED empieza a destellar en azul y rojo.
2. Suelte el botón de emparejamiento después de que el LED esté destellando, el estado indica que
el auricular o adaptador de audio está en modo emparejamiento.
3. Después de 2-3 seg el LED para de destellar en Azul y rojo. Eso significa que el proceso de
emparejamiento esta terminado. El auricular y el audio volverán al estado normal destellando sólo
en azul.

Español
- 39 -
Por favor siga las instrucciones de abajo para emparejar el auricular con un teléfono móvil
Bluetooth:
1. Presione y mantenga el Botón de emparejamiento durante 2-3 seg hasta que el LED de auricular
empieza a destellar en azul y rojo.
2. Suele el botón de emparejamiento después de que el LED esté destellando, el estado indica que
el auricular está en modo emparejamiento y esperando para emparejar con otro dispositivo
Bluetooth.
3. Siga las instrucciones de funcionamiento para su móvil Bluetooth para empezar el proceso de
emparejamiento.
4. La pantalla del móvil indicará que ha encontrado uno o más dispositivos Bluetooth, el “i-PHONO”
debería estar incluido en la lista, por favor selecciónelo para emparejar.
5. La pantalla del móvil le pedirá que introduzca un código de emparejamiento o PIN. Por favor
introduzca cuatro ceros “0000”.
6. Cuando el proceso de emparejamiento ha terminado satisfactoriamente, el LED del auricular
volverá al estado normla destellando sólo en azul.
7. Puede que la pantalla de móvil le pida si quiere cambiar el nombre del auricular. Puede cambiar el
“i-PHONO” con cualquiera que prefiera.
Reproduciendo música
Antes de reproducir música, por favor asegúrese de que el auricular haya sido ya emparejado con el
adaptador de audio.
Conecte el conector Hi-Fi del adaptador de audio a un reproductor MP3, walkman o reproductor de
CD. Encienda el adaptador de audio, auricular y reproductor de música. Reproduzca la música en el
reproductor. Y entonces escuchará la música en el auricular.
p.s. Si quiere para de escuchar música desde el auricular, puede presionar el botón de emparejamiento en el adaptador
de audio. Y entonces el adaptador de audio no envía ninguna señal al auricular. Presione el botón de emparejamiento
otra vez para devolver la música.
Español
- 40 -
Conectando con un Móvil
Antes de usar esta función, por favor asegúrese de que el auricular haya sido emparejado con el
teléfono móvil.
Haciendo una llamada
Use el teclado del teléfono. Como uso general, marque el número de teléfono al que quiere llamar
presionando las teclas del teléfono.
Contestando una llamada
Después de ser emparejado con su
teléfono móvil, el auricular está ahora
preparado para recibir llamadas entrantes
sin utilizar el móvil. Cuando haya una
llamada entrante, tanto el teléfono móvil
como el auricular sonarán
simultaneamente. Después de escuchar
los tonos del timbre a través del altavoz de
auricular puede responder a la llamada
entrante presionando el botón de
emparejamiento y hable con normalidad.
Terminando una llamada
Puede usar cualquiera de los modos para terminar una llamada:
1. Presione durante 3 seg. el botón de
emparejamiento del auricular para acabar
una llamada.
2. Presione el teclado del móvil para
terminar una llamada.
p.s. Puede haber un proceso de funcionamiento
distinto para algunos teléfonos móviles. Por favor
visite nuestra página web www.blietake.com
Puede que el el timbre del auricular no esté
disponible para algunos teléfonos móviles.
Timbre entrante o llamada saliente mientras escucha música
Cuando esté disfrutando de música, puede recibir o realizar una llamada con la función “auto
cambiar”. Una vez que tenga una llamada entrante o saliente, puede escuchar el tono del timre
desde el auricular. Entonces siga proceso como al comunicar con el teléfono Movil. La música
volverá después de acabar la llamada.

Pyccкий
- 41 -
Содержание
Информацияь общего характера……….....................................…………….…………..42
- Знакомство с аппартным обеспечением ………….……….....................................………………42
- Эластичный ободок для крепления на шее……………………..….................................…………42
- Эластичный микрофон ……………………………………….………..........................…………….…42
- Аксессуары входящие в комплектацию………………..……….….................................……………43
- Прикрепление Аудио Заглушки к музыкальному плееру………...................................….……43
- Информация по безопасности. …………..………………………...................................……………43
Приложение ………………………………………….………………......................……..……………….44
Подготовка …………………….………………………………………….......................…………………45
- Подключение питания и зарядка батарейки .…………………….….....................................……45
- Снятие крышки с наушников…………………………………………….................................………45
Работа ………………………………………………………..……………….......................………………46
- Включение и выключение наушников и Аудио Заглушки ………………………..............................……46
- Процесс Спаривание ……………………………………………………………......................………46
+ Спаривание с Аудио Заглушкой ……………….……………………………......................…………46
+ Спаривание с сотовым телефоном ………………………………………....................................47
Прослушивание музыки………………………………………………..............................………47
- Подключение кмобильному телефону ………………………………..............................……..……48
+ Совершение телефонного звонка ……………………………………................................….……48
+ Входной звонок ………………………..………………………………......................….……………48
+ Завершения разговора по телефону.………………………………………......................…………48
Совершать или отвечать на телефонный звонок во время прослушивания музыки…..…48

Pyccкий
- 42 -
Общая информация
Знакомство с аппаратным обеспечением
Наушники
1. Кнопка питания
2. Разъем DC
3. LED индиктор зарядки
4. Эластичный микрафон
5. LED индикатор статуса
6. +/- Кнопка уровня громкости
7. Кнопка Разговор/Спаривание
8. Обод для ношения на шее
9. Цветная панель
Аудио защита
1. Разъем для подсоединения сетевого шнура
2. Кнопка питания
3. Кнопка спаривания
4. LED индикатор
5. Провод Hi-Fi Audio-in
Эластичный ободок для крепления на шее.
Эластичный ободок для крепления на шее также удобен при транспортировки и хранение.
Эластичный Микрофон
Если вы на данный момент не собираетесь пользоваться микрафоном, то вы можете легко
изменить положение микрафона, приподняв его.
Pyccкий
- 43 -
Аксессуары, входящие в комплектацию
5V 500mA Адаптер USB првод для под зарядки x 1 Цветная панель x 4
Переменного Тока x 1
Меджикбенд x 1 Волшебная пленка x 1 1-a-2 коннектор адаптера x 1
Прикрепление аудио заглушки к музыкальному плееру.
На рисунке показаны способы прикрепления Аудио заглушки к музыкальному плееру.
Информация по безопасности
1. Наушники и Аудио заглушку не следует использовать в близи систем безопасности, в
Больницах и самолетах.
2. В целях поддрежания качества аудио сигнала, держите наушники и адио зваглушку вдали от
систем, вырабатывающих мощный радио сигнал.

Pyccкий
- 44 -
Приложение
Благодаря Передовому Профилю
Расспределению Аудио Сигнала, (A2DP),
I-PHONE BT430 BLUETOOTH HI-FI Аудио
Заглушка позволяет вашему аудио
устройству передовать беспроводным
путем аудио сигнал на наушники
спортивного типа I-PHONE BT420
BLUETOOTH HI-FI.
Инстали
р
ованное а
у
дио
у
ст
р
ойство BT430
Наушники спортивного типа
I-PHONE BT420 BLUETOOTH HI-FI.
Просто подсоедините стандартный
стерео аудио штепсель3.5мм (1/8
дюймов) Аудио Заглушки i-PHONO
BT430 Bluetooth Hi-Fi к разъему
вашего аудио устройства такого как
кассетный плеер, МР3/ MD / CD
плеер, Карманный ПК, Планшетный
ПК и т.д.
Во время прослушивания музвкальных
фвйлов, вы можете совершать и
отвечать на телефонные звонки по
средствам встроенного эластичного
микрофона и встроенной технологии
«автоматического переключения
наушников спортивного типа i-PHONO
BT420 Bluetooth Hi-Fi.
.
Сотовый телефон
поддепживающий Bluetooth
Pyccкий
- 45 -
Подготовка
Подключение питания и зарядка батарейки
Прежде чем осуществлять подсоединение адаптера Переменного Тока к источнику
электропитания, убедитесь что напряжение тока в сети соответствует спецификации адаптера
Переменного Тока.
1. Подсоедините адаптер Переменного тока к разъему Постоянного Ток а расположенного в
нижней части наушников и Аудио Заглушки.
2. Подсоедините адаптер Переменного тока к источнику электро питания.
3. При подзарядки наушников и аудио заглушки, LED индикатор загорится красным цветом.
4. После того как батарейка будет полностью подзаряжена, LED индикатор наушников
загорится зеленым цветом, а Аудио заглушки – красным.
5. Отсоедините адаптер Переменного Тока от наушников и Аудио заглушки.
Прежде чем приступить к пользованию наушниками и аудио заглушки, вам будет необходимо подзаряжать
батарейку на протяжение приблизительно 5 часов.
Снятие крышки с наушников
Следуйте направлению для снятия крышки как это показано на рис.1 и рис.2. Пожалуйста
осторожно снемите крышку с наушников.

Pyccкий
- 46 -
Оперирование
Включение и выключение наушников и Аудио Заглушки
ON OFF ON OFF
Плавно поверните переключатель в положенение включить или выключить.
Для оптимального сохранения энергии, при неиспользование наушников и аудио залушки их следует выключать
Процесс Спаривания
Перед тем как приступить к акитивизицие ваши наушники, аудио защиту или сотовый телефон
Bluetooth в первый раз , вы должны осуществить спаривание ваших наушников с Аудио
Заглушкой или сотовым телефоном Bluetooth. Процесс спаривания позволяет создать
уникальную беспроводную связь между двух устройств. После того как процесс спаривание
будет успешно завершен, для осуществления связи между двумя устройствами больше не
будет требоваться индефикация или авторизация.
Процесс спаривания с аудио заглушкой
Пожалуйста следуйте инструкции внизу для осуществления процесса спаривания
наушников и аудио заглушки:
1. Нажмите и держите кнопку спаривания на наушниках или на аудио заглушка на протяжение
2-3 секунд пока LED индикатор не начнет мигать синим и красным цветом.
2. Отпустите кнопку спаривания после того как LED индикатор начнет мигать. Данный статус
указывает на то, что наушники или аудио заглушка находятся в режиме спаривания.
3. После 2-3 секунд LED индикатор перестанет мигать синим и красным цветом. Это значит,
что процесс спаривания завершен. Наушники и аудио заглушка вернуться к стандартнаму
операционному статусу и будут мигать только синим цветом.
Pyccкий
- 47 -
Пожалуйста следуйте инструкции внизу для осуществления процесса спаривания
наушников с сотовым телефоном Bluetooth:
1. Нажмите и держите кнопку спаривания на протяжение 2-3 секунд до тех пор пока LED
индикатор наушников начнет мигать синим и красным цветом.
2. Отпустите кнопку спаривания после того как LED индикатор начнем мигать, данный статус
указывает на то, что наушники готовы к активизации процесса спаривания с другим
устройством Bluetooth.
3. Для начала процесса спаривания следуйте инструкциям вашего телефона Bluetooth.
4. На дисплее телефона появится сообщение о том что он обнаружил одно или более
устройств Bluetooth, опция “i-PHONO” должна быть также включена в список устройств для
спаривания, выберите ее для спаривания.
5. На дисплее телефона появиться требования о вводе пароля для спаривания или PIN кода.
Вам следует ввести четыре ноля “0000”.
6. После того как процесс спаривания будет успешно завершен, LED индикатор наушников
вернется к стандартному операционному статусу и будет мигать синим цветом.
7. Возможно на дисплее вашего телефона появится запрос о вашем желание изменить имя
наушников. Вы можете заменить “i-PHONO” на любое другое имя по вашему усмотрению.
Прослушивание музыки.
Прежде чем вы приступите к прослушивание музыки, убедитесь что процесс спаривания
нушников с проигователем музыкальных файлов полностью завершен.
Подсоедините коннектор аудио защиты к пригрователю МР3 или проигрователю Компакт
Дисков. Включите аудио заглушку наушники и проигрватель. После того как проигрователь
будет активизирован вы сможете прослушивать музыку по средствам наущников.
Если вы хотите завершить прослушивание музыки по средствам наушников, вам следует нажать на кнопку
спаривания для активизации функции аудио заглушки, после чего аудио защита прикратит подачу аудио сигнала
на наушники. Для того чтобы вновь активизировать функцию подачи аудио сигнала на наушники, нажмите на
кнопку спаривания еще один раз.

Pyccкий
- 48 -
Подсоединение к мобильному телефону
Прежде чем приступить к активизации данной функции, убедитесь, что процесс спаривания
ваших наушников с мобильным телефоном полностью завершен.
Совершение телефоного звонка
По средствам клавиатуры мобильного телефона совершите набор желаемого телефоного
номера.
Входной звонок
После того как процесс спаривания с вашим
сотовым телефоном завершен, гарнитура
готова к автоматическому приему
телефонных звонков и вам нет необходимости
принимать или совершать звонки нажимая на
соответствующие кнопки сотового телефона.
При наличие входного звонка, сотовый
телеофон и наушники одновременно подадут
звуковой сигнал. После того как вы услышите
данный звуковой сигнал в наушниках вы можете ответить на входной звонок нажав кнопку
спаривания
Завершение разговора по телефону
Завершить телефонный разговор вы можете следующими способами:
1. Для завершения звонка, на протяжение 3
сек нажмите. кнопку спаривания наушников.
2. Нажмите кнопку завершения разговора на
сотовом телефоне.
Возможно вы будете испытавать трудности при
активизации данной функции на некоторых мобильных
телефонах Пожалуйста посетите нашу веб станицу,
которая находится по адресу: www.bluetake.com.
Функция звукового сигнала наушников не доступна для
некоторых моделей сотовых телефонов.
Совершать или отвечать на телефонный звонок во время прослушивания музыки
Во время прослушивания музыки вы можете совершать или отвечать на телефонные звонки по
средствам функции «автоматического переключения». Во время поступления или совершения
телефонного звонка вы услышите в наушниках звуковой сигнал. После того как разговор по
телефону будет завершен, произойдет автоматическое восстановление функции
проигрование музыки.

- 49 -
Appendix I LED indication
Headphone right ear
Blue Red Interval
Turn on Flashes 5 times
Standby Flashes once 4 sec
Pairing Flashes blue and red alternately until the pairing is complete or time out 60 sec
Talk and Play Flashes 4 times 4 sec
Incoming Call Flashes 3 times 2 sec
Left ear
Green Red
Charging on
Battery fully on
Low Battery on
Audio dongle
Blue Red Interval
Charging When the battery is full During the charging
Standby Flashes once 4 sec
Pairing Flashes blue and red alternately until the pairing is complete or time out
Battery Low Flash once 5 sec
Appendix II Button definition
Headphone
Function Process
Answer/end calls Press the Talk button once
Pairing
Pairing
Press the Pairing button and keep it pressed for about 3
sec until the blue and red indicators flash
alternately( discounect with Audio Dongle or Mobile phone)
Volume Up Increase the volume Press the Volume up button repeatedly until you reach
your desired level
Volume Down Decrease the volume Press the Volume down button repeatedly until you reach
your desired level
Power on Power turn on
Power Switch Power off Power turn off
Audio dongle
Function Process
Pairing Press the Pairing button and keep it pressed for about 3
sec until the blue and red indicators flash alternately Pairing
Interrupt Radio Signal Press once to stop signal. Press once again to return it.
Power on Power turn on
Power Switach Power off Power turn off

- 50 -
Specification
Headphone
General Radio
Carrier Frequency : 2.4 ~ 2.483GHz
Data Rate : 1 Mbps
Spread Spectrum
FHSS (Frequency Hopping Spread Spectrum)
Modulation Method
GFSK (Gaussian Frequency Shift Keying)
Radio Coverage
Up to 5~10 meters (in open space). The valid operating range depends on the paired phone model, battery power, and
environmental factors.
Bluetooth Profile Supported
A2DP (Advanced Audio Distribution Profile), HSP (Headset Profile),
HFP (Hands-Free Profile), SPP (Serial Port Profile)
Multi-Pairing
Max. 5 different Bluetooth enabled devices
Antenna
Ceramic Antenna
Sensitivity
< 0.1% BER at -80 dBm
RF Output Power
-6dBm to 0dBm
Audio Format
SBC
Power Consumption
Tx Typical: 65mA
Rx Typical: 45mA
Input Power
5V 500mA, AC adapter
Battery
3.7V / 600mA / Li-Polymer / Embedded and Rechargeable
Listening Time / Talking Time
6 hours / 8 hours
Environment
Operating Temperature : -10 ~ +55℃℃
Dimensions
Folded : 100mm x 88mm x 77mm
Unfolded : 150mm x 140mm x 75mm
Max. extended ear-to-ear distance : 180mm
Weight
98g (battery included)
- 51 -
Audio Dongle
General Radio
Carrier Frequency : 2.4 ~ 2.483GHz
Data Rate : 1 Mbps
Spread Spectrum
FHSS (Frequency Hopping Spread Spectrum)
Modulation Method
GFSK (Gaussian Frequency Shift Keying)
Radio Coverage
Up to 5~10 meters (in open space). The valid operating range depends on the paired phone model, battery power, and
environmental factors.
Bluetooth Profile Supported
A2DP (Advanced Audio Distribution Profile), HSP (Headset Profile),
HFP (Hands-Free Profile), SPP (Serial Port Profile)
Antenna
Ceramic Antenna
Sensitivity
< 0.1% BER at -80 dBm
RF Output Power
-6dBm to 0dBm
Audio Format
SBC
Power Consumption
Tx Typical: 65mA
Rx Typical: 45mA
Input Power
5V 500mA, AC adapter
Battery
3.7V / 600mA / Li-Polymer / Embedded and Rechargeable
Listening Time
6 hours
Environment
Operating Temperature : -10℃~ +55℃
Dimensions
50mm x 51mm x 15mm
Weight
36g (battery included)
