Boly Media Communications 00006 Scouting Camera User Manual
Boly Media Communications (Asia) Co., Ltd. Scouting Camera
User Manual

Infrared Mobile Digital Scouting Camera
User’s Manual
MG883G-12mHD
FCC ID: Y2L00006
Content
1 Instruction....................................................................1
1.1 Camera Body Interfaces...................................1
1.2 General Description......................................... 1
1.3 Remote Control................................................ 2
1.4 Shooting Information Display........................3
1.5 Two Way Communication...............................3
1.6 Cautions.............................................................4
2QuickStartGuide
.......................................................6
2.1 Power Supply....................................................6
2.2InserttheSDcardandSIMcard
...................7
2.3 Do the Camera Settings.................................. 7
2.4 Enter into Test Mode...................................... 8
2.5 Custom Settings............................................... 9
2.6 Enter into On Mode........................................ 9
2.7 SMS Control....................................................10
2.8 SMS Command List....................................... 11
2.9 Power Off........................................................ 12
3ItemSettings
.............................................................13
3.1 Camera Menu..................................................13
3.2 Default Setting................................................19
3.3 Playback Mode...............................................20
3.4 Laser Pointer.................................................. 21
4TroubleShooting
..................................................... 22
5PIRDetectionZone
................................................. 23
6 Technical Specifications......................................... 24
7PartsList
....................................................................25
MG883G-12mHD 1 Instruction
Page 1
1 Instruction
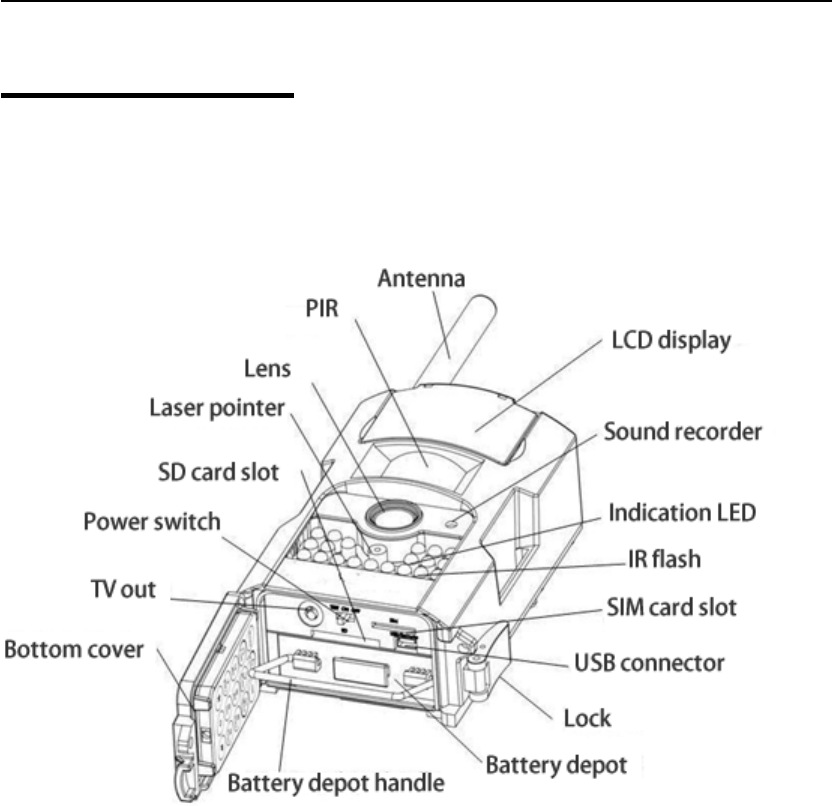
1.1 Camera Body Interfaces
1.2 General Description
This camera, a digital scouting camera with black IR
and 3G communication function, is a digital
infrared surveillance camera, triggered by any
movement of humans or animals monitored by a
high sensitive Passive Infrared (PIR) motion sensor,
and then automatically captures high quality
pictures or records video clips according to default
settings or preset customer settings. It will then
send the pictures instantly to your mobile device or
e-mail via GSM/WCDMA network. You’ll be alerted
just when the camera is triggered or per custom

MG883G-12mHD 1 Instruction
Page 2
settings.
There is a 1.5” color LCD display screen on the
camera and a sound recorder embedded in the
camera. A laser pointer is used to help target the
photo area of the camera.
It is resistant against water and snow. The camera
can also be used as a portable digital camera.
1.3 Remote Control
The remote control is the input device for the
camera and is primarily used for customer settings.
Thisisaninfraredtypewirelessremotecontrol.The
maximum remote distance is about 30 feet.
Note:
The remote will not work properly without the
antenna attached.
When power on the camera, allow approximately
10-20 seconds for the camera t
o
acquire a signal. The remote will no
t
function properly until the camer
a
has acquired a signal. You ca
n
determine that the camera ha
s
acquired a signal by locating th
e
signal icon on the LCD screen.
Press the punctuation “*” for lase
r
pointer.
Menu
Cancel
OK
1
2
abc
3
def
4
ghi
5
jkl
6
mno
7
pqrs
8
tuv
9
wxyz
*
0
#
Menu
Cancel
OK
1
2
abc
3
def
4
ghi
5
jkl
6
mno
7
pqrs
8
tuv
9
wxyz
*
0
#

MG883G-12mHD 1 Instruction
Page 3
1.4 Shooting Information Display
When the camera is turned on (power switch is slid
to TEST position), the current settings will be
displayed on the screen.
1.5 Two Way Communication
You can set SMS control submenu as ON to open
the two way communication function. Under this
setting, the camera can receive and respond to your
SMS command or the Android APP command. This
camera can send pictures instantly to your mobile
device via WCDMA/GSM network. You’ll be alerted

MG883G-12mHD 1 Instruction
Page 4
just when a picture or video has been taken. The
camera sends MMS or Email message through
MMSC(MMS Service Center) or GPRS network, so
before using this function, you need to open MMS
and GPRS service from your service provider. It
supports following bands:GSM with 850MHz,
900MHz, 1800MHz and 1900MHz;WCDMA with
850MHz, 900MHz, 1900MHz and 2100MHz.
SIM card Icon:There are two SIM card icons which
stand for different installation situations. means
the SIM card is inserted and it works well.
means the MMS function can’t work correctly
because of loss of signal or other communication
issues.
1.6 Cautions
★The working voltage of the camera is 6V.The
camera is supplied by 8 AA batteries or DC power
adapter with output of 6V. Please install batteries
according to shown polarity.
★Please insert the SD card when the power switch
is in the OFF position before testing the camera.
The camera has no internal memory for saving
images or videos. If no SD card is inserted, the
camera will shut down automatically after a
continuous indication beep.
★Please do not insert or take out the SD card when
the power switch is in the ON position.
★It is recommended to format the SD card by the
camera when used for the first time.
★The camera will be in USB mode when connected

MG883G-12mHD 1 Instruction
Page 5
to a computer. In this case, the SD card function
is as a removable disk.
★In TEST mode, the camera will shut down
automatically after 3 minutes if no operation is
done. Please turn on the power again if you want
to continue to work with the camera.
★The normal operate position is more than 20cm

MG883G-12mHD 2 Quick Start Guide
Page 6
2QuickStartGuide
2.1 Power Supply
To supply power for the camera, four or eight size
AA batteries are needed.
1. High-density and high-performance alkaline
batteries (Recommended)
2. Rechargeable alkaline batteries
3. Rechargeable NiMH batteries
When in a low-battery state, the camera will be
automatically shut down after two indication
sounds. Please change the batteries at this time. If
you have set the MMS function, it will send you a
SMS or Email to indicate the low battery situation.
Caution: Risk of explosion if battery is replaced by
an incorrect type. Also dispose of used batteries
according to the instructions.
Correct Disposal of this product. This marking
indicates that this product should not be disposed
with other household wastes throughout the EU. To
prevent possible harm to the environment or
human health from uncontrolled waste disposal,
recycle it responsibly to promote the sustainable
reuse of material resources. To return your used
device, please use the return and collection systems
or contact the retailer where the product was
purchased. They can take this product for
environmental safe recycling.
MG883G-12mHD 2 Quick Start Guide
Page
7
2.2 Insert the SD card and SIM card
Open the bottom cover. Insert SD card and SIM
card into the card slot. Please note that the SD card
is on the “write” (not locked) position otherwise the
camera will not function correctly.
2.3 Do the Camera Settings
Down load the camera setup software
(BMC_config.zip) with a simple instruction from
our website.
The specified website is written in the
last page of the manual.
MG883G-12mHD 2 Quick Start Guide
Page 8
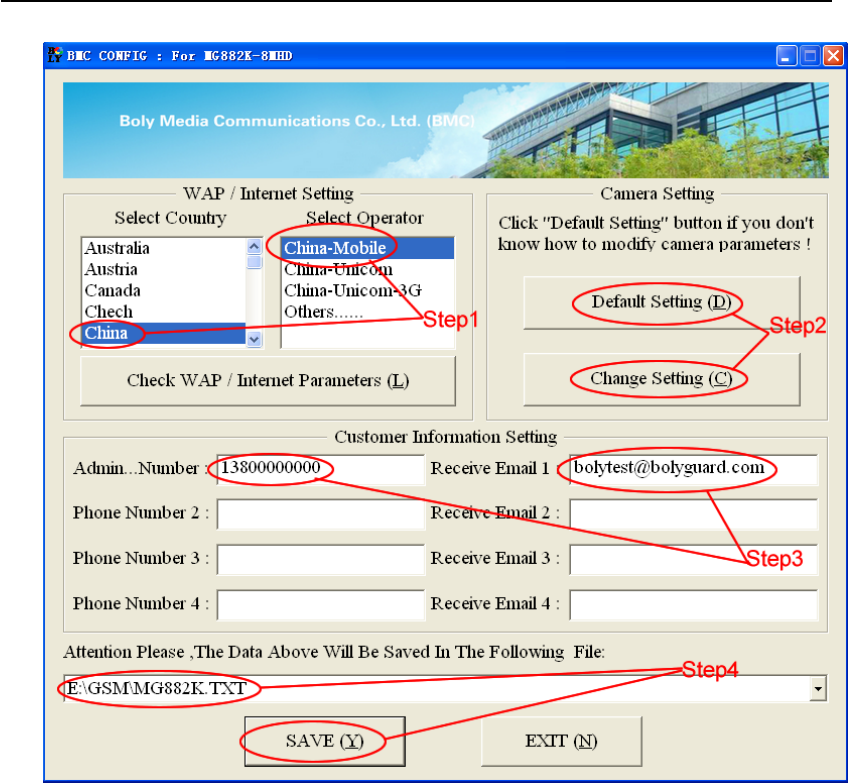
First, select your country and carriers (step1)
according to your SIM card and input your receiving
phone number in “administrator number” and
receiving e-mail address in “ Receive Email 1 ”
(step3). For first time use, we suggest you to use
default settings (step2), any settings you want to
change, please click “Change Setting”
Please note save the txt file in the root directory of
GSM folder of SD card after all settings being done
(step4), the file will automatically disappear once
camera is turned on.
2.4 Enter into Test Mode
Slide the power switch to the TEST position and

MG883G-12mHD 2 Quick Start Guide
Page 9
enter into TEST mode, default the camera in menu
setting. There are some functions in TEST mode:
custom settings, manual capture, preview or send
MMS manually. The remote control is needed in
this mode.
2.5 Custom Settings
Press MENU on the remote control to enter into the
menu setting. The camera can be adjusted to
manually customize the camera settings which
display on the LCD screen of the camera.
You can press RIGHT key to manually capture
photos or record a video and again RIGHT to stop a
videoafterexitmenusetting.
When Send Mode is set as “Manual”, you can send
the selected photo (in playback mode by pressing
OK to enter) to the preset address in TEST
mode. ”Daily Report” and “Instant” mode are used
in ON mode. Please note that the images can only
be sent and video cannot be sent. If the SIM card is
not inserted, the image cannot be sent as well.
2.6 Enter into On Mode
Slide the power switch to the ON position to power
on the camera and enter into the ON mode. Before
entering into the ON mode, you can adjust the
camera towards the target monitoring area by laser
pointer (press *on the remote to control).
After switching on the camera, the motion
indication LED (red) light will blink for about 10s.
MG883G-12mHD 2 Quick Start Guide
Page 10
The 10s is a buffering time before automatically
capturing photos or videos, e.g. for closing and
locking the bottom cover, fixing the camera on a
tree and walking away.
The camera has the sound recording function, so
the sound will be embedded in the video clip while
capturing a video.
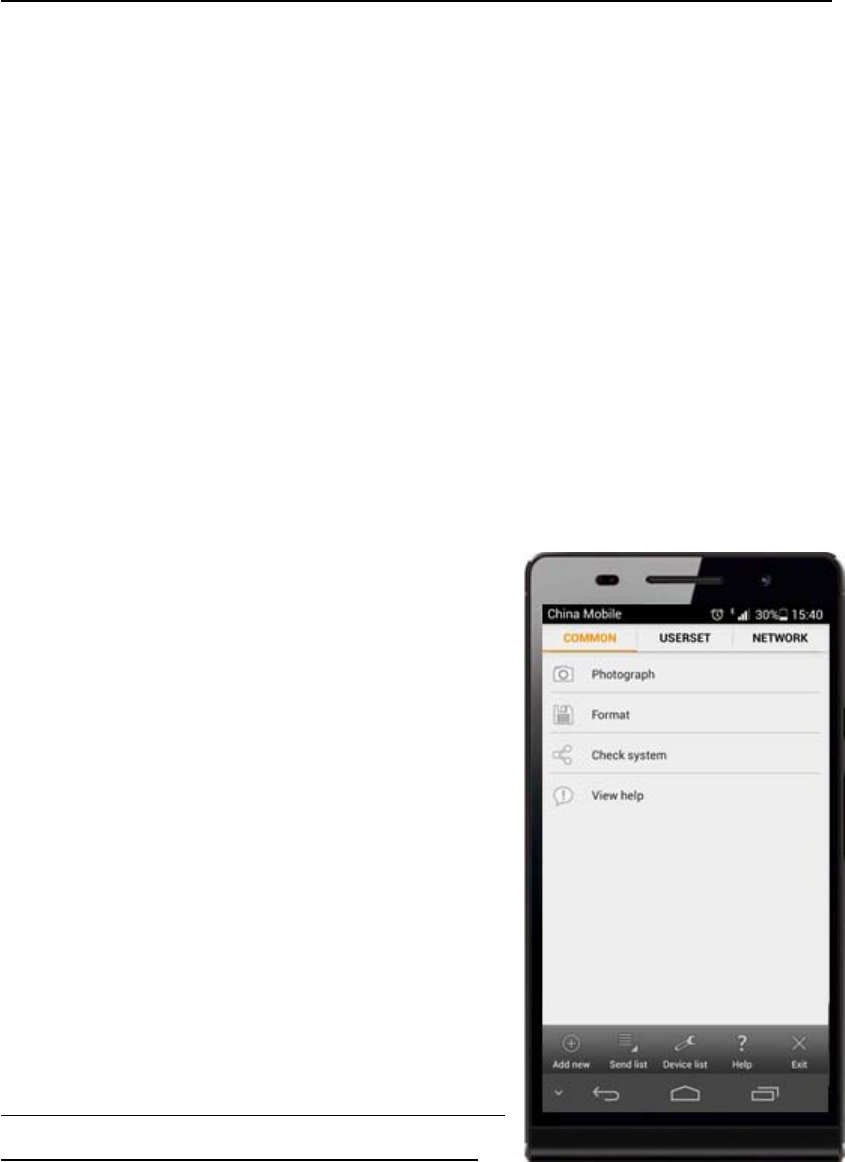
2.7 SMS Control
When camera is in ON mode, you can send text
message to camera to change some settings. Besides,
command of “#T#” can help
you to get an on spot image.
Also we support an
A
ndroi
d
application tool for you to sen
d
commands to the camera. Bu
t
the APP will charge you a
n
SMS fee for each command.
Down load the Android contro
l
software (BGTools.zip) from
our website. For Iphone,
j
us
t
download it from the APP Stor
e
by searching BGTools.
The specified website is
w
ritte
n
inthelastpageofthemanual.

MG883G-12mHD 2 Quick Start Guide
Page 11
2.8 SMS Command List
No Function SMS Command
1Set MMS
Parameters
#m#http://mmsc.cingular.com
#66.209.11.32#8080#wap.cingu
lar# account#password#
(The example parameters
are for the carrier of AT&T)
2Set GPRS
Parameters
#s#bmctest123@163.com#b
mc123#25#cmnet#smtp.163
.com#account#password#
(The example parameters
are for 163 email)
3SetNormal
User’s
Phone
#n#13800138001#1380013
8002#13800138003#
4SetReceive
Email
Address
#r#bmc1@sina.com#bmc2
@sina.com#bmc3@bmc3@s
ina.com#
5GetOnSpot
Photo
#t# (Send MMS to phone)
#t#e# (Send picture to
Email by GPRS)
6CheckCamera
Settings
#L#
7EditWork
Parameters
#e#cp#s5#fh#b1#v60#t#l10
m#pn#i5s#Hon08:30-20:30
(cp: camera mode, s5:photo
size, fh: video size, b1:photo
burst, V60: video length, t:
set clock, l10m: time lapse,
pn: pir trigger, i5s: PIR

MG883G-12mHD 2 Quick Start Guide
Page 12
interval, mp: send to, Hon:
work hour)
8 Format SD
Card
#F#
9Set
Administrator
’s Password
#P#0000#
10 Help #H#
Note all sms commands are only available by admin
number, each camera has only one admin number.
2.9 Power Off
Slide the power switch to OFF position to power off
the camera. Please note that even in OFF mode, the
camera still consumes a small amount of battery
power. Therefore, please remove the batteries if the
camera is not in use for a length of time.

MG883G-12mHD 3 Item Settings
Page 13
3 Item Settings
3.1 Camera Menu
To view the camera settings menu, press MENU in
TEST mode. With the remote, use “▲”or“▼”key
to select the sub-menu, use “◄”or“►”keytoselect
the different options. Press “OK” to save the
settings.
After changing EACH setting in TEST menu you
must press “OK”, otherwise the camera will stay at
the default setting.
Setting
Items
Description
Langua
ge
Choose language you need. It supports
four languages: English, Finnish,
German, Swedish.
Camera
Mode
Choose capturing Photo, Video or
Pic+Video.
Set
Clock
Set camera date and time. You can
change the date and time of the device by
setting this parameter when necessary,
e.g., after every battery change. The date
format is month/day/year,thetime
format is hour:minute:second.Thevalid
value for year is between 2009 and 2050.
Photo
Size
Choose the image size, e.g. 12 mega
pixels, 8 mega pixels or 5 mega pixels.
Photo Choose the continuous shooting numbers

MG883G-12mHD 3 Item Settings
Page 14
Burst after each triggering.
Video
Size
Choose the video size: 1280x720 or
640x480.
Video
Length
Choose duration of recording video. This
parameter is effective and can be
adjusted only when the device in the
video mode under ON mode. Its value
extends from 5 to 60 seconds with a step
of one second. The default value is 10
seconds. Press LEFT and RIGHT to
decrease or increase the value by 1
second.
Time
Lapse
Time lapse means the camera can
capture images or videos at a preset time
interval regardless of whether motions
are detected. The default parameter is
Off, which means the timer function is
disabled. Changing this parameter to a
non-zero value turns on the Time Lapse
mode, and camera will take photos at
given time interval.
Please note that if the PIR Trigger is set
to Off, then the Time Lapse can’t be set to
Off
.
PIR
Trigger
Choose sensitivity of the PIR sensor.
This parameter defines the sensitivity of
the PIR. There are four sensitivity
parameters: High, Normal, Low and Off.
The default value is “Normal”. The higher
degree indicates that the Camera is more
easily to be triggered by motion, taking

MG883G-12mHD 3 Item Settings
Page 15
more pictures or recording more videos.
It is recommended to use high sensitivity
degree in room or environment with little
interference, and to use lower sensitivity
for outdoor or environment with lots of
interference like hot wind, smoke, near
window etc. Furthermore, the sensitivity
of the PIR is strongly related to the
temperature. Higher temperature leads
to lower sensitivity. Therefore it is
suggested to set a higher sensitivity for
high temperature environment.
Please note that if the Time Lapse is set
to Off, then the PIR Trigger can’t be set
to Off
.
PIR
Interval
This parameter indicates how long the
PIR (Passive Infrared motion sensor) will
be disabled after each triggering in ON
mode. During this time the PIR of the
device will not react to the motion of
human (or animals). The minimum
interval is 0 second, it means the PIR
works all the time. The maximum
interval is 1 hour. It means the PIR will
be disabled for 1 hour after each
triggering. Press LEFT or RIGHT to
decrease or increase the value.
Work
Hour
Choose a time period of a day to let the
camera work. The camera will awake at
the setting time duration in a day. In the
rest of the time the camera is sleeping.

MG883G-12mHD 3 Item Settings
Page 16
Set Work Hour as off means the camera
works all day.
MMS
Set
The camera sends MMS message through
GPRS network, so before using this
function, you need to open GPRS service
from your service provider. You should
set the right MMS setting parameters.
The settings of MMS: URL,APN,IP and
Port.Pleasecontactthenetworkservice
provider if you are not familiar with the
settings.
GPRS
Set
The camera sends image through GPRS
network with SMTP protocol to an Email
address. In this way the communication
cost will be much cheaper in many
countries. You should set the right GPRS
setting parameters. The settings of GPRS:
Email server port,APN and so on,
please contact the network service
provider if you are not familiar with the
settings.
Send
Mode
There are 3 sending modes:
“Manual”works in TEST mode, “Daily
report”and“Instant”work in ON mode.
1)“Manual”:
Choose“Manual” in Test mode. Please
ensure a SIM card is inserted properly;
Please note, only photos can be sent,
video information can’t be sent in TEST
mode.
2)“Daily Report”:

MG883G-12mHD 3 Item Settings
Page 17
Daily Report works only in the ON
mode, which means that the camera will
report the summarized information at
the preset time (if the preset time is,
eg.20:00PM) on how many pictures it
had taken per day. So, you will get a
summarized text message with the last
picture taken until 20:00PM.
If it is on Photo mode, the camera will
send a MMS at the preset time. The MMS
will show you the latest photo and the
total qty of the pictures got taken. If it is
on Video mode, the camera will send a
SMS at the preset time. The SMS will
show you how many video clips the
camera has taken within 24 hours.
3) “Instant”:
Instant, just works in ON mode,
which means the camera will send a
MMS instantly after it captures a photo.
You can choose the number of how many
pictures you want it to send out per day.
If it is on Photo mode and you chose
the Instant MMS mode, and set the MAX
number is 10, the camera will send 10
MMS within 24 hours .And then it
continues to capture photos and save
them on the SD card. After 24 hours, the
camera will send MMS again when it
captures photos. If it is on Video mode,
the Camera will send only SMS instead of

MG883G-12mHD 3 Item Settings
Page 18
MMS.
4) “OFF”: To disable communication
function.
Send To
Choose sending the image to your Phone
or to Email.
Phone[MMS]:Send the image to cell
phone via WAP.
Email[MMS]:Send the image to Email
address via WAP.
Email[GPRS]:Send the image to Email
address via SMTP. In this way the
communication cost will be much
cheaper in many countries.
SMS
Control
SMS Control can enable two way
communication function. It means if you
choose SMS Control as ON,thiscamera
can receive and respond to your SMS
command. Also you can retrieve live
pictures at any time. But the power
consumption will be a little more than
normal hunting status.
Position
ID
It means camera position. You can set
A-Z position for your camera, so that you
can distinguish which photo is taken by
which camera.
Version This parameter shows the information
about Firmware and IMEI of this camera.
Format
SD
All images and videos in the SD card will
be deleted, so make sure that you have
made a backup of important data.
Default Restore all customer settings to default

MG883G-12mHD 3 Item Settings
Page 19
Set values.
3.2 Default Setting
Setting
Items Default Options Submenu
Language English
Suomi
Deutsch
Svenska
Camera
Mode Photo Video
Pic+Video
Set Clock Enter Adjust Clock
Photo Size 12MP 5MP
8MP
Photo
Burst 1Photo 2Photos
3Photos
Video Size 1280x720 640x480
Video
Length 10 sec 5–60 sec
Time
Lapse Off 5–55Min
1–8Hour
PIR
Trigger Normal
High
Low
Off
PIR
Interval 5Sec 0–55 Sec,
1–60 Min
Work
Hour Off On 00:00–23:59
MMS Set Enter URL, APN, IP,
Port
GPRS Set Enter Server, Port,

MG883G-12mHD 3 Item Settings
Page 20
APN
Send
Mode Manual
Daily
Report,
Instant,
Off
Send To Phone[M
MS]
Email[MM
S],
Email[GPR
S]
SMS
Control Off On
Position
ID Off A-Z
Version Enter Firmware
IMEI
Format
SD Enter Yes, No
Default
Set Save
3.3 Playback Mode
In playback mode, images or videos can be viewed
and deleted. An image can also be manually sent by
MMS or GPRS. It can only be done in TEST mode.
The images can be viewed on the LCD screen on
camera. The videos can only be viewed on your
computer. For simplicity, operations with PC won’t
be introduced here.
View photo in playback mode:PressOK of the
remote to view the latest picture in TEST mode, UP

MG883G-12mHD 3 Item Settings
Page 21
or DOWN to view the previous and the next one.
And OK to return to info display. Note that video
can not be displayed on the screen.
Delete photo or video: View the image (or video)
which to be deleted, select the one you want to
delete. Press MENU,thenUP or Down to delete.
3.4 Laser Pointer
The laser light pointer beam can be turned on as an
additional function for pointing to an object or a
certain region of interested (ROI) by pressing ﹡of
the remote.
NOTE:
The laser could be harmful to eyes if pointed at
other person.
MG883G-12mHD 4 Trouble Shooting
Page 22
4 Trouble Shooting
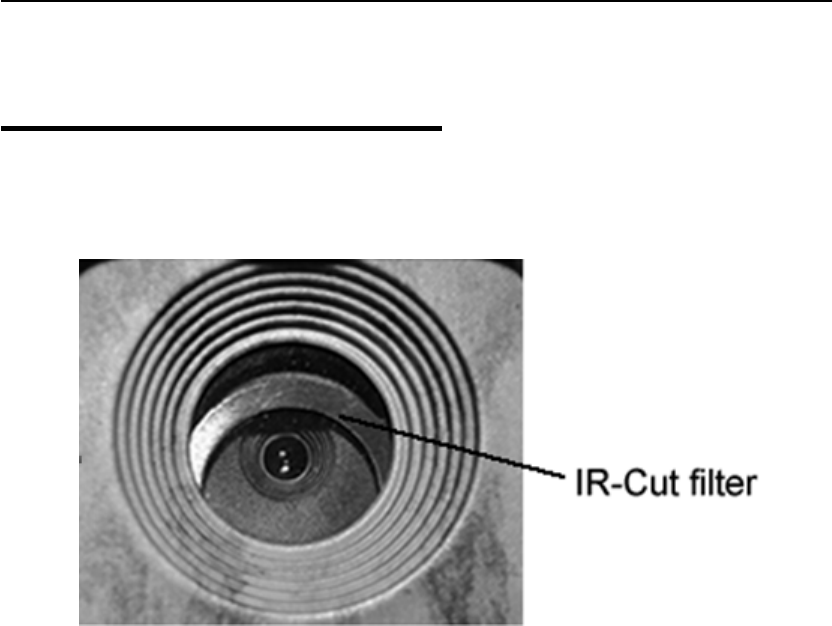
1 There is something in front of the camera lens. Is
the camera broken?
A: The camera is not broken. It’s an IR-cut filter.
When the camera is powered on, the IR-cut will be
reset and cover the lens. Only when the camera is
powered off, the IR-cut will be at a random place.
2 The camera display screen is not working
anymore.
A: Most likely, no SD card has been inserted in the
camera when it is turned on. Please make sure a
working SD card has been inserted in the camera
before it is turned on.
3Whymyphonecan’treceiveMMS?
A: MMS/GPRS function needs the SIM cards in
both your camera and phone to have enough
balance and to be opened to data business.
MG883G-12mHD 5 PIR Detection Zone
Page 23
5PIRDetectionZone
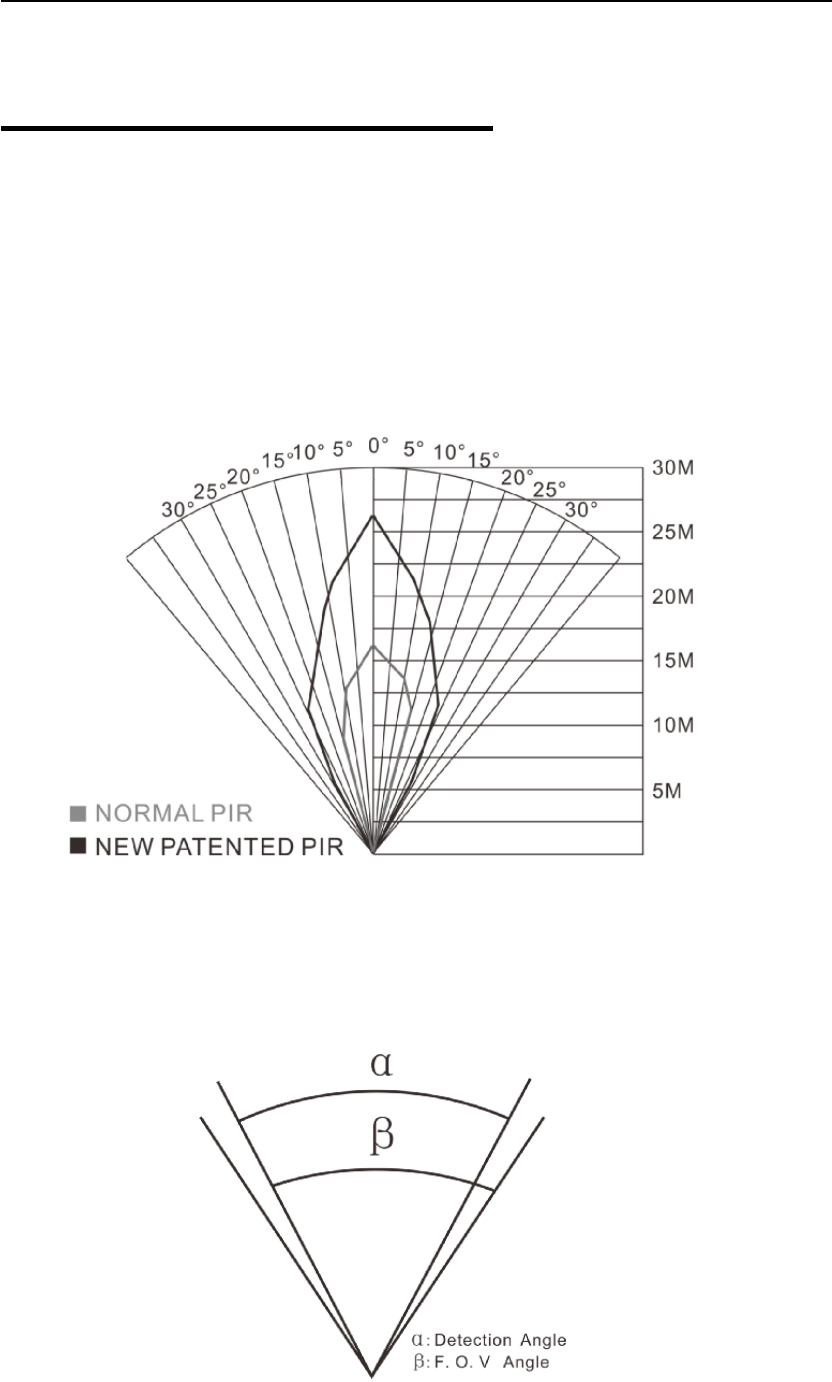
This camera has a new design of PIR and the new
PIR is patented. The new patented PIR’s detection
range can reach to 85ft in good environments.
Following picture shows the compared detection
zone between normal PIR and the new patented
PIR.
The PIR detection angle (α) is just smaller than the
field of view (FOV) angle (β). The advantage of this
design is to reduce empty picture rate and capture
most, if not all, motions.

MG883G-12mHD 6 Technical Specification
Page 24
6 Technical Specifications
Image Sensor 5MP Color CMOS,
8MP, 12MP Interpolation
Lens F/NO=2.2
FOV(Field of View)=60°
PIR detection range 85ft
Display Screen 1.5” LCD
Memory Card From 8 MB to 32 GB
Picture Resolution
12MP=4032×3024
8MP = 3264×2448
5MP = 2560×1920
Video Resolution 1280x720
640×480
PIR Sensitivity Adjustable (High/Normal/Low)
Trigger Time 1.2s
Weight 0.30 kg (without battery)
Operation/Storage
Tem. -20-+40°C/- 10 -+50°C
Power Supply 8×AA or 4×AA
External DC 6V,2A
Low Battery Alert LED Indicator
Sound Recording Available
Mounting Rope/Belt/Python lock
Dimensions 140 x87 x55 mm
Operation Humidity 5% - 90%
Security
Authentication CE, RoHS

MG883G-12mHD 7 Parts List
7PartsList
Part Name Quantity
Digital Camera One
User Manual One
Enhanced Antenna One
Warranty Card One
Down load the APP software from here:
http://www.bolyguard.com/download.html
Version 1.0

FCC RF EXPOSURE INFORMATION:
WARNING!! Read this information before using your phone
In August 1986 the Federal Communications Commission (FCC) of the United States with its action
in Report and Outer FCC 96-326 adopted an updated safety standard for human exposure to radio
frequency (RF) electromagnetic energy emitted by FCC regulated transmitters. Those guidelines are
consistent with the safety standard previously set by both U.S. and international standards bodies.
The design of this phone complies with the FCC guidelines and these international standards. Use
only the supplied or an approved antenna. Unauthorized antennas modifications, or attachments
could impair call quality, damage the phone, or result in violation of FCC regulations. Do not use the
phone with a damaged antenna. If a damaged antenna comes into contact with the skin, a minor burn
may result. Please contact your local dealer for replacement antenna.
Your wireless handheld portable camera is a low power radio transmitter and receiver. When it is
ON, it receives and also sends out radio frequency (RF) signals. In August, 1996, the Federal
Communications Commissions (FCC) adopted RF exposure guidelines with safety levels for hand-
held wireless camera. Those guidelines are consistent with the safety standards previously set by
both U.S. and international standards bodies:
<ANSIC95.1> (1992) / <NCRP Report 86> (1986) / <ICNIRP> (1999)
Those standards were based on comprehensive and periodic evaluations of the relevant scientific
literature. For example, over 120 scientists, engineers, and physicians from universities, government
health agencies, and industry reviewed the available body of research to develop the ANSI Standard
(C95.1). Nevertheless, we recommend that you use a hands-free kit with your phone (such as an
earpiece or headset) to avoid potential exposure to RF energy. The design of your camera complies
with the FCC guidelines (and those standards).
Use only the supplied or an approved replacement antenna. Unauthorized antennas, modifications,
or attachments could damage the phone and may violate FCC regulations.
This device complies with Part 15 of the FCC Rules. Operation is subject to the following two
conditions: (1) this device may not cause harmful interference, and
(2) this device must accept any interference received, including interference that may cause
undesired operation.
The device has been evaluated to meet general RF exposure requirement. The separation
distance between the user and the antenna of the device is 20 cm.
NOTE: The manufacturer is not responsible for any radio or TV interference caused by unauthorized
modifications to this equipment. Such modifications could void the user’s authority to operate the
equipment.
NOTE: This equipment has been tested and found to comply with the limits for a Class B digital
device, pursuant to part 15 of the FCC Rules. These limits are designed to provide reasonable
protection against harmful interference in a residential installation. This equipment generates uses
and can radiate radio frequency energy and, if not installed and used in accordance with the
instructions, may cause harmful interference to radio communications. However, there is no
guarantee that interference will not occur in a particular installation. If this equipment does cause
harmful interference to radio or television reception, which can be determined by turning the
equipment off and on, the user is encouraged to try to correct the interference by one or more of the
following measures:
- Reorient or relocate the receiving antenna.
- Increase the separation between the equipment and receiver.
-Connect the equipment into an outlet on a circuit different from that to which the receiver is
connected.
-Consult the dealer or an experienced radio/TV technician for help
Do not use the device with the environment which below minimum -10℃ or over maximum 50℃,
the device may not work.
Changes or modifications to this unit not expressly approved by the party responsible for
compliance could void the user’s authority to operate the equipment.