Bosch Security Systems DCNMWDE DICENTIS WIRELESS DEVICE EXTENDED User Manual DICENTIS Wireless ConfigSWM
Bosch Security System BV DICENTIS WIRELESS DEVICE EXTENDED DICENTIS Wireless ConfigSWM
Contents
- 1. 07a_User Manual_DICENTIS_Wireless_ConfigSWM_V1 0_enUS
- 2. 07b_User Manual_DICENTIS_Wireless_IM_V1.0_enUS
- 3. 07c_User Manual_DICENTIS_Wireless_UM_V1.0
07a_User Manual_DICENTIS_Wireless_ConfigSWM_V1 0_enUS
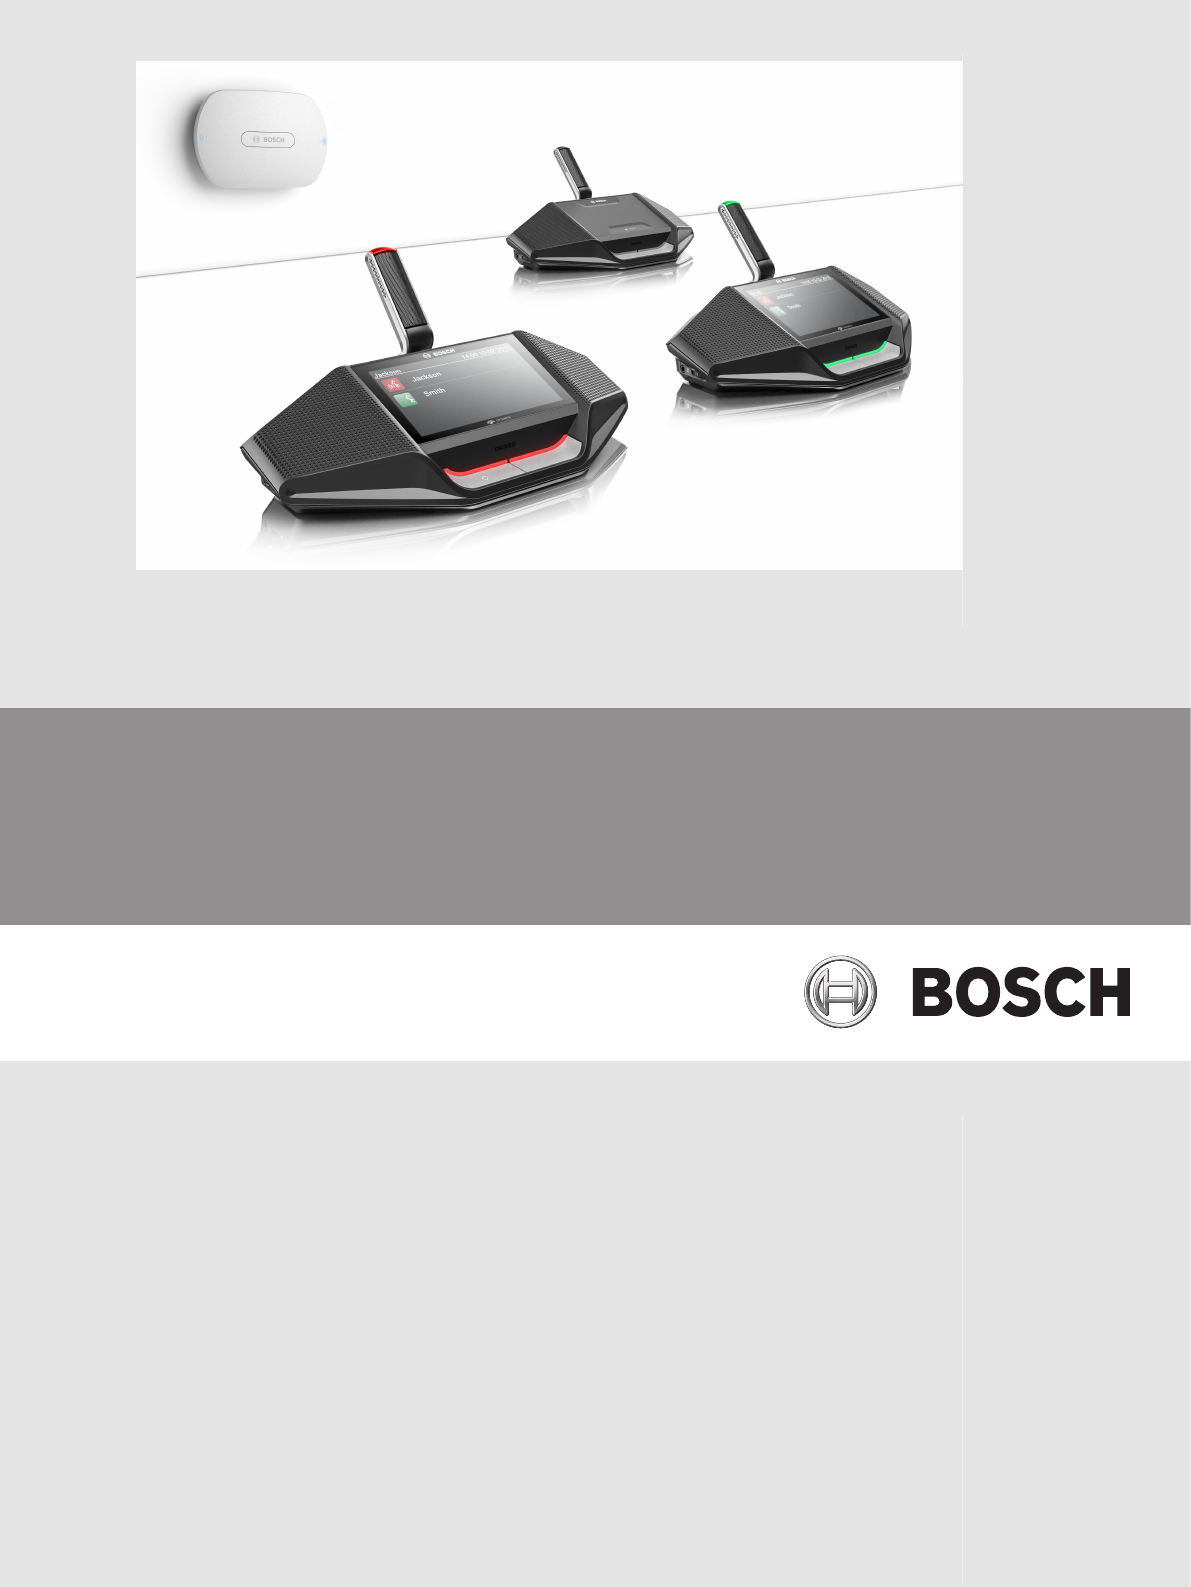
DICENTIS
Wireless Conference System
en Configuration manual

Table of contents
1Safety 4
2About this manual 5
2.1 Intended audience 5
2.2 Copyright and disclaimer 5
2.3 Document history 5
3System overview 6
4First use configuration 7
4.1 Login 8
4.2 Wireless Device initialization 9
5Web interface application 10
5.1 Manage discussion 12
5.2 Prepare discussion 13
5.3 Voting 15
5.4 System settings 16
5.4.1 Users 17
5.4.2 Audio 17
5.4.3 Equalizer 18
5.4.4 Cameras 18
5.4.5 Licensing 19
5.4.6 Network and general settings 19
5.4.7 Seats 20
5.4.8 Date and time 21
5.4.9 Upgrade 21
5.5 Participants 23
5.6 Switch system on/off 24
5.7 Battery & Signal 24
5.8 Logging 25
5.9 System info 25
5.10 Logout 25
6Wireless Access Point LED behavior 26
7Troubleshooting 27
7.1 Customer service 27
DICENTIS Table of Contents | en 3
Bosch Security Systems B.V. Configuration manual 2015.03 | V1.0 |

Safety
Prior to installing or operating products, always read the Important Safety Instructions which
are available as a separate multilingual document: Important Safety Instructions (Safety_ML).
These instructions are supplied together with all equipment that can be connected to the
mains supply.
Old electrical and electronic appliances
Electrical or electronic devices that are no longer serviceable must be collected separately and
sent for environmentally compatible recycling (in accordance with the European Waste
Electrical and Electronic Equipment Directive).
To dispose of old electrical or electronic devices, you should use the return and collection
systems put in place in the country concerned.
1
4en | Safety DICENTIS
2015.03 | V1.0 | Configuration manual Bosch Security Systems B.V.
About this manual
The purpose of this manual is to provide information required for configuring, preparing, and
managing the DICENTIS Wireless Conference System. This manual describes in general how to
use the Wireless Access Point (DCNM-WAP) web interface. If required, refer to the Hardware
Installation Manual and Wireless Devices User Manual of the DICENTIS Wireless Conference
System.
This manual is available as a digital document in the Adobe Portable Document Format (PDF).
Refer to the product related information on: www.boschsecurity.com.
Intended audience
This manual is intended for people who have the authorizations to configure, prepare and/or
manage a DICENTIS Wireless Conference System.
Copyright and disclaimer
All rights reserved. No part of this document may be reproduced or transmitted in any form by
any means, electronic, mechanical, photocopying, recording, or otherwise, without the prior
written permission of the publisher. For information on getting permission for reprints and
excerpts, contact Bosch Security Systems B.V..
The content and illustrations are subject to change without prior notice.
Document history
Release date Documentation version Reason
2015.03 V1.0 1st edition.
2
2.1
2.2
2.3
DICENTIS About this manual | en 5
Bosch Security Systems B.V. Configuration manual 2015.03 | V1.0 |

System overview
The DICENTIS Wireless Conference System is a “standalone” IP based system. It uses
WiFi IEEE 802.11n for wireless distribution and processing of audio and data signals.
For an overview of the system, please refer to the DICENTIS Wireless Conference System
installation manual.
3
6en | System overview DICENTIS
2015.03 | V1.0 | Configuration manual Bosch Security Systems B.V.

First use configuration
The Wireless Access Point (DCNM-WAP) includes a web interface wizard to help you with the
initial configuration of the DICENTIS Wireless Conference System.
Web browser
The DCNM-WAP web interface is compatible with and optimized for the latest version of these
web browsers:
– Internet Explorer.
– Safari.
– Firefox.
– Opera.
– Chrome.
Preconditions
– All used system devices are prepared and installed as described in the DICENTIS Wireless
Conference System installation manual. Also see System overview, page 6.
– The Wireless Access Point (DCNM-WAP) is powered on.
– On a PC/laptop, make sure Windows PC DNS‑SD is installed (DNS‑SD is supplied on the
media delivered with the DCNM-WAP).
– On any other device, make sure Apple Bonjour is installed (Download via Apple website).
Note: Apple Bonjour or DNS‑SD are not available for Android.
– When using WiFi, make sure both 2.4 GHz and 5 Ghz on your device are used to run the
browser.
How to connect the DCNM-WAP
1. To connect directly to the DCNM-WAP using WiFi:
– Use the WiFi discovery function of you PC/Tablet, and select the DICENTIS Wireless
Conference System Network Name (SSID): Bosch DICENTIS
– Enter the WPA2 key: dcnm-wap
– Wait until the connection is made.
– Open your web browser and type: http://dcnm-wap.local, in Android type: http://
172.27.2.1
2. To connect directly to the DCNM-WAP using wired:
– Open your web browser and type: http://dcnm-wap.local
Note: This is not supported on Android, because Android does not support Bonjour
and DNS-SD.
3. To connect via a network to the DCNM-WAP:
– Consult the network owner to obtain the URL or IP address of the DCNM-WAP.
4
DICENTIS First use configuration | en 7
Bosch Security Systems B.V. Configuration manual 2015.03 | V1.0 |

Initial setup
– When the DCNM-WAP is used for the first time (or set to factory defaults) the wizard is
shown.
– In "Lets get started", select the required language for the web application, and click
setup device.
– In "Country", select the country, the date, the time, the time‑zone, and then click next:
–Note: It is illegal to select a country other than the country where the DCNM-WAP is
used!
– In "User", define a password for the administrator user, and add a user for daily business
use with the required user rights (see Users, page 17). It is not recommended to use the
administrator user for daily business. Click next.
– In "Wifi" the Network name (SSID), WPA2 Key and Host name can be changed. It is
recommended to change the WPA2 Key:
– The length of the Network name (SSID) must be between 1 and 25 characters. The
following characters are allowed: A-Z, a-z, 0-9, _, space.
– The length of the WPA2 Key must be between 8 and 64 characters.
– The length of the Host name must be between 1 and 63 characters. The following
characters are allowed: A-Z, a-z, 0-9, -
– Click setup device to save these changes.
– The wizard is completed and the login page is shown.
Login
Log in to the web application
1. Enter the correct user name and password, select the required language, and click
Login.
2. The web interface homepage is displayed. See Web interface application, page 10.
4.1
8en | First use configuration DICENTIS
2015.03 | V1.0 | Configuration manual Bosch Security Systems B.V.
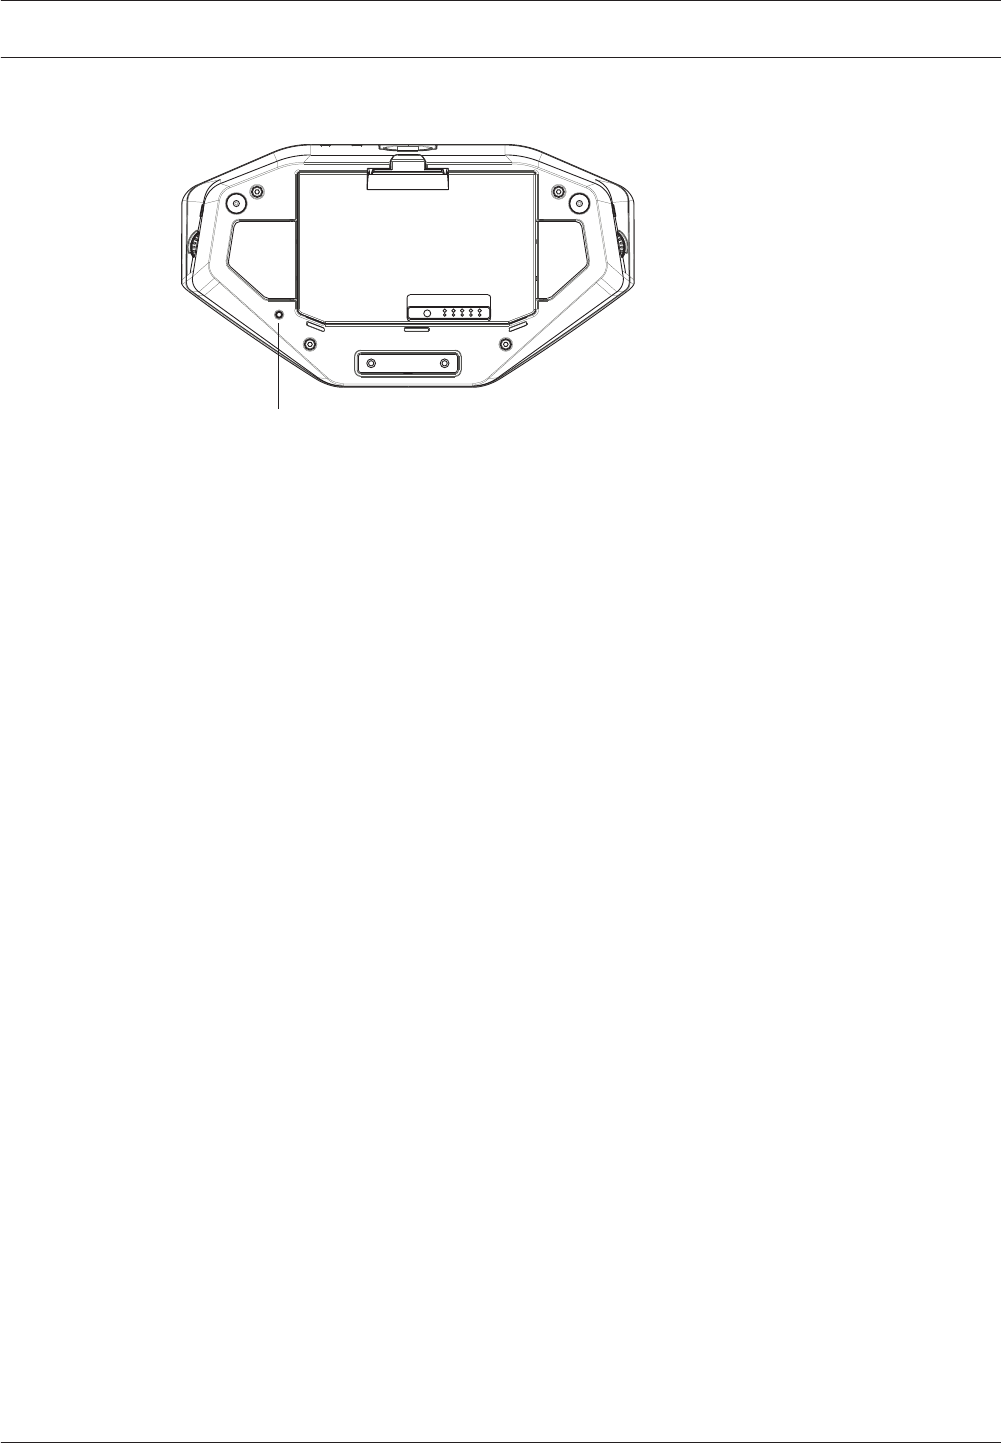
Wireless Device initialization
1
Figure 4.1: DCNM‑WD(E) Wireless Device bottom view
Preconditions Wireless Devices and DCNM-WAP
– The DCNM-WAP must be powered on and configured. Refer to First use configuration,
page 7, if required.
– All Wireless Devices must be:
– placed within the range of the DCNM-WAP.
– powered on (by inserting the Battery Pack and pressing the microphone request
button).
– de‑initialized.
A Wireless Device is de‑initialized when all LEDs on the Wireless Devices are on. To de-
initialize a Wireless Device, use a thin screwdriver to press and hold in the De‑init button on
the base of the Wireless Device (1) until all LEDs are on.
Preconditions web interface application
– The logged in user must have the access right: Configure system.
Initialization
1. Log in to the web interface application, and go to the Seats page. Refer to Seats, page
20.
2. Enable the Subscription mode.
3. Press the microphone request button of a Wireless Device.
– The Wireless Device starts subscribing, and the LED-bar above the microphone
request button starts alternating between red and green.
– When the LED-bar is off, the Wireless Device is subscribed.
4. Wait until a Wireless Device is subscribed before subscribing the next Wireless Device.
Subscribing a Wireless Device before the previous device has finished subscribing will
result in overlap.
– In overlap, the subscription is disabled for 2 minutes, which is shown in the web
interface application.
– Starting subscription before the current overlap time period has finished will restart
the overlap time period of two minutes.
– If another WiFi system is in subscription mode, this will also activate the overlap
period in the DCNM-WAP.
5. When all Wireless Devices are subscribed, disable the Subscription mode in the web
interface application. The subscription mode will automatically switch off after 2 minutes.
4.2
DICENTIS First use configuration | en 9
Bosch Security Systems B.V. Configuration manual 2015.03 | V1.0 |
Web interface application
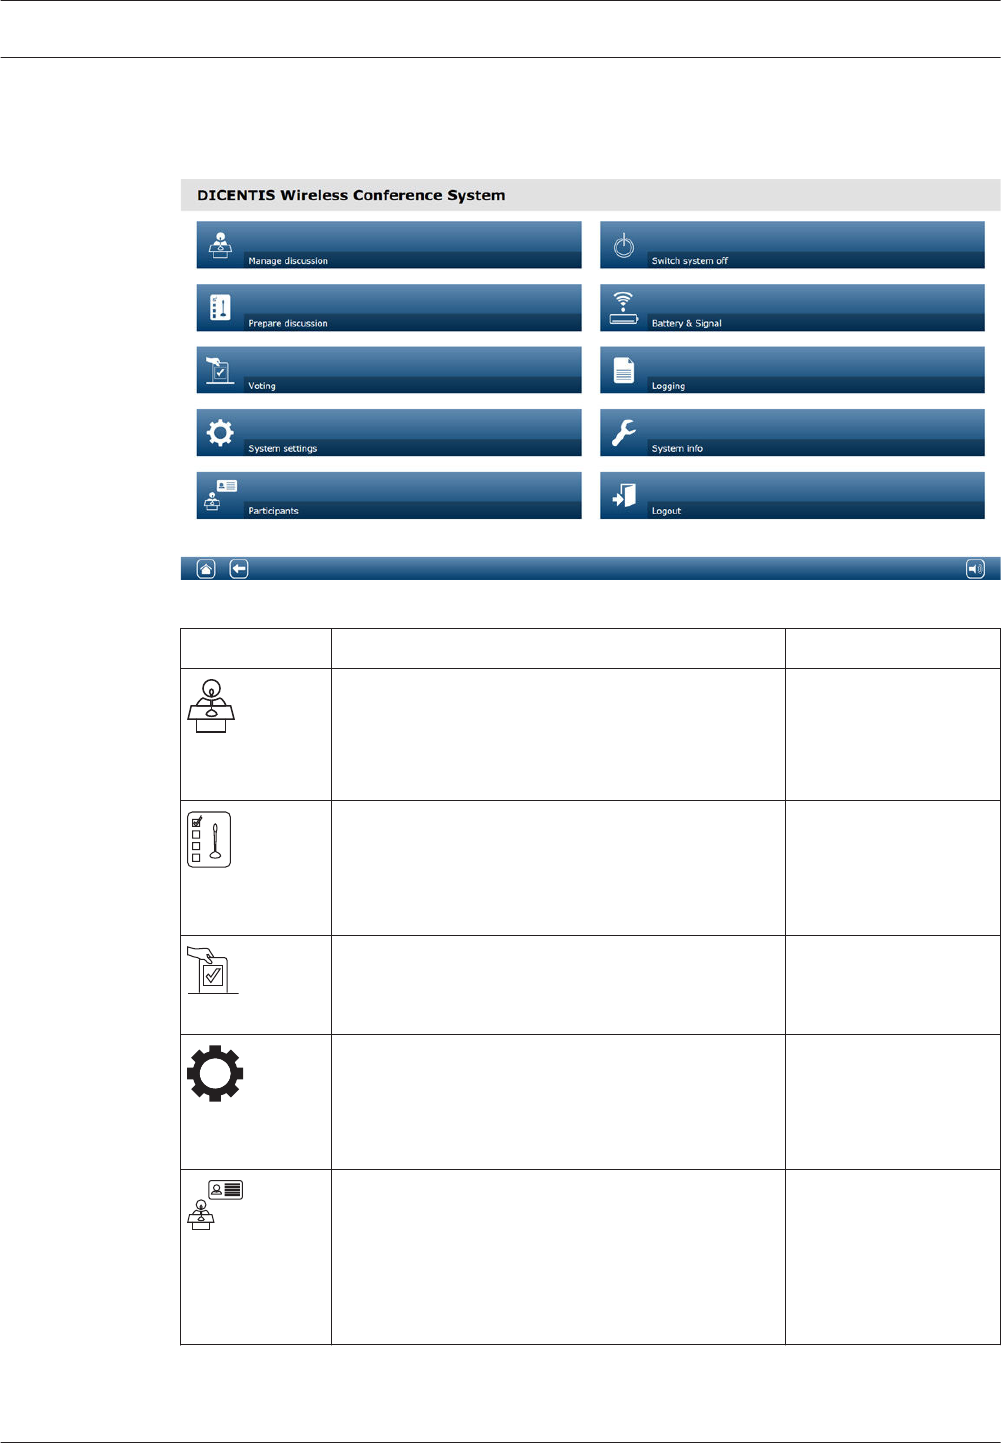
Depending on user rights, the following buttons are displayed on the web interface homepage:
Figure 5.1: Web interface homepage (typical setup)
Button Description Access right
Manage
discussion
To manage a discussion. See Manage discussion,
page 12.
Manage meeting
Prepare
discussion
To prepare a discussion. See Prepare discussion,
page 13.
Prepare meeting
Voting
To use voting. See Voting, page 15.Manage meeting
System
settings
To configure the system. See System settings, page
16.
Configure or modify
users
Participants
To set the identification mode for the system.
To create participants:
– Give participants a name.
– Give participants an NFC-ID.
– Assign seats to participants.
See Participants, page 23.
Prepare meeting
5
10 en | Web interface application DICENTIS
2015.03 | V1.0 | Configuration manual Bosch Security Systems B.V.

Button Description Access right
Switch system
on/off
–Switch system on: Switches on the DCNM-
WAP. The devices need to be switched on
manually (See Power up in the User manual).
–Switch system off: Switches off the
subscribed devices and the DCNM-WAP. The
web GUI on the DCNM-WAP can still be
accessed.
Prepare system
Battery &
Signal
Overview of:
– Wireless Devices battery condition.
– WiFi signal strength status.
– Range test button and results.
See Battery & Signal, page 24.
Configure or Prepare
system
Logging
Overview and saving of system events. See
Logging, page 25.
Configure
System info
System overview. See System info, page 25.
Configure
Logout
Exits the discussion application and returns you to
the login page. See Logout, page 25.
None
Home
Returns you to the web interface homepage. None
Back
Returns you to the previous page. None
Master volume
Opens the master volume control slider. Controls
the Wireless Devices loudspeaker volume.
Configure or Manage
meeting
See also
–Login, page 8
–Users, page 17
–Seats, page 20
–Switch system on/off, page 24
DICENTIS Web interface application | en 11
Bosch Security Systems B.V. Configuration manual 2015.03 | V1.0 |

Manage discussion
Preconditions:
– The logged on user must have the access right: Manage meeting.
Click the Manage discussion button on the homepage to open the Manage discussion page.
Manage discussion means:
– View discussion list: Speakers and waiting participants.
– Add, remove, and shift waiting and speaking participants.
– Master volume control.
Manage discussion
The overview on the left‑hand and right‑hand side, shows the discussion list. This list contains
waiting and speaking participants.
Use the Shift button to shift participants from Waiting to Speaker. If the speaker list is full,
the longest speaking participant is removed from the speaker list.
By clicking the Stop and remove all button, all Waiting speakers and Speakers can be
removed from the lists.
– Click the + button to select and add participants to the Waiting list or Speakers list.
– Click the trash can to remove a seat from the Waiting list or Speakers list.
Master volume control button
Click the master volume control button to adjust the audio output level of the Wireless
Devices loudspeaker and Wireless Access Point.
5.1
12 en | Web interface application DICENTIS
2015.03 | V1.0 | Configuration manual Bosch Security Systems B.V.

Prepare discussion
Preconditions:
– The logged on user must have the access right: Prepare meeting.
To prepare a discussion, click Prepare discussion. This opens the Prepare discussion page.
Prepare discussion means:
– Define the discussion settings.
Prepare a discussion
–Discussion mode:
–Open: When selected (grey), participants can control their own microphone. If the
speakers list is full, a microphone request is queued in the request list.
Auto Shift: When selected, queues in the waiting list are automatically shifted to the
speaker list, if it is not full yet
–Override: When selected (grey), participants can control their own microphone. If
the speakers list is full, a microphone request overrides the longest speaking
participant in the list.
–Voice: When selected (grey), participants can activate their microphones by speaking
into them. A microphone can be temporarily muted by pressing and holding down
the microphone button.
–Push To Talk: When selected (grey), participants can speak by pushing and holding
in their microphone buttons. The microphone is deactivated when the microphone
button is released. The maximum number of participants that can speak is
determined by the number of open microphones.
–Speakers options:
–Maximum number of speakers: Selects the maximum number of speakers in the
speakers list.
–Switch microphone off when not used for 30 seconds: This function can be used
when participants forget to switch off the microphone manually.
–Allow participants to switch off their microphone: When selected, participants are
allowed to switch off their microphone.
–Show Possible To Speak: When selected, the white light in the Wireless Device
microphone request button might be lit.
5.2
DICENTIS Web interface application | en 13
Bosch Security Systems B.V. Configuration manual 2015.03 | V1.0 |

–Waiting options:
–Maximum number of waiting: The maximum number of requests in the waiting list
can be selected here.
–Allow participants to remove themselves from the waiting list: When selected,
participants can remove themselves from the waiting list.
–Show the first in the waiting list on the seat: When selected, the LED on top of the
Wireless Device microphone that is first in the waiting list will blink green instead of
being steady green. Can only be used when Show Possible To Speak is also
selected. Note: This does not influence the behavior of the button bar LED above the
microphone request buttons.
–Priority options:
–Priority chime audible: When selected, a priority chime is audible when the device
priority button is used.
–Mute all speakers: When selected (grey), it mutes all speakers temporarily when the
device priority button is used.
–Stop all speakers and remove all waiting participants: When selected (grey), it
cancels all speakers and requests when the device priority button is used.
14 en | Web interface application DICENTIS
2015.03 | V1.0 | Configuration manual Bosch Security Systems B.V.
Voting
Preconditions:
The logged on user must have the access right: Manage meeting.
To manage voting, click Voting. This opens the Manage voting page.
Manage voting means:
– Define the voting settings, and control the voting round.
Define voting settings
–Topic: The name of the voting round. This name is also displayed on the touch screen of
the Wireless Devices Extended when the voting round is opened.
–Drop-down menu with answer sets for:
– for/against
– for/against/abstain
– for/against/abstain/dnpv
– yes/no
– yes/no/abstain
– yes/no/abstain/dnpv
The selected answer set is displayed on the touch screen of the Wireless Device Extended
when the voting round is opened.
Notice!
DNPV (Do Not take Part in the Vote) can be selected by participants to indicate that they do
not want to take part in the vote. This option is only used for the French language, where
DNPV is abbreviated as NPPV.
Control voting round
–Open button: Opens the voting round. Once voting is opened, this button changes to the
Hold button.
–Hold button: Puts the voting round on hold. The participants voting buttons are
temporarily disabled and votes cannot be changed or cast. This button changes to
the Resume button when it is pressed.
–Resume button: Allows voting to be resumed. Votes can be cast or changed. This
button changes to the Hold button when it is pressed.
–Close button: Closes the voting round.
5.3
DICENTIS Web interface application | en 15
Bosch Security Systems B.V. Configuration manual 2015.03 | V1.0 |
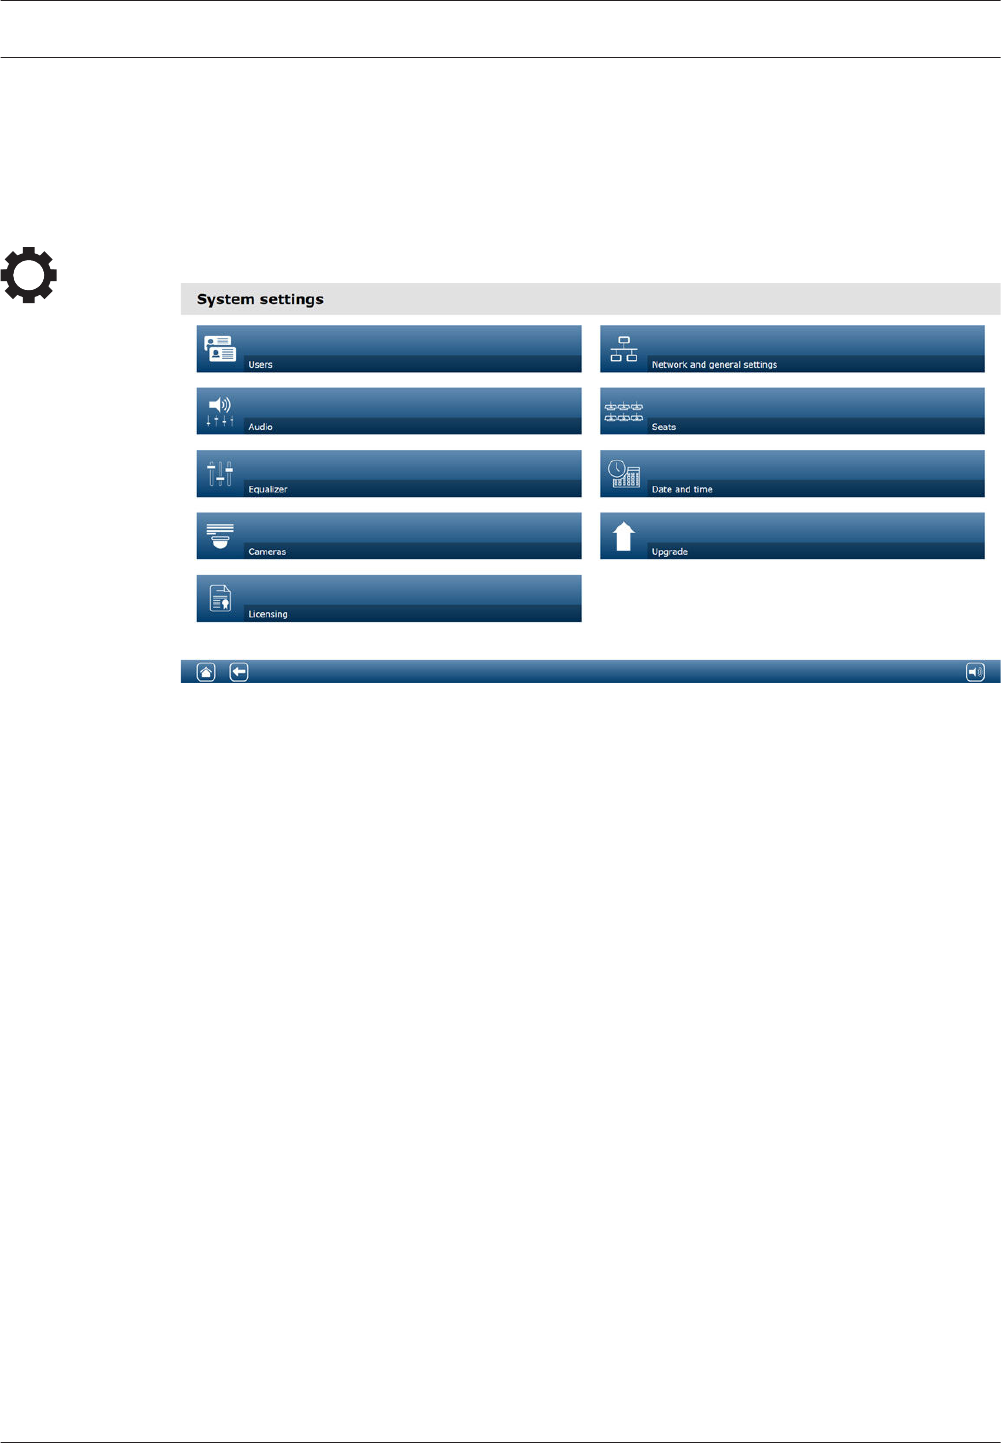
System settings
Preconditions:
– To access system settings and change parameters, the logged on user must have the
access rights: Configure, and Modify users.
Click the System settings button to open the System settings page:
Figure 5.2: System settings page
See also
–Users, page 17
–Audio, page 17
–Cameras, page 18
–Seats, page 20
–Date and time, page 21
–Network and general settings, page 19
–System info, page 25
–Licensing, page 19
–Upgrade, page 21
–Participants, page 23
–First use configuration, page 7
5.4
16 en | Web interface application DICENTIS
2015.03 | V1.0 | Configuration manual Bosch Security Systems B.V.
Users
Click the Users button on the System settings page to open the Users settings page.
To add Users, click the + button to open the Add new user screen.
To change or remove Users, select a user, and use the edit icons.
For each (new) user, the following can be entered or selected:
–General: Enter First name, Last name, Username, Password (may be empty).
–User rights to be selected (the grey button color means: selected) are for example:
–Manage meeting. This right gives access to the Manage discussion and Voting
pages. Refer to Manage discussion, page 12 or Voting, page 15.
–Prepare meeting. This right gives access to the Prepare discussion and Participants
pages. Refer to Prepare discussion, page 13.
–Modify users. This right gives access to Users. Refer to Users, page 17.
–Configure. This right gives access to the System settings, System info, Logging, and
Battery and Signal pages. Refer to System settings, page 16.
–Prepare system. This right gives access to the Switch system on/off and Battery
and Signal pages. Refer to Switch system on/off, page 24.
Audio
Click the Audio button to open the Audio settings page:
–System:
–Master: Master volume control for the loudspeakers of the Wireless Devices, and the
line output of the Wireless Access Point.
–Line input/output:
–In: Sets the sensitivity of the audio line input of the Wireless Access Point.
–Out: Sets the level of the audio line output of the Wireless Access Point.
–Routing options I/O: Defines the audio routing mode of the Wireless Access Point:
–Recorder: Use this mode to connect an external recorder via the audio line input and
audio line output.
–Floor: In this mode, the level of the audio line output is “also” controlled by the
Master.
–Mix‑minus: Use this mode to connect an external telephone coupler, or two systems,
via the audio line input and audio line output.
–Insertion: Use this mode to connect external audio devices, such as audio mixers,
and audio processors.
–Public Address (PA): In this mode, the level of the audio line output is “not”
controlled by the Master.
–Feedback Prevention:
–Digital Acoustic Feedback Suppression: When selected, enables the DAFS function.
–Loudspeaker active when microphone is on: When selected, enables the
loudspeaker of the device, when the microphone is on.
–Attenuate headphone when speaking: When selected and the microphone is on,
attenuates the headphone volume of the Wireless Device 18 dB.
–Test Tone: Click the appropriate button to test the audio in the system with a 1 kHz or
Sweep tone. Click the Off button to stop the test tone.
– When Send test tone to loudspeakers is selected, generates the selected test tone
to the connected Wireless Devices loudspeaker.
5.4.1
5.4.2
DICENTIS Web interface application | en 17
Bosch Security Systems B.V. Configuration manual 2015.03 | V1.0 |
– When Send test tone to loudspeakers is selected, generates the selected test tone
to the connected Wireless Devices headphone.
– When Send test tone to loudspeakers is selected, generates the selected test tone
to the audio line output of the Wireless Access Point.
Equalizer
Click the Equalizer button to open the Equalizer settings page:
The Equalizer page is used to set the equalizer settings of the audio line input and output of
the Wireless Access Point and Wireless Devices loudspeaker.
Equalizer filters
–Filter 1 type: Shelving filter - A shelving filter for low frequencies with a fixed quality
factor.
–Filter 2, 3, 4 type: Full parametric section - Three full parametric filters with adjustable
quality factors, gains and frequencies.
–Filter 4 type: Shelving filter - A shelving filter for high frequencies with a fixed quality
factor.
Equalizer settings
Proceed as follows to configure a filter:
1. Enter the frequency of the filter. Possible values from 50 Hz up to 22 kHz.
2. Enter the gain of the filter. Possible values from -12 dB to +12 dB with steps of 0.1.
3. Enter the quality (Q) factor of the filter. Possible values from 0.4 to 14 with steps of 0.1.
4. Enable or bypass the filter by clicking the checkmark. All changes are immediately
applied.
Cameras
Click the Cameras button to open the Camera settings page:
–Overview Camera: Defines the camera used as the overview camera.
–Preposition: Defines the preposition camera used for the overview. Only available when a
PTZ/Dome camera has been selected as an overview camera (if a fixed camera or None is
selected, this field is not visible).
–SDI Switcher: Enter the IP address of the HD‑SDI video switcher used. Do not use leading
zeros. If leading zeros are entered, the DCNM-WAP will not be able to control the
switcher.
–Example:
Correct IP address: 192.168.10.111
Incorrect IP address: 192.168.010.111
– Overview list: Here all connected cameras are listed. The overview list shows: the Camera
name, Serial number, Software version, camera Type and to which video switcher Input
the camera is connected to.
– The camera Serial number is used as a link to the camera configuration web pages.
Note: Only possible if your PC/laptop or tablet device is connected via the wired
Ethernet connection of the DCNM-WAP.
Notice!
Ensure that the Bosch Onvif Camera has firmware 5.80 or higher.
– A trash can is displayed next to the Camera name for removing a selected camera.
Note: Only a disconnected camera can be removed.
5.4.3
5.4.4
18 en | Web interface application DICENTIS
2015.03 | V1.0 | Configuration manual Bosch Security Systems B.V.

Licensing
Click the Licensing button to open the Licensing page.
Licensing is only required when you purchase software licenses.
The licensing page provides you with an overview of the activated licenses.
Activate a license:
To activate software you need to have an activation ID which was send by email after
purchasing the software license. Activation requires a USB memory stick and any PC
connected to the internet.
Note: License activation is not supported for tablets.
1. Insert the USB memory stick into the PC connected to the DCNM-WAP.
2. Click the Add license button.
3. Enter all required Customer information and Activation ID, click the Add button and
then the Activate button. Note: You can add more than one Activation ID. When all
Activation IDs are added, click the Activate button.
– A Save as dialog is shown. Save the Request file to your USB memory stick.
4. Go to the website https://licensing.boschsecurity.com using a PC/Laptop which is
connected to the internet, and login. If you do not have a username, contact your local
Bosch representative to acquire an account:
– Go to Manage license and upload the request file from the USB memory stick.
– Save the Response file to your USB memory stick.
5. In the DICENTIS web interface application, click the Process response message button.
Select the correct Response file, and then click Open.
– Now the license is activated.
– New functionality is added and can be used by the system.
Returning a license
The return license process is started in the license website.
1. Log on to https://licensing.boschsecurity.com
2. Go to the overview, and find the customer that the license must be returned to.
3. Click on the link in the Location column to open the System details pop-up.
4. Click the Return License button.
– A file will be generated. Save it to a USB stick.
5. Go to the license page of the web interface application.
6. Click the Process response message button.
– Select the correct file, and then click Open.
– A save as dialog is shown. Save the file to your USB memory stick.
7. Return to the license website, go to Manage license, and upload the Request file from
the USB memory stick.
– Now the license is returned.
Network and general settings
Click the Network and general settings button to view the Network and general settings
page. To change theses settings, click the Change network settings button.
–Network settings:
–Network Name (SSID): Bosch DICENTIS (factory default).
–WPA2 Key (password): dcnm-wap (factory default).
–Channel: Shows the currently selected WiFi channel. This channel is automatically
defined by the system and cannot be changed.
5.4.5
5.4.6
DICENTIS Web interface application | en 19
Bosch Security Systems B.V. Configuration manual 2015.03 | V1.0 |
–Hostname: Enter the network name of the DCNM-WAP. The default name is
dcnm‑wap.
–Change network settings button: Click this button to open the change settings
screen. Change the settings, if required, and click either the Cancel or Save button.
–General settings:
–DCNM‑WDE GUI language: Select the GUI language for the DCNM-WDE Wireless
Devices touch screen.
–Show custom logo on DCNM‑WDE: When selected, the custom logo will be visible
on the Wireless Devices (DCNM-WDE) touch screen.
–Factory default button: Click the button to reset the Wireless Access Point to factory
default settings and values. Important: Make sure all Wireless Devices are switched
on and are in range before you activate the factory default because all Wireless
Devices will be de-initialized. After a factory default, all settings are returned to their
default value, and all Wireless Devices need to be subscribed.
Seats
Click the Seats button to open the Seats settings page.
Here the Wireless Devices can be assigned to seats:
–Seats overview:
–Select: The header of this column shows the number of known seats and the number
of connected seats. If a seat is disconnected, the disconnect symbol is displayed to
the left of the seat row.
–Seat name: Change the seat name.
–Prio: When selected, the participant is able to use the Wireless Device priority
(chairperson) button.
–Dual: When selected, the Wireless Device is configured for dual-use.
Note: A device cannot be prio and dual simultaneously, so when Prio is selected, the
dual checkbox is disabled.
–ID: When selected, the identification feature is enabled. Participants can use an NFC
tag to identify themselves at the Wireless Device Extended.
–Voting: When selected, the voting feature is enabled. Participants can cast their vote
at the Wireless Device Extended.
–Serial nr: The serial number of the connected Wireless Device.
–Camera: The camera name connected to the seat. Only available when the camera
control license is installed.
–Pre‑position: Camera preposition setting number assigned to the seat. Only available
when the camera control license is installed.
–Selection mode: When selected, a Wireless Device can be located by clicking the Select
symbol to the left of the seat row. The red microphone LED on the selected Wireless
Device will illuminate to indicate its position in the conference room.
–Subscription mode: When selected, a Wireless Device not associated with a DCNM-WAP,
can be associated with this DCNM-WAP by pressing the request button on the wireless
device. A new seat will be assigned to this device and added to the seats overview. Refer
to Wireless Device initialization, page 9.
–De‑init button: When clicked, it erases the subscription of all Wireless Device. All LEDs on
the Wireless Device are on when the Wireless Device does not have a subscription.
–Remove disconnected seats button: Removes all seats which are currently not connected
to the system.
5.4.7
20 en | Web interface application DICENTIS
2015.03 | V1.0 | Configuration manual Bosch Security Systems B.V.
Date and time
Click the Date and time button to open the Date and time settings page:
Click the Change date and time settings button to select:
–Date: Select the current date.
–Time: Select the local time.
–Time zone: Select the local time zone from the list.
Notice!
The DCNM-WAP can automatically synchronize the date and time with a internet time server.
If the internet is not available, the DCNM-WAP tries to synchronize with a time server which is
offered by the DHCP server. If the time server can not be reached, the date and time can be
set manually. If a time server becomes available the DCNM-WAP will synchronize the date and
time.
Upgrade
Notice!
Upgrade is not available on tablets.
Click the Upgrade button to open the software Upgrade page.
The Upgrade page is used to:
– upgrade/maintain the software of the Wireless Access Point (DCNM-WAP) and Wireless
Devices (DCNM-WD and DCNM-WDE).
– upload the custom logo to the Wireless Device Extended (DCNM-WDE).
1. From the product related information page on www.boschsecurity.com, download the
upgrade software file. Each device will have its own file:
– Always start with upgrading the Wireless Devices.
– Upgrade the DCNM-WAP last.
2. From the Upgrade page, click in the File box to select your saved software file.
3. The web interface application will automatically select the correct devices, depending on
the selected file. If you do not want to upload firmware to a particular device, uncheck
the checkbox for that device.
4. Click the Start button to start the upload process:
–Progress bars are displayed indicating the upload process.
– The upload status is shown in the State column (Idle, Programming, Rebooting,
Done or Failed after reboot). If the upgraded file is corrupt or not recognized, an
error message is displayed.
– Software versions (numbers) are shown in the Version column. The uploaded
software version number is only shown when the upgrade process is successful.
– As soon as the DCNM-WAP is upgraded, it will reboot.
5. Exit the Upgrade page after completion of the upload process (Done state).
5.4.8
5.4.9
DICENTIS Web interface application | en 21
Bosch Security Systems B.V. Configuration manual 2015.03 | V1.0 |

Notice!
When downgrading DCNM-WD(E)s, they will become disconnected from the Wireless Access
Point, and the upgrade page cannot correctly indicate when the downgrade has finished. A
WD(E) can be subscribed again when the yellow LEDs on the WD(E) come on.
Notice!
If you need to downgrade the DCNM-WAP, make sure you de‑initialize all Wireless Devices
first.
Upload custom logo
The custom logo can be uploaded to the Wireless Devices (DCNM-WDE) in the same way as
upgrade software. The following conditions apply:
– The filename must start with DCNM-WDE
– Only upload PNG files with dimensions of 480 x 272 pixels.
Other file formats and dimensions are not supported.
22 en | Web interface application DICENTIS
2015.03 | V1.0 | Configuration manual Bosch Security Systems B.V.

Participants
Preconditions:
– The logged on user must have the access right: Prepare meeting.
Click the Participants button to open the Participants and identification settings page.
Participants can be assigned seats and/or can use an NFC tag to identify themselves to the
system. When a participant is identified by the system, the name of the participant is shown in
the speaker list and waiting list.
The following items can be set on this page:
Identification
–Off (grey):
– Participant names are not used and are not shown in the speaker list and waiting
list.
– Participants cannot use an NFC tag to identify themselves.
–By assignment (grey):
– Seats must be assigned to participants. If a seat is not assigned to a participant, that
seat cannot be used.
– Participants cannot use an NFC tag to identify themselves.
– A seat can be used without having to identify the participant, by assigning a dummy
participant with a general name to a seat.
–At assigned seat (grey):
– Seats must be assigned to participants. If a seat is not assigned to a participant, that
seat cannot be used.
– Participants must use an NFC tag to identify themselves at the assigned seat.
– If a participant tries to identify him/herself at another seat, a message is displayed
on the Wireless Device to inform the participant that they are at the incorrect seat.
– The seat cannot be used until the assigned participant is identified at the seat.
–At any seat (grey):
– Participants can use an NFC tag at any seat to identify themselves.
– The seat cannot be used, until a participant has been identified at that seat.
Participants overview
–Trash can: Removes the selected participant.
–Name: The participants (editable) name.
–NFC‑ID: The number of the Near Field Communication (NFC) tag of the participant.
–Seat: Selects the seat name, from the list, that the participant is assigned to.
5.5
DICENTIS Web interface application | en 23
Bosch Security Systems B.V. Configuration manual 2015.03 | V1.0 |
Switch system on/off
Preconditions:
– The logged on user must have the access right: Prepare system.
Use the Switch system on/off button to set the system in the “power on” or “power off”
mode:
– Click the Switch system on button to set the system in the “power on” mode.
– Press the microphone request button of a Wireless Device to switch it on.
Note: The Wireless Devices have to be switched on individually.
– Click the Switch system off button to set the system in the “power off” mode. This will
switch off all Wireless Devices.
–Note: If you try to switch on a Wireless Device, by pressing the microphone request
button when the system is in the “power off” mode, the device will momentarily switch
on and then switch off.
Battery & Signal
Preconditions:
– The logged on user must have the access right: Configure or Prepare system.
Click the Battery & Signal button to open the Battery and Signal overview page.
The following information is shown for each seat that is currently connected to the Wireless
Access Point:
Note: If a seat is disconnected, the disconnect symbol is displayed to the left of the seat row,
and the data in the seat row is not displayed.
–Seat: The seat name.
–Battery: Indicates the remaining power supply capacity, in hours, of the Wireless Device
Battery Pack.
Note: After replacing a battery or powering up a Wireless Device, the number of battery
hours displayed might be higher that the actual life of the battery. This value will stabilize
after a short while.
–Charges: Shows the number of times the Battery Pack battery is charged.
–Signal: Indicates the WiFi signal strength, in dBm.
–Test: This column shows the result of the range test.
– Press the button to Start the range test. The system DCNM-WAP starts to measure if
all Wireless Devices are in range of several frequencies. This guarantees that the
Wireless Devices will continue to work if the DCNM-WAP decides to switch to
another WiFi channel in case of interference.
–Serial number: The serial number of the Battery Pack.
5.6
5.7
24 en | Web interface application DICENTIS
2015.03 | V1.0 | Configuration manual Bosch Security Systems B.V.
Logging
Preconditions:
– The logged on user must have the access right: Configure.
Click the Logging button to open the Logging page.
– Click the Clear view button to clear all events.
– Click the Export button to export and save the current event logging overview file (*.txt
format).
Notice!
Logging export is not available for tablets.
System info
Preconditions:
– The logged on user must have the access right: Configure.
System info is used by a technician. When the System info button is clicked, the following
system information is shown on the System info page:
–Ethernet MAC and IP address.
–Wireless IP address.
– Software Versions.
Logout
Preconditions:
– None
Click the Logout button to log out, which returns you to the Login page.
5.8
5.9
5.10
DICENTIS Web interface application | en 25
Bosch Security Systems B.V. Configuration manual 2015.03 | V1.0 |
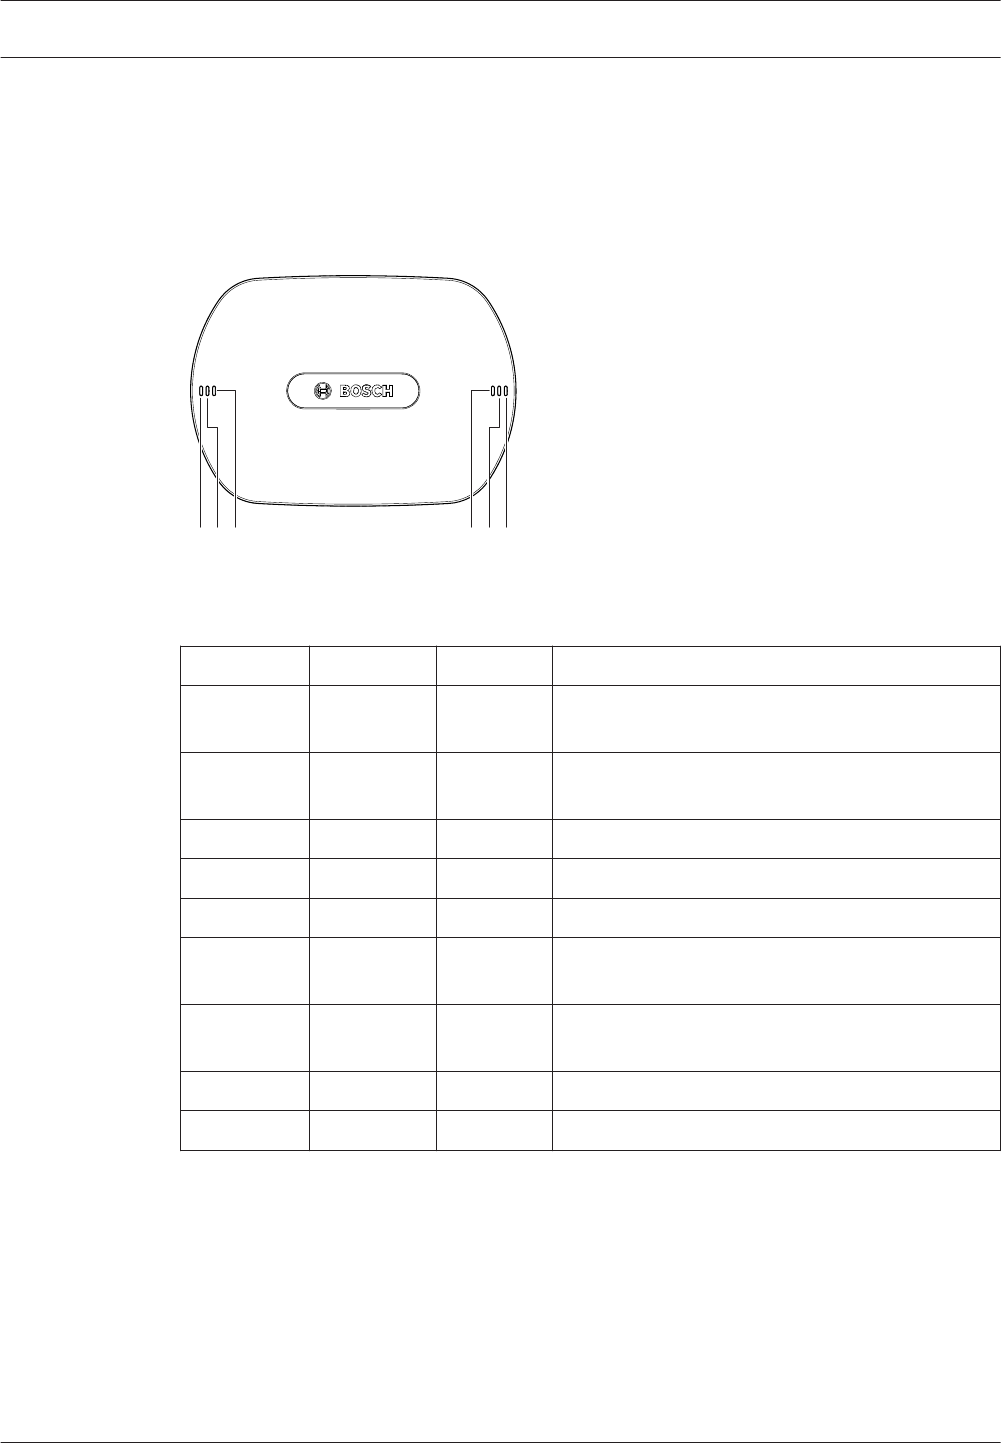
Wireless Access Point LED behavior
The LEDs on the front panel of the Wireless Access Point (DCNM-WAP) give information on the
(configuration) status of the Wireless Access Point.
A B C C B A
Figure 6.1: DCNM-WAP status LEDs
Blue (A) Red (B) Blue (C) Description
Flashing Off Off – No DCNM-WD(E) connected yet.
– Subscription mode is off.
On Off Off – At least one DCNM-WD(E) is connected.
– Subscription mode is off.
Flashing Flashing Flashing – The DCNM-WAP is starting‑up.
On Flashing Off – DCNM-WAP software upgrade active.
On Flashing On – DCNM-WD(E)s software upgrade active.
Flashing Off On – Subscription mode is on.
– No DCNM-WD(E)s connected yet.
On Off On – Subscription mode is on.
– At least one DCNM-WD(E) is connected.
Off Flashing Off – System is in Power off mode.
Off Off Off – No DC power supply connected.
Table 6.1: Status LEDs
6
26 en | Wireless Access Point LED behavior DICENTIS
2015.03 | V1.0 | Configuration manual Bosch Security Systems B.V.

Troubleshooting
Customer service
If a fault cannot be resolved, please contact your supplier or system integrator, or go directly
to your Bosch representative.
7
7.1
DICENTIS Troubleshooting | en 27
Bosch Security Systems B.V. Configuration manual 2015.03 | V1.0 |

Bosch Security Systems B.V.
Torenallee 49
5617 BA Eindhoven
The Netherlands
www.boschsecurity.com
© Bosch Security Systems B.V., 2015