Bosch Security Systems H226 50 mW Plastic Handheld Transmitter User Manual REV PH User s Manual 2
Bosch Security Systems, Inc. 50 mW Plastic Handheld Transmitter REV PH User s Manual 2
User's Manual

Page 1
Users Manual
Electro-Voice Model REV-PH Handheld Wireless Microphone Transmitter
The Electro-Voice (Ev) REV-PH is a Professional Grade Wireless Handheld
Transmitter operating in the UHF frequency range. The REV-PH combines frequency
agility and ease of use like no other. The transmitter operates within a 24 MHz wide
segment in 25 KHz steps.
The high quality audio circuitry and advanced Radio Frequency (RF) signal
processing offer broadcast quality signal-to-noise and audio clarity. The typical line-of-
sight distances for the system may be up to 300 feet.
System features include:
Durable Painted Molded Handle.
Permanent Flash Memory for frequency/setting storage.
On-Loc prevents accidental power off (when set).
LCD Display for ease of viewing.
Internal Half Wave Dipole Antenna.
Page 2
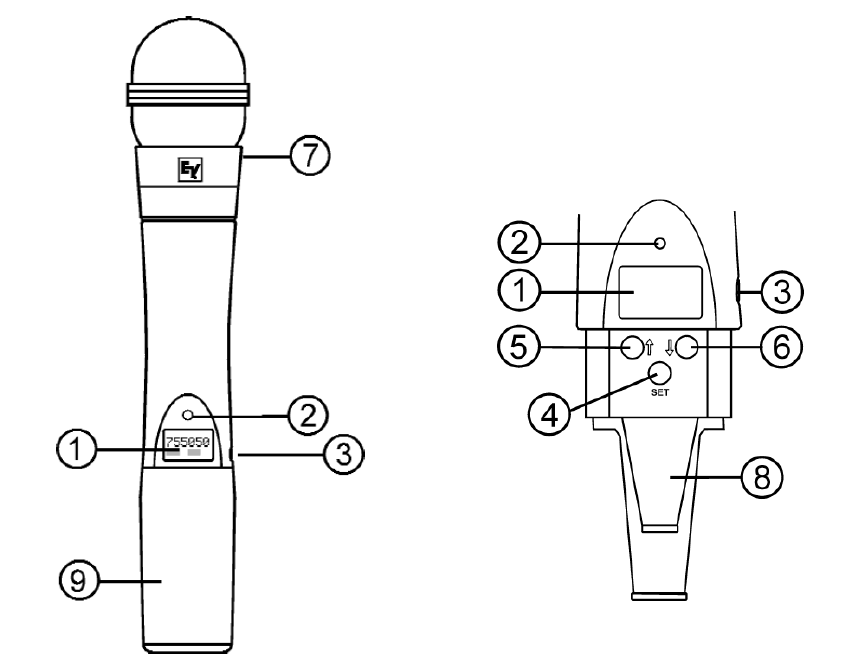
REV-PH Controls and Connections:
1. Main Display – LCD.
2. Red low battery LED indicator
3. Power On/Off Switch
4. SET Control Button
5. Channel / Frequency Up Switch
6. Channel / Frequency Down Switch
7. Microphone Element
8. 9V Battery Compartment
9. Battery Cover – Screw Type
Page 3
Quick set-up:
1. With the Power Switch on the transmitter OFF, install fresh batteries into
the transmitter.
2. To prevent feedback or unintentional noise, mute the audio
mixer/amplifier or other device during set-up adjustments.
Place the transmitter Power Switch to the ON position.
3. The operating screen (display) light will come on momentarily.
The display will show the current frequency group and channel.
Note: Anytime Power is removed and turned back on, the GP/CH
screen will be displayed. The Low Battery light will flash momentarily.
4. If the Group and Channel match the desired receiver group and channel,
proceed to Step 11. If not, proceed to Step 5.
5. To select a different GP/CH, press SET one time. The Group will start
flashing. Use the up and down arrows to change the group number. Press
the SET button to save the Group.
6. After setting the Group, The Channel number will start flashing . Use the
up/down arrows to change the Channel number. Press SET and the
channel is now saved.
7. There are 18 Groups and up to 16 Channels (preferred groups/channels)
stored in memory. If desired, you can create new groups/ channels but
you must change to a new frequency to store in that group/channel.
8. In order to select a new frequency, you must have a “users” group
/channel selected. Press the SET button. The Group should be flashing.
Press the Up arrow until group 19u (user programmable) is found.
(group 20u can also be used) Press SET. The Channel should now be
flashing. Select a channel with the up/down arrow. Press SET.
9. You are now ready to select a frequency to store in the users group
above. Press and hold the set and down arrows at the same time for 3
seconds and release to go to the next screen function.
Page 4
10. The next screen displays the operating frequency of the group/channel.
If there is no frequency currently stored in the selected users
group/channel, a dashed line will be shown. Press SET. The dashed line
or frequency will start flashing. Press the up arrow one step at a time to
find the desired frequency or hold down the up arrow to scroll through
the frequencies quickly. The frequencies can be scrolled either way by
the up/down buttons. When the desired frequency is showing, press SET.
11. Press the set and down arrows at the same time then release to go to the
next screen function.
12. The next screen shows the battery level in % (percent). Press the set and down
arrows at the same time then release to go to the next screen.
13. The next screen shows the audio setting. The display is shown in dB.
0 dB is (maximum volume), -27 dB is (minimum volume). Press the set
and down arrows at the same time then release to go to the next screen.
Setting the attenuator for the maximum Audio Meter reading on the
receiver without peak distortion will produce the best signal to noise
ratio.
14. The next screen shows the transmitter RF level (Lo or Hi). Press the Set
button if you wish to change the RF level. Press the up button to go to
Hi or the down button to go to Lo. Press Set to store.
The transmitter RF is normally shipped set to “Lo” for use with
multiple frequency systems and the best battery life.“Hi power can be
selected for longer distances or to suppress noise or interference. The
nominal power in Hi is 50 milliwatts.
15. Press the set and down arrows at the same time then release to go to the
next screen function, which will return to the Gp/Ch screen. The
display screen will automatically show the Gp/Ch screen when the
transmitter is first turned on.
16. When power off is required, simply place the power Off-On switch in the OFF
position. The display will then delay slightly to allow the receiver to shut down
quietly.

Page 5
REV-PH Specifications:
RF Frequency range……………………...…512.0 to 536.0 MHz.
RF Channel Step……………………….….. 25 KHz.
RF Power……………………………..…… Norm, 5 mW, High, 50 mW (typical).
Modulation……………………………...…. FM, 40 KHz Deviation nominal.
Audio Frequency Response……………...…80-15000 Hz +/- 2 dB.
Audio attenuator Range…………………… 27 dB.
Microphones ( Dynamic)………………..… 150 Ohms.
Antenna…………………………………..... Internal Half Wave.
Power……………………………………… Two AA Batteries.
Battery Life (9 Volt Alkaline)……….……..8-10 Hours Typical.
Approval Information:
(English)
The Electro-Voice REV-PH Transmitter is Type Accepted under United States Federal
Communications Commission CFR 47, Part 74 and Certified to Industry Canada RSS-
123. The device also complies with CRF 47, Part 15 of the FCC Rules and Industry
Canada ICES-003 rules.
Operation is subject to the following conditions:
1. This device may not cause harmful interference.
2. This device must accept any interference received, including interference that may
cause undesired operation.
3. Use only the manufacturer or dealer supplied accessories for this device.
4. This device must not be co-located or operated in conjunction with any other antenna
or transmitter.
CAUTION: Any changes or modifications not expressly approved by the party
responsible for compliance could void the user’s authority to operate this equipment.
Licensing of Electro-Voice equipment is the users responsibility and licensability
depends upon the user’s classification, user’s application and frequency selected.
Bosch Security Sysetms, Inc., strongly urges the user to contact the appropriate
telecommunications authority for any desired clarification.
This Class B digital apparatus complies with Canadian ICES-003.
Page 6
This equipment has been tested and found to comply with the limits for a Class B digital
device, pursuant to Part 15 of the FCC Rules. These limits are designed to provide
reasonable protection against harmful interference in a residential installation.
This equipment generates, uses, and can radiate radio frequency energy and, if not
installed and used in accordance with the instructions, may cause harmful interference to
radio communications. However, there is no guarantee that interference will not occur in
a particular installation. If this equipment does cause harmful interference to radio or
television reception, which can be determined by turning the equipment off and on, the
user is encouraged to try to correct the interference by one or more of the following
measures:
Reorient or relocate the receiving antenna.
Increase the separation between the equipment and receiver.
Connect the equipment into an outlet on a circuit different from that to which
the receiver is connected.
Consult the dealer or an experienced radio/TV technician for help.
(French)
Le Electro-Voice REV-PH émetteur est Type accepté aux termes des États-Unis de la
Federal Communications Commission CFR 47, partie 74 et certifié à Industrie Canada
RSS-123. Le dispositif est également conforme CRF 47, partie 15 des règles de la FCC et
Industrie Canada NMB-003 des règles. Son fonctionnement est soumis aux conditions
suivantes:
1. Le dispositif ne doit pas causer d'interférences nuisibles.
2. Cet appareil doit accepter toute interférence reçue, y compris les interférences qui
peuvent perturber le fonctionnement.
3. Utilisez uniquement le fabricant ou le revendeur accessoires fournis avec cet appareil.
4. Ce dispositif ne doit pas être co-implantés ou exploités en conjonction avec une autre
antenne ou transmetteur.
ATTENTION: Les changements ou modififications à cet appareil sans expressément
approuvée par la partie responsable de conformité pourraient annuler l'autorité de
l'utilisateur de faire fonctionner cet équipement.
Attribution de licences à Electro-Voice équipement est la responsabilité de l'utilisateur et
elle dépend à la classification de l'utilisateur, l'application utilisateur et de la fréquence
sélectionnée. Bosch Security Sysetms, Inc, exhorte à l'utilisateur de communiquer avec
l'autorité de télécommunications appropriés pour toute précision souhaitée.
Cet appariel numérique de la classe B est conforme à la norme NMB-003 du Canada.
Page 7
Conformité aux normes FCC Cet équipement a été testé et trouvé conforme aux limites
pour un dispositif numérique de classe B, conformément à la Partie 15 des règlements de
la FCC et NMB-003 canadien. Ces limites sont conçues pour fournir une protection
raisonnable contre les interférences nuisibles dans une installation résidentielle.
Cet équipement génère, utilise et peut émettre des fréquences radio et, s'il n'est pas
installé et utilisé conformément ment aux instructions du fabricant, peut causer des
interferences nuisibles aux communications radio.
Rien ne garantit cependant que l'interférence ne se produira pas dans une installation
particulière. Si cet équipement provoque des interférences nuisibles à la réception radio
ou de télévision, qui peut être déterminé en comparant et en l'éteignant, l'utilisateur est
encouragé à essayer de corriger les interférence par une ou plusieurs des mesures
suivantes:
Réorienter ou déplacer l'antenne de réception.
Augmenter la distance entre l'équipement et le récepteur.
Branchez l'appareil dans une prise sur un circuit différent de celui auquel le
récepteur est connecté.
Consultez votre revendeur ou un technicien radio / TV pour
assistance.Avertissement