Boschhome 24 Compact Vented Dryer Axxis Wtv76100Cn Owners Manual
2014-08-26
: Boschhome Boschhome-24-Compact-Vented-Dryer-Axxis-Wtv76100Cn-Owners-Manual boschhome-24-compact-vented-dryer-axxis-wtv76100cn-owners-manual boschhome pdf
Open the PDF directly: View PDF ![]() .
.
Page Count: 28
en Operating Care and
Installation Instruction
Dryer
V20-UL
Household Appliances

2
Table of Contents
Definitions ...................................................................................................................................................................3
IMPORTANT SAFETY INSTRUCTIONS .....................................................................................................................4
GROUNDING INSTRUCTIONS ........................................................................................................ .................................. 5
INSTALLATION INSTRUCTIONS ...............................................................................................................................6
Introduction ................................................................................................................... ......................................................... 6
Information concerning waste disposal.......................................................................................... .................................. 6
Before installing the dryer .................................................................................................... ............................................... 6
Installation location.......................................................................................................... ..................................................... 7
Washer-dryer connecting set.................................................................................................... .......................................... 7
Built under Installation....................................................................................................... ................................................... 7
Electrical connection .......................................................................................................... .................................................. 8
Integrated socket .............................................................................................................. .................................................... 9
Exhaust air connection ......................................................................................................... .............................................10
Installation -step by step..................................................................................................... ...............................................12
Check list before using the dryer .............................................................................................. ......................................12
Preparing to transport the dryer............................................................................................... ........................................12
OPERATING INSTRUCTIONS ..................................................................................................................................13
Your new dryer ................................................................................................................. ...................................................13
Panel .......................................................................................................................... ...........................................................14
Safety information ....................................................................................................................................................15
Intended Use ................................................................................................................... ....................................................15
Before switching on the dryer .................................................................................................. ........................................15
Using the dryer................................................................................................................ ....................................................15
Protecting the dryer........................................................................................................... .................................................15
Before using the dryer for the first time...................................................................................... ....................................15
Temporary disconnection of the dryer........................................................................................... .................................15
Laundry......................................................................................................................................................................16
Identification of fabrics...................................................................................................... .................................................16
Drying tips .................................................................................................................... ........................................................16
Protection of environment ...................................................................................................... ...........................................16
Program selection ....................................................................................................................................................17
Automatic programs............................................................................................................. ..............................................17
Time programs .................................................................................................................. ..................................................17
Option ......................................................................................................................... ..........................................................17
Indicator of program sequence.................................................................................................. ......................................17
Operation...................................................................................................................................................................18
Using the dryer................................................................................................................ ....................................................18
Cleaning and care.....................................................................................................................................................19
Cleaning the dryer ............................................................................................................. .................................................19
Cleaning the lint filter ....................................................................................................... ..................................................19
Cleaning the exhaust duct ...................................................................................................... ..........................................20
Cleaning the moisture sensor ................................................................................................... .......................................20
Cleaning the bearing shield.................................................................................................... ..........................................20
Troubleshooting .......................................................................................................................................................21
SERVICE and REPAIR ............................................................................................................. ..........................................22
STATEMENT OF LIMITED PRODUCT WARRANTY................................................................................................23
Warranty Exclusions
Program selection table ...........................................................................................................................................26
Summary of instructions .........................................................................................................................................27
3
Congratulations on having selected
a Bosch clothes dryer, the choice of
those that demand exceptional per-
formance from their clothes dryer.
This dryer complies with
UL 2158 A Electric Clothes Dryers.
A distinctive feature of your dryer is
low energy consumption.
An easy operation philosophy, a
variety of customized drying
programs and a solid touch and
feel make this appliance a user-
friendly assistant in your household.
The Bosch dryer offers the following
standard features:
– High efficiency precision drying
system.
– Exceptionally quiet operation.
– Sensor controlled auto cycles.
– Timed cycles for
20 and 40 minutes.
Each dryer which leaves our factory
has undergone a thorough
performance test and is in full
working condition. If you have any
questions especially concerning
installation of the dryer - our
customer service team will be
happy to advise you.
Further information and a selection
of our products can be found on our
web site:
www.boschappliances.com
Information
Please read and follow these
operating and installation
instructions and all other
information enclosed with the dryer.
Definitions
This symbol is used to draw
the user's attention to
something in particular.
WARNING
WARNING – This indicates that
death or serious injuries may
occur as a result of not
observing this warning.
CAUTION
CAUTION – This indicates that
injuries or significant damage
may occur as a result of not
observing this warning.
CAUTION
CAUTION – This indicates that
minor injuries or damage may
occur as a result of not
observing this warning.

4
IMPORTANT SAFETY INSTRUCTIONS
1. Read all instructions before
using the dryer. Bosch dryers
are provided with Operating,
Care and Installation
Instructions.
2. Do not dry articles that have
been previously cleaned,
washed, soaked, or spotted
with gasoline, dry cleaning
solvents, other flammable, or
explosive substances as they
give off vapors that could ignite
or explode.
3. Do not allow children to play on
or in the appliance at any time;
severe injury or death could
result. Children should be kept
a safe distance away from
appliances at all times. Children
should only be permitted within
an appliance's vicinity if under
close, constant adult
supervision.
4. When children become old
enough to operate the
appliance, it is the legal
responsibility of the parents or
legal guardians to ensure that
they are instructed in safe
practices by qualified persons.
5. Before the appliance is
removed from service or
discarded, remove the door to
the drying compartment.
6. Do not reach into the appliance
if the drum is rotating.
7. Do not install or store this
appliance where it will be
exposed to the weather.
8. Do not tamper with the controls.
9. Do not repair or replace any
part of the appliance or attempt
any service unless specifically
recommended in the user-
maintenance instructions or in
published user repair
instructions that you understand
and have the skills to carry out.
10. Do not use fabric softeners or
products to eliminate static
unless recommended by the
fabric manufacturer.
11. Do not use heat to dry articles
containing foam rubber (may
be labeled latex foam) or
similarly textured rubber-like
materials. Foam rubber
materials can ignite by
spontaneous combustion.
12. Keep area around the exhaust
opening and adjacent
surrounding areas free from the
accumulation of lint, dust and
dirt. An obstructed port might
reduce the airflow.
13. Clean lint screen before or after
each load.
14. The interior of the machine
should be cleaned periodically
by qualified service personnel.
15. Always be sure to unplug the
dryer from the electrical supply
before attempting any service.
Disconnect the power cord by
grasping the plug, not the cord.
16. Store all laundry chemicals and
aids in a cool dry place
according to the manufacturer's
instructions in an area where
children cannot reach them.
17. To reduce the risk of fire,
clothes, cleaning rags, mop
heads and the like which have
traces of any flammable
substance, such as vegetable
oil, cooking oil, petroleum
based oils or distillates, waxes,
fats, etc., must not be placed in
the dryer. These items may
contain some flammable
substance(s) even after
washing, which may smoke or
catch fire by itself.
18. Do not place items exposed to
cooking oils in your dryer. Items
contaminated with cooking oils
may contribute to a chemical
reaction that could cause a
load to catch fire.
19. Do not sit on top of the dryer.
20. To reduce the risk of fire or
electrical shock, DO NOT use
an extension cord or an
adapter to connect the dryer to
the electrical power supply.
21. The dryer must only be used for
its intended purpose.
22. Use the integrated socket only
for listed appliances.
23. Always check pockets and
remove any objects. Cigarette
lighters are particularly
hazardous.
24. Replace worn out power cords
and/or loose plugs.
25. Do not operate the dryer if any
guards and/or panels have
been removed.
26. Do not operate the dryer if any
parts are missing or broken.
27. Do not bypass any safety
devices.
28. Do not use a plastic or non-
metal flexible duct with this
dryer. Plastic or non-metal
flexible duct are a potential fire
hazard.
WARNING
To reduce the risk of fire, electric
shock, serious injury or death to
persons and /or damage when
using your dryer, follow basic
precautions, including the
following.

5
29. Do not operate this dryer until
you are sure that the dryer has
been installed according tothe
INSTALLATION INSTRUCTIONS
and that installation and
grounding are in compliance
with all local regulations and/or
other applicable regulations
and requirements.
30. Failure to install, maintain and/
or operate the dryer according
to the manufacturer's
instructions may result in injury
and/or damage.
31. To avoid floor damage and
mold growth, do not let spills or
splashout cause standing water
around or under the appliance.
Notes:
A The IMPORTANT
SAFEGUARDS and
WARNINGS presented in
this manual do not cover
all possible conditions that
may occur.
Common sense, caution
and care must be
exercised when installing,
maintaining or operating
the dryer.
B Always contact your
dealer, distributor, service
agent or the manufacturer
about any problems or
conditions that you do not
understand.
C Follow also the Safety
Information in the
INSTALLATION
INSTRUCTIONS and the
OPERATING
INSTRUCTIONS.
GROUNDING
INSTRUCTIONS
This appliance must be grounded.
In the event of malfunction or
breakdown, grounding will reduce
the risk of electric shock by
providing a path of least resistance
for the electric current.
This appliance is equipped with a
cord having an equipment-
grounding conductor and a
grounding plug.
The plug must be plugged into an
appropriate outlet that is properly
installed and grounded in
accordance with all local codes and
ordinances.
KEEP THESE
INSTRUCTIONS FOR
FUTURE REFERENCE.
In case of change of ownership,
manual should be conveyed with
the dryer.
SAVE THESE INSTRUCTIONS
WARNING
State of California Proposition 65
warnings:
This product contains chemicals
known to the State of California to
cause cancer, birth defects or
other reproductive harm.
WARNING
Improper connection of the
equipment grounding conductor
can result in a risk of electric
shock.
Check with a qualified electrician
or service person if you are in
doubt as to whether the dryer is
properly grounded.
DO NOT modify the plug
provided with the appliance. If it
does not fit the outlet, have a
proper outlet installed by a
qualified electrician.

6
INSTALLATION INSTRUCTIONS
Introduction
Read these installation instructions
completely and carefully. They will
save you time and effort and help to
ensure optimum dryer
performance. Be sure to observe all
listed warnings and cautions.
In addition to these instructions the
dryer must be installed in
accordance with all local codes or,
in the absence of a local code:
– In the U.S.A., in accordance
with the National Electric Code,
ANSI/NFPA70-latest edition/
State and Municipal codes
and/or local codes.
–In Canada, in accordance wit the
Canadian Electric Code
C22.1 – latest edition/Provincial
and Municipal codes and/or local
codes.
Information
concerning waste
disposal
Disposal of the packaging
All packaging materials are
environmentally friendly and can be
reused. Please dispose of
packaging in an environmentally
friendly manner.
Please ask your dealer or inquire at
your local authority about the
current means of disposal.
Disposal of the old appliance
To prevent children from locking
themselves in the appliance,
remove the door.
Old appliances are not worthless
rubbish! Valuable raw materials can
be reclaimed from environmentally
friendly recycling.
Please ask your dealer or inquire at
your local authority about the
current means of disposal.
Before installing
the dryer
Unpacking the appliance
Check the dryer for transportation
damage. Do not connect a dryer
which is visibly damaged. If in
doubt, contact your dealer.
Supplied components
The dryer is delivered as a
complete unit. The operating
instructions and supplied
accessories can be found in the
drum.
WARNING
WARNING – Risk of Fire.
– Clothes dryer installation must
be performed by a qualified
installer.
– Install the clothes dryer
according to the
manufacturer's instructions
and local codes.
– Do not install a clothes dryer
with flexible plastic venting
materials. If flexible metal (foil
type) duct is installed, it must
be of a specific type identified
by the appliance manufacturer
as suitable for clothes dryers.
Flexible venting materials are
known to collapse, be easily
crushed and trap lint. These
conditions will obstruct clothes
dryer airflow and increase the
risk of fire.
– To reduce the risk of severe
injury or death, follow all
installation instructions.
– SAVE THESE INSTRUCTIONS
WARNING
Keep children away from
shipping carton and packaging
components. Danger of
suffocation from plastic foil and
folding cartons.
WARNING
If appliance is no longer usable,
pull out main plug, cut off power
cord and discard with main plug.
CAUTION
The dryer is very heavy. Do not
lift it by yourself. Do not lift the
appliance by projecting
components (e.g. door) – due to
risk of breakage.
CAUTION
Remove the appliance
packaging carefully to prevent
damage to the surfaces.
CAUTION
After removing the packaging,
immediately remove any objects
from the drum.
7
Installation location
The installation room must be well
ventilated, otherwise the dryer will
operate below optimum
performance.
Do not operate the dryer at
temperatures above 104°F (40°C)
and below 41 °F (5°C). Low
temperatures affect the automatic
program sequence and may
prolong the drying times.
The installation surface for the dryer
must be clean, level and firm. Do
not install the appliance on carpets!
Compensate for uneven floors with
the height-adjustable feet.
Install the dryer and level side to
side and front to back. Use a
bubble level. Never remove the
height-adjustable feet!
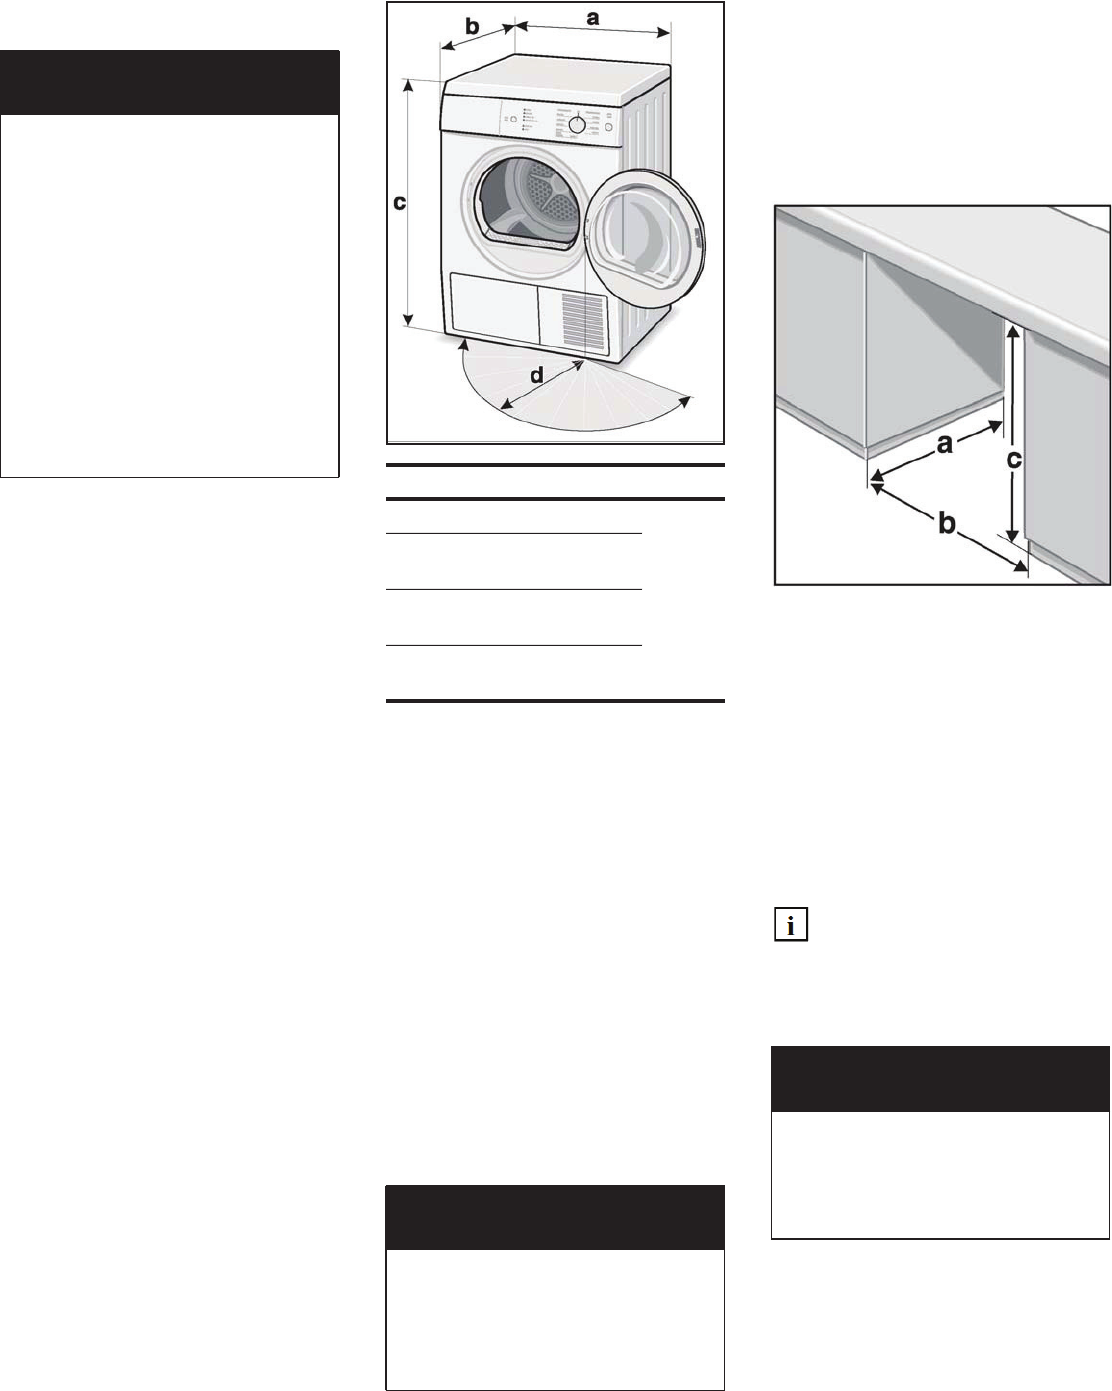
The size of the installation area
depends on the dimensions of the
dryer. Ensure that there is adequate
space to fully open the door.
Note:
Follow MINIMUM CLEARENCES
and OPEN AREA shown on front on
appliance for closet installation.
Washer-dryer
connecting set
The dryer can be placed on top of a
Bosch washer of the same
dimensions to save space.
Use the special washer-dryer sets
which can be obtained from
customer service or your local
dealer.
–WTZ11310
washer-dryer connection set
(standard)
–WTZ11300
washer-dryer connection set
with removable worktop
Built under Installation
The appliance can be built under;
that is, you can install the dryer
under-counter in a kitchen cabinet
opening. The cabinet opening
should be square and have
dimensions as shown in the figure.
a. 600 mm minimum // 23 ȿ"
(additionally approx. 150 mm
//5.9" for exhaust air
connection - rear)
b. 600 mm minimum // 23 ȿ"
(additionally approx. 150 mm
//5.9" for exhaust air
connection - left-hand side)
c. 850 mm minimum // 33 A"
If installed under a countertop,
the countertop must be
continuous and securely
attached to neighboring
cabinets.
You can use the cover for appliance
underneath worktop which can be
obtained from customer service or
your local dealer (WTZ10290).
CAUTION
Do not install the dryer:
– outdoors,
– in an environment with
dripping water,
– near flammable materials,
– in rooms which are at risk of
frost,
– in rooms which may contain
gas or other fuels,
– in cupboards or closets with
lockable doors.
Dimension Weight
a 23.6" (600 mm) 85.8 lbs
(39kg)
with
packaging
90.2 lbs
(41 kg)
b 23.0...24.2"
(585...615 mm)
c 33.1... 34.2"
(840...868 mm)
d
angle
17.7" (450 mm)/
170-180°
CAUTION
For reasons of safety, the dryer
must be installed by an expert.
Always use the connection set to
secure the dryer to the washer –
risk of injury.
CAUTION
BUILT UNDER INSTALLATION
The area in front of the appliance
must be fully open. No doors or
coverings are allowed.
8
Electrical connection
For CANADA
Your dryer comes with a power
supply cord, CSA listed in Canada.
The Bosch dryer requires a 4-wire
receptacle.
When installing the receptacle for
the dryer cord, ensure that the
power supply cord is accessible
when the dryer is in the installed
position.
The power cord should only be
replaced by a qualified person.
Use a 4-wire power supply cord
(see electrical connection U.S.A.
below).
For U.S.A.
Your dryer comes without a 3- or
4-wire power supply cord. The
power cord kit must meet the
following requirements:
– UL listed in the USA
– 208 - 240 volt rated (minimum)
– 30 amps
– Type SRDT or DRT (UL 2158 A)
– Five feet long (minimum)
– Marked suitable for dryer
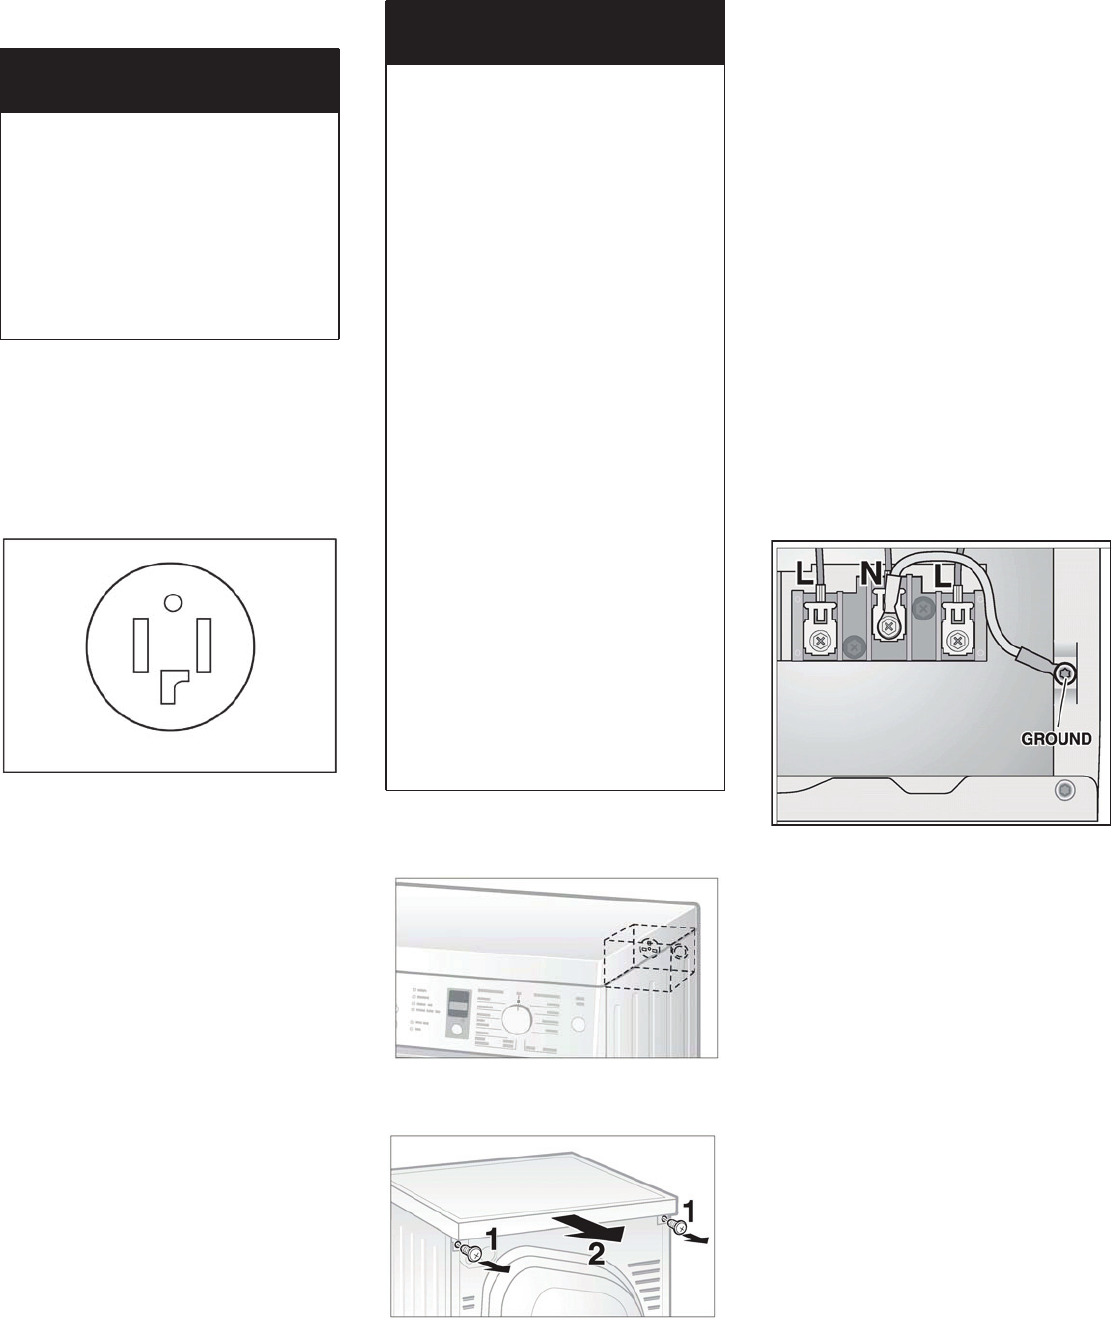
The splitting box is located at the
top rear of the appliance.
To connect the power cord you
have to remove the cover plate.
1. Remove the screws of the
cover plate on the rear side of
the appliance.
2. Push the cover plate from the
front to the rear side and lift
up.
3. Open the splitting box in the
right corner (20 Torx).
4. Loosen the strain relief in the
appliance.
5. Thread the power cord
through the U.L. strain relief
clamp.
6. Tighten the screws (2.5 Nm)
of the U.L. strain relief clamp
so that the power cord cannot
be moved.
7. Connect the power cord as
described below.
8. After connecting the power
cord close the splitting box
and replace the cover plate
fasten in place with reverse
handling.
Dryer supplied to customer
Connecting 4-wire power supply
cord
1. Remove the screws from the
cover of the terminal block.
2. Remove the screws from the
grounding cable.
3. Remove the grounding cable.
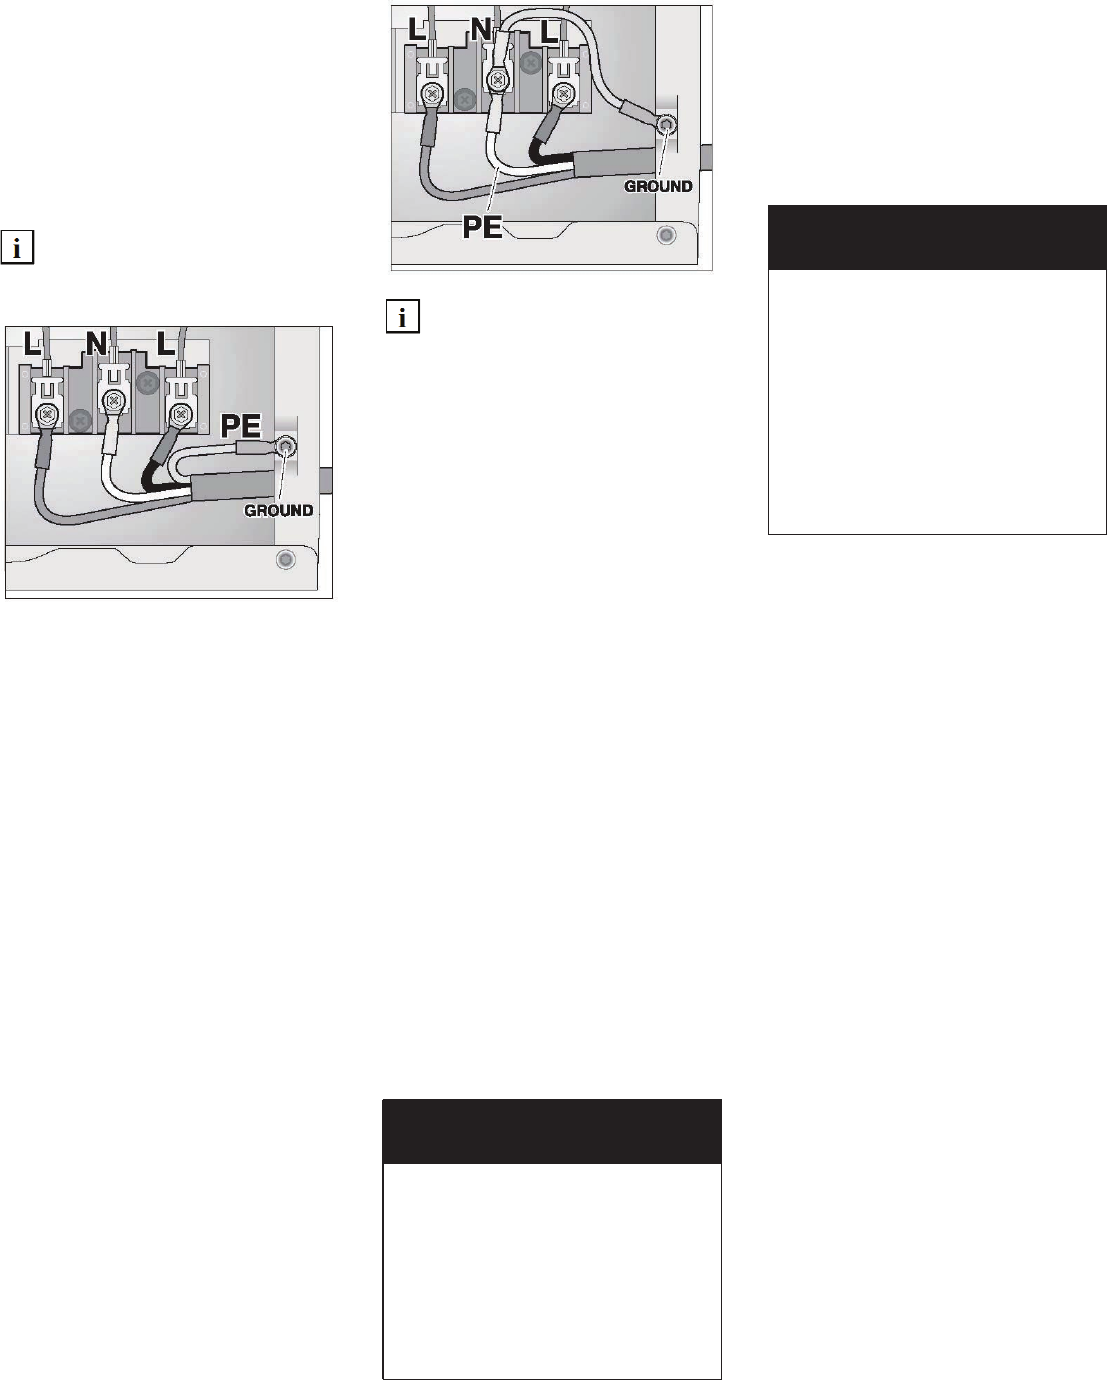
4. Loosen the 2 screws labeled L
in the terminal block.
5. Attach the power cord ground
conductor (green) to the
GROUND point. Tighten the
screw (2.5 Nm) so that the
ground conductor is held
securely in place.
6. Attach the 2 power cord outer
conductors (red and black) to
the 2 terminals labeled L and
the remaining power cord
conductor (white) to the
terminal labeled N.
CAUTION
Power cord must be connected
by a qualified person only.
Connect to individual Brunch
Circuit.
Do not use an adapter.
Do not use an extension cord.
Do not remove ground prong.
CAUTION
Power cord must be connected
by a licensed electrician only.
Use only a U.L. approved
30 amp power cord with strain
relief clamp –
note manufacturer's instructions.
Do not plug end of power cord
into a live receptacle before con-
necting power cord to appliance
terminals and closing junction/
splitter box as described below.
Do not reuse old power cord.
Cord must have closed loop or
upturned end wire terminating
connectors.
Do not make a sharp bend or
crimp wiring/conductor at
connections.
Only a 4-conductor cord shall
be used when the appliance is
installed in a mobile home, in a
recreational vehicle, in a new
branch circuit installation or an
area where the local codes do
not permit grounding through
the neutral.
9
7. Tighten all 3 screws (3 Nm) so
that the power conductors are
held securely in place.
8. Check the U.L. strain relief
clamp to make sure that it is
tight and cannot be turned.
9. Replace the cover on the
terminal block and fasten in
place.
Make sure that the U.L. strain
relief clamp is outside the
cover!
The appliance is now ready to be
plugged into the 4-wire receptacle
of the power rating.
Connecting 3-wire power supply
cord
1. Remove the screws from the
cover of the terminal block
located at the top rear of the
appliance.
2. Make sure that there is a
grounding cable.
3. Loosen the 2 screws labeled L
and the screw labeled N in the
terminal block.
4. Attach the 2 power cord outer
conductors (red and black) to
the 2 terminals labeled L and
the remaining power cord
conductor (white) to the
terminal labeled N.
5. Tighten all 3 screws (3 Nm) so
that the power conductors are
held in place securely.
6. Check the U.L. strain relief
clamp to make sure that it is
tight and cannot be turned.
7. Replace the cover on the
terminal block and fasten in
place.
Make sure that the U.L. strain
relief clamp is outside the
cover!
Additional grounding procedure
– Some local regulations may
require a separate ground. In
such cases, the required
accessory ground wire, clamp
and screw must be purchased
separately.
– Never ground the dryer to
plastic plumbing lines,
gas lines or water pipes.
Grounding instruction
This appliance must be grounded.
In the event of a malfunction or
breakdown, grounding will reduce
the risk of electric shock by
providing a path of least resistance
for the electric current.
For Canada the dryer comes with a
cord which has an equipment
grounding conductor and a
grounding plug. The plug must be
plugged into an appropriate outlet
which has been properly installed
and grounded in accordance with
all local regulations and
ordinances.
Integrated socket
This appliance is equipped with a
socket for connecting a washer
without fuses. Only the listed
washer may be connected. For all
other connections Bosch will
assume no liability.
CAUTION
Improper connection of the
equipment grounding conductor
may result in electric shock.
Have the appliance checked by
a qualified electrician or service
technician if you are in doubt as
to whether the dryer has been
properly grounded.
CAUTION
Use copper conductors only.
Connect to a 30 A minimum
individual branch circuit, fused at
30 A maximum.
Use receptable only for:
208 – 240 VAC 60 Hz 11 A
washer: WFR2460UC,
WFL2060UC, WAE20060UC,
WAS20160UC, WAS24460UC.
10
Exhaust air connection
You can use the exhaust air set
which can be obtained from
customer service or your local
dealer (WTZ1130).
Also any products which are
commercially available can be used
for the exhaust air duct:
– flexible tubes,
– galvanised sheet metal ducts or
tubes,
– connection, transfer and
by-pass adapters for use in
flat duct or tubular ducting
systems,
– wall boxes for ventilation into the
open air or into an air shaft,
– adapters for rectangular ducts,
– rectangular ducts or plastic
tubesone-way flap.
The Bosch dryers are intended to
be vented outdoors. To prevent
build-up of moisture and
accumulation of lint indoors, as well
as to maintain maximum drying
efficiency, it is recommended that
the dryer is vented outdoors.
Position the exhaust air duct
so that there is no counter-
pressure (e.g. from wind) on
the exhaust outlet.
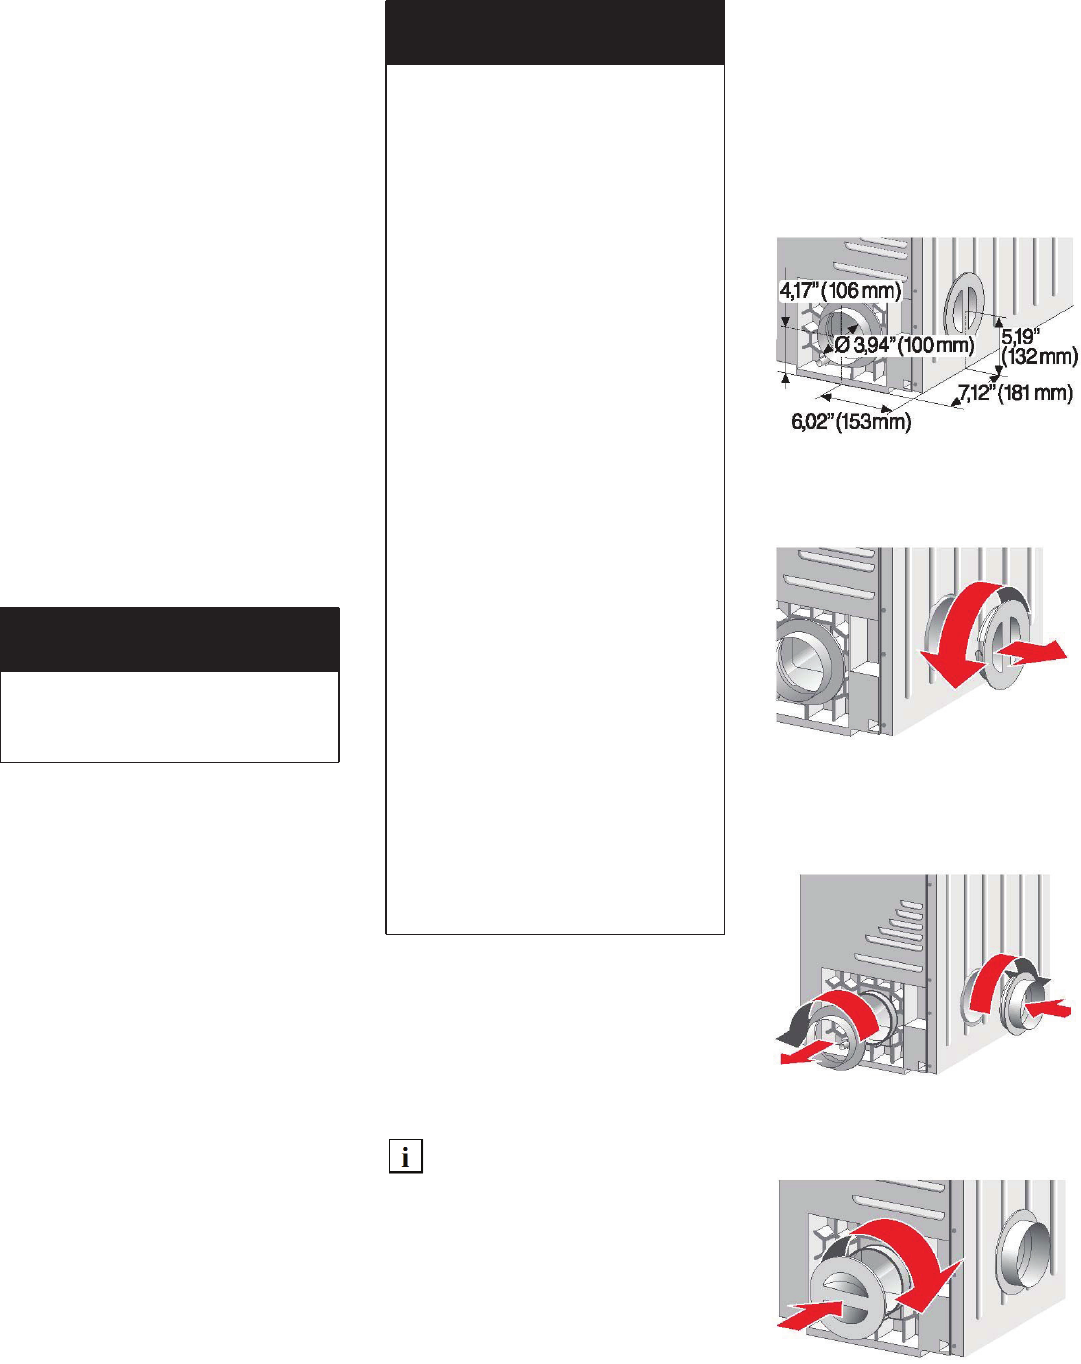
Rear panel connection
The dryer is delivered with an
exhaust air outlet on the rear of the
appliance. The exhaust air vent on
the left-hand side panel is closed
and covered.
Select the most suitable exhaust air
outlet.
Left-hand side panel connection
1. Remove the cover from the
side panel.
2. Remove the bayonet ring from
the rear panel and attach it to
the side panel vent.
3. Close off the rear panel vent
with the cover.
CAUTION
All materials must be
heat-resistant up to 80 °C and
humidity-resistant.
CAUTION
1. To reduce the risk of fire, this
dryer MUST BE EXHAUSTED
OUTDOORS.
2. To reduce the risk of fire, do
not use the ductwork longer
than recommended.
3. DO NOT use a plastic or
non-metal duct with this
dryer.
4. DO NOT use a duct smaller
than 4 inches in diameter.
5. DO NOT use exhaust hoods
with magnetic latches.
6. DO NOT exhaust the dryer
into: a chimney, wall, ceiling,
concealed space of a
building, furnace cold air
duct, attic, crawl space, or
any other ductwork used for
venting.
7. DO NOT install a flexible
duct in an enclosed wall,
ceiling or floor.
8. DO NOT crush or kink the
duct.
9. Do clean and inspect the
exhaust system on a regular
basis; at least once a year.
10. The exhaust duct must
terminate in a manner to
prevent back drafts or entry
of birds or other wildlife.
11
Ductwork
To ensure optimum performance,
the ducting system of the dryer
should be as short as possible with
a minimum number of elbows. Your
dryer will work best when the
venting system has as few air flow
restrictions as possible. Exhaust
ducting which is longer than
recommended may extend drying
time, cause lint to accumulate and
affect dryer performance and dryer
life-time.
Four-inch (approx. 100 mm, in
Canada 102 mm) diameter ducting
should be used. Use either rigid
metal or flexible metal ducting
material.
DO NOT use plastic or non-metal
duct with this dryer.
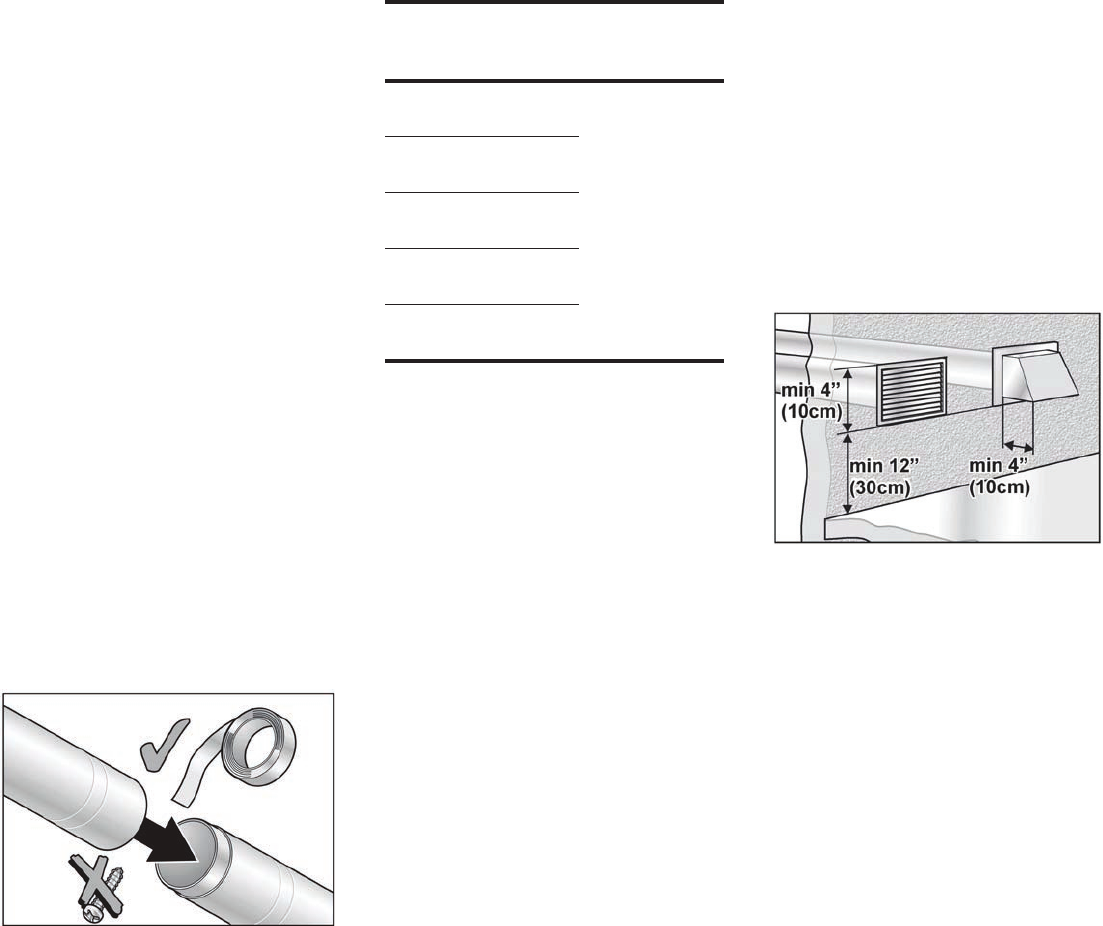
DO NOT assemble the ductwork
with screws or fasteners that
extend into the duct. They will serve
as an accumulation point for lint.
Joints should be secured with duct
tape.
All joints should be tight to avoid
leaks. The male end of each duct
section must point away from the
dryer.
Whether connecting to an existing
venting system or a new venting
system, make sure that all ducting
is clean and free of lint.
The maximum permitted length for
both rigid and flexible metal duct is
shown in the table below.
Note:
Left-hand side exhaust installation
has a 90° turn inside the dryer. To
determine maximum exhaust
length, add one 90° turn to the
chart.
More than two 90° turns are not
recommended. For best
performance, separate all turns by
at least 4 ft. of straight duct,
including distance between last turn
and exhaust hood.
Condensation outlet
If water from condensation builds
up in the exhaust air duct, it is
recommended that a condensation
collector (as commercially
available) is fitted or that a drain
hole of approximately 3 mm in
diameter is introduced in the lowest
section of the exhaust air duct.
Exhaust vent hood
The exhaust duct must end with an
approved exhaust vent hood with
swing out damper(s). DO NOT use
an exhaust vent hood with magnetic
latches.
To avoid exhaust restriction, the
outlet must be a minimum of
12 inches (30 cm) above ground
level or any other obstructing
surface.
Required parts
The parts required for the exhaust
air system (elbows, lines, exhaust
air outlets) are not included in
standard delivery of the dryer.
Number of
90° Turns
or Elbows
Rigid Duct Flexible Duct
0 66 ft.
(2011 cm)
8 ft.
(240 mm)
1 56 ft.
(1707 cm)
2 48 ft.
(1463 cm)
3 39 ft.
(1189 cm)
430 ft.
(914 cm)
12
Installation –
step by step
1. Unpack the dryer.
2. Remove all objects from the
drum.
3. Check the dryer for visible
damage.
4. Position the dryer near the
installation location.
If space is very restricted, it is
recommended to fit the
exhaust air duct to the dryer
before the dryer is moved to
its final installation location.
5. Move the dryer to its final
location and align.
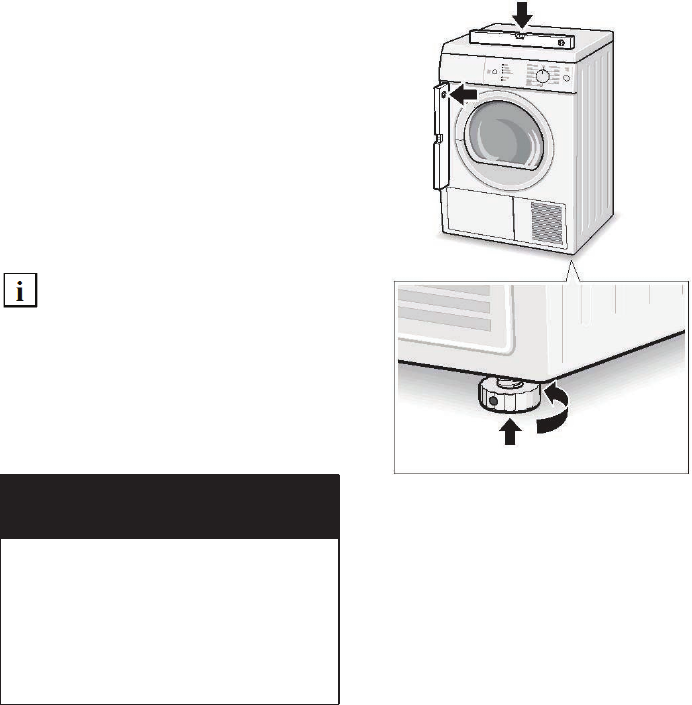
6. Position and then level the
dryer.
The dryer should be level with
all four feet firmly on the
ground. The dryer must not
wobble.
If the dryer is not level or if it
does wobble, the feet must be
adjusted. Adjust the
height-adjustable feet until the
dryer does not rock and is
level, both front-to-back and
side-to-side.
7. Insert plug into the wall
receptacle.
Check list before
using the dryer
1. Check that steps 1-7 have
been implemented properly.
2. Ensure that the dryer is
connected to the power
supply.
3. Read the operating
instructions to understand how
your dryer operates.
4. Conduct an appliance test:
Check that the drum is
empty.
Close the dryer door.
Switch the dryer to
Extra dry and then press
the Start button.
After 3-5 minutes press the
Stop button and open the
door.
5. If the interior of the dryer feels
warm, the dryer has been
connected properly. Switch
the dryer to Off.
6. If the dryer does not work,
switch the dryer to Off.
Look in the troubleshooting
section (page 21) of the
OPERATING INSTRUCTIONS
and find the fault.
Preparing to transport
the dryer
1. Rotate the program selector
to Off.
2. Pull out power supply plug.
3. Place any accessories in the
drum.
4. Close the door and secure
with adhesive tape.
5. Screw the height-adjustable
feet of the dryer into the
housing to prevent them from
being damaged during
transportation.
CAUTION
Do not slide dryer across the
floor if height-adjustable feet
have been extended. Feet and/
or dryer base may be damaged
if dryer is slid across floor with
height-adjustable feet extended.
13
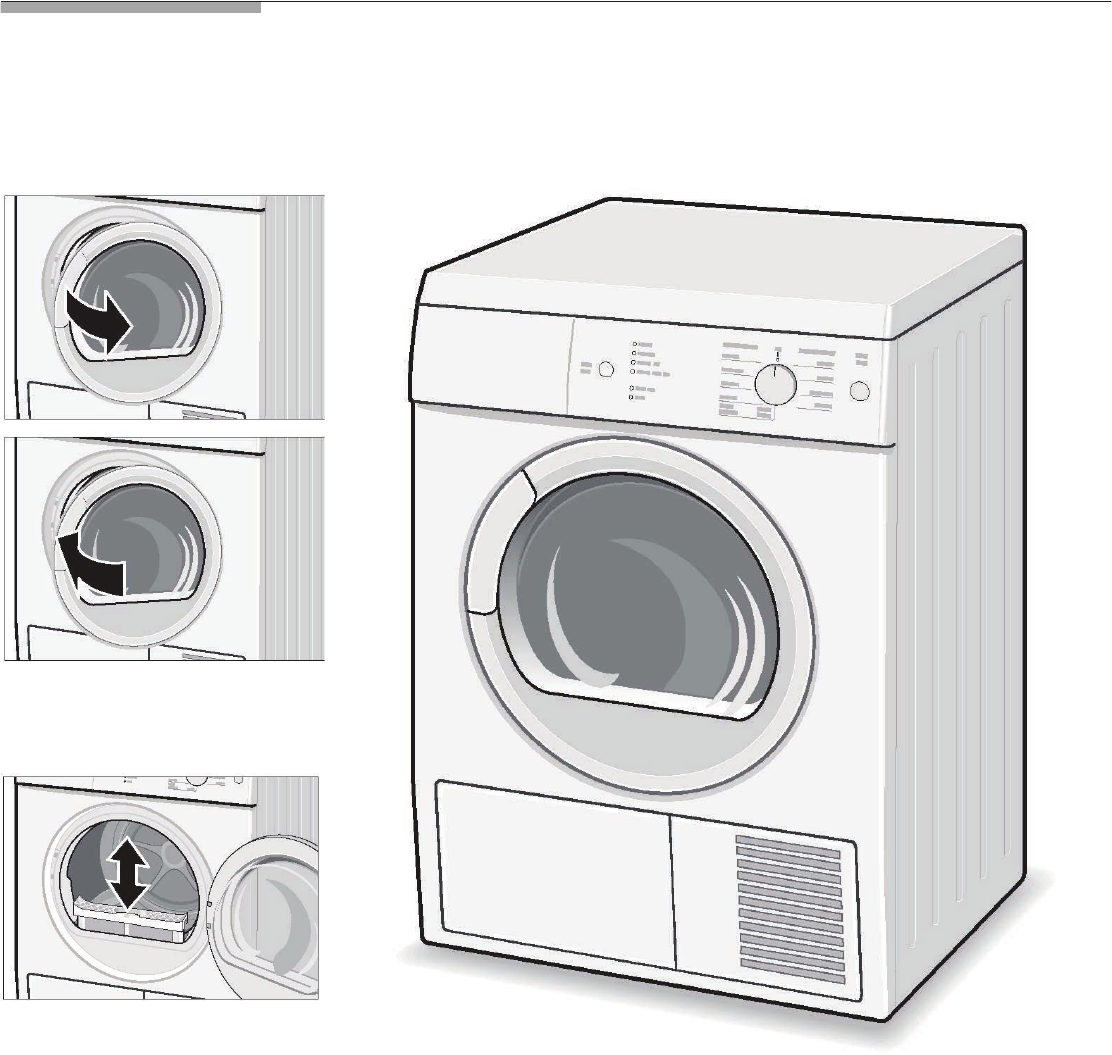
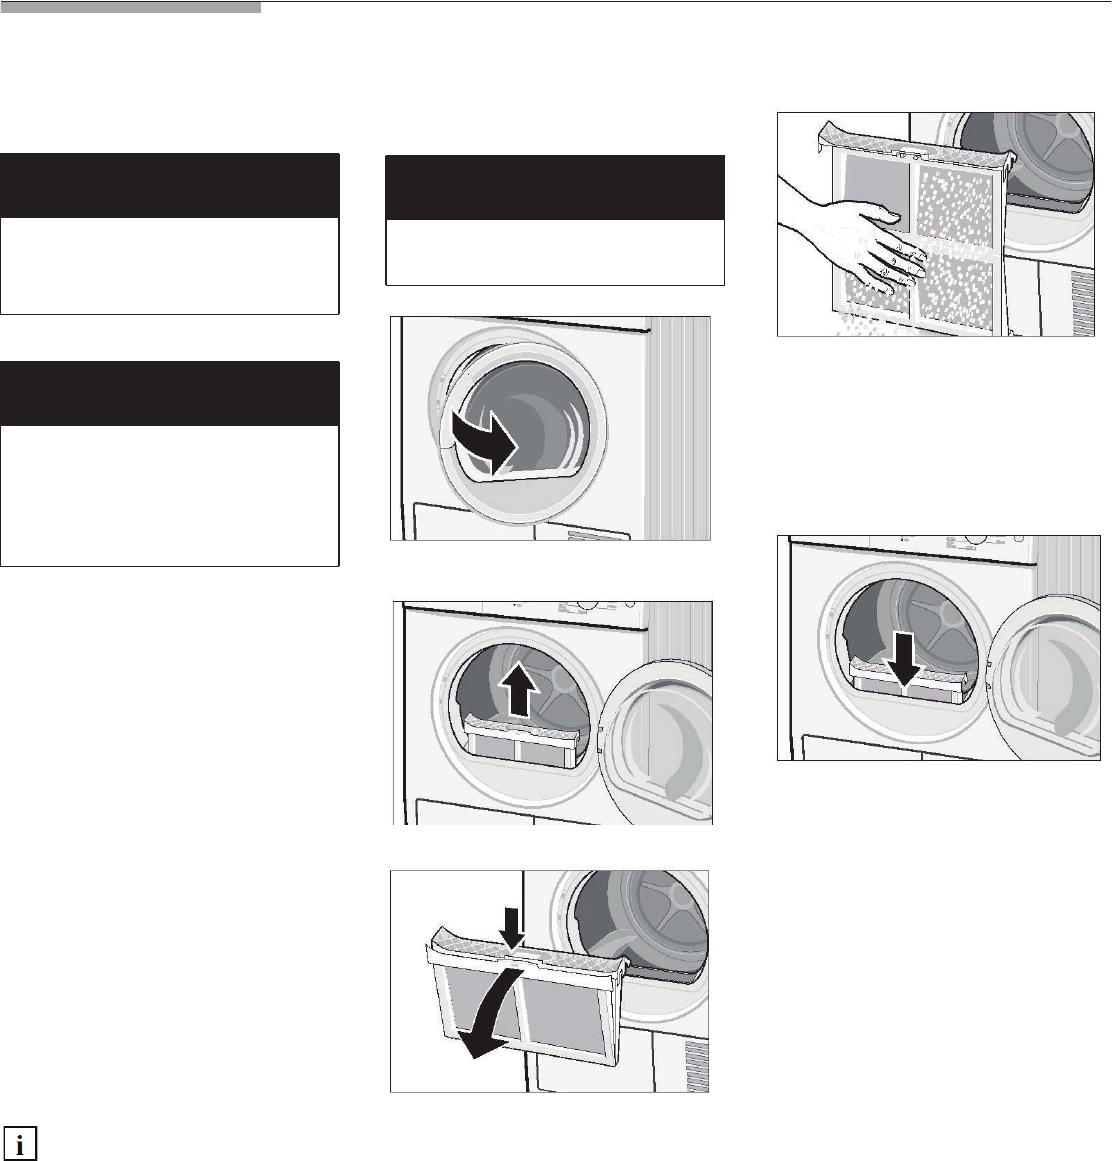
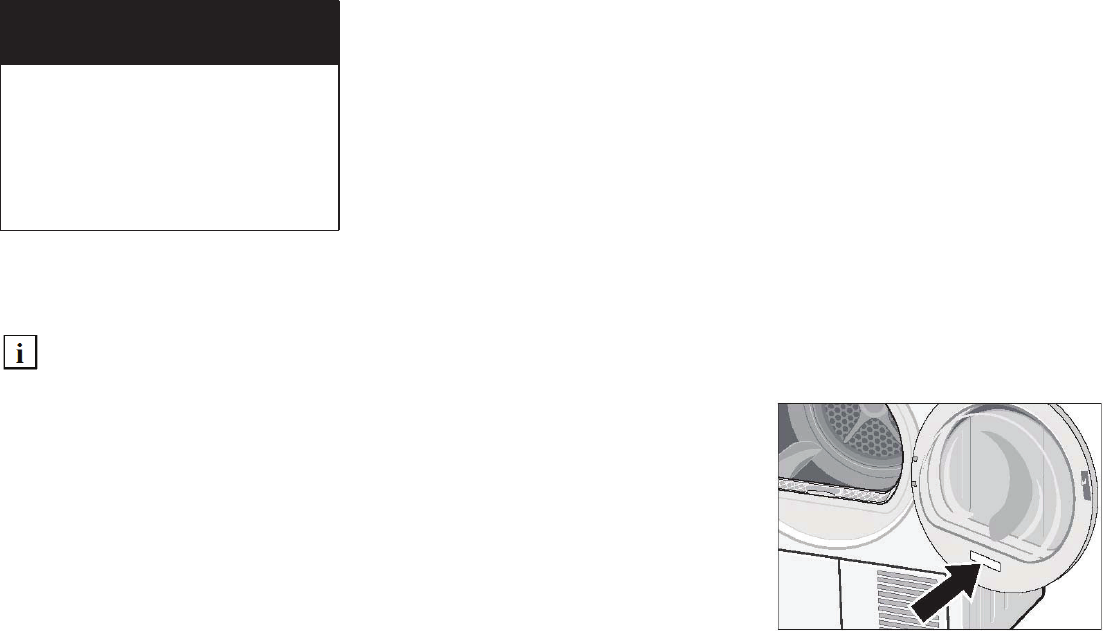
OPERATING INSTRUCTIONS
Your new dryer
Open the door...
...and close the door.
Lint filter
14
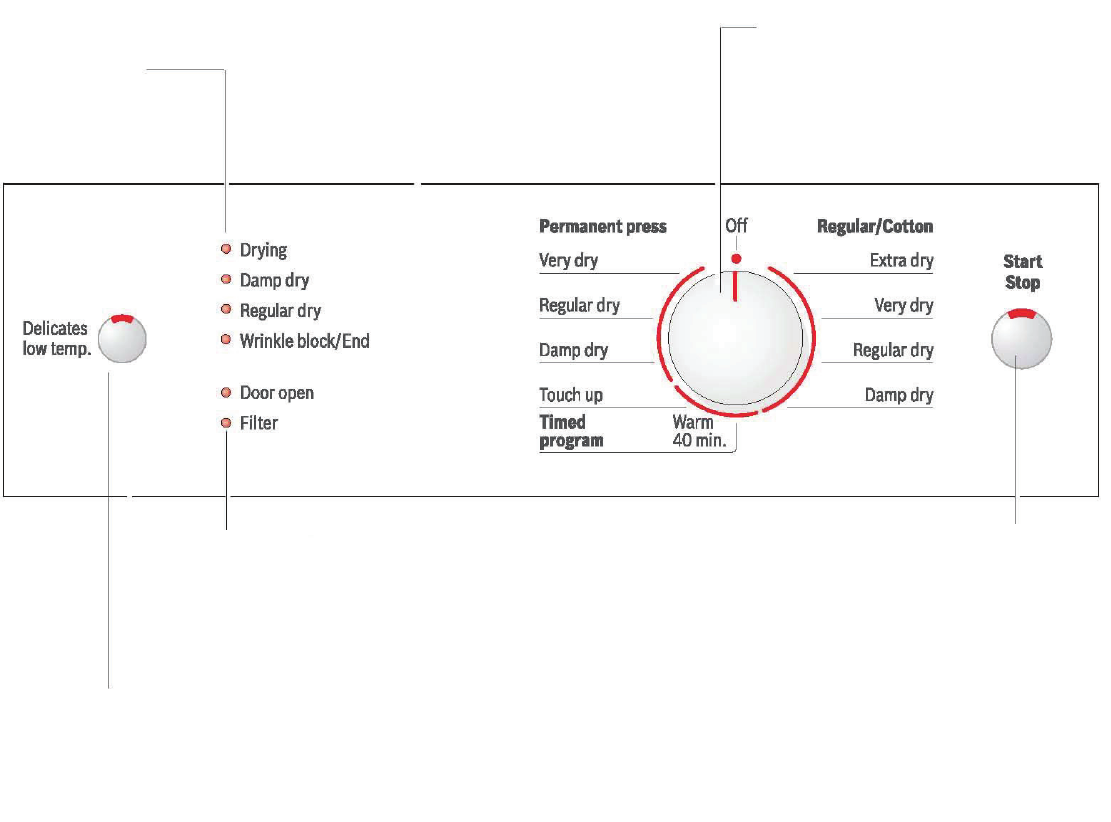
Panel
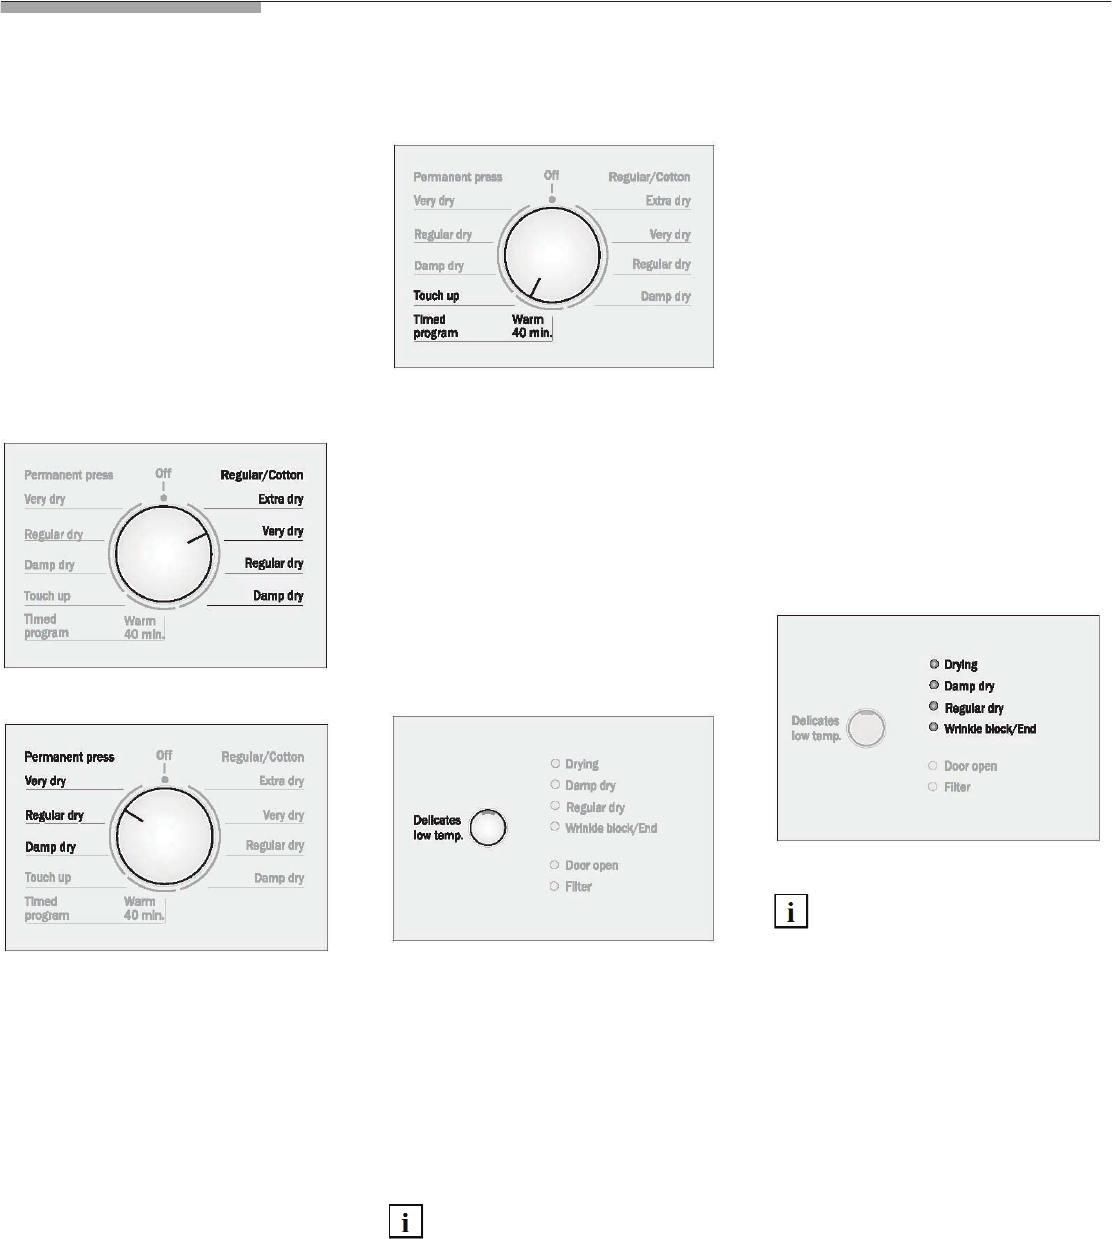
Status lights
Program selector
Selects a program. See page 17.
Can be rotated in both directions.
To switch off the dryer, rotate the
program selector to Off.
Start/Stop button
Starts, interrupts and ends
the drying process.
Indicator lights (LED)
Door open Close door.
Filter Clean fluff filter.
Button for additional option
Délicates low temp.
Reduced temperature, the drying time is extended
correspondingly; for sensitive textiles ',
e.g. polyacrylic, polyamide, elastane, acetate.

15
Safety information
Intended Use
Use the dryer only in the house and
for drying normal amounts of
laundry for the household. Use only
for drying textiles which were
washed with water.
Before switching
on the dryer
Install the dryer in accordance
with the installation instructions
(from page 6).
Do not use a dryer which is visibly
damaged. If in doubt, contact your
dealer.
Using the dryer
Do not leave children unsupervised
near the dryer.
Keep pets away from the dryer.
Before closing the door, check the
contents of the drum.
Remove all objects from pockets.
Lighters are particularly hazardous.
Risk of explosion!
Switch off the dryer at the end of the
program.
Protecting the dryer
Do not climb on the dryer.
Do not lean or sit on the door.
Risk of dryer tipping over!
Do not store or use solvent
detergent boosters or stain remover
in the vicinity of the dryer.
The dryer could be damaged.
Do not lift the dryer by projecting
components.
Risk of breakage!
Risk of injury!
Before using the dryer
for the first time
Before you use the dryer for the first
time:
1. Read these operating
instructions carefully.
2. Check that the supply voltage
corresponds with the voltage
specifications on the rating
plate of the dryer, see rear
side of the dryer.
3. Remove all objects from the
drum.
4. Check the dryer for visible
damage. If damages found
contact your dealer.
5. Wipe the inside of the drum
with a damp cloth.
6. Conduct an appliance test,
see page 12.
7. If the dryer does not work,
switch the dryer to Off.
Look in the troubleshooting
section (page 21) of the
operating instructions and find
the fault.
Temporary
disconnection of the
dryer
Operate your dryer only when you
are at home. If you intend going on
vacation or are not using your dryer
for an extended period of time, you
should:
1. Turn off the circuit breaker.
2. Pull out the power supply plug
if possible.
3. Clean the lint filter.
WARNING!
To reduce the risk of fire, electric
shock or injury to persons always
follow the IMPORTANT SAFETY
INSTRUCTIONS
(see page 4).
WARNING!
EXPLOSION HAZARD!
Keep flammable materials and
vapors, such as gasoline, away
from the dryer.
Do not dry anything that has ever
had anything flammable on it
(even after washing).
Do not dry anything that has ever
had any type of oil on it
(including cooking oils).
Items containing foam, rubber or
plastic must be dried on a
clothes-line or by using an Air
fluff cycle.
Do not allow items containing
flammable materials, such as
lighters, to remain in clothes
while drying.
Failure to follow these
instructions may result in
explosion or fire.
Risk of death or injury!

16
Laundry
Identification
of fabrics
Observe the treatment symbols on
the textile labels. They provide
valuable information as well as
limitations about the drying
process.
Do not dry the following textiles in
the dryer:
– Air-tight textiles
(e.g. rubberized).
– Delicate fabrics (silk, synthetic
curtains).
Drying tips
In principle, the following applies to
all drying programs:
– To ensure a uniform drying
result, sort the laundry
according to fabric type and
drying program.
– Fasten zippers, hooks and eyes.
Fasten loose belts, apron
strings, etc..
– Do not overdry easy-care
laundry – risk of wrinkling!
Leave laundry to dry in the air.
– Do not iron laundry immediately
after drying. Place the laundry in
a pile for a short while. Residual
moisture will then be distributed
uniformly.
– Knitted textiles (e.g. T-shirts,
cotton jersey laundry) often
shrink when dried for the first
time. Do not use the Very dry/
Extra dry program.
Protection of
environment
Tips on saving energy
To save energy, money and time,
Bosch recommends the following:
–Drain the laundry thoroughly!
Before drying, spin the laundry
thoroughly in the washing
machine. Use the highest
possible spin speed for the type
of laundry! Higher spin speeds
reduce the drying time and the
energy consumption.
–Use optimum load!
Use maximum recommended
loads. However, do not exceed
loads.
–Clean filter!
Clean the filter before and after
each drying process
(see page 19).
–Ventilate the room!
During the drying process
provide an adequate supply
offresh air.
–Do not dry unsuitable
materials!
Do not dry rubberized or
air-tight items.
–Do clean and inspect the
exhaust system on a regular
basis!
Blockages may extend drying
time.
17
Program selection
For optimum drying results your
dryer offers several program
groups and additional options.
Select the required drying program
from the program table according
to the examples (see page 26).
Automatic programs
There are automatic programs for
different types of textiles (regular/
cotton, permanent press).
Regular/Cotton
Permanent Press
The program sequence of
automatic programs is controlled
via sensors. The duration of the
program depends on the measured
degree of moisture in the laundry
and on the selected degree of
dryness (e.g. damp dry or extra
dry).
Time programs
Time programs run at specific
temperatures. Suitable for predried,
multi-ply, delicate textiles or
individual small items. Also for
subsequent drying.
– Warm 40 min.
– Touch up (20 min) for extreme
temperature sensitive textiles.
Option
Delicates low temp.
Press the Delicates low temp.
button for temperature sensitive
textiles. Observe the care
information or symbols on the
textiles. The temperature of the
drying process is reduced, the
drying time is extended.
For extreme temperature
sensitive textiles
(e.g. camisoles, paints) press
the Delicates low temp.
button to reduce the
temperature of the drying
process.
Indicator of program
sequence
The dryer uses an electronic
scanning system for all programs
except the time programs.
A moisture sensor continuously
checks the moisture in the laundry.
Drying ends automatically as soon
as the selected degree of dryness
has been reached.
The drum continues to rotate at
specific intervals for one hour to
prevent creasing.
The current state of the process
and the level reached during the
program sequence is indicated via
indicator lights (Drying, Damp dry,
Regular dry, Wrinkle block/ End).
If the indicator light Wrinkle
block/End illuminates when
the program selector is in
Off-Position – turn off the
circuit breaker and call for
customer service!
18
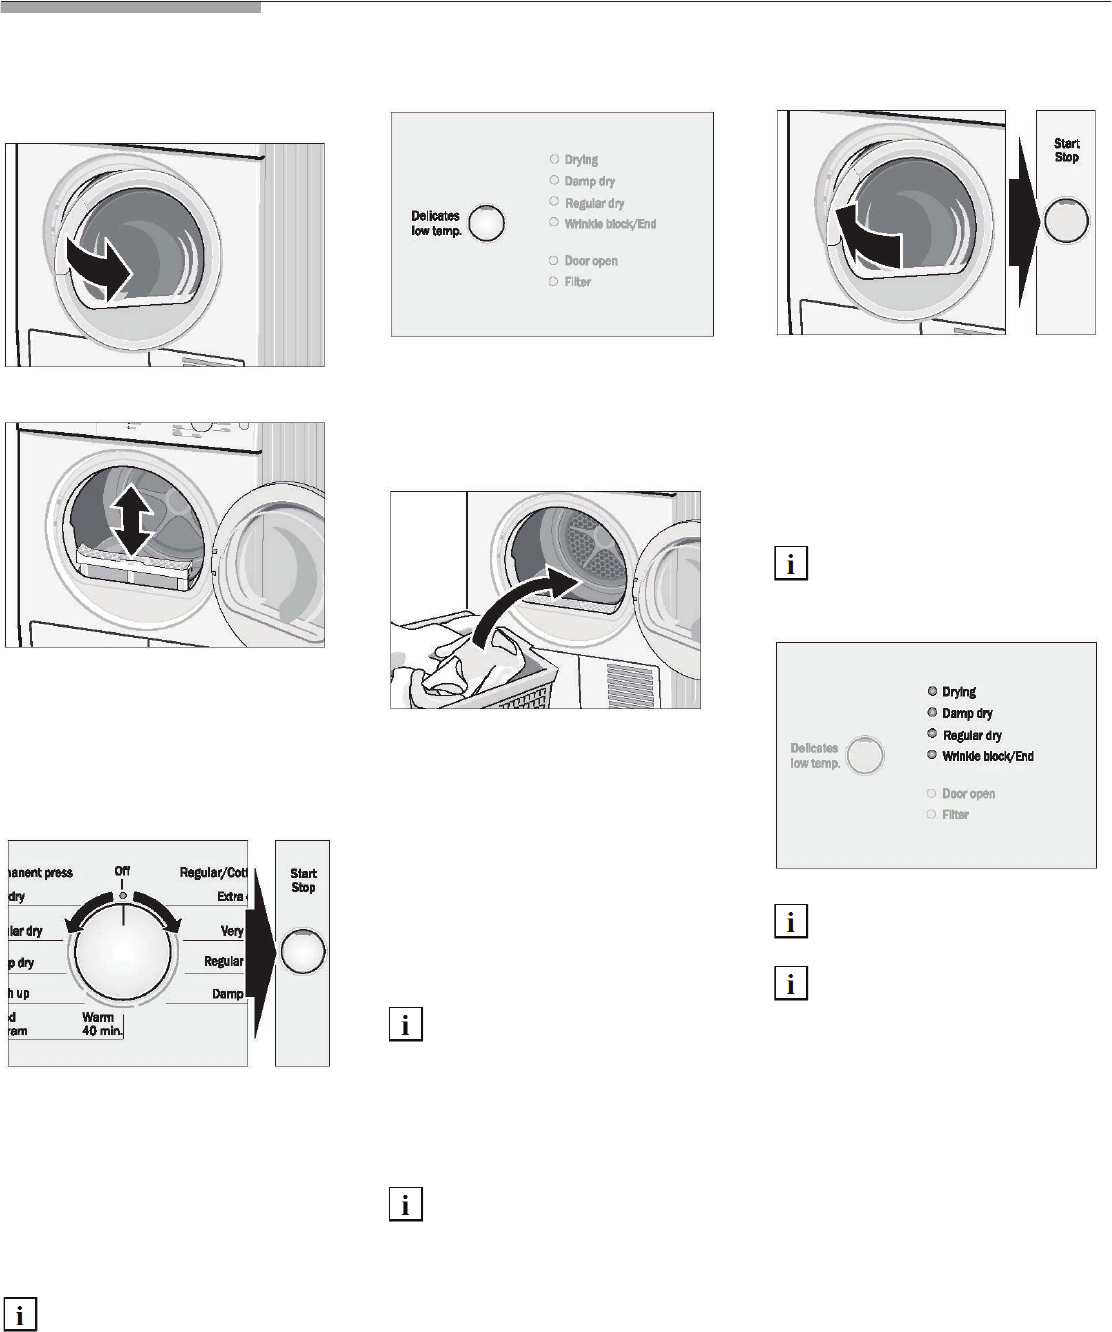
Operation
Using the dryer
1. Open the door.
2. Check lint filter.
The filter should be cleaned
after and before every drying
process. Cleaning the filter
reduces the drying time and
saves energy.
3. Rotate program selector to the
desired program. Select the
program which corresponds to
the laundry in the dryer from
the program selection table
(see page 26).
The Start/Stop indicator light starts
flashing.
Lint filter indicator flashes for
5 seconds – Check lint filter!
4. If required, select Delicates
low temp. by pressing the
button.
See explanation on page 17.
5. Place laundry in the empty
drum. Put each piece of
laundry into the machine
separately.
For best results the laundry to
be dried must be sorted
according to type of laundry
and desired degree of drying.
For further information see
page 16.
Observe drying symbols of the
laundry manufacturer.
Ensure that there is only laundry in
the drum. Check that all items are
completely in the drum.
6. Close the door.
If the door has not been
closed properly, the dryer will
not start.
7. Press the Start/Stop button.
The Start/Stop indicator light
illuminates.
If an automatic program has been
selected, the indicator lights
indicate the progress of the
program sequence.
At the end of the program
sequence Damp dry is emitted
(if set).
At program end the LED
Wrinkle block/End illuminates.
When the drying process is
complete (program or
selected time program
ended), the drum rotates at
specific intervals. This prevent
the laundry from creasing.
8. Open the door.
9. Take the laundry out of the
dryer.
10. Rotate the program selector
to Off.
The dryer light goes out.
11. Clean the filter.
The filter should be cleaned
after each drying process.
Cleaning the filter reduces the
drying time and saves energy.
12. Close the door.
19
Cleaning and care
Cleaning the dryer
Wipe the housing and fascia with a
soft cloth and soapy water only.
Wipe the drum, door seal and
inside of the door with a damp cloth
only.
Immediately remove washing and
cleaning agent residue.
Cleaning the lint filter
A dirty filter extends the drying time
and increases energy consumption.
The filter should be cleaned before
and after each drying process,
however at the latest when the
Filter indicator light illuminates.
If the Filter indicator light
illuminates during a drying program,
clean the filter immediately.
The program interrupts
automatically.
1. Switch off the dryer. Program
selector to Off.
2. Open the door.
3. Pull out filter...
4. ...and open.
5. Remove fluff (run hand over
filter).
The filter should be rinsed once a
year under warm running water. The
filter must be dried thoroughly
before being replaced.
6. Close filter adn re-insert.
7. Close the door.
WARNING!
RISK OF EXPLOSION!
Never use solvents or highly
flammable liquids for cleaning.
CAUTION!
Incorrect cleaning may damage
the dryer. Do not spray with a
water jet. Do not use scouring
agents or all-purpose cleaners.
Do not use steam cleaners.
CAUTION!
The inside of the door heats up
during the drying process.

20
Cleaning the exhaust
duct
Inspect and clean the exhaust
ducting at least once a year to
prevent clogging. A partially
clogged exhaust can lengthen the
drying time.
1. Switch off the dryer and allow
it to cool down.
2. Pull out power supply plug.
3. Disconnect the duct from the
dryer.
4. Vacuum and reconnect the
duct.
Cleaning the moisture
sensor
Occasionally the moisture sensor
has to be cleaned because a fine
layer of transparent buildup is
deposited on the sensors.
This deposit can easily be removed
by wiping the sensors (the two bars
next to the lint filter) with a cloth and
a little white vinegar.
Use white vinegar only!
Clean the moisture sensor once a
month.
Cleaning the bearing
shield
Over time, fluff from the drying
process collects in the bearing
shield.
This fluff can be easily removed
using your vacuum cleaner, at least
once a month.
21
Troubleshooting
Before calling the customer service,
check whether you can rectify the
fault yourself by means of the
following table.
If a fault cannot be rectified or a
repair is required:
1. Set program selector to Off.
2. Turn off the circuit breaker.
3. Pull the mains plug out of the
socket.
4. Call customer service
(see page 22).
WARNING!
RISK OF ELECTRICAL SHOCK !
EXPLOSION HAZARD!
Repairs or replacement of parts
may be carried out by authorized
technicians only.
Problem Possible cause Remedial action
Dryer does not start.
Start/Stop indicator light does not
illuminate.
Main plug not inserted at all or not inserted correctly. Insert main plug correctly.
A fuse of power supply has tripped. Replace/switch on fuse.
Start/Stop button not pressed. Press Start/Stop button.
Door not closed. Close door.
Ambient temperature below 41 °F/5 °C. Increase room temperature.
Program has been interrupted. Filter
indicator light illuminates, awarning
signal is emitted and the display
shows "F:01" or "F:02".
Lint filter dirty. Clean filter as described on page 19.
Switch off/switch on again.
Exhaust air duct is blocked or too long. Clean exhaust air duct. Reduce exhaust air duct to
maximum length as described on page 11.
Switch off/switch on again.
Fault in program sequence or malfunction. Switch off dryer, leave to cool down for 30 min,
switch on again. Restart program.
The room/cabinet is not adequately ventilated. Provide an adequate supply of fresh air.
Switch off/switch on again.
Start/Stop indicator light does not
illuminate. Wrinkle block/Finished
indicator lights.
The display shows "–0–".
Fault in program sequence or malfunction. Switch off dryer, leave to cool down for 30 min,
switch on again. Restart program.
Degree of drying has not been
reached or the drying time is too long.
Display may indicate "F:04".
Moisture sensor dirty. Clean moisture sensor as described on page 20.
Switch off/switch on again.
Exhaust air duct is blocked or too long. Clean exhaust air extraction. Reduce exhaust air duct
to maximum length as described on page 11.
Switch off/switch on again.
Laundry was too wet. Spin laundry at higher speed in the washing machine.
Switch off/switch on again.
Unsuitable program selected. Select program with aid of the program selection
table (see page 26). Switch off/switch on again.
Maximum drying time was exceeded. Clean lint filter (see page 19).
Spin laundry at a higher speed in your washer.
Motor limit temperature was exceeded. Switch off dryer, leave to cool down for 30 min.
Switch on again. Start program.
22
SERVICE and REPAIR
The Bosch dryers require no
special care other than the care and
cleaning noted above.
If you are having a problem
with your dryer, before calling
for service please refer to
Table on page 21, following.
If service becomes necessary,
contact your dealer or installer or an
authorized service center. Do not
attempt to repair the appliance
yourself. Any work performed by
unauthorized personnel may void
the warranty.
If you are having a problem with
your Bosch dryer and are not
pleased with the service you have
received:
– First, please contact your
installer or the Bosch
Authorized Service Contractor
in your area and explain to
them why you are not satisfied.
This will usually correct the
problem.
– If after working with your
installer or service person the
problem still has not been
resolved to your satisfaction,
please let us know by either
writing to us at,
BSH Home Appliances
5551 Mc Fadden Avenue
Huntington Beach, CA 92649
or, calling us at
1-800-944-2904.
Please be sure to include, if writing,
or have available, if calling, the
following information:
– Model Number
– Serial Number
– Date of Original Purchase
– Date Problem Originated
– Explanation of Problem
Also, if writing, please be sure to
include a daytime telephone
number and a copy of the sales
invoice.
You will find the model number and
serial number information on the
rating plate.
CAUTION!
CAUTION – Label all wires prior
to disconnection when servicing
controls. Wiring errors can cause
improper and dangerous
operation. Verify proper
operation after servicing.

23
STATEMENT OF LIMITED PRODUCT WARRANTY
Bosch Nexxt® Clothes Dryer
What this Warranty Covers & Who it Applies to: The limited warranty provided by BSH Home Appliances Corporation (Bosch) in
this Statement of Limited Product Warranty applies only to the Bosch Nexxt® Clothes Dryer ("Product") sold to you, the first using
purchaser, but strictly conditioned on the Product having been purchased: (1) for your normal, household (non-commercial) use, and
has in fact at all times only been used for normal household purposes (any commercial use or setting of the Product automatically
voids the warranty): (2) new at retail (not a display, "as is", or previously returned model) purchased directly by the end-user
consumer, and not for resale, or commercial use: and (3) within the United States or Canada, and has at all times remained within
the country of original purchase. The warranties stated herein apply only to the first purchaser of the Product and are not transferable.
The warranty is automatically void if the Product was a display model, sold "as is", tampered with, a damaged or "scratch and dent"
model, or a previously returned model, a free give-away, charitable donation or contest prize.
• Please make sure to return your registration card: while not necessary to effectuate warranty coverage, it is the best way for Bosch
to notify you in the unlikely event of a safety notice or product recall.
How Long the Warranty Lasts: Bosch warrants that the Product is free from defects in materials and workmanship for a period of
three hundred sixty-five days (365) days from the date of purchase. The foregoing timeline begins to run upon the date of purchase,
and shall not be stalled, tolled, extended, or suspended, for any reason whatsoever.
Repair/Replace as Your Exclusive Remedy: During this warranty period, Bosch or one of its authorized service providers will repair
your Product without charge to you (subject to certain limitations stated herein) if your Product proves to have been manufactured
with a defect in materials or workmanship. If reasonable attempts to repair the Product have been made without success, then Bosch
will replace your Product (upgraded models may be available to you, in Bosch's sole discretion, for an additional charge). All removed
parts and components shall become the property of Bosch at its sole option. All replaced and/or repaired parts shall assume the
identity of the original part for purposes of this warranty and this warranty shall not be extended with respect to such parts. Bosch's
sole liability and responsibility hereunder is to repair manufacturer-defective Product only, using a Bosch-authorized service provider
during normal business hours. For safety and property damage concerns, Bosch highly recommends that you do not attempt to repair
the Product yourself, or use an un-authorized servicer: Bosch will have no responsibility or liability for repairs or work performed by
a non-authorized servicer. If you choose to have someone other than an authorized service provider work on your Product, THIS
WARRANTY WILL AUTOMATICALLY BECOME NULL AND VOID. Authorized service providers are those persons or companies that
have been specially trained on Bosch products, and who possess, in Bosch's opinion, a superior reputation for customer service and
technical ability (note that they are independent entities and are not agents, partners, affiliates or representatives of Bosch).
Notwithstanding the foregoing, Bosch will not incur any liability, or have responsibility, for the Product if it is located in a remote area
(more than 100 miles from an authorized service provider) or is reasonably inaccessible, hazardous, threatening, or treacherous
locale, surroundings, or environment: in any such event, if you request, Bosch would still pay for labor and parts and ship the parts
to the nearest authorized service provider, but you would still be fully liable and responsible for any travel time or other special
charges by the service company, assuming they agree to make the service call.

24
Extended Limited Warranty:
Out of Warranty Product: Bosch is under no obligation, at law or otherwise, to provide you with any concessions, including
repairs, pro-rates, or Product replacement, once this warranty has expired.
LENGTH OF WARRANTY SCOPE OF WARRANTY
2 Year Limited Warranty
From Date of Purchase
Bosch will provide replacement parts, free of charge, for any component
part that proves defective under conditions of normal home use during the
first two years from the date of purchase, normal (non-expedited) shipping
costs included, labor charges excluded.
2 Year Limited Warranty on Electronics
From Date of Purchase
Bosch will repair or replace, free of charge, any microprocessor or printed
circuit board that proves defective under conditions of normal home use
during the first two years from the date of purchase, labor charges
excluded.
2 Year Limited Warranty on Motor
From Date of Purchase
Bosch will repair or replace, free of charge, any motor or component part
of the motor that proves defective under conditions of normal home use
during the first two years from the date of purchase, labor charges
excluded.
25
Warranty Exclusions: The warranty coverage described herein excludes all detects or damage that are not the direct fault of Bosch,
Including without limitation, one or more of the following: (1) use of the Product in anything other than its normal, customary and
intended manner (including without limitation, any form of commercial use, use or storage of an indoor product outdoors, use of the
Product in conjunction with air or water-going vessels); (2) any party's willful misconduct, negligence, misuse, abuse, accidents,
neglect, improper operation, failure to maintain, improper or negligent installation, tampering, failure to follow operating instructions,
mishandling, unauthorized service (including self-performed "fixing" or exploration of the appliance's internal workings); (3)
adjustment, alteration or modification of any kind; (4) a failure to comply with any applicable state, local, city, or county electrical,
plumbing and/or building codes, regulations, or laws, including failure to install the product in strict conformity with local fire and
building codes and regulations; (5) ordinary wear and tear, spills of food, liquid, grease accumulations, or other substances that
accumulate on, in, or around the Product; and (6) any external, elemental and/or environmental forces and factors, including without
limitation, rain, wind, sand, floods, fires, mud slides, freezing temperatures, excessive moisture or extended exposure to humidity,
lightning, power surges, structural failures surrounding the appliance, and acts of God. In no event shall Bosch have any liability or
responsibility whatsoever for damage to surrounding property, including cabinetry, floors, ceilings, and other structures or objects
around the Product. Also excluded from this warranty are scratches, nicks, minor dents, and cosmetic damages on external surfaces
and exposed parts; Products on which the serial numbers have been altered, defaced, or removed; service visits to teach you how
to use the Product, or visits where there is nothing wrong with the Product; correction of installation problems (you are solely
responsible for any structure and setting for the Product, including all electrical, plumbing or other connecting facilities, for proper
foundation/flooring, and for any alterations including without limitation cabinetry, walls, floors, shelving, etc.); and resetting of breakers
or fuses. TO THE EXTENT ALLOWED BY LAW, THIS WARRANTY SETS OUT YOUR EXCLUSIVE REMEDIES WITH RESPECT TO
PRODUCT, WHETHER THE CLAIM ARISES IN CONTRACT OR TORT (INCLUDING STRICT LIABILITY, OR NEGLIGENCE) OR
OTHERWISE. THIS WARRANTY IS IN LIEU OF ALL OTHER WARRANTIES, WHETHER EXPRESS OR IMPLIED. ANY WARRANTY
IMPLIED BY LAW, WHETHER FOR MERCHANTABILITY OR FITNESS FOR A PARTICULAR PURPOSE, OR OTHERWISE, SHALL BE
EFFECTIVE ONLY FOR THE PERIOD THAT THIS EXPRESS LIMITED WARRANTY IS EFFECTIVE. IN NO EVENT WILL THE
MANUFACTURER BE LIABLE FOR CONSEQUENTIAL, SPECIAL, INCIDENTAL, INDIRECT, "BUSINESS LOSS", AND/OR PUNITIVE
DAMAGES, LOSSES, OR EXPENSES, INCLUDING WITHOUT LIMITATION TIME AWAY FROM WORK, HOTELS AND/OR
RESTAURANT MEALS, REMODELLING EXPENSES IN EXCESS OF DIRECT DAMAGES WHICH ARE DEFINITIVELY CAUSED
EXCLUSIVELY BY Bosch, OR OTHERWISE. SOME STATES DO NOT ALLOW THE EXCLUSION OR LIMITATION OF INCIDENTAL OR
CONSEQUENTIAL DAMAGES, AND SOME STATES DO NOT ALLOW LIMITATIONS ON HOW LONG IMPLIED WARRANTY LASTS,
SO THE ABOVE LIMITATIONS MAY NOT APPLY TO YOU. THIS WARRANTY GIVES YOU SPECIFIC LEGAL RIGHTS, AND YOU MAY
ALSO HAVEOTHER RIGHTS, WHICH VARY FROM STATETO STATE. No attempt to alter, modify or amend this warranty shall be
effective unless authorized in writing by an officer of BSH.
How to Obtain Warranty Service: To obtain warranty service for your Product, you should contact the nearest Bosch
authorized service center.
BSH Home Appliances Corporation – 5551 McFadden Avenue, Huntington Beach, CA 92649 / 1-800-944-2904
26
Program selection table
Automatic programs
For Cottons and coloreds made of cotton or linen.
Press Delicates low temp, button for temperature-sensitive textiles.
Regular/Cottons
Bed linen and table linen, towels
For laundry,
which is to be ironed Damp dry
Bed linen and table linen, towels, T-shirts, sports shirts, overalls
T-shirts, sports shirts, dresses, trousers, overalls, underwear
Terry towels, kitchen towels, hand towels, bed linen, underwear, cotton
socks
which is not to be ironed Regular dry
Terry towels, kitchen towels, hand towels, bed linen, underwear, cotton
socks
which is not to be ironed, thick
multi-ply
Very dry
Terry bathrobes and terry bed linen which is particularly thick or
multi-ply
Extra dry
Easy-care (drip-dry) laundry made of synthetic and blended fabric, cotton e.g. polyester
Press the Delicates low temp, button for very temperature-sensitive textiles.
Permanent Press
For laundry,
which is not to be or only lightly
ironed
Damp dry
Trousers, dresses, skirts, shirts, blouses, leggings, sports clothing with
synthetic-rich fibers, lingerie
Shirts, blouses, sports clothing which is not to be ironed Regular dry
Bed linen and table linen, track suits, anoraks, blankets which is not to be ironed, thick
multi-ply
Very dry
Timed program
Pre-dried textiles with low moisture content, individual small items, e.g. bath towels, bathing suits, dish cloths,
For smallest loading condition from 0.22 lb-0.44 lb (0.1 kg - 0.2 kg) (i.e. one small towel), for this a time dry
program should be selected. Also for subsequent drying.
Press the Delicates low temp, button for temperature-sensitive textiles.
Warm 40 min. / Touch up (20 min.)
27
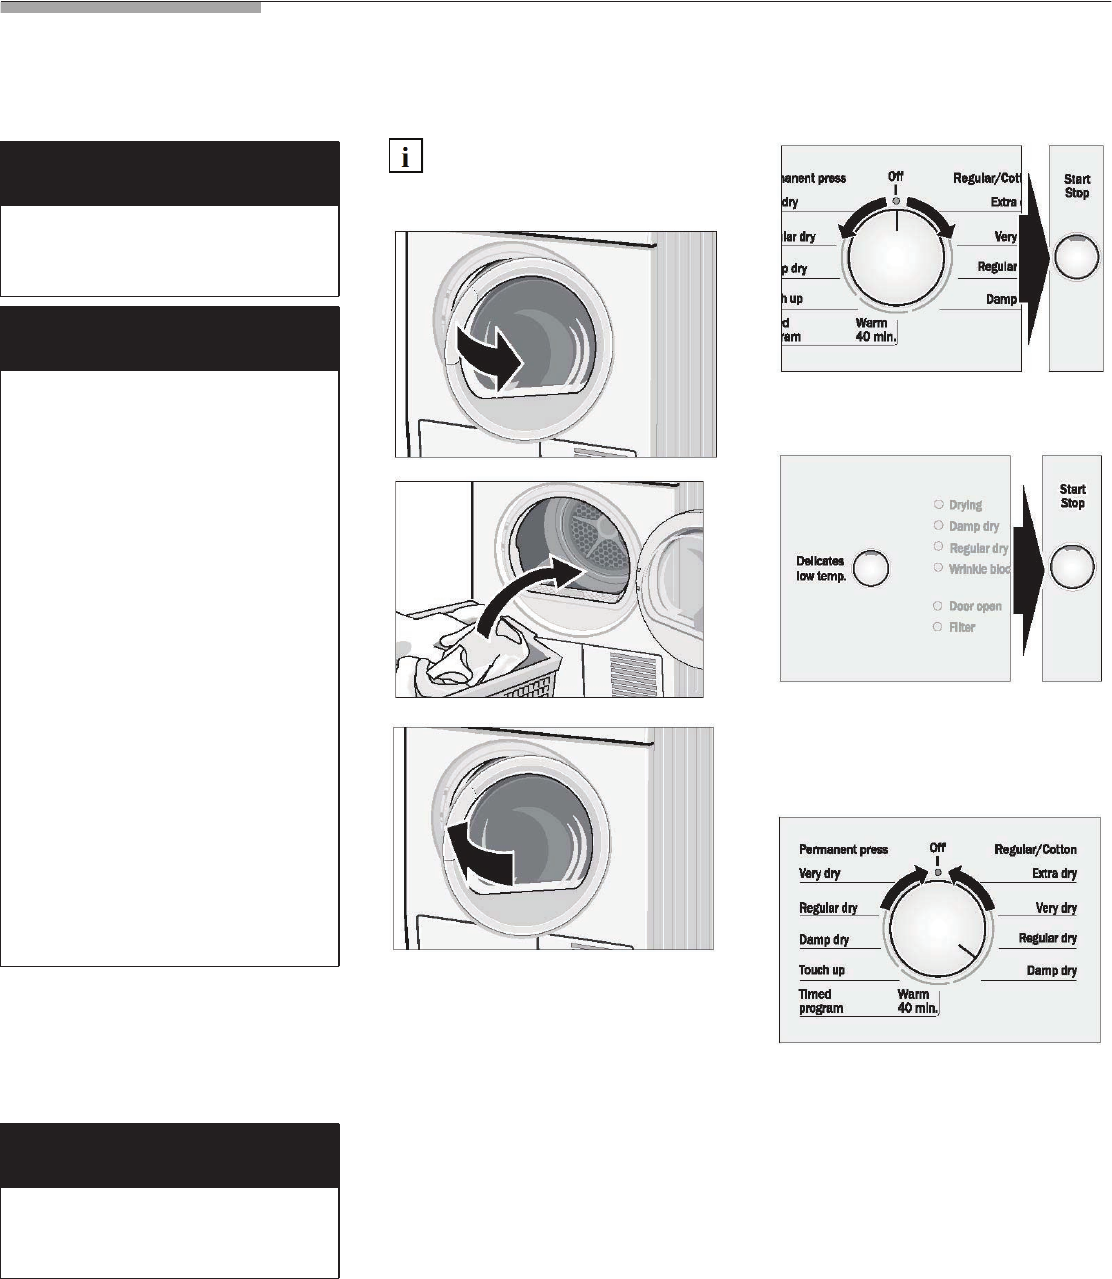
Summary of instructions
Safety information
Use the dryer only in the house and
for drying normal amounts of
laundry for the household. Use only
for drying textiles which were
washed with water.
Preparing the dryer
Check the lint filter. The filter
should be cleaned before and
after every drying process.
Selecting a program
Choose an option...
...and start the dryer.
Switch off the dryer
WARNING!
Always follow the IMPORTANT
SAFETY INSTRUCTIONS
(see page 4).
WARNING!
EXPLOSION HAZARD!
Keep flammable materials and
vapors, such as gasoline, away
from the dryer.
Do not dry anything that has ever
had anything flammable on it
(even after washing). Do not dry
anything that has ever had any
type of oil on it (including
cooking oils).
Items containing foam, rubber or
plastic must be dried on a
clothes-line or by using an Air
fluff cycle.
Do not allow items containing
flammable materials, such as
lighters, to remain in clothes
while drying.
Failure to follow these
instructions may result in
explosion or fire.
Risk of death or injury!
CAUTION
Before using your dryer read and
follow all installation and
operating instructions.
28
9305 us/can
9000230588
*230588*
