Boschhome Bosch Appliances Webcam 3922 988 43318 Users Manual BSS_DCN_GB
DCN - Installation Guide DCN - Installation Guide
3922 988 43318 to the manual 75ecdf7b-f758-401e-9cc3-82b6be8ad3e0
2015-01-21
: Boschhome Boschhome-Bosch-Appliances-Webcam-3922-988-43318-Users-Manual-239739 boschhome-bosch-appliances-webcam-3922-988-43318-users-manual-239739 boschhome pdf
Open the PDF directly: View PDF ![]() .
.
Page Count: 172 [warning: Documents this large are best viewed by clicking the View PDF Link!]
- IMPORTANT SAFEGUARDS
- About this Manual
- Table of Contents
- Chapter 1. Introduction Digital Congress Network (DCN)
- 1.1 Contribution equipment
- 1.2 Central Control Equipment
- 1.3 Simultaneous Interpretation and Language Distribution Equipment
- 1.4 Information display equipment
- 1.5 Application software packages
- 1.6 Installation equipment.
- 1.7 Quick reference to DCN’s functions
- 1.8 DCN Software packages
- 1.8.1 Microphone Management software
- 1.8.2 Synoptic Microphone Control
- 1.8.3 Simultaneous Interpretation
- 1.8.4 Language Distribution
- 1.8.5 Voting
- 1.8.6 Attendance Registration and Access Control
- 1.8.7 Intercom
- 1.8.8 Text/Status Information Displays
- 1.8.9 Automatic Camera Control
- 1.8.10 Delegate Database software
- 1.8.11 ID-Card Encoder software
- 1.8.12 Message Distribution software
- 1.8.13 System Installation software
- 1.8.14 Video Display
- 1.8.15 Multi-CCU Control
- 1.8.16 DCN Startup
- 1.8.17 DCN Open Interface
- 1.9 Glossary of Abbreviations and Acronyms
- Chapter 2. Contribution Equipment
- 2.1 CONTRIBUTION EQUIPMENT
- 2.2 LBB 3530/xx and LBB 3531/xx Delegate Discussion Unit
- 2.3 LBB 3533/xx and LBB 3534/xx Chairman Discussion Unit
- 2.4 LBB 3544/00, LBB 3545/00 and LBB 3546/00 Delegate conference units (Concentus)
- 2.5 LBB 3547/00 Chairman Conference Unit (Concentus)
- 2.6 LBB 3549/00, LBB 3549/50 Pluggable Microphones
- 2.7 LBB 3555/00 Intercom handset
- 2.8 Flush-mounted Contribution equipment
- 2.9 LBB 3535/00 Dual Audio Interface unit
- 2.10 LBB 3536/00, /10 Hand-microphones
- 2.11 LBB 3540/15 Multi-purpose connection unit
- 2.12 LBB 3537/00, LBB 3537/50 Delegate microphone with control panel
- 2.13 LBB 3537/10 Chairman microphone with control panel
- 2.14 LBB 3537/20 Pluggable Microphone control panel
- 2.15 LBB 3538/00 FM Loudspeaker panel
- 2.16 LBB 3541/00 FM Delegate Voting Control panel
- 2.17 LBB 3542/00, LBB 3542/20 FM Delegate/Chairman voting control panel with LC-display
- 2.18 LBB 3543/15 FM Chip-Card Reader
- 2.19 LBB 4157/05 Set of 100 Chip Cards
- 2.20 LBB 4157/00 Chip Card Encoder
- 2.21 LBB 3524/00, LBB 3524/10 and LBB 3526/10 FM Electronic channel selector panel
- 2.22 LBB 3525/00 Table top housing for Channel selector or Voting control panel
- 2.23 LBB 3539/00 Blanking panels
- 2.24 LBB 3527/00 Table top housing
- Chapter 3. Interpretation Equipment
- Chapter 4. Central Control Equipment
- 4.1 Introduction Central control equipment
- 4.2 LBB 3500/05, LBB 3500/05(D) Basic Central Control Unit
- 4.3 LBB 3500/15, LBB 3500/15(D) Central Control Unit
- 4.4 LBB 3500/35, LBB 3500/35(D) Multi Central Control Unit
- 4.5 CCU Trunk Communication Board (TCB4)
- 4.6 CU Protocol and Serial Port settings
- 4.7 Multi-CCU card
- 4.8 Connecting peripheral equipment to the CCU
- 4.9 CCU Audio Routing Modes
- 4.10 LBB 4106/00, LBB 4106/00D Extension power supply unit
- 4.11 LBB 3508/00 & LBB 3508/00D Audio Media Interface and Power Supply Unit
- 4.12 19” Rack Mounting DCN Control Units
- Chapter 5. DCN Control using Personal Computers
- 5.1 Minimum Software and hardware requirements
- 5.2 LBB 3510/00 PC Network card
- 5.3 Windows and DCN Software modules
- 5.4 LBB 3511/00 PC Card for Multi-CCU Systems
- 5.5 Connection PC to CCU
- 5.6 PC NETWORK SYSTEM
- 5.7 Software configuration Master CCU PC (OS/2) (Serial Ports 1 and 2)
- 5.8 Connecting Peripheral devices
- Chapter 6. DCN Camera Control
- Chapter 7. DCN Installation accessories
- Chapter 8. Information Displays
- Chapter 9. DCN Peripheral Equipment
- Chapter 10. Installation Techniques
- 10.1 Introduction Installation Techniques
- 10.2 Power Handling Capacity
- 10.3 Trunk outlets and Tap-offs
- 10.4 Calculating the PCF of a System with respect to cable length
- 10.5 Control Capacity
- 10.6 Stand-alone Systems
- 10.7 Computer Based Systems
- 10.8 Multi-CCU system
- 10.9 Remote Controller
- 10.10 Interconnecting Interpretation Equipment
- 10.11 Language Distribution Equipment
- Chapter 11. System Set-up & Operation
- 11.1 Introduction
- 11.2 Setting up a stand-alone system
- 11.3 Multi-CCU Set-up for the first-time.
- 11.4 Maintenance Menu
- 11.5 Sound Management
- 11.6 Additional stand-alone operations (applicable to conference units only)
- 11.7 Delegate/Chairman unit operation (Conference units only)
- 11.8 Operating Delegate/Chairman units (Discussion units only)
- 11.9 Interpretation
- 11.10 Operating the Interpreter Desk
- 11.11 Programming the Interpreter desk
- Chapter 12. Environmental Conditions and Maintenance
- Chapter 13. Technical Data
- 13.1 Mechanical data
- 13.2 Table-top units
- 13.3 Flush Mounted Equipment
- 13.3.1 LBB 3524/00 and LBB 3424/10 FM Electronic Channel Selector Panel
- 13.3.2 LBB 3526/10 FM Electronic Channel Selector Panel
- 13.3.3 LBB 3537/00 and LBB 3537/50 Microphone with FM Control Panel
- 13.3.4 LBB 3537/10 FM Chairman Priority Control Panel
- 13.3.5 LBB 3539/00 Blank panel
- 13.3.6 LBB 3537/20 and LBB 3537/50 FM Microphone Control Panel for microphones LBB 3549/00 and LB...
- 13.3.7 LBB 3538/00 FM Loudspeaker panel
- 13.3.8 LBB 3540/15 Multi-purpose Connection Unit
- 13.3.9 LBB 3541/00 Delegate Voting Control Panel
- 13.3.10 LBB 3542/00 FM Delegate/Chairman Voting Control Panel with LC-display
- 13.3.11 LBB 3543/15 Chip Card Reader
- 13.4 Installation Accessories
- 13.5 Electrical data
- 13.6 System limitations
- 13.7 Connection details
- 13.8 Available Audio Down Link Channels
- 13.9 TEMPLATE FOR TABLE CUT-OUT OF CONCENTUS UNITS
Digital Congress Network - DCN
Installation and Operating Manual
Digital Congress Network en
Security Systems

2
Bosch Security Systems
| 04-2003 | 3922 988 43318 en
en
| i
DCN
Digital Congress Network
Bosch Security Systems B.V.
© 2003
All rights strictly reserved.
Reproduction by third parties in any form is strictly forbidden, unless prior written authorisation has been given. In
the continuing quest for product improvement BOSCH reserves the right to change the specification of any article or
system without prior notice.

2
Bosch Security Systems
| 04-2003 | 3922 988 43318 en
en
| ii
IMPORTANT SAFEGUARDS
Prior to installing or operating this product always read the Safety Instructions,
which are available as a separate document.

2
Bosch Security Systems
| 04-2003 | 3922 988 43318 en
en
| iii
About this Manual
This manual is a comprehensive guide to the installation and operation of the Digital Congress
Network System DCN. For portability and ease of use, this manual combines both installation details
and a comprehensive section on individual and system operational procedures.
The manual is divided into the following chapters:
•Chapter 1. Introduction
Chapter 1 provides an introduction to the DCN system, as well as introducing the user to its
System Philosophy based on the new technology recently introduced into congress systems.
•Chapter 2. to Chapter 9. Equipment Description.
Chapters 2 to 9 provide a comprehensive detailed description of all system units that combine
to make up the DCN system.
•Chapter 10. Installation Techniques
Chapter 10 provides an introduction to the fundamentals of system design as well as a detailed
description on how to install, configure and interconnect the DCN system units.
•Chapter 11. System Operation
Chapter 11 provides a comprehensive and detailed description on how to set-up and operate
DCN’s main system items and its individual units.
•Chapter 12. Environmental Conditions and Maintenance
Chapter 12 gives the environmental conditions in which the DCN system should operate.
A section on maintenance is also included describing how to clean and store the DCN system
units.
•Chapter 13. Technical data
Chapter 13 gives both the mechanical and electrical details of the DCN system. The mechanical
section gives the dimensions of individual units. The electrical section gives the technical specifica-
tion of the DCN system.
Microsoft® Windows® are registered trademarks of the Microsoft Corporation. IBM is a registered
trademark. Pentium is a registered trademark of Intel Corporation.

2
Bosch Security Systems
| 04-2003 | 3922 988 43318 en
en
| iv
This page has been left blank intentionally

2
Bosch Security Systems
| 04-2003 | 3922 988 43318 en
Digital Congress Network
| Installation and Operating Manual | Table of Contents
en
| v
Table of Contents
Table of Contents
Chapter 1. Introduction Digital Congress Network (DCN) ............................1-1
1.1 Contribution equipment .................................................................................. 1-1
1.2 Central Control Equipment ............................................................................ 1-1
1.3 Simultaneous Interpretation and Language Distribution Equipment .... 1-2
1.4 Information display equipment ....................................................................... 1-2
1.5 Application software packages ..................................................................... 1-2
1.6 Installation equipment. ..................................................................................... 1-3
1.7 Quick reference to DCN’s functions ............................................................ 1-4
1.8 DCN Software packages ................................................................................ 1-4
1.8.1 Microphone Management software ....................................... 1-4
1.8.2 Synoptic Microphone Control ................................................ 1-4
1.8.3 Simultaneous Interpretation .................................................... 1-4
1.8.4 Language Distribution .............................................................. 1-4
1.8.5 Voting ............................................................................................ 1-5
1.8.6 Attendance Registration and Access Control .................... 1-5
1.8.7 Intercom ....................................................................................... 1-5
1.8.8 Text/Status Information Displays ............................................ 1-5
1.8.9 Automatic Camera Control ..................................................... 1-5
1.8.10 Delegate Database software .................................................. 1-5
1.8.11 ID-Card Encoder software ...................................................... 1-5
1.8.12 Message Distribution software ............................................... 1-5
1.8.13 System Installation software ................................................... 1-5
1.8.14 Video Display .............................................................................. 1-5
1.8.15 Multi-CCU Control .................................................................... 1-5
1.8.16 DCN Startup ............................................................................... 1-6
1.8.17 DCN Open Interface ................................................................. 1-6
1.9 Glossary of Abbreviations and Acronyms ................................................... 1-7
Chapter 2. Contribution Equipment ....................................................................2-1
2.1 CONTRIBUTION EQUIPMENT .................................................................... 2-1
2.1.1 Table-top Contribution units .................................................... 2-1
2.1.2 Delegate unit ............................................................................... 2-2
2.1.3 Chairman unit ............................................................................. 2-2
2.1.4 ‘Microphone Only’ Function .................................................... 2-2
2.1.5 Interpreter desk .......................................................................... 2-2
2.2 LBB 3530/xx and LBB 3531/xx Delegate Discussion Unit .................... 2-3
2.3 LBB 3533/xx and LBB 3534/xx Chairman Discussion Unit ................... 2-3
2.3.1 Adjustment setting discussion units ...................................... 2-4
2.3.2 Interconnection details discussion units .............................. 2-5
2.3.3 Mounting discussion units (FIG. 2-6) ................................... 2-5
2.4 LBB 3544/00, LBB 3545/00 and LBB 3546/00
Delegate conference units (Concentus) ..................................................... 2-6
2.5 LBB 3547/00 Chairman Conference Unit
(Concentus) .......................................................................................................2-7
2.5.1 Adjustment setting conference (Concentus) units ...........2-9
2.6 LBB 3549/00, LBB 3549/50 Pluggable Microphones ........................ 2-10
2.7 LBB 3555/00 Intercom handset ............................................................... 2-10
2.8 Flush-mounted Contribution equipment ................................................... 2-11
2.9 LBB 3535/00 Dual Audio Interface unit ................................................. 2-12
2.9.1 Flush Mounting Solutions .......................................................2-13
2.10 LBB 3536/00, /10 Hand-microphones ................................................... 2-15
2.11 LBB 3540/15 Multi-purpose connection unit ........................................ 2-15
2.11.1 Flush Mounting Solutions .......................................................2-17
2.12 LBB 3537/00, LBB 3537/50 Delegate microphone with
control panel ................................................................................................... 2-20
2.13 LBB 3537/10 Chairman microphone with control panel .................... 2-21
2.14 LBB 3537/20 Pluggable Microphone control panel ............................ 2-21
2.15 LBB 3538/00 FM Loudspeaker panel .................................................... 2-22
2.16 LBB 3541/00 FM Delegate Voting Control panel ................................ 2-22
2.17 LBB 3542/00, LBB 3542/20 FM Delegate/Chairman voting
control panel with LC-display ...................................................................... 2-23
2.18 LBB 3543/15 FM Chip-Card Reader ...................................................... 2-24
2.19LBB 4159/00 Set of 100 Chip Cards .....................................................2-24
2.20 LBB 4157/00 Chip Card Encoder ............................................................ 2-25
2.20.1 Position of the DIP switches ................................................ 2-25
2.21 LBB 3524/00, LBB 3524/10 and LBB 3526/10FM Electronic
channel selector panel .................................................................................. 2-27
2.22 LBB 3525/00 Table top housing for Channel selector or
Voting control panel ...................................................................................... 2-29
2.23 LBB 3539/00 Blanking panels ................................................................. 2-29
2.24 LBB 3527/00 Table top housing .............................................................. 2-29
Chapter 3. Interpretation Equipment .................................................................3-1
3.1 LBB 3520/10 Interpreter desk with back-lighting LC-display ..............3-1
3.1.1 Removal cable guide (Interpreter desk LBB 3520/10) .....3-4
3.1.2 Installing Intercom Handset to LBB 3520/10......................3-4
3.1.3 LBB 3513/00 Analog Audio Input/output Module .............3-5
Chapter 4. Central Control Equipment .............................................................. 4-1
4.1 Introduction Central control equipment .......................................................4-1
4.2 LBB 3500/05, LBB 3500/05(D) Basic Central Control Unit ................4-2
4.3 LBB 3500/15, LBB 3500/15(D) Central Control Unit ............................4-2
4.4 LBB 3500/35, LBB 3500/35(D) Multi Central Control Unit .................. 4-2
4.4.1 CCU Mains voltage and adjustment .....................................4-5
4.4.2 CCU Mains cable, plug and socket ......................................4-5
4.4.3 CCU Mains fuse rating ............................................................4-5

2
Bosch Security Systems
| 04-2003 | 3922 988 43318 en
Digital Congress Network
| Installation and Operating Manual | Table of Contents
en
| vi
Table of Contents
4.5 CCU Trunk Communication Board (TCB4) ............................................... 4-6
4.5.1 Installation ........................................................................................... 4-6
4.5.2 S9 DIP-Switch settings .................................................................. 4-7
4.5.3 Jumper settings .................................................................................. 4-7
4.6 CU Protocol and Serial Port settings .......................................................... 4-8
4.6.1 LBB 3500/05 Port 1 for Camera Control ................................... 4-8
4.6.2 LBB 3500/15 and LBB 3500/35 (TCB 4)................................... 4-8
4.7 Multi-CCU card ................................................................................................. 4-9
4.7.1 Installation ............................................................................................ 4-9
4.7.2 DIP-Switches S12 and S13 ............................................................ 4-9
4.7.3 Jumper settings .................................................................................. 4-9
4.7.4 LED indications .................................................................................. 4-9
4.8 Connecting peripheral equipment to the CCU ........................................4-11
4.9 CCU Audio Routing Modes ........................................................................4-12
4.9.1 Audio Routing INSERTION mode .............................................. 4-13
4.10 LBB 4106/00, LBB 4106/00D Extension power supply unit .............4-14
4.11 LBB 3508/00 & LBB 3508/00D Audio Media Interface and
Power Supply Unit .........................................................................................4-15
4.12 19” Rack Mounting DCN Control Units ....................................................4-16
Chapter 5. DCN Control using Personal Computers ......................................5-1
5.1 Minimum Software and hardware requirements ........................................ 5-1
5.2 LBB 3510/00 PC Network card ................................................................. 5-2
5.2.1 Installing PC-Network card ............................................................. 5-3
5.2.2 Interconnections PC Network card ............................................... 5-3
5.3 Windows and DCN Software modules ....................................................... 5-3
5.4 LBB 3511/00 PC Card for Multi-CCU Systems ..................................... 5-4
5.4.1 Installing PC-Card for Multi-CCU systems ................................. 5-4
5.4.2 LBB 3511/00 DIP-switch S12 and S13 settings ....................... 5-5
5.5 Connection PC to CCU .................................................................................. 5-6
5.6 PC NETWORK SYSTEM ............................................................................... 5-9
5.7 Software configuration Master CCU PC (OS/2) ....................................... 5-9
5.8 Connecting Peripheral devices ...................................................................5-13
Chapter 6. DCN Camera Control ..........................................................................6-1
6.1 Allegiant Video Switcher ................................................................................. 6-1
6.1.1 Allegiant Switcher Control Keyboards .................................. 6-1
6.1.2 Cameras and Monitors ............................................................. 6-1
6.1.3 INSTALLATION .......................................................................... 6-2
6.1.4 Set-up Camera configuration .................................................. 6-5
6.2 Direct Camera Control .................................................................................... 6-6
6.2.1 Virtual Keyboard ......................................................................... 6-6
6.2.2 Camera and Monitor ................................................................. 6-6
6.2.3 Installation ................................................................................... 6-6
6.2.4 Set-up Camera Configuraion .................................................. 6-7
6.2.4.1Stand-alone DCN system .................................................... 6-7
6.2.4.2DCN PC controlled system with single CCU ................. 6-8
6.3 Switching options using a personal computer ...........................................6-8
Chapter 7. DCN Installation accessories .......................................................... 7-1
7.1 Introduction Installation accessories ............................................................7-1
7.1.1 LBB 4114/00 Trunk-cable splitter 7 .................................................-2
7.1.2 LBB 4115/00 Tap-off Unit ............................................................... 7-2
7.1.3 Cable assemblies and connectors ................................................ 7-3
7.1.4 Connectors ......................................................................................... 7-4
7.1 .5 LB B 4117/00 Set of 25 cable locking clamps ........................... 7-4
7.1.6 LBB 4118/00 Termination plug for DCN Cable ........................ 7-4
Chapter 8. Information Displays ......................................................................... 8-1
8.1 LBB 3512/00 Data Distribution Board ...................................................... 8-1
8.1.1 Remote Switching Solutions ...........................................................8-3
8.1.2 Installing Data Distribution board LBB 3512/00. ....................... 8-4
8.1.3 Connecting Hall Displays to the DCN System ...........................8-4
8.1.4 Interconnection for Video hall displays and Video
Projectors ............................................................................................ 8-5
Chapter 9. DCN Peripheral Equipment ..............................................................9-1
9.1 Introduction Peripheral Equipment ...............................................................9-1
9.1.1 Telos Digital Telephone Interface ...................................................9-1
Chapter 10. Installation Techniques ...................................................................10-1
10.1 Introduction Installation Techniques .......................................................... 10-1
10.1.1 System design fundamentals ........................................................10-1
10.2 Power Handling Capacity ............................................................................ 10-2
10.3 Trunk outlets and Tap-offs ........................................................................... 10-3
10.3.1 Tap-off limitations .............................................................................10-3
10.3.2 Using Tap-Off unit LBB 4115/00 .................................................10-5
10.3.3 Maximum cable lengths using Trunk-outlets
and/or Tap-offs .................................................................................10-5
10.4 Calculating the PCF of a System with respect to cable length .......... 10-6
10.4.1 Calculating Step-by-Step ..............................................................10-6
10.4.2 Graph explanation ...........................................................................10-8
10.4.3 Graph reference examples ............................................................10-9
10.5 Control Capacity ..........................................................................................10-10
10.6 Stand-alone Systems ..................................................................................10-10
10.6.1 Basic System (without extension units) ...................................10-10
10.6.2 System layout (without extension units) ...................................10-11
10.6.3 System with Extension units ........................................................10-11
10.7 Computer Based Systems ........................................................................10-12
10.7.1 PC Network System ......................................................................10-14
10.8 Multi-CCU system .......................................................................................10-15
10.8.1 Multi-CCU and PC interconnection ..........................................10-15

2
Bosch Security Systems
| 04-2003 | 3922 988 43318 en
Digital Congress Network
| Installation and Operating Manual | Table of Contents
en
| vii
Table of Contents
10.9 Remote Controller ....................................................................................... 10-16
10.9.1 Installation .......................................................................................10-16
10.9.2 Typical examples using the Remote Controller ......................10-17
10.10 Interconnecting Interpretation Equipment ............................................. 10-18
10.10.1 Interconnecting Interpreter desks ..............................................10-18
10.10.2 Interconnection between booths ............................................... 10-18
10.11 Language Distribution Equipment ........................................................... 10-19
10.11.1 Introduction .....................................................................................10-19
10.11.2 Installation .......................................................................................10-20
Chapter 11. System Set-up & Operation .......................................................... 11-1
11.1 Introduction ......................................................................................................11-1
11.1.1 Initializing a stand-alone system .................................................... 11-1
11.1.2 Initializing a PC-based system ...................................................... 11-1
11.2 Setting up a stand-alone system .................................................................11-2
11.2.1 System mode selection (Multi-CCU only) ................................. 11-2
11.2.2 Microphone control modes ............................................................ 11-2
11.3 Multi-CCU Set-up for the first-time. ............................................................11-3
11.3.1 Downloading Control PC-software ............................................. 11-3
11.4 Maintenance Menu .........................................................................................11-3
11.4.1 To set system default LANGUAGE ............................................. 11-4
11.4.2 To set system INTERCOM OPERATOR POSITION ............. 11-4
11.5 Sound Management .......................................................................................11-5
11.5.1 Equalizer function ............................................................................ 11-5
11.5.2 Loudspeakers ................................................................................... 11-5
11.6 Additional stand-alone operations (applicable to conference
units only) .........................................................................................................11-6
11.6.1 Voting modes .................................................................................... 11-6
11.6.2 Intercom Facilities ............................................................................ 11-6
11.7 Delegate/Chairman unit operation (Conference units only) .................11-7
11.7.1 Introduction ....................................................................................... 11-7
11.7.2 OPERATION Delegate Units LBB 3544/00,
LBB 3545/00, LBB 3546/00 ...................................................... 11-8
11.7.3 OPERATION Chairman Unit LBB 3547/00 ........................... 11-11
11.8 Operating Delegate/Chairman units (Discussion units only) ............ 11-14
11.8.1 Microphone ..................................................................................... 11-14
11.8.2 Priority function ( LBB 3533/xx and
LBB 3534/xx only) ........................................................................11-14
11.8.3 Language channel selection (LBB 3531/..
and LBB 3534/.. only) .................................................................. 11-14
11.9 Interpretation ................................................................................................. 11-15
11.9.1 Incoming channel control (LISTENING) ..................................11-15
11.9.2 Outgoing channel control (SPEAKING) ..................................11-15
11.9.3 Microphone (Micro) ......................................................................11-15
11.9.4 Microphone locks ..........................................................................11-15
11.9.5 ‘Override’ .........................................................................................11-15
11.9.6 Relay Interpretation with auto-relay 11-15
11.10 Operating the Interpreter Desk 11-17
11.10.1 Incoming Channel Selection .......................................................11-17
11.10.2 Assigning Pre-select keys ............................................................11-17
11.10.3 Incoming Floor switch and Auto-relay .......................................11-17
11.10.4 Language Quality Indication ........................................................11-17
11.10.5 Interpreter desk Listening ............................................................11-18
11.10.6 Outgoing Channel Selection ......................................................11-18
11.10.7 Typical Displays showing outgoing channels ..........................11-19
11.11 Programming the Interpreter desk ...........................................................11-20
11.11.1 Programming the Interpreter desk ............................................ 11-20
11.11.2 Entering the desks programming mode ...................................11-21
11.11.3 Menu Programming procedures .................................................11-21
Chapter 12. Environmental Conditions and Maintenance ...........................12-1
12.1 System .............................................................................................................. 12-1
12.2 Public areas ..................................................................................................... 12-1
12.2.1 Lighting ..............................................................................................12-1
12.2.2 Public displays (placement/viewing distance) ..........................12-1
12.2.3 Public walkways ...............................................................................12-1
12.2.4 Headphones with interpreter systems ........................................12-1
12.2.5 Recommended speaking distance ..............................................12-1
12.3 Technical rooms ............................................................................................. 12-1
12.4 Interpreter booths .......................................................................................... 12-2
12.5 Ventilation ........................................................................................................ 12-2
12.6 Cleaning ........................................................................................................... 12-2
12.7 Storage ............................................................................................................. 12-2
Chapter 13. Technical Data ...................................................................................13-1
13.1 Mechanical data ............................................................................................. 13-1
13.1.1 LBB 3500/.. Central Control Units ............................................13-1
13.1.2 Mounting brackets (in-
cluded with type No.s LBB 3500/xx,
LBB 4106/00, LBB 3508) ............................................................13-1
13.1.3 LBB 4106/00 and LBB 4106/00 (D)
Extension Power Supply Unit ........................................................13-2
13.1.4 LBB 3508/00 and LBB 3508 (D)
Audio Media Interface Unit ............................................................13-2
13.2 Table-top units ................................................................................................ 13-2
13.2.1 Conference Units .............................................................................13-2
13.2.2 Discussion Units ..............................................................................13-2
13.2.3 LBB 3535/00 Dual Audio Interface Unit ..................................13-2
13.2.4 LBB 3536/xx Hand microphones ...............................................13-3
13.2.5 LBB 3555/00 Intercom handset ................................................13-3
13.2.6 LBB 3525/00 Channel Selector housing ................................13-3
13.2.7 LBB 3527/00 Table-top housing for FM loudspeaker
panel ...................................................................................................13-3
13.3 Flush Mounted Equipment ........................................................................... 13-4
13.3.1 LBB 3524/00 and LBB 3424/10 FM Electronic
Channel Selector Panel .................................................................13-4

2
Bosch Security Systems
| 04-2003 | 3922 988 43318 en
Digital Congress Network
| Installation and Operating Manual | Table of Contents
en
| viii
Table of Contents
13.3.2 LBB 3526/10 FM Electronic Channel Selector Panel ... 13-4
13.3.3 LBB 3537/00 and LBB 3537/50 Microphone with
FM Control Panel ..................................................................... 13-5
13.3.4 LBB 3537/10 FM Chairman Priority Control Panel ........ 13-5
13.3.5 LBB 3539/00 Blank panel ................................................... 13-5
13.3.6 LBB 3537/20 and LBB 3537/50 FM Microphone
Control Panel for microphones LBB 3549/00 and
LBB 3549/50 ........................................................................... 13-6
13.3.7 LBB 3538/00 FM Loudspeaker panel .............................. 13-6
13.3.8 LBB 3540/15 Multi-purpose Connection Unit ................ 13-7
13.3.9 LBB 3541/00 Delegate Voting Control Panel ................. 13-7
13.3.10 LBB 3542/00 FM Delegate/Chairman Voting Control
Panel with LC-display ............................................................. 13-7
13.3.11 LBB 3543/15 Chip Card Reader ....................................... 13-8
13.4 Installation Accessories ................................................................................13-8
13.4.1 LBB 4114/00 Trunk Cable Splitter LBB 4115/00
Tap-off Unit ................................................................................ 13-8
13.5 Electrical data ..................................................................................................13-9
13.5.1 Microphones (General) .......................................................... 13-9
13.5.2 Headphones ............................................................................. 13-9
13.5.3 Transmission links .................................................................... 13-9
13.5.4 Combined units ...................................................................... 13-10
13.5.5 System Electrical and Electro-acoustical
characteristics ........................................................................ 13-10
13.5.6 System environmental conditions ...................................... 13-10
13.5.7 Interface data .......................................................................... 13-10
13.5.8 Mains supply ........................................................................... 13-10
13.5.9 Power consumption (nominal) ............................................ 13-10
13.6 System limitations ........................................................................................ 13-11
13.7 Connection details ...................................................................................... 13-11
13.7.1 Mains cable ............................................................................. 13-11
13.7.2 DCN circular connectors ..................................................... 13-11
13.7.3 Cable connection ................................................................. 13-11
13.7.4 Pluggable microphones LBB 3549/xx ............................ 13-11
13.7.5 CONCENTUS units .............................................................. 13-12
13.7.6 CONCENTUS units .............................................................. 13-12
13.7.7 Cable connection ...................................................................13-12
13.7.8 Jack-plug .................................................................................. 13-12
13.7.9 Interpreter desk (headset socket DIN-type) .................... 13-12
13.7.10 15-pole D-type connector PC Interface ........................... 13-12
13.8 Available Audio Down Link Channels 13-13
13.8.1 Stand-alone systems ............................................................. 13-13
13.8.2 Systems with a PC ................................................................ 13-13
13.9 TEMPLATE FOR TABLE CUT-OUT OF CONCENTUS UNITS ...... 13-14

2
Bosch Security Systems
| 04-2003 | 3922 988 43318 en
Digital Congress Network
| Installation and Operating Manual | Chapter 1 - Introduction to DCN
en
| 1-1
Contribution equipment
Chapter 1. Introduction Digital
Congress Network
(DCN)
The BOSCH Digital Network System (DCN) provides flexible control facilities for all types of
conferences from small discussion groups to international, multi-lingual congresses with hundreds of
delegates. Facilities range from basic microphone management, to delegate identification and
registration, electronic voting, information distribution and display, up to extensive simultaneous
interpretations and automatic camera control. A single operator using a computer with DCN’s
application software can control even the largest of congresses. Systems can be expanded by adding
more contribution equipment and introducing PC control with DCN’s application software.
The full range of DCN equipment includes:
1. Contribution equipment
2. Central control equipment
3. Simultaneous interpretation and language distribution equipment
4. Information display equipment
5. Application software packages
6. Installation equipment
DCN equipment is also complemented by external equipment such as video and character displays,
TV cameras, personal computers, monitors, PA amplifiers, loudspeakers and printers all of which are
fully compatible and easily integrated into the DCN system.
1.1 Contribution equipment
Contribution equipment describes the units which participants use to contribute to a conference.
Depending on the type of contribution unit, delegates can access the DCN’s wide range of facilities to
listen, speak, register a request-to-speak, receive screen messages, communicate with other delegates
via an intercom and to participate in electronic voting sessions. On insertion of an ID-card dedicated
software is required giving much more facilities.
Contribution units can be used free-standing on a table-top, or flush-mounted in desks, seat backs or
armrests. Other microphone types such as lavalier and hand-held are also available, allowing
contribution from non seated participants such as a guest speaker for example.
1.2 Central Control Equipment
The Central Control Unit (CCU) forms the heart of the DCN system. The CCU can operate stand-
alone to provide automatic conference control, or it can be accessed by an operator via a personal
computer (PC) when more extensive management control is required.
All CCU’s can control up to 240 contribution units. If more capacity is required, slave CCU’s can be
connected, each of which increases the system capacity by 240 contribution units. A maximum of 16
slave CCU’s can be connected to a system. Other extension units include an Extension Power Supply
unit and an Audio Media Interface unit which extend the systems power handling capacity.
The CCU offers basic microphone management, simultaneous interpretation and electronic voting
facilities, as well as digital audio channels, data channels and communication channels. This allows
effective unsupervised control of even large or international conferences. The extended CCU offers
all the facilities of the basic CCU, but allows operator control via a personal computer (PC). The
operator can access the wide range of DCN application software packages, each with a specific
function in controlling and monitoring conferences. This includes advanced simultaneous
interpretation and microphone management, message generation and display, voting procedures,
intercom, creating a delegate data base, attendance registration, audio processing and automatic
camera control.

2
BOSCH Security Systems
| 04-2003 | 3922 988 43318 en
Digital Congress Network
| Installation and Operating Manual | Chapter 1 - Introduction to DCN
en
| 1-2
Simultaneous Interpretation and Language Distribution Equipment
1.3 Simultaneous Interpretation and Language
Distribution Equipment
Interpretation.
Using the same trunk-line cabling DCN’s interpreter desks can easily be integrated into existing
systems, offering comprehensive facilities for simultaneous interpretation. The desk can accommodate
up to 15 different language channels, plus the original floor language. A maximum of six desks can be
installed per interpreter booth. They can be used stand-alone or as part of a more comprehensive
system. When used stand-alone, the units built-in microprocessor is manually programmed to allocate
language channels, channel routing and interlocks. In PC operator-controlled systems, the desk is used
in combination with DCN dedicated software, and other interpreter desks (if required) to form a
completely integrated interpretation network. An in-built facility enables direct or auto-relay
interpretation to cater for less well known languages. Each desk has two output channels, one for the
normal interpretation and one for second or auto-relay translation.
Language Distribution
Distribution of languages to individual delegates can be by wired or wireless language distribution
systems. A wired language distribution system uses delegate contribution units that include a language
channel selector, or dedicated language channel selector units. A wireless language distribution system
uses the Infra-red transmission technique.
1.4 Information display equipment
The DCN system can distribute information to conference participants quickly and efficiently to suit
all requirements. A wide range of displays are supported from simple LCD personal screens to video
equipment for venue broadcasting.
The chairman unit, interpreter desk and one type of the delegate unit is equipped with a graphic
(chairman, delegate) or alphanumeric (interpreter) LC-display which displays delegate information,
voting results and operational procedures, public and personal messages, microphone status and
multi-lingual user instructions.
Hall displays can quickly display conference information to a large number of conference participants.
Numeric, alphanumeric or geographical displays are available, to display voting results. TV receivers
and Video Displays allow high quality display of any live or recorded material, computer-generated
graphics, text, and information generated by DCN software.
1.5 Application software packages
A comprehensive range of software packages is available for use with centrally controlled PC-systems.
These packages run under Microsoft® Windows® integrate conference preparation management
and control into this versatile graphical computer environment. Any combination of packages can be
down-loaded according to specific system requirements. DCN software packages are generally used
in larger scale systems where operator control is required.
The PC running the software is connected to the DCN system and therefore has direct
communication links with contribution, interpretation and control equipment via the systems trunk-
line data bus or the CCU’s serial communication port. Therefore all aspects of conference
management can be brought to a single point of control, Leading to increased ease of use, efficiency
and data distribution.
The range of DCN software packages include
s:
• Microphone management
• Synoptic Microphone control
• System installation
• Parliamentary voting
• Multi- voting
• Delegate Database
• Simultaneous Interpretation
• Text/Status Display
• Attendance Registration
• ID-Card Encoding
• Message Distribution
• Intercom
• Video Display
• Automatic Camera Control
• DCN Start-up
• Multi-CCU
• DCN Open Interface

2
Bosch Security Systems
| 04-2003 | 3922 988 43318 en
Digital Congress Network
| Installation and Operating Manual | Chapter 1 - Introduction to DCN
en
| 1-3
Installation equipment.
1.6 Installation equipment.
Fast cost-saving installation is an important benefit of the DCN’s digital technology. A thin twin-coaxial
cable carries all the system’s digital signals, eliminating the need for the costly and vulnerable multi-
core cables used in conventional analogue installations. The same cable is used to transport the signals
to all delegates’ microphone units throughout the system and can be ‘tapped off ’ at any desired point
to connect the microphone units or any system unit associated with the DCN system. Later capacity
extensions - for example to add extra microphone units does not demand changes to the system
cabling. All that is needed is to connect the required DCN system units or branches to the installed
cabling. Trunk-line splitters and extension cable assemblies are available to simplify installations in
difficult working areas.
DCN’s System Philosophy.
The DCN introduces the latest digital technology, bringing far reaching benefits to the audio quality, as
well as to promote the addition of a wide range of external peripheral equipment to conference
systems.
FIG 1-1 shows the concept of DCN’s digital communication techniques. The Network cabling forms
the system infrastructure providing the communication media between the Microprocessor
controlled Central Control and all units connected to it. Using standard plugs and connectors
throughout the system means that units can be connected to the Network at any convenient points,
making installation quick and simple.
Communication through the Network cabling and all units connected to it, is done using three
dedicated digital communication IC’s, ACN
1
, ACN 2 and ACN 3. Units that include an ACN
1
microprocessor - such as the delegate unit, chairman unit and interpreter desk - communicate to the
Central Control Unit, via the units ACN 2 microprocessor on a send and receive basis (active or
passive). Units that include an ACN 3 microprocessor - such as the Channel selector units - receive
information on a receive basis only, such units are known as passive units.
Praedic
The integrated circuit (IC), PRAEDIC (Professional Audio Encoder Decoder Integrated Circuit)
combines a built-in amplifier with both Analogue-to-Digital and Digital-to-Analogue convertors. The
IC converts analogue signals (such as from a delegates’ microphone) and digitizes them for
distribution throughout the DCN network cabling. In return the digitize signal is then fed back to the
Praedic and converted back to an analogue signal for distribution throughout the DCN units - such as
delegate loudspeakers and headphones.
FIG 1-1 DCN’s digital communication technique
Alternative for PC
with LBB 3510/00
Network card
DCN Discussion
Delegate/Chairman/Interpreter
(contribution & distribution)
Channel selector unit
(language distribution)
ACN 1 - up/down
ACN 2 - up/down
ACN 3 - down only
Central Control Unit (CCU)
Delegate/Chairman unit (Concentus)
ACN 1
ACN 1
ACN 3
ACN 1
ACN 1
ACN 3DAC
PRAEDIC
PC-bus
PRAEDIC
ACN 1 PRAEDIC
ACN 2
PERSONAL
COMPUTER
DAC
LBB 3510/00
Network card
LBB 3512/00
Data Distribution Board
CONTROL
PANEL
µProc.
e.g Hall Display
PRAEDIC
µProc. FLASH
EPROM RAM DSP
Network cabling

2
BOSCH Security Systems
| 04-2003 | 3922 988 43318 en
Digital Congress Network
| Installation and Operating Manual | Chapter 1 - Introduction to DCN
en
| 1-4
Quick reference to DCN’s functions
1.7 Quick reference to DCN’s functions
Stand-alone System
A discussion system; delegates control their own microphone actions - without the need of a non-
participating operator. Discussion systems cater for smaller groups, although the number of delegates
can be extended to the total capacity of the DCN system. A discussion system therefore is ideal for
small meeting halls, boardrooms, and hotels etc. where clear and concise speech intelligibility through
sound amplification is required.
PC Controlled System
Delegates’ microphone actions are controlled by a none participating operator using a personal
computer.
Microphone Management
Method by which delegates/operator control the microphone units. Microphone Management
control therefore is needed in order to conduct civilised and disciplined discussions/conferences.
The DCN system has its own built-in standard microphone control functions. These functions are
usually sufficient for use in discussion groups using a stand-alone system. In conference systems
however a central PC operator has extended microphone management capabilities when using
DCN’s dedicated microphone management software.
Microphone Management Operation Modes:
OPEN (AUTO)
The OPEN mode allows up to 1, 2 or 4 delegates (Active Micros) to control the on/off state of
their own microphones unit simultaneously without the use of operator intervention. When more
than the number of Active Micros has been reached, delegates requesting to speak join a request-
to-speak list.
OVERRIDE
(First-In-First-Out)
The Override mode allows up to 1, 2 or 4 delegates to speak on a FIRST-IN FIRST-OUT basis i.e
Override. With the override mode, their is no request-to-speak list, only the pre-selected number
of Active Micro’s may be switched on simultaneously. This means that if another delegate should
switch on his microphone unit, the microphone of the first delegate having joined the group will
be switched off, allowing the latest delegate to join in the discussion.
VOICE ACTIVATION
The ‘Voice’ activation mode is an automatic method for activating the microphones of the dele-
gate and chairman units by voice. The maximum number of voice activated units available for
selection in a stand-alone system is 2 or 4. This mode of operation is intended for free discussion
amongst participating delegates. For enhanced operation an additional Public Address system is
highly recommended.
1.8
DCN Software packages
1.8.1 Microphone Management software
Microphone management software provides a text-based solution (delegates’ names) for managing
delegates’ microphones. Run under Windows® the operator controls the delegates’ microphone
operations through menus.
The Microphone Management software offers five modes of microphone control:
• Operator with *Request-to-speak list (MANUAL)
• Operator with *Request and **Response list
• Delegate with *Request-to-speak list (OPEN)
• Delegate control with override (of other delegates’ microphones)
*A Request-to-speak list is a list of delegates waiting to speak. To join the list delegates first press
their microphone keys. If the maximum number of delegates are already speaking the delegates
then joins the list. The number of delegates allowed to speak at the same time is set to 1,2,3, or
4.
** A response list is a list of delegates that need to react immediately to a current speaker.
Response requests are positioned at the top of the request list.
• Delegate with Voice activation
REFERENCE:
For more information refer to the LBB 3570 software manual
1.8.2 Synoptic Microphone Control
Synoptic microphone control software provides a graphical solution using pictograms of microphone
units. Run under Windows® the operator controls microphone units by simply pointing and clicking a
mouse on the desired unit. Synoptic microphone control is icon based. It relies on the location of
seats and uses pictograms that show icons with seat numbers or with names.
REFERENCE:
For more information refer to the LBB 3571 software manual
1.8.3 Simultaneous Interpretation
Interpretation is the term used where the language of the floor speaker is interpreted by interpreters
using interpreter desks into the languages of the other conference participants.
REFERENCE:
For more information refer to the LBB 3572 software manual

2
Bosch Security Systems
| 04-2003 | 3922 988 43318 en
Digital Congress Network
| Installation and Operating Manual | Chapter 1 - Introduction to DCN
en
| 1-5
DCN Software packages
1.8.4 Language Distribution
Language distribution describes the means by which delegates listen to the floor speaker in the
language of their choice. Interpretations can be forwarded to delegates headphones using units with
either a built-in language channel selector or via an infra-red receiver.
1.8.5 Voting
Parliamentary voting
Parliamentary voting allows delegates to vote ‘NO’, ‘ABSTAIN’ or ‘YES’. It provides facilities for vote
registration and display, with a choice of ‘OPEN’ (non-secret) and ‘CLOSED’ (secret) voting modes
and selectable interim voting functions. Up to 9999 voting motions can be prepared in advance in a
single script file and recalled instantly during a voting session (available with PC systems only). In PC
based systems, editing facilities are also provided to simplify the preparation of updating script files.
REFERENCE:
For more information refer to the LBB 3575 software manual
Multi voting
Multi-voting software allows up to 6 voting methods to be selected, ‘Parliamentary, ‘Audience
response’, ‘Multiple choice’, Opinion poll, Rating and For/against. Vote related parameters can be
specified for each individual voting method, such as: vote type, result display type, interim display,
screen and print legends, hall display, vote weighting, roll call, voting LEDs and abstain options. The
user is able to print the final result and automatically export it to an MS-DOS file.
For more information refer to the LBB 3576 software manual.
REFERENCE:
For more information refer to the LBB 3576 software manual
1.8.6 Attendance Registration and Access Control
To register delegates to the DCN system, personnel ID-cards can be programmed and allocated to
participating delegates. The card ensures that only authorised delegates are able to access the
functions of a microphone unit, participate in a voting session and to make an intercom call. This
facility is only applicable to units fitted with an ID chip card reader.
REFERENCE:
For more information refer to the LBB 3578 software manual
1.8.7 Intercom
An intercom handsets allows two-way vocal communication between conference participants,
interpreters and operator.
REFERENCE:
For more information refer to the LBB 3573 software manual
1.8.8 Text/Status Information Displays
Information displays range from hall displays for rooms of all sizes, down to personal displays for
individual delegates.
Most of the displayed information is in the form of alphanumeric messages, shown on microphone
units equipped with LC-displays, as well as on hall displays. A choice of solutions are available for hall
display information like voting motions and results, delegates’ names and affiliations, request-to speak
lists, personal messages, public announcements and multiple choice questions.
Display facilities for video signals and graphic information such as seating plans and statistical voting
representations can also be added to the system, using hall displays such as projection or direct view
TV receivers, or giant-screen VidiWalls for larger audiences. Personal video displays can also be added
in the form of LCD TV displays.
REFERENCE:
For more information refer to the LBB 3583 software manual
1.8.9 Automatic Camera Control
Automatic camera control allows the speaker to be displayed on one or more video displays
connected to a video control switcher. One or more dome cameras’ with a fast moving pan and tilt,
zoom lens and a large number of pre set positions are automatically activated by the microphone
control signals of the contribution units.
REFERENCE:
For more information refer to the LBB 3588 software manual
1.8.10 Delegate Database software
Delegate Database software is used to create names files of conference participants. It is used by
several other DCN software modules to identify the conference participant and to control the
delegates access to DCN functionality, i.e. microphone control, voting, use of intercom facilities.
REFERENCE:
For more information refer to the LBB 3580 software manual.
1.8.11 ID-Card Encoder software
ID-Card Encoder Software enables encoding of a unique ID-card number to allow identification of
each delegate when using DCN contribution units with an ID-card reader.
REFERENCE:
For more information refer to the LBB 3580 software manual.
1.8.12 Message Distribution software
Message Distribution Software enables an operator to send individual or group messages to
conference participants such as delegates and interpreters and to display text messages on hall
displays.
REFERENCE:
For more information refer to the LBB 3582 software manual.
1.8.13 System Installation software
System Installation is used to configure the DCN system. It allows linking of contribution units and
users and assigning functions to audio channels. An installation file is required for DCN operation with
PC control.
REFERENCE:
For more information refer to the LBB 3585 software manual.
1.8.14 Video Display
Video Display software enables sending of relevant information for large screen video/data display or
personal video/data display via a Video Client application.
REFERENCE:
For more information refer to the LBB 3584 software manual.

2
BOSCH Security Systems
| 04-2003 | 3922 988 43318 en
Digital Congress Network
| Installation and Operating Manual | Chapter 1 - Introduction to DCN
en
| 1-6
DCN Software packages
1.8.15 Multi-CCU Control
Multi-CCU Control software allows to use up to 16 CCU’s in a DCN system for a max. of 3840
contribution units. (Note: DCN’s Delegate Database software LBB 3580 supports names files with up
to 1500 names). The Multi-CCU Control software is installed on a Master CCU PC operating under
OS/2. It allows assignment of the CCU acting as "Audiomaster" and the CCU used for connection of
interpreter desks.
REFERENCE:
For more information refer to the LBB 3586 software manual.
1.8.16 DCN Startup
DCN Startup software is the basic software module for installation of all DCN software modules. The
Startup screen shows the icons of all installed software modules that can be activated. It also can
show the system configuration, defines auto-start options, takes care for error logging and allows the
operator to control the master volume level and to listen to interpretations via a headphone.
REFERENCE:
For more information refer to the LBB 3590 software manual.
1.8.17 DCN Open Interface
The DCN open interface software allows remote control of a selected DCN functions via third party
equipment. Control data exchange between DCN and the remote control device or system is done
via a RS-232 port on the CCU. Access to the CCU is opened with the Open Interface software via a
PC connection to the serial port of the CCU.
REFERENCE:
For more information refer to the documentation on the disk of this module.

2
Bosch Security Systems | 04-2003 | 3922 988 43318 en
Digital Congress Network | Installation and Operating Manual | Chapter 1 - Introduction to DCN en | 1-7
Glossary of Abbreviations and Acronyms
1.9 Glossary of Abbreviations and Acronyms
A
ACN-1, ACN-2, ACN-3 Integrated Circuit (IC)
Active unit Sends data on the up link and receives data on the down link
Allow cancel request A pre-programmed system interlock, allowing the delegate to cancel a
request-to-speak
Allow mic. off facility A pre-programmed system interlock, allowing delegates to switch off
their microphone units without consent
C
CCU Central Control Unit
Chairman One who presides over or heads a meeting or conference
Contribution Participation within a meeting or conference using contribution units
Central Operator One who controls and organises a meeting or conference from a per-
sonal computer (PC)
D
Data Communication Communication of data between microprocessor controlled units
DCN Digital Congress Network
Delegate A representative to a conference
Distribution The distribution to delegates of interpreted languages
E
End of Voting End of Voting Displayed on the delegate unit to inform delegates that
the voting session has ended
F
Flush-mounted Units that are built into tabletops or the arm rests of seats
H
Hold Voting session on hold or temporarily halted
I
Information display Display showing related conference information
Interlocks Pre-programmed settings for use in interpretation procedures
Interpretation The art of interpreting one language into another
Interpretation (simultaneous) The art of interpreting one language into
another at the same time
Interpreter One who translates orally for people speaking in different languages
N
Network cabling See Trunk-line
M
Multi-CCU Systems using more than one CCU, linked using a Multi-CCU link.
P
PC Personal Computer
PCF Power Consumption Factor
PCF value The value assigned to a specific unit or system
PRAEDIC Professional Audio Encoder Decoder IC.
Passive Unit DCN unit that Receives data on the down link only
R
Rack-mounted Defines units that are capable of being mounted in a 19-inch cabinet
Request accepted Displayed on a delegate unit informing the delegate the delegate that
his request-to-speak has been accepted
Request Initiated by a delegate requesting to speak
Request cancelled Displayed on delegate units informing the delegate that his request-to-
speak has been cancelled or rejected
Restart
Response
Voting session restarted after being on Hold
Initiated by a delegate wishing to respond.
S
Speaker Floor speaker
Speak now Displayed on delegate units to inform the delegate that he may speak
T
Trunk-line Cabling between units run in a loop-through chain
Trunk-outlet Used for trunk-cable splitting and pulse regeneration purposes
Table-top Units placed on top of a table or similar type surface
V
Voting To cast one vote, exercise a choice or decision, express an opinion
Voting on-hold Displayed on a delegate unit when a voting session has been tempo-
rarily suspended

2
Bosch Security Systems | 04-2003 | 3922 988 43318 en
Digital Congress Network | Installation and Operating Manual | Chapter 1 - Introduction to DCN en | 1-8
Glossary of Abbreviations and Acronyms
This page has been left blank intentionally
2
Bosch Security Systems | 04-2003 | 3922 988 43318 en
Digital Congress Network | Installation and Operating Manual | Chapter 2 - Contribution Equipment en | 2-1
CONTRIBUTION EQUIPMENT
Chapter 2. Contribution
Equipment
The following chapter describes the functionality of each unit and its interconnection and mounting
facilities. All unit’s dimensions are referenced in Chapter 13.: “Technical data”.
2.1 CONTRIBUTION EQUIPMENT
The DCN range of contribution equipment falls into 3 categories: table-top, table-top + flush
mounted (universal) and flush mounted.
2.1.1 Table-top Contribution units
Table-top contribution units include delegate, chairman and interpreter units. All are designed for
uncluttered longitudinal placement on table-tops or similar type surfaces.
NOTE: DCN offers two different styles of table-top contribution units. Therefore for clar-
ity throughout this manual, they will be divided into conference and discussion units.
The range of DCN’s table top equipment includes the following units:
Unit Description Type No. Unit Type.
Active units
Delegate unit LBB 3530/xx LBB 3531/xx
LBB 3544/00 LBB 3545/00 LBB 3546/00
Discussion
Conference
Chairmans unit LBB 3533/xx LBB 3534/xx
LBB 3547/00
Discussion
Conference
Microphones for conference
units
LBB 3549/00
LBB 3549/50
Conference
Conference
Interpreter desk LBB 3520/10 Interpretation
Intercom handset LBB 3555/00 with mounting plate LBB 3556/00
Multi-purpose connection unit LBB 3540/15 (Flush-mounted applications only)
A “Microphone only” function is also available using the following:
Hand microphones LBB 3536/00, /10 (Flush-mounted applications only)
Dual Audio Interface LBB 3535/00 (Flush-mounted applications only)
Passive units (no contribution, only in FM section)
Electronic channel selector LBB 3524/00*, LBB 3524/10*, LBB 3526/10
Note: *The electronic channel selector is a flush-mounted unit but can also be used in table-top
installations (using the LBB 3525/00 housing).
2
Bosch Security Systems | 04-2003 | 3922 988 43318 en
Digital Congress Network | Installation and Operating Manual | Chapter 2 - Contribution Equipment en | 2-2
CONTRIBUTION EQUIPMENT
2.1.2 Delegate unit
For use by delegates to actively participate in discussion/conference proceedings - ranging from small
discussion groups to multi-national conferences. Its basic functions allow delegates to speak, listen to
other participants, and to participate in voting sessions (conference units only) using the units voting
keys .
2.1.3 Chairman unit
For use by a chairman, the chairmans unit is similar to the delegate unit but includes a ‘priority button’.
This button when pressed temporarily mutes or permanently cancels all other microphone users. An
optional chime tone is available when the priority button is used. A system may have one or more
chairman units; for use by assigned delegates, privileged speakers or VIP’s etc. In permanent mode, all
delegates waiting to speak are also removed from the request-list. Chairman unit LBB 3547/00 has
five soft-keys that enable the chairman to control, initiate, and to participate in voting sessions, as well
as to cancel all delegates’ microphones and requests-to-speak.
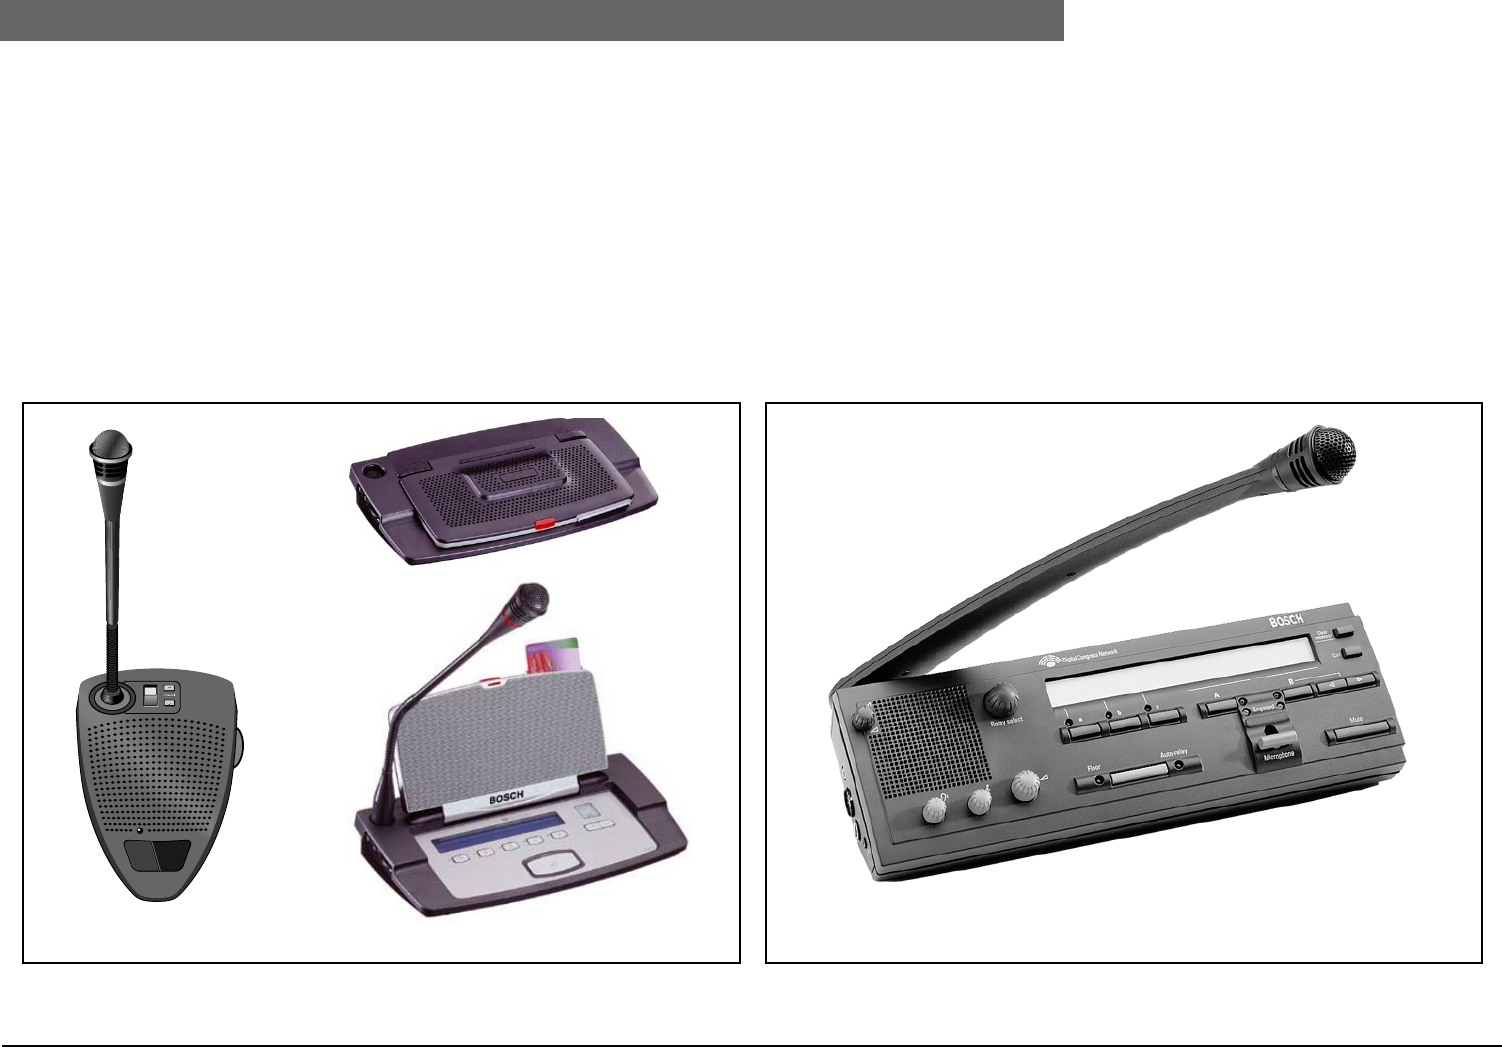
FIG. 2-1 Table-top contribution units
2.1.4 ‘Microphone Only’ Function
A microphone ‘only’ function is for use by Podium and mobile floor speakers, or in installations where
no delegate units are used. DCNs range of microphones can be connected to a Dual Audio Interface
unit or a Multi-purpose connection unit. The Dual Audio Interface unit LBB 3535/00 can serve two
delegate positions.
2.1.5 Interpreter desk
For use in bi/multi-lingual discussions/conferences, the interpreter desks can handle up to 15 different
language channels in addition to the floor language. Up to six interpreter desks can be installed per
booth. Its design provides for efficient operation, and preselection of the incoming language. A back-
lit alphanumeric display shows the selected language in combination with a ‘quality indication’ (direct
or indirect interpretation). An ‘auto-relay’ facility enables interpreters to interpret from unfamiliar
languages, where the desk automatically transmits the relay language to all other interpreter desks for
onward interpretation.
FIG. 2-2 Interpreter desk LBB 3520/10
DCN Discussion unit
BOSCH
DCN Concentus unit (conference)
Interpretation
2
Bosch Security Systems | 04-2003 | 3922 988 43318 en
Digital Congress Network | Installation and Operating Manual | Chapter 2 - Contribution Equipment en | 2-3
LBB 3530/xx and LBB 3531/xx Delegate Discussion Unit
2.2 LBB 3530/xx and LBB 3531/xx
Delegate Discussion Unit
Delegate units LBB 3530/xx and LBB 3531/xx enable delegates to speak, register a request-to-speak
and listen to the floor speaker. Delegate unit LBB 3531/xx includes a built-in channel selector, for use
in discussions where more than one language is used and simultaneous interpretation is available. The
channel selector includes up/down select keys and a 1.5-digit LC-display for rapid selection of the
required language channel. Channel selection is limited to the number of channels available.
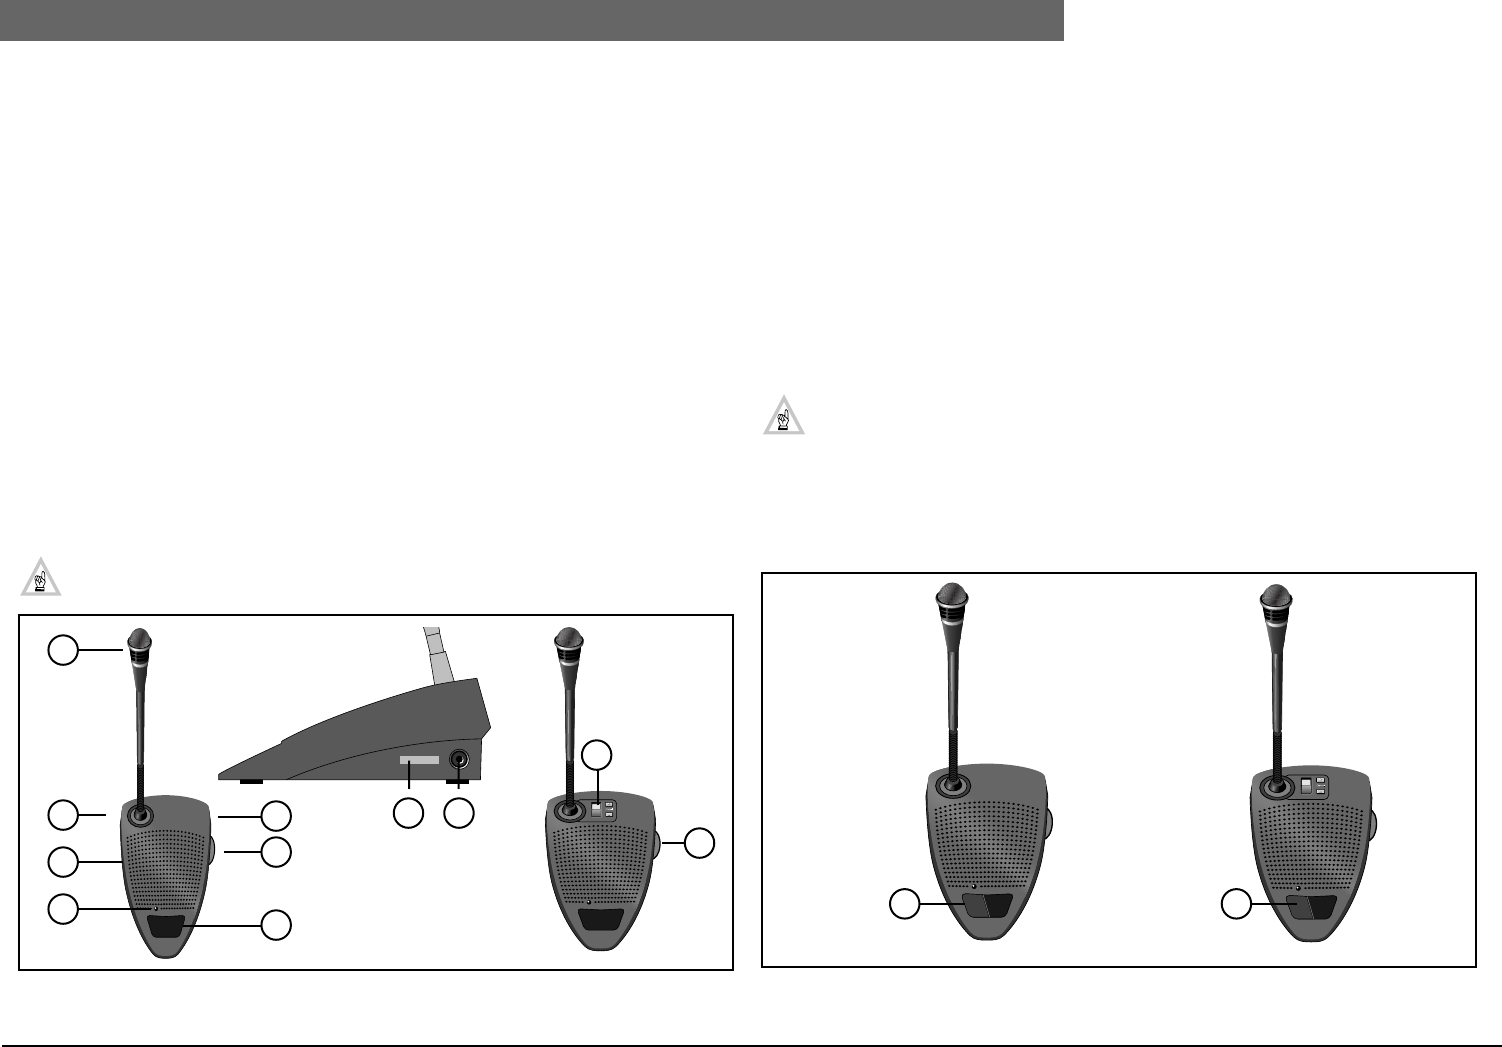
Controls and Indicators (FIG. 2-3)
1. Uni-directional condenser microphone with built-in pop and windshield, mounted on a ‘flexible’
stem. Its illuminated light ring indicates microphone active (Default: not active in ‘Voice’ activated
mode, for other settings see Chapter 2.3.1 - Adjustment setting discussion units)
2. Numeric display (1.5-digit LC-display with back-lighting) with 2 x push-button (up/down) for
language channel number selection (LBB 3531/xx only)
3. 2 x 3.5 mm jackplug socket for headphones.
4. Rotary volume control for headphones only
5. Microphone on/off button.
6. Microphone on/request-to-speak bi-colour LED (red - on, green - request-to-speak)
7. Loudspeaker. The loudspeaker is muted automatically when the microphone is ON and or a
headphone is connected
NOTE: Mic. stem length LBB 3530/00, LBB 3531/00 (310mm/12.20 in) incl. microphone.
LBB 3530/50, LBB 3531/50 (480mm/18.89 in) incl. microphone.
For rear view see FIG. 2-6.
FIG. 2-3 Delegate units LBB 3530 and LBB 3531
2.3 LBB 3533/xx and LBB 3534/xx
Chairman Discussion Unit
The Chairman units LBB 3533/xx and LBB 3534/xx have the same functions as a delegate unit with
the exception of a ‘Priority’ button. This button when pressed enables its user to control the
discussion by temporarily or permanently overruling and muting all active microphones. Chairman
unit LBB 3534/xx also includes a built-in channel selector (see delegate unit). In permanent mode, all
delegates waiting to speak are also removed from the request-list.
Controls and Indicators (FIG. 2-3 and FIG. 2-4)
8. Priority key which when pressed temporarily or permanently overrules and mutes all active
microphones (depends on setting in the CCU), and keeps the microphone on for as long as the
button is pressed.
NOTE: Micr. stem length LBB 3533/00, LBB 3534/00 (310 mm/2.20 in) incl. microphone.
LBB 3533/50, LBB 3534/50 (480 mm/18.89 in) incl. microphone.
For rear view see FIG. 2-6
For side view see FIG. 2-3
FIG. 2-4 Chairman units LBB 3533 and LBB 3534
BOSCH
BOSCH
1
3
7
6
3
4
5
4
2
Side view
34
LBB 3530/00
LBB 3530/50
LBB 3531/00
LBB 3531/50
BOSCH
BOSCH
LBB 3533/00
LBB 3533/50 LBB 3534/00
LBB 3534/50
8 8
2
Bosch Security Systems | 04-2003 | 3922 988 43318 en
Digital Congress Network | Installation and Operating Manual | Chapter 2 - Contribution Equipment en | 2-4
LBB 3533/xx and LBB 3534/xx Chairman Discussion Unit
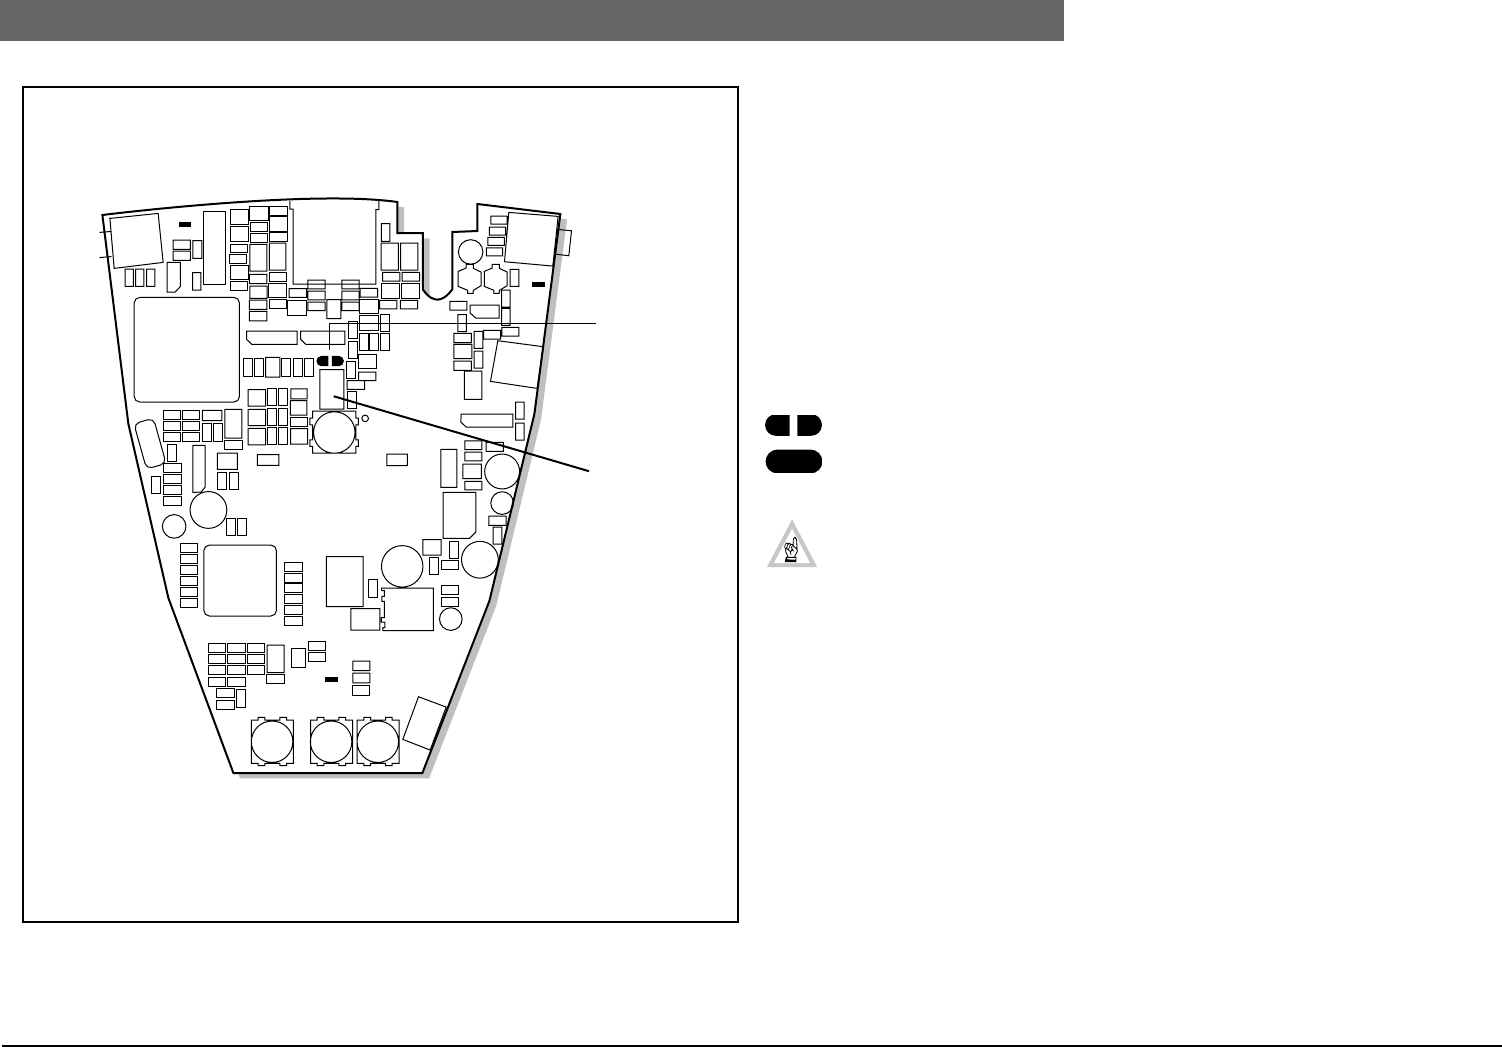
FIG. 2-5 Discussion unit, functional adjustment using solder spot J1
2.3.1 Adjustment setting discussion units
The operational functionality of the delegate discussion units LBB 3530/xx, LBB 3531/xx and the
chairman discussion units LBB 3533/xx, LBB 3534/xx, can be set by a solder spot J1. If a flashing LED
ring is required when the speaker has only 60 seconds of speech time remaining, then the solder spot
J1 must be closed.
To locate the solder spot proceed as follows:
Refer to FIG. 2-5
• Unscrew and remove the two retaining TorX™ screws located on the underside of the unit.
• Carefully remove the units housing, and locate the printed circuit board.
• On the printed circuit board remove the loudspeaker connector
• Locate solder spot JI.
• Set the units functionally (see below).
• Once done, replace the loudspeaker connection and replace the units housing.
Solder spot J1
Open (default) : Normal operation
Closed : Microphone LED ring will begin to flash when the last 60 seconds of
speech time remains
NOTE: If J1 is ‘closed’ when the ‘Voice’ activation mode is selected, the microphone LED
ring will remain lit when speaking into the microphone.
Top
Loudspeaker
connector
Bottom
Layout of Discussion unit ‘Printed Circuit Board’
Solder spot J1
2
Bosch Security Systems | 04-2003 | 3922 988 43318 en
Digital Congress Network | Installation and Operating Manual | Chapter 2 - Contribution Equipment en | 2-5
LBB 3533/xx and LBB 3534/xx Chairman Discussion Unit
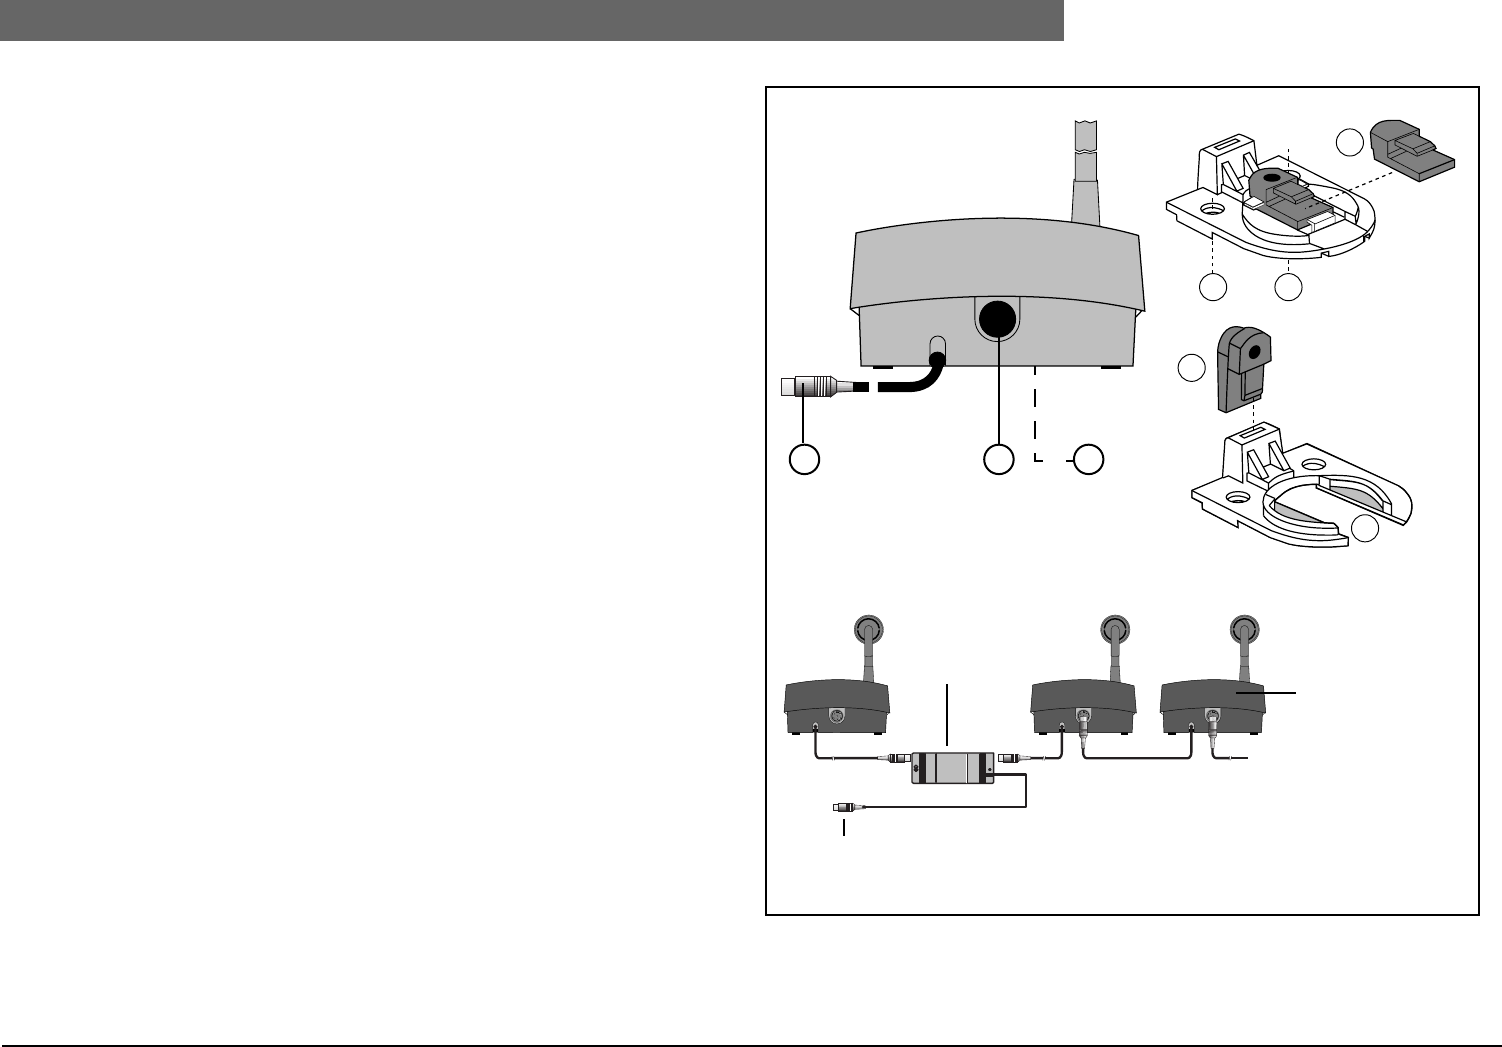
2.3.2 Interconnection details discussion units
All discussion units include connectors for loop-through connection of one unit to the other (i.e. ‘daisy
chain’). FIG. 2-6 shows the connectors and the interconnection method used.
Key to symbols (FIG. 2-6 )
1. 2 m long cable terminated with a 6-pole circular connector.
2. 6-pole socket for loop-through from other system units.
3. Recessed microswitch for resetting the unit’s address (De-Init).
2.3.3 Mounting discussion units (FIG. 2-6)
In portable systems, discussion units can be free-standing on a level surface - such as a table-top. In
permanent installations, the units can be nut/bolt mounted using the 2 x M3 threaded holes under the
unit. In such an installation, the units cable securing clamp can be removed from its cable entry and
modified, allowing its 2 m cable to be neatly run through a hole directly under the table-top surface
(see opposite). For cable clamp modification, remove the cable clamp at the rear of the unit by
unscrewing the clamps two securing screws (A) . Once removed, use a sharp cutting tool to remove
the small insert (B) from its housing. Run the units cable through the cable run and secure it into the
free cable entry using the removed insert (B) as shown in (D).
FIG. 2-6 Interconnections discussion unit (rear view)
1 2 3
Rear view Discussion unit
To Central Control Unit (CCU)
Trunk Cable Splitter
LBB 4114/00
Discussion unit
(rear view)
LBB 3530/xx
LBB 3531/xx
LBB 3533/xx
LBB 3534/xx
D
B
A A
C
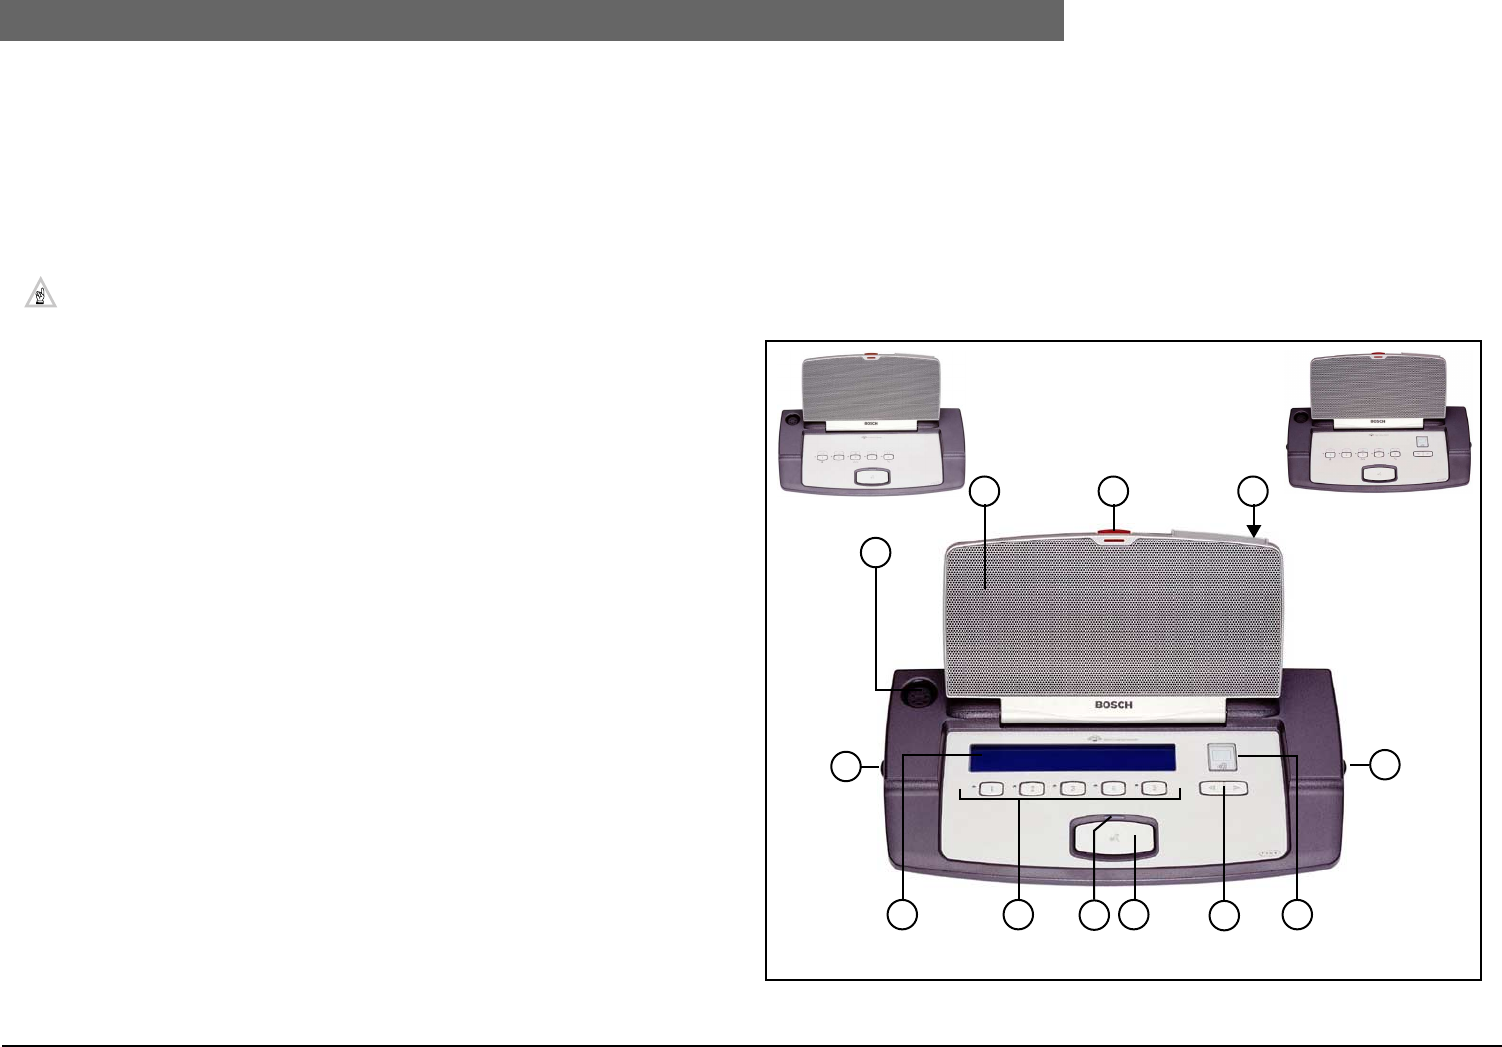
2
Bosch Security Systems | 04-2003 | 3922 988 43318 en
Digital Congress Network | Installation and Operating Manual | Chapter 2 - Contribution Equipment en | 2-6
LBB 3544/00, LBB 3545/00 and LBB 3546/00 Delegate conference units (Concentus)
2.4 LBB 3544/00, LBB 3545/00 and LBB 3546/00
Delegate conference units (Concentus)
Intended for table-top and flush-mounting, the delegate conference units enable participants to
actively join in a discussion (i.e. speaking and listening). The unit includes a connection for a pluggable
microphone type LBB 3549/00 or LBB 3549/50 and a microphone on/off button. Delegate unit types
LBB 3545/00 and LBB 3546/00 includes a language channel selector, and LC-display to select the
required language channel when used in combination with an interpretation system.
NOTE: Delegate unit LBB 3544/00 does not include a language channel selector, head-
phone/headset connections and volume controls.
Controls and Indicators (FIG. 2-7) (version illustrated LBB 3546/00)
* Not applicable to delegate units LBB 3544/00
** Not applicable to delegate units LBB 3545/00
1. XLR socket for ‘uni-directional’ condenser microphone (LBB 3549/00 or LBB 3549/50
(see 2.6) with illuminated LED light-ring to indicate microphone active (not active in ‘Voice’ acti-
vated mode). See Chapter 2.3.1 ‘Adjustment settings discussion units’.
2. Loudspeaker. The loudspeaker is automatically muted when the microphone is on.
3. Microphone ON indication (RED)
4. * **ID-chip-card reader for delegate identification.
5. *Numeric 1.5-digit LC-display for visual indication of the selected language channel. The display is
activated once headphones are inserted in to the units jack socket.
6. *Up/down channel select keys for use in combination with the numeric display.
7. Microphone On/Off or request-to-speak button.
8. Microphone- ON indication (bi-colour LED green = ‘request-to-speak’, red = ‘microphone ON’)
9. 5 soft-keys with confirmation indicators (yellow LEDs) for use in combination with the units
graphic LC-display provides the following (not applicable for *LBB 3544/00 and **LBB 3545/00):
To display:
- Conference information
- User information
- Individual messages
To participate in the following voting procedures
- Parliamentary voting (‘PRESENT’, ‘No’, ‘Abstain’, ‘Yes’)
- Multiple choice or opinion poll voting (Numerals: 1 to 24 max.)
- Audience response voting (Rating scale - -, -, O, +, + +)
10. * **Graphical 2-line x 40 character LC-display (15 Chinese characters only) with back-lighting for
displaying the following:
- Conference related information
- User information
- Individual messages
- Voting information and results
Rear, side and under views (FIG. 2-9 and FIG. 2-10)
12. *1 x 3.5 mm jack socket for headset/external microphone
13. 2 x 3.5 mm stereo jack sockets for headphones (1 at each side of the unit).
14. 2 x Rotary volume control for headphones (1 at each side of the unit)
15. Securing screw M3 for pluggable microphone (use Allen-key)
16. 6-pole socket for loop-through from other system units
17. 2 m (6.5ft.) long cable terminated with 6-pole circular connector
18. Modular jack-socket for intercom handset LBB 3555/00
19. 2x M3 guide holes for unit mounting (using custom built fixing bracket/strap)
20. Recessed micro-switch for resetting the unit’s address (DE-INIT).
21. 4 x securing screws for unit housing
FIG. 2-7 Delegate conference units LBB 3544/00, LBB 3545/00 and LBB 3546/00
2
1
3 4
14
14
5
6
710 9
NOTE: see 2.3.1 ‘Adjustment settings CONCENTUS units’.
8
LBB 3545/00
LBB 3546/00
LBB 3544/00
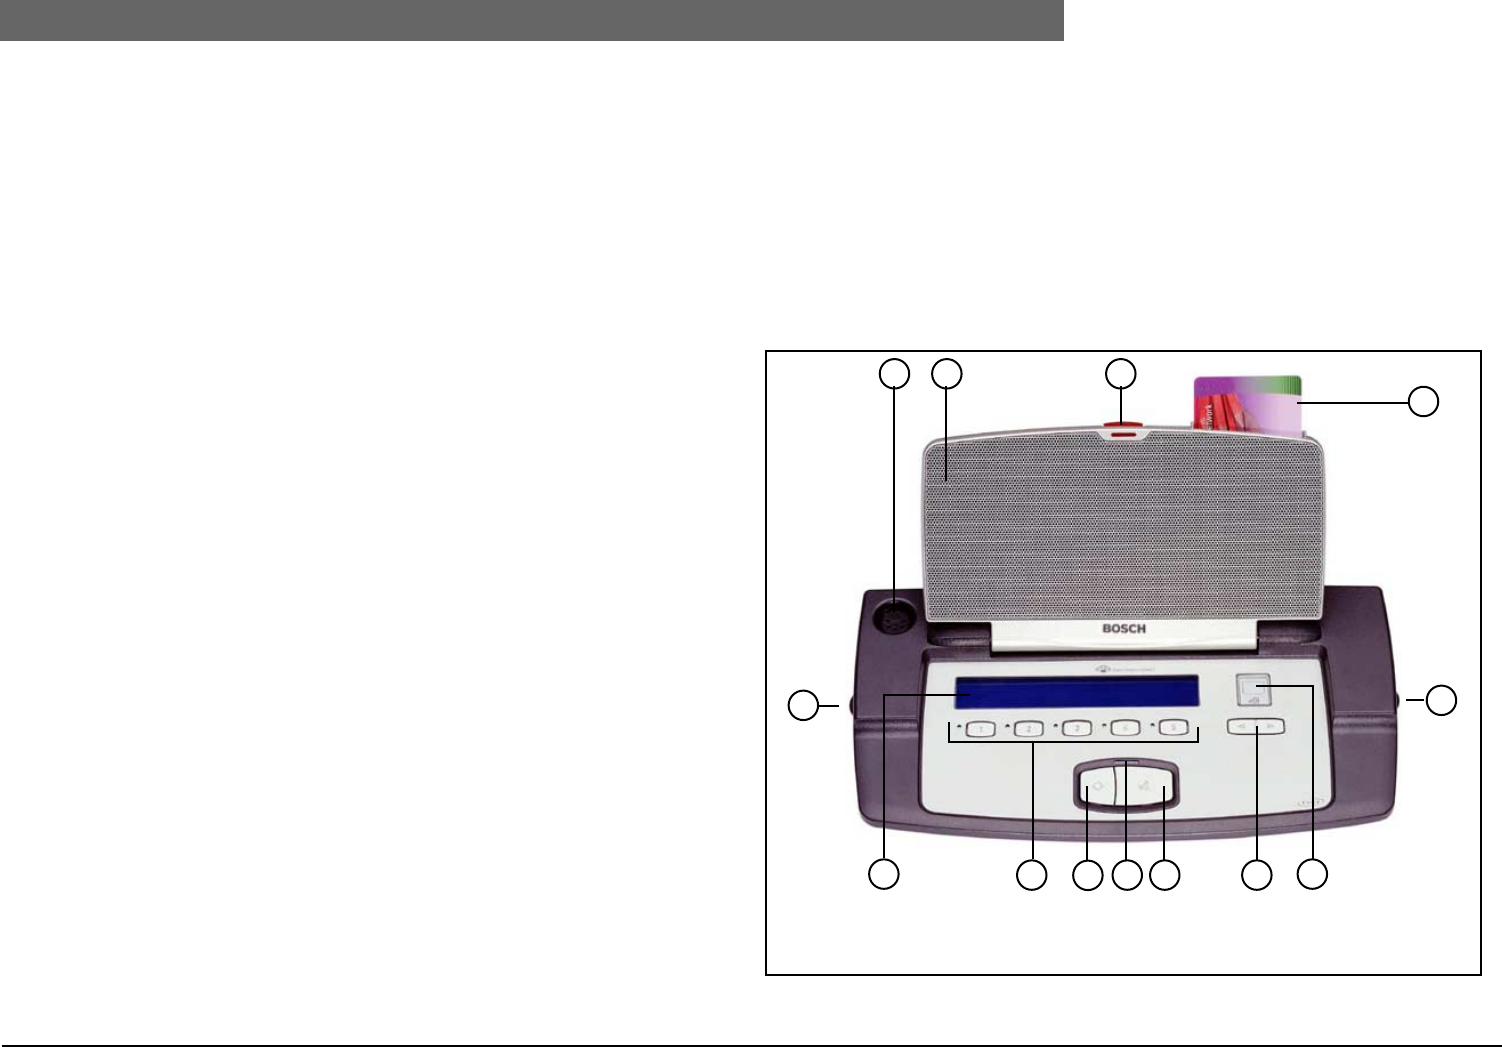
2
Bosch Security Systems | 04-2003 | 3922 988 43318 en
Digital Congress Network | Installation and Operating Manual | Chapter 2 - Contribution Equipment en | 2-7
LBB 3547/00 Chairman Conference Unit (Concentus)
2.5 LBB 3547/00 Chairman Conference Unit
(Concentus)
The unit provides access to the DCN systems main functions of listening to the floor via the units
built-in loudspeaker, speaking and control of delegate microphones using a priority key, control of
voting sessions, the viewing of displayed messages, language channel selection and monitoring via
headphones and an ID card reader facility. The ID-card reader - for insertion of an ID-card - allows the
chairman to be identified by the system allowing access to the functions of the chairman unit.
The chairman unit uses a pluggable microphone LBB 3549/00 or LBB 3549/50 (not included),
microphone on/off button, built-in graphical LC-display, five soft-keys with LED indicators, and a
priority key. The priority key sets all currently active delegate microphones in the system to off
allowing the chairman to take over the control of the meeting.
Controls and indicators (FIG. 2-8)
1. XLR socket for ‘uni-directional’ condenser microphone (LBB 3549/00 or LBB 3549/50
(see FIG. 2-6)) with illuminated LED light-ring to indicate microphone active (not active in ‘Voice’
activated mode).
2. Loudspeaker. The loudspeaker is automatically muted when the microphone is on.
3. Microphone ON indication (RED)
4. ID-chip-card reader for chairman identification.
5. Numeric 1.5-digit LC-display for visual indication of the selected language channel. The display
switches on when the plug of the headphones are inserted in to the jack socket.
6. Up/down channel select keys for use in combination with the numeric display (5)
7. Microphone On/Off button
8. Microphone- ON indication (bi-colour LED green = ‘request-to-speak’, red = ‘microphone ON’)
(Permanently on in ‘Voice activated mode).
9. Priority key, which when pressed emits a chime sound (if programmed) while temporarily muting
all active delegate units. The chairman’s microphone remains active for as long as the priority but-
ton is kept pressed. This key can also be used to cancel all active delegate units and remove all del-
egates waiting to speak from the request list (if programmed in the CCU).
10. 5 x Soft-keys with confirmation indicators (yellow LEDs) are used in combination with the units
graphical LC-display to provide the following functions:
- Microphone control, such as ‘Cancel all Request’, Cancel all speakers and requests.
- Voting control (Start, Hold, Restart, Stop)
- Voting participating function (No, Abstain, Yes)
- Messages
11. Graphical 2-line x 40 character LC-display (15 Chinese characters only) with back-lighting for
displaying the following:
- Conference related information
- User information
- Individual messages
- Voting information and results
Rear, side and under views (FIG. 2-9 and FIG. 2-10)
12. 1 x 3.5 mm jack socket for headset/external microphone
13. 2 x 3.5 mm stereo jack sockets for headphones (1 at each side of the unit).
14. 2 x Rotary volume control for headphones (1 at each side of the unit)
15. Securing screw M3 for pluggable microphone (use Allen-key)
16. 6-pole socket for loop-through from other system units
17. 2 m (6.5ft.) long cable terminated with 6-pole circular connector
18. Modular jack-socket for intercom handset LBB 3555/00
19. 2x M3 guide holes for unit mounting (using custom built fixing bracket/strap)
20. Recessed micro-switch for resetting the unit’s address (DE-INIT).
21. 4 x securing screws for unit housing
FIG. 2-8 LBB 3547/00 Chairman unit
Front view
1 2
4
14
8
9
3
14
65
7
11 10
NOTE: see 2.3.1 ‘Adjustment settings CONCENTUS units’.
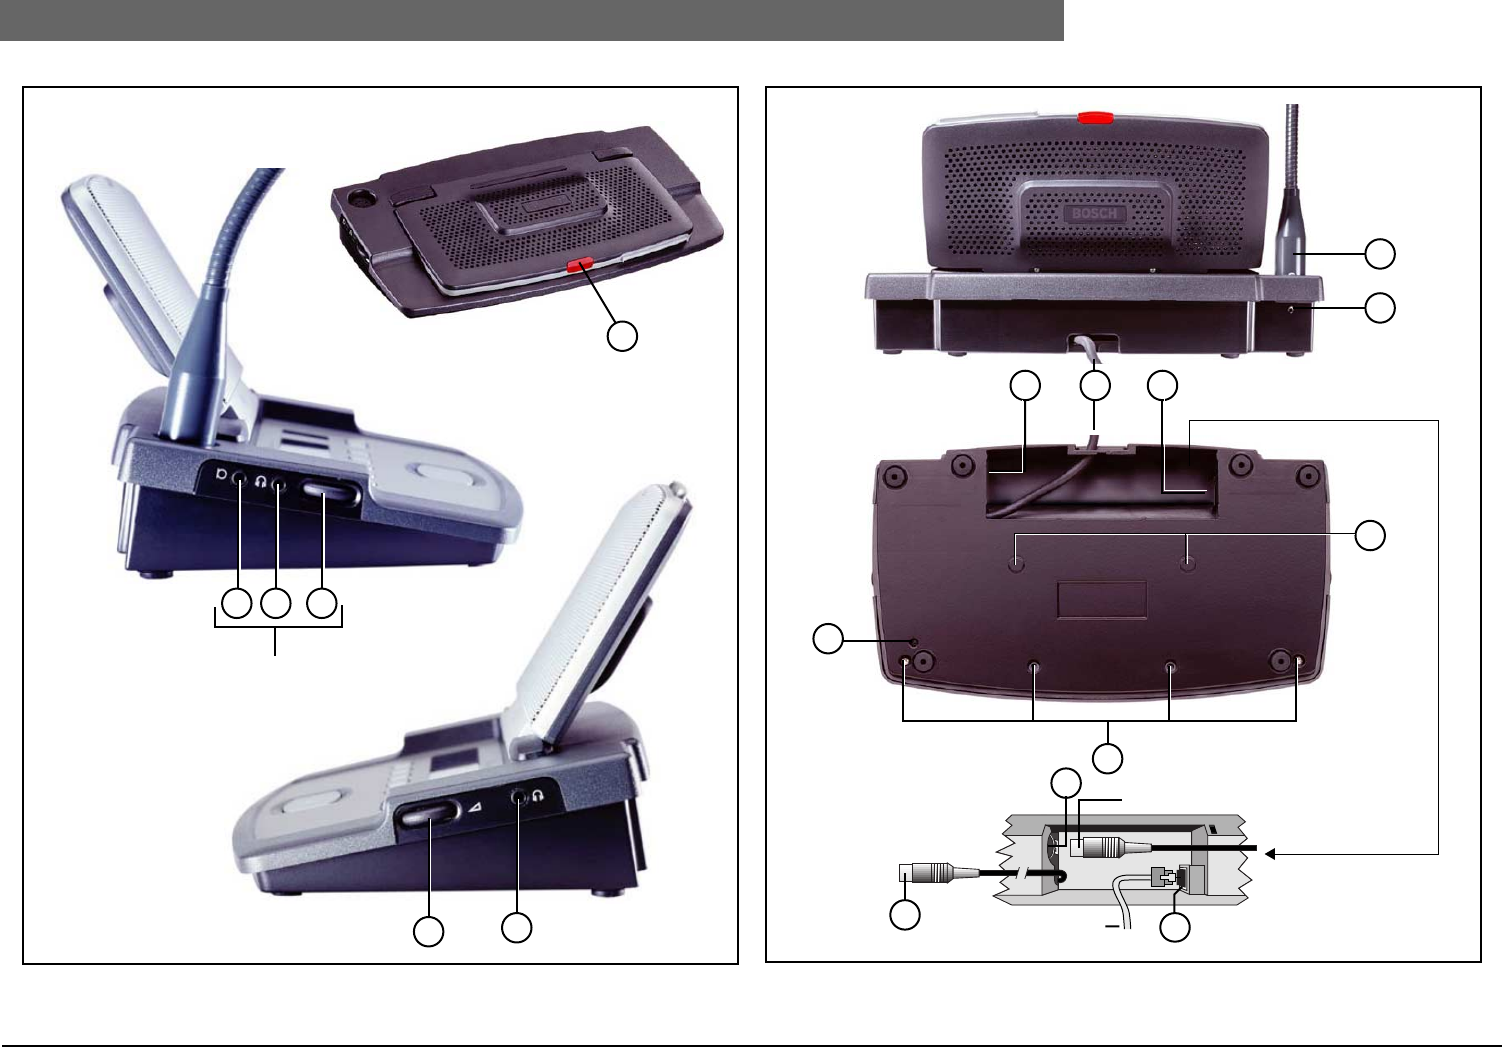
2
Bosch Security Systems | 04-2003 | 3922 988 43318 en
Digital Congress Network | Installation and Operating Manual | Chapter 2 - Contribution Equipment en | 2-8
LBB 3547/00 Chairman Conference Unit (Concentus)
FIG. 2-9 Concentus units (side views) FIG. 2-10 Concentus units (rear and underside views)
12 13 14
3
Left side
Right side
Transportable state (collapsed)
13
14
Not applicable
to LBB 3544/00
18
20
DE-INIT
17
1
Rear
Under
16 From next unit
To previous unit
17 18
From Intercom handset
LBB 3555/00
16
21
19
15
Microphone
release screw
(for transportation)
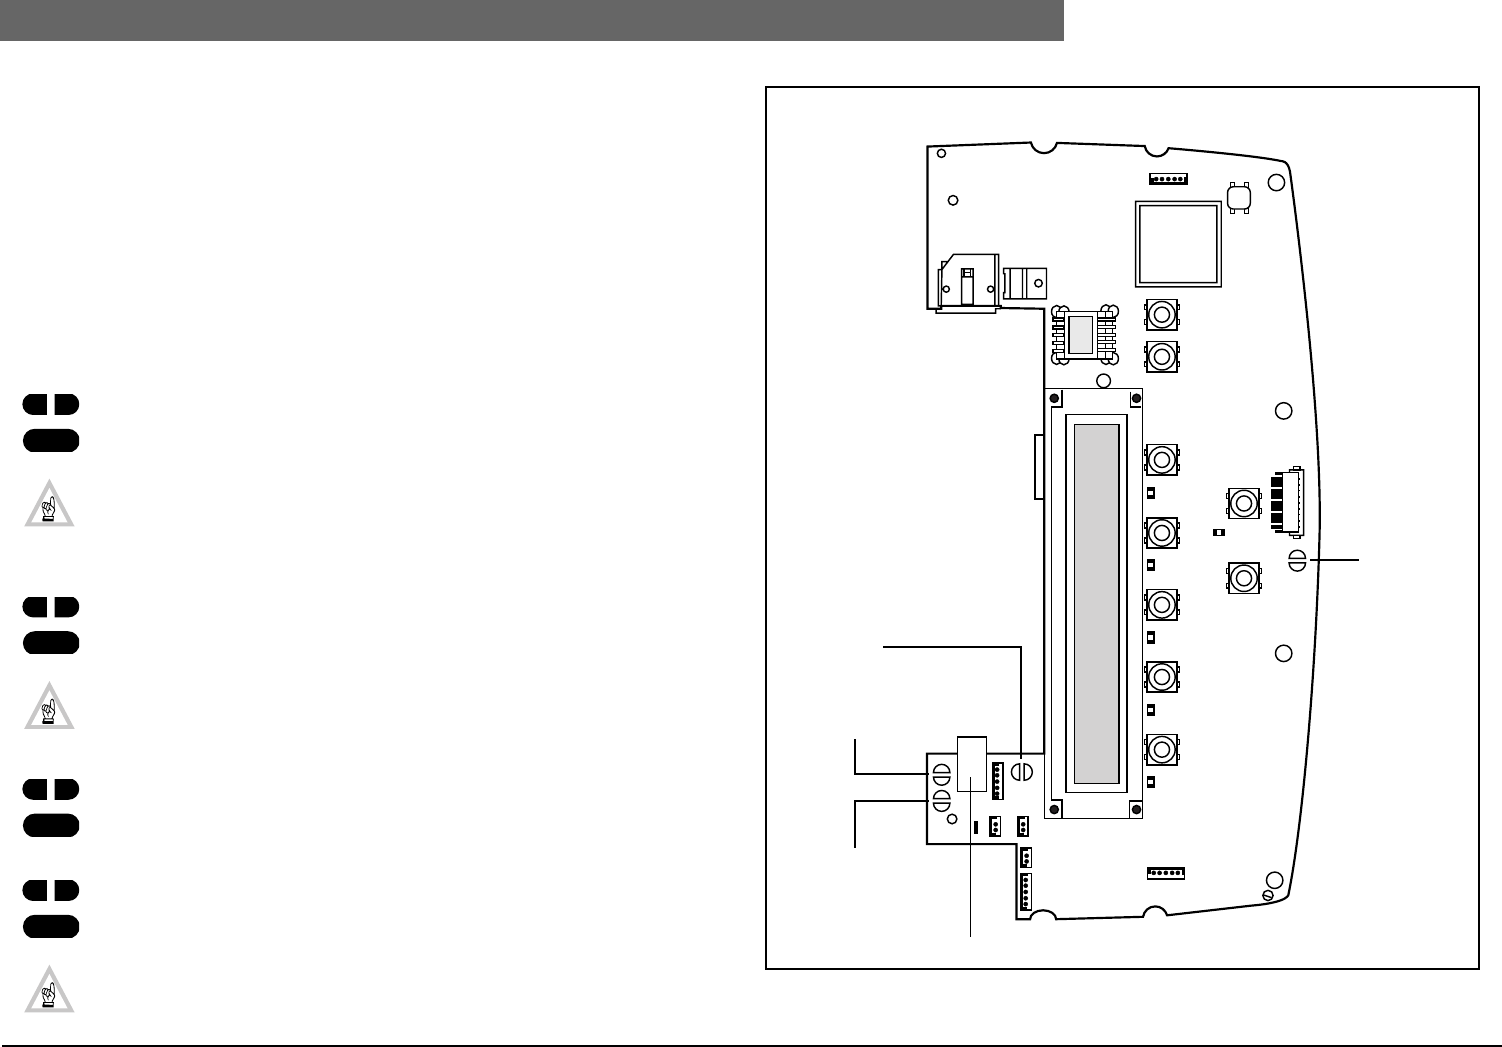
2
Bosch Security Systems | 04-2003 | 3922 988 43318 en
Digital Congress Network | Installation and Operating Manual | Chapter 2 - Contribution Equipment en | 2-9
LBB 3547/00 Chairman Conference Unit (Concentus)
2.5.1 Adjustment setting conference (Concentus) units
The operational functionality of the delegate conference (Concentus) units LBB 3544/00,
LBB 3545/00, LBB 3546/00, and the chairman conference units LBB 3547/00 can be set by solder
spots 1070, 1170, 1171 and 1172 located on the units PCB.
To locate the solder spots proceed as follows:
• Refer to FIG. 2-10
• Unscrew and remove the 4 securing TorX™ screws located on the underside of the unit.
• Carefully remove the units housing, and locate the printed circuit board (FIG. 2-11).
• If necessary carefully remove the loudspeaker connector.
• Locate solder spots 1070, 1170, 1171 and1172 (FIG. 2-11).
• Set the units functionally (see below).
• Once done, replace the loudspeaker connection and replace the units housing.
Functionality
Solder spots 1070
Open (default) : Normal operation
Closed : Microphone LED ring will begin to flash when the last 60 seconds of
speech time remains.
NOTE: If 1070 is ‘closed’ when the ‘Voice’ activation mode is selected, the microphone
LED ring will remain lit when speaking into the microphone. If a flashing LED ring is required
when the speaker has only 60 seconds of speech time remaining, then solder spot 1070
must be closed.
Solder spots 1170
Open (default) : Normal operation
Closed : The intercom function is no longer available (see Note)
NOTE: If 1170 is closed, the functionality of solder spots 1171 and 1172 is available
(for example - an external make contact can be connected to PINS 1 and 2 of the intercom
connector for ‘FRAude’ (Fraud push_button) and ‘FINger’ (Finger print reader) operation.
Solder spots 1171
Open (default) : Normal operation
Closed : ‘FRAude’ bit is available via the intercom connector (see Note)
Solder spots 1172
Open (default) : Normal operation
Closed : ‘FINger’ bit is available via the intercom connector (see Note)
NOTE: If solder spot 1170 is closed a choice of only one of the functions is available
‘FRAude’ or FINger’ NOT both. FIG. 2-11 PCB layout conference (Concentus) units
1007
Concentus PCB (Top view rotated 90°)
Solder spot
1172
Solder spot
1171
Solder spot
1170
Solder spot
1070
Intercom handset connector
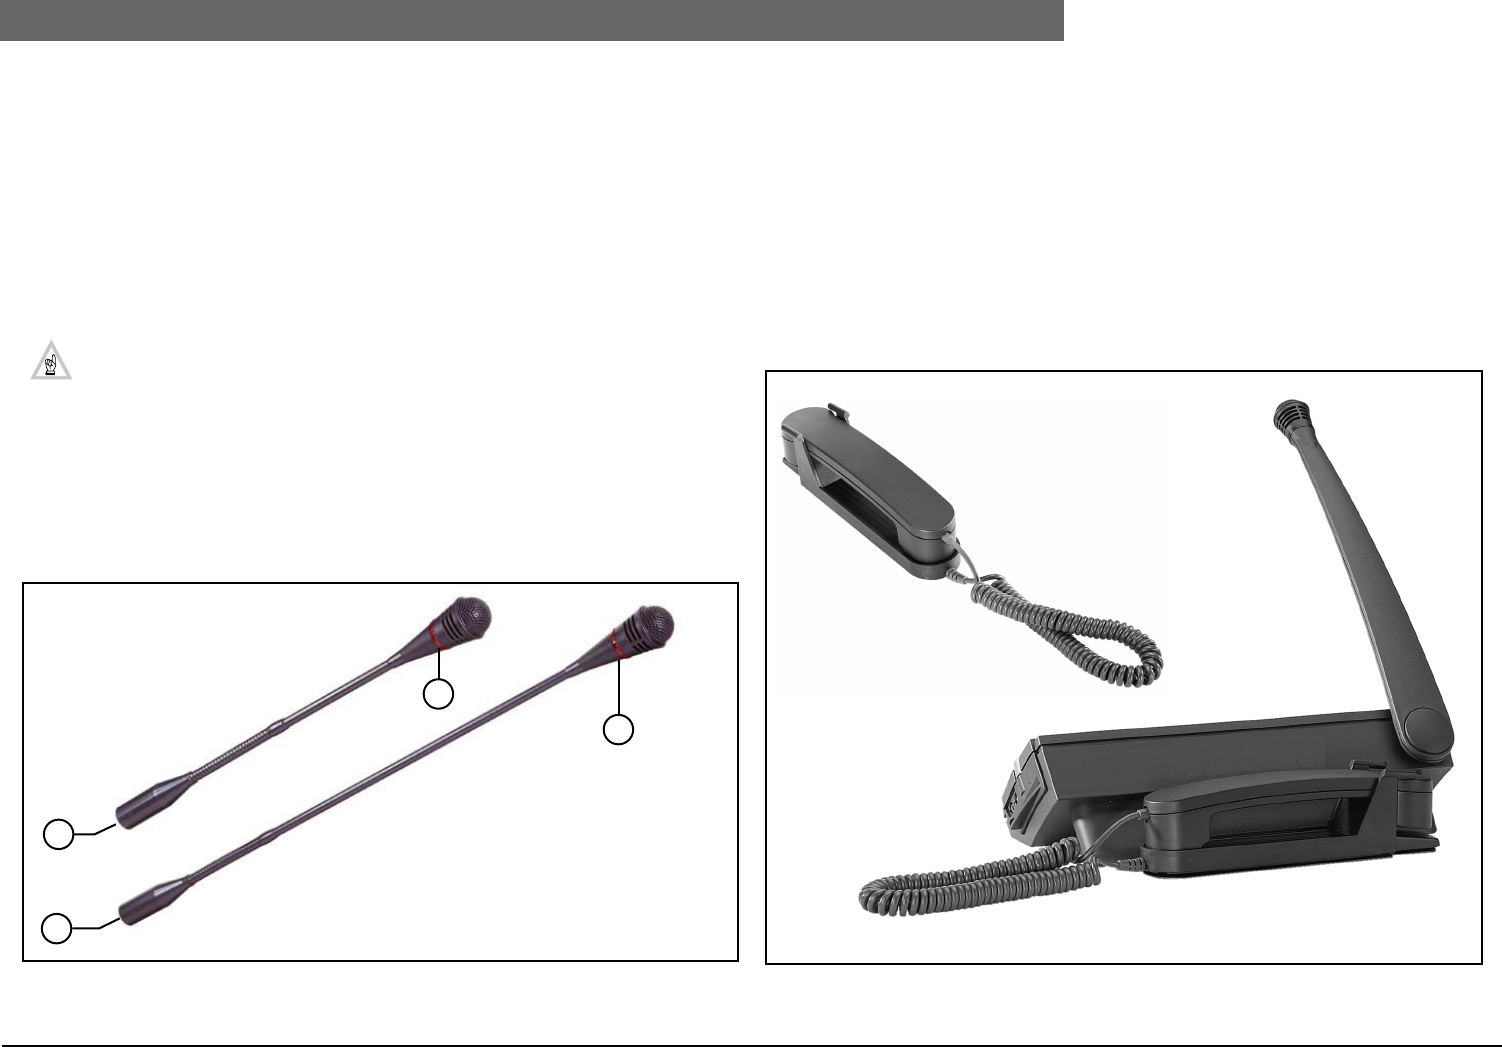
2
Bosch Security Systems | 04-2003 | 3922 988 43318 en
Digital Congress Network | Installation and Operating Manual | Chapter 2 - Contribution Equipment en | 2-10
LBB 3549/00, LBB 3549/50 Pluggable Microphones
2.6 LBB 3549/00, LBB 3549/50 Pluggable Microphones
The pluggable flexible stem microphones LBB 3549/00 and LBB 3549/50 are unidirectional
microphones intended for use with delegate units LBB 3544/00, LBB 3545/00, LBB 3546/00, chairman
unit LBB 3547/00 and flush mounted microphone control panel LBB 3537/20.
Type number description:
Controls and Indicators
1. Unidirectional microphone, mounted on a flexible stem with built-in pop and windshield. The
microphones include an illuminated indicator ring for microphone active status.
Interconnection
2. 5-pole XLR-connector for connection to the delegate units LBB 3544/00, LBB 3545/00,
LBB 3546/00, chairman unit LBB 3547/00 and microphone control panel LBB 3537/20.
FIG. 2-12 Pluggable microphones LBB 3549/00 and LBB 3549/50
2.7 LBB 3555/00 Intercom handset
The Intercom handset enables private two-way vocal communication between conference
participants. The handset is hard-wired to the cradle by a coiled cable (0.5 m (19.68 in) coiled, 2 m
uncoiled (78.74 in) hard wired to the cradle (FIG. 2-13). The cradle output cable is terminated with a
6-pole modular jack connector for connection to a conference units, interpreter desks, Multi-purpose
connection units and the PC Network card.
When used in permanent installations, the handset is easily mounted to a table-top or wall using the
screw holes in the cradle. In portable systems the handset can be simply attached to an Interpreter
desk with the aid of a mounting plate LBB 3556/00.
For installing on an Interpreter desk LBB 3520 refer to Chapter 3.1.2.
FIG. 2-13 LBB 3555/00 Intercom Handset
LBB 3549/00 Pluggable microphone with flexible stem
Mic. stem length: 310 mm (12.2 in) (incl. mic.)
LBB 3549/50 As LBB 3544/00 but with extended stem length: 480 mm (18.8 in) (incl. mic.)
NOTE: See also Chapter 2.1.2 LBB 3537/20 Pluggable Microphone control panels.
LBB 3549/00
LBB 3549/50
1
1
2
2
Interpreter desk
LBB 3520/10
Intercom handset
LBB 3555/10
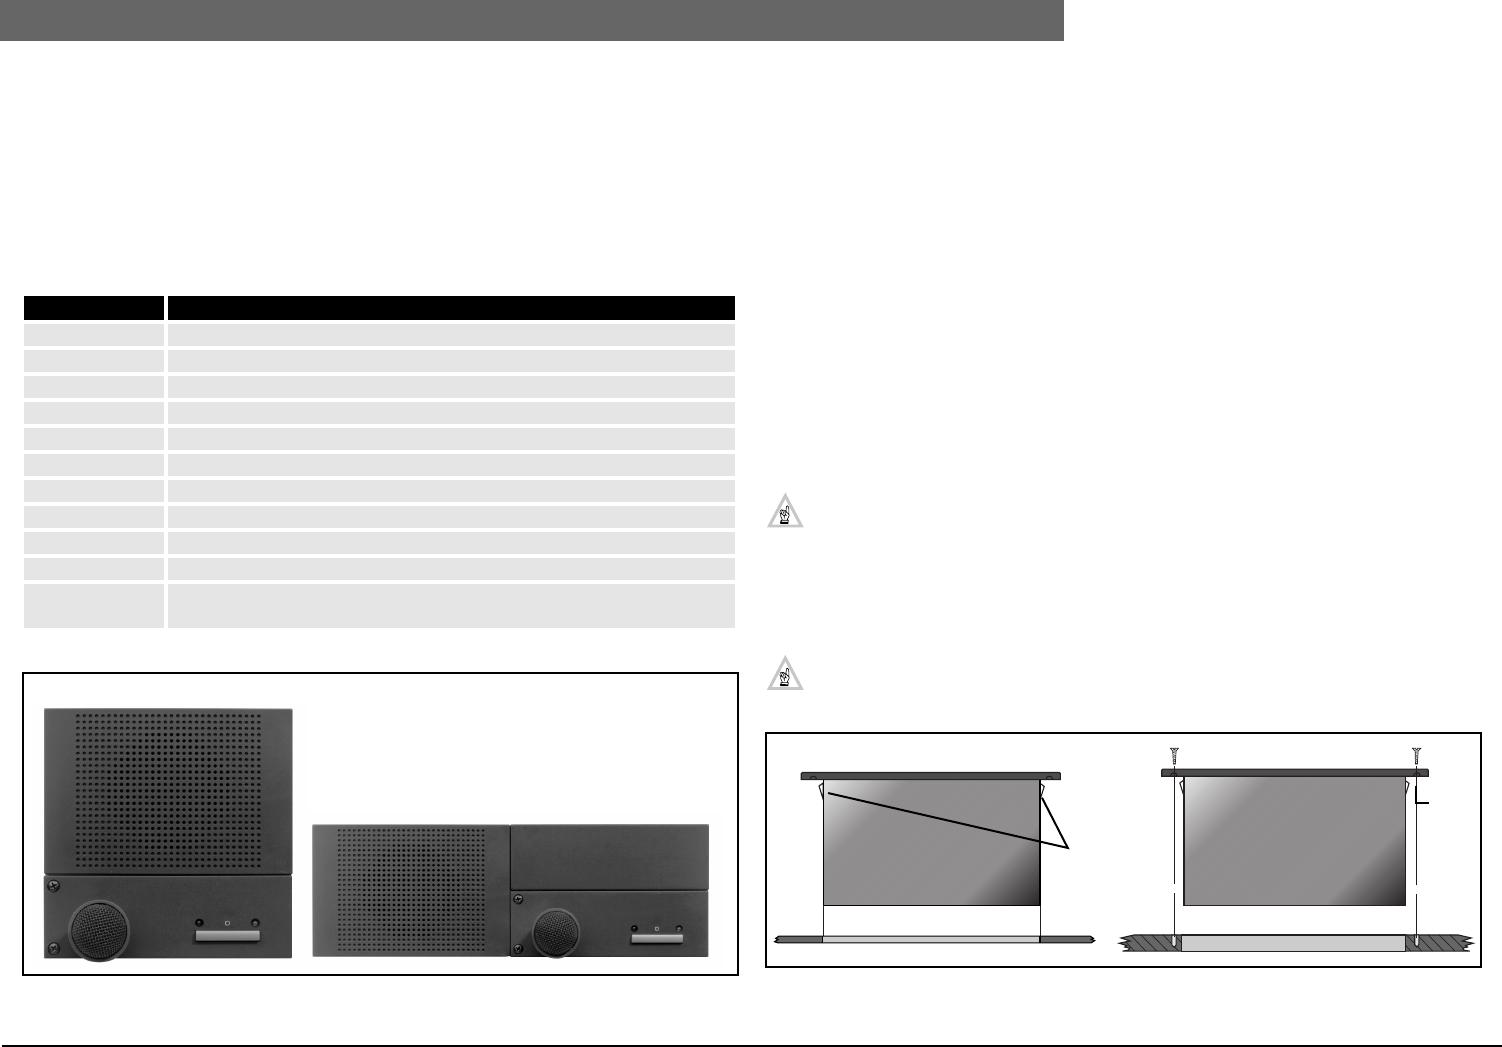
2
Bosch Security Systems | 04-2003 | 3922 988 43318 en
Digital Congress Network | Installation and Operating Manual | Chapter 2 - Contribution Equipment en | 2-11
Flush-mounted Contribution equipment
2.8 Flush-mounted Contribution equipment
DCN’s broad range of flush mounted units form the building blocks for creating individual system
contribution units for use in custom built solutions. The flush-mounted units are intended for use in
fixed installations, where portability is not required. The units can be neatly installed in to either table-
tops or seat armrests. The range of flush-mounted units available, provides all the functions and
facilities offered by the table-top contribution units. For example a delegate unit can be created by
combining a Multi-purpose connection unit LBB 3540/15 or Dual Audio Interface Unit LBB 3535/00.
These units being the main components when creating flush-mounted solutions in combination with
the following units:
* Applicable to Multi-purpose Connection Unit LBB 3540/15 only
FIG. 2-14 Orientation flush-mounted units
All flush-mounted units are available in standard sizes of 40 x 120 mm (1.57 x 4.72 in) with the
exception of the flush-mounted loudspeaker unit LBB 3538/00 which has a dimension of 80 x 120
mm (3.14 x 4.72 in) and the Delegate/chairman voting control panel LBB 3542/00 which has a
dimension of 80 x 240 mm (3.14 x 9.44 in). The dimensions of the flush-mounted units allow units to
be neatly installed and positioned along side each other in either a portrait or landscape type
configuration.
Mounting
All DCN’s flush-mounted units include a ‘click-to-fit’ mechanism, enabling units to be secured into cut-
outs on table-tops or the armrest of seats in a landscape or portrait type format.
Two methods are used to mount the flush-mounted units. Method 1 is used when mounting units
into a metal surface and method 2, used when mounting units into a wooden surface.
Method 1 (mounting into a metal surface)
The ‘click-to-fit’ mechanism available on all flush mounting unit is used to secure the units into cut-
outs on table-tops or the armrests of seats etc. Additional screws are needed when mounting LBB
3537/xx Control Panel with microphone. The recommended method when installing the units, is to
install them into a 2 mm (0.07 in) thick metal panel. The metal panel is used as the platform for
securing the units. The panel needs to be cut-out according to the units template.
NOTE: Table top mounting is also possible for certain units with the Table-top
housing LBB 3527/00. Refer to Chapter 2.24.
Method 2 (mounting into a wooden surface)
Units are secured by screws using the holes available on each unit. All units include drill guide holes
located under the front cover of each flush-mounted unit. The guide holes are used for guidance
when drilling the units screw holes.
General
For cut-out templates and dimensions when physically installing the units refer to Chapter
13. “Mechanical data”.
FIG. 2-15 Flush mounting in metal and wooden surfaces
Type No. Description
LBB 3536/00-/10 Hand microphones
LBB 3537/00, /50 Microphone control panel
LBB 3537/10 Chairman microphone control panel with priority
LBB 3537/20 Pluggable microphone control panel
LBB 3538/00 Loudspeaker panel
LBB 3539/00 Blank mounting panel
LBB 3541/00 Delegate voting control panel*
LBB 3542/00 Delegate/chairman voting control panel with LC-display*
LBB 3543/15 Chip-Card reader panel*
LBB 3555/00 Intercom handset*
LBB 3524/xx +
LBB 3526/10
Electronic Channel Selector Panel (connected to DCN trunk-line)
Portrait
Landscape
Metal mounting Wood mounting
Drill-
holes
Wood surface2mm (0.07”) Metal plate
‘Click-to-fit’
mechanism
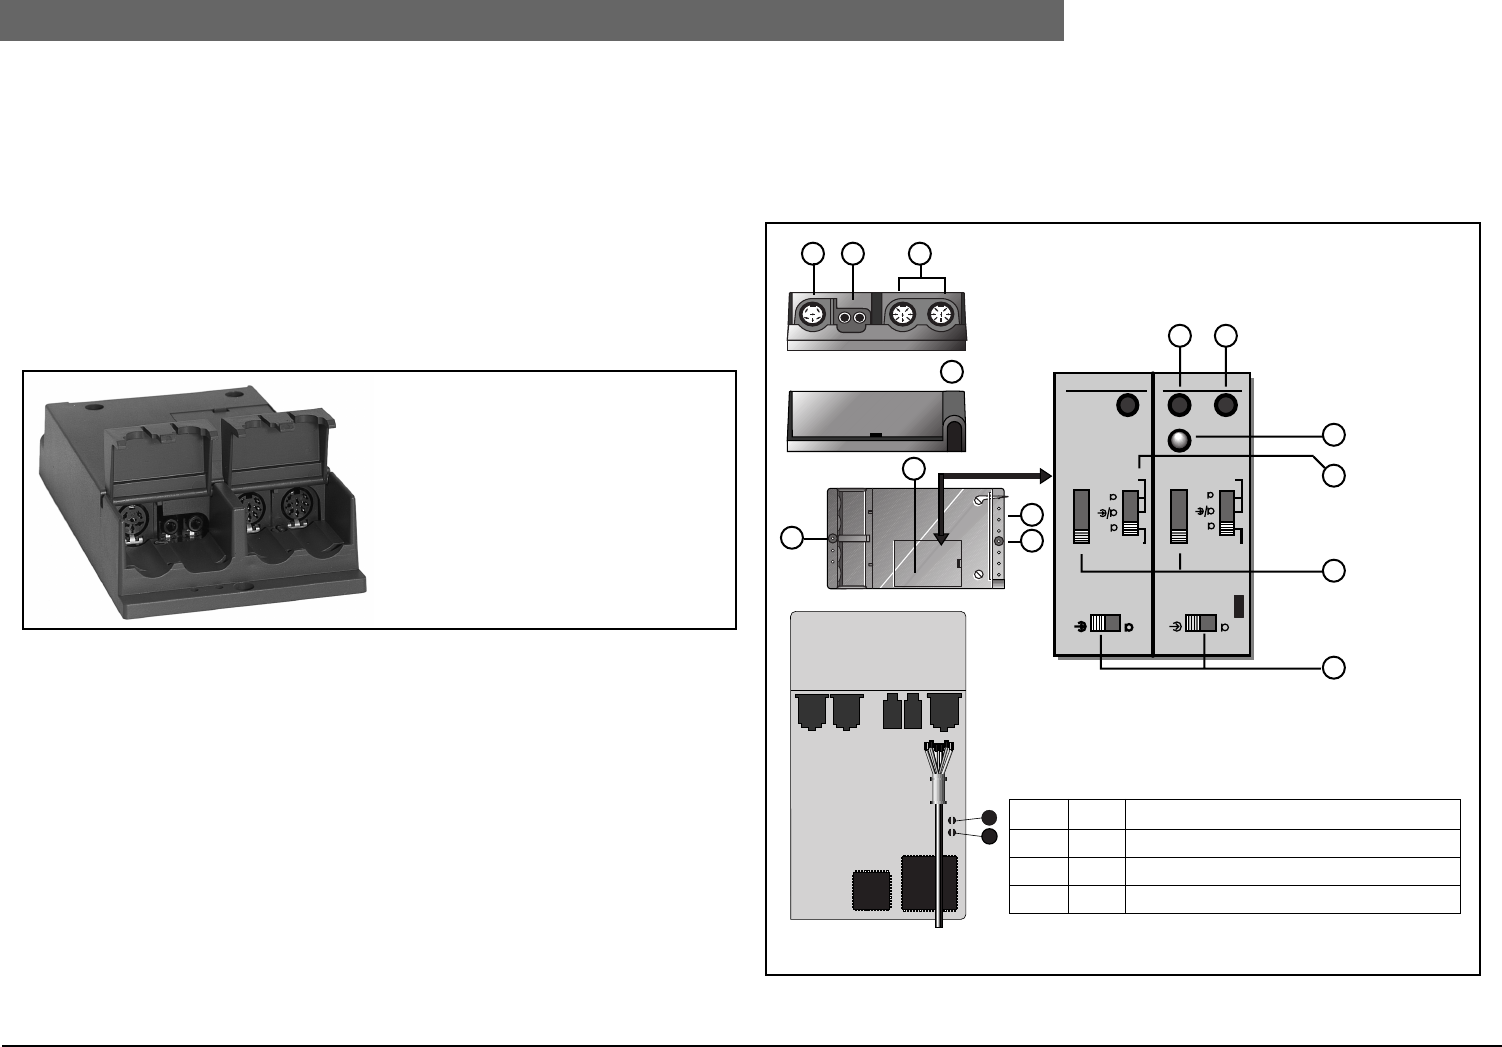
2
Bosch Security Systems | 04-2003 | 3922 988 43318 en
Digital Congress Network | Installation and Operating Manual | Chapter 2 - Contribution Equipment en | 2-12
LBB 3535/00 Dual Audio Interface unit
2.9 LBB 3535/00 Dual Audio Interface unit
The LBB 3535/00 allows a variety of microphones, as well as line sources, to be connected to the
DCN system. The unit can be used in combination with the LBB 3536/xx Hand microphone when
mounting in seat armrest etc., or with the LBB 3537/xx Microphone with Control Panel when flush-
mounting into table-tops etc.
The unit includes two separate inputs, each selectable for use with either a microphone or line input
source. Each input can be assigned with its own seat number, providing two delegate or chairman
positions.
Two 3.5 mm jack sockets provide the connection to headphones or to loudspeaker panels LBB 3538/
00, or a combination of both. The output is switched off when the corresponding input is switched
on.
FIG. 2-16 LBB 3535/00 Dual Audio Interface Unit
Controls, Indicators and Interconnection (Chapter 2.17)
1. 6-pole circular connector for loop through system.
2. 2 x loudspeaker output connectors (marked 1 and 2) (3.5 mm jackplug socket). The loudspeaker
is muted automatically when the corresponding microphone is on.
3. 2 x balanced audio input (marked 1 and 2) for line level (-12 dBV) or microphone level (-60 dBV)
sources with or without a phantom power supply). (2 x 8-pole 262° DIN-type socket).
4. 2 m long cable terminated with a moulded 6-pole circular connector.
5. 2 x screw holes for securing the unit.
6. Switch panel with cover.
7. Tie-wrap holes for securing connected cables.
8. Initialization button (INIT) used for initializing the unit during installation. Also used to reset the
unit’s address (De-Init).
9. Input 1 and 2: ± 3 dB input level potentiometer for fine adjustment.
10. Initialization LED indicator. The LED illuminates when the unit is not being initialized. The LED is
Off when the unit has been initialized.
11. Selector switch for selecting an asymmetrical microphone input, or a symmetrical microphone/
line level input, or a symmetrical microphone input with Phantom power supply (12 V/680 Ohm).
12. Input attenuation selection of: 0, 6, 12 or 18 dB. Factory setting: 6 dB.
13. Microphone or line level select switch.
FIG. 2-17 LBB 3535/00 Dual Audio Interface Unit
1
2
Init +/-3dB+/-3dB
Attn
P12
Attn
P12
-12 dBV -60 dBV
Sym
Asym
Sym
Asym
18
12
6
0
INPUT LEVEL INPUT LEVEL
-60 dBV
-12 dBV
18
12
6
0
dB dB
J2
J1
IC 1
IC 8
121 2
1 2 3
4
6
55
7
8 9
10
11
12
13
J1 J2 Function
Open Open Mic. on inputs 1 and 2 (factory setting)
Closed Open Chairman mic. on input 2, priority panel on input 1
Open Closed Ambient mic. on input 2
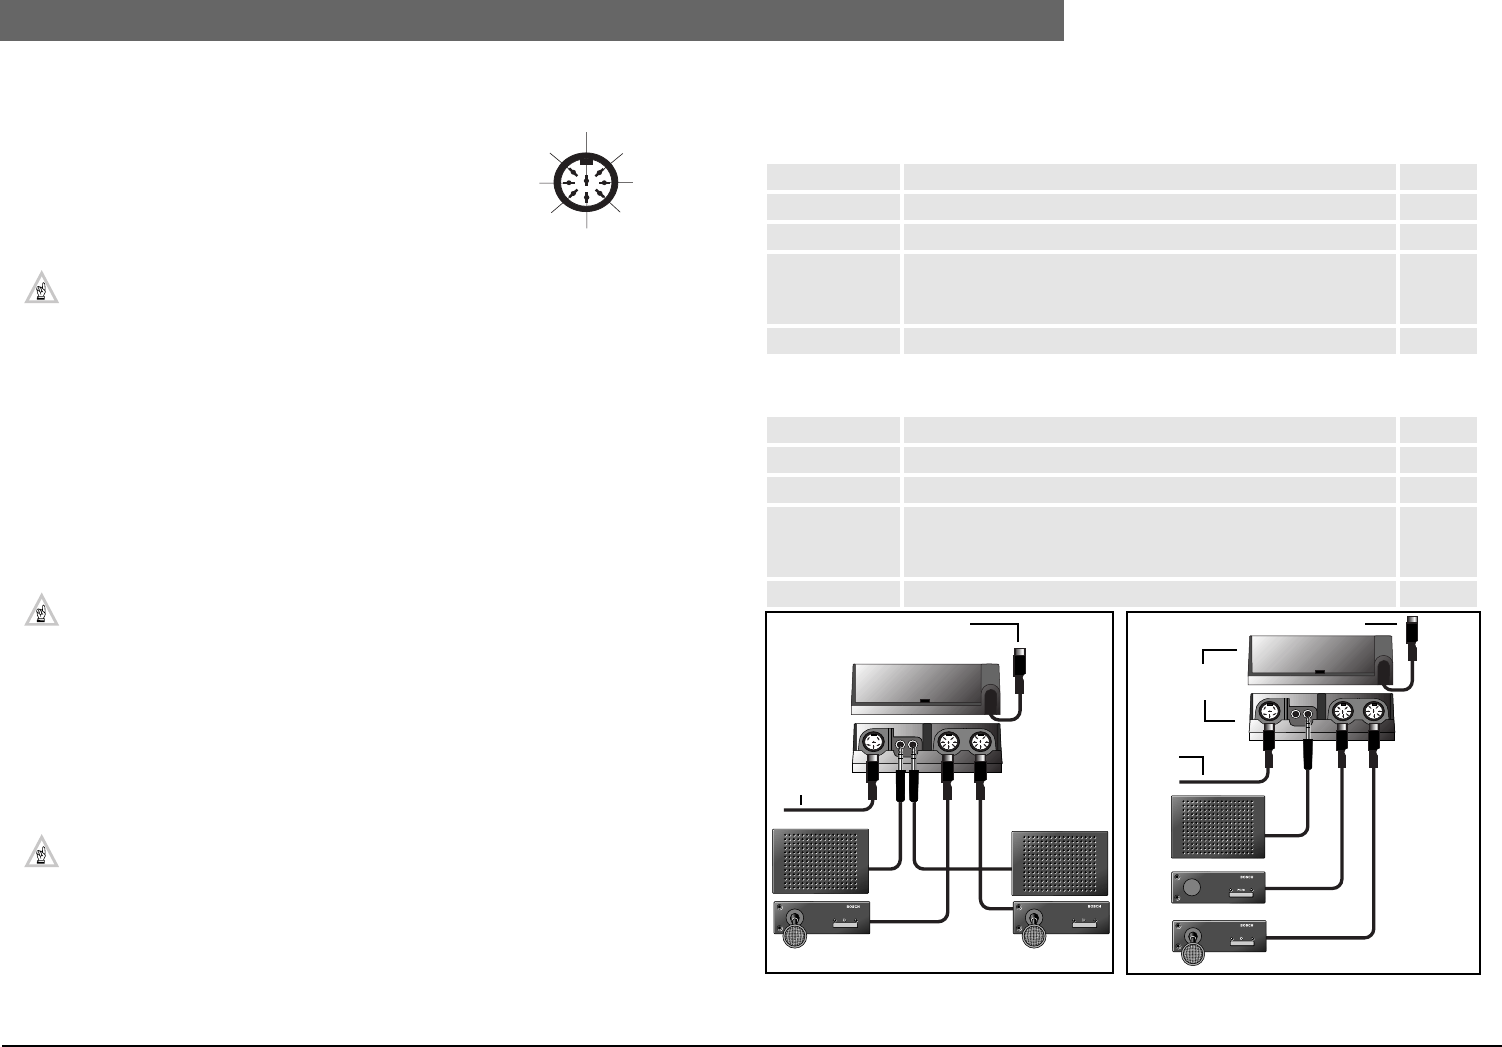
2
Bosch Security Systems | 04-2003 | 3922 988 43318 en
Digital Congress Network | Installation and Operating Manual | Chapter 2 - Contribution Equipment en | 2-13
LBB 3535/00 Dual Audio Interface unit
Connection details: 8-pole 262° DIN-socket
PIN 1 - 3 Symmetrical input (PIN 1(signal +), PIN 3 (signal -)
PIN 2 Screen 0V
PIN 4 Mic. On LED (red)
PIN 5 Request-to-speak LED (green)
PIN 6 Mic. switch
PIN 7 +5 volt
PIN 8 Light-ring indicator (LBB 3537/xx)
NOTE: PINS 1 and 3 provide a symmetrical input and PINS 1 and 2 provide an asymmet-
rical input. For custom built solutions the following connections are required:
• PIN 4 to PIN 7 for mic. On LED(pin 4 = cathode, pin 7 = anode)
• PIN 5 to PIN 7 for Request-to-speak LED(pin 5 = cathode, pin 7 = anode)
• PIN 6 to PIN 7 for mic. switch
INSTALLING DUAL AUDIO INTERFACE UNIT
The unit can be mounted free-standing on a table-top, mounted on a wall, or discreetly mounted into
table-tops or into the arm rests of chairs using the screw holes provided on the unit.
When connecting microphones or line level sources, the switch settings on the top of the unit should
be set to their correct operating positions. A jumper setting assigns the unit as either a delegate or
chairman or ambient microphone position. When assigned as a chairman position, input 1 is used for
the microphone, and input 2 is used for the priority input, using Priority Control panel LBB 3537/10.
NOTE: Two solder spots J1 and J2 are used when assigning the unit for use as either a del-
egate unit, chairman unit, or as an ambient microphone. When used as a chairman unit, one
input is used to connect microphone LBB 3537/xx, and the other input is used for the
Chairman Priority control panel LBB 3537/10. Refer to Chapter 2.17 for the solder spots
and their settings.
Floor stand or Podium Microphones (FIG. 2-20 and FIG. 2-21)
The Dual Audio Interface Unit LBB 3535/00 can be used to connect floor-stand, podium, or wireless
microphone systems to the DCN system. FIG. 2-20 and FIG. 2-21 shows two typical examples using
a floor-stand and podium microphones. In the podium example the Dual Audio Interface Unit is used
to connect two Microphone with control panels LBB 3537/xx and a Loudspeaker panel LBB 3538/00.
IMPORTANT: WHEN USED IN ‘VOICE’ ACTIVATED MODE, ONLY ONE
MICROPHONE CAN BE USED (INPUT 2).
2.9.1 Flush Mounting Solutions
Flush mounted solution No.1 (serving two delegate positions) FIG. 2-18
Flush mounted solution No.2 (serving a chairman position) FIG. 2-19
13
87
45
2
6
LBB 3535/00 Dual Audio Interface Unit
2 x LBB 3537/00 Microphone control panel with microphone stem (310mm/12.2 in) or
2 x LBB 3537/50 Microphone control panel with microphone stem (480mm/18.8 in) or
2 x LBB 3537/20 Microphone control panel for pluggable microphones types:
- LBB 3549/00 Microphone with stem length (310mm/12.2 in) or
- LBB 3549/50 Microphone with stem length (480mm/18.8 in)
2 x LBB 3538/00 Loudspeaker panel
LBB 3535/00 Dual Audio Interface Unit
LBB 3537/00 Microphone control panel with microphone stem (310mm/12.2 in) or
LBB 3537/50 Microphone control panel with microphone stem (480mm/18.8 in) or
LBB 3537/20 Microphone control panel for pluggable microphones types:
- LBB 3549/00 Microphone with stem length (310mm/12.2 in) or
- LBB 3549/50 Microphone with stem length (480mm/18.8 in)
LBB 3537/10 Chairman priority panel
FIG. 2-18 Serving two delegates FIG. 2-19 Serving a chairman position
121 2
To previous unit
LBB 3535/00
From
next
unit
LBB 3537/00
LBB 3538/0
0
121 2
To previous unit
LBB 3535/00
From
next
unit
LBB 3538/00
LBB 3537/10
LBB 3537/00
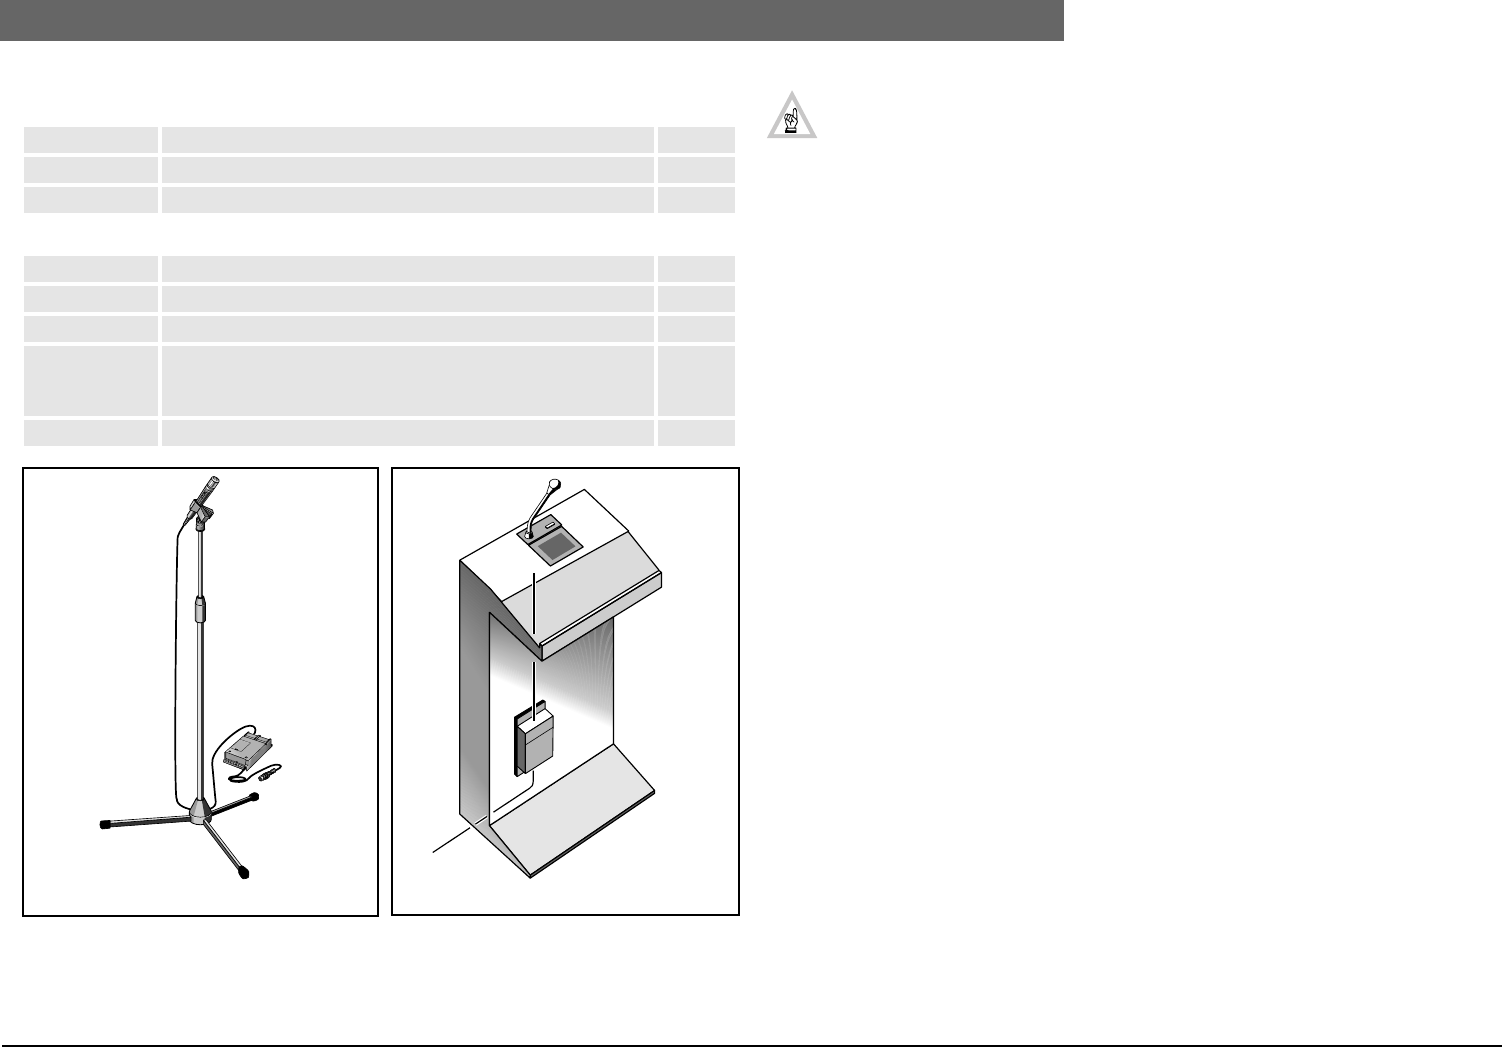
2
Bosch Security Systems | 04-2003 | 3922 988 43318 en
Digital Congress Network | Installation and Operating Manual | Chapter 2 - Contribution Equipment en | 2-14
LBB 3535/00 Dual Audio Interface unit
Flush mounted solution No.3 (floor stand with (interruption) microphones
FIG. 2-20
Flush mounted solution No.4 (Rostrum with one microphone position) FIG. 2-21
General
A hand-held microphone LBB 3536/00 with 5 m cable or LBB 3536/10 with coiled cable
can be used instead of a flush mounted Microphone Control Panel with microphone (fixed
or pluggable).
LBB 3535/00 Dual Audio Interface Unit
LBB 3536/00 Hand held microphone with 5 m cable or
LBB 3536/10 Hand held microphone with coiled cable
LBB 3535/00 Dual Audio Interface Unit
LBB 3537/00 Microphone control panel with microphone stem (310mm/12.2 in) or
LBB 3537/50 Microphone control panel with microphone stem (480mm/18.8 in) or
LBB 3537/20 Microphone control panel for pluggable microphones types:
- LBB 3549/00 Microphone with stem length (310mm/12.2 in) or
- LBB 3549/50 Microphone with stem length (480mm/18.8 in)
LBB 3538/00 Loudspeaker panel
FIG. 2-20 floor stand microphone FIG. 2-21 Podium microphone
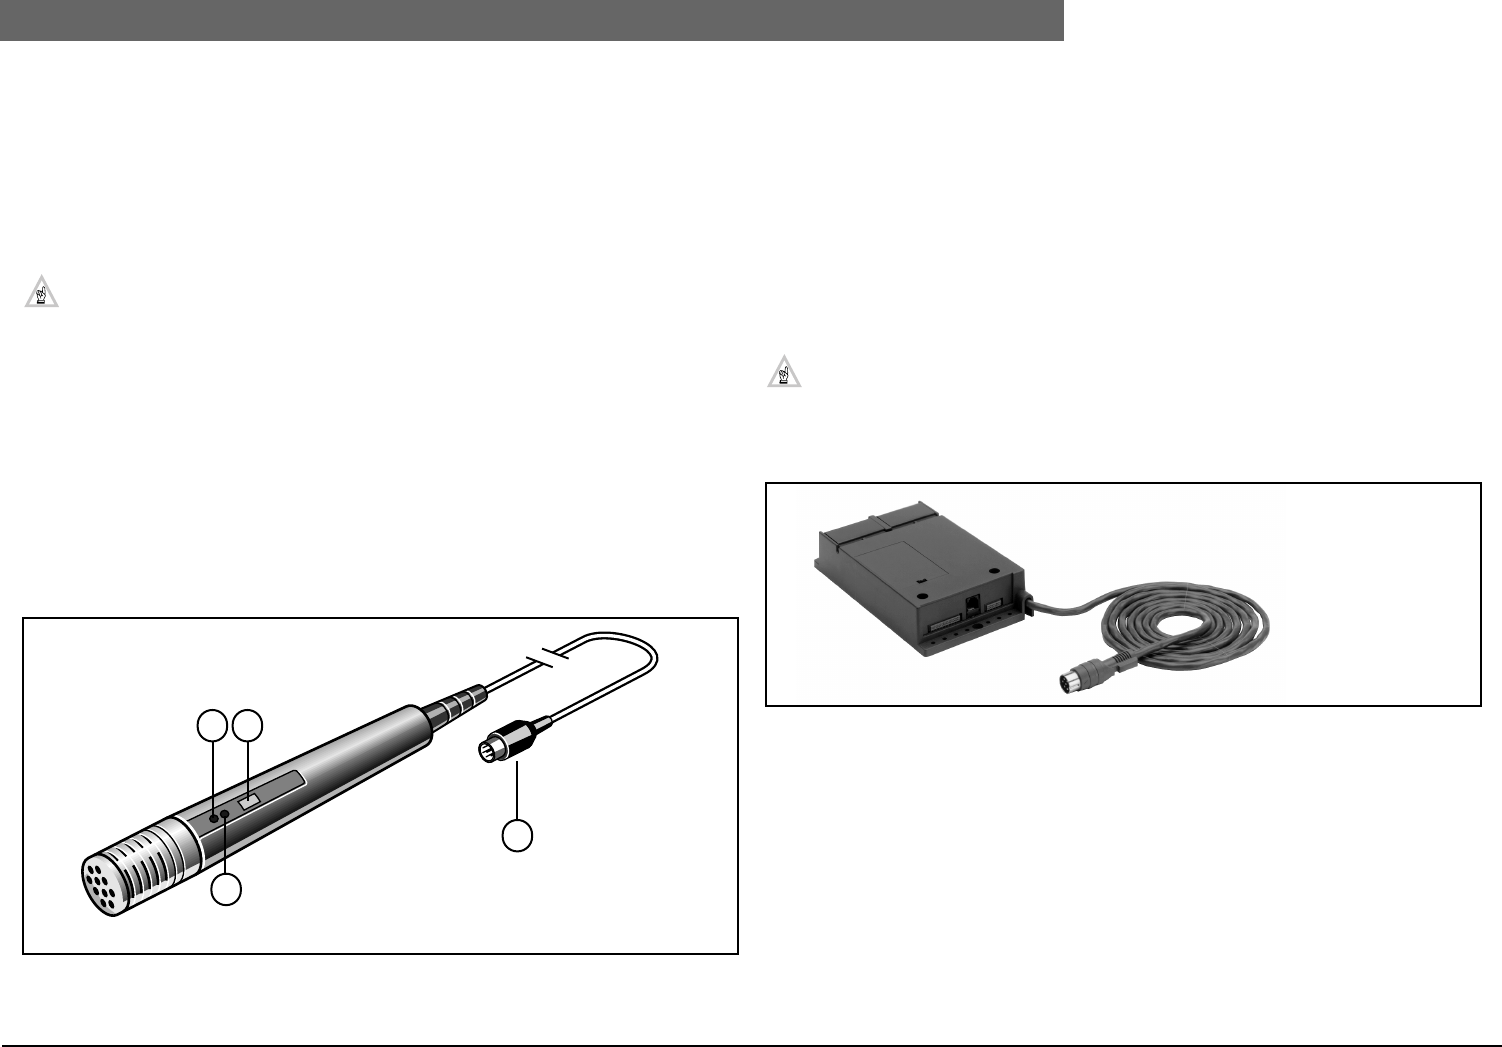
2
Bosch Security Systems | 04-2003 | 3922 988 43318 en
Digital Congress Network | Installation and Operating Manual | Chapter 2 - Contribution Equipment en | 2-15
LBB 3536/00, /10 Hand-microphones
2.10 LBB 3536/00, /10 Hand-microphones
Unidirectional back-plate electret microphones with built-in pop and wind-shield. Both microphones
include a microphone on/off button and indicator lamps (LEDs). Microphones can be connected to
the Dual Audio Interface Unit LBB 3535/00 or to Multi-purpose connection unit LBB 3540/15.
LBB 3536/00 includes an uncoiled 5m (16.4 feet) long cable, and LBB 3536/10 includes a coiled cable
0.4 m long (uncoiled 1.4 m (4.5 ft.) long).
NOTE: The maximum length of extension cable that can be used is 5 m. (16.4 ft.).
Controls and Indicators (FIG. 2-22):
1. Request-to-speak confirmation indicator (green LED).
2. Microphone On/Off or Request-to-speak button.
3. Microphone On indicator (red LED).
Interconnection
4. Cable terminated with an 8-pole 262° DIN-type plug.
Mounting
Clamps are available for mounting on floor stands
• For floor stands: Universal mic. clamp LBC 1215/01
FIG. 2-22 Hand microphones
2.11 LBB 3540/15 Multi-purpose connection unit
The LBB 3540/15 is intended for use in tailored flush mounted solutions. Its versatility enables a
number of functions to be added, making it ideal for both delegate and chairman positions. Functions
include voting control panel, with or without LC-display (LBB 3541/00 or LBB 3542/00) and an ID-
Chip Card Reader LBB 3543/15.
Two mixed audio input sockets with phantom supply enables up to two microphones to be
connected. The sensitivity of the microphones can be adjusted simultaneously in 4 steps of 6 dB and
a fine adjustment of ±3dB. Facilities are also available for connecting an intercom handset LBB 3555/
00. A 3.5 mm stereo jack socket is provided for connection to headphones or to a loudspeaker panel
LBB 3538/00. The loudspeaker output is switched off when the microphone is switched on.
NOTES:
1. A jumper on selection panel (FIG. 2-25 (11) is used when assigning the unit for use as
either a delegate or chairman unit. When used as a chairman unit, MIC 2 input is for
microphone (LBB 3537/xx) and MIC 1 input for priority control (LBB 3537/10).
2. The unit can also be used as an entrance or exit unit for registration and access
purposes
FIG. 2-23 LBB 3540/15 Multi-purpose connection unit
Controls and Indicators (FIG. 2-24 and FIG. 2-25)
1. 6-pole circular connector for connection of other system units (loop-through).
2. 2 x 3.5 mm stereo jackplug sockets (marked I and 2) for connection to:
- LBB 3538/00 FM loudspeaker* panel (or)
- Headphones (or)
- Combination of both of the above
* Loudspeaker output 2 is automatically muted when the microphone(s) on input(s) 3 is active.
3. 2 x 8-pole 262° DIN-type connectors (marked I and 2) for connection to:
Microphone with FM Control Panel LBB 3537/xx, or the Chairman microphone Priority Switch
Panel LBB 3537/10 or standard microphones LBB 3536/00 and /10. When two microphones are
connected (delegate mode only), both are switched on at the same time.
1 2
3
4
LBB 3536/00
(LBB 3536 includes 5 m (16.4ft.)
coiled cable)

2
Bosch Security Systems | 04-2003 | 3922 988 43318 en
Digital Congress Network | Installation and Operating Manual | Chapter 2 - Contribution Equipment en | 2-16
LBB 3540/15 Multi-purpose connection unit
4. 20-pole Micromatch connector for connection to:
- LBB 3541/00 FM Delegate voting control panel
- LBB 3542/00 FM Delegate/Chairman voting control panel with LC-display
- Custom-built solutions including push-button and LEDs
5. 6-pole modular jack for LBB 3555/00 Intercom handset.
6. 10-pole Micromatch connector for connection to:
- ID Chip Card reader panel LBB 3543/15.
7. 2 m long cable terminated with a 6-pole circular connector for connection to the trunk-line.
8. Screw holes for securing the unit.
9. Switch cover panel.
10. Tie-wrap holes for securing attached cables. Tie--wraps are included with the unit.
11. Jumper for assigning the unit as either a delegate or as a chairman unit.
12. Initialization button (Init) used for initializing the unit during installation. Also used to reset the
unit’s address (De-Init).
13. Input level potentiometer: ± 3 dB.
14. Initialization indicator (LED) indicating the unit requires initializing.
15. Selector switch for selecting:
- Asymmetrical microphone input or Symmetrical microphone input or Symmetrical microphone
input with Phantom power supply (applicable to both inputs).
16. Input attenuation selection of: 0, 6, 12 or 18 dB (applicable to both inputs). Default setting: 6 dB.
17. Jumper J01for assigning connected units as either an entrance or exit unit. (See Table. 2-1.)
NOTES:
1. Jack socket marked (2) is ideally suited for loudspeaker panel LBB 3538/00 because its output is
switched off when a microphone is switched on (preventing acoustic feedback). Jack socket out-
put marked (1) is not muted when a microphone is switched-on
2. For connection details of the input sockets see LBB 3535/00 Dual Audio Interface Unit
FIG. 2-24 LBB 3540/15 connection FIG. 2-25 Layout LBB 3540/15 Multi-purpose connection unit
4
5
10
6 7
121 2
Init +/- 3dB
Attn
P12
Sym
Asym
18
12
6
0
dB
Chairman
Delegate
8
9
8
10
1
5 6 74
2
311 12
13
14
15
16
PCB located inside the unit
J02
MIC J01
UNIT
J03
ND
BOSCH
J02
J01
Installation
Solder spot J01See table below
Solder spot J02 Open (default)
Solder spot J02 Closed (To set LED
light ring Indication to flash for the last
minute of remaining speech time).
Solder spot J03 Open (default)
Solder spot J03 Closed (no display
unit connected)
Table 2-1. Jumper J01
Jumper
Chairman/delegate
J01 Function
Open
Chairman
Delegate
OPEN
Assigned as Chairman unit
Assigned as Chairman unit
Assigned as Delegate unit
Open
Chairman
Delegate
CLOSED
Assigned as Entrance unit
Assigned as Entrance unit
Assigned as Exit unit
J03
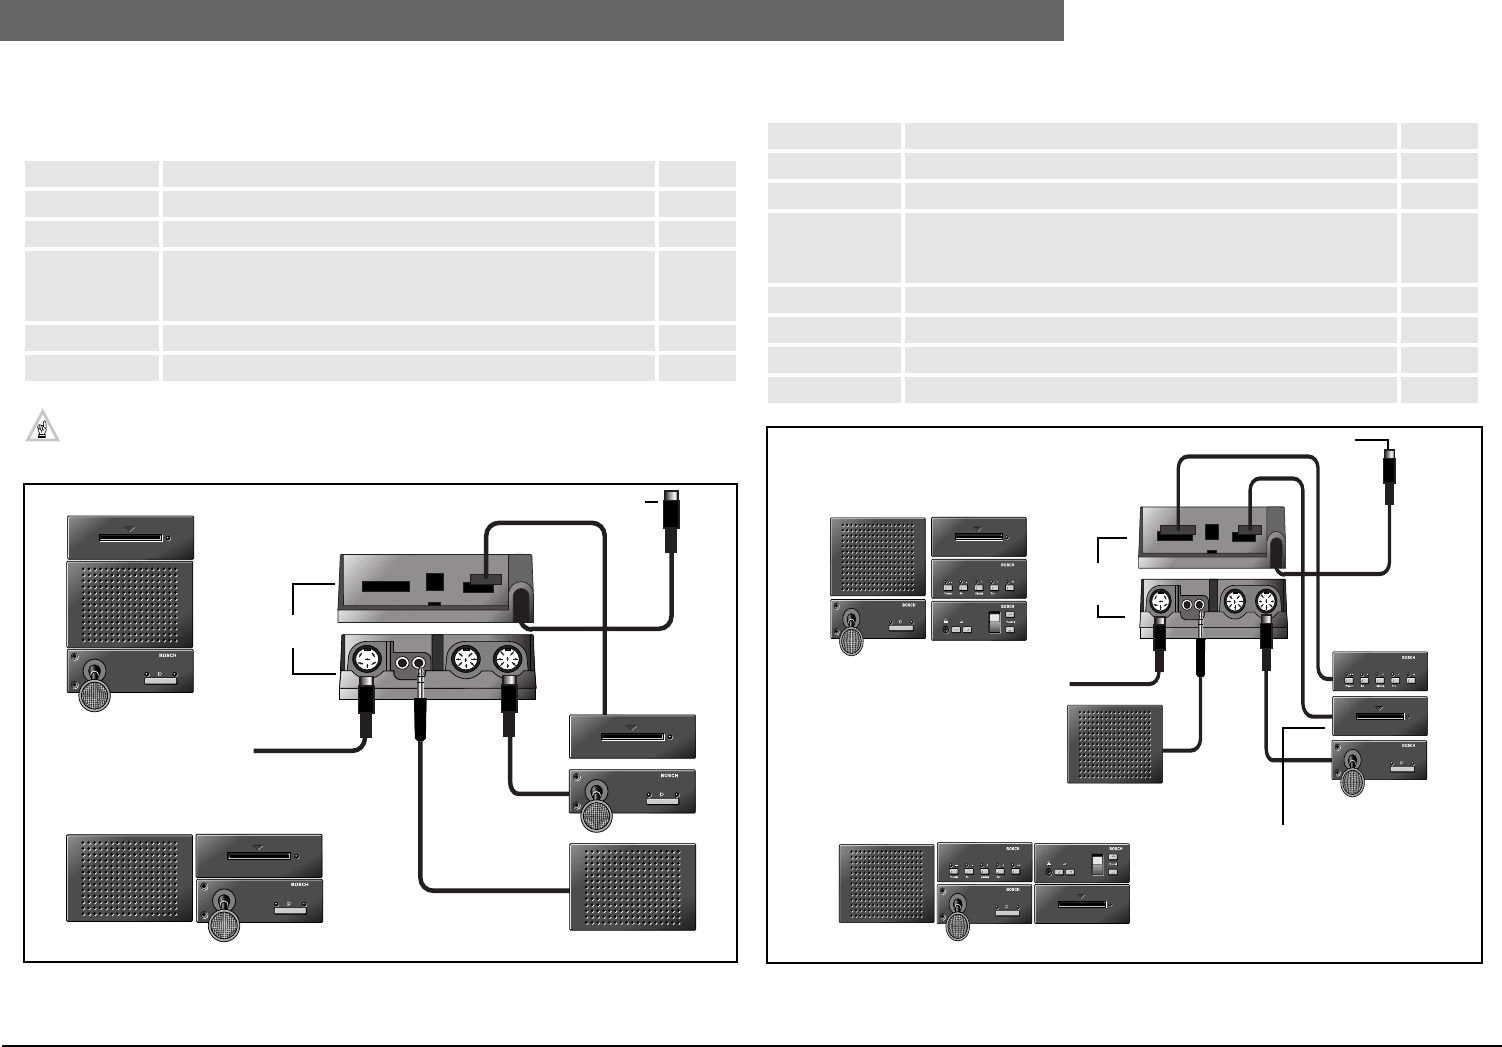
2
Bosch Security Systems | 04-2003 | 3922 988 43318 en
Digital Congress Network | Installation and Operating Manual | Chapter 2 - Contribution Equipment en | 2-17
LBB 3540/15 Multi-purpose connection unit
2.11.1 Flush Mounting Solutions
Flush mounted solution No.5 (delegate position) FIG. 2-26
General
* A hand-held microphone LBB 3536/00 with 5 m cable or LBB 3536/10 with coiled cable
can be used instead of a flush mounted Microphone Control Panel with microphone (fixed
or pluggable).
FIG. 2-26 Flush mounted solution 5 using LBB 3540/15
Flush mounted solution No.6 (delegate position) FIG. 2-27
FIG. 2-27 Flush mounted solution 6 using LBB 3540/15
LBB 3540/15 Multi-purpose connection unit
LBB 3537/00 Microphone control panel with microphone stem (310mm/12.2 in) or
LBB 3537/50 Microphone control panel with microphone stem (480mm/18.8 in) or
LBB 3537/20 Microphone control panel for pluggable microphones types:
- LBB 3549/00 Microphone with stem length (310mm/12.2 in) or
- LBB 3549/50 Microphone with stem length (480mm/18.8 in)
LBB 3538/00 Loudspeaker panel
LBB 3543/15 ID-chip card reader
121 2
Portrait
Landscape
From next unit
LBB 3540/15
To previous unit
LBB 3537/xx
LBB 3538/00
LBB 3543/15
LBB 3540/15 Multi-purpose connection unit
LBB 3537/00 Microphone control panel with microphone stem (310mm/12.2 in) or
LBB 3537/50 Microphone control panel with microphone stem (480mm/18.8 in) or
LBB 3537/20 Microphone control panel for pluggable microphones types:
- LBB 3549/00 Microphone with stem length (310mm/12.2 in) or
- LBB 3549/50 Microphone with stem length (480mm/18.8 in)
LBB 3538/00 Loudspeaker panel
LBB 3543/15 ID-chip card reader
LBB 3541/00 Voting control panel
LBB 3524/xx Channel selector panel (loop-through trunk-line connection)
121 2
Portrait
To previous unit
LBB 3537/xx
LBB 3540/15
LBB 3538/00
Landscape LBB 3543/15
From next unit
LBB 3541/00
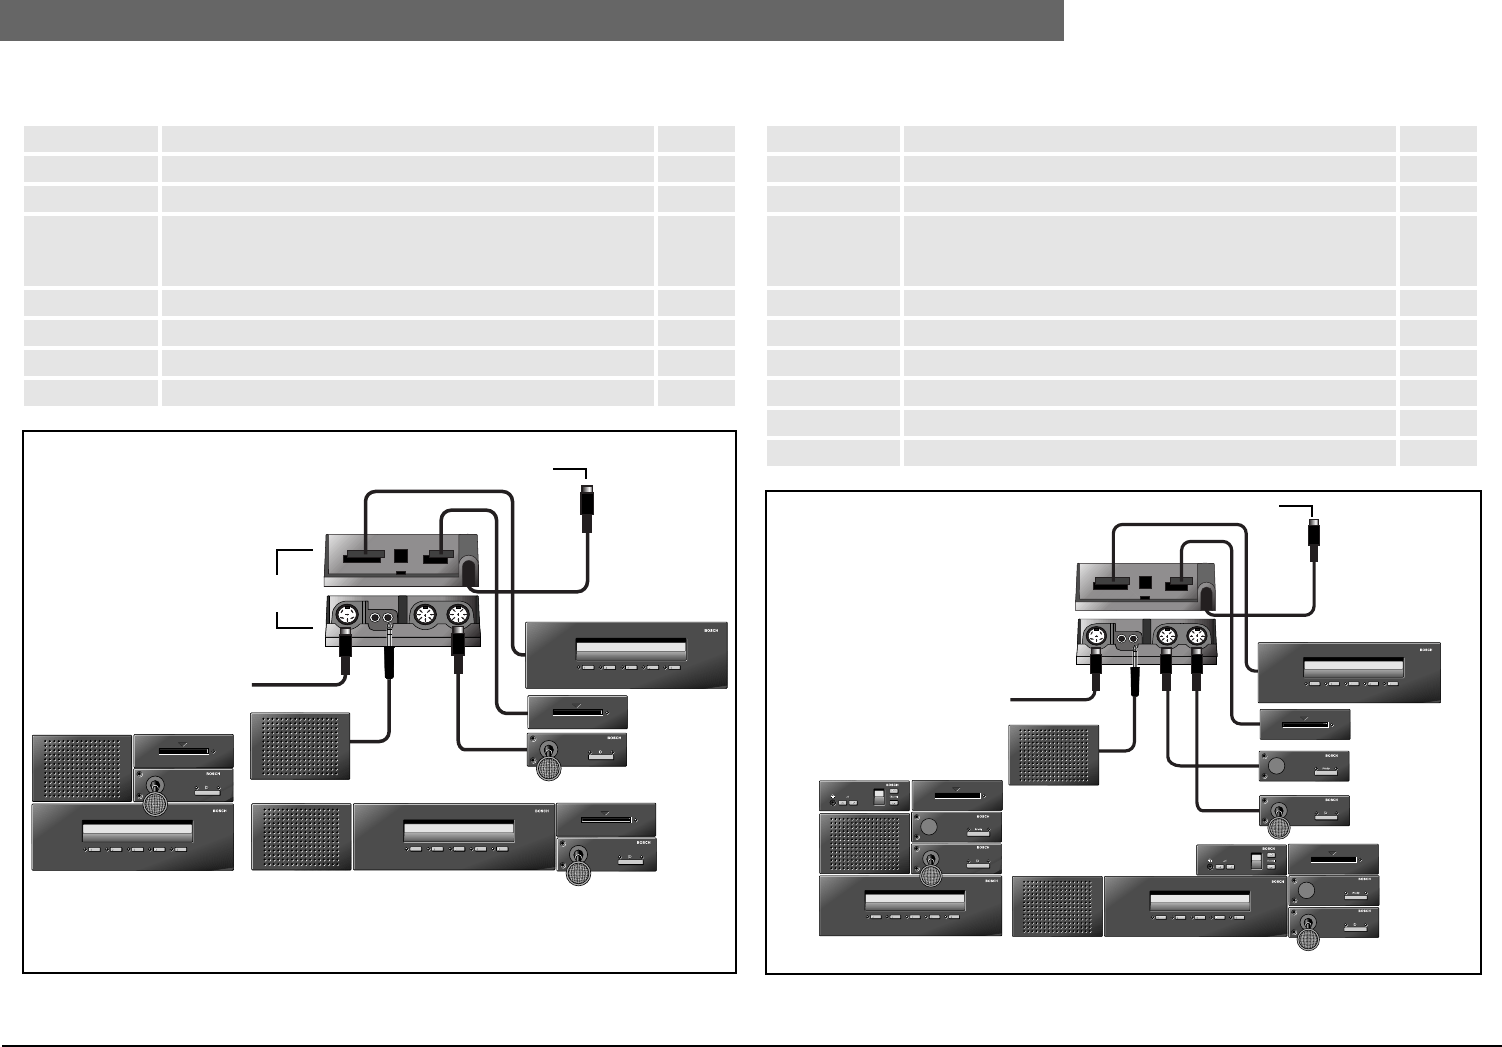
2
Bosch Security Systems | 04-2003 | 3922 988 43318 en
Digital Congress Network | Installation and Operating Manual | Chapter 2 - Contribution Equipment en | 2-18
LBB 3540/15 Multi-purpose connection unit
Flush mounted solution No.7 (delegate position) FIG. 2-28
FIG. 2-28 Flush mounted solution 7 using LBB 3540/10
Flush mounted solution No.8 (Chairman position) FIG. 2-29
FIG. 2-29 Flush mounted solution 8 using LBB 3540/15
LBB 3540/15 Multi-purpose connection unit
LBB 3537/00 Microphone control panel with microphone stem (310mm/12.2 in) or
LBB 3537/50 Microphone control panel with microphone stem (480mm/18.8 in) or
LBB 3537/20 Microphone control panel for pluggable microphones types:
- LBB 3549/00 Microphone with stem length (310mm/12.2 in) or
- LBB 3549/50 Microphone with stem length (480mm/18.8 in)
LBB 3538/00 Loudspeaker panel
LBB 3543/15 ID-chip card reader
LBB 3542/00 Voting control panel with alphanumeric LC-display or
LBB 3542/20 Voting control panel with alphanumeric Cyrillic LC-display
121 2
To previous unit
Portrait
Landscape
From next unit
LBB 3540/15 LBB 3542/00
LBB 3543/15
LBB 3537/xx
LBB 3538/00
LBB 3540/15 Multi-purpose connection unit
2 x LBB 3537/00 Microphone control panel with microphone stem (310mm/12.2 in) or
2 x LBB 3537/50 Microphone control panel with microphone stem (480mm/18.8 in) or
2 x LBB 3537/20 Microphone control panel for pluggable microphones types:
- LBB 3549/00 Microphone with stem length (310mm/12.2 in) or
- LBB 3549/50 Microphone with stem length (480mm/18.8 in)
LBB 3537/10 Chairman priority panel
LBB 3538/00 Loudspeaker panel
LBB 3543/15 ID-chip card reader
LBB 3542/00 Voting control panel with alphanumeric LC-display
LBB 3542/20 Voting control panel with alphanumeric Cyrillic LC-display
LBB 3524/xx Channel selector panel (loop-through trunk-line connection)
121 2
To previous unit
Portrait
Landscape
LBB 3538/00
From next unit
LBB 3542/00
LBB 3543/15
LBB 3537/10
LBB 3537/xx
(see Note)
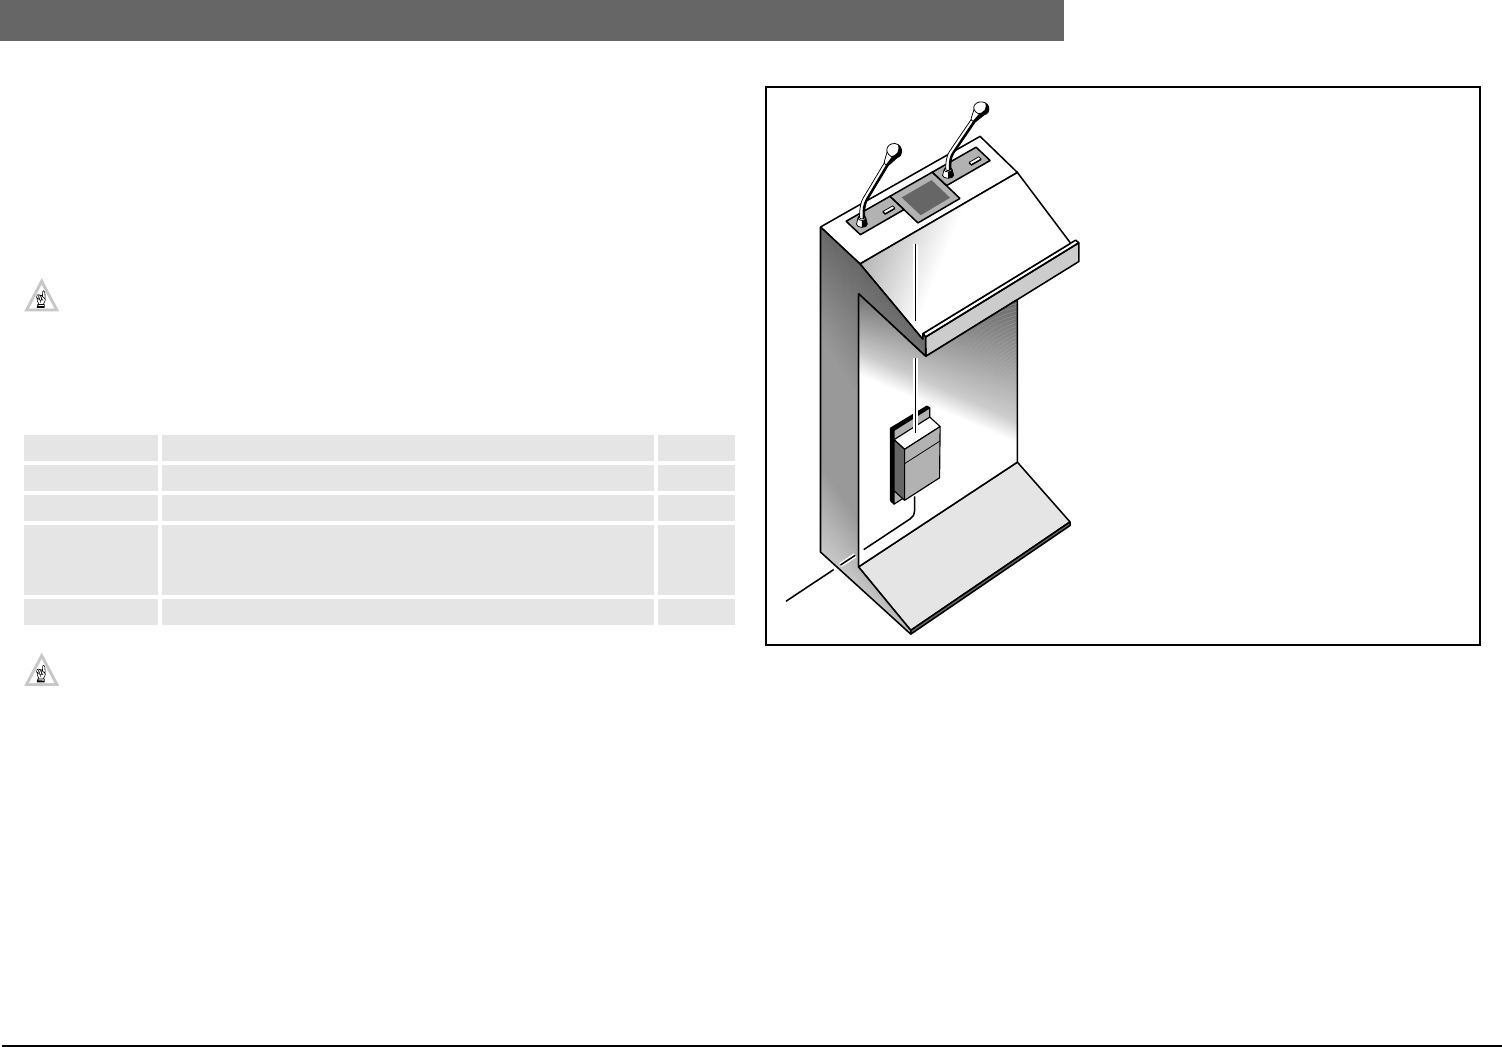
2
Bosch Security Systems | 04-2003 | 3922 988 43318 en
Digital Congress Network | Installation and Operating Manual | Chapter 2 - Contribution Equipment en | 2-19
LBB 3540/15 Multi-purpose connection unit
Applicable to solution No.8.
1. Jumper J01 on the Multi-purpose connection unit is used to assign the unit for a chairman
position.
2. If the chairman needs to view the number of delegates currently speaking or requesting to speak,
then the LBB 3542/00 or LBB 3542/20 Voting control panel with alphanumeric LC-display can be
used.
3. The ID-chip card reader LBB 3543/15 is used to provide a chairman registration and/or access
function.
NOTE: Using the LBB 3540/15 in combination with the range of flush-mounted units, any
number of configurations can be achieved to suit any conference requirement. The exam-
ples given, cater for both delegate and chairman positions with all the functions of a confer-
ence unit.
Flush mounted solution No.9 (Rostrum with two microphones) FIG. 2-30
General
A hand-held microphone LBB 3536/00 with 5 m cable or LBB 3536/10 with coiled cable
can be used instead of a flush mounted Microphone Control Panel with microphone (fixed
or pluggable).
FIG. 2-30 Rostrum with two microphones
LBB 3540/15 Multi-purpose connection unit
2 x LBB 3537/00 Microphone control panel with microphone stem (310mm/12.2 in) or
2 x LBB 3537/50 Microphone control panel with microphone stem (480mm/18.8 in) or
2 x LBB 3537/20 Microphone control panel for pluggable microphones types:
- LBB 3549/00 Microphone with stem length (310mm/12.2 in)
- LBB 3549/50 Microphone with stem length (480mm/18.8 in)
or
LBB 3538/00 Loudspeaker panel
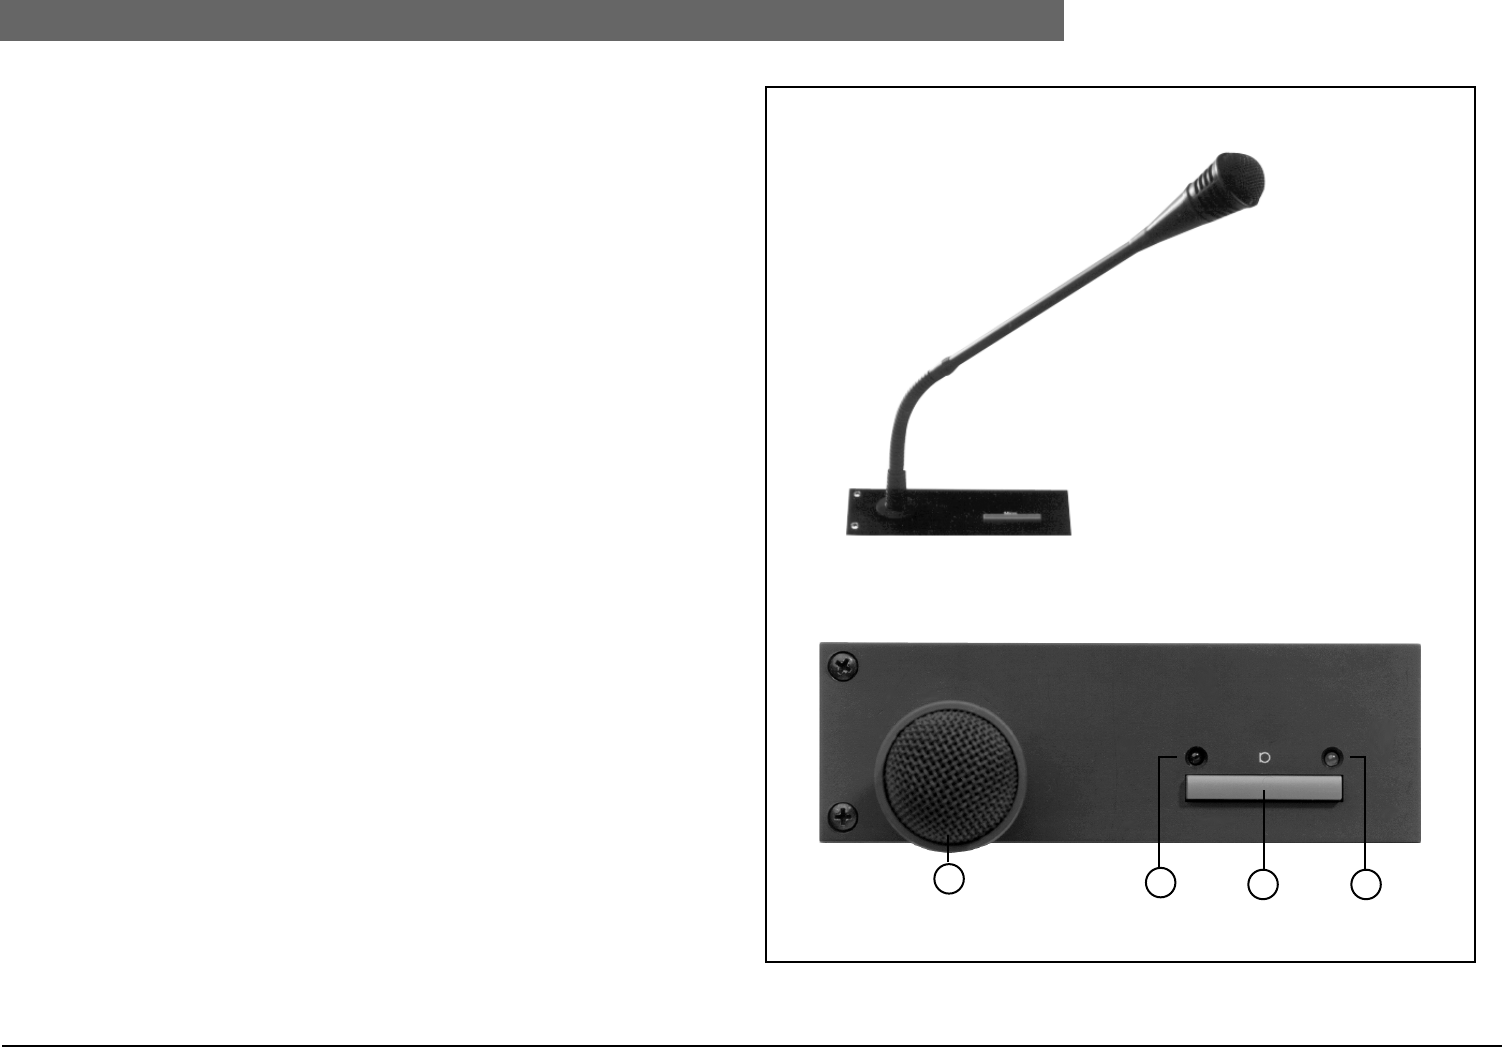
2
Bosch Security Systems | 04-2003 | 3922 988 43318 en
Digital Congress Network | Installation and Operating Manual | Chapter 2 - Contribution Equipment en | 2-20
LBB 3537/00, LBB 3537/50 Delegate microphone with control panel
2.12 LBB 3537/00, LBB 3537/50
Delegate microphone with control panel
The LBB 3537/00 and LBB 3537/50 are uni-directional condenser microphones, mounted on a flush
mounted control panel by means of a flexible stem. The microphones have a built-in plop- and
windshield, as well as a light ring indicator which illuminates when the microphone is on. The control
panel can be connected to a Multi-purpose connection unit LBB 3540/15, or to an input of the Dual
Audio Interface unit LBB 3535/00.
Type number description:
Controls and Indicators (FIG. 2-31)
1. Unidirectional microphone, mounted on a flexible stem with built-in pop and windshield. The
microphone includes an illuminated indicator ring for microphone active status.
2. Microphone On indicator (red LED).
3. Microphone On/Off or request-to-speak button.
4. Request-to-speak confirmation indicator (green LED).
Interconnection
• 2 m (6.5 ft.) long cable terminated with an 8-pole 262° DIN-type plug for connection to the
Multi-purpose connection unit LBB 3540/15, or the Dual Audio Interface unit LBB 3535/00.
FIG. 2-31 LBB 3537/00 and LBB 3537/50 FM Microphone control panels
LBB 3537/00 Microphone with control panel: 40 x 120 mm (1.5 x 4.7 in) (incl. mic.)
Mic. stem length: 310 mm (12.2 in) (incl. mic.)
LBB 3537/50 As LBB 3537/00 but with extended stem length: 480 mm (18.8 in) (incl. mic.)
Microphone stem length:
LBB 3537/00 (310 mm / 12.2 in)
LBB 3537/50 (480 mm / 18.8 in)
1
LBB 3537/00 and LBB 3537/50
243
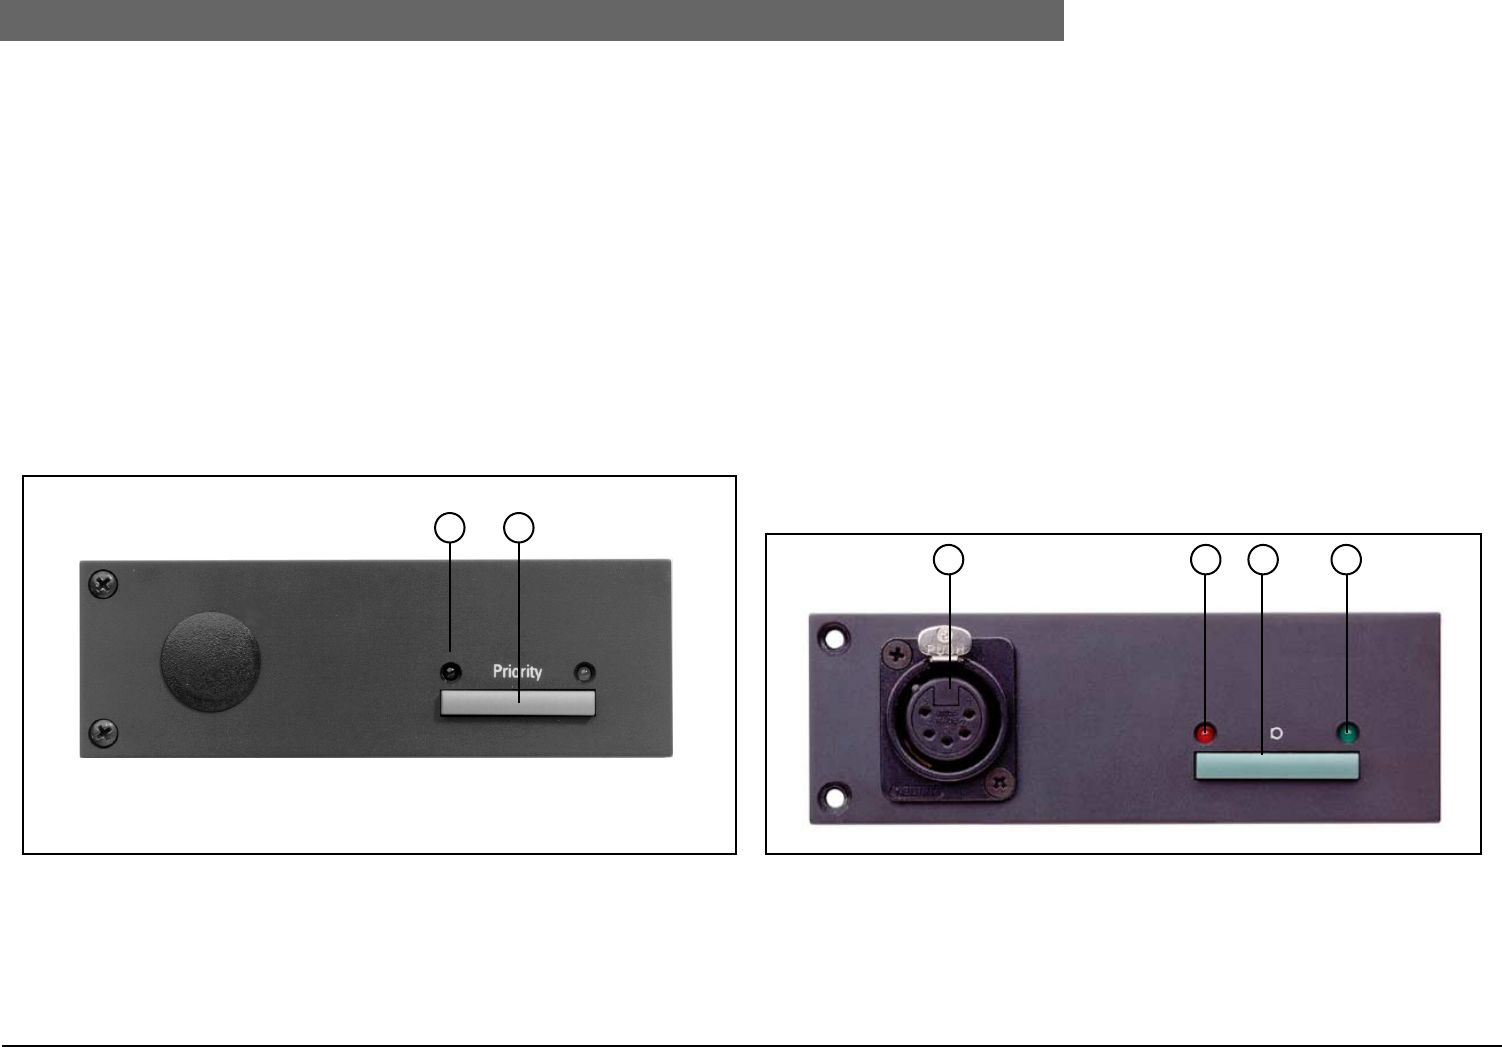
2
Bosch Security Systems | 04-2003 | 3922 988 43318 en
Digital Congress Network | Installation and Operating Manual | Chapter 2 - Contribution Equipment en | 2-21
LBB 3537/10 Chairman microphone with control panel
2.13 LBB 3537/10 Chairman microphone with control
panel
The LBB 3537/10 includes a priority button and an LED indicator. The unit is used in combination
with the microphone control panel LBB 3537/00 or microphone control panel LBB 3537/20 with
pluggable microphones LBB 3549/00 and LBB 3549/50 to create a chairman position. The priority
button when pressed sets all currently active delegates’ microphones in the system to off, giving the
chairman priority status over other participating delegates. The panel can be connected to the Multi-
purpose connection unit LBB 3540/15, or the Dual Audio Interface unit LBB 3535/00.
Controls and Indicators (FIG. 2-32)
1. Microphone on indicator (red LED).
2. ‘Priority’ key.
Interconnection
• 2 m (6.5 ft.) long cable terminated with an 8-pole 262° DIN-type connector for connection to
the Multi-purpose connection unit LBB 3540/15 or Dual Audio Interface Unit LBB 3535/00.
FIG. 2-32 LBB 3537/xx Chairman priority control panel
2.14 LBB 3537/20 Pluggable Microphone control panel
The Pluggable Microphone Control Panel LBB 3537/20 is intended for use with pluggable
microphones type LBB 3549/00 and LBB 3549/50. The microphone control panel can be connected
to the Multi-purpose connection unit LBB 3540/15, or the Dual Audio Interface unit LBB 3535/00.
Controls and Indicators (FIG. 2-33)
1. 5-pole XLR connector (female) for connection to pluggable microphones LBB 3549/00 or
LBB 3549/50 (see 2.6 Pluggable microphones).
2. Microphone on indicator (red LED).
3. Microphone On/Off or request-to-speak button.
4. Request-to-speak confirmation indicator (green LED).
Interconnection
1. 2 m (6.5 ft.) long cable terminated with an 8-pole 262° DIN-type connector for connection to
the Multi-purpose connection unit LBB 3540/15 or Dual Audio Interface Unit LBB 3535/00.
FIG. 2-33 LBB 3537/20 Pluggable Microphone control panel
1 2
LBB 3537/20 Microphone control panel for use with pluggable microphones LBB 3549/00 and
LBB 3549/50
1 2 3 4
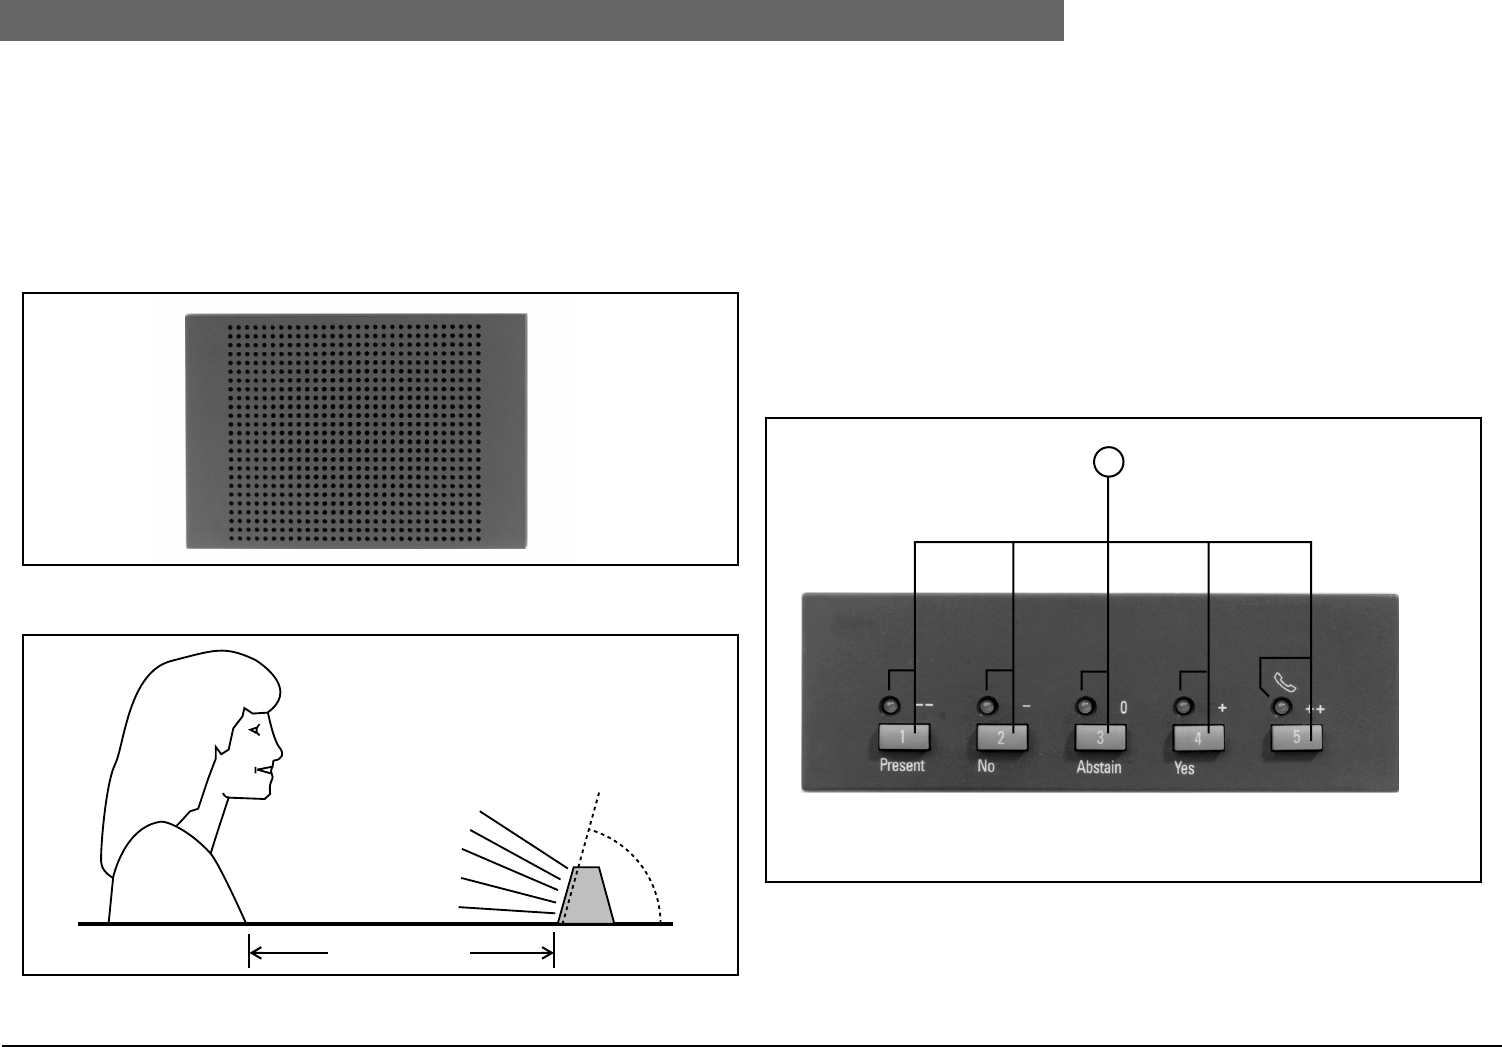
2
Bosch Security Systems | 04-2003 | 3922 988 43318 en
Digital Congress Network | Installation and Operating Manual | Chapter 2 - Contribution Equipment en | 2-22
LBB 3538/00 FM Loudspeaker panel
2.15 LBB 3538/00 FM Loudspeaker panel
The LBB 3538/00 is used to distribute the floor signal when used with flush-mounted units. The panel
is intended for flush mounting into table-tops or the back-rests of seats or for table-top placement
using ‘Table-top housing LBB 3527/00. The panel is intended for use with the Dual Audio Interface unit
LBB 3535/00 or the Multi-purpose connection unit LBB 3540/15.
Interconnection
• 2 m (6.5 ft.) long cable terminated with a 3.5 mm stereo jackplug.
FIG. 2-34 LBB 3538/00 FM Loudspeaker panel
FIG. 2-35 Recommended loudspeaker placement
2.16 LBB 3541/00 FM Delegate Voting Control panel
The LBB 3541/00 includes voting facilities enabling delegates to participate in set voting sessions. The
panel can be connected to the Multi-purpose connection unit LBB 3540/15.
Controls, Indicators and Interconnection (FIG. 2-36):
1. 5 voting keys each with confirmation indicators (yellow LEDs) for participation in the following
voting procedures:
• Parliamentary voting (‘Present’, ‘No’, ‘Abstain’, ‘Yes’)
• Multiple choice or opinion poll voting (Numerals: 1 to 5 max.)
• Audience response voting (Rating scale - -, -, O, +, + +)
Interconnection
• 2 m (6.5 ft.) long flat ribbon cable terminated with a 20-pole Micromatch connector.
FIG. 2-36 LBB 3541/00 FM Delegate voting control panel
100 cm(max.)
Recommended angle:
45° - 60°
1
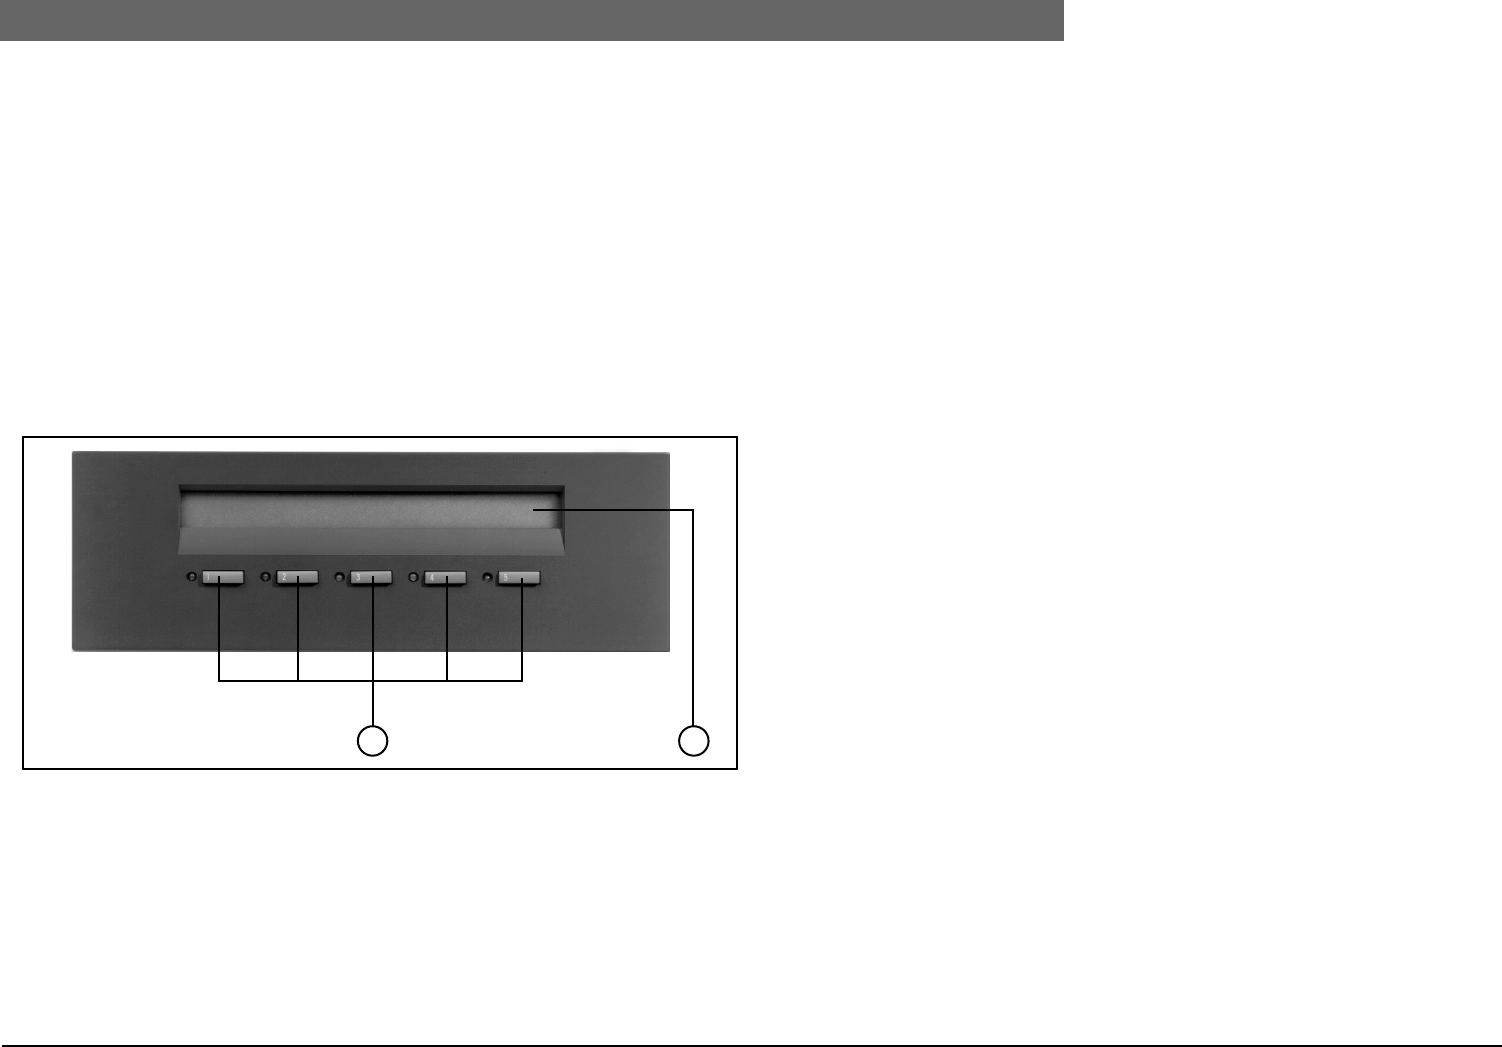
2
Bosch Security Systems | 04-2003 | 3922 988 43318 en
Digital Congress Network | Installation and Operating Manual | Chapter 2 - Contribution Equipment en | 2-23
LBB 3542/00, LBB 3542/20 FM Delegate/Chairman voting control panel with LC-display
2.17 LBB 3542/00, LBB 3542/20
FM Delegate/Chairman voting control panel with
LC-display
The LBB 3542/00 and LBB 3542/20 include voting functions and message display facilities. The panel
includes an alphanumeric 2-line by 40 character LC-display. The LBB 3542/20 is for display of Cyrillic
characters. The panel can be connected to Multi-purpose connection unit LBB 3540/15. The panel
can be used for both delegate and chairman positions.
The LC-display provides for conference related information, general user instructions, and text
messages to be viewed by a delegate or chairman.
Interconnection
• 2 m (6.5 ft.) long flat-ribbon cable terminated with a 20-pole Micro-match connector for con-
nection to the Multi-purpose Connection Unit LBB 3540/15.
FIG. 2-37 LBB 3542/00 & LBB 3542/20 FM Delegate/chairman voting control panel
Controls and indicators (FIG. 2-37):
1. Assigned Chairman
5 soft-keys each with confirmation indicators (yellow LEDs) in combination with the units LC-dis-
play provides some-or-all of the following functions:
- Microphone control
- Voting control
- Voting participating function
- Messages
- Intercom
1. Assigned Delegate
5 soft-keys marked 1-5 with confirmation indicators (yellow LEDs) for use in combination with
the units LC-display provides the following functions:
- Conference information
- User information
- Individual messages
• Participation in the following voting procedures:
- Parliamentary voting (‘Present’, ‘No’, ‘Abstain’, ‘Yes’)
- Multiple choice or opinion poll voting (Numerals: 1 to 24 max.)
- Audience response voting (Rating scale - -, -, O, +, + +)
2. Alphanumeric 2-line x 40 character LC-display.
* LBB 3542/20 Alphanumeric 2-line x 40 character Cyrillic LC-display.
1 2
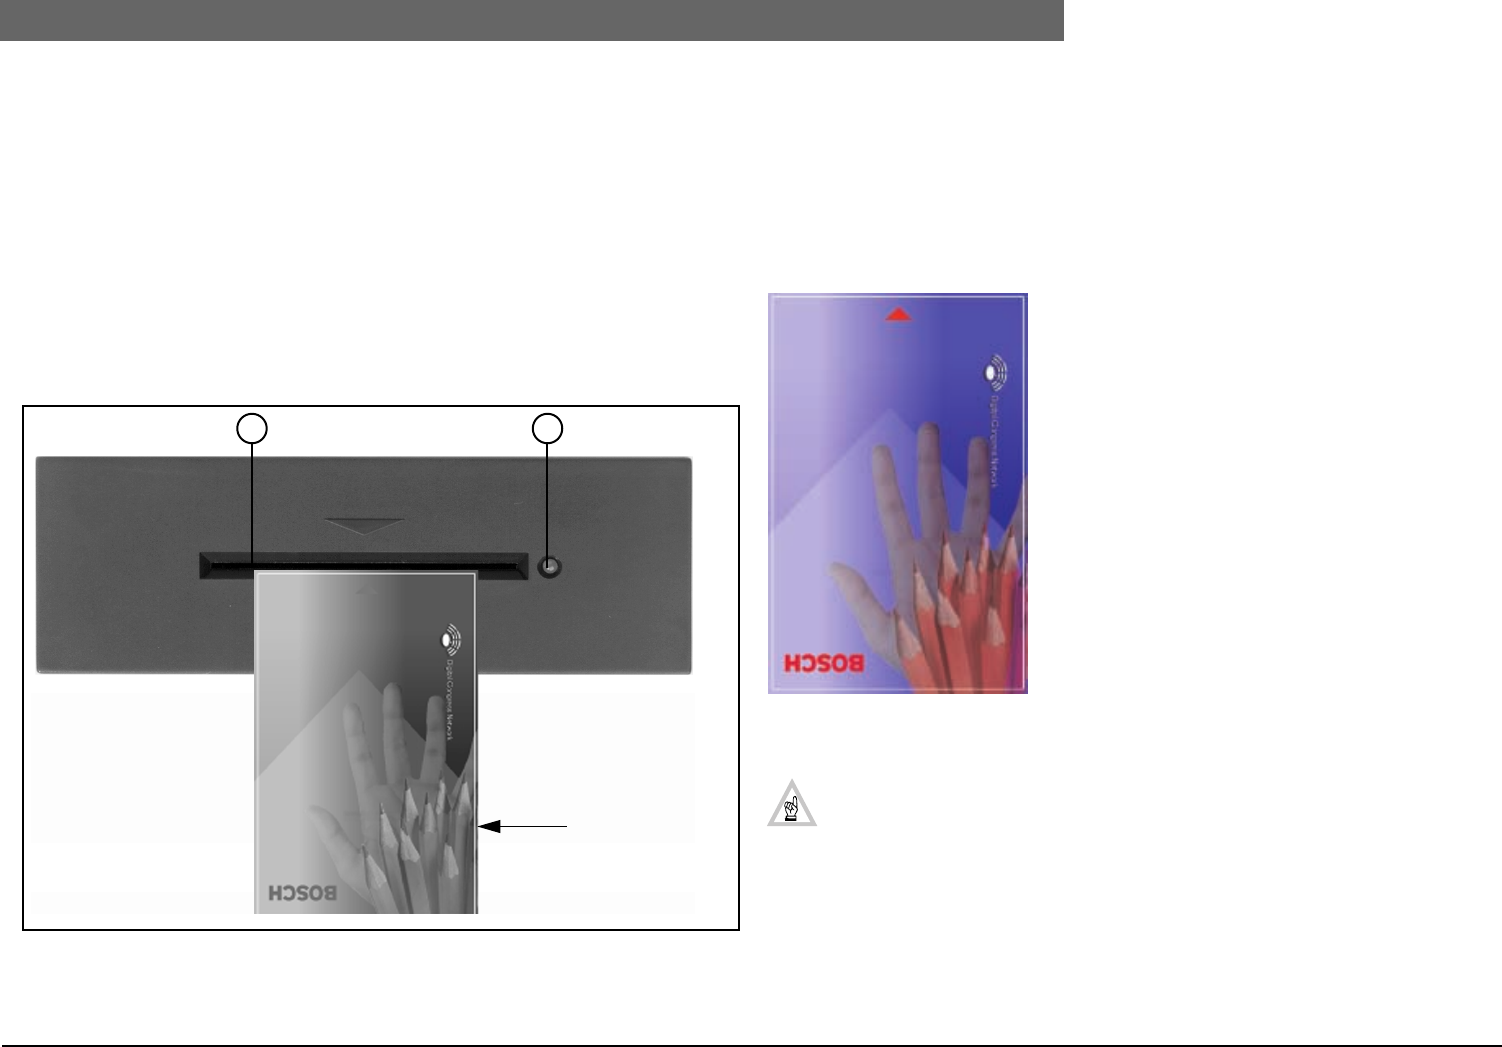
2
Bosch Security Systems | 04-2003 | 3922 988 43318 en
Digital Congress Network | Installation and Operating Manual | Chapter 2 - Contribution Equipment en | 2-24
LBB 3543/15 FM Chip-Card Reader
2.18 LBB 3543/15 FM Chip-Card Reader
Intended for use with the Multi-Purpose Connection UnIt LBB 3540/15, the Flush Mounted Chip
Card Reader LBB 3543/15 provides electronic identification of delegates to the DCN system as well
as ensuring that only authorized delegates participate in voting sessions or general conference
proceedings - such as the use of a microphone.
Controls and Indicators (see FIG. 2-38):
1. Card reader slot for delegate identification.
2. Card accepted indicator (yellow LED).
Interconnection
• 2 m (6.5 ft.) long flat-ribbon cable terminated with a 10-pole Micromatch connector.
FIG. 2-38 LBB 3543/15 ID Card Reader
2.19 LBB 4159/00 Set of 100 Chip Cards
The Chip Cards allow delegate identification to the system and access control to the delegate
microphone, voting and intercom functions. LBB 4159/00 includes a series of 100 Chip Cards. The
Chip Cards have ample space for placing a label for user reference.
The cards are encoded using the Chip Card encoder LBB 4157/00 in combination with the DCN
software package LBB 3581/00. The cards when encoded can also be used for other utility functions -
for example, visitor identification at exhibitions.
Card specification
Number of cards: 100
Label area: 72 x 24 mm (2.8 x 0.9 in)
Memory 4096 bits (512 bytes)
Characteristics Conform: ISO 7816 1-2
Dimensions (H x W)54 x 85.7 mm (2.1 x 3.3 in)
Thickness:0.76 mm ±0.08 (0.02 in)
Code Position
FIG. 2-39 Chip-card (front)
NOTES:
1. Labels larger than 72 x 24 mm (2.8 x 0.9 in) can be used on the rear side.
2. Code Position:
Refer to the User Manual of the ‘Delegate Database’ software module LBB 3580 for infor-
mation about the position of the card code in the chip.
1 2
Chip Card
LBB 4159/00
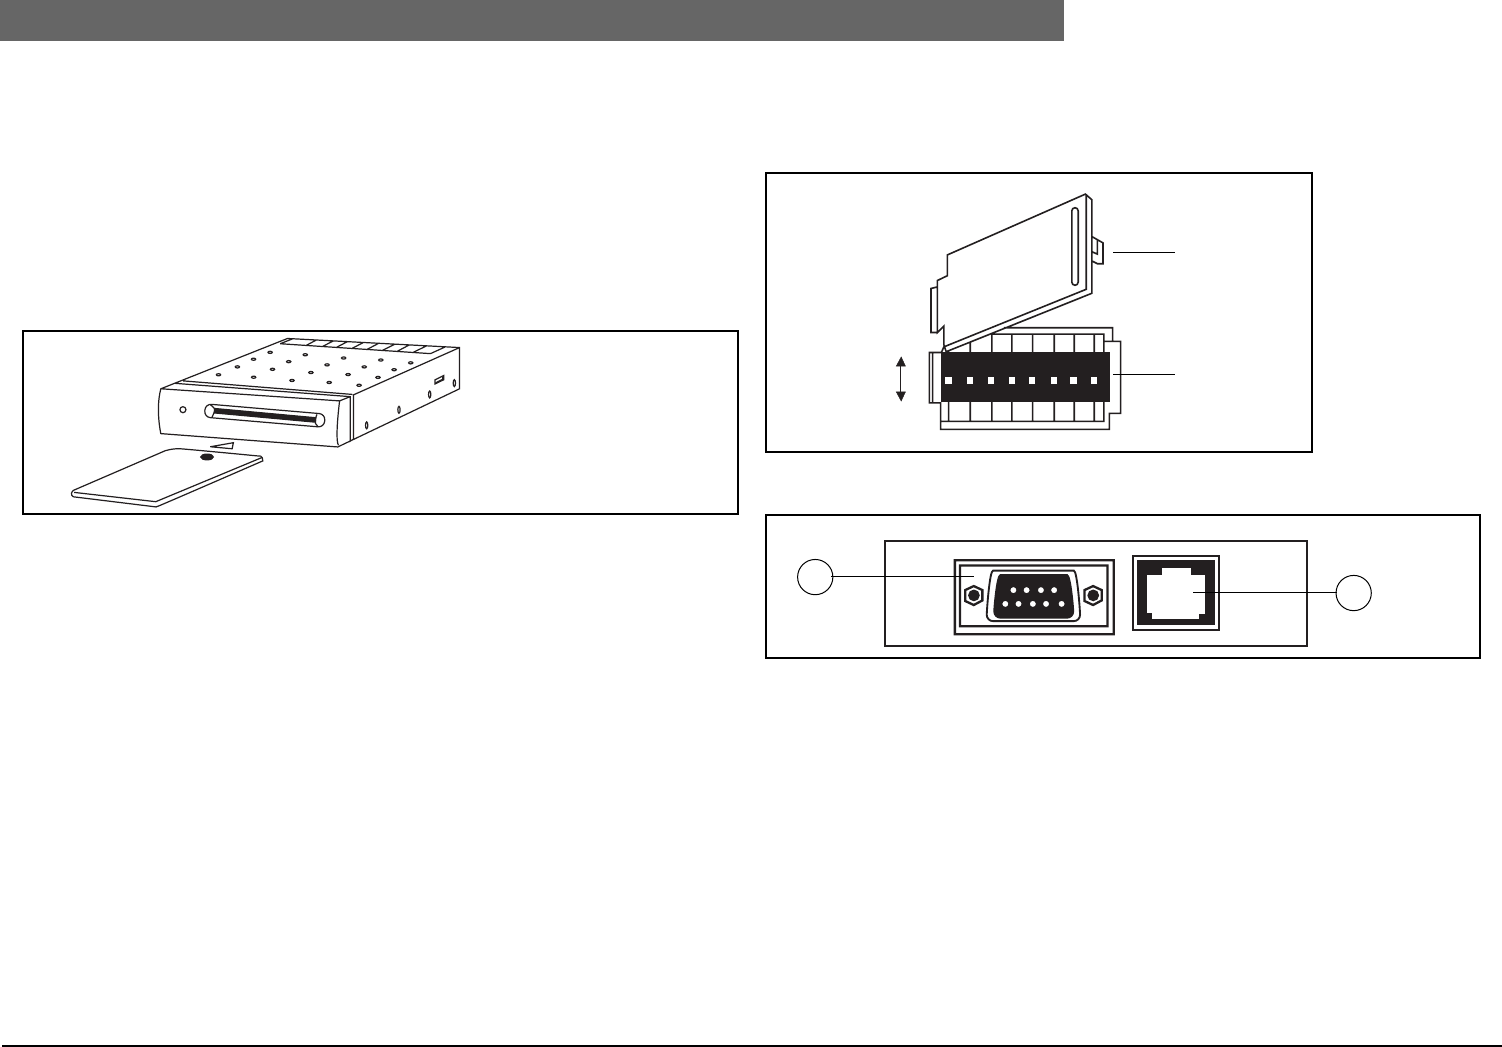
2
Bosch Security Systems | 04-2003 | 3922 988 43318 en
Digital Congress Network | Installation and Operating Manual | Chapter 2 - Contribution Equipment en | 2-25
LBB 4157/00 Chip Card Encoder
2.20 LBB 4157/00 Chip Card Encoder
Supporting a wide range of micro-processor cards compliant with ISO standards as well as the most
frequently used synchronous cards, the LBB 4157 Chip Card encoder can easily be
integrated into the DCN system.
The LBB 4157/00 is delivered with an external installation kit, and is powered by the workstation to
which it is connected by a serial port.
The encoder is used in combination with DCN’s ID Card Encoder Software package LBB 3581/00.
The software can detect whether a Chip Card encoder or Magnetic stripe card encoder is connected.
FIG. 2-40 LBB 4157/00 Chip Card Encoder
Technical specification
Chip Card Interface: - 8-contact friction connector (ISO location)
- Protection against unexpected card withdrawal, short circuits and over
consumption
Serial Interface: - RS232 interface to the DCN PC on RJ45 connector (connector 2)
- RS232 interface on DB9 connector reserved for future use
(connector 1)
Internal architecture: - 8-bit microcontroller
- 128-Kbyte OTP memory
- 32-Kbyte static RAM
Power consumption: - 200 mA maximum on 5V
Compliance: The LBB 4157/00 complies with the following security and
EMC directives and international standards:
- 73/23/CEE, ISO/IEC 7816-1/2/3 and CEM 89/336/CEE, modified by the
92/31/CEE directive.
- EN 55022 Class B, EN 60950 and EN 50082-1, provided that cables
supplied by BOSCH and an EC-certified computer are used.
The Chip Card Encoder is a SELV (Safety Extra Low Voltage) equipment and must be connected to a
PC of the same kind.
2.20.1 Position of the DIP switches
• Open the DIP compartment under the encoder by lifting the lid.
• Using a sharp object such as a pencil, set all the DIPs to the OFF position (see below)
FIG. 2-41 Bottom view DIP compartment
FIG. 2-42 Rear view of the Chip card encoder
ON
87654321
ON
OFF DIP switches
Lid
12
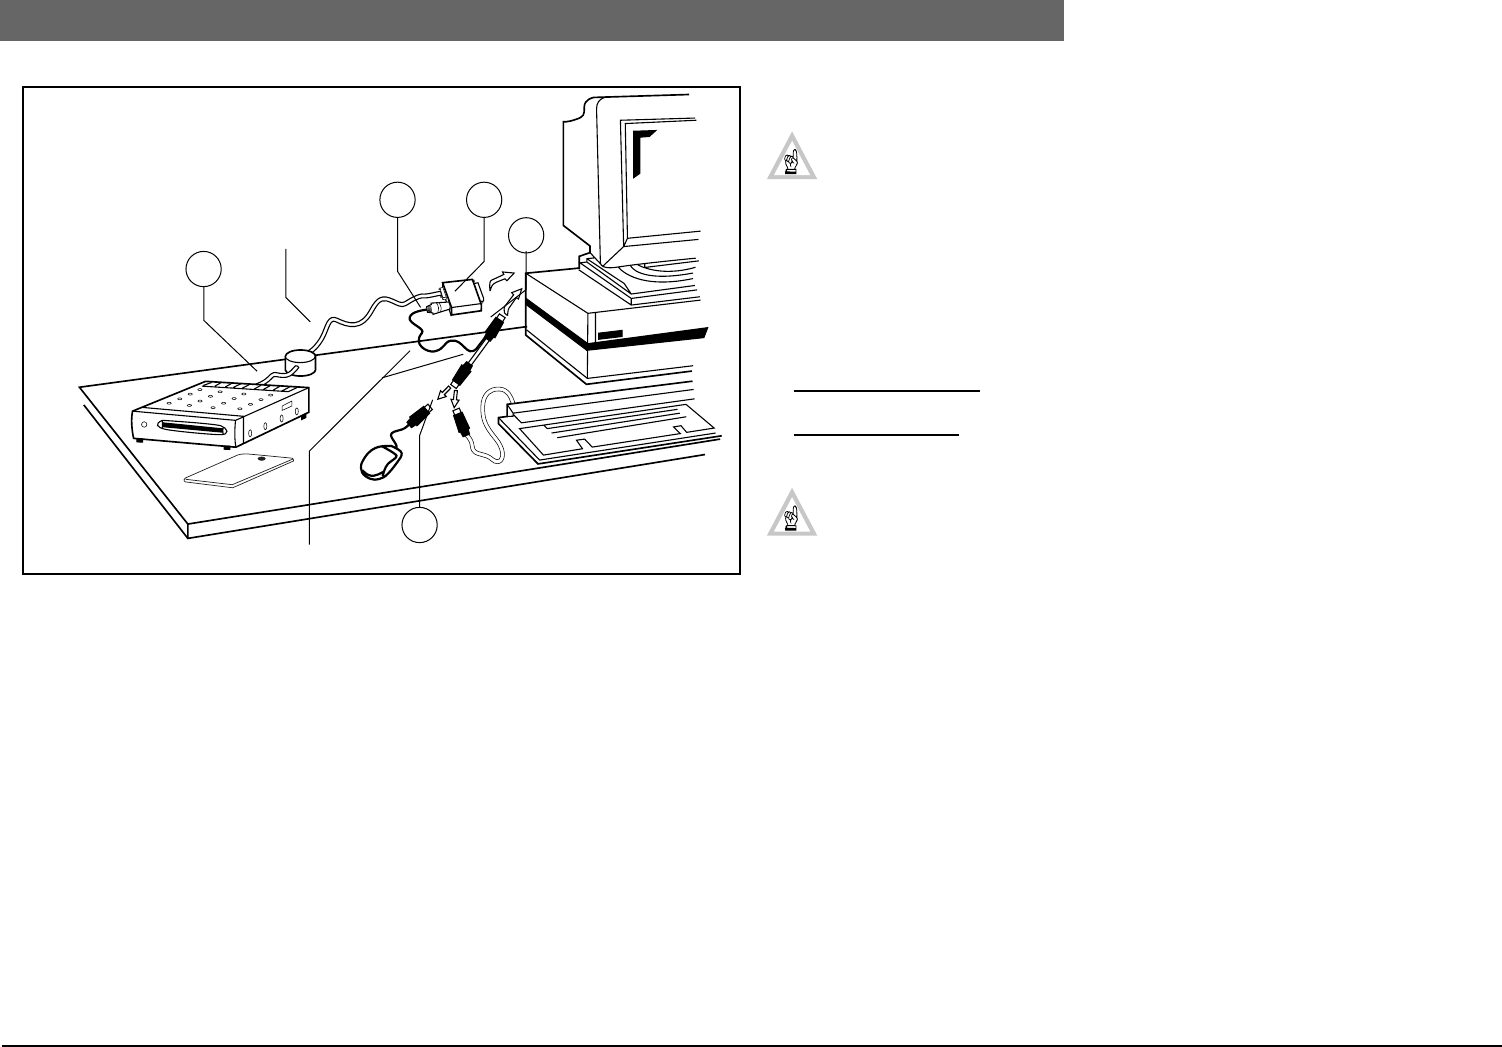
2
Bosch Security Systems | 04-2003 | 3922 988 43318 en
Digital Congress Network | Installation and Operating Manual | Chapter 2 - Contribution Equipment en | 2-26
LBB 4157/00 Chip Card Encoder
FIG. 2-43 Connecting the Chip Card Encoder
Contents of the External Installation Kit
• 1 Serial cable
• 1 Power supply cable
• 4 self adhesive feet
• 2 Velcro strips
Installing the External Encoder (see FIG. 2-43):
CAUTION: Prior to any installation switch-off the computer and remove the mains supply.
1. Connect the serial cable by plugging the RJ46 connector (3) to the encoder connector (2) and
the DB9 connector (5) to the serial port of the PC, tightening the screws.
2. Disconnect either the PC keyboard or mouse. Connect it to part (7) of the power supply cable
3. Connect the mini jack (4) to the serial cables jack socket (5)
4. Connect part (6) of the power supply cable to the PC’s mouse or keyboard port.
Positioning the Encoder
1. Beside the Computer: Stick the 4 self adhesive feet into the circular recesses meant for that
purpose under the encoder.
2. On the Computer: Stick one velcro strip under the encoder, and the other one on the main
unit of the computer. Put the encoder on the main unit.
NOTE: The Chip Card Encoder and the DCN Magnetic Stripe Encoder can only be used
alternatively and not at the same time.
Do not stick anything on the DIPs compartment
3
Serial
cable
5
4
7
Power supply cable
6

2
Bosch Security Systems | 04-2003 | 3922 988 43318 en
Digital Congress Network | Installation and Operating Manual | Chapter 2 - Contribution Equipment en | 2-27
LBB 3524/00, LBB 3524/10 and LBB 3526/10 FM Electronic channel selector panel
2.21 LBB 3524/00, LBB 3524/10 and LBB 3526/10
FM Electronic channel selector panel
All channel selector panels include a 1.5-digit numeric built-in display with up/down select keys for
selection of the required language channel. A headphone socket is provided for discrete listening via
headphones. The unit is intended for mounting into table-tops or seat armrests. The LBB 3524/10* is
identical to the LBB 3524/00 but includes two 1 m (3.2 ft.) long integrated input and output cables for
ease of installation, and a backlit LC-display for easy viewing in darkened congress venues. The LBB
3426/10 is identical to the LBB 3524/10 but has a longer width (144 mm (5.6 in) instead of 120 mm
(4.72 in) (for the LBB 3524/00 and LBB 3524/10).
NOTE: *an unused output cable must be terminated using a termination plug LBB 4118/00.
Controls and Indicators (FIG. 2-44):
1. 3.5 mm jacksocket for headphones (6.35 mm for LBB 3526/10).
2. 2 x push-button (up/down) for headphone volume control.
3. Numeric display (1.5-digit LC-display) for channel number indication.
4. 2 x push-button (up/down) for language channel selection.
Interconnection (FIG. 2-45):
LBB 3524/00
5. 2 m (6.5 ft.) long cable terminated with a moulded 6-pole circular connector.
6. 6-pole circular connector for loop-through connection.
LBB 3524/10 and LBB 3526/10 (FIG. 2-47):
5. 1 m (3.2 ft.) long input cable terminated with a moulded 6-pole DIN DCN female connector.
6. 1 m (3.2 ft.) long output cable terminated with a moulded 6-pole DIN DCN male connector.
FIG. 2-44 LBB 3524/00 FM Channel Selector Panel
FIG. 2-45 LBB 3524/00 FM Electronic channel selector panel (bottom view)
FIG. 2-46 LBB 3524/10 and LBB 3526/10 FM Electronic channel selector panels
FIG. 2-47 Interconnections LBB 3524/10 and LBB 3526/10
1 2 3 4
5 6
LBB 3524/10 LBB 3526/10
Includes two 1 m integrated input
and output cables Includes two 1 m integrated input
and output cables
BOSCH
BOSCH
BOSCH
BOSCH
11
BOSCH
11
5
6
5
6
LBB 3526/10
LBB 3524/10
Female
Female
Male
Male
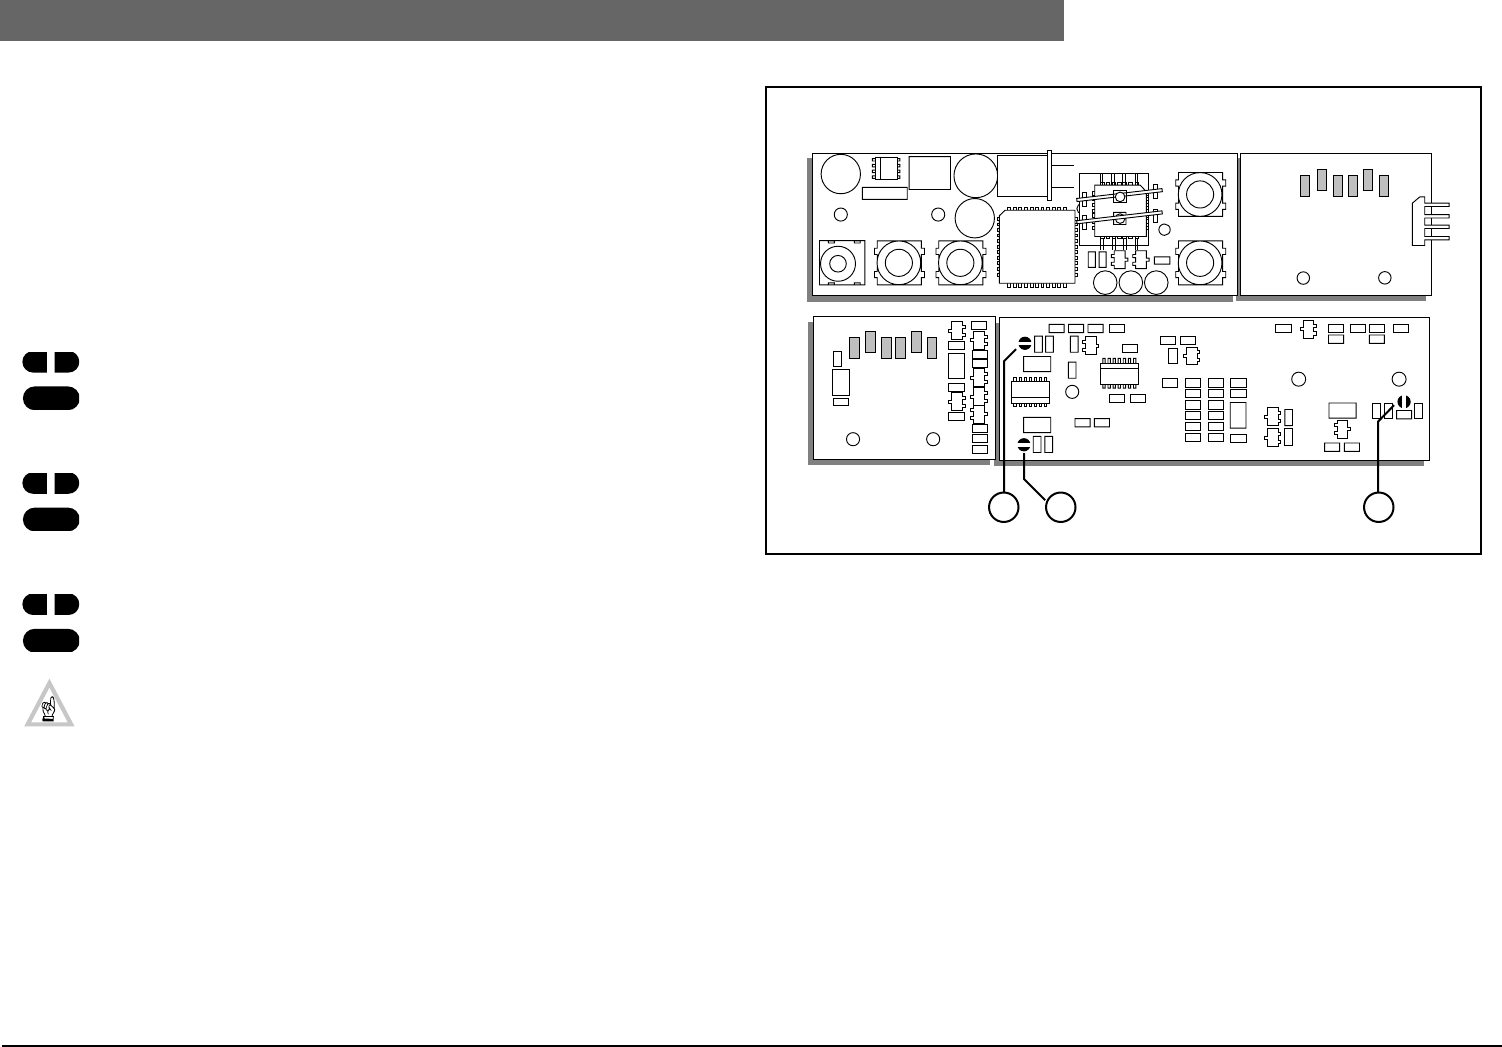
2
Bosch Security Systems | 04-2003 | 3922 988 43318 en
Digital Congress Network | Installation and Operating Manual | Chapter 2 - Contribution Equipment en | 2-28
LBB 3524/00, LBB 3524/10 and LBB 3526/10 FM Electronic channel selector panel
Auto Switch-Off function
The unit’s ‘Auto Switch-Off ’ function can be enabled or disabled. If enabled, the unit is switched off by
removing headphones from the jack socket. If disabled, the units remains on when headphones are
removed from the jack socket. See solder spot jumper and resistor configuration. The backlighting
feature is only active when a headphone is connected.
LBB 3524/xx and LBB 3526/10 Jumper and Resistor configuration (FIG. 2-48)
Solder spots J70 and J71 sets the channel selector’s volume up and down controls. The volume-up
and volume-down can be set independently. The ‘Auto Switch-Off ’ function is enabled or disabled
using solder spot J72.
1. Solder spot J70 (to set repeat/single-step volume-up control)
OPEN Auto repeat volume-up
CLOSED Single-step volume-up
2. Solder spot J71 (to set repeat/single-step volume-down control)
OPEN Auto repeat volume-down
CLOSED Single-step volume-down
3. Solder spot J72 (to set Auto-switch Off function)
OPEN Enabled
CLOSED Disabled
IMPORTANT: The last panel (LBB 3524/10, LBB 3526/10) connected (daisy-chain) must
be terminated with a termination plug LBB 4118/00.
FIG. 2-48 Interconnections LBB 3524/10 and LBB 3526/10
1 2 3
Bottom view
Top view
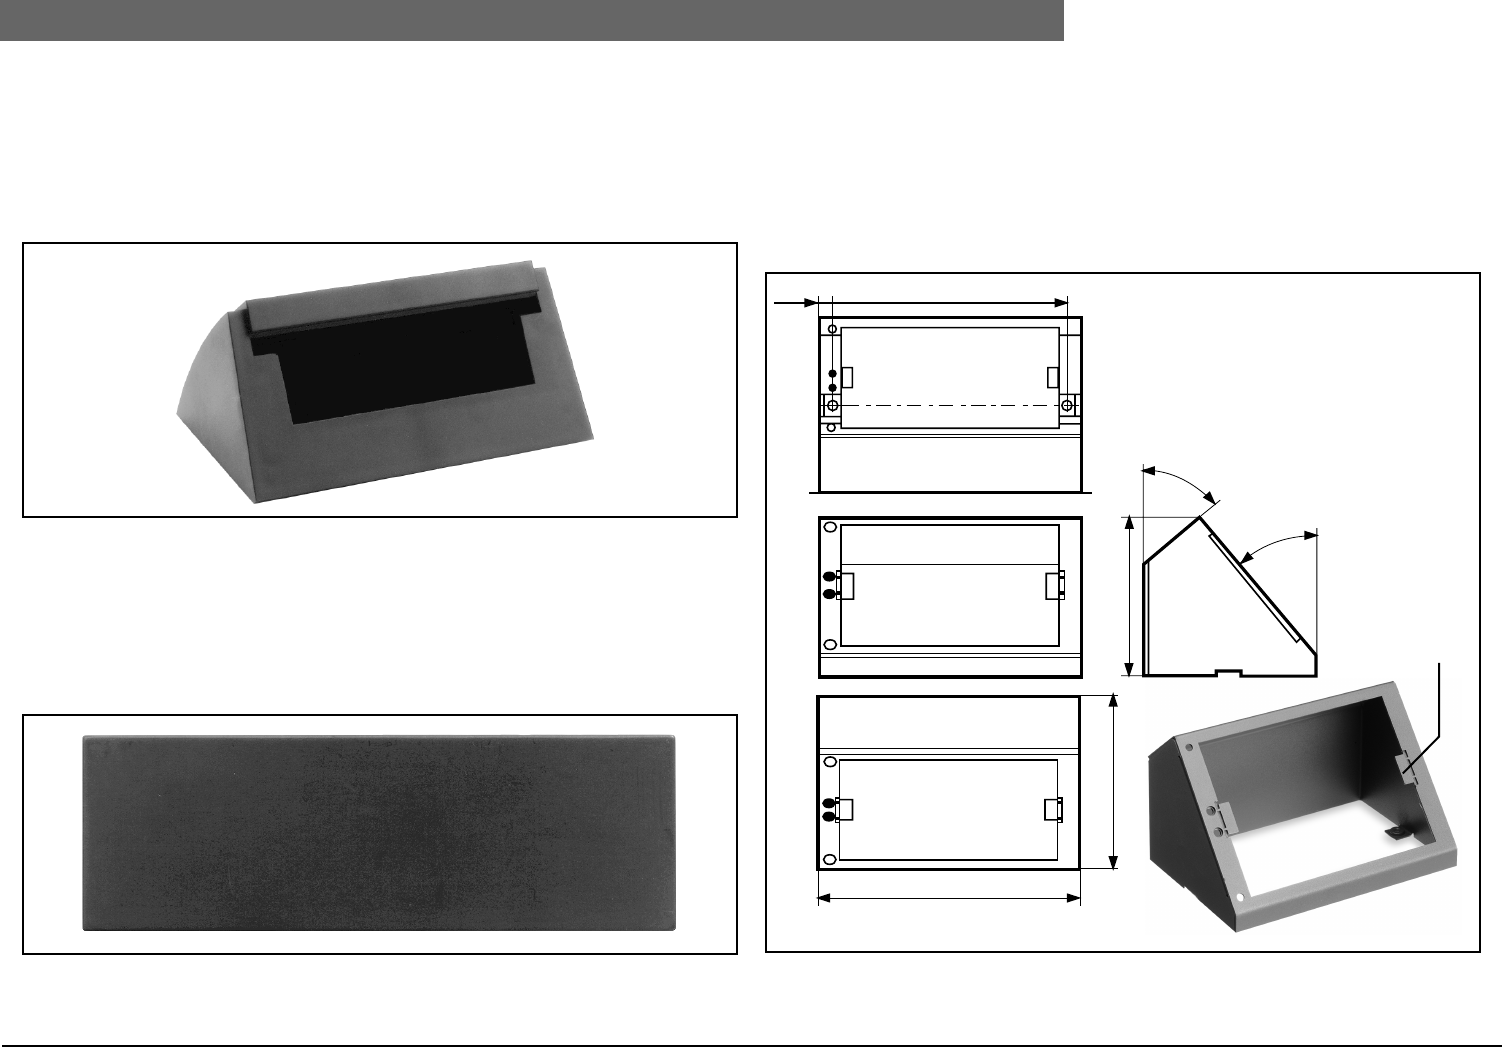
2
Bosch Security Systems | 04-2003 | 3922 988 43318 en
Digital Congress Network | Installation and Operating Manual | Chapter 2 - Contribution Equipment en | 2-29
LBB 3525/00 Table top housing for Channel selector or Voting control panel
2.22 LBB 3525/00 Table top housing for
Channel selector or Voting control panel
The housing is intended for use in portable/table-top systems. It is designed to neatly accommodate
the Electronic Channel Selector panels LBB 3524/00 or LBB 3524/10 or Voting control panel
LBB 3541/00
FIG. 2-49 LBB 3525/00 Channel selector housing
2.23 LBB 3539/00 Blanking panels
A blank panel can be used to blank over redundant flush-mounted table-top slots which might be
used for future expansion of the system.
FIG. 2-50 LBB 3539/00 Blanking panel
2.24 LBB 3527/00 Table top housing
The table top housing LBB 3527/00 can accommodate 2 flush mounted units with dimensions (H x
W) 40 x 120 am (1.57 x 4.72 in). For example: Channel selector panel LBB 3524/xx (lower position)
and Microphone panel LBB 3537/0xx (upper panel) or any other combination of units that fits. The
unit can also accommodate one flush-mounted loudspeaker panel LBB 3538/00.
NOTE: Remove the ‘snap-off’ lugs before installing the relevant unit.
FIG. 2-51 LBB 3527/00 Flush Mounted Table-top housing
73
50°
40°
1086
80
120
2 x ‘snap-off’ lugs

2
Bosch Security Systems | 04-2003 | 3922 988 43318 en
Digital Congress Network | Installation and Operating Manual | Chapter 2 - Contribution Equipment en | 2-30
LBB 3527/00 Table top housing
This page has been left blank intentionally
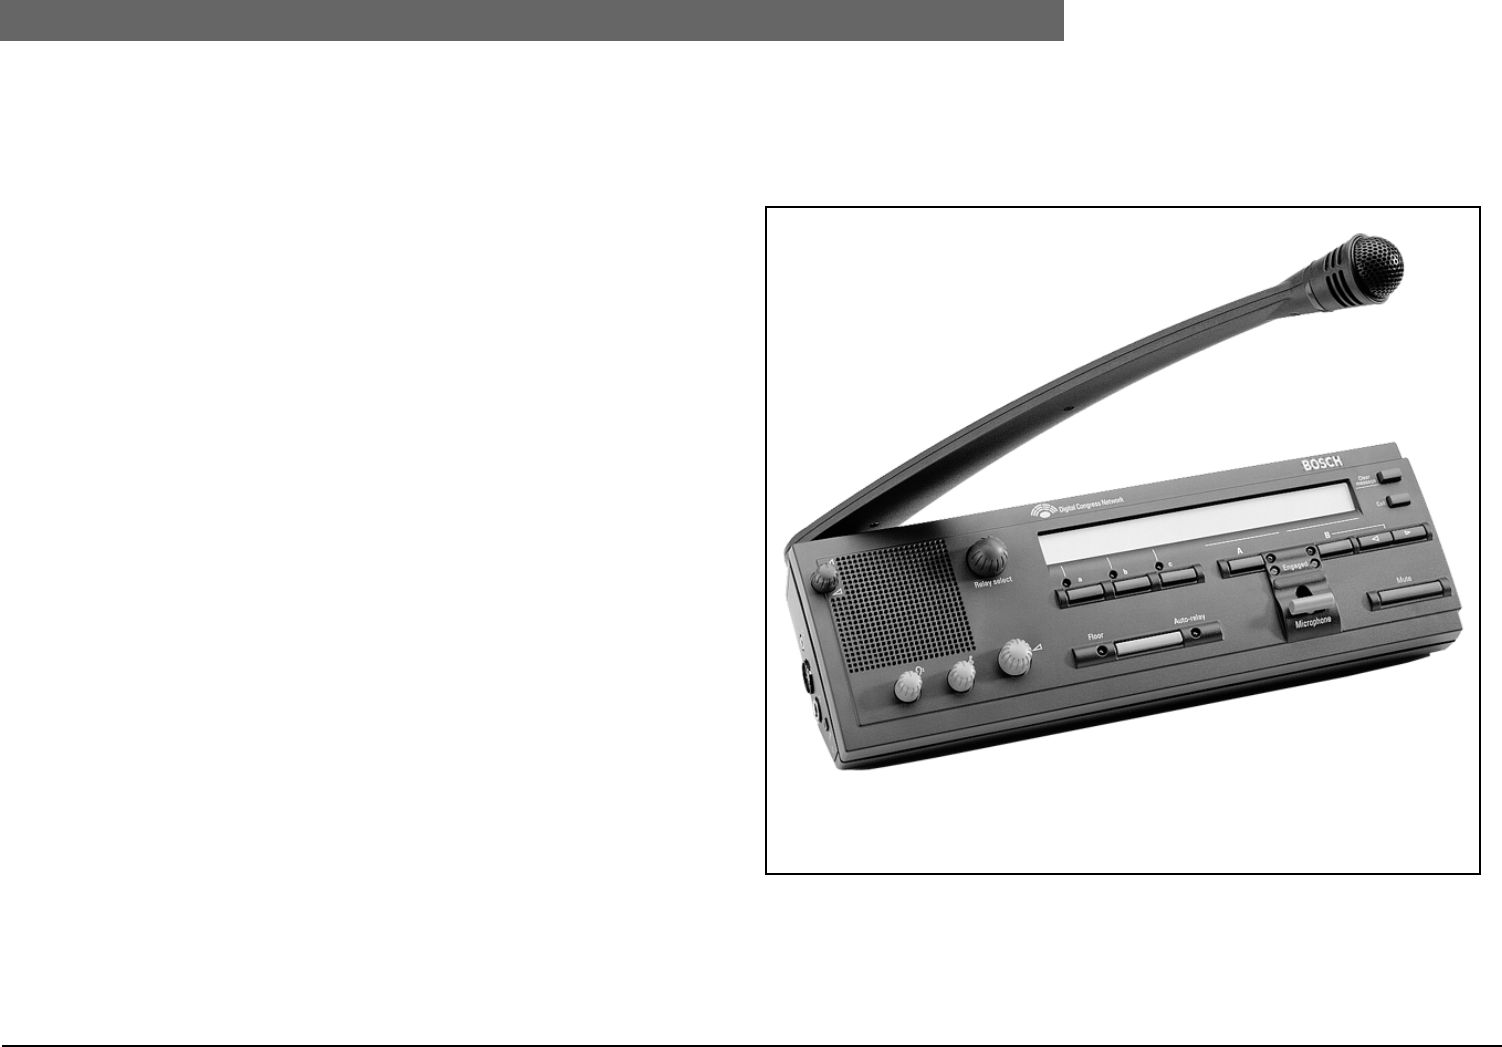
2
Bosch Security Systems | 04-2003 | 3922 988 43318 en
Digital Congress Network | Installation and Operating Manual | Chapter 3 - Interpretation Equipment en | 3-1
LBB 3520/10 Interpreter desk with back-lighting LC-display
Chapter 3. Interpretation
Equipment
The DCN system offers comprehensive facilities for simultaneous interpretation and distribution of
the interpreted languages to delegates, allowing the system to meet all the demands of international
conference and congress venues. All interpretation facilities are fully integrated in the basic system
concept, with digital distribution of the language signals using the same cabling as all the other system
functions.
3.1 LBB 3520/10 Interpreter desk with back-lighting
LC-display
The interpreter desks provides each interpreter with all the necessary facilities according to
internationally agreed standards. The microprocessor controlled desk (A-B type) can handle up to 15
different language channels plus the original floor language. Up to six desks can be fitted per booth.
The desk includes an intercom facility where an intercom handset can be mounted for two-way vocal
communication between interpreters, the chairman and delegates.
Being microprocessor controlled, with a built-in LC-display, the desk in stand-alone systems can be
programmed manually, to preset the allocation of the language channels, channel distribution, and
interlocks. In PC operator controlled systems the desk in combination with dedicated software can be
programmed by the operator to set all functional interlocks and channel allocation parameters.
An innovative function of the interpreter desk is its three personal incoming language pre-select keys.
Instead of having to manually select from all the available channels, the interpreter can quickly pre-
select the three incoming languages which are most relevant as well as the floor language. This allows
quick, secure switching between the preferred languages and reduces the chance of operating errors.
The alphanumeric display gives an at-a-glance indication of the selected language in plain text form. A
further refinement is an indication of the ‘quality level’ of the incoming channels. Up to now,
interpreters often had no way of knowing if they were receiving a direct or an indirect interpretation.
This facility gives them the option of avoiding the use of an INDIRECT interpretation if a DIRECT
interpretation is available in a language which is known to the interpreter.
The desk also provides for convenient transfer or relay interpretation, to enable the handling of
‘exotic’ languages for which sufficient qualified interpreters are not available. In this case, the DCN’s
unique auto-relay function automatically transmits the relay language to all the other interpreter desks
for onward interpretation. FIG 3-1 Interpreter desk LBB 3520/10

2
Bosch Security Systems | 04-2003 | 3922 988 43318 en
Digital Congress Network | Installation and Operating Manual | Chapter 3 - Interpretation Equipment en | 3-2
LBB 3520/10 Interpreter desk with back-lighting LC-display
Controls and Indicators LBB 3520/10 (see FIG 3-2):
LISTENING FUNCTIONS
Loudspeaker Controls
1. Built-in loudspeaker.
2. Loudspeaker volume control for distribution of the floor language when all the microphones in
the booth are switched off.
3. Volume, treble and bass controls for headphones and headset.
Incoming Channel Controls
4. Rotary selector switch, for selection of the incoming language channel.
5. Three Preselect relay keys a, b and c with a green LED indication for quick access to the interpret-
ers’ personal designated incoming language channels.
6. Floor language indication (green LED).
7. Select key for selection of the original floor language or auto-relay language when available.
8. Auto-relay indication (green LED).
SPEAKING FUNCTIONS
Outgoing Channel Controls
9. Outgoing A-channel and B-channel select keys with channel select indicators (red LED).
10. Uni-directional condenser microphone on a ‘fold-away’ stem with an illuminated red light ring to
indicate ‘microphone status’. The microphone itself includes a built-in pop and windshield.
11. Clear message/ Speak-to-fast key.
12. Call key (voice) two-way communication between interpreter and chairman/operator.
13. Outgoing B-channel selection keys (forward/reverse).
14. Microphone Mute key.
15. Channel engaged indicators for A and B outputs (yellow LEDs).
16. Microphone On/Off lever-type switch.
17. Microphone status indicator (red LED bar).
VIEWING FUNCTION
18. Alphanumeric 2-line by 40-character LC-display with back-lighting
Interconnections
All interpreter desks include connectors for loop-through connection of one unit to the other (i.e.
‘daisy chain’). FIG 3-2 shows the connectors and the interconnection method used.
19. 6.3 mm jack headphone connector.
20. Headphone or headset connector (5-pole 180° DIN-type socket) (according IEC 268-11).
21. 3.5 mm jack headphone connector.
22. Selector switch to select an external headset microphone or built-in microphone.
23. 2 m (6.5 ft.) long cable terminated with a moulded 6-pole circular connector.
24. 6-pole circular connector for loop-through connections.
25. Modular jack connector for connection to intercom handset LBB 3555.
26. Recess microswitch for resetting the unit’s address (De-Init).
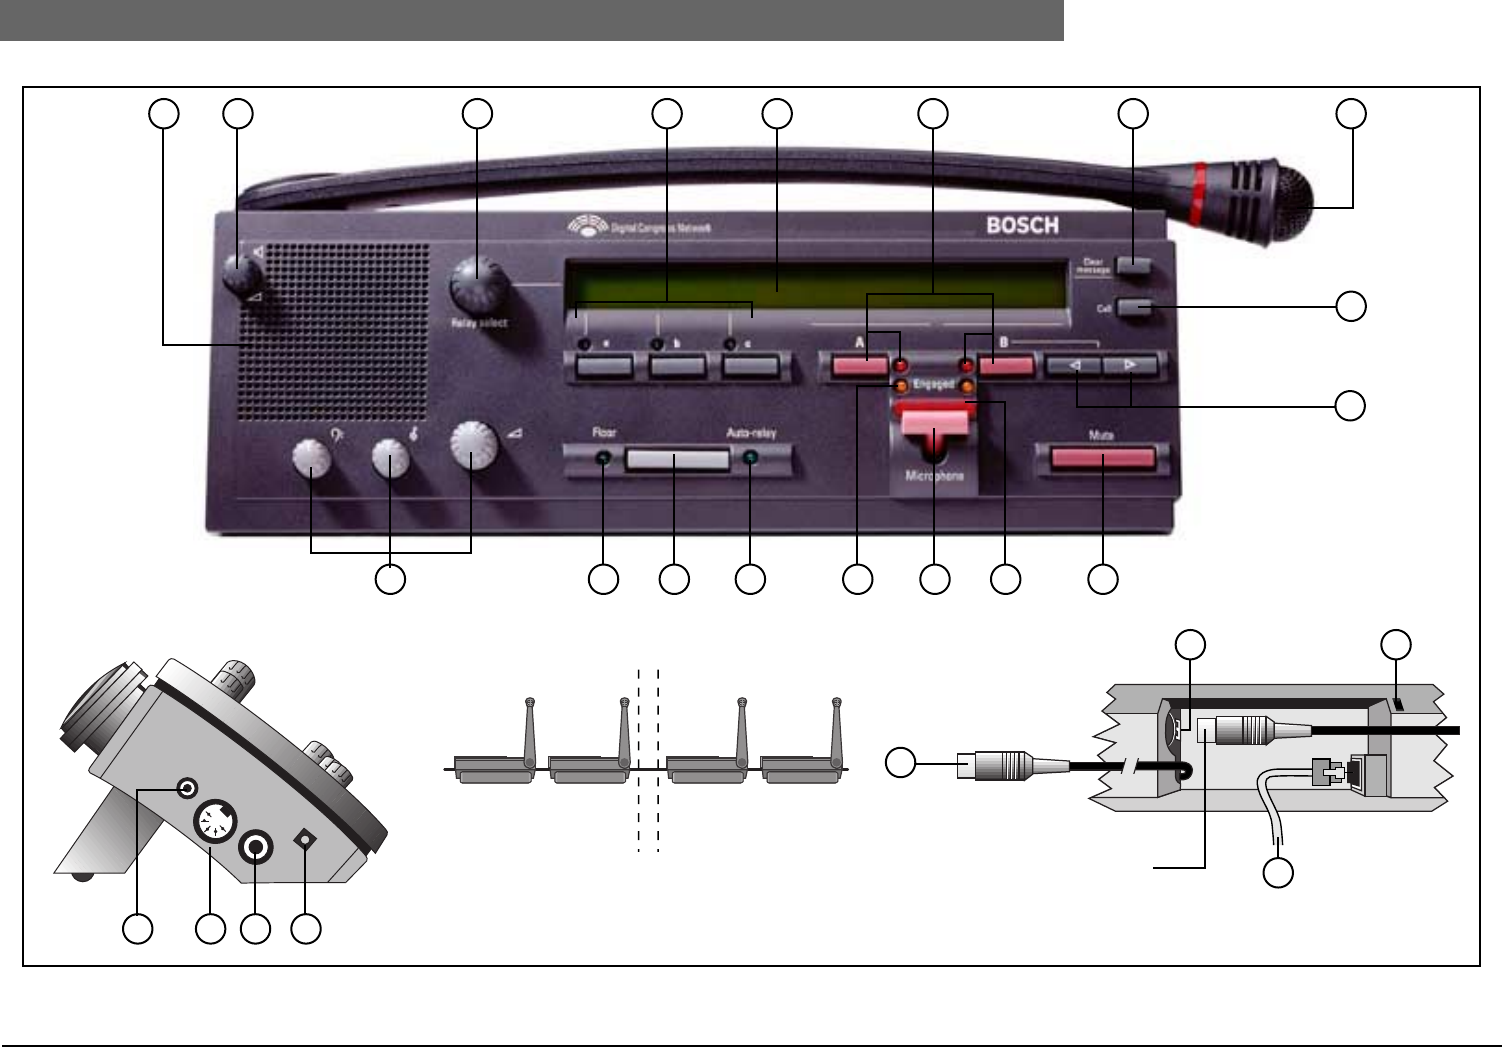
2
Bosch Security Systems | 04-2003 | 3922 988 43318 en
Digital Congress Network | Installation and Operating Manual | Chapter 3 - Interpretation Equipment en | 3-3
LBB 3520/10 Interpreter desk with back-lighting LC-display
FIG 3-2 LBB 3520/10 Interpreter desk
1 2 4 1851011
12
13
14171615876 3
LBB 3520/10
Interconnecting Interpreter desks
To previous unit
24 26
25
From next unit
23
21 20 19 22
Side view LBB 3520/10
Interconnection
9
From Intercom handset
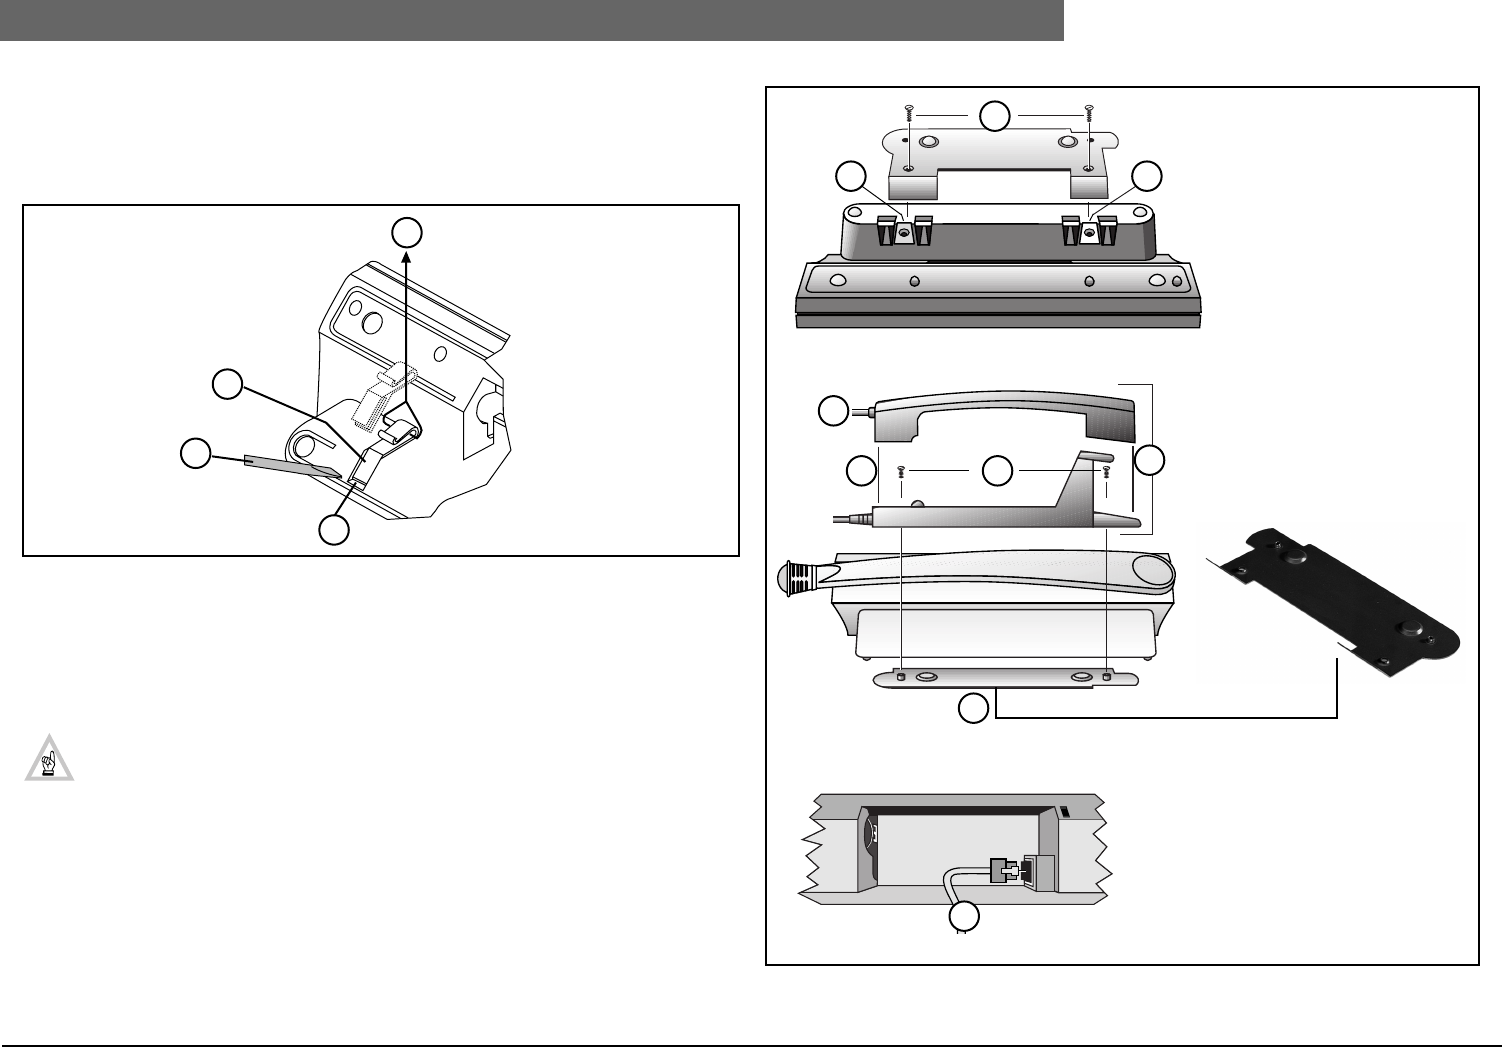
2
Bosch Security Systems | 04-2003 | 3922 988 43318 en
Digital Congress Network | Installation and Operating Manual | Chapter 3 - Interpretation Equipment en | 3-4
LBB 3520/10 Interpreter desk with back-lighting LC-display
3.1.1 Removal cable guide (FIG 3-3) (Interpreter desk LBB 3520/10)
To access the cable guide proceed as follows:
1. Wrap a small cord round the cable guide and pull firmly in the direction shown.
2. Place the head of a screwdriver in the cable guide groove as shown and twist gently.
FIG 3-3 Removal of cable guide
3.1.2 Installing Intercom Handset to LBB 3520/10 (see FIG 3-4)
Handsets can be mounted and attached to the rear of an Interpreter desk LBB 3520/10, using a metal
mounting plate LBB 3556/00, screws and two spire speed nuts. The spire speed nuts are delivered
with the unit, and the securing screws are delivered with the mounting plate.
NOTE: When mounting the handset, spire speed nuts need to be mounted on the unit
after first removing the units cable guides (see FIG 3-4).
Using the available mounting facilities, handsets can be mounted for both left and right hand users. In
systems using flush-mounted units, handsets with cradles can be table-top mounted or fixed to an
adjacent wall using the screw-holes on the handset cradle.
FIG 3-4 Installing Intercom handset to an Interpreter desk LBB 3520/10
5
6
6
5
Underside Interpreter desk LBB 3520/10
Key to Symbols
1. Screws A
2. For mounting ‘spire’ speed
nuts
3. Handset
4. Handset cradle
5. Screws B
6. For flush and table top
mounting
7. Mounting plate LBB 3556/00
8. To intercom handset
LBB 3555/00
1
2 2
3
4 5 6
7
8
Interpreter desk LBB 3520/10
Interpreter desk LBB 3520/10
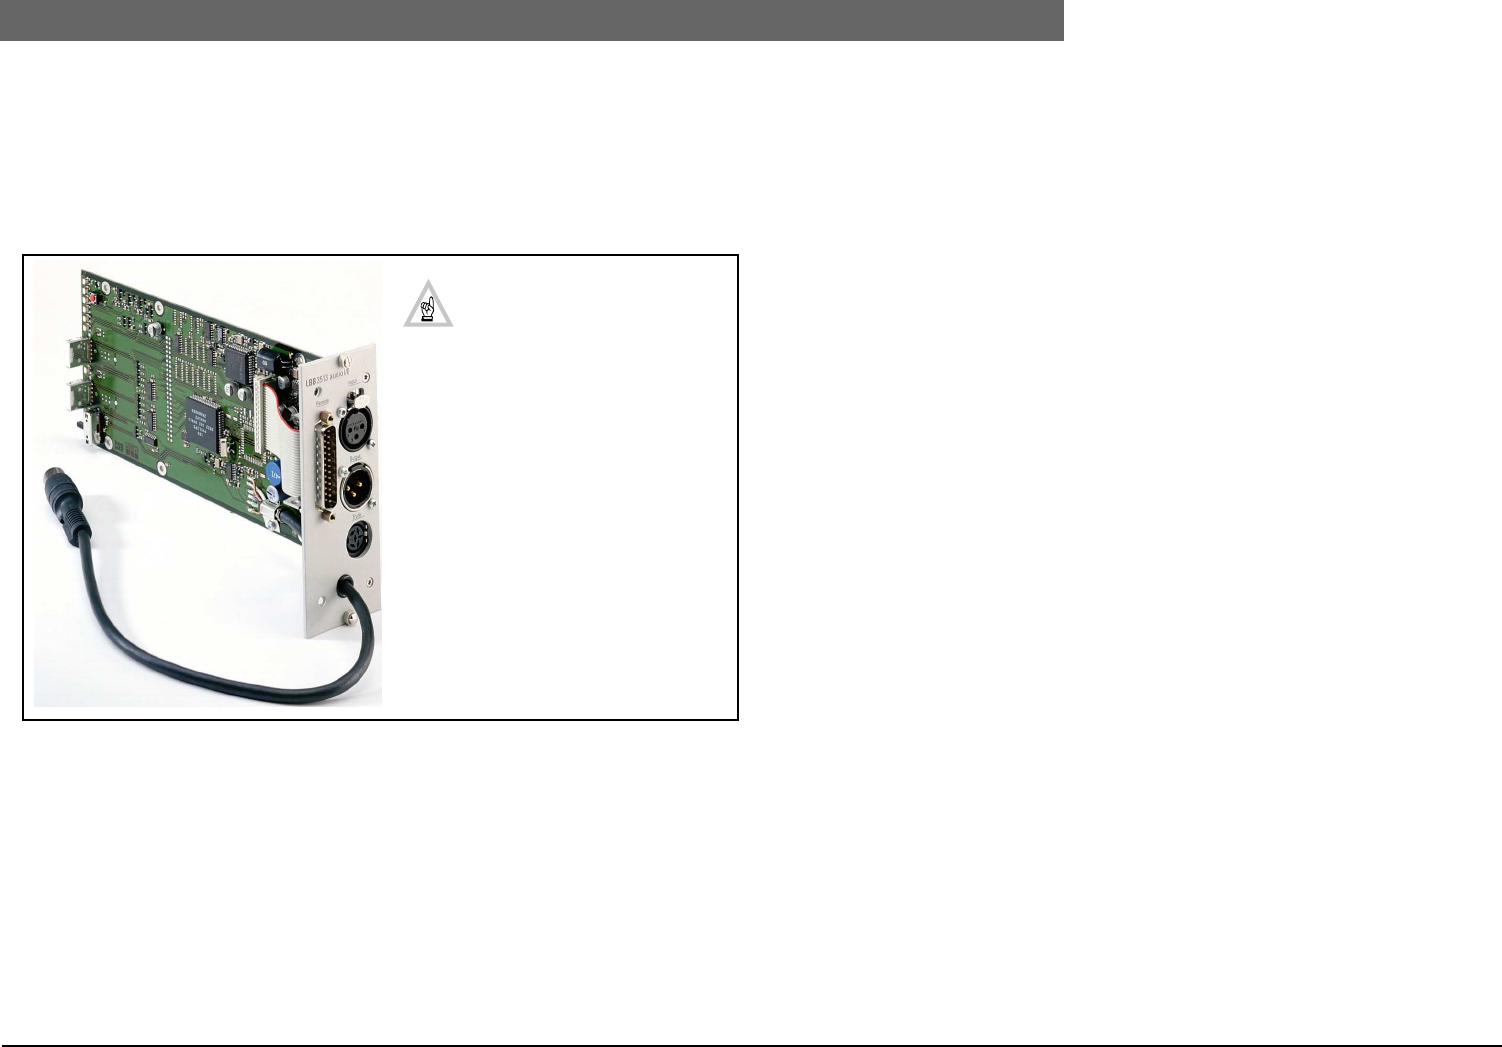
2
Bosch Security Systems | 04-2003 | 3922 988 43318 en
Digital Congress Network | Installation and Operating Manual | Chapter 3 - Interpretation Equipment en | 3-5
LBB 3520/10 Interpreter desk with back-lighting LC-display
3.1.3 LBB 3513/00 Analog Audio Input/output Module
The Analog Audio Input/Output Module type LBB 3513/00 has been designed for use in the BOSCH
Digital Congress Network (DCN) system. The module is used to connect external analog audio
equipment for distribution through one of the DCN audio distribution channels. The module also
provides monitoring facilities for the distributed audio channels as well as facilities for coupling to
external audio reproduction systems and audio recording equipment.
FIG 3-5 LBB 3513/00 Analog Audio Input/Output module
The module is ideally suited for the following applications:
• Audio/music input for distribution via DCNs language channels.
• Distribution of one of DCNs distribution channels to a PA system, monitoring or recording
facilities.
• Connecting an interpreter at a remote site via standard communication links e.g. telephone line.
• Connecting to a remote DCN system.
The module also includes a remote control facility for custom built panel solutions where channel
selection and various signal indications are available on a 25-pole SUB-D connector.
NOTE: Only DCN software 8.10
or higher. For further information
on applications and connection
details refer to the Instructions
for use for the module, code No.
(3922 988 9251x).

2
Bosch Security Systems | 04-2003 | 3922 988 43318 en
Digital Congress Network | Installation and Operating Manual | Chapter 3 - Interpretation Equipment en | 3-6
LBB 3520/10 Interpreter desk with back-lighting LC-display
This page has been left blank intentionally
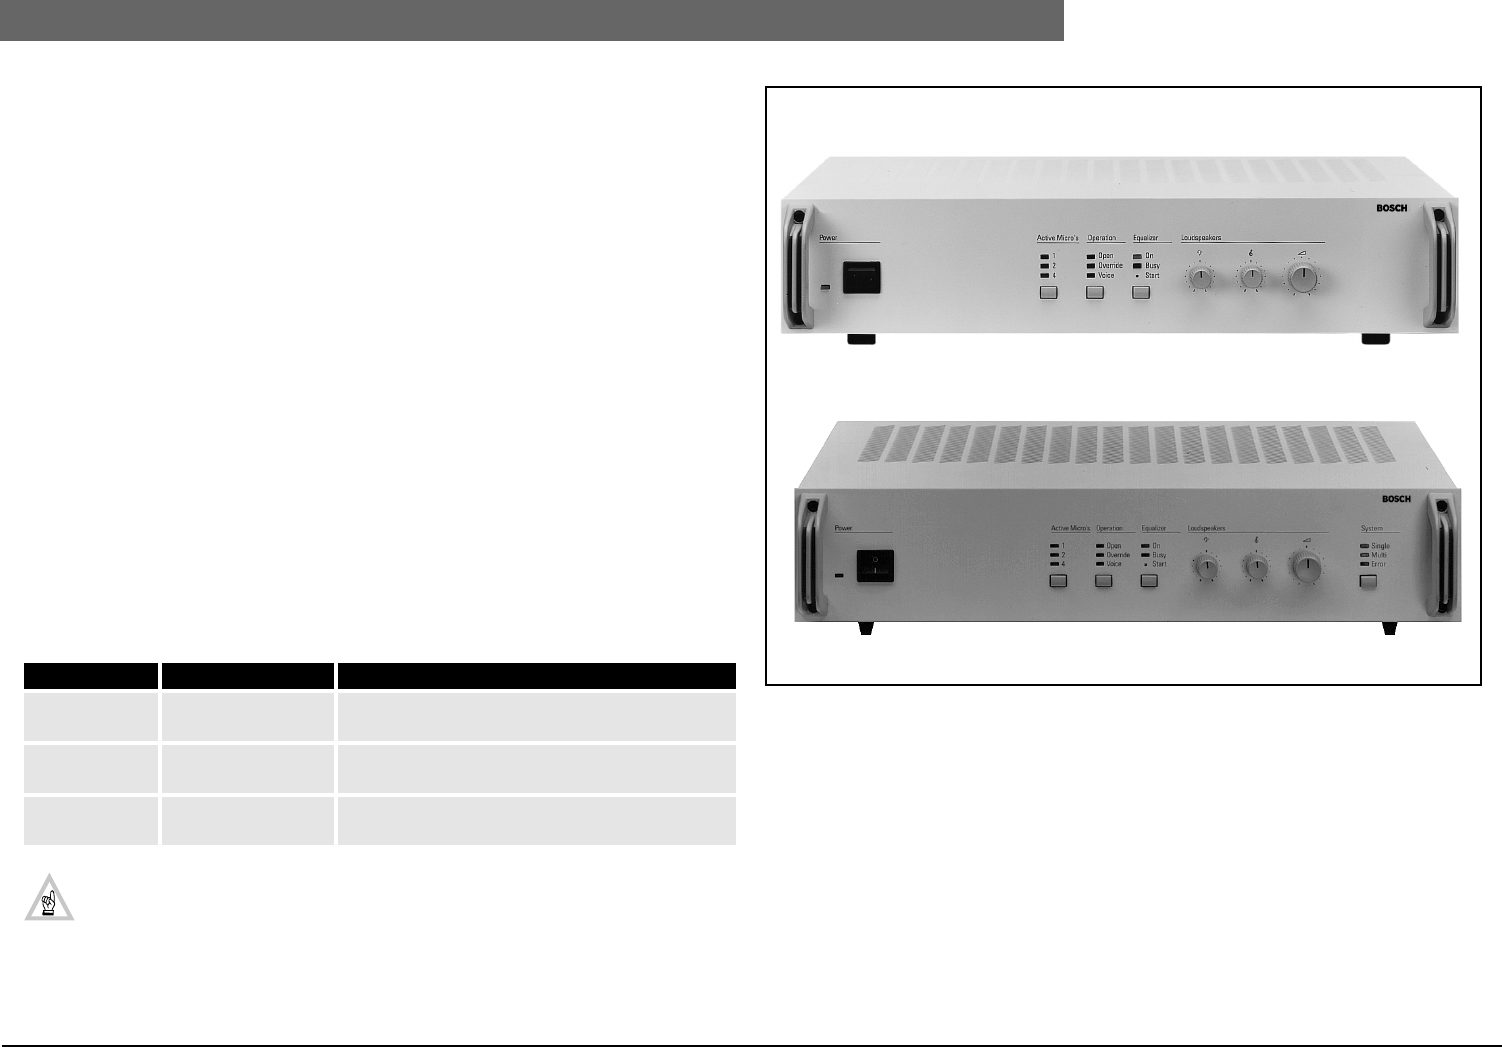
2
Bosch Security Systems | 04-2003 | 3922 988 43318 en
Digital Congress Network | Installation and Operating Manual | Chapter 4 - Central Control Equipment en | 4-1
Introduction Central control equipment
Chapter 4. Central Control
Equipment
4.1 Introduction Central control equipment
The Central Control Unit (CCU) is at the heart of the DCN system, and has control facilities for up
to 240 contribution units, such as delegate and chairman units, interpreter desks, as well as audio and
multipurpose interface units. The CCU can function with or without a central operator using a PC.
Stand-alone systems
For use in smaller systems where an operator is not essential, the Central Control Unit type
LBB 3500/05 is used as a ‘stand-alone’ unit providing basic microphone operational modes, basic
parliamentary voting procedures, and facilities for organizing interpretation channels and basic
intercom functions. A dedicated RS 232 port is used for automatic camera control (default) and can
also be set for ‘test and diagnostic’ purposes.
PC control
For use in larger systems requiring a central operator, Central Control Units type LBB 3500/15 and
LBB 3500/35 are used allowing a PC to be used as the interface between an operator and the DCN
system. A wide range of Windows based DCN application software modules are available to run on
the PC to provide comprehensive facilities for conference control and management. Each CCU has a
dedicated built-in RS232 port for ‘DIRECT’ connection to a PC ( the PC does NOT require a PC-
Network card LBB 3510/00). See Chapter 5. DCN Control using Personal Computers.
IMPORTANT: (D) versions are intended for the North American market only.
All controls and indicators described for DCN Control equipment (i.e. LBB 3500/05,
LBB 3500/15, LBB 3500/35, LBB 4106/00 and LBB 3508/00) are also valid (unless
mentioned) for (D) type versions with the exception of the ‘power supply’.
See Chapter 4.4.1.
FIG 4-1 Central Control Units
Table 4-1: Range of DCN Central Control Units
CCU Range PCF rating (max) Ports (default settings)
LBB 3500/05
LBB 3500/05(D)
90 PCF 1 x RS232 COM Port (camera control)
LBB 3500/15
LBB 3500/15(D)
180 PCF 2 x RS232 COM Ports
(Port 1 = PC control, Port 2 = camera control)
LBB 3500/35
LBB 3500/35(D)
180 PCF 2 x RS232 COM Ports
(Port 1 = PC control, Port 2 = camera control)
LBB 3500/35 and LBB 3500/35(D)
LBB 3500/05, LBB 3500/00(D) and LBB 3500/15, LBB 3500/15(D)

2
Bosch Security Systems | 04-2003 | 3922 988 43318 en
Digital Congress Network | Installation and Operating Manual | Chapter 4 - Central Control Equipment en | 4-2
LBB 3500/05, LBB 3500/05(D) Basic Central Control Unit
4.2 LBB 3500/05, LBB 3500/05(D)
Basic Central Control Unit
The LBB 3500/05 is intended for use in stand-alone discussion systems only (i.e. no central PC
operator). Its built in control facilities can control up to 240 active contribution units, while its power
handling capacity can handle up to 90 PCF points*.
*The figure stated represents the number of units rated with a Power Consumption Factor (PCF) of
1. For further information regarding the Power Consumption Factor refer to Chapter 10.1.1: “System
design fundamentals”.
The unit’s built-in functions include:
• Power supply to supply up to a maximum of 90 PCF points
• Control facilities for controlling up to 240 contribution units
• Digital audio control and processing facilities for 2 x 15 HiQ digital audio channels, used for
contribution, distribution and interpretation units
• Automatic audio equalizer for adjusting the frequency response of the delegate and chairman
loudspeaker channels
• Three basic microphone Operational modes (Operation) including:
(1) ‘Open’: Microphone key-control
(2) ‘Override’: Microphone key-control with override (First-In-First-Out)
(3) ‘Voice’ activated: Microphone control activated by voice-sample
• Each mode of Microphone operation allows the selection of 1,2 or 4 microphones to be
switched on concurrently (in ‘Voice’ activated mode 2 or 4 microphones can only be selected).
• Control for basic electronic parliamentary voting procedures with Present, Yes, No and Abstain.
• Basic Simultaneous Interpretation facilities providing control for as many as 11 interpretation
channels plus the floor channel.
• Basic intercom facilities for one two-way communication channel between Delegate, Chairman
and Interpreters.
NOTE: For Control and Indicators see Chapter 4.4 and FIG 4-2
4.3 LBB 3500/15, LBB 3500/15(D)
Central Control Unit
The LBB 3500/15 can be used for use in both ‘stand-alone’ discussion systems and PC controlled
systems
As for LBB 3500/05 but includes:
• Power supply to supply up to a maximum of 180 PCF points
• Built-in RS232 Communication port for direct connection to a PC.
• Extended facilities are available when connected to a PC using the wide range of DCN’s soft-
ware. See DCN Data Brochure for available software packages
NOTE: For Control and Indicators see Chapter 4.4 and FIG 4-2.
4.4 LBB 3500/35, LBB 3500/35(D)
Multi Central Control Unit
The Multi-CCU LBB 3500/35 is functionally identical to the LBB 3500/15 Central Control Unit and is
used to extend the capacity of the DCN system when more than 240 contribution units are required.
Each subsequent slave CCU (max. 16) added, increases the system capacity by a further 240 units.
The unit can be used stand-alone and function as an LBB 3500/15 CCU. If the software package
installed allows, the ‘Single’ operating mode can be selected by means of a front-panel push-button
switch. The flexibility of the unit means that it can cater for virtually every conference requirement.
When the CCU is set to the Multi CCU system mode, a dedicated PC must be connected which acts
as the master to all slave Multi-CCU’s connected. This PC must be fitted with a Multi-CCU PC card
type LBB 3511/00 and Multi-CCU software type LBB 3586 (see Chapter 5.4).
The unit’s built-in functions for the Multi-CCU system mode include: (see also Chapter 4.6).
As for the LBB 3500/15 but includes:
• Up to 16 Multi-CCUs can be connected, allowing in total up to 3840 (max.) active DCN units to
be connected, or up to 7680* microphones to be connected using Dual Audio Interface units
LBB 3535/00.
NOTE: * The delegate database can only contain 1500 records.
• Switchable between Single and Multi-CCU mode.
• Two basic microphone Operational modes (Operation) including:
(1) ‘Open’: Microphone key-control with request-to-speak registration
(2) ‘Override’: Microphone key-control with override (First-In-First-Out)
Each mode of Microphone operation allows the selection of 1, 2 or 4 microphones to be
switched on concurrently.
NOTE: When set to Single system mode, the Multi-CCU’s built-in functions are identical to
those of the Extended CCU, type LBB 3500/15.
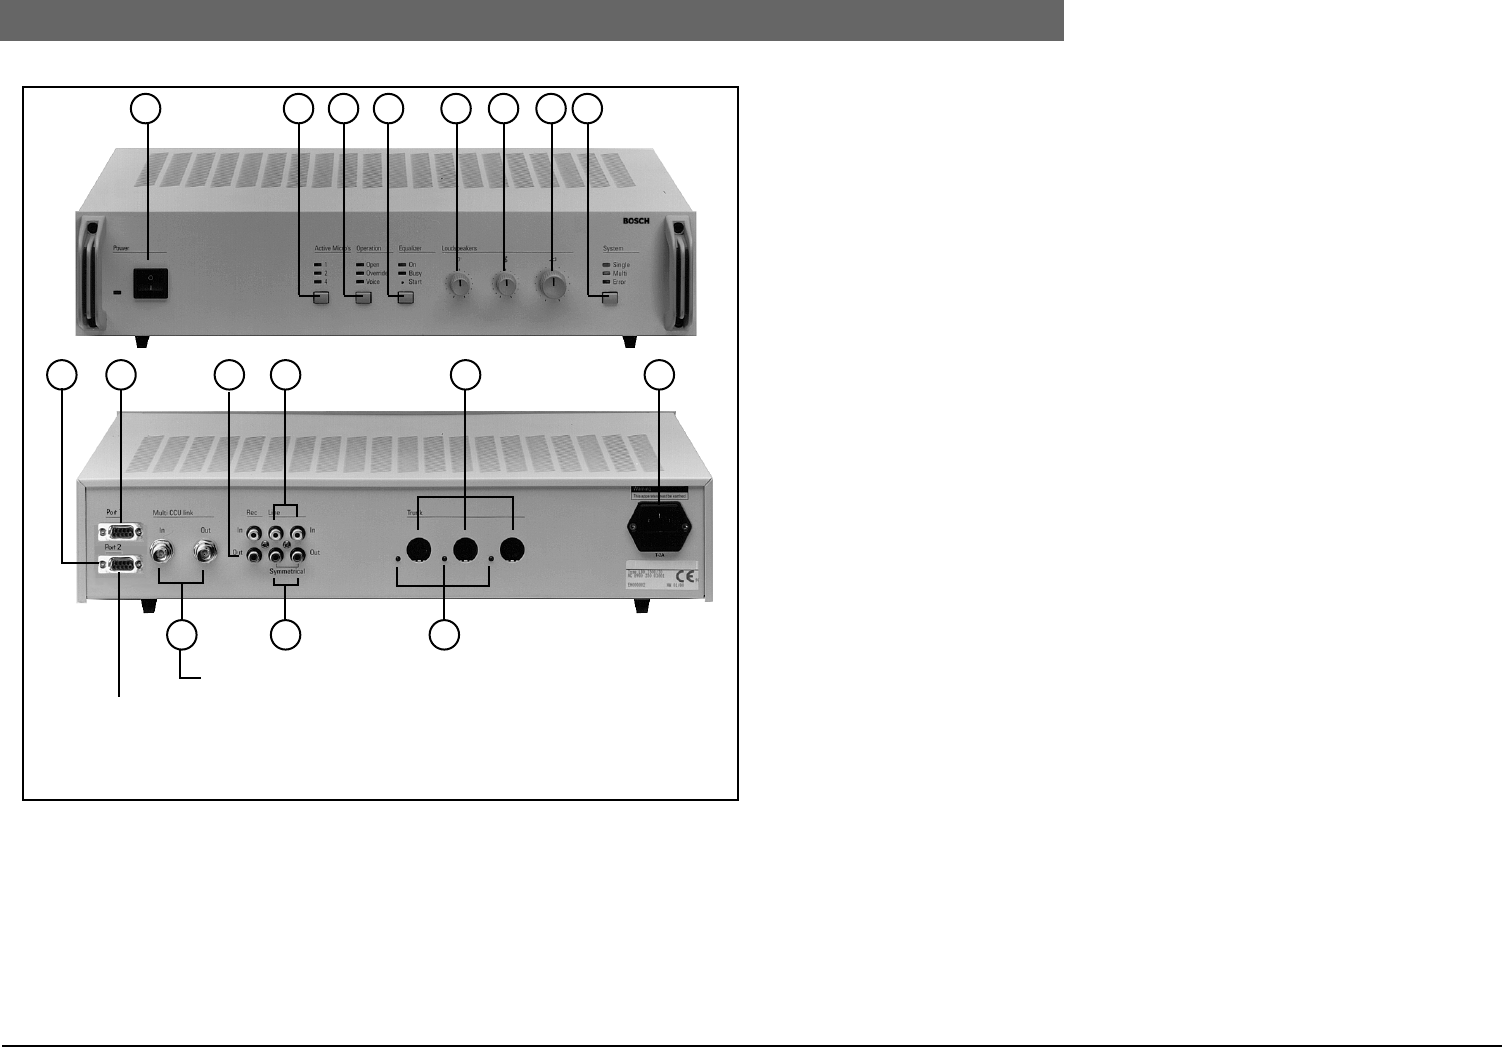
2
Bosch Security Systems | 04-2003 | 3922 988 43318 en
Digital Congress Network | Installation and Operating Manual | Chapter 4 - Central Control Equipment en | 4-3
LBB 3500/35, LBB 3500/35(D) Multi Central Control Unit
FIG 4-2 LBB 3500/35 Multi Central Control Unit (front and rear)
Controls and Indicators (Illustrated version LBB 3500/35 (FIG 4-2)
* Not applicable to LBB 3500/05
** Not applicable to LBB 3500/05 and LBB 3500/15
Front panel
1. Mains On/Off switch with indicator (green LED).
2. ‘Active Micros’
3 indicators (yellow LEDs) and a push-button selector switch to select the maximum number of
delegate microphones which may be activated concurrently 1, 2 or 4.
3. ‘Operation’
3 indicators (yellow LEDs) and a push-button selector switch to select the microphone mode of
operation: Open, Override or Voice.
4. ‘Equalizer’
1 x Microswitch (start) to initiate audio equalizer adjustment.
1 x Equalizer On’ indicator (green LED)
1 x Equalizer ‘Busy’ indicator (red LED)
1 x Equalizer On/Off button
5. Unit loudspeakers tone control (bass).
6. Unit loudspeakers tone control (treble).
7. Unit loudspeakers volume control.
Units include: Delegate, Chairman units and Flush mounted units with loudspeaker.
8. **Selection switch to select single or Multi-CCU systems, with error indication.
(not applicable for CCUs LBB 3500/05 and LBB 3500/15)
Rear panel:
9. *COM Port 2. RS232 connection for automatic camera control (default) (see Chapter 5.)
10. *COM Port 1. RS232 ‘DIRECT’ connection to DCN control PC (Default) (see Chapter 5.)
IMPORTANT: Port 1 on the CCU type LBB 3500/05 is NOT available for DCN PC control,
but set (default) for camera control.
11. Tape/cassette recorder Input and output (cinch-type) for floor input and output.
12. 2 x Asymmetrical line input connectors (cinch-type) (floor input).
13. 3 x outlet trunk-line cable connectors for connection of contribution, distribution, and interpreta-
tion units, plus extension power supplies. (3 x 6-pole circular connectors)
14. Euro-mains socket with in-built fuse (a.c. mains voltage selectable inside unit). Matching mains
cable (1.7 m (5.5 ft.) (D-version 2.5 m (8.2 ft.) included.
15. **Two BNC connectors (in/out), for loop-through connection to other Multi-CCU’s and Master
PC.
16. 2 x Asymmetrical line output connectors (cinch-type)
or 1 x Symmetrical line output for floor distribution to Public Address systems.
17. 3 indicators to indicate trunk-line overload (red LEDs).
Internal view:
See FIG 4-3
Version illustrated LBB 3500/35
1 2 3 4 5 6 7 8
910
15
11
16
12 13
17
14
Port 2 not applicable for LBB 3500/05
LBB 3500/35 only
For 19” rack mounting see Chapter 4.12
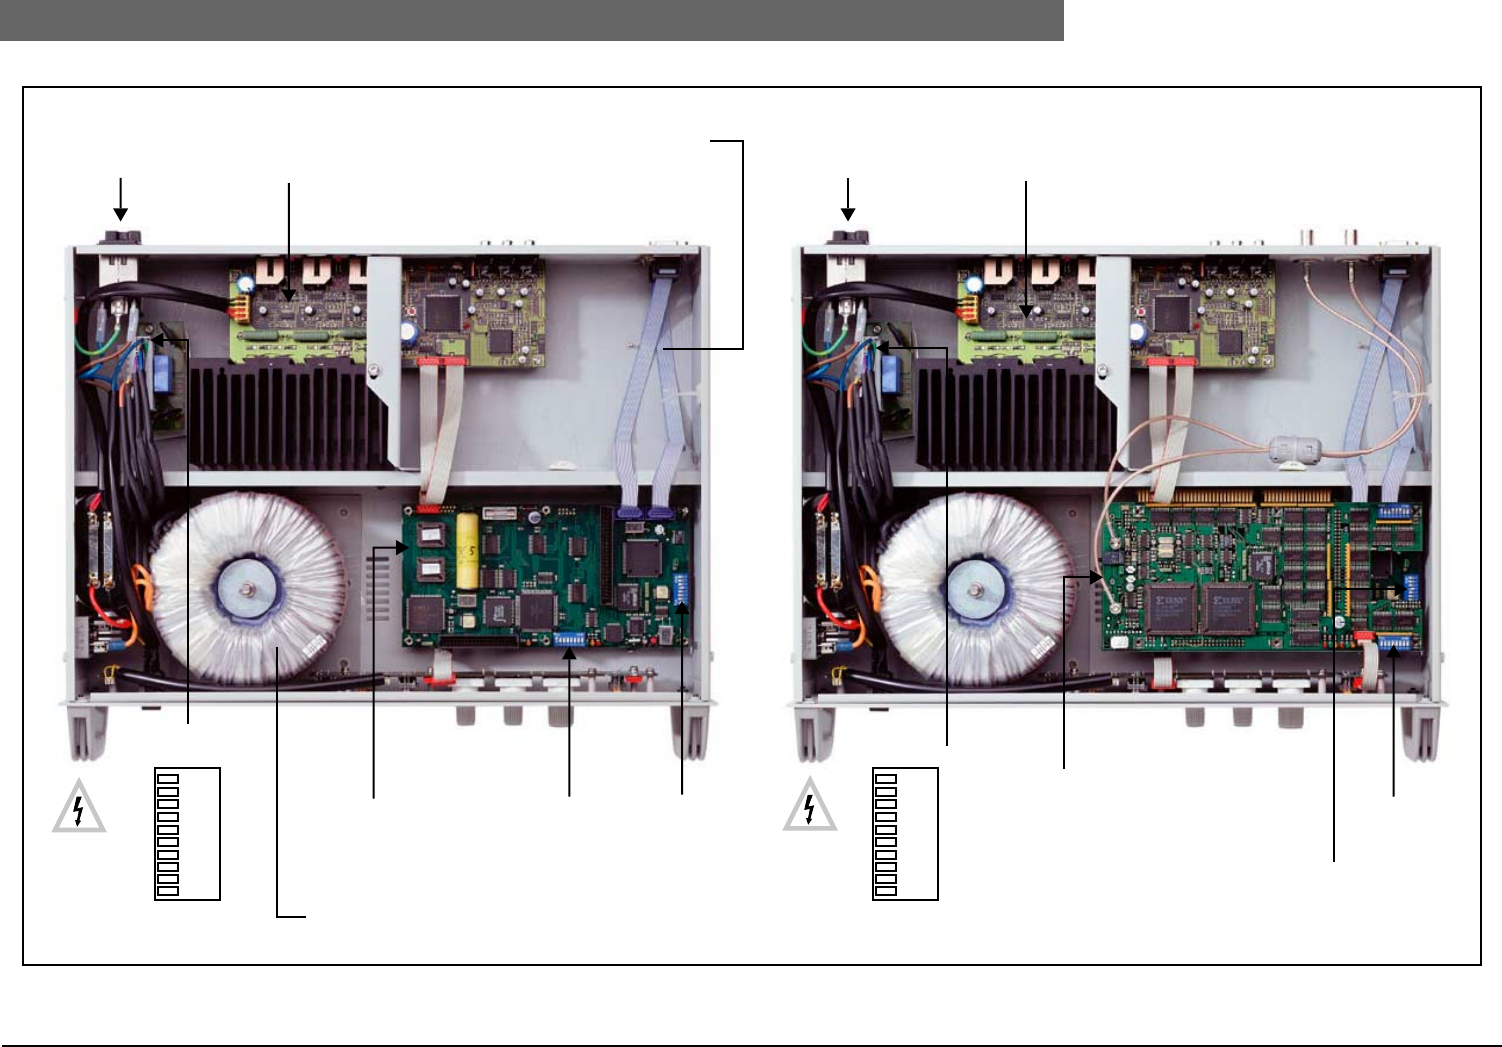
2
Bosch Security Systems | 04-2003 | 3922 988 43318 en
Digital Congress Network | Installation and Operating Manual | Chapter 4 - Central Control Equipment en | 4-4
LBB 3500/35, LBB 3500/35(D) Multi Central Control Unit
FIG 4-3 CCU internal view
DIP-switch
S9 DIP-switch
S12
DIP-switch
S14 on TCB4
DIP-switch
S14
The Multi-CCU PCB is mounted on top
of the TCB4 card
LBB 3500/35LBB 3500/05 and LBB 3500/15
Euro mains
socket
10-pole Mains
I/O Control Board
Euro mains
socket
1
10
10-pole Mains connector block
I/O Control Board
1
10
Port 2 not applicable for
CCU type LBB 3500/05
connector block
Smaller transformer in CCU type LBB 3500/05 See Chapter 4.4.1
See Chapter 4.4.1
Printed Circuit Board
TCB 4
(see Chapter 4.5)
Multi CCU PCB
LBB 3500/35 only
(see Chapter 4.7
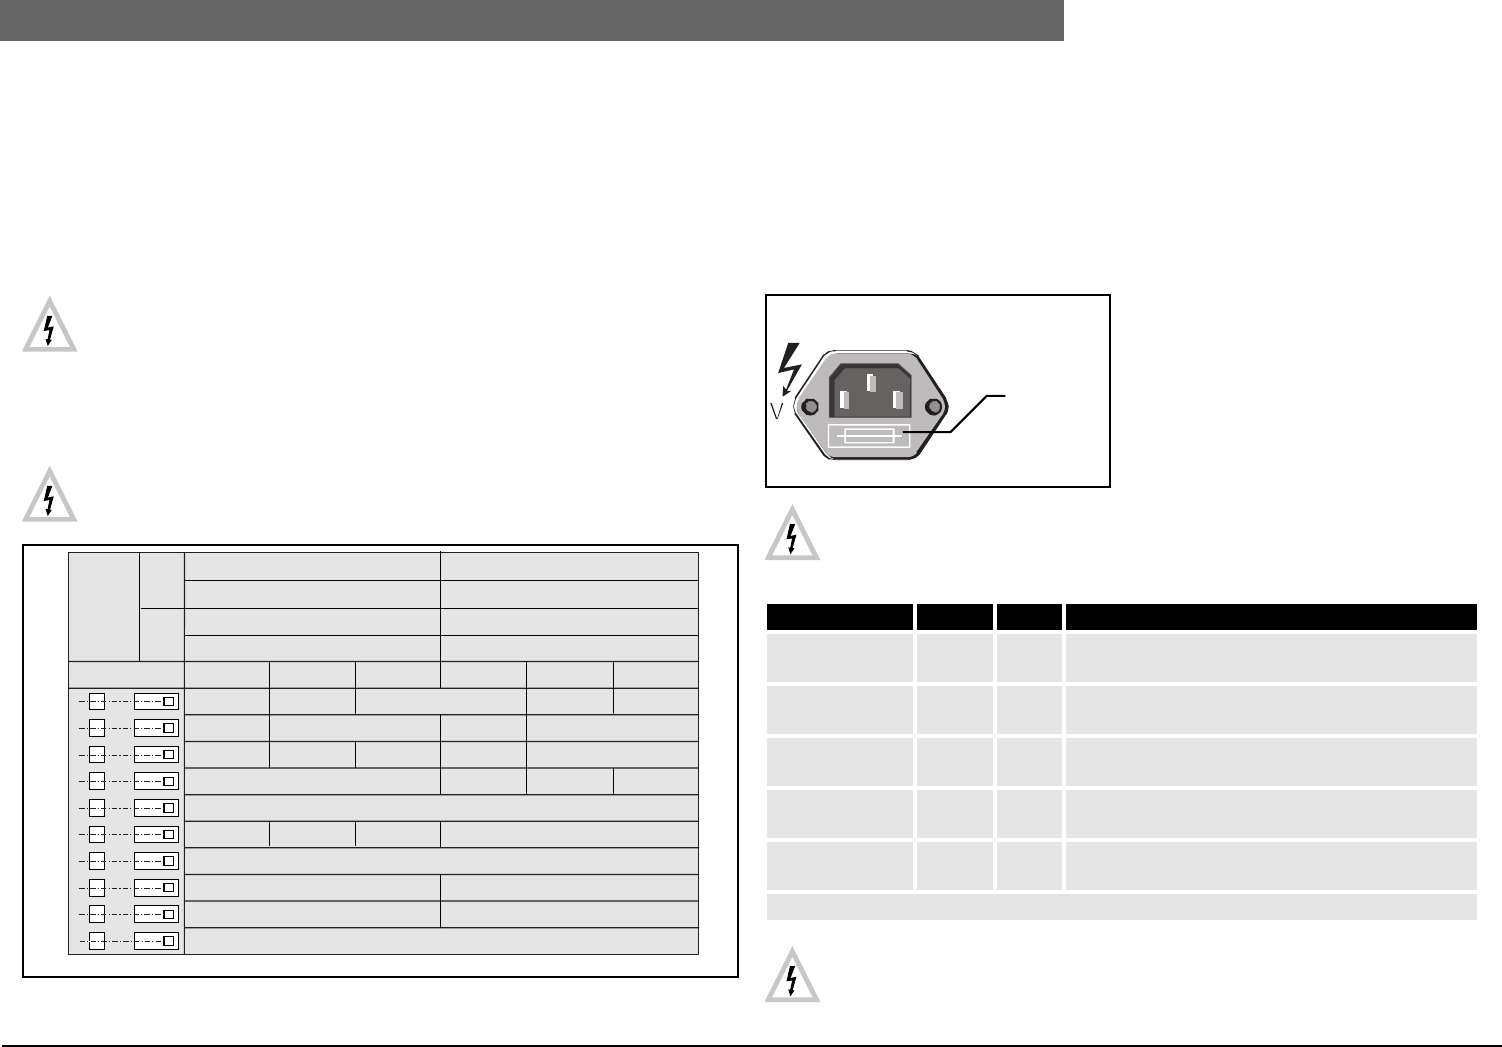
2
Bosch Security Systems | 04-2003 | 3922 988 43318 en
Digital Congress Network | Installation and Operating Manual | Chapter 4 - Central Control Equipment en | 4-5
LBB 3500/35, LBB 3500/35(D) Multi Central Control Unit
4.4.1 CCU Mains voltage and adjustment
Depending on the CCU version, the CCU on delivery is set ready for use on one of the following
voltages:
• LBB 3500/xx(European version) 230 V a.c.
• LBB 3500/xxD(UL approved version) 125 V a.c. plus mains cable
For alternative voltages (i.e. 105 V, 115 V, 220 V or 240 V a.c.) the unit provides a 10-pole connector
block for mains selection (see FIG 4-3). A mains tally (FIG 4-4) showing the connection details is
visible on one side of the unit once the top cover is removed.
Removal top cover
WARNING: Before removing the top cover, disconnect the mains and mains cable from
the unit. Read also the ‘Safety Precautions’ at the front of this manual.
1. Unscrew and remove the four side panel securing screws (two on each side of the unit) and care-
fully remove the top cover.
2. DO NOT lose the toothed shake-proof washers, these electrically bond the top cover to the
earthed chassis. For safety reasons these washers must always be fitted when the unit is in use.
WARNING Ensure that the CCU is not connected to the mains supply when rewiring for
a different mains voltage. The CCU must be earthed via the mains supply using the green/
yellow wire. The mains plug must be an earthed type.
FIG 4-4 Mains supply tally and mains socket
4.4.2 CCU Mains cable, plug and socket
The CCU is supplied with a 3-core mains cable terminated with a 2-pole mains plug with earth
contacts (or earth pin LBB 3500/xxD) for connection to the mains supply, and at the other end with
a CEE connector for connection to the mains socket on the CCU. For use in some countries it may
be necessary to replace the mains cable with one of a local standard type.
• Live/brown
• Neutral/blue
• Earth/green yellow
4.4.3 CCU Mains fuse rating
The CCU mains fuse is housed in the mains socket
located at the rear of the unit (see opposite)
Replacement fuses see Table 4-2::
WARNING: All units must be powered via an earthed mains outlet.
WARNING: Only replace with fuse of the same type (Rating and Breaking Capacity).
CONNECTOR 10P
1
2
3
4
5
6
7
8
9
10
/05
FUSE
105V
BLUE MAINS BLUE MAINS
BLUE (from transformer)
YELLOW
BROWN
BLUE MAINSN.C N.C
BLUE MAINS
BLUE MAINS
ORANGE
ORANGE
N.C N.C
BLACK
N.C
N.C
N.C
N.CBLACK
VIOLET
VIOLET
BLACKGREEN GREEN
GREEN BLACK GREEN BLACK
115V 125V 220V 230V 240V
/35 IEC
IEC
/15 UL/CSA
UL/CSA T 2.5 A
T 4 A
T 5 A
T 5 A
T 1.25 A
T 2 A
T 2.5 A
T 4 A
IEC
IEC
UL/CSA
UL/CSA
N.C. = Not Connected
Table 4-2: Mains voltage and Fuse ratings on delivery
Type No. Voltage Fuse Nominal Power consumption (Watts)
LBB 3500/05
LBB 3500/05 (D)
230 V
125 V
T-2A
T-2,5A
175 W
LBB 3500/15
LBB 3500/15(D)
230 V
125 V
T-4A
T-5A
350 W
LBB 3500/35
LBB 3500/35(D)
230 V
125 V
T-4A
T-5A
350 W
LBB 4106/00
LBB 4106/00(D)
230 V
125 V
T 4A
T 5A
350 W
LBB 3508/00
LBB 3508/00(D)
230 V
125 V
T 2A
T 2.5A
175 W
NOTE: (D) versions applicable for North American market only.
T 2A 250V
WARNING
This apparatus must be earthed
illustrated
Fuse holder
version LBB 3500/05
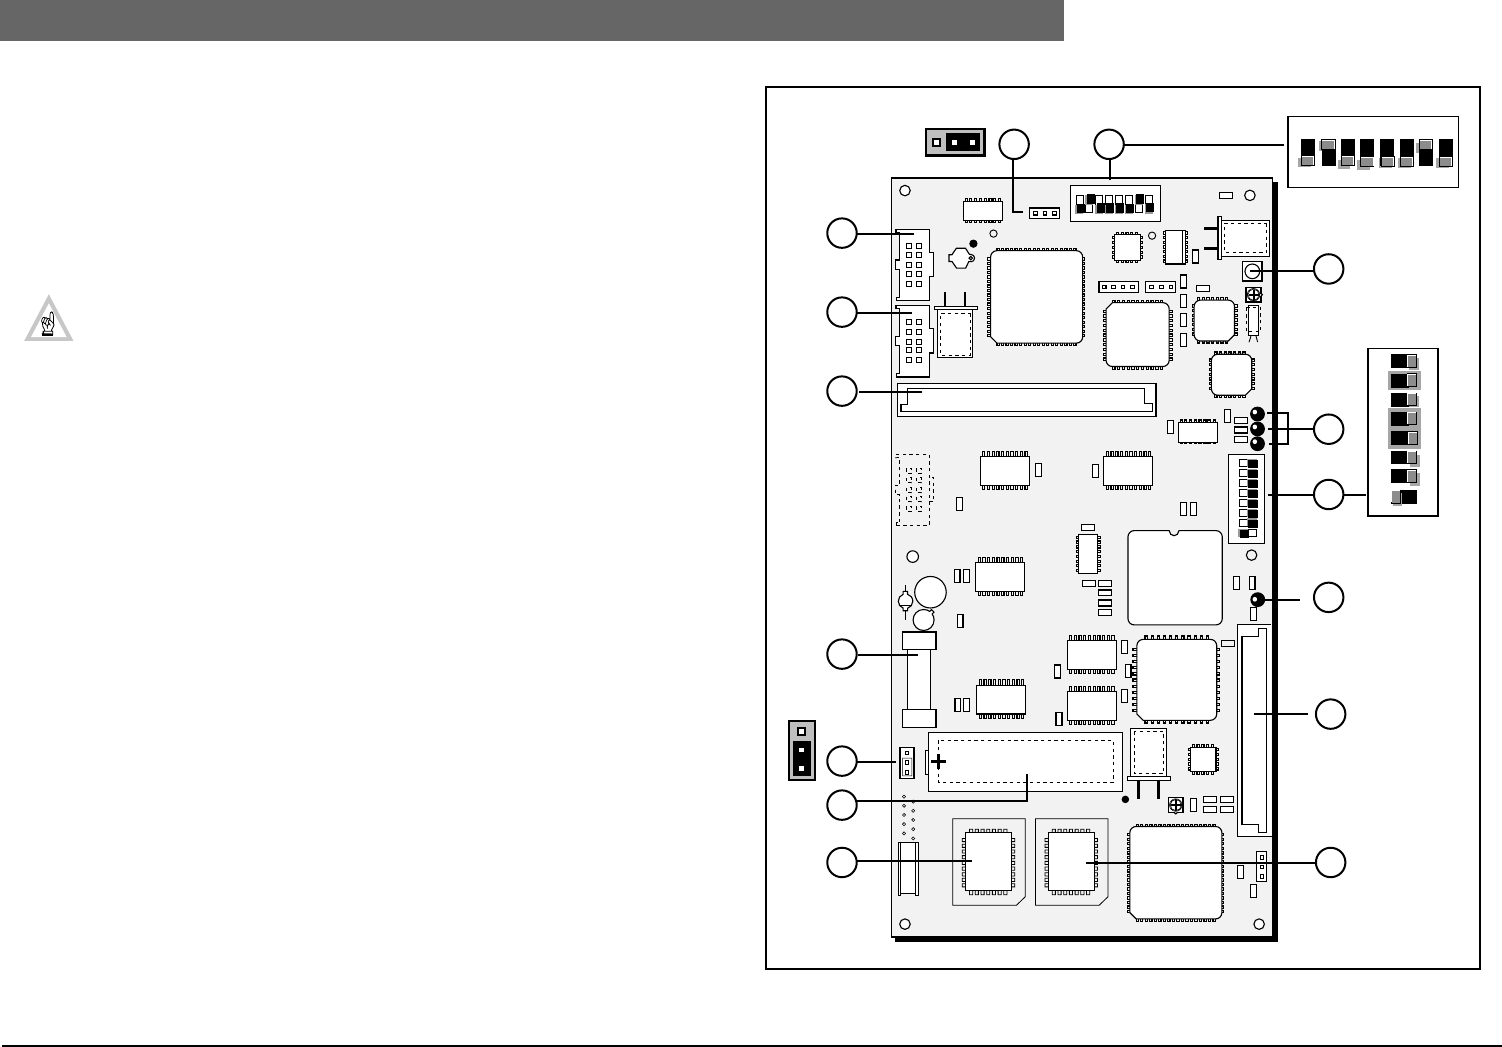
2
Bosch Security Systems | 04-2003 | 3922 988 43318 en
Digital Congress Network | Installation and Operating Manual | Chapter 4 - Central Control Equipment en | 4-6
CCU Trunk Communication Board (TCB4)
4.5 CCU Trunk Communication Board (TCB4)
All CCU’s (LBB 3500/05, LBB 3500/15, LBB 3500/35) include an in-built ‘Trunk Communication
Board’ (TCB4) (see FIG 4-3 and FIG 4-5). The board installed in CCUs’ type LBB 3500/15 and
LBB 3500/35 provides the CCUs’ with two similar high speed serial RS 232 ports (Port1 and Port 2).
Port 1 is used for ‘DIRECT’ connection to a DCN control PC (default) and Port 2 is used for either
test/diagnostics or camera control (default). The board housed in the CCU type LBB 3500/05
provides the CCU with ONLY one high speed serial RS 232 port (Port 1). This port is used for either
automatic camera control (default) or for test and diagnostics purposes.
NOTE: CCU’s with TCB3 boards, can be upgraded for use with TCB4 boards using the
upgrade kit LBB 3519/20. For installation details refer to the Installation Instructions,
supplied with the upgrade kit.
Key to symbols (FIG 4-5) :
4.5.1 Installation
1. See ‘Safety Precautions’ at the front of this manual.
2. DIP-switch S14 must be set, to configure the communication protocol and baud rate used on
Port 1 and Port 2 (see Chapter 4.6 ).
3. DIP-switch S9 must be set to configure the boards functionality (see Chapter 4.5.2 ).
4. Jumpers X13 and X14 must be set (see Chapter 4.5.3).
FIG 4-5 Layout ‘Trunk Communication Board (TCB 4)
1Jumper X14 (See Chapter 4.5.3 (Table 4-4:))
2S14 DIP-switches 1 - 8 (See Chapter 4.6 )
3S10 Push-button switch to reset the Central Control Unit during servicing.
4Three LEDs (left to right) green/yellow/red. Normally the green/yellow LEDs
flash in sequence, indicating the software is running. Red LED illuminates during
system reset.
5S9 DIP-switches 1 - 8 (See Chapter 4.5.2 (Table 4-3:))
6Yellow LED indicates Digital Signal Processing (DSP) software is running.
7Connector for multi-trunk board (used only in the multi-CCU)
8Sockets for inserting flash EPROM (even)
9Sockets for inserting flash EPROM (odd)
10 SRAM back-up battery 3.6 V (life-time 5 years min.)
11 Jumper X13 (See Chapter 4.5.3 (Table 4-4:))
12 Fuse 3.15 amp (delayed)
13 Connector for multi-trunk board (used only in the multi-CCU)
14 Serial RS232 Port 1
15 Serial RS232 Port 2
12345678
ON
87654321
ON
BATTERY
FUSE
IC4 IC3 IC6
IC8
IC9
S9
S14
X1
X11
X13
X10
X40
X41
X14
X17a X17b
181
1
OFF
ON
S10
IC1
IC04
IC11
IC12
21
3
4
5
6
7
89
10
11
12
13
14
15
DIP-switch S9
S10
Reset Switch
TCB 4 DIP-switch S14
Port 2
Port 1
X13
123
132
X14
S14 ON
87654321
S9 ON
12345678
See Chapter 4.5.2
See Chapter 4.6
location
Chapter 4.3
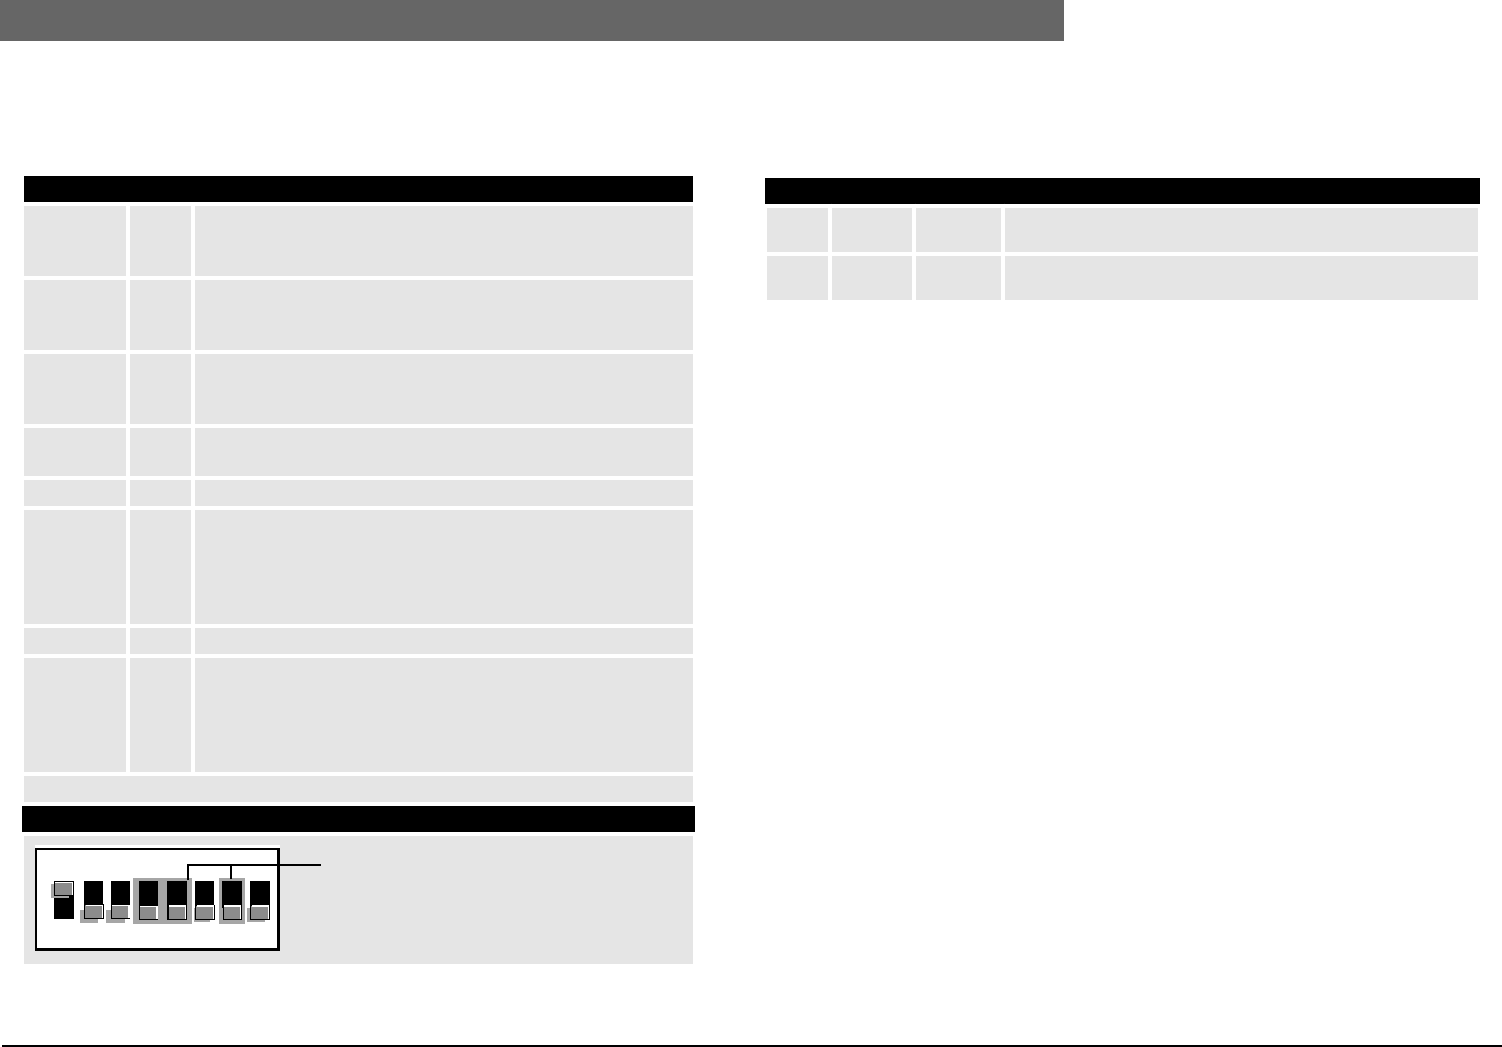
2
Bosch Security Systems | 04-2003 | 3922 988 43318 en
Digital Congress Network | Installation and Operating Manual | Chapter 4 - Central Control Equipment en | 4-7
CCU Trunk Communication Board (TCB4)
4.5.2 S9 DIP-Switch settings
See FIG 4-5 for location, and Table 4-3: for functionality of the DIP-switches.
4.5.3 Jumper settings
See FIG 4-5 for location, and Table 4-4: for functionality of the jumpers.
Table 4-3: S9 DIP-switch settings
TCB4
SW 1 ON*
OFF
Chairman priority tone ON (default).
Chairman priority tone OFF
SW 2 ON
OFF*
Audio ‘Mix-Minus’ mode activated in combination with SW3 = OFF
Normal Operation (default).
SW 3 ON
OFF*
Audio ‘Insertion’ mode activated in combination with SW2 = OFF
Normal Operation (default).
SW 4 OFF*
ON
Floor distribution ON (default).
No floor distribution on unused language channels
SW 5 OFF Reserved (IMPORTANT: must not be changed)
SW 6 ON
OFF*
Active microphones and request will be permanently switched off if
the priority function of the chairman unit is used. (default).
Active microphones will be switched off temporarily if the priority
function of the chairman unit is activated.
SW 7 OFF Reserved (IMPORTANT: must not be changed)
SW 8 ON
OFF*
Switching on the CCU will activate the BOOT software, this makes a
new download possible. All memory settings will be erased and
returns to the default settings. The unit addresses will not be erased.
Normal operation (default).
* = default setting
DIP switch S9 (default settings)
For location
see FIG. 4-3 and FIG 4-5.
S9 ON
12345678
switches 5 and 7 are ‘RESERVED’
Must NOT be changed
Table 4-4: Jumper settings
Jumper Default Function
3X13 1 & 2 Jumpered to provide SRAM Battery back-up
Open when removing back-up battery. (Position 2 & 3)
7X14 1 & 2 Watchdog active
Open for service purposes. (Position 2 & 3)
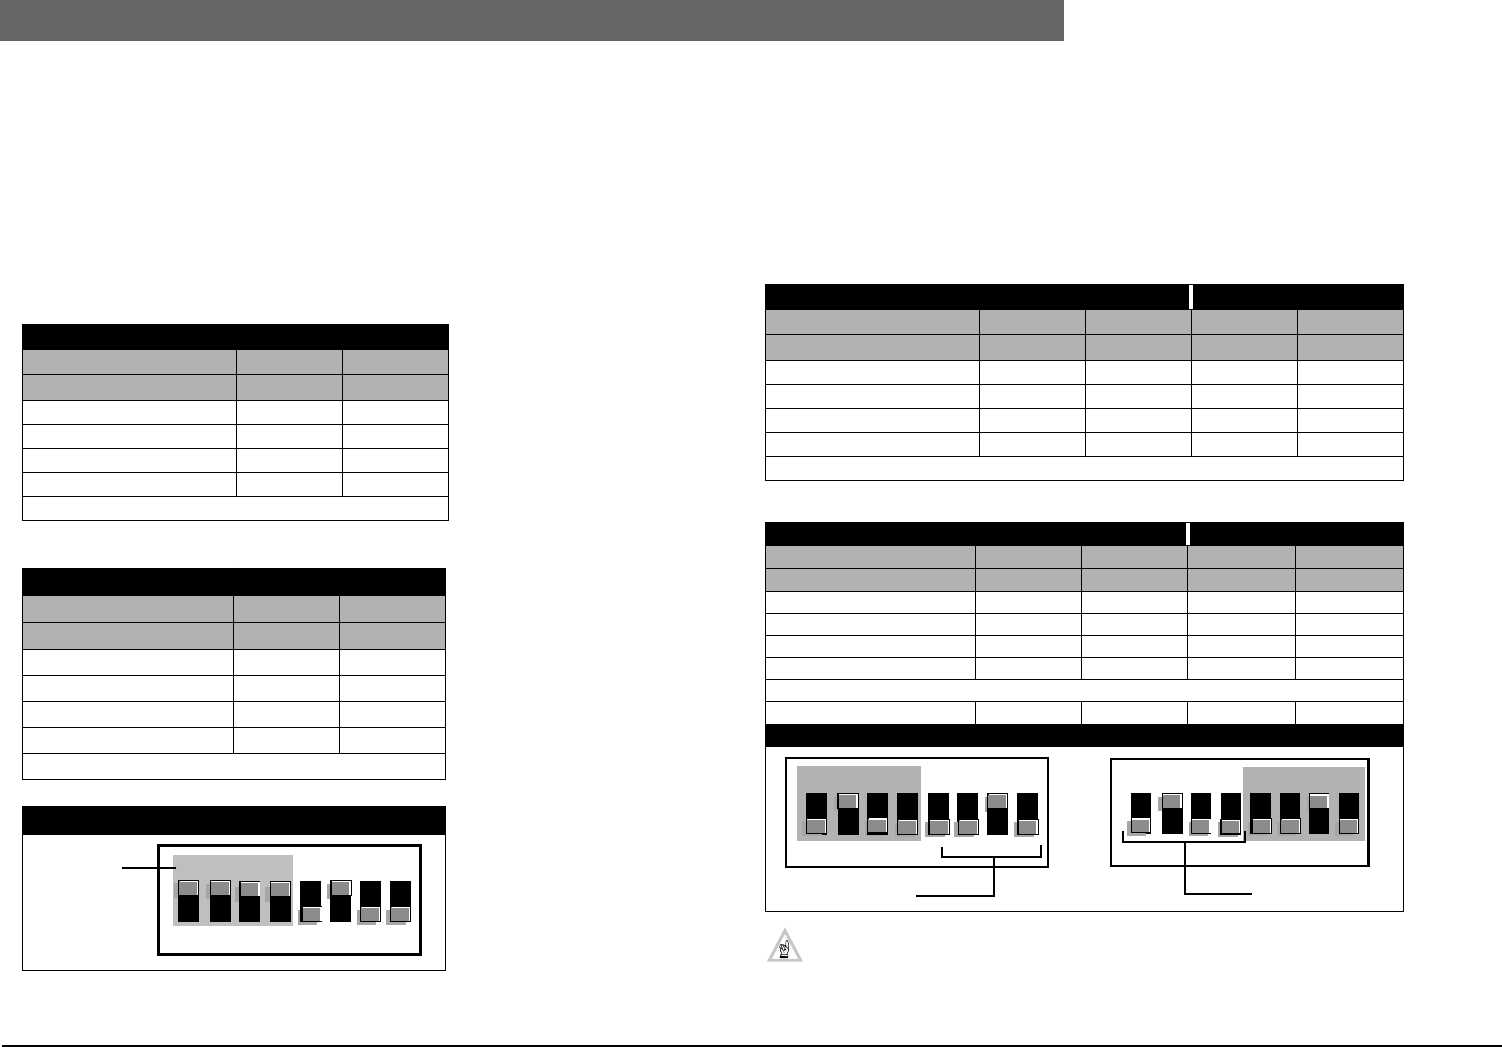
2
Bosch Security Systems | 04-2003 | 3922 988 43318 en
Digital Congress Network | Installation and Operating Manual | Chapter 4 - Central Control Equipment en | 4-8
CU Protocol and Serial Port settings
4.6 CU Protocol and Serial Port settings
For location of DIP-switches see FIG 4-3 and FIG 4-5.
4.6.1 LBB 3500/05 Port 1 for Camera Control
In a single (stand-alone) CCU system only one COM-port (Port 1) is available: Default settings are;
• 8 data bits
• No parity check
• 1 Stop bit
4.6.2 LBB 3500/15 and LBB 3500/35 (TCB 4) - Port 1 : DCN Control PC
Port 2 : Camera Control
In a single (stand-alone) CCU systems two serial COM-ports (Port 1 and Port 2) are available.
Both ports can be individually configured. Default settings are;
• 8 data bits
• No parity check
• 1 Stop bit
NOTE: It is possible to select ‘Full’ protocol on both Port 1 and Port 2. However this is NOT
recommended due to processing power and memory limitations.
Table 4-5: LBB 3500/05 Protocol settings
DIP-switch S14D RA Port 11
Switch Switch
DP-1 DP-2
Not applicable OFF OFF
Terminal OFF ON
Not applicable ON OFF
Camera control* ON ON
* default settings for LBB 3500/05
Table 4-6: LBB 3500/05 Baud rate settings
DIP-switch S14 Port 1
Switch Switch
DP-3 DP-4
9.6 K OFF OFF
19.2 K* OFF ON
57.6 K ON OFF
115.2 K ON ON
* default settings for LBB 3500/05
DIP-switch S14: Port 1 (default settings)
S14 ON
87654321
5 - 8
Not used
Table 4-7: LBB 3500/15 and LBB 3500/15 Protocol settings
DIP-switch S14 Port 1 Port 2RT
Switch Switch Switch Switch
DP-1 DP-2 DP-5 DP-6
Simple (Open interface) OFF OFF OFF OFF
Terminal OFF ON OFF ON
Full ON* OFF* ON OFF
Camera control ON ON ON* ON*
* default settings for LBB 3500/15 and LBB 3500/35
Table 4-8: LBB 3500/15 and LBB 3500/35 Baud rate settings
DIP-switch S14 Port 1 Port 2
Switch Switch Switch Switch
DP-3 DP-4 DP-7 DP-8
9.6 K OFF OFF OFF OFF
19.2 K OFF ON OFF* ON*
57.6 K ON OFF ON OFF
115.2 K ON* ON* ON ON
* default settings for LBB 3500/15 and LBB 3500/35
DIP-switch S14 (default settings)
ONS14
87654321
Port 1 default
ONS14
87654321
Port 2 default

2
Bosch Security Systems | 04-2003 | 3922 988 43318 en
Digital Congress Network | Installation and Operating Manual | Chapter 4 - Central Control Equipment en | 4-9
Multi-CCU card
4.7 Multi-CCU card
The Multi-CCU card installed in the Central Control Unit LBB 3500/35 and LBB 3500/35(D) allows
other Multi-CCU’s (max.16) to be connected, thus extending the capacity of the DCN system. The
multi-CCU card is connected and located on top of the Trunk Communication Board (TCB 4).
See FIG 4-3 for location details.
NOTE: The Multi-CCU card is similar to the PC card used for Multi-CCU systems
LBB 3511/00 (see also Chapter 5.4).
4.7.1 Installation (FIG 4-6)
The following steps are required to ensure correct operation:
1. Set the cards ‘Slave’ address only. Each Multi-CCU installed in a system (max.16) is required to
have its own dedicated address. This address is assigned and selected on the Multi-CCU card by
DIP-switch S12. See DIP-switch settings (Chapter 4.7.2).
2. Set Jumpers X24 and X32.
4.7.2 DIP-Switches S12 and S13
DIP-Switch S12
DIP-Switch S13
4.7.3 Jumper settings
3. X32 Not placed (default)
4. X24 Placed
CAUTION: The units power supply poses hazards of electrical shock to personnel and
damage to equipment. The unit should only be worked on by trained service technicians.
When removing the housing to work inside the CCU, observe the precautions below:
1. To prevent personnel injury, first switch off the CCU and disconnect the power cable.
2. When installing or removing the TCB4, handle the card carefully by its edges to pre
vent damage.
3. Refer to ‘Safety Precautions’ at the front of this manual
4.7.4 LED indications
Table 4-9: DIP-switch S12
1S12 DIP switches to define the card’s ‘Slave Address’.
(default fixed positions 1, 2, 3 =OFF) (IMPORTANT: Must not be changed).
Slave address is set by DIP-switches: 4, 5, 6, 7 and 8 (address 0 --31)
S12 ON
87654321
1, 2 and 3 FIXED
DO NOT CHANGE !
Slave address use 4,5,6,7 and 8 only (address 0 - 31)
Table 4-10: DIP-switch S13
2S13 DIP switches to define the card’s I/0-address (04E0 HEX)
(default: Fixed positions 1=ON, 2=OFF, 3=OFF, 4=ON, 5=ON, 6=ON, 7=OFF, 8=OFF
I/O address: 04EO HEX (IMPORTANT: Default: do NOT be change).
5D1
D2
D3
(Yellow) Output port 1 indicator,
(Green) Output port 1 indicator,
(Red) Output port 1 indicator.
6D4
D5
D6
(Yellow) Indicates the master state of the PC card,
(Green) Indicates card has been initialized by the software,
(Red) Indicates power-on.
IMPORTANT: FIXED DEFAULT DO NOT CHANGE
ONS13
87654321
04E0 HEX
2
Bosch Security Systems | 04-2003 | 3922 988 43318 en
Digital Congress Network | Installation and Operating Manual | Chapter 4 - Central Control Equipment en | 4-10
Multi-CCU card
FIG 4-6 Multi-CCU PCB for CCU LBB 3500/35 (DIP-switch and jumper settings)
S13 ON
X31A
X32
D1 D2 D3 D4 D5 D6
1 X25
X29
X24
IC1IC2
X11
X10 IC200
87654321
S12 ON
87654321
S12 ON
87654321
DIP Switch S12
Address Settings 0 to 31
Select a different address for every CCU
installed. Use switch positions 4 to 8 only)
Switches 1,2 and 3 not available for selection
(DO NOT CHANGE)
1 3
2
S12
S13
DIP Switch S13
ON
87654321 Input/Output (I/O) settings (04E0 HEX)
Default settings DO NOT CHANGE
NOTE: S13 is shown in its default position
4
EXAMPLE SETTING (Address 25)
S12 ON
87654321
DIP-Switch S12
The decimal value assigned to each DIP-switch is as follows:
SW 8 ON = 1 LSB (Least Significant Bit)
SW 7 ON = 2
SW 6 ON = 4
SW 5 ON = 8
SW 4 ON = 16 MSB (Most Significant Bit)
SW 3 OFF *
SW 2 OFF *
SW 1 OFF *
*DO NOT CHANGE !
Jumper X24
Jumper X32
(NOT PLACED)
(PLACED)
!
5 6
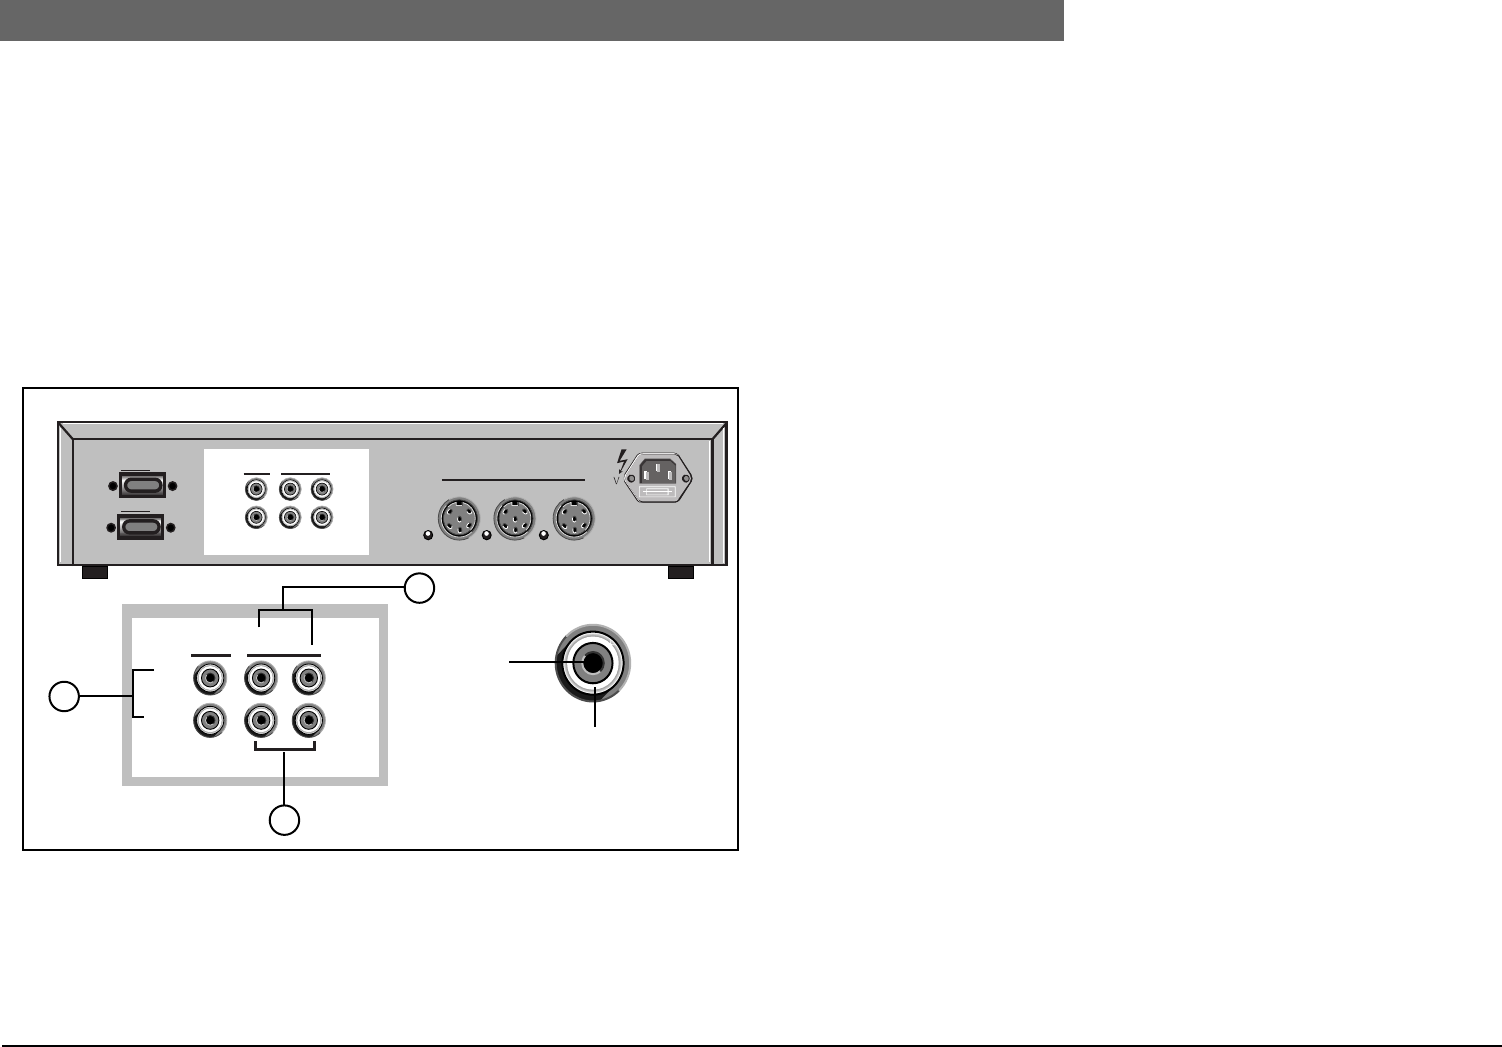
2
Bosch Security Systems | 04-2003 | 3922 988 43318 en
Digital Congress Network | Installation and Operating Manual | Chapter 4 - Central Control Equipment en | 4-11
Connecting peripheral equipment to the CCU
4.8 Connecting peripheral equipment to the CCU
The Central Control Unit can connect to the following external equipment:
• Recording equipment (Recording floor only)
• Public address system
• Telephone coupler
• Mixing desk
The interconnection facilities located at the rear of the unit (FIG 4-7) are as follows:
1. Two Cinch-type sockets, Input (In) and Output (Out) for connection to a tape/cassette recorder
(Rec.).
2. Two cinch-type sockets for Asymmetrical line Input (In).
3. Two cinch-type sockets for Symmetrical/Asymmetrical line Output (Out).
FIG 4-7 Connecting peripheral equipment
This section of the page has been left blank intentionally
Port 1
Port 2
Trunk
Rec.
Line
In
Symmetrical
Out
In
Out
Rec.
Symmetrical
Line
In
Out
In
Out
1
2Cinch socket
Screen
Signal +
3
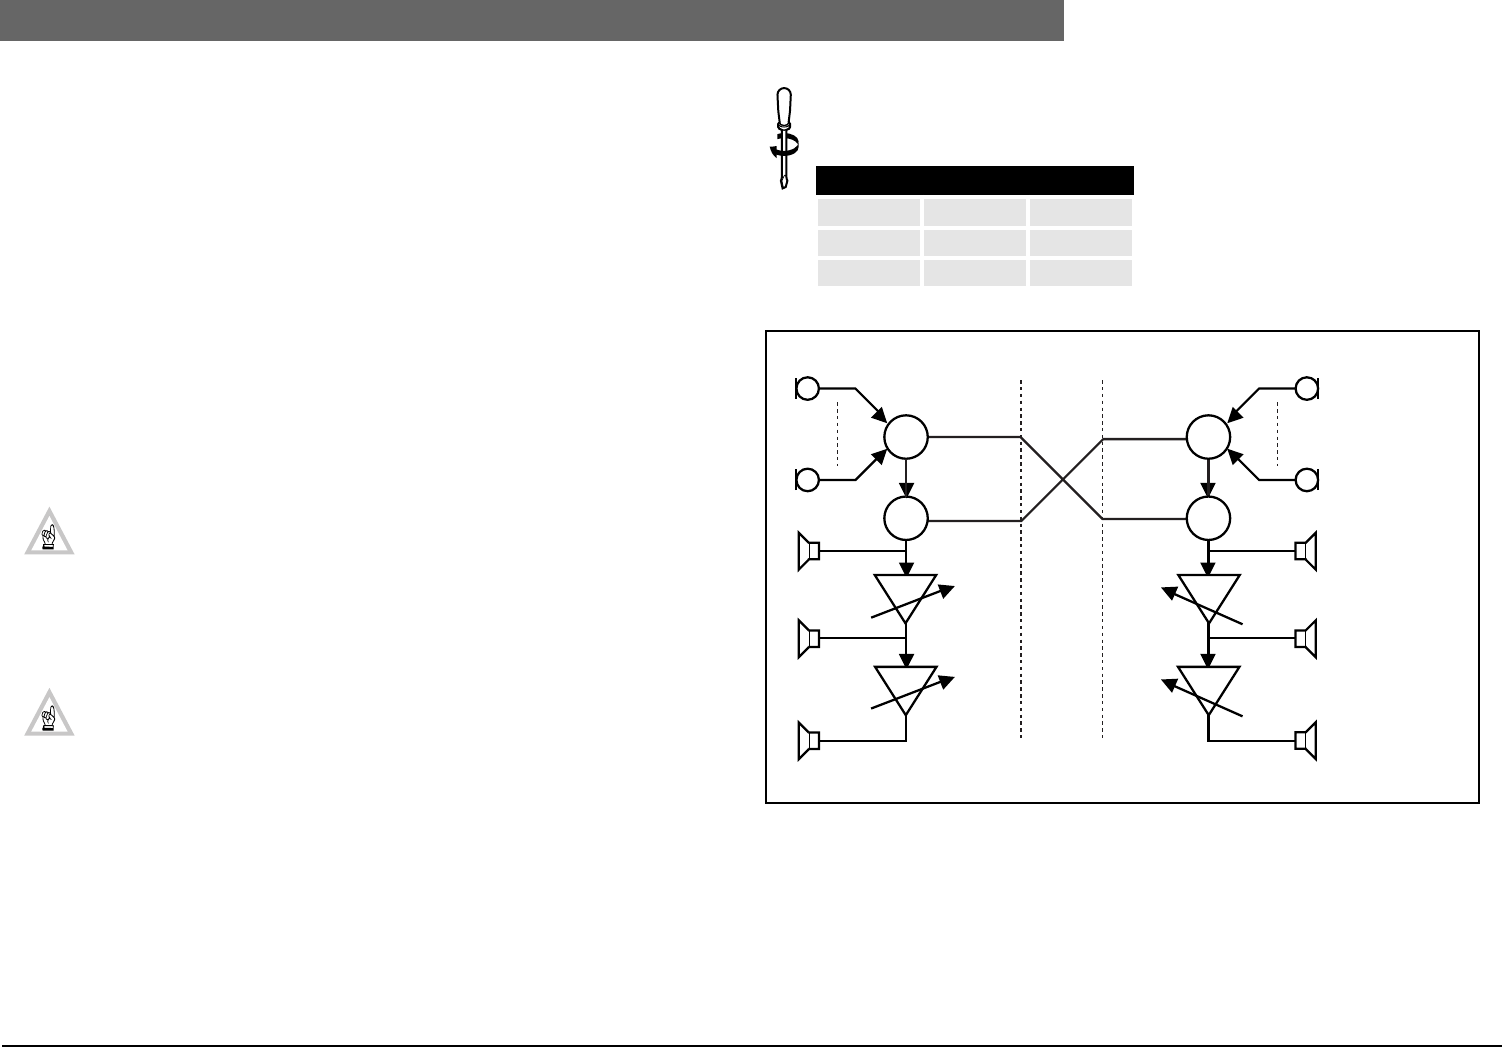
2
Bosch Security Systems | 04-2003 | 3922 988 43318 en
Digital Congress Network | Installation and Operating Manual | Chapter 4 - Central Control Equipment en | 4-12
CCU Audio Routing Modes
4.9 CCU Audio Routing Modes
To provide additional functionality in the CCU, the DCN software from release version 7.01 includes
two new ‘Audio Routing’ modes - ‘MIX-MINUS’ and ‘INSERTION’ mode. Both modes are selected by
setting DIP-switches (S9) on the TCB4 card located in the Central Control Unit CCU (see Chapter
4.5.2).
MIX-MINUS mode (FIG 4-8)
The main feature of this mode, is that audio signals connected to the ‘Line-Input’ of the CCU are no
longer routed to the ‘Line-Output’ of the CCU. This feature is especially desired for the following
applications:
1. Where a remote audio connection is made via a telephone coupler for connection to a remote
delegate or specialist speaker.
2. To interconnect two DCN systems.
IMPORTANT!: In the ‘Mix Minus’ mode, a permanent audio channel is used for ‘Line-Input’.
Therefore the number of available interpretation channels is one channel less than in the standard
mode (i.e. 10 channels instead of 11 channels as available in ‘Stand-alone’ and ‘Multi-CCU’ systems.
NOTE: For recording the total audio signal (i.e. Floor + Line-Input) use an Audio Media
Interface unit LBB 3508/00 on channel 0 (see Chapter 4.11).
Using this mode of operation, the audio connection is considerably improved, and avoids ‘Echo’ due
to feedback as was experienced in the standard mode of operation.
FIG 4-8 gives an example of ‘Audio Routing’ in the CCU’s and the external routing for connection of
two DCN systems A and B.
NOTE: If connection is done via the Public Telephone Network, telephone couplers must
be used (not shown in FIG 4-8).
Installation:
To set the CCU for the Mix-Minus mode Dip-switch ‘S9’ on the Trunk
Communication Board must be set as follows:
FIG 4-8 ‘MIX-MINUS’ mode
DIP-switch S9
Switch-2 Switch-3 Mode
Off Off Standard
On Off Mix-Minus
∑
∑
∑
∑
DCN System A
CH.13
CH.12
CH.0
CH.14 CH.14
CH.13
CH.12
CH.0
CCU Volume
Line-OUT Line-OUT
Line-IN Line-IN
CCU Volume
DCN System B
Mix-Minus
Insertion OUT
Mix-Minus
Insertion IN
Mix-Minus
Insertion IN
Mix-Minus
Insertion IN
Master volume
PC control
Master volume
PC control
Delegate/Chairman
microphones
Interpreter headphones
Unit loudspeaker
Delegate headphones
Equalizer PA
Local PA (MCCU)
Delegate unit
loudspeaker
(See Chapter 4.5.2 (Table 4-4:)
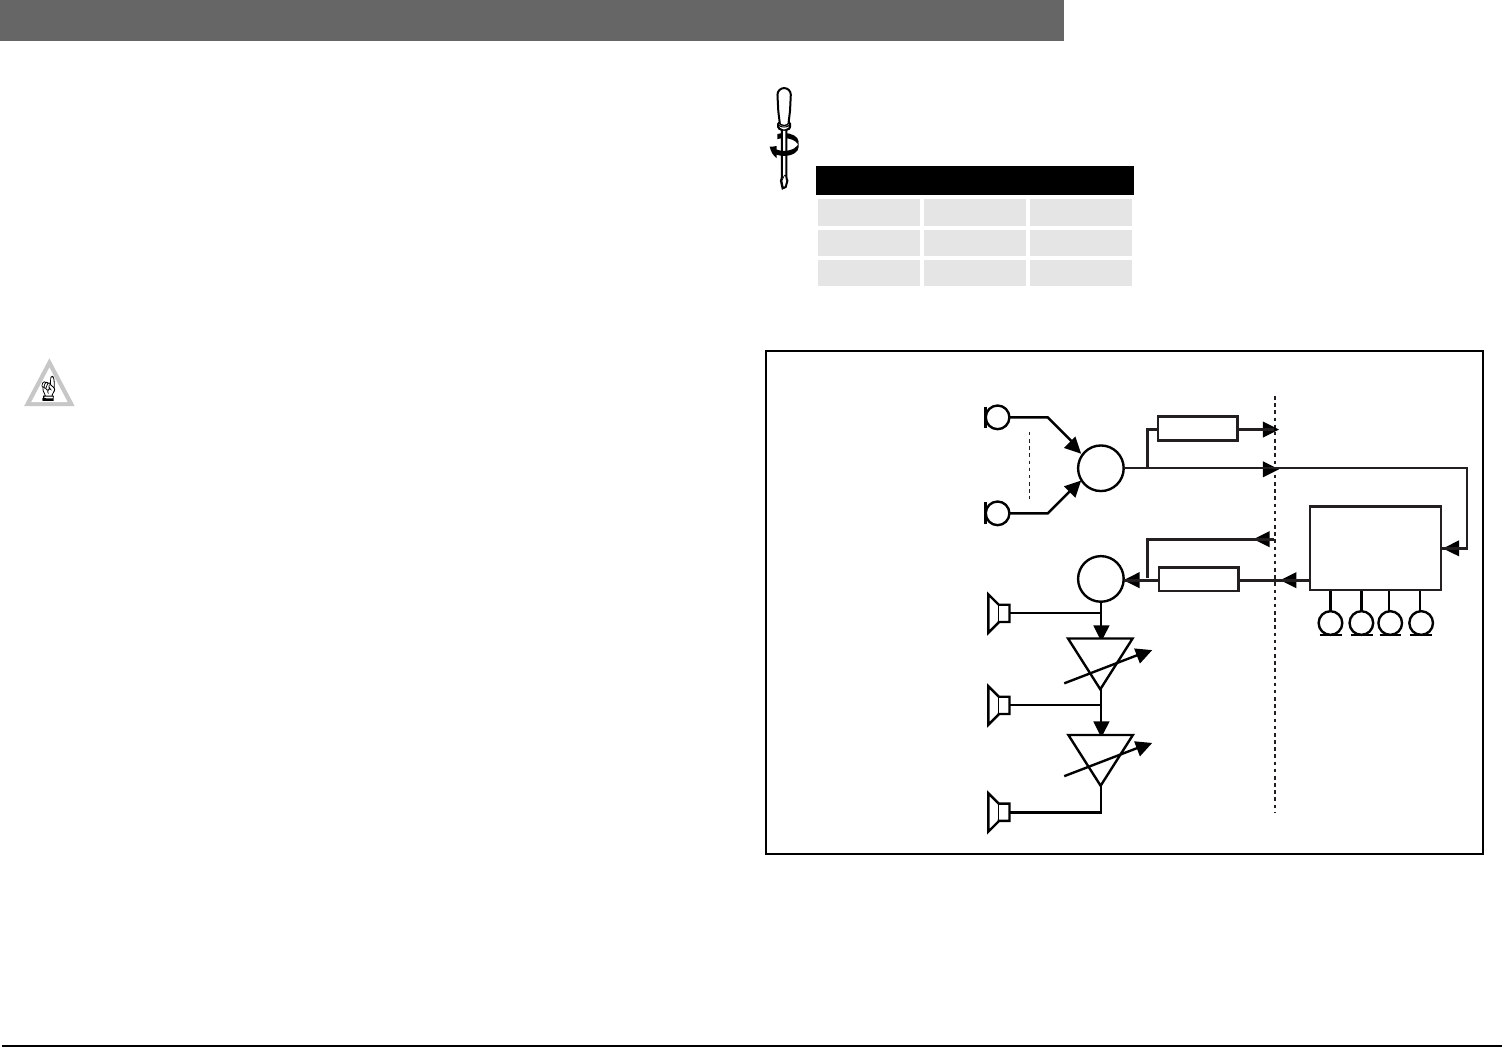
2
Bosch Security Systems | 04-2003 | 3922 988 43318 en
Digital Congress Network | Installation and Operating Manual | Chapter 4 - Central Control Equipment en | 4-13
CCU Audio Routing Modes
4.9.1 Audio Routing INSERTION mode (FIG 4-9)
In the ‘INSERTION’ mode, the normal audio routing path in the CCU from added microphone signals
to the loudspeakers of the delegate and chairman units is interrupted to allow connection of an
external device for example - an audio mixer. The external audio device is connected between the
‘Line-Output’ and ‘Line-Input’ of the CCU.
FIG 4-9 shows the audio routing in the CCU and external device.
In the ‘INSERTION’ mode, a permanent audio channel is used for the ‘Line-Input’. Therefore the
number of available interpretation channels is one channel less than in the standard mode i.e. 10
channels instead of 11 channels in ‘Stand-alone’ and ‘Multi-CCU’ systems.
NOTES:
1. In INSERTION mode, recording of the ‘Line-Input’ signal via the recorder output of
the CCU is no longer available.
2. For recording the total audio signal (i.e. Floor + Line-Input) use an Audio Media
Interface unit LBB 3508/00 on channel 0 (see Chapter 4.11).
Installation:
To set the CCU for the ‘INSERTION’ mode DIP-switch ‘S9’ on the Trunk Communication
Board (TCB 4) must be set as follows:
FIG 4-9 ‘INSERTION’ mode
DIP-switch S9
Switch-2 Switch-3 Mode
Off Off Standard
Off On Insertion
DCN System
∑
∑
Line-OUT
Line-IN
CH.13
CH.0
CH.12
CH.13
REC. UIT
REC. IN
Volume CCU
Master volume
PC control
e.g. AUDIO
MIXER
Delegate/Chairman
microphones
Interpreter Headphone
Unit loudspeaker
Delegate Headphone
Equalizer PA
Local PA (MCCU)
Delegate unit
loudspeaker
(See Chapter 4.5.2 and Table 4-4:
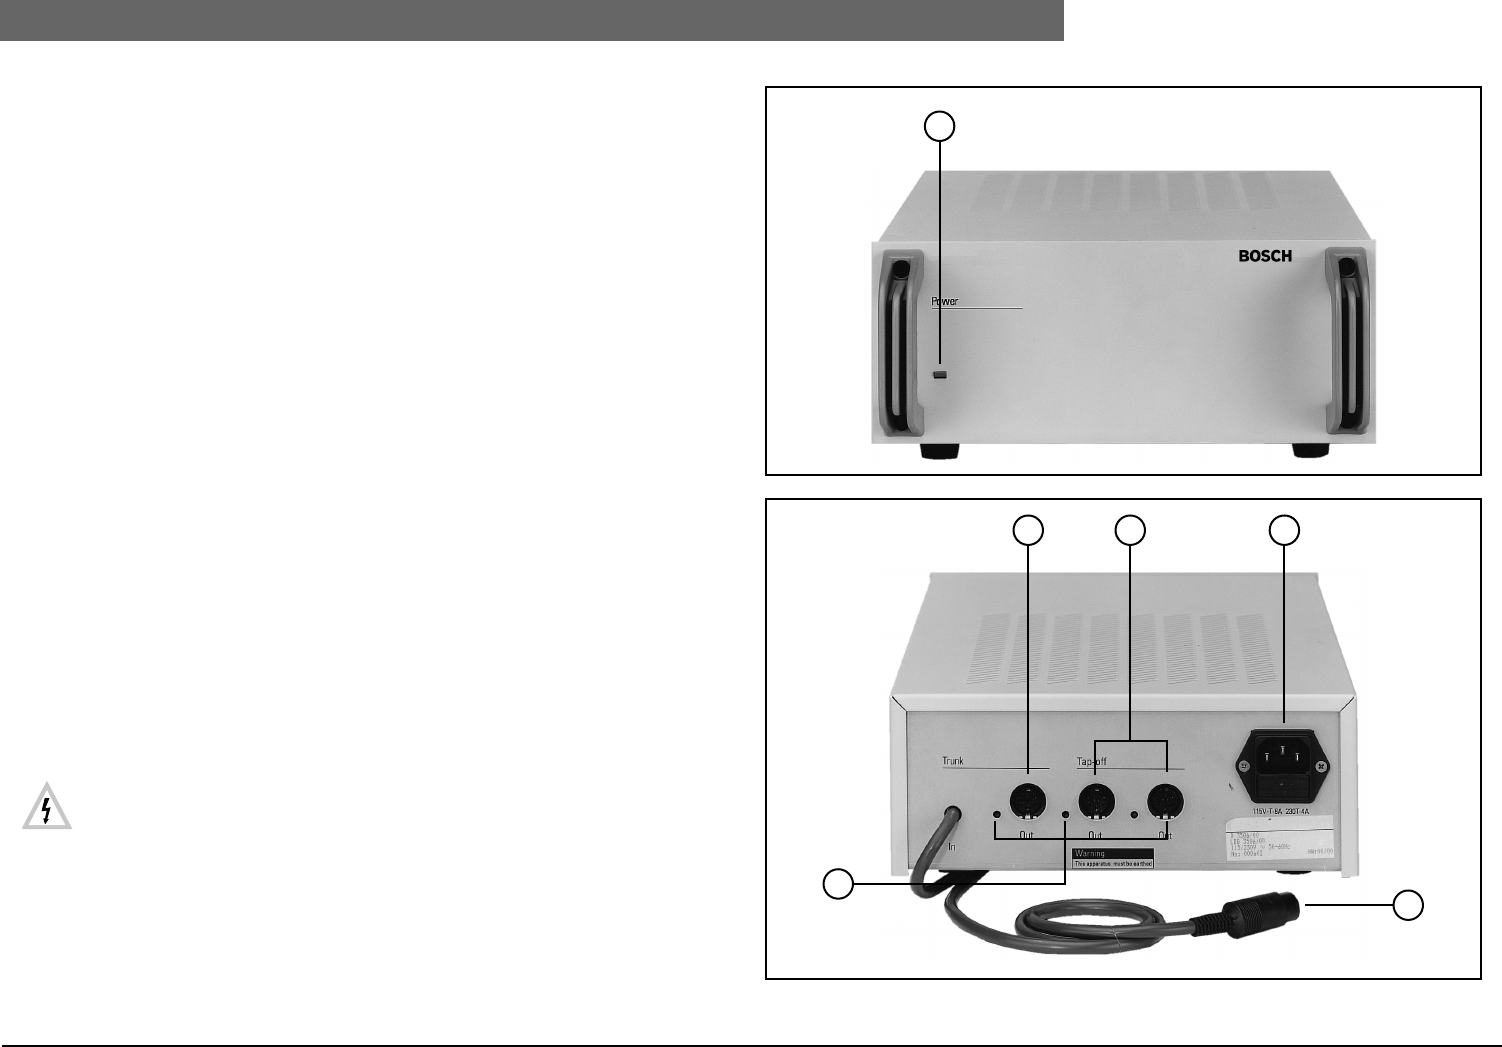
2
Bosch Security Systems | 04-2003 | 3922 988 43318 en
Digital Congress Network | Installation and Operating Manual | Chapter 4 - Central Control Equipment en | 4-14
LBB 4106/00, LBB 4106/00D Extension power supply unit
4.10 LBB 4106/00, LBB 4106/00D
Extension power supply unit
The Extension power supply unit is remotely controlled by the CCU and enables systems to be
extended. Used in combination with a central control unit, the unit is used to supply power for up to
an additional 180* PCF points.
*The figure stated represents the number of units rated with a Power Consumption Factor (PCF) of
1. For further information regarding the Power Consumption Factor refer to Chapter 10.1.1: “System
design fundamentals”.
The unit connects to the main trunk-line cabling using the loop-through cabling method and is
switched on automatically when the CCU is switched on. A built-in trunk-line splitter enables the unit
to be installed anywhere within the system cabling. All its outputs are protected against short circuit
of the power supply lines.
Mounting
The unit can only be rack-mounted when two Extension power supply units LBB 4106/00 are used.
The units are attached to each other using a supplied metal plate used to join the units together at
the front and rear. Once joined the unit can be mounted using the mounting brackets supplied with
each unit. Mounting the unit is similar to CCU mounting (see Chapter 4.12 ).
Controls and Indicators (see FIG 4-10):
1. Power On indicator (green LED).
2. 1 x Trunk-line outlet connector for loop-through connection** (without regeneration) of the
trunk-line plus indicator (red LED) to indicate trunk-line overload. The outlet is protected against
short circuit of the d.c. supply lines.
3. 2 x Tap-off outlet trunk-line cable connectors** (with regeneration)***. Each outlet includes an
indicator (red LED) to indicate trunk-line overload. Each outlet is protected against short-circuit
of the d.c. supply lines.
4. Euro-mains socket with in-built fuse (a.c. mains voltage selectable inside unit). Matching mains
cable (1.7 m (5.5 ft.) (D-version 2.5 m (8.2 ft.) included.
5. 2 m (6.5 ft.) long cable terminated with a moulded 6-pole circular connector for connection to
the DCN network cabling.
6. 3 indicators to indicate trunk-line overload (red LEDs).
Mains connection
• For mains voltage selection, fuse rating and mains cable and plug and socket connections
refer to the Central Control Unit LBB 3500/xx. (Chapter 4.4.1). A mains tally, showing
the connection details is visible on one side of the unit once the top cover is removed.
The fuse ratings are the same as used for CCUs LBB 3500/15 and LBB 3500/35
• The unit must be powered via an earthed mains outlet.
** For connection of contribution, distribution, and interpretation units, incl. ext. power supplies.
*** For more information on regeneration see Chapter 10.3.
FIG 4-10 LBB 4106/00 Front and rear view Extension Power Supply unit
1
Front view
2 43
6
5
Rear view
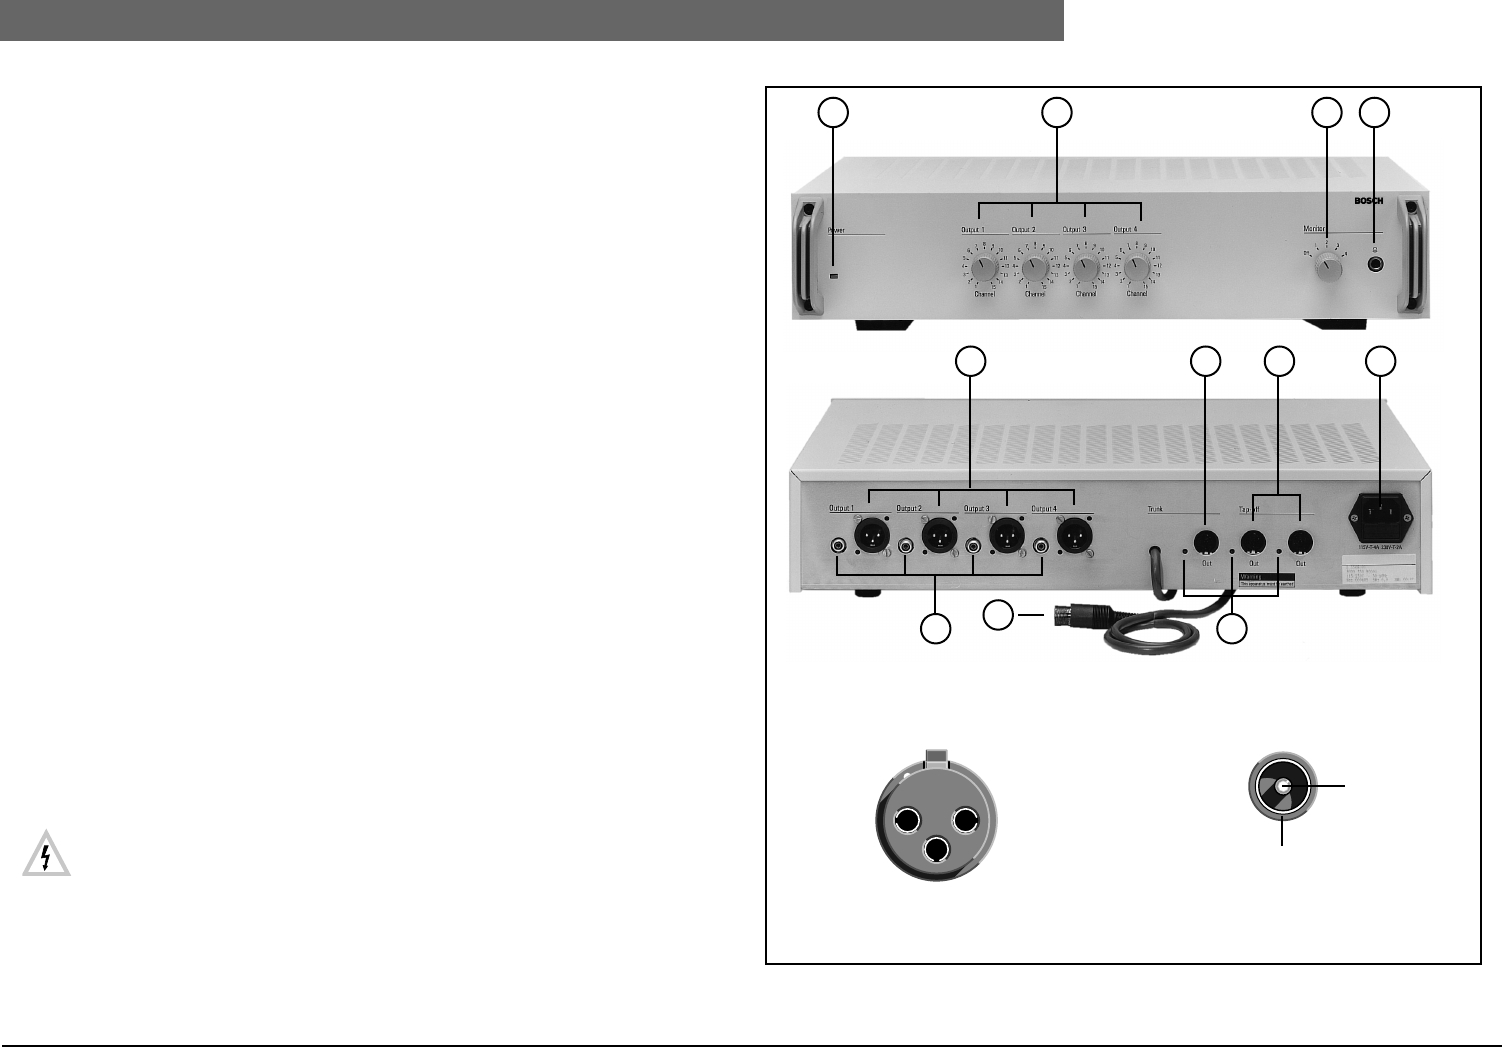
2
Bosch Security Systems | 04-2003 | 3922 988 43318 en
Digital Congress Network | Installation and Operating Manual | Chapter 4 - Central Control Equipment en | 4-15
LBB 3508/00 & LBB 3508/00D Audio Media Interface and Power Supply Unit
4.11 LBB 3508/00 & LBB 3508/00D
Audio Media Interface and Power Supply Unit
The Audio Media Interface Unit is remotely controlled by the CCU and enables external analogue
equipment to be connected to DCN’s digital network - such as broadcast, recording, and sound
distribution equipment. The unit is equipped with four Digital to Analogue convertors with channel
select switches for the selection of the floor or interpretation channels. The units built-in power supply
for up to an additional 90* PCF points. Its built-in trunk-line splitter enables the unit to be connected
to the trunk-line using the loop-through cabling method.
*The figure stated represents the number of units rated with a Power Consumption Factor (PCF) of
1. For further information regarding the Power Consumption Factor refer to Chapter 10.1.1 “System
design fundamentals”.
The unit connects to the main trunk-line cabling using the loop-through method of cabling and is
switched on automatically when the main Central Control Unit is switched on. The unit can be free-
standing on a table top or with the use of brackets supplied with the unit (Chapter 4.12) can be
mounted in to a 19” rack. Mounting the unit is similar to CCU mounting.
Controls and Indicators (see FIG 4-11):
1. Power On indicator (green LED).
2. 4 x 15-position rotary channel selector controls for Outputs 1, 2, 3 and 4.
3. 5-position output selector to select audio output for monitoring (Output 1 - 4 and off).
4. 6.3 mm stereo jack Headphone connector for audio monitoring.
5. 4 x 3-pin XLR male audio output sockets (balanced).
6. 1 x Trunk-line outlet connector for loop-through connection** (without regeneration) of the
trunk-line plus indicator (red LED) to indicate trunk-line overload. The outlet is protected against
short circuit of the d.c. supply lines.
7. 2 x Tap-off outlet trunk-line cable connectors** (with regeneration)***. Each outlet includes an
indicator (red LED) to indicate trunk-line overload. Each outlet is protected against short-circuit
of the d.c. supply lines.
8. Euro mains socket (a.c. mains voltage selectable inside the unit) with built-in fuse. Mains cable 1.7
m (5.5 ft.) (D-version 2.5 m (8.2 ft.) long included.
9. 3 indicators to indicate trunk-line overload (red LEDs).
10. 2 m (6.5 ft.) long cable terminated with a moulded 6-pole circular connector for connection to
the DCN Network Cable
11. 4 x audio output cinch-type sockets (Asymmetrical)
Mains connection
• For mains voltage selection, fuse rating and mains cable and plug and socket connections
refer to the Central Control Unit LBB 3500/xx. (Chapter 4.4.1). A mains tally, showing
the connection details is visible on one side of the unit once the top cover is removed.
The fuse ratings are the same as used for the CCU LBB 3500/05.
• The unit must be powered via an earthed mains outlet.
** For connection of contribution, distribution, and interpretation units, plus ext. power supplies.
*** For more information on regeneration see Chapter 10.3.FIG 4-11 LBB 3508/00 Audio Media Interface Unit (Front and rear view)
XLR Connector
(Male)
Earth (1) (2) Signal -
(3)
Signal +
Cinch Connector
(Male)
Signal +
Screen
1 2 3 4
5 6 7 8
11 10 9
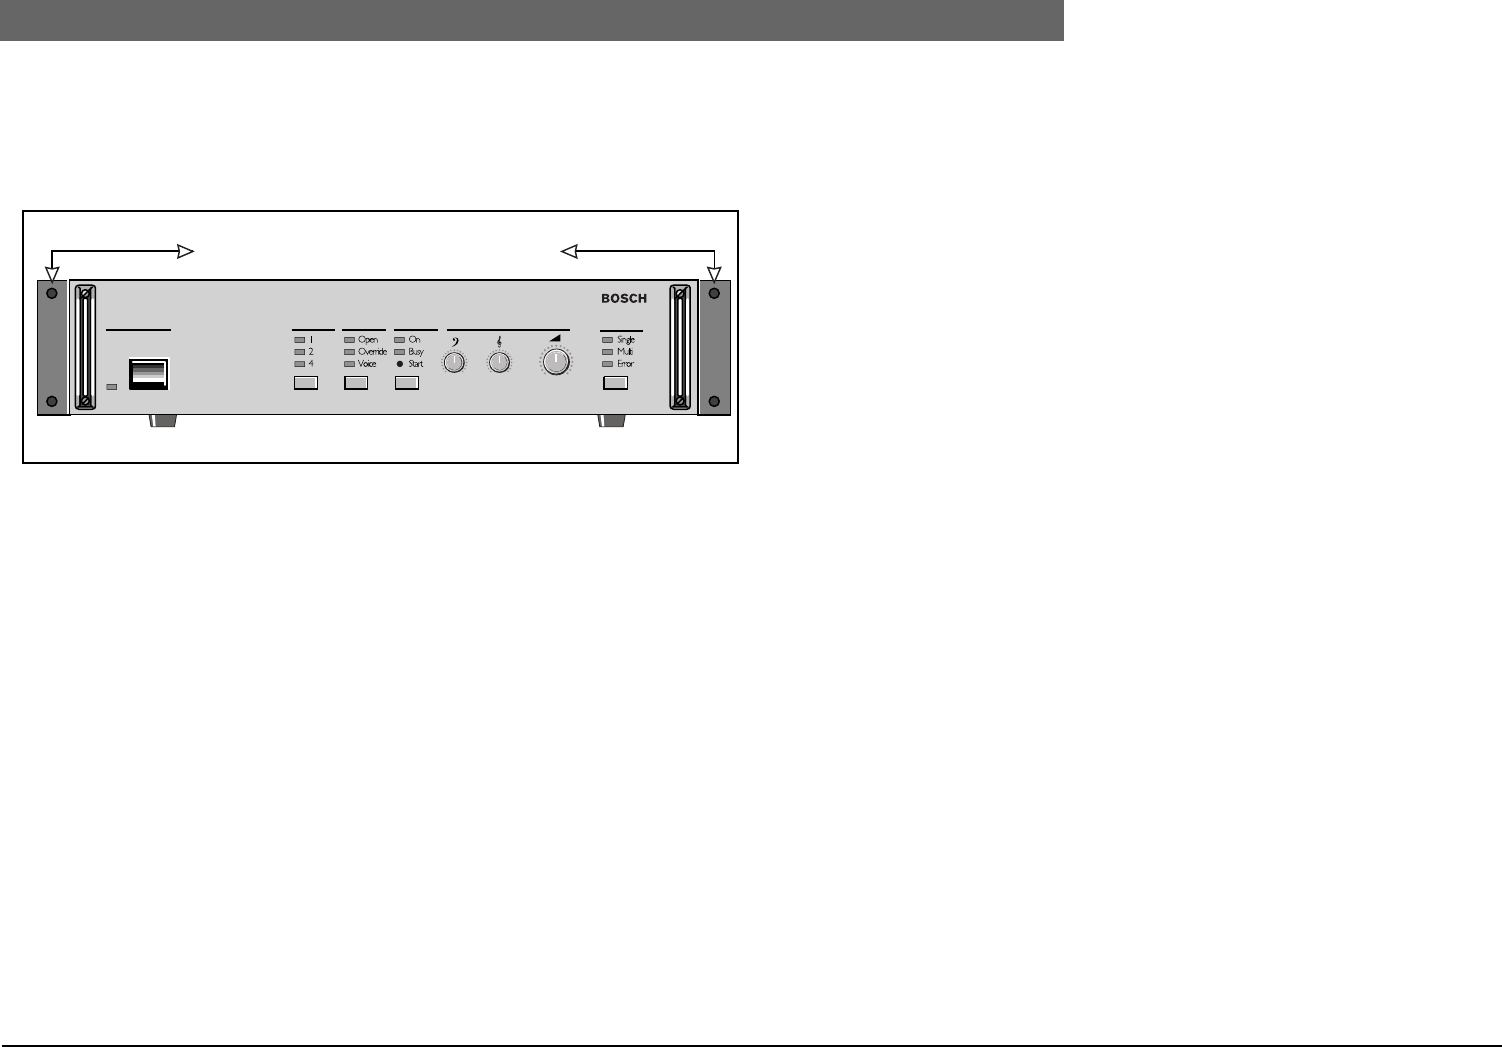
2
Bosch Security Systems | 04-2003 | 3922 988 43318 en
Digital Congress Network | Installation and Operating Manual | Chapter 4 - Central Control Equipment en | 4-16
19” Rack Mounting DCN Control Units
4.12 19” Rack Mounting DCN Control Units
The Central Control Unit can be rack-mounted into a 19” rack or simply placed on a table-top or
similar type surface close to the mains supply. When placing ensure that the unit has adequate
ventilation (Refer to Chapter 12.).
FIG 4-12 CCU with mounting brackets
SystemLoudspeakers
Power OperationActive Micro's
Equalizer
19” Rack mounting brackets
(Supplied with the CCU)
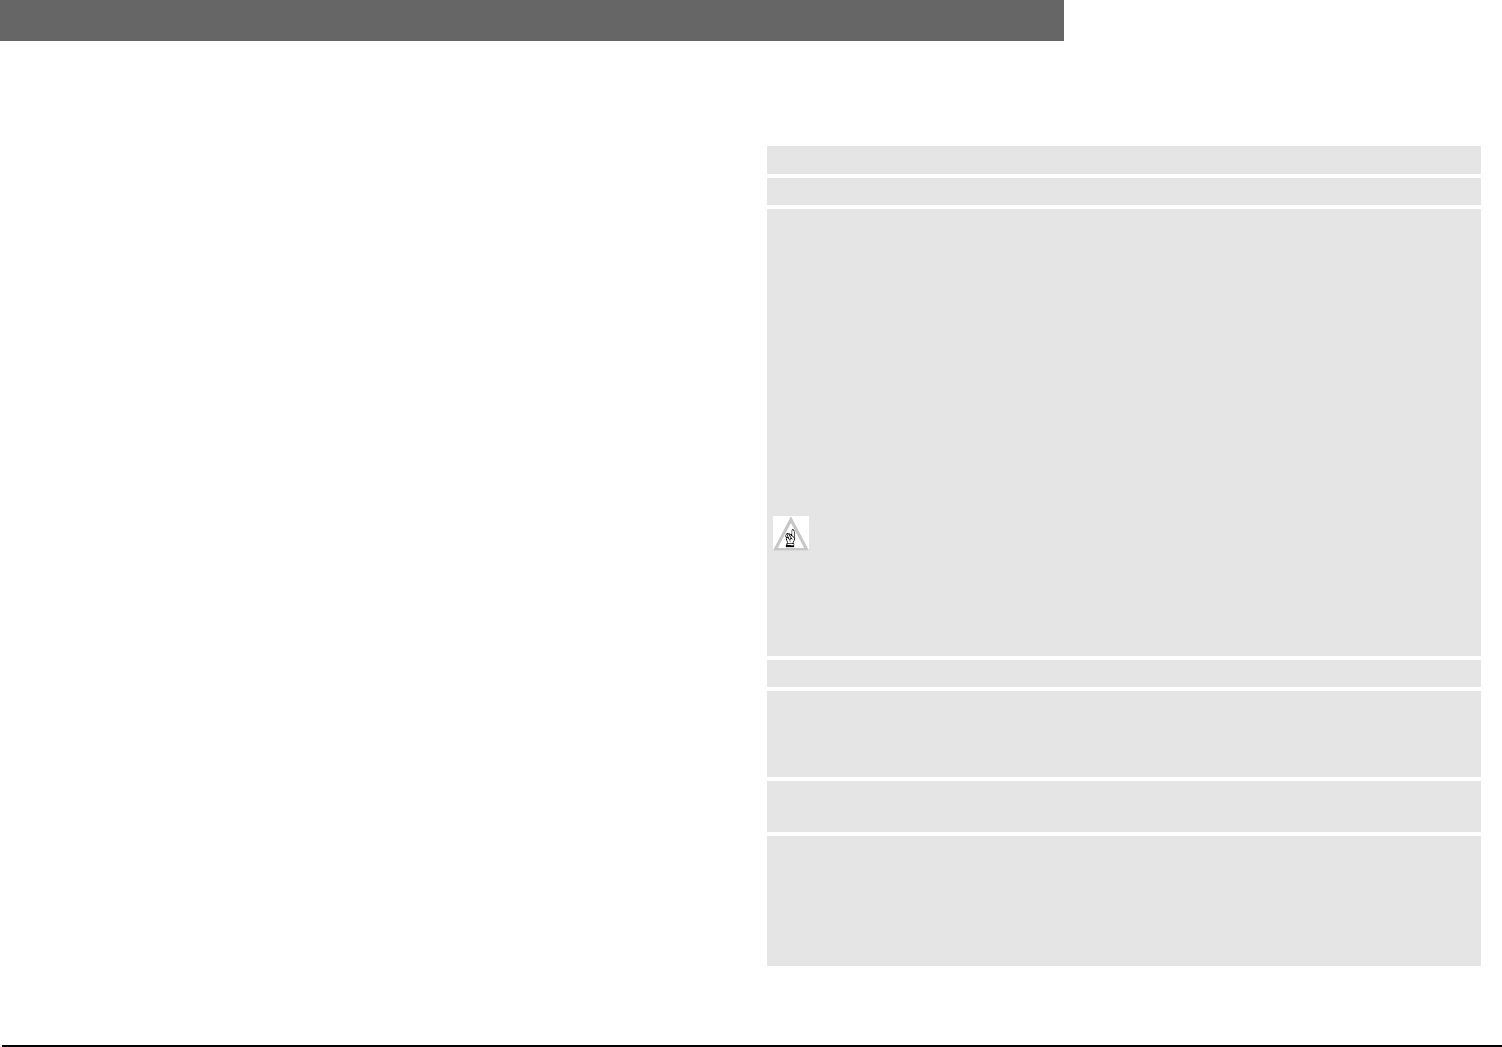
2
Bosch Security Systems | 04-2003 | 3922 988 43318 en
Digital Congress Network | Installation and Operating Manual | Chapter 5 - Control using PC en | 5-1
Minimum Software and hardware requirements
Chapter 5. DCN Control using
Personal
Computers
To meet the ever changing requirements of modern conference venues and the demands of rapid
technological changes, the DCN system has now integrated conference control and management
with the flexibility and user friendliness of a personal computer. See Chapter 1. Introduction.
5.1 Minimum Software and hardware requirements
Table 5-1: PC requirements
DCN Control PC
For Windows 95, 98
• Pentium II processor or higher
• 48 Mbytes of memory or more (at least 32 Mbytes)
• Video card supporting at least VGA and SVGA resolutions, high or true colour
• Hard disk with data access time <10 ms and 100 MB free disk space, after installation of
Windows.
• Ethernet network card for use in multi-PC systems
• Free ISA slot for network card LBB 3510/00 or free RS-232 port for direct connection to
CCU
Serial ports (RS-232) for connection to:
• Chip card encoder/reader
• Label printer
• Error logging
• Printing microphone activity
NOTE: A PC with at least 4 serial ports is recommended if a direct CCU connection and
Chip-card encoder is used.
Parallel Printer Port for connection to printer
Connections for:
• Keyboard
• Mouse
For NT 4.0, Windows 2000 or Windows XP Professional
• The same requirements as used for Windows 95 and 98 but with at least 64 MB of memory,
96 MB recommended, PC-card LBB 3510/00 NOT supported.
• Free serial port for connection to CCU (baudrate 115,200 recommended).
• For XP Pentium IV: 1.7 GHz and 256 MB RAM
IMPORTANT:
1. If a ‘DIRECT’ connection is made between the Control PC and the CCU, the operator has no
connection to the PC for headphone or intercom handset. Additional DCN hardware is
required for the operator if these functions are required. Use can be made of DCN table-top or
flushmounted hardware depending on the requirements.
2. If the connection to the DCN control PC is via the PC-Network card, (installed in the DCN
control PC) ONLY Windows 95 and 98 can be used.
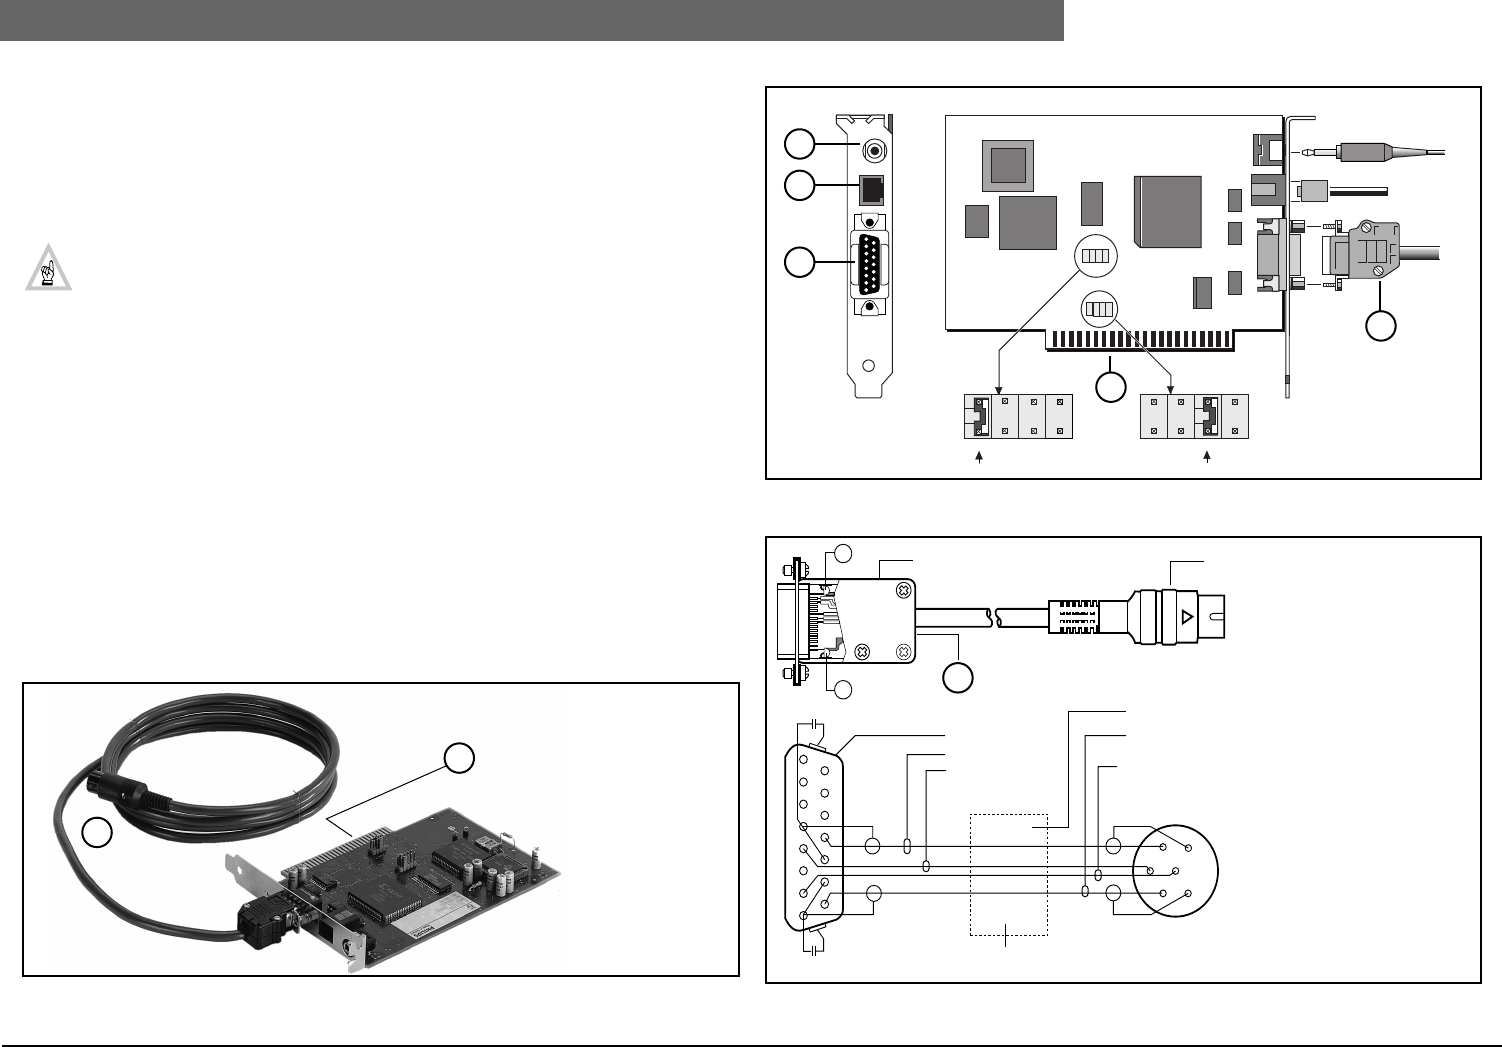
2
Bosch Security Systems | 04-2003 | 3922 988 43318 en
Digital Congress Network | Installation and Operating Manual | Chapter 5 - Control using PC en | 5-2
LBB 3510/00 PC Network card
5.2 LBB 3510/00 PC Network card
When installed into the 8-bit ISA-bus expansion slot of a personal computer (PC) running ‘Windows’
95 or 98 operating system, the PC network card provides the interface between a PC and the ‘DCN’
system. The interface card includes a headphone socket for monitoring the floor and translation
channels and an intercom handset socket for connection to an intercom handset used for vocal
communication. When connected to the DCN network its input and outputs are optically isolated.
NOTE:
1. PC control is also possible via a ‘DIRECT’ serial link between a COM-port of the DCN
control PC and Port 1 (default) or Port 2 of the CCU (LBB 3500/15, LBB 3500/35 only)
when used in ‘Single CCU mode.
2. ‘DIRECT’ PC control in Multi-CCU systems requires a serial connection between a
COM-port of the DCN control PC and a COM-port of the Master PC (OS/2) for Multi-
CCUs .
3. Simultaneous use of the PC Network card and ‘DIRECT’ PC control is NOT possible
Cable and connectors (see FIG 5-1 and FIG 5-2):
1. 3.5 mm jack-socket for operator headphones.
2. Modular jack-socket for Intercom handset type LBB 3555.
3. 15-pole Sub-D type connector for connection to the DCN trunk-line.
4. ISA-bus (8-bit) connector
5. 2 m (6.5 ft.) long trunk-line input cable, terminated at one end with a 6-pole moulded circular
connector (male) and at the other with a 15-pole D-sub plug (female) matching the 15-pole
socket on the PCB (3) .
Jumpers
X2 to select I/O address
X3 to select Interrupt Request Number (IRQ)
FIG 5-1 LBB 3510/00 Network card for PC
FIG 5-2 LBB 3510/00 layout Network card
FIG 5-3 LBB 3510/00 Network cable assembly
5
4
Dimensions
0.5 AT slot length.
X2
X3
256 512 640 768 IRQ9 IRQ4 IRQ5 IRQ7
1
2
3
4
5
C2
C1
100 nF
12
5
C1
C2
4
36
12 34 567 8
910 11 12 13 14 15
5
Metal shield
Total screen
Brown
Green
White
Blue
Screen (white)
Screen (green)
15-pole D-type connector
Rear view Front view
6-pole circular connector
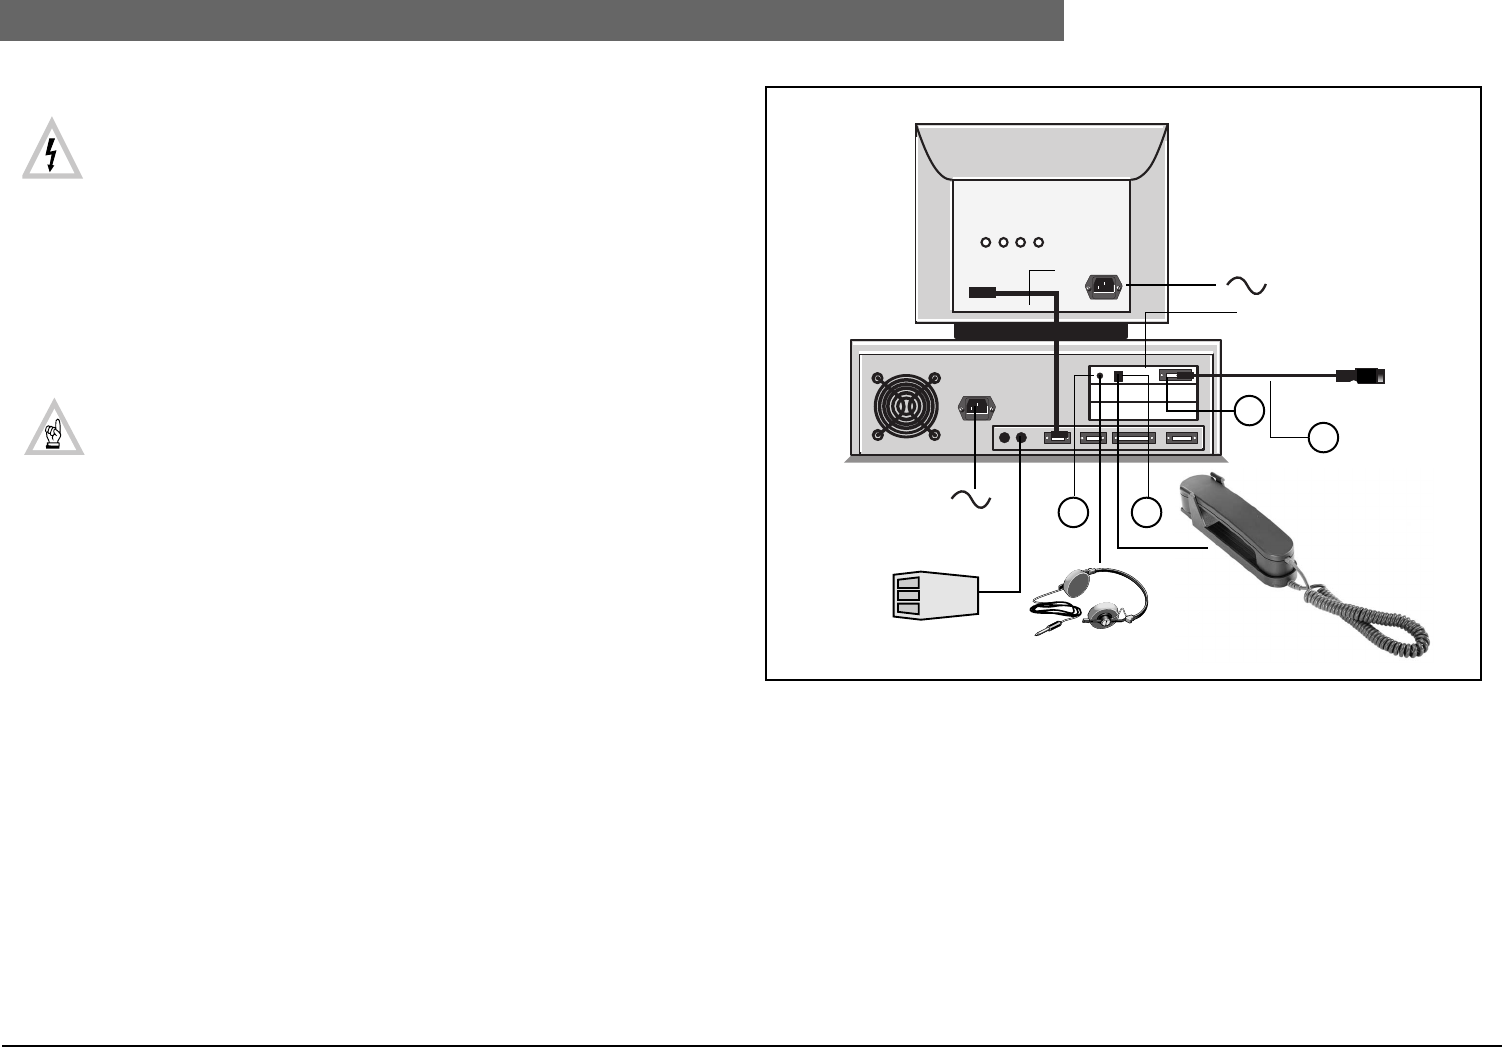
2
Bosch Security Systems | 04-2003 | 3922 988 43318 en
Digital Congress Network | Installation and Operating Manual | Chapter 5 - Control using PC en | 5-3
Windows and DCN Software modules
5.2.1 Installing PC-Network card
WARNING: Before connecting a computer to the DCN network cabling, ensure the
following: Refer also to the ‘Safety Precautions’ found at the front of this manual.
1. The mains supply is OFF.
2. The voltage selection switch on the computer is set for the correct mains voltage.
3. Refer to the manual supplied with your PC on how to install a PC-card. Follow the
recommended installation procedures.
5.2.2 Interconnections PC Network card
Connecting PC to DCN cabling
• For connection via Network card see FIG 5-4.
• For ‘DIRECT’ connection to a PC (no PC-Network card necessary) see Chapter 5.2.
NOTE: The PC when fitted with a PC-Network card LBB 3510/00, as with all other
DCN system units, can be connected to any convenient point within the trunk-line
cabling. It can also be connected ‘DIRECT’ to a Central Control unit (<15 m) . However,
when connecting a PC to the trunk-line cabling no loop-through facility is available. To
bypass the PC, a trunk-splitter or Tap-off unit can be used. For more information see
Chapter 10..
Connecting Intercom handset
To connect an intercom handset to the PC, locate the Modular jack socket (2) on the PC-Network
card LBB 3510/00). and connect the intercom’s modular jack to it.
Connecting Headphones
For operator monitoring, connect headphones to the 3.5 mm jack socket (1) located on the PC
Network card (FIG 5-4).
FIG 5-4 Interconnection Personal Computer (PC)
5.3 Windows and DCN Software modules
Refer to relevant DCN software manuals.
For available software packages refer to Chapter 1.
DCN PC
Mains
To previous unit
Trunk-line
Intercom Handset
LBB 3555/00
Headphones
Mouse
Mains
3
21
5
PC-network card
LBB 3510/00 (FIG 5-2)
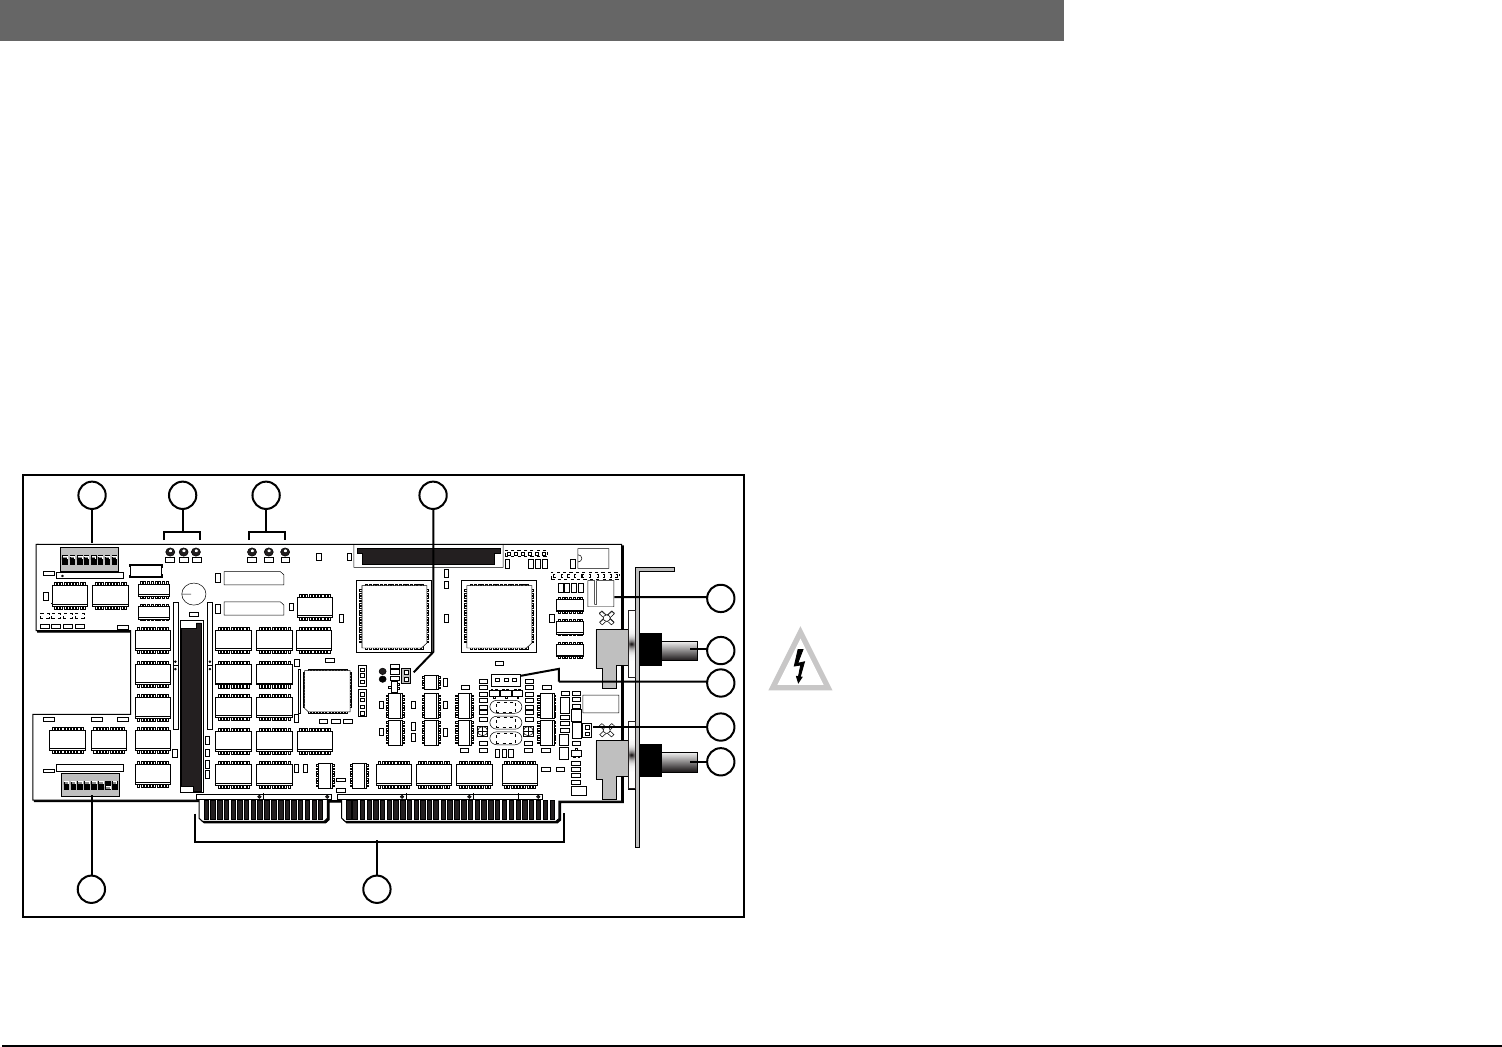
2
Bosch Security Systems | 04-2003 | 3922 988 43318 en
Digital Congress Network | Installation and Operating Manual | Chapter 5 - Control using PC en | 5-4
LBB 3511/00 PC Card for Multi-CCU Systems
5.4 LBB 3511/00 PC Card for Multi-CCU Systems
The interface card LBB 3511/00 provides the interface between a master PC and interconnected
CCUs type LBB 3500/35 only. The card is installed in a 16-bit ISA-bus expansion slot of a OS/2
personal computer. The interface card should be installed in a secondary PC, running OS/2 (3.0 Warp
or higher), and not in the main DCN system control PC. Once the card and the Multi-CCU software
package LBB 3586 is installed, the PC performs as the master network provider for all CCUs
connected to the Multi-CCU network. A maximum of 16 CCUs can be connected to the card, in
closed loop configuration, using the two BNC connectors on the card. Standard 75 Ohm coaxial
cable is used to make the connection.
Connectors (see FIG 5-5):
5. Input connection for External power-fail signal (active low).
6. Connector for Multi-trunk Out.
7. Pin connectors for test purposes only.
9. Connector for Multi-trunk In.
10. Card edge connector for connection to ISA-bus.
FIG 5-5 LBB 3511/00 Layout PC card for Multi-CCU systems
LED indications
Jumpers
DIP-switches (see Chapter 5.4.2)
5.4.1 Installing PC-Card for Multi-CCU systems
WARNING: Before connecting a computer to the DCN network cabling, ensure the
following: Refer also to the ‘Safety Precautions’ found at the front of this manual.
1. The mains supply is OFF.
2. The voltage selection switch on the computer is set for the correct mains voltage.
3. Refer to the manual supplied with your PC on how to install a PC-card. Follow the
recommended installation procedures.
The following steps are required to ensure correct operation:
1. Set the cards I/O address. The card installed in the PC is required to have its own dedicated
address. This address is assigned on the PC card for Multi-CCU systems by DIP-switch (S13).
See Chapter 5.4.2.
2. Set the cards functionality using DIP-switch (S12) . See DIP-switch settings Chapter 5.4.2.
3. Set Jumpers X24 (8) and X32 (4) accordingly
1 2 3
5
S13 ON
X31A
X32
D1 D2 D3 D4 D5 D6
1 X25
X29
X24
IC1IC2
X11
X10 IC200
87654321
S12 ON
87654321
4
6
7
8
9
1011 S13
S12
Dimensions:
0.5 AT slot length.
2D1
D2
D3
(Yellow) Output port 1 indicator,
(Green) Output port 1 indicator,
(Red) Output port 1 indicator.
3D4
D5
D6
(Yellow) Indicates the master state of the PC card,
(Green) Indicates card has been initialized by the software,
(Red) Indicates power-on.
4X32 When placed (indicated by LED D4) the Multi-CCU board is in its master state
(default: placed).
8X24 Not placed
1S12 DIP-switches 1 and 6 define the priority functionality for the chairman
1 = ON, 6 = OFF (default settings)
(default 2, 3, 4, 5, 7 and 8 = OFF (IMPORTANT: Fixed, must NOT be changed).
11 S13 Defines the cards I/O address
(default 1 = OFF, 2 = ON, 3 = OFF, 4 = OFF, 5 = OFF, 6 = OFF, 7 = OFF, 8 = 0FF)
I/O address on delivery: 0200 HEX
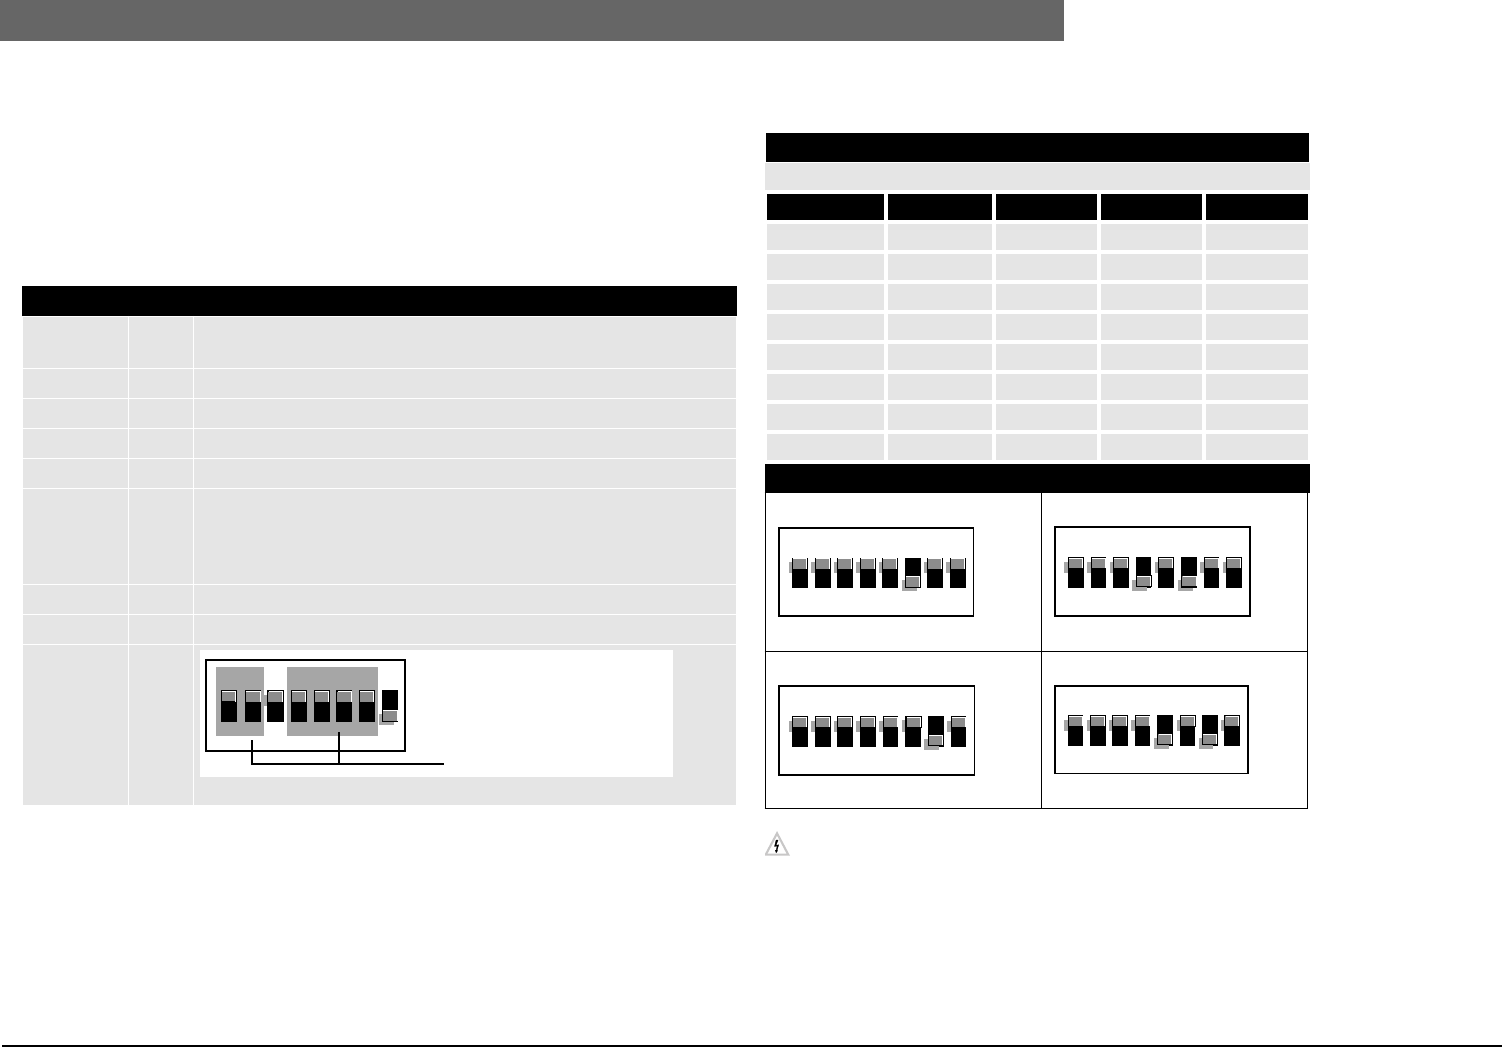
2
Bosch Security Systems | 04-2003 | 3922 988 43318 en
Digital Congress Network | Installation and Operating Manual | Chapter 5 - Control using PC en | 5-5
LBB 3511/00 PC Card for Multi-CCU Systems
5.4.2 LBB 3511/00 DIP-switch S12 and S13 settings
For location details see FIG 5-5
DIP-switch S12 : Assign cards digital input (0 - 31)
DIP-switch S13 : Assign cards 1/O (Input/Output) address (04E0 HEX)
DIP-switch S12
IP switches to define the card’s ‘digital input’.
DIP-switch S13
NOTES:
1. Available addresses (HEX): 0100, 0140, 0200 (default), 0280.
These addresses must be set with the DIP-switches and in the Config.sys file of the OS/2
PC.
2. Available interrupts IRQ: 3, 4, 5, 7, 9, 10 (default) and 12.
NOTE: These interrupts must be set in the Config.sys file of the OS/2 PC.
Table 5-2: DIP-switch S12
LBB 3511/00 PC-card for Multi-CCU systems
SW 1 ON
OFF
Chairman priority tone ON (default)
Chairman priority tone OFF
SW 2 OFF Reserved for card’s Master Address (IMPORTANT: must NOT be changed)
SW 3 OFF Reserved for card’s Master Address (IMPORTANT: must NOT be changed)
SW 4 OFF Reserved for card’s Master Address (IMPORTANT: must NOT be changed)
SW 5 OFF Reserved for card’s Master Address (IMPORTANT: must NOT be changed)
SW 6 ON
OFF
Active microphones and requests will be permanently switched OFF if the
priority function of the chairman’s unit is activated.
Active microphones will be switched OFF temporarily if the priority
function of the chairman’s unit is activated (default)
SW 7 OFF Reserved for card’s Master Address (IMPORTANT: must NOT be changed)
SW 8 OFF Reserved for card’s Master Address (IMPORTANT: must NOT be changed)
S12 ON
87654321
IMPORTANT:
DO NOT CHANGE
Table 5-3: DIP-switch S13
LBB 3511/00 PC-card for Multi-CCU systems
DIP-switches to define the cards I/O address (default: 0200 HEX)
I/O address 0100 HEX 0140 HEX 0200 HEX 0280 HEX
SW 1 OFF OFF OFF OFF
SW 2 OFF OFF ON ON
SW 3 ON ON OFF OFF
SW 4 OFF OFF OFF ON
SW 5 OFF ON OFF OFF
SW 6 OFF OFF OFF OFF
SW 7 OFF OFF OFF OFF
SW 8 OFF OFF OFF OFF
Actual address settings DIP switch S13
DIP-SWITCH S13
Address (0100HEX)
S13 ON
87654321
DIP-SWITCH S13
Address (0140HEX)
S13 ON
87654321
DIP-SWITCH S13
Address (0200HEX)
S13 ON
87654321
(default)
DIP-SWITCH S13
Address (0280HEX)
S13 ON
87654321

2
Bosch Security Systems | 04-2003 | 3922 988 43318 en
Digital Congress Network | Installation and Operating Manual | Chapter 5 - Control using PC en | 5-6
Connection PC to CCU
5.5 Connection PC to CCU
Two methods for connecting the DCN Control PC to the CCU are available:
1. ‘DIRECT’ connection from a serial COM-port of the DCN Control PC to the serial COM-port
of the CCU (not applicable for CCU type LBB 3500/05).
2. Using PC-Network card LBB 3510/00. (see Note 2). For installation details see Chapter 5.2.
NOTES:
1. This function is only possible when the ‘Windows® 95 or 98’ operating system installed
on the DCN Control PC. It is NOT possible when running under the ‘Windows® NT
4.0 and ‘Windows® 2000 operating systems.
2. Simultaneous use of the PC-Network card LBB 3510/00 and ‘DIRECT’ PC control is
NOT possible.
The examples shown in this chapter are:
1. SINGLE-CCU system with control PC and Camera control
2. Multi-CCU System with control PC and Camera control
For further information refer to Chapter 10.. Installation techniques
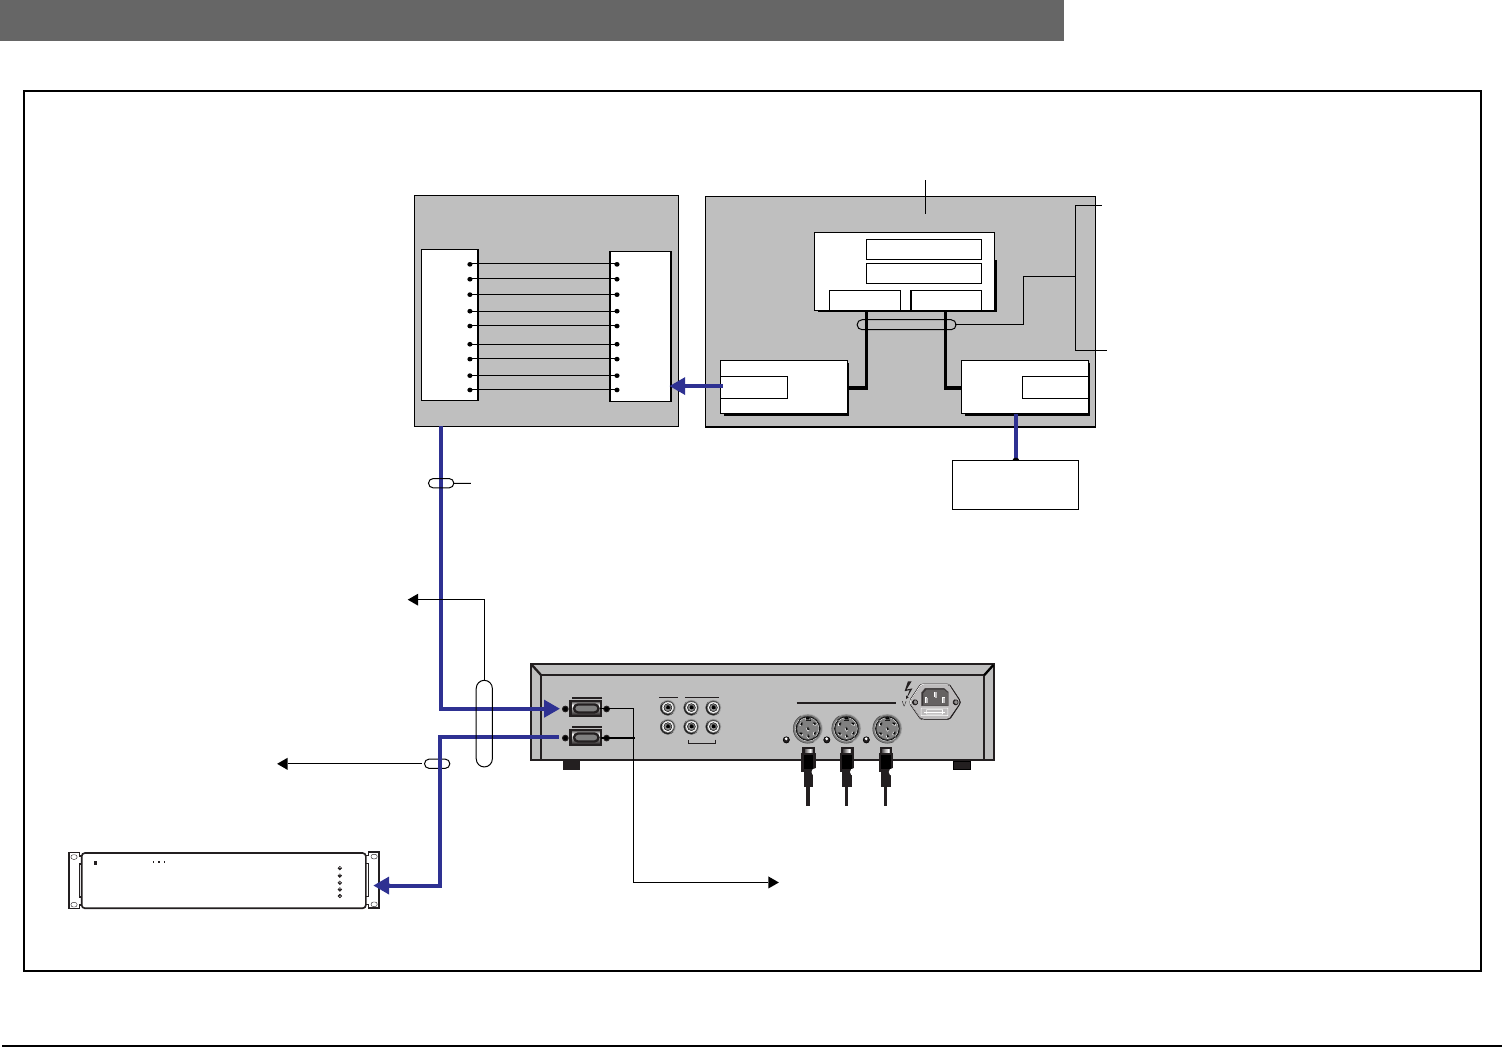
2
Bosch Security Systems | 04-2003 | 3922 988 43318 en
Digital Congress Network | Installation and Operating Manual | Chapter 5 - Control using PC en | 5-7
Connection PC to CCU
FIG 5-6 Example SINGLE-CCU system with control PC and Camera control
1
2
3
4
5
6
7
8
9
DCD
RD
TD
DTR
GND
DSR
RTS
CTS
RI
1
2
3
4
5
6
7
8
9
DCD
RD
TD
DTR
GND
DSR
RTS
CTS
RI RS232RS232
CCU LBB 3500/15 PC
Male Female
9-pole D-type cable connections
Male Male
Control PC
EXAMPLE 1: SINGLE-CCU system with control PC and Camera control
Port 1
Port 2
Rec.
Line
In
Out
In
Out
Symmetrical
Trunk
115V-T4A 230V -T2A
Control PC with
LBB 3500/15
‘wire-to-wire’
‘DIRECT’ DCN PC control
Power
Code Out
Alarm
Status
Battery Low
ALLEGIANT Video System
- CCU Port 1
- Protocol: FULL
Allegiant video switcher
Windows 95, 98, NT 4.0 or 2000
IMPORTANT: The LBB 3510/00 PC
Network card CANNOT be used in a PC
running Windows NT 4.0 or 2000.
Simultaneous use of the PC-Network card
and ‘DIRECT’ connection is NOT possible.
- Baudrate: 115.2k
NOTES:
1. When using the ‘DIRECT’ method the
functions of the PC-Network card are
NOT available (i.e. headphones and
intercom). These functions are available
on the DCN Concentus units or with the
‘Multi-purpose connection unit’ LBB
3540/15.
2. The baud-rate setting of the PC COM-
port and the corresponding CCU Port
must be the same. If a different setting is
required this setting must be selected
accordingly:
CCU: DIP-switch S14 on TCB4.
PC: During DCN software installation
or in the dcn.ini file
- CCU Port 2
- Protocol: CAMERA
- Baudrate: 19.2k
NOTE: The number of required PC COM-
ports depend on the number of permanent
connections for peripheral devices (e.g. ID
chip-card encoder, and serial printer).
CAMERA control with Allegiant
The default functions of Port 1 and Port 2 can be interchanged or set for use with remote
control devices or for ‘Test/Diagnostic’ purposes instead of camera control by DIP-switch
(S14) on the TCB4 card (see Chapter 4.5 and Chapter 4.6).
video switcher
COM 2* COM 1 * The COM-port for CCU control is selected
during DCN software installation. COM 2 is
default when no ID chip card-encoder is used
(COM 3 is recommended otherwise).
see Note 2
(default)
Serial printer
See Chapter 6.. for installation details
DCN Trunk-lines
(see also Chapter 10.7)
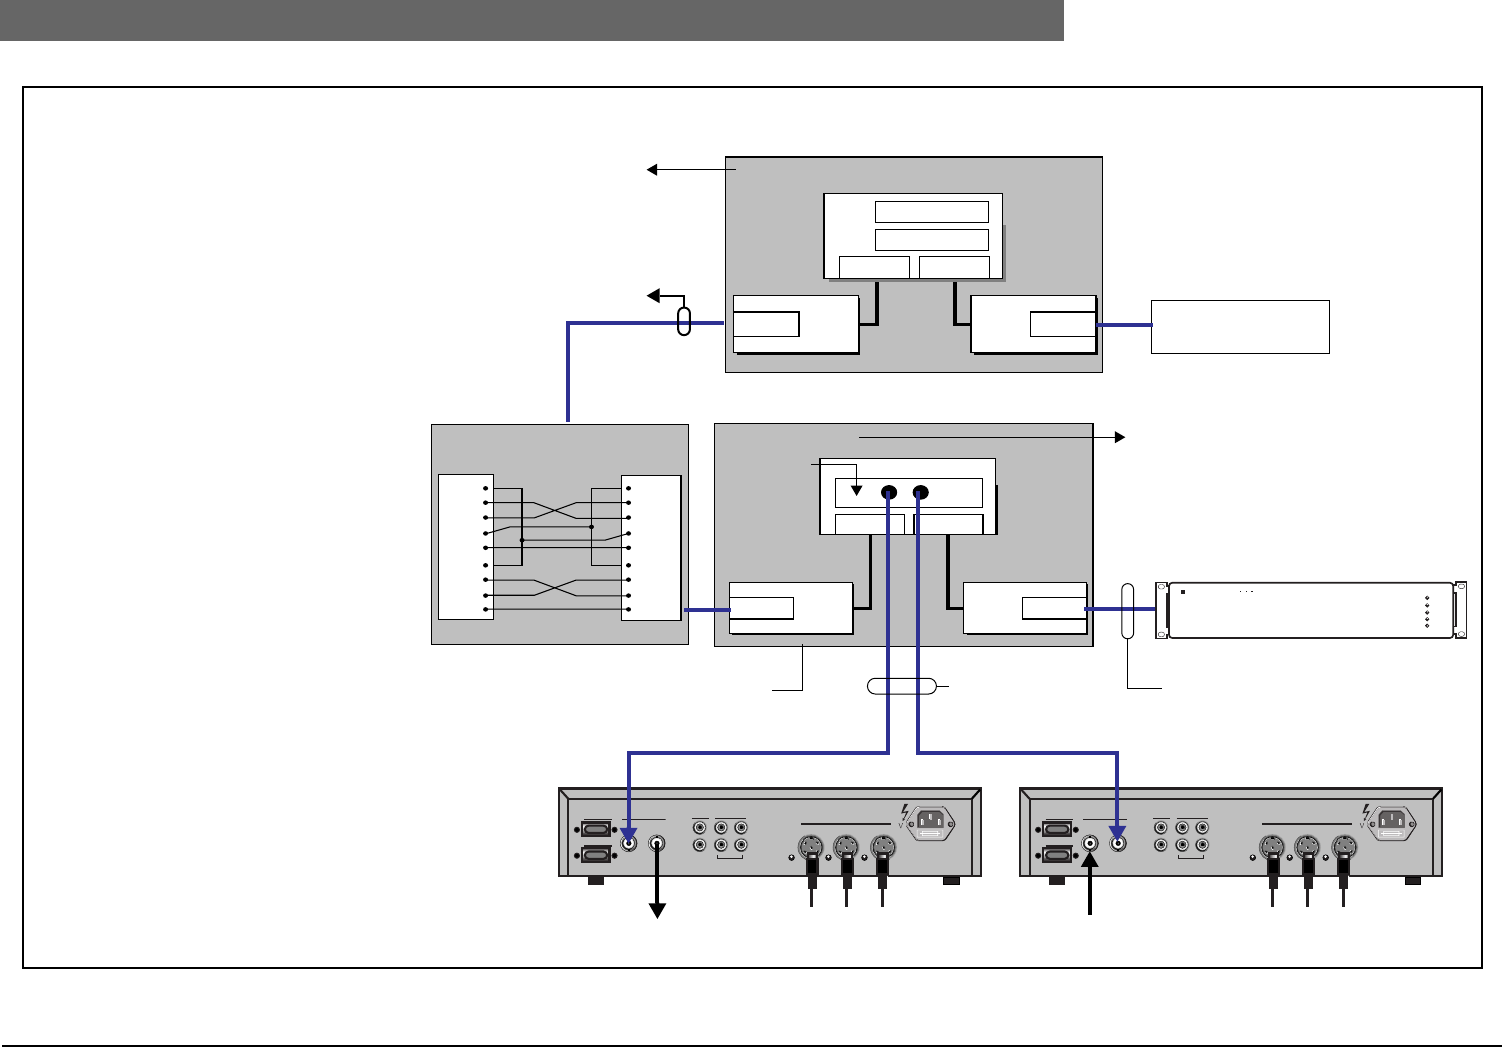
2
Bosch Security Systems | 04-2003 | 3922 988 43318 en
Digital Congress Network | Installation and Operating Manual | Chapter 5 - Control using PC en | 5-8
Connection PC to CCU
FIG 5-7 Multi-CCU System with control PC and Camera control
1
2
3
4
5
6
7
8
9
DCD
RD
TD
DTR
GND
DSR
RTS
CTS
RI
1
2
3
4
5
6
7
8
9
DCD
RD
TD
DTR
GND
DSR
RTS
CTS
RI RS232RS232
1
2
3
4
5
6
7
8
9
DCD
RD
TD
DTR
GND
DSR
RTS
CTS
RI
1
2
3
4
5
6
7
8
9
DCD
RD
TD
DTR
GND
DSR
RTS
CTS
RI
Mult-CCU Trunk
115V-T4A 230V -T2A
Port 1
Port 2
Rec.
Line
In
Out
In
Out
Symmetrical
In Out
Master CCU PC
RS232RS232
Control PC OS/2 PC
EXAMPLE 2: Multi-CCU System with control PC and Camera control
Control PC requirements:
- Windows 95, 98, NT 4.0 or 2000
- Start-up software LBB 3590.
- DCN software application modules as
required.
Master CCU PC requirements:
- OS/2 version 3.0 Warp or higher
- Multi-CCU software LBB 3586
- UPS (Uninterrupted Power Supply)
recommended
Female Female
‘Null modem ’
Video switcher (if applicable)
OUT
To next Multi-CCU
LBB 3500/35
Control PC
COM 1 COM 2
COM 1 COM 2
LBB 3511/00
Multi-CCU
PC-card
‘DIRECT’ DCN PC control
- Master CCU Port 1
- Protocol: FULL
- Baudrate: 115.2k
IMPORTANT: The LBB 3510/00 PC Network
card CANNOT be used in a PC running
Windows NT 4.0 or 2000.
Simultaneous use of the PC-Network card and
‘DIRECT’ connection is NOT possible.
NOTES:
1. When using the ‘DIRECT’ method the
functions of the PC-Network card are NOT
available (i.e. headphones and intercom).
These functions are available on the DCN
Concentus units or with the ‘Multi-purpose
connection unit’ LBB 3540/15.
2. The baud-rate setting of the Master CCU
PC port and the corresponding Control PC
port must be the same. The available baud
rate settings are 9600, 19200, 38400, 57600
and 115200. Baud rate setting on the Master
CCU PC must be set in the CCU_CFG file
(SERIAL SPEED I <baud-rate>). For more
information refer to the README.TXT file
of the Multi CCU software LBB 3586. Baud-
rate setting on the DCN Control PC must
be set in the DCN.INI file. This file can be
found in the WINDOWS or WINNT
directory.
[Server]
SerialLink=Yes
[Serial Link]
ComPort=1
Baudrate=<Baudrate>
FullProtocol=Yes
Mult-CCU Trunk
115V-T4A 230V -T2A
Port 1
Port 2
Rec.
Line
In
Out
In
Out
Symmetrical
In Out
IN
From Multi-CCU
1 n (max.16)
9-pole D-type cable connections
75 Ohm Coax cable
Male Male
LTC 8506/00
e.g. Card encoder or
The COM-port for Master CCU control is
selected during software installation.
Select COM 1.
By default an ID-chip card encoder is connected
to COM 2. COM 2 settings can be changed in
the dcn.ini file (see Table 5-11).
serial printer etc.
Power
Code Out
Alarm
Status
Battery Low
ALLEGIANT Video System
LBB 3500/35
Male Male
For COM-port settings of the Master CCU PC
(see Chapter 5.7)
See Chapter 6. for installation details

2
Bosch Security Systems | 04-2003 | 3922 988 43318 en
Digital Congress Network | Installation and Operating Manual | Chapter 5 - Control using PC en | 5-9
PC NETWORK SYSTEM
5.6 PC NETWORK SYSTEM
The example below show a typical PC network installation providing more operator control
positions. For more information refer to the software manual supplied with the System Installation
software LBB 3585. A typical example of a PC Network system is given in Chapter 10.7.1.
FIG 5-8 PC Network system
5.7 Software configuration Master CCU PC (OS/2)
(Serial Ports 1 and 2)
In the CCU_CFG file , three items are reserved to control the serial COM-ports (Port 1 and Port 2)
on the Master CCU (OS/2 PC) - ‘SERIALPORT’ , ‘SERIALSPEED’ and
‘SERIALPROTOCOL’ . Both ports can be used to connect a control PC, Remote Controller,
Allegiant video switcher or other peripheral equipment to the Multi-CCU.
1
2
3
4
5
6
7
8
9
DCD
RD
TD
DTR
GND
DSR
RTS
CTS
RI
1
2
3
4
5
6
7
8
9
DCD
RD
TD
DTR
GND
DSR
RTS
CTS
RI RS232RS232
COM2COM1
ETHERNET CARD
RS232RS232
CLIENT PC
SERVER PC
Port 1
Port 2
Rec.
Line
In
Out
In
Out
Symmetrical
Trunk
115 V-T4A 230 V -T2A
CLIENT PC requirements:
- Windows 95, 98, NT 4.0 or 2000
- Start-up software LBB 3590.
- DCN software application modules
as required.
SERVER PC requirements:
- Windows 95, 98, NT 4.0 or 2000
- Start-up software LBB 3590.
- System installation LBB 3585
- DCN software application modules
as required.
Male
Male
Male
Female
CCU PC
‘wire-to-wire’
9-pole D-type cable connections
Ethernet link
(3Com recommended)
4 CLIENT PC’s offer full DCN functionality.
Up to 8 PC’s offer limited DCN functionality.
COM 1 COM 2
see EXAMPLE 1: Single CCU system
Ethernet
See Chapter 10.. Installation techniques
Table 5-4: Port number setting
SERIALPORT<number> <portnumber>
number 1 or 2First or second logic port
portnumber 0
1 - 2
Turns off serial communication (default when NOT found or invalid port
given.
Serial port number of the Master CCU PC (OS/2) (COM1 - COM2)
Table 5-5: Port baud-rate setting
SERIALSPEED<number> <baudrate>
number 1 or 2First or second logic port
baudrate 19200 Valid values are: 9600, 19200, 57600 and 115200.
Any invalid value will be decreased to the nearest valid value. Values below
9600 are set to 9600.
NOTE: Baudrate 115200 is NOT supported on older PC’s by OS/2.
Table 5-6: Port Protocol setting
SERIALPROTOCOL<number> <type>
number 1 or 2First or second logic port
type TERMINAL The serial port is used with an ASCII interface (e.g. terminal for ‘Test’
and ‘Diagnostics’ on the CCU).
SIMPLE The serial port is used with the ‘SIMPLE’ feature protocol.
FULL The serial port is used with the ‘FULL’ feature protocol.
CAMERA The serial port is used for connection to an ‘Allegiant video switcher’.
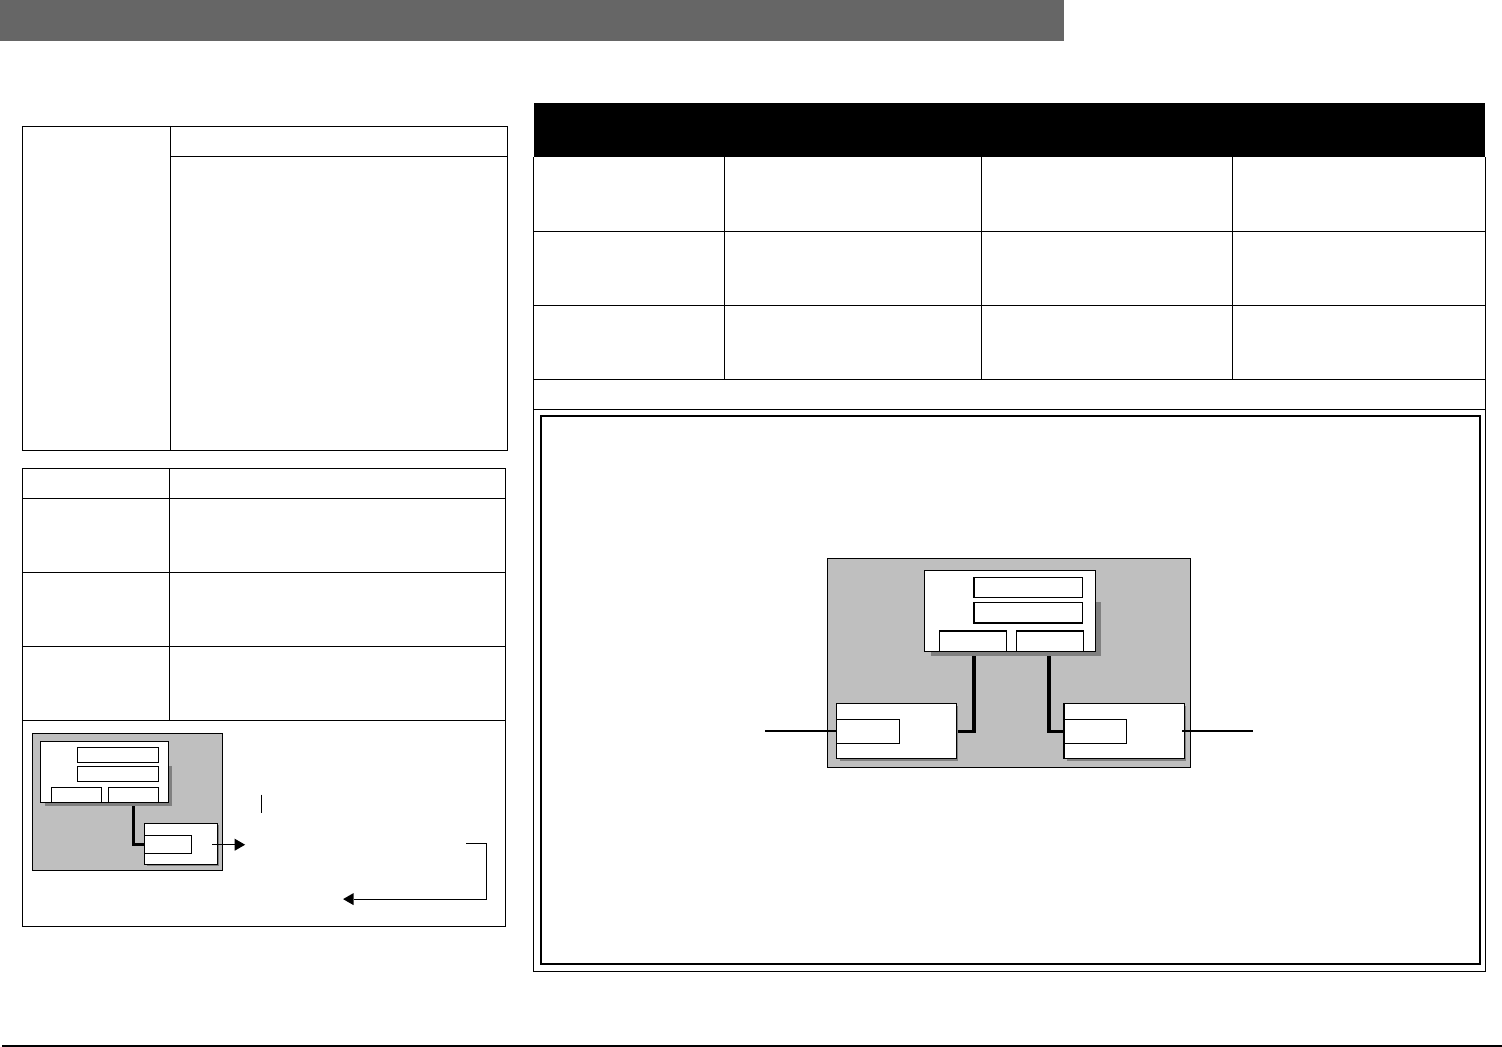
2
Bosch Security Systems | 04-2003 | 3922 988 43318 en
Digital Congress Network | Installation and Operating Manual | Chapter 5 - Control using PC en | 5-10
Software configuration Master CCU PC (OS/2) (Serial Ports 1 and 2)
Table 5-7: Example CCU_CFG file for ‘DIRECT’ PC and
camera control
Location: C:\DCN\MCCU (default)
LOCATION CCU_0
LOCATION CCU_1
LOCATION CCU_2
LOCATION CCU_3
AUDIOMASTER CCU_1
CONTROLPC_CCU_0
INTERPRETER CCU_2
SERIALPORT1 2
SERIALSPEED1 19200
SERIALPROTOCOL1 CAMERA
SERIALPORT2 1
SERIALSPEED2 115200
SERIALPROTOCOL2 FULL
Table 5-8: Single COM-port only (default COM 2)
Function Single COM-port only (Port 1)
Remote control SERIALPORT1 2
SERIALSPEED1 19200
SERIALPROTOCOL1 SIMPLE
Camera control
(default)
SERIALPORT1 2
SERIALSPEED1 19200
SERIALPROTOCOL1 CAMERA
DCN PC control SERIALPORT1 2
SERIALSPEED1 115200
SERIALPROTOCOL1 FULL
RS232
COM2COM1
SERIALPORT1 2
SERIALSPEED1 19200
SERIALPROTOCOL1 CAMERA
CCU_CFG file setting
To CCU (Port 2)
CAMERA control (default)
Table 5-9: Two COM-ports (Port 1 and Port 2)
COM-port
functionality
Remote control Camera control DCN PC Control
Port 1: Remote control
Port 2 Camera control
SERIALPORT2 1
SERIALSPEED2 19200
SERIALPROTOCOL2 SIMPLE
SERIALPORT1 2
SERIALSPEED1 19200
SERIALPROTOCOL1 CAMERA
Not applicable
Port 1: DCN PC control
Port 2 Camera control
Not applicable SERIALPORT1 2
SERIALSPEED1 19200
SERIALPROTOCOL1 CAMERA
SERIALPORT2 1
SERIALSPEED2 115200
SERIALPROTOCOL2 FULL
Port 1: DCN PC control
Port 2 Remote control
SERIALPORT1 2
SERIALSPEED1 19200
SERIALPROTOCOL1 SIMPLE
Not applicable SERIALPORT2 1
SERIALSPEED2 115200
SERIALPROTOCOL2 FULL
The settings for each COM-port shall be present in the CCU_CFG file: (see below)
RS232RS232
COM2COM1
CCU_CFG file settings
SERIALPORT2 1
SERIALSPEED2 115200
SERIALPROTOCOL2 FULL
SERIALPORT1 2
SERIALSPEED1 19200
SERIALPROTOCOL1 CAMERA
Master CCU PC
Control PC Allegiant video switcher
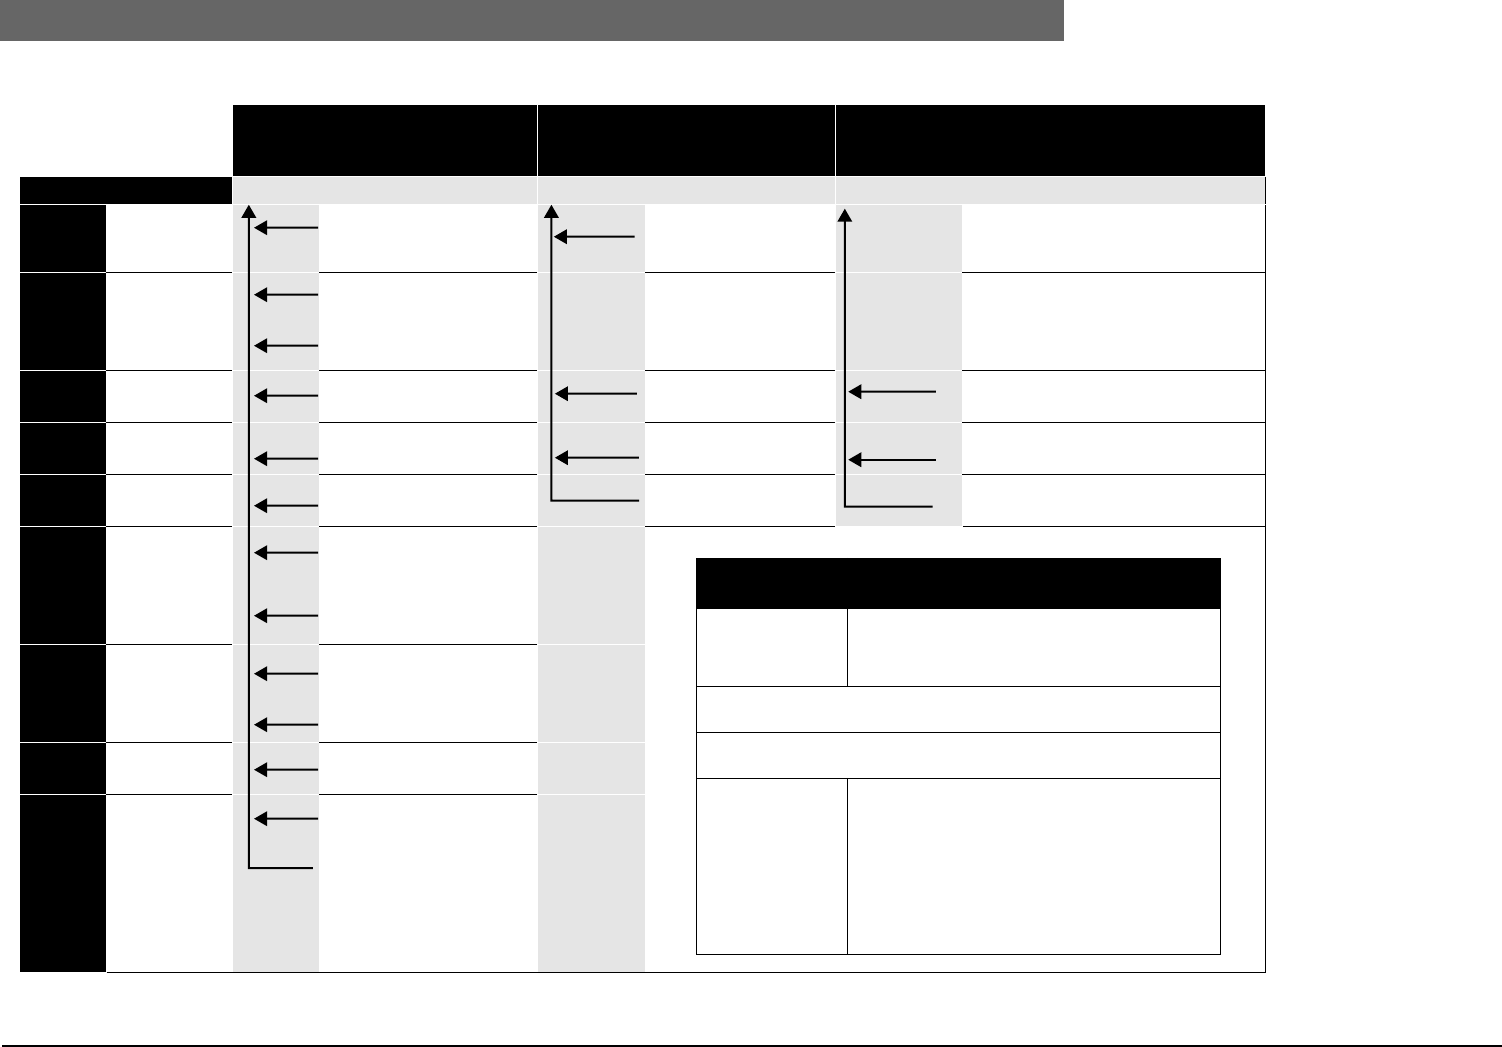
2
Bosch Security Systems | 04-2003 | 3922 988 43318 en
Digital Congress Network | Installation and Operating Manual | Chapter 5 - Control using PC en | 5-11
Software configuration Master CCU PC (OS/2) (Serial Ports 1 and 2)
Table 5-10: DCN Printer and COM-ports for systems using PC-control with PC-Network card LBB 3510/00 (see Chapter 5.7 and Chapter 5.8)
LASER PRINTER
LPT-1 (IRQ=7)
MATRIX PRINTER
COM 1 (IRQ = 4)
CARD ENCODER/ AUX.- INTERFACE
COM 2 (IRQ=3)
SOFTWARE PACKAGE Windows® Print Manager = ASCII + CR + LF = ASCII + CR + LF
LBB 3590 Startup Error messages
Printing
Error logging
Real-time
Sent to Auxiliary
LBB 3585 System
Installation
Seat numbers
Printing
Channel assignment
Printing
LBB 3571 Synoptic Micro-
phone control
Microphone activity
List Printing
Microphone activity
Real-time Printing
Microphone activity
Real-time to Aux. (Camera ctrl.)
LBB 3570 Microphone
Management
Microphone activity
List Printing
Microphone activity
Real-time Printing
Microphone activity
Real-time to Aux. (Camera ctrl.)
LBB 3580 Delegate
Database
Database
List Printing
Label printing Microphone activity
Card encoder
LBB 3575 Parliamentary
Voting
Voting file total* and individual*
Printing
(Real-time) Post-voting
total* and individual*
Printing
* Depends
on which-
mode
selected
LBB 3572 Simultaneous
Interpretation
Desk language assignment
Auto Printing
Channel language assignment
Printing
LBB 3573 Intercom
switching
File
Printing
LBB 3578 Attendance
Registration
List Registration
Printing
File Registration
Printing
For COM and LPT cable connections, refer to FIG 5-9
LPT1 Default settings
COM 1 and COM 2
8- bit standard Baud-rate = 9600
Data-bits = 8
Parity = None
Flow control = None
* Change default COM-port assignments. (This can only be done in the
dcn.ini file located in the ‘Window® directory)
** Change COM-port settings: (Using the Port program found in the
Windows Control Panel. Only applicable for Micactlogging)
* 1 Not possible
* 2 Not possible
* 3 Not possible
* 3 Not possible
* 4 Not possible
* 5 Not possible
*1 [Errorlogging]
Comport=2
*2 [MicActlogging]
Prt-port=2
*3 [MicActlogging]
Comport=1
** Baudrate - 19200
*4 [Label printing]
Comport=2
*5 [CardEncoding]
Comport=1
*5
*3
*3
*4
*2
*2
*1
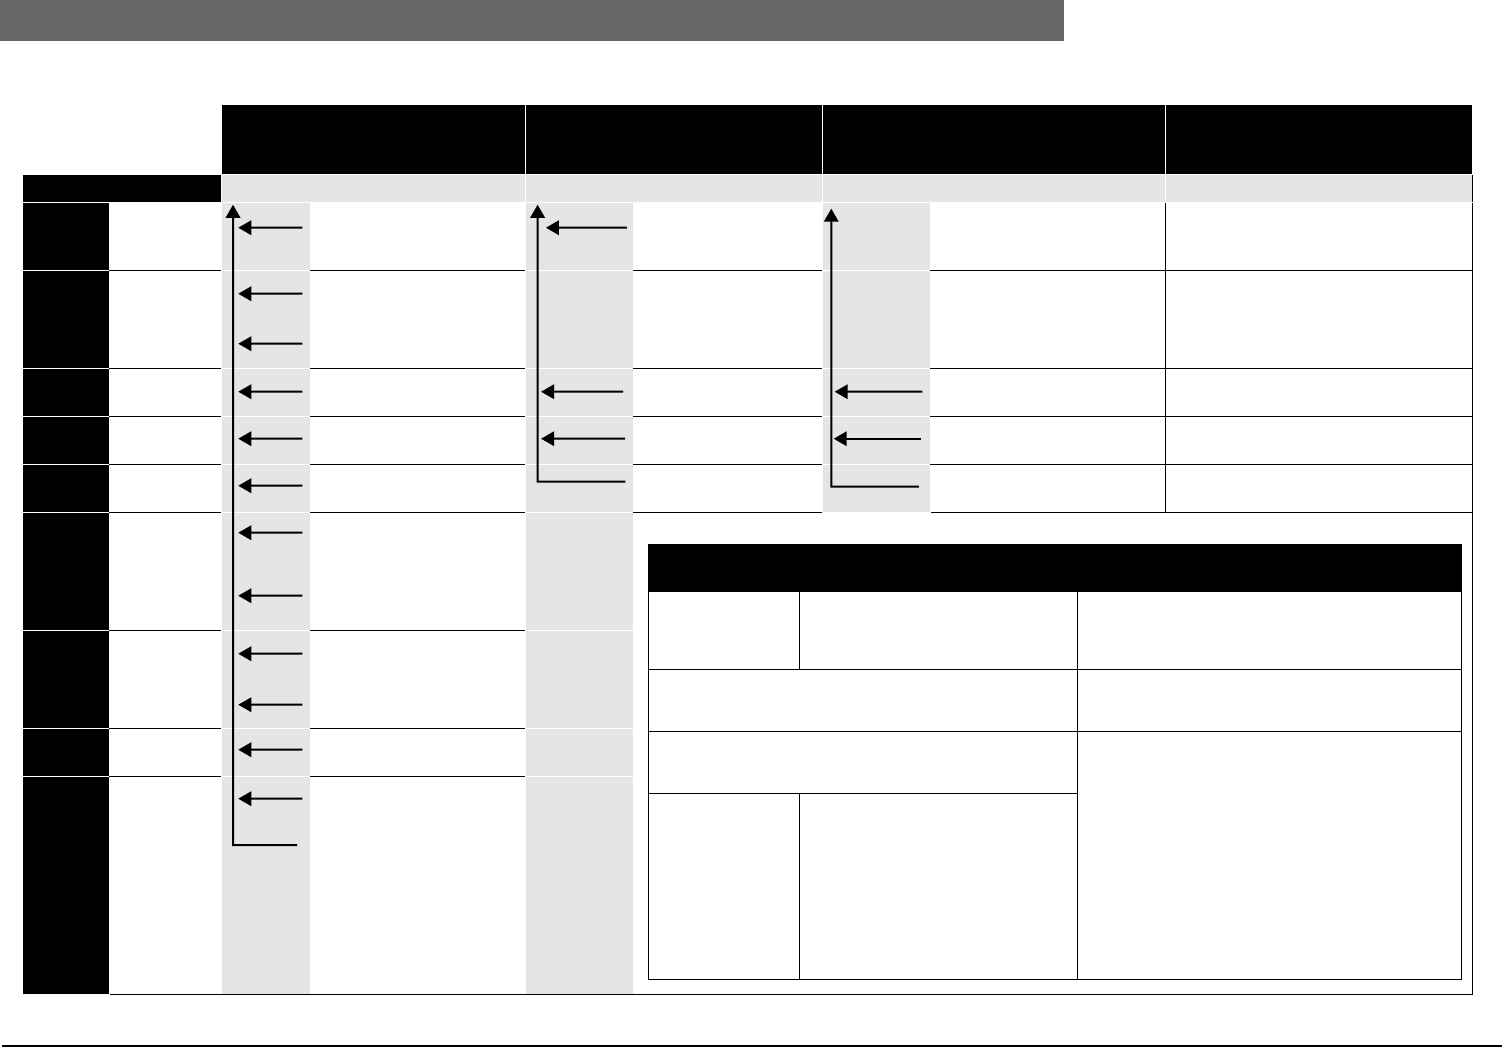
2
Bosch Security Systems | 04-2003 | 3922 988 43318 en
Digital Congress Network | Installation and Operating Manual | Chapter 5 - Control using PC en | 5-12
Software configuration Master CCU PC (OS/2) (Serial Ports 1 and 2)
Table 5-11: DCN Printer and COM-ports for systems using ‘DIRECT’ PC control (see Chapter 5.7 and Chapter 5.8)
LASE RPRINTER
LPT1 (IRQ=7)
MATRIX PRINTER
COM 1 (IRQ = 4)
CARD ENCODER/ AUX.- INTERFACE
COM 2 (IRQ=3)
CENTRAL CONTROL UNIT
COM 3 (IRQ=* (free IRQ)
SOFTWARE PACKAGE Windows® Print Manager = ASCII + CR + LF = ASCII + CR + LF
LBB 3590 Startup Error messages
Printing
Error logging
Real-time
Sent to Auxiliary
LBB 3585 System
Installation
Seat numbers
Printing
Channel assignment
Printing
LBB 3571 Synoptic Micro-
phone control
Microphone activity
List Printing
Microphone activity
Real-time Printing
Microphone activity
Real-time to Aux. (Camera ctrl.)
LBB 3570 Microphone
Management
Microphone activity
List Printing
Microphone activity
Real-time Printing
Microphone activity
Real-time to Aux. (Camera ctrl.)
LBB 3580 Delegate
Database
Database
List Printing
Label printing Chip card encoder
LBB 3575 Parliamentary
Voting
Voting file total* and individual*
Printing
(Real-time) Post-voting
total* and individual*
Printing
* Depends
on which-
mode
selected
LBB 3572 Simultaneous
Interpretation
Desk language assignment
Auto Printing
Channel language assignment
Printing
LBB 3573 Intercom
Switching
File
Printing
LBB 3578 Attendance
Registration
List Registration
Printing
File Registration
Printing
For COM and LPT cable connections, refer to FIG 5-9
LPT1 Default settings
COM 1 and COM 2 Default settings
COM 3
8- bit standard Baud-rate = 9600
Data-bits = 8
Parity = None
Flow control = None
Baud-rate = 9600
Data-bits = 8
Parity = None
Flow control = HW
* Change default COM-port assignments. (This can only be
done in the dcn.ini file located in the ‘Window®
directory)
* COM-port selected during software installation.
(Can be changed in the dcn.ini file located in the
‘Window® directory)
** Change COM-port settings: (Using the Port program
found in the Windows Control Panel. Only applicable
for Micactlogging)
* 1 Not possible
* 2 Not possible
* 3 Not possible
* 3 Not possible
* 4 Not possible
* 5 Not possible
*1 [Errorlogging]
Comport=2
*2 [MicActlogging]
Prt-port=2
*3 [MicActlogging]
Comport=1
** Baudrate - 19200
*4 [Label printing]
Comport=2
*5 [CardEncoding]
Comport=1
*5
*3
*3
*4
*2
*2
*1
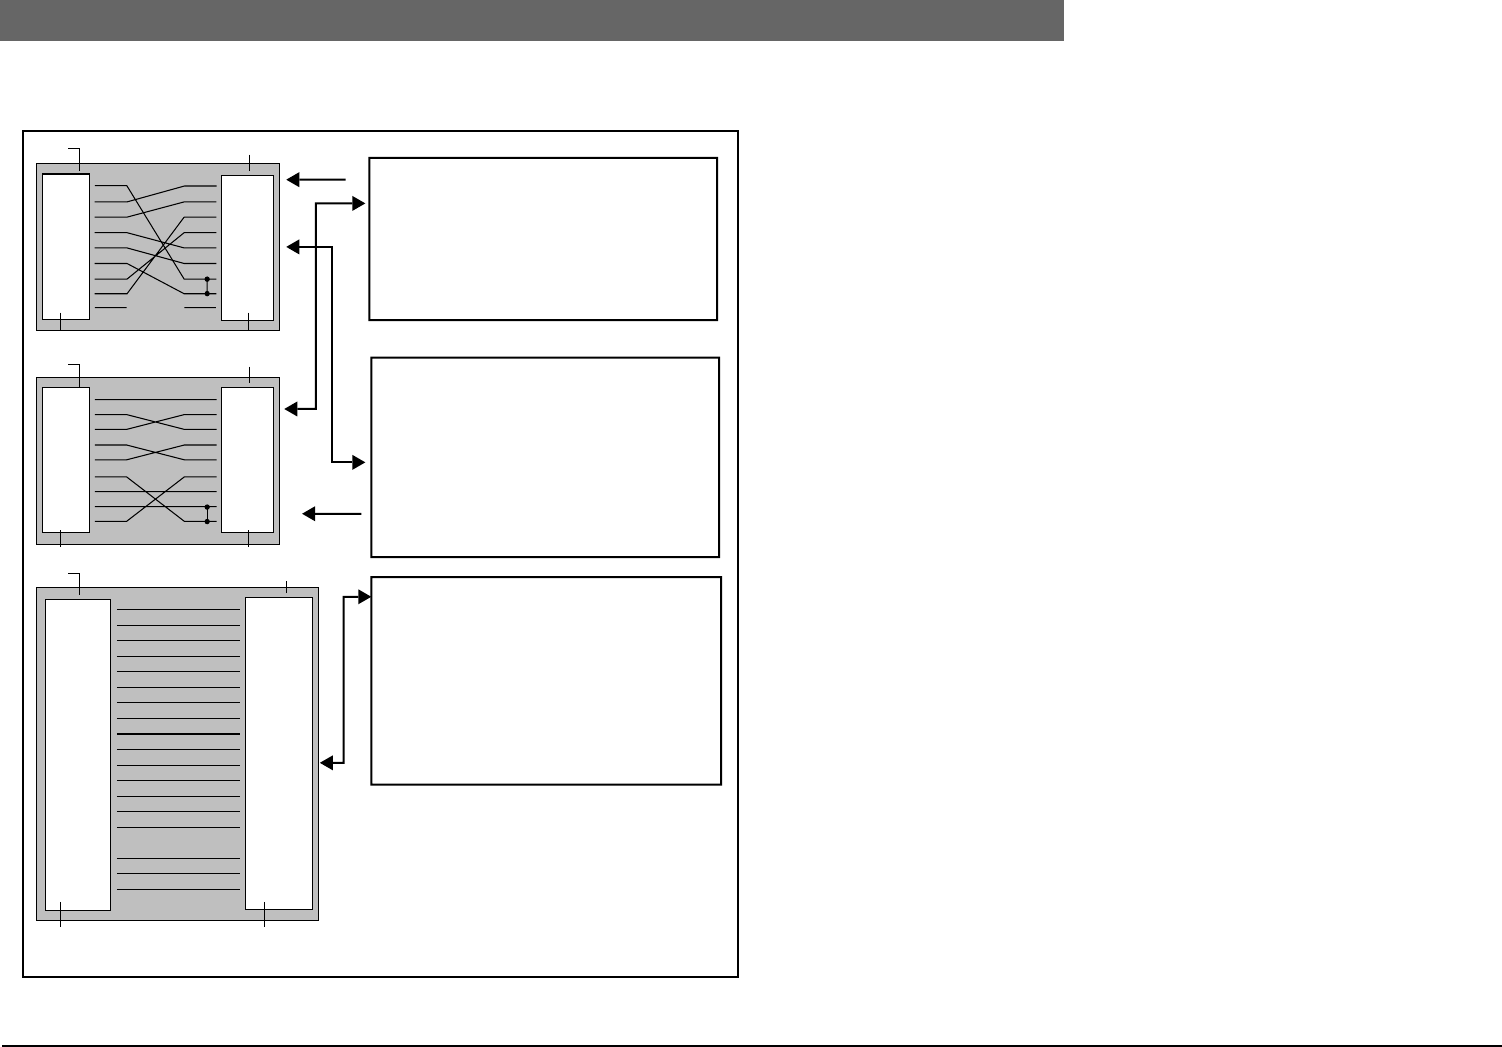
2
Bosch Security Systems | 04-2003 | 3922 988 43318 en
Digital Congress Network | Installation and Operating Manual | Chapter 5 - Control using PC en | 5-13
Connecting Peripheral devices
5.8 Connecting Peripheral devices
FIG 5-9 Connecting Peripheral devices
1
2
3
4
5
6
7
8
20
Chassis
TxD
RxD
RTS
CTS
DSR
GND
DCD
DTR
1
2
3
4
5
6
7
8
20
Chassis
TxD
RxD
RTS
CTS
DSR
GND
DCD
DTR
2
3
4
5
6
7
8
20
22
TxD
RxD
RTS
CTS
DSR
GND
DCD
DTR
n.c
1
2
3
4
5
6
7
8
9
DCD
RxD
TxD
DTR
GND
DSR
RTS
CTS
n.c.
1
2
3
4
5
6
7
8
9
10
11
12
13
14
19
30
32
36
nSTROBE
DATA 1
DATA 2
DATA 3
DATA 4
DATA 5
DATA 6
DATA 7
DATA 8
nACKNLG
BUSY
CALL (PE)
SELECT
nAutoFd
GND
GND
nFAULT
nSelIn
.
.
.
.
.
.
1
2
3
4
5
6
7
8
9
10
11
12
13
14
18
25
15
17
nSTROBE
DATA 1
DATA 2
DATA 3
DATA 4
DATA 5
DATA 6
DATA 7
DATA 8
nACKNLG
BUSY
CALL (PE)
SELECT
nAutoFd
GND
GND
nFAULT
nSelIn
.
.
.
.
.
.
LASER printer (LPT1)
Connects via a parallel port (LPT1) of DCN
Control PC, to provide a high-quality hard
copy data such as voting results,
attendance registration and delegate lists.
The print function within different DCN
software packages can be activated. The
printer should be equipped with a minimum
2 MB internal memory (4 MB
recommended).
MATRIX printer (COM 1* or COM 2*)
Connects via a serial port (COM1* or COM
2*) of a DCN Control PC, to provide a hard
copy data for speaker logging and printing
card labels. The print function within
different DCN software packages can be
activated.
CHIP-CARD ENCODER
(COM 1* or COM 2*)
Connects via a serial port (COM 1* or COM
2*) to encode delegate ID cards for use in
the DCN system, as well as reading raw data
on used cards. The encoder can be used in
combination with DCN encoder software
package LBB 3581/00 and Delegate
Database software package LBB 3580,
*The default COM ports can be set by changing
the dcn.ini file located in the DCN control PC
(see Tables 5.10 and 5.11)
PC Serial Printer/Card encoder
9-pole D-type
(female) (male)
(female) (male)
25-pole D-type
9-pole - 25 pole
25-pole - 25 pole
25-pole - 36 pole
PC Serial Printer/Card encoder
25-pole D-type 25-pole D-type
PC Laser printer
(male) (male)
25-pole D-type 36-pole Centronics

2
Bosch Security Systems | 04-2003 | 3922 988 43318 en
Digital Congress Network | Installation and Operating Manual | Chapter 5 - Control using PC en | 5-14
Connecting Peripheral devices
This page has been left blank intentionally
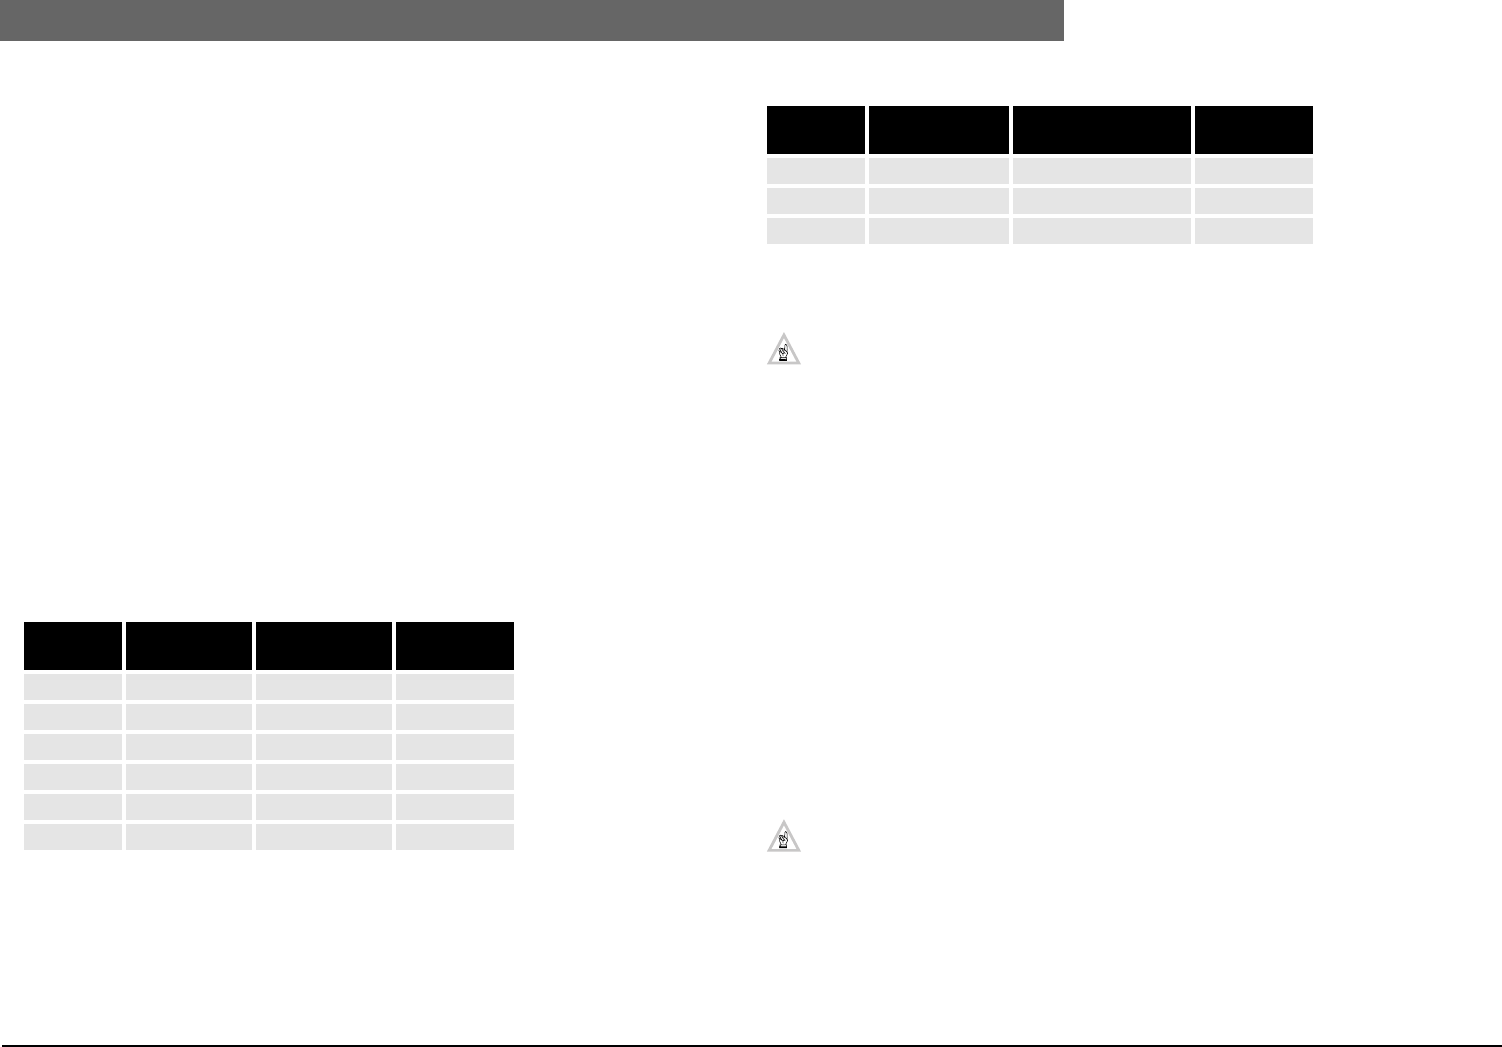
2
Bosch Security Systems | 04-2003 | 3922 988 43318 en
Digital Congress Network | Installation and Operating Manual | Chapter 6 - DCN Camera Control en | 6-1
Allegiant Video Switcher
Chapter 6. DCN Camera
Control
The ‘DCN Automatic Camera Control (DACC) directs video cameras toward speaking conference
participants (e.g. delegates chairman etc.) to display them on a monitor. The DACC has two
possibilities to connect cameras and monitors to the system.
• Via Allegiant Video switcher (AVS) to connect more than one camera and monitor.
• Direct Camera Control (DCC) to connect one camera and one monitor.
6.1 Allegiant Video Switcher
To provide ‘DCN’ Automatic Camera Control Allegiant Video switchers (FIG 6-1) and their associated
equipment are used. For use in DCN stand-alone or PC operator controlled systems, the Video
switcher in combination with the relevant software modules allows video cameras to be configured
for switching and directing towards speaking conference participants (i.e. delegates, chairman etc.) for
display on monitor screens.
The Allegiant Video Switchers control systems and control keyboards are controlled via the DCN
software and programmable via a combination of the Allegiant keyboard and DCN GUI software
modules for DACC in Stand-alone and PC-controlled systems. The maximum number of video inputs
supported by the DCN software is 256.
The following table gives the range of applicable Allegiant Video Switchers.
The Video Switcher series LTC8200 for example provides 16 camera inputs, and 5 monitor outputs.
Using the Video switchers signal distribution ports, connection to on-site receiver/drivers
(AutoDome™ camera’s with pan/tilt motors), provide operator control of pan, tilt, zoom, multiple
pre-fix positions, four auxiliaries, auto-pan and random scan.
The following table provides a survey of type numbers for the range of compact (one bay) Allegiant
video switchers:
Refer to the CCTV Systems Data Book for Allegiant Video switchers, versions
LTC 8500, LTC 8600 and LTC 8800.
NOTE: All Allegiant switchers shall have firmware 7.2x or higher.
6.1.1 Allegiant Switcher Control Keyboards
At least one keyboard is required for manual control and programming of the Allegiant switcher.
Using the keyboard enables camera preset positions to be defined, manual override of automatic
positions and picture selection. The recommended control keyboard is the LTC 8555 with variable
speed joystick and reduced size.
6.1.2 Cameras and Monitors
A combination of fixed and orientable cameras with remote positioning and zoom lenses are available
for connection to the video switcher. The maximum number being dependent on the number of
available video inputs. Colour cameras are preferred, providing composite video outputs according to
the PAL B and NTSC standards.
Orientable cameras must accept bi-phase control signals as generated by the Allegiant video
switchers. Upon start up, when no microphones are activated or during camera movement from one
position to the next (if enabled in the software) an “overview” picture is shown on the connected
video displays (e.g. monitors, large screen TV’s, video projectors). This picture is provided by the
“overview” camera (fixed (preferred) or orientable) which is always connected to video input No.1. If
an orientable camera is used (preferred type ‘AutoDome’ system) the highest available preposition is
used (software dependent).
NOTE: For preferred camera types, both fixed and orientable, refer to the DCN Confer-
ence and Discussion Systems Data catalogue.
Video displays, accepting composite video signals according to PAL B or NTSC standard are required
for showing the picture to the operator and audience. A 14” or 17” monitor for the operator with
high or at least medium video performance is preferred. This monitor must always be connected to
video output No.1 of the used video switcher. For preferred monitor types refer to the DCN
Conference & Discussion Systems Data catalogue.
Series No. of
Video inputs
No. of
video outputs
Max. No. of
keyboards
LTC 8100 8 2 2
LTC 8200 16 5 4
LTC 8300 32 6 4
LTC 8500 64 8 8
LTC 8600 128 16 16
LTC 8800 256 64 32
Series 19” rack height European version
(220 - 240 VAC)
US version
(120 VAC)
LTC 8100 1U LTC 8100/50 LTC 8100/60
LTC 8200 1U LTC 8200/50 LTC 8200/60
LTC 8300 2U LTC 8300/50 LTC 8300/60
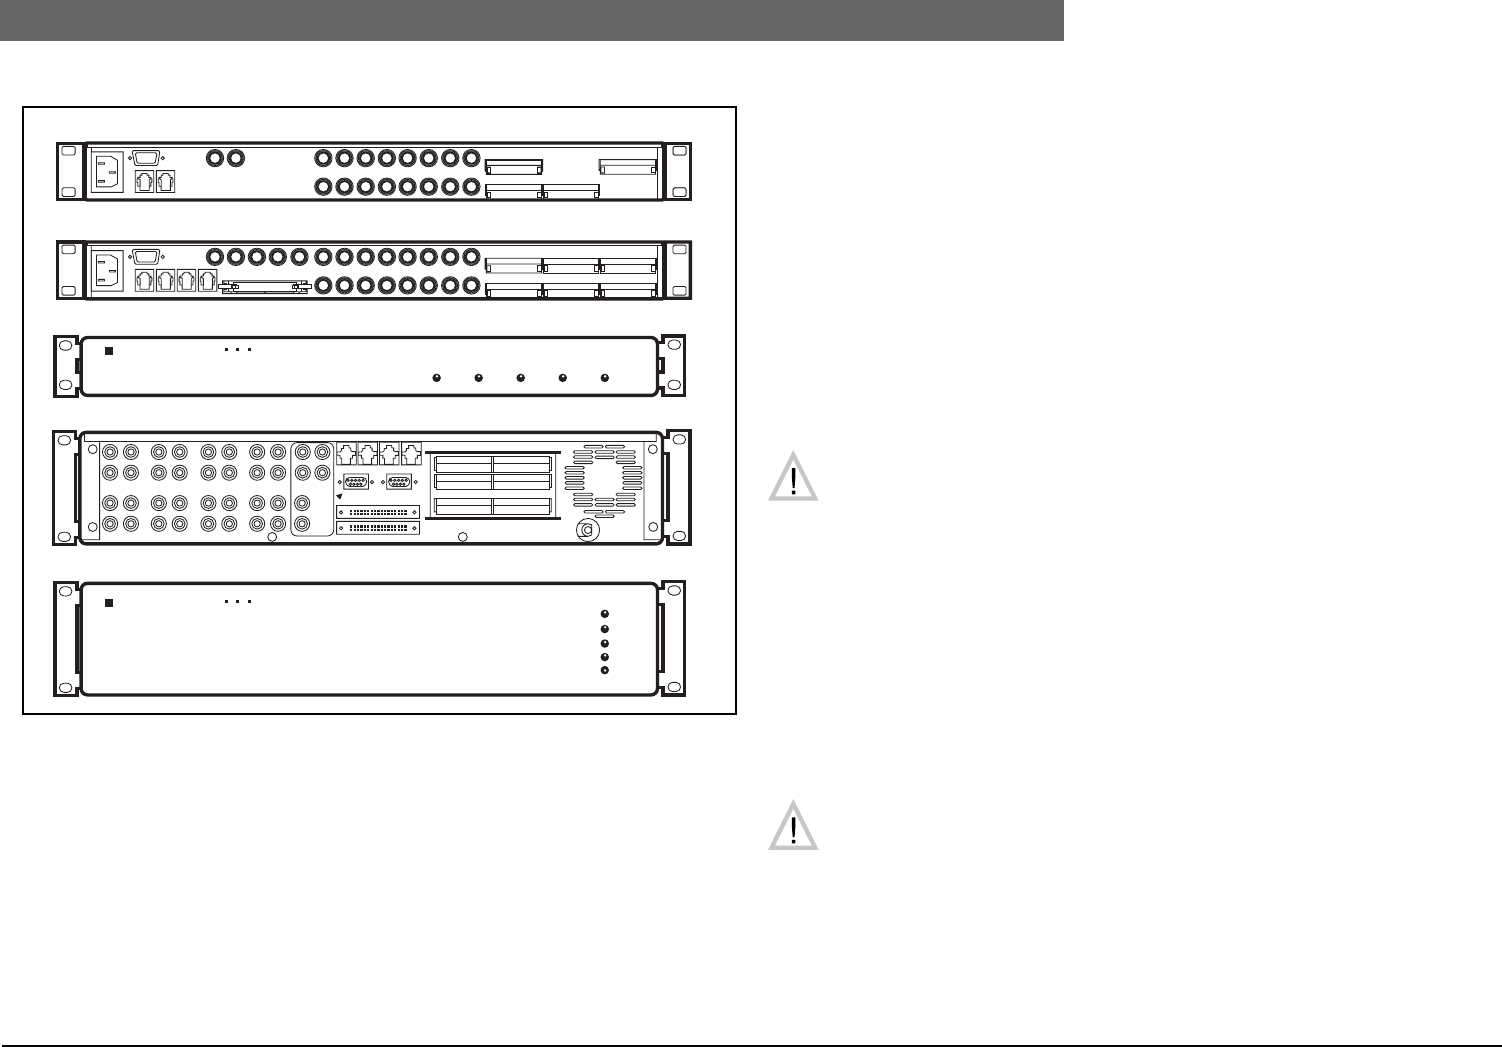
2
Bosch Security Systems | 04-2003 | 3922 988 43318 en
Digital Congress Network | Installation and Operating Manual | Chapter 6 - DCN Camera Control en | 6-2
Allegiant Video Switcher
FIG 6-1 Range of BOSCH Allegiant Video Switchers
A maximum of 4 audience video displays can be connected to the Allegiant video switcher (not
applicable for video switcher LTC 8100 series) using outputs 2 to 5. The actual number set is defined
in the DCN Camera Control software LBB 3562 or LBB 3588. This option may save the need to use
a video distribution amplifier. Use of more than one video output for the audience may have a
negative influence on the system performance (response to events) for camera control.
Audience video displays shall be selected in accordance with the requirements of the conference
venue, e.g. large screen video projector(s), large screen monitors or TV-sets.
6.1.3 INSTALLATION
Requirements
1. To install Allegiant Video Switcher panel, video cameras and monitors.
2. To connect the DCN system to the Allegiant Video switcher panel.
3. To configure/set-up video cameras in relation to microphone activity for use in DCN stand-alone
and PC controlled systems.
CAUTION: When Installing and Operating the Allegiant Video Switcher/Control sys-
tem, cameras and monitors refer to the documentation delivered with the equipment.
Connections to Allegiant Video Switcher Panel (see FIG 6-2 and FIG 6-3):
1. Using an RS232 cable terminated with 9-pole Sub-D connectors, connect the cable to the RS232
socket (‘Port 2 (default)) at the rear of the CCU to the 9-pole Sub-D socket marked
(‘CONSOLE’) at the rear of the Allegiant Video Switcher Panel.
FIG 6-3 shows the available RS232 cable connection for connecting the following configurations
1. Single CCU to video switcher
2. Installation PC to CCU and Video switcher
3. Connection OS/2 Master CCU to video switcher.
(This cable can be ordered under type number LTC 8506/00)
4. Installation PC to OS/2 Master CCU and Video switcher.
CAUTION: To meet EMC requirements all connections made to the ‘Port 1 output of the
CCU LBB 3500/xx or Port 1 and Port 2 of the CCU LBB 3500/05 or LBB 3500/35 must be
screened cables, where at least one side of the screening is connected to ground.
ALARM 1 - 5
BIPHASE OUT RELAY OUT
ALARM 9 - 16
ALARM 17 - 24 ALARM 25 - 32
KEYBOARD
CONSOLE
MONITOR
1
2
5
6
3
4
1
2
3
9
10
11
4
5
6
7
812
13
14
15
16
17
18
19
20
21
22
23
24
25
26
27
28
29
30
31
32
PRINTER
VIDEO 1 - 16
VIDEO 17 - 32
Power
Code Out
Alarm
Status
Battery Low
Front Panel Video Switcher LTC8300
Rear Panel Video Switcher LTC8300
Rear Panel Video Switcher LTC8200
Front Panel Video Switcher LTC8100/LTC 8200
Rear Panel Video Switcher LTC8100
CONSOLE
KEYBOARD
CAMERA INPUTS
MONITOR OUTPUTS
LOOPING VIDEO
ALARM 1 - 8 RELAY OUT
BIPHASE OUT BIPHASE OUT
21 1 3456782
1 3456782
CONSOLE
KEYBOARD
MONITOR OUTPUTS
ALARM 1 - 8 ALARM 9 - 16 RELAY OUT
BIPHASE OUT BIPHASE OUT BIPHASE OUT
LOOPING VIDEO 1 - 16
21
9 10 111213141516
43 1 34567825
PowerBattery LowCode Out
ALLEGIANT Video System
StatusAlarm
ALLEGIANT Video System
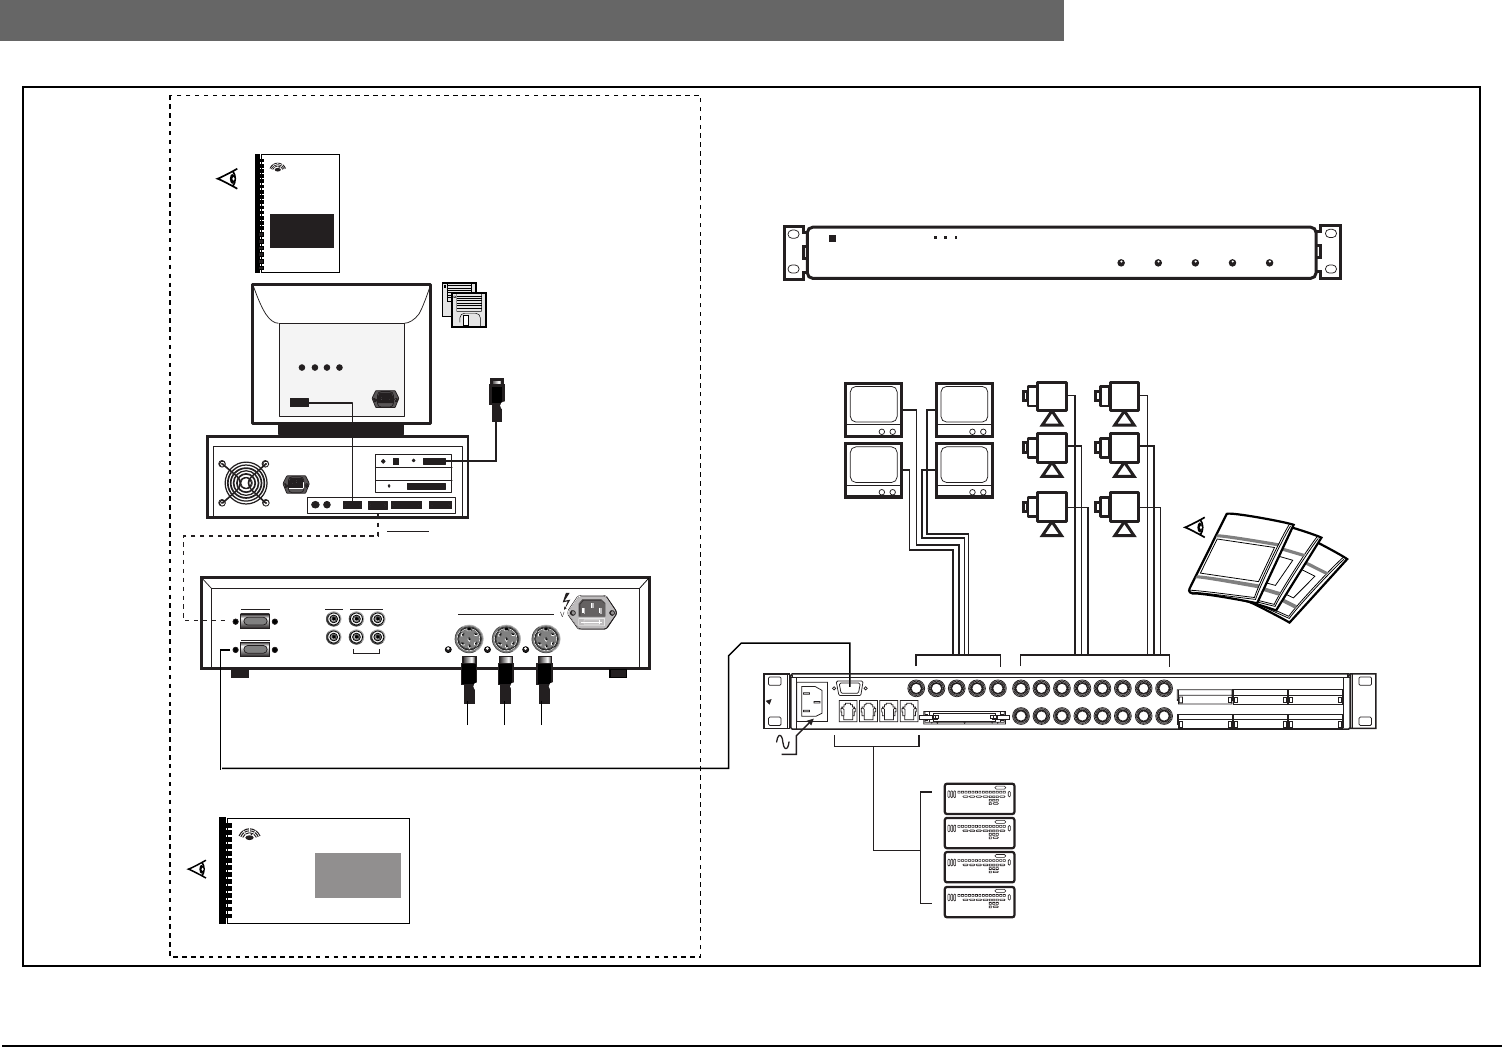
2
Bosch Security Systems | 04-2003 | 3922 988 43318 en
Digital Congress Network | Installation and Operating Manual | Chapter 6 - DCN Camera Control en | 6-3
Allegiant Video Switcher
FIG 6-2 DCN Automatic Camera Control (DACC)
Rear Panel
Video Switcher LTC8200
RS232 Control data to CCU
Mains
Front Panel Video Switcher LTC8200
Up to 16 Video Camera inputs
To CCU
(PC controlled systems
using LBB 3510/00 PC-
Network card)
Alternative CCU connection for 'DIRECT'
PC control (see FIG. 5-6)
DCN Trunk-line
See Cable wiring details
Up to 4
Allegiant keyboards
Installation
&
Operating
BOSCH
Up to 5 Monitor Outputs Up to 16 Video Camera inputs
Up to 5 Monitor Outputs
DACC for
Camera Configuration only:
Stand-alone systems
LBB 3562/00
PC-Controlled systems
LBB 3588/00
DCN
Software
Manuals
Port 1
Port 2
Rec.
Line
In
Out
In
Out
Symmetrical
Trunk
115 V -T4A 230 V -T2A
LBB 3500/.. Central Control Unit
Digital Congress Network
Installation and Operating Manual
DCN ALLEGIANT® VIDEO SWITCHING/CONTROL EQUIPMENT
CONSOLE
KEYBOARD
MONITOR OUTPUTS
ALARM 1 - 8 ALARM 9 - 16 RELAY OUT
BIPHASE OUT BIPHASE OUT BIPHASE OUT
LOOPING VIDEO 1 - 16
21
9 10 11121314 1516
43 1 34567825
PowerBattery LowCode Out
ALLEGIANT Video System
StatusAlarm
BOSCH
BOSCH
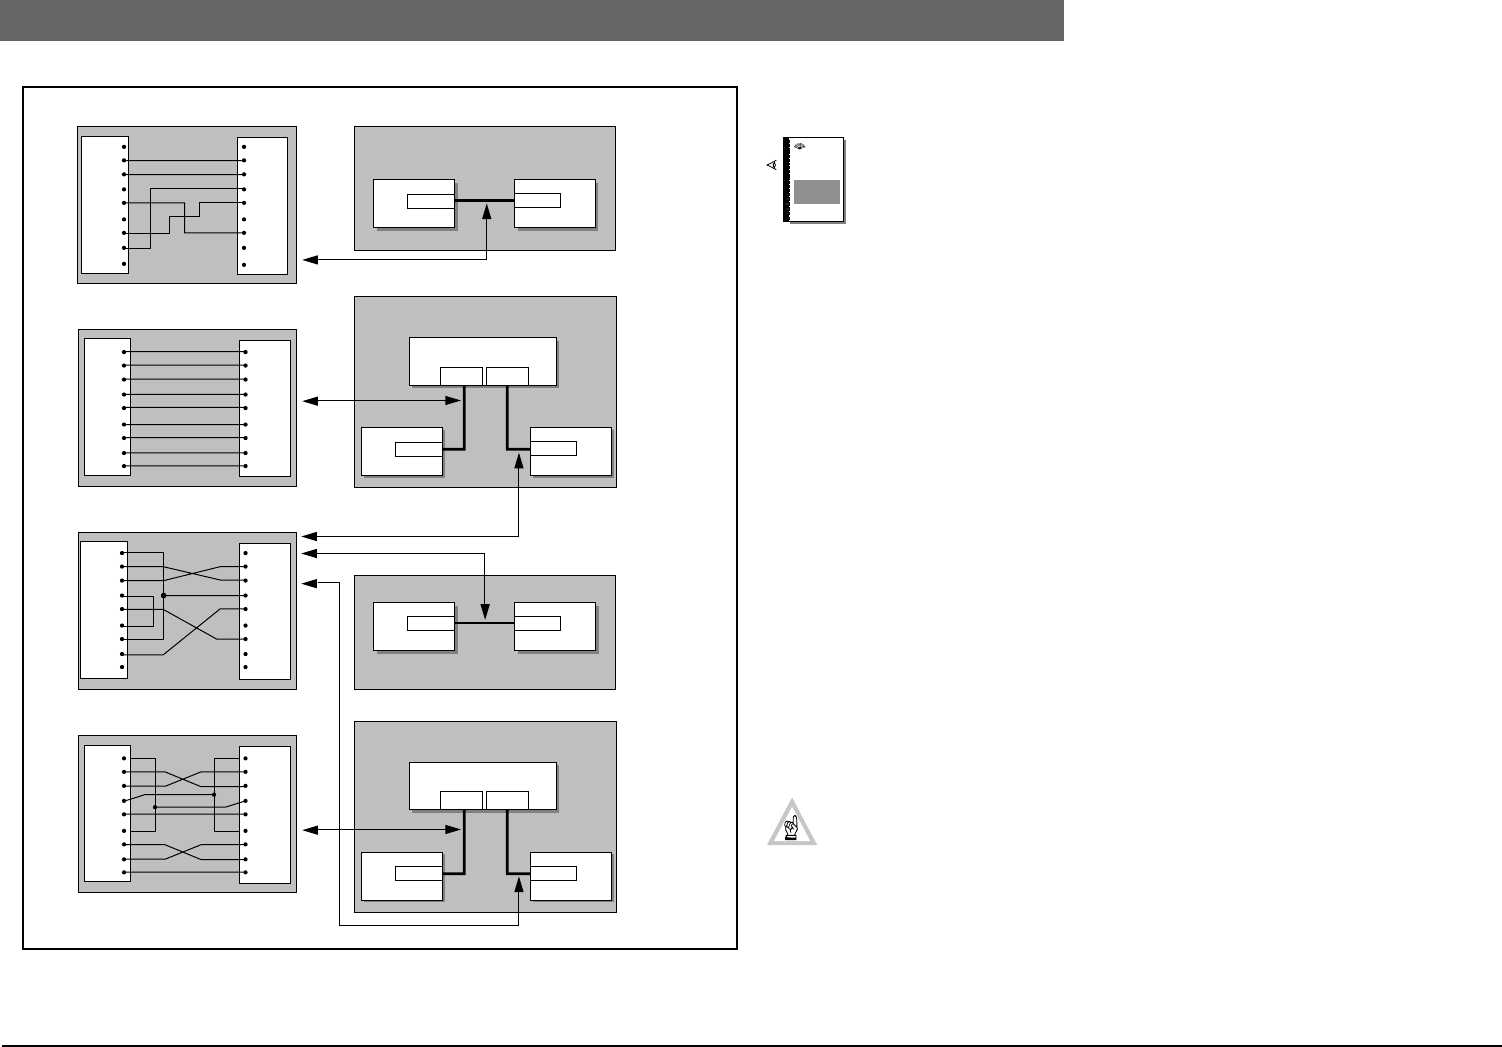
2
Bosch Security Systems | 04-2003 | 3922 988 43318 en
Digital Congress Network | Installation and Operating Manual | Chapter 6 - DCN Camera Control en | 6-4
Allegiant Video Switcher
FIG 6-3 RS232 Connections for AVS
6.1.4 Set-up Camera configuration
Reference: To configure and set-up camera positions according to delegate/chairman
microphone activity, DACC is available for Stand-alone DCN systems using DCN
software package LBB 3562/00 and LBB 3588/00 for PC controlled systems. Refer to
the relevant software manuals when programming the
configuration for the DACC system.
To Install and download the required software modules proceed as follows:
6.1.4.1 Stand-alone DCN System with Camera Control
For camera installation with stand-alone Camera Control software LBB 3562/00 a temporary PC
connection is required. The minimum PC requirements are as follows:
• 80486 DX/66 MHz or Pentium processor
• Operating system: Windows 95, Windows 98, Windows 2000, Window NT 4.0
• 4MB Random Access Memory (RAM)
• Video card: SVGA resolution 640 x 480 pixels, 256 colours
• Floppy disc drive 3.5 inch, 1.44 MB
• 100 MB hard disk
• 2 Serial ports
• Monitor or built-in colour LC-display
• Keyboard and mouse
6.1.4.2 Installation of a Single CCU
1. Connect the temporary PC (COM-port 2) to the Allegiant Video switcher (console port).
2. Connect the temporary PC (COM-port 1) to the CCU (Port 2) (see FIG 6-3 (2)).
6.1.4.3 Installation of a Multi-CCU
1. Connect the temporary PC (COM-port 2) to the Allegiant Video switcher (console port).
2. Connect the temporary PC CCU (COM-port 1) to the Master CCU (COM-port 2)
(see FIG 6-3 (4)).
NOTE: The PC must be installed with the following:
1. OS/2 operating system
2. Multi-CCU interface card LBB 3511/00
3. Multi-CCU software LBB 3586/00
6.1.4.4 4. PC COM Port settings
COM 1 for communication to the CCU (default)
COM 2 for communication to the video switcher
If other settings are required they must be specified in the DCNCI.INI file in the Windows directory.
The following settings must then be added or changed depending on the selected COM-port:
1
2
3
*1
4
(Male) (Female)(Wire - to - Wire cable)
(Cable LTC 8506/00)
CCU PC
1
2
3
4
5
6
7
8
9
DCD
RD
TD
DTR
GND
DSR
RTS
CTS
RI
1
2
3
4
5
6
7
8
9
DCD
RD
TD
DTR
GND
DSR
RTS
CTS
RI
9 pole D-type
(Male)(Female)
9 pole D-type
PC Video Switcher
CCU
(Male) (Male)
1
2
3
4
5
6
7
8
9
GND
RD
TD
CTS
RTS
n.c
GND
n.c
n.c
1
2
3
4
5
6
7
8
9
DCD
RD
TD
DTR
GND
DSR
RTS
CTS
RI
9 pole D-type Video Switcher
DCD
RD
TD
DTR
GND
DSR
RTS
CTS
RI
1
2
3
4
5
6
7
8
9
1
2
3
4
5
6
7
8
9
GND
RD
TD
CTS
RTS
n.c
GND
n.c
n.c
(Female) (Female)(Null Modem Cable)
OS2/CCU PC
1
2
3
4
5
6
7
8
9
DCD
RD
TD
DTR
GND
DSR
RTS
CTS
RI
1
2
3
4
5
6
7
8
9
DCD
RD
TD
DTR
GND
DSR
RTS
CTS
RI
9 pole D-type
RS232 RS232
Single CCU
(female) (female)
Video Switcher
RS232 RS232
OS/2 Master CCU
COM 2
PC
(female)
Video Switcher
RS232
COM1 COM2
RS232
Single CCU
(female) (female)
Video Switcher
Temporary Installation PC
Connection Installation PC
to CCU and Video Switcher
Single CCU to Video Switcher
Connection OS/2 Master CCU
to Video Swicher
RS232
COM1 COM2
RS232
(male)
(male)
(female)
Video Switcher
Temporary Installation PC
Connection Installation PC
to OS/2 Master CCU and Video Switcher
OS/2 Master CCU
COM 2
PC
DCN
Software
Manuals
BOSCH

2
Bosch Security Systems | 04-2003 | 3922 988 43318 en
Digital Congress Network | Installation and Operating Manual | Chapter 6 - DCN Camera Control en | 6-5
Allegiant Video Switcher
Camera Control
CCU = 1 // COM-port 1 . . 4
Video = 2 // COM-port 1 . . 4
Other fixed settings are:
Baudrate = 19200
Databits = 8
Parity = none
Stopbits = 1
NOTE: The default video switcher communication settings should NOT be changed
5. Communication settings:
1. Refer to DIP-switch S14 settings on the ‘Trunk Communication Board’ (TCB4 (see Chapter 4.6).
2. For multi-CCU systems the correct settings must be present in the CCU_CFG file of the Multi-
CCU control software LBB 3586 (see Table 5-8: and Table 5-9:).
3. The default communication settings of the video switcher are the same as used in a DCN
stand-alone system.
6.1.4.5 Installation of Camera Control software on the temporary PC
1. Install the ‘Stand-alone’ Camera Control software package LBB 3562/00.
2. Use the software program to configure and set up camera positions. On completion, all data and
configuration settings will be automatically downloaded to the CCU.
3. Once camera positions are configured remove the temporary PC and make a direct connection
as follows:
• Single CCU system: direct connection between CCU and video switcher (see FIG 6-3(1)).
• Multi-CCU system: direct connection between Master-CCU and the video switchers
(see FIG 6-3 (3)).
4. Refer to relevant software manual.
6.1.4.6 Installation of Camera Control in DCN system with PC control
1. Requires DCN software release version 8.0 or higher
2. Requires a permanent connection in the following systems:
• Single CCU system: direct connection between CCU and video switcher (see FIG 6-3 (1)).
• Multi-CCU system: direct connection between Master CCU PC and the video switchers (see
FIG 6-3 (3)).
3. Install software package LBB 3588/00 on the DCN control PC (server PC in a ‘Multi-PC system).
4. Refer to relevant software manual.
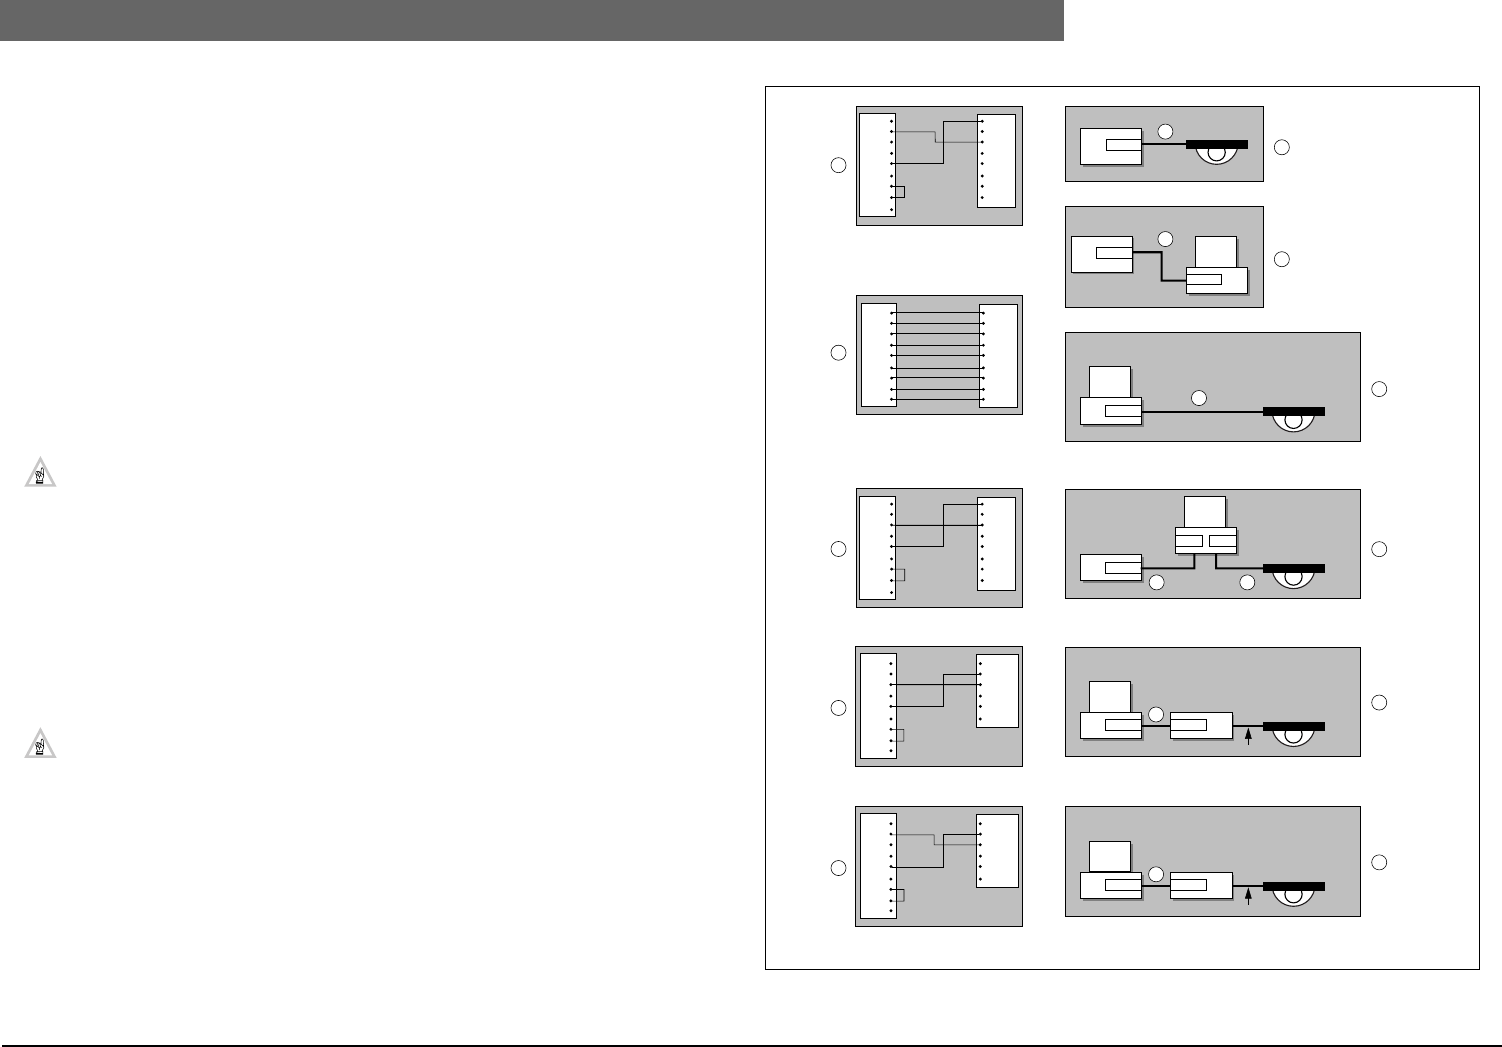
2
Bosch Security Systems | 04-2003 | 3922 988 43318 en
Digital Congress Network | Installation and Operating Manual | Chapter 6 - DCN Camera Control en | 6-6
Direct Camera Control
6.2 Direct Camera Control
With Direct Camera Control (DCC) it is possible to connect one AutoDome camera directly to a
CCU. In combination with the relevant software DCC can direct the AutoDome camera towards
speaking conference participants. The DCC can only be used in combination with:
• A BOSCH AutoDome camera
• A CCU with TCB 4 or higher
• DCN software 9.30 or higher
6.2.1 Virtual Keyboard
A virtual keyboard is used to set the pre-positions of the AutoDome camera. The virtual keyboard
software LTC 5138/00 must be installed on your temporary PC or DCN control PC.
6.2.2 Camera and Monitor
One BOSCH AutoDome camera, with RS232 control, can be connected to the CCU. One or more
video displays can be connected to the camera output. These video displays must accept video signals
according to the PAL-B or NTSC standard as provided by the AutoDome camera.
NOTE: If the distance between camera and CCU or PC is more than 15 meters the RS232
signal must be converted to Biphase with an LTC 8784/50 converter. (For connection refer to
FIG 6-4).
6.2.3 Installation
FIG 6-4 shows the required cables for the following connections:
1. Single CCU to AutoDome camera.
2. DCN control or temporary PC to CCU.
3. DCN control or temporary PC to AutoDome camera.
4. DCN control or temporary PC to CCU and AutoDome camera (2 COM ports)
5. DCN control or temporary PC to AutoDome camera via LTC 8784/50 data converter.
CAUTION: To meet EMC requirements all connections made to the ‘Port 1’ output of the
CCU LBB 3500/05(D) or ‘Port 1’ and ‘Poet 2’ of the CCU LBB 3500/15(D) or LBB 3500/35(D)
must be screened cables, where at least one side of the screening is connected to ground.
FIG 6-4 Connections for DCC
*1
CCU PC
1
2
3
4
5
6
7
8
9
1
2
3
4
5
6
7
8
9
CCU
9-pole D-type male
9-pole D-type male 9-pole D-type female
terminal block
1
2
3
4
5
6
7
8
GND
TXD
RXD
+BP
-BP
SHLD
+BP
-BP
1
2
3
4
5
6
7
8
9
AutoDome Camera
RS232
Single CCU
AutoDome Camera
AutoDome Camera
Biphase
DCN Control or
installation PC
LTC 8784/50
Data Converter
RS232 RS232
Single CCU
DCN Control,
or installation PC
PC
9-pole D-type female
9-pole D-type female
terminal block
AutoDome Camera
AutoDome Camera
DCN Control or
installation PC
CL 14155009_001
191101
DCD
RD
TD
DTR
GND
DSR
RTS
CTS
RI
1
2
3
4
5
6
7
8
GND
TXD
RXD
+BP
-BP
SHLD
+BP
-BP
1
2
3
4
5
6
7
8
9
DCD
RD
TD
DTR
GND
DSR
RTS
CTS
RI
DCD
RD
TD
DTR
GND
DSR
RTS
CTS
RI
DCD
RD
TD
DTR
GND
DSR
RTS
CTS
RI
RS232
RS232
AutoDome Camera
DCN Control or
installation PC
Single CCU
RS232
RS232RS232
RS232
RS232
A
1
2
5
3
4
B C
B
A
B
D
AutoDome Camera
Biphase
Single CCU
LTC 8784/50
RS232 RS232
6
E
C
C
D
(Rj-plug)
PC
Data
Converter
1
2
3
4
5
6
12 VDC
GND
RX
TX
not used
12 VDL
1
2
3
4
5
6
7
8
9
DCD
RD
TD
DTR
GND
DSR
RTS
CTS
RI
9-pole D-type male
E
(Rj-plug)
CCU
Data
Converter
1
2
3
4
5
6
12 VDC
GND
RX
TX
not used
12 VDL
1
2
3
4
5
6
7
8
9
DCD
RD
TD
DTR
GND
DSR
RTS
CTS
RI

2
Bosch Security Systems | 04-2003 | 3922 988 43318 en
Digital Congress Network | Installation and Operating Manual | Chapter 6 - DCN Camera Control en | 6-7
Direct Camera Control
6.2.4 Set-up Camera Configuraion
Reference: To configure and set-up camera positions according to delegate/chairman
microphone activity, DCC is available for Stand-alone DCN systems using DCN
software package LBB 3562/00 and LBB 3588/00 for PC controlled systems.
Refer to the relevant software manuals when programming the
configuration for the DCC system.
To install and download the required software modules proceed as described in the following
sections.
For camera installation with stand-alone Camera Control software LBB 3562/00 a temporary PC
connection is required.
The minimum PC requirements are as follows:
•Pentium II processor
•48 MB RAM
•Video card supporting at least VGA and SVGA resolutions
•Hard disk with a data access time of 14 ms
•100 MB free disk space
•Ethernet network card for multi-PC systems
•Serial port (RS232)
6.2.4.1 Stand-alone DCN system
The following procedure describes the connection of a PC with one COM-port. If you use a PC with
two COM-ports you can connect the CCU to the second COM-port. It is not necessary to
disconnect the AutoDome camera (item 6).
1. Connect the AutoDome to the PC-COM-port (RS232).
2. Connect a monitor to the video output of the AutoDome via a 75 Ohm coax cable.
3. Install the virtual keyboard software LTC 5138 (see enclosed Instructions for Use).
The required AutoDome communication settings are:
•9600 baud
•8 data bits
•No parity
•1 stop bit
•No handshaking
4. Set the camera prepositions for the microphone positions in the room. The highest preposition is
used for an overview picture.
5. Close the virtual keyboard application.
6. Connect the CCU (LBB 3500/x5) to the PC COM-port (disconnect the AutoDome)
The required CCU communication settings are (see paragraph 4.6):
•Camera control protocol
•9600 baud
7. Install the DCN stand-alone camera control software LBB 3562/00 on the PC and assign the
defined AutoDome prepositions to the DCN units (See the LBB 3562 software manual).
8. Disconnect the CCU from the PC.
9. Connect the AutoDome to the CCU.
NOTE: Re-adjustments of the stored AutoDome prepositions can only be done with the
AutoDome connected to the temporary or DCN control PC with virtual keyboard software.
6.2.4.2 DCN PC controlled system with single CCU
The following procedure describes the connection to a PC with one COM-port. If you use a PC with
two COM-ports you can connect the AutoDome camera to the second COM-port. It is not
necessary to disconnect (item 1) and reconnect (item 7) the CCU. The procedure assumes that you
have an installed DCN system with PC control with an LBB 3500/15(D) or LBB 3500/35(D) CCU.
1. Disconnect the control PC from the CCU.
2. Connect the AutoDome to the PC COM-port (RS232)
3. Connect a monitor to the video output of the AutoDome via a 75 Ohm coax cable.
4. Install the Virtual keyboard software LTC 5138/00 (see enclosed Instructions for Use).
The required AutoDome communication settings are:
•9600 baud
•8 data bits
•No parity
•1 stop bit
•No handshaking
5. Set the camera prepositions for the microphone positions in the room. The highest preposition is
used for an overview picture.
6. Close the virtual keyboard application.
7. Connect the CCU to the PC COM-port (disconnect the AutoDome)
The required CCU communication settings are:
•Fulll protocol
•115200 baud
8. Connect the AutoDome camera to Port 2 of the CCU.
The required CCU communication settings are:
•Camera control protocol
•115200 baud
9. Install the DCN camera control software LBB 3588/00 on the PC and assign the defined
AutoDome prepositions to the DCN units (See the LBB 3588 software manual).
10. Check the DCN system with DCC functionality.
NOTE: Re-adjustments of the stored AutoDome prepositions can only be done with the
AutoDome connected to the temporary PC with Virtual Keyboard software.
DCN
Software
Manuals
BOSCH

2
Bosch Security Systems | 04-2003 | 3922 988 43318 en
Digital Congress Network | Installation and Operating Manual | Chapter 6 - DCN Camera Control en | 6-8
Switching options using a personal computer
6.3 Switching options using a personal computer
Using the communication port (COM-port 2) of a PC, a wide variety of communication and
switching options are available. For example, video cameras can be switched and directed towards
speaking delegates when a VCS (Video Control Switcher) is connected to the PC. Using DCN’s
Microphone Management software LBB 3570, and/or Synoptic Microphone Management software
LBB 3571, cameras can be switched corresponding to the status of delegates’ microphone actions.
Directing a camera towards a speaking delegate is done using motor driven pan/tilt equipment,
programmed and linked according to the microphone activity function which can be activated within
the mentioned software packages.
NOTE: Using this method of switching options is a custom made alternative for ‘Automatic
camera’ control with Allegiant video switchers. The equipment required including the software
are NOT supplied by BOSCH Security Systems. See also the DCN manual for External Inter-
faces.
FIG 6-5 gives an example, showing the method used to switch and direct video cameras using the
PC’s COM 2 port and a video control matrix. Using the PC’s RS232 communication port, video
recording equipment can also be switched.
Table 5-10: and Table 5-11: show the default COM-port setting.
The data format for RS232 communication
FIG 6-5 Using microphone activity for video switching
Microphone on: $1 <SEAT NUMBER> CR LF
Microphone off: $2 <SEAT NUMBER> CR LF
Request on: &1 <SEAT NUMBER> CR LF
Request off: &2 <SEAT NUMBER> CR LF
All requests off: &3 0000 CR LF
Priority on: #1 <SEAT NUMBER> CR LF
Priority off: #2 <SEAT NUMBER> CR LF
53
2
1
4
VIDEO CONTROL
SWITCHER
Key to symbols
1. DCN trunk-line
2. COM-port 2
3. Video OUT
4. Video IN
5. Control signals for camera
system
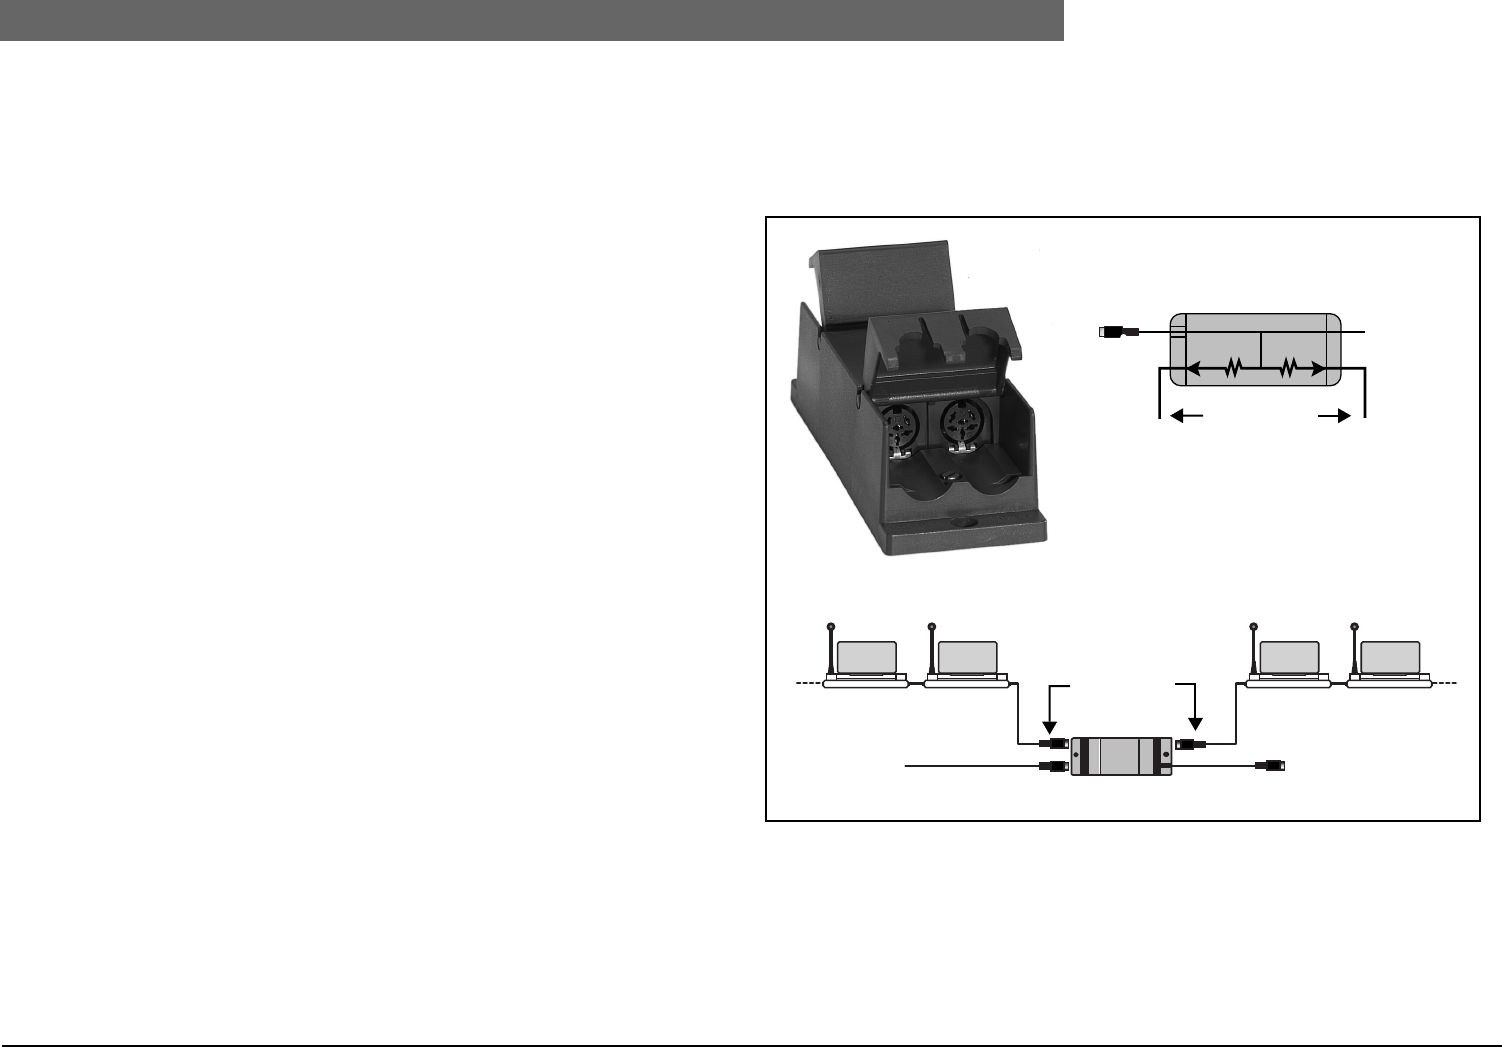
2
Bosch Security Systems | 04-2003 | 3922 988 43318 en
Digital Congress Network | Installation and Operating Manual | Chapter 7 - DCN Installation Accessories en | 7-1
Introduction Installation accessories
Chapter 7. DCN Installation
accessories
7.1 Introduction Installation accessories
DCN’s installation accessories allows system installation to be simplified with the use of ready made
cables complete with connectors. Trunk-cable splitters allow trunk-lines to be split and run in diverse
directions, allowing contribution units to be placed where needed within a conference room. The easy
to connect accessories are used for both fixed and portable installations.
FIG 7-1 LBB 4114/00 Trunk-cable splitter
Regenerative
Tap-offs to
multiple units
Trunk-line
Trunk
-
line
To CCU
Trunk-line Trunk-line
connector
LBB 4114/00
Regenerative
Tap-offs to
multiple units
LBB 4114/00
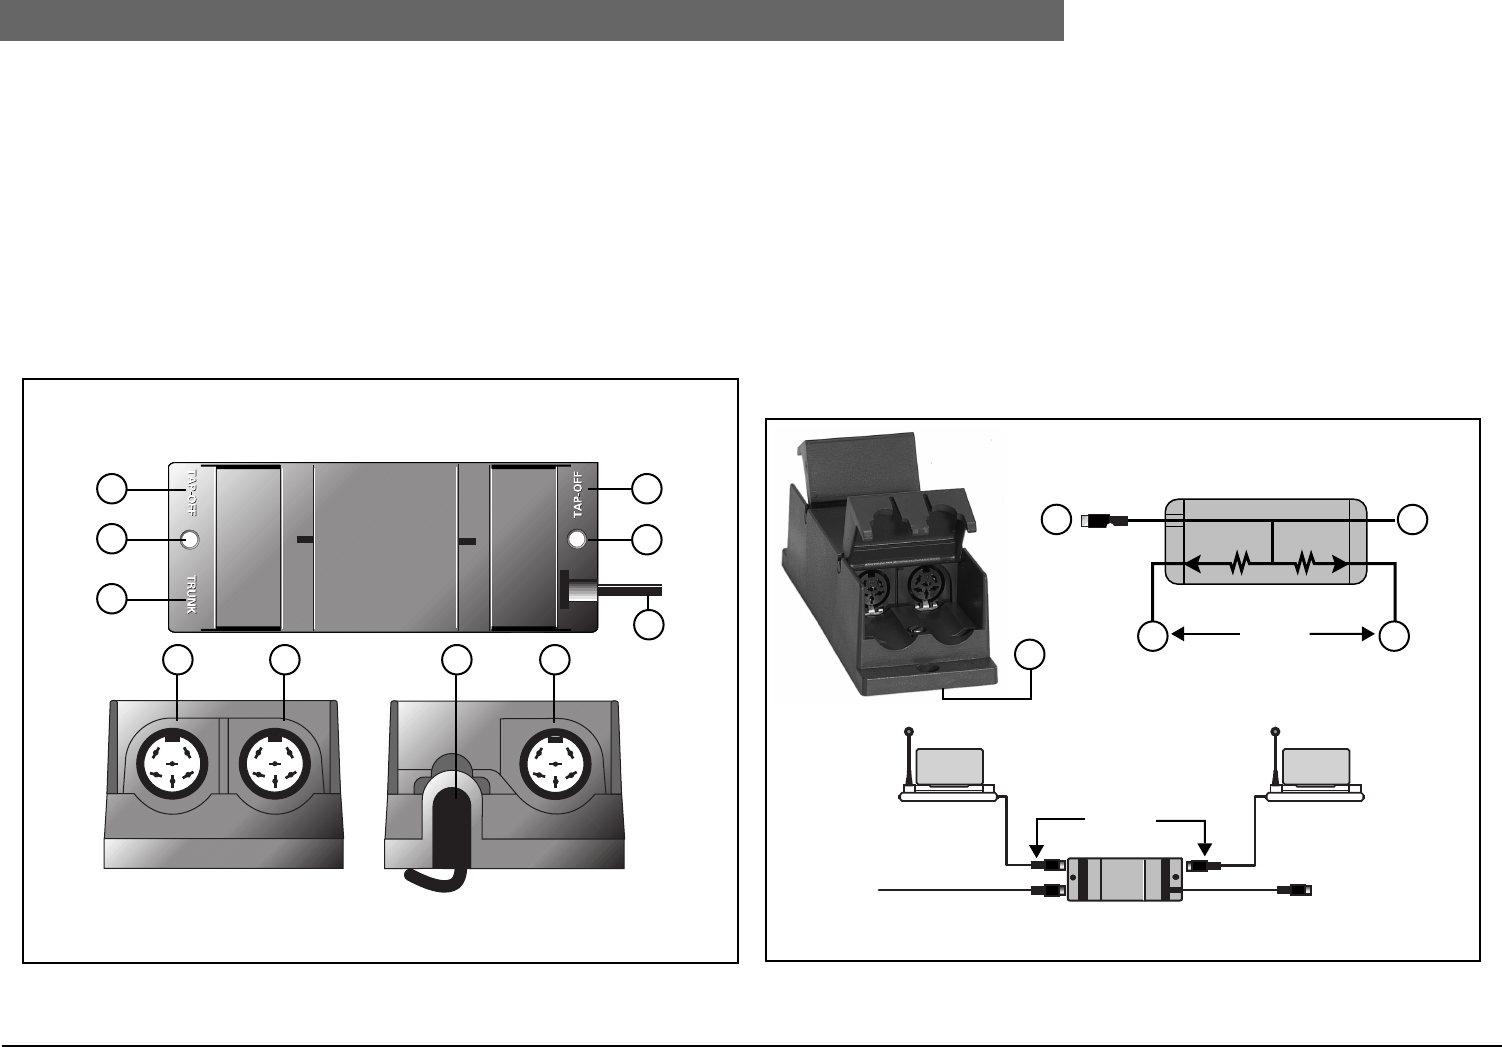
2
Bosch Security Systems | 04-2003 | 3922 988 43318 en
Digital Congress Network | Installation and Operating Manual | Chapter 7 - DCN Installation Accessories en | 7-2
Introduction Installation accessories
7.1.1 LBB 4114/00 Trunk-cable splitter
For use in combination with the systems installation cabling, the splitter is used to divide the trunk-line
cabling into diverse directions, to achieve where necessary, a neat and tidy layout of the system
cabling and its connected equipment. The splitter comes complete with cable restraining clamps and
include mounting holes for fixation to a floor or for mounting against a wall.
Key to symbols (see FIG 7-2):
1. 2 m (6.5 ft.) long cable terminated with a moulded 6-pole circular connector.
2. 6-pole circular connector for trunk-cable splitting and pulse regeneration purposes (tap-off).
3. 6-pole circular connector for Loop-through connection (Trunk).
4. 6-pole circular connector for trunk-cable splitting and pulse regeneration purposes (tap-off).
5. Screw holes for securing the unit.
FIG 7-2 Layout Trunk-cable splitter (top and side view)
7.1.2 LBB 4115/00 Tap-off Unit
The LBB 4115/00 is used to create short-circuit proof tap-off points on the trunk-line cabling. Each
tap-off point allows for connection of up to five channel selector panels or one contribution unit such
as delegate, chairman or interpreter unit. The tap-off unit comes complete with cable restraining
clamps and includes mounting holes for fixing purposes.
Interconnection (see FIG 7-3):
1. 2 m (6.5 ft.) long cable terminated with a moulded 6-pole circular connector.
2. 6 pole circular connector for tap-off purposes. The tap-off is equipped with an electronic short
circuit protection facility on the power supply lines with a max load of 2.5 PCF.
3. 6-pole circular connector for loop-through connections (Trunk).
4. 6 pole circular connector for tap-off purposes. The tap-off is equipped with an electronic short
circuit protection facility on the power supply lines with a max load of 2.5 PCF.
5. Screw holes for securing the unit.
FIG 7-3 LBB 4115/00 Tap-off unit
BOSCH
BOSCH
1
4
5
3
2
5
4 3 1 2
2.5 PCF (max.) 2.5 PCF (max.)
LBB 4115/00
Trunk-line
Trunk-line
To CCU
Tap-offs
1
2 4
3
LBB 4115/00
Trunk-line
Trunk-line
connector
5
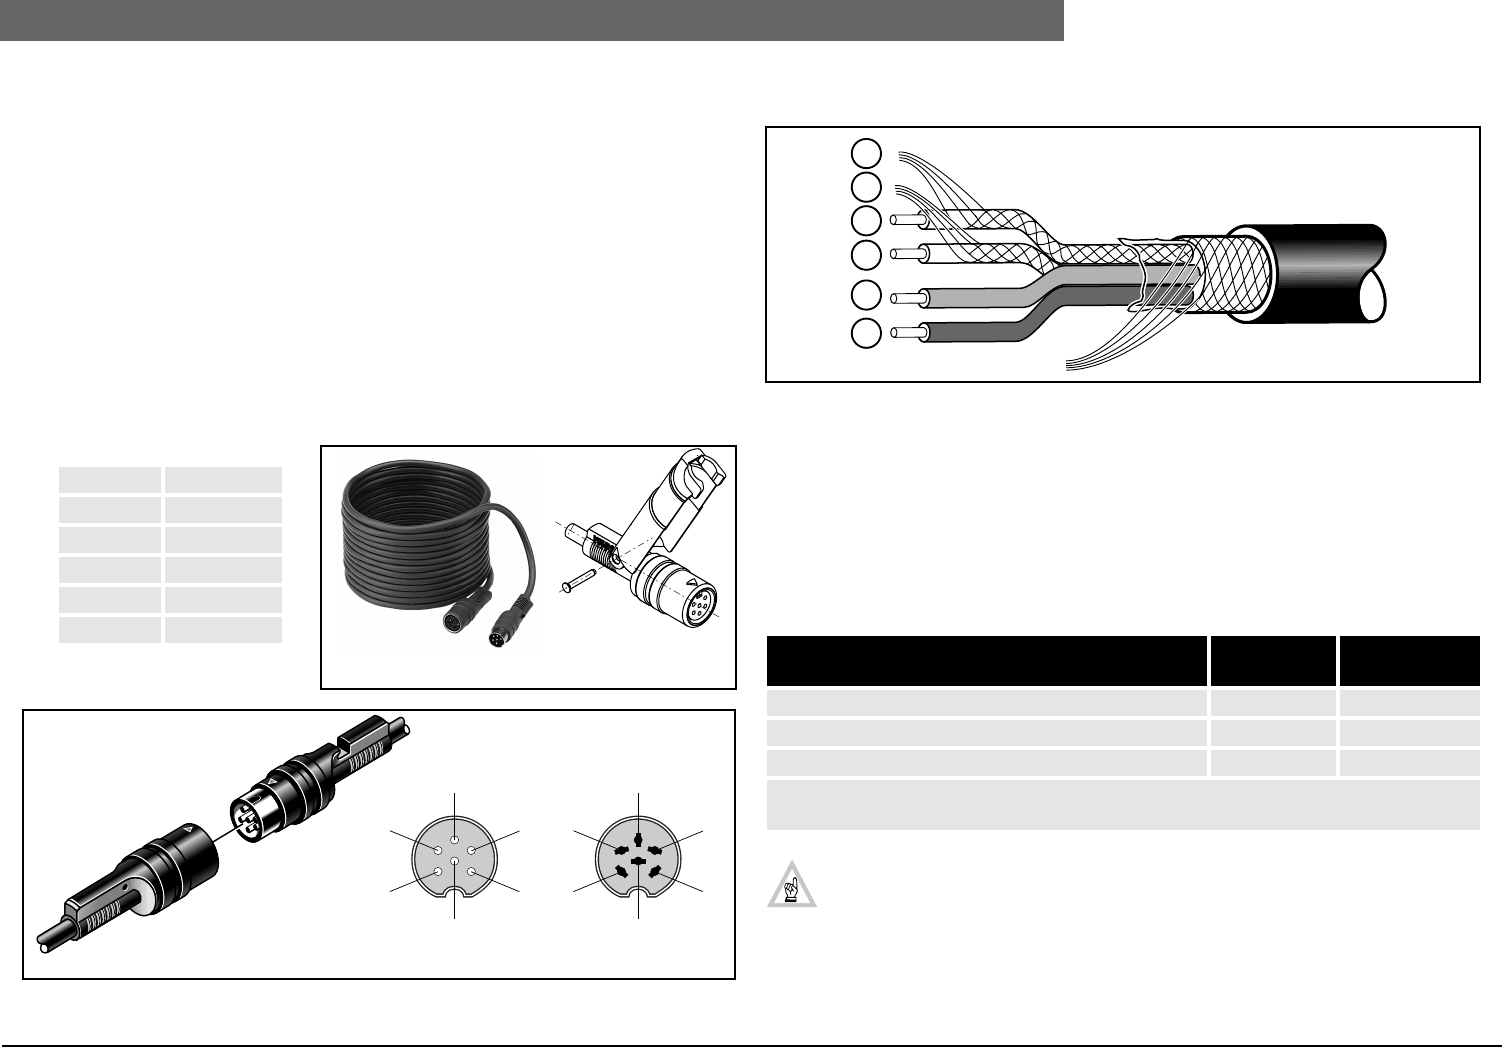
2
Bosch Security Systems | 04-2003 | 3922 988 43318 en
Digital Congress Network | Installation and Operating Manual | Chapter 7 - DCN Installation Accessories en | 7-3
Introduction Installation accessories
7.1.3 Cable assemblies and connectors
The following Cable assemblies are available with the DCN system.
LBB 4116/00 Installation cable (100 m (328 ft.) without connectors)
LBB 4116/xx Extension cable assembly (available in various cable lengths)
• Extension cable assemblies LBB 4116/xx
These cable assemblies are used to extend the length of the trunk-line cable and to extend the
length of cable between a delegate, chairman or interpreter desk. The cable assemblies are ter-
minated with moulded 6-pole circular connectors (male and female).
The 6-pole circular connectors male and female include a plug locking facility. To interlock the
male and female connectors use cable locking clamps LBB 4117/00.
• Installation cable LBB 4116/00
Supplied without connectors the 100 m (328 ft.) installation cable is for use in installations where
the normal DCN unit cables and extension cable assemblies are too short.
Available Extension cables
FIG 7-4 LBB 4116/05 Extension cable assembly (5m) (16.4 ft.)
Cable Connection details:
FIG 7-5 DCN Cable connection details
PIN 1 - Down-link screen/ground
PIN 2 - Down-link signal (green)
PIN 3 - Positive supply (max. 40V) (brown)
PIN 4 - Up-link-signal (white)
PIN 5 - Up-link screen/ground
PIN 6 - Positive supply (max. 40V) (blue)
• Custom-made cables
For customising DCN system cable connections, refer to the table below.
NOTE: The screening of the DCN cable is connected to the earth tag of the Hirschmann
cable plug/socket, and is potentially live. Therefore only use isolated sockets for extension
cables, patch panels and floor boxes.
LBB 4116/02 2 m (6.5 ft.)
LBB 4116/05 5 m (16.4 ft.)
LBB 4116/10 10 m (32.8 ft.)
LBB 4116/15 15 m (49.2 ft.)
LBB 4116/20 20 m (65.6 ft.)
LBB 4116/25 25 m (82 ft.) Cable Locking clamp
LBB 4117/00
LBB 4116/05
Male
Female
Male Female
BOSCH
BOSCH
1
6
2
3
4
5 5
6
4
3
2
1
Male
Female
DCN Trunk-cable connectors Hirschmann
Type No.
Service
Code No.
Cable-plug (Black) with locking screw (male) MAS 6100 5322 264 54055
Cable-plug (Black) without locking screw (male) MAS 60 4822 264 40026
Cable socket with locking screw (female) MAK 6100 5322 264 10367
Note: MAS 6100 cannot be used in the Trunk-splitter due to the length of cap.
Therefore, use a Hirschmann plug without locking (MAS 60).
1
5
2
4
3
6
Ground
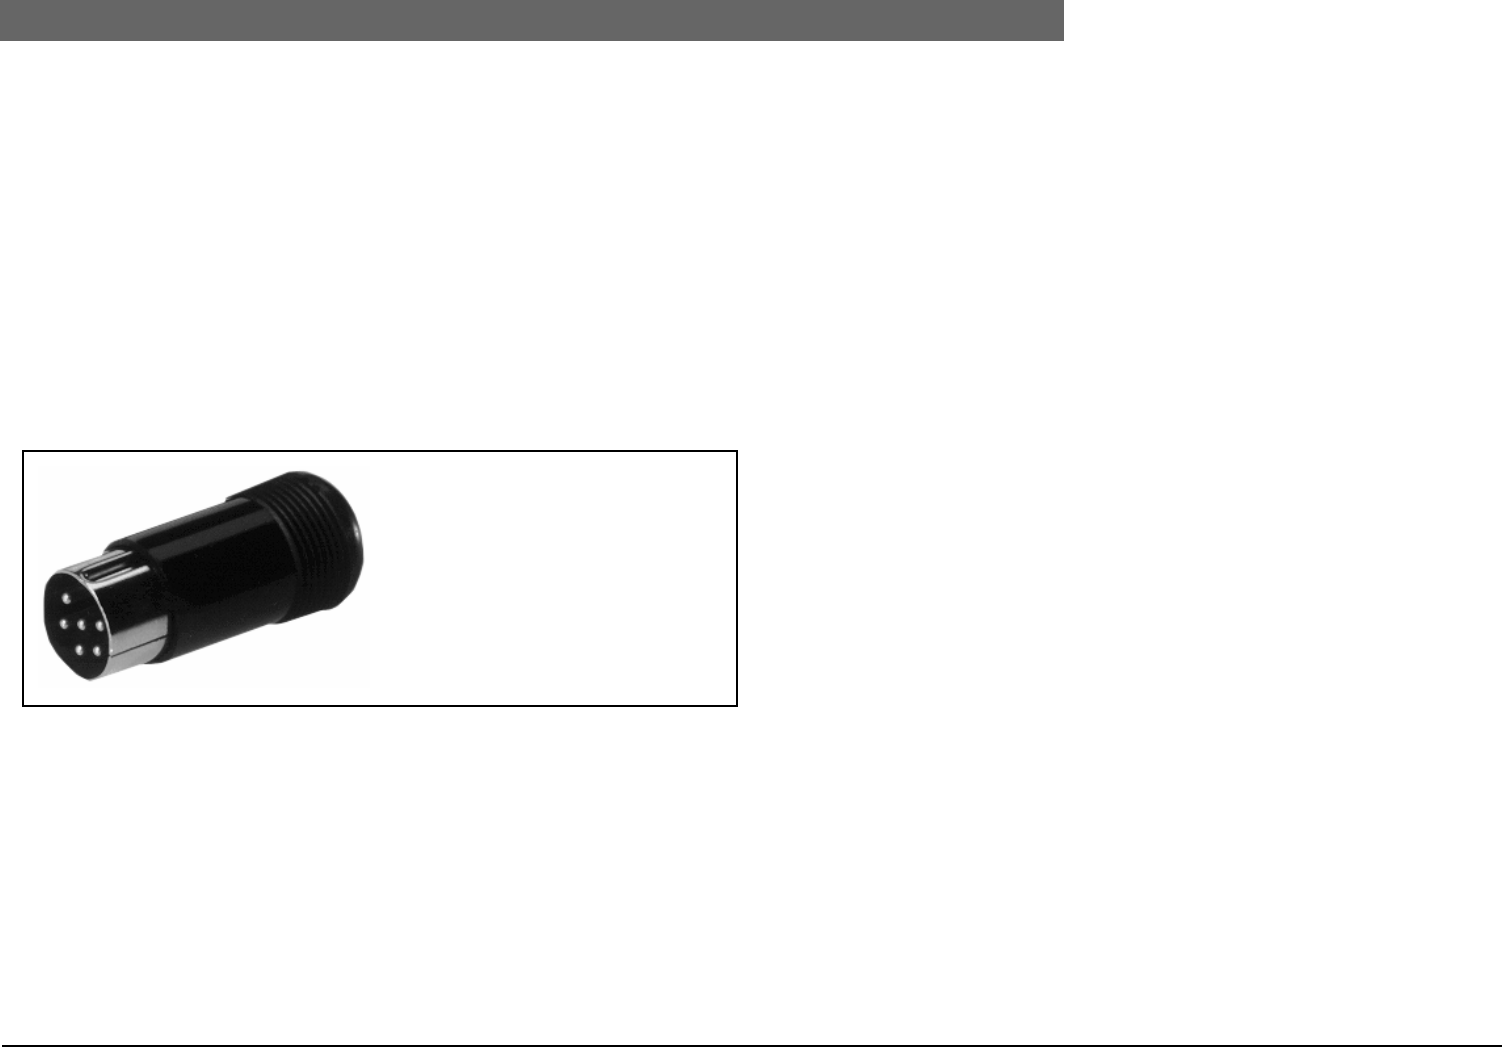
2
Bosch Security Systems | 04-2003 | 3922 988 43318 en
Digital Congress Network | Installation and Operating Manual | Chapter 7 - DCN Installation Accessories en | 7-4
Introduction Installation accessories
7.1.4 Connectors
The 6-pole moulded circular connectors, male and female include a plug locking facility for use with
cable locking clamps LBB 4117/00.
When connecting connectors to extension cables, it is recommended that insulated metal shield
connectors be used, rather than plastic to protect the connectors according to EMC specifications.
For connection details refer to Chapter 13.7.
7.1.5 LBB 4117/00 Set of 25 cable locking clamps
Clamps for male/female cable connectors, such as those on the extension cable LBB 4116. One
clamp per connector set male/female is required.
7.1.6 LBB 4117/00 Termination plug for DCN Cable
The LBB 4117/00 termination plug is specially designed for use with the open-ended DCN cabling. It
is connected to the output cable on the last electronic channel selector panel (LBB 3524/10, LBB
3526/10) in a daisy -chain configuration..
FIG 7-6 Termination plug LBB 4117/00
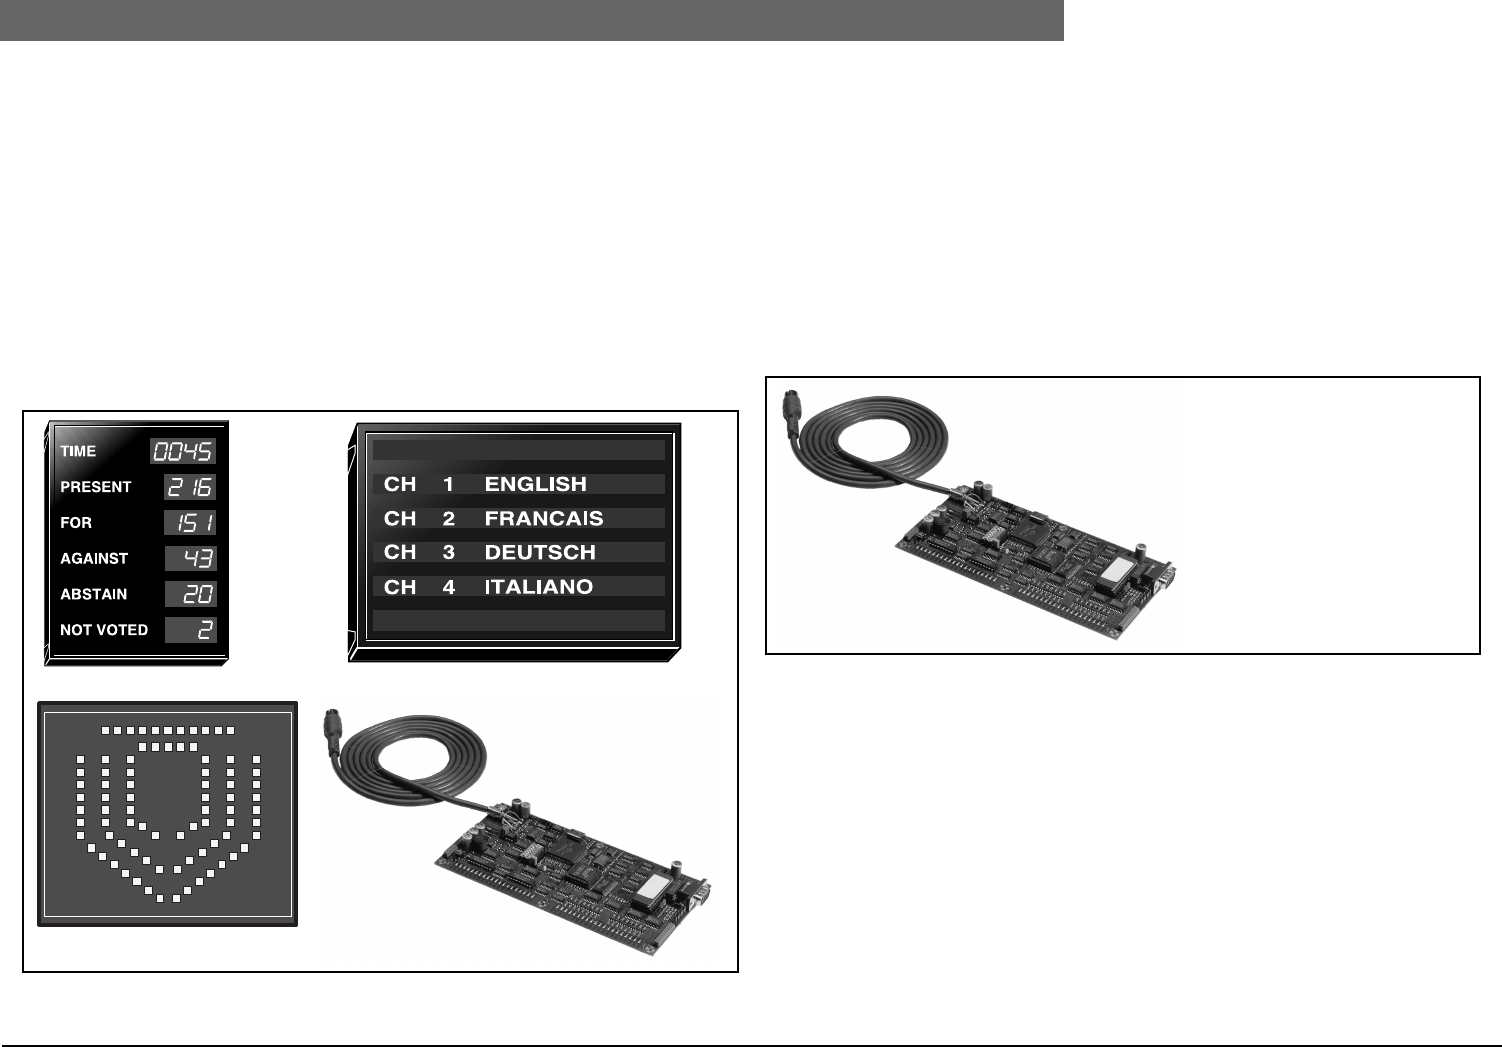
2
Bosch Security Systems | 04-2003 | 3922 988 43318 en
Digital Congress Network | Installation and Operating Manual | Chapter 8 - Information Displays en | 8-1
LBB 3512/00 Data Distribution Board
Chapter 8. Information
Displays
Hall displays enable conference information to be clearly and effectively displayed to a large number
of conference participants. Numeric, alphanumeric and geographical displays are available, and mainly
used for displaying voting results and other text and conference related data. Also direct view or
front and rear projector video displays can be used e.g. TV receivers, Video projectors for long
distance viewing
In order to drive a hall displays, a data distribution board LBB 3512 must be installed in the display. The
board includes an RS232 communication port with a baud rate of 9600 or 19200 baud selectable by
an on-board dip-switch. Opto couplers isolate it from the DCN system. It can be powered from the
DCN system or an external power source.
FIG 8-1 Information display
8.1 LBB 3512/00 Data Distribution Board
The data distribution board provides the communication interface between the DCN system and
externally connected peripheral equipment - such as hall displays, remote switching panels and
tailored conference solutions. The board is intended for mounting in the relevant equipment and
includes an RS232 communication port with a baud rate of 9600 and 19200 baud - selectable by an
on-board dip switch. The board can be powered by the system itself or from an external power
source.
Interconnection between the board and the DCN system is via a 6-pole circular connector. The board
has no system loop-through facility, therefore a Trunk-splitter LBB 4114/00 or Tap-off unit LBB 4115/
00 is used to bypass the board in a loop-through configuration.
The board can be used as either a passive unit for reception of data , or as an active unit for
transmission of data to the CCU.
FIG 8-2 LBB 3512/00 Data Distribution Board
Electrical data
•16-bit parallel data input/output
15 inputs/16 outputs (5V CMOS input/open collector output)
•Address allocation: 248 - 255. The following addresses are defined as:
- 248 Numeric display
- 249 Alpha-numeric display 1
- 250 Alpha-numeric display 2
- 251 Status display (= e.g. synoptic display) (1500 delegate positions for individual results)
- 252 Chairman display EC version (Reserved)
- 253 Not used
- 254 Not used
- 255 Interpreter lamp panel (e.g. Speak to-fast indication)
Numeric Hall Display
Geographic Hall Display
Alphanumeric Hall Display
Data Distribution Board LBB 3512/00
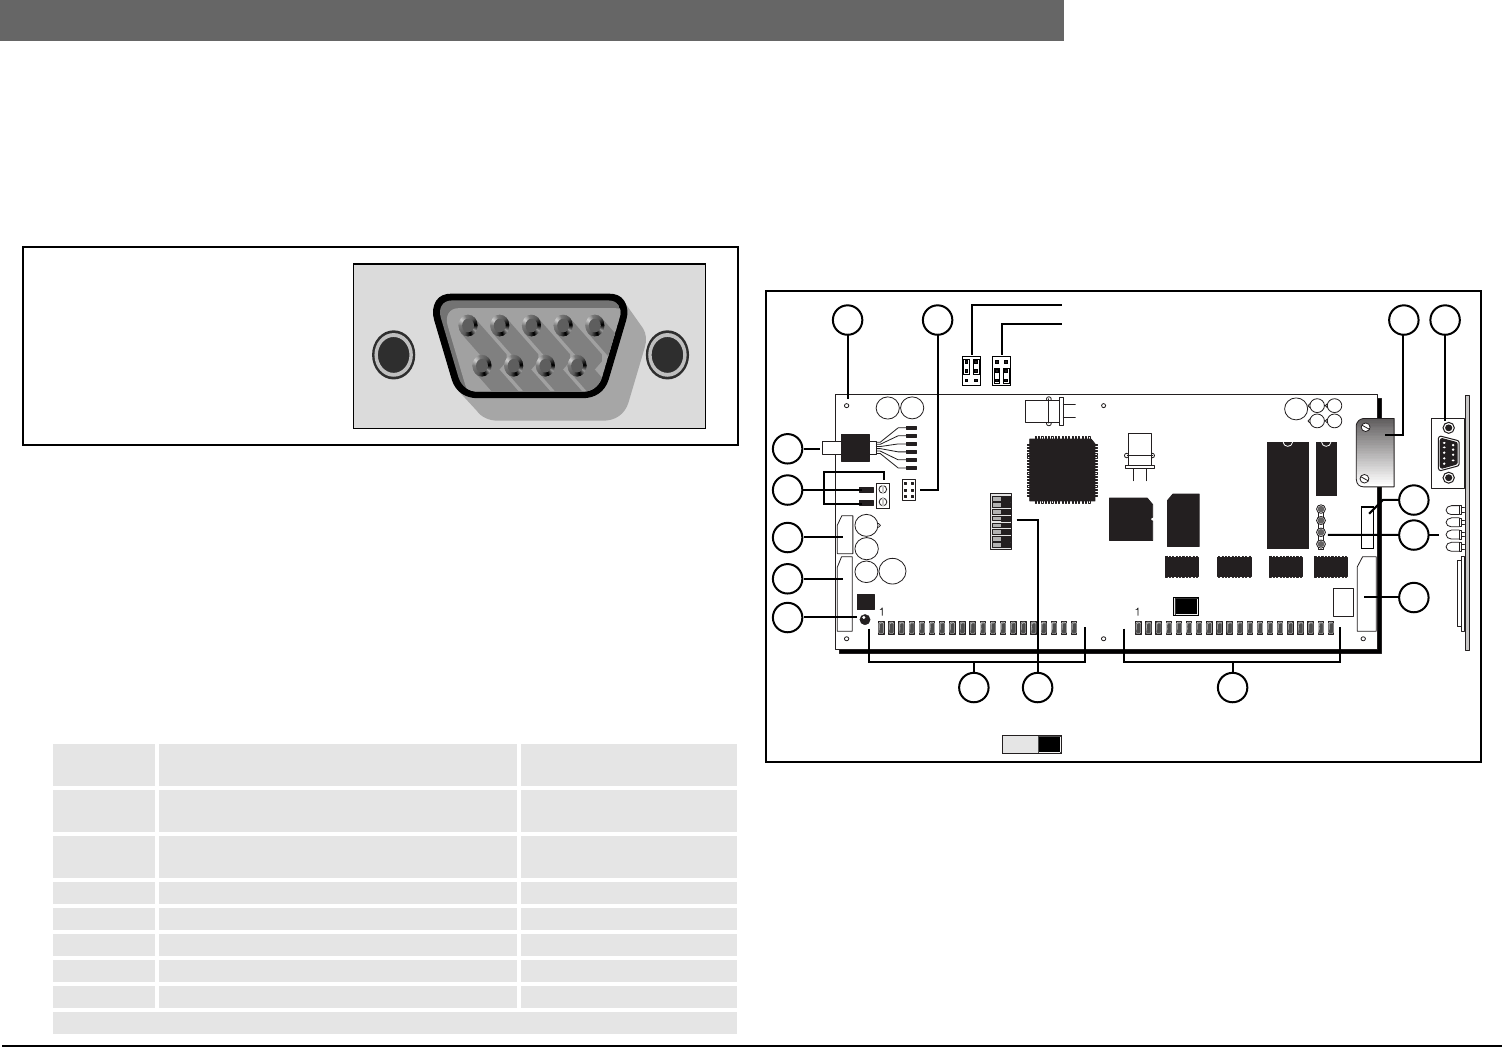
2
Bosch Security Systems | 04-2003 | 3922 988 43318 en
Digital Congress Network | Installation and Operating Manual | Chapter 8 - Information Displays en | 8-2
LBB 3512/00 Data Distribution Board
Electrical requirements
•Supply voltage (optional):10 - 40 V d.c.
•Current consumption:< 50 mA @ 40 V
The Data Communication board includes a 10-pole and two 20-pole ‘Micromatch’ flat-cable
connectors (female) and a 9-pin D-type connector (male) for serial data output.
The pin configuration is of the D-type is shown below:
FIG 8-3 Data Distribution Board 9-pin Sub-D connector
Connectors, Controls and Indicators (see FIG 8-4)
1. 6 x 3.5 mm (0.13 in) mounting holes.
2. 2 x jumpers to select between either the DCN system power supply or an external power sup-
ply.
3. 9-pole Sub-D connector (male) for RS232 communication.
4. 4 x LED indicators for test purposes.
5. Parallel input connector 20-pole Micro-Match connector.
6. Parallel input connector via 20 solder pads.
7. Connector for test purposes.
8. 8-pole dip switch for communication mode and function setting as follows:
9. Parallel output connector via 20 solder pads (open collector outputs).
10. Initialization button with LED indicator to indicate the none initialized mode.
11. Parallel output connector 20-pole Micro-Match connector.
12. 10-pole Micro-Match connector for the external power supply. Initialization status output and
initialization button.
13. 2-pole external power supply connector (2-solder pads) and a 2-pole screw connector.
14. 2 m (6.5 ft.) long cable terminated with a 6-pole circular connector for connection to the DCN
trunk-line.
FIG 8-4 Layout Data Distribution Board
Parts delivered with LBB 3512/00
•2 x Micromatch connector 2x10-pole2-215083-0 AMP
•1 x Micromatch connector 2x5-pole1-215083-0 AMP
•1 x Bus connectorSOURIAU DE 09 S 067HT
•2 x Screw retainer167500-1 AMP
•1 x Cable clamp 9-poleAMP 207467-1
DP1 RS232 uplink transfer disabled/enabled OFF - Disabled
ON - Enabled
DP2 Passive or active mode setting OFF - Passive
ON - Active
DP3 Baudrate for RS232 communication OFF - 9600 Baud (default)
ON - 19200 Baud
DP4 Reserved -
DP5 Reserved -
DP6* Passive mode, Least Significant address bit 0 OFF - 0, ON - 1
DP7* Passive mode address bit 1 OFF - 0, ON - 1
DP8* Passive mode most significant address bit 2 OFF - 0, ON - 1
*See board address settings.
15432
6987
PIN 1 Not connected
PIN 2 RxD
PIN 3 TxD
PIN 4 Not connected
PIN 5 Signal ground
PIN 6 Not connected
PIN 7 RTS
PIN 8 CTS
PIN 9 Not connected
1
1
8
1 2 DCN system supply
Ext. power supply
14
13
12
10
11
9 8 6
5
4
7
3 3
DIP-switch
OFF ON
Dimensions (h x w): 100 x 200 mm (3.93 x 7.87”)
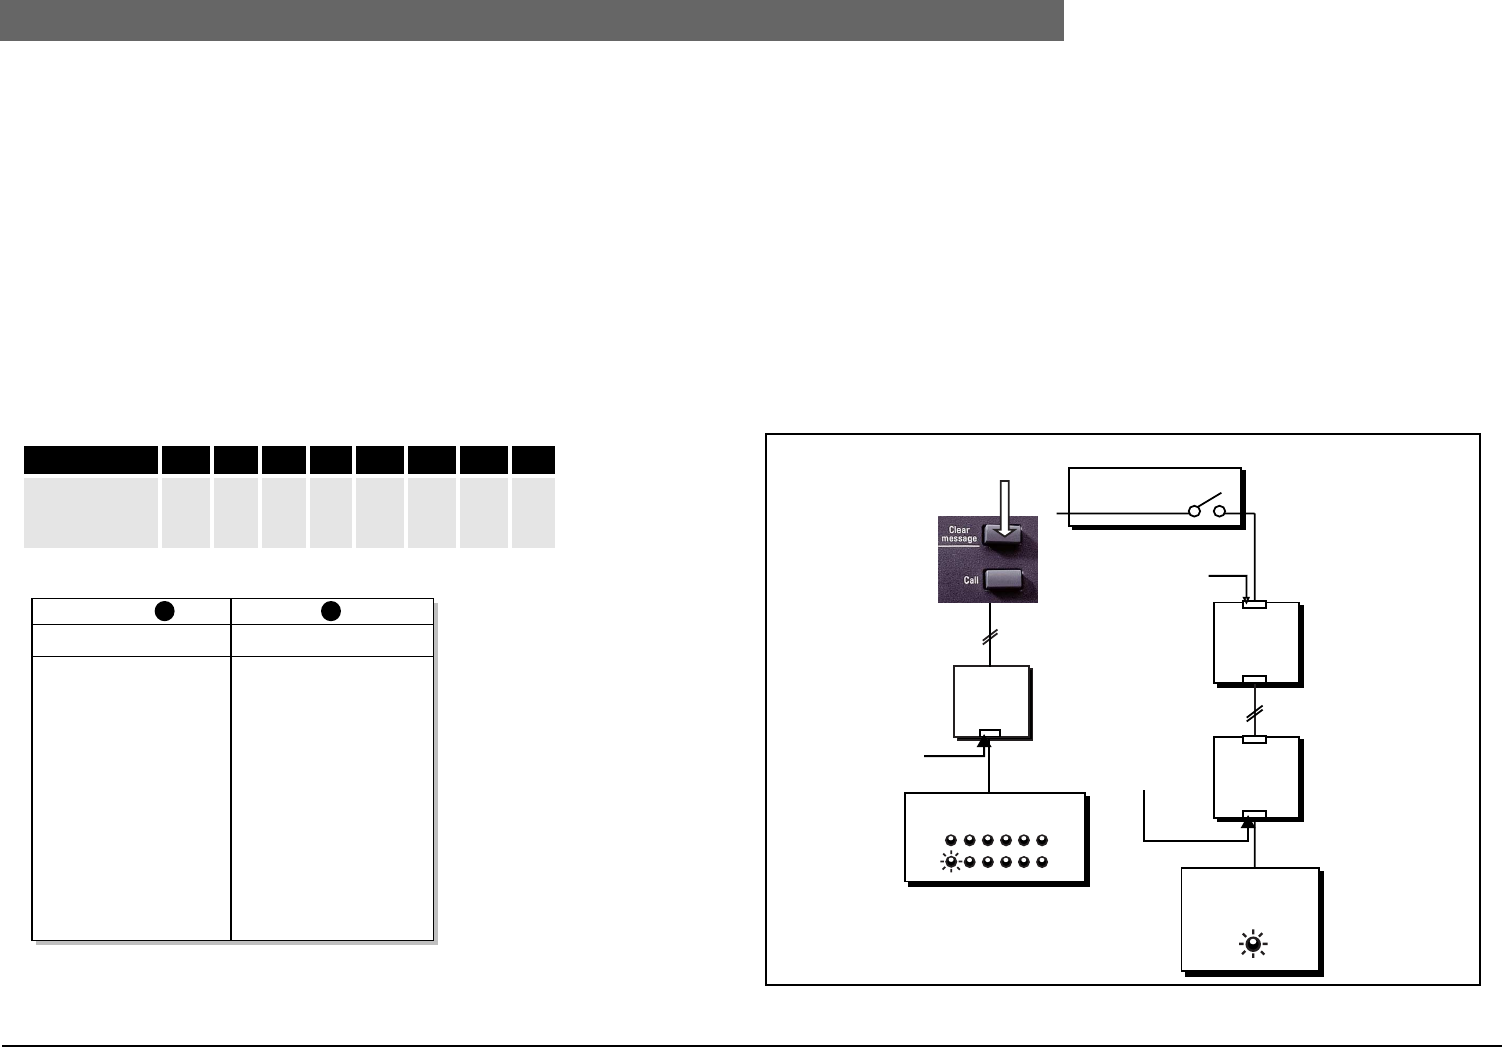
2
Bosch Security Systems | 04-2003 | 3922 988 43318 en
Digital Congress Network | Installation and Operating Manual | Chapter 8 - Information Displays en | 8-3
LBB 3512/00 Data Distribution Board
Data Format Specifications: RS232 Output
•9600/19200 baud (selected by dip switch)
•8 data bits
•1 stopbit
•No parity
Electrical specifications according to RS232 C standard.
Further information concerning the Data Distribution Board is available on request.
Parallel input and output connections
When using the board’s parallel input or output, either the solder pads (6) and (9) or the Micro
Match connectors (5) and (11) can be used. Two 20-pole male Micro Match connectors are provided
with the board. These connectors can be connected to a 20-pole flat cable using a special connecting
tool (not provided).
Board Address setting
FIG 8-5 Data Distribution Board connection details
8.1.1 Remote Switching Solutions
Using the Data Distribution Board LBB 3512/00 an interface facility is provided for the control of
external equipment such as loudspeaker group switching and other special switching facilities (FIG 8-
6).
Application 1.
Application 1, gives a typical solution when using the data distribution board in combination with an
interpreter desk. The interpreter desk includes an external message key, this key when pressed can
alert for example, some one in the secretariat via an LED indication panel or as a ‘speak-to-fast’
indication to the chairman.
Application 2.
Application 2, shows a typical example using the DCN system as a transparent control path using two
data distribution boards LBB 3512. Using this example a variety of switching solutions are possible- for
example, to switch lights on or off, or even to drive a motor that will open or close curtains as used
in large congress halls etc.
FIG 8-6 Remote switching solutions
DIP Switch 248 249 250 251 252 253 254 255
DP6
DP7
DP8
0
0
0
1
0
0
0
1
0
1
1
0
0
0
1
1
0
1
0
1
1
1
1
1
Solder Pad
L to R
Vcc
D00
D01
D02
D03
D04
D05
D06
D07
Gnd
Vcc
D08
D09
D10
D11
D12
D13
D14
D15
Gnd
Micromatch
connector
1
2
3
4
5
6
7
8
9
10
11
12
13
14
15
16
17
18
19
20
Solder Pad
L to R
Vcc
U00
U01
U02
U03
U04
U05
U06
U07
Gnd
Vcc
U08
U09
U10
U11
U12
U13
U14
U15
Gnd
Micromatch
connector
1
2
3
4
5
6
7
8
9
10
11
12
13
14
15
16
17
18
19
20
OUTPUTS INPUTS
9 6
DDB 1
LBB 3512
DDB 2
LBB 3512
DDB
LBB 3512
APPLICATION 1 APPLICATION 2
Sectional view
Interpreter desk
LBB 3520/10
External message key
DCN
System cabling
Passive mode
address 255
Parallel output
Customized Remote
indication panel
Parallel input connector
(PIN 1-15)
External switching
device
DCN
System cabling
Active mode
(CCU selected
address DP ON)
Passive mode
(Address:
248 - 254)
Remote
indication panel
connector
(PIN 1 - 15)
Parallel output
connector
(PIN 1 - 15
PIN 16 reserved)
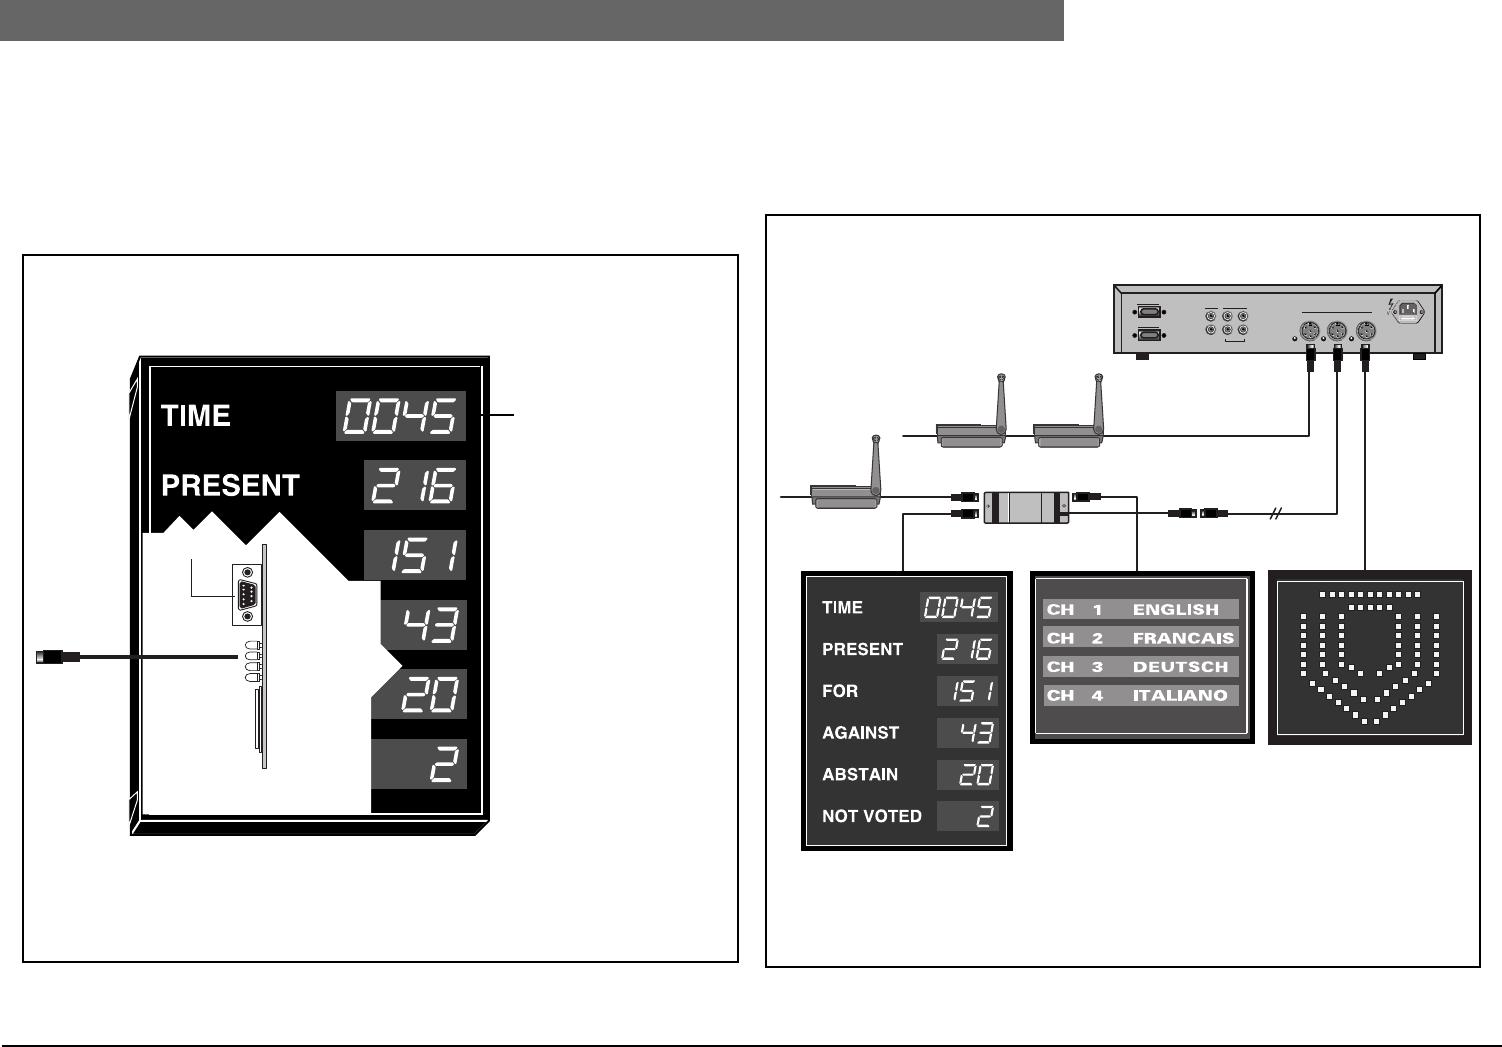
2
Bosch Security Systems | 04-2003 | 3922 988 43318 en
Digital Congress Network | Installation and Operating Manual | Chapter 8 - Information Displays en | 8-4
LBB 3512/00 Data Distribution Board
8.1.2 Installing Data Distribution board LBB 3512/00.
To install the board, first mount and secure the board in a convenient position inside the relevant hall
display. Connect one end of the connector cable to the 9-pole Sub-D connector on the data
distribution board and connect the other end to the displays RS232 port. The length of cable should
not exceed 5 m (16.4 ft.) when using a baud rate of 9600. The boards 2m (6.5 ft.) long cable,
terminated with a 6-pole connector, connects directly to the DCN system trunk-line. To extend the
length of cable to the trunk-line, extension cables LBB 4116/.. can be used.
FIG 8-7 Installing Data Distribution Board LBB 3512/00
8.1.3 Connecting Hall Displays to the DCN System
FIG 8-8 shows a typical example using a trunk-splitter when connecting hall displays to the DCN
system. When placing displays in the far off corners of a large conference room, extension cables
LBB 4116/.. can be used. See Chapter 8.1: “LBB 3512/00 Data Distribution Board” for the address
allocation and board settings of the LBB 3512/00.
FIG 8-8 Typical layout for connecting hall display
RS 232
LBB 3512/00
NOTE: The displayed time
is derived from a ‘built-in’
clock, and NOT from the
DCN system itself.
To DCN
system
Numeric Display fitted with
Data Distribution Board
LBB 3512/00
Address 248
Alphanumeric Display* fitted
with Data Distribution Board
LBB 3512/00
Address 249-250
Geographical Status Display*
fitted with Data Distribution
Board LBB 3512/00
Address 251
LBB 3500/..
Port 1
Port 2
Rec.
Line
In
Out
In
Out
Symmetrical
Trunk
115 V-T4A 230 V -T2A
*Running only with software-modules on Control-PC
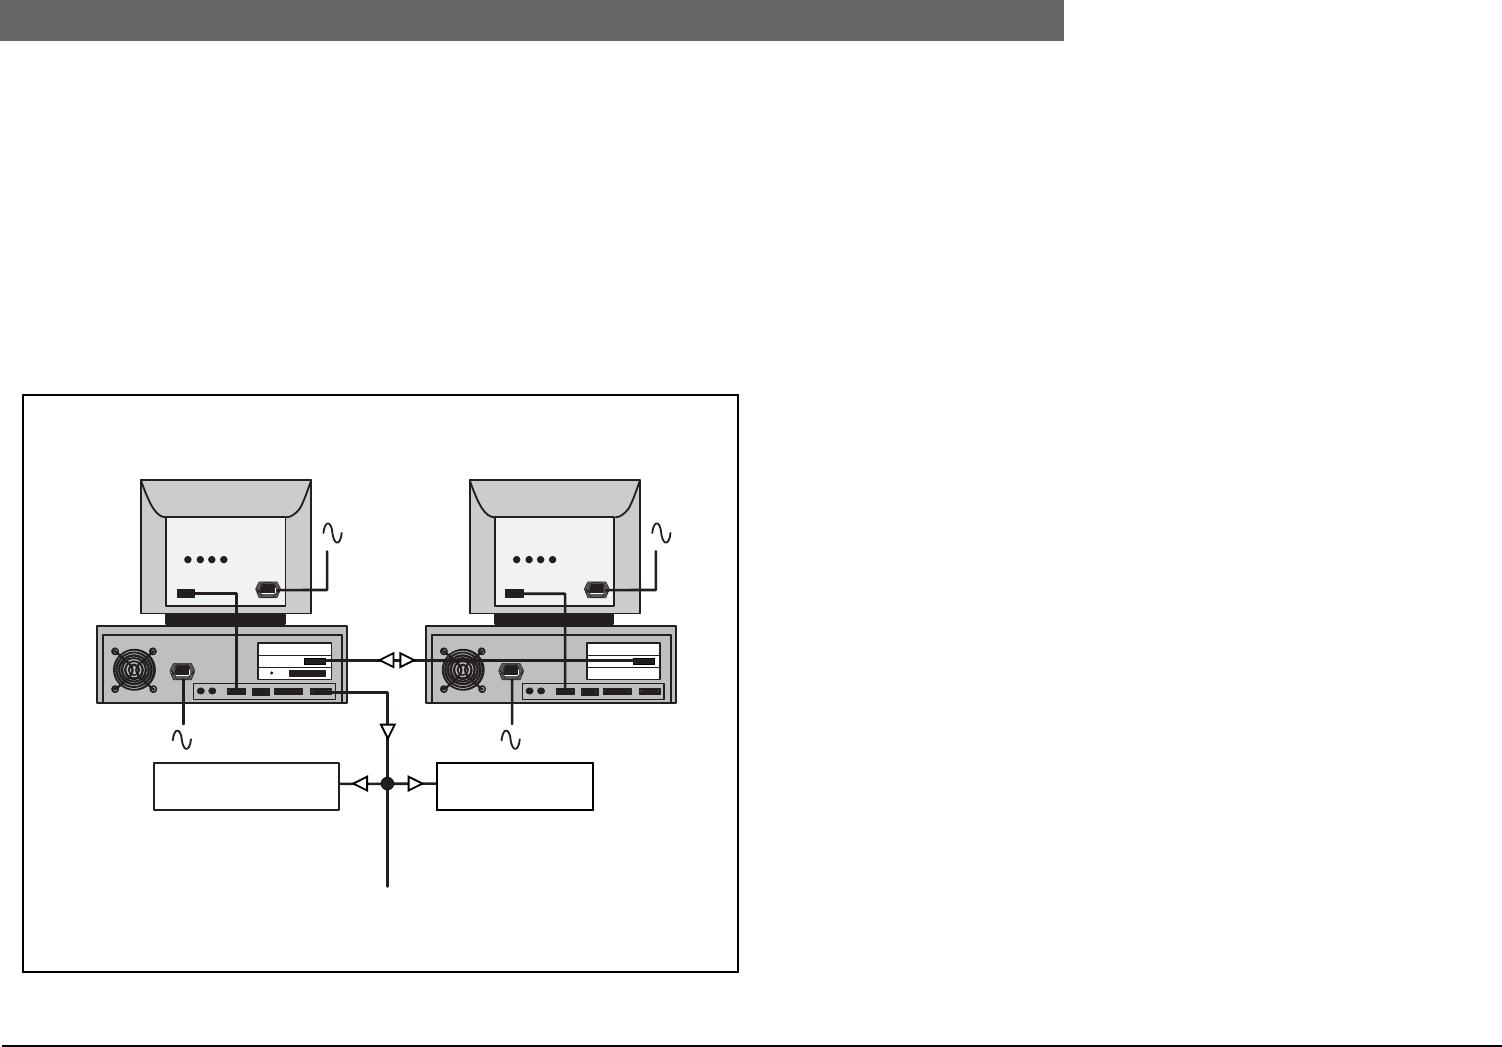
2
Bosch Security Systems | 04-2003 | 3922 988 43318 en
Digital Congress Network | Installation and Operating Manual | Chapter 8 - Information Displays en | 8-5
LBB 3512/00 Data Distribution Board
8.1.4 Interconnection for Video hall displays and Video Projectors
Refer to FIG 8-9.
To display information on a Video hall display or Video projector:
Use the VGA/SVGA output of a client computer, other than the one used as the main DCN central
computer. The client PC, with video display (client) software package, is connected to the main DCN
PC (server) via an Ethernet link.
•The data information is transported by means of the DDE-link (Dynamic Data Exchange). For
hardware information see Chapter 10..
•The ‘Video Display’ software package LBB 3584 has to be installed in the DCN PC (server) only.
The LBB 3590 start-up does not need to be installed on the client PC.
FIG 8-9 Interconnection Hall Display and Video Projector
To other video displays
CLIENT PC DCN PC (Server‘)
DCN Control PC
Ethernet link
from DCN PC
VIDEO HALL DISPLAY VIDEO PROJECTOR

2
Bosch Security Systems | 04-2003 | 3922 988 43318 en
Digital Congress Network | Installation and Operating Manual | Chapter 8 - Information Displays en | 8-6
LBB 3512/00 Data Distribution Board
This page has been left blank intentionally
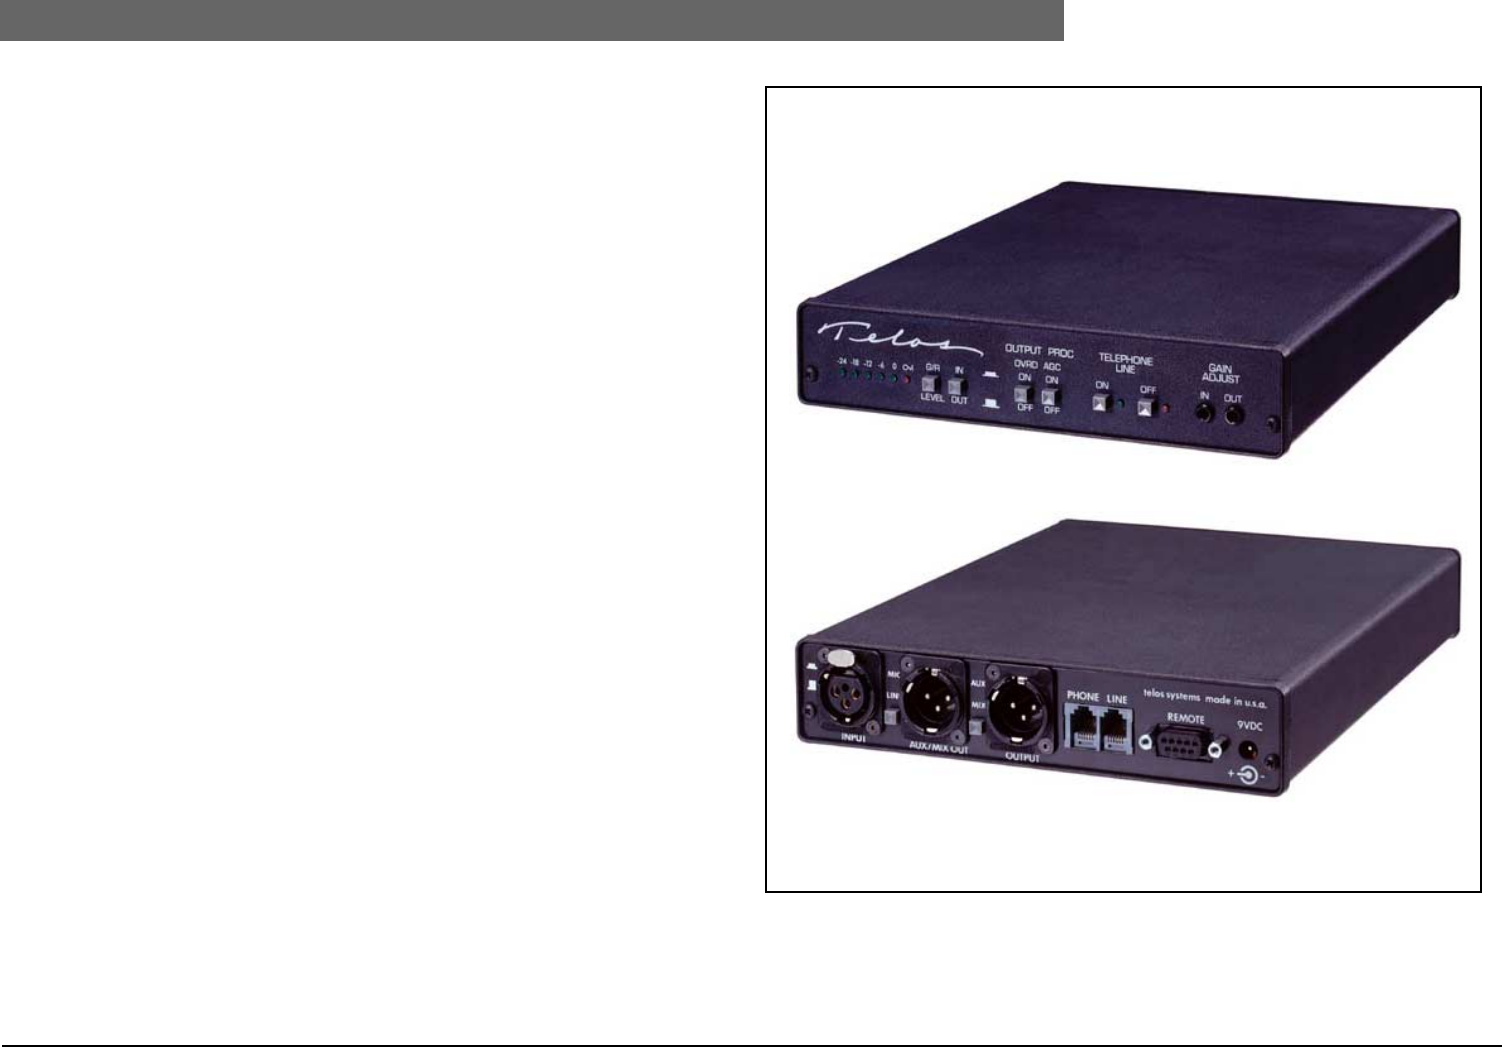
2
Bosch Security Systems | 04-2003 | 3922 988 43318 en
Digital Congress Network | Installation and Operating Manual | Chapter 9 - DCN Peripheral Equipment en | 9-1
Introduction Peripheral Equipment
Chapter 9. DCN Peripheral
Equipment
9.1 Introduction Peripheral Equipment
The DCN system can be connected to various external devices including a telephone coupler.
9.1.1 Telos Digital Telephone Interface
The ‘TELOS’ digital telephone interface allows participation in a DCN conference without actually
being present. The interface links the DCN system to the public telephone network. It enables a caller
- such as one providing specialist advice or information to participate from a remote location - even
overseas.
The interface can be connected to the DCN system via the Central Control Unit LBB 3500/.. .
A power supply unit provides power to the interface unit as well as providing the connection to a
telephone or fax machine. For further information view the TELOS web-site at www.zephyr.com.
Interconnection
The telephone interface is connected to the line INPUT’ and line OUTPUT’ of the CCU. Use of the
‘MIX-MINUS mode of the CCU is recommended (see Chapter 4.9). The telephone interface can also
be used for ‘Remote interpretation’ in combination with the ‘Analog Audio Input/Output’ module
LBB 3513/00 (Refer to the Instructions-for-use for the ‘Analog Audio Input/Output’ module code No.
3922 988 92511).
FIG 9-1 TELOS Digital Telephone Interface
Front view
Rear view

2
Bosch Security Systems | 04-2003 | 3922 988 43318 en
Digital Congress Network | Installation and Operating Manual | Chapter 9 - DCN Peripheral Equipment en | 9-2
Introduction Peripheral Equipment
This page has been left blank intentionally

2
Bosch Security Systems | 04-2003 | 3922 988 43318 en
Digital Congress Network | Installation and Operating Manual | Chapter 10 - Installation Techniques en | 10-1
Introduction Installation Techniques
Chapter 10. Installation
Techniques
10.1 Introduction Installation Techniques
The primary focus of this chapter is to provide system installation techniques, typical examples, and
system limitations for stand-alone and PC- controlled systems using the range of equipment described
in Chapter 2..
The cable attached to each DCN unit forms the trunk-line cabling (‘daisy-chain’). This cable carries all
the systems digital signals, up-down links and power supplies. Its versatility allows units to be ‘tapped-
off ’ anywhere throughout an installation, meaning that systems can easily be expanded without the
need to change the system cabling. The single cable handles as many as 16 up and 16 down high
quality contribution, distribution and data channels or 15 up and 15 down plus four speech-quality
intercom channels.
Installation is simplified by the use of ready-made cables, and where needed trunk-line splitters and
Tap-off units.
REMARK: Before attempting to install a DCN system read the following Chapter 10.1.1,
‘System design fundamentals’ . This chapter introduces the reader to DCNs power handling
requirements and its control limitations.
10.1.1 System design fundamentals
The total number of system units in any installation is limited by the maximum power handling
capacity and control capacity of the CCU (as well as the current consumed by individual system
units). Because each DCN unit is a current consuming device, each unit draws a certain amount of
current, depending on its power consumption requirements. This value normally expressed in Watts
has been simplified to help make the total power handling capacity of a system easier to calculate.
To overcome the limitations of a system, dedicated units with extension facilities are available to
extend the systems power handling capabilities. Such units include an Extension Power Supply Unit
LBB 4106/00 and an Audio Media Interface Unit LBB 3508/00. Where more than 240 units are
required, the system offers a Multi Central Control Unit (Multi-CCU) configuration (See Chapter 4.4
for more information)

2
Bosch Security Systems | 04-2003 | 3922 988 43318 en
Digital Congress Network | Installation and Operating Manual | Chapter 10 - Installation Techniques en | 10-2
Power Handling Capacity
10.2 Power Handling Capacity
To understand the power handling capacity of a system, individual DCN units have been assigned with
a Power Consumption Factor (PCF). The PCF therefore has a bearing on the total number of units
that can be connected to a system. The maximum number of units, quoted for a CCU is based on all
units having a PCF of 1. This means for example, that a CCU can accommodate 60 units of PCF (valid
for each trunk/tap-off output), but can also accommodate 120 units of PCF 0.5. Table No. 10.1 gives
the PCF value rated for each DCN system unit.
The length of (extension) cable used also has an influence on the number of units connected to a
system. Therefore to calculate the PCF value in relation to the length of cable used, a calculation
graph has been devised (refer to Chapter 10.4 “Calculating the PCF of a system”).
FIG 10-1 shows the maximum PCF values that can be connected to a single and all three trunk-
outlets of the following units:
1. Central Control Unit LBB 3500/..
2. Audio Media Interface unit LBB 3508/00
3. Extension Power Supply Unit LBB 4106/00
FIG 10-1 Power Handling Capacities
REMINDER: The Central Control Unit type LBB 3500/05 has a maximum rated PCF
value of 90 PCF. Central control units type LBB 3500/15 and LBB 3500/35 have a
maximum rated PCF value of 180 PCF.
Table 10.1: Power Consumption Factor PCF
Type No. DCN Unit Description PCF Value
LBB 3530/xx Delegate unit (discussion) 1
LBB 3531/xx Delegate unit (discussion) 1
LBB 3533/xx Chairman unit (discussion) 1
LBB 3534/xx Chairman unit (discussion) 1
LBB 3544/00, LBB 3545/00 Delegate unit (Concentus) 2
LBB 3546/00 Delegate unit (Concentus) 2.5
LBB 3547/00 Chairman unit (Concentus) 2.5
LBB 3520/10 Interpreter desk 2.5
LBB 3524/xx Channel selector unit 0.5
LBB 3526/10 Channel selector unit 0.5
LBB 3535/00* Dual audio interface unit 1.5
LBB 3540/15 Multi-purpose connection unit 2
LBB 3512/00 Data Distribution Board 1
LBB 4106/00 (D) Extension Power Supply Unit 0.5
LBB 3508/00 (D) Audio Media Interface unit 0.5
LBB 3423/00 DCN Interface module 0.5
LBB 3510/00 PC network card 1
LBB 3513/00 Analog Audio Input/Output Module 1
LBB 4114/00 Trunk-cable Splitter 1
LBB 4115/00 Tap-Off unit 1
The PCF value of a unit includes its attached 2 m (6.5 ft.) long cable.
* The PCF value of these units include the flush-mounted units and/or hand microphones
connected to it
Port 1 Rec.
Line
In
Out
In
Out
Symmetrical
Trunk
115 V-T4A 230 V -T2A
Port 1 Rec.
Line
In
Out
In
Out
Symmetrical
Trunk
115 V-T4A 230 V -T2A 115 V-T4A 230 V -T2A
Output 1 Output 2 Output 3 Output 4 Trunk Tap-off
115 V-T4A 230 V -T2A
Output 1 Output 2 Output 3 Output 4 Trunk Tap-off
Trunk
11 5V -T 4A 2 30V -T2A
Tap-off
In
Trunk
11 5V -T 4A 2 30V -T2A
Tap-off
In
Port 1
Port 2
Rec.
Line
In
Out
In
Out
Symmetrical
Trunk
115 V-T4A 230 V -T2A
LBB 3500/xx Central Control Unit
LBB 3500/05 Central Control Unit
LBB 3500/15 and LBB 3500/35
Central Control Unit
LBB 3508/00 Audio Media Interface Unit
PCF = ≤ 60 max. PCF = ≤ 60 max.
PCF = ≤ 180 max.
PCF = ≤ 90 max.
PCF = ≤ 90 max.
LBB 4106 Ext. Power Supply Unit LBB 4106 Ext. Power Supply Unit
PCF = ≤ 60 max. PCF = ≤ 180 max.
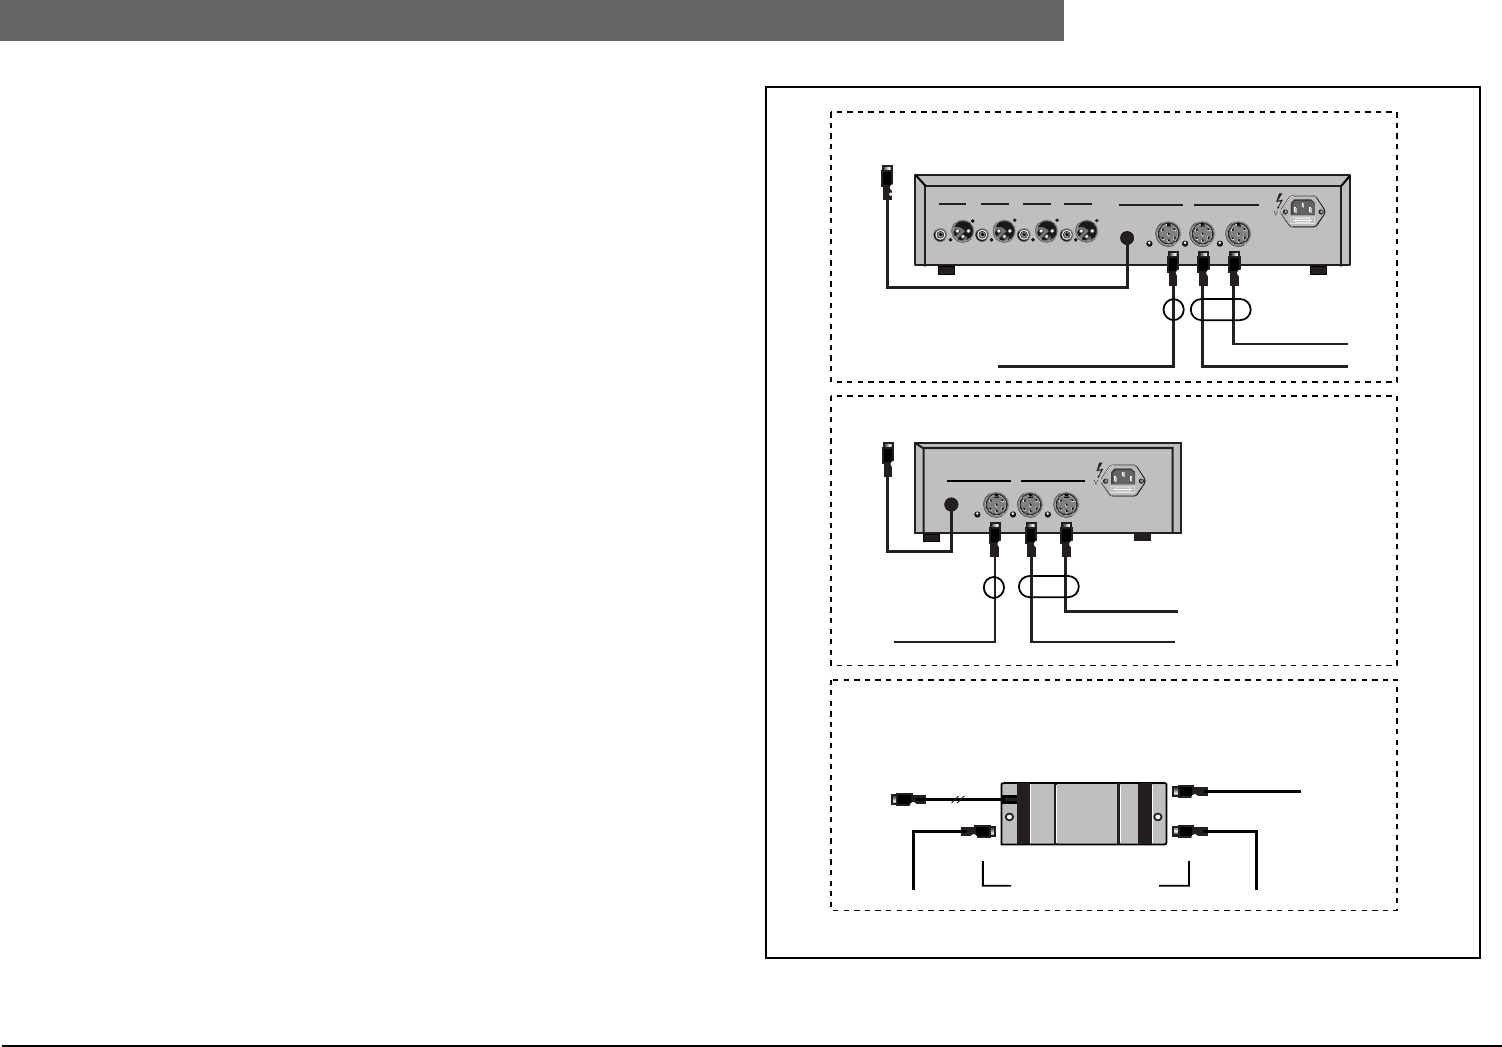
2
Bosch Security Systems | 04-2003 | 3922 988 43318 en
Digital Congress Network | Installation and Operating Manual | Chapter 10 - Installation Techniques en | 10-3
Trunk outlets and Tap-offs
10.3 Trunk outlets and Tap-offs
The Extension Power Supply Unit LBB 4106/00, Audio Media Interface Unit LBB 3508/00, Trunk-cable
splitter LBB 4114/00 and Tap-off Unit LBB 4115/00 all have Trunk outlets and Tap-offs. Trunk-outlets
are used for loop-through of the DCN trunk-line, and tap-offs are used for trunk-cable splitting. These
units have regenerative Tap-offs, regenerating the digital DCN signal.
FIG 10-2 shows the Trunk outlets and Tap-offs of the following units:
1. Audio Media Interface Unit LBB 3508/00
2. Extension Power Supply unit LBB 4106/00
3. Trunk-cable splitter LBB 4114/00 and Tap-off unit LBB 4115/00
10.3.1 Tap-off limitations
The number of serial tap-off connections from the CCU to the last tap-off in its chain should not
exceed 4. Any unit connected thereafter will not function. See FIG 10-3.
FIG 10-2 Trunk-outlet and tap-off connections
115 V -T4A 230 V -T2A
Output 1 Output 2 Output 3 Output 4 Trunk Tap-off
-T2
Trunk
11 5V
-T4A
230V
Tap-off
In
1
2
3
LBB 3508 Audio Media Interface Unit
LBB 4106/00 Extension Power Supply Unit
Tap-offs
Trunk-outlet
LBB 4114/00 Trunk-cable splitter
LBB 4115/00 Tap-off unit
Tap-offs
Trunk-in Trunk-out
Trunk-outlet Tap-offs
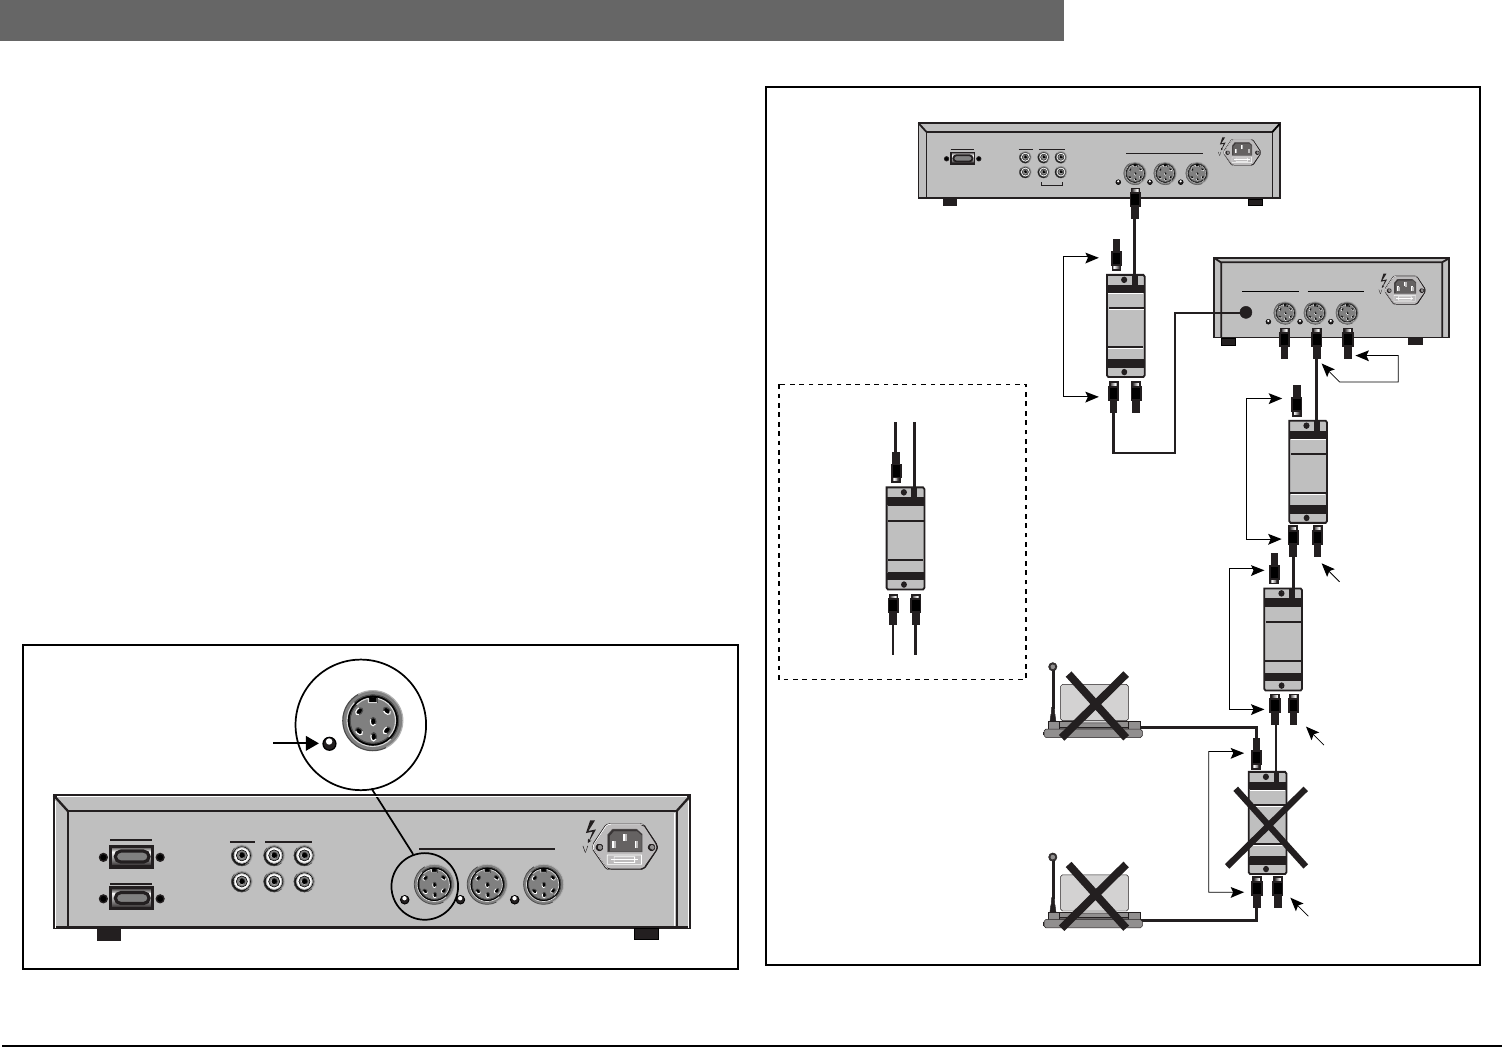
2
Bosch Security Systems | 04-2003 | 3922 988 43318 en
Digital Congress Network | Installation and Operating Manual | Chapter 10 - Installation Techniques en | 10-4
Trunk outlets and Tap-offs
Max. number of units connected in series (without the use of extension cables)
The maximum number of units connected in series to a Trunk outlet or Tap-off of a CCU (LBB 3500),
Extension Power Supply unit (LBB 4106/00) and Audio Media Interface unit (LBB 3508/00) is:
• Table-top units
- 50 x Delegate/Chairman discussion units with a PCF value of 1(see Limit 1)
•Flush mounted units
- 40 x Dual Audio Interface units (see Limit 2),
or 30 x Multi-purpose connection units (see Limit 2),
or 50 x Channel selector units (see Limit 1),
or 24 x Delegate/Chairman Concentus units including interpreter desks with a PCF value of 2.5
(see limit 2).
Limit 1: The maximum cable length is 100 m (328 ft.). The length of cable attached to each unit is 2
m (6.5 ft.), therefore a maximum of 50 discussion units (50 x 2 m (6.5 ft.) = 100 m (328 ft.)) can be
connected even though the maximum PCF value of 60 has not yet been reached.
Limit 2: The maximum total PCF value that can be connected to one outlet is 60. The Dual Audio
Interface has a PCF value of 1.5 (40 x 1.5 = 60) and the Multi-purpose connection unit has a PCF
value of 2 (2 x 30 = 60).
System overload
Each outlet socket is protected against short circuit at the power supply lines, and each has a red LED
indicator (FIG 10-3) to indicate when the trunk-line has exceeded its maximum PCF value. In an
overload situation, when the LED is lit, the system has a built-in delay time of 30 seconds before
scanning the system again for a repeat overload situation. If the overload has been corrected the LED
goes out. Refer to Chapter 10.2 Power Handling Capacity.
FIG 10-3 Overload indication FIG 10-4 Tap-off limitations
Port 1
Port 2
Rec.
Line
In
Out
In
Out
Symmetrical
Trunk
115 V-T4A 230 V -T2A
Overload LED
also applicable
for LBB 4106/00
Trunk
11 5V-T 4A 2 30 V -T2 A
Tap-off
In
Port 1 Rec.
Line
In
Out
In
Out
Symmetrical
Trunk
115 V-T4A 230 V -T2A
LBB 3500/xx Central Control Unit
1st Tap-off
LBB 4114/00
LBB 4114/00
LBB 4114/00
LBB 4114/00
1st Tap-off
2nd Tap-off
LBB 4114/00
2nd Tap-off
3rd Tap-off
4th Tap-off
5th Tap-off
4th Tap-off
3rd Tap-off
LBB 4106/00
Tap-off Trunk-line
Trunk-lineTap-off
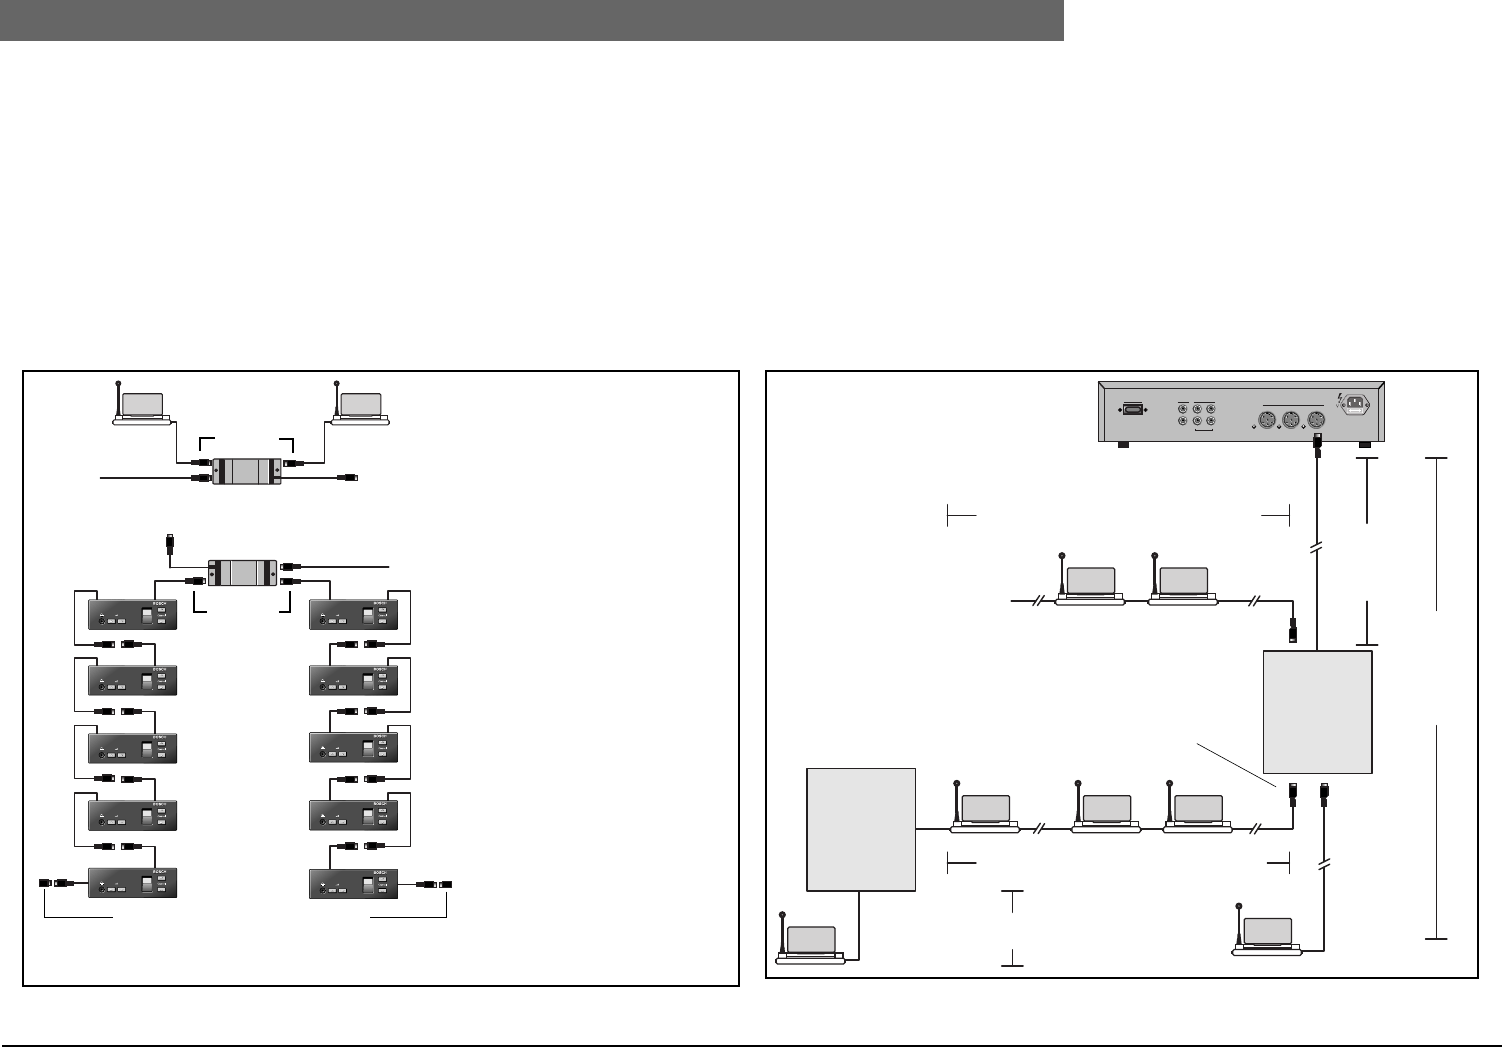
2
Bosch Security Systems | 04-2003 | 3922 988 43318 en
Digital Congress Network | Installation and Operating Manual | Chapter 10 - Installation Techniques en | 10-5
Trunk outlets and Tap-offs
10.3.2 Using Tap-Off unit LBB 4115/00
The Tap-off unit LBB 4115/00 (FIG 10-5) provides short-circuit protection on the Tap-off connector.
Each tap-off connector can accommodate up to a maximum of 2.5 PCF including a DCN units
extension cable; for example:
• Table-top units
- 2 x Concentus Delegate, Chairman units or Interpreter Desks
• Flush mounted units
-1 x Dual Audio Interface unit
or 1 x Multi-purpose connection unit
or 5 x Channel selector units.
NOTE: The Tap-off connector can handle up to 2.5 PCF per outlet (1x Concentus unit per tap-off)
FIG 10-5 LBB 4115/00 Tap-off unit limitations
10.3.3 Maximum cable lengths using Trunk-outlets and/or Tap-offs
Extension cables are used to extend the length of cable on DCN system units. The length of cable
used, directly affects the PCF value of a system.
System limits (FIG 10-6)
1. The total cable length (using standard LBB 4116/xx cable) between the CCU and the last unit in
any branch of the system must not exceed 250 m (820 ft.). This includes all extension cables and
the 2 m (6.5 ft.) cable attached to each system unit.
2. The total length of the cable from the CCU to the first regenerative tap-off (i.e. from Trunk Cable
Splitter LBB 4114/00, Audio Media Interface Unit LBB 3508/00 or Extension Power Supply Unit
LBB 4106/00 must not exceed 100 m (328 ft.).
3. The total length of the cable between regenerative tap-offs outputs must not exceed 100 m
(328 ft.).
FIG 10-6 Maximum cable lengths
Termination plug LBB 4118/00
(for use with Channel selector panels LBB 3524/10 and LBB 3526/10)
LBB 4115/00
Trunk-line Trunk-line
Tap-offs
see Note
Trunk-line
Trunk-line
LBB 4115/00
Tap-offs
Port 1 Rec.
Line
In
Out
In
Out
Symmetrical
Trunk
115 V-T4A 230V -T2A
Tap-off outlet
Tap-off outlet
Trunk outlet
Max. cable length = <100 m (328 ft.)
Max. cable length = <100 m (328 ft.)
Max. cable length = <50 m (164 ft.)
Tap-off outlet
Max. cable
length =
< 100 m
(328 ft.)
Max. cable
length =
< 100 m
(328 ft.)
Trunk-line
LBB 3500/xx
Regenerative
tap-off
LBB 4114
LBB 3508
LBB 4106
Regenerative
tap-off
LBB 4114
LBB 3508
LBB 4106
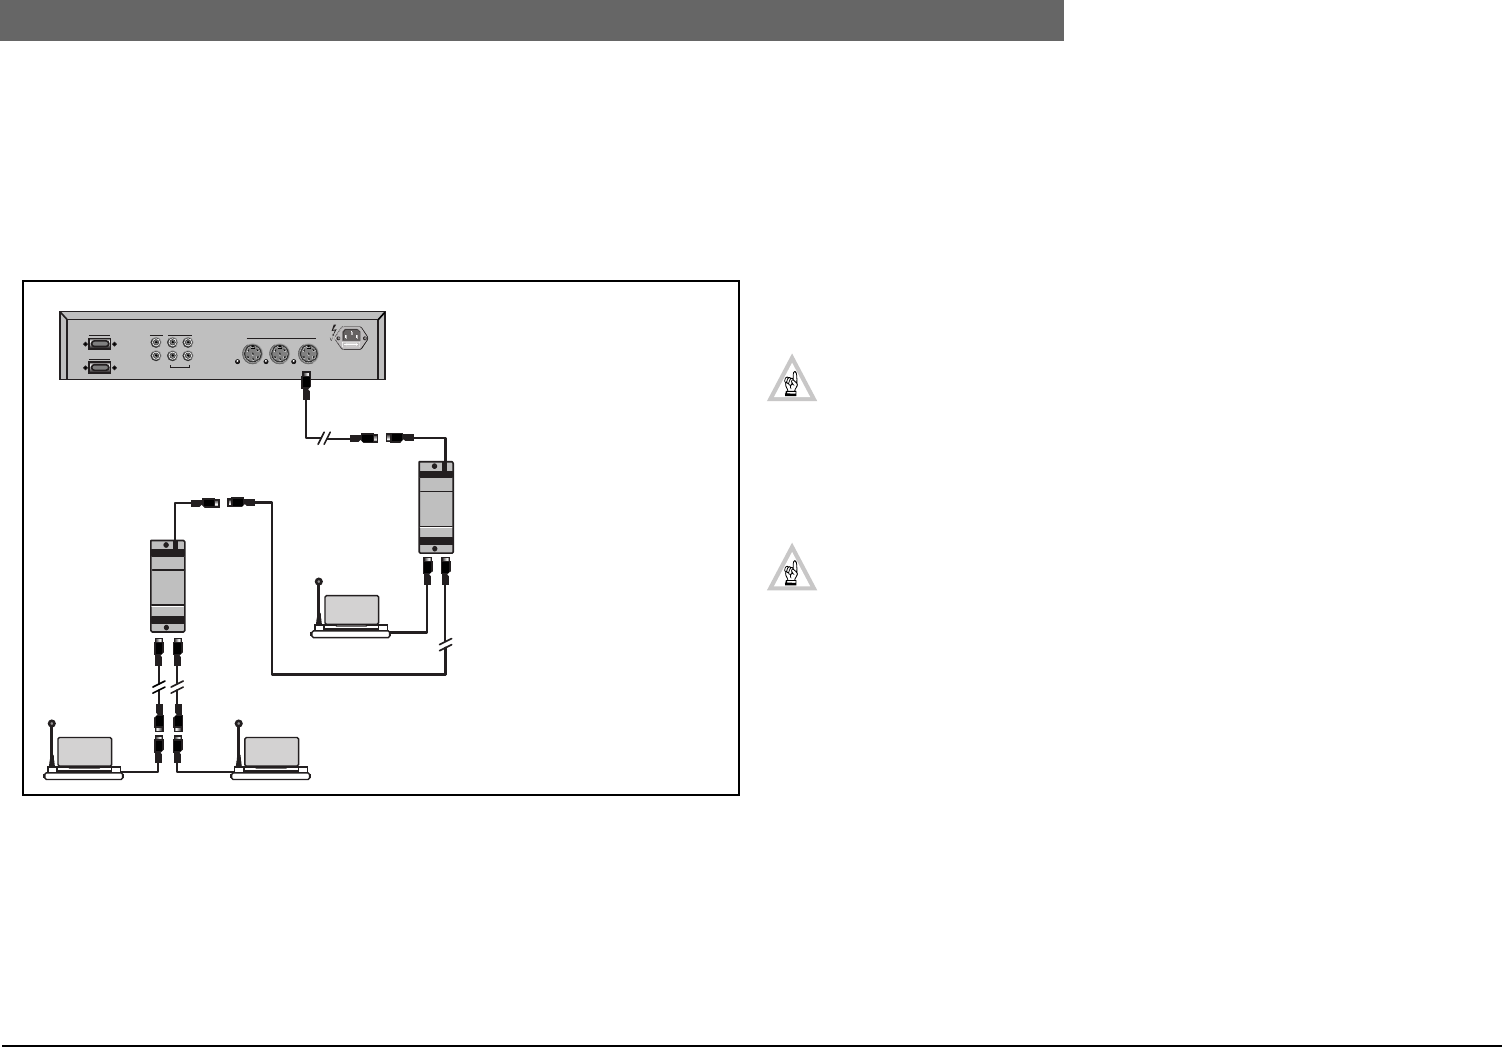
2
Bosch Security Systems | 04-2003 | 3922 988 43318 en
Digital Congress Network | Installation and Operating Manual | Chapter 10 - Installation Techniques en | 10-6
Calculating the PCF of a System with respect to cable length
10.4 Calculating the PCF of a System with respect to cable
length
As stated, the length of cable used in a system has a direct influence on the PCF of a system. In the
example shown in FIG 10-7, the second in-line trunk-splitter has two extension cables connected to
it, with lengths of 20 m (65.6 ft.) and 50 m (164 ft.) When determining the cable length of a trunk-
outlet or tap-off connector, the longest extesion cable only is taken in to account - in this example,
the 50 m (164 ft.) cable. Therefore, in this example the total extension cable length from a single
trunk-outlet of the CCU is calculated as 20 (65.6)+10 (32) +50 (164)= 80 m (262 ft.).
FIG 10-7 Calculating the length of extension cables
10.4.1 Calculating Step-by-Step
Before calculating the PCF of a system, consider the following:
•How many units will be connected, and what is their total PCF value?
•What is the total length of cables used per CCU trunk-outlet, and what is the total length of
extension cable used on this trunk-outlet?
Calculation Method
•Using the PCF table (Table 10.1) and the graph (FIG 10-10) calculate the PCF value required for
the system. If the PCF value exceeds 60, then more than one of the CCU’s Trunk outlets must
be used.
•Calculate the length of the cable for each Trunk outlet. “Maximum cable lengths using Trunk
outlets and Tap-offs” when attaining the length of an extension cable.
•A unit with a regenerative tap-off should be placed every 100 m (328 ft.). This length includes
the 2 m (6.5 ft.) cable length of each attached unit.
1. Using the graph, check for each CCU outlet that the cross-over point according to the extension
cable length and the PCF value is within the approved system limits. The approved system limits
are defined by the grey shaded area of the graph.
NOTES:
1. If only one CCU Trunk outlet is needed, step 2 is not applicable.
2. An Microsoft Excel based DCN calculation tool for use on a PC is available on request.
2. Using the data obtained in step 1, (i.e. the PCF value and the length of extension cable) use the
cable correction graph to calculate the PCF value for the relevant Trunk outlets. The PCF values
with cable correction are shown within small white squares. Once done add the PCF value for
each trunk-line. This summed total gives the system PCF value.
NOTE:
This method of calculation is used for all units with Trunk outlets and Tap-offs
The maximum PCF capacities are:
•60 PCF for each of the Trunk outlets and Tap-offs
•90 PCF in total for the LBB 3500/05 Central Control unit
•180 PCF in total for the LBB 3500/15 and LBB 3500/35 Central Control unit
•90 PCF in total for the LBB 3508/00 Audio Media Interface unit
•180 PCF in total for the LBB 4106/00 Extension Power Supply unit
When using Trunk-splitters or Tap-off units, their PCF must also be taken into account
(see PCF Table 1).
EXAMPLE:
These examples are based on the system configurations shown in FIG 10-8 and FIG 10-9. These
configurations show two systems using all three trunk-line connectors.
1. Using the graph shown (FIG 10-10) check that each trunk-line in use is within the approved sys-
tem limits (i.e. within the grey shaded area).
2. Using the PCF extension cable correction graph, locate the PCF value on the ‘Y’ axis, that are be
connected to the trunk-line. On the ‘X’ axis, locate the length of extension cable needed. Using
standard graph reading procedures join the two together to obtain the PCF value including exten-
sion cable length correction. The actual PCF value is shown within small shaded squares.
Table No.10.2 gives the PCF value for the example shown in FIG 10-8
Table No.10.3 gives the PCF value for the example shown in FIG 10-9
Port 1 Rec.
Line
In
Out
In
Out
Trunk
115V-T4A 230V -T2A
Port 2
LBB 3500/xx Central Control Unit
20 m (65.6 ft.)
10 m (32.8 ft.)
50 m (164 ft.)20 m (65.6 ft.)
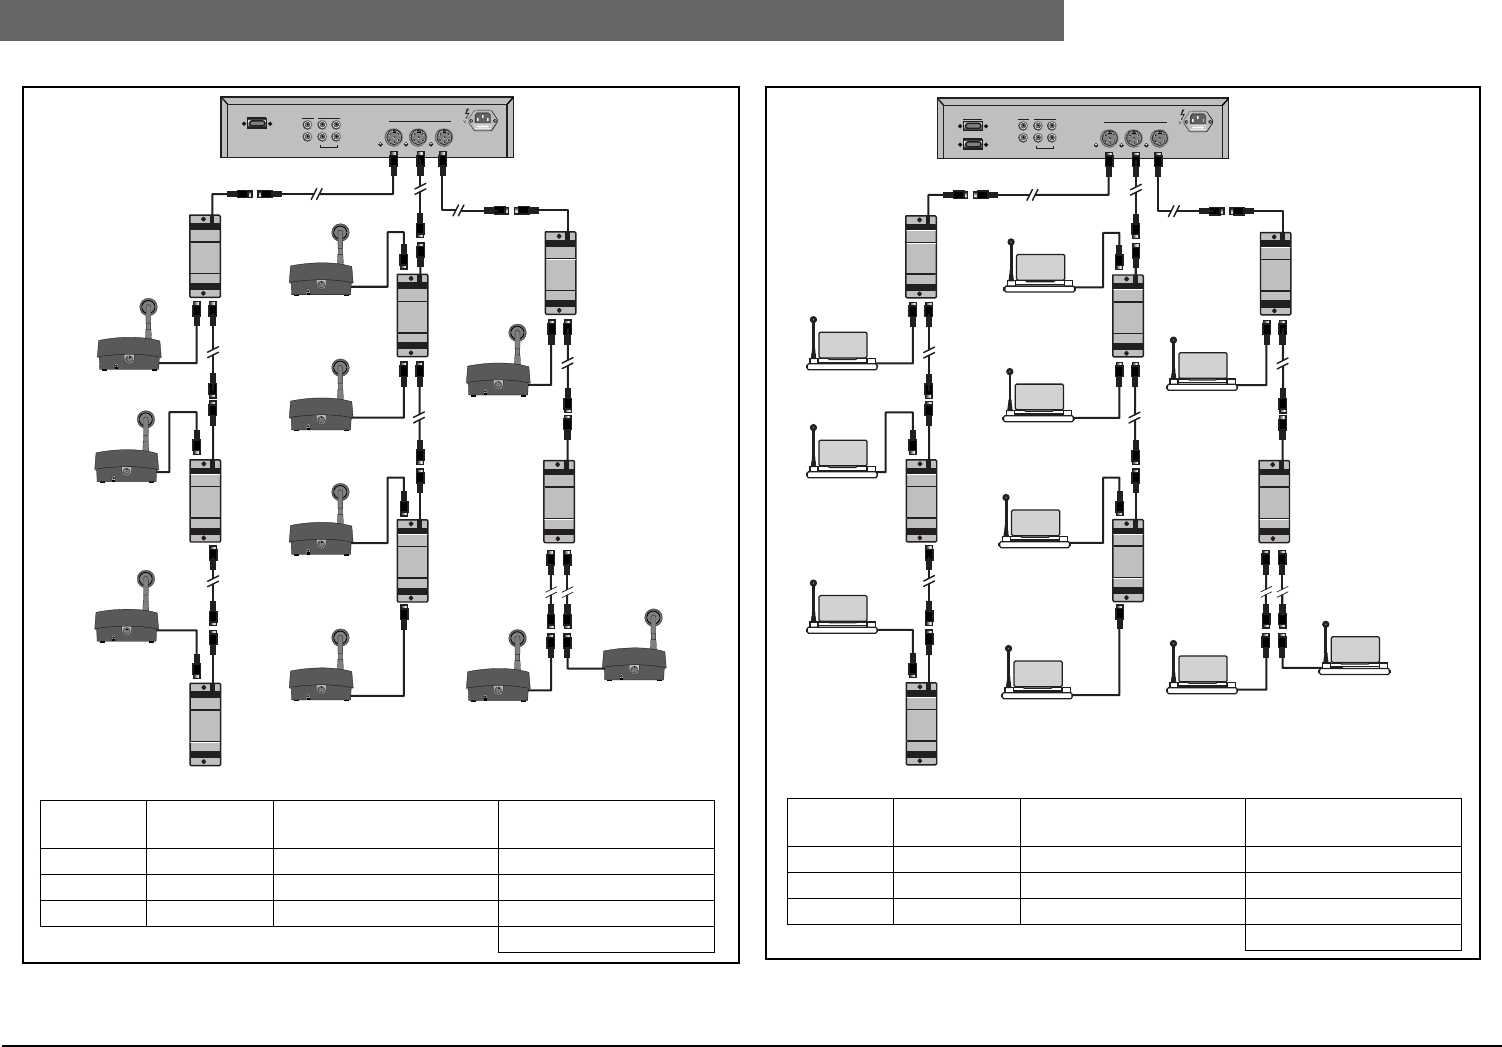
2
Bosch Security Systems | 04-2003 | 3922 988 43318 en
Digital Congress Network | Installation and Operating Manual | Chapter 10 - Installation Techniques en | 10-7
Calculating the PCF of a System with respect to cable length
FIG 10-8 Example when calculating the PCF of a system using discussion units
(e.g. LBB 3530/00)
FIG 10-9 Example when calculating the PCF value of a system using Concentus units
(e.g. LBB 3544/00, LBB 3545/00, LBB 3546/00 and LBB 3547/00)
Port 1 Rec.
Line
In
Out
In
Out
Trunk
115 V-T4A 230V -T2A
123
Table 10.2:
Trunk_Outlet Total cable
length
PCF Value
(without Ext. cable correction)
PCF Value
(with Ext. cable correction)
1 40 m (131 ft.) 20 24
2 20 m (65.6 ft.) 35 38
3 80 m (26.2 ft.) 15 22
System PCF = 84
SYSTEM USING
DISCUSSION UNITS
10 m (32.8 ft.)
10 m (32.8 ft.) 30 m (98.4 ft.)
10 m (32.8 ft.)
10 m (32.8 ft.)
40 m (131 ft.)
20 m (65.6 ft.)10 m (32.8 ft.)
20 m (65.6 ft.)
7 units
5 units
5 units
8 units
9 units
8 units
8 units
2 units
6 units
5 units
LBB 3505/05
Port 1
Port 2
Rec.
Line
In
Out
In
Out
Trunk
115 V-T4A 230V -T2A
123
Table 10.3:
Trunk_Outlet Total cable
length
PCF Value
(without Ext. cable correction)
PCF Value
(with Ext. cable correction)
1 40 m (131 ft.) 46 55
2 20 m (65.6 ft.) 55 60
3 80 m (26.2 ft.) 35 52
System PCF = 167
SYSTEM USING
CONCENTUS
UNITS
10 m (32.8 ft.)
10 m (32.8 ft.) 30 m (98.4 ft.)
10 m (32.8 ft.)
10 m (32.8 ft.)
40 m (131 ft.)20 m (65.6 ft.)10 m (32.8 ft.)
20 m (65.6 ft.)
7 units
5 units
5 units
5 units
5 units
5 units
6 units
2 units
6 units
5 units
LBB 3500/15, LBB 3500/35
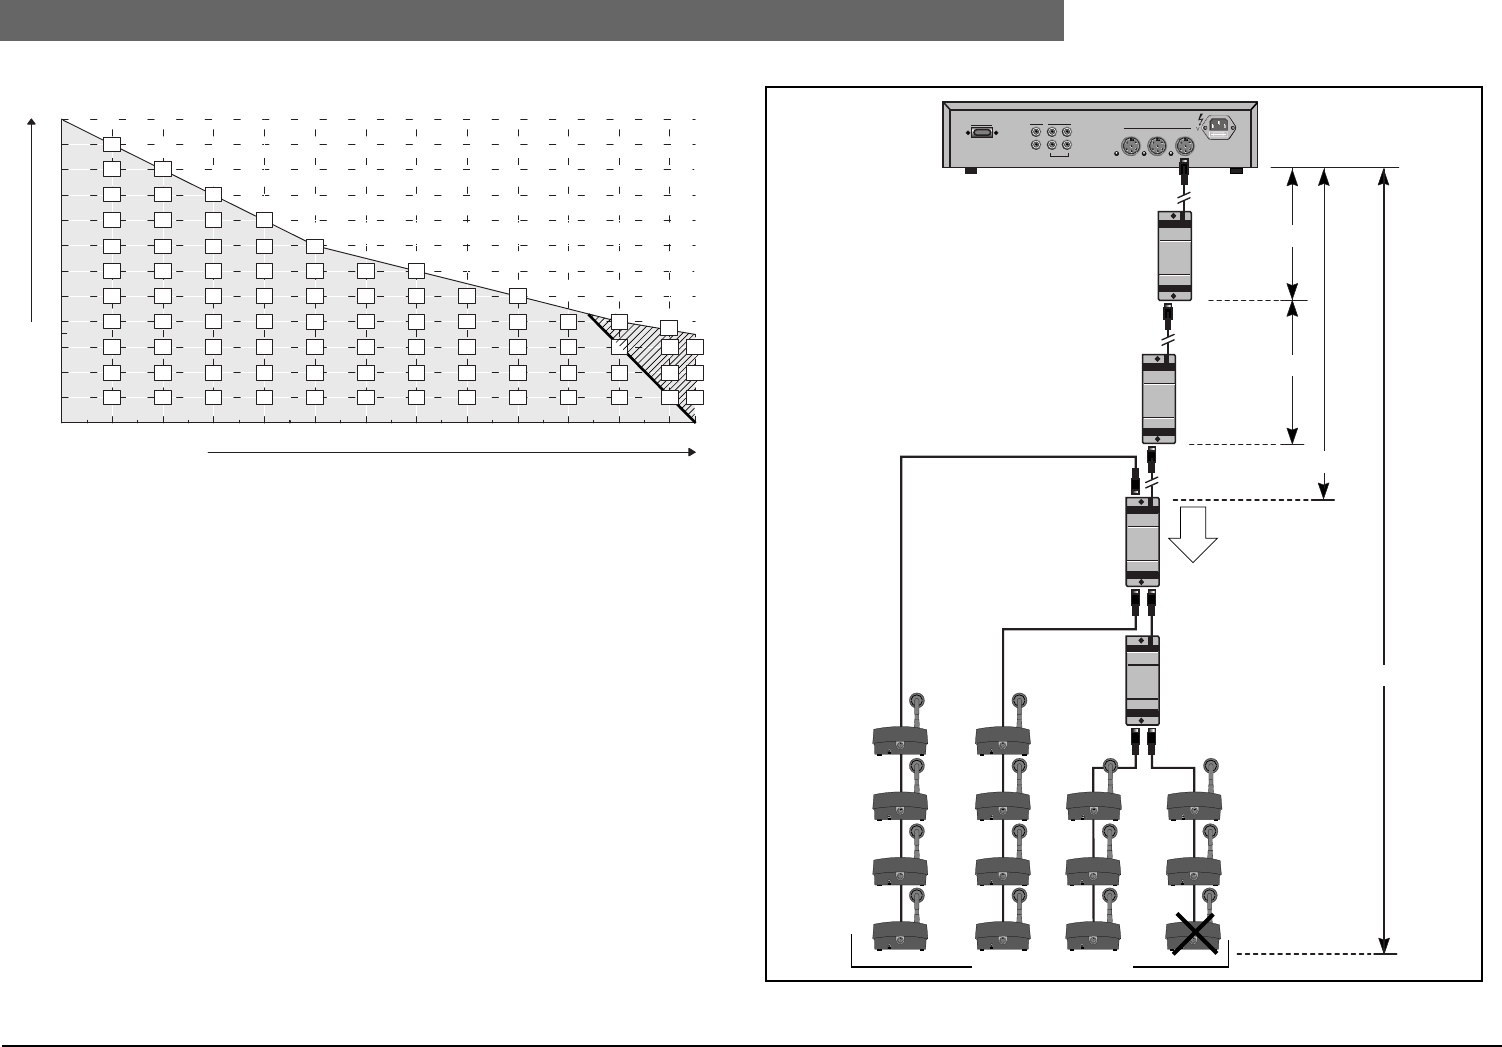
2
Bosch Security Systems | 04-2003 | 3922 988 43318 en
Digital Congress Network | Installation and Operating Manual | Chapter 10 - Installation Techniques en | 10-8
Calculating the PCF of a System with respect to cable length
FIG 10-10 Graph for calculating the PCF value of a system including extension cable length
correction
10.4.2 Graph explanation
The Y-axis of the graph gives the PCF per trunk-outlet (max. 60 PCF) in relation to the X-axis, which
gives the length of extension cable used (max. 250 m (820 ft.)).
If the length of cable from the Trunk outlet exceeds 250 m (820 ft.), the graph shows that no units can
be connected. At 240 m (787 ft.), the graph shows that a PCF of 17 can be connected. For an
example of a single trunk-outlet limitation refer to FIG 10-11 and FIG 10-11.
For typical PCF graph references in relation to Trunk outlets and Tap-offs for systems with and without
extension cables refer to FIG 10-12.
FIG 10-11 Example Single Trunk-outlet limitations
Y
X
8020 40 60
100 120 140 160 180 200 220 240 250
5
10
15
20
17
25
30
35
40
45
50
55
60
0
54
60
49
60
54
48
42
36
44
38
33
6
11
16
22
27
6
12
18
24
30
7
13
20
27
33
40
47
53
60
8
15
22
30
37
45
52
60
9
17
26
34
43
51
60
9
18
28
37
46
55
10
20
30
40
50
60
11
22
33
44
55
12
24
36
48
60
14
27
41
54
15
30
45
17
60 60
Ext. Cable (m)
PCF value
Port 1 Rec.
Line
In
Out
In
Out
Symmetrical
Trunk
115 V-T4A 230 V -T2A
Discussion units
Trunk splitter
5 x 2 = 10 m
(32.8 ft.)
LBB 4114/00
Trunk splitter
LBB 4114/00
Trunk splitter
LBB 4114/00
Regenerative
‘Tap-offs’
Regenerative
‘Tap-offs’
100 m (328 ft.)
100 m (328 ft.)
240 m (787 ft.)
250 m (820 ft.) (max.)
Max. PCF = 17 at
240 m (787 ft.) acc.
to the graph. The
first two Trunk
splitters use 2 PCF,
therefore the PCF
value left at this point
is 15.
LBB 3500/xx
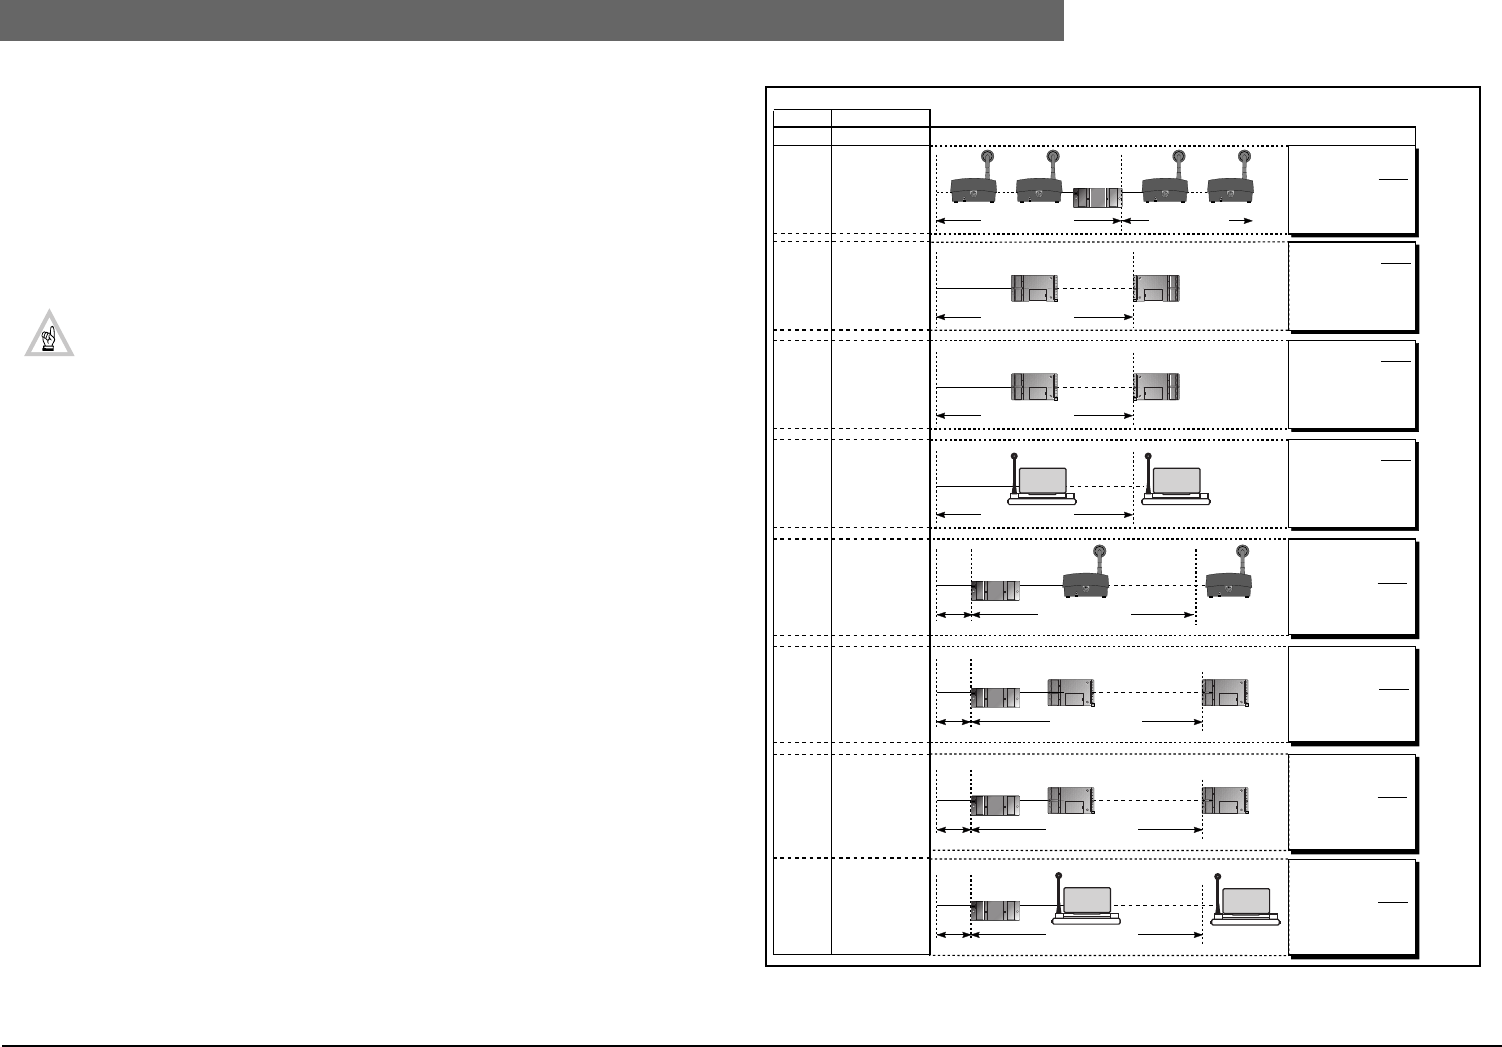
2
Bosch Security Systems | 04-2003 | 3922 988 43318 en
Digital Congress Network | Installation and Operating Manual | Chapter 10 - Installation Techniques en | 10-9
Calculating the PCF of a System with respect to cable length
10.4.3 Graph reference examples
FIG 10-12 in combination with the PCF graph (FIG 10-10) gives examples of how to calculate the
PCF value of a single trunk-outlet. Using these examples, the total PCF value of all three trunk-outlets
of a CCU can be calculated.
TS = Trunk-splitter DA1 = Dual Audio Interface units
TT = Table-top discussion units MPC = Multi-purpose Connection units
CON = Concentus units
NOTE: (1 m = 39.37 in)
FIG 10-12 PCF Calculation examples for a single trunk-line
1
50 x 2 m = 100 m
TS
TT 50
TT 59
TT
49
TT
341
TS TT TT
140DAI DAI
40 x 2 m = 80 m
130MPC
CON
CON CON
CON
MPC
1DAI 22DAI
30 x 2 m = 60 m
34 x 2 m = 68 m
100 m
Ext. cable
TS
22 x 2 m =44 m
100 m
100 m
Ext. cable
Ext. cable
17MPC1MPC
TS
17 x 2 m = 34 m
PCF CALCULATION
BLOCK DIAGRAMS
GRAPH REFERENCE
TT = 59 x 1 PCF = 59 PCF
TS = 1 x 1 PCF = 1 PCF
TOTAL = 60 PCF
DAI = 40 x 1.5 PCF = 60 PCF
TOTAL = 60 PCF
TT = 34 x 1 PCF = 34 PCF
TS = 1 x 1 PCF = 1 PCF
TOTAL = 35 PCF
+ Ext. cable = 60 PCF
DAI = 22 x 1.5 PCF = 33 PCF
TS = 1 x 1 PCF = 1 PCF
TOTAL = 34 PCF
+ Ext. cable = 60 PCF
MPC = 17 x 2 PCF = 34 PCF
TS = 1 x 1 PCF = 1 PCF
TOTAL = 35 PCF =
+ Ext. cable = 60 PCF
MPCU = 30 x 2 PCF = 60 PCF
TOTAL = 60 PCF
Y axis X axis (max.)
PCF Ext. Cable (m)
60 0
60 0
60 0
124
24 x 2 m = 48 m
CON = 24 x 2.5 PCF = 60 PCF
TOTAL = 60 PCF
60 0
35 100
35 100
35 100
Tap-off
Tap-off
Tap-off
Tap-off
100 m
Ext. cable
13
1
TS
13 x 2 m = 26 m
CON =13 x 2.5 PCF = 32.5 PCF
TS = 1 x 1 PCF = 1 PCF
TOTAL = 33.5 PCF =
+ Ext. cable = 60 PCF
35 100
Tap-off
9 x 2 m = 18 m
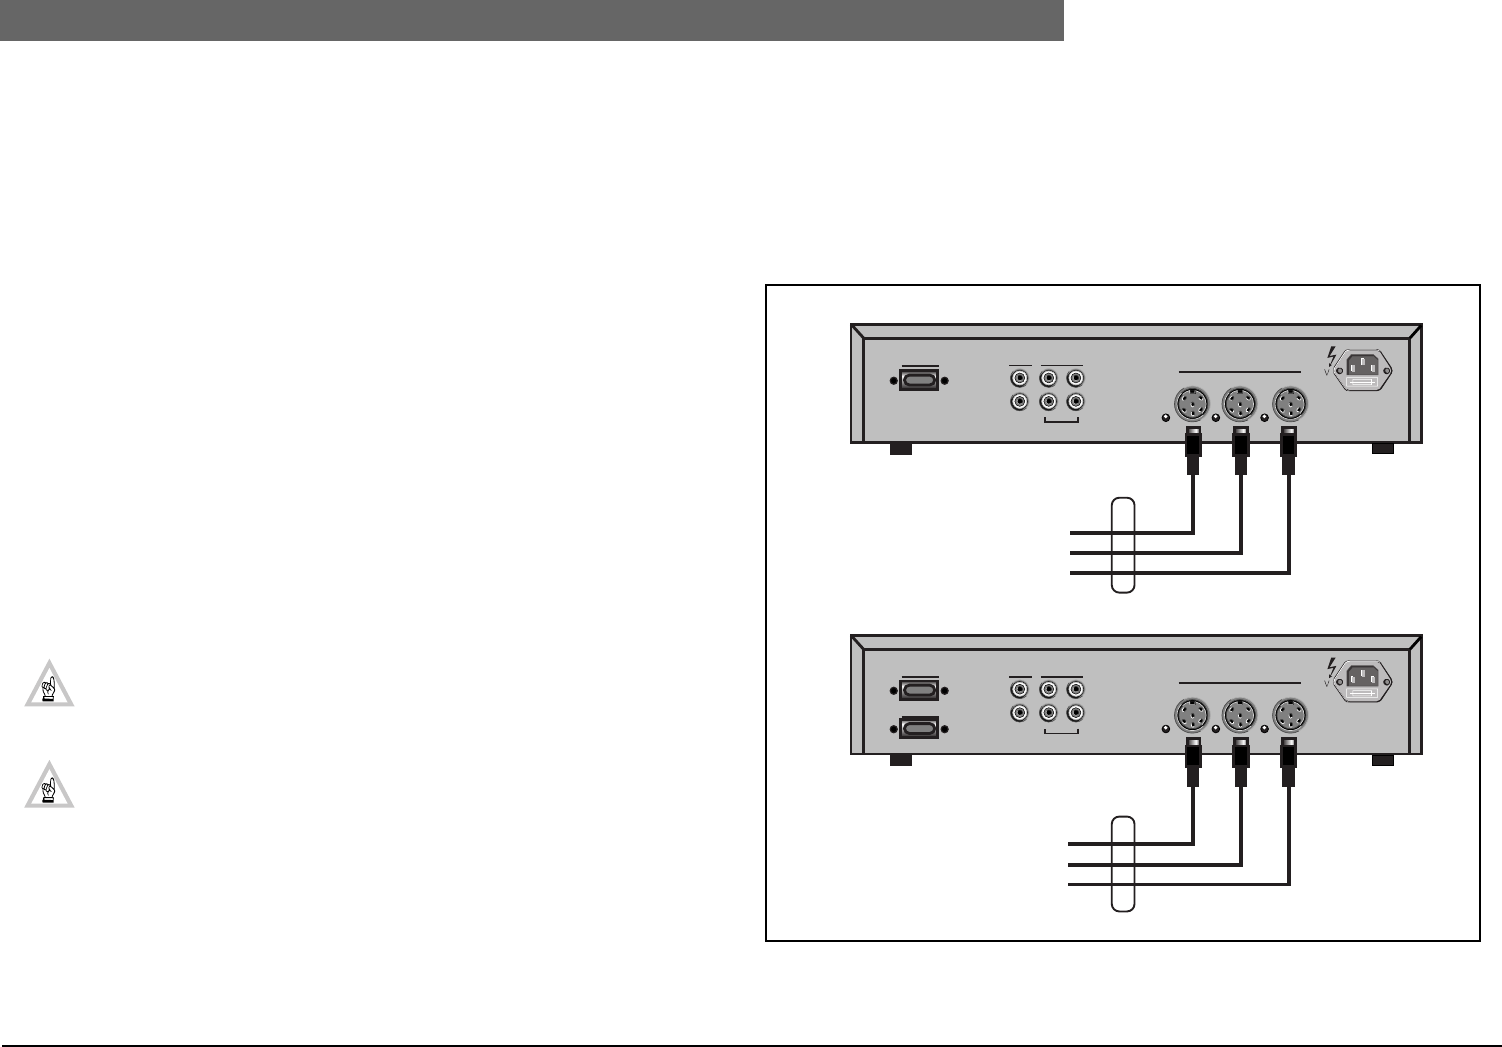
2
Bosch Security Systems | 04-2003 | 3922 988 43318 en
Digital Congress Network | Installation and Operating Manual | Chapter 10 - Installation Techniques en | 10-10
Control Capacity
10.5 Control Capacity
The Central Control Unit LBB 3500/05 has a power handling capacity to power up to 90 DCN units,
while Central Control Units LBB 3500/15 and LBB 3500/35 have a power handling capacity to power
up to 180 DCN units. However, the built-in ‘control facilities’ of all CCUs are capable of controlling up
to a maximum of 240 active units* and an unlimited number of passive units**. A combination of
both active and passive units can be connected to any system ‘tap-off ’ or trunk-line outlet connector.
Where more than 240 active units are required, the DCN system can be extended with the Multi-
Central Control unit LBB 3500/35 for use in Multi-CCU systems. In combination with a dedicated PC,
fitted with a Multi-PC- card LBB 3511/00 and Multi-CCU software LBB 3586/00, the PC can control
up to a maximum of 16 CCU’s connected in a 75 ohm coaxial loop-through chain. Each CCU in the
chain has the same Power handling and control capacity as the Extended CCU (LBB 3500/15).
In total, a maximum of 3,840 active units, using sixteen LBB 3500/35 type CCU’s can be controlled.
* Active (contribution) units include:
•LBB 3530/xx, LBB 3531/xx, ...............................................................Delegate discussion units
•LBB 3533/xx, LBB 3534/xx .................................................................Chairman discussion units
•LBB 3544/00, LBB 3545/00, LBB 3546/00, LBB 3547/00 ..Conference units (Concentus)
•LBB 3520/10................................................................................................Interpreter desk
•LBB 3535/00................................................................................................Dual Audio Interface Unit (See Note 1)
•LBB 3540/00................................................................................................Multi-purpose Connection Unit
•LBB 3512/00................................................................................................Data Distribution Board
•LBB 3510/00................................................................................................PC Network Card
•LBB 3513/00................................................................................................Analog Audio Input/Output Module
**Passive (distribution) units include:
•LBB 3524/xx/, LBB 3526/10 ............................................................Channel Selector Panel (See Note 2)
NOTE 1: The Dual Audio Interface Unit is controlled by the system as a single active unit,
however two microphone inputs can be individually switched on or off. Therefore, when
using the Dual Audio Interface Unit LBB 3535/00, up to a maximum of 480 microphones
can be connected to a single Central Control Unit.
NOTE 2: Up to 10,000 Channel Selector Panels LBB 3524/xx and LBB 3526/xx can be
connected to a single Central Control Unit in combination with Extension power supply
units and/or Audio Media Interface Units to provide the required power.
10.6 Stand-alone Systems
(using Extension cables, Trunk-splitter and Tap-off units)
All DCN system units are connected to the CCU via its three outlet trunk-line cable connectors.
10.6.1 Basic System (without extension units)
FIG 10-13 shows a basic trunk-line interconnection, without extension units.
FIG 10-13 System Interconnection without extension unit
Port 1 Rec.
Line
In
Out
In
Out
Symmetrical
Trunk
115 V-T4 A 230 V -T2A
Port 1
Port 2
Rec.
Line
In
Out
In
Out
Symmetrical
Trunk
115 V-T4 A 230 V -T2A
Central Control Unit
Central Control Unit
LBB 3500/05
LBB 3500/15
≤ 90 PCF (max.)
≤ 180 PCF (max.)

2
Bosch Security Systems | 04-2003 | 3922 988 43318 en
Digital Congress Network | Installation and Operating Manual | Chapter 10 - Installation Techniques en | 10-11
Stand-alone Systems
10.6.2 System layout (without extension units)
Using extension cables, Trunk-splitters and Tap-off units, the length of cable on a system unit can be
lengthened, and cable runs can be laid out in diverse directions. FIG 10-14 gives a typical layout
configuration using a Trunk-splitter and extension cables LBB 4116/xx.
FIG 10-14 Unit layout possibilities using trunk-splitters
10.6.3 System with Extension units
FIG 10-15 shows the Audio Media Interface unit connected directly to the Central Control Unit,
however in principle the unit can be connected to any convenient point within the DCN network
cabling.
The illustration shows a centralized configuration where all the DCNs Central Control equipment is
installed in a 19”-inch rack for example.
In a de-centralized configuration, the Extension Power Supply unit and the Audio Media Interface unit,
are placed in different locations separated from the Central Control equipment.
NOTE: The example below uses a Central Control Unit LBB 3500/05 having a total power
handling capacity of 90 PCF. Using a Central Control Unit LBB 3500/15 the power han-
dling capacity is limited to 180 PCF (max. 60 PCF per output).
FIG 10-15 Typical system interconnection
Tap-offs To CCU
Trunk-line
Trunk-line
LBB 4114/00
Tap-offs
To CCU
Trunk-line
Trunk-line
LBB 4114/00
115 VT4A
230 V
- T2A
Output 1 Output 2 Output 3 Output 4 Trunk Tap-off
Port 1 Rec.
Line
In
Out
In
Out
Symmetrical
Trunk
115 V-T4A 230 V -T2A
115 VT4A
230 V
- T2A
Output 1 Output 2 Output 3 Output 4 Trunk Tap-off
Port 1 Rec.
Line
In
Out
In
Out
Symmetrical
Trunk
115 V-T4A 230 V -T2A
Trunk
11 5V -T 4A 2 30V -T2A
Tap-off
In
LBB 3500/05
CENTRALISED SYSTEM
DE-CENTRALISED SYSTEM
LBB 3508/00
LBB 4106/00
PCF ≤180 (max.)
PCF ≤60 (max.)
LBB 3508/00
PCF ≤90 (max.)
PCF ≤90 (max.) PCF ≤90 (max.)
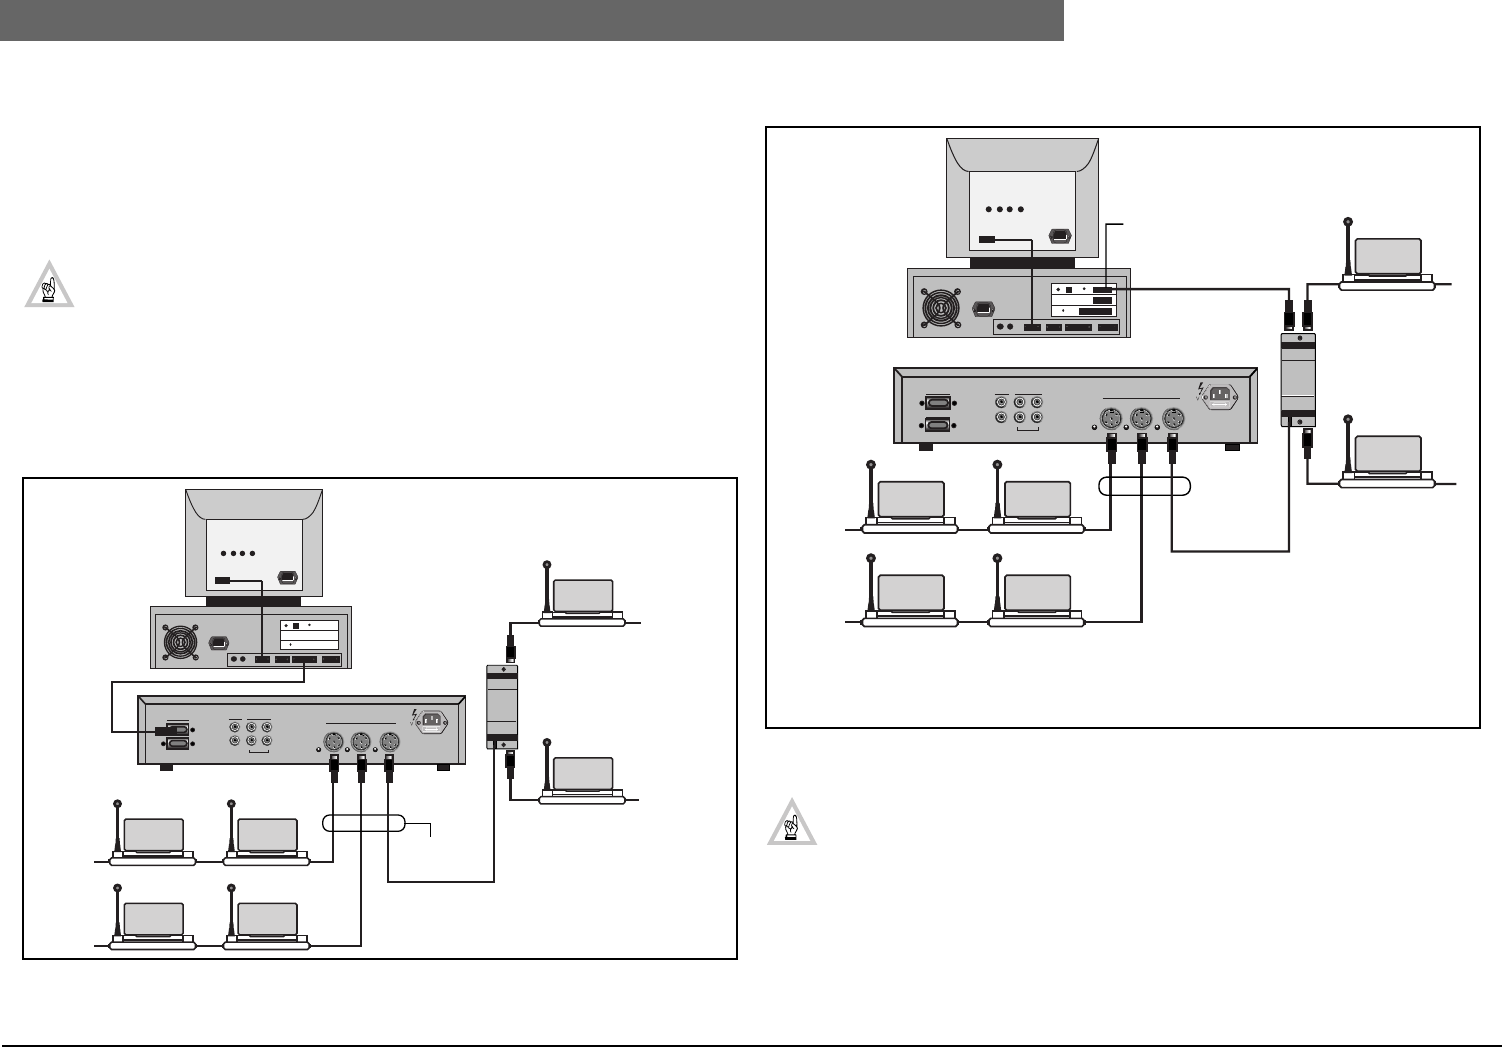
2
Bosch Security Systems | 04-2003 | 3922 988 43318 en
Digital Congress Network | Installation and Operating Manual | Chapter 10 - Installation Techniques en | 10-12
Computer Based Systems
10.7 Computer Based Systems
The DCN 2000 system offers two methods for connecting a central control PC to the DCN system:
DIRECT and IN-DIRECT.
DIRECT connection (see FIG 10-16). Using this method, the built-in RS232 port located at the rear
of the CCU (LBB 3500/15 and LBB 3500/35 only) is used to connect the CCU to a COM-port of the
control PC. See also Chapter 5. DCN Control using Personal Computers.
IMPORTANT: When using the DIRECT connection method between the Control PC
and the CCU, the central operator has NO facilities on the PC for using headphones or an
intercom handset. Additional DCN units are then required to provide these functions.
IN-DIRECT connection see FIG 10-17). Using this method, a Network card LBB 3510/00 (see
Chapter 5.2) is installed in the central control PC. Using the cable supplied with the Network card
LBB 3510/00, connect the 15-pole D-type connector to the 15-pole D-type socket located on the
PC Network card, and connect the DCN 6-pole modular connector to the DCN trunk-line Cabling.
Ensure the PC Network card is configured and set-up correctly.
DIRECT Connection from CCU to PC
FIG 10-16 Direct connection
IN-DIRECT Connection using PC Network card LBB 3510/0
FIG 10-17 Connection using PC Network card
IMPORTANT:
1. A ‘DIRECT’ connection is ‘MANDATORY’ when the control PC uses ‘‘Windows NT
4.0’, Windows 2000 or Windows XP Professional as the operating system.
2. When using ‘Windows 95 or Windows 98 both the ‘DIRECT’ or ‘INDIRECT’ method
may be used, but NEVER at the same time.
3. When using the IN-DIRECT connection method, facilities are available on the PC
Network card for using headphones or an intercom handset.
Rec.
Port 1
Line
In
Out
In
Out
Symmetrical
Trunk
115 V-T4A 230 V -T2A
PC SYSTEM
FOR 180 PCF PC
LBB 3500/15 & /35
DIRECT
LBB 4114/00
PCF ≤ 180
Rec.
Port 1
Port 2
Line
In
Out
In
Out
Symmetrical
Trunk
115 V-T4A 230 V -T2A
NOTE: FIG 10-17 shows a PC system catering for a PCF of 180. Because the Network
card (PC) has no loop-through facility, a trunk splitter LBB 4114/00 is used.
PC SYSTEM
FOR 180 PCF PC
PCF ≤ 180
LBB 4114/00
LBB 3500/15 & /35
PC Network Card
LBB 3510/00
IN-DIRECT
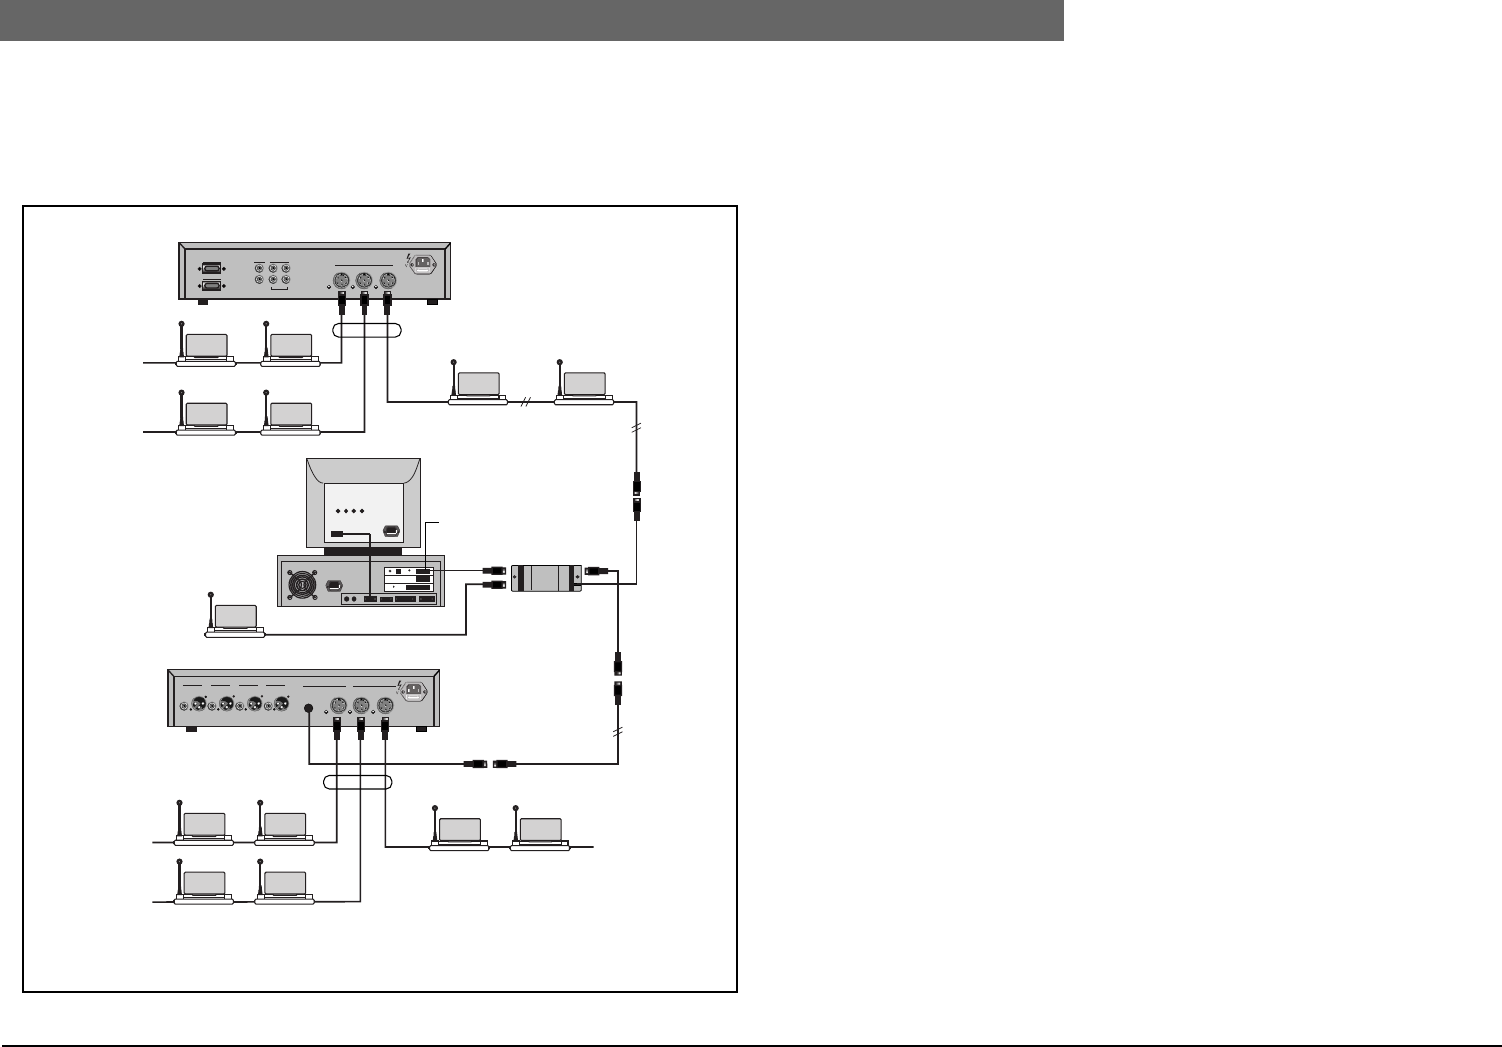
2
Bosch Security Systems | 04-2003 | 3922 988 43318 en
Digital Congress Network | Installation and Operating Manual | Chapter 10 - Installation Techniques en | 10-13
Computer Based Systems
PC system for 270 PCF
FIG 10-18 shows a PC system catering for 270 PCF. An Audio Media Interface Unit LBB 3508/00 is
used to extend the system by 90 PCF. Because the Network card (PC) has no loop-through facility, a
trunk splitter LBB 4114/00 is used.
FIG 10-18 PC Control for a PCF of 270
This page has been left blank intentionally
Rec.
Port 1
Port 2
Line
In
Out
In
Out
Symmetrical
Trunk
115 V-T4A 230V -T2A
115 VT4A
230 V
T2A
Output 1 Output 2 Output 3 Output 4 Trunk Tap-off
PC SYSTEM
FOR 270 PCF
NOTE: The above example uses the IN-DIRECT method of connecting the PC to the DCN
trunk-line cabling
LBB 3500/15 or /35
PCF ≤ 180 (max.)
PC
PC Network Card
LBB 3510/00
LBB 4114/00
LBB 4116/xx
PCF ≤ 90 (max.)
LBB 3508/00
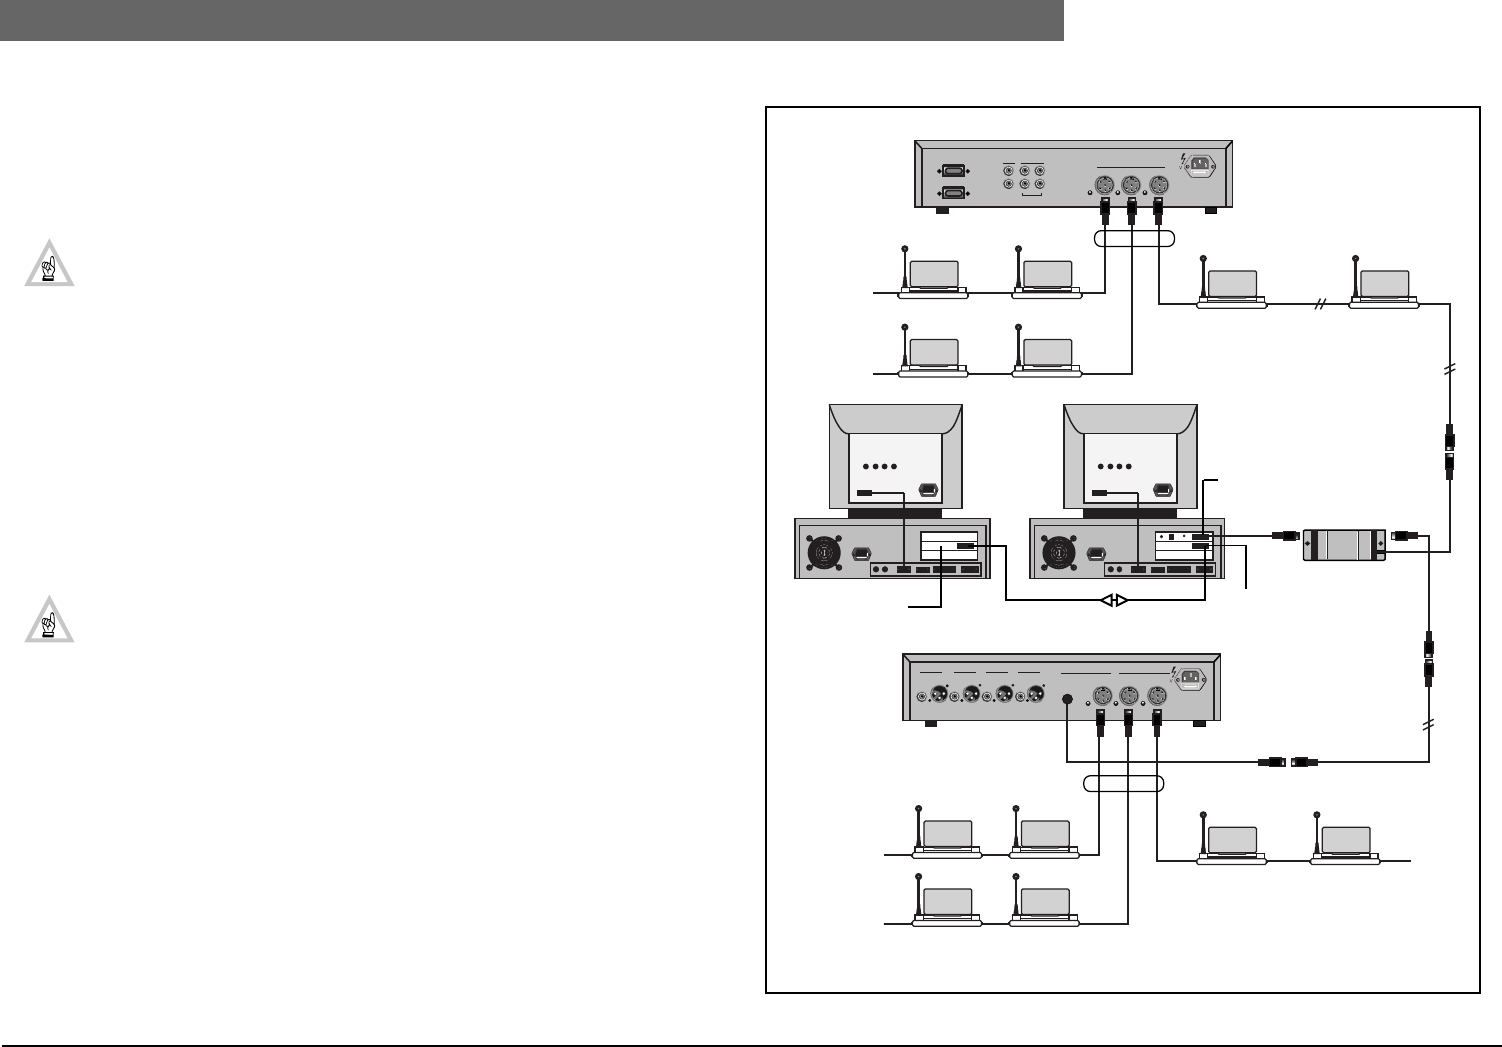
2
Bosch Security Systems | 04-2003 | 3922 988 43318 en
Digital Congress Network | Installation and Operating Manual | Chapter 10 - Installation Techniques en | 10-14
Computer Based Systems
10.7.1 PC Network System
In installations where more than one PC operator control position is required, an additional PC can
be connected via a ‘Peer-to-Peer’ Network, using a separate cable. PC’s connected in this method
both require an Ethernet card installed in the computer with ‘Microsoft operating systems:
Windows® 95, 98 2000, NT 4.0 or XP Professional. See also Chapter 5.. DCN Control Using
Personal Computers
NOTE: Information is available on request concerning ‘Microsoft® Windows® and for
using the Ethernet card .
FIG 10-19 shows a typical configuration with an additional PC installed.
Ethernet requirements
•Ethernet card (3Com recommended)
These cards have to be installed on each PC on a free interrupt e.g 10.
•‘Microsoft Windows® 95, 98, NT 4.0, 2000 or XP Professional.
•Connection between a server and a client PC:
- UTP cable or
- 50 Ohm coax cable with:
- Two 50 Ohm T-pieces
- Two 50 Ohm terminating plugs
NOTE: The DCN software needed for this function must be version 6.0 or higher.
Software requirements on the PC’s
Server PC:
•LBB 3590 Start-up
•LBB 3585 System Installation
•One or more software application modules to control the required functions
Client PC:
•LBB 3590 Start-up
•One or more software application modules to control the required functions
Audio monitoring on the client PC
If the audio monitoring function is also required on the slave PC, a language selector panel can be
used or an additional PC network card LBB 3510/00 must be installed in the client PC.
Port 1 Rec.
Line
In
Out
In
Out
Symmetrical
Trunk
115V-T4A 230V -T2A
Port 2
115 VT4A
230V
T2A
Output 1 Output 2 Output 3 Output 4 Trunk Tap-off
LBB 3500/15 or LBB 3500/35
PCF ≤ 180
LBB 4116/xx
LBB 4114/00
PC Network Card
LBB 3510/00
Ethernet
Card
Ethernet
Card LBB 3508/00
PCF ≤ 90
LBB 4116/xx
Ethernet link
SERVER PC
CLIENT PC
NOTE: The above example uses the IN-DIRECT (PC-Network card LBB 3510/00)
method of trunk-line cabling connecting the PC to the DCN.
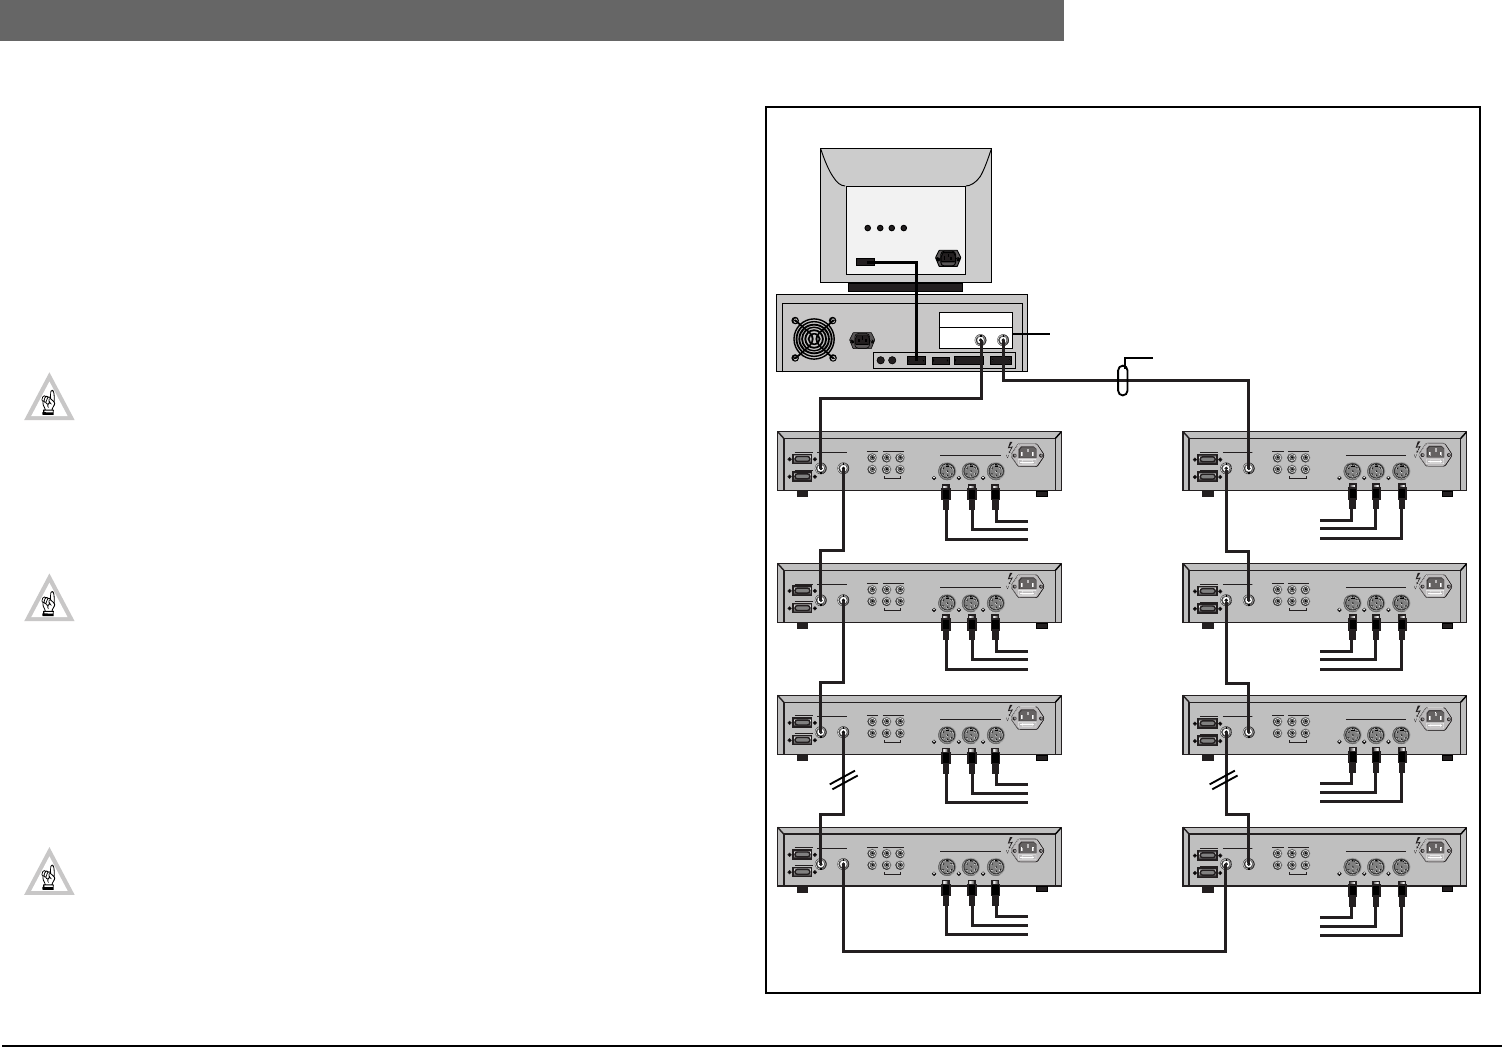
2
Bosch Security Systems | 04-2003 | 3922 988 43318 en
Digital Congress Network | Installation and Operating Manual | Chapter 10 - Installation Techniques en | 10-15
Multi-CCU system
FIG 10-19 Typical solution providing more control positions
10.8 Multi-CCU system
Multi-CCU caters for situations where more than 240 contribution units are required. Multi-CCU
systems are controlled from a separate, dedicated PC running OS.2 version 3.00 Warp operating
system, the Multi-CCU software (LBB 3586) and equipped with the LBB 3511/00 Network/Multi-
CCU card. All Multi-CCU units and the LBB 3511/00 are interconnected via a closed loop. FIG 10-20
shows a typical Multi-CCU configuration, for connection of up to a maximum of 16 LBB 3500/35
CCU’s.
10.8.1 Multi-CCU and PC interconnection
For PC setup see Chapter 5.. DCN Control using Personal Computers.
WARNING: Before connecting the computer or the CCU’s to the Multi-CCU cabling,
ensure that the mains supply is off on all units, and the voltage selection switch on the
computer is set for the correct mains voltage.
Using the Multi-CCU BNC cables, connect the Multi-CCU card’s OUT-port to the first CCU’s IN-
port. The next CCU’s IN-port must be connected to the previous CCU’s OUT-port. The OUT-port
of the final CCU must be connected to the Multi-CCU card’s IN-port (see FIG 10-20). The
interpreter desks can be connected to any CCU if the Multi-CCU mode is selected. However it is
recommended to connect all interpreter desks to one and the same CCU.
NOTES:
1.Ensure that the Multi-CCU cabling is always connected from an OUT-port of a unit to an
IN-port of another unit.
2.The maximum cable length between interconnected CCUs is 100 m. (328 ft.):
1. Checking the Multi-CCU link
When the Multi-CCU link is operating correctly, the Error LEDs of all interconnected CCU’s are off. If
not (i.e. error LEDs on), check the interconnections and unit settings.
2. Installing the Multi-CCU software package LBB 3586/00
Information on how to install the Multi-CCU software, can be found in the DCN Software User’s
Manual delivered with software package LBB 3586/00.
NOTE: For address selection see Chapter 4.7 and Chapter 5.4.
Mult-CCU Trunk
115 V-T4A 230V -T2A
Port 1
Port 2
Rec.
Line
In
Out
In
Out
Symmetrical
In Out
InOut
Mult-CCU Trunk
115 V-T4A 230V -T2A
Rec.
Line
In
Out
In
Out
Symmetrical
In Out
Mult-CCU Trunk
115 V-T4A 230V -T2A
Rec.
Line
In
Out
In
Out
Symmetrical
In Out
Mult-CCU Trunk
115 V-T4A 230V -T2A
Rec.
Line
In
Out
In
Out
Symmetrical
In Out
Mult-CCU Trunk
115 V-T4A 230V -T2A
Rec.
Line
In
Out
In
Out
Symmetrical
In Out
Mult-CCU Trunk
115 V-T4A 230V -T2A
Rec.
Line
In
Out
In
Out
Symmetrical
In Out
Mult-CCU Trunk
115 V-T4A 230V -T2A
Rec.
Line
In
Out
In
Out
Symmetrical
In Out
Mult-CCU Trunk
115 V-T4A 230V -T2A
Rec.
Line
In
Out
In
Out
Symmetrical
In Out
1
2
3
8
15
14
9
Port 1
Port 2
Port 1
Port 2
Port 1
Port 2
Port 1
Port 2
Port 1
Port 2
Port 1
Port 2
Port 1
Port 2
PC dedicated for Multi-CCU’s
UPS (Uninterrupted Power Supply) recommended
Multi-CCU Software LBB 3586 and OS.2
PC Network card (LBB 3511/00)
75 Ohm coax cable (RG 59)
LBB 3500/35
LBB 3500/35
LBB 3500/35
LBB 3500/35 LBB 3500/35
LBB 3500/35
LBB 3500/35
LBB 3500/35
≤180 PCF
≤180 PCF
≤180 PCF
≤180 PCF
≤180 PCF
≤180 PCF
≤180 PCF
≤180 PCF
16 (max)
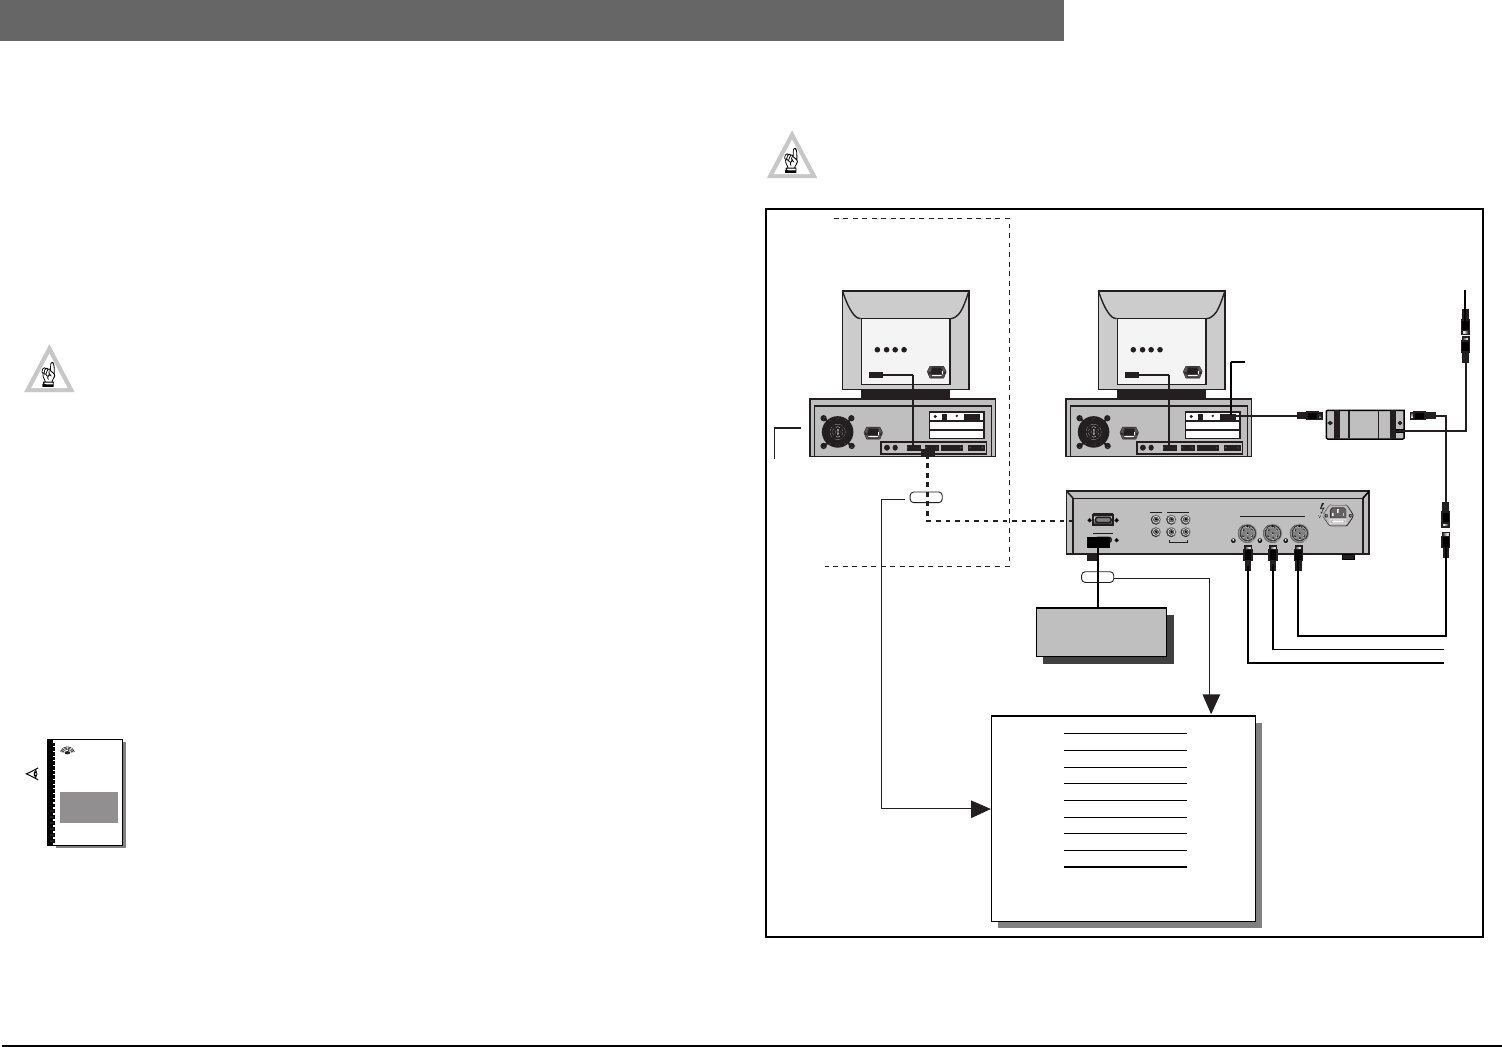
2
Bosch Security Systems | 04-2003 | 3922 988 43318 en
Digital Congress Network | Installation and Operating Manual | Chapter 10 - Installation Techniques en | 10-16
Remote Controller
FIG 10-20 Multi-CCU configuration and connection
10.9 Remote Controller
The DCN system provides a facility for connecting to a ‘Remote controller. The remote controller
can be custom built to your requirements enabling remote control of the following functions”
•Microphone management
•Parliamentary voting
•Attendance registration
Dedicated control panels or control devices such as touch screens for example (available from
companies such as Creston and Panja) along with dedicated software interfaces can be used.
NOTE: Remote control is only available with the following CCU’s:
LBB 3500/15 and LBB 3500/35. The CCU uses its RS 232 serial COM-ports for remote
control. The communication between the CCU and the ‘Remote controller’ is message
based (remote functions and update notification). Messages are transported as binary
streams of bytes. (Refer to Software User Manual for Remote Control software LBB 3587).
The remote control interface must be configured by setting DIP-switches (S14) on the
Trunk Communication Board (TCB 4) See Chapter 4.7.
Requirements
1. The dedicated ‘Remote control’ software package LBB 3587/00 MUST BE installed on an
external (remote PC). This remote PC must be installed with the operating system DOS 5.0 or
higher and connected to the CCU using an RS232 cable (see Installation).
2. The DCN embedded software version MUST BE 7.00 or higher.
10.9.1 Installation
The ‘remote control’ interface software LBB 3587 can be installed in a ‘Single or a Multi CCU system.
During installation, options are available for changing the COM-port settings of the remote PC.
NOTE: For detailed functionality, installation, commands and communication
protocols refer to the user documentation delivered with the Remote control soft-
ware package LBB 3587/00. Extended information is available on request.
1. Single CCU System (LBB 3500/15 and LBB 3500/35 (FIG 10-21)
CCU types LBB 3500/15 and LBB 3500/35 have two RS232 serial ports (Port 1 and Port 2) located
at the rear of the unit. An RS-232 cable with 1 to 1 wiring (RS232 extension cable) is used to
connect the CCU to the remote controller. Note that these CCU’s uses hardware handshaking with
the CTS and RTS signals. All other ‘handshake’ signals are internally chained together in the CCU to
form the appropriate signals for the remote controller. The maximum cable length between the CCU
and the ‘Remote controller’ should not exceed 5 m (16.4 ft.). Where longer distances are required an
‘interface unit’ should be used to ensure correct transmission.
NOTE: The communication protocol and a higher baud-rate for the serial COM-port can
be adjusted as necessary (see Chapter 4.6 and Chapter 5.7).
FIG 10-21 Remote control Single CCU System
DCN
Software
Manuals
BOSCH
CD 1
Rx 2
Tx. 3
DTR 4
GND 5
DSR 6
RTS 7
CTS 8
RI 9
1. CD
2. Rx
3. Tx
4. DTR
5. GND
6. DSR
7. RTS
8. CTS
9. RI
Port 1
Port 2
Rec.
Line
In
Out
In
Out
Symmetrical
Trunk
115V-T4A 230V -T2A
Remote control
software LBB 3587
INSTALLED
OPEN INTERFACE
Remote PC
RS232
RS232
RS232
Remote
Controller
LBB 3500/15 or LBB 3500/35
LBB 4114/00
PC Network card
LBB 4115/00
DCN Control PC
SINGLE CCU SYSTEM
Male Female
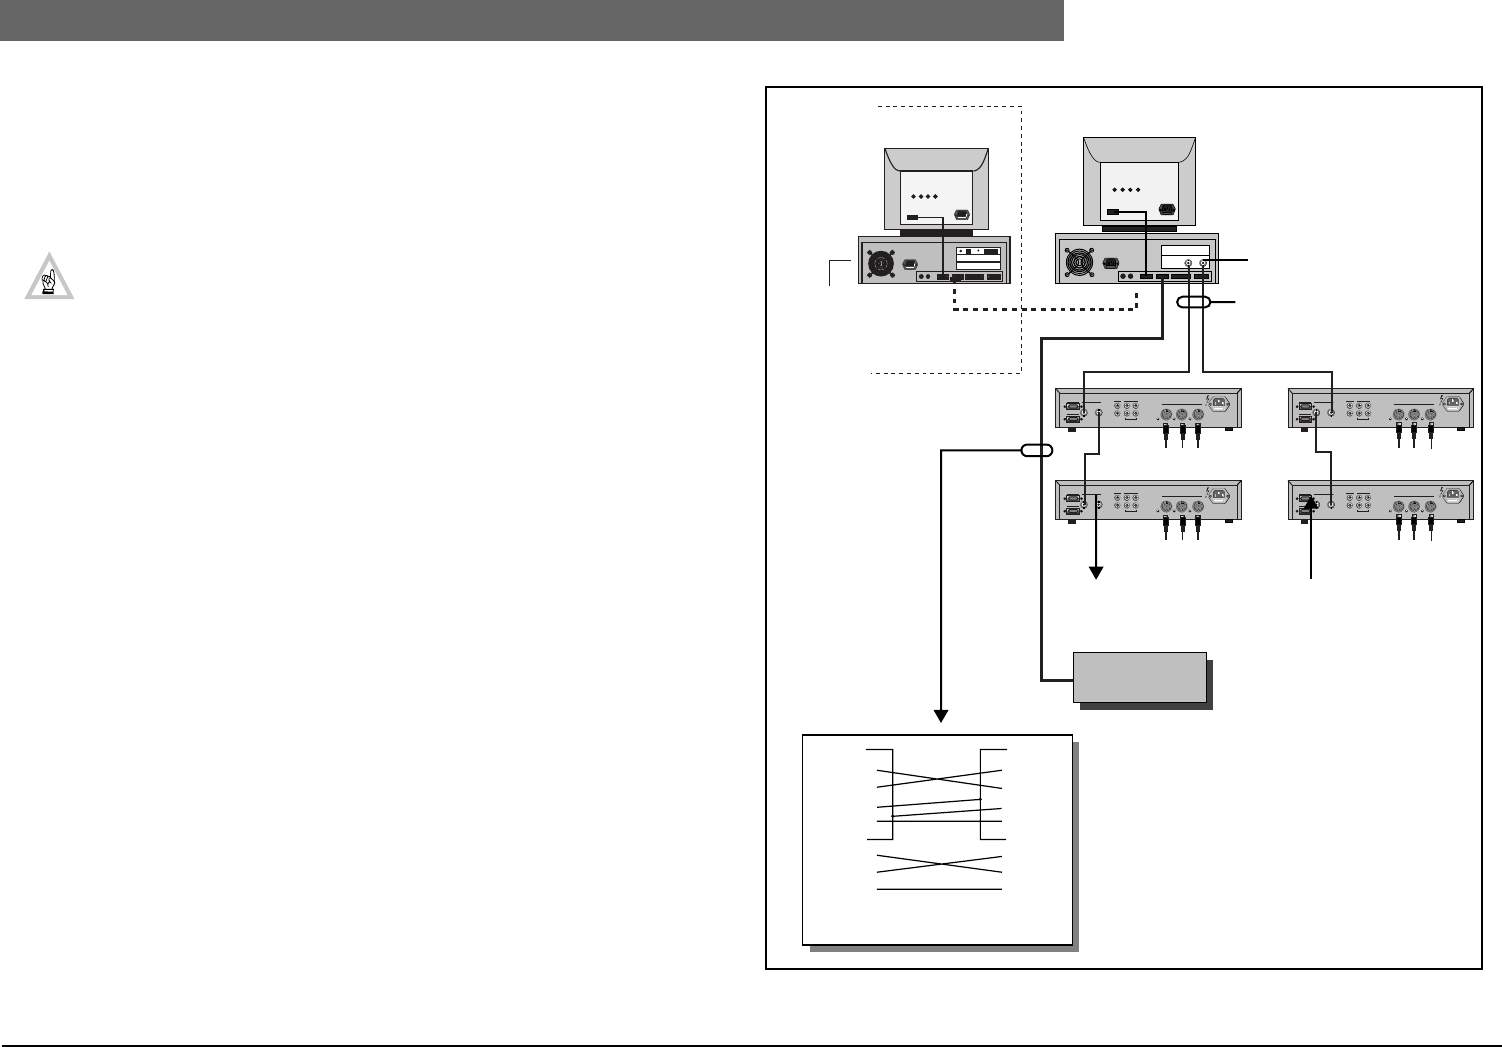
2
Bosch Security Systems | 04-2003 | 3922 988 43318 en
Digital Congress Network | Installation and Operating Manual | Chapter 10 - Installation Techniques en | 10-17
Remote Controller
2. Multi- CCU System (FIG 10-22)
A null-modem RS-232 cable is used to connect the ‘Master CCU PC’ to the remote controller. The
maximum cable length between the ‘Master CCU PC’ and the ‘Remote controller’ should not exceed
5 m (16.4 ft.). Where longer distances are required an ‘interface unit’ should be used to ensure
correct transmission. See also Chapter 5.. DCN Control using Personal Computers
NOTES:
1. The COM-port settings for a Multi-CCU system can be changed. Refer to the ‘
‘Readme.txt’ file associated with the LBB 3586 Multi-CCU software package.
2. The RS232 COM-port on the slave CCU’s is disabled when used in a multi-CCU
system
3. The communication protocol and a higher baud-rate for the serial COM-port can be
adjusted as necessary (see Chapter 4.6 and Chapter 5.7).
10.9.2 Typical examples using the Remote Controller
1. Assigning Microphones to push-button on the remote controller
In order to assign microphones to push-button on the remote controller panel, a push-button should
first be assigned for switching the remote controller between the ‘Installation and Operational’ mode.
To assign push-button to microphones, the remote controller should be switched to the ‘installation’
mode. Once in the installation mode, press the microphone button of the unit in the hall to be
assigned, and then press its corresponding push-button (i.e. for microphone 2 press the push-button
marked 2 etc..) and so on till all microphones have been assigned.
2. Assigning Microphone Management Modes and No. of active microphones.
Using the RS-232 capability the functions of the CCU can be simulated on the remote controller - for
example: ‘Active Micros ( the number of microphones which can be activated simultaneously) can be
selected, and the ‘Operation’ mode (microphone operational modes: ‘Open’, ‘Override’ and ‘Voice’)
can also be selected.
Other examples are also possible. Further information about additional remote control functions and
the communication protocol is available on request.
FIG 10-22 Remote control Multi-CCU system
CD 1
Rx 2
Tx. 3
DTR 4
GND 5
DSR 6
RTS 7
CTS 8
RI 9
Male Female
1. CD
2. Rx
3. Tx
4. DTR
5. GND
6. DSR
7. RTS
8. CTS
9. RI
Port 1
Port 2
Mult-CCU Trunk
115V -T4 A 230 V -T2A
Rec.
Line
In
Out
In
Out
Symmetrical
In Out
InOut
Mult-CCU Trunk
115V -T4 A 230 V -T2A
Rec.
Line
In
Out
In
Out
Symmetrical
In Out
Port 1
Port 2
Port 1
Port 2
Mult-CCU Trunk
115V -T4 A 230 V -T2A
Rec.
Line
In
Out
In
Out
Symmetrical
In Out
Mult-CCU Trunk
115V -T4 A 230 V -T2A
Rec.
Line
In
Out
In
Out
Symmetrical
In Out
Port 1
Port 2
PC dedicated for Multi-CCU’s
Remote control
software LBB 3587
INSTALLED
Remote
Controller
RS232 Out In
LBB 3500/35 ≤ 180 PCF
≤ 180 PCF
To next CCU
PC card LBB 3511/00
Remote PC UPS (Uninterrupted Power Supply)
Multi-CCU Software LBB 3586
recommended
and OS.2
75 Ohm coax cable (RG 59)
OPEN INTERFACE
From previous CCU
≤ 180 PCF
1
2
n (max.16)
RS232
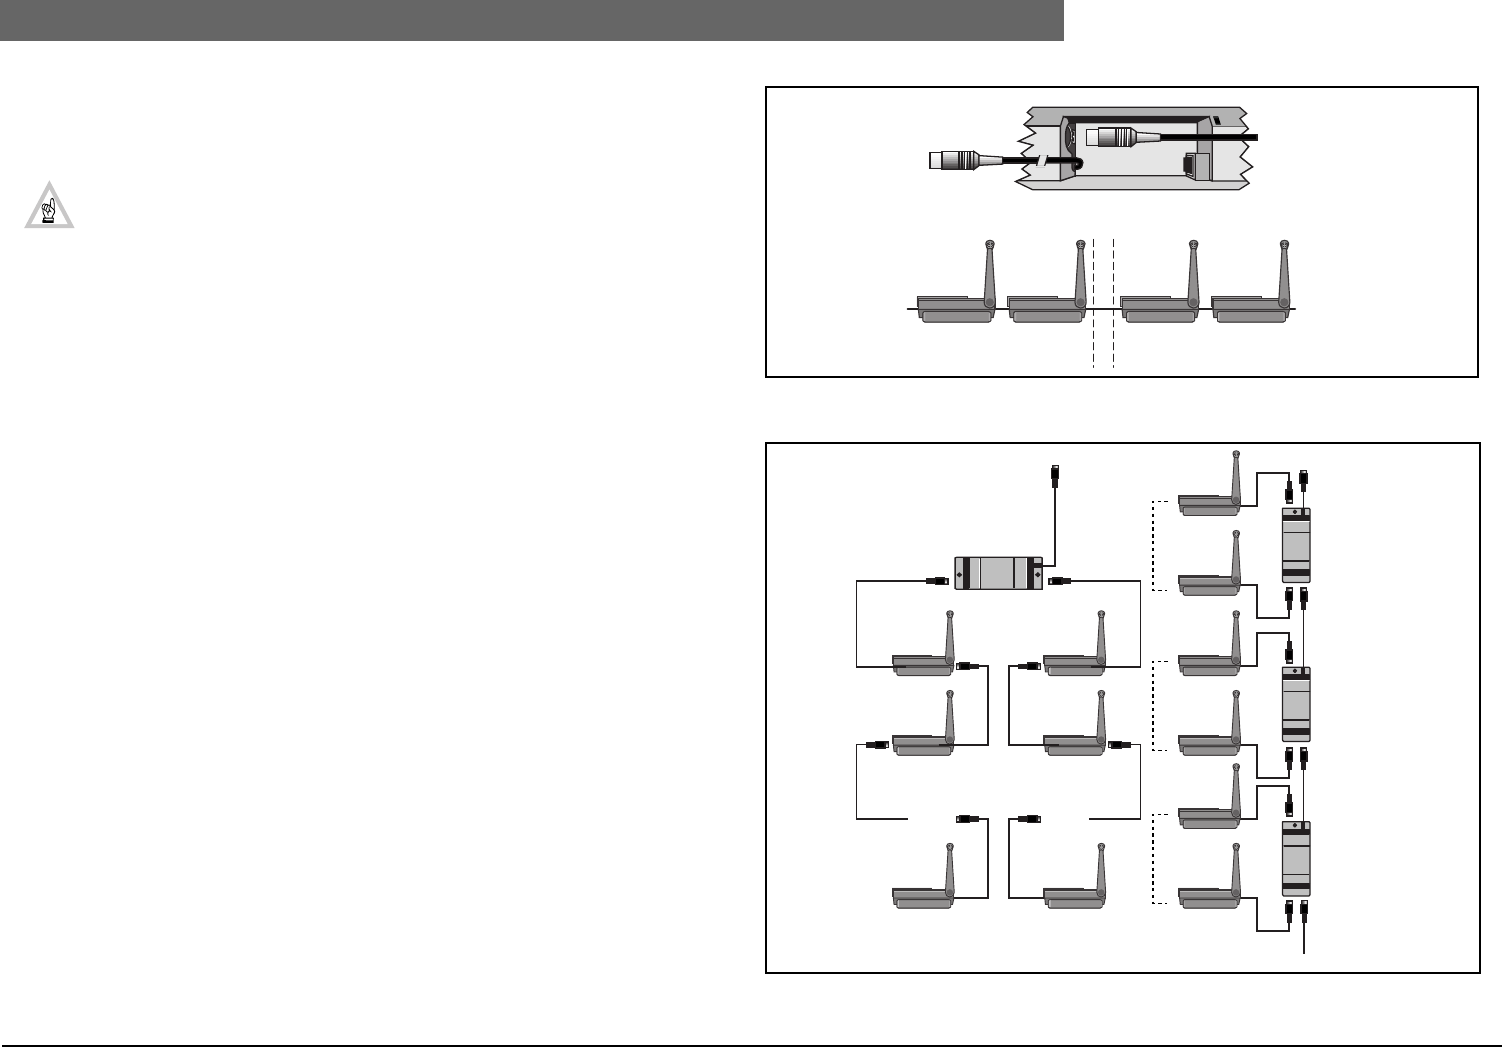
2
Bosch Security Systems | 04-2003 | 3922 988 43318 en
Digital Congress Network | Installation and Operating Manual | Chapter 10 - Installation Techniques en | 10-18
Interconnecting Interpretation Equipment
10.10 Interconnecting Interpretation Equipment
A maximum of six desks can be installed per interpreter booth. The desk can be used stand-alone or
as part of a more comprehensive system.).
NOTE: The maximum number of channels available in a PC based system is 15. However
when using 15 interpretations, it is recommended to use two CCU’s, one for contribution
and one for interpretation. The maximum number of channels available in a system where
one CCU is used for both contribution and interpretation is 11.
10.10.1 Interconnecting Interpreter desks
The interpreter desk, includes the same interconnection facilities as the delegate and chairman units
(FIG 10-23). Interpreter desks can be connected in series using the loop-through cabling method, or
to a Tap-off Unit LBB 4115/00. When using the Tap-off unit LBB 4115/00, two interpreter desks - one
to each tap-off connector only - can be connected to the trunk-line cabling, see FIG 10-24.
10.10.2 Interconnection between booths
FIG 10-24 shows a typical system using either Trunk-splitter LBB 4114/00 or Tap-off unit LBB 4115/00.
Using the examples, interpreter desks can be arranged in booths at specific locations where needed.
Using the Trunk-splitter method a multiple of units in series are connected to a single Trunk-splitter.
Using the Tap-off unit LBB 4115/00, only ONE desks can be connected to a single tap-off, allowing in
total only TWO interpreter desks to be connected. In the event of a unit failure, other desks
connected to the same line can be affected. Using the Tap-off unit, only one booth is affected,
however using the Trunk-splitter all units connected to a single line can be affected.
FIG 10-23 Interpreter desk interconnection details
FIG 10-24 Interpretation system layout using trunk-cable splitters and tap-off units
From next unit
To previous unit
BOOTH No.1 BOOTH No.2
. . .
. . . . . .
To CCU
LBB 4114/00
Booths
1 - 7
Booth 1
Booth 2
Booth 7
Booth 8
Booth 9
Booth 15
Desk 1
Desk 2
Desk 2
To CCU
LBB 4115/00
LBB 4115/00
LBB 4115/00
Desk 1
Desk 2
Desk 1
Booth 1
Booth 2
Booth 3
Booths
8 - 15
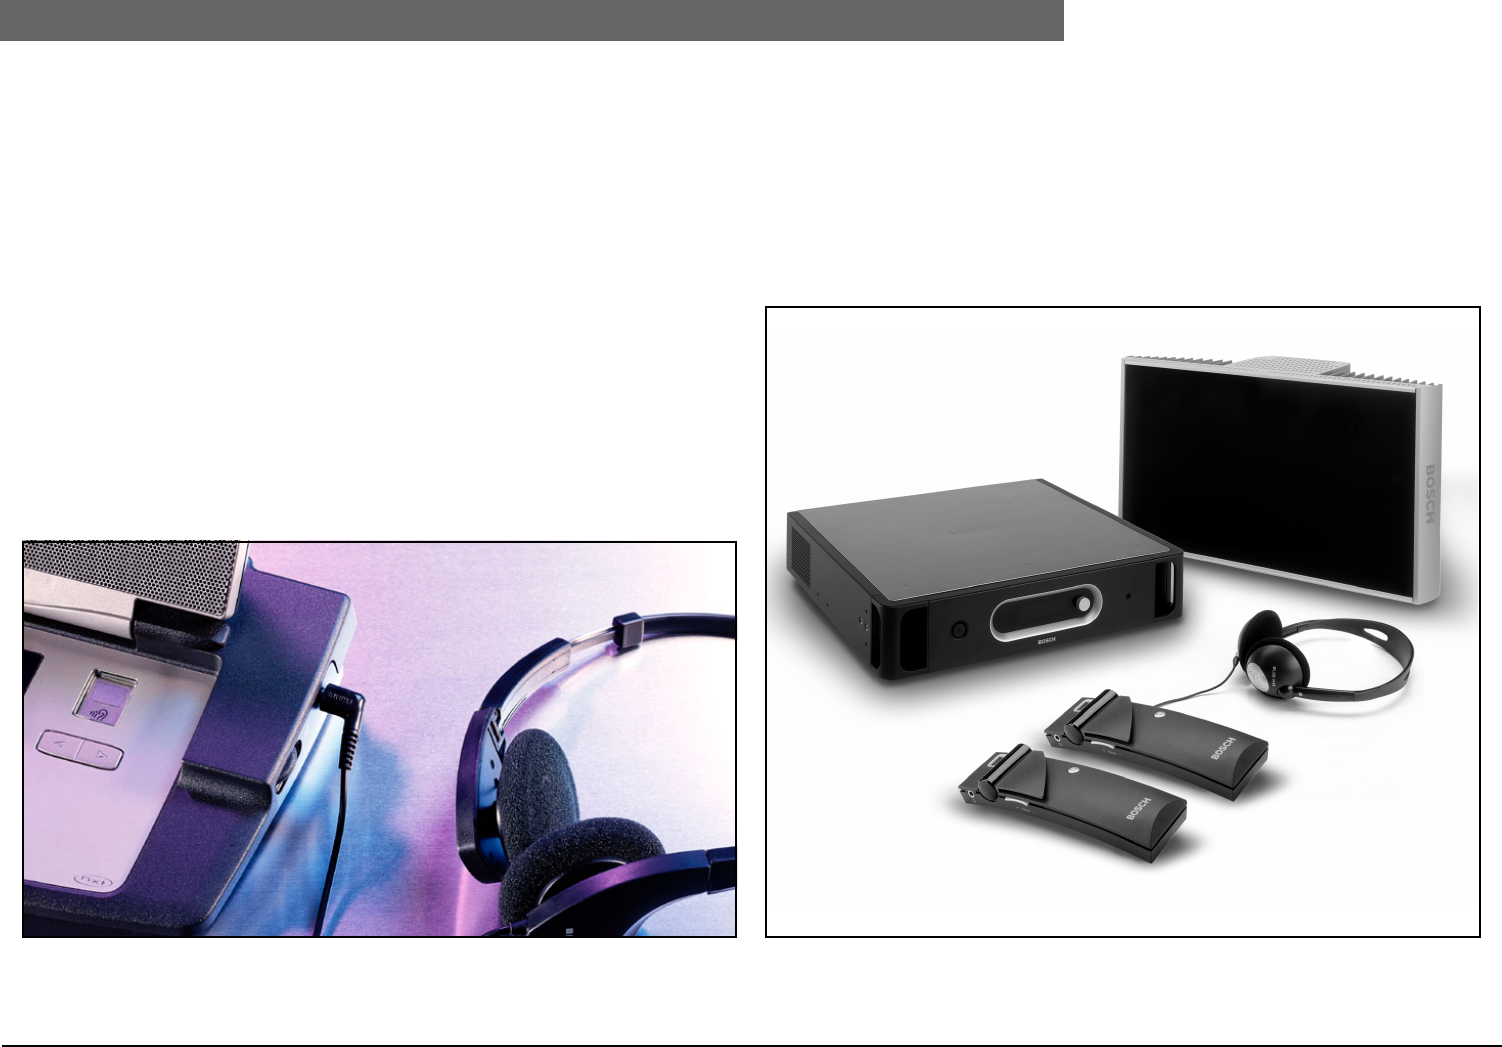
2
Bosch Security Systems | 04-2003 | 3922 988 43318 en
Digital Congress Network | Installation and Operating Manual | Chapter 10 - Installation Techniques en | 10-19
Language Distribution Equipment
10.11 Language Distribution Equipment
10.11.1 Introduction
Distribution of interpreted languages to delegates can be handled using two different methods of
language distribution - Wired and Wireless.
1. Wired
The distribution of interpreted languages through language channels can be handled using the
standard DCN system cabling. Delegates with contribution units fitted with channel selection facilities
can listen to the language channel of their choice. Stand-alone channel selector units type LBB 3524/
xx and LBB 3526/10 are available for use in both portable and fixed installations. In fixed installations
the channel selector units can be installed in to table-tops or armrests.
2. Wireless
For those delegates with no access to a channel selector, an infra-red wireless distribution system can
be used. Using this system infra-red signals carrying language channels are transmitted from wall or
ceiling mounted radiators, and received by delegates using personal infra-red receiver units.
The infra-red language distribution system comprises of an IR transmitter, a Multi-channel Audio
Interface Unit LBB 3423, one or more radiators and personal IR receivers with channel selectors for
selection of the required language channel.
Integrus digital infra red system
An infra-red system comprises an infra-red transmitter, several radiators and infra-red receivers
carried by delegates. A well balanced installation should be based on sufficient direct radiation
intensity for the area to be covered. Each situation demands its own solution to maintain a high
enough signal-to-noise ratio in order to ensure good clear reception within the conference area.
Optimally positioned radiators will both minimize installation and running costs.
For further detailed information on installing an Integrus digital infra red system, particularly on
positioning radiators and operating the system, refer to the Infra-red Language Distribution Systems
Installation and Operating Instructions manual, Code No. 3122 475 2201x.
FIG 10-25 Integrus digital infra red system
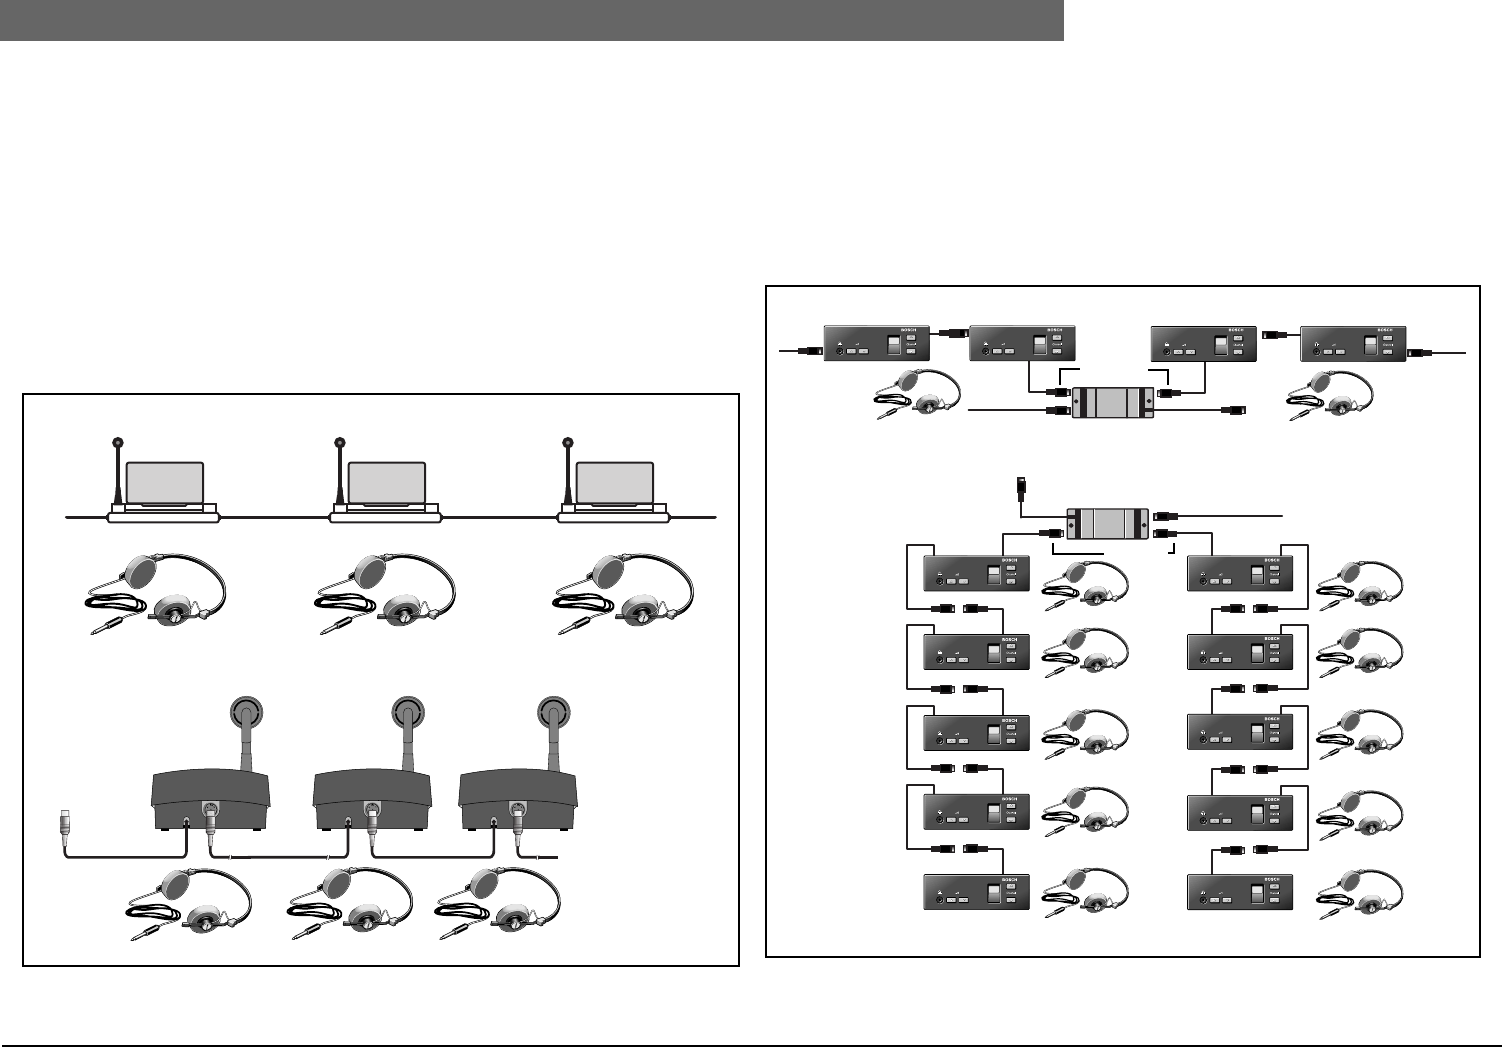
2
Bosch Security Systems | 04-2003 | 3922 988 43318 en
Digital Congress Network | Installation and Operating Manual | Chapter 10 - Installation Techniques en | 10-20
Language Distribution Equipment
10.11.2 Installation
Distribution of the interpreted languages to conference delegates can be distributed by using a wired
or wireless language distribution system.
1. Wired Language Distribution
In a wired distribution system, the interpreted languages are distributed to the delegates via the DCN
system cabling using either table-top delegate units fitted with channel selector units or using the
dedicated Electronic Channel Selector Panel LBB 3524/xx and LBB 3526/10.
Table Top Language Distribution
In a table-top wired distribution system, the interpreted languages are distributed via table top
delegate units, LBB 3531/xx, LBB 3545/00 and LBB 3546/00 and via the chairman unit LBB 3534/xx
and LBB 3547/00. These units include a built-in language channel selector and 1.5-digit LC-display for
selection and viewing of the interpreted languages.
FIG 10-26 Table-top language distribution
Flush Mounted Language Distribution
The main component in a flush-mounted wired language distribution system is the Electronic Channel
Selector Panel LBB 3524/xx. In fixed installations, the selector panels can be neatly installed into
table-tops or seat armrests, and can be arranged discreetly to follow the delegates’ seating
arrangements.
Interconnection
The Electronic Channel Selector Panels LBB 3524/xx and LBB 3526/10 can be directly connected to
the trunk-line in a loop-through chain, or connected to the trunk-line using a trunk-splitter LBB 4114/
00 or tap-off unit LBB 4115/00.
FIG 10-27 Connecting Electronic Channel Selector Panels LBB 3524/00 using trunk-cable
splitters and tap-off units
Conference Units
Discussion Units
LBB 3524/xx LBB 3524/xx LBB 3524/xx LBB 3524/xx
Trunk-line
Trunk-line LBB 4114/00
Tap-offs
Trunk-line
Trunk-line
Tap-offs
LBB 3524/xx LBB 3524/xx

2
Bosch Security Systems | 04-2003 | 3922 988 43318 en
Digital Congress Network | Installation and Operating Manual | Chapter 10 - Installation Techniques en | 10-21
Language Distribution Equipment
2. Integrus digital Infra red system
For further detailed information when installing an IIntegrus digital infra-red system - particularly on
positioning radiators, and operating the system - refer to the Installation and Operating Manual
Integrus Digital Infra Red Distribution System, Code No. 3922 475 2201x.

2
Bosch Security Systems | 04-2003 | 3922 988 43318 en
Digital Congress Network | Installation and Operating Manual | Chapter 10 - Installation Techniques en | 10-22
Language Distribution Equipment
This page has been left blank intentionally
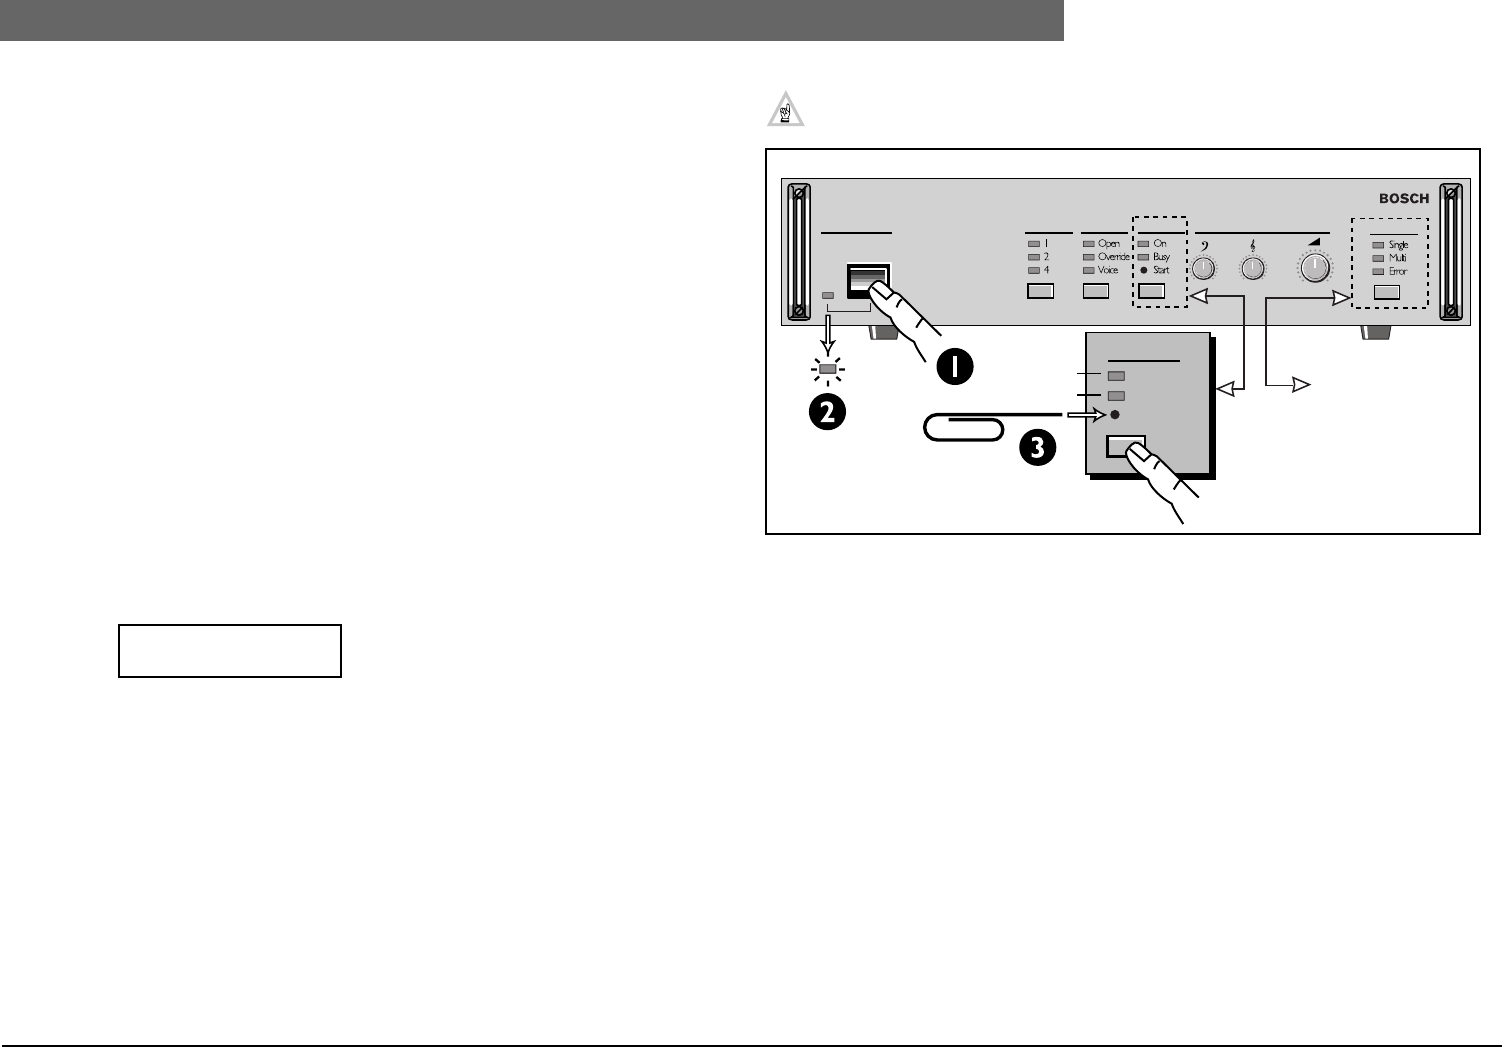
2
Bosch Security Systems | 04-2003 | 3922 988 43318 en
Digital Congress Network | Installation and Operating Manual | Chapter 11 - System Set-up and Operation en | 11-1
Introduction
Chapter 11. System Set-up &
Operation
11.1 Introduction
When all the units in a system have been installed, the system must be initialized and made ready for
use. The initialization procedure enables all DCN units installed to be recognized by the CCU.
Recognition is given in the form of an address, allocated by the CCU to each active unit in the system.
A ‘de-init’ switch located under each DCN contribution unit is used to clear the units allocated
address when conflicts with duplicated addresses occur.
The following describes how to initialize a ‘Stand-alone’ and PC-based system.
11.1.1 Initializing a stand-alone system (FIG 11-1)
Note: Step 1 is normally not required for systems powered-up for the first time. First-time systems
are de-initialized, therefore proceed with step 3 after switching on the CCU for the first-time.
STEP 1. On the CCU locate the push-button and the small recessed switch (Start) under ‘Equal-
izer’. Using a small pointed device (e.g. paper-clip) insert the device into the recess hole
(3) and activate the switch while holding down the equalizer ‘Start’ switch and ‘Equal-
izer’ push-button for at least 10 seconds after switching on the CCU (1). Ensure its
power LED is lit. (2). DCN units with LC-display show the firmware release version of
the unit itself and not the CCU firmware release version
STEP 2. All unit addresses have been cleared and the LEDs on all active units illuminate after com-
pleting step 1. NOTE: If this is not the case resume at step 1 again or remove the unit.
STEP 3. To initialize an individual unit press the units microphone key while the units LEDs are lit
(for interpreters desk press the ‘Mute’ key, the Dual Audio Interface Unit and the Multi-
Purpose Connection have their own ‘de-init’ , but can also be initialized by pressing the
microphone key of a connected microphone). Once pressed the units LEDs go out. The
unit is now recognized in the system by the CCU. Repeat this procedure for all active
units installed in the system one by one. Initialize all units one by one (not simulta-
neously) to eliminate addressing problems.
STEP 4. To clear the individual address of a delegate/chairman unit in the event of an address
conflict, press the ‘DE-INIT’ switch of the relevant unit (see Chapter 2.).
NOTE: After the initialization process, it is recommended that the function of each active
unit installed is checked individually.
FIG 11-1 De-initializing CCU
11.1.2 Initializing a PC-based system
The clearing of addresses and the initialization procedure for systems using a PC is identical to that of
a Stand-alone system. However by using DCN’s System Installation Software LBB 3585/00, seat
numbers can be linked to units that have already been initialized.
Using Software package LBB 3585, two methods are available for linking active units to seat numbers/
names:
a. From the hall, by physically pressing delegate unit microphone buttons in sequence. Each
microphone unit is then registered by the PC which in turn automatically links a unit to a
specific seat number.
b. From the PC, where the operator simply selects a microphone unit. This unit is then linked to
a specific seat number. From this selected seat number the PC assigns the next microphone
unit in sequence. This sequence is according to the initialization process.
The Dual Audio Interface unit can be linked to two seat numbers even though the CCU during
initialization assigns it with a single address.
Bosch Security Systems B.V.
Release : x : xx
LoudspeakersPower OperationActive Micro's Equalizer
Equalizer
On
Busy
Start
System
LBB 3500/xx
LED
LED LBB 3500/35 only
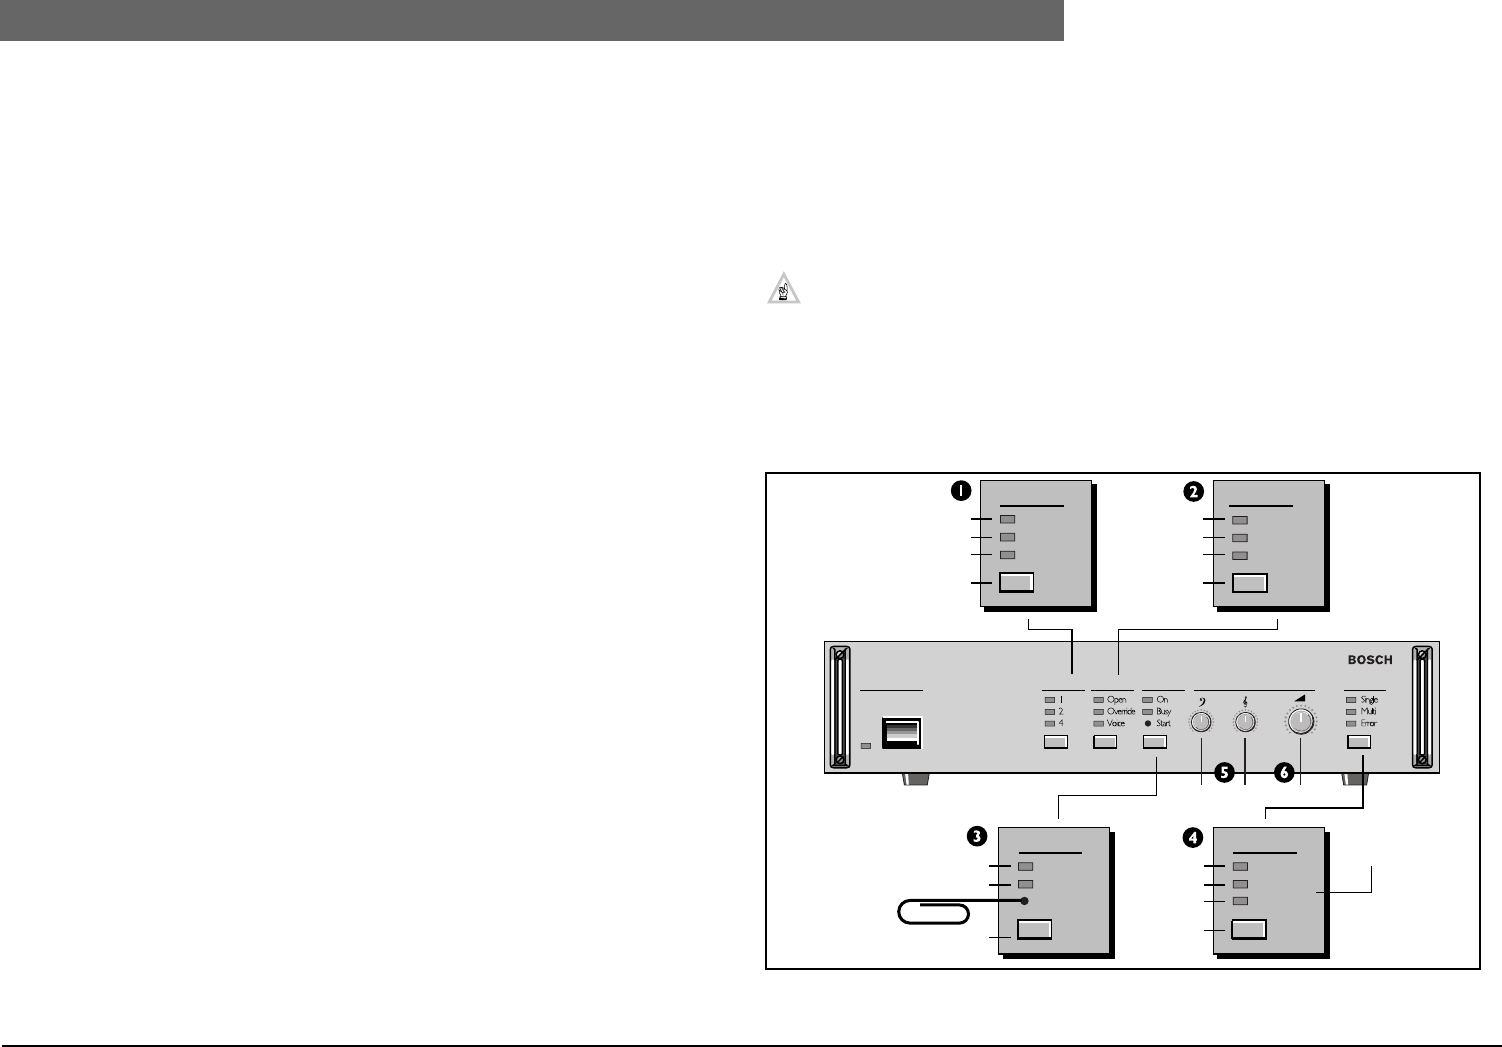
2
Bosch Security Systems | 04-2003 | 3922 988 43318 en
Digital Congress Network | Installation and Operating Manual | Chapter 11 - System Set-up and Operation en | 11-2
Setting up a stand-alone system
11.2 Setting up a stand-alone system
The Central Control unit, in stand alone systems enables four basic conference procedures to be
conducted:
•Microphone management using various microphone operating procedures,
•Voting procedures using the basic parliamentary voting procedure,
•Interpretation facilities,
•Intercom to the Intercom Operator.
The programming of the interpretation system (i.e. interpreter desk) in a stand-alone system is done
manually (see Chapter 11.11 “Programming the interpreter desk”).
11.2.1 System mode selection (Multi-CCU LBB 3500/35 only)
Refer to FIG 11-2 (4). Single or Multi-CCU mode can be centrally selected using Multi-CCU software
package LBB 3586. Using the ‘System’ mode push-button, the Multi-CCU LBB 3500/35 can be
selected for use in Single mode if the LED indication for Multi-CCU mode is seen to flash.
11.2.2 Microphone control modes (FIG 11-2 (2))
The CCU in stand-alone mode, offers three microphone operational modes:
•‘Open’,
•‘Override’,
•‘Voice activation’.
In each mode of operation, the maximum number of active microphones (Active Micro’s) that can be
switched on at the same time during a discussion, can be assigned.
To select the number of active microphones, press the ‘Active Micro’s’ button, its LED
corresponding to the chosen number (1, 2 or 4*) will illuminate.
* The number of active microphones available for selection in Voice activation mode is (2 or 4).
1. ‘Open’ mode
When the ‘Open’ mode is selected, delegates activate their microphones by pressing the microphone
button on their delegate units. The number of delegates permitted to speak at the same time is
limited to the number of active microphones selected. This means for example, - that if 4 Active
Micro’s have been selected and four delegates are currently speaking, no other delegates may join in
the debate. If a fifth delegate wants to join in the debate, this delegates joins a ‘Request-to-speak’ list
However, if one of the current speakers switches his microphone off, the next delegate to switch on
his microphone can join in the debate.
The maximum number of delegates in the Request-to-Speak list is 20.
2. .‘Override’ mode
When the ‘Override mode is selected, delegates activate their microphones by pressing the
microphone button on their delegate units. If the number of active microphones is four and the
number of current speakers is three then the delegate can join in the debate without interrupting the
group of speakers. However if the number of current speakers is four and a new delegate now
presses his microphone button to join in the debate, the microphone unit of the first speaker in the
group will be switched off (FIFO First-In-First-Out), allowing the new delegate to join in the
discussion. Using the override mode, no ‘Request-to-speak’ list is available.
NOTE: In ‘Open’ and ‘Override’ mode the chairman can, at anytime, switch on his micro-
phone.
3. ‘Voice Activation’ mode (Single CCU systems only)
When the ‘Voice Activation’ mode is selected, the delegates’ microphones are activated when spoken
into. However, its light ring indicator is not functional in this mode (*default). The number of
delegates permitted to speak at the same time in this mode, is limited to the number of active
microphones selected (2 - 4 only). * The default setting can be changed, see Chapter 2.3.1 and
Chapter 2.5.1.
FIG 11-2 CCU (version illustrated LBB 3500/35)
Equalizer
On
Busy
Start
SystemLoudspeakersPower OperationActive Micro's Equalizer
Active Micro's
1
2
4
Open
Override
Voice
Operation
System
Single
Multi
Error
LED
LED
LED
Push-button Push-button
LED
LED
LED
LED
LED
LED
LED
LED
Push-button Push-
Applicable to:
LBB 3500/35
only
button

2
Bosch Security Systems | 04-2003 | 3922 988 43318 en
Digital Congress Network | Installation and Operating Manual | Chapter 11 - System Set-up and Operation en | 11-3
Multi-CCU Set-up for the first-time.
11.3 Multi-CCU Set-up for the first-time.
Proceed as follows:
1. Install the PC-card LBB 3511/00 into the master PC used for the multi-CCU system. Ensure that
all DIP-switches and jumpers are set correctly.
2. Ensure that all units are connected correctly, and that the multi-CCU’s and master PC are con-
nected to a network as shown in Chapter 10., FIG 10-20.
3. Each CCU connected to the network must have its own unique address. To set the address,
remove the cover from the multi-CCU and locate DIP-switch S12 located on the ‘Multi-trunk
Board’. To set the address see Chapter 4.7, the range of addresses can be set between 0 to 31.
4. Switch-on each CCU one-by-one and ensure that they are in the ‘Single’ mode. The ‘Single’ mode
is selected by pressing the ‘System’ push-button located on the units front panel for at least 3-sec-
onds (refer to FIG 11-2 ).
5. Initialize all connected units according to the standard procedure as described in Chapter 11.1.
6. Once all units have been initialized, the PC’s operating system software OS/2 and the ‘Multi-CCU
system software LBB 3586/00 must be installed. Refer to the relevant documentation when
installing the OS/2 system software and the Multi-CCU software. Once installed the system can
be configured according to the user manual delivered with the Multi-CCU software LBB 3586/00.
7. When starting the OS/2 master software, or selecting the ‘Operate’ menu-item in the master
software, all connected CCU’s will switch to ‘multi-CCU’ mode. Check that when changing the
operation mode on one of the connected ‘multi-CCU’s’, the other ‘multi-CCU’s’ are also affected.
Check that the microphones on all the connected CCU’s are operational.
NOTES:
1. Switching a CCU to ‘Single-mode’ is only possible when the OS/2 master software is
not running.
2. When switching OFF the master PC (Multi-CCU) all system mode LED’s will begin to
flash, indicating that selection of the ‘Single-CCU’ mode on the CCU is possible.
Connected units are disabled when their is a flashing LED.
11.3.1 Downloading Control PC-software
Before you begin to work for the first time, ensure that all CCU’s have the same firmware. To
download the software from the DCN control PC to all CCU’s in the system, select the ‘Single’ mode.
To download the software to individual CCU’s, connect the DCN control PC to one of the CCU’s
and download the software as described in the ‘Software User Documentation’. Once done for the
first CCU, connect the DCN control PC to the next CCU and download the software again. Repeat
this procedure for all CCU’s connected to the system. Once the software has been downloaded to all
CCU’s, connect the DCN control PC (if needed) to your preferred and configured CCU and select
the ‘Operate’ mode on the master PC.
If you are using a DCN control PC, check in the ‘System Config !’ window’ of the “Startup” software
that all connected units and the PC-card (when used) are present. To create ‘Installation’ and ‘Names’
files use the procedures as used for a single-CCU system. These procedures and descriptions of the
relevant software applications, LBB 3580, LBB 3585 and LBB 3590 can be found in their respective
software manuals.
11.4 Maintenance Menu
Central Control Units (CCU) with version 4.0 software and higher comprise additional embedded
software. This software introduces a ‘Maintenance Menu’ for a ‘Stand-alone’ system. Using this menu
the following default options can be set:
•Default language for the delegate/chairman’s unit LC-displays
•Assign ‘Stand-alone’ intercom operator.
NOTE: The DCN PC software will terminate if the maintenance mode is selected.
The maintenance menu sets the internal settings for the CCU’s ‘stand-alone’ operation and can only
be entered when the CCU is running in ‘stand-alone’ mode (either ‘Single’ or ‘Multi’-CCU). The
maintenance menu is entered by pressing and holding down for at least 3 seconds, one of the
following button-combinations.’
•Active Micro’s + Operation button or
•Active Micro’s + Equalizer On button or
•Operation + Equalizer start button.
Once the maintenance menu has been entered into, all units equipped with an LC-display (except
Interpreter units) will display the ‘Maintenance Menu. Once displayed all congress activities will stop
and all CCU control panel LEDs will flash.
While in the ‘Maintenance Menu” select a unit to set the menu options. The unit chosen will set the
menu options for all connected units. Once a button on the selected unit has been pressed, then LC-
display of all other units will be cleared.
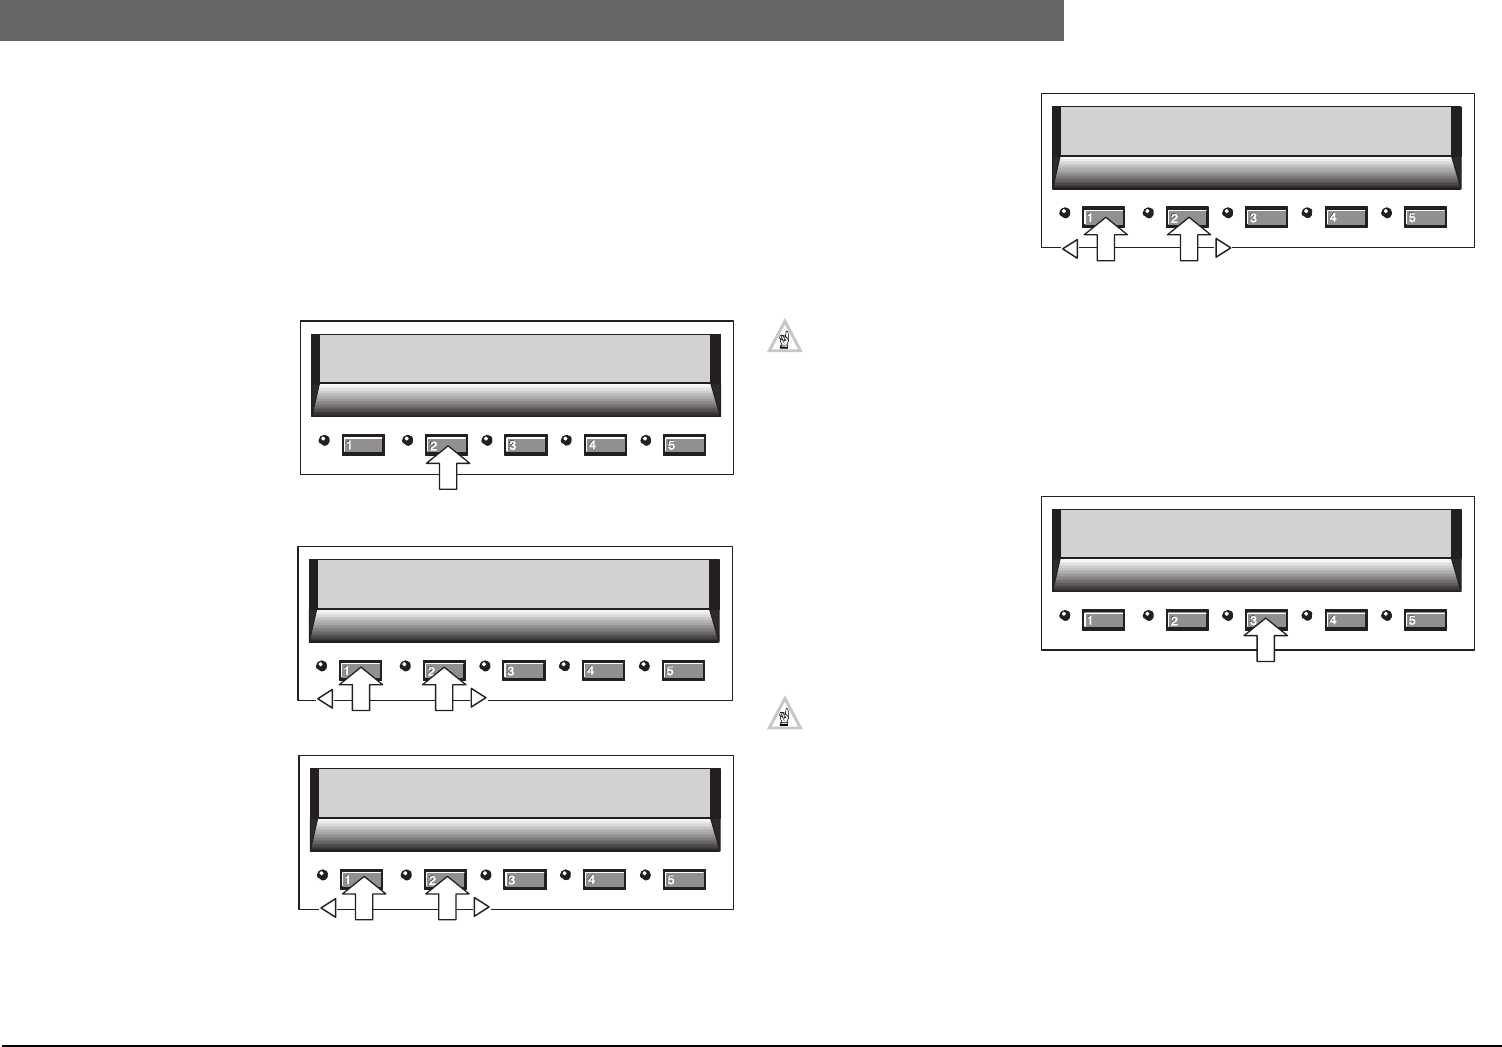
2
Bosch Security Systems | 04-2003 | 3922 988 43318 en
Digital Congress Network | Installation and Operating Manual | Chapter 11 - System Set-up and Operation en | 11-4
Maintenance Menu
When the selected units <RETURN> softkey has been pressed the CCU reverts back into the
congress operational mode. To access the settings of the Maintenance menu on another unit, the
‘Maintenance Mode’ should be started again.
The displays below shows the units LC-display once the CCU has been entered into the ‘Maintenance
Menu’.
11.4.1 To set system default LANGUAGE
Display language is for all units with an LC-display
1. Press the key located under the
display text <LANGUAGE.>.
The current system language is
displayed between square brack-
ets [ ] .
2. To select another language press
keys < to show the previous
language and press the key > to
show the next available lan-
guage.
3. The selected language is shown
between arrowed brackets i.e.
< >.
4. To select and confirm the default
language press the <ENTER>
key when the required language
is selected. Confirmation shows
the default language enclosed in
square brackets i.e.
[LANGUAGE].
5. The changed default language
takes effect when the <ENTER>
key is pressed.
NOTE: When installing DCN software, 6 languages are available for selection.
These languages can be selected in the ‘MAINT. menu.
6. Press the <RETURN> key to return to the Maintenance Menu.
11.4.2 To set system INTERCOM OPERATOR POSITION
To set the default position for the system “Intercom Operator” proceed as follows::
1. Press the key located under the
display text <IC OPER> to
assign this unit as the ‘Intercom
Operators’ position. When set
ensure that the unit is equipped
with a hand-set.
NOTE: Once the ‘Intercom operators’ position has been set, no further indication is given
2. The default system intercom operators position will only take effect when the CCU reverts back
to the congress operational mode.
LANGUAGE IC OPER RETURN
[ENGLISH]
< > ENTER RETURN
<DEUTSCH>
< > ENTER RETURN
[DEUTSCH]
< > ENTER RETURN
LANGUAGE IC OPER RETURN
2
Bosch Security Systems | 04-2003 | 3922 988 43318 en
Digital Congress Network | Installation and Operating Manual | Chapter 11 - System Set-up and Operation en | 11-5
Sound Management
11.5 Sound Management
11.5.1 Equalizer function
To produce optimum speech intelligibility for a particular discussion room or conference hall the CCU
includes a built-in system audio equalization facility. This facility automatically sets the overall audio
characteristics of the DCN unit loudspeakers. (see fig 11-2 9(3)).
NOTE: Channels 12 (line-output) and channel 13 (delegate/loudspeakers) only will be equalized. See
Chapter 13.8 Available Audio Down Link Channels.
To Equalize the system proceed as follows:
NOTE: Before carrying out the equalization process, it is recommended that the surround-
ing area be kept as quiet as possible.
The number of microphones which can be selected for the ‘auto-equalization’ measurement process
can be selected by the user. Proceed as follows:
1. Press the equalizing recess switch ‘Start’ located on the front of the CCU to enter the micro-
phone selection mode (FIG 11-1). Entry into this mode is indicated by an illuminated busy LED.
2. The chairmans microphone will automatically be selected for the auto equalization procedure,
however, the user can select up to 8 microphones to gain better performance. To select addi-
tional microphones simply press the ON/OFF button of the relevant microphone. If a chairman
unit is not connected to the system, a delegates microphone will be switched on.
3. To activate the ‘auto-equalization’ procedure press the equalizing recess switch ‘Start’ once again.
A noise will be heard and the busy LED will begin to flash, indicating automatic equalization is
being processed. After the measurements, the filter settings are calculated (this may take a few
minutes).
NOTES:
1. To abort the auto equalization procedure press any button on the CCU. Aborting
restores the previous equalization settings.
2. Selecting the auto-equalization measurement process is only possible when in the “Single
CCU” mode.
3. The equalizer function can be used with or without DCN software running. However,
the ‘Auto’ equalizer facility will not function if the DCN software is running.
REMARKS:
1.The frequency response of a room is dependent on the position of microphone and loud-
speaker used, particularly if a microphone is relative close to a loudspeaker. Switching
between a microphone-loudspeaker combination and another can result in an entire
different frequency response. Therefore, equalization has primarily an advantage if the
microphone is in the diffuse field of the loudspeaker, for example if a separate PA sys-
tem is used.
2.The equalizer is only active on the delegate loudspeaker channel and the equalized PA
output. The equalized PA output is only available on the Audio Media Interface LBB
3508/00, channel 12.
11.5.2 Loudspeakers
The three rotary loudspeaker controls located on the front panel of the Central Control Unit are
used for setting the overall system gain/volume of the DCN’s contribution unit loudspeakers.
•Control (FIG 11-2 (6) ) sets the overall volume/gain level of the discussion unit loudspeak-
ers in 1.5 dB steps throughout the entire system.
NOTE: When turned fully anti-clockwise the audio signal to all system units, with the
exception of the interpreter desk is switched off.
1. Control (FIG 11-2 (5)) sets the overall system treble control of the contribution unit
loudspeakers.
2. Control (FIG 11-2 (5)) sets the overall system bass control of the contribution unit
loudspeakers.
How to Set System Volume/gain level
1. Switch on the maximum number of Active-Micro’s (4 plus a chairman unit).
2. Select a delegate unit and speak loudly into it while adjusting the volume/gain control to the point
where audio feedback is just audible.
3. From the feedback point adjust the volume/gain control to just below the feedback level.

2
Bosch Security Systems | 04-2003 | 3922 988 43318 en
Digital Congress Network | Installation and Operating Manual | Chapter 11 - System Set-up and Operation en | 11-6
Additional stand-alone operations (applicable to conference units only)
11.6 Additional stand-alone operations (applicable to confer-
ence units only)
11.6.1 Voting modes
The DCN system in stand-alone operation offers an electronic voting procedure to meet the
majority of conference requirements. A voting session is initiated from the chairman unit. The
chairman unit includes 5 softkeys, two of which are used to either start the voting session ‘Start’ or to
Stop the voting session ‘Stop’. A ‘Hold’ key enables the chairman to freeze a voting session for as long
as is necessary. A ‘Restart’ key, restarts the session when in the ‘Hold’ mode.
NOTE: For details on how to conduct a voting session using the chairman unit, refer to
Chapter 11.7.3: “Operation Chairman’s unit LBB 3547/00”.
The voting mode available with stand-alone systems is the Parliamentary voting procedure. This mode
of operation allows delegates to register a ‘No’, ‘Abstain’ or ‘Ye s ’.
11.6.2 Intercom Facilities
If a delegate/chairman unit or interpreter desk is provided with an Intercom handset type
LBB 3555/00, its user can participate in a two-way conversation with an assigned central Intercom
Operator. The central operator position is a single assigned* stand-alone delegate unit with handset.
*Assigned using the CCU maintenance menu.
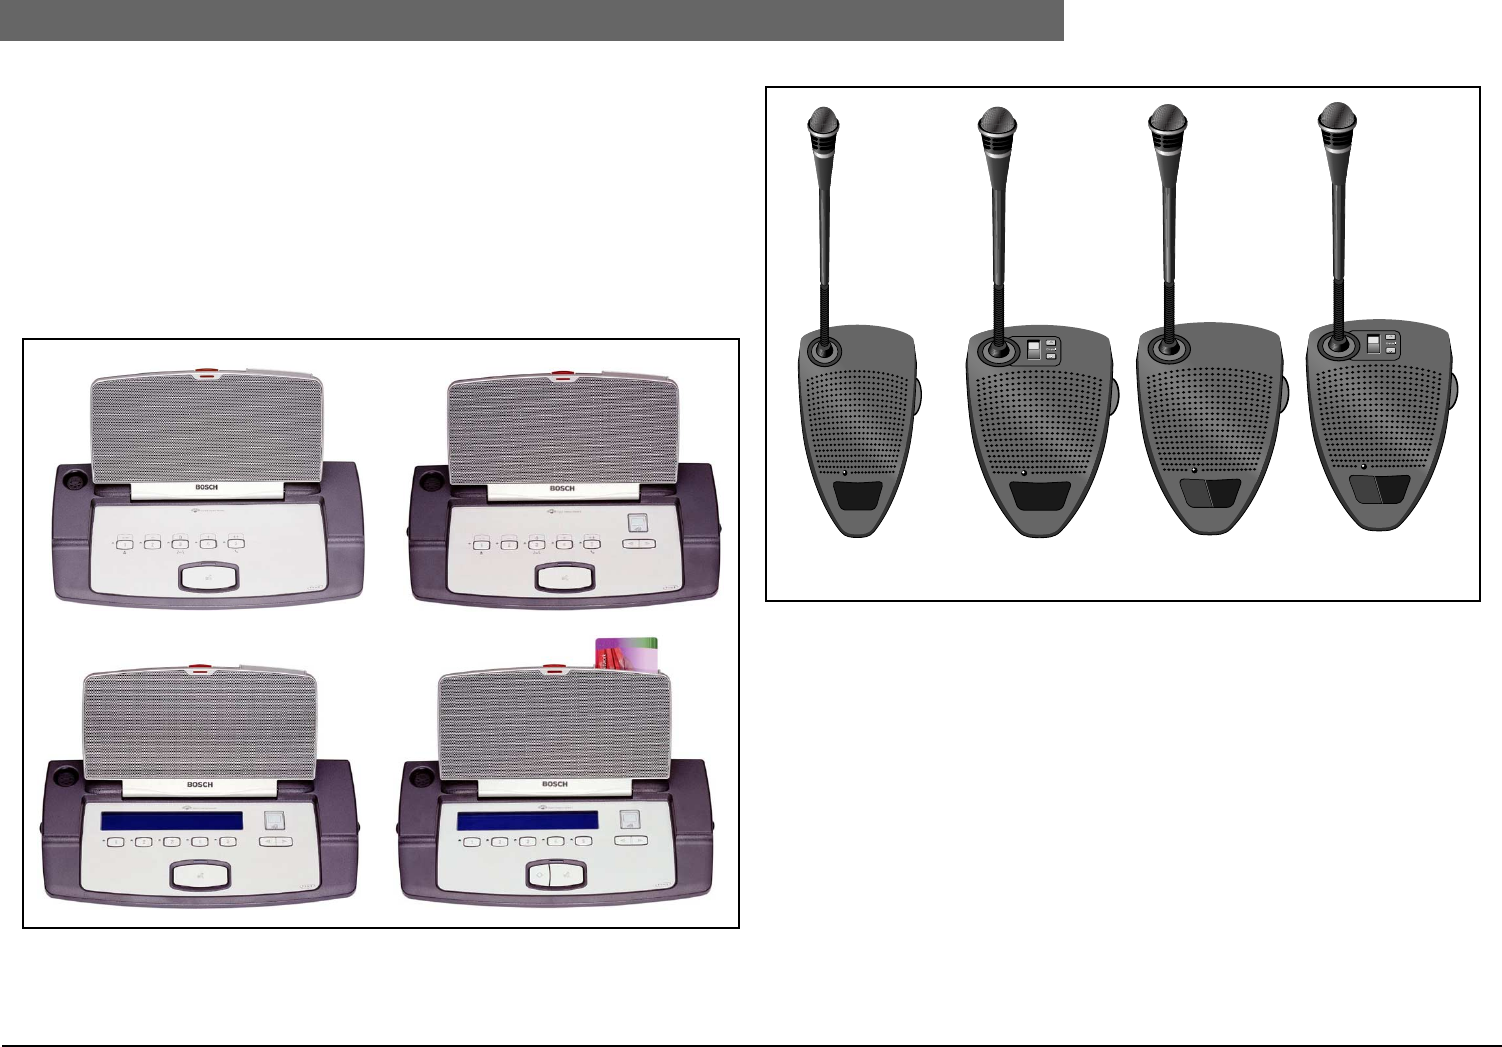
2
Bosch Security Systems | 04-2003 | 3922 988 43318 en
Digital Congress Network | Installation and Operating Manual | Chapter 11 - System Set-up and Operation en | 11-7
Delegate/Chairman unit operation (Conference units only)
11.7 Delegate/Chairman unit operation (Conference units only)
11.7.1 Introduction
Microphone management as its term suggest, refers to the technique of managing and controlling the
different methods by which delegates are able to use their microphone units.
In PC-based systems, the control of delegates’ microphone units can be conducted by a central
operator using DCN’s dedicated software. For further information refer to DCN User Software
Manuals for Synoptic Microphone Control LBB 3571 and Microphone Management LBB 3570.
For unit description see Chapter 2.4 and Chapter 2.5
FIG 11-3 DCN Conference units
FIG 11-4 DCN Discussion units
LBB 3544/00 LBB 3545/00
LBB 3546/00 LBB 3547/00
LBB 3530/xx LBB 3531/xx LBB 3533/xx LBB 3534/xx
BOSCH
BOSCH
BOSCH
BOSCH
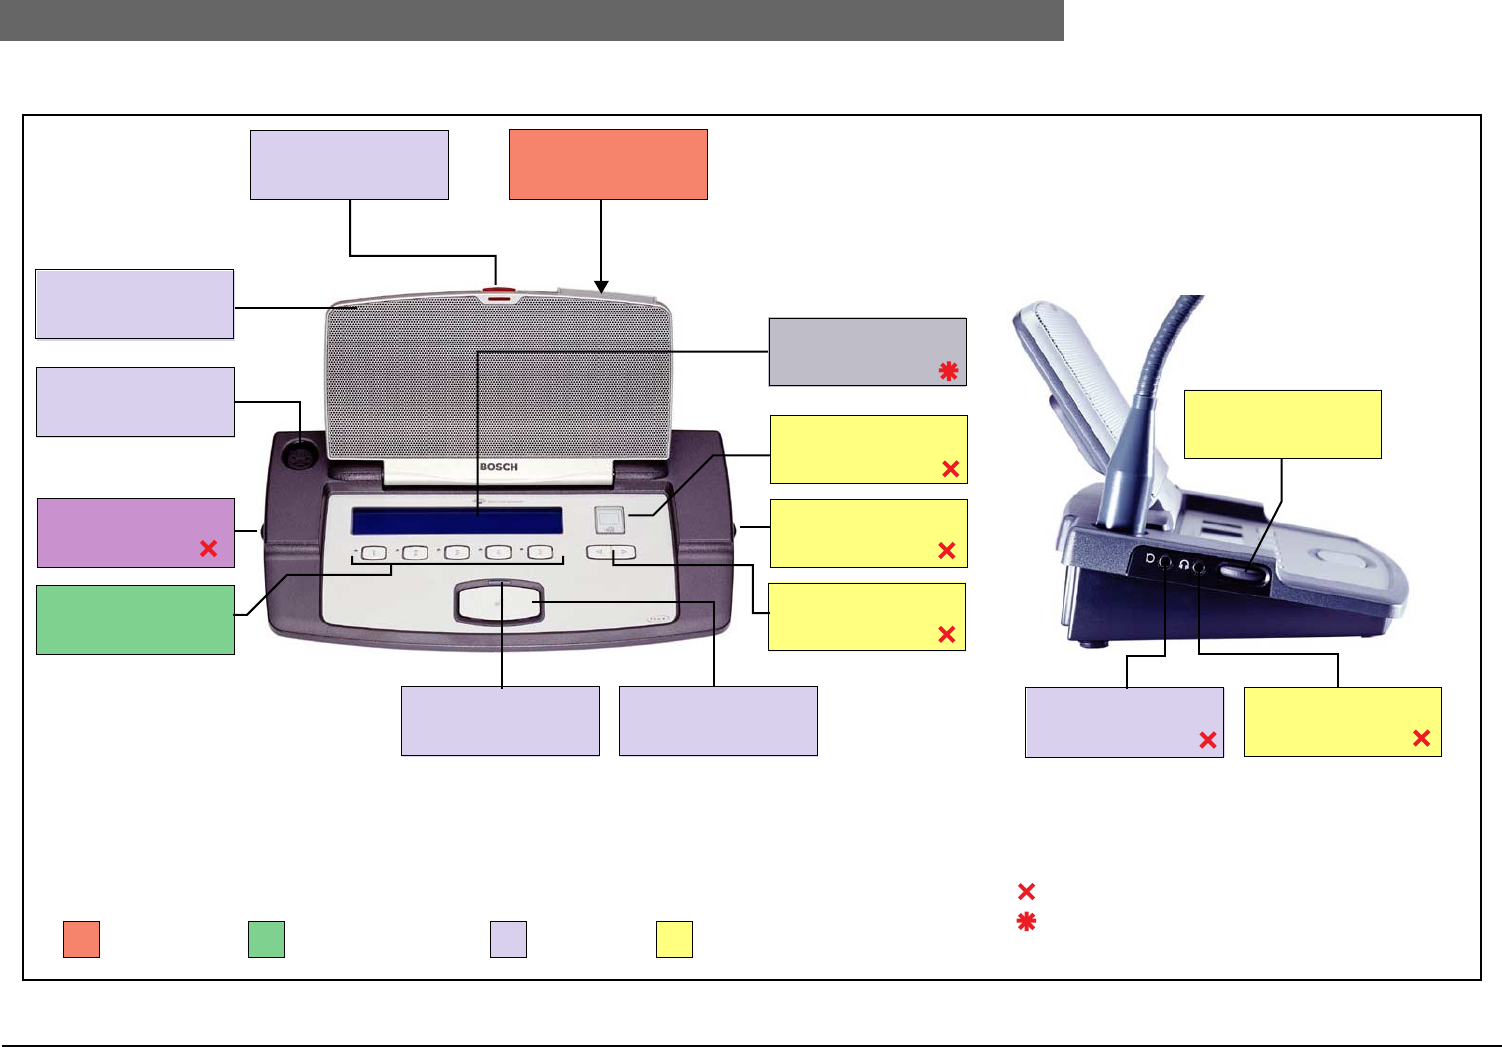
2
Bosch Security Systems | 04-2003 | 3922 988 43318 en
Digital Congress Network | Installation and Operating Manual | Chapter 11 - System Set-up and Operation en | 11-8
Delegate/Chairman unit operation (Conference units only)
11.7.2 OPERATION Delegate Units LBB 3544/00, LBB 3545/00, LBB 3546/00
FIG 11-5 Operation CONCENTUS (conference) Delegate units LBB 3544/00, LBB 3545/00 and LBB 3546/00
** The unit has three microphone status indicators. Two located on the unit itself and the other a ‘light-ring’ indicator (red) located
on the installed pluggable microphone LBB 3549/00 or LBB 3549/50 (not shown). All three are illuminated when the microphone
is ON. When a microphone/headset is inserted into its jack socket, the pluggable microphone and its illuminated light ring are
automatically switched OFF.
The bi-colour LED illuminates as follows: red = microphone ON, green = ‘request-to-speak’, yellow = initializing
Numeric LC-display for
language channel select
indication
Microphone/headset
Jack socket 3.5 mm
ID Chip-card reader
Headphone
volume control
Microphone Status
indicator**
(bi-colour LED)
Microphone On/Off key
Headphone
volume control
Language channel select
keys up/down
Graphic LC-display
with back-lighting
(see page 11-9)
5-softkeys with LED
indicators
(see page 11-9)
Side view
Headphone
jack socket 3.5 mm
Headphone sockets and
volume controls located at
both sides of the unit,
catering for two delegates.
Microphone headset
located at the left side of
the unit only (microphone
must be electret type only)
Access control Softkeys for voting and
Microphone functions
Microphone Language channel
selection
Not applicable LBB 3544/00
Microphone ON
indicator**
Loudspeaker
(muted when
microphone is ON)
XLR Socket for
pluggable microphone
LBB 3549/xx (not shown)
Headphone
volume control
Not applicable LBB 3544/00 and LBB 3545/00
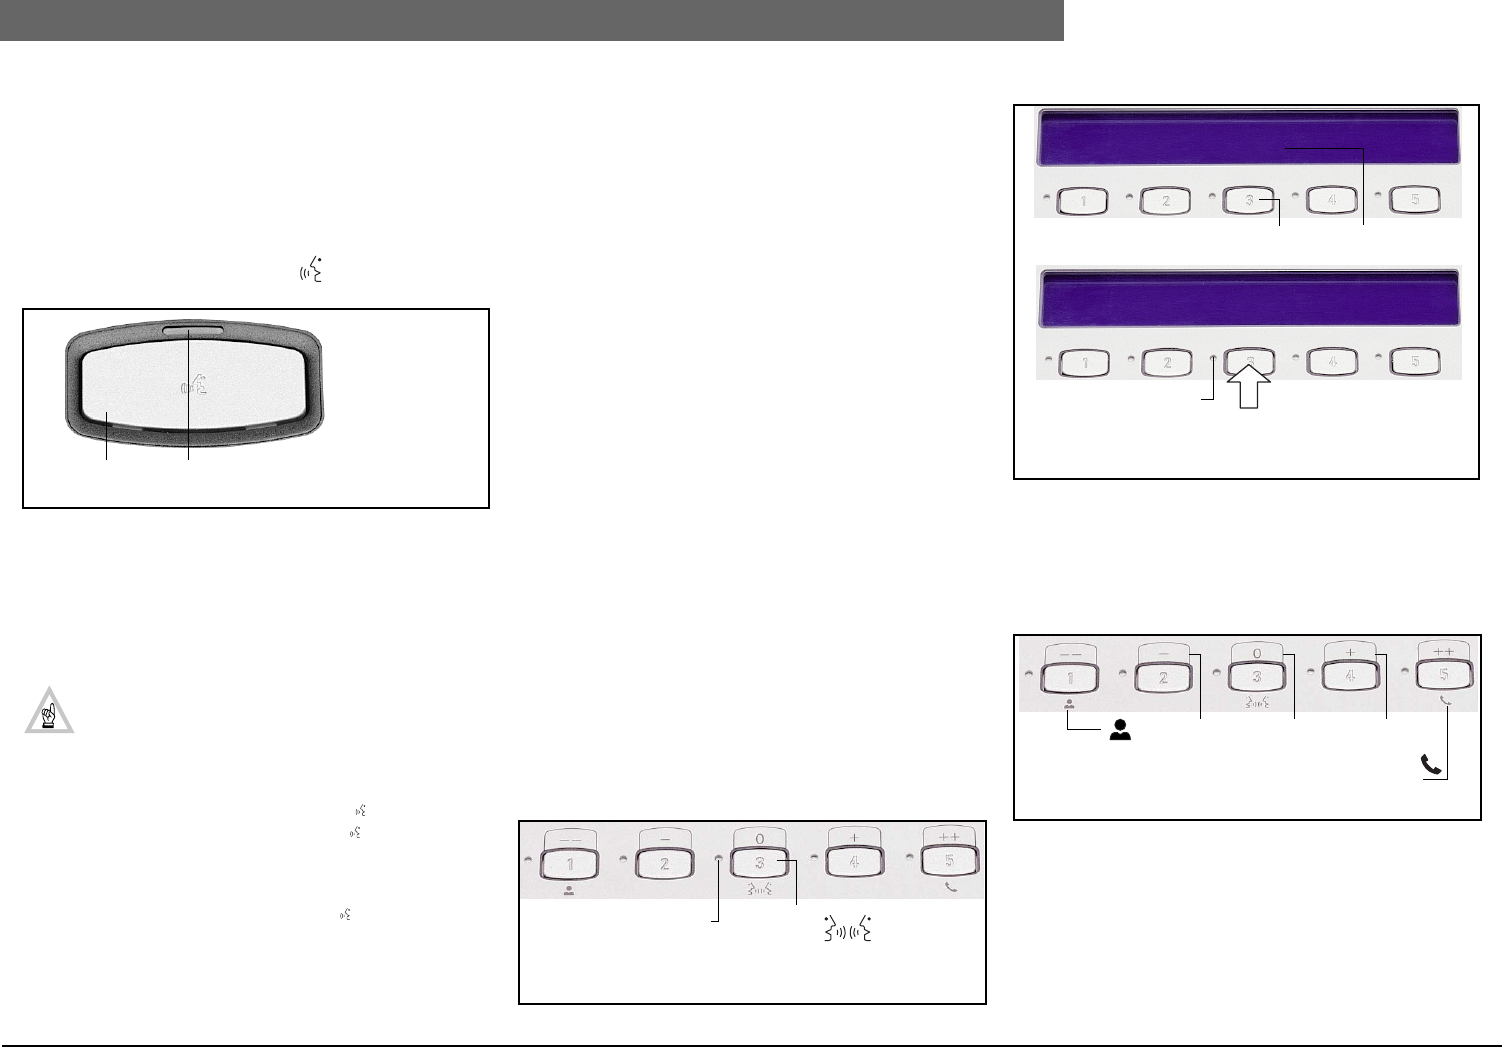
2
Bosch Security Systems | 04-2003 | 3922 988 43318 en
Digital Congress Network | Installation and Operating Manual | Chapter 11 - System Set-up and Operation en | 11-9
Delegate/Chairman unit operation (Conference units only)
OPERATION Delegate units LBB 3544/00, LBB
3545/00 and LBB 3546/00
* Not applicable LBB 3544/00
** Not applicable LBB 3545/00
*** Not applicable LBB 3544/00 and LBB 3545/00
Microphone functions
1. Press the microphone key marked to switch units
microphone ON.
Three microphone indicators show the status of the microphone:
1. ‘Light ring’ indicator on pluggable microphone (red = ON)
2. An indicator located at the top of the flat-panel loudspeaker
(red = ON).
3. Bi-colour LED above mIcrophone push-button (red =ON,
green = ‘request-to-speak’).
NOTE: When an external microphone is used (*3.5
mm jack socket at side of unit) the pluggable micro-
phone LBB 3549/xx (if mounted) is switched OFF auto-
matically along with its light-ring indicator.
•Once switched on the display*** shows ‘‘SPEAK NOW.’
•To switch the microphone OFF, press the key again. If the
green LED flashes after first pressing the key, the unit has
been registered in a ‘request-to-speak’ list and the micro-
phone function is not yet available. The display*** displays
‘REQUEST ACCEPTED’.
•To cancel a ‘request-to-speak’ press the key again. The dis-
play,*** displays ‘REQUEST CANCELLED.’
LANGUAGE CHANNEL SELECT*
Insert headphones to switch-on the units numeric LC display. In
combination with its select up/down keys, select the required
simultaneous interpretation language channel. The headphone
volume controls can be used to adjust the headphone listening
level.
ID-CARD READER
For use in PC operated systems only, the ID-card reader ensures
that only authorized users can use the unit after first inserting an
ID-card.
USING THE DISPLAY AND SOFT KEYS***
(see page 11-10)
In its normal operational mode, the units graphic display shows
MICRO. Under the MICRO menu two options are available:
SPEAKERS’ and REQUESTS.
Select SPEAKERS’ to display the number of participants
speaking (Screenline can be displayed if only one participant is
speaking). Select REQUESTS to display the number of
delegates waiting to speak.
•Message (PC controlled systems only)
If MESSAGE is displayed under the ‘MAIN’ menu, and its
associated LED flashes, press its soft-key to display an
incoming message.
•Response (applicable to all delegate units)
If in PC-controlled systems, the microphone control mode
‘Operator with Request and Response List’ is selected,
delegates can ‘respond’ by pressing the ‘Response’ button’
The ‘response list is shown on the ‘operators’ PC monitor. The
operator then decides which respondents’ microphone can be
switched ON to ‘respond’ to the current speaker.
LBB 3544/00, LBB 3545/00 units without display
LBB 3546/00 unit with display
VOTING* (see page 11-10)
Voting sessions are initiated by the chairman. Depending on the
application software, the units five softkeys can be used as voting
buttons with confirmation indicators (yellow LEDs), enabling
participation in voting procedures: e.g. PRESENT, NO, ABSTAIN,
YES (Parliamentary voting)
Other voting methods (1/- -, 2/-, 3/0, 5/+ and 5/++) are also
available using Alpha-numeric characters. Simply enter your
choice, the LED of the voting option will illuminate constantly,
while the LED of the remaining options will extinguish. Your voting
option can be changed as and when required by pressing the
relevant voting option key.
Microphone
active key Microphone status
indication (red)
Response
button
Flashes when ‘Response’
button pressed.
LED stops flashing = Microphone ON (operator control) or
cancelled by the delegate, pushing the ‘Response’ button again.
Response
button
Flashes when ‘Response’
button pressed.
LED stops flashing = Microphone ON (operator control) or
cancelled by the delegate, pushing the ‘Response’ button again.
RESPONSE
Response
mode active
RESPONSE ACCEPTED
MICRO
PRESENT icon
NO ABSTAIN YES
INTERCOM icon
For Intercom handset operation see page 11-10
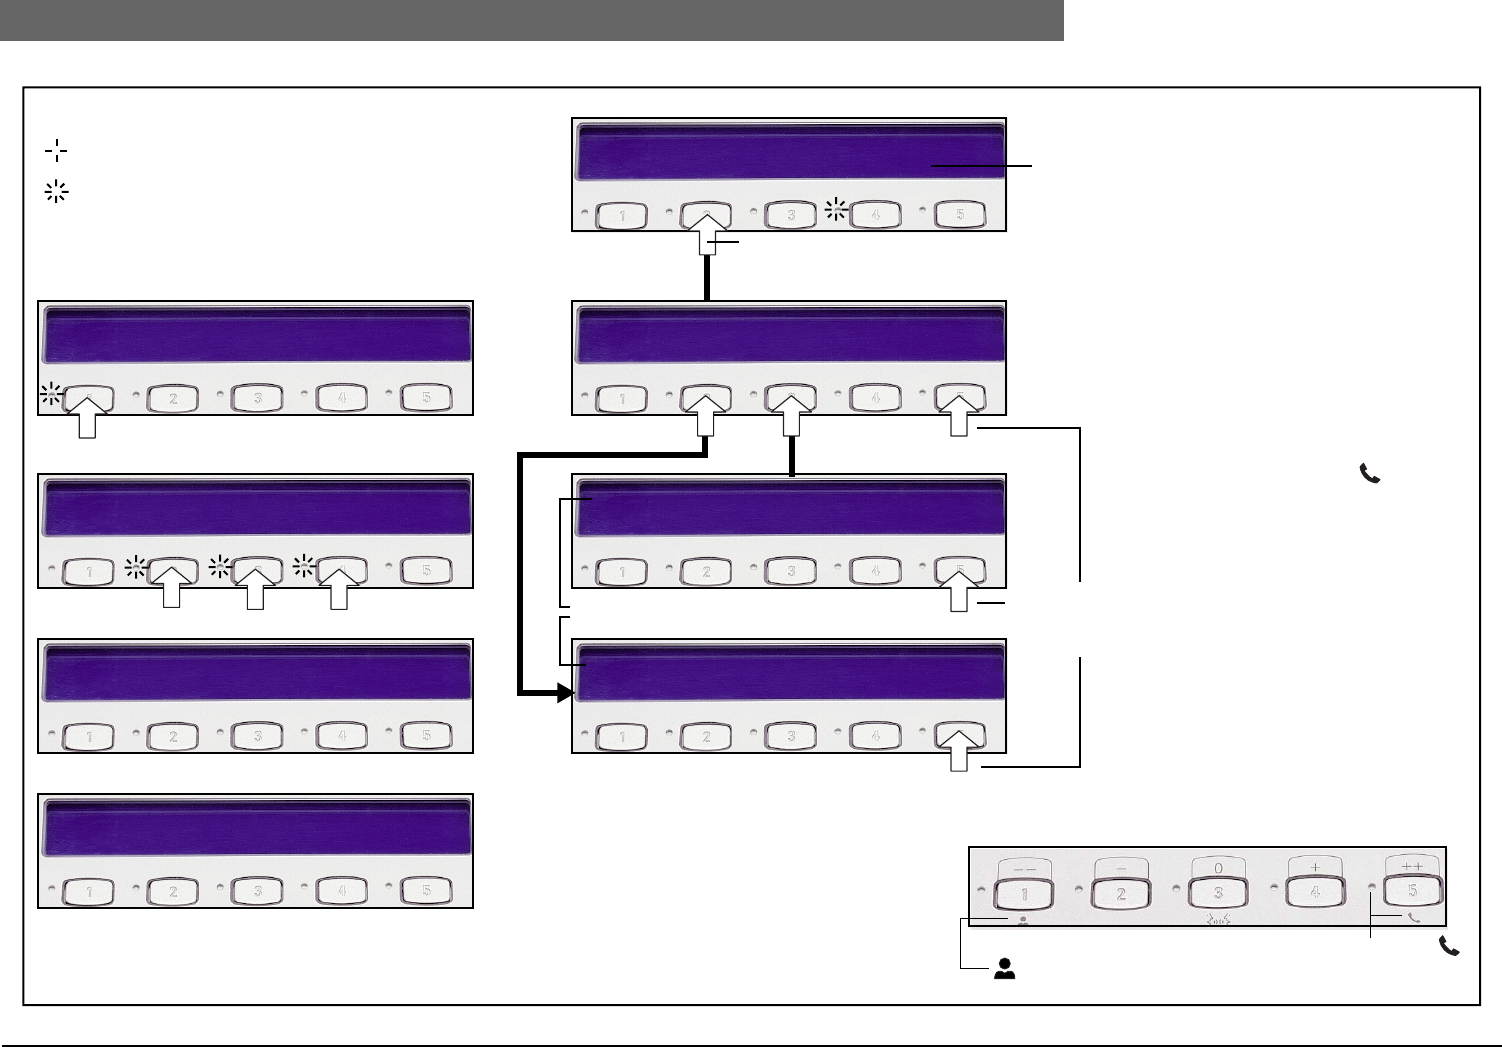
2
Bosch Security Systems | 04-2003 | 3922 988 43318 en
Digital Congress Network | Installation and Operating Manual | Chapter 11 - System Set-up and Operation en | 11-10
Delegate/Chairman unit operation (Conference units only)
MICRO MESSAGE
MAIN MENU
MICRO MENU
RETURNREQUESTS
XX DELEGATES WAITING TO SPEAK
RETURN
RETURN
XX PARTICIPANTS SPEAKING
PARLIAMENTARY VOTING
PRESENT
NO ABSTAIN YES
Select voting option
P:0089 -:0017 ?:0013 +:0049 #:0010
P:0099 -:0020 ?:0015 +:0054 #:0010
MESSAGE (only displayed if
message sent from PC-operator)
XX = Defines number of participants Press ‘RETURN’
to return to the
previous menu.
Press key
Key to voting symbols
P: Number of participants present
-: Number of participants voting NO
?: Number of participants ABSTAINING
+: Number of participants voting YES
#: Number of participants voting NOT YET VOTED
LED status during voting procedure
ON
FLASHING
LBB 3544/00 and LBB 3545/00 Softkeys
SPEAKERS
VOTING ON HOLD
END OF VOTING
- Audience response voting: (Rating scale - -, -, 0, +, ++)
- Multi-choice/opinion poll voting: (Numerals 1 - 24)
(1 - 5 numerals: LBB 3544/00 & LBB 3545/00)
INTERCOM OPERATION
( Applicable to units with an intercom
handset only)
To communicate with the system operator,
lift the handset. If in use a ‘busy tone’ is
heard. Replace the handset and try again.
Units with an LC-display, display ‘ALL
INTERCOM LINES BUSY’. If not in use
‘CALLING OPERATOR...”. At the same
time ‘INTERCOM CALL’ is shown on the
LC-display of the intercom operator.
INTERCOM LED status
1. LED flashes when being called
2. LED ON (steady) when connection is
made
3. LED OFF when Intercom handset
placed back on to its cradle
Intercom handset
indication (see above)
PRESENT icon
After 1 minute returns to MAIN menu
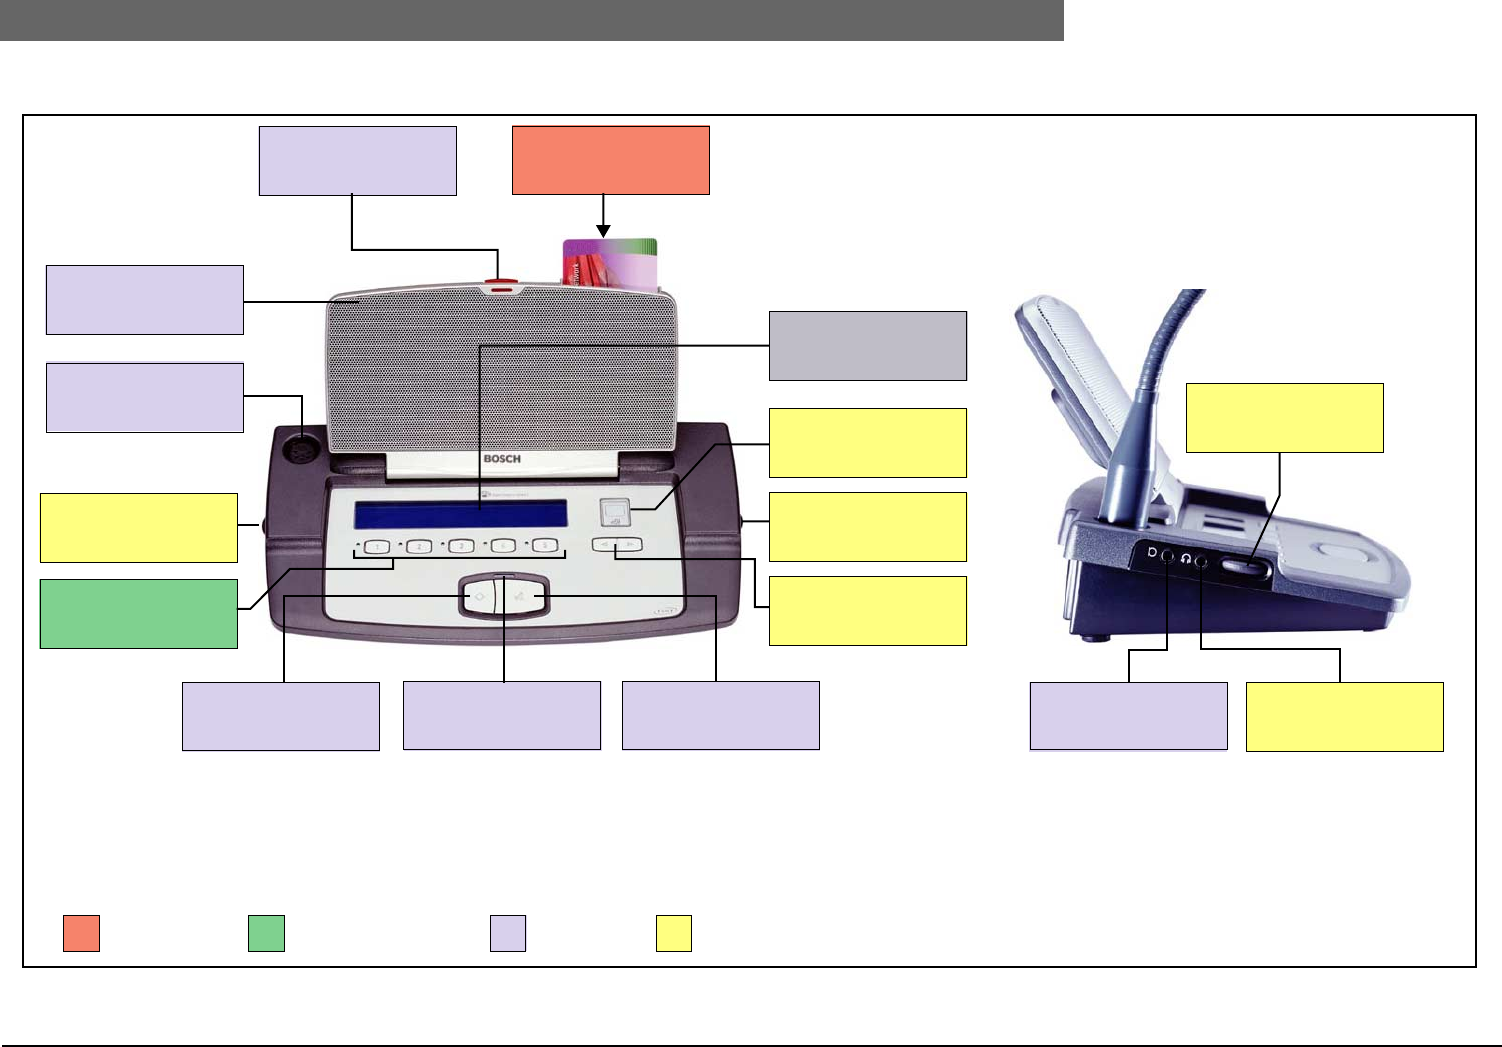
2
Bosch Security Systems | 04-2003 | 3922 988 43318 en
Digital Congress Network | Installation and Operating Manual | Chapter 11 - System Set-up and Operation en | 11-11
Delegate/Chairman unit operation (Conference units only)
11.7.3 OPERATION Chairman Unit LBB 3547/00
FIG 11-6 Operation CONCENTUS (conference) Chairman units LBB 3547/00
Microphone/headset
Jack socket 3.5 mm
ID Chip-card reader
Headphone
volume control
Microphone Status
indicator**
Microphone On/Off key
Priority key
Microphone ON
indicator**
Graphic LC-display
with back-lighting
(see page 11-12 )
5-softkeys with LED
indicators
(see page 11-12 )
Side view
Headphone
jack socket 3.5 mm
Headphone sockets and
volume controls located at
both sides of the unit,
catering for two delegates.
Microphone headset
located at the left side of
the unit only (microphone
must be electret type only)
Access control Softkeys for voting and
Microphone functions
Microphone Language channel
selection
** The unit has three microphone status indicators. Two located on the unit itself and the other a ‘light-ring’ indicator (red) located
on the installed pluggable microphone LBB 3549/00 or LBB 3549/50 (not shown). All three are illuminated when the microphone
is ON. When a microphone/headset is inserted into its jack socket, the pluggable microphone and its illuminated light ring are
automatically switched OFF.
Loudspeaker
(muted when
microphone is ON)
XLR Socket for
pluggable microphone
LBB 3549/xx (not shown)
Language channel select
keys up/down
Headphone
volume control
Numeric LC-display for
language channel select
indication
Headphone
volume control
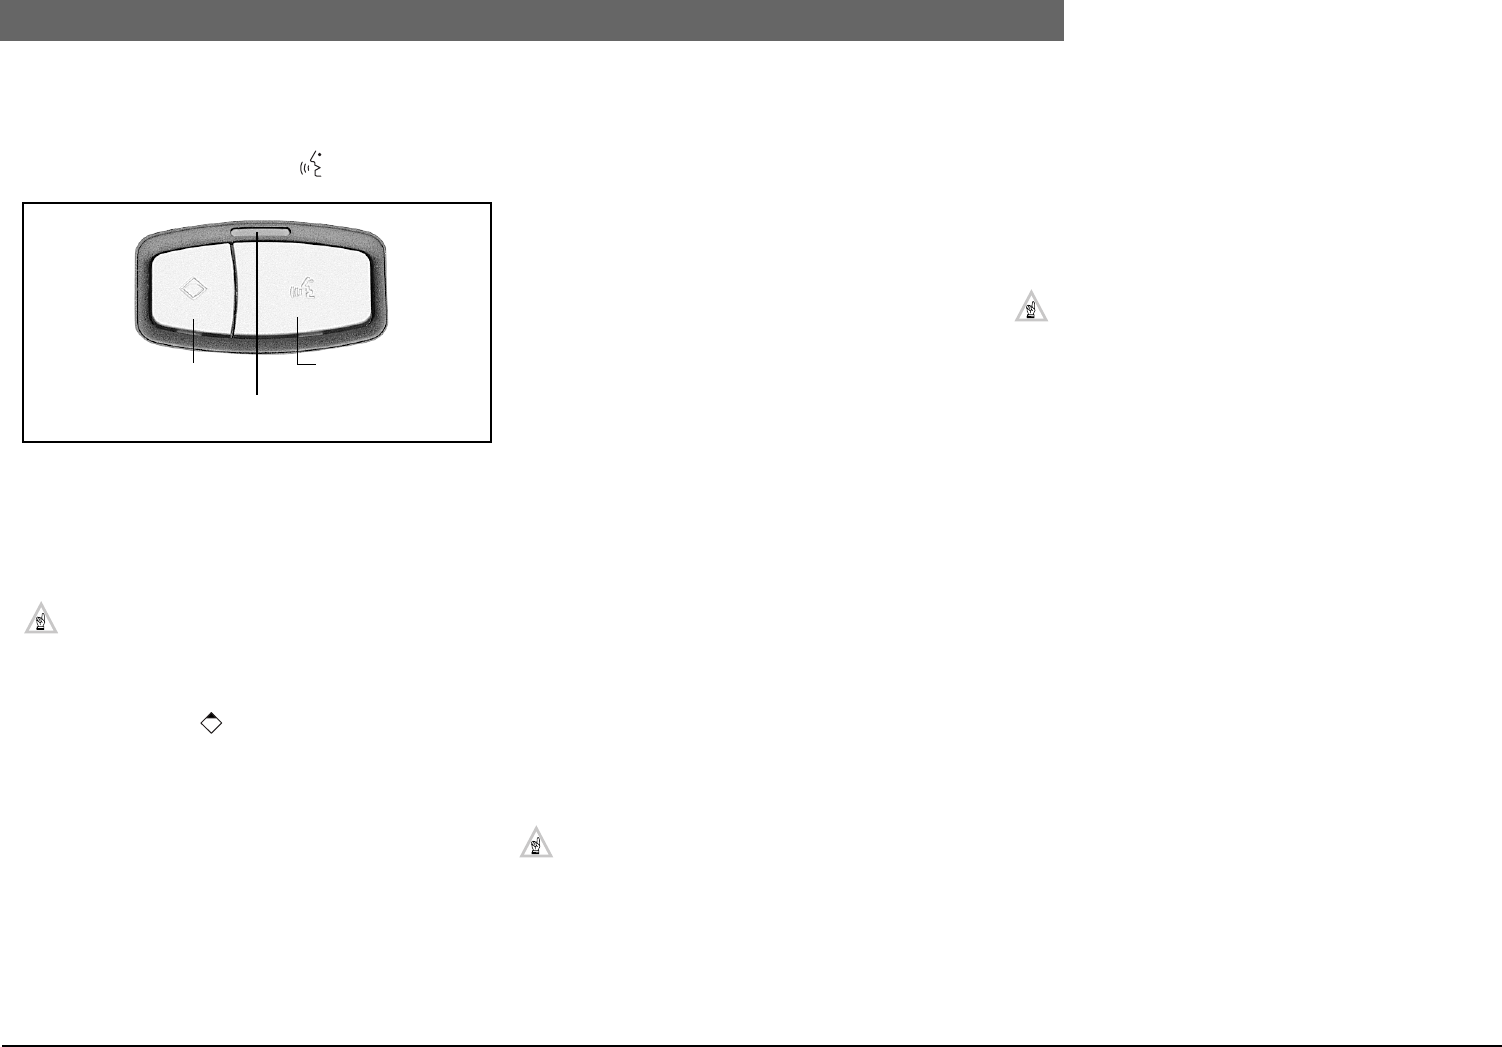
2
Bosch Security Systems | 04-2003 | 3922 988 43318 en
Digital Congress Network | Installation and Operating Manual | Chapter 11 - System Set-up and Operation en | 11-12
Delegate/Chairman unit operation (Conference units only)
OPERATION CHAIRMAN UNIT LBB 3547/00
Microphone functions
1. Press the microphone key marked to switch units
microphone ON.
Three microphone indicators show the status of the microphone:
1. ‘Light ring’ indicator on pluggable microphone (red = ON)
2. An indicator located at the top of the flat-panel loudspeaker
(red = ON).
3. Bi-colour LED above mIcrophone push-button (red =ON,
When an external microphone is used (*3.5 mm jack
socket at side of unit) the pluggable microphone LBB
3549/xx (if mounted) is switched OFF automatically
along with its light-ring indicator.
• Priority key
The Priority key marked when pressed, mutes all currently
active microphone units for the duration the key remains pressed,
or mutes all active microphone units and clears the request-to-
speak list (see 11.7.2). An attention tone is heard when this
function is activated. This attention tone can be switched on or off
in the microphone application software and in the CCU or
Master CCU (PC-card LBB 3511/00).
LANGUAGE CHANNEL SELECT
Use the units numeric LC display in combination with its select up/
down keys to select the desired simultaneous interpretation
language channel. The headphone column control can be used to
adjust the volume for listening.
ID-CARD READER
The ID-card reader provides a chairman’s unit access function This
function ensures that only authorized users may use the
chairman’s unit by inserting an ID-card.
USING THE DISPLAY AND SOFT KEYS
The units graphic LC display in its normal operational mode
displays the MAIN menu. The MAIN menu provides the with a
choice of options: MICROS, VOTING, and MESSAGE.
• MICRO
The MICROS menu provides a microphone management function
enabling its user to display the status of the participants
microphone. Under SPEAKER the number of participants
speaking is displayed (Screenline can be displayed if only one
participant is speaking), Under REQUESTS the number of
delegates waiting to speak is displayed. Press the softkey marked
CANCEL ALL to cancel all activated microphones and
microphones from the delegates requesting to speak-list.
•VOTING
The voting menu is selected in the MAIN menu by pressing the
voting softkey. In the voting menu press the softkey START to
start the voting session. Once started the display invites
participants and chairman to cast their votes. To temporarily hold
the voting session press the HOLD softkey. To restart the session
press the RESTART softkey. All voting functions are once again
available. To end the voting session press the STOP softkey, the
display returns to the START voting menu.
NOTE: The voting procedure described above
(parliamentary voting) is for use in a ‘stand-alone’
system. In PC-controlled systems a selection of voting
options are available (i.e. Multiple choice, opinion poll
and audience response voting).
•MESSAGE
A yellow LED flashes (adjacent softkey 4) , if a message has been
sent by the PC operator (via the message application software).
MESSAGE appears in the MAIN menu. Press softkey marked (4)
MESSAGE to display the incoming message. Press the softkey
RETURN to stop displaying the message (LED =OFF). The option
MESSAGE remains in the display until cleared by the PC-
operator and can be recalled for instant viewing by pressing the
softkey (4) again.
NOTE: The chairmans functions described are depen-
dent on the software applications installed on the DCN
control PC.
Microphone
active key
Priority key
Microphone status
indication
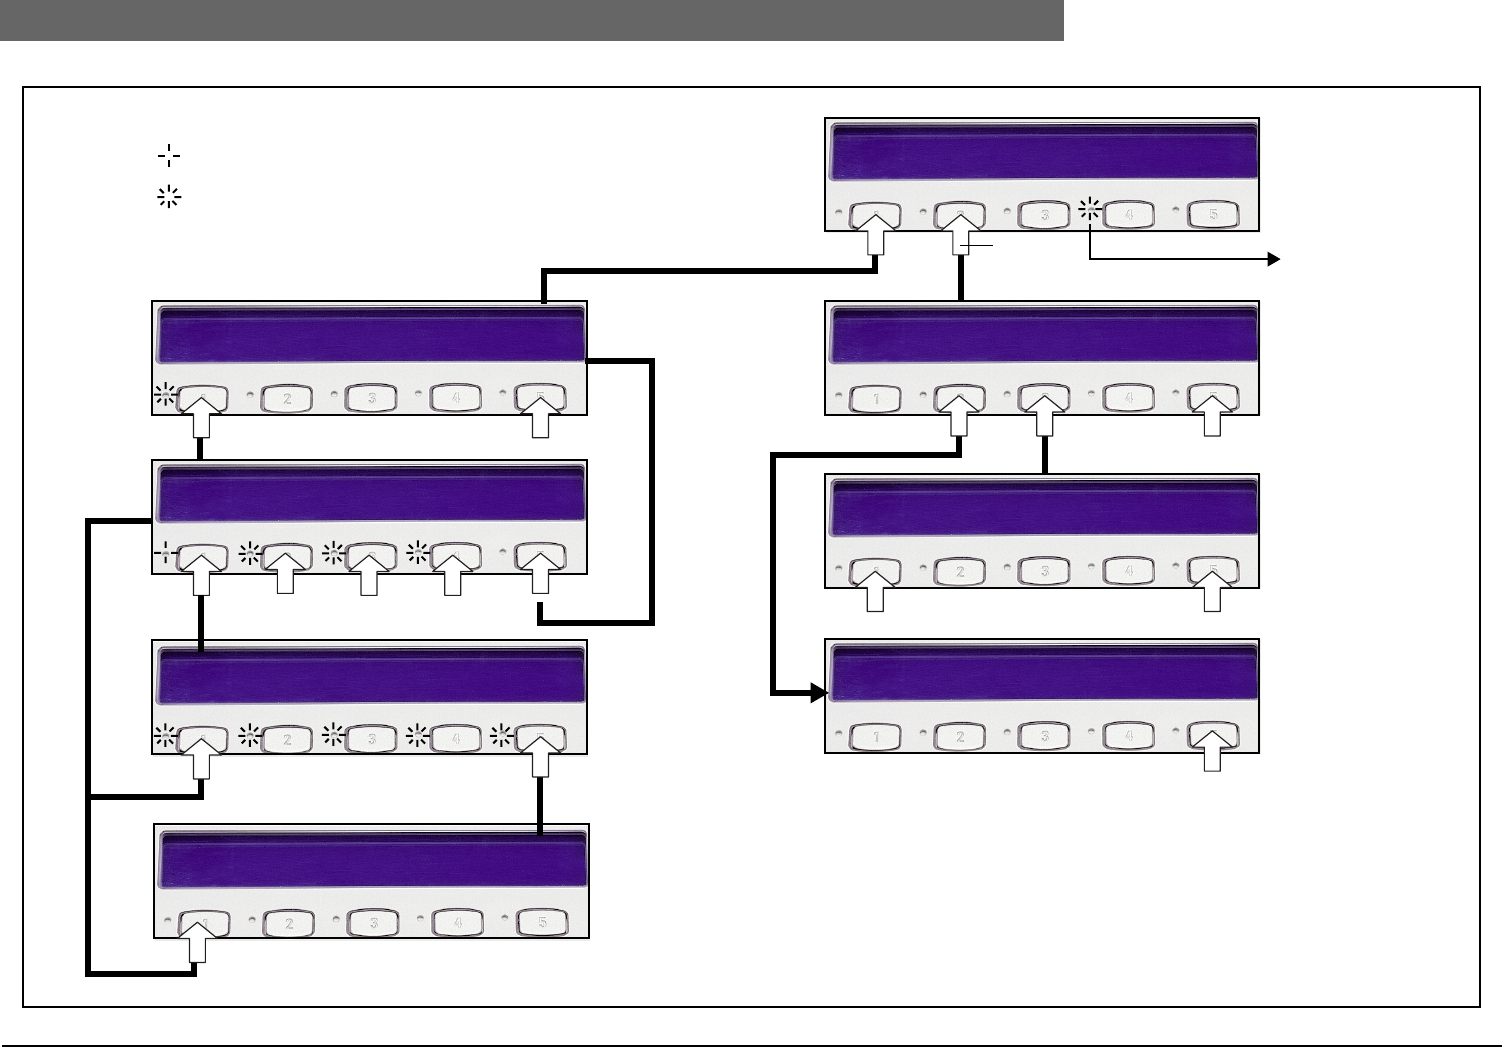
2
Bosch Security Systems | 04-2003 | 3922 988 43318 en
Digital Congress Network | Installation and Operating Manual | Chapter 11 - System Set-up and Operation en | 11-13
Delegate/Chairman unit operation (Conference units only)
P:0099 -:0020 ?:0015 +:0054 #:0010
NO ABSTAIN YES STOPRESTART
MICRO MESSAGE
MAIN MENU
MICRO MENU
RETURNREQUESTS
XX DELEGATES WAITING TO SPEAK
RETURN
RETURN
XX PARTICIPANTS SPEAKING
VOTING MENU
START
NO ABSTAIN YES
Select voting option
XX = Defines number of participants
Key to voting symbols
P: Number of participants present
-: Number of participants voting NO
?: Number of participants ABSTAINING
+: Number of participants voting YES
#: Number of participants NOT YET VOTED
but registered their presence
RETURN
VOTING
* Press ‘RETURN’ to return
to the previous menu.
*
*
*
*
Incoming MESSAGE
Indication (yellow flashing)
from PC operator.
•Press softkey to
display message.
•Press softkey
RETURN to stop
viewing the mes-
sage. (LED =OFF).
Press softkey(4) again
to re-view message.
•MESSAGE option
remains in MAIN
menu (until cleared
by PC operator).
HOLD STOP
SPEAKERS
Cancel ALL requests
CANCEL ALL
CANCEL ALL
Press key
P:0099 -:0020 ?:0015 +:0054 #:0010
END OF VOTING
LED status during voting procedure
ON
FLASHING
This MENU is shown for 3 seconds only.
Returns to VOTING MENU with results for 1 minute when START is not pressed.
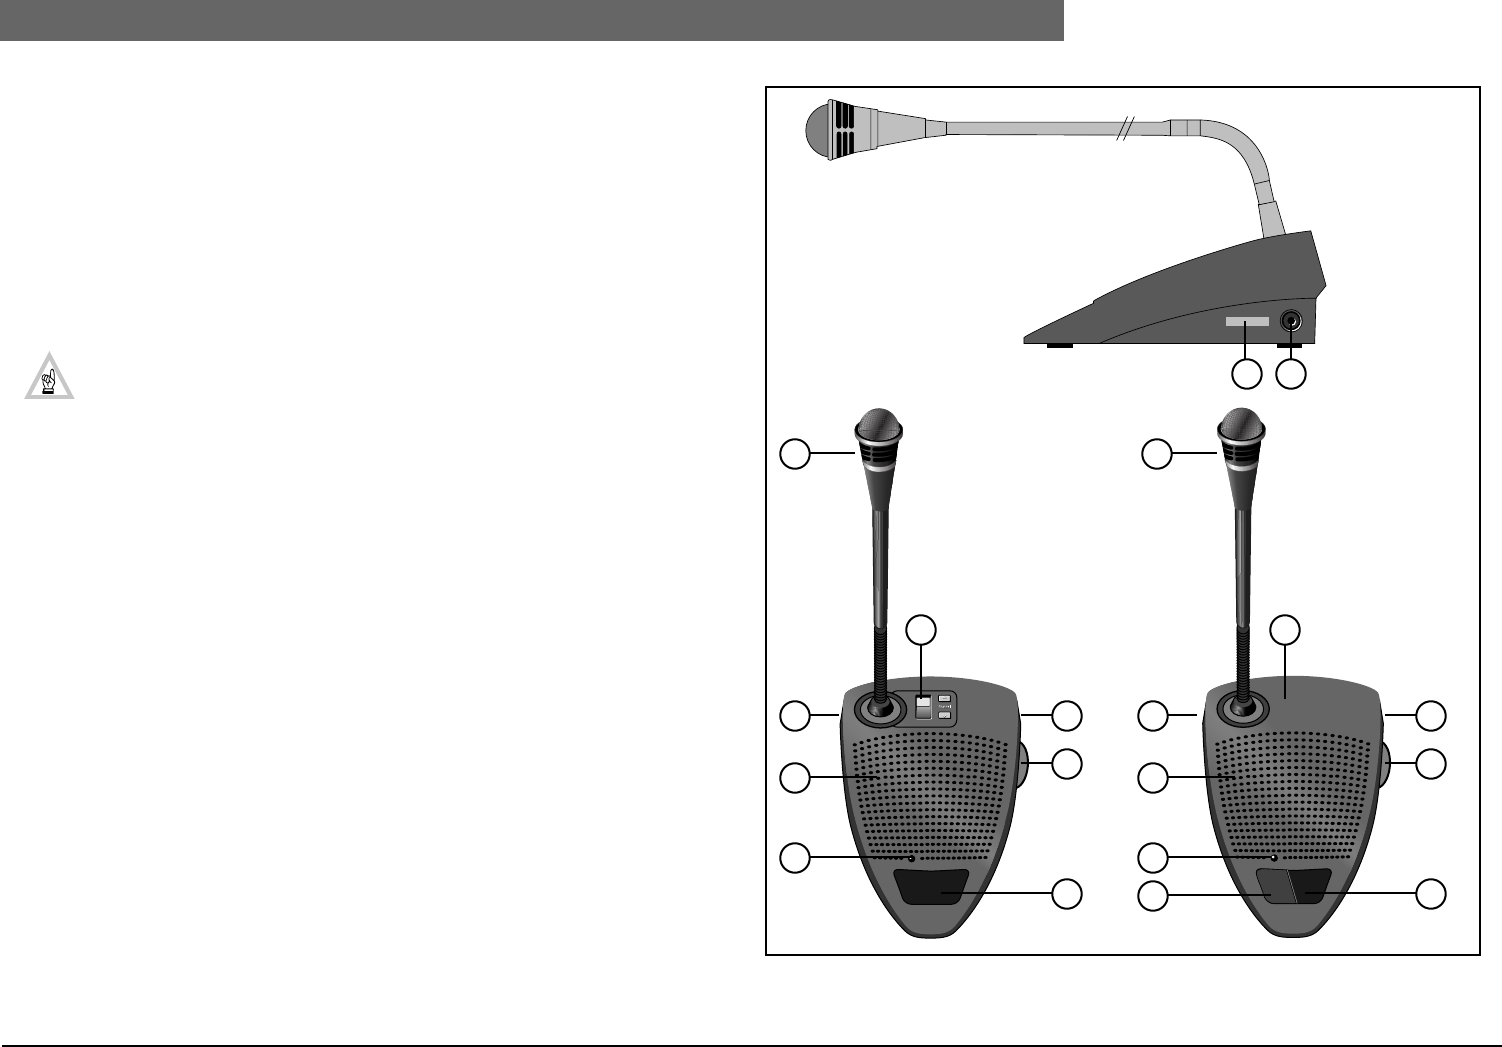
2
Bosch Security Systems | 04-2003 | 3922 988 43318 en
Digital Congress Network | Installation and Operating Manual | Chapter 11 - System Set-up and Operation en | 11-14
Operating Delegate/Chairman units (Discussion units only)
11.8 Operating Delegate/Chairman units (Discussion units only)
For unit description (see Chapter 2.2 and Chapter 2.2)
11.8.1 Microphone
• Press the microphone (6) button to switch on the microphone. If the request-to-speak is
granted (depending on the ‘Operation’ mode and the number of ‘Active Micros’ selected) the
units red LED indicator ring (1) will illuminate and the mic. bi-colour LED (7) illuminates red. If
the microphone request has not been granted, the mic bi-colour LED (7) will flash green, indi-
cating that the unit is in the ‘request-to-speak’ mode. Refer to microphone operational modes.
NOTE: In ‘Voice‘ mode, the LED indicator ring is always off (default*) and the red bi-colour
LED (7) always illuminates. To mute the units microphone press the microphone on/off
button. * See Chapter 2.3.1 ‘Adjustment setting discussion units’ to change default.
•Headphones: Two sockets (4) allow a single or two sets of headphones to be connected to the
delegate unit for listening to the floor speaker. The volume control (5) is used to adjust the
headphone listening level. Connecting headphones mutes the units loudspeaker.
11.8.2 Priority function ( LBB 3533/xx and LBB 3534/xx only)
1. Press the ‘Priority’ button (9) to overrule/mute or cancel other active microphone users. An
optional chime tone is available, when the priority function is used. (see Notes)
NOTES: (applicable to chairmans unit LBB 3533/xx and LBB 3534/xx only)
1. The priority function can be set at the CCU (S9 see Chapter 4.5) to temporarily or permanently
mute active microphones. In the temporarily mode, active microphones are muted for as long as
the priority button is pressed, once released the muted microphones become active again.
2. In the permanent mode, active microphones are permanently muted including those on the
‘request-to-speak’ list and cannot be switched on again until their users press their microphone
buttons.
3. The optional chime tone can be switched on or off at the CCU (Internal setting).
11.8.3 Language channel selection (LBB 3531/.. and LBB 3534/.. only)
Use the units numeric LC display (2) in combination with its select up/down keys to select the
desired simultaneous interpretation language channel. The headphone volume control (5) can be
used to adjust the volume listening level.
FIG 11-7 Operating Discussion delegate/chairman units
BOSCH
BOSCH
5 4
1 1
4
2
7
4
2
7
9
4
5
6
4
5
6
LBB 3530/xx
LBB 3531/xx
(illustrated)
LBB 3533/xx
LBB 3534/xx
(illustrated)
2 2
not applicable
LBB 3530/xx not applicable
LBB 3533/xx

2
Bosch Security Systems | 04-2003 | 3922 988 43318 en
Digital Congress Network | Installation and Operating Manual | Chapter 11 - System Set-up and Operation en | 11-15
Interpretation
11.9 Interpretation
The interpreter desk has two functional modes: the operational mode and the programming mode. In
the operational mode the interpreter desk is divided into two main working sections: the listening
section and the speech section. The listening section at the left side of the unit includes headphone
and loudspeaker monitoring facilities for listening to the floor or other translations. The speech section
at the right of the unit includes controls for the outgoing translation channels. In its programming
mode, operational functions can be set before a conference begins. The programming mode under a
menu driven display enables audio channels to be assigned to specific languages, the selection of the
interpreters A and B output translations, as well as providing an override and interlock facility
between and within booths.
11.9.1 Incoming channel control (LISTENING)
Each interpreter desk includes a Relay select rotary switch for selection of the incoming language, as
well as three incoming channel pre-select keys a, b, and c. The pre-select keys a, b, and c can be
assigned to the interpreters three most familiar or working languages. The incoming language is
displayed on the units alphanumeric LC-display together with a quality indication, providing the
interpreter with an at a glance indication of the quality of the incoming language. For example the
quality indication displays whether the incoming language is direct from the floor speaker (FLOOR) or
whether its a translation of the floor language (+) or whether its a translation of a translation of the
floor language (-). Monitoring the incoming languages is done via the units built-in loudspeaker (floor
only) or by using headphones or headset. Three rotary controls at the lower left of the unit provide
headphone volume, treble and bass adjustment. A rotary switch at the top left of the unit provides a
loudspeaker volume control adjustment.
11.9.2 Outgoing channel control (SPEAKING)
To distribute the translation, the desk provides two outputs, output A and output B. Output A is a
preset output used for the interpreter’s normal outgoing output, and output B (if selected during
programming) is used for translating from less common languages, or as a second outgoing language
output where different languages are to be distributed from the same desk.
Selection of the A or B outputs is by means of two push-buttons marked A and B. Red LEDs adjacent
to the push-buttons indicate which output has been selected. If output B is selected, the output
language from that desk can be automatically distributed to the other interpreter desk (booths) for
relay interpretation into other languages (if the auto-relay function is enabled in the desk
programming procedure).
11.9.3 Microphone (Micro)
A microphone on/off switch (Micro) controls the status of the units microphone while a Mute push-
button temporarily mutes the microphone for as long as the key remains pressed. An illuminated light
ring and a microphone status indicator (LED bar) indicates microphone on status.
11.9.4 Microphone locks
In its programming mode, the desk can be programmed with a microphone ‘Override’ or microphone
‘Interlock’ function, or given free microphone access ‘None’. The microphone interlocks are only
active when interpreter desks from different booths, try to gain access to the same channel.
11.9.5 ‘Override’
If programmed, the ‘Override’ function allows all interpreters assigned to the same output channel, to
switch-on their microphones and access the output channel on a First-In-First-Out basis - thus
switching off already active microphones. This function therefore, assures that only one microphone at
a time is active on a channel.
‘Interlock’
The interlock function permits only one microphone on a channel to be switched on at any time, thus
preventing other interpreters from using the same output channel. The ‘Interlock’ function therefore
operates on a First-In-First-Served basis.
‘None’
When programmed ‘None’, interpreters assigned to the same channel can switch on their
microphones simultaneously.
NOTE: In PC-based systems the ‘Override’, ‘Interlock’ and ‘None’ facility can be pro-
grammed for within booths or between booths. In stand-alone systems the ‘Override’,
‘Interlock’ and ‘None’ facilities are only active between booths.
11.9.6 Relay Interpretation with auto-relay
In circumstances where the original floor-language is ‘well known’ or not ‘so well known’, two different
operational procedures can be used. In normal operational mode (FIG 11-9) the original floor
language is well-known to all interpreters, and they listen to the original floor language for
interpretation. The translations are then fed to the language distribution channels. In situations where
interpreters are unfamiliar with the floor language and therefore unable to interpret it, the system
offers an automated relay interpretation facility (auto-relay - see FIG 11-10). An interpreter assigned
to translate the floor language, translates it into another language easily understood by other
interpreters. The floor language on all interpreter desks will be replaced by this transfer interpretation.
This transfer interpretation or “auto-relay” is then used as the base for further translations.
In the example shown in FIG 11-10, Japanese is the floor and the auto-relay facility is enabled on the
Japanese interpreter’s desk. This interpreter selects outgoing channel B and automatically relays an
English interpretation as AUTO-RELAY to all other desks for interpretation and also feeds the English
language distribution channel. The incoming channel AUTO-RELAY indicator shows on all other desks
that auto-relay is active.

2
Bosch Security Systems | 04-2003 | 3922 988 43318 en
Digital Congress Network | Installation and Operating Manual | Chapter 11 - System Set-up and Operation en | 11-16
Interpretation
FIG 11-8 Operation Interpreter unit LBB 3520/10
Microphone
Mute key
FLOOR
2ENG 3FR 4GER Japanese Indonesian
+-9 12
Incoming channel
language display
(abbreviated)
Incoming channel
quality indication
Outgoing Ch.A
language
Outgoing Ch.B
language
LC-display
LBB 3520/10
Call channel
Microphone
Headphone
Incoming channels
Outgoing channels
Alphanumeric
LC-display
Incoming channel
selector
Incoming channel
preselect keys with
LED Indicator
Out-going A-select
key with LED
indicator (red)
Out-going B-select
key with LED
indicator (red)
External message
key
Microphone with
light-ring indicator
Floor
loudspeaker
Loudspeaker
volume control
(floor only)
Headphone
tone/volume
controls
Floor LED
indication
Incoming floor
key
Auto-relay
indicator
Channel engaged
indicators (yellow)
Mic/headset
select switch
6.3 mm
headphone socket
3.5 mm
headphone socket
Headset connector
5-pole DIN
Microphone
On/Off key
Microphone status
indicator (red)
Out-going language
B-select keys
Intercom call-key to
chairman/operator

2
Bosch Security Systems | 04-2003 | 3922 988 43318 en
Digital Congress Network | Installation and Operating Manual | Chapter 11 - System Set-up and Operation en | 11-17
Operating the Interpreter Desk
FIG 11-9 Normal operation (floor active)
FIG 11-10 Relay Interpretation (Auto-relay active)
11.10 Operating the Interpreter Desk
11.10.1 Incoming Channel Selection
Using the desks three Incoming channel pre-select keys, a, b and c, the interpreter can quickly select,
one of three familiar incoming languages for translations. The diagram below shows the three pre-
select keys with their LED indicators.
11.10.2 Assigning Pre-select keys
Refer to interpreter desk overlay.
1. Select one of the keys a, b or c that is to be assigned to an incoming language channel.
2. When the assigned key has been pressed and its associated LED is lit, turn the incoming channel
selector knob ‘Relay select’ to the left or right to visually scan and select the required incoming
language. The last language selected will be assigned to the selected pre-select key.
3. The above procedure is used to assign the remaining two pre-select keys.
11.10.3 Incoming Floor switch and Auto-relay
1. Pressing the Incoming floor key, switches the incoming language channel to the floor channel or to
the Auto-relay channel, if Auto-relay has been programmed. This action illuminates the LED
marked ‘Floor’, or if applicable the LED marked ‘Auto-relay’.
11.10.4 Language Quality Indication
The language quality indication gives the interpreter an at-a-glance quality of the incoming language.
For example, FLOOR above an incoming language indicates that, that language is the original floor
language. A plus sign (+) displayed above an incoming language, indicates that the translation is based
on a direct translation of the original floor language. A minus sign (-) displayed above an incoming
language indicates that the translation is an indirect translation and based on the translation of another
translation derived from the original floor language.
1234
English FloorFloor
EnglishGermanFrenchJapanese
AAAA
ENGLISH
4
234
Japanese EnglishGermanFrench
AAA
English
B
Auto-relay
Floor
Floor
JAPANESE
Incoming Channel personal pre-select keys a, b and c
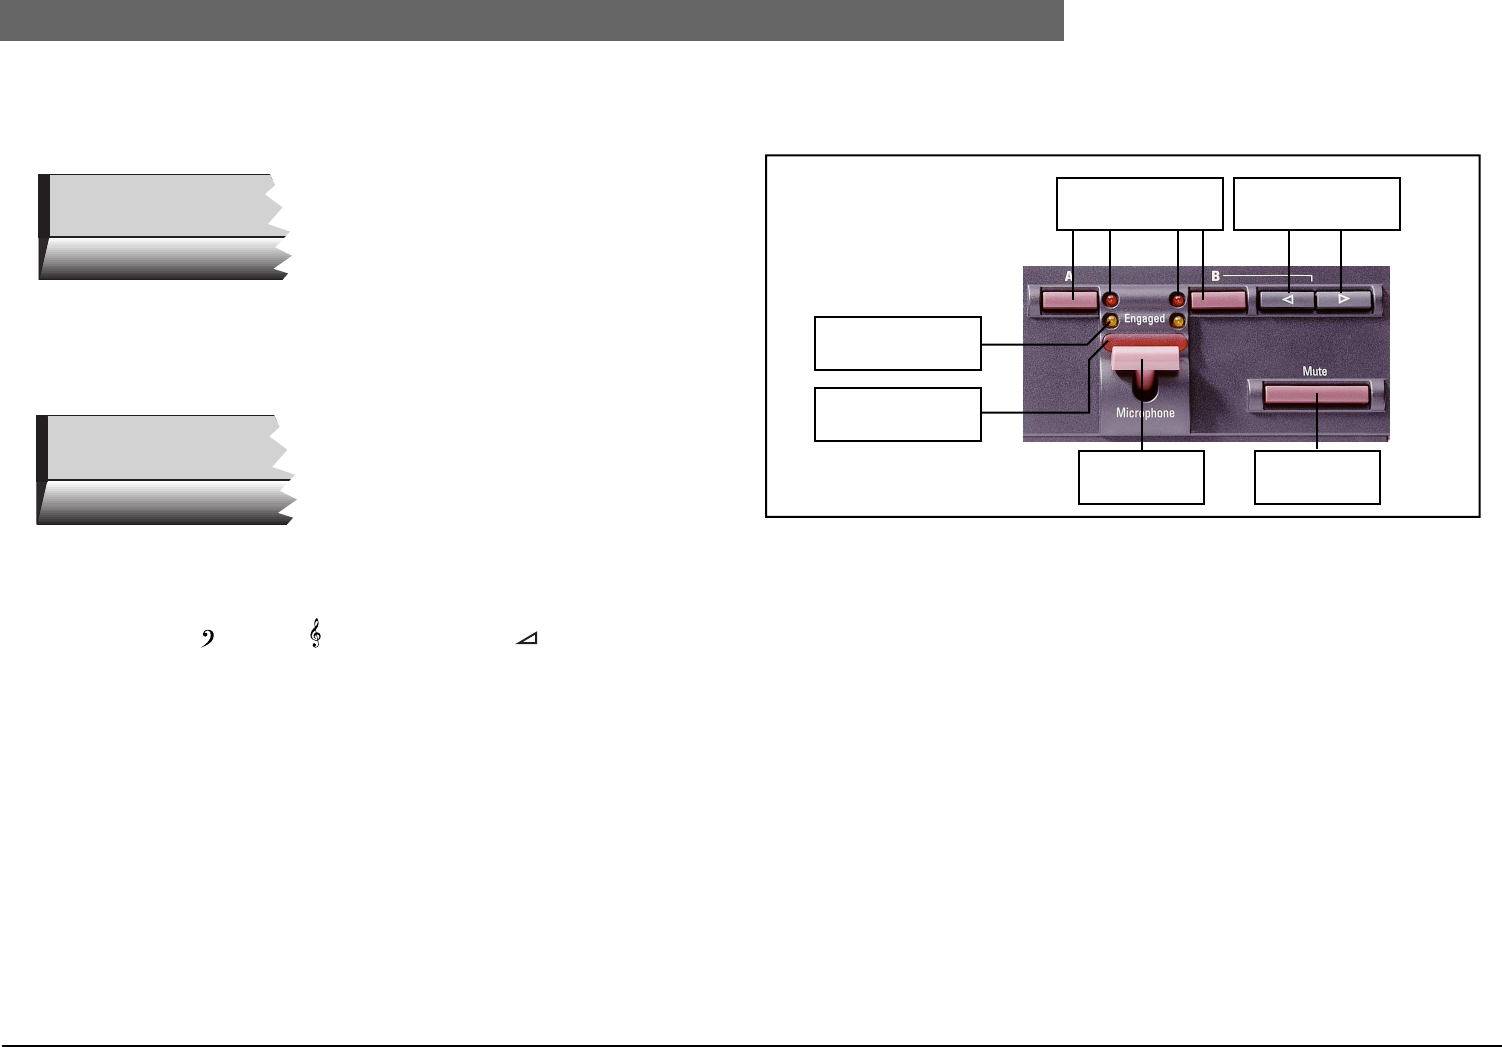
2
Bosch Security Systems | 04-2003 | 3922 988 43318 en
Digital Congress Network | Installation and Operating Manual | Chapter 11 - System Set-up and Operation en | 11-18
Operating the Interpreter Desk
The display below shows the interpreter’s desk in its operational mode, displaying three incoming
language channels. Channel 2ENG, channel 3FR, and Channel 4GER. For a list of language
abbreviations refer to Table 11.1, (PAGE 11-25).
The following display gives an example of the language Quality Indication function. The display
indicates that Channel 2ENG is the original floor language, while Channel 4GER (German) (+) is a
direct translation based on the original FLOOR language, whereas Channel 3FR (French) (-) is an
indirect translation based on a translation of a translation of the original FLOOR language.
11.10.5 Interpreter desk Listening
Two tone controls (bass , and treble ) and one volume control enables the adjustment of
the sound level and sound quality when using headphones or a headset when listening to the floor or
selected translations.
A built-in loudspeaker with volume control enables the interpreter to monitor the floor language only.
All interpreter desk loudspeakers within a booth are muted, when an interpreter’s microphone within
that booth is switched on.
11.10.6 Outgoing Channel Selection
To select the required outgoing language channels, the interpreter desk provides the following keys:
FIG 11-11 Outgoing Channel Selection
The interpreter desk offers three methods of distributing a translation. Using the A-output only, using
both the A-output + B-output, and using both the A-output + B-output with the Auto-relay facility.
A- Output
The A-channel is normally reserved for the interpreter’s most familiar outgoing language. Press the ‘A-
Channel select’ key to output on the A-Channel, its associated red LED illuminates.
A+B- Output
As well as using the A-output as described above, the interpreter can also select a second outgoing
language for distribution on channel B (if programmed), by using the desks ‘B-select’ up/down keys.
Pressing the ‘B-Channel select’ key, activates the Outgoing B-channel, while switching off the
Outgoing A-Channel. Their associated red LEDs act accordingly.
A+B-Output + Auto-relay facility
As well as using the outgoing A and B-channels, an additional facility is available for use where an
exotic language is unfamiliar to the majority of interpreters. In the desk programming mode the
Outgoing B channel of an interpreter desk can be assigned with the auto-relay facility. This facility
automatically replaces the incoming floor channel with the assigned auto-relay language, which is
distributed to other interpreters to base their translations. To output the auto-relay procedure, the
assigned interpreter simply presses the ‘Outgoing B’ key on his desk.
FLOOR FLOOR FLOOR 9
2ENG 3FR 4GER J
FLOOR - + 9
2ENG 3FR 4GER J
Outgoing A - B select
keys with indicators
Outgoing channel B
select keys (up/down)
Microphone
On/Off key
Microphone
Mute key
Channel engaged
indicators
Microphone
status indicator
2
Bosch Security Systems | 04-2003 | 3922 988 43318 en
Digital Congress Network | Installation and Operating Manual | Chapter 11 - System Set-up and Operation en | 11-19
Operating the Interpreter Desk
11.10.7 Typical Displays showing outgoing channels
The following display shows the interpreter desk displaying both the incoming language channels and
the outgoing language channels The incoming languages are displayed in their abbreviated form along
with their channel number, and the outgoing channels are displayed in full with the channel number
displayed above.
Engaged LEDs
The A and B outgoing channel engaged LEDs, indicate when the relevant channels are occupied. A
flashing engaged LED, indicates that this desk’s and other interpreter desk(s) microphones are
switched on to the same channel.
A flashing engaged LED (depends on the microphone interlock selected) indicates that the desks
microphone activating key is in the ON position, but the microphone is not activated. A constant
illuminated LED, indicates an attempt to access an occupied channel while the desks microphone
activating key is in the OFF position. All indications disappear as soon as the channel is unoccupied.
NOTE: In the software application module ‘Simultaneous Interpretation’ LBB 3572, the
option ‘Flashing microphone LED bar when engaged’ can be enabled. If enabled, the micro-
phone LED bar above the microphone switch will flash together with the ‘Engaged LEDs
giving improved engaged status visibility. This option remains also active when the
‘Simultaneous Interpretation. software LBB 3572 or the PC is switched OFF. Disabling this
function is only possible via the software module ‘Simultaneous Interpretation LBB 3572.
Override/Interlock/None
In the desk’s programming mode, the desks can be programmed to provide an ‘Override’, ‘Interlock’
or a ‘None’ function.
Override.
The override function enables interpreters on the same channel to override each others microphone
on a First-In-First-Served basis. To activate the microphone when overridden, switch the microphone
on/off key to off and switch on once again.
Interlock
The interlock function if programmed permits only one microphone, on one channel, at a time to be
activated between and in booths. The interlock function therefore prevents other interpreters located
in different booths from using the same Outgoing channel at any one time until the active microphone
has been switched off.
NOTE: Note: To activate the microphone in an interlock situation, wait till the engaged LED
extinguishes, put the microphone on/off key to off and then switch on again.
None
When programmed None, no override or interlock facility is available, this means that interpreters
assigned with the same outgoing channel are able to access the output channel and switch on their
microphones simultaneously.
NOTE: In a stand-alone system their is no ‘Interlock’ or ‘Override’ facility available within a
booth. The system default is set to ‘None’. In PC-based systems all functions are available
either between booths or within booths.
Microphone operation
To activate the microphone place the microphone activating key forward, the microphone status LED
bar and light-ring illuminates. To switch the microphone off pull the microphone switch towards you,
the microphone status LED bar extinguishes. If access to the output channel is denied, the system may
be interlocked. In such a case, wait till the relevant engaged LED extinguishes, then release the
microphone activating key (if on) and switch on again.
The ‘Mute’ key when pressed temporarily switches the microphone off (if on).
Call
The Call push-button when pressed opens the intercom communication channel, between the
interpreters and the intercom operator.
Message distribution
When the central operator distributes a message using the Message Distribution Software Package
LBB 3582, the message is shown on the top-line of the display, using additional screens if the message
is longer than one screen.
Intercom operation
In a system, interpreter desks fitted with a handset can be used for intercom communication with the
intercom operator. To use this facility proceed as follows:
1. Lift the handset to open the intercom communication line
2. At the operator position, an LED illuminates indicating an incoming intercom call.
3. If the intercom-line is in use, a ‘busy-tone’ is heard. In this case replace the handset and repeat the
above steps after an appropriate delay.
In PC-based systems running the DCN software package Intercom LBB 3573, participants using a unit
with an installed handset can also participate in private two-way communication.
An incoming intercom call is indicated by a text on the top-line of the display.
NOTE: The intercom function can also be performed with the unit’s microphone and the
headphone.
FLOOR
2ENG 3FR 4GER Japanese Indonesian
+-9 12
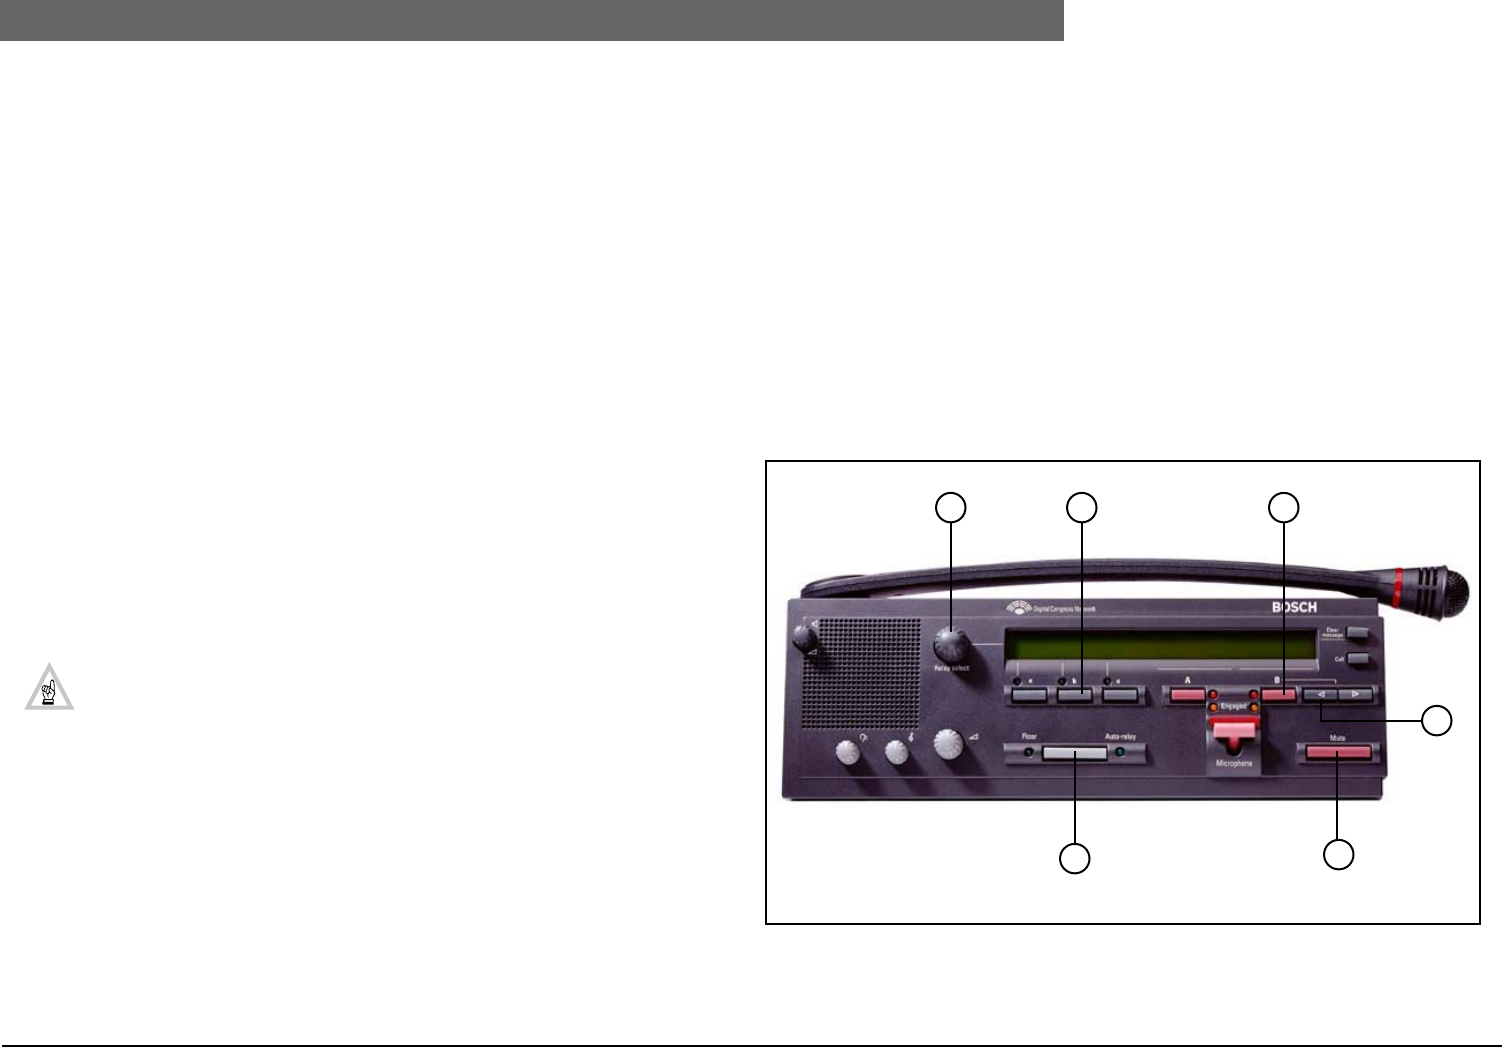
2
Bosch Security Systems | 04-2003 | 3922 988 43318 en
Digital Congress Network | Installation and Operating Manual | Chapter 11 - System Set-up and Operation en | 11-20
Programming the Interpreter desk
11.11 Programming the Interpreter desk
Introduction
Entering the interpreter desk into its programming mode, enables the desk’s individual and
interpretation system parameters to be programmed manually prior to the start of a conference.
11.11.1 Programming the Interpreter desk
Using the desks built-in LC-display and easy to use menu system the following menus are available: It
should be noted however that some menus are applicable only to the desk being programmed, while
other menus are applicable to all interpreter desks installed in the system. Therefore the following
menus will be assigned as ‘Desk only’ and ‘System’. When programming the ‘System’ a single desk only
should be assigned for the task. This is necessary because all interpreter desks can program the system
parameters.
Menu a Select user language (System)
Menu b Select booth number (Desk only)
Menu c Select desk number (Desk only)
Menu d Select number of channels (System)
Menu e Select language list (System)
Menu f Select language Channels (System)
Menu g Select outgoing channel via A-output (Desk only)
Menu h Select outgoing channel(s) via B-output (Desk only)
Menu j Select number of auto-relay supply booth(s) (System)
Menu k Select auto-relay supply booth (System)
Menu l Select Microphone locks between booths (System)
END End, use keys ‘b” and ‘B’ to return to operational mode
NOTE: PC based systems using the DCN Simultaneous software package LBB 3572 have
extended control and preset facilities as compared to a stand-alone interpretation system.
The B-channel, auto-floor function, and interlock function of individual desks can be over-
ruled by the PC. The operator can preset and update the language channel routing on both
outgoing A and B outputs on all interpreter desks installed in the system, and assign free or
fixed selection of output channel numbers on outgoing output B.
In PC based systems only the Menu b (Select booth number) and the Menu c (select desk number)
need to be programmed manually on each desk. All other menus are programmed from the PC.
When in the programming mode some of the desks keys are re-defined as programming keys.
The following is an explanation of the redefined keys.
Explanation of redefined keys:
Normal operational Mode Programming Mode
1. Relay select : Input Select (Left Up Right down)
2. Pre-select b : Mode selection
3. Outgoing B : Mode selection
4. B-select : Menu Select (up - down)
5. Mute : Clear key
6. Floor : Enter key
FIG 11-12 Redefined programming keys (Interpreter desk LBB 3520/10)
1 2 3
4
5
6
2
Bosch Security Systems | 04-2003 | 3922 988 43318 en
Digital Congress Network | Installation and Operating Manual | Chapter 11 - System Set-up and Operation en | 11-21
Programming the Interpreter desk
11.11.2 Entering the desks programming mode
Before attempting to program the interpreter desk, ensure that the system has first been initialized
(see Chapter 11.1 Initializing). If the system has been initialized and the display shows ‘DESK NOT
INSTALLED‘ ,the desk is ready to be programmed.
NOTE: Only one desk can be programmed at the same time.
To enter the desk in to its “Programming” mode proceed as follows::
1. Press the key ‘Pre-select b’ and the ‘Outgoing B’ keys simultaneously.
The Installation mode is shown as follows:
NOTE: Due to the length of the opening message, the message is displayed over additional
screens. The message in full is as follows:
11.11.3 Menu Programming procedures
STEP 1. Press the ‘B-Select’ up/down keys < > to scroll through and select the required
Installation menu.
STEP 2. Once in the chosen menu, rotate the ‘Relay select’ knob (left, up, right, down) to high-
light the required selection. Arrow brackets <..> highlight the chosen entry. If this
function is not available, press the ‘Mute’ key to clear a previous setting.
A previous setting is displayed with square brackets [..].
STEP 3. To input and confirm the selected entry, press the ‘Floor’ key. Once entered, the
selected entry is surrounded with square brackets [..].
STEP 4. Press the ‘Mute’ key to clear a previous settings. Pressing this key throughout the
programming mode allows a previous settings to be cleared, ready for new input data
and errors to be corrected.
* * * * * * * DESK NOT INSTALLED * * * * * * *
Installation mode, press ‘Floor’ to
enter or ‘Mute’ to clear, use ‘Select’
knob to select option and B - select ‘<>’
keys to select next or previous function
Installation mode, press ‘Floor’ to enter or
‘Mute’ to clear, use ‘Relay select’ knob to
select option and B-select ‘<>’ keys to
select next or previous function.
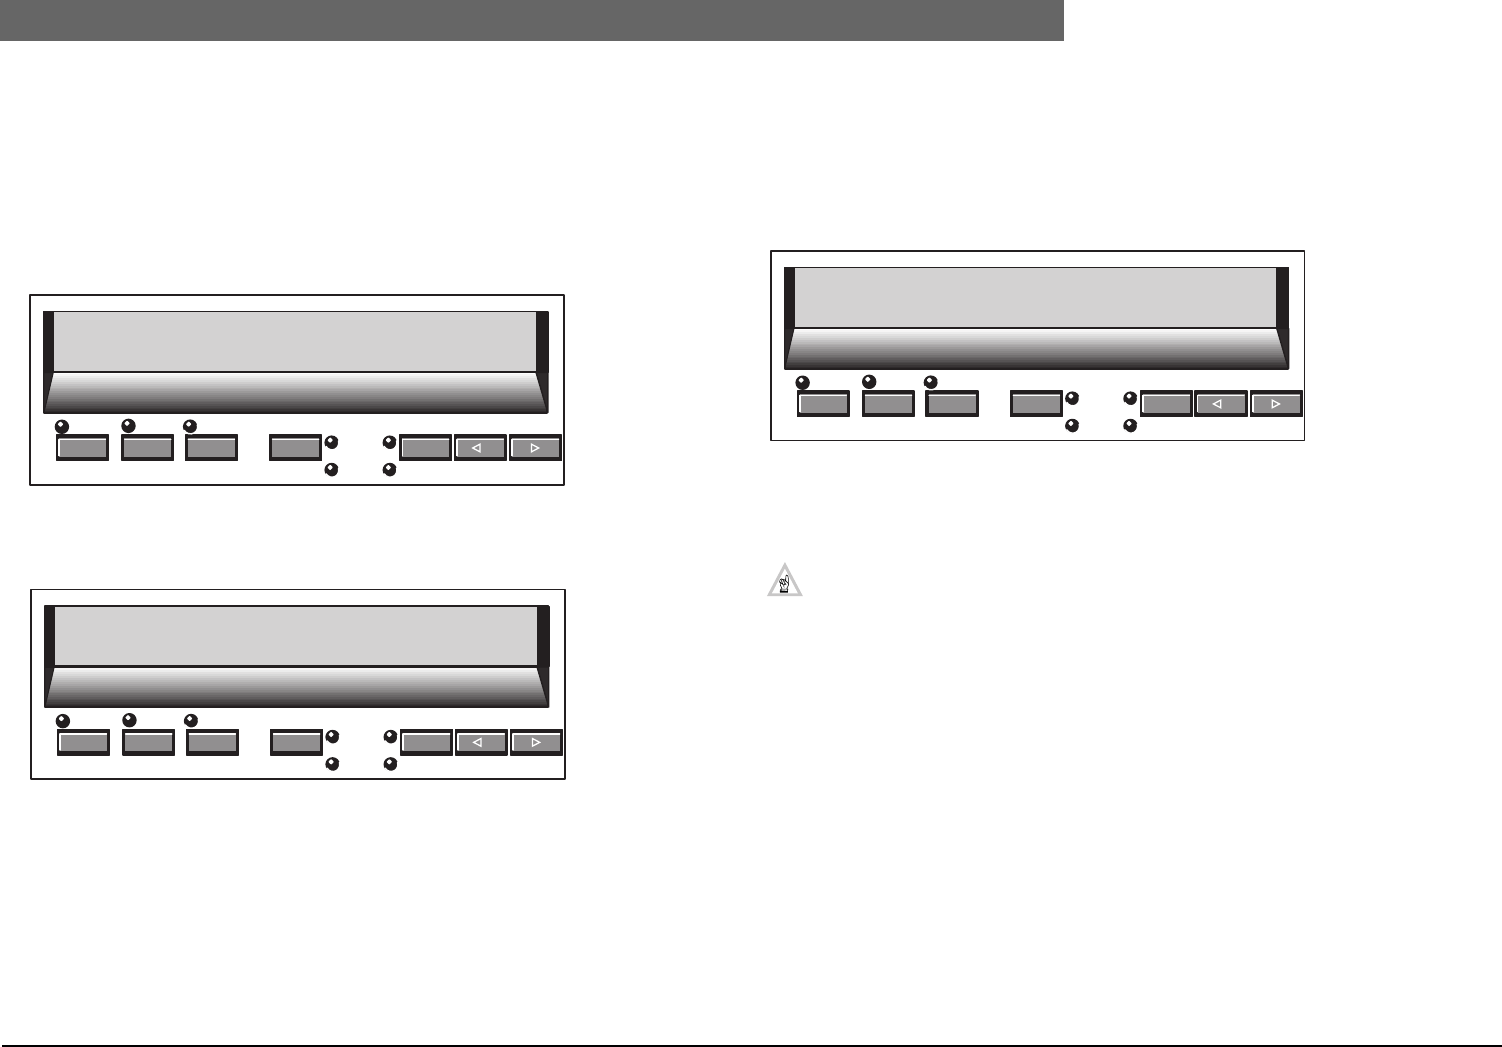
2
Bosch Security Systems | 04-2003 | 3922 988 43318 en
Digital Congress Network | Installation and Operating Manual | Chapter 11 - System Set-up and Operation en | 11-22
Programming the Interpreter desk
MENUS
Menu a. SELECT DISPLAY PROGRAMMING LANGUAGE
To set the required language for display when programming the desk. The language set, for all
interpreter desks installed in the system. If a language is not set, the desk will revert to its default
[ENGLISH].
1. Select Menu a, ‘Select user Language’ menu as described in step 2 (Programming procedures).
The following Menu should be displayed:
2. Rotate the ‘Relay select’ knob to scroll and select the required user language as described in
Programming procedures Step 3.
3. To enter the selected language press the ‘Floor’. Refer to step 4.
Menu b. SELECT BOOTH NUMBER
To assign the interpreter desk to a specific booth. Each interpreter desk installed in the system needs
to be programmed individually.
Procedure:
Select Menu b, ‘Select booth number’ as described in step 2 (Programming procedures).
The following Menu is displayed:
1. Rotate the ‘Relay select’ knob to scroll and select the required booth number as described in
Programming procedures Step 3.
2. Press the ‘Floor’ key to enter the required booth number. Refer to step 4.
NOTE: The booth number selected can be different from the channel number.
a
A
Engaged
B
bc
Select user language: <ENGLISH> FRANCAIS
DEUTCH ITALIANO ESPANOL NEDERLANDS a
a
A
Engaged
B
bc
Select user language: ENGLISH FRANCAIS
DEUTCH ITALIANO ESPANOL [NEDERLANDS] a
a
A
Engaged
B
bc
Select booth number:
<1> 2 3 4 5 6 7 8 9 10 11 12 13 14 15 b
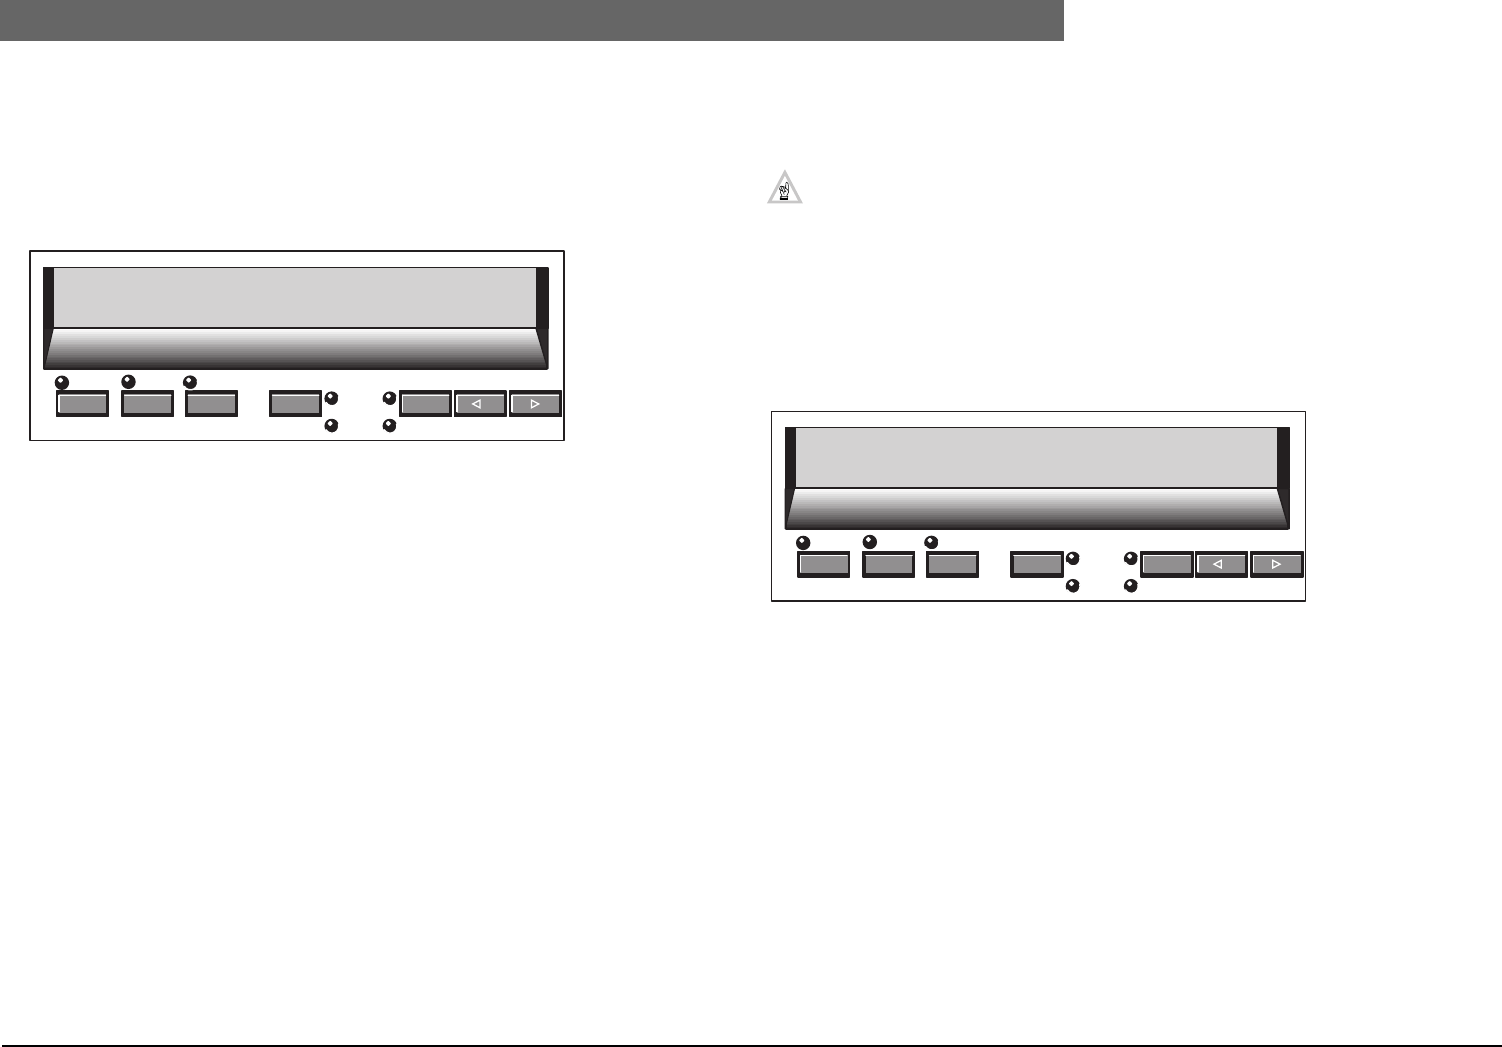
2
Bosch Security Systems | 04-2003 | 3922 988 43318 en
Digital Congress Network | Installation and Operating Manual | Chapter 11 - System Set-up and Operation en | 11-23
Programming the Interpreter desk
Menu c. SELECT DESK NUMBER WITHIN A BOOTH
To assign the interpreter desk with a specific number within a booth. Each interpreter desk installed
in the system needs to be programmed individually.
Procedure:
Select Menu c, ‘Select desk number’ as described in step 2 (Programming procedures). The following
Menu is displayed:
1. Rotate the ‘Relay select’ knob to scroll and select the required booth number as described in
Programming procedures Step 3.
2. Press the ‘Floor’ key to enter the required desk number. Refer to step 4.
Menu d. SELECT NUMBER OF CHANNELS
To set the number of language channels. In stand-alone systems the maximum number of channels
available is 11 in PC-based systems 15.
NOTE: Up to 30 interpretation channels are supported with PC software when special
interpreter desks and language channel selectors are used. For more information about this
functionality refer to the manual for software application ‘Simultaneous Interpretation’
LBB 3572, Appendix A.
Once set, this number will be applicable for all desks installed in the system, therefore this procedure
only needs to be done once.
Procedure:
Select Menu d, ‘Select number of channels’ as described in step 2 (Programming procedures). The
following Menu is displayed:
1. Rotate the ‘Relay select’ knob to scroll and select the required number of channels as
described in Programming procedures Step 3.
2. Press the ‘Floor’ key to enter the required number of channels. Refer to step 4.
a
A
Engaged
B
bc
Select desk number:
<1> 2 3 4 5 6 c
a
A
Engaged
B
bc
Select number of channels:
<1> 2 3 4 5 6 7 8 9 10 11 d
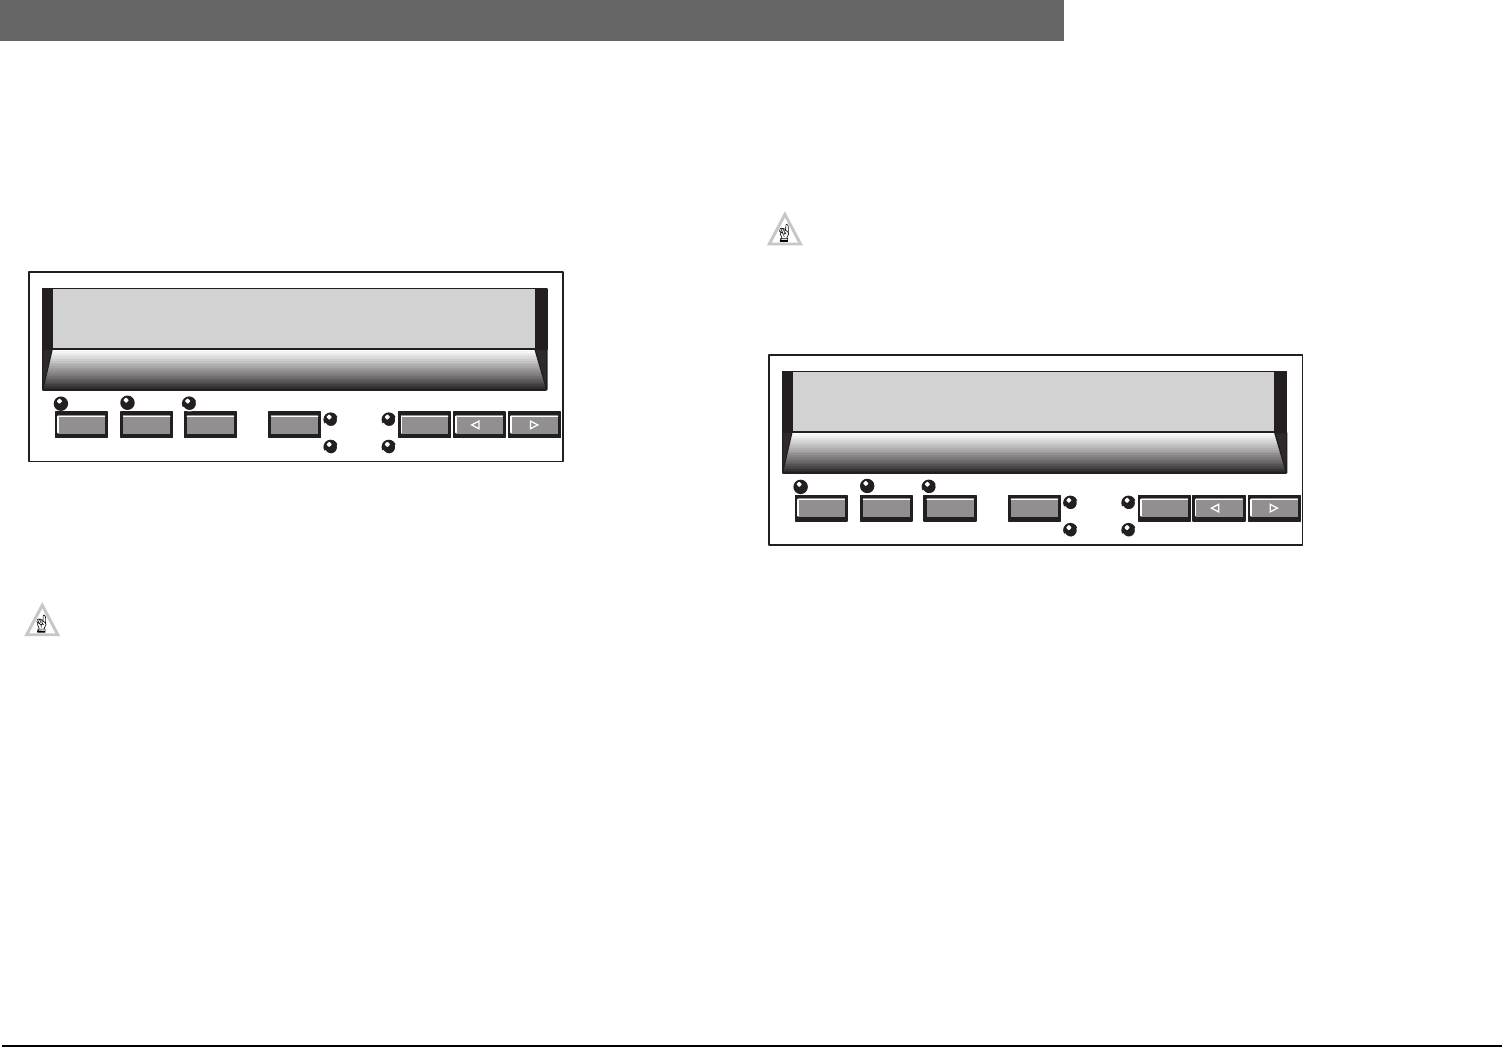
2
Bosch Security Systems | 04-2003 | 3922 988 43318 en
Digital Congress Network | Installation and Operating Manual | Chapter 11 - System Set-up and Operation en | 11-24
Programming the Interpreter desk
Menu e. Select language list
To select a list of languages and their abbreviations for display in either ‘English’, ‘French’ or in their
‘Original’ language. The language set is for all interpreter desks installed in the system, therefore this
procedure only needs to be done once.
Procedure:
Select Menu e, ‘Select language list’ as described in step 2 (Programming procedures). The following
Menu is displayed:
1. Rotate the ‘Relay select’ knob to scroll and select the required language list as described in
Programming procedures Step 3.
2. Press the ‘Floor’ key to enter the required language list. Refer to step 4.
NOTE: Refer to Table 11.1. for the lists of languages and their abbreviations.
Menu f. Select language for channels
To assign languages (up to 11 channels for stand-alone systems) to a channel for selection by the
interpreters. The number of channels assigned is dependent of the number of channels set in menu d
‘Select number of Channels. The language(s) set in this menu are set for all interpreter desks installed
in the system and therefore needs only to be done once.
NOTE: if no channels where selected in Menu d, this menu will be bypassed and the next
programming menu, Menu g will be displayed.
Procedure:
Select Menu f, ‘Select language for channel’ as described in step 2 (Programming procedures).
The following Menu is displayed:
1. Rotate the ‘Relay select’ knob to scroll and select the required language as described in Pro-
gramming procedures Step 3.
2. Press the ‘Floor’ key to enter the required language to the required channel number.
Refer to STEP 4.
3. If more than one channel needs assigning, use the B-select ‘Up’ key to select the remaining
channels. Refer to Table 11.1. for the lists of languages and their abbreviations.
a
A
Engaged
B
bc
Select language list:
<ENGLISH> FRENCH ORIGINAL e
a
A
Engaged
B
bc
Select language for channel 1:
<ENG - ENGLISH> f
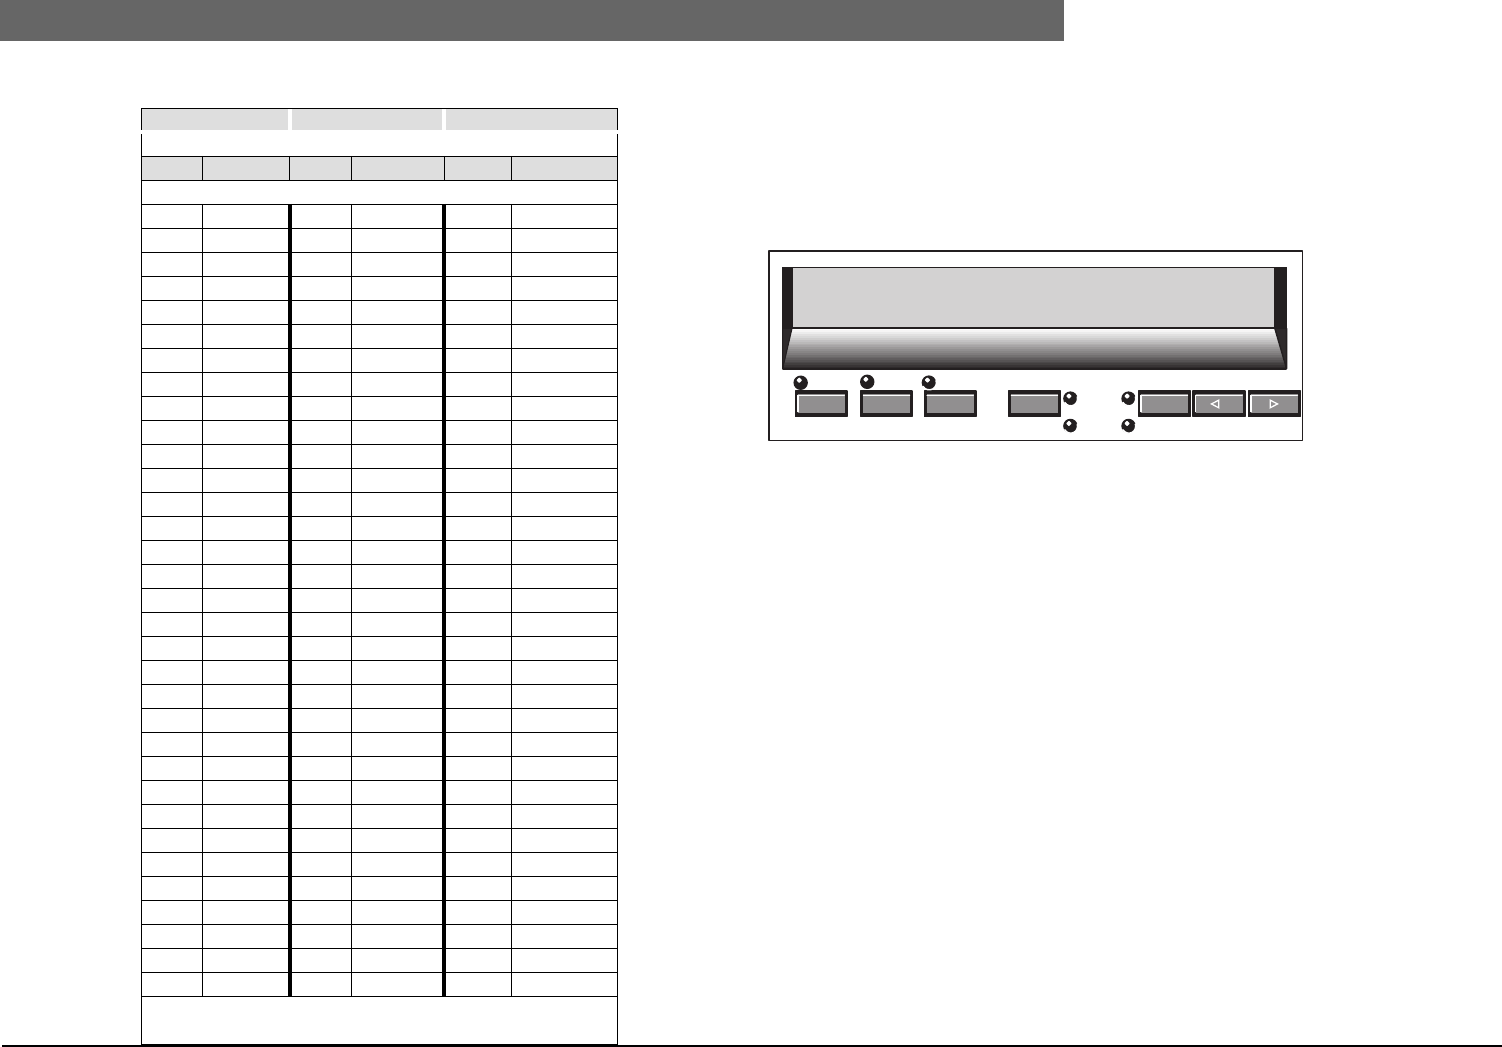
2
Bosch Security Systems | 04-2003 | 3922 988 43318 en
Digital Congress Network | Installation and Operating Manual | Chapter 11 - System Set-up and Operation en | 11-25
Programming the Interpreter desk
Menu g. Select outgoing channel via A-output
To set the desk’s A-output channel number. The number set is only for the desk being programmed.
The number of channels is determined by the number of channels assigned in Menu d.
Procedure:
Select Menu g, ‘Select outgoing channel via A-output’ as described in step 2 (Programming
procedures). The following Menu is displayed:
1. Rotate the ‘Relay select’ knob to scroll and select the required channel number as described in
Programming procedures Step 3.
2. Press the ‘Floor’ key to enter the required channel number. Refer to step 4.
Table 11.1 Language and Abbreviations
ENGLISH FRENCH ORIGINAL
IN OUT IN OUT IN OUT
ALB Albanian ALB Albanais SQ Shqip
ARA Arabic ARA Arabe AR Arabi
BUL Bulgarian BUL Bulgare BG Balgarisk
CAT Catalan CAT Catalan CA Catala
CHI Chinese CHI Chinois ZH Zhongwen
CZE Czech TCH Tchèque CS Cesky
DAN Danish DAN Danois DA Dansk
DU Dutch HOL Hollandais NL Nederlands
ENG Dutch ANG Anglais EN English
FIN Finnish FIN Finnois FI Suomi
FR French FR Français FR Français
GER German AL Allemand DE Deutsch
GRE Greek GRE Grec EL Ellinika
HEB Hebrew HEB Hébreu IW Iwrith
HUN Hungarian HON Hungrois HU Magyar
IND Indonesian IND Indonésien IN Indonesian
ITA Italian ITA Italien IT Italiano
JAP Japanese JAP Japonais JA Nihongo
KOR Korean COR Coréen KO Chonso-o
MAL Malay MAL Malais MS Malaysian
NOR Norwegian NOR Norvégien NO Norsk
PER Persian PER Persan FA Farsi
POL Polish POL Polonais PL Polski
POR Portuguese POR Portugais PT Português
ROU Romanian ROU Roumain RO Romana
RUS Russian RUS Russe RU Russkij
SER Serbian SER Serbe SR Srpski
SPA Spanish ESP Espagnol ES Español
SWE Swedish SUE Suedois SV Svenska
TUR Turkish TUR Turc TR Turkce
... .......... ... .......... ... .........
... .......... ... .......... ... .........
... OFF...... ... ARRETTE ... .........
IN = Incoming language channel abbreviations
OUT = Outgoing language channel text
a
A
Engaged
B
bc
Select outgoing channel(s) via A-output:
1 2 3 4 5 6 7 8 9 10 11 12 13 14 15 g
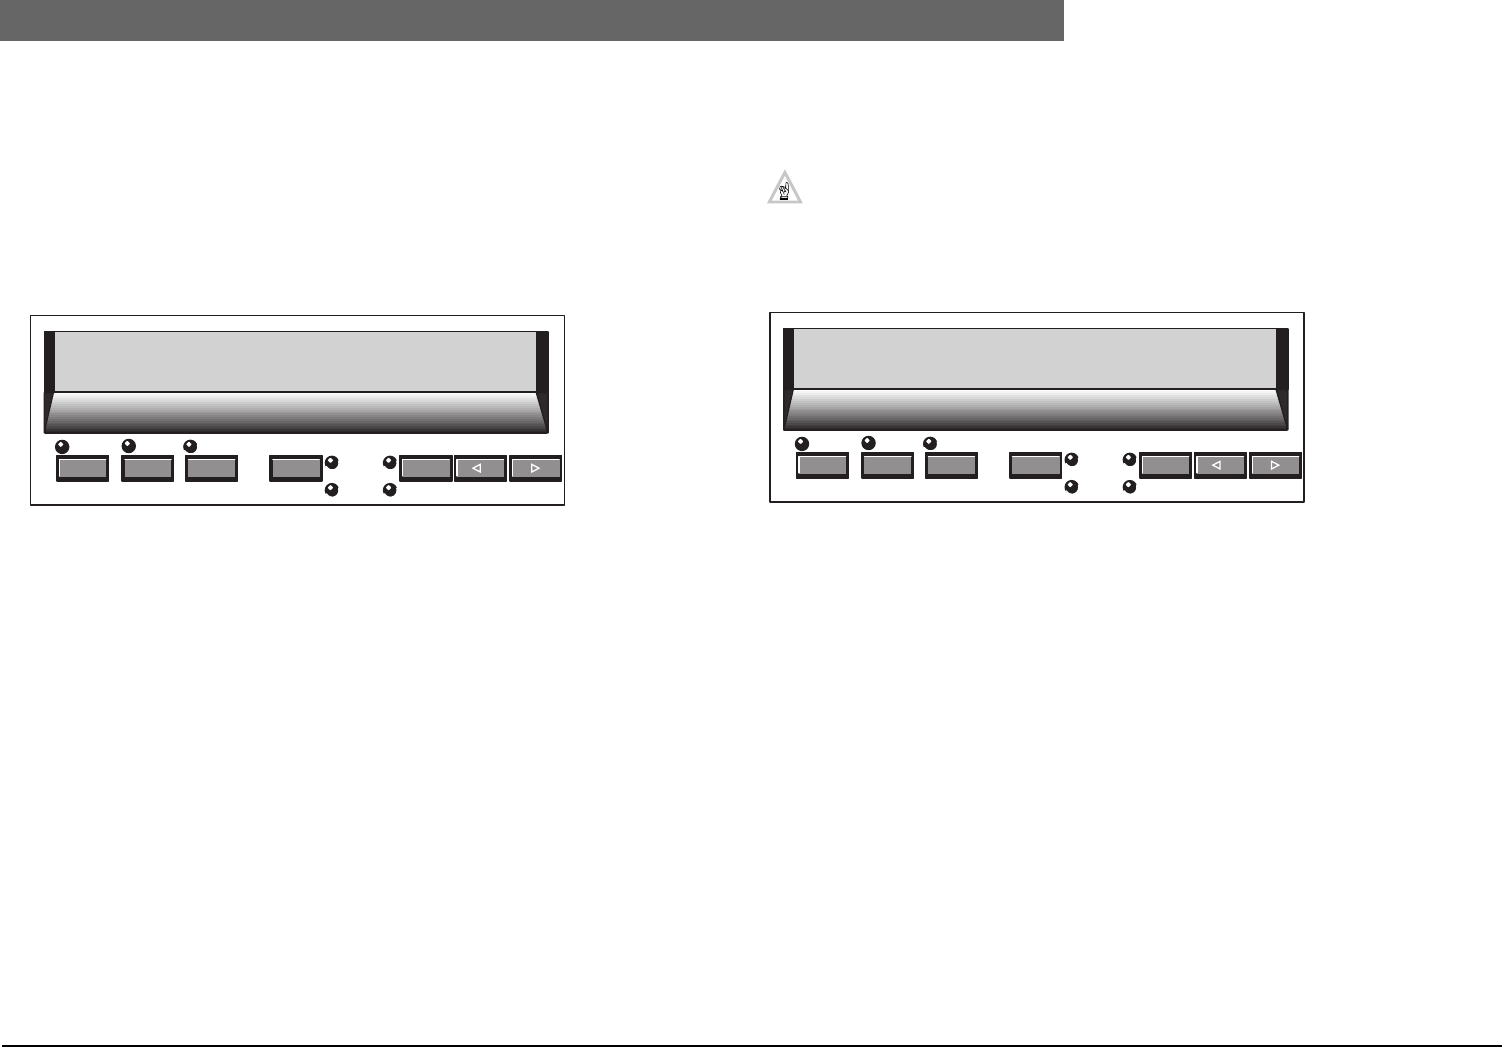
2
Bosch Security Systems | 04-2003 | 3922 988 43318 en
Digital Congress Network | Installation and Operating Manual | Chapter 11 - System Set-up and Operation en | 11-26
Programming the Interpreter desk
Menu h. Select outgoing channel(s) via B-output
To set the interpreter’s B-output. The B-output can be assigned to NONE or to ALL channels
(applicable to stand-alone systems only). If ALL is selected, this enables the interpreter to use the
‘B-select’ up/down keys to scroll and select the assigned language channels, assigned in Menu f, for
distribution on the B-output. The selection made in this menu is applicable only for the desk being
programmed.
Procedure:
Select Menu h, ‘Select outgoing channel via B-output’ as described in step 2 (Programming
procedures). The following Menu is displayed:
1. Rotate the ‘Relay select’ knob to scroll and select NONE or ALL as described in
Programming procedures Step 3.
2. Press the ‘Floor’ key to enter the required choice. Refer to step 4.
Menu j. Select number of auto-relay booth(s)
Selecting this menu the number of booths supplying an auto-relay function can be assigned.
The number of booths assigned will be set for the interpretation system.
NOTE: If NONE is selected the Menu k is bypassed.
Procedure:
Select Menu j, ‘Select number of auto-relay booths’ as described in step 2 (Programming
procedures). The following Menu is displayed:
1. Rotate the ‘Relay select’ knob to scroll and select NONE or 1, 2 or 3 as described in
Programming procedures Step 3.
2. Press the ‘Floor’ key to enter the required choice. Refer to step 4.
NOTES :
1. When selecting the number of booths providing an auto-relay function, it must be noted that this
function will not be available if the required desk within the selected booth has not had its B-out-
put programmed for auto-relay.
2. Using DCN’s simultaneous interpretation software package LBB 3572 (from release 8.10) it is
possible to set the number of ‘auto-relay’ booths to 15 (max). However when using the menu on
the desk itself, the settings done using the software package LBB 3572 (from release 8.10) will be
deleted allowing a maximum of 3 ‘auto-relay’ booths only to be set.
a
A
Engaged
B
bc
Select outgoing channel(s) via B-output:
<NONE> ALL h
a
A
Engaged
B
bc
Select number of auto-relay booth(s):
<NONE> 1 2 3 j
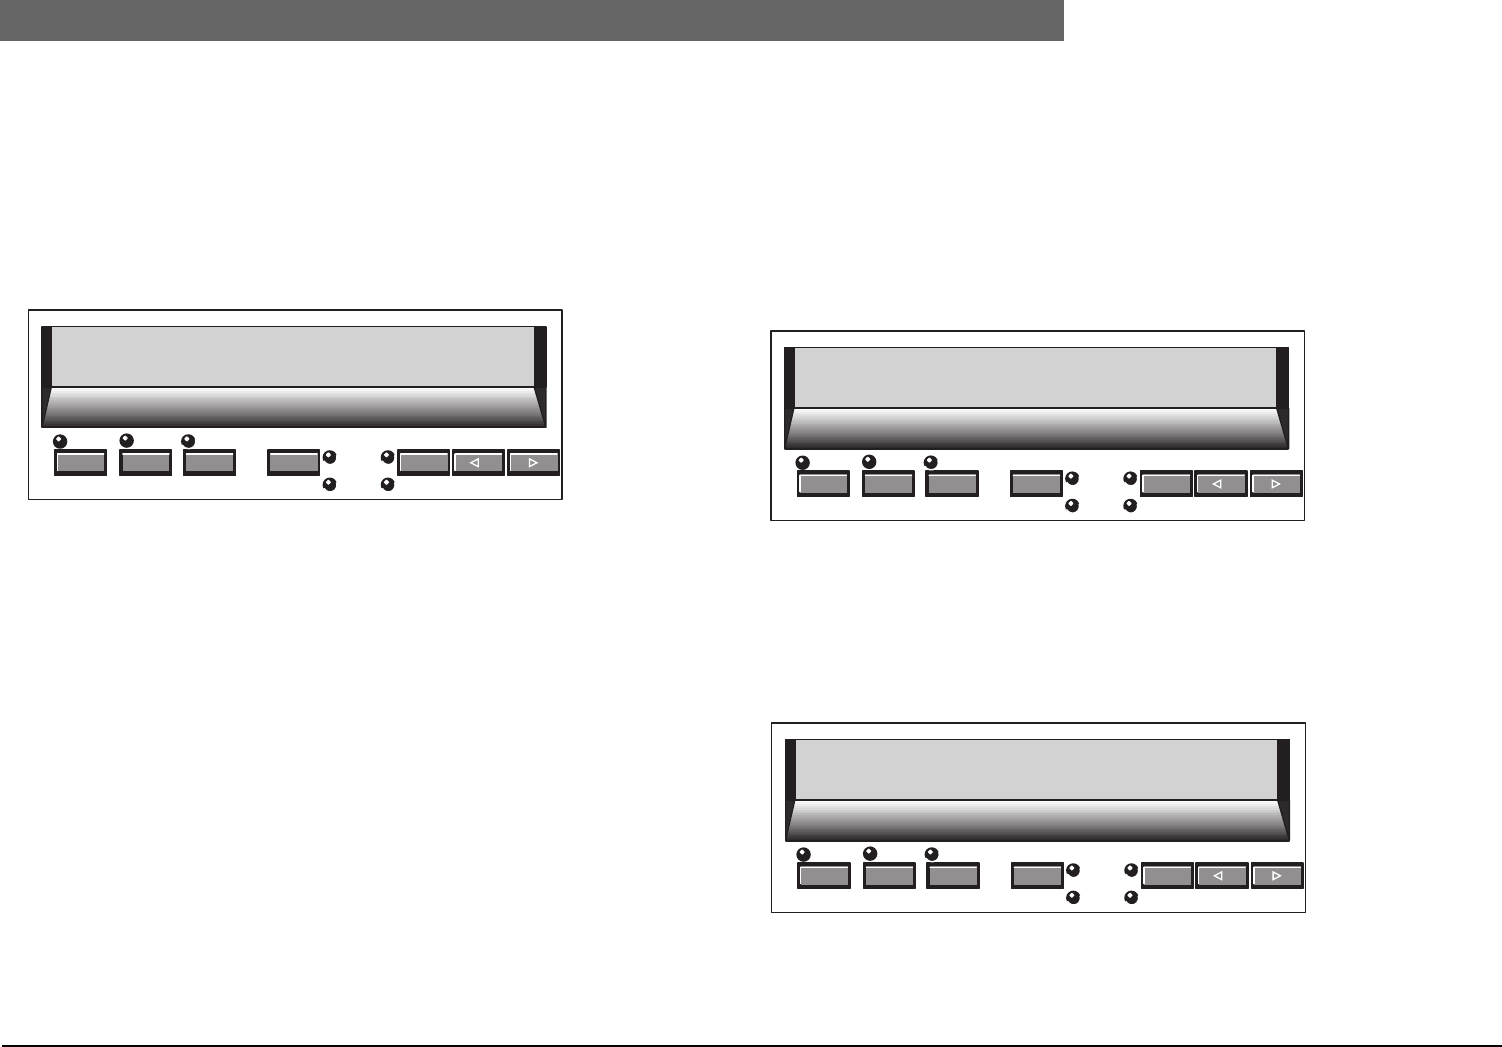
2
Bosch Security Systems | 04-2003 | 3922 988 43318 en
Digital Congress Network | Installation and Operating Manual | Chapter 11 - System Set-up and Operation en | 11-27
Programming the Interpreter desk
Menu k. Select auto-relay booth
This function is only available if in Menu J, ‘Select number of auto-relay booth(s)’ is set to either
[1, 2 or 3], if [ NONE] was selected, this menu is bypassed. The number of booths available for
selection is dependent on the number of booths installed. The selection made is set for all interpreter
desks installed in that booth. The following screen shows the selection for booth 1 only. If in Menu J,
2 or 3 booths have been selected, use the B-select key to select the remaining number of booths.
Procedure:
Select Menu j, ‘Select auto-relay booth n’ as described in step 2 (Programming procedures).
The following Menu is displayed:
1. Rotate the ‘Relay select’ knob to scroll and select the booth number as described in
Programming procedures Step 3.
2. Press the ‘Floor’ key to enter the required choice. Refer to step 4 or repeat the above steps for
the next booth.
Menu l. Select microphone locks between booths
Using this menu ‘Select microphone locks between booths’ enables an ‘Override’ and ‘Interlock’ facility
to be assigned between booths. The ‘Override’ function allows an interpreter to override another
interpreter in a different booth supplying the same interpretation channel. The ‘Interlock’ function,
blocks another interpreter from using the same channel in a different booth.
The function set is for all interpreter desks installed in the system.
Procedure:
Select Menu l, ‘Select microphone locks between booths’ as described in step 2 (Programming
procedures). The following Menu is displayed:
1. Rotate the ‘Relay select’ knob to scroll and select NONE, OVERRIDE or INTERLOCK as
described in Programming procedures Step 3.
2. Press the ‘Floor’ key to enter the required choice. Refer to step 4.
End Programming session
To end the programming session and enter the desk in to its normal operational mode press the key
‘Relay select b’ and the ‘B’ key simultaneously.
a
A
Engaged
B
bc
Select auto-relay booth 1:
<Booth 1> k
a
A
Engaged
B
bc
Select microphone locks between booths:
<NONE> OVERRIDE INTERLOCK
l
a
A
Engaged
B
bc
End, use keys ‘b’ and ‘B’ to return to
operational mode

2
Bosch Security Systems | 04-2003 | 3922 988 43318 en
Digital Congress Network | Installation and Operating Manual | Chapter 11 - System Set-up and Operation en | 11-28
Programming the Interpreter desk
This page has been left blank intentionally

2
Bosch Security Systems | 04-2003 | 3922 988 43318 en
Digital Congress Network | Installation and Operating Manual | Chapter 12 - Environmental Conditions & Maintenance en | 12-1
System
Chapter 12. Environmental
Conditions and
Maintenance
12.1 System
Where appropriate use cable ducts for extension and mains cables. In order to identify such cables
consider using cable tallies. Trunk-lines where appropriate should be divided into manageable
geographic locations - for example- use one trunk-line for committee members or dignitaries seated
on a stage, and reserve, if appropriate one trunk-line for interpreter desks etc.. It is recommended
that the chairman unit and interpreter desks are connected at the beginning of a trunk-line and not at
the end. In public areas where connectors and cables could be trampled on, consider using protective
metal covers according to the existing protection specification.
12.2 Public areas
12.2.1 Lighting
When placing contribution and channel selector units comprising an LC-display, ensure that the
displays are positioned in such away as to avoid direct lighting or sunlight. The recommended viewing
distance (due to the size of characters) is at arms length 1.5 m with a minimum light level of 50 lux,
or even shorter for channel selector units without back-lighting so as to operate the unit while still
having a good viewing angle.
12.2.2 Public displays (placement/viewing distance)
Place public displays in positions where they can be easily viewed by all participants concerned. Avoid
placement in direct lighting or sunlight. The size and viewing distance for public displays shall be
selected depending on the visibility criteria for each specific system. Aspects such as viewing distance,
character size for hall displays, contrast an brightness under the usual lighting conditions shall be taken
into account. Advise to be given by the equipment suppliers.
12.2.3 Public walkways
In public areas ensure that the cables attached to the system units, including extension cables, are run
and laid out in a neat and tidy manner where they do not interfere and hinder public walk ways.
12.2.4 Headphones with interpreter systems
Where appropriate place headphones/headsets with the relevant contribution units and interpreter
desks.
NOTE: Acoustic feedback, causing ‘Larsen’ effect (howling), is possible when connected
headphones/headsets reproducing the floor channel with a high volume, come too close to
an activated microphone. The minimum distance recommended between microphone and
headphones/headsets to avoid the ‘Larsen’ effect, depends on the type of headphones/
headset, the volume setting and if worn or laid down on a desk or table. User should be
instructed to keep sufficient distance or to set the volume level not louder than necessary.
12.2.5 Recommended speaking distance
The recommended speaking distance from microphones is 30 cm (1 ft.).
12.3 Technical rooms
It is recommended that in technical rooms where DCN’s central control equipment is housed the
following conditions should be met:
•When units are mounted in a 19” rack ,sufficient rack space is required between heat generating
units to allow proper ventilation. Proper precautionary measures should also be taken inside the
rack (e.g. forced ventilation inside racks) to keep the ambient temperature well below the
maximum allowed temperature so as to extend the life-time of the equipment.
Refer to Chapter 13.. ‘Technical data’ for the allowed temperatures.
•Ensure that the area is a dust-free environment.
•Ensure adequate air-conditioning.
•Ensure adequate ventilation.
•Ensure adequate lighting. But ensure that the lighting does not impede the central operators.
•Do not place objects on top of the units, which could fall into vents or which could cover them
and prevents proper cooling of the units electronics. This could infiltrate into the unit which
could cause trouble such as fire and electric shock.
•Do not expose units to rain or excessive moisture to avoid the risk of shock or permanent dam-
age to the system units.
•Do not attempt to remove the top cover of the Central Control Unit, Audio Media Interface
Unit and Extension Power Supply Unit as you will be exposed to a shock hazard. The covers
should only be removed by qualified service personnel. The units are designed for indoor use
only. Please refrain from subjecting the units to vibration, and never place the units near or over
a radiator, heat grill or in direct sunlight.
•In PC based systems, be warned that placing a magnet or loudspeaker system in the vicinity of
the PC will corrupt data files stored on the hard or disk or floppy disks.
WARNING: Damage to the power cable may cause fire or a potential shock hazard.

2
Bosch Security Systems | 04-2003 | 3922 988 43318 en
Digital Congress Network | Installation and Operating Manual | Chapter 12 - Environmental Conditions & Maintenance en | 12-2
Interpreter booths
12.4 Interpreter booths
Pressure and speed of work at most international conferences means that interpreters have to take
turn and turn about to keep pace and ensure a steady flow of smooth interpretation. This means that
each interpreter booth has to be large enough to accommodate at least two or maybe three
interpreters. The specification for interpreter booths as laid down by the international organization for
standardization is briefly as follows:
•Booths should be constructed at the back or the side of the hall.
•Booths should be elevated to provide an overall, unobstructed view of the chairman, the
speakers and any other relevant visual aids.
•A window should be installed across the whole length of the booth.
•The inner pane should be inclined with its upper edge towards the hall to avoid acoustic reflec-
tions and mirror effects. There should also be a side window so that interpreters can communi-
cate with one another visually. All glass used should satisfy sound insulation requirements.
•The dimensions of the booth, where possible should have a minimum size of 2.5 m (8.2 ft.) wide,
2.3 m (7.5 ft.) high and 2.4 m (7.8 ft.) deep for up to 6 languages, and 3.4 m (11.15 ft.) wide for
6 to 12 languages.
•Booths should not have interconnecting doors, but should open onto a carpeted corridor which
is normally used by delegates or members of staff.
•Air conditioning should be provided so that concentrates of carbon dioxide never exceeds
0.10%.
•Temperature should be controllable between 18 °C (64.5°F) and 22 °C (71.3°F) by means of an
individual regulator in each booth. The relative humidity should be maintained between 45% and
65%.
•The A-weighted sound pressure level generated by the air conditioning system, lighting and
other sound sources should not exceed 35 dB.
•A large working surface should be provided for each interpreter. This should be at least 50 cm
(19 in) deep and not be obstructed by equipment. The surface should be covered with a sound
absorbent material. The working surface available to each interpreter (0.4 m2 (4.2ft2) shall have
individual lighting to produce a uniform intensity of at least 300 lux.
•Reverberation time inside the booth should not exceed 0.5 seconds for frequencies between
125 and 4000 Hz.
•A rest room should be provided adjacent to the booths. A separate booth should be provided
for the engineer handling the control equipment. It should be similar to the interpreter booth.
12.5 Ventilation
Maintain good ventilation. Ventilation holes are provided on top of the central control units. Place the
units on a hard and level surface and position at least 4-inches from walls to ensure proper ventilation.
12.6 Cleaning
Do not use alcohol, ammonia or petroleum based liquids or abrasive cleaners to clean the
equipment. Unplug and clean with a soft cloth slightly dampened with mild soap and water solution.
Allow to dry completely before operating the relevant unit.
12.7 Storage
Disconnect the mains supply from all mains supplied units, if the units are not to be used for an
extended period of time. Store in a dust free dry area with adequate ventilation. Do not store in
areas affected by direct sunlight or in high or extreme cold conditions. See Technical data Chapter 13..
t is recommended that contribution and interpreter desks are stored in their relevant suitcases.

2
Bosch Security Systems | 04-2003 | 3922 988 43318 en
Digital Congress Network | Installation and Operating Manual | Chapter 13 - Technical Data en | 13-1
Mechanical data
Chapter 13. Technical Data
13.1 Mechanical data
Metric/imperial Conversion
Central Control Equipment
13.1.1 LBB 3500/.. Central Control Units
Mounting : Free standing on a table-top or mounted into a 19-inch rack
(Requires 2HE).
Dimensions H x W x D : 100 x 440 x 308 mm (3.9 x 17.3 x 12.1 in) excl. plugs
Width including brackets : 483 mm (19. in)
Depth including handles : 348 mm (13.7 in)
Weight LBB 3500/05 : 9.3 kg (20.5 lb)
LBB 3500/15 : 10.9 kg (24 lb)
LBB 3500/35 : 11.2 kg (24.7 lb)
13.1.2 Mounting brackets
(included with type No.s LBB 3500/xx, LBB 4106/00, LBB 3508)
Mounting brackets used for mounting central control equipment, and extension units.
NOTE: Two mounting brackets are supplied with each unit.
FIG 13-1 Mounting brackets
Length
2.54 cm = 1 inch
1 m = 39.37 inches
1 m = 3.28 ft.
Weight
1 kilogram = 2.2lbs. approximately
454 grams = 1 lbs. approximately
0.11
3
1.14
29
66
2.5
8±0.1
0.31±0.1
mm
in
0.17±0.1
4.5±0.1
1.53±1
39±1
88±0.2
3.46
3
0.11
22.3±0.2
0.8 ±0.2

2
Bosch Security Systems | 04-2003 | 3922 988 43318 en
Digital Congress Network | Installation and Operating Manual | Chapter 13 - Technical Data en | 13-2
Table-top units
13.1.3 LBB 4106/00 and LBB 4106/00 (D)
Extension Power Supply Unit
Mounting : Free standing on a table-top or mounted into a 19-inch rack.
(Requires 2HE - 0.5 width) See Chapter 4.12. 19”Rack mounting
DCN control units
Dimensions H x W x D : 100 x 220 x 308 mm (3.9 x 8.6 x 12.1 in) excl. plugs
Depth including handles : 348 mm (13.7 in)
Weight : 8.3 kg (18.2 lb)
13.1.4 LBB 3508/00 and LBB 3508 (D)
Audio Media Interface Unit
Mounting : Free standing on a table-top or mounted into a 19-inch rack
(Requires 2HE).
Dimensions H x W x D : 100 x 440 x 308 mm (3.9 x 17.3 x 12.1 in) excl. plugs
Width including brackets : 483 mm (19. in)
Depth including handles : 348 mm (13.7 in)
Weight : 9.1 kg (20. lb)
13.2 Table-top units
13.2.1 Conference Units
Delegate/chairman unit :LBB 3546/00 and LBB 3547/00
Dimensions H x W x D : 50 x 275 x 155 mm (2.0 x 10.8 x 6.1 in)(free-standing)
30 x 275 x 155 mm (1.2 x 10.8 x 6.1 in) (flush-mounted)
Weight (approx.) : 1.5 kg
Delegate units :LBB 3544/00 and LBB 3545/00
Dimensions H x W x D : 50 x 275 x 155 mm (2.0 x 10.8 x 6.1 in) (free-standing)
30 x 275 x 155 mm (1.2 x 10.8 x 6.1 in) (flush-mounted)
Weight (approx.) : 1.4 kg
Pluggable microphones :LBB 3549/00 and LBB 3549/50
LBB 3549/00 LBB 3549/50
Total length : 330 mm (13.0 in) 500 mm (19.7 in)
Weight (approx.) : 110 g (0.24 lb) 125 g (0.29 lb)
Interpreter desk :LBB 3520/10
Mounting : Free standing.
Dimensions H x W x D : 87 x 300 x 125 mm (3.4 x 11.8 x 4.9 in) excl. plugs
Length when microphone is placed in its transportable position: 340 mm ( 13.34 in)
Weight : approx: 1kg (2.2 lb)
13.2.2 Discussion Units
Delegate units : LBB 3530/00, LBB 3530/50, LBB 3531/00 LBB 3531/50
Chairman unit : LBB 3533/00, LBB 3533/50, LBB 3534/00, LBB 3534/50
Mounting : Free standing.
Dimensions H x W x D
without mic. : 63 x 124 x 172 mm ( 2.4 x 4.8 x 6.7 in)
height with folded mic.
(mic. in horizontal position) : 127 mm (5 in)
length of mic. from
mounting surface : /00 versions: 313 mm (12.3 in)
/50 versions: 488 mm ( 19.2 in)
Weight : ±900 g (±18 lbs)
13.2.3 LBB 3535/00 Dual Audio Interface Unit
Mounting : Free standing (table-top) flush mounting, floor or wall mounting.
Dimensions H x W x D : 35 x 100 x 170 mm (1.3 x 3.9 x 6.6 in) excl. plugs
Weight : 512 g (1.1 lb)

2
Bosch Security Systems | 04-2003 | 3922 988 43318 en
Digital Congress Network | Installation and Operating Manual | Chapter 13 - Technical Data en | 13-3
Table-top units
13.2.4 LBB 3536/xx Hand microphones
Dimensions Diam x H : 28 x 265 mm ( 1.1 x 10.4 in) Excl. cable
Weight : 280 g ( 0.6 lb)(/00)
: 320 g (0.7 lb)(/10)
13.2.5 LBB 3555/00 Intercom handset
Dimensions H x W x L : 57 x 53 x 215 mm (2.2 x 2.0 x 8.4 in)
Weight : 240 g (0.5 lb)
13.2.6 LBB 3525/00 Channel Selector housing
Mounting: : Free standing, or fixed on a table using the unit’s screw mounting
facilities and alternative cable in/outlets. Used for mounting Chan-
nel Selector Panel LBB 3524/00.
Cable out: : Left or right side of the unit.
Dimensions H x W x L : 70 x 135 x 95 mm (2.7 x 5.3 x 3.7 in)
Weight : 210 g (0.4 lb)
FIG 13-2 Channel Selector Housing
13.2.7 LBB 3527/00 Table-top housing for FM loudspeaker panel
Mounting: : Free standing, or fixed on a table using the unit’s screw mounting
facilities and alternative cable in/outlets. Used to accommodate 1
x FM loudspeaker panel LBB 3538/00 or 2 -flush-mounted units
with dimensions (H x W) 40 x 120 mm (1.57 x 4.72 in). For
example: channel selector panel LBB 3524/00 (lower position)
and microphone panel LBB 3537/xx (upperpanel) or any other
combination of units that fit the panel dimensions.
Cable out: : Left or right side of the unit.
Dimensions H x W x L : 73 x 120 x 108 mm (2.8 x 4.7 x 4.2 in)
Weight : 210 g (0.46 lb)
FIG 13-3 Table-top housing for FM Loudspeaker panel
34.6±0.3
1.36
69.2±0.3
2.72
18±0.2 (2x)
0.70 (2x)
0.15 (2x)
4±0.2 (2x)
2.28
58±0.3
4.56
116±0.3
mm
in
Cable holes
(only when required)
To previous unit
(alternative)
From next unit
(alternative)
To previous unit
From next unit
73
50°
40°
1086
80
120

2
Bosch Security Systems | 04-2003 | 3922 988 43318 en
Digital Congress Network | Installation and Operating Manual | Chapter 13 - Technical Data en | 13-4
Flush Mounted Equipment
13.3 Flush Mounted Equipment
13.3.1 LBB 3524/00 and LBB 3424/10 FM Electronic Channel Selector Panel
Mounting : Flush mounting using the units click-to-fit mechanism in a metal
panel with a thickness of 2 mm, or flush mounting in a wooden
surface using the units screw mounting facilities.
Dimensions H x W x D : 40 x 120 x 60 mm (1.5 x 4.7 x 2.3 in)
Weight : 230 g (0.5 lb)
FIG 13-4 Electronic Channel Selector Panel
13.3.2 LBB 3526/10 FM Electronic Channel Selector Panel
Mounting : Flush mounting using the units click-to-fit mechanism in a metal
panel with a thickness of 2 mm, or flush mounting in a wooden
surface using the units screw mounting facilities.
Dimensions H x W x D : 40 x 144 x 60 mm (1.5 x 5. x 2.3 in)
Weight : 230 g (0.5 lb)
FIG 13-5 Microphone with Flush-mounted Control Panel
4.33
110±0.2
100±0.2
3.93
0.19
5±0.2
1.18
30±0.2
1.25
32.4±0.2
2.4±0.1
0.09
0.04
1.2±0.2
mm
in
0.11
3
2.28
58
58
2.28
mm
in
133.5
118.5
4.6
0.31
8
0.31
3
0.11
8
1.18
30±0.2
1.39
35.5
3
0.11
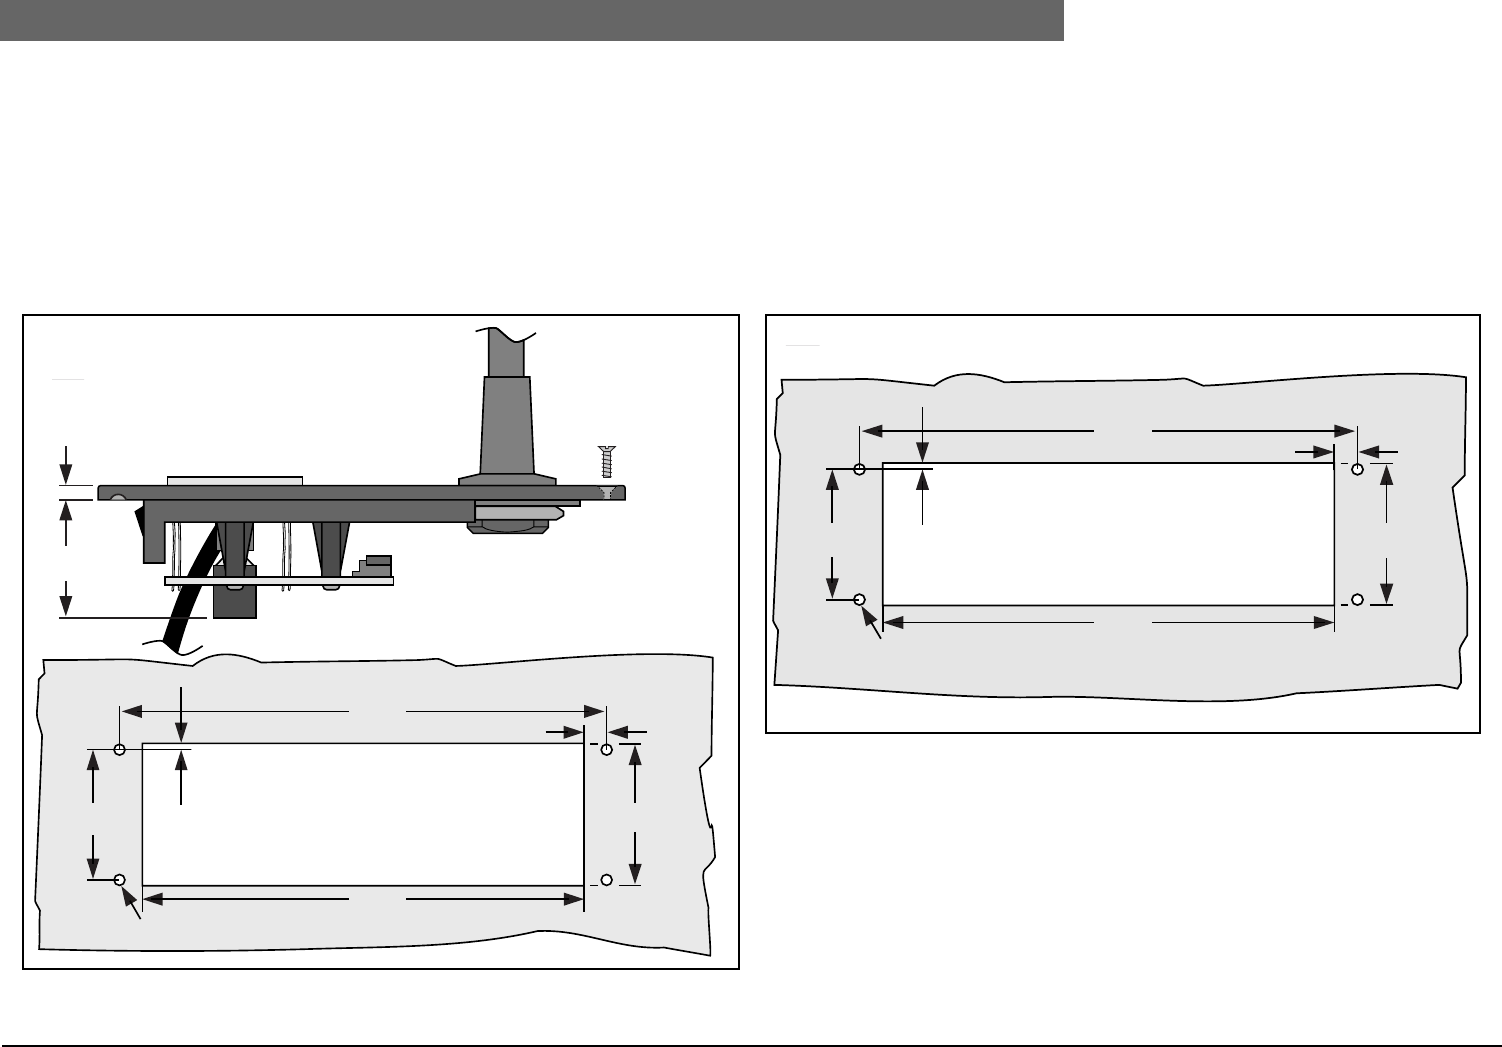
2
Bosch Security Systems | 04-2003 | 3922 988 43318 en
Digital Congress Network | Installation and Operating Manual | Chapter 13 - Technical Data en | 13-5
Flush Mounted Equipment
13.3.3 LBB 3537/00 and LBB 3537/50 Microphone with FM Control Panel
Mounting : Flush mounting using the units click-to-fit mechanism in a metal
panel with a thickness of 2 mm, or flush mounting in a wooden
surface using the units screw mounting facilities (2 screws pro-
vided).
Dimensions L x W : 120 x 40 mm ( 4.7 x 1.5 in)
Built-in depth : 30 mm (1.1 in)
Weight : 165 g (0.36 lb)
Microphone height : LBB 3537/00 : 310 mm ( 12.2 in) extended
LBB 3537/50 : 480 mm ( 18.9 in) extended
FIG 13-6 Microphone with Flush-mounted Control Panel
13.3.4 LBB 3537/10 FM Chairman Priority Control Panel
Mounting : Flush mounting using the units click-to-fit mechanism in a metal
panel with a thickness of 2 mm, or flush mounting in a wooden
surface using the units screw mounting facilities (2 screws pro-
vided).
Dimensions L x W : 120 x 40 mm (4.7 x 1.5 in)
Built-in depth : 30 mm (1.1 in)
Weight : 125 g (0.3 lb)
Microphone height : 310 mm (12.2 in) extended
FIG 13-7 Flush-mounted Chairman Control Panel
13.3.5 LBB 3539/00 Blank panel
Mounting : Flush mounting using the units click-to-fit mechanism in a metal
panel with a thickness of 2 mm, or flush mounting in a wooden
surface using the units screw mounting facilities (4 screws pro-
vided).
For cut-out dimensions refer to FIG 13-7.
Dimensions H x W x D : 40 x 120 x 25 mm (1.5 x 4.7 x 0.9 in)
Weight : 30 g (0.06 lb)
110±0.2
4.33
100±0.2
3.93
5±0.2
0.19
30±0.2
1.18
32.4±0.2
1.27
2.4±0.1
0.09
1.2±0.2
0.04
26.5
1.04
3
0.1
mm
in
110±0.2
4.33
100±0.2
3.93
5±0.2
0.19
30±0.2
1.18 32.4±0.2
1.27
2.4±0.1
0.09
1.2±0.2
0.04
mm
in
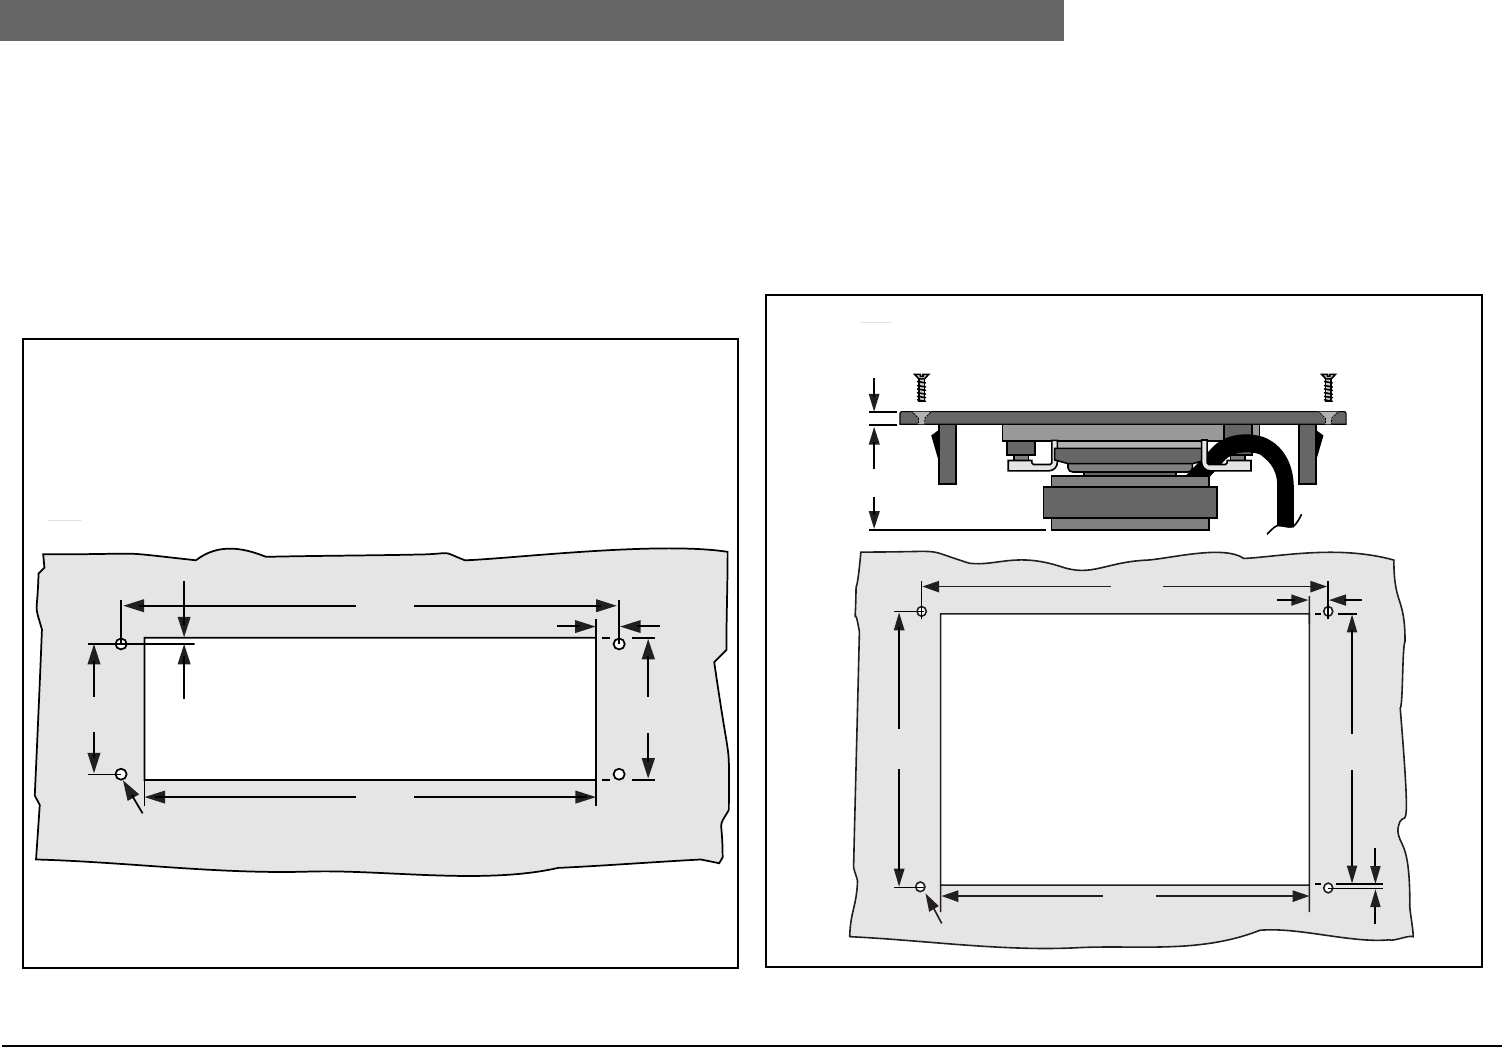
2
Bosch Security Systems | 04-2003 | 3922 988 43318 en
Digital Congress Network | Installation and Operating Manual | Chapter 13 - Technical Data en | 13-6
Flush Mounted Equipment
13.3.6 LBB 3537/20 and LBB 3537/50 FM Microphone Control Panel
for microphones LBB 3549/00 and LBB 3549/50
Mounting : Flush mounting using the units click-to-fit mechanism in a metal
panel with a thickness of 2 mm, or flush mounting in a wooden
surface using the units screw mounting facilities (2 screws pro-
vided).
Dimensions L x W : 120 x 40 mm (4.7 x 1.5 in)
Built-in depth : 30 mm (1.1 in)
Weight : 125 g (0.3 lb)
Microphone height : 310 mm (12.2 in) extended
FIG 13-8 Flush-mounted Microphone control panel
13.3.7 LBB 3538/00 FM Loudspeaker panel
Mounting : Flush mounting using the units click-to-fit mechanism in a metal
panel with a thickness of 2 mm, or flush mounting in a wooden
surface using the units screw mounting facilities (4 screws pro-
vided).
Dimensions L x W : 120 x 80 mm ( 4.7 x 3.1 in) landscape or portrait
Built-in depth : 30 mm(1.1 in)
Weight : 175 g (0.38 lb)
FIG 13-9 Flush-mounted Loudspeaker Panel
110±0.2
4.33
100±0.2
3.93
5±0.2
0.19
30±0.2
1.18 32.4±0.2
1.27
2.4±0.1
0.09
1.2±0.2
0.04
mm
in
110±0.2
4.33
100±0.2
4.33
5±0.2
0.19
2.4±0.1
0.09
68.4±0.2
2.69
0.8±0.2
0.03
70±0.2
2.75
3
0.11
26
1.02
mm
in
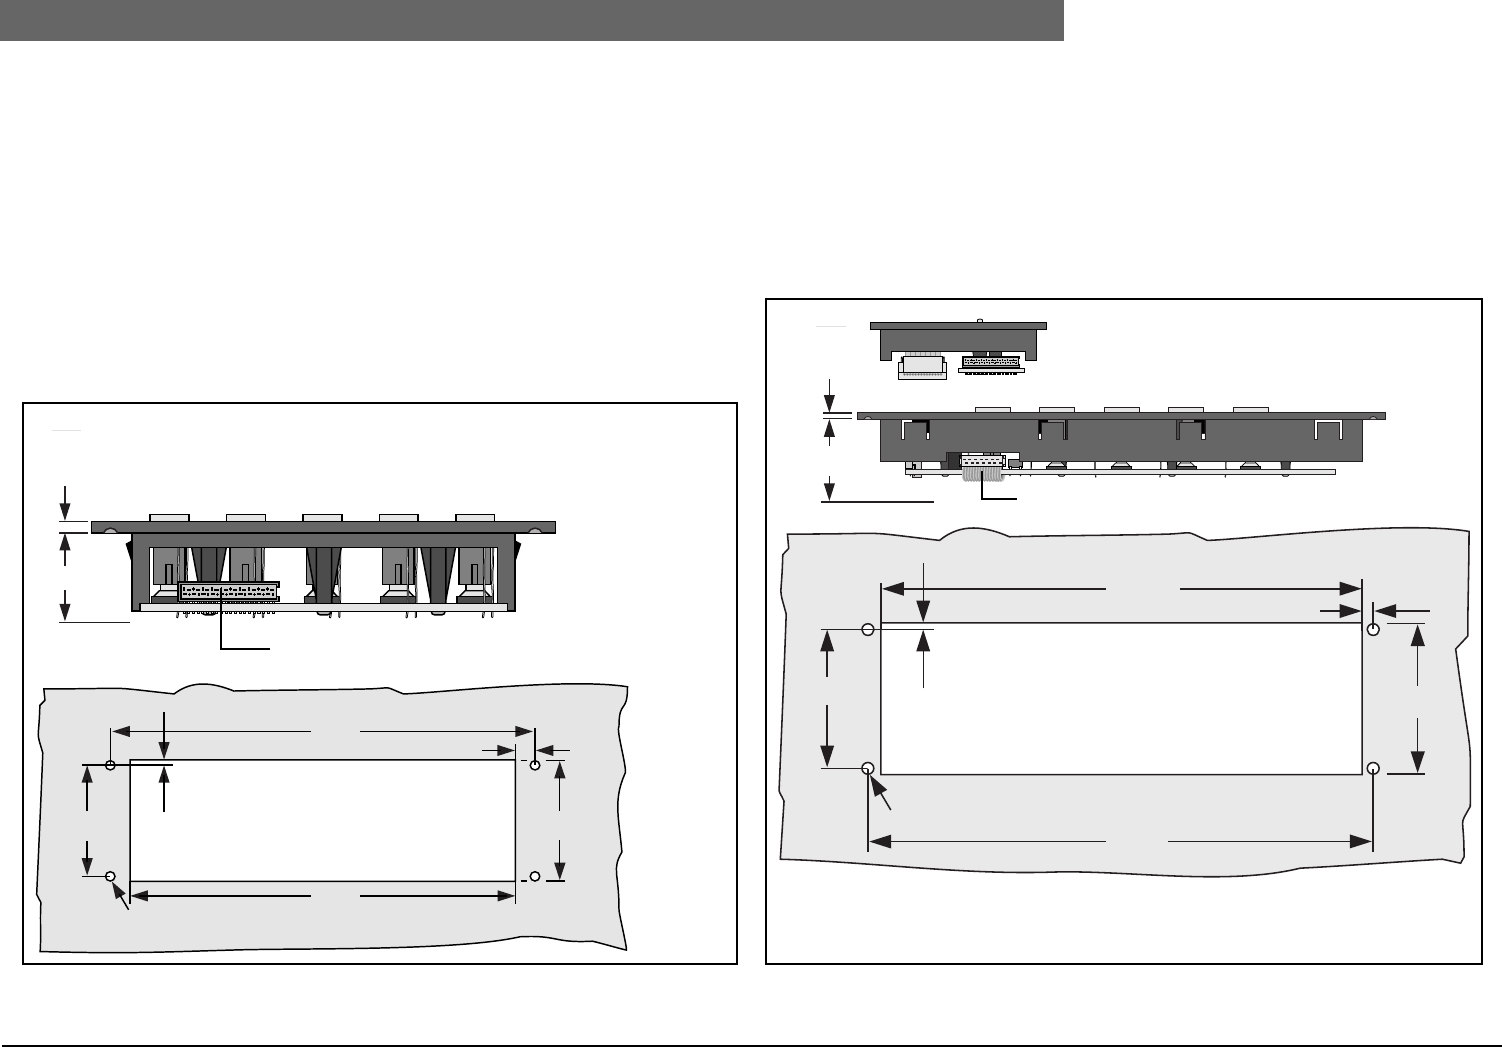
2
Bosch Security Systems | 04-2003 | 3922 988 43318 en
Digital Congress Network | Installation and Operating Manual | Chapter 13 - Technical Data en | 13-7
Flush Mounted Equipment
13.3.8 LBB 3540/15 Multi-purpose Connection Unit
Mounting : Free standing on a table-top, flush mounting, floor or wall
mounting.
Dimensions H x W x D : 35 x 100 x 170 mm (1.3 x 3.9 x 6.6 in) excl. plugs
Weight : 530 g
13.3.9 LBB 3541/00 Delegate Voting Control Panel
Mounting : Flush mounting using the units click-to-fit mechanism in a metal
panel with a thickness of 2 mm (0.07 in), or flush mounting in a
wooden surface using the units screw mounting facilities (4
screws provided)
Dimensions H x W x D : 40 x 120 x 25 mm (1.5 x 4.7 x 0.9 in)
Weight : 115 g (0.25 lb)
FIG 13-10 Flush-mounted Delegate Voting Control Panel
13.3.10 LBB 3542/00 FM Delegate/Chairman Voting Control Panel with
LC-display
Mounting : Flush mounting using the units click-to-fit mechanism in a metal
panel with a thickness of 2 mm (0.07 in) , or flush mounting in a
wooden surface using the units screw mounting facilities (4
screws provided).
Dimensions H x W x D : 80 x 240 x 30 mm (3.1 x 9.4 x 1.1 in)
Weight : 260 g (0.57 lb)
FIG 13-11 Flush-mounted Delegate/Chairman Voting Control Panel
110±0.2
4.33
100±0.2
3.93
5±0.2
0.19
30±0.2
1.18
32.4±0.2
1.27
2.4±0.1
0.09
1.2±0.2
0.04
3
0.11
23
0.9
mm
in
Flat cable connector
30
1.18
3
0.11
220.6±0.2
8.68
230±0.2
9.05
4.7±0.2
0.18
7 0±0.2
2.75 72±0.2
2.83
2.4±0.1
0.09
1±0.2
0.03
mm
in
Flat cable connector
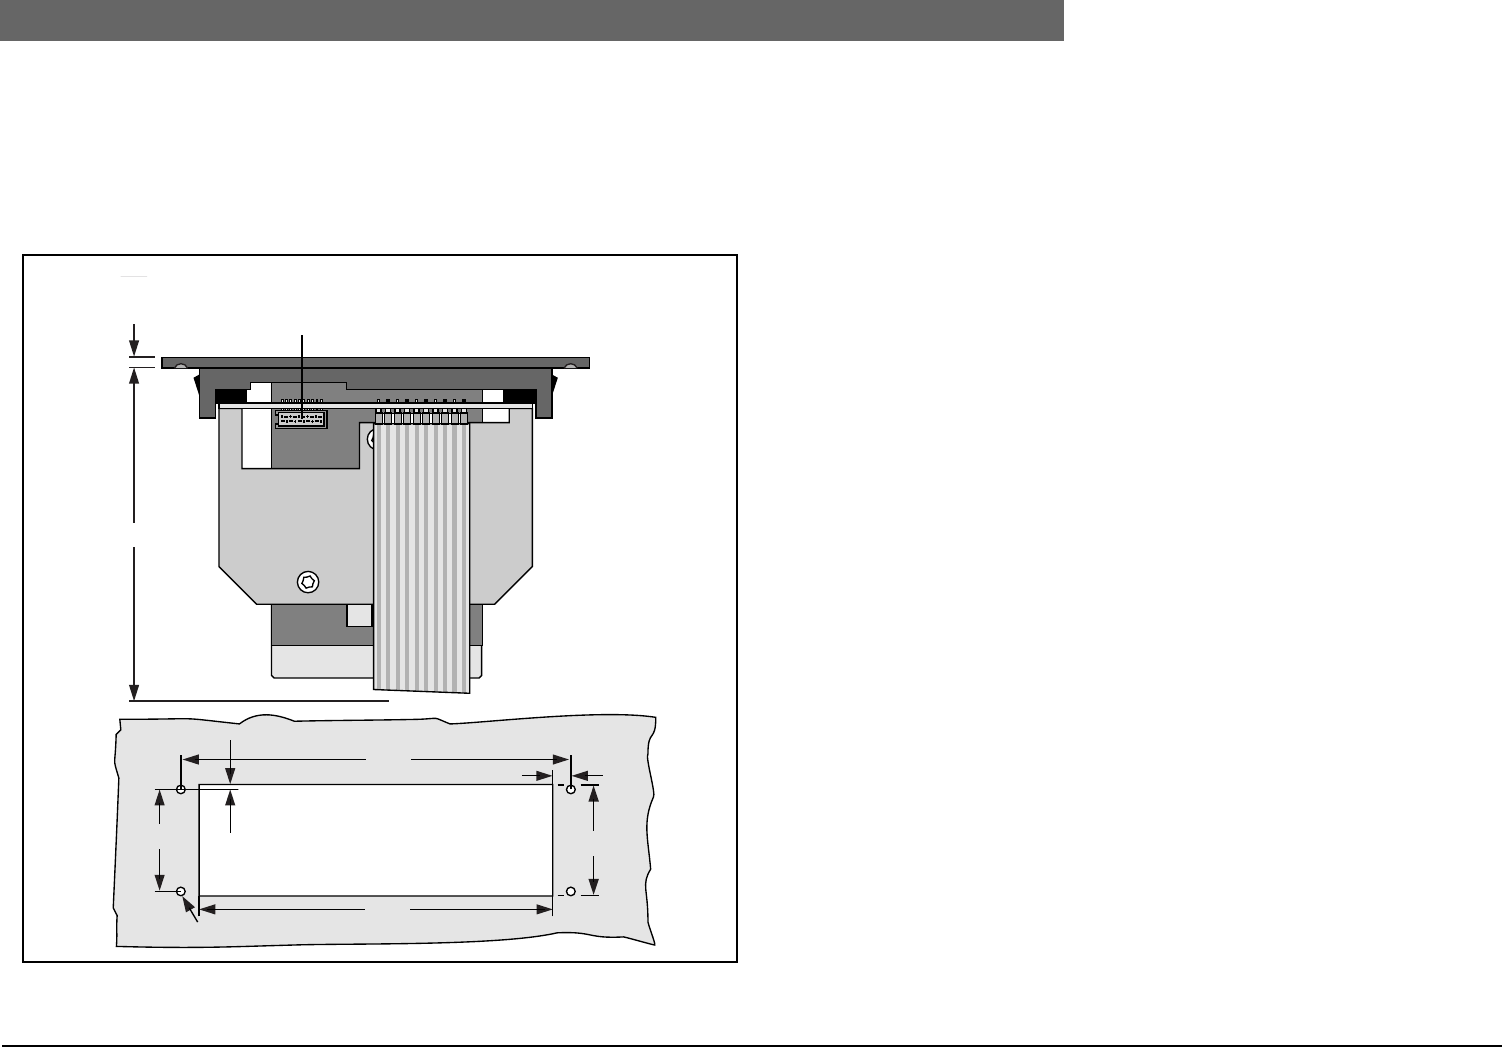
2
Bosch Security Systems | 04-2003 | 3922 988 43318 en
Digital Congress Network | Installation and Operating Manual | Chapter 13 - Technical Data en | 13-8
Installation Accessories
13.3.11 LBB 3543/15 Chip Card Reader
Mounting : Flush mounting using the units click-to-fit mechanism in a metal
panel with a thickness of 2 mm (0.07 in), or flush mounting in a
wooden surface using the units screw mounting facilities (4
screws provided).
Dimensions H x W x D : 40 x 120 x 84 mm (1.57 x 4.72 x 3.49 in)
Weight : 165 g (0.36 lb)
FIG 13-12 Flush-mounted Chip Card Reader
13.4 Installation Accessories
13.4.1 LBB 4114/00Trunk Cable Splitter LBB 4115/00 Tap-off Unit
Mounting:Free standing on a table-top, flush mounting, floor or wall mounting.
Dimensions H x W x D : 35 x 140 x 48 mm (1.3 x 5.5 x 1.8 in)
Weight : 320 g (0.70 lb)
Cable bending angle using cable assembly LBB 4116/xx : ±90°
110±0.2
4.33
100±0.2
3.93
5±0.2
0.19
30±0.2
1.18 32.4±0.2
1.27
2.4±0.1
0.09
1.2±0.2
0.04
3
0.11
81
3.49
mm
in
Flat cable connector

2
Bosch Security Systems | 04-2003 | 3922 988 43318 en
Digital Congress Network | Installation and Operating Manual | Chapter 13 - Technical Data en | 13-9
Electrical data
13.5 Electrical data
13.5.1 Microphones (General)
Freq. response : 100 - 16.000 Hz
Transducer type : Condenser
Directional pattern : Cardioid
Max. SPL for THD <3% : 110 dB
Equivalent input noise level : 24 dB (A)
Sensitivity index (dB)
Pluggable microphones LBB 3549/xx
Overload microphone level : 110 dB SPL
Nominal microphone level : 85 dB SPL±2dB (1kHz)
Typical frequency response ; 100 - 16000 Hz
External microphone for CONCENTUS units
Element : Electret condenser
Polar pattern : omni-directional
Operating voltage : 5V d.c.
Sensitivity : -62 dB (0 dB = 1V/µbar, 1000 Hz) at load 1.2 KOhms
Frequency response : 100 Hz - 14 kHz
13.5.2 Headphones
Light weight stereo headphones LBB 3443/00
Impedance : 32 Ohms
Frequency response : 50 Hz - 20 kHz (-10 dB)
Max. power : 98 dB SPL/Earpiece at 1 mW/Earpiece
Weight : 70 g (0.16 lb)
Colour : Charcoal with silver
Under the Chin headphones LBB 3441/00
Impedance LBB 3015/04:300 Ohms
Frequency response:50 Hz - 15 kHz (-10dB)
Max. power:60 mW
Sensitivity:107 dB SPL/Earpiece at 0 dbV/*
Weight:33 g (0.07 lb)
Colour:black
Interpreter headphones LBB9095/30
Impedance:2 x 720 Ohms
Frequency response:250 Hz to13 kHz (-10 dB)
Max. power:200 mW
Sensitivity:97 dB SPL/Earpiece at 0 dbV/*
96 dB SPL/Earpiece at 1 mW/*
Weight:78 g (0.17 lb)
Colour:black/grey
* = System
Single earphone LBB 3442/00
Impedance:32 Ohms
Frequency response:100 Hz to 5 kHz (-10 dB)
Max. power:5 mW
Sensitivity:114 dB SPL at 1mW/*
Weight:25 g (0.06 lb)
Colour:dark grey
Dynamic headphones LBB 3015/04 and LBB 9095/30
Impedance:360 Ohms (LBB 9095/30 2 x 720 Ohms)
Frequency response:250 Hz to 13 kHz (-10 dB)
Max. power:200 mW
Sensitivity:97 dB SPL at 0 dBV/*
96 dB SPL at 1mW/*
Weight:90 g (0.19 lb)
Colour:black/grey
13.5.3 Transmission links
•From delegate microphone to interpreter headphone
•From delegate microphone to delegate headphone
•From interpreter microphone to delegate headphone
•From interpreter microphone to interpreter headphone
•From auxiliary input to delegate headphone
•From auxiliary input to interpreter headphone
•From delegate microphone to auxiliary output
•From interpreter microphone to auxiliary output
Frequency response : 125 Hz - 14.000 Hz *
Harmonic distortion : < 0.5%
Harmonic distortion at overload : < 1%
Crosstalk attenuation at 4 kHz : > 80 dB
Dynamic range : > 90 dB
* Intercom links 125 - 3.500 Hz
2
Bosch Security Systems | 04-2003 | 3922 988 43318 en
Digital Congress Network | Installation and Operating Manual | Chapter 13 - Technical Data en | 13-10
Electrical data
13.5.4 Combined units
•Delegate microphone with transmission link to interpreter headphone
•Delegate microphone with transmission link to delegate headphone
•Delegate microphone with transmission link to auxiliary output
•Interpreter microphone with transmission link to interpreter headphone
•Interpreter microphone with transmission link to delegate headphone
•Interpreter microphone with transmission link to auxiliary output
Typical frequency response : 125 Hz (-8 dB) - 14.000 Hz (-8 dB)
Front-to random sensitivity index : > 4.6 dB
Rated equivalent sound pressure level
due to inherent noise : < 25 dB (A)
Total harmonic distortion at overload : < 1 %
Crosstalk attenuation : > 80 dB
13.5.5 System Electrical and Electro-acoustical characteristics
Nominal input level : 85 dB SPL
Overload input level : 110 dB SPL
Automatic gain reduction at Overload
input level (not applicable to
PA-floor output) : 30 dB (interpretation channels)
18 dB (loudspeaker channel)
Automatic gain reduction with : 3 dBm (2 microphones on)
- 6 dBm (4 microphones on)
Operator master gain control : 15 x 1.5 dB and OFF (Mute)
Loudspeaker gain control : 14 x 1.5 dB and OFF
13.5.6 System environmental conditions
Temperature range:
•Transport:-20 to +55 °C (-65 to 131° F)
•Operational:+5 to +45 °C (+41 to 113° F)
•Relative humidity:95% max.
•Safety:acc. to EN 60065, and: acc. to CAN/CSA E65-94 and UL6500 (UL and cUL) for LBB
3500/xxD, LBB 4106/00D and LBB 3508/00D
•EMC emission:acc. to harmonized standard EN 55013 (1988)and FCC rules (part 15) complying
with the limits for a class A digital device.
•EMC immunity:acc. to harmonized standard EN 55020 (1987)
•EMC approvals:affixed with the CE mark, EC directive 89/336 EEC
•Shock resistance:acc. to IEC 86.2.29 Eb
•Vibration resistance:acc. to IEC 68.2.6 Fc, procedure A
NOTE: The maximum operational temperature for ALL operational contribution units
with LC-display is 40°C. The maximum operational temperature for the Ext. Power supply
unit LBB 4106/.. is +40°C.
Safety Standards for North America
•Approvals (CSA, C and USA):CAN/CSA E65 -94 UL 6500
13.5.7 Interface data
LBB 3500/.. Central Control Unit
•Line in/outputs:-18 dBV/ +12 dBV* (nominal/maximum)
•Recorder input/output:-33 dBV/ -3 dBV(nominal/maximum)
* -12 dBV / +18 dBV when used as symmetrical output..
LBB 3508/00 Audio Media Interface Unit
Symmetrical line outputs (XLR)
•Channels 0 up to 11 (Interpretation):+1 dBV/1 dBV (nominal/maximum)
•Channels 12 and 14 (PA):-8 dBV/ +22 dBV
•Channel 13 (del. loudspeaker):+1 dBV/ +13 dBV
Asymmetrical line outputs (Cinch)
•Channels 0 pot 11 (Interpretation) :-10 dbV/ -10 dBV (nominal/maximum)
•Channels 12 and 14 (PA):-19 dBV/ +11 dBV
•Channel 13 (del. loudspeaker):-10 dBV/ +2 dBV
13.5.8 Mains supply
LBB 3500/05 (D), LBB 3500/15 (D), : 105 - 115 - 125 - 220 - 230 - 240 V
LBB 3500/35 (D), LBB 4106/00 (D), + 6% / -10 %
LBB 3508/00 (D)
NOTE: Upon delivery : 230 V
125 V (D-versions)
13.5.9 Power consumption (nominal)
LBB 3500/05 (D) : 175 W
LBB 3500/15, LBB 3500/35 (D) : 350 W
LBB 4106/00 (D) : 350 W
LBB 3508/00 (D) : 175 W
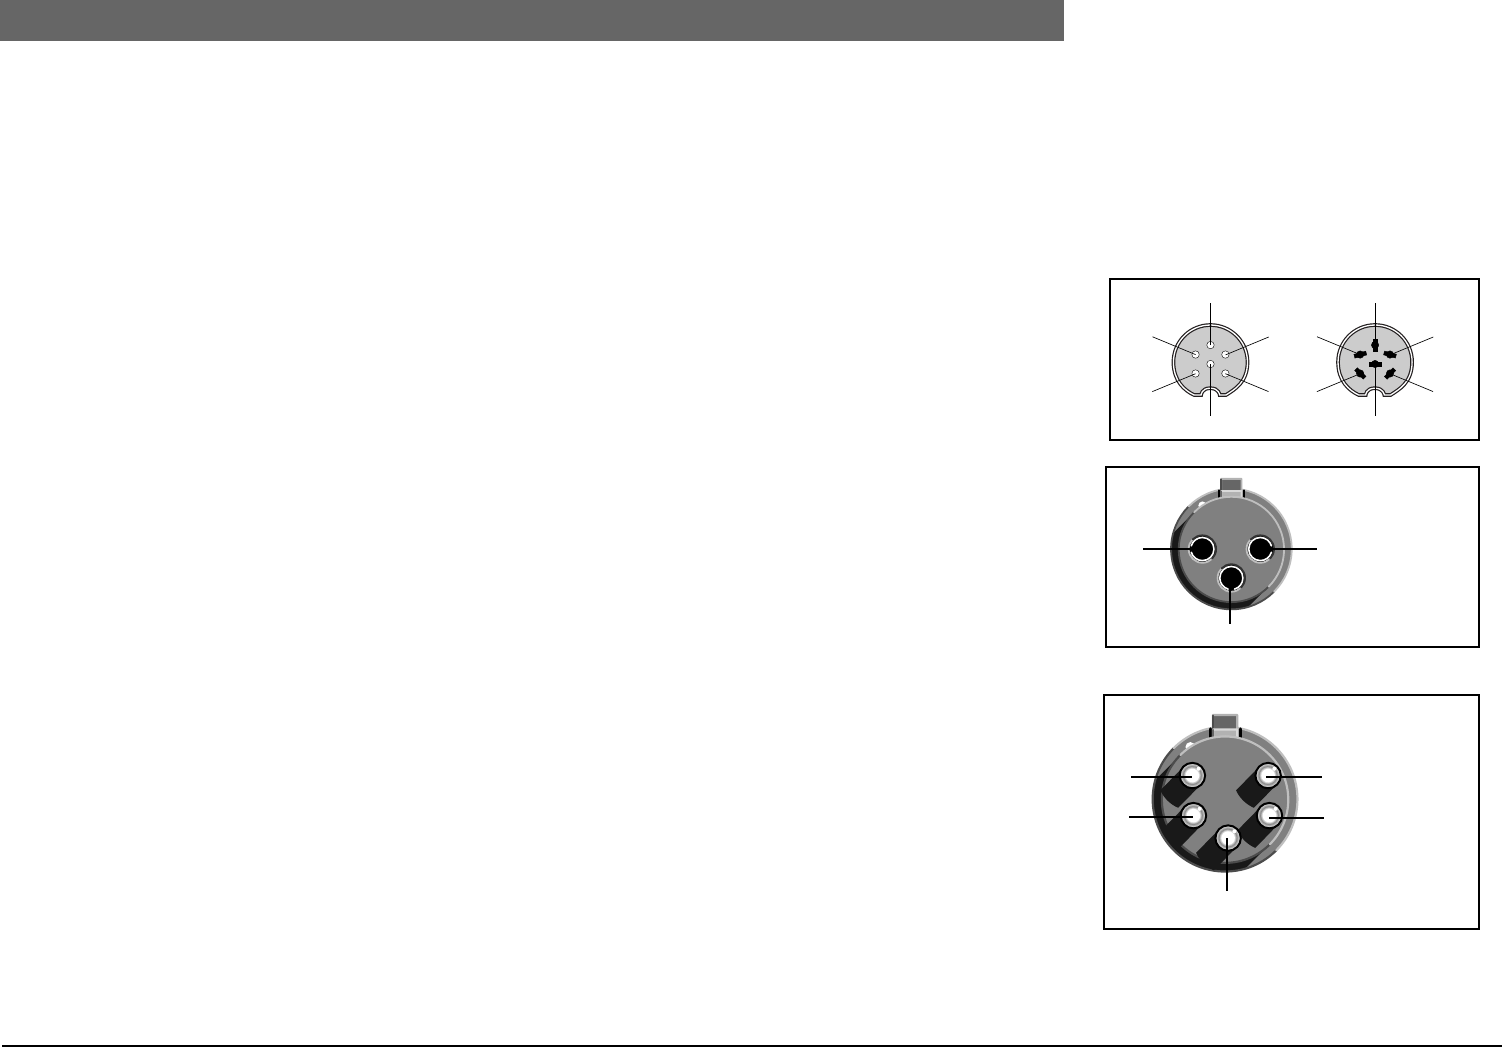
2
Bosch Security Systems | 04-2003 | 3922 988 43318 en
Digital Congress Network | Installation and Operating Manual | Chapter 13 - Technical Data en | 13-11
System limitations
13.6 System limitations
1. The maximum length of cable (including the 2 m cable attached to the DCN system units) that
can be connected to a tap-off outlet of a Central Control Unit LBB 3500/.., Audio Media Interface
Unit LBB 3508/00 and Extension Power Supply LBB 4106/00 must not exceed 100 m.
2. The cable length between the Central Control Unit and the last unit in any system installation
must not exceed 250 m. This includes all extension cables used as well as the 2 m long cable
attached to each system unit.
3. The maximum number of serial tap-off outlet connections from the Central Control Unit LBB
3500/.. to the last tap-off in its chain should not exceed four.
Tap-off outlets are available on the Extension Power Supply Unit LBB 4106/00, Audio Media Inter-
face Unit LBB 3508/00, Trunk-cable splitter LBB 4114/00, and Tap-off unit LBB 4115/00.
4. The maximum number of units that can be connected in series, via the trunk outlet loop-through
connector, is 60 Units (i.e. units assigned a PCF value of 1) also include, the delegate, chairman
and interpreter desks, Dual Audio Interface Unit LBB 3535/00 and the Multi-purpose Connection
Unit LBB 3540/15 and trunksplitter LBB 4114/00.
13.7 Connection details
13.7.1 Mains cable
The wires in the mains cable are coloured in accordance with the following code:
Blue Neutral
Brown Live
Green/yellow Earth/Ground
13.7.2 DCN circular connectors
PIN 1 Down-link screen
PIN 2 Down-link signal
PIN 3 < +40 V
PIN 4 Up-link signal
PIN 5 Up-link screen
PIN 6 < +40 V
13.7.3 Cable connection
3-pole XLR connector (female)
PIN 1 Earth
PIN 2 Signal +
PIN 3 Signal -
13.7.4 Pluggable microphones
LBB 3549/xx
5-pole XLR connector (male)
PIN 1 lightring control (active low)
PIN 2 lightring +5V
PIN 3 microphone signal
PIN 4 electrical ground
PIN 5 shield
1
6
2
3
4
5 5
6
4
3
2
1
21
3
1
4
3
2
3
5
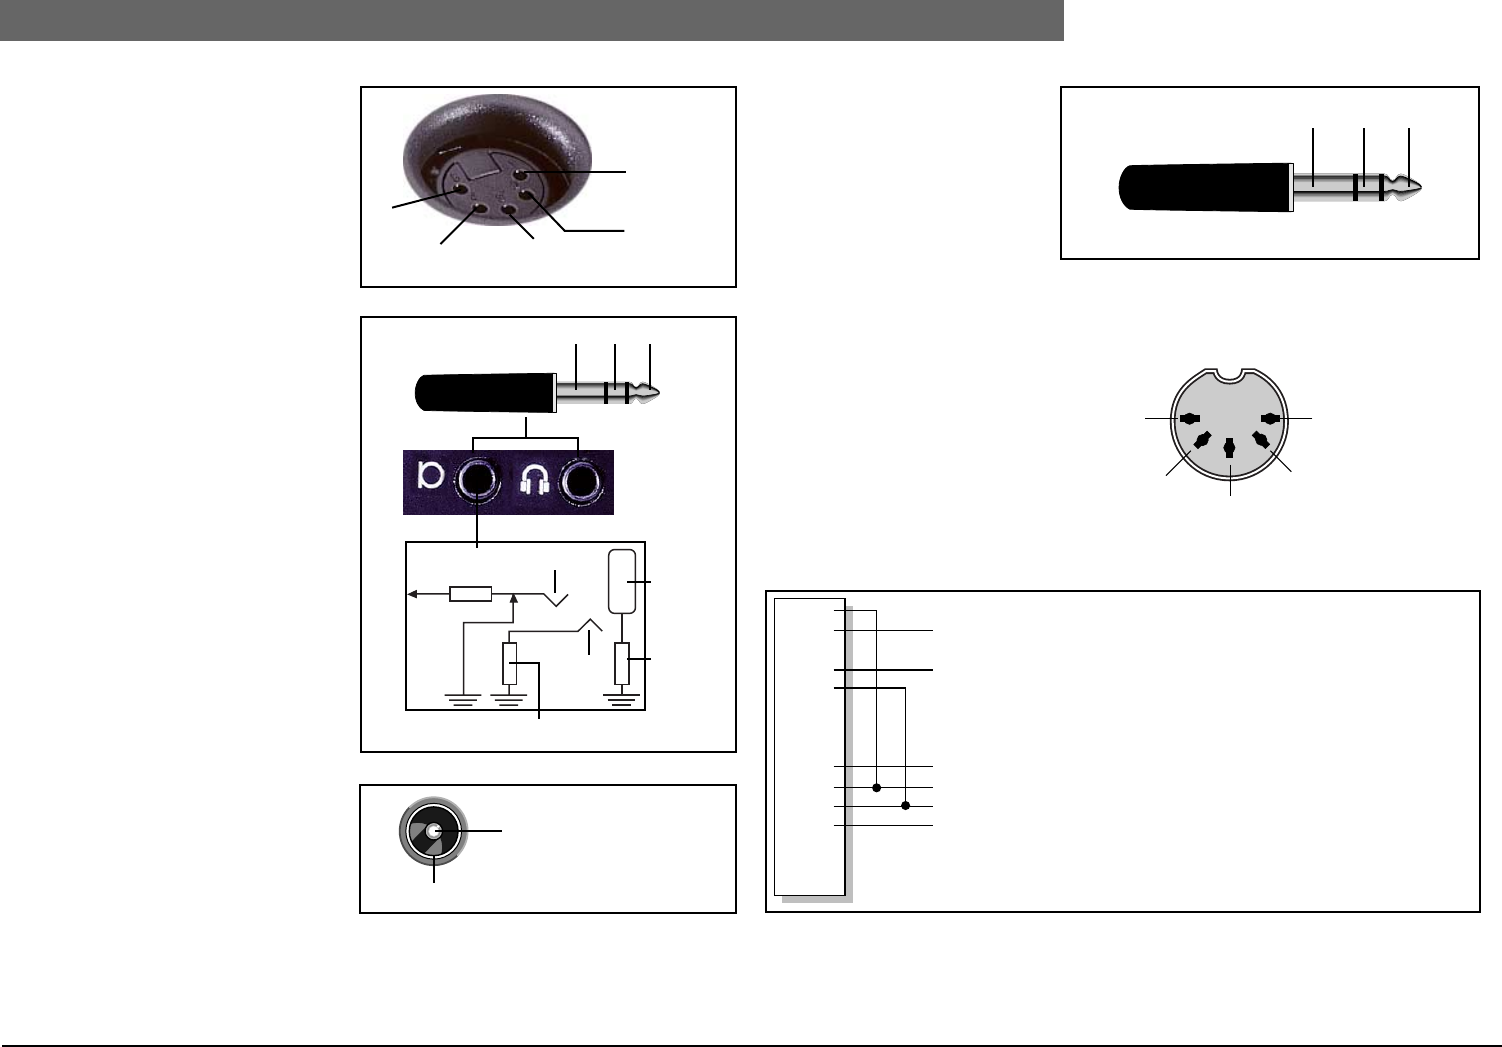
2
Bosch Security Systems | 04-2003 | 3922 988 43318 en
Digital Congress Network | Installation and Operating Manual | Chapter 13 - Technical Data en | 13-12
Connection details
13.7.5 CONCENTUS units
5-pole XLR connector (female) for
pluggable microphones LBB 3549/xx
PIN 1 lightring control (active low)
PIN 2 lightring +5V
PIN 3 microphone signal
PIN 4 electrical ground
PIN 5 shield
13.7.6 CONCENTUS units
External Microphone connection
Stereo or mono 3.5 mm jack plug
1. Tip: Signal (live)
2. Ring: Signal (return)
3. Sleeve: Electrical earth/screen)
13.7.7 Cable connection
CINCH connector (male)
1 Signal +
2 Screen
13.7.8 Jack-plug
1. TIP: Signal (live)
2. RING: Signal (return)
3. Sleeve: Electrical earth/screen)
13.7.9 Interpreter desk (headset socket DIN-type)
Headset connector according IEC 268-11
PIN 1 Mic. supply
PIN 2 Mic. live
PIN 3 Left hand headphone
PIN 4 Return (both headphones)
PIN 5 Right hand headphone
Shield Ground
13.7.10 15-pole D-type connector PC Interface
1
2
34
5
Top view
3.5 mm
470 Ωtip
ring
sleeve
1R
optional
213
1
2
321
54
31
2
PIN 1
PIN 2
PIN 3
PIN 4
PIN 5
PIN 6
PIN 7
PIN 8
PIN 9
PIN 10
PIN 11
PIN 12
PIN 13
PIN 14
PIN 15
+Ve (max. 40V)
+Ve (max 40V)
Up-link signal
Up-link screen/ground
Down-link screen/ground
Down-link signal
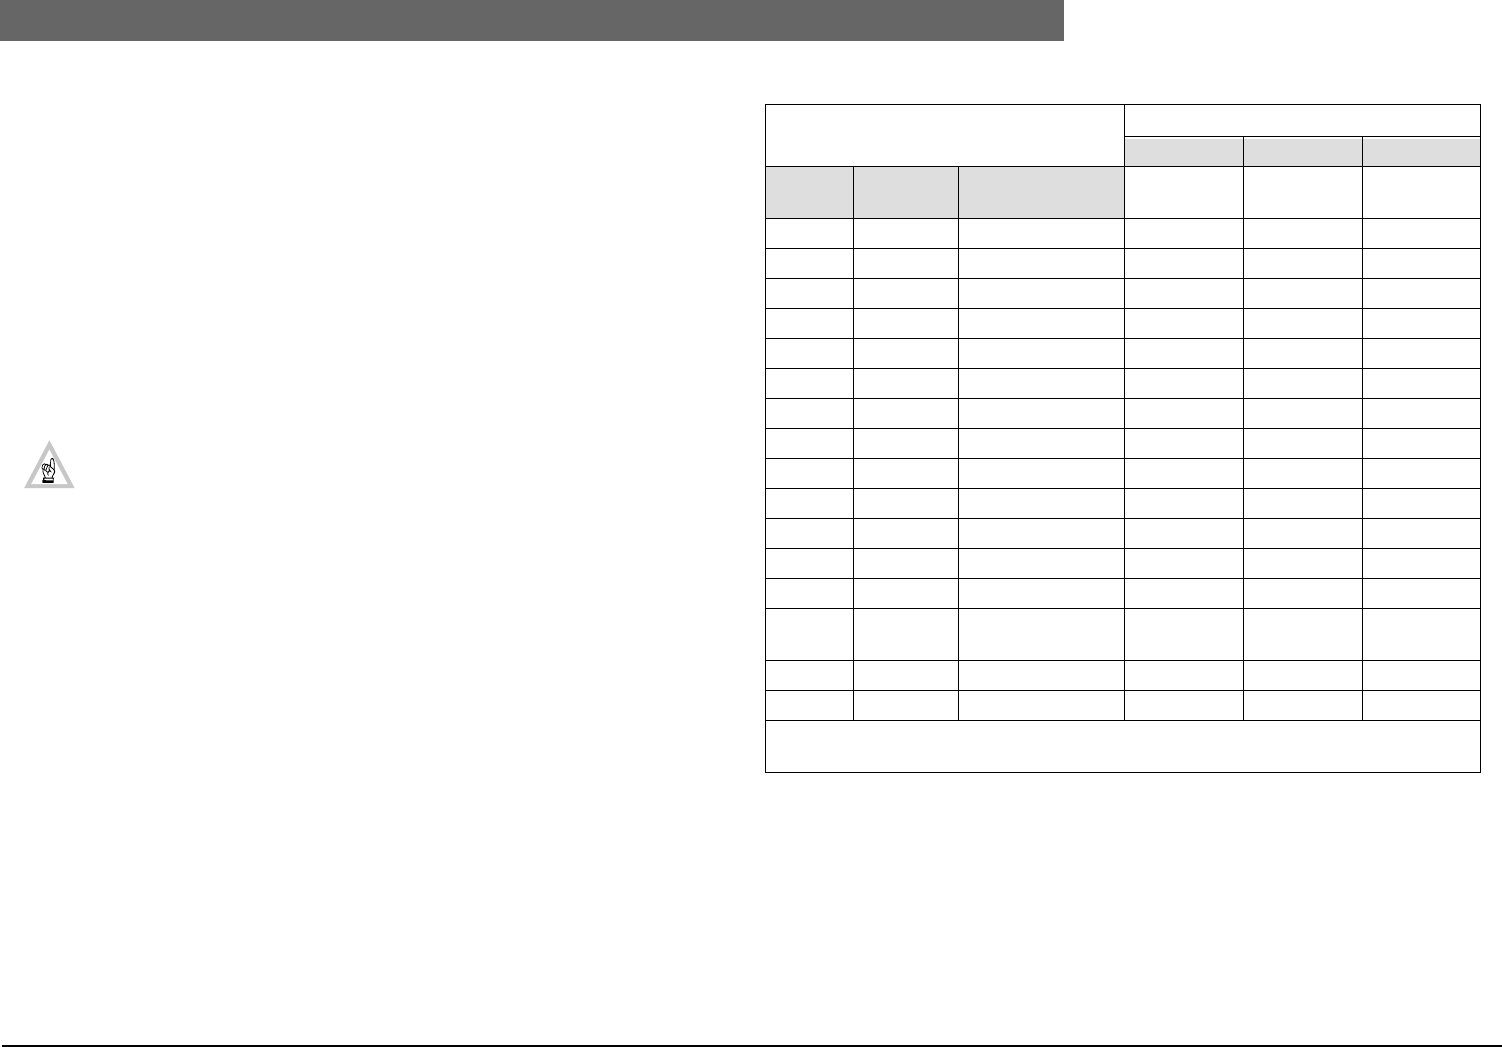
2
Bosch Security Systems | 04-2003 | 3922 988 43318 en
Digital Congress Network | Installation and Operating Manual | Chapter 13 - Technical Data en | 13-13
Available Audio Down Link Channels
13.8 Available Audio Down Link Channels
The DCN system has a total of 16 down-link audio channels (numbered 0 - 15).
13.8.1 Stand-alone systems
In a stand-alone system, all audio channels are fixed and assigned according to Table 13-1:.
The audio output signals, available on different system units are listed according to Table 13-1:.
13.8.2 Systems with a PC
In a system using a PC, channels can be assigned to suit system requirements. This is done using
software package ‘System Installation LBB 3585’.
The channel assignment for a PC system are as follows:
•Channels 1 - 11 can be assigned as interpretation, floor or intercom.
Channels 12 - 15 can be assigned as interpretation,
NOTE:
1. When in Multi-CCU mode, only channels 1 - 11 can be assigned as interpretation
channels.
2. Local floor audio of all contribution units connected to a CCU LBB 3500/35 is
available via channel 12. This signal can be used for group recording, or for systems
requiring speech localization. Channel 12 audio signal output is available via the Audio
Media Interface Unit LBB 3508/00 and LBB 3508/00(D) or via the Analog Audio
Input/Output Module LBB 3513/00
•Channel 15 is assigned as the intercom channel. Each audio channel assigned to intercom can
actually accommodate up to 4 separate intercom channels with limited audio frequency charac-
teristics.
For more information refer to the software user manual for System Installation LBB 3585.
The Table opposite shows the basic configuration. Other configurations can be assigned using the
DCN application software.
Table 13-1: Available audio down link channels
+ = Audio outputs Audio Outputs
LBB 3500/.. LBB 3508/00 LBB 3513/00
Channel Descrip-
tion
Remark
0 Floor Interpretation - + +
1 Interpret 1 Distribution 1 - + +
2 Interpret 2 Distribution 2 - + +
3 Interpret 3 Distribution 3 - + +
4 Interpret 4 Distribution 4 - + +
5 Interpret 5 Distribution 5 - + +
6 Interpret 6 Distribution 6 - + +
7 Interpret 7 Distribution 7 - + +
8 Interpret 8 Distribution 8 - + +
9 Interpret 9 Distribution 9 - + +
10 Interpret 10 Distribution 10 - + +
11 Interpret 11 Distribution 11 - + +
12 Floor Line output equalized - + +
13 Floor Delegate loudspeak-
ers equalized
-++
14 Floor Line output + +
15 *Intercom + **
* Intercom channels not suitable for distribution
** Available for interpretation when channels 1 - 15 are assigned for interpretation.
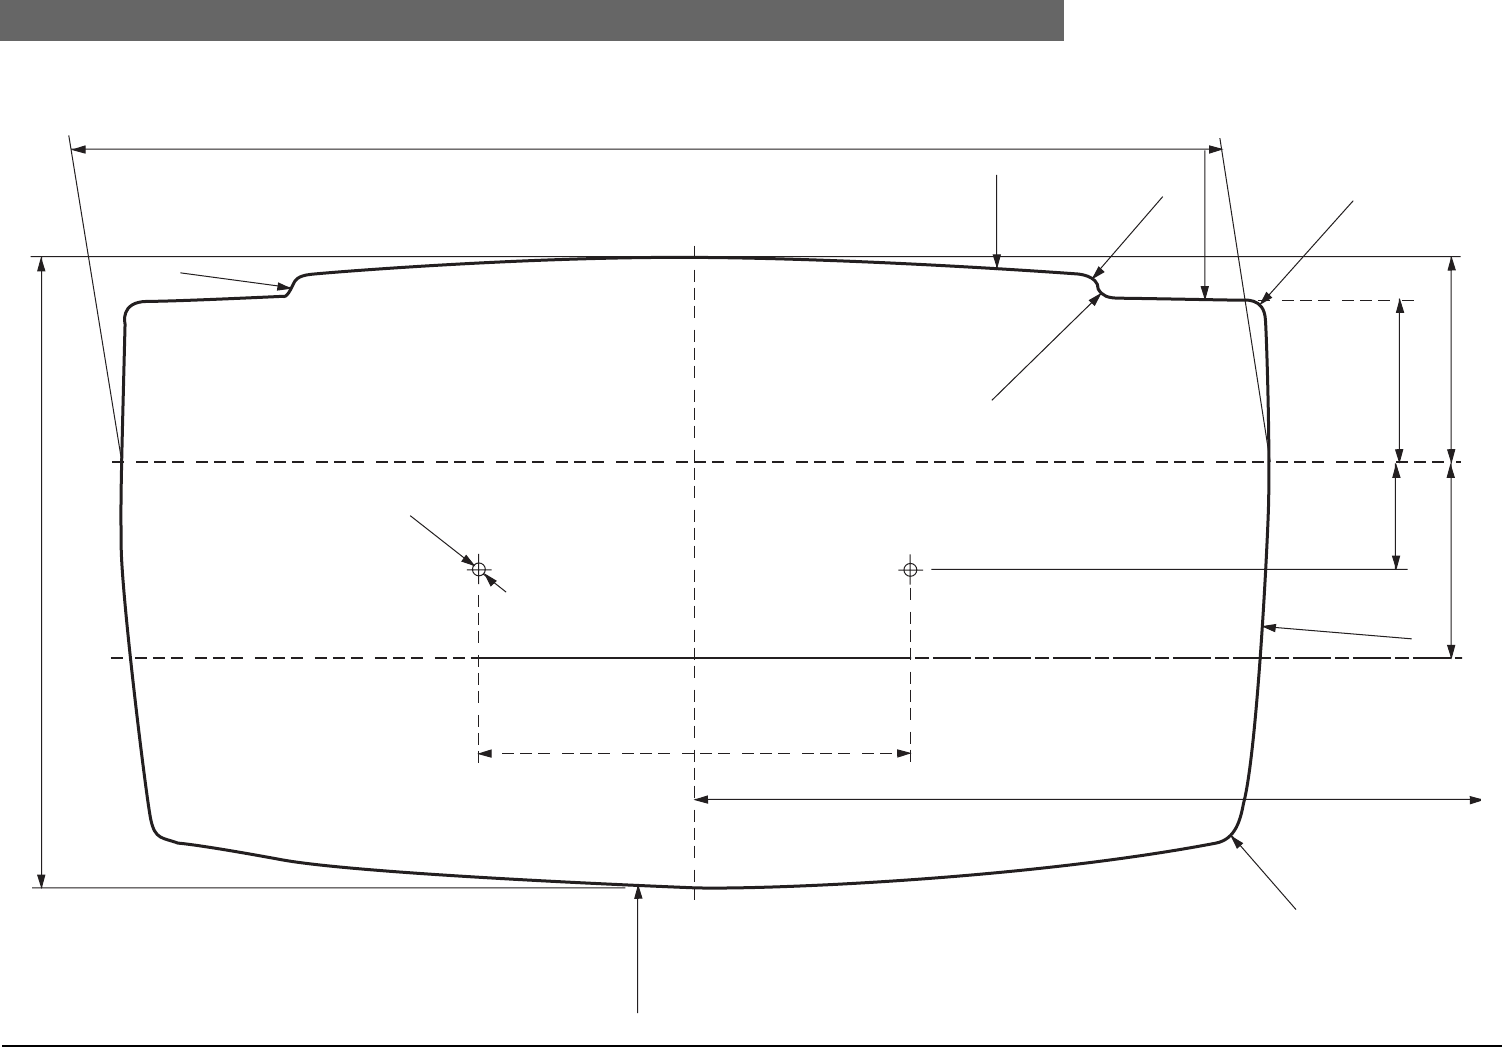
2
Bosch Security Systems | 04-2003 | 3922 988 43318 en
Digital Congress Network | Installation and Operating Manual | Chapter 13 - Technical Data en | 13-14
TEMPLATE FOR TABLE CUT-OUT OF CONCENTUS UNITS
13.9 TEMPLATE FOR TABLE CUT-OUT OF CONCENTUS UNITS
Centre Line for R495.5
588(2x) Dim for centre R696.5
100
266
146
R995.5
38
48
48
24.5
R4995.5(2X)
R3.5(2x)
R3.5(2x)
R2.5(2x)
R4.95(2x)
R700.5
Centre Line for R695.5
R695.5(2x)
M3(2x)
R5.512x1
CHECK DIMENSION ! This template is for use in making a cut-out’
in a desk or table-top for flush-mounting CONCENTUS units.
CAUTION: First check the dimensions against the actually printed
template dimension before attempting to use the template.

© 2003 Bosch Security Systems B.V.
Data subject to change without notice
04-2003 | 3922 988 43318 en
For more information please visit www.boschsecuritysystems.com
