Bose 420129 Remote Control User Manual Cover 8 5x6 5 OP Guide 3L
Bose Corporation Remote Control Cover 8 5x6 5 OP Guide 3L
Bose >
User Manual
©2010 Bose Corporation, The Mountain,
Framingham, MA 01701-9168 USA
AM324446 Rev.00
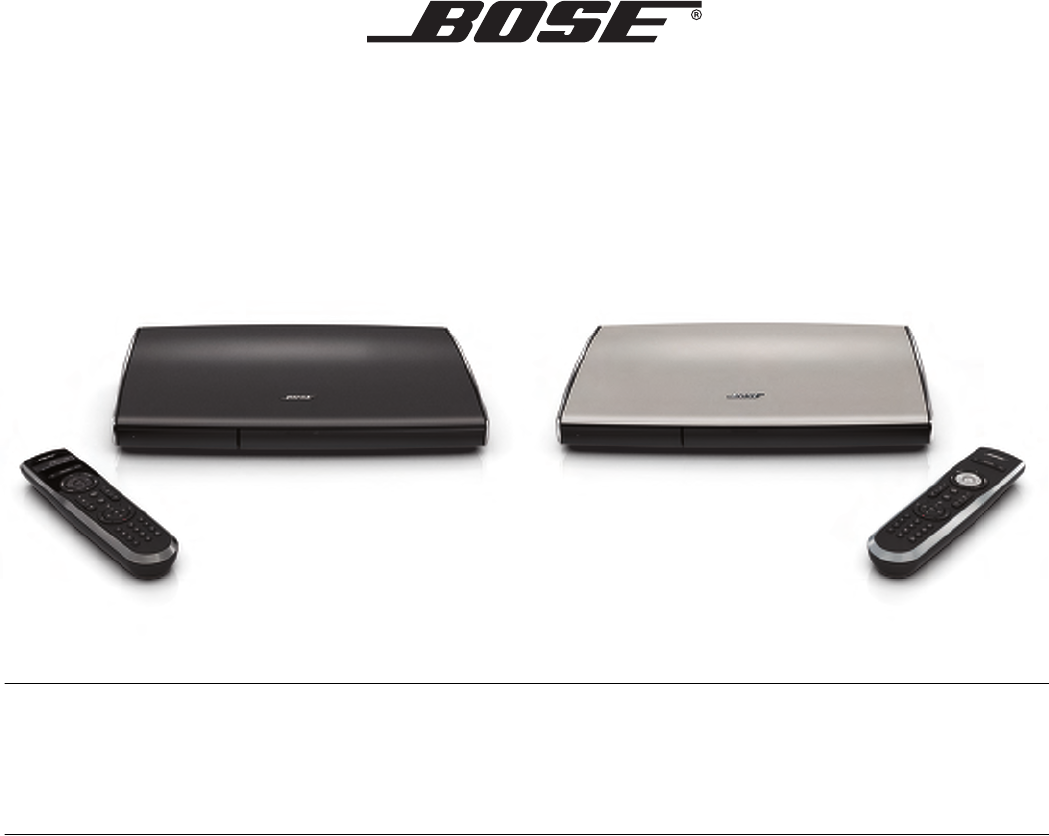
LIFESTYLE® V35/V25 HOME ENTERTAINMENT SYSTEMS
LIFESTYLE® T20/ T10 HOME THEATER SYSTEMS
Operating Guide | Guía del usuario | Guide d’utilisation
Cover_8.5x6.5_OP Guide_3L.fm Page 1 Monday, November 9, 2009 4:34 PM
ii
EnglishTAB 6TAB 8 TAB 7 TAB 3TAB 5 TAB 2TAB 4
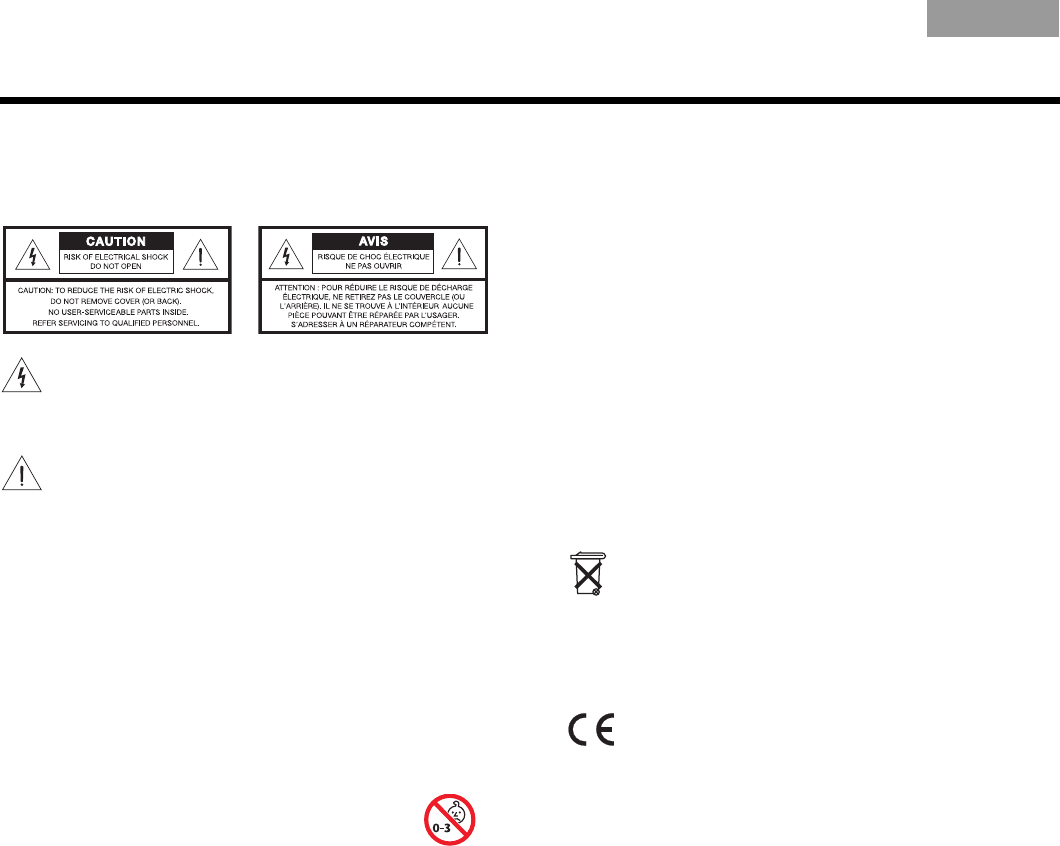
SAFETY INFORMATION
Please read this guide
Please take the time to follow the instructions in this guide
carefully. They will help you set up and use your system properly
so you can enjoy its advanced features. Please save this guide
for future reference.
The lightning flash with arrowhead symbol within an
equilateral triangle alerts the user to the presence of
uninsulated, dangerous voltage within the system
enclosure that may be of sufficient magnitude to constitute
a risk of electric shock.
The exclamation point within an equilateral triangle alerts
the user to the presence of important operating and
maintenance instructions in this guide.
WARNINGS:
• To reduce the risk of fire or electrical shock, do not expose the
product to rain or moisture.
• Do not expose this apparatus to dripping or splashing, and do
not place objects filled with liquids, such as vases, on or near
the apparatus. As with any electronic products, use care not to
spill liquids into any part of the system. Liquids can cause a
failure and/or a fire hazard.
• Do not place any naked flame sources, such as lighted candles,
on or near the apparatus.
• Keep the remote control batteries away from children. They
may cause a fire or chemical burn if mishandled. Do not re-
charge, disassemble, heat above 100ºC (212ºF), or incinerate.
Dispose of used batteries promptly. Replace only with batteries
of the correct type and model number.
• Contains small parts that may be a choking hazard.
Not suitable for children under age 3.
CAUTIONS:
• Make no modifications to the system or accessories.
Unauthorized alterations may compromise safety,
regulatory compliance, and system performance, and
may void the warranty.
• Long-term exposure to loud music may cause hearing damage.
It is best to avoid extreme volume when using headphones,
especially for extended periods.
Notes:
• Where the mains plug or appliance coupler is used as the
disconnect device, such disconnect device shall remain
readily operable.
• The product must be used indoors. It is neither designed nor
tested for use outdoors, in recreation vehicles, or on boats.
• This product is intended to be used only with the power supply
provided.
• The product label is located on the bottom of the product.
Additional safety information
See the additional instructions on the Important Safety
Information sheet enclosed in the shipping carton.
Batteries
Please dispose of used batteries properly, following any
local regulations. Do not incinerate.
Class B emissions
This device complies with FCC and Industry Canada RF radiation
exposure limits set forth for general population. It must not be
co-located or be operating in conjunction with any other
antennas or transmitters.
Th
is product conforms to all EU Directive requirements as
applicable by law. The complete Declaration of Conformity
can be found at www.Bose.com/compliance.
ResoluteVigilanteOG.book Page ii Monday, December 7, 2009 9:48 AM

iii
TAB 5TAB 4TAB 6TAB 8TAB 7English TAB 3TAB 2
Notice
This equipment has been tested and found to comply with the
limits for a Class B digital device, pursuant to Part 15 of the FCC
rules. These limits are designed to provide reasonable protection
against harmful interference in a residential installation. This
equipment generates, uses, and can radiate radio frequency
energy and, if not installed and used in accordance with the
instructions, may cause harmful interference to radio
communications. However, there is no guarantee that
interference will not occur in a particular installation. If this
equipment does cause harmful interference to radio or television
reception, which can be determined by turning the equipment off
and on, you are encouraged to try to correct the interference by
one or more of the following measures:
• Reorient or relocate the receiving antenna.
• Increase the separation between the equipment and receiver.
• Connect the equipment to an outlet on a different circuit than
the one to which the receiver is connected.
• Consult the dealer or an experienced radio/TV technician for
help.
Changes or modifications not expressly approved by Bose
Corporation could void the user’s authority to operate this
equipment.
Operation is subject to the following two conditions: (1) This
device may not cause harmful interference, and (2) this device
must accept any interference received, including interference that
may cause undesired operation.
For your records
Bose recommends that you record your system model
information here and the serial numbers both here and on
your Product Registration Card.
Serial numbers are located on the bottom of the console, and
on the connection panel of the Acoustimass® module.
System model name and number (on the carton):
LIFESTYLE® ___________________________________________
Serial numbers:
Control console:________________________________________
Acoustimass® module:_______________________________
Retailer information:
Dealer name: __________________________________________
Dealer phone:__________________________________________
Purchase date:_________________________________________
Please keep your sales receipt and a copy of your Product
Registration card together with this guide.
©2010 Bose Corporation. No part of this work may be reproduced,
modified, distributed, or otherwise used without prior written permission.
ResoluteVigilanteOG.book Page iii Monday, December 7, 2009 9:48 AM
iv
EnglishTAB 6TAB 8 TAB 7 TAB 3TAB 5 TAB 2TAB 4
Manufactured under license from Dolby Laboratories. “Dolby”
and the double-D symbol are trademarks of Dolby Laboratories.
Confidential Unpublished Works. ©1992-1997 Dolby
Laboratories. All rights reserved.
This product contains one or more programs protected under
international and U.S. copyright laws as unpublished works.
They are confidential and proprietary to Dolby Laboratories. Their
reproduction or disclosure, in whole or in part, or the production
of derivative works therefrom without the express permission of
Dolby Laboratories is prohibited. ©1992-1996 by Dolby
Laboratories, Inc. All rights reserved.
Manufactured under license under U.S. Patent #’s:
5,451,942; 5,956,674; 5,974,380; 5,978,762;
6,487,535 & other U.S. and worldwide patents
issued & pending. DTS and the Symbol are registered trademarks
& DTS Digital Surround and the DTS logos are trademarks of
DTS, Inc. Product includes software. ©DTS, Inc. All Rights
Reserved.
Designed with UEI Technology™ Under License from Universal
Electronics Inc. ©UEI 2000-2002.
HDMI, the HDMI logo and High-Definition Multimedia Interface
are trademarks or registered trademarks of HDMI Licensing,
LLC in the United States and other countries.
Apple TV is a trademark of Apple, Inc. Xbox is a trademark of
Microsoft Corporation. TiVo is a trademark of Tivo, Inc. or its
subsidiaries. Other trademarks are property of their respective
owners.
Applicable only for LIFESTYLE® V25 and V35
home entertainment systems
“Made for iPod” means that an electronic
accessory has been designed to connect
specifically to iPod and has been certified
by the developer to meet Apple performance
standards.
Apple is not responsible for the operation of this device or its
compliance with safety and regulatory standards.
iPod and iPhone are trademarks of Apple, Inc., registered in
the U.S. and other countries. All other marks are registered
trademarks and trademarks of Bose Corporation.
ResoluteVigilanteOG.book Page iv Monday, December 7, 2009 9:48 AM

CONTENTS
v
TAB 5TAB 4TAB 6TAB 8TAB 7English TAB 3TAB 2
INTRODUCTION 1
Welcome . . . . . . . . . . . . . . . . . . . . . . . . . . . . . . . 1
System features . . . . . . . . . . . . . . . . . . . . . . . . . . 1
If you need help . . . . . . . . . . . . . . . . . . . . . . . . . . 1
YOUR REMOTE CONTROL 2
YOUR CONTROL CONSOLE 5
POWER ON/OFF CONTROLS 6
Starting your system . . . . . . . . . . . . . . . . . . . . . . 6
Turning on your TV . . . . . . . . . . . . . . . . . . . . . . . 6
Shutting down your system . . . . . . . . . . . . . . . . . 6
OPERATING YOUR CONNECTED DEVICES 7
Selecting a connected device . . . . . . . . . . . . . . . 7
Watching TV . . . . . . . . . . . . . . . . . . . . . . . . . . . . 8
Using a set top box . . . . . . . . . . . . . . . . . . . . . 8
Using the tuner in your TV . . . . . . . . . . . . . . . . 8
Tuning to a TV station . . . . . . . . . . . . . . . . . . . . 8
Playing audio/video devices . . . . . . . . . . . . . . . . 9
Listening to a Bose link input device . . . . . . . . . . 9
Playing an iPod or iPhone (V25 and V35 only) . . 10
Using the front console inputs . . . . . . . . . . . . . . . 11
Front USB input . . . . . . . . . . . . . . . . . . . . . . . . . 11
Front Analog A/V input . . . . . . . . . . . . . . . . . . . 12
Front HDMI input . . . . . . . . . . . . . . . . . . . . . . . . 12
Changing the image view . . . . . . . . . . . . . . . . . . . 12
LISTENING TO THE RADIO
(V25 AND V35 SYSTEMS) 13
Selecting the radio . . . . . . . . . . . . . . . . . . . . . . . . 13
Tuning to a station . . . . . . . . . . . . . . . . . . . . . . . . 13
Storing a preset station . . . . . . . . . . . . . . . . . . . . 13
Recalling a preset station . . . . . . . . . . . . . . . . . . . 13
Deleting a preset station . . . . . . . . . . . . . . . . . . . . 13
Optional radio tuner settings . . . . . . . . . . . . . . . . 13
MORE BUTTONS AND SYSTEM OPTIONS 14
MORE buttons . . . . . . . . . . . . . . . . . . . . . . . . . . . 14
Activating a MORE button function . . . . . . . . . . 14
Button function definitions . . . . . . . . . . . . . . . . . 14
Changing system options . . . . . . . . . . . . . . . . . . . 15
ResoluteVigilanteOG.book Page v Monday, December 7, 2009 9:48 AM

vi
EnglishTAB 6TAB 8 TAB 7 TAB 3TAB 5 TAB 2TAB 4
USING THE SETUP MODE 18
About the Setup mode . . . . . . . . . . . . . . . . . . . . . 18
Setup menu . . . . . . . . . . . . . . . . . . . . . . . . . . . . . 18
ADDING SOUND TO ANOTHER ROOM
(V25 AND V35 SYSTEMS)* 19
Expanding your system . . . . . . . . . . . . . . . . . . . . 19
Expansion guidelines . . . . . . . . . . . . . . . . . . . . . . 19
CARE AND MAINTENANCE 20
Replacing the batteries . . . . . . . . . . . . . . . . . . . . 20
Cleaning . . . . . . . . . . . . . . . . . . . . . . . . . . . . . . . . 20
Viewing system information . . . . . . . . . . . . . . . . . 20
Troubleshooting . . . . . . . . . . . . . . . . . . . . . . . . . . 21
Resetting the system . . . . . . . . . . . . . . . . . . . . 24
Pairing the remote with the console . . . . . . . . . 24
Performing a system software update . . . . . . . 24
Contacting customer service . . . . . . . . . . . . . . . . 24
Limited warranty . . . . . . . . . . . . . . . . . . . . . . . . . 25
Technical information . . . . . . . . . . . . . . . . . . . . . . 25
*Not applicable to systems sold in Japan.
ResoluteVigilanteOG.book Page vi Monday, December 7, 2009 9:48 AM

1
TAB 5TAB 4TAB 6TAB 8TAB 7English TAB 3TAB 2
INTRODUCTION
Welcome
Thank you for choosing a Bose® LIFESTYLE® system
for your home. This elegant and easy-to-use system
delivers superior performance for both music and
video.
By now you should have successfully set up your
system using the UnifyTM intelligent integration system
and calibrated the sound for your room using the
ADAPTiQ® audio calibration system.
This guide describes your new remote control and
shows you how to operate your system and its
connected devices.
System features
•Unify
TM intelligent integration system to help you
easily add devices to your system
• ADAPTiQ audio calibration system that optimizes
system performance for your room
• RF remote control
•HDMI connectivity
• Video up-conversion to 1080p
• Photo viewing using a USB flash drive
• Embedded iPod/iPhone interface and dock
(V25 and V35 systems only)
• AM/FM radio (V25 and V35 systems only)
• Can deliver sound in up to 14 additional rooms or
locations (V25 and V35 systems only, not applicable
for systems sold in Japan)
If you need help
If you have questions while operating your new
LIFESTYLE® system, go to http://owners.Bose.com
on the Internet for helpful operating information.
If you experience any operating difficulties, be sure to
check the troubleshooting table on page 21. You can
solve the most common operating problems using the
helpful tips provided there.
IMPORTANT! – Please register your
product right away!
Registering your product enables you to receive
notifications of system software updates to keep your
product performing optimally. It also allows us to send
you information about new products and special offers
from Bose.
Please follow the instructions on your Product
Registration Card to register. Failure to register will
not affect your limited warranty rights.
04.RV_OG_Intro.fm Page 1 Monday, December 7, 2009 10:09 AM
2
EnglishTAB 6TAB 8 TAB 7 TAB 3TAB 5 TAB 2TAB 4
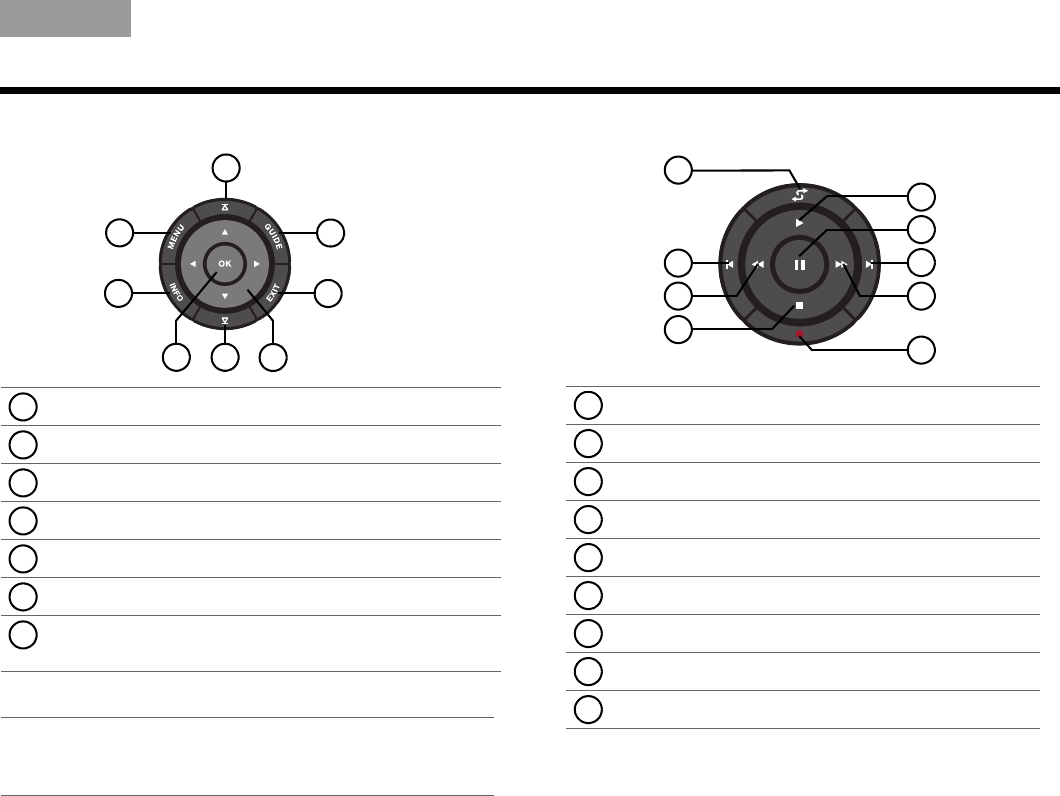
YOUR REMOTE CONTROL
This advanced radio frequency remote works
throughout the room. You do not need to aim it at the
control console.
*For V25 and V35 systems delivering sound to another room through
Bose® link OUT (not applicable to systems sold in Japan)
The Beatles
iPod 3:20
14
13
12
11
10
9
8
7
6
5
4
3
2
1
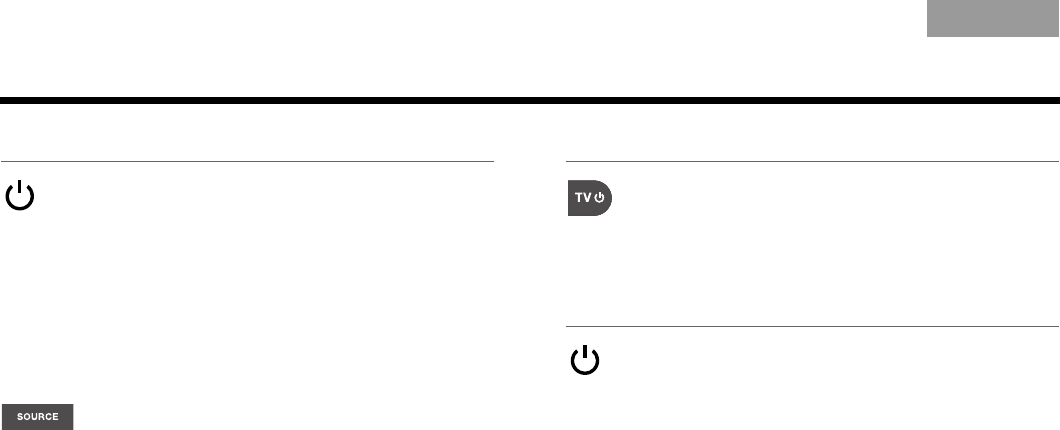
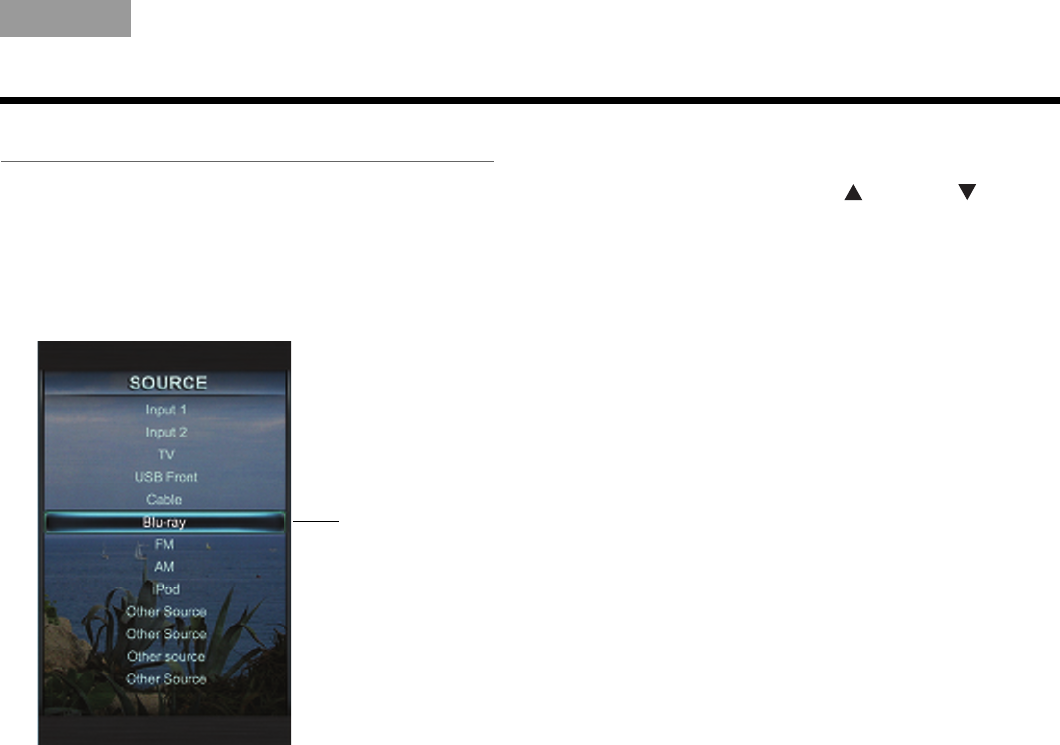
SOURCE – Displays and selects connected devices
from the source list on your TV.
Power – Turns your LIFESTYLE® system on or off
(press and hold to turn off all rooms*)
Volume Up/Down – Increases (+) or decreases (–)
the system volume
Mute – Mutes/unmutes system speakers
(Press and hold to mute/unmute all rooms*)
Image View – Changes the way video appears
Numeric Keypad – Allows manual entry of channels
and settings
TV Input – Changes inputs on your TV
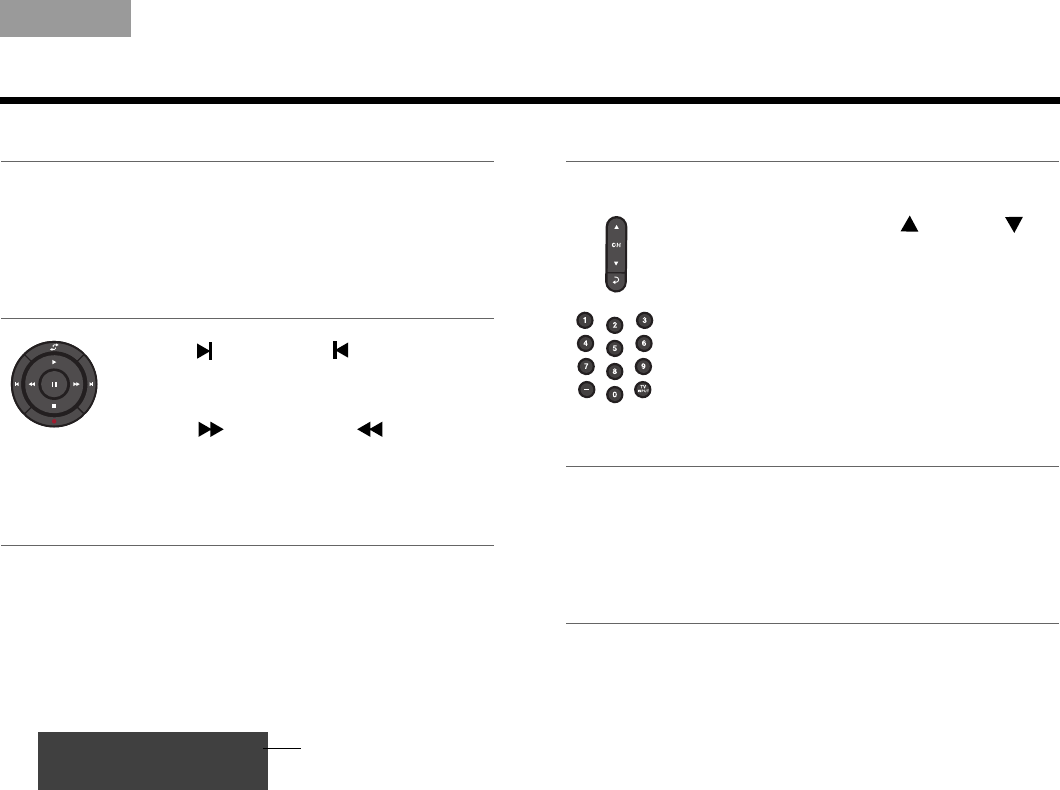
Playback Controls – See page 3
Last Channel – Returns to last channel or preset
Channel Up/Down – Next/previous channel or
preset
MORE – Displays additional device-specific controls
and information on your TV
Navigation controls – See page 3
TV Power – Turns your TV on or off
Information Display (V25 and V35 system remotes)
1
2
3
4
5
6
7
8
9
10
11
12
13
14
ResoluteVigilanteOG.book Page 2 Monday, December 7, 2009 9:48 AM
3
YOUR REMOTE CONTROL
TAB 5TAB 4TAB 6TAB 8TAB 7English TAB 3TAB 2
Navigation controls
Note: See “Operating Your Connected Devices” on
page 7 for more details on using navigation and
playback controls with selected sources.
Playback controls
Page Up/Down – Moves to next/previous page
MENU – Displays the menu for a connected device
INFO – Displays program information
OK – Selects or confirms highlighted item
Left/Right and Up/Down – Navigation control
EXIT – Clears a menu or guide from your TV screen
GUIDE – Displays your set top box or TV program
guide, or Blu-ray Disc™ player popup menu
6
7
1
45
2
3
1
1
2
3
4
5
6
7
Shuffle
Quick Replay/Skip Backward
Seek Backward/Rewind
Stop
Record
Seek Forward/Fast Forward
Quick Skip/Skip Forward
Pause
Play
9
8
7
6
5
4
3
2
1
1
2
3
4
5
6
7
8
9
ResoluteVigilanteOG.book Page 3 Monday, December 7, 2009 9:48 AM
4
YOUR REMOTE CONTROL
EnglishTAB 6TAB 8 TAB 7 TAB 3TAB 5 TAB 2TAB 4
Information display
(V25 and V35 system remotes)
The display provides operating and system status
information.
Examples:
• Source identification
•Volume
• Radio tuner
•iPod
• Operating prompts
Remote glow button
Pressing the glow button on the rear of the remote
illuminates the remote buttons (and the display for
V25 and V35 systems). The light turns off automatically
after several seconds to prolong battery life.
Cable
Cable
43
FM P1
90.9 - WBUR90.9
iPod
Album
Hold number key
to set preset
Glow button
To adjust the illumination level:
Note: To avoid the risk of deleting a
radio preset, switch to any source
other than AM or FM before making
this adjustment.
1. Press and hold the Glow and
OK buttons at the same time
for 5 seconds.
2. Press the up/down navigation
button to select Brightness or
Contrast.
3. Press the left/right navigation
button to decrease or increase
the illumination level.
4. Press either the OK or Glow
button to return to normal
operation.
ResoluteVigilanteOG.book Page 4 Monday, December 7, 2009 9:48 AM
5
TAB 5TAB 4TAB 6TAB 8TAB 7English TAB 3TAB 2
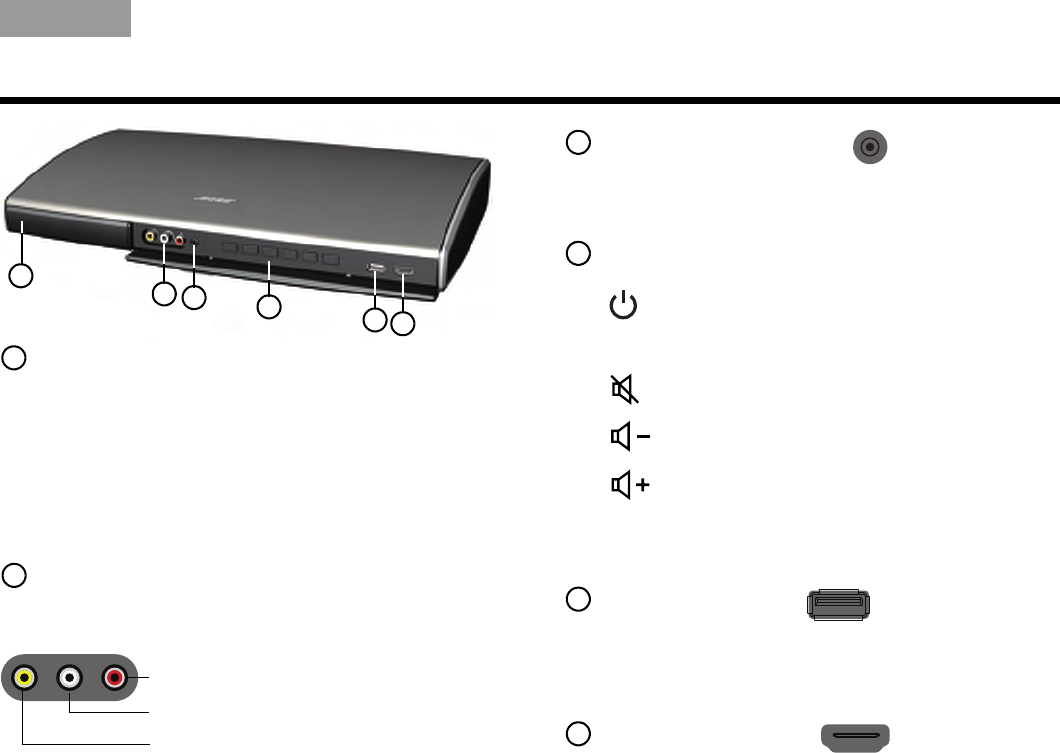
YOUR CONTROL CONSOLE
Power light
• Red........................ System is off (Standby)
• Blinking green........ System is starting
• Steady green ......... System is on and ready to use in
the main room or other rooms
• Amber.................... System off and charging iPod
(V25 and V35 systems only)
Front A/V inputs
Used for temporarily connecting an audio/video device
such as a camcorder.
Headphones output
Accepts stereo headphones with a 3.5 mm stereo plug.
Volume level is set by the volume controls.
Control buttons
Front USB input
Used for viewing photo files from a USB device
including a digital camera. Also used for updating
system software.
Front HDMI input
Used for temporarily connecting an HDMI device such
as a video camera.
1
3456
2
1
2
Right (R) audio channel (red)
Left (L) or mono audio channel (white)
Composite video (yellow)
Turns system power on or off
Source Lists system sources on your TV
Mutes/unmutes the system speakers
Decreases system volume
Increases system volume
Setup Displays the Setup menu (press and release)
or system information (press and hold)
3
4
5
6
ResoluteVigilanteOG.book Page 5 Monday, December 7, 2009 9:48 AM
6
EnglishTAB 6TAB 8 TAB 7 TAB 3TAB 5 TAB 2TAB 4
POWER ON/OFF CONTROLS
Starting your system
Press the power button on the remote or on the
console.
To keep energy consumption to a minimum, the system
operates in a very low power state when in standby (off)
mode. Because of this, the system requires several
seconds to start. The power LED on the console
changes to blinking green while the system starts up.
When it changes from blinking to solid green, your
system is on and ready to use.
Pressing the remote SOURCE button also
starts your system and puts the SOURCE
menu on your TV screen.
Pressing the Setup button on the console
also starts your system and puts the Setup
menu on your TV screen.
Turning on your TV
If you programmed your remote during the initial
setup, press the TV power button on the remote
control to turn on your TV. Otherwise, use the
remote that came with your TV.
Shutting down your system
Press the power button on the remote or on
the control console. The system will shut down
automatically after a few seconds. However, if
you decide to access the power controls for
connected devices, automatic shutdown will be
stopped and you must complete the shutdown
using the on-screen controls.
Setup
ResoluteVigilanteOG.book Page 6 Monday, December 7, 2009 9:48 AM
7
TAB 5TAB 4TAB 6TAB 8TAB 7English TAB 3TAB 2
OPERATING YOUR CONNECTED DEVICES
Selecting a connected device
The SOURCE menu allows you to select your
connected devices.
1. Press the remote SOURCE button to display a list
of connected devices on your TV. The currently
selected device is highlighted as shown in the
following example:
2. Keep pressing SOURCE to move the highlight
down the list and select the source you want.
• You can also use the up ( ) or down ( ) naviga-
tion buttons to select a source.
• If you named a device during the setup process,
the assigned name appears in the list. Unnamed
devices appear as generic inputs such as
“Input 1 (HDMI)” and “Input 2 (HDMI).”
• If you select a device that is not turned on, a
message will appear on the screen reminding you
to make sure the device is turned on.
Highlighted
selection
ResoluteVigilanteOG.book Page 7 Monday, December 7, 2009 9:48 AM
8
OPERATING YOUR CONNECTED DEVICES
EnglishTAB 6TAB 8 TAB 7 TAB 3TAB 5 TAB 2TAB 4
Watching TV
Your TV may be receiving its program content through a
set top box or the tuner built into your TV.
Note: Since most TVs come with an IR (infrared) remote,
you may need to point the Bose® remote at your TV to
operate it.
Using a set top box
If you connected a cable, satellite, or other set top box
to your TV, it will appear in the SOURCE menu under
the name you assigned it during the setup process.
1. Press the remote SOURCE button and select the
device that provides your TV programs.
2. Tune to a station. See “Tuning to a TV station.”
Using the tuner in your TV
If you are using the tuner in your TV to receive TV
programs:
1. Press the remote SOURCE button and select TV.
2. Press the TV Input button to select the internal
tuner in your TV.
3. Tune to a station. See “Tuning to a TV station.”
To return to using other sources, use the TV Input
button to first select the input for the Bose system, then
press the SOURCE button and select another source.
Tuning to a TV station
You can tune to a TV station using any of the following
methods.
Enter the channel number on the keypad
and press OK. Use the dash button for
channel numbers using a dash or period.
Press Channel Up ( ) or
Down ( ) to change channels.
Press to tune to last selected channel.
Press GUIDE. Use the navigation, page
up/down, and OK buttons to select a
station from the program guide.
ResoluteVigilanteOG.book Page 8 Monday, December 7, 2009 9:48 AM
9
OPERATING YOUR CONNECTED DEVICES
TAB 5TAB 4TAB 6TAB 8TAB 7English TAB 3TAB 2
Playing audio/video devices
During the interactive setup process you may have
connected an audio/visual device such as a CD, DVD,
DVR, or Blu-ray Disc™ player. These would typically be
connected to inputs 1-5.
If you programmed the Bose® remote for the device,
you can use the following controls to operate the
selected device.
Listening to a Bose link input
device
You can use your LIFESTYLE® system to listen to
content from a Bose link-compatible system, such as
another LIFESTYLE® system. Connect that system to
the Bose link IN connector on the rear panel of the
control console.
To listen to the Bose link source, press the SOURCE
button and select Bose link.
Be sure to connect your Bose link device before
attempting to select it. It will not appear in the
SOURCE list until it is connected.
MENU Display device menu (if available) or
system setup menu
GUIDE Display Blu-ray pop-up menu
INFO Display device information
EXIT Exit menu
Up one item
Down one item
Move left
Move right
Select
Next page, channel, or disc
Previous page, channel, or disc
Play
Pause
Stop
Record
Fast forward or search forward
Fast rewind or search reverse
Quick skip or skip forward
Quick replay or skip backward
Shuffle mode
ResoluteVigilanteOG.book Page 9 Monday, December 7, 2009 9:48 AM
10
OPERATING YOUR CONNECTED DEVICES
EnglishTAB 6TAB 8 TAB 7 TAB 3TAB 5 TAB 2TAB 4
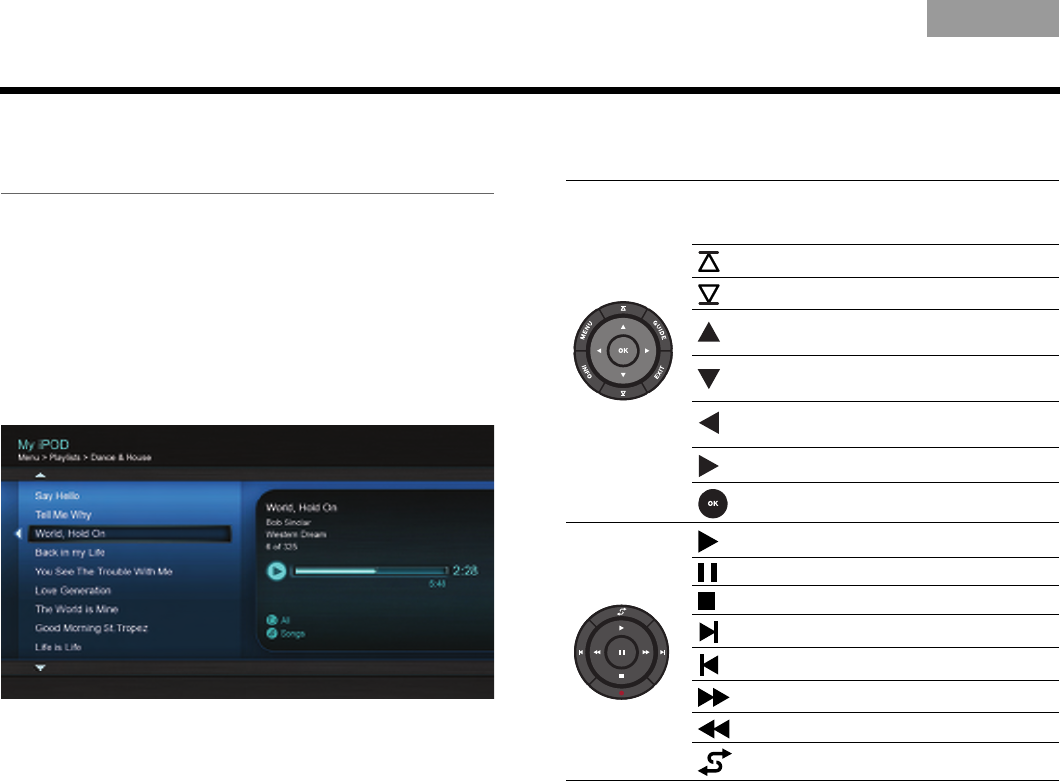
Playing an iPod or iPhone
(V25 and V35 only)
Your LIFESTYLE® system can play audio and video
from your iPod or iPhone.
Be sure to dock your iPod before attempting to
select it. It will not appear in the SOURCE list
until you dock it.
Your iPod menus and content appear on the left side
of your screen as shown in the following example.
The “Now Playing” track appears on the right.
The following controls are available to operate your
connected iPod.
MENU
Up one menu level (press and hold to
go to top menu level) (If playing
video, pause and return to menu)
Up one page
Down one page
Up one menu item
(press and hold to scroll quickly)
Down one menu item
(press and hold to scroll quickly)
Up one menu level (If playing video,
pause and return to menu)
Down one menu level
Down one menu level
Play
Pause
Stop
Next track or audio bookmark
Previous track or audio bookmark
Fast forward
Fast rewind
Shuffle on/off
ResoluteVigilanteOG.book Page 10 Monday, December 7, 2009 9:48 AM

11
OPERATING YOUR CONNECTED DEVICES
TAB 5TAB 4TAB 6TAB 8TAB 7English TAB 3TAB 2
Using the front console inputs
The front of the console provides analog A/V inputs
plus a USB and an HDMI input. These inputs appear in
the SOURCE menu as A/V (Front), USB, and HDMI
(Front) only when a device is connected. These inputs
are provided for temporarily connecting devices such
as digital cameras and video cameras.
Front USB input
Your LIFESTYLE® system can display photo files (.jpg or
.jpeg format only) from a USB storage device.
When selecting the USB source, folders appear at the
top of the list on the left followed by single image files.
Selecting a folder displays its contents.
Use the following controls for viewing digital photos.
Up one menu item (press and hold to
repeat)
Down one menu item (press and hold
to repeat)
Up one folder level, or exit and return
to browsing folders (if viewing a
slideshow)
MENU
Up one folder level, or exit and return
to browsing folders (if viewing a
slideshow)
Down one folder level
Down one folder level (if a folder is
highlighted), or
Play slideshow (if a photo file is
highlighted)
Up nine items
Down nine items
EXIT Exit slideshow and return to
browsing folders
Play slideshow of highlighted folder
Pause slideshow
Exit slideshow and return to
browsing folders
Next image
Previous image
ResoluteVigilanteOG.book Page 11 Monday, December 7, 2009 9:48 AM
12
OPERATING YOUR CONNECTED DEVICES
EnglishTAB 6TAB 8 TAB 7 TAB 3TAB 5 TAB 2TAB 4
Front Analog A/V input
You can use this input for devices that have composite
video and left/right audio outputs. The Bose® remote
does not control a device connected to this input.
You need to use the controls on the device itself or
the remote that came with it.
Front HDMI input
You can use this input for devices that have an HDMI
output. The Bose remote does not control a device
connected to this input. You need to use the controls
on the device itself or the remote that came with it.
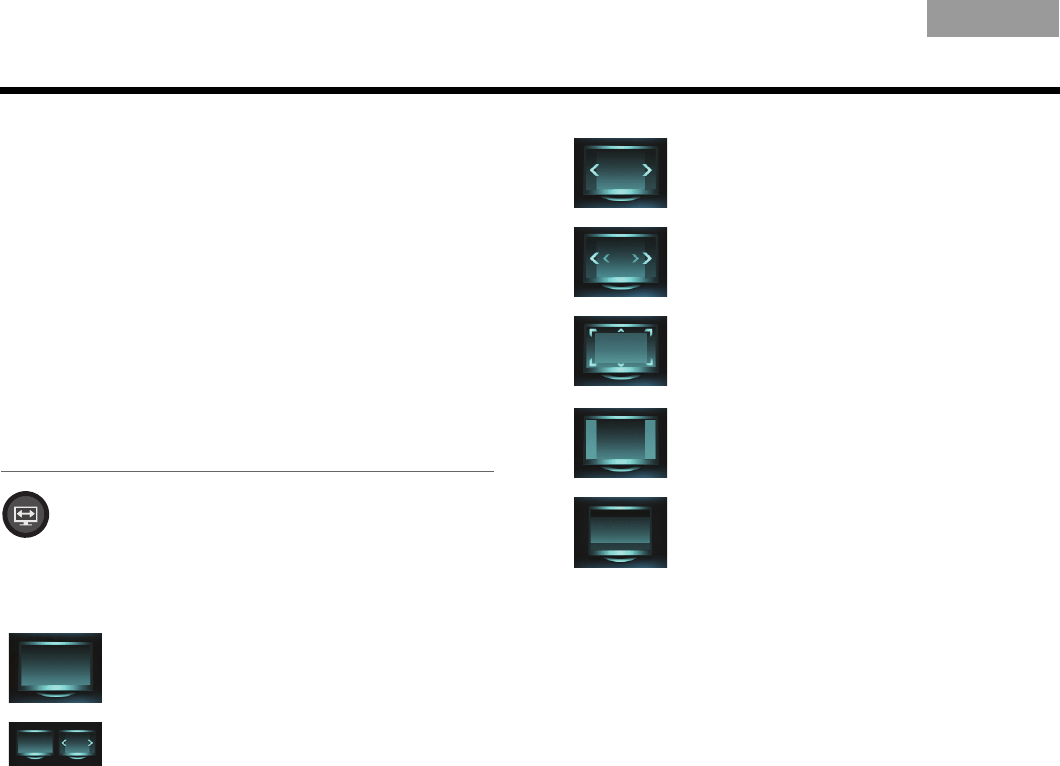
Changing the image view
Press the image view button to display a menu
of video formatting choices. Continue to press
this button to highlight your choice.
Your TV picture will change momentarily after you
select a format.
Normal Leaves original video image
unchanged.
Auto-Wide Fills width of the screen without
cropping any content.
Stretch 1 Stretches video image evenly
from the center.
Stretch 2 Stretches the edges of the
video image much more than
the center portion of the image.
Zoom Enlarges the video image (press
the up/down navigation buttons
to vertically offset the image on
your screen).
Gray Bars Places vertical gray bars on the
left and right of a standard
definition video image.
Fit Fits the video image to your
screen.
ResoluteVigilanteOG.book Page 12 Monday, December 7, 2009 9:48 AM
13
TAB 5TAB 4TAB 6TAB 8TAB 7English TAB 3TAB 2
LISTENING TO THE RADIO (V25 AND V35 SYSTEMS)
Selecting the radio
1. Press the SOURCE button.
2. Keep pressing the SOURCE button to select FM or
AM in the SOURCE list.
Tuning to a station
Storing a preset station
The built-in radio tuner can store up to 25 FM and 25
AM preset stations.
1. Tune to a radio station.
2. For presets 1-9, press and hold the number key.
For 10-25, press and hold the OK button to store
the station in the next available preset.
Recalling a preset station
To recall your stored presets:
Deleting a preset station
1. Recall the preset station you want to delete.
2. Press and hold the OK button until the preset
number disappears from the display.
Optional radio tuner settings
1. Press the MORE button and select OPTIONS.
2. Select an option to change from the menu (see
“OPTIONS menu” on page 16 for details):
• Current Station: Allow Stereo, Stereo Off
•RDS: On, Off
• Press (increase) or (decrease) to
tune up or down the frequency band.
OR
• Press (seek next) or (seek
previous) to find the next/previous
strong station.
FM P1
90.9 - WBUR90.9
Preset number
• Press the channel up or down
button to go to the next or previous
preset.
• For quick access to presets 1-9, press
the number key of the preset.
ResoluteVigilanteOG.book Page 13 Monday, December 7, 2009 9:48 AM
14
EnglishTAB 6TAB 8 TAB 7 TAB 3TAB 5 TAB 2TAB 4
MORE BUTTONS AND SYSTEM OPTIONS
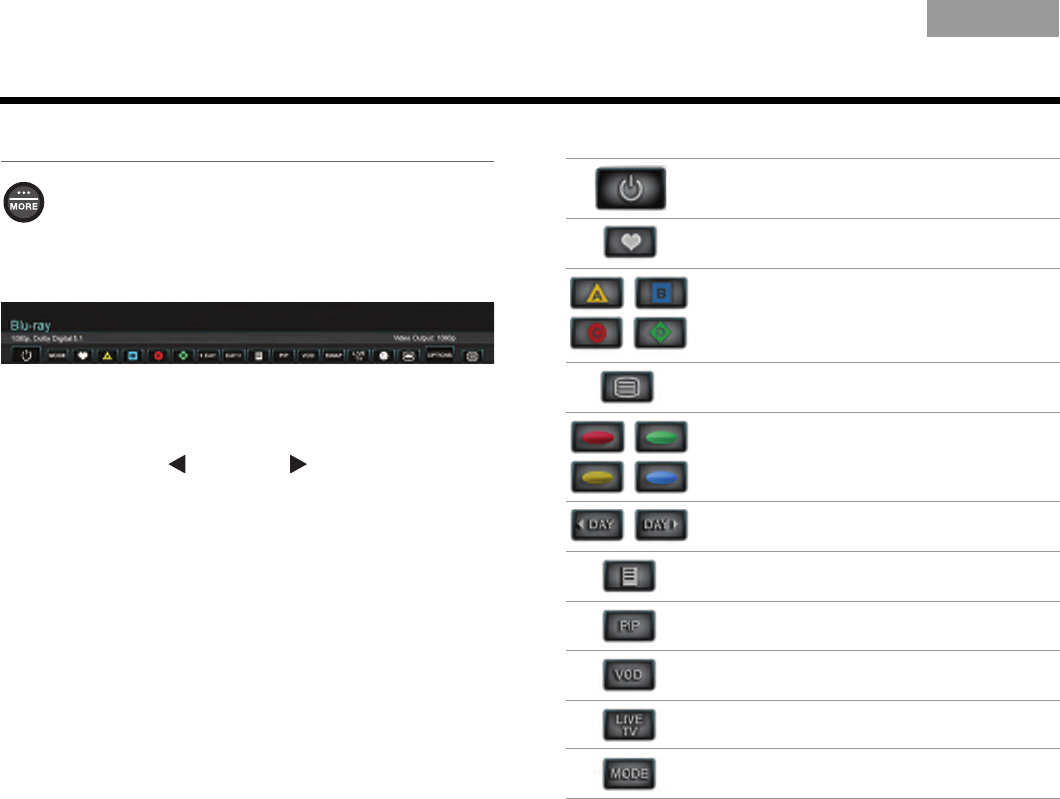
MORE buttons
Press the MORE button to display additional
button functions along the top of your TV screen
for the current source. The functions that appear
depend on the selected source. The following
example shows how these buttons appear on your TV.
Activating a MORE button function
1. Press the remote MORE button.
2. Using the left ( ) and right ( ) navigation buttons,
highlight the button function you want to activate.
3. Press the remote OK button.
Button function definitions
Turns device power on/off.
Displays a list of favorite channels.
Performs A, B, C, or D functions in an
interactive program guide.
Enables or disables Teletext functions.
Performs Red, Green, Yellow, or Blue
functions on Blu-ray Disc™ players, set top
boxes and Teletext.
Displays program guide for previous or
next day.
Displays playlist of recorded programs.
Activates picture-in-picture mode.
Accesses video on demand.
Switches your TV to live programming.
Switches between DVD and VCR in a
combo player.
ResoluteVigilanteOG.book Page 14 Monday, December 7, 2009 9:48 AM
15
MORE BUTTONS AND SYSTEM OPTIONS
TAB 5TAB 4TAB 6TAB 8TAB 7English TAB 3TAB 2
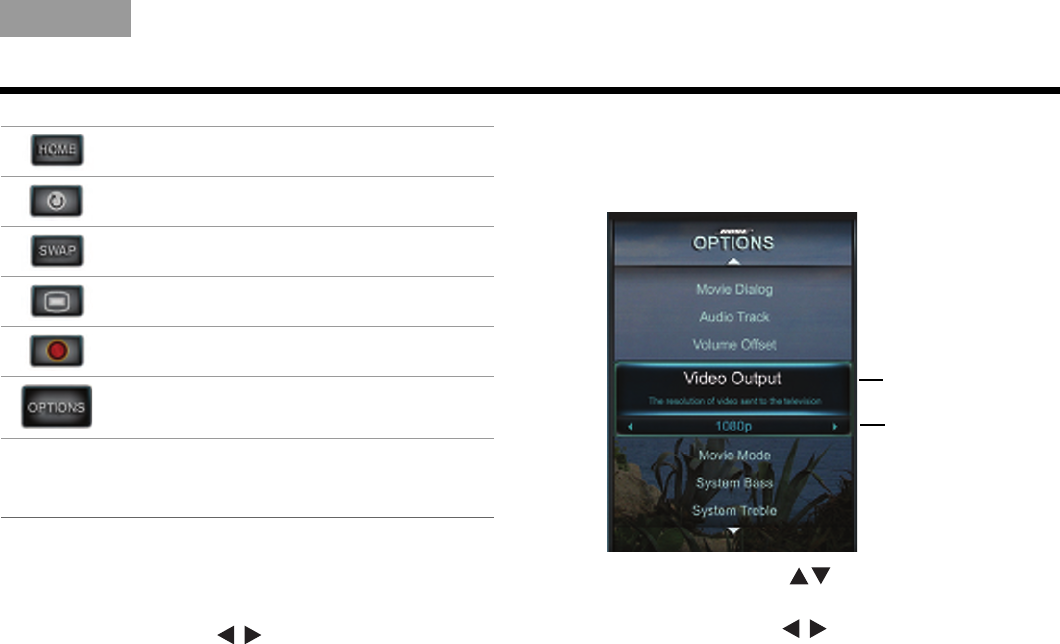
Changing system options
The number of items appearing in the OPTIONS menu
depends on which source is currently selected.
1. Press the remote MORE button.
2. Using the left/right ( ) navigation buttons,
highlight OPTIONS.
3. Press the remote OK button to display the
OPTIONS menu for the current source.
The following is an example for a video device.
4. Using the up/down ( ) navigation buttons,
highlight the option you want to change.
5. Using the left/right ( ) navigation buttons,
select the setting.
6. Press the remote EXIT button when done.
Moves to the “Home” state of the device.
Repeat track on an iPod or other digital
media players.
Switches tuners in a multi-tuner device.
Accesses the system menu for your
set top box.
Accesses interactive features for some
digital television services (EU only).
See the following on “Changing system
options.”
Highlighted option
Selected setting
ResoluteVigilanteOG.book Page 15 Monday, December 7, 2009 9:48 AM

16
MORE BUTTONS AND SYSTEM OPTIONS
EnglishTAB 6TAB 8 TAB 7 TAB 3TAB 5 TAB 2TAB 4
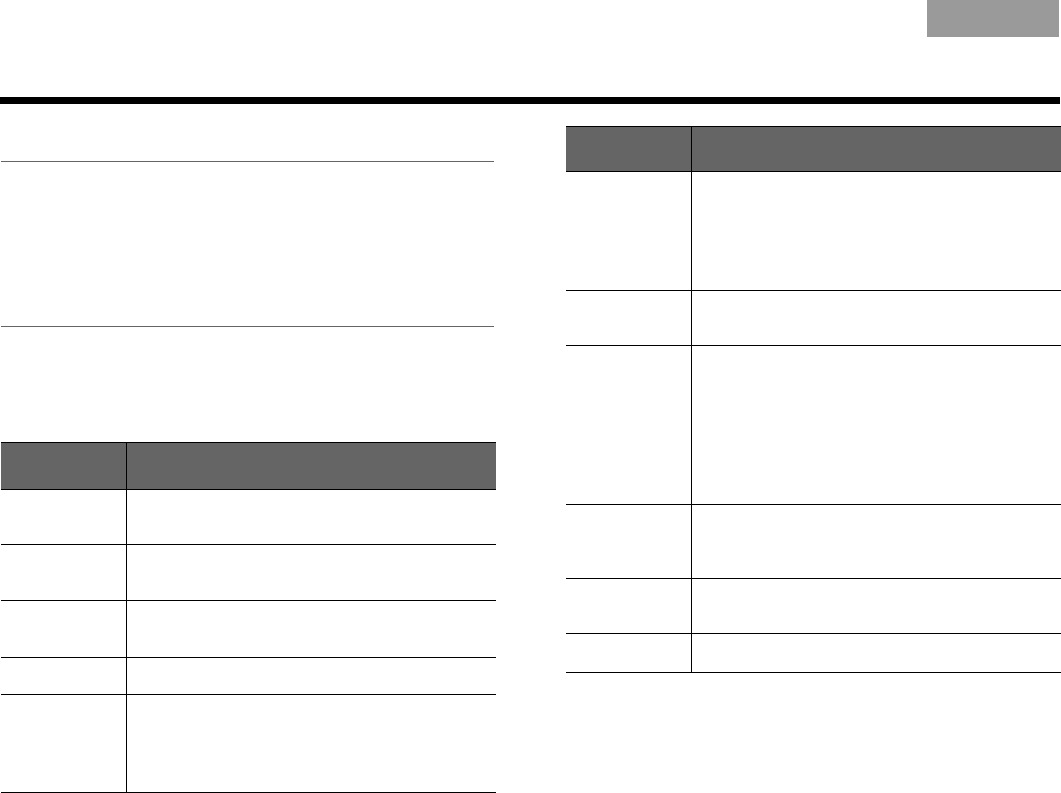
OPTIONS menu
Option Available Settings
Sound Original ................... Plays stereo audio when stereo audio is received from the source
Recommended* ...... Plays 5-channel audio whether or not 2- or 5-channel audio is received from the source
Alternative .............. Plays 5-channel audio when either stereo or 5-channel audio is received from the source
Enhanced Mono ..... Plays simulated surround sound when monaural audio is received from the source
Current Station
(V35/V25 only) Allow Stereo* .......... Allows stereo sound from the current stereo FM radio station
Stereo Off ............... Changes the current station to mono, which can help when tuning to a weak radio station
RDS
(V35/V25 only) On* ......................... Displays RDS information on the remote
Off ........................... No RDS information on the remote
Game Mode On ........................... Produces improved video performance for game systems
Off* .......................... Normal video performance
Audio
Compression Off* .......................... No change to audio track
Enhance Dialog ....... Enhances sound output so you can hear movie dialogs more distinctly
Smart Volume.......... Reduces the range of volume levels in a movie soundtrack so the difference between
extremely loud outbursts and soft sounds is less noticeable
Audio Track Track 1* ................... Selects track 1 from an external audio stream with multiple audio tracks
Track 2..................... Selects track 2 from an external audio stream with multiple audio tracks
Both Tracks ............. Selects tracks 1 and 2 from an external audio stream
Not Available ........... Automatically selected when only one track is received
Volume Offset Increases the volume level of the selected source relative to other sources (0* to 10)
Source
Overscan On ........................... Applies video overscan to the current video source
Off* .......................... Video source unaffected
System Bass Adjusts bass level
–9 to Normal* to +6 (After ADAPTiQ® calibration)
–14 to Normal* to 14 (No ADAPTiQ calibration)
ResoluteVigilanteOG.book Page 16 Monday, December 7, 2009 9:48 AM

17
MORE BUTTONS AND SYSTEM OPTIONS
TAB 5TAB 4TAB 6TAB 8TAB 7English TAB 3TAB 2
* Factory setting
System Treble Adjusts treble level
–9 to Normal* to +6 (after ADAPTiQ® calibration)
–14 to Normal* to +14 (no ADAPTiQ calibration)
A/V Sync Adjusts the audio delay to synchronize audio with the video
–2 to Normal* to +5
Rear Speakers Adjusts the volume level of the rear speakers relative to front speakers (–10 to Normal* to +6)
This option is unavailable if the Speakers option is set to Stereo (2) or Front (3)
Center Speaker Adjusts the volume level of the front center speaker relative to other speakers (–8 to Normal* to +8) (unavailable if
the Speakers option is set to Stereo (2))
Speakers Stereo (2) ......... Activates only front left and right speakers
Front (3) ...........Activates only front left, center, and right speakers
Surround (5)* ... Activates all front and rear speakers
Volume on TV On* .................. Enables the system to display the volume level meter and mute indicator on your TV
Off ...................Prevents the display of the volume level meter and mute indicator
TV Speakers On ...................Sends HDMI audio to your TV (audio from the TV is not affected by plugging headphones into
the control console or by pressing Mute or Volume on the remote)
Off* ...................Sends HDMI audio to the LIFESTYLE® system speakers
Video Output Changes the resolution (Standard/720p/1080i/1080p) of the video signal sent to your TV (only settings supported
by your TV appear as options)
Option Available Settings
ResoluteVigilanteOG.book Page 17 Monday, December 7, 2009 9:48 AM
18
EnglishTAB 6TAB 8 TAB 7 TAB 3TAB 5 TAB 2TAB 4
USING THE SETUP MODE
About the Setup mode
After performing the initial system setup using the
Unify™ intelligent integration system, you can make
additional changes to your system at any time using
the Setup mode.
Setup menu
To display the Setup menu on your TV, press the Setup
button on the front of the control console. Using the
navigation buttons on the remote, select the function
you want and follow the instructions on the screen.
NOTES:
1. Appears only if initial setup is incomplete.
2. Appears only if initial setup is complete.
3. Appears only in LIFESTYLE® V25 and V35 systems if initial setup
is complete.
Menu item What you can do
Resume initial
setup (Note 1) Return to the interactive setup process at the
last completed event
Restart initial
setup (Note 1) Start the interactive setup process from the
beginning
Language Change the language of the on-screen
display
ADAPTiQ®Start the ADAPTiQ audio calibration process
TV options
(Note 2) • Program your remote to control your TV
• Replace your TV
• Add, change, or remove the TV audio
connection
Source setup
options
(Note 2)
• Change a device name
• Program your remote to control a device
and add the IR emitter if needed
• Remove a device
• Add or change audio or video connections
Add a device
(Note 2) Add another device or accessory to your
system
Homewide
(Note 3) • Select the house code mode: Standard
(16 house codes, 16 room codes) or
Alternative (64 house codes, 4 room codes)
• Change the room code
• For more information on Homewide expan-
sion, see “Adding Sound to Another Room
(V25 and V35 systems)*” on page 19
Update Perform a system software update (see
“Performing a system software update” on
page 24” for more information)
Teach mode
(Note 2) Send IR codes to program a learning remote
Exit Returns you to the last source selected
Menu item What you can do
ResoluteVigilanteOG.book Page 18 Monday, December 7, 2009 9:48 AM

19
TAB 5TAB 4TAB 6TAB 8TAB 7English TAB 3TAB 2
ADDING SOUND TO ANOTHER ROOM (V25 AND V35 SYSTEMS)*
Expanding your system
Your LIFESTYLE® system can deliver Bose® quality
sound in up to 14 additional rooms in your home.
Connecting a Bose link-compatible product to the
Bose link OUT connector on the control console
enables you to listen to a different sound source in
other rooms. For example, a DVD movie can be playing
in the main room while you listen to the AM/FM radio in
the other room.
For more information or to purchase additional
products, contact your local Bose dealer. See the
contact list included with your system.
Expansion guidelines
To set up a Bose link-compatible system in another
room, follow the instructions included with the
expansion product and be aware of the following:
•Bose link connections – Your system cannot
operate with Bose link-enabled products connected
to both the Bose link IN and Bose link OUT
connectors at the same time.
•Room codes – The speaker system and the remote
in your other room must be set to the same room
code. See the owner’s guide that came with the Bose
link product for information on setting room codes.
•House code – The house code is what enables the
remote control in another room to communicate with
the control console. If you set up a Bose link-enabled
speaker system in another room, the remote used in
that room must be set to the same house code that is
stored in the control console.
Your system is set to house code 15 at the factory.
To see the house code, select Homewide in the
Setup menu and then select house code. On the
screen, you will see the house code and a
representation of how the second room remote
control switches should be set to match the house
code in the control console.
Your system has two house code modes. The
Standard mode provides 16 house codes and
16 room codes. If you live in a multi-unit dwelling,
you can select the Alternative mode that provides
64 house codes and 4 room codes.
Note: Switching between Standard and Alternative
house code modes resets the house code to zero (0).
•Using HDMI connections – To hear audio in
another room from any device connected to HDMI
input 1, 2, or 3, you must also make an analog audio
connection between the device and the left (L) and
right (R) analog connections for that input. Likewise,
you must also make analog audio connections if a
digital audio connection is made for input 4 or 5.
•Radio operation – Using an expansion room
remote, you can select and control the radio that
is built into the control console in the main room.
However, if both rooms want to listen to the radio
at the same time, they can only listen to the same
station.
*Not applicable to systems sold in Japan.
ResoluteVigilanteOG.book Page 19 Monday, December 7, 2009 9:48 AM
20
EnglishTAB 6TAB 8 TAB 7 TAB 3TAB 5 TAB 2TAB 4
CARE AND MAINTENANCE
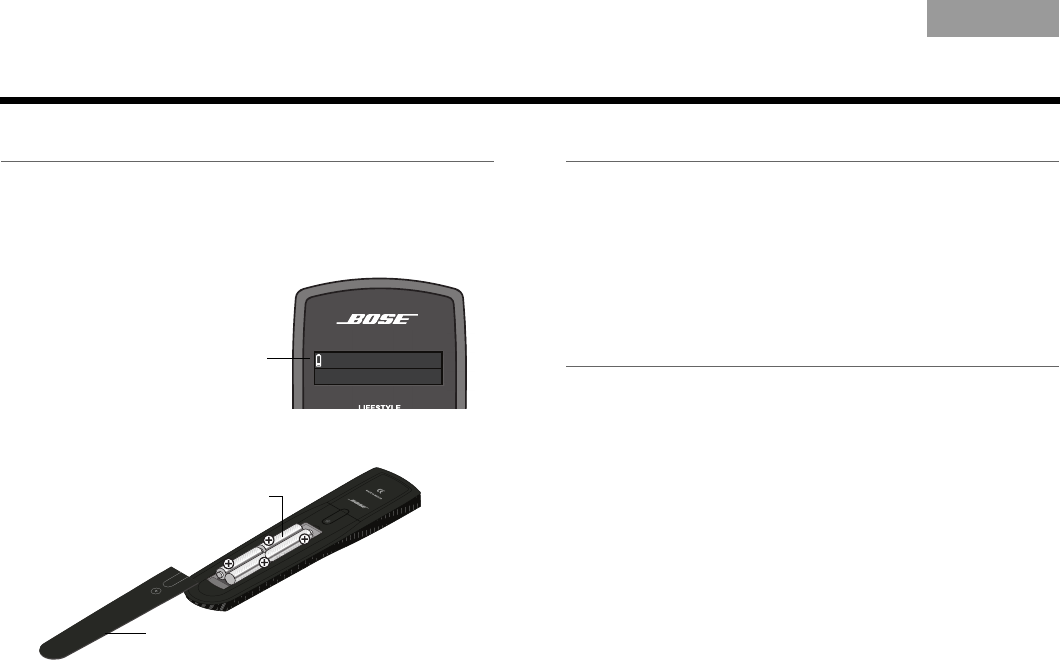
Replacing the batteries
Replace all four batteries when you notice a marked
decrease in the range or response of your remote
control, or when you see the low battery indicator
(V25 and V35 systems) on the display.
1. Slide the battery compartment cover off the back
of the remote control.
2. Remove the old batteries.
3. Install four new AA (IEC-LR6) 1.5V batteries,
matching the polarity markings (+ and –) to the
markings inside the battery compartment.
4. Slide the battery cover back into place.
Cleaning
You can wipe the outside surfaces using a soft dry
cloth. You can also lightly vacuum the speaker grilles.
• DO NOT use solvents, chemicals, or sprays.
• DO NOT allow liquids to spill or objects to drop into
any openings.
Viewing system information
Press and hold the Setup button on the control console
to display the following system information on your TV:
• Control console serial number, software version, and
IR database
•Acoustimass
® module serial number and software
version
• Radio software version
• TV connection status
• Remote control ID number and software version
•House code
• Connected Bose® link rooms
• Device connections
Press the Setup button again to remove the list from
the screen.
The Beatles
iPod 3:20
Th
e
B
iP
0
Beat
l
es
Pod
3:2
Cable
Low battery icon
(V25 and V35 systems)
AA (IEC-LR6) batteries (4)
Battery compartment cover
ResoluteVigilanteOG.book Page 20 Monday, December 7, 2009 9:48 AM
21
CARE AND MAINTENANCE
TAB 5TAB 4TAB 6TAB 8TAB 7English TAB 3TAB 2
Troubleshooting
Problem What to do
The system is not responding
to initial operation of my
Bose® remote
• Make sure the control console is turned on.
• Make sure batteries are in the remote.
• Reset the system. See “Resetting the system” on page 24.
• Press any remote key and watch the power light on the control console. It should blink with each press.
If not, see “Pairing the remote with the console” on page 24 and follow the procedure.
The Bose remote does not
control a device I added
during the initial setup
• Try setting up the device again. Press the Setup button on the control console. Select the device options
and follow the on-screen instructions to set up the device again.
• Your system may need a software update. See “Performing a system software update” on page 24.
One video connection is less
than optimum
• To change a video connection, press the Setup button on the control console and select the device setup
options. Follow the on-screen instructions.
System doesn’t do
anything
• Make sure the AC power cord is inserted securely into the power supply.
• Make sure the Acoustimass® module and the power supply are fully plugged into a live AC (mains) outlet.
• Select a connected device from the SOURCE menu.
• Reset the system. See “Resetting the system” on page 24.
No sound • Make sure the Acoustimass module is plugged into a live AC (mains) outlet.
• Increase the volume.
• Press the Mute button ( ) and make sure your system is not muted.
• Check the input connections on the control console. Make sure that you have selected the right source.
• Make sure that the audio input cable is firmly plugged into the Acoustimass connector on the control
console and the other end is firmly seated into the Media Center connector on the Acoustimass module.
• Check connections between the front and rear speakers and the Acoustimass module.
• For radio operation (V25 and V35 systems only), connect the FM and AM antennas.
• Reset the system. See “Resetting the system” on page 24.
ResoluteVigilanteOG.book Page 21 Monday, December 7, 2009 9:48 AM

22
CARE AND MAINTENANCE
EnglishTAB 6TAB 8 TAB 7 TAB 3TAB 5 TAB 2TAB 4
Sound is marred by a loud
hum or buzz, which may
be electrical in nature
(not harmonic)
• Contact Bose® Customer Service to determine if and how other electrical devices in the room may be
creating unwanted signals, and to obtain possible remedies.
No sound from center
speaker
• Make sure the center speaker cable is connected at both ends.
• Set the Speakers option to Front(3) or Surround(5) in the OPTIONS menu.
• In the OPTIONS menu, make sure the Sound setting is not Original.
Center speaker is too loud • Decrease the Center Speaker volume setting in the OPTIONS menu for the current source.
No sound from rear speakers • Make sure the Speakers option is set to Surround(5) in the OPTIONS menu.
• Increase the Rear Speakers setting in the OPTIONS menu for the current source.
• Make sure the video sound source is stereo-encoded or surround-encoded, and the device used
(DVD, VCR, DVR, etc.) is stereo.
• For stereo inputs, make sure the Sound option is set to Recommended or Alternative.
Rear speakers are too loud • Decrease the Rear Speakers volume setting in the OPTIONS menu for the current source.
• Make sure the left and right front speakers are connected to the front speaker jacks, and the left and right
rear speakers are connected to the rear speaker jacks.
Radio does not work
(V25 and V35 systems only)
• Make sure antennas are connected properly.
• Move AM antenna at least 20 inches (50 cm) from the control console and Acoustimass® module.
• Adjust antenna position to improve reception.
• Make sure the AM antenna is in an upright position.
• Move antennas farther from control console, TV, or other electronic equipment.
• Select another station. You may be in an area of weak signal coverage for some stations.
FM sound is distorted
(V25 and V35 systems only)
• Adjust antenna position to reduce interference.
• Fully extend the FM antenna.
Problem What to do
ResoluteVigilanteOG.book Page 22 Monday, December 7, 2009 9:48 AM

23
CARE AND MAINTENANCE
TAB 5TAB 4TAB 6TAB 8TAB 7English TAB 3TAB 2
FM sound is noisy when
Speakers option is set to
Front(3) or Surround(5)
(V25 and V35 systems only)
• Weak FM stations will produce static in the rear speakers. Set Speakers option to Stereo(2) in the
OPTIONS menu to minimize noise.
Sound is distorted • Make sure speaker cables are not damaged and the connections are secure.
• Reduce the volume output level from any external devices connected to the control console.
No sound from a connected
device
• Check the connections.
• If using a coaxial or optical audio connection, make sure you have not made both types of connections to
the same input on the control console.
• Make sure that device is turned on.
• Refer to the owner’s manual that came with the device.
No TV picture, but audio is
heard
• Check the TV video input selection. Make sure it is correct for the video source.
• Make sure video cables are securely connected.
A connected device does not
respond consistently to
remote commands
• Try connecting the included external IR emitter to the control console. For guidance, press the Setup
button on the control console. Select the device options and follow the on-screen instructions.
Intermittent audio dropouts
heard on coaxial digital audio
inputs
• Contact Bose® Customer Service to request a composite video cable that can be used for the coaxial
digital audio connection.
Problem What to do
ResoluteVigilanteOG.book Page 23 Monday, December 7, 2009 9:48 AM

24
CARE AND MAINTENANCE
EnglishTAB 6TAB 8 TAB 7 TAB 3TAB 5 TAB 2TAB 4
Resetting the system
1. Press and hold the power button on the control
console for 5 seconds or until the power light on
the control console changes to red.
The power light on the control console changes to
red when the system shuts down.
2. Press and release the power button on the control
console to restart the system. The power light
changes to blinking green and then solid green
when the system is on and ready to use.
3. If you still cannot operate the system using the
remote, try the next procedure to pair the remote
with the control console.
Pairing the remote with the console
1. Make sure your system is on. If not, press the
power button on the control console.
2. Hold the remote close to the control console.
3. Press and hold both the Mute button ( ) on the
control console and the OK button on the remote at
the same time for five seconds. The power light
blinks when pairing is complete.
4. Press any remote button and verify that the power
light on the control console blinks with each button
press.
Performing a system software update
System software updates are available periodically and
can be downloaded over the Internet to the USB drive
included with your system.
1. Press the Setup button on the front of the control
console to display the Setup menu.
2. Using the remote navigation buttons, select
Update.
3. Follow the instructions on the screen.
Note: To make sure your Bose® remote is updated, hold
the remote near the front of the control console while it is
being updated.
Contacting customer service
For additional help in solving problems, contact Bose®
Customer Service. See the address sheet included in
the carton.
ResoluteVigilanteOG.book Page 24 Monday, December 7, 2009 9:48 AM
25
CARE AND MAINTENANCE
TAB 5TAB 4TAB 6TAB 8TAB 7English TAB 3TAB 2
Limited Warranty
Your LIFESTYLE® system is covered by a limited warranty. Details
of the limited warranty are provided on the product registration
card that is included in the carton. Please refer to the card for
instructions on how to register. Failure to register will not affect
your limited warranty rights.
What you must do to obtain Limited Warranty Service:
Return product, with proof of purchase from an authorized Bose
dealer, using the following procedures:
1. Contact the Bose organization in your country/region
(visit Global.Bose.com/register for Bose contact
information in your country/region) for specific return
and shipping instructions;
2. Label and ship the product, freight prepaid, to the address
provided by the Bose organization in your country; and
3. Place any necessary return authorization number prominently
on the outside of the carton. Cartons not bearing a return
authorization number, where required, will be refused.
Technical information
Remote control
Frequency: 2.4 GHz
Range: 33 ft (10 m)
Control console power supply rating
AC input: 100-240V 50/60 Hz, 0.5A (0,5A)
DC output: 12V 20W Max.
Acoustimass® module rating
USA/Canada: 100-120V 50/60 Hz 350W
International: 220-240V 50/60 Hz 350W
Dual voltage: 100-120/220-240V 50/60 Hz 350W
Licensing information
This product contains one or more free or open source software
programs originating from third parties and distributed as part of
the STLinux software package. Visit www.stlinux.com/download
for further details. This free and open source software is subject
to the terms of the GNU General Public License, GNU Library/
Lesser General Public License, or other different and/or
additional copyright licenses, notices and disclaimers. To
understand your rights under these licenses, please refer to the
specific terms of the licenses, notices, and disclaimers, which
are provided to you in an electronic file, named “licenses.pdf,”
located within the product’s control console. To read this file,
you will need a computer with a USB port and a software
program that can view .pdf files. To download “licenses.pdf”
from your product’s control console:
1. Press and hold the Setup button on the front of the control
console to display the System Information screen.
2. Insert a USB drive (there should be one included in your
system package) into the USB input on the front of the
control console.
3. Press the OK button on the remote control to copy the file to
the USB drive. This download process should be completed
within 30 seconds. You may then remove the USB drive.
4. To read the file “licenses.pdf,” plug the USB drive into a
computer with a USB port, navigate to the USB root directory,
and open “licenses.pdf” with a software program that can
view .pdf files.
To receive a copy of the source code for the open source
software programs included in this product, please mail your
written request to: Licensing Manager, Mailstop 6A2, Bose
Corporation, The Mountain, Framingham, MA 01701-9168. Bose
Corporation will distribute such source code to you on a disc for
a charge covering the cost of performing such distribution, such
as the cost of media, shipping and handling. All of the above
referenced licenses, notices and disclaimers are reproduced and
available with such source code. This offer is valid for a period of
three (3) years following the date of distribution of this product by
Bose Corporation.
ResoluteVigilanteOG.book Page 25 Monday, December 7, 2009 9:48 AM

©2010 Bose Corporation, The Mountain,
Framingham, MA 01701-9168 USA
AM324446 Rev.00
LIFESTYLE® V35/V25 HOME ENTERTAINMENT SYSTEMS
LIFESTYLE® T20/ T10 HOME THEATER SYSTEMS
Operating Guide | Guía del usuario | Guide d’utilisation