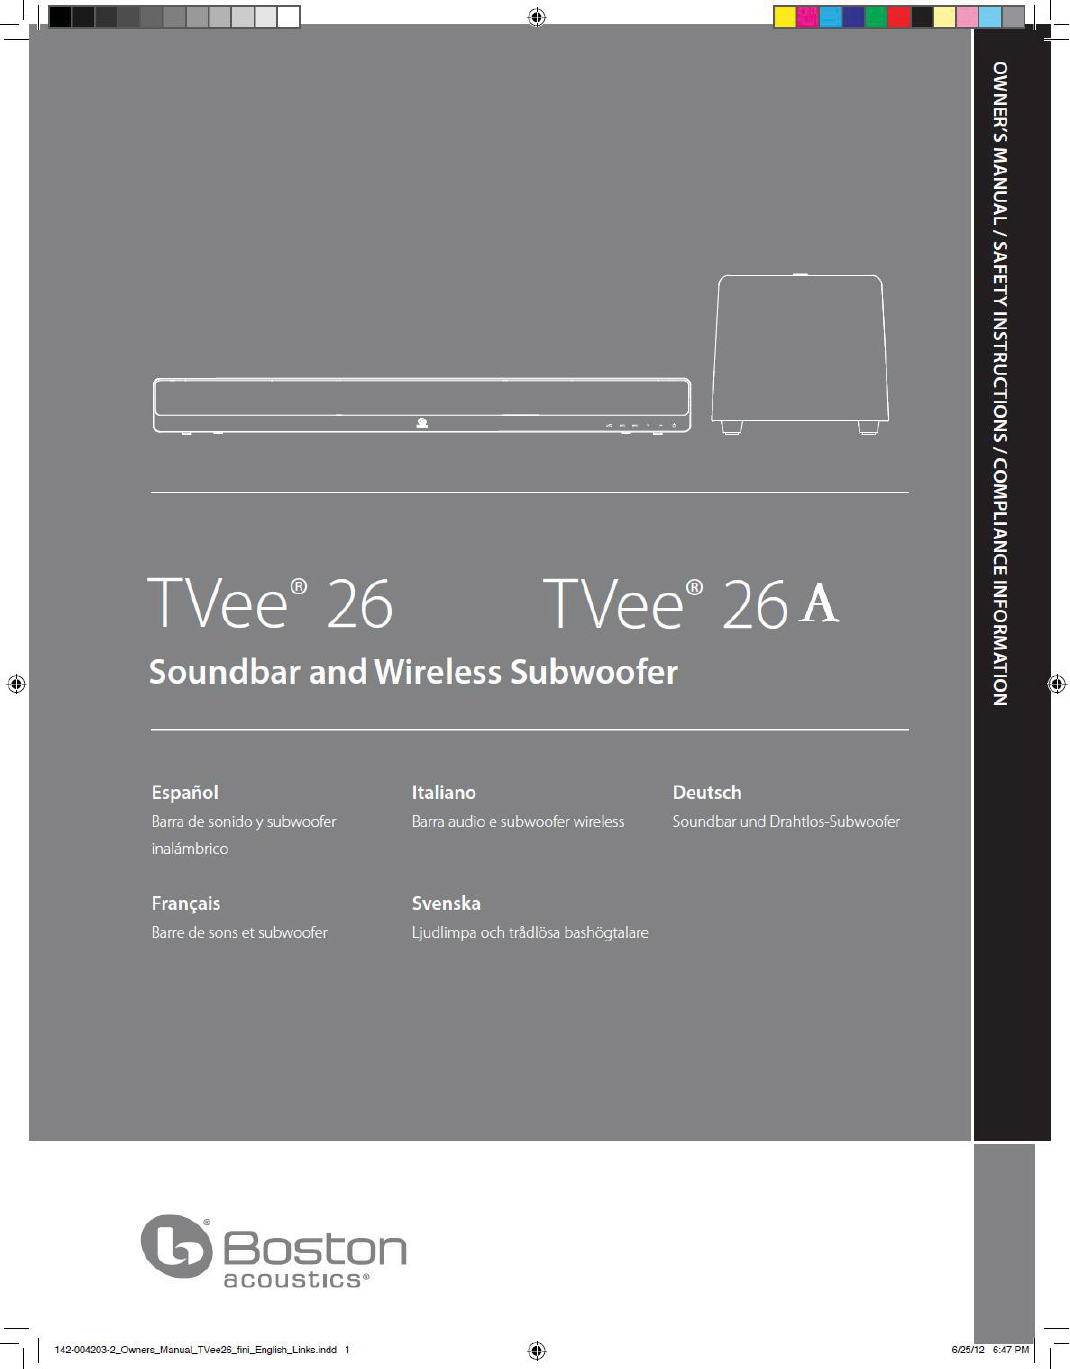
Boston Acoustics TVEE26A Wireless Speaker System User Manual 12
Boston Acoustics, Inc Wireless Speaker System 12
Contents
- 1. User manual
- 2. User manual II
User manual

2
1. Read these instructions.
2. Keep these instructions.
3. Heed all warnings.
4. Follow all instructions.
5. Do not use this apparatus near water.
6. Clean only with dry cloth.
7. Do not block any ventilation openings. Install in accordance with
the manufacturer’s instructions.
8. Do not install near any heat sources such as radiators, heat
registers, stoves, or other apparatus (including amplifiers) that
produce heat.
9. Do not defeat the safety purpose of the polarized or grounding-
type plug. A polarized plug has two blades with one wider than the
other. A grounding-type plug has two blades and a third grounding
prong. The wide blade or the third prong is provided for your
safety. If the provided plug does not fit into your outlet, consult an
electrician for replacement of the obsolete outlet.
10. Protect the power cord from being walked on or pinched particularly
at plugs, convenience receptacles, and the point where they exit
from the apparatus.
11. Only use attachments/accessories specified by the manufacturer.
12. Unplug this apparatus during lightning storms or when unused for
long periods of time.
IMPORTANT SAFETY INSTRUCTIONS
13. Refer all servicing to qualified service personnel. Servicing is
required when the apparatus has been damaged in any way, such
as power-supply cord or plug is damaged, liquid has been spilled
or objects have fallen into the apparatus, the apparatus has been This class B digital apparatus complies with Canadian ICES-003.
Cet appareil numérique de classe B est conforme á la norme
NMB-003 du Canada.
exposed to rain or moisture, does not operate normally, or has
been dropped.
14. Maintain a minimum distance of 2" (50mm) around the front, rear,
and sides of the apparatus for sufficient ventilation. The ventilation
should not be impeded by covering the ventilation openings or
placing on or around the apparatus items such as newspapers,
table-cloths, curtains, etc.
15. No open flame sources, such as lighted candles, should be
placed on the apparatus.
16. The apparatus shall not be exposed to dripping or splashing.
17. Either the power inlet connector on the rear of the apparatus or
the power plug at the wall must remain accessible, to be able to
disconnect power from the apparatus.
18.
19.
To completely disconnect this apparatus from the AC Mains,
disconnect the power supply cord plug from the AC receptacle.
Use only with the cart, stand, tripod, bracket,
or table specified by the manufacturer, or sold
with the apparatus. When a cart or rack
is used, use caution when moving the
cart/apparatus combination to avoid injury
from tip-over.
20. CAUTION: These servicing instructions are for use by qualified
service personnel only. To reduce the risk of electric shock, do not
perform any servicing other than that contained in the operating
instructions unless you are qualified to do so.
21. WARNING: Only use attachments/accessories specified or
provided by the manufacturer
22. WARNING Please refer the information on exterior bottom
enclosure for electrical and safety information before installing
or operating the apparatus.
25. When not in use and during movement, please take care of the
power cordset, e.g. tie up the power cordset with cable tie or
something like that. It shall be free from sharp edges and the
like that can cause abrasion of the power cordset. When put into
use again, please make sure the power cordset being not damaged,
If any damages found, please look for the service person to
replace the power cordset specified by the manufacturer or have
the same characteristics as the original one.
26. Warning: To reduce the risk of electric shock, do not remove cover
(or back) as there are no user-serviceable parts inside. Refer
servicing to qualified personnel.
No objects filled with liquids, such as vases, shall be placed on
the apparatus.
Note: This equipment has been tested and found to comply with
the limits for a Class B digital device, pursuant to part 15 of the FCC
American Users:
Rules. These limits are designed to provide reasonable protection
against harmful interference in a residential installation. This equip-
ment generates, uses, and can radiate radio frequency energy and, if
not installed and used in accordance with the instructions, may cause
harmful interference to radio communications. However, there is no
guarantee that interference will not occur in a particular installation. If
this equipment does cause harmful interference to radio or television
reception, which can be determined by turning the equipment off and
on, the user is encouraged to try to correct the interference by one or
more of the following measures:
Reorient or relocate the receiving antenna.
Increase the separation between the equipment and receiver.
Connect the equipment into an outlet on a circuit different from
that to which the receiver is connected.
Consult the dealer or an experienced radio/TV technician for help.
’
Caution: Unauthorized changes or modifications to the receiver could
void the user s authority to operate the equipment.
This symbol found on the apparatus indicates hazards
arising from dangerous voltages.
This symbol found on the apparatus indicates the user
should read all safety statements found in the user manual.
This symbol found on the apparatus indicates
double insulation.
Warning!
To reduce the risk of fire or electrical shock, do not
expose this apparatus to rain or moisture.
Canadian Users:
RLAN - Radio Local Area Network Equipment
This equipment may only be used indoors in FR.
This equipment may only be used in one’s own premises in IT.
This equipment is for private use only in LU
Operation is not allowed within a radius of 20 km from the centre
of Ny-Ålesund in NO.
Hereby, Boston Acoustics, Inc. 7 Constitution Way, Woburn, MA 01801
essential requirements and other relevant provisions of Directive
obtained from:
Oliver Kriete
Boston Acoustics, Division of D&M Europe B.V.
Beemdstraat 11
The Netherlands
European Users:
AT CZ FI IS LT PT SE FR
BE DK DE IE MT SK CH IT
EE GR LV NL SI TR LU CY
HU PL ES GB NO
Manufactured under license from Dolby Laboratories.
Dolby and the double-D symbol are trademarks of Dolby Laboratories.
23. WARNING: Batteries (battery pack or batteries installed)
shall not be exposed to excessive heat such as sunshine,
fire or the like.
24. Use only power supplies listed in the user instructions.

System Power: 150 watts peak
Frequency Range: 40Hz to 20kHz
Power Input: DC 18V 2.0A
Soundbar
Subwoofer AC 110V – 240V ~ , 50Hz / 60 Hz 1A
3
Introduction
Thanks for choosing Boston Acoustics and selecting the TVee 26 as your home entertainment system. This manual
includes important information on setting up and using your new system, as well as troubleshooting information in
case you have any difficulties.
Key Features:
t&BTZPOFXJre hookup & wireless subwoofer
tSoundbar learns your existing remote control
tMovie Mode for surround sound
tMusic Mode for stereo music
t#PTton-engineered with best-in-class performance
t%Jgital input features Dolby Digital decoding for superior surround sound
tRear-mounted mini-stereo AUX inputs to connect your portable media device
Specications
Soundbar Speakers: Dual 2 x 5” (51 x127mm) HHRT drivers
Subwoofer:
Dimensions: (H x W x D) Soundbar 3⁵/16 x 31½ x 2¹⁵/16” (83 x 800 x 73.5mm)
Subwoofer 9³/8 x 10½ x 11” (238 x 266 x 279.4mm)
Weight: Soundbar
4.8 lbs (2.1kg)
Subwoofer 6.6 lbs (3kg)
Wireless Technologies: 2.4 GHz frequency hopping (subwoofer)
(165mm) woofer
E
N
G
L
I
S
H
142-004203-2_Owners_Manual_TVee26_fini_English_Links.indd 3 6/25/12 6:47 PM
External power supply manufacturer: %POHHVBO%POHTPOH&MFDUSPOJD$P-UE
Model A: DYS40-180200W Model B: DYS40-180200W-1
Adapter input: 110V-240V~, 50/60Hz, 1.0A Max.
Output: O/P: 18.0Vdc, 2.0A
4
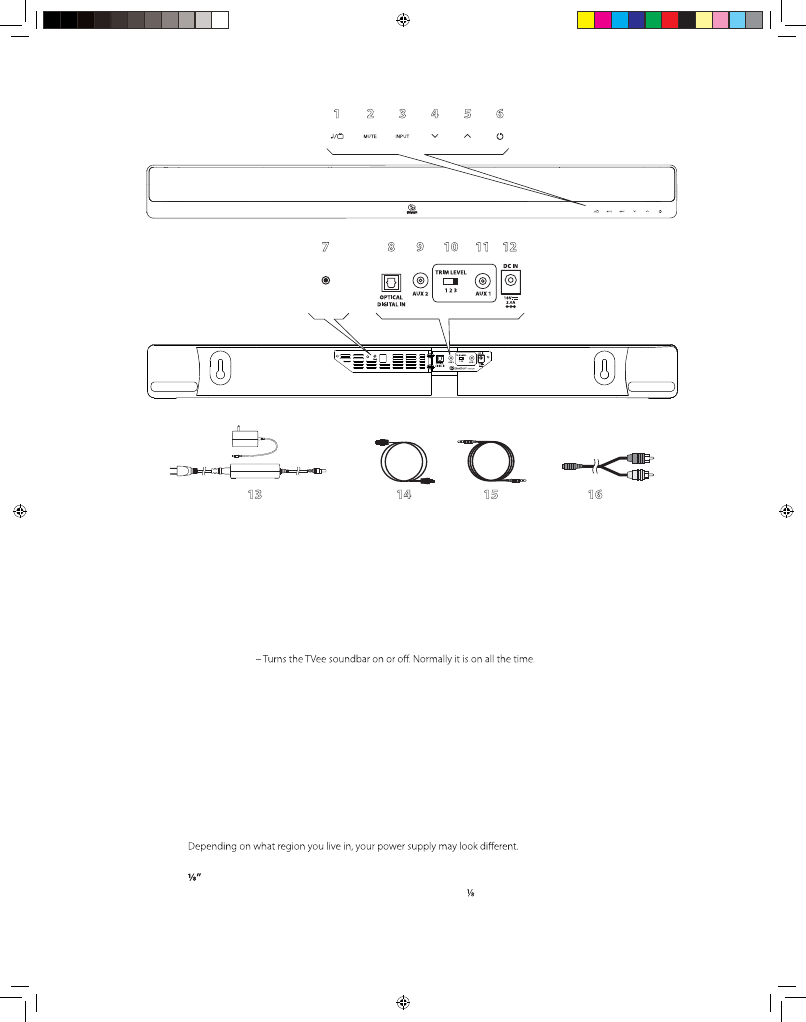
1 2 3 4 5 6
789 10 11 12
13 14 15 16
PAIR
Soundbar
Front Panel Controls
1 Music/Movie Button – Selects the style of sound you want to hear. Music Mode is for music and Movie Mode
is for movies and television.
2 Mute Button – Lets you temporarily mute TVee.
3 Input Button – Lights in various colors to indicate which input is playing.
4 Volume Down Button – Lets you manually adjust the volume of the TVee.
5 Volume Up Button – Lets you manually adjust the volume of the TVee.
6 Power Button
Rear Panel Controls
7 Pair Button – Pre-paired at the factory. See Pairing the soundbar and subwoofer.
8 Optical Digital In – The preferred input for the TVee using the supplied Optical Digital Cable 14.
9 Aux 2 – Mini plug AUX INPUT for connecting to a audio source.
10 Trim Level – Adjusts the input sensitivity of TVee for Aux 111.
11 Aux 1 – Mini plug AUX INPUT for connecting to an audio source.
12 Power Input – Connect the Power Supply 13 here.
Cables
13 Power Supply – Provides power to the soundbar. Plug it into the wall and connect it to the power input 12.
14 Optical Digital Cable – Best choice for connecting digital audio sources to TVee.
15 (3.5mm) Stereo Cable – Connect sources to the Aux Inputs.
16 RCA to 3.5mm Adaptor – Connects a left/right RCA to a stereo ” (3.5mm).
142-004203-2_Owners_Manual_TVee26_fini_English_Links.indd 4 6/25/12 6:47 PM
5
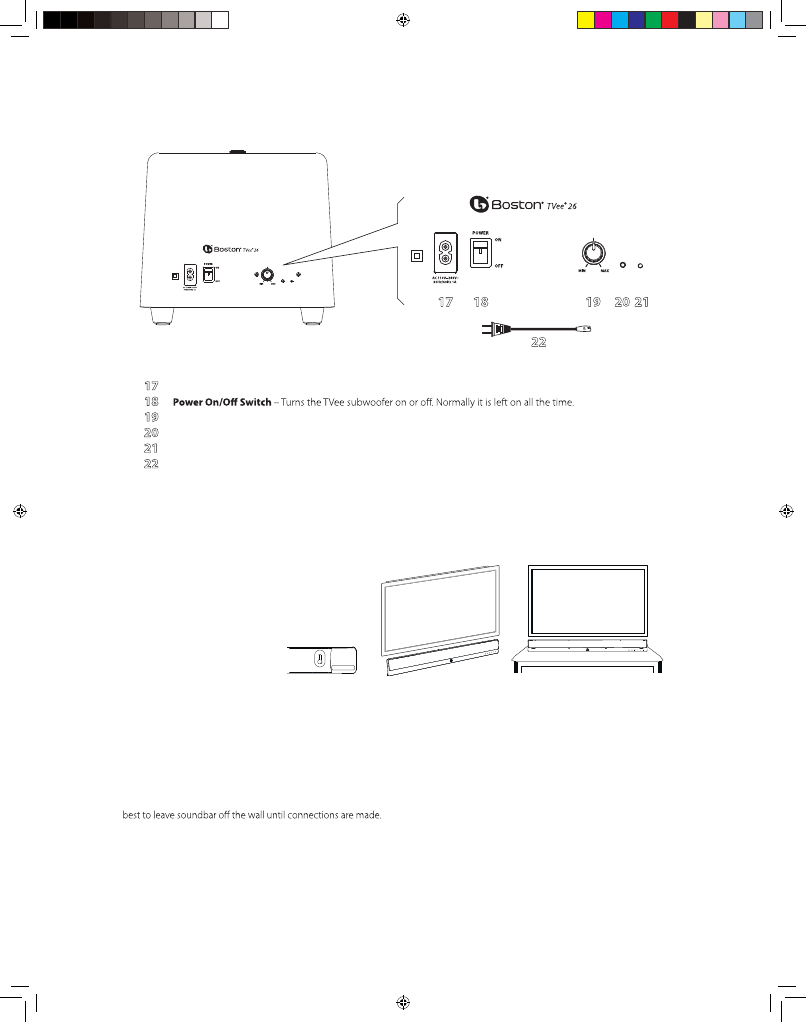
SUBWOOFER
VOLUME
PAIR
SUBWOOFER
VOLUME
PAIR
17 18 19 20 21
22
Subwoofer Panel Controls
17 Power Input– Plug in the Power Cord 22 here and plug the other end into an AC outlet.
18
19 Subwoofer Volume – Adjusts the volume of the subwoofer for best balance with the soundbar.
20 Pair Button – Pre-paired at the factory. See Pairing the soundbar and subwoofer.
21 Status Indicator – Lights green when the subwoofer is active and red when it is standby mode.
22 Power Cord – Provides power to the subwoofer.
Place Your System
Decide on the location and position of the system before making any connections.
Soundbar Location
Place the soundbar on a table surface or shelf near the
television, or wall-mount the soundbar above or below
the television.
Keyhole mounts on the rear of the
soundbar permit wall mounting.*
Wall-Mounting
The TVee 26 soundbar can be wall-mounted using the integrated keyhole mounts. A mounting template can be found in
the product carton. Using a level tool, position and tape the template to the wall in the desired location.
Install hardware* using the template as a guide and then remove the mounting template from the wall. Connect your audio
and power cables prior to mounting the soundbar on the wall.
*Consult a person knowledgeable about your wall type to recommend suitable hardware for hanging the speaker. Usually it is
Subwoofer
142-004203-2_Owners_Manual_TVee26_fini_English_Links.indd 5 6/25/12 6:47 PM
6
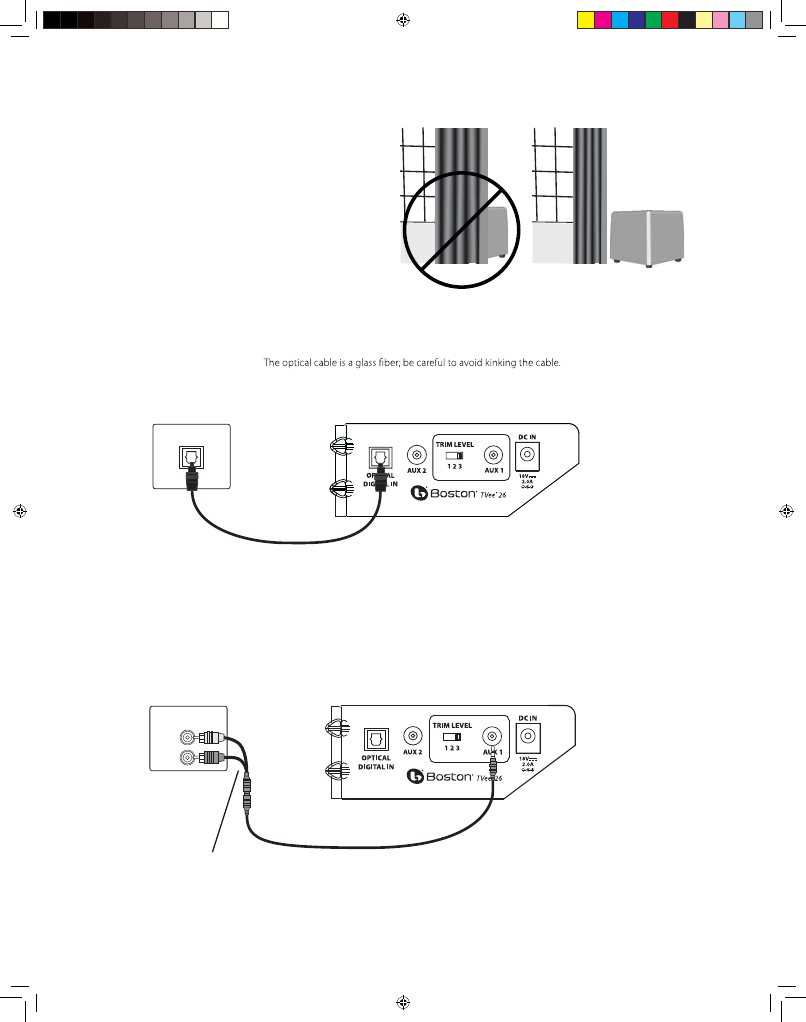
Subwoofer Location
Place the wireless subwoofer anywhere in the room. For
the best sound, place the subwoofer near a wall or corner
within 20 feet (6 meters) of the soundbar on the same
side of the room as the soundbar. The wireless subwoofer
range is 25 feet (8 meters).
Be careful to avoid placing the subwoofer in a position
where curtains or blankets block the sound.
Connect your system
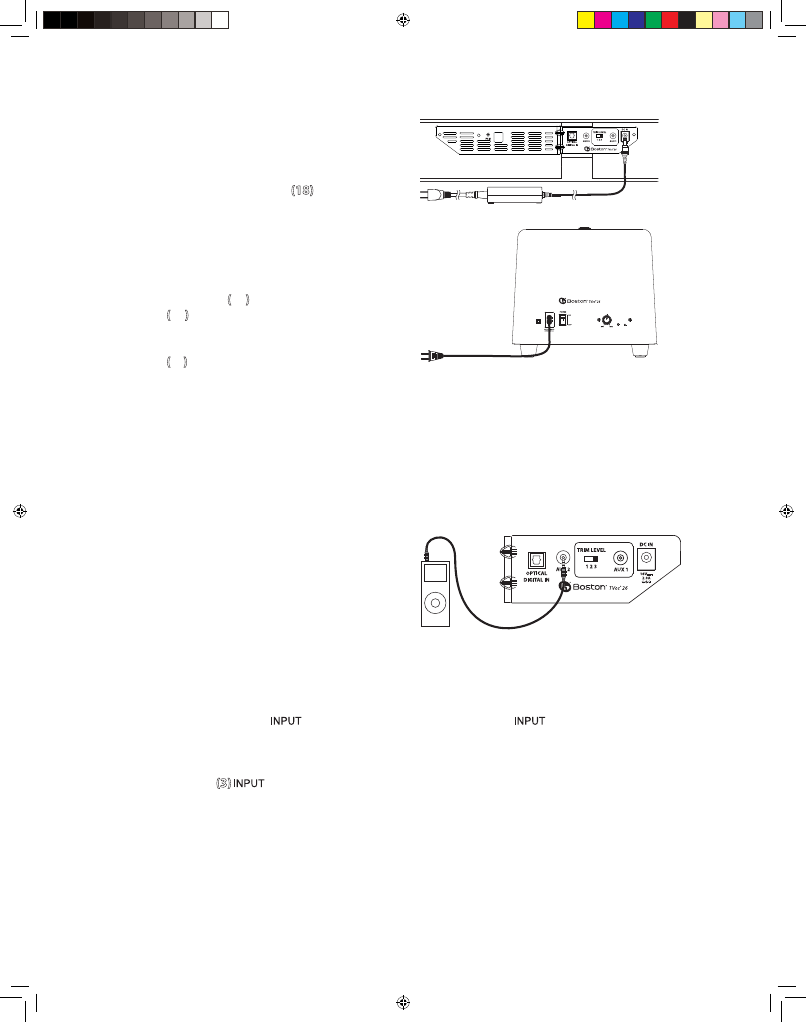
Next you need to get an input signal from your TV into the TVee soundbar. Select from two easy options.
Option 1 (preferred)
Optical digital cable. Note:
Or Option 2
RCA stereo audio cable. Use if your TV does not have an Optical Out. If you have a TV with RCA outputs, please use the RCA to
mini cable adaptor as shown, if the TV has 3.5mm output, then you don’t need the adaptor.
OK
Television
Optical Digital Cable (14)
OPTICAL OUT
Soundbar connection panel
AUDIO
OUTPUT
RCA to 3.5mm
Adaptor (16)
1/8” (3.5mm)
Stereo Cable (15)
Television Soundbar connection panel
142-004203-2_Owners_Manual_TVee26_fini_English_Links.indd 6 6/25/12 6:47 PM
7
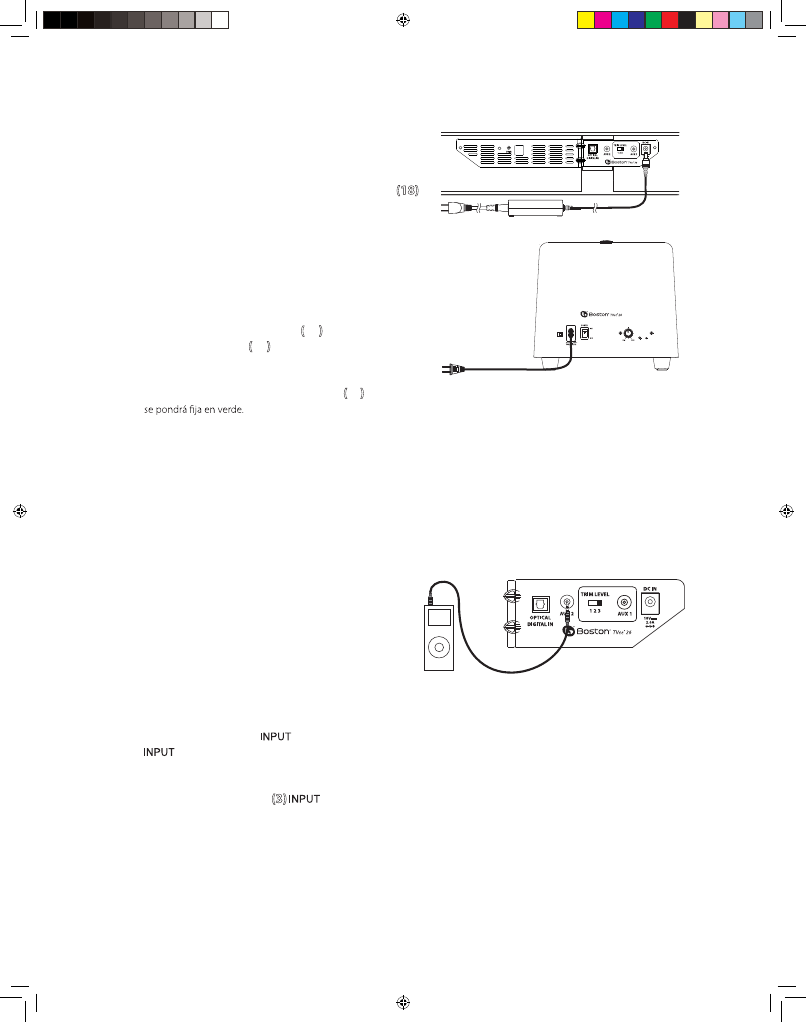
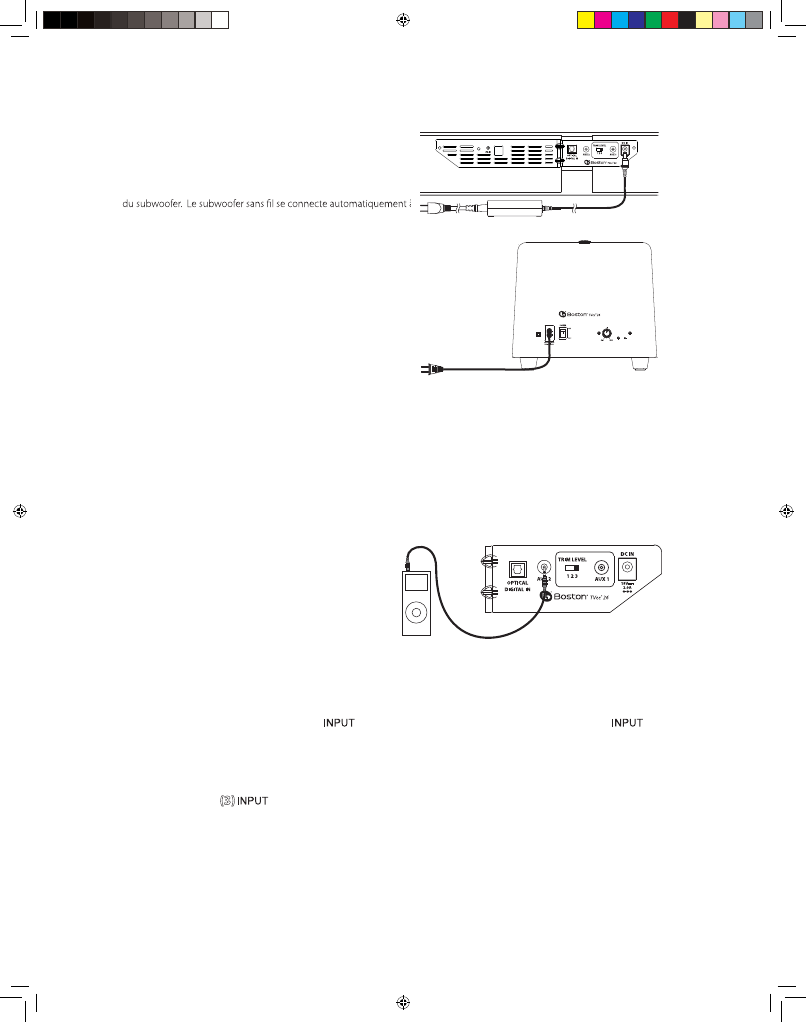
Connect Power
1.
Connect the soundbar power supply and power cord to
the soundbar. Connect
the subwoofer power cord to the subwoofer.
Plug both into AC power outlets.
2.
Turn ON the rear panel power switch
(18)
on the subwoofer.
The wireless subwoofer connects to the soundbar automatically.
Pairing the soundbar and subwoofer
The subwoofer and soundbar are paired at the factory
. However if the
communication is interrupted please follow this simple procedure.
1.
Press the Pair Button
(
20
)
on the subwoofer until the Status
Indicator
(
21
)
flashes red.
2.
Press the Pair Button on the back of the soundbar. The Status
Indicator
(
21
)
on the subwoofer will be solid green.
Status Indicator (21)
Red LED: Subwoofer not paired to, or searching for TVee soundbar
Green LED: Subwoofer is paired to TVee soundbar. Your system is ready.
Note: The lights only illuminate temporarily to show a mode or function change.
Using the rear panel Auxiliary Input
Use the rear panel AUX 1 or AUX 2 Inputs to connect
a portable media device.
How do I watch TV?
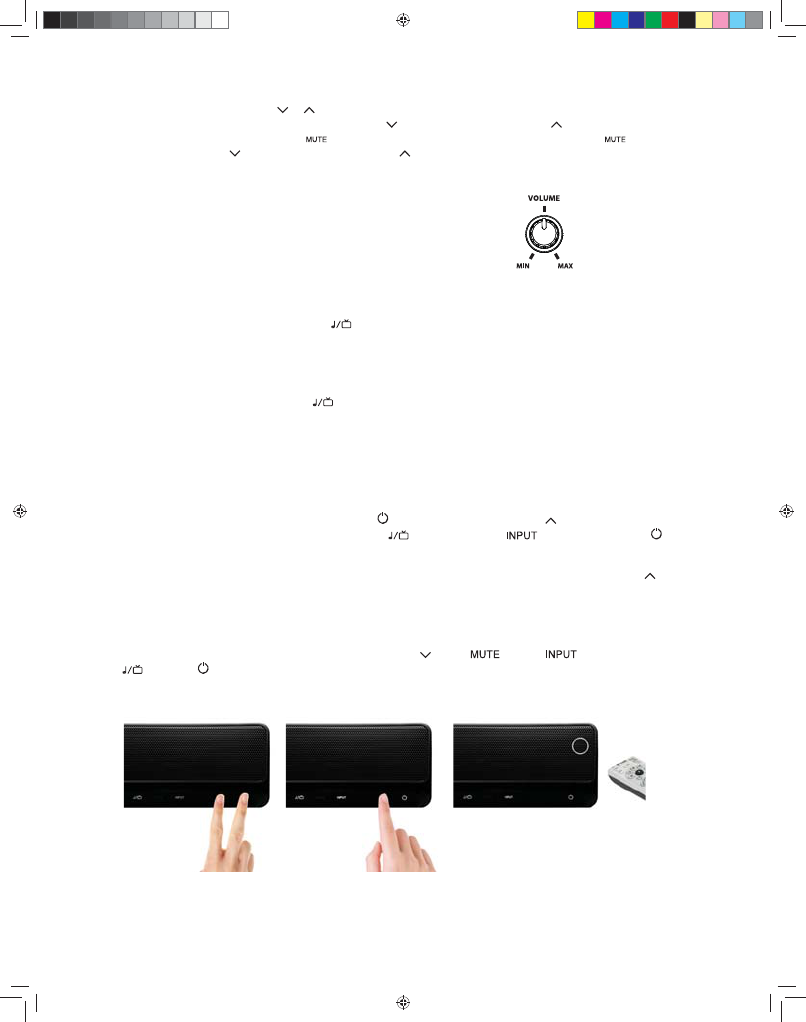
Select an input
Use the front panel Input Button to choose an input. Each time the Input Button is pressed, the input changes
in sequence from Optical Digital In to analog Aux 1 input to analog Aux 2 input back to Optical Digital In. The color of the
Input Mode Light indicates which input is selected.
Input Button Light (3)
Green: Optical Digital In is selected.
Orange: Analog Aux 1 input is selected.
Red: Analog Aux 2 Input is selected.
Soundbar connection panelMP3 player
SUBWOOFER
VOLUME
PAIR
142-004203-2_Owners_Manual_TVee26_fini_English_Links.indd 7 6/25/12 6:47 PM
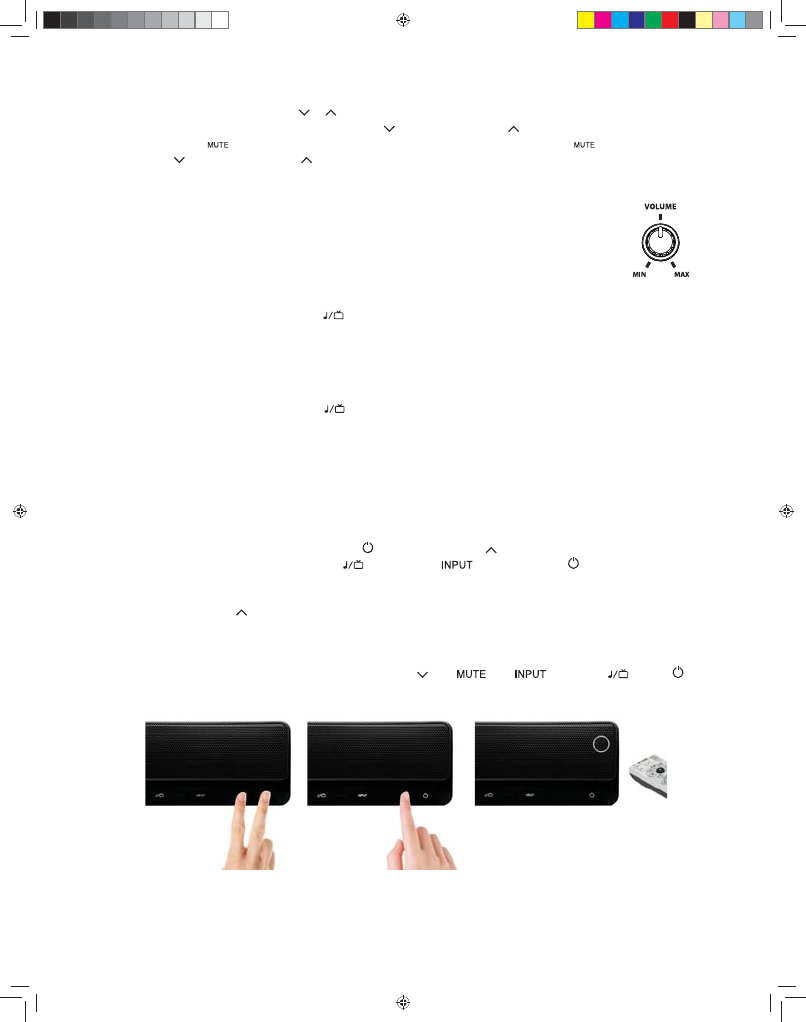
Adjust the Volume
6TFUIFGSPOUQBOFMVolume Down Button
and Volume Up Button UPBEKVTUUIFWPMVNF6TFUIFMute Button to
mute the audio. To cancel audio muting, push the Mute Button , Volume Down Button , or Volume Up Button .
Mute Button Light
Red Blinking: .VUF.PEFJTPO
Adjusting the subwoofer sound level
6TFUIF7PMVNF,OPC (19) on the rear of the subwoofer to adjust its sound output level.
*ONBOZSPPNTTFUUJOHCFUXFFOBOEPDMPDLXJMMTPVOEHPPE0ODFTFUZPVUZQJDBMMZ
XPOUOFFEUPBEKVTUUIJTDPOUSPM
Music/Movie selection
.PWJF.PEFJTBMJLFBNPWJFUIFBUFSPSTVSSPVOETPVOETZTUFNBOEIBTBXJEFTQBDJPVTTPVOE'PSFOIBODFEQMBZCBDLPGNVTJD
UIF.VTJD.PEFJTMJLFBUSBEJUJPOBM
TUFSFPNVTJDTZTUFNPQUJNJ[FEGPSQVSFBVEJPBDDVSBDZ&JUIFSNPEFDBOCFVTFEGPSBOZ
type of input or audio.
The TVee 26 will remember whatever mode was last chosen for each input.
Music/Movie Mode light: (1)
Green: 1MBZJOHJO.PWJF.PEF
Orange: 1MBZJOHJO.VTJD.PEF
Programming your Soundbar
&WFSZCVUUPOPOUIF57FFTPVOECBSDBOCFDPOUSPMMFEWJBZPVSPXOSFNPUFDPOUSPM5IJTXJMMUBLFBGFXNJOVUFTCVUPODF
programmed you can control your TVee from almost any remote.
A Press and hold Power Button and Volume Up Button on the soundbar for 2 seconds until the Music/Movie
Button , Input Button , and Power Buttons flash orange.
B -FUTMFBSOUIFRemote7PMVNF6Q#VUUPOmSTU1SFTTVolume Up Button button on soundbar until the lights turn solid
orange.
C )PMEZPVSSFNPUFGUDNQPJOUJOHUPUIFVQQFSSJHIUDPSOFSPGUIFTQFBLFSHSJMMFBTTIPXOCFMPX1SFTTVolume Up
Button on your Remote 4 times until the lights flash green.
3FQFBU4UFQTA to C to set up Volume Down , Mute , Input , Music/Movie , and Power buttons.
AB C
Engages the soundbar in
Learning Mode
Choose the function on the
soundbar you wish to learn
Learn your remote control’s
command
142-004203-2_Owners_Manual_TVee26_fini_English_Links.indd 8 6/25/12 6:47 PM

9
Troubleshooting TVee
Soundbar does not power on.
t*TUIFQPXFSTVQQMZQMVHHFEJOUPBMJWFXBMMPVUMFU
t*TUIFQPXFSTVQQMZQSPQFSMZDPOOFDUFEUPUIFTPVOECBSQPXFSJOQVU
No sound from TVee Soundbar.
t*TUIFTPVOECBSDPOOFDUFEUPBOBVEJPTPVSDFUIBUJTQMBZJOHBVEJPUISPVHIJUTPVUQVU
t*TUIFTPVOECBSTFUUPUIFDPSSFDUJOQVUTPVSDF
t"SFUIFTPVOECBSBOETVCXPPGFSSFDFJWJOHQPXFSBOEUVSOFEPO
t5VSOVQUIFWPMVNFPGUIF57FFTPVOECBS
t5VSOVQUIFWPMVNFPGUIFUFMFWJTJPOPSDBCMFCPY57FFJTDPOOFDUFEUP
t$IFDL.VUFTUBUVToJTUIFMute ButtonCMJOLJOHSFE 1SFTTUIFMute Button on the soundbar.
t
'PSEJHJUBM57TPSPUIFSEJHJUBMTPVSDFTNBLFTVSFUIFPVUQVUGPSNBUJTTFUUPi%PMCZ%JHJUBMw4FFUIFTPVSDFQSPEVDUT
TFUVQNFOV
t'PSEJHJUBMTPVSDFTNBLFTVSFUIFPQUJDBMDBCMFJTOPULJOLFEPSCSPLFO5IJTTUPQTUIFEJHJUBMMJHIUTJHOBM
No Sound from the Subwoofer.
t$IFDLUIFQPJOUTJOUIFi4PVOECBSEPFTOPUQPXFSPOwTFDUJPOBCPWF
t5VSOVQUIFWPMVNFDPOUSPM
t.PWFUIFTVCXPPGFSDMPTFSUPUIFTPVOECBS
t$IFDLUIFStatus Indicator to make sure the light is solid green.
Distorted sound from the Soundbar.
t$IBOHFUIF5SJN-FWFMTXJUDITFUUJOHUPBMPXFSOVNCFS"VYJOQVUPOMZ
t$IFDLUIFTJHOBMTPVSDFUPCFTVSFUIFEJTUPSUJPOJTOPUPSJHJOBUJOHUIFSF
t5VSOEPXOUIFWPMVNFPGUIFTPVSDFVOUJMUIFEJTUPSUJPOHPFTBXBZ
Bass not loud enough.
t5VSOVQUIFTVCXPPGFS7PMVNFDPOUSPM
t1MBDFUIFTVCXPPGFSDMPTFSUPBDPSOFSJOUIFSPPN
t4PNFUFMFWJTJPOTBOEDBCMFCPYFTIBWFBNPEFUIBUMJNJUTUIFCBTT$IFDLUIBUQSPEVDUTBVEJPTFUVQNFOVBOETFU
UIFBVEJPNPEFUPiXJEFwSBUIFSUIBOiOPSNBMwPSiOBSSPXw
TVee won’t learn my remote control commands.
t$BSFGVMMZGPMMPXUIFQSPHSBNNJOHJOTUSVDUJPOT
t)PMEUIFSFNPUFTUFBEZBOEJODIFTGSPNUIFGSPOUPGUIFTPVOECBS
t1SFTTBOESFMFBTFUIFSFNPUFDPOUSPMCVUUPOTslowly!
t$IFDLUIFSFNPUFDPOUSPMTCBUUFSJFT
Note: 57FFMFBSOTBMNPTUBMM*3DPNNBOETCVUTPNF*3QSPUPDPMTDBOOPUCFQSPHSBNNFE
Volume of my television speakers gets louder than my TVee system over time.
t8IFOUIFSFNPUFDPOUSPMWPMVNFCVUUPOJTIFMEEPXOZPVSUFMFWJTJPONBZDIBOHFWPMVNFMFWFMTGBTUFSUIFO57FF
t6TFUIFCVUUPOTPOUIFTPVOECBSUPBEKVTUUIFWPMVNFPGUIF57FFUPUIFDPSSFDUCBMBODFXJUIUIFUFMFWJTJPOTQFBLFST
t*GQPTTJCMFVTFUIFUFMFWJTJPOTTFUVQNFOVUPNVUFUIFUFMFWJTJPOTPXOTQFBLFST
The subwoofer seems to have interference with its wireless signal.
t5IFTVCXPPGFSDPVMECFUPPGBSGSPNUIFTPVOECBSUPHFUBHPPETJHOBM5SZNPWJOHJUDMPTFS
Limited Warranty
Boston Acoustics warrants to the original purchaser of our TVee system that it will be free of defects in materials and
workmanship in its mechanical parts for a period of 5 years from the date of purchase. The warranty period for the electrical
components of
TVee is 1 year.
Your responsibilities are to install and use them according to the instructions supplied, to provide safe and secure transportation
UPBOBVUIPSJ[FE#PTUPO"DPVTUJDTTFSWJDFSFQSFTFOUBUJWFBOEUPQSFTFOUQSPPGPGQVSDIBTFJOUIFGPSNPGZPVSTBMFTTMJQXIFO
SFRVFTUJOHTFSWJDF
142-004203-2_Owners_Manual_TVee26_fini_English_Links.indd 9 6/25/12 6:47 PM
10
&YDMVEFEGSPNUIJTXBSSBOUZJTEBNBHFUIBUSFTVMUTGSPNBCVTFNJTVTFJNQSPQFSJOTUBMMBUJPOBDDJEFOUTTIJQQJOHPSSFQBJST
NPEJmDBUJPOTCZBOZPOFPUIFSUIBOBOBVUIPSJ[FE#PTUPO"DPVTUJDTTFSWJDFSFQSFTFOUBUJWF
5IJTXBSSBOUZJTMJNJUFEUPUIF#PTUPO"DPVTUJDTQSPEVDUBOEEPFTOPUDPWFSEBNBHFUPBOZBTTPDJBUFEFRVJQNFOU
This warranty does not cover the cost of removal or reinstallation. This warranty is void if the serial number has been removed
PSEFGBDFE5IJTXBSSBOUZHJWFTZPVTQFDJmDMFHBMSJHIUTBOEZPVNBZBMTPIBWFPUIFSSJHIUTXIJDIWBSZGSPNTUBUFUPTUBUF
If Service Seems Necessary
6OJUFE4UBUFT
'JSTUDPOUBDUUIFEFBMFSGSPNXIPNZPVQVSDIBTFEUIFQSPEVDU*GUIBUJTOPUQPTTJCMFTFOEBOFNBJMUPTVQQPSU!CPTUPOBDPN
PSXSJUFUP
#PTUPO"DPVTUJDT*OD
$PSQPSBUF%SJWF
.BIXBI/+64"
$BOBEB
'JSTUDPOUBDUUIFEFBMFSGSPNXIPNZPVQVSDIBTFEUIFQSPEVDU*GUIBUJTOPUQPTTJCMFTFOEBOFNBJMUPTVQQPSU!ENDBOBEBDB
PSXSJUFUP
%.$BOBEB
"QQMF$SFFL#MWE
.BSLIBN0/-3#
"MM0UIFS$PVOUSJFT
$POUBDUUIFEFBMFSGSPNXIPNZPVQVSDIBTFEUIFQSPEVDUPSDPOUBDUZPVSMPDBMEJTUSJCVUPS
'PSNPSFJOGPSNBUJPOQMFBTFWJTJUCPTUPOBDPVTUJDTDPNTVQQPSU
This symbol found on the product indicates that the product must not be disposed of with household
XBTUF*OTUFBEJUNBZCFQMBDFEJOBTFQBSBUFDPMMFDUJPOGBDJMJUZGPSFMFDUSPOJDXBTUFPSSFUVSOFEUPBSFUBJMFS
when purchasing similar product. The producer paid to recycle this product. Doing this contributes to reuse
BOESFDZDMJOHNJOJNJ[FTBEWFSTFFõFDUTPOUIFFOWJSPONFOUBOEIVNBOIFBMUIBOEBWPJETBOZmOFTGPS
incorrect disposal.
142-004203-2_Owners_Manual_TVee26_fini_English_Links.indd 10 6/25/12 6:47 PM
11
INSTRUCCIONES DE SEGURIDAD IMPORTANTES
’
AT CZ FI IS LT PT SE FR
BE DK DE IE MT SK CH IT
EE GR LV NL SI TR LU CY
HU PL ES GB NO
Fabricado bajo licencia otorgada por Dolby Laboratories.
Dolby y el símbolo de la doble D son marcas registradas de
Dolby Laboratories.
23.
Cuando no está en uso y durante un desplazamiento, tenga
cuidado con el cable de alimentación, por ejemplo, ate el cable
eléctrico con una sujeción de cable o algo similar. No debe tener
bordes filosos y cosas parecidas pues podrían raspar el cable de
alimentación. Al volver a ponerlo en uso, verifique que el cable de
alimentación no esté dañado. Si se detectan daños, por favor
pida al personal de mantenimiento que reemplace el cable de
alimentación especificado por el fabricante o que tenga las
mismas características que el original.
24.
Advertencia: Para reducir el riesgo de choque eléctrico,
no retire la tapa (o parte trasera) pues adentro no hay piezas
de mantenimiento para el usuario. Deje que el servicio técnico
lo realice personal calificado.
Usuarios estadounidenses:
Nota:
Este equipo ha sido probado y se ha determinado que cumple
con los límites para un dispositivo digital Clase B, de acuerdo con la
parte 15 del Reglamento de la FCC. Estos límites están destinados a
ofrecer protección razonable contra la interferencia perjudicial en una
instalación residencial. Este equipo genera, usa y puede irradiar
energía de radiofrecuencia y, si no se instala y utiliza según las
instrucciones, puede ocasionar interferencia perjudicial para las
radiocomunicaciones. Sin embargo, no hay garantía de que no se
produzca interferencia en una instalación en particular. Si este equipo
efectivamente ocasiona interferencia perjudicial a la recepción de
radio o televisión, lo que se puede determinar apagando y encendi-
endo el equipo, se recomienda al usuario intentar corregir la
interferencia implementando una o más de las siguientes medidas:
Reorientar o reubicar la antena receptora.
Aumentar la separación entre el equipo y el receptor.
Conectar el equipo a un circuito distinto al que está
conectado el receptor.
Consultar al distribuidor o a un técnico de radio/televisión.
Precaución:
Los cambios o modificaciones que se realicen al receptor sin
autorización podrían anular la autoridad del usuario para utilizar el equipo.
Usuarios canadienses:
Este aparato digital clase B cumple con la norma canadiense
ICES-003. Cet appareil numérique de classe B est conforme á la
norme NMB-003 du Canada.
Usuarios europeos:
RLAN - Radio Local Area Network Equipment (Equipo de red
radioeléctrica de área local)
Este equipo solo puede usarse en interiores en FR.
Este equipo sólo puede usarse en sus propias instalaciones en IT.
Este equipo es sólo para uso privado en LU.
No se permite utilizarlo dentro de un radio de 20km del centro de
Ny-Ålesund en NO.
Por la presente, Boston Acoustics, Inc. 7 Constitution Way, Woburn,
MA 01801 EE.UU., declara que este equipo TVee 26 cumple con los
requerimientos esenciales y otras normas de la Directiva 1999/5/EC.
Se puede obtener una copia de la Declaración de Conformidad
(Declaration of Conformity, DOC) de:
Oliver Kriete
Boston Acoustics, División de D&M Europe B.V.
Beemdstraat 11
5653 MA Eindhoven
Países Bajos
PRECAUCIÓN
RIESGO DE CHOQUE
ELÉCTRICO – NO ABRIR
0E8B)A8B@D43427>24;42CA8@D4=4?0B>DEA8A
Este símbolo que aparece en el aparato indica peligros
derivados de voltajes peligrosos.
Este símbolo que aparece en el aparato indica que
el usuario debe leer todos los avisos de seguridad
del manual del usuario.
Este símbolo que aparece en el aparato indica doble
aislación.
¡Advertencia!
Para reducir el riesgo de incendio o choque eléctrico,
no exponga el aparato a la lluvia o a la humedad.
1. Lea estas instrucciones.
2. Guarde estas instrucciones.
3. Preste atención a todas las advertencias.
4. Siga todas las instrucciones.
5. No use este aparato cerca de agua.
6. Limpie únicamente con un paño seco.
7. No obstruya las aberturas de ventilación. Instale de acuerdo
con las instrucciones del fabricante.
8. No instale cerca de fuentes de calor, por ejemplo, radiadores,
rejillas de calefacción, estufas u otros aparatos (incluidos
amplificadores) que emitan calor.
9. No anule el propósito de seguridad del enchufe polarizado o de
puesta a tierra. Un enchufe polarizado tiene dos patas, una más
ancha que la otra. Un enchufe de puesta a tierra tiene dos patas
y una tercera de puesta a tierra. La pata ancha o la tercera pata
es para su seguridad. Si el enchufe provisto no encaja en el toma,
consulte a un electricista para reemplazar el toma obsoleto.
10. Proteja el cable de alimentación para que no se lo pise ni apriete,
especialmente en los enchufes, en los receptáculos, y en el punto
donde salen del aparato.
11. Utilice únicamente aditamentos o accesorios especificados por
el fabricante.
12. Desenchufe el aparato durante tormentas eléctricas o cuando
no se lo utilice durante períodos largos.
13. Toda la asistencia técnica debe ser proporcionada por personal
de servicio calificado. Se requiere asistencia técnica cuando el
aparato se ha deteriorado de cualquier manera; por ejemplo:
se ha dañado el cable de alimentación o el enchufe, se ha
derramado un líquido o caído un objeto dentro del aparato,
se ha expuesto el aparato a la lluvia o la humedad, el aparato
no funciona normalmente o se ha caído.
14. Mantenga una distancia mínima de 2” (50mm) en el frente,
la parte posterior y los lados del aparato, para que el mismo
tenga suficiente ventilación. No se debe obstaculizar la ventilación
cubriendo las aberturas de ventilación ni colocando sobre o
alrededor del aparato elementos como periódicos, manteles,
cortinas, etc.
15. No se deben colocar fuentes de llama expuesta, por ejemplo,
velas encendidas, sobre el aparato.
16. El aparato no se debe exponer a goteos ni salpicaduras.
No se deben colocar objetos llenos de líquido, por ejemplo,
floreros, sobre el aparato.
17. Tanto el conector de entrada de alimentación de la parte posterior
del aparato como el enchufe de la pared deben permanecer
accesibles, para poder desconectar la energía del aparato.
18. Para desconectar totalmente el aparato de la red de CA,
desconecte el cable eléctrico del tomacorriente de CA.
19. Use solamente el carrito, la base, el trípode,
soporte o mesa que indica el fabricante o que
se vende con el aparato. Si se usa un carrito
o estante, tenga precaución al mover el carrito/
aparato para evitar lesiones causadas por vuelcos.
20. PRECAUCIÓN: Estas instrucciones técnicas están destinadas
exclusivamente a personal de mantenimiento calificado. Para
reducir el riesgo de choque eléctrico, no realice ninguna tarea de
mantenimiento no incluida en las instrucciones operativas a menos
que esté calificado para hacerlo.
21. ADVERTENCIA: Utilice únicamente aditamentos o accesorios
especificados o proporcionados por el fabricante.
22. ADVERTENCIA: Por favor, antes de instalar o hacer funcionar
el aparato, consulte la información eléctrica y de seguridad que
figura en la caja exterior inferior.
142-004203-2_Owners_Manual_TVee26_fini_English_Links.indd 11 6/25/12 6:47 PM
Power Input: DC 18V 2.0A
Soundbar
Subwoofer AC 110V – 240V ~ , 50Hz / 60 Hz 1A
12
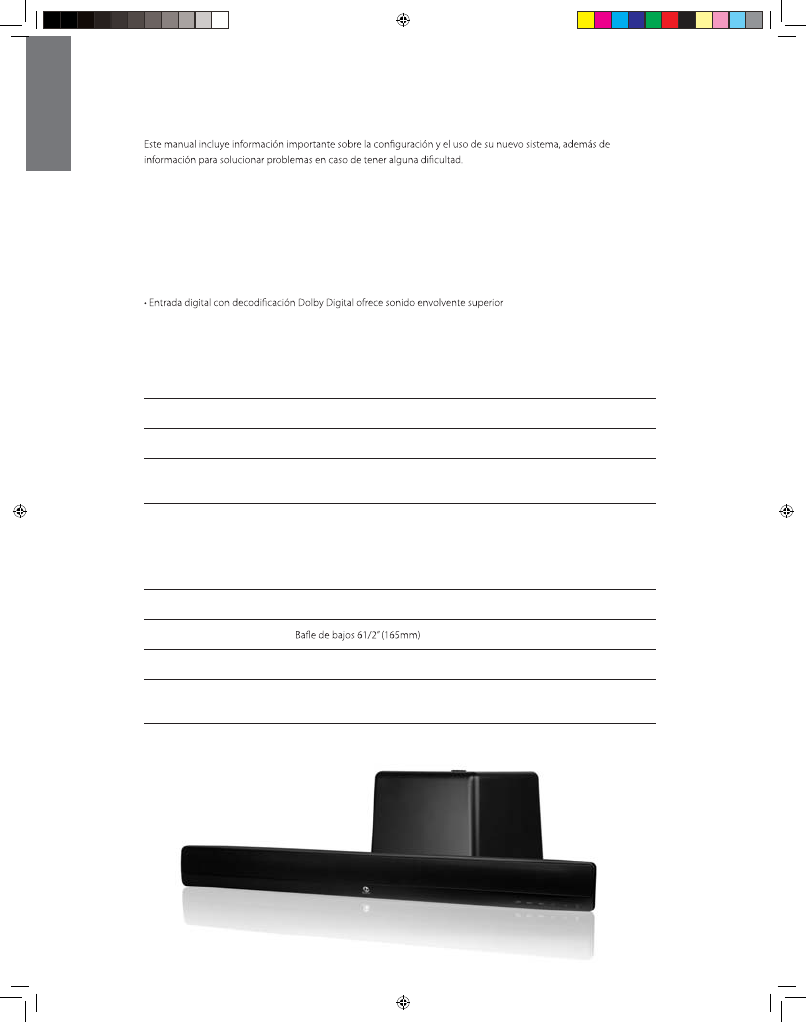
Introducción
Gracias por elegir a Boston Acoustics y por seleccionar a TVee26 como su sistema de entretenimiento doméstico.
Características clave:
tSencilla conexión única y subwoofer inalámbrico
t-BCBrra de sonido reconoce a su actual control remoto
tModo de película para sonido envolvente
tModo de música para música estéreo
tProducido por Boston con mejor desempeño en su clase
t%JTF×PTFODJMMPZGVODJPOBMBEBQUBCMFBDVBMRVJFStelevisor
t El procesamiento envolvente virtual con optimización digital de Boston permite obtener efectos envolventes precisos
como si estuviera en un teatro
t&OUSBEBTAUX mini estéreo sobre el panel trasero para conectar su dispositivo de medios portátil
Especicaciones
Potencia del sistema: 150 vatios pico
Rango de frecuencia: 40Hz a 20kHz
Parlantes de barra de sonido: Unidades dobles HHRT 2 x 5” (51 x 127mm)
Subwoofer:
Tecnologías inalámbricas: 2,4GHz salto de frecuencia (subwoofer)
Dimensiones: Barra de sonido 3⁵/16 x 31½ x 2¹⁵/16” (83 x 800 x 73,5mm)
(alto x ancho x profundidad) Subwoofer 9³/8 x 10½ x 11” (238 x 266 x 279,4mm)
Peso:: Barra de sonido 4,8 lbs (2,1kg)
Subwoofer 6,6 lbs (3kg)
E
S
P
A
Ñ
O
L
142-004203-2_Owners_Manual_TVee26_fini_English_Links.indd 12 6/25/12 6:47 PM
External power supply manufacturer: %POHHVBO%POHTPOH&MFDUSPOJD$P-UE
Model A: DYS40-180200W Model B: DYS40-180200W-1
Adapter input: 110V-240V~, 50/60Hz, 1.0A Max.
Output: O/P: 18.0Vdc, 2.0A
13
1 2 3 4 5 6
789 10 11 12
13 14 15 16
PAIR
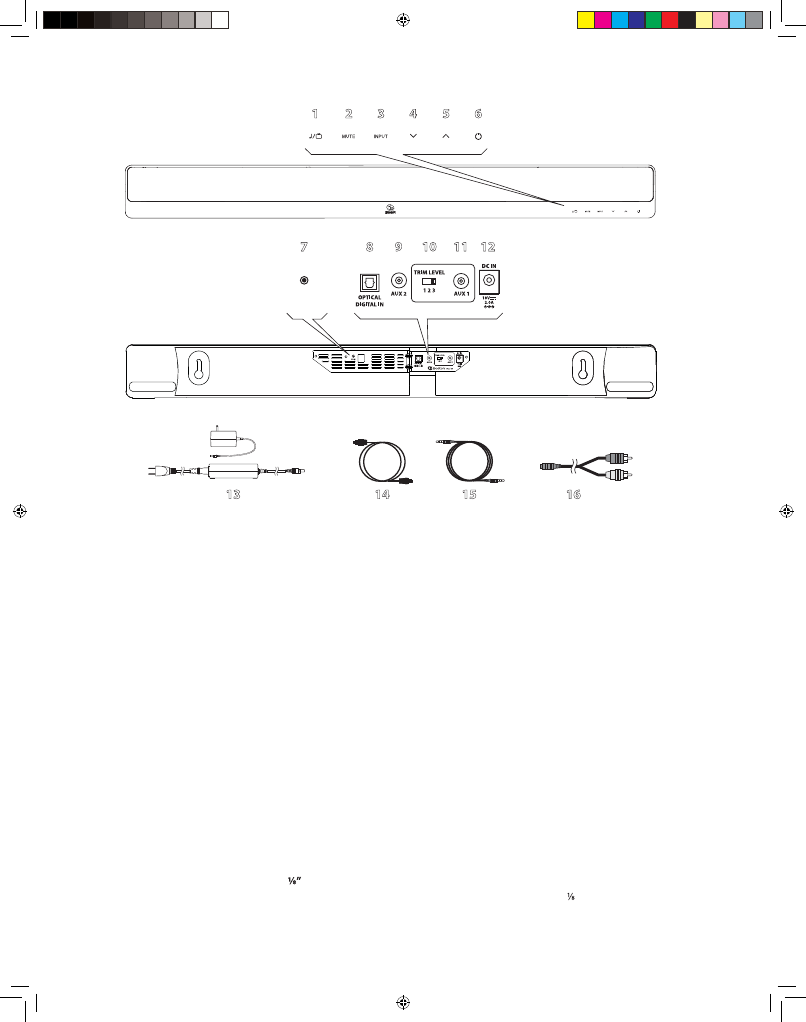
Barra de sonido
Controles del panel frontal
1 Botón de música/película: – Selecciona el estilo de sonido que desea escuchar. Modo de música para la música
y modo de película para películas y televisión.
2 Botón de silencio – Permite silenciar temporalmente el TVee.
3 Botón de entrada – Se enciende en distintos colores para indicar la entrada que se está reproduciendo.
4 Botón para bajar el volumen – Permite ajustar manualmente el volumen del TVee.
5 Botón para subir el volumen – Permite ajustar manualmente el volumen del TVee.
6 Botón de potencia – Enciende o apaga la barra de sonido de TVee. Normalmente se mantiene encendido.
Controles del panel posterior
7 Botón de asociación – Pre-asociado en fábrica. Ver Asociación de la barra de sonido y subwoofer.
8 Entrada digital óptica – Entrada preferida del TVee usando el cable digital óptico 14 provisto 14.
9 Aux 2 – Mini conector ENT AUX para enchufar a una fuente de audio.
10 Nivel de ajuste – Ajusta la sensibilidad de entrada del TVee para Aux 111.
11 Aux 1 – Mini conector ENT AUX para enchufar a una fuente de audio.
12 Entrada de alimentación – Conecta la fuente de alimentación 13 aquí.
Cables
13 Fuente de alimentación – Suministra energía a la barra de sonido. Enchúfelo a la pared y conéctelo a la entrada
de alimentación 12.
Dependiendo de la región donde viva, su fuente de alimentación podría tener un aspecto diferente.
14 Cable digital óptico – La mejor opción para conectar fuentes de audio digitales al TVee.
15 Cable estéreo de (3,5mm) – Connect sources to the Aux Inputs.
16 Adaptador RCA a 3,5mm – Conecta un RCA izquierdo/derecho a un cable estéreo de ” (3,5mm).
142-004203-2_Owners_Manual_TVee26_fini_English_Links.indd 13 6/25/12 6:47 PM
14
SUBWOOFER
VOLUME
PAIR
SUBWOOFER
VOLUME
PAIR
17 18 19 20 21
22
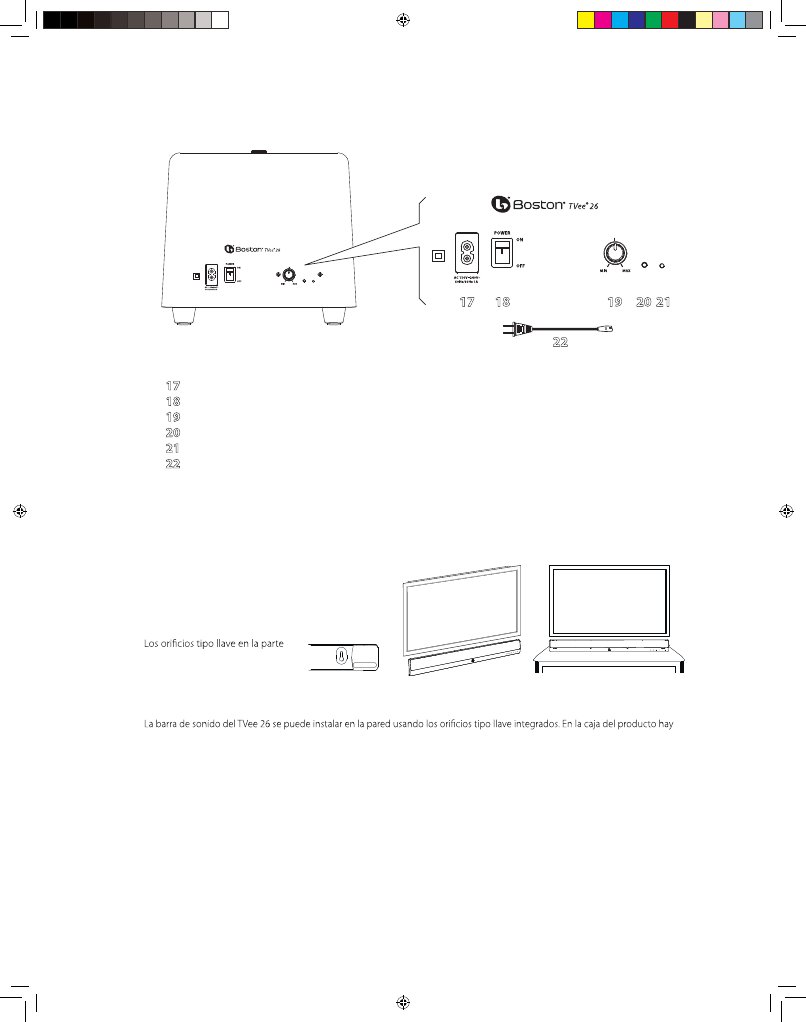
Panel de control del subwoofer
17 Entrada de alimentación– Enchufe el Cable de Alimentación 22 aquí y el otro extremo en un toma de CA.
18 Interruptor de encendido/apagado – Enciende o apaga el subwoofer del TVee. Normalmente se deja encendido.
19 Volumen del subwoofer – Ajusta el volumen del subwoofer para lograr el equilibrio con la barra de sonido.
20 Botón de asociación – Pre-asociado en fábrica. Ver Asociación de la barra de sonido y subwoofer.
21 Indicador de estado – La luz verde indica que el subwoofer está activo y la luz roja que está en modo de espera.
22 Cable de alimentación – Suministra energía al subwoofer.
Ubicación del sistema
Decida la ubicación y posición que va a ocupar el sistema antes de hacer las conexiones.
Ubicación de la barra de sonido
Coloque la barra de sonido sobre una mesa o estante
cerca del televisor, o instálela en la pared por encima o
debajo del televisor.
posterior de la barra de sonido
permiten colgarla de la pared.*
Instalación en la pared
una plantilla de instalación. Usando un nivel, posicione y sujete con cinta adhesiva la plantilla a la pared en el lugar deseado.
Instale los herrajes* usando la plantilla como guía y luego retire la plantilla de la pared. Conecte los cables de audio y de
alimentación antes de colgar la barra de sonido de la pared.
*Consulte a una persona con conocimientos sobre el tipo de pared para que le recomiende los herrajes adecuados para colgar el
parlante. Normalmente es mejor no colgar la barra de sonido de la pared antes de hacer las conexiones.
Subwoofer
142-004203-2_Owners_Manual_TVee26_fini_English_Links.indd 14 6/25/12 6:47 PM
15
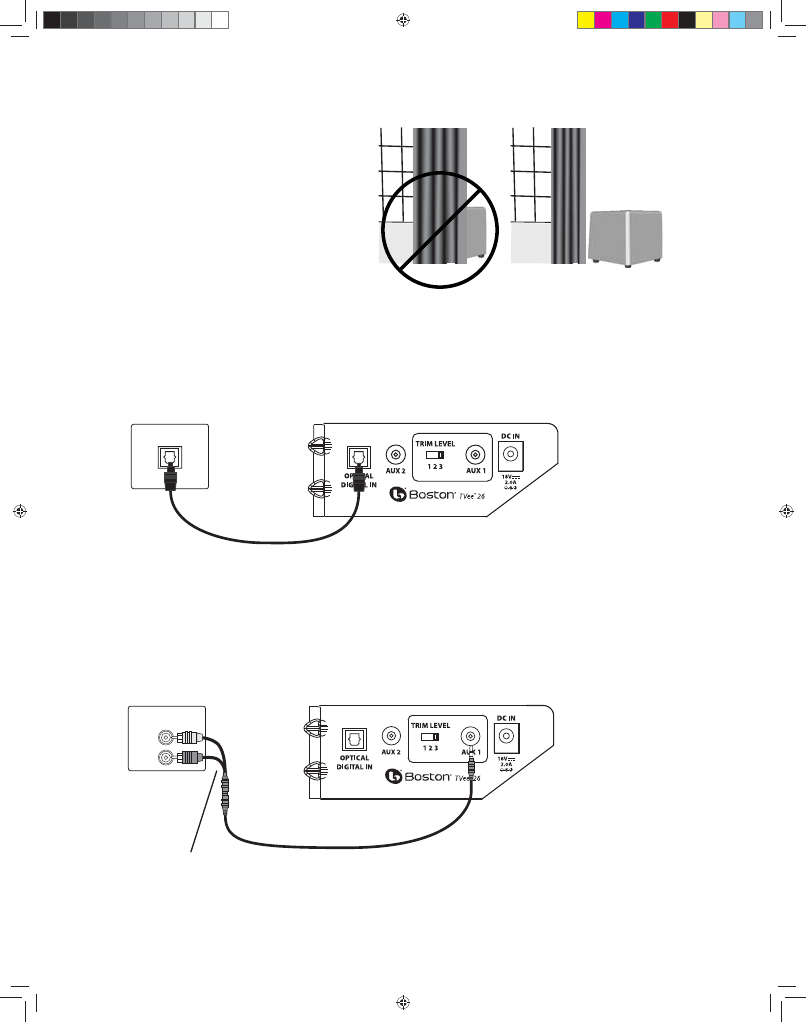
Ubicación del subwoofer
$PMPRVFFMTVCXPPGFSJOBMÈNCSJDPFODVBMRVJFSMVHBSEFMB
IBCJUBDJØO1BSBPCUFOFSFMNFKPSTPOJEPDPMØRVFMPDFSDBEF
VOBQBSFEPSJODØOBOPNÈTEFNFUSPTEFMBCBSSBEFTPOJ-
EPZEFMNJTNPMBEPEFMBIBCJUBDJØORVFMBCBSSBEFTPOJEP
&MBMDBODFEFMTVCXPPGFSJOBMÈNCSJDPFTEFNFUSPT
5SBUFEFFWJUBSDPMPDBSFMTVCXPPGFSFOVOBQPTJDJØOEPO-
de las cortinas o mantas puedan obstruir el sonido.
Conexión del sistema
"DPOUJOVBDJØOOFDFTJUBVOBTF×BMEFFOUSBEBEFMUFMFWJTPSBMBCBSSBEFTPOJEPEFM57FF&MJKBFOUSFEPTPQDJPOFTTFODJMMBT
Opción 1 (preferida)
$BCMFEJHJUBMØQUJDPNota&MDBCMFØQUJDPFTEFmCSBEFWJESJPUFOHBDVJEBEPEFOPEPCMBSMP
U Opción 2
$BCMFEFBVEJPFTUÏSFP3$"ÁTFMBTJTV57OPUJFOFTBMJEBØQUJDB4JUJFOFVO57DPOTBMJEBT3$"QPSGBWPSVTFFMBEBQUBEPSEF
3$"BNJOJDBCMFDPNPTFJMVTUSBTJFM57UJFOFVOBTBMJEBEFNNFOFTFDBTPOPOFDFTJUBFMBEBQUBEPS
OK
Television
Optical Digital Cable (14)
OPTICAL OUT
Soundbar connection panel
AUDIO
OUTPUT
RCA to 3.5mm
Adaptor (16)
1/8” (3.5mm)
Stereo Cable (15)
Television Soundbar connection panel
142-004203-2_Owners_Manual_TVee26_fini_English_Links.indd 15 6/25/12 6:47 PM
16
Conexión de alimentación eléctrica
1. Conecte la fuente de alimentación y el cable de alimentación de la
barra de sonido a la barra de sonido. Conecte el cable de alimentación del
subwoofer al subwoofer. Enchufe ambos en los tomacorrientes de CA.
2.
Encienda el interruptor de encendido del panel posterior
(18)
del subwoofer. El subwoofer inalámbrico se conecta automáticamen-
te a la barra de sonido.
Asociación de la barra de sonido
y subwoofer.
El subwoofer y la barra de sonido son asociados en fábrica. Sin embar-
go, si se interrumpe la comunicación, por favor siga este procedimiento
simple.
1. Presione el
Botón de Asociación
(
20
) del subwoofer hasta que
el
Indicador de Estado
(
21
) destelle en rojo.
2. Presione el
Botón de Asociación
que está en la parte posterior
de la barra de sonido.
El Indicador de Estado
(
21
) del subwoofer
Indicador de Estado (21)
LED rojo: El subwoofer no está asociado o está buscando la barra de sonido del TVee.
LED verde: El subwoofer está asociado a la barra de sonido del TVee. Su sistema está listo.
Nota: Las luces sólo se encienden temporalmente para mostrar un cambio de modo o función.
Uso de la entrada auxiliar del panel
posterior
Utilice las entradas AUX 1 o AUX 2 del panel posterior para
conectar a un dispositivo de medios portátil.
¿Cómo miro la TV?
Selección de una entrada
Use el Botón de Entrada del panel frontal para elegir una entrada. Cada vez que se presiona el Botón de Entrada
, la entrada cambia de secuencia de Entrada Digital Óptica a entrada Aux 1 analógica, nuevamente a entrada Aux 2
analógica, nuevamente Entrada Digital Óptica. El color de la Luz de Modo de Entrada indica qué entrada está seleccionada.
Luz del Botón de Entrada (3)
Verde: La Entrada digital óptica está seleccionada.
Naranja: La entrada Aux 1 analógica está seleccionada.
Roja: La entrada Aux 2 analógica está seleccionada.
Soundbar connection panelMP3 player
PAIR
SUBWOOFER
VOLUME
PAIR
142-004203-2_Owners_Manual_TVee26_fini_English_Links.indd 16 6/25/12 6:47 PM
Ajuste del volumen
Para ajustar el volumen, use el Botón para bajar el volumen y el Botón para subir el volumen del panel frontal. Para
silenciar el audio, use el Botón de silencio . Para cancelar el silencio de audio, presione el Botón de silencio , el Botón
para bajar el volumen , o el Botón para subir el volumen .
Luz del botón de silencio
Rojo intermitente: &TUÈFONPEPEFTJMFODJP
Ajuste del nivel de sonido del subwoofer
6TFMB1FSJMMBEFMWPMVNFO(19) de la parte posterior del subwoofer para ajustar el
nivel de salida del sonido.
&ONVDIPTBNCJFOUFTMBDPOmHVSBDJØOFOUSFZIPSBTQPTJDJØOEFMSFMPK
TVFOBCJFO6OBWF[DPOmHVSBEPOPSNBMNFOUFOPTFSÈOFDFTBSJPBKVTUBSFTUFDPOUSPM
Selección Música/Película
&MNPEPEFQFMÓDVMBFTDPNPFOVOUFBUSPPVOTJTUFNBEFTPOJEPFOWPMWFOUFDPOVOTPOJEPBNQMJPZFTQBDJPTP1BSBSFQSPEVDJS
NÞTJDBSFBM[BEBFMNPEPEFNÞTJDBFTDPNPVOTJTUFNBEFNÞTJDBFTUÏSFPUSBEJDJPOBMPQUJNJ[BEPQBSBTPOJEPOÓUJEPZDMBSP"NCPT
NPEPTQVFEFOVTBSTFQBSBDVBMRVJFSUJQPEFFOUSBEBPEFBVEJP&M57FFSFDVFSEBFMNPEPFMFHJEPMBÞMUJNBWF[QBSBDBEBFOUSBEB
Luz de modo de música/película: (1)
Verde: 3FQSPEVDDJØOFONPEPEFQFMÓDVMB
Naranja: 3FQSPEVDDJØOFONPEPEFNÞTJDB
Programación de la barra de sonido
"UPEPTMPTCPUPOFTEFMBCBSSBEFTPOJEPEFM57FFMPTQVFEFDPOUSPMBSDPOTVDPOUSPMSFNPUP&TUPMFMMFWBSÈBMHVOPTNJOVUPT
QFSPVOBWF[QSPHSBNBEPTVTUFEQPESÈDPOUSPMBSTV57FFEFTEFDBTJDVBMRVJFSDPOUSPMSFNPUP
A Presione y mantenga presionado el Botón de potencia y el Botón para subir el volumen de la barra de sonido
EVSBOUFTFHVOEPTIBTUBRVFFMBotón de Música/Película el Botón de Entrada , y el Botón de potencia
estén en naranja intermitente.
B $POP[DBNPTQSJNFSPFM#PUØOQBSBTVCJSFMWPMVNFOEFM Control remoto Presione el Botón para subir el volumen
EFMBCBSSBEFTPOJEPIBTUBRVFMBTMVDFTTFQPOHBOmKBTFOOBSBOKB
C 5FOHBTVDPOUSPMSFNPUPBDNBQVOUBOEPBMBFTRVJOBTVQFSJPSEFSFDIBEFMBSFKJMMBEFMQBSMBOUFDPNPTFJMVTUSBNÈTBCBKP
Presione el Botón para subir el volumen de su Control remotoWFDFTIBTUBRVFMBTMVDFTFTUÏOEFDPMPSWFSEFJOUFSNJUFOUF
3FQJUBMPTQBTPTA a C para ajustar los botones de Bajar el volumen , Silencio , Entrada , Música/Película
, y Potencia .
AB C
Activa la barra de sonido en
Modo Reconocimiento
Elija la función de la barra de
sonido que desea reconocer.
Reconozca el comando de
su control remoto
142-004203-2_Owners_Manual_TVee26_fini_English_Links.indd 17 6/25/12 6:47 PM

Solución de problemas del sistema TVee
La barra de sonido no se activa.
t{4FIBFODIVGBEPMBGVFOUFEFBMJNFOUBDJØOBVOUPNBEFQBSFEFOFSHJ[BEP
t{&TUÈCJFODPOFDUBEBMBGVFOUFEFBMJNFOUBDJØOBMBFOUSBEBEFBMJNFOUBDJØOEFMBCBSSBEFTPOJEP
La barra de sonido del TVee no emite sonido.
t{&TUÈDPOFDUBEBMBCBSSBEFTPOJEPBVOBGVFOUFEFBVEJPRVFTFSFQSPEVDFBUSBWÏTEFTVTBMJEB
t{4FIBDPOmHVSBEPMBCBSSBEFTPOJEPFOMBGVFOUFEFFOUSBEBDPSSFDUB
t{3FDJCFOBMJNFOUBDJØOZFTUÈOBDUJWBEPTMBCBSSBEFTPOJEPZFMTVCXPPGFS
t4VCBFMWPMVNFOEFMBCBSSBEFTPOJEPEFM57FF
t4VCBFMWPMVNFOEFMUFMFWJTPSPEFMEFDPEJmDBEPSEFDBCMFBMRVFFTUÈDPOFDUBEPFM57FF
t7FSJmRVFFMFTUBEPEFTJMFODJPo{FTUÈSPKPJOUFSNJUFOUFFMBotón de silencio 1VMTFFMBotón de silencio de la barra
de sonido.
t&OMPTUFMFWJTPSFTEJHJUBMFTVPUSBTGVFOUFTEJHJUBMFTDPNQSVFCFRVFFMGPSNBUPEFTBMJEBFTUÏDPOmHVSBEPFO
i%PMCZ%JHJUBMw$POTVMUFFMNFOÞEFDPOmHVSBDJØOEFMQSPEVDUPGVFOUF
t&OMBTGVFOUFTEJHJUBMFTWFSJmRVFRVFFMDBCMFØQUJDPOPFTUÏEPCMBEPPSPUP4FDPSUBMBTF×BMEFMV[EJHJUBM
El subwoofer no emite sonido.
t$PNQSVFCFMPTQVOUPTNFODJPOBEPTFOMBTFDDJØOBOUFSJPSi-BCBSSBEFTPOJEPOPTFBDUJWBw
t4VCBFMDPOUSPMEFWPMVNFO
t"DFSRVFFMTVCXPPGFSBMBCBSSBEFTPOJEP
t7FSJmRVFFMIndicador de estadoQBSBBTFHVSBSRVFMBMV[FTUÏmKBFOWFSEF
La barra de sonido emite sonido distorsionado.
t$BNCJFMBDPOmHVSBDJØOEFMJOUFSSVQUPSEF/JWFMEFBKVTUFBVOOÞNFSPNÈTCBKP4ØMPMBFOUSBEB"VY
t7FSJmRVFMBGVFOUFEFMBTF×BMQBSBBTFHVSBSTFRVFMBEJTUPSTJØOOPTFPSJHJOBBMMÓ
t#BKFFMWPMVNFOEFMBGVFOUFIBTUBRVFEFTBQBSF[DBMBEJTUPSTJØO
Los graves no se escuchan bien.
t4VCBFMDPOUSPMEFWPMVNFOEFMTVCXPPGFS
t"DFSRVFFMTVCXPPGFSBVOSJODØOEFMBIBCJUBDJØO
t"MHVOPTUFMFWJTPSFTZEFDPEJmDBEPSFTEFDBCMFUJFOFOVONPEPRVFMJNJUBMPTHSBWFT7FSJmRVFFMNFOÞEFDPOmHVSB-
DJØOEFBVEJPEFMQSPEVDUPZmKFFMNPEPEFBVEJPFOiBNQMJPwFOMVHBSEFiOPSNBMwPiBOHPTUPw
El TVee no reconoce los comandos de mi control remoto.
t4JHBMBTJOTUSVDDJPOFTEFQSPHSBNBDJØODPODVJEBEP
t.BOUFOHBFMDPOUSPMmSNFBQVMHBEBTEFMGSFOUFEFMBCBSSBEFTPOJEP
t1SFTJPOFZTVFMUFMPTCPUPOFTEFMDPOUSPMSFNPUPlentamente.
t7FSJmRVFMBTCBUFSÓBTEFMDPOUSPMSFNPUP
Nota: &MTJTUFNB57FFSFDPOPDFMBNBZPSÓBEFMPTDPNBOEPT*3QFSPBMHVOPTQSPUPDPMPT*3OPTFQVFEFOQSPHSBNBS
Con el paso del tiempo el volumen de los parlantes del televisor sube más que el del sistema TVee.
t$VBOEPTFNBOUJFOFBQSFUBEPFMCPUØOEFWPMVNFOEFMDPOUSPMSFNPUPFTQPTJCMFRVFFMUFMFWJTPSDBNCJFFMOJWFMEF
WPMVNFONÈTSÈQJEPRVFFM57FF
t6TFMPTCPUPOFTEFMBCBSSBEFTPOJEPQBSBBKVTUBSFMWPMVNFOEFM57FFZFRVJMJCSBSMPDPOMPTQBSMBOUFTEFMUFMFWJTPS
t4JFTQPTJCMFVTFFMNFOÞEFDPOmHVSBDJØOEFMUFMFWJTPSQBSBTJMFODJBSMPTQBSMBOUFTEFMUFMFWJTPS
Parece que el subwoofer tiene interferencia en la señal inalámbrica.
t&TQPTJCMFRVFFMTVCXPPGFSTFFODVFOUSFEFNBTJBEPMFKPTEFMBCBSSBEFTPOJEPQBSBPCUFOFSVOBCVFOBTF×BM
*OUFOUFBDFSDBSMP
142-004203-2_Owners_Manual_TVee26_fini_English_Links.indd 18 6/25/12 6:47 PM
19
Garantía Limitada
#PTUPO"DPVTUJDTHBSBOUJ[BBMDPNQSBEPSPSJHJOBMEFOVFTUSPTJTUFNB57FFRVFOPUFOESÈEFGFDUPTEFNBUFSJBMFTOJEFNBOP
EFPCSBFOTVTQJF[BTNFDÈOJDBTEVSBOUFVOQFSÓPEPEFB×PTEFTEFMBGFDIBEFDPNQSB&MQFSÓPEPEFHBSBOUÓBEFMPTDPN-
QPOFOUFTFMÏDUSJDPTEFM57FFFTEFB×P
&TTVSFTQPOTBCJMJEBEJOTUBMBSMPTZVUJMJ[BSMPTDPOGPSNFBMBTJOTUSVDDJPOFTTVNJOJTUSBEBTQSPQPSDJPOBSUSBOTQPSUFTFHVSPIBTUB
VOSFQSFTFOUBOUFEFTFSWJDJPBVUPSJ[BEPEF#PTUPO"DPVTUJDTZQSFTFOUBSFMDPNQSPCBOUFEFDPNQSBFOMBGPSNBEFMSFDJCPBM
solicitar el servicio.
2VFEBOFYDMVJEPTEFFTUBHBSBOUÓBMPTEB×PTRVFSFTVMUFOEFMVTPJODPSSFDUPEFMNBMVTPEFVOBJOTUBMBDJØOJOBEFDVBEBEF
BDDJEFOUFTEFMUSBOTQPSUFPEFSFQBSBDJPOFTNPEJmDBDJPOFTRVFOPTFBOSFBMJ[BEBTQPSFMSFQSFTFOUBOUFEFTFSWJDJPBVUPSJ[B-
do de Boston Acoustics.
&TUBHBSBOUÓBTFMJNJUBBMQSPEVDUPEF#PTUPO"DPVTUJDTZOPDVCSFEB×PTEFFRVJQPTBmOFT&TUBHBSBOUÓBOPDVCSFMPTDPTUPT
EFEFTJOTUBMBDJØOPSFJOTUBMBDJØO&TUBHBSBOUÓBTFSÈOVMBDVBOEPTFIBZBSFUJSBEPPCPSSBEPFMOÞNFSPEFTFSJF&TUBHBSBOUÓB
MFPUPSHBEFSFDIPTMFHBMFTFTQFDÓmDPTZUBNCJÏOMFQPESÓBODPSSFTQPOEFSPUSPTEFSFDIPTRVFWBSÓBOEFVOFTUBEPBPUSP
Si cree que necesita servicio técnico
&TUBEPT6OJEPT
1SJNFSPQØOHBTFFODPOUBDUPDPOFMEJTUSJCVJEPSBMRVFMFDPNQSØFMQSPEVDUP4JFTUPOPFTQPTJCMFFOWÓFVODPSSFPFMFDUSØOJDP
BTVQQPSU!CPTUPOBDPNPFTDSJCBB
#PTUPO"DPVTUJDT*OD
$PSQPSBUF%SJWF
.BIXBI/+64"
$BOBEÈ
1SJNFSPQØOHBTFFODPOUBDUPDPOFMEJTUSJCVJEPSBMRVFMFDPNQSØFMQSPEVDUP4JFTUPOPFTQPTJCMFFOWÓFVODPSSFPFMFDUSØOJDP
BTVQQPSU!ENDBOBEBDBPFTDSJCBB
%.$BOBEB
"QQMF$SFFL#MWE
.BSLIBN0/-3#
0USPT1BÓTFT
$PNVOÓRVFTFDPOFMEJTUSJCVJEPSBUSBWÏTEFMDVBMBERVJSJØFMQSPEVDUPPDPOFMSFQSFTFOUBOUFMPDBM
1BSBNÈTJOGPSNBDJØOWJTJUFCPTUPOBDPVTUJDTDPNTVQQPSU
&TUFTÓNCPMPRVFBQBSFDFFOFMQSPEVDUPJOEJDBRVFFMQSPEVDUPOPEFCFTFSBSSPKBEPKVOUPDPOMPTSFTJEVPT
EPNÏTUJDPT%FCFDPMPDBSTFFOVOQVOUPEFSFDPMFDDJØOTFQBSBEPQBSBEFTFDIPTFMFDUSØOJDPTPEFCFFOUSFHBSTF
FOFMFTUBCMFDJNJFOUPNJOPSJTUBBMDPNQSBSVOQSPEVDUPTJNJMBS&MGBCSJDBOUFIBQBHBEPQBSBRVFFTUFQSPEVDUP
TFSFDJDMF&TUBQSÈDUJDBDPOUSJCVZFBMBSFVUJMJ[BDJØOZBMSFDJDMBEPNJOJNJ[BMPTFGFDUPTBEWFSTPTTPCSFFMNFEJP
BNCJFOUFZMBTBMVEIVNBOBZFWJUBMBJNQPTJDJØOEFNVMUBTQPSFMJNJOBDJØOJODPSSFDUBEFSFTJEVPT
142-004203-2_Owners_Manual_TVee26_fini_English_Links.indd 196/25/12 6:47 PM
20
CONSIGNES DE SÉCURITÉ IMPORTANTES
’
AT CZ FI IS LT PT SE FR
BE DK DE IE MT SK CH IT
EE GR LV NL SI TR LU CY
HU PL ES GB NO
Fabriqué sous licence de Dolby Laboratories.
Dolby et le symbole double-D sont des marques déposées de
Dolby Laboratories.
23. Lorsqu'il n'est pas utilisé et pendant le mouvement, veuillez prendre
soin du câble d'alimentation, par exemple, attacher le câble
d'alimentation avec un serre-câble ou équivalent. Il doit être exempt de
bords tranchants et de tout ce qui peut causer l'abrasion du câble
d'alimentation. Lors de la remise en service, veuillez vous assurer que
le câble d'alimentation n'est pas endommagé. Si des dégradations
sont trouvées, veuillez demander à la personne en charge des
réparations de remplacer le câble d'alimentation spécifié par le
fabricant ou ayant les mêmes caractéristiques que l'original.
24. Avertissement : Pour réduire le risque de choc électrique, ne pas retirer
le couvercle (ou le dos) car il n'existe pas de pièces réparables par
l'utilisateur à l'intérieur. Confier les réparations à un personnel qualifié.
Utilisateurs américains :
Remarque :
Cet équipement a été testé et déclaré conforme aux limites
relatives à un appareil numérique de classe B conformément à la partie 15
des Règlements de la FCC. Ces limites sont destinées à assurer une
protection raisonnable contre les interférences dommageables dans une
installation résidentielle. Cet équipement génère, utilise et peut émettre de
l'énergie sous forme de radiofréquences. Si son installation et son
utilisation ne sont pas conformes aux présentes instructions, il peut
provoquer des interférences nuisibles aux communications radio.
Cependant, l'absence totale d'interférences dans une installation
particulière n'est pas garantie. Si cet équipement entraîne des interférences
nuisibles à la réception de la radio ou de la télévision, ce qui est vérifiable
en éteignant et en rallumant l'appareil, il est recommandé de corriger ces
interférences en suivant une ou plusieurs des mesures suivantes :
Réorienter ou déplacer l'antenne de réception.
Augmenter la distance entre l'équipement et le récepteur.
Brancher l'équipement à un circuit électrique différent de la prise à
laquelle le récepteur est connecté.
Consulter le revendeur ou un technicien radio/TV expérimenté pour
obtenir de l'aide.
Attention :
tout changement ou modification non autorisé du récepteur
peut annuler le droit des utilisateurs à employer cet équipement.
Utilisateurs canadiens :
Cet appareil numérique de classe B est conforme á la norme ICES-003 du
Canada.
Utilisateurs européens :
RLAN – Radio-équipement de réseau local sans fil
Cet équipement peut être utilisé uniquement à l'intérieur en France (FR).
Cet équipement peut être utilisé uniquement dans la résidence d'une
personne en Italie (IT).
Cet équipement est destiné uniquement à une utilisation privée au
Luxembourg (LU).
L'utilisation est interdite dans un rayon de 20 km du centre de Ny-Ålesund
en Norvège (NO).
Par la présente, Boston Acoustics, Inc. 7 Constitution Way, Woburn, MA
01801 USA, déclare que son appareil TVee 26 est conforme aux exigences
essentielles et autres dispositions applicables de la Directive 1999/5/CE.
Une copie de la Déclaration de Conformité peut être obtenue auprès de :
Oliver Kriete
Boston Acoustics, Division of D&M Europe B.V.
Beemdstraat 11
5653 MA Eindhoven
Pays-Bas
ATTENTION
RISQUE DE CHOC ÉLECTRIQUE -
NE PAS OUVRIR
0E8B)A8B@D43427>2q;42CA8@D4=4?0B>DEA8A
Ce symbole apposé sur l'appareil indique des tensions
dangereuses.
Ce symbole apposé sur l'appareil indique à l'utilisateur qu'il
doit lire l'ensemble des consignes de sécurité mentionnées
dans le manuel de l'utilisateur.
Ce symbole apposé sur l'appareil indique une double
isolation.
Avertissement !
Pour réduire les risques d'incendie ou de choc électrique,
ne pas exposer cet appareil à la pluie ou à l'humidité.
1. Lire les présentes instructions.
2. Conserver les présentes instructions.
3. Respecter tous les avertissements.
4. Suivre toutes les instructions.
5. Ne pas faire fonctionner cet appareil à proximité d'un liquide.
6. Nettoyer l'appareil uniquement avec un chiffon sec.
7. Ne pas obturer les ouvertures d'aération. Installer l'appareil suivant les
instructions du fabricant.
8. Ne pas installer l'appareil à proximité d'une source de chaleur, telle
qu'un radiateur, une bouche de chaleur, une cuisinière ou autre appareil
(y compris des amplificateurs) qui dégage de la chaleur.
9. Ne pas désactiver le dispositif de sécurité de la prise de terre ou de la
prise polarisée. Une prise polarisée est équipée de deux fiches, l'une
étant plus large que l'autre. Une prise de terre est équipée de trois fiches
dont l'une est une fiche de terre. Cette troisième fiche ou fiche la plus
large est présente pour des raisons de sécurité. Si la prise fournie ne
correspond pas à votre prise murale, consultez un électricien pour
remplacer cette prise murale inadaptée.
10. Protéger le câble d'alimentation (personne ne doit marcher dessus
et il ne doit pas être pincé, en particulier au niveau des prises),
les prises de courant et le point où les prises sortent de l'appareil.
11. Utiliser uniquement les accessoires recommandés par le fabricant.
12. Débrancher l'appareil pendant les orages ou pendant les périodes
prolongées de non-utilisation.
13. Consulter un professionnel qualifié pour toutes les réparations. L'appareil
doit être réparé quand il a été endommagé, notamment si le câble
d'alimentation ou la prise sont abîmés, si un liquide a été renversé ou si
des objets sont tombés sur l'appareil, si l'appareil a été exposé à la pluie
ou à l'humidité, s'il ne fonctionne pas correctement, ou s'il est tombé.
14. Maintenir une distance minimale de 50 mm tout autour de l'appareil afin
d'assurer une aération adéquate. L'aération ne doit pas être bloquée en
obturant les ouvertures d'aération ou en plaçant sur ou à côté de
l'appareil des objets tels que des journaux, des nappes, des rideaux, etc.
15. Aucune flamme nue, notamment des bougies allumées, ne doit être
placée sur l'appareil.
16. L'appareil ne doit pas être exposé à un suintement ou des éclabous-
sures d'eau. Aucun objet rempli de liquide, tel qu'un vase, ne doit être
posé sur l'appareil.
17. Soit le connecteur d'entrée d'alimentation situé à l'arrière de l'appareil,
soit la prise d'alimentation murale doit rester accessible afin de pouvoir
couper l'alimentation de l'appareil.
18. Pour déconnecter totalement cet appareil du secteur d’alimentation,
débranchez le câble d'alimentation de la prise murale d’alimentation.
19. Utiliser uniquement un chariot, un trépied, une
console ou une table spécifié par le fabricant,
ou vendu avec l'appareil. Quand un chariot ou
un porte bagage est utilisé, soyez prudent lorsque
vous déplacez l'ensemble chariot / appareil afin
d'éviter toute blessure en cas de chute.
20. ATTENTION : Ces instructions de réparation sont destinées uniquement à
un usage réservé au personnel qualifié. Pour réduire le risque de choc
électrique, ne pas effectuer d'autres réparations que celles contenues dans
les instructions de fonctionnement sauf si vous êtes qualifiés pour le faire.
21. AVERTISSEMENT : Utiliser uniquement les accessoires spécifiés ou
fournis par le fabricant.
22. AVERTISSEMENT : Veuillez vous référer aux informations au-dessous
de l’extérieur de l'enceinte pour obtenir les informations électriques et de
sécurité avant d'installer ou de faire fonctionner l'appareil.
142-004203-2_Owners_Manual_TVee26_fini_English_Links.indd 20 6/25/12 6:47 PM
Power Input: DC 18V 2.0A
Soundbar
Subwoofer AC 110V – 240V ~ , 50Hz / 60 Hz 1A
21
Introduction
Merci d’avoir choisi Boston Acoustics et sélectionné TVee 26 en tant que système de vos divertissements à domicile.
Caractéristiques principales :
t-BCBrre de sons apprend les commandes de votre télécommande existante
tMode Movie (Film) pour un son surround
tMode Music (Musique) pour la musique en stéréo
tConçu par les ingénieurs de Boston avec les meilleures performances dans sa catégorie
t6OEFTJgn simple et fonctionnel pour s’adapter à n’importe quel téléviseur
t&OUrée numérique disposant du décodage Dolby Digital pour un son surround supérieur
t
comme au cinéma
t&OUrées A69NJOJTtéréo montées à l’arrière pour connecter votre appareil multimédia portable
Spécications
Alimentation : 150 watts crête
Plage de fréquence : 40Hz à 20 kHz
Haut-parleurs de la barre de sons : Double 2 x 5 po (51 x127 mm) pilotes HHRT
Subwoofer : Woofer (Caisson de basses) 165 mm
Sauts de fréquences de 2,4 GHz (subwoofer)
Dimensions :)Y-Y1 Barre de sons 83 x 800 x 73,5 mm
Subwoofer 238 x 266 x 279,4 mm
Poids : Barre de sons 2,1 kg
Subwoofer 3 kg
F
R
A
N
Ç
A
I
S
142-004203-2_Owners_Manual_TVee26_fini_English_Links.indd 21 6/25/12 6:47 PM
External power supply manufacturer: %POHHVBO%POHTPOH&MFDUSPOJD$P-UE
.PEFM"%:48.PEFM#%:48
"EBQUFSJOQVU77_)[".BY
0VUQVU017ED"
22
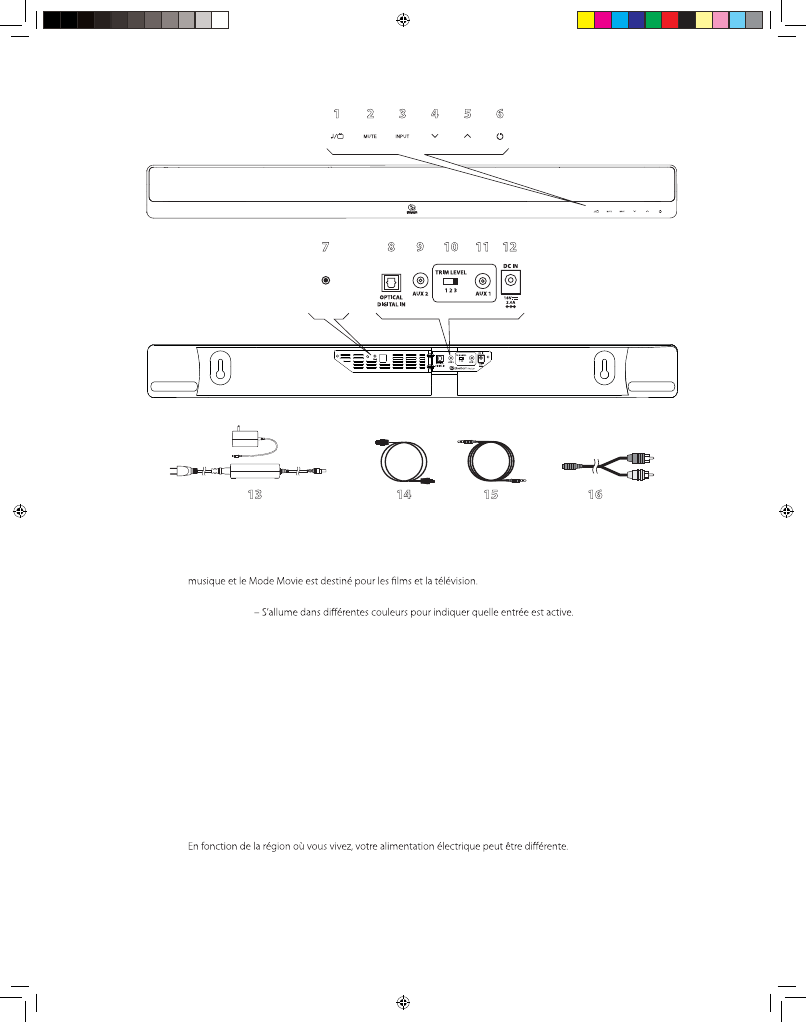
1 2 3 4 5 6
789 10 11 12
13 14 15 16
PAIR
Barre de sons
Commandes du panneau avant
1 Bouton Music/Movie – Sélectionne le style de son que vous voulez entendre. Le Mode Music est destiné à la
2 Bouton Mute – Vous permet de couper temporairement TVee.
3 Bouton Input
4 Bouton Volume Down – Permet de régler manuellement le volume du TVee.
5 Bouton Volume Up – Permet de régler manuellement le volume du TVee.
6 Bouton Power – Allume ou éteint la barre de son TVee. Normalement, il est allumé tout le temps.
Commandes du panneau arrière
7 Bouton Paire – Pré-jumelé en usine. Voir Pairage de la barre de sons et du subwoofer.
8 Optical Digital In – L’entrée privilégiée pour le TVee à l’aide du câble numérique optique fourni 14.
9 Aux 2 – Fiche mini AUX INPUT (ENTRÉE AUX) pour le raccordement à une source audio.
10 Trim Level – Permet de régler la sensibilité d’entrée de TVee pour Aux 1 11.
11 Aux 1 – Fiche mini ENTRÉE AUX pour le raccordement à une source audio.
12 Power Input – Connecter l’alimentation électrique 13 ici.
Câbles
13 Alimentation – Alimente la barre de sons en électricité. Branchez-la à une prise murale et à l’entrée électrique 12.
14 Câble optique numérique – Le meilleur choix pour la connexion de sources audio numériques au TVee.
15 Câble stéréo 3,5 mm – Brancher les sources aux entrées auxiliaires.
16 Adaptateur RCA à 3,5 mm – Permet de connecter un RCA gauche/droit à un stéréo 3,5 mm.
142-004203-2_Owners_Manual_TVee26_fini_English_Links.indd 22 6/25/12 6:47 PM
23
SUBWOOFER
VOLUME
PAIR
SUBWOOFER
VOLUME
PAIR
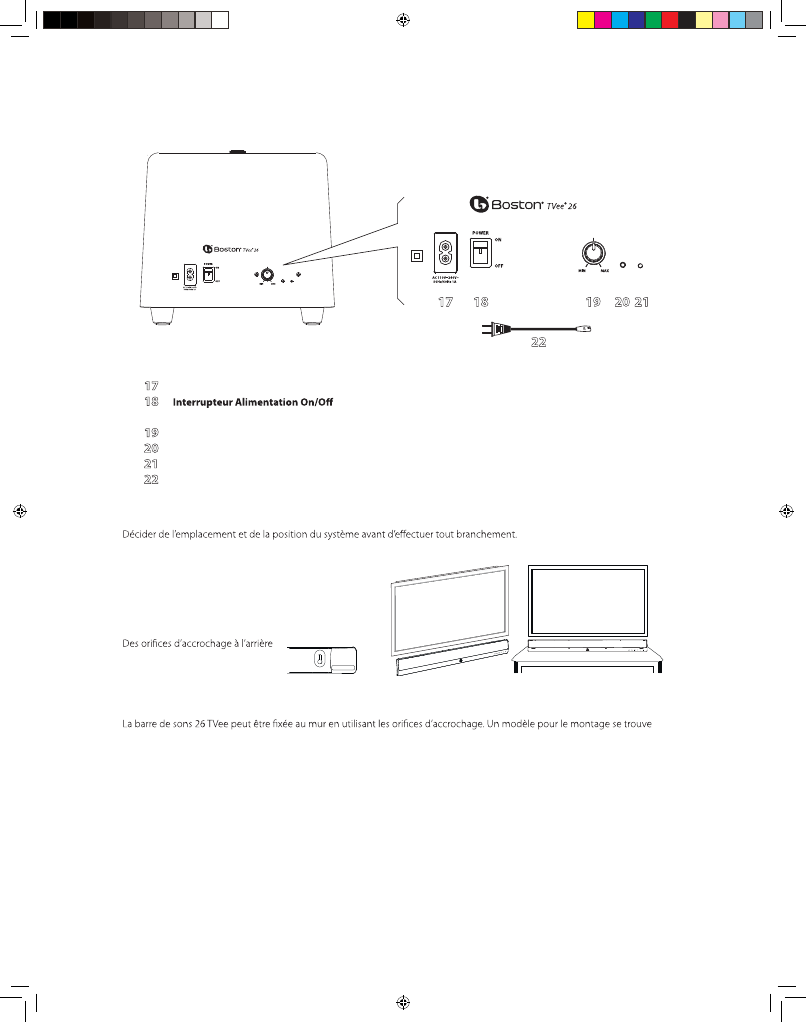
17 18 19 20 21
22
Panneau de conguration du Subwoofer
17 Power Input– Brancher le câble d’alimentation 22 ici et brancher l’autre extrémité sur une prise secteur.
18 – Allume ou éteint le subwoofer du TVee. Normalement, il est laissé allumé tout
le temps.
19 Volume du Subwoofer – Règle le volume du subwoofer pour une meilleure harmonie avec la barre de sons.
20 Bouton Paire – Pré-jumelé en usine. Voir Pairage de la barre de sons et du subwoofer.
21 Indicateur d’état – Allumé en vert quand le subwoofer est actif et en rouge quand il est en mode veille (standby).
22 Câble d’alimentation – Alimente le subwoofer en électricité.
Placement de votre Système
Emplacement de la barre de sons
Placer la barre de sons sur une surface de table ou une
étagère près de la télévision, ou en pose murale au-dessus
ou en dessous de la télévision.
de la barre de sons permettent le
montage mural.*
Montage mural
dans la boîte du produit. À l’aide d’un outil de niveau, positionner et attacher le modèle au mur à l’endroit désiré.
Installer le matériel* en utilisant le modèle comme guide, puis retirer le modèle de montage du mur. Connecter vos appa-
reils audio et les câbles d’alimentation avant de monter la barre de sons au mur.
*Consulter une personne bien informée au sujet de la consistance de votre mur pour recommander le matériel adéquat pour ac-
crocher le haut-parleur. Habituellement, il est préférable de laisser barre de sons en dehors du mur jusqu’à ce que les connexions
soient réalisées.
Subwoofer
142-004203-2_Owners_Manual_TVee26_fini_English_Links.indd 23 6/25/12 6:47 PM
24
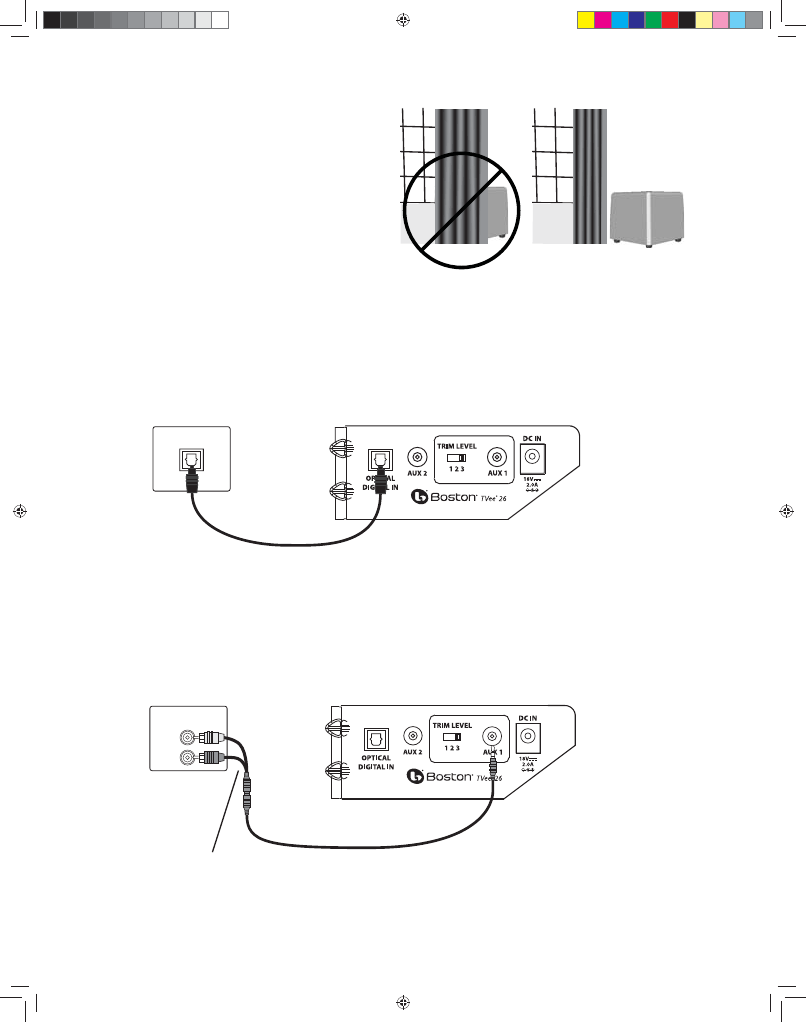
Emplacement du subwoofer
1MBDFSMFTVCXPPGFSTBOTmMOJNQPSUFPáEBOTMBQJÒDF
1PVSMFNFJMMFVSTPOQMBDFSMFTVCXPPGFSQSÒTEVONVS
PVEVODPJOEBOTMFTNÒUSFTEFMBCBSSFEFTPOTEV
NÐNFDÙUÏEFMBQJÒDFRVFMBCBSSFEFTPOT-BQPSUÏFEV
TVCXPPGFSTBOTmMFTUEFNÒUSFT
³USFBUUFOUJGËÏWJUFSEFQMBDFSMFTVCXPPGFSEBOTVOFN-
QMBDFNFOUPáEFTSJEFBVYPVEFTWPJMFTCMPRVFOUMFTPO
Branchement de votre système
&OTVJUFWPVTBWF[CFTPJOEPCUFOJSVOTJHOBMEFOUSÏFËQBSUJSEFWPUSFUÏMÏWJTFVSEBOTMBCBSSFEFTPOT57FF$IPJTJSQBSNJ
EFVYPQUJPOTGBDJMFT
Option 1 (préférée)
$ÉCMFOVNÏSJRVFPQUJRVFRemarque-FDÉCMFPQUJRVFÏUBOUFOmCSFEFWFSSFÐUSFBUUFOUJGËÏWJUFSEFUPSESFMFDÉCMF
Ou Option 2
$ÉCMFBVEJPTUÏSÏP3$"-VUJMJTFSTJWPUSFUÏMÏWJTFVSOFEJTQPTFQBTEVOFTPSUJFPQUJRVF0QUJDBM0VU4JWPVTQPTTÏEF[VO
UÏMÏWJTFVSBWFDEFTTPSUJFT3$"WFVJMMF[VUJMJTFSMBEBQUBUFVS3$"WFSTNJOJDÉCMFDPNNFJMMVTUSÏ4JMFUÏMÏWJTFVSQPTTÒEFVOF
TPSUJFNNBMPSTWPVTOBWF[QBTCFTPJOEFMBEBQUBUFVS
OK
Television
Optical Digital Cable (14)
OPTICAL OUT
Soundbar connection panel
AUDIO
OUTPUT
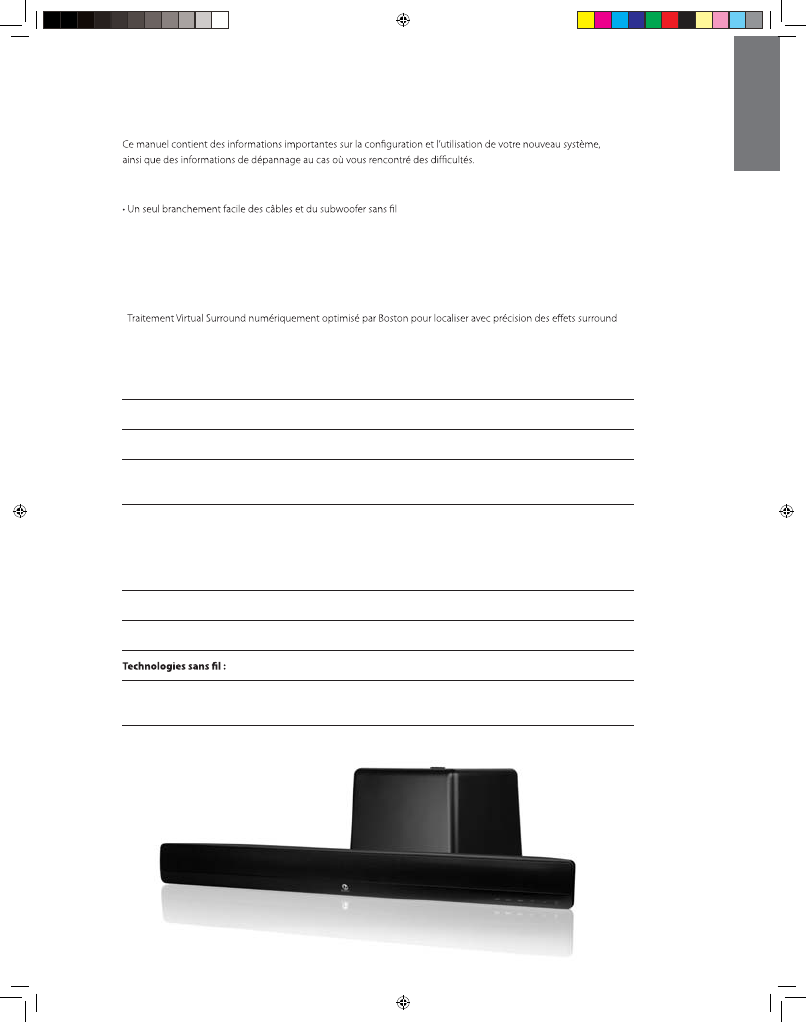
RCA to 3.5mm
Adaptor (16)
1/8” (3.5mm)
Stereo Cable (15)
Television Soundbar connection panel
142-004203-2_Owners_Manual_TVee26_fini_English_Links.indd 246/25/12 6:47 PM
25
Branchement de l’alimentation
1.
Brancher l’alimentation de la barre de sons et le câble d’alimentation
à la barre de sons. Brancher le câble d’alimentation du subwoofer au
subwoofer. Brancher les deux dans les prises de courant du secteur.
2.
Tourner à ON l’interrupteur d’alimentation du panneau arrière (18)
la barre de sons.
Pairage de la barre de sons et du
subwoofer.
Le subwoofer et la barre de sons sont jumelés en usine. Toutefois, si la
communication est interrompue, veuillez suivre cette procédure simple.
1.
Appuyer sur le Bouton Paire (20) du subwoofer jusqu’à ce que
l’Indicator d’état (21) clignote en rouge.
2.
Appuyer sur le Bouton Paire au dos de la barre de sons.
L’Indicateur d’état (21) sur le subwoofer sera vert en continu.
Indicateur d’état (21)
LED rouge : Subwoofer non couplé, ou recherche de la barre de sons TVee
LED verte : Le subwoofer est couplé à la barre de sons TVee. Votre système est prêt.
Remarque : Les témoins ne s’allumeront temporairement que pour indiquer un mode ou un changement de fonction.
Utilisation de l’entrée auxiliaire du panneau arrière
Utiliser les entrées du panneau arrière AUX 1 ou AUX 2
pour connecter un appareil multimédia portable.
Comment faire pour
regarder la télévision ?
Sélectionner une entrée
Sur le panneau avant, utiliser le Bouton Input pour choisir une entrée. Chaque fois que le Bouton Input est
enfoncé, l’entrée change dans l’ordre depuis l’entrée numérique optique Optical Digital In à l’entrée analogique Aux 1, puis à
l’entrée analogique Aux 2 puis de retour à l’entrée numérique optique Optical Digital In. La couleur du témoin de mode
d’entrée indique quelle entrée est sélectionnée.
Témoin des entrées (3)
Vert : L’entrée numérique optique (Optical Digital In) est sélectionnée.
Orange : L’entrée analogique Aux 1 est sélectionnée.
Rouge : L’entrée analogique Aux 2 est sélectionnée.
Soundbar connection panelMP3 player
PAIR
SUBWOOFER
VOLUME
PAIR
142-004203-2_Owners_Manual_TVee26_fini_English_Links.indd 25 6/25/12 6:47 PM
26
Réglage du Volume
Sur le panneau avant, utiliser le Bouton Volume Down et le Bouton Volume Up QPVSSÏHMFSMFWPMVNF6UJMJTFSMF
Bouton Mute pour couper le son. Pour annuler la coupure audio, appuyer sur le Bouton Mute , le Bouton Volume
Down ou le Bouton Volume Up .
Témoin Mute
Rouge clignotant : -FNPEF.VUFFTUBDUJWÏ
Réglage du niveau du son du subwoofer
6UJMJTFSMFCPVUPOEFWPMVNF(19)ËMBSSJÒSFEVTVCXPPGFSQPVSBEBQUFSTPOOJWFBVEFTPSUJFEVTPO
%BOTEFOPNCSFVTFTQJÒDFTMFSÏHMBHFFOUSFFUIFVSFTQSPEVJSBVOCPOTPO6OFGPJTSÏHMÏ
WPVTOFEFWSF[IBCJUVFMMFNFOUQMVTBKVTUFSDFDPOUSÙMF
Sélection Music/Movie
-F.PEF.PWJF'JMNFTUVOQFVDPNNFVOTZTUÒNFEFTBMMFEFDJOÏNBPVEFTPOTVSSPVOEFUEJTQPTFEVOÏWFOUBJMEFTPOT
SJDIFT1PVSVOFMFDUVSFBNÏMJPSÏFEFMBNVTJRVFMFNPEF.VTJD.VTJRVFGPODUJPOOFDPNNFVOTZTUÒNFEFNVTJRVFTUÏSÏP
USBEJUJPOOFMPQUJNJTÏQPVSMBQSÏDJTJPOEFMBQVSFUÏBVEJP$IBRVFNPEFQFVUÐUSFVUJMJTÏQPVSUPVUUZQFEFOUSÏFPVEBVEJP-F
57FFTFTPVWJFOESBEVEFSOJFSNPEFDIPJTJQPVSDIBRVFFOUSÏF
Témoin du mode Music/Movie : (1)
Vert : -FDUVSFFO.PEF.PWJF'JMN
Orange : -FDUVSFFO.PEF.VTJD.VTJRVF
Programmation de votre barre de sons
$IBRVFCPVUPOEFMBCBSSFEFTPOT57FFQFVUÐUSFDPNNBOEÏWJBWPUSFQSPQSFUÏMÏDPNNBOEF$FMBWBQSFOESFRVFMRVFT
NJOVUFTNBJTVOFGPJTQSPHSBNNÏWPVTQPVWF[DPOUSÙMFSWPUSF57FFËQBSUJSEFQSFTRVFOJNQPSUFRVFMMFUÏMÏDPNNBOEF
A Appuyer et maintenir enfoncé le Bouton Power et le Bouton Volume 6Q sur la barre de sons pendant 2 secondes
KVTRVBVNPNFOUPáMF Bouton Music/Movie , le Bouton Input , et le Bouton Power clignotent en orange.
B 3ÏBMJTPOTEBCPSEMBQQSFOUJTTBHFEVCPVUPO7PMVNF6QBVHNFOUFSMFWPMVNFEFMBtélécommande Appuyer sur le
Bouton Volume Up BVHNFOUFSMFWPMVNFTVSMBCBSSFEFTPOTKVTRVËDFRVFMFTWPZBOUTWJSFOUËMPSBOHFDPOUJOV
C .BJOUFOJSWPUSFUÏMÏDPNNBOEFËDNFOQPJOUBOUWFSTMFDPJOTVQÏSJFVSESPJUEFMBHSJMMFEVIBVUQBSMFVSDPNNFJOEJRVÏ
ci-dessous. Appuyer sur le Bouton Volume6QTVSWPUSFtélécommandeGPJTKVTRVËDFRVFMFTUÏNPJOTDMJHOPUFOUFOWFSU
3ÏQÏUFSMFTÏUBQFTAËC pour régler les boutons Volume Down .VUF *OQVU .VTJD.PWJF , et Power .
AB C
Enclencher la barre de sons
en mode Apprentissage
(Learning mode)
Choisir la fonction sur la barre
de sons que vous souhaitez
soumettre à l’apprentissage
Faire apprendre la commande
de votre télécommande
142-004203-2_Owners_Manual_TVee26_fini_English_Links.indd 26 6/25/12 6:47 PM

Dépannage du TVee
La barre de sons ne s’allume pas.
t-BMJNFOUBUJPOFTUFMMFCSBODIÏFEBOTVOFQSJTFNVSBMFTPVTUFOTJPO
t-BMJNFOUBUJPOFTUFMMFDPSSFDUFNFOUDPOOFDUÏFËMFOUSÏFEBMJNFOUBUJPOEFMBCBSSFEFTPOT
Aucun son ne sort de la barre de sons TVee.
t-BCBSSFEFTPOTFTUFMMFSFMJÏFËVOFTPVSDFBVEJPFODPVSTEFMFDUVSFBVEJPQBSMFCJBJTEFTBTPSUJF
t-BCBSSFEFTPOTFTUFMMFSÏHMÏFËMBTPVSDFEFOUSÏFDPSSFDUF
t-BCBSSFEFTPOTFUMFTVCXPPGFSSFÎPJWFOUJMTMBMJNFOUBUJPOÏMFDUSJRVFFUTPOUJMTBMMVNÏT
t"VHNFOUFSMFWPMVNFEFMBCBSSFEFTPOT57FF
t"VHNFOUFSMFWPMVNFEVUÏMÏWJTFVSPVEVEÏDPEFVSEFDÉCMFDPOOFDUÏBWFDMF57FF
t7ÏSJmFSMÏUBUEFMBGPODUJPO.VUFoMFBouton Mute DMJHOPUFUJMFOSPVHF "QQVZFSTVSMFBouton Mute sur la
barre des sons.
t
1PVSMFTUÏMÏWJTFVSTOVNÏSJRVFTPVEBVUSFTTPVSDFTOVNÏSJRVFTTBTTVSFSRVFMFGPSNBUEFTPSUJFFTUSÏHMÏTVS
j%PMCZ%JHJUBMx7PJSMFNFOVEFSÏHMBHFEVQSPEVJUTPVSDF
t1PVSMFTTPVSDFTOVNÏSJRVFTTBTTVSFSRVFMFDÉCMFPQUJRVFOFTUQBTQMJÏPVDBTTÏ$FMBBSSÐUFMFTJHOBM
OVNÏSJRVFPQUJRVF
Aucun son ne sort du subwoofer.
t7ÏSJmFSMFTQPJOUTEBOTMBTFDUJPOj-BCBSSFEFTPOTOFTBMMVNFQBTxDJEFTTVT
t5PVSOFSMBDPNNBOEFEFWPMVNFFOMBVHNFOUBOU
t%ÏQMBDFSMFTVCXPPGFSQMVTQSÐUEFMBCBSSFEFTPOT
t7ÏSJmFSMIndicateur d’étatQPVSTBTTVSFSRVFMFUÏNPJOFTUWFSUFODPOUJOV
Le son est déformé par la barre de sons.
t$IBOHFSMFSÏHMBHFEFMJOUFSSVQUFVSEF/JWFBVEF4FOTJCJMJUÏ5SJN-FWFMËVOOVNÏSPJOGÏSJFVSTFVMFNFOUMFOUSÏF"VY
t7ÏSJmFSMBTPVSDFEVTJHOBMQPVSÐUSFTßSRVFMBEJTUPSTJPOOFQSPWJFOUQBTEVTPOEPSJHJOF
t#BJTTFSMFWPMVNFEFMBTPVSDFKVTRVËDFRVFMBEJTUPSTJPOEJTQBSBJTTF
Les basses ne sont pas assez fortes.
t5PVSOFSMBDPNNBOEFEFWPMVNFEVTVCXPPGFSFOMBVHNFOUBOU
t1MBDFSMFTVCXPPGFSQMVTQSPDIFEVODPJOEFMBQJÒDF
t$FSUBJOTUÏMÏWJTFVSTFUEÏDPEFVSTDÉCMFPOUVONPEFRVJMJNJUFMFTCBTTFT7ÏSJmFSQBSMFNFOVEFDPOmHVSBUJPOEV
QSPEVJUBVEJPFUSÏHMFSMFNPEFBVEJPËjMBSHFxQMVUÙURVBjOPSNBMxPVjÏUSPJUx
TVee n’apprend pas mes commandes de la commande à distance.
t4VJWSFBUUFOUJWFNFOUMFTJOTUSVDUJPOTEFQSPHSBNNBUJPO
t5FOJSEFNBOJÒSFTUBCMFMBDPNNBOEFËEJTUBODFËDNEFMBWBOUEFMBCBSSFEFTPOT
t"QQVZFSQVJTSFMÉDIFSMFTUPVDIFTEFMBUÏMÏDPNNBOEFlentement!
t7ÏSJmFSMFTQJMFTEFMBUÏMÏDPNNBOEF
Remarque : 57FFBQQSFOEQSFTRVFUPVUFTMFTDPNNBOEFTJOGSBSPVHFTNBJTDFSUBJOTQSPUPDPMFTJOGSBSPVHFTQFVWFOU
ne pas être programmés.
Le volume des haut-parleurs de la télévision s’entendent plus fort que mon système TVee au l du temps.
t-PSTRVFMFCPVUPOEVWPMVNFEFMBUÏMÏDPNNBOEFFTUNBJOUFOVFOGPODÏWPUSFUÏMÏWJTFVSQFVUDIBOHFSMFTOJWFBVYEF
WPMVNFQMVTSBQJEFNFOURVF57FF
t6UJMJTFSMFTCPVUPOTEFMBCBSSFEFTPOTQPVSSÏHMFSMFWPMVNFEV57FFËVOKVTUFÏRVJMJCSFBWFDMFTIBVUQBSMFVSTEFMB
télévision.
t4JQPTTJCMFVUJMJTFSMFNFOVEFSÏHMBHFEFMBUÏMÏWJTJPOQPVSDPVQFSMFTQSPQSFTIBVUQBSMFVSTEVUÏMÏWJTFVS
Le subwoofer semble avoir d’interférence avec son signal sans l.
t-FTVCXPPGFSQFVUÐUSFUSPQMPJOEFMBCBSSFEFTPOTQPVSPCUFOJSVOCPOTJHOBM&TTBZFSFOMFEÏQMBÎBOUQMVTQSÒT
142-004203-2_Owners_Manual_TVee26_fini_English_Links.indd 27 6/25/12 6:47 PM

Garantie limitée
#PTUPO"DPVTUJDTHBSBOUJUËMBDIFUFVSEPSJHJOFRVFMFTQJÒDFTNÏDBOJRVFTEVTZTUÒNF57FFOFDPNQPSUFOUBVDVOEÏGBVU
EFQJÒDFFUNBJOEVWSFQFOEBOUVOFQÏSJPEFEFBOTËQBSUJSEFMBEBUFEBDIBU-BQÏSJPEFEFHBSBOUJFEFTDPNQPTBOUT
ÏMFDUSJRVFTEV57FFFTUEFBO
7PUSFSFTQPOTBCJMJUÏDPOTJTUFËJOTUBMMFSFUËVUJMJTFSMFTBQQBSFJMTTFMPOMFTJOTUSVDUJPOTGPVSOJFTËBTTVSFSVOUSBOTQPSUTÏDVSJTÏWFST
VOSFQSÏTFOUBOUEFTFSWJDFBHSÏÏEF#PTUPO"DPVTUJDTFUËQSÏTFOUFSVOFQSFVWFEBDIBUTPVTMBGPSNFEVOUJDLFUEFDBJTTFFO
DBTEFEFNBOEFEFTFSWJDFBQSÒTWFOUF
-FTEPNNBHFTSÏTVMUBOUEVOFVUJMJTBUJPOBCVTJWFPVFSSPOÏFEVOFJOTUBMMBUJPOJODPSSFDUFEVOBDDJEFOUEVOFFYQÏEJUJPO
JOBEBQUÏFPVEFSÏQBSBUJPOTNPEJmDBUJPOTQBSVOFQFSTPOOFBVUSFRVVOSFQSÏTFOUBOUEFTFSWJDFBHSÏÏEF#PTUPO"DPVTUJDT
TPOUFYDMVTEFDFUUFHBSBOUJF
-BQSÏTFOUFHBSBOUJFFTUSÏTFSWÏFBVQSPEVJUEF#PTUPO"DPVTUJDTFUOFDPVWSFQBTMFTEPNNBHFTEVORVFMDPORVFÏRVJQF-
NFOUBTTPDJÏ$FUUFHBSBOUJFOFDPVWSFQBTMFDPßUEFMFOMÒWFNFOUPVEFMBSÏJOTUBMMBUJPO-BQSÏTFOUFHBSBOUJFFTUBOOVMÏF
TJMFOVNÏSPEFTÏSJFBÏUÏFOMFWÏPVSFOEVJMMJTJCMF$FUUFHBSBOUJFWPVTBDDPSEFEFTESPJUTMÏHBVYTQÏDJmRVFT7PVTQPVWF[
EJTQPTFSEFESPJUTDPNQMÏNFOUBJSFTRVJEJõÒSFOUEVO²UBUËMBVUSF
Demande de service après-vente
²UBUT6OJT
7FVJMMF[DPOUBDUFSFOQSFNJFSMJFVMFSFWFOEFVSBVQSÒTEVRVFMWPVTBWF[BDIFUÏDFQSPEVJU4JDFMBOFTUQBTQPTTJCMFFOWPZFSVO
FNBJMËTVQQPSU!CPTUPOBDPNPVÏDSJSFË
#PTUPO"DPVTUJDT*OD
$PSQPSBUF%SJWF
.BIXBI/+64"
$BOBEB
7FVJMMF[DPOUBDUFSFOQSFNJFSMJFVMFSFWFOEFVSBVQSÒTEVRVFMWPVTBWF[BDIFUÏDFQSPEVJU4JDFMBOFTUQBTQPTTJCMFFOWPZFSVO
FNBJMËTVQQPSU!ENDBOBEBDBPVÏDSJSFË
%.$BOBEB
"QQMF$SFFL#MWE
.BSLIBN0/-3#
Tous les autres pays
$POUBDUFSMFSFWFOEFVSBVQSÒTEVRVFMWPVTBWF[BDIFUÏMFQSPEVJUPVDPOUBDUFSWPUSFEJTUSJCVUFVSMPDBM
1PVSQMVTEJOGPSNBUJPOTWFVJMMF[WJTJUFSCPTUPOBDPVTUJDTDPNTVQQPSU
-BQSÏTFODFEFDFTZNCPMFTVSMFQSPEVJUJOEJRVFRVFDFEFSOJFSOFQFVUQBTÐUSFKFUÏEBOTMFTPSEVSFT
NÏOBHÒSFT7PVTEFWF[MFEÏQPTFSEBOTVOFJOTUBMMBUJPOEFDPMMFDUFTÏQBSÏFEFTUJOÏFBVYEÏDIFUTÏMFDUSP-
OJRVFTPVMFSFUPVSOFSDIF[VOSFWFOEFVSMPSTEFMBDIBUEVOQSPEVJUTJNJMBJSF-FGBCSJDBOUBQBZÏQPVSMF
SFDZDMBHFEFDFQSPEVJU"JOTJWPVTDPOUSJCVF[ËMBSÏVUJMJTBUJPOFUBVSFDZDMBHFWPVTNJOJNJTF[MFTFõFUT
OÏGBTUFTTVSMFOWJSPOOFNFOUFUMBTBOUÏFUWPVTÏWJUF[EFTBNFOEFTQPVSVOFNJTFBVSFCVUJODPSSFDUF
142-004203-2_Owners_Manual_TVee26_fini_English_Links.indd 28 6/25/12 6:47 PM