Boston Scientific CRM2920A05 Model 2920 & Model 2901 User Manual
Boston Scientific Corporation Model 2920 & Model 2901
Contents
- 1. User Manual
- 2. User Manual update
User Manual
Operator’s Manual
ZOOM™
Programming
System
Model 2920 PRM
RESTRICTED DEVICE: Federal law (USA) restricts
the sale, distribution, or use of this device to, by, or
on the lawful order of a physician.
Blank Page
CONTENTS
DESCRIPTION AND USE . . . . . . . . . . . . . . . . . . . . . . . . . . . . 1
Intended Use . . . . . . . . . . . . . . . . . . . . . . . . . . . . . . . . . . . 1
Contraindications . . . . . . . . . . . . . . . . . . . . . . . . . . . . . . . . 1
Precautions . . . . . . . . . . . . . . . . . . . . . . . . . . . . . . . . . . . . . 1
Adverse Effects . . . . . . . . . . . . . . . . . . . . . . . . . . . . . . . . . 2
SYSTEM FEATURES . . . . . . . . . . . . . . . . . . . . . . . . . . . . . . . . 2
System Accessories . . . . . . . . . . . . . . . . . . . . . . . . . . . . . . 3
Optional External Printer . . . . . . . . . . . . . . . . . . . . . . . . . . 3
Optional External Monitor . . . . . . . . . . . . . . . . . . . . . . . . . . 4
PREPARATION FOR USE . . . . . . . . . . . . . . . . . . . . . . . . . . . . 4
USING THE PRM . . . . . . . . . . . . . . . . . . . . . . . . . . . . . . . . . . . 6
Key Functions . . . . . . . . . . . . . . . . . . . . . . . . . . . . . . . . . . . 7
Paper Speed Keys . . . . . . . . . . . . . . . . . . . . . . . . . . . . . . . 8
Monitoring/Recording Functions . . . . . . . . . . . . . . . . . . . . . 8
Touchscreen . . . . . . . . . . . . . . . . . . . . . . . . . . . . . . . . . . . . 9
Indicators . . . . . . . . . . . . . . . . . . . . . . . . . . . . . . . . . . . . . . 9
MAINTENANCE AND HANDLING . . . . . . . . . . . . . . . . . . . . . . 9
Loading the Paper . . . . . . . . . . . . . . . . . . . . . . . . . . . . . . . 9
Thermal Paper Storage . . . . . . . . . . . . . . . . . . . . . . . . . . 10
Cleaning the PRM . . . . . . . . . . . . . . . . . . . . . . . . . . . . . . 10
Patient Data Disk . . . . . . . . . . . . . . . . . . . . . . . . . . . . . . . 11
Operating and Storage Conditions . . . . . . . . . . . . . . . . . . 12
PRM Storage . . . . . . . . . . . . . . . . . . . . . . . . . . . . . . . . . . 13
TROUBLESHOOTING . . . . . . . . . . . . . . . . . . . . . . . . . . . . . . 14
LABEL SYMBOLS . . . . . . . . . . . . . . . . . . . . . . . . . . . . . . . . . 16
WARRANTY INFORMATION . . . . . . . . . . . . . . . . . . . . . . . . . 17
ORDERING ACCESSORIES . . . . . . . . . . . . . . . . . . . . . . . . . 17
SERVICE . . . . . . . . . . . . . . . . . . . . . . . . . . . . . . . . . . . . . . . . 17
SPECIFICATIONS (Nominal) . . . . . . . . . . . . . . . . . . . . . . . . . 18
1
DESCRIPTION AND USE
The ZOOM Programming System, which includes the Model 2920 Pro-
grammer/Recorder/Monitor (PRM), is a portable cardiac rhythm manage-
ment system designed to be used with certain models of Guidant implant-
able pulse generators.
Refer to the Guidant physician’s system manual for the pulse generator
being interrogated for instructions on programming the pulse generator.
Intended Use
The Model 2920 PRM is intended to be used as a complete system to
communicate with Guidant implantable pulse generators.
The software in use controls all communication functions for the pulse
generator. Refer to the physician’s system manual for the pulse generator
being interrogated for detailed software application instructions.
Contraindications
See the physician’s system manual for the Guidant pulse generator for
contraindications for use.
The Model 2920 PRM is contraindicated for use with any pulse generator
other than a Guidant device.
Precautions
General
• Use only the appropriate Guidant programmers equipped with the ap-
propriate software to program Guidant pulse generators.
• The Model 2920 PRM is designed to be used only with the
Model 6577 Sterilizable Telemetry Wand. Do not use the Model 6575
Telemetry Wand with the Model 2920 PRM.
• Use only the supplied stylus with the Model 2920 PRM; the use of any
other object could damage the touchscreen.
NOTE: Use of the stylus is recommended for accuracy; however, touch-
ing the screen with your finger will also activate a selection.
Preparation for Use
•Remove the telemetry wand from all packaging material before steril-
ization with steam.
•Avoid establishing telemetry communication between the PRM and
the pulse generator when the PRM is in close proximity to monitors,
high-frequency electrosurgical equipment, and strong magnetic fields,
such as MRI devices. The telemetry link may be impaired and, in the
case of MRI, may interfere with the PRM.
Maintenance and Handling
•Do not use an abrasive cloth or volatile solvents to clean any portion
of the PRM.
2
•Keep disks away from magnets and magnetized objects, including
telephones, power supply adapters, and monitors.
•Do not use a head cleaning kit intended for standard disk drives on
this disk drive.
•The PRM is not waterproof or explosion proof. It should not be used
in the presence of flammable gas mixtures including anesthetic mix-
ture with air, oxygen, or nitrous oxide.
Adverse Effects
None known.
SYSTEM FEATURES
The PRM communicates with Guidant pulse generators via
radio-frequency (RF) telemetry using the Guidant Model 6577 Sterilizable
Telemetry Wand to perform the following functions:
•Interrogates the programmable pulse generator
•Programs detection and therapy parameters for an implantable
Guidant pulse generator
•Displays, records, and stores patient data and allows the physician to
evaluate alternative prescription modes
•Stores patient data that can be recalled later in the patient session for
analysis
•Patient data can be stored on a disk that can be accessed at future
sessions
•Generates printed reports that detail pulse generator functions, stored
patient data, and test results
•Allows the physician to perform tests in an electrophysiology (EP) lab-
oratory, operating room, emergency room, or at a patient’s bedside
In addition, the PRM has the following capabilities:
•Provides a direct interface between an external stimulator and an im-
planted Guidant pulse generator for programmed electrical stimula-
tion (PES) during EP studies
•Provides use without device telemetry as an ECG display and record-
er for patient diagnosis
•Simultaneously prints real-time surface ECG and telemetered signals
(intracardiac electrograms and event markers) via the internal printer/
recorder
The PRM is equipped with the following features:
•PRM function keys including PROGRAM, STAT PACE, STAT
SHOCK, and DIVERT THERAPY
•Printer/recorder function keys including paper speed keys, calibrate,
zero to baseline, and paper feed
•Touchscreen with tethered stylus
3
•Color display screen
•One LS 120 disk drive
•Internal hard drive
•High-speed 4-inch (110 cm) thermal printer/recorder
•Connections for slaved stimulation via an external signal source
•Connection to record data on an external FM tape recorder or strip
chart recorder or both
•Connection for an optional external printer.
System Accessories
The ZOOM programming system consists of the Model 2920 PRM and
the following accessories:
•Model 2902 AC Power Cord
•Model 6577 Sterilizable Telemetry Wand
•Model 6627 Patient Data Disks (10)
•Model 6750 Surface ECG Patient Cable
•Model 6979 Printer Paper (4)
Other accessories for use with the PRM that can be ordered from Guidant
include the following:
•Model 6809 Accessory Kit
•Model 6892 Controller-Stimulator Cable
•Model 6750 Surface ECG Patient Cable
•Model 6924 External Recorder Cable
•Model 6629 ECG-BNC Slave Cable
•Model 6930 Stimulation Input Cable Adapters
•Model 6934 Phono-BNC Adapters
•Model 6977 VGA Extension Cable
NOTE: Accessories should comply with the equivalent safety require-
ments
of the PRM. The PRM complies with those standards listed in “Op-
erating and Storage Conditions.”
Optional External Printer
The use of an external printer is optional. Only compatible external print-
ers that have been tested and qualified for use should be used with the
Model 2920 PRM. Contact your Guidant sales representative to deter-
mine which printer(s) can be used.
Although the external printer meets leakage-current requirements for
commercial products, it may not meet the leakage requirements for med-
ical products. Consequently, the external printer must be kept outside the
patient environment (at least 1.5 meters away from the patient).

4
Optional External Monitor
The use of an external monitor is optional. Contact your Guidant sales
representative to determine which monitor(s) can be used.
Although the external monitor meets leakage-current requirements for
commercial products, it may not meet the leakage requirements for med-
ical products.
PREPARATION FOR USE
1. Set Up the System
Place the PRM on a steady surface. Slide the screen latches to the front
and raise the screen. Tilt it to a comfortable viewing angle.
2. Turn the Power On
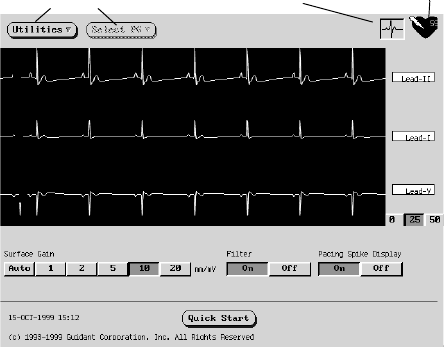
a. Connect the power cord into the AC connector on the back panel
(Figure 3).
b. Plug the power cord into the appropriate AC outlet.
c. Move the power switch to the ON ( I ) position (Figure 1).
d. Monitor the PRM screen during power-up for status messages.
Figure 1. Left side panel of the PRM.
3. Prepare the Telemetry Wand
If the telemetry wand is to be used in a sterile field when using the PRM,
it first must be sterilized with ethylene oxide or steam. To sterilize, follow
the instructions in the product literature for the wand.
CAUTION: Remove the telemetry wand from all packaging material be-
fore sterilization.
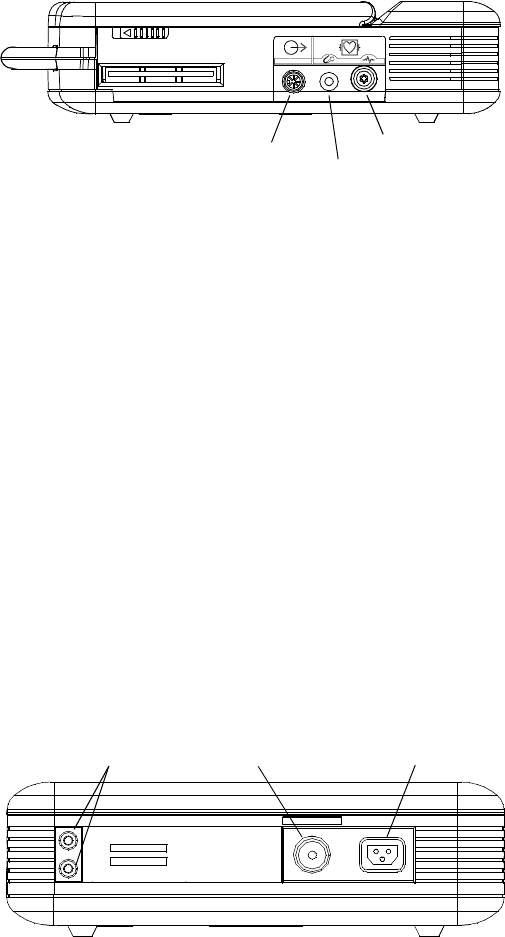
Plug the telemetry wand into the connector on the right side of the PRM
(Figure 2).
Power Switch Latch
External Printer Connection
External VGA Monitor Connection
5
Figure 2. Right side panel of the PRM.
CAUTION: Avoid establishing telemetry communication between the
PRM and the pulse generator when the PRM is in close proximity to
monitors, high-frequency electrosurgical equipment, and strong
magnetic fields, such as MRI devices. The telemetry link may be im-
paired and, in the case of MRI, may interfere with the PRM.
4. Make External Cable Connections
a. Connect the Model 6750 Surface ECG Patient Cable to the “ECG”
connector on the right side of the PRM (Figure 2). This patient
connection is electrically isolated. Attach the surface electrodes to
the patient in a standard 3-wire or 5-wire configuration.
NOTE: If the PRM is in close proximity to high-frequency electrosurgical
equipment, the surface ECG traces may exhibit noise interference. Refer
to the troubleshooting section for corrective action.
b. Connect the Model 6924 External Recorder Cable to the analog
output channel on the right side of the PRM (Figure 2). Connect
the other end to the multichannel recorder or external strip chart
recorder. The Model 2920 PRM has high-level analog outputs.
c. Connect the Model 6892 Controller-Stimulator Cable to the pacing
stimulation source connector marked Stimulator Input (Figure 3)
on the rear panel, and then into the corresponding terminal on the
electrical stimulation source.
Figure 3. Rear panel of the PRM.
ECG Connector
Telemetry Wand Connector
Analog Output Channel
Stimulator Inputs Grounding Connector AC Connector
6
d. (Optional) Connect the external printer to the PRM using the par-
allel cable provided with the printer (Figure 1). The external printer
must be connected and activated to allow external reports to be
printed.
e. (Optional) Connect the external monitor to the PRM using a stan-
dard VGA cable (Figure 1). The Model 6977 VGA Extension Cable
is available from Guidant as an accessory.
USING THE PRM
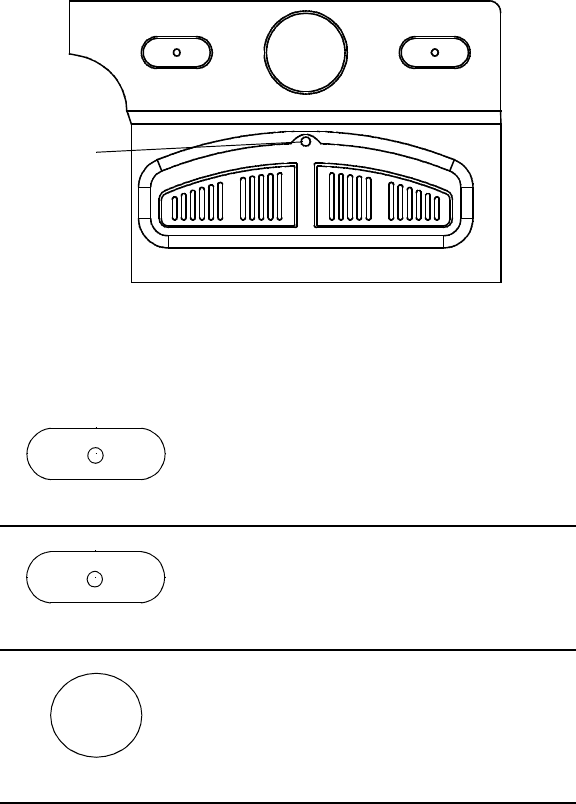
The PRM can be used as an ECG display and/or recorder without running
a specific application. Connect the patient leads and start the recorder by
selecting the ECG button on the upper right corner of the startup screen
(Figure 4). The heart-rate indicator will display the intrinsic ventricular rate
as the trace runs.
Figure 4. The ECG screen as accessed from the Startup screen.
Menu buttons ECG button Heart-rate indicator
7
Key Functions
Refer to the applicable physician’s system manual for specific instructions
on operating the PRM key functions, use of the STAT SHOCK, STAT
PACE, DIVERT THERAPY, INTERROGATE, and PROGRAM keys, and
how to use the telemetry wand.
Figure 5. Model 2920 PRM keypad.
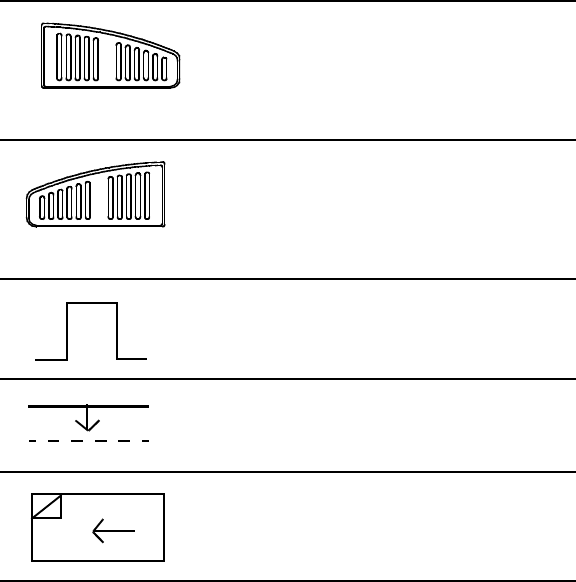
Figure 5 shows the location of the PRM keys. General key functions are
summarized below.
Press STAT SHOCK when in telemetry
communication with an automatic implantable
cardioverter defibrillator to program predetermined
high-energy parameters for emergency shock
delivery.
Press STAT PACE when in telemetry communication
with the pulse generator to program predetermined
parameters for emergency bradycardia pacing
Press DIVERT THERAPY when in telemetry
communication with an automatic implantable
cardioverter defibrillator to divert tachycardia therapy
delivery.
STAT PACE STAT SHOCK
DIVERT THERAPY
PROGRAM INTERROGATE
Telemetry
Indicator
Light
STAT SHOCK
STAT PACE
DIVERT THERAPY
8
Paper Speed Keys
Use the speed keys to specify the paper speed for the internal printer/re-
corder. Values are 0 (stop), 10, 25, 50, and 100 mm/sec.
The printout will show the date and time, lead(s) being printed, gain set-
ting, chart speed, and filter setting.
Monitoring/Recording Functions
Surface ECG
Pressing any speed key will run a surface ECG if the surface ECG patient
cable is connected to the PRM and electrodes are attached to the patient
(unless a report is being printed). Refer to Step 4 “Make External Cable
Connections” for detailed instructions.
Telemetered Channels
Intracardiac electrograms may be printed or displayed and event markers
may be printed by the PRM. Refer to the physician’s system manual for
detailed instructions.
Press INTERROGATE when in telemetry
communication with the pulse generator to obtain
information stored in the pulse generator’s memory.
Press PROGRAM when in telemetry communication
with the pulse generator to transmit new parameter
values to the pulse generator.
Press this key to cause the internal printer/recorder
to print a 1-mV calibration pulse.
Press this key to force the trace back to baseline
after a defibrillation shock.
Press the paper feed key to scroll the printer paper
on the internal printer/recorder.
INTERROGATE
PROGRAM
9
Touchscreen
Use the stylus to activate the desired selection by touching and releasing
the screen target. Touch the screen navigation buttons at the bottom of
the screen to move from one screen to another.
CAUTION: Use only the supplied stylus with the Model 2920 PRM; the
use of any other object could damage the touchscreen.
NOTE: Use of the stylus is recommended for accuracy; however, finger
touches will also work on the screen.
Indicators
Telemetry Indicator Light
The Telemetry Indicator Light on the keypad illuminates when telemetry
has been established and interrogation or programming is occurring (Fig-
ure 5).
Power On Indicator Light
The Power On Indicator Light, located below the screen, is lit when the
PRM is turned on.
MAINTENANCE AND HANDLING
Loading the Paper
The internal printer/recorder uses 4-inch wide (110 mm) thermosensitive
printing paper. Model 6979 Printer Paper refills can be ordered from
Guidant.
Use the following procedure to load paper into the internal printer/
recorder:
1. Open the printer door.
2. If any sheets from the previous pack remain, but did not feed, remove
these and rotate the roller with clean fingertips to remove any small
pieces of paper still under the printhead.
3. Unfold one sheet of paper and orient the pack such that the sensitive
side is up and the pagination mark is at the bottom of the paper. Slip
the pack into the printer/recorder.
NOTE: You must use paper with pagination markings. Paper will not
paginate properly if paper does not have markings.
4. Allow the unfolded sheet to lay straight between the guides on the
right of the printer/recorder.
5. Close the printer door completely. The printer/recorder will automati-
cally begin the paper-loading sequence and will stop at the first pag-
ination mark after paper is detected. If the paper’s edges are wrin-
10
kled, let 4 or 5 pages feed through-the printer will self-align the paper
to its proper position.
The printer/recorder is now ready to resume printing.
For information regarding loading paper into the optional external printer,
refer to the user manual for the printer.
Thermal Paper Storage
Store the heat-sensitive paper for the internal printer/recorder in a cool,
dark environment. Do not attempt to erase the printer/recorder paper.
Printed paper will last approximately 30 days under direct fluorescent
light. To ensure the permanence of the patient’s record, store the printed
paper away from direct sunlight, heat, or fumes from organic com-
pounds. Storage temperatures above 65°C, sustained exposure to direct
sunlight, or exposure to high humidity, acetone, ammonia, alcohols, or
other organic compounds may cause the paper to discolor.
NOTES:
•If printed reports are to be kept for prolonged periods, you must
make a photocopy of the thermosensitive paper as this paper is not
intended for long-term retention, and will lose legibility over time.
•Some brands of adhesive tape applied to a printed report will fade
the printing after 30 days.
Cleaning the PRM
Clean the housing and touchscreen of the PRM with a soft cloth lightly
dampened with water.
Clean the printer/recorder with a dry, soft brush to eliminate dust and par-
ticles that may accumulate during printing and storage.
CAUTION: Do not use an abrasive cloth or volatile solvents to clean any
portion of the PRM.
The cables used with the PRM are not packaged sterile
.
When neces-
sary, clean the cables with a soft cloth dampened with a mild cleaning so-
lution (eg, Liqui-nox for the sterilizable telemetry wand; Borax or a 1:10
bleach solution for other cables). Using the same method, wipe them
completely with sterile water and towel or air dry. DO NOT use an ultra-
sonic cleaner nor immerse the cables. Clean the sterilizable teleme-
try wand in the same manner, allowing no fluids to enter the wand
cavity. See the “Preparation for Use” section for sterilization in-
structions.
11
Patient Data Disk
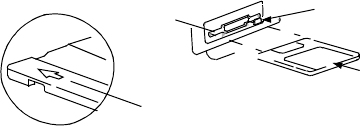
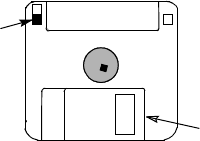
The Model 6627 Patient Data Disk must be inserted with the arrow on the
top left side and pointing into the disk drive (Figure 6). Be certain that the
write-protect tab is closed on the disk (Figure 7). Insert a patient data disk
firmly into the disk drive on the right side of the PRM until the disk ejection
button protrudes.
NOTE: Refer to the physician’s system manual for complete instructions
on using the patient data disk.
Figure 6. Disk drive on the right side of the PRM.
Caring for Disks
Floppy disks can be damaged easily, making them unusable. To prevent
damage to the disks, observe the following:
•Write on labels before applying them to disks.
•Use only a felt-tipped pen to write on a label that is already applied to
a disk.
•Keep food and beverages away from disks and away from the PRM.
•Keep disks away from heat or direct sunlight. Disks should be stored
at temperatures between 5° and 60°C (41°-140°F).
•Keep disks dry and stored in a dry area (relative humidity between 8%
and 80%).
•Do not bend disks.
•Do not attach paper clips, staples, or rubber bands to disks.
•Do not try to open the sliding shutter that covers the disks (Figure 7).
•Never touch the exposed disk area beneath the sliding shutter.
NOTE: The write-protect tab must be closed in order to record data to the
disk and to print reports. If data cannot be recorded to the disk, check to
see that the tab is positioned to cover the hole (Figure 7).
Arrow on top and pointing to
the disk drive
Disk Drive Disk Ejection Button
Patient Data Disk
12
Figure 7. Floppy disk (3.5-inch) with write-protect tab closed.
CAUTION: Keep disks away from magnets and magnetized objects, in-
cluding telephones, power supply adapters, and monitors.
NOTE: To remove a disk from the disk drive when the PRM is turned off
or if the disk ejection button doesn’t function, insert a straight metal wire
such as a straightened paper clip into the small hole next to the opening
for the disk.
Caring for the LS-120 Disk Drive
The Model 2920 PRM contains an LS-120 disk drive that can receive
standard DD or HD disks, or an LS-120 disk. The disk drive manufacturer
recommends the drive be cleaned after approximately every 80 hours of
disk operation using only an LS-120 head cleaning kit.
CAUTION: Do not use a head cleaning kit intended for standard disk
drives on this disk drive.
Operating and Storage Conditions
The Model 2920 PRM requires careful handling. The hard disk drive and
the LS-120 disk drive must be protected from abusive handling. To protect
the PRM from damage, observe the following:
•Do not turn off the PRM while the drive is accessing data.
•Do not subject the PRM to abusive shocks or vibrations.
•When transporting the PRM from a cold environment to a warm envi-
ronment, allow the PRM to warm to ambient temperature before use.
•Do not place heavy objects on the PRM surface when closed or when
in operation.
•Do not place a magnet on the PRM.
•Do not pour or splash liquid into or onto the PRM.
•Do not scratch, nick or push the touchscreen surface.
•Do not disassemble the PRM.
•Remove any disks from the drive prior to transporting the PRM.
•Turn off the PRM and close all covers and doors prior to transporting.
•Unplug all external cables and cords prior to transporting the PRM.
Write-protect tab closed
(black tab covering hole)
Sliding Shutter
13
Operate the PRM within a temperature range of 10° to 40°C. Store the
PRM at temperatures between -40° and 70°C, humidity of 10-100%, and
500-1060 hPa pressure. If the PRM has been stored in cold conditions
(less than 10°C), turn it on and let the fan run for at least one hour before
use.
The PRM is a Class III device that complies with the following standards:
•UL2601-1
•EN60601-1
•CSA-C22 No. 601-1-1
•CSA-C22 No. 601-1-2
•EN50097
•UL94
The PRM is capable of continuous operation, and will not shut off auto-
matically if not used for an extended time, or if paper runs out. Keep the
air intake and outlet free from obstruction.
CAUTION: The PRM is not waterproof or explosion proof. It should not
be used in the presence of flammable gas mixtures including anes-
thetic mixture with air, oxygen, or nitrous oxide.
PRM Storage
1. If using a patient data disk, remove disk from the disk drive by press-
ing the disk ejection button (Figure 6), and store the disk in a safe
place.
2. Turn the PRM switch to the OFF (O) position (Figure 1).
3. Unplug the cables from the back and side panels and other equip-
ment.
4. Lower the screen until the left and right latches lock in place.

14
TROUBLESHOOTING
If the PRM does not operate properly, be certain that electrical cords and
cables are securely connected, and that cords and cables are in good
working order (ie, free of visible defects). Table 1 indicates possible caus-
es and corrective action for PRM problems. For external printer problems,
refer to the manual for the external printer.
Table 1. Possible Causes and Corrective Actions for PRM Problems
Symptom Possible Cause Corrective Action
Internal printer/
recorder does
not function
No AC line voltage
Be certain power cord is
plugged securely into the rear
connector panel of the PRM.
Change to a different electrical
outlet.
Paper jam Clear paper path of any
obstruction.
Internal printer/
recorder-paper
feed problems
Paper
misaligned Reload paper.
Paper feed
obstruction
Clear obstruction from around
the paper supply.
Internal printer/
recorder-no print
visible
Paper loaded upside
down
Reload paper. (See the
“Loading the Paper” section.)
No analog
output
Using incorrect output
port and/or
connections
Recheck connection of the
Model 6924 External Recorder
Cable.
Patient data disk
error
Using disk created for a
previous model of PRM
or unformatted floppy
disk
Use only Guidant Model 6627
Patient Data Disks.
Write-protect tab open Close write-protect tab.
Noise problems-
ECG
Improper patient
connections
Recheck patient leads for
adequate skin contact and
correct limb lead placement.
“Noisy” equipment
Check surrounding area for
equipment with excessive radio
frequency emissions. Move
unneeded equipment away
from patient and/or PRM, or
power off unneeded
equipment.

15
Telemetry-No
communication
Incorrect application
software or incorrect
PRM for pulse
generator
Install proper application
software for pulse generator in
use.
Incomplete telemetry
communication
Reposition wand over the
device; repeat interrogation.
Te l e m e t r y -
Intermittent
communication
Incorrect telemetry
wand
Use only the Guidant Model
6577 Sterilizable Telemetry
Wand.
“Noisy” equipment
Check surrounding area for
equipment with excessive radio
frequency emissions. Move
unneeded equipment away
from patient and/or PRM, or
power off unneeded
equipment.
Incomplete telemetry
communication
Reposition wand over the
device, repeat interrogation.
Table 1. Possible Causes and Corrective Actions for PRM Problems
Symptom Possible Cause Corrective Action
16
LABEL SYMBOLS
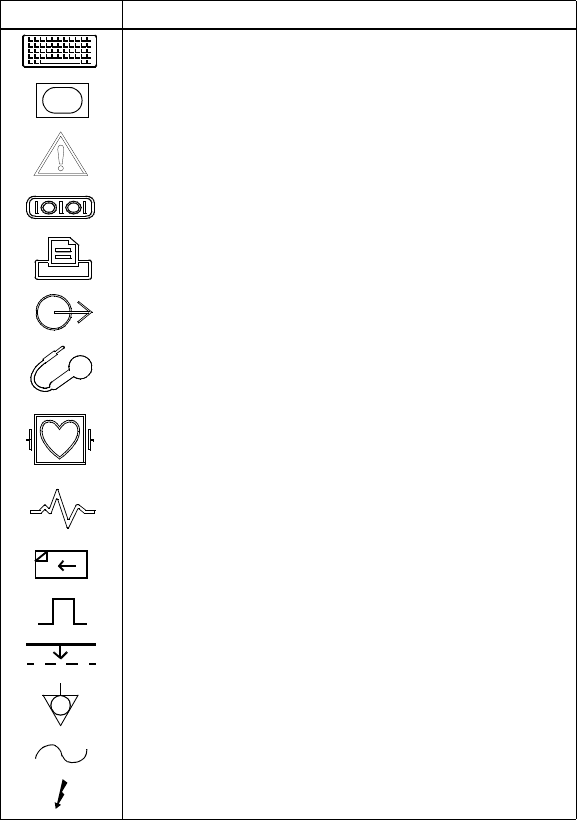
Table 2 illustrates the symbols used on the Model 2920 PRM and includes
an explanation of each symbol.
Table 2. Label Symbols and Their Meanings
Symbol Meaning
External keyboard connection (For Guidant use only)
VGA output for external monitor
See instruction manual
Serial connector (For Guidant use only.)
Parallel connector
Analog output
Telemetry wand input
Indicates defibrillator-proof CF-type patient
ECG cable connector
Paper form feed
Calibration pulse
Bring trace to baseline
Indicates the potential equalization conductor. This
connection allows a common ground with other equipment in
a clinical setting.
Alternating current
Indicates the risk of electric shock; do not remove the cover
(or back). Refer servicing to Guidant.
17
WARRANTY INFORMATION
A limited one-year warranty and a warranty registration card for the
Guidant PRM is packaged with the PRM. Unless otherwise agreed, the
PRM remains the property of Guidant and Guidant must perform all nec-
essary servicing and repair work.
ORDERING ACCESSORIES
To order accessories, contact the nearest Guidant sales representative or
contact Guidant Corporation at the address or phone number on the back
cover of this manual.
SERVICE
For problems or questions that arise regarding operation or repair of the
PRM, call the nearest Guidant representative or the Guidant 24-hour con-
sultation number at 1-800-CARDIAC (1-800-227-3422). The PRM must
be serviced by Guidant personnel only.
If the Guidant PRM malfunctions and requires repair, help to ensure effi-
cient service by following these guidelines:
1. Leave the configuration of the instrument exactly as it was at the
time of malfunction. Contact the nearest Guidant representative or
the 24-hour consultation number at 1-800-CARDIAC
(1-800-227-3422).
2. Write a detailed description of the malfunction(s).
3. Save printouts or other materials that illustrate the problem.
4. If the PRM must be returned to Guidant for service, pack it in the ship-
ping container in which it was received or in a shipping container pro-
vided by Guidant.
5. Send the PRM to Guidant at the address on the back of this manual.
For problems or questions that arise regarding operation or repair of the
optional external printer, contact the printer manufacturer or agent.

18
SPECIFICATIONS (Nominal)
Dimensions 15.4 in (38.7 cm) deep, 13.3 in (33.7 cm)
wide, 3.9 in (10.3 cm) high
Weight (approximate) 15.7 lb (7.1 kg)
Power rating 100-240 VAC, 2.6 A and 50-60 Hz
Power cord 8 ft. 120 VAC
Operating temperature 50°F to 105°F (10°C to 40°C)
Storage temperature -40°F to 160°F (-40°C to 70°C)
Relative humidity
• Storage 5-100%
• Operating 20-95%
Atmospheric pressure 500-1060 hPa
External printer support DB 25 parallel port connector
External monitor support DB 15 VGA port connector
Analog output + 1 V output via 7-pin DIN connector
ECG performance
• lead selection I, II, III, aVR, aVL, aVF, V
• intrinsic vent. rate display 30-240 bpm + 6 bpm
• input impedance > 2.5 M Ω
• electrode offset tolerance 300 mV
• storage resolution 800 samples/sec, 4.56 µV
• filter settings ON: 0.5-40 Hz, + 0.2 dB;
OFF: 0.05-100 Hz + 0.2 dB
• gain settings 1, 2, 5, 10, 20 mm/mV + 10%
Internal printer
• paper type thermo-sensitive
• paper width 4 in (110 mm)
• chart speed 10, 25, 50, 100 mm/sec
Safety features
• leakage current < 10 µA (patient); < 100 µA (chassis)
• defibrillator protection to 5000 V, 400 J
Blank Page

Guidant Corporation
Cardiac Rhythm Management
4100 Hamline Avenue North
St. Paul, MN 55112-5798 USA
24-Hour Consultation
1-800-CARDIAC (227-3422)
Worldwide: 651-582-4000
www.guidant.com
© 2000 Guidant Corporation.
All rights reserved. Printed USA. 355527-003 A 7/00