Boston Scientific CRMG17912 G168,G160,G166,G161,G164,D032,D030,D033,D031,D162,D160,D163,D161,G158,G150,G156,G151, G154,D022,D020,D023,D021,D152,D150,D153,D151,G148,G140,G146,G141,D012,D010,D013,D011, D142,D140,D143,D141,G058,G050,G056,G051,D001,D000,D003,D002,D052,D050,D053,D05 User Manual Updated 2

Boston Scientific Corporation G168,G160,G166,G161,G164,D032,D030,D033,D031,D162,D160,D163,D161,G158,G150,G156,G151, G154,D022,D020,D023,D021,D152,D150,D153,D151,G148,G140,G146,G141,D012,D010,D013,D011, D142,D140,D143,D141,G058,G050,G056,G051,D001,D000,D003,D002,D052,D050,D053,D05 Updated 2

Contents

Updated user manual 2

PHYSICIAN’S TECHNICAL MANUALDYNAGEN™EL ICD, DYNAGEN™MINI ICD,INOGEN™EL ICD, INOGEN™MINI ICD,ORIGEN™EL ICD, ORIGEN™MINI ICDIMPLANTABLE CARDIOVERTER DEFIBRILLATORModel D150, D151 , D152, D153, D020, D021, D022, D023, D140, D141, D142,D143, D010, D011, D012, D013, D050, D051, D052, D053, D000, D001, D002,D003CAUTION: Federal law (USA)restricts this device to sale byor on the order of a physiciantrained or experienced indevice implant and follow-upprocedures.
Table of ContentsAdditional Technical Information..................................................................................................... 1Device Description.......................................................................................................................... 1Related Information ........................................................................................................................ 3Intended Audience ................................................................................................................3Indications and Usage .................................................................................................................... 3Contraindications............................................................................................................................ 4Warnings ........................................................................................................................................ 4Precautions..................................................................................................................................... 6Supplemental Precautionary Information ..................................................................................... 17Post-Therapy Pulse Generator Follow Up .......................................................................... 17Transcutaneous Electrical Nerve Stimulation (TENS)......................................................... 18Electrocautery and Radio Frequency (RF) Ablation............................................................ 20Ionizing Radiation................................................................................................................ 21Elevated Pressures ............................................................................................................. 22Potential Adverse Events ............................................................................................................. 23Mechanical Specifications ............................................................................................................ 26Items Included in Package ........................................................................................................... 29Symbols on Packaging ................................................................................................................. 30Characteristics as Shipped........................................................................................................... 34X-Ray Identifier............................................................................................................................. 36Federal Communications Commission (FCC) .............................................................................. 37Pulse Generator Longevity........................................................................................................... 37Warranty Information .................................................................................................................... 42Product Reliability......................................................................................................................... 42Patient Counseling Information ....................................................................................................43Patient Handbook................................................................................................................ 44Lead Connections......................................................................................................................... 44
Implanting the Pulse Generator.................................................................................................... 47Step A: Check Equipment ................................................................................................ 47Step B: Interrogate and Check the Pulse Generator ........................................................ 48Step C: Implant the Lead System..................................................................................... 48Step D: Take Baseline Measurements ............................................................................. 49Step E: Form the Implantation Pocket.............................................................................. 51Step F: Connect the Leads to the Pulse Generator.......................................................... 53Step G: Evaluate Lead Signals......................................................................................... 56Step H: Program the Pulse Generator.............................................................................. 59Step I: Test for Ability to Convert Ventricular Fibrillation and Inducible Arrhythmias ........ 59Step J: Implant the Pulse Generator ................................................................................ 61Step K: Complete and Return the Implantation Form....................................................... 62Bidirectional Torque Wrench......................................................................................................... 63Follow Up Testing ......................................................................................................................... 65Predischarge Follow Up ...................................................................................................... 66Routine Follow Up............................................................................................................... 66Explantation.................................................................................................................................. 67
ADDITIONAL TECHNICAL INFORMATIONFor additional technical reference guides, go to www.bostonscientific.com/ifu.DEVICE DESCRIPTIONThis manual contains information about the DYNAGEN, INOGEN, and ORIGEN families of implantablecardioverter defibrillators (ICDs), which contains the following types of pulse generators (specific models arelisted in "Mechanical Specifications" on page 26):• VR—single-chamber ICD combining ventricular tachyarrhythmia therapy with ventricular pacing andsensing• DR—dual-chamber ICD combining ventricular tachyarrhythmia therapy with ventricular and atrial pacingand sensingNOTE: Specific features discussed in this manual may not apply to all models.TherapiesThese pulse generators have a small, thin, physiologic shape that minimizes pocket size and may minimizedevice migration. They provide a variety of therapies, including:• Ventricular tachyarrhythmia therapy, which is used to treat rhythms associated with sudden cardiacdeath (SCD) such as VT and VF• Bradycardia pacing, including adaptive rate pacing, to detect and treat bradyarrhythmias and to providecardiac rate support after defibrillation therapyCardioversion/defibrillation therapies include:• A range of low- and high-energy shocks using a biphasic waveform1
• The choice of multiple shock vectors:– Distal shock electrode to proximal shock electrode and pulse generator case (TRIAD electrodesystem)– Distal shock electrode to proximal shock electrode (RV Coil to RA Coil)– Distal shock electrode to pulse generator case (RV Coil to Can)LeadsThe pulse generator has independently programmable outputs and accepts one or more of the followingleads, depending on the model:•OneIS-11atrial lead• One DF-1/IS-12cardioversion/defibrillation lead• One DF4-LLHH or DF4-LLHO3multipolar connector cardioversion/defibrillation leadLeads with either a GDT-LLHH/LLHO or DF4-LLHH/LLHO label are equivalent and are compatible with adevice containing either a GDT-LLHH or DF4-LLHH port.The pulse generator and the leads constitute the implantable portion of the pulse generator system.PRM SystemThese pulse generators can be used only with the ZOOM LATITUDE Programming System, which is theexternal portion of the pulse generator system and includes:• Model 3120 Programmer/Recorder/Monitor (PRM)• Model 3140 ZOOM Wireless Transmitter1. IS-1 refers to the international standard ISO 5841-3:2000.2. DF-1 refers to the international standard ISO 11318:2002.3. DF4 refers to the international standard ISO 27186:2010.2
• Model 2868 ZOOMVIEW Software Application• Model 6577 Accessory Telemetry WandYou can use the PRM system to do the following:• Interrogate the pulse generator• Program the pulse generator to provide a variety of therapy options• Access the pulse generator’s diagnostic features• Perform noninvasive diagnostic testing• Access therapy history dataRELATED INFORMATIONRefer to the lead’s instruction manual for implant information, general warnings and precautions, indications,contraindications, and technical specifications. Read this material carefully for implant procedure instructionsspecific to the chosen lead configurations.Refer to the PRM system Operator’s Manual for specific information about the PRM such as setup,maintenance, and handling.This device is designed to be LATITUDE enabled; LATITUDE availability varies by region.Intended AudienceThis literature is intended for use by professionals trained or experienced in device implant and/or follow-upprocedures.INDICATIONS AND USAGEBoston Scientific implantable cardioverter defibrillators (ICDs) are intended to provide ventricular antitachycardiapacing (ATP) and ventricular defibrillation for automated treatment of life-threatening ventricular arrhythmias.3
CONTRAINDICATIONSThese Boston Scientific pulse generators are contraindicated for the following patients:• Patients whose ventricular tachyarrhythmias may have reversible cause, such as:– Digitalis intoxication– Electrolyte imbalance– Hypoxia– Sepsis• Patients whose ventricular tachyarrhythmias have a transient cause, such as:– Acute myocardial infarction (MI)– Electrocution–Drowning• Patients who have a unipolar pacemakerWARNINGSGeneral• Labeling knowledge. Read this manual thoroughly before implantation to avoid damage to the pulsegenerator and/or lead. Such damage can result in patient injury or death.• For single patient use only. Do not reuse, reprocess, or resterilize. Reuse, reprocessing, orresterilization may compromise the structural integrity of the device and/or lead to device failure which, inturn, may result in patient injury, illness, or death. Reuse, reprocessing, or resterilization may also createa risk of contamination of the device and/or cause patient infection or cross-infection, including, but notlimited to, the transmission of infectious disease(s) from one patient to another. Contamination of thedevice may lead to injury, illness, or death of the patient.4
• Backup defibrillation protection. Always have external defibrillation equipment available duringimplant and electrophysiologic testing. If not terminated in a timely fashion, an induced ventriculartachyarrhythmia can result in the patient’s death.• Resuscitation availability. Ensure that an external defibrillator and medical personnel skilled in CPR arepresent during post-implant device testing should the patient require external rescue.• Separate pulse generator. Do not use this pulse generator with another pulse generator. Thiscombination could cause pulse generator interaction, resulting in patient injury or a lack of therapy delivery.Handling• Avoid shock during handling. Program the pulse generator Tachy Mode(s) to Off during implant,explant, or postmortem procedures to avoid inadvertent high voltage shocks.• Do not kink leads. Do not kink, twist, or braid the lead with other leads as doing so could cause leadinsulation abrasion damage or conductor damage.• Handling the lead without Connector Tool. For leads that require the use of a Connector Tool, usecaution handling the lead terminal when the Connector Tool is not present on the lead. Do not directlycontact the lead terminal with any surgical instruments or electrical connections such as PSA (alligator)clips, ECG connections, forceps, hemostats, and clamps. This could damage the lead terminal, possiblycompromising the sealing integrity and result in loss of therapy or inappropriate therapy, such as ashort within the header.• Handling the terminal while tunneling. Do not contact any other portion of the DF4–LLHH orDF4–LLHO lead terminal, other than the terminal pin, even when the lead cap is in place.Programming and Device Operations• Atrial tracking modes. Do not use atrial tracking modes in patients with chronic refractory atrialtachyarrhythmias. Tracking of atrial arrhythmias could result in ventricular tachyarrhythmias.5
Post-Implant• Protected environments. Advise patients to seek medical guidance before entering environments thatcould adversely affect the operation of the active implantable medical device, including areas protectedby a warning notice that prevents entry by patients who have a pulse generator.• Magnetic Resonance Imaging (MRI) exposure. Do not expose a patient to MRI scanning. Strongmagnetic fields may damage the pulse generator and/or lead system, possibly resulting in injury toor death of the patient.•Diathermy.Do not subject a patient with an implanted pulse generator and/or lead to diathermy sincediathermy may cause fibrillation, burning of the myocardium, and irreversible damage to the pulsegenerator because of induced currents.• Ensure PTM is enabled. If desired, ensure that Patient Triggered Monitor is enabled prior to sendingthe patient home by confirming the Magnet Response is programmed to Store EGM. If the feature isinadvertently left in the Inhibit Therapy setting, the patient could potentially disable tachyarrhythmiadetection and therapy.• Magnet Response set to Inhibit Therapy. Once the Patient Triggered Monitor feature has beentriggered by the magnet and an EGM has been stored, or after 60 days have elapsed from the daythat Store EGM was enabled, the Magnet Response programming automatically will be set to InhibitTherapy. When this happens, the patient should not apply the magnet because tachyarrhythmia therapycould be inhibited.PRECAUTIONSClinical Considerations• Pacemaker-mediated tachycardia (PMT). Programming minimum PVARP less than retrograde V–Aconduction may increase the likelihood of a PMT.6
Sterilization and Storage• If package is damaged. The blister trays and contents are sterilized with ethylene oxide gas beforefinal packaging. When the pulse generator and/or lead is received, it is sterile provided the container isintact. If the packaging is wet, punctured, opened, or otherwise damaged, return the pulse generatorand/or lead to Boston Scientific.• If device is dropped. Do not implant a device which has been dropped while outside of its intact shelfpackage. Do not implant a device which has been dropped from a height of more than 24 inches (61 cm)while within its intact shelf package. Sterility, integrity and/or function cannot be guaranteed under theseconditions and the device should be returned to Boston Scientific for inspection.• Storage temperature and equilibration. Recommended storage temperatures are 0°C–50°C(32°F–122°F). Allow the device to reach a proper temperature before using telemetry communicationcapabilities, programming or implanting the device because temperature extremes may affect initialdevice function.•Devicestorage.Store the pulse generator in a clean area away from magnets, kits containing magnets,and sources of EMI to avoid device damage.•Usebydate.Implant the pulse generator and/or lead before or on the USE BY date on the packagelabel because this date reflects a validated shelf life. For example, if the date is January 1, do notimplant on or after January 2.Implantation• Expected benefits. Determine whether the expected device benefits provided by programmable optionsoutweigh the possibility of more rapid battery depletion.• Evaluate patient for surgery. There may be additional factors regarding the patient’s overall healthand medical condition that, while not related to device function or purpose, could render the patient apoor candidate for implantation of this system. Cardiac health advocacy groups may have publishedguidelines that may be helpful in conducting this evaluation.7
• Lead compatibility. Prior to implantation, confirm the lead-to-pulse generator compatibility. Usingincompatible leads and pulse generators can damage the connector and/or result in potential adverseconsequences, such as undersensing of cardiac activity or failure to deliver necessary therapy.• Telemetry wand. Make sure a sterile telemetry wand is available should loss of ZIP telemetry occur.Verify that the wand can easily be connected to the programmer and is within reach of the pulse generator.• Line-powered equipment. Exercise extreme caution if testing leads using line-powered equipmentbecause leakage current exceeding 10 µA can induce ventricular fibrillation. Ensure that any line-poweredequipment is within specifications.• Replacement device. Implanting a replacement device in a subcutaneous pocket that previously houseda larger device may result in pocket air entrapment, migration, erosion, or insufficient grounding betweenthe device and tissue. Irrigating the pocket with sterile saline solution decreases the possibility ofpocket air entrapment and insufficient grounding. Suturing the device in place reduces the possibility ofmigration and erosion.• Do not bend the lead near the lead-header interface. Insert the lead terminal straight into the leadport. Do not bend the lead near the lead-header interface. Improper insertion can cause insulationor connector damage.• Absence of a lead. The absence of a lead or plug in a lead port may affect device performance. If alead is not used, be sure to properly insert a plug in the unused port, and then tighten the setscrewonto the plug.8
• Electrode connections. Do not insert a lead into the pulse generator connector without taking thefollowing precautions to ensure proper lead insertion:• Insert the torque wrench into the preslit depression of the seal plug before inserting the lead into theport, to release any trapped fluid or air.• Visually verify that the setscrew is sufficiently retracted to allow insertion. Use the torque wrenchto loosen the setscrew if necessary.• Fully insert each lead into its lead port and then tighten the setscrew onto the terminal pin.•Defibrillation lead impedance. If total shocking lead impedance during implant is less than 20 ,verifythe proximal coil is not in contact with the pulse generator surface. A measurement of less than 20 isan indication of a short somewhere in the system. If repeated measurements show the total shockinglead impedance is less than 20 , the lead and/or pulse generator may need to be replaced.• Shunting energy. Do not allow any object that is electrically conductive to come into contact with thelead or device during induction because it may shunt energy, resulting in less energy getting to thepatient, and may damage the implanted system.• Do not suture directly over lead. Do not suture directly over the lead body, as this may cause structuraldamage. Use the suture sleeve to secure the lead proximal to the venous entry site to prevent leadmovement.Device Programming• Device communication. Use only the designated PRM and software application to communicatewith this pulse generator.• STAT PACE settings. When a pulse generator is programmed to STAT PACE settings, it will continue topace at the high-energy STAT PACE values if it is not reprogrammed. The use of STAT PACE parameterswill likely decrease device longevity.9
• Pacing and sensing margins. Consider lead maturation in your choice of Pacing Amplitude, pacingPulse Width, and Sensitivity settings.• An acute Pacing Threshold greater than 1.5 V or a chronic Pacing Threshold greater than 3 V canresult in loss of capture because thresholds may increase over time.• An R-Wave Amplitude less than 5 mV or a P-Wave Amplitude less than 2 mV can result inundersensing because the sensed amplitude may decrease after implantation.• Pacing Lead Impedance should be greater than the programmed Low Impedance Limit (between200 and 500 ) and less than the programmed High Impedance Limit (between 2000 and 3000 ).• Proper programming of the shock vector. If the shock vector is programmed to RVcoil>>RAcoil andthe lead does not have an RA coil, shocking will not occur.• Programming for supraventricular tachyarrhythmias (SVTs). Determine if the device andprogrammable options are appropriate for patients with SVTs because SVTs can initiate unwanteddevice therapy.• Adaptive-rate pacing. Rate Adaptive Pacing should be used with care in patients who are unable totolerate increased pacing rates.• Ventricular refractory periods (VRPs) in adaptive-rate pacing. Adaptive-rate pacing is not limited byrefractory periods. A long refractory period programmed in combination with a high MSR can result inasynchronous pacing during refractory periods since the combination can cause a very small sensingwindow or none at all. Use Dynamic AV Delay or Dynamic PVARP to optimize sensing windows. If youare entering a fixed AV Delay, consider the sensing outcomes.• Shock waveform polarity. For IS-1/DF-1 leads, never change the shock waveform polarity by physicallyswitching the lead anodes and cathodes in the pulse generator header—use the programmable Polarityfeature. Device damage or nonconversion of the arrhythmia post-operatively may result if the polarityis switched physically.10
• Tachy Mode to Off. To prevent inappropriate shocks, ensure that the pulse generator’s Tachy Mode isprogrammed to Off when not in use and before handling the device. For tachyarrhythmia detection andtherapy, verify that the Tachy Mode is programmed to Monitor + Therapy.• Atrial oversensing. Take care to ensure that artifacts from the ventricles are not present on the atrialchannel, or atrial oversensing may result. If ventricular artifacts are present in the atrial channel, theatrial lead may need to be repositioned to minimize its interaction.• ATR entry count. Exercise care when programming the Entry Count to low values in conjunction witha short ATR Duration. This combination allows mode switching with very few fast atrial beats. Forexample, if the Entry Count was programmed to 2 and the ATR Duration to 0, ATR mode switching couldoccur on 2 fast atrial intervals. In these instances, a short series of premature atrial events could causethe device to mode switch.• ATR exit count. Exercise care when programming the Exit Count to low values. For example, if theExit Count was programmed to 2, a few cycles of atrial undersensing could cause termination of modeswitching.• Proper programming without an atrial lead. If an atrial lead is not implanted (port is plugged instead),or an atrial lead is abandoned but remains connected to the header, device programming should beconsistent with the number and type of leads actually in use.• Sensing adjustment. Following any sensing range adjustment or any modification of the sensing lead,always verify appropriate sensing. Programming Sensitivity to the highest value (lowest sensitivity) mayresult in delayed detection or undersensing of cardiac activity. Likewise, programming to the lowest value(highest sensitivity) may result in oversensing of non-cardiac signals.• Patients hear tones coming from their devices. Patients should be advised to contact their physicianimmediately if they hear tones coming from their device.• Patient use of patient triggered monitor. Determine if the patient is capable of activating this featureprior to being given the magnet and prior to enabling Patient Triggered Monitor. Remind the patient toavoid strong magnetic fields so the feature is not inadvertently triggered.11
• Patient initiate stored EGM. Consider having the patient initiate a stored EGM at the time PatientTriggered Monitor is enabled to assist with patient education and feature validation. Verify the activationof the feature on the Arrhythmia Logbook screen.Environmental and Medical Therapy Hazards• Avoid electromagnetic interference (EMI). Advise patients to avoid sources of EMI because EMI maycause the pulse generator to deliver inappropriate therapy or inhibit appropriate therapy.Moving away from the source of the EMI or turning off the source usually allows the pulse generatorto return to normal operation.Examples of potential EMI sources are:• Electrical power sources, arc welding or resistance welding equipment, and robotic jacks• High voltage power distribution lines• Electrical smelting furnaces• Large RF transmitters such as radar• Radio transmitters, including those used to control toys• Electronic surveillance (antitheft) devices• An alternator on a car that is running• Medical treatments and diagnostic tests in which an electrical current is passed through the body,such as TENS, electrocautery, electrolysis/thermolysis, electrodiagnostic testing, electromyography,or nerve conduction studies• Any externally applied device that uses an automatic lead detection alarm system (e.g., an EKGmachine)12
• Wireless ECG. Wireless ECG is susceptible to RF interference, and may have an intermittent or lostsignal. If interference is present, especially during diagnostic testing, consider using a surface ECGinstead.Hospital and Medical Environments• Mechanical ventilators. During mechanical ventilation, respiration-based trending may be misleading;therefore, the Respiratory Sensor should be programmed to Off.• Conducted electrical current. Any medical equipment, treatment, therapy, or diagnostic test thatintroduces electrical current into the patient has the potential to interfere with pulse generator function.• External patient monitors (e.g., respiratory monitors, surface ECG monitors, hemodynamicmonitors) may interfere with the pulse generator’s impedance-based diagnostics (e.g., shocklead impedance measurements, Respiratory Rate trend). To resolve suspected interactions withRespiratory Sensor-based diagnostics, deactivate the pulse generator’s Respiratory Sensor byprogramming it to Off.• Medical therapies, treatments, and diagnostic tests that use conducted electrical current (e.g.,TENS, electrocautery, electrolysis/thermolysis, electrodiagnostic testing, electromyography, ornerve conduction studies) may interfere with or damage the pulse generator. Program the deviceto Electrocautery Protection Mode prior to the treatment, and monitor device performance duringthe treatment. After the treatment, verify pulse generator function ("Post-Therapy Pulse GeneratorFollow Up" on page 17).•Internaldefibrillation. Do not use internal defibrillation paddles or catheters unless the pulse generatoris disconnected from the leads because the leads may shunt energy. This could result in injury to thepatient and damage to the implanted system.13
• External defibrillation. Itcantakeupto15secondsforsensingto recover after an external shock isdelivered. In non-emergency situations, for pacemaker dependent patients, consider programming thepulse generator to an asynchronous pacing mode and programming the Respiratory Sensor to Off prior toperforming external cardioversion or defibrillation.Avoid placing a pad (or paddle) directly over any subcutaneous leads.External defibrillation or cardioversion can damage the pulse generator. To help prevent damage to thepulse generator, consider the following:• Avoid placing a pad (or paddle) directly over the pulse generator. Position the pads (or paddles)as far from the pulse generator as possible.• Position the pads (or paddles) in a posterior-anterior orientation when the device is implanted inthe right pectoral region or an anterior-apex orientation when the device is implanted in the leftpectoral region.• Set energy output of external defibrillation equipment as low as clinically acceptable.Following external cardioversion or defibrillation, verify pulse generator function ("Post-Therapy PulseGenerator Follow Up" on page 17).• Lithotripsy. Extracorporeal shock wave lithotripsy (ESWL) may cause electromagnetic interference withor damage to the pulse generator. If ESWL is medically necessary, consider the following to minimize thepotential for encountering interaction:• Focus the ESWL beam at least 15 cm (6 in) away from the pulse generator.• Depending on the pacing needs of the patient, program the Brady Mode to Off or anon-rate-responsive VVI mode.• Program the Tachy mode to Off to prevent inappropriate shocks.14
• Ultrasound energy. Therapeutic ultrasound (e.g., lithotripsy) energy may damage the pulse generator. Iftherapeutic ultrasound energy must be used, avoid focusing near the pulse generator site. Diagnosticultrasound (e.g., echocardiography) is not known to be harmful to the pulse generator.• Electrical interference. Electrical interference or “noise” from devices such as electrocautery andmonitoring equipment may interfere with establishing or maintaining telemetry for interrogating orprogramming the device. In the presence of such interference, move the programmer away fromelectrical devices, and ensure that the wand cord and cables are not crossing one another. If telemetry iscancelled as a result of interference, the device should be re-interrogated prior to evaluating informationfrom pulse generator memory.• Radio frequency (RF) interference. RF signals from devices that operate at frequencies near that ofthe pulse generator may interrupt ZIP telemetry while interrogating or programming the pulse generator.This RF interference can be reduced by increasing the distance between the interfering device andthe PRM and pulse generator.• Central line guidewire insertion. Use caution when inserting guidewires for placement of other typesof central venous catheter systems such as PIC lines or Hickman catheters in locations where pulsegenerator leads may be encountered. Insertion of such guidewires into veins containing leads couldresult in the leads being damaged or dislodged.Home and Occupational Environments• Home appliances. Home appliances that are in good working order and properly grounded do notusually produce enough EMI to interfere with pulse generator operation. There have been reports ofpulse generator disturbances caused by electric hand tools or electric razors used directly over thepulse generator implant site.15
• Magnetic fields. Advise patients that extended exposure to strong (greater than 10 gauss or 1 mTesla)magnetic fields may trigger the magnet feature. Examples of magnetic sources include:• Industrial transformers and motors• MRI scanners• Large stereo speakers• Telephone receivers if held within 1.27 cm (0.5 inches) of the pulse generator• Magnetic wands such as those used for airport security and in the Bingo game• Electronic Article Surveillance (EAS). Advise patients to avoid lingering near antitheft devices such asthose found in the entrances and exits of department stores and public libraries. Patients should walkthrough them at a normal pace because such devices may cause inappropriate pulse generator operation.• Cellular phones. Advise patients to hold cellular phones to the ear opposite the side of the implanteddevice. Patients should not carry a cellular phone that is turned on in a breast pocket or on a belt within15 cm (6 inches) of the implanted device since some cellular phones may cause the pulse generator todeliver inappropriate therapy or inhibit appropriate therapy.Follow-up Testing• Conversion testing. Successful VF or VT conversion during arrhythmia conversion testing is noassurance that conversion will occur post-operatively. Be aware that changes in the patient’s condition,drug regimen, and other factors may change the DFT, which may result in nonconversion of thearrhythmia post-operatively.• Pacing threshold testing. If the patient’s condition or drug regimen has changed or device parametershave been reprogrammed, consider performing a pacing threshold test to confirm adequate marginsfor pace capture.16
• Follow-up considerations for patients leaving the country. Pulse generator follow-up considerationsshould be made in advance for patients who plan to travel or relocate post-implant to a country other thanthe country in which their device was implanted. Regulatory approval status for devices and associatedprogrammer software configurations varies by country; certain countries may not have approval orcapability to follow specific products.Contact Boston Scientific, using the information on the back cover, for help in determining feasibility ofdevice follow-up in the patient’s destination country.Explant and Disposal• Incineration. Be sure that the pulse generator is removed before cremation. Cremation and incinerationtemperatures might cause the pulse generator to explode.• Device handling. Before explanting, cleaning, or shipping the device, complete the following actions toprevent unwanted shocks, overwriting of important therapy history data, and audible tones:• Program the pulse generator Tachy and Brady Modes to Off.• Program the Magnet Response feature to Off.• Program the Beep when Explant is Indicated feature to Off.• Program the Beep When Out-of-Range feature to OffClean and disinfect the device using standard biohazard handling techniques.SUPPLEMENTAL PRECAUTIONARY INFORMATIONPost-Therapy Pulse Generator Follow UpFollowing any surgery or medical procedure with the potential to affect pulse generator function, you shouldperform a thorough follow-up, which may include the following:• Interrogating the pulse generator with a programmer17
• Reviewing clinical events and fault codes• Reviewing the Arrhythmia Logbook, including stored electrograms (EGMs)• Reviewing real-time EGMs• Testing the leads (threshold, amplitude, and impedance)• Performing a manual capacitor re-formation• Reviewing respiratory sensor-based diagnostics• Verifying battery status• Programming any permanent brady parameter to a new value and then reprogramming it back to thedesired value• Programming the Tachy Mode to a new value and then reprogramming it back to the desired value• Saving all patient data• Verifying the appropriate final programming prior to allowing the patient to leave the clinicTranscutaneous Electrical Nerve Stimulation (TENS)CAUTION: TENS involves passing electrical current through the body, and may interfere with pulse generatorfunction. If TENS is medically necessary, evaluate the TENS therapy settings for compatibility with the pulsegenerator. The following guidelines may reduce the likelihood of interaction:• Place the TENS electrodes as close together and as far away from the pulse generator and leadsas possible.• Use the lowest clinically-appropriate TENS energy output.• Consider cardiac monitoring during TENS use, especially for pacemaker-dependent patients.18
Additional steps can be taken to help reduce interference during in-clinic use of TENS:• If interference is suspected during in-clinic use, turn off the TENS unit.• Do not change TENS settings until you have verified that the new settings do not interfere with pulsegenerator function.If TENS is medically necessary outside the clinical setting (at-home use), provide patients with the followinginstructions:• Do not change the TENS settings or electrode positions unless instructed to do so.• End each TENS session by turning off the unit before removing the electrodes.• If the patient receives a shock during TENS use, or if they experience symptoms of lightheadedness,dizziness, or loss of consciousness, they should turn off the TENS unit and contact their physician.Follow these steps to use the PRM to evaluate pulse generator function during TENS use:1. Program the pulse generator Tachy Mode to Monitor Only.2. Observe real-time EGMs at prescribed TENS output settings, noting when appropriate sensing orinterference occurs.NOTE: Patient triggered monitoring may be used as an additional method to confirm device function duringTENS use.3. When finished, turn off the TENS unit and reprogram the Tachy Mode to Monitor + Therapy.You should also perform a thorough follow-up evaluation of the pulse generator following TENS, to ensure thatdevice function has not been compromised ("Post-Therapy Pulse Generator Follow Up" on page 17).For additional information, contact Boston Scientific using the information on the back cover.19
Electrocautery and Radio Frequency (RF) AblationCAUTION: Electrocautery and RF ablation may induce ventricular arrhythmias and/or fibrillation, and maycause asynchronous pacing, inhibition of pacing, inappropriate shocks, and/or a reduction in pulse generatorpacing output possibly leading to loss of capture. RF ablation may also cause ventricular pacing up to the MTRand/or changes in pacing thresholds. Additionally, exercise caution when performing any other type of cardiacablation procedure in patients with implanted devices.If electrocautery or RF ablation is medically necessary, observe the following to minimize risk to the patientand device:• Depending on the pacing needs of the patient, program the Tachy Mode to Electrocautery ProtectionMode or Off.• Have temporary pacing and external defibrillation equipment available.• Avoid direct contact between the electrocautery equipment or ablation catheters and the pulse generatorand leads. RF ablation close to the lead electrode may damage the lead-tissue interface.• Keep the path of the electrical current as far away as possible from the pulse generator and leads.• If RF ablation and/or electrocautery is performed on tissue near the device or leads, monitor pre- andpost-measurements for sensing and pacing thresholds and impedances to determine the integrity andstability of the system.• For electrocautery, use a bipolar electrocautery system where possible and use short, intermittent, andirregular bursts at the lowest feasible energy levels.• RF ablation equipment may cause telemetry interference between the pulse generator and PRM. Ifdevice programming changes are necessary during an RF ablation procedure, turn off the RF ablationequipment before interrogation.When the procedure is finished, cancel the Electrocautery Protection Mode or program Tachy Mode to Monitor+ Therapy in order to reactivate the previously programmed therapy modes.20
Ionizing RadiationCAUTION: It is not possible to specify a safe radiation dosage or guarantee proper pulse generator functionfollowing exposure to ionizing radiation. Multiple factors collectively determine the impact of radiation therapyon an implanted pulse generator, including proximity of the pulse generator to the radiation beam, type andenergy level of the radiation beam, dose rate, total dose delivered over the life of the pulse generator, andshielding of the pulse generator. The impact of ionizing radiation will also vary from one pulse generator toanother and may range from no changes in function to a loss of pacing and defibrillation therapy.Sources of ionizing radiation vary significantly in their potential impact on an implanted pulse generator.Several therapeutic radiation sources are capable of interfering with or damaging an implanted pulse generator,including those used for the treatment of cancer, such as radioactive cobalt, linear accelerators, radioactiveseeds, and betatrons.Prior to a course of therapeutic radiation treatment, the patient’s radiation oncologist and cardiologist orelectrophysiologist should consider all patient management options, including increased follow-up and devicereplacement. Other considerations include:• Maximizing shielding of the pulse generator within the treatment field• Determining the appropriate level of patient monitoring during treatmentEvaluate pulse generator operation during and following the course of radiation treatment to exercise as muchdevice functionality as possible ("Post-Therapy Pulse Generator Follow Up" on page 17). The extent, timing,and frequency of this evaluation relative to the radiation therapy regimen are dependent upon current patienthealth, and therefore should be determined by the attending cardiologist or electrophysiologist.Many pulse generator diagnostics are performed automatically once per hour, so pulse generator evaluationshould not be concluded until pulse generator diagnostics have been updated and reviewed (at least one hourafter radiation exposure). The effects of radiation exposure on the implanted pulse generator may remainundetected until some time following exposure. For this reason, continue to monitor pulse generator functionclosely and use caution when programming a feature in the weeks or months following radiation therapy.21
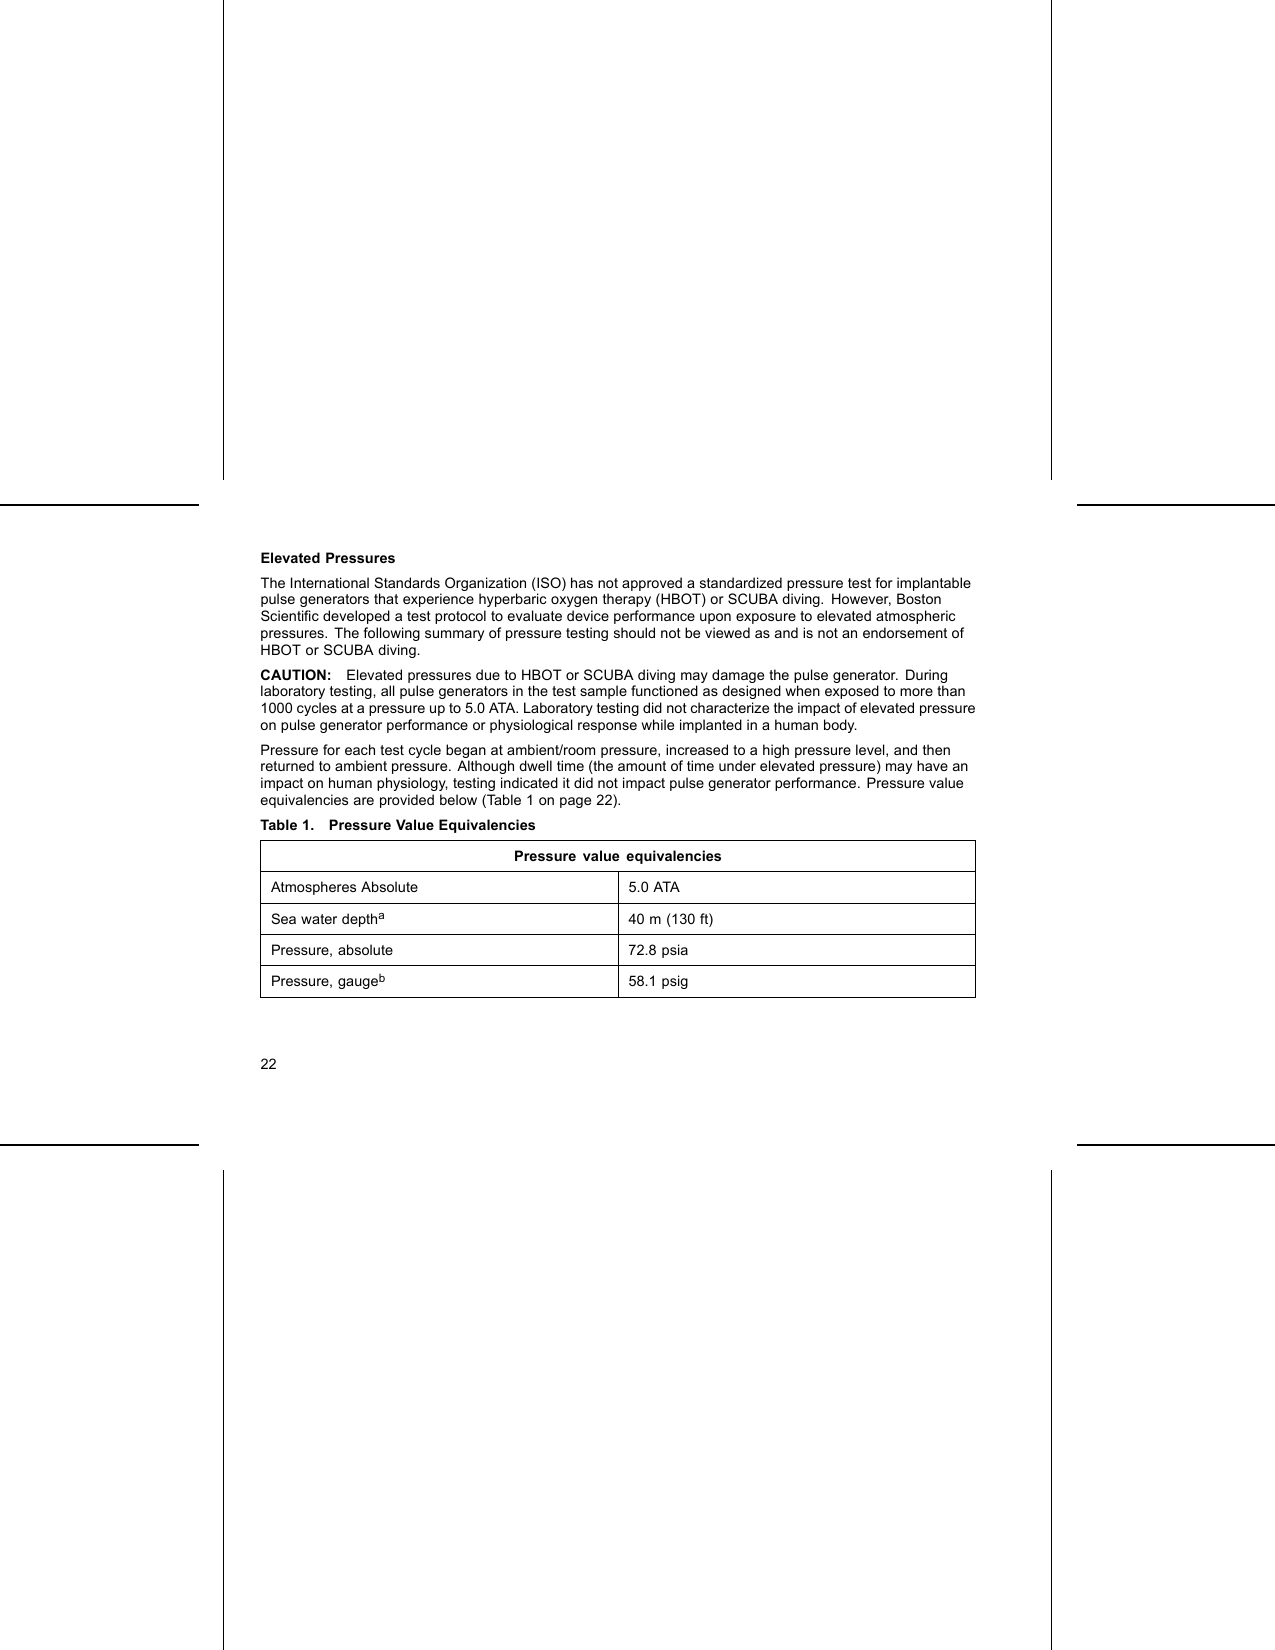
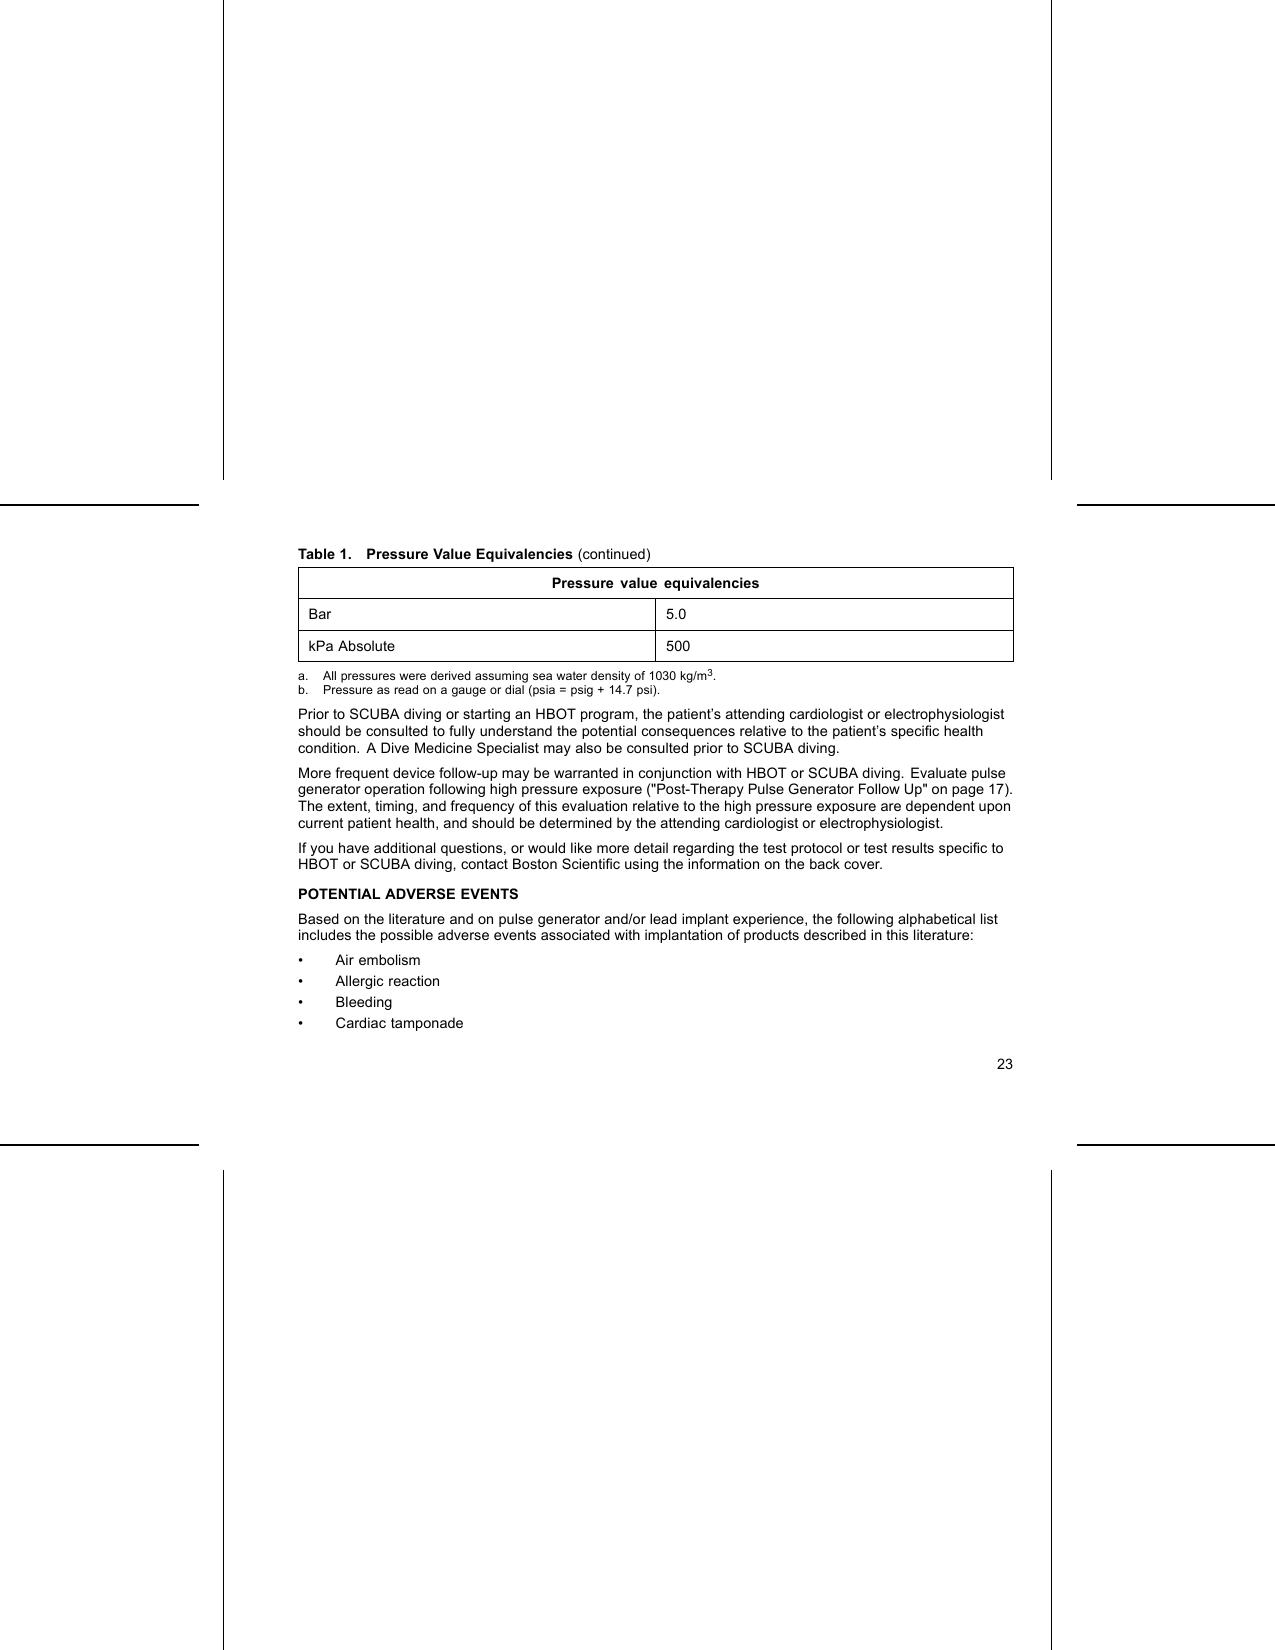
Elevated PressuresThe International Standards Organization (ISO) has not approved a standardized pressure test for implantablepulse generators that experience hyperbaric oxygen therapy (HBOT) or SCUBA diving. However, BostonScientific developed a test protocol to evaluate device performance upon exposure to elevated atmosphericpressures. The following summary of pressure testing should not be viewed as and is not an endorsement ofHBOT or SCUBA diving.CAUTION: Elevated pressures due to HBOT or SCUBA diving may damage the pulse generator. Duringlaboratory testing, all pulse generators in the test sample functioned as designed when exposed to more than1000 cycles at a pressure up to 5.0 ATA. Laboratory testing did not characterize the impact of elevated pressureon pulse generator performance or physiological response while implanted in a human body.Pressure for each test cycle began at ambient/room pressure, increased to a high pressure level, and thenreturned to ambient pressure. Although dwell time (the amount of time under elevated pressure) may have animpact on human physiology, testing indicated it did not impact pulse generator performance. Pressure valueequivalencies are provided below (Table 1 on page 22).Table 1. Pressure Value EquivalenciesPressure value equivalenciesAtmospheres Absolute 5.0 ATASea water deptha40 m (130 ft)Pressure, absolute 72.8 psiaPressure, gaugeb58.1 psig22
Table 1. Pressure Value Equivalencies (continued)Pressure value equivalenciesBar 5.0kPa Absolute 500a. All pressures were derived assuming sea water density of 1030 kg/m3.b. Pressure as read on a gauge or dial (psia = psig + 14.7 psi).Prior to SCUBA diving or starting an HBOT program, the patient’s attending cardiologist or electrophysiologistshould be consulted to fully understand the potential consequences relative to the patient’s specifichealthcondition. A Dive Medicine Specialist may also be consulted prior to SCUBA diving.More frequent device follow-up may be warranted in conjunction with HBOT or SCUBA diving. Evaluate pulsegenerator operation following high pressure exposure ("Post-Therapy Pulse Generator Follow Up" on page 17).The extent, timing, and frequency of this evaluation relative to the high pressure exposure are dependent uponcurrent patient health, and should be determined by the attending cardiologist or electrophysiologist.If you have additional questions, or would like more detail regarding the test protocol or test results specifictoHBOT or SCUBA diving, contact Boston Scientific using the information on the back cover.POTENTIAL ADVERSE EVENTSBased on the literature and on pulse generator and/or lead implant experience, the following alphabetical listincludes the possible adverse events associated with implantation of products described in this literature:• Air embolism• Allergic reaction• Bleeding• Cardiac tamponade23
• Chronic nerve damage• Component failure• Conductor coil fracture•Death• Elevated thresholds•Erosion• Excessive fibrotic tissue growth• Extracardiac stimulation (muscle/nerve stimulation)• Failure to convert an induced arrhythmia• Fluid accumulation• Foreign body rejection phenomena• Formation of hematomas or seromas• Heart block• Heart failure following chronic RV apical pacing• Inability to defibrillate or pace• Inappropriate therapy (e.g., shocks and antitachycardia pacing [ATP] where applicable, pacing)• Incisional pain• Incomplete lead connection with pulse generator• Infection including endocarditis• Insulating myocardium during defibrillation with internal or external paddles• Lead dislodgment• Lead fracture• Lead insulation breakage or abrasion24
• Lead perforation• Lead tip deformation and/or breakage• Local tissue reaction• Loss of capture• Myocardial infarction (MI)• Myocardial necrosis• Myocardial trauma (e.g., tissue damage, valve damage)• Myopotential sensing• Oversensing/undersensing• Pacemaker-mediated tachycardia (PMT) (Applies to dual-chamber devices only.)• Pericardial rub, effusion• Pneumothorax• Pulse generator migration• Shunting current during defibrillation with internal or external paddles• Tachyarrhythmias, which include acceleration of arrhythmias and early, recurrent atrial fibrillation• Thrombosis/thromboemboli• Valve damage• Venous occlusion• Venous trauma (e.g., perforation, dissection, erosion)• Worsening heart failurePatients may develop psychological intolerance to a pulse generator system and may experience the following:• Dependency•Depression25
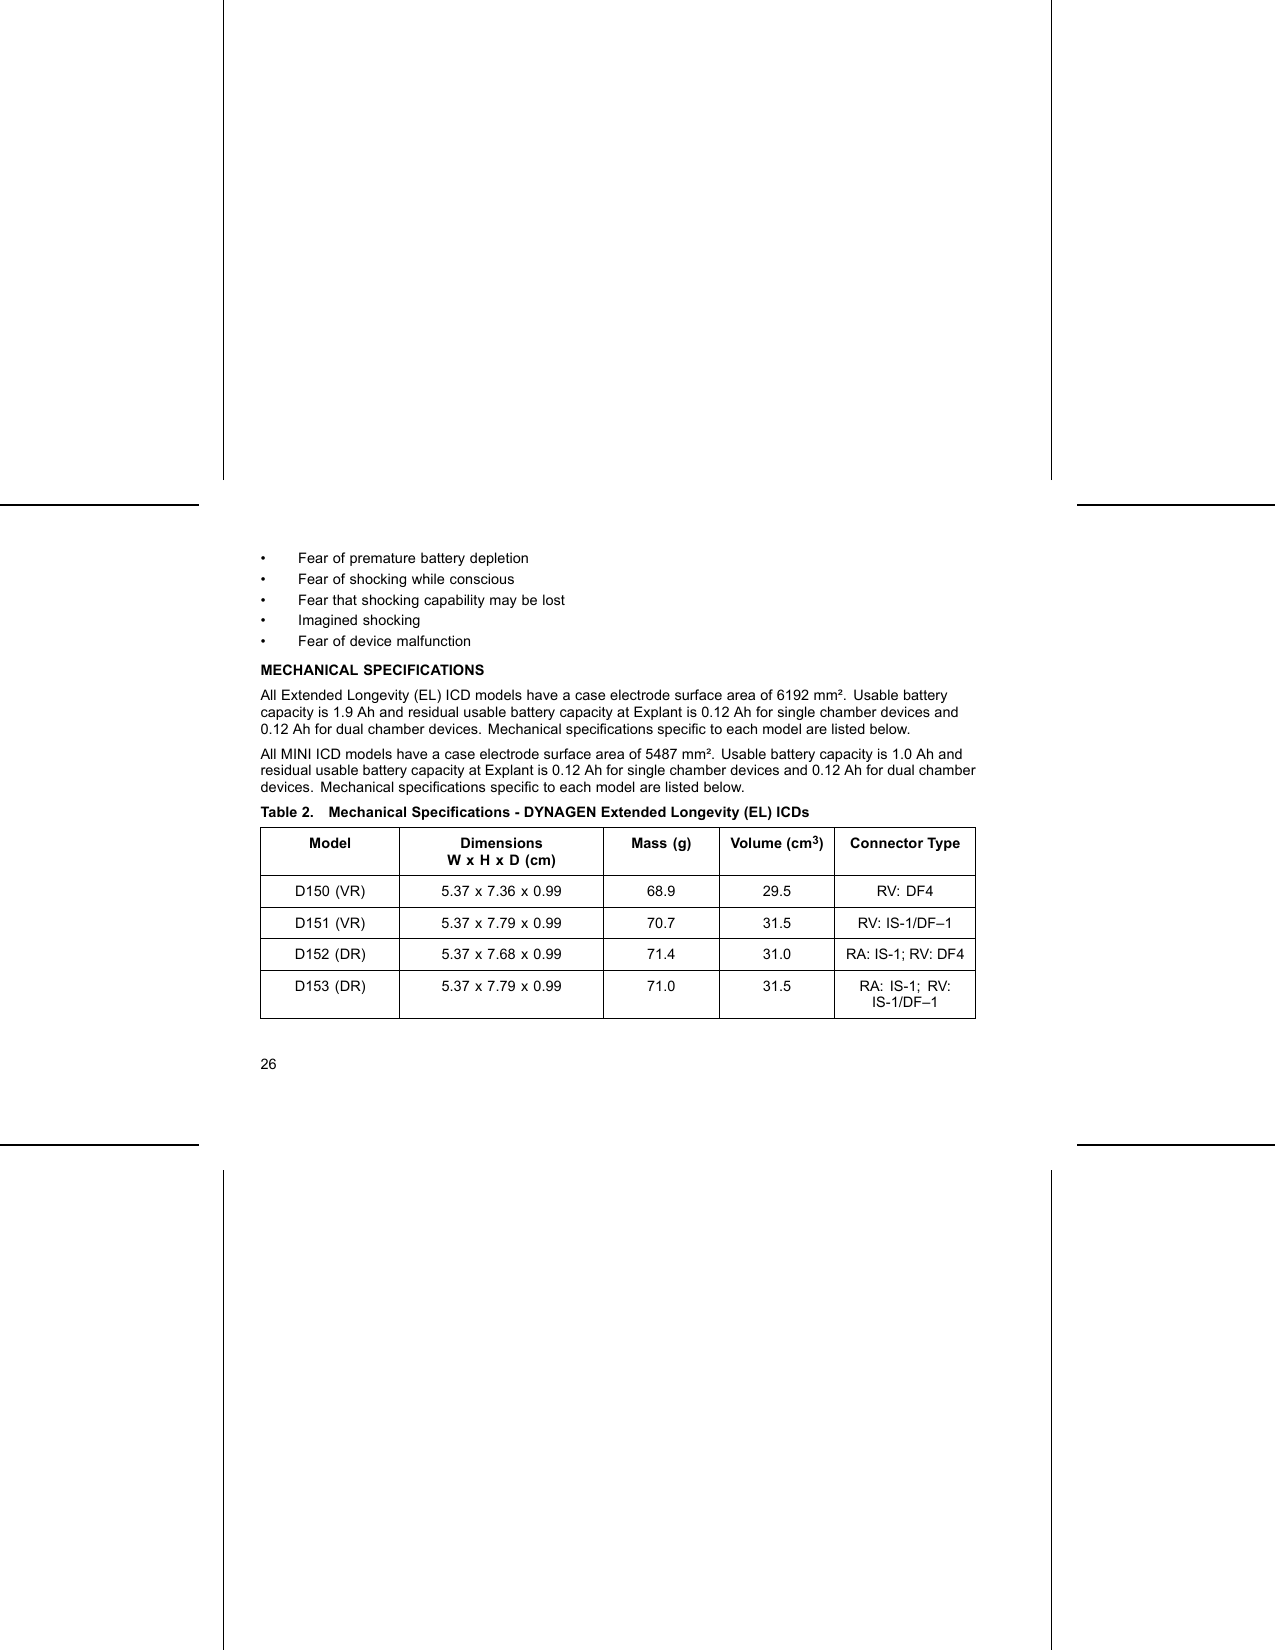
• Fear of premature battery depletion• Fear of shocking while conscious• Fear that shocking capability may be lost• Imagined shocking• Fear of device malfunctionMECHANICAL SPECIFICATIONSAll Extended Longevity (EL) ICD models have a case electrode surface area of 6192 mm². Usable batterycapacity is 1.9 Ah and residual usable battery capacity at Explant is 0.12 Ah for single chamber devices and0.12 Ah for dual chamber devices. Mechanical specifications specific to each model are listed below.All MINI ICD models have a case electrode surface area of 5487 mm². Usable battery capacity is 1.0 Ah andresidual usable battery capacity at Explant is 0.12 Ah for single chamber devices and 0.12 Ah for dual chamberdevices. Mechanical specifications specific to each model are listed below.Table 2. Mechanical Specifications - DYNAGEN Extended Longevity (EL) ICDsModel DimensionsWxHxD(cm)Mass (g) Volume (cm3) Connector TypeD150 (VR) 5.37 x 7.36 x 0.99 68.9 29.5 RV: DF4D151 (VR) 5.37 x 7.79 x 0.99 70.7 31.5 RV: IS-1/DF–1D152 (DR) 5.37 x 7.68 x 0.99 71.4 31.0 RA:IS-1;RV:DF4D153 (DR) 5.37 x 7.79 x 0.99 71.0 31.5 RA: IS-1; RV:IS-1/DF–126
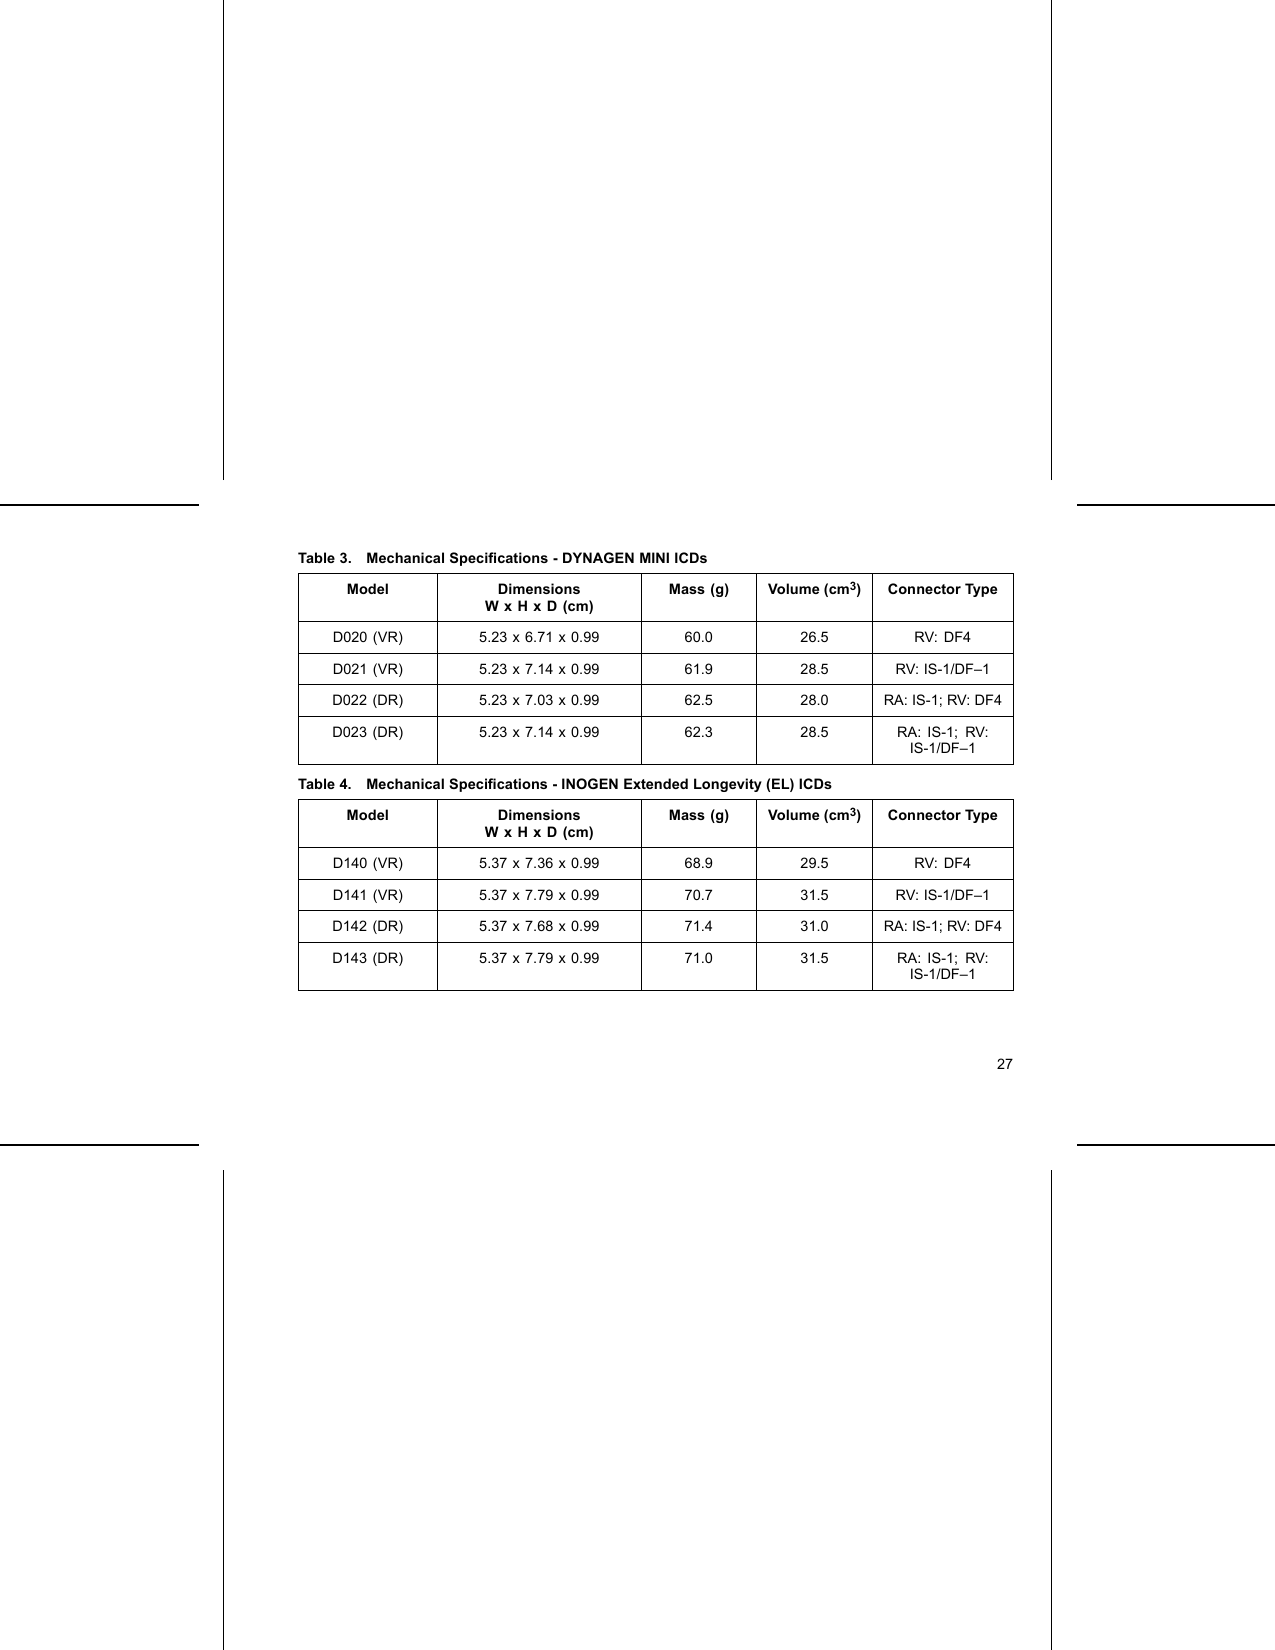
Table 3. Mechanical Specifications - DYNAGEN MINI ICDsModel DimensionsWxHxD(cm)Mass (g) Volume (cm3) Connector TypeD020 (VR) 5.23 x 6.71 x 0.99 60.0 26.5 RV: DF4D021 (VR) 5.23 x 7.14 x 0.99 61.9 28.5 RV: IS-1/DF–1D022 (DR) 5.23 x 7.03 x 0.99 62.5 28.0 RA:IS-1;RV:DF4D023 (DR) 5.23 x 7.14 x 0.99 62.3 28.5 RA: IS-1; RV:IS-1/DF–1Table 4. Mechanical Specifications - INOGEN Extended Longevity (EL) ICDsModel DimensionsWxHxD(cm)Mass (g) Volume (cm3) Connector TypeD140 (VR) 5.37 x 7.36 x 0.99 68.9 29.5 RV: DF4D141 (VR) 5.37 x 7.79 x 0.99 70.7 31.5 RV: IS-1/DF–1D142 (DR) 5.37 x 7.68 x 0.99 71.4 31.0 RA:IS-1;RV:DF4D143 (DR) 5.37 x 7.79 x 0.99 71.0 31.5 RA: IS-1; RV:IS-1/DF–127
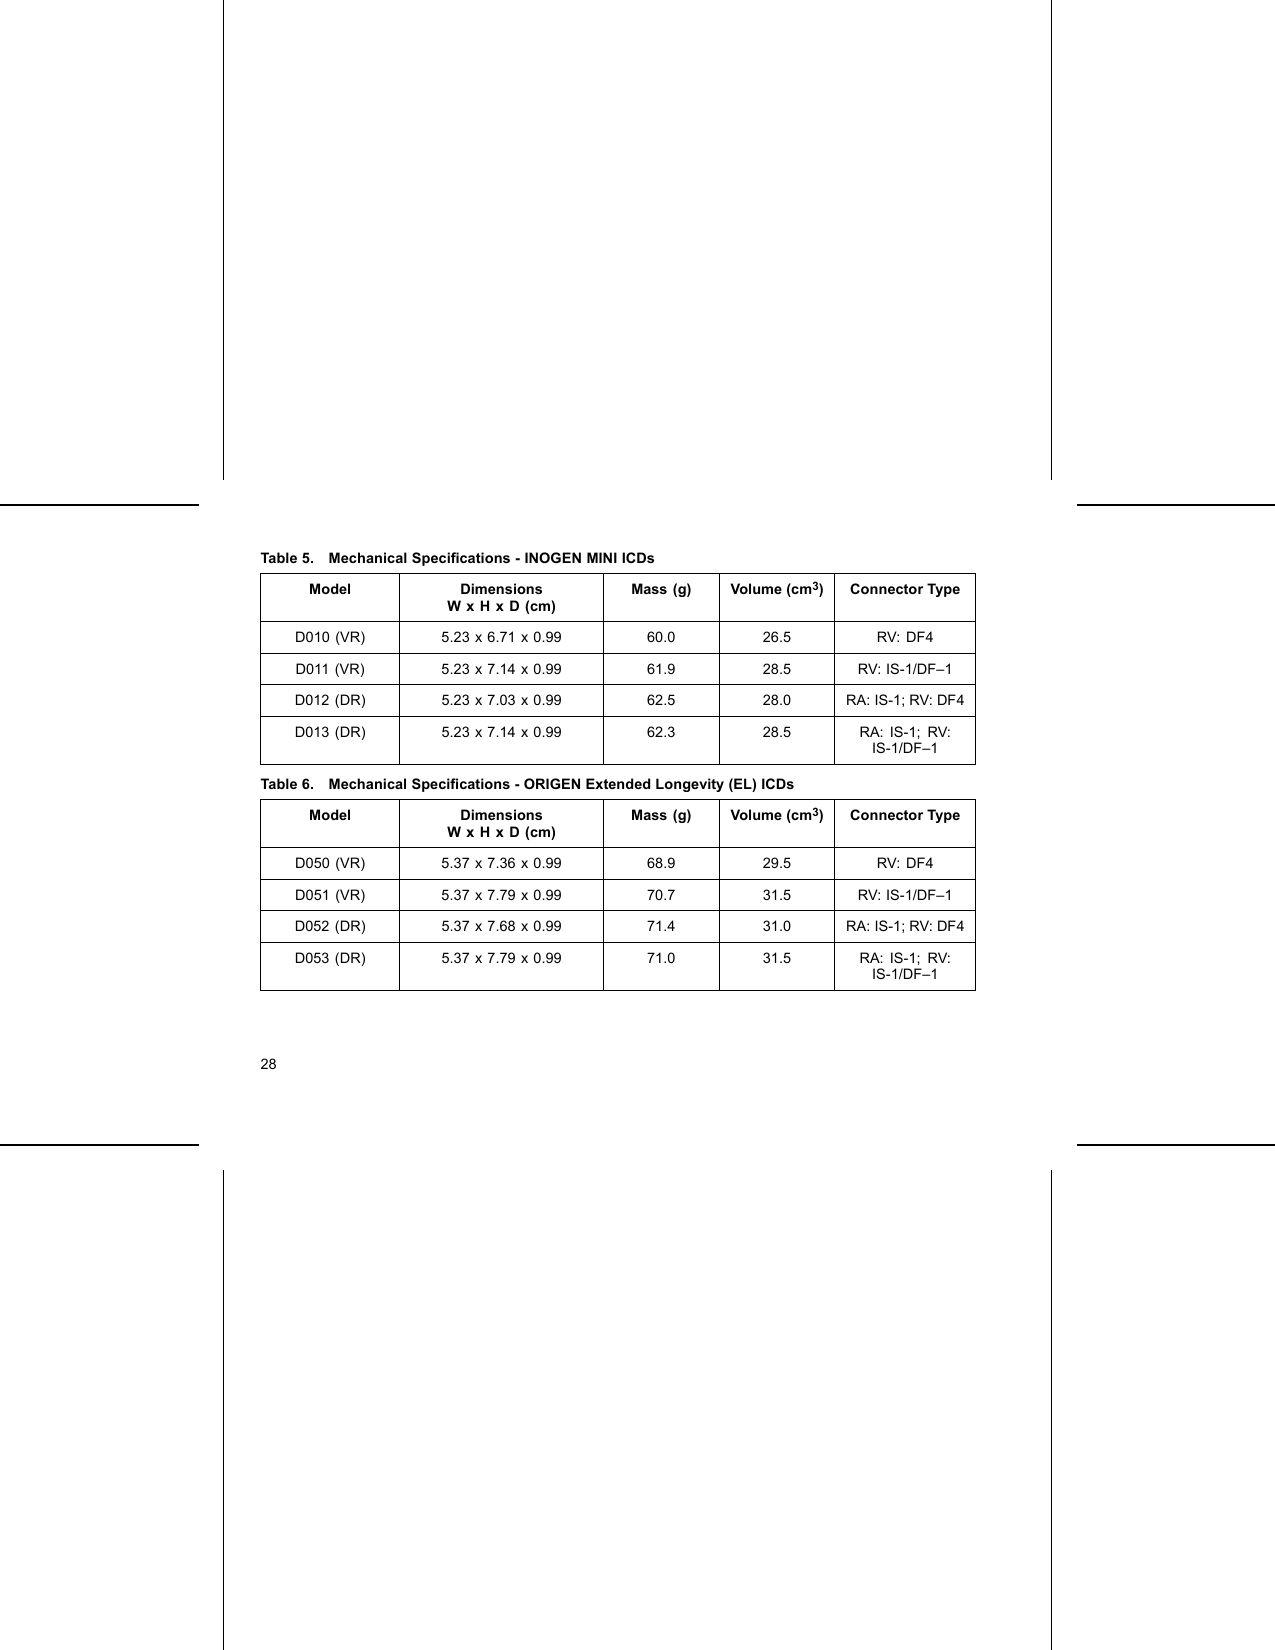
Table 5. Mechanical Specifications - INOGEN MINI ICDsModel DimensionsWxHxD(cm)Mass (g) Volume (cm3) Connector TypeD010 (VR) 5.23 x 6.71 x 0.99 60.0 26.5 RV: DF4D011 (VR) 5.23 x 7.14 x 0.99 61.9 28.5 RV: IS-1/DF–1D012 (DR) 5.23 x 7.03 x 0.99 62.5 28.0 RA:IS-1;RV:DF4D013 (DR) 5.23 x 7.14 x 0.99 62.3 28.5 RA: IS-1; RV:IS-1/DF–1Table 6. Mechanical Specifications - ORIGEN Extended Longevity (EL) ICDsModel DimensionsWxHxD(cm)Mass (g) Volume (cm3) Connector TypeD050 (VR) 5.37 x 7.36 x 0.99 68.9 29.5 RV: DF4D051 (VR) 5.37 x 7.79 x 0.99 70.7 31.5 RV: IS-1/DF–1D052 (DR) 5.37 x 7.68 x 0.99 71.4 31.0 RA:IS-1;RV:DF4D053 (DR) 5.37 x 7.79 x 0.99 71.0 31.5 RA: IS-1; RV:IS-1/DF–128
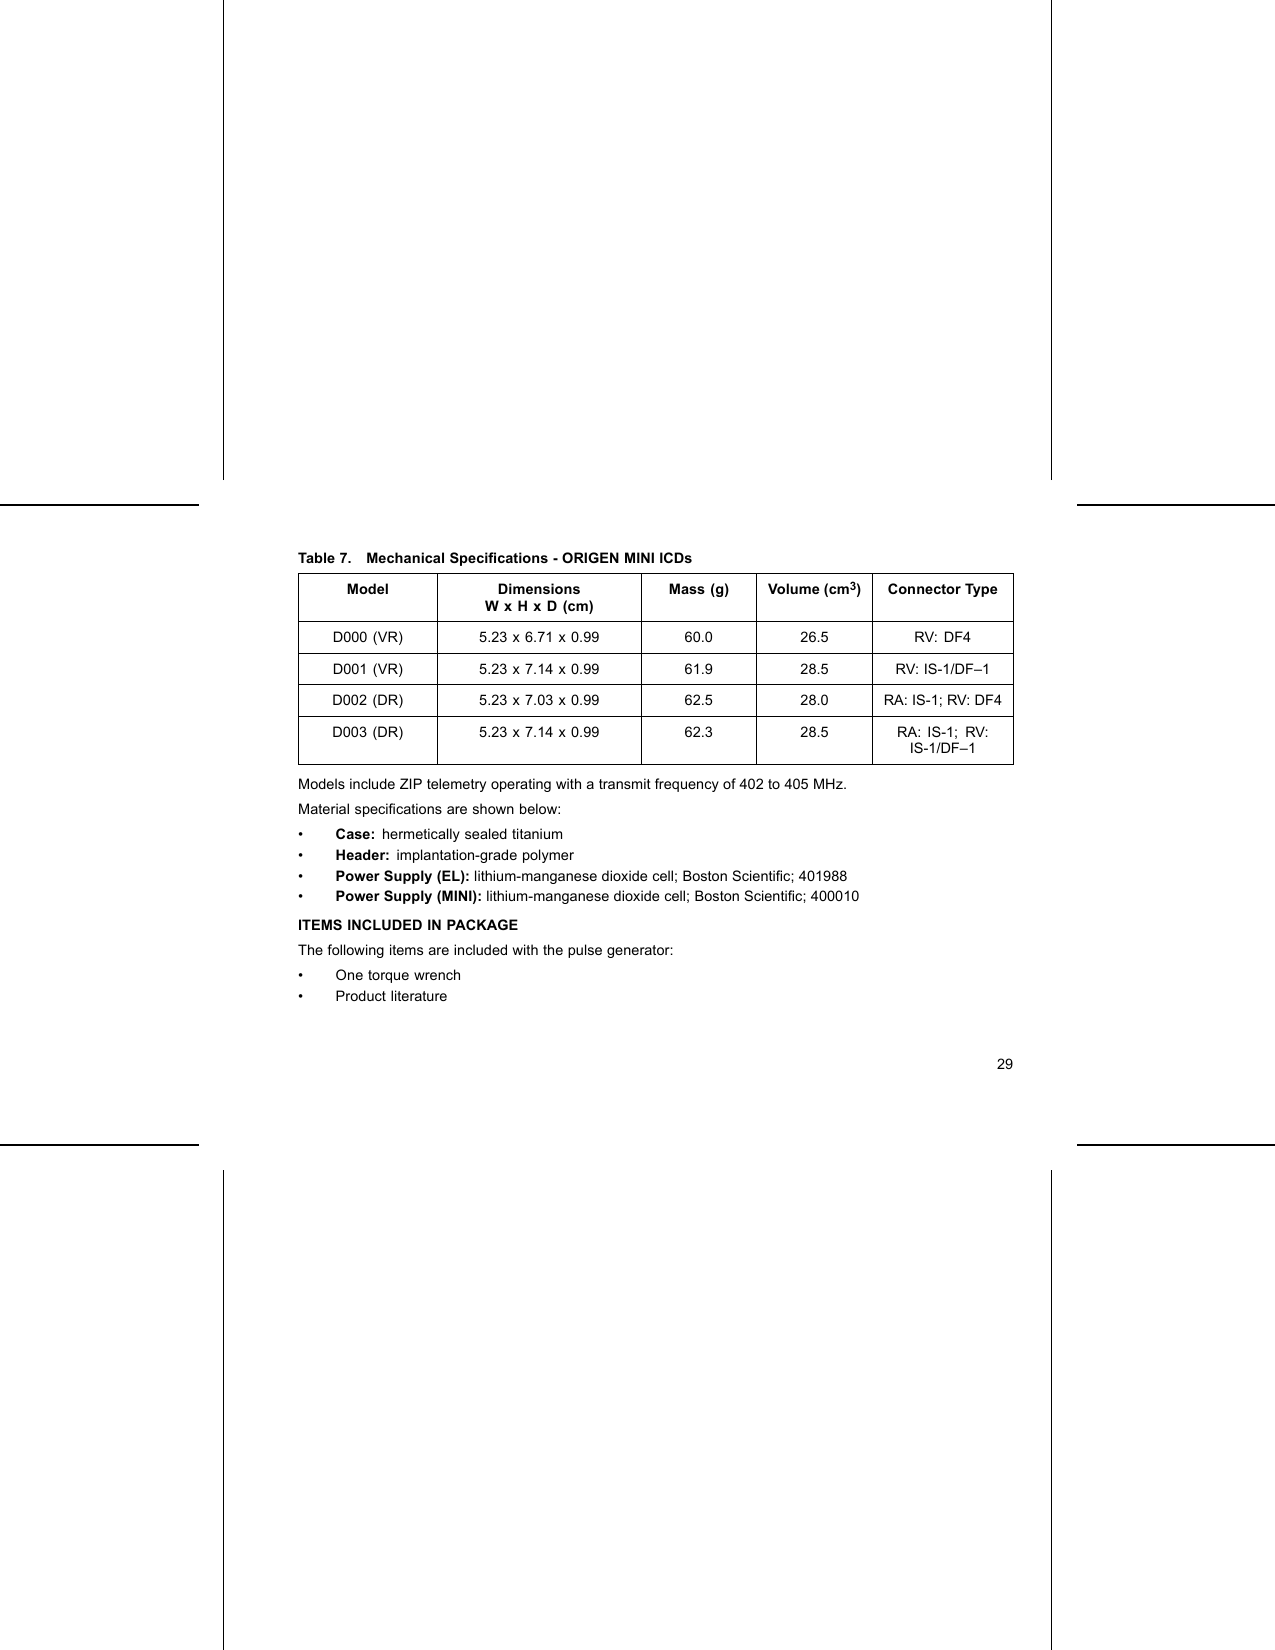
Table 7. Mechanical Specifications - ORIGEN MINI ICDsModel DimensionsWxHxD(cm)Mass (g) Volume (cm3) Connector TypeD000 (VR) 5.23 x 6.71 x 0.99 60.0 26.5 RV: DF4D001 (VR) 5.23 x 7.14 x 0.99 61.9 28.5 RV: IS-1/DF–1D002 (DR) 5.23 x 7.03 x 0.99 62.5 28.0 RA:IS-1;RV:DF4D003 (DR) 5.23 x 7.14 x 0.99 62.3 28.5 RA: IS-1; RV:IS-1/DF–1Models include ZIP telemetry operating with a transmit frequency of 402 to 405 MHz.Material specifications are shown below:•Case: hermetically sealed titanium•Header: implantation-grade polymer•Power Supply (EL): lithium-manganese dioxide cell; Boston Scientific; 401988•Power Supply (MINI): lithium-manganese dioxide cell; Boston Scientific; 400010ITEMS INCLUDED IN PACKAGEThe following items are included with the pulse generator:• One torque wrench• Product literature29
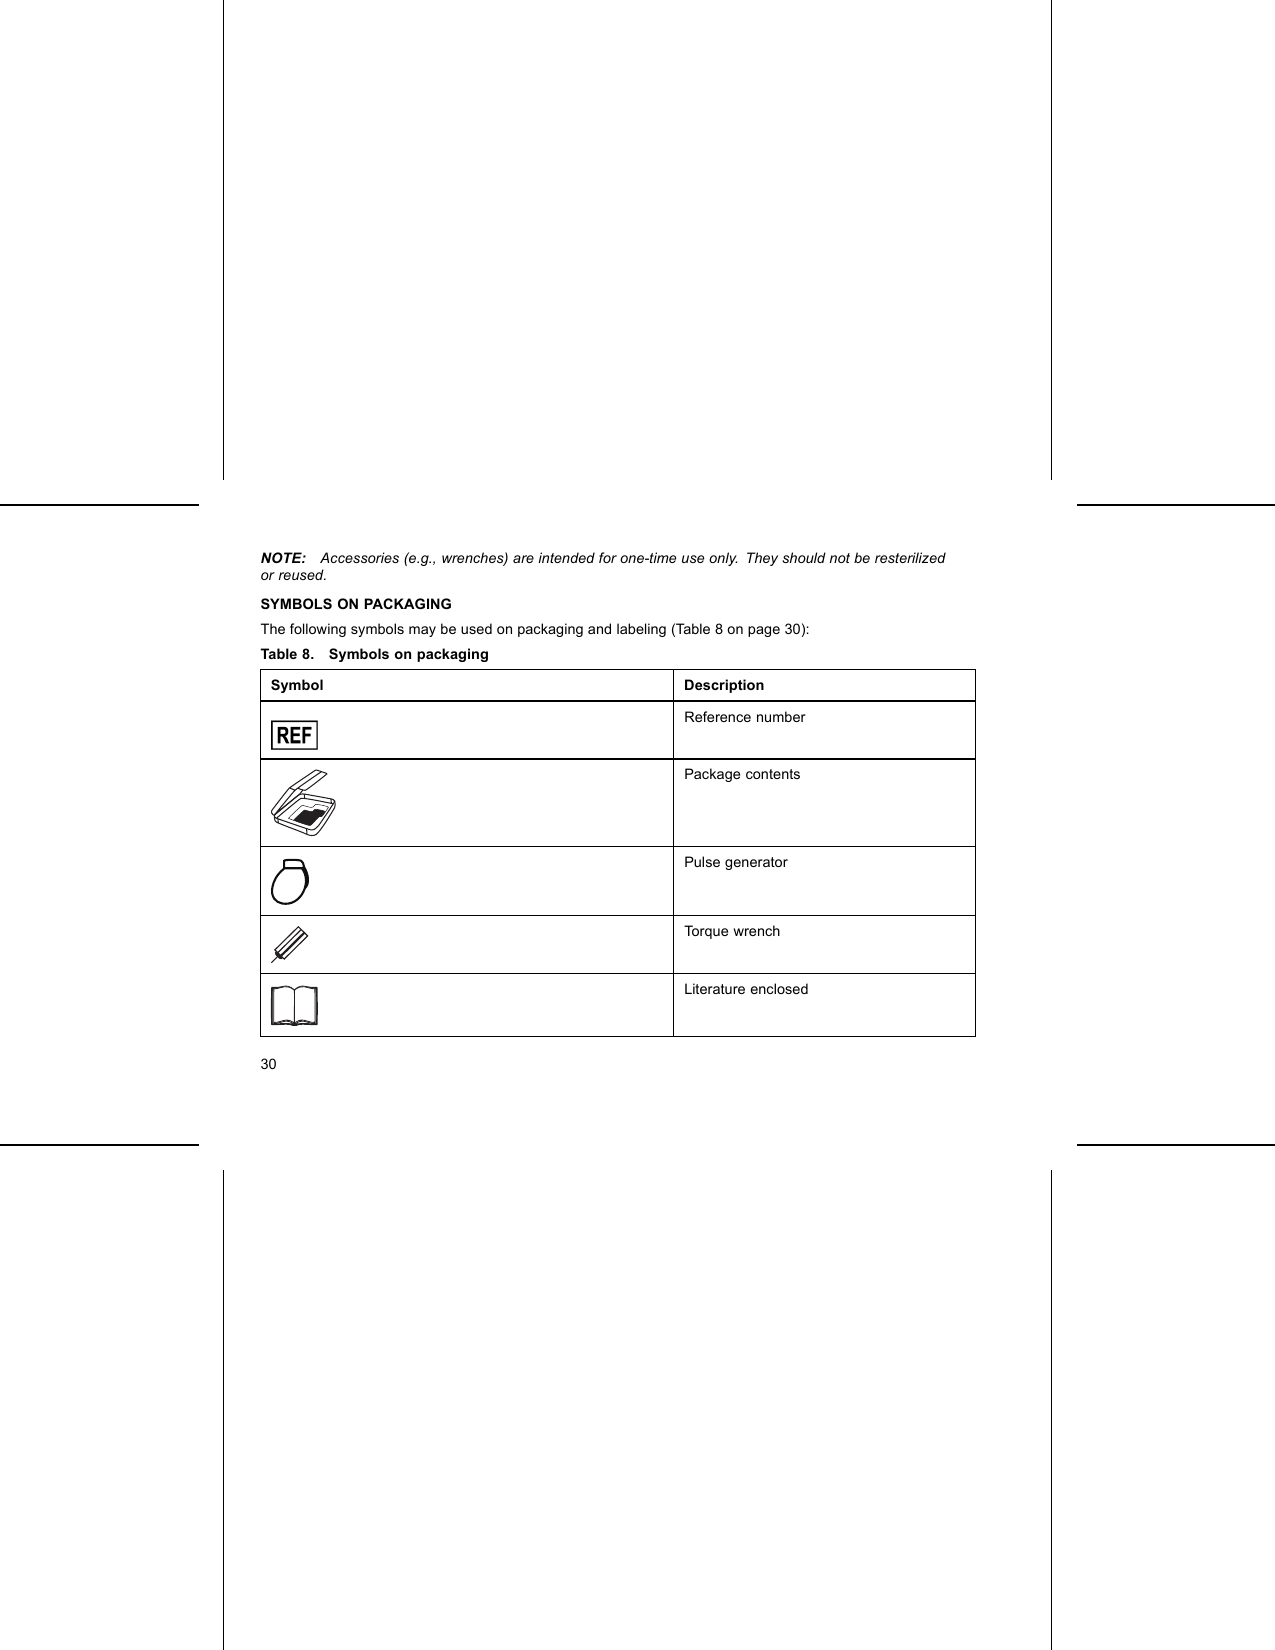
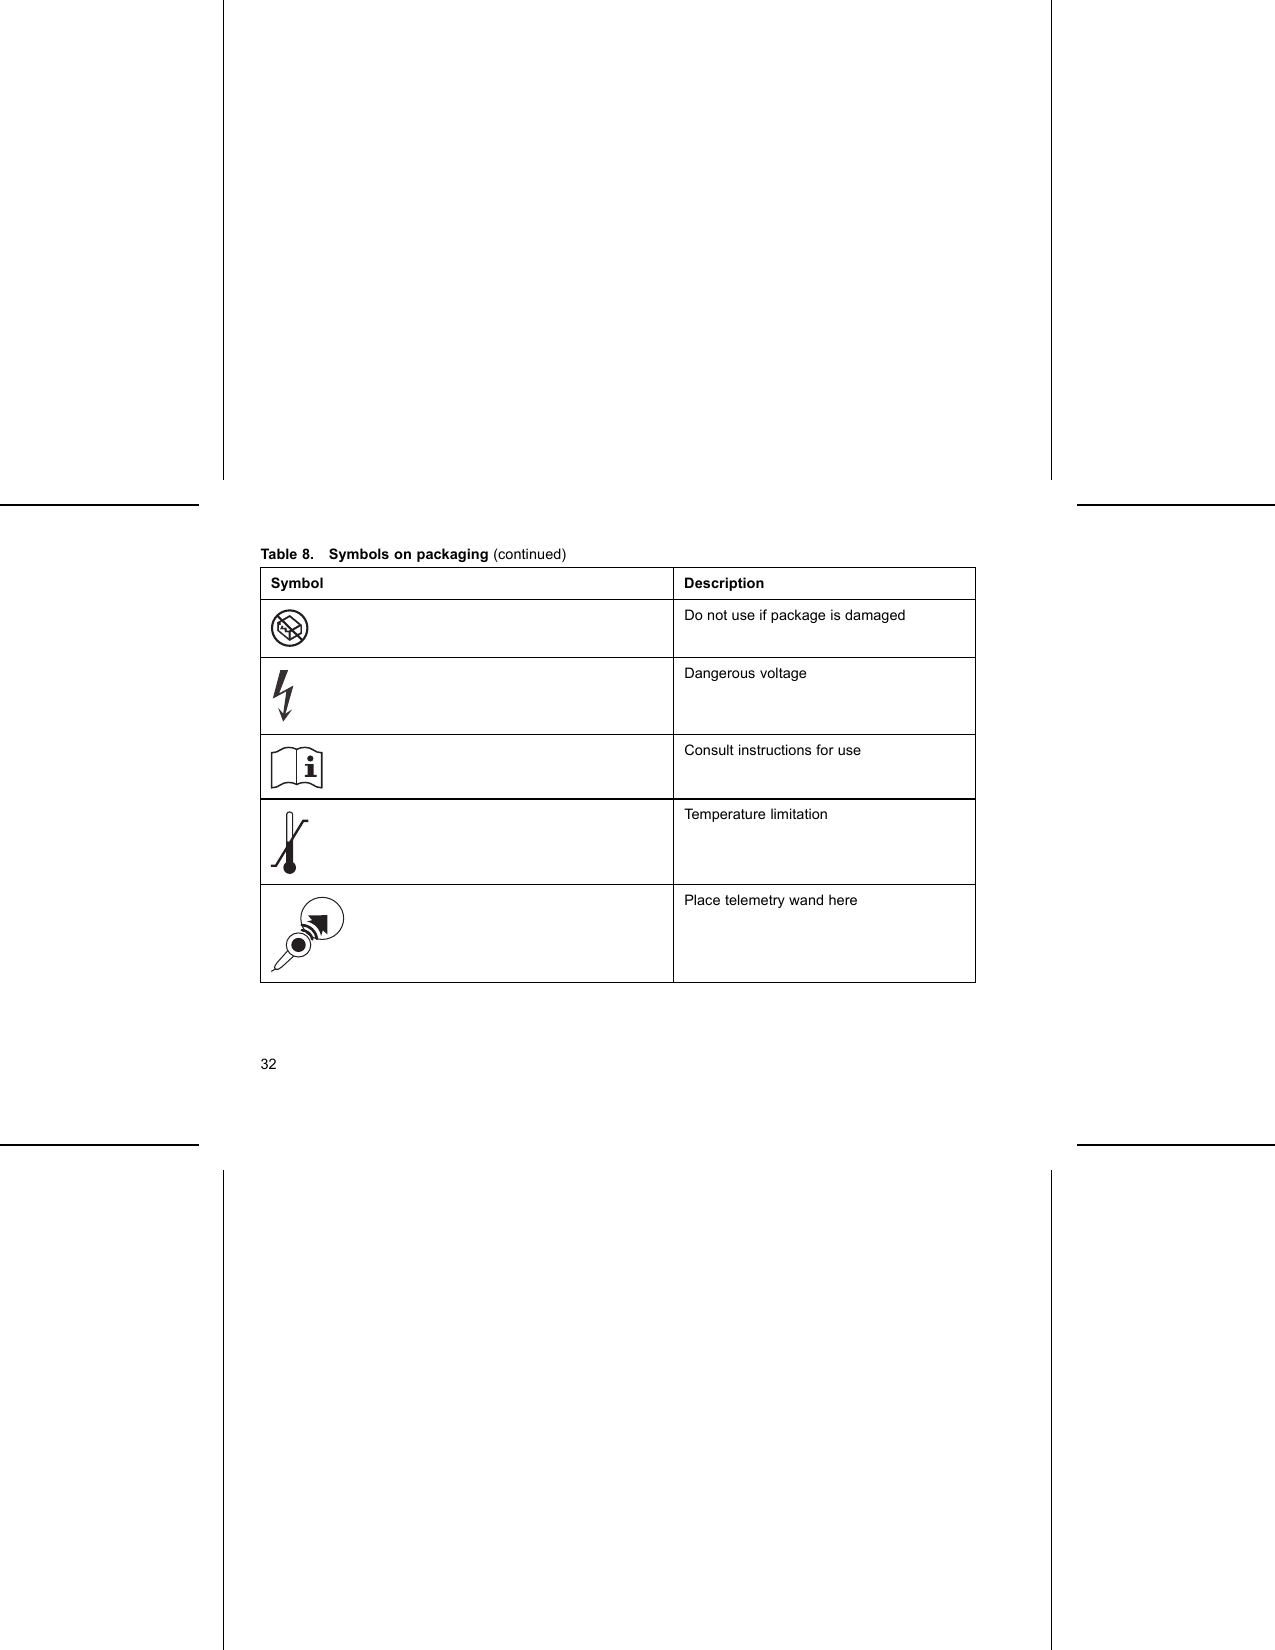
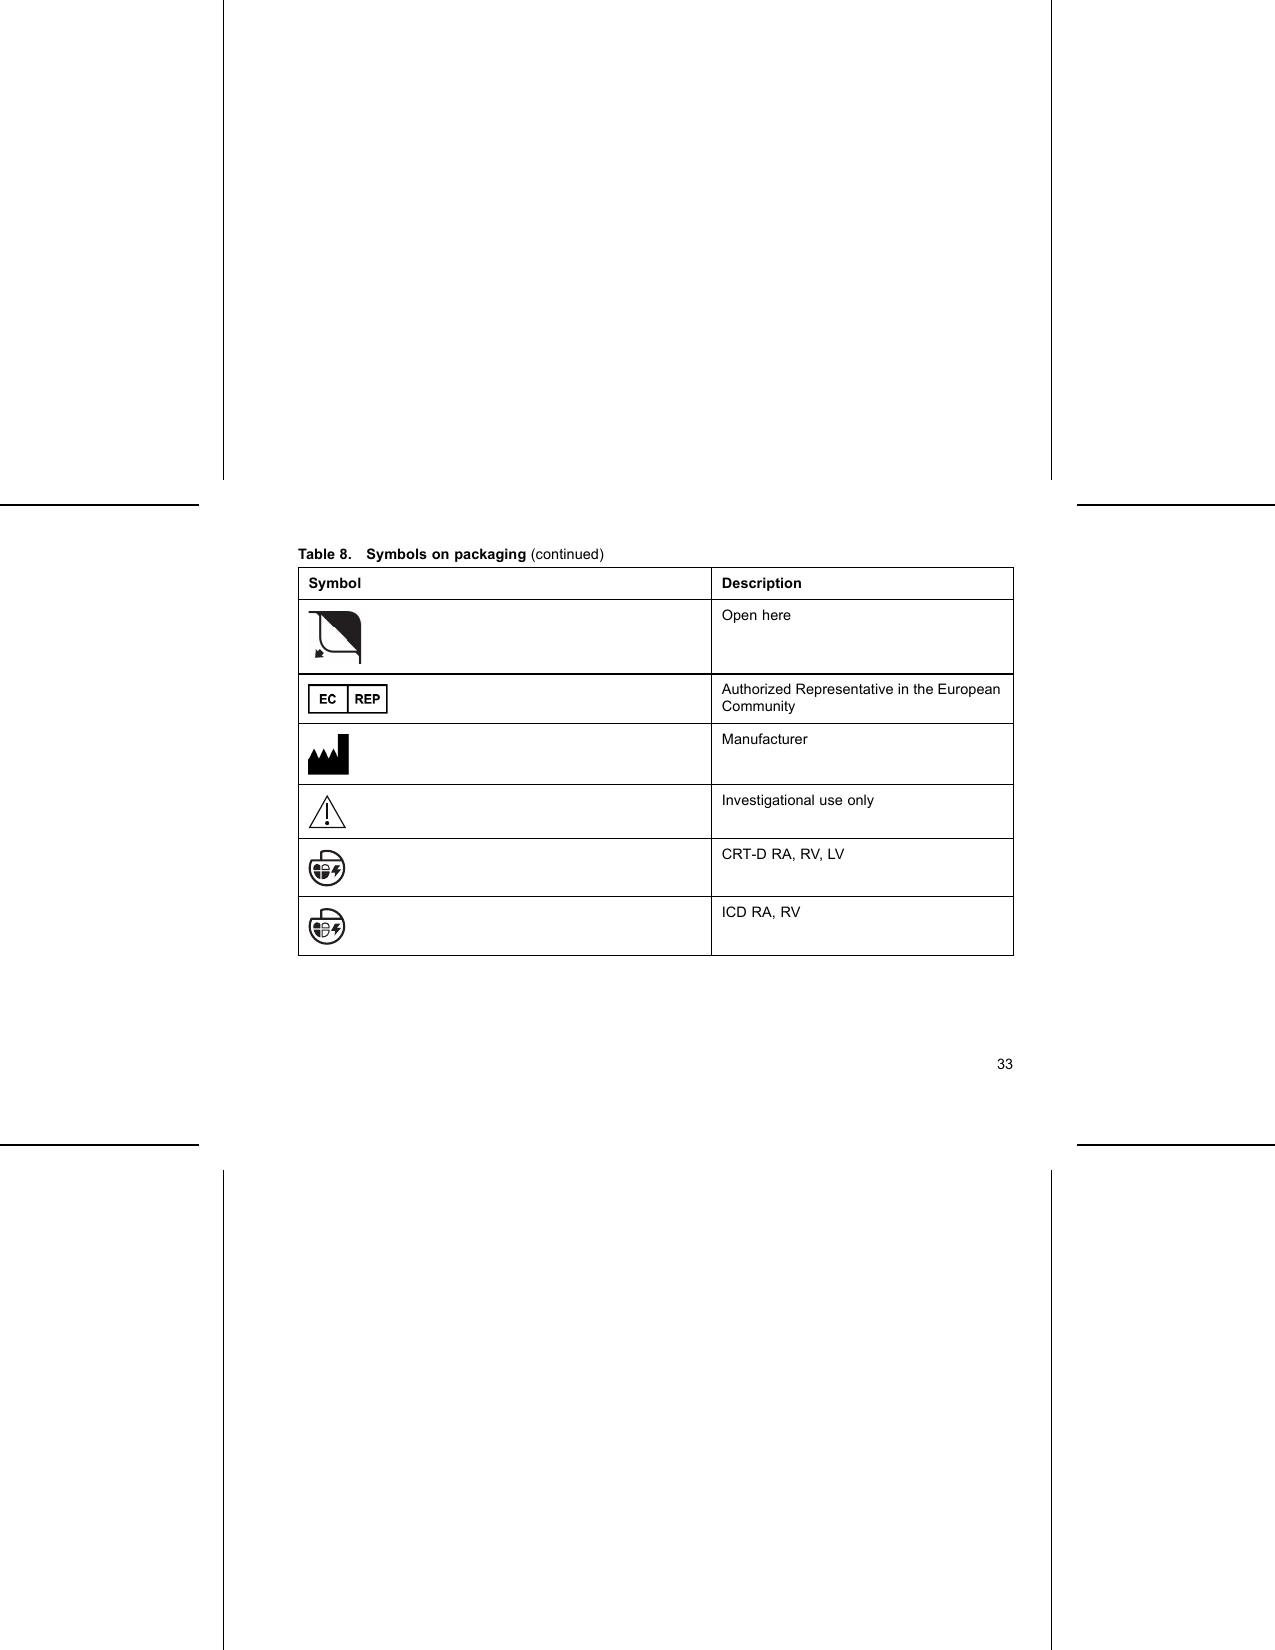
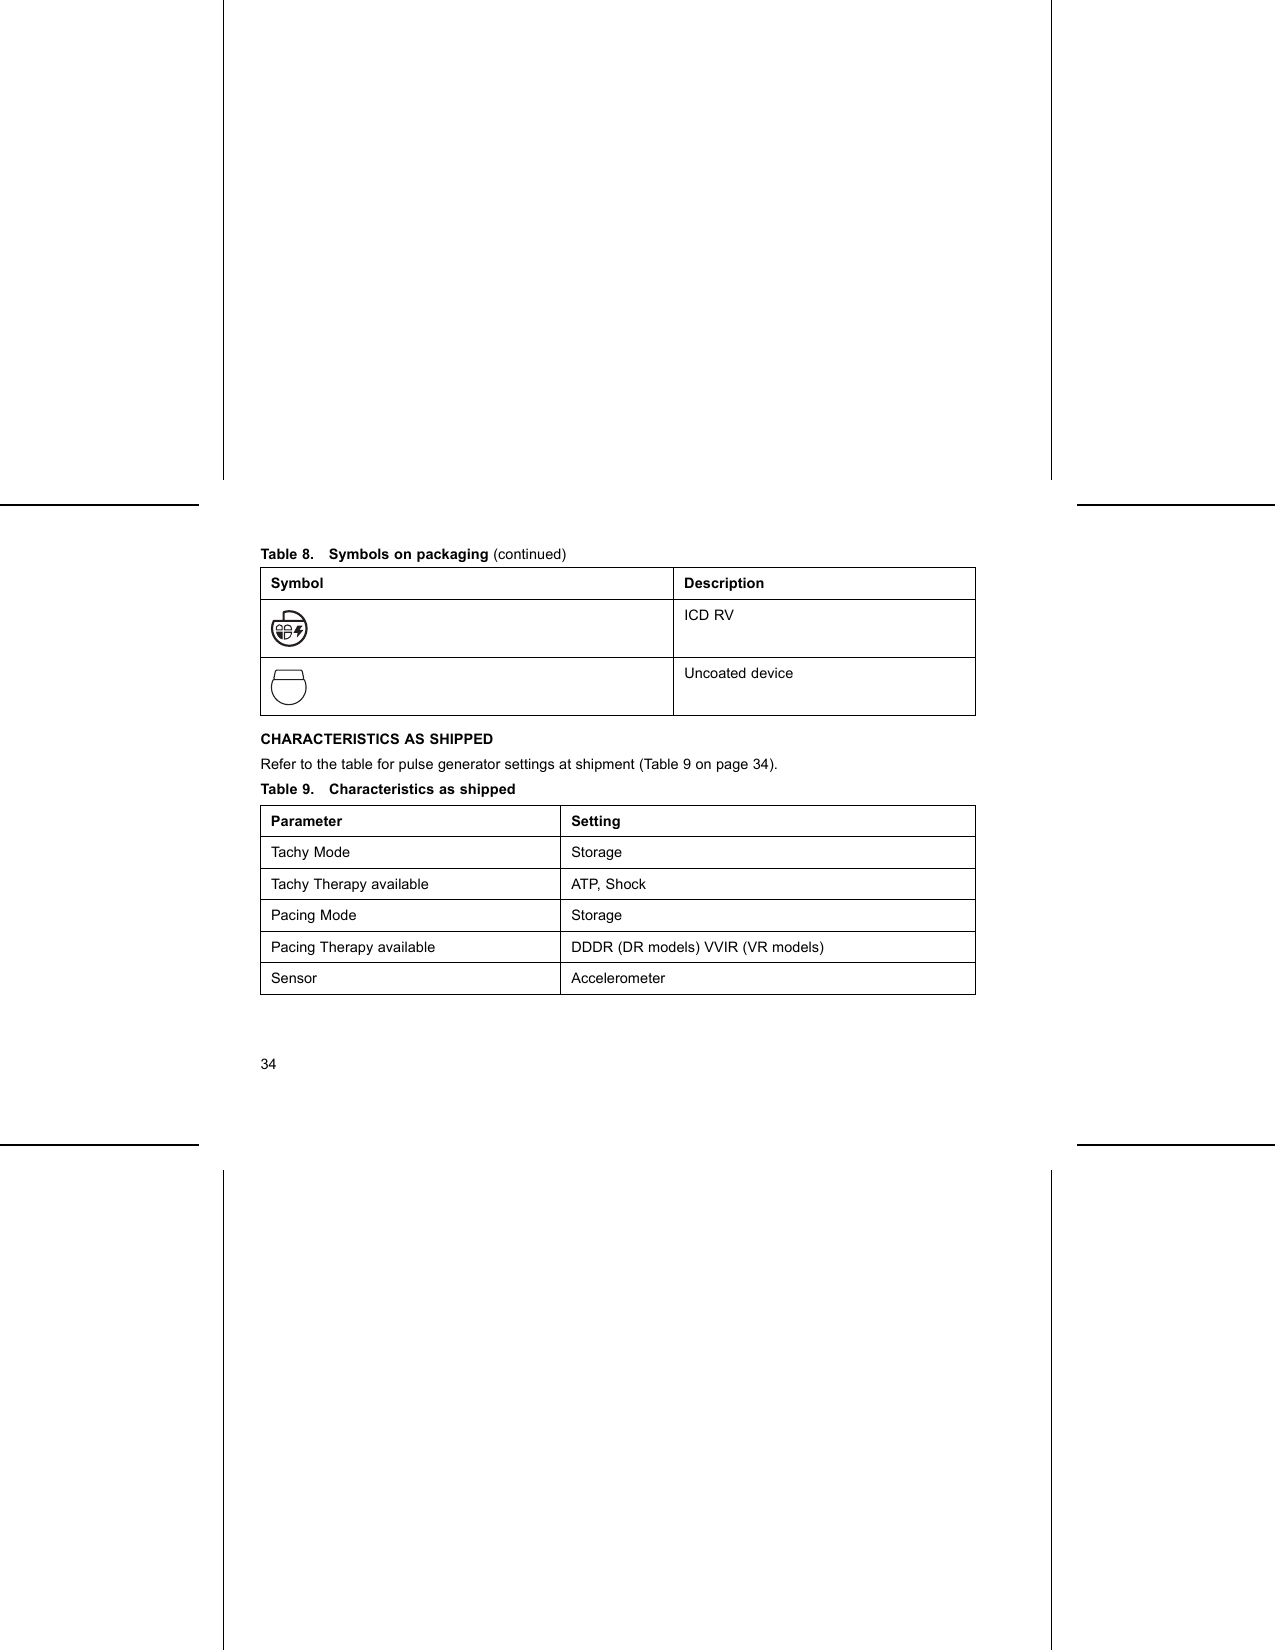
NOTE: Accessories (e.g., wrenches) are intended for one-time use only. They should not be resterilizedor reused.SYMBOLS ON PACKAGINGThe following symbols may be used on packaging and labeling (Table 8 on page 30):Table 8. Symbols on packagingSymbol DescriptionReference numberPackage contentsPulse generatorTorque wrenchLiterature enclosed30
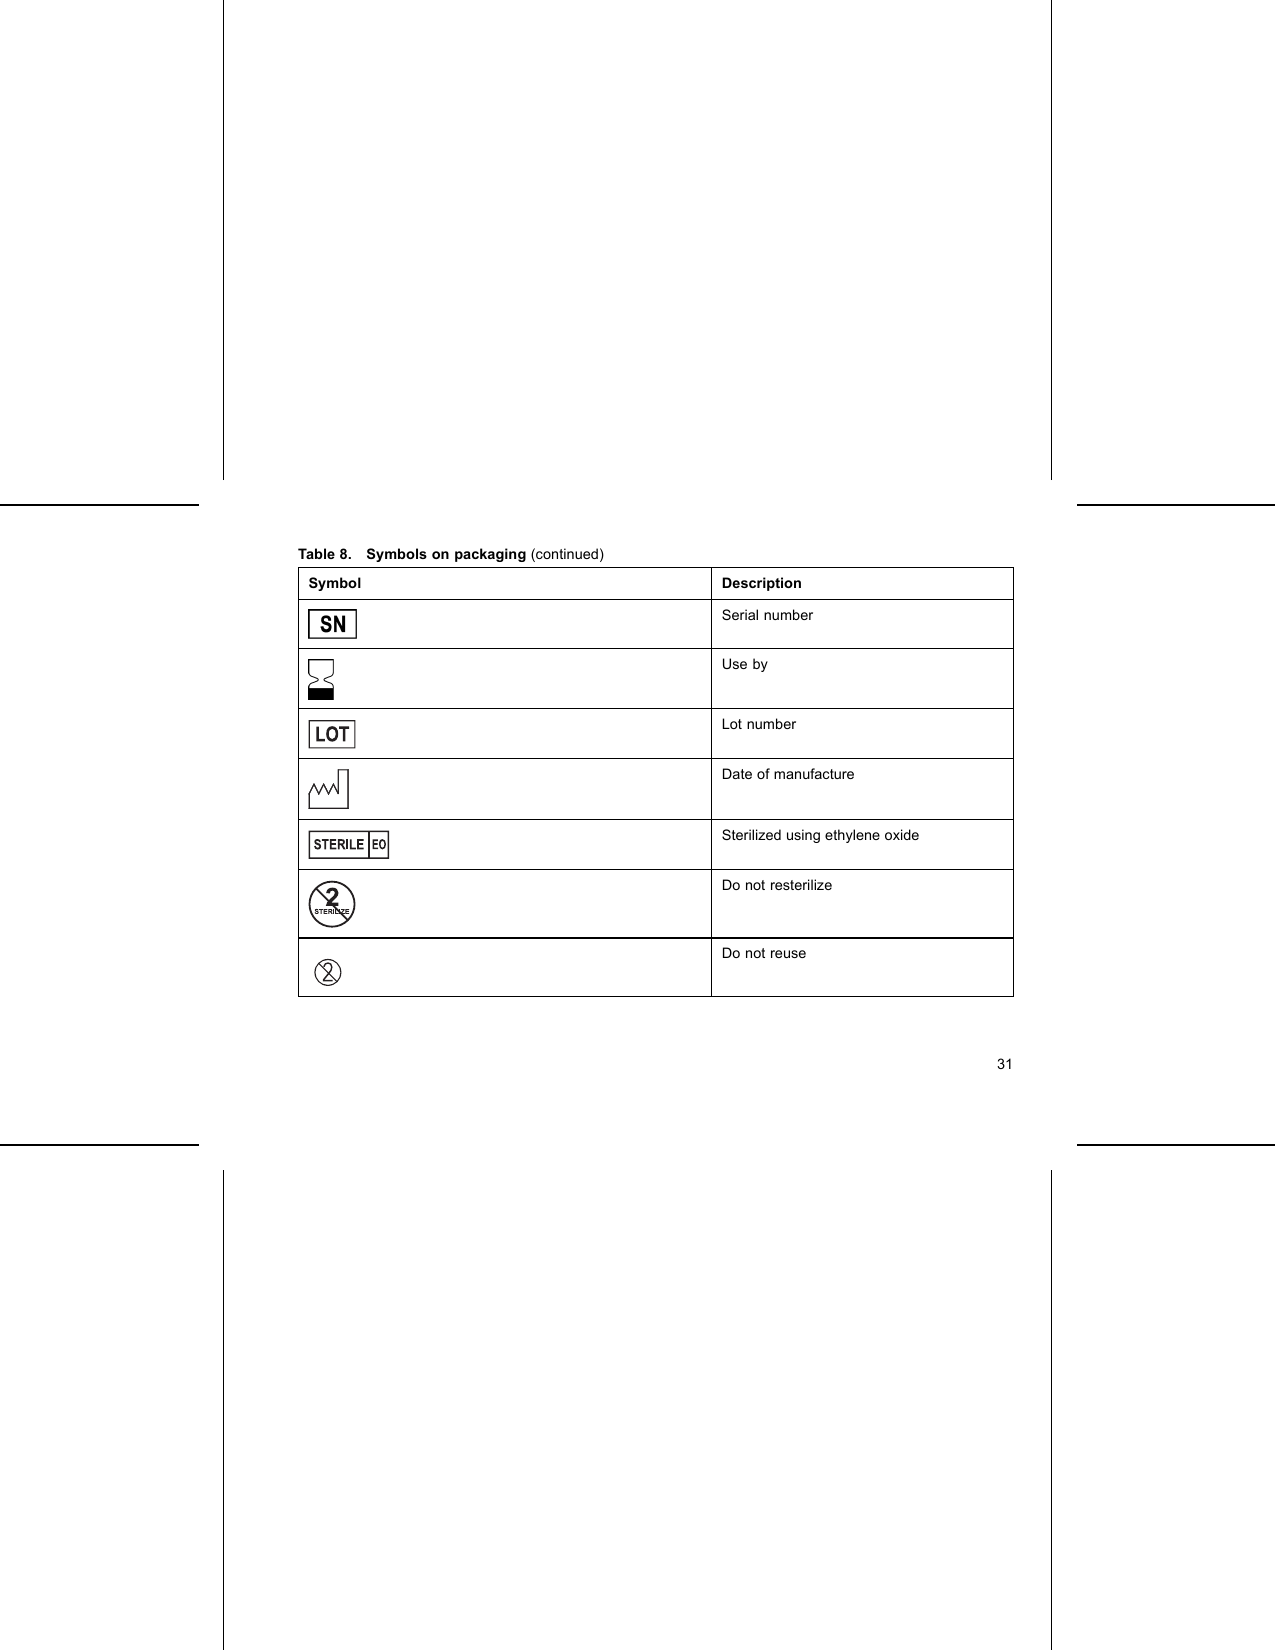
Table 8. Symbols on packaging (continued)Symbol DescriptionSerial numberUse byLot numberDate of manufactureSterilized using ethylene oxideDo not resterilizeDo not reuse31
Table 8. Symbols on packaging (continued)Symbol DescriptionDo not use if package is damagedDangerous voltageConsult instructions for useTemperature limitationPlace telemetry wand here32
Table 8. Symbols on packaging (continued)Symbol DescriptionOpen hereAuthorized Representative in the EuropeanCommunityManufacturerInvestigational use onlyCRT-D RA, RV, LVICD RA, RV33
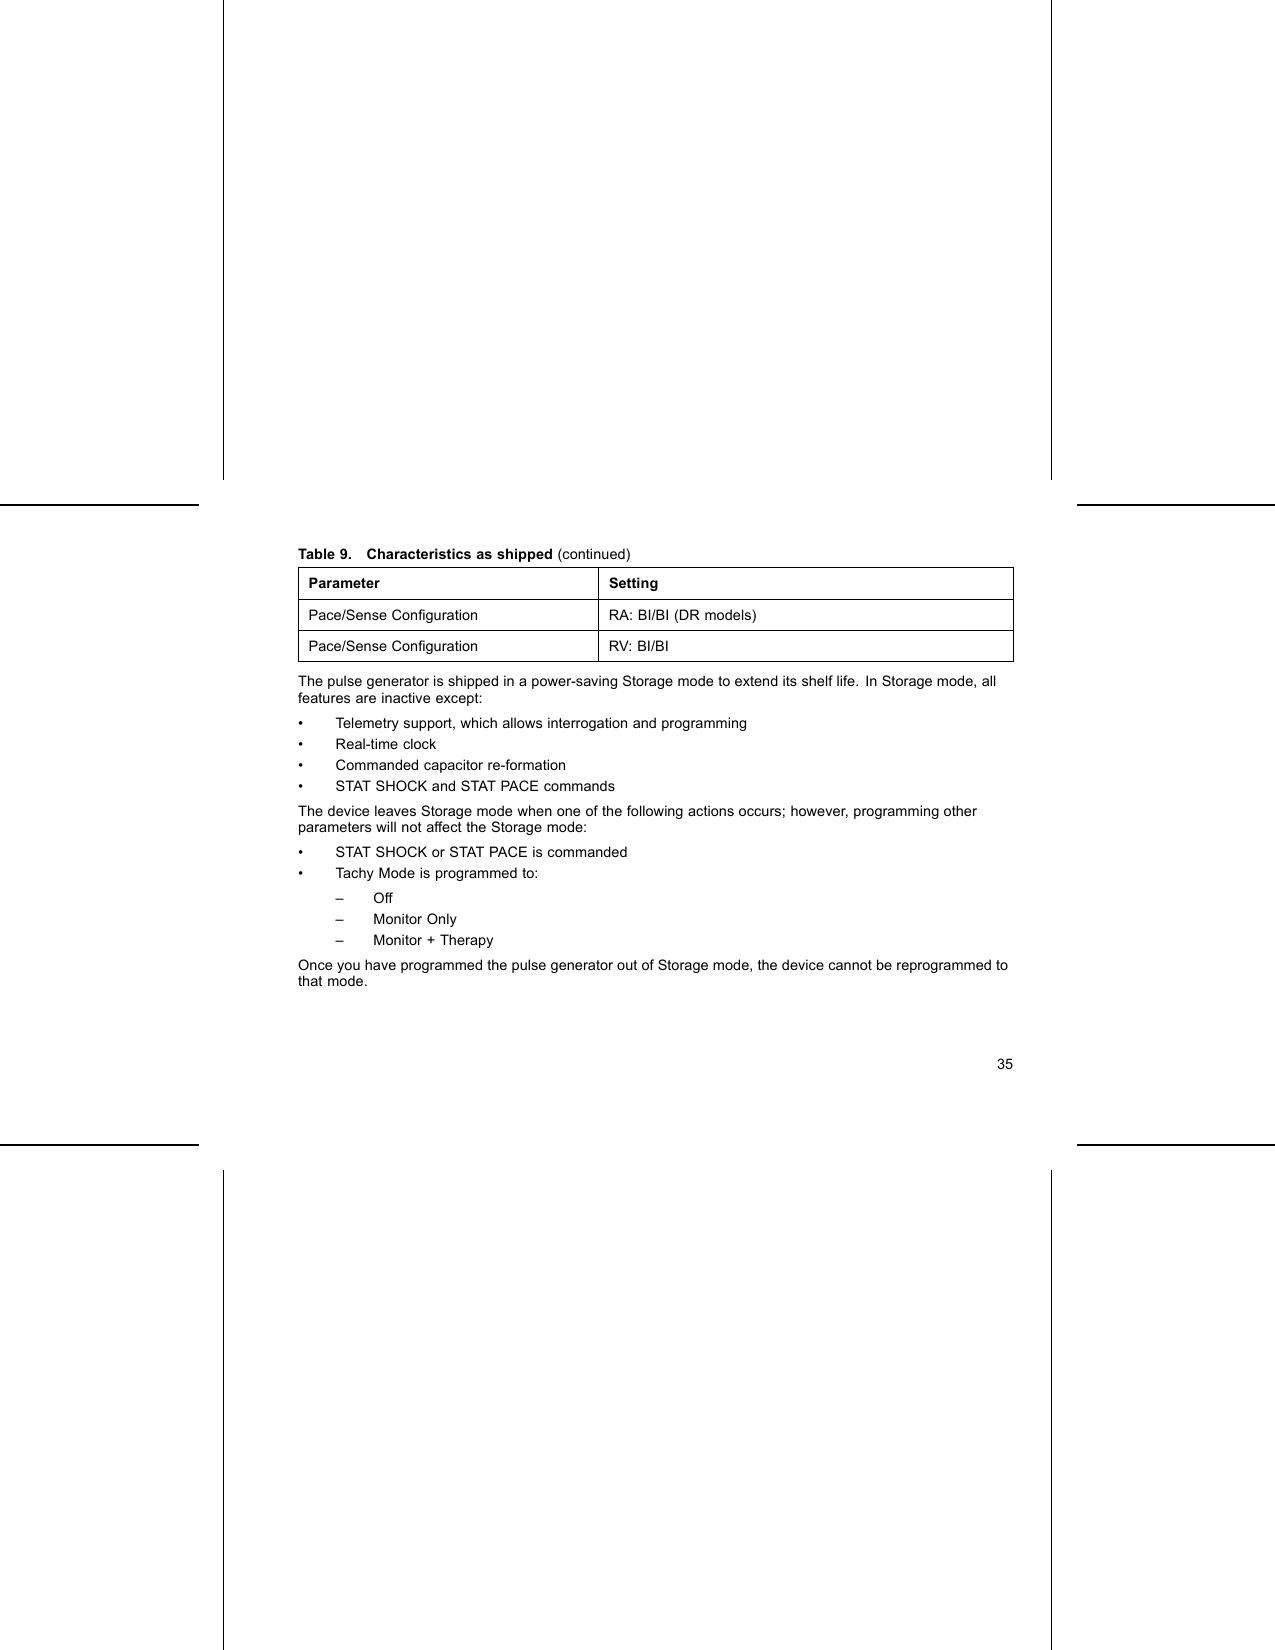
Table 8. Symbols on packaging (continued)Symbol DescriptionICD RVUncoated deviceCHARACTERISTICS AS SHIPPEDRefer to the table for pulse generator settings at shipment (Table 9 on page 34).Table 9. Characteristics as shippedParameter SettingTachy Mode StorageTachy Therapy available ATP, ShockPacing Mode StoragePacing Therapy available DDDR (DR models) VVIR (VR models)Sensor Accelerometer34
Table 9. Characteristics as shipped (continued)Parameter SettingPace/Sense Configuration RA: BI/BI (DR models)Pace/Sense Configuration RV: BI/BIThe pulse generator is shipped in a power-saving Storage mode to extend its shelf life. In Storage mode, allfeatures are inactive except:• Telemetry support, which allows interrogation and programming• Real-time clock• Commanded capacitor re-formation• STAT SHOCK and STAT PACE commandsThe device leaves Storage mode when one of the following actions occurs; however, programming otherparameters will not affect the Storage mode:• STAT SHOCK or STAT PACE is commanded• Tachy Mode is programmed to:–Off– Monitor Only– Monitor + TherapyOnce you have programmed the pulse generator out of Storage mode, the device cannot be reprogrammed tothat mode.35
X-RAY IDENTIFIERThe pulse generator has an identifier that is visible on x-ray film or under fluoroscopy. This identifier providesnoninvasive confirmation of the manufacturer and consists of the following:• The letters, BSC, to identify Boston Scientific as the manufacturer• The number, 140, to identify the Model 2868 PRM software application needed to communicate with thepulse generatorThe x-ray identifier is embedded in the header of the device. For a left side pectoral implant, the identifier willbe visible by x-ray or fluorography at the approximate location shown (Figure 1 on page 36).123[1] X-Ray Identifier [2] Header [3] Pulse Generator CaseFigure 1. X-ray identifierFor information on identifying the device via the PRM, refer to the PRM Operator’s Manual.36
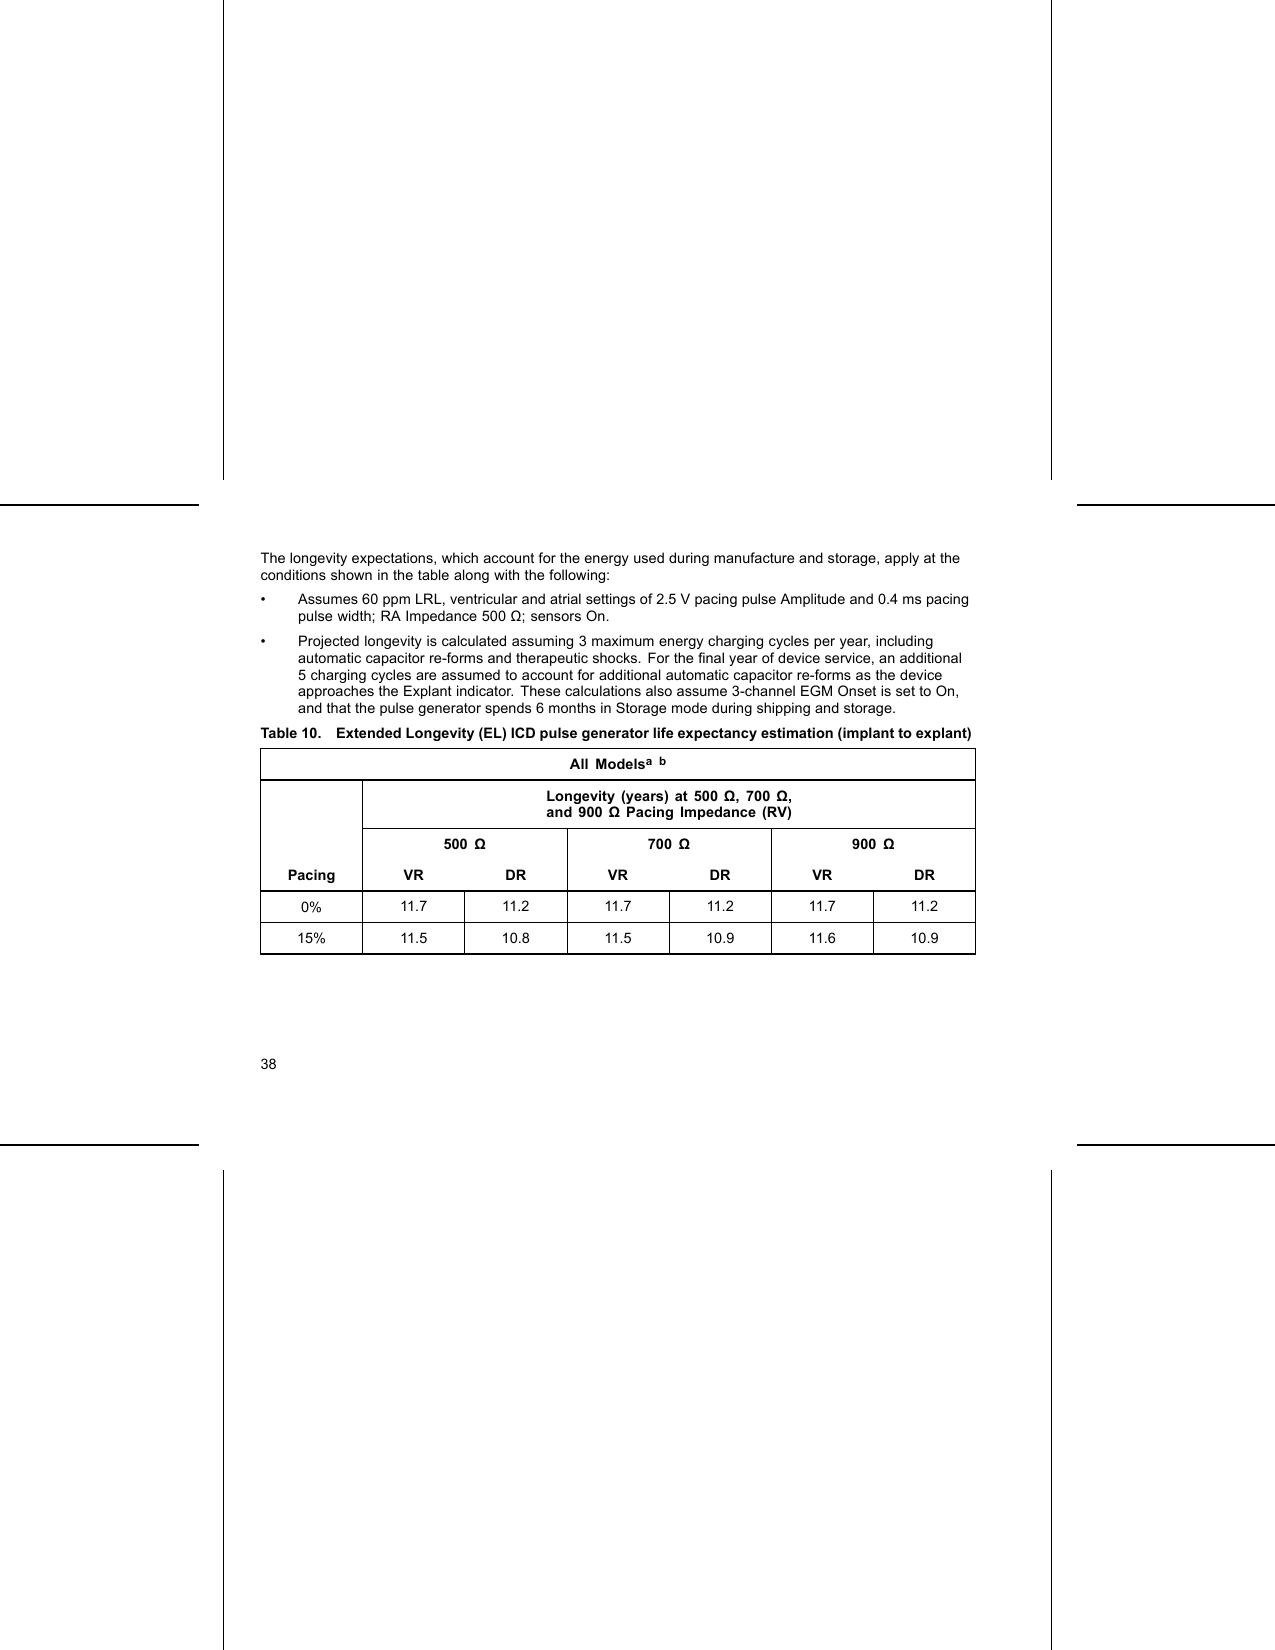
The pulse generator model number is stored in device memory and is shown on the PRM Summary screenonce the pulse generator is interrogated.FEDERAL COMMUNICATIONS COMMISSION (FCC)This device complies with Title 47, Part 15 of the FCC rules. Operation is subject to the following two conditions:• This device may not cause harmful interference, and• This device must accept any interference received, including interference that may cause undesiredoperation.This transmitter is authorized by rule under the Medical Device Radiocommunication Service (in part 95 ofthe FCC Rules) and must not cause harmful interference to stations operating in the 400.150–406.000 MHzband in the Meteorological Aids (i.e., transmitters and receivers used to communicate weather data), theMeteorological Satellite, or the Earth Exploration Satellite Services and must accept interference that may becaused by such stations, including interference that may cause undesired operation. This transmitter shallbe used only in accordance with the FCC Rules governing the Medical Device Radiocommunication Service.Analog and digital voice communications are prohibited. Although this transmitter has been approved by theFederal Communications Commission, there is no guarantee that it will not receive interference or that anyparticular transmission from this transmitter will be free from interference. This transmitter operates between402–405 MHz band and uses FSK modulation.Wanded telemetry operates at 57 kHz and uses QPSK modulation.CAUTION: Changes or modifications not expressly approved by Boston Scientific could void the user’sauthority to operate the equipment.PULSE GENERATOR LONGEVITYBased on simulated studies, it is anticipated that these pulse generators have average longevity to explantas shown below.37
The longevity expectations, which account for the energy used during manufacture and storage, apply at theconditions shown in the table along with the following:• Assumes 60 ppm LRL, ventricular and atrial settings of 2.5 V pacing pulse Amplitude and 0.4 ms pacingpulse width; RA Impedance 500 ;sensorsOn.• Projected longevity is calculated assuming 3 maximum energy charging cycles per year, includingautomatic capacitor re-forms and therapeutic shocks. For the final year of device service, an additional5 charging cycles are assumed to account for additional automatic capacitor re-forms as the deviceapproaches the Explant indicator. These calculations also assume 3-channel EGM Onset is set to On,and that the pulse generator spends 6 months in Storage mode during shipping and storage.Table 10. Extended Longevity (EL) ICD pulse generator life expectancy estimation (implant to explant)All ModelsabLongevity (years) at 500 Ω, 700 Ω,and 900 ΩPacing Impedance (RV)500 Ω700 Ω900 ΩPacing VR DR VR DR VR DR0% 11.7 11.2 11.7 11.2 11.7 11.215% 11.5 10.8 11.5 10.9 11.6 10.938
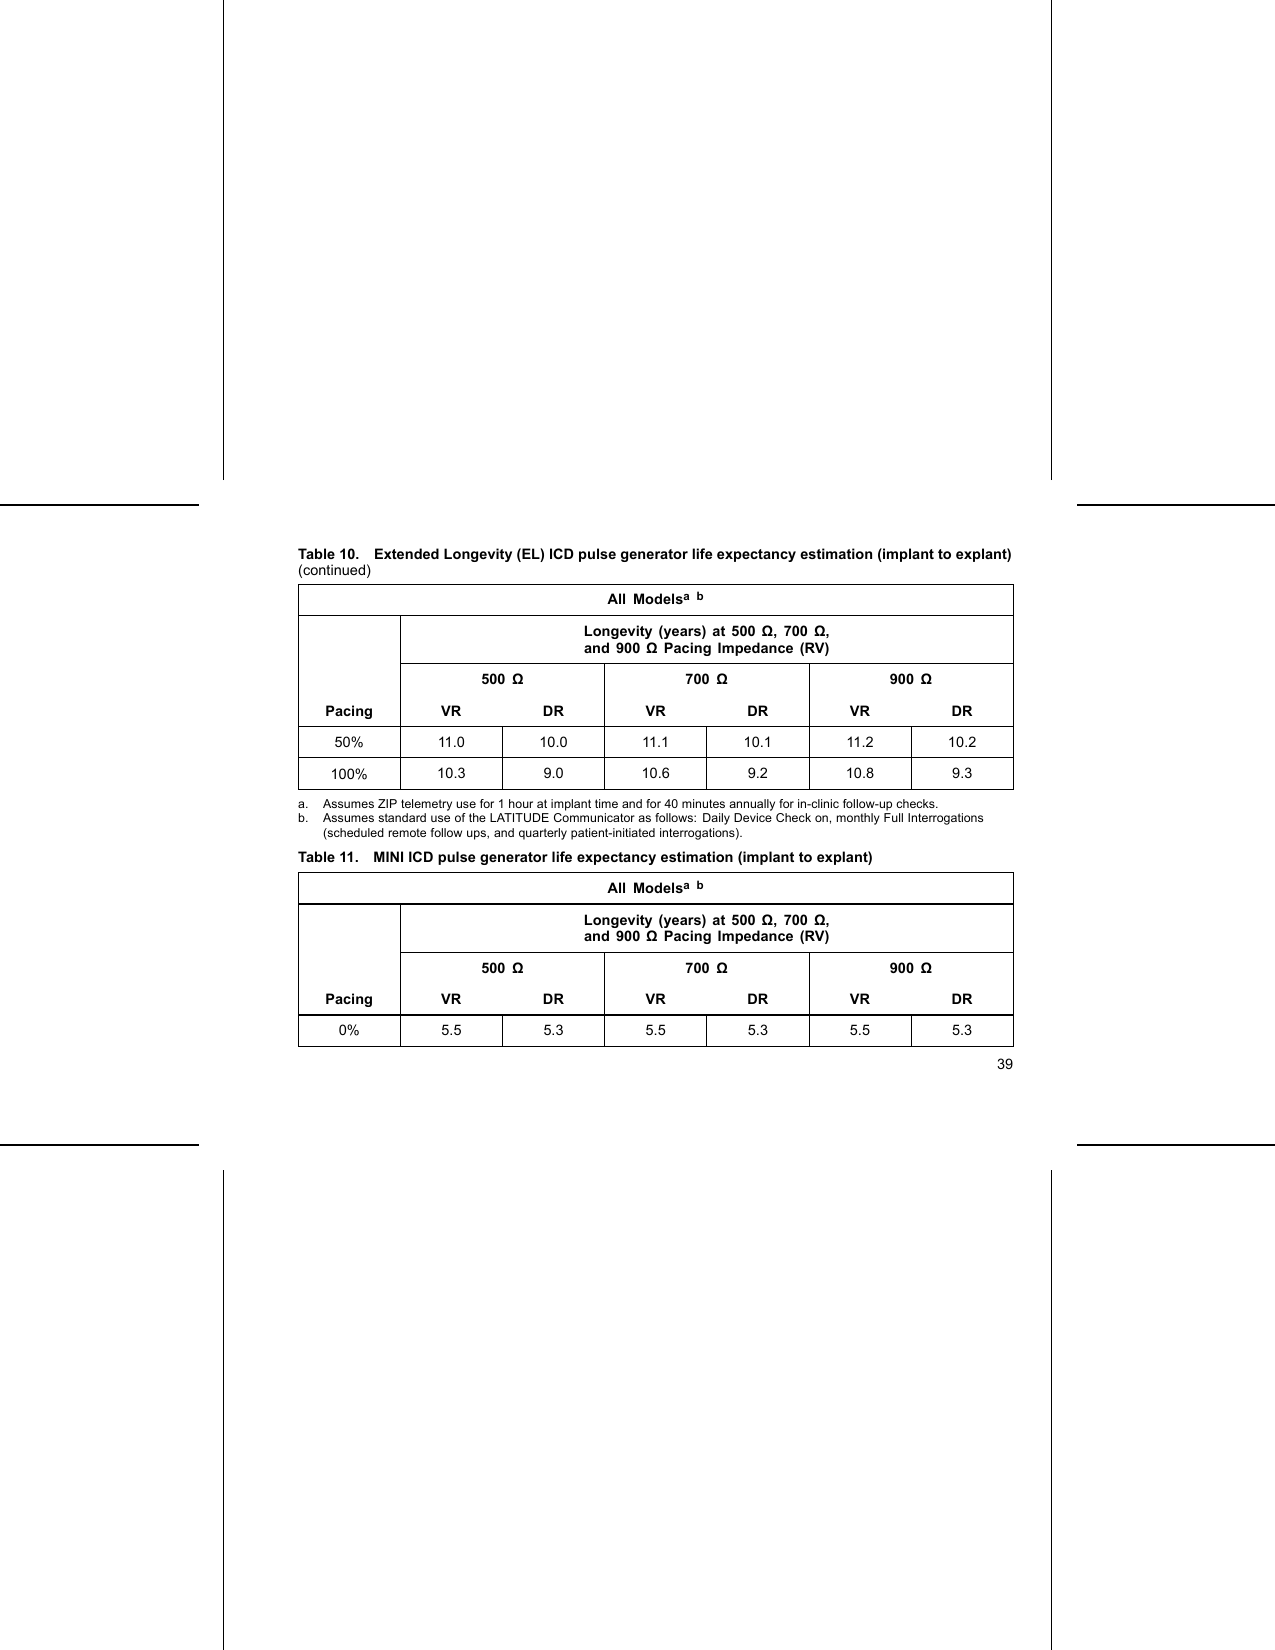
Table 10. Extended Longevity (EL) ICD pulse generator life expectancy estimation (implant to explant)(continued)All ModelsabLongevity (years) at 500 Ω, 700 Ω,and 900 ΩPacing Impedance (RV)500 Ω700 Ω900 ΩPacing VR DR VR DR VR DR50% 11.0 10.0 11.1 10.1 11.2 10.2100% 10.3 9.0 10.6 9.2 10.8 9.3a. Assumes ZIP telemetry use for 1 hour at implant time and for 40 minutes annually for in-clinic follow-up checks.b. Assumes standard use of the LATITUDE Communicator as follows: Daily Device Check on, monthly Full Interrogations(scheduled remote follow ups, and quarterly patient-initiated interrogations).Table 11. MINI ICD pulse generator life expectancy estimation (implant to explant)All ModelsabLongevity (years) at 500 Ω, 700 Ω,and 900 ΩPacing Impedance (RV)500 Ω700 Ω900 ΩPacing VR DR VR DR VR DR0% 5.5 5.3 5.5 5.3 5.5 5.339
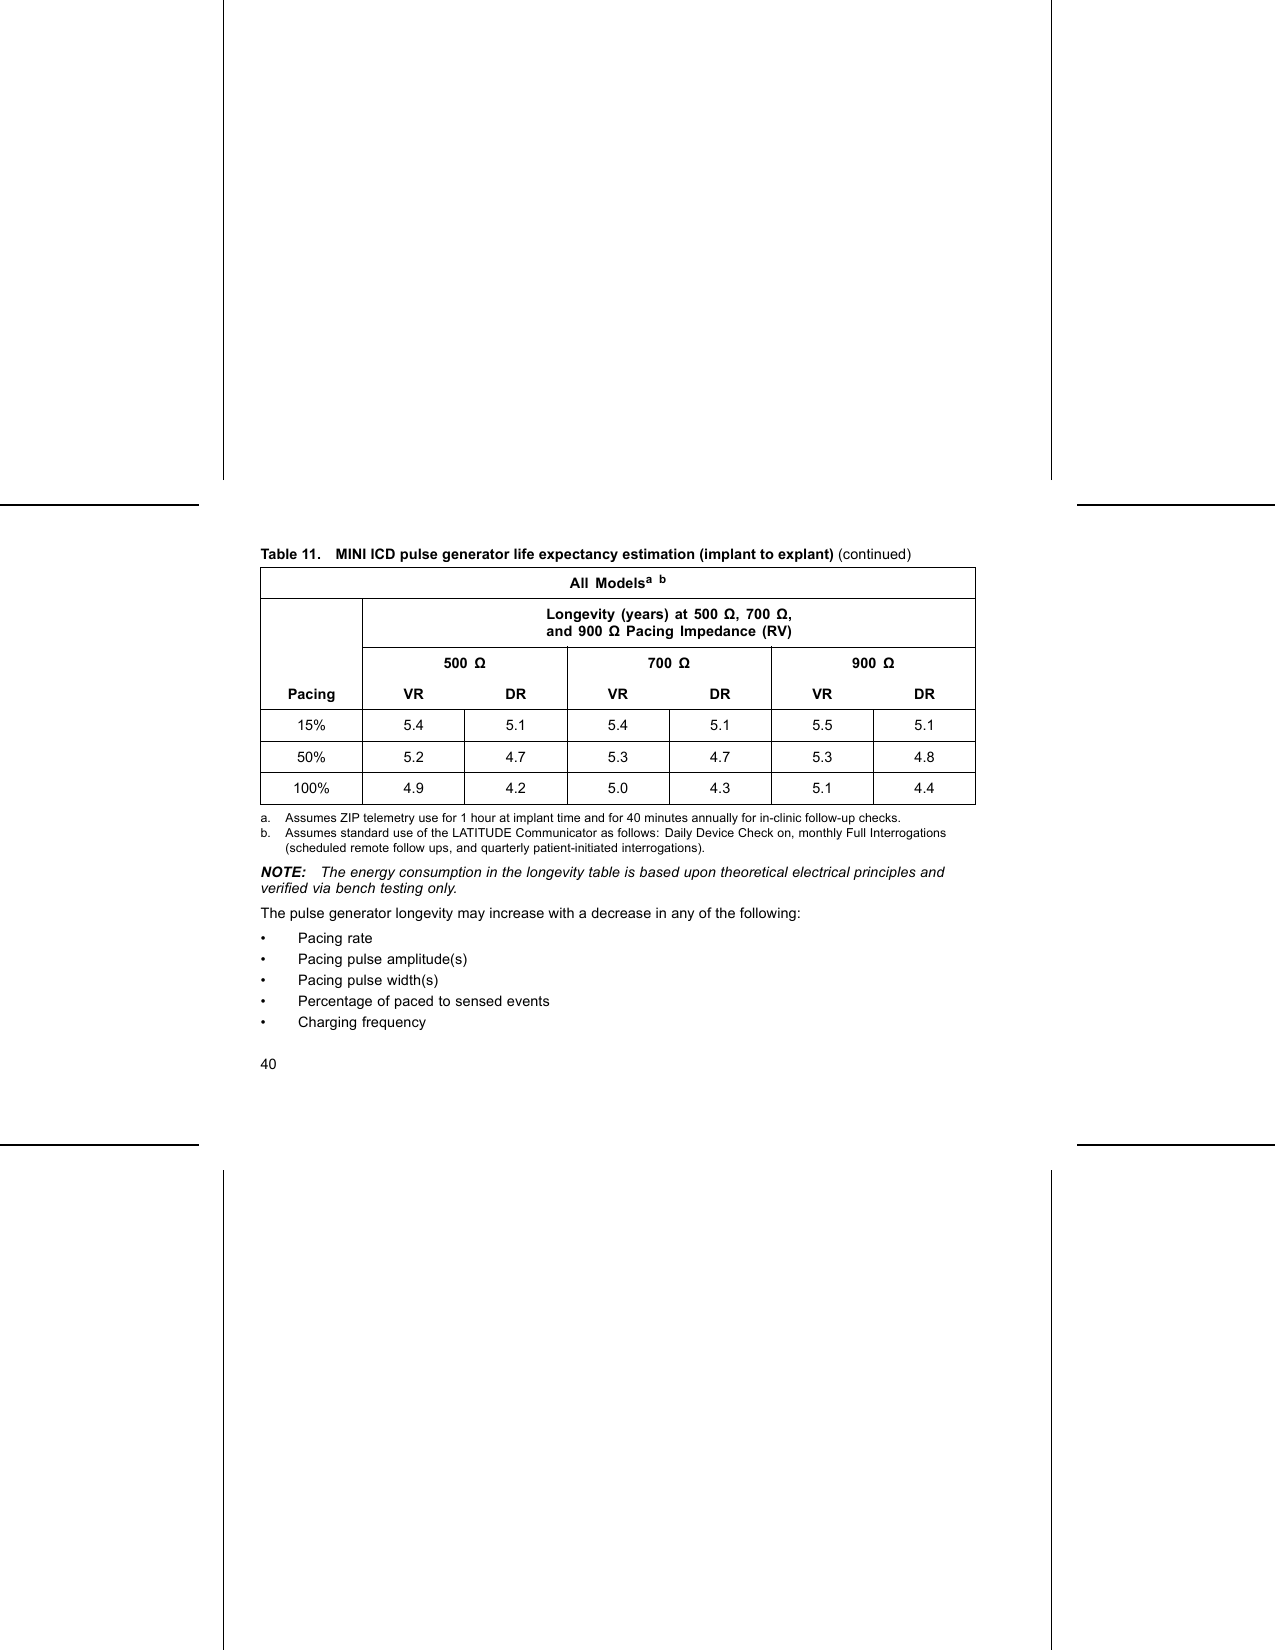
Table 11. MINI ICD pulse generator life expectancy estimation (implant to explant) (continued)All ModelsabLongevity (years) at 500 Ω, 700 Ω,and 900 ΩPacing Impedance (RV)500 Ω700 Ω900 ΩPacing VR DR VR DR VR DR15% 5.4 5.1 5.4 5.1 5.5 5.150% 5.24.75.34.75.34.8100% 4.94.25.04.35.14.4a. Assumes ZIP telemetry use for 1 hour at implant time and for 40 minutes annually for in-clinic follow-up checks.b. Assumes standard use of the LATITUDE Communicator as follows: Daily Device Check on, monthly Full Interrogations(scheduled remote follow ups, and quarterly patient-initiated interrogations).NOTE: The energy consumption in the longevity table is based upon theoretical electrical principles andverified via bench testing only.The pulse generator longevity may increase with a decrease in any of the following:• Pacing rate• Pacing pulse amplitude(s)• Pacing pulse width(s)• Percentage of paced to sensed events• Charging frequency40
Longevity is also affected in the following circumstances:• A decrease in pacing impedance may reduce longevity.• For Extended Longevity (EL) devices, when the Respiratory Sensor is programmed Off for the life of thedevice, longevity is increased by approximately 4.5 months.• For MINI devices, when the Respiratory Sensor is programmed Off for the life of the device, longevity isincreased by approximately 2 months.• When Patient Triggered Monitor is programmed to On for 60 days, longevity is reduced by approximately5 days.• One hour of additional telemetry reduces longevity by approximately 9 days.• Five patient-initiated LATITUDE Communicator interrogations per week for a year reduces longevity byapproximately 39 days.• For Extended Longevity (EL) devices, an additional maximum-energy shock reduces longevity byapproximately 21 days.• For MINI devices, an additional maximum-energy shock reduces longevity by approximately 23 days.• An additional 6 months in Storage mode prior to implant will reduce longevity by 54 days. Assumesimplanted settings of 60 ppm LRL, 2.5 V pacing pulse Amplitude and 0.4 ms pacing Pulse Width; 500 pacing Impedance; 50% pacing.Device longevity may also be affected by:• Tolerances of electronic components• Variations in programmed parameters• Variations in usage as a result of patient conditionRefer to the PRM Summary and Battery Detail Summary screens for an estimate of pulse generator longevityspecific to the implanted device.41
WARRANTY INFORMATIONA limited warranty certificate for the pulse generator is available at www.bostonscientific.com. For a copy,contact Boston Scientific using the information on the back cover.PRODUCT RELIABILITYIt is Boston Scientific’s intent to provide implantable devices of high quality and reliability. However, thesedevices may exhibit malfunctions that may result in lost or compromised ability to deliver therapy. Thesemalfunctions may include the following:• Premature battery depletion• Sensing or pacing issues• Inability to shock• Error codes• Loss of telemetryRefer to Boston Scientific’s CRM Product Performance Report on www.bostonscientific.com for moreinformation about device performance, including the types and rates of malfunctions that these devices haveexperienced historically. While historical data may not be predictive of future device performance, such datacan provide important context for understanding the overall reliability of these types of products.Sometimes device malfunctions result in the issuance of product advisories. Boston Scientific determines theneed to issue product advisories based on the estimated malfunction rate and the clinical implication of themalfunction. When Boston Scientific communicates product advisory information, the decision whether toreplace a device should take into account the risks of the malfunction, the risks of the replacement procedure,and the performance to date of the replacement device.42
PATIENT COUNSELING INFORMATIONThe following topics should be discussed with the patient prior to discharge.• External defibrillation—the patient should contact their physician to have their pulse generator systemevaluated if they receive external defibrillation• Beeping tones—the patient should contact their physician immediately if they hear tones coming fromtheir pulse generator• Signs and symptoms of infection• Symptoms that should be reported (e.g., sustained high-rate pacing requiring reprogramming)• Protected environments—the patient should seek medical guidance before entering areas protected by awarning notice that prevents entry by patients who have a pulse generator• Avoiding potential sources of EMI in home, work, and medical environments• Persons administering CPR—the presence of voltage (tingling) on the patient’s body surface may beexperienced when the pulse generator delivers a shock• Reliability of their pulse generator ("Product Reliability" on page 42)• Activity restrictions (if applicable)• Minimum heart rate (lower rate limit of the pulse generator)• Frequency of follow up• Travel or relocation—Follow-up arrangements should be made in advance if the patient is leaving thecountry of implant• Patient ID card—the patient should be advised to carry their patient ID card at all times (a temporarypatient ID card is provided with the device, and a permanent ID card will be sent to the patient 4 to 6weeks after the implant form is received by Boston Scientific)43
Patient HandbookThe Patient Handbook is provided for each device.It is recommended that you discuss the information in the Patient Handbook with concerned individuals bothbefore and after implantation so they are fully familiar with pulse generator operation.For additional copies, contact Boston Scientific using the information on the back cover.LEAD CONNECTIONSLead connections are illustrated below.CAUTION: Prior to implantation, confirm the lead-to-pulse generator compatibility. Using incompatible leadsand pulse generators can damage the connector and/or result in potential adverse consequences, such asundersensing of cardiac activity or failure to deliver necessary therapy.44
435DF4-LLHHIS-1 BIRVRA12[1] RA: White [2] RV: Red [3] RA (-) [4] Suture Holes [5] RV (-)Figure 2. Lead connections and setscrew locations, RA: IS-1, RV: DF4-LLHH32DF4-LLHH RV1[1] RV: Red [2] RV (-) [3] Suture HolesFigure 3. Lead connections and setscrew locations, RV: DF4-LLHH45
95678IS-1 BI RV–+RADF-1DF-1IS-1 BI1 24 3[1] Defib(-): Red[2]Defib (+): Blue [3] RA: White [4] RV: White [5] Defib(+)[6]Defib (-) [7] RA (-) [8]RV (-) [9] Suture HoleFigure 4. Lead connections and setscrew locations, RA: IS-1, RV: IS-1/DF-146
7456IS-1 BI RV–+DF-1DF-1123[1] Defib(-):Red[2]Defib(+): Blue[3]RV:White[4]Defib(+)[5]Defib (-) [6] RV (-) [7] Suture HoleFigure 5. Lead connections and setscrew locations, RV: IS-1/DF-1NOTE: The pulse generator case is used as a defibrillating electrode unless the pulse generator has beenprogrammed to the Distal Coil to Proximal Coil (or “Cold Can”) Shock Vector.IMPLANTING THE PULSE GENERATORImplant the pulse generator by performing the following steps in the sequence provided. Some patientsmay require pacing therapies immediately upon connecting the leads to the pulse generator. In such cases,consider programming the pulse generator before or in parallel with implanting the lead system and formingthe implantation pocket.Step A: Check EquipmentIt is recommended that instrumentation for cardiac monitoring, defibrillation, and lead signal measurementshould be available during the implant procedure. This includes the PRM system with its related accessories47
and the software application. Before beginning the implantation procedure, become completely familiar with theoperation of all the equipment and the information in the respective operator’s and user’s manuals. Verify theoperational status of all equipment that may be used during the procedure. In case of accidental damage orcontamination, the following should be available:• Sterile duplicates of all implantable items• Sterile wand• Sterile PSA cables• Torque and non-torque wrenchesDuring the implantation procedure, always have a standard transthoracic defibrillator with external pads orpaddles available for use during defibrillation threshold testing.Step B: Interrogate and Check the Pulse GeneratorTo maintain sterility, test the pulse generator as described below before opening the sterile blister tray. Thepulse generator should be at room temperature to ensure accurately measured parameters.1. Interrogate the pulse generator using the PRM. Verify that the pulse generator’s Tachy Mode isprogrammed to Storage. If otherwise, contact Boston Scientific using the information on the back cover.2. Perform a manual capacitor re-formation.3. Review the pulse generator’s current battery status. Counters should be at zero. If the pulse generatorbattery status is not at full capacity, do not implant the pulse generator. Contact Boston Scientificusingthe information on the back cover.Step C: Implant the Lead SystemThe pulse generator requires a lead system for sensing, pacing, and delivering shocks. The pulse generatorcanuseitscaseasadefibrillating electrode.48
Selection of lead configuration and specific surgical procedures is a matter of professional judgment. Thefollowing leads are available for use with the pulse generator depending on the device model.• ENDOTAK endocardial cardioversion/defibrillation and pacing lead system• Ventricular endocardial bipolar lead• Atrial bipolar lead• Superior vena cava lead coupled with a ventricular patch lead• Two-patch epicardial leads configurationCAUTION: The absence of a lead or plug in a lead port may affect device performance. If a lead is not used,be sure to properly insert a plug in the unused port, and then tighten the setscrew onto the plug.CAUTION: Do not suture directly over the lead body, as this may cause structural damage. Use the suturesleeve to secure the lead proximal to the venous entry site to prevent lead movement.Whichever lead configuration is used for both pacing/sensing and defibrillating, several considerations andcautions should be heeded. Factors such as cardiomegaly or drug therapy may necessitate repositioning of thedefibrillating leads or substituting one lead for another to facilitate arrhythmia conversion. In some instances,no lead configuration may be found that provides reliable arrhythmia termination at energy levels available fromthe pulse generator. Implantation of the pulse generator is not recommended in these cases.Implant the leads via the surgical approach chosen.NOTE: Should lead performance changes occur which cannot be resolved with programming, the leadmay need to be replaced if no adapter is available.Step D: Take Baseline MeasurementsOnce the leads are implanted, take baseline measurements. Evaluate the lead signals. If performing a pulsegenerator replacement procedure, existing leads should be reevaluated, (e.g., signal amplitudes, pacing49
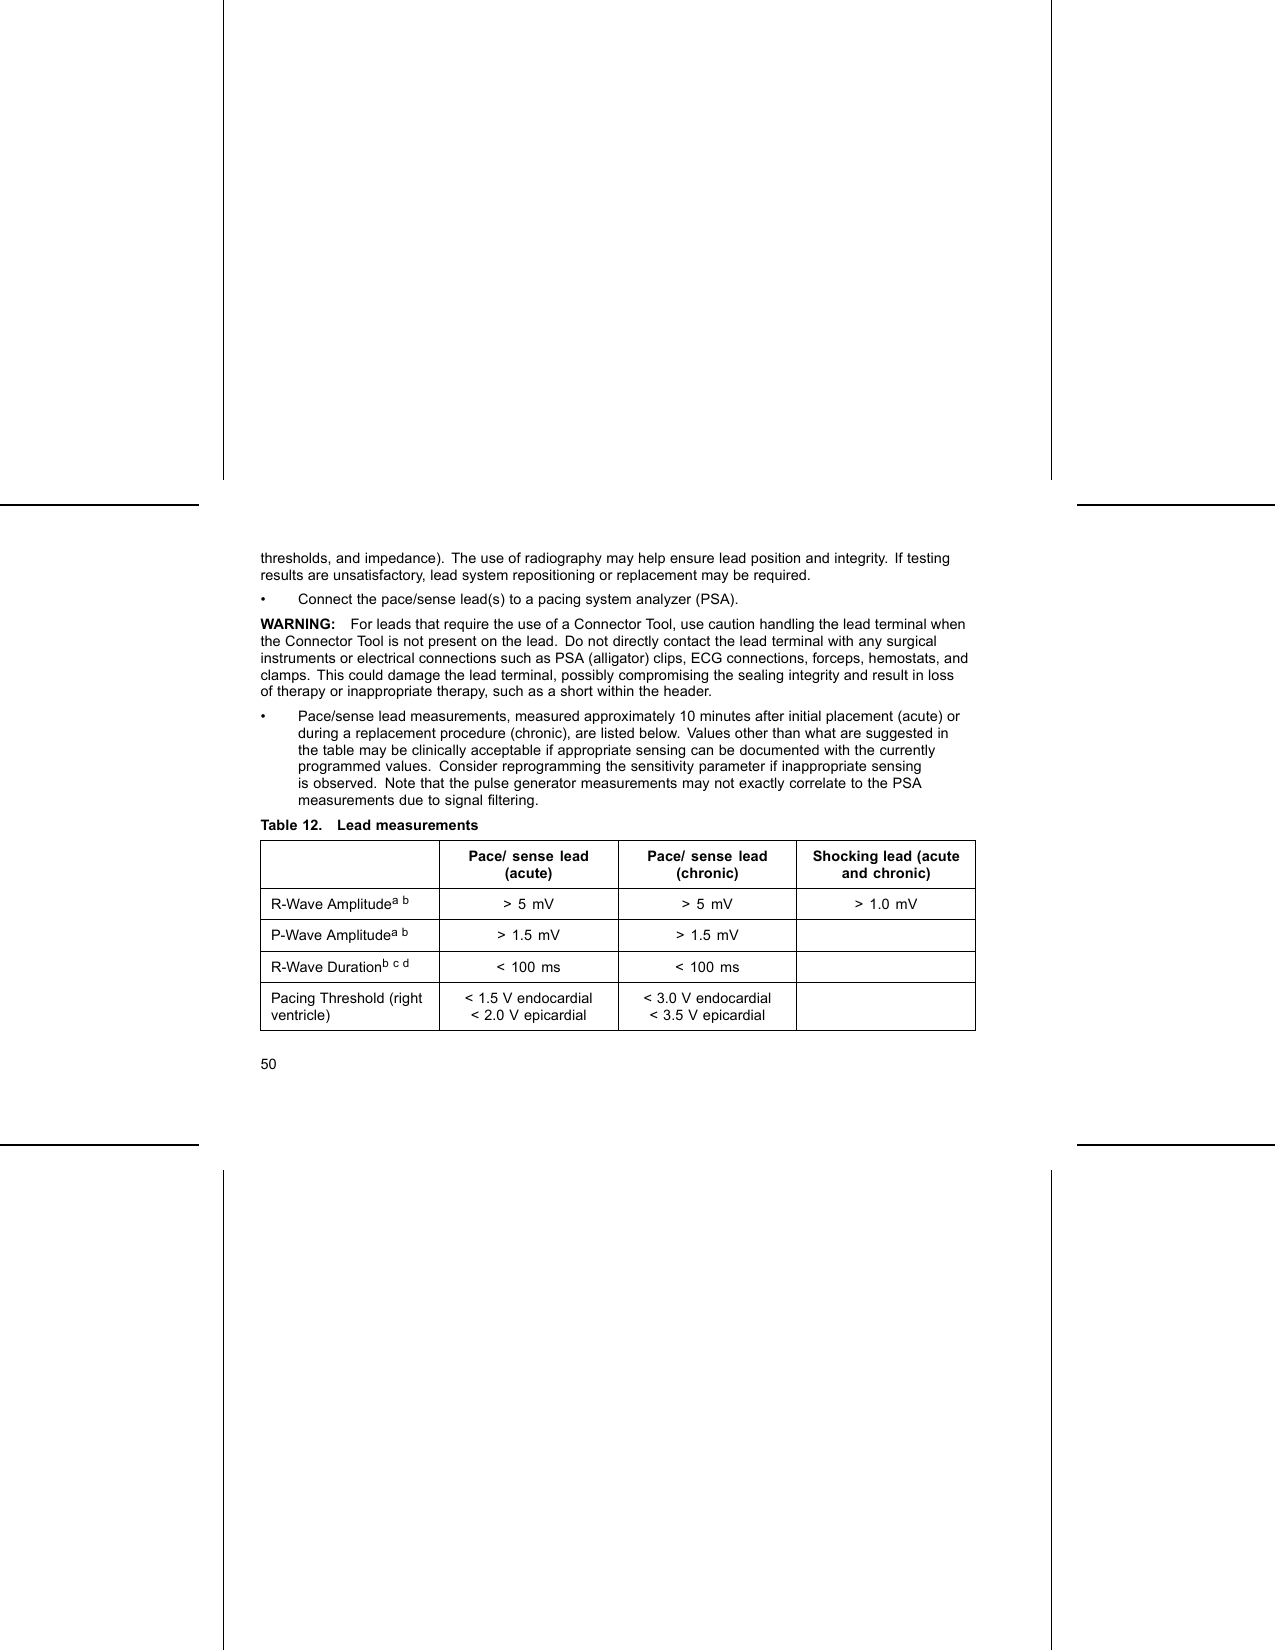
thresholds, and impedance). The use of radiography may help ensure lead position and integrity. If testingresults are unsatisfactory, lead system repositioning or replacement may be required.• Connect the pace/sense lead(s) to a pacing system analyzer (PSA).WARNING: For leads that require the use of a Connector Tool, use caution handling the lead terminal whenthe Connector Tool is not present on the lead. Do not directly contact the lead terminal with any surgicalinstruments or electrical connections such as PSA (alligator) clips, ECG connections, forceps, hemostats, andclamps. This could damage the lead terminal, possibly compromising the sealing integrity and result in lossof therapy or inappropriate therapy, such as a short within the header.• Pace/sense lead measurements, measured approximately 10 minutes after initial placement (acute) orduring a replacement procedure (chronic), are listed below. Values other than what are suggested inthe table may be clinically acceptable if appropriate sensing can be documented with the currentlyprogrammed values. Consider reprogramming the sensitivity parameter if inappropriate sensingis observed. Note that the pulse generator measurements may not exactly correlate to the PSAmeasurements due to signal filtering.Table 12. Lead measurementsPace/ sense lead(acute)Pace/ sense lead(chronic)Shocking lead (acuteand chronic)R-Wave Amplitudeab > 5 mV > 5 mV > 1.0 mVP-Wave Amplitudeab > 1.5 mV > 1.5 mVR-Wave Durationbcd < 100 ms < 100 msPacing Threshold (rightventricle)< 1.5 V endocardial< 2.0 V epicardial< 3.0 V endocardial<3.5Vepicardial50
Table 12. Lead measurements (continued)Pace/ sense lead(acute)Pace/ sense lead(chronic)Shocking lead (acuteand chronic)Pacing Threshold(atrium)< 1.5 V endocardial < 3.0 V endocardialLead impedance (at 5.0V and 0.5 ms atrium andright ventricle)e> programmed LowImpedance Limit(200–500 )< programmed HighImpedance Limit(2000–3000 )> programmed LowImpedance Limit(200–500 )< programmed HighImpedance Limit(2000–3000 )>20<programmedHighImpedance Limit(125–200 )a. Amplitudes less than 2 mV cause inaccurate rate counting in the chronic state, and result in inability to sense atachyarrhythmia or the misinterpretation of a normal rhythm as abnormal.b. Lower R-wave amplitudes and longer duration may be associated with placement in ischemic or scarred tissues. Since signalquality may deteriorate chronically, efforts should be made to meet the above criteria by repositioning the leads to obtainsignals with the largest possible amplitude and shortest duration.c. Durations longer than 135 ms (the pulse generator’s refractory period) may result in inaccurate cardiac rate determination,inability to sense a tachyarrhythmia, or in the misinterpretation of a normal rhythm as abnormal.d. This measurement is not inclusive of current of injury.e. Changes in the defibrillation electrode surface area, such as changing from a triad configuration to a single coil configuration,can affect the impedance measurements. Baseline defibrillation impedance measurements should fall within therecommended values indicated in the table.Step E: Form the Implantation PocketUsing standard operating procedures to prepare an implantation pocket, choose the position of the pocketbased on the implanted lead configuration and the patient’s body habitus. Giving consideration to patientanatomy and pulse generator size and motion, gently coil any excess lead and place adjacent to the pulse51
generator. It is important to place the lead into the pocket in a manner that minimizes lead tension, twisting,sharp angles, and/or pressure. Pulse generators are typically implanted subcutaneously in order to minimizetissue trauma and facilitate explant. However, deeper implantation (e.g., subpectoral) may help avoid erosionor extrusion in some patients.If an abdominal implant is suitable, it is recommended that implantation occur on the left abdominal side.If it is necessary to tunnel the lead, consider the following:WARNING: For leads that require the use of a Connector Tool, use caution handling the lead terminal whenthe Connector Tool is not present on the lead. Do not directly contact the lead terminal with any surgicalinstruments or electrical connections such as PSA (alligator) clips, ECG connections, forceps, hemostats, andclamps. This could damage the lead terminal, possibly compromising the sealing integrity and result in lossof therapy or inappropriate therapy, such as a short within the header.WARNING: Do not contact any other portion of the DF4–LLHH or DF4–LLHO lead terminal, other than theterminal pin, even when the lead cap is in place.• If a compatible tunneler is not used, cap the lead terminal pins. A Penrose drain, large chest tube, ortunneling tool may be used to tunnel the leads.• For DF4-LLHH or DF4-LLHO leads, if a compatible tunneling tip and/or tunneler kit is not used, cap thelead terminal and grip only the terminal pin with a hemostat or equivalent.• Gently tunnel the leads subcutaneously to the implantation pocket, if necessary.• Reevaluate all lead signals to determine if any of the leads have been damaged during the tunnelingprocedure.If the leads are not connected to a pulse generator at the time of lead implantation, they must be cappedbefore closing the incision.52
Step F: Connect the Leads to the Pulse GeneratorTo connect leads to the pulse generator, use only the tools provided in the pulse generator sterile tray oraccessory kit. Failure to use the supplied torque wrench may result in damage to the setscrews, seal plugs, orconnector threads. Do not implant the pulse generator if the seal plugs appear to be damaged. Retain the toolsuntil all testing procedures are complete and the pulse generator is implanted.NOTE: Some patients may require pacing therapies immediately upon connecting the leads to the pulsegenerator. In such cases, consider programming the pulse generator before continuing.Leads should be connected to the pulse generator in the following sequence (for pulse generator header andsetscrew location illustrations, refer to "Lead Connections" on page 44):a. Right ventricle. Connect the RV lead first because it is required to establish RV-based timing cycles thatyield appropriate sensing and pacing in all chambers, regardless of the programmed configuration.• In models with an IS-1 RV lead port, insert and secure the terminal pin of an IS-1 RV pace/senselead.• In models with a DF4-LLHH RV lead port, insert and secure the terminal pin of a DF4-LLHH orDF4-LLHO lead.b. Right atrium.• In models with an IS-1 RA lead port, insert and secure the terminal pin of an IS-1 atrial pace/senselead.c. Defibrillation lead.• In models with DF-1 lead ports, first insert and secure the defibrillation lead anode (+, proximal) intothe (+) DF-1 lead port. Then insert and secure the lead cathode (–, distal) into the (–) DF-1 lead port.53
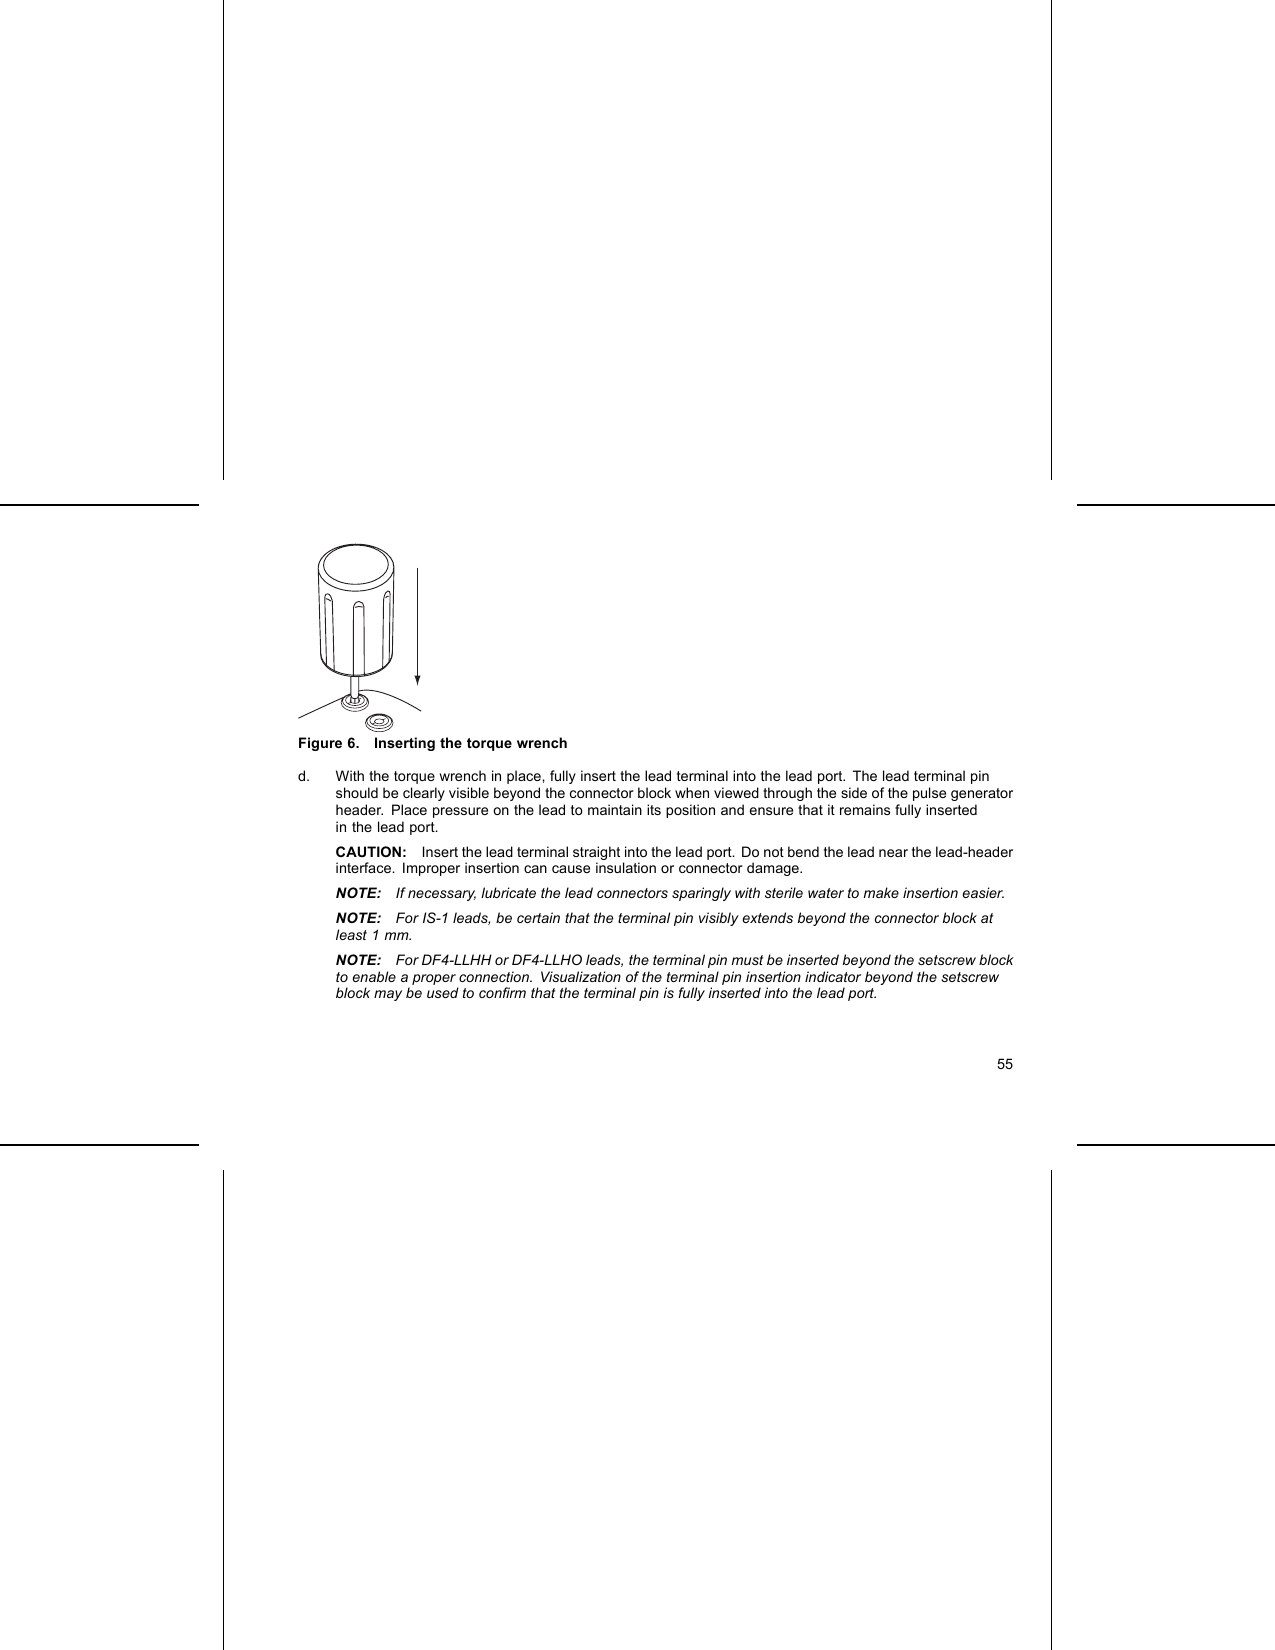
CAUTION: For IS-1/DF-1 leads, never change the shock waveform polarity by physically switching the leadanodes and cathodes in the pulse generator header—use the programmable Polarity feature. Device damageor nonconversion of the arrhythmia post-operatively may result if the polarity is switched physically.Connect each lead to the pulse generator by following these steps (for additional information about the torquewrench, refer to "Bidirectional Torque Wrench" on page 63):a. Check for the presence of any blood or other body fluids in the lead ports on the pulse generator header.If fluid inadvertently enters the ports, clean them thoroughly with sterile water.b. If applicable, remove and discard the tip protection before using the torque wrench.c. Gently insert the torque wrench blade into the setscrew by passing it through the preslit, centerdepression of the seal plug at a 90° angle (Figure 6 on page 55). This will open up the seal plug, relievingany potential pressure build-up from the lead port by providing a pathway to release trapped fluid or air.NOTE: Failure to properly insert the torque wrench in the preslit depression of the seal plug may resultin damage to the plug and its sealing properties.CAUTION: Do not insert a lead into the pulse generator connector without taking the followingprecautions to ensure proper lead insertion:• Insert the torque wrench into the preslit depression of the seal plug before inserting the lead into theport, to release any trapped fluid or air.• Visually verify that the setscrew is sufficiently retracted to allow insertion. Use the torque wrenchto loosen the setscrew if necessary.• Fully insert each lead into its lead port and then tighten the setscrew onto the terminal pin.54
Figure 6. Inserting the torque wrenchd. With the torque wrench in place, fully insert the lead terminal into the lead port. The lead terminal pinshould be clearly visible beyond the connector block when viewed through the side of the pulse generatorheader. Place pressure on the lead to maintain its position and ensure that it remains fully insertedin the lead port.CAUTION: Insert the lead terminal straight into the lead port. Do not bend the lead near the lead-headerinterface. Improper insertion can cause insulation or connector damage.NOTE: If necessary, lubricate the lead connectors sparingly with sterile water to make insertion easier.NOTE: For IS-1 leads, be certain that the terminal pin visibly extends beyond the connector block atleast 1 mm.NOTE: For DF4-LLHH or DF4-LLHO leads, the terminal pin must be inserted beyond the setscrew blockto enable a proper connection. Visualization of the terminal pin insertion indicator beyond the setscrewblock may be used to confirm that the terminal pin is fully inserted into the lead port.55
e. Apply gentle downward pressure on the torque wrench until the blade is fully engaged within the setscrewcavity, taking care to avoid damage to the seal plug. Tighten the setscrew by slowly turning the torquewrench clockwise, until it ratchets once. The torque wrench is preset to apply the proper amount of forceto the captive setscrew; additional rotation and force is unnecessary.f. Remove the torque wrench.g. Apply gentle traction to the lead to ensure a secure connection.h. If the lead terminal is not secure, attempt to reseat the setscrew. Reinsert the torque wrench as describedabove, and loosen the setscrew by slowly turning the wrench counterclockwise, until the lead is loose.Then repeat the sequence above.i. If a lead port is not used, insert a plug into the unused port and tighten the setscrew.CAUTION: The absence of a lead or plug in a lead port may affect device performance. If a lead is notused, be sure to properly insert a plug in the unused port, and then tighten the setscrew onto the plug.Step G: Evaluate Lead Signals1. Take the pulse generator out of power-saving Storage mode by programming the Tachy Mode to Off.CAUTION: To prevent inappropriate shocks, ensure that the pulse generator’s Tachy Mode is programmed toOff when not in use and before handling the device. For tachyarrhythmia detection and therapy, verify that theTachy Mode is programmed to Monitor + Therapy.2. Evaluate the pace/sense and defibrillation lead signals by viewing the real-time EGMs and markers. Thesignal from the implanted defibrillation leads should be continuous and without artifact, similar to abody-surface ECG. A discontinuous signal may indicate a poor connection, lead fracture or otherwisedamaged lead, or an insulation break that would necessitate lead replacement. Inadequate signals mayresult in failure of the pulse generator system to detect an arrhythmia, inability to deliver programmedtherapy, or unnecessary delivery of therapy. Lead measurements should reflect those above (Table 12 onpage 50).56
CAUTION: Take care to ensure that artifacts from the ventricles are not present on the atrial channel, oratrial oversensing may result. If ventricular artifacts are present in the atrial channel, the atrial lead mayneed to be repositioned to minimize its interaction.3. Evaluate all lead impedances.CAUTION: If total shocking lead impedance during implant is less than 20 , verify the proximal coil is notin contact with the pulse generator surface. A measurement of less than 20 is an indication of a shortsomewhere in the system. If repeated measurements show the total shocking lead impedance is less than20 , the lead and/or pulse generator may need to be replaced.The High Impedance Limit is nominally set to 2000 , and is programmable between 2000 and 3000 in250 increments. The Low Impedance Limit is nominally set to 200 , and is programmable between 200and 500 in 50 increments. Consider the following factors when choosing a value for the High and LowImpedance Limits:• For chronic leads, historical impedance measurements for the lead, as well as other electricalperformance indicators such as stability over time• For newly implanted leads, the starting measured impedance valueNOTE: Depending on lead maturation effects, during follow-up testing the physician may choose to reprogramthe High or Low Impedance Limits.• Pacing dependence of the patient• Recommended impedance range for the lead(s) being used, if availableThe Shock Low Impedance Limit is fixed at 20 . The Shock High Impedance Limit is nominally set to 125, and is programmable between 125 and 200 in 25 increments. Consider the following factors whenchoosing a value for the High Impedance Limits:• For chronic leads, historical impedance measurements for the lead, as well as other electricalperformance indicators such as stability over time57
• For newly implanted leads, the starting measured impedance valueNOTE: Depending on lead maturation effects, during follow-up testing the physician may choose toreprogram the High Impedance Limits.• Recommended impedance range for the lead(s) being used, if available• The impedance value of a high or maximum energy shock impedance testShocking lead impedance readings between 20 and the programmed High Impedance Limit are consideredin-range. If abrupt or large impedance fluctuations or out-of-range conditions are observed, consider thefollowing:• Verify the configuration—ensure the programmed Shock Vector matches the configuration of theimplanted lead (e.g., use RV Coil to Can with a single-coil lead).• Verify the connection—ensure the shocking lead’s terminal pins are placed in the correct lead portsand verify a secure lead connection.• Verify the contact—ensure the device is inside a wet implant pocket since the pulse generator caseserves as an active electrode in the V-TRIAD configuration. Avoid pocket manipulation during the test.• Turn off sources of external noise (e.g., electrocautery equipment, monitors).• Use other troubleshooting tools, as needed, to further assess lead system integrity, including electrogramanalysis, X-ray or fluoroscopic image review, or internal visual inspection.NOTE: Because this device uses a subthreshold test pulse to conduct shock lead impedance measurements,it can be difficult to measure responses to test signals when electrical interference or “noise” (e.g.,electrocautery or external monitoring equipment attached directly to the patient) is present during the test. Thismay result in impedance measurement variations, particularly at implant. In the absence of such electricalinterference, shock lead impedance readings will be more stable.58
Step H: Program the Pulse Generator1. Check the Programmer Clock and set and synchronize the pulse generator as necessary so that theproper time appears on printed reports and PRM strip chart recordings.2. It may be useful to program the Beep During Capacitor Charge feature to On during conversion testingand implantation to help recognize when the pulse generator is charging to deliver a shock.3. Perform a manual capacitor re-formation if not already performed.4. Program the pulse generator appropriately if a lead port(s) is not used.5. Program the pulse generator to desired parameters appropriate for the patient for conversion testing.CAUTION: To prevent inappropriate shocks, ensure that the pulse generator’s Tachy Mode is programmed toOff when not in use and before handling the device. For tachyarrhythmia detection and therapy, verify that theTachy Mode is programmed to Monitor + Therapy.Step I: Test for Ability to Convert Ventricular Fibrillation and Inducible ArrhythmiasAfter obtaining acceptable signals from the implanted leads, the physician may choose to perform VT and VFconversion testing to determine (1) if the configuration and position of the implanted leads are appropriatefor the patient and (2) if the pulse generator’s programmed shock energy or maximum-shock energy willbe sufficient to convert arrhythmias reliably and (3) if AGC and RhythmMatch Threshold are programmedappropriately to detect VF/VT. A conversion test consists of inducing the arrhythmia and then attempting toconvert the arrhythmia with a preselected energy level.Demonstrating conversion of ventricular fibrillation is suggested before implanting a pulse generator because ashock delivered during ventricular tachycardia has the potential to accelerate the arrhythmia. Intraoperativetesting may be minimized by performing only VF testing at time of implant and performing VT testingpost-operatively in the electrophysiology lab prior to the patient’s discharge.59
If the conversion is unsuccessful, the patient should be rescued using an appropriate transthoracic defibrillator.Early conversion is important because a prolonged arrhythmia may be more difficult to terminate.WARNING: Always have external defibrillation equipment available during implant and electrophysiologictesting. If not terminated in a timely fashion, an induced ventricular tachyarrhythmia can result in the patient’sdeath.NOTE: If open chest surgery is performed and a chest retractor is used, remove it before conversion testingto best simulate the ambulatory conditions in which the pulse generator will operate and to avoid potentialshunting of energy.Induce the Patient’s ArrhythmiaAn arrhythmia can be induced by using the induction features of the pulse generator.Allow the patient’s blood pressure and electrophysiologic status to return to baseline between arrhythmiainductions, whether successful or unsuccessful. It is also suggested to allow a minimum of one minute betweeninductions.During each arrhythmia induction, note the heart rate to determine the appropriate rate threshold values.Ventricular cycle lengths that occur close to but below the lowest programmed rate threshold value may bedetected as normal sinus rhythm. To provide sufficient opportunity for detection, the rate threshold value(s)should be programmed at least 10 bpm below the rate of the arrhythmia(s) that is to be treated.Perform the Induction1. Insert the pulse generator into the implantation pocket. Temporarily close the pocket enough to ensurethat the pulse generator will remain in position during conversion testing. Make sure the pulse generatorhas good contact with surrounding tissue; flush the pocket with saline solution, if necessary, to avoid adry pocket.CAUTION: Do not allow any object that is electrically conductive to come into contact with the lead ordevice during induction because it may shunt energy, resulting in less energy getting to the patient, and maydamage the implanted system.60
2. Verify magnet function and telemetry to ensure the pulse generator is within acceptable range.3. Program the appropriate parameters and change the pulse generator Tachy Mode to Monitor + Therapy.4. Perform the induction using the programmer.Determine DFTDefibrillation threshold (DFT) testing should be performed at implant to ensure adequate safety margins for theshock energy (safety margin = device maximum shocking energy minus DFT). The DFT is the minimum energytested that reliably converts VF or polymorphic VT in a series of arrhythmia trials with decreasing energy steps.To determine DFT, induce VF (or PVT or ventricular flutter if VF is not inducible). Attempt to convert thearrhythmia with a 31-J shock; if conversion is successful, then induce again and attempt to convert thearrhythmia at 29 J. Continue in this manner, decreasing the energy level until failure to convert VF occurs or 3 Jis successful. If the initial conversion at 31 J is unsuccessful, reposition the lead, or reverse polarity, or add anadditional lead. The energy level that last successfully converted the arrhythmia is the DFT. It is a matter ofclinical judgment as to what constitutes a demonstration of reliable conversion.Shocks intended for VF therapy should be programmed with a 10 J safety margin above the shock energylevel that the physician determines is required for successful VF conversion. In some situations an alternativesafety margin may be determined by the physician to be adequate above the shock energy level requiredfor successful VF conversion.NOTE: Since the results of any single test may be an example of statistical variation, a one-time conversion ofa rhythm disturbance at a particular energy level does not guarantee or assure that the energy level is reliablefor conversion. As a safety margin, it is recommended that you perform the conversion test at the DFT twotimes if the DFT is 31 J, or one time if the DFT is 29 J with no failures to convert.Step J: Implant the Pulse Generator1. Program the Tachy Mode to Off.61
2. Verify magnet function and wanded telemetry to ensure the pulse generator is within acceptable rangeto initiate interrogation.3. Ensure that the pulse generator has good contact with surrounding tissue of the implantation pocket, andthen suture it in place to minimize device migration (for suture hole location illustrations, refer to "LeadConnections" on page 44). Gently coil excess lead and place adjacent to the pulse generator. Flushthe pocket with saline solution, if necessary, to avoid a dry pocket.WARNING: Do not kink, twist, or braid the lead with other leads as doing so could cause lead insulationabrasion damage or conductor damage.4. Close the implantation pocket. Consideration should be given to place the leads in a manner to preventcontact with suture materials. It is recommended that absorbable sutures be used for closure of tissuelayers.5. Complete any electrocautery procedures before reactivating the pulse generator.6. Program the Tachy Mode to the desired setting and confirm final programmed parameters.CAUTION: Following any sensing range adjustment or any modification of the sensing lead, alwaysverify appropriate sensing. Programming Sensitivity to the highest value (lowest sensitivity) may result indelayed detection or undersensing of cardiac activity. Likewise, programming to the lowest value (highestsensitivity) may result in oversensing of non-cardiac signals.7. Use the PRM to print out parameter reports and save all patient data.Step K: Complete and Return the Implantation FormWithin ten days of implantation, complete the Warranty Validation and Lead Registration form and return theoriginal to Boston Scientific along with a copy of the patient data saved from the PRM. This information enablesBoston Scientific to register each implanted pulse generator and set of leads, and provide clinical data on theperformance of the implanted system. Keep a copy of the Warranty Validation and Lead Registration form andprogrammer printouts, and the original patient data for the patient’s file.62
Complete the temporary patient identification card and give it to the patient. After receiving the validation form,Boston Scientific sends the patient a permanent identification card.BIDIRECTIONAL TORQUE WRENCHA torque wrench (model 6628) is included in the sterile tray with the pulse generator, and is designed fortightening and loosening #2-56 setscrews, captured setscrews, and setscrews on this and other BostonScientific pulse generators and lead accessories that have setscrews that spin freely when fully retracted(these setscrews typically have white seal plugs).This torque wrench is bidirectional, and is preset to apply adequate torque to the setscrew and will ratchetwhen the setscrew is secure. The ratchet release mechanism prevents overtightening that could result indevice damage. To facilitate the loosening of tight extended setscrews, this wrench applies more torque in thecounterclockwise direction than in the clockwise direction.NOTE: As an additional safeguard, the tip of the torque wrench is designed to break off if used to overtightenbeyond preset torque levels. If this occurs, the broken tip must be extracted from the setscrew using forceps.This torque wrench may also be used for loosening setscrews on other Boston Scientific pulse generatorsand lead accessories that have setscrews that tighten against a stop when fully retracted (these setscrewstypically have clear seal plugs). However, when retracting these setscrews, stop turning the torque wrenchwhen the setscrew has come in contact with the stop. The additional counterclockwise torque of this wrenchmay cause these setscrews to become stuck if tightened against the stop.Loosening Stuck SetscrewsFollow these steps to loosen stuck setscrews:1. From a perpendicular position, tilt the torque wrench to the side 20º to 30º from the vertical center axis ofthesetscrew(Figure7onpage65).63
2. Rotate the wrench clockwise (for retracted setscrew) or counterclockwise (for extended setscrew) aroundthe axis three times, such that the handle of the wrench orbits the centerline of the screw (Figure 7 onpage 65). The torque wrench handle should not turn or twist during this rotation.3. As needed, you may attempt this up to four times with slightly more angle each time. If you cannot fullyloosen the setscrew, use the #2 torque wrench from Wrench Kit Model 6501.4. Once the setscrew has been freed, it may be extended or retracted as appropriate.5. Discard the torque wrench upon completion of this procedure.64
20°–30°[1] Clockwise rotation to free setscrews stuck in the retracted position [2] Counterclockwise rotation to freesetscrews stuck in the extended positionFigure 7. Rotating the torque wrench to loosen a stuck setscrewFOLLOW UP TESTINGIt is recommended that device functions be evaluated with periodic follow-up testing by trained personnel.Follow up guidance below will enable thorough review of device performance and associated patient healthstatus throughout the life of the device.WARNING: Ensure that an external defibrillator and medical personnel skilled in CPR are present duringpost-implant device testing should the patient require external rescue.65
Predischarge Follow UpThe following procedures are typically performed during the predischarge follow up test using PRM telemetry:1. Interrogate the pulse generator and review the Summary screen.2. Verify pacing thresholds, lead impedance, and amplitude of intrinsic signals.3. Review counters and histograms.4. When all testing is complete, perform a final interrogation and save all the patient data.5. Print the Quick Notes and Patient Data reports to retain in your files for future reference.6. Clear the counters and histograms so that the most recent data will be displayed at the next follow upsession. Counters and histograms can be cleared by pressing Reset on the Histogram screen, TachyCounters screen, or Brady Counters screen.Routine Follow UpYou should conduct routine follow up examinations one month after the predischarge check and every threemonths thereafter to evaluate device programming, therapy effectiveness, lead status, and battery status.Office visits may be supplemented by remote monitoring where available.NOTE: Because the duration of the device replacement timer is three months (starting when Explant statusis reached), three month follow up frequency is particularly important after the One Year Remaining statusis reached.Consider performing the following procedures during a routine follow-up test:1. Interrogate the pulse generator and review the Summary screen.2. Verify pacing thresholds, lead impedance, and amplitude of intrinsic signals.3. Print the Quick Notes and Patient Data reports to retain in your files for future reference.66
4. Review the Arrhythmia Logbook screen and for episodes of interest, print episode details and storedelectrogram information.5. Clear the counters and histograms so that the most recent episode data will be displayed at the nextfollow-up session.NOTE: Echo-Doppler studies may be used to non-invasively evaluate AV Delay and other programmingoptions post-implant.CAUTION: Verify with a conversion test that the patient’s tachyarrhythmias can be detected and terminatedby the pulse generator system if the patient’s status has changed or parameters have been reprogrammed.EXPLANTATIONNOTE: Return all explanted pulse generators and leads to Boston Scientific. Examination of explanted pulsegenerators and leads can provide information for continued improvement in system reliability and warrantyconsiderations.WARNING: Do not reuse, reprocess, or resterilize. Reuse, reprocessing, or resterilization may compromisethe structural integrity of the device and/or lead to device failure which, in turn, may result in patient injury,illness, or death. Reuse, reprocessing, or resterilization may also create a risk of contamination of the deviceand/or cause patient infection or cross-infection, including, but not limited to, the transmission of infectiousdisease(s) from one patient to another. Contamination of the device may lead to injury, illness, or death ofthe patient.Contact Boston Scientific when any of the following occur:• When a product is removed from service.• In the event of patient death (regardless of cause), along with an autopsy report, if performed.• For other observation or complications reasons.67
NOTE: Disposal of explanted pulse generators and/or leads is subject to applicable laws and regulations. Fora Returned Product Kit, contact Boston Scientific using the information on the back cover.NOTE: Discoloration of the pulse generator may have occurred due to a normal process of anodization,and has no effect on the pulse generator function.CAUTION: Be sure that the pulse generator is removed before cremation. Cremation and incinerationtemperatures might cause the pulse generator to explode.CAUTION: Before explanting, cleaning, or shipping the device, complete the following actions to preventunwanted shocks, overwriting of important therapy history data, and audible tones:• Program the pulse generator Tachy and Brady Modes to Off.• Program the Magnet Response feature to Off.• Program the Beep when Explant is Indicated feature to Off.• Program the Beep When Out-of-Range feature to OffClean and disinfect the device using standard biohazard handling techniques.Consider the following items when explanting and returning the pulse generator and/or lead:• Interrogate the pulse generator and print a comprehensive report.• Deactivate the pulse generator before explantation.• Disconnect the leads from the pulse generator.• If leads are explanted, attempt to remove them intact, and return them regardless of condition. Do notremove leads with hemostats or any other clamping tool that may damage the leads. Resort to toolsonly if manual manipulation cannot free the lead.• Wash, but do not submerge, the pulse generator and leads to remove body fluids and debris using adisinfectant solution. Do not allow fluids to enter the pulse generator’s lead ports.68
• Use a Boston Scientific Returned Product Kit to properly package the pulse generator and/or lead, andsend it to Boston Scientific.69
70
For additional technical reference guides, go towww.bostonscientific.com/ifu.Boston Scientific4100 Hamline Avenue NorthSt. Paul, MN 55112–5798 USAwww.bostonscientific.com1.800.CARDIAC (227.3422)+1.651.582.4000© 2013 Boston Scientific Corporation or its affiliates.All rights reserved.359050-002 EN US 2013-07FCC ID: ESCCRMG17912*359050-002*

Navigation menu