Bowflex Owner's Manual BFX Xtreme2 SE OM
Owner's Manual BFX_Xtreme2_SE_OM Bowflex Product Manuals | Bowflex
User Manual: Bowflex Owner's Manual Bowflex Product Manuals | Bowflex
Open the PDF directly: View PDF  .
.
Page Count: 68
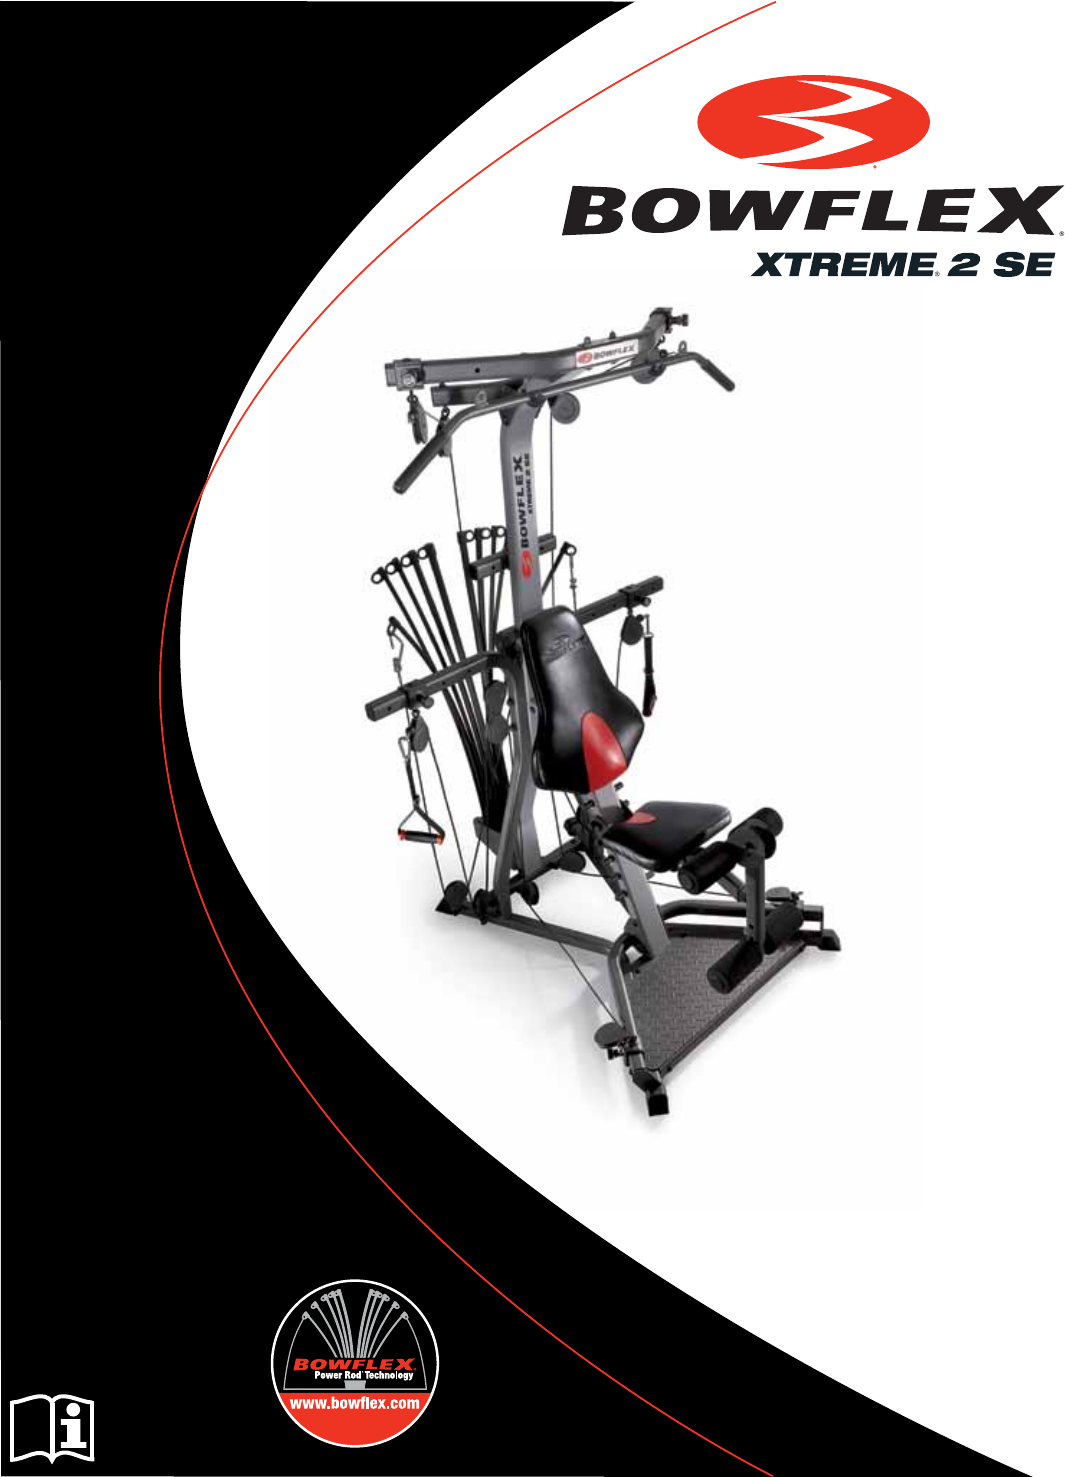
The Bowflex Xtreme® 2 SE
Home Gym
Owner’s Manual
and Fitness Guide
001-7032-013011E
CONGRATULATIONS on your commitment to improving your health and fitness! With the Bowflex Xtreme® 2 SE
home gym, you have everything you need to exceed all of your physical fitness, strength, and health expectations!
The Bowflex Xtreme® 2 SE home gym’s exceptional resistance and quality is unmatched by any other single piece
of home fitness equipment available. You will not believe the amazing results your body will get with the Bowflex
Xtreme® 2 SE home gym!
Please take your time to read through the entire manual and follow it carefully before attempting to use your
Bowflex Xtreme® 2 SE home gym. Also locate and read all warning labels that are posted on the machine. It’s
important to understand how to properly perform each exercise before you do so using Power Rod® Resistance.
With all of the fitness choices available today, finding the best workout equipment for your needs can be very
confusing. Everyone at Nautilus would like to thank you for selecting the Bowflex Xtreme® 2 SE home gym.
The Bowflex Xtreme® 2 SE home gym is the finest home fitness product available, and you’re just about to prove it
to yourself.
Serial Number
Date of Purchase
To validate warranty support, keep the original proof of
purchase and record the following information:
To register your product warranty, go to:
www.bowflex.com/register
or call 1 (800) 605–3369.

Bowflex Xtreme® 2 SE Owner’s Manual 1
Important Safety Instructions ...............................2
Product Specifications ....................................5
Getting To Know Your Machine ...........................6
How to Use Your Machine ..................................9
Maintenance .............................................12
Define Your Goals .........................................13
The Workouts ............................................16
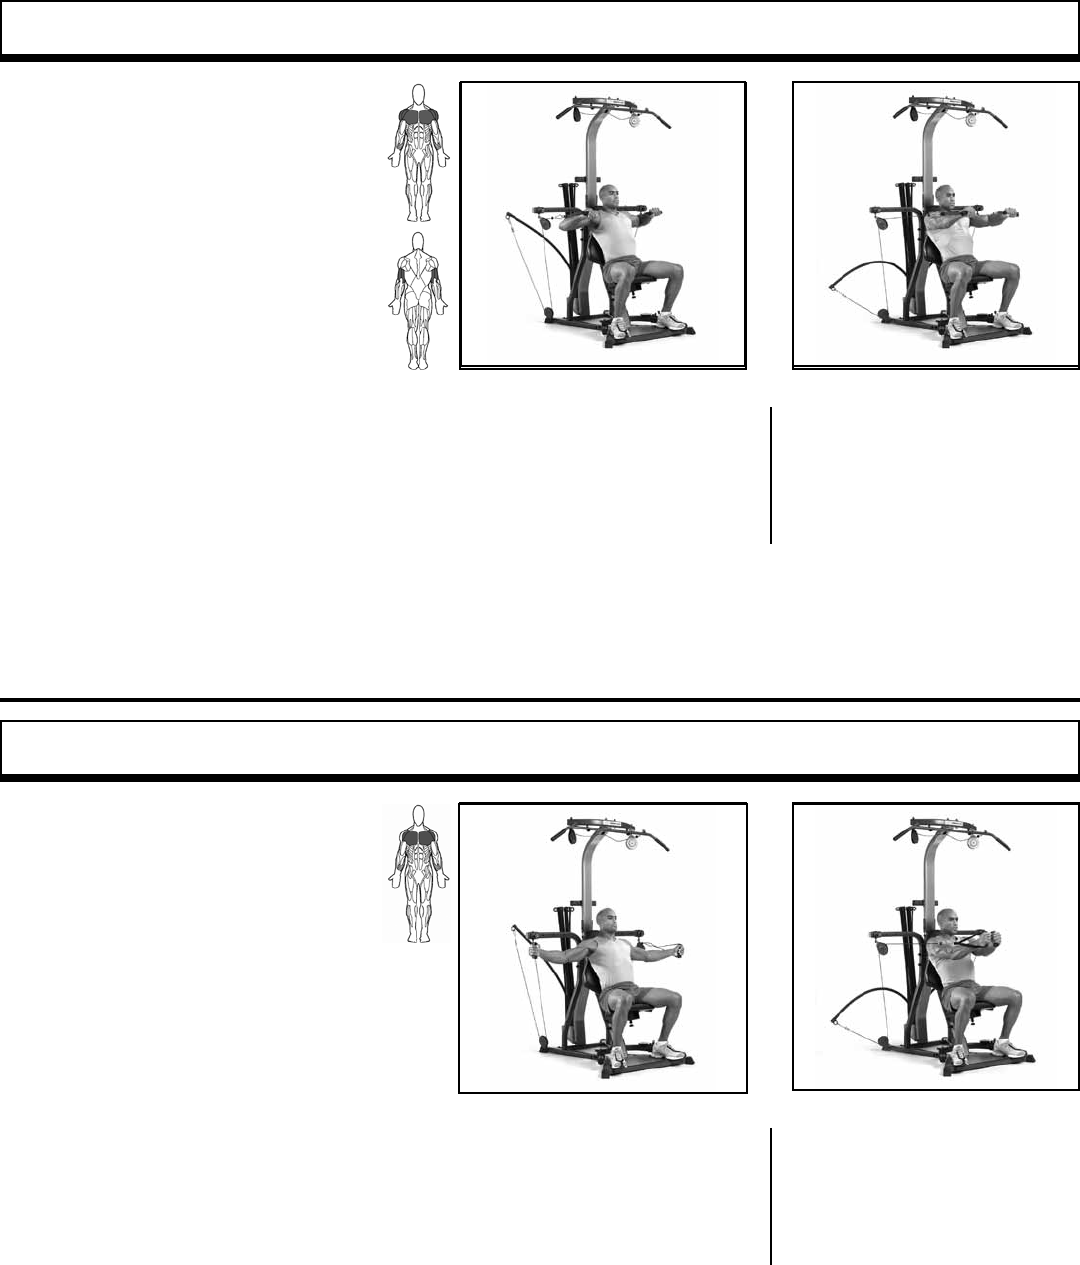
Chest Exercises:
Bench Press ..............................................22
Chest Fly .................................................22
Decline Bench Press ......................................23
Incline Bench Press .......................................23
Decline Chest Fly .........................................24
Incline Chest Fly ..........................................24
Shoulder Exercises:
Reverse Fly ...............................................25
Crossover Reverse Fly .....................................25
Crossover Rear Deltoid Rows ..............................26
Crossover High Rear Deltoid Rows .........................26
Lateral Shoulder Raise ....................................27
Forearm Lateral Shoulder Raise ............................27
Front Shoulder Raise ......................................28
Seated Shoulder Press ....................................28
Shoulder Rotator Cuff (internal) ............................29
Shoulder Rotator Cuff (external) ...........................29
Shoulder Extension .......................................30
Shoulder Shrug ...........................................30
Scapular Protraction ......................................31
Scapular Depression ......................................31
Crossover Seated Rear Delt Rows ..........................32
Scapular Retraction .......................................32
Back Exercises:
Good Morning ............................................33
Standing Low Back Extension ..............................33
Standing Shoulder Pullover w/ Bent Lat Bar .................34
Standing Shoulder Pullover w/ Hand Grips ..................34
Narrow Pulldowns w/ Bent Lat Bar .........................35
Narrow Pulldowns w/ Hand Grips ..........................35
Bent Over Row ...........................................36
Crossover Bent Over Row .................................36
Seated Lat Rows ..........................................37
Crossover Seated Lat Rows ................................37
Reverse Grip Pulldowns w/ Lat Bar .........................38
Reverse Grip Pulldowns w/ Hand Grips .....................38
Crossover Wide Pulldowns w/ Hand Grips ..................39
Crossover Narrow Pulldowns w/ Hand Grips ................39
Pulldowns ................................................40
Stiff Arm Pulldowns .......................................40
Seated Lat Pulldowns .....................................41
Seated Wide Lat Pulldowns ................................41
Arm Exercises:
Triceps Pushdown w/ Hand Grips ..........................42
Triceps Hammer Pushdown ................................42
Triceps Pushdown w/ Bent Lat Bar .........................43
Single Arm Pushdown .....................................43
Triceps Extension .........................................44
Cross Triceps Extension ...................................44
Hammer Triceps Extension .................................45
Rope Pushdown ..........................................45
Triceps Kickback .........................................46
Hammer Triceps Kickback .................................46
Resisted Dip ..............................................47
Biceps Curl ...............................................47
Standing Biceps Curl ......................................48
Hammer Biceps Curl ......................................48
Concentration Biceps Curl .................................49
Reverse Curl ..............................................49
Barbell Biceps Curl ........................................50
Reverse Barbell Biceps Curl ...............................50
Seated Biceps Curl ........................................51
Seated Biceps Hammer Curl ...............................51
Arm Opposition Push-Pull .................................52
Upper Body Opposition Push-Pull ..........................52
Wrist Extension ...........................................53
Wrist Curl ................................................53
Abdominal Exercises:
Trunk Rotation ............................................54
Seated (resisted) Oblique Abdominal Crunch ................54
Seated (resisted) Abdominal Crunch ........................55
Leg Exercises:
Leg Extension ............................................56
Squat ....................................................56
Standing Hip Extension (knee bent) .........................57
Standing Hip Extension (knee extended) ....................57
Leg Kickback .............................................58
Hip Flexion ...............................................58
Dead Lift .................................................59
Stiff Leg Dead Lift .........................................59
Standing Hip Adduction ...................................60
Standing Hip Abduction ...................................60
Calf Raise ................................................61
Single Leg Calf Raise ......................................61
Muscle Chart .............................................62
Exercise Log .............................................63
Bowflex Xtreme® 2 SE Home Gym 6-Week
Satisfaction Guarantee ....................................65
Contacts .................................................66
Table of Contents
2Bowflex Xtreme® 2 SE Owner’s Manual
Important Safety Instructions
Indicates a potentially hazardous situation which, if not avoided, could result in death or serious injury.
Read and understand the complete Owner’s Manual. Keep Owner’s Manual for future reference.
Read and understand all warnings on this machine. If at any time the Warning stickers become loose,
unreadable or dislodged, contact Nautilus® Customer Service for replacement stickers.
Before using this equipment, obey the following warnings:
• Children must not be let on or near to this machine. Moving parts and other features of the machine can be
dangerous to children.
• Not intended for use by anyone under 14 years of age.
• Consult a physician before you start an exercise program. Stop exercising if you feel pain or tightness in your
chest, become short of breath, or feel faint. Contact your doctor before you use the machine again.
•
Before each use, examine this machine for loose parts or signs of wear. Inspect all cables, pulleys and
their connections, making sure they are properly secured and attached, and show no signs of visible
wear or damage. Contact Nautilus® Customer Service for repair information.
• Maximum user weight limit: 300 lb. (136 kg). Do not use if you are over this weight.
• This machine is for home use only.
• Do not wear loose clothing or jewelry. This machine contains moving parts. Do not put fingers or other objects
into moving parts of the exercise equipment.
• Always wear rubber soled athletic shoes when you use this machine. Do not use the machine with bare feet or
only wearing socks.
• Set up and operate this machine on a solid, level, horizontal surface.
• Do not operate this machine outdoors or in moist or wet locations.
• Keep at least 6” (15 cm) clear behind the rod box, and 36” (91 cm) in front of the machine. Keep 15” (38 cm)
on the sides of the machine clear. This is the recommended safe distance for access and passage around and
emergency dismounts from the machine. Keep third parties out of this space when machine is in use.
• Do not over exert yourself during exercise. Operate the machine in the manner described in this manual.
• Do not use Dumbbells or other weight equipment to incrementally increase the weight resistance. Use only the
weight resistance designed for use with this gym.
• Correctly engage the Selector Hook to the Rod End.
• Correctly adjust and safely engage all Positional Adjustment Devices. Make sure that the Adjustment Devices
do not hit the user.
• Keep clear of Power Rod® movement path during operation. Keep any bystanders clear of machine and Power
Rod® movement path during operation.
• Do not move the machine without aid. Injury to you or damage to the machine can occur.
Bowflex Xtreme® 2 SE Owner’s Manual 3
1
3
2
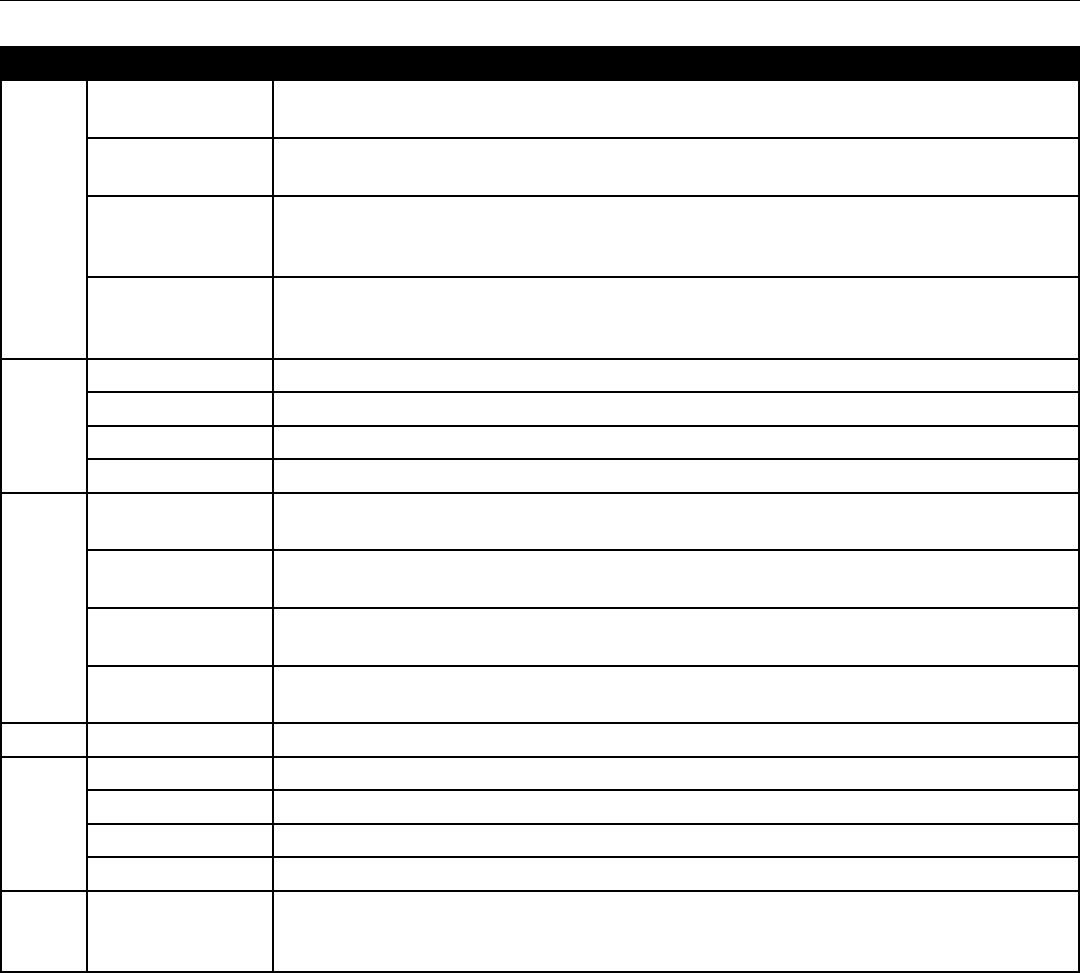
Safety Warning Labels
6
5
7
Type Description
1 WARNING • Misuse or abuse of this equipment may lead to serious injury.
• Keep children away and supervise teenagers using equipment.
• Obtain, read and understand the owner’s manual provided with this fitness equipment
prior to use.
• Replace this or any other warning label if damaged, illegible or missing.
Locate and read all safety warnings on the machine before using it. Replace any warning label if it is damaged, illegible,
or missing. If you need replacement labels, call a Nautilus Representative. Refer to the Contacts page at the back of this
manual.
4
4Bowflex Xtreme® 2 SE Owner’s Manual
Safety Label Warnings
Type Description
2 CAUTION Before each use check all snap hooks, cables and pulleys for wear and proper function.
Tighten all fasteners as necessary.
MISE EN GARDE Avant chaque utilisation, vérifiez le fonctionnement do tous les mousqueton, câbles et
poulies. Serrez bien toutes les fixations au besoin.
VORSICHT Überprüfen Sie alle Karabinerhaken, Kabel und Rollen vor jeder Benutzung auf
Abnutzungserscheinungen und Fehlfunktionen. Ziehen Sie alle Befestigungselemente
ordnungsgemäß an.
PRECAUCIÓN Antes de cada uso, revise todos los cierres a presión, cables y poleas para asegurarse de
que no estèn desgastados y que funcionan correctamente. Apriete todos los sujetadores
según sea necesario.
3[NOTICE] Do not hang from bar.
Ne pas pendre de la barre.
Nicht von der Stange hängen.
No cuelgue de la barra.
4 WARNING The Maximum User Weight for this machine is 300 pounds (136 KG).
This machine is for Home use only.
WARNUNG Das Maximale Belastungsgewicht für diese Maschine beträgt 136 kg.
Dieses Gerät ist nur für die nutzung im Heimbereich fregegeben.
AVERTISSEMENT Le poids maximum de l’utilisateur pour cette machine est de 136 kg (300 livres).
Cet équipement est destiné à un usage privé uniquement.
ADVERTENCIA El peso máximo para el usario de esta Máquina es de 136 kg (300 libras).
Este equipamiento sólo se puede utilizar en el hogar.
5 WARNING Make sure selector pin is securely locked into place before starting exercise.
6 CAUTION At all times, stay out of the paths of moving rods.
MISE EN GARDE Restez toujours à l’écart des tiges mobiles.
VORSICHT Halten Sie stets Abstand zu beweglichen Stangen.
PRECAUCIÓN En todo momento, manténgase alejado del trayecto de las barras movibles.
7 Serial Number Located on the back of the lower lat tower.
Note: For future reference record this number in the serial number box on the Contacts
page of this manual.

Bowflex Xtreme® 2 SE Owner’s Manual 5
Regulatory Approvals
Product Weight 157 lbs. (71 kg)
Product Dimensions 53" (135 cm) long x 49" (124 cm) wide x 82" (208 cm) high
Workout Area 96" (244 cm) long x 78" (198 cm) wide
Number of Exercises Over 70
Power Rod® Resistance 210 lbs. (95 kg) Nominal
Power Rod® Upgradability 310 lbs. (141 kg.)
410 lbs. (186 kg.)
User Weight Limit 300 lbs. (136 kg)
Meets:
EN957-1 Class H
EN957-2 Class H
Meets:
ASTM F2276-05
ASTM F2216-05
Product Specifications
Specifications / Approvals
6Bowflex Xtreme® 2 SE Owner’s Manual
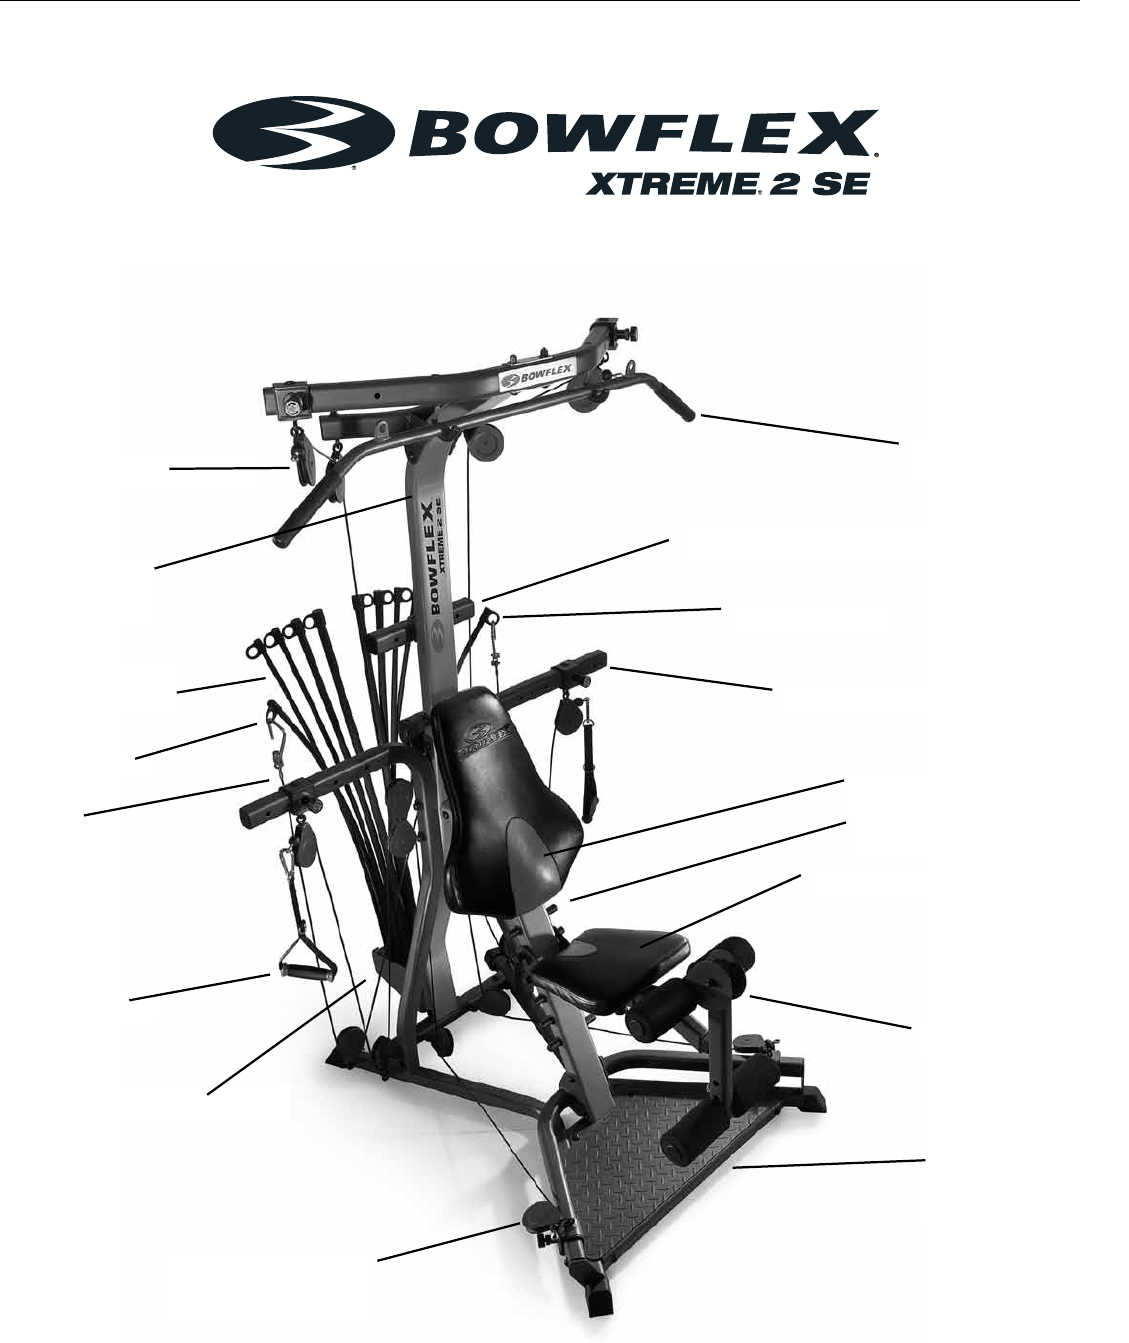
Getting to Know Your Machine
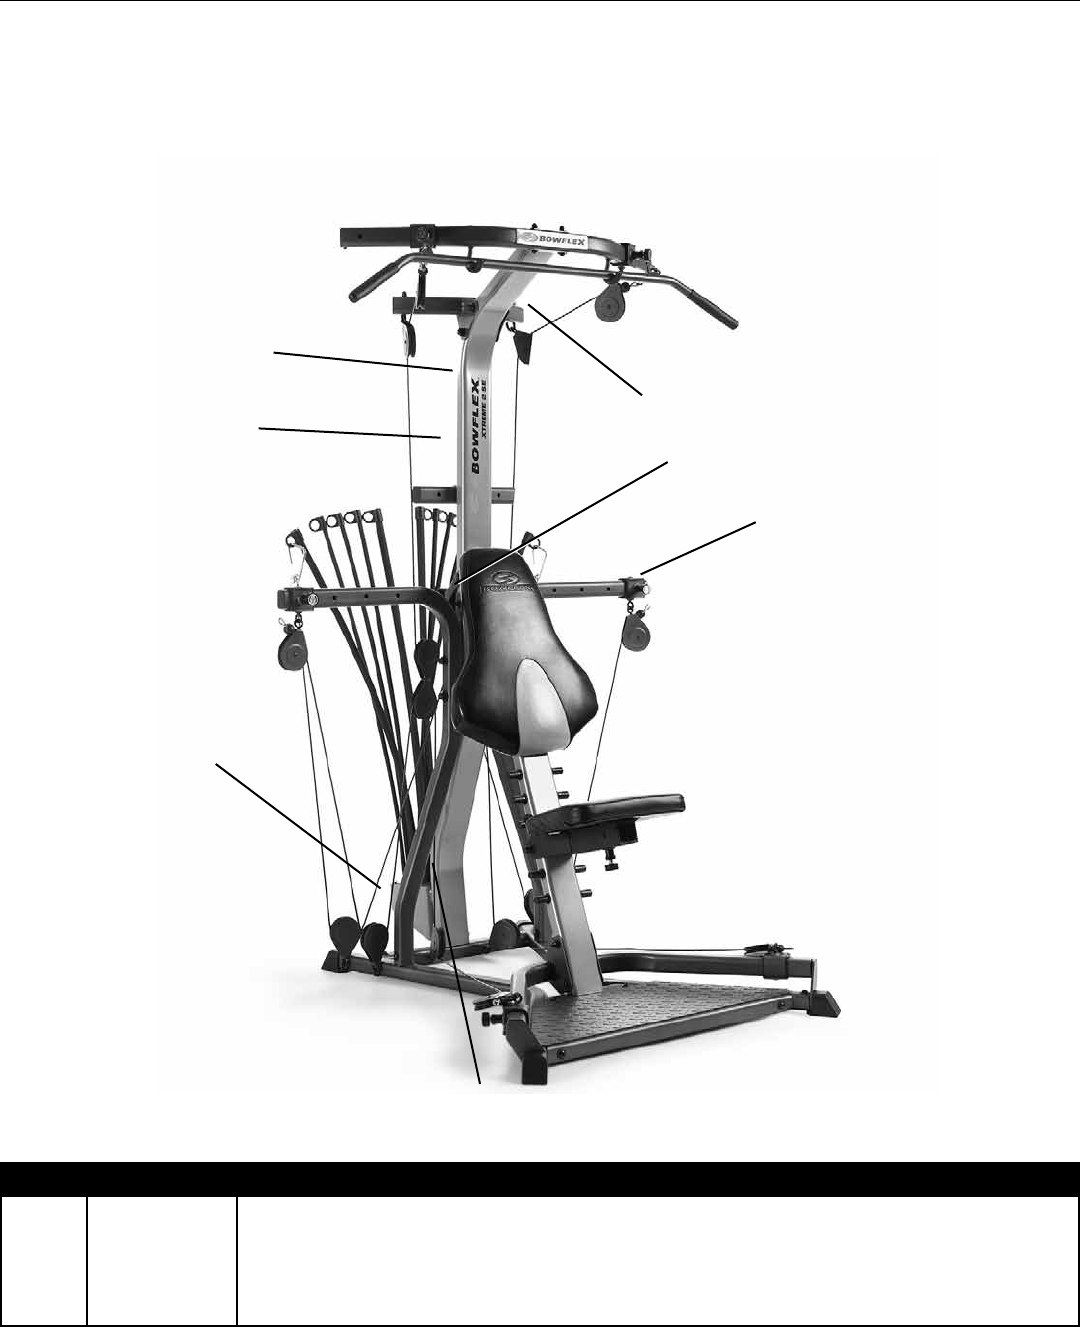
Power Rod®
Resistance Rods
Rod Hook
Lat Tower
Seat Back Pad
Seat
Base Frame
Platform
Rod Caps
Cable
Hand Grip
Rod Box
Lower Pulley/ Squat
Station
Center Cross Bar
Leg Attachment
50” Bent Lat
Bar
Pulley
Abdominal Bar
Seat Locking Pin
Bowflex Xtreme® 2 SE Owner’s Manual 7
Power Rod® Resistance
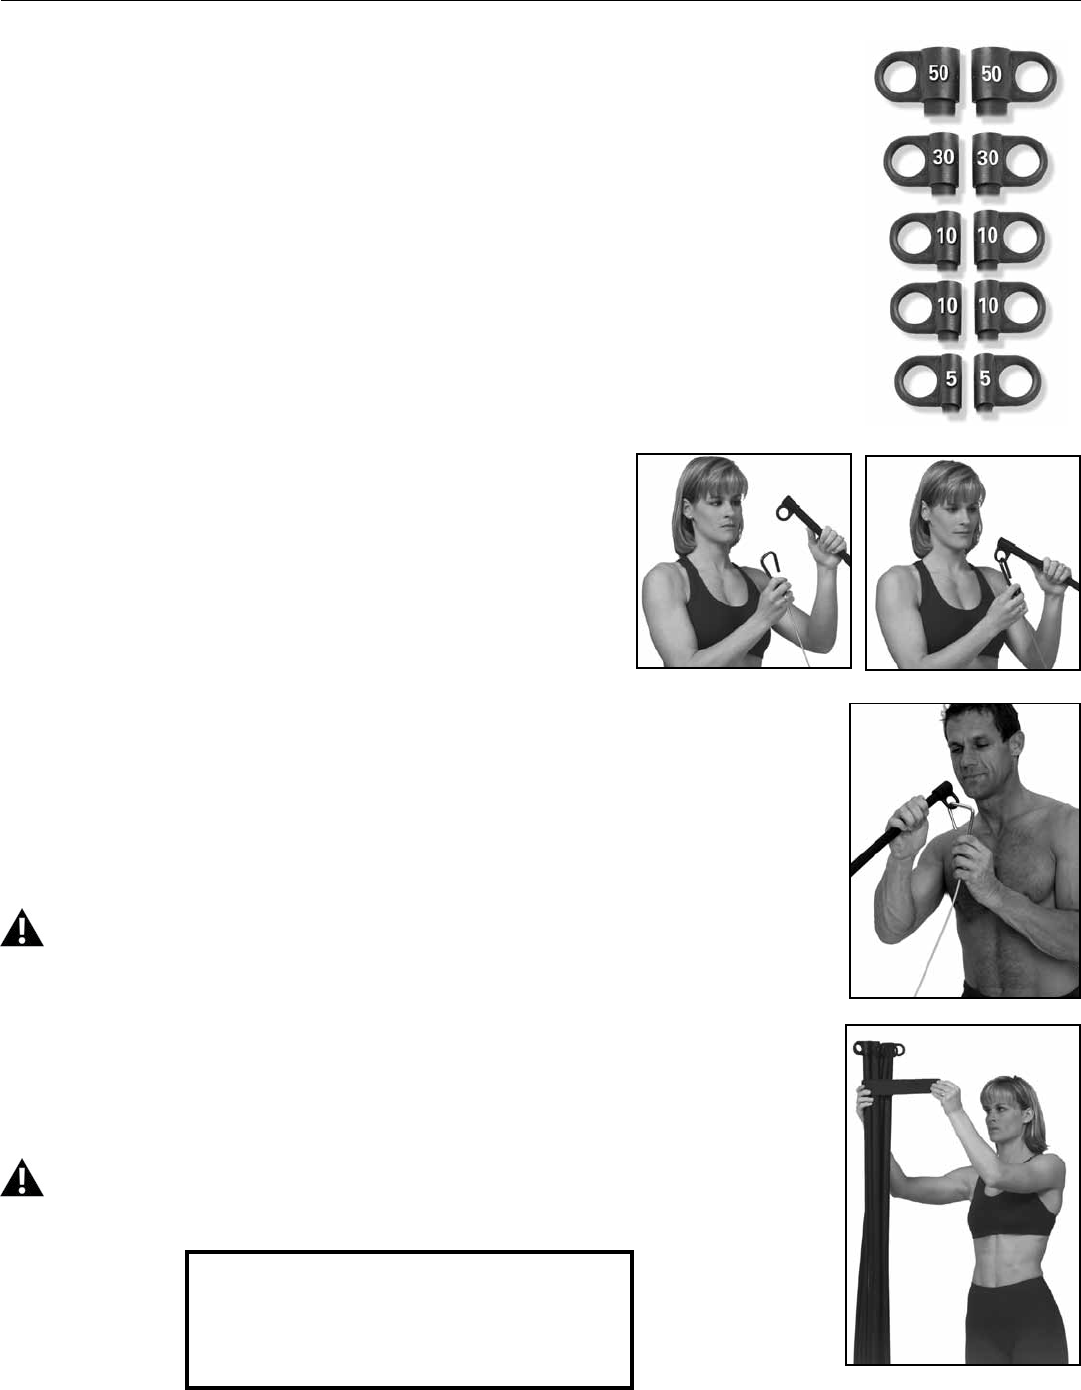
Power Rod® resistance rods are made from a special composite material. Your rods are
sheathed with a protective black rubber coating. Each rod is marked with its weight rating
on the “Rod Cap.”
Adjusting and Understanding the Resistance
The standard Bowflex Xtreme® SE home gym comes with 210 pounds
of nominal resistance (one pair of 5 lb. (2.25 kg) rods, two pairs of 10 lb. (4.5 kg) rods, one
pair of 30 lb. (13.5 kg) rods, and one pair of 50 lb. (22.5 kg) rods.
Note: Power Rod® Resistance Rods are manufactured using nylon composite material.
The weight resistance measurements are estimates and resistance can vary based on
environmental and usage patterns and other factors. Rod resistance will normally degrade
over time and after extensive usage. If you have any questions regarding the resistance of
your Power Rod® Resistance Rods, contact our Bowflex® Customer
Service department for assistance.
If you upgraded to a 310 (140 kg) or 410 pound (186 kg) capacity
you will have an additional one or two pair of 50 lb. (22.5 kg) rods,
respectively.
Connecting the Power Rod® Unit to the Cables
You may use one rod or several rods in combination, to create your
desired resistance level.
To hook multiple rods up to one cable, bend the closest rod toward the cable and place the
cable hook through that rod cap. You can then hook up the next closest rod through the
same cable hook.
Hooking up the closest rod first prevents rods from crossing over the top of one another.
Safety
When hooking the Power Rod® resistance rods to the cable hooks, do not stand
directly over the tops of the rods. Stand off to one side when connecting and
disconnecting the Power Rod® resistance rods from the cables.
When You Are Not Using Your Home Gym
Disconnect the cables from the Power Rod® resistance rods when your are not using your
Bowflex Xtreme® SE home gym.
Keep the cables and Power Rod® units bound with the rod binding strap when not
in operation, and be sure and remove the binding strap before beginning any
exercises using the rods.
To Order Additional Sets
of 50 lb. (22.5 kg) Power Rod®
Resistance Rods,
Please Call (800) 628-8458.
Getting to Know Your Machine
8Bowflex Xtreme® 2 SE Owner’s Manual
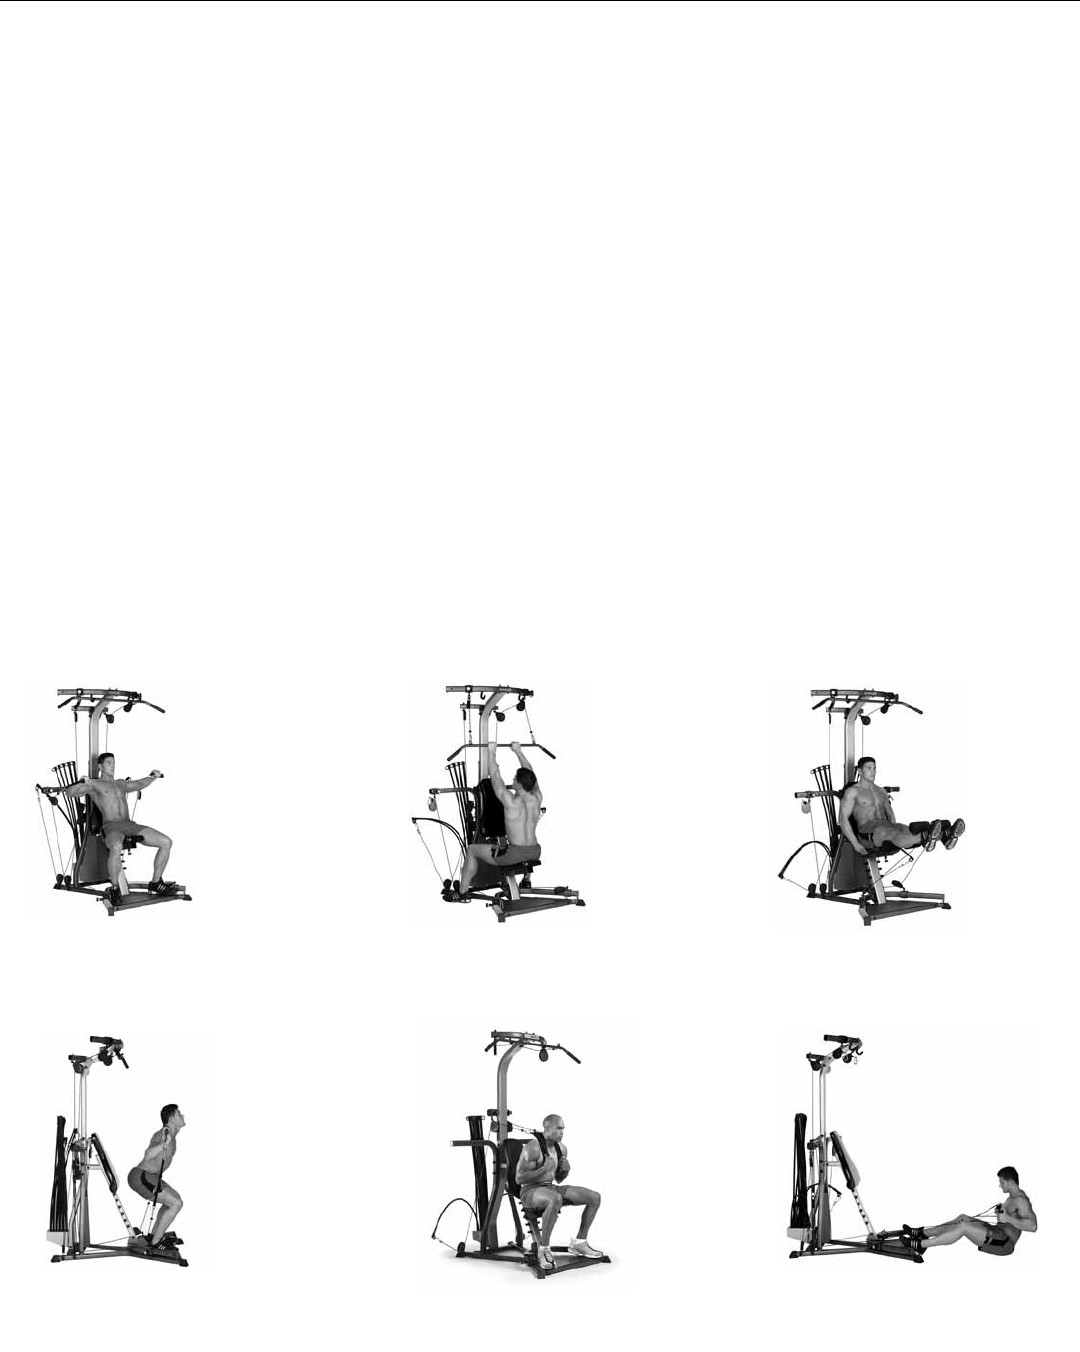
Abdominal Crunch position:
Active pulleys are on lat tower.
Getting to Know Your Machine
Center Cross Bar:
Standard position – used when
performing exercises like a
Bench Press or Chest Fly.
Rowing Position:
Active pulleys are on squat pulley
frame.
Leg Extension:
Active pulleys are on the squat
pulley frame.
Lat Tower:
Used for exercises like
Pulldowns and Pushdowns.
Squat:
Active pulleys are on squat pulley
frame and on center cross bar.
The Bowflex Xtreme® 2 SE Home Gym Pulleys
With the versatility to perform over 75 different exercises, the Bowflex Xtreme® 2 SE home gym is designed to give
you the best workout possible. And with its innovative, easy-to-use multiple pulley system, you are guaranteed to
maximize every exercise for every muscle group.
There are a few things you will need to remember to get the most from your Bowflex Xtreme® 2 SE home gym
Pulleys:
Slider Pulleys
The Bowflex Xtreme® 2 SE home gym comes with adjustable “Slider” pulleys which can be personalized for
your body by adjusting them to widths that fit your unique physique. There are Slider Pulleys on the Lat Tower (2
positions per side), Center Cross Bars (4 positions per side) and the Squat Pulley Frame (4 positions per side).
You will need to determine which Pulley positions are most comfortable for you when performing ‘Standard’
exercises, and then adjust the pulleys outward or inward to perform exercises in ‘Wide’ or ‘Narrow’ positions.
Using the Slider Pulleys at wider or narrower positions for an exercise can target different parts of the same
muscle group and increases the benefit of each exercise.
Pulley Locations
Below is a guide to the six different pulley positions used to perform a full workout routine:
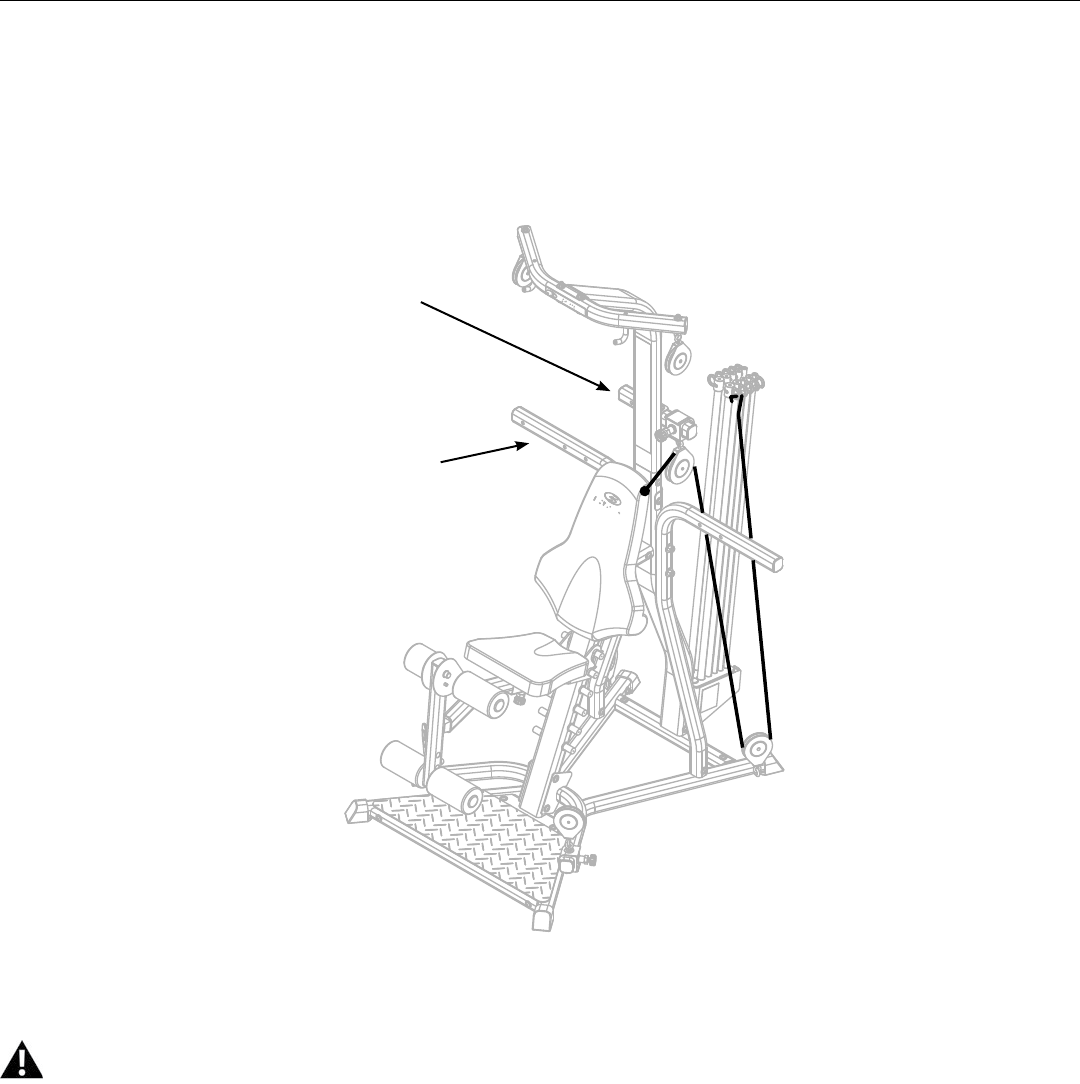
Bowflex Xtreme® 2 SE Owner’s Manual 9
How to Use Your Machine
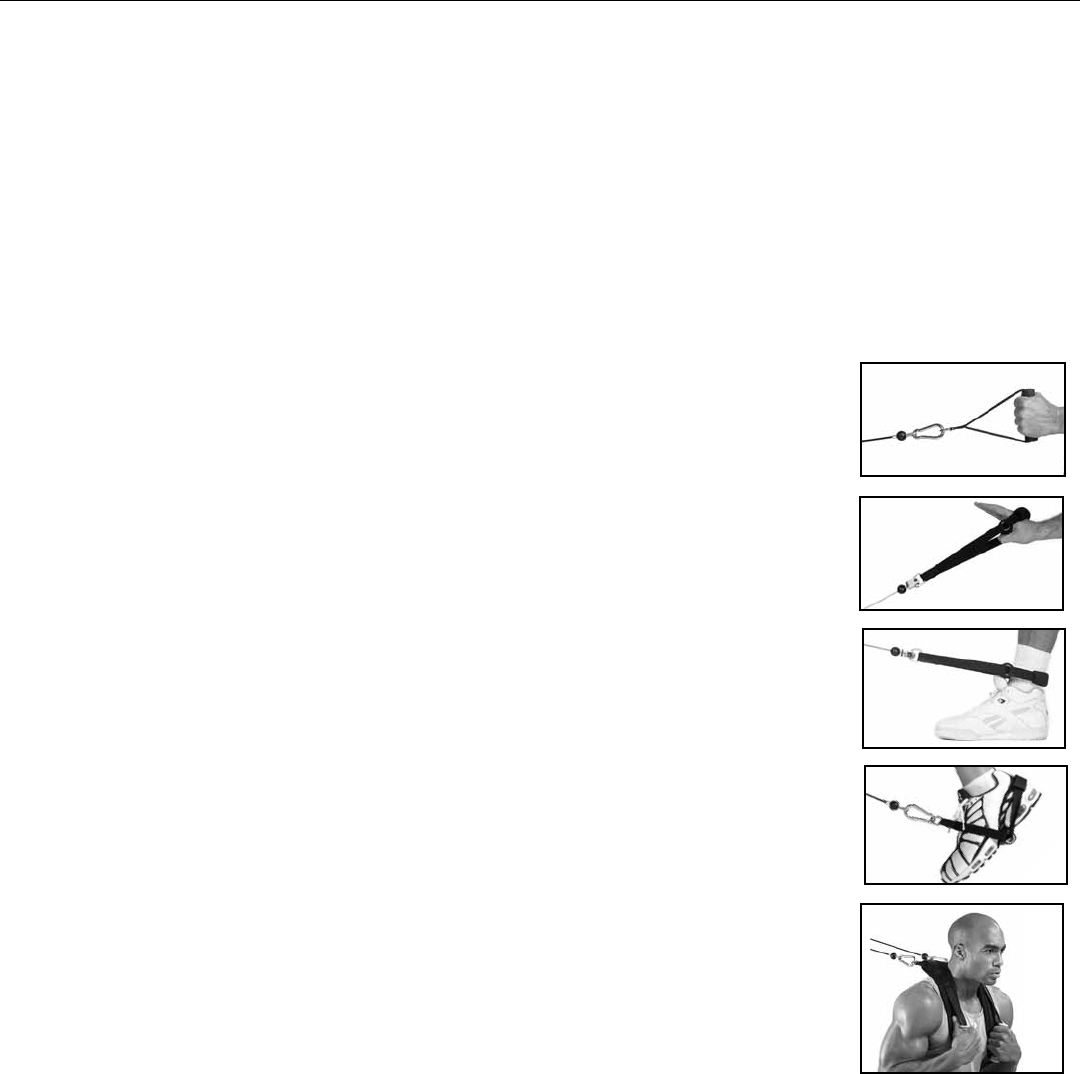
The Bowflex Xtreme® 2 SE Home Gym Cable Routing
To use the Ab Crunch position, you will move the Slider Pulleys and cables from the Center Cross Bar to the Abdominal
Bar on the Lat Tower. Refer to the illustrations below for proper cable routing.
Abdominal Bar
Center Cross Bar
Keep your body weight centered on the machine, seat or base frame platform while exercising.
When using the machine for standing leg exercises, always hold the Lat Tower of the machine for stability.
Do not make any adjustments to the seat while sitting on it. Do not stand on the seat.
All exercises in this manual are based on the calibrated resistance and capacity levels of this machine.
Only exercises included in this manual or in written materials authorized and supplied by Bowflex® are
recommended for operation with this machine.
10 Bowflex Xtreme® 2 SE Owner’s Manual
How to Use Your Machine
Seat Locking Pin
The Seat Locking Pin securely fastens the seat bottom bracket to the seat support rail. The locking pin serves to
stabilize the seat for all exercises that require sitting or leaning on it. Make sure the seat has been secured before
putting weight on it or attaching Power Rod® resistance to cables attached to the Leg Extension attachment.
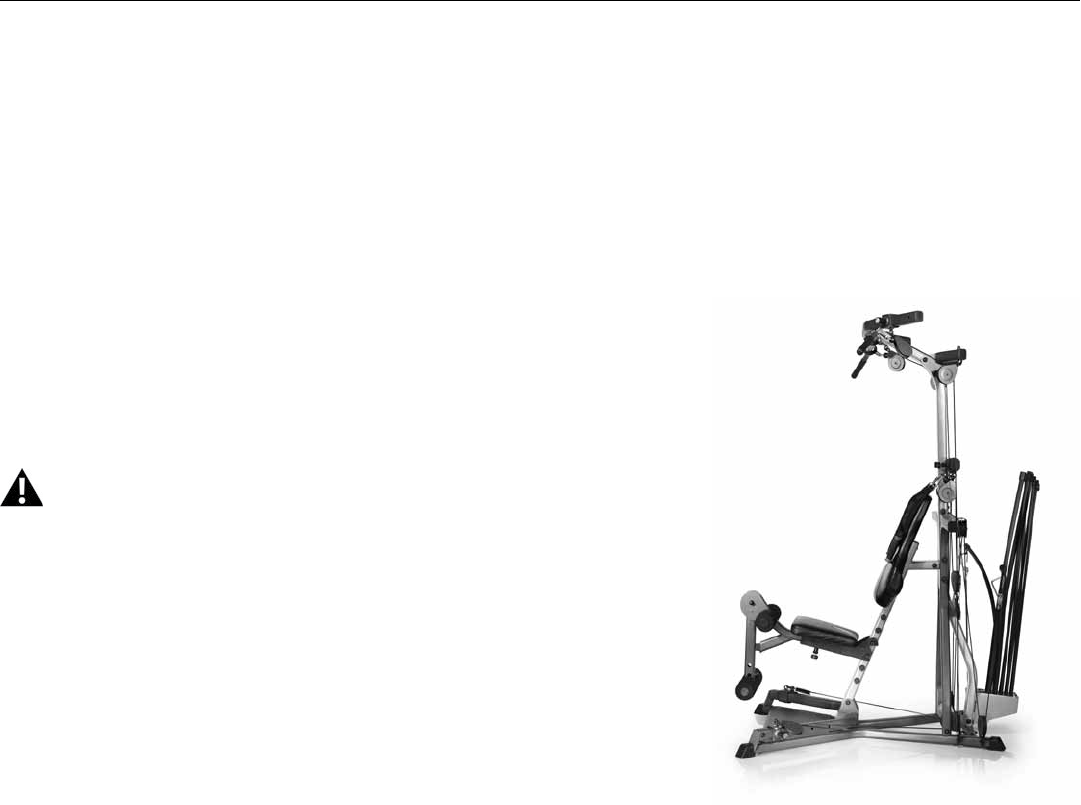
Handgrips and Straps
The handgrips fit snugly around your wrist, ankle, or instep. Attach grips to cables by snapping the cable clip onto the
D-ring.
Standard Grip: Grasp the handle and cuff together to form a grip without inserting
your hand through the cuff portion. Most exercises utilize this grip. The
Standard Grip also is used for Hammer Grip exercises, when you need
to hold the hand grip vertically for greater wrist support.
Hand Cuff Grip: Slip your hand through the cuff so that the foam pad rests on the back
of your hand. Then grasp the remainder of the grip that is sitting in
your palm. This method of gripping is great for exercises like front
shoulder raises or any exercise where your palm is facing down.
Ankle Cuff Grip: The cuff opening can be made larger to accommodate the ankle.
Simply insert your hand in the cuff and slide it away from the handle.
Insert your foot or ankle and tighten the grip by sliding the handle back
toward the cuff.
Arch Cuff Grip: The cuff opening can also fit securely over the arch of
your foot. For this grip, insert your foot through the cuff
until it is around the arch of your instep, and tighten
the cuff around your heel to secure the grip.
Attach the snap hooks to the D-rings on both ends of the harness. Place the harness on your
shoulders letting the handles hang over your chest. Grab both handles. With high resistance,
a cross arm opposite-handle grip may be used.
Lat Pulldown Bar
The Lat Pulldown Bar enhances exercises that work back, shoulders and triceps muscles.
Abdominal Crunch
Shoulder Harness:
Bowflex Xtreme® 2 SE Owner’s Manual 11
How to Use Your Machine
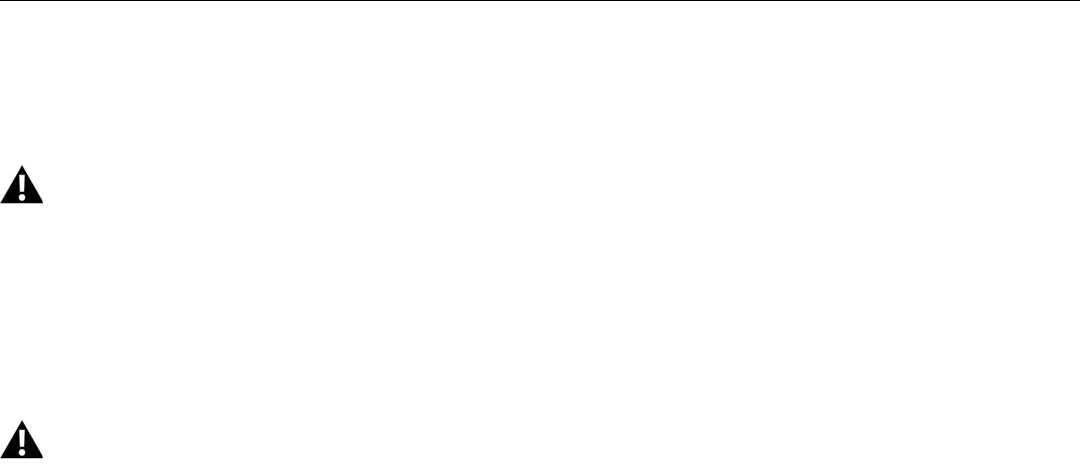
Leg Extension Attachment
The leg extension attachment enables you to work the major muscle groups in the legs.
Abdominal Crunch Shoulder Harness
The ab harness gives you the ability to strengthen the muscles of the abdomen by safely adding resistance to
abdominal exercises. When using the ab harness, relocate the pulleys from
the chest bar to the short abdominal bar.
Safety
Make sure that the seat has been stabilized with the seat locking pin
before sitting or putting weight on the seat.
Before using the grips, straps, lat bar, or ab harness, make sure that all
fasteners are in place and tightened.
Make sure that auxiliary cables for the lat bar and leg extension are
securely fastened to the primary cables on the unit.
Always use the lock knob on the slider to secure pulleys. Do not allow
pulleys to change position during any exercise.
Always use the bar holders to support the lat bar or remove the bar
when not in use.
Do not hang from the Lat Tower nor attempt to perform “chin ups” from
the bar.
Never pull on the bar unless there is resistance attached to it.
Always use the Lock Knob to secure the attachment to your Bowflex Xtreme® 2 SE home gym.
Grips manufactured under license agreement with Hands-On Sports & Gym Accessories, Inc. Patent #4756527
12 Bowflex Xtreme® 2 SE Owner’s Manual
Maintenance
Inspect your machine for any worn or loose components prior to use. Tighten or replace any worn or loose components
prior to use. Pay close attention to cables, straps, or harness and their connections.
Review all warning notices.
The safety and integrity designed into a machine can only be maintained when the equipment is regularly
examined for damage and repaired. It is the sole responsibility of the owner to ensure that regular
maintenance is performed. The owner is responsible to make sure that regular maintenance is done.
Worn or damaged components must be repaired or replaced immediately. Only manufacturer supplied
components should be used to maintain/repair the equipment.
Clean the bench with a non-abrasive household cleaner after each use. This will keep it looking new. Do not use
automotive cleaner, which can make the bench too “slick.”
This product, its packaging, and components contain chemicals known to the State of California to cause
cancer, birth defects, or reproductive harm. This Notice is provided in accordance with California’s
Proposition 65. If you would like additional information, please refer to our Web site at
www.nautilus.com/prop65.
If you have any questions regarding your Bowflex Xtreme® 2 SE home gym, please contact our Customer Service
Department at 1-800-605-3369 or by mail to: Customer Service, Nautilus, Inc. World Headquarters, 16400 SE
Nautilus Drive, Vancouver, WA 98683.

Bowflex Xtreme® 2 SE Owner’s Manual 13
Your body will do what you train it to do. That’s why it’s important to define your goals and focus them. Here are some
fitness components that will help you define your goals and choose your fitness program.
Muscle Strength is the maximum force that you can
exert against resistance at one time. Your muscle
strength comes into play when you pick up a heavy bag
of groceries or lift a small child. It is developed when a
localized muscle is worked both positively (concentric)
and negatively (eccentric) at a resistance – great enough
so you can perform only five to eight repetitions of the
exercise before the muscle fails. Each set of repetitions
is followed by a rest interval that typically runs three
times longer than the set. Later, between exercise
sessions, the muscle overcompensates for the stress
and usually increases in both strength and size.
Muscle Endurance is the ability to perform repeated
contractions. It comes into play when you cross-country
ski or work on your feet all day. Endurance training
addresses the slow twitch, endurance muscle fibers,
which depend on oxygen for energy. To develop muscle
endurance, use low resistance and high repetitions –
about 15-20 repetitions in each set, three sets to each
exercise, working the muscle only to fatigue.
Muscle Power is the combination of strength and speed
of the muscular contraction. This is often misinterpreted
as A) being directly associated with certain skill or
sport and/or B) meaning that you must move fast. Load
is actually a more important factor than speed when
attempting to improve power. When training to achieve
muscular power, pick a resistance that fatigues you
in the 3-5 repetition range. When performing these
reps, it is more important to think of contracting the
muscles faster rather than attempting to move faster.
Performing sport simulation exercises usually results
in a deterioration of the motor pattern or skill. The bio-
mechanically sound method of improving power in
your sport is to train for power using the correct joint
movements, as described in this manual. Then practice
the skill associated with your sport, learning to apply this
newly achieved power.
Body Composition is the ratio of fat weight (fat) to lean
weight (muscles, bones and tissue). As you age, the
ratio shifts. The fat weight increases and the lean weight
decreases. Training for muscle strength will generally
increase muscle size and aerobic conditioning will
help burn extra calories. Performing these two forms of
exercise, either at different times or together, will create
the greatest changes in body fat weight.
Balanced Strength and alignment are the result of equal
strength developed in all parts of the body. It comes
into play in your standing and sitting posture, and in
your ability to perform just about any activity safely and
effectively. An over-development of the back will round
the shoulders; weak or stretched abdominals can cause
lower back pain. You want a balance of muscle strength
in front and back. In addition, you need a balance of
strength between your middle, lower and upper body.
Flexibility is the ability of a muscle or group of muscles
to move the joint through a full range of motion. Flexibility
comes into play when you execute an overhand serve or
stretch for the top shelf in the kitchen. It is a cooperative
movement of opposite muscle groups. When a muscle
contracts, its opposite muscle group must relax for the
action to occur. Increased flexibility means an increased
range of motion, made possible by this simultaneous
contracting and relaxing. Good flexibility is important
in protecting the body from injury and can be achieved
through the balanced strength training programs that are
included in this manual.
Cardiovascular Endurance is the ability of the heart
and lungs to supply oxygen and nutrients to exercising
muscles over an extended period of time. It comes into
play when you jog a mile or ride a bike. It is a critical
component of overall fitness and health. You may want to
design your own personal program specifically geared to
your goals and lifestyle. Designing a program is easy, as
long as you follow the below guidelines.
Define Your Goals

14 Bowflex Xtreme® 2 SE Owner’s Manual
Design Your Own Program
Understand fitness and its components. Improperly
designed programs can be dangerous. Take some time
to review this manual as well as other fitness guides.
Know your current fitness level. Before you start any
fitness program you should consult a physician who will
help you determine your current abilities.
Identify your goals. Goals are critical to choosing and
designing an exercise program that fits and enhances
your lifestyle, but so is strategy. It’s important not to rush
the process and try to accomplish too much too soon.
That will lead to setbacks and discouragement. Instead,
set a series
of smaller achievable goals.
Select complementary exercises. Be sure to
pair exercises that address compound joint movements
and single joint movements. In
addition, select exercises that address compli-mentary
muscle groups.
Put first things first. During each session, first work
muscle groups that need the most training.
Remember your cardiovascular component. Any
fitness program must contain a cardiovascular fitness
component to be complete. So complement your
resistance training with aerobic exercise such as
walking, running, or bicycling.
Training variables. When designing your own program
there are several variables that, when mixed properly,
will equal the right fitness formula for you. In order to
find out the best formula, you must experiment with
several combinations of variables.
The variables are as follows:
• Training Frequency: The number of times you train
per week. We recommend daily activity but not daily
training of the same muscle group.
• Training Intensity The amount of resistance
used during your repetition.
• Training Volume The number of repetitions
and sets performed.
• Rest Intervals The time you rest between sets and the
time you rest between workouts.
Once you’ve established a base of fitness, follow these
basic principles:
• Isolate Muscle Groups Focus work on specific
muscle groups.
• Progressive Loading The gradual systematic increase
of repetitions, resistance and exercise period.
Define Your Goals

Bowflex Xtreme® 2 SE Owner’s Manual 15
Working Out
A workout begins in your mind’s eye. With concentration
and visualization you can approach your workout with
a positive, constructive attitude. A good pre-workout
mental routine is to sit and relax, so that you can focus
on what you are about to do and think about achieving
your end goal.
Warming Up
We recommend that you warm up by doing
light stretching and performing light exercises
on the Bowflex Xtreme® 2 SE home gym.
Your Routine
The workout portion of your fitness routine is the
series of exercises devoted to your particular goals.
Remember, make sure to have fun!
Cool Down
An essential part of the exercise routine is the cool
down. Gradually reduce the level of exercise intensity
so that blood does not accumulate in one muscle
group, but continues to circulate at a decreasing rate.
Remember to gradually move yourself into a relaxed
state.
Breathing
The most important part of breathing during exercise is,
quite simply, that you do it. Breathing in or out during the
actual performance is not dependent upon the direction
of air flow relative to exertion. It is, in fact, a mechanical
process that changes the position of your spine as your
rib cage moves. Here are some tips for breathing:
1) Be cautious when you are concentrating or
exerting effort. This is when you will probably
hold your breath. DO NOT hold your breath. Do
not exaggerate breathing. Depth of inhalation and
exhalation should be natural
for the situation.
2) Allow breathing to occur, naturally,
don’t force it.
Workout Guide
16 Bowflex Xtreme® 2 SE Owner’s Manual
20 Minute Better Body Workout
Frequency: 3 Days Per Week (M-W-F) Time: About 20 Minutes
Start by performing one set of each exercise. Warm up with a light resistance that you can perform easily for 5 -10 reps without
fatiguing. Focus on practicing and learning your technique before increasing the resistance. Then move to a more challenging
resistance that you can perform no less than 10 reps and no more than 15 reps without your form deteriorating. As you become
stronger, you can advance to two sets for each exercise. Complete all sets of each exercise before moving on to the next one. Rest 30
to 45 seconds between sets. Move slowly on each rep. Use a pace that would allow you to stop the movement instantly at any point in
the rep. Count three seconds up and three seconds down and work to fatigue during each set.
Advanced General Conditioning
Frequency: 4 Days Per Week (M-T-TH-F) Time: About 35-45 Minutes
When you are proficient in performing the exercise techniques of the above routine and are no longer realizing results, or have become
just plain bored, it is time to change your program. You can increase your training with this “split system” routine that works opposing
muscle groups on different days. To do this, you’ll increase your resistance when you can perform 12 reps perfectly, and you’ll increase
your volume by performing more sets and more exercises. Move slowly on each rep. Use a pace that would allow you to stop the
movement instantly at any point in the rep. Count three seconds up and three seconds down and work to fatigue during each set.
Body Part
Chest
Back
Shoulders
Arms
Legs
Trunk
Exercise
Bench Press
Seated Lat Rows
Crossover Rear Deltoid Rows
Biceps Curl
Triceps Pushdown
Leg Extension
Standing Low Back Extension
Seated Abdominal Crunch
Sets
1-2
1-2
1-2
1-2
1-2
1-2
1-2
1-2
Reps
10-15
10-15
10-15
10-15
10-15
10-15
10-15
10-15
Body Part
Back
Shoulders
Arms
Trunk
Exercise
Seated Lat Rows
Seated Lat Pulldowns
Crossover Rear Deltoid Row
Biceps Curl
Reverse Curl
Standing Low Back Extension
Seated Abdominal Crunch
Sets
1-3
1-3
1-3
1-3
1-3
1-3
1-3
Reps
10-12
10-12
10-12
10-12
10-12
10-12
10-12
Body Part
Chest
Shoulders
Arms
Legs
Exercise
Bench Press
Seated Shoulder Press
Triceps Pushdown
Biceps Curl
Leg Extension
Sets
1-3
1-3
1-3
1-3
1-3
Reps
10-12
10-12
10-12
10-12
10-12
Day 1 & 3
Day 2 & 4
The Workouts
Bowflex Xtreme® 2 SE Owner’s Manual 17
Body Part
Chest
Back
Shoulders
Arms
Exercise
Bench Press
Seated Lat Rows
Crossover Rear Deltoid Rows
Biceps Curl
Triceps Extension
Sets
1-3
1-3
1-3
1-3
1-3
Reps
12-15
12-15
12-15
12-15
12-15
20 Minute Upper/Lower Body
Frequency: 4 Days Per Week (M-T-TH-F) Time: About 20 Minutes
This program provides you with a quick and effective workout that combines muscle conditioning with some cardiovascular benefits.
Do this routine when you are limited in time or just want a variation to your normal routine. Perform this program training 2 days, resting
1 to 2. Perform all exercises to near failure, stopping at the point that your technique starts to deteriorate. Rest only 20-30 seconds
between sets. As you get stronger, increase the number of sets you perform. Move slowly on each rep. Use a pace that would allow
you to stop the movement instantly at any point in the rep. Count three seconds up and three seconds down.
DAY 1 & 3
Body Part
Legs
Trunk
Exercise
Leg Extension
Standing Hip Extension
Standing Hip Abduction
Standing Low Back Extension
Seated Abdominal Crunch
Sets
1-3
1-3
1-3
1-3
1-3
Reps
12-15
12-15
12-15
10-12
10-12
DAY 2 & 4
The Workouts
18 Bowflex Xtreme® 2 SE Owner’s Manual
Body Building
Frequency: 3 Days On, 1 Day Off Time: About 45-60 Minutes
Body building requires focused concentration and dedication to training, as well as proper eating habits. Train each muscle group to
failure before moving on to the next exercise. Do not neglect any muscle group. If needed, include an aerobic activity to increase your
caloric expenditure and help to reduce your body fat levels to achieve a defined muscular look. Rest 30-60 seconds between each set
and exercise. Focus on proper form. Tighten the muscle before you move, squeeze the muscle as you move, cramp the muscle at the
point of full contraction, and resist the movement as you lower the weight. Move slowly on each rep. Use a pace that would allow you
to stop the movement instantly at any point in the rep. Count three seconds up and three seconds down and work to fatigue during each
set.
Body Part
Chest
Shoulders
Exercise
Bench Press
Chest Fly
Seated Shoulder Press
Crossover Rear Deltoid Row
Lateral Shoulder Raise
Shoulder Shrug
Sets
2-4
2-4
2-4
2-4
2-4
2-4
Reps
8-12
8-12
8-12
8-12
8-12
8-12
DAY 1
Body Part
Back
Arms
Exercise
Seated Lat Row
Seated Lat Pulldowns
Biceps Curl
Reverse Curl
Triceps Pushdown
Triceps Extension
Sets
2-4
2-4
2-4
2-4
2-4
2-4
Reps
8-12
8-12
8-12
8-12
8-12
8-12
DAY 2
Body Part
Legs
Trunk
Exercise
Squat
Leg Extension
Standing Hip Extension
Standing Low Back Extension
Seated Abdominal Crunch
Seated Oblique Abdominal Crunch
Sets
2-4
2-4
2-4
2-4
2-4
2-4
Reps
8-12
8-12
8-12
8-12
8-12
8-12
DAY 3
The Workouts
Bowflex Xtreme® 2 SE Owner’s Manual 19
Circuit Training – Anaerobic/Cardiovascular
Frequency: 2-3 Times Per Week Time: About 20-45 Minutes
Circuit training is a great way to achieve the benefits of strength training and cardiovascular training in one quick, challenging routine.
The idea is to move quickly from exercise to exercise, taking only as much rest between sets as it takes to set up the next exercise
(less than 20 seconds). One circuit equals one set of each exercise. Initially, start with completing one round of Circuit 1. Then add
an additional round of the same circuit. Once you reach three rounds of Circuit 1, add one round of Circuit 2. Add additional rounds of
Circuit 2 as your fitness level increases. Repeat process with Circuit 3. Do not let your heart rate exceed 220 minus your resting heart
rate. Perform each rep of each exercise slowly and with perfect technique. Count three seconds up and three seconds down.
Circuit 1
Circuit 2
Body Part
Chest
Legs
Back
Trunk
Exercise
Bench Press
Squat
Seated Lat Row
Seated Abdominal Crunch
Reps
8-12
8-12
8-12
8-12
Body Part
Shoulders
Legs
Back
Trunk
Arms
Exercise
Seated Shoulder Press
Leg Extensions
Seated Lat Pulldowns
Standing Low Back Extension
Biceps Curl
Reps
8-12
8-12
8-12
8-12
8-12
Body Part
Shoulders
Arms
Trunk
Exercise
Crossover Rear Deltoid Rows
Triceps Pushdown
Seated Oblique Crunch
Reps
8-12
8-12
8-12
Circuit 3
The Workouts
20 Bowflex Xtreme® 2 SE Owner’s Manual
True Aerobic Circuit Training
Frequency: 2-3 Times Per Week Time: About 20-60 Minutes
Circuit training is a great way to achieve the benefits of strength training and cardiovascular training in one quick, challenging
routine. By returning to an aerobic exercise between each set you are increasing your aerobic capacity, endurance and burning fat
as energy. The idea is to move quickly from exercise to exercise, taking only as much rest between sets as it takes to set up the next
exercise (less than 20 seconds). One circuit equals one set of each exercise. Initially, start with completing one round of Circuit 1.
Then add an additional round of the same circuit. Once you reach three rounds of Circuit 1, add one round of Circuit 2. Add additional
rounds of Circuit 2 as your fitness level increases. Do not let your heart rate exceed 220 minus your resting heart rate. Perform each
rep of each exercise slowly and with perfect technique. Count three seconds up and three seconds down.
Any type of aerobic exercise can be used for this routine. Some examples are: jumping jacks, jogging in place
or stair climbing.
Body Part
Chest
Aerobic Exercise
Legs
Aerobic Exercise
Back
Aerobic Exercise
Trunk
Aerobic Exercise
Exercise
Bench Press
30 – 60 Seconds
Squat
30 – 60 Seconds
Seated Lat Rows
30 – 60 Seconds
Seated Abdominal Crunch
30 – 60 Seconds
Reps
8-12
8-12
8-12
8-12
Circuit 1
Body Part
Shoulders
Aerobic Exercise
Legs
Aerobic Exercise
Back
Aerobic Exercise
Trunk
Aerobic Exercise
Arms
Exercise
Seated Shoulder Press
30 – 60 Seconds
Leg Extension
30 – 60 Seconds
Seated Lat Pulldowns
30 – 60 Seconds
Standing Low Back Extension
30 – 60 Seconds
Biceps Curl
Reps
8-12
8-12
8-12
8-12
8-12
Circuit 2
The Workouts
Bowflex Xtreme® 2 SE Owner’s Manual 21
Strength Training
Frequency: 3 Days Per Week (M-W-F) Time: About 45-60 Minutes
This program is designed to emphasize overall strength development. This is an advanced routine to be used only after you
have progressed from the advanced general conditioning routine and only after you have perfected your exercise techniques.
Work each set to near exhaustion. If you can perform more than 5 to 8 reps, you should increase your resistance 5 pounds
and decrease your reps to 5. Rest 60 – 120 seconds between each set and exercise. Focus on proper form. Tighten the muscle
before you move, squeeze the muscle as you move, cramp the muscle at the point of full contraction, and resist the movement
as you lower the weight. Move slowly on each rep. Use a pace that would allow you to stop the movement instantly at any
point in the rep. Count two seconds up and four seconds down and work to fatigue during each set.
Body Part
Chest
Shoulders
Exercise
Bench Press
Chest Fly
Seated Shoulder Press
Crossover Rear Deltoid Rows
Shoulder Shrug
Sets
2-4
2-4
2-4
2-4
2-4
Reps
5-8
5-8
5-8
5-8
5-8
Body Part
Back
Arms
Exercise
Seated Lat Row
Seated Lat Pulldowns
Biceps Curl
Reverse Curl
Triceps Pushdown
Triceps Extension
Sets
2-4
2-4
2-4
2-4
2-4
2-4
Reps
5-8
5-8
5-8
5-8
5-8
5-8
Body Part
Legs
Trunk
Exercise
Squat
Leg Extension
Standing Low Back Extension
Seated Abdominal Crunch
Sets
2-4
2-4
2-4
2-4
Reps
5-8
5-8
8-12
5-8
Day 1
Day 2
Day 3
The Workouts
START ACTION
START FINISH
START ACTION
START FINISH
22 Bowflex Xtreme® 2 SE Owner’s Manual
Chest Exercises
Bench Press – Shoulder Horizontal Adduction (and Elbow Extension)
START FINISH
• Sit and grasp hand grips.
• Straighten arms to front.
• Be sure arms are directly in line
with cables, palms facing down
and wrists straight.
• Raise chest and pinch shoulder-
blades together. Maintain a very
slight, comfortable, arch in lower
back.
• Slowly move elbows out,
simultaneously bending
arms, keeping forearms in
line with cables.
• Stop when upper arms are straight
out to the sides, level with shoul-
ders.
• Slowly press forward, moving
hands toward center. Return to
start position with arms straight to
front at shoulder width. Keep chest
muscles tightened.
Chest Fly – Shoulder Horizontal Adduction (Elbow Stabilized)
Muscles worked:
Emphasizes chest muscles (pectoralis
major). Involves front shoulder muscles
(anterior deltoid).
Position:
Seated – facing outward
Accessory:
Hand Grips
Pulleys:
Center Cross Bar – wide position
Before you begin:
Remove Leg Extension and adjust seat
height. The pulleys should be in the wide
position.
Key Points:
• Maintain 90º angle between upper arms
and torso throughout exercise.
• Limit range of motion so elbows do not
travel behind shoulders.
• Keep shoulderblades pinched together
and maintain good spinal alignment.
START FINISH
• Sit and grasp hand grips.
• Straighten arms to front.
• Be sure arms are directly in line
with cables, palms facing in and
wrists straight.
• Raise chest and pinch shoulder-
blades together. Maintain a slight,
comfortable, arch in lower back.
• Slowly move arms inward, main-
taining the elbows in a slightly
bent position throughout move-
ment.
• Stop when upper arms are straight
out in front, level with shoulders.
• Slowly return to start position.
Keep chest muscles tightened
during motion.
Muscles worked:
Chest muscles (pectoralis major). Also
involves front shoulder muscles (anterior
deltoid and triceps, located on the back
of the upper arm.
Position:
Seated – facing outward
Accessory:
Hand Grips
Pulleys:
Center Cross Bar – wide position
Before you begin:
Remove Leg Extension and adjust seat height.
The pulleys should be in the wide position.
Key Points:
• Maintain a 90º angle between upper arms and
torso throughout exercise.
• Limit range of motion so elbows do not travel
behind shoulders.
• Keep shoulderblades pinched together and
maintain good spinal alignment.
START ACTION
START FINISH
START ACTION
START FINISH
Bowflex Xtreme® 2 SE Owner’s Manual 23
Chest Exercises
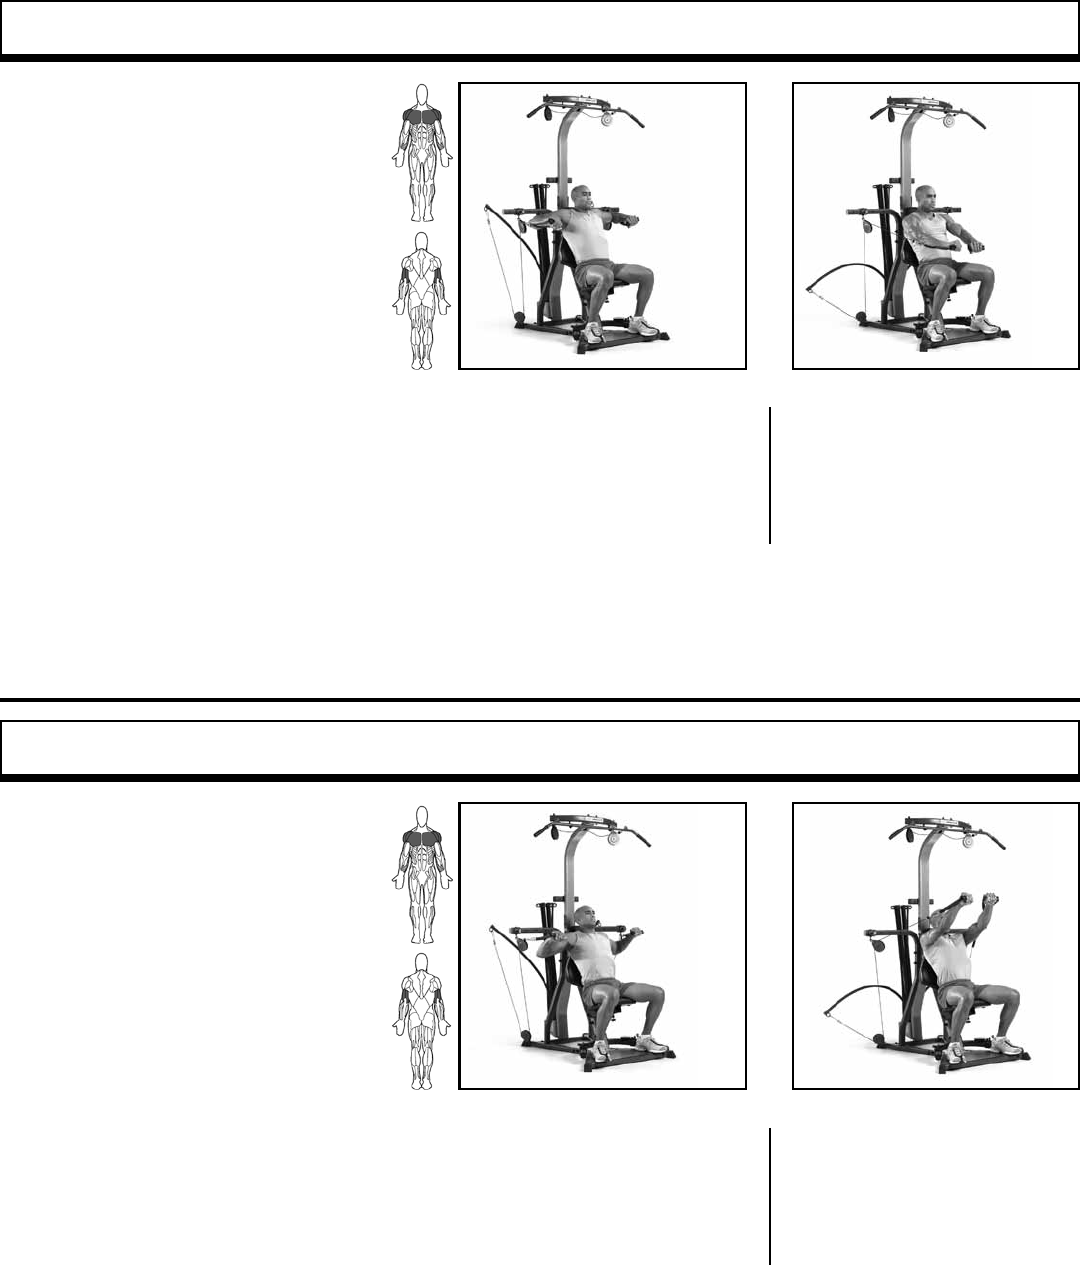
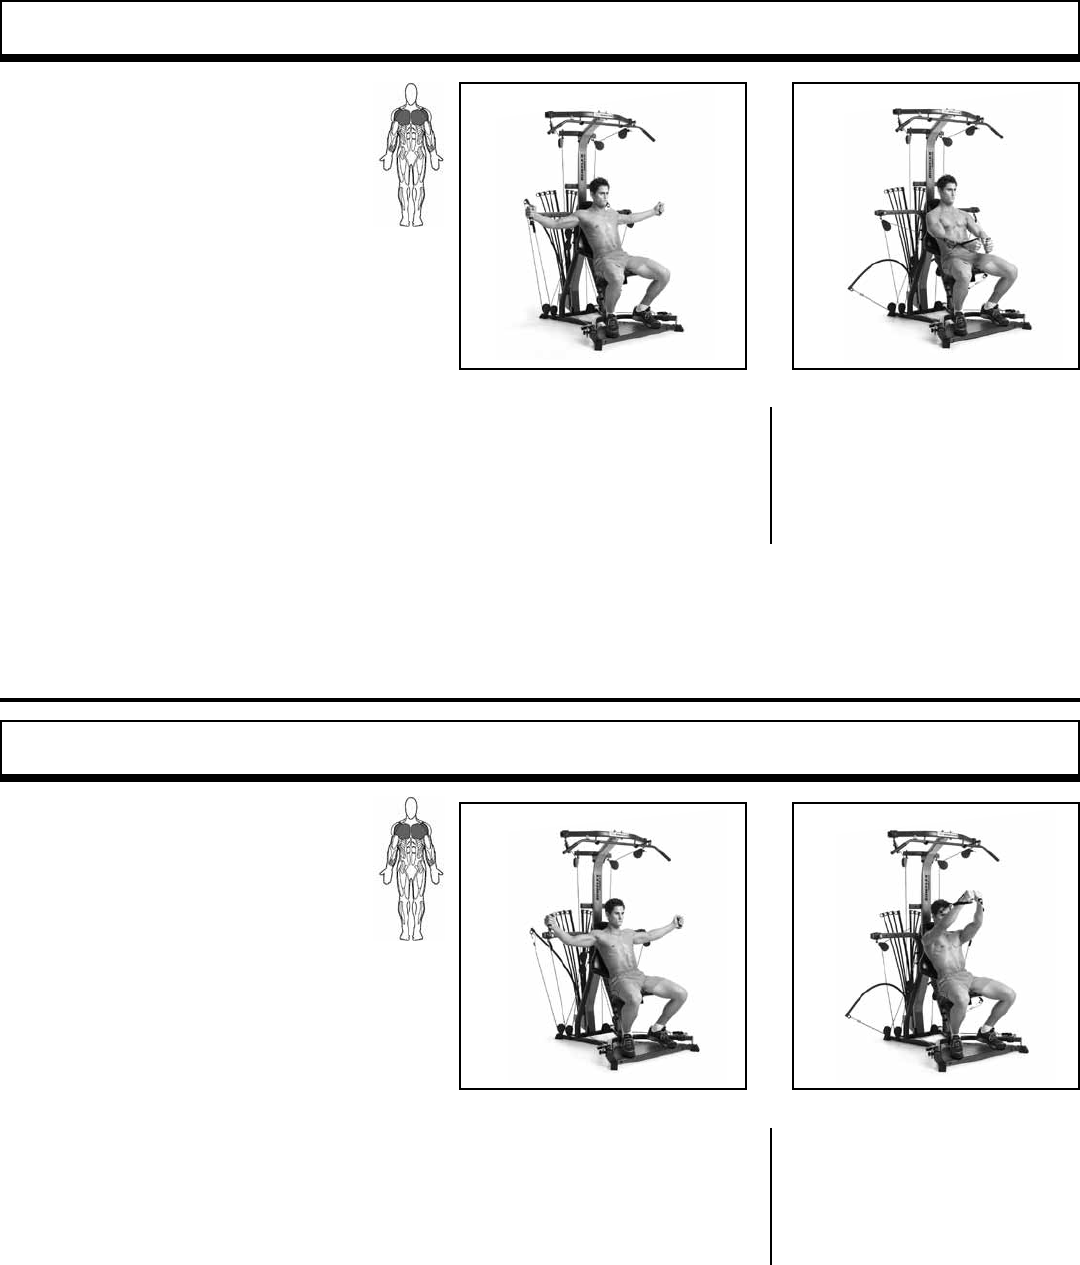
Decline Bench Press – Shoulder Horizontal Adduction (and Elbow Extension)
Muscles worked:
Chest muscles (pectoralis major). Also
involves front shoulder muscles (anterior
deltoid) and triceps.
Position:
Seated (seat in lowest position)
facing outward
Accessory:
Hand Grips
Pulleys:
Center Cross Bar – standard position
Before You Begin:
Remove Leg Extension and adjust seat to
lowest setting.
Key Points:
• Maintain 90º angle between upper arms and
torso at the bottom of the motion, and slightly
less than 90º at the top of the motion.
• Limit range of motion so elbows do not travel
behind shoulders.
• Keep shoulderblades pinched together and
maintain good spinal alignment.
• Sit and grasp hand grips with
cable and grip positioned beneath
forearm.
• Lower arms 5-6 inches from stan-
dard bench press position.
• Straighten arms to front.
• Be sure arms are directly in line
with cables, palms facing down and
wrists straight.
• Raise chest and pinch shoulder-
blades together. Keep a gentle arch
in lower back.
• Slowly move elbows outward,
simultaneously bending arms,
keeping forearms in line with
cables at all times.
• Stop when upper arms are straight
out to sides, 10º below shoulders.
• Slowly press forward, moving
hands toward center. Return to
start position, arms straight at
shoulder width, hands just above
knees in line with cables. Keep
chest muscles tightened.
START FINISH
Incline Bench Press – Shoulder Horizontal Adduction (and Elbow Extension)
Muscles worked:
Chest muscles (pectoralis major), especially
upper portion. Also involves front shoulder
muscles (anterior deltoid) and triceps.
Position:
Seated – facing outward
Accessory:
Hand Grips
Pulleys:
Center Cross Bar – wide position
Before You Begin:
Remove Leg Extension and adjust
seat height.
Key Points:
• Upper arms will be 90º from sides of
torso at the bottom of movement and slightly
more than 90º from the front of torso at the top.
• Limit range of motion so elbows do not travel
behind shoulders.
• Keep shoulderblades pinched together and
maintain good spinal alignment.
• Sit and grasp hand grips.
• Straighten arms to front.
• Raise arms 6-8 inches above
regular bench press position.
• Keep arms in line with cables,
palms down, wrists straight.
• Raise chest and pinch shoulder-
blades together. Keep a slight,
comfortable, arch in lower back.
• Slowly move elbows out, simulta-
neously bending arms. Keep fore-
arms in line with cables.
• Stop when upper arms are out to
sides, 10º above shoulders.
• Slowly press forward, moving
hands toward center. Return to
start position, with arms straight
to front at shoulder width and in
line with cables.
START FINISH
START ACTION
START FINISH
START ACTION
START FINISH
24 Bowflex Xtreme® 2 SE Owner’s Manual
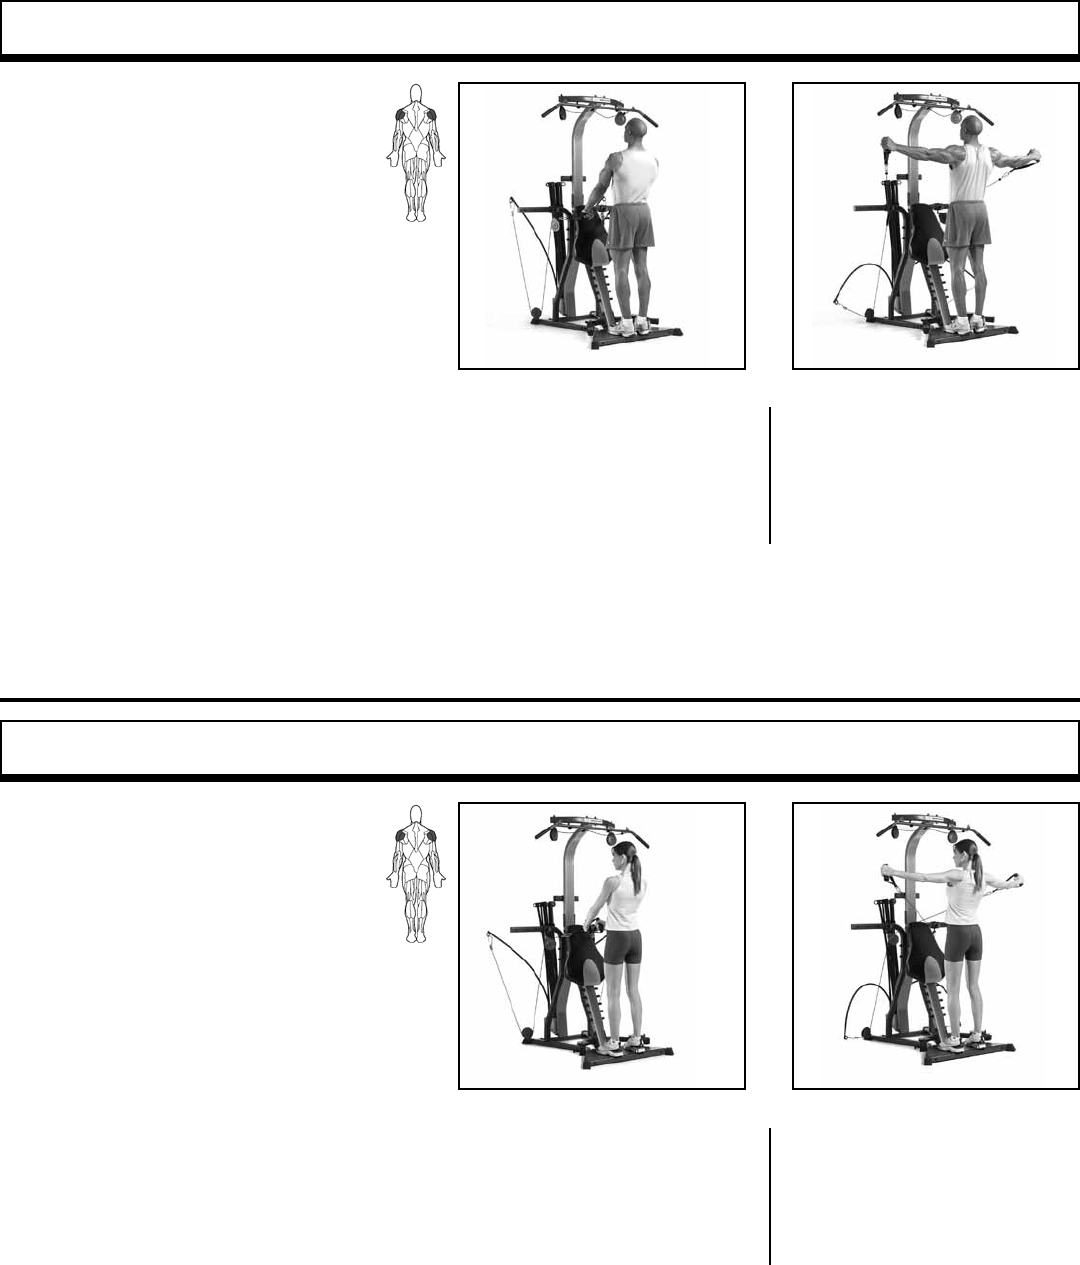
Decline Chest Fly—Shoulder Horizontal Adduction (elbow stabilized)
Incline Chest Fly—Shoulder Horizontal Adduction (elbow stabilized)
• Grasp Hand Grips in both hands.
• Open your arms into a wide,
“embrace” position, elbows
slightly bent. Press your forearms
downward. At full extension,
hands should be level with your
hips, palms facing forward.
• Do not lock your elbows.
• Raise chest, pinch shoulderblades
together, and maintain a slight,
comfortable arch in your lower
back.
• Slowly press your arms forward
and downward, straightening
arms and moving your hands
together. Hands should be 5-6"
lower than standard Chest Fly
Finish position.
• Rotate your wrists and forearms
upward.
• Return to start position, slowly
bringing your arms in front of
you, just below chest level.
Muscles worked:
Pectoralis Major; Anterior Deltoid
Position:
Seated—facing outward
Accessory:
Hand Grips
Pulleys:
Center Cross Bar—Wide Position
Leg Extension:
Removed
Success Tips
• Maintain a 60-90° angle between upper
arms and torso during exercise.
• Keep chest muscles tightened. Limit and
control your range of motion.
• Keep knees bent, feet on Platform, head
back against Seat Back Pad.
• To improve your pectoralis involvement,
pinch your shoulderblades together
throughout movement.
Muscles worked:
Pectoralis Major; Anterior Deltoid
Position:
Seated—facing outward
Accessory:
Hand Grips
Pulleys:
Center Cross Bar—Wide Pulleys
Leg Extension:
Removed
Success Tips
• Maintain a 60-90° angle between upper
arms and torso during exercise.
• Keep chest muscles tightened. Limit and
control your range of motion.
• Keep knees bent, feet on Platform, head
back against Seat Back Pad.
• To improve your pectoralis involvement,
pinch your shoulderblades together
throughout movement.
• Grasp Hand Grips in both hands.
• Press your arms forward and
upward, straightening arms ans
moving your hands together. Hands
should be 5–6" higher than the
standard Chest Fly start position..
• Do not lock your elbows.
• Raise chest, pinch shoulderblades
together, and maintain a slight,
comfortable arch in your lower
back.
• Open your arms into a wide,
“embrace” position, elbows
slightly bent. Press your forearms
upward. At full extension, your
elbows should be level with your
ears, palms facing forward.
• Rotate your wrists and
forearms upward.
• Return to Start position, slowly
bringing your arms in front of
you, just below chest level.
Chest Exercises
START ACTION
START ACTION
Bowflex Xtreme® 2 SE Owner’s Manual 25
Shoulder Exercises
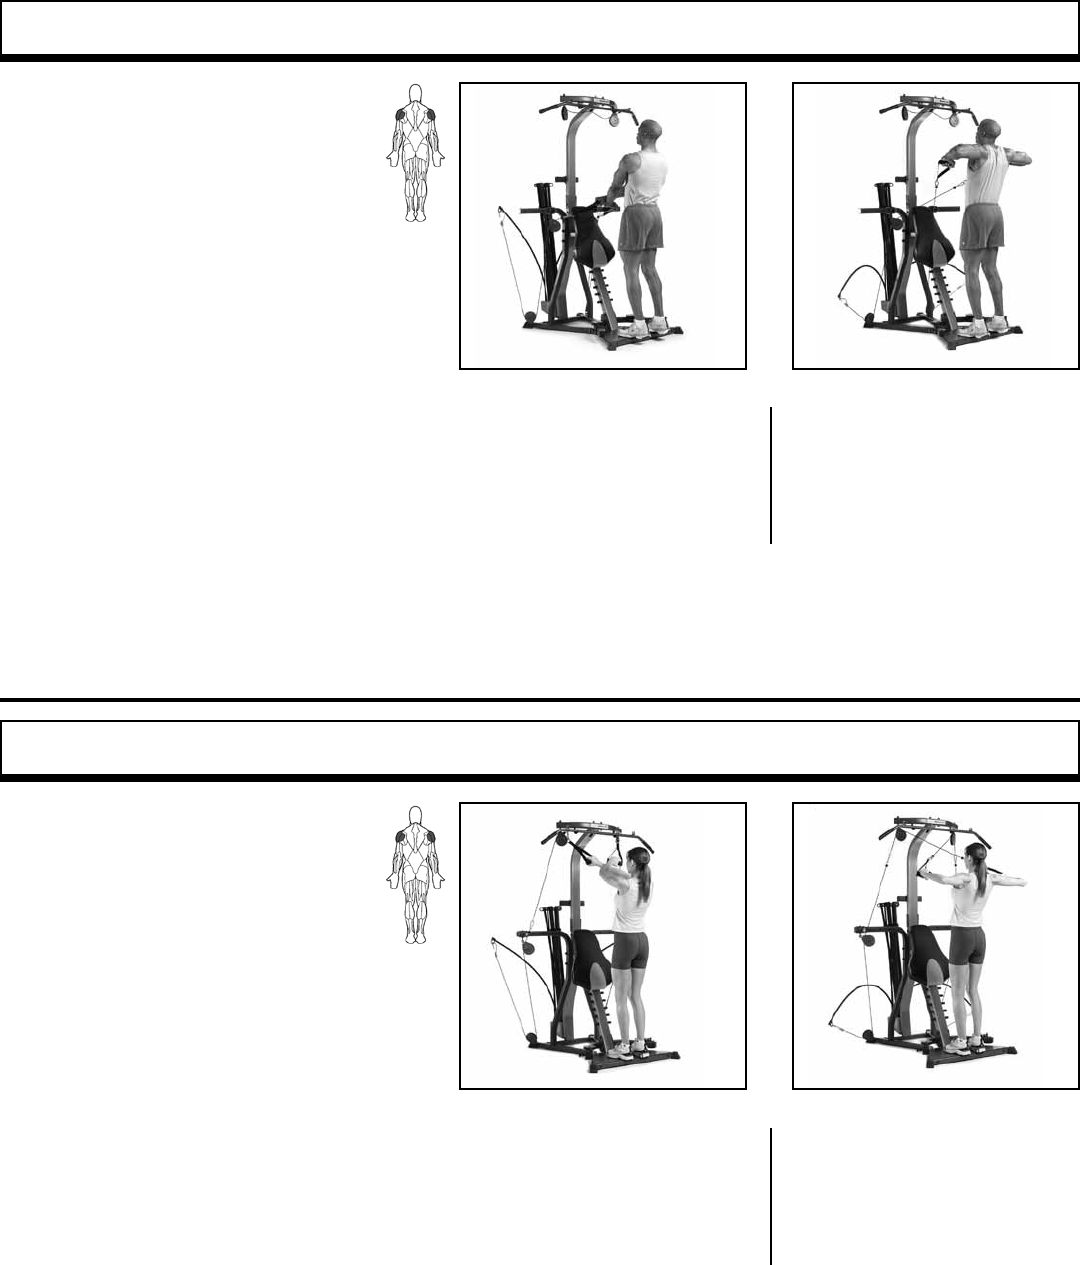
Reverse Fly – Shoulder Horizontal Abduction (Elbows Stabilized)
Muscles worked:
Back portion of shoulder muscles (rear
deltoids, rear portion of middle deltoids).
Position:
Standing – facing machine
Seat:
Removed
Accessory:
Hand Grips
Pulleys:
Center Cross Bar – narrow position
Before You Begin:
Remove Leg Extension. The pulleys should be in
the narrow position.
Key Points:
• Maintain a 90º angle between
upper arms and sides of torso
throughout exercise.
• Keep shoulderblades pinched together and
maintain good spinal alignment.
START FINISH
• Stand on platform.
• Grasp hand grips with palms
facing floor, arms nearly straight.
• Stand up straight and bend over
slightly from hips until arms are
in front of body at a 90º angle to
torso.
• Lift chest and pinch shoulder-
blades together.
• Maintaining the same slight bend
in arms, move elbows
out and back, keeping a 90º angle
between upper arms
and sides of torso.
• Move until elbows are slightly
behind shoulders, then
slowly reverse the motion,
keeping rear shoulder muscles
tightened.
Crossover Reverse Fly – Shoulder Horizontal Abduction (Elbows Stabilized)
Muscles worked:
Back portion of shoulder muscles (rear
deltoids, rear portion of middle deltoids).
Position:
Standing – facing machine
Accessory:
Hand Grips
Pulleys:
Center Cross Bar – narrow position
Before You Begin:
• Remove seat and leg extension. The
pulleys should be in the narrow posi-
tion.
Key Points:
• Maintain 90º angle between upper arms
and sides of torso throughout exercise.
• Keep shoulderblades pinched together
and maintain good spinal alignment.
START FINISH
• Stand on platform.
• Cross arms in front of body and grasp
hand grips (right grip in left hand and
vice versa) with palms facing floor
and arms nearly straight.
• Stand up straight and bend
over slightly from hips until
arms are in front of body at a
90º angle to torso.
• Lift chest and pinch shoulderblades
together.
• Maintaining same slight bend in
arms, move elbows out and back,
crossing cables as you pull arms
back.
• Keep a 90º angle between upper
arms and sides of
torso.
• Move until elbows are slightly
behind shoulders, then slowly
reverse motion keeping rear
shoulder muscles tightened.
START ACTION
START ACTION
26 Bowflex Xtreme® 2 SE Owner’s Manual
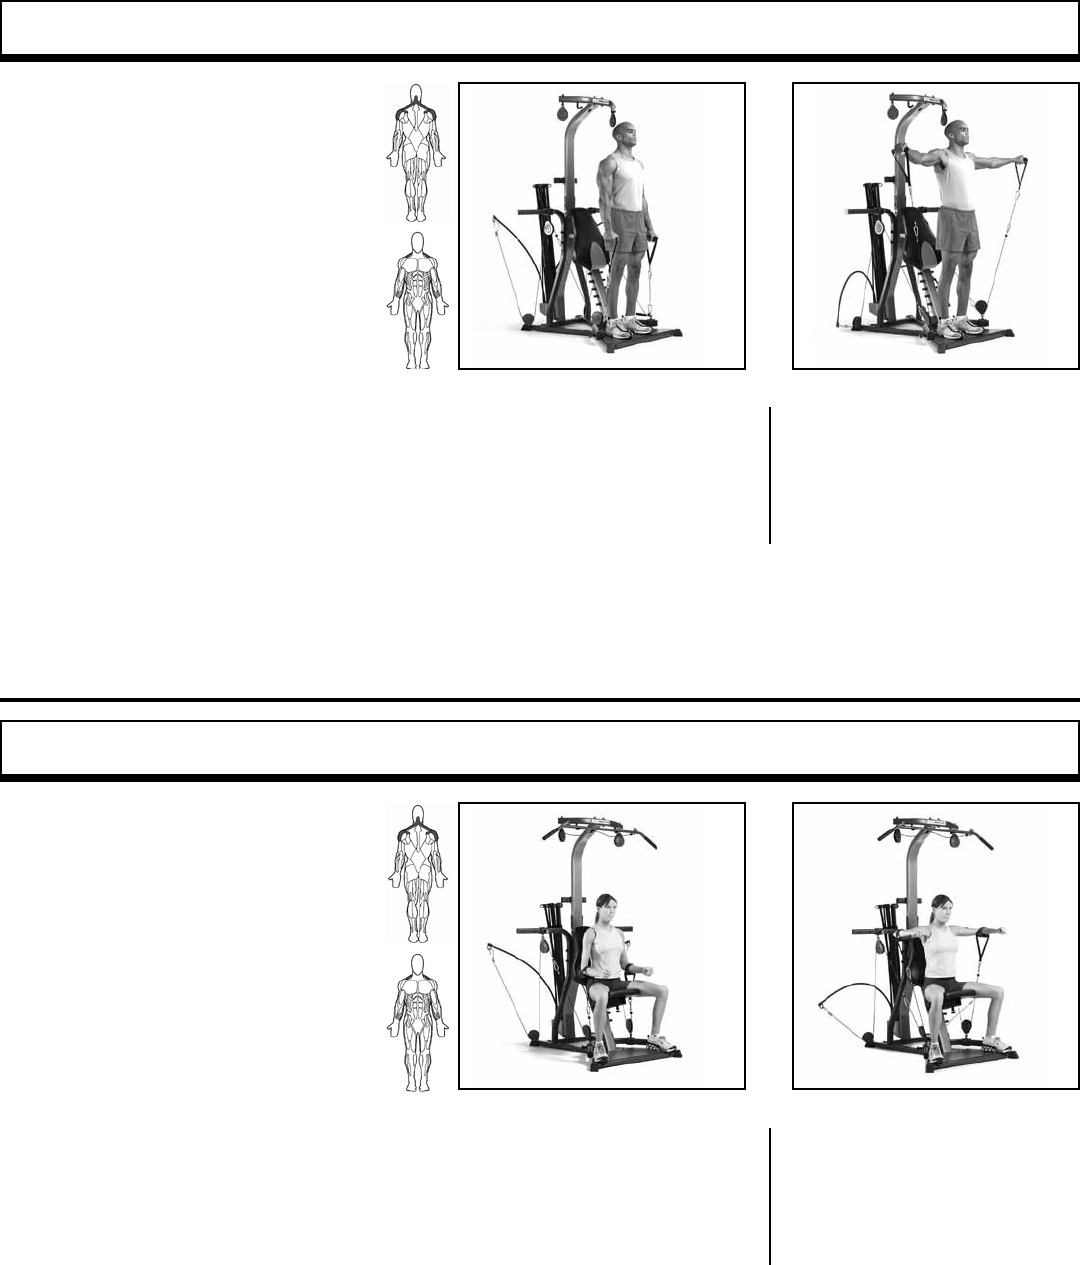
Crossover Rear Deltoid Rows – Elbow Flexion
Muscles worked:
Back portion of shoulder muscles (rear
deltoids, rear portion of middle deltoids).
Position:
Standing – facing machine
Accessory:
Hand Grips
Pulleys:
Center Cross Bar – narrow position
Before You Begin:
Remove Leg Extension and seat.
Center Cross Bar Pulleys should be
in narrow position.
Key Points:
• Maintain a 90º angle between upper arms
and sides of torso.
• Keep shoulderblades pinched together and
maintain good spinal alignment.
• To work one arm at a time, place non-
working hand on top of bench for addi-
tional stabilization.
START FINISH
• Stand on platform.
• Cross arms in front of body and
grasp hand grips (right grip in left
hand and vice versa) with palms
facing down and arms nearly
straight.
• Bend over slightly from hips (not
spine) and raise arms in front of
body, 90º to torso.
• Lift chest, stand up straight with
spine in good alignment and tighten
trunk muscles.
• Allowing arms to bend as you go,
move elbows outward and back-
ward keeping a 90º angle between
upper arms and sides of torso.
• Always point forearms in the
direction of cables.
• Move until elbows are slightly
behind shoulders, then slowly
reverse motion. Keep rear
shoulder muscles tightened during
entire motion.
Crossover High Rear Deltoid Rows – Elbow Flexion
Muscles worked:
Back portion of shoulder muscles (rear
deltoids, rear portion of middle deltoids).
Position:
Standing – facing machine
Accessory:
Hand Grips
Pulleys:
Lat Tower
Before You Begin:
Remove Leg Extension and seat.
Key Points:
• Keep shoulderblades pinched together
and maintain good spinal alignment.
START FINISH
• Stand on platform, with knees
slightly bent.
• Cross arms and grab hand grips
with palms facing down, arms
straight (right hand on left hand
grip and vice versa).
• Stand up straight and slightly lean
back from hips.
• Lift chest and pinch shoulder-
blades together.
• Allowing arms to bend as you
go, move elbows out and back
keeping a 90º angle between
upper arms and sides of torso.
• Always point forearms in direction
of cables.
• Move until elbows are slightly
behind shoulders, then slowly
reverse motion. Keep rear
shoulder muscles tightened.
Shoulder Exercises
START ACTION
START ACTION
Bowflex Xtreme® 2 SE Owner’s Manual 27
Lateral Shoulder Raise – Shoulder Abduction (Elbows Stabilized)
Muscles worked:
Side shoulder muscles (middle
deltoids), top muscle of rotator cuff
(supraspinatus) and upper trapezius
muscles.
Position:
Standing – facing outward
Accessory:
Hand Grips
Pulleys:
Squat Pulley Frame – use
squat straps
Before You Begin:
Remove Seat and Leg Extension
Key Points:
• DO NOT swing arms upward or move
trunk.
START FINISH
• Stand on platform facing outward.
Grasp hand grips with palms facing
each other.
• Attain good spinal posture and bend
forward slightly at hip (15 to 20º) by
keeping spine straight and sticking
rear end out. Do not bend at waist.
• Let arms hang directly in line with
cables.
• Elevate shoulders slightly toward
back of head.
• Raise arms out to sides to nearly
shoulder level.
• Keep side of arm/elbow facing out/
up throughout movement.
• Slowly bring arms into start posi-
tion without relaxing.
Seated Forearm Lateral Shoulder Raise – Elbows Stabilized
Muscles worked:
Side shoulder muscles (middle
deltoids), top muscle of rotator cuff
(supraspinatus) and upper trapezius
muscles.
Position:
Seated – facing outward
Accessory:
Hand Grips over elbows
Pulleys:
Squat Pulley Frame – narrow
position
Before You Begin:
Remove Seat and Leg Extension
Key Points:
• DO NOT swing arms upward or
move trunk.
START FINISH
• Slide hand grips over forearms
until grip is cradled in elbow.
• Let upper arms hang in
line with cables and bend elbows
90º.
• Elevate shoulders slightly toward
the back of your head.
• Raise chest and pinch shoulder-
blades together.
• Maintain a slight, comfortable,
arch in lower back.
• Raise arms out to sides to almost
shoulder level.
• Keep side of forearms/elbows
facing out/up throughout move-
ment.
• Slowly bring arms to start
position without relaxing.
Shoulder Exercises
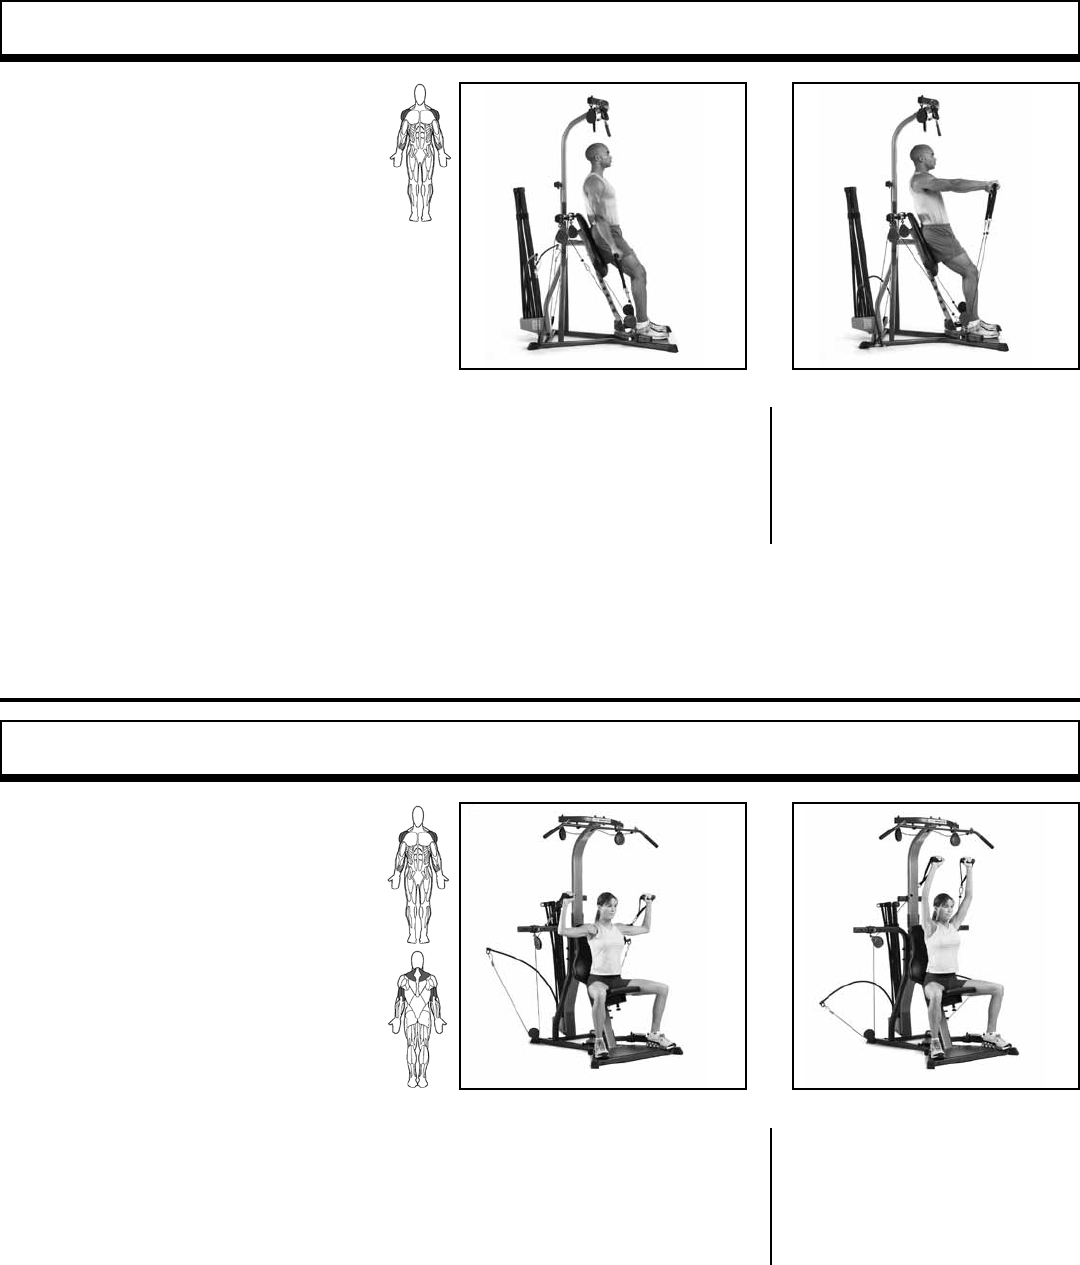
START ACTION
START ACTION
28 Bowflex Xtreme® 2 SE Owner’s Manual
Front Shoulder Raise – Shoulder Flexion (Elbow Stabilized)
Muscles worked:
Front part of shoulder muscles (front
deltoids) and front part of middle deltoids.
Position:
Standing – facing outward
Accessory:
Hand Grips
Pulleys:
Squat Pulley Frame
Before You Begin:
Remove Leg Extension and seat. Use plat-
form pulleys.
Key Points:
• Keep chest lifted and abdominals tightened
throughout entire motion and maintain
good spinal alignment.
• Do not increase arch in lower back while
lifting arms.
• Stand on platform facing outward
with knees slightly bent. You may
want to lean back against bench.
• Keep chest up, ads tight and main-
tain a slight arch in
lower back.
• Grasp hand grips with palms
facing machine and arms straight
at sides.
• Arms may be moved alternately or
together.
• Keeping arms straight, move them
forward, then up to shoulder
height.
• Slowly return arms beside
torso and repeat.
START FINISH
Seated Shoulder Press – Shoulder Adduction (and Elbow Extension)
Muscles worked:
Front portion of shoulder muscles
(front deltoids and front part of middle
deltoids), upper back muscles (upper
trapezius), and triceps.
Position:
Seated – facing outward
Accessory:
Hand Grips
Pulleys:
Center Cross Bar – wide position
Before You Begin:
Remove Leg Extension and adjust seat
height.
Key Points:
• Keep abdominals tight throughout entire
motion and maintain good spinal align-
ment.
• Do not let the arch increase in the lower
back while pressing up.
START FINISH
• Sit facing outward, knees bent and
feet flat on floor.
• Keep chest up, abs tight and main-
tain a slight arch in
lower back.
• Grasp hand grips with palms
facing away from machine.
• Raise hand grips to just above
shoulder level, keeping palms
facing forward.
• Straighten arms overhead,
focusing on moving elbows up
and in toward head.
• Slowly return to starting position
keeping tension in front shoulder
muscles.
Shoulder Exercises
START ACTION
START ACTION
Bowflex Xtreme® 2 SE Owner’s Manual 29
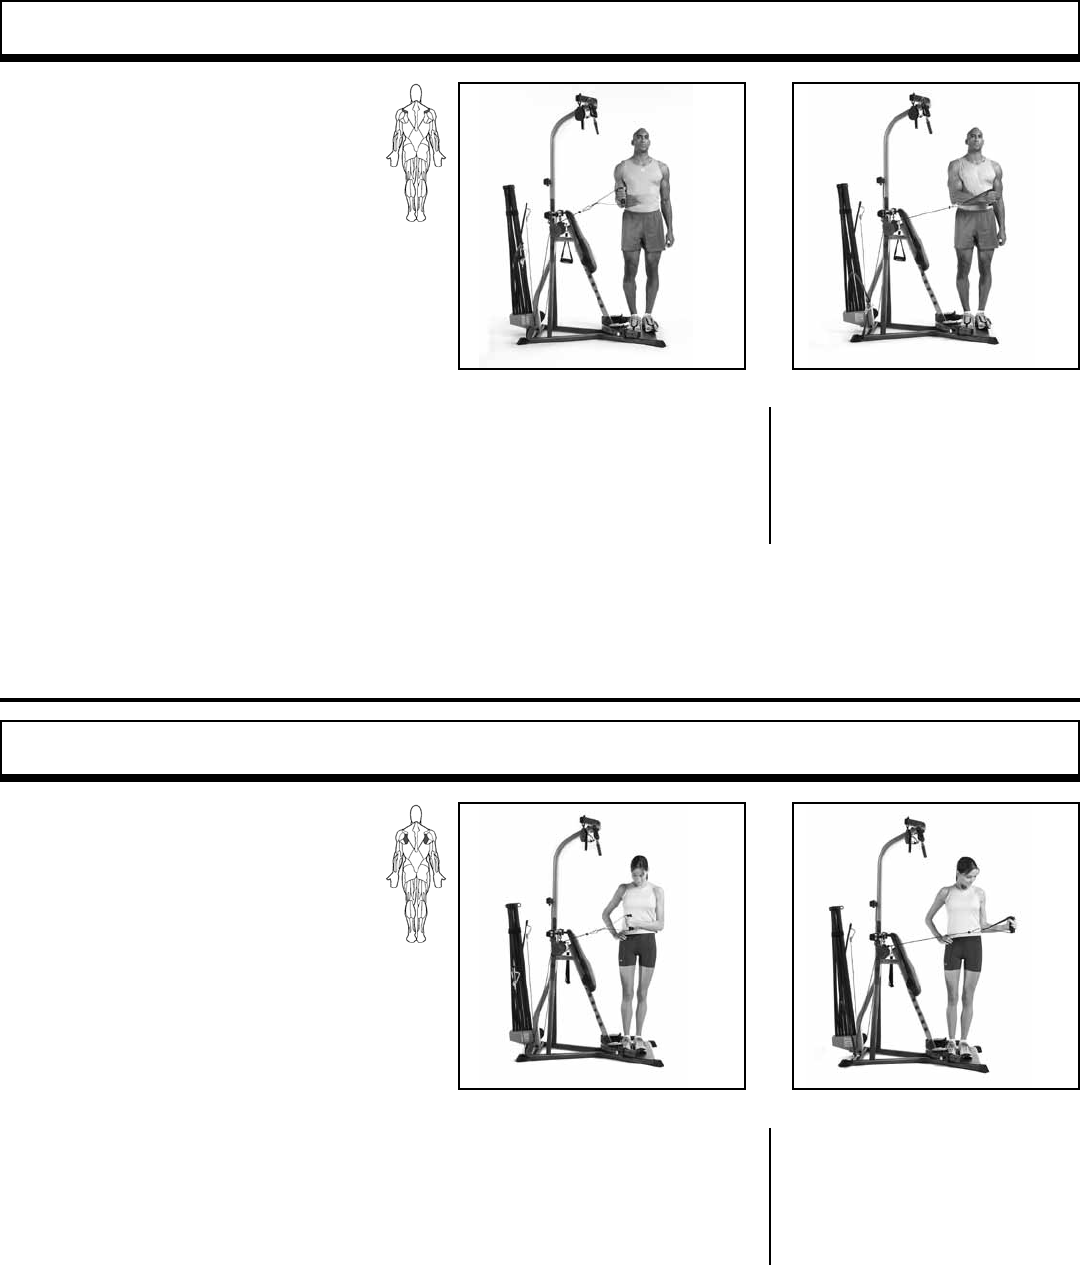
Shoulder Rotator Cuff – Internal Rotation
Muscles worked:
Front rotator cuff muscle
(subscapularis).
Position:
Standing – facing left or right
Accessory:
Hand Grips
Pulleys:
Center Cross Bar -wide position
Before You Begin:
Remove Seat and Leg Extension
Key Points:
• Motion should be slow and controlled.
• Do not rotate spine to get
additional range of motion. Try for pure
rotation of shoulder joint. More is not
better!
• Use light resistance only. Pick a resis-
tance that you can perform
12-15 perfect reps.
START FINISH
Shoulder Rotator Cuff – External Rotation
Muscles worked:
Rear portion of rotator cuff (infraspinatus,
teres minor muscles).
Position:
Standing – facing left or right
Accessory:
Hand Grips
Pulleys:
Center Cross Bar – wide position
Before You Begin:
Remove Leg Extension and seat.
Key Points:
• Motion should be slow and controlled.
• Do not rotate spine to get additional
range of motion. Try for pure external
rotation of shoulder joint. More is not
better!
• Use light resistance only. Pick a
resistance that allows you to perform
12-15 reps.
START FINISH
• Stand on platform with one
side toward machine. Maintain good
spinal alignment.
• Using arm furthest from rods, reach
across body, grasp hand grip nearest
you and draw
arm back into side. Keep elbow bent
90º.
• Allow forearm to rest against
abdomen and elbow against
side, taking out some of the
slack or in cables.
• Rotate forearm away from abdomen
and out to side, keeping elbow/upper
arm
by side.
• Slowly return to start position.
• Rotate forearm toward abdomen,
keeping elbow by side.
• Slowly return to start position.
• Stand on platform with one
side toward machine. Maintain
good spinal alignment.
• Grasp hand grip with arm closest to
machine and draw upper arm into
side, keeping elbow bent 90º.
• Distance yourself from tower to
eliminate slack in cable.
• Use very light resistance.
Shoulder Exercises
START ACTION
START ACTION
30 Bowflex Xtreme® 2 SE Owner’s Manual
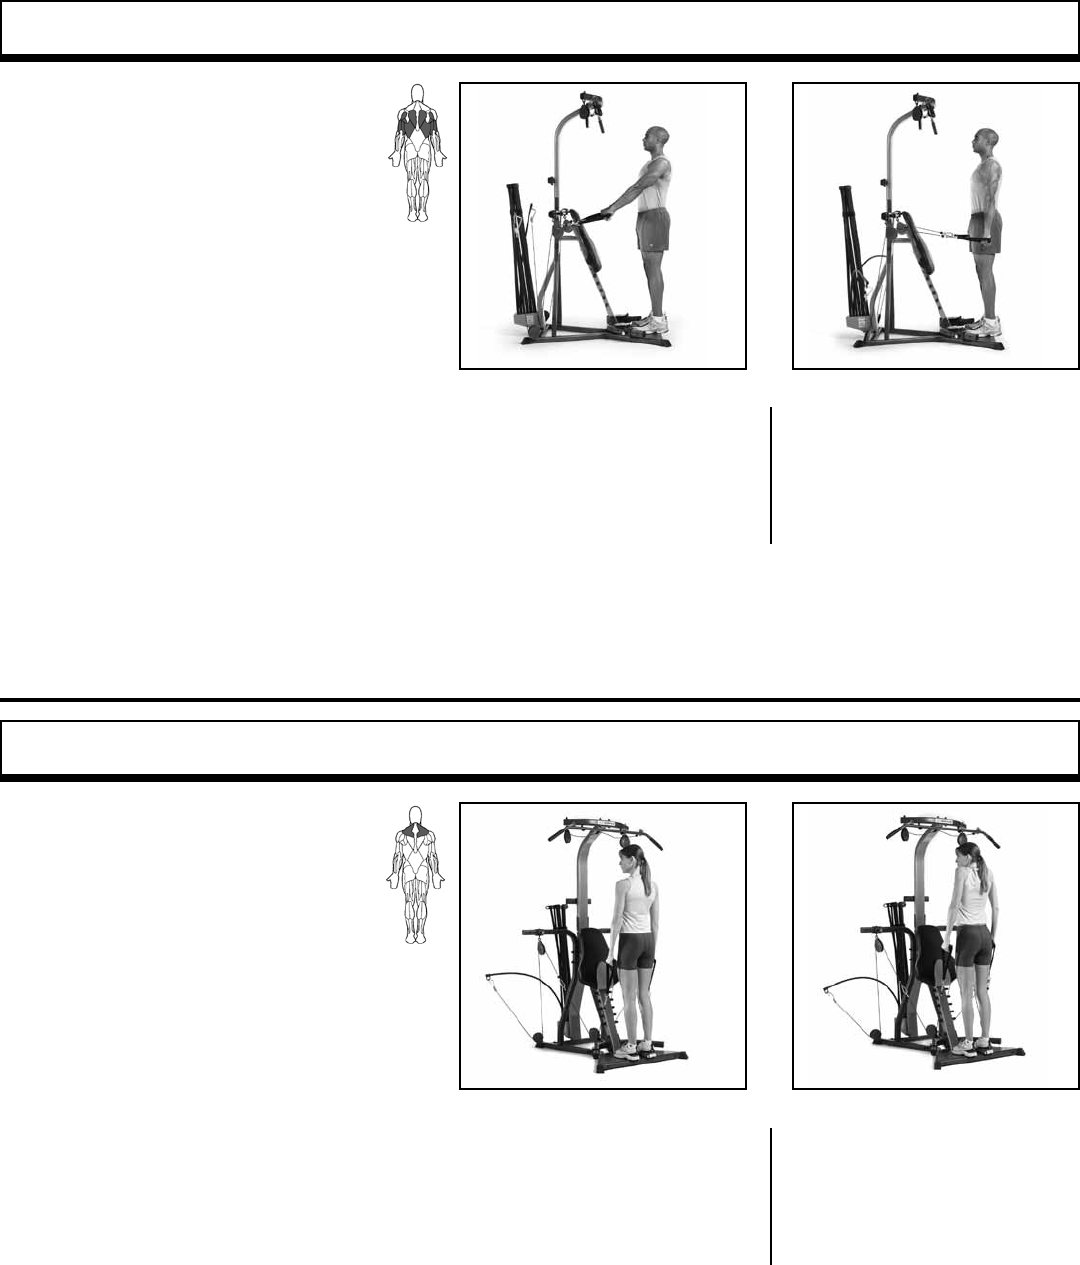
Shoulder Extension – Elbows Stabilized
Muscles worked:
Upper back (latissimus dorsi, teres major,
rear deltoid muscles), muscles between
shoulderblades (middle trapezius,
rhomboid muscles) and triceps.
Position:
Standing – facing machine
Accessory:
Hand Grips
Pulleys:
Center Cross Bar – narrow position
Before You Begin:
Remove Leg Extension and seat.
Key Points:
• Do not lose spinal alignment, keep
chest lifted.
• Keep lats tightened throughout
entire motion.
• Release shoulderblades at end of
each rep. Initiate new rep by retracting
shoulderblades.
START FINISH
• Stand on platform, facing
machine, knees slightly bent, feet
flat on floor.
• Grasp hand grips with palms
facing floor.
• Tighten trunk muscles to stabilize
spine while maintaining a slight
arch in lower back.
• Initiate by pinching shoulderblades
together.
• Continue movement by moving
hands in an arc, down and back
toward hips.
• Slowly return to start position.
START FINISH
Shoulder Shrug – Scapular Elevation
Muscles worked:
Upper trapezius and associated smaller muscles
of region.
Position:
Standing – facing machine
Accessory:
Hand Grips
Pulleys:
Squat Pulley Frame
Before You Begin:
Remove Leg Extension and seat.
Key Points:
• Do not bend neck backward or forward while
raising shoulders.
• Do not slouch upon lowering
shoulders.
• Keep spine in good alignment through entire
motion.
• Make sure both shoulders raise evenly.
• For variation, bend forward slightly from hips, not
spine.
• Stand on platform facing machine.
• Reach down and grasp hand grips
with palms facing away.
• Let arms hang, extending toward
pulleys.
• Raise shoulders toward back of
head, making sure neck/head
does not move.
• Slowly reverse motion, keeping
upper trapezius muscles tight.
Shoulder Exercises
START ACTION
START ACTION
Bowflex Xtreme® 2 SE Owner’s Manual 31
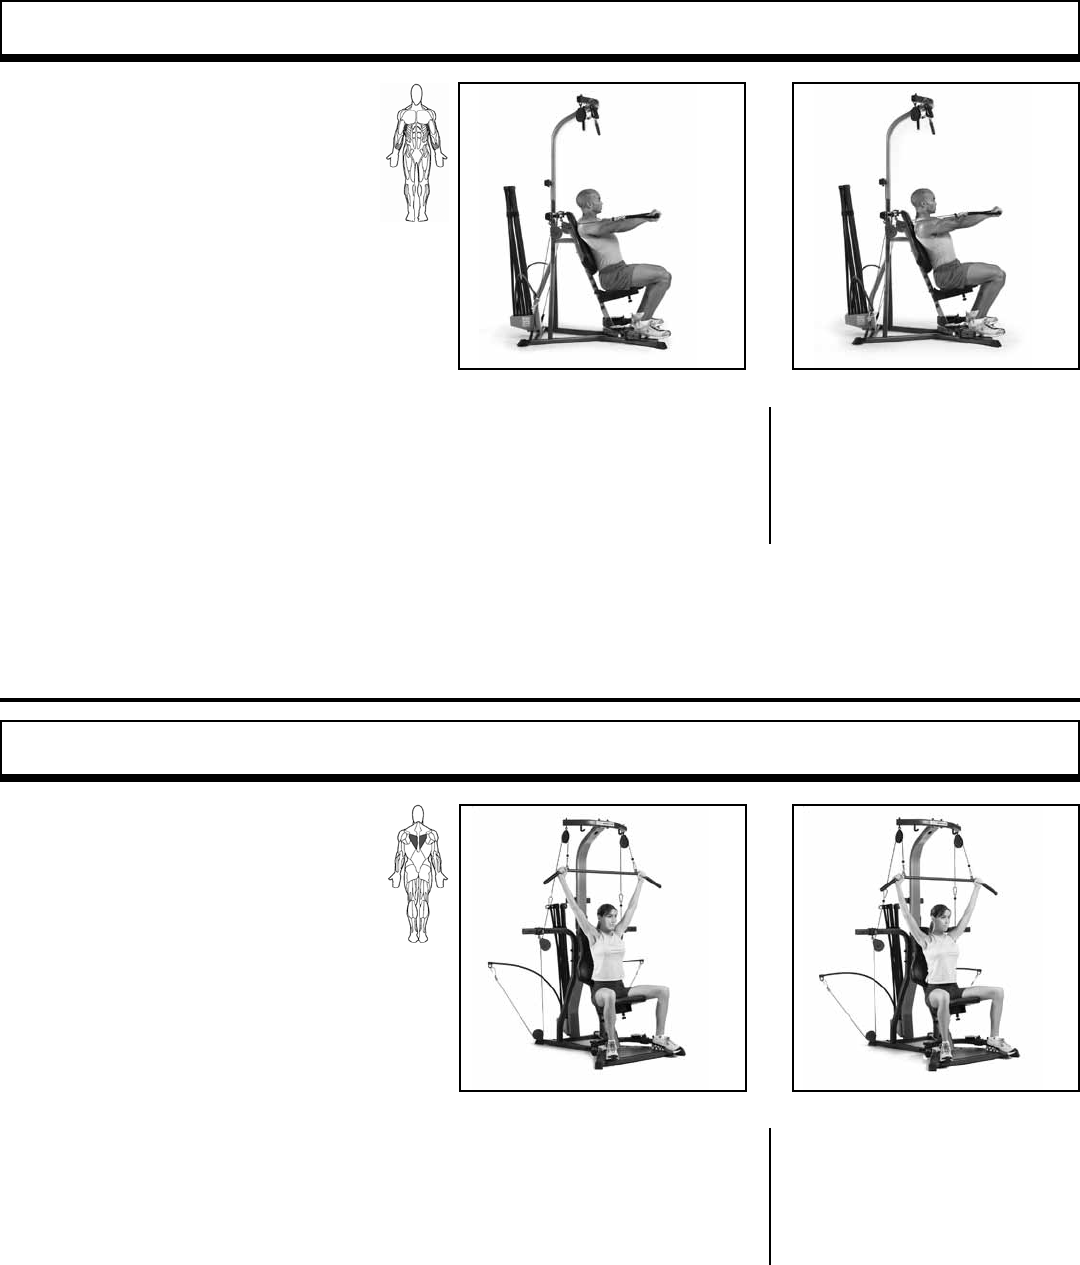
Scapular Protraction – Elbows Stabilized
Muscles worked:
Serratus anterior muscles, the muscles
on the side of the rib cage.
Position:
Seated – facing outward
Accessory:
Hand Grips
Pulleys:
Center Cross Bar – narrow position
Before You Begin:
Remove Leg Extension and adjust seat height.
Key Points:
• Maintain a 90º angle between upper arms
and torso throughout the exercise.
• Keep elbows straight.
• Do not slouch forward in the upper spine to
further the motion. Maintain
a very slight arch in lower back
at all times.
START FINISH
• Sit grasp hand grips.
• Lie head back on bench and
straighten arms to front.
• Be sure arms are in line with cables,
palms facing down and wrists
straight.
• Raise chest and pinch shoul-
derblades. Maintain a slight,
comfortable, arch in lower back.
• Keeping arms straight and pointing in
the same direction of cables, slowly
move shoulderblades forward off
bench.
• Slowly return to start position.
• Movement is subtle and only occurs
in shoulder.
Muscles worked:
Develops lower trapezius
muscles, which stabilize and
move shoulderblades.
Position:
Seated – facing outward
Accessory:
50” Bent Lat Bar
Pulleys:
Lat Tower
Before You Begin:
Remove Leg Extension and adjust seat
height.
Key Points:
• Do not lose spinal alignment,
keep chest lifted.
Scapular Depression
START FINISH
• Sit facing outward, knees bent, feet
flat on floor.
• Grasp 50” Bent Lat Bar.
• Tighten trunk muscles to stabilize
spine while maintaining a slight arch
in lower back.
• Keeping arms straight, slide shoul-
derblades toward hips.
• When shoulderblades are fully
depressed, slowly return to start
position.
• Movement is subtle and only occurs
in shoulder.
Shoulder Exercises
START ACTION
START FINISH
START ACTION
START FINISH
32 Bowflex Xtreme® 2 SE Owner’s Manual
Shoulder Exercises
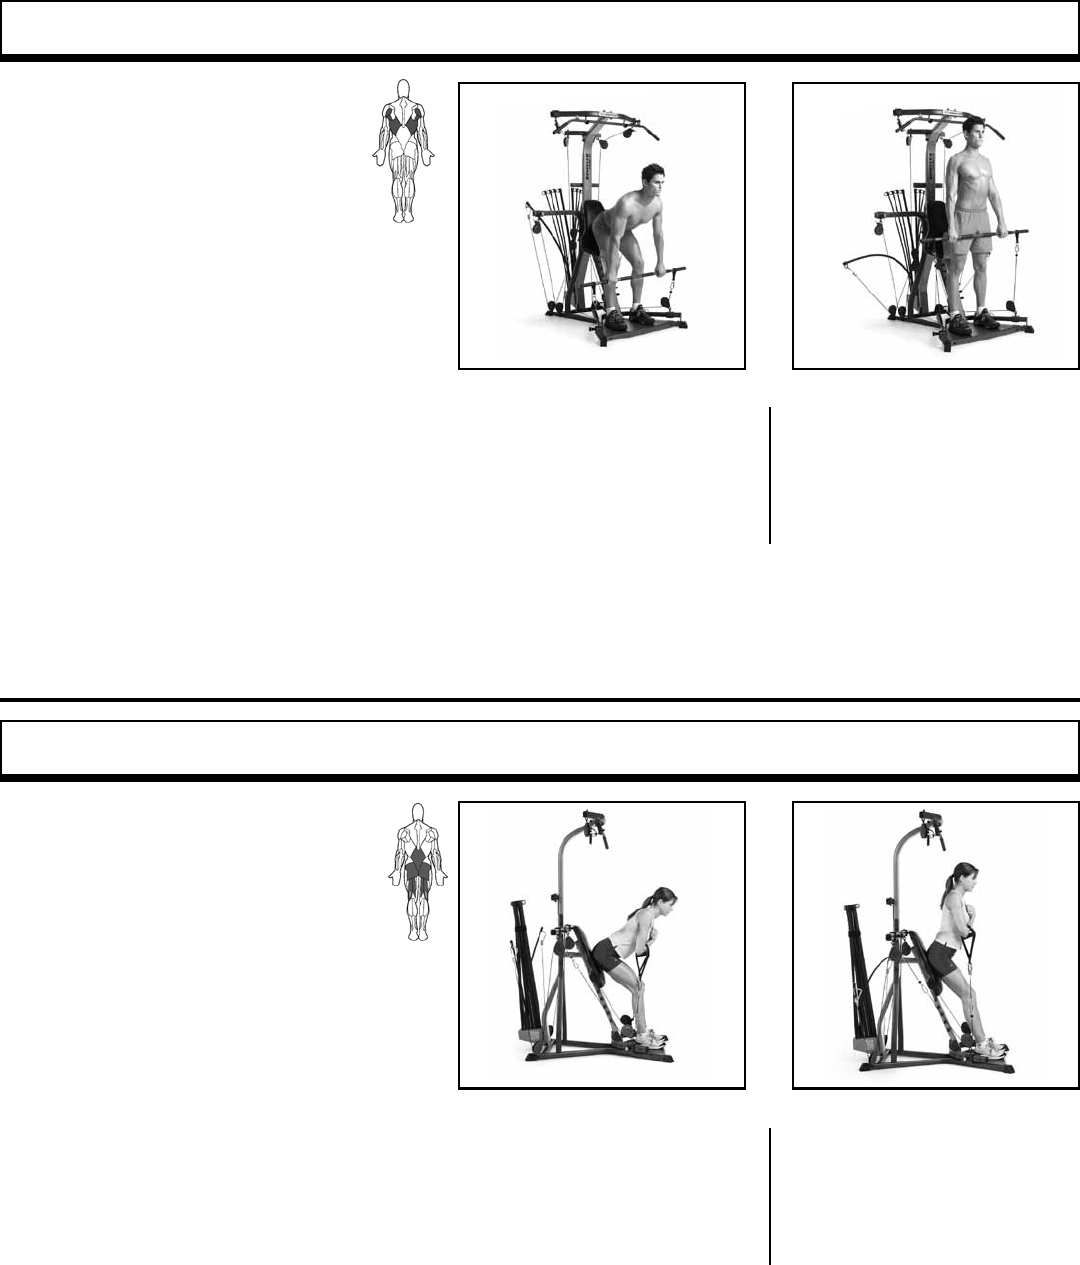
Scapular Retraction
Muscles worked:
Develops muscles between shoulderblades
(trapezius and rhomboids).
Position:
Seated on floor, facing machine
Accessory:
Hand Grips
Pulleys:
Squat Pulley Frame
Before You Begin:
Remove Leg Extension and Seat
Key Points:
• Do not bend torso forward.
• Do not lose spinal alignment, keep chest
lifted.
• Do not pull with arm muscles.
• Sit on oor facing machine.
• Grab hand grips with palms facing
each other.
• Place heels against end of plat-
form, bend hips and knees, arms
straight.
• Lift chest, sit up straight with spine
in good alignment and tighten
trunk muscles.
• Keeping arms straight, slowly
pinch shoulderblades together.
• When shoulderblades are
fully retracted, slowly return
to start position.
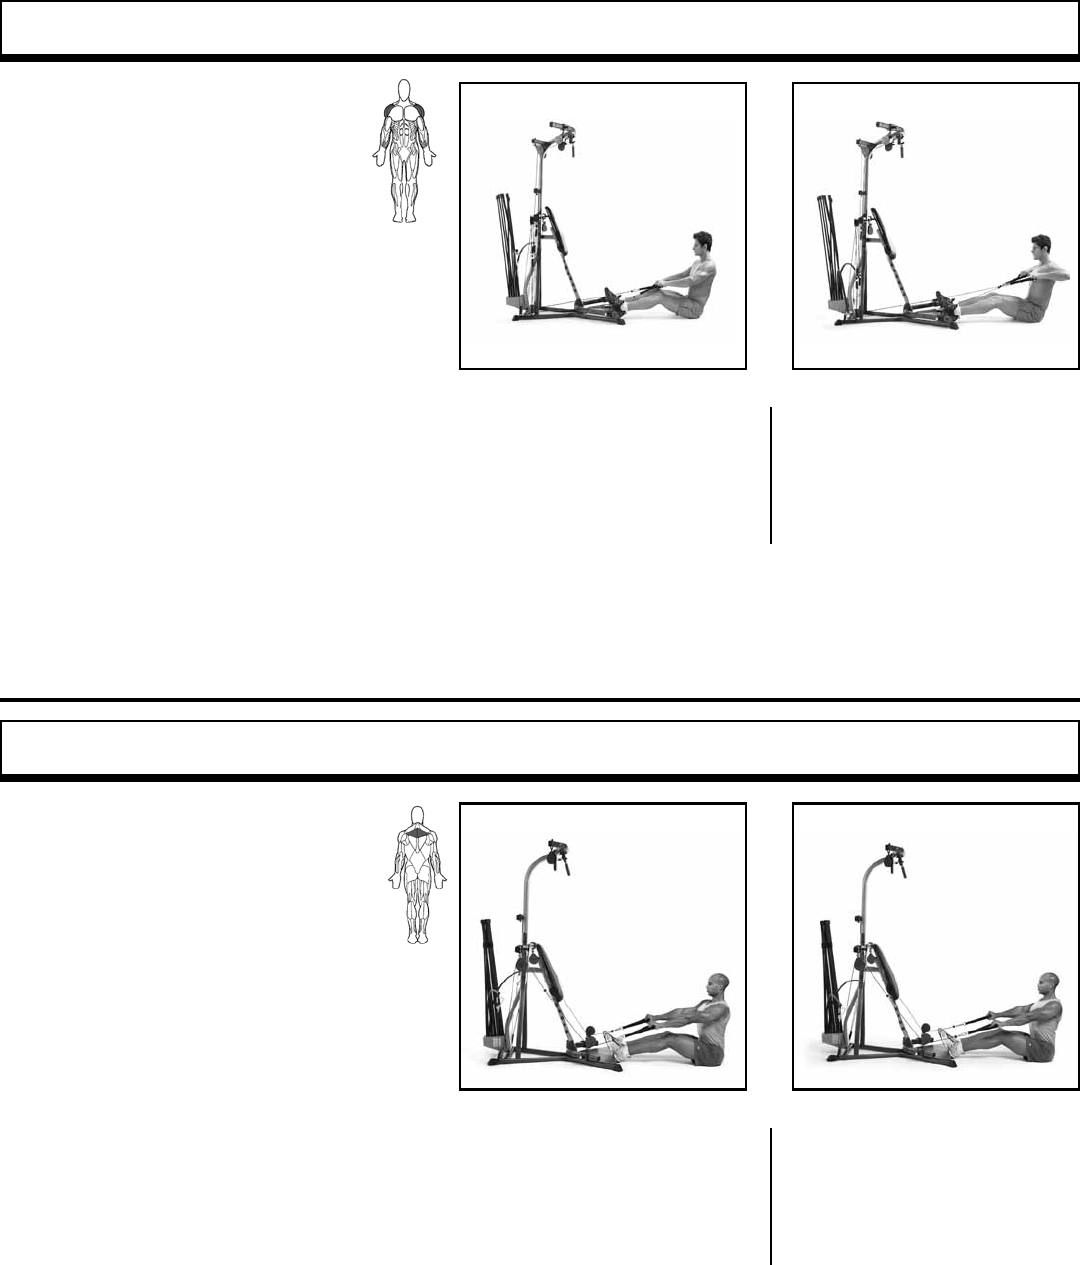
Crossover Seated Rear Delt Rows—Elbow Flexion
• Cross your arms in front of you and
grasp the Hand Grips (right Grip
in left hand and vice versa), palms
facing toward the floor.
• Brace your heels against the end
of the Standing Platform.
• Lean back slightly and straighten
your arms.
• Raise your arms until they are in
front of your body at approximately
a 90° angle to your torso.
• Allowing your arms to bend
as you go, move your elbows
outward and backward until
elbows are parallel with your
shoulders.
• Keep your forearms pointing in
the direction of the cables.
• Slowly return to the start
position. Do not relax the tension
in your shoulder muscles.
Muscles worked:
Anterior and Middle Deltoids
Position:
Seated on the floor —facing machine
Accessory:
Hand Grips
Pulleys:
Squat Pulley Frame
Leg Extension:
Removed
Success Tips
• Maintain a 90° angle between your upper
arms and torso during motion.
• Keep knees bent and feet braced against
the Standing Platform.
• Do not bend your torso forward.
• Keep shoulderblades pinched together
and maintain good spinal alignment.
START ACTION
START FINISH
START ACTION
START FINISH
Bowflex Xtreme® 2 SE Owner’s Manual 33
Back Exercises
START FINISH
START FINISH
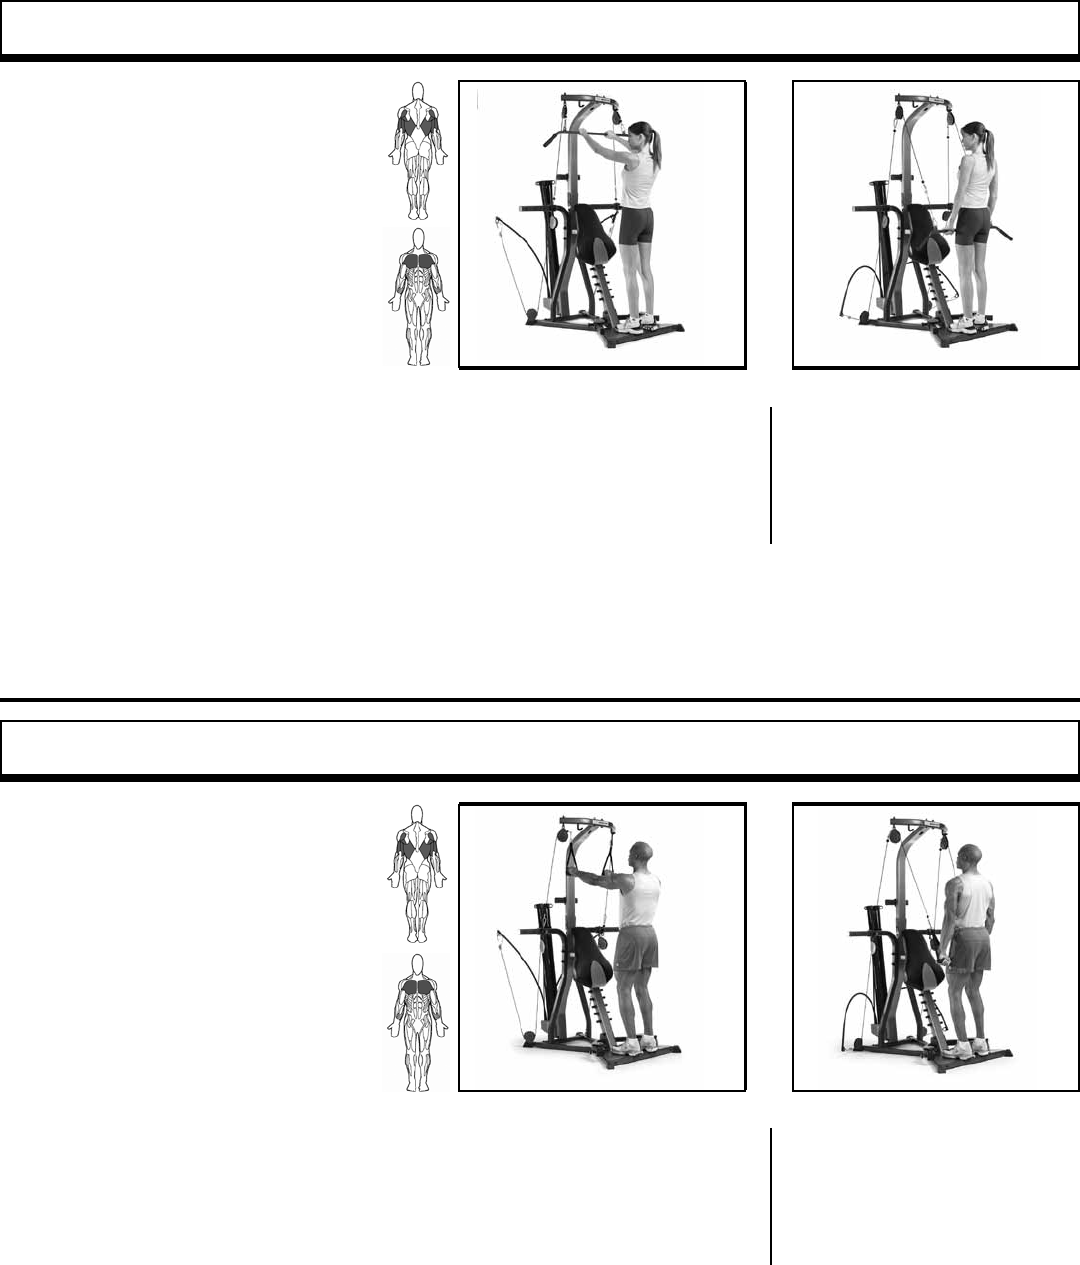
Standing Low Back Extension – with Hip Extension
Muscles worked:
Muscles in lower back (erector spinae, deep
spinal muscles), lower back muscles, gluteus
maximus and hamstrings.
Position:
Standing – facing outward
Accessory:
Hand Grips
Pulleys:
Squat Pulley Frame – standard position
Before You Begin:
Remove Seat and Leg Extension
Key Points:
• Keep chest lifted and a very slight arch in
lower back at all times.
• Move from hips only, not waist. Do not
increase or decrease the arch in lower back
during the movement.
• Stand facing out.
• Slide hand grips up over
fore arms to elbows.
• Bend knees comfortably, cross arms
in front of chest and pull hand grips
tightly to chest.
• Lift chest, tighten trunk muscles
and arch lower back slightly. Pinch
shoulderblades together slightly.
• Lean forward from hips, slightly
letting out tension in the cables.
• Keep chest lifted, move entire
torso up as a unit by pivoting at
hips.
• Slowly return to start position
without slouching or changing
spinal alignment.
Good Morning
• Grasp the Squat Bar with your
palms facing downward.
• Keep your legs bent slightly.
• Bend over, approximately 90˚
from your hips (not your waist)
• Initiate the movement by pushing
your hips forward.
• Slowly move your trunk until
you are in the standing position.
Back should be tightened when
reaching upright position
• Slowly return to the start position
without relaxing tension in your
legs.
Muscles worked:
Latissimus Dorsi; Teres Major;
Rear Deltoids
Position:
Standing—facing outward
Accessory:
Squat Bar
Pulleys:
Squat Pulley Frame
Leg Extension:
Removed
Success Tips
• Keep your chest lifted, spine aligned, abs
tight and your back flat with no arch.
• Lift with your legs, not lower back or
arms.
• Use a light resistance for this movement.
• Lift your head, keep your knees bent and
feet on Standing Platform.
START ACTION
START FINISH
START ACTION
START FINISH
34 Bowflex Xtreme® 2 SE Owner’s Manual
Standing Shoulder Pullover – with Bent Lat Bar (Elbows Stabilized)
Muscles worked:
Upper back (latissimus dorsi, teres major,
rear deltoid muscles). Also involves chest
(pectoralis major muscles) and triceps.
Position:
Standing – facing machine
Accessory:
50” Bent Lat Bar
Pulleys:
Lat Tower
Before You Begin:
Remove Seat and Leg Extension
Key Points:
• Do not lose spinal alignment. Relax neck,
keep chest lifted, abs tight and maintain
a very slight arch in lower back.
• Keep lats tightened throughout
entire motion.
• Release shoulderblades at end of each rep.
Initiate new rep by depressing shoulder-
blades.
• Stand on platform.
• Keep knees slightly bent and feet
flat on platform.
• Extend arms overhead and grasp
50” Bent Lat Bar, palms facing
down.
• Tighten abs to stabilize spine while
maintaining a slight arch in lower
back.
• Move hands in an arc down
toward legs.
• End with arms by sides,
pressing shoulderblades down,
completely tightening lats.
• Control the return to start posi-
tion by slowly moving arms
overhead and releasing shoul-
derblades.
Standing Shoulder Pullover – with Hand Grips (Elbows Stabilized)
Muscles worked:
Upper back (latissimus dorsi, teres major,
rear deltoid muscles). Also involves chest
(pectoralis major muscles)and triceps.
Position:
Standing – facing machine
Accessory:
Hand Grips
Pulleys:
Lat Tower
Before You Begin:
Remove Seat and Leg Extension:
Key Points:
• Do not lose spinal alignment. Relax neck,
keep chest lifted, abs tight and maintain
a very slight arch in lower back.
• Keep lats tightened throughout entire
motion.
• Release shoulderblades at end of each rep.
Initiate new rep by depressing shoulder-
blades.
• Stand on platform.
• Keep knees slightly bent and feet
flat on platform.
• Extend arms overhead and grasp
Hand Grips, palms facing down.
• Tighten abs to stabilize spine while
maintaining a slight arch in lower
back.
• Move hands in an arc down
toward legs.
• End with arms by sides,
pressing shoulderblades down,
completely tightening lats.
• Control the return to start posi-
tion by slowly moving arms
overhead and releasing shoul-
derblades.
Back Exercises
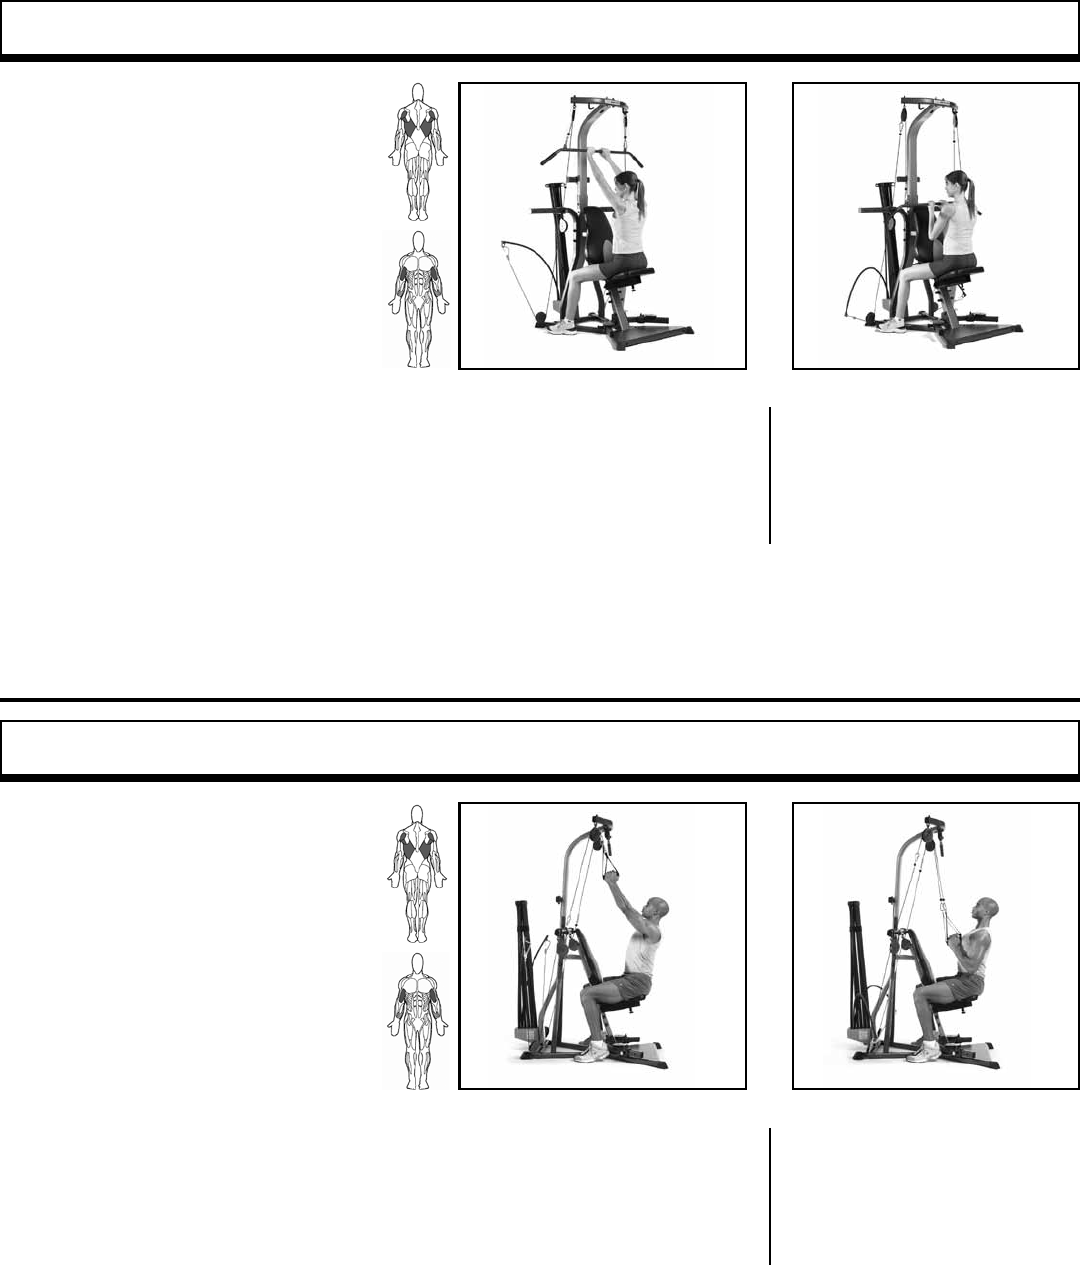
START ACTION
START FINISH
START ACTION
START FINISH
Bowflex Xtreme® 2 SE Owner’s Manual 35
Narrow Pulldowns with Bent Lat Bar – Shoulder Extension (with Elbow Flexion)
Muscles worked:
Latissimus dorsi, teres major and rear
deltoid, which make up the large pulling
muscles of upper back. Also involves biceps
group.
Position:
Seated – facing machine
Accessory:
50” Bent Lat Bar
Pulleys:
Lat Tower
Before You Begin:
Remove Leg Extension
Key Points:
• Do not lose spinal alignment.
• Keep lats tightened throughout entire
motion.
START FINISH
• Grasp 50” Bent Lat Bar, palms
facing down, and sit facing
machine.
• Position thighs under pulleys.
Sit upright with arms extending
up. You may position hips under
pulleys, but you must lean back
slightly from the hips.
• Maintain good spinal alignment,
chest lifted, abs tight and slight
arch in lower back.
• Pull shoulderblades down and
together while drawing elbows
down to front, and then in,
toward sides of body.
• At end of motion, arms should be
near (not touching) sides, shoulder-
blades fully depressed toward hips,
and forearms in line with cables
(not forward).
• Slowly return to start position. Allow
arms and shoulderblades to move
up, w/o relaxing muscles.
Narrow Pulldowns with Hand Grips – Shoulder Extension (with Elbow Flexion)
Muscles worked:
Latissimus dorsi, teres major and rear
deltoid, which make up the large pulling
muscles of upper back. Also involves
biceps group.
Position:
Seated – facing machine
Accessory:
Hand Grips
Pulleys:
Lat Tower
Before You Begin:
Remove Leg Extension
Key Points:
• Do not lose spinal alignment.
• Keep lats tightened throughout entire
motion.
START FINISH
• Grasp Hand Grips, palms facing
each other, and sit facing
machine.
• Position thighs under pulleys and
sit upright with arms extending
up. You may position hips under
pulleys but you must lean back
slightly from the hips.
• Maintain good spinal alignment,
chest lifted, abs tight and a slight
arch in lower back.
• Pull shoulderblades down and
together while drawing elbows
down and then in, toward sides of
body.
• At end of motion, arms should be
near (not touching) sides, shoul-
derblades fully depressed toward
hips and forearms in line with
cables (not forward).
• Slowly return to start position.
Allow arms and shoulderblades
to move up fully, without relaxing
muscles.
Back Exercises
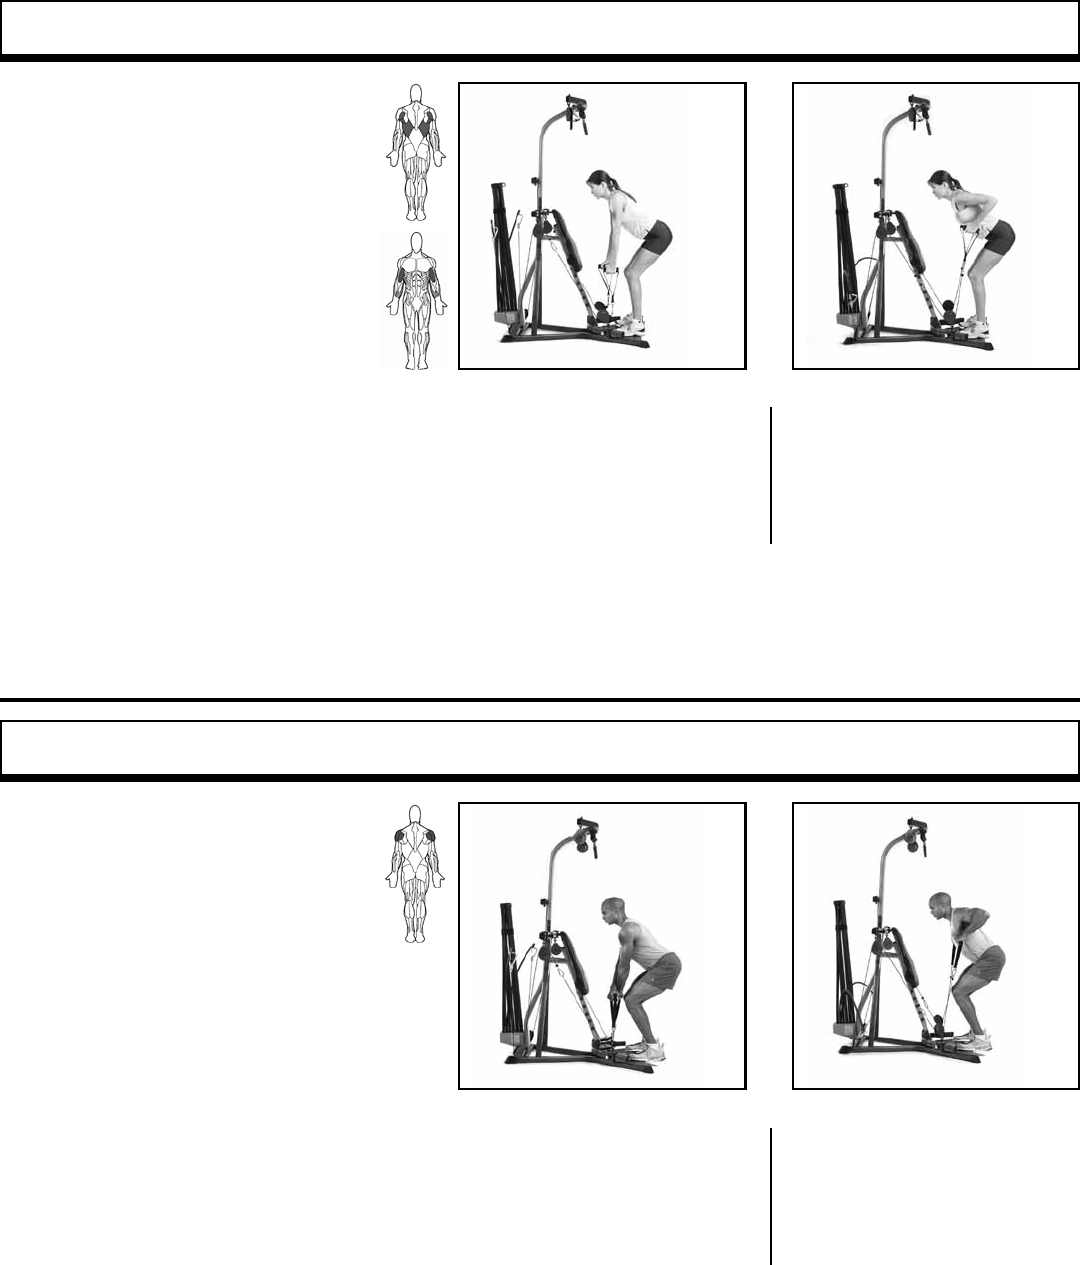
START ACTION
START FINISH
START ACTION
START FINISH
36 Bowflex Xtreme® 2 SE Owner’s Manual
Bent Over Row
Muscles worked:
Latissimus dorsi, teres major and rear
deltoid, which make up the large pulling
muscles of upper back. Also involves
biceps group.
Position:
Standing – facing machine
Accessory:
Hand Grips
Pulleys:
Squat Pulley Frame
Before You Begin:
Remove Seat and Leg Extension
Key Points:
• Do not bend neck backward or forward
while raising bar.
• Do not slouch when lowering
hand grips.
• Keep spine in good alignment through
entire motion.
START FINISH
• Stand on platform. Reach down
and grasp hand grips, palms
facing each other.
• Let arms extend in direction
of pulleys.
• Keep back at and knees bent.
• Move elbows back as you
bring hand grips to a point below
chest.
• Slowly reverse motion. Keep knees
bent and back flat.
Crossover Bent Over Row
Muscles worked:
Back portion of shoulder muscles (rear
deltoids, rear part of middle deltoids).
Position:
Standing – facing machine
Accessory:
Hand Grips
Pulleys:
Squat Pulley Frame
Before You Begin:
Remove Seat and Leg Extension
Key Points:
• Do not bend neck backward or forward
while raising bar.
• Do not slouch when lowering
hand grips.
• Keep spine in good alignment through
entire motion.
START FINISH
• Stand on platform.
• Cross arms and reach down and
grasp hand grips, palms facing
back (left grip in right hand and
vice versa).
• Let arms extend in direction
of pulleys.
• Keep back at and knees bent.
• Move elbows back as you bring
hand grips to a point below
chest.
• Slowly reverse motion. Keep
knees bent and back flat.
Back Exercises
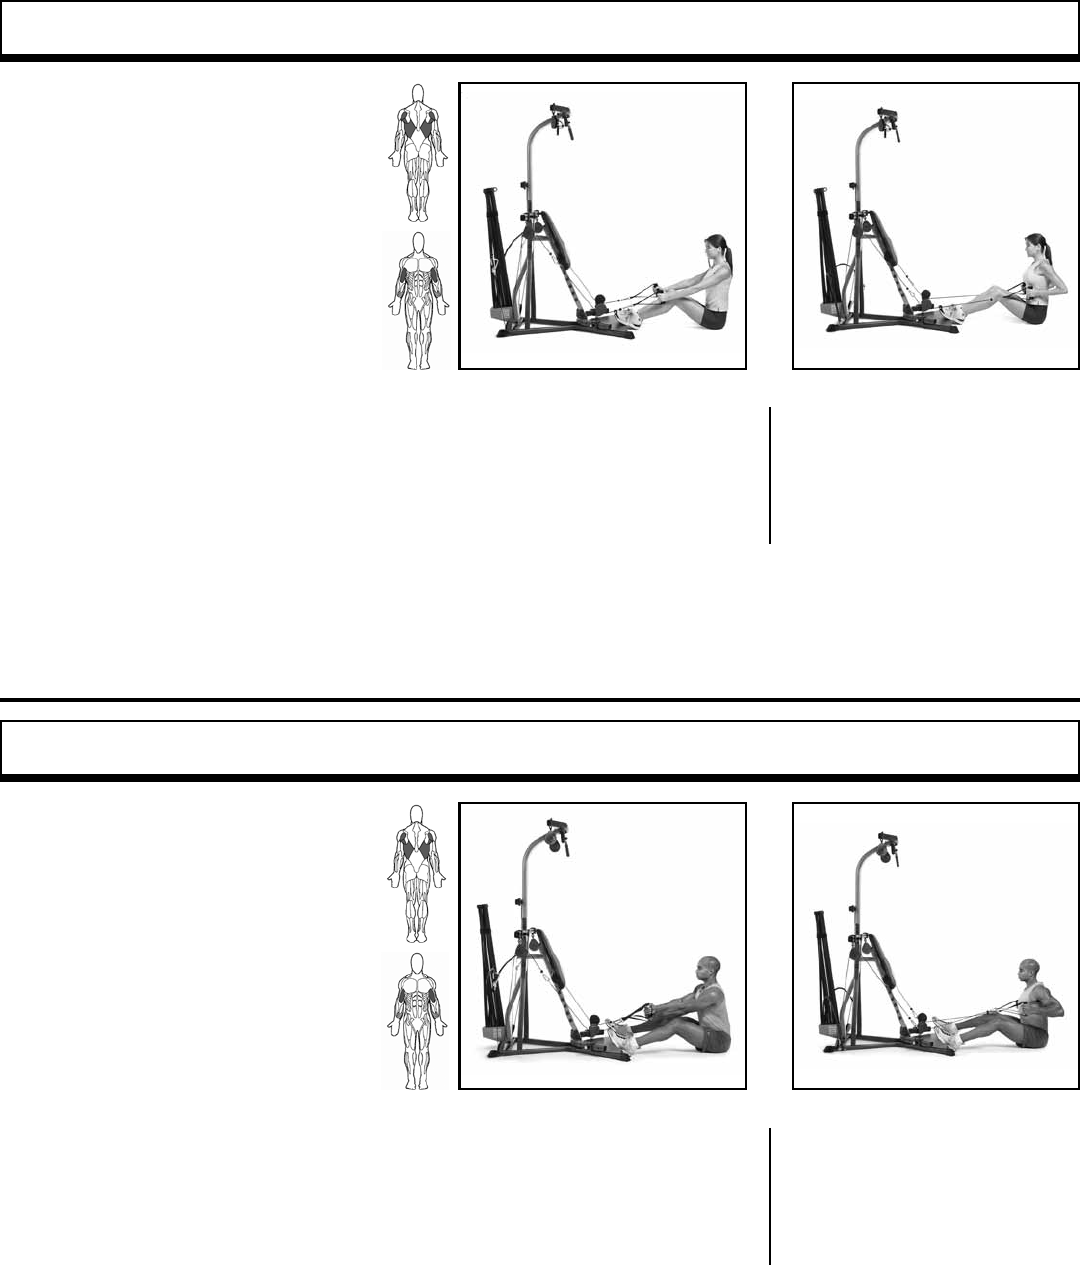
START ACTION
START FINISH
START ACTION
START FINISH
Bowflex Xtreme® 2 SE Owner’s Manual 37
Seated Lat Rows – Shoulder Extension (and Elbow Flexion)
Muscles worked:
Latissimus dorsi, teres major and rear
deltoid muscles, which make up the large
pulling muscles of upper back.
Also involves biceps.
Position:
Seated on ground, facing machine
Accessory:
Hand Grips
Pulleys:
Squat Pulley Frame
Before You Begin:
Remove Leg Extension and Seat
Key Points:
• Do not bend torso forward at any point.
• Do not lose spinal alignment – keep chest
lifted.
• Release shoulderblades at end of each rep
and initiate new rep by pinching shoulder-
blades.
START FINISH
• Grab hand grips with palms facing
each other.
• Place heels against end of plat-
form, bend knees comfortably.
• Sit up straight with spine in good
alignment.
• Pinch shoulderblades together.
• Pull upper arms down and back,
brushing past sides of the body
while keeping forearms pointing in
direction of cable.
• Slowly return to start position.
Crossover Seated Lat Rows – Shoulder Extension (and Elbow Flexion)
Muscles worked:
Latissimus dorsi, teres major and rear
deltoid muscles, which make up large
pulling muscles of upper back. Also
involves biceps.
Position:
Seated on the ground, facing machine
Accessory:
Hand Grips
Pulleys:
Squat Pulley Frame
Before You Begin:
Remove Leg Extension
Key Points:
• Do not bend torso forward at any point.
• Do not lose spinal alignment, keep chest
lifted.
• Release shoulderblades at end of each
rep. Initiate new rep by pinching shoul-
derblades.
START FINISH
• Cross arms and grasp hand grips
(right grip in left hand and vice
versa) with palms facing each
other.
• Place heels against end of platform,
bend knees comfortably.
• Sit up straight, spine in good align-
ment.
• Pinch shoulderblades together.
• Pull upper arms down and back,
brushing past sides of body while
keeping forearms pointing in
direction of cable.
• Slowly return to start position.
Back Exercises
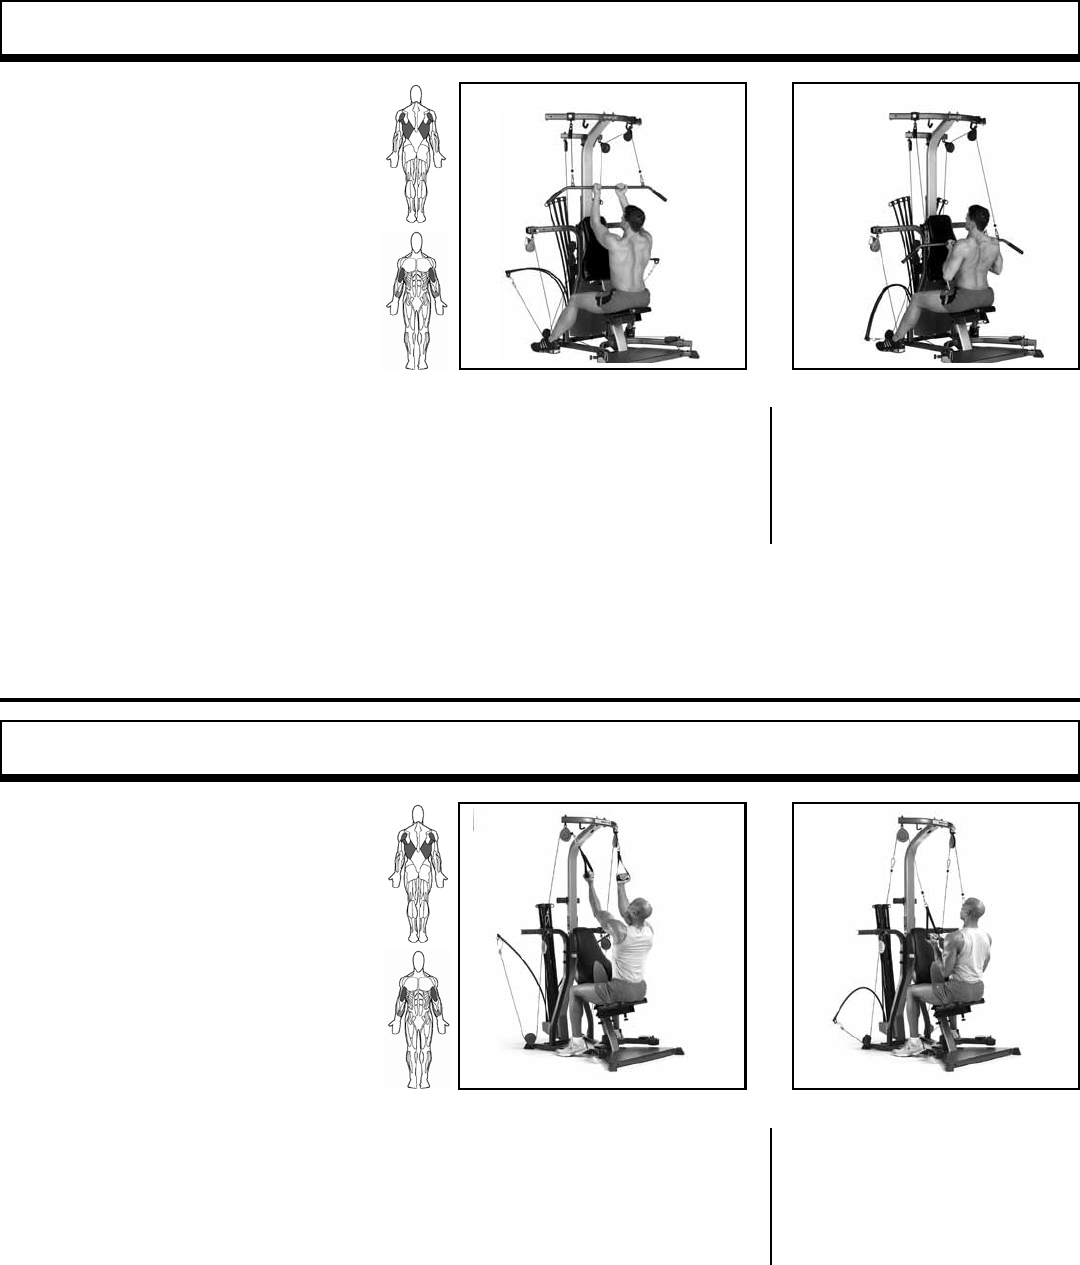
START ACTION
START FINISH
START ACTION
START FINISH
38 Bowflex Xtreme® 2 SE Owner’s Manual
START FINISH
Reverse Grip Pulldowns – Lat Tower – Shoulder Extension (with Elbow Flexion)
Muscles worked:
Latissimus dorsi, teres major and rear deltoid.
Also involves biceps group.
Position:
Seated – facing machine
Accessory:
Hand Grips
Pulleys:
Lat Tower
Before You Begin:
Remove Leg Extension
Key Points:
• Do not lose spinal alignment.
• Keep lats tightened throughout entire motion.
START FINISH
• Grasp hand grips with an underhand
grip, at a comfortable width, then sit
on seat.
• Position thighs under pulleys and sit
upright with arms extending up. You
may position hips under pulleys but
you must lean back slightly from the
hips (not the waist).
• Maintain good spinal alignment,
chest lifted, abs tight, and a slight
arch in lower back.
• Pull shoulderblades down
and together while drawing elbows
down to sides, then in, toward body.
• At end of motion, arms should be
drawn near sides (although may not
be touching sides), shoulderblades
fully depressed towards hips and
forearms in line with direction of
cables.
• Slowly return to start position
allowing arms and shoulderblades
to move up, without relaxing
muscles.
Back Exercises
Reverse Grip Pulldown with Lat Bar
• Grasp the Lat Pulldown Bar,
keeping your hands at shoulder
width with an underhand grip,
and then sit, with your arms
extending upward, muscles
relaxed and ready.
• You may position your thighs
directly beneath the pulleys, but
lean back slightly from hips.
• Initiate the movement by pulling
your shoulderblades downward
and together, drawing your
elbows down toward your hips
and then inward into your trunk.
• The Lat Pulldown Bar may not
touch your chest.
• Forearms should stay in line with
the direction of the cables.
• Slowly return to the start position,
without relaxing the tension in
your shoulders.
Muscles worked:
Latissimus Dorsi; Teres Major;
Rear Deltoids; Biceps
Position:
Seated—facing machine
Accessory:
Lat Pulldown Bar
Pulleys:
Lat Cross Bar
Leg Extension:
Removed
Success Tips
• Lift your chest, keep your knees bent and
feet on Standing Platform.
• Do not bend your neck forwards or
backwards during motion.
• Keep your spine aligned, abs tight and
a slight arch in your lower back. Do not
slouch.
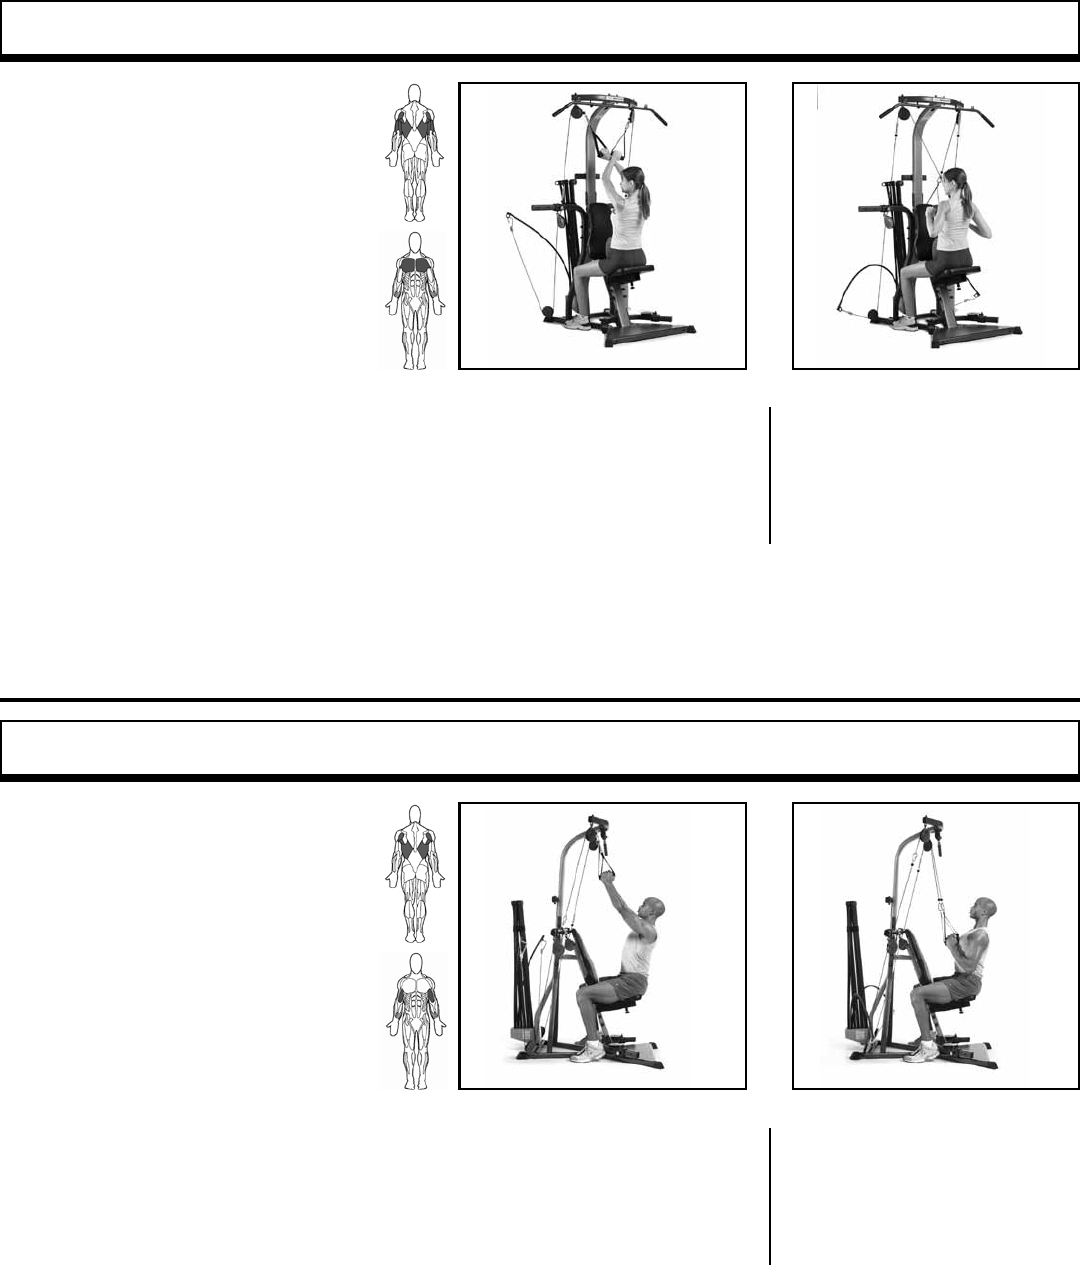
START ACTION
START FINISH
START ACTION
START FINISH
Bowflex Xtreme® 2 SE Owner’s Manual 39
Crossover Wide Pulldowns – Shoulder Extension (with Elbow Flexion)
Muscles worked:
Latissimus dorsi, teres major and rear
deltoid. Also involves pectoralis major and
triceps.
Position:
Seated – facing machine
Accessory:
Hand Grips
Pulleys:
Lat Tower
Before You Begin:
Remove Leg Extension
Key Points:
• Do not lose spinal alignment.
• Keep lats tightened throughout entire
motion.
• Do not lean backward as you pull.
START FINISH
• Cross arms, then grasp hand grips
with palms facing forward (right
grip in left hand and vice versa). Sit
on seat.
• Position thighs under pulleys and sit
up with arms extending upward. You
may position hips under pulleys but
you must lean back from hips (not
waist).
• Maintain good spinal alignment,
chest up, abs tight and a slight arch
in lower back.
• Pull shoulderblades down and
together while drawing elbows
out, away from sides.
• At end of motion, arms should be
drawn away from sides, shoul-
derblades fully depressed toward
hips, and forearms in line with
direction of cables.
• Slowly return to start position.
Allow arms and shoulderblades
to move fully up, without relaxing
muscles.
Crossover Narrow Pulldowns – Shoulder Extension (with Elbow Flexion)
Muscles worked:
Latissimus dorsi, teres major and rear
deltoid. Also involves biceps group.
Position:
Seated – facing machine
Accessory:
Hand Grips
Pulleys:
Lat Tower
Before You Begin:
Remove Leg Extension
Key Points:
• Do not lose spinal alignment.
• Keep lats tightened throughout entire
motion.
START FINISH
• Cross arms, then grasp hand grips
with palms facing each other (left
grip in right hand and vice versa).
Sit on seat.
• Position thighs under pulleys and
sit up with arms extending upward.
You may position hips under pulleys
but you must lean back from hips
(not waist).
• Maintain good spinal alignment,
chest lifted, abs tight and a slight
arch in lower back.
• Pull shoulderblades down and
together while drawing elbows down
to sides, and then in, toward body.
• At end of motion, arms should be
drawn near sides (although not
touching sides), shoulderblades fully
depressed toward hips and forearms
up, in line with cables.
• Slowly return to start position
allowing arms and shoulderblades
to move fully up, without relaxing
muscles.
Back Exercises
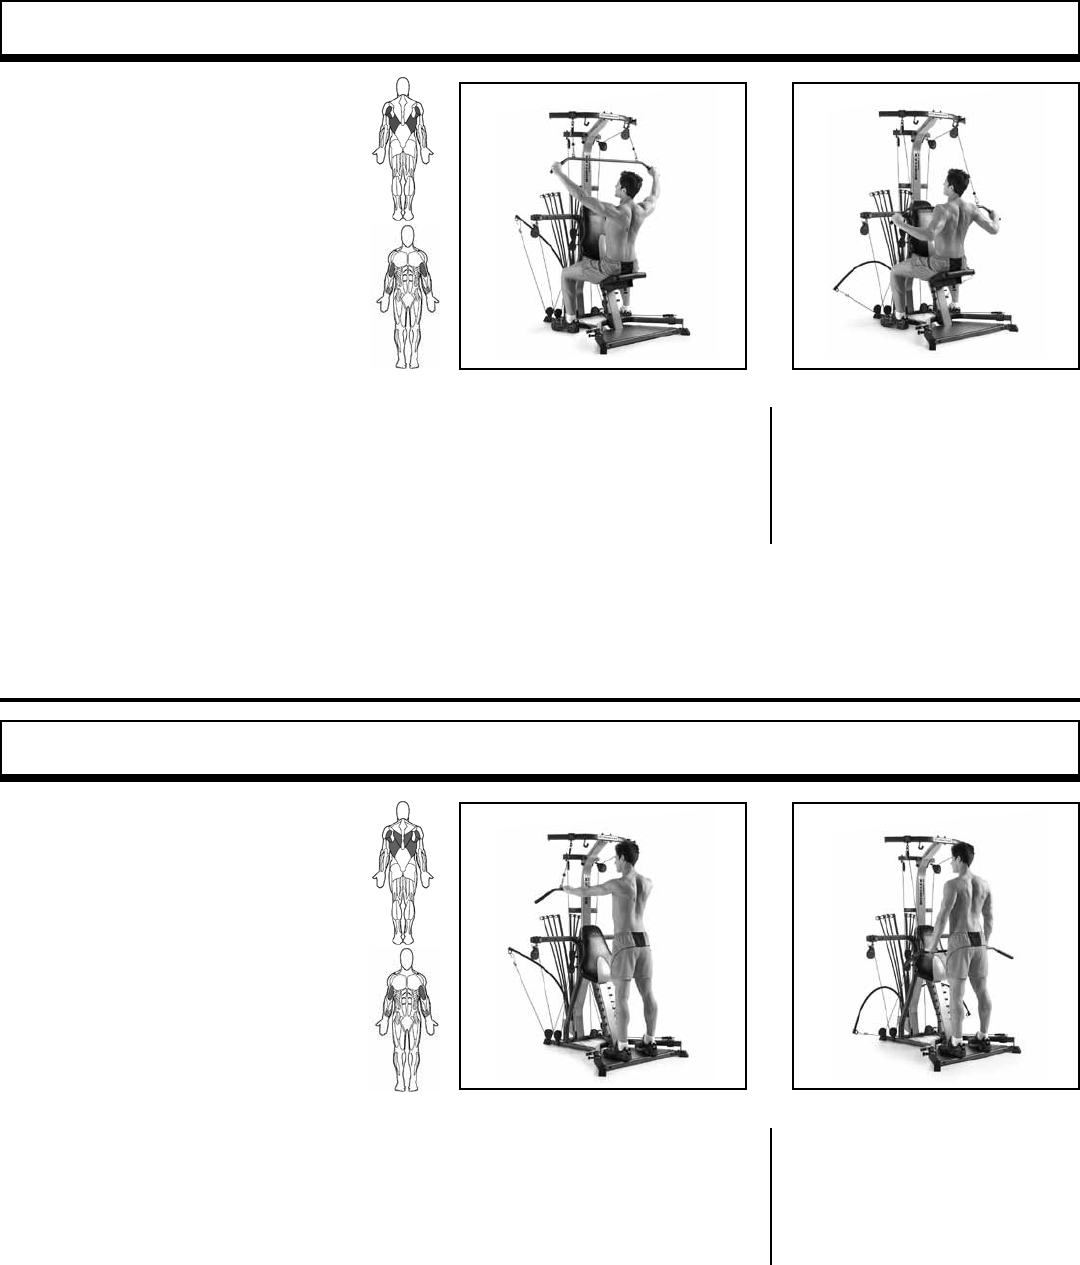
START ACTION
START FINISH
START ACTION
START FINISH
40 Bowflex Xtreme® 2 SE Owner’s Manual
Pulldowns—Shoulder Adduction (with elbow flexion)
• Grasp the Lat Pulldown Bar
with an overhanded grip (palms
facing the floor), at the grip width
determined by following the
directions in the Success Tips.
• Keep your arms extended and
muscles relaxed and ready.
• Initiate movement by pulling
shoulderblades together while
simultaneously drawing elbows
down and inward.
• The Lat Pulldown Bar may not
touch your chest. At the end of
the motion, arms should be near
your sides, shoulderblades fully
depressed.
• Keep forearms in line with
the Cables.
• Slowly return to start position.
Stiff-Arm Pulldown—Shoulder Extension (elbow stabilized)
• Grasp the Lat Pulldown Bar with
your palms facing down.
• Step back slightly, making sure
that there is enough movement
in the cable to complete your
sfull range of motion with
this exercise.
• Bend slightly from hips, lift
chest and tighten your abs to
stabilize spine.
• Initiate the movement by
lowering your shoulder
blades, bringing them down
and together.
• Keep your arms straight, moving
your hands downward in an arc
and slowly in toward your thighs.
• Slowly return to the start position
without relaxing
muscle tension.
Muscles worked:
Latissimus Dorsi; Teres Major;
Rear Deltoids; Biceps
Position:
Seated—facing machine
Accessory:
Lat Pulldown Bar
Pulleys:
Lat Cross Bar
Leg Extension:
Removed
Success Tips
• Lift your chest, keep your knees bent and
feet on Standing Platform.
• To determine the appropriate grip width
for you, hold your arms straight out to
your sides at shoulder height. Bend your
elbows approximately 90°. Hands should
be no wider apart than your elbows.
• Keep your spine aligned, abs tight and a
slight arch in your lower back.
Muscles worked:
Latissimus Dorsi; Teres Major; Rear
Deltoids; Lower Trapezius; Biceps
Position:
Standing—facing machine
Accessory:
Lat Pulldown Bar
Pulleys:
Lat Cross Bar
Leg Extension:
Removed
Success Tips
• Keep your lats tightened throughout the
entire motion.
• Keep your chest lifted and maintain
spinal alignment, keeping a very slight
arch in your lower back.
• Release your shoulderblades at the end
of each rep. Initiate each new rep by
depressing your shoulderblades.
• Keep your elbows nearly straight (do not
lock elbows) throughout exercise.
Back Exercises
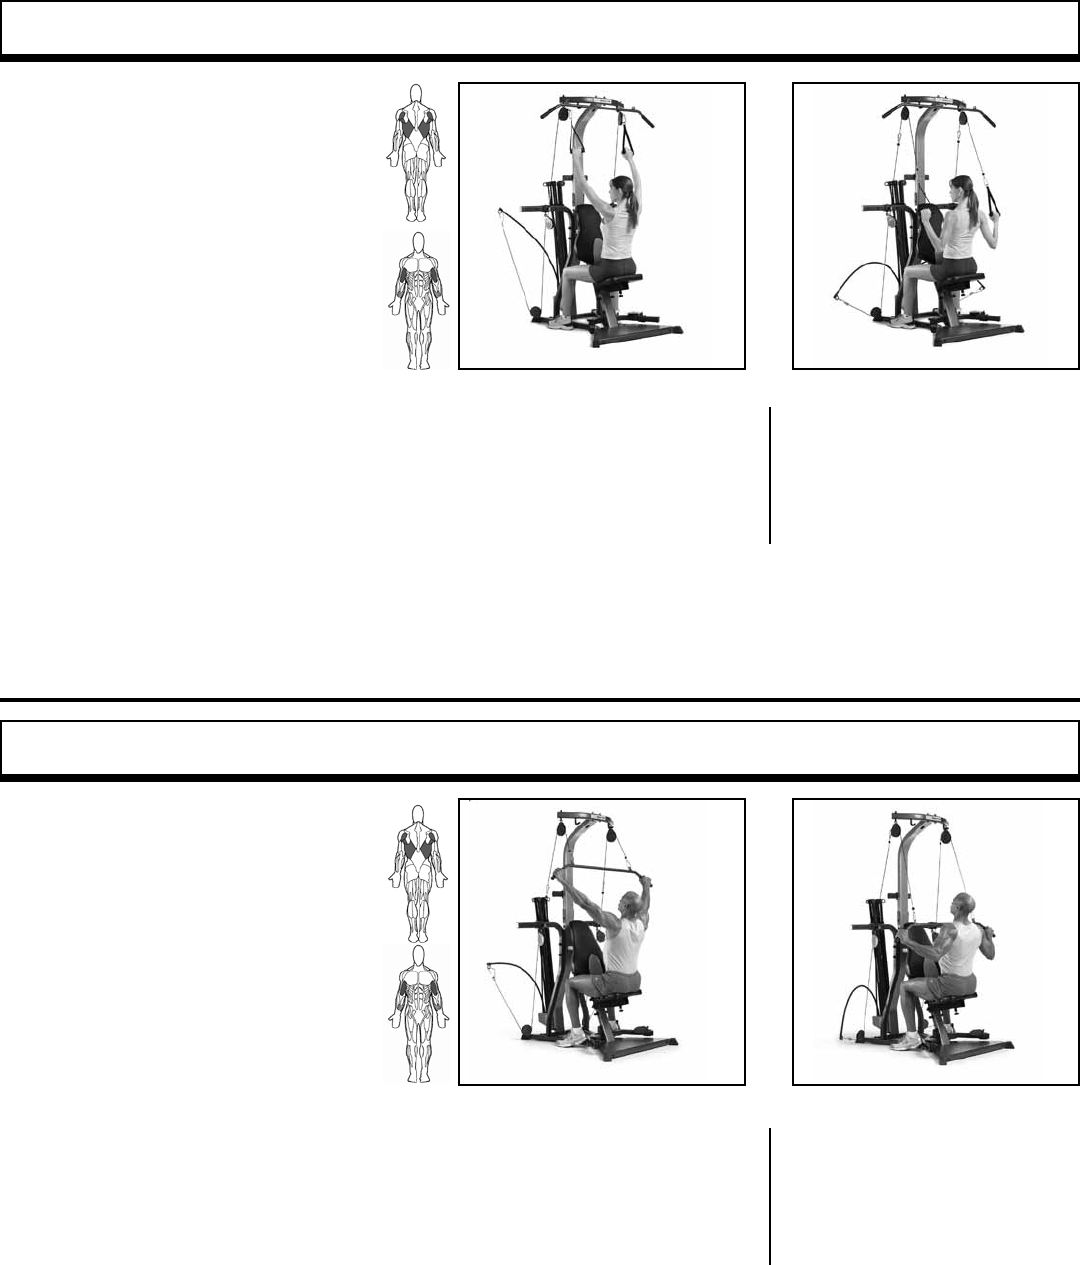
Seated Lat Pulldowns – Shoulder Adduction (with Elbow Flexion)
Muscles worked:
Latissimus dorsi, teres major and rear
deltoid. Also involves biceps group.
Position:
Seated – facing machine
Accessory:
Hand Grips
Pulleys:
Lat Tower
Before You Begin:
Remove Leg Extension
Key Points:
• Maintain good spinal alignment, chest
lifted, abs tight and a slight arch in lower
back.
• Keep lats tightened throughout entire
motion.
• Do not let grips touch chest.
START FINISH
• Hold arms out to sides at shoulder
height. Bend elbows 90º, hands
slightly less than elbow width.
• Grasp hand grips at same width as
above, then sit down with
arms extending upward.
• You may position hips under pulleys
but only lean back slightly from hips
(not the waist).
• Pull shoulderblades down
and together while drawing elbows
down to sides, then in, toward trunk.
• At end of motion, arms should be
drawn near sides (not touching
sides), shoulderblades fully
depressed toward hips and forearms
up in line with cables.
• Slowly return to start position. Allow
arms and shoulderblades to move
up, w/o relaxing muscles.
Seated Wide Lat Pulldowns – Shoulder Adduction (with Elbow Flexion)
Muscles worked:
Latissimus dorsi, teres major and rear
deltoid. Also involves biceps group.
Position:
Seated – facing machine
Accessory:
50” Bent Lat Bar
Pulleys:
Lat Tower
Before You Begin:
Remove Leg Extension
Key Points:
• Do not lose spinal alignment.
• Keep lats tightened throughout entire motion.
• If you can’t complete the exercise with hands in the
wide position, bring hands closer together.
START FINISH
• Grasp 50” Bent Lat Bar at a
comfortable, wide grip, then sit
with arms extending up.
• You may position hips under pulleys
but you must lean back slightly
from hips (not the waist).
• Maintain good spinal alignment,
chest lifted, abs tight and a slight
arch in lower back.
• Pull shoulderblades down
and together while drawing elbows
down to sides, then in, toward trunk.
• 50” Bent Lat Bar may not touch
chest, but, at end of motion, arms
should be drawn near sides (not
touching sides), shoulderblades fully
depressed toward hips and forearms
up in line with cables.
• Slowly return to start position,
Allow arms and shoulderblades to
move fully upward, without relaxing
muscles.
Back Exercises
START ACTION
START ACTION
41
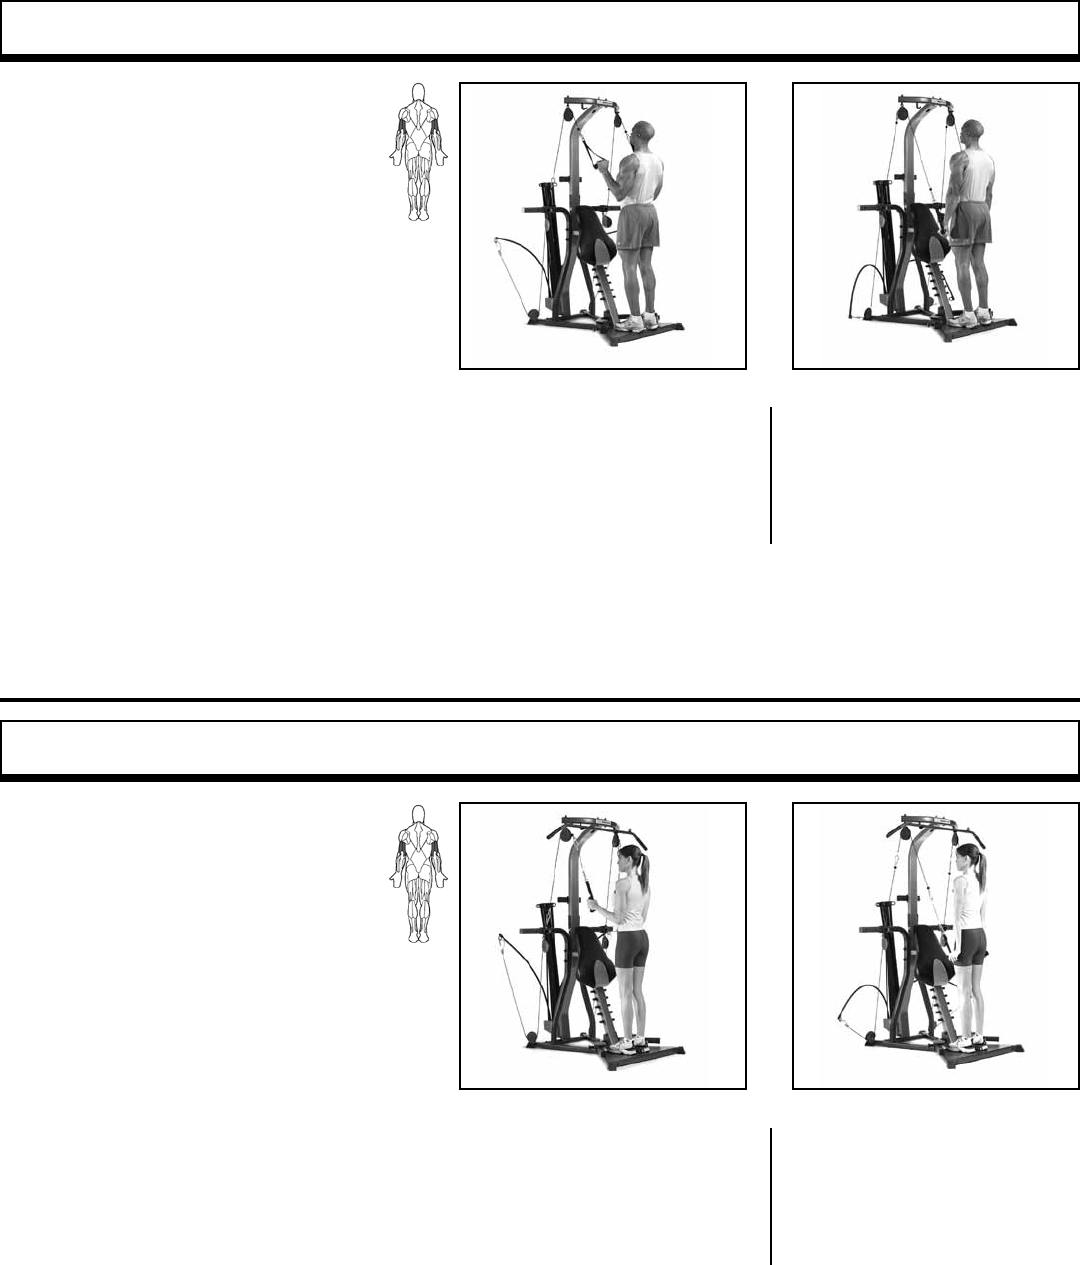
START ACTION
START ACTION
42 Bowflex Xtreme® 2 SE Owner’s Manual
Arm Exercises
Triceps Pushdown – Elbow Extension
Muscles worked:
Triceps
Position:
Standing – facing machine
Accessory:
Hand Grips
Pulleys:
Lat Tower
Before You Begin:
Remove Seat and Leg Extension
Key Points:
• Keep upper arms motionless.
• Keep wrists straight.
• Tighten triceps throughout exercise and
control motion on the way up.
• Maintain good posture by keeping chest
lifted and abs tight. Maintain a very slight
arch in the lower back.
START FINISH
• Stand on platform.
• Grasp hand grips at shoulder width,
palms down.
• Bring arms down to sides, elbows
straight. This is Start Position.
• Bend over slightly from hips, so
shoulders are directly over hands.
Lift chest and tighten abs to stabi-
lize spine. Maintain a slight arch in
lower back.
• Keep upper arms stationary and
elbows next to sides of torso.
Slowly allow elbows to bend,
moving hands in arcing motion
away from legs and up.
• Stop at 90º.
• Think about tightening triceps.
Slowly reverse arcing motion and
straighten arms fully.
Triceps Hammer Pushdown – Elbow Extension
Muscles worked:
Triceps
Position:
Standing – facing machine
Accessory:
Hand Grips in “Hammer Grip”
Pulleys:
Lat Tower
Before You Begin:
Remove Seat and Leg Extension
Key Points:
• Keep upper arms motionless.
• Keep wrists straight.
• Tighten triceps throughout exercise and
control motion on the way up.
• Maintain good posture by keeping chest
lifted and abs tight. Maintain slight arch
in lower back.
START FINISH
• Stand on platform.
• Grasp hand grips at shoulder width,
with grips in vertical hammer posi-
tion.
• Bring arms down to sides, elbows
straight. This is Start Position.
• Bend over slightly from hips, so
shoulders are directly over hands.
Lift chest and tighten abs to stabi-
lize spine. Maintain a slight arch in
lower back.
• Keep upper arms stationary and
elbows next to sides of torso.
Slowly allow elbows to bend,
moving hands in arcing motion
away from legs and up.
• Stop at 90º.
• Think about tightening triceps.
Slowly reverse arcing motion and
straighten arms fully.
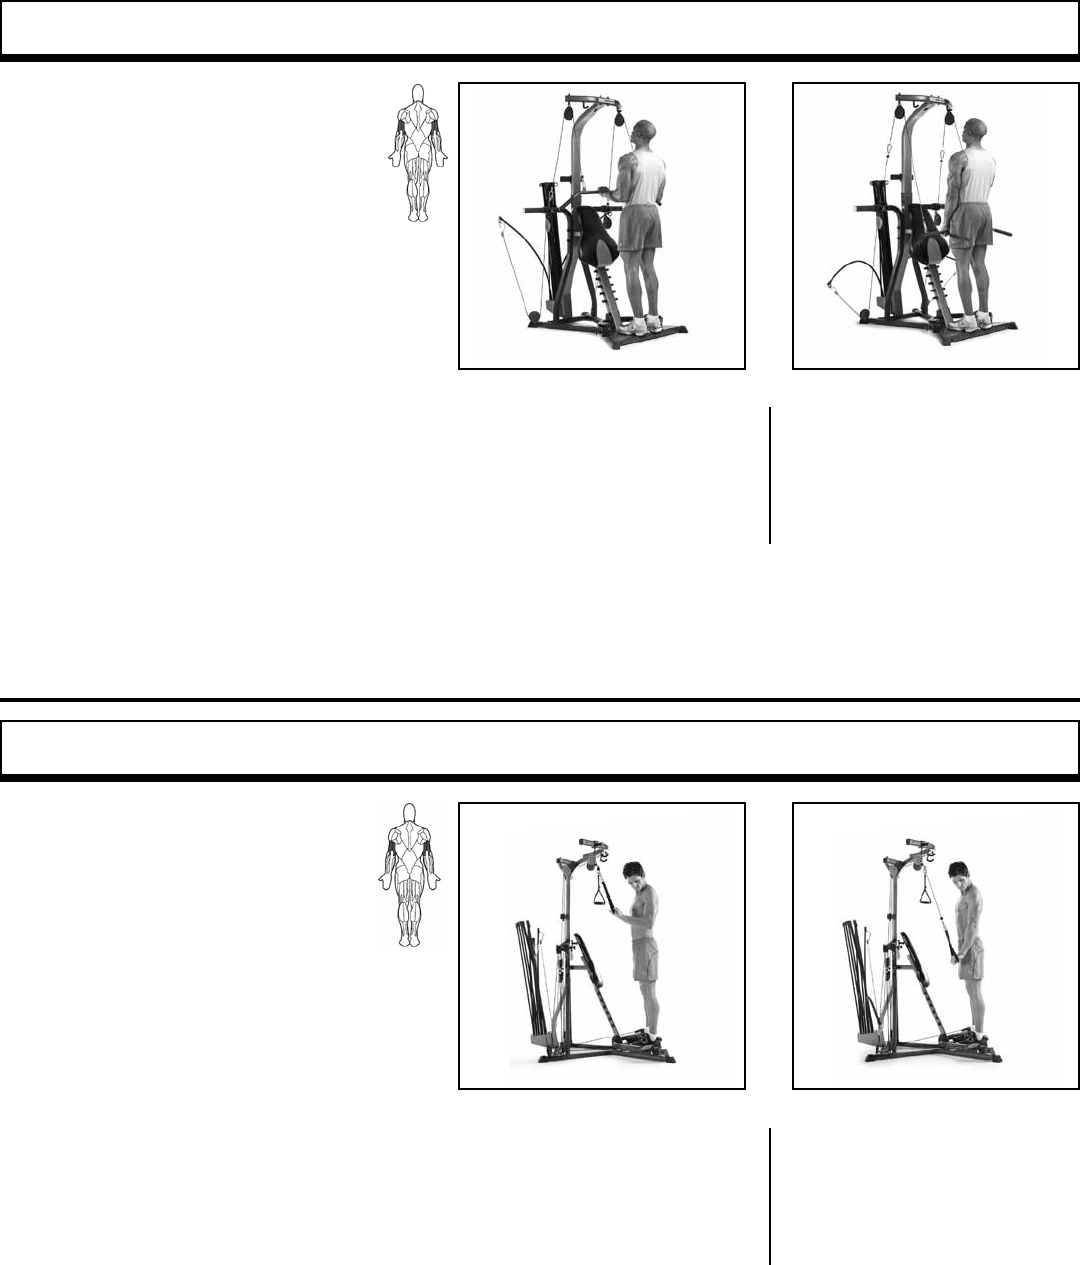
START ACTION
START FINISH
START ACTION
START FINISH
Bowflex Xtreme® 2 SE Owner’s Manual 43
Triceps Pushdown – with Bent Lat Bar (Elbow Extension)
Muscles worked:
Triceps
Position:
Standing – facing machine
Accessory:
50” Bent Lat Bar
Pulleys:
Lat Tower
Before You Begin:
Remove Leg Extension and Seat
Key Points:
• Keep upper arms motionless.
• Keep wrists straight.
• Tighten triceps throughout exercise and
control motion on the way up.
• Maintain good posture by keeping chest
lifted, abs tight. Maintain a very slight arch
in lower back.
START FINISH
• Stand on platform.
• Grasp 50” Bent Lat Bar at shoulder
width, palms down.
• Bring arms down to sides, elbows
straight. This is Start Position.
• Bend over from hips, so shoulders
are over hands. Lift chest and
tighten abs to stabilize spine while
maintaining a slight arch in lower
back.
• Keep upper arms stationary and
elbows next to sides of torso.
Slowly allow elbows to bend,
moving hands in arcing motion
away from legs and up.
• Stop at 90º.
• Think about tightening triceps.
Slowly reverse arcing motion and
straighten arms fully.
START FINISH
Arm Exercises
Single Arm Pushdown—Elbow Extension
• Grasp one Hand Grip, palm
facing downward.
• Stand approximately 1-2 feet
from Lat Tower (adjust for
comfort), but keeping feet on
Standing Platform.
• Bring your arm in front of you,
Hand Grip at chest level.
• Bend over slightly from hips, so
that your shoulder is directly
over your hand.
• Keeping your upper arm
stationary, elbow next to trunk,
slowly push your arm downward
in a gentle arc until your hand is
near top of the thigh.
• Keeping your triceps tightened,
slowly reverse the arcing motion,
bringing the Hand Grip back to
the start position.
Muscles worked:
Triceps
Position:
Standing—facing machine
Accessory:
Hand Grips
Pulleys:
Lat Cross Bars
Leg Extension:
Removed
Success Tips
• Keep your upper arms motionless and
your wrists straight.
• Keep your chest lifted and maintain
spinal alignment, keeping a very slight
arch in your lower back.
• Tighten the triceps throughout the
exercise, using controlled motion.
• Keep your knees bent and feet on
Standing Platform.
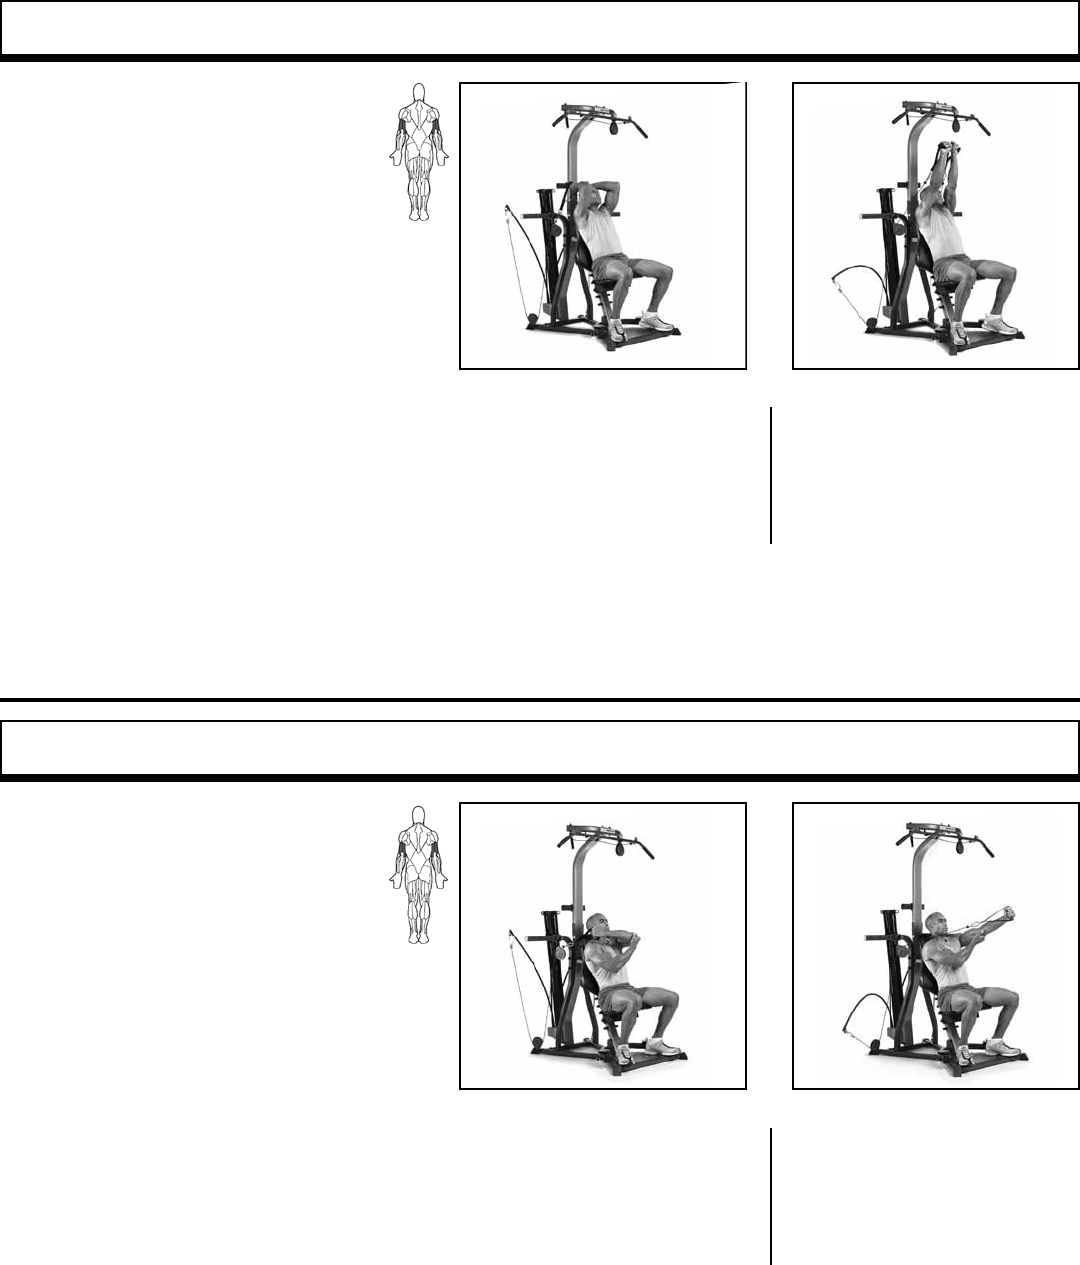
START ACTION
START FINISH
START ACTION
START FINISH
44 Bowflex Xtreme® 2 SE Owner’s Manual
Cross Triceps Extension
Muscles worked:
Triceps
Position:
Seated – facing outward
Accessory:
Hand Grips in “Hammer Grip”
Pulleys:
Center Cross Bar – narrow position
Before You Begin:
Remove Leg Extension
Key Points:
• Keep upper arm motionless.
• Keep wrist straight.
• Tighten triceps throughout
exercise and control motion
on the way down.
• Keep knees bent and feet at
on floor.
• Reach over shoulder and grasp a
hand grip. Using the Hammer Grip,
bend elbow until hand is in front of
chest, palm down.
• Lay head back against bench and
straighten arm to front.
• With free hand, lightly grasp back
of arm near elbow, to stabilize
working arm.
• Raise chest and pinch shoulder-
blades together. Maintain a slight
arch in lower back.
• Keep upper arm stationary. Bend
elbow, moving hand in arcing
motion across chest.
• Stop motion when arm is straight,
then slowly reverse arc motion
until elbow is back in start posi-
tion.
Triceps Extension – Elbow Extension
Muscles worked:
Triceps
Position:
Seated – facing outward
Accessory:
Hand Grips
Pulleys:
Center Cross Bar – narrow position
Before You Begin:
Remove Leg Extension and adjust seat
height.
Key Points:
• Keep upper arms/shoulders motionless.
• Keep wrists straight.
• Tighten triceps throughout
exercise and control motion on
the way down.
• Bend knees and place feet
flat on floor.
• Reach behind and grasp one or
both of the hand grips, palms
facing away.
• Keep elbows above shoulders,
directly in line with cables, palms
facing out, wrists straight.
• Raise chest and pinch shoulder-
blades together. Maintain a slight,
comfortable, arch in lower back.
• Keep upper arm stationary. Slowly
straighten elbows allowing hands
to move in arcing motion above
head.
• Slowly reverse arcing motion until
elbows are bent again.
Arm Exercises
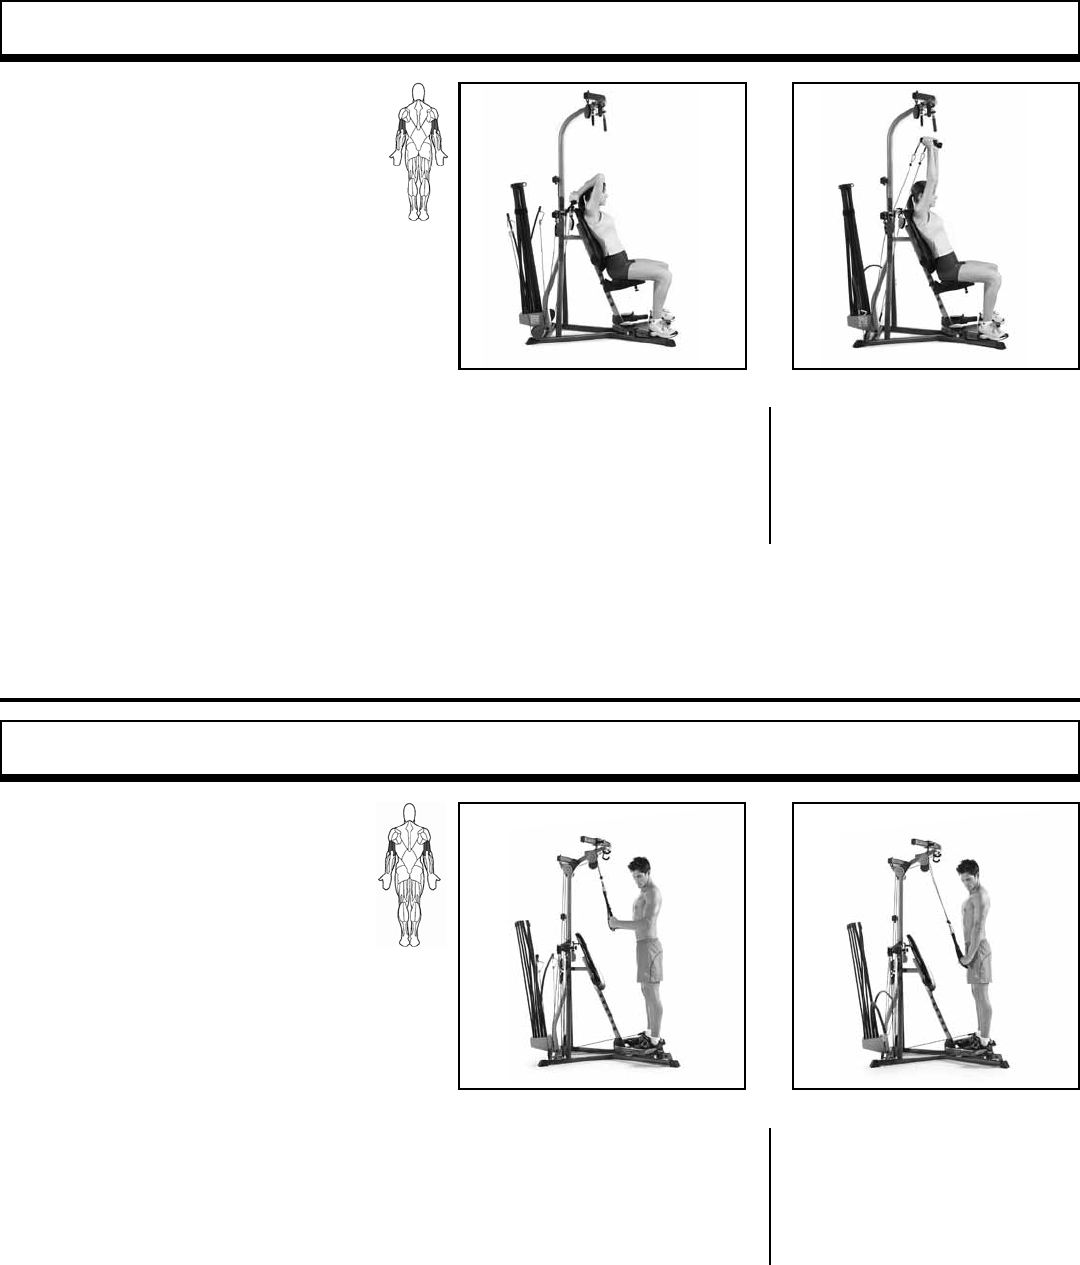
START ACTION
START FINISH
START ACTION
START FINISH
Bowflex Xtreme® 2 SE Owner’s Manual 45
Hammer Triceps Extension – Elbow Extension
START FINISH
Muscles worked:
Triceps
Position:
Seated – facing outward
Accessory:
Hand Grips in “Hammer Grip”
Pulleys:
Center Cross Bar – narrow position
Before You Begin:
Remove Leg Extension and adjust seat
height.
Key Points:
• Keep upper arms/shoulders
motionless.
• Keep wrists straight.
• Tighten triceps throughout
exercise and control the motion
on the way down.
• Bend knees. Place feet at
on platform.
• Reach behind and grasp one
or both of the hand grips in the
vertical hammer grip position.
• Keep elbows above shoulders,
directly in line with cables, palms
facing down, wrists straight.
• Raise chest and pinch shoulderblades
together. Maintain a slight, comfort-
able, arch in lower back.
• Keep upper arm stationary. Slowly
straighten elbows, allowing hands
to move in arching motion above
head.
• Slowly reverse arcing motion until
elbows are bent again.
START FINISH
Arm Exercises
“Rope” Pushdown—Elbow Extension
• Distance yourself from the Lat
Tower, but keep your feet on the
Standing Platform.
• Cross your arms and grasp the
Hand Grips (right Grip in left
hand and vice versa), using the
hammer grip position.
• Bring hands toward each other,
in front of you, until they are
positioned as if grabbing a rope.
• Keep your elbows bent, upper
arms at your sides.
• Keeping your upper arms
stationary, elbows next to trunk,
slowly straighten your arms
downward, in a gentle arc,
until hands are near tops of
your thighs, hands and elbows
straightened and directly in line
with shoulders.
• Keeping your triceps tightened,
slowly reverse the arcing motion
and bring the Hand Grips back to
the start position.
Muscles worked:
Triceps
Position:
Standing—facing machine
Accessory:
Hand Grips in “Hammer Grip”
Pulleys:
Lat Cross Bar
Leg Extension:
Removed
Success Tips
• Keep your knees bent and feet on
Standing Platform.
• Keep your upper arms motionless and
your wrists straight.
• Keep your chest lifted, abs tight and
maintain a slight arch in lower back.
• Tighten the triceps throughout the
exercise, using controlled motion.
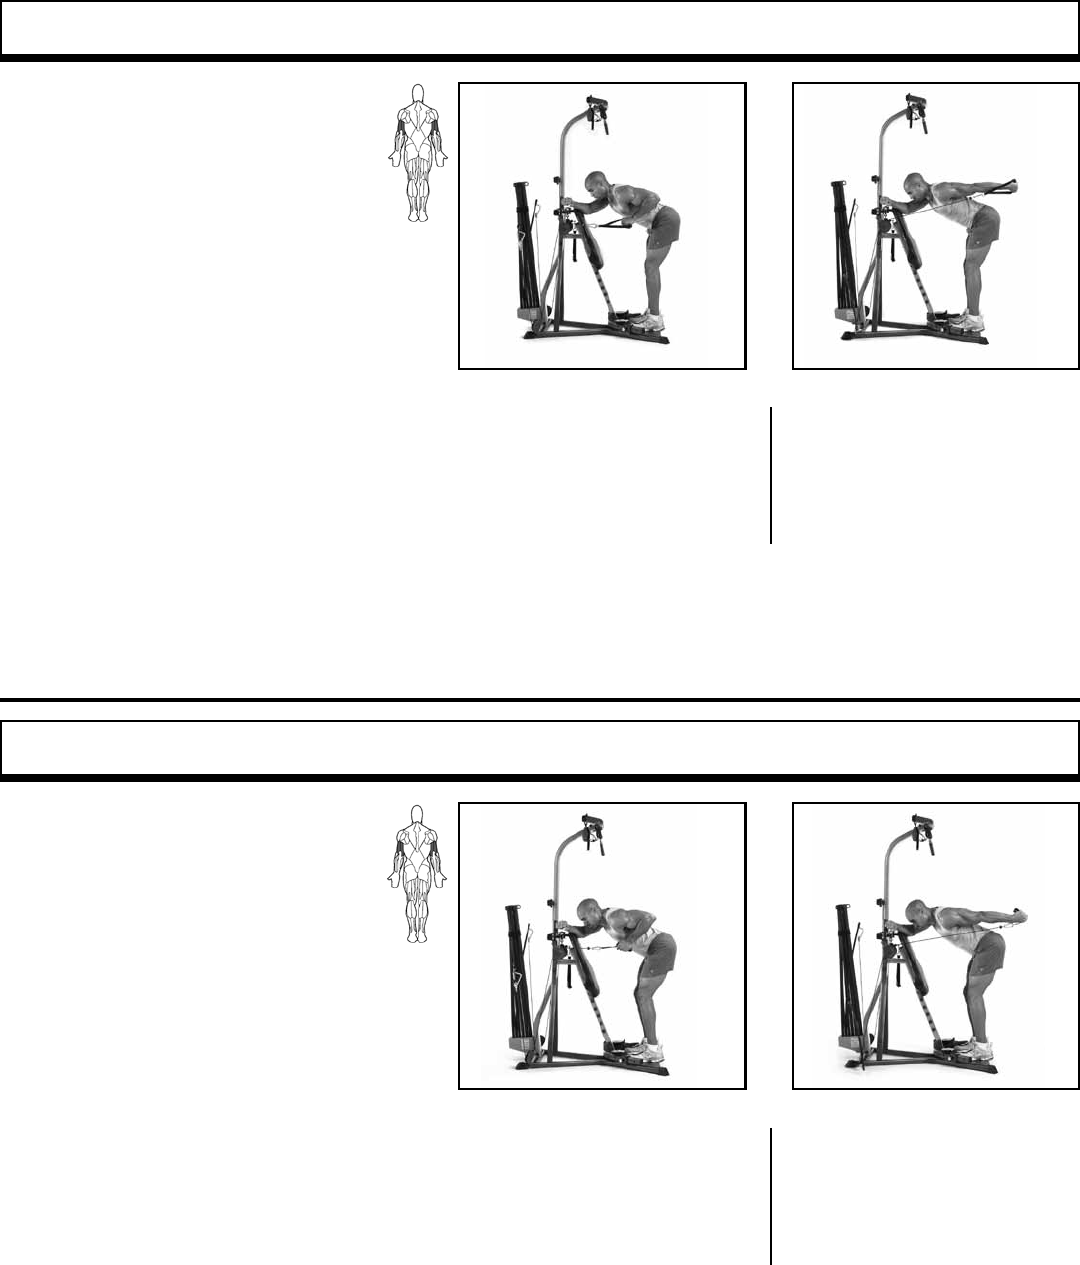
START ACTION
START FINISH
START ACTION
START FINISH
46 Bowflex Xtreme® 2 SE Owner’s Manual
Triceps Kickback
Muscles worked:
Triceps
Position:
Standing – facing machine
Accessory:
Hand Grips
Pulleys:
Center Cross Bar – narrow position
Before You Begin:
Remove Seat and Leg Extension
Key Points:
• Maintain spinal alignment.
• Keep arm at side and wrist straight
throughout entire motion.
• Tighten triceps throughout exercise and
control motion.
• Keep palms facing upward.
START FINISH
• Stand on platform.
• Keep chest lifted and maintain a
slight arch in lower back.
• Support yourself with one arm
on the horizontal bar and grasp
a hand grip with free hand, palm
facing backward.
• Draw elbow back so upper arm is
beside body, elbow bent approxi-
mately 90º.
• Straighten elbow while keeping
upper arm completely still.
• When arm is straight, slowly return
to start position.
Hammer Triceps Kickback
Muscles worked:
Triceps
Position:
Standing – facing machine
Accessory:
Hand Grips in “Hammer Grip”
Pulleys:
Center Cross Bar – narrow position
Before You Begin:
Remove Seat and Leg Extension
Key Points:
• Maintain spinal alignment.
• Keep arm at side and wrist straight
throughout motion.
• Tighten triceps throughout exercise and
control motion.
• Maintain Hammer Grip throughout exer-
cise.
START FINISH
• Stand on platform.
• Keep chest lifted and maintain a
slight arch in lower back.
• Support yourself with one arm on
horizontal bar and grasp a hand
grip in the vertical hammer grip
position with free hand, palm
facing in.
• Draw elbow back so upper arm
is beside body and elbow bent
approximately 90º.
• Straighten elbow while keeping
upper arm completely still.
• When arm is straight, slowly return
to start position.
Arm Exercises
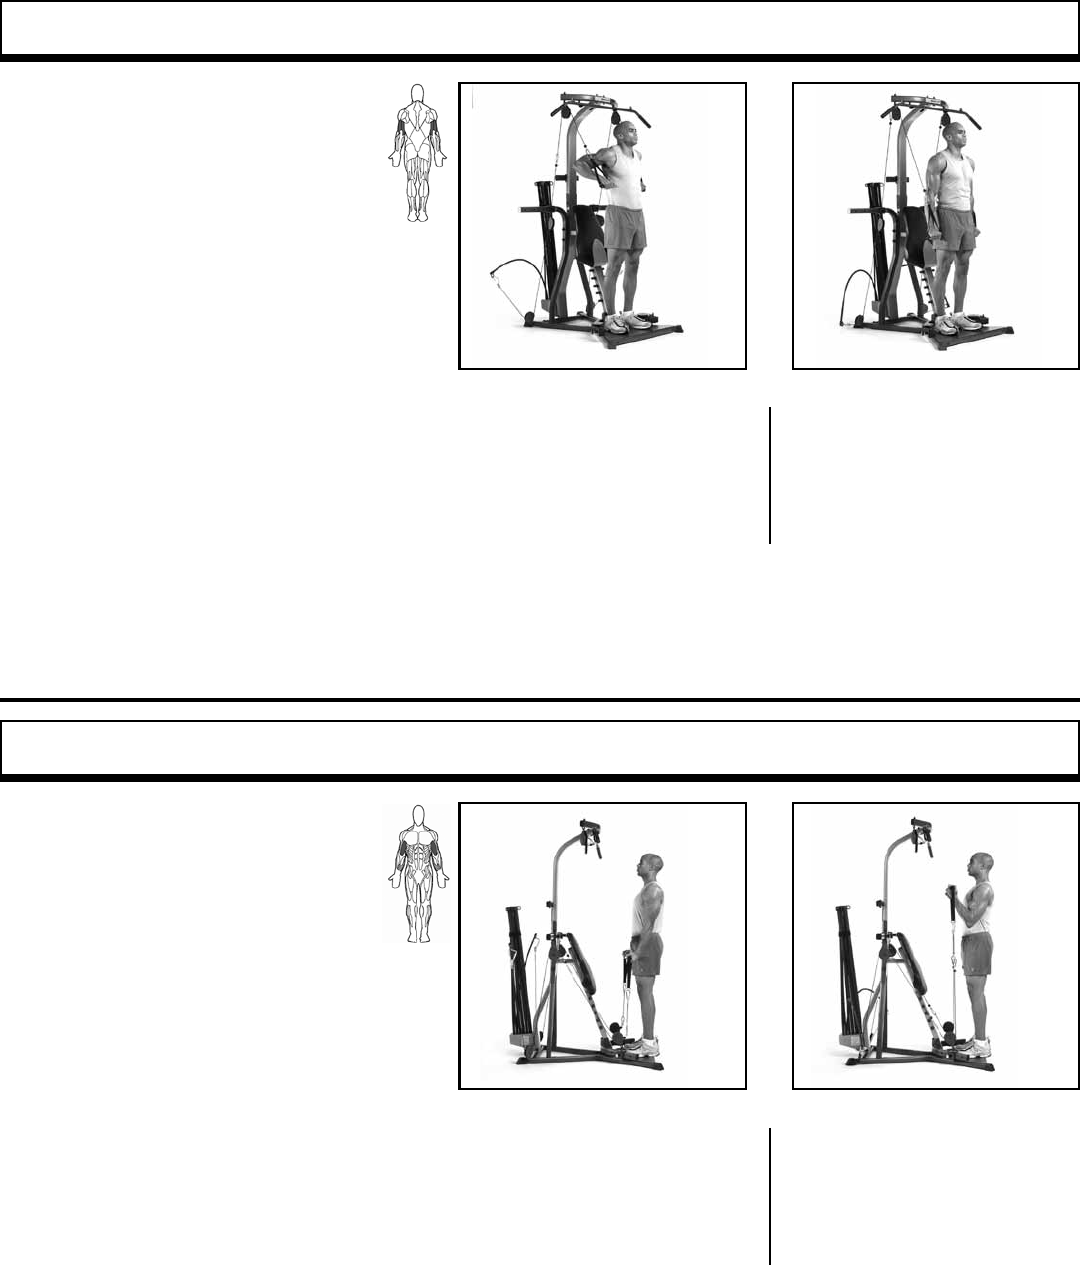
START ACTION
START FINISH
START ACTION
START FINISH
Bowflex Xtreme® 2 SE Owner’s Manual 47
Resisted Dip – Elbow Extension
Muscles worked:
Triceps
Position:
Standing – facing outward
Accessory:
Hand Grips
Pulleys:
Lat Tower
Before You Begin:
Remove Seat and Leg Extension
Key Points:
• Keep back straight and knees
slightly bent.
• Keep the abdominals tight throughout
the entire motion and maintain good
spinal alignment.
• Stand on the platform facing away
from machine. Reach back and
grab hand grips with thumbs on
inside toward body.
• Cable should be between arm and
body.
• Upper arms should be at a 90º
angle from torso.
• Straighten arms down, focusing on
moving elbows down and inward
toward hips.
• Slowly return to start position
keeping tension in back shoulder
muscles.
Biceps Curl – Elbow Flexion (in Supination)
Muscles worked:
Biceps
Position:
Standing – facing machine
Accessory:
Hand Grips
Pulleys:
Squat Pulley Frame
Before You Begin:
Remove Seat and Leg Extension
Key Points:
• Keep elbows at sides.
• Keep wrists straight.
• Keep trunk muscles tight and maintain a
very slight arch in lower back.
• Stand on platform.
• Bend down and grasp hand grips
with palms forward.
• Stand with upper arms by sides.
Lift chest, tighten abs and main-
tain a slight arch in lower back.
• Curl hand grips forward, then up,
and then in toward shoulders
while keeping elbows at sides and
upper arms completely still.
• Slowly lower to start position
by performing the same arcing
motion.
START FINISH
START FINISH
Arm Exercises
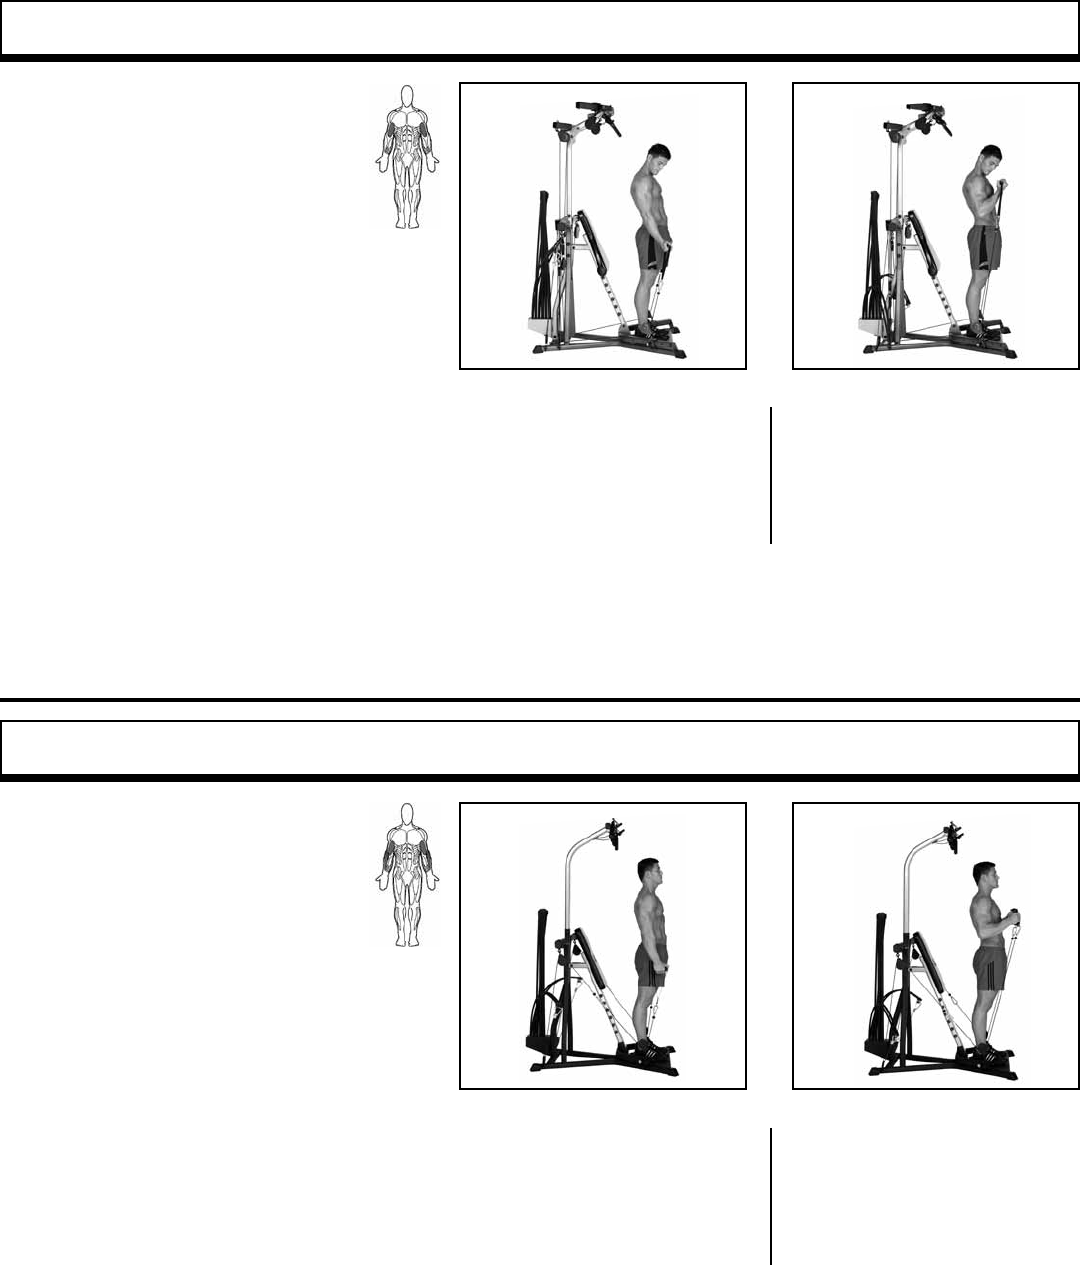
START ACTION
START FINISH
START ACTION
START FINISH
48 Bowflex Xtreme® 2 SE Owner’s Manual
Arm Exercises
Standing Biceps Curl—Elbow Flexion (in supination)
• Reach down and grasp the Hand
Grips, palms facing forward.
• Straighten, keeping your arms by
your sides, elbows loose.
• Keeping your upper arms
stationary and your elbows at
your sides, slowly curl the Hand
Grips forward, then upward and
in towards your shoulders.
• Slowly reverse the arcing motion
bringing your hands back to the
start position.
Muscles worked:
Biceps
Position:
Standing—facing outward
Accessory:
Hand Grips
Pulleys:
Squat Pulley Frame
Leg Extension:
Removed
Success Tips
• Keep your knees bent and feet on
Standing Platform.
• Keep your chest lifted, abs tight and a
very slight arch in your lower back.
• Keep your elbows at your sides and your
wrists straight.
Hammer Biceps Curl—Elbow Flexion (in supination)
• Reach down and grasp the Hand
Grips using the Hammer hold.
Press your upper arms into your
sides and bend your elbows until
they are at 90˚ angles.
• Straighten your spine, keeping
your upper arms by your sides,
elbows loose.
• Keeping your upper arms
stationary and your elbows at
your sides, slowly curl the Hand
Grips forward, then upward and
in towards your shoulders.
• Slowly reverse the arcing motion
bringing your hands back to the
start position.
Muscles worked:
Biceps; Brachialis; Brachioradialis
Position:
Standing—facing outward
Accessory:
Hand Grips in “Hammer” Hold (see Page 10)
Pulleys:
Squat Pulley Frame
Leg Extension:
Removed
Success Tips
• Keep your knees bent and feet on the
Standing Platform
• Keep your chest lifted, shoulders pinched
together, and a very slight arch in your
lower back.
• Keep your upper arms and shoulders
motionless and your wrists straight.
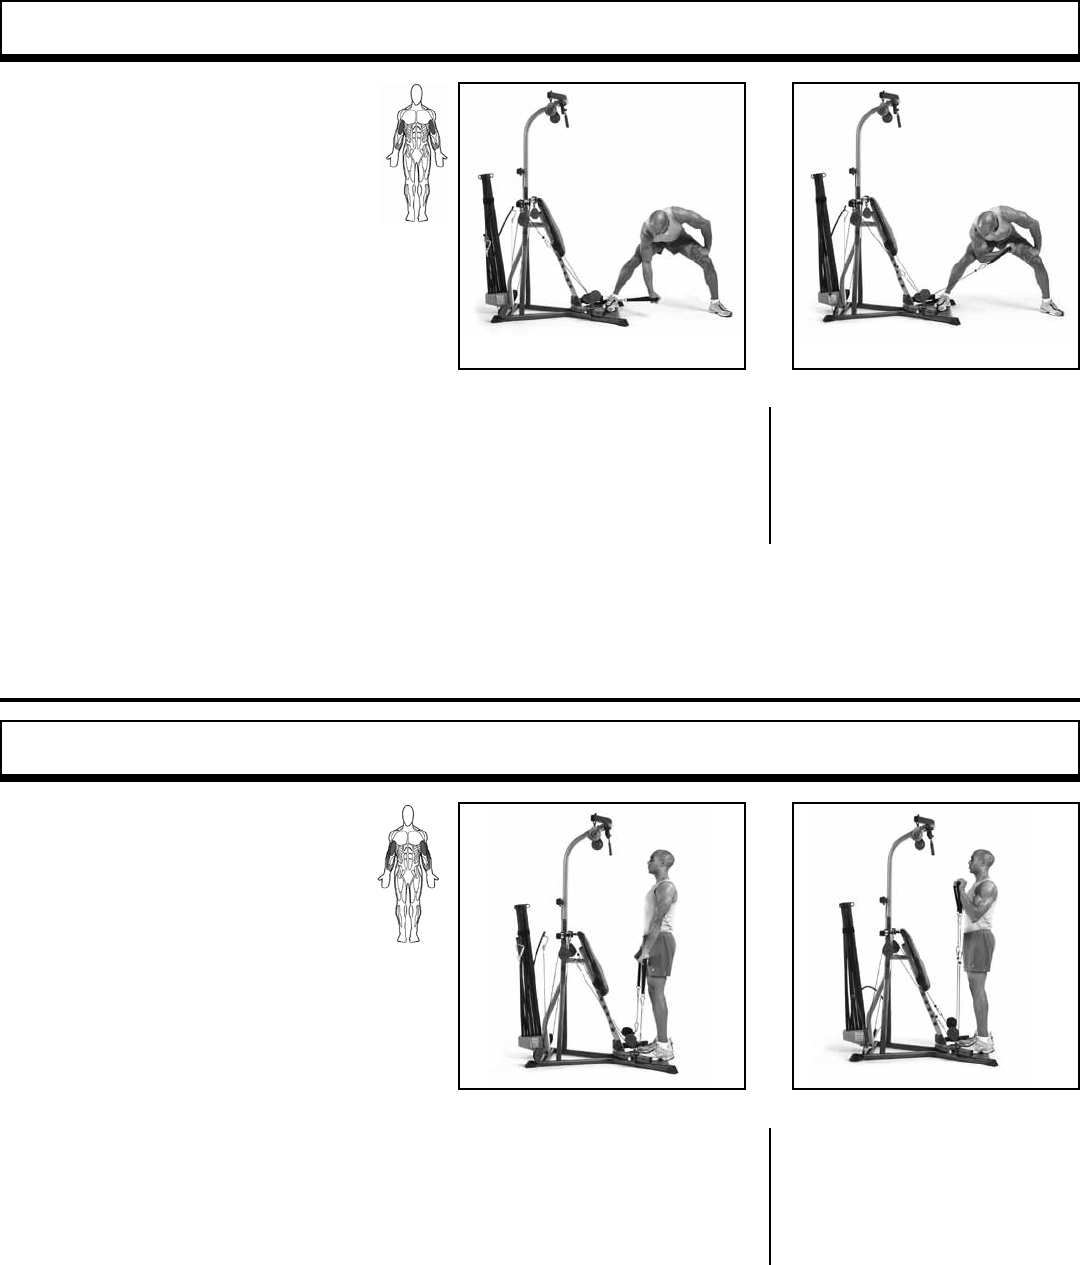
START ACTION
START ACTION
Bowflex Xtreme® 2 SE Owner’s Manual 49
Concentration Biceps Curl – Elbow Flexion (in Supination)
Muscles worked:
Biceps
Position:
Standing – right or left side facing machine
Accessory:
Hand Grips
Pulleys:
Squat Pulley Frame
Before You Begin:
Remove Seat and Leg Extension
Key Points:
• Keep elbow pointing toward oor
at all times.
• Keep wrist straight.
• Bend at hips, not at the waist.
• Keep back straight, chest up
and maintain a very slight arch in lower
back.
START FINISH
• Stand on platform, one side
toward machine.
• With hand closest to Power Rod
®
resistance rods , grasp hand grip.
• Keeping back straight, bend at
hips and knees, until trunk is
parallel to floor. Place uninvolved
hand on thigh to help stabilize.
• Curl hand grip away from cable,
then up toward shoulder while
keeping upper arm completely
motionless and elbow pointing
toward the floor at all times.
• Slowly return to start position
performing the same arc of
motion.
Reverse Curl – Elbow Flexion (in Pronation)
Muscles worked:
Deep arm muscle(brachialis).
Also the front forearm muscle (brachiora-
dialis) and biceps.
Position:
Standing – facing machine
Accessory:
Hand Grips
Pulleys:
Squat Pulley Frame – with squat straps
Before You Begin:
Remove Seat and Leg Extension
Key Points:
• Keep elbows at sides.
• Keep wrists straight.
• Keep trunk muscles tight and
maintain a very slight arch in
lower back.
START FINISH
• Stand on platform.
• Bend down and grasp hand grips
with palms facing
backward.
• Stand with arms by sides.
• Lift chest, tighten abs and maintain
slight arch in
lower back.
• Keeping palms facing down,
slowly curl hand grips forward,
then up, then in toward
shoulders while keeping elbows
at sides and upper
arms completely still.
• Slowly lower to start position.
Arm Exercises
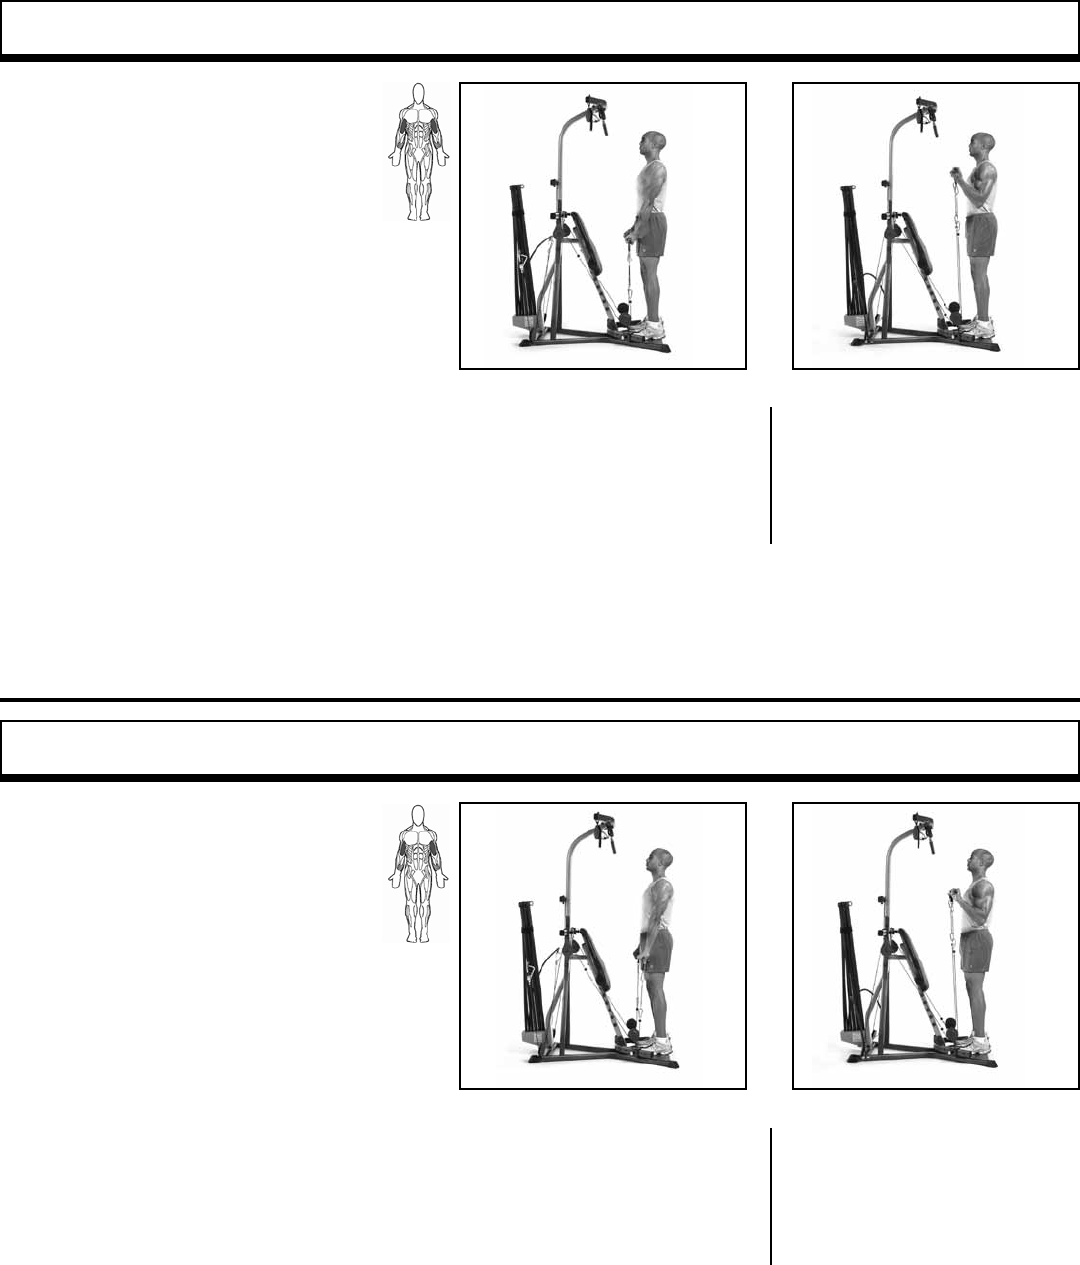
START ACTION
START ACTION
50 Bowflex Xtreme® 2 SE Owner’s Manual
START FINISH
START FINISH
Barbell Biceps Curl – Elbow Extension
Muscles worked:
Biceps
Position:
Standing – facing machine
Accessory:
Squat Bar – with squat straps
Pulleys:
Squat Pulley Frame
Before You Begin:
Remove Seat and Leg Extension
Key Points:
• Keep elbows at sides.
• Keep wrists straight.
• Keep trunk muscles tight and maintain a
very slight arch in lower back.
• Stand on platform.
• Bend down and grasp squat bar
with palms facing forward.
• Stand with upper arms by sides
(although not pressed tightly). Lift
chest, tighten abs and maintain a
slight arch in
lower back.
• Curl squat bar forward, then up,
and then in toward shoulders
while keeping elbows at sides and
upper arms completely still.
• Slowly lower to start position by
performing same arcing motion.
Reverse Barbell Biceps Curl – Elbow Extension
Muscles worked:
Biceps
Position:
Standing – facing machine
Accessory:
Squat Bar – with squat straps
Pulleys:
Squat Pulley Frame
Before You Begin:
Remove Seat and Leg Extension
Key Points:
• Keep elbows at sides.
• Keep wrists straight.
• Keep trunk muscles tight and maintain
a very slight arch in lower back.
• Stand on platform.
• Bend down and grasp squat bar
with palms facing down.
• Stand with upper arms by sides
(although not pressed tightly). Lift
chest, tighten abs and maintain a
very slight arch in lower back.
• Curl wrists back to bring squat
bar forward, then up, and then in
toward shoulders while keeping
elbows at sides and upper arms
completely still.
• Slowly lower to start position by
performing same arcing motion.
Arm Exercises
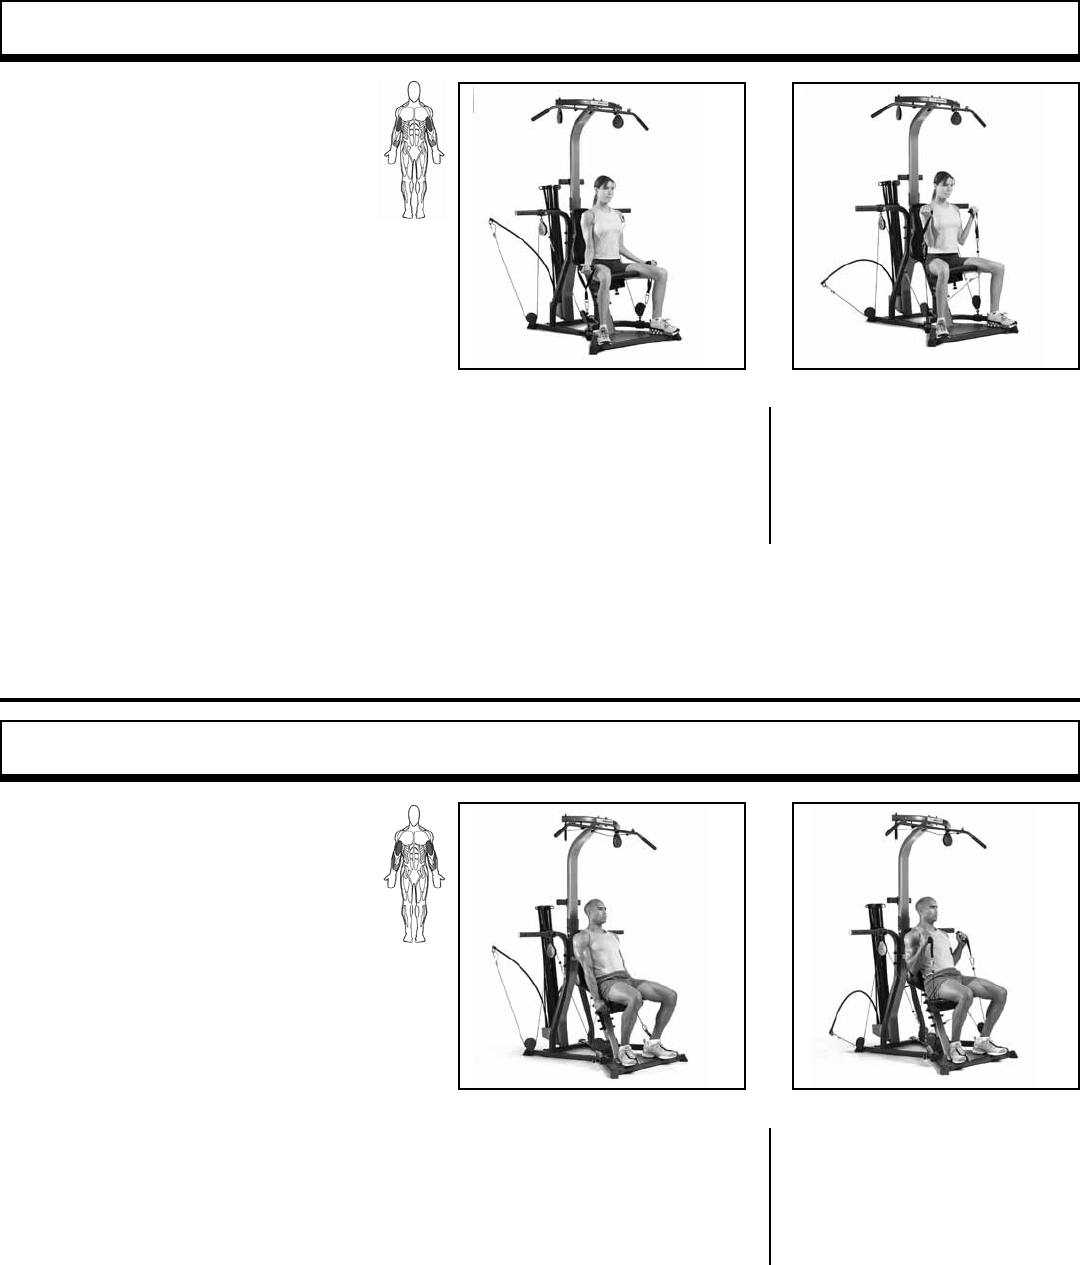
START ACTION
START ACTION
Bowflex Xtreme® 2 SE Owner’s Manual 51
Seated Biceps Curl – Elbow Flexion (in Supination)
Muscles worked:
Biceps
Position:
Seated – facing outward
Accessory:
Hand Grips
Pulleys:
Squat Pulley Frame
Before You Begin:
Remove Leg Extension
Key Points:
• Do not rock upper body while bending
elbow.
• Keep wrists straight.
• Keep chest lifted, trunk muscles tight
and maintain a very slight arch in
lower back.
START FINISH
• Grasp hand grips, arms at sides
with forearms near thighs.
• Maintain correct spinal
alignment.
• Curl forearms toward upper arms,
keeping upper arms completely
still.
• Slowly return to start position
without relaxing biceps.
Seated Biceps Hammer Curl – Elbow Flexion
Muscles worked:
Biceps muscles and brachioradialis.
Position:
Seated – facing outward
Accessory:
Hand Grips in “Hammer Grip”
Pulleys:
Squat Pulley Frame
Before You Begin:
Remove Leg Extension
Key Points:
• Do not rock upper body while bending
elbow.
• Keep wrists straight.
• Keep chest lifted, trunk muscles tight
and maintain a very slight
arch in lower back.
START FINISH
• Grasp hand grips in vertical
hammer grip position, arms at
sides, forearms near thighs.
• Maintain correct spinal
alignment.
• Curl forearms toward upper arms,
keeping upper arms completely
still.
• Slowly return to start position
without relaxing biceps.
Arm Exercises
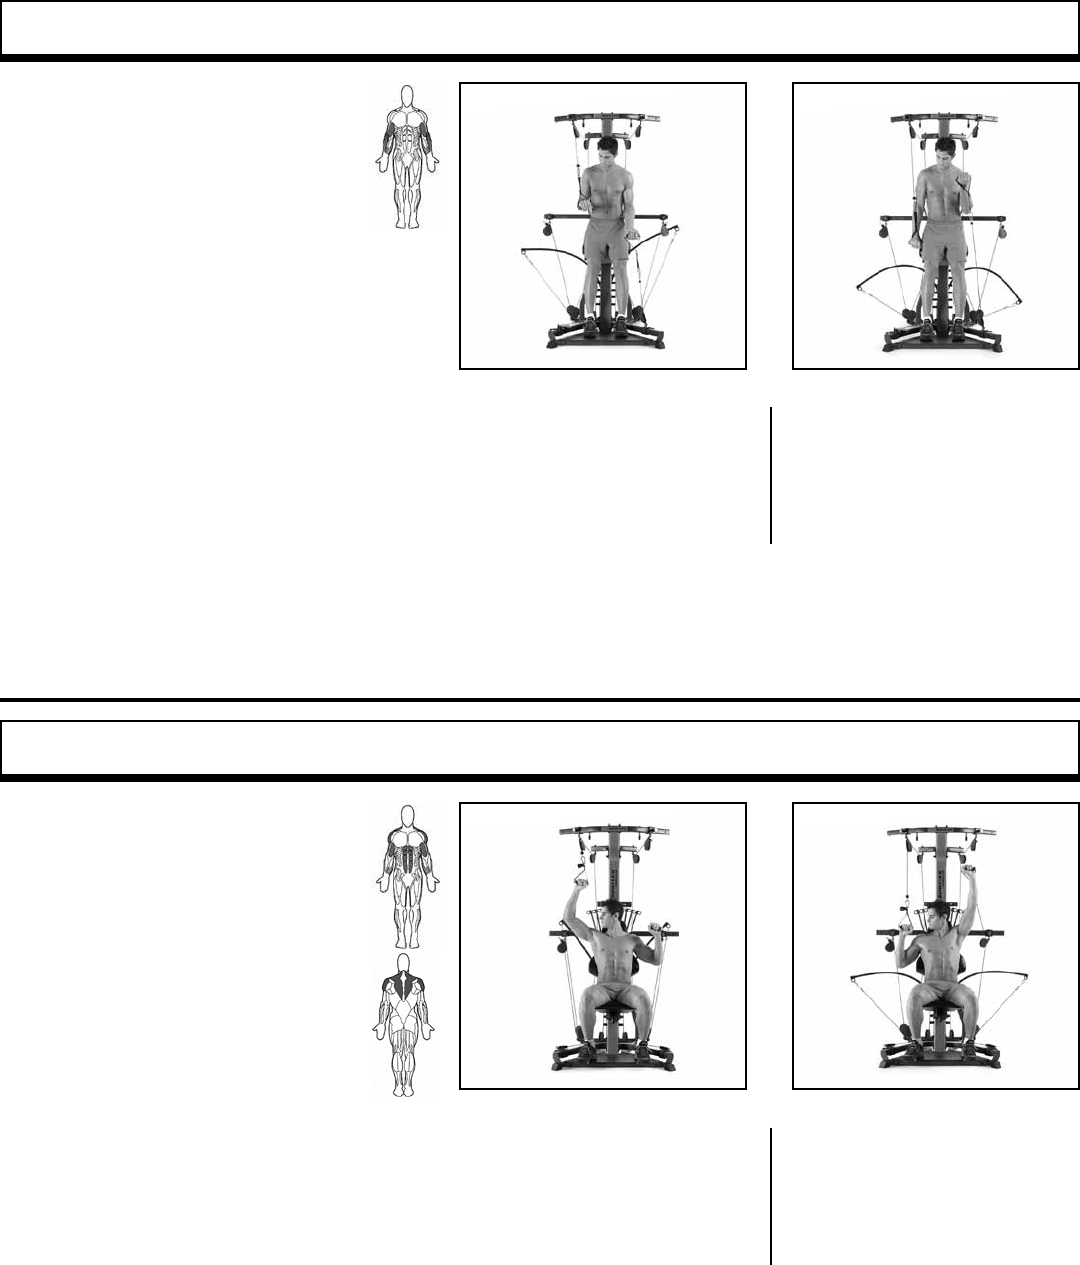
START ACTION
START FINISH
START ACTION
START FINISH
52 Bowflex Xtreme® 2 SE Owner’s Manual
Arm Exercises
Arm Opposition Push-Pull
• Grasp the Hand Grips, keeping
the one attached to the Lat
Tower in an overhand grip and
the one attached to the Rod
Cable in an underhand grip.
• Bend your forearms at a 90°
angle from your upper arms,
which should be at 90° angles
from your torso.
• Slowly raise the Rod Cable arm
while simultaneously lowering
the Lat Cable arm, until each
arm has reached full possible
extension in opposition to
each other.
• Slowly reverse, returning to
start position.
• Grasp the Hand Grips, keeping
the one attached to the Lat
Tower in an overhand grip and
the one attached to the Squat
Cable in an underhand grip.
• Straighten the Squat Cable arm
and bend the Lat Cable arm at a
90° angle from your upper arm.
• Slowly raise the Squat Cable arm
while simultaneously lowering
the Lat Cable arm, until each
arm has reached full possible
extension in opposition to each
other.
• Slowly reverse, returning to start
position.
Muscles worked:
Biceps; Brachialis; Brachioradialis
Position:
Standing—facing outward
Accessory:
Hand Grips
Pulleys:
Lat Cross Bar and Squat Pulley Frame
Leg Extension:
Removed
Success Tips
• Lift your chest and keep your
knees slightly bent and feet on
Standing Platform.
• For this exercise, one Hand Grip is
attached to a Lat Cable and one Hand
Grip is attached to a Squat Cable.
Alternate sides to build muscle evenly.
• Keep your upper body motionless, elbows
at your sides and your wrists straight.
• Keep your trunk muscles tight and
maintain a slight arch in lower back.
Muscles worked:
Middle Deltoids; Supraspinatus;
Trapezius; Biceps; Abs
Position:
Seated—facing outward
Accessory:
Hand Grips
Pulleys:
Lat Cross Bar and Center Cross Bar
Leg Extension:
Removed
Success Tips
• Lift your chest and keep your knees bent
and feet on Standing Platform.
• For this exercise, one Hand Grip is
attached to a Lat Cable and one Hand
Grip is attached to a Rod Cable. Alternate
sides to build muscle evenly.
• Keep your upper body motionless, elbows
at your sides and your wrists straight.
• Keep your trunk muscles tight and
maintain a slight arch in lower back.
Upper Body Opposition Push-Pull
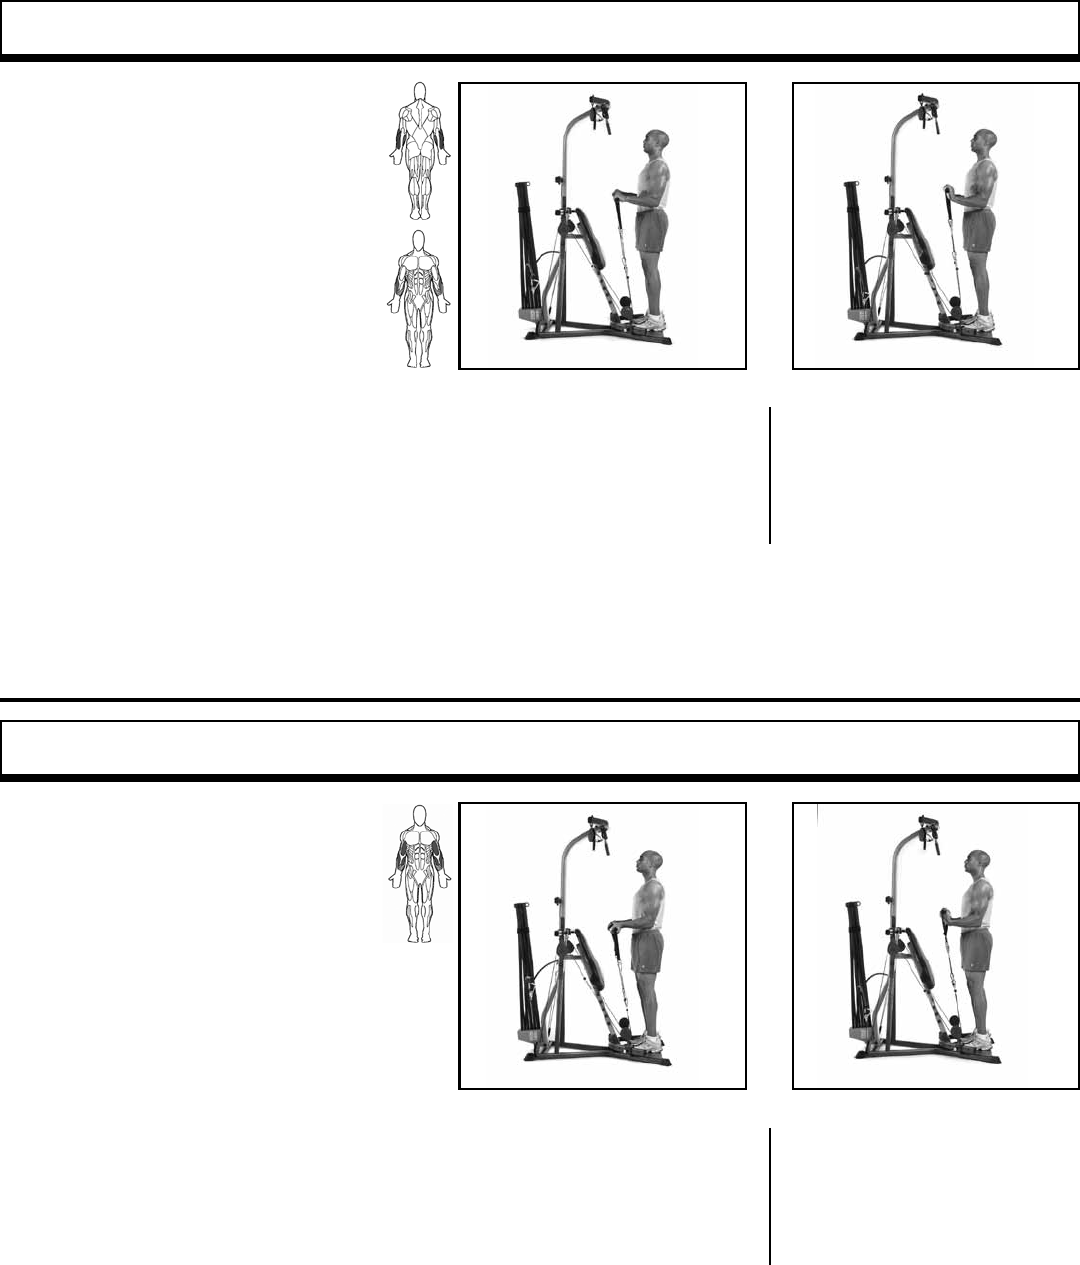
START ACTION
START FINISH
START ACTION
START FINISH
Bowflex Xtreme® 2 SE Owner’s Manual 53
Wrist Curl – with Wrist Flexion
Muscles worked:
Front part of forearms. Also increases
the strength of grip and isometrically
challenges biceps.
Position:
Standing – facing machine
Accessory:
Hand Grips
Pulleys:
Squat Pulley Frame Removed
Before You Begin:
Remove Seat and Leg Extension
Key Points:
• Move slowly and keep tension in front of
forearm at all times.
• Do not increase or decrease bend in
arms, perform the entire motion at wrist.
• Do not rock body. Keep chest lifted, abs
tight and maintain a slight arch in lower
back.
• Stand on platform.
• Bend down and grasp hand grips,
palms facing forward, fingertips
down.
• Stand with upper arms and elbows
by sides.
• Lift chest, tighten trunk muscles
and maintain a slight arch in
lower back.
• Bend arms 90º, palms up. Hold
position throughout entire exer-
cise.
• Slowly curl sts towards front of
forearms.
• Keeping forearms still, slowly let
fists return to start position.
START FINISH
START FINISH
Wrist Extension
Muscles worked:
Back and top parts of forearms.
Position:
Standing – facing machine
Accessory:
Hand Grips
Pulleys:
Squat Pulley Frame
Before You Begin:
Remove Seat and Leg Extension
Key Points:
• Move slowly and keep tension in back of
forearms at all times.
• Perform this exercise one arm
at a time to make it easier to focus
and isolate the back of forearms,
or perform it with both arms
simultaneously to save time.
• Stand on platform, knees slightly
bent.
• Grasp hand grips, palms facing
down. Rest mid-forearms
against sides with elbows flared
out.
• Raise chest, tighten trunk
muscles and maintain a slight
arch in lower back.
• Slowly curl back of sts toward
forearms.
• Slowly return to start position.
Arm Exercises
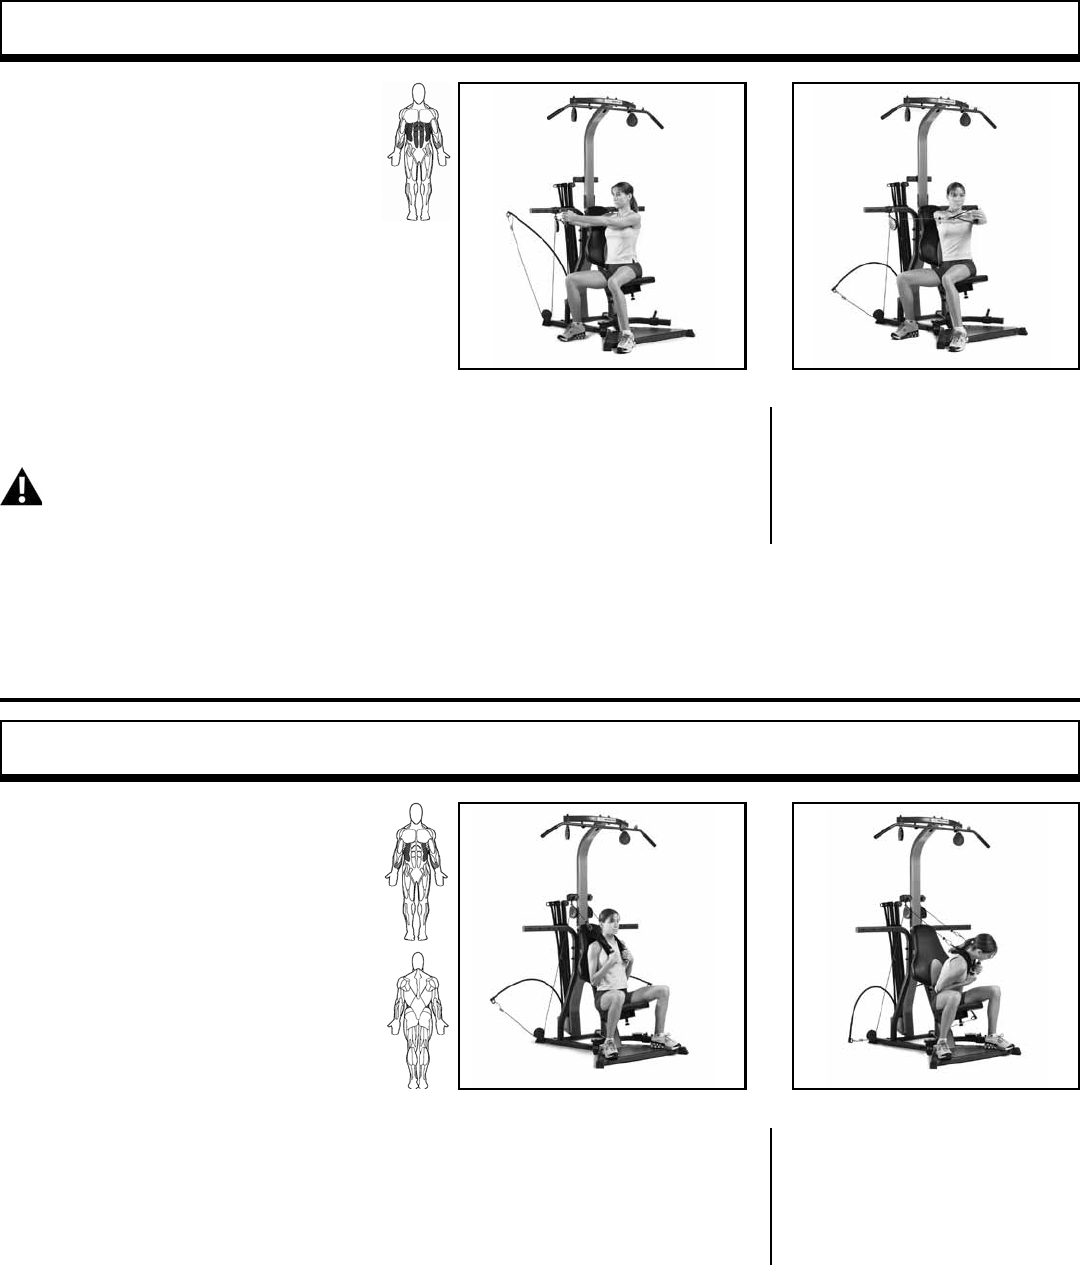
START ACTION
START FINISH
START ACTION
START FINISH
54 Bowflex Xtreme® 2 SE Owner’s Manual
Trunk Rotation
Muscles worked:
Most of trunk muscles. Note: rotation is limited
in the spine and should be performed
with minimal resistance, in proper alignment.
Position:
Seated, facing outward left or right
Accessory:
Hand Grips
Pulleys:
Center Cross Bar – standard position
Before You Begin:
Remove Leg Extension
Key Points:
Failure to perform this exercise correctly
could result in injury. Use only low
weight Power Rods.
• Keep chest lifted and maintain good spinal
alignment with a slight arch in lower back.
• Keep hands centered in front of middle of
chest and shoulderblades pinched together.
Make sure all of motion occurs in torso.
• Move only as far as muscles will take you and
eliminate uncontrolled momentum.
START FINISH
• Sitting sideways on seat with
one side facing machine, grasp
hand grip closest to you with both
hands.
• Raise both arms up to shoulder
level, centered in front of middle
chest.
• Keep elbows slightly bent.
• Lift chest, pinch shoulderblades
together, tighten abs and maintain
a slight arch in lower back.
• Tighten entire ab area and slowly
rotate rib cage/arms away from
cables (30 – 40º),
as if rotating with a rod through
middle of spine.
• Slowly return to start position.
Seated (Resisted) Oblique Abdominal Crunch
Muscles worked:
External obliques on resistance side and
internal obliques on opposite side.
Position:
Seated – facing outward
Accessory:
Abdominal Crunch Shoulder Harness
Pulleys:
Abdominal bar
Before You Begin:
Remove Leg Extension
Key Points:
• Allow exhalation up and inhalation down,
don’t exaggerate it.
• Do not lift head/chin. head should follow rib
motion, not lead, allowing you to maintain
normal neck posture.
• Tighten abs throughout range of motion. Do
not let abs relax until
set is over.
• MOVING SLOWLY to eliminate momentum is
critical.
START FINISH
• Place seat in lowest position.
• Attach the Abdominal Crunch
Shoulder Harness by snapping a
hook to each of the D rings. Place
the harness on your shoulders
letting the handles hang over your
chest. Grab both handles. With high
resistance, a cross arm opposite-
handle grip may be used.
• Lower back can start at or in a
normal arch, knees and hips bent,
feet flat on floor.
• Tighten abs before you move,
focusing on area from side of ribs
to front of pelvis on the same side.
• Slowly move diagonally,
rotating and curling torso,
with the side of ribs directed
toward front of pelvis.
• Move as far as you can, without
moving hips or lower back from
bench.
• Slowly reverse motion returning to
start position without resting.
Abdominal Exercises
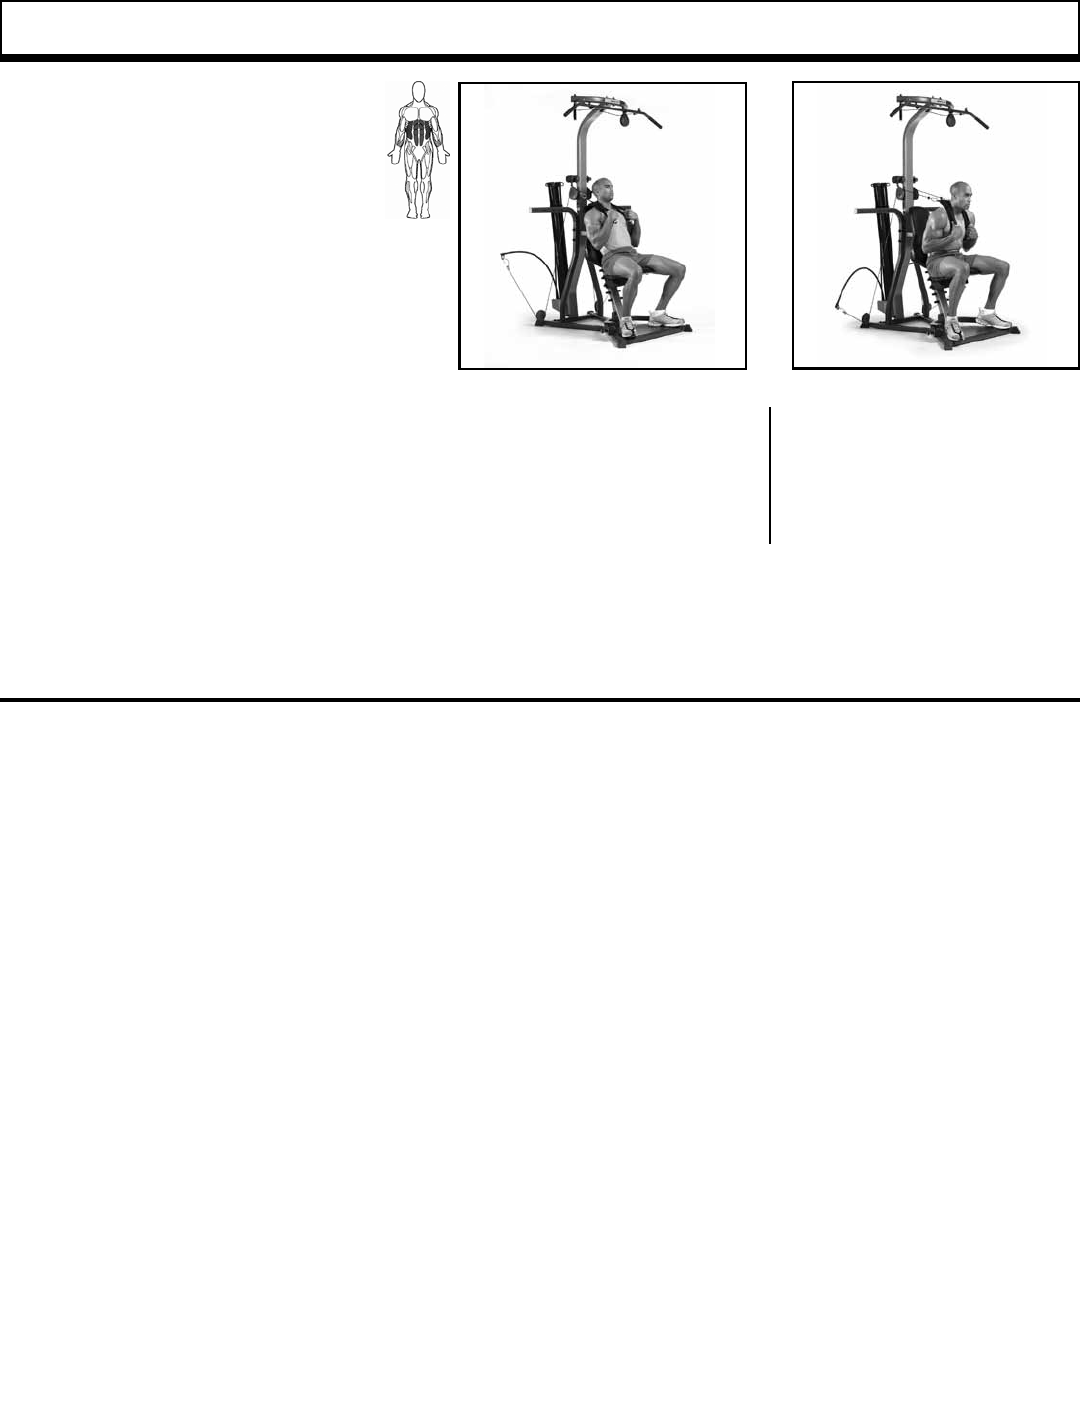
START ACTION
START FINISH
START ACTION
START FINISH
Bowflex Xtreme® 2 SE Owner’s Manual 55
Abdominal Exercises
Seated (Resisted) Abdominal Crunch – Spinal Flexion
Muscles worked:
Abdominal area including upper and lower
front abs (rectus abdominus)
and side abs (obliques).
Position:
Seated – facing outward
Accessory:
Abdominal Crunch Shoulder Harness
Pulleys:
Abdominal bar
Before You Begin:
Remove Leg Extension
Key Points:
• Allow exhalation up and inhalation down,
but don’t exaggerate it.
• Do not lift head/chin. Your head should
follow rib motion, not lead, allowing you to
maintain normal neck posture.
• Tighten abs throughout range of motion. Do
not let abs relax until
set is over.
• MOVING SLOWLY to eliminate momentum
is critical.
• Attach the Abdominal Crunch
Shoulder Harness by
snapping one hook to each of the
D rings. Place the harness on your
shoulders letting the handles hang
over your chest. Grab both handles.
With high resistance, a cross arm
opposite-handle grip may be used.
• Lower back can start out at or in
normal arch, knees and hips bent
and feet flat on floor.
• Tighten abs and curl only torso,
slowly moving ribs toward hips.
Move as far as you can without
moving hips or neck. LOWER
BACK SHOULD NOT LOSE
CONTACT WITH BENCH when
fully crunched.
• Slowly reverse motion returning to
start position without relaxing.
FINISH
START
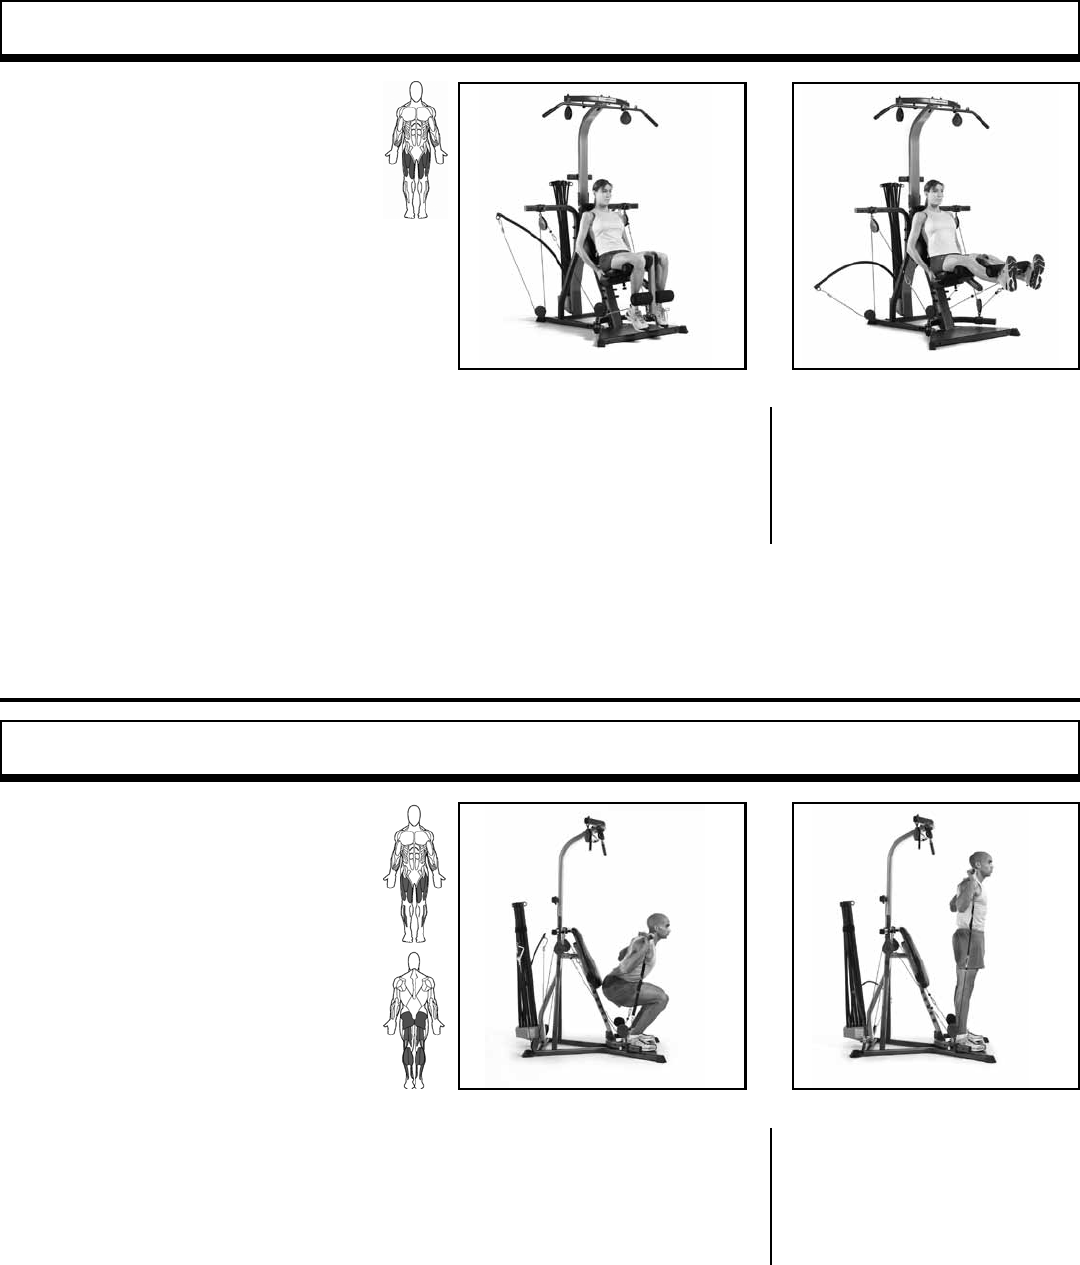
START ACTION
START FINISH
START ACTION
START FINISH
56 Bowflex Xtreme® 2 SE Owner’s Manual
Leg Exercises
Leg Extension
Muscles worked:
All muscles on front of upper thigh
(quadriceps muscle group).
Position:
Seated – facing outward
Accessory:
Leg Extension
Pulleys:
Squat Pulley Frame
Before You Begin:
Adjust seat height
Key Points:
• Use slow controlled motion. Do not “kick”
into extension.
• Do not let knees rotate out during exercise.
Keep kneecaps pointing up and forward.
START FINISH
• Sit on seat facing away from
machine with knees near
pivot point and lower roller pads
on shins.
• Adjust thighs to hip width, pointing
knee caps to front.
• Grasp sides of seat.
• Sit up straight with chest lifted,
abs tight and a slight arch in
lower back.
• Tighten quads and straighten
legs by moving feet forward, then
upward until legs are completely
straight and kneecaps are
pointing up toward the ceiling.
• Slowly return to start position
keeping tension in quads during
movement.
Squat
Muscles worked:
All muscles of legs and buttocks (gluteus
maximus).
Position:
Standing – facing outward
Accessory:
Squat Bar – with squat straps
Pulleys:
Squat Pulley Frame
Before You Begin:
Remove Seat and Leg Extension
Key Points:
• Make sure you do not bend waist or
lower back.
• Keep abs tight throughout entire exer-
cise.
• Keep knees pointed straight out in front
of you.
• Never step off platform while under
resistance.
START FINISH
• Stand on platform, feet shoulder
width apart.
• Squat down and place squat bar
across shoulders. Adjust strap on
bar to make sure you have resis-
tance at start of movement.
• Keep spine in good posture, with
chest lifted, abs tight and maintain
a very slight arch in lower back.
• Slowly rise to standing position.
Keep knees slightly bent.
• Slowly return to start position. Do
not allow knees to exceed
a 90º angle.
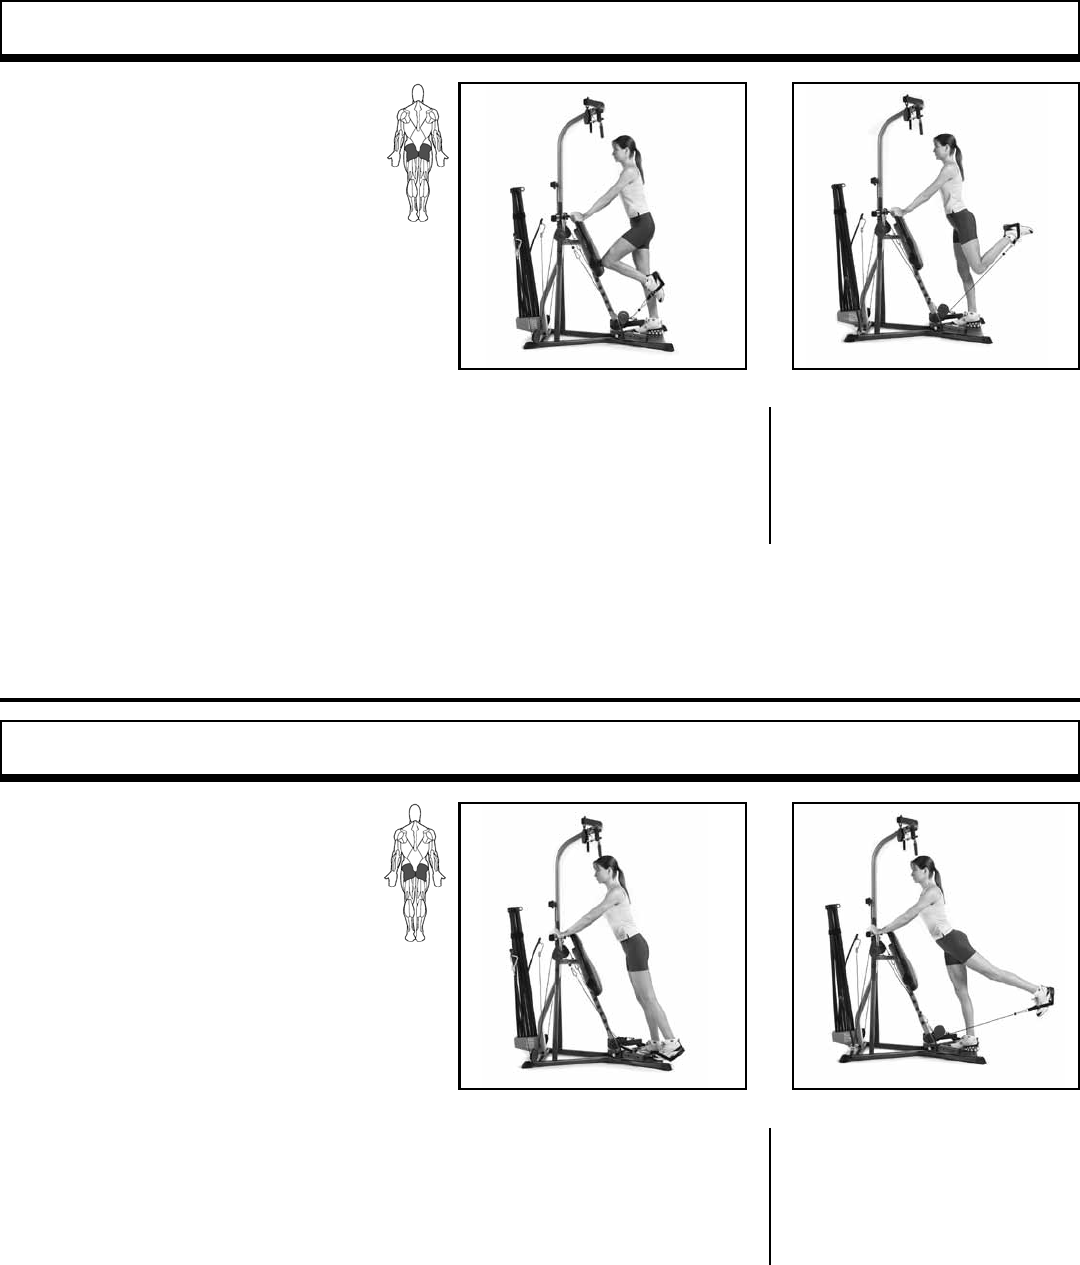
START ACTION
START FINISH
START ACTION
START FINISH
Bowflex Xtreme® 2 SE Owner’s Manual 57
START FINISH
Muscles worked:
Buttocks area (gluteus maximus).
Position:
Standing – facing machine
Accessory:
Hand Grip on arch
Pulleys:
Squat Pulley Frame
Before You Begin:
Remove Seat and Leg Extension
Key Points:
• Make sure all motion occurs at hip,
NOT waist or lower back.
• Keep abs tight throughout entire
exercise.
• Maintain exactly the same bend in
the knee of moving leg throughout
entire exercise.
Standing Hip Extension – Knee Bent
• Secure hand grip around arch of
foot. Keep this leg bent at approxi-
mately 90º.
• Hold onto seat back pad to stabi-
lize yourself.
• Keep spine in good posture, chest
lifted, abs tight. Maintain a slight
arch in lower back.
• Tighten glutes. Extend hip by
moving entire leg backward.
• Slowly move leg as far as you can,
without allowing ANY movement
to occur at waist.
• Slowly return to start position.
Standing Hip Extension – Knee Extended
Muscles worked:
Buttocks area (gluteus maximus).
Position:
Standing – facing machine
Accessory:
Hand Grip on arch
Pulleys:
Squat Pulley Frame
Before You Begin:
Remove Seat and Leg Extension
Key Points:
• Make sure all motion occurs at hip, NOT
waist or lower back.
• Keep abs tight throughout entire exer-
cise.
• Keep leg in same position – slightly
away from body’s midline through entire
exercise.
• Secure hand grip around arch of
foot. Move leg very slightly away
from midline – enough
to move leg freely.
• Very slightly bend knee of support
leg.
• Hold onto seat back pad to stabi-
lize yourself.
• Keep spine in good posture, chest
lifted, abs tight. Maintain a slight
arch in lower back.
• Tighten glutes. Extend hip by
moving entire leg backward.
• Slowly move leg as far as you can,
without allowing ANY movement
to occur at waist.
• Slowly return to start position.
START FINISH
Leg Exercises
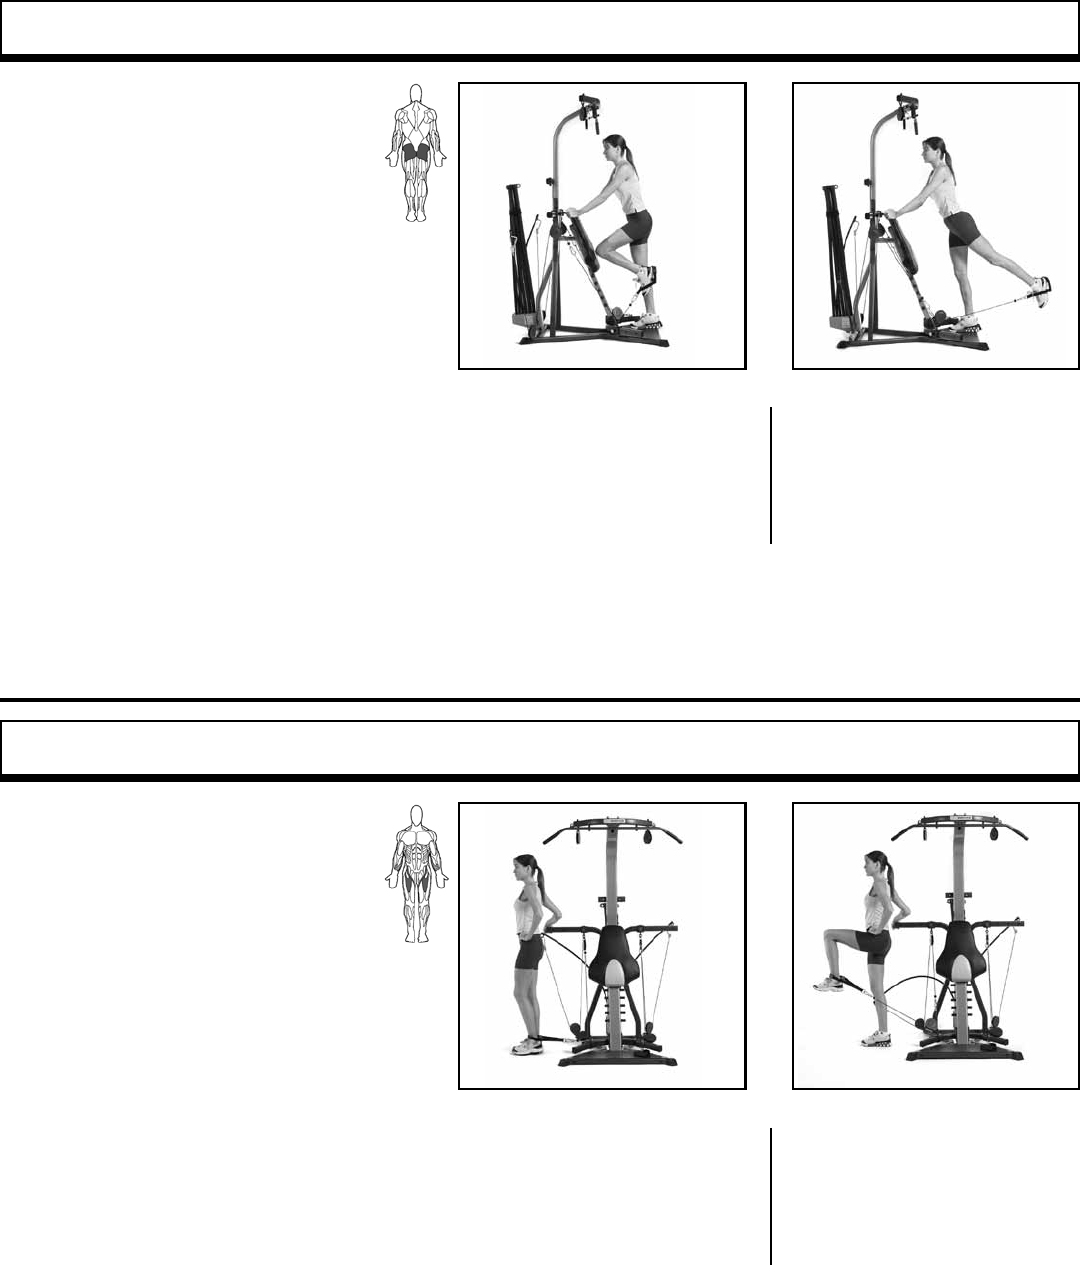
START ACTION
START FINISH
START ACTION
START FINISH
58 Bowflex Xtreme® 2 SE Owner’s Manual
Leg Kickback – Hip and Knee Extension
Muscles worked:
Buttocks area (gluteus maximus).
Position:
Standing – facing machine
Accessory:
Hand Grip on arch
Pulleys:
Squat Pulley Frame
Before You Begin:
Remove Seat and Leg Extension
Key Points:
• Do not allow waist, lower back or
supportive hip to move.
• Keep abs tight throughout entire
exercise.
START FINISH
• Secure cuff around arch of foot.
Keep this leg bent at approxi-
mately 90º.
• Hold onto seat back pad to stabi-
lize yourself.
• Keep spine in good posture, chest
lifted, abs tight. Maintain a slight
arch in lower back.
• Extend entire leg backward,
straightening knee.
• Slowly move leg as far as you can,
without allowing ANY movement
to occur at waist.
• Slowly return to start position.
Hip Flexion – Knee Flexion
Muscles worked:
Muscles on front of hips (iliopsoas,
rectus femoris).
Position:
Standing to the left or right of machine
facing away
Accessory:
Hand Grip on ankle
Pulleys:
Squat Pulley Frame
Before You Begin:
Remove Seat and Leg Extension
Key Points:
• Make sure all motion occurs at hip,
NOT waist or lower back.
• Keep chest lifted and trunk muscles
tight throughout entire exercise.
• Allow lower leg to hang in the direction
of cable at all times.
START FINISH
• Use Center Cross Bar as a
stabilizer.
• Secure a hand grip around one of
ankles.
• Straighten, but do not lock, knee of
support leg.
• Keep spine in good posture, chest
lifted, abs tight. Maintain a slight
arch in lower back.
• Lift knee up and in
toward torso.
• Allowing knee to bend as you
move, bring knee up as far as you
can, without allowing ANY move-
ment to occur at waist or lower
back.
• Slowly return to start position
without resting leg muscles.
Leg Exercises
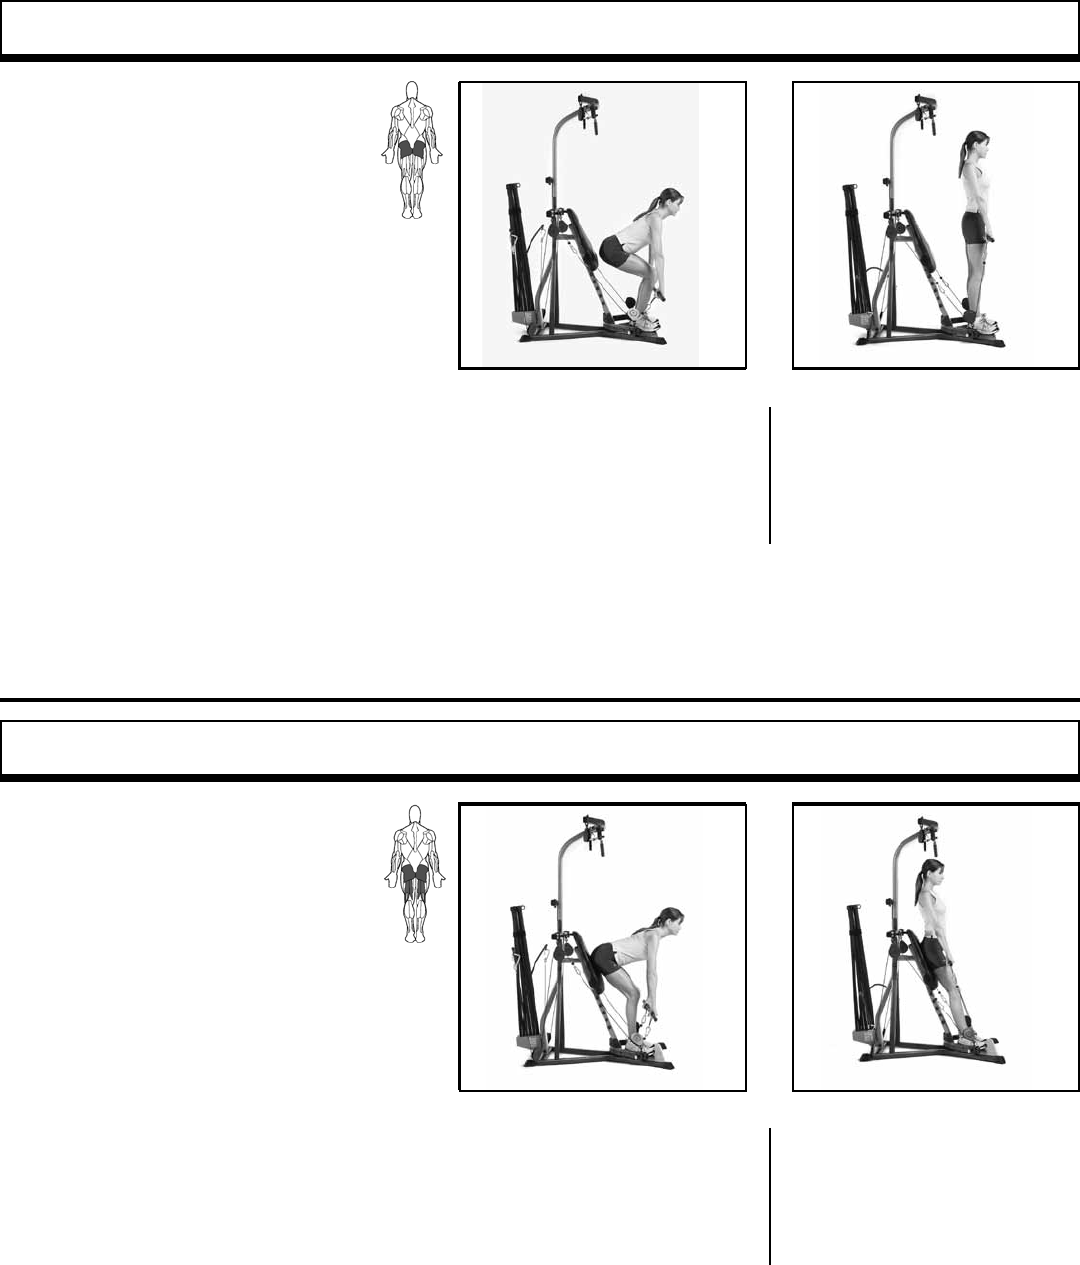
START ACTION
START FINISH
START ACTION
START FINISH
Bowflex Xtreme® 2 SE Owner’s Manual 59
START FINISH
Dead Lift
Stiff Leg Dead Lift
Muscles worked:
Buttocks area (gluteus maximus)
and hamstrings.
Position:
Standing – facing outward
Accessory:
Squat Bar
Pulleys:
Squat Pulley Frame
Before You Begin:
Remove Seat and Leg Extension
Key Points:
• Make sure to keep your back at – do
not arch.
• Your motion is entirely at the hips NOT
the waist.
• Keep knees slightly bent and
head up.
• Use light weight.
• Stand on platform. Grasp squat
bar with palms facing down.
• Keep legs very slightly bent.
• Bend 90º from hips (not waist).
• Keep spine in good posture, chest
lifted and abs tight. Maintain a
slight arch in lower back.
• Push hips forward.
• Slowly move trunk up until
you are in standing position.
Glutes should be tight when
reaching standing position.
• Slowly return to start position.
Muscles worked:
Buttocks area (gluteus maximus).
Position:
Standing – facing outward
Accessory:
Squat Bar
Pulleys:
Squat Pulley Frame
Before You Begin:
Remove Seat and Leg Extension
Key Points:
• Make sure to keep back at –
do not arch.
• Lift with legs, not your back or arms.
• Keep knees bent and head up.
START FINISH
• Facing away from machine, grip
squat bar using one hand with
an underhand grip and the other
hand with an overhand grip.
• Keep legs bent at 90º. Bend over
30-45º from hips (not waist).
• Keep spine in good posture,
chest lifted, abs tight. Maintain
a slight arch in lower back.
• Push up with legs.
• Slowly move up until you are in the
standing position.
• Slowly return to start position.
Leg Exercises
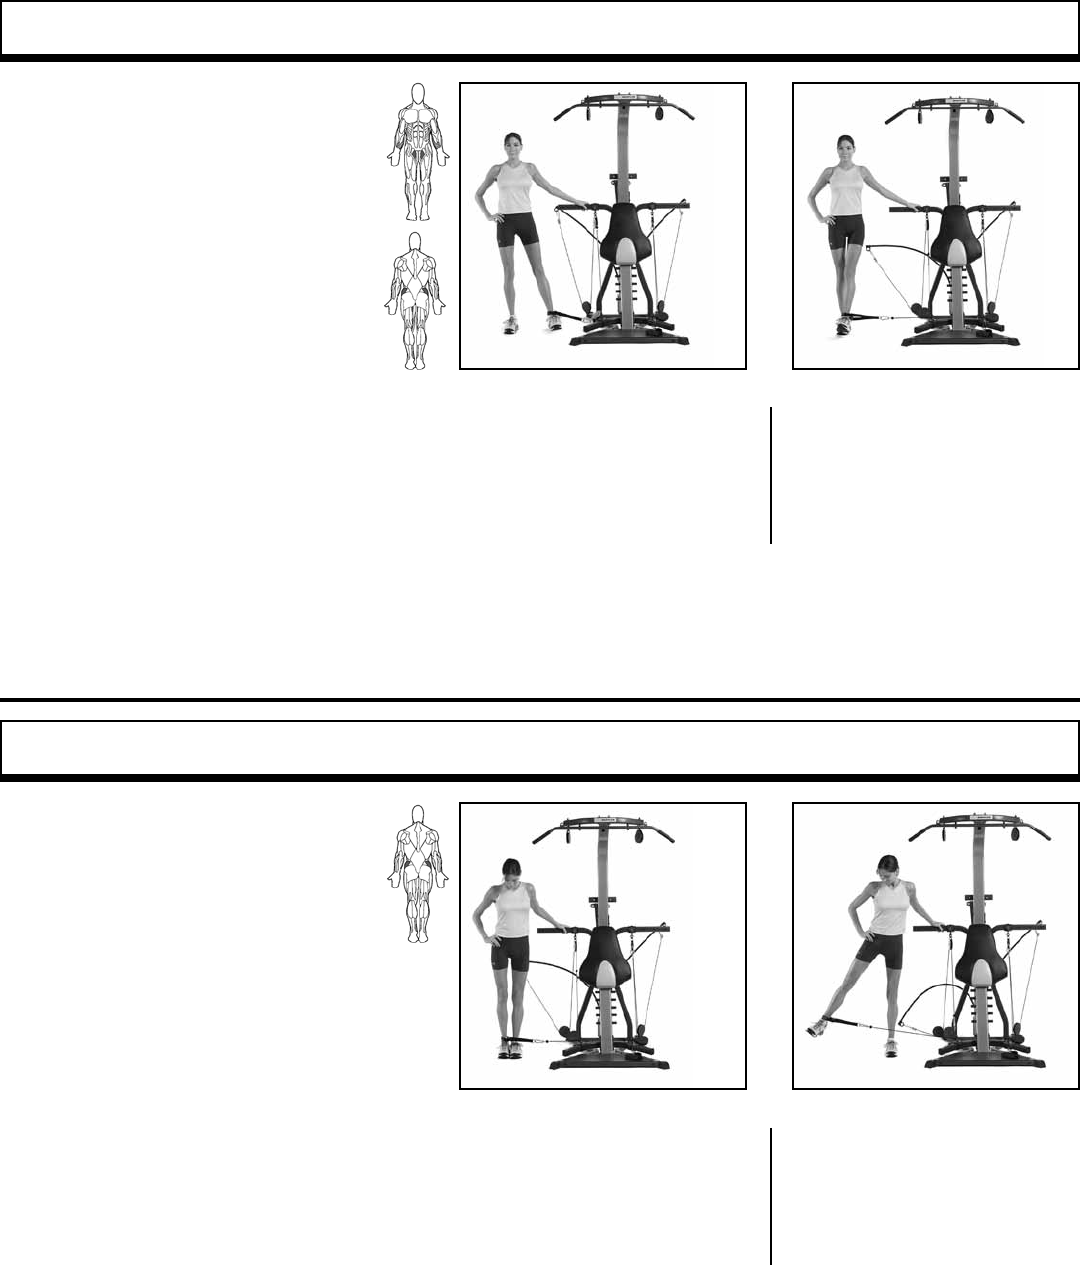
START ACTION
START ACTION
60 Bowflex Xtreme® 2 SE Owner’s Manual
Standing Hip Adduction
START FINISH
START FINISH
Standing Hip Abduction
Muscles worked:
Sides of hips (gluteus medius), especially on
the standing/support side.
Position:
Stand to left or right of machine –
facing outward
Accessory:
Hand Grip over ankle
Pulleys:
Squat Pulley Frame
Before You Begin:
Remove Seat and Leg Extension
Key Points:
• Do not use this exercise for losing fat from
hips. It will not make hips smaller. Use it to
develop hip strength and stability.
• Use a small range of motion. More is not
better.
• Keep spine straight and hips level. Try not to
raise hips when raising leg
to the side.
• Stand to one side of platform with
one side near machine. Slide
hand grip to ankle furthest from
machine (outside leg).
• Stand up straight, lift chest, tighten
abs and maintain a slight arch in
lower back.
• Adjust position so there is some
resistance in cables.
• Slowly move attached leg out to
side away from pulley (30-45º),
keeping hips and spine still.
• Slowly return to start position
without relaxing muscles.
Muscles worked:
Insides of thighs (adductor muscle
groups). Also, the outside of hip
(gluteus medius) on support leg.
Position:
Stand to left or right of machine –
facing outward
Accessory:
Hand Grip over ankle
Pulleys:
Squat Pulley Frame
Before You Begin:
Remove Seat and Leg Extension
Key Points:
• Do not use exercise for losing fat from thighs.
Use it to develop hip strength and stability.
• Do not cross attached leg in front of standing/
support leg. Use a small range of motion.
More is not better.
• Keep spine straight and hips level. Try not to
raise hips when raising leg to side or drop the
hip when returning to start position.
• Slowly allow attached leg to move
in toward support leg (30-45º),
keeping hips and spine still.
• Slowly draw leg back to start posi-
tion.
• Stand to one side of platform with
one side near machine. Slide
a hand grip over ankle nearest
machine (inside leg).
• Stand straight, lift chest, tighten abs
and maintain a slight arch in lower
back.
• Adjust position away from machine
so there is room to move attached
leg toward pulley.
Leg Exercises
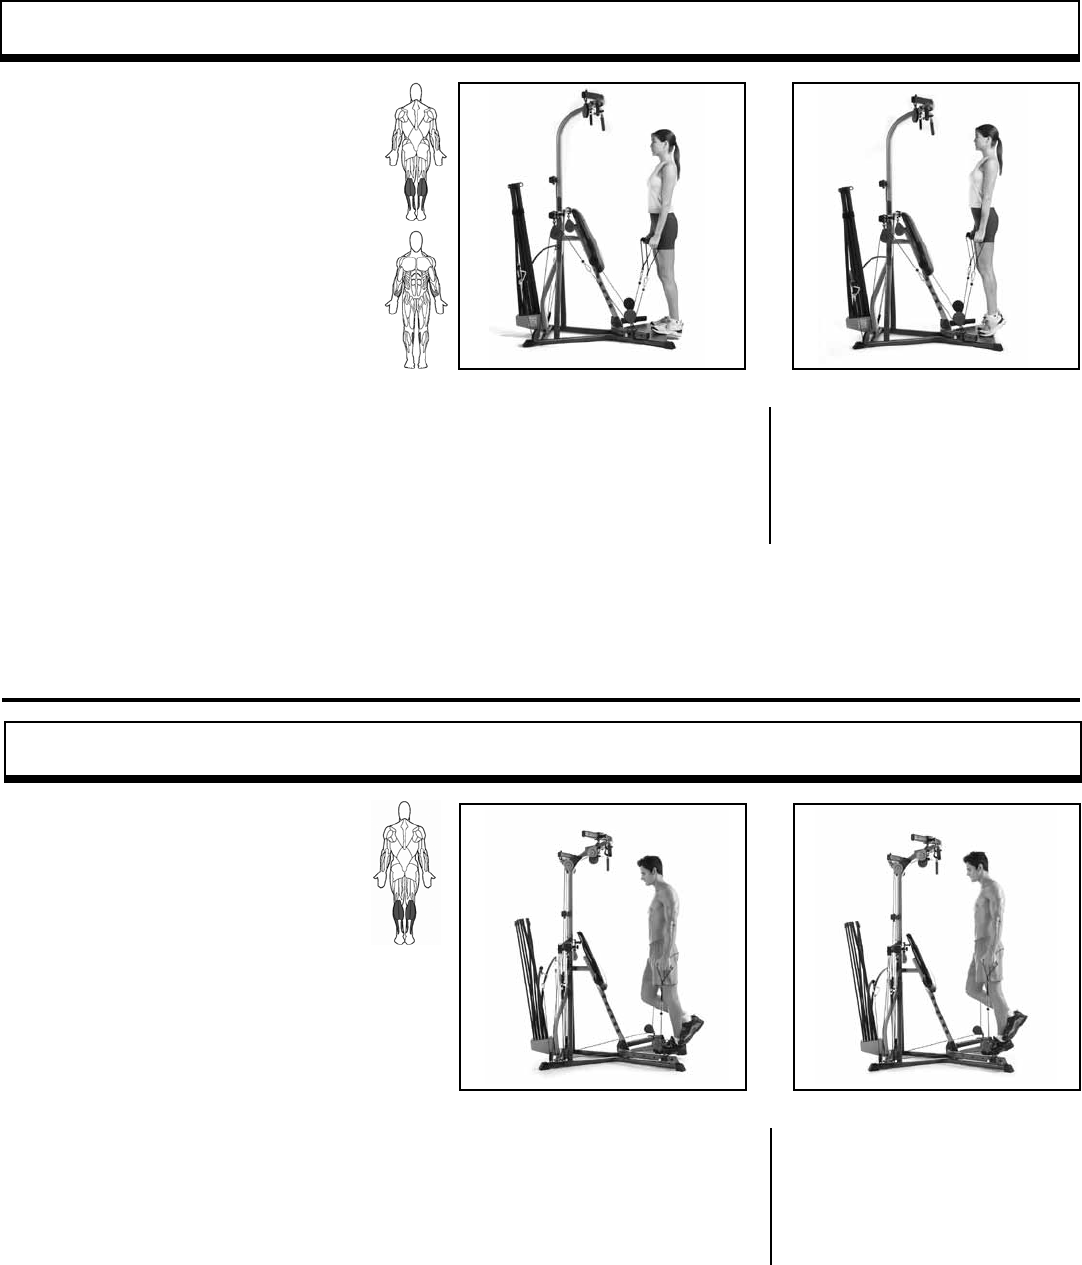
START ACTION
Bowflex Xtreme® 2 SE Owner’s Manual 61
Calf Raise – Ankle Plantarflexion (Knee Stabilized)
Muscles worked:
Lower leg or calf (gastrocnemius,
soleus).
Position:
Standing – facing machine
Accessory:
Hand Grips
Pulleys:
Squat Pulley Frame
Before You Begin:
Remove Seat and Leg Extension
Key Points:
• Do not lose contact between
the balls of feet and the frame
as you push.
• Do not change hip or knee
position, ONLY ankle motion should
be allowed.
START FINISH
• Stand with toes on platform and
heels hanging over edge.
• Use hand grips in both hands as
resistance and a balance stabi-
lizer.
• Lift chest, tighten abs and main-
tain a slight arch in
lower back.
• Slowly press balls of feet into plat-
form and lift heels up.
• Slowly return to start position.
Leg Exercises
Single Leg Calf Raise—Ankle Plantarflexion (knee stabilized)
START ACTION
START
• Stand on one foot, with your toes/
balls of feet on the Standing
Platform, heels hanging over the
edge.
• Use the Hand Grips in both hands
as resistance and as a balance
stabilizer.
• Keep the unused leg out of
the way, do not use it to build
momentum.
• Slowly press the ball of your foot
into the Standing Platform and lift
your heel upward.
• Then, maintaining tension, slowly
return to the start position.
FINISH
Muscles worked:
Gastrocnemius; Soleus
Position:
Standing—facing machine
Accessory:
Hand Grips
Pulleys:
Squat Pulley Platform—Standard Pulley
Leg Extension:
Removed
Success Tips
• Do not lose contact with the balls of
your foot and the Standing Platform
during motion.
• Keep your chest lifted, spine aligned, abs
tight and a slight arch in your lower back.
• Do not lift your hips or excessively arch
your back.
• Do not change hip or knee
position—ONLY ankle motion should be
used.
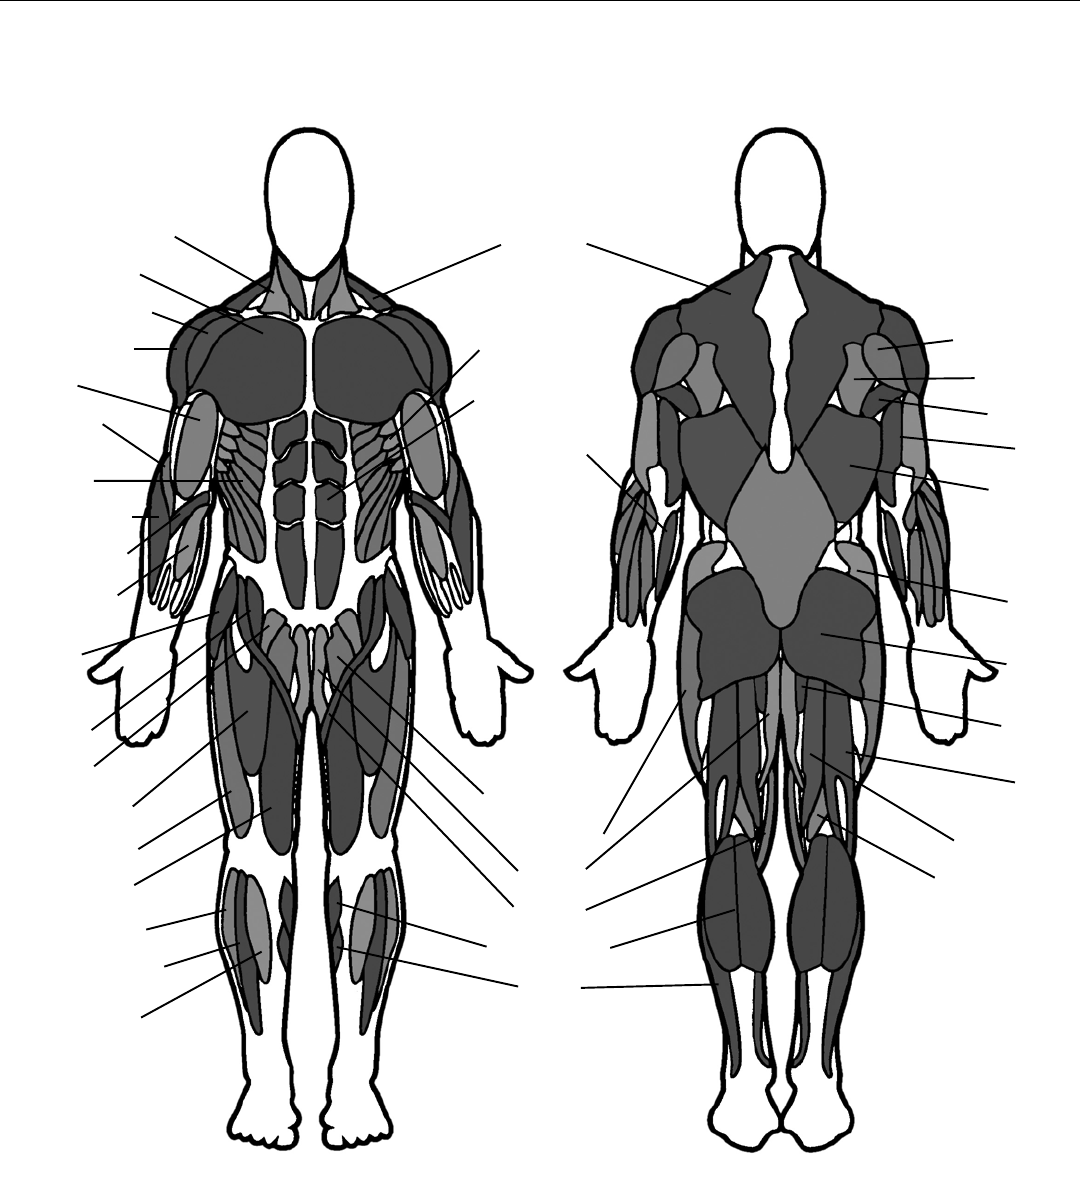
62 Bowflex Xtreme® 2 SE Owner’s Manual
Sternocleidomastoid
Pectoralis Major
Anterior Deltoid
Medial Deltoid
Biceps
Brachialis
External
Obliques
Brachioradialis
Pronator Teres
Flexor Carpi
Radialis
Tensor
Fasciae
Latae
Iliopsoas
Pectineus
Rectus Femoris
Vastus Lateralis
Vastus Medialis
Peroneus Longus
Extensor Digitorum
Longus
Tibialis Anterior
Posterior Deltoid
Infraspinatus
Teres Major
Triceps
Latissimus
Dorsi
Gluteus
Medius
Gluteus
Maximus
Adductor
Magnus
Biceps
Femoris
Semitendinosus
Semimembranosus
Trapezius
Serratus Anterior
Rectus Abdominus
Flexor Digitorum
Superficialis
Adductor Longus
Iliotibial Tract
Gracilis
Sartorius
Gastrocnemius
Soleus
Muscle Chart
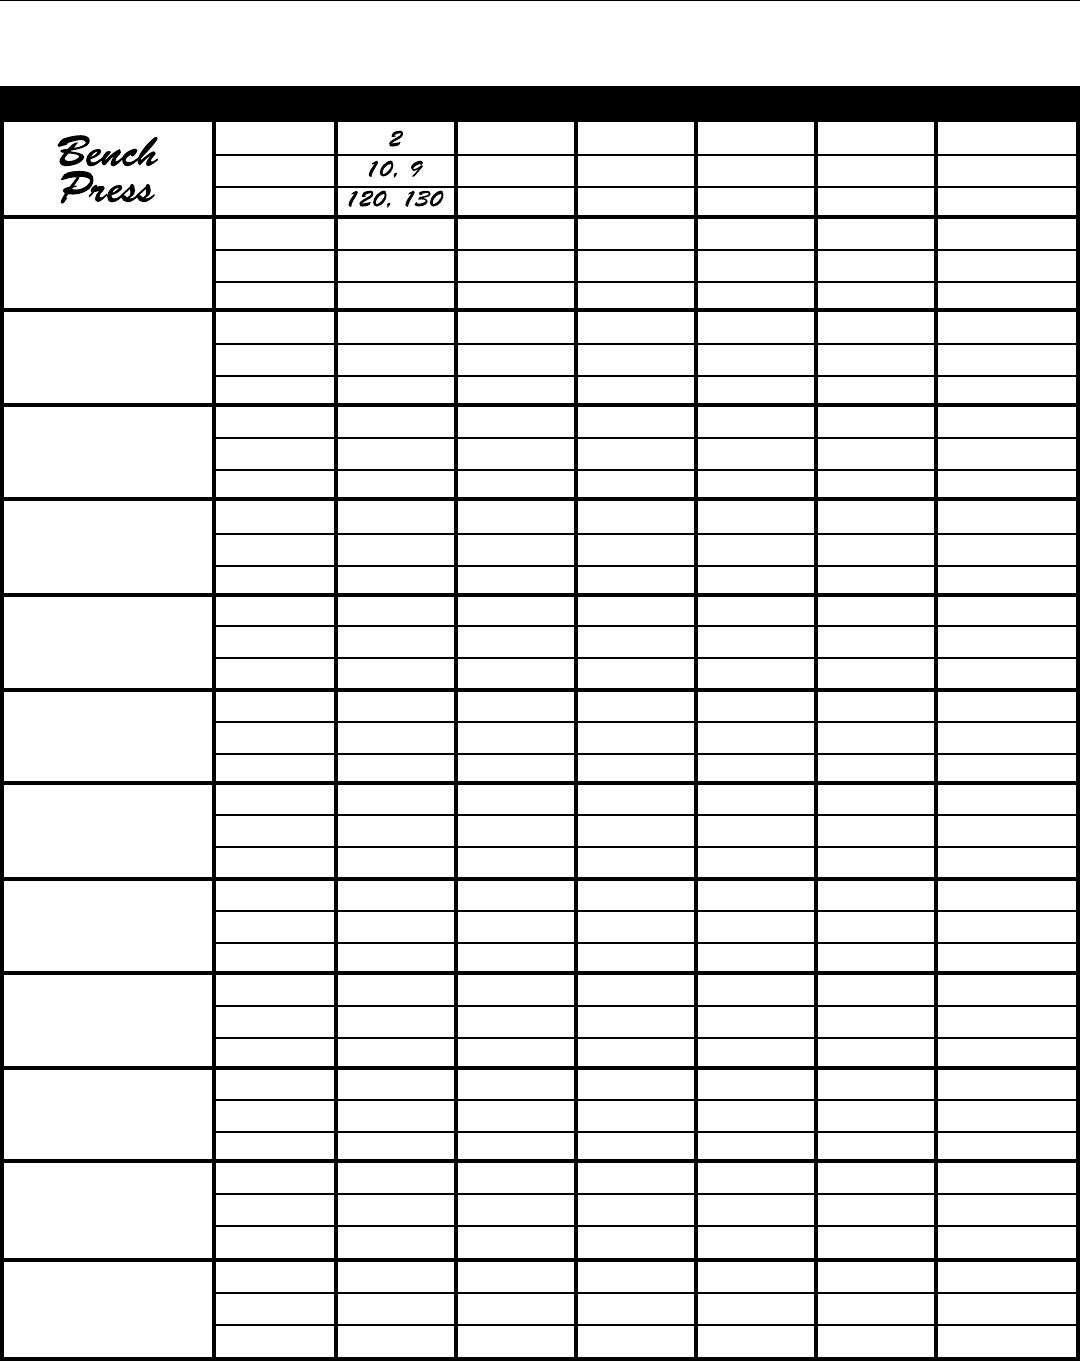
Bowflex Xtreme® 2 SE Owner’s Manual 63
Exercise Log
Please feel free to make copies of this chart to continue your exercise log.
EXERCISE DAT E DATE DATE DATE DAT E DAT E
Sets
Reps
Resistance
Sets
Reps
Resistance
Sets
Reps
Resistance
Sets
Reps
Resistance
Sets
Reps
Resistance
Sets
Reps
Resistance
Sets
Reps
Resistance
Sets
Reps
Resistance
Sets
Reps
Resistance
Sets
Reps
Resistance
Sets
Reps
Resistance
Sets
Reps
Resistance
Sets
Reps
Resistance
64 Bowflex® Body Leanness Program
Exercise Log
EXERCISE DAT E DATE DATE DATE DAT E DAT E
Sets
Reps
Resistance
Sets
Reps
Resistance
Sets
Reps
Resistance
Sets
Reps
Resistance
Sets
Reps
Resistance
Sets
Reps
Resistance
Sets
Reps
Resistance
Sets
Reps
Resistance
Sets
Reps
Resistance
Sets
Reps
Resistance
Sets
Reps
Resistance
Sets
Reps
Resistance
Sets
Reps
Resistance
We want you to know that Bowflex Xtreme® 2 SE home gym is a superior product. Your
satisfaction is guaranteed.
If, for any reason, you are not 100% satisfied with your Bowflex Xtreme® 2 SE home gym,
please follow the instructions below to return your merchandise and receive a refund of the
purchase price, less shipping and handling.
1. Call a Bowflex® Representative at 1-800-605-3369 for a Return Authorization Number.
Return Authorization will be granted if:
a. You purchased your Bowflex Xtreme® 2 SE home gym directly from Nautilus, Inc.;
and
b. You are calling within 6 weeks of the delivery date of your merchandise.
2. All returned merchandise must be properly packaged in the original boxes and in good
condition. Returns should be shipped to the address given to you by the Bowflex®
Representative.
NOTE: You are responsible for return shipping and for any damage or loss to
merchandise that occurs during return shipment. We highly recommend that you
insure your shipment.
3. Please mark all boxes clearly with:
• Return Authorization Number
• Your Name
• Your Address
• Your Phone Number
Boxes without this information clearly marked on the outside may be refused.
4. Please make copies of your original invoice and put one in each box of merchandise.
Nautilus, Inc. must receive your shipment within two weeks from the date the Bowflex®
Representative issued you your Return Authorization Number.
Refunds may be denied or delayed
if these instructions are not completely followed.
This Bowflex® Satisfaction Guarantee applies only to merchandise purchased by
consumers directly from Nautilus, Inc. This guarantee does not apply to sales made by
dealers or distributors.
Bowflex® 6-Week Satisfaction Guarantee
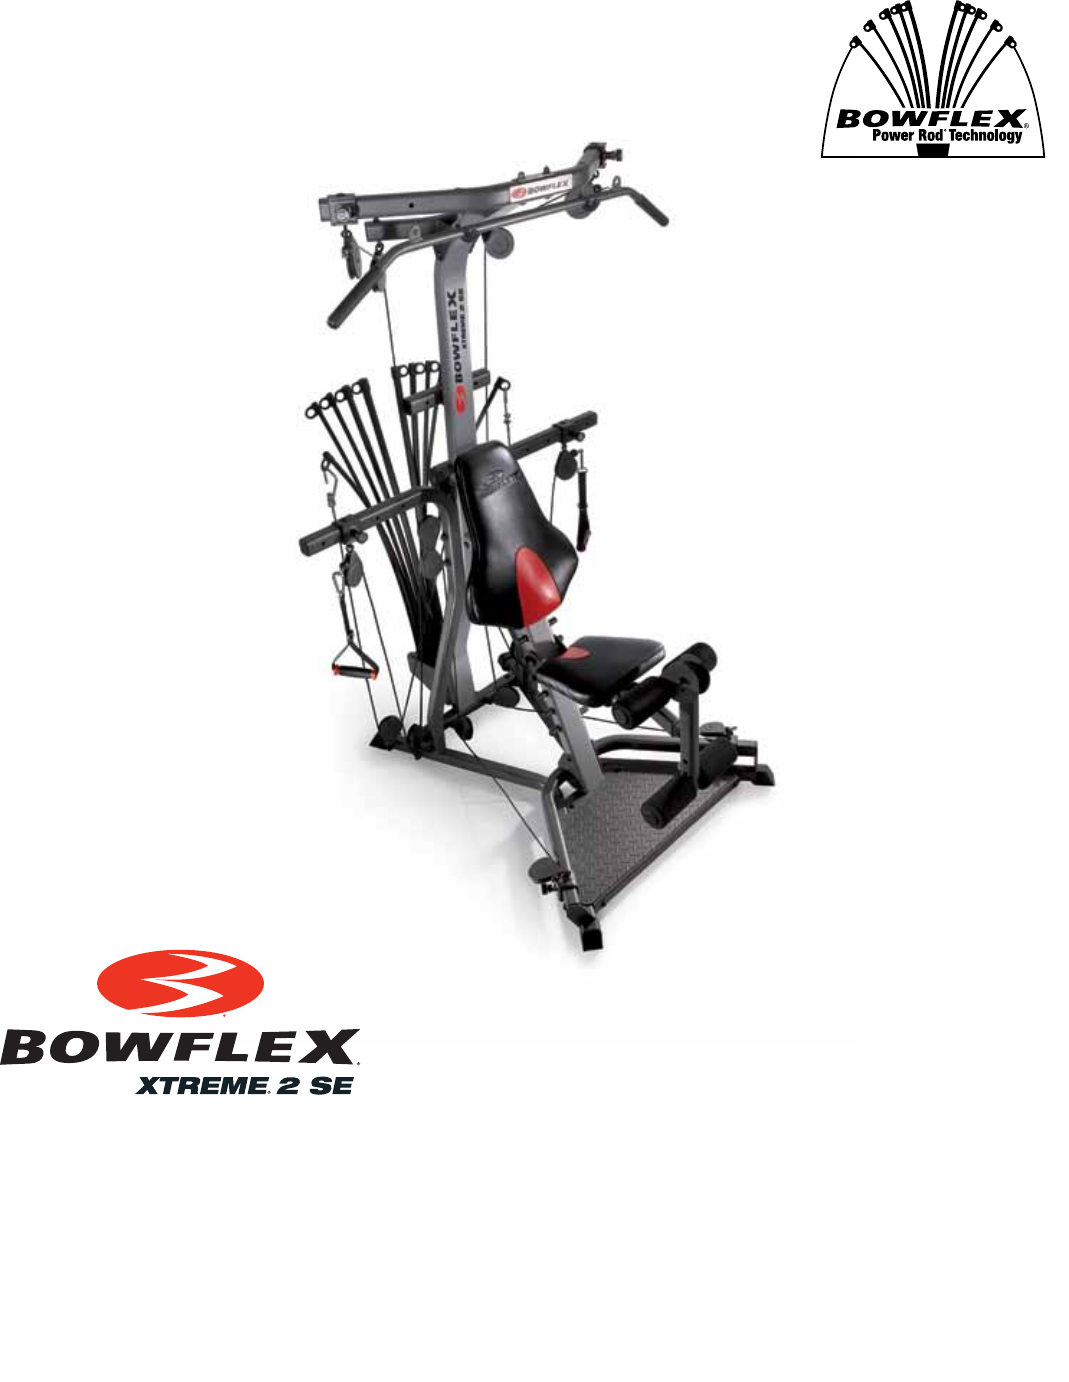
Nautilus, Inc., (800) NAUTILUS / (800) 628-8458, www.NautilusInc.com - Customer Service: North America (800) 605-3369, customerservice@bowflex.com | Asia Pacific & Latin America (360)
859-5180, technics-APLA@nautilus.com | Printed in China | © 2008 Nautilus, Inc., All rights reserved. ™ and ® indicate a trademark or registered trademark. Nautilus, Inc. (www.NautilusInc.
com) trademarks include NAUTILUS®, BOWFLEX®, XTREME®, SCHWINN® and UNIVERSAL® and respective logos. Other trademarks are the property of their respective owners.
