Brain Sentinel SLU01-90001 SeizureLink User Manual
Brain Sentinel SeizureLink Users Manual
Users Manual

SeizureLink Alerting System
User Manual
This user manual is intended for use in the USA only.

OVERVIEW
Page 1
Content
OVERVIEW ........................................................................................................................... 2
1. Welcome to the SeizureLinkTM Community ....................................................................... 2
1.1 Product Description ...............................................................................................................................2
1.2 Disclaimers ........................................................................................................................................... 2
1.3 How to Properly Use the SeizureLink System .........................................................................................3
2. What’s in the Box ............................................................................................................ 5
2.1 sEMG Monitor .......................................................................................................................................6
1.2 Electrodes .............................................................................................................................................6
1.3 Rechargable Battery..............................................................................................................................8
1.4 Charging Dock ......................................................................................................................................9
3. Monitoring with the SeizureLink System ....................................................................... 10
3.1 Electrode Placement ...........................................................................................................................10
3.2 Understanding The Buttons and LED Indicators ....................................................................................11
4. Managing the App ........................................................................................................ 13
4.1 Account Setup .....................................................................................................................................13
4.2 Synching The App and The Seizurelink Monitor ....................................................................................13
4.3 For Managing Caregivers ....................................................................................................................14
4.4 Managing The Seizurelink Phone Call ................................................................................................. 15
4.5 How To Change Your Profile Photo .......................................................................................................15
4.6 What Happens During A Seizure Alarm? ............................................................................................... 16
4.4 Seizure Diary ...................................................................................................................................... 18
4.5 Troubleshooting ..................................................................................................................................18
5. Technical Specifications ................................................................................................ 29
5.1 Monitor ............................................................................................................................................... 29
5.2 Electrode ............................................................................................................................................29
5.3 Battery ................................................................................................................................................20
5.4 Connectivity ........................................................................................................................................ 20
6. Customer Support ......................................................................................................... 20
For Use During Usability Study only

OVERVIEW
Page 2
Welcome to the
SeizureLinkTM Community
1
Welcome to the Hero community! At Brain Sentinel, we refer to the wearers of the SeizureLink System device
as Heroes. Christopher Reeve1, described a Hero in the following way:
“A Hero is an ordinary individual who finds the strength to persevere and endure in spite of overwhelming
obstacles.”
1
We think his definition of a Hero truly defines those living with epilepsy and perfectly describes why you are
our Heroes.
Thank you for making the SeizureLink Alerting System part of your daily routine. Our goal is to provide you
with the shortest link between a seizure happening and help arriving. We love helping Heroes just like you.
This instruction manual describes how to properly use your SeizureLink System.
1.1 Product Description
The SeizureLink System is designed to do one job: Alarm and notify Caregivers to help shorten the time
needed to get help to a Hero (wearer) during a seizure. The SeizureLink System is the only consumer, over-
the-counter (OTC) seizure alerting system that recognizes surface electromyography (sEMG) – the new
standard in seizure monitoring.
The sEMG signal is analyzed by SeizureLink’s algorithm to sense for muscle contractions that may be
indicative of a generalized tonic-clonic seizure even when there is no shaking so the system knows when
to alert. In fact, the SeizureLink System offers the fastest signal on the market; a clinical study showed that
SeizureLink’s algorithm alerts on average between 9-12 seconds*. The SeizureLink algorithm also recognized
94 percent of generalized tonic-clonic seizures, with a false alarm rate of only 0.67 per day and only 1 per
every 82 nights in the evening.
The easy-to-use free SeizureLink app helps you send alerts to your connected Caregivers, manage your
seizure diary and create reports.
1.2 Disclaimers
The SeizureLink System is not a medical device and is not cleared by the FDA for medical device application
or to monitor, treat, diagnose or prevent a medical condition. Use of SeizureLink System is not a substitute
for professional medical advice concerning your condition, medical treatment for you, or for proper
supervision concerning your condition. Please consult your physician or your healthcare provider to ask
questions, discuss your condition and the options for you.
*Beniczky, Sándor, et al.
“Automated Real-Time Detection of Tonic-Clonic Seizures Using a Wearable EMG Device.”
Advances in Pediatrics., U.S. National Library of Medicine,
30 Jan. 2018, www.ncbi.nlm.nih.gov/pmc/articles/PMC5791791/.
1. http://www.chrisreevehomepage.com/stillme.html
For Use During Usability Study only

OVERVIEW
Page 3
1.3 How to Properly Use the SeizureLink System
Special care must be taken when using the SeizureLink System.
A. DO NOT USE IN WATER
1. The SeizureLink monitor is not waterproof.
2. Liquids will damage the electronics inside the SeizureLink monitor.
The SeizureLink monitor is never to be submerged in water or any other liquid, including but not
limited to:
- bathtub
- swimming pool
- filled kitchen sink
3. The SeizureLink monitor should not be worn in the shower.
4. The SeizureLink monitor cannot recognize seizures or send remote alarms while submerged.
5. Do not use the sEMG monitor if there is any liquid inside.
6. Do NOT spill liquid on the sEMG monitor; doing so may damage its internal electronics and make
the entire system unusable.
7. If you feel any part of the SeizureLink System has been compromised, please contact Brain Sentinel
to determine whether a replacement is needed.
B. DO NOT USE IN A MAGNETIC RESONANCE IMAGING (MRI) SYSTEM
The SeizureLink System is not safe for use during or near an MRI scan. Do not allow any part of the
SeizureLink System in or near an MRI system.
C. RADIO FREQUENCY (RF) ENERGY
The SeizureLink System contains a transmitter and receiver of RF energy through an antenna located on
the inside of the sEMG monitor below the status LEDs.
The SeizureLink System is designed, tested, and manufactured to comply with regulations governing
radio frequency emissions. There is no known electronic equipment with which the SeizureLink System
interferes. However, if the wireless transmitters and/or other electrical circuits in the system are
suspected of causing interference in other electronic equipment, take the following precautions:
- Increase the physical distance between the SeizureLink System and the equipment you suspect
may be experiencing RF energy interference
- Always beware of locations that restrict the use of RF devices
For Use During Usability Study only

OVERVIEW
Page 4
D. UNINTERRUPTED BLUETOOTH CONNECTIONS
In order to ensure continuous monitoring, a Bluetooth connection must be maintained between the
monitor and the Bluetooth device on which the app has been loaded (i.e phone, tablet, etc...). This will
help ensure uninterrupted, active alerting of potential GTC seizure activity when the sEMG monitor is in
use and properly placed on the belly of the biceps.
If the SeizureLink System is out of Bluetooth range, an alarm will sound on the mobile device for the
Hero and the Caregiver, and real-time alerting will be interrupted. Remote seizure alerts will only be sent
when the SeizureLink System is connected to the internet for both Caregivers and Heroes. Caregivers
should take additional measures to ensure Hero safety when a GTC seizure occurs. Whether or not the
SeizureLink System is connected to Bluetooth, the SeizureLink System is not a substitute for adequate
supervision or medication. A competent, responsible, trained Caregiver needs to be present to provide
assistance to the Hero when the SeizureLink System alarms.
E. SYSTEM SECURITY
Brain Sentinel uses commercially available best practices to secure the data that is transmitted to our
servers.
F. ADDITIONAL NOTES ABOUT THE PROPER USE OF SEIZURELINK
1. The System is not to be used for recognizing partial onset seizures that do not secondarily
generalize.
2. The System does not predict sEMG signals that may be associated with GTC seizures.
3. The safety and effectiveness of the SeizureLink System has not been established in recognizing
sEMG signals that may be associated with seizures other than a GTC seizure.
4. Connecting the USB connector on the SeizureLink charger to equipment not authorized by Brain
Sentinel can result in unacceptable hazards to the operator, and can damage the SeizureLink
System as well as the unauthorized equipment.
NOTE OF ADHESIVE ALLERGY:
DO NOT USE IF THE HERO IS ALLERGIC TO ADHESIVES!
For Use During Usability Study only
OVERVIEW
Page 5
What’s
in the Box
2
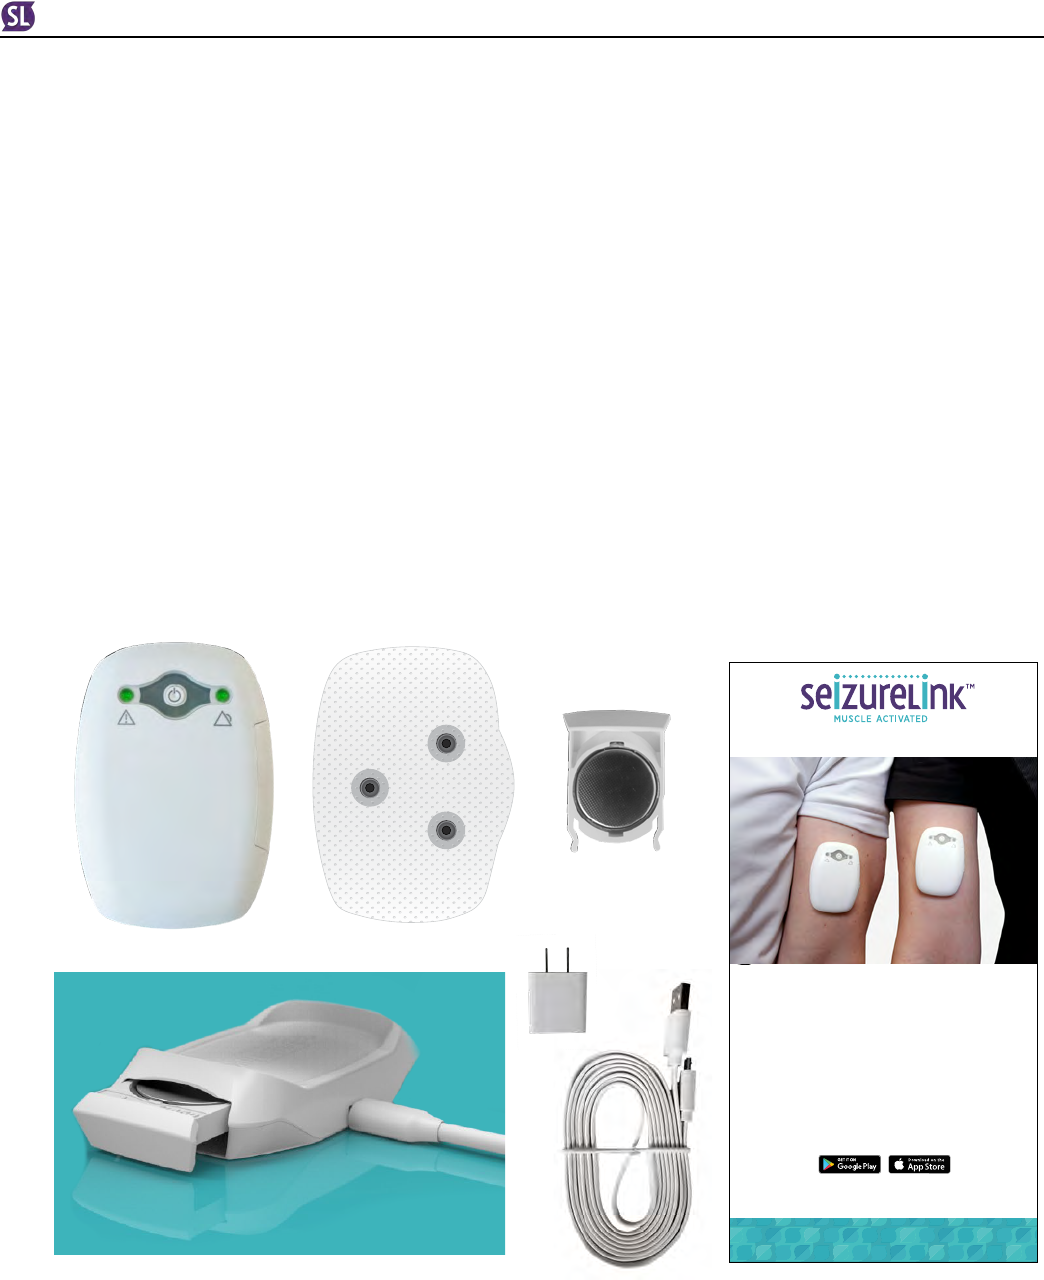
Everything you need to get the SeizureLink System set up quickly
(figure 2a)
:
• 1 SeizureLink biceps monitor
• 32 Electrodes
• 2 EZ Battery Trays
• 1 Charging dock
• 1 Wall and USB charger (110-220V)
• 1 Quick start guide
There is no additional charge for alarms and alerts.
QUICK START GUIDE
LIST OF ITEMS IN THE BOX
1 SeizureLink biceps monitor
32 Electrodes
2 EZ battery trays
1 Charging dock
1 Wall and USB charger (110-220V)
Quick Start Guide
The free app is available on
Google Play and Apple App store
SeizureLink™ monitors for muscle activation and it is not a medical device nor is it cleared by
the FDA for medical device application. It is not cleared to monitor, treat, diagnose or prevent a
medical condition. Use of SeizureLink is not a substitute for professional medical advice concerning
your condition or medical treatment for you. Please consult your physician or your healthcare
provider to ask questions, discuss your condition and the options for you.
1. Account Setup
- Download the SeizureLink App on the Google Play store or the
Apple Store.
- WEARER: Open the app. Press “Create Account”
(Figure 1)
. Follow the
instructions until you get to the “Device Setup” screen.
- CAREGIVER: Open the app. Press “Create Account”
(Figure 1)
. Follow
the instructions until you get to the “Device Setup” screen.
2. Proper Placement of the
SeizureLink Monitor
1
2
3
- EZ battery tray should be fully charged before use.
- Get an electrode patch. Snap it to the back of your SeizureLink monitor.
- Clean the skin on the biceps before adding your electrode patch.
Skin should not have lotion and should NOT be cleaned with
alcohol, as these can interfere with the connection between the
skin and the electrode.
- Find the belly of the biceps by finding your highest peak when flexing
your biceps muscle. Remove the plastic backing of the electrode
patch and place it on the top of the belly of the biceps muscle.
- Turn on the monitor by pressing the button until you hear it beep.
- Turn on Bluetooth on your mobile device.
- Push the button 3 quickly times on the monitor then follow the
instructions on the app.
- Click “START DISCOVERY” on the app to sync your SeizureLink.
- Once the monitor is connected to the app, it should read
Congratulations, your SeizureLink monitor is now linked for monitoring.”
- If you get the screen that says “Whoopsie! That didn’t go as planned.”
See Section 5. Troubleshooting:
3. Managing Caregivers
- Open up the SeizureLink App and go to “Settings”.
- Click “Manage Caregivers”.
- Click “Add New” to add a new Caregiver to your SeizureLink System.
- Complete the form on the “Enroll Caregivers” and invite up to 10
Caregivers by their email address.
- If the Hero does not have a phone, the Primary Caregiver should
create a wearer account instead of a Caregiver one. The Hero should
stay within Bluetooth range of the phone they were set up on in order
to continue monitoring.
4. Testing Your
SeizureLink Monitor
- For your Caregiver to receive seizure alerts, they must accept the
Caregiver request sent by the Hero. To do this, the Caregiver must
log into the app, go to settings, then click “Manage Caregiver
Requests”. Next, click the image of the Hero and hit “Connect”
(Figure 2).
- To test your, press the button once until you hear it beep. The
Caregiver should receive a phone call as well as notifications. You can
turn it off by pressing the button twice quickly.
- To stop the alert, press the button twice quickly.
5.Troubleshooting
- If you are having issues connecting your app to your monitor or if your
Caregiver is not receiving alerts, make sure the following items have
been done:
• Bluetooth is turned on
• The monitor is powered on
• The Caregiver accepted your request in their app
- If you still have issues, try restarting the app and your monitor.
- If that does not work, try logging out, then log back into the account.
- If all of those items do not work, email us at
SLSupport@brainsentinel.com
6. About the Electrode Patches
- Electrode patches should be changed every 24 hours: Any time the
SeizureLink monitor is removed from the Hero’s arm, or whenever a
loose electrode alarm occurs.
- Electrode patches need to be stored in a cool, dry place. Electrode
patches are not waterproof. Exposure to water or excessive sweat may
cause the patch to come off the biceps. When replacing an electrode
patch it is a good idea to alternate on which arm you are wearing the
monitor to limit skin integrity issues. To change an electrode patch:
- Step 1: Turn OFF the SeizureLink monitor by pressing the button for
4 seconds.
- Step 2: Unsnap the monitor from the used electrode patch.
- Step 3: Gently remove the patch by rolling the adhesive away from
the skin. Discard the used patch as regular household waste.
- Step 4: Clear any adhesive residue left on your arm.
- Step 5: Snap a new electrode patch into the SeizureLink monitor.
- Repeat Section 2: “Proper Placement of the SeizureLink Monitor” to
place a new electrode on your biceps.
7. Changing the EZ Battery Tray
- The EZ battery trays are designed to last a maximum of 24 hours, and
changing them can be done while still wearing the monitor. To change
the EZ battery tray, follow the steps below:
- Turn OFF the SeizureLink monitor by pressing the button on the
device for 4 seconds.
- Remove the EZ battery tray on the side of the SeizureLink monitor.
- Remove a fully charged battery tray from the SeizureLink charging dock.
- Slide the fully charged EZ battery tray into the SeizureLink monitor
until it snaps into place.
- Turn ON the SeizureLink monitor by pressing the button on the
monitor. Make sure it is synced with your app.
- Slide the Discharged EZ battery tray in to the charging Dock to
recharge.
Figure 1
Create Account
Figure 2
Connect with Hero
Figure 3
Home Screen
SeizureLink
System
Condition
Troubleshooting Tips
Active
Monitoring
Status
Blinks
Green -
If it blinks green every
5 seconds, the Hero is
connected correctly and
is being monitored for
potential GTC seizure
events.
Signal is
Detected -Blinks
Green
A small amount of signal
is detected.
Approaching
Threshold - Orange
sEMG signal is
approaching the seizure
threshold. Seizure alarm
may sound soon.
Seizure
Alarm - Red
The right light goes
red when above the
threshold- if at red for
5 seconds a seizure will
alarm.
Battery Low Blinks
Orange -
The battery being used
is critically low and
should be replaced with
a fully charged battery.
SeizureLink Monitor
SINGLE BUTTON TO:
• Power ON/OFF
• Set Off Alarm
• Stop Alarm
EZ BATTERY
TRAY
TWO LED
INDICATOR
LIGHTS
TOP OF THE
MONITOR
BOTTOM OF
THE MONITOR
- When not in use, keep the extra EZ battery trays in the charging
dock for recharging.
- Do NOT submerge the SeizureLink monitor in water, including
in a bathtub
- Do NOT shower while wearing the SeizureLink monitor.
- Make sure the SeizureLink is placed on the belly of the biceps
muscle.
- Order additional electrodes at SeizureLink.com
- For additional questions or system troubleshooting, contact us at
SLSupport@brainsentinel.com.
Helpful Reminders
Accessories
Electrode Patch
Charging Dock
EZ Battery Tray with
Rechargable Batteries
Wall and USB Charger
CSLBL0006.001 Date: 08/2018
SLSupport@BrainSentinel.com
Belly
of the
Biceps
2a Box contents
Box with 32 Electrode patches
For Use During Usability Study only
OVERVIEW
Page 6
2.1 sEMG Monitor
The SeizureLink monitor runs on an internal, rechargeable EZ battery
tray, if fully charged, the battery can provide up to 24 hours of alerting
before needing to be recharged.
When a generalized tonic-clonic seizure is analyzed, the monitor alarms
and sends out a real-time alert to the SeizureLink app on a mobile
device. This alert goes out to Caregivers so that help can arrive as
soon as possible. The recognized event gets logged into a seizure diary
so that details can be added to it later and shared with Caregivers or
physicians.
The SeizureLink algorithm is muscle activated. It recognizes an electrical
(electromyography) signal that comes on from the motor cortices of the
brain. Since we recognize it on the skin surface over the biceps, it is
more properly known as surface electromyography, or sEMG.
The SeizureLink algorithm can sense when the muscles clench and
tighten during the tonic phase of seizure, which is the part when there
is little or no movement. Active recognizing for seizure activity occurs at
a rate of 1024 Hz, meaning 1,024 times per second.
The SeizureLink monitor is discreet. It weighs only one ounce and is
roughly the size of a sugar packet. The monitor is durable and child-
friendly
(Figure 2b)
.
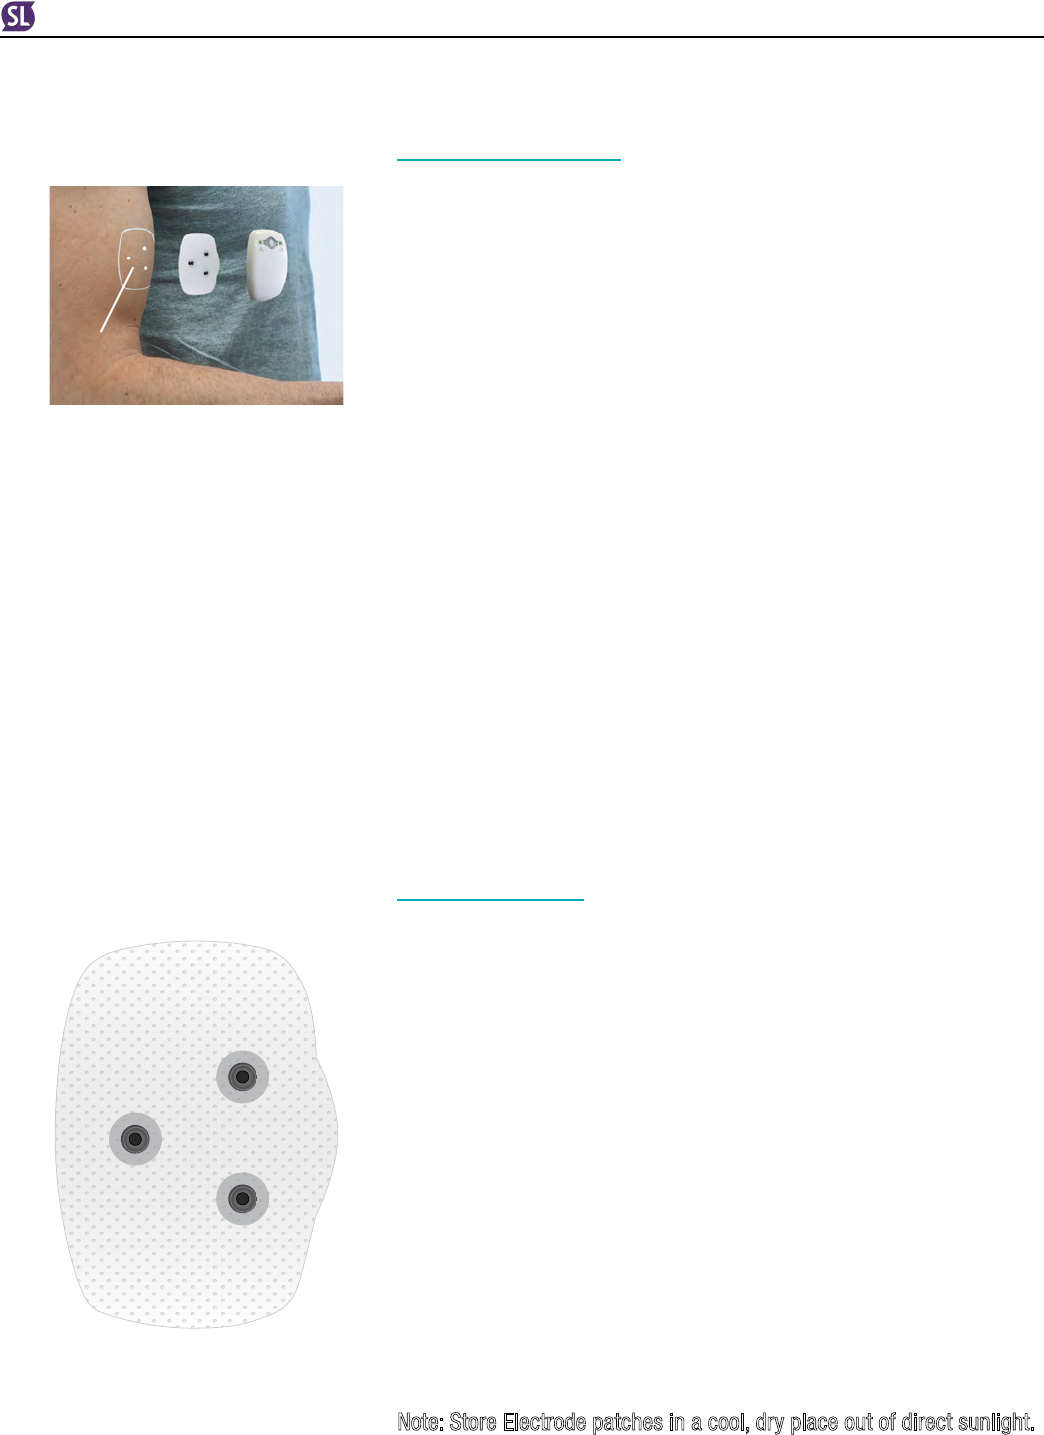
2.2 Electrodes
The electrode patch is latex-free and made of white, spunlace, non-
woven polyester fabric. The electrode patch has a triode configuration
that provides physical contact to three equally spaced points on the
skin of the Hero’s biceps. Each electrode is designed to be used for
24 hours. Usage and activities of the Hero may require more frequent
replacement. When removing the electrode patch, take care to pull it
away gently to avoid skin irritation. Make sure to alternate the arm
used for alerting. If the electrode patch is removed and the skin shows
redness or irritation that does not improve after 24 hours, contact
your physician. If the Hero has a known allergy to adhesives and/
or conductive hydrogels, shows signs of an allergic reaction to the
electrode patch, consult the physician’s office immediately
(Figure 2c)
.
Prolonged exposure to air, heat, or sunlight will prematurely dry out the
hydrogel. For this reason, the unused electrode patches should be kept
in the resealable bag and stored in a cool location out of direct sunlight.
Note: Store Electrode patches in a cool, dry place out of direct sunlight.
2c sEMG Electrode Patches
Triode Configuration
1
2
3
Belly
of the
Biceps
For Use During Usability Study only

OVERVIEW
Page 7
• The electrode patch should never be applied to wet, irritated or
broken skin
• The electrode patch may damage the skin if removed carelessly
• Discontinue use and consult your physician if any of the following
occur:
- Redness, itching or discomfort that persists for more than
24 hours after removal
- Skin discoloration
- Blisters forming near the patch
- Bruising at the electrode site
- Tearing of the skin
A. CHANGING THE ELECTRODES
Electrode patches should be changed every 24 hours, any time the
SeizureLink monitor is removed from the Hero’s arm, or whenever a
loose electrode alarm occurs. Electrode patches are not waterproof;
exposure to water or excessive sweat may cause the patch to come
off. When replacing an electrode patch, it is a good idea to alternate the
wearing arm to give your skin a break.
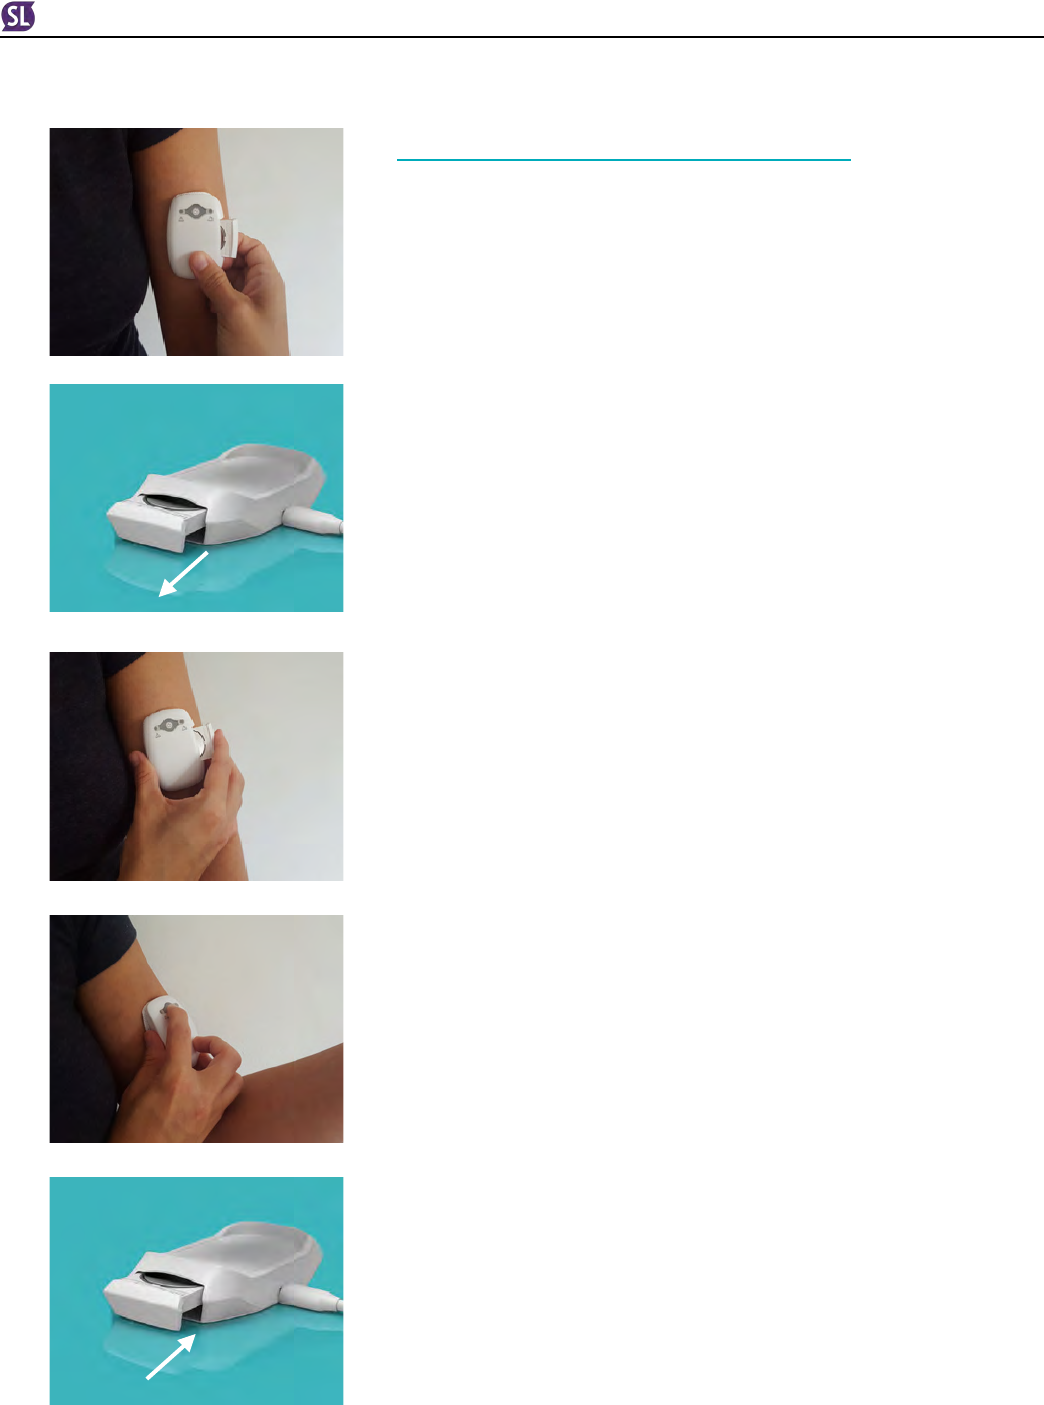
To change an electrode patch:
1. Turn OFF the SeizureLink monitor by pressing the button and
holding for 4 seconds
(Figure 2d)
.
2. Unsnap the monitor from the used electrode patch
(Figure 2e)
.
3. Gently remove the patch by rolling the adhesive away from the skin
(Figure 2f).
Discard the used patch as regular household waste.
4. Clear any adhesive residue left on your arm
(Figure 2g)
.
5. Snap a new electrode patch into the SeizureLink monitor.
(Figure 2h)
.
2f Removing the Electrode Patch
2d Turn off device
2g Clear adhesive left on the arm
2e Unsnap Electrode Patch from monitor
2h Snap a new Electrode Patch into monitor
For Use During Usability Study only
OVERVIEW
Page 8
2.3 Rechargeable EZ Battery Tray
The lithium-ion polymer EZ battery trays are rechargeable and designed
to last a maximum of 24 hours
(Figure 2i)
.
If the EZ battery tray is low, the Left LED light on the monitor will blink
orange to indicate that the EZ battery tray is critically low and should be
replaced with a fully charged EZ battery tray. When not in use, keep the
extra EZ battery trays in the charging dock for recharging.
Keep batteries away from children. If the EZ battery tray compartment
does not close securely, stop using the product and keep it away from
children.
NOTE: DO NOT INGEST EZ BATTERY TRAY. IF YOU THINK EZ BATTERY
TRAYS MIGHT HAVE BEEN SWALLOWED, SEEK IMMEDIATE
MEDICAL ATTENTION.
CHANGING THE EZ BATTERY TRAYS
The EZ battery trays are designed to last approximately 24 hours.
Changing them is simple and can be done while still wearing the
monitor. To change the EZ battery trays, follow the steps below:
1. Turn OFF the SeizureLink monitor by pressing the button on
the system and holding for 4 seconds
(Figure 2d)
.
2. Remove the EZ battery tray on the side of the SeizureLink
monitor
(Figure 2i)
.
3. Remove a fully charged EZ battery tray from the SeizureLink
charging dock
(Figure 2j)
.
4. Slide the fully charged EZ battery tray into the SeizureLink
monitor until it snaps into place
(Figure 2k)
.
5. Turn ON the SeizureLink monitor by pressing the button on
the monitor. Make sure it is synced with your app
(Figure 2l)
.
6. Slide the Discharged EZ battery tray in to the charging dock
to recharge the battery
(Figure 2m)
.
2k Slide fully charged EZ battery tray into monitor
2i Remove the EZ battery tray
2l Turn on monitor
2m Slide the discharged EZ Battery tray
in to the charging dock
2j Remove charged EZ battery trays from
charging dock
For Use During Usability Study only
OVERVIEW
Page 9
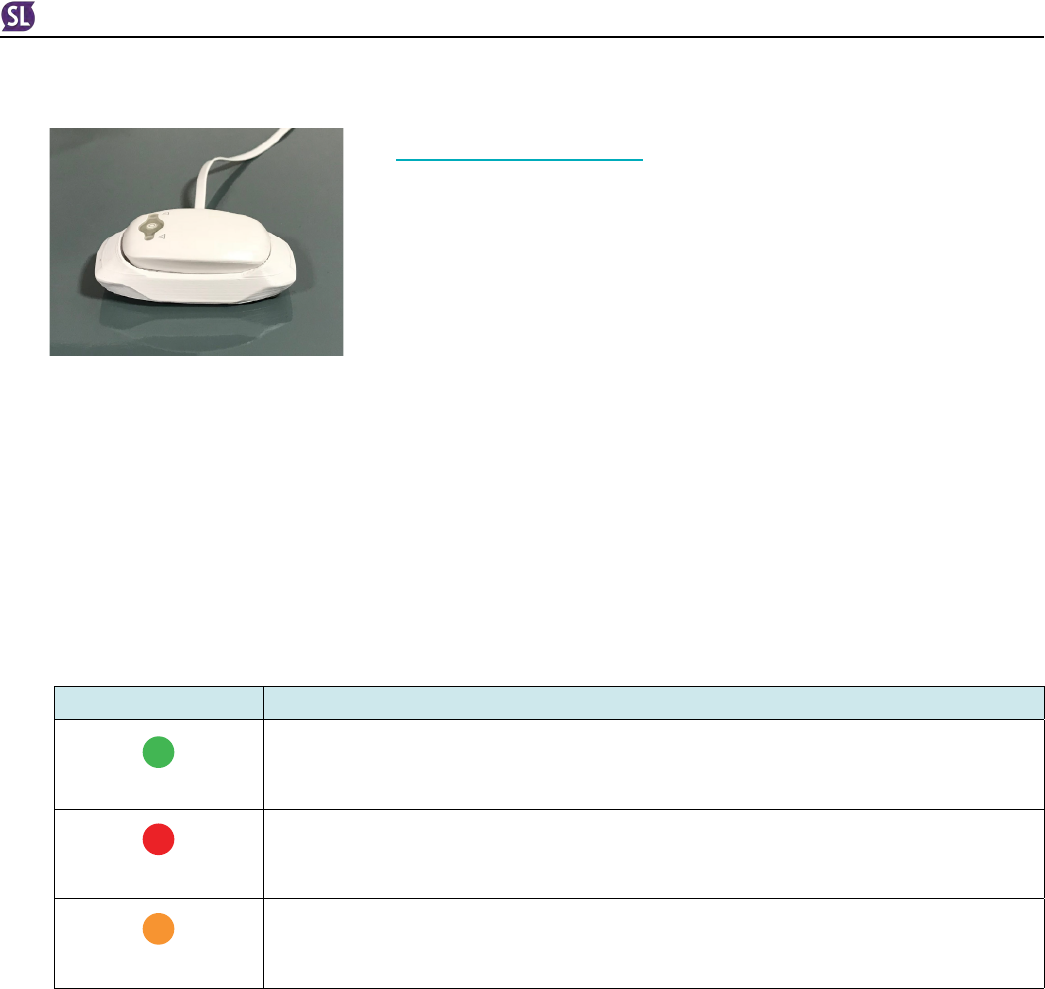
2.4 Charging Dock
The charging dock is designed to recharge the two SeizureLink EZ
battery trays at the same time
(figure 2n)
. The unit contains charging slots
on either side, one for each EZ battery tray. While the device itself is not
charged on the dock, it can fit on top of the charging dock as a storage
system when the device is not being worn by the Hero. The EZ battery
trays click into the dock the same way they click into the unit, so there
is no concern about proper EZ battery tray placement. See the section
above,
Changing the EZ battery trays
, for more information.
Battery status is communicated from the SeizureLink device to the app
only, not from the charging dock. The charging dock has LED indication
lights to indicate effective battery recharging. The lights glow bright
enough to be seen in the daytime and just bright enough at night to be
seen but to not be a distraction during sleep.
The lights are the only form of communication between the dock and the
user. Here are the three things these two lights communicate:
LED Light Communication
Solid
The EZ battery tray is fully charged
Solid
The EZ battery tray is charging
Solid
The dock is plugged in and there is no EZ battery tray in the charger.
2n. Charging Dock
For Use During Usability Study only
USAGE
Page 10
Monitoring with
the SeizureLink System
3
3a. Correct Positioning of the SeizureLink on the Biceps
1
2
3
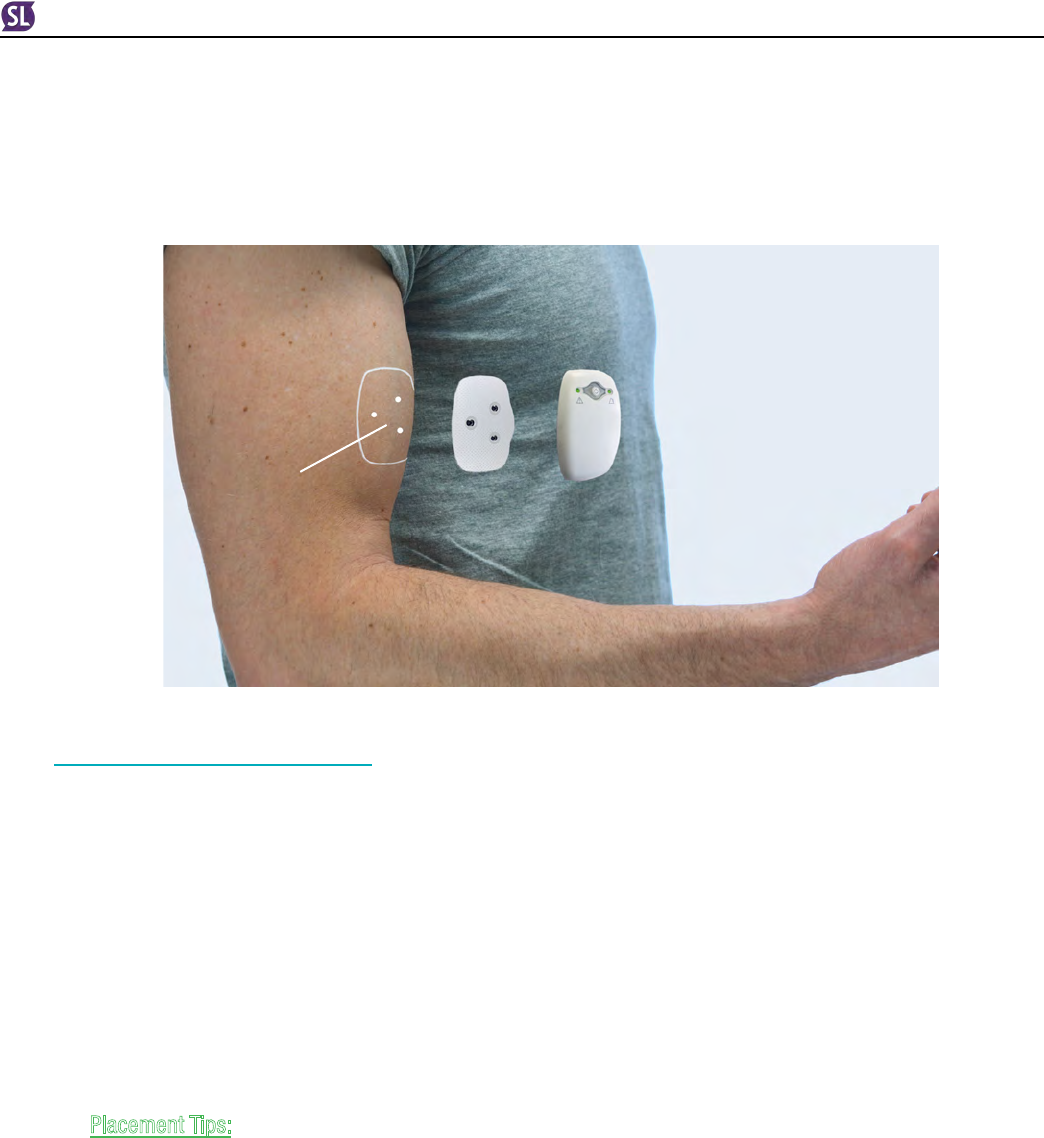
3.1 Electrode Placement
For proper placement of the SeizureLink monitor, center the monitor directly over the belly of the biceps
muscle of the arm. To find the belly of the biceps, bend your arm at the elbow and make a fist. The belly of the
biceps is the thickest part of the muscle, about halfway between your shoulder and elbow
(Figure 3a)
.
Since the monitor works by continuously sensing and recognizing sEMG signals, this placement is essential to
ensure proper alerting in order to receive seizure notifications. The SeizureLink monitor should not be worn on any
body location other than the biceps muscle. The monitor can be worn on either the left or right biceps.
Prior to placement on the biceps, remove the naturally occurring oils on the surface of the skin. This will ensure
that the electrode patch has good skin contact and that it stays properly in place on the arm. You can wash the
biceps with soap and water, then completely dry to remove any oils from the skin.
Placement Tips:
- Make sure to snap SeizureLink monitor to the electrode patch before attaching to arm.
- Do not attach the SeizureLink system to wet skin.
- Do not use alcohol to prep the skin; the alcohol will react with the electrode gel and may cause
skin irritation.
- Never apply an electrode patch to irritated or broken skin.
- Consult your physician if skin irritation or skin discoloration persists for more than 24 hours.
Belly
of the
Biceps
For Use During Usability Study only
USAGE
Page 11
After the skin is properly prepared, follow these instructions:
1. Take one electrode patch from the box.
2. Reseal the packaging to protect the unused electrode patches.
3. Store the unused patches in a cool, dry place out of the sun.
4. Turn the SeizureLink monitor over; on the back of the unit you will see 3 electrode sockets.
5. Take the electrode patch and secure all three snaps into the sockets of the SeizureLink monitor.
6. There is an audible small click when each snap is secured properly.
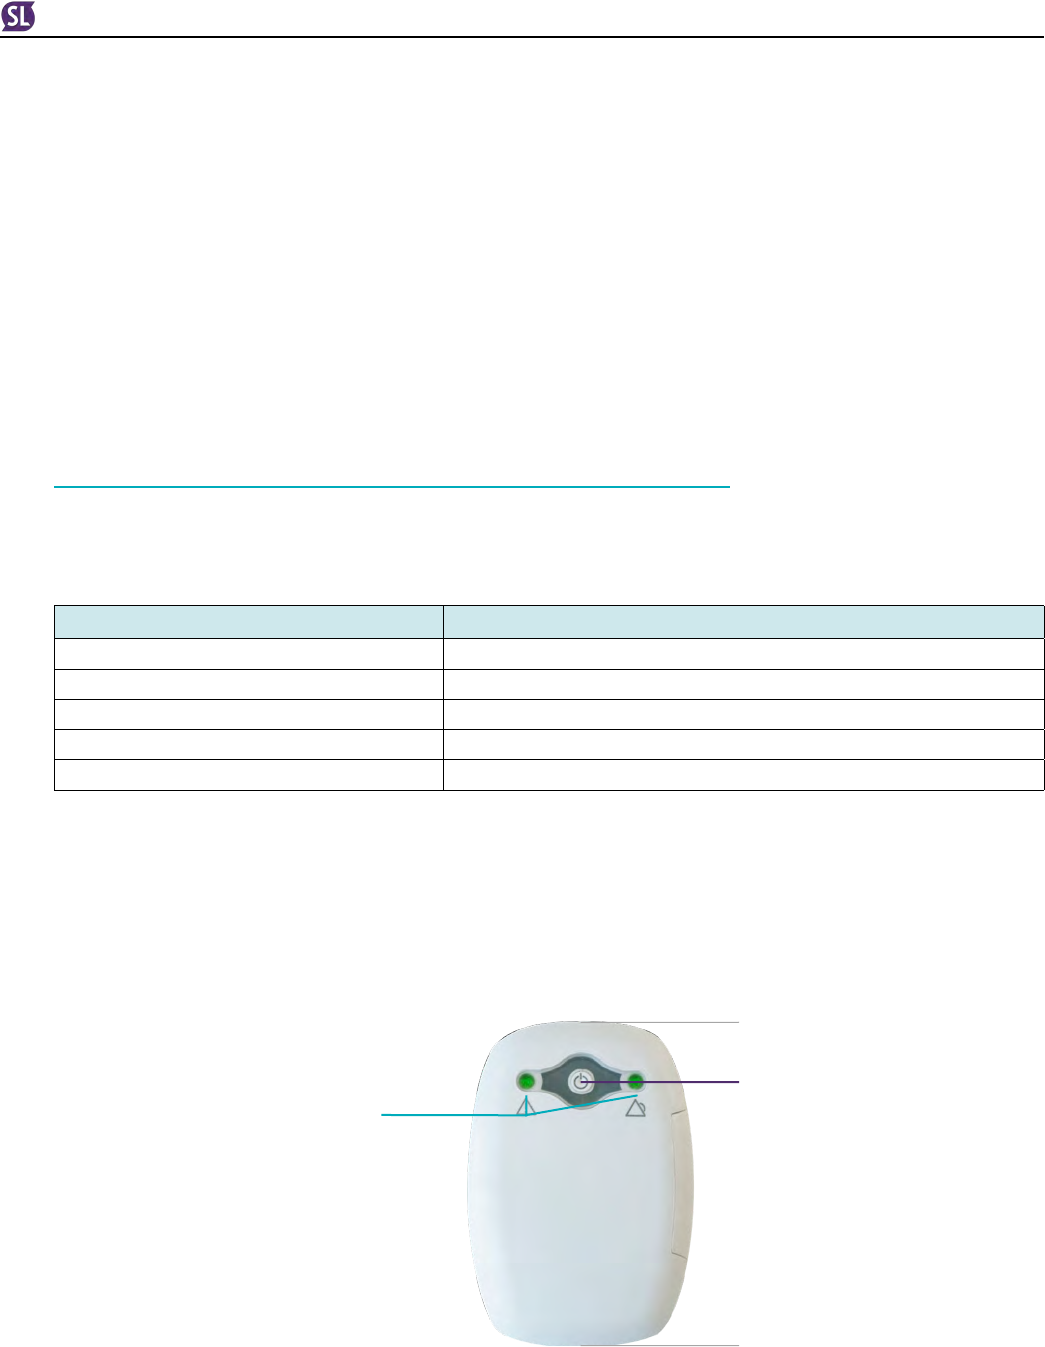
3.2 Understanding The Buttons and LED Indicators
The SeizureLink monitor has one active button and two LED indicator lights.
The single button is used to power the unit on and off, and to set off the alarm.
Function Access using the Single Button
(figure 3.b)
Turn On Press once
Call for Help / Test Alarm Press once (When already on)
Turn Off a Seizure Alarm Press twice quickly
Turn Off Hold down 4 seconds
Become Discoverable when linking to Bluetooth Press 3 times quickly
A. MANUAL SEIZURE ALARM BUTTON
When a Hero or Caregiver presses the Manual Seizure Alarm Button on the front of the unit, a Seizure
Alarm is triggered. The SeizureLink monitor will sound an alarm and communicate the alarm to the Hero’s
alerting device and to all Caregivers.
(Figure 3b)
.
3b. sEMG monitor Button and Lights
Single Button
TOP
BOTTOM
Two Led
Indicator lights
For Use During Usability Study only
USAGE
Page 12
B. CANCEL BUTTON: STOPPING THE MONITORING SESSION
The small button on the face of the SeizureLink monitor can be pressed 2 times quickly to cancel the
seizure alarm.
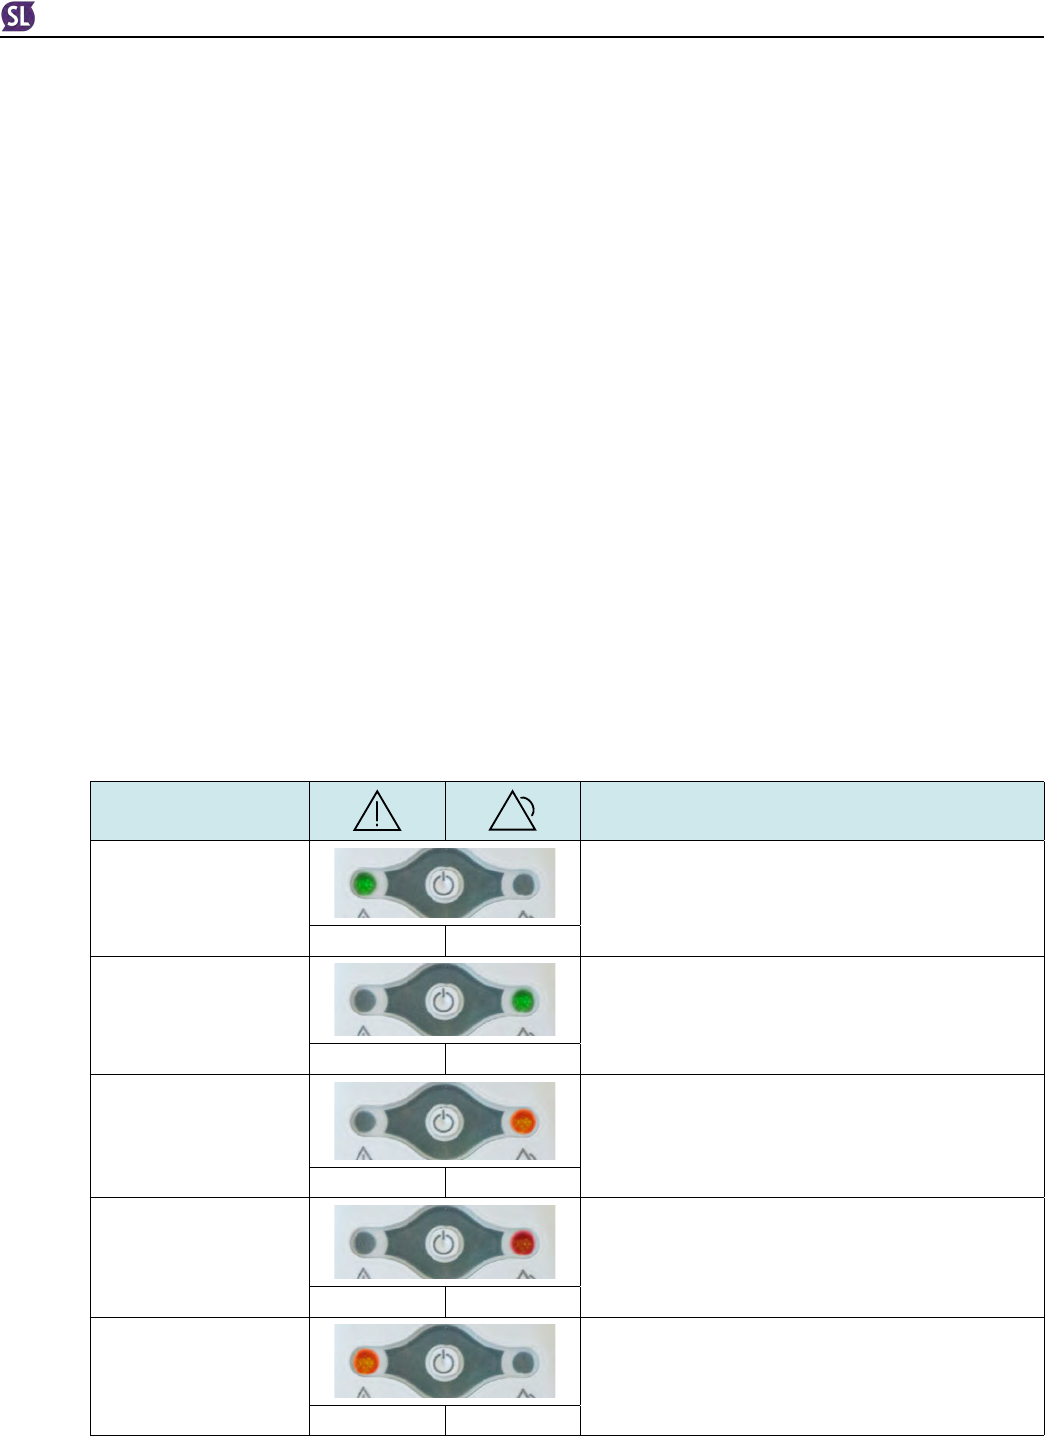
C. LED INDICATOR LIGHTS
When the unit is in active alerting status, the left LED light will blink green. It will continue to blink green
every 5 seconds, indicating the Hero is connected correctly and is being monitored for potential GTC
seizure events.
The right LED light will shine green when a signal is recognized.
When the Hero is approaching the seizure threshold, the right LED light will shine orange to indicate that
the sEMG signal is approaching the seizure threshold. An orange light indicates that the seizure alarm
may sound soon.
When the right LED light is red, this indicates a seizure alarm, meaning the sEMG has gone above the
threshold. If the light remains red for 5 seconds, a seizure alarm will activate.
Finally, when the unit has a low battery, the left LED light will blink orange to indicate that the battery
being used is critically low and should be replaced with a fully charged EZ battery tray from the charging
dock. When not in use, keep the extra EZ battery trays in the charging dock for recharging.
D. sEMG MONITOR LED INDICATORS
SeizureLink
System Condition
Troubleshooting
Tips
Active Alerting Status
If it blinks green every 5 seconds, the Hero is connected
correctly and is the algorithm is checking for potential GTC
seizure events.
Blinks Green -
Signal is Recognized A small amount of signal is recognized.
- Blinks Green
Approaching Threshold sEMG signal is approaching the seizure threshold. Seizure
alarm may sound soon.
- Solid Orange
Seizure Alarm The right light goes red when above the threshold- if at red
for 5 seconds a seizure will alarm.
- Solid Red
Battery Low The battery being used is critically low and should be
replaced with a fully charged battery.
Blinks Orange -
For Use During Usability Study only

USAGE
Page 13
4a. Account Setup
4b. Syncing App to the SeizureLink monitor
Managing
the App
4
This section provides information on how to get the app, create an
account, sync it to the SeizureLink monitor, and how to set up the app
for Caregiver use.
When a generalized tonic-clonic seizure is analyzed, the monitor alarms
and sends out a real-time alert to the aleting app on a mobile device.
This alert goes out to Caregivers so that help can arrive as soon as
possible. The recognized event gets logged into a seizure diary on the
Hero’s phone so that details can be added to later and shared with
Caregivers or physicians.
4.1 Account Setup
Both the Caregiver and Hero should download the free SeizureLink app
from either the Google Play or the Google App store. Once the app is
downloaded, open the app. Press “Create Account”
(Figure 4a)
.
A. FOR THE HERO
Follow the instructions until the “Device Setup” screen appears.
Ensure proper placement of the SeizureLink monitor. See section
3.1 for proper placement instructions. Correct placement is
important for the SeizureLink monitor to function properly.
4.2 Syncing The App and The Seizurelink Monitor
A. FOR THE HERO
After the SeizureLink monitor is properly placed on the Hero’s arm:
1. Turn on the monitor by pressing the button until it beeps.
2. Click “START DISCOVERY” on the app to sync the SeizureLink
monitor
(Figure 4b)
.
3. Press the button 3 times quickly on the monitor then follow
the instructions on the app.
4. Once the monitor is connected to the app, it should read
“Congratulations, your SeizureLink monitor is now linked for
monitoring.”
5. If you get the screen that says “Whoopsie! That didn’t go as
planned”, see the Troubleshooting section in this manual.
For Use During Usability Study only
USAGE
Page 14
6. To test the SeizureLink monitor, press the button once to
activate the alarm.
7. To end the alarm, press the button twice quickly.
4.3 For Managing Caregivers
When a generalized tonic-clonic seizure is recognized, the monitor
alarms and sends out a real-time alert to the monitoring app on a
mobile device. This alert goes out to Caregivers so that help can arrive
as soon as possible.
The recognized event gets logged into the seizure diary on the Hero’s
phone to provide details to later share with Caregivers or physicians.
After the monitor alerts with lights and an audible alarm, the
SeizureLink System uses Bluetooth connectivity to send alerts to
Caregivers via the smartphone app. The mobile app connects the Hero
to Caregivers, manages the seizure diary, creates reports, and includes
location-based services.
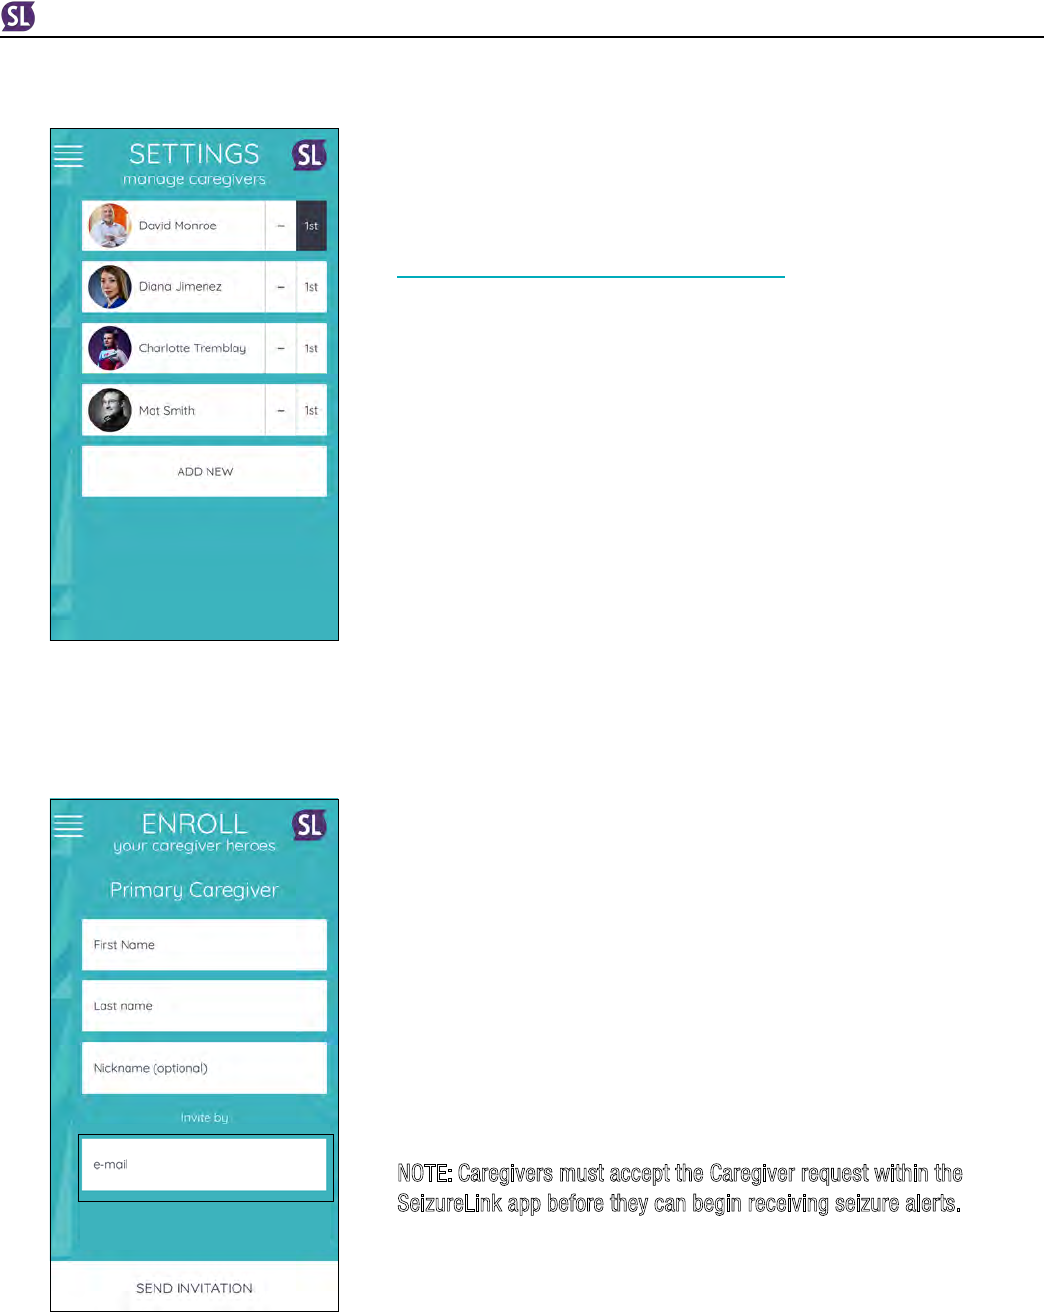
A. FOR THE HERO
The app has a special feature for adding and managing Caregivers:
1. Folllow the account creation instructions on the app until you
make it to the home screen of the app.
2. Open the SeizureLink App and go to “Settings”.
3. Click “Manage Caregivers”.
4. Click “Add New” to add a new Caregiver to your SeizureLink
System
(Figure 4c)
.
5. Complete the form on the “Enroll Caregivers” page and invite
them by their email address
(Figure 4d)
.
6. Heroes (wearers) can invite up to 10 Caregivers.
NOTE: Caregivers must accept the Caregiver request within the
SeizureLink app before they can begin receiving seizure alerts.
4c. Manage Caregivers - Add New
4d. Enroll Caregivers form
For Use During Usability Study only
USAGE
Page 15
B. FOR THE CAREGIVER
Once the Hero invites a Caregiver using their email that is associated
with their SeizureLink profile, the Caregiver should follow these
instructions.
1. Log on to the SeizureLink App using your username and
password you created upon setup.
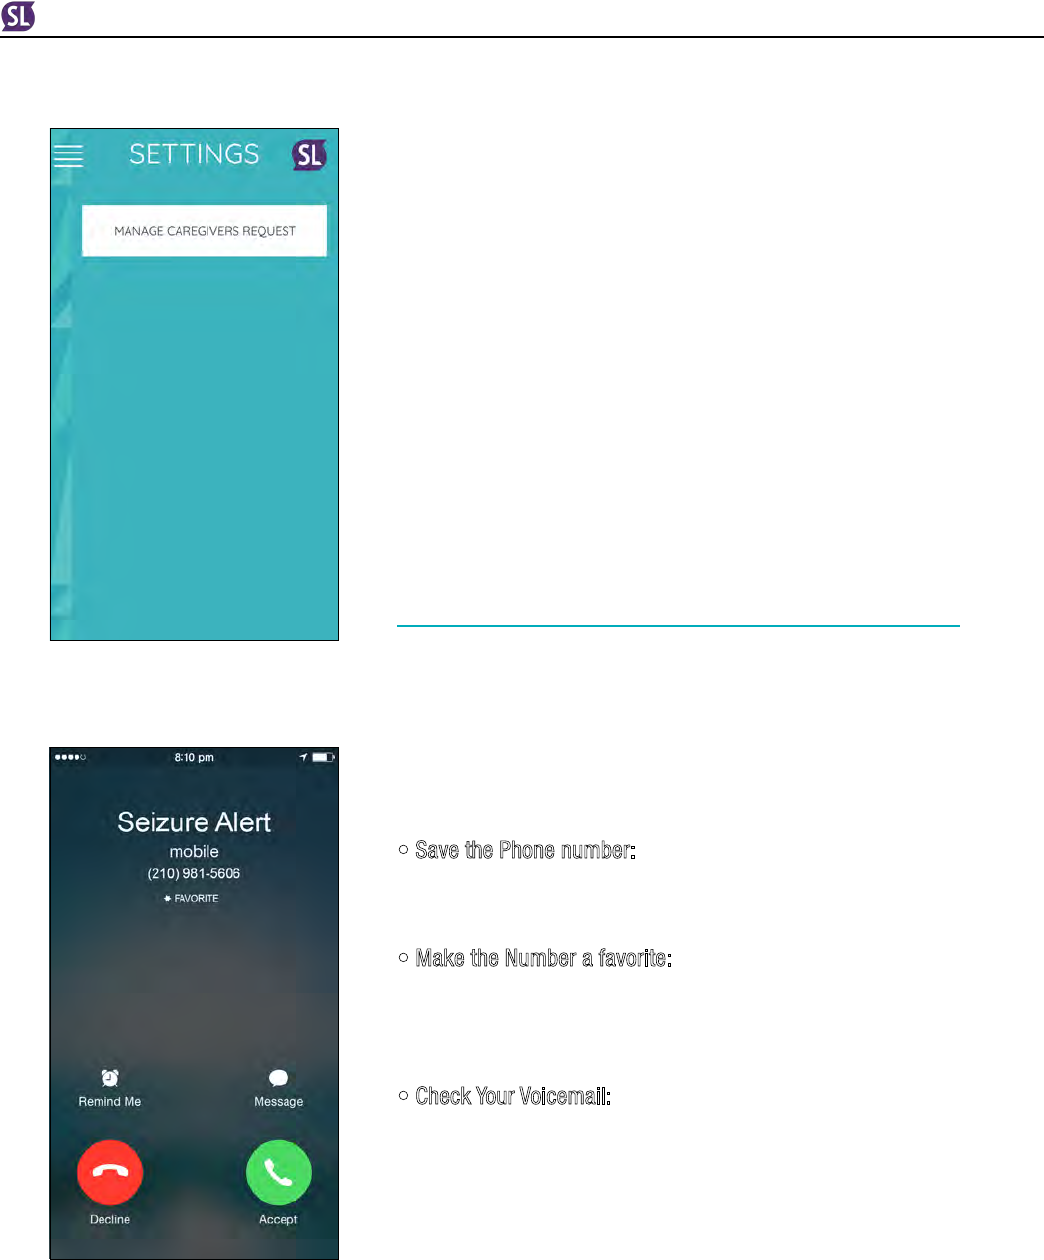
2. Go to “Settings,” then click on “manage Caregiver requests”
(Figure 4e)
.
3. If the Hero sent an invitation, you should see their profile
picture. Click on their profile then hit the accept button at the
bottom of the screen.
4. You are now ready to receive alerts.
4.4 Managing The SeizureLink Phone Call
A. FOR THE CAREGIVER
When the SeizureLink Alarm sounds, the Caregiver(s) will also receive
a phone call letting them know that the Hero is having a seizure. There
are a few things to do to make sure the phone call always comes
through.
• Save the Phone number: The number that will call you during a
seizure alarm is (210) 981-5606
(Figure 4f)
. Save this number as a
contact that you will remember. Ex. Seizure Alert.
• Make the Number a favorite: If you ever put your phone on do
not disturb, you may still want to receive a call if your loved one is
experiencing a seizure. Make the Seizure Alert contact a favorite so that
it will come through, even if your phone is in “Do Not Disturb” mode.
• Check Your Voicemail: If a phone call is missed, the SeizureLink
Alert Call will leave a voicemail on the Caregiver’s and Hero’s phone
communicating that the Hero is having a seizure.
4f. Phone Call Alarm
4e. Settings Screen
For Use During Usability Study only
USAGE
Page 16
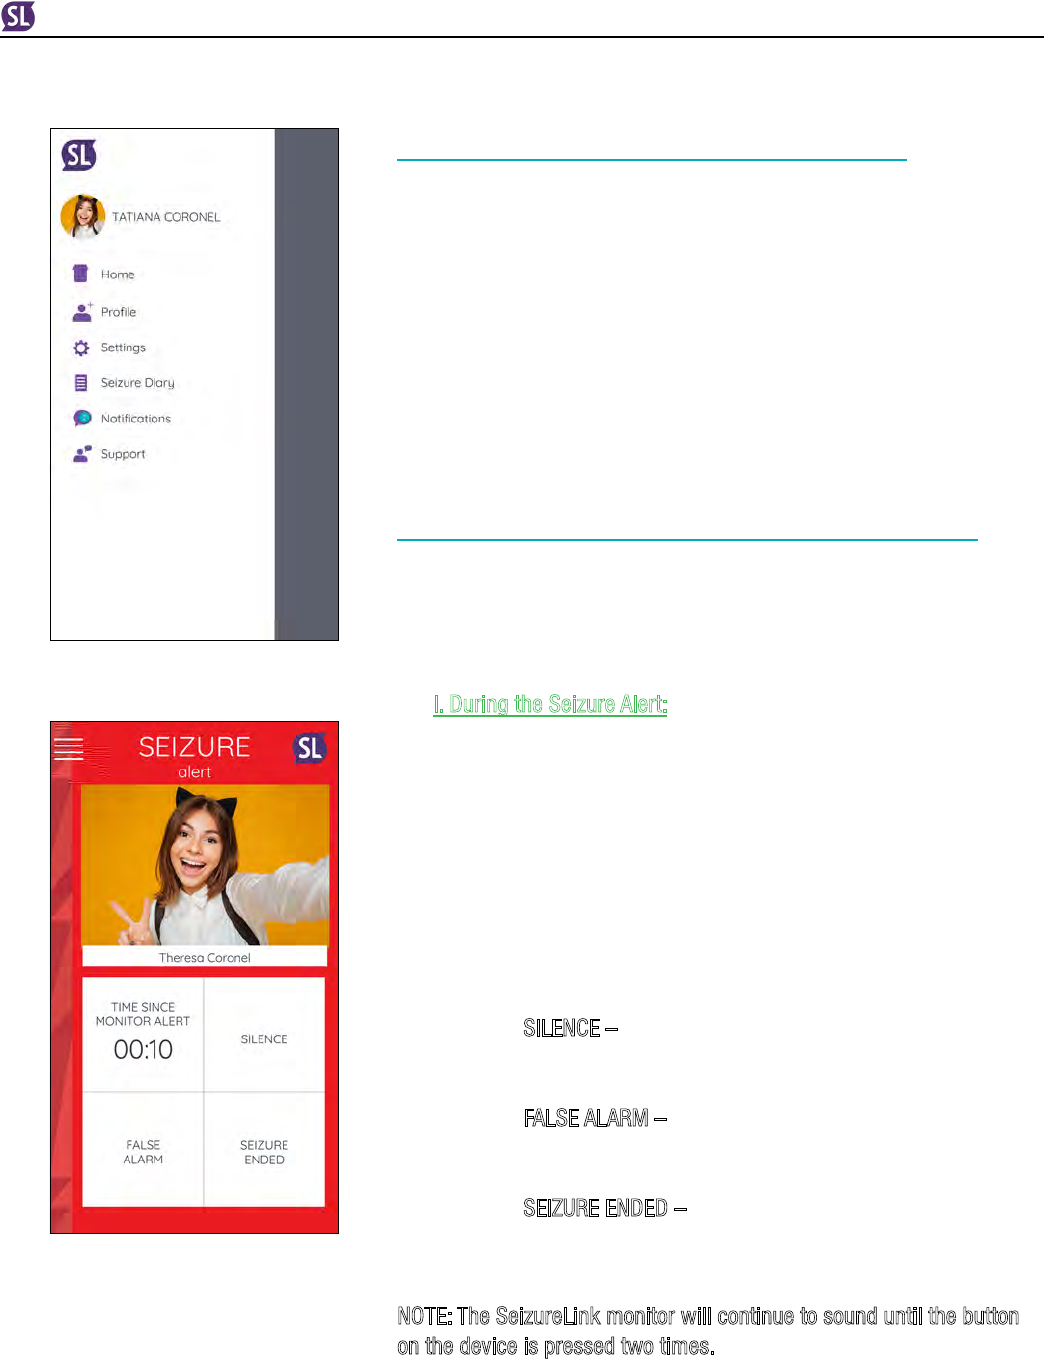
4.5 How To Change Your Prole Photo
If you want to change the profile photo in the SeizureLink app follow
these steps.
1. Login to the SeizureLink app.
2. Click on “profile” on the left hand side
(Figure 4g)
.
3. Click on the photo to change to a different photo.
4. Next select either “Choose Photo,” to select from the photos
on the phone or “Take Selfie” To take a photo to add to the
profile now.
4.6 What Happens During A Seizure Alarm?
A. FOR THE HERO
When the Hero is experiencing a seizure, or testing the alarm, there are
a few things that will happen.
I. During the Seizure Alert:
1. The SeizureLink monitor will audibly sound.
2. The mobile app will audibly sound if the phone’s sound is
turned on.
3. The Hero’s phone will display the alarm screen along with the
amount of time since the seizure was recognized
(Figure 4h).
The screen gives the Hero the option to choose one of the
three options:
- SILENCE – Quiets the alarm on the phone, but the seizure
alarm screen will still show until either “False Alarm” or
“Seizure Ended” is selected
- FALSE ALARM – Stops the alarm on the phone and takes
the Hero back to the home screen. Alarm ends and
seizure ended notification is sent to the Caregiver
- SEIZURE ENDED – Stops the alarm on the phone and
takes the Hero to the post-ictal survey; Caregiver alarm
ends and goes to the post-ictal survey as well
(Figure 4j)
NOTE: The SeizureLink monitor will continue to sound until the button
on the device is pressed two times.
4h. Hero Screen
During Seizure Alarm
4g. Menu - Profile
For Use During Usability Study only
USAGE
Page 17
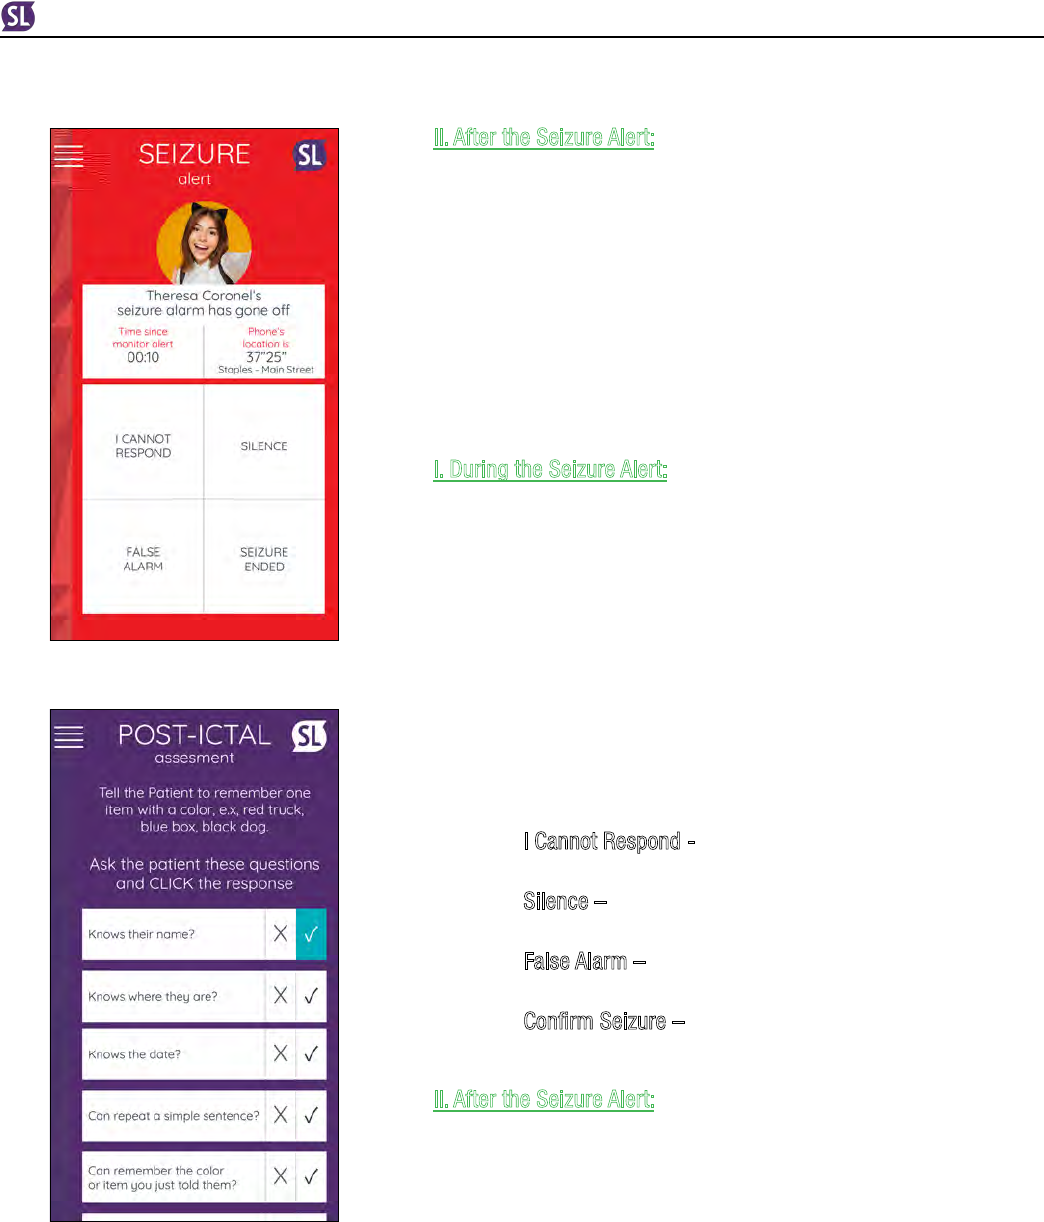
II. After the Seizure Alert:
1. The post-ictal survey will appear, and it will ask a few
questions to assess the Hero after the seizure.
2. Once the information is recorded, it is stored into the seizure
diary on the Hero’s app.
B. FOR THE CAREGIVER
The Caregiver has a few things that happen on their phone when the
seizure alert is sounding
(Figure 4i)
.
I. During the Seizure Alert:
1. The Caregiver will receive a notification saying “(Hero’s
Name) seizure alarm has gone off. Time since monitor alert: X
Phone’s location is: X”.
2. The Caregiver will receive a phone call from (210) 981-5606
that tells them the Hero is having a seizure.
3. If they do not answer the call, the Caregiver will receive a
voicemail.
4. If the SeizureLink App is open, the Caregiver will get the
Caregiver Alarm Screen with four options:
- I Cannot Respond -Goes back to home screen – no post-
ictal survey
- Silence – Quiets alarm, but stays on the alarm screen
until the seizure ends
- False Alarm – Goes back to home screen – no post-ictal
survey
- Confirm Seizure – Stops the alarm, and goes to post-ictal
survey
(Figure 4j)
II. After the Seizure Alert:
1. The Caregiver will receive a notification letting them know
that the seizure ended.
2. If the Caregiver clicks the “Confirm Seizure” button, they are
taken to the post-ictal screen where they answer questions
regarding the Hero’s condition after the seizure. This is later
saved in the Hero’s seizure diary.
4j. Post-Ictal
4i. Hero Screen
During Seizure Alarm
For Use During Usability Study only
USAGE
Page 18
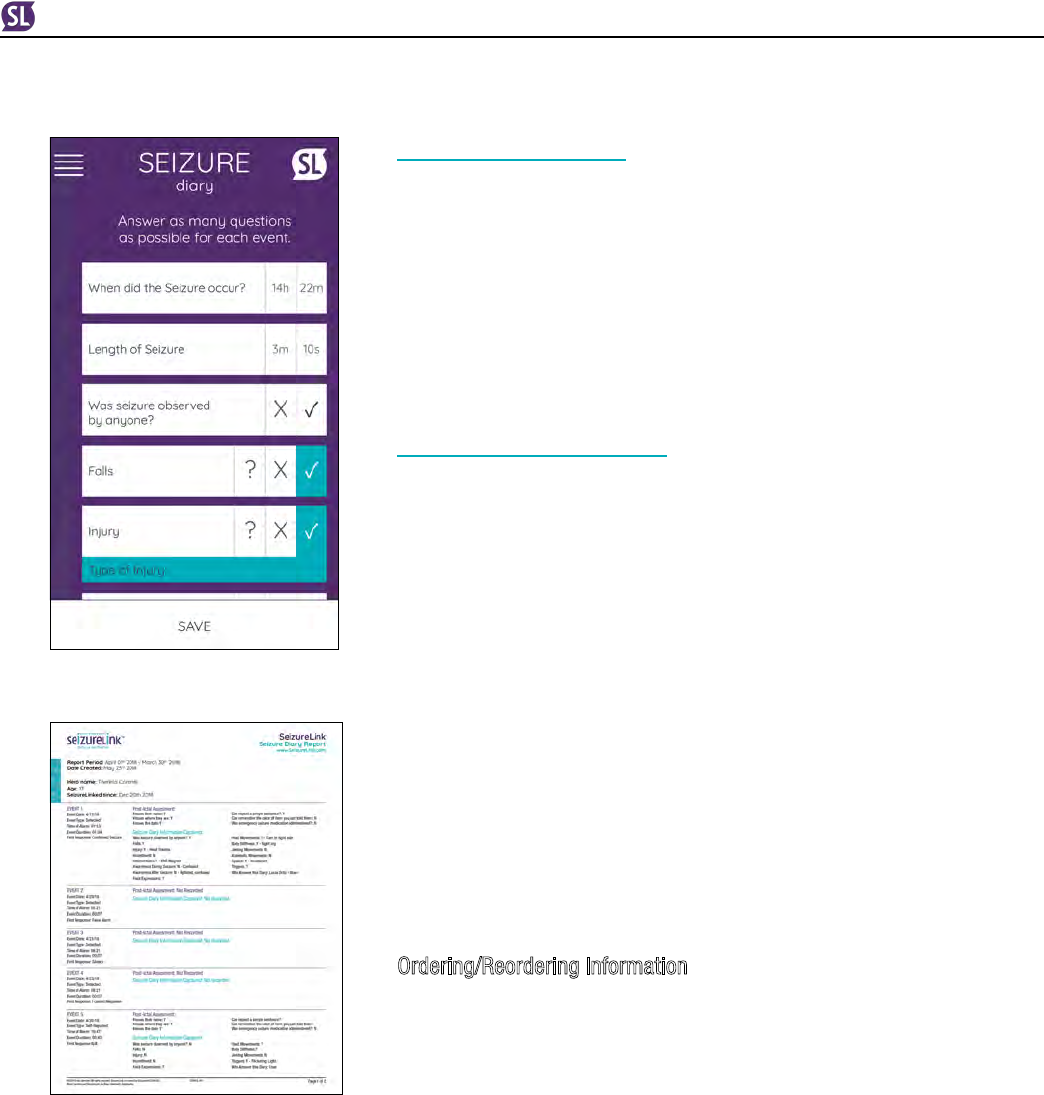
4.7 Seizure Diary
The seizure diary is a log of recognized seizure events
(Figure 4k)
. The
Hero can see all diary events and can edit events to add important
information about the seizure event. The app even creates a diary
report. Simply select a start and end date to generate a report of all
events during that date range. The report can be emailed to the email
address associated with the Hero’s app account
(Figure 4l)
.
4.8 Troubleshooting
If you are having issues connecting your app to your monitor or if your
Caregiver is not receiving alerts, make sure the following items have
been done:
• Bluetooth is turned on
• The monitor is powered on
• The Caregiver accepted your request in their app
- If you still have issues, try restarting the app and your monitor.
- If that does not work, try logging out, then log back into the account.
- If all of those items do not work, feel free to email us at
SLSupport@brainsentinel.com
Ordering/Reordering Information
You can request additional components by contacting Brain Sentinel’s
Hero Support Team at SLSupport@brainsentinel.com
4k. Seizure Diary
4l. Seizure Diary Report
For Use During Usability Study only
ADDITIONAL INFORMATION
Page 19
Technical
Specications
5
5a Technology: surface electromyography (sEMG)
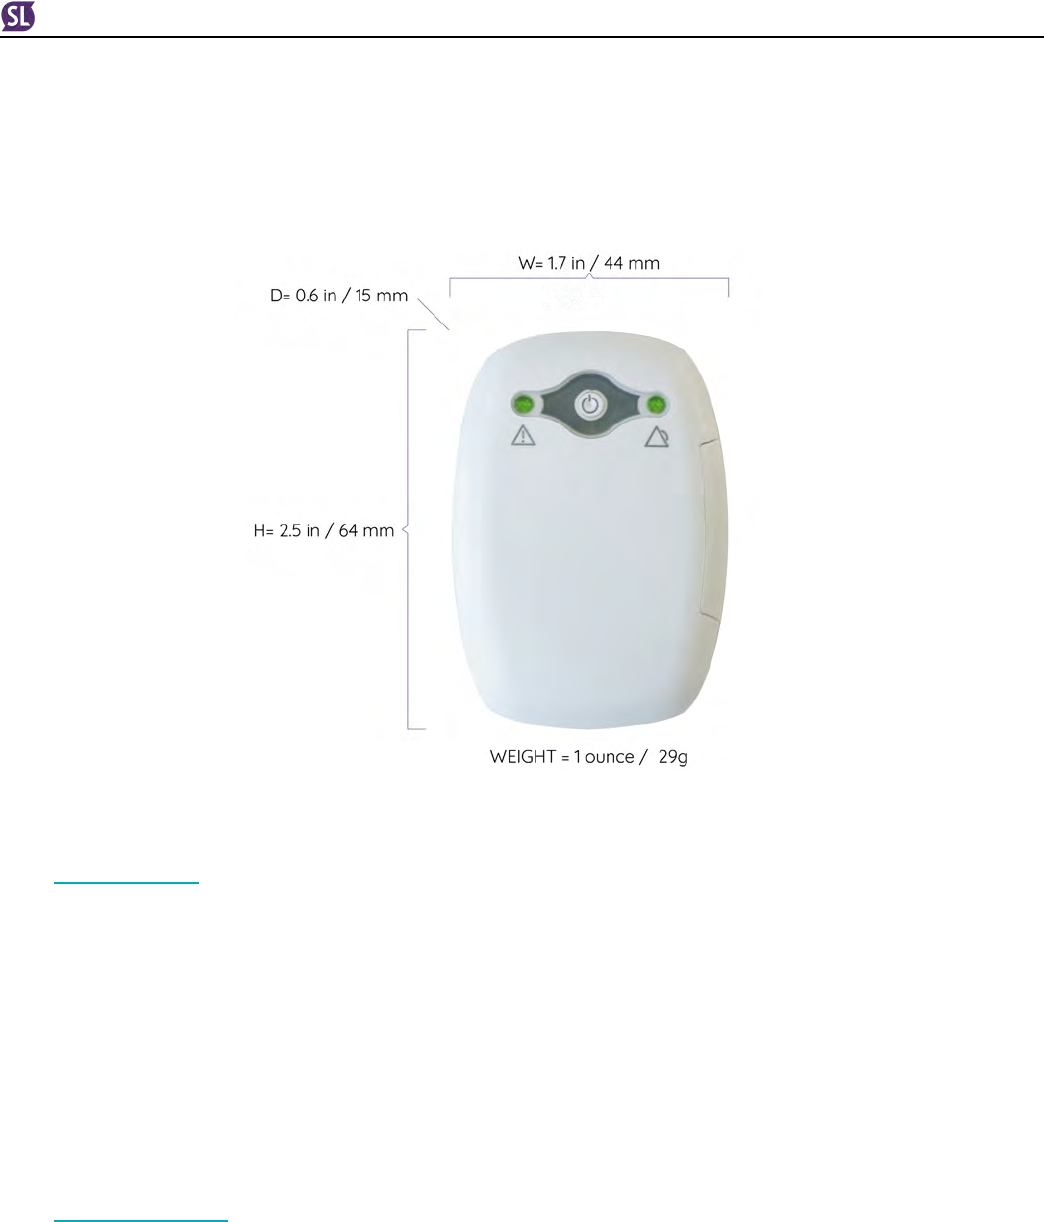
5.1 Monitor
• Cover is made of acrylonitrile butadiene
• Weight: 1 ounce (29 grams)
• Dimensions:
Width=1.7 in / 44mm
Height=2.5 in / 64mm
Depth = 0.6 in / 15mm
5.2 Electrode
• Each electrode is single-use and designed for 24-hour use
• Skin contact material is a skin-friendly hydrogel that is latex free
For Use During Usability Study only
ADDITIONAL INFORMATION
Page 20
5.3 EZ Battery Tray
• 200mAh rechargeable battery
• Lithium-ion polymer construction
• Lasts for approximately 24 hours before needing to be recharged
5.4 Connectivity
• Bluetooth: 4.1
• Mobile app compatibility & availability: Android, iOS
• Location-based services via the phone application included
• Connected to multiple Caregivers
Customer
Support
6
For customer support contact us at SLSupport@brainsentinel.com.
Changes or modifications not expressly approved by Brain Sentinel could void the user’s authority to operate
the equipment.
FOR USE DURING USABILITY STUDY ONLY
For Use During Usability Study only
www.SeizureLink.com
CSLBL0007
This device complies with Part 15 of FCC Rules.
Operation is subject to the following two conditions: (1) this device may not cause harmful interference, and (2)
this device must accept any interference received, including interference that may cause undesired operation.
This equipment has been tested and found to comply with the limits for a Class B digital device, pursuant to Part
15 of the FCC Rules. These limits are designed to provide reasonable protection against harmful interference
in a residential installation. This equipment generates, uses and can radiate radio frequency energy and, if not
installed and used in accordance with the instructions, may cause harmful interference to radio communications.
However, there is no guarantee that interference will not occur in a particular installation. If this equipment does
cause harmful interference to radio or television reception, which can be determined by turning the equipment off
and on, the user is encouraged to try to correct the interference by one or more of the following measures:
- Reorient or relocate the receiving antenna.
- Increase the separation between the equipment and receiver.
- Connect the equipment into an outlet on a circuit different from that to which the receiver is connected.
- Consult the dealer or an experienced radio/TV technician for help.
Changes or modifications not expressly approved by the party responsible for compliance could void the user’s
authority to operate the equipment.
FCC ID: 2AG2I-SLU01-90001