Breville Caf Venezia Bes250Xl Users Manual
Breville-Bes250Xl-Instruction-Booklet-746413 breville-bes250xl-instruction-booklet-746413
BES250XL to the manual cd627df7-8813-42cb-b049-1b473a554ea5
2015-01-05
: Breville Breville-Caf-Venezia-Bes250Xl-Users-Manual-163454 breville-caf-venezia-bes250xl-users-manual-163454 breville pdf
Open the PDF directly: View PDF ![]() .
.
Page Count: 48
1
Espresso Machine Cafetière à Espresso BES250XL
Instruction booklet Manuel d’emploi

2
CONGRATULATIONS
on the purchase of your new
Breville Café Venezia™

3
4 Breville Recommends Safety First
6 Know Your Breville Café Venezia™
8 Operating Your Breville Café Venezia™
14 Tips on Making the Perfect Espresso
16 Care, Cleaning and Storage
19 Troubleshooting
21 Coffee Variations
22 One Year Limited Warranty
24 French Instructions
CONTENTS

4
BREVILLE RECOMMENDS SAFETY FIRST
Never remove the filter holder during •
the brewing operation as the machine is
under pressure.
Do not leave the Breville Café Venezia™ •
unattended when in use.
Do not touch hot surfaces. Scalding may •
occur. Allow the Breville Café Venezia™
to cool down before moving or cleaning
any parts.
Do not place anything, other than cups •
for warming, on top of the Breville
Café Venezia™.
Always switch off the Breville Café •
Venezia™ by pressing the POWER
button ‘Off' and unplug if appliance is to
be left unattended, if not in use, before
cleaning, before attempting to move the
appliance, disassembling, assembling
and when storing the appliance.
Keep the Breville Café Venezia™ and •
accessories clean.
The use of accessory attachments not •
recommended by Breville may result in
fire, electric shock or injury to persons.
Follow the cleaning instructions provided •
in this book (refer to page 16).
IMPORTANT
SAFEGUARDS
READ ALL INSTRUCTIONS
Carefully read all instructions before •
operating and save for future reference.
Remove any packaging material and •
promotional labels or stickers before
using the Breville Café Venezia™ for
the first time.
Do not place the Breville Café Venezia™ •
near the edge of a bench or table
during operation. Ensure the surface is
level, clean and free of water and other
substances.
Do not place the Breville Café Venezia™ •
on or near a hot gas or electric burner, or
where it could touch a heated oven.
Do not use the Breville Café Venezia™ on •
a sink drain board.
Always ensure the Breville Café Venezia™ •
is properly assembled before connecting
to power outlet and operating.
The Breville Café Venezia™ is not •
intended to be operated by means of an
external timer or separate remote control
system.
Use only cold tap water in the water tank.•
Do no use any other liquid.•
Never use the Breville Café Venezia™ •
without water in the water tank.
Ensure the filter holder is firmly inserted •
and secured into the brewing head before
using the machine.
We at Breville are very safety conscious. We design and manufacture consumer products with
the safety of you, our valued customer foremost in mind. In addition, we ask that you exercise a
degree of care when using any electrical appliance and adhere to the following precautions:

5
FOR HOUSEHOLD USE ONLY
SAVE THESE INSTRUCTIONS
FOR ALL ELECTRICAL
APPLIANCES
Unwind the cord before use.•
To protect against electric shock, do not •
immerse cord, plug or appliance in water
or any other liquid.
Do not let the cord hang over the edge of •
a bench or table, touch hot surfaces, or
become knotted.
This appliance is not intended for use by •
persons [including children] with reduced
physical sensory or mental capabilities,
or lack of experience and knowledge
unless they are supervised or have been
given instruction concerning use of the
appliance by a person responsible for
their safety.
Children should be supervised to ensure •
they do not play with the appliance.
This appliance is for household use only.•
Do not use this appliance for anything •
other than its intended use. Do not use
in moving vehicles or boats. Do not use
outdoors.
It is recommended to inspect the •
appliance regularly. Do not use the
appliance if power supply cord, plug or
appliance becomes damaged in anyway.
Return the entire appliance to the nearest
authorised Breville service centre for
examination and/or repair.
Any maintenance other than cleaning •
should be performed at an authorized
Breville Service Center.
CALIFORNIA PROPOSITION 65:
(Applicable to California residents only).
This product contains chemicals known
to the State of California to cause
cancer and birth defects or other
reproductive harm.
BREVILLE RECOMMENDS SAFETY FIRST

6
KNOW
your Breville Café Venezia™
7
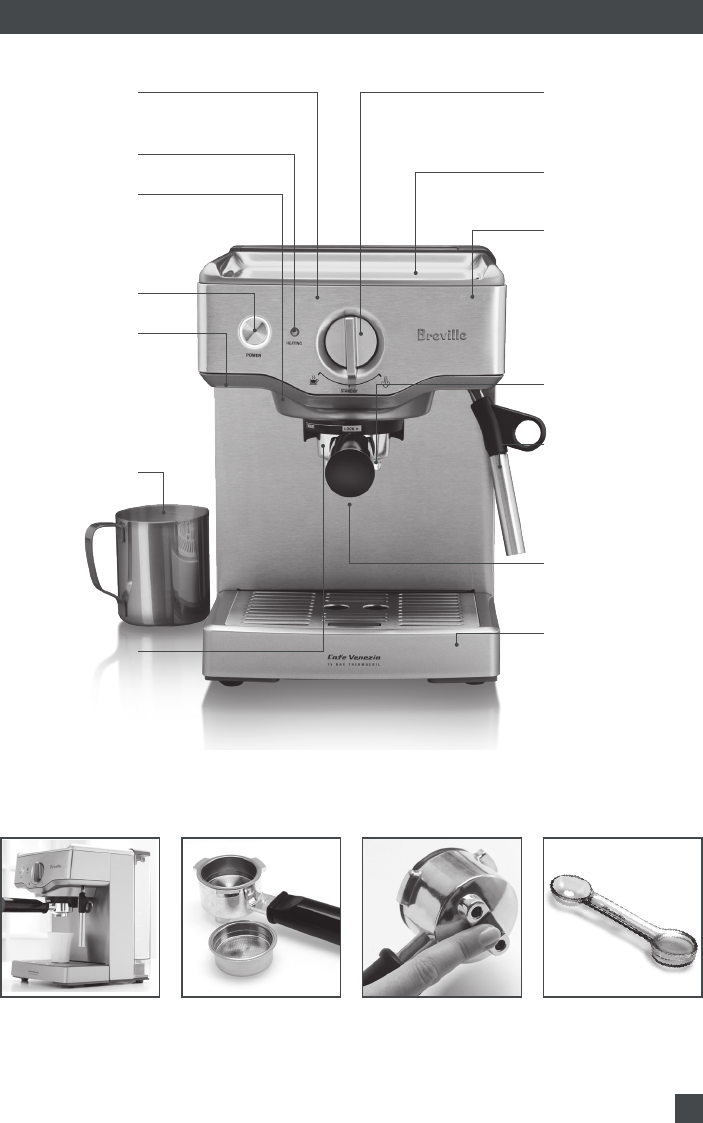
KNOW YOUR BREVILLE CAFÉ VENEZIA™
Thermocoil
heating system
Stainless steel
housing
Die-cast cup
warming tray
Easy Eject™ filter
system
Removable drip tray
and stainless steel
grid
4.5" head elevation
for full-size mugs
Cleaning tool
storage located
at the front of the
machine under the
left of the group
head
Heating light
Power button
Selector control
for espresso or
steam function
Auto Purge™
system for
optimal coffee
extraction
Advanced
dual-wall crema
system for ideal
crema
45° pivoting
steam wand
with stainless
steel frothing
attachment
Milk frothing jug
93 oz removable water
tank with hinged handle.
Single, double, and pod
stainless steel filters.
Easy Eject™ filter
system
Tamping tool /
measuring spoon.

8
OPERATING
your Breville Café Venezia™
9
Before First Use
Remove any packaging material or
promotional stickers before using your
Breville Café Venezia™ for the first time.
Wipe the outer housing with a soft damp
cloth and dry thoroughly. Do not immerse
the outer housing, power cord or plug in
water or any other liquid.
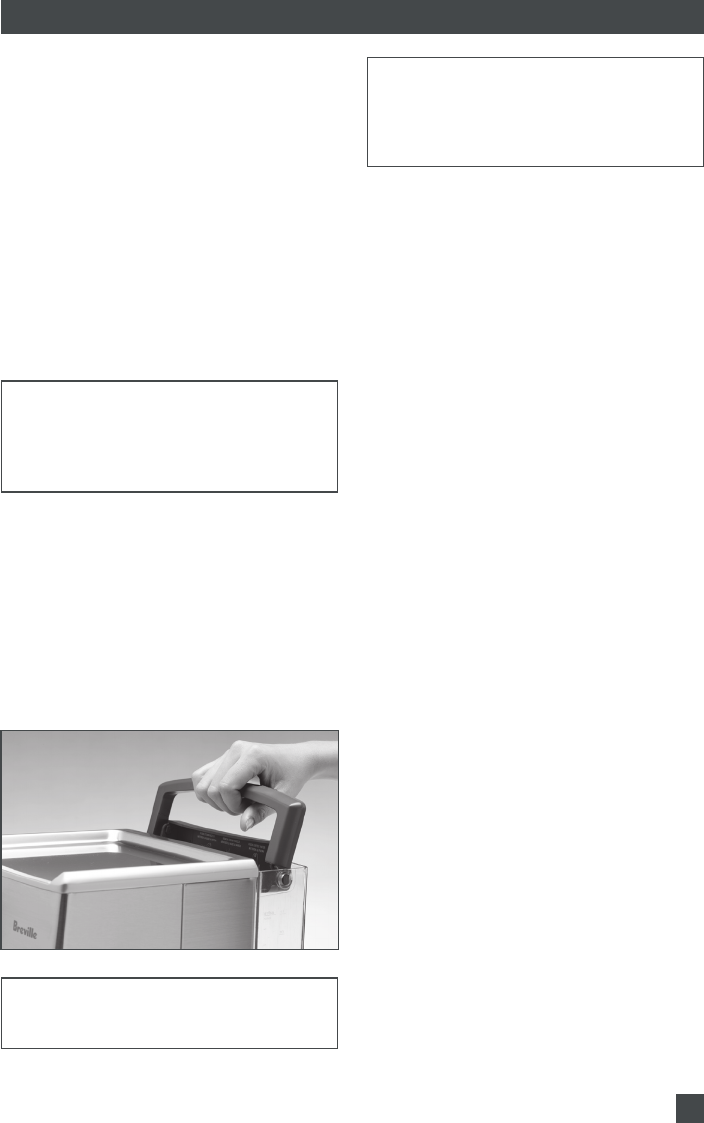
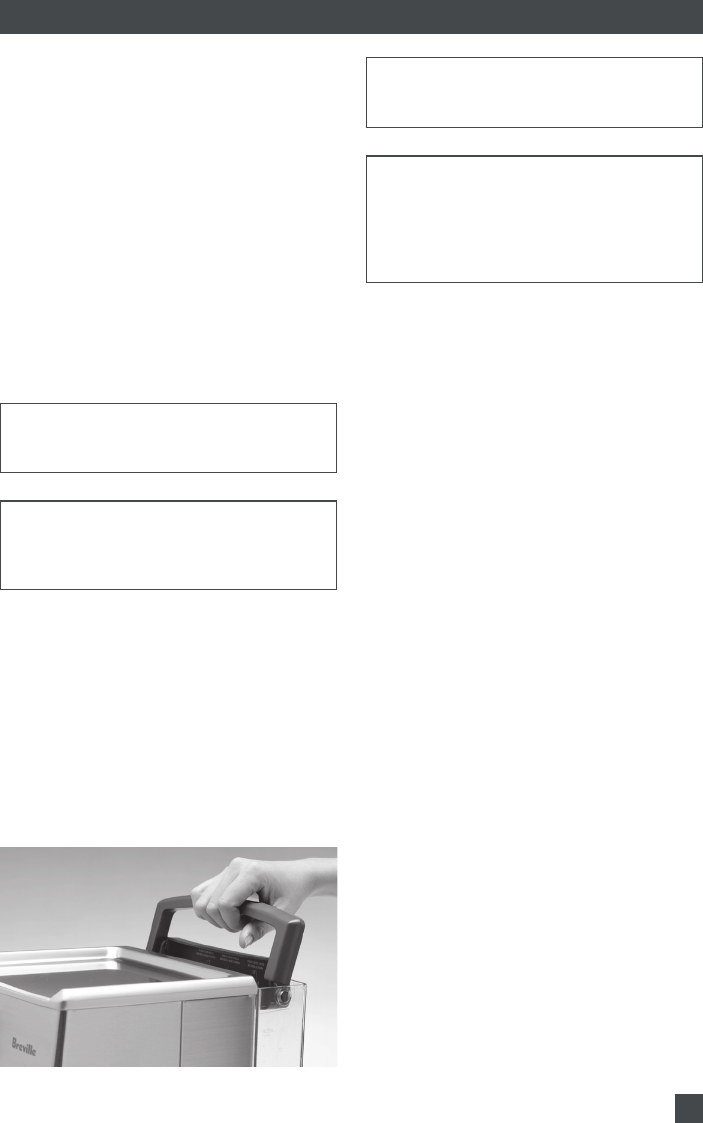
The water tank is located at the back of the
machine. Lift the hinged handle and pull up
to remove the water tank. Wash in warm,
soapy water using a non-abrasive
washing liquid. Rinse and dry thoroughly
NOTE:
All accessories should be washed in
warm soapy water prior to use.
Do not clean any parts or accessories in
the dishwasher.
Filling the Water Tank
Ensure the Selector Control is set to the
'STANDBY' position.
Lift the hinged handle and pull up to
remove the water tank. Fill with cold water
to the maximum mark and replace in the
machine.
Close the water tank lid.
NOTE:
The water tank has an integrated lid/carry
handle.
NOTE:
The water tank should be filled with fresh
cold water before use.
Check water level before use and replace
the water daily.
Priming and Pre-heating the Machine
Priming fills the internal tank with water
and cleanses the brewing system. This
process is recommended before first use,
however, it can be repeated prior to each
time you prepare an espresso to pre-heat
the machine.
Ensure the ‘Selector Control’ is in the
‘STANDBY’ position and plug the power
cord into a 120V power outlet.
Press the ‘POWER’ button ‘On’. The
‘POWER’ button surround will illuminate.
The red ‘HEATING’ light will illuminate and
turn off when the machine has reached the
correct temperature.
Place an empty cup or container under the
group head. As soon as the red ‘HEATING’
light turns off, set the ‘Selector Control’ to
the ‘ESPRESSO’ position and run a small
amount of water through the brewing head
for a few seconds without the filter holder
in place.
A pumping noise will be heard during this
operation, and water will run through the
group head. Your Café Venezia™ has now
been Primed/Pre-Heated and you may
proceed onto preparing an espresso.
Pre-heating the Filter Holder
Pre-heat the filter holder by placing
underneath the group head. Rinse with
hot water from the group head using the
‘ESPRESSO’ pour function. Dry the filter
and filter holder thoroughly before use.
OPERATING YOUR BREVILLE CAFÉ VENEZIA™
10
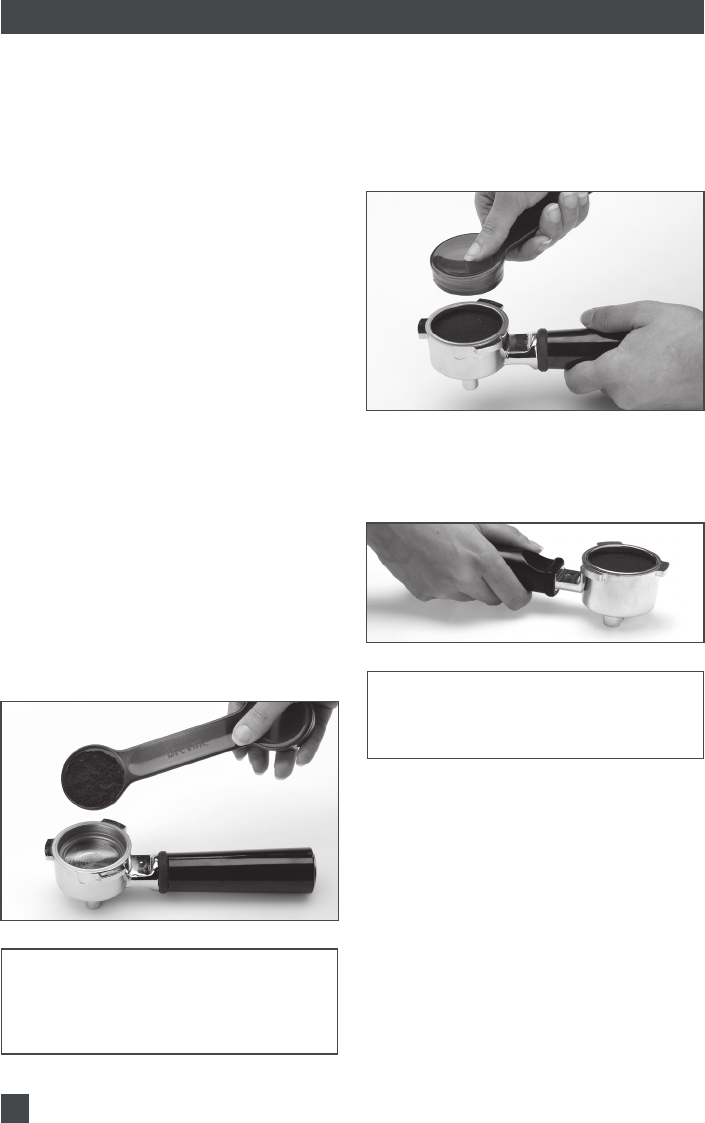
Tamping the Ground Coffee
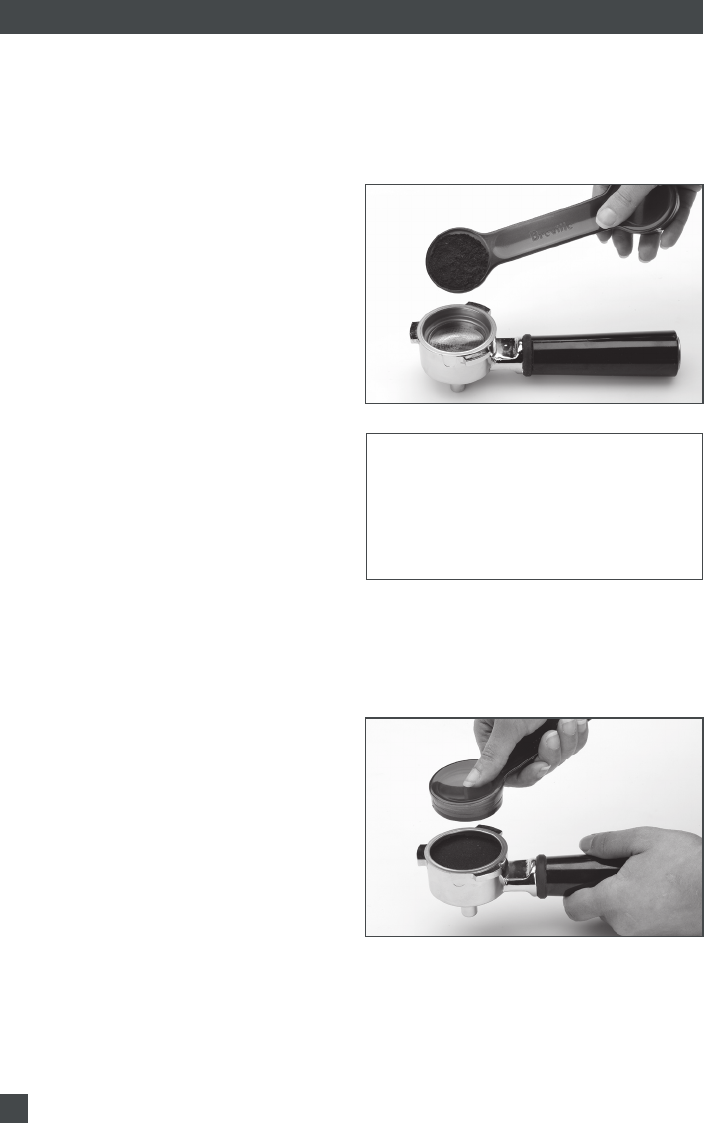
Distribute the ground coffee evenly in
the filter and press down firmly with the
tamping end of the measuring spoon and
ensure that it is level.
Clean any excess ground coffee from the
rim of the filter holder to ensure a proper fit
into the group head.
NOTE:
1 cup filter for single shot (1oz/30ml),
2 cup filter for double shot (2oz/60ml) or
two single shots.
OPERATING YOUR BREVILLE CAFÉ VENEZIA™ ESPRESSO MACHINE
Pre-warming Cups
The Cup Warming Tray will start to warm as
the machine heats.
Pre-warm the cups by placing them on
the Cup Warming Tray or by rinsing them
with hot water from the group head. This
will help maintain the coffee’s optimal
temperature when brewed into the cups.
Preparing the Coffee
Place the 1 or 2 cup filter basket into the
filter holder.
Use the smaller filter for 1 cup/1oz and the
larger filter for 2 cups/2oz or 2 singles at
the same time. When brewing for a mug of
coffee always use the 2 cup filter and only
extract 2 oz. If you require a larger coffee,
add the hot water first and then brew the
coffee.
Use 1 level measure of ground espresso
coffee for the 1 cup filter basket and 2 level
measures for the 2 cup filter basket. It is
important to use the correct amount of
coffee for each filter as the filter perforations
have been constructed to utilize the
pressure in the machine to extract optimal
flavor with each brewing.
NOTE:
When brewing for a mug of coffee, always
use the 2 cup filter. If you require a larger
coffee, add the hot water first and then
brew the coffee.
11
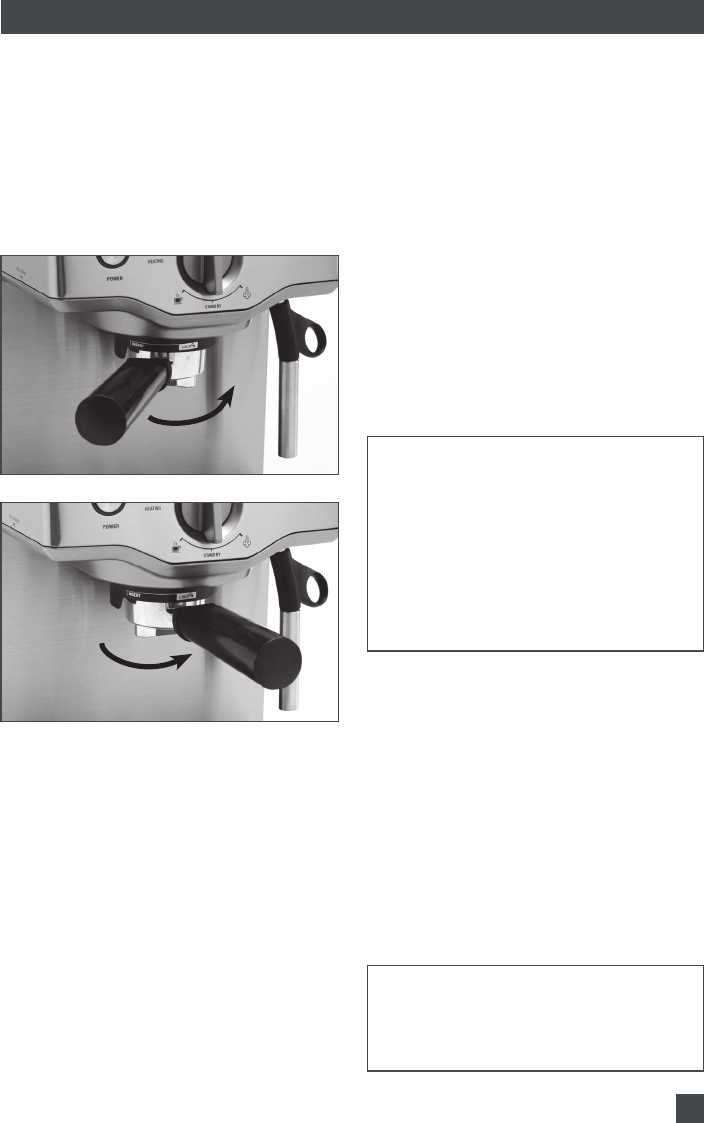
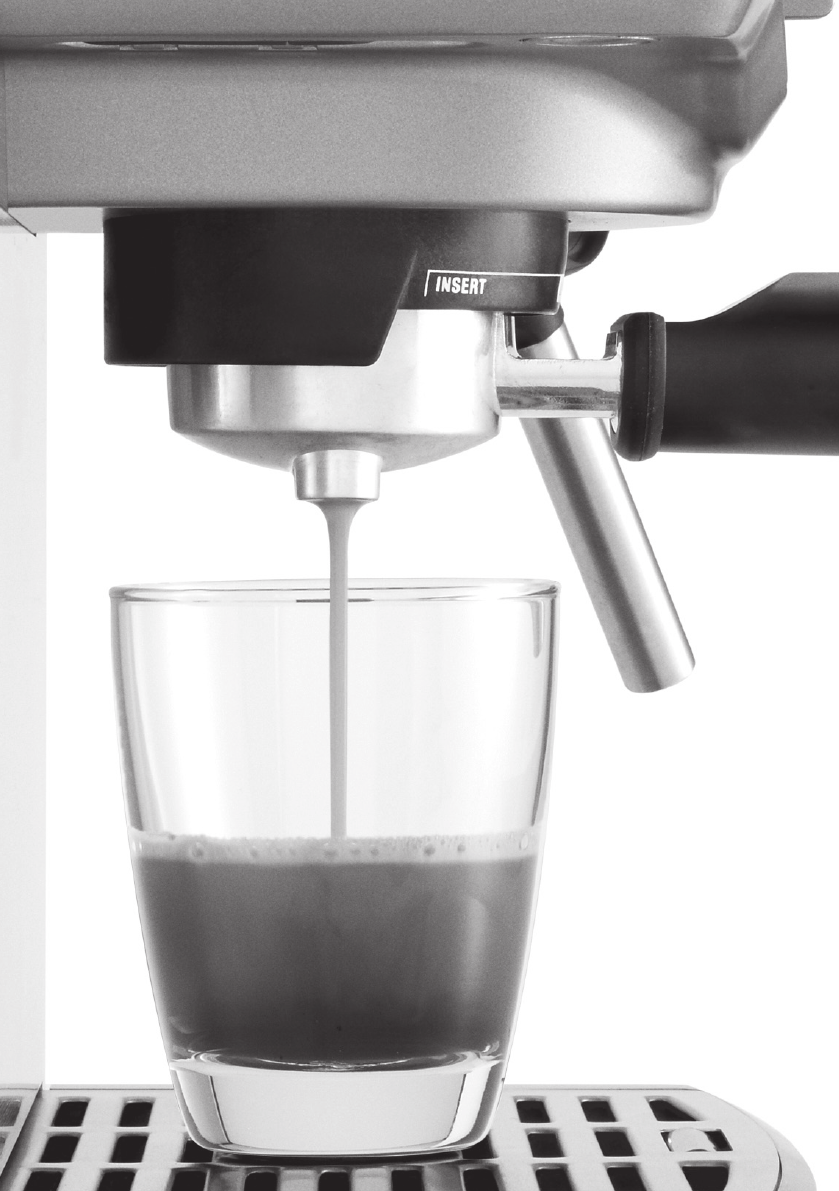
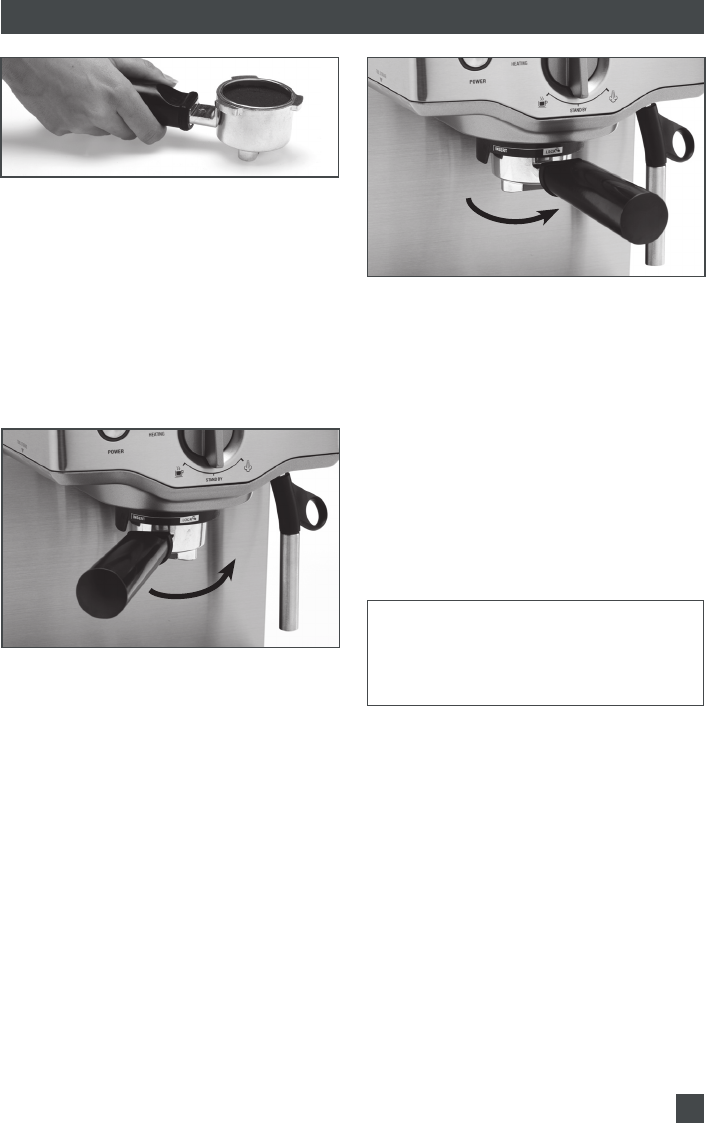
Inserting the Filter Holder
Place the filter holder underneath the group
head so that the handle is aligned with the
insert graphic. Insert the filter holder up
into the group head and rotate the handle
to the right until resistance is felt or until it
can no longer be rotated. This will be at an
approximate 90° angle to the machine.
Brewing Coffee
Ensure the ‘Selector Control’ is in the
‘STANDBY’ position and plug the power
cord into a 120V power outlet.
Press the ‘POWER’ button ‘On’. The
‘POWER’ button surround will illuminate.
The red ‘HEATING’ light will illuminate and
turn off when the machine has reached the
correct temperature.
As soon as the red ‘HEATING’ light turns
off, the machine has heated up.
Ensure the drip tray and filter holder are in
place.
Place one or two pre-warmed cups under
the filter holder outlet. When brewing into
two cups at the same time, no more than
1oz should be extracted into either cup.
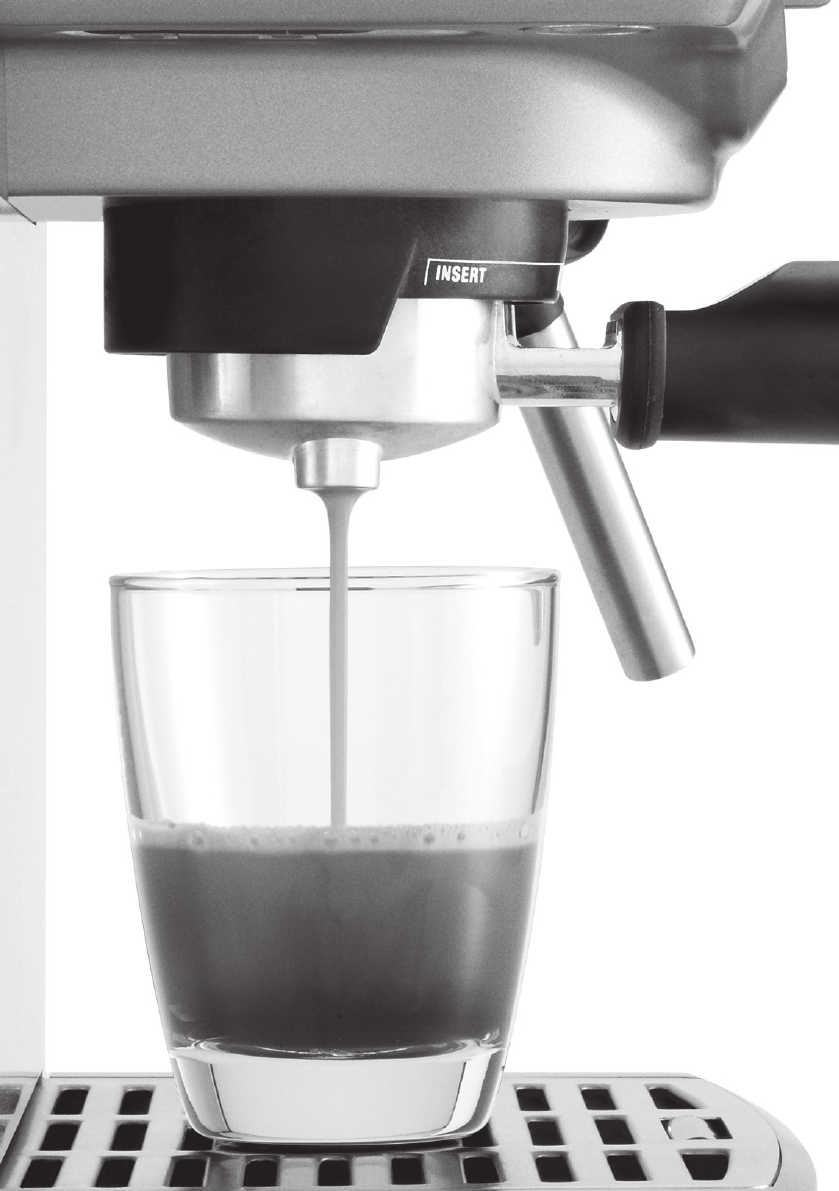
Set the ‘SELECTOR CONTROL’ to the
‘ESPRESSO’ position. After a few seconds,
the extraction of espresso will begin.
When sufficient coffee has been extracted,
set the ‘SELECTOR CONTROL’ to the
‘STANDBY’ position. This will stop the flow
of coffee.
If you do not need to use the steam
function, press the ‘POWER’ button ‘Off’,
unplug the power cord and allow the
machine to cool.
NOTE:
Recommended measurements are
1oz/30ml for 1 shot and 2oz/60ml for
2 shots. The machine remains ready
for brewing and maintains a constant
heating temperature as long as the
‘POWER’ switch is left ‘On’. If the
temperature should drop, the red heating
light will illuminate and the machine
will automatically heat up to the correct
brewing temperature.
Preparing Espresso Pods
Your Café Venizia™ can be used with
most leading brands of espresso pods. To
prepare the pod for brewing, place the pod
in the pod filter and ensure that all of the
pod’s surface area is fitted inside the filter. If
the edges of the pod overflow the filter, you
will need to trim them off until the pod is
contained wholly within the filter. Lock the
filter holder in place and brew the coffee as
per the instructions in the 'Brewing Coffee'
section.
NOTE:
The quality of the coffee and créma
produced will be dependent on the type
of pod used. Only use the pod filter when
using the espresso pods.
OPERATING YOUR BREVILLE CAFÉ VENEZIA™ ESPRESSO MACHINE
Lock
12
Turn the ‘Selector Control’ to the •
‘STEAM’ position. The red light will
illuminate indicating that the Thermocoil
Heating System is heating and preparing
to create steam.
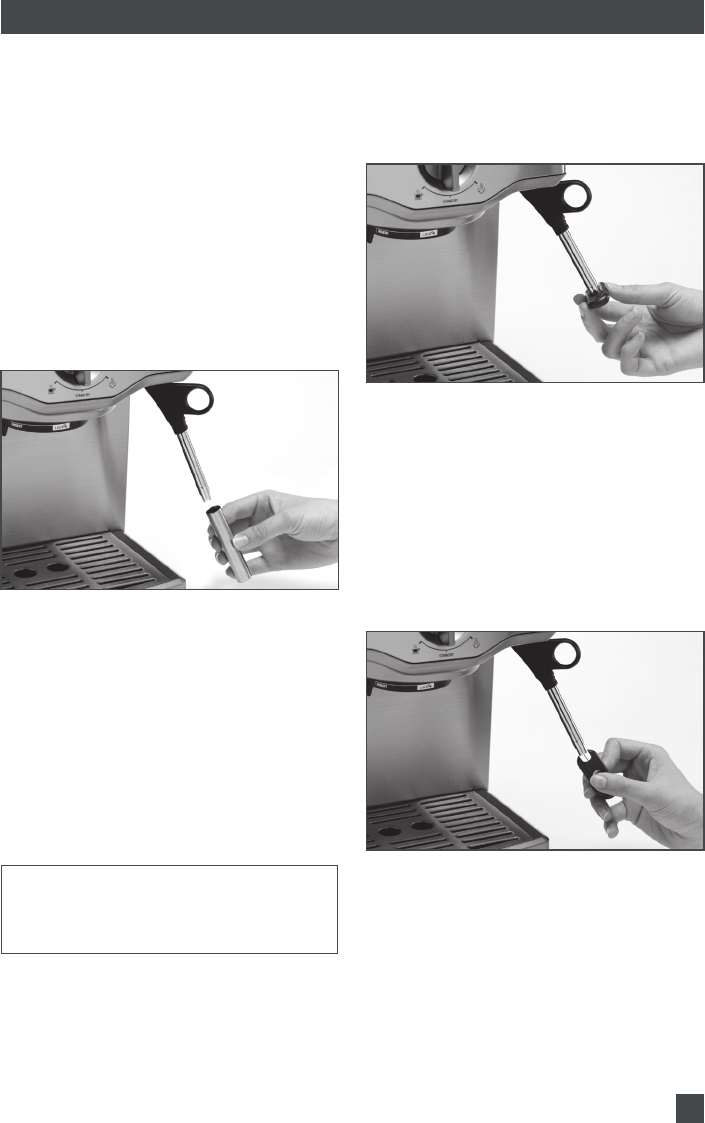
For improved results allow the water •
to be released and to start generating
steam before immersing into milk.
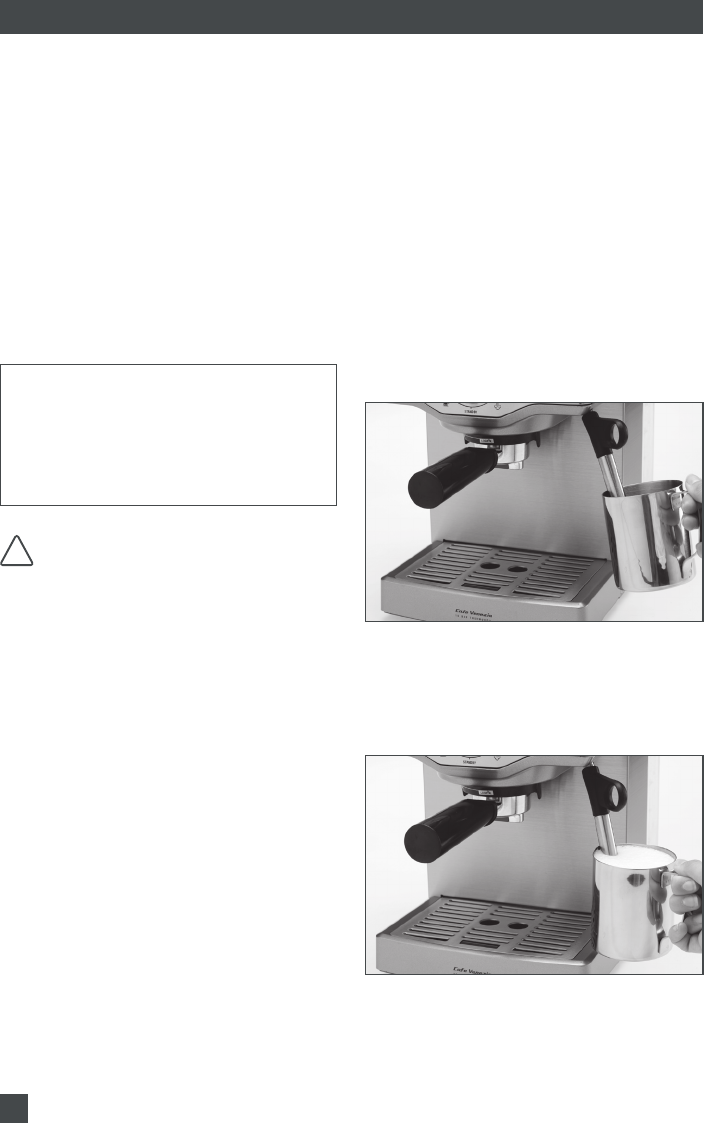
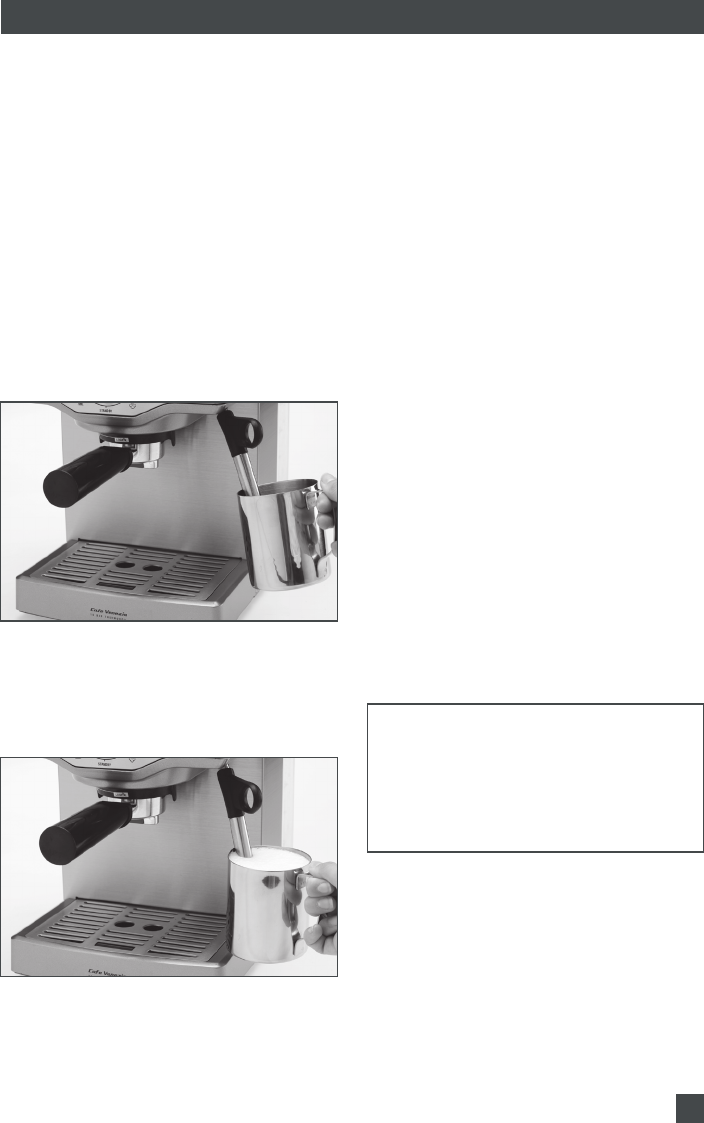
Hold the milk frothing jug at an angle •
so that steam wand and/or the frothing
attachment sits just below the surface of
the heating milk and the steam will move
the milk around the inside of the milk
frothing jug in a circular motion.
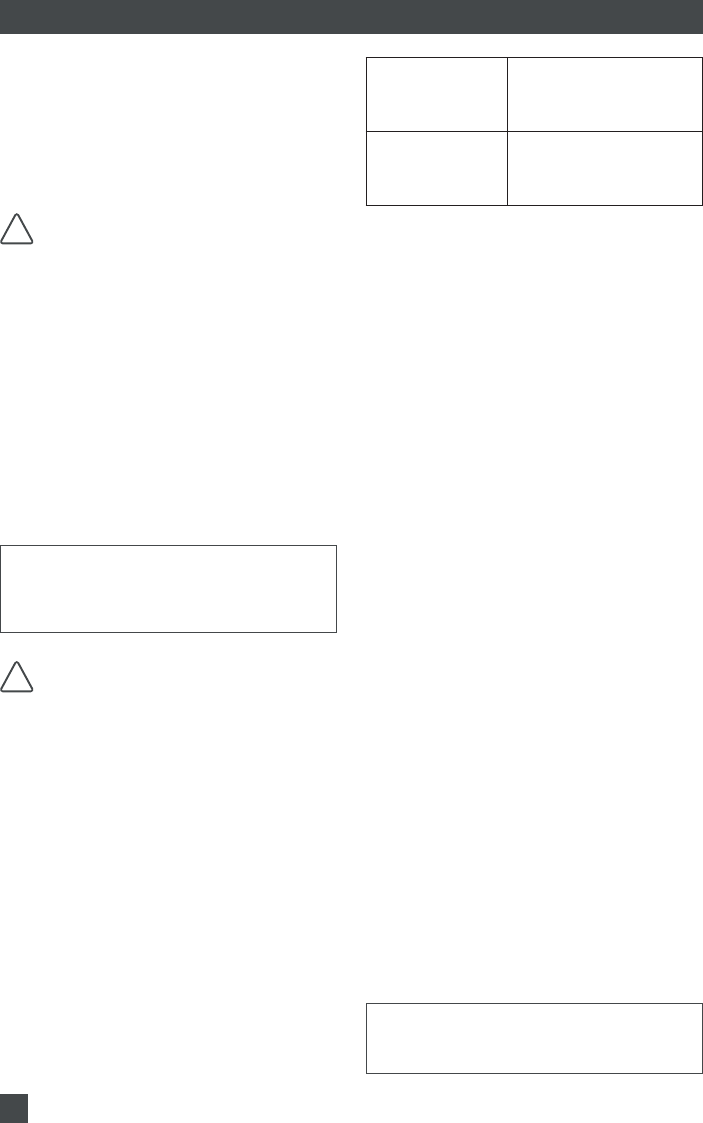
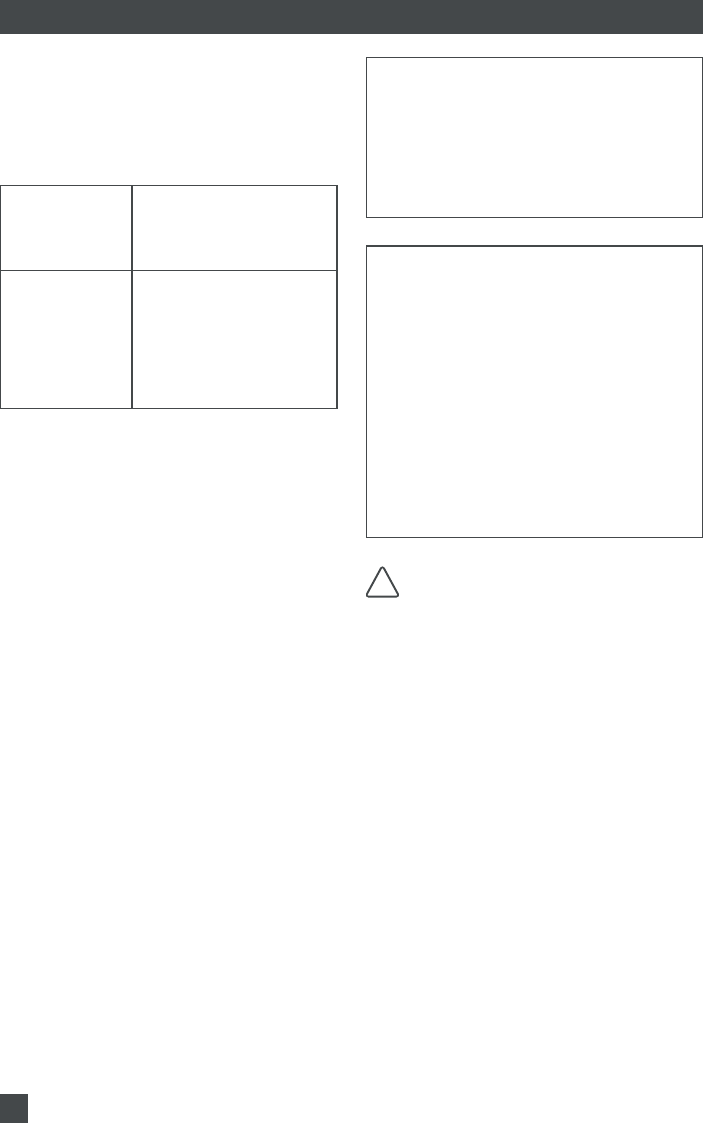
When the desired volume of froth has •
been achieved, immerse the steam wand
and / or frothing attachment deeper into
the milk frothing jug to heat the milk.
Hold the milk frothing jug at an angle with •
one hand and place your other hand on
the outer base of the milk frothing jug.
OPERATING YOUR BREVILLE CAFÉ VENEZIA™
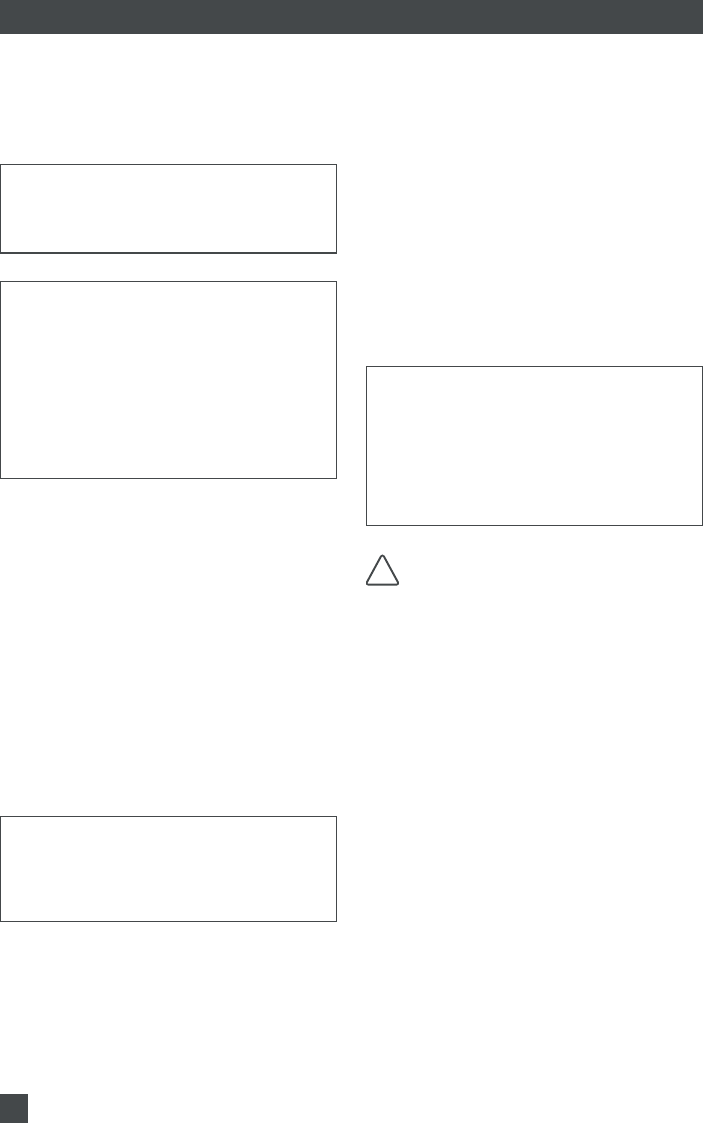
Emptying the Filter Holder
Remove the filter holder from the group
head by rotating the filter holder to the left
until it releases. To empty the used coffee
grounds, turn the filter holder upside down
in a bin and gently tap out the coffee puck
(used coffee grounds should be thrown
away with domestic waste and not down
the sink which may block drains). Remove
the filter by pressing on the ‘EJECT’ button
on the underside of the filter holder. Rinse
the filter and filter holder with water and
allow to dry.
NOTE:
To help prevent the filter from clogging,
place the empty filter into the filter holder
and reinsert the filter holder onto the
group head. Run a small amount of water
through the empty filter to remove any
remaining coffee grounds.
WARNING: THE METAL PARTS OF
THE FILTER HOLDER MAY STILL
BE VERY HOT. COOL THESE PARTS
IN COLD WATER.
How To Texture Milk For A
Cappuccino or Latté
The Breville Café Venezia™ comes
complete with a stainless steel frothing
attachment for easier texturing of milk.
When using the frothing attachment on the
steam wand a large amount of textured
milk is easily created.
The first step in making a cappuccino/latté
is to make a short espresso (see “Brewing
Coffee”).
Then:
Pour the desired amount of cold fresh •
milk (approx. 1⁄3 full) into the stainless
steel milk frothing jug.
!
13
Cappuccino ¹/³ espresso
¹/³ steamed milk
¹/³ frothed milk
Latté ¹/³ espresso topped
with steamed milk and
about 10mm of frothed
milk (traditionally served
in a glass).
NOTE:
Always ensure that the frothing
attachment has been firmly pushed onto
the steam wand. For best results use fresh
cold milk. Always clean the steam wand
and froth enhancer immediately after
every use (refer to care and cleaning).
NOTE:
For brewing more coffee immediately after
using the steam function, this machine
features an Auto-Purge™ function. This
ensures that ground coffee will not be
burnt by the initial water flow from the
Thermocoil being too hot.
Instead, this water is automatically
released internally into the drip tray
ensuring that the internal thermostat is at
optimal temperature for extracting coffee.
Your coffee will always be extracted at
this optimal temperature ensuring only the
best flavored coffee is achieved.
WARNING: MILK SHOULD NOT
BE ALLOWED TO RUN OVER THE
TOP OF THE FROTH ENHANCER,
OTHERWISE IT WILL NOT
FUNCTION PROPERLY. TO AVOID
SPLATTERING OF HOT MILK, DO
NOT LIFT THE STEAM NOZZLE
ABOVE THE SURFACE OF THE
MILK WHILE FROTHING.
ENSURE THE SELECTOR CONTROL
IS IN THE ‘OFF’ POSITION BEFORE
REMOVING THE FROTHING JUG.
OPERATING YOUR BREVILLE CAFÉ VENEZIA™
When the base of the milk frothing •
jug becomes too hot to touch, set the
‘Selector Control’ to the ‘STANDBY’
position, stopping the steaming function
before removing the milk frothing jug.
A pumping noise will sound for a short
time; do not be alarmed as there will be
a five second delay prior to the machine
carrying out the Auto-Purge™ function.
The optimum milk temperature is •
140 - 149 ºF. A food thermometer
could be used to achieve the correct
temperature. Milk will begin to boil
at around 161ºF. If the milk boils, or
becomes too hot, the natural sweetness
and texture of the milk will be affected.
To avoid milk build up ensure steam •
wand is cleaned immediately after use.
To eliminate larger bubbles, tap the •
milk frothing jug lightly on bench top to
combine froth and steamed milk before
pouring.
NOTE:
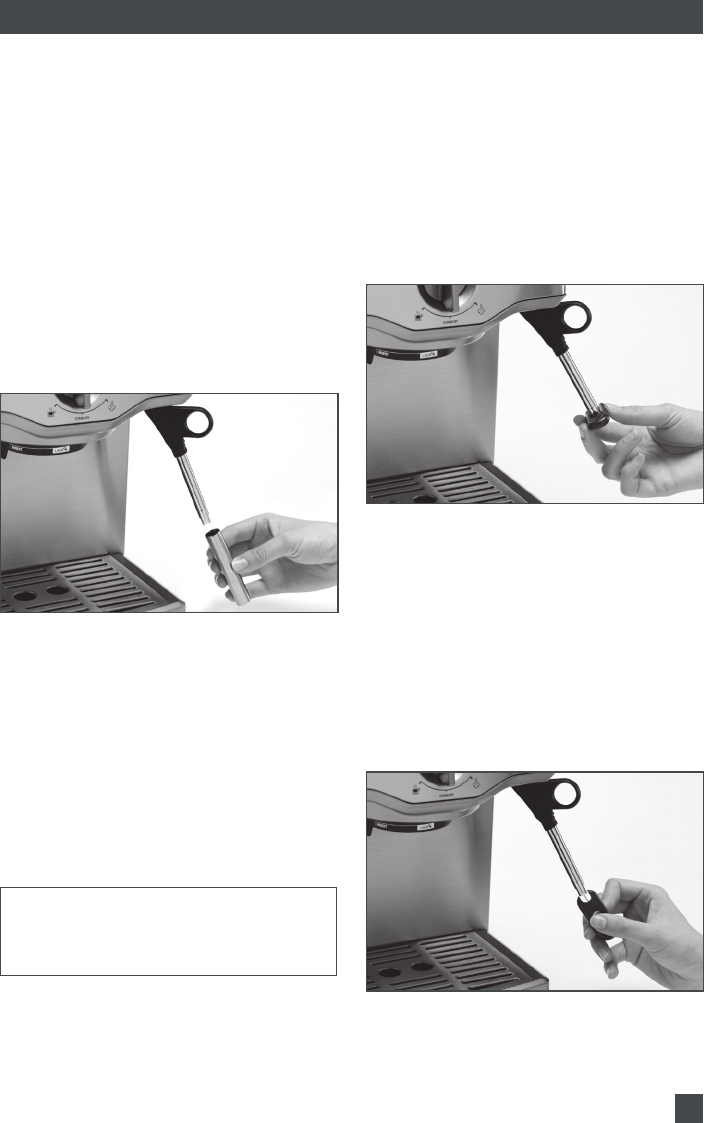
If less texture is required, remove the
frothing attachment from the steam
wand and steam the milk using the steam
wand. To remove the frothing attachment,
ensure it is cool then simply pull down
and remove.
To refit the frothing attachment, ensure it •
is securely attached to the steam wand
by inserting it onto the steam wand and
pushing firmly upwards onto the rubber
surround.
Pour the steamed milk into each cup •
of freshly brewed espresso coffee and
spoon in the milk froth, in the following
ratios:
!

14
COFFEE MAKING TIPS
Tips On Making The Perfect Espresso
Don’t just rely on your coffee machine to do
all the work. Making a good cup of coffee
is: an art.
Warming Your Cup Or Glass
A warm cup will help maintain the coffee’s
optimal temperature. Preheat your cup by
storing on the cup warming tray or rinsing
with hot water from the group head.
Warming The Filter Holder
A cold filter holder can drop the extraction
temperature enough to significantly affect
the quality of your coffee. Always ensure
the filter holder is preheated by running
hot water through it before tamping it with
coffee.
NOTE:
Always wipe the filter and filter holder dry
before tamping with ground coffee as
moisture can encourage ‘drilling’ - this is
when water bypasses the ground coffee
during extraction.
The Grind
If using a pre-ground coffee, ensure an
espresso grind suitable for espresso/
cappuccino machines is purchased.
If grinding coffee beans, the grind should
be fine but not too fine or powdery. The
grind will affect the rate at which the water
flows through the coffee in the filter and
therefore the taste of the coffee.
If the grind is too fine (looks like powder
and feels like flour when rubbed between
fingers), the water will not flow through
the coffee even when under pressure. The
resulting coffee will be over extracted, too
dark and bitter, with a mottled and uneven
créma on top.
If the grind is too coarse the water will flow
through the coffee too quickly. This will
result in an under-extracted coffee lacking
in flavor and without the thick créma on the
top layer of coffee.
The Right Measurement
A single shot of espresso is made with
¼ ounce or 7g of coffee. A single level
measure of the tamp/spoon is the correct
amount of coffee for a single espresso.
Two level measures of the tamp/spoon is
the correct amount of coffee for a double
espresso. It is important to use the correct
filter for the amount of coffee. Single cup
filter for a single espresso. Two cup filter for
a double espresso or two single espressos
at the same time.
Tamping Correctly
Level the desired amount of coffee by
gently tapping the side of the filter holder
before pressing down firmly with the
tamping end of the measuring spoon.
When packing for a double espresso it is
important only to tamp after the second
measure. Tamping between measures will
create a layer in the coffee that can impede
full extraction.
Purge The Group Head
Before inserting the filter holder, run some
water through the group head. It will ensure
that your machine has a last minute ‘clean
through’ and stabilizes the temperature
prior to extracting.
NOTE:
Make sure to wipe off any excess coffee
from the rim of the filter to ensure a
proper seal is achieved under the group
head.

15
COFFEE MAKING TIPS
Brewing Your Espresso
The most common mistake in brewing is to
over extract from your ground coffee.
This results in a bitter beverage with visibly
bleached crèma. Crèma is the caramel
colored layer that floats on top of the coffee
following extraction.
Correct Extraction
A single espresso is approx 1oz
A double espresso is approx 2oz
NOTE:
The taste of your coffee will, of course,
depend on personal preference and on
many other factors such as:
• Freshness of the coffee bean
• Fineness or coarseness of the grind
• Tamping pressure (pressing down)
• Quantity of the coffee grind in the
filter basket
We recommend experimenting by varying
these factors to achieve the coffee taste of
your preference.
16
CARE AND CLEANING
of your Breville Café Venezia™
17
Soak the tip in hot water before using •
the pin on the cleaning tool to unblock.
Replace the tip back onto the steam
wand and secure with the cleaning tool.
Cleaning The Filters, Filter Holder And
Brewing Head
The stainless steel filters and filter •
holder should be rinsed under water
directly after use to remove all coffee
particles. Should the fine holes in the
filters become blocked; the fine pin on
the cleaning tol can be used to clear the
holes.
The group head interior should be wiped •
with a damp cloth to remove any ground
coffee particles.
Periodically run water through the •
machine with the filter holder in place,
but without any ground coffee, to rinse
out any residual coffee particles.
CARE AND CLEANING
Before cleaning, ensure the ‘Selector
Control’ is in the ‘STANDBY’ position and
press the ‘POWER’ button ‘Off’, then
unplug the power cord and allow the unit
to cool.
Cleaning The Steam Wand And
Froth Enhancer
The steam wand and froth enhancer •
should always be cleaned after frothing
milk.
If attached, remove the froth enhancer •
and rinse under warm tap water.
Wipe the steam wand with a damp cloth, •
and then with the steam wand directed
back into the drip tray, briefly set the
‘SELECTOR CONTROL’ to the ‘STEAM’
position. This will clear any remaining milk
from inside the steam wand.
If the steam wand becomes blocked, •
wait for the machine to cool before using
the ‘CLEANING TOOL’ to unblock the
opening.
NOTE:
The 'Cleaning Tool' is located at the front
of the machine under the left of the group
head.
If the steam wand continues to be •
blocked, the tip of the steam wand can
be removed by using the spanner in the
middle of the cleaning tool.
18
Diluted
Solution
(for softer water)
1 part white vinegar
2 parts cold tap water
Concentrated
Solution
(for harder water)
1 part white vinegar
1 part cold tap water
Ensure the ‘SELECTOR CONTROL’ is in •
the ‘STANDBY’ position, the ‘POWER’
button is in the ‘Off’ position and the
machine is unplugged.
Remove the filter holder and frothing •
attachment. Pour the mixture of white
vinegar and water into the water tank.
Press the ‘POWER’ button to the ‘On’ •
position and turn the ‘SELECTOR
CONTROL’ to the ‘STANDBY’ position.
Place a large container under the group •
head, and steam wand.
When the brewing temperature has •
been reached the red ‘HEATING’ light
will switch off. Turn the ‘SELECTOR
CONTROL’ to the ‘ESPRESSO’ position
to commence pour.
Once half the mixture of white vinegar •
and water has run through the group
head turn the ‘SELECTOR CONTROL’ to
the ‘STANDBY’ position.
Set the ‘SELECTOR CONTROL’ to the •
‘STEAM’ position and allow the remaining
solution to run through the steam wand.
When the solution has run through, set
the ‘SELECTOR CONTROL’ back to
‘STANDBY’ position.
After decalcifying, remove the water tank •
and rinse thoroughly then re-fill with fresh
cold water. To rinse the machine, repeat
previous steps.
NOTE:
Do not use any other decalcifying agents,
other than vinegar.
CARE AND CLEANING
Cleaning The Housing / Cup
Warming Tray
The outer housing can be wiped with a •
soft, damp cloth (do not use abrasive
agents or cloths which can scratch
the surfaces).
WARNING: DO NOT IMMERSE
CORD, PLUG OR APPLIANCE IN
WATER OR ANY OTHER LIQUID.
Cleaning The Drip Tray
The drip tray should be removed, •
emptied and cleaned at regular intervals,
particularly when the drip tray full
indicator is showing ‘Empty Me!
Remove the stainless steel grid and pull •
the ‘Empty Me!’ full indicator upwards
to dislodge from the drip tray. Wash with
warm soapy water, using a non-abrasive
washing liquid, rinse and dry thoroughly.
NOTE:
Make sure to wipe off any excess coffee
from the rim of the filter to ensure a proper
seal is achieved under the group head.
WARNING: DO NOT IMMERSE
CORD, PLUG OR APPLIANCE IN
WATER OR ANY OTHER LIQUID.
Decalcifying The Machine
After regular use, hard water can cause •
mineral build up in and on many of the
inner functioning components, reducing
the brewing flow, power of the machine,
and affecting the quality of coffee.
We advise decalcifying the machine on a •
regular basis (every 2-3 months) using a
mixture of white vinegar and water.
Follow the instructions provided or use •
the following as a guide:
!
!

19
PROBLEM POSSIBLE CAUSES
Coffee does not run through
Machine is not turned on or •
plugged in.
Water tank is empty.•
Selector Control not in • ‘ESPRESSO’
position.
Coffee grind is too ne.•
Too much coffee in the lter.•
The lter is blocked. •
(see Care and Cleaning).
Excessive tamping•
Coffee runs out too quickly
Coffee grind is too coarse•
Incorrect quantity of coffee in the •
lter basket.
Not rmly tamped.•
Coffee runs too slowly
The water tank is empty or low.•
Coffee grind is too ne.•
Machine is blocked by scale build •
up (see Care and Cleaning).
Too much coffee in the filter basket.•
Excessive tamping.•
The filter is blocked •
(see Care and Cleaning)
Coffee runs out around the edge of
the filter holder
Filter holder is not inserted in the •
brew head properly.
There are coffee grounds affecting •
the sealing around the lter rim.
TROUBLESHOOTING

20
PROBLEM POSSIBLE CAUSES
Coffee is too weak or watery
Coffee grind is not ne enough•
(use coffee ground for espresso
machines).
Not enough coffee in the lter.•
Incorrect quantity of coffee in the •
lter basket.
Not rmly tamped.•
Coffee is too cold
Machine not preheated.•
Cups not preheated.•
Milk not heated enough (if making •
a cappuccino or latte), refer to
Milk guide.
No créma
Coffee ground is too coarse.•
Not enough coffee in the lter.•
Incorrect quantity of coffee.•
Not rmly tamped.•
Coffee is not fresh.•
No steam is generated
Machine is not turned on.•
Water tank is empty.•
Selector control not in 'STEAM'•
position.
Steam wand is blocked•
(see Care and Cleaning).
Milk is not foamy after frothing
Not enough steam•
Milk is not fresh and cold•
Incorrect technique•
(refer to How to Texture Milk).
TROUBLESHOOTING
21
COFFEE VARIATIONS
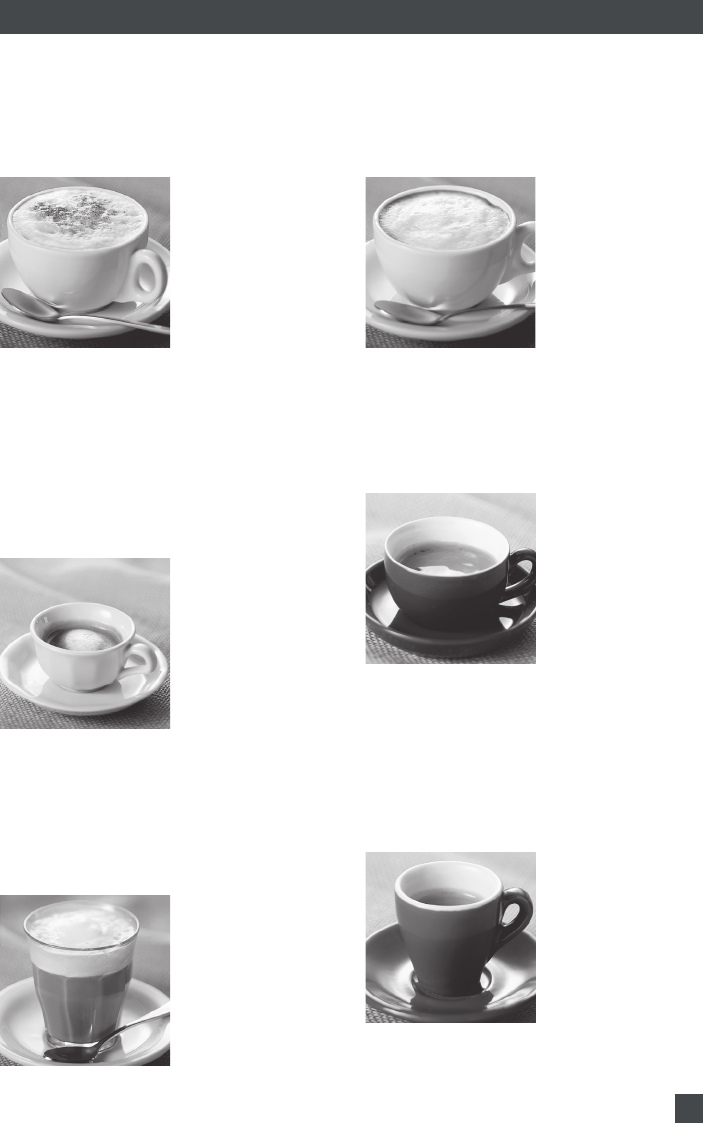
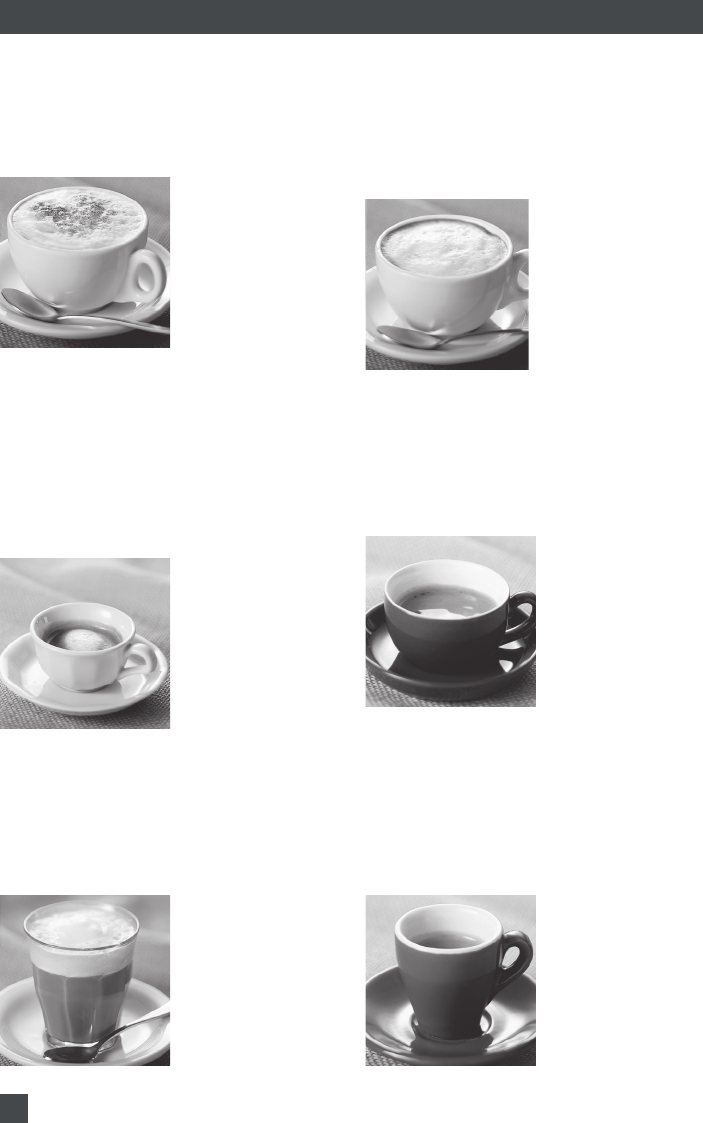
CAPPUCCINO
A cappuccino is very light and almost
lukewarm. This has one-third espresso,
one-third milk and one-third foam.
ESPRESSO
Intense and aromatic, an espresso or short
black as it’s also known uses about 0.3oz
(7g) of ground coffee. It is served in a small
cup or glass to a level of approximately
11/2” (35mm).
CAFFE LATTÉ
Served in a glass, a caffe latté consists of
one-third espresso, topped with steamed
milk and about 1/2” (10mm) of foam.
MACCHIATO
Traditionally served short, the macchiato is
also poured as a long black with a dash of
milk or a dollop of foam.
LONG ESPRESSO
A long espresso is generally served as a
double shot of espresso.
RISTRETTO
Meaning restricted, a ristretto is an
extremely short espresso of approximately
2/3” (15mm), distinguished by its intense
flavor and aftertaste.

22
Breville®* warrants this Breville® appliance
against defects that are due to faulty
material or workmanship for a period
of one (1) year from the date of original
consumer purchase. This warranty does
not cover damage from abuse, neglect, use
for commercial purposes, or any other use
not found in the printed “Instructions for
use” booklet. There is no warranty for glass
parts, glass containers, filter basket, blades
and agitators. HWI Breville® expressly
disclaim all responsibility for consequential
damages for incidental losses caused
by use of this appliance. Some states or
provinces do not allow this exclusion or
limitation for incidental or consequential
losses, so the foregoing disclaimer may not
apply to you.
ANY WARRANTY OF MERCHANTABILITY
OR FITNESS WITH RESPECT TO THIS
PRODUCT IS ALSO LIMITED TO THE ONE
YEAR LIMITED WARRANTY PERIOD.
Some states or provinces do not allow
disclaimer of the implied warranty with
respect to consumer goods, so the
foregoing disclaimer may not apply to you.
This warranty gives you specific legal rights
and you may also have other legal rights
which vary from state to state or province
to province.
If the appliance should become defective
within the warranty period, do not return
the appliance to the store. Please contact
our Customer Service Center.
Toll free phone number:
1-866-BREVILLE (1-866-273-8455)
Internet email:
AskUs@BrevilleUSA.com
AskUs@Breville.ca (in Canada)
*HWI Breville® products are distributed in Canada
by Anglo Canadian Housewares, L.P. and in USA
by Metro/Thebe Inc.
ONE YEAR LIMITED WARRANTY

23

24
NOUS VOUS FÉLICITONS
d’avoir fait l’acquisition de votre nouvelle
Café Venezia
MC de Breville

25
26 Breville vous recommande la
sécurité avant tout
28 Faites la connaissance de votre Café
Venezia
MC de Breville
30 Fonctionnement de votre Café
Venezia
MC de Breville
38 Conseils sur la façon d’obtenir
l’Espresso parfait
40 Entretien, nettoyage et entreposage
44 Guide de dépannage
46 Différent types de cafés
47 Garantie limitée d'un an
TABLE DES MATIÉRES

26
BREVILLE VOUS RECOMMANDE LA SÉCURITÉ AVANT TOUT
Assurez-vous que le porte-filtre est bien •
inséré et verrouillé dans la tête d’infusion
avant d’utiliser l’appareil.
Ne retirez jamais le porte-filtre lors de •
l’infusion car l’appareil est alors sous
pression.
Ne laissez jamais votre Café Venezia• MC
sans surveillance lorsqu’ elle est en
marche, car vous pourriez vous brûler
si le couvercle est enlevé durant le
processus d’infusion.
Ne touchez pas aux surfaces brûlantes •
de l’appareil. Laissez-le refroidir avant de
le déplacer ou de le nettoyer.
Ne déposez rien d’autre que des tasses •
sur le réchaud de votre Café Venezia
MC.
Éteignez toujours votre Café Venezia • MC
en plaçant l’interrupteur à la position hors
tension (OFF) et débranchez-le s’il est
laissé sans surveillance, s’il n’est pas en
marche, ou avant de le nettoyer, de le
déplacer, de le démonter, de le monter ou
de l’entreposer.
Gardez votre machine à Café Venezia • MC
et ses accessoires toujours propres.
L’utilisation de pièces non recommandées
par Breville peut occasionner des risques
d’incendie, de chocs électriques ou de
blessures corporelles
Suivez les instructions de nettoyage •
fournies à la page 40 de ce livret.
LISEZ TOUTES LES
INSTRUCTIONS
Veuillez lire attentivement toutes les •
instructions avant d’utiliser votre appareil
et conservez-les pour consultation future.
Enlevez tout matériel d’emballage et •
étiquettes ou collants promotionnels
avant d’utiliser votre Machine à Expresso
Café Venezia
MC pour la première fois.
Ne placez pas votre Café Venezia • MC sur
le bord d’un comptoir ou d’une table
lorsqu’elle est en marche. Assurez-vous
que la surface est plane, propre, sèche et
dégagée de toutes substances.
Ne laissez pas votre Café Venezia • MC sur
ou près d’une cuisinière au gaz ou d’un
élément électrique, et évitez tout contact
avec un four allumé.
N’utilisez pas votre Café Venezia • MC sur
le plateau d’égouttement d’un lavabo.
Veillez toujours à ce que votre Café •
Venezia soit bien montée avant de la
brancher et de l’utiliser.
La machine à Café Venezia • MC n’est pas
conçue pour fonctionner à l’aide d’une
minuterie externe ou d’un système de
commande à distance.
Remplissez le réservoir avec l’eau froide •
du robinet seulement.
N’utilisez aucun autre liquide•
Ne vous servez jamais de votre Café •
Venezia
MC si le réservoir est à sec.
Chez Breville, la sécurité occupe une place de choix. Nous concevons et fabriquons des
produits destinés au consommateur sans jamais perdre de vue la sécurité de notre précieuse
clientèle. De plus, nous vous demandons d’être très vigilant lorsque vous utilisez un appareil
électroménager et de respecter les mesures de sécurité suivantes:
IMPORTANTES MESURES
DE SÉCURITÉ

27
POUR USAGE DOMESTIQUE
SEULEMENT
GARDEZ CES RECOMMANDATIONS
À PORTÉE DE LA MAIN
POUR TOUT APPAREIL
ÉLECTROMÉNAGER
Déroulez le cordon avant de vous servir •
de l’appareil.
Pour éviter les chocs électriques, ne •
plongez ni le cordon, la che ou l’appareil
dans l’eau ou tout autre liquide.
Ne laissez pas le cordon pendre d’un •
comptoir ou d’une table, entrer en
contact avec des surfaces brûlantes ou
se nouer.
L’appareil ne doit pas être utilisé •
sans surveillance par des personnes
(ou des enfants) handicapées ou
inexpérimentées, à moins d’être
supervisées par une personne
responsable.
Veillez à ce que les enfants ne jouent pas •
avec l’appareil.
Cet appareil est conçu pour usage •
domestique seulement.
Utilisez l’appareil uniquement dans le •
cadre de l’utilisation recommandée.
Ne l’utilisez pas dans un véhicule en •
mouvement, un bateau ou à l’extérieur.
Nous vous recommandons de vérifier •
l’appareil régulièrement. Ne l’utilisez pas
si le cordon d’alimentation, la fiche ou
l’appareil sont endommagés. En cas
de doute, confiez l’examen et/ou la
réparation à un centre de service
autorisé Breville.
Tout entretien autre que le nettoyage •
doit se faire dans un centre de service
autorisé Breville.
PROPOSITION 65 DE LA CALIFORNIE:
(Ceci s’applique aux résidants de la
Californie seulement).
Ce produit contient produits chemiques
reconnu par l’État de la Californie
comme pouvant causer le cancer et des
malformations à la naissance ou des
malformations congénitales.
BREVILLE VOUS RECOMMANDE LA SÉCURITÉ AVANT TOUT
28
FAITES LA CONNAISSANCE
DE VOTRE
Café Venezia
MC de Breville

29
FAITES LA CONNAISSANCE DE VOTRE CAFÉ VENEZIA
MC DE BREVILLE
Système de
réchauffement
Thermocoil
Boîtier en acier
inoxydable
Réchaud en métal
moulé
Système
d’éjection de filtre
Easy EjectMC
Plateau
d’égouttement
et grille en acier
inoxydable
Hauteur de la tête
de 11,5 cm pour
gobelets
Rangement pour
accessoires de
nettoyage situé
à l’avant de la
machine sous la
gauche de la tête
d’infusion
Indicateur de
réchauffement
Touche de
démarrage
Sélecteur de
contrôle pour
espresso ou
vapeur
Système de
vidange Auto
Purge
MC pour un
café idéal
Système de
créma de pointe
à double paroi
pour un créma
parfait
Buse à vapeur
pivotant sur
45° avec
amplificateur de
mousse en acier
inoxydable
Tasse à
moussage
Réservoir amovible de
2.75L avec poignée à
charnières
Filtres à double paroi
en acier inoxydable
pour 1 ou 2 portions
et pour Pods
Système
d’éjection de filtre Easy
EjectMC
Cuiller à mesurer/
bourroir

30
FONCTIONNEMENT
De votre Café Venezia
MC de Breville
31
Avant la première utilisation
Retirez tout matériel d’emballage ou
étiquettes promotionnelles avant d’utiliser
votre Café Venezia
MC de Breville pour la
première fois.
Essuyez le boîtier avec un chiffon humide
et asséchez-le complètement. Ne plongez
pas le boîtier, le cordon d’alimentation ou la
fiche dans de l’eau ou tout autre liquide.
Le réservoir est situé à l’arrière de la
machine. Levez la poignée à charnières
et tirez-le vers le haut. Lavez à l’eau
chaude avec un détergent doux. Rincez et
asséchez-le bien.
NOTEZ!!
Ne lavez aucune pièce ou accessoire au
lave-vaisselle.
NOTEZ!!
Tous les accessoires doivent être lavés à
l’eau chaude savonneuse avant chaque
Utilisation.
Remplissage du réservoir
Assurez-vous que le sélecteur est au mode
de veille (STAND BY).
Levez la poignée à charnières et tirez le
réservoir vers le haut. Remplissez d’eau
froide jusqu’au maximum et replacez-le
dans la machine. Assurez-vous qu’il est
bien en place.
Replacer le couvercle sur le réservoir.
NOTEZ!!
Le réservoir est muni d’un couvercle qui
sert également de poignée.
NOTEZ!!
Le réservoir doit être rempli d’eau froide
avant d’utiliser la machine.
Vérifiez le niveau d’eau avant de vous
servir de la machine et remplacez l’eau
quotidiennement.
Pré-infusion et préchauffage
de de l’appareil
Lors de la pré-infusion, le réservoir intérieur
s’emplit d’eau et nettoie le système
d’infusion. Nous vous recommandons
d’utiliser ce procédé avant la première
utilisation. Cependant, vous pouvez répéter
l’opération avant chaque espresso afin de
réchauffer la machine.
Assurez-vous que le sélecteur est au mode
de veille (STAND BY) et branchez le cordon
dans une prise de 110V.
Enfoncez l’interrupteur en position sous
tension (ON). Le contour du bouton
s’illuminera. Le bouton de réchauffement
(HEATING) rouge s’illuminera et s’éteindra
quand la machine aura atteint la
température appropriée.
Placez une tasse vide ou un contenant
sous la tête de l’appareil.
FONCTIONNEMENT DE VOTRE CAFÉ VENEZIA
MC DE BREVILLE
32
mouture de café pour chaque filtre car les
perforations du filtre ont été conçues pour
se servir de la pression accumulée dans
l’appareil pour maximiser l’extraction du
café à chaque infusion.
NOTEZ!!
Lorsque vous utilisez une chope à café,
choisissez toujours le filtre à deux
portions. Si vous désirez une plus grande
quantité de breuvage, ajoutez un peu
d’eau bouillante dans votre chope avant
d’infuser le café.
Tassage de la mouture
Distribuez uniformément le café dans le
filtre et arasez-le en le tassant fermement à
l’aide du bourroir.
Nettoyez l’excès de café résiduel autour
du porte-filtre afin que ce dernier adhère
parfaitement à la tête d’infusion.
FONCTIONNEMENT DE VOTRE CAFÉ VENEZIA
MC DE BREVILLE
Placez une tasse vide ou aussitôt que
le voyant lumineux rouge (HEATING)
s’éteindra, placez le sélecteur à la position
ESPRESSO et laissez couler un peu d’eau
de la tête d’infusion durant quelques
secondes sans le porte-filtre. Durant cette
opération, un bruit de pompage se fera
entendre. La fonction de pré-infusion/
préchauffage est maintenant terminée et
vous pouvez préparer votre café espresso.
Préchauffage du porte-filtre
Préchauffez le porte-filtre en le mettant en
place sous la tête de la machine.
Rincez-le avec l’eau chaude qui s’en
écoule en utilisation la fonction ESPRESSO.
Asséchez complètement le filtre et le
porte-filtre avant l’infusion.
Préchauffage des tasses
Le réchaud pour tasses commencera à se
réchauffer en même temps que la machine.
Préchauffez les tasses en les plaçant sur
le réchaud ou en les rinçant avec de l’eau
chaude provenant de la tête d’infusion.
Ceci gardera le café chaud une fois dans
la tasse.
Infusion du café
Placez le filtre pour une portion ou celui
pour deux portions dans le porte-filtre.
Utilisez le petit filtre pour une portion (30ml)
ou le plus grand pour deux portions (60ml)
ou pour deux cafés à la fois. Lorsque
vous utilisez une chope à café, choisissez
toujours le filtre pour deux portions(60 ml).
Si vous désirez une plus grande quantité de
breuvage, ajoutez un peu d’eau bouillante
dans votre chope avant d’infuser le café.
Utilisez la cuiller à mesurer-bourroir pour
verser une mesure de café expresso dans
le filtre pour une portion, et deux mesures
dans le filtre pour deux portions. Il est
important d’utiliser la quantité appropriée de
33
Insertion du porte-filtre
Placez le porte-filtre sous la tête d’infusion
en alignant la poignée, tel qu’illustré.
Insérez le porte-filtre dans la tête d’infusion
en le soulevant vers le haut et le tournant
vers la droite jusqu’à ce que vous sentiez
une résistance et qu’il ne puisse plus
pivoter. Il formera alors un angle d’environ
90° avec la machine.
Infusion du café
Assurez-vous que le sélecteur soit en mode
de veille (STAND BY) et branchez-le dans
une prise de 110V.
Enfoncez l’interrupteur en position sous
tension (ON). Le contour du bouton
s’illuminera. Le bouton de réchauffement
(HEATING) s’illuminera en rouge et
s’éteindra quand la machine aura atteint la
température appropriée.
Aussitôt que le voyant de réchauffement
(HEATING) sera éteint, la machine sera
prête pour l’infusion.
Assurez-vous que le plateau d’égouttement
et le porte-filtre sont bien en place.
Placez une ou deux tasses réchauffées
sous l’orifice du porte-filtre. Si vous utilisez
deux tasses à la fois, une once seulement
doit être extraite par tasse.
Placez le sélecteur à la position
ESPRESSO.
Après quelques secondes, l’extraction du
café commencera.
Lorsqu’une quantité suffisante de café
aura été extraite, placez le sélecteur en
mode de veille (STAND BY). Ceci arrêtera
l’extraction.
NOTEZ!!
Utilisez le filtre à 1 portion (30 ml) pour
un espresso simple et celui à 2 portions
(60 ml) pour un espresso double ou deux
espressos simples.
FONCTIONNEMENT DE VOTRE CAFÉ VENEZIA
MC DE BREVILLE
Lock
34
Vidange du porte-filtre
Retirez le porte-filtre de la tête d’infusion
en le faisant tourner vers la gauche jusqu’à
ce qu’il cède. Pour vider les grains de café
usés, tournez le porte-filtre à l’envers et
tapez-le légèrement afin d’en extraire le
café (les grains de café usés devraient être
jetés à la poubelle et non pas dans l’évier,
car la tuyauterie pourrait se boucher).
Retirez le filtre en pressant sur le bouton
EJECT situé sous le côté du porte-filtre.
Rincez le filtre et le porte-filtre et bien les
assécher.
NOTEZ!!
L’appareil reste prêt pour l’infusion et
conserve une température constante tant
que l’interrupteur est à la position sous
tension (ON). Si la température baisse,
le témoin rouge s’allumera et l’appareil
se réchauffera automatiquement à la
température d’infusion appropriée.
AVERTISSEMENT: LES PIÈCES
MÉTALLIQUES DU PORTE-FILTRE
SONT TRÈS CHAUDES APRÈS
L’INFUSION. REFROIDISSEZ-LES
TOUJOURS À L’EAU FROIDE.
Moussage du lait pour un
cappuccino ou un latté
La Café Venezia
MC de Breville est munie
d’un amplificateur de mousse qui facilite
le moussage du lait. Lorsque vous utilisez
l’amplificateur de mousse de la buse
vapeur, le volume du lait augmente de
façon importante.
La première étape pour préparer un
cappuccino ou un latté consiste à préparer
un espresso corsé (suivez les instructions
sur l’infusion du café), puis:
Remplissez de lait froid le tiers du pichet •
en acier inoxydable.
FONCTIONNEMENT DE VOTRE CAFÉ VENEZIA
MC DE BREVILLE
Si vous ne désirez pas utiliser la fonction
vapeur, enfoncez le interrupteur de mise
hors tension (OFF), débranchez la machine
et la laisser refroidir.
NOTEZ!!
Nous vous recommandons les mesures
suivantes: 30ml pour une portion et 60ml
pour deux portions.
NOTEZ!!
L’appareil reste toujours en mode
d’infusion et maintient une température
constante aussi longtemps que
l’interrupteur est en position sous
tension (ON). Si la température baisse,
le voyant rouge s’allumera et l’appareil
se réchauffera automatiquement pour
atteindre la température requise pour
l’infusion.
Préparation pour les Pods à Espresso
Votre Café Venezia
MC peut accomoder
toutes les marques de Pods Espresso.
Pour l’infusion, placez le Pod dans le
filtre à Pod en vous assurant qu’il soit
parfaitement inséré dans le filtre. Si les
rebords du Pod excèdent le filtre, vous
devrez les tailler de façon à ce que le Pod
soit complètement inséré dans le filtre.
Verrouillez le porte-filtre en place et infuser
le café selon les indications contenues à la
page selon les indications contenues à la
section Infusion du Café.
NOTEZ!!
Le genre de Pod que vous utiliserez
déterminera la qualité du café et son
créma. Utilisez uniquement le filtre à Pod
pour les Pods à Espresso.
!
35
Tournez le sélecteur à la position vapeur •
(STEAM). Le témoin rouge s’allumera
pour indiquer que le système de
réchauffement Thermocoil est en marche
pour de produire de la vapeur.
Pour de meilleurs résultats, attendez •
que l’eau qui s’écoule se transforme en
vapeur avant de plonger la buse vapeur
dans le lait.
Tenez le pichet légèrement penché an •
que la buse vapeur/amplicateur de
mousse soit à peine sous la surface du
lait. La vapeur fera alors circuler le lait à
l’intérieur du pichet.
Lorsque le lait a atteint le volume désiré, •
plongez la buse vapeur/amplicateur
de mousse plus profondément dans le
pichet an de réchauffer le lait.
FONCTIONNEMENT DE VOTRE CAFÉ VENEZIA
MC DE BREVILLE
Tenez le pichet à lait d’une main en •
l’inclidant légèrement et placez l’autre
main sous la base du pichet.
Lorsque la base du pichet est trop •
chaude, tournez le sélecteur à la position
de veille (STAND BY) pour arrêter la
fonction de vapeur puis retirez le pichet.
Vous entendrez momentanément un bruit
de pompage. Ne vous alarmez pas. Il
y aura alors un délai de cinq secondes
avant que la fonction de vidange
Auto-Purge
MC ne se mette en marche.
La température idéale du lait est 140°-•
149°F (60°-65°C). Vous pouvez utilisez
un thermomètre pour aliments an de
vous assurer de la bonne température.
Le lait bout à 161°F (72°C). S’il bout ou
devient trop chaud, son goût naturel de
sucre et sa texture d’en seront affectés.
An d’éviter que le lait ne déborde, •
nettoyez la buse vapeur immédiatement
après chaque utilisation.
Pour éliminer l’apparition de bulles d’air •
dans le lait, tapez légèrement le pichet
sur le comptoir an de combiner la
mousse et le lait chaud. Versez ensuite
dans le pichet.
NOTEZ!!
Si vous désirez moins de mousse, retirez
l’amplificateur de mousse et utilisez
uniquement la buse vapeur. Pour retirer
l’amplificateur de mousse, laissez-le
refroidir puis tirez-le tout simplement
vers le bas.
Pour remettre l’amplificateur de mousse •
en place, insérez-le autour de la buse
vapeur en le poussant fermement vers le
haut jusqu’à ce qu’il soit fixé autour du
bord de caoutchouc de la buse.
36
FONCTIONNEMENT DE VOTRE CAFÉ VENEZIA
MC DE BREVILLE
NOTEZ!!
Assurez-vous que l’amplificateur de
mousse est bien en place autour de la
buse vapeur. Pour de meilleurs résultats,
utilisez du lait frais très froid. Nettoyez
toujours la buse vapeur et l’amplificateur
de mousse immédiatement après chaque
utilisation (Voir Entretien et Nettoyage).
NOTEZ!!
Il est possible de préparer un deuxième
café immédiatement après avoir utilisé la
fonction vapeur, car l’appareil est muni
un système de vidange Auto-Purge mC
qui empêche la mouture de brûler par le
premier débit d’eau provenant du système
Thermocoil qui pourrait être trop chaud.
Cette eau chaude est plutôt évacuée
automatiquement dans le plateau
d’égouttement pour s’assurer que le
thermostat interne est à la température
idéale pour l’extraction du café. Vous
obtiendrez ainsi un café à la bonne
température et toujours très savoureux.
AVERTISSEMENT: NE
PLONGEZ PAS LE DESSUS
DE L’AMPLIFICATEUR DE
MOUSSE DANS LE LAIT CAR
CECI L’EMPÊCHERA DE BIEN
FONCTIONNER. POUR ÉVITER
LES ÉCLABOUSSURES DE LAIT
CHAUD, NE SOULEVEZ PAS LA
BUSE VAPEUR À L’EXTÉRIEUR DU
PICHET PENDANT LE MOUSSAGE.
ASSUREZ-VOUS QUE LE
SÉLECTEUR SOIT À LA POSITION
DE VEILLE (STAND BY) AVANT
DE RETIRER LE PICHET DE
MOUSSAGE.
!
Versez le lait chaud dans une tasse •
contenant un l’espresso fraîchement
infusé et ajouter la mousse à l’aide d’une
cuiller. Nous vous recommandons les
proportions suivantes:
Cappuccino ¹/³ d’espresso
¹/³ de lait chaud
¹/³ de mousse
Latté ¹/³ d’espresso recouvert
de lait chaud et
d’environ 10mm de
mousse (servi
habituellement dans
un verre).

38
CONSEILS RELATIFS À LA PRÉPARATION DU CAFÉ
Conseils relatifs à la préparation d’un
Espresso parfait
La machine à espresso ne peut faire le
travail toute seule. Réussir un bon café est
un art.
Comment réchauffer votre tasse
de café
Une tasse chaude permet de garder le café
chaud. Réchauffer votre tasse en la plaçant
sur le réchaud ou rincez-la à l’eau très
chaude qui s’écoule de la tête d’infusion.
Préchauffer le porte-filtre
Un porte-filtre froid peut abaisser la
température du café de façon significative
et ainsi en affecter la qualité. Assurez-vous
de toujours le réchauffer à l’eau chaude
avant de le remplir de mouture.
NOTEZ!!
Asséchez toujours le porte-filtre et le
filtre avant de le remplir de café, car la
moisissure peut provoquer un phénomène
de ‘drilling’, ce qui signifie que l’eau ne
passe pas au travers des grains de café
durant l’infusion.
La mouture
Si vous utilisez du café déjà moulu,
procurez-vous une mouture à espresso
qui convienne à une machine à espresso/
cappuccino. Si vous moulez votre café
vous-même, la mouture doit être fine mais
pas poudreuse, car elle influence le débit
d’eau coulant à travers le filtre et a une
incidence sur la saveur du café.
Si la mouture est trop fine (lorsqu’elle est
poudreuse et qu’elle a la consistance de
la farine), l’eau ne passera pas à travers,
même sous pression. Le café sera trop
infusé, trop foncé et amer, avec un créma
inégal sur le dessus.
Si la mouture est trop grossière, l’eau
coulera trop rapidement au travers. Ainsi,
le café ne sera pas assez infusé, manquera
de saveur et n’aura pas de riche créma sur
le dessus.
Les bonnes mesures
Un espresso simple est fait de ¼ oz (7g)
de café. Une cuiller rase de café (cuiller-
bourroir fournie) convient à un expresso
simple et deux cuillers rases, à un double.
Il est important d’utiliser le bon filtre pour
la quantité de café voulue. Utilisez le
filtre pour une portion pour un espresso
simple et le filtre pour deux portions pour
un espresso double ou deux espressos
simples à la fois.
Le bourrage du café
Mettez la quantité de café désirée dans le
filtre en donnant des petits coups sur le
bord du porte-filtre et pressez fermement
avec le bourroir.
Quand vous préparez un double espresso,
il est important de presser le café
seulement après la deuxième mesure et
non la première, sinon le café sera divisé
en deux couches et l’infusion en sera
affectée.
Vidange de la tête d’infusion
Avant d’insérer le porte-filtre, laissez
couler un peu d’eau provenant de la tête
d’infusion. Cela permettra à la machine de
se nettoyer et stabilisera la température
avant de commencer l’infusion.
NOTEZ!!
Enlevez l’excès de café qui pourrait
s’accumuler sur le bord du filtre afin que
celui-ci soit bien scellé à la tête d’infusion.

39
CONSEILS RELATIFS À LA PRÉPARATION DU CAFÉ
Infusion de votre Espresso
L’erreur la plus répandue lorsque l’on
prépare un espresso est d’extraire trop
de café.
Il en résulte un breuvage amer au créma
décoloré. Le Créma est cette couche
crémeuse de couleur caramel qui flotte sur
le café après l’infusion.
Quantité recommandée
30ml pour un espresso simple
60ml pour un espresso double
NOTEZ!!
Le saveur de votre café dépendra de vos
goûts personnels et de plusieurs autres
facteurs, comme:
• La fraîcheur du grain de café
• La consistance de la mouture
• Le bourrage
• La quantité de mouture dans le
porte-filtre
Nous vous recommandons de faire
plusieurs essais pour en arriver à
l’obtention d’un café à votre goût.

40
ENTRETIEN ET NETTOYAGE
De votre Café Venezia
MC de Breville
41
Si la buse vapeur reste bloquée, vous •
pouvez en retirer l’embout à l’aide de la
clé qui se trouve au centre de l’outil de
nettoyage.
Laissez tremper l’embout dans de •
l’eau chaude avant de le débloquer
avec l’épingle de nettoyage. Remettez
l’embout sur la buse vapeur et fixez-le à
l’aide de l’outil de nettoyage.
Nettoyage des filtres, du porte-filtre
et de la tête d’infusion
Les filtres et le porte-filtre en acier •
inoxydable devraient être rincés sous
l’eau du robinet immédiatement après
l’utilisation afin d’enlever toutes
les particules de café. Lorsque les
perforations des filtres se bloquent,
utilisez l’aiguille fine de l’outil de
nettoyage pour les dégager.
ENTRETIEN ET NETTOYAGE
Avant de nettoyer l’appareil, placez le
sélecteur à la position de veille (STAND BY)
et enfoncez le interrupteur à la position
OFF. Débranchez ensuite l’appareil et
laissez-le refroidir.
Nettoyage de la buse vapeur et de
l’amplificateur de mousse
Il faut toujours nettoyer la buse vapeur et •
l’amplificateur de mousse immédiatement
après avoir fait mousser le lait.
Si l’amplificateur de mousse est en •
place, retirez-le et rincez-le à l’eau chaude
du robinet.
Essuyez la buse vapeur avec un chiffon •
humide, orientez-la directement
au-dessus du plateau d’égouttement et
réglez le sélecteur à la position de vapeur
(STEAM), ce qui permettra de dégager
tout dépôt de lait à l’intérieur de la
buse vapeur.
Si la buse vapeur est bloquée, laissez •
refroidir la machine puis débloquez la
buse à l’aide de l’épingle de nettoyage.
NOTEZ!!
L’outil de nettoyage est rangé sur le devant
de l’appareil, sous la gauche de la tête
d’infusion.

42
Décalcification de la machine
À la suite d’une utilisation sur une base •
régulière, l’eau dure peut causer une
accumulation de calcaire dans ou sur les
nombreuses composantes internes de
l’appareil. Cela réduira d’autant le débit
d’infusion et le rendement de la machine,
tout en affectant la qualité du café.
Il est conseillé de décalcier régulièrement •
la machine (aux deux ou trois mois) à
l’aide d’un mélange de vinaigre blanc et
d’eau.
Suivez les instructions qui suivent à titre •
de référence:
Solution
Diluée
(pour eau douce)
1 partie de vinaigre
blanc
2 parties d’eau froide
du robinet
Solution
Concentrée
(pour eau dure)
1 partie de vinaigre
blanc
1 partie d’eau froide
du robinet
Assurez-vous que le sélecteur soit à •
la position de veille (STAND BY), que
l’interrupteur soit à la position OFF et que
l’appareil soit débranché.
Retirez le porte-filtre et l’amplificateur de •
mousse. Versez la solution décalcifiante
dans le réservoir.
Enfoncez l’interrupteur à la position sous •
tension (ON) et tournez le sélecteur à la
position de veille (STAND BY).
Placez un grand récipient sous la tête •
d’infusion et la buse vapeur.
Dès que la température d’infusion est •
atteinte, le témoin rouge (HEATING)
s’éteint. Tournez le sélecteur à la
position ESPRESSO pour commercer
l’écoulement.
L’intérieur de la tête d’infusion doit être •
essuyée avec un chiffon humide pour
enlever tout résidu de mouture.
Il est conseillé de faire couler l’eau à •
travers le porte-filtre sans mouture, afin
d’enlever toutes particules de grains de
café qui pourraient rester.
Nettoyage du boîtier et du réchaud
pour les tasses
Le boîtier et le réchaud de l’appareil •
peuvent être nettoyés avec un chiffon
doux et humide (n’utilisez pas de produits
nettoyants ou de chiffons abrasifs qui
pourraient égratigner les surfaces).
AVERTISSEMENT!! NE PLONGEZ
PAR LE CORDON, LA FICHE OU
L’APPAREIL DANS DE L’EAU OU
TOUT AUTRE LIQUIDE
Nettoyage du plateau d’égouttement
Il faut enlever le plateau d’égouttement, •
le vider et le nettoyer à intervalles
réguliers, surtout lorsque l’indicateur
de niveau d’eau indique que le plateau
est plein.
Enlevez la grille en acier inoxydable et •
soulevez l’indicateur de niveau d’eau
du plateau d’égouttement. Lavez-les
dans de l’eau chaude avec un savon
liquide non abrasif. Rincez et asséchez
correctement.
NOTEZ!!
Enlevez l’excès de café qui pourrait rester
sur le bord du filtre afin que celui-ci soit
bien scellé à la tête d’infusion.
AVERTISSEMENT!! NE PLONGEZ
PAR LE CORDON, LA FICHE OU
L’APPAREIL DANS DE L’EAU OU
TOUT AUTRE LIQUIDE.
!
!
ENTRETIEN ET NETTOYAGE

43
Une fois que la moitié de la solution •
décalcifiante se sera écoulée de la tête
d’infusion, tournez le sélecteur à la
position de veille (STAND BY).
Tournez ensuite le sélecteur à la position •
de vapeur (STEAM) et laissez le reste
de la solution couler par la buse vapeur.
Lorsque le processus est terminé,
remettez le sélecteur à la position de
veille (STAND BY).
Après la décalcification, retirez le •
réservoir et rincez-le, puis remplissez-le
de nouveau avec de l’eau froide. Pour
rincez la machine, répétez les étapes
précédentes.
NOTEZ!!
N’utilisez aucun autre produit de
décalcification que le vinaigre.
ENTRETIEN ET NETTOYAGE

44
PROBLÈME CAUSES POSSIBLES
Le café ne coule pas
L’appareil n’est pas sous tension ou •
est débranché.
Le réservoir est vide.•
Le sélecteur n’est pas à la position •
ESPRESSO.
La mouture est trop ne.•
Il y a trop de café dans le ltre.•
Le ltre est bloqué. •
(Voir Entretien et Nettoyage).
Le café est trop bourré. •
Le café coule trop vite
La mouture est trop grossière•
Il n’y a pas assez de café dans •
le ltre.
Le café n’est pas assez bourré.•
Le café coule trop lentement
Le réservoir est vide ou presque.•
La mouture est trop ne.•
La machine est bloquée à cause de •
l’accumulation de lait (voir Entretien
et Nettoyage).
Il y a trop de café dans le filtre.•
Le café est trop bourré.•
Le café coule du rebord du
porte-filtre
Le porte-ltre n’est pas inséré •
correctement dans la tête d’infusion.
Il y a des particules de café sur le •
bord du ltre, l’empêchant d’être
bien scellé.
Le café est trop froid
L’appareil n’est pas réchauffé.•
Les tasses ne sont pas réchauffées.•
Le lait n’est pas assez réchauffé (si •
vous préparez un cappuccino ou un
latté) (Voir Moussage du lait).
GUIDE DE DÉPANNAGE

45
PROBLÈME CAUSES POSSIBLES
Le café est trop faible et goûte
l’eau
La mouture n’est pas assez fine •
(utilisez une mouture pour machines
à espresso)
Il n’y a pas assez de café dans le •
ltre.
Il n’y a pas la bonne quantité de •
café dans le ltre.
Le café n’est pas assez bourré.•
Il n’y a pas de créma
La mouture est trop grossière.•
Il n’y a pas assez de café dans •
le ltre.
Il n’y a pas la bonne quantité de •
café dans le ltre.
Le café n’est pas assez bourré.•
Le café n’est pas frais.•
L’appareil ne produit pas de vapeur
L’appareil n’est pas sous tension.•
Le réservoir est vide.•
Le sélecteur n’est pas à la position
de vapeur (STEAM).
La buse vapeur est bloquée •
(Voir Entretien et Nettoyage)
Le lait ne mousse pas
L’appareil ne produit pas •
sufsamment de vapeur
Le lait n’est pas frais ou froid•
La technique de moussage est
incorrecte (Voir Moussage du lait)
GUIDE DE DÉPANNAGE
46
DIFFÉRENTS TYPES DE CAFÉS
CAPPUCCINO
Un cappuccino est très léger et presque
tiède. Il se compose d’un tiers d’expresso,
d’un tiers de lait et d’un tiers de mousse.
ESPRESSO
Intense et aromatique, un expresso, ou
café corsé, est fait à partir d’environ 7 g
(0,3 oz) de café moulu. On le sert dans une
demitasse ou dans un verre jusqu’à une
hauteur d’environ 35 mm (11⁄2 po).
CAFFE LATTÉ
Servi dans un verre, le café au lait consiste
en un tiers d’expresso, garni de lait frappé
et d’environ 10 mm (1⁄2 po) de mousse.
MACCHIATO
Traditionnellement servi comme un
espresso, ce café peut également être un
café allongé avec une goutte de lait et une
bonne cuillerée de mousse.
ESPRESSO ALLONGÉ
Il s’agit d’un espresso simple ou double
allongé grâce à une plus grande quantité
d’eau que le traditionnel expresso.
RISTRETTO
Il s’agit d’un expresso bien tassé d’environ
15 mm (2⁄3 po); on le distingue par sa
saveur intense et le goût qu’il laisse dans
la bouche.

47
Breville®* garantit cet appareil contre
tous défauts causés par un matériau ou
une fabrication défectueux pendant une
période d’un an suivant la date du premier
achat par le consommateur. La présente
garantie ne couvre pas les dommages
dus aux abus, à la négligence, à un usage
commercial ou à tout autre usage non
précisé dans le mode d’emploi imprimé.
Aucune garantie ne couvre les pièces en
verre, les cruches en verre, les paniers-
filtre, les lames et les agitateurs. HWI
Breville dénie toute responsabilité en cas
de dommages ou pertes consécutifs à
l’usage de cet appareil.
TOUTE GARANTIE RELATIVE À LA
COMMERCIALITÉ OU À L’ADAPTATION DE
CE PRODUIT EST ÉGALEMENT LIMITÉE
À LA PÉRIODE D’UN AN PRÉVUE PAR LA
GARANTIE LIMITÉE.
Certains états ou provinces ne permettent
pas cette exclusion ou limitation des pertes
connexes ou consécutives et il se pourrait
donc que la dénégation qui précède ne
s’applique pas à vous.
La présente garantie vous accorde
certaines garanties juridiques particulières
et il se pourrait que vous ayez également
d’autres garanties juridiques susceptibles
de varier d’un état à l’autre ou d’une
province à l’autre.
Si l’appareil devient défectueux dans
les limites de la période de garantie, ne
retournez pas l’appareil au magasin.
Veuillez communiquer avec notre centre de
service à la clientèle.
Numéro de téléphone sans frais:
1-866-BREVILLE (1-866-273-8455)
Courriel:
AskUs@BrevilleUSA.com
AskUs@Breville.ca
*Les produits Breville sont distribués au Canada par
la compagnie Anglo Canadian L.P. et aux USA par
Metro/Thebe inc.
GARANTIE LIMITÉE D’UN AN

48
www.breville.com
Breville is a registered trademark of Breville Pty Ltd. A.B.N. 98 000 092 928.
USA: 19400 S.Western Ave, Torrance, CA90501-1119, Tel: 1 866 BREVILLE.
CANADA: 2555, Avenue de l’Aviation, Pointe-Claire (Montreal) Quebec, H9P2Z2. Tel: 1 866 BREVILLE
Copyright Breville Pty Ltd 2007. Due to continued product improvement, the products illustrated/photographed in this brochure may
vary slightly from the actual product.
Model BES250XL Issue NA-1/08
US Customers
Mail: 19400 S.Western Ave
Torrance
CA 90501-1119
Phone: Customer Service
1 (866) BREVILLE
Email: Customer Service
askus@brevilleusa.com
Canada Customers
Mail: Anglo Canadian
2555, Avenue de l’Aviation
Pointe-Claire (Montreal)
Quebec
H9P 2Z2
Phone: Customer Service:
1 (866) BREVILLE
Email: Customer Service
askus@breville.ca
Breville Customer Service Center
