Cover Bright Author User Guide 2.3
2016-03-31
: Brightsign Brightauthor Userguide 2.3 BrightAuthor_UserGuide_2.3 website s
Open the PDF directly: View PDF ![]() .
.
Page Count: 90
- Cover - pdf.pdf
- Table of Contents - pdf
- Ch 1 - Getting Started - pdf
- Ch 2 - Creating Presentations - pdf
- Ch 3 - TD1012 - pdf
- Ch 4 - BP900 and BP200 - pdf
- Ch 5 - Publishing Presentations - pdf
- Ch 6 - Setting up units - pdf
- Ch 7 - Customizing Presentations - pdf
- Ch 8 - Managing Your BrightSign and Local Network - pdf
- Ch 9 - FAQs - pdf
- Appendix A - pdf

User Guide
BrightAuthor Release 2.3
COMPATIBLE WITH
•
BrightSign HD110, HD210, HD210w, HD410, HD810, HD1010, HD1010w, and TD1012
www.brightsign.biz

ii
•
•
•
•
•
•
Copyright
Copyright © 2011 by BrightSign, LLC. All rights reserved. The BrightSign logo is a registered trademark of BrightSign,
LLC. Other brand and product names are trademarks or registered trademarks of their respective holders.

1
•
•
•
•
•
•
• • • • • •
Contents
Chapter 1
Getting Started . . . . . . . . . . . . . . . . . . . . . . . . . . . . . . . . . . . . . . . . . . . . . . . . . . . . . . . . . . 4
What is BrightAuthor? . . . . . . . . . . . . . . . . . . . . . . . . . . . . . . . . . . . . . . . . . . . . . . . . . . . . . . . . . 4
What kind of presentations can I create?. . . . . . . . . . . . . . . . . . . . . . . . . . . . . . . . . . . . . . . . 5
What type of layouts can I use?. . . . . . . . . . . . . . . . . . . . . . . . . . . . . . . . . . . . . . . . . . . . . . . . . 5
Step 1: Get the hardware you need . . . . . . . . . . . . . . . . . . . . . . . . . . . . . . . . . . . . . . . . . . . . . 5
Step 2: Install the BrightAuthor software. . . . . . . . . . . . . . . . . . . . . . . . . . . . . . . . . . . . . . . . 7
Step 3: Launch the BrightAuthor application. . . . . . . . . . . . . . . . . . . . . . . . . . . . . . . . . . . . 8
Step 3: Add your content . . . . . . . . . . . . . . . . . . . . . . . . . . . . . . . . . . . . . . . . . . . . . . . . . . . . . . 8
Step 4: Create your presentations . . . . . . . . . . . . . . . . . . . . . . . . . . . . . . . . . . . . . . . . . . . . . . 8
Step 5: Publish your presentations . . . . . . . . . . . . . . . . . . . . . . . . . . . . . . . . . . . . . . . . . . . . . 9
Chapter 2
Creating Presentations . . . . . . . . . . . . . . . . . . . . . . . . . . . . . . . . . . . . . . . . . . . . . . . . . .10
Creating a full-screen presentation . . . . . . . . . . . . . . . . . . . . . . . . . . . . . . . . . . . . . . . . . . . . 10
Creating a multi-zone presentation . . . . . . . . . . . . . . . . . . . . . . . . . . . . . . . . . . . . . . . . . . . 14
Making a presentation interactive . . . . . . . . . . . . . . . . . . . . . . . . . . . . . . . . . . . . . . . . . . . . . 19
Adding Lists, Live Text, and Interactive Menus to your playlists . . . . . . . . . . . . . . . . . 26
Adding commands to your playlists . . . . . . . . . . . . . . . . . . . . . . . . . . . . . . . . . . . . . . . . . . . 34
Creating a Dynamic Playlist . . . . . . . . . . . . . . . . . . . . . . . . . . . . . . . . . . . . . . . . . . . . . . . . . . .36

2
•
•
•
•
•
•
Chapter 3
The TD1012 . . . . . . . . . . . . . . . . . . . . . . . . . . . . . . . . . . . . . . . . . . . . . . . . . . . . . . . . . . . .38
Using your TD1012 BrightSign Unit. . . . . . . . . . . . . . . . . . . . . . . . . . . . . . . . . . . . . . . . . . . . 38
Chapter 4
BP900 and BP200 Button Boards . . . . . . . . . . . . . . . . . . . . . . . . . . . . . . . . . . . . . . . . .41
Creating BP900 and BP200 Interactive Events. . . . . . . . . . . . . . . . . . . . . . . . . . . . . . . . . . 41
Chapter 5
Publishing Presentations . . . . . . . . . . . . . . . . . . . . . . . . . . . . . . . . . . . . . . . . . . . . . . . .44
Publishing a presentation using Local Storage . . . . . . . . . . . . . . . . . . . . . . . . . . . . . . . . . 45
Publishing a presentation using BrightSign Network. . . . . . . . . . . . . . . . . . . . . . . . . . . 47
Publishing a presentation using a Local Network . . . . . . . . . . . . . . . . . . . . . . . . . . . . . . 50
Publishing a presentation using Simple File Networking . . . . . . . . . . . . . . . . . . . . . . . 53
Chapter 6
Setting Up Units. . . . . . . . . . . . . . . . . . . . . . . . . . . . . . . . . . . . . . . . . . . . . . . . . . . . . . . . .58
Adding BrightSign units to your BrightSign Network. . . . . . . . . . . . . . . . . . . . . . . . . . . 58
Adding BrightSign units to your Local Network . . . . . . . . . . . . . . . . . . . . . . . . . . . . . . . . 61
Adding BrightSign units to your Simple File Network . . . . . . . . . . . . . . . . . . . . . . . . . . 63
Setting up BrightSign units for standalone use. . . . . . . . . . . . . . . . . . . . . . . . . . . . . . . . . 66
Chapter 7
Customizing Presentations . . . . . . . . . . . . . . . . . . . . . . . . . . . . . . . . . . . . . . . . . . . . . .69
Setting zone properties . . . . . . . . . . . . . . . . . . . . . . . . . . . . . . . . . . . . . . . . . . . . . . . . . . . . . . . 69
Setting presentation properties . . . . . . . . . . . . . . . . . . . . . . . . . . . . . . . . . . . . . . . . . . . . . . . 73
Customizing template layouts . . . . . . . . . . . . . . . . . . . . . . . . . . . . . . . . . . . . . . . . . . . . . . . . 75
Setting default properties. . . . . . . . . . . . . . . . . . . . . . . . . . . . . . . . . . . . . . . . . . . . . . . . . . . . . 77
Chapter 8
Managing Your BrightSign Network . . . . . . . . . . . . . . . . . . . . . . . . . . . . . . . . . . . . . .80
Viewing unit status on your BrightSign Network . . . . . . . . . . . . . . . . . . . . . . . . . . . . . . . 80

3
•
•
•
•
•
•
Creating groups in your BrightSign Network. . . . . . . . . . . . . . . . . . . . . . . . . . . . . . . . . . . 81
Viewing presentation status on your BrightSign Network . . . . . . . . . . . . . . . . . . . . . . 81
Viewing your library on your BrightSign Network . . . . . . . . . . . . . . . . . . . . . . . . . . . . . . 82
View dynamic playlist status on your BrightSign Network . . . . . . . . . . . . . . . . . . . . . . 84
Viewing unit status on your Local Network . . . . . . . . . . . . . . . . . . . . . . . . . . . . . . . . . . . . 84
Using advanced tools . . . . . . . . . . . . . . . . . . . . . . . . . . . . . . . . . . . . . . . . . . . . . . . . . . . . . . . . . 85
Chapter 9
Frequently Asked Questions . . . . . . . . . . . . . . . . . . . . . . . . . . . . . . . . . . . . . . . . . . . . .86
Appendix A
Remote Control Protocols. . . . . . . . . . . . . . . . . . . . . . . . . . . . . . . . . . . . . . . . . . . . . . . .88

4
•
•
•
•
•
•
Chapter 1
• • • • • •
Getting Started
What is BrightAuthor?
BrightAuthor is a software application that helps you create presentations for your digital sign or kiosk. You can
play your BrightAuthor presentations on BrightSign models: HD110, HD210, HD210w, HD410, HD810, HD1010,
HD1010w, and TD1012. Your presentations can include any of the following types of content:
•
Images
•
Pre-recorded videos
•
Live videos (HD810, HD1010, and HD1010w)
•
Audio
•
RSS
•
Dynamic Playlists
•
SignChannel (HD210, HD210w, HD1010, HD1010w, and TD1012 only. Subscription required,
go to
www.signchannel.com
for details)
•
Text
•
Date or time

5
•
•
•
•
•
•
What kind of presentations can I create?
You can create two types of presentations with BrightAuthor:
•
Non-interactive:
A slide show or video that plays as a continuous loop. You can play non-interactive
presentations on all BrightSign models that are compatible with BrightAuthor.
•
Interactive:
A presentation that requires input from the user via a button board, keyboard, mouse, or similar
input device. To play interactive presentations, you must use an HD210, HD210w, HD410, HD810, HD1010,
HD1010w, or TD1012.
What type of layouts can I use?
You can choose from a variety of ready-to-use layout templates or create your own layout template. Layout
templates fall into two basic categories:
•
Full screen:
A slide show or video that occupies the full screen.
•
Multi-zone:
A presentation with different types of content in each region of the screen. The screen can
include one video zone, and multiple Clock, Text, Ticker, or Image zones.
Step 1: Get the hardware you need
To create presentations with BrightAuthor and play these presentations, you need the following:
•
Windows PC
•
BrightSign
•
Display
•
Storage card
•
Card reader/writer (optional if using USB storage)
•
Input device (optional)
See below for details on these requirements.

6
•
•
•
•
•
•
Windows PC
Any Windows PC that meets or exceeds the following
minimum
requirements:
•
2.3 GHz CPU
•
2 GB RAM required (4 GB recommended)
•
100 MB available hard disk space for program files (additional disk space required if storing content and/or
presentations on your hard disk)
•
One of these operating systems:
•
Windows Vista 32 or 64 bit
•
Windows7 32 or 64 bit
BrightSign
Any of the following models with firmware version 3.7.44 or later:
•
HD110
•
HD210 and HD210w
•
HD410
•
HD810
•
HD1010 and HD1010w
•
TD1012
Display
Any monitor, TV, or Elo touch screen with one of the following types of inputs:
•
VGA
•
Component (HD810, HD1010, and HD1010w only)
•
HDMI
Storage Media
Either of the following:
•
USB Flash Drive (HD810, HD1010, and HD1010w only)
•
SD card
•
SDHC card
Card Reader/Writer
(not required with USB Flash Drive) The card reader/writer must be connected to your PC
and must be compatible with your storage card.

7
•
•
•
•
•
•
Input device
(HD410, HD810, HD1010, HD1010w, and TD1012 only) One or more of the following types of
input devices:
•
Touch screen equipped with a touch controller that supports the standard HID specification. For a list of all
supported touch controllers, see the following link:
http://support.brightsign.biz/entries/262256-what-
touchscreens-can-i-use-with-the-brightsign.
(HD810, HD1010, and HD1010w only)
•
Many brands of USB Keyboards (HD810, HD1010, and HD1010w only)
•
Many brands of USB Mouse or Trackballs (HD810, HD1010, and HD1010w only)
•
Many brands of USB Bar Code Scanners (these appear as a keyboard; HD810, HD1010, and HD1010w only)
•
Quadravox Serial Button Board
•
AMX, Crestron, and similar control devices (serial & ethernet)
•
Any GPIO (open/close contact switch) button, signal, or LED (your custom board or LED display). USB button
boards can be purchased from the BrightSign website:
http://www.brightsign.biz/products/expansion_module.php
•
PC via serial port
•
IR remote control using the NEC Remote Control Protocols. You can purchase a compatible remote from
BrightSign (see
Appendix A
for remote control codes).
Step 2: Install the BrightAuthor software
Download the latest software and install it on your PC.
NOTE:
BrightAuthor requires the latest version of Microsoft .Net Framework. If this component is not already on
your PC, BrightAuthor installs it during the installation. However, if BrightAuthor needs to install Microsoft .Net
Framework, the installation may take up to 45 minutes to complete and you may need to restart your PC to
complete the installation process.
1Go to the BrightSign web site www.brightsign.biz/support.
2Click the BrightAuthor Downloads link.
3Follow the onscreen instruction to install the software on your PC.

8
•
•
•
•
•
•
Step 3: Launch the BrightAuthor application
1Double-click the BrightAuthor icon on your desktop.
2(Optional) If prompted, sign in to BrightSign Network (account required). See Publishing a presentation
using BrightSign Networkfor details.
Step 3: Add your content
Your BrightAuthor presentations can include the following types of media files:
•
Video files.
BrightSigns support the following video files encodings/compressions:
•
MPEG-2 (can be saved as a .mpg, .ts, or .vob container)
•
MPEG-1 (can be saved as a .mpg container)
•
H.264 (MPEG-4, Part 10) (can be saved as a .mp4, .mov, or .ts container)
For further details on video files encoding and support, see the following link:
http://support.brightsign.biz/entries/143091-what-video-formats-and-codecs-does-the-brightsign-support
•
Audio files.
BrightSigns support the following audio formats:
•
AAC (LC - Low complexity profile) at Constant Bit Rate, as part of a video file (.mp4, .mov, or .ts) at 44.1 KHz,
48 KHz
•
MP2 (MPEG-1 Layer 2) at Constant Bit Rate, as part of a video file (.mpg, or .ts) at 44.1 KHz, 48 KHz
•
MP3 at Constant Bit Rate, 44.1 KHz, 48 KHz, 32 KHz at up to 224 Kbps bitrate, as a standalone file (i.e. not
encoded as an audio track in a video file)
•
AC3 5.1 passed through (un-decoded, RAW data) HDMI. Audio streams in this format are supported by
BrightSigns, but will require an AC3 decoder (HDMI AV receiver).
•
Image files.
For still images, use BMP, PNG, and JPEG files. The maximum supported resolution is 1920x1080.
Step 4: Create your presentations
Now you’re ready to start using your BrightAuthor to create presentations. Just add your content and follow the
directions in the next chapter of this guide to create your presentations.

10
•
•
•
•
•
•
Chapter 2
• • • • • •
Creating Presentations
Creating a full-screen presentation
In a full-screen presentation, your images or video occupy the entire screen.
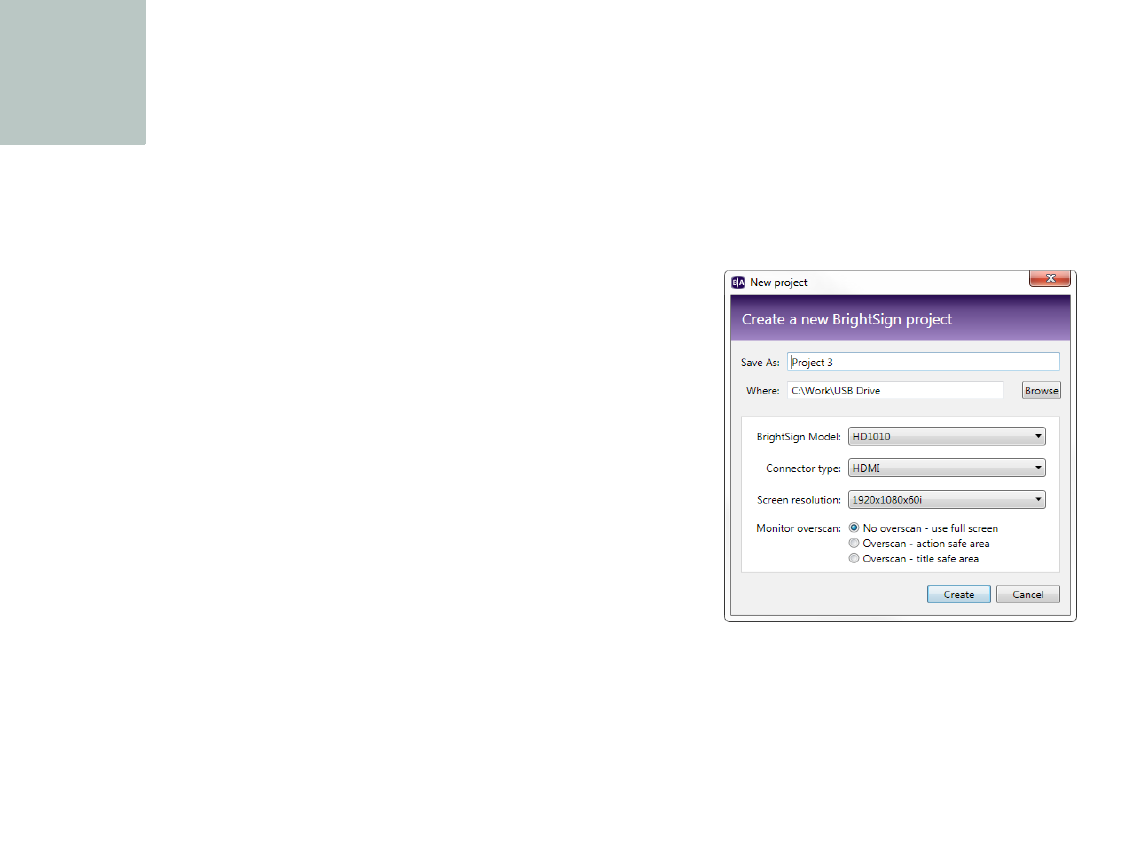
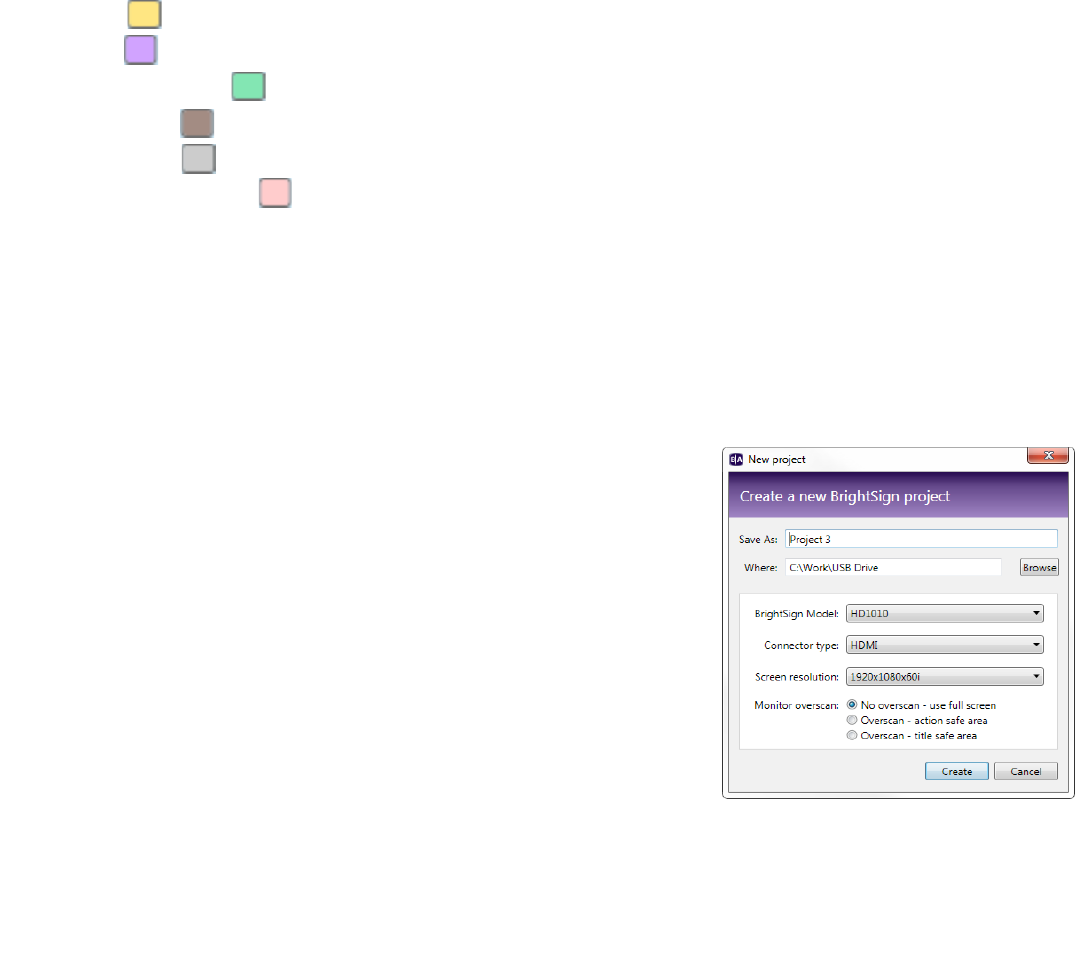
1Create a new presentation project:
a
Double-click the
BrightAuthor
icon on your desktop.
b
Click
File
>
New Presentation
TIP
:
If you don’t see
New Presentation
under
File
, make sure you have the
Edit, Publish, or Manage tab selected in the upper-left side of the screen.
c
In the
Create a new BrightSign project
window, enter a name for
the presentation in the
Save As
field.
d
In the
Where
field, enter the folder where you want to store the
presentation. Click
Browse
to navigate to the desired folder.
e
Select your
BrightSign Model
,
Connector type
, and
Screen
resolution
.
f
Select a
Monitor overscan
setting to control how the image fills the display screen:
•
No overscan:
Displays images all the way to the edge of the video signal.
•
Overscan action safe:
Restricts the image display to an area that is compatible with most displays.
11
•
•
•
•
•
•
•
Overscan title safe:
Restricts the image display to an area that is much smaller than the image generated
by the video signal.
NOTE:
Don’t be afraid to experiment to find the overscan setting that works best with your display.
g
Click
Create
.
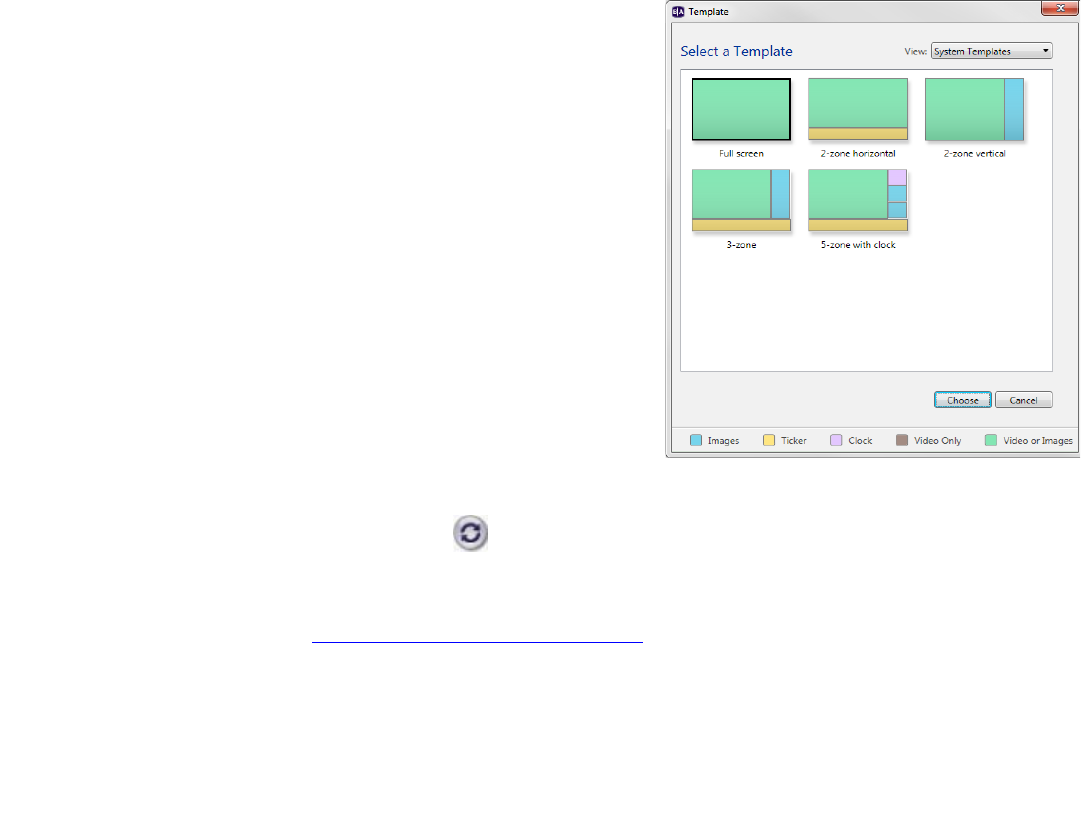
2Click the Full Screen template, and then click Choose.
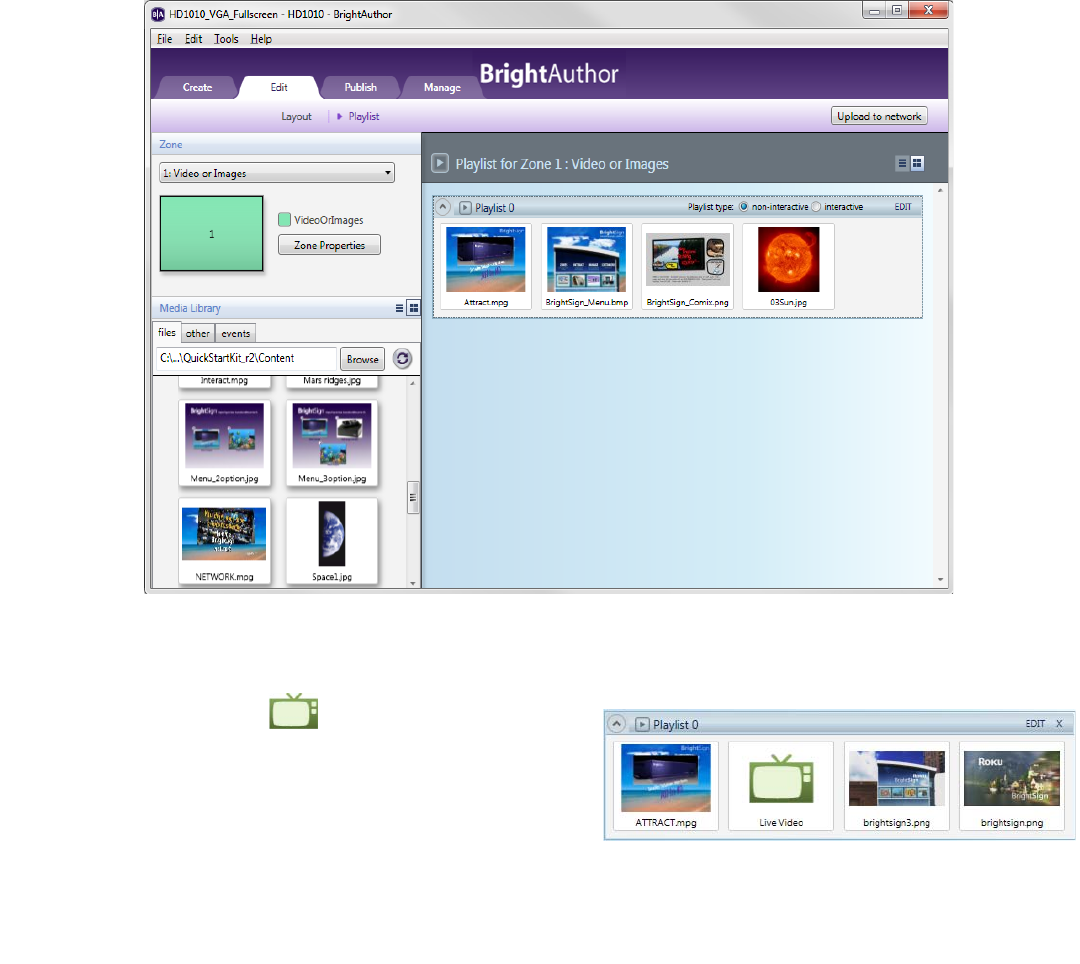
3Add your Media Library:
a
On the left side of the screen, under the file tab, click
Browse.
b
Navigate to the folder where your content is stored.
c
Click
OK
.
NOTE:
If you have a lot of large files in your content folder, it may take
a while for the thumbnail images to appear.
4Add media files to your presentation by dragging files from the
Media Library folders to the playlist area.
•
To select a series of adjacent media files, press
Shift+Click
as
you select the files.
•
To select a group of non-adjacent files, press
Ctrl+Click
as you
select the files.
•
To set the order in which files play, drag them to the playlist area
in the proper order. You can change the order of files already in
the playlist by clicking a file and dragging it to a new position.
•
To refresh the Media Library folders, click (next to the Browse button).
•
To remove an item from a playlist, highlight it in the playlist area and press
Delete
on your PC keyboard.
•
(HD210, HD210w, HD410, HD810, HD1010, HD1010w, and TD1012 only) To enable the presentation to
respond to user input, see
Making a presentation interactive
for details.
12
•
•
•
•
•
•
5HD810, HD1010, HD1010w, and TD1012 only (Optional) Add Live Video to your playlist:
a
Click the
Other
tab on the left side of the screen.
b
Drag the
Live Video
icon to the playlist area. To
add more than one live video sequence, drag the Live
Video icon to your playlist again for each sequence
you want to add.
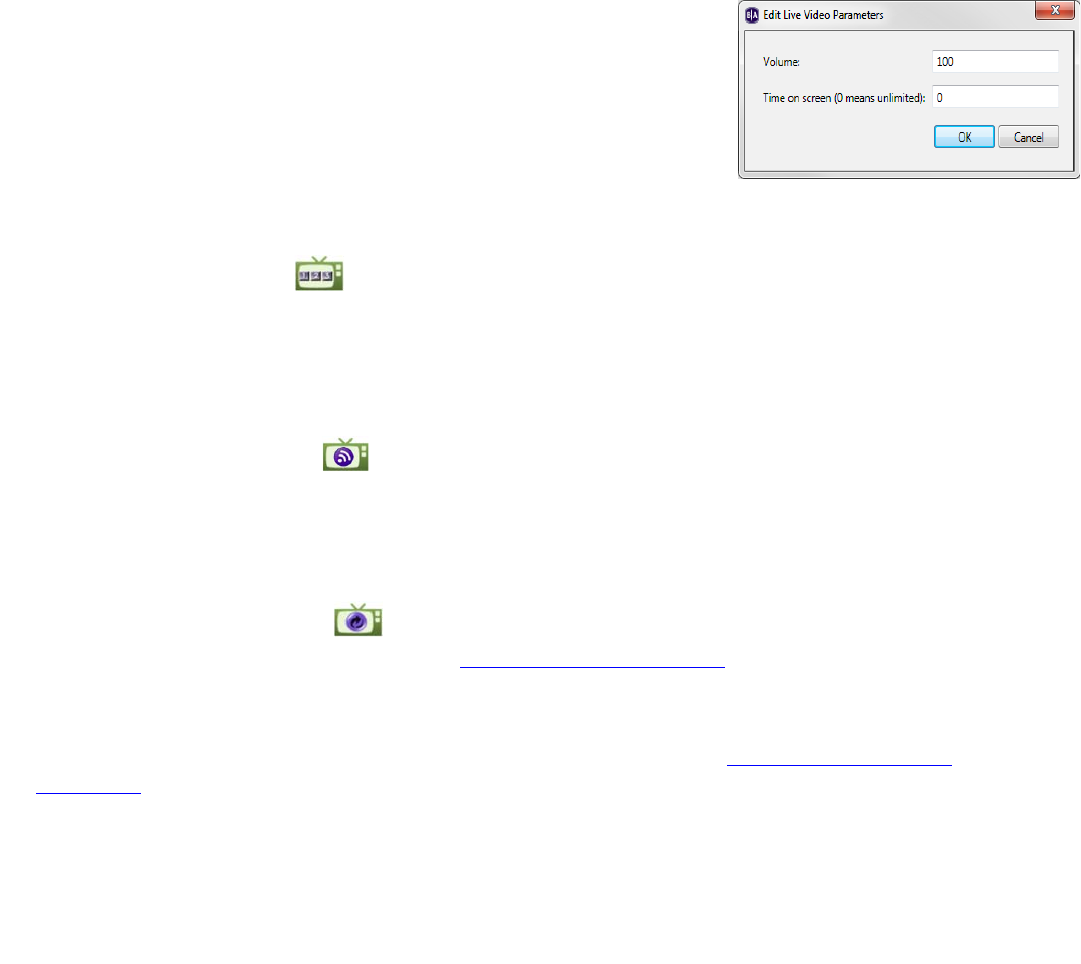
13
•
•
•
•
•
•
c
(Optional) Set the video volume: Right-click
Live Video
in the playlist
area, select
Edit
, and then enter the settings you want to apply to
the selected item.
TIP:
To remove a Live Video item from a playlist, highlight it in the playlist area
and press
Delete
on your PC keyboard.
6HD210, HD210w, HD1010, HD1010w, and TD1012only (Optional)
Add SignChannel content to your playlist:
a
Click the
Other
tab on the left side of the screen.
b
Drag the
SignChannel
icon to the playlist area.
TIP:
To remove a SignChannel item from a playlist, highlight it in the playlist area and press
Delete
on your PC
keyboard.
7HD210, HD210w, HD1010, HD1010w, and TD1012 only (Optional) Add Media RSS Feed to your playlist:
a
Click the
Other
tab on the left side of the screen.
b
Drag the
Media RSS Feed
icon to the playlist area. The
Add RSS
window will pop up. Type the URL for
the RSS feed and click
OK
.
8HD210, HD210w, HD1010, HD1010w, and TD1012 only (Optional) Add Dynamic Playlist content to your
playlist:
a
Click the
Other
tab on the left side of the screen.
b
Drag the
Dynamic Playlist
icon to the playlist area.
TIP:
To learn more about Dynamic Playlists, see
Creating a Dynamic Playlist
. To remove a Dynamic Playlist item
from a playlist, highlight it in the playlist area and press
Delete
on your PC keyboard.
NOTE
:
Although the Video List, Image List, Audio List, Live Text, and Interactive Menu icons appear under the
Other
tab, these options are only available for Interactive presentations. See
Making a presentation
interactive
for details.
14
•
•
•
•
•
•
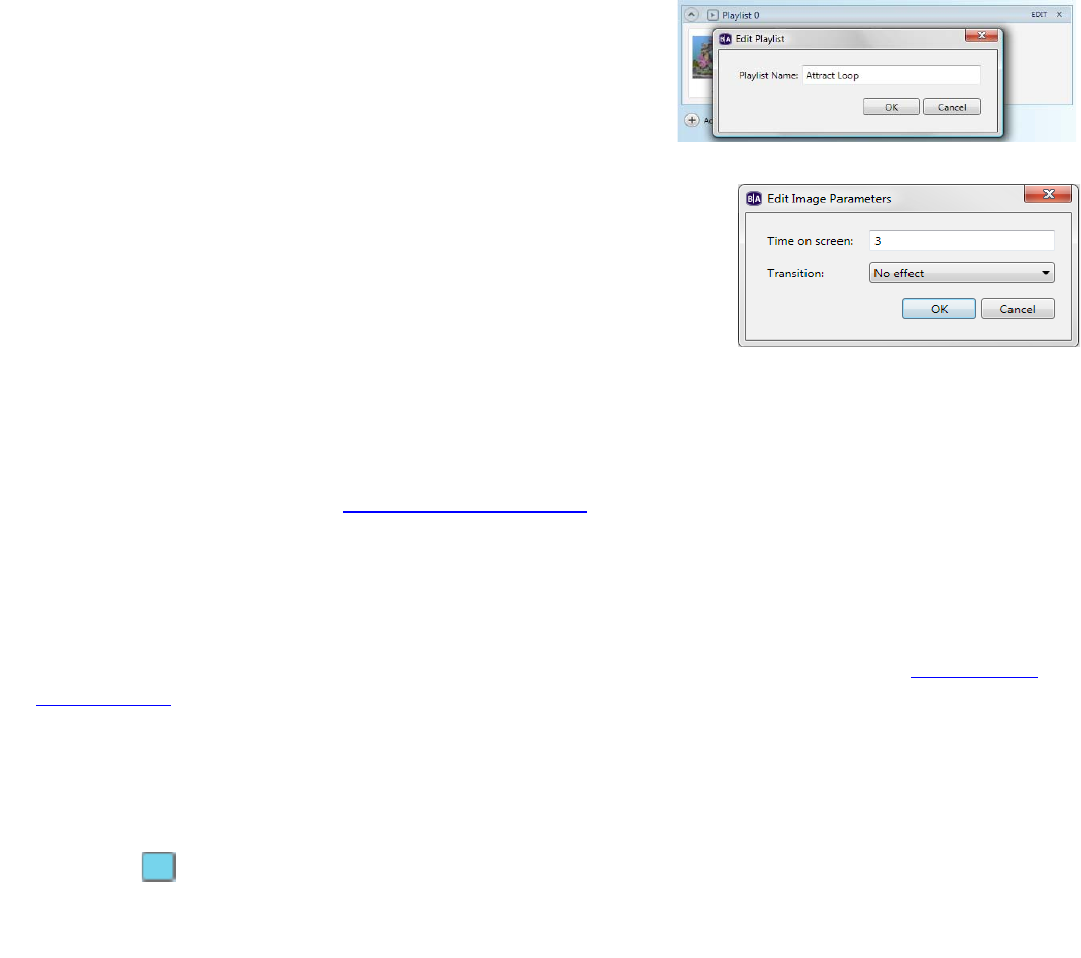
9(Optional) Rename the playlist:
a
Click
Edit
in the upper-right corner of the playlist area.
b
Enter a new name for the playlist.
c
Click
OK
.
10 (Optional) Set playback options:
•
To edit settings for a single item, right-click the thumbnail in the playlist
area, select
Edit
, and then choose the settings you want to apply to the
selected item.
•
To edit settings for multiple items, press
Ctrl+Click
to select the items
in the playlist area. On the menu bar, click
Edit
>
Selected Items
, and
then choose the settings you want to apply to all selected items.
11 On the menu bar, click File > Save… to store your presentation.
NOTE:
Make sure you have the Edit tab selected in the upper-left side of the screen. To save the presentation with
a different name or in a different folder, select
File
>
Save… As
. To export the presentation and associated
content, select
File
>
Export…
.
12 Publish your presentation. See Publishing Presentationsfor details.
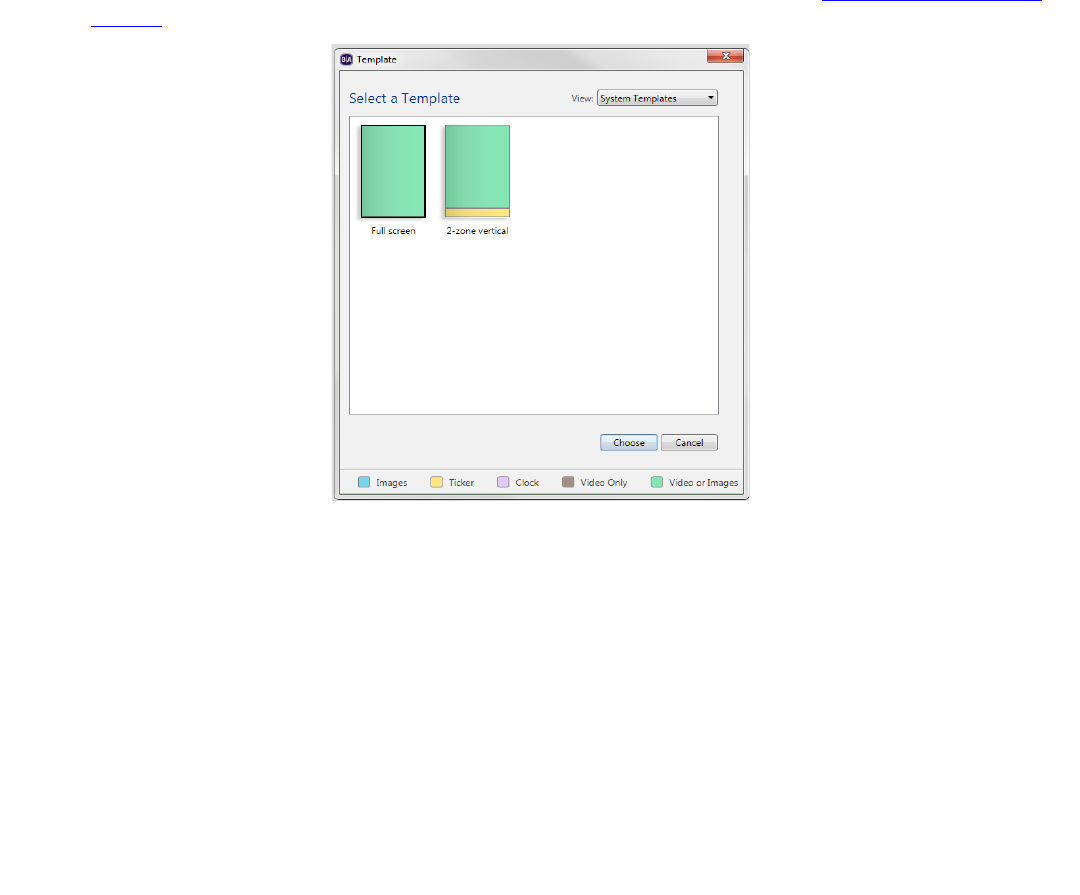
Creating a multi-zone presentation
In a multi-zone presentation, BrightAuthor divides the screen into rectangles called
zones
. You can play different
content in each zone and each zone supports a specific type of content. BrightAuthor provides a handful of
multi-zone templates. You can choose one of the existing templates, or create your own (see
Customizing
Presentations
).
When using a multi-zone template, you need to know which type of content you can include in each zone. The
color-coded key at the bottom of the template screen shows the available content types, and the color-coded
templates indicate which type of content you can include in each zone of the templates. The following list
describes the available content types:
•
Images
: Plays images. You can include multiple Images zones.
15
•
•
•
•
•
•
•
Ticker
: Plays an RSS feed or pre-defined text strings. You can include multiple Ticker zones.
•
Clock
: Displays the time or date. You can include multiple Clock zones.
•
Video or Images
: Plays videos and images. You can include only one Video or Images zone.
•
Video Only
: Plays videos. You can include only one Video Only zone.
•
Audio Only
: Plays audio. You can include multiple Audio Only zones.
•
Background Image :
Places an image in the background of your presentation. All other zones appear on
top of the background image. When using a background image, you cannot include a Video Only zone or a
Video or Images zone. You can include only one Background Image zone.
NOTE
:
You can include only one zone with video per presentation. Therefore you must choose between a Video or
Images zone, a Video Only zone, or a Background Image zone. You cannot have more than one of these zone types
in the same presentation.
1Create a new presentation project:
a
Double-click the
BrightAuthor
icon on your desktop.
b
Click
File
>
New Presentation
TIP
: If you don’t see
New Presentation
under
File
, make sure you have the
Edit, Publish, or Manage tab selected in the upper-left side of the screen.
c
In the
Create a new BrightSign project
window, enter a name for
the presentation in the
Save As
field.
d
In the
Where
field, enter the folder where you want to store the
presentation. Click
Browse
to navigate to the desired folder.
e
Select your
BrightSign Model
,
Connector type
, and
Screen
resolution
.
f
Select a
Monitor overscan
setting to control how the image fills the
display screen:
•
No overscan:
Displays images all the way to the edge of the video
signal.
16
•
•
•
•
•
•
•
Overscan action safe:
Restricts the image display to an area that is compatible with most displays.
•
Overscan title safe:
Restricts the image display to an area that is much smaller than the image generated
by the video signal.
2Click the multi-zone template you want to use, and then click
Choose.
3Add your Media Library:
a
On the left side of the screen, under the file tab, click
Browse.
b
Navigate to the folder where your content is stored.
c
Click
OK
.
NOTE:
If you have a lot of large files in your content folder, it may take
a while for the thumbnail images to appear.
4Add content to each zone in your playlist:
a
Click the zone you want to populate.
NOTE:
Each zone has its own playlist.
b
Under the
File
tab, drag items from the Media Library folders
to the playlist area. Click
Browse
to add more files to the Media
Library folders.
•
To select a series of adjacent files, press
Shift+Click
as you select the files.
•
To select a group of non-adjacent files, press
Ctrl+Click
as you select the files.
•
To set the order in which files play, drag them to the playlist area in the proper order. You can change the
order of files already in the playlist by clicking a file and dragging it to a new position.

17
•
•
•
•
•
•
c
Under the
Other
tab, you can add Live Video, SignChannel, Media RSS Feeds, and Dynamic Playlists.
•
(HD810, HD1010, HD1010w, and TD1012 only) To add live video, drag the
Live Video
icon to the
playlist area.
•
(HD210, HD210w, HD1010, HD1010w, and TD1012only) To add SignChannel content, drag the
SignChannel
icon to the playlist area.
•
(HD210, HD210w, HD1010, HD1010w, and TD1012 only) To add a media RSS feed, drag the
Media RSS
Feed
icon to the playlist area. The
Add RSS
window will pop up. Type the URL for the media RSS feed
and click
OK
.
18
•
•
•
•
•
•
•
(HD210, HD210w, HD1010, HD1010w, and TD1012 only) To add a Dynamic Playlist, click the
Other
tab on
the left side of the screen and drag the
Dynamic Playlist
icon to the playlist area. To learn more
about Dynamic Playlists, see
Creating a Dynamic Playlist
.
NOTE
:
Although the Video List, Image List, Audio List, Live Text, and Interactive Menu iconsappear under the
Other
tab, these options can only be used with interactive presentations. See
Making a presentation
interactive
for details.
d
RSS and Text feeds are added via the Ticker zone. These can only included text, unlike a media RSS feed
which can include audio, video, and images.
•
(HD210, HD210w, HD1010, HD1010w, and TD1012 only) To add an RSS feed (not Media RSS), select the
Ticker
zone, click the
RSS
tab drag the
New RSS Feed
icon onto the playlist, when prompted, enter
the URL, and then click
OK
. Repeat this step to add additional RSS feeds.
TIP
:
RSS feeds are ideal for instant textual updates from sources such as Twitter. Simply add the URL for the Twitter
feed in a Ticker zone and all new tweets will instantly reach your presentations.
•
To add a text feed, create a text file that contains the text. Insert a line break between each text item in the
text file. Save the text file and place it in your Media Library folder. Select the
Ticker
zone, click the
Text
tab, and then drag the text file
into the playlist. Repeat this step to add additional text files.
e
Repeat steps a - d for the remaining zones.
•
To remove an item from a playlist, highlight it in the playlist area and press
Delete
on your PC keyboard.
•
(HD210, HD210w, HD410, HD810, HD1010, HD1010w, and TD1012 only) To enable the presentation to
respond to user input, see
Making a presentation interactive
for details.
f
Repeat steps a and b for the remaining zones.
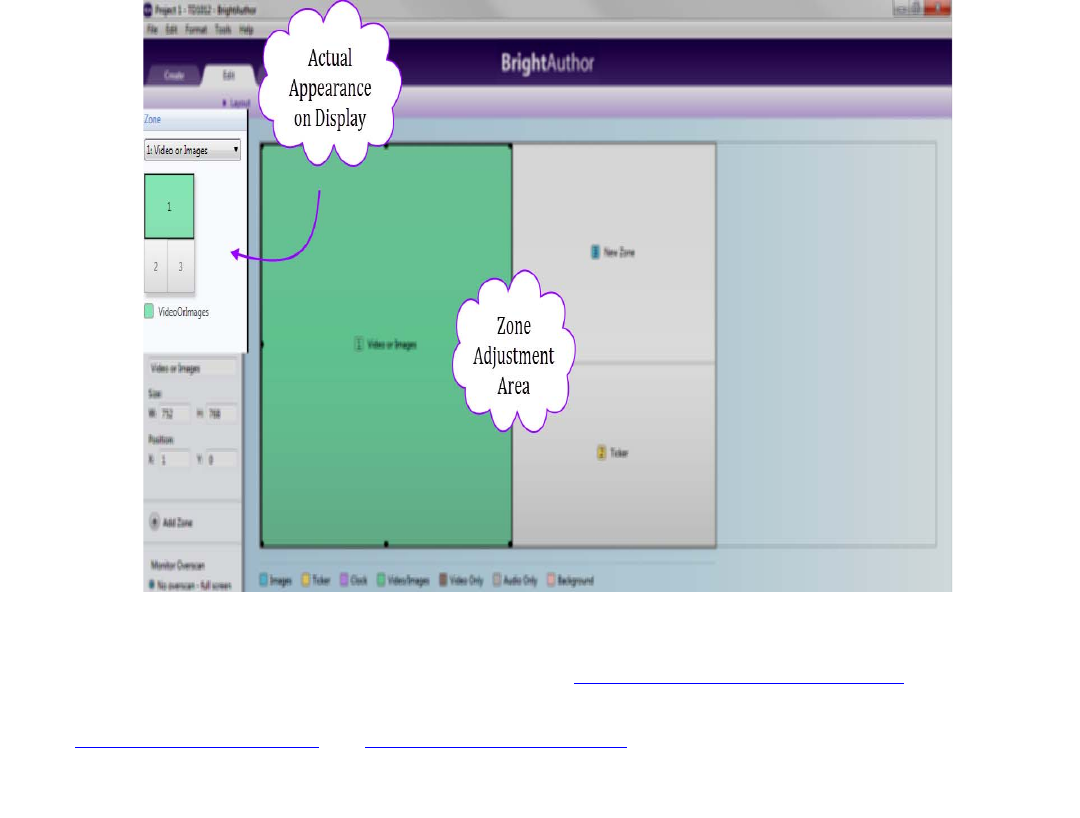
5Click the Layout tab to add new zones or adjust the position of your zones. To add a new zone, click the
Add Zone button. To adjust the position and size of zones, drag and resize in the horizontal rectangle to
the right. See Customizing template layouts for details.
6(Optional) Set playback options:
•
To edit settings for a single item, right-click the thumbnail in the playlist area and select
Edit
, and then choose
the settings you want to apply to the selected item.

19
•
•
•
•
•
•
•
To edit settings for multiple items, press
Ctrl+Click
to select the items in the playlist area. On the menu bar,
click
Edit > Selected Items
, and then choose the settings you want to apply to all of the selected items.
7(Optional) Rename the playlists:
a
For each playlist, click
Edit
in the upper-right corner of the playlist area.
b
Enter a new name for the selected playlist.
c
Click
OK
.
8(Optional) Set zone properties.
See
Setting zone properties
for details.
9On the menu bar, click File > Save… to store your presentation.
NOTE:
Make sure you have the Edit tab selected in the upper-left side of the screen. To save the presentation with
a different name or in a different folder, select
File
>
Save… As
. To export the presentation and associated
content, select
File
>
Export…
.
10 Publish your presentation. See Publishing Presentations for details.
Making a presentation interactive
You can use BrightAuthor to make presentations interactive. Interactive presentations respond to interactive
events, such as input from buttons or other GPIO devices, or from devices connected to a BrightSign
communication port. The supported communication methods vary by BrightSign model.
RS232 serial devices:
HD410, HD810, HD1010, HD1010w, and TD1012
USB devices (such as
touch screens, mice, keyboards, barcode scanners, IR remote controls):
HD810,
HD1010, and HD1010w (see
Appendix A
for remote control codes)
Ethernet devices:
HD210, HD210w, HD1010, and HD1010w
1Open a presentation project:
NOTE
:
If you haven’t already created a presentation project, see
Creating a full-screen presentation
or
Creating
a multi-zone presentation
for details.
a
Double-click the
BrightAuthor
icon on your desktop.
20
•
•
•
•
•
•
b
On the menu bar, click
File > Open Presentation
.
NOTE
: If you don’t see
New Presentation
under
File
, make sure you have the Edit, Publish, or Manage tab
selected in the upper-left side of the screen.
c
Select the presentation you want to open.
d
Click
Open
.
2Choose the Home screen:
The
Home
icon identifies the Home screen in your playlist. The Home screen is the first media file (video
or image) in the playlist, and it is where the presentation begins. It usually includes either of the following:
•
An attract video that loops until the user provides input
•
A list of options from which the user can choose the next action
By default, the first item you drag into the playlist will become the
Home screen. You can switch the Home Screen at any time by double-
clicking the desired file in the playlist, checking the
Set as initial state
box, and clicking
OK
. To choose the Home screen, do the following:
a
Click the
Edit
tab.
b
On the left side of the screen, click any zone (except a ticker or
clock zone) that you want to make interactive.
c
On the right side of the playlist area, click
interactive
.
d
Drag the media file you want to use as the first file in your presentation (Home screen) to the playlist.
Repeat steps b – d for any other zones you want to make interactive.
21
•
•
•
•
•
•
3If you haven’t already done so, add media files to each of the zones in your presentation. See Creating a full-
screen presentation or Creating a multi-zone presentation for details.
4Define interactive events:
a
In the playlist toolbar above the media files in the playlist area, click the interactive event icon you want to
define. For example, to define what happens when the user presses button 1 on a button board, click .
22
•
•
•
•
•
•
b
Click the file name below the thumbnail image (the pointer becomes a hand). This media file (referred to as
the Initial state or Start state) is what the user sees before performing the interactive event you are about to
define.
NOTE
: The first interactive event must begin with the Home screen.
c
Drag the hand pointer to the thumbnail image of the media file you want to play when the user presses the
button you selected in step (a). This second media file is referred to as the Next state or New state.
d
Repeat steps a – c to define the remaining interactive events.
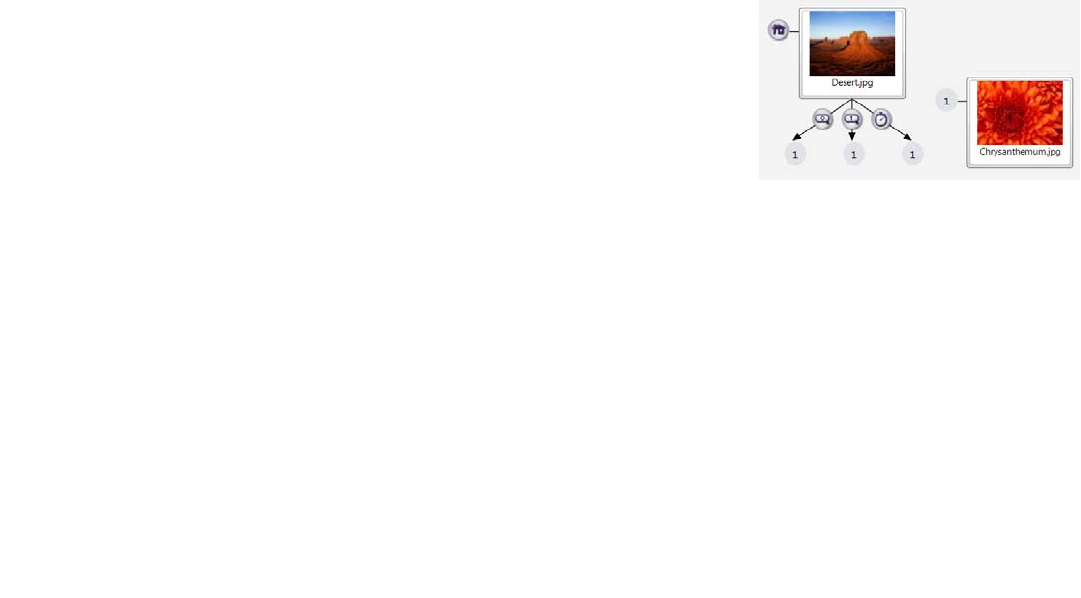
Subsequent interactive events can start with any item and correspond to any other item in the playlist. For
example, you can set the first interaction to display an image when the user presses button 1 from the
Home screen. By defining a new event with the same event icon, you can set a second interaction to
display another media file when the user presses button 1 again while the first image is displayed.
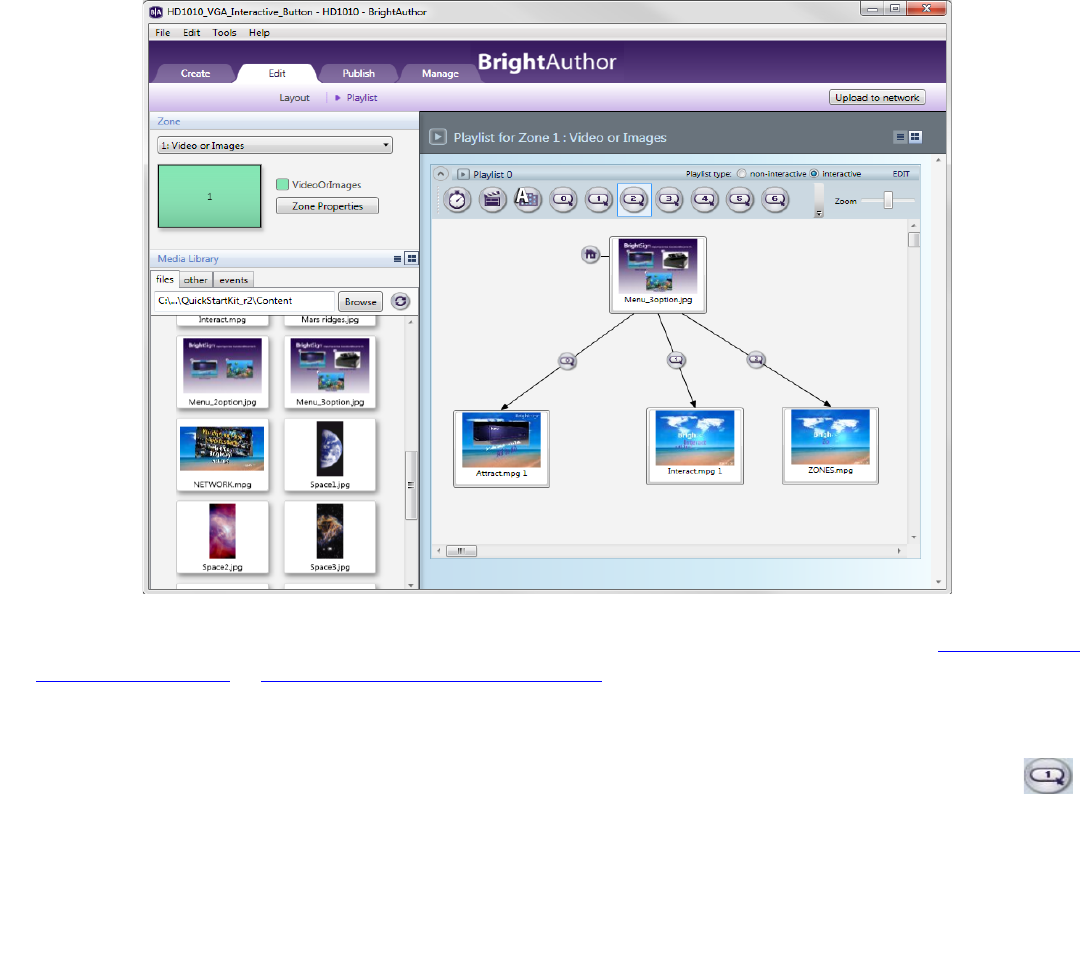
Multiple interactive events can be utilized to transition from the Initial
state to the Next state. Y
ou can also apply interactions to multiple items
(except for touch events). To select consecutive items, press
Shift
and click
the first and last items. To select non-consecutive items, press and hold
Ctrl
while clicking the items. To select all items, press
Ctrl + A
. Then, define the
interactive event from one selected media file and it will be created for all
selected files.
If you don’t see the button you want in the playlist toolbar, click the arrow to the left of the Zoom control.
Here, you can add or remove event icon buttons from your toolbar. You can also access Event icons by
clicking the events tab under Media Library.
When creating an event with an Event icon from the events tab, drag the event icon onto the thumbnail
of the media file you want to be the Initial state. A window will automatically pop up. Here, you can specify
which media file you want to be the Next state. See below step (e) for details.
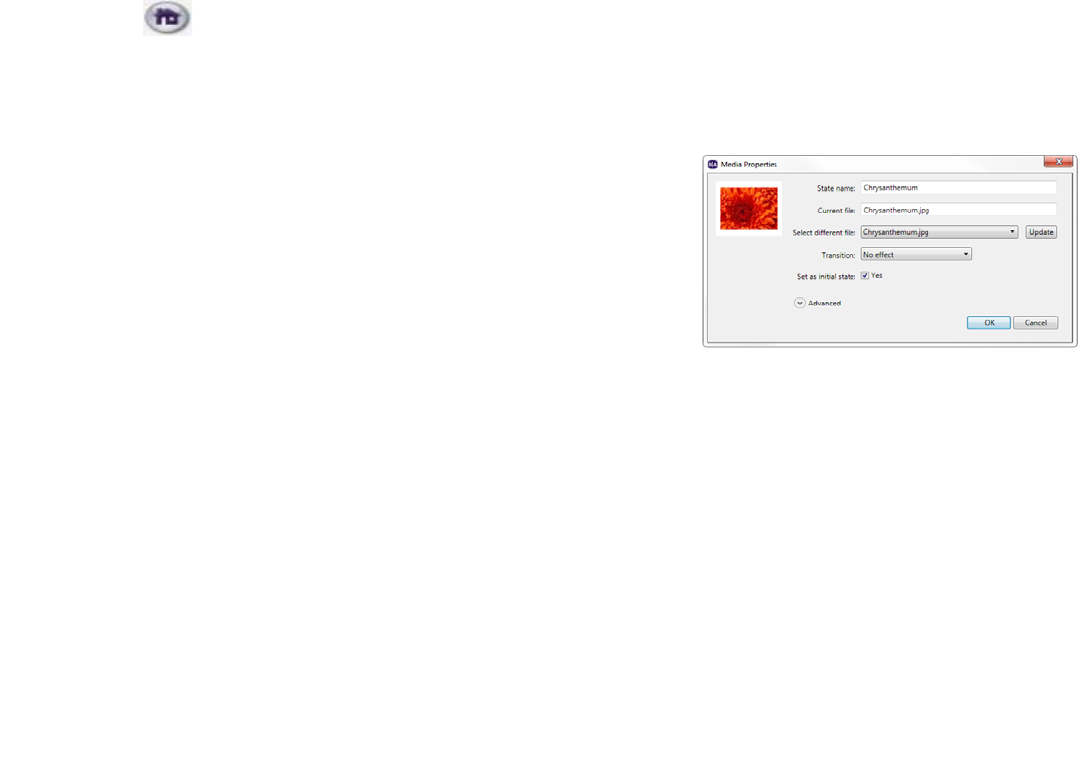
eYou can further adjust how your media files transition from state to state by double-clicking the event
icon you created in step (c).

23
•
•
•
•
•
•
For example, if you create an event with the Timeout Event icon, the media file displayed in your presentation
will transition to the next state after a certain period of time. You can adjust this time period by double-clicking
the Timeout Event icon between the two media files and changing the duration in the
Timeout Event
window
that pops up.
The window that pops up when double-clicking a created event icon is the same window that
automatically pops up when you drag an event icon from the events tab. Each window will present
options specific to the type of interactive event chosen. However, every event window displays the
following options:
•
Transition to new state
: Specify which media file in your playlist will be the next state when the
interactive event is performed.
•
Return to prior state
: If you select this option, the presentation will revert to the previous media file when
the interactive event is performed.
•
Remain on current state
: If you select this option, the state will not change when the interactive event is
performed. This option is useful for creating changes within one media file. You can create these changes
by adding Commands. See
Adding commands to your playlists
for details.
•
Advanced
: Click the
Advanced
arrow to reveal the display options and Commands section.
Here you can
set how you view the interactive events between states in the playlist area. Show line draws a line
between the media files. Show label creates a label either to the Right or Bottom of the media file
which indicates transitions from states. See Adding commands to your playlistsfor details on
Commands.
f
You can delete a defined event at any time by click the event icon and pressing
Delete
on your keyboard.
24
•
•
•
•
•
•
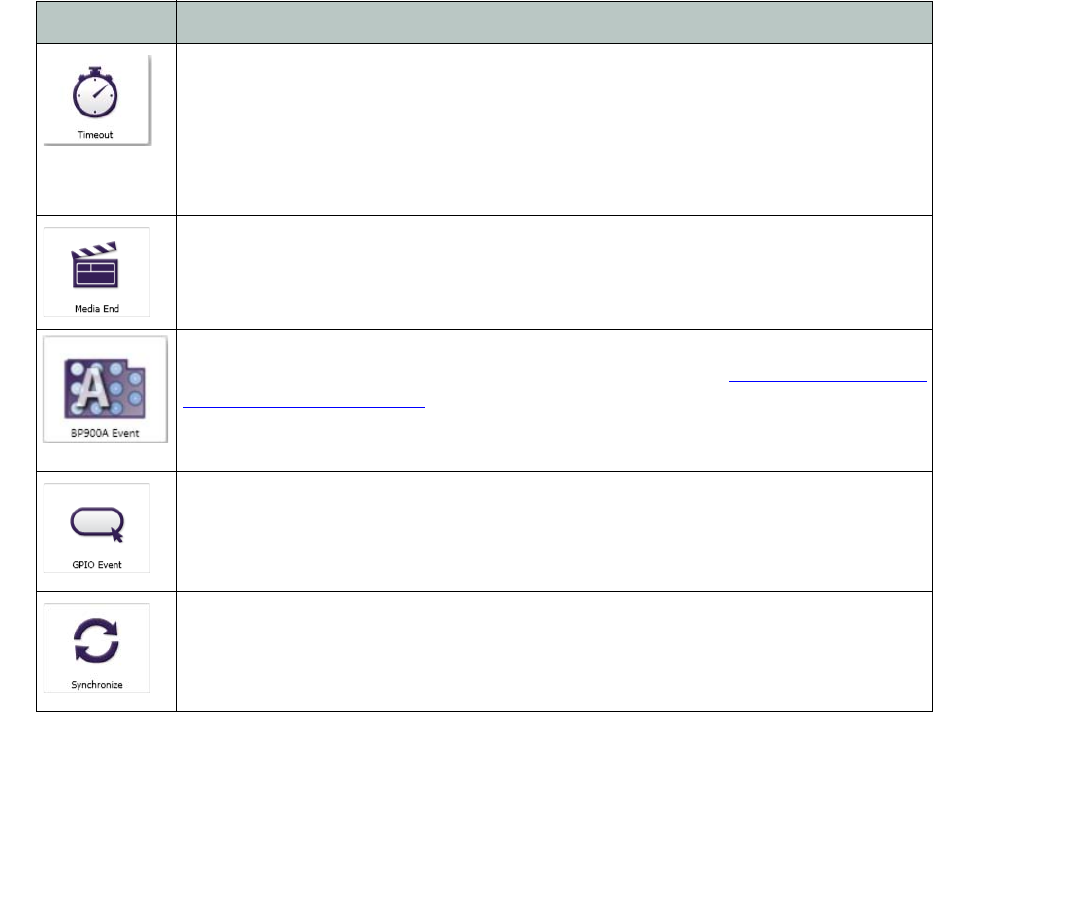
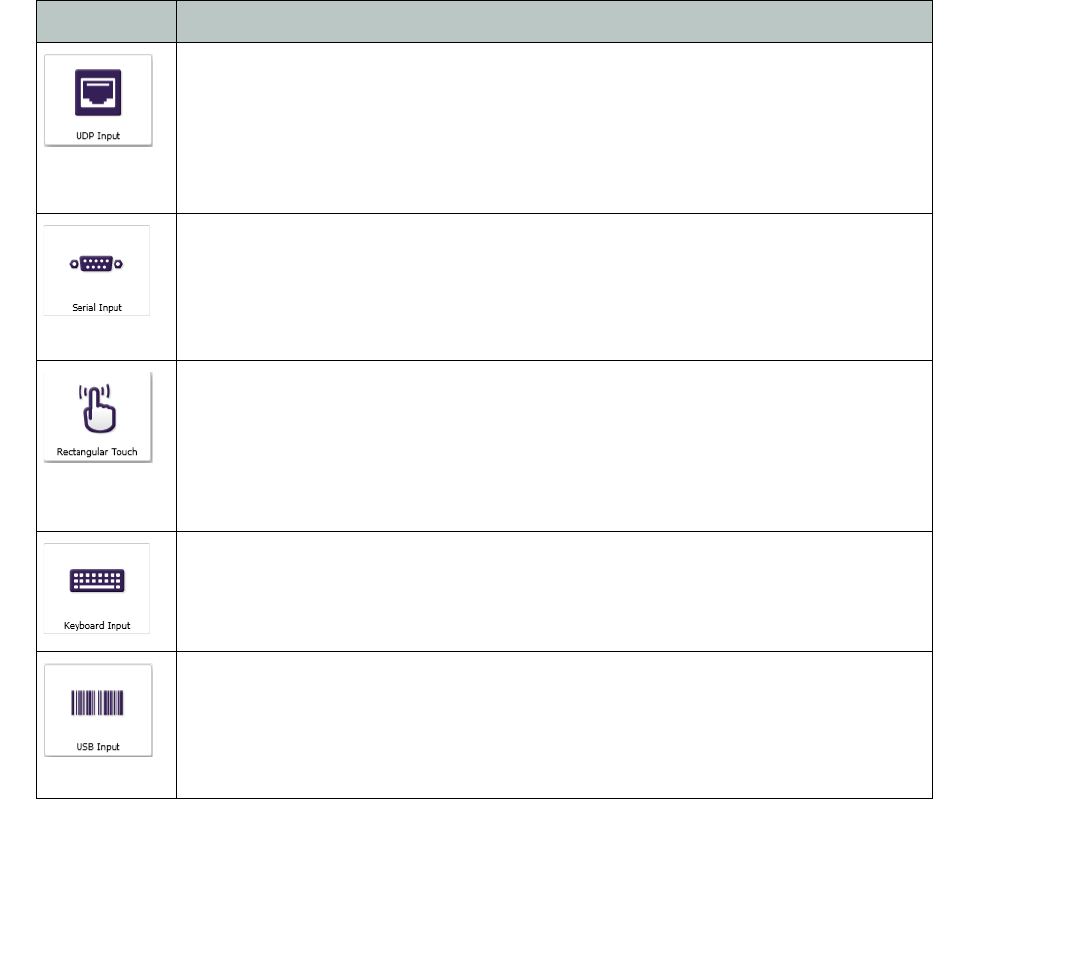
Interactions can include any of the following events:
Event Icon Description
Displays an item for a predetermined period of time before the next action occurs
automatically. To create a Timeout event, drag the
Timeout
icon onto the item to which it
applies and then drag to the target item. To define the length of the timeout interval double-
click the
Timeout
icon below the item to open the Timeout Event window. In the
Specify
timeout (seconds)
field, enter the number of seconds you want the item to display, and
then click
OK
.
Sets the action that occurs after a video or audio file finishes playing.
Sets the action that occurs when a specific BP900 or BP200 button is pressed. There are six
icons: BP900A, BP900B, BP900C, BP200A, BP200B, and BP200C. See
Creating BP900 and
BP200 Interactive Events
for details.
Sets the action that occurs when a specific GPIO button/input is pressed or activated. By
default, the playlist toolbar includes several GPIO buttons which you can use to define
interactions. To define a GPIO interaction, click the GPIO button on the Event bar and then
drag a line from the trigger item to the target item.
Synchronizes content with another BrightSign on the same network. To define the
connection, drag the
Synchronize
icon onto the item to which it applies. When the
Synchronize Event window opens, enter the trigger in the
Specify synchronization
keyword
field, and then click
OK
.
25
•
•
•
•
•
•
Sets the action that occurs when BrightSign receives input from a network device. Use this
event when you want an external device to control BrightSign using UDP (User Datagram
Protocol or Universal Datagram Protocol). To define the trigger, drag the
UDP Input
icon
onto the item to which it applies and then drag to the target item. When the UDP Input
Event window opens, enter the network address for the external device in the
Specify UDP
input
field, and then click
OK
.
Sets the action that occurs when BrightSign receives specific input from a device connected
to the serial port. To define the input, drag the
Serial Input
icon onto the item to which
it applies and then drag to the target item. When the Serial Input Event window opens,
enter the serial string that triggers the next event in the
Specify serial input
field, and
then click
OK
.
Sets the action that occurs when the user touches the specified rectangular area on a
touchscreen. To define the area, drag the
Rectangular Touch
icon onto the item to which it
applies and then drag to the target item. When the Add Touch Event window opens, drag
the box to resize the touch area (or enter the exact
Size
and
Position)
. To add additional
touch regions to the selected item, click
Add Touch Region
,
and define the parameters, and
then click
OK
.
Sets the action that occurs when BrightSign receives specific input from a keyboard. To
define the keyboard input, drag the
Keyboard Input
icon onto the item to which it applies.
When the Keyboard Input Event window opens, enter the keyboard input that triggers the
next event in the
Specify keyboard input
field, and then click
OK
.
Sets the action that occurs when BrightSign receives input from a device connected to the
USB (Universal Serial Bus) port. To define the trigger, drag the
USB Input
icon onto the item
to which it applies and then drag to the target item. When the USB Input Event window
opens, enter the USB input that triggers the next event in the
Specify USB input
field, and
then click
OK
.
Event Icon Description
26
•
•
•
•
•
•
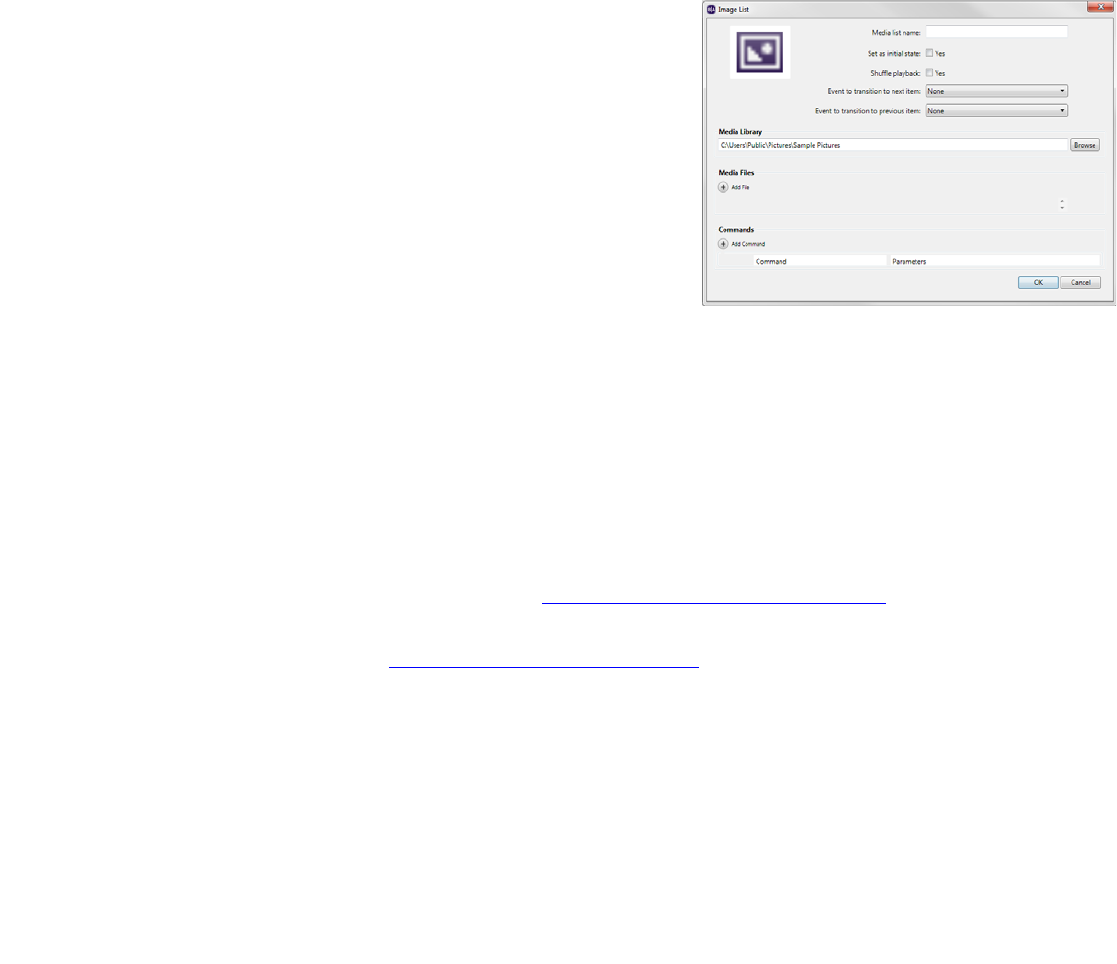
Adding Lists, Live Text, and Interactive Menus to your playlists
Under the
Other
tab, the Video List, Image List, Audio List, Live Text, and Interactive Menu icons are displayed.
These choices can only be used with interactive presentations.
aThe List icons allow you to create a list of media files which will appear as one thumbnail in your playlist
area. This is convenient when creating a presentation with many items. Rather than populating your
playlist with many thumbnails of individual items, you can isolate the Video, Image, and Audio files into
one thumbnail each. To use a list, drag the icon into your playlist area. A window will pop up displaying
the following options:
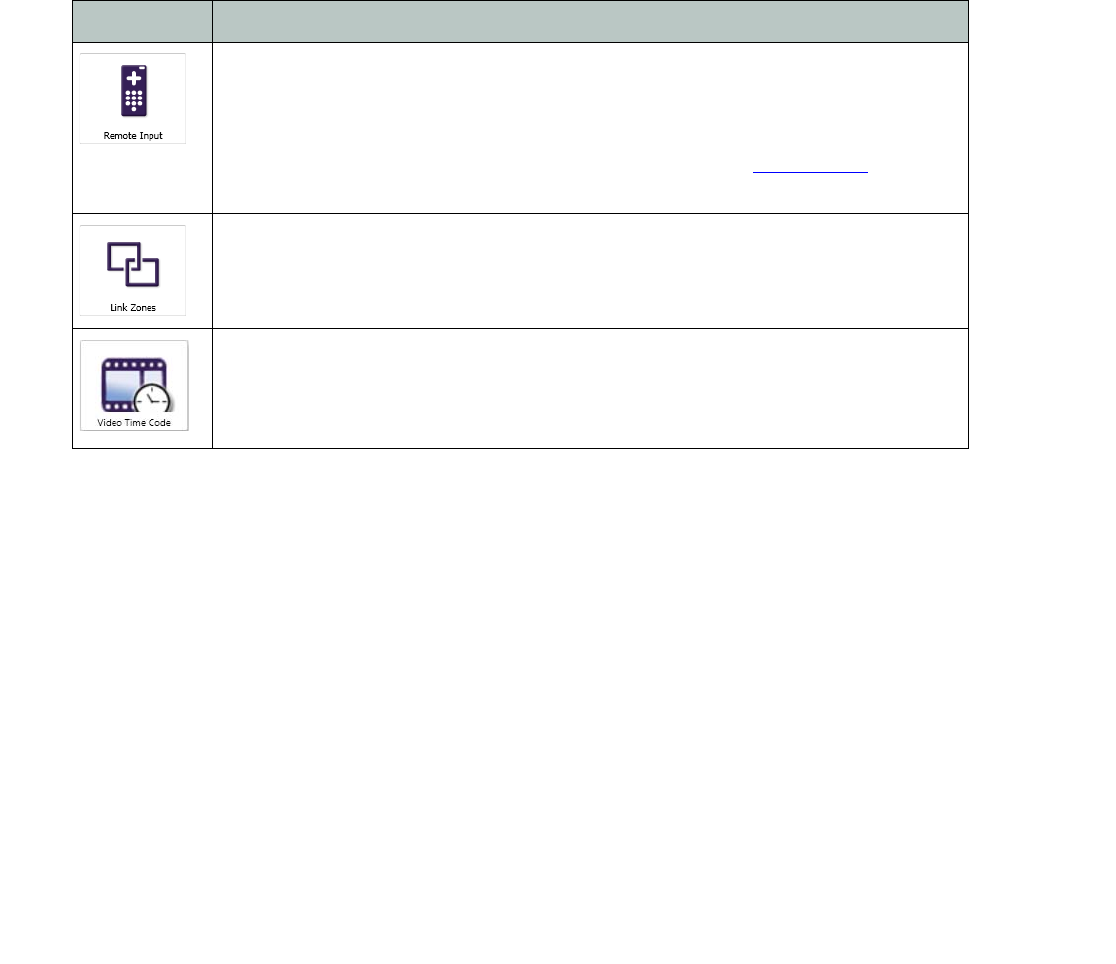
Sets the action that occurs when BrightSign receives specific input from a remote control
(Iguanaworks USB transceiver required). To define the remote input, drag the
Remote Input
icon onto the item to which it applies and then drag to the target item. When the Remote
Input Event window opens, enter the remote character that triggers the next event in the
Specify remote input
field, and then click
OK
. For more info, see
Appendix A
for remote
control codes.
Synchronizes content in another zone. To define the link, drag the
Link Zones
icon onto the
item to which it applies. When the Link Zones Event window opens, enter the trigger in the
Specify link keyword
field, and then click
OK
.
Performs commands at specific times during video playback. To define the commands and
times, drag the
Video Time Code
icon onto the video to which it applies. When the Video
Time Code Events window opens, click
Add Time Code
, enter the
Timeout
interval, select
the
Command
and
Parameters
from the corresponding lists, and then click
OK
.
Event Icon Description
27
•
•
•
•
•
•
•
Media list name
: Create a unique name for the list.
•
Set as initial state
: Click this box to set the list as your
Home screen.
•
Shuffle playback
: Click this box to randomize the order in
which the files are played from the list.
•
Event to transition to next item
: Select what interactive
event allows the user to transition to the next file in the list.
•
Event to transition to previous item
: Select what
interactive event allows the user to transition to the
previous file in the list.
NOTE
: With Lists, you can transition to the next or previous file in the
list, or randomize the order by selecting the Shuffle playback
option. However, you may not select specific files to transition to
within the list.
•
Media Library
: Click the
Browse
button to select the folder that contains all the files you want to include
in the list.
•
Media Files
: Add individual files to the list by clicking the
Add File
button. The files available will only be
those contained in the folder you selected in Media Library above. When a file appears in the list, click the
arrow and select the specific file you want from the drop-down list.
•
Commands
: Add commands to the list. See
Adding commands to your playlists for
details.
NOTE
:
Click File > Presentation Properties and navigate to the Media List tab to edit features of your
Video, Image, or Audio list(s). See Setting presentation properties for details.
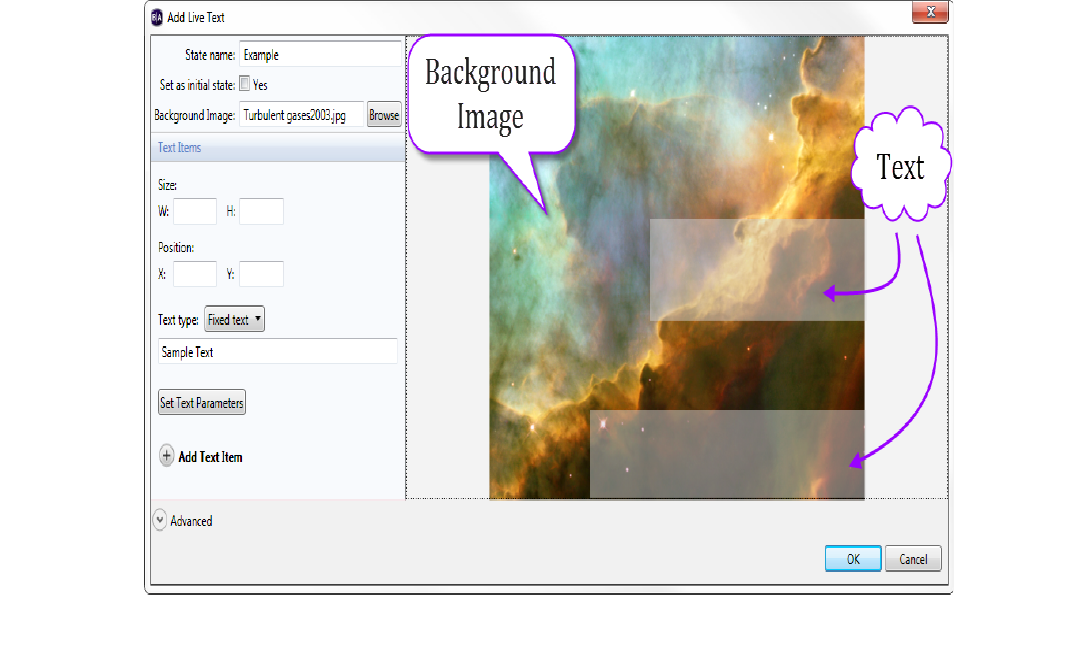
bLive Text is an image you can create directly with BrightAuthor that functions like a media file in your
playlist. This option allows you to create and edit one or more text fields over a background image.
With Live Text, you can type any message, place it over any image, and display it at a time of your
choosing.
The possibilities with Live Text are vast because you have the freedom to create and customize your own text
based media. To use Live Text, drag the Live Text icon to the playlist area. The
Live Text
window will pop up
displaying the following options:
28
•
•
•
•
•
•
•
State name
: Here, you can type a unique name for the Live Text state you are creating.
•
Set as initial state
: Click this box to make the Live Text image your Home screen.
•
Background Image
: Click
Browse
to locate and select an image you want to be your background.
•
Size
: Adjust the size of your text fields. The
W
field corresponds to the width of the text. The
H
field
corresponds to the height of the text.
•
Position
: Adjust the position of your text fields. The
X
field corresponds to the position of the text on a
horizontal axis. The
Y
field corresponds to the position of the text on a vertical axis.
NOTE
: Alternatively, you can click the text fields displayed over the background image and change their size and
location with the pointer.

29
•
•
•
•
•
•
•
Text type
: Select either a Fixed text or System variable. With Fixed text, you can type whatever text you
want to appear over the background image. Simply type the desired text in the field below. The System
variable option displays a predefined text such as the Serial number of your BrightSign unit. After selecting
System variable, a drop-down list will appear displaying the available text options.
•
Set Text Parameters
: Adjust various aspects of the text. These include Number of Lines, Rotation,
Alignment, Foreground Text Color, Background Text Color, Transparency, Font, Background Bitmap, and
Safe Text Region. See
Setting zone properties
for details on these options.
•
Add Text Item
: Click to add a new text field. Each new text field will appear in the area to the right.
NOTE
: Although the actual text does not appear in the text fields over the background image, by clicking each text
field, you can see the corresponding text in the field where it was originally typed.
•
Advanced
: Under the advanced menu, you can add Commands. See
Adding commands to your playlists
for details.
NOTE
:
Live Text can be used in an Image or Video/Images zone, not in a Ticker zone.
c
The Interactive Menu allows you to create DVD style menus which users can navigate across with interactive
events. You can link media files to items in the menu, which allows users to transition to new states via
interactive events. Interactive Menus make great Home screens because they can serve as a bridge to many
items and outline everything available for the user to explore. To use an Interactive Menu, drag the
Interactive Menu icon to the playlist area. The
Interactive Menu
window will pop up.
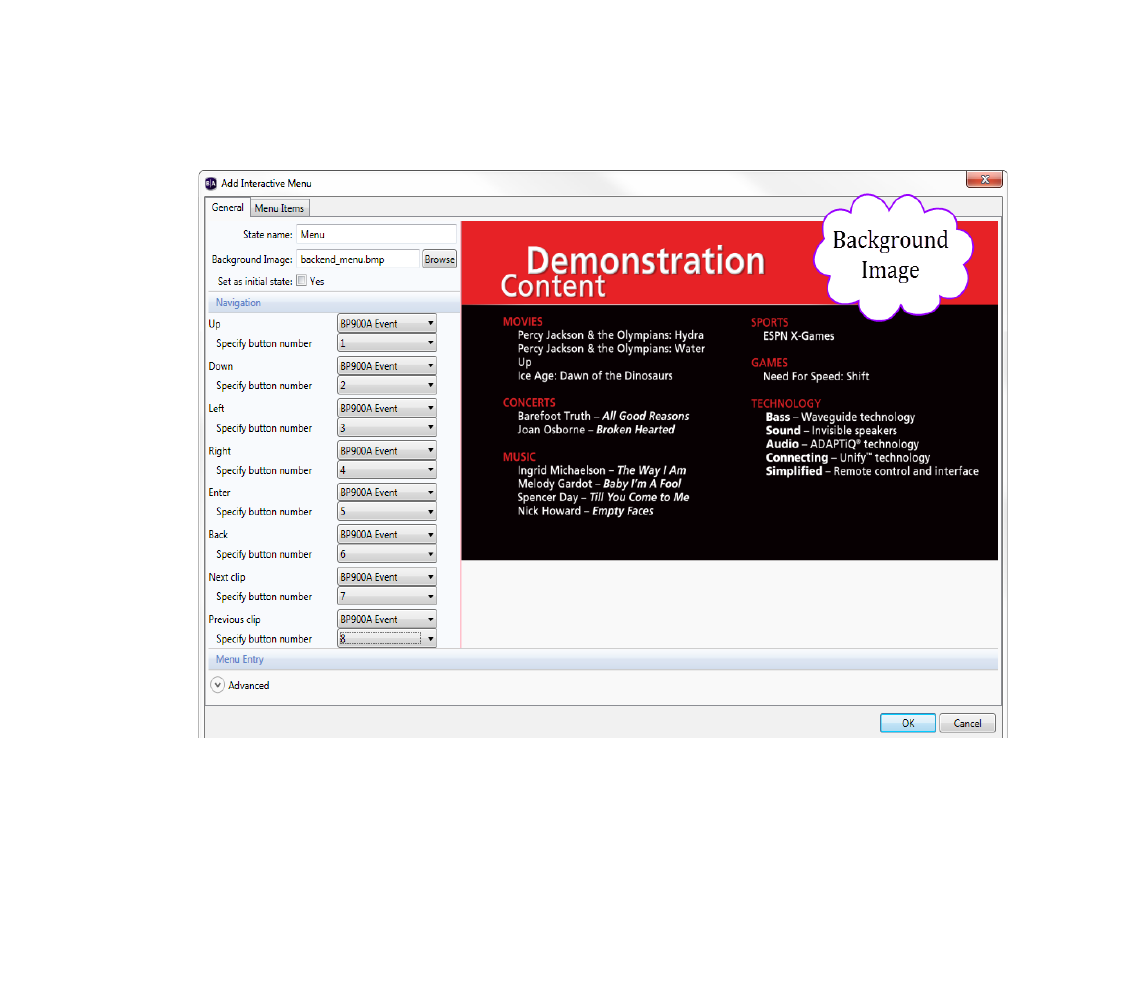
Under the
General
tab, the following options are displayed:
•
State name
: Create a unique name for your Interactive menu.
30
•
•
•
•
•
•
•
Background image
: Click
Browse
to select an image you want to act as your menu display.
IMPORTANT
: The background image is not simply a background for the actual menu items. It must contain all
images and text you want displayed in the menu. These images and text will act as the menu items the user can
interact with.
•
Set as initial state
: Click this box to set the Interactive menu as the Home screen.
The Navigation section is where you can define how a user navigates across the menu. Click the drop down
menu for each option (Up, Down, Left, Right, Enter, Back, Next clip, Previous clip) and select the type of
event you are utilizing (GPIO Event, Serial input, etc.). A second drop down menu or text field will appear.
Specify the button or input you want to correspond to the action you are defining.

31
•
•
•
•
•
•
For example, let’s say you want to define the Up action with a keyboard event. In the drop-down list across
Up, select Keyboard Input. A text field will appear below where you can specify a button. Type U here.
Now, when a user presses U on a keyboard, the cursor will move up along the menu items.
You don’t need to define every possible action. You can simply leave the drop-down list on the default
None
.
However, to create a more intuitive experience between the user and menu, it might be best to define each
possible action. Below are the actions available for defining in the Navigation section:
•
Up, Down, Left, Right
: These are the primary methods by which the user will navigate from one menu
item to the next.
•
Enter
: With this button, the user can select a desired menu item.
•
Back
: Once the user presses the defined input for
Enter
on a menu item, a state you have chosen in the
Menu Items
tab will appear. However, the user can press the
Back
button at any point to return to the
menu.
•
Next clip
: If the user is viewing a media file after pressing
Enter
on a menu item, pressing the
Next clip
button will switch to the corresponding media file of the next menu item.
•
Previous clip
: Pressing this button will stop the media file currently being played and switch to the media
file of the previous menu item.
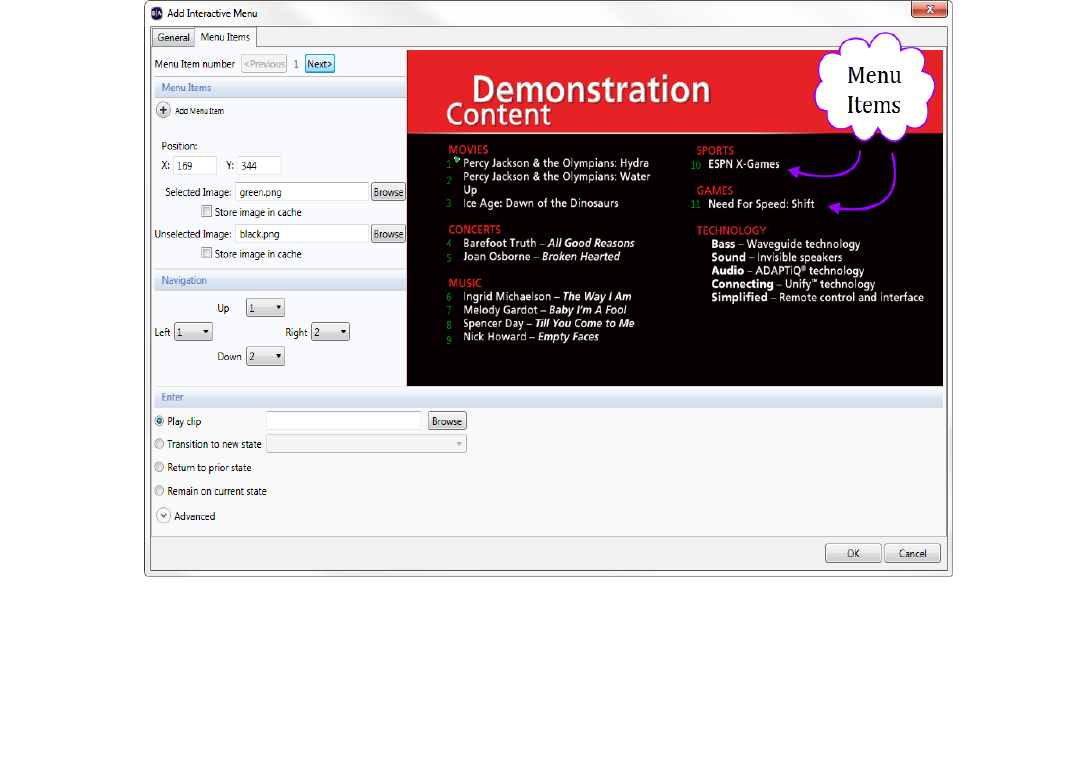
Under the
Menu Items
tab, the following options are displayed:
•Menu Item number: Every Menu item has a unique Menu Item number. The first one you create is 1,
the second is 2, and so on. Here, you can navigate between the Menu items you have created by
clicking the Previous and Next buttons. Everything displayed below this section corresponds to the
Menu item you have selected here.
The Menu Items section is where you can create and adjust individual menu items.
•Add Menu Item: Press this button to create a Menu item. The Add Menu Item window will pop up.
There are two items, the Active Image and Inactive Image. The Active image serves as a cursor
which tells the user what Menu item they are on. The Inactive image is what will appear beside the
current Menu item when the user navigates to a different Menu item. Use the Browse buttons to
select each image. Click OK to create the menu item.
32
•
•
•
•
•
•
After creating a Menu item, its Menu item number will appear over the background image in the area to the
right. If it is the Menu Item selected in the
Menu Item number
section above, the Active image will appear
beside the number. For all other Menu Items, only the Inactive images will appear beside their Menu Item
number.
TIP
: If you want nothing to appear beside a Menu item when it is not selected, choose an Inactive image that
matches the color of the background.
•
Position
: Adjust the position of your Menu item by inputting various numbers. The
X
field corresponds to
the position of the Menu item on a horizontal axis. The
Y
field corresponds to the position of the Menu
item on a vertical axis. Alternatively, you can click the Active Image in the area to the right, a nd drag it to
the desired position.

33
•
•
•
•
•
•
•
Selected Image
: This is the Active image you selected when creating the Menu item. Click browse to
change the image at any point.
•
Unselected Image
: This is the Inactive image you selected when creating the Menu item. Click
Browse
to
change the image at any point.
•
Store image in cache
: This box appears beneath Selected Image and Unselected Image. Click the
Store
image in cache
box to save the image in a cache and more readily use it as an Active or Inactive image in
subsequent Menu Items you create.
The Navigation section is where you determine how a user moves from one Menu item to the next. The possible
actions are
Up
,
Down
,
Left
, and
Right
. The button or input a user must press to perform these actions is
whatever you specified under the
General
tab. In this section, each action has a drop-down list which displays
the Menu item number for each Menu item you created. By default,
None
is selected for each possible action.
Change the Menu item number in any of the drop-down lists to allow the user to navigate to that Menu item
from the current Menu item by performing the corresponding action. Let’s say you are adjusting the features of
Menu item number 1, meaning 1 is displayed between the
Previous
and
Next
buttons at the top of the screen.
If you click the drop-down list for the Down action and select 2, the user can now navigate from Menu item 1 to
Menu item 2 by pressing the
Down
button (remember, this button is whatever you previously defined in the
Navigation section of the
General
tab).
The Enter section is where you can determine what happens when a user presses the
Enter
button on a
particular Menu item. The following options are displayed:
•
Play clip
: Click the
Browse
button to select a video you want to play when the user presses the
Enter
button.
•
Transition to new state
: Here, a drop-down list contains all the media files previously placed in the playlist
area of your zone. Select a file to allow the user to transition to that state after pressing
Enter
.
•
Return to prior state
: If you select this option, the presentation will display the previous state when a user
presses
Enter
.
•
Remain on current state
: If you select this option, the state will not change when a user presses
Enter
.
However, you can add Commands to create changes that occur while remaining on the Interactive menu.
Click the
Advanced
arrow to reveal the Commands section. See
Adding commands to your playlists
for
details.
34
•
•
•
•
•
•
Adding commands to your playlists
To add extended functions to your presentations, you can connect devices to the ports on your BrightSign and
then add commands to your playlist to control these devices. For example, you can connect a projector to
BrightSign’s serial port and then create a playlist to turn it on and another playlist to turn it off. You can then use
the playlist scheduling feature to automatically turn the projector on in the morning and off in the evening.
1Open an interactive presentation project:
NOTE:
If you haven’t already created an interactive presentation project, see
Making a presentation interactive
for details.
a
Double-click the
BrightAuthor
icon on your desktop.
b
On the menu bar, click
File > Open Presentation
.
NOTE
: If you don’t see
New Presentation
under
File
, make sure you have the Edit, Publish, or Manage tab
selected in the upper-left side of the screen.
c
Select the presentation you want to open.
d
Click
Open
.
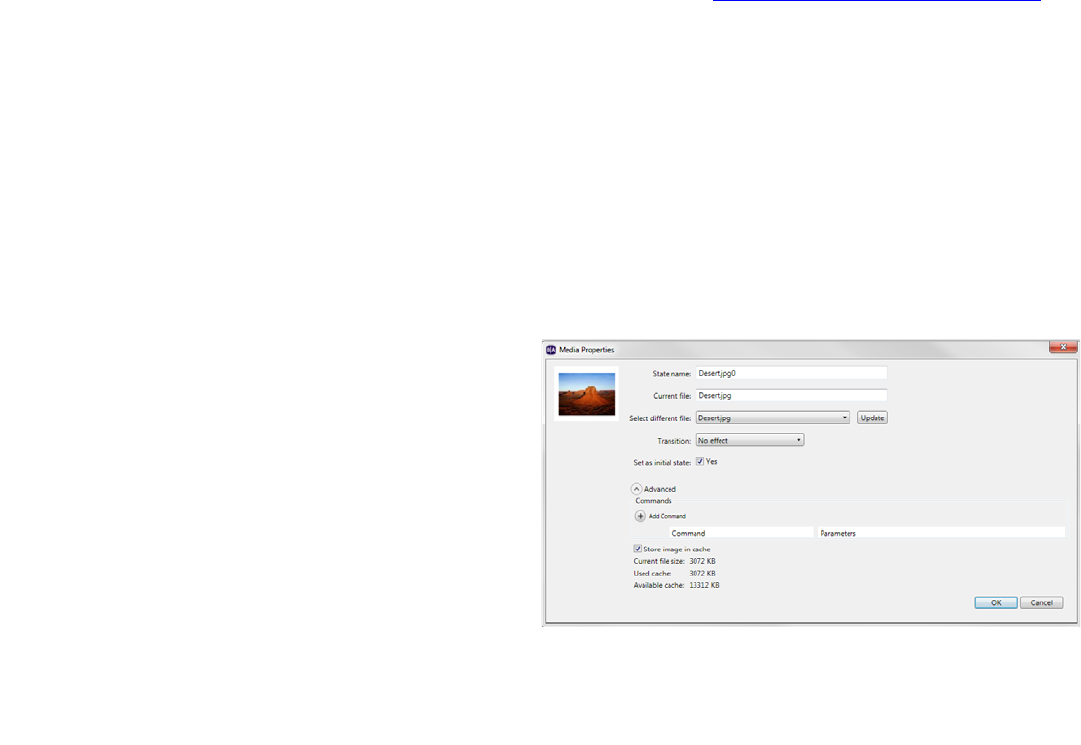
2In the playlist area, double-click the media file to which you want to apply the command.
3In the Media Properties window, click
Advanced.
NOTE
: The cache option is displayed here. Click the
Store image in cache
box to save the current file
in a cache for faster loading. If the file is capable of
supporting 3D, the
Video Display Mode
option
will be displayed. Select 2D, 3D side-by-side, or 3D
top-over-bottom from the drop-down list.
4Click Add Command.

35
•
•
•
•
•
•
5Select the command you want to add from the list and enter the appropriate parameter for that command.
The commands vary based on the type of content you selected and may include any of the following:
•
BP900A, BP900B, BP900C - Set Output:
Turns on and off different LED lights; sets LED lights to slow,
medium, or fast blink when a button is pressed on the BP900 button board(s).
•
BP200A, BP200B, BP200C - Set Output:
Turns on and off different LED lights; sets LED lights to slow,
medium, or fast blink when a button is pressed on the BP200 button board(s).
•
Set Audio Output:
Specifies the type of audio you want to use for this item.
•
Set Volume:
Specifies the volume level. Enter a value between 0 and 100.
•
Increment Volume:
Specifies how much the volume level increases with each interaction.
•
Decrement Volume:
Specifies how much the volume level decreases with each interaction.
•
Mute/Unmute Digital Audio:
Turns digital audio output on or off.
•
Mute/Unmute Analog Audio:
Turns analog audio output on or off.
•
Mute/Unmute HDMI Audio:
Turns HDMI audio output on or off.
•
Send UDP:
Sends a command to the device using UDP protocols.
•
Serial-send string (CR):
Sends the specified string to the specified serial port. This command adds a carrier
return at the end of the string.
•
Serial-send string (no CR):
Sends the specified string to the specified serial port. This command does not
add a carrier return at the end of the string.
•
Serial-send byte:
Sends the specified byte to the specified serial port.
•
Serial-send bytes (comma separated):
Sends the specified bytes to the specified serial port in comma-
separated format.
•
Synchronize:
Specifies the synchronization trigger.
•
Link Zones:
Specifies the trigger to link zones.
•
GPIO On:
Turns on the specified GPIO outputs. Other GPIO output are not affected.
•
GPIO Off:
Turns off the specified GPIO output.
•
Set GPIO Set State:
Enables you to turn each GPIO line on or off.

36
•
•
•
•
•
•
•
Pause Video:
Pauses video playback.
•
Resume Video:
Resumes video playback.
•
Enable monitor power save mode:
Turns the monitor's power saving mode on.
•
Disable monitor power save mode:
Turns the motor's power saving mode off.
•
BrightControl - Display On:
Turns the display on.
•
BrightControl - Display Off:
Turns the display off.
•
BrightControl - Send Ascii String:
Sends a CEC command.
•
BrightControl - Philips Set Volulme:
Sets Philips TV volume.
•
Pause:
Pauses presentation playback for specified number of milliseconds.
•
Reboot:
Restarts the BrightSign unit.
NOTE
:
There are several ways to add commands.
•
To add a command when a state is transitioned to, simply double-click the thumbnail of the file and add a
command.
•
To add a command when a state is transitioned to from a specific file, define an interactive event that links
the two files. Double-click the icon of the interactive event and add the command there.
•
To add a command that occurs within one state, such as increasing the volume of the video being played,
define an interactive event linking the video to another item . However, when you double-click the event
icon, after adding the command, choose the
Remain on current state
. In the playlist area, the line
between the video and the other item will disappear. Now, the command will occur within the video file
when the interactive event you defined is performed.
Creating a Dynamic Playlist
A Dynamic Playlist enables you to easily update and share content in multiple presentations. Let’s say you need
to add daily announcements to your presentations, and you don’t want to update each presentation separately.
You can add a Dynamic Playlist to all of your presentations and each day insert a new video announcement in
the Dynamic Playlist. When you upload the revised Dynamic Playlist to the network, every presentation that
includes the Dynamic Playlist receives the new content, so a single update reaches multiple presentations. To
use Dynamic Playlists, you must have a BrightSign Network account.

37
•
•
•
•
•
•
1Create a Dynamic Playlist where you will add content that is automatically sent to all presentations linked
to the playlist.
a
Click the
Create
tab in the upper-left side of the screen.
b
On the menu bar, click
File
>
New Dynamic Playlist
. You can also open previously created Dynamic Playlists
by clicking
File
>
Open Dynamic Playlist
.
c
Add files to your Media Library by clicking the
Browse
button and selecting a folder that contains the files
you want to include in the Dynamic Playlist.
d
Drag the files added in step (c) to the playlist area.
e
Click the
Upload to Network
button in the upper-right side of the screen.
f
You will be prompted to save the playlist. Click
Yes
. The
Save As
window will pop up. Type a name for your
playlist and click
Save.
The
Save complete
window will pop up. Click
OK.
The playlist will now upload onto
the BrightSign Network. Click
OK
.
Now, all presentations linked to the Dynamic Playlist will automatically receive the new content. You change the
content of the Dynamic playlist at any point by opening the playlist (
File
>
Open Dynamic Playlist
) and
dragging new media files into the playlist area.
2Link individual presentations to the Dynamic Playlist created in step (1).
a
Open a presentation project.
NOTE
:
If you don’t see
Open Presentation
under
File
,
make sure you have the Edit, Publish, or Manage tab
selected in the upper-left side of the screen.
b
Click the
Edit
tab.
c
In the Media Library section, click the
Other
tab. Drag the
Dynamic Playlist
icon to the playlist area.
d
The
Add Dynamic Playlist
window will pop up. From the drop-down list, select which Dynamic Playlist you
want to link to the current presentation. Click
OK
.
38
•
•
•
•
•
•
Chapter 3
• • • • • •
The TD1012
Using your TD1012 BrightSign Unit
The TD1012 is a unique BrightSign unit in that it is an all-inclusive digital signage solution. It is the only
BrightSign unit that includes a high resolution screen for playing your presentations.
Creating presentations for your TD1012 is fundamentally similar to creating presentations for any other
BrightSign unit. See Creating a full-screen presentationor Creating a multi-zone presentationfor details.
However, the following details are unique to the TD1012:
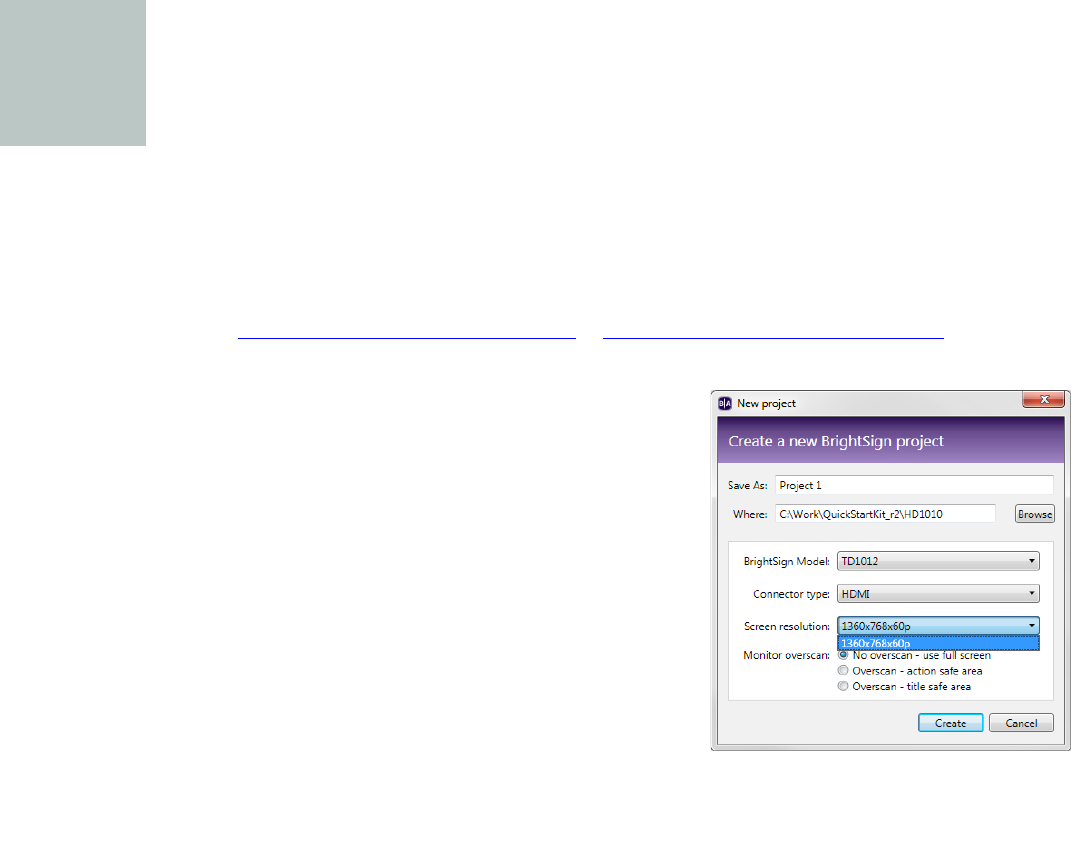
•
In the
New Project
window, the
Screen resolution
drop-
down list only contains 1360x768x60p. This is the only
resolution supported by the TD1012.
39
•
•
•
•
•
•
•
In the
New Project
window, when you click
Create
, the
Template
window will pop up. The zone
templates here are different from those available with other BrightSign units. However, you can still add
and adjust zones by clicking the
Add Zone
button under the
Layout
tab. See
Customizing template
layouts
for details.
•
The TD1012 does not support Audio. You may include videos in your TD1012 presentations, but no Audio
associated with the videos will play.
NOTE
: When creating presentations for your TD1012 unit, you may encounter audio settings. For example, the
Audio Only zone is still available when you click the
Add Zone
button. None of these audio related options apply
to the TD1012.
40
•
•
•
•
•
•
•
As usual, clicking the
Layout
tab allows you to adjust the position and size of your zones. However, the
horizontal rectangle that represents your display is actually rotated 90 degrees because the TD1012 screen
is a vertical rectangle. When adjusting the zones for your TD1012 presentation, refer to the vertical
rectangle under the Zone section to the left. This will show you how the zones will appear to the viewer
when the presentation is playing
•
The TD1012 only supports wireless network connection.
•
The TD1012 only supports interactivity through network commands. Use the
UDP Input
icon for defining
interactive events with a TD1012 presentation. See
Making a presentation interactive
for details.
The process for Publishing and Customizing TD1012 presentations is no different from other BrightSign units.
See
Publishing Presentations
and
Customizing Presentations
for details.

41
•
•
•
•
•
•
Chapter 4
• • • • • •
BP900 and BP200 Button Boards
Creating BP900 and BP200 Interactive Events
The HD810, HD1010, and HD1010w units support BP900 and BP200 button pads via the USB ports. Up to
3 button pads can be connected to these BrightSign units (one in each USB port).
1Make the presentation interactive.
a
Create a new presentation or open a previously created presentation with the HD810, HD1010, or HD1010w
model selected. See
Creating a full-screen presentation
or
Creating a multi-zone presentation
for details.
b
Click
Interactive
in the upper-right side of the playlist area.
2Define the BP900 or BP200 interactive event.
a
Choose the proper event icon based on what kind of button pad you are connecting to the BrightSign
(BP900 or BP200), and how many button pads you are connecting.
For the BP900 and BP200, there are a total of 6 event icons.
The letters A, B, and C correspond to each
individual button pad and help you keep track of them. Let’s say you are using all 3 USB ports by
connecting 2 BP900s and 1 BP200. To define interactive events for each, you would use the BP900A icon,
the BP900B icon, and the BP200A icon (not BP200C). Alternatively, if you wanted to connect 3 BP900
button boards, you would use the BP900A, BP900B, and BP900C event icons.
42
•
•
•
•
•
•
If the BP900 or BP200 event icons are not displayed in your toolbar, click the arrow beside the Zoom
control in the upper-right side of the screen to add them to your toolbar. Alternatively, you can click the
events tab in the Media Library section and drag the BP900 or BP200 event icons to the playlist area.
b
Define the BP900 or BP200 event as you would any other event. See
Making a presentation interactive
for
details.
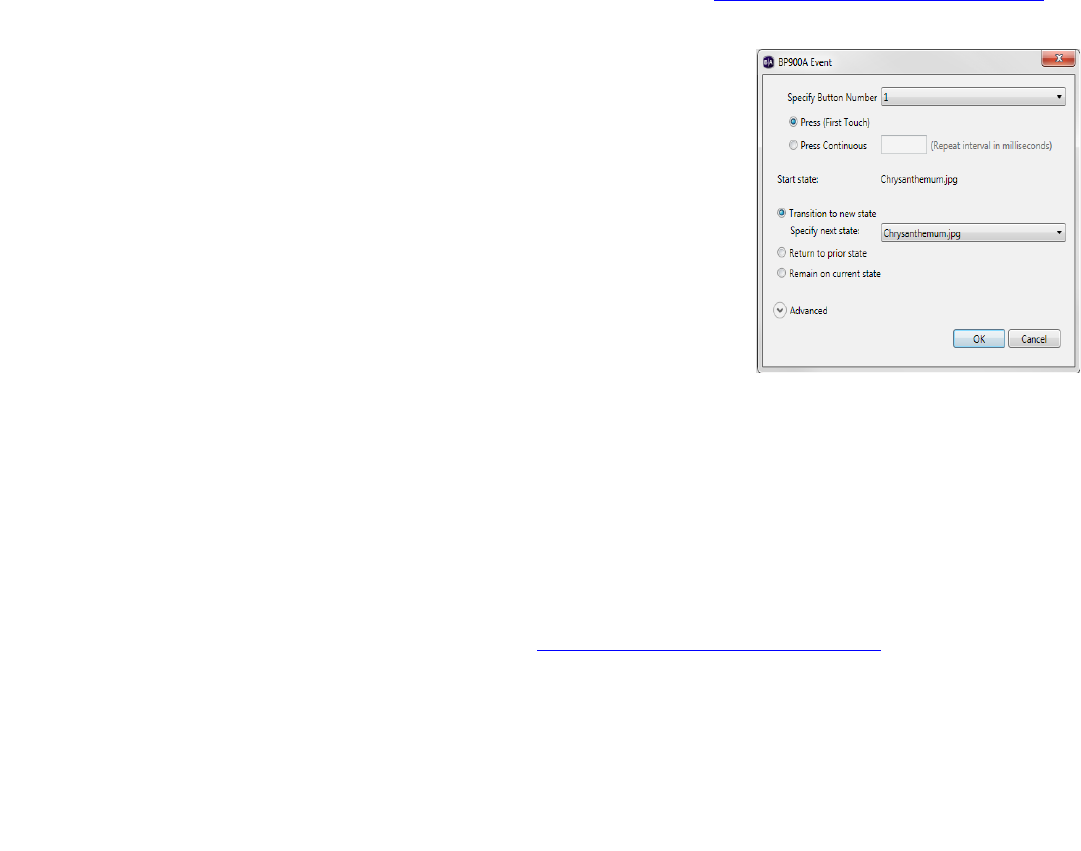
c
The
BP900
or
BP200 Event
window will pop up automatically.
Choose the desired options for your event. The following options are
displayed:
•
Specify Button Number
: Select which button number on your
BP900 or BP200 you want the user to press to transition to the next
state.
•
Press (First Touch)
: Select if you want the transition to occur after
one push of the button.
•
Press Continuous
: Select if you want the user to continually press
the button. Specify a repeat interval in the text field (in
milliseconds).
•
Transition to new state
: Click to specify which media file in your
playlist will be transitioned to when the specified button is pushed.
•
Return to prior state
: Click to revert the presentation to the previous media file when the specified button
is pushed.
Remain on current state
: Click to remain on the current media file when the specified button is pushed.
TIP
:
This option is useful for creating interactions within the same media file. Let’s say your file is a video. If you
create an event with button 1 and select Remain on current state, you can set a variety of outcomes to occur
when the user presses button 1, such as pausing and resuming the video. These interactions are created by
adding Commands under the Advanced arrow. See Adding commands to your playlists for details.

43
•
•
•
•
•
•
•
Advanced
:Click the Advanced arrow to reveal the display options. Here, you can set how you view
the interactive events between states in the playlist area. Show line draws a line between the media
files. Show label creates a label either to the Right or Bottom of the media file which indicates
transitions from states. The Advanced arrow also reveals the Commands section. See Adding
commands to your playlists for details.
d
Click
OK
. Your BP900 or BP200 interactive event is now defined. Repeat steps a - c to define the remaining
button pad events.

44
•
•
•
•
•
•
Chapter 5
• • • • • •
Publishing Presentations
After you create and save a presentation, you’re ready to publish it and play it on your BrightSign. There are four
ways to publish a presentation:
•
Local Storage
•
BrightSign Network
•
Local Networking
•
Simple File Networking
The following sections describe each of these publication methods.
Publishing a presentation using Local Storage
Publishing a presentation using Local Storage enables you to copy your presentation to an SD card or USB Flash
card which you can insert directly into your BrightSign. A BrightSign account is not required. When you want to
change or replace your presentation, you must save a copy of the new presentation on an SD card or USB Flash
card and insert it into your BrightSign.
1Open the presentation project you want to publish:
a
Double-click the
BrightAuthor
icon on your desktop.
45
•
•
•
•
•
•
b
On the menu bar, click
File > Open Presentation
.
NOTE
:
If you don’t see
Open Presentation
under
File
, make sure you have the Edit, Publish, or Manage tab
selected in the upper-left side of the screen.
c
Select the presentation you want to open.
d
Click
Open
.
2Select the presentation you want to publish:
a
Click the
Publish
tab on the upper-left side of the screen.
b
Click
Local Storage
(below the Publish tab).
c
Under
Presentations
, click
Browse
, select the folder where your presentations are located, and then click
OK
.
d
Select the presentation(s) you want to publish from the list of presentations.
46
•
•
•
•
•
•
3Create a schedule for the presentation.
a
Drag the presentation to a time slot during which you want it to play.
b
Click and drag the selection handles to adjust playing time within one day.
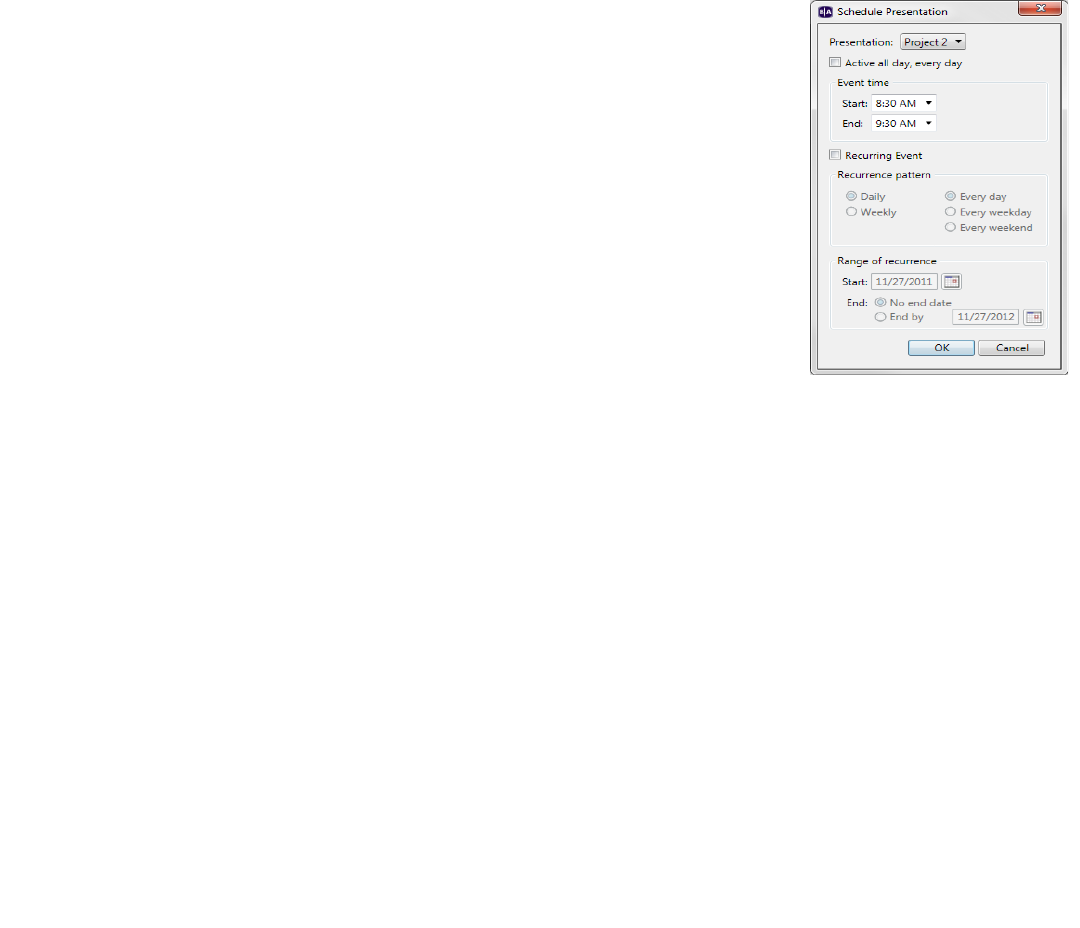
cDouble-click the highlighted presentation name in the calendar. The
Schedule Presentation window will pop up. Here, you can adjust the
times during which your presentation will play. Rather than repeatedly
dragging the presentation into multiple time slots, simply drag it into one
slot as in step (a), double-click the presentation, and make the necessary
adjustments. The following options are displayed in the window:
•
Presentation
: Specifies which presentation you are scheduling.
•
Active all day, every day
: Click this box if you want your presentation to
play 24 hours a day.
•
Event time
: Change the times during the day when the presentation will
play. Select the desired
Start
and
End
times from the drop-down lists.
•
Recurring Event
: Click this box if you want the presentation to play repeatedly during specified times.
•
Recurrence pattern
: Specify the days when you want the presentation to play. If you click
Daily
, you can
specify Every day, Every weekday, or Every weekend. If you click
Weekly
, a checklist of every day of the
week will appear and you can specify the individual days when you want the presentation to play.
•
Range of recurrence
: Specify the first day you want the presentation to play in the
Start
text field.You can
click the
Calendar
icon beside the text field to navigate to the desired date. Specify the end of the event.
If you do not want the presentation to stop recurring, click
No end date
. If an end date is desired, click
End
by
. Type an end date in the text field or click the
Calendar
icon beside the text field to navigate to the
desired date.
d
Click
OK
. The adjustments made will now appear in the calendar.
e
If prompted, indicate whether you want to replace the existing schedule and click
OK
.
4Publish the presentation on your SD card:
a
Insert an SD card into your card reader.
b
(Optional) Under
Firmware
, select an update option.
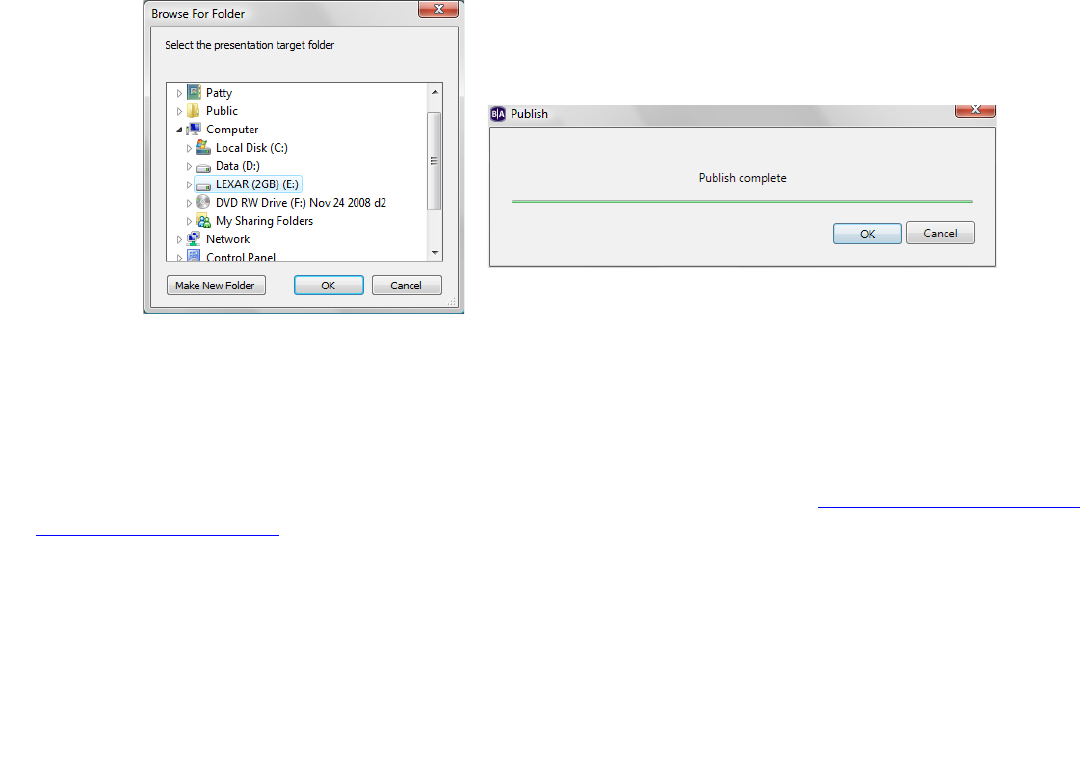
47
•
•
•
•
•
•
c
(Optional) Under
Debugging
, click the appropriate box to enable either
Serial debugging
or
System log
debugging
.
d
Under
Publish to
, click
Browse
, select the drive where your SD card is located, and then click
OK
.
e
Click
Publish
.
f
When the Publish complete message appears, click
OK
.
Publishing a presentation using BrightSign Network
Publishing a presentation using BrightSign Network enables you to distribute your presentation to your
BrightSign units via an Internet connection. To publish via BrightSign Network, you must first contact BrightSign
to obtain an account name, a user name, and a password. You must also upload your presentation to the
BrightSign Network server and then add your BrightSign units to your network (see
Adding BrightSign units to
your BrightSign Network
).
1Open the presentation project you want to publish:
a
Double-click the
BrightAuthor
icon on your desktop.
b
On the menu bar, click
File > Open Presentation
.
c
Select the presentation you want to open.

48
•
•
•
•
•
•
d
Click
Open
.
2Upload your presentation to the BrightSign Network server:
a
On the menu bar, click
Tools > Sign In to BrightSign Network
.
b
If prompted, enter your
Account
,
User name
, and
Password
, and then click
Sign In
.
c
On the
Edit
tab, click
Upload to network
(in the upper-right corner).
d
When the upload is complete, click
OK
.
3Select the group and presentation you want to publish:
a
Click the
Publish
tab on the upper-left side of the screen.
b
Click
BrightSign Network
(above the calendar).
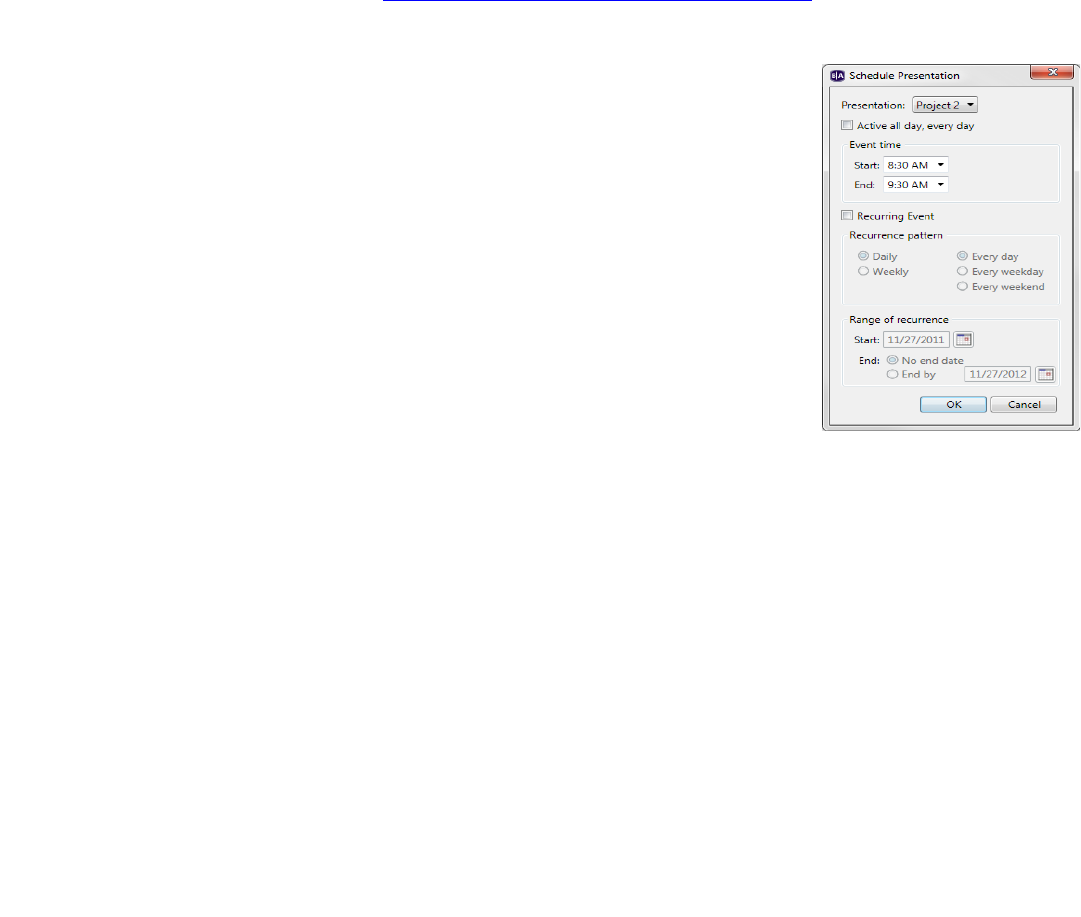
49
•
•
•
•
•
•
cUnder Select Group to Schedule, select the group in which you want the presentation to belong.
For
details on setting up groups, see
Creating groups in your BrightSign Network
.
d
Under
Presentations
, select the presentation you want to publish.
4Create a schedule for the presentation.
a
Drag the presentation to a time slot during which you want it to play.
b
Click and drag the selection handles to adjust playing time within one day.
cDouble-click the highlighted presentation name in the calendar. The
Schedule Presentation window will pop up. Here, you can adjust the
times during which your presentation will play. Rather than repeatedly
dragging the presentation into multiple time slots, simply drag it into one
slot as in step (a), double-click the presentation, and make the necessary
adjustments. The following options will be displayed in the window:
•
Presentation
: Specifies which presentation you are scheduling.
•
Active all day, every day
: Click this box if you want your presentation to
play 24 hours a day.
•
Event time
: Change the times during the day when the presentation will
play. Select the desired
Start
and
End
times from the drop-down lists.
•
Recurring Event
: Click this box if you want the presentation to play repeatedly during specified times.
•
Recurrence pattern
: Specify the days when you want the presentation to play. If you click
Daily
, you can
specify Every day, Every weekday, or Every weekend. If you click
Weekly
, a checklist of every day of the
week will appear and you can specify the individual days when you want the presentation to play.
•
Range of recurrence
: Specify the first day you want the presentation to play in the
Start
text field.You can
click the
Calendar
icon beside the text field to navigate to the desired date. Specify the end of the event.
If you do not want the presentation to stop recurring, click
No end date
. If an end date is desired, click
End
by
. Type an end date in the text field or click the
Calendar
icon beside the text field to navigate to the
desired date.
d
Click
OK
. The adjustments made will now appear in the calendar.
e
If prompted, indicate whether you want to replace the existing schedule and click
OK
.
5Publish the presentation:
a
(Optional) Under
Firmware
, select an update option.

50
•
•
•
•
•
•
b
(Optional) Under
Debugging
, click the appropriate box to enable either
Serial debugging
or
System log
debugging
.
c
Click
Publish Schedule
.
d
When the Publish complete message appears, click
OK
.
Publishing a presentation using a Local Network
Publishing a presentation using a Local Network lets you distribute your presentation to your BrightSign
units without using an Internet connection. This is convenient if you only have a small number of
BrightSign units and are on a local network. With a Local Network, the BrightSign unit does not need to
wait until it polls the web server to receive updates. You can simply select a BrightSign unit on
BrightAuthor and publish a presentation directly to it, sending updates immediately.
1Open the presentation project you want to publish:
a
Double-click the
BrightAuthor
icon on your desktop.
b
On the menu bar, click
File > Open Presentation
.
NOTE
:
If you don’t see
Open Presentation
under
File
, make sure you have the Edit, Publish, or Manage tab
selected in the upper-left side of the screen.
c
Select the presentation you want to open.
d
Click
Open
.
2Select the presentation you want to publish:
a
Click the
Publish
tab on the upper-left side of the screen.
b
Click
Local Network
(below the Publish tab).
c
Under
Presentations
, click
Browse
, select the folder where your presentations are located, and then click
OK
.
d
Select the presentation(s) you want to publish from the list of presentations.
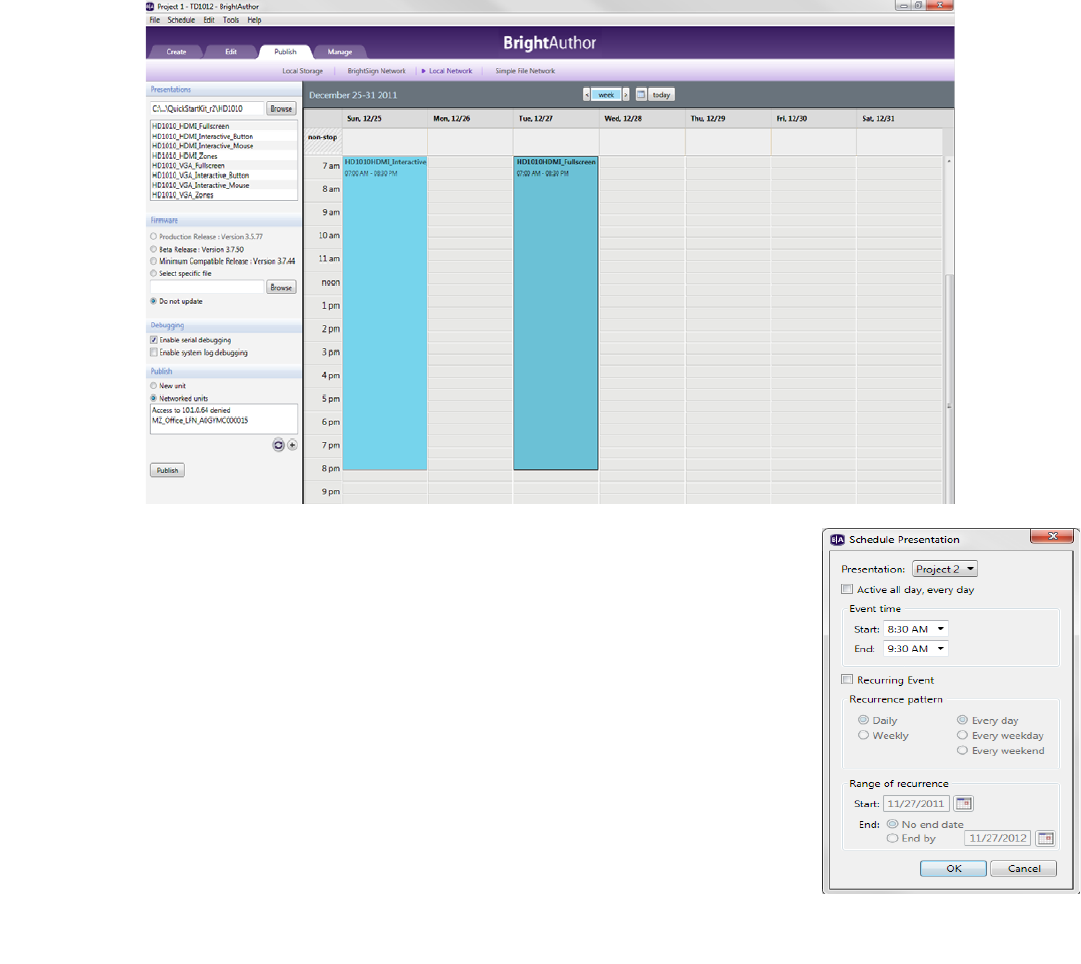
51
•
•
•
•
•
•
3Create a schedule for the presentation.
a
Drag the presentation to a time slot during which you want it to play.
b
Click and drag the selection handles to adjust playing time within one day.
cDouble-click the highlighted presentation name in the calendar. The
Schedule Presentation window will pop up. Here, you can adjust the
times during which your presentation will play. Rather than repeatedly
dragging the presentation into multiple time slots, simply drag it into one
slot as in step (a), double-click the presentation, and make the necessary
adjustments. The following options will be displayed in the window:
•
Presentation
: Specifies which presentation you are scheduling.
•
Active all day, every day
: Click this box if you want your presentation to
play 24 hours a day.

52
•
•
•
•
•
•
•
Event time
: Change the times during the day when the presentation will play. Select the desired
Start
and
End
times from the drop-down lists.
•
Recurring Event
: Click this box if you want the presentation to play repeatedly during specified times.
•
Recurrence pattern
: Specify the days when you want the presentation to play. If you click
Daily
, you can
specify Every day, Every weekday, or Every weekend. If you click
Weekly
, a checklist of every day of the
week will appear and you can specify the individual days when you want the presentation to play.
•
Range of recurrence
: Specify the first day you want the presentation to play in the
Start
text field.You can
click the
Calendar
icon beside the text field to navigate to the desired date. Specify the end of the event.
If you do not want the presentation to stop recurring, click
No end date
. If an end date is desired, click
End
by
. Type an end date in the text field or click the
Calendar
icon beside the text field to navigate to the
desired date.
d
Click
OK
. The adjustments made will now appear in the calendar.
If prompted, indicate whether you want to replace the existing schedule and click
OK
.
4Publish the presentation.
a
(Optional) Under
Firmware
, select an update option.
b
(Optional) Under
Debugging
, click the appropriate box to enable either
Serial debugging
or
System log
debugging
.
c
Under
Publish
, select a BrightSign unit.
•
If you want to publish to a new BrightSign unit, click
New unit
. Click the button below the text field.
The
Add BrightSign Unit
window will pop up. Type the IP address of the new BrightSign unit in the text
field. Click
OK
.
•
If you want to publish to a previously added BrightSign unit, click
Networked Units
. The text field below
will display all networked units. Select the desired unit from the list. Click the button to refresh the list.
d
Click
Publish
.
e
Click
OK
when publishing is complete.
NOTE
:
When publishing to a new BrightSign unit, the
BrightSign unit setup
window will pop up after you click
Publish
. See
Adding BrightSign units to your Local Network
for details.

53
•
•
•
•
•
•
Publishing a presentation using Simple File Networking
Publishing a presentation using Simple File Networking enables you to distribute your presentation to your
BrightSign units via a web folder. To use Simple File Networking, you must first add each unit to your network
(see
Adding BrightSign units to your Simple File Network
).
1Open the presentation project you want to publish:
a
Double-click the
BrightAuthor
icon on your desktop.
b
On the menu bar, click
File > Open Presentation
.
NOTE
: If you don’t see
Open Presentation
under
File
, make sure you have the Edit, Publish, or Manage tab
selected in the upper-left side of the screen.
c
Select the presentation you want to open.
d
Click
Open
.
2Select the presentation you want to publish:
a
Click the
Publish
tab on the upper-left side of the screen.
b
Click
Simple File Networking
(above the calendar).
c
Under
Presentations
, click
Browse
, select the folder where your presentations are located, and then click
OK
.
d
Select the presentation(s) you want to publish.
54
•
•
•
•
•
•
3Create a schedule for the presentation.
a
Drag the presentation to a time slot during which you want it to play.
b
Click and drag the selection handles to adjust playing time within one day.
cDouble-click the highlighted presentation name in the calendar. The
Schedule Presentation window will pop up. Here, you can adjust the
times during which your presentation will play. Rather than repeatedly
dragging the presentation into multiple time slots, simply drag it into one
slot as in step (a), double-click the presentation, and make the necessary
adjustments. The following options will be displayed in the window:
•
Presentation
: Specifies which presentation you are scheduling.
•
Active all day, every day
: Click this box if you want your presentation to
play 24 hours a day.
•
Event time
: Change the times during the day when the presentation will
play. Select the desired
Start
and
End
times from the drop-down lists.
•
Recurring Event
: Click this box if you want the presentation to play repeatedly during specified times.
•
Recurrence pattern
: Specify the days when you want the presentation to play. If you click
Daily
, you can
specify Every day, Every weekday, or Every weekend. If you click
Weekly
, a checklist of every day of the
week will appear and you can specify the individual days when you want the presentation to play.
•
Range of recurrence
: Specify the first day you want the presentation to play in the
Start
text field.You can
click the
Calendar
icon beside the text field to navigate to the desired date. Specify the end of the event.
If you do not want the presentation to stop recurring, click
No end date
. If an end date is desired, click
End
by
. Type an end date in the text field or click the
Calendar
icon beside the text field to navigate to the
desired date.
d
Click
OK
. The adjustments made will now appear in the calendar.
If prompted, indicate whether you want to replace the existing schedule and click
OK
.
4Publish the presentation.
a
(Optional) Under
Firmware
, select an update option.
55
•
•
•
•
•
•
b
(Optional) Under
Debugging
, click the appropriate box to enable either
Serial debugging
or
System log
debugging
.
c
Click
Set Parameters
.
d
Under
Unit Configuration
, enter the URL for the web folder.
IMPORTANT
:
The Web folder URL must be identical to the URL you entered when you set up your Simple File
Network. See
Adding BrightSign units to your Simple File Network
for details.
e
(Optional) Under
Network Connection Frequency
, adjust connection settings.
•
Connect to Server
: Click the drop-down list to set how often you want the unit to check the server for
updates.
•
Limit content downloads
: Click
Ye s
to limit content downloads. Set a timeframe for download periods
with the
Start of range
and
End of range
drop-lists. Click
No
to set no limit on downloads.
f
(Optional) Under
Logging
, check any of the following boxes to create the selected type of logs and to specify
upload settings, and then click
OK
:
56
•
•
•
•
•
•
•
Enable playback logging:
Creates a log that specifies when a playlist was used.
•
Enable event logging:
Creates a log that specifies when events are triggered.
•
Enable diagnostic logging:
Creates a log that provides troubleshooting information.
•
On startup:
Uploads log files each time you start the unit.
•
At specific time each day:
Uploads log files daily at the specified time.
g
(Optional) Under
Rate Limit Network Download Traffic
, set parameters for download traffic. The options
are divided into
Outside content download window
and
During content download window
.
•
Click
Unlimited download rate
to set no limit.
•
Click
Default limit
to use the default limit on downloads.
•
Click
Specify limit
to enter a desired limit in the text field (in Kibits/second).

57
•
•
•
•
•
•
h
Click
OK
.
i
Under
Publish to
, click
Browse
, select the location where you want to store the files, and then click
OK
.
•
If you have a mapped drive or shortcut that points to your web folder, publish your presentation to that
location.
•
If you use FTP to transfer files to your web folder, publish your presentation to a folder on your computer
and then use FTP software to copy the files to your web folder.
j
Click
Publish
.
k
When the Publish complete message appears, click
OK
.

58
•
•
•
•
•
•
Chapter 6
• • • • • •
Setting Up Units
If you’re using BrightSign Network, Local Networking, or Simple File Networking to publish your
presentations, you must set up your BrightSign units by adding them to your network. You can also set up
units for use as standalone units that are not connected to a network. The following sections describe how to
add units to your network or set them up for standalone use.
Adding BrightSign units to your BrightSign Network
To publish and manage presentations using BrightSign Network, you must first contact BrightSign to obtain an
account name, user name and password. After you obtain your account credentials, you need to add your
BrightSign units to your network by creating and installing a setup file for each unit. The setup file provides
details about your network and BrightSign Network connections, where the presentations associated with the
selected group are stored, and when to run the presentations.
1Sign in to your BrightSign Network account:
a
On the menu bar, click
Tools
>
Sign In to BrightSign Network
.
b
If prompted, enter your
Account, User name
, and
Password
, and then click
Sign In
.
2On the menu bar, click Tools > Setup BrightSign Unit.
3Under Name Specification, do the following:
a
Enter a
Name
and
Description
for this unit.
b
Select whether you want to append the unit ID to the name or to use the name only.
59
•
•
•
•
•
•
4Under Network Properties, set the following:
•
Time zone:
Select the time zone
where this unit is located.
•
Time server:
Select the clock for this unit.
•
IP address:
Indicate whether the IP is auto-generated or static. If you’re using a static IP address, enter
parameters.
•
Wired/Wireless:
Indicate whether the network is wired or wireless and enter the SSID and Security key if the
network is secured.
5Under Firmware, indicate whether you want to update the firmware and to which version.

60
•
•
•
•
•
•
6Under Unit Configuration, click Networked with BrightSign Network, and then specify the following:
•
(Optional)
Enable diagnostic web server
: Click the box to enable the diagnostic web server. You can include
a username and password in the text field below for added security.
•
(Optional)
Enable local web server
: Click the box to enable the local web server. You can include a username
and password in the text field below for added security.
•
Group:
Assigns this unit to the specific group in which you published the presentation (see
Creating groups
in your BrightSign Network
and
Publishing a presentation using BrightSign Network
).
•
Network Connection Frequency:
Sets how often this unit checks the server for updates.
•
Limit content downloads:
Sets a timeframe during which downloads can take place.
•
Copy content from the current published schedule:
Copies content from the current published schedule
to your storage card. Use this option to reduce initial download time when setting up a unit.
7Under Logging, check any of the following boxes to create the selected type of logs and to specify upload
settings:
•
Enable playback logging:
Creates a log that specifies when a playlist was used.
•
Enable event logging:
Creates a log that specifies when events are triggered.
•
Enable diagnostic logging:
Creates a log that provides troubleshooting information.
•
On startup:
Uploads log files each time you start the unit.
•
At specific time each day:
Uploads log files daily at the specified time.
8(Optional) Under Rate Limit Network Download Traffic, set parameters for download traffic. The options
are divided into Outside content download window and During content download window.
•
Click
Unlimited download rate
to set no limit.
•
Click
Default limit
to use the default limit on downloads.
•
Click
Specify limit
to enter a desired limit in the text field (in Kibits/second).
9Create and install the setup file:
a
Click
Create Setup Files
.
b
Select an SD card, SDHC card, or a USB Flash drive to store the setup files.

61
•
•
•
•
•
•
c
Click
OK
.
d
Turn off the BrightSign unit by unplugging the power adapter. Insert the card or Flash drive into the unit.
e
Turn on the BrightSign unit by reconnecting the power adapter.
NOTE
:
The card or Flash drive must remain connected to the BrightSign or it will not receive scheduled
presentations from the network. The BrightSign unit has no internal storage and therefore cannot receive content
without a storage device connected.
Adding BrightSign units to your Local Network
To publish and manage BrightSign units on your Local Network, you must create and install a setup file for
each unit. The setup file provides details about where presentations are stored and whether logging
options are enabled.
1On the menu bar, click Tools > Setup BrightSign Unit.
2Under Name Specification, do the following:
a
Enter a
Name
and
Description
for this unit.
b
Select whether you want to append the unit ID to the name or to use the name only.
3Under Network Properties, set the following:
•
Time zone:
Select the time zone
where this unit is located.
•
Time server:
Select the clock for this unit.
•
IP address:
Indicate whether the IP is auto-generated or static. If you’re using a static IP address, enter
parameters.
4Under Firmware, indicate whether you want to update the firmware and to which version.
62
•
•
•
•
•
•
5Under Unit Configuration, click Networked with Local File Networking.
•
(Optional)
Enable diagnostic web server
: Click the box to enable the diagnostic web server. You can include
a username and password in the text field below for added security.
6
(Optional)
Enable local web server
: Click the box to enable the local web server. You can include a username
and password in the text field below for added security.
7Under Logging, check any of the following boxes to create the selected type of logs:
•
Enable playback logging:
Creates a log that specifies when a playlist was used.
•
Enable event logging:
Creates a log that specifies when events are triggered.

63
•
•
•
•
•
•
•
Enable diagnostic logging:
Creates a log that provides troubleshooting information.
8Create and install the setup file:
a
Click
Create Setup Files
.
b
Select an SD card, SDHC card, or a USB Flash drive to store the setup files.
c
Click
OK
.
d
Turn off the BrightSign unit by unplugging the power adapter. Insert the card or Flash drive into the unit.
e
Turn on the BrightSign unit by reconnecting the power adapter.
NOTE
:
The card or Flash drive must remain connected to the BrightSign or it will not receive scheduled
presentations from the network. The BrightSign unit has no internal storage and therefore cannot receive content
without a storage device connected.
Adding BrightSign units to your Simple File Network
To publish and manage presentations using Simple File Networking, you must first add your BrightSign units to
your network by creating and installing a setup file for each unit. The setup file provides details about your
network, the web folder associated with a unit, where presentations are stored, and when to check for updates.
1On the menu bar, click Tools > Setup BrightSign Unit.
2Under Name Specification, do the following:
a
Enter a
Name
and
Description
for this unit.
b
Select whether you want to append the unit ID to the name or to use the name only.
3Under Network Properties, set the following:
•
Time zone:
Select the time zone
where this unit is located.
•
Time server:
Select the clock for this unit.
•
IP address:
Indicate whether the IP is auto-generated or static. If you’re using a static IP address, enter
parameters.
•
Wired/Wireless:
Indicate whether the network is wired or wireless and enter the SSID and Security key if the
network is secured.

64
•
•
•
•
•
•
4Under Firmware, indicate whether you want to update the firmware and to which version.
5Under Unit Configuration, click Networked with Simple File Networking, and then specify the
following:
•
(Optional)
Enable diagnostic web server
: Click the box to enable the diagnostic web server. You can include
a username and password in the text field below for added security.
•
(Optional)
Enable local web server
: Click the box to enable the local web server. You can include a username
and password in the text field below for added security.

65
•
•
•
•
•
•
•
URL for the web folder:
Sets the location from which this unit downloads presentations. Do not use trailing
slashes in your URL; some web servers do not support trailing slashes.
IMPORTANT
: The URL for the web folder must be identical to the Web folder URL you enter when you publish your
presentation (see
Publishing a presentation using Simple File Networking
).
•
Network Connection Frequency:
Sets how often this unit checks the web folder for updates.
•
Limit content downloads:
Sets a timeframe during which downloads can take place.
6Under Logging, check any of the following boxes to create the selected type of logs and to specify upload
settings:
•
Enable playback logging:
Creates a log that specifies when a playlist was used.
•
Enable event logging:
Creates a log that specifies when events are triggered.
•
Enable diagnostic logging:
Creates a log that provides troubleshooting information.
•
On startup:
Uploads log files each time you start the unit.
•
At specific time each day:
Uploads log files daily at the specified time.
•
Relative URL for log handler:
Uploads log files to this location.
7(Optional) Under Rate Limit Network Download Traffic, set parameters for download traffic. The options
are divided into Outside content download window and During content download window.
•
Click
Unlimited download rate
to set no limit.
•
Click
Default limit
to use the default limit on downloads.
Click
Specify limit
to enter a desired limit in the text field (in Kibits/second).
8Create and install the setup file:
a
Click
Create Setup Files
.
b
Select an SD card, SDHC card, or a USB Flash drive to store the setup files.
c
Click
OK
.
d
Turn off the BrightSign unit by unplugging the power adapter. Insert the card or Flash drive into the unit.

66
•
•
•
•
•
•
e
Turn on the BrightSign unit by reconnecting the power adapter.
NOTE
:
The card or Flash drive must remain connected to the BrightSign or it will not receive scheduled
presentations from the network. The BrightSign unit has no internal storage and therefore cannot receive content
without a storage device connected.
Setting up BrightSign units for standalone use
To publish and manage presentations for standalone use, you must create and install a setup file for each unit.
The setup file provides details about where presentations are stored and whether logging options are enabled.
1On the menu bar, click Tools > Setup BrightSign Unit.
2Under Name Specification, do the following:
a
Enter a
Name
and
Description
for this unit.
b
Select whether you want to append the unit ID to the name or to use the name only.
3Under Network Properties, set the following:
•
Time zone:
Select the time zone
where this unit is located.
•
Time server:
Select the clock for this unit.
•
IP address:
Indicate whether the IP is auto-generated or static. If you’re using a static IP address, enter
parameters.
4Under Firmware, indicate whether you want to update the firmware and to which version.
5Under Unit Configuration, click Standalone.
67
•
•
•
•
•
•
6Under Logging, check any of the following boxes to create the selected type of logs:
•
Enable playback logging:
Creates a log that specifies when a playlist was used.
•
Enable event logging:
Creates a log that specifies when events are triggered.
•
Enable diagnostic logging:
Creates a log that provides troubleshooting information.
7Create and install the setup file:
a
Click
Create Setup Files
.
b
Select an SD card, SDHC card, or a USB Flash drive to store the setup files.
c
Click
OK
.

68
•
•
•
•
•
•
d
Turn off the BrightSign unit by unplugging the power adapter. Insert the card or Flash drive into the unit.
e
Turn on the BrightSign unit by reconnecting the power adapter.
NOTE
:
The card or Flash drive must remain connected to the BrightSign or it will not receive scheduled
presentations from the network. The BrightSign unit has no internal storage and therefore cannot receive content
without a storage device connected.

69
•
•
•
•
•
•
Chapter 7
• • • • • •
Customizing Presentations
Setting zone properties
Whether you’re creating a full-screen presentation with a single zone or a multi-zone presentation, you can
customize the settings for each zone in your presentation as described in this section. For information about
changing the default zone settings,
see
Setting default properties
.
1Open a presentation project:
NOTE:
If you haven’t already created a presentation project, see
Creating a full-screen presentation
or
Creating
a multi-zone presentation
for details.
a
Double-click the
BrightAuthor
icon on your desktop.
b
On the menu bar, click
File > Open Presentation
.
NOTE
: If you don’t see
New Presentation
under
File
, make sure you have the Edit, Publish, or Manage tab selected
in the upper-left side of the screen.
c
Select the presentation you want to open.
d
Click
Open
.
2In the upper-left corner, click the zone for which you want to change the properties.
3Click Zone Properties.
NOTE
:
The
Zone Properties
window that pops up corresponds to the type of zone you select. You may set the
following features for each zone:
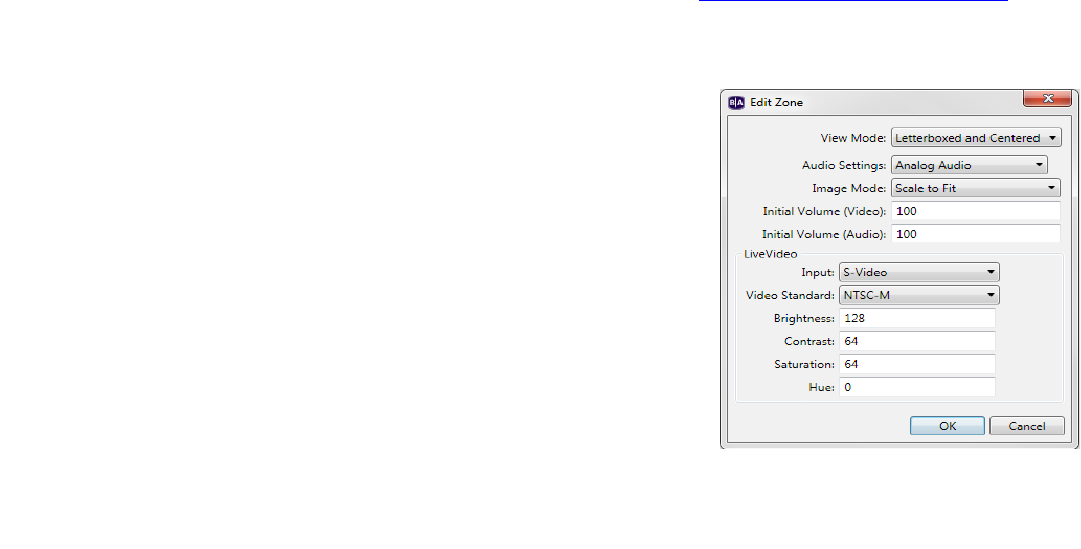
70
•
•
•
•
•
•
•
Video or Images Zone
: View Mode, Audio Settings, Image Mode, Initial Volume (Video), Initial Volume
(Audio), Live Video.
•
Video Only Zone
: View Mode, Audio Settings, Initial Volume (Video), Initial Volume (Audio), Live Video.
•
Images Zone
: Image Mode.
•
Audio Only Zone
: Audio Settings, Initial Volume (Audio)
•
Ticker Zone
: Number of Lines, Time to Display Each Line, Rotation, Alignment, Text Appearance, Foreground
Text Color, Background Text Color, Transparency, Font. Under the
Advanced
arrow are Background Bitmap
and Safe Text Region.
•
Clock Zone
: Rotation, Foreground Text Color, Background Text Color, Transparency, Font. Under the
Advanced
arrow are Background Bitmap and Safe Text Region.
•
Background Image Zone
: You cannot click the
Zone Properties
button for a Background Image Zone.
Choose a background image by selecting the Background Image Zone and dragging a file to the playlist area.
If you only want a specific background color, do not add a Background Image Zone. The background screen
color can be changed in the
Presentation Properties
window. See
Setting presentation properties
for
details.
4Set any of the following:
View Mode
•
Scale to Fit:
Scales the video to fill the screen without maintaining
the aspect ratio. Images may appear stretched.
•
Letterboxed and Centered:
Centers the image and adds black
borders. The aspect ratio is maintained.
•
Fill Screen and Centered:
Centers the image and fills the screen. The
aspect ratio is maintained.
Audio Settings
Specifies the type of audio you want to use for this item. You can select
Analog audio, Digital Audio (Stereo PCM), Digital Audio (Raw
Multichannel), or Analog audio with HDMI Raw Multichannel.
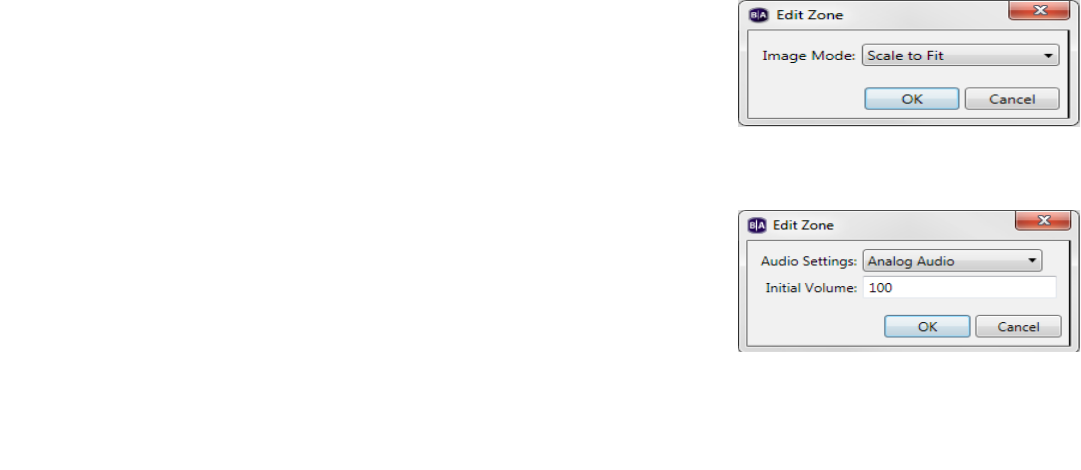
71
•
•
•
•
•
•
Image Mode
•
Center Image:
Centers the image without scaling (may result in cropping if the image is larger than the
current videomode resolution).
•
Scale to Fit:
Scales the image to fit the display. The whole image is displayed as large as possible with correct
aspect ratio.
•
Scale to Fill and Crop:
Scales the image to fill the display while maintaining aspect ratio.
•
Scale to Fill:
Scales the image to fill the screen without maintaining aspect ratio.
Initial Volume (Video)
Sets the initial volume for your video files. Enter a number in the text field to adjust (0 - 100).
Initial Volume (Audio)
Sets the initial volume for your audio files. Enter a number in the text field to adjust (0 - 100).
Live Video
Sets attributes for a live video feed. You can select the Input and Video Standard types and enter parameters for
Brightness, Contrast, Saturation, and Hue.
Number of Lines
Sets the number of lines of text in a Ticker zone.
Time to Display Each Line
Sets how long each line of text displays in a Ticker zone.
Rotation
Sets the angle of the text in a Ticker zone.
Alignment
Sets whether the text is left aligned, right aligned, or centered in a Ticker
zone.
Text Appearance
Sets whether the text is animated or static in a Ticker zone.
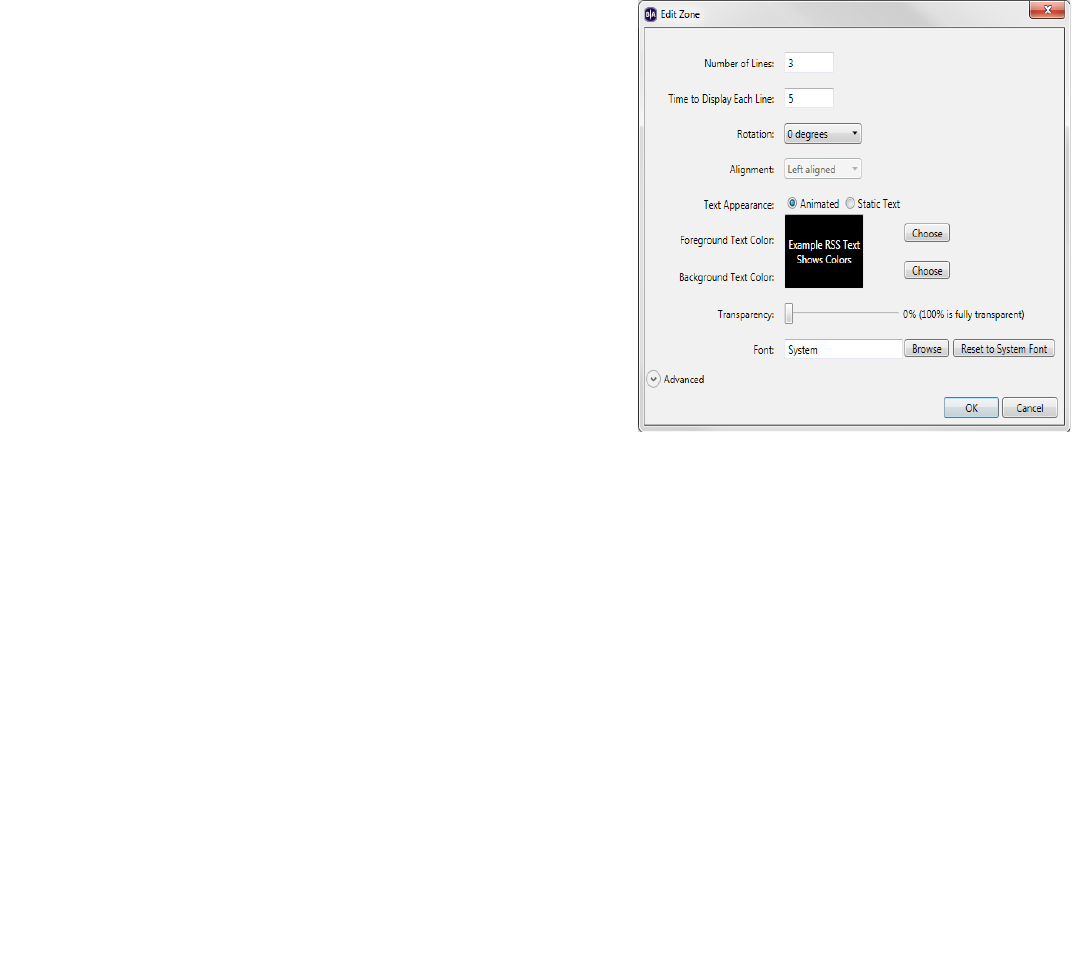
72
•
•
•
•
•
•
Foreground Text Color
Sets the text color in Ticker or Clock zones.
Background Text Color
Sets the color of the background behind the text in Ticker or
Clock zones.
Transparency
Sets the transparency of the text in Ticker or Clock zones.
Font
Sets the font of the text in Ticker or Clock zones. You can use
any TrueType font.
Background Bitmap
Adds the specified file as a background image. You can add a
background bitmap to Ticker or Clock zones. You can also
indicate whether you want to stretch the image to fill the zone
region.
Safe Text Region
Defines the location and size of the text region within the zone.
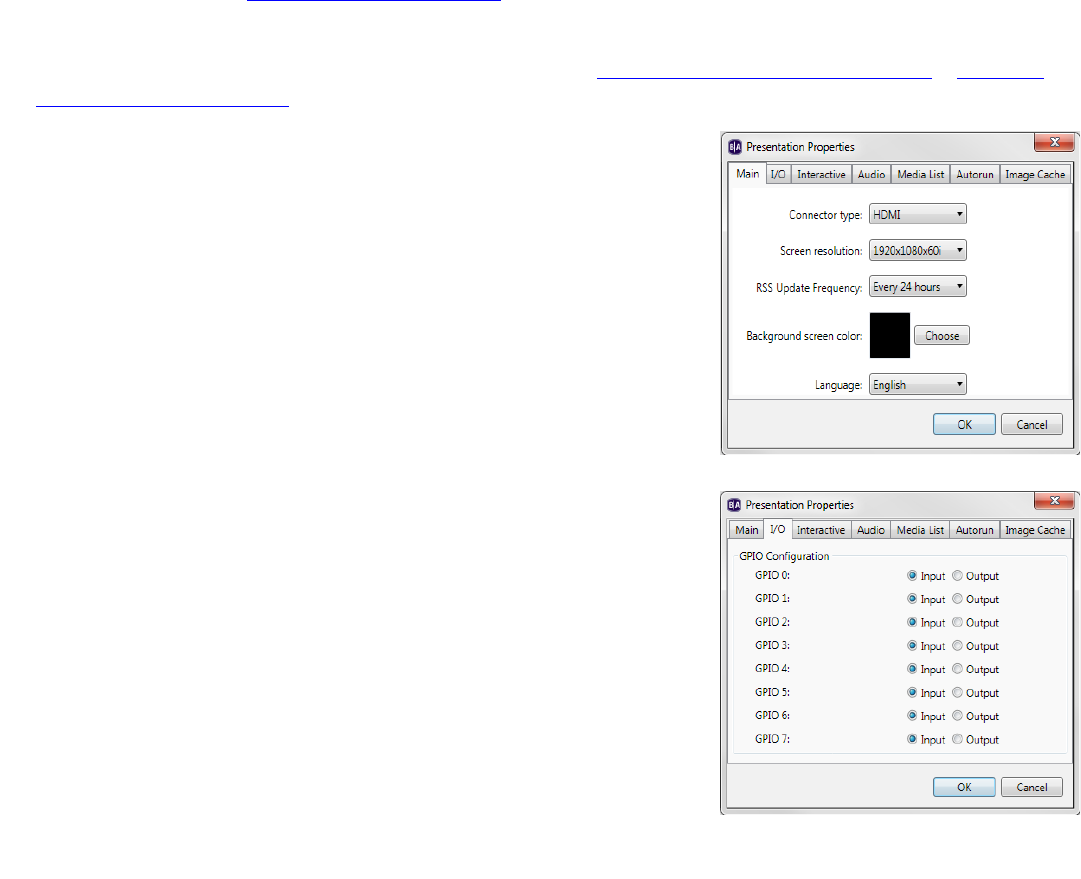
73
•
•
•
•
•
•
Setting presentation properties
Presentation properties apply to your entire presentation. The default settings are based on your current default
property settings (see
Setting default properties
).
1Open a presentation project:
NOTE:
If you haven’t already created a presentation project, see
Creating a full-screen presentation
or
Creating
a multi-zone presentation
for details.
a
Double-click the
BrightAuthor
icon on your desktop.
b
On the menu bar, click
File > Open Presentation
.
NOTE
: If you don’t see
New Presentation
under
File
, make sure you have
the Edit, Publish, or Manage tab selected in the upper-left side of the
screen.
c
Select the presentation you want to open.
d
Click
Open
.
2
On the menu bar, click
File > Presentation Properties
.
3Click the Main tab and set any of the following:
•
Connector
type:
Indicates the type of display that is connected to
the BrightSign on which you want to run the presentation: VGA,
HDMI, or Component.
•
Screen resolution:
Sets the display resolution. Choose a resolution
that is compatible with the display that is connected to your
BrightSign.
•
RSS Update Frequency
: Sets how often BrightSign checks for RSS
feed updates.
•
Background screen color:
Sets the backdrop color for your sign.
Click
Choose
, select a color, and then click
OK
.
•
Language:
Sets the language for your presentation.
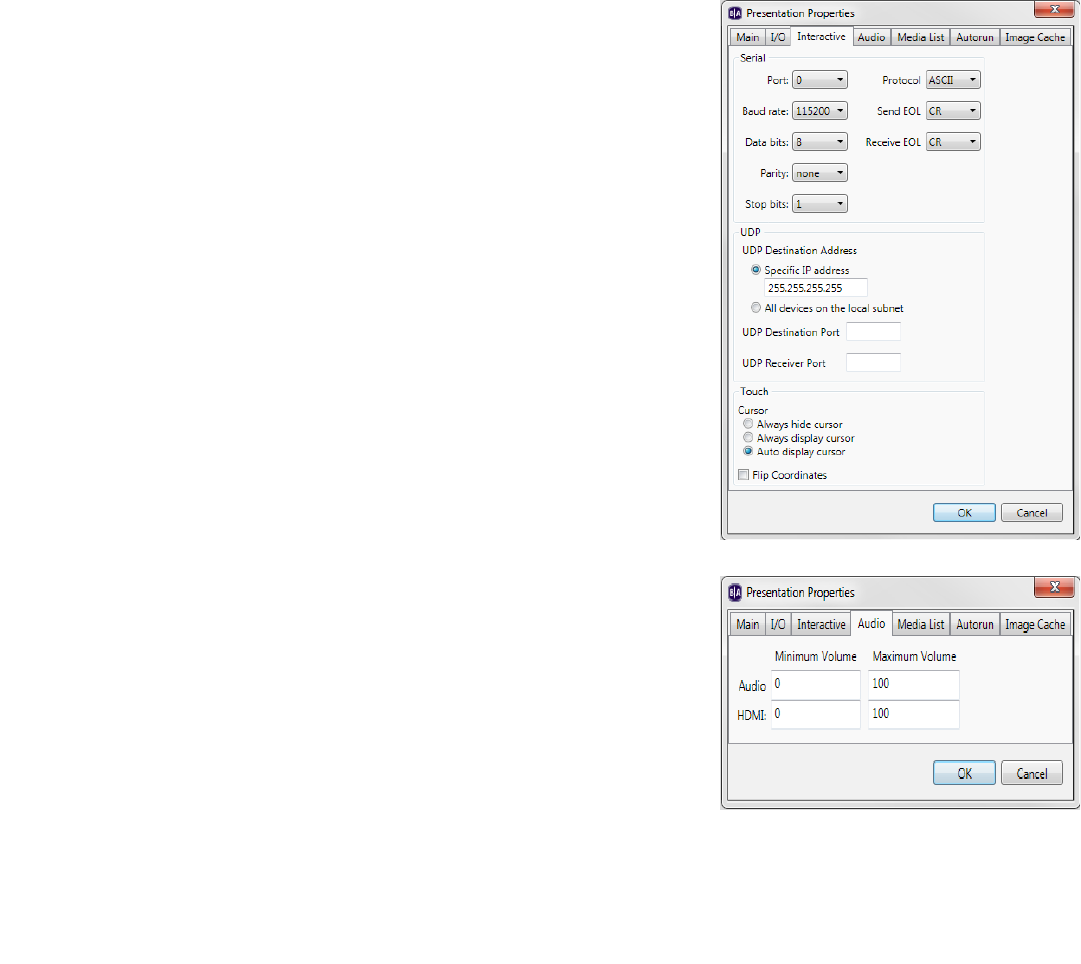
74
•
•
•
•
•
•
4Click the I/O tab and click Input or Output next to each GPIO port to
indicate whether the port is sending or receiving information.
5Click the Interactive tab and set any of the following:
•
Serial:
Sets the parameters for serial communications. You can
enter the following settings for multiple serial ports: Port
(number), Baud rate, Data bits, Parity, and Stop bits. Toggle
between Binary and ASCII mode (Protocol), and Set EOL character
CR, LF, LF+CR (Send EOL and Receive EOL). Note that the standard
port is port 0 and the 5v TTL port is port 1.
•
UDP:
Sets the parameters for UDP communications. You can
specify the UDP Destination Address in dotted quad form (or
select All devices on the local subnet), the UDP Destination Port,
and the UDP Receiver Port.
•
Touch:
The Cursor option sets whether the cursor is hidden, visible,
or present only if there is more than one touch region on the screen.
Flip Coordinates reverses the coordinates of the touch screen. Use
this option only if the touch screen coordinates appear to
be reversed.
6Click the Audio tab and set any of the following:
•
Audio Minimum and Maximum Volume (0 - 100).
•
HDMI Minimum and Maximum Volume (0 - 100).
7Click the Media List tab and set the following:
•
Return to start after inactivity
: Click
Yes
to set Media lists to return
to the start of the list after a period of inactivity.
•
Inactivity timeout (seconds)
: If you clicked
Ye s
above, type a
number in the text field to specify how long Media lists will wait
through a period of inactivity before returning to the start.
8Click the Autorun tab and click Standard Autorun or Select
custom Autorun to select the Autorun file for the presentation.
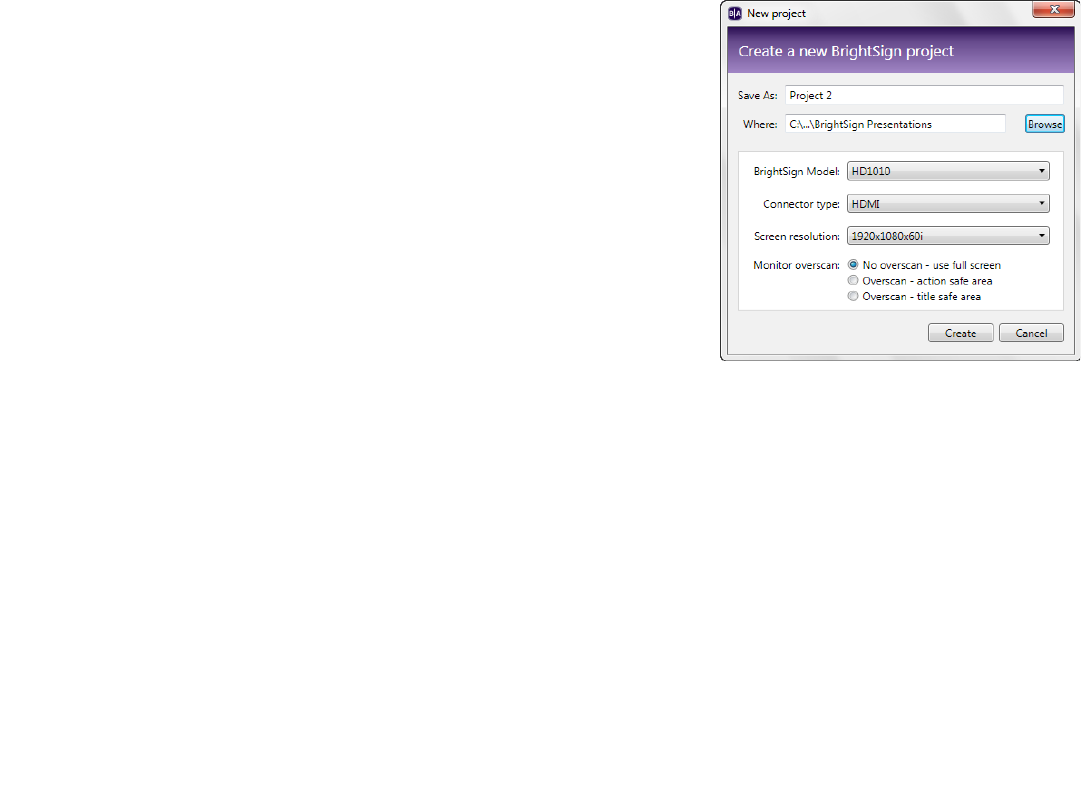
75
•
•
•
•
•
•
9Click the Image cache tab. A list of all media files in your playlist is displayed. Click the boxes to select
which files you want stored in an Image cache for faster loading.
10 Click OK.
Customizing template layouts
If the predefined template layouts do not meet your needs, you can
create your own templates.
1Create a new presentation project:
a
Double-click the
BrightAuthor
icon on your desktop.
b
In the
Create a new BrightSign project
window, enter a name for
the presentation in the
Save As
field.
TIP:
If you don’t see the Create a new BrightSign project window, make sure
you have the Edit, Publish, or Manage tab selected in the upper-left side of
the screen. On the menu bar, click
File > New Presentation
.
c
In the
Where
field, enter the folder where you want to store the
presentation. To navigate to the folder you want to select, click
Browse
.
d
Select your
BrightSign Model
,
Connector type
, and
Screen resolution
.
e
Select a
Monitor overscan
setting to control how the image fills the display screen:
•
No overscan:
Displays images all the way to the edge of the video signal.
•
Overscan action safe:
Restricts the image display to an area that is compatible with most displays.
•
Overscan title safe:
Restricts the image display to an area that is much smaller than the image generated
by the video signal.
2Click the template that is most similar to the layout you want to use, and then click Choose.
3Click Layout (below the Edit tab) and do any of the following:
76
•
•
•
•
•
•
•
Resize a zone by clicking the zone and then dragging the selection handles, or enter the
Size
information in
the left side of the screen.
W
corresponds to the width of the zone, and
H
corresponds to the height of the
zone.
•
Change the position of a zone by clicking the zone and dragging it to the desired position, or enter the
Position
information in the left side of the screen. The
X
field corresponds to the position of the zone on a
horizontal axis. The
Y
field corresponds to the position of the zone on a vertical axis.
•
Make two or more zones the same size by pressing
Ctrl+Click
to select the zones you want to resize. On the
menu bar, click
Format > Make Same Size
and then select a resize option.

77
•
•
•
•
•
•
•
Align two or more zones by pressing
Ctrl+Click
to select the zones you want to align. On the menu bar, click
Format > Align
and then select an alignment option.
•
Center a zone on the screen by clicking the zone you want to center. On the menu bar, click
Format > Center
in Form
and then select
Horizontally
or
Vertically
.
•
Remove an unwanted zone by clicking the zone and then pressing
Delete
on your keyboard.
•
Add a zone by clicking
Add Zone
, entering a
Zone name
, selecting the
Zone Type
, and then clicking
OK
.
•
Rename a zone by entering a new label in the
Name
text field on the left side of the screen.
TIP:
You can place an Image zone, a Ticker zone, or a Clock zone on top of a Video Only zone. You can then use the
transparency settings in the Ticker or Clock zone to control how much of the underlying video is visible. Note that
you cannot place zones on top of a Video or Images zone.
4Click Save Template (in the bottom of the left pane), enter a name for the template, and then click OK.
Setting default properties
When you create or add to a presentation project, the initial settings are based on the default properties. If you
often use the same set of properties, you can streamline the development process by changing the default
property settings to match the settings you use most often.
NOTE:
Changing the default properties does not change any existing presentations. Changes made to default
properties will only apply to new presentations.
78
•
•
•
•
•
•
1
On the menu bar, click
Edit > Preferences
.
2Click the Video tab and set the default video settings:
Volume
Sets the volume level by specifying a value between 0 and 100.
Live Video - Time on Screen
Sets a default period for Live Videos to remain on the screen.
3Click the Images tab and set the default image settings:
Slide Transition
Sets the effect between image transitions.
Slide Delay Interval
Sets the how long each image displays.
4Click the Interactive tab and set a default timeout period for media files.
5Click the Clock tab and set the default clock settings:
Language
Select a language to use a predefined date and time format. To customize a
format, click
Customize
, enter the settings you want to use, and then click
OK
.
6Click the Networking tab to enable or disable BrightSign Network,
Local Network, and Simple File Networking settings. When these
networking settings are disabled, you cannot see network options on
BrightAuthor screens.
79
•
•
•
•
•
•
7Click the UI tab and set the default Publishing, Save Properties, and
Transitions settings:
Publishing
Click the boxes to
Show File Overwrite dialog
and
Copy and replace
duplicate files when publishing locally
.
Save Properties
Click the box to show
Save Properties dialog
.
Transitions
Set the display mode between media files in your playlist to
Automatic, Always display line, or Always display label. Set the
label location to Bottom or Right (of the media file)
8Click OK.
80
•
•
•
•
•
•
Chapter 8
• • • • • •
Managing Your BrightSign and Local Network
Viewing unit status on your BrightSign Network
Viewing network status enables you to see unit activation status, the group to which the unit is assigned, and
which presentations are associated with that unit.
1Sign in to your BrightSign Network
account:
a
On the menu bar, click
Tools > Sign
In to BrightSign Network
.
b
If prompted, enter your
Account,
User name
, and
Password
, and
then click
Sign In
.
2Click the Manage tab in the upper-
left side of the screen.
3Click Status (below the Manage tab).
4Click a group to view details for
current presentations in that group.

81
•
•
•
•
•
•
5Right-click a presentation within a group and then click Download Progress to view whether all files have
been fully downloaded.
6(Optional) Sort the Status view by clicking the column you want to use as the sort criteria. For example, to
sort by Status, click the Status column. To switch between ascending and descending order, click Status
again.
NOTE:
When a presentation is active, you cannot delete it. You can, however, delete presentations that are not
scheduled to run in the future and were not scheduled to run in the past 24 hours.
Creating groups in your BrightSign Network
Groups enable you to test your presentation and then distribute them to a specific set of BrightSigns. For
example, you can create groups based on the region or department in which the BrightSigns reside.
BrightAuthor includes two default groups: Default and LocalTest. LocalTest is the group you use to test your
presentations on your local network.
1Click the Manage tab on the upper-left side of the screen.
2Click Status (below the Manage tab).
3Click the Add Groups button (in the lower-left corner of the screen).
4Enter the name of the group you want to add, and then click OK.
Viewing presentation status on your BrightSign Network
Viewing presentation status enables you to see which presentations you’ve uploaded to your BrightSign
Network, which presentations are active, and when presentations were last modified.
1Sign in to your BrightSign Network account:
a
On the menu bar, click
Tools > Sign In to BrightSign Network
.
b
If prompted, enter your
Account, User name
, and
Password
, and then click
Sign In
.
2Click the Manage tab on the upper-left side of the screen.
3Click Presentations (below the Manage tab).
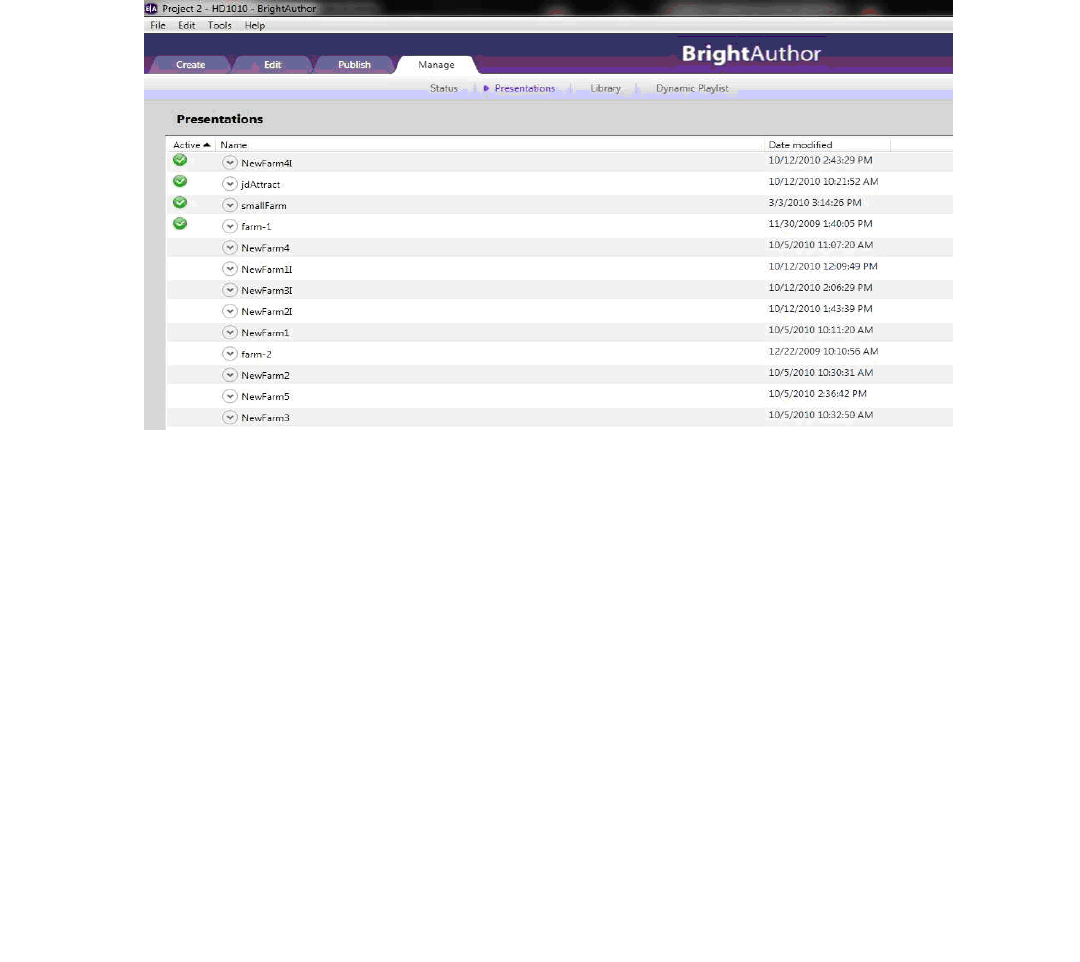
82
•
•
•
•
•
•
4Click a presentation to view which groups are currently using the presentation.
5(Optional) Sort the Presentation view by clicking the column you want to use as the sort criteria. For
example, to sort by Name, click the Name column. To switch between ascending and descending order,
click Name again.
NOTE:
When a presentation is active, you cannot delete it. You can, however, delete presentations that are not
scheduled to run in the future and were not scheduled to run in the past 24 hours.
Viewing your library on your BrightSign Network
Viewing your library enables you to see the content you’ve uploaded to your BrightSign Network.
1Sign in to your BrightSign Network account:
a
On the menu bar, click
Tools > Sign In to BrightSign Network
.
b
If prompted, enter your
Account, User name
, and
Password
, and then click
Sign In
.
2Click the Manage tab on the upper-left side of the screen.
3Click Library (below the Manage tab).
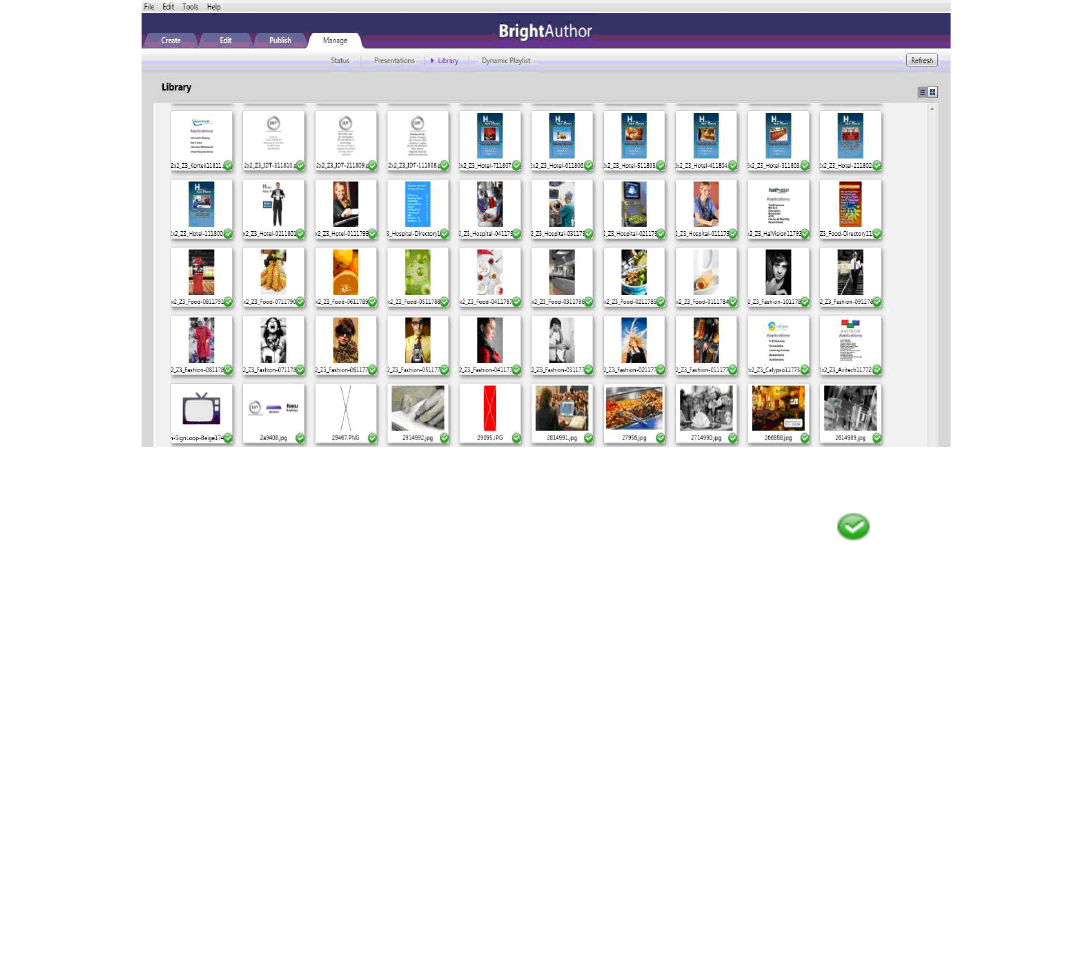
83
•
•
•
•
•
•
4Do any of the following:
•
Identify which items are currently used by a presentation.
A green checkmark indicates the item is
in use. You cannot delete an item when it is in use.
•
Switch between thumbnail and list view.
Click the icons in the upper-right part of the screen.
•
View item info.
Right-click an item and select
Info
to see the file size, type, date modified, date uploaded,
presentations that are using the item, and dynamic playlists that are using the item.
•
Delete an item.
Right-click an item and select
Delete
. Remember that you cannot delete an item when it is
in use.
•
Refresh the Library display.
Click
Refresh
in the upper-right corner.
NOTE:
The thumbnails you see in Library view are based on the codecs available on your PC. If an image does not
display properly, you may not have the necessary codecs on your PC.

84
•
•
•
•
•
•
Viewing dynamic playlist status on your BrightSign Network
Viewing dynamic playlist status enables you to see which playlists you’ve created, which playlists have
presentations linked to them, and when playlists were last modified.
1Sign in to your BrightSign Network account:
a
On the menu bar, click
Tools > Sign In to BrightSign Network
.
b
If prompted, enter your
Account, User name
, and
Password
, and then click
Sign In
.
2Click the Manage tab in the upper-left side of the screen.
3Click Dynamic Playlist (below the Manage tab).
4Right-click any playlist to Delete it or check its Info. The Info window displays the date and time the
playlist was last modified, and the names of all presentations linked to it.
NOTE
:
Under
Used
,
beside each playlist name, a green checkmark indicates if any presentations are linked
to the playlist.
5Click the Refresh button in the upper-right side of the screen to refresh the list.
Viewing unit status on your Local Network
Viewing unit status on your Local Network enables you to remove units, view info for all units, and specify a
username and password for units.
1Sign in to your BrightSign Network account:
a
On the menu bar, click
Tools > Sign In to BrightSign Network
.
b
If prompted, enter your
Account, User name
, and
Password
, and then click
Sign In
.
2Click the Manage tab in the upper-left side of the screen.
3Click Local Network (below the Manage tab).
4Right-click to Remove the unit(s), Show all units, Specify a username and password, and view Info.
When you click Info, the Unit Properties window will pop up. Here, you can view the Unit ID, IP Address
linked to the unit, BrightSign Model, Firmware version, and Autorun version.
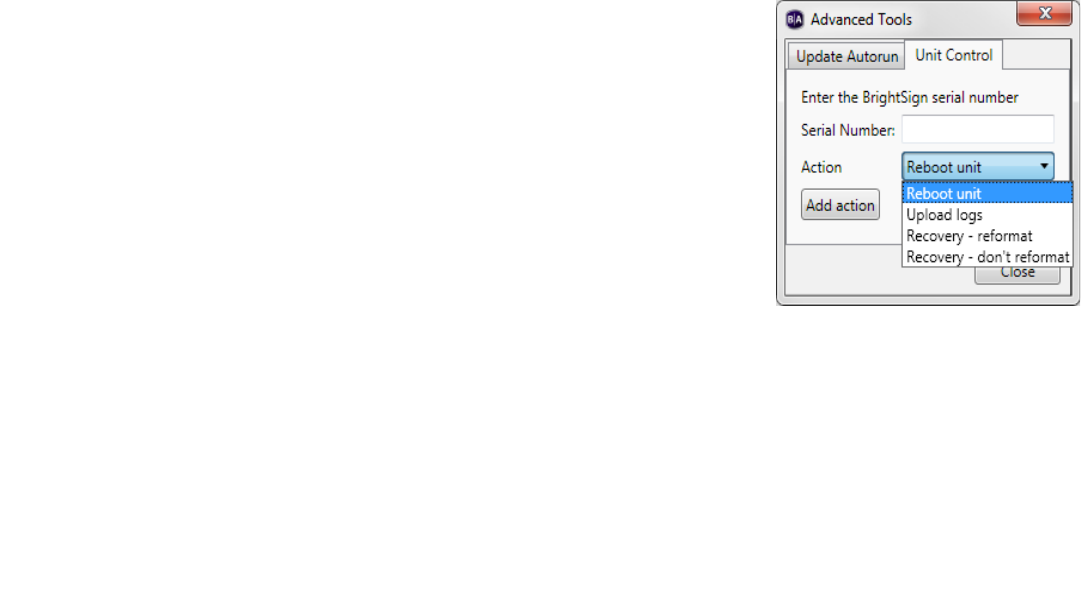
85
•
•
•
•
•
•
Using advanced tools
Advanced tools enable you to control your units remotely. You can reboot units, upload logs, and put a unit in
recovery mode with or without reformatting the unit’s storage card.
1Sign in to your BrightSign Network account:
a
On the menu bar, click
Tools > Sign In to BrightSign Network
.
b
If prompted, enter your
Account, User name
, and
Password
, and then click
Sign In
.
2
On the menu bar, click
Tools > Advanced
.
3
Click the
Update Autorun
tab.
4
Click the boxes to select the groups you want updated with the latest Autorun file version stored in the
Templates folder, and then click
Update now
.
5Click the Unit Control tab.
6In the Serial Number field, enter the serial number of the unit you want
to control.
7Click the Action list and select the action you want to perform:
•
Reboot unit:
Restarts the unit.
•
Upload logs:
Uploads log files based on the Upload Log setting you
selected on the Unit Setup screen.
•
Recovery - reformat:
Puts the unit in recovery mode and reformats the
unit’s storage card.
•
Recovery - don’t reformat:
Puts the unit in recovery mode and downloads
the latest autorun script to the storage card without reformatting the unit’s
storage card.
8(Optional) To add another action, click Add action. To remove an action, click Remove action.
9Click Close.

86
•
•
•
•
•
•
Chapter 9
• • • • • •
Frequently Asked Questions
To view additional Frequently Asked Questions, go to
support.brightsign.biz/forums
.
Can I use BrightAuthor with the HD600 or HD2000?
No, BrightAuthor only supports the HD110, HD210, HD210w, HD410, HD810, HD1010, HD1010w, and TD1012.
Can I open the autoplay.xml file using BrightAuthor?
No. The autoplay.xml file that is generated when you publish a presentation is a playlist file. This file includes only
the information required for playback on a BrightSign. This file is not the same as a presentation project file.
How do I use a different font?
To use a different font, browse to a folder on your computer that has a true type font. This font will be copied to
the SD card when you publish the presentation. You can use your own custom fonts or download free TrueType
fonts from the web.
Can I export a template?
Yes. Although there isn't a template export option, you can save the presentation project you're using with the
new template. You can then open the presentation project on another computer, click the
Layout
tab, and select
Save Template
.
Can I use the schedule feature on the HD110 or HD410?
No. Only network-enabled units that set the time over the network, or the HD810, with a real-time clock, can use
the schedule feature.

87
•
•
•
•
•
•
Why does BrightAuthor take a long time to process my folder?
If the folder you selected has a large number of images and videos, the files list on the Playlist tab may take a
couple minutes to update. Please be patient.
Why can’t BrightAuthor locate my files when I try to publish my presentation?
If you copy a presentation project from one computer to another computer, or if you move or rename files used
in a BrightAuthor presentation, BrightAuthor cannot locate your files and you will receive an error message
when you try to publish. To resolve the error, you must remove the files from each playlist in your presentation,
and then add them again.
Why are some of my videos missing thumbnails in the Files tab?
The thumbnails are generated by codecs installed on your computer. If you don't see thumbnails for your
transport streams, for example, you can try downloading a codec such as K-Lite.
What do I do if BrightAuthor crashes while I'm using it?
For any errors or crashes you encounter with BrightAuthor, post a description of the problem in the forums or
send us an email at support@brightsign.biz and be sure to include the following information:
•
Steps to duplicate the problem (or indicate that you can't duplicate it)
•
Any error dialogs you saw, and any text from the error dialog
•
The contents of your event log right after the crash. You can find the log in this folder:
C:\Users\Owner\AppData\Local\BrightSign\BrightAuthor\. Look for a subfolder named after the
BrightAuthor version number, such as 2.3.0
•
A copy of the presentation project where you experience the problem

88
•
•
•
•
•
•
Appendix A
• • • • • •
Remote Control Protocols
Follow these steps to set up your BrightSign to communicate with a remote control:
a
Create an interactive presentation (see
Making a presentation interactive
).
b
Select
Remote Input
as the input device.
c
Enter any of the following remote control codes:
WEST
EAST
NORTH
SOUTH
SEL
EXIT
PWR
MENU
SEARCH
PLAY
FF
RW
PAUSE
ADD
SHUFFLE
REPEAT
VOLUP
VOLDWN
BRIGHT
