Bright Sign App User Guide (ver 1.0.1)
2013-10-17
: Brightsign Brightsign App User Guide (Ver 1.0.1) BrightSign App User Guide (ver 1.0.1) s
Open the PDF directly: View PDF ![]() .
.
Page Count: 14
BRIGHTSIGN APP USER GUIDE
iOS App Version 1.0.1
BrightSign, LLC. 16795 Lark Ave., Suite 200 Los Gatos, CA 95032 | 408-852-9263 | www.brightsign.biz

TABLE OF CONTENTS
Introduction 1
Using the BrightSign App 2
UI Overview 2
Adding Players to the App 3
Switching between Players 4
Removing a Player from the List 5
Creating and Editing Commands 5
Sending Commands 6
Changing User Variables 6
Using the Diagnostic Web Server 7
Retrieving App Logs 7
BrightAuthor and the BrightSign App 8
Diagnostic and Local Web Servers 8
Using UDP Events 9
UDP Commands with Multiple Players 9
Creating User Variables 11
Using Conditional Targets 11

1
INTRODUCTION
The BrightSign App for iPad and iPhone allows you to broadcast commands to BrightSign players and
other compatible network devices over your local network using UDP (User Datagram Protocol) packets.
The app automatically retrieves UDP events in BrightAuthor presentations that are currently active on
the network, allowing you to access and activate them using a straightforward UI. You can also use the
App to modify User Variables and create new UDP Commands on the fly.
The BrightSign App is compatible with all networked BrightSign players, including the XD230, XD1030,
XD1230, HD220, HD1020, and HD1010.
2
USING THE BRIGHTSIGN APP
UI Overview
Once you download the BrightSign App from the Apple
Store, opening it will take you to the BrightSign App UI.
The first time you open the app, the main window will be
blank because you have not added any BrightSign
players to the app database yet.
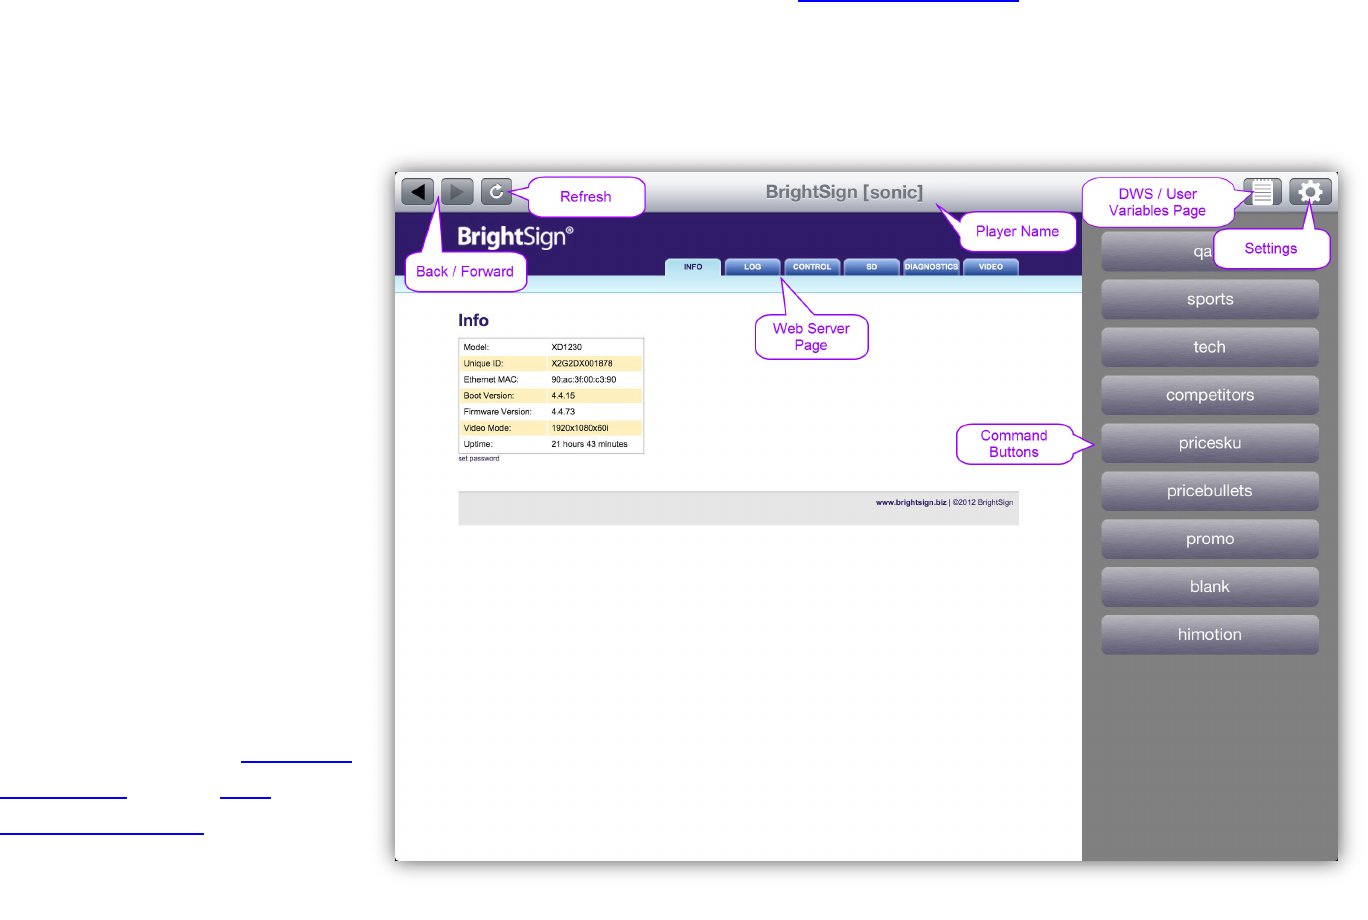
• Back / Forward: Navigates the
Diagnostic Web Server or User
Variables webpage similar to a
web browser.
• Refresh: Reloads the page data
of the Diagnostic Web Server or
User Variables webpage.
• Player Name: The name of the
player that is currently
connected to the app. The
player name is designated
during the player setup process
in BrightAuthor.
Note: The BrightSign App can only
connect to one player at a time.
• DWS / User Variables Page:
Switches between the
Web Server
Diagnostic
and the
Variables webpage
User
pages will only be available if they are enabled
during the
. These
player setup process in BrightAuthor.
• Settings: Opens the settings menu, which allows you
to add players to the app, select players that have
been added, and add or edit the UDP Commands
for a player.
The BrightSign App main page for iPad
3
• Web Server Page: The main area of the App displays
either the Diagnostic Web Server or the User
Variables page of the selected player if they were
enabled during the player setup process.
• Command Buttons: Sends commands to the
connected player with the press of a button. In
the Settings menu, you can designate the title of
each button, as well as the UDP data that is sent.
• (iPhone only) Actions Menu: Displays the
Command Buttons for use.
Adding Players to the App
Once you are connected to a local network, the App will
automatically detect BrightSign players on the network.
However, there may be instances when you need to
manually add a new player to the App database. To do
so, follow these steps:
1. Ensure that your iPad or iPhone is connected to the
same local network as your BrightSign player.
2. Open the BrightSign App.
3. Press the Settings button.
4. Press the button in the BrightSign Unit field.
Adding a new player in the Select Unit window
The Command Button display for iPhone
4
This will take you to the Select Unit window, which
displays all currently active BrightSign players.
5. Press the button in the Add Unit field.
6. Enter the IP address of the BrightSign player you
wish to add to the app database. Then press
Search. If you haven’t manually specified the IP
address of the player during setup, or if you don’t
know the IP address of the player, you can find it by
following these steps:
a. Power off the player by unplugging the power
supply.
b. Remove the SD card (as well as the internal
µSD card if you are using an XD player).
c. Power on the BrightSign player by reconnecting
the power supply.
d. Wait for the player to boot up: The IP address of
the player, along with the serial number and
firmware version, will be displayed on the
screen.
7. After searching, the app will return the name and ID
of any player or other device matching the IP
address you entered.
8. Press the Add button to add the player to the app
database. Then press Done.
Switching between Players
You can create a list of locally networked BrightSign
players by adding units using the method described
above. To choose a player to send commands and User
Variable updates to, follow these steps:
1. Press the Settings button.
2. Navigate to the Select Unit window by pressing
the button in the BrightSign Unit field.
3. Tap the unit you wish to connect to. A checkmark
will appear next to that unit.
4. Return to the Settings page using the button in
the top left.
5. Save your new selection by pressing the Save
button in the top right.
Deleting a player in the Select Unit window
5
Adding a new Command button in the Settings window
Removing a Player from the List
The BrightSign App does not automatically remove
BrightSign players from the Active BrightSign Units list.
If you modify the IP address of a player or remove it from
the local network, that player will remain (marked in red)
on the Active BrightSign Units list.
If you would like to remove a player from the from the
Active BrightSign Units list, follow these steps:
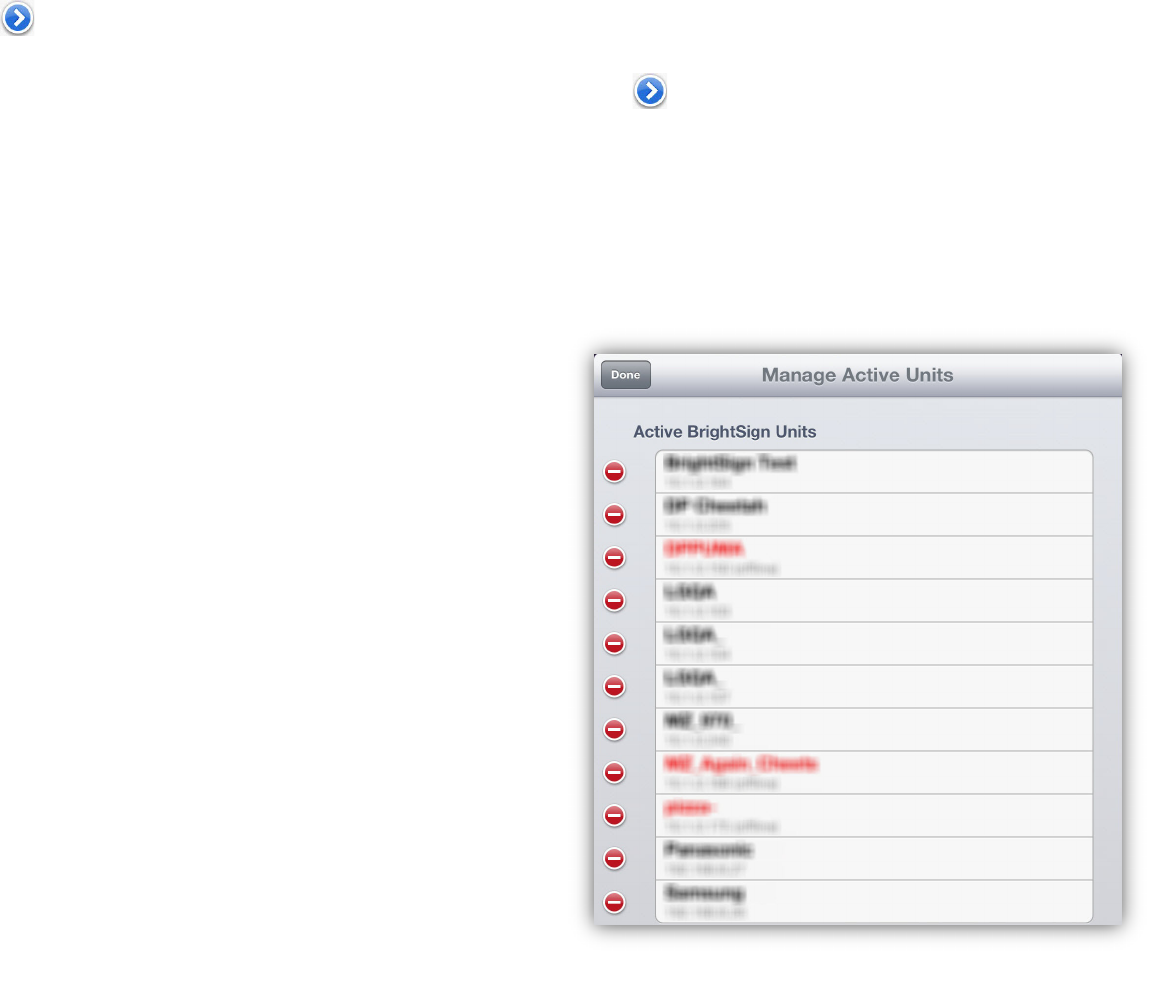
1. In the Select Unit window, press the Edit button
in the top right. Each player should now have a
button next to its name.
2. Press a button to turn it. You will now be able to
delete a player from the list by pressing the Delete
button to the right of the player name.
3. Press Done to save the changes you’ve made.
Note: Deleting players only removes them from the
app database. The configuration settings of the
players themselves are not changed in any way.
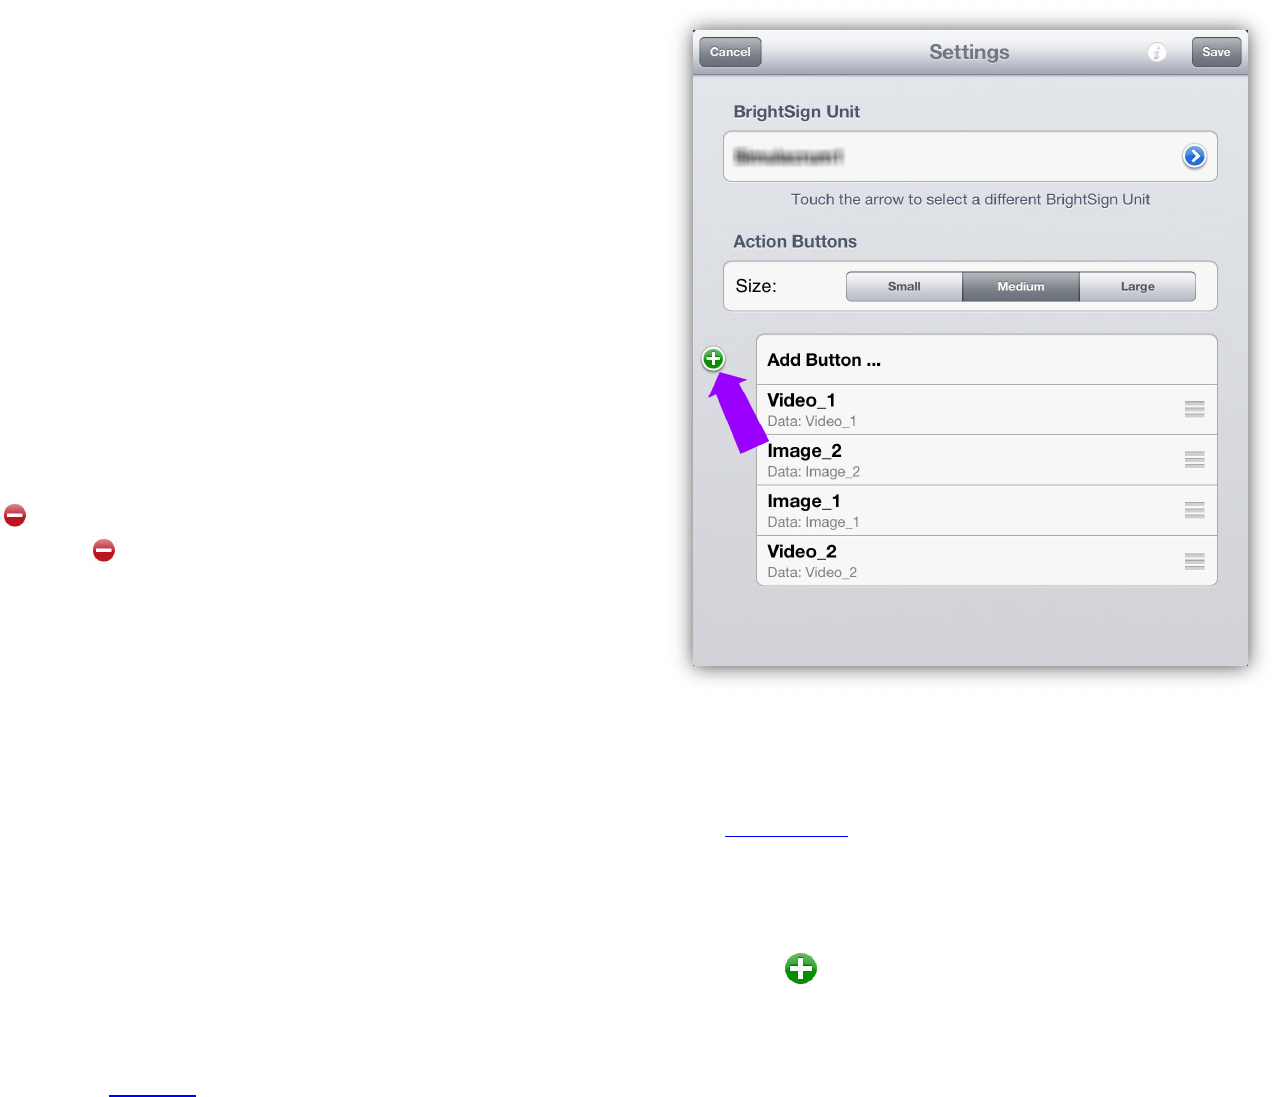
Creating and Editing Commands
The BrightSign App automatically populates a list of UDP
Commands that are being used in the current
BrightAuthor presentation. However, in some cases you
may need to manually add command buttons (for
example, when using the BrightSign App to send UDP
commands to other types of networked devices).
1. Press the Settings button.
2. Use the Small, Medium, and Large Size buttons
to edit the size of the action buttons in
the Commands field. Making the Command
buttons smaller allows you to fit more buttons on
the screen.
3. Add a new UDP Command button to the UI by
pressing Add Button…. This will bring up a
window that allows you to enter an Label, as well
as Data.
6
a. Label: The name of the button as it is
displayed in the Commands field and the
Settings menu.
b. Data: The command parameter that is sent
to the player in the form of a UDP packet.
For the BrightSign App to activate the
BrightAuthor UDP event, this text must
match exactly the text in the Specify UDP
input field of the UDP Input Event in
BrightAuthor.
4. Press the Save button once you are finished
inputting the Label and Data.
When the App connects to a player, it assigns a name to
each command based on the data of that command. If
you would like to edit these default names, click the
button to the right of a command in the Settings
window. You can then edit both the Label and Data.
Sending Commands
You can send UDP Commands using the Commands
field in the UI. Simply touch one of the command buttons
to send the UDP Command string to the currently
connected player.
If you would like to affect multiple players with a single
command, please see the UDP Commands with Multiple
Players section.
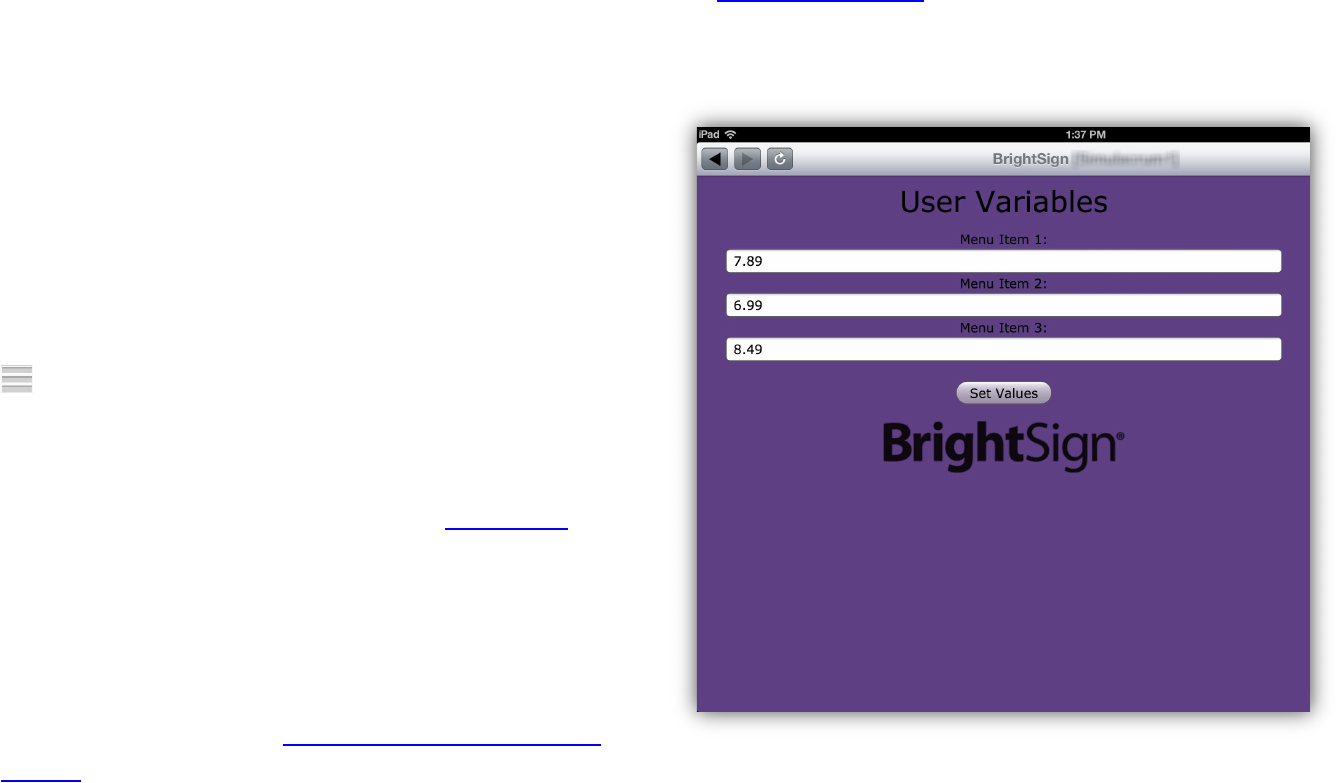
Changing User Variables
You can also use the BrightSign App to change the value
of User Variables. User Variables have various uses in
BrightAuthor presentations: You can display them on
screen like dynamic price tags, or you can use them
as conditionals targets in a presentation (for example, by
configuring the presentation to play a different video if the
variable is equal to a certain value).
Changing variable values on the User Variables webpage
7
By default, the home page of the BrightSign App displays
the Diagnostic Web Server. To change the values of
User Variables, you will need to switch to the User
Variables webpage.
The title above a field reflects the name of the User
Variable. The number in the field reflects the current
value of the User Variable. To change the value of a User
Variable, tap the field, enter a new value, and then press
Set Values. If you chose to Enable Update Notifications
when setting up the player, the User Variables page will
automatically refresh whenever a variable value changes.
Note: Like UDP Commands, you can only work with User
Variables that are available on the currently selected
player.
Using the Diagnostic Web Server
The Diagnostic Web Server is a helpful tool for managing
and monitoring networked players. It is included with the
BrightSign App to increase the overall utility of the App,
but it is not directly related to the interactive capabilities
of UDP Commands or User Variables. Please see
the Diagnostic Web Server User Guide to learn more
about using this tool.
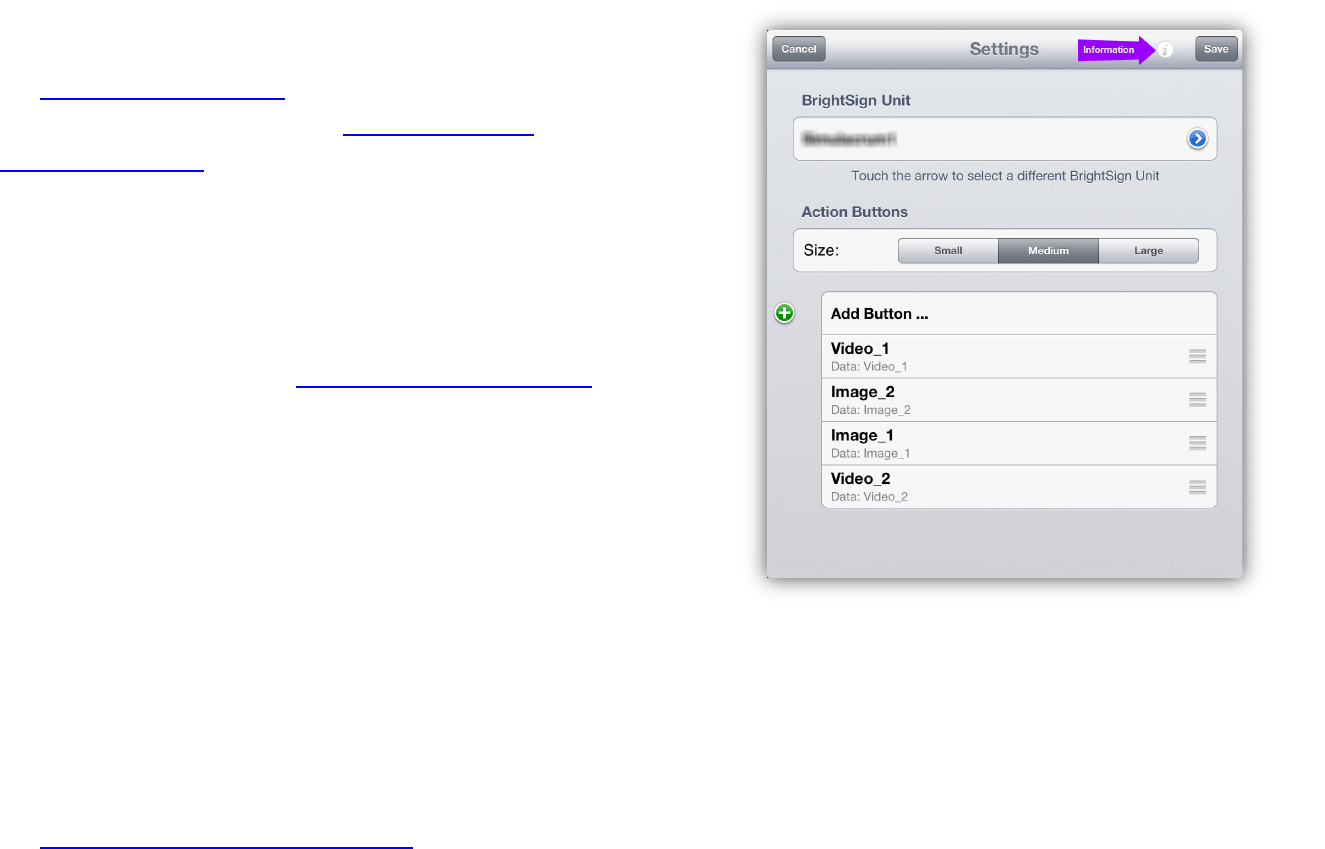
Retrieving App Logs
Follow these steps to retrieve a record of actions taken in
the BrightSign App:
1. Open the Settings window.
2. Press the Information button in the top right.
3. Select the Logs button.
4. Enter an Email recipient and subject line for the
log report.
Opening the Information panel
8
BRIGHTAUTHOR AND THE BRIGHTSIGN APP
This chapter details how to create BrightAuthor
presentations that work with the BrightSign App. The
following sections are intended as quick setup
instructions. For a more comprehensive explanation of
BrightAuthor features, please see the BrightAuthor User
Guide.
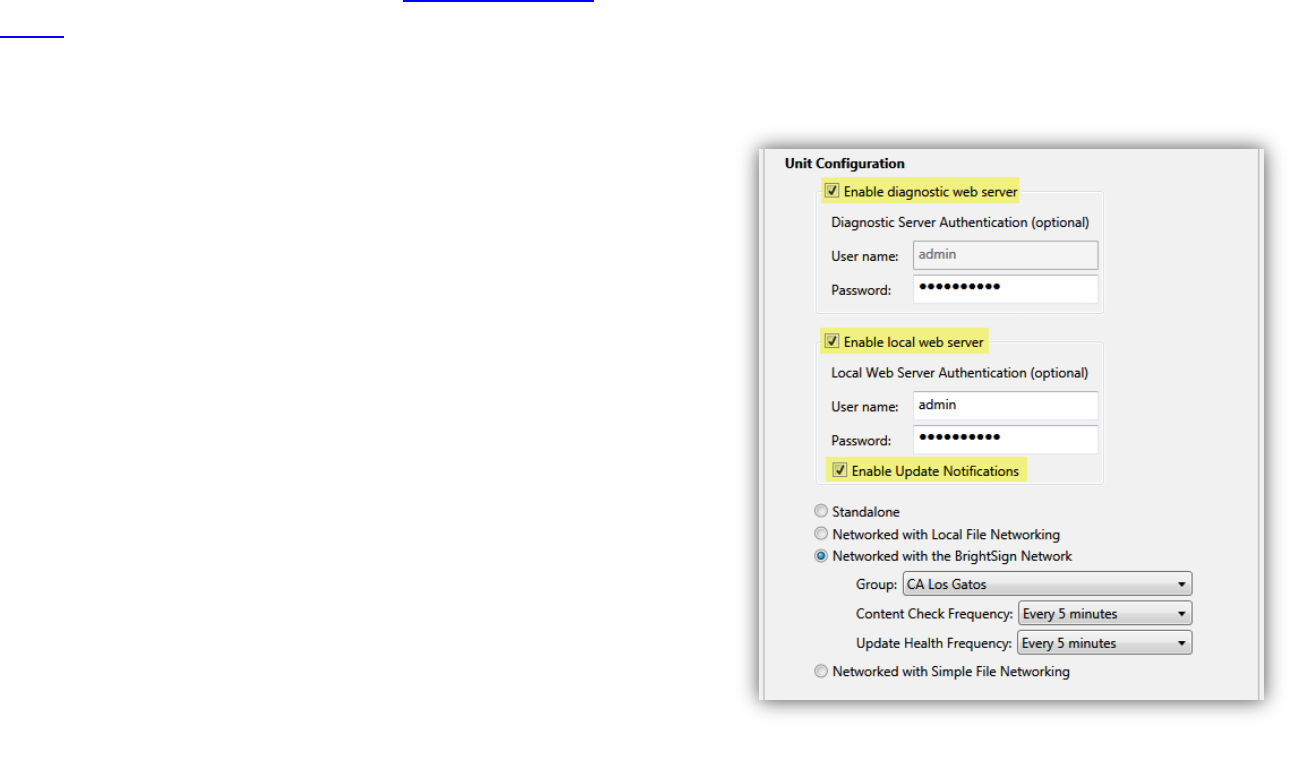
Diagnostic and Local Web Servers
In order to use the Diagnostic Web Server and User
Variables pages in the BrightSign App, you will need to
make sure they are enabled during the setup process in
BrightAuthor.
1. Create new setup files for a BrightSign player by
navigating to Tools > Setup BrightSign Unit.
2. Check the Enable diagnostic web server box.
3. Check the Enable local web server box. By
default, this enables the User Variables webpage.
If you would like to disable the User Variables
webpage or use a custom webpage, navigate to
File > Presentation Properties > Variables.
4. (Optional) Enter a Password for the Diagnostic
Web Server and a User name and Password for
the Local Web Server.
5. (Optional) Click Enable Update Notifications to
have the player automatically refresh the User
Variables webpage when variable values change
on the player.
Note: This feature is only available in BrightAuthor
versions 3.7.0.16 and later.
6. Specify other settings for the BrightSign player as
needed.
7. Click Create Setup Files to publish the setup files
to an SD card.
Enabling the Diagnostic Web Server and Local Web Server
9
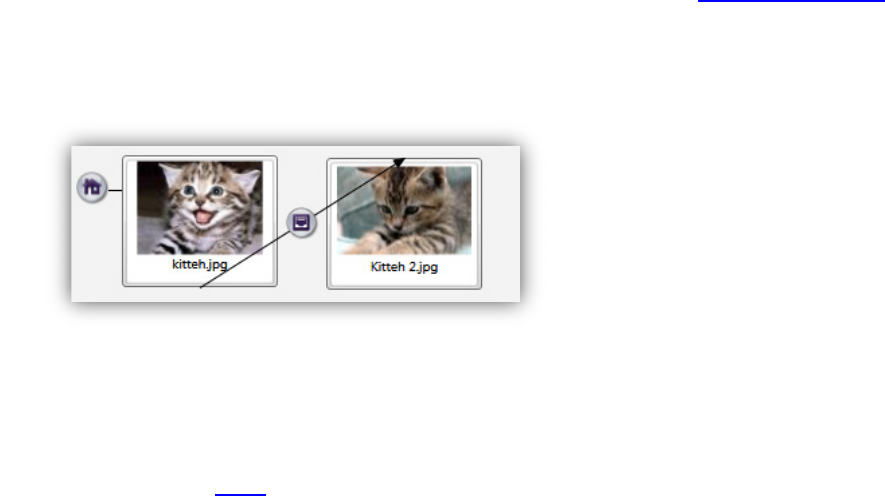
Connecting media items with a UDP Input Event
Using UDP Events
You can use Commands on the BrightSign App to trigger
UDP Events on a BrightSign player. This allows you to
program a wide range of interactivity into your
BrightAuthor presentations. Here we’ll demonstrate how
to create a simple media transition event using UDP
input:
1. Make your presentation interactive by clicking the
Edit > Playlist tab and then selecting the
Interactive option under Playlist type.
2. Drag two media items (images, videos, or audio)
into the playlist area from the Media Library.
3. Click the Events tab under the Media Library.
Drag and drop the UDP Input Event onto the first
media item.
4. Specify a desired command parameter in the
Specify UDP input field. This is the same as the
parameter in the Data field in the BrightSign App:
Sending this data from the BrightSign App (using a
command button) will activate the UDP Input
Event.
5. Select Transition to new state. Make sure the
second media file is chosen.
6. Press OK.
You have now created an interactive presentation that
will transition from one media item to another with the
press of a button in the BrightSign App. When you use
the app to connect to the player, the app will
automatically retrieve and display the UDP Input Event
as a Command Button.
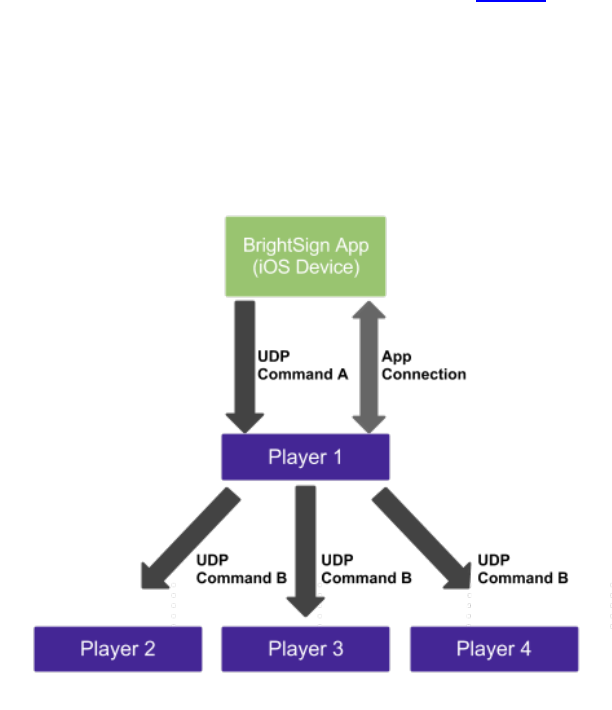
UDP Commands with Multiple Players
The BrightSign App can only connect to (and send UDP
Commands to) one player at a time. However, you can
use UDP commands and UDP events to broadcast a
BrightSign App command from one player to multiple
players. This is useful if , for example, you want to
change the content of an entire sales floor with a single
command from the BrightSign App.
1. Double-click an existing UDP Input Event (like the
event created in the previous example).
2. Navigate to the Advanced tab and click the Add
Command button.
3. Under Commands, choose the Send category.
10
4. Under Command Parameters, select UDP and
enter a command parameter.
Note: Commands entered here use the same format
as commands from the BrightSign App. This means
that a player will respond to a UDP command with a
certain parameter regardless of whether it is sent from
the BrightSign App or from another player.
5. Navigate to File > Presentation Properties and
click the Interactive tab. In the UDP section,
choose one of the following:
a. Select Specific IP address if you want
UPD commands to be sent to only one
player on your local network. Enter the IP
address of the player.
b. Select All devices on the local subnet if
you want UDP commands to be sent to all
players on your local network.
6. Change the default UDP Destination Port if
desired.
Note: If you change the destination port for this
presentation, you will need to change the receiver
ports for all presentations that are linked to the
command.
7. Create a new presentation for the player(s) that
will be linked to the first player.
8. Add two media items of your choosing to an
interactive presentation (similar to the previous
example).
9. Click the Events tab under Media Library. Drag
and drop the UDP Input event onto the first media
item.
10. In the Specify UDP Input field, enter the same
command parameter that you used in Step 4.
Now, when you send a command to the first player using
the BrightSign App, it will send a similar command to the
other player(s) on the local network.

11
Creating User Variables
To modify User Variables in the BrightSign App, you
must first create them in a BrightAuthor presentation:
1. Go to File > Presentation Properties.
2. Navigate to the Variables tab and click the Add
Variable button.
3. Specify a Name for the variable. This will be
displayed above the value field in the BrightSign
App.
4. Select a Default Value for the User Variable.
5. (Optional) Check the Networked box if you want
the User Variable to also be updatable via RSS,
Live Text, or Dynamic Playlist (see the BrightAuthor
User Guide for more details).
6. Repeat the above process to add as many User
Variables as needed.
You can display User Variables in Live Text states to
create price tags, menus, and schedules that are
dynamic and updatable from the BrightSign App. You can
also utilize User Variables to change the volume of media
files on the fly.
Using Conditional Targets
If you have User Variables in your interactive
presentation, you can also use conditional targets.
Though they can be somewhat complex and difficult to
master, conditional targets, used in conjunction with the
User Variables page on the BrightSign App, allow for
nearly limitless interactivity and customization within a
presentation.
Conditional targets allow you to manipulate how a
presentation will behave depending on the value of one
or more User Variables. You can change what media is
displayed and what media is transitioned to, along with
display properties like connector volume and video
playback, by changing the values of variables.
As a simple example, we will take the UDP Input event
created for the BrightSign App in the Using UDP Events
section and add a conditional target to make the media
transition dynamic. In this example, we will create a
presentation that transitions to a certain media item when
Creating a User Variable
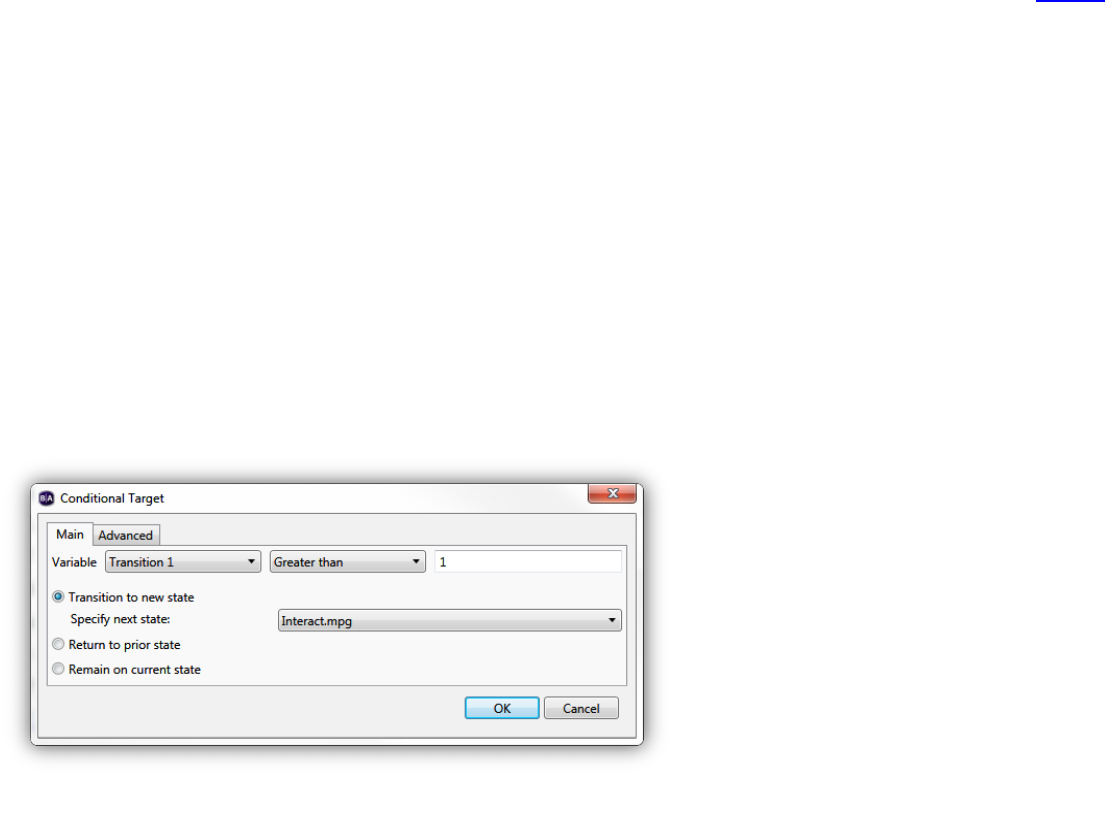
12
the User Variable has a value of 1, but will transition to
another media item if the User Variable has any value
greater than 1.
1. Add a User Variable to the presentation using the
instructions in the previous section.
2. Name the variable “Transition 1” and give it a value
of 1.
3. Click OK to save the variable.
4. Add another media file to the interactive playlist.
This will be the file that the UDP Input event will
transition to conditionally.
5. Open the UDP Input event and navigate to the
Advanced tab.
6. Click the Set Conditional Targets button near the
bottom of the window.
7. Click the Add Conditional Target button. The
conditional target equation has three parts: the
variable, the operator, and the value.
a. Set the variable to Transition 1.
b. Set the operator to Greater than.
c. Enter “1” in the value field.
8. Select the Transition to new state option and
specify the media file that you added to the
interactive playlist in Step 4.
9. Click OK when you are finished.
Now there are two media items you can transition to
using the command from the BrightSign App. If you leave
the “Transition 1” variable set to 1, the command will
continue to transition to the original media item. If you go
to the User Variables page and change the “Transition 1”
variable to any number greater than 1, the command will
transition to the new media item instead.
Creating the conditional target equation
