BrightSign HD600 UserGuide V3 HD600User Guidev3
2016-03-31
: Brightsign Hd600Userguidev3 HD600UserGuidev3 website s
Open the PDF directly: View PDF ![]() .
.
Page Count: 16

1
Roku BrightSign
User Guide
Matches Software Version: 1.0.70
California, USA
www.rokulabs.com
2
Table of Contents
INTRODUCTION ............................................................................................................................. 3
TRY THE DEMO.............................................................................................................................. 3
EXAMPLES .................................................................................................................................... 4
FIRMWARE VERSIONS .................................................................................................................... 4
BRIGHTSIGN DOCUMENTATION................................................................................................. 4
EXAMPLE BRIGHTSIGN SETUPS ................................................................................................ 4
PLAYING MEDIA WITH BRIGHTSIGN .......................................................................................... 5
AUTO PLAYING A VIDEO OR SLIDE SHOW UPON POWER-UP ............................................................. 6
AUTO EXECUTING A “.CSV” FILE UPON POWER-UP........................................................................ 7
AUTO EXECUTING A SCRIPT UPON POWER-UP............................................................................... 7
MEDIA TYPES SUPPORTED............................................................................................................. 7
CONNECTORS ............................................................................................................................... 8
DEVICE SOFTWARE AND UPGRADING...................................................................................... 8
BRIGHTSIGN SHELL ..................................................................................................................... 9
CREATING INTERACTIVE DISPLAYS........................................................................................ 10
DEVICE TYPES SUPPORTED ......................................................................................................... 10
USING EXCEL TO CREATE INTERACTIVE SIGNS.............................................................................. 11
SCRIPTS...................................................................................................................................... 13
HELLO WORLD ............................................................................................................................. 14
ROKU OBJECTS........................................................................................................................... 14
EXAMPLES .................................................................................................................................. 15
GPIO CONTROL PORT................................................................................................................. 15
LEARNING MORE AND SUPPORT............................................................................................. 16
Introduction
The Roku BrightSign HD600 is a complete standalone Digital Sign or Kiosk Controller
that can play content from standard Flash memory cards, and with a future software
update, over an Ethernet network. BrightSign can be used in looping or interactive
modes while displaying video and images on almost any standard or high definition
display. It has no moving parts, is completely digital, is compatible with standard media
authoring software, and is very reliable. It is intended as a key component of a kiosk,
tradeshow display or retail display, and can often be used to replace a PC. Reliability,
durability, and flexibility in playing video, audio, and photos make it ideal for other
applications as well.
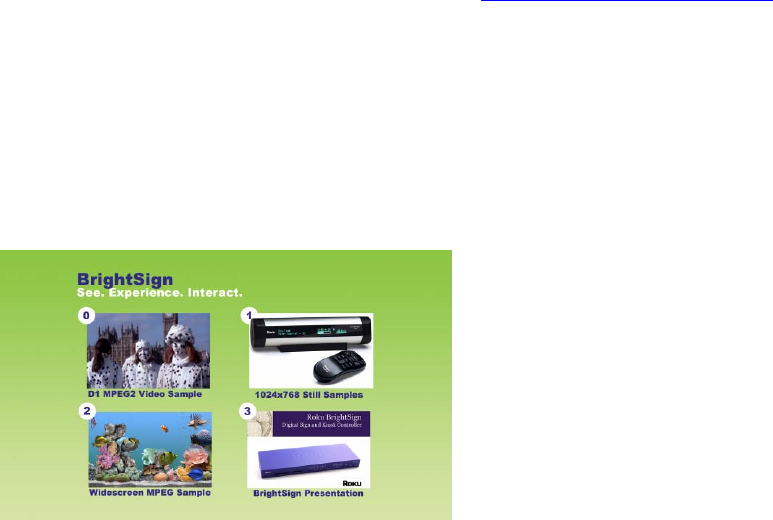
Try the Demo
Roku has created a BrightSign demo that shows an example interactive digital sign that
uses still slides, video clips, and responds to button, touchscreen, or mouse events. It’s
easy to try if you have a BrightSign. Follow these steps:
1. Upgrade your BrightSign software if needed (see “Firmware Versions” section)
2. Download the BrightSignDemo.zip file at www.rokulabs.com/brightsign
3. Unzip it and copy the contents into the root directory of a Compact Flash card.
4. Connect your BrightSign to an Elo touch screen, or connect it to a standard VGA
monitor and to a USB Mouse or the Roku Button Board.
5. Insert the CF card.
6. Turn on the power.
7. Touch/Click one of the four hot spots, or press button 0 through 3 on the Roku
Button Board.
The demo can also be used to try BrightSign on different monitor types and modes.
Connect your BrightSign via VGA or the component connection. Then with the demo
running, use the front panel “video mode” button to try the different video modes (480p,
720p, VGA 1024x768, NTSC or PAL (the 1080i mode is not working in the current
software, but will be enabled in a future software update). After you put your BrightSign
in a specific mode, make sure your monitor/tv supports the mode and verify your monitor
is configured to the correct input type and is connected using the correct cable. You

4
should now see the demo in various video modes, and see how it auto scales and supports
widescreen or 4x3.
Examples
Here are some examples of what you can do with a BrightSign:
• Display a looping video with “DVD” quality.
• Display a looping slide show in high definition.
• Play looping music.
• Combine any of the above.
• Create interactive displays that play video, photos, or audio in response to
customers using touch screens, mouse, keyboard, or a custom button board you
have created.
• Play audio or music by itself, synchronized to video, or simultaneous with video.
Software Versions
This manual describes version 1.0.70 of the BrightSign software. This version of the
software may not have been installed on your BrightSign at the factory (depending when
you purchased it). You should download the software from the Roku web site
www.rokulabs.com/BrightSign and upgrade your unit by following the steps in this
manual in the section “Device Software and Upgrading”. The only way to check which
software version is installed on your BrightSign is to use the shell. See the section in this
manual “BrightSign Shell”.
Roku plans more software updates to add new functions for existing BrightSigns. Watch
our web site for more information.
BrightSign Documentation
The complete set of BrightSign documentation is available at
www.rokulabs.com/BrightSign. It includes:
• BrightSign HD600 Installation and Regulatory Guide
• BrightSign HD600 User Guide (this document)
• BrightSign HD600 Hardware Guide
• BrightSign HD600 BrightScript Reference
• BrightSign HD600 Object Reference
• BrightSign HD600 Specifications
• Example Scripts
Example BrightSign Setups
Probably the simplest way to use BrightSign is to put a video or set of still images on a
CompactFlash card, and use a VGA cable to connect the BrightSign to a flat panel
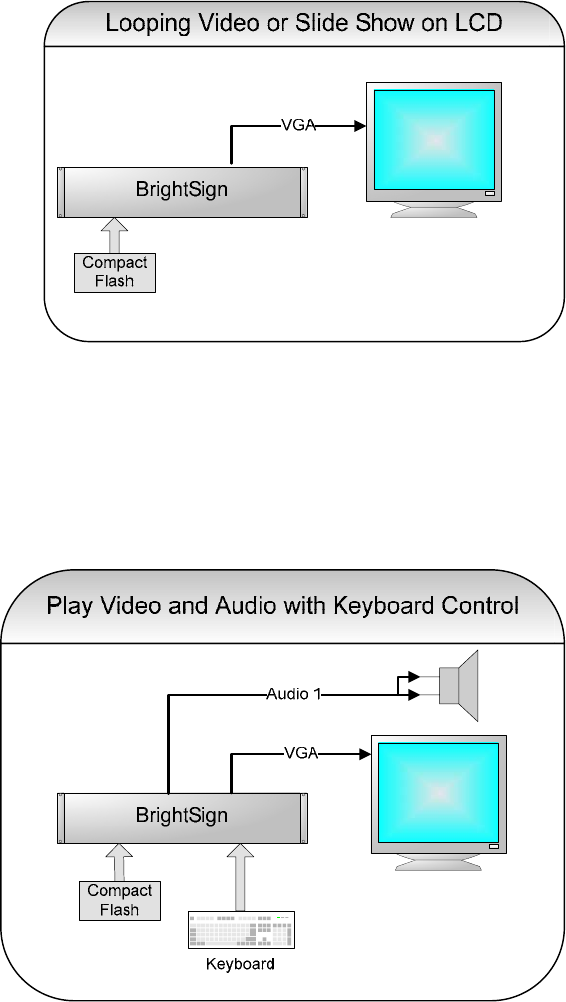
5
monitor. Variations on this setup include using the component out to connect to a High
Definition display (like a PlasmaTV), or even connecting to a standard definition display.
As well as looping video or slides shows, you can add audio by connecting powered
speakers, and you can add interactivity. In the example below, an off-the-shelf USB
keyboard is connected to the BrightSign. You can also connect touch screens, buttons
and LEDs to the Bright Sign for a more custom solution.
Playing Media with BrightSign
Media can autoplay from a CompactFlash card upon power-up, play via a script on a
CompactFlash card, or be tested using the serial shell commands.
The following types of media can autoplay:
1. a single mpeg 2 video file (loops)

6
2. a slide show of BMP image files (loops)
3. a “.CSV” (comma separated values) file that you create using Microsoft Excel.
BrightSign can use this file format as a description of an interactive sign that
responds to buttons, touch screen, mouse, track balls, etc. These are easy to
create without any scripting and very powerful. The BrightSign Demo available
to download from our web site uses this method.
4. a custom BrightScript file for arbitrarily complex interactive media sequences.
Auto Playing a Video or Slide Show upon Power-up
To autoplay a video file on power-up or reset, do the following:
1. Make sure you have upgraded your BrightSign to version 1.0.70 or greater (see
“Device Software and Upgrading”).
2. Copy the video file onto the root directory of a CompactFlash card and name it
“autoplay.vob”. Video files must be created with an audio track. If you don’t
need an audio track, use “silence”. The audio out connector does not need to be
connected (unless you want to hear audio).
3. OR Copy your image files onto the root directory of a CompactFlash card and
name them “autoplay1.bmp, autoplay2.bmp, …” . If your files are in another
graphics format, convert them to bmp. For VGA, you should save them in “24 bit
color” in 1024x768 resolution.
4. To copy files from a PC to a CompactFlash (CF) card, you may need to purchase
a USB multi-card reader/writer for about $25.
5. The CompactFlash Card should be formatted as “Fat32”. This is the normal case,
but if for some reason your file does not play, this is one thing to check.
6. Go to www.rokulabs.com/brightsign and download the “autoplay.zip” file. This
contains a script named autorun.bas. Copy autorun.bas into the root directory of
your CF card. Make sure you are using version 1.0.3 or later. The version
number can be determined by opening autorun.bas in a text editor (like notepad).
7. Insert the CF card into the BrightSign
8. Apply power
9. After a few moments, the video or slide show should play and auto loop.
10. The video will come out the VGA connector, and the resolution will be 1024x768
(video files will be scaled up to this resolution by the scalar built into BrightSign.
Still images should be authored at this resolution). You can use the front panel
button on the front of the BrightSign to change the video output format.
11. The 1.0 version of the BrightSign software does not support “hot swap” of
CompactFlash cards. You must put in the CF card before applying power. The
1.0 software does not support the SD card slot.
12. If video or slides do not autoplay, double check:
a. That you have upgraded your BrightSign to software version 1.0.70 or
greater
b. That you are using the “autorun.bas” file version 1.0.3 or greater
c. That the files are named correctly (see above)
d. Use the shell (see the section “BrightSign Shell”) to check the BrightSign
software version number, to verify that BrightSign can read your CF card
(use “dir /” and make sure the directory shows up), and that BrightSign
7
can play your files (use the shell “videoplay” and “imageplay”
commands).
e. BrightSign works with most CF cards, but is not compatible with all CF
cards. You can test your card by using the “dir /” shell cmd, and/or using
the shell cmd “readperf”
f. That you do not have an "autoplay.csv" file also on the card (unless you
are trying to play a .CSV file).
Auto Executing a “.CSV” File Upon Power-Up
BrightSign has a powerful mode whereby it can play a sophisticated sign that is described
in a “.CSV” file. CSV stands for “comma separated values”, and is a simple text file that
contains a table of information. Using Microsoft Excel you can easily create a CSV file
that describes a sophisticated interactive sign using a text table. The table describes
which media to play, and which media to play when a user presses a button or triggers
other events.
To autoplay media described by a .csv file on power-up or reset, do the following:
1. Make sure you have upgraded your BrightSign to version 1.0.70 or greater (see
“Device Software and upgrading”).
2. Create your CSV file using Microsoft Excel as described in this manual’s section
“Using Excel to Create Interactive Signs”.
3. Copy your media files and your csv file onto the root directory of a CompactFlash
card. Name the file “autoplay.csv”. Video files must be created with an audio
track. If you don’t need an audio track, use “silence”. The audio out connector
does not need to be connected (unless you want to hear audio).
4. Continue through the steps in the prior section starting at Number 4.
5. If your .CSF file does not play, as well is the suggestions in the prior section,
verify that you do not have an "autoplay.vob", "autoplay1.bmp", or
"autoplay.mpg" file also on the card.
Auto Executing a Script Upon Power-Up
Creating a BrightScript file allows you the most control over your interactive digital sign
application. To autorun a script:
1. Create the script using a text editor (see the script section of this manual for more
information)
2. Save it to the root directory of your CompactFlash card with the name
“autorun.bas”
Media Types Supported
With the 1.0 version of the BrightSign software the following media types are supported:
• MPEG2 Video Files (aka “VOB” or “MPG” files). These are the same types of
files that are found on DVDs. They can be authored using software such as
Pinnacle Studio or iMovie. Video sizes up to D1 (720 x 480) are supported with
bit rates up to approximately 6 to 8 mbps. When a video is played, it will be
scaled in real time to the output resolution (which can be much higher definition).
8
• 24 bit .BMP files. These can be authored using almost any paint software such as
Adobe PhotoShop, Macromedia Firefly, or even “Paint”, which comes with
Windows. Any digital camera image can be saved in or converted to this format.
A variety of resolutions are supported, up to 1024x768 if outputting via VGA, or
1920x1080 (1080i) if outputting via “Component”.
• MP3 audio files. With the 1.0 software, these must be at 48KHZ sampling rate.
Connectors
The BrightSign has a large number of connectors that can be used in a variety of different
ways.
1. DB9 Serial Port. In this software release the serial port can be used to control a
Quadrovox capacitive touch button board, or to access the shell.
2. DB25 GPIO Control Port. For connecting your own LEDs or Buttons (see the
GPIO Control Port section of this manual)
3. Line Level Audio Outputs and SPDIF. When audio is playing back (either by
itself or as part of a video), it can be directed to any one of these audio outputs, or
to SPDIF, or to USB Speakers. This allows you to control multiple sets of
speakers from one BrightSign.
4. Two USB Host Ports. Connect USB Speakers, USB Mouse/Trackballs, USB
Keyboards or Elo Touch Screen.
5. VGA. Drive a VGA monitor in various modes up to 1024x768.
6. Component. The three Component outputs can be configured to drive a
Component TV in 480p, 720p, or 1080i modes, or to generate S-Video, or NTSC
or PAL composite.
• Composite video – from Blue jack.
• S-Video: Luma from Green jack and Chroma from Red jack (see hardware manual
for adaptor circuit diagram).
• 480P video: Y from Green jack, Pr from Red jack, and Pb from Blue jack.
• 720P video: Y from Green jack, Pr from Red jack, and Pb from Blue jack.
• 1080i video: Y from Green jack, Pr from Red jack, and Pb from Blue jack.
7. Ethernet. The 10/100 port will be enabled in a future software update.
Device Software and Upgrading
The BrightSign HD600 is pre-programmed with two primary software images: a “Safe
Mode” and a “Run Mode”. The Safe Mode software image is write protected, and not
changed once programmed by the factory. Its main purpose is to validate that the run
mode rom image is not corrupt, and boot the unit. In addition, it can upgrade or re-
program the main run-mode rom image.
The main run mode software image is stored on a flash rom and may be upgraded in the
field. Roku is always working on improving the BrightSign software, so you should
check our web site for possible upgrades. To upgrade the BrightSign run-mode rom,
9
follow these steps:
1. Download the file from rokulabs.com
2. Copy it to a CompactFlash card using your PC and a standard CompactFlash Card
reader/writer. These usually connect to your USB port.
3. Name the upgrade file either “update.rok” or “update_save.rok”. “update.rok” will
auto-delete after the upgrade is complete. This is useful if you want to distribute the
update to the field on the same CF card that contains the display content. In this
mode, after the first boot, the unit will no longer upgrade, but will continue to autorun
any auto-run content on the CF card. If named “update_save.rok” the file will not be
auto-deleted. This is useful for using the same CF card to upgrade multiple
BrightSigns.
4. Insert the CF card into the BrightSign
5. Apply Power to the BrightSign.
6. Wait. If a display is connected it will be blank. After several seconds one of the
LEDs on the front panel will start to flash. Once it completes flashing, the upgrade is
complete. If you are using the “update.rok” method, the unit will then reboot as
normal.
7. If you wish to verify the new software version, use the BrightSign Shell and the
“version” command.
8. BrightSign works with most CF cards, but is not compatible with all CF cards. You
can test your card by using the “dir /” shell cmd, and/or using the shell cmd
“readperf”.
9. Because of the two versions of the software that exist in BrightSign (“safe mode” and
“run mode”), more CF cards are compatible with version 1.0.70 (“run mode”) than
are compatible with the “safe mode”. The effect of this is that “upgrade.rok” files
may not be detected on a larger set of CF cards. It is impossible to tell by a CF card’s
name, brand, or description if it is compatible. You must try it. We are continuing to
add support for more CF cards. Version 1.0.70 works with 90%+ of them.
The upgrade process is very safe. If for some reason it fails, for example a power failure
in the middle of the update, the unit’s “safe-mode” will still boot and will still perform
upgrades as above.
BrightSign Shell
BrightSign has a command line shell that can be accessed via the serial port. The shell
allows you to type in commands to trigger tasks such as running scripts, playing video,
trying different video modes, etc. It is not required that you use the shell. You can
simply put your content on a CF card and configure it to auto play on power-up (see prior
sections).
You may find it useful to use the shell to test various options or for debugging. Follow
these steps to access the shell:
1. Connect the DB9 connector on the BrightSign to your PC’s Serial Port using a
“null modem cable” (available at Frys, RadioShack, etc).

10
2. Run a “terminal emulator”, such as HyperTerminal on Windows XP (Start | All
Programs | Accessories | Communications | HyperTerminal.)
3. Configure the terminal for: 9600 baud, 8 data bits, no parity, 1 stop bit, NO flow
control, “TTY mode”.
4. Insert a CF card into BrightSign with some test files on it (24 bit BMP graphics,
48KHZ mp3 files, MPEG 2 video, etc)
5. Connect speakers and/or a monitor to the BrightSign
6. Power-up the BrightSign
7. After a few moments you should see the BrightSign shell appear. It should also
show you the software version number. Verify it is 1.0.70 or greater.
8. Type: help <enter> for a list of commands, and then type the command on a line
by itself for more information on a particular command.
All files on the CompactFlash card should be referenced with a “/” in front of the
filename. For example, to play a video named “myvideo.vob” on the CF card, enter this
command:
playvideo /myvideo.vob
For a Directory of the cards contents use:
dir /
To change the videomode use the videomode command. Example:
Videomode 1024x768x60p
The 1.0 version of the BrightSign software does not support “hot swap” of CompactFlash
cards. You must put in the CF card before applying power. The 1.0 software does not
support the SD card slot.
Creating Interactive Displays
With BrightSign you can create displays that respond to user input. For example, give
the customer options of watching different videos dependent on which button is pressed.
To accomplish this with BrightSign, you need to decide what the input device will be,
and you will need to either (a) use Microsoft Excel to create a control table and use
BrightSign’s “autoplay .CSV files” mode, or (b) create a custom control script. Roku is
also working on a variety of “template” scripts that can be used “as-is” for common
interactive tasks. Visit our web site for more information.
Device Types Supported
With the 1.0 version of the BrightSign the following devices can be connected to a
BrightSign. If you have specific requests for device support, contact
sales@rokulabs.com. We are constantly adding new device support and the ones we
pick are customer driven.

11
• Elo Touch Screens
• Many brands of USB Keyboards
• Many brands of USB Speakers
• Many brands of USB Mouse or Trackballs
• Quadravox Serial Button Board
• Any “GPIO” button, signal or LED (your custom board or led display). Roku has
a test button board available for purchase on our estore.
• VGA Monitors
• Component-input TVs.
• NTSC, PAL, and High Definition Monitors/TVs
• Speakers/Amplifiers with stereo line-level inputs
• Audio playback devices with SPDIF optical digital audio input
• PC via Serial Port
• IR Remote Control using the “NEC” protocol. A compatible remote can be
purchased from Roku.
Using Excel to Create Interactive Signs
BrightSign has a powerful mode whereby it can play a sophisticated sign that is described
in a “.CSV” file. CSV stands for “comma separated values”, and is a simple text file that
contains a table of information. Using Microsoft Excel you can create a CSV file that
describes a sophisticated interactive sign using a text table. The table describes which
media to play, and which media to play when a user presses a button or triggers other
events.
A good example of a CSV file is the one used in the Roku Bright Sign demo. Run the
demo as described in the introduction. Then find the file “autoplay.csv” in the zip file.
Copy it out of the zip file onto your desktop, then double click it to load it into Microsoft
Excel (you must have Excel installed on your computer. If not, you can load it into any
text editor, but it won’t be displayed in the nice tabular format). After you edit the file,
you can save it with “Save As…” and select “CSV” as the file format to save as.
Below is a section of the autoplay.csv file from the Roku demo. Due to space limitations
on the page, it does not include all the columns. The extra columns (not seen below) to
the right are similar to the “elo” columns, and describe what happens when buttons are
pressed, or when a video finishes or a slide times out.
VIDEOMODE 1024x768x60p
IMAGEMODE 1
EVENTS elo:110:18
0:350:200 elo:510:180:350:2
00 elo:110:400:350:2
00 elo:510:400:
350:200 elo:0:0:1024:768
STATE demo_menu.bmp Dalmations
.mpg art1.bmp cars.mpg bs1.bmp
STATE Dalmations.mpg demo_menu.bmp
STATE Cars.mpg demo_menu.bmp
STATE art1.bmp demo_menu.bmp
STATE art2.bmp demo_menu.bmp

12
STATE art3.bmp demo_menu.bmp
STATE art4.bmp demo_menu.bmp
STATE bs1.bmp bs2.bmp
STATE bs2.bmp bs3.bmp
STATE bs3.bmp bs4.bmp
STATE bs4.bmp bs5.bmp
STATE bs5.bmp bs6.bmp
STATE bs6.bmp bs7.bmp
STATE bs7.bmp bs8.bmp
STATE bs8.bmp bs9.bmp
STATE bs9.bmp bs10.bmp
STATE bs10.bmp demo_menu
.bmp
The first two lines use the optional “videomode” and “imagemode” keywords. These
items are optional, but if used, can have these parameters (in the column after the
keyword VIDEOMODE or IMAGEMODE).
VIDEOMODE
• ntsc
• pal
• 640x480x60p
• 800x600x60p
• 1024x768x60p
• 720x480x60p
• 1280x720x60p
• 1920x1080x60i
Note that if you set the VIDEOMODE, the front panel button will be locked out. If you
leave this option off, the BrightSign will default to 1024x768 VGA, and you can use the
front panel button to dynamically change the video mode.
IMAGEMODE
• 0 - Center image. No scaling takes place, only cropping if the image is bigger than
the screen.
• 1 - Scale to fit. The image is scaled so that it is fully viewable with its aspect ratio
maintained. NOTE: In the 1.0.70 software there is an issue that causes this to fail
on “large” images.
• 2 - Scale to fill and crop. The image is scaled so that it totally fills the screen,
though with its aspect ratio maintained.
• 3 - Scale to fill. The image is stretched so that it fills the screen and the whole
image is viewable. This means that the aspect ratio will not be maintained if it is
different to that of the current screen resolution.
EVENTS and STATE

13
Next begins the main part of the table. The first line is the EVENTS row. For every
event type you want to respond to, you must make an entry in this row. You do not need
to enter events you don’t use. The following event types are supported:
• elo. Elo Touch Screen presses. You must also define the touch area using this
format: elo:x:y:width:height based on a 1024x768 resolution, with 0,0 in the
upper left. You can have as many elo events as you wish. Events can overlap
touch areas, but in this case, you should only use one at a time (see the demo
example and how it uses a touch area that covers the entire screen when not in the
main menu).
• button. Triggers on a GPIO Control Port button press. The format is:
button:number, where number is between 0 and 12.
• timeout. When a video or slide is displaying, you can use a “timeout” event. The
format is: timeout:seconds. Where seconds is the number of seconds after the
video/image starts that the event will trigger. This event can be used to move a
slide show to the next slide, or exit a looping video after a certain number of
seconds of playback.
• videoend. This event triggers when a video finishes playing. It can be used to
move on to another state after the video ends. The format is: videoend. There
are no parameters.
After the EVENTS row, are one or more STATE rows. These begin with the keyword
STATE. The first column after the STATE keyword is the name of the video or image
file to display. When the “state is entered”, this file starts playing. The remaining
columns describe what state to jump to when the corresponding event happens. For
example, in the above example, the first state is “demo_menu.bmp”. This is the main
menu for the demo, and is displayed when the demo starts. While “in this state” (the
demo_menu.bmp is showing), if the user presses the elo in the right spot to trigger the
“elo:110:180:350:400” event, then the new state “cars.mpg” is jumped to. If you look at
the STATE rows, you will find one that starts with “cars.mpg” (there can be only one
state with a particular file).
To understand this better, look at the actual demo “autoplay.csv” file in Excel while
playing the demo on your BrightSign. As you select options on the BrightSign, see how
the .CSV file is telling the BrightSign what to do. You can then edit the “autoplay.csv”
file in Excel and Save As… a CSV file to create your own applications.
Scripts
BrightSign can be used without any knowledge of scripts to accomplish common goals
such as playing looping video or playing a slideshow (see the prior section in this manual
“Playing Media”). In addition, using CSV files you can create most sophisticated signs.
But by adding scripts, you can create the most interactive digital signs or kiosks. For
higher volume deployments and/or for a fee, Roku can help you write scripts. Contact
sales@rokulabs.com for more information.
A script is a simple program that controls behaviors, like video playback, based on events
such as button presses. Scripts are also commonly used on PCs and Web Sites. For
14
example, Microsoft Office “macros” are often Basic Scripts. Adobe Flash apps often rely
on ActionScripts for their logic, and web pages are often driven by scripts written in
PHP, Perl, or JavaScript. If you don’t have scripting skills in-house, IT and Web
developers can be contracted to write scripts for you. Roku can also be contracted to
develop custom scripts and applications (contact sales@rokulabs.com).
BrightSign has a built in scripting language (called BrightScript), similar in many ways to
the Basic found in Microsoft Office, or Windows XP “Windows Script Hosting”
VBScript.
Scripts can be as simple as one or two lines, and as complicated as hundreds of lines.
Hello world
Here is how to create your first, very simple script
1. Using a text editor create a file called “hello.bas” with this line:
print “hello world”
2. Save “hello.bas” into the root directory of a CF card
3. Insert the CF card into BrightSign
4. Connect the serial port of BrightSign to you PC using a null modem cable, and
run hyperterminal (see the “Shell” section of this manual for more details).
5. Power up BrightSign.
6. Wait for it to boot, and for the “Roku>” shell prompt to appear
7. type: script /hello.bas
8. You should see “hello world” on your terminal window.
9. If you want the script to autorun upon boot, rename it “autorun.bas”
Roku Objects
As well as the BrightScript language itself, BrightSign relies upon a library of “Roku
Objects” to expose the hardware to the scripting language. Each Roku Object provides
access to certain capabilities. For example, there is a roVideoPlayer object and a
roTouchScreen object. To create an object in a script, the CreateObject() function is
used.
Refer to the following two manuals when writing scripts:
• BrightSign HD600 BrightScript Reference -- this describes the actual scripting
language
• BrightSign HD600 Object Reference -- this describes the Roku Objects, such as
“roVideoPlayer”

15
Examples
A good way to learn BrightScript is to look at or modify existing scripts. You can find
links to example scripts at www.rokulabs.com/brightsign. The BrightSign Demo
“autorun.bas” is an example of a more sophisticated script.
You can also test BrightScript commands using the shell. Here is an example:
Welcome to the Roku Shell version 1.0.70 Release
Type '?' for help or 'help <command>' for help on <command>.
Roku> script
BrightScript Micro Debugger.
Enter any BrightScript statement, debug commands, or HELP.
BrightScript> print "hello"
hello
BrightScript> ? "hello"
hello
BrightScript> ?5+6
11
BrightScript> ?type(5)
rotINT32
BrightScript> if 1=1 then print"1 does equal 1!" else print "strange!"
1 does equal 1!
BrightScript> ?right("abcdef",3)
def
BrightScript> exit
Roku>
GPIO Control Port
The BrightSign has a DB25 General Purpose Input Output (GPIO) Port. This port has
12 inputs that can be directly connected to buttons or switches, and 6 outputs that can
directly drive LEDs. To use this port you must create a simple but custom cable that
connects a DB25 connector to your buttons or LEDs. See the BrightSign Hardware
Manual for more information and example circuits. Roku has a test button/LED board
that you can purchase to evaluate the GPIO port and test your scripts that read the buttons
or set the LEDs.
Here is an example script that will flash an LED for half a second each time a button is
pressed on the BrightSign button/led board.
print "BrightSign Button-LED Test Running"
p = CreateObject("roMessagePort")
tmr = CreateObject("roMessagePort")
gpio = CreateObject("roGpioControlPort")
gpio.SetPort(p)
sw = CreateObject("roGpioControlPort") 'switch/led control port
sw.SetPort(p)
LED1=2 ^ 17
LED2=2 ^ 18
LED3=2 ^ 19
LED4=2 ^ 20

16
LED5=2 ^ 21
LED6=2 ^ 22
dim idx(5):idx(0)=LED1:idx(1)=LED2:idx(2)=LED3:idx(4)=LED4:idx(5)=LED5
event_loop:
msg=wait(0, p)
if type(msg)<>"roGpioButton" then event_loop
butn = msg.GetInt()
if butn > 5 then event_loop
sw.SetOutputState(butn+17,1)
print "Button Pressed: ";butn
msg = wait (500, tmr)
sw.SetOutputState(butn+17,0)
clear_events:
msg=p.GetMessage():if type(msg)<>"rotINT32" then clear_events
goto event_loop
Learning More and Support
The following resources can help you get the most from your BrightSign:
1. Visit www.rokulabs.com/brightsign
2. Refer to each of the different BrightSign documents available (listed at the start of
this manual).
3. Visit the BrightSign community Forums to discuss projects with other customers
and Roku engineers: www.rokulabs.com/forums
4. Contact sales@rokulabs.com for help with custom projects
