Brightstar A295X Mobile Phone User Manual Quad Band GSM GPRS Handset
Brightstar Corporation Mobile Phone Quad Band GSM GPRS Handset
UserManual.wiki
>
Brightstar
>
A295X User Manual
User manual
Navigation menu
Upload a User Manual
Namespaces
Wiki Guide
HTML
PDF
Info
Views
User Manual
Discussion / Help
Navigation
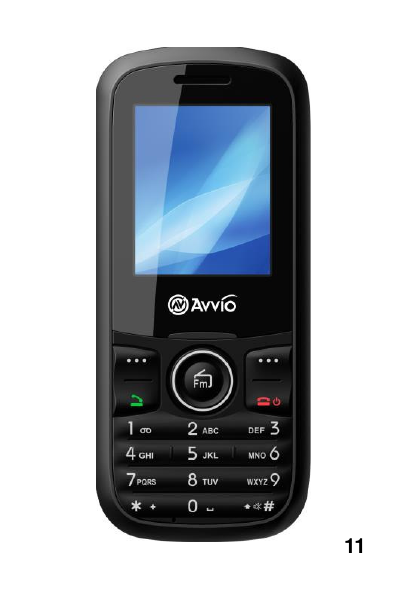

![16 Getting started. Insert the SIM Card ○ Insert the SIM card under the SIM card holder. ○ When you need to remove the SIM card, you should first switch off the phone, remove the battery and take it away from under the SIM card holder. ○ Always handle the SIM card with care and insert with the gold contacts facing down. Insert & Remove the Micro SD Card ○ Insert the Micro SD card under the Micro SD card holder. Power ON/OFF ○ Make sure that the battery is attached. You can switch your phone On/Off by long pressing the [End] key.](https://usermanual.wiki/Brightstar/A295X/User-Guide-2209331-Page-16.png)
![18 CALL FUNCTIONS Making a call ○ In the idle mode, you will enter the dialing mode by pressing any numeric key. By pressing the [Send] key, you can make a call. ○ Key operation: You can end a call by pressing, [End] key or the hook button on the headset. Adjusting the Call Volume ○ During a call, if you want to adjust volume, use the Up/Down-volume key. Press Volume up key to increase the volume level, press the Volume down key decrease the volume level. International Call ○ You should press [+/O] key , the symbol “+” appear on the screen. By doing so, you can make an international call in whatever country](https://usermanual.wiki/Brightstar/A295X/User-Guide-2209331-Page-18.png)
![19 without having to input the international dialing code. When you are dialing an international call, you should omit the digit “0” before the city code. ○ To dial a fixed number: “+”Country code + complete number + [Send] key Call from the List ○ Your phone automatically stores each number dialed or answered in its memory. You can view the Dialed Call numbers by pressing [Send] key. You can also dial the numbers in the list by pressing [Send] key. Emergency Call ○ In whichever countries covered by the digital GSM network, you can make an emergency call if you are within the coverage of the network. The network signal strength indictor will tell you whether you can make it](https://usermanual.wiki/Brightstar/A295X/User-Guide-2209331-Page-19.png)
![20 or not. If no service is available, you can make an emergency call even without the SIM card in place. ○ ! Note: Some network may not allow the emergency call and may request to insert SIM card. Receiving a call ○ When you receive an incoming call , press the [Send] key to talk and hang up using [End] key. ○ Press the [Send] key to answer a call as a default setting. ○ Available functions during the call ○ These options are visible only when you are during the process of a call. The multi-part call function should get support by the network. Please contact you network service provider for further information. ○ The following options are available: “Hold”, “End single call”, “New call”, “Phonebook”, “Call history”,](https://usermanual.wiki/Brightstar/A295X/User-Guide-2209331-Page-20.png)


![32 ▪ Open/Close speaker: You can enable to hear to speaker or headset. ▪ Background play : you can hear FM radio in the idle state or other menu . ▪ Record : you can record FM radio. ▪ Timing record : you can record FM radio in the setting time ▪ Record file list : you can check file manager ▪ Storage : You can save the recoded file in the phone or Memory Card. ▪ Help : you can see how to use about FM radio. Tip! Press [navi left/right] key, search algorism Press [navi center ]key, turn on/off power Press [navi up/down]key, adjust volume Recorder ○ In the sound recorder, you can record the sound. ○ You can set the corresponding](https://usermanual.wiki/Brightstar/A295X/User-Guide-2209331-Page-32.png)
![34 Application ■ Bluetooth You can turn on/off Bluetooth. You can search new device for pairing. ■ Calculator ○ Enter numbers by pressing [0]—[9]. Press [.] for a decimal point. Press the [Del] key to clear your input. ○ You can press the Up, Down, Left, Right navigation keys to enter the symbols of addition, subtraction, multiplication and division. ○ Clear the latest input digit or result by pressing the [Delete] key. Long press the [Delete] key to clear all the input or the result. ○ Press the center key to calculate and the result will appear on the screen. ○ Note! The precision of the calculator is limited for the round off error.](https://usermanual.wiki/Brightstar/A295X/User-Guide-2209331-Page-34.png)
![42 coverage of your home GSM network. You probably are in the coverage of another GSM network but you are not allowed to be registered to the network. If any tone is not generated when you press a keypad… ☞ You need to check the quick silence mode setting. If you can find icon on the top of the main display screen it is the quick silence mode. By pressing and holding [#] key on the idle screen, you can switch it off. You need to check the Key Tone Type of Sound Setting menu. You need to check Key Tone Volume of the profile option that you have set on Profiles menu. If an audible alert is not made when a call is received… ☞ You need to check the quick silence mode setting. If you can find icon on top of the main display screen it is the quick silence mode. By pressing and](https://usermanual.wiki/Brightstar/A295X/User-Guide-2209331-Page-42.png)
![43 holding [#] key on the idle screen, you can switch it off. You need to check Ring Type and Ring Volume of the profile option that you have set on Profiles menu. If an audible alert is not made when an alarm is expired… ☞ You need to check the quick silence mode setting. If you can find icon on top of the main display screen it is quick silence mode. By pressing and holding [Space] key on the idle screen, you can switch it off. If an outgoing call is not made… ☞ You have probably set an outgoing calls barring option. You need to check Call Barring menu. Otherwise, you have probably set to Hide Number in Caller Number menu of Call Setting menu. In some network, when you make a call with hiding the telephone number, the network does not allow to make the call. If an incoming call is not made…](https://usermanual.wiki/Brightstar/A295X/User-Guide-2209331-Page-43.png)
![44 ☞ You have probably set an incoming calls barring option. You need to check Call Barring menu. If an outgoing SMS message is not sent… ☞ You need to check the Message Center option in SMS Setting menu. If all audible key tones are muted and all audible alerts are changed to vibrator alert… ☞ You need to check the quick silence mode setting. If you can find icon on top of the main display screen it is the quick silence mode. By pressing and holding [#] key on the idle screen, you can switch it off. If some audible action is not prompted on a menu of Sound Setting menu… ☞ You need to check the quick silence mode setting. If you can find icon on top of the main display screen it is the quick silence mode. By pressing and](https://usermanual.wiki/Brightstar/A295X/User-Guide-2209331-Page-44.png)
![45 holding [#] key on the idle screen, you can switch it off. If the image on the screen is blurred when you try to take a picture… ☞ You need to check that the protection film is detached or the lens is clean. To remove fingerprints or other stains, wipe the lens with soft cloth.](https://usermanual.wiki/Brightstar/A295X/User-Guide-2209331-Page-45.png)
![56 body-worn accessory should be avoided. Guía de Usuario del Avvio 295 versión 1.0 [SPA] © Copyright 2013, Brightstar Corp., Todos los derechos reservados.](https://usermanual.wiki/Brightstar/A295X/User-Guide-2209331-Page-56.png)