Brightstar A776X mobile phone User Manual MTK 72M
Brightstar Corporation mobile phone MTK 72M
User manual

Avvio 776S User manual
1 / 46
Avvio 776S Android Smartphone
User Manual

Avvio 776S User manual
2 / 46
Contents
Welcome to use ................................................................................................................. 9
Safety and Maintenance .................................................................................................... 9
1. Brief of Functions ......................................................................................................... 12
Description of Keys ............................................................................................................. 12
Guide of the main functions ................................................................................................ 13
1.1 Dial a call ................................................................................................................... 13
1.2 Phonebook ................................................................................................................. 13
Notice Icons ........................................................................................................................ 14
Status Icons ........................................................................................................................ 15
2. Introduction ................................................................................................................ 16
2.1 Connect the network for the first time ...................................................................... 16
2.1.1 SIM Card ............................................................................................................... 16
2.1.2 Insert and take out the SIM Card ....................................................................... 16
2.1.3 Switch on /off the phone ....................................................................................... 16
2.1.4 Unlock the SIM card ............................................................................................ 16
2.1.5 Unlock the phone .................................................................................................. 17
2.1.6 Connect the network ............................................................................................ 17
2.1.7 Dial a call ............................................................................................................... 17
2.1.8 Dial domestic calls ................................................................................................ 17
2.1.9 Dial fixed-line telephone extension ...................................................................... 17
2.1.10 Answer calls ........................................................................................................ 18
2.1.11 Call menu ............................................................................................................ 18
3. Basic Operation .......................................................................................................... 19
3.1 Basic operation ............................................................................................................ 19
3.1.1 Exit menu .............................................................................................................. 19
3.1.2 Lock screen by one key ........................................................................................ 19
3.2 Menu structure ............................................................................................................ 19
3.2.1 Outer menu interface ................................................................................................ 19
Avvio 776S User manual
5 / 46
................................................................. 21
4. Usage Detail ................................................................................................................. 22
4.1 Dial a call ...................................................................................................................... 22
4.1.1 Enter the Dial Page ............................................................................................... 22
4.1.2 Video call ............................................................................................................... 23
4.1.3 Dial an emergency call ......................................................................................... 24
4.2 Receive or reject calls .................................................................................................. 24
4.2.1 Receive calls .......................................................................................................... 24
4.2.2 Reject calls ............................................................................................................. 24
4.2.3 Call options ........................................................................................................... 25
4.3 Call records .................................................................................................................. 26
4.3.1 Use call records ..................................................................................................... 26
4.3.2 Create new contacts .............................................................................................. 27
4.4 Activate and deactivate mobile phone function ........................................................ 27
4.4.1 Activate or deactivate flight mode. ..................................................................... 27
Avvio 776S User manual
6 / 46
4.5 Create and manage of contacts .................................................................................. 27
4.5.1 View contacts ........................................................................................................ 28
4.5.2 Add new contacts .................................................................................................. 28
4.6 SMS and MMS ............................................................................................................. 28
4.6.1 View messages ....................................................................................................... 28
4.6.2 Create and send SMS and MMS ......................................................................... 28
4.6.3 Create and send SMS ........................................................................................... 28
..................................................................... 29
4.6.4 Create and send MMS .......................................................................................... 30
4.6.5 Store message as draft .......................................................................................... 30
4.6.6 Receive SMS and MMS ........................................................................................ 30
4.6.7 Manage message and message conversation group ........................................... 30
4.7 E-mail ........................................................................................................................... 31
4.7.1 Open E-mail .......................................................................................................... 31
4.7.2 Create new POP3 / IMAP E-mail account ......................................................... 31
4.8 Set connection .............................................................................................................. 31
4.8.1 Connect to the network ........................................................................................ 31

Avvio 776S User manual
7 / 46
4.9 Use the browser ........................................................................................................... 33
4.9.1 Activate the browser ............................................................................................. 33
4.9.2 Go to WebPages .................................................................................................... 33
4.9.3 Set web page .......................................................................................................... 33
4.9.4 Browse WebPages ................................................................................................. 33
4.9.5 Zoom on the web ................................................................................................... 33
4.10 Use Bluetooth function .............................................................................................. 34
4.11 Camera and Video recorder ..................................................................................... 35
4.11.1 Preparation ......................................................................................................... 35
4.11.2 Activate camera .................................................................................................. 35
4.11.3 Deactivate the Camera ....................................................................................... 35
4.11.4 Capture mode...................................................................................................... 35
4.11.5 Change capture mode ......................................................................................... 35
4.11.6 Capture Photos ................................................................................................... 35
4.11.7 Capture Videos ................................................................................................... 35
4.12 Image-video Gallery .................................................................................................... 35
4.12.1 Activate image-video gallery.............................................................................. 36
4.12.2 Use photos ........................................................................................................... 36
4.12.3 View photos ......................................................................................................... 36
4.12.4 Browse photos ..................................................................................................... 37
4.12.5 Cut photos ........................................................................................................... 38
4.13 Play videos .................................................................................................................. 38
4.13.1 Use videos ............................................................................................................ 38
4.13.2 Watch videos ....................................................................................................... 38
4.14 Music ........................................................................................................................... 39
4.14.1 Use Music ............................................................................................................ 39
4.15 Install applications..................................................................................................... 40
4.15.1 Search for applications ....................................................................................... 40
4.15.2 Install applications .............................................................................................. 40
4.16 Management of the Mobile Phone ........................................................................... 40

Avvio 776S User manual
8 / 46
4.16.1 Basic Settings ...................................................................................................... 40
4.16.2 Display Settings ................................................................................................... 41
4.16.3 Tone setup ........................................................................................................... 41
4.16.4 Protect the mobile phone ................................................................................... 41
4.16.5 Unlock the SIM card .......................................................................................... 41
4.16.6 Restore Phone Factory Settings......................................................................... 42
5. Common Troubles ........................................................................................................ 42
5.1 TF Card & USB Function Setting .............................................................................. 42
5.1.1 Installation and removing of T-flash card ............................................................. 42
5.1.2 Use of T-flash card ................................................................................................. 43
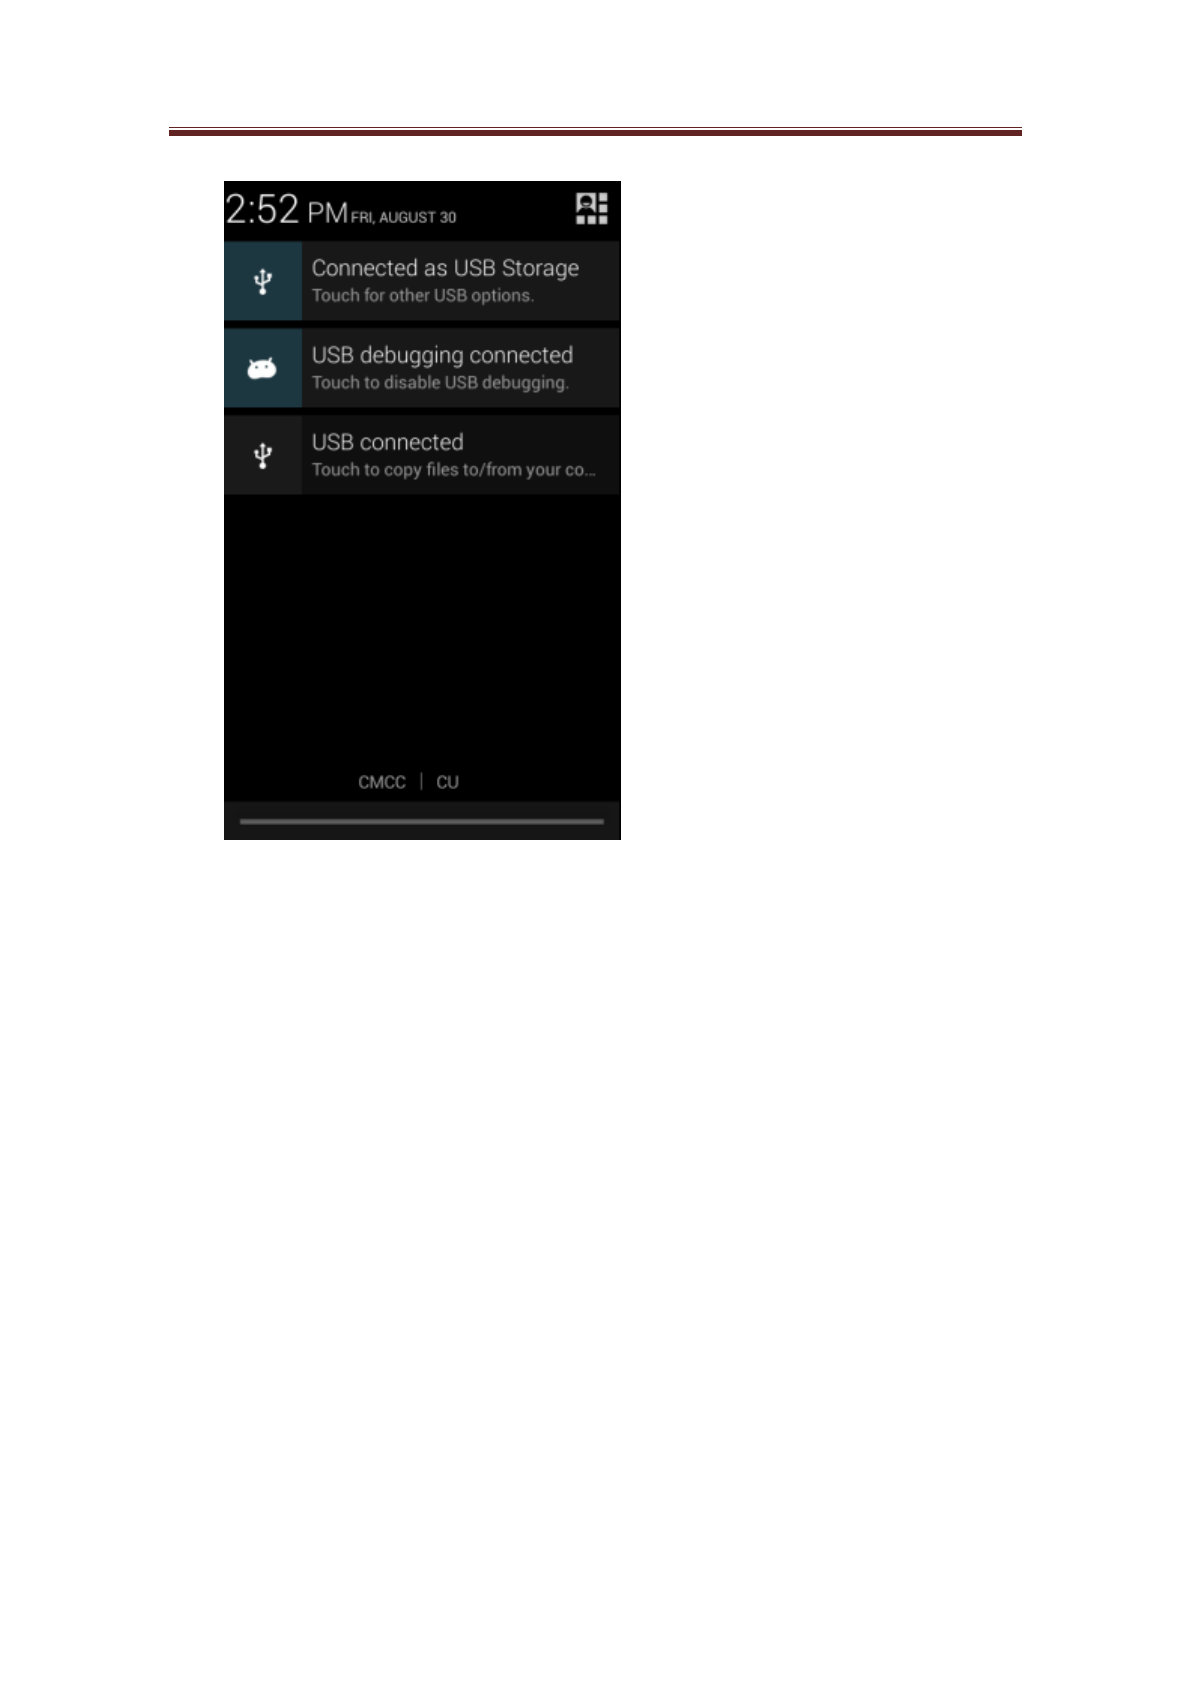
5.1.3 USB Function Setting ............................................................................................. 43
5.2 Common Troubles and Troubleshootings ................................................................. 44
FCC Regulations: .............................................................................................................. 45
RF Exposure Information (SAR) ..................................................................................... 46

Avvio 776S User manual
9 / 46
Welcome to use
Safety and Maintenance
When using the mobile phone, you shall abide by the following regulations:
Before use, please read carefully the user’s manual or the marks on the battery surface.
Please do not open the phone when phone using is prohibited or when phone using
might cause disturbance.
During flight, always switch off your mobile phone. If the alarm clock and memo
functions etc of your mobile phone can be automatically switch on the mobile phone, be
sure to cancel these functions for safety check.
When using the mobile phone, keep it away from heat source and high-voltage
environment, such as electrical appliances and electrical cooking devices.
Pay attention to fire. Switch off the mobile phone near chemical factory, gas station and
fuel storehouse etc with flammable substances.
During driving, never use mobile phone. Do not put the mobile phone above the safety
airbag or any other place the expanded airbag can reach so as to prevent the mobile
phone standing strong exterior force from the expanding airbag and thus causing severe
injury to you.
Use only the standard battery, charger and accessories specified by the company. We
will not be responsible for any consequence caused by the use of the third party’s
accessories.
As interference may be caused when the mobile phone is close to electronic devices,
keep it from electronic devices such as TV set, radio, PC etc. Never put the mobile
phone near credit card or magnetic field.
Switch off the mobile phone near the hospital or healthcare center; otherwise, the use of
the mobile phone will interfere with the medical equipments in these places such as
pacemaker, deaf-aid etc.
Prevent the mobile phone from mechanic vibration or shaking and never knock its
screen with sharp object.
Mobile phone sheath or plastic mobile sheath may damage the coating of the mobile
phone.
Never dismantle the mobile phone without permission.
Never use solvent such as benzene, thinner or spirit to wipe the outer casing of the
mobile phone, nor let erosive chemical or cleanser touch the mobile phone. Use only
clean soft cloth to wipe your mobile phone slightly.
Never expose the mobile phone under direct sunshine or in the place with too much
smoke and dust.
Be careful to use headset etc. Where unnecessary, never touch the antenna. Use only the
original antenna. The use of any other antenna without permission may cause damage to
the mobile phone.
Always hold the plug rather than the cable of the charger to pull the charger out.
Do not take the mobile phone as the only communication tool in emergency case, such

Avvio 776S User manual
10 / 46
as medical aid.
Always keep the mobile phone out of children’s reach so as to prevent danger.
When using the battery you shall abide by the following regulations:
Before use, please read carefully the user’s manual or the marks on the battery surface.
Please charge the battery in cool and well-ventilated room; otherwise, too high
temperature will cause heat, smoking, burning or distortion and even explosion.
As the battery has special protection circuit and unit inside, never dismantle the battery;
otherwise, broken LCD board or liquid crystal leakage may be caused. In the event
where liquid crystal enters eyes, which may cause blindness, immediately wash the eyes
with clear water (never knead the eyes) and see a doctor immediately.
Never squeeze the battery, mechanical vibration or shaking, battery short, because this
will damage the battery or the components connected with the battery. Short may be
caused by connecting the positive pole and negative pole of the battery with coil, pen
and pin etc; therefore, never put the battery together with metal objects.
Keep the metal contact and the battery clear all the time.
Never use broken or consumed battery.
Replace the battery when it cannot meet the performance requirements. The battery can
be charged hundreds of times until it must be replaced. As the battery is consumable,
although it can be charged hundreds of times, its power capacity may be lowered
gradually. When finding the work time (call time and standby time) is shortened,
immediately replace the battery.
Never expose the battery directly under sunshine or the place with too much smoke and
dust. Never use the battery in the place with too much moisture such as bathroom. The
battery is not waterproof, so always keep it from rain or moisture.
Never put the battery in too hot or cold place; the temperature above 50 ° C or below
-10 ° C environment will affect battery performance.
Never throw the battery into fire so as to prevent explosion.
Never put the battery into water so as to prevent inner short and heat, smoking,
distortion, break and even explosion.
Please dispose the battery as specified (such as recycle); never treat the waste battery as
common waste so as to prevent explosion and pollution.
Use only the specified charger to charge the battery; and keep the continuous charging
time below 24h.
Always keep the battery out of children's reach so as to prevent danger.
When using the charger, you shall abide by the following regulations:
Before use, please read the use instructions and the icons on the charger surface
carefully.
Do not dismantle or modify the charger; never use the charger when the power cable is
broken, otherwise, electric shock, fire and break may occur.
Never touch the charger with wet hand. If the charger touches water or other liquids,
immediately cut off the power.
Never make the charger short and prevent mechanical vibration or shaking, direct
sunshine; never use the charger in the place with too much moisture such as bathroom.
The charger is not waterproof, prevent it from rain or moisture.

Avvio 776S User manual
11 / 46
Never use the charger near TV set, radio etc.
Never plug or unplug the battery by holding the plug instead of pulling the power cable.
Always keep the charger out of children's reach so as to prevent danger.
When using the headset(Maybe headset shall be additionally bought)., you shall
abide by the following regulations:
Please pay attention to appropriately control the volume lest hearing may be damaged.
Please do not pull the headset line forcefully lest rupture phenomenon may occur.
Long time use of headset in places of high temperature and high humidity may easily
damage the headset or reduce its service life
Please do not use headphones when driving a car, riding a bicycle or walking on the
road, otherwise, traffic accidents will happen easily.
Always keep the headset out of children's reach so as to prevent danger.
Avvio 776S User manual
12 / 46
1. Brief of Functions
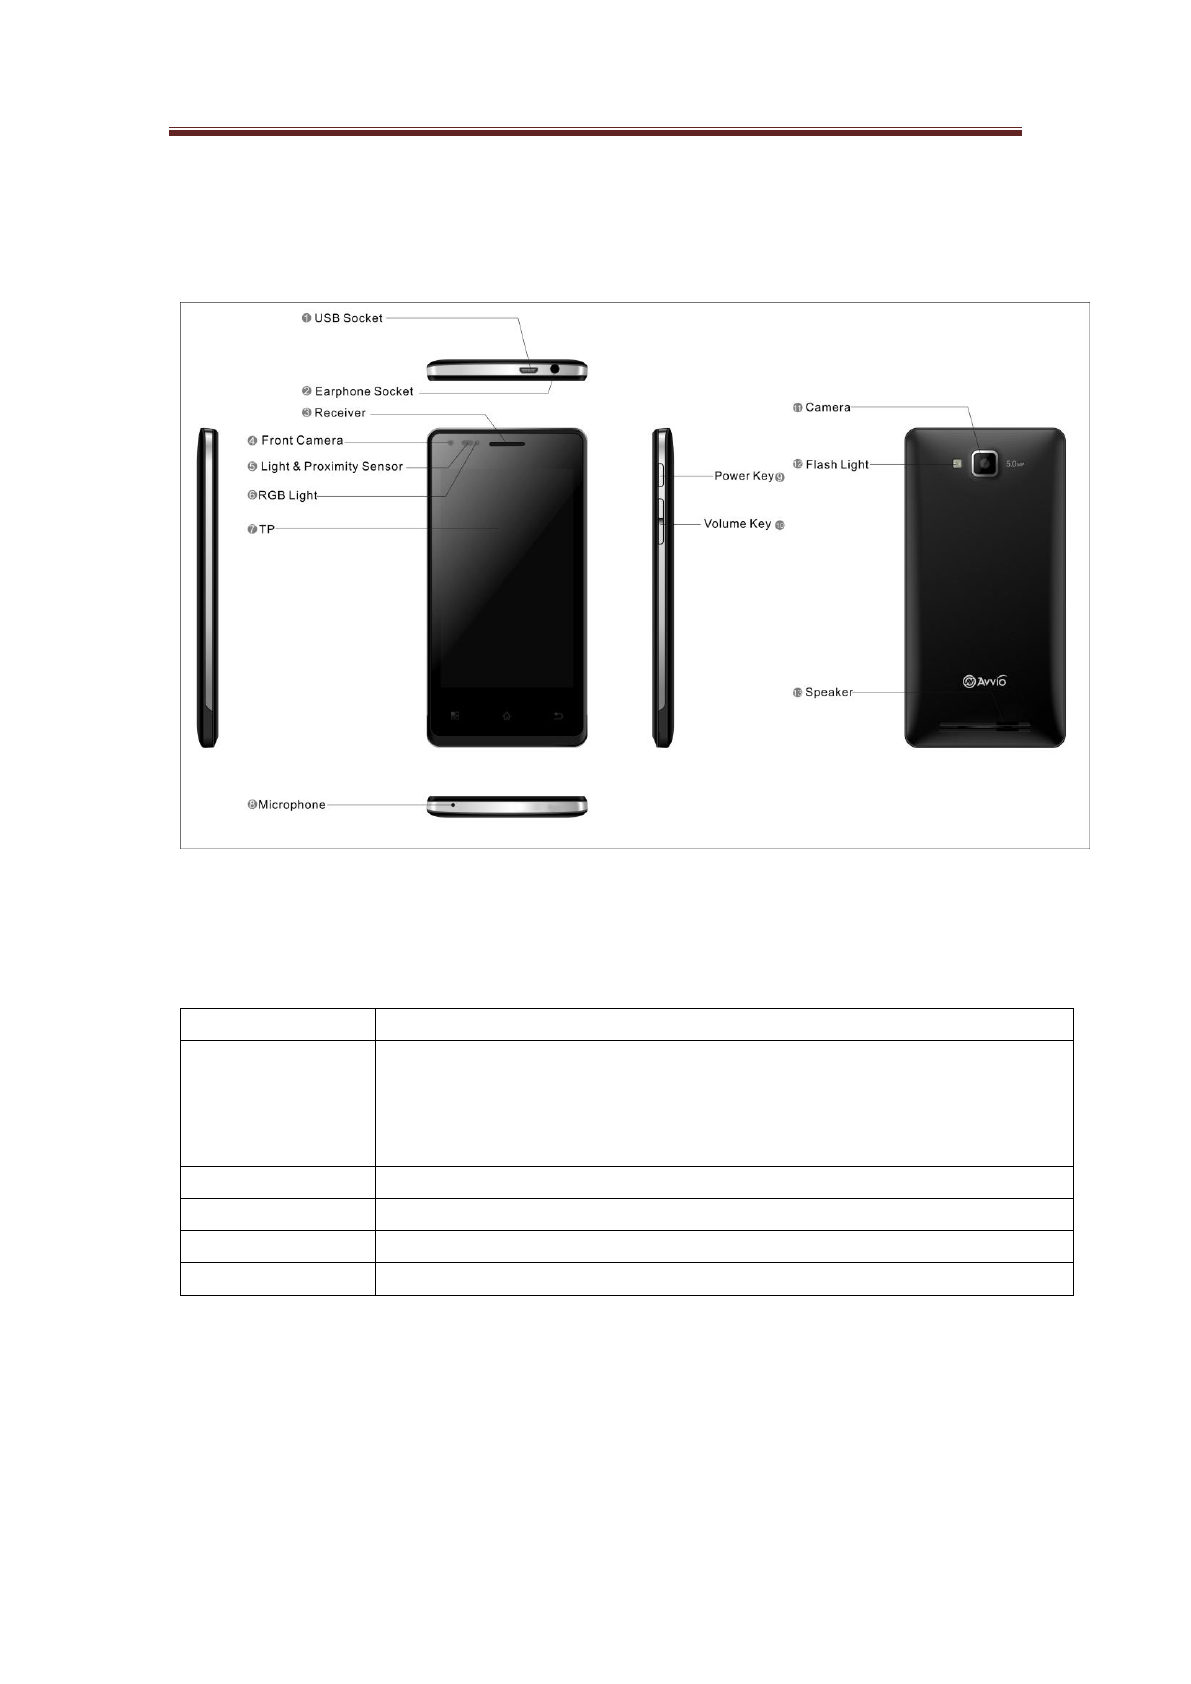
Description of Keys
Key
Descriptions
Power Key
In the power-on state, press this key shortly to allow the mobile phone to enter
the sleep state and long to activate the power-off menu.
In the power-off state, press this key shortly to get no reaction and long to
power on.
Back Key
Return to previous menu
Home Key
Return to the standby interface.
Menu Key
Enter the main menu.
Volume Key
Adjust the volume.

Avvio 776S User manual
13 / 46
Guide of the main functions
1.1 Dial a call
After the logo of the network supplier is shown on the screen, you can make or answer calls. The
signal bars at the up right corner of the screen show the strength of the signal. The conversation
quality is strongly affected by barriers. So, moving within small area when making the call will
improve the conversation quality.
Dial a Domestic Call
Input phone number under standby state, and then press the Dial-up icon to dial the call. When the
called party answers the call, information about the conversation status will be shown on the
screen. After the conversation, press the End Call icon to end the conversation.
1.2 Phonebook
You can use the Phonebook to save important information, such as names, mobile numbers, fixed
telephone numbers, office telephone numbers, etc.
Note: The number of phone numbers the SIM can store depends on the capacity of the
SIM card.
Input Text
This mobile phone has been installed with input methods. You can download other input method
to install and use.
You can input text in the following items:
-Input and edit messages
-Input and edit names in the Phonebook
……
Input method
After choosing input method, you can click the icon on the input method interface to
switch input mode:
Input number/Chinese/symbols/letter according to need.
You can also install other input methods by your own.
Avvio 776S User manual
14 / 46
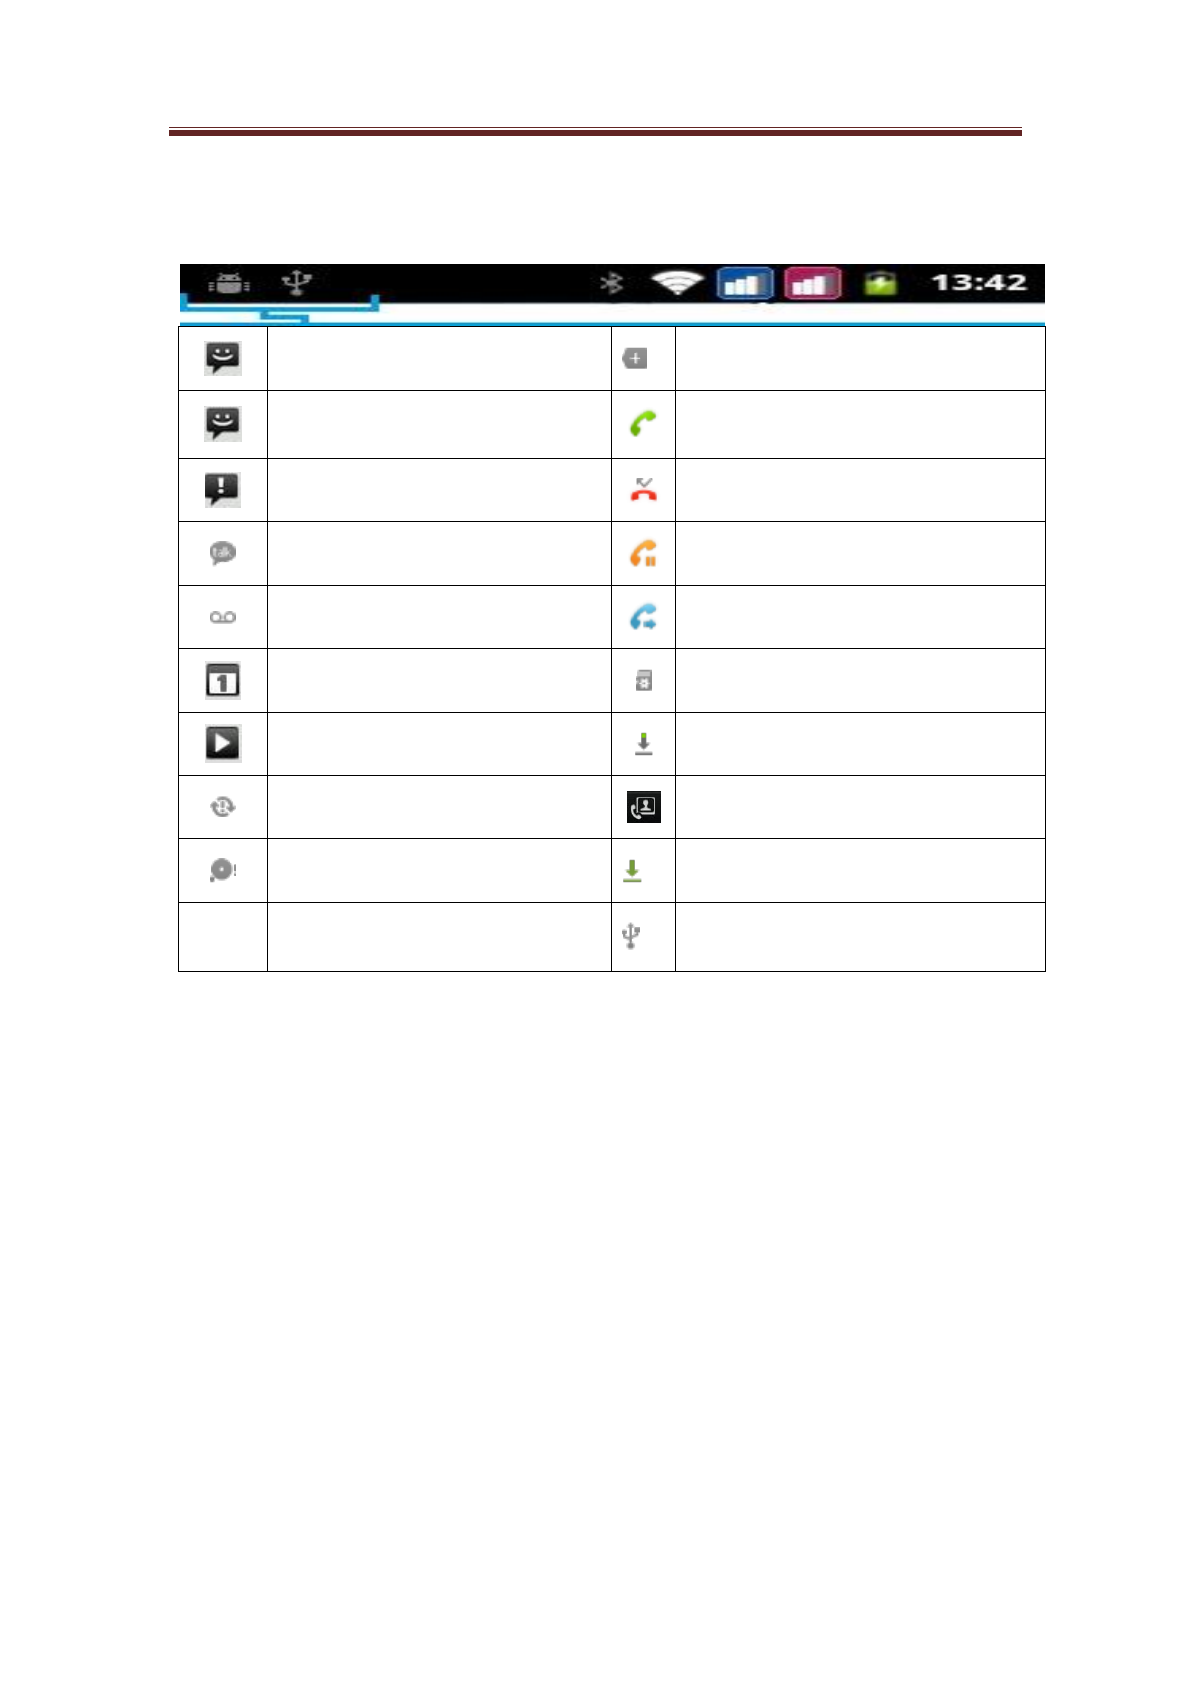
Notice Icons
The following icons may appear in the notice area of the status bar:
New message received
More (not displayed) notice
New SMS/MMS
Calling
Message Send Failed
Missed Calls
New Instant Message
Holding
New Voicemail
Call divert function is activated
Todo list
No T-flash card
Playing music
Data Downloading
Login/ synchronization error
Video call
Memory full
Downloaded Content
USB Connected
Avvio 776S User manual
15 / 46
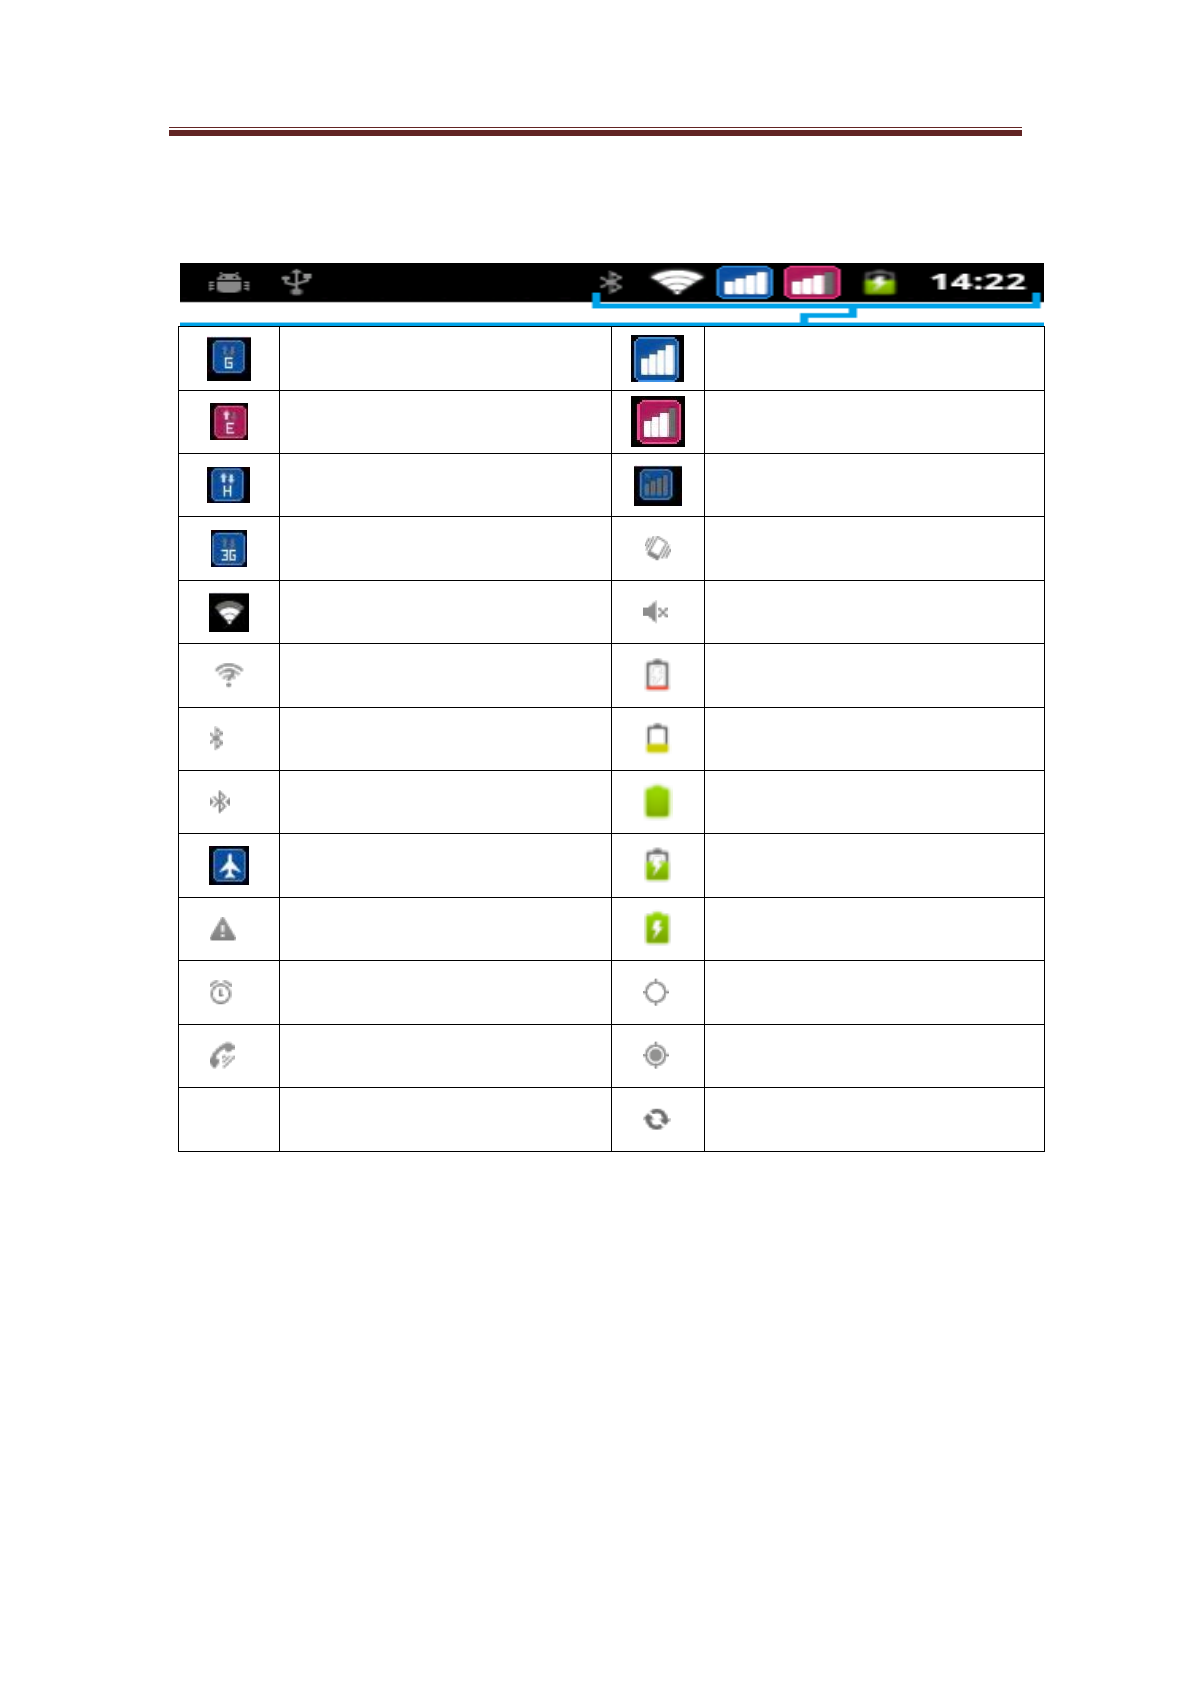
Status Icons
The following icons may appear in the status area of the status bar:
GPRS Connected
SIM1
EDGE Connected
SIM2
HSPA In Use
No network
3G Connected
Vibration Mode
WiFi Connected
Mute
Connected with Wi-Fi net.
The battery is too low
Bluetooth function is activated.
The battery is low.
Connected to the Bluetooth.
The battery is full.
Flight mode
In Charge
Connected with BUB
Charging is completed
Alarm clock is activated.
GPS activated
Hands-free is activated.
GPS In Connecting
Data synchronizing

Avvio 776S User manual
16 / 46
2. Introduction
2.1 Connect the network for the first time
2.1.1 SIM Card
When registering a mobile phone number, you will get an insert-type SIM card from the service
provider. The SIM cards save the parameters needed for communications and personal data,
including PIN code, phonebook, short message and other extra system services. Do not distort or
scratch the SIM card nor let it contact static, dust or moisture. If it is lost, please contact
immediately your network operator for help.
Note: As the SIM card is small object, keep it out of children’s touch or prevent children gulping
it!
2.1.2 Insert and take out the SIM Card
The SIM card embed in a paper card, you should carefully remove it from the paper card before
insert into your mobile phone.
Unlock the keyboard lock if the phone has been switched on, then press the On/Off key
until the Power Off menu appears on the interface.
Turn to the back of the phone, and then push down the back cover, take off the battery.
Push down the SIM card into the card slot with the metal contact facing downward and
the missing angle directing to the missing angle of the card slot.
Push up the SIM card when you want to take it out.
Note: SIM card slot 1: Supports "GSM", WCDMA (Unicom 3G).
SIM card slot 2: Only supports GSM and it does not support WCDMA.
2.1.3 Switch on /off the phone
Switch on or off the phone by pressing the Power key continuously.
If you turned on the phone without the SIM card, the phone will prompt you to insert the SIM card.
After inserting the SIM card, the phone will examine the validity of the SIM card automatically.
Then the following notices will be shown on the interface in turn:
Input PIN1 —— If you set SIM card password.
Input phone password ——If you have set the password.
Search for network ——The phone will search for the network until available network
is found.
2.1.4 Unlock the SIM card
In order to prevent illegal use of the SIM card, PIN1 (personal identification number) code is used
to protect your SIM card. If this option is selected, you should input PIN1 code every time you
turn on the phone. After that, the SIM card is unlocked, and then you can make or answer calls.
The user can cancel this option. And under such conditions, SIM card is not protected.
Long press Power key to turn on the phone;
Input PIN1 code, and clear the wrong inputting with the Right soft key. Press OK key to
confirm. For example, if the PIN1 code is set to be 1234. The code should be input correctly
as follows:
Note: In order to avoid injury caused by your mistake operation, please read in
detail this guide and safe operating instruction before use.

Avvio 776S User manual
17 / 46
1 2 3 4
If the password is input wrongly, your SIM card will be locked. And your phone will ask for
PUK1 code, if you do not know this, please do not input the code randomly. The best way to
solve the problem is to send your SIM card to the network operator.
Notice: The network supplier has set a standard PIN1 code (4 to 8 words) for you, please
change it to your personal password soon after you purchased the phone.
2.1.5 Unlock the phone
In order to prevent the illegal use of the phone, you can set a password for your phone. If you
activate this option, every time you input PIN1 code (if you have set PIN code), you must input
phone password, so that you can unlock the phone. And then you can make or answer calls. You
can clear the phone password. Under such condition, the phone is not protected from being
illegally used.
Long press Power key to turn on the phone;
Input phone password, and use the Right soft key to clear the wrong inputting. Press OK key
to confirm. For example, if the phone password is set to be 1111, then you should input the
numbers correctly: 1111.
If you forget your phone password, you will have to contact the retailer or local authorized
service center to unlock your phone.
2.1.6 Connect the network
After the SIM card has been successfully decrypted, the phone will automatically search for
available network (Network searching is displayed on the interface). Once the phone is connected
with the network, the network supplier’s name will appear in the screen lock interface or slide
down in the background menu.
Notice: If Emergency is only shown on the interface, that means you are beyond the network
coverage. But, you can still make emergency calls according to the strength of the signal.
2.1.7 Dial a call
After the logo of the network supplier is shown on the interface, you can make or answer calls.
The signal bars at the up right corner of the screen show the strength of the signal. The
conversation quality is strongly affected by barriers. So, moving within small area when making
the call will improve the conversation quality.
2.1.8 Dial domestic calls
Use the Number keys to input the telephone number and then press dial key to dial a call. If you
need to change the telephone number, you can press the Delete key to delete the existing number.
When dialing, the animation will be shown on the screen. When the called party answers the call,
information about the conversation status will be shown on the interface. If you have turn on
completed connection alter tone, you will hear an alert tone (this function needs the support of the
network).
After the conversation, click the Hang Up on the screen to end the conversation.
2.1.9 Dial fixed-line telephone extension
Some extension can’t be dialed directly, so you will have to dial the telephone exchange first, then
the extension. When you dial the number of the extension, you can input a suspend character P
between the numbers of the telephone exchange and the extension. In this way, the phone will
complete the all the dialing, and connect the extension automatically. The way to input P is to

Avvio 776S User manual
18 / 46
press * key continuously until P is seen.
Area code, Telephone exchange number, P, Extension number, Dial key
For example:021----88888888----P-----666------
2.1.10 Answer calls
You can click Answer on the screen to answer a call. If the headset has been plugged in, you can
use the key on the headset to answer the call. Or you can answer the call by Bluetooth headset.
2.1.11 Call menu
In call state, you can press the Hands-free to active the hands-free function, press Options to enter
the call menu. The operation of the Call menu is the same with the function menu.
The menu can only been seen in conversation mode. And at the same time, functions such as Call
waiting, Call divert and conference call, etc should be supported by the network. Please contact
your network supplier for this.
Avvio 776S User manual
19 / 46
3. Basic Operation
3.1 Basic operation
In the standby and screen locked state, via screen unlocking, click to enter the main menu key.
At all levels of main menu or submenus, press the FUNCTION key to enter the desired function
menu, where you may enter or one-key exit from the menu.
3.1.1 Exit menu
Generally, you can press the Exit to exit some menu or back to the standby interface.
3.1.2 Lock screen by one key
Press the Power Off key on the top of the phone, the phone will enter into the screen lock status,
and when the screen is dark, the phone enters into the power saving mode.
3.2 Menu structure
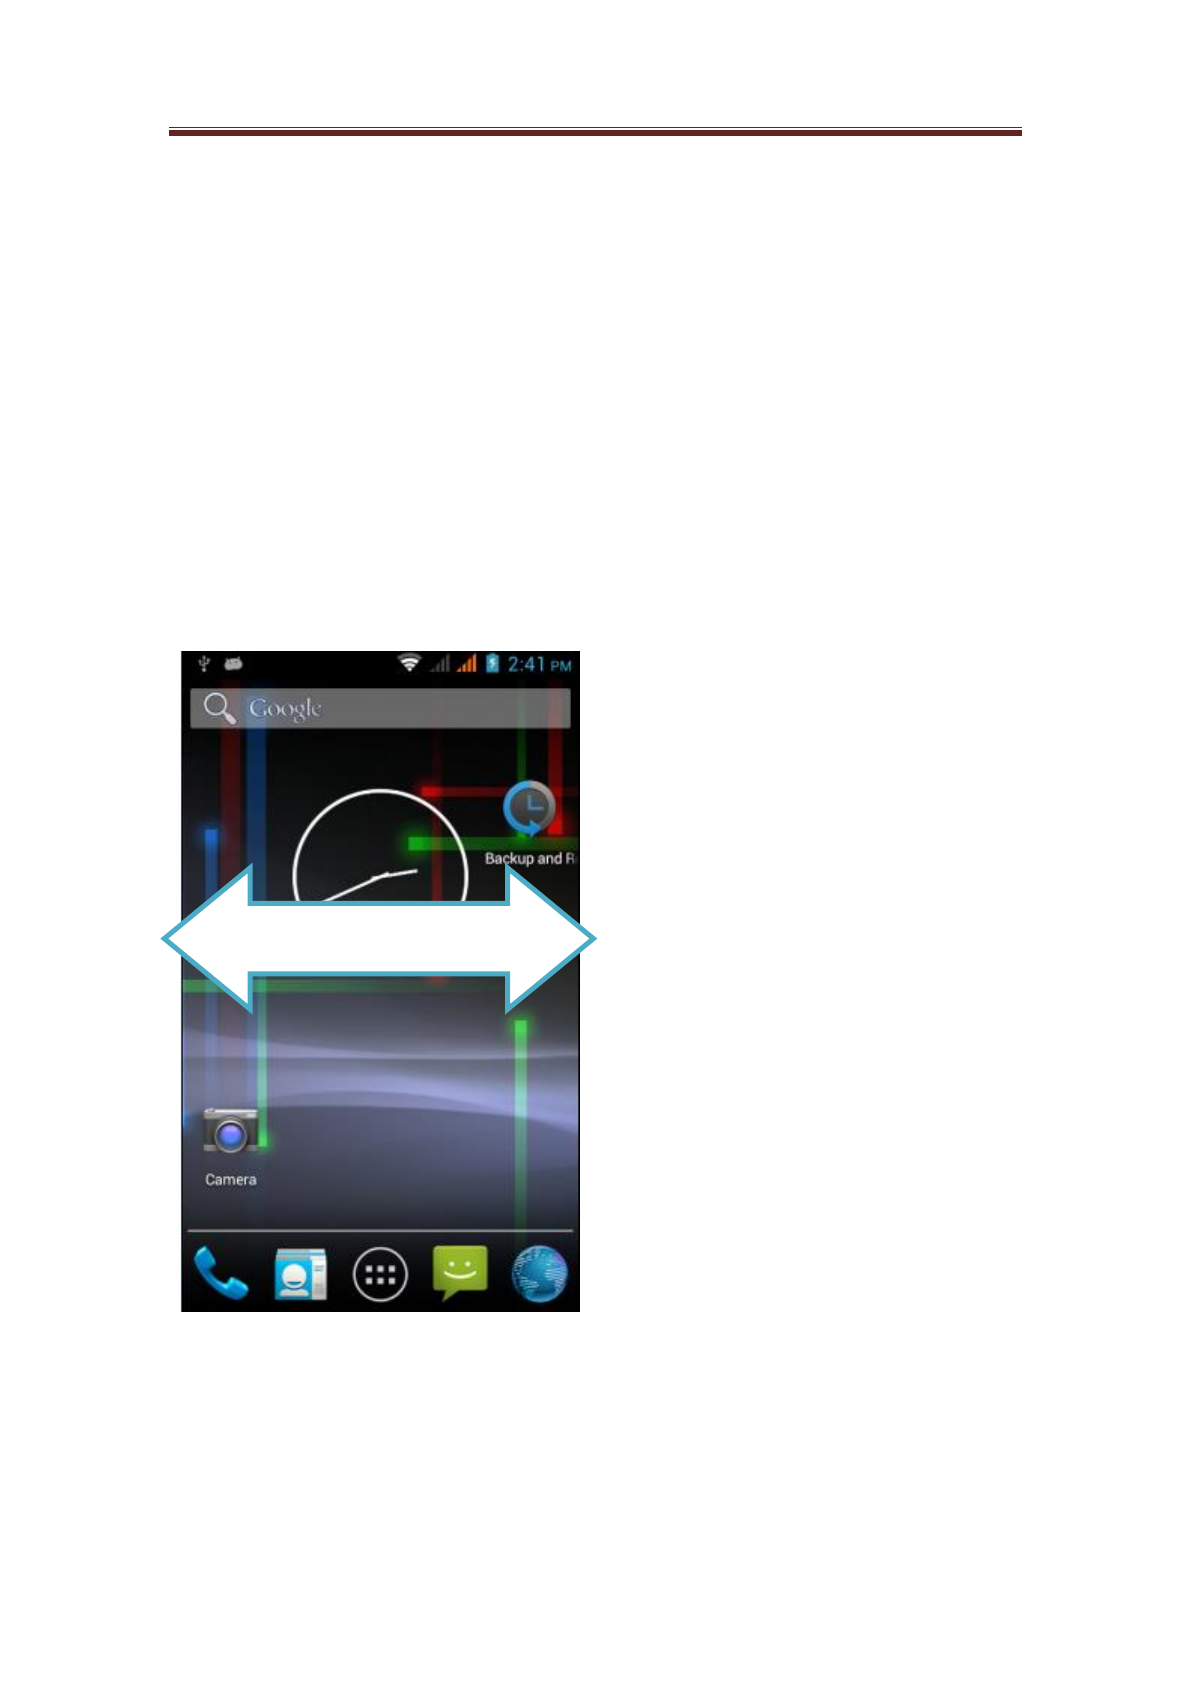
3.2.1 Outer menu interface
Slide left and right to turn the
page
Avvio 776S User manual
20 / 46
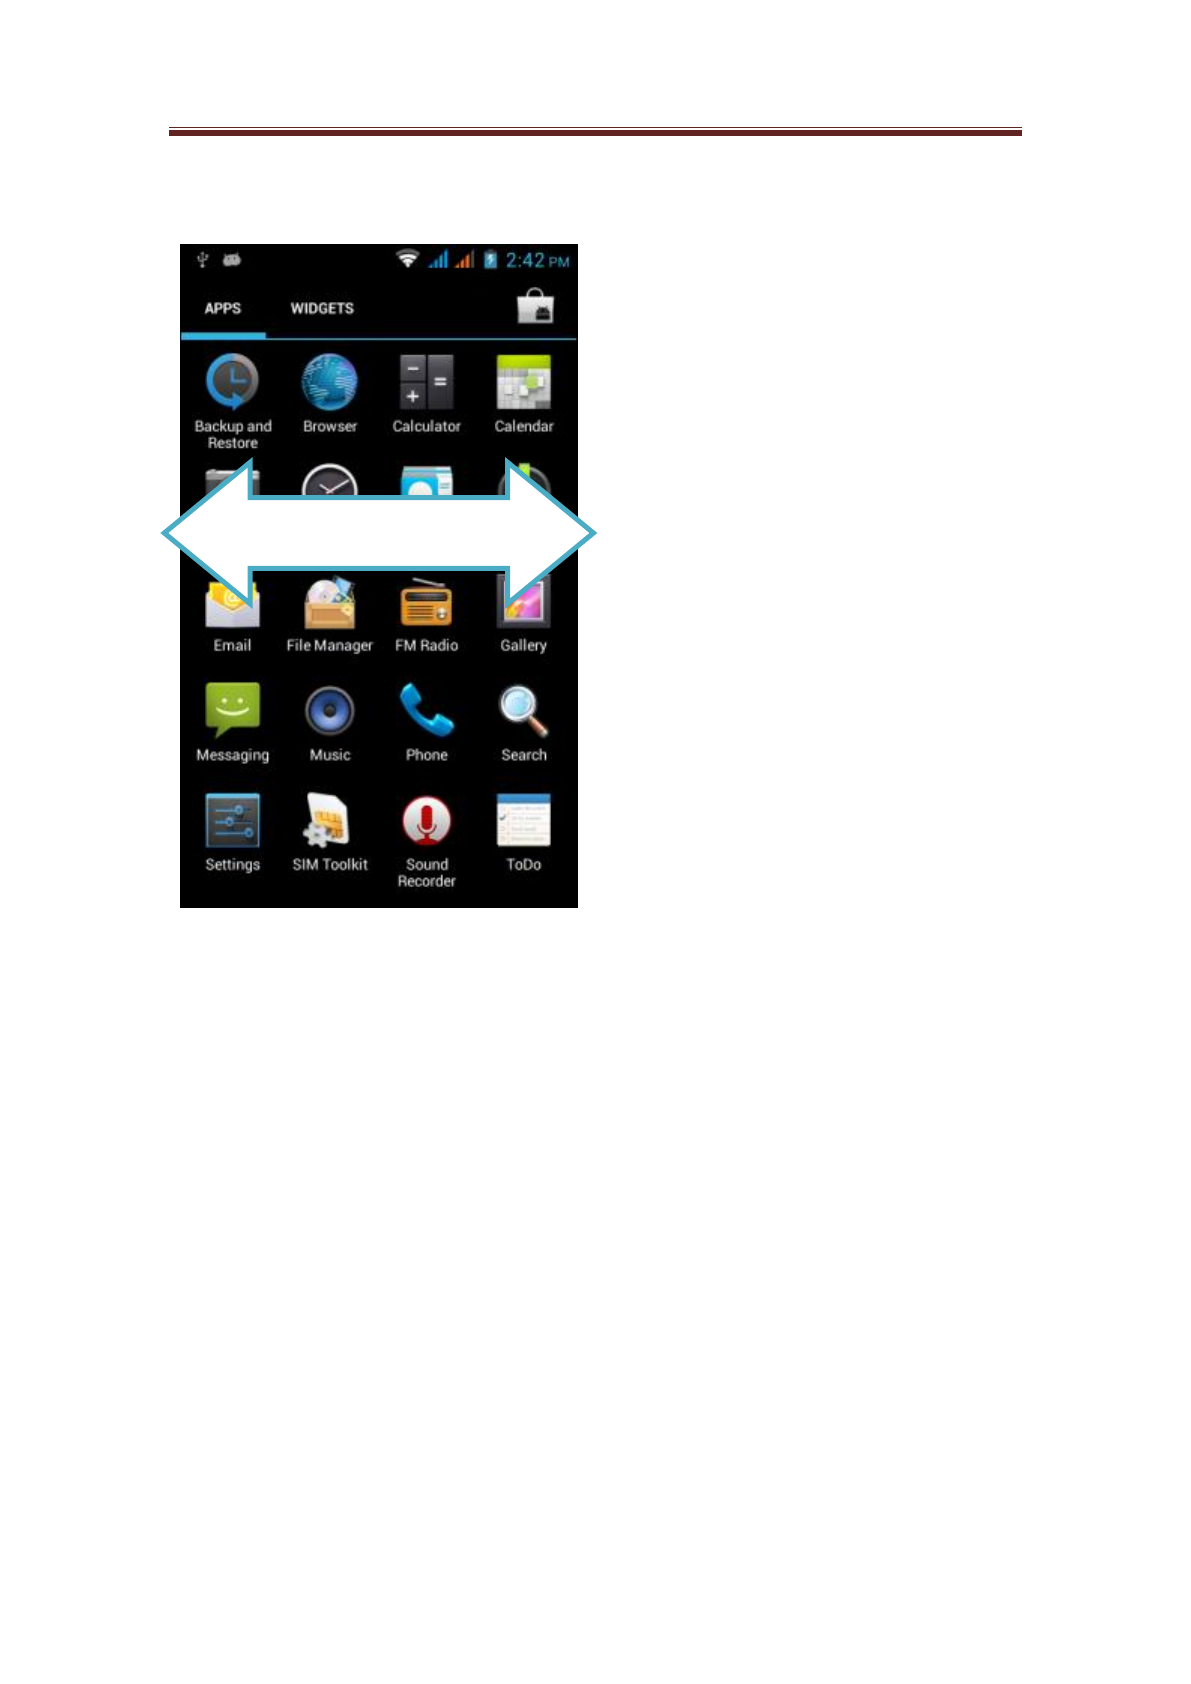
3.2.2 Inner main menu interface
Slide left and right to turn the
page
Avvio 776S User manual
21 / 46
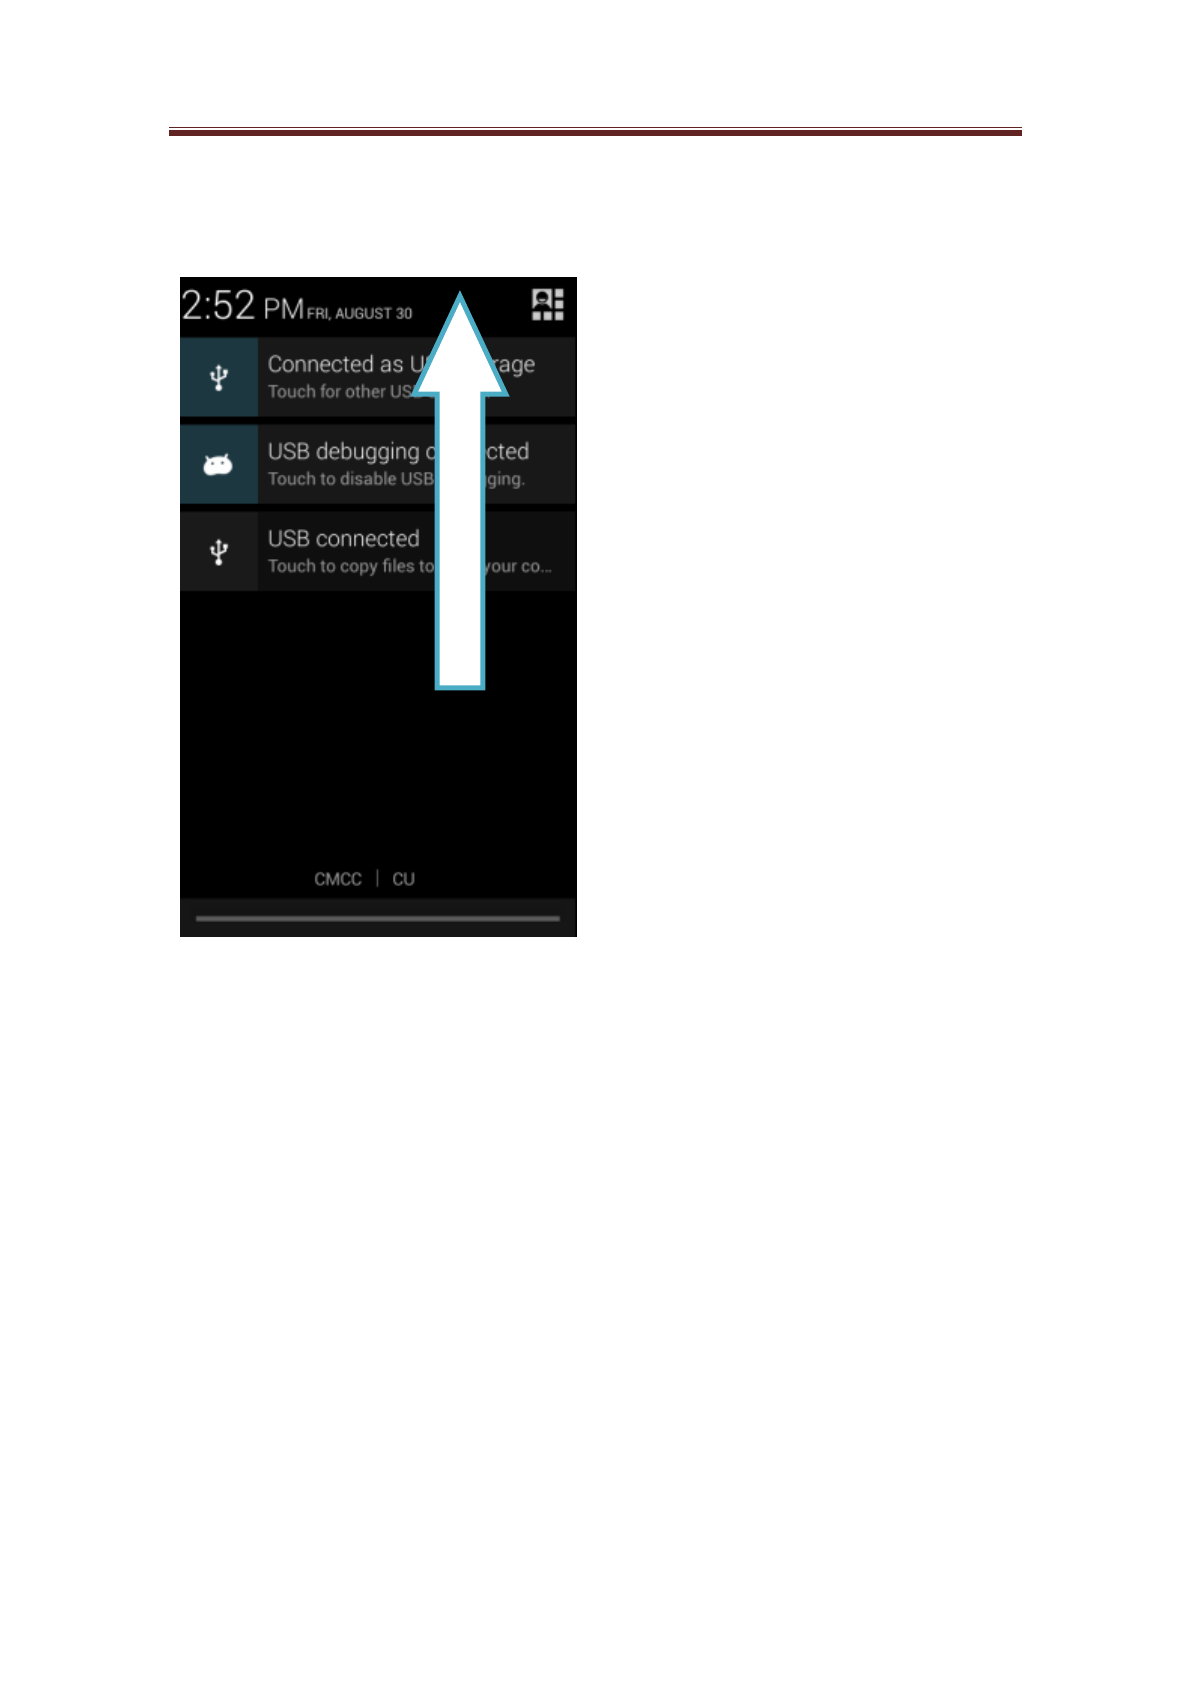
3.2.3 Notice bar(background list)
Click here to slide down
Avvio 776S User manual
22 / 46
4. Usage Detail
4.1 Dial a call
You may dial a call via the application of Dial of the phone.
Note: If two SIM cards have been inserted, please pay attention to distinguishing Card
1 and Card 2 when call.
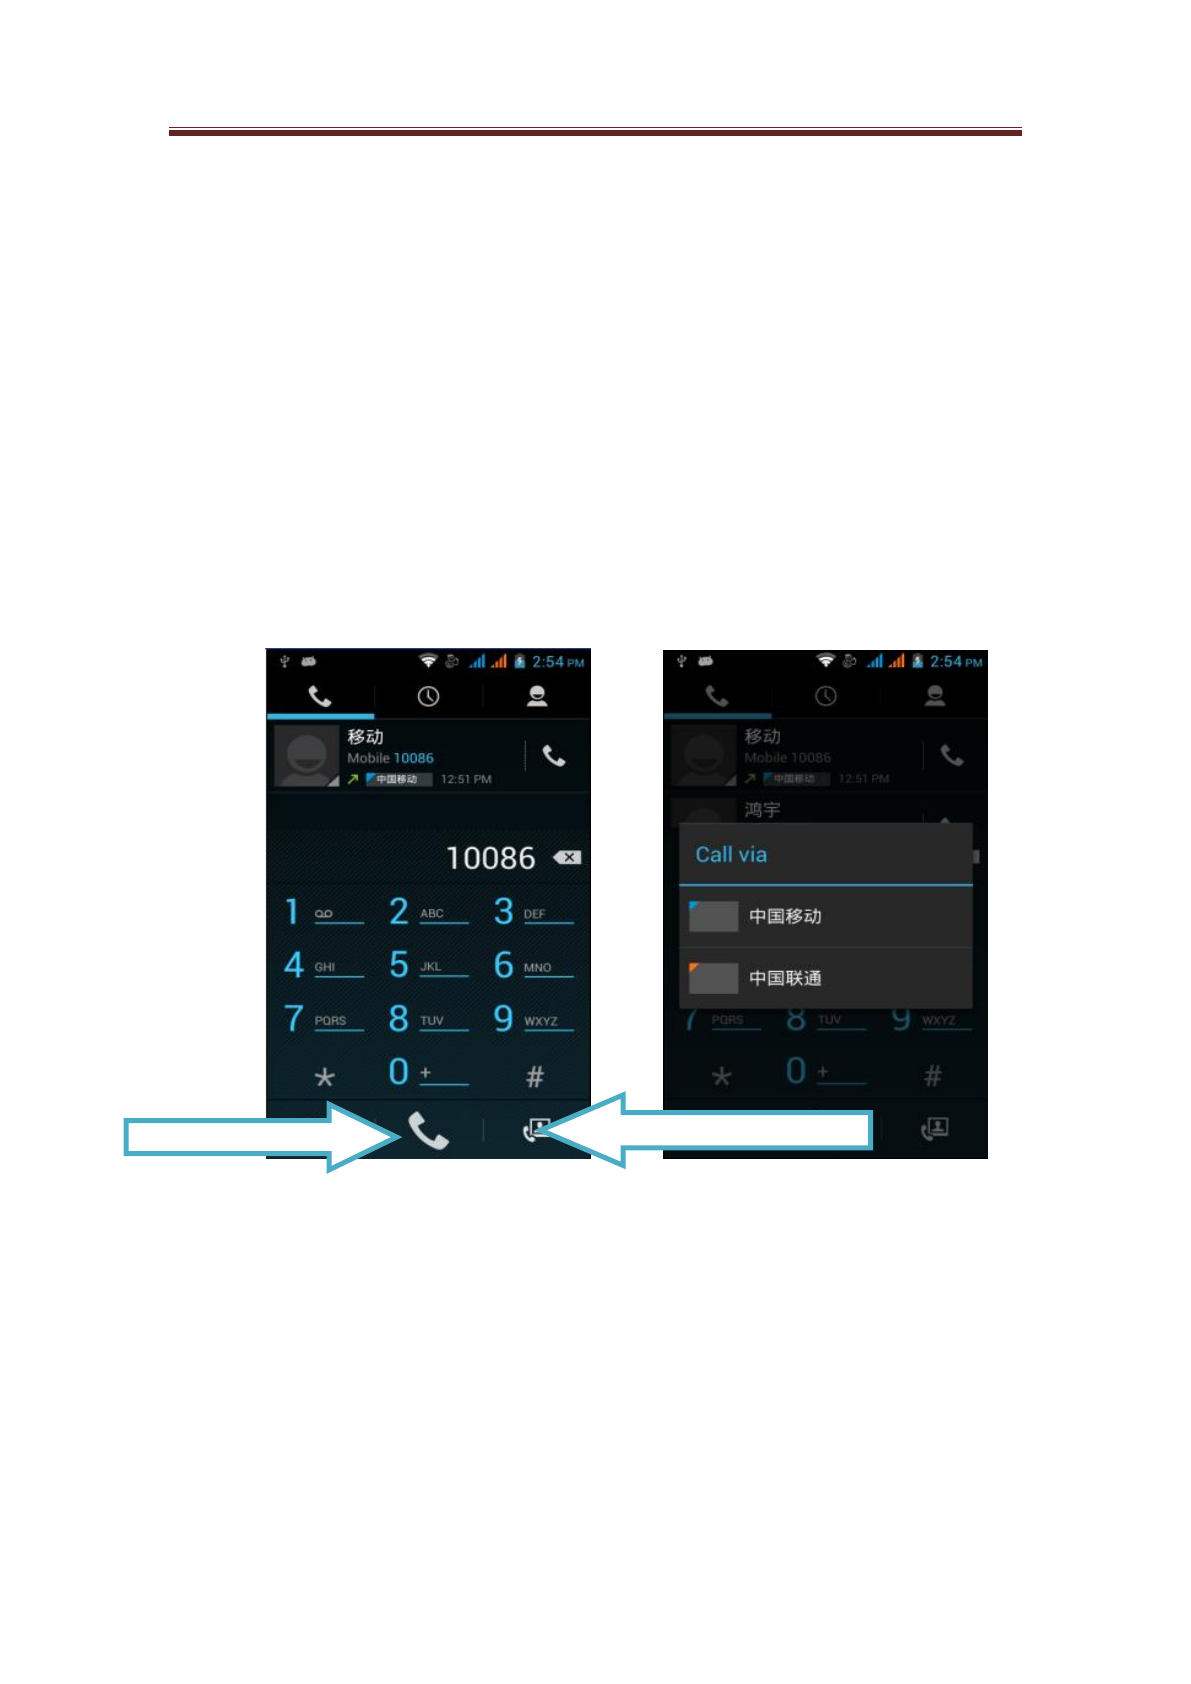
4.1.1 Enter the Dial Page
You may activate Dial with any of the following methods:
Press the Home Key, click the Dial program shortcut on the home page.
Press the Home Key, click the Main Menu tag and then click the Dial in the main menu.
Press the Call Key.
Choose whichever network to call (in double cards state)
Note: The defaulted outgoing call may choose one SIM card for call conversation. Setting steps:
Settings-> SIM card settings->Voice settings.
Click to dial
Click to dial video call
Avvio 776S User manual
23 / 46
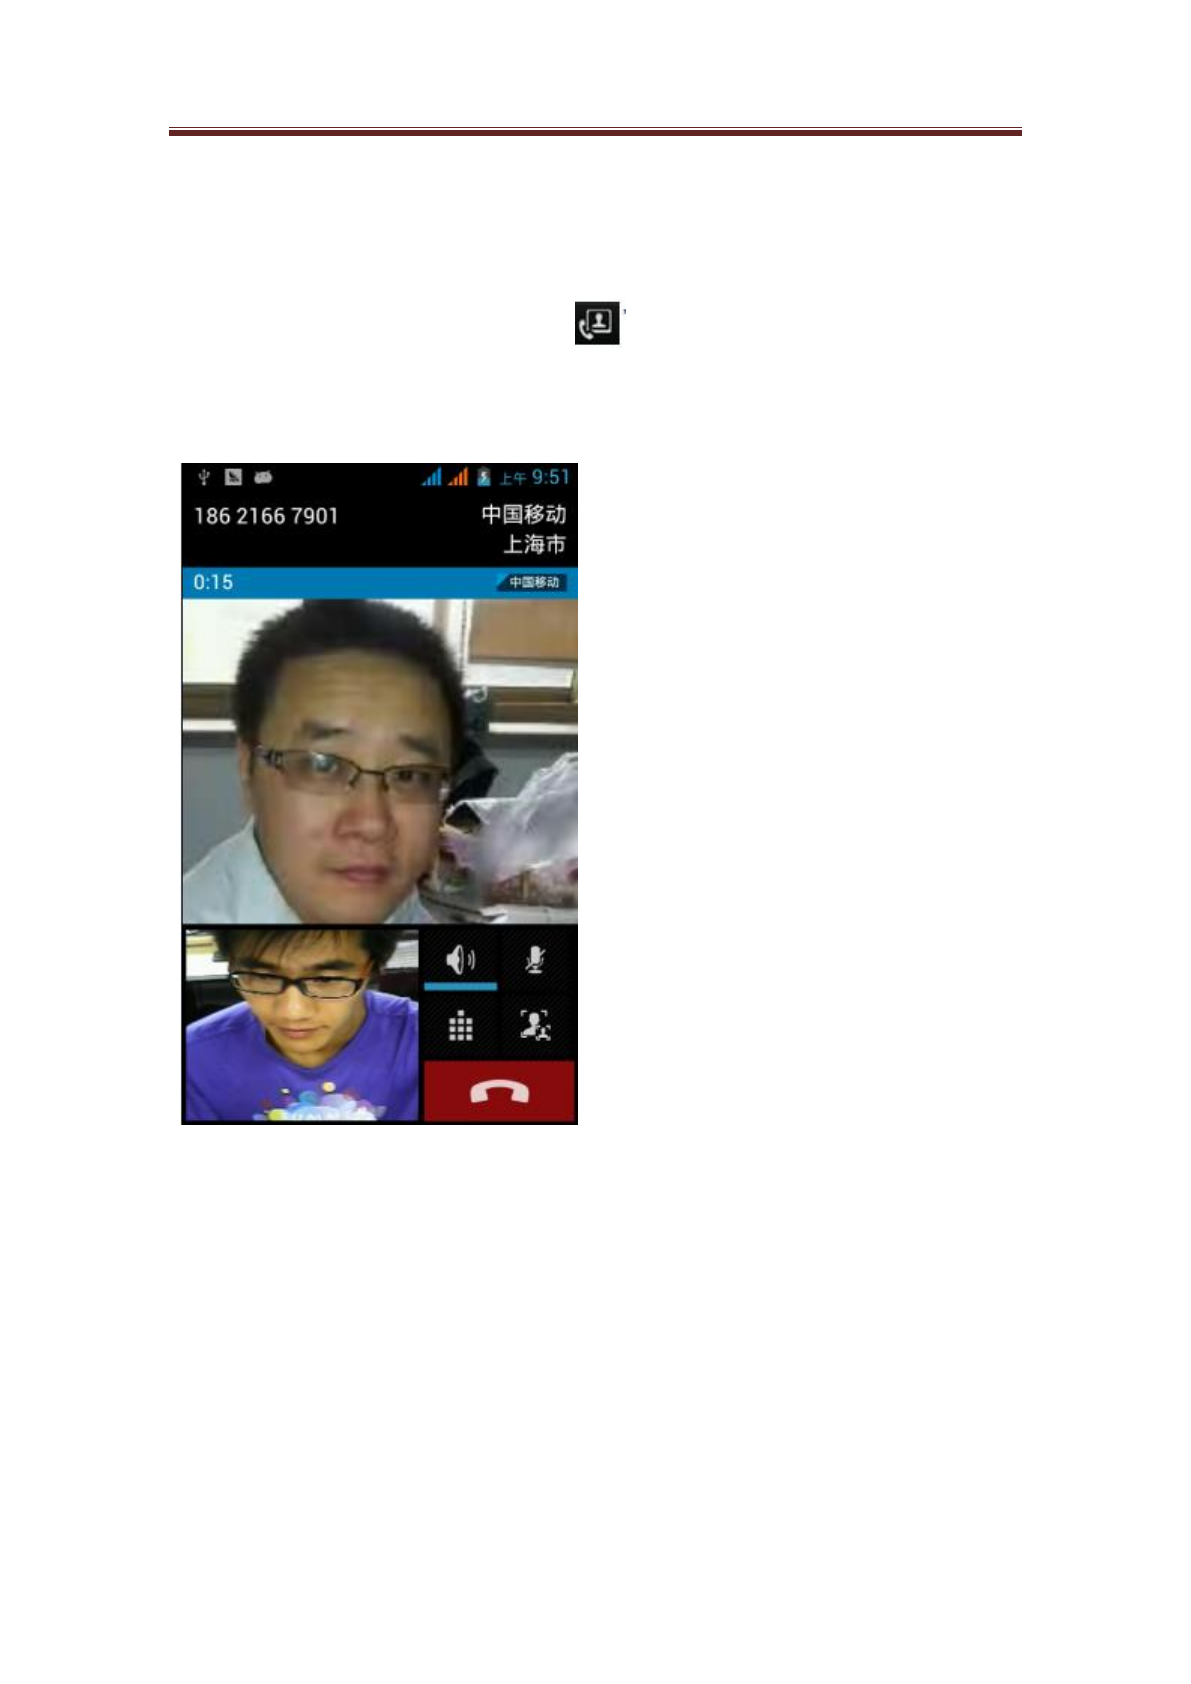
4.1.2 Video call
With video call, you may see the image of the callee in real time while having the call
conversation.
• Input the number in the dial keyboard, click “ ” to enter the interface of video call.
•In the call conversation process, as long as the mobile phone of the callee supports such function,
the call interface will display the image of you and also the image of the callee.
• Please refer to the picture below for detailed function instruction:
Note: Video call needs network operator’s support. Currently, it only supports Unicom 3G
network. Video call is expensive, please use the function appropriately, the charges is collected by
the operator.
Display
area of
the call
image of
the
Screenshot
Mute
Avvio 776S User manual
24 / 46
4.1.3 Dial an emergency call
Dial the local international emergency telephone number (for example, 110) on the screen of your
phone, and then press Call.
Note:
When the screen is locked, you must first unlock the screen, only then you can dial
out an emergency call. If the phone is in sleep mode, please press any button to wake
up the mobile phone, and then press the Select key to unlock the screen.
Other emergency numbers might be set in the SIM card. Please contact
telecommunication companies to obtain detailed information.
4.2 Receive or reject calls
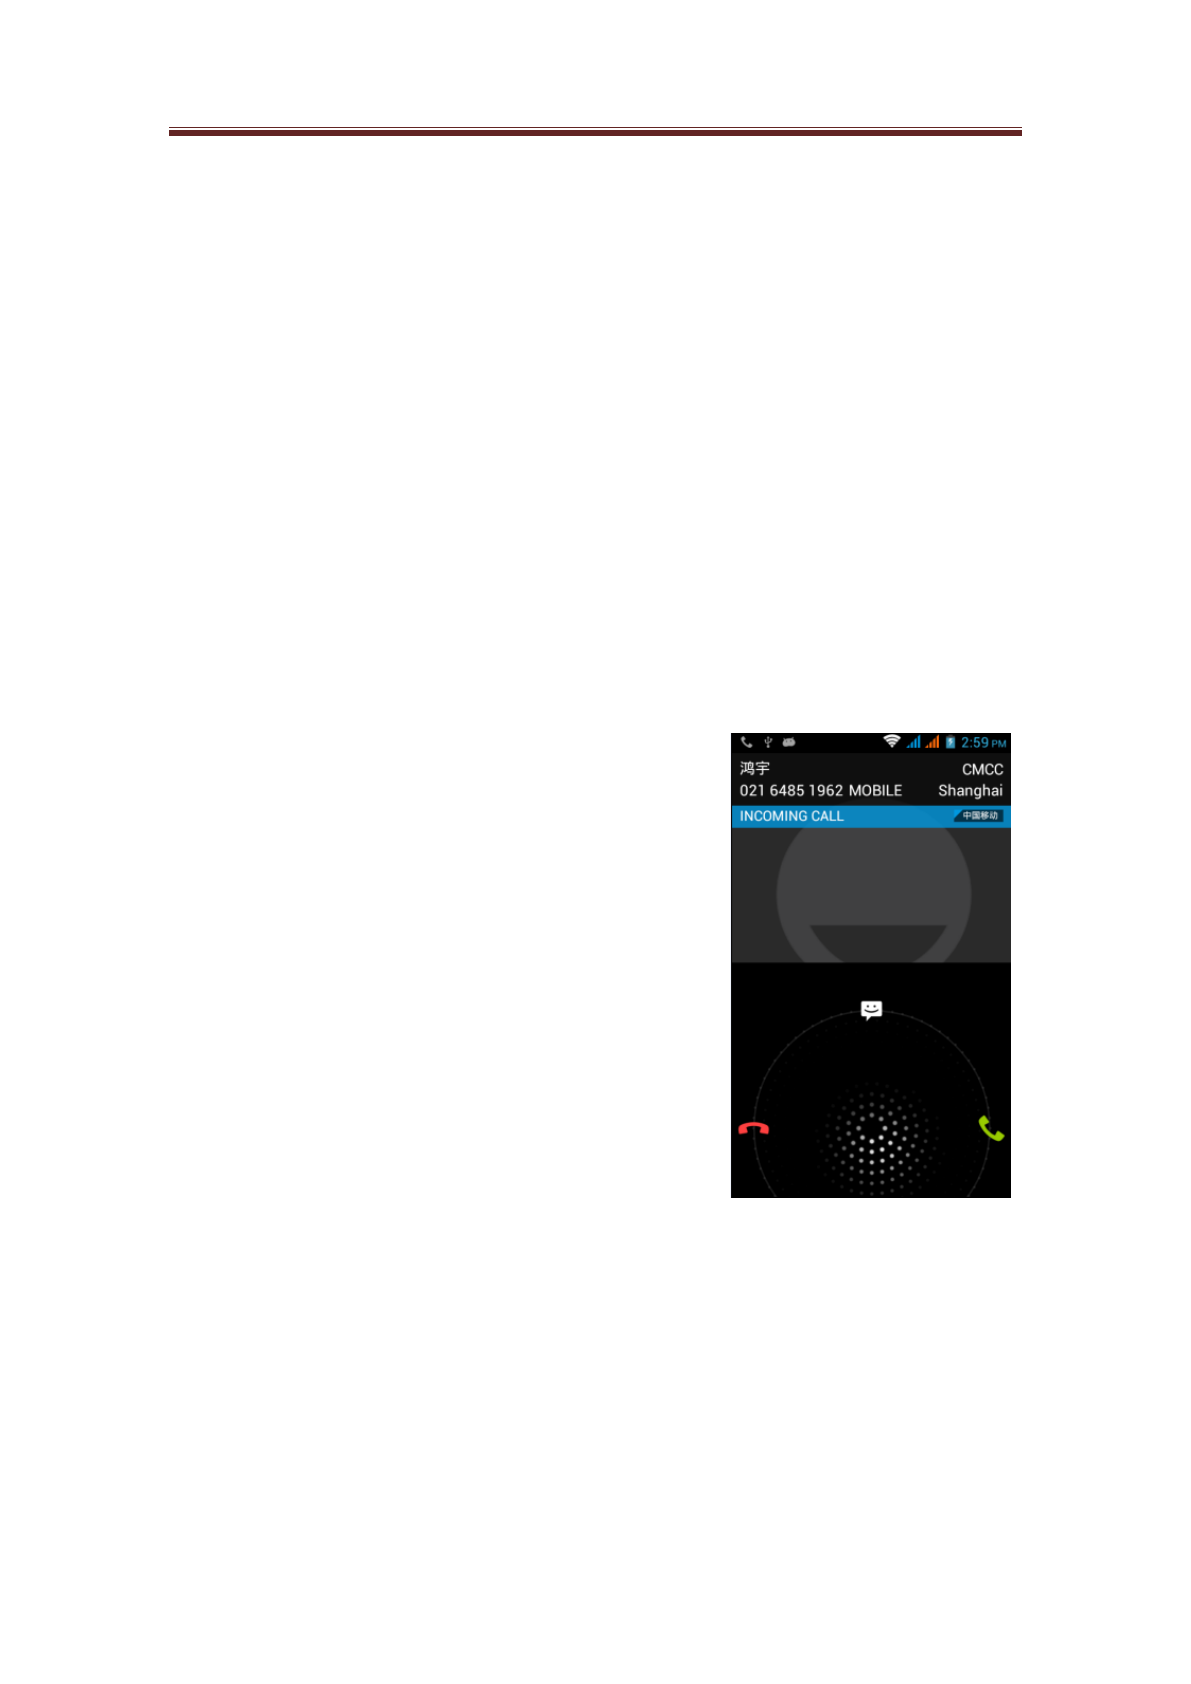
When your phone receives an incoming call, it will display the name, number, contact portrait, etc
on the screen. If the number of the caller is not stored in the list of contacts, only number and
defaulted portrait can be displayed.
4.2.1 Receive calls
Where there is a call coming, click the “answer” to
receive the incoming call.
When a headset or Bluetooth headset is used, you may press th
e specified key on the headset to receive the incoming call.
4.2.2 Reject calls
Where there is a call coming, click the “reject” to
reject the incoming call.
When a headset or Bluetooth headset is used, you may press th
e specified key on the headset to reject the incoming call.
Avvio 776S User manual
25 / 46
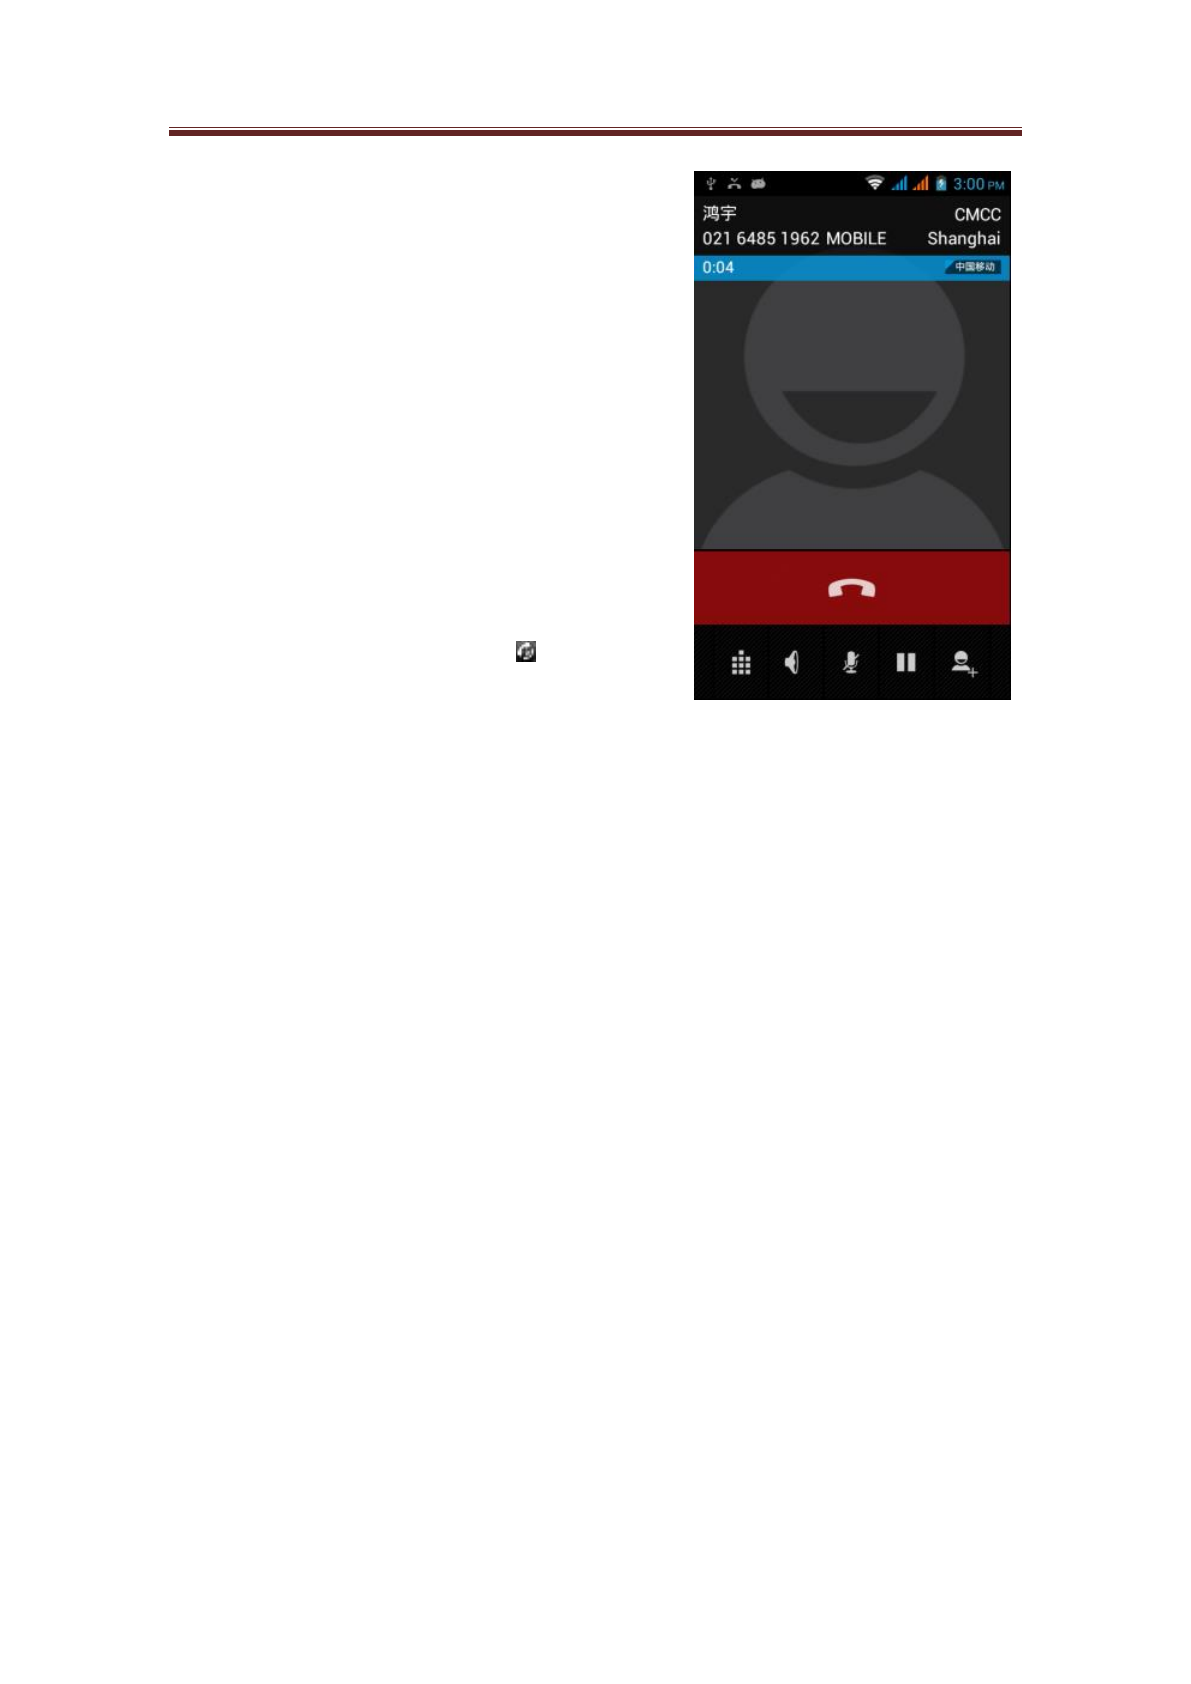
4.2.3 Call options
In Call, click "Select" to activate Call Options menu.
Click the function button in the menu to realize such
functions as Hold Calls, Dial a New Call, Mute Phone
Speaker, etc.
4.2.3.1 Hold calls
In Call, click “Select” and then click “Hold”, then the
current call will be held.
In such case, the indicator on the Hold Key will become
green and the icon of Hold will appear on the status bar.
Click Hold again to restore the call.
4.2.3.2 Activate or deactivate the speaker function
In Call, click Select, then click Speaker, the speaker
function will be activate or deactivate. When the speaker
function is activated, the indicator on the Speaker Key
will become green and icon of speaker ( ) will appear on
the status bar.
4.2.3.3 End a call
You may end a call by any of the following methods:
Press the End Key.
Press Select, and click End Call.
If you use the attached cabled headset, you may
press Headset Key to end a call.
Avvio 776S User manual
26 / 46
4.3 Call records
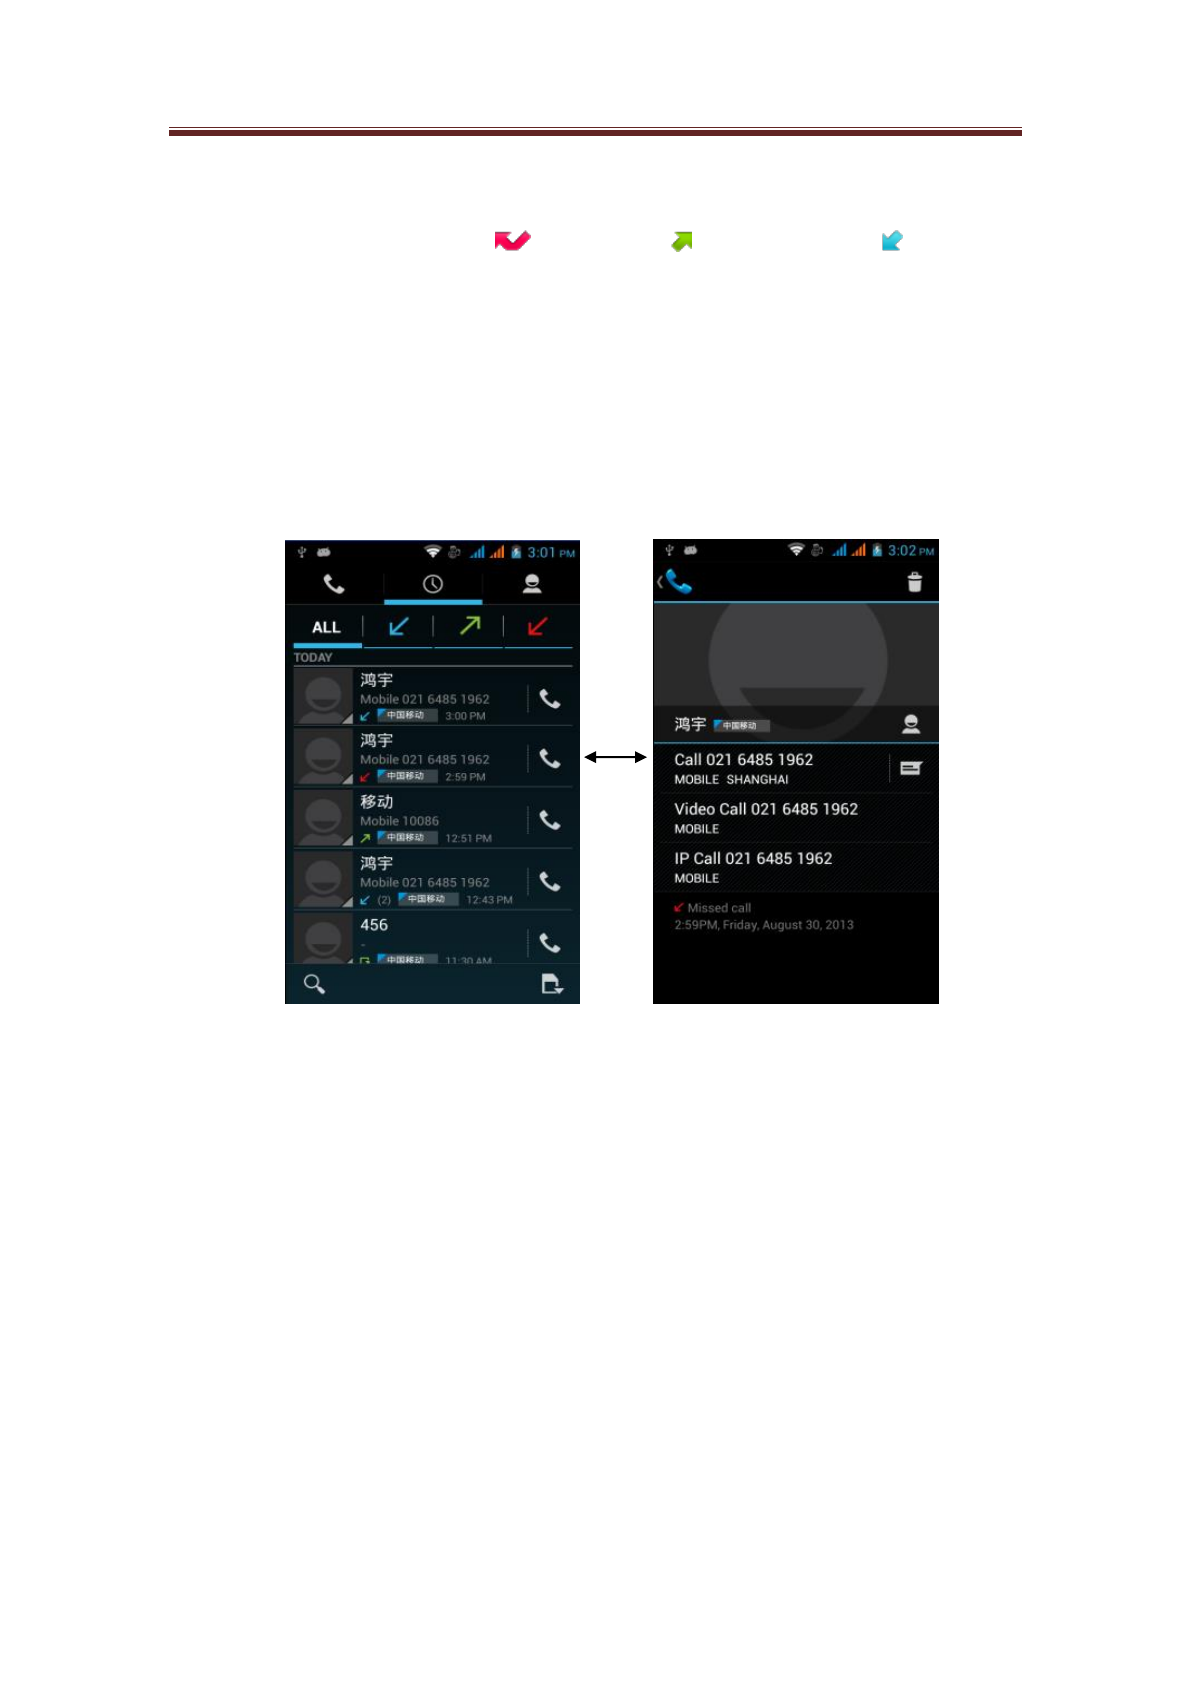
The call log will list all missed calls ( ), dialed calls ( ) and received calls ( ).
4.3.1 Use call records
1. Press the Call Key, choose Call Records to enter the call records list.
2. Please carry out any of the following steps:
On the interface of call records list, click the Dial icon of the number or name
of any entry to dial a call.
Click the name or number in the list, then view such options as dial, video call,
send messages, view contacts information (if the number has been stored in the
contact list) and edit number before redial

Avvio 776S User manual
27 / 46
4.3.2 Create new contacts
If the caller's number is not stored in the contacts list, you may choose to store the phone number
after hanging up.
1. Press the call key on any interface, and then click Call Records.
2. Click the caller number you want to store in the contacts list, then click Add to
Contacts.
3. On the interface of add to contacts, click Create New Contacts. The received phone
number will be automatically added to the mobile phone column of the new phone
number section.
4. Enter the information of the contacts according to need.
5. Scroll downward the screen, then click Finish.
View missed calls
When there are missed calls, missed call icons ( )will appear on the title bar. To view the
caller, press Call key, then click call records. If missed call icon ( ) appears on the left, then
it is a not answered call.
Clear call records
Please carry out any of the following steps:
• To delete all entries, press Select and then click Clear call records.
• To delete one entry, please press such name or number long, then click Delete from Call records.
4.4 Activate and deactivate mobile phone function
Many countries have such regulations that the plane passengers must deactivate phone function.
Another method to deactivate mobile phone function is to switch to the mobile phone flight mode.
When the flight mode is activated, all the wireless will be deactivated, including cell phone
function, Bluetooth and Wi-Fi.
4.4.1 Activate or deactivate flight mode.
1. Press Home key > Select, then click Settings > Wireless Network Control.
2. Select flight mode click square to activate or deactivate this mode. After being activated, flight
mode icon ( ) will be shown in the status bar.
4.5 Create and manage of contacts
Avvio 776S User manual
28 / 46
4.5.1 View contacts
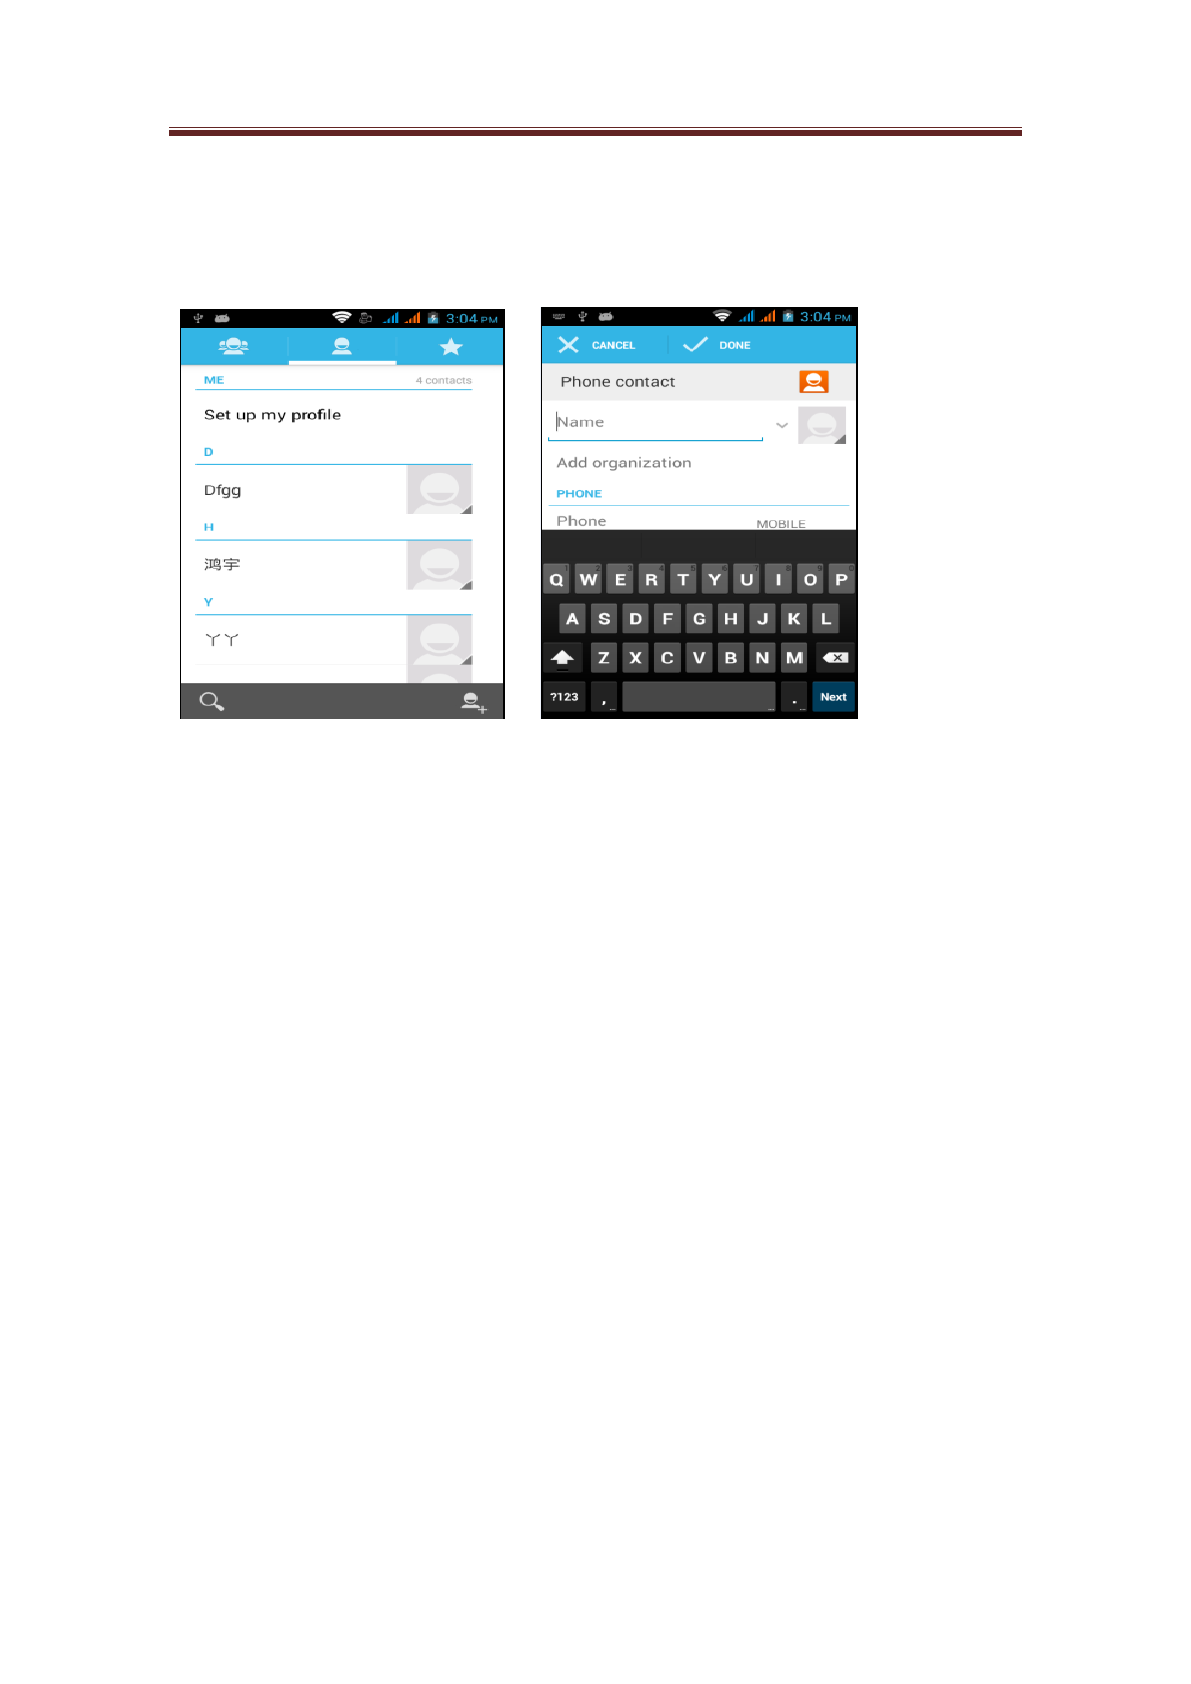
Press the Home key, and then click Contacts.
4.5.2 Add new contacts
Click the Menu to activate the Tool Bar.
Create new contacts on the phone.
1. On the interface of contacts list, click Create New Contacts.
Note: If there have been contacts in the phone, please press Select, then click New Contacts.
2. Input the contact's name, and then input contact information, such as mobile phone number,
home number or email address, etc. Slide your finger upward or downward, you can view more
options.
3. After that, press Select and then click Finish.
4.6 SMS and MMS
The Message application allow you to edit and send text messages (SMS) and multimedia
messages (MMS) to other mobile phones or receive the text messages and multimedia messages
from others.
4.6.1 View messages
Press Home key, then click Applications Program, then click Messages. Then there will be
messages list.
4.6.2 Create and send SMS and MMS
A piece of text message (SMS) you create may contain at most 160 characters. If you continue
input information after the message reaches up to the maximum bytes, the message will be divided
into at least two messages to be sent together. You can call it chain message.
Multimedia messages (MMS) may consist of words, images, audios, videos, music or slides.
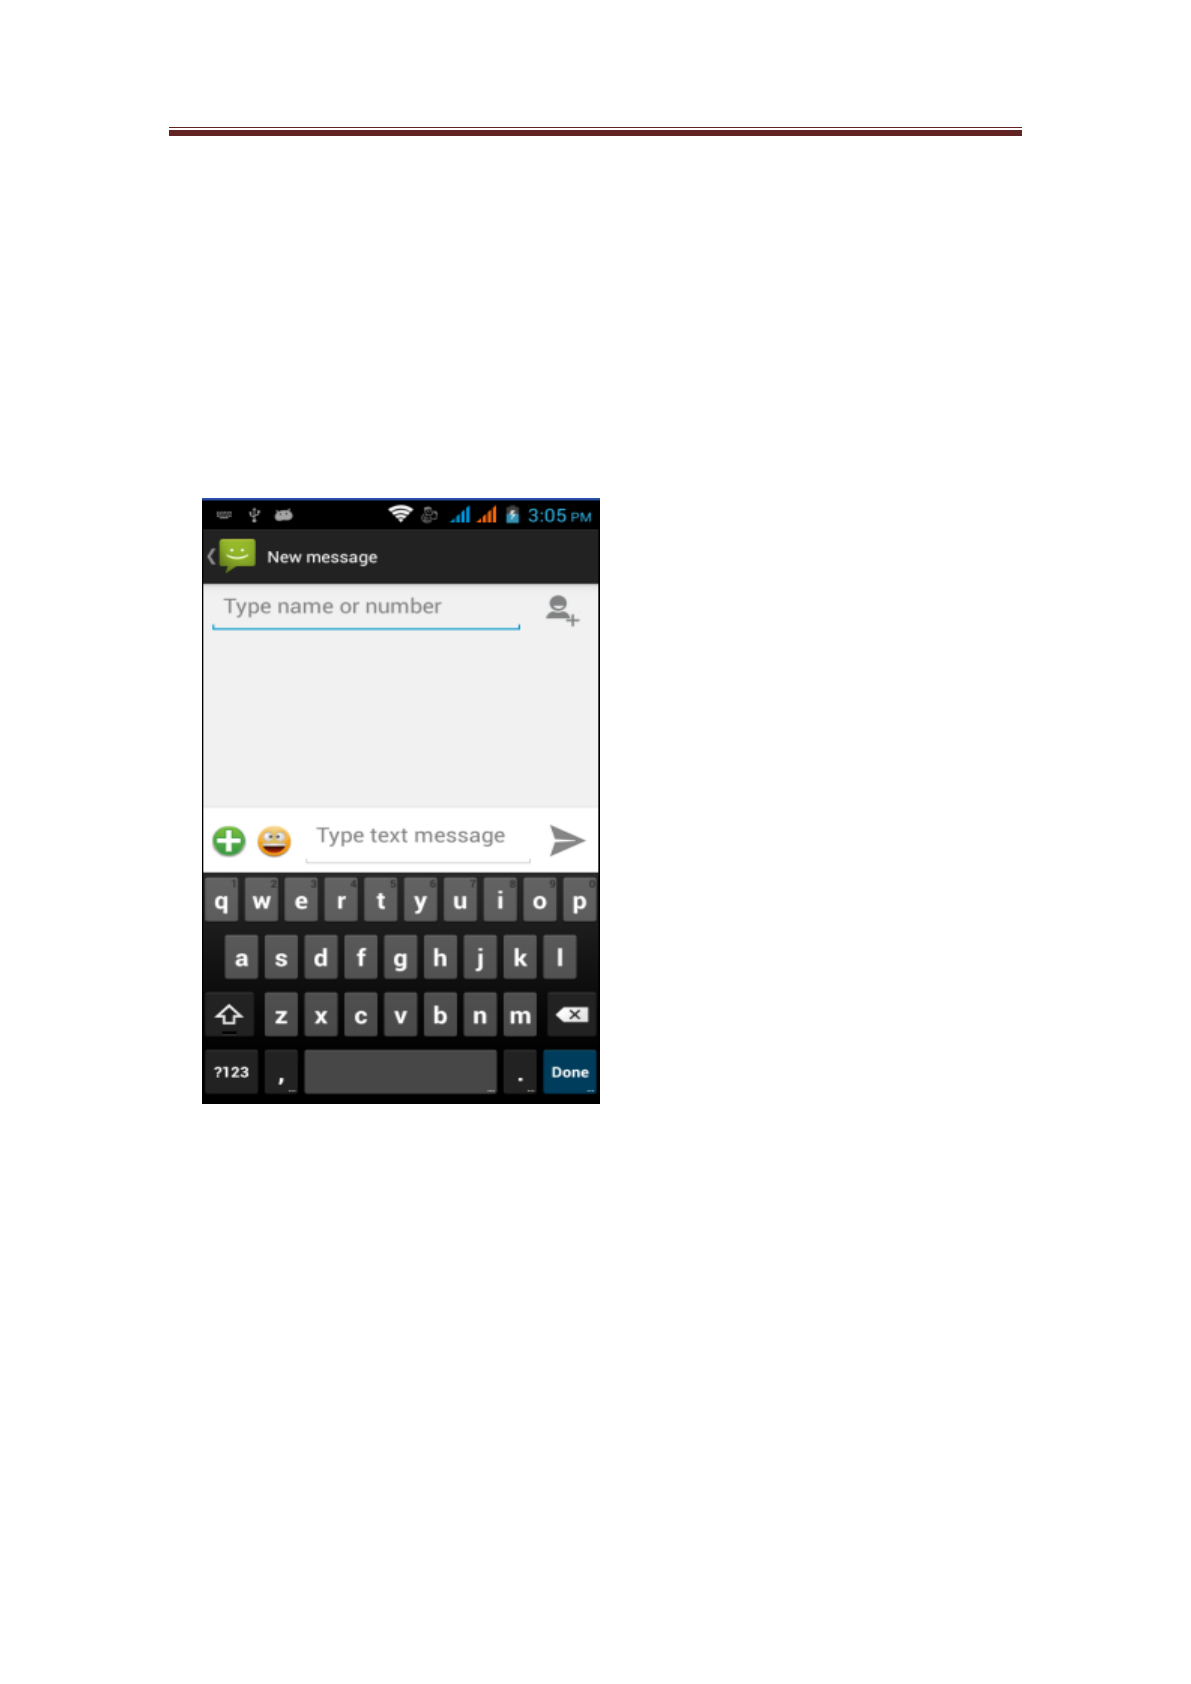
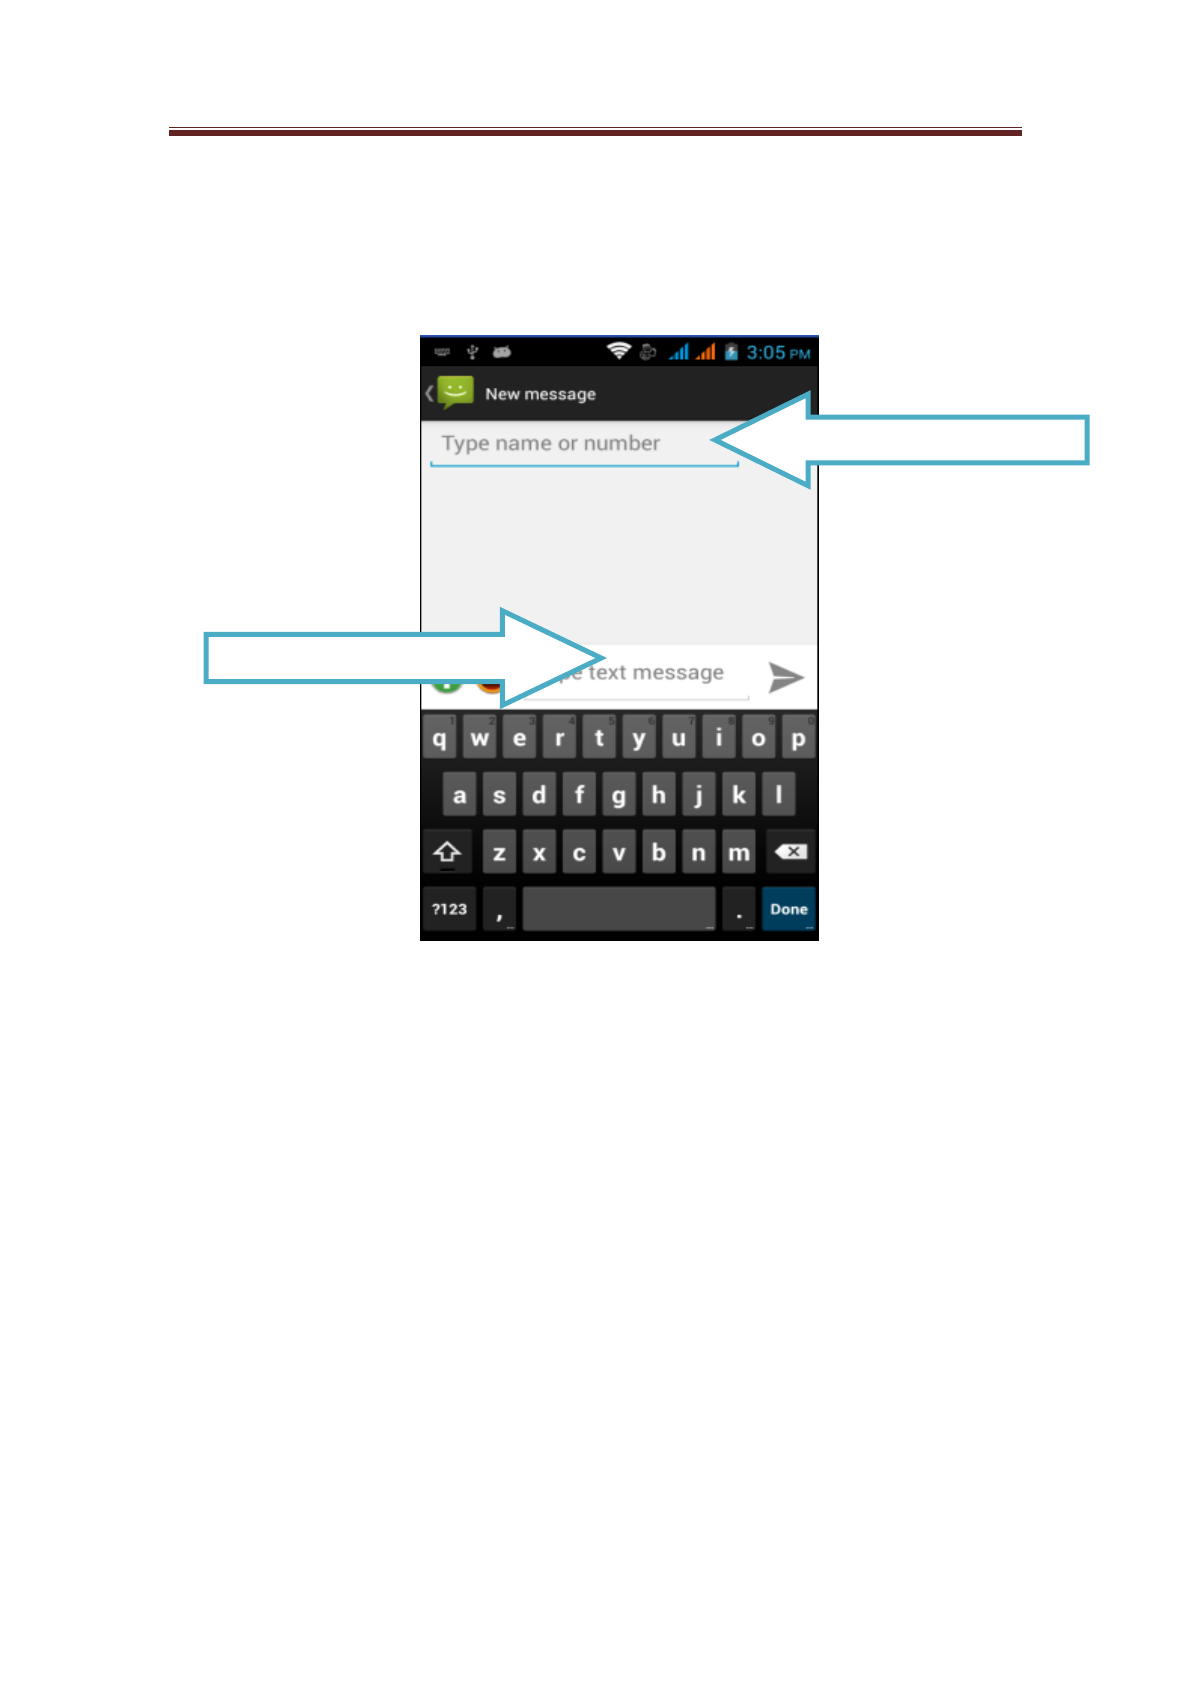
4.6.3 Create and send SMS
1. In the Message interface, click Create New Message. Then the editing interface will be
activated.
2. Input the cell phone number of the message receiver in the receiver column. When you input
Avvio 776S User manual
29 / 46
the phone number, the complying contacts will appear on the interface. Click the appearing
receiver or continue inputting the phone number of the receiver.
3. Click Input Content input box to start creating your message.
4. After that, click Send to send message. The sending progress will be shown on the right of the
message in the message conversation group or the message list.
Message editing area.
Contacts adding area

Avvio 776S User manual
30 / 46
4.6.4 Create and send MMS
1. In the Message interface, click Create New Message, then the editing interface will be
activated.
2. Input the cell phone number or email address of the message receiver in the receiver column.
When you input the phone number or email address, the complying contacts will appear on the
interface. Click the appearing receiver or continue inputting the phone number or email address of
the receiver.
Tip: You can press Select, then click New Attach to add the main attachment.
3. Press Select, then click Attach.
4. In the Attach window, you may choose the following annexes:
Photos: You may activate the images gallery. Click the photo on the screen, and they
will be attached to the message.
Capture Photos: You may activate the camera application to take your desired photo
and then attach it to the message. For more information about camera, please refer to the
section of “Camera”
Videos: You may activate the videos gallery. Click the video on the screen, and they will
be attached to the message.
Capture Videos: You may activate the video recorder application to take your desired
video and then attach it to the message. For more information about video recorder,
please refer to the section of “Video Recorder”.
Audio: You may attach the music or audio record in the music gallery into the message.
Audio Record: You may activate the audio record program to record a segment of audio
file and then attach it into the message. For more information, please refer to the section
of “Audio Recorder”.
4.6.5 Store message as draft
You can store SMS or MMS in Drafts Box.
4.6.6 Receive SMS and MMS
When the phone receives new SMS or MMS, it will play the ringtone, vibrate or shortly display
message content in the status bar according to different notification settings. If you want to change
the message notice, please refer to “SMS and MMS Settings” in the second half of this chapter.
4.6.7 Manage message and message conversation group
The messages sent to somebody or received from multiple numbers of one contact will be sorted
into similar chat program dialog. The messages in dialog will be sorted according to reception
order and the latest message will appear on the topmost part.
Open and view messages
Please carry out any of the following steps:
1. Press Select and click the status bar table, and then slide down on the screen to open the
notice panel. Click New Message to open message and view.
2. In messages list, click Message or message conversation group to open message and
read.
Open and view MMS
1. In the messages list, click MMS or Message conversation group to open message and
read.
2. Click the play button on the right side of MMS, you can view the message.

Avvio 776S User manual
31 / 46
Reply SMS or MMS
1. In the messages list, click SMS or MMS Conversation group to open message.
2. Touch the screen to browse to the text box at the bottom of the screen, input your reply
message, and then click Send.
Delete message or message conversation group
1. In the messages list, click the message or message conversation group you want to delete.
2. Please carry out any of the following steps:
• If you want to delete the whole conversation group, please click Select, and then click
Delete Conversation Group. Please click OK when confirmation tip appears.
• If you want to delete the message in the conversation group, please click the message
you want to delete, then click Delete Message. Please click OK when confirmed tips
appear.
Note: If you want to delete all the messages in the messages list, please press Select in the
message list, then click Delete Conversation Group.
4.7 E-mail
Mail application provides E-mail elves, by which you can add new external POP3 or IMAP email
account, can use the account of the common web-based E-mail service providers such as Yahoo!
® Mail Plus, AOL and Microsoft ® Exchange ActiveSync and etc.
4.7.1 Open E-mail
Press Home key, then click the label of the application and click E-mail.
4.7.2 Create new POP3 / IMAP E-mail account
1. Press Home key, then click the label of the application and click E-mail.。
2. In mail provider selection interface, click Other (POP3 / IMAP).
Note: If the account type you want is not stored in the mobile phone’s database, the mobile phone
will ask you to enter more detailed information. You are suggested to get first all the information
related to E-mail account including send in/send out server settings and etc, and then continue
your setting.
3. Input the E-mail address and password of the E-mail account, and then click the Next.
4. Input account name and your name, then click Finish.
Create other E-mail account
Please carry out any of the following steps:
• If you are on the interface of account list, please press Select, then click More > New Account.
• If you are in the E-mail Inbox, please press Select, then click More > New Account.
Tip: If you are in the Inbox of a E-mail account, and you want to return to the menu of account list,
please press Select, then click More > Account List.
4.8 Set connection
4.8.1 Connect to the network
The network function of the mobile phone can bring you to the access of the Internet by any kind
of connection in the following column:
• GPRS/3G/EDGE
• Wi-Fi

Avvio 776S User manual
32 / 46
• GPRS/EDGE
Your mobile phone will, on the first activating of the phone, be automatically set to use the GPRS
/ 3 G/EDGE service (SIM card shall have been inserted) provided by telecommunication
companies.
View the network connection you used.
1. Press Home key > Select, then click Settings.
2. Click Wireless Network Control > Mobile Network > choose telecommunication
companies or the name of access point.
Set up new APN
When you add other GPRS/3G/FM connection on the phone, you need to obtain the name and
settings (must include user’s name and password) of the access point from the telecom operator.
1. Press Home key > Select, then click Settings.
2. Click Wireless Network Control > Mobile Network > Name of Access Point.
3. In APN menu, press Select, then click New APN.
4. On Access Point Editing interface, enter the APN settings. Click APN Setting Items to
edit.
5. After setting the new APN, please press Select, then click Save.
Wi-Fi
Wi-Fi provides a wireless network access range as far as 300 feet (100 meters).
Note: The availability and coverage of Wi-Fi signal depend on the quantity, basic structure, and
other objects penetrated by signals.
Activate Wi-Fi and connect to a wireless network
1. Press Home key > Select, then click Settings > Wireless Network Control.
2. Select Wi-Fi Tick Square to activate wireless network. The mobile phone will scan for
available wireless network.
3. Click Wi-Fi Settings, then the detected network name and security settings (Open
Network Computing or encrypted with WEP) of Wi-Fi wireless network will be displayed
in the Wi-Fi wireless network section.
4. Click one Wi-Fi network to connect to it. When you choose an open network, the phone
will automatically connect to such network. If you choose an encrypted network, you
must input WEP key (security) and then click Connect.
Note:
• Unless you restore the factory settings of the phone, when the phone wants to connect to the
encrypted network you have ever connected before for the next time, you don’t need to reinput the
WEP key.
• Wi-Fi network can search automatically, that is to say, the mobile phone can be connected to a
wireless network needless of additional steps. Some blocked wireless network may require the user
name and password.
View the state of the wireless network
You can view the current wireless connection status by methods listed in the below column:
• State
When the phone is connected to a wireless network, the status bar will display the Wi-Fi icon ( )
and the probable signal strength (the number of lighted up strip). If the network notice of the

Avvio 776S User manual
33 / 46
Wi-Fi wireless has been activated, when the mobile phone has tested a wireless network within the
testing scope, it will display the icon ( ) in the status bar.
• Wi-Fi Network
On the wireless control interface, click Wi-Fi Settings, then click the currently connected Wi-Fi,
then the phone will display the name, status, speed, signal strength, security, IP address, etc of the
Wi-Fi network.
Note: If you want to cancel the wireless network settings of the mobile phone, please click
Clear of this interface. If you want to connect to the network, you must enter these
settings again.
Connect to other Wi-Fi network
1. In the wireless network control interface, click Wi-Fi settings. The detected wireless networks
will be shown on Wi-Fi wireless network section.
2. Click Other Wi-Fi Wireless Network, the network will be connected.
4.9 Use the browser
With this function, you may activate the browser to browse WebPages. This browser has been
optimized and has many senior functions so that you may browse WebPages on the phone as you
wish.
Note: You must have the material for the functions (3G function, GPRS) or wireless network
connectivity to access the Internet
4.9.1 Activate the browser
Please carry out any of the following steps:
Press the Home Key and then click the Browser shortcut on the home page.
Press the Home Key, click Application label, and then click Browser to enter the
browser page.
Tips: When you click the webpage connection in email or message, you will automatically activate
the browser.
4.9.2 Go to WebPages
1. In the browser interface, press Select, then click Go To Web Page.
2. Enter web address through the keyboard. When you enter address, the accordant web address
will appear on the screen. You can touch the web site to directly go to the web site or continue to
enter web site.
4.9.3 Set web page
1. Press Select, then click More > Settings > Set Home Page.
2. Input the web site you want to use as home page, then click OK. If you want to go to your home
page, please press Select, then click More > Home Page.
4.9.4 Browse WebPages
As the browser provides multiple functions, you may browse WebPages with the phone like a PC.
Changes the direction of pictures
The mobile phone can automatically change the picture directions according to holding direction.
Note: If you want to automatically change the picture direction, you need to select the direction
tick square (this option is in Home Page > Select > Settings > Sound Effects and Display).
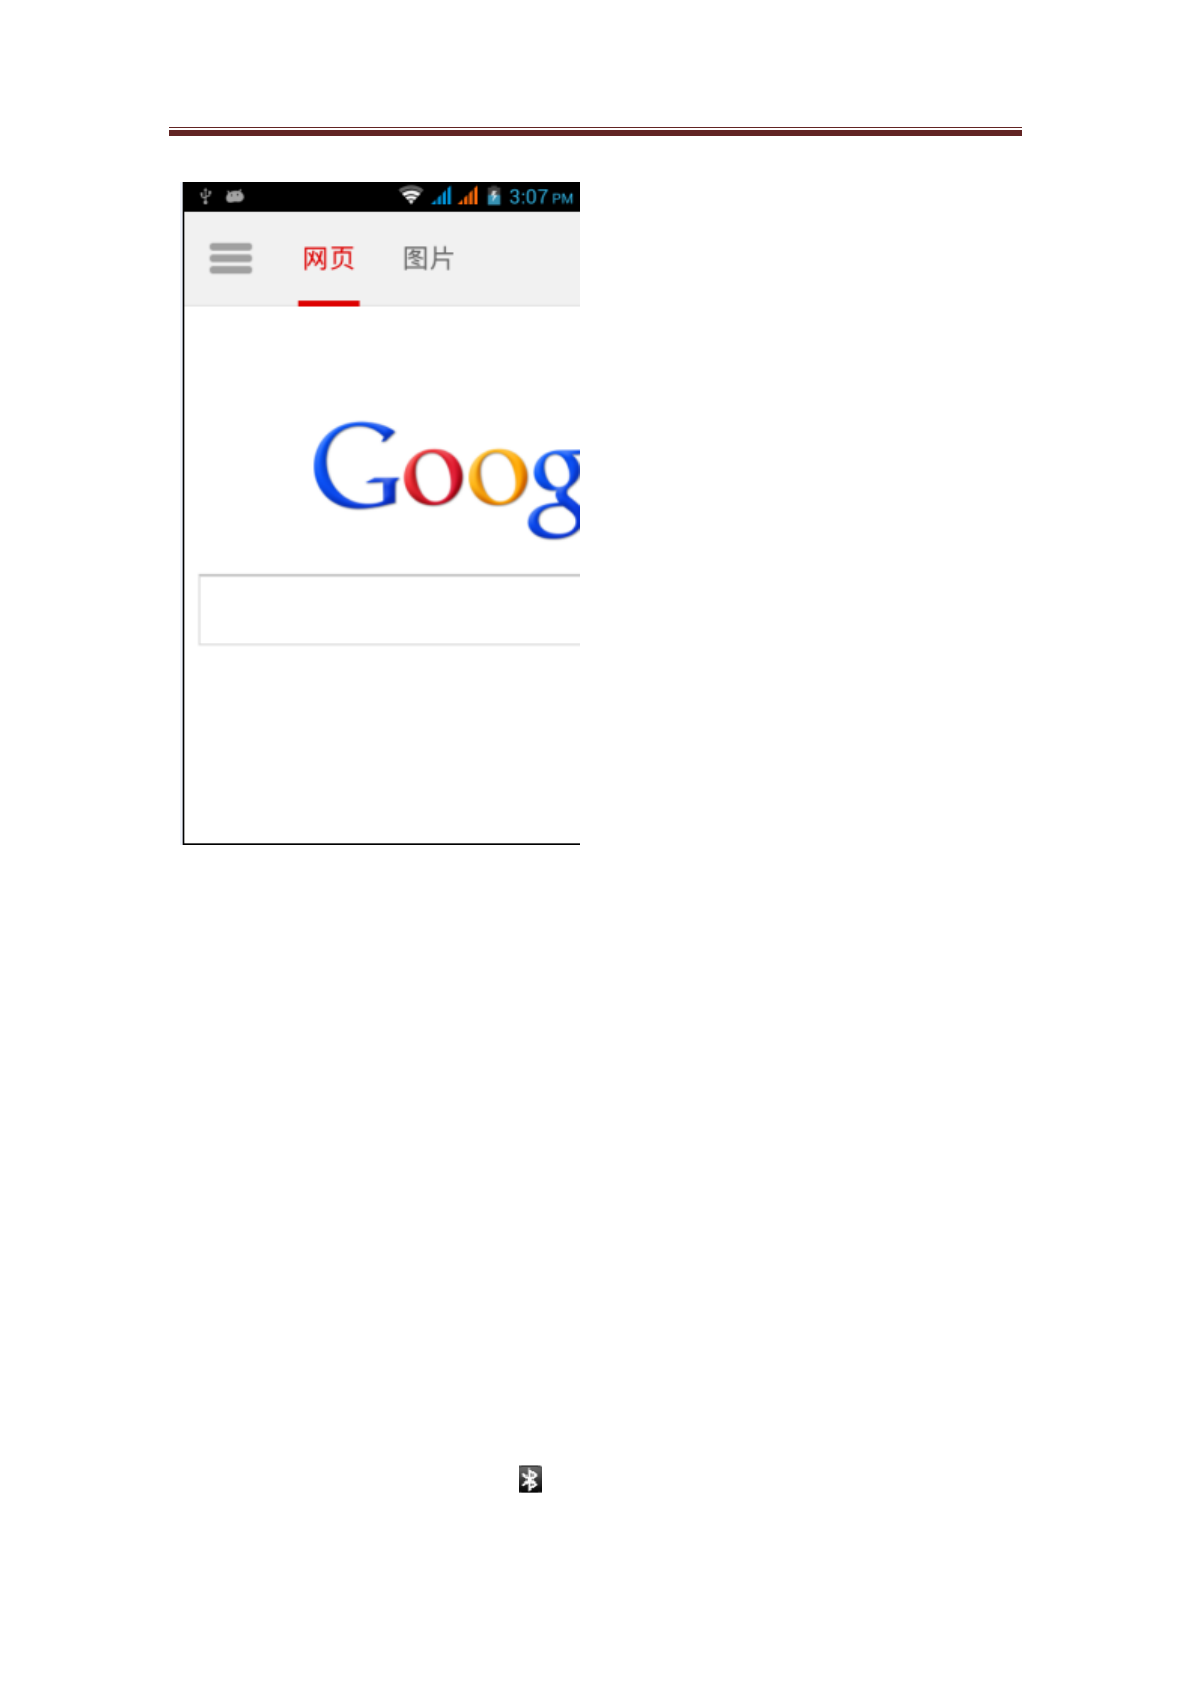
4.9.5 Zoom on the web
Click Zoom, the size of the web page can be scaled (as shown in the picture).
Avvio 776S User manual
34 / 46
4.10 Use Bluetooth function
Bluetooth is a kind of short-distance wireless communication technology and it allows Bluetooth
devices to exchange information in about 8m distance without any real connections.
The Bluetooth function of the mobile phone offers three different kinds of operating modes:
• On: Bluetooth function has been activated. The mobile phones can detect other devices
which have Bluetooth function, conversely, if the device is not set as detectable, other
device will not be able to detect the device.
• Detectable: Bluetooth function has been activated. The mobile phones can be detected
by other devices which have Bluetooth function
• Off: Bluetooth function has been deactivated. In this mode, Bluetooth function can not
be used to transmit or receive message.
Activate the Bluetooth or set the mobile phone as can be detected
1. Press Home key > Select, then click Settings.
2. Click Wireless Network Control, tick and choose Bluetooth to activate Bluetooth function.
After it is activated, the Bluetooth icon ( ) will appear on the status bar.
3. Click Bluetooth Settings, then select the detectable tick square, set the mobile phone as

Avvio 776S User manual
35 / 46
detectable, so that other Bluetooth devices within the scope can detect the mobile phone.
4.11 Camera and Video recorder
You can camera or video recorder to take photographs and record videos, and then share with
others. The mobile phone can let you make clear photos and videos.
4.11.1 Preparation
Before using the camera or video recorder, you need to install a T-flash card so that all
photos or videos you take can be stored on it.
The back camera of the phone is stuck with a layer of protective film during
transportation, be sure to tear it down before using the camera.
4.11.2 Activate camera
Press the Home Key and click the Applications Program tag. To capture photos, please click
Camera; to capture videos, click Video Recorder. When the camera or video recorder is activated,
the screen will be automatically switched into horizontal mode.
4.11.3 Deactivate the Camera
In the camera menu, click Back.
4.11.4 Capture mode
The mobile phone provides two kinds of capture modes: photo and film.
4.11.5 Change capture mode
1. Press Menu in the camera interface, and then click Switch.
Note: The image displayed will differ due to the different capture modes you select.
2. In the capture mode menu, select the capture mode you want to use, and then click OK.
4.11.6 Capture Photos
1. Switch to the desired photo capture mode.
2. Align the lens against the capture object.
4.11.7 Capture Videos
1. Switch to video capture mode.
2. Align the lens against the object.
3. Press the OK key to start capture and again to stop.
4.12 Image-video Gallery
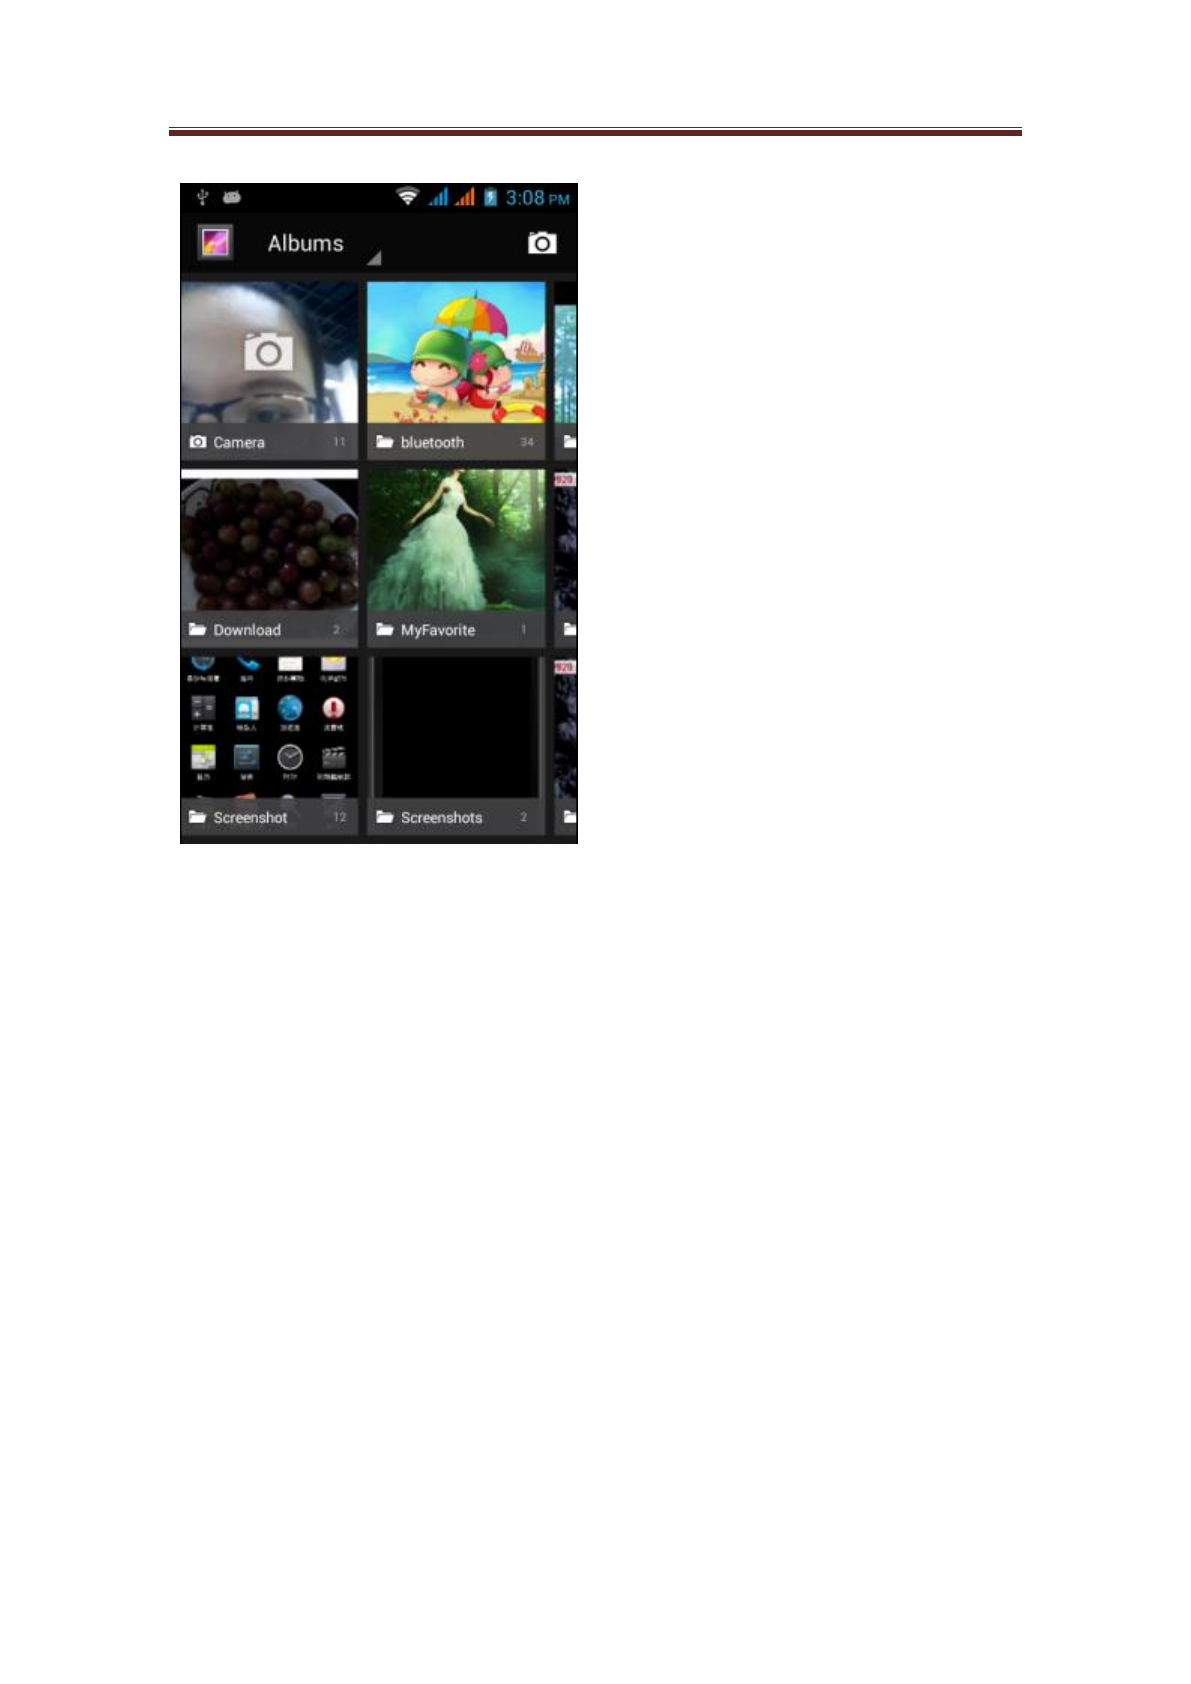
Image-video gallery allows you to view photos and play videos. You can do basic photo editing
work, design antependium or contact photos, and share with friends.
Avvio 776S User manual
36 / 46
4.12.1 Activate image-video gallery
• Press Home key, click the application label, and then click image-video gallery.
If you store files in the file folder (directory) of the memory card, the image-video gallery will
display these files in an individual album. The album on the most upper left corner contains all the
photos in the memory card.
Note: There are many images stored on the T-flash card, so it will take certain time to preview
them. Please wait patiently.
Deactivate image-video gallery
On the interface of image-video gallery, click Home key or Back, the application will be
deactivated.
Note: If image-video gallery is activated by way of camera application, when you press Back, the
interface will return to the camera interface.
4.12.2 Use photos
After taking photos, you can also view the photos or share them with friends
4.12.3 View photos
1. On the interface of image-video gallery, click Album, you can view photos in the album.
Note: If there is no photo album, slide your finger upward or downward on the screen, you can
browse each photo.
2. Click Zoom, you can view photos on the full screen. You can also click Zoom, then click View
in the options to open files.

Avvio 776S User manual
37 / 46
Tips: You can choose to display with small or big thumbnails, or sort the album to show the latest
pictures first or last. On the interface of image-video gallery, press Select, then click Settings.
Browse to the general settings section, click Display Size or Sort Oder, then adjust the settings.
4.12.4 Browse photos
Please carry out any of the following steps to view photos in full screen:
Click the left of the interface to view the previous image, or click the right of the
interface to view the next image.
Click the visible scroll arrow on the interface; click the left arrow to view the previous
image, the right arrow to view the next image.
Roll the trace ball left to view the previous image, right to view the next image.
View photos in horizontal mode
Turn the mobile phone laterally to view photos in horizontal mode. The mobile phone can
automatically change the picture directions according to holding direction.
Note: If you want to automatically change the picture direction, you need to tick square (this
option is in Home Page > Select > Settings > Sound Effects and Display).
If you want to rotate the picture and store the state after rotation, please refer to 「rotate and store
the state after rotation」at below.
Rotate and store the state after rotation

Avvio 776S User manual
38 / 46
1. On the image-video gallery, click the photo to be rotated. To view photos in full screen, press
choose.
2. In the option selection menu, click Rotate, and then choose to rotate to the left or right.
Note: When any of the rotation options is clicked, the image will rotate by 90° counterclockwise
(leftward) or clockwise (rightward).
4.12.5 Cut photos
1. When viewing photos in full screen, press Select, then touch Cut. Then the cutting device will
appear
2. Please carry out any of the following steps:
• If you want to adjust the size of the cutting device, please click the edge of the cutting device.
When the arrow of the cutting device appears, drag your finger from the center of the cutting
device to the inside or outside direction, then the size can be adjusted.
• If you want to keep the proportion of the cutting device during size adjustment, please click
any of the four corners.
• If you want to move the cutting device to other areas of the screen, please click the inside the
cutting device, then drag the finger until the cutting device is at the wished position.
4.13 Play videos
4.13.1 Use videos
After capture videos, you also can view the video or share with close friends.
4.13.2 Watch videos
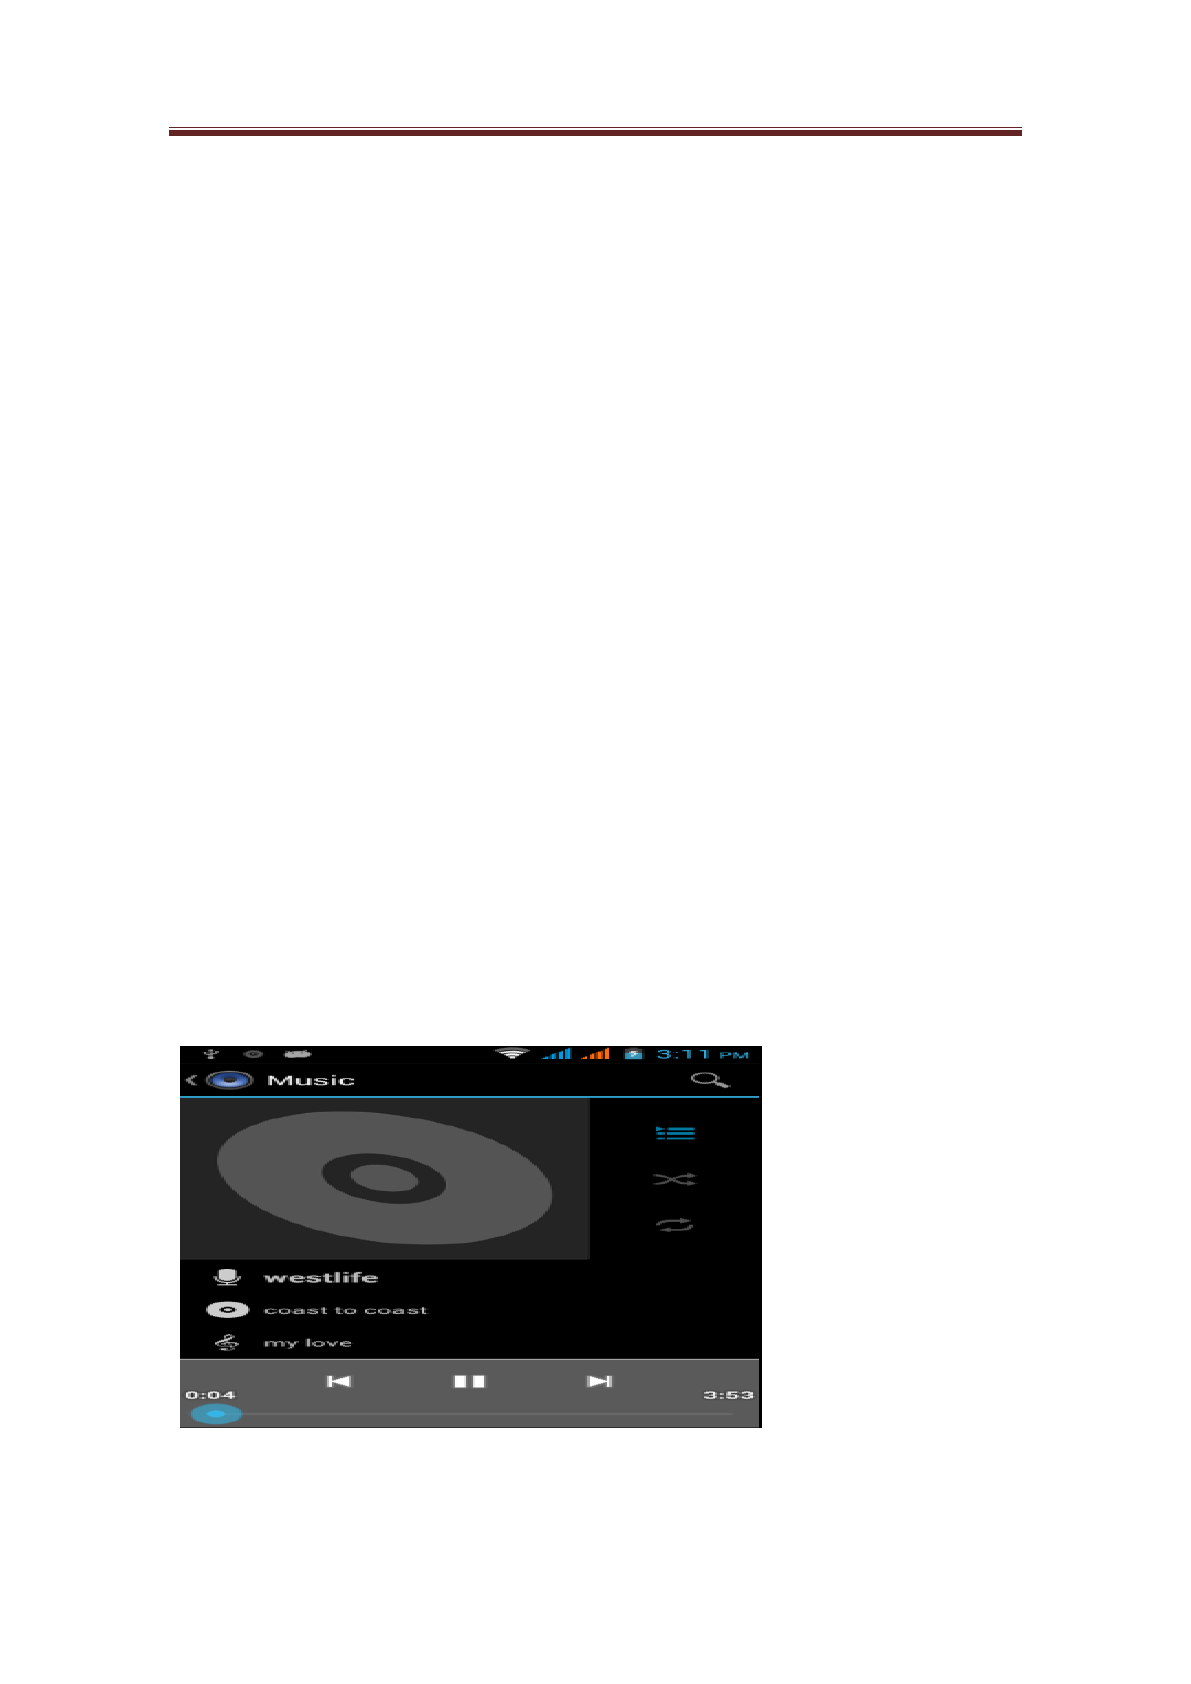
1. In the video gallery, click the video you want to start playing.
2. Then click screen, the play control options will appear.
Avvio 776S User manual
39 / 46
4.14 Music
4.14.1 Use Music
Music player can play the digital audio file stored in the memory card of the mobile phone. The
Music player may play multiple formats of music including MP3, M4A (iTunes AAC application,
DRM-free), AMR, WMA (8), MIDI, WAV, OGG, Vorbis, etc.
Music player can only play the audio file stored in the memory card of the mobile phone, so you
must copy the audio file in the memory card first before play.
Copy music to memory card
1. Set the memory card of the mobile phone as USB disk drive.
2. Browse the USB disk drive on computer, then activate the disk drive.
3. Create a folder (for example: Music) in the root folder of the memory card.
Tips: You can also build folders, and use the folder to store your music in the Music folder created.
4. Copy music to your folder created.
5. After music having been copied, unload or exit the disk drive in accordance with the
requirements of the computer’s operating system, and then remove the mobile phone safely.
6. Disconnect the connection between mobile phone and computer.
Activate Music
Press the Home Key, click Applications and then click Music to enter the music gallery page.
Music gallery
Your music management is divided into four categories, i.e. Artist, Album, Music and playlist.
Choose one category and view the list content in it; keep choosing Enter until you find your
favorite music. For example, if you click Artist, the artist list will appear which is arranged
according to the sequence of the English alphabet. If you click one artist, the list will be activated
to show all the albums or music. Choose one of the albums, the song list of the album will appear.
Play music
In any layer of a music gallery, press one item (such as music, artist, album or playlist) long to
open its options menu; then click Play, the play interface will appear.

Avvio 776S User manual
40 / 46
4.15 Install applications
4.15.1 Search for applications
The home page of Android Market offers a variety of ways to search for the applications. Besides
displaying selected applications, the home page also shows in different columns according to
categories application list, game list, searching connection, and my download connect.
You can scroll levelly the selected items, or select category to view the content, and then continue
to select the subdivision. In each subdivision, you can select to sort items according to popular
degrees or date to view.
4.15.2 Install applications
Installation and activate applications
1. Browse the items you want to download, then select the item.
2. In the detailed information menu of the items, you can get information related to the
applications including the overall scores and user comments. If you scroll downward to the menu
of developers, you can also view developers’ other applications, visit developers’ web sites, and
send E-mail messages to developers.
Note: Press Select, and then select Safe Permission, you can view the functions and the data the
item can be store in your mobile phone.
3. Click Install in the detailed information interface of any application.
4. If you want to view the download schedule, please open the Notice Panel. The installation of
most of the applications only need a few seconds. If you want to stop downloading items, please
click Cancel Download.
5. After the item has been downloaded on the mobile phone and the installation is complete, the
notice area of the status bar will display the content download icon
4.16 Management of the Mobile Phone
4.16.1 Basic Settings
Date, time zone and time settings
According to the preset, the mobile phone will automatically use the date, time zone and time
provided by the Internet.
Manually adjust the date, time zone and time
1. Press Home key> Select, then click Settings.
2. Scroll down the interface, then click the Date and Time
3. Clear out the Automatic Tick Square.
4. Click Date Settings. On the Date Settings interface, click to adjust the date, month and year,
then click Settings.
5. Click Zone Settings, then select time zone from the list. Scroll down the list to view more time.
6. Click Time Settings. On the time settings interface, click or to adjust hour or minute,
then click the AM to change into PM, and vice versa. Click Settings after completion.
7. Select and use the Tick Square of 24-hour format so as to switch between 12-hour or 24-hour
format.
8. Click to choose the desired date format, and then choose the display mode of date on the mobile
phone. The choose date format will at the same time apply to the date on the alarm clock.

Avvio 776S User manual
41 / 46
4.16.2 Display Settings
Adjust Screen Brightness
1. Press Home key > Select, then click Settings
2. Click Sound Effect and Display, scroll down the interface, and then click Brightness.
3. Drag and drop the Brightness Slider Bar to the left, the screen brightness will be lowered; drag
and drop to the right, the brightness will be increased.
4. Click OK.
4.16.3 Tone setup
Select caller ringtone
1. Press Home key > Select, then click Settings.
2. Click Sound Effect and Display > Caller Ringtone
3. Click the caller ringtone to be used, and then click OK. The ringtone will be played briefly after
selection.
The sound effect to be played by the phone for using the phone keyboard and/or touching screen
can be set.
1. Press Home key > Select, then click Settings.
2. Click Sound Effect and Display, then scroll down the screen.
3. Selection favorite sound effect from the list, then click OK.
Select notice ring
The ring to be played when the mobile phone receives new notice can be selected.
1. Press Home key > Select, then click Settings.
2. Click Sound Effect and Display > Notice Ring.
3. Selection favorite notice ring from the list, then touch OK.
4.16.4 Protect the mobile phone
SIM Card Protection with PIN Code
You may use PIN code (Personal Identification Number) to protect the SIM card and prevent it
being used by others.
Activate the PIN code of the SIM card
1. Press Home key > Select, and then click Settings.
2. Click Security, scroll downward the screen, then click Set SIM Card to lock.
3. Select Lock SIM Card.
4. Use the keyboard to input the preset PIN code of the SIM card, then click OK.
5. If you want to change the PIN code of the SIM card at any time, please click Change PIN Code.
Tips: You don't need to input PIN code to dial an emergency call at any time.
4.16.5 Unlock the SIM card
If the times that you input wrong PIN codes are more than the upper limit allowed, your SIM card
will become “PUK code locked”. At this time, you must enter new PUK code to restore device
access. This set of passwords will be provided with the SIM card offered by telecommunication
companies.
Click Emergency Call, then press in sequence the keys in the following column:
* * 0 5 * [PUK Code]*[New PIN Code]* [New PIN Code] #
For example, if your PUK code is 888888, and you want to reset the PIN code of the SIM card as
7777, please dial in the emergency call:-* * * 888888 * 7777 * 7777 #
Avvio 776S User manual
42 / 46
Protect the mobile phone by locking the screen
You can further protect your information by locking screen and/or requiring drawing the screen
unlocking graphics every time the mobile phone is activated or activated from sleeping mode
(screen deactivated).
Lock screen
Press End Call/Power. Locking screen can prevent the screen from being touched accidentally
when the mobile phone is in the back bag, portfolio or pocket.
Create and activate graphic lock
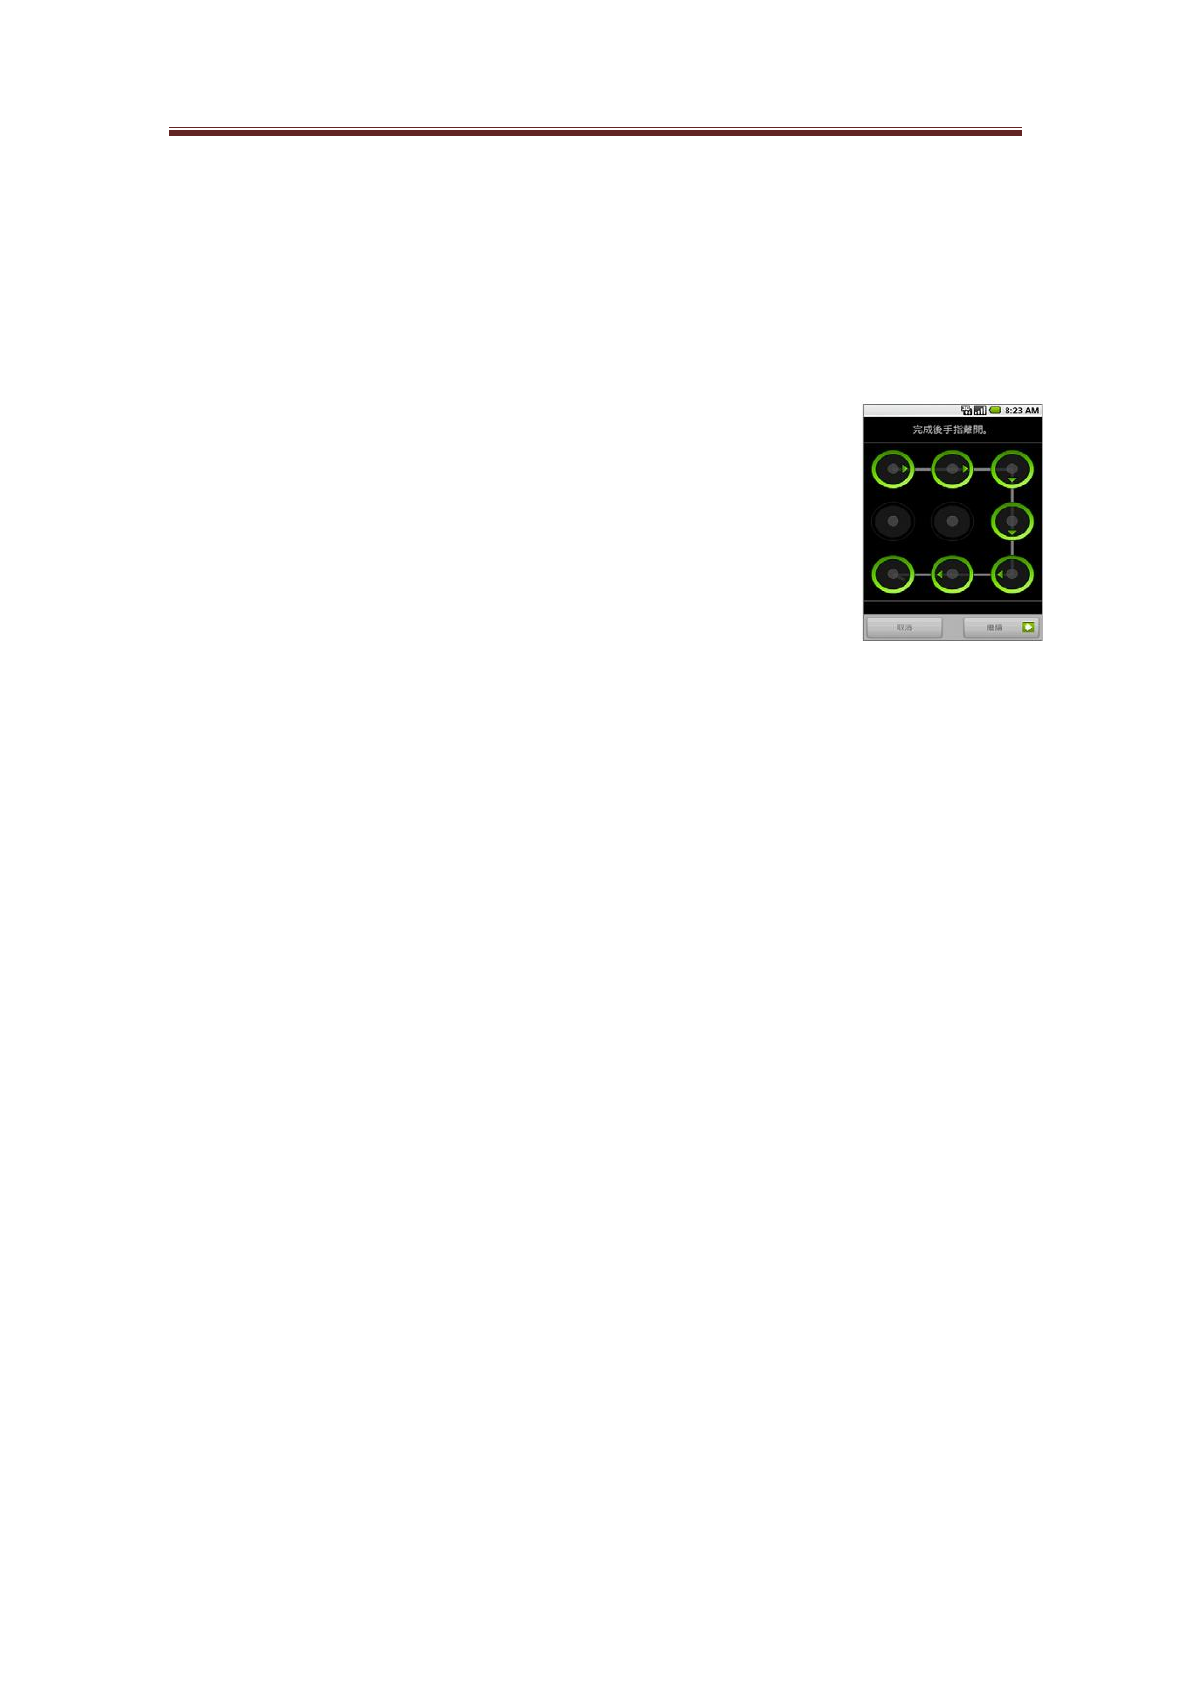
You may set up a phone graphic lock to further improve the security of
your phone. After this is activated, for every switch-on or wake, you must
draw a correct unlock graphic.
1. Press Home key > Select, and then click Settings.
2. Click Security, > Set Unlock Graphic
3. Carefully read the information on the screen and then click Next.
4. Carefully observe the example on the screen and then click Next.
5. Draw the phone lock graphic twice successively, click OK.
4.16.6 Restore Phone Factory Settings
The restoration of factory settings will delete all information including downloaded applications
and restore the phone into the original status, namely the status before the phone is powered on for
the first time.
Note: Before the execution of the factory information resetting, please back up the important data
on the phone.
Reset the mobile phone
1. Press Home key > Select, and then click Settings.
2. Scroll the screen downward, then click SD Card and Mobile Phone Storage.
3. Browse to the internal memory section of the mobile phone, then click Restore Factory Settings.
4. In the Restore Factory Settings menu, click Reset Phone and then click Delete All.
Restore Factory Settings by the keypad of the phone
1. When the mobile phone is turn off, press Home key and Back key.
2. When Home key and Back key have been pressed, press End Call/Power key.
5. Common Troubles
5.1 TF Card & USB Function Setting
Your phone supports UPnP T-flash card to extend your storage. Operations as below:
5.1.1 Installation and removing of T-flash card
The T-flash card slot is on the side of SIM card slot. Insert T-flash card into the phone

Avvio 776S User manual
43 / 46
according to the installation mark; push the T-flash card in before removing it and it’ll take
out automatically. It may bring eternal damage if you pull it out with force.
Generally, it is not recommended to dismantle and install the T-Flash card.
Note: MP3 files should be stored in My Music folder of the T-flash card for the Music player
to identify.
E-book files should be stored in the E-book folder of the T-flash card for the E-book to
identify.
Video files should be stored in the Video folder of the T-flash card for the Video player
to identify.
Image files should be stored in the Photo folder of the T-flash card so that the images
can be viewed in the album.
5.1.2 Use of T-flash card
As one of the mobile phone’s memory cards, T-flash card is set as the default memory in the
factory, you can use it directly without any setting.
Used as memory of the mobile phone: When the T-Flash card is inserted for the first time,
you need to default setting the music player, video player, video recorder, camera and audio
recorder etc as memory card, i.e. using the storage space of the T-Flash card (please refer to
the setting method in the corresponding functions above).
5.1.3 USB Function Setting
When the mobile phone is connected with computers by data line, you can use USB setting
function.
Used as U-disk:
In the power-off state, after the USB cable is connected, you may realize the direct copy of
the data in the computer. For details, refer to the use of U-disk.
In the power-on state, after the USB cable is connected, a USB setting menu will appear. On
the menu, choose “Storage device”, then you may realize the direct copy of the data in the
computer.
Used as network camera:
In the power-on state, after the USB cable is connected, a USB setting menu will appear. On
the menu, choose “Network camera”, then you may use the mobile phone as a network
camera. To achieve such function, you may use such third-party communication software as
QQ, MSN and so on.

Avvio 776S User manual
44 / 46
5.2 Common Troubles and Troubleshootings
If any trouble occurs during the use of the mobile phone, please refer to the following table.
Common Troubles
Possible Causes
Solutions
Bad reception
The mobile phone may be used in the
area with weak signals, such as near tall
buildings or in basement where radio
wave cannot be sent effectively.
Avoid this case as possible.
Call may be in denseness period or
busy line such as rush hour.
Avoid this case as possible.
Too far away from the base station of
the network operator.
Ask the network operator to
provide service region map.
Echo or noise
Maybe the network operator trunk line
is not effective, which is related to area.
Hang up and redial the mobile
phone; or change to more effective
line.
Local line maybe does not work
effectively in some regions.
Standby time
shortened.
Standby time is related to the system
setting of the network operator.
Please power off the mobile phone
when in poor signal area.
The battery wears off.
Replace the battery with a new one.
When receiving no signal, the mobile
phone may continue emitting to seek
for the base station, consuming much
power and causing shortened standby
time.
Move to the area with strong signal
or switch off the mobile phone
temporarily.
Unable to switch on
The battery wears off.
Check the power capacity of the
battery or charge it where
necessary.
Wrong SIM card
The SIM card may be damaged.
Contact the network operator.
The SIM card maybe is not installed
properly.
Check whether the SIM card is
installed properly.
Dirt may occur on the metal surface of
the SIM card.
Clean the metal contact of the SIM
card with clean cloth.
Unable to connect to
network
SIM card ineffective.
Contact the network operator.
Out of GSM service area.
Consult the network operator to
check the service area.
Weak signals.
Please move to the place with
strong signals and try again.
Unable to dial a call.
Call restrictions used.
Cancel it.
Fixed dial used.
Cancel it.
Wrong PIN number
The PIN number is input wrongly for
three times successively.
Contact the network operator.
Unable to charge
The battery or the charger is broken.
Replace.
Charge below -10℃ or above 55℃.
Change the charge environment.
Bad contact.
Check whether the plug is in good
condition.
Unable to add
phonebook records.
The phonebook is full.
Delete the unwanted records.
Unable to set some
functions.
The network operator does not support
these functions or you do not apply for
these functions.
Contact the network operator.

Avvio 776S User manual
45 / 46
FCC Regulations:
This mobile phone complies with part 15 of the FCC Rules. Operation is subject to the following
two conditions: (1) This device may not cause harmful interference, and (2) this device must
accept any interference received, including interference that may cause undesired operation.
This mobile phone has been tested and found to comply with the limits for a Class B digital device,
pursuant to Part 15 of the FCC Rules. These limits are designed to provide reasonable protection
against harmful interference in a residential installation. This equipment generates, uses and can
radiated radio frequency energy and, if not installed and used in accordance with the instructions,
may cause harmful interference to radio communications. However, there is no guarantee that
interference will not occur in a particular installation If this equipment does cause harmful
interference to radio or television reception, which can be determined by turning the equipment off
and on, the user is encouraged to try to correct the interference by one or more of the following
measures:
-Reorient or relocate the receiving antenna.
-Increase the separation between the equipment and receiver.
-Connect the equipment into an outlet on a circuit different from that to which the receiver is
connected.
-Consult the dealer or an experienced radio/TV technician for help.
FCC Note:
Caution: Changes or modifications not expressly approved by the party responsible for
compliance could void the user‘s authority to operate the equipment.

Avvio 776S User manual
46 / 46
RF Exposure Information (SAR)
This phone is designed and manufactured not to exceed the emission limits for exposure to radio
frequency (RF) energy set by the Federal Communications Commission of the United States.
During SAR testing, this device was set to transmit at its highest certified power level in all tested
frequency bands, and placed in positions that simulate RF exposure in usage against the head with
no separation, and near the body with the separation of 10 mm. Although the SAR is determined at
the highest certified power level, the actual SAR level of the device while operating can be well
below the maximum value. This is because the phone is designed to operate at multiple power
levels so as to use only the power required to reach the network. In general, the closer you are to
a wireless base station antenna, the lower the power output.
The exposure standard for wireless devices employing a unit of measurement is known as the
Specific Absorption Rate, or SAR.
The SAR limit set by the FCC is 1.6W/kg.
This device is complied with SAR for general population /uncontrolled exposure limits in
ANSI/IEEE C95.1-1992 and had been tested in accordance with the measurement methods and
procedures specified in IEEE1528. This device has been tested and meets the FCC RF exposure
guidelines when tested with the device directly contacted to the body.
The FCC has granted an Equipment Authorization for this model phone with all reported SAR
levels evaluated as in compliance with the FCC RF exposure guidelines. SAR information on this
model phone is on file with the FCC and can be found under the Display Grant section of
www.fcc.gov/oet/ea/fccid after searching on FCC ID: WVBA776X.
For this device, the highest reported SAR value for usage against the head is 0.66 W/kg, for usage
near the body is 1.44 W/kg.
While there may be differences between the SAR levels of various phones and at various positions,
they all meet the government requirements.
SAR compliance for body-worn operation is based on a separation distance of 10 mm between the
unit and the human body. Carry this device at least 10 mm away from your body to ensure RF
exposure level compliant or lower to the reported level. To support body-worn operation, choose
the belt clips or holsters, which do not contain metallic components, to maintain a separation of 10
mm between this device and your body.
RF exposure compliance with any body-worn accessory, which contains metal, was not tested and
certified, and use such body-worn accessory should be avoided.

