Brightstar AVVIO251 GSM 850/1900 Cell phone User Manual WVBVVIO251
Brightstar Corporation GSM 850/1900 Cell phone WVBVVIO251
manual

AVVIO 251
User Manual
INTRODUCTION
Keys Specification
1.1 Keys specification
General keypad definitions:
Left soft key Generally indicates Confirmation
Right soft key Generally to delete or clear a letter or number.
Navigation key Generally to move the cursor.
#key Switch between different input methods.
*key show the Symbols interface.
Call key Generally to call the number.
End key Generally to end a call.
1 key ,.?!1
2 key ABC,abc,2
3 key DEF, def.3
4 key GHI, ghi, 4
5 key JKL, jkl, 5
6 key MNO, mno, 6
7 key PQSR, pqsr, 7
8 key TUV, tuv, 8
9 key WXYZ, wxyz, 9

0 key 0, space
2 User Guide
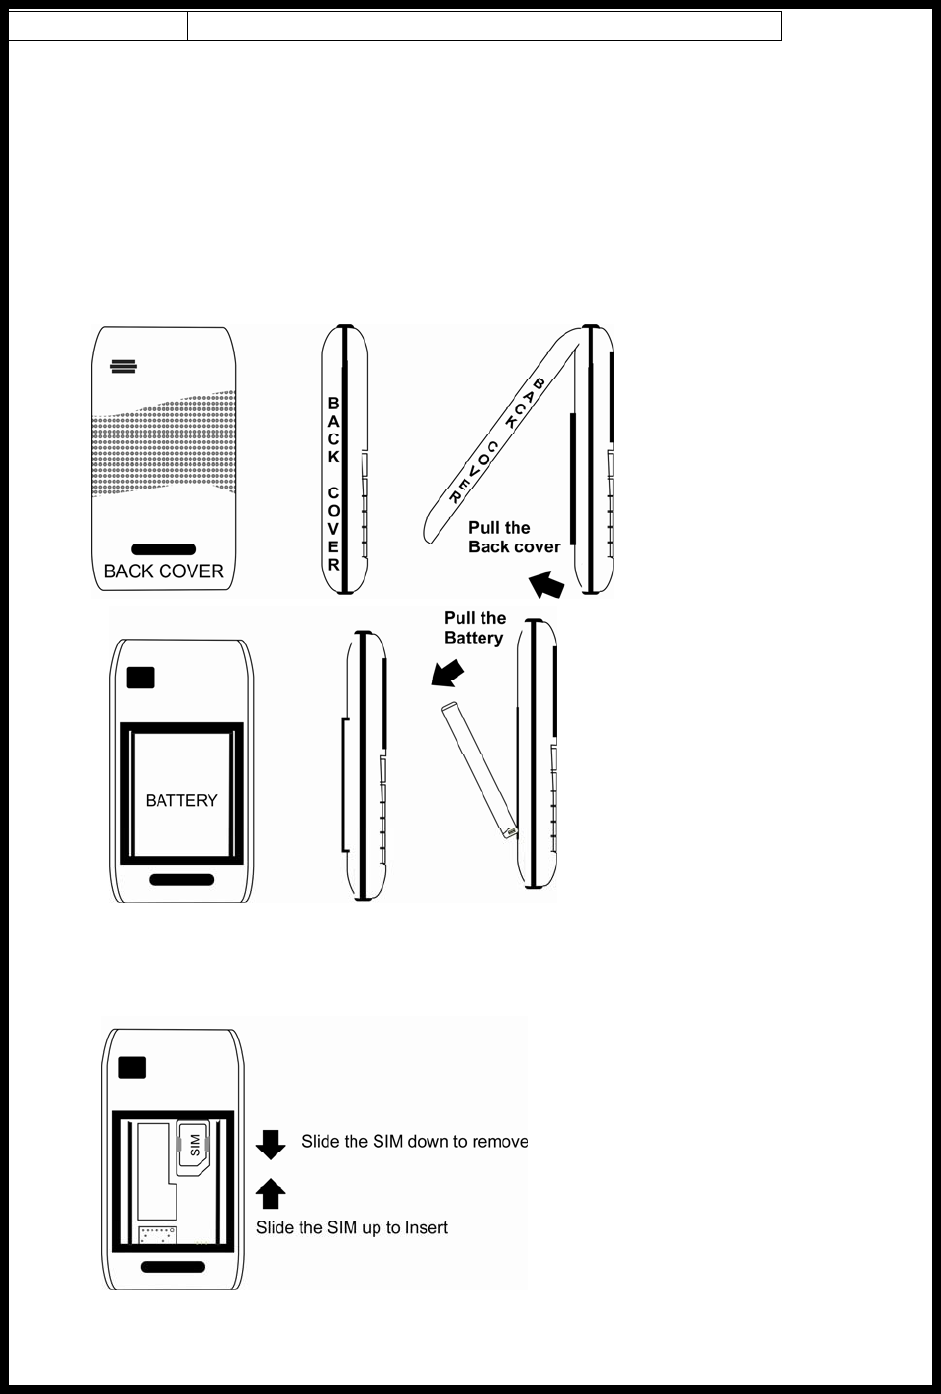
2.1 Installing/ Removing the battery/SIM card.
Installation Notice
Before you install or remove the battery and the SIM card, please make sure to turn off the mobile
phone.
1) Removing the battery.
Step1:
Step2:
Remove the back cover.
Remove the battery from the battery slot properly.
2) Inserting/Removing the SIM card.
Step3:
Insert/Remove the SIM card.

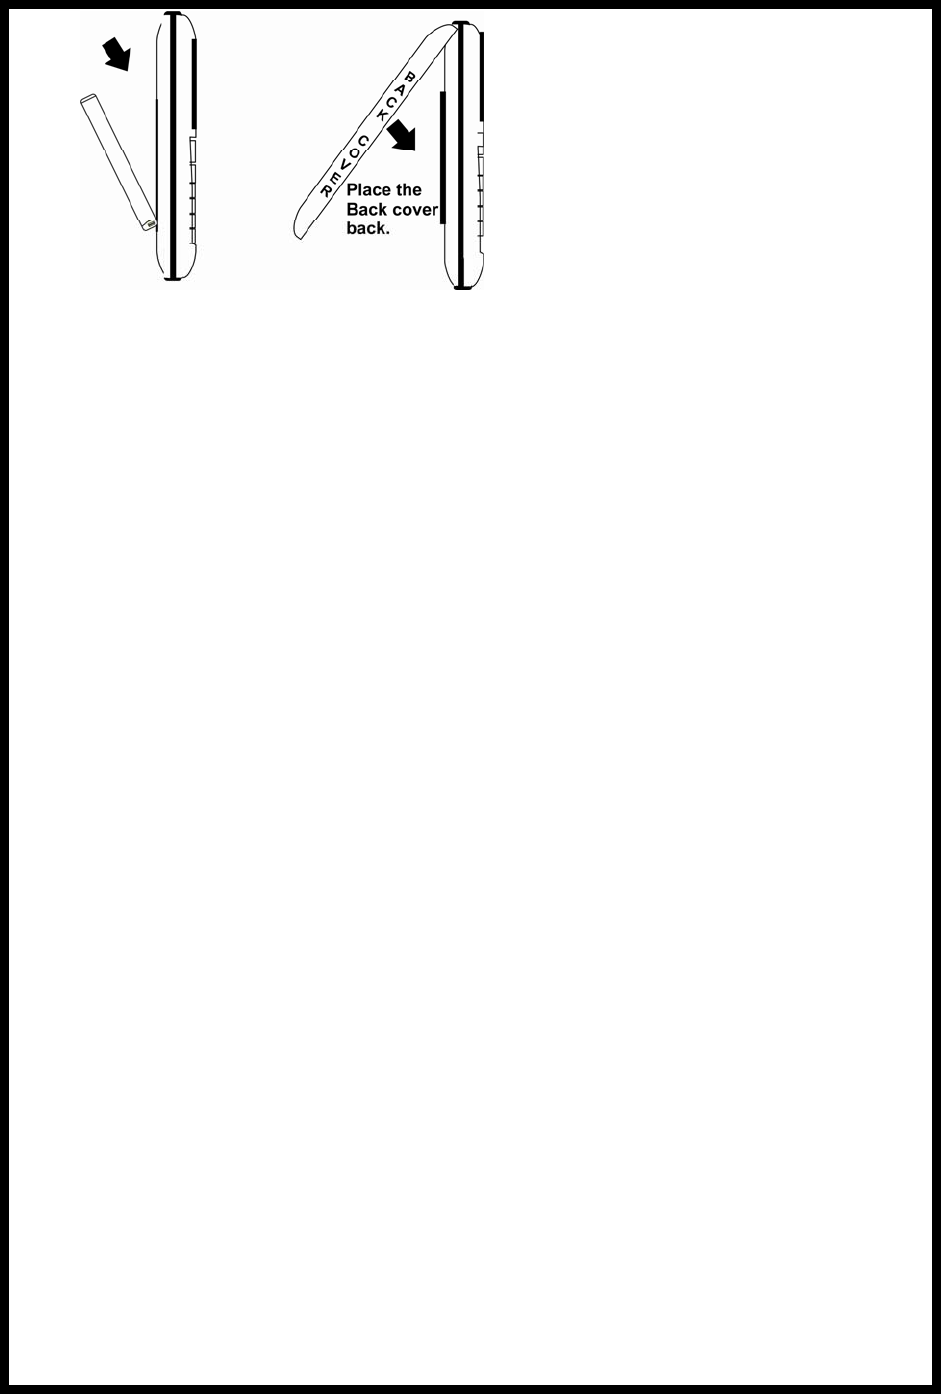
Step4:
Insert the battery
Place the Back cover on.
2.2 Charging the battery
Plug the charger into the electrical outlet.
Plug the charger connector into the mobile phone
The Battery indicator icon starts to flash until charging is finished.
When charging is complete, disconnect the charger connector from the mobile phone
and unplug the charger from electrical outlet.
2.3 Flashlight
This mobile phone has a flashlight function. In idle state, long press the middle key to turn on the
flashlight and when the flashlight is on and your on the Idle state, press the middle key to turn off
the flashlight.
2.4 Power On or Off
Make sure the battery is already inserted:
Power on/off: Long Press the End key to Switch on/off the mobile phone.
3 Call Functions
3.1 Making a Call
On idle state, input the phone number directly
Press the Call key to make a call.
You can input number in this order:
(Area code, phone number, and press the Call key)
3.2 Emergency Calls
You can make emergency calls as long as your current location is covered by the network area.
You can check the signal strength bar on the top left corner of the screen.
3.3 Dialing an International Number
Making International calls:
For international calls, long press the “0” key until the “+” sign is shown in the screen then enter

the number in the following order:
(“+”, Country code, complete number then press the Call key)
3.4 Rejecting a Call
Press the End key to Reject or cancel an incoming call.
3.5 Missed Calls
The unanswered incoming calls appear on the display screen. Press Middle key to check the
details of the missed calls or press Call key to call the number.
3.6 Call Waiting
In this menu, you can activate the call waiting function to be notified of incoming calls while you
have a call in progress.
3.7 Call Options
Press the left soft key or the middle key to perform the following options:
Mute: turn on/off microphone.
Loudspeaker: turn on/off the loudspeaker function.
Speaker volume: change the speaker volume.
Hold/Remove hold: Put a call on hold or retrieve a call.
Contacts: enter phonebook menu.
Messages: enter message menu.
4 CALL
All calls: lists of the missed, dialed and received calls.
Missed Calls: lists the records of missed calls.
Received Calls: lists the records of received calls.
Dialed Calls: lists the records of dialed calls.
Call Time: four sub-menus are provided in Call Duration: Last Call, Dialed Calls, Received
Calls and Reset all time.
5 STK
Please contact your service provider about the STK features.
6 Profiles
Profiles options: General, Meeting, Outdoor, Indoor and Headset.
Select and enter personal settings menu, profile modification are as follows:
Tone setup: lets you specify the ring tone for incoming calls and alerts.
Volume setup: set the volume of the Ring tone, Speaker volume and Key tone.
Alert type: set the ring tone type.
7 Games
This mobile phone has games for you to enjoy.

8 Contacts
Add new contact: add a new contact to SIM or phone.
Edit: edit the phonebook details.
Delete: delete the contact details.
Search: input the name you want to search.
Speed dial list: Check speed-dial list
Send a message: send a text message to the selected contact.
Add to speed dial list: set the number corresponding to the numeric keys from 2 to 9,
when this function is activated, press and hold the numeric keys to automatically call the
specific contact (only in idle state).
Call firewall: set the number in the blacklist number list to reject the incoming call(s) of the
Copy: copy the contact details to the phone or the SIM.
Move: move the contact details to the phone or the SIM.
Settings:
Preferred storage: select the default storage location.
Used space: the memory status of SIM card and the phone.
Ringtone: set the tones of the different group.
Speed dial list: view the speed dial list.
Batch operation:
Copy SIM to phone: copy all the SIM contact to phone.
Copy phone to SIM: copy all the phone contacts to SIM.
Move SIM to Phone: move all the SIM contact to phone.
Move phone to SIM: move all the phone contacts to SIM.
Delete all SIM Contacts: delete all the SIM contacts
Delete all Phone Contacts: delete all the phone contacts
9 Messages
9.1 Write message
Done: done creating a message and ready to be send.
Use templates: select the template message from the template list.
Insert name card: insert the contact details from the phonebook list to the write message
interface.
After editing the message, select “Done” from options to perform the following options:
Send: send the message.
Send to many: send the message to many.
Save: save the message.
9.2 Inbox
Reply: reply a message to the sender
Delete: delete the current message
Forward: send this message to somebody else.
Call reply: call the sender of the message.
Extract number: use the number inside the message.

9.3 Outbox
Read: view the message content.
Delete: delete the current message
Send: send the unsent message.
Forward: send this message to somebody else.
Extract number: use the number inside the message.
9.4 Draftbox
The Drafts stores any messages that you have saved.You can view the messages in the Drafts
list.
9.5 Message settings
You can set your SMS through this menu options:
Template edit: edit the template from the template list.
Message center: edit and save the SIM message center.
Message validity: set the message validity period.
Delivery report: turn on/off the delivery report function.
Used space: check the capacity of message storage
Preferred Storage: set the default message storage location, including phone storage and
SIM card.
Send and save: turn on/off the send and save function.
9.6 Voicemail
This function needs network support, for activation or details please contact your local
network service provider.
9.7 Cell Broadcast
For details should contact your local network service provider.
10 Alarms
To set an alarm clock, Select alarm then press left soft key and choose from once, Daily, weekly
or workday alarm to set the period that it will alarm and then edit its time, date and ring tone.
11 Settings
11.1 Phone settings
Language: set your phone’s display language.
Clock settings: set your current time/date, format and display of date and time.
Display settings:
- Wallpaper: set the standby image.
- Brightness: set the brightness of the LCD.
- Backlight: set the backlight time of the LCD.
Dedicated key: Set the function of navigation keys in idle screen
Own number: set or add your own number.
Greeting text: Set/edit the greeting text function

Poweron ring:Set on/off the poweron ring
Poweroff ring:Set on/off the poweroff ring
11.2 Call settings:
- Anykey answer: Incoming call anykey to answer.
- Auto answer: Calls automatic answer
- CLIR: set the call ID to set by network, Hide ID or Send ID.
- Call time reminder: Allow the user to limit the duration of a call.
- Connected reminder: turn on/off this function.
- Call Waiting: You can activate it to be notified of incoming calls while you have a call in
progress.
- Call Divert: The call diversion network service permits you to divert an incoming call to
another number (designated by you). Select from the options (Divert all voice calls,
Divert if unreachable, Divert if no answer, Divert if busy, Divert all data calls and Cancel
all divert.)
Divert all voice calls: divert incoming calls to another number.
If out of reach: divert incoming calls to another number if you cannot be reached.
If busy: divert incoming calls to another number when your mobile phone network is
busy.
If no answer: divert incoming calls to another number after you phone rings for a
specified time without answering.
Cancel all diverts: cancel all the active divert call function.
11.3 Network settings
Set the network selection mode to Automatic or Manual.
11.4 Security settings
Auto lock keypad: Activate the Auto keypad lock function and set the time in which the
keypad should be lock.
PIN code: SIM protection code.
Phone code: this function prevents the illegal use of your phone.
- : set the number in the Call firewall list to reject the incoming call(s) of the contact that
was set in the Call firewall list,
- Barred dial: to restrict calls
International Calls: restrict international calls.
All expect home: restrict all the calls except your home number.
Incoming Calls: restrict the Incoming of calls
Incoming if abroad: restrict the Incoming calls if your abroad.
Outgoing Calls: restrict outgoing calls.
Cancel All Barring: cancel all the active barred function.
Change password: Set a new password.The default value of Phone Lock is 123456;
please change it as soon as possible.
11.5 Call firewall
set the number in the Call firewall list to reject the incoming call(s) of the contact that was set in
the Call firewall list,

11.6 Restore factory settings
This function lets you restore the initialized settings.
Note: The default value of Restore Factory Setting password is: “0000”.
12 Extras
12.1 FM radio
earphones must be plugged in first before you can use the FM radio function.
12.2 Calculator
Calculator functions:
1) Press numerical key to input the desired numbers.
2) Press navigation keys to operative symbol “+、-、×、÷”.
3) Press the left soft key or the middle key to get the result.
4) Press right soft key to clean screen information. When all the character is cleaned, you
press right soft key to exit the function.
12.3 World Clock
Enter World Clock from the Organizer and you can see a picture of the world time zone. Move the
Left and right navigation key to view the current time in any city. Press left soft key to save the
selected country as the default city.
12.4 Calendar
Press the 4-way navigation key up, down, left or right to move to different date or press the left
soft key “Goto” to go to specific date you want.

13 RF Exposure Information and Statement
The SAR limit of USA (FCC) is 1.6 W/kg averaged over one gram of tissue. This model (FCC ID:
WVBAVVIO251) has also been tested against this SAR limit. The highest SAR value reported under this
standard during product certification for use at the ear is 1.438 W/kg and when properly worn on the body
is 0.729 W/kg. This device was tested for typical body-worn operations with the back of the handset kept
1.5cm from the body. To maintain compliance with FCC RF exposure requirements, use accessories that
maintain a 1.5cm separation distance between the user's body and the back of the handset. The use of belt
clips, holsters and similar accessories should not contain metallic components in its assembly. The use of
accessories that do not satisfy these requirements may not comply with FCC RF exposure requirements,
and should be avoided.
This device complies with part 15 of the FCC rules. Operation is subject to the following two conditions:
(1) this device may not cause harmful interference, and (2) this device must accept any interference
received, including interference that may cause undesired operation.
NOTE: The manufacturer is not responsible for any radio or TV interference caused by unauthorized
modifications to this equipment. Such modifications could void the user’s authority to operate the
equipment.
NOTE: This equipment has been tested and found to comply with the limits for a Class B digital device,
pursuant to part 15 of the FCC Rules. These limits are designed to provide reasonable protection against
harmful interference in a residential installation. This equipment generates uses and can radiate radio
frequency energy and, if not installed and used in accordance with the instructions, may cause harmful
interference to radio communications. However, there is no guarantee that interference will not occur in a
particular installation. If this equipment does cause harmful interference to radio or television reception,
which can be determined by turning the equipment off and on, the user is encouraged to try to correct the
interference by one or more of the following measures:
- Reorient or relocate the receiving antenna.
- Increase the separation between the equipment and receiver.
-Connect the equipment into an outlet on a circuit different from that to which the receiver is connected.
-Consult the dealer or an experienced radio/TV technician for help