Brightstar FXP86XW Fixed Wireless Phone User Manual
Brightstar Corporation Fixed Wireless Phone
UserManual.wiki
>
Brightstar
>
FXP86XW User Manual
User Manual
Navigation menu
Upload a User Manual
Namespaces
Wiki Guide
HTML
PDF
Info
Views
User Manual
Discussion / Help
Navigation
![2 Contents PHONE OVERVIEW .................................................................................................... 4 INSTALLATION ............................................................................................................. 5 KEY FUNCTION ........................................................................................................... 6 [1] Left / Right Soft Key ( Menu / Call logs key ) ................................................ 6 [2] Send key ........................................................................................................... 6 [3] End key ............................................................................................................. 6 [4] Numeric Keys / ‘*’ keys / ‘#’ Keys ................................................................. 6 [5] Navigation / Scroll keys .................................................................................. 6 [6] Speaker key ...................................................................................................... 7 [7] Volume key ....................................................................................................... 7 [8] FM Radio ........................................................................................................... 7 [9] OK key .............................................................................................................. 7 DISPLAY INDICATORS AND ICONS ........................................................................ 8 BASIC OPERATION .................................................................................................... 9 [1] Switching the phone ON and OFF .............................................................. 9 [2] Making a call.................................................................................................. 9 [3] Answering a call ......................................................................................... 10 [4] Speaker mode. ............................................................................................ 10 [5] Adjusting the Ring Volume ........................................................................ 10 [6] Redialing the last-dialed number .............................................................. 10 [7] Caller ID ....................................................................................................... 11 [8] SMS and Voice Mail .................................................................................... 11 [9] Wi-Fi hotspot ............................................................................................... 11 USING PHONE MENUS............................................................................................ 13 [1] Menus ........................................................................................................... 13 [2] Scrolling through menus ........................................................................... 13 [3] Exiting menu levels .................................................................................... 13](https://usermanual.wiki/Brightstar/FXP86XW/User-Guide-2020534-Page-3.png)
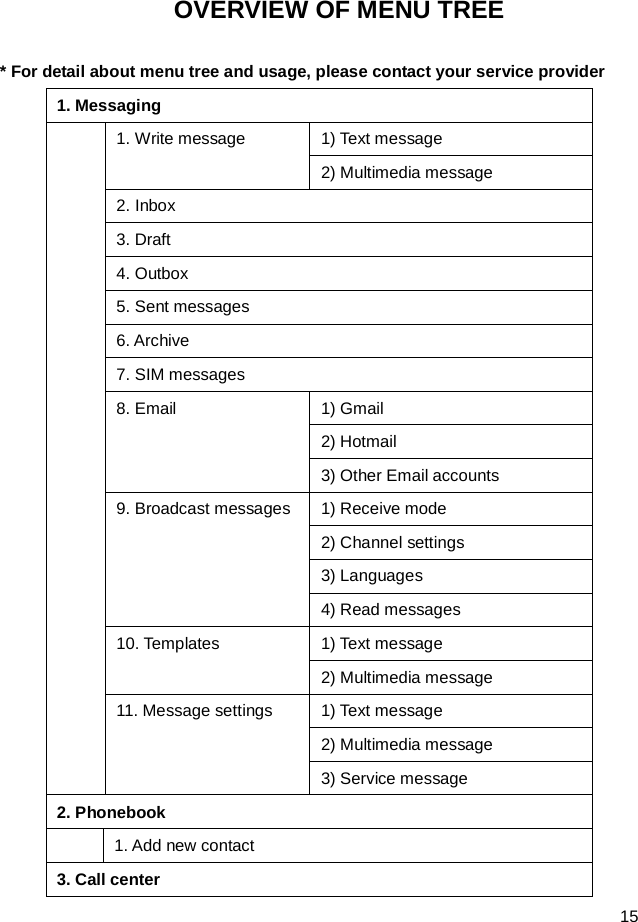
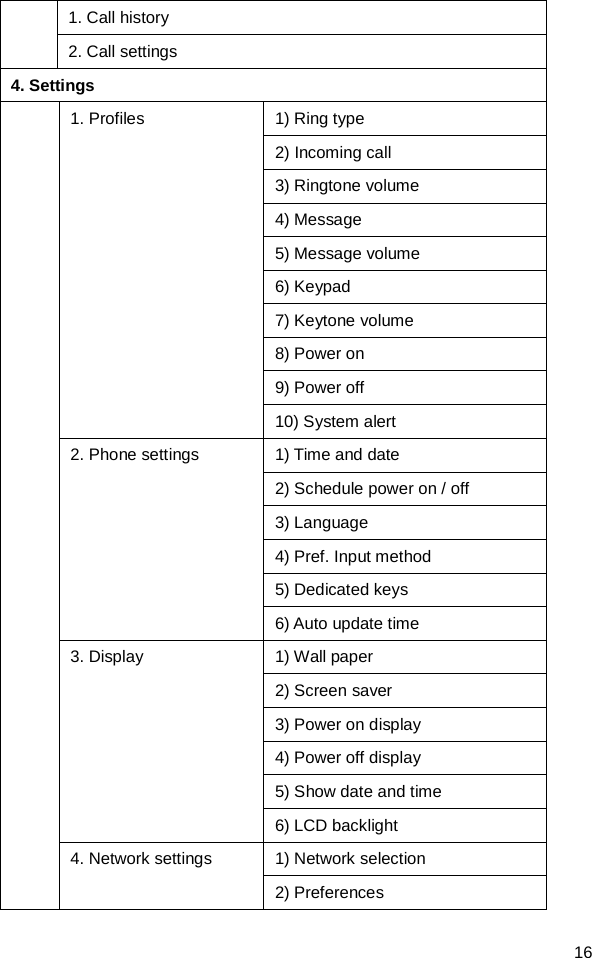
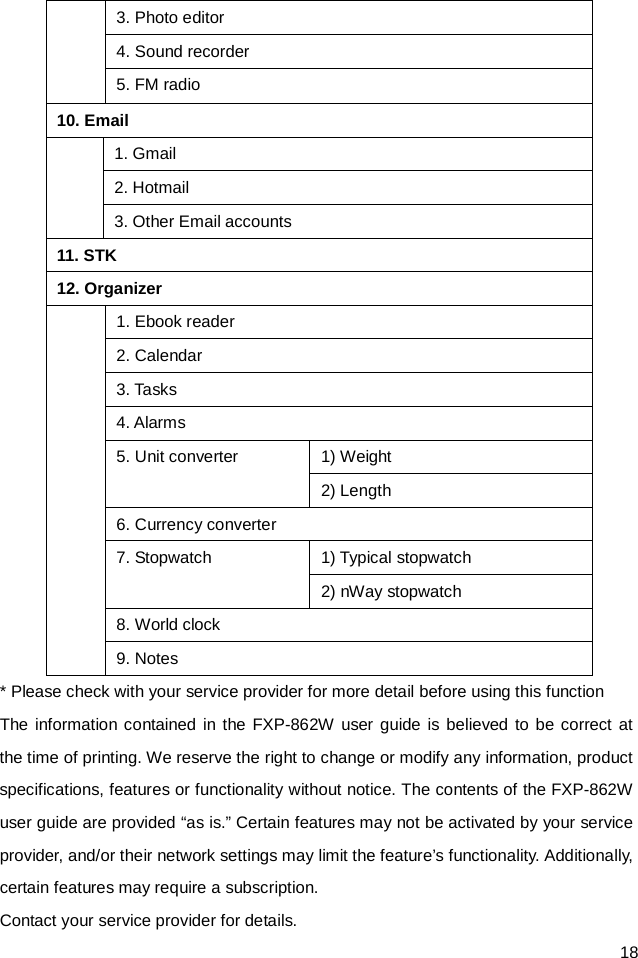
![3 [4] Menu Tree .................................................................................................... 13 [5] Using shortcuts through menu ................................................................. 13 ENTER LETTERS AND NUMBERS ........................................................................ 14 [1] Entering Letters ............................................................................................. 14 [2] Editing name or phone number ...................................................................... 14 [3] Changing the case of letters and numbers ................................................... 14 OVERVIEW OF MENU TREE .................................................................................. 15 SAFETY INFORMATION ........................................................................................... 19 GARANTÍA.................................................................................................................. 23 FCC NOTICE TO USERS......................................................................................... 26 REGULATORY ............................................................................................................ 28](https://usermanual.wiki/Brightstar/FXP86XW/User-Guide-2020534-Page-4.png)
![5 INSTALLATION [1] Connect the coil cord to both the handset and the transceiver (phone). [2] Install the antenna to the antenna connector. Hold the plastic portion of the antenna and turn the metal screw clock-wise. [3] Connect the adaptor to the AC Wall outlet and put adapter jack into the hole on the rear side of transceiver [4] Remove the battery door and Insert SIM card into the SIM slot in the right direction. After this, please connect the rechargeable battery pack into the battery plug and replace the battery door. [5] After installing the handset correctly, press the power key which is on the right of the front panel for about 3 seconds, the phone will then automatically test whether the SIM Card is inserted and valid. Wait for the antenna icon to display indicator bars before you make a call. Note: The battery pack is a backup for emergencies in case of a power failure. Do not operate the phone without having the AC/DC adaptor connected. Be sure to carefully match the positive and negative terminals as shown on the battery. When using the phone for the first time, charge it for over 6 hours to ensure optimum battery charge. Caution: It is prohibited to use the SIM card for this Fixed Wireless Phone in other GSM phone. Once the SIM pin number is entered, the SIM pin maybe automatically changed so the initial PIN is no longer valid. Therefore, it is highly recommended NOT to take out the SIM card once it is installed in this product. DO NOT bend or scratch your SIM card, and avoid exposing it to static electricity, water, or dirt.](https://usermanual.wiki/Brightstar/FXP86XW/User-Guide-2020534-Page-6.png)
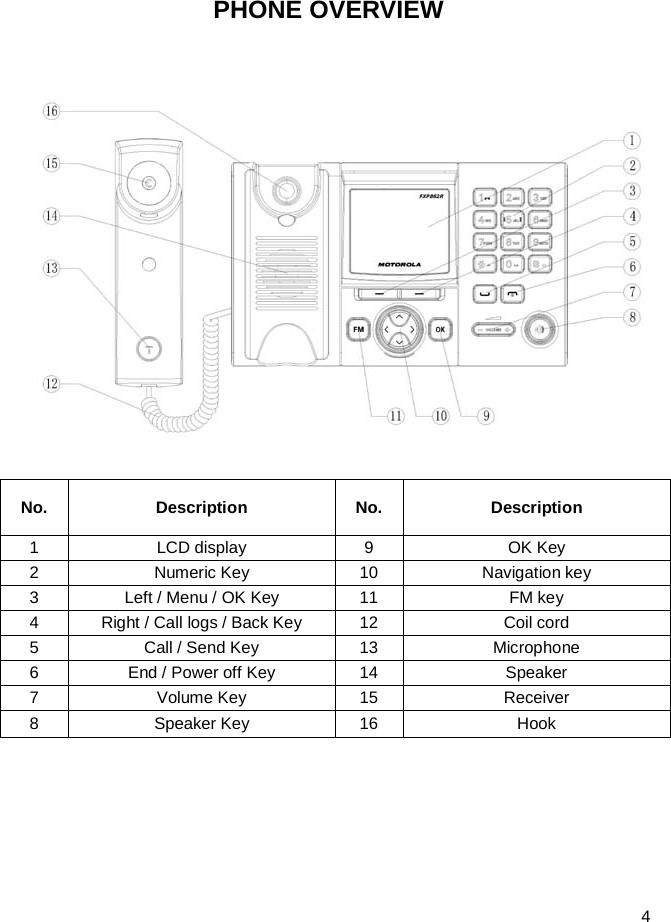
![6 KEY FUNCTION [1] Left / Right Soft Key ( Menu / Call logs key ) Press the left soft key (Menu/OK) to perform the function indicated by the text on the screen above the key. Press the right soft key (Call logs/Back) to directly access the Call Record list Note: The functions of the soft keys depend on the guiding text shown above the keys. For example, when the text Menu is above the left soft key, press, and the left key enters the menu functions. Similarly, pressing the right soft key under the text Call logs accesses the call Record list functions [2] Send key Press to make a call to a name / number shown on the screen. Press to answer a call. Press to access the list of recently outgoing call . [3] End key Press to end a call. Press once to exit a function and return to the idle screen. [4] Numeric Keys / ‘*’ keys / ‘#’ Keys Used for entering numbers and letters. Press and hold number 1 key to call the voice mailbox. Press ‘#’ key to toggle between upper case, lower case and numeric modes in message mode. Press ‘*’ key to toggle between letters and symbols in message mode. [5] Navigation / Scroll keys Press up navigation key to go into New SMS.](https://usermanual.wiki/Brightstar/FXP86XW/User-Guide-2020534-Page-7.png)
![7 Press down navigation key to go into Alarm Press Right navigation key to go into Calendar menu Press Left navigation key to go into Phonebook( Contacts ). Press up/down key to up / down the phone’s menu. Note: The key assignment of each navigation key could be different according each telephone service provider’s preference. For the detail, please contact your service provider. [6] Speaker key If you are using the handset to call and you want to transfer the call to the speakerphone mode, press the Speaker key button and hang up the receiver to transfer the call to the speakerphone [7] Volume key Press Volume left/right key to change volume level. [8] FM Radio Press the shortcut key ( FM ) to directly access the sub-menu [9] OK key Press the shortcut key ( OK ) to directly select OK instead of left Soft key](https://usermanual.wiki/Brightstar/FXP86XW/User-Guide-2020534-Page-8.png)
![9 BASIC OPERATION [1] Switching the phone ON and OFF 1) To turn on your phone, press and hold “End key” for a few seconds or until the display turns on. 2) To turn off your phone, press and hold “End key” for a few seconds. [2] Making a call 1) Dial a Call Raise your receiver and enter phone number which you want to call. After entering phone number and press “Call key” to make a call. Tip: In some menus like Phonebook, Call center, etc. which have individual phone number, Press “Call key” directly to make a call. 2) Dial the Fixed Phone Extension Number Some fixed phone extension can’t be called directly, it need a phone exchange. If you input the pause character ‘P’ between the exchange phone number and extension number, the phone will finish the dial procedure, connect to the extension. To get the “P”, press the “*” key some time till the “P” displayed on the phone screen. 3) Dial a International Call Press the “*” key some time till the character “+” displayed on the phone screen. Input the country code and the phone number after the prefix. 4) Dial from Phonebook Press Left navigation key to get into the phone book. Press Up / Down key to scroll the list to search the caller’s name. Then press call key to make a call. 5) Speed Dial Press 2 ~ 9 keys for a while, the phone number stored in speed dial list will be sent out. Make sure the speed dial key has been set up.](https://usermanual.wiki/Brightstar/FXP86XW/User-Guide-2020534-Page-10.png)
![10 [3] Answering a call When your phone rings, just raise your receiver to answer, or press “Send key” or “Speaker key” to answer in speaker phone mode. [4] Speaker mode. You can make or answer a phone call by pressing Speaker key when the handset is on the base To make a call: 1) Press the number you want to connect to without pick the handset up. 2) Press Send key Note: The call is automatically made without pressing, approximately 3 seconds after you dial the number. To answer a call When the phone rings, press Speaker key to turn ON the speaker phone mode. [5] Adjusting the Ring Volume You can adjust the ring tone volume by pressing the left/right navigation keys on the phone in setting menu. 1) Incoming a call or During a call, directly press Volume keys to enter the Ring Volume control screen. 2) Press volume key to right to increase the volume. 3) Press volume key to left to decrease the volume. [6] Redialing the last-dialed number The phone stores up to 20 last dialed numbers. 1) Press Send key to find the most recently dialed numbers. 2) Press navigation key to scroll to the number you wish to dial. 3) Press Send key once. Note: If no recently dialed numbers are stored, you will not be able to use this function.](https://usermanual.wiki/Brightstar/FXP86XW/User-Guide-2020534-Page-11.png)
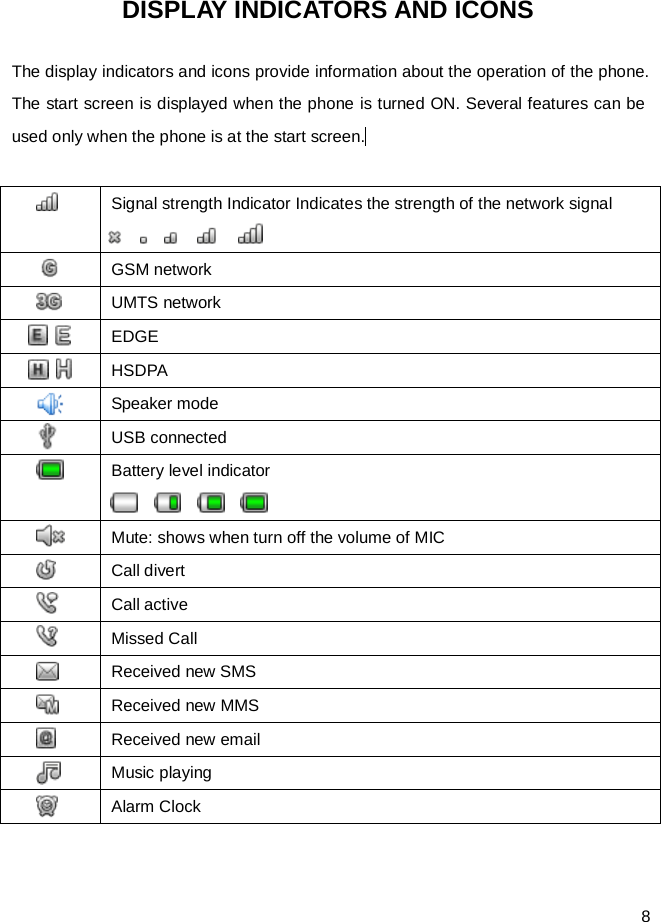
![11 [7] Caller ID Requires a subscription to a calling plan that supports this feature. Not available in all areas. Contact you telephone service provider for availability and details. When Caller ID is active, your phone shows the caller’s phone number during an incoming call, as long as this number is a part of your service provider’s wireless network. The wireless network lets you know if it does not recognize the caller’s phone number. The wireless network will also let you know if the calling party has blocked the Caller ID feature. If you have stored the name and number of the calling party in your Phonebook and that number is supported by the wireless network, the caller’s name will also appear. [8] SMS and Voice Mail Requires a subscription to a calling plan that supports this feature. Not available in all areas. Contact you telephone service provider for availability and details. A new SMS arrives: The back light of the LCD is ON and the display shows “New Message, 1 unread” message with SMS icon. And if you want to read received new Message, press the left soft key ( View ). If you want to check message later, press the right soft key ( Back ). Voice mail arrives : The back light of the LCD is ON and the pop up display shows the receiving of New Voice Message with Voicemail icon. And if you want to check new voice message, press the left soft key. If you want to check message later, press the right soft key . [9] Wi-Fi hotspot FXP-862W can supports a hotspot that share Internet access through the GPRS or 3G data network with other devices over the wireless LAN(Wi-Fi). Instructions to configure a Wi-Fi hotspot : 1) Insert the SIM card to support data network service 2) Select main menu->Setting->Connectivity->Internet tethering->WLAN hotspot](https://usermanual.wiki/Brightstar/FXP86XW/User-Guide-2020534-Page-12.png)

![13 USING PHONE MENUS [1] Menus A menu is a list of choices you can make. Your phone has 11 menus. ( And your service provider may add STK menu extra depending on network service ) Each menu contains options that allow you to use the message, change the ring tone, etc. You can use menus and sub-menus in two ways: by scrolling or by using shortcuts. [2] Scrolling through menus 1) From the Start screen, press Menu, and then scroll through the menus using Up / Down / Left / Right Navigation key. 2) Use the scroll and OK key to select the submenus and back key to return to the Start screen. [3] Exiting menu levels 1) To return to the previous menu level, press Back key. 2) To return to the Start screen, press End key. No menu setting changes will be saved. [4] Menu Tree You can refer to below pages about Menu tree for more details. [5] Using shortcuts through menu 1) Call logs : press the right soft key directly 2) Dialed calls: press Send key one time for a second. 3) SMS : press up navigation key directly. 4) Alarm : press down navigation key directly. 5) Phonebook ( Contacts ) : press left navigation key directly 6) Calendar : press right navigation key directly 7) FM: press FM shortcut key to FM directly Note: The key assignment of each shortcut could be different according each telephone service provider. For the detail, please contact your service provider.](https://usermanual.wiki/Brightstar/FXP86XW/User-Guide-2020534-Page-14.png)
![14 ENTER LETTERS AND NUMBERS [1] Entering Letters When you want to add new names or when you view names in the Contacts, your phone automatically switches to the abc (ABC) mode and displays the abc icon on the left upper side in Display. ※: Abc→ ABC→ abc→ 123 and or→ ES→ es→ Es→ 123 like rotated 1) 1 key : displays many kinds of letter or symbol like “. , ? ! 1…^_~” for your selecting 2) 2 ~ 9 key : displays the English and Spanish character or number marked on each key button, for example, if you press 2 key, it displays “a, b, c, à, á, ç, 2” for your selecting 3) 0 key : displays (Space) or ‘0’ 4) * key : displays many kinds of symbols for your selecting 5) # key : it is for changing letter case (※) [2] Editing name or phone number 1) From the Phonebook, select the name you want to edit by scrolling Up / Down navigation key and press OK key. 2) To edit, press the left soft key and scroll down to the edit option and press Select key. 3) Edit the name and or the phone number you want to change and press again OK key. 4) Press Clear key to correct any mistakes or press hold to clear all. 6) Press the OK key to save changes [3] Changing the case of letters and numbers You can switch the mode among uppercase and lowercase letters and numbers by pressing # key.](https://usermanual.wiki/Brightstar/FXP86XW/User-Guide-2020534-Page-15.png)


![28 REGULATORY Brightstar Corp. hereby declares this unit to be in compliance with the relevant Provisions of the Low Voltage Directive 73/23/EEC and the EMC Directive 89 / 336 / EEC. Brightstar Corp. hereby declares this unit to be in compliance with the essential requirements and other relevant provisions of Directive 1999/5/EEC. The FCC certification is applicable only for FXP-862W User Manual of FXP-862W version 0.1 [ENG] 07/09/2013 Copyright 2013, Motorola Inc., All rights reserved.](https://usermanual.wiki/Brightstar/FXP86XW/User-Guide-2020534-Page-29.png)