Brightstar WD210P DESK PHONE User Manual USERS MANUAL
Brightstar Corporation DESK PHONE USERS MANUAL
UserManual.wiki
>
Brightstar
>
WD210P User Manual
USERS MANUAL
Navigation menu
Upload a User Manual
Namespaces
Wiki Guide
HTML
PDF
Info
Views
User Manual
Discussion / Help
Navigation
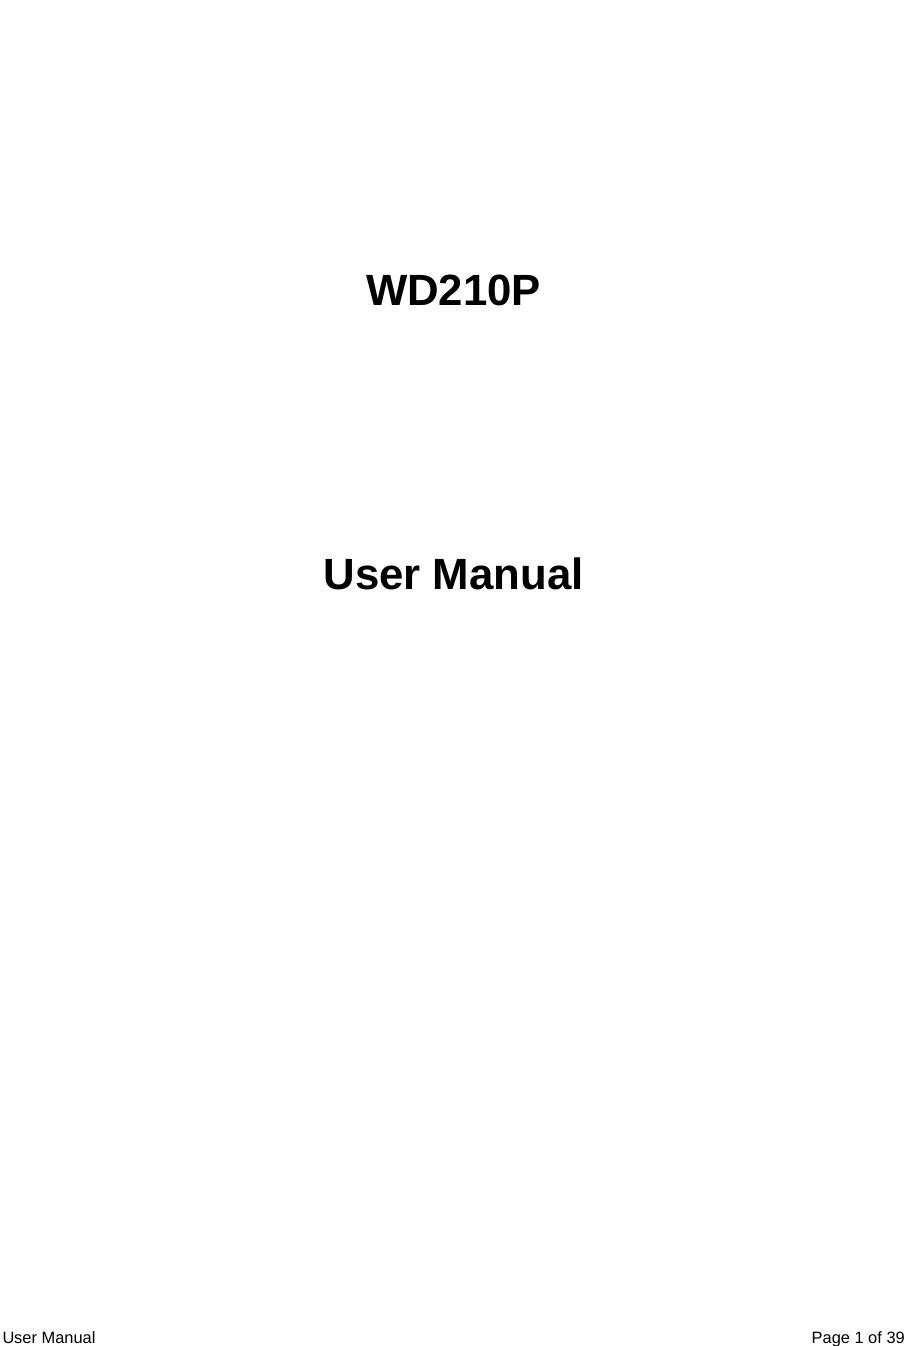
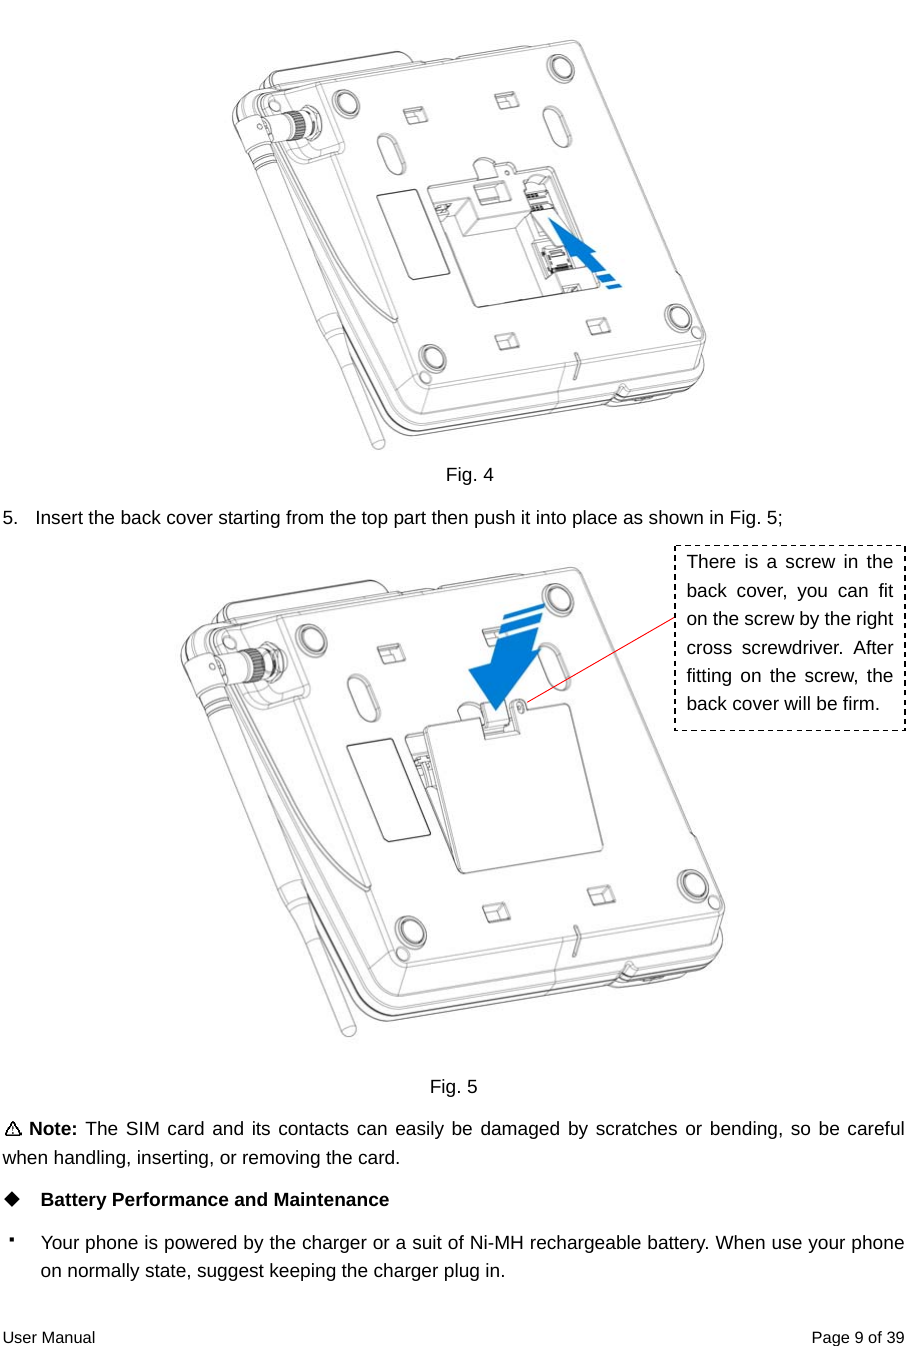
![User Manual Page 12 of 391.4. Definition of Buttons Redial key Right Selection Key[RSK] Left Navigation keyPhone book key Down Navigation key or Volume key Left Selection Key[LSK] Right Navigation keyAlpha-numeric keys and *, # key Call key Power key Up Navigation key or Volume key OK key Calculator key Speaker key](https://usermanual.wiki/Brightstar/WD210P/User-Guide-1047166-Page-12.png)
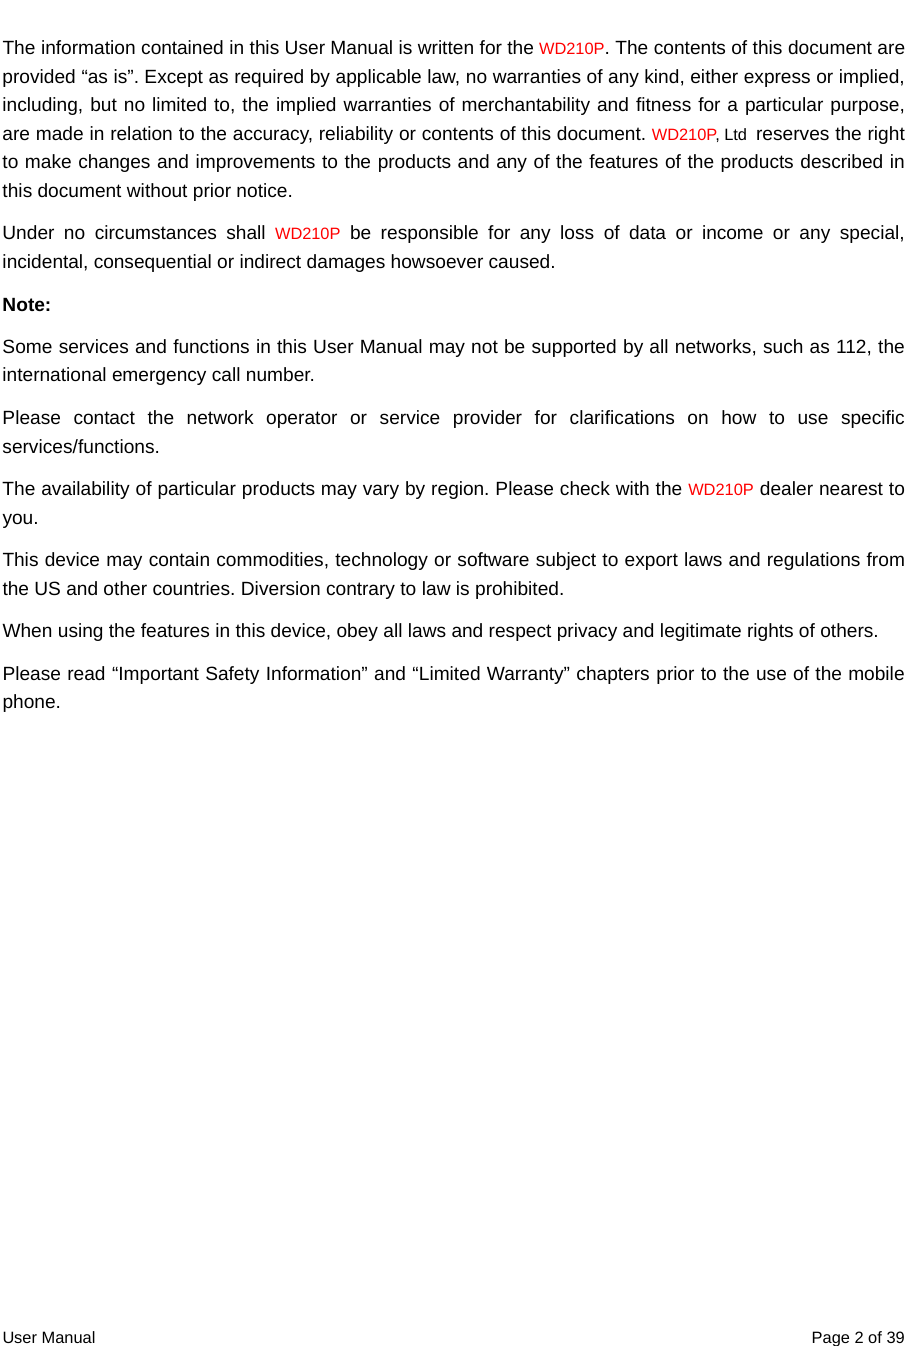
![User Manual Page 13 of 39 Left Selection Key [LSK] Idle mode: Performs the function shown directly above the button Long press to lock keypad Menu mode: Press to enter the menu of the selected function Editing mode: Press to enter the menu of the selected function Selection keys (Each key can be assigned with a function) Right Selection Key [RSK] Idle mode: Performs the function shown directly above the button Menu mode: Press to go back to previous screen Editing mode: Clears the character to the left of the cursor when there is character, press to go back to previous screen when there is no character OK key Idle mode: Press to open Main Menu Menu mode: Press to select a function or command Up navigation key Idle mode: Press to open the function assigned to the button Menu mode: Move upward to highlight a menu item Editing mode: Move cursor upward in a text field Control the volume of the earpiece and loudspeaker. Down navigation key Idle mode: Press to open the function assigned to the button Menu mode: Move downward to highlight a menu item Editing mode: Move cursor downward in a text field Control the volume of the earpiece and loudspeaker. Left navigation key Idle mode: Press to open the function assigned to the button Editing mode: Move cursor to the left in a text field Navigation keys Right navigation key Idle mode: Press to open the function assigned to the button Editing mode: Move cursor to the right in a text field Call key Idle mode: Press to open All Calls list function Dialing and incoming call mode: Dial or Accept calls Power key Back to Idle Screen, and press and hold to switch on and off the phone Redial key Redial call. It is only valid on idle screen, other screen, it is no function. Phonebook key Open the phonebook. It is only valid on idle screen, other screen, it is no function Calculator key Open the calculator. It is only valid on idle screen, other screen, it](https://usermanual.wiki/Brightstar/WD210P/User-Guide-1047166-Page-13.png)
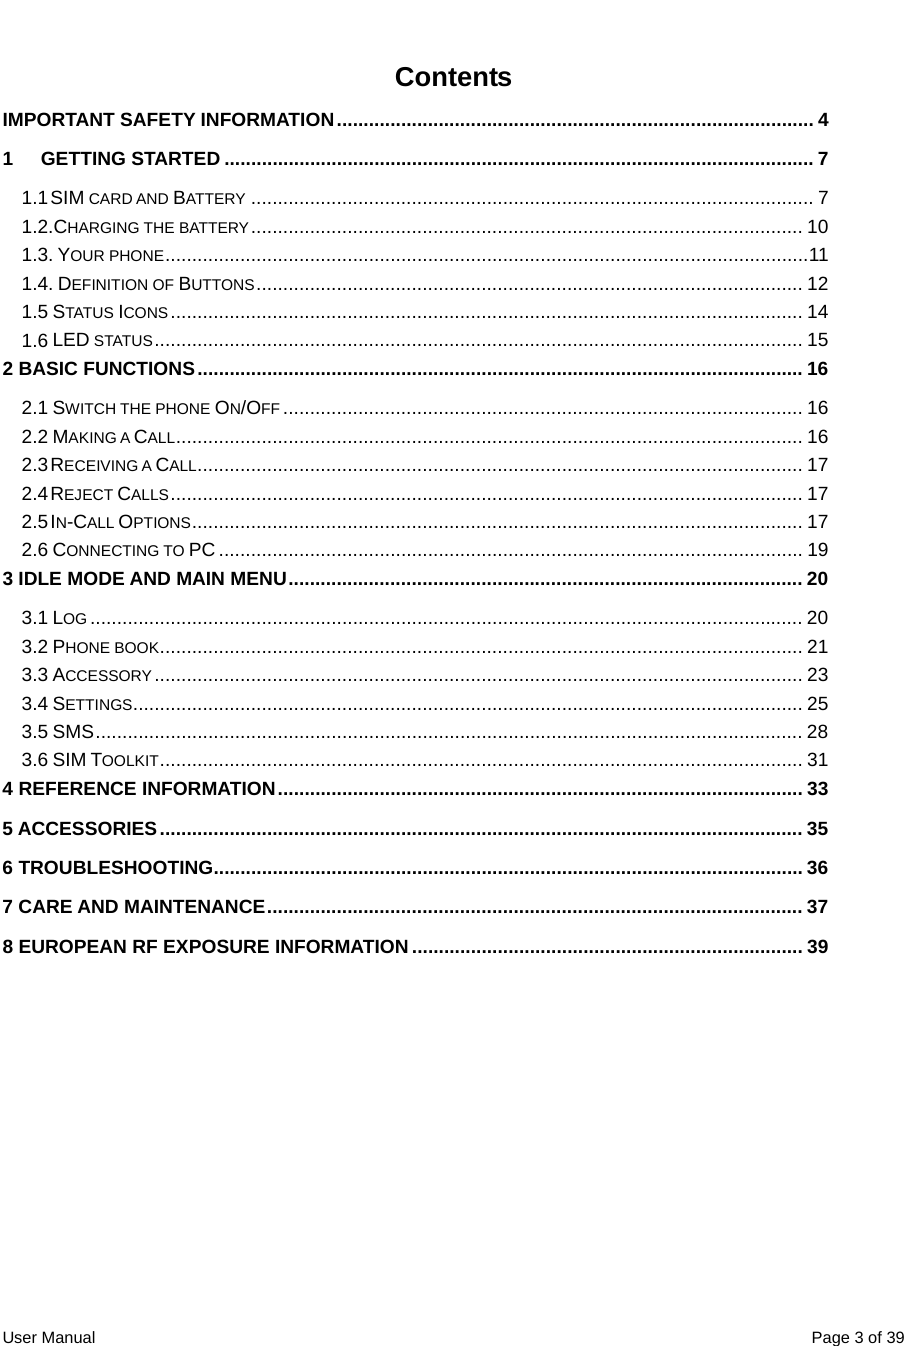
![User Manual Page 14 of 39is no function. Speaker key 1. When there is no calling exist and incoming call, user press the speaker key, it should answer the incoming. 2. When calling and the earpiece is not taken up, user press the speaker key, it should hang up the calling. 3. When calling and the earpiece is taken up and the sound path is not speaker, user press the speaker key, it should switch the sound path to the speaker. Then user press the speaker key again, the sound path should be switch to the earpiece. 4. When there is no calling exist, if user press the speaker key, it should lighten the LED and send out the busying sound. Alpha-numeric keys Idle mode: Press to enter numbers and characters Call Mode: Press and Hold [Number keys 1 to 9] to fast dial the number or contact that you set [Number key 0] to input “+” and start dialing an international number Menu mode: Press to enter into the corresponding menu option Editing mode: Press to enter numbers, letters, or symbols * key Idle mode: Press it to input “*” Edit mode: Press to change the text input mode # key Idle mode: Press to input “#”, Press and hold to insert pause “P” character for special dialing Editing mode: Press to display list of symbols 1.5 Status Icons SN Meaning Simple description Icon Low power Battery charge level 1 Battery status Charging status Unread SMS Unsent SMS 2 SMS status SMS Inbox is full (1) (2) (3) (4) (5) (6)](https://usermanual.wiki/Brightstar/WD210P/User-Guide-1047166-Page-14.png)
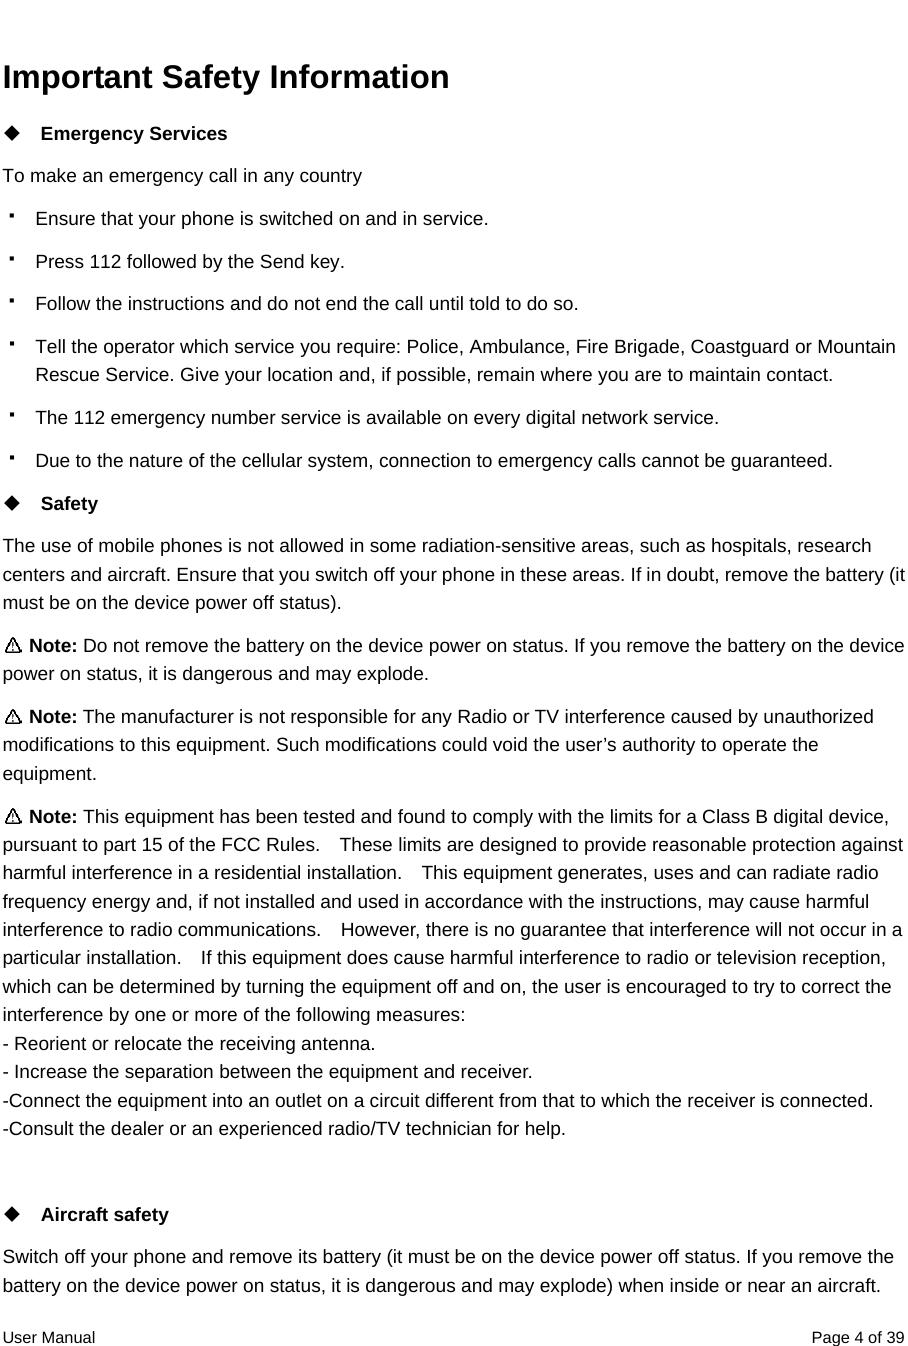
![User Manual Page 16 of 392 Basic Functions 2.1 Switch the phone On/Off Press and hold the Power button for approximately 3 seconds to turn the power On or Off. Plug in the charger connector to the phone and then plug the other end of the charger to the AC outlet, the phone will power On automatically. 2.2 Making a Call From Numeric Keypad Enter the phone number by pressing the number keys, then press [Send] key to call the number. Speed Dialing Up to 8 phone numbers from the Contacts List memory (either handset or SIM) can be assigned for one-key dialing. Press and hold any of number keys [2-9] and the phone number saved in the Speed Dials list will be dialed. From Phone Book Scroll through the list in the Phone Book until the contact you desire is highlighted. Press [Send] key to make a voice call to the phone number chosen. From Call Log The phone registers the phone numbers of received, missed, and dialed calls. The phone stores the last 20 calls in each of these categories. The Call Log can be opened in one of the following ways: Press [Send] key to view All Calls From the Main Menu, select Log to view Missed Calls, Received Calls, and Dialed Calls individually. Scroll through the Calls List until the desired contact name or phone number is highlighted. Press [Send] key to make a voice call to the phone number selected; International call Press and hold number key 0 until a “+” sign (international dialing prefix) is displayed. Enter the Country Code, followed by the Area Code (drop the leading zero) and the phone number then press [Send] key.](https://usermanual.wiki/Brightstar/WD210P/User-Guide-1047166-Page-16.png)
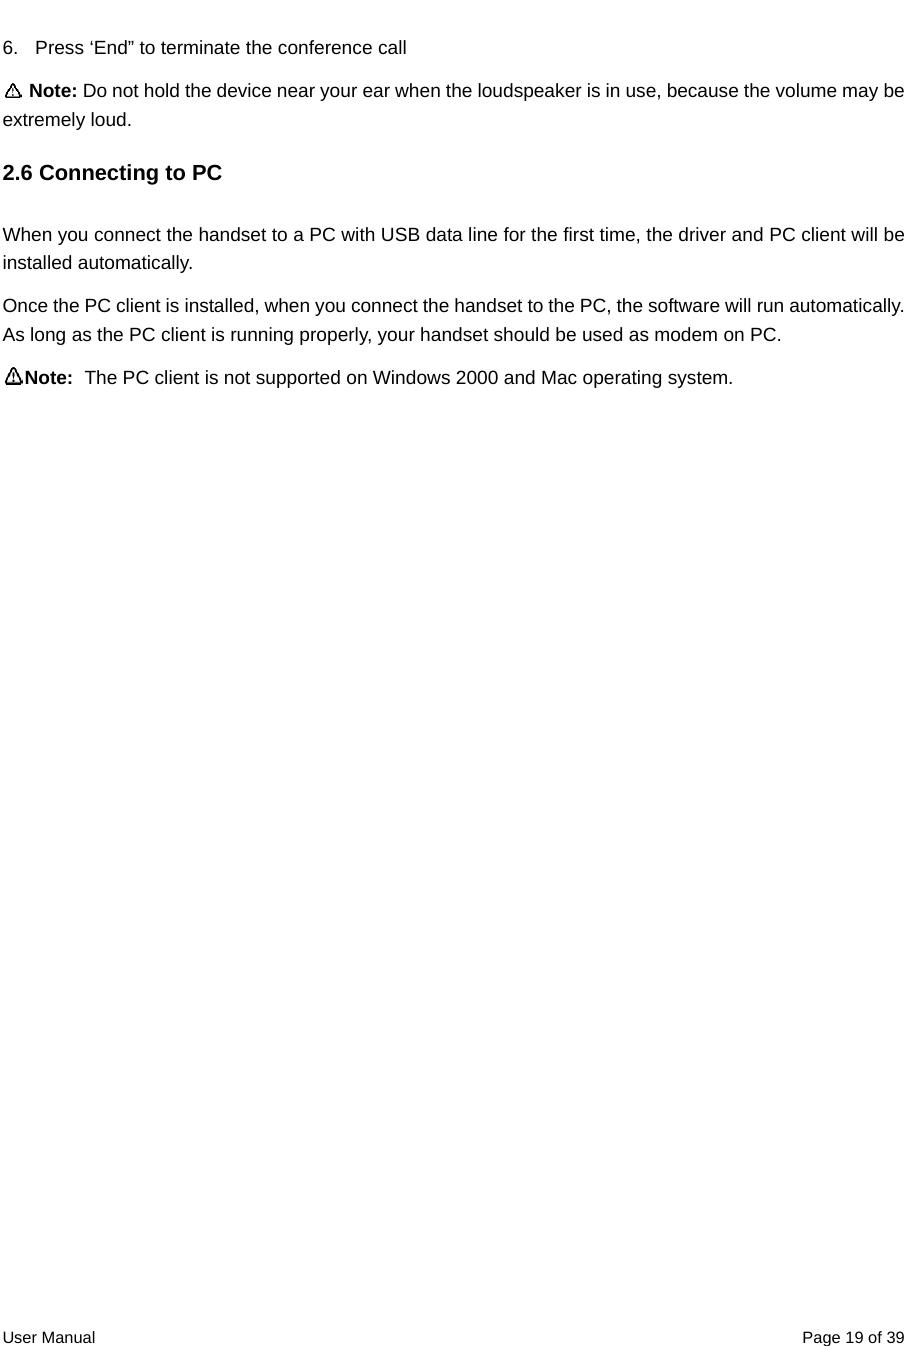
![User Manual Page 17 of 39 Extension numbers The phone permits direct dialing of extension numbers in a telephone exchange. You can insert a pause character “P” between the phone number and extension number. Enter the telephone exchange number, then press and hold “#” key to input “P”, then enter the extension number. Press [Send] key to dial the number. The phone will automatically dial the extension number after connecting to the telephone exchange. Emergency call Calls to emergency service numbers can be made under any circumstance, even if the phone is locked. Dial the Emergency number appropriate for your location then press the [Send] key to make an emergency call. 2.3 Receiving a Call When you receive a call, an “Incoming” status is displayed on the screen. The phone number of the calling party also appears on the screen. The caller’s name and number will be displayed if the information is in the Contacts List. You may opt to answer the call, reject it, or just ignore it. If you miss an incoming call, answer the call, reject it or choose to ignore it, the call will be recorded in the phone’s Log. To answer an incoming call, press the [LSK] or press the [Send] key. While the phone is ringing, press [OK] to silence the ring tone. 2.4 Reject Calls Press [RSK] to reject incoming calls. 2.5 In-Call Options Note: Some functions depend on the support of network service provider and whether you have registered the function. Your phone has additional functions available while a call is in progress. Press [LSK] to display a list of common in-call functions such as Hold, SMS, Phonebook, Mute/Unmute, New call. Hold This function allows you to make a second call by putting the current call on hold. During a call, press [LSK] then select “Hold.” and then the current call will be put on hold. Press [LSK] and select Phone Book or New Call to dial the phone number of the second party. When the second call is](https://usermanual.wiki/Brightstar/WD210P/User-Guide-1047166-Page-17.png)
![User Manual Page 18 of 39established, press [LSK] and select “Switch” to swap between the two calls. SMS During a call, press [LSK] then select “SMS” to create an SMS or access the Inbox, Sent Items, or Drafts folders. Phone Book During a call, press [LSK] then select Phone Book to search for the phone number in the Contacts List. Mute/Unmute During a call, press [LSK] then select “Mute” to turn off the microphone. At this mode, the other party will not hear you but you can still hear the other party. Press [LSK] and select “Unmute” to turn the microphone back on and the other party can hear you again. New Call To make another call while a voice call is in progress, press [LSK] then select New Call then enter and dial the phone number of the second party. Multi-party Conference Call Your phone allows you to engage in a conference call so you can talk to a maximum of five other parties at the same time. To make a conference call: 1. Dial the number of the first participant in the normal way. 2. Press [LSK] and select Phone Book or New Call to dial the phone number of the second party. The first call is automatically put on hold. 3. When the second call is established, press [LSK] and select “Create conference.” This joins the first participant into the conference call. 4. To add more participants, repeat steps 2 and 3, then select Add to Conference. Note: The conference call feature is a network service. Check with your network operator if this service is supported. Private Conversation During Conference Call 1. During a conference call, press [LSK] and select “Conference List”; 2. Select one participant who you want to talk privately. 3. Press [LSK] to select “Split call.” This will put the conference call on hold while you talk to the selected participants. The remaining participants still can talking to each other. 4. Press [LSK] and select “Conference” to return to the conference call. 5. To drop a participant from the conference call, press [LSK] and select “Conference List” and then select “End.”](https://usermanual.wiki/Brightstar/WD210P/User-Guide-1047166-Page-18.png)
![User Manual Page 20 of 393 Idle Mode and Main Menu In idle mode, the screen displays lots of useful information, such as Missed Calls, New messages, Alarm List. The Main Menu screen allows you to access any of your phone’s features. These are displayed in a grid. In idle mode, press [OK] key to access the Main Menu and press the navigate keys to browse the icons, or press number key 1-8 to access the functions directly. The following table shows the nine functions of the Main Menu where icons appear in the same order on the screen. Log Phone book Accessory Settings SMS SIM toolkit Entertainment My data 3.1 Log The phone’s Log feature allows you to view information about phone and data calls you have made and received. The Log records and monitors your missed calls, received calls, dialed calls, all calls, call duration, and packet data counter. Missed Calls](https://usermanual.wiki/Brightstar/WD210P/User-Guide-1047166-Page-20.png)
![User Manual Page 21 of 39Displays the last 20 calls made to the phone that were missed or ignored Received Calls Displays the last 20 calls that the phone has received Dialed Calls Displays the last 20 calls made from the phone All calls Display the last 60 calls that are total missed calls, received calls and dialed calls. Each entry in the list contains the Name, Number, Time, Date, and Call Duration. You can highlight an entry in the Call Log List then press [LSK] to select from the following functions: Save, Call, Send SMS, Edit before call, Delete and Delete all. Call Duration This feature provides you with detailed information regarding the total length of your incoming and outgoing calls. Packet Data Counter This allows you to confirm the number of data (in kilobytes) sent and received during packet data connections. Note: The actual invoice for calls and services from your service provider may vary, depending on network features, rounding off for billing, taxes, and so forth. 3.2 Phone book The Phone book contains all contacts information stored in your phone memory and SIM. To access your Phone book, press [OK] to open the Main Menu then select Phone book and then press [OK]. A quicker way to access your Phone book is to simply press [Number key 2] while Main Menu is opened. The Phone book records the information of contacts, including name, multiple phone numbers, multiple e-mails, addresses, reject option and so on. You can make a call and send SMS directly from the Contacts List. SIM contacts can be copied to Phone Contacts List, and vice-versa. To open a contact entry quickly without having to scroll through your Contacts List, enter the first few characters of the contact’s name. Once the desired contact is displayed, highlight it and press [LSK] or [OK]. IMPORTANT: Your phone OS is designed for exact name search approach. Example: To search for the contact name ‘JOHN’ in your Phone book, simply press the [Number key 5] once for ‘J’, the [Number key 6] three times for ‘O’, the [Number key 4] twice for ‘H’, and the [Number key 6] twice for ‘N’.](https://usermanual.wiki/Brightstar/WD210P/User-Guide-1047166-Page-21.png)
![User Manual Page 22 of 39 All Contacts Select All Contacts to display contacts stored in all two locations: phone, SIM. When opening Contacts, all your current contacts will be displayed in a list, in alphabetical order. You can use the [Navigation key] to scroll the contacts list then press [OK] to display detailed information of the contact. Press [Send] to dial the contact. When viewing Contact List, press [LSK] to select from the following options: New contact, Call, Send SMS, Copy to Phone/SIM, Delete. When viewing a contact entry, press [LSK] to select from the following options: Edit, Call, Edit before call, Send SMS, Copy to Phone/SIM, Delete. Phone Contacts Your phone can store up to 1000 contact names, 5000 contact numbers, 1000 E-mail addresses. Select Phone Contacts to view the Contacts List stored in the phone. Scroll and highlight the desired contact entry then press [OK] to display the detailed information of the contact To make a Voice Call, press [Send] to dial the contact; When viewing Contact List, press [LSK] to select from the following options: New contact, Call, Send SMS, Copy to SIM, Delete. When viewing a contact entry, press [LSK] to select from the following options: Edit, Call, Edit before call, Send SMS, Copy to SIM, Delete. SIM Contacts Select SIM Contacts to view the contact list stored in SIM card. Scroll and highlight the desired contact entry then press [OK] to display the detailed information of the contact To make a Voice Call, press [Send] to dial the contact; When viewing Contact List, press [LSK] to select from the following options: New contact, Call, Send SMS, Copy to Phone, Delete. When viewing a contact entry, press [LSK] to select from the following options: Edit, Call, Edit before call, Send SMS, Copy to Phone, Delete. Search function In contacts list screen, user can find the contact by input corresponding characters in search area. Enter the first few letters or other characters of a name (using Multi-tap method if input method is set to ‘abc’) in the text editing window, then press [OK] to display the contact names that match with the letters entered.](https://usermanual.wiki/Brightstar/WD210P/User-Guide-1047166-Page-22.png)
![User Manual Page 23 of 39 New contact You can create a new contact. The following items can be saved in the Phone Contacts List: Name, Mobile number, Home number, and Office number, Fax number, Other number, Email, Group, Reject call On/Off, Memo The following items can be saved in the SIM Contacts List: Name, Number. Management The management includes functions: Group, Storage type, Copy & Delete, Other numbers. Other numbers include: View my number, Service number. Group: A Contact Group can act as a distribution list, making it quicker to send SMS to multiple recipients. If your SIM card supports group function, you can divide contacts into groups saved in the SIM card. In the phone group list, you can set a group ring tone for voice call and message; SIM grouping cannot support this function. Storage type: You can set storage type as Phone or SIM. - Phone: When you add a contact, it will be added to the phone automatically. - SIM: When you add a contact, it will be added to SIM automatically. Copy & Delete: By selecting this menu, you can do operations: Multi-Copy (Copy several), Multi-Delete (Delete several), Copy all and Delete all. Other numbers: Other numbers include View my number, Service number. - View my number: For user setting of local number stored in SIM card. My number list will be shown according to the numbers saved in the SIM card, and the max value of my number list is 5. You can edit and modify the names and numbers. In the own number list screen, select [LSK] for pop-up menu, press [Direction navigation key] to select: - Edit: Edit the selected item - Delete: Delete the selected item - Service number: The Service number phone book contains customer service, hotline service numbers, etc. The contents are defined by your network service provider. Memory status This function shows you the number of used and available storage locations in the Contact List of the phone and SIM. 3.3 Accessory From Main Menu, select Accessory to display a list of extra features that your phone has such as Clock alarm, Calculator and Notes.](https://usermanual.wiki/Brightstar/WD210P/User-Guide-1047166-Page-23.png)
![User Manual Page 24 of 39 Clock alarm You can use your phone as an alarm clock. 1. In the Accessory list, select Clock alarm to display three alarms that you can set up 2. Select one of the alarms and change the settings: - Status: Activate or deactivate the alarm function - Time: Set the desired time for the alarm to sound off - Repeat: Set the days you want the alarm to sound off. You can select Once, Daily, or Weekly - Snooze: Set the time for the alarm to sound again after turning it off. You can select "Off", 2 minute, 5 minutes or 10 minutes - Ring: Change the alert tone - Rename: Change the name of alarm Select Status then select Start to save and enable the alarm settings. An alarm indicator will then be displayed at idle mode. If you want to disable the alarm, select Status then select Stop. Press [RSK] to return to Accessory list. When the alarm sounds off, press [RSK] to turn it off. You may also press [LSK] or press any key to make the alarm snooze for a few minutes. The alarm will sound off even if your phone is turned off. Calculator Your phone comes with a calculator function which can perform the four basic arithmetic operations: addition, subtraction, multiplication and division. Note: This calculator has limited accuracy and is designed for simple calculations. 1. In the Accessory list, select Calculator then press [OK] to display the calculator screen. 2. Keypad operation for calculator is as follows: - Use [0-9] numeric keys to enter a number - Press [*] key to enter a decimal point - Press [#] key to make a number ‘+‘ or ‘-‘ - Press [OK] to display result of calculation - Press [LSK] key to clear a number or an operation 3. Press [RSK] to close Calculator function and go back to Accessory list. Notes Your phone allows to you write notes which can then be saved as text files.](https://usermanual.wiki/Brightstar/WD210P/User-Guide-1047166-Page-24.png)
![User Manual Page 25 of 391. In the Accessory list, select Notes then press [OK] to display a list of your notes. 2. To write a new note, press [LSK] then select New to open the notepad. Press numeric keypad to enter text. Press [OK] to save the note. 3.4 Settings Your can customize your phone by changing its settings in order to suit the way you use it. From idle mode, press [OK] to open Main Menu. Scroll to select Settings then press [OK] to display Settings menu. Phone Select Phone to display the following settings: Clock (Time and date): Use the settings to change the time and the date, as well as the format in which time and date are displayed. Select from the following settings: - Set time: Enter the current time - Set date: Enter the current date - Set time format: Select if time will be formatted to 12-hour or 24-hour clock - Set date format: Select how the date will be formatted Default input method: Change the method of text input Shortcut key: Assign a function to the Navigation keys [Up/Down/Left/Right] and Selection (Soft) keys [Left and Right] Phone modes You can use Phone modes to quickly change how you receive all notifications in a particular environment. - Ring volume: Adjust the volume level of the ring tone - Message volume: Adjust the volume level of the message alert tone - Keypad volume: Select volume level 0 to 6 of the tone when a key is pressed - Ringtone: Assign a ring tone each for voice call, and message alert - Ring type: Set the ring tone type as repeat or ascending - Coverage tone: Set a warning tone "On" or "Off" when there is no signal. Display You can change the Backlight timer and Contrast. - Backlight timer: You can set the backlight duration to conserve battery power among 5 seconds, 10 seconds, 20 seconds, 40 seconds, 60 seconds, 5 minutes - Contrast: You can adjust the Contrast level from level1 to level7.](https://usermanual.wiki/Brightstar/WD210P/User-Guide-1047166-Page-25.png)
![User Manual Page 28 of 39Select this option to delete all data and cancel all settings previously done on your phone. 3.5 SMS Select [SMS] from Main Menu and open a list of default SMS folders: “New”, “Inbox”, “Drafts”, “Outbox”, “Sent”, “Settings”, and “Memory Status”. Creating and Sending SMS 1. From Main Menu, select SMS then select New. 2. Enter the number of the recipient in the “To:” field using the phone keypad. If the number is stored in the Phonebook or used recently or log or contact group, press [OK] then enter Recently used, Contacts, All calls and Contact group list screen then open Recently used, Contacts, All calls or Contact group to mark one or more receiver to send the message to, and then press [LSK] to go back to the SMS message screen. Alternatively, you can also press [LSK] then enter Recently used, Contacts, All calls and Contact group list screen then open Recently used, Contacts, All calls or Contact group to mark one or more receiver to send the message to, and then press [LSK] to go back to the SMS message screen. 3. Press [Down navigation key] to move to “Content:” field 4. Compose your message using the phone keypad. 5. Press [OK] to send message. After composing your message in Step (4), you may press [LSK] and select from the following edit options: “Send”, “Send and save”, “Add recipient”, “Save”, “Clear field”, “Insert contact”, “Notes”, “Cut”, “Copy”, “Paste”, “Symbols”, “Line feed” and “Insert smiley”. - Send: When ready to send your composed message. - Send and save: When ready to send and save your composed message. - Add recipient: When ready to select/edit/add the message recipient(s). - Save: Current message will be stored into Drafts folder. - Clear field: Clear current receiver and content. - Insert contact: Contact name, number and email will be inserted the content. - Notes: Open notes list to select note. - Cut: Cut the selected words or symbols. - Copy: Copy the selected words or symbols. - Paste: Paste the selected words or symbols to the focus. -Symbols: Open symbol table.](https://usermanual.wiki/Brightstar/WD210P/User-Guide-1047166-Page-28.png)
![User Manual Page 29 of 39- Line feed: Move the focus and the text behind the focus to next line. - Insert smiley: Open smiley list to select smiley. You can send your SMS to more than one recipient at one time. You can enter as many numbers in the “To:” field with each entry separated by a semi-colon (;). You may also add multiple recipients or send to a defined Group from the Contacts List. Receiving SMS All received SMS messages are stored in the Inbox. Your phone will notify you when a new message is received. The number of New Messages is displayed on the screen in idle mode with a closed envelope icon beside it and another one on top of the screen directly beside the battery indicator. To read a new message from idle mode, press [Down/Up Navigation key] to highlight New Message, then press [OK] to open “New Message” list. Select New SMS to open “Unread SMS” List then press the Contact Name or number of the message sender. This will open the message straight from the Inbox. You can also open your Inbox from the Main Menu. Select SMS then select Inbox to open the message list with the most recently received message(s) appearing on top. Press [LSK] to select from the following options: - Read: View the content of the received message, the name or number of the message sender, and time when message was received. After reading the message, you may press [LSK] to perform the following options: Reply, Forward, Get Information, Call, Copy to SIM/Phone, and Delete. - Reply: Create a message in response to a received message. The numbers of the message sender will be automatically copied to the “To:” field - Forward: Forward a received message to another party. The message is copied to an edit text field then you can enter the number/s of the recipient(s) to the “To:” field - Call: Make a voice call to the message sender - Delete: Delete a selected message from the Inbox. You will be prompted if you are certain in deleting the message. - Multi-delete: Multi-select then delete messages in the Inbox. You will be prompted if you are certain in deleting the select messages. - Delete all: Delete all messages in the Inbox. You will be prompted if you are certain in deleting all messages. Drafts All unfinished or unsent messages are stored in the Drafts folder. Enter SMS menu, press [Down Navigation key] to find Drafts folder and open the message list. Use [Up/Down Navigation key] to select the message to edit or send. Press [OK] to open the message then press [LSK] to perform any of the following options:](https://usermanual.wiki/Brightstar/WD210P/User-Guide-1047166-Page-29.png)
![User Manual Page 30 of 39- Edit: Edit message before sending - Forward: Forward the selected message to another recipient - Delete: Delete the selected message in the Drafts folder - Delete all: Delete all messages in the Drafts folder Outbox A message that cannot be sent for some reason will be temporarily stored in the Outbox folder. Enter SMS menu, press [Down Navigation key] to find Outbox and open the message list. Use [Up/Down Navigation key] then press [OK] to open the selected message. Press [LSK] to perform any of the following options: - Read: View details of unsent message - Edit: Edit the selected message before resending - Resend: Resend the selected message - Delete: Delete the selected message in Outbox - Delete all: Delete all messages in Outbox • Sent All messages sent successfully from your phone are stored in the Sent folder. Enter SMS menu, press [Down Navigation key] to find Sent and open the message list. Use [Up/Down Navigation key] then press [OK] to open the selected message. Press [LSK] to perform any of the following options: - Read: View details of sent message - Forward: Forward the selected message to another recipient - Call: Make a voice call to the message sender - Delete: Delete the selected message in Sent folder - Multi-delete: Multi-select then delete messages in the Sent box, you will be prompted if you are certain in deleting the select messages. - Delete all: Delete all sent messages in Sent folder • Settings You can select from the following options to set up your messages. - Service Center: Your messages are delivered to your phone via a message center number defined and preset by your service provider for SIM. - Expiry period: This indicates the number of hours or days for which a message you send may remain undelivered to the recipient. If the recipient cannot be reached within the set period, the](https://usermanual.wiki/Brightstar/WD210P/User-Guide-1047166-Page-30.png)
![User Manual Page 31 of 39message is removed from the message service center. Validity period can be set at 1 hour, 6 hours, 1 day, 3 days, 1 week or network maximum. - Delivery reports: When set to “On”, you will receive a status report from the message center to inform you that the recipient has received your message. - Storage type: Select whether you want new messages to be automatically stored to the Phone SMS Inbox or SIM card. - Broadcast: Cell broadcast allows you to receive information of various topics sent by your service provider. Contact your service provider to get the available topics via Cell Broadcast. Memory status Displays the number of used and available storage locations on the phone and SIM. 3.6 SIM Toolkit In addition to the features installed on your phone, you may also have certain operator features and services contained on the SIM card. The content will vary according to what SIM services that your operator provides. You can see STK menu from SIM card. Note: For availability, rates, and information on using SIM services, contact your SIM card vendor, for example, network operator, service provider, or other vendor. Entertainment From Main Menu, select Entertainment to display a list of extra features that your phone has such as FM Radio and Music player. ◆ FM Radio To listen to the FM Radio on your phone, you must first plug in the stereo headset. From Main Menu, select Entertainment, and then select FM Radio Press [Left/Right Navigation key] to scan FM stations in sequential order. Press [Up Navigation key] to display a list of previously saved stations. Press [Down Navigation key] to open Search Mode and select from the following options: Manual, Favorite, or Automatic. Press the volume key to increase/decrease loudness of audio. Press [OK] to mute/unmute the headset speaker. Press [LSK] then select from the following options: - Save: Save current tuned station to My favorite list - My favorites: Create your own list of most listened to FM stations. Press [LSK] to select from the following options:](https://usermanual.wiki/Brightstar/WD210P/User-Guide-1047166-Page-31.png)

![User Manual Page 33 of 394 Reference Information 1. Input Text You can enter text and numbers on your phone using the keypad. Your phone supports some input modes for entering text and numbers: T9 En, en, EN T9 English predictive text input mode Abc, abc, ABC Multi-tap input mode 123 Numeric input mode When you select a field that requires text or numeric entry, the phone automatically defaults to the appropriate input mode. The status indicator on the title bar shows the input mode you are currently using. To switch input modes: Press the [*] asterisk key to switch between numeric and text input modes. In the text editor field, press [#] key to switch to symbol input mode, select from the symbols table by pressing [Up/Down Navigation key]. To select, highlight the symbol and then press [OK] or by pressing the numeric key that corresponds to the symbol. To insert a space in Multi-tap or T9 mode, Press [Number key 0] key To start a new line, press and hold [#] key. 2. Entering Text and Numbers ABC ABC is multi-tap text input method. You press each key as many times as needed to show the letter you want. For example: If you want to input “c”, you should press [Number key 2] three times. Input letters by number keys on the keypad, the letters will be displayed on the cursor. Press [Number key 1] repeatedly to select common punctuation in turns as: . , - ? ! ‘ @ : ; / 1 Press [Number key 0] to input space. 123 Press [*] repeatedly to switch to Numeric mode and then just press the number(s) you want to enter on the keypad. T9 English This is a built-in dictionary feature which suggests words by the sequence of letters that you type. In using T9, you only have to press each key once. The letters change as you type, so it is important that you ignore what is displayed on the screen until you have finished typing completely. Press [Up/Down Navigation key] repeatedly to display all the words that match one at a time. Press [OK] to confirm your](https://usermanual.wiki/Brightstar/WD210P/User-Guide-1047166-Page-33.png)