BroMax Communications WR251 Wireless Print Server User Manual Manual
BroMax Communications Inc Wireless Print Server Manual
Manual

Wireless Print Server
LPV2-WS11GC
User’s Manual

Using this Manual
This section explains the symbols and signs used in this manual.
Symbols
Caution
Items to which you must pay attention when handling the product. Failure to follow this mark
may result in personal injury and/or damage to the equipment.
Note
Supplementary information you should know for handling the product.
Reference
Refers to a related subject page.
• Text in bold indicates the names of menu options, buttons, text boxes, check boxes, software, dialog boxes,
etc., that you can select to perform operations.
• A personal computer with the BUFFALO Wireless LAN Card installed is called the Wireless LAN PC.
• The following terminology is used in this manual to distinguish between an Ethernet 10/100BASE-T LAN
and a Wireless LAN.
Ethernet LAN: A LAN connected by cables
Wireless LAN: A LAN connected by radio signal
The preceding terminology is strictly for use in this manual for the sake of convenience and should not be
construed as generally accepted terminology outside this context.
• The personal computer to be used to change the LPV2-WS11GC settings is referred to as the Setting PC.
All rights for this manual are owned by BUFFALO. No part of it may be transmitted, reproduced or revised without
expressed permission from BUFFALO.
The names of other products used in this manual are trademarks or registered trademarks. Trademark symbols , ,
are not indicated in this manual.
Specifications, designs and other descriptions in this manual are subject to change without notice.
This manual has been carefully prepared, however, feel free to contact your nearest sales representative if you have
any questions or problems.
In addition, please note that BUFFALO. shall not be liable for any expenses incurred due to damage or loss arising
from use of the LPV2-WS11GC, even though BUFFALO has been advised of the possibility of such damage.
LPV-WL11G User’s Manual (Introduction) 3
For your safety, be sure to follow the instructions
given below.
Follow the instructions below to avoid harming yourself, other people and property, and to ensure
safe use of the product.
For your, others and property safety be sure to read, understand and follow the instructions given
below thoroughly before using the product. This manual contains instructions concerning general
operation of the computer to which the product is connected in addition to those concerning the
product itself.
Please take note that our warranty will not cover any failures and problems of the computer, any
losses and failures of data, or failures and problems of the product caused by misuse.
Signs and symbols used in this manual
Warning signs:
Symbols:
WARNING
The instructions with this sign indicate prohibited actions. Failure to fol-
low the instructions shown with this sign may result in death or serious
injury to the user.
CAUTION Failure to follow the instructions shown with this sign may result in
injury to the user or property damage.
This indicates warnings and cautions.
(Ex. Exercise care to avoid an electric shock.)
This indicates prohibiting actions. (Ex. Do not disassemble.)
This indicates what must be done. (Ex. Disconnect the plug from the outlet.)
WARNING
Strongly
recommended
Follow the warning and caution instructions which are issued by the PC and
peripheral manufactures.
Prohibit
Do not attempt to disassemble or repair the LPV2-WS11GC.
This may result in fire or electric shock.
Strongly
recommended
Install this product away from children.
Failure to do so may result in injury.

LPV-WL11G User’s Manual (Introduction)4
Prohibit
Do not handle the equipment with wet hands while the power supply cable is
connected to the AC socket.
This may result in electric shock.
Unplug the
power supply
If you see smoke or smell strange or hear noise from the device unplug the
power.
Using the device continuously may result in a short circuit, fire, or electric shock. Con-
sult your dealer immediately.
Unplug the
power supply
If the product is dropped or subjected to severe shock, unplug the power.
Using the device continuously may result in a short circuit, fire, or electric shock. Con-
sult your dealer immediately.
Unplug the
power supply
If liquid or foreign matter enters the equipment, unplug the power.
Using the device continuously may result in a short circuit, fire, or electric shock. Con-
sult your dealer immediately.
Prohibit
Do not damage, process, overheat or attempt to repair the power supply cable,
as this may result in fire or electric shock.
• When installing this product, do not crimp the power supply cable.
• Do not place heavy objects on the power supply cable, or pull the cable.
• Do not place the power supply cable close to heat sources, or overheat the cable.
• When removing the power supply cable, be sure to remove it by holding the plug.
• Do not bend the cable too much.
• Do not move this product with the power supply cable still connected.
• If the power supply cable is damaged, replace it.
Strongly
recommended
Use this product under supervision and guidance of an adult when a small child
uses.
Strongly
recommended
Insert the AC adapter into the AC socket firmly.
Using this product without the AC adapter firmly inserted may cause a short circuit,
overheating, fire or electric shock.
Strongly
recommended
Be sure to use the Power Cable (AC adapter) provided.
Using other Power cable (including internal connections) and AC adapter may cause
fumes or fire due to incompatible voltage or terminal polarity.
LPV-WL11G User’s Manual (Introduction) 5
CAUTION
Strongly
recommended
To prevent damage due to the static electricity touch a metal object such as a
door handle or metal window before touching the device.
Static electricity may result in damage to the equipment.
Strongly
recommended
For usage of the PC and peripheral, refer to the product manual.
Strongly
recommended
Remove the dust from all connectors.
Dust may result in failure in performance.
Prohibit
Do not locate this product in the following locations. Doing so may result in elec-
tric shock or fire, or may adversely affect this product.
• Locations with strong magnetic fields or static electricity (may result in failure)
• Locations prone to vibration (may result in injury or damage)
• Locations that are not level (may result in injury or damage)
• Locations in direct sunlight (may result in failure or deformation)
• Locations close to fire, or subject to heating (may result in failure or deformation)
• Locations with water leakage or current may result in failure or electric shock
• Locations with excessive dust (may result in failure)
Prohibit
Using the device with different voltages, such as overseas, may result in a short
circuit, smoke, or fire.
Plug into only 120 VAC(US)/100-240VAC(EU) power supply.
Strongly
recommended
Be careful not to get your body caught on the cables connected to this product.
Doing so may result in personal injury and/or damage this product.
Strongly
recommended
Be sure to back up the contents of the hard disk to other media such as floppy
disks or MO disks..
We recommend that dual backup before and after updating of original data be created
for unrecoverable important data. Data may be damaged or lost in the following cases.
• When the device is used incorrectly
• When the device receives static electricity or electrical noise
• When the device breaks down or is repaired
• When the power is turned on immediately after the PC is turned off
• When the device is damaged by natural disasters
Please note that MELCO INC. shall not be liable for any expenses incurred due to the
damage or loss of hard disk data that may arise in the above cases or in any other case.

LPV-WL11G User’s Manual (Introduction)6
Strongly
recommended
Be sure to back up the contents of the hard disk before making any changes to
your PC environment such as installing software or installing or removing hard-
ware.
Even if data is damaged or lost due to misuse or faults, backup data can minimize the
extent of such damage. Please note that MELCO INC. shall not be liable for any
expenses incurred due to the damage or loss of hard disk data.

LPV-WL11G User’s Manual (Introduction) 7
Preface
This section explains the organization of the LPV2-WS11GC manual.
Organization of the LPV2-WS11GC Manual
The LPV2-WS11GC user’s manual consists of Introduction, Application and Settings.
The contents are:
Easy Setting Guide
Introduction is intended for those who are not familiar with local area networks (LANs) and their
connections. Operation procedures are described with screen shots. A few possible actions when
printing cannot be accomplished are described..
LPV2-WS11GC User’s Manual (This Manual)
These sections are for those who already has a large-scale LAN or changing the setting in ESS-
ID, wireless channels, server names and port names.
* The LPV2-WS11GC cannot be set up from Macintosh or UNIX OS. It must be set from the
Windows OS with* a Wi-Fi certified wireless LAN card. (It is possible to print from Macin-
tosh or UNIX.)

LPV-WL11G User’s Manual (Introduction)
8
Overview of the LPV2
This section describes the features and operating environment of the LPV2.
Features
LPV2 is the wireless print server that allows printing from PCs on wireless LANs. It supports
four protocols: NetBEUI, AppleTalk, TCP/IP and NetWare. If the ESS-ID is set for the wireless
LAN to be used just install the printer driver for printing.
A wireless LAN PC is required for setting the LPV2. The wireless LAN PC or the "setting PC"
must use the Windows OS with a Wi-Fi certified wireless LAN card. (It is not possible to set
the LPV2 from a 2Mbps wireless LAN cards.) For printing through a wireless access point,
the Wi-Fi certified access point such as MELCO’s AirStation should be used.
Features of the LPV2 are:
• Complies with IEEE802.11b and the baud rate of 11 Mbps over a wireless LAN.
• Supports a printer port (D-sub 25-pin).
• The maximum range is 115 m indoor or 550 m outdoor LOS.
The range may change depending on the baud rate as below.
11 Mbps:160 m outdoor LOS
50 m indoor (1) LOS
25 m indoor (2) LOS
Note: Indoor (1) is defined here as offices with less obstructions and indoor (2) is defined
as offices with more obstructions.
*
The range is depending on the environment and it may become shorter in the following
situations.
1. Inside the reinforced concrete buildings such as apartment house.
2. Near the large metal objects.
• Supports a multi-channel (11ch) function that reduces network load.
• Supports 128/40 bit WEP. Refer to the “WEP (Encryption) Encryption Recommendations” sec-
tion (page 11)” for further infomation.
* When using 128-bit WEP, the access point must also be set to 128-bit WEP. (128-bit WEP and
40-bit WEP cannot be used together.)
• Supports DHCP, BOOTP and RARP.
• Supports SNMP and MIB2.
• Provided with LPV Manager 2.

LPV-WL11G User’s Manual (Introduction) 9
Operating Environment
Protocols Supported
TCP/IP, NetBEUI, AppleTalk (EtherTalk)*
* Supports only PostScript printers (ASCII mode).
Operating Systems for the LAN
Windows XP/Me/98/95, Windows 2000/NT4.0, MacOS7.6 or later, UNIX
* Note that the LPV2 cannot be set from Mac OS or UNIX.
WEP (Encryption): Encryption Recommendations
This product transmits data using radio waves, thereby causing the possibility of wireless packets
to be accessed by external sources. Therefore, we recommend setting a WEP encryption key for
transmission of wireless packets to provide security.
This product enables 128-bit WEP and 40-bit WEP encryption. 128-bit WEP (13 ASCII charac-
ters or 26 Hex characters) provides greater security. For communications with wireless LAN
products that only support 40-bit WEP (5 ASCII characters or 10 Hex characters), however, the
WEP setting of this product must also be set to 40-bit WEP.
* For details of WEP (encryption) setting methods for AirStation, refer to the manual provided
with AirStation.
Content of this Package
This package contains the following items. Should you find any missing items, contact the dealer
from which you purchased this product.
LPV2 Wireless Print Server: . . . . . . . . . . . . . . . . . . . . . . . . . . . . . . . . . . . . . . . 1
AC adapter . . . . . . . . . . . . . . . . . . . . . . . . . . . . . . . . . . . . . . . . . . . . . . . . . . . . .1
LPV2 Utility CD (CD-ROM) . . . . . . . . . . . . . . . . . . . . . . . . . . . . . . . . . . . . . . 1
Easy Setting Guide . . . . . . . . . . . . . . . . . . . . . . . . . . . . . . . . . . . . . . . . . . . . . . 1
* Be sure to read attached documents included in the package.
Parts Nomenclature and their functions
This section explains the name and function of each LPV2 component.

LPV-WL11G User’s Manual (Introduction)
10
■ Top View Diagram
■ Side View Diagram
LPV-WL11G User’s Manual (Introduction) 11
WIndows Adhoc Mode Setting
Windows Adhoc Mode allows you to print directly through LPV2, not via AirStation. This set-
ting process is basically same amoung any MS-Windows. This capter shows how to setup with
Windows98.
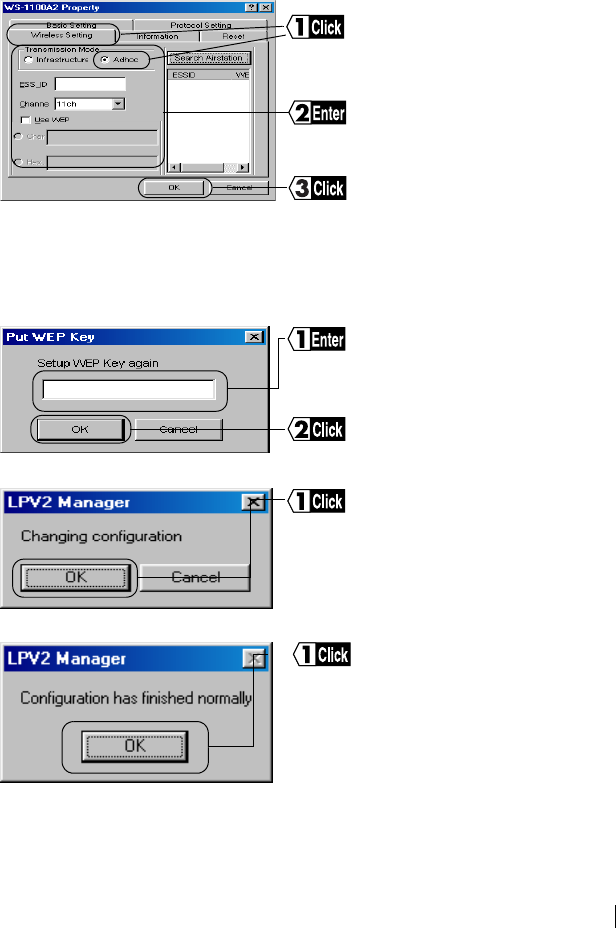
1Start LPV2 Manager
• If you don’t not know about “Channel”, please open Client Manager Program and refer to
Manual Setting window by selecting [File]-[Manual Setting].
• If you are using WEP Key, put check mark on the [Use WEP Key] Box and enter WEP
Key.
2
3
Setup is completed.
Click “Wireless Setting” and set “Ad-
hoc“ mode.
Set Wireless Setting
Click[OK]
Please re-enter WEP Key again at
“Setup WEP Key again” message
Click[OK]
Click[OK]
Click[OK]
LPV-WL11G User’s Manual (Introduction)
12
WindowsXP/2000 Adhoc Mode Setting
This chapter shows how to set up Adhoc Mode with the WindowsXP/2000.
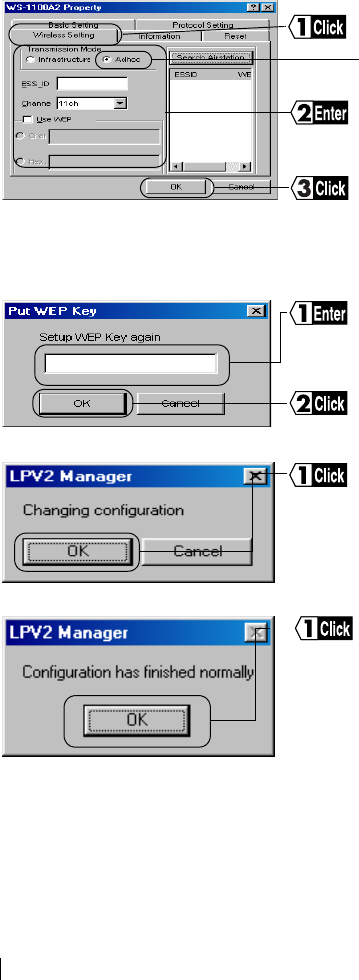
1Start LPV2 MANAGER
• Set the channel the same as Wireless LAN card setting to "Channel Box".
• If you are using a WEP Key, put check mark on the "USE WEP Key" box and enter a
WEP Key.
2
3
Setup is completed.
Click "Wireless Setting" and set “Ad-
hoc“ mode.
Enter Wireless Setting
Click [OK]
Please re-enter WEP Key at the "Re-
enter
WEP Key" message Box.
Click[OK]
Click[OK]
Click[OK]

LPV-WL11G User’s Manual (Introduction) 13
Printing from Mac (OS9.x or before)
This chapter shows how to setup your Mac (OS9.x or before) to be able to print through LPV2.
1 Select [Apple Menu] → [Selector]
2Select "LaserWriter8"
3Select "WS-xxxxxx-P1"
4Click "Setting"
Please always select "LaserWriter8" for printing through LPV2 . Other printer driver will not
work with LPV2 correctly.
'xxxxxx" is last 6 digits of LPV2 MAC address.
MAC address is 12 digits of numbers and is labeled on the side of back panel.
5Click [PPD]
6
Select "Printer Description File"
7Click "Select"
8Select Printer Description File for your printer.
<If your printer is not listed in the menu box.>
1.Copy the Printer Description File from your printer driver FD or CD to Desktop
2.Click Desktop and Select the Printer Description File in the window.
9
Close Selector
You have to re-setup whenever you select a different printer.
LPV-WL11G User’s Manual (Introduction)
14
Printing from Mac (OS X)
This chapter shows how to setup your Mac (OS X) to be able to print through LPV2.
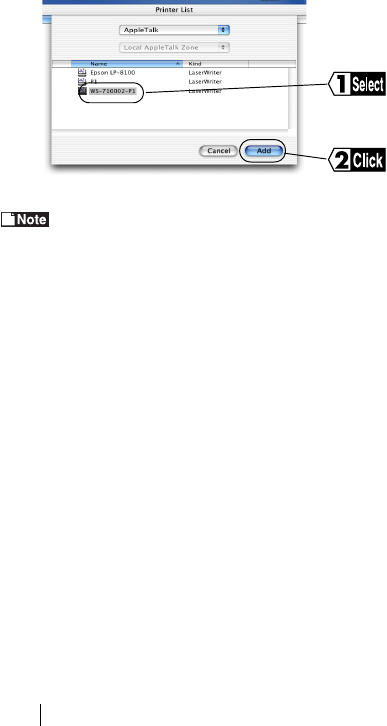
<< Using AppleTalk>>
10 Select "Applications" - "Utilities" - "Print Center"
11 Click [Add] at "No Available Printer" the message.
If you have setup before, you will see the printer list. Please click "Add Printer".
12 Select "AppleTalk" in the list-box.
13 Available printer/server names will be listed. Select "WS-xxxxxx-P1" and click "Add"
'xxxxxx" is last 6 digits of LPV2 MAC address.MAC address is 12 digits of number and is
labeled on the side of back panel.
14 If you see the printer server name on the printer list, the setup is completed.
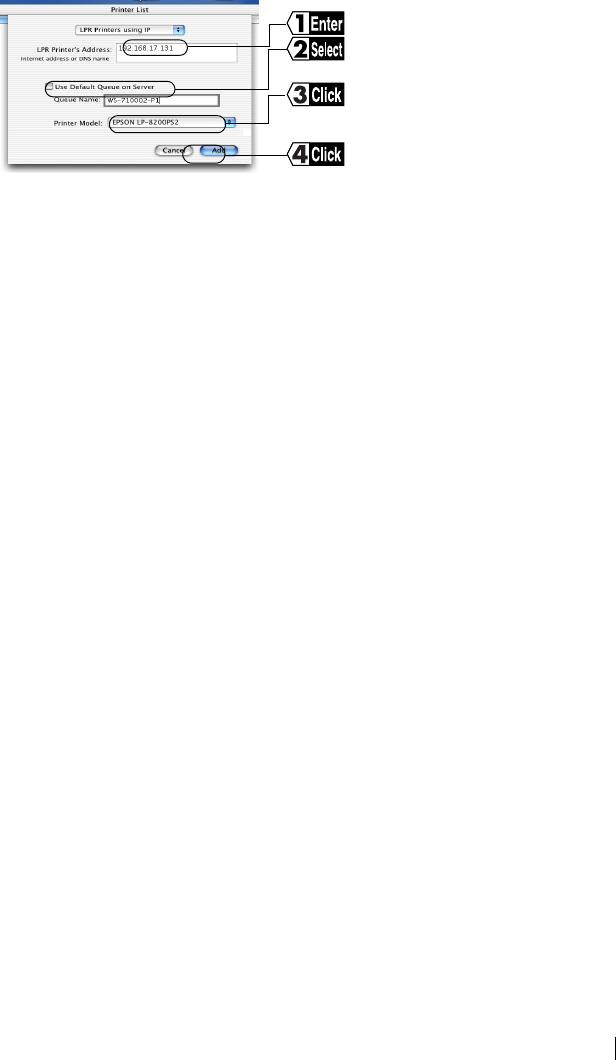
<<Using TCP/IP>>
1Select "Applications" - "Utilities" - "Print Center"
2Click [Add] at "No Available Printer" the message.
If you have setup before, you will see the printer list. Please click "Add Printer".
3Select "AppleTalk" in the list-box.
Select "WS-xxxxxx-P1"
Click "Add"
LPV-WL11G User’s Manual (Introduction) 15
4Enter the following items and click "Add"
5If you see the printer server name on the printer list, the setup is completed.
Enter LPV2 IP address
Put check mark on "Use Server's
default que"
Click "Add"
Click to chose your printer

LPV-WL11G User’s Manual (Introduction)
16
Printing from UNIX base Computer
LPV2 is not able to be setup directly from UNIX base Computer. You need to use Windows base
computer with Buffalo Wireless Client (WLI-PCM-L11G etc.) to setup the LPV2 to be able to
Print from UNIX base Computer.
Procedure:
1 Set LPV2. IP Address (In case of Static IP)
2 Verify the IP Address setting
3 Edit "/etc/hosts" file
4 Edit "/etc/printcap"
5 Print by using "lpr" command
LPV2 default setting:
• Server Name: WS-xxxxxx
• (xxxxxx is last 6 digit of MAC address. Please Refer to Page 11)
• Printer Port Name: WS-xxxxxx-P1
• IP Address: DHCP/BOOTP/RARP - automatically allocated by Server
1Set LPV2 IP Address
EX: Use following command:
Arp -s 192.168.9.123 00:60:1D23:BA:42
(Set LPV2 IP Address to 192.168.0.123)
If the LPV2 IP Address is set to [1.1.1.1], it is not able to print through LPV2. Please
set IP to other than [1.1.1.1].
2Verify the IP address setting
EX: USE following command:
Ping 192.168.0.123
3Edit "/etc/hosts" file
Define LPV2 IP Address, Domain Name and LPV2 Server Name on "etc/hosts" file.
Add as following:
192.168.0.123

LPV-WL11G User’s Manual (Introduction) 17
4Edit "/etc/printcap" file
Add a line as following:
LPV|LPV Line printer/:lp=:rm=LPV:sd=/usr/spool/LPV:rp=WS-23BA42-P1:
Meaning of the words in description:
lp (Local Printer): It specifies the Local Printer Name.
rm (Remote Machine): It specifies the LPV Host Name which should be
defined in "hosts" file.
sd (Spool Directory): It specifies the directory where system spools print
data.
The spool directory must be setup before printing.
rp (Remote Printer): It specifies the port on which printer is connected.
5Print by using lpr command.
6Use lpr command to Print
Lpr-PLPV "File Name"
If you need to print without re-boot the computer after all setup, please use following
command:
lpc restart LPV
LPV-WL11G User’s Manual (Introduction)
18
Changing LPV2 Setting
This chapter will explain to you about possible issues, causes, and solutions in using LPV2
Here, we show the how to change the LPV2 setting with Windows98 as an example.
LPV2 Default Setting:
• LPV2 Server Name: WS-xxxxxx
• Printer Port Name: WS-xxxxxx-P1
*"(xxxxxx" is last 6 digit of MAC address. Please Refer to Page 11)
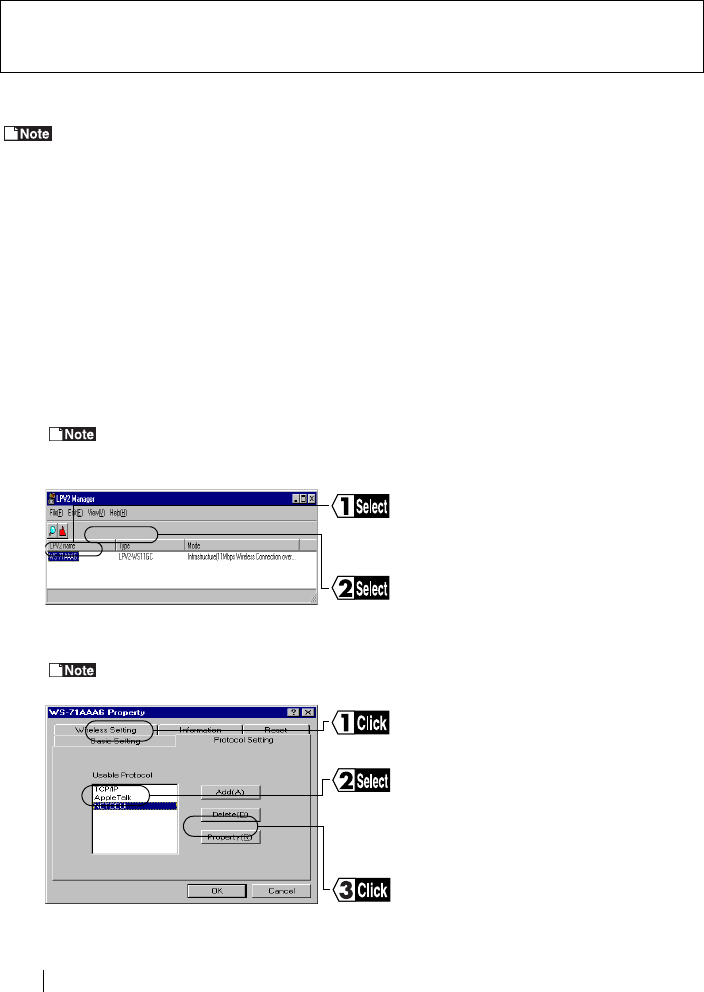
Changing Workgroup Setting (EX: Workgroup Name: "WORKGROUP" → "BUFFALO")
1Select [Start] → [Program] → [BUFFALO AIRSTATION] → [LPV2 MANAGER]
Windows XP: Select [Start] → [All Program] → [BUFFALO AIRSTAION] → [LPV2
MANAGER]
2
If the "Password BOX" is showed, please enter the password and click OK.
The setting password will be showed as "*".
3
Changing Workgroup Setting (For NetBEUI protocol
users ONLY)
Select "LPV Name" in the window.
Select [EDIT]
→
[Login]
Click "Protocol Setting"
"Property"
Select "NetBEUI"
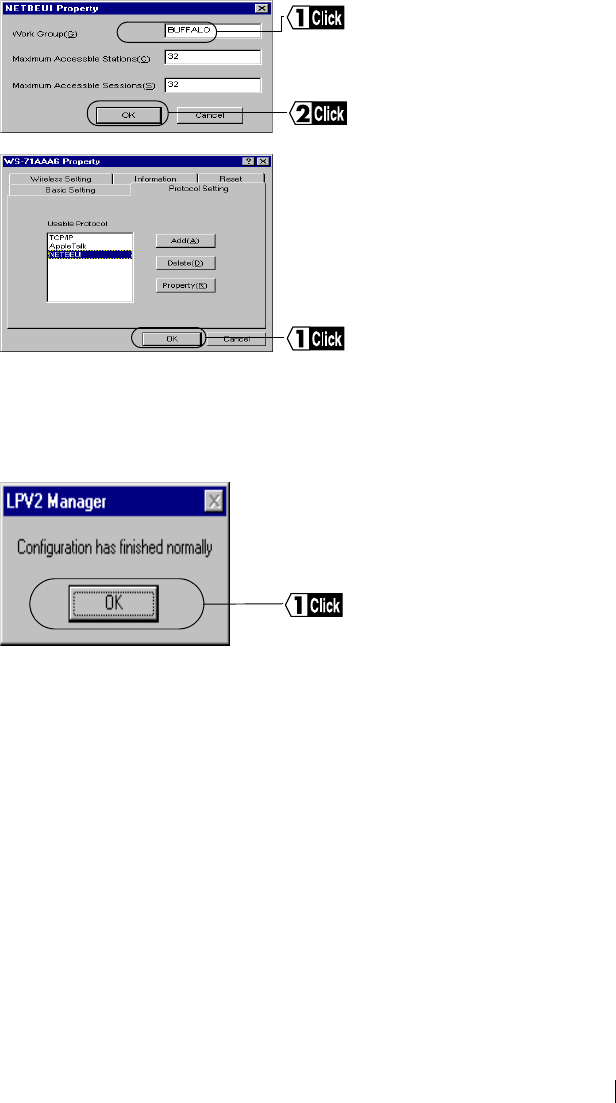
LPV-WL11G User’s Manual (Introduction) 19
4
5
6Click [OK]
The setting will be changed.
7
Exit "LPV2 MANAGER"
Click and Change the name
[WORKGROUP] to [BUFFALO]
Click [OK]
Click [OK]
[OK]
LPV-WL11G User’s Manual (Introduction)
20
Here, we show how to change the LPV2 setting with Windows98 as a example.
LPV2 Default Setting:
• LPV2 Server Name: WS-xxxxxx
• Printer Port Name: WS-xxxxxx-P1
*"(xxxxxx" is last 6 digit of MAC address. Please Refer to Page 11)
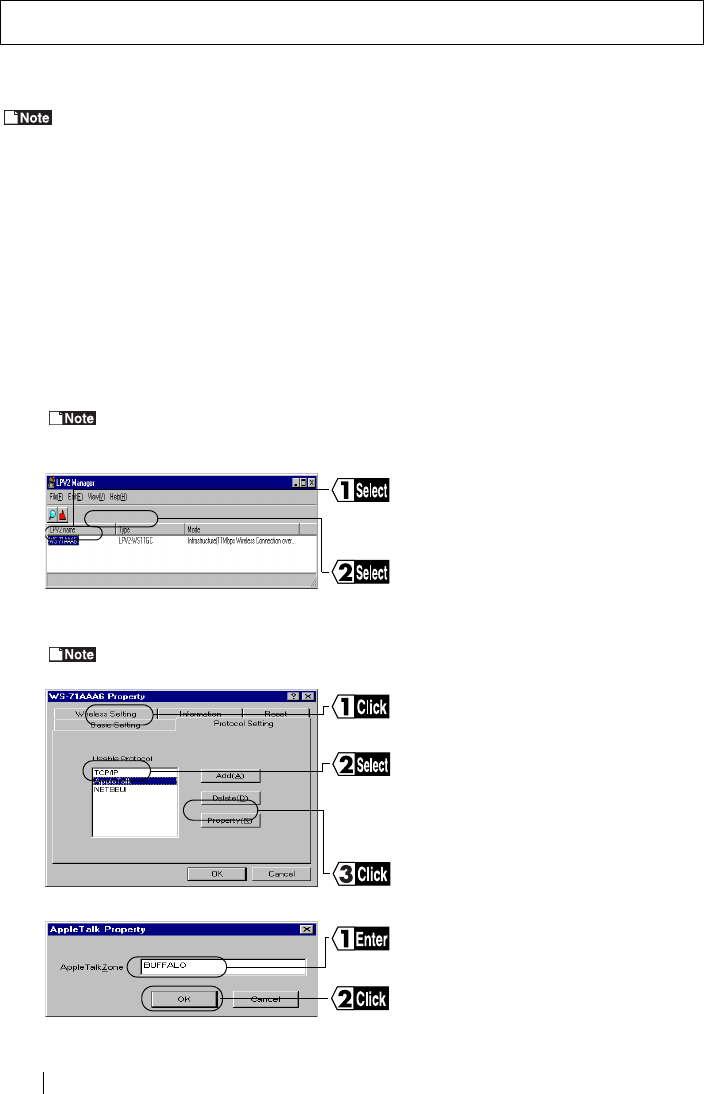
EX: Changing "AppleTalkZone" → "BUFFALO"
1Select [Start] → [Program] → [BUFFALO AIRSTATION] → [LPV2 MANAGER]
Windows XP: Select [Start] → [All Program] → [BUFFALO AIRSTAION] → [LPV2
MANAGER]
2
If the "Password BOX" is showed, please enter the password and click OK.
The setting password will be showed as "*".
3
4
Changing AppleTalk Setting (Zone)
Select "LPV Name" in the window.
Select [EDIT]
→
[Login]
Click "Protocol Setting"
"Property"
Select "NetBEUI"
Click and Change [AppleTalkZone]to
[BUFFALO]
Click [OK]
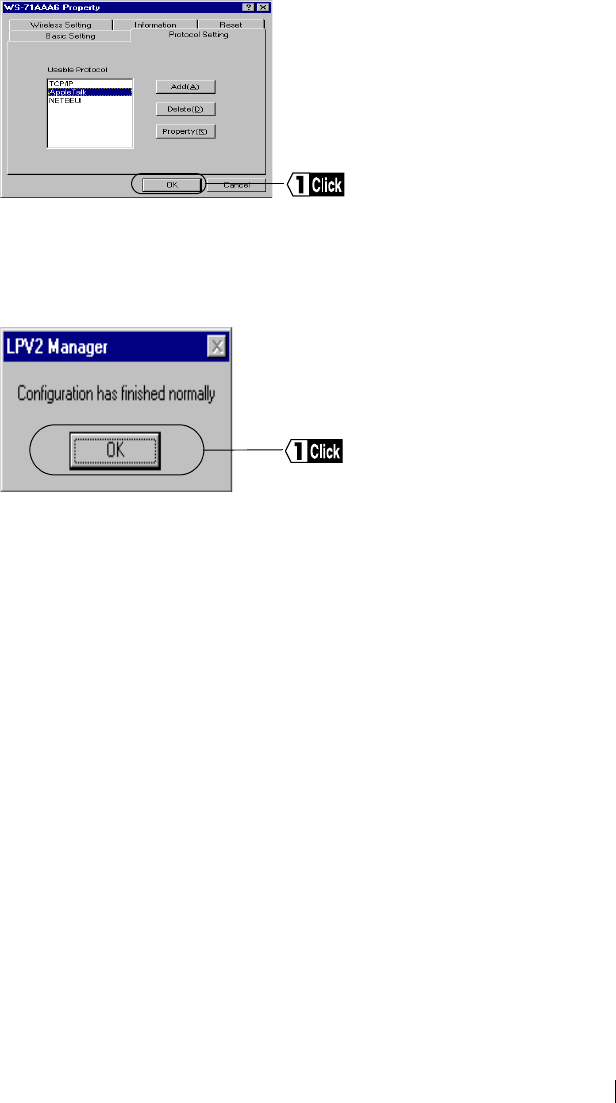
LPV-WL11G User’s Manual (Introduction) 21
5
6Click [OK]
The setting will be changed.
7
Exit "LPV2 MANAGER"
Click [OK]
[OK]

LPV-WL11G User’s Manual (Introduction)
22
LPV2 Factory Default Settig
※ [
xxxxxx
]: Last 6 digits of MAC Address. Please refer to P11
Item Default Setting
Standard Setup
Server Name WS-xxxxxx ※
Password None
Port Name WS-xxxxxx-P1 ※
High Speed Transfer Enabled
Protocol Setup
Get IP Address Automatically
DHCP Enabled
BOOTP Enabled
RARP Enabled
IP Address 1.1.1.1
Sub Set Mask 255.0.0.0
Gateway 0.0.0.0
AppleTalkZone *
Work Group WORKGROUP
Max. Number of Connection 32
Max. Number of Session 32
Wireless Setup
Communication Mode Adhoc
ESS-ID None
Wireless Channel 11 channels
WEP Disabled

LPV-WL11G User’s Manual (Introduction) 23
Product Specifications
Wireressl LAN
Interface
Conforming Stan-
dards
IEEE802.11b (Wireless LAN Standard Proto-
col)
RCR STD-33、ARIB STD-T66 (Low-Powor
Data communication System Standards)
Data Transfer
Method
DS-SS Simplex (Half Duplex)
Data Transfer Rate 1 , 2 , 5.5 , 11Mbps Auto Sense
Access Method Infrastracture Mode / Adhock Mode
Frequency Range
Mid-Frequency)2412 ∼2484MHz
※ No confrict with Cell-Phone, Codeless
phone, Television, and Radio
Communications
Distance (Depend-
ing on ambient con-
ditions)
25m Indors, 50m outdors at 11 Mbps
35m Indors, 70m outdors at 5.5 Mbps
40m Indors, 90m outdors at 2 Mbps
50m Indors, 115m outdors at 1Mbps
Printer Interface 36pin Standard Printer Interfacet
Power / Current Con-
sumption
3.5W (Max) / 0.7A (Max)
Operating Tempra-
ture / Humidity
0℃ to 40 ℃ / 0% to 80% (noncondensing)
Weight 重量 70g (without AC Adoptor)
Dimensions 62(W) ×98(H) ×25(D)mm

LPV-WL11G User’s Manual (Introduction)
24
Printer Interface Specification
DB25 Pin Printer Port
モジュラコネクタ仕様
Pin Num. Name of Singnal Pin Num. Name of Singnal
1nStrobe 19 Signal Ground(nStrobe)
2Data1 20 Signal Ground(Data1)
3Data2 21 Signal Ground(Data2)
4Data3 22 Signal Ground(Data3)
5Data4 23 Signal Ground(Data4)
6Data5 24 Signal Ground(Data5)
7Data6 25 Signal Ground(Data6)
8Data7 26 Signal Ground(Data7)
9Data8 27 Signal Ground(Data8)
10 nAck 28 Signal Ground(Paper Empty ,
Select , nAck)
11 Busy 29 Signal Ground(Busy , nFault)
12 Paper Empty 30 Signal Ground(nAutoFd ,
nSelect , nInit)
13 Select 31 nInit
14 nAutoFd 32 nFault
15 Not defined 33 Not defined
16 Logic Gnd 34 Not defined
17 Chassis Gnd 35 Not defined
18 Phipheral Logic High 36 nSelect In

PY00-28003-DM20-01 1-01
Federal Communication Commission Interference Statement
This equipment has been tested and found to comply with the limits for a Class B digital
device, pursuant to Part 15 of the FCC Rules. These limits are designed to provide
reasonable protection against harmful interference in a residential installation. This
equipment generates, uses and can radiate radio frequency energy and, if not installed
and used in accordance with the instructions, may cause harmful interference to radio
communications. However, there is no guarantee that interference will not occur in a
particular installation. If this equipment does cause harmful interference to radio or
television reception, which can be determined by turning the equipment off and on, the
user is encouraged to try to correct the interference by one of the following measures:
-Reorient or relocate the receiving antenna.
-Increase the separation between the equipment and receiver.
-Connect the equipment into an outlet on a circuit different from that
to which the receiver is connected.
-Consult the dealer or an experienced radio/TV technician for help.
FCC Caution: To assure continued compliance, (example - use only shielded interface
cables when connecting to computer or peripheral devices). Any changes or modifications
not expressly approved by the party responsible for compliance could void the user's
authority to operate this equipment.
This device complies with Part 15 of the FCC Rules. Operation is subject to the following
two conditions: (1) This device may not cause harmful interference, and (2) this device
must accept any interference received, including interference that may cause undesired
operation.
IMPORTANT NOTE:
FCC Radiation Exposure Statement:
This equipment complies with FCC radiation exposure limits set forth for an uncontrolled
environment. This equipment should be installed and operated with minimum distance
20cm between the radiator & your body.
This transmitter must not be co-located or operating in conjunction with any other antenna
or transmitter.