Broadcom BRCM1015 2.4 GHz / 5 GHz 802.11a/b/g WLAN Mini PCI Card User Manual Contents Dell TrueMobile WLAN Card User s Guide

Broadcom Corporation 2.4 GHz / 5 GHz 802.11a/b/g WLAN Mini PCI Card Contents Dell TrueMobile WLAN Card User s Guide

Contents

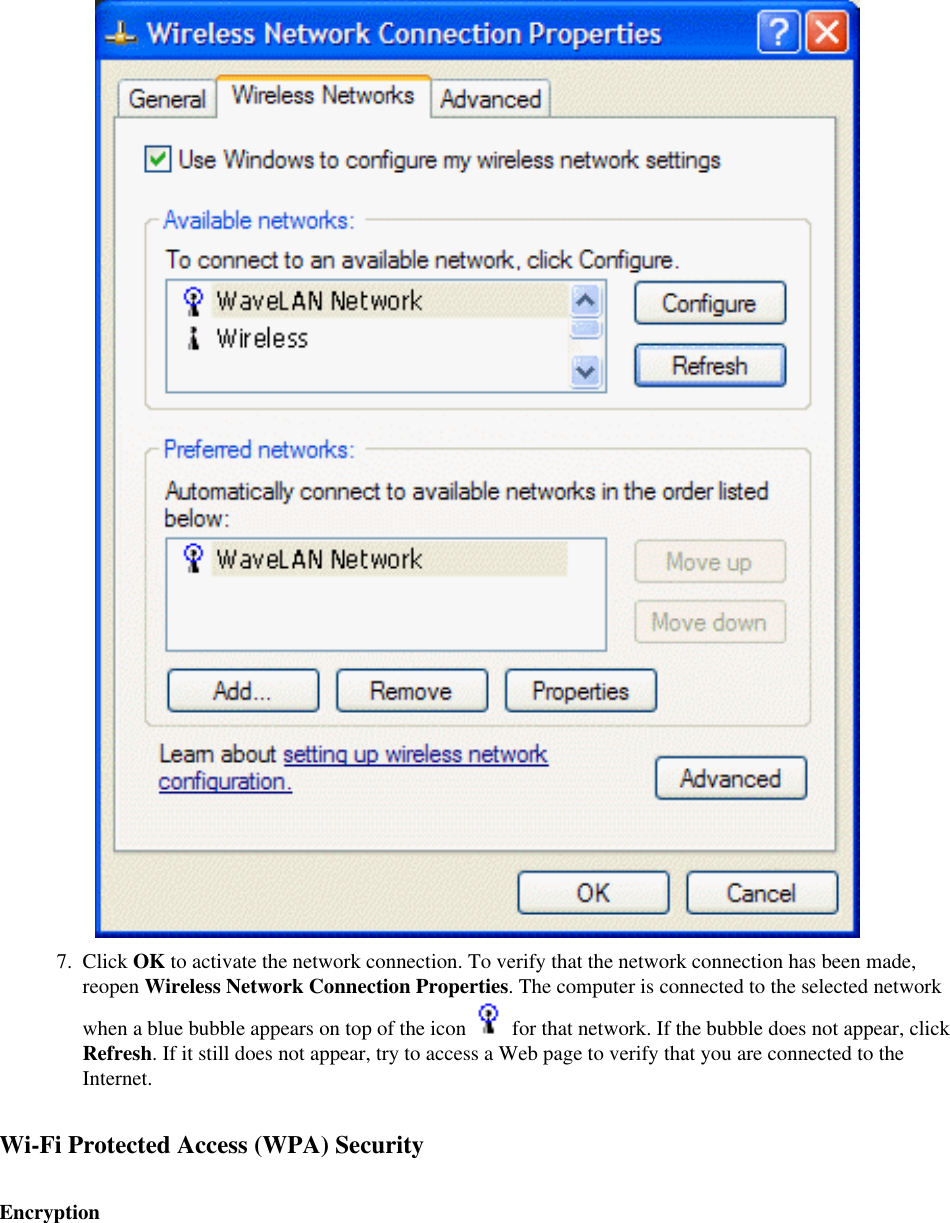
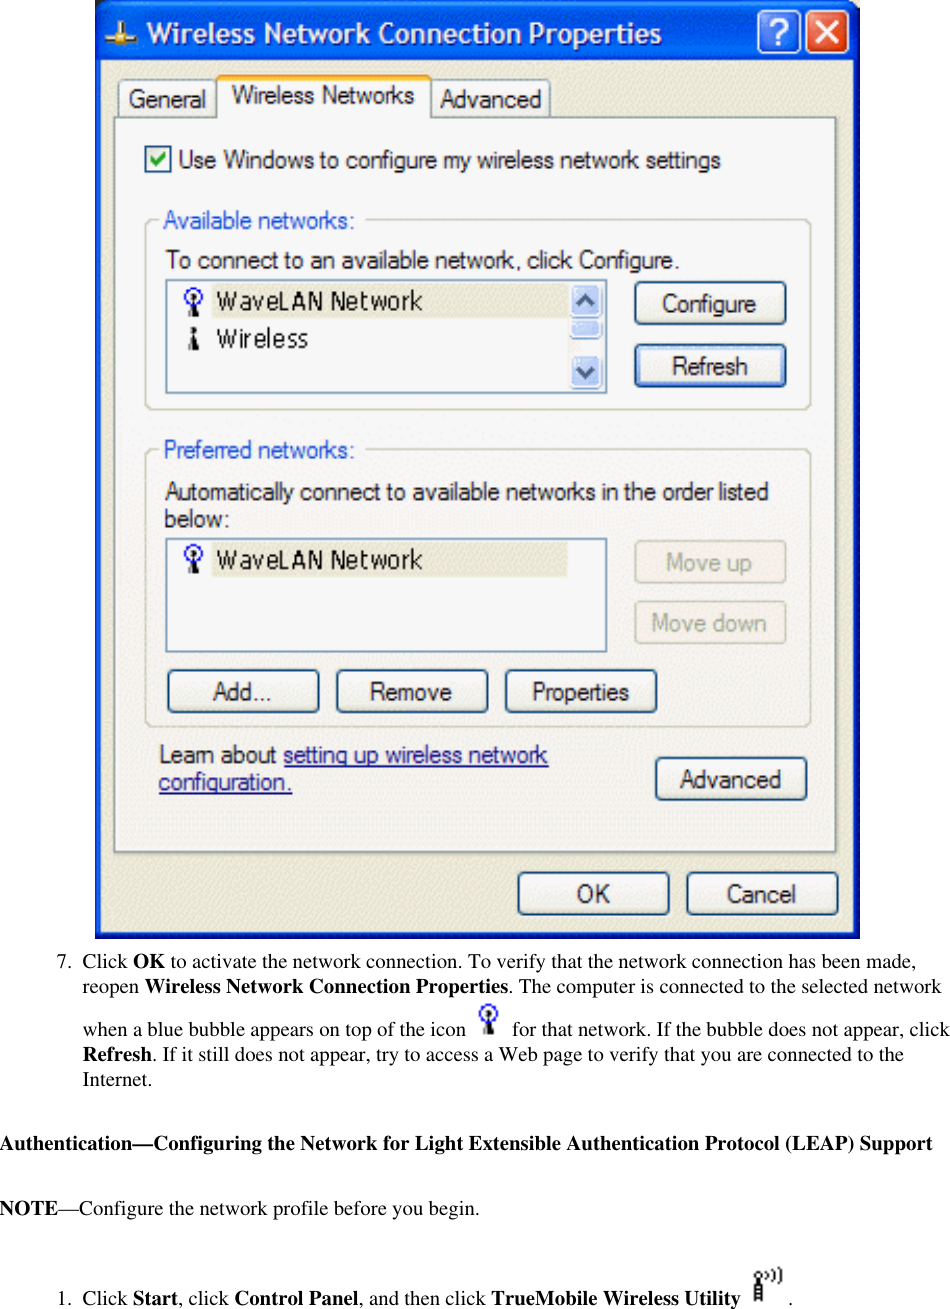
WLAN Card Users Guide

Boadcom 802.11ag WLAN Card User's Guide, BCM94309MPThe TrueMobile SolutionThe TrueMobile solution accesses wireless local area networks (WLANs), enables the sharing of a local printer and files with others in the network, enables Internet connection sharing, and enables roaming about the office—wire-free. This wireless LAN solution is designed for both the home user and businesses—and it is scalable so that users can be added and new network features can be enabled as networking needs grow. Configuring a Network Profile in Infrastructure Mode (Windows® XP Environment)Before you can connect to a wireless network, you must configure a network profile for that network on your notebook computer. If you purchased your notebook computer with the Boadcom WLAN Card already installed and set up at the factory, follow the network profile configuration instructions provided below. If this is not the case, first verify that the Boadcom WLAN Card has been properly installed in your computer according to the installation instructions. Then proceed with the following instructions for configuring your network profiles.To begin configuring a network profile, open Wireless Network Connection Properties. 1.  Click Start, click Control Panel, and then click Network Connections.
2.  Click Wireless Network Connection.3.  Under Network Tasks, click Change settings of this connection. NOTE—For more information on how to configure a network profile and IEEE 802.1x authentication, click Learn about setting up wireless network configuration.You can configure a network profile for networks that are listed under Available networks as well as those that are not listed. When you have completed configuring a network profile, the network name and icon appear at the top of the list under Preferred networks. Your computer automatically connects to the network at the top of the list. Follow the applicable instruction set below, based on whether or not the network is listed and whether or not the network requires network key information (check with your network administrator or access point (AP) installer to see if network key information is required). NOTE—Both the network name and the network key information are case-sensitive.❍     Configuring a Profile for a Listed Network That Does Not Require Network Key Information❍     Configuring a Profile for a Listed Network That Requires Network Key Information❍     Configuring a Profile for a Network That Is Not Listed and Does Not Require Network Key Information❍     Configuring a Profile for a Network That Is Not Listed and Requires Network Key InformationConfiguring a Profile for a Listed Network That Does Not Require Network
Key Information (Windows XP Environment)1.  Click the network name under Available networks and click Configure.2.  Click OK. The network name and icon appear at the top of the list under Preferred networks.
3.  Click OK to activate the network connection. To verify that the network connection has been made, reopen Wireless Network Connection Properties. The computer is connected to the selected network when a blue bubble appears on top of the icon   for that network. If the bubble does not appear, click Refresh. If it still does not appear, try to access a Web page to verify that you are connected to the Internet. Configuring a Profile for a Listed Network That Requires Network Key Information (Windows XP Environment)Wired Equivalent Privacy (WEP) Security
2.  Clear the The key is provided for me automatically check box. 3.  From the Network Authentication list, select Open. 4.  From the Data encryption list, select WEP. 5.  Type the network key in the Network key box and again in the Confirm network key box. 6.  Click OK. The network name and icon appear at the top of the list under Preferred networks. 1.  Click the network name under Available networks and then click Configure.
7.  Click OK to activate the network connection. To verify that the network connection has been made, reopen Wireless Network Connection Properties. The computer is connected to the selected network when a blue bubble appears on top of the icon   for that network. If the bubble does not appear, click Refresh. If it still does not appear, try to access a Web page to verify that you are connected to the Internet. Wi-Fi Protected Access (WPA) SecurityEncryption
3.  From the Network Authentication list, select the network authentication type specified by the network administrator/AP installer.4.  From the Data encryption list, select the data encryption type specified by the network administrator/AP installer.5.  If required by the network administrator/AP installer, type the network key in the Network key box and again in the Confirm network key box. NOTE—A network key is not required for WPA type network authentication.6.  Click OK. The network name and icon appear at the top of the list under Preferred networks. 1.  Click the network name under Available networks and then click Configure. 2.  Clear the The key is provided for me automatically check box.
7.  Click OK to activate the network connection. To verify that the network connection has been made, reopen Wireless Network Connection Properties. The computer is connected to the selected network when a blue bubble appears on top of the icon   for that network. If the bubble does not appear, click Refresh. If it still does not appear, try to access a Web page to verify that you are connected to the Internet.Authentication—Configuring the Network for Light Extensible Authentication Protocol (LEAP) SupportNOTE—Configure the network profile before you begin.1.  Click Start, click Control Panel, and then click TrueMobile Wireless Utility .
2.  Click the LEAP tab.3.  Select the Enable LEAP check box.4.  Click the network name, and then click Properties. 5.  Type the network name, LEAP user name, and LEAP password in the respective boxes and click OK.
Configuring a Profile for a Network That Is Not Listed and Does Not Require Network Key Information (Windows XP Environment)
2.  Type the network name in the Network name (SSID) box and Click OK. 1.  Under Preferred networks, click Add.
3.  Click OK to activate the network connection. To verify that the network connection has been made, reopen Wireless Network Connection Properties. The computer is connected to the added network when a blue bubble appears on top of the icon   for that network. If the bubble does not appear, click Refresh. If it still does not appear, try to access a Web page to verify that you are connected to the Internet.
Using Wireless Utility: Windows XP Environment1.  Open the TrueMobile Wireless Utility.
2.  Click the Link Status tab. The quality of the connection (signal strength and noise) of the particular network you are connected to is indicated by the horizontal bars and the decibel level values that are displayed at the bottom of the Link Status tab. The connection quality is also indicated by the appearance of the utility icon  in the desk top system tray. The description of the signal strength appears when you hover the cursor over the icon.The table below shows the quality level and suggested action for improving the signal quality for each icon image that may be displayed. If the signal strength indications are anything other than very good or excellent, you should take the appropriate suggested action.Four vertical green bars indicate that the signal strength is very good or excellent.Three vertical green bars indicate that the signal is good.
Three vertical yellow bars indicate that the signal strength is low.Suggested action: Move closer to the access point.Two red vertical red bars indicates that the signal strength is very low.Suggested action: Move closer to the access point.Uncolored vertical bars indicate that there is no signal being received.Probable causes: ●     The computer is trying to establish an initial connection but has not yet succeeded.●     You may have moved out of range of the access point.Suggested action:●     Wait●     Move closer to the access point.Uncolored vertical bars with a superimposed red letter x indicate that there is no radio connection.Probable cause: The radio is disabled. Suggested action: Enable the radio. To enable the radio, right-click the utility icon   in the system tray and click Enable Radio.Disabling the RadioTo disable the radio on your Broadcom WLAN Card, right-click the utility icon   in the system tray and click Disable Radio. To enable the radio, right-click the icon  and click Enable Radio. On newer Dell TrueMobile enabled notebooks, the radio can be enabled/disabled by pressing Fn + F2.DiagnosticsYou can run a number of diagnostics on your Broadcom WLAN Card to verify its operational and functional status. NOTE—The network connection is lost when you run the diagnostics. When the test run is over, however, your network connection is automatically reestablished.
2.  Click the Diagnostics tab.3.  To see a description of the test, click each test and look in the Recommendations area.4.  All tests are selected by default. To run an individual test or some but not all of the tests, clear the check box for those tests that you do not want to run.5.  Click Run Tests. 6.  If your Braodcom WLAN Card fails any of the diagnostics tests, see Troubleshooting.Windows XP Environment1.  Open the TrueMobile Wireless Utility.
Regulatory Information: Information for the UserRegulatory InformationInformation for the UserWireless InteroperabilityThe Broadcom WLAN Card products are designed to be interoperable with any wireless LAN product that is based on direct sequence spread spectrum (DSSS) and orthogonal frequency division multiplexing (OFDM) radio technology and to comply with the following standards:●     IEEE Std 802.11b-1999. Standard on 2.4 GHz Wireless LAN●     IEEE draft Std 802.11g. Standard on 2.4 GHz Wireless LAN●     IEEE Std 802.11a-1999. Standard on 5 GHz Wireless LANThe Broadcom WLAN Cards and Your HealthThe Broadcom  WLAN Cards, like other radio devices, emit radio frequency electromagnetic energy. The level of energy emitted by these devices, however, is less than the electromagnetic energy emitted by other wireless devices such as mobile phones. The Broadcom  WLAN Card devices operate within the guidelines found in radio frequency safety standards and recommendations. These standards and recommendations reflect the consensus of the scientific community and result from deliberations of panels and committees of scientists who continually review and interpret the extensive research literature. In some situations or environments, the use of a Broadcom  WLAN Card wireless device may be restricted by the proprietor of the building or responsible representatives of the applicable organization. Examples of such situations include the following:●     Using the Broadcom  WLAN Card equipment onboard airplanes, or●     Using the Broadcom  WLAN Card equipment in any other environment where the risk of interference with other devices or services is perceived or identified as being harmful.If uncertain of the policy that applies to the use of wireless devices in a specific organization or environment (an airport, for example), ask for authorization to use the Broadcom  WLAN Card device before turning it on.Regulatory InformationThe Broadcom  WLAN Card devices must be installed and used in strict accordance with the manufacturer's instructions as
described in the user documentation that comes with the product. Boadcom is not responsible for any radio or television interference caused by unauthorized modification of the devices included with this Broadcom WLAN Card kit, or the substitution or attachment of connecting cables and equipment other than that specified by Broadcom Corporation. The correction of interference caused by such unauthorized modification, substitution, or attachment is the responsibility of the user. Broadcom Corporation and its authorized resellers or distributors are not liable for any damage or violation of government regulations that may arise from the user's failing to comply with these guidelines.Canada—Industry Canada (IC)These devices comply with RSS210 of Industry Canada.Europe—EU Declaration of ConformityThis equipment complies with the essential requirements of the European Union directive 1999/5/EC.Cet équipement est conforme aux principales caractéristiques définies dans la Directive européenne RTTE 1999/5/CE.Die Geräte erfüllen die grundlegenden Anforderungen der RTTE-Richtlinie 1999/5/EG.Questa apparecchiatura è conforme ai requisiti essenziali della Direttiva Europea R&TTE 1999/5/CE.Este equipo cumple los requisitos principales de la Directiva 1999/5/CE de la UE, "Equipos de Terminales de Radio y Telecomunicaciones".Este equipamento cumpre os requisitos essenciais da Directiva 1999/5/CE do Parlamento Europeu e do Conselho (Directiva RTT).O exoplismos autos plhroi tis basikes apaits ths koinotikhs odhgias EU R&TTE 1999/5/E.Deze apparatuur voldoet aan de noodzakelijke vereisten van EU-richtlijn betreffende radioapparatuur en telecommunicatie-eindapparatuur 1999/5/EG.Dette udstyr opfylder de Væsentlige krav i EU's direktiv 1999/5/EC om Radio- og teleterminaludstyr.Dette utstyret er i overensstemmelse med hovedkravene i R&TTE-direktivet (1999/5/EC) fra EU.Utrustningen uppfyller kraven för EU-direktivet 1999/5/EC om ansluten teleutrustning och ömsesidigt erkännande av utrustningens överensstämmelse (R&TTE).Tämä laite vastaa EU:n radio- ja telepäätelaitedirektiivin (EU R&TTE Directive 1999/5/EC) vaatimuksia.This product is intended to be used in all countries of the European Economic Area when operating in IEEE 802.11b and/or IEEE draft 802.11g mode at 2.4 GHz (see France below). When operating in the IEEE 802.11a mode at 5 GHz, however, the product is restricted further. Refer to Dell's Web site (www.dell.com) for full information.
France  In all Metropolitan départements, wireless LAN frequencies can be used under the following conditions, either for public or private use:  • Indoors with a maximum power (EIRP) of 100 mW across the entire 2400–2483.5 MHz frequency band. • Outdoors witha maximum power (EIRP) of 100 mW for the 2400–2454 MHz frequency band, and a maximum power (EIRP) of 10 mW for the 2454–2483.5 MHz frequency band.   USA—Federal Communications Commission (FCC)  These devices comply with Part 15 of the FCC Rules. Operation of the devices is subject to the following two conditions: • The devices may not cause harmful interference. • The devices must accept any interference that may cause undesired operation.  Interference statement This equipment has been tested and found to comply with the limits for a Class B digital device, pursuant to Part 15 of the FCC Rules. These limits are designed to provide reasonable protection against harmful interference in a residential installation. This equipment generates, uses, and can radiate radio frequency energy. If the equipment is not installed and used in accordance with the instructions, the equipment may cause harmful interference to radio communications. There is no guarantee, however, that such interference will not occur in a particular installation. If this equipment does cause harmful interference to radio or television reception (which can be determined by turning the equipment off and on), the user is encouraged to try to correct the interference by taking one or more of the following measures:  • Reorient or relocate the receiving antenna. • Increase the distance between the equipment and the receiver. • Connect the equipment to an outlet on a circuit different from that to which the receiver is connected. • Consult the dealer or an experienced radio/TV technician for help.    FCC Radiation Exposure Statement  Important Note: To comply with FCC RF exposure compliance requirement, the antenna used for this transmitter must be installed to provide a separation distance of at least 20cm from all persons and must not be co-located or operating in conjunction with any other transmitter.
DGT warning statement

Navigation menu