Broadxent CB5722 BLUETOOTH MODEM User Manual CB5722 UG
Broadxent Pte Ltd. BLUETOOTH MODEM CB5722 UG
Users Manual


User’s Guide
Creative Modem Blaster Wireless CB5722
Information in this document is subject to change without notice and does not represent a commitment on the part of Creative
Technology Ltd. No part of this manual may be reproduced or transmitted in any form or by any means, electronic or mechanical,
including photocopying and recording, for any purpose without the written permission of Creative Technology Ltd. The software
described in this document is furnished under a license agreement and may be used or copied only in accordance with the terms of
the license agreement. It is against the law to copy the software on any other medium except as specifically allowed in the license
agreement. The licensee may make one copy of the software for backup purposes only.
The Software License Agreement can be found on the Installation CD.
Copyright © 2004 Creative Technology Ltd. All rights reserved.
Version 1.0
June 2004
The Creative logo, Blaster, and Modem Blaster are trademarks or registered trademarks of Creative Technology Ltd. in the United
States and/or other countries. Microsoft, MS-DOS, Windows, Windows NT and the Windows logo are registered trademarks of
Microsoft Corporation. Intel and Pentium are registered trademarks of Intel Corporation. AMD and AMD-K6 are trademarks or
registered trademarks of Advanced Micro Devices, Inc. The Bluetooth word mark and logos are owned by the Bluetooth SIG, Inc.
All other products are trademarks or registered trademarks of their respective owners. All specifications are subject to change without
prior notice. Actual contents may differ slightly from those pictured. This product is covered by one or more of the following U.S.
patents:
4,506,579; 4,699,038; 4,987,600; 5,013,105; 5,072,645; 5,111,727; 5,144,676; 5,170,369; 5,248,845; 5,298,671; 5,303,309;
5,317,104; 5,342,990; 5,430,244; 5,524,074; 5,698,803; 5,698,807; 5,748,747; 5,763,800; 5,790,837.

Contents

i
Contents
1 Introduction
Before You Begin....................................................................................................................................... 1-2
Package Contents............................................................................................................................ 1-2
Minimum System Requirements................................................................................................. 1-2
Model Number and Serial Number........................................................................................... 1-2
Creative Knowledge Base............................................................................................................. 1-2
Product Registration....................................................................................................................... 1-3
Customer Support Services and Warranty information..................................................... 1-3
Document Conventions................................................................................................................ 1-4
2 About Your Hardware
Your Modem............................................................................................................................................... 2-1
Your Creative Wireless USB Adapter................................................................................................ 2-3
3 Setting Up A Bluetooth Connection
Noting Down the Modem BDA and Pin Code............................................................................... 3-1
Installing Software...................................................................................................................................... 3-1
Installing Hardware.................................................................................................................................... 3-3
Configuring Your Bluetooth Device.................................................................................................... 3-4
Verifying Your Bluetooth Installation.................................................................................................. 3-4
Pairing Your Bluetooth Devices............................................................................................................ 3-5

ii
4 Setting Up A Serial Connection
Installing Software...................................................................................................................................... 4-1
Installing Hardware.................................................................................................................................... 4-2
Notes on connecting the telephone line and telephone..................................................... 4-4
Testing Modem Drivers........................................................................................................................... 4-5
In Windows XP and Windows 2000......................................................................................... 4-5
In Windows Me and Windows 98 SE....................................................................................... 4-6
5 Uninstalling Drivers and Software
Uninstalling Bluetooth Software............................................................................................................ 5-1
In Windows XP and Windows 2000......................................................................................... 5-1
In Windows Me and Windows 98 SE....................................................................................... 5-1
Uninstalling Serial Modem Drivers....................................................................................................... 5-2
In Windows XP and Windows 2000......................................................................................... 5-2
In Windows Me and Windows 98 SE....................................................................................... 5-2
6 Modem Features
Basic Features............................................................................................................................................. 6-1
System Compatibility...................................................................................................................... 6-1
Bluetooth connectivity................................................................................................................... 6-1
Exceptional Performance.............................................................................................................. 6-1
Voice Mail........................................................................................................................................... 6-1
Fax Support........................................................................................................................................ 6-1
Backward Compatibility................................................................................................................. 6-1
V.92 Features.............................................................................................................................................. 6-2
V.44 Compression........................................................................................................................... 6-2
PCM Upstream................................................................................................................................. 6-2

iii
Quick Connect................................................................................................................................. 6-2
Modem-On-Hold............................................................................................................................. 6-3
Receiving a call........................................................................................................................ 6-4
Making a call............................................................................................................................. 6-6
Appendixes
A Technical Specifications
Modem.......................................................................................................................................................... A-1
Size (L x W x H)................................................................................................................... A-1
Weight...................................................................................................................................... A-1
Bluetooth Specifications...................................................................................................... A-1
Data Features......................................................................................................................... A-2
Fax Features............................................................................................................................ A-2
Voice Features....................................................................................................................... A-2
Video Instant Messaging Support..................................................................................... A-2
LED Indicators....................................................................................................................... A-2
Interface Switch..................................................................................................................... A-3
Operating Temperature..................................................................................................... A-3
Relative Humidity.................................................................................................................. A-3
Storage Temperature.......................................................................................................... A-3
Caller ID.................................................................................................................................. A-3
Creative Wireless USB Adapter........................................................................................................... A-3
Size (L x W x H)................................................................................................................... A-3
Weight...................................................................................................................................... A-3
Profiles...................................................................................................................................... A-3
Operating Temperature..................................................................................................... A-4
Relative Humidity.................................................................................................................. A-4

iv
Storage Temperature.......................................................................................................... A-4
Compliance............................................................................................................................. A-4
Operating Range................................................................................................................... A-4
Network Support................................................................................................................. A-4
Security..................................................................................................................................... A-4
Input Voltage.......................................................................................................................... A-4
Data Rate................................................................................................................................. A-4
RF module sensitivity........................................................................................................... A-4
Transmitting Power.............................................................................................................. A-4
LED Indicators....................................................................................................................... A-5
B Frequently Asked Questions
Installation and Configuration................................................................................................................ B-1
Operation..................................................................................................................................................... B-4
Difficulties with Modem-On-Hold.............................................................................................. B-9
Maintenance and Safety.......................................................................................................................... B-10
Updates....................................................................................................................................................... B-11
Introduction

Introduction 1-1
Introduction
Creative Modem Blaster® Wireless CB5722 is an easy-to-use, external modem
that provides mobile access to the Internet for your Bluetooth enabled Windows®
computer. Modem Blaster Wireless CB5722 is a Class 1 Bluetooth device that
provides wireless connections to computers at ranges of up to 100 m (330 ft)*. At
the flick of a switch, your modem can enable Bluetooth connectivity immediately.
Modem Blaster Wireless CB5722 makes connecting to the Internet much more
convenient. You enjoy shorter dial-up times, and can continue to receive and make
phone calls while surfing**. You can also be assured of outstanding performance
from your computer because of Modem Blaster Wireless CB5722's unique modem
controller, which frees up your computer resources.
Security is ensured with the Bluetooth security key, unique to each Bluetooth
device. The key is transmitted in a secure environment to prevent interception.
* Depends on environment and interference.
** Call services are available only with serial connection and requires support from your ISP.

Introduction 1-2
Before You
Begin
Package Contents • Modem Blaster Wireless modem (CB5722)
• Quick Start leaflet
• Serial cable (RS-232)
• Creative Wireless USB Adapter (CW2430)
• Telephone cable (RJ-11)
• Power adapter
• Installation CD
Minimum System
Requirements*• Microsoft® Windows® XP, Windows Millennium Edition (Me), Windows 2000 or
Windows 98 Second Edition (SE)
•Intel
® Pentium® II 300 MHz or equivalent
• 50 MB of free hard disk space (100 MB for full software installation)
• 64 MB RAM (128 MB recommended)
• Available 9-pin or 25-pin serial port (for serial connections)
• Available USB port (for Bluetooth connections)
• CD-ROM/DVD-ROM drive for software installation
Model Number
and Serial Number Note down the model and serial numbers for your modem. You will need to provide
these numbers if you contact Customer Support Services.
You also need to note down the Bluetooth device address (BDA) and pin code when
setting up your Bluetooth connection.
Creative
Knowledge Base Resolve and troubleshoot technical queries at Creative's 24-hour self-help
Knowledge Base. Go to www.creative.com and select your region.
* Individual software may have additional system requirements.

Introduction 1-3
Product
Registration Enjoy a host of benefits by registering your product during installation, or at
www.creative.com/register. Benefits include:
• Service and product support from Creative
• Exclusive updates on promotions and events
Customer Support
Services and
Warranty
information
You can find Customer Support Services, Warranty and other information in the
Installation CD.
(replace d:\ with the drive letter of your CD-ROM/DVD-ROM drive, <region> with
the region that you are in, and <language> with the language that your
document is in)
Technical Support d:\support\<language>\support.pdf
Warranty d:\warranty\<region>\<language>\warranty.pdf
Please keep your Proof of Purchase for the duration of the
warranty period.
Regulatory d:\fcc\<language>\doc.pdf

Introduction 1-4
Document
Conventions We use icons to highlight useful or urgent information for you:
Tip. This tells you about short cuts or hints relating to a feature.
Note. This highlights additional or important information about a
feature.
Caution! This highlights proper usage of your product. Follow these
directions to prevent the loss of data, or damage to your product or
system.
Warning! This warns you of possible hazards that may result in
bodily harm or life-threatening situations.
About Your Hardware
About Your Hardware 2-1
About Your Hardware
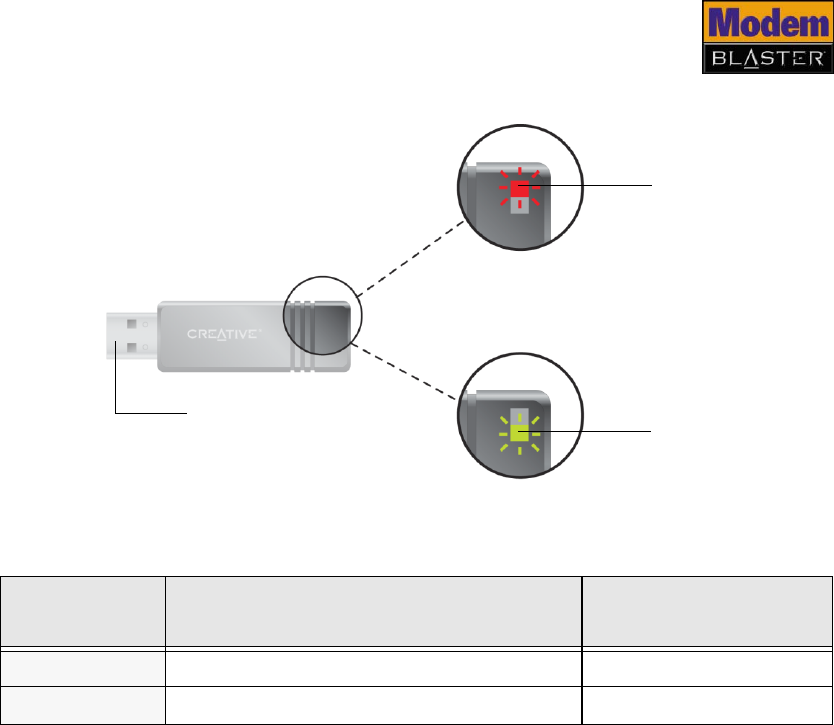
Your Modem
For more information
on the light-emitting
diode (LED) indicators,
see "Technical
Specifications" on page
A-1.
This LED... When lighted up, the modem
is... When blinking, the
modem is...
Activity status – Sending and receiving
data
Modem Off
Hook Using the phone line. –
Link Connected to a Bluetooth device. –
Power Turned on. –
Figure 2-1: Front view of your Modem Blaster Wireless.
Activity
status
LED Modem
Off Hook
LED
Power
LED
Link
LED
Antenna
About Your Hardware 2-2
Jack, port
or switch Description
AC adapter
jack Connect the power adapter to this.
Interface
switch Allows you to switch between a Bluetooth or serial connection.
RS-232 serial
port Connect the supplied RS-232 serial cable to this.
Phone jack Connect a phone set to this.
Telephone
Line jack Connect a telephone line to this.
Figure 2-2: Back view of your Modem Blaster Wireless.
AC adapter
jack
Interface
switch Phone
jack
RS-232
serial port
Antenna
Telephone
Line jack
About Your Hardware 2-3
Your Creative
Wireless USB
Adapter
This LED When lighted up, the adapter
is... When blinking, the
adapter is...
Red Plugged into your computer. Transmitting data
Green Ready for Bluetooth access. Receiving data
Figure 2-3: Front view of your Creative Wireless USB Adapter.
Red LED
Green LED
USB connector

Setting Up A Bluetooth
Connection

Setting Up a Bluetooth Connection 3-1
Setting Up a Bluetooth Connection
Noting Down
the Modem
BDA and Pin
Code
Before you install your Modem Blaster Wireless, take note of the Bluetooth device
address (BDA) and pin code found on a label on your modem and Wireless USB
Adapter. You need them later to verify your Bluetooth installation and pair your
Bluetooth devices.
Installing
Software DO NOT connect your modem or your Creative Wireless USB Adapter to your
computer until you have installed the software.
1. Insert the Installation CD into your CD-ROM/DVD-ROM drive.
The disc supports Windows Autoplay mode and starts running automatically. If
not, you need to enable the Windows auto-insert notification feature for your
CD-ROM/DVD-ROM drive. For more information, see "What do I do when the
installation does not start automatically after the Installation CD is inserted?"
on page B-1.
2. Follow the instructions on the screen to complete the installation.
Note: Make sure that Bluetooth Software is selected during installation.
You may be asked, after an application is installed, if you want to restart your
computer. Select No until all the drivers and applications are installed.
If you have accidentally
connected your modem
to your computer
before installing the
software, see
"Frequently Asked
Questions" on page B-1
for troubleshooting
advice.
Setting Up a Bluetooth Connection 3-2
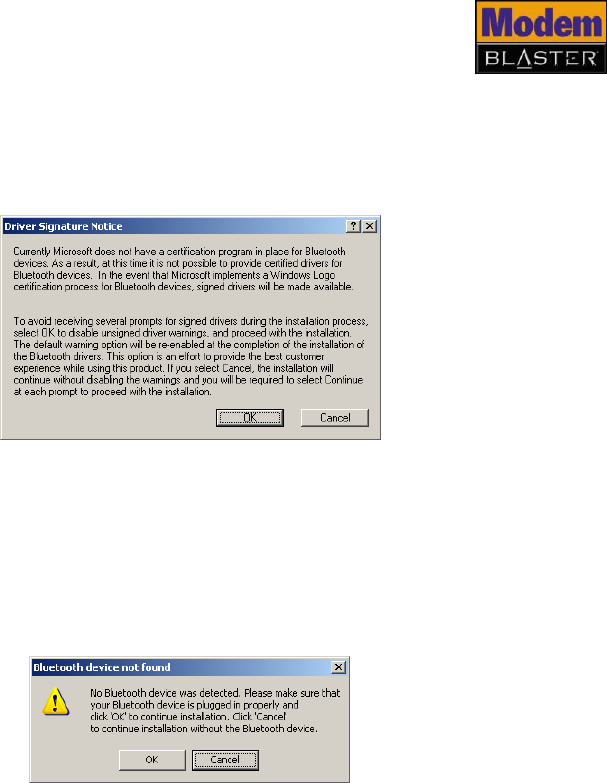
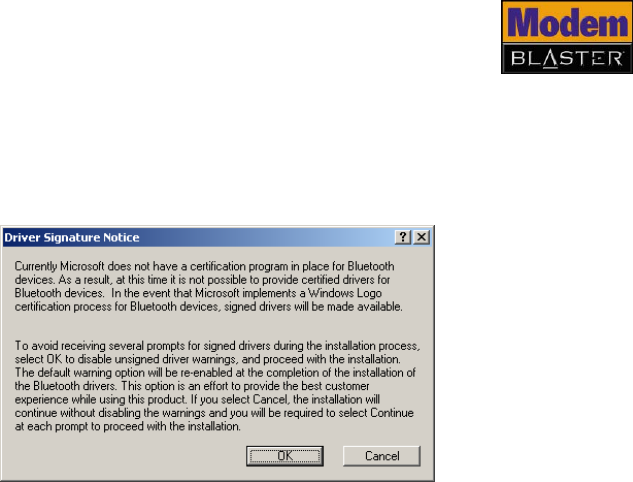
3. For Windows XP and Windows 2000 only: If the Driver Signature Notice
error message appears (Figure 3-1), click the OK button. For more
information about this message, see "Why does a Digital Signature Notice
error message appear on a Windows XP or Windows 2000 operating system
during installation?" on page B-2.
4. For Windows 98 SE only:
i. If prompted for the Windows 98 SE Installation CD, replace the modem
Installation CD with the appropriate CD.
ii. In the Insert Disk dialog box, click the OK button.
iii. Follow the instructions on the screen.
5. If you are prompted to plug in your Bluetooth device, click the Cancel button
(Figure 3-2).
Figure 3-1
Figure 3-2
Setting Up a Bluetooth Connection 3-3
6. Click the Finish button, and then restart your computer if you are prompted
to do so.
7. After your computer restarts, see "Installing Hardware" in the next section for
instructions on connecting your modem to your computer.
Installing
Hardware Set up your modem, turn it on and connect Creative Wireless USB Adapter as
shown below.
Windows automatically detects your Creative Wireless USB Adapter and installs
your device.
To configure your Modem Blaster Wireless as a Bluetooth device, see "Configuring
Your Bluetooth Device" on page 3-4.
• To turn on your
modem, connect the
power adapter to
the wall outlet and
where necessary,
turn on the mains.
The PWR LED on
your modem lights
up.
• To turn off your
modem, disconnect
the power adapter
from the wall, or
turn off the mains.
Avoid using a USB
extension cable to
connect the Creative
Wireless USB Adapter
to your computer, as
this may affect its
functionality.
Telephone Line jack
Connect this to a
telephone line for data
and facsimile
transmissions.
Phone jack
Connect a phone set
to the Phone jack.
Creative Wireless USB Adapter
USB
port
Power
adapter
Interface switch
Push this towards
the BT symbol.
Figure 3-3
Notebook or
desktop computer
Setting Up a Bluetooth Connection 3-4
Configuring
Your Bluetooth
Device
1. On your taskbar, right-click the Bluetooth icon , and select Start Using
Bluetooth. The Initial Bluetooth Configuration Wizard dialog box
appears.
2. Follow the instructions on the screen to complete the configuration.
3. When you are prompted to install another Bluetooth device, click the Skip
button.
4. Click the Finish button.
Verifying Your
Bluetooth
Installation
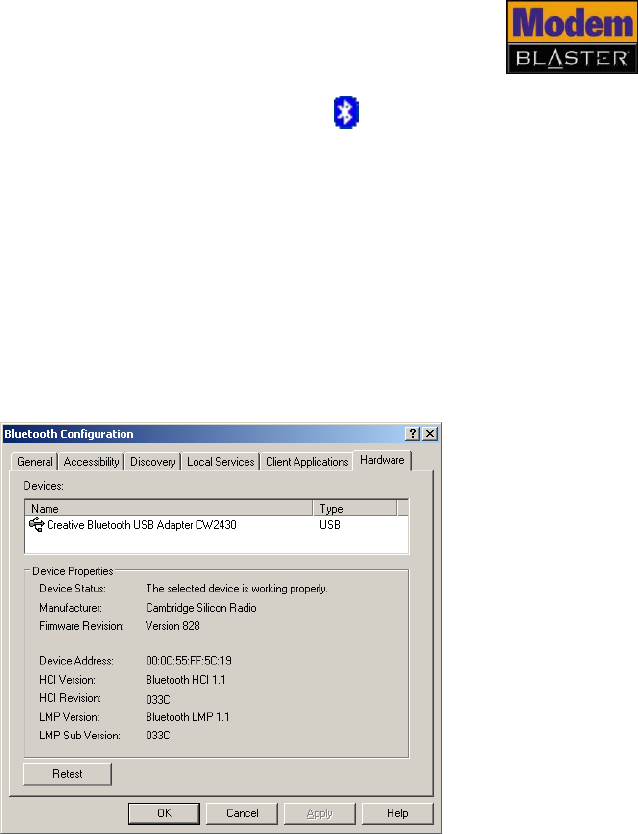
1. On your taskbar, right-click the Bluetooth icon, and select Advanced
Configuration. The Bluetooth Configuration dialog box appears.
2. Click the Hardware tab. The Bluetooth Configuration dialog box, similar to
Figure 3-4 appears.
Figure 3-4
Setting Up a Bluetooth Connection 3-5
3. In the Device Properties box, check the device status and device address.
The device should be working properly and the device address should match
the Bluetooth device address (BDA), found on a label on your Creative
Wireless USB Adapter.
Pairing Your
Bluetooth
Devices
1. On your taskbar, double-click the Bluetooth icon.
The My Bluetooth Places window appears.
2. Double-click the Find Bluetooth Devices icon.
For Windows XP only: In the Bluetooth Tasks box, click View devices in
range.
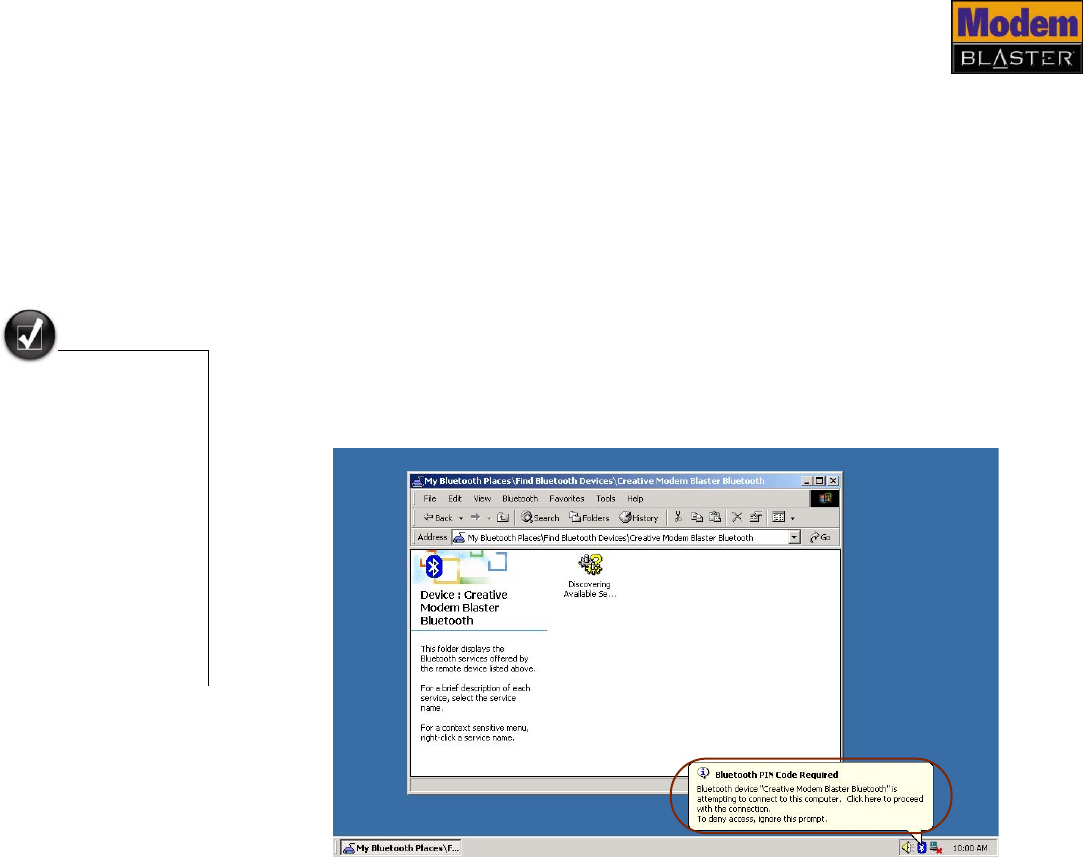
3. In the Entire Bluetooth Neighborhood dialog box, double-click the
Creative Modem Blaster Bluetooth icon.
The Bluetooth PIN Code Required pop-up message appears as shown in
Figure 3-5.
•Make sure your
modem is turned on
and the interface
switch is pushed
towards the BT
symbol.
• You can also pair the
Wireless USB
Adapter with other
remote devices using
Bluetooth wireless
technology. Refer to
the device’s user
guide for
instructions.
Figure 3-5
Setting Up a Bluetooth Connection 3-6
4. Click the Bluetooth PIN Code Required pop-up message.
The Bluetooth PIN Code Request dialog box appears.
5. In the Bluetooth PIN Code box, type your modem’s pairing pin code, found
on a label on your modem.
6. Click the OK button.
7. In the Creative Modem Blaster Bluetooth dialog box, double-click the
Dial-up Networking on Creative Modem Blaster Bluetooth icon.
For Windows XP only: In the Bluetooth Tasks box, click Discover services,
and then double-click the Dial-up Networking on Creative Modem Blaster
Bluetooth icon.
If this is your first time using a dial-up connection, the Location Information
dialog box appears. Type the required information and click the Close button.
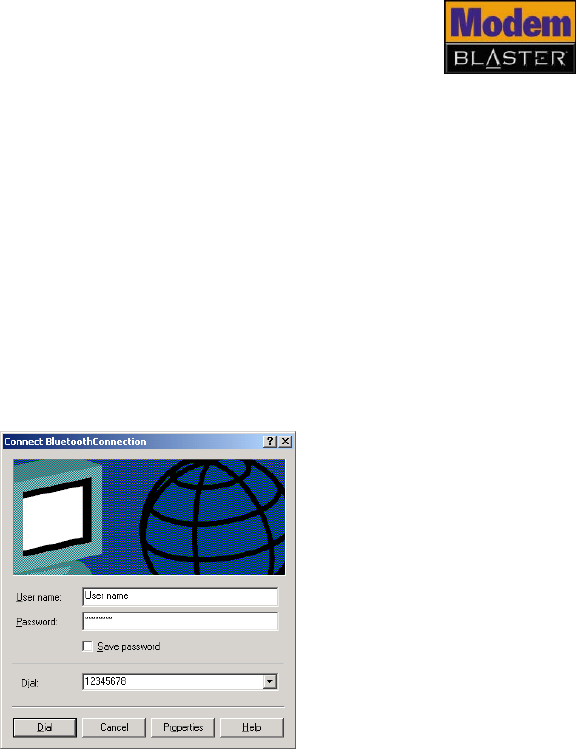
If not, the Connect BluetoothConnection dialog box appears.
8. In the Connect BluetoothConnection dialog box, type your user name,
password and Internet dial-up number.
9. Click the Dial button.
You will be connected to the Internet shortly.
Figure 3-6

Setting Up A Serial Connection
Setting Up a Serial Connection 4-1
Setting Up a Serial Connection
Installing
Software DO NOT connect your modem or your Creative Wireless USB Adapter to your
computer until you have installed the software.
1. Insert the Installation CD into your CD-ROM/DVD-ROM drive.
The disc supports Windows Autoplay mode and starts running automatically. If
not, you need to enable the Windows auto-insert notification feature for your
CD-ROM/DVD-ROM drive. For more information, see "What do I do when the
installation does not start automatically after the Installation CD is inserted?"
on page B-1.
2. Follow the instructions on the screen to complete the installation.
Note: Make sure that Modem Drivers is selected during installation.
You may be asked, after an application is installed, if you want to restart your
computer. Click the No button.
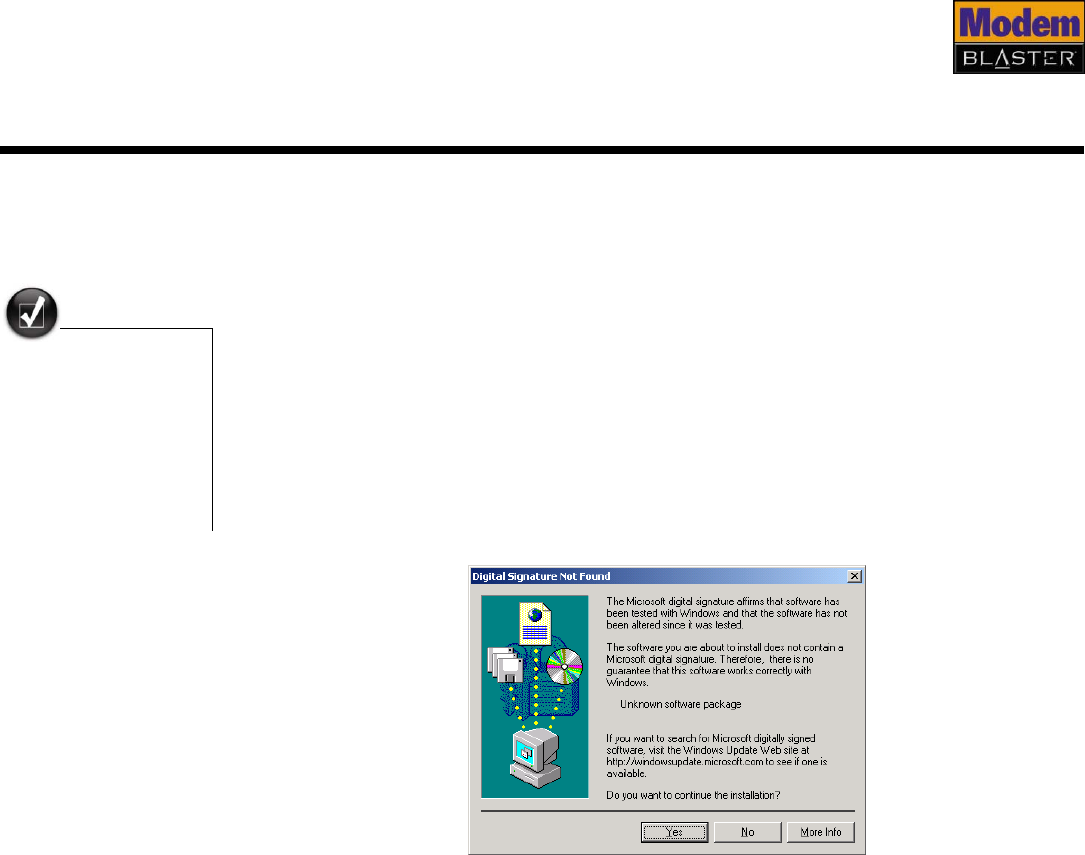
3. For Windows XP and Windows 2000 only: If the Digital Signature Not
Found window appears, click the Yes button.
If you have accidentally
connected your modem
to your computer
before installing the
software, see
"Frequently Asked
Questions" on page B-1
for troubleshooting
advice.
Figure 4-1
Setting Up a Serial Connection 4-2
4. Click the Finish button.
5. When prompted to restart your computer, click the No button.
6. Shut down your computer.
For instructions on connecting your modem to your computer, see "Installing
Hardware" on page 4-2.
Installing
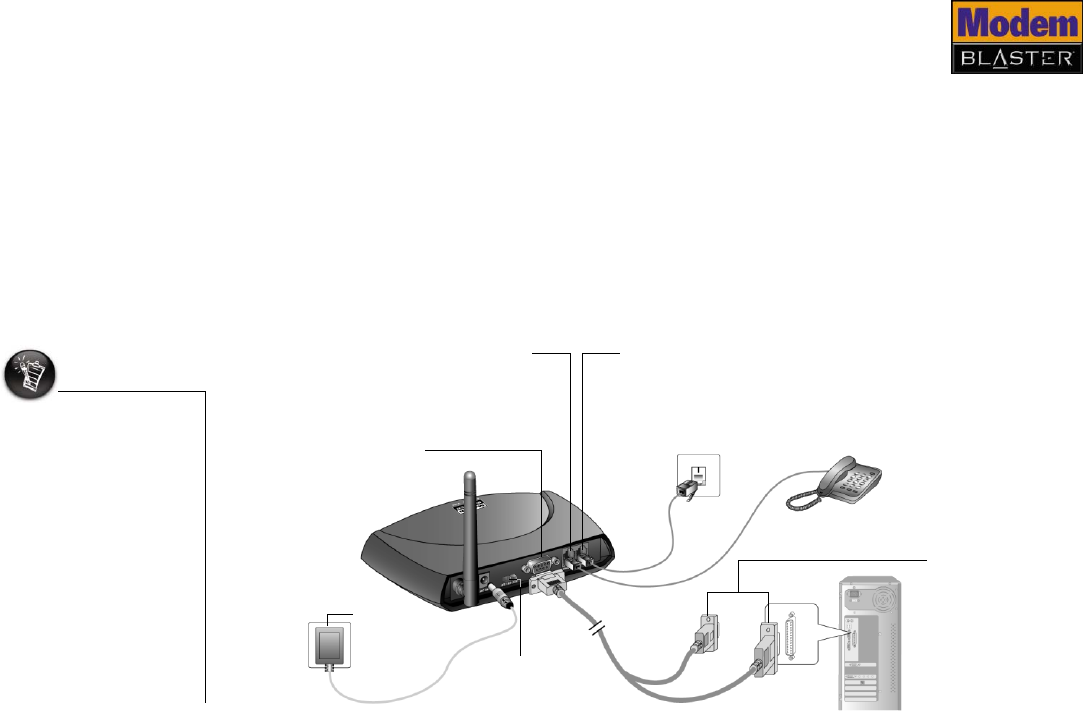
Hardware 1. Turn off your computer, and if applicable, disconnect its power adapter from
the power outlet.
2. Set up your modem as shown below, and turn on the modem and computer.
• To turn on your
modem, connect the
power adapter to
the wall outlet and
where necessary,
turn on the mains.
The PWR LED on
your modem lights
up.
• To turn off your
modem, disconnect
the power adapter
from the wall, or
turn off the mains. Serial
port
Phone jack
Connect a phone set
to the Phone jack.
Telephone Line jack
Connect this to a
telephone line for data
and facsimile
transmissions.
Serial cable
The supplied serial
cable features two
different connector
heads. Choose the
connector head that
is appropriate for the
serial port on your
computer.
Power
adapter
Interface switch
Push this towards
the RS-232 symbol.
Figure 4-2
Computer
Serial
port

Setting Up a Serial Connection 4-3
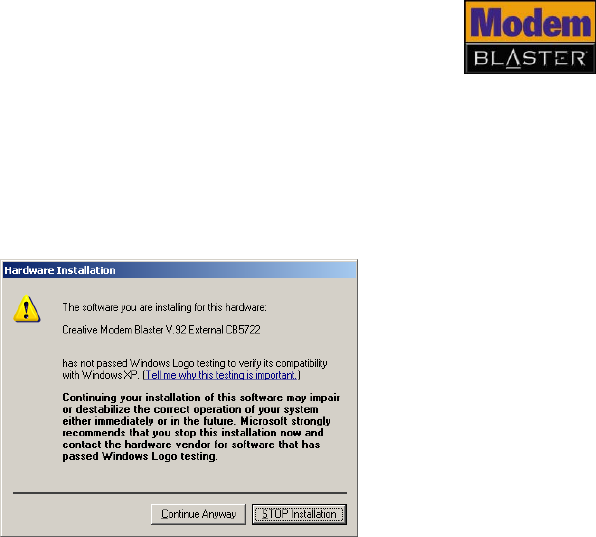
3. For Windows XP only: If the Hardware Installation error message appears
(Figure 4-3), click the Continue Anyway button. For more information about
this message, see "Why does a Hardware Installation error message appear
on a Windows XP operating system during installation?" on page B-3.
Figure 4-3

Setting Up a Serial Connection 4-4
4. For Windows 2000 only: If the Digital Signature Not Found window
appears, click the Yes button.
5. For Windows 98 SE only:
i. If prompted for the Windows 98 SE Installation CD, replace the modem
Installation CD with the appropriate CD.
ii. In the Insert Disk dialog box, click the OK button.
iii. Follow the instructions on the screen.
To verify if your installation is successful, go to "Testing Modem Drivers" on page
4-5.
Notes on
connecting the
telephone line and
telephone
Your modem cannot be used on “party lines”, nor can it be used on toll or
coin-operated lines.
Figure 4-4
Setting Up a Serial Connection 4-5
In addition, your modem is only intended for use on an analog telephone line, also
called a POTS (Plain Old Telephone Service) line. Your modem cannot be directly
connected to a digital telephone line, such as those commonly found in commercial
buildings and offices. If you only have a digital telephone line, either use an analog
converter (available separately) that is compatible with your telephone line, or
subscribe to an analog line.
Contact your local telephone company for help if you are not sure about the
suitability of your telephone line.
Testing Modem
Drivers
In Windows XP
and Windows 2000 1. Click Start → Control Panel or Start →
Settings → Control Panel. The Control
Panel window appears.
2. For Windows XP only: If Control Panel is
in Category View, click the Printers and
Other Hardware icon, and then click the
Phone and Modem Options icon.
If Control Panel is in Classic View,
double-click the Phone and Modem
Options icon.
3. For Windows 2000 only: Double-click
the Phone and Modem Options icon.
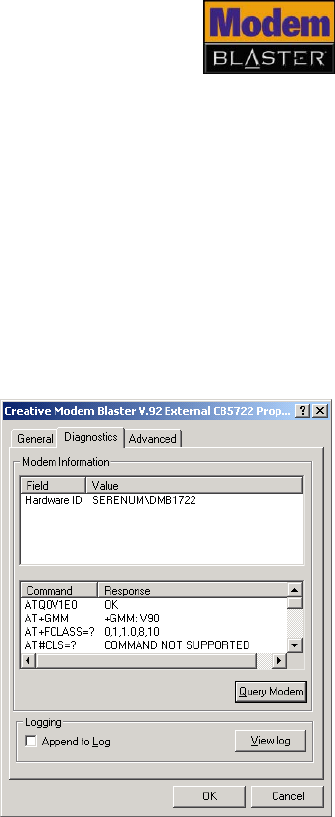
4. In the Creative Modem Blaster V.92
External CB5722 Properties dialog box
similar to Figure 4-5, click the Diagnostics
tab.
5. Click the Query Modem button to display
the response status of your modem. Figure 4-5
Setting Up a Serial Connection 4-6
6. If your modem is not responding, it may be due to a hardware conflict
between the modem and another peripheral device. To resolve the conflict,
you must change the settings of your modem. For more information, see "How
do I resolve hardware conflicts?" on page B-6.
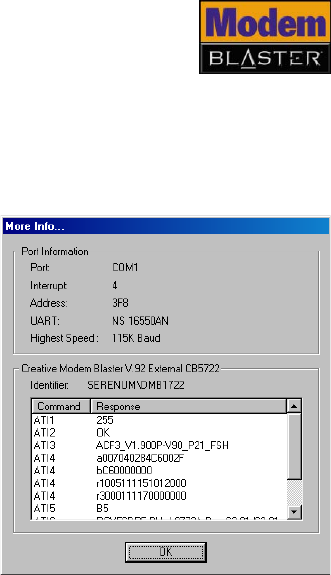
In Windows Me
and Windows
98 SE
1. Click Start → Settings → Control Panel.
2. In the Control Panel window, double-click
the Modems icon.
3. In the Modem Properties dialog box, click
the Diagnostics tab.
4. Select the COM port that has been assigned
to your modem, and click the More Info
button to display the response status of
your modem. You should see a dialog box
similar to Figure 4-6.
5. If your modem is not responding, it may be
due to a hardware conflict between the
modem and another peripheral device. To
resolve the conflict, you must change the
settings of your modem. For more
information, see "How do I resolve
hardware conflicts?" on page B-6.
Figure 4-6

Uninstalling Drivers and Software

Uninstalling Drivers and Software 5-1
Uninstalling Drivers and Software
Uninstalling
Bluetooth
Software
In Windows XP
and Windows 2000 1. Click Start → Control Panel or Start → Settings → Control Panel.
2. In the Control Panel window, double-click the Add or Remove Programs
icon.
3. In the Add or Remove Programs dialog box, select WIDCOMM Bluetooth
Software and then click the Change/Remove button.
4. Follow the instructions on the screen to complete the uninstallation.
In Windows Me
and Windows
98 SE
1. Click Start → Settings → Control Panel.
2. In the Control Panel window, double-click the Add/Remove Programs
icon.
3. In the Add/Remove Programs Properties dialog box, select WIDCOMM
Bluetooth Software and then click the Add/Remove button.
4. Follow the instructions on the screen to complete the uninstallation.

Uninstalling Drivers and Software 5-2
Uninstalling
Serial Modem
Drivers
In Windows XP
and Windows 2000 1. Click Start → Control Panel or Start → Settings → Control Panel.
2. In the Control Panel window, double-click the Add or Remove Programs
icon.
3. In the Add or Remove Programs dialog box, select Creative Modem
Blaster V.92 External CB5722 Properties and then click the Change/
Remove button.
4. Follow the instructions on the screen to complete the uninstallation.
In Windows Me
and Windows
98 SE
1. Click Start → Settings → Control Panel.
2. In the Control Panel window, double-click the Add/Remove Programs
icon.
3. In the Add/Remove Programs Properties dialog box, select Creative
Modem Blaster V.92 External CB5722 Properties and then click the Add/
Remove button.
4. Follow the instructions on the screen to complete the uninstallation.
Modem Features

Modem Features 6-1
Modem Features
Basic Features
System
Compatibility Compatible with all supported operating systems.
Bluetooth
connectivity Use Bluetooth at the flick of a switch.
Exceptional
Performance The integrated modem controller frees your computer's resources to ensure
exceptional performance while online.
Voice Mail Create a virtual voice mail system and receive incoming calls while surfing!
Fax Support Send and receive faxes from your computer using the software provided.
Backward
Compatibility Supports the V.92* and V.90 standards to ensure full compatibility with your
Internet Service Provider (ISP) today and in the future.
* Available only with serial connection and requires support from your ISP.

Modem Features 6-2
V.92 Features V.92* features shortens the time you need to make your 56 Kbps connection and
make dialing up to the Internet more convenient.
V.44 Compression V.44 Compression reduces the time it takes to download web pages, run web
searches, and receive e-mail.
PCM Upstream PCM Upstream makes it up to 40% faster to send e-mails with attachments, send
files through Instant Messaging programs, and upload pictures to a website.
Quick Connect Quick Connect cuts dial-up time by as much as half, getting you online faster.
* Available only with serial connection and requires support from your ISP.

Modem Features 6-3
Modem-On-Hold Your Modem Blaster Wireless offers complete Modem-On-Hold features so you can
pause your Internet connection while you answer incoming phone calls or while
you make outgoing phone calls.
Incoming Modem-On-Hold lets you pause the Internet connection while you
answer phone calls without losing your connection.
Outgoing Modem-On-Hold lets you pause your Internet connection while you make
phone calls.
In addition to ISP
support for V.92,
Modem-On-Hold also
requires that you have
Call Waiting and
Three-Way Call
services with your
phone company. You
must also install and
enable the supplied
NetWaiting™ software
application.
Modem Features 6-4
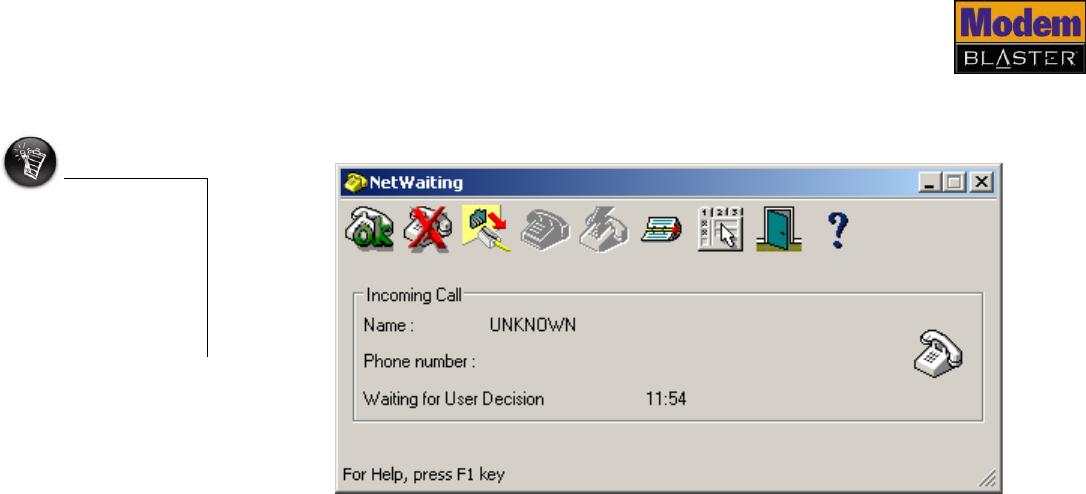
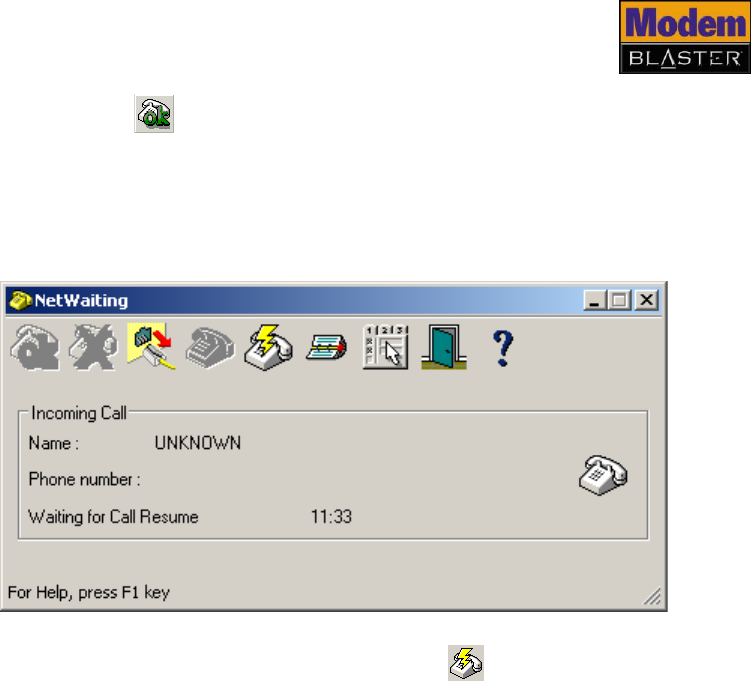
Receiving a call 1. When a call comes in while you are surfing the Internet, the NetWaiting
dialog box appears.
You need to have Call
Waiting to use
incoming
Modem-On-Hold.
Contact your phone
company for more
information about Call
Waiting.
Modem Features 6-5
2. Click the Accept button to pause your Internet connection and accept the
call.
The amount of time you have left to complete your call is displayed in the
NetWaiting dialog box.The amount of time is determined by your ISP. If your
call is longer than the available hold time, your Internet connection will be
disconnected and you will need to dial-up again after completing the call.
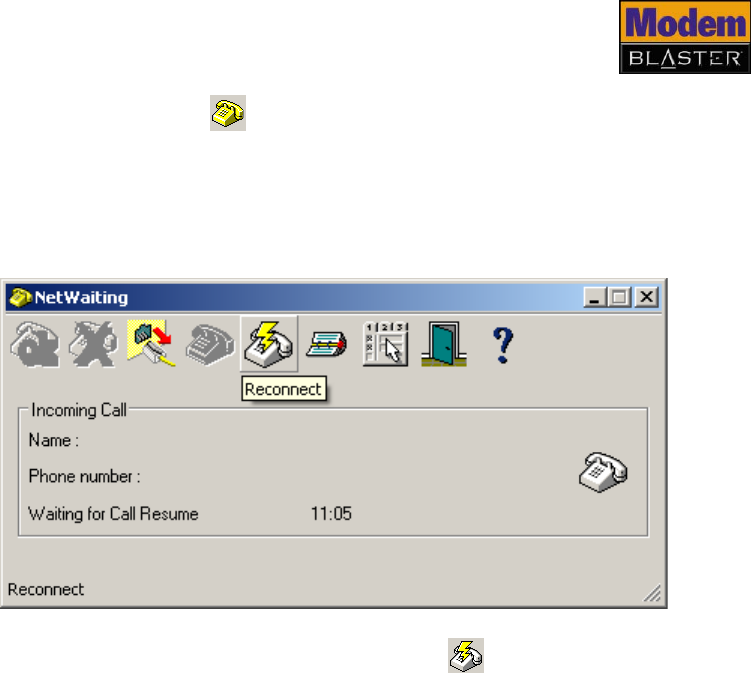
3. After completing your call, click the Reconnect button to resume your
Internet connection.
Modem Features 6-6
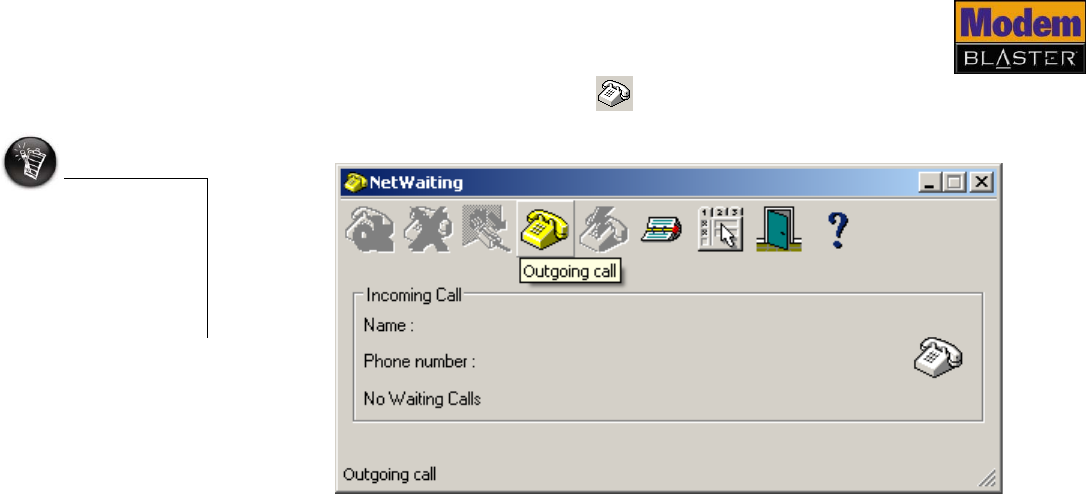
Making a call 1. Double-click the NetWaiting icon on the taskbar. The NetWaiting dialog
box appears.
You need Three-Way
Call to use outgoing
Modem-On-Hold.
Contact your phone
company for more
information about
Three-Way Call.
Modem Features 6-7
2. Click the Outgoing call button to pause your Internet connection. You
can start making your phone call.
The amount of time you have left to complete your call is displayed in the
NetWaiting dialog box.The amount of time is determined by your ISP. If your
call is longer than the available hold time, your Internet connection will be
disconnected and you will need to dial-up again after completing the call.
3. After completing your call, click the Reconnect button to resume your
Internet connection.
Technical Specifications

Technical Specifications A-1
Technical Specifications
Modem
Size (L x W x H) ❑170 mm (6.7") x 125 mm (4.9") x 35 mm (1.38")
Weight ❑285 g
Bluetooth
Specifications Compliance
❑With Bluetooth Specification V1.1
Protocol
❑Bluetooth 2.4 GHz ISM band frequency hopping
Output power
❑4~20 dBm Class 1 Bluetooth radio
Data rate
❑Up to 723,000 bps
Operating range
❑Up to 100 m (330 ft)*
Receiver sensitivity
❑-88 dBm
Profiles
❑Serial Port Profile
❑Dial-up Networking Profile
❑Fax Profile
* Depends on environment and interference

Technical Specifications A-2
Data Features*❑Integrated data, fax, and voice mail modem
❑56,000/54,667/53,333/52,000/50,667/49,333/48,000/46,667/45,333/42,667/41,333/
40,000/38,667/37,333/36,000/34,667/33,333/32,000 bps data speeds
❑33,600/31,200/28,800/26,400/24,000/21,600/19,200/16,800/14,400/12,000/9,600/
7,200/4,800/2,400/1,200/300 bps data speeds
❑Compatibility with the following data modem standards:
•V.92
**, V.90, V.34, V.32bis, V.32, V.23, V.22bis, V.22 and V.21; Bell 212A and 103
• V.42 LAPM and MNP2-4 error correction
• V.44, V.42bis and MNP5 data compression
Fax Features ❑Supports Class 1 fax commands
❑Fax speeds up to 14,400 bps for send and receive
❑Compatibility with the following fax modem transmission standards:
• V.17 (14.400 bps)
• V.21 Channel 2 (300 bps)
• V.27ter (7,200 bps)
• V.29 (9,600 bps)
Voice Features ❑Record and play voice messages
❑Multiple mailboxes using included communications software
Video Instant
Messaging Support ❑Supports V.80 standard to allow high performance Video Instant Messaging over standard
phone lines and the Internet. Video Instant Messaging standards are H.324 and H.323.
LED Indicators ❑LED to indicate activity status. Blinks when the unit is sending and receiving data.
❑LED to indicate Modem Off Hook status. Lights up when the unit is in this mode.
❑LED to indicate Bluetooth status. Lights up during Bluetooth connection.
❑LED to indicate power status. Lights up when the unit is turned on.
* Due to line conditions and FCC regulations, download and upload speeds may vary. Current FCC regulations limit download
speed to a maximum of 53 Kbps.
** Available only with serial connection and requires support from your ISP.

Technical Specifications A-3
Interface Switch ❑Between Bluetooth and serial connectivity
Operating
Temperature ❑5 ~ 50°C
Relative Humidity ❑10 ~ 95%
Storage
Temperature ❑-20 ~ 65°C
Caller ID ❑Displays the phone number of a calling party
Creative
Wireless USB
Adapter
Size (L x W x H) ❑66 mm (2.6") x 18 mm (0.7") x 9 mm (0.4")
Weight ❑9 g
Profiles ❑General Access Profile
❑Service Discovery Application Profile
❑Serial Port Profile
❑Dial-up Networking Profile
❑Fax Profile
❑LAN Access Profile
❑Generic Object Exchange Profile
❑Object Push Profile
❑File Transfer Profile
❑Synchronization Profile

Technical Specifications A-4
❑Headset Profile
❑Personal Area Network Profile
Operating
Temperature ❑5 ~ 50°C
Relative Humidity ❑5 ~ 95%
Storage
Temperature ❑-20 ~ 65°C
Compliance ❑With Bluetooth Specification V1.1
Operating Range ❑Bluetooth wireless access up to 100 m (330 ft)*
Network Support ❑Up to 7 different Bluetooth wireless technology enabled devices
Security ❑Link key prevents unauthorized access to your modem
Input Voltage ❑5 V
Data Rate ❑723,000 bps
RF module
sensitivity ❑-80 dBm at 0.1% bit error rate (BER)
Transmitting Power ❑4-20 dBm Class 1 Bluetooth radio
* Depends on environment and interference

Technical Specifications A-5
LED Indicators ❑One green LED to indicate Bluetooth status. Lights up when Bluetooth access is ready and
blinks when receiving data.
❑One red LED to indicate power status. Lights up when the unit is switched on and blinks
when transmitting data.
Frequently Asked Questions

Frequently Asked Questions B-1
Frequently Asked Questions
If you have more questions about this product, you may wish to consult our
self-help tool "Knowledge Base". Go to www.creative.com and select your
region.
Installation and
Configuration What do I do when the installation does not start automatically after the
Installation CD is inserted?
The AutoPlay feature in your Windows system may not be enabled.
To start the installation program through the My Computer shortcut menu
1. On your Windows desktop, double-click the My Computer icon.
2. Right-click the CD-ROM/DVD-ROM drive icon, and then click AutoPlay.
3. Follow the instructions on the screen.
To enable AutoPlay through Auto Insert Notification (in Windows Me and Windows 98 SE
only)
1. Click Start → Control Panel or Start → Settings → Control Panel.
2. Double-click the System icon. The System Properties dialog box appears.
3. Click the Device Manager tab and select your CD-ROM drive.
4. Click the Properties button.
5. Click the Settings tab, and then select Auto Insert Notification.
6. Click the OK button.
To start the installation program through Windows Explorer
1. In Windows Explorer, search and locate the d:\ctrun folder (replace d:\ with
the drive letter of your CD-ROM/DVD-ROM drive).
2. Double-click the ctrun.exe file.
Frequently Asked Questions B-2
Why does a Digital Signature Notice error message appear on a
Windows XP or Windows 2000 operating system during installation?
At the time of this product’s release, a Microsoft Bluetooth certification program
was unavailable. As such, a message similar to the one below may appear when
you are installing this product's driver.
Click the OK button if you do not wish to continue seeing this notice throughout
the installation procedure. Creative has tested this driver on Windows XP and
Windows 2000, and it does not impair or destabilize your computer.
Frequently Asked Questions B-3
Why does a Hardware Installation error message appear on a Windows XP
operating system during installation?
At the time of this product's release, Microsoft strongly encouraged companies to
submit their hardware solutions for certification. If a hardware device driver is not
submitted, or does not qualify, for Microsoft certification, a warning message
similar to the one shown here, appears.
You may see the message when installing this driver. If you do, you may choose to
click the Continue Anyway button. Creative has tested this driver on Windows
XP, and it does not impair or destabilize your computer.
What do I do if I connected the modem to my computer before installing
the software?
Follow the instructions below if you connected your modem to your computer
before installing the software:
1. If the Add New Hardware Wizard or Found New Hardware Wizard dialog
box appears when your computer starts up, click the Cancel button.
2. Shut down your computer and disconnect the modem from your computer.

Frequently Asked Questions B-4
3. Follow the software installation instructions that apply to your operating
system in the "Installing Software" on page 3-1 for Bluetooth connection and
"Installing Software" on page 4-1 for serial connection.
My Creative Wireless USB Adapter does not connect with my Bluetooth
devices. Why?
One of the following may have occurred:
• The remote device is not turned on.
• The remote device is out of the connection range. If you are using different
classes of devices, the distance over which you can communicate with your
devices varies.
• There is an object obstructing the radio transmission between the device and
your computer.
• There is an interference from a nonremote device, for example, a cordless
phone.
Operation Can my transmitted data be intercepted by other Bluetooth users?
No. When you pair your modem to your Creative Wireless USB Adapter, you are
creating a secure link between the two devices. Your devices contain a unique
Bluetooth security key to ensure that only paired devices are communicating with
each other in a secure environment.
Can your Creative Wireless USB Adapter work with notebooks, computers,
and Personal Digital Assistants (PDAs)?
Yes, if these devices are compliant with Bluetooth version 1.1 (or higher) and
support the required profile. For example, your Modem Blaster Wireless
establishes a dial-up session through Creative Wireless USB Adapter to connect to
the Internet by using the Dial-up Networking profile found on both devices.

Frequently Asked Questions B-5
My modem dials but is unable to connect to the Internet. Why?
The access number, username or password may be wrong or non-functioning.
There may also be excessive line noise generated by other devices using the same
line.
Try the following:
• Verify that your dial-up settings, such as your access number and username,
are correct.
• Use a different initialization string.
• Use your modem on a different access number.
• Disconnect other devices on the same line as the modem, and ensure that your
modem is directly connected to a wall outlet telephone jack, and not through a
splitter, fax machine or similar device.
What do I do if my modem is unable to dial out?
The modem driver may be corrupted, there may be problems with the Bluetooth or
serial port connection, or third-party software or drivers may be conflicting with
your modem’s software.
Try the following:
• Uninstall all modem drivers (including old ones) on your computer, and then
reinstall the drivers for your modem. For more information on uninstalling
drivers, see "Uninstalling Serial Modem Drivers" on page 5-2.
• Use the modem on a different serial port.
• Disable third-party applications, such as fax or PDA software, as these
applications may prevent the modem from functioning.

Frequently Asked Questions B-6
How do I resolve hardware conflicts?
Hardware conflicts may occur when two or more peripheral devices are set to use
the same I/O address, IRQ line or DMA channel.
If you are not sure which device is causing the conflict, you can isolate the source
of the difficulty by temporarily removing all devices (except your modem and
essential devices such as the disk controller). After that, add the devices back one
at a time until the device that is causing the conflict is found.
To resolve hardware conflicts in Windows XP and Windows 2000
1. Click Start → Control Panel or Start → Settings → Control Panel.
2. Click the System icon. The System Properties dialog box appears.
3. Click the Hardware tab.
4. Click the Device Manager button.
5. Double-click Modem.
6. Right-click the name of your modem. A menu appears.
7. Select the Properties option.
8. Click the Resources tab.
9. Select the Use Automatic Settings check box. If this check box is already
selected, go to the Properties dialog box of the conflicting peripheral device
and select the same check box there.
10. Restart your computer.
To resolve hardware conflicts in Windows Me and Windows 98 SE
1. Click Start → Settings → Control Panel.
2. Click the System icon. The System Properties dialog box appears.
3. Click the Device Manager tab.
4. Double-click Modem.
5. Select your modem and click the Properties button. The Properties dialog
box of the modem appears.

Frequently Asked Questions B-7
6. Click the Resources tab.
7. Select the Use Automatic Settings check box. If this check box is already
selected, go to the Properties dialog box of the conflicting peripheral device
and select the same check box there.
8. Restart your computer.
My modem is unable to accept commands to dial or answer calls. Why?
There may be an improper telephone line connection. Do the following:
• Make sure the telephone cable is attached to the telephone jack.
• Check that all devices are turned on.
This may also be due to interference on the telephone line that is connected to
your modem. Try moving the telephone line away from all power sources,
monitors, printers and computer cables.
Why does my modem connect to the Internet at speeds less than 56
Kbps?
Connection speeds are affected by line conditions in your area. Also, FCC
regulations are such that it is not always possible to achieve the maximum data
rate.
Why does my computer show the Internet connection speed at
115 200 bps?
Your computer is showing the Data Terminal Equipment (DTE) speed between the
modem and the Wireless USB Adapter, and not the modem connection speed.

Frequently Asked Questions B-8
The modem or communications software is unable to detect that the
remote user has hung up. Why?
The modem or communications software relies on the dial tone, busy tone or
period of silence to detect that a remote user has hung up. This method of
detection may not work during one of the following situations:
• Your local telephone system does not generate the dial or busy tone when the
remote user hangs up.
• The period of silence for the modem or communications software to detect that
the remote user has hung up is not long enough.
• The modem or communications software cannot detect a different dial or busy
tone. For example, if you are connecting to a PABX system, the dial or busy
tone generated is different from the usual dial or busy tone.
To resolve this problem, prompt the remote user to respond. This may, however,
result in a long delay before the communications software responds to the remote
user hanging up. To minimize this delay, modify the following settings:
• Voice message recording time
• Number of prompts
• Time to wait for a response after prompting
Where can I locate the AT Command set for my modem?
The AT Command set can be found on the Installation CD in the atcomm.txt file.
While connecting to the Internet using Dial-up Networking, a Serial Port
or Fax connection error message appears. Why?
You are using more than one service that utilises the same COM port. You can only
use the dial-up networking, serial port or fax service at any one time.
One of the following may have occured:
• You tried launching Bluetooth Fax services after connecting to the Internet
using Dial-up Networking.
• You tried launching Bluetooth serial port services after connecting to the
Internet using Dial-up Networking.

Frequently Asked Questions B-9
Difficulties with
Modem-On-Hold Why is my Internet connection lost after I make outgoing phone calls?
If your phone service does not include Three-Way Call, your Internet connection
will be lost when you make outgoing phone calls using the NetWaiting application.
Contact your phone company for more information about Three-Way Call.
In addition, your ISP will need to support Modem-On-Hold if you are to use its
features. Contact your ISP and check for Modem-On-Hold support. If your ISP
does not support Modem-On-Hold, you may wish to disable Call Waiting before
going online. Your modem can be set to automatically disable Call Waiting while
you are online.
To disable Call Waiting in Windows XP (in Classic View) and Windows 2000
1. Click Start → Control Panel or Start → Settings → Control Panel.
2. Double-click the Phone and Modem Options icon.
3. The Edit Location dialog box appears.
4. Click your Internet location from the list to select it, and then click the Edit
button.
5. Click the check box next to the To disable call waiting, dial option.
6. Click the arrow next to the To disable call waiting, dial box.
Three options are displayed: *70, 70# and 1170.
7. Select the appropriate option. If you are unsure which option is appropriate for
your area, contact your ISP for more information.
To disable Call Waiting in Windows Me and Windows 98 SE
1. For Windows Me users, click Start → Settings → Control Panel, and then
click the Dial-Up Networking icon.
2. For Windows 98 SE users, double-click the My Computer icon located on your
Windows Desktop.
3. In the next dialog box, double-click the Dial-up Networking icon for your
Internet connection. The Connect To dialog box appears.
You may need to check
with your local
telephone company for
the correct code to
disable Call Waiting.

Frequently Asked Questions B-10
4. Click the Dial Properties button, and then click the check box next to the To
disable call waiting, dial option.
5. Click the arrow next to the To disable call waiting, dial box.
Three options are displayed: *70, 70# and 1170.
6. Select the appropriate option. If you are unsure which option is appropriate for
your area, contact your ISP for more information.
7. Click the Apply button, and then click the OK button.
Maintenance
and Safety How do I maintain my modem?
To keep your modem in good working condition, observe the following
maintenance and safety tips:
• Store away from direct sunlight.
• Do not expose to heat or fire.
• Avoid using or storing in environments that exceed 45°C (113°F).
• Keep away from excessive moisture.
• Do not subject to excessive force or impact.
• Do not modify or disassemble.
• Do not use outdoors.
• Only clean the product with a soft dry cloth. Do not use liquid cleaners.
• Only qualified personnel should repair or service the product.
