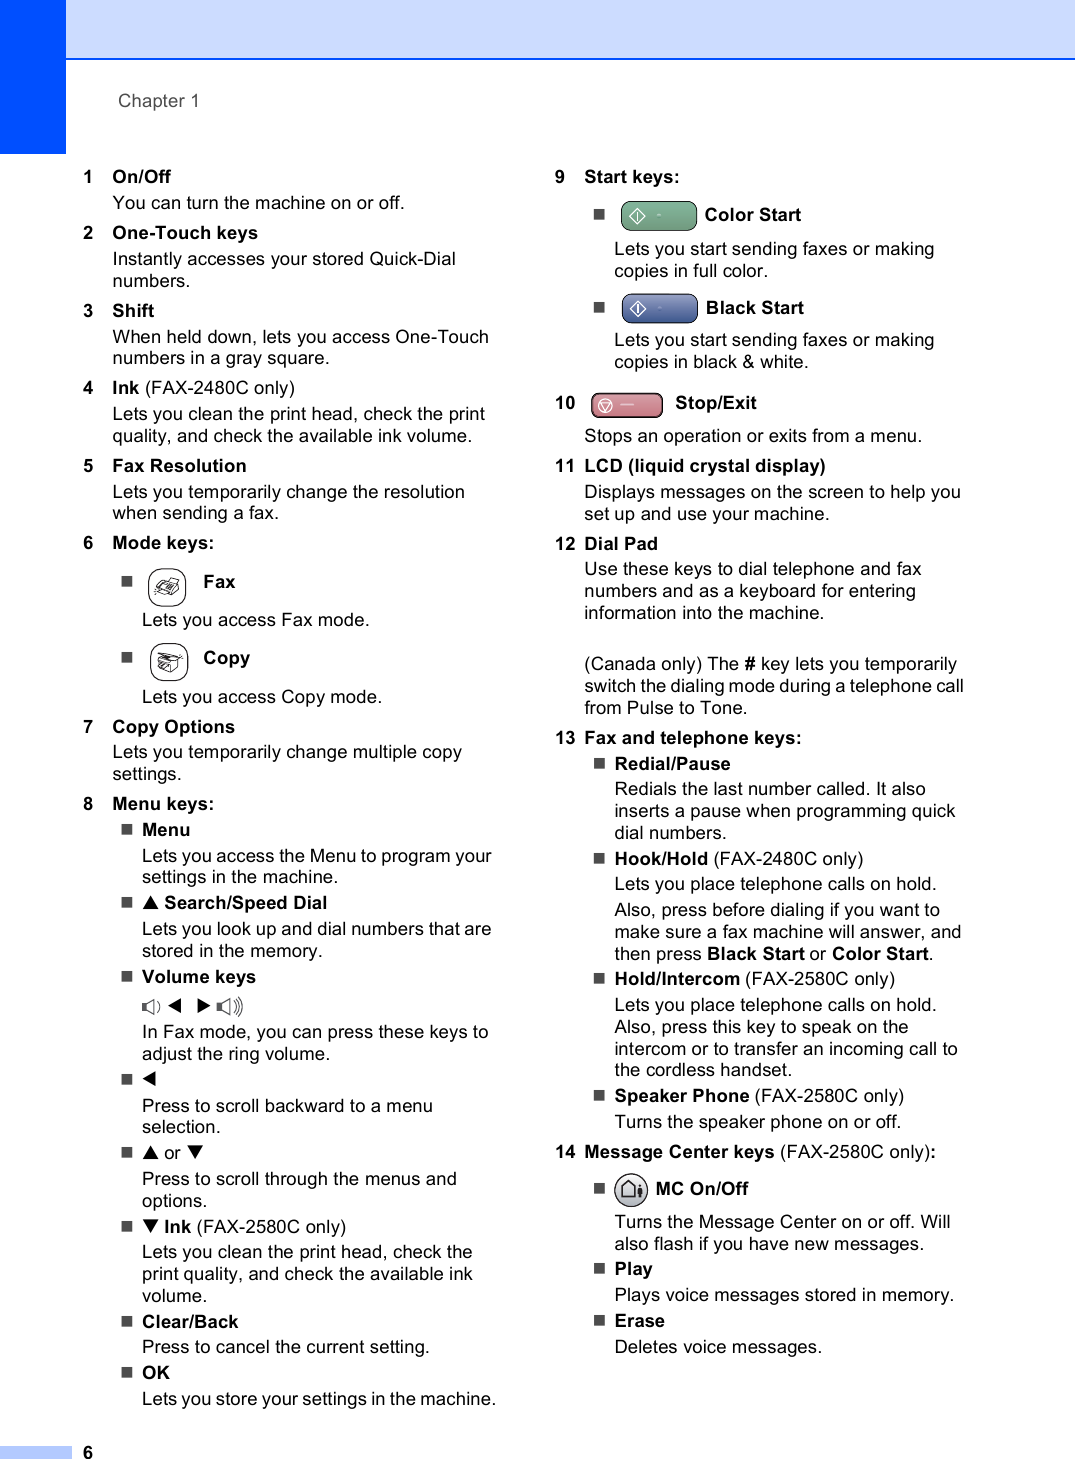
Brother 8CAA20 Spread Spectrum Transmitter User Manual FAX 2480C 2580C UG US

Brother Industries, Ltd. Spread Spectrum Transmitter FAX 2480C 2580C UG US
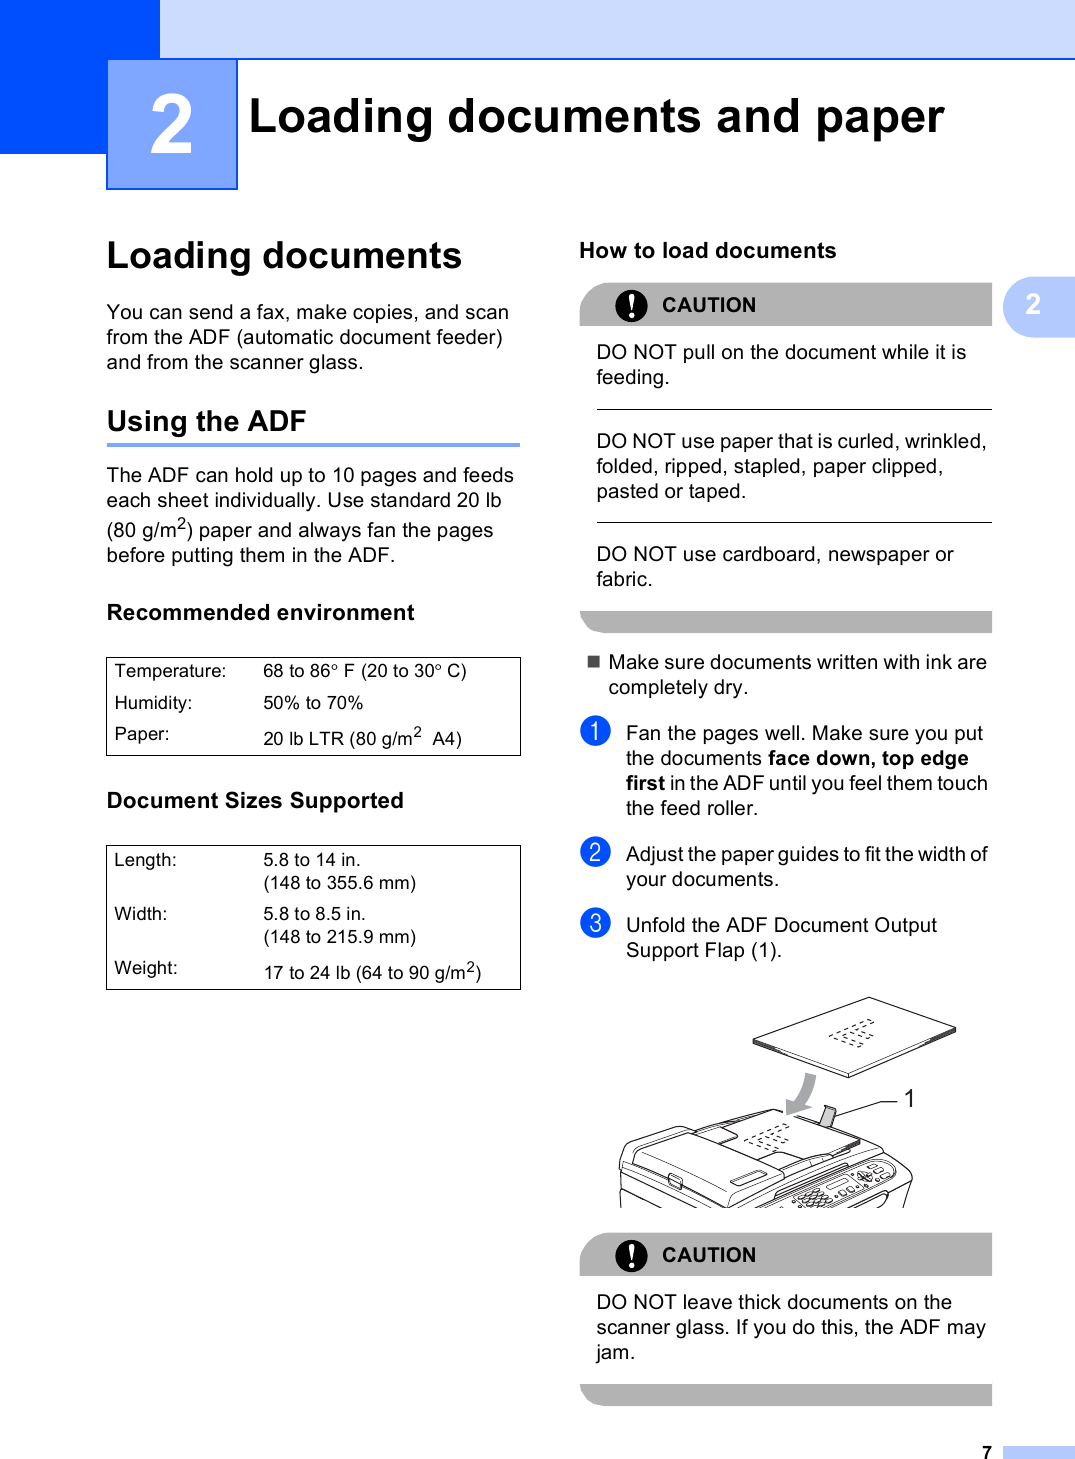
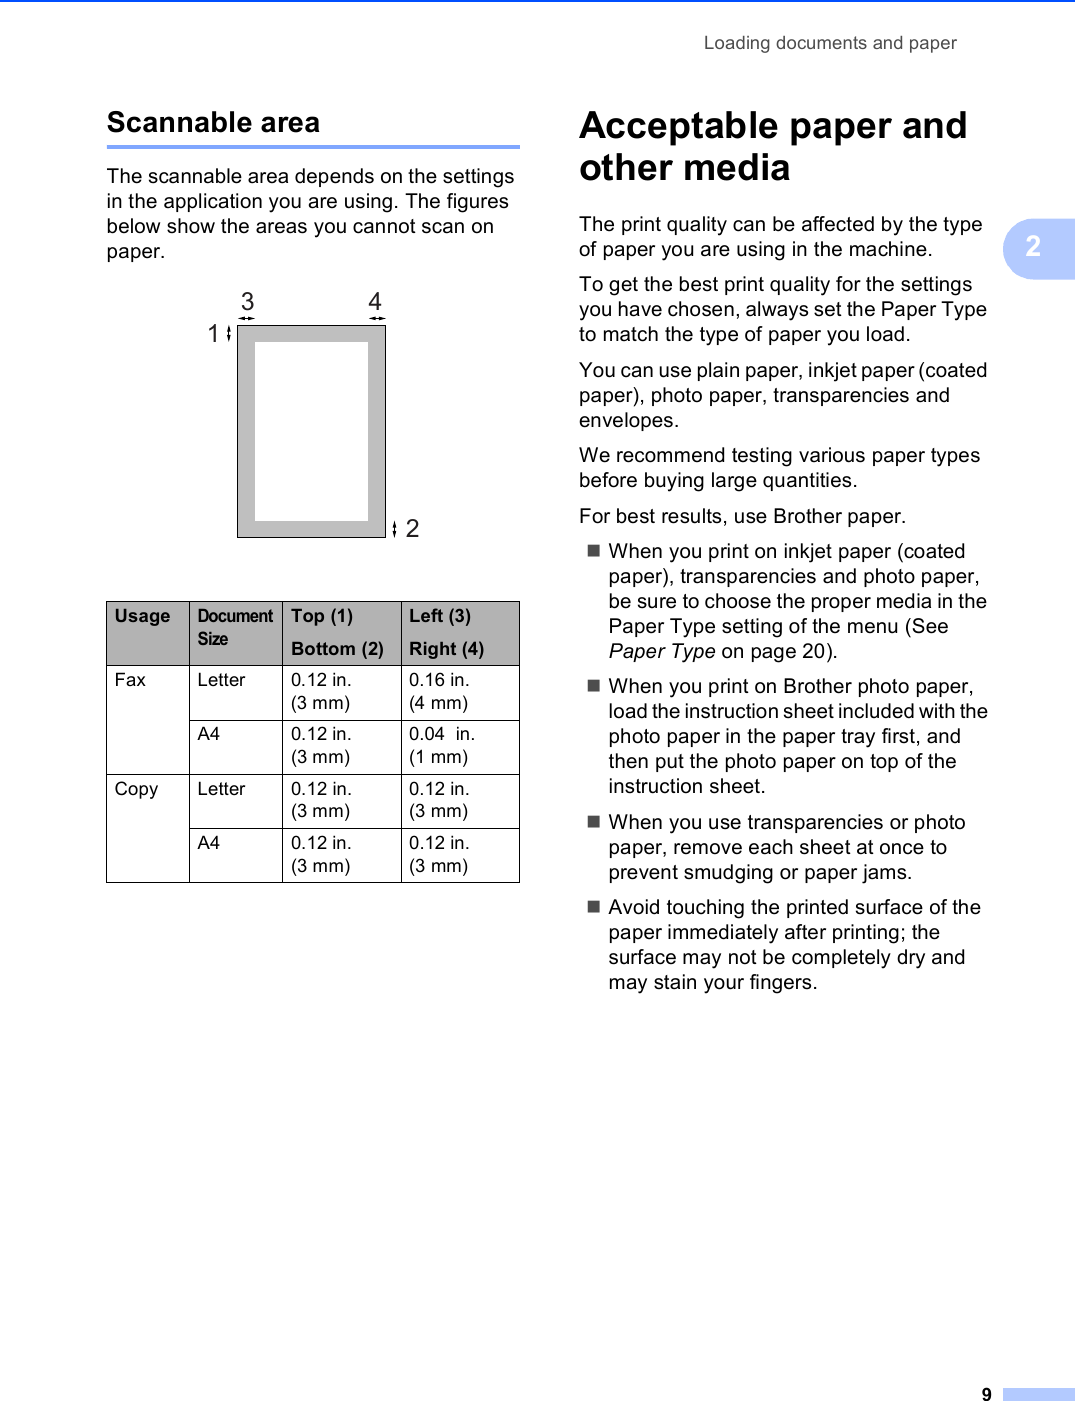
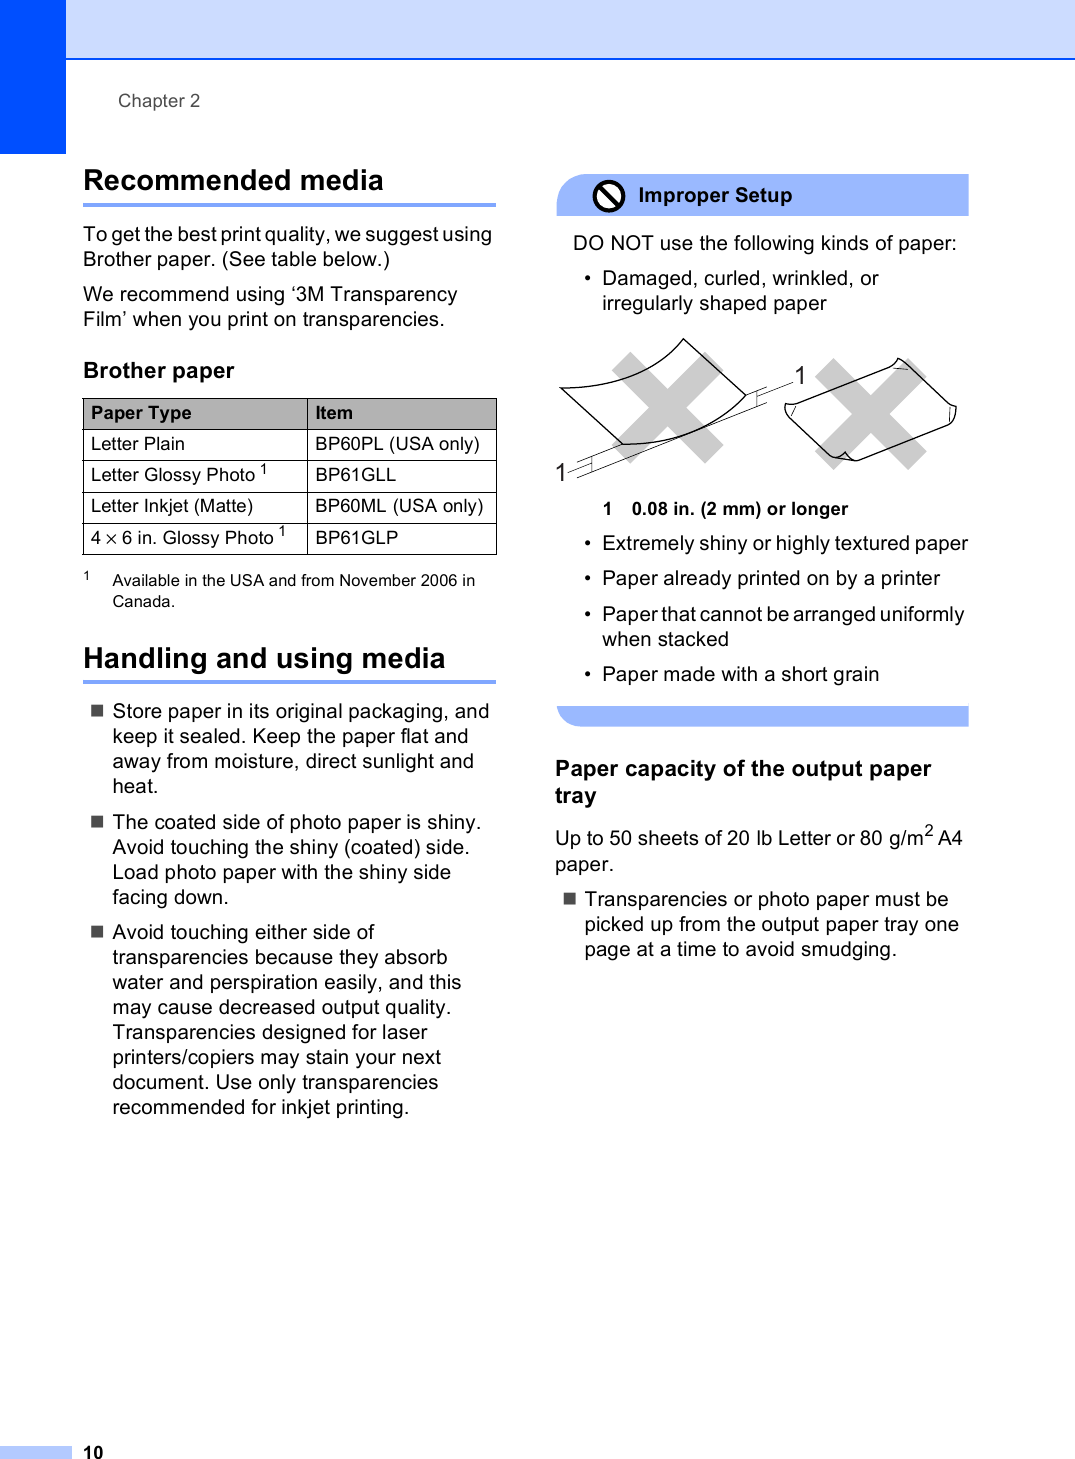
Contents

User Manual 1

USER’S GUIDEFAX-2480CFAX-2580C Please see "User manual 2[Short-Term Confidentiality].pdf" for FCC manual statements.
If you need to call Customer ServicePlease complete the following information for future reference:Model Number: FAX-2480C and FAX-2580C (Circle your model number)Serial Number: 1                                                                   Date of Purchase:                                                                    Place of Purchase:                                                                  1The serial number is on the back of the unit. Retain this User's Guide with your sales receipt as a permanent record of your purchase, in the event of theft, fire or warranty service.Register your product on-line at http://www.brother.com/registration/ By registering your product with Brother, you will be recorded as the original owner of the product. Your registration with Brother:may serve as confirmation of the purchase date of your product should you lose your receipt;may support an insurance claim by you in the event of product loss covered by insurance; and,will help us notify you of enhancements to your product and special offers.The most convenient and efficient way to register your new product is on-line at http://www.brother.com/registration/© 2006 Brother Industries, Ltd.
iBrother numbersIMPORTANTFor technical help, you must call the country where you bought the machine. Calls must be made from within that country. Register your productBy registering your product with Brother International Corporation, you will be recorded as the original owner of the product. Your registration with Brother:may serve as confirmation of the purchase date of your product should you lose your receipt;may support an insurance claim by you in the event of product loss covered by insurance; and,will help us notify you of enhancements to your product and special offers.Please complete and fax the Brother Warranty Registration And Test Sheet or, for your convenience and most efficient way to register your new product, register on-line at  http://www.brother.com/registration/ FAQs (frequently asked questions)The Brother Solutions Center is our one-stop resource for all your Fax Machine/Multi-Function Center needs. You can download the latest software documents and utilities, read FAQs and troubleshooting tips, and learn how to get the most from your Brother product. http://solutions.brother.com Note• You can check here for Brother driver updates.• To keep your machine performance up to date, check here for the latest firmware upgrade (for Windows® only). For Customer Service In USA: 1-800-284-4329 (voice)1-901-379-1215 (fax)1-800-284-3238 (TTY service for the hearing-impaired)In Canada: 1-877-BROTHER (voice)(514) 685-4898 (fax)
iiService Center Locator (USA only)For the location of a Brother authorized service center, call 1-800-284-4357.Service Center Locations (Canada only)For the location of a Brother authorized service center, call 1-877-BROTHER.Brother fax back system (USA only)Brother has installed an easy-to-use fax back system, so you can get instant answers to common technical questions and product information for all Brother products. This system is available 24 hours a day, 7 days a week. You can use the system to receive faxed instructions and an Index of fax back subjects.In USA only: 1-800-521-2846
iiiOrdering accessories and supplies For best quality results use only genuine Brother accessories, which are available at most Brother retailers. If you cannot find the accessory you need and you have a Visa, MasterCard, Discover, or American Express credit card, you can order accessories directly from Brother. (In the USA, you can visit us online for a complete selection of the Brother accessories and supplies that are available for purchase.) 1Available in the USA and from November 2006 in Canada.In USA: 1-888-879-3232 (voice)1-800-947-1445 (fax) http://www.brothermall.com In Canada: 1-877-BROTHER (voice)Description ItemInk Cartridge Standard <black> LC51BK (Prints approx. 500 pages)Ink Cartridge <yellow> LC51Y (Prints approx. 400 pages)Ink Cartridge <cyan> (blue) LC51C (Prints approx. 400 pages)Ink Cartridge <magenta> (red) LC51M (Prints approx. 400 pages)Premium Glossy Photo Paper(Letter size / 20 sheets)(4"×6" size / 20 sheets)BP61GLL 1BP61GLP 1Matte Inkjet Paper(Letter size / 25 sheets)BP60ML (USA only)Inkjet Plain Paper(Letter size / 250 sheets)BP60PL (USA only)Telephone Line Cord LG3077001 (USA only)Telephone Handset(FAX-2480C only)LE5803016 (USA only)Handset Curled Cord(FAX-2480C only)UL8019005 (USA only)Cordless Handset(FAX-2580C only)BCL-D10 (USA only)User's Guide LP3291001
ivNotice - Disclaimer of Warranties(USA and Canada)BROTHER'S LICENSOR(S), AND THEIR DIRECTORS, OFFICERS, EMPLOYEES OR AGENTS (COLLECTIVELY BROTHER'S LICENSOR) MAKE NO WARRANTIES, EXPRESS OR IMPLIED, INCLUDING WITHOUT LIMITATION THE IMPLIED WARRANTIES OF MERCHANTABILITY AND FITNESS FOR A PARTICULAR PURPOSE, REGARDING THE SOFTWARE. BROTHER'S LICENSOR(S) DOES NOT WARRANT, GUARANTEE OR MAKE ANY REPRESENTATIONS REGARDING THE USE OR THE RESULTS OF THE USE OF THE SOFTWARE IN TERMS OF ITS CORRECTNESS, ACCURACY, RELIABILITY, CURRENTNESS OR OTHERWISE. THE ENTIRE RISK AS TO THE RESULTS AND PERFORMANCE OF THE SOFTWARE IS ASSUMED BY YOU. THE EXCLUSION OF IMPLIED WARRANTIES IS NOT PERMITTED BY SOME STATES IN THE USA AND SOME PROVINCES IN CANADA. THE ABOVE EXCLUSION MAY NOT APPLY TO YOU.IN NO EVENT WILL BROTHER'S LICENSOR(S) BE LIABLE TO YOU FOR ANY CONSEQUENTIAL, INCIDENTAL OR INDIRECT DAMAGES (INCLUDING DAMAGES FOR LOSS OF BUSINESS PROFITS, BUSINESS INTERRUPTION, LOSS OF BUSINESS INFORMATION, AND THE LIKE) ARISING OUT OF THE USE OR INABILITY TO USE THE SOFTWARE EVEN IF BROTHER'S LICENSOR HAS BEEN ADVISED OF THE POSSIBILITY OF SUCH DAMAGES. BECAUSE SOME STATES IN THE USA AND SOME PROVINCES IN CANADA DO NOT ALLOW THE EXCLUSION OR LIMITATION OF LIABILITY FOR CONSEQUENTIAL OR INCIDENTAL DAMAGES, THE ABOVE LIMITATIONS MAY NOT APPLY TO YOU. IN ANY EVENT BROTHER'S LICENSOR'S LIABILITY TO YOU FOR ACTUAL DAMAGES FROM ANY CAUSE WHATSOEVER, AND REGARDLESS OF THE FORM OF THE ACTION (WHETHER IN CONTRACT, TORT (INCLUDING NEGLIGENCE), PRODUCT LIABILITY OR OTHERWISE), WILL BE LIMITED TO $50.Compilation and Publication NoticeUnder the supervision of Brother Industries Ltd., this manual has been compiled and published, covering the latest product descriptions and specifications.The contents of this manual and the specifications of this product are subject to change without notice.Brother reserves the right to make changes without notice in the specifications and materials contained herein and shall not be responsible for any damages (including consequential) caused by reliance on the materials presented, including but not limited to typographical and other errors relating to the publication.
vBrother® One Year Limited Warranty and Replacement Service (USA only)Who is covered:This limited warranty (“warranty”) is givenonly to the original end-use/retail purchaser(referred to in this warranty as “OriginalPurchaser”) of the accompanying product,consumables and accessories (collectivelyreferred to in this warranty as “thisProduct”).If you purchased a product from someoneother than an authorized Brother reseller inthe United States or if the product was used(including but not limited to floor models orrefurbished product), prior to yourpurchase you are not the OriginalPurchaser and the product that youpurchased is not covered by this warranty.What is covered:This Product includes a Machine andConsumable and Accessory Items.Consumable and Accessory Items includebut are not limited to print heads, toner,drums, ink cartridges, print cartridges, refillribbons, therma PLUS paper and thermalpaper.Except as otherwise provided herein,Brother warrants that the Machine and theaccompanying Consumable andAccessory Items will be free from defects inmaterials and workmanship, when usedunder normal conditions.This warranty applies only to productspurchased and used in the United States.For products purchased in, but usedoutside, the United States, this warrantycovers only warranty service within theUnited States (and does not includeshipping outside the United States).What is the length of the Warranty Periods:Machines: one year from the originalpurchase date.Accompanying Consumable andAccessory Items: 90 days from the originalpurchase date or the rated life ofconsumable, whichever comes first.What is NOT covered:This warranty does not cover: 1 Physical damage to this Product;2 Damage caused by improper installation,improper or abnormal use, misuse, neglector accident (including but not limited totransporting this Product without the properpreparation and/or packaging);3 Damage caused by another device orsoftware used with this Product (includingbut not limited to damage resulting fromuse of non Brother®-brand parts andConsumable and Accessory Items);4 Consumable and Accessory Items thatexpired in accordance with a rated life; and,5 Problems arising from other than defects inmaterials or workmanship.6 Normal Periodic Maintenance Items, suchas Paper Feeding Kit, Fuser and LaserUnits.This limited warranty is VOID if this Producthas been altered or modified in any way(including but not limited to attempted warrantyrepair without authorization from Brotherand/or alteration/removal of the serialnumber).What to do if you think your Product iseligible for warranty service:Report your issue to either our CustomerService Hotline at 1-800-284-4329 for Fax,MFC and DCP and 1-800-276-7746 forPrinters, or to a Brother Authorized ServiceCenter  within the applicable warrantyperiod. Supply Brother or the BrotherAuthorized Service Center with a copy of yourdated bill of sale showing that this Product waspurchased within the U.S. For the name oflocal Brother Authorized Service Center(s),call 1-800-521-2846. What Brother will ask you to do:After contacting Brother or a BrotherAuthorized Service Center, you may berequired to deliver (by hand if you prefer) orsend the Product properly packaged, freightprepaid, to the Authorized Service Centertogether with a photocopy of your bill of sale.You are responsible for the cost ofshipping, packing product, and insurance(if you desire). You are also responsible forloss or damage to this Product in shipping.What Brother will do:If the problem reported concerning yourMachine and/or accompanying Consumableand Accessory Items is covered by thiswarranty and if you first reported the problemto Brother or an Authorized Service Centerwithin the applicable warranty period, Brotheror its Authorized Service Center will repair orreplace the Machine and/or accompanyingConsumable and Accessory Items at nocharge to you for parts or labor. The decisionas to whether to repair or replace the Machineand/or accompanying Consumable andAccessory Items is made by Brother in its sole
viBrother® One Year Limited Warranty and Replacement Service (USA only)discretion. Brother reserves the right to supplya refurbished or remanufactured replacementMachine and/or accompanying Consumableand Accessory Items and use refurbishedparts provided such replacement productsconform to the manufacturer's specificationsfor new product/parts. The repaired orreplacement Machine and/or accompanyingConsumable and Accessory Items will bereturned to you freight prepaid or madeavailable for you to pick up at a convenientlylocated Authorized Service Center.If the Machine and/or accompanyingConsumable and Accessory Items are notcovered by this warranty (either stage), youwill be charged for shipping the Machineand/or accompanying Consumable andAccessory Items back to you and charged forany service and/or replacement parts/productsat Brother's then current published rates.The foregoing are your sole (i.e., only) andexclusive remedies under this warranty.What happens when Brother elects toreplace your Machine:When a replacement Machine is authorized byBrother, and you have delivered the Machineto an Authorized Service Center, theAuthorized Service Center will provide youwith a replacement Machine after receivingone from Brother. If you are dealing directlywith Brother, Brother will send to you areplacement Machine with the understandingthat you will, after receipt of the replacementMachine, supply the required proof ofpurchase information, together with theMachine that Brother agreed to replace. Youare then expected to pack the Machine thatBrother agreed to replace in the package fromthe replacement Machine and return it toBrother using the pre-paid freight bill suppliedby Brother in accordance with the instructionsprovided by Brother. Since you will be inpossession of two machines, Brother willrequire that you provide a valid major creditcard number. Brother will issue a hold againstthe credit card account number that youprovide until Brother receives your originalProduct and determines that your originalProduct is entitled to warranty coverage. Yourcredit card will be charged up to the cost of anew Product only if: (i) you do not return youroriginal Product to Brother within five (5)business days; (ii) the problems with youroriginal Product are not covered by the limitedwarranty; (iii) the proper packaginginstructions are not followed and has causeddamage to the product; or (iv) the warrantyperiod on your original Product has expired orhas not been sufficiently validated with a copyof the proof of purchase (bill of sale). Thereplacement Machine you receive (even ifrefurbished or remanufactured) will becovered by the balance of the limited warrantyperiod remaining on the original Product, plusan additional thirty (30) days. You will keep thereplacement Machine that is sent to you andyour original Machine shall become theproperty of Brother. Retain your originalAccessory Items and a copy of the returnfreight bill, signed by the courier.Limitations:Brother is not responsible for damage to orloss of any equipment, media, programs ordata related to the use of this Product. Exceptfor that repair or replacement as describedabove, Brother shall not be liable for anydirect, indirect, incidental or consequentialdamages or specific relief. Because somestates do not allow the exclusion or limitationof consequential or incidental damages, theabove limitation may not apply to you.THIS WARRANTY IS GIVEN IN LIEU OF ALLOTHER WARRANTIES, WRITTEN ORORAL, WHETHER EXPRESSED BYAFFIRMATION, PROMISE, DESCRIPTION,DRAWING, MODEL OR SAMPLE. ANY ANDALL WARRANTIES OTHER THAN THISONE, WHETHER EXPRESS OR IMPLIED,INCLUDING IMPLIED WARRANTIES OFMERCHANTABILITY AND FITNESS FOR APARTICULAR PURPOSE, ARE HEREBYDISCLAIMED.This Limited Warranty is the only warrantythat Brother is giving for this Product. It isthe final expression and the exclusive andonly statement of Brother's obligations toyou. It replaces all other agreements andunderstandings that you may have withBrother or its representatives.This warranty gives you certain rights andyou may also have other rights that mayvary from state to state.This Limited Warranty (and Brother'sobligation to you) may not be changed inany way unless you and Brother sign thesame piece of paper in which we (1) referto this Product and your bill of sale date, (2)describe the change to this warranty and(3) agree to make that change.Important:We recommend that you keep all originalpacking materials, in the event that you shipthis Product.© 2003 Brother International Corporation
viiBROTHER MULTIFUNCTION CENTER/FACSIMILE MACHINE LIMITED WARRANTY (Canada only)Pursuant to this limited warranty of 1 year from the date of purchase for labour and parts,Brother International Corporation (Canada) Ltd. (“Brother”), or its Authorized ServiceCenters, will repair this MFC/Facsimile machine free of charge if defective in material orworkmanship. This Limited Warranty does not include cleaning, consumables (including,without limitation, print cartridges, print head, toner and drum) or damage caused by accident,neglect, misuse or improper installation or operation, any damage caused from service,maintenance, modifications, or tampering by anyone other than a Brother Authorized ServiceRepresentative, or from the use of supplies or consumable items that are non-Brotherproducts. Operation of the MFC/Facsimile machine in excess of the specifications or with theSerial Number or Rating Label removed shall be deemed abuse and all repairs thereaftershall be the sole liability of the end-user/purchaser. In order to obtain warranty service, theMFC/Facsimile machine must be delivered or shipped freight prepaid by the enduser/purchaser to a “Brother” Authorized Service Center, together with your Proof ofPurchase in the form of a Sales Receipt.For laser products: Failure to remove the Toner Cartridge (and Toner Drum Unit on applicablemodels) during shipping will cause severe damage to the MFC/Facsimile and will VOID theWarranty. (Refer to your User's Guide for proper packaging.)For ink-jet products: Do not remove the ink cartridges during shipping. Damage to your printhead resulting from packing without the ink cartridges will VOID your warranty. (Refer to yourUser's Guide for proper packaging.)BROTHER DISCLAIMS ALL OTHER WARRANTIES EXPRESSED OR IMPLIEDINCLUDING, WITHOUT LIMITATION, ANY IMPLIED WARRANTIES OFMERCHANTABILITY OR FITNESS FOR A PARTICULAR PURPOSE, EXCEPT TO THEEXTENT THAT ANY WARRANTIES IMPLIED BY LAW CANNOT BE VALIDLY WAIVED.No oral or written information, advice or representation provided by Brother, its AuthorizedService Centers, Distributors, Dealers, Agents or employees, shall create another warrantyor modify this warranty. This warranty states Brother's entire liability and your exclusiveremedy against Brother for any failure of the MFC/Facsimile machine to operate properly.Neither Brother nor anyone else involved in the development, production, or delivery of thisMFC/Facsimile machine shall be liable for any indirect, incidental, special, consequential,exemplary, or punitive damages, including lost profits, arising from the use of or inability touse the product, even if advised by the end user/purchaser of the possibility of such damages.Since some Provinces do not allow the above limitation of liability, such limitation may notapply to you.This Limited Warranty gives you specific legal rights and you may also have other rightswhich vary from Providence to Providence.Warranty Service is available at Brother Authorized Service Centers throughoutCanada. For Technical Support or for the name and location of your nearestAuthorized Service Center call 1-877-BROTHER.Internet support: support@brother.ca or browseBrother's Web Site: www.brother.comBrother International Corporation (Canada) Ltd.1 Rue Hôtel de VilleDollard-Des-Ormeaux, QC H9B 3H6
viiiTable of ContentsSection I General1 General InformationUsing the documentation .......................................................................................3Symbols and conventions used in the documentation ....................................3Control panel overview ..........................................................................................42 Loading documents and paperLoading documents ...............................................................................................7Using the ADF .................................................................................................7Using the scanner glass ..................................................................................8Scannable area ...............................................................................................9Acceptable paper and other media........................................................................9Recommended media ...................................................................................10Handling and using media .............................................................................10Choosing the right media...............................................................................11Loading paper and other media...........................................................................13Loading envelopes and post cards ................................................................15Removing small printouts from the machine .................................................16Printable Area................................................................................................173 General setupOn/Off key............................................................................................................18Turning the machine off.................................................................................18Turning the machine on.................................................................................18On/Off setting ......................................................................................................18Mode Timer..........................................................................................................19Paper settings......................................................................................................20Paper Type ....................................................................................................20Paper Size .....................................................................................................20Volume Settings...................................................................................................20Ring Volume ..................................................................................................20Beeper Volume..............................................................................................20Speaker Volume ............................................................................................21Handset Volume (FAX-2480C only) ..............................................................21Choosing the Handset Volume (For Volume Amplify) (FAX-2480C only)......................................................................................21Setting Volume Amplify (FAX-2480C only)....................................................22Automatic Daylight Savings Time........................................................................22LCD display .........................................................................................................23LCD Contrast.................................................................................................23
ix4 Security featuresTX Lock (FAX-2480C only)..................................................................................24Setting and changing the TX Lock password ................................................24Turning the TX Lock on/off ............................................................................25Memory Security (FAX-2580C only)....................................................................25Setting and changing the memory security password ...................................26Turning the memory security on/off...............................................................26Section II Fax5 Sending a faxEntering Fax mode ..............................................................................................28Faxing from the ADF .....................................................................................28Faxing from the scanner glass ......................................................................28Faxing A4 size documents from the scanner glass .......................................29Color fax transmission...................................................................................29Canceling a fax in progress...........................................................................29Broadcasting (Black & White only) ......................................................................29Canceling a Broadcast in progress................................................................30Additional sending operations..............................................................................30Sending faxes using multiple settings ...........................................................30Contrast.........................................................................................................31Changing Fax Resolution ..............................................................................31Dual access (Black & White only)..................................................................32Real time transmission ..................................................................................32Overseas Mode .............................................................................................33Delayed Faxing (Black & White only) ............................................................33Delayed Batch Transmission (Black & White only) .......................................33Checking and canceling waiting jobs.............................................................33Sending a fax manually .................................................................................34Sending a fax at the end of a conversation ...................................................34Out of Memory message ...............................................................................346 Receiving a FaxReceive modes....................................................................................................35Choosing the Receive Mode .........................................................................35Using receive modes ...........................................................................................37Fax only.........................................................................................................37Fax/Tel...........................................................................................................37Manual...........................................................................................................37Message Center (MC:Msg Ctr) (FAX-2580C only)........................................37External TAD (FAX-2480C only) ...................................................................37Receive mode settings ........................................................................................38Ring Delay .....................................................................................................38F/T Ring Time (Fax/Tel mode only)...............................................................38Easy Receive.................................................................................................39
xAdditional receiving operations............................................................................39Printing a reduced incoming fax ....................................................................39Receiving a fax at the end of a conversation.................................................40Printing a fax from the memory .....................................................................407 Telephone Services and External devicesVoice operations ..................................................................................................41Making a telephone call ................................................................................41Answering calls with the Speaker Phone (FAX-2580C only).........................41Hold ...............................................................................................................41Tone or Pulse (Canada only).........................................................................41Fax/Tel mode when the power key is on .......................................................42Fax/Tel mode when the power key is off .......................................................42Telephone services..............................................................................................42Distinctive Ring..............................................................................................42Caller ID.........................................................................................................44Connecting an external TAD (telephone answering device)................................45Connections...................................................................................................46Recording an outgoing message (OGM) on an external TAD.......................46Special line considerations ............................................................................47Multi-line connections (PBX) .........................................................................48External and extension phones ...........................................................................49Connecting an external or extension telephone ............................................49Using external and extension telephones......................................................49Using a non-Brother cordless external telephone (FAX-2480C only)............49Using remote codes.......................................................................................498 Dialing and storing numbersHow to Dial ..........................................................................................................51Manual dialing ...............................................................................................51One-Touch dialing .........................................................................................51Speed-Dialing ................................................................................................51Search ...........................................................................................................52Fax Redial .....................................................................................................52Storing numbers ..................................................................................................53Storing a pause .............................................................................................53Storing One-Touch dial numbers...................................................................53Storing Speed-Dial numbers .........................................................................54Changing One-Touch and Speed-Dial numbers ...........................................54Setting up groups for broadcasting................................................................55Dialing access codes and credit card numbers .............................................559 Message Center mode (FAX-2580C only)Message Center Mode ........................................................................................56Setting up the Message Center .....................................................................56Outgoing message (OGM) ............................................................................56Fax/Tel OGM .................................................................................................57Activating Message Center memory..............................................................57
xiManaging your messages ...................................................................................57Message Indicator .........................................................................................57Playing voice messages................................................................................57Printing fax messages  ..................................................................................58Erasing incoming messages..........................................................................58Additional Message Center operations................................................................59Setting maximum time for incoming messages.............................................59Setting toll saver ............................................................................................59ICM Recording Monitor..................................................................................5910 Remote fax options (Black & White only)Fax Forwarding....................................................................................................60Paging .................................................................................................................61Fax Storage .........................................................................................................61Turning off Remote Fax Options..........................................................................62Changing Remote Fax Options ...........................................................................62Remote Retrieval.................................................................................................63Setting a Remote Access Code.....................................................................63Using your Remote Access Code..................................................................63Remote Fax commands ................................................................................64Retrieving fax messages ...............................................................................66Changing your Fax Forwarding number ........................................................6611 Printing ReportsFax reports...........................................................................................................67Transmission Verification Report...................................................................67Fax Journal (activity report) ...........................................................................67Reports ................................................................................................................68How to print a report......................................................................................6812 PollingPolling overview...................................................................................................69Polling receive .....................................................................................................69Setup to receive polling .................................................................................69Sequential polling ..........................................................................................69Polled transmit (Black & White only)....................................................................70Set up for polled transmit...............................................................................70Section III Copy13 Making copies How to copy.........................................................................................................72Entering Copy mode......................................................................................72Making a single copy.....................................................................................72Making multiple copies ..................................................................................72Stop copying..................................................................................................72
xiiCopy options........................................................................................................73Changing copy quality ...................................................................................74Enlarging or reducing the image copied ........................................................74Making N in 1 copies or a poster ...................................................................75Sorting copies using the ADF (Black & White only).......................................76Adjusting Brightness, Contrast and Color......................................................77Paper options ................................................................................................78Section IV AppendixesA Safety and LegalChoosing a location .............................................................................................80To use the machine safely...................................................................................81Important safety instructions..........................................................................85Standard telephone and FCC Notices (These notices are in effect on models sold and used in the United States only.)...............................................................................................86Federal Communications Commission (FCC) Declaration of Conformity (USA only) .................................................................................................88Industry Canada Compliance Statement (Canada only) ...............................88Legal limitations for copying ..........................................................................89Trademarks ...................................................................................................90B Troubleshooting and Routine MaintenanceTroubleshooting ...................................................................................................91If you are having difficulty with your machine ................................................91Error messages ...................................................................................................95Transferring your faxes or Fax Journal report ...............................................99Document jam ...............................................................................................99Printer jam or paper jam ..............................................................................100Dial Tone .....................................................................................................101Phone line interference................................................................................102Routine maintenance.........................................................................................102Replacing the ink cartridges ........................................................................102Cleaning the outside of the machine ...........................................................104Cleaning the scanner...................................................................................105Cleaning the machine printer platen............................................................106Cleaning the paper pick-up roller.................................................................106Cleaning the print head ...............................................................................107Checking the print quality ............................................................................107Checking the printing alignment ..................................................................108Checking the ink volume .............................................................................109Uninstalling the handset and handset cradle (FAX-2480C only) .................109Machine Information ..........................................................................................109Checking the serial number.........................................................................109Packing and shipping the machine....................................................................110
xiiiC Menu and FeaturesOn-screen programming....................................................................................112Menu table...................................................................................................112Memory storage...........................................................................................112Menu keys .........................................................................................................113Menu Table........................................................................................................114Entering Text .....................................................................................................121D SpecificationsGeneral..............................................................................................................122Print media.........................................................................................................124Fax.....................................................................................................................125Message Center (FAX-2580C only)...................................................................126Cordless handset (FAX-2580C only).................................................................127Battery cradle (FAX-2580C only).......................................................................127Copy ..................................................................................................................128Printer ................................................................................................................129Interfaces...........................................................................................................130Consumable items.............................................................................................131E GlossaryFIndex
xiv
Section IGeneral IGeneral Information 3Loading documents and paper 7General setup 18Security features 24
Chapter 12
311Using the documentation 1Thank you for buying a Brother machine! Reading the documentation will help you make the most of your machine. Symbols and conventions used in the documentation 1The following symbols and conventions are used throughout the documentation.General Information 1Bold Bold typeface identifies specific keys on the machine control panel.Italics Italicized typeface emphasizes an important point or refers you to a related topic.Courier NewText in the Courier New font identifies messages on the LCD of the machine. Warnings tell you what to do to prevent possible personal injury. Electrical Hazard icons alert you to possible electrical shock. Hot Surface icons warn you not to touch machine parts that are hot. Cautions specify procedures you must follow or avoid to prevent possible damage to the machine or other objects. Notes tell you how you should respond to a situation that may arise or give tips about how the operation works with other features. Improper Setup icons alert you to devices and operations that are not compatible with the machine.
Chapter 14Control panel overview 1FAX-2480C FAX-2580C 113321214
General Information51 NoteMost of the illustrations in this User’s Guide show the FAX-2480C.  11 1057869
Chapter 161On/OffYou can turn the machine on or off.2 One-Touch keysInstantly accesses your stored Quick-Dial numbers.3ShiftWhen held down, lets you access One-Touch numbers in a gray square.4Ink (FAX-2480C only)Lets you clean the print head, check the print quality, and check the available ink volume.5 Fax ResolutionLets you temporarily change the resolution when sending a fax.6 Mode keys: FaxLets you access Fax mode. CopyLets you access Copy mode.7 Copy OptionsLets you temporarily change multiple copy settings.8 Menu keys:MenuLets you access the Menu to program your settings in the machine.a Search/Speed DialLets you look up and dial numbers that are stored in the memory.Volume keys d   c In Fax mode, you can press these keys to adjust the ring volume.d Press to scroll backward to a menu selection.a or bPress to scroll through the menus and options.b Ink (FAX-2580C only)Lets you clean the print head, check the print quality, and check the available ink volume.Clear/BackPress to cancel the current setting.OKLets you store your settings in the machine.9 Start keys:Color StartLets you start sending faxes or making copies in full color.Black StartLets you start sending faxes or making copies in black & white.10  Stop/ExitStops an operation or exits from a menu.11 LCD (liquid crystal display)Displays messages on the screen to help you set up and use your machine.12 Dial PadUse these keys to dial telephone and fax numbers and as a keyboard for entering information into the machine.(Canada only) The # key lets you temporarily switch the dialing mode during a telephone call from Pulse to Tone.13 Fax and telephone keys:Redial/PauseRedials the last number called. It also inserts a pause when programming quick dial numbers.Hook/Hold (FAX-2480C only)Lets you place telephone calls on hold.Also, press before dialing if you want to make sure a fax machine will answer, and then press Black Start or Color Start. Hold/Intercom (FAX-2580C only)Lets you place telephone calls on hold. Also, press this key to speak on the intercom or to transfer an incoming call to the cordless handset.Speaker Phone (FAX-2580C only)Turns the speaker phone on or off.14 Message Center keys (FAX-2580C only): MC On/OffTurns the Message Center on or off. Will also flash if you have new messages.PlayPlays voice messages stored in memory.EraseDeletes voice messages.
722Loading documents 2You can send a fax, make copies, and scan from the ADF (automatic document feeder) and from the scanner glass.Using the ADF 2The ADF can hold up to 10 pages and feeds each sheet individually. Use standard 20 lb (80 g/m2) paper and always fan the pages before putting them in the ADF.Recommended environment 2Document Sizes Supported 2How to load documents 2CAUTION DO NOT pull on the document while it is feeding.  DO NOT use paper that is curled, wrinkled, folded, ripped, stapled, paper clipped, pasted or taped.  DO NOT use cardboard, newspaper or fabric. Make sure documents written with ink are completely dry.aFan the pages well. Make sure you put the documents face down, top edge first in the ADF until you feel them touch the feed roller. bAdjust the paper guides to fit the width of your documents.cUnfold the ADF Document Output Support Flap (1). CAUTION DO NOT leave thick documents on the scanner glass. If you do this, the ADF may jam. Loading documents and paper 2Temperature: 68 to 86°F (20 to 30°C)Humidity: 50% to 70%Paper: 20 lb LTR (80 g/m2 A4)Length: 5.8 to 14 in. (148 to 355.6 mm)Width: 5.8 to 8.5 in. (148 to 215.9 mm)Weight: 17to24lb (64to90g/m2)1
Chapter 28Using the scanner glass 2You can use the scanner glass to fax, copy or scan pages of a book or one page at a time.Document Sizes Supported 2How to load documents 2NoteTo use the scanner glass, the ADF must be empty. aLift the document cover.bUsing the document guidelines on the left, center the document face down on the scanner glass.  cClose the document cover.CAUTION If you are scanning a book or thick document, DO NOT slam the cover down or press on it. Length:  Up to 11.7 in. (297 mm)Width: Up to 8.5 in. (215.9 mm)Weight: Up to 4.4 lb (2 kg)
Loading documents and paper92Scannable areaThe scannable area depends on the settings in the application you are using. The figures below show the areas you cannot scan on paper. Acceptable paper and other media 2The print quality can be affected by the type of paper you are using in the machine.To get the best print quality for the settings you have chosen, always set the Paper Type to match the type of paper you load.You can use plain paper, inkjet paper (coated paper), photo paper, transparencies and envelopes.We recommend testing various paper types before buying large quantities.For best results, use Brother paper.When you print on inkjet paper (coated paper), transparencies and photo paper, be sure to choose the proper media in the Paper Type setting of the menu (See Paper Type on page 20).When you print on Brother photo paper, load the instruction sheet included with the photo paper in the paper tray first, and then put the photo paper on top of the instruction sheet.When you use transparencies or photo paper, remove each sheet at once to prevent smudging or paper jams.Avoid touching the printed surface of the paper immediately after printing; the surface may not be completely dry and may stain your fingers.UsageDocument SizeTop (1)Bottom (2)Left (3)Right (4)Fax Letter 0.12 in. (3 mm)0.16 in. (4 mm)A4 0.12 in. (3 mm)0.04  in. (1 mm)Copy Letter 0.12 in. (3 mm)0.12 in. (3 mm)A4 0.12 in. (3 mm)0.12 in. (3 mm)3412
Chapter 210Recommended media 2To get the best print quality, we suggest using Brother paper. (See table below.)We recommend using ‘3M Transparency Film’ when you print on transparencies.1Available in the USA and from November 2006 in Canada.Handling and using media 2Store paper in its original packaging, and keep it sealed. Keep the paper flat and away from moisture, direct sunlight and heat.The coated side of photo paper is shiny. Avoid touching the shiny (coated) side. Load photo paper with the shiny side facing down.Avoid touching either side of transparencies because they absorb water and perspiration easily, and this may cause decreased output quality. Transparencies designed for laser printers/copiers may stain your next document. Use only transparencies recommended for inkjet printing.Improper Setup DO NOT use the following kinds of paper:• Damaged, curled, wrinkled, or irregularly shaped paper 1 0.08 in. (2 mm) or longer• Extremely shiny or highly textured paper• Paper already printed on by a printer• Paper that cannot be arranged uniformly when stacked• Paper made with a short grain Paper capacity of the output paper tray 2Up to 50 sheets of 20 lb Letter or 80 g/m2 A4 paper.Transparencies or photo paper must be picked up from the output paper tray one page at a time to avoid smudging.Brother paperPaper Type ItemLetter Plain BP60PL (USA only)Letter Glossy Photo 1 BP61GLLLetter Inkjet (Matte) BP60ML (USA only)4 × 6 in. Glossy Photo 1 BP61GLP11
Loading documents and paper112Choosing the right media 2Paper type and size for each operation2Paper Type Paper Size UsageFax Copy PrintCut Sheet Letter  8 1/2 × 11 in. (216 × 279 mm) Yes Yes YesA4 8.3 × 11.7 in. (210 × 297 mm) Yes Yes YesLegal 8 1/2 × 14 in. (216 × 356 mm) Yes Yes YesExecutive 7 1/4 × 10 1/2 in. (184 × 267 mm) – – YesJIS B5 7.2 × 10.1 in. (182 × 257 mm) – – YesA5 5.8 × 8.3 in. (148 × 210 mm) – Yes YesA6 4.1 × 5.8 in. (105 × 148 mm) – – YesCards Photo 4 × 6 in. (10 × 15 cm) – Yes YesPhoto 2L 5 × 7 in. (13 × 18 cm) ––YesIndex Card 5 × 8 in. (127 × 203 mm) – – YesPost Card 1 3.9 × 5.8 in. (100 × 148 mm) – – YesPost Card 2 (Double)5.8 × 7.9 in. (148 × 200 mm) – – YesEnvelopes C5 Envelope 6.4 × 9 in. (162 × 229 mm) – – YesDL Envelope 4.3 × 8.7 in. (110 × 220 mm) – – YesCOM-10 4 1/8 × 9 1/2 in. (105 × 241 mm) – – YesMonarch 3 7/8 × 7 1/2 in. (98 × 191 mm) – – YesJE4 Envelope 4.1 × 9.3 in. (105 × 235 mm) – – YesTransparenciesLetter 8 1/2 × 11 in. (216 × 279 mm) – Yes YesA4 8.3 × 11.7 in. (210 × 297 mm) – Yes Yes
Chapter 212Paper weight, thickness and capacity 21Up to 50 sheets for Legal size paper 20 lb (80 g/m2).Up to 100 sheets of 20 lb (80 g/m2) paper.Paper Type Weight Thickness No. of sheetsCut SheetPlain Paper 17 to 32 lb (64 to 120 g/m2)0.003 to 0.006 in. (0.08 to 0.15 mm) 100 1Inkjet Paper 17 to 53 lb (64 to 200 g/m2)0.003 to 0.01 in. (0.08 to 0.25 mm) 20Glossy Paper Up to 58 lb (Up to 220 g/m2)Up to 0.01 in. (Up to 0.25 mm) 20Cards Photo 4" × 6" Up to 64 lb (Up to 240 g/m2)Up to 0.01 in. (Up to 0.28 mm) 20Index Card Up to 32 lb (Up to 120 g/m2)Up to 0.006 in. (Up to 0.15 mm) 30Post Card Up to 53 lb (Up to 200 g/m2)Up to 0.01 in. (Up to 0.23 mm) 30Envelopes 20 to 25 lb (75 to 95 g/m2)Up to 0.02 in. (Up to 0.52 mm) 10Transparencies – – 10
Loading documents and paper132Loading paper and other media 2aPull the paper tray completely out of the machine.If the paper support flap is open, close it and lift the output paper tray cover (1).  bPress and slide the paper side guides (1) and paper length guide (2) to fit the paper size. cFan the stack of paper well to avoid paper jams and misfeeds. NoteAlways make sure that the paper is not curled. 1112
Chapter 214dGently put the paper into the paper tray print side down and top edge first.Check that the paper is flat in the tray. NoteWhen you use Legal size paper, press and hold the universal guide release button as you slide out the front of the paper tray.  eGently adjust the paper side guides with both hands and the paper length guide to the paper.Make sure the paper side guides touch the sides of the paper. NoteBe careful that you do not push the paper in too far; it may lift at the back of the tray and cause feed problems. fClose the output paper tray cover.
Loading documents and paper152gSlowly push the paper tray completely into the machine. hWhile holding the paper tray in place, pull out the paper support (1) until it clicks and unfold the paper support flap (2). NoteDo not use the paper support flap for Legal paper. Loading envelopes and post cards 2About envelopes 2Use envelopes that weigh from 20 to 25 lb (75 to 95 g/m2).Some envelopes need margin settings to be set in the application. Make sure you do a test print first.CAUTION Do not use any of the following types of envelopes, as they will cause paper feed problems:• If they are of a baggy construction.• That are embossed (have raised writing on them).• That have clasps or staples.• That are pre-printed on the inside.Occasionally you may experience paper feed problems caused by the thickness, size and flap shape of the envelopes you are using. Glue 2Double flap 2
Chapter 216How to load envelopes and post cards2aBefore loading, press the corners and sides of the envelopes or post cards to make them as flat as possible.NoteIf the envelopes or post cards are ‘double-feeding,’ put one envelope or post card in the paper tray at a time.    bPut the envelopes or post cards into the paper tray with the address side down and the leading edge as shown in the illustration in first as shown in the illustration. Slide the paper side guides (1) and paper length guide (2) to fit the size of the envelopes or post cards. If you have problems when printing on envelopes, try the following suggestions: 2aOpen the envelope flap.bMake sure the open flap is either to the side of the envelope or to the back edge of the envelope when printing.cAdjust the size and margin in your application.  Removing small printouts from the machine 2When the machine ejects small paper onto the output paper tray you may not be able to reach it. Make sure printing has finished, and then pull the tray completely out of the machine.  12
Loading documents and paper172Printable Area 2The printable area depends on the settings in the application you are using. The figures below show the unprintable areas on cut sheet paper and envelopes. The machine can only print in the shaded areas when the Borderless print feature is available and turned on.NoteThe Borderless feature is not available for envelopes. Cut Sheet Paper Envelopes   Top (1) Bottom (2) Left (3) Right (4)Cut Sheet 0.12 in. (3 mm) 0.12 in. (3 mm) 0.12 in. (3 mm) 0.12 in. (3 mm)Envelopes 0.47 in. (12 mm)  0.95 in. (24 mm)  0.12 in. (3 mm)  0.12 in. (3 mm) 34123412
183On/Off key 3When the machine is idle, you can turn it on and off by pressing the On/Off key. NoteIf you have connected an external telephone or TAD, it is always available. Turning the machine off 3aPress and hold down the On/Off key until the LCD shows Shutting Down.The LCD light goes off.Turning the machine on 3aPress and hold down the On/Off key until the LCD shows Please Wait.The LCD shows the date and time.On/Off setting  3You can customize the machine's On/Off key. The default setting is Fax Receive:Off. Your machine will not work when it is switched off, but it will clean the print head periodically. If you turn this setting to Fax Receive:On, you can receive faxes or calls even when the machine is switched off. (See On/Off key on this page.)aPress Menu, 1, 6.bPress a or b to choose Fax Receive:On, or Fax Receive:Off.Press OK.cPress Stop/Exit.General setup 3
General setup1931You cannot receive a fax with Black Start or Color Start.2You can receive telephone calls by lifting the handset (FAX-2480C) or cordless handset (FAX-2580C).3FAX-2480C only4FAX-2580C only5Set before you switch off the machine.Mode Timer 3The machine has two temporary mode keys on the control panel: Fax and Copy. You can change the amount of time the machine takes after the last Copy operation before it returns to Fax mode. If you choose Off, the machine stays in the mode you used last. aPress Menu, 1, 1.bPress a or b to choose 0 Sec, 30 Secs, 1 Min, 2 Mins, 5 Mins or Off.Press OK.cPress Stop/Exit.On/Off settingReceive modeAvailable operationsFax Receive:Off(default)— No machine operations will be available.Fax Receive:On 1 2Fax OnlyExternal TAD 3Fax/TelFax ReceiveEasy ReceiveDelayed Fax 5Fax Forward 5Paging 5Fax Storage 5Remote Retrieval 5MC:Msg Ctr 4Fax ReceiveRecording of incoming messagesEasy ReceiveDelayed Fax 5Fax Forward 5Paging 5Fax Storage 5Remote Retrieval 5Manual Easy Receive, Delayed Fax 5
Chapter 320Paper settings 3Paper Type 3To get the best print quality, set the machine for the type of paper you are using.aPress Menu, 1, 2.bPress a or b to choose Plain Paper, Inkjet Paper, Brother Photo, Other Photo or Transparency.Press OK.cPress Stop/Exit.NoteThe machine ejects paper with printed surfaces face up onto the paper tray in the front of the machine. When you use transparencies or glossy paper, remove each sheet at once to prevent smudging or paper jams. Paper Size 3You can use five sizes of paper for printing copies: Letter, Legal, A4, A5, and 4 × 6in. (10 × 15 cm) and three sizes for printing faxes: Letter, Legal and A4. When you change the size of paper you load in the machine, you will need to change the paper size setting at the same time so your machine can fit an incoming fax on the page.aPress Menu, 1, 3.bPress a or b to choose Letter, Legal, A4, A5 or 4"×6".Press OK.cPress Stop/Exit.Volume Settings 3Ring Volume 3You can choose a range of ring volume lev-els, from High to Off.While in Fax mode  , press  d or c to adjust the volume level. The LCD shows the current setting, and each key press will change the volume to the next level. The machine will keep the new setting until you change it.You can also change the volume through the menu, by following the instructions below:Setting the Ring Volume from the menu 3aPress Menu, 1, 4, 1.bPress a or b to choose Low, Med, High or Off.Press OK.cPress Stop/Exit.Beeper Volume 3When the beeper is on, the machine will beep when you press a key, make a mistake or after you send or receive a fax.You can choose a range of volume levels, from High to Off.aPress Menu, 1, 4, 2.bPress a or b to choose Low, Med, High or OffPress OK.cPress Stop/Exit.
General setup213Speaker Volume 3You can choose a range of speaker volume levels, from High to Off.aPress Menu, 1, 4, 3.bPress a or b to choose Low, Med, High or Off.Press OK.cPress Stop/Exit.You can also adjust the speaker volume by pressing Hook/Hold.aPress Hook/Hold.bPress  d or c.This setting will stay until you change it again.cPress Hook/Hold.Handset Volume (FAX-2480C only) 3aPress Menu, 1, 4, 4.bPress a or b to choose Low or High.Press OK.cPress Stop/Exit.You can also adjust the handset volume any time you are talking on the telephone. There are two handset volume levels, Low and High. The default setting is Low.Press  d or c to adjust the volume level. The LCD shows the setting you are choosing. The new setting will remain until you change it again.Choosing the Handset Volume (For Volume Amplify) (FAX-2480C only) 3Before you begin to use the machine, you must decide if you need to set the handset volume to Vol Amplify:On for a user who is hearing-impaired. The AMPLIFY volume level complies with FCC standards.Vol Amplify:OffThis default setting is appropriate if none of the users are hearing-impaired. During a conversation, users can press  d or c on the control panel to adjust the volume to Low or High. When the handset is replaced, the handset volume will remain until you change it again.Vol Amplify:On—TemporaryThis setting is appropriate if some of the users are hearing-impaired. During a conversation, users can press  d or c on the control panel to adjust the volume to Low, High or Volume Amplify.When the handset is replaced, the handset volume returns to the default setting of Low. Vol Amplify:On—PermanentChoose Vol Amplify:On—Permanent if all of the users are hearing-impaired. During a conversation, users can press  d or c on the control panel to adjust the volume to Low, High or Volume Amplify. When the handset is replaced, the handset volume returns to the default setting of Volume Amplify.Note• When you press  d or c on the control panel to adjust the volume, the LCD shows the setting you are choosing. Each key press changes the volume to the next setting.
Chapter 322WARNING It is important that you do NOT choose Permanent unless ALL the users are hearing-impaired. Otherwise, the default setting of Volume Amplify may damage the hearing of some users. Setting Volume Amplify (FAX-2480C only) 3Please carefully read Choosing the Handset Volume (For Volume Amplify) (FAX-2480C only) on page 21 before you do the following steps:aPress Menu, 1, 4, 5.bDo one of the following:If none of the users are hearing-impaired, press a or b to choose Vol Amplify:Off, and then press OK and go to step d.If some or all of the users are hearing-impaired, press a or b to choose Vol Amplify:On, and then press OK.cDo one of the following:If all the users are hearing-impaired, press a or b to choose Vol Amplify:On—Permanent, and then press OK.If only some of the users are hearing-impaired, choose Vol Amplify:On—Temporary, and then press OK.dPress Stop/Exit.Automatic Daylight Savings Time 3You can set the machine to change automatically for daylight savings time. It will reset itself forward one hour in the Spring and backward one hour in the Fall. Make sure you have set the correct date and time in the Date/Time setting.aPress Menu, 1, 5.bPress a or b to choose On or Off.Press OK.cPress Stop/Exit.
General setup233LCD display 3LCD Contrast 3You can adjust the LCD contrast for a sharper and more vivid display. If you are having difficulty reading the LCD, try changing the contrast setting.aPress Menu, 1, 7.bPress a or b to choose Light or Dark.Press OK.cPress Stop/Exit.
244TX Lock (FAX-2480C only) 4TX Lock lets you prevent unauthorized access to the machine.While TX Lock is On, the following operations are available:Receiving faxesFax Forwarding (If Fax Forwarding was already On)Remote retrieval (If Fax Storage was already On)While TX Lock is On, the following operations are NOT available:Sending faxesCopyingSetting and changing the TX Lock passwordSetting up the password 4Note• If you forget the TX Lock password, please call Brother Customer Service.• If you have already set the password, you will not need to set it again. aPress Menu, 2, 0, 1.bEnter a 4-digit number for the password.Press OK.cWhen the LCD shows Verify:, re-enter the password.Press OK.dPress Stop/Exit.Changing the TX Lock password 4aPress Menu, 2, 0, 1.bPress a or b to choose Set Password.Press OK.cEnter a 4-digit number for the current password.Press OK.dEnter a 4-digit number for a new password.Press OK.eWhen the LCD shows Verify:, re-enter the password.Press OK.fPress Stop/Exit.Security features 4
Security features254Turning the TX Lock on/offTurning TX Lock on 4aPress Menu, 2, 0, 1.bPress a or b to choose Set TX Lock.Press OK.cEnter the registered 4-digit password.Press OK.The machine goes offline and the LCD shows TX Lock Mode.Turning TX Lock off 4aPress Menu.bEnter the registered 4-digit password.Press OK.TX lock is automatically turned off.NoteIf you enter the wrong password, the LCD shows Wrong Password and stays offline. The machine will stay in TX Lock mode until the registered password is entered. Memory Security (FAX-2580C only) 4Memory Security lets you prevent unauthorized access to the machine. You will not be able to continue to schedule Delayed Faxes or Polling jobs. However, any pre-scheduled Delayed Faxes will be sent even if you turn on Memory Security, so they will not be lost.While Memory Security is On, the following operations are available:Receiving faxes into memory (limited by memory capacity)Fax Forwarding (If Fax Forwarding was already On) Remote retrieval (If Fax Storage was already On) Cordless handset (MFC-845CW only) • Making a call• Receiving a call• Viewing Caller ID (with subscriber service)While Memory Security is on, the following operations are NOT available: Printing received faxesSending faxesCopyingCordless handset• Intercom• Transfer a call• Register cordless handsetNoteTo print the faxes in memory, turn off Memory Security.
Chapter 426Setting and changing the memory security password 4Setting a password for the first time 4Note• If you forget the Memory Security password, please call Brother Customer Service.• If you have already set the password, you will not need to set it again. aPress Menu, 2, 0, 1.bEnter a 4-digit number for the password.Press OK.cWhen the LCD shows Verify:, re-enter the password.Press OK.dPress Stop/Exit.Changing your memory security password 4aPress Menu, 2, 0, 1.bPress a or b to choose Set Password.Press OK.cEnter the registered 4-digit number for the current password.Press OK.dEnter a 4-digit number for a new password.Press OK.eWhen the LCD shows Verify:, re-enter the new password.Press OK.fPress Stop/Exit.Turning the memory security on/off 4Turning on the memory security lock 4aPress Menu, 2, 0, 1.bPress a or b to choose Set Security.Press OK.cEnter the registered 4-digit password.Press OK.The machine goes offline and the LCD shows Secure Mode.NoteIf there is a power failure the data will stay in memory for approximately 24 hours. Turning off the memory security 4aPress Menu.bEnter the registered 4-digit password.Press OK.Memory Security is automatically turned off.NoteIf you enter the wrong password, the LCD shows Wrong Password and stays offline. The machine will stay in Secure mode until the registered password is entered.
Section IIFax IISending a fax 28Receiving a Fax 35Telephone Services and External devices 41Dialing and storing numbers 51Remote fax options (Black & White only) 60Printing Reports 67Polling 69
285Entering Fax mode 5To enter fax mode, press  (Fax), and the key will glow green.The LCD will show the new job number and the memory available.The number of pages you can scan into the memory will vary depending on the data that is printed on them.Faxing from the ADF 5aMake sure you are in Fax mode  .bPut the document face down in the ADF.cDial the fax number.dPress Black Start or Color Start.The machine starts scanning the document.Note• To cancel, press Stop/Exit.• If the memory is full, the fax will be sent in real time. Faxing from the scanner glass5You can use the scanner glass to fax pages of a book one at a time. The documents can be up to letter or A4 size.You cannot send multiple pages for color faxes.NoteSince you can only scan one page at a time, it is easier to use the ADF if you are sending a multiple page document. aMake sure you are in Fax mode  .bLoad your document on the scanner glass.cDial the fax number.dPress Black Start or Color Start.If you press Black Start, the machine starts scanning the first page. Go to step e.If you press Color Start, the machine starts sending the document.eDo one of the following:To send a single page, press 2 to choose No. (or press Black Start again).The machine starts sending the document.To send more than one page, press 1 to choose Yes and go to step f.fPut the next page on the scanner glass.Press OK.The machine starts scanning the page. (Repeat step e and step f for each additional page.)NoteIf the memory is full and you are faxing a single page, it will be sent in real time. Sending a fax 5
Sending a fax295Faxing A4 size documents from the scanner glass 5When documents are A4 size, you need to set Scan Size to A4. If you do not, the bottom portion of the faxes will be missing.aMake sure you are in Fax mode  .bPress Menu, 2, 2, 0.cPress a or b to choose A4.Press OK.Color fax transmission 5Your machine can send a color fax to machines that support this feature.However, color faxes cannot be stored in the memory. When you send a color fax, the machine will send it in real time (even if Real Time TX is set to Off). Canceling a fax in progress 5If you want to cancel a fax while the machine is scanning, dialing or sending, press Stop/Exit.Broadcasting (Black & White only) 5Broadcasting is when the same fax message is automatically sent to more than one fax number. You can include Groups, One-Touch, Speed-Dial numbers and up to 50 manually dialed numbers in the same broadcast. After the broadcast is finished, a Broadcast Report will be printed.aMake sure you are in Fax mode  .bLoad your document.cEnter a number. Press OK.You can use either a One-Touch, Speed-Dial, a Group or a manually entered number using the dial pad.dRepeat c until you have entered all the fax numbers you wish to broadcast to.ePress Black Start.Note• If you did not use up any of the numbers for Groups, or access codes, or credit card numbers, you can ‘broadcast’ faxes to as many as 140 (FAX-2480C) or 154 (FAX-2580C) different numbers.• The available memory will vary depending on the types of jobs in the memory and the number of locations used for broadcasting. If you broadcast to the maximum numbers available, you will not be able to use dual access.• Enter the long dialing sequence numbers as you would normally, but remember that each Speed-Dial number counts as one number, so the number of locations you can store becomes limited. • If the memory is full, press Stop/Exit to stop the job. If more than one page has been scanned, press Black Start to send the portion that is in the memory.
Chapter 530Canceling a Broadcast in progress 5aPress Menu, 2, 6.The LCD will show the fax number being dialed.bPress OK.The LCD will show the job number: XXXXXXXX 1.Clear 2.ExitcPress 1 to clear.The LCD will then show the Broadcast job number and 1.Clear 2.Exit.dTo cancel the Broadcast, press 1.ePress Stop/Exit.Additional sending operations 5Sending faxes using multiple settings 5When you send a fax you can choose any combination of these settings: resolution, contrast, overseas mode and real time transmission.aMake sure you are in Fax mode  .bLoad your document.cChoose a setting you want to change.Press OK.dChoose one of the options below: Other Settings 1.Yes 2.NoPress 1 to change another setting.Press 2 when you have finished choosing your settings.eSend the fax as normal.
Sending a fax315Contrast 5If your document is very light or very dark, you may want to change the contrast. Use Light when sending a light document.Use Dark when sending a dark document.aMake sure you are in Fax mode  .bLoad your document.cPress Menu, 2, 2, 1.dPress a or b to choose Auto, Light or Dark. Press OK. NoteEven if you choose Light or Dark, the machine will send the fax using the Auto setting in any of the following conditions:• When you send a color fax.• When you choose Photo as the Fax Resolution. Changing Fax Resolution 5The quality of a fax can be improved by changing the fax resolution. Resolution can be changed for the next fax or for all faxes.To change the fax resolution for the next fax 5aMake sure you are in Fax mode  .bLoad your document.cPress Fax Resolution then a or b to choose the resolution.Press OK.To change the default fax resolution 5aMake sure you are in Fax mode  .bPress Menu, 2, 2, 2.cPress a or b to choose the resolution you want.Press OK. NoteYou can choose four different resolution settings for black & white faxes and two for color.If you choose S.Fine or Photo and then use the Color Start key to send a fax, the machine will send the fax using the Fine setting. Black & White Standard Suitable for most typed documents.Fine Good for small print and transmits a little slower than Standard resolution.S.Fine Good for small print or artwork and transmits slower than Fine resolution.Photo Use when the document has varying shades of gray or is a photograph. This has the slowest transmission.ColorStandard Suitable for most typed documents.Fine Use when the document is a photograph. The transmission time is slower than Standard resolution.
Chapter 532Dual access (Black & White only) 5You can dial a number and start scanning the fax into memory—even when the machine is sending from memory, receiving faxes or printing PC data. The LCD shows the new job number and available memory.The number of pages you can scan into the memory will vary depending on the data that is printed on them.NoteIf the Out of Memory message appears while scanning documents, press Stop/Exit to cancel or Black Start to send the scanned pages. Real time transmission 5When you are sending a fax, the machine will scan the documents into the memory before sending. Then, as soon as the phone line is free, the machine will start dialing and sending.If the memory is full or you are sending a color fax, the machine will send the document in real time (even if Real Time TX is set to Off).Sometimes, you may want to send an important document immediately, without waiting for memory transmission. You can set Real Time TX to On for all documents or Next Fax Only for the next fax only.NoteIn Real Time Transmission, the automatic redial feature does not work when using the scanner glass. Sending in real time for all faxes 5aMake sure you are in Fax mode  .bPress Menu, 2, 2, 5. 5.Real Time TX Realtime TX:OncPress a or b to choose On or Off.Press OK.Sending in real time for the next fax only 5aMake sure you are in Fax mode  .bPress Menu, 2, 2, 5.cPress a or b to choose Next Fax Only. Press OK.dPress a or b to choose On (or Off).
Sending a fax335Overseas Mode 5If you are having difficulty sending a fax overseas due to possible interference on the phone line, we recommend that you turn on the Overseas mode. After you send a fax using this feature, the feature will turn itself off.aMake sure you are in Fax mode  .bLoad your document.cPress Menu, 2, 2, 7.dPress a or b to choose On (or Off).Press OK.Delayed Faxing (Black & White only) 5During the day you can store up to 50 faxes in the memory to be sent within 24-hours. These faxes will be sent at the time of day you enter in step d.aMake sure you are in Fax mode  .bLoad your document.cPress Menu, 2, 2, 3.dDo one of the following:Press OK to accept the displayed time.Enter the time you want the fax to be sent (in 24-hour format).(For example, enter 19:45 for 7:45 PM.)Press OK.NoteThe number of pages you can scan into the memory depends on the amount of data that is printed on each page. Delayed Batch Transmission (Black & White only) 5Before sending the delayed faxes, your machine will help you economize by sorting all the faxes in the memory by destination and scheduled time. All delayed faxes that are scheduled to be sent at the same time to the same fax number will be sent as one fax to save transmission time.aMake sure you are in Fax mode  .bPress Menu, 2, 2, 4.cPress a or b to choose On (or Off).Press OK.dPress Stop/Exit.Checking and canceling waiting jobs 5You can check which jobs are still waiting in the memory to be sent and cancel a job. (If there are no jobs, the LCD shows No Jobs Waiting.)aPress Menu, 2, 6.Any waiting jobs appear on the LCD.bPress a or b to scroll through the jobs and choose the job you want to cancel.Press OK.cDo one of the following:Press a or b to scroll through the waiting jobs, press OK to choose a job, and then press 1 to cancel it.Press 2 to exit without canceling.dWhen you have finished, press Stop/Exit.
Chapter 534Sending a fax manually 5Manual transmission lets you hear the dialing, ringing and fax-receiving tones while sending a fax.aMake sure you are in Fax mode  .bLoad your document.c(FAX-2480C)Pick up the handset of the machine or press Hook/Hold and listen for a dial tone.(FAX-2580C)Press Speaker Phone on the machine or press   on the cordless handset.dDial the fax number you want to call.eWhen you hear the fax tone, press Black Start or Color Start.If you are using the scanner glass, press 1 to send the fax. 1.Send 2.ReceivefIf you picked up the handset or cordless handset, replace it. Sending a fax at the end of a conversation 5At the end of a conversation you can send a fax to the other party before you both hang up.aAsk the other party to wait for fax tones (beeps) and then to press the Start or Send key before hanging up.bMake sure you are in Fax mode  . cLoad your document.dPress Black Start or Color Start.If you load the document on the scanner glass, press 1 to send the fax. 1.Send 2.ReceiveeIf you picked up the handset or cordless handset, replace it.Out of Memory message 5If you get an Out of Memory message while scanning the first page of a fax, press Stop/Exit to cancel the fax. If you get an Out of Memory message while scanning a subsequent page, you will have the option to press Start to send the pages scanned so far, or to press Stop/Exit to cancel the operationNoteIf you get an Out of Memory message while faxing and you do not want to delete your stored faxes to clear the memory, you can send the fax in real time. (See Real time transmission on page 32.)
3566Receive modes 6You must choose a receive mode depending on the external devices and telephone subscriber services you have on your line.Choosing the Receive Mode 6The diagram below will help you choose the correct mode.For more detailed information on the receive modes see page 37.FAX-2480C  6Receiving a Fax 6Do you use a Distinctive Ring subscriber service?YesYesSee Distinctive Ring.Fax OnlyNoYesNoNoNoYesManualYesExternal TADNoFax/TelAre you connecting an external telephone or external TAD (telephone answering device) to the machine?Do you want the machine to answer fax and telephone calls automatically?Are you using the voice message function of your external TAD  (telephone answering device)?Do you want to use the  machine for fax only?
Chapter 636FAX-2580C  6To set a receive mode, follow the instructions below.aPress Menu, 0, 1.bPress a or b to choose Fax Only, Fax/Tel, External TAD (FAX-2480C only) or Manual.Press OK.cPress Stop/Exit.The LCD will display the current receive mode. 1 Current receive modeFax: Fax OnlyDo you use a Distinctive Ring subscriber service?YesYesSee Distinctive Ring.Fax OnlyNoYesNoNoNoYesManualYesNoFax/TelAre you connecting an external telephone or external TAD (telephone answering device) to the machine?Do you want the machine to answer fax and telephone calls automatically?Are you using the voice message function of your external TAD  (telephone answering device)?Do you want to use the  machine for fax only?Are you using the built-in Message Center? See Message Center.NoYesManual* * We recommend you set Easy Receive to On.12/10 11:53  Fax12/10 11:53  Fax1
Receiving a Fax376Using receive modes 6Some receive modes answer automatically (Fax Only and Fax/Tel). You may want to change the ring delay before using these modes. See Ring Delay on page 38.Fax only 6Fax only mode will automatically answer every call. If the call is a fax your machine will receive it.Fax/Tel 6Fax/Tel mode helps you automatically manage incoming calls, by recognizing whether they are fax or voice calls and handling them in one of the following ways:Faxes will be automatically received.Voice calls will start the F/T ring to tell you to pick up the line. The F/T ring is a fast double ring made by your machine.Also see F/T Ring Time (Fax/Tel mode only) on page 38 and Ring Delay on page 38.Manual 6Manual mode turns off all automatic answering functions unless you are using the Distinctive Ring feature.To receive a fax in manual mode press Black Start or Color Start when you hear fax tones (short repeating beeps). You can also use the Easy Receive feature to receive faxes by lifting a handset on the same line as the machine.Also see Easy Receive on page 39.Message Center (MC:Msg Ctr) (FAX-2580C only) 6Message Center (MC:Msg Ctr) helps you automatically manage incoming calls, by recognizing whether they are fax or voice calls and handling them in one of the following ways:Faxes will be automatically received.Voice callers can record a message.To set up the Message Center mode, see page 56.External TAD (FAX-2480C only) 6External TAD mode lets an external answering device manage your incoming calls. Incoming calls will be handled in one of the following ways:Faxes will be automatically received.Voice callers can record a message on the external TAD.For more information see Connecting an external TAD (telephone answering device) on page 45.If Message Center Mode is On, it will override your receive mode setting. The screen shows MC:Msg Ctr.If  Message Center Mode is Off, the receive mode returns to your original setting. (See Message Center Mode on page 56.)
Chapter 638Receive mode settings 6Ring Delay 6The Ring Delay sets the number of times the machine rings before it answers in Fax Only or Fax/Tel mode. If you have external or extension phones on the same line as the machine or subscribe to the telephone company’s Distinctive Ring service, keep the ring delay setting of 4. (See Using external and extension telephones on page 49 and Easy Receive on page 39.)If toll saver is On, then the ring delay setting has no effect. See Setting toll saver on page 59. (FAX-2580C only)aPress Menu, 2, 1, 1.b(FAX-2580C only)Press a or b to choose Ring Delay.Press OK.cPress a or b to choose how many times the line rings before the machine answers (00-04).Press OK.If you choose 00, the line will not ring at all.dPress Stop/Exit.F/T Ring Time (Fax/Tel mode only) 6If you set the Receive Mode to Fax/Tel, you need to decide how long the machine will signal you with its special pseudo/double-ring when you have a voice call. If it's a fax call, the machine receives the fax.This pseudo/double-ring happens after the initial ringing from the phone company. Only the machine rings and no other phones on the same line will ring with the special pseudo/double-ring. However, you can still answer the call on any telephone.aPress Menu, 2, 1, 2.bPress a or b to choose how long the machine will ring to alert you that you have a voice call (20, 30, 40 or 70 seconds).Press OK.cPress Stop/Exit.NoteEven if the caller hangs up during the pseudo/double-ringing, the machine will continue to ring for the set time.
Receiving a Fax396Easy Receive 6If Easy Receive is On:6The machine receives fax calls automatically, even if you lift the machine’s handset, press Speaker Phone, or lift the handset of an extension or external phone. When you see Receiving on the LCD or when you hear ‘chirps’ through the handset of an extension phone connected to another telephone wall jack, just replace the handset or press Speaker Phone and your machine will do the rest. If Easy Receive is Semi:6The machine will only receive a fax call if you answered it using the machine’s handset, Speaker Phone or Brother cordless handset.If Easy Receive is Off:6You have to lift the handset of an external phone, and then press Black Start or Color Start on the machine.If you are not at your machine, press l 5 1 on the extension phone. (See Using external and extension telephones on page 49.)Note• If this feature is set to On, but your machine does not connect a fax call when you lift an extension or external phone handset, press the fax receive code l 5 1. • If you send faxes from a computer on the same phone line and the machine intercepts them, set Easy Receive to Off. aPress Menu, 2, 1, 3.bPress a or b to choose On, Semi (or Off).Press OK.cPress Stop/Exit.Additional receiving operations 6Printing a reduced incoming fax 6If you choose On, the machine automatically reduces each page of an incoming fax to fit on one page of A4, Letter, Legal size paper.The machine calculates the reduction ratio by using the page size of the fax and your Paper Size setting (Menu, 1, 3).aMake sure you are in Fax mode  .bPress Menu, 2, 1, 5.  5.Auto ReductioncUse a or b to choose On or Off.Press OK.dPress Stop/Exit.
Chapter 640Receiving a fax at the end of a conversation 6At the end of a conversation you can ask the other party to send you a fax before you both hang up.aAsk the other party to place the document in their machine and to press Start or Send key.bWhen you hear the CNG tones (slowly repeating beeps), press Black Start or Color Start.cPress 2 to receive a fax. 1.Send 2.ReceivedIf you picked up the handset, replace it.Printing a fax from the memory 6If you have chosen paging or fax storage, you can still print a fax from the memory when you are at your machine. (See Turning off Remote Fax Options on page 62.)aPress Menu, 2, 5, 3.bPress Black Start.
4177Voice operations 7Voice calls can be made either with the handset, the cordless handset (FAX-2580C), the speaker phone (FAX-2580C), an extension or external telephone, and by dialing manually, or by using One-Touch or Quick-Dial numbers.NoteIf you have FAX-2580C, see the Digital Cordless Handset User’s Guide. Making a telephone call  7aTo start a voice call, choose one of the options below:(FAX-2480C) Pick up the handset.(FAX-2580C) Press Speaker Phone on the machine or press   on the cordless handset.bWhen you hear the dial tone, enter a number using the dial pad, One Touch, Speed-Dial or Search.c(Speaker phone for FAX-2580C only) Speak clearly toward the microphone  .dTo hang up, choose one of options below:For FAX-2480C, replace the handset.For FAX-2580C, press Speaker Phone on the machine or  on the cordless handset.Answering calls with the Speaker Phone (FAX-2580C only) 7When the machine rings, instead of lifting the handset, press Speaker Phone on the machine.Speak clearly toward the microphone  . To end the call, press Speaker Phone.Hold 7If you want to put a call on hold, press Hook/Hold (Hold/Intercom). To release the call from hold, press Speaker Phone or pick up the machine’s handset.Picking up an extension handset will not release the call from hold.Tone or Pulse (Canada only) 7If you have a Pulse dialing service, but need to send Tone signals (for example, for telephone banking), follow the instructions below:aLift the handset of the machine or press Hook/Hold.bPress # on the machine’s control panel. Any digits dialed after this will send tone signals.When you hang up, the machine will return to the Pulse dialing service.Telephone Services and External devices 7
Chapter 742Fax/Tel mode when the power key is on 7When the machine is in Fax/Tel mode, it will use the F/T Ring Time (pseudo/double-ringing) to alert you to pick up a voice call.If you are at the machine, you chan lift the handset (FAX-2480C) or press Speaker Phone or lift the cordless handset (FAX-2580C) to answer.If you are at an extension phone, you'll need to lift the handset during the F/T Ring Time and then press #51 between the pseudo/double rings. If no one is on the line, or if someone wants to send you a fax, send the call back to the machine by pressing l51.Fax/Tel mode when the power key is off 7You can change the default setting of the On/Off key to Fax Receive:On so that you can receive faxes when the power key is off. (See On/Off setting on page 18.) Fax/Tel mode will work in the following ways.When the machine is in Fax/Tel mode and F/T rings to tell you to pick up a voice call, you can only answer by picking up the machine’s handset or cordless handset.If you answer before the machine F/T rings, you can also pick up the call at an external or extension phone.Telephone services 7Your machine supports the Caller ID and Distinctive Ring subscriber telephone services that some telephone companies offer.Features like Voice Mail, Call Waiting, Call Waiting/Caller ID, RingMaster, answering services, alarm systems or other custom features on one phone line may affect the way your machine works. If you have Voice Mail on your phone line, please read the following carefully.Distinctive Ring 7Brother uses the term ‘Distinctive Ring’ but different telephone companies have other names for this service such as SmartRing, RingMaster, Teen-Ring, Indent-a-Call or Indent-a-Ring.What does your telephone company's ‘Distinctive Ring’ do? 7Your telephone company's Distinctive Ring service allows you to have more than one number on the same phone line. If you need more than one phone number, it is cheaper than paying for an extra line. Each phone number has its own distinctive ring pattern, so you will know which phone number is ringing. This is one way you can have a separate phone number for your machine.NotePlease call your telephone company for availability and rates.
Telephone Services and External devices437What does Brother's ‘Distinctive Ring’ do? 7The Brother machine has a Distinctive Ring feature that allows you to use your machine to take full advantage of the telephone company's Distinctive Ring service. The new phone number on your line can just receive faxes.NoteYou must pay for your telephone company's Distinctive Ring service before you program the machine to work with it. Do you have Voice Mail? 7If you have Voice Mail on the phone line that you will install your new machine on, there is a strong possibility that Voice Mail and the machine will conflict with each other while receiving incoming calls. However, the Distinctive Ring feature allows you to use more than one number on your line, so both Voice Mail and the machine can work together without any problems. If each one has a separate phone number, neither will interfere with the other's operations.If you decide to get the Distinctive Ring service from the telephone company, you will need to follow the directions on next page to ‘register’ the new Distinctive Ring pattern they give you. This is so your machine can recognize its incoming calls.NoteYou can change or cancel the Distinctive Ring pattern at any time. You can switch it off temporarily, and turn it back on later. When you get a new fax number, make sure you reset this feature. Before you choose the ring pattern to register 7You can only register one Distinctive Ring pattern with the machine. Some ring patterns cannot be registered. The ring patterns below are supported by your Brother machine. Register the one your telephone company gives you.NoteIf the ring pattern you received is not on this chart, please call your telephone company and ask for one that is shown. The machine will only answer calls to its registered number.The first two rings are silent on the machine. This is because the fax must ‘listen’ to the ring pattern (to compare it to the pattern that was ‘registered’). (Other telephones on the same line will ring.)If you program the machine properly, it will recognize the registered ring pattern of the ‘fax number’ within 2 ring patterns and then answer with a fax tone. When the ‘voice number’ is called, the machine will not answer.Ring PatternRings1 long-long  2 short-long-short  3 short-short-long  4 very long (normal pattern)
Chapter 744Registering the Distinctive Ring pattern 7Very Important!After you have set the Distinctive Ring feature to on, the receive mode is set to Manual automatically. You cannot change the receive mode to another mode while the Distinctive Ring is set to on.aPress Menu, 2, 0, 3. 0.Miscellaneous 3.DistinctivebPress a or b to choose Set.Press OK.cPress a or b to choose the stored ring pattern you want to use.Press OK.(You hear each pattern as you scroll through the four patterns. Make sure you choose the pattern that the telephone company gave you.)dPress Stop/Exit.Distinctive Ring is now set to on.Turning off Distinctive Ring 7aPress Menu, 2, 0, 3.bPress a or b to choose Off.Press OK.cPress Stop/Exit.NoteIf you turn off Distinctive Ring, the machine will stay in Manual receive mode. You will need to set the Receive Mode again. (See Choosing the Receive Mode on page 35.) Caller ID 7The Caller ID feature lets you use the Caller ID subscriber service offered by many local telephone companies. Call your telephone company for details. This service shows the telephone number, or name if it is available, of your caller as the line rings.After a few rings, the LCD shows the telephone number of your caller (and name, if available). Once you pick up the external phone's handset, the Caller ID information disappears from the LCD, but the call information stays stored in the Caller ID memory.You can see the first 16 characters of the number (or name).The Out of Area message means the call originated outside your Caller ID service area.The Private Call message means the caller has intentionally blocked transmission of information.You can print a list of the Caller ID information received by your machine. (See Printing Caller ID List on page 45.)NoteCaller ID service varies with different carriers. Call your local telephone company to find out about the kind of service available in your area.
Telephone Services and External devices457Viewing Caller ID List 7Your machine stores information for the last thirty calls in the Caller ID list. You can view or print this list. When the thirty-first call comes in to the machine, it replaces information about the first call.aPress Menu, 2, 0, 4.bPress a or b to choose Display#.Press OK.The Caller ID of the last call will appear on the display. If no ID is stored, the beeper will sound and No Caller ID will appear on the display.cPress a or b to scroll through the Caller ID memory to choose the Caller ID you want to view, and then press OK. The LCD shows the caller's number and the date and time of the call.dDo one of the following:To return to the Caller ID listing, press a or b.To finish viewing, press Stop/Exit.Printing Caller ID List 7aPress Menu, 2, 0, 4.bPress a or b to choose Print Report.Press OK.If no ID is stored, the beeper will sound and No Caller ID will appear on the LCD.cPress Black Start or Color Start.dAfter printing has finished, press Stop/Exit.Connecting an external TAD (telephone answering device) 7You may choose to connect an external answering device. However, when you have an external TAD on the same telephone line as the machine, the TAD answers all calls and the machine ‘listens’ for fax calling (CNG) tones. If it hears them, the machine takes over the call and receives the fax. If it does not hear CNG tones, the machine lets the TAD continue playing your outgoing message so your caller can leave you a voice message.The TAD must answer within four rings (the recommended setting is two rings). The machine cannot hear CNG tones until the TAD has answered the call, and with four rings there are only 8 to 10 seconds of CNG tones left for the fax ‘handshake’. Make sure you carefully follow the instructions in this guide for recording your outgoing message. We do not recommend using the toll saver feature on your external answering machine if it exceeds five rings.Note• If you do not receive all your faxes, reduce the Ring Delay setting on your external TAD.• If You Subscribe to your Telephone company's Distinctive Ring Service:You may connect an external TAD to a separate wall jack only if you subscribe to your telephone company's Distinctive Ring service, have registered the distinctive ring pattern on your machine, and use that number as a fax number. The recommended setting is at least four rings on the external TAD when you have the telephone company's Distinctive Ring Service. You cannot use the Toll Saver setting.
Chapter 746• If You Do Not Subscribe to Distinctive Ring Service:You must plug your TAD into the EXT. jack of your machine. If your TAD is plugged into a wall jack, both your machine and the TAD will try to control the phone line. (See the illustration below.)  1TADWhen the TAD answers a call, the LCD shows Ext.Tel in Use. Connections 7The external TAD must be plugged into the jack labeled EXT. Your machine cannot work properly if you plug the TAD into a wall jack (unless you are using Distinctive Ring).aPlug the telephone line cord from the telephone wall jack into the jack labeled LINE.bPlug the telephone line cord from the external TAD into the jack labeled EXT. (Make sure this cord is connected to the TAD at the TAD's telephone line jack, and not its handset jack.)cSet your external TAD to four rings or less. (The machine's Ring Delay setting does not apply.)dRecord the outgoing message on your external TAD.eSet the TAD to answer calls.fDo one of the following:(FAX-2480C) Set the Receive Mode to External TAD. (See Choosing the Receive Mode on page 35.)(FAX-2580C) Set the Receive Mode to Manual.Recording an outgoing message (OGM) on an external TAD 7Timing is important in recording this message. The message sets up the ways to handle both manual and automatic fax reception.aRecord 5 seconds of silence at the beginning of your message. (This allows your machine time to listen for the fax CNG tones of automatic transmissions before they stop.)bLimit your speaking to 20 seconds.cEnd your 20-second message by giving your Fax Receive Code for people sending manual faxes. For example: ‘After the beep, leave a message or send a fax by pressing l51 and Start.’NoteWe recommend beginning your OGM with an initial 5-second silence because the machine cannot hear fax tones over a resonant or loud voice. You may try omitting this pause, but if your machine has trouble receiving, then you must re-record the OGM to include it. 11
Telephone Services and External devices477Special line considerations 7Roll over phone lines 7A roll over phone system is a group of two or more separate telephone lines that pass incoming calls to each other if they are busy. The calls are usually passed down or ‘rolled over’ to the next available phone line in a preset order.Your machine can work in a roll over system as long as it is the last number in the sequence, so the call cannot roll away. Do not put the machine on any of the other numbers; when the other lines are busy and a second fax call is received, the fax call will be sent to a line that does not have a fax machine. Your machine will work best on a dedicated line.Two-line phone system 7A two-line phone system is nothing more than two separate phone numbers on the same wall outlet. The two phone numbers can be on separate jacks (RJ11) or mixed into one jack (RJ14). Your machine must be plugged into an RJ11 jack. RJ11 and RJ14 jacks may be equal in size and appearance and both may contain four wires (black, red, green, yellow). To test the type of jack, plug in a two-line phone and see if it can access both lines. If it can, you must separate the line for your machine. (See Easy Receive on page 39.)Converting telephone wall outlets 7There are three ways to convert to an RJ11 jack. The first two ways may require help from the telephone company. You can change the wall outlets from one RJ14 jack to two RJ11 jacks. Or you can have an RJ11 wall outlet installed and slave or jump one of the phone numbers to it.The third way is the easiest: Buy a triplex adapter. You can plug a triplex adapter into an RJ14 outlet. It separates the wires into two separate RJ11 jacks (Line 1, Line 2) and a third RJ14 jack (Lines 1 and 2). If your machine is on Line 1, plug the machine into L1 of the triplex adapter. If your machine is on Line 2, plug it into L2 of the triple adapter.Triplex Adapter 7Installing machine, external two-line TAD and two-line telephone 7When you are installing an external two-line telephone answering device (TAD) and a two-line telephone, your machine must be isolated on one line at both the wall jack and at the TAD. The most common connection is to put the machine on Line 2, which is explained in the following steps. The back of the two-line TAD must have two telephone jacks: one labeled L1 or L1/L2, and the other labeled L2. You will need at least three telephone line cords, the one that came with your machine and two for your external two-line TAD. You will need a fourth line cord if you add a two-line telephone.RJ14RJ11RJ14
Chapter 748aPut the two-line TAD and the two-line telephone next to your machine.bPlug one end of the telephone line cord for your machine into the L2 jack of the triplex adapter. Plug the other end into the LINE jack on the back of the machine.cPlug one end of the first telephone line cord for your TAD into the L1 jack of the triplex adapter. Plug the other end into the L1 or L1/L2 jack of the two-line TAD. dPlug one end of the second telephone line cord for your TAD into the L2 jack of the two-line TAD. Plug the other end into the EXT. jack on the left side of the machine. 1 Triplex Adapter2 Two Line Phone3 External Two Line TAD4 MachineYou can keep two-line telephones on other wall outlets as always. There are two ways to add a two-line telephone to the machine's wall outlet. You can plug the telephone line cord from the two-line telephone into the L1+L2 jack of the triplex adapter. Or you can plug the two-line telephone into the TEL jack of the two-line TAD.Multi-line connections (PBX) 7We suggest you ask the company who installed your PBX to connect your machine. If you have a multi line system we suggest you ask the installer to connect the unit to the last line on the system. This prevents the machine being activated each time the system receives telephone calls. If all incoming calls will be answered by a switchboard operator we recommend that you set the Receive Mode to Manual.We cannot guarantee that your machine will operate properly under all circumstances when connected to a PBX. Any difficulties with sending or receiving faxes should be reported first to the company who handles your PBX.1234
Telephone Services and External devices497External and extension phones 7Connecting an external or extension telephone 7You can connect a separate telephone directly to your machine as shown in the diagram below. 1 Extension telephone2 External telephoneConnect the telephone line cord to the jack labeled EXT.When you are using an external phone, the LCD shows Ext. Tel in Use.Using external and extension telephones 7If you answer a fax call on an extension or an external telephone connected to the EXT. jack of the machine, you can make your machine take the call by using the Fax Receive Code. When you press the Fax Receive Code l51, the machine starts to receive the fax.If the machine answers a voice call and pseudo/double-rings for you to take over, use the Telephone Answer Code # 5 1 to take the call at an extension phone. (See F/T Ring Time (Fax/Tel mode only) on page 38.)If you answer a call and no one is on the line: 7You should assume that you're receiving a manual fax.Press l 5 1 and wait for the chirp or until the LCD shows Receiving, and then hang up.NoteYou can also use the Easy Receive feature to make your machine automatically take the call. (See Easy Receive on page 39.) Using a non-Brother cordless external telephone (FAX-2480C only) 7If your non-Brother cordless telephone is connected to the EXT. jack of the machine and you typically carry the cordless handset elsewhere, it is easier to answer calls during the Ring Delay. If you let the machine answer first, you will have to go to the machine so you can press Hook/Hold to send the call to the cordless handset.Using remote codes 7Fax receive code 7If you answer a fax call on an extension or external telephone, you can tell your machine to receive it by dialing the fax receive code l 5 1. Wait for the chirping sounds then replace the handset. See Easy Receive on page 39. Your caller will have to press Start to send the fax.Telephone answer code 7If you receive a voice call and the machine is in F/T mode, it will start to sound the F/T (double) ring after the initial ring delay. If you pick up the call on an extension phone you can turn the F/T ring off by pressing # 5 1 (make sure you press this between the rings).12
Chapter 750Changing the remote codes 7The preset Fax Receive Code is l51. The preset Telephone Answer Code is #51. If you want to, you can replace them with your own codes.aPress Menu, 2, 1, 4. 1.Setup Receive 4.Remote CodesbPress a or b to choose On (or Off).Press OK.cEnter the new Fax Receive Code.Press OK.dEnter the new Telephone Answer Code.Press OK.ePress Stop/Exit.Note• If you are always disconnected when accessing your external TAD remotely, try changing the Fax Receive Code and Telephone Answer Code to another three-digit code (such as ### and 999).• Remote Codes might not work with some telephone systems.
5188How to Dial 8Manual dialing 8Press all of the digits of the fax number. One-Touch dialing 8Press the One-Touch key that stores the number you want to call.  To dial One-Touch numbers shown in a gray square, hold down Shift as you press the One-Touch key.Speed-Dialing 8aPress Search/Speed Dial, the # (pound) key and then the two digit Speed-Dial number.NoteIf the LCD shows Not Registered when you enter a Speed-Dial or a One-touch number, a number has not been stored at this location. Dialing and storing numbers 8(FAX-2480C) Two-digit number
Chapter 852Search 8You can search for names you have stored in the One-touch and Speed-Dial memories. Press Search/Speed Dial and the navigation keys to search, or use the dial pad to search alphabetically.  1 To search numerically.2 To search alphabetically, you can use the dial pad to enter the first letter of the name you are looking for.Fax Redial 8If you are sending a fax manually and the line is busy, press Redial/Pause, and then press Black Start or Color Start to try again. If you want to make a second call to the last number dialed, you can save time by pressing Redial/Pause and Black Start or Color Start. Redial/Pause only works if you dialed from the control panel.If you are sending a fax automatically and the line is busy, the machine will automatically redial one time after five minutes.NoteIn Real Time Transmission the automatic redial feature does not work when using the scanner glass. 12
Dialing and storing numbers538Storing numbers 8You can set up your machine to do the following types of easy dialing: One-Touch, Speed-Dial and Groups for broadcasting faxes. When you dial a Quick-Dial number, the LCD shows the name, if you stored it, or the number.NoteIf you lose electrical power, the Quick-Dial numbers that are in the memory will not be lost. Storing a pause 8Press Redial/Pause to put a 3.5-second pause between numbers. If you are dialing overseas, you can press Redial/Pause as many times as needed to increase the length of the pause.Storing One-Touch dial numbers 8Your machine has One-Touch keys where you can store fax or phone numbers for automatic dialing. Two numbers can be stored on each One-Touch key. To access numbers shown in a gray square, hold down Shift as you press the One-Touch key. aPress Menu, 2, 3, 1.bPress the One-Touch key where you want to store a number.cEnter the number (up to 20 digits). Press OK.dChoose one of the options below:Enter the name using the dial pad (up to 16 characters). Use the chart on Entering Text on page 121 to help you enter letters. Press OK.Press OK to store the number without a name.eChoose one of the options below:To store another One-Touch number, go to step b.To finish storing One-Touch numbers press Stop/Exit.(FAX-2480C)
Chapter 854Storing Speed-Dial numbers 8You can store up to 80 (FAX-2480C) or 100 (FAX-2580C) 2-digit Speed-Dial locations with a name. When you dial you will only have to press a few keys (For example: Search/Speed Dial, the two-digit number, and Black Start or Color Start).aPress Menu, 2, 3, 2.bUse the dial pad to enter a 2-digit Speed-Dial location number.Press OK.cEnter the fax or telephone number (up to 20 digits).Press OK.dDo one of the following:Enter the name (up to 16 characters) using the dial pad.Press OK. (To help you enter letters, see Entering Text on page 121.)To store the number without a name press OK.eDo one of the following:To store another Speed-Dial number, go to step b.To finish the setting, press Stop/Exit.Changing One-Touch and Speed-Dial numbers 8If you try to store a One-Touch or Speed-Dial number where a number has already been stored, the LCD will show the name or number that has been stored there, and will ask you to do one of the following: Press 1 to change the stored number. #05:Mike 1.Change 2.ExitPress 2 to exit without making a change.If you chose 1, you will be able to change the stored number and name, or enter a new one. Follow the instructions below:aEnter a new number. Press OK.bEnter a new name. Press OK.To change a character, use d or c to position the cursor under the character you want to change, then press Clear/Back. Re-enter the character.cPress Stop/Exit.
Dialing and storing numbers558Setting up groups for broadcasting 8If you regularly want to send the same fax message to many fax numbers you can set up a Group. Groups are stored on a One-Touch key or Speed-Dial number. Each group uses up a One-Touch or Speed-Dial location. You can then send the fax message to all the numbers stored in a group just by entering a One-Touch or Speed-Dial number, and then pressing Black Start.Before you can add numbers to a Group, you need to store them as One-Touch or Speed-Dial numbers. You can have up to six small Groups, or you can assign up to 79 numbers to one large Group.aPress Menu, 2, 3, 3. 3.Set Quick-Dial 3.Setup GroupsbChoose an empty location where you want to store the Group in one of the following ways:Press a One-Touch key.Press Search/Speed Dial and entera two-digit location. Press OK.cUse the dial pad to enter a Group number (1 to 6).Press OK. Setup Group:G01dTo add One-Touch or Speed-Dial numbers follow the instructions below:For One-Touch numbers, press the One-Touch keys one after the other. For Speed-Dial numbers, press Search/Speed Dial then the Speed-Dial number.The LCD will display your chosen One-Touch numbers with a l, or Speed-Dial numbers with a # (for example l06, #09). G01:l06#09ePress OK when you have finished adding numbers.fUse the dial pad to enter a name for the Group.Press OK.gPress Stop/Exit.NoteYou can easily print a list of all your One-Touch and Speed-Dial numbers. Numbers that are part of a group will be marked in the GROUP column. (See How to print a report on page 68.) Dialing access codes and credit card numbers 8You can combine more than one Quick-Dial number when you dial. This feature may be useful if you need to dial an access code for a cheaper rate long distance carrier.For example, you might have stored ‘555’ on One-Touch key 1 and ‘7000’ on One-Touch key 2. You can use them both to dial ‘555-7000’ if you press One-Touch key 1 and One-Touch key 2 and Color Start or Black Start.Numbers can be added manually by entering them on the dial pad:One-Touch key 1, 7, 0, 0, 1 (on the dial pad), and Color Start or Black Start.This would dial ‘555–7001’. You can also add a pause by pressing the Redial/Pause key.
569Message Center Mode 9The Message Center feature will store up to 99 incoming voice or fax messages. Messages are stored in the order in which they are received.Voice messages can be up to 3 minutes in length, and can also be picked up remotely (See Setting a Remote Access Code on page 63.) The number of messages you can store will depend on how much memory is being used by other features (for example, delayed and stored faxes).In the event of a power failure your machine will retain messages that are in the memory for approximately 24 hours. Setting up the Message Center 9Recording the Message Center outgoing message (Msg Ctr OGM) is the first step you need to follow before you can use the Message Center. To enter Message Center mode, follow the steps below: aRecord your Message Center OGM.bPress and hold   until it lights to activate the Message Center.Outgoing message (OGM) 9Recording your OGM 9You can record the following two different types of OGM:Your OGM must be less than 20 seconds long.aPress Menu, 2, 7, 1.The LCD prompts you to choose an OGM.bPress a or b to choose Msg Ctr OGM.cPress a or b to choose Record OGM. Press OK.dRecord your message, do following:Speak clearly toward the integrated microphone   to record your message. Press Stop/Exit when finished. The Message Center will play your OGM back to you. ePress Stop/Exit.Message Center mode (FAX-2580C only) 9Msg CtrThis message will be played when a call is received. The caller will be able to leave a voice or fax message.F/T This message is played when a call is received and your machine is set to Fax/Tel mode. The caller will not be able to leave a message. See page 57.
Message Center mode (FAX-2580C only)579Listening to your OGM 9aPress Menu, 2, 7, 1.bPress a or b to choose Msg Ctr OGM.cPress a or b to choose Play OGM. Press OK.dPress Stop/Exit. Erasing your OGM 9aPress Menu, 2, 7, 1.bPress a or b to choose Msg Ctr OGM or F/T OGM, then press OK.cPress a or b to choose Erase OGM. Press OK.dDo one of the following:Press 1 to erase the OGM.Press 2 to exit without erasing.ePress Stop/Exit. Fax/Tel OGM 9If your machine is set to Fax/Tel receive mode, this message will be played by your Brother machine to a caller. Unlike the Msg Ctr OGM, the caller will not be able to leave a message.To record your Fax/Tel OGM follow the instructions page 56. If you need to review the steps for setting up the Fax/Tel receive mode, Receiving a Fax on page 35.Activating Message Center memory 9When the   light glows, Message Center mode is active. Press and hold   until it lights to enter MC:Msg Ctr mode.  MC:Msg CtrManaging your messages  9Message Indicator 9The   light flashes if you have any new messages waiting for you.The LCD displays the total number of voice and fax messages stored in the Message Center memory.  Voice:03 Fax:00Fax messages are only stored when Fax Storage is turned on. To turn fax storage on press Menu 2, 5, 1.Playing voice messages 9All messages are played in the order they were recorded. The LCD shows the number of the current message, the total number of messages, and the time and date the message was recorded.Follow the steps below to listen to your voice messages:aPress Play.The following commands are available when playing messages:bPress Stop/Exit.l  (RWD) Repeats a message#    (FWD) Skips to the next message or  Adjusts the volume
Chapter 958Printing fax messages  9Once you print a new fax message stored in memory it will automatically be erased from the memory.aPress Play. After two seconds, the fax machine begins to play voice messages. bIf Fax Storage is on, and there are fax messages in memory, the LCD displays the following: Print Fax? 1.Yes 2.NocDo one of the following: Press 1 to print your faxes. Press 2 to exit without printing. Erasing incoming messages 9To erase voice messages individually 9aPress Play.The machine will sound a two second beep and begins message playback. Each message is preceded by one long beep, and followed by two short beeps.bTo erase a specific message, press Erase immediately after the two short beeps, or while the message is playing.cDo one of the following: Erase this Msg.? 1.Yes 2.NoPress 1 to erase the message. Press 2 to exit without erasing. dPress Stop/Exit.To erase all of your messages 9aPress Erase.bPress a or b to choose one of the options below. Then press OK.cDo one of the following:Press 1 to erase all of your messages. Press 2 to cancel. dPress Stop/Exit.Voice: All voice messageFax: All fax messagesErase All Msg.? All voice and fax message
Message Center mode (FAX-2580C only)599Additional Message Center operations 9Setting maximum time for incoming messages 9Your machine’s default setting will save incoming messages up to 30 seconds long. To change this setting follow the steps below:aPress Menu, 2, 7, 2. 7.Setup Msg Ctr 2.ICM Max.TimebPress a or b to choose the maximum time setting for incoming messages (30, 60, 120 or 180 seconds). Press OK.cPress Stop/Exit.Setting toll saver 9When the toll saver feature is on, the machine will answer after two rings if you do have voice or fax messages, and after four rings if you do not have any messages.This way, when you call your machine for remote retrieval, if it rings three times, you have no messages and can hang up to avoid a toll charge. The toll saver feature is only available when Message Center mode is on. When toll saver is On, it overrides your ring delay setting.If you are using Distinctive Ring, do not use the Toll Saver feature.aMake sure you are in fax mode. If not then press   (Fax).bPress Menu, 2, 1, 1. 1.Setup Receive 1.Toll SavercPress a or b to choose Toll Saver. Press OK.dPress a or b to choose On (or Off). Press OK.ePress Stop/Exit. ICM Recording Monitor 9This feature lets you turn the speaker volume for voice messages On or Off. When you turn the monitor Off, you will not hear messages as they come in. aPress Menu, 2, 7, 3. 7.Setup Msg Ctr 3.ICM Rec.MonitrbUse a or b to choose Off or On. Press OK.cPress Stop/Exit.

Navigation menu