Brother Cp 1800 Owner S Manual
2014-07-05
: Brother Brother-Cp-1800-Owner-S-Manual brother-cp-1800-owner-s-manual brother pdf
Open the PDF directly: View PDF ![]() .
.
Page Count: 27

Table of Contents
1. Important Safety Precautions 1
2. Setup 2
3. Operation 10
4. Maintenance 15
5. Specifications 20
6. Accessories 21
User’s Manual
CP1800
Thank you for purchasing the Brother CP1800 copyboard. This copyboard has
been designed for easy operation; however, we suggest that you first read this
User’s Manual so that you can install the copyboard safely and use the
copyboard to its fullest potential. In addition, we suggest that you keep this
manual in a handy place for future reference.
If You Need to Call Customer Service:
Please complete the following information for future reference.
Model Number: CP1800
Serial Number*:
Date of Purchase:
Place of Purchase:
* The serial number is on the bottom of the printer.
Retain this User’s Manual with your sales receipt as a permanent record
of your purchase, in the event of a theft, fire or warranty service.
Compilation and Publication Notice
This manual, covering the latest product descriptions and specifications, has
been compiled and published under the supervision of Brother Industries, Ltd.
The contents of this manual and the specifications of this product are subject to
change without notice.
Brother reserves the right to make changes without notice in the specifications
and materials contained herein and shall not be responsible for any damages
(including consequential) caused by reliance on the materials presented,
including but not limited to typographical and other errors relating to the
publication.
Trademarks
Brother is a registered trademark of Brother Industries, Ltd.
The brother logo is a registered trademark of Brother Industries, Ltd.
All other terms, brand names and product names mentioned in this
manual are registered trademarks of their respective companies.

1
1. Important Safety Precautions
Read all instructions and save them for future reference. Follow all warnings and instruc-
tions indicated on the product.
• To reduce the risk of electric shock, always disconnect all cables from the wall outlets
before servicing, modifying, or installing the equipment. Unplug this product from the
wall outlet and refer servicing to an authorized Brother Service Center under the
following conditions:
a) when the power supply cord is damaged or frayed
b) if foreign objects, such as liquid, metal, or paper scraps, have been dropped into
the product
c) if the product has been exposed to rain or water
d) if the product does not operate normally when the operating instructions are
followed (Adjust only those controls that are covered by the operating instructions.
Improper adjustment of other controls may result in damage and will often require
extensive work by a qualified technician to restore the product to normal operation.)
e) if the product produces smoke or an unusual odor
f) if the product has been dropped or the cabinet has been damaged
g) if the product exhibits a distinct change in performance, indicating a need for service
• Use of controls, adjustments, or performance of procedures other than those specified
in this manual may result in hazardous invisible radiation exposure.
• This product should be operated using the type of power source specified. If you are
not sure of the type of power available, consult your dealer or local power company.
• Do not hang on or lean against this unit. Do not subject the printer to strong impacts.
• Use only enclosed AC adaptor (LG2286001).
• Unplug the AC adaptor before moving the unit. Grab the plug, not the cord, when unplugging
the AC adaptor. Never touch the AC adaptor, its cord or the AC cord with wet hands.
• Disconnect the machine from the electrical wall outlet before cleaning. Never use
liquid or aerosol cleaners. Only use a damp cloth for cleaning.
•
Be sure to turn off the unit after finishing using it. Disconnect the AC cord from the
electrical wall outlet and clean it at least once a year. If the unit will not be used for a long
period of time, disconnect the AC adaptor from both the unit and the electrical wall outlet.
• Do not modify the AC adaptor cord or the AC cord.
• Do not pull, excessively bend, or place heavy objects on the AC adaptor cord or the AC cord.
• Do not remove any covers or screws other than those specified.
• Do not insert your fingers or hands into the printer while it is printing.
• Important information is indicated by the following symbols.
+This symbol indicates notes or additional information.
bThis symbol indicates precautions that should be observed in order to
prevent damage to or malfunction of the machine.
aThis symbol indicates precautions that should be observed in order to avoid
injury or property damage.
2
2. Setup
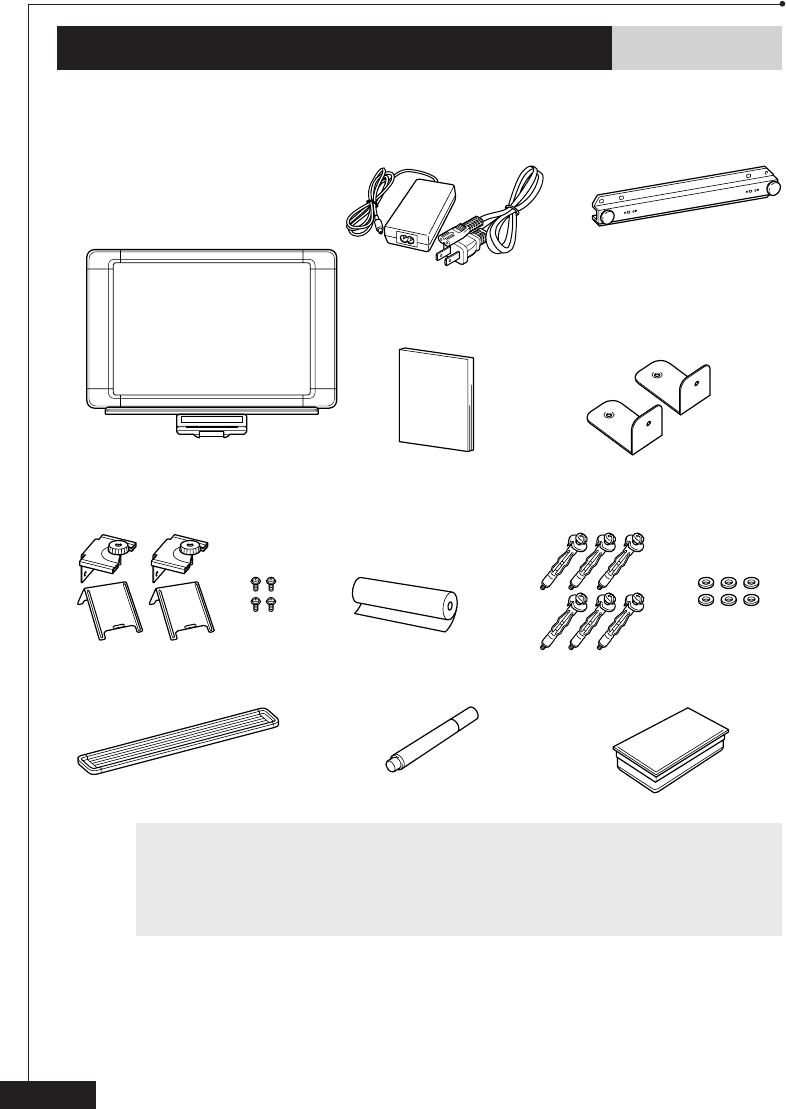
Package contents
Check that the following items are enclosed.
bWhen shipping the copyboard or transporting it over a long distance, be sure to
use the original packing materials that it was supplied in. Improperly packing the
machine may void the warranty.
Be careful not to damage the printer control panel while unpacking it, transport-
ing it, or while removing and installing the printer.
If an item is missing, contact Brother Customer Service at:
1-800-276-7746
See section 6. Accessories on page 21 for item numbers.
CP1800 copyboard
AC adaptor & AC cord
Owner’s Manual
2 partition-mounting
brackets
Tray Dry Erase marker Eraser
Starter Therma PLUS paper
(up to 30 pages)
Wall-mounting bar
2 L-shaped brackets
6 anchors
(For plasterboard only)
4 screws 6 washers
3
2. Setup
Choosing a location
•Set up the unit on a stable surface or a sturdy wall that is free from vibrations and shocks.
•Do not set up this unit in a high-traffic area or near heaters, air conditioners, refrigera-
tors, liquids, or chemicals.
•Do not set up this unit in a location where it will be exposed to direct sunlight,
excessive heat, moisture, or dust.
•Do not set up this unit near speakers, the base units of cordless phones, or other
sources of interference.
•Do not allow anything to rest on the power cord. Do not place this product where the
cord may be walked on.
•Lightning and power surges can damage this product. We recommend that this unit be
used with a surge protection device, or be unplugged during lightning storms.
•If an extension cord is used with this product, make sure that the total ampere rating
of all products plugged into the extension cord do not exceed the extension cord
ampere rating. The total of all products plugged into the wall outlet must not exceed
15 amperes (USA only).
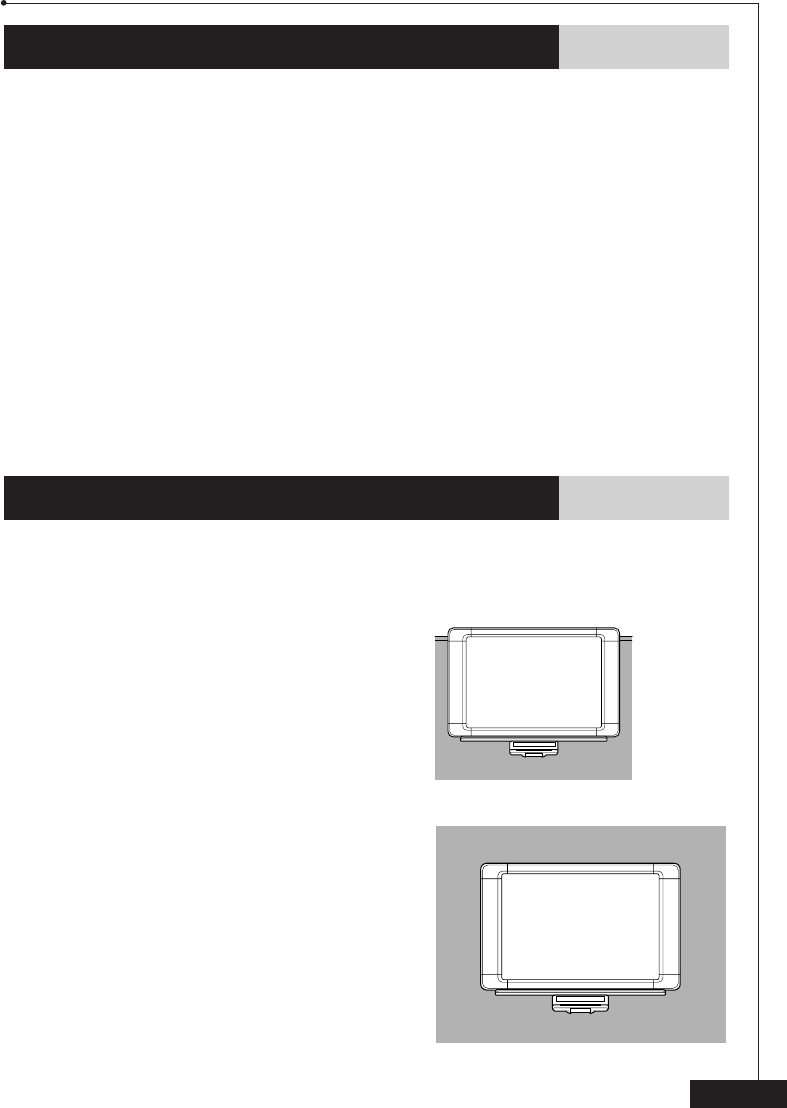
Setup
The versatility and portability of the CP1800 copyboard allows it to be set up in various
locations mounted on a partition or a wall.
Partition mounting
(Refer to pages 8 and 9 for details on
mounting the copyboard on a partition.)
Wall mounting
(Refer to pages 4 through 7 for details
on mounting the copyboard on a wall.)
4
Wall mounting
With the enclosed wall-mounting bar, the copyboard can easily be mounted on a wall.
Attaching the wall-mounting bar
Follow the precautions below to mount the copyboard correctly on the wall
and reduce the risk of it falling down.
aUse the enclosed anchors to attach the wall-mounting bar to plasterboard that is
at least 0.5 in. to 0.63 in. (12.7 mm to 15.9 mm) thick. When mounting the
copyboard on other types of walls, consult with a contractor first and be sure to
use the appropriate types of screws.
Make sure that there is no metal, wood, or wires behind the wall at the points
where the anchors will be installed.
+Before mounting the copyboard on the wall, check that it is operating correctly.
After loading the paper, lay the copyboard on the floor, facing upward, to check
the operation. The sensor for paper doesn't work when the copyboard is laid on
the floor. If the paper doesn’t come out from the unit after pressing or ,
make sure that the paper is loaded.
During installation, keep in mind that an anchor is difficult to remove once it has
been installed in the wall.
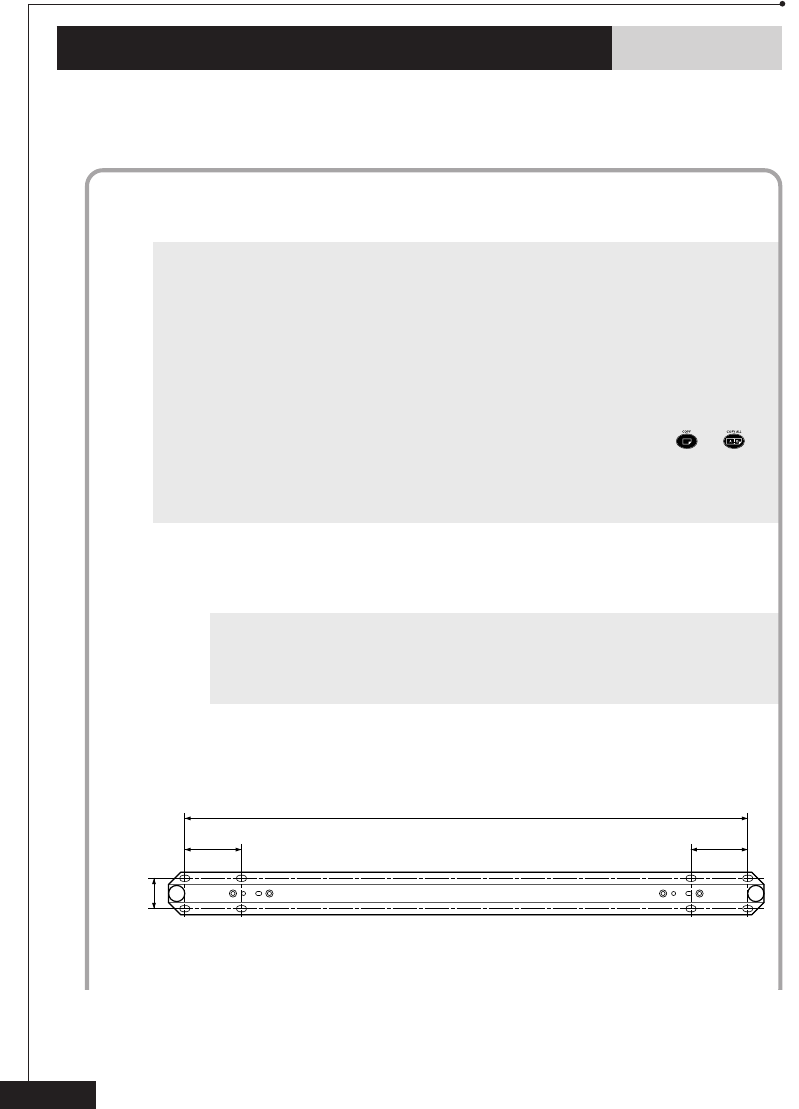
1Hold the wall-mounting bar against the wall at the position where it
will be attached, making sure that it is level, and then mark the wall at
the four points where the anchors will be installed.
+Be sure to attach the bar using either pair of holes A or B together with
either pair of holes C or D.
It is recommended that holes A and D be used. However, holes B and C
can be used if necessary.
Wall-mounting bar
2. Setup
1.42 in.
(36 mm)
2.36 in.
(60 mm)
A
A
B
B
C
C
D
D
23.34 in.
(593 mm)
2.36 in.
(60 mm)
5
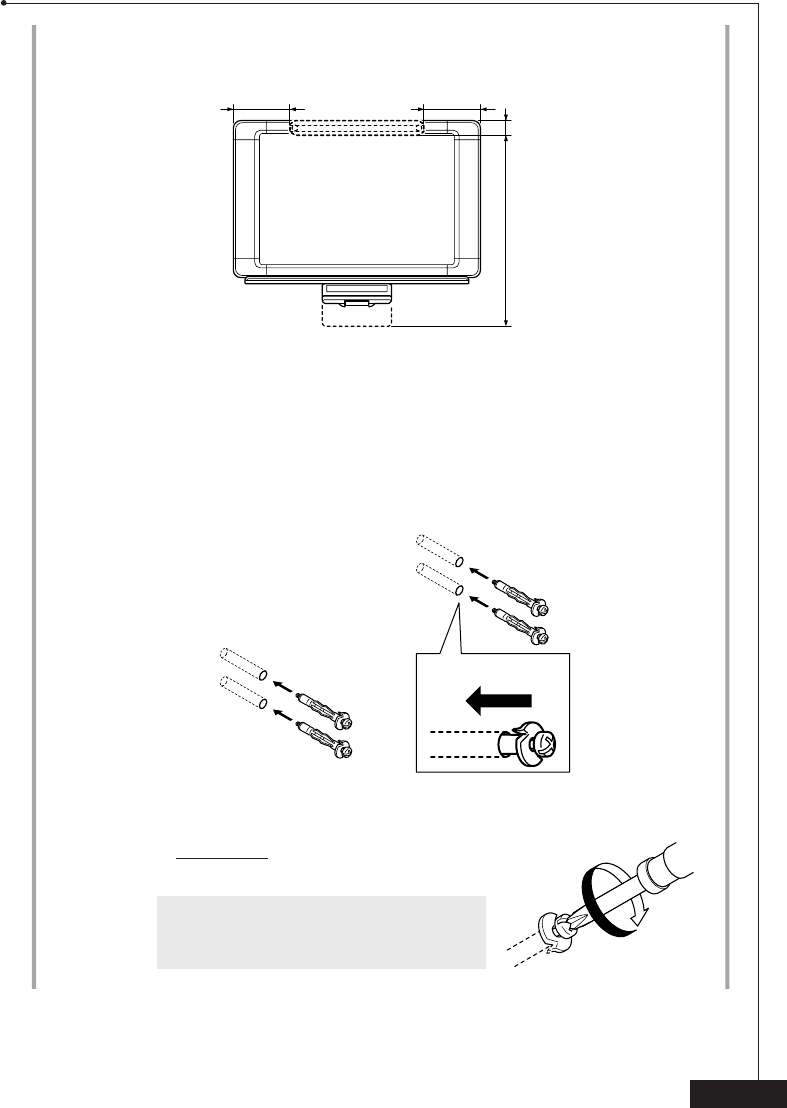
10.2 in.
(259 mm)
10.2 in.
(259 mm)
1.9 in.
(48 mm)
36.7 in.
(932 mm)
2Using a 5/16 in. (8 mm) drill bit, drill a hole at each point marked on the
wall.
3Insert one of the enclosed anchors into each hole, and then push it into
the wall until the teeth on the rim firmly grip the wall.
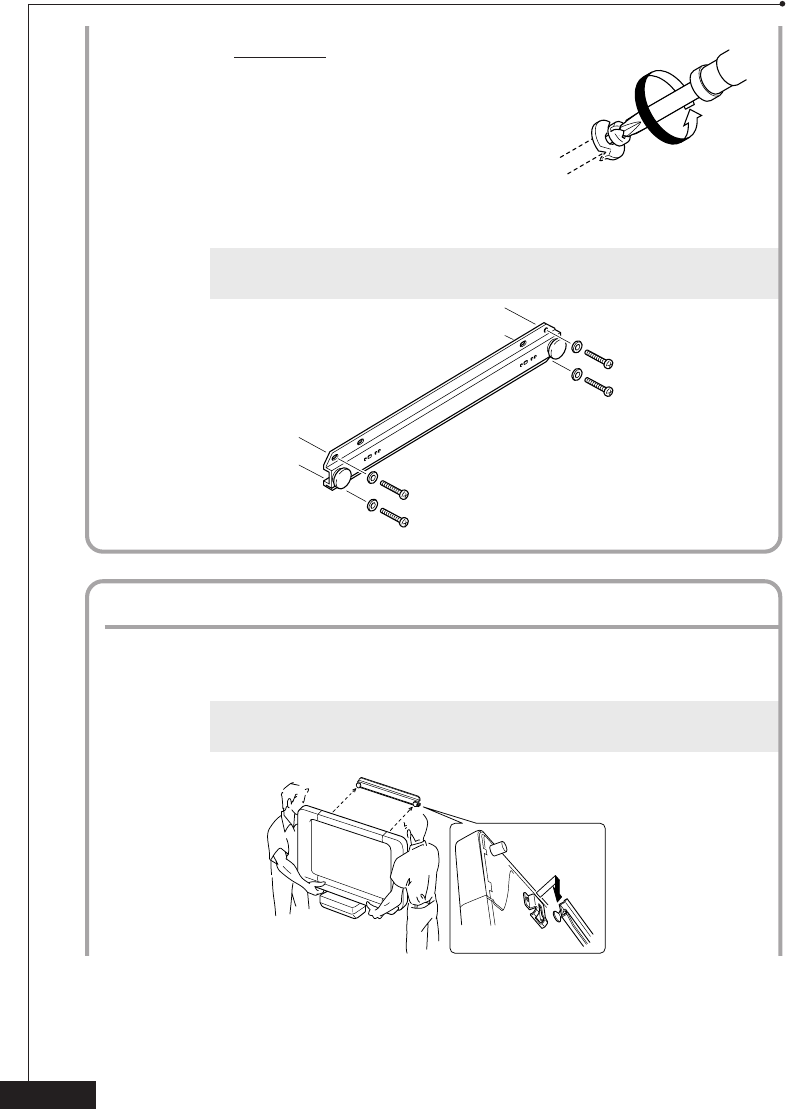
4Tighten each screw (by turning it clockwise)
approximately 20 turns.
aThe screws must be tightened by hand.
Do not use an electric screwdriver,
otherwise the copyboard may fall down.
PUSH
Position of the wall-mounting bar in relation to the copyboard
2. Setup
6
2. Setup
5Remove each screw.
6Attach the wall-mounting bar to the wall by re-installing the screws
into the anchors, while making sure to use the enclosed washers.
aMake sure that the bar is firmly attached to the wall, otherwise the
copyboard may fall down.
Mounting the copyboard
1While holding both sides of the copyboard, hook the brackets at the
back of the copyboard onto the wall-mounting bar pegs.
aDo not release the copyboard until you are sure that it is securely mounted
on the wall-mounting bar, otherwise the copyboard may fall down.
7
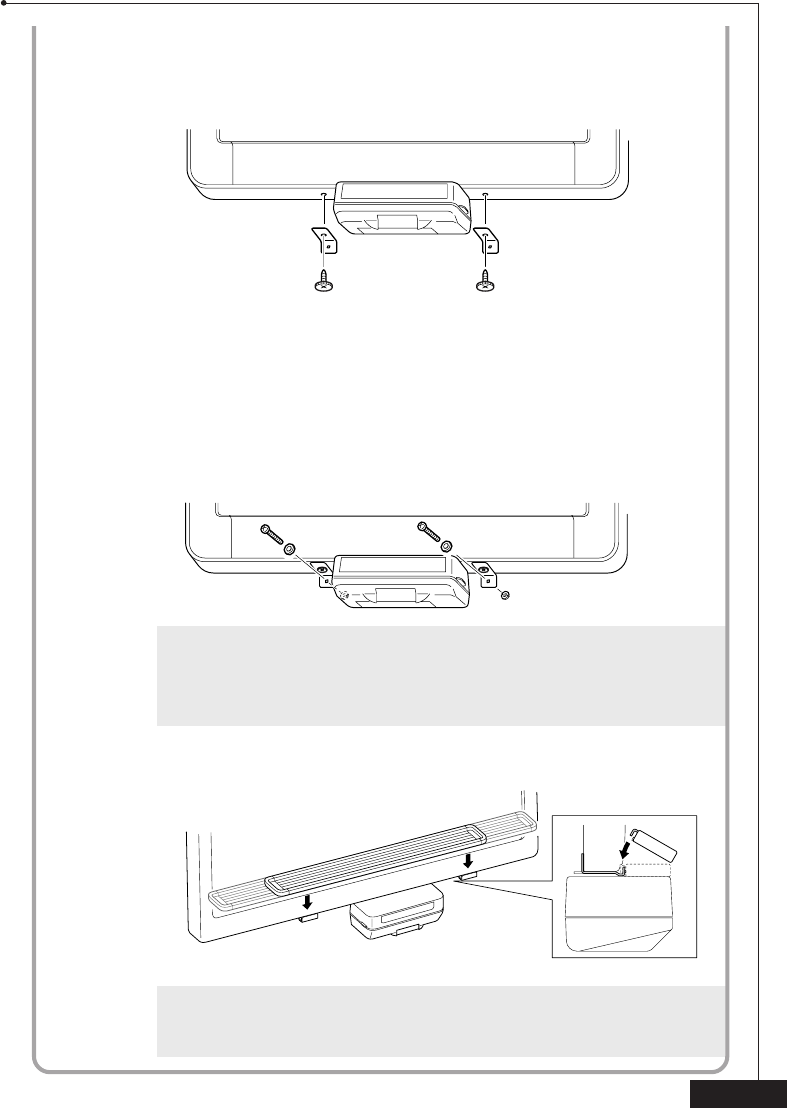
2With the copyboard mounted on the wall, remove the two screws on
the bottom of the unit with a screwdriver. Attach the long ends of the
two enclosed L-shaped brackets to the bottom of the unit using the
two screws.
3With the short ends of the L-shaped brackets against the wall, mark the
wall at the two points where the anchors will be installed, and then
remove the copyboard from the wall-mounting bar.
4Install the two anchors as described in steps 2 through 4 of Attach-
ing the wall-mounting bar on page 5.
5Remove the screws from the anchors, hang the copyboard back onto the
wall-mounting bar, and then attach the L-shaped brackets to the wall by
re-installing the screws, while making sure to use the enclosed washers.
aRegularly check that the copyboard is securely mounted to the wall in
order to reduce the risk of the copyboard falling down.
bWhen removing the copyboard from the wall, also remove the L-shaped
brackets.
6Attach the tray by sliding its slots on each sides on back of the tray over
the two brackets on the front of the copyboard above the printer.
bThe ends of the tray can be pulled out to extend it.
Do not subject the tray to strong impacts or use it in any way other than
for holding markers and erasers.
2. Setup
8
Partition mounting
Follow the precautions below to mount the copyboard correctly on the partition
and reduce the risk of it falling down.
aBefore attempting to hang your copyboard on a cubicle wall or partition, consult
the manufacturer of the partition to verify that the partition is capable of support-
ing the copyboard without adverse consequences.
The enclosed partition-mounting brackets allow you to hang the copyboard on a
standing partition 1.5 in. to 4 in. (38 mm to 102 mm) thick and sturdy enough to
withstand a weight of at least 77.3 lbs. (35 kg).
Do not install, adjust, or remove the partition-mounting brackets with the copyboard
hanging from the wall-mounting bar. Always remove the copyboard beforehand.
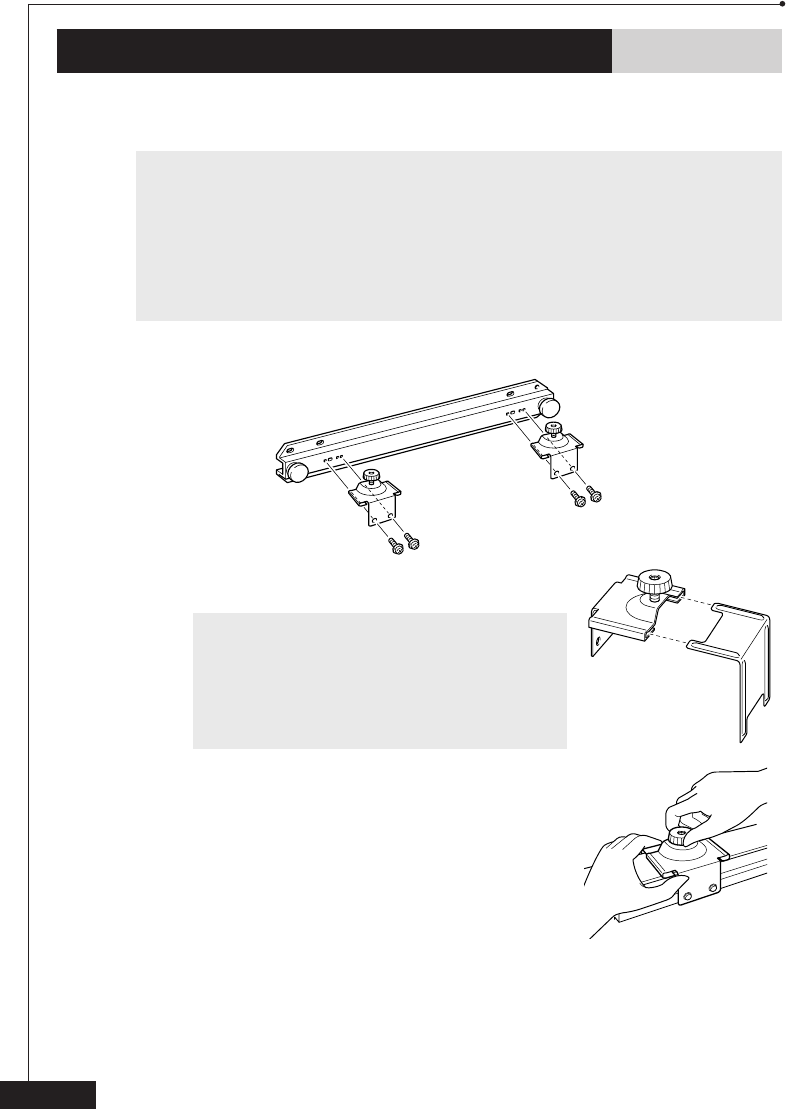
1Attach the two fixed parts of the partition-mounting brackets to the wall-
mounting bar with the four enclosed screws.
2Insert the ends of the movable parts of the
partition-mounting brackets into the fixed parts.
+Either end of the movable part of the bracket
can be used depending on the width of the
partition. Insert the end stamped A if the
partition is 1.5 in. to 2.8 in. (38 mm to 71 mm).
Insert the end stamped B if the partition is 2.7
in. to 4 in. (69 mm to 102 mm).
3While holding the partition-mounting brackets
clamped around the top of the partition, tighten
the knobs.
2. Setup
9
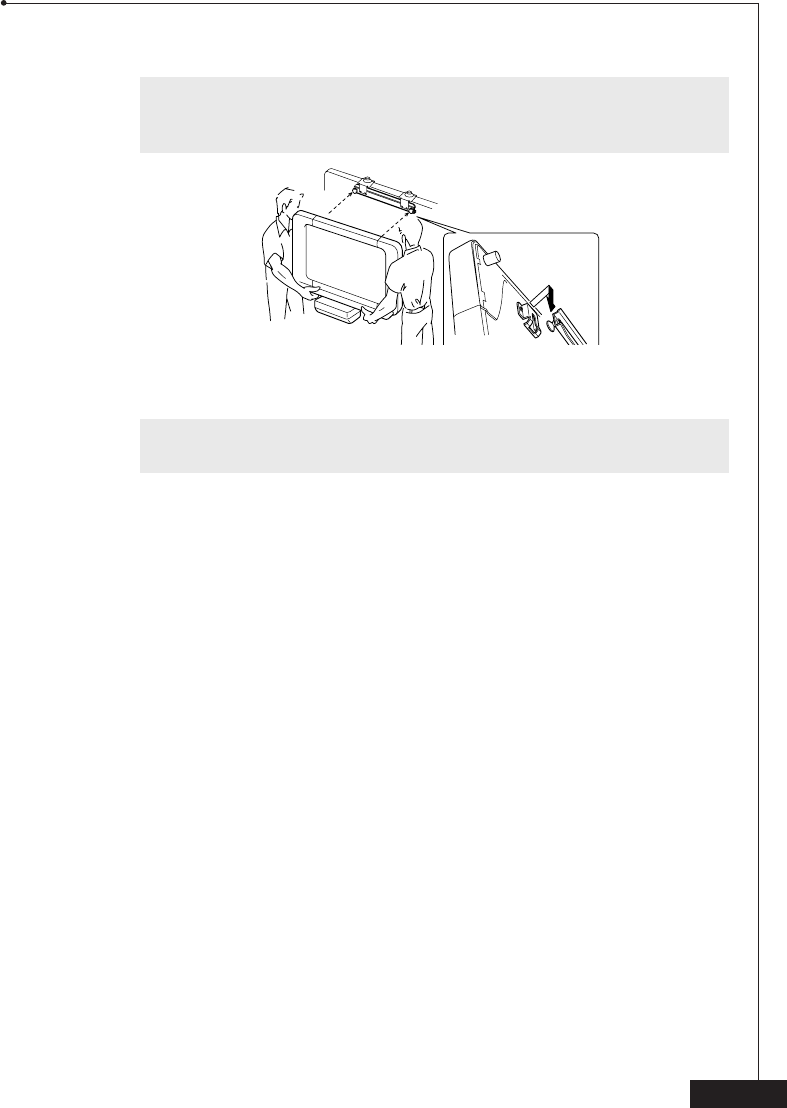
4While holding both sides of the copyboard, hook the brackets at the back
of the copyboard onto the wall-mounting bar pegs.
aDo not release the copyboard until you are sure that it is securely mounted
on the wall-mounting bar.
Do not push the unit upward or to either side, otherwise it may fall down.
5Attach the tray by sliding its slots over the two brackets on the front of the
copyboard above the printer.
bDo not subject the tray to strong impacts or use it in any way other than for
holding markers and erasers.
2. Setup

10
3. Operation
Printer description
1DC jack
2Power supply switch
3COPY ALL button: Press this button to print out both writing surfaces.
4COPY button: Press this button to print out the front writing surface.
5FEED button: Press this button to scroll the copyboard.
6ERROR indicator: This indicator lights up when the printer head is overheated.
7PAPER indicator: This indicator lights up when the paper compartment cover is open
or the printer has run out of paper.
8POWER indicator: This indicator is lit when the printer is turned on.
9Paper compartment cover
:Paper compartment latch
APaper exit slot
BWriting surface
bDo not try to move or turn off the copyboard while it is printing.
Do not allow the seam of the writing surface to become dirty.
Do not hit or scratch the writing surface with sharp or hard objects.
3
A: 9B
2
14 5 6 7 8
1800
11
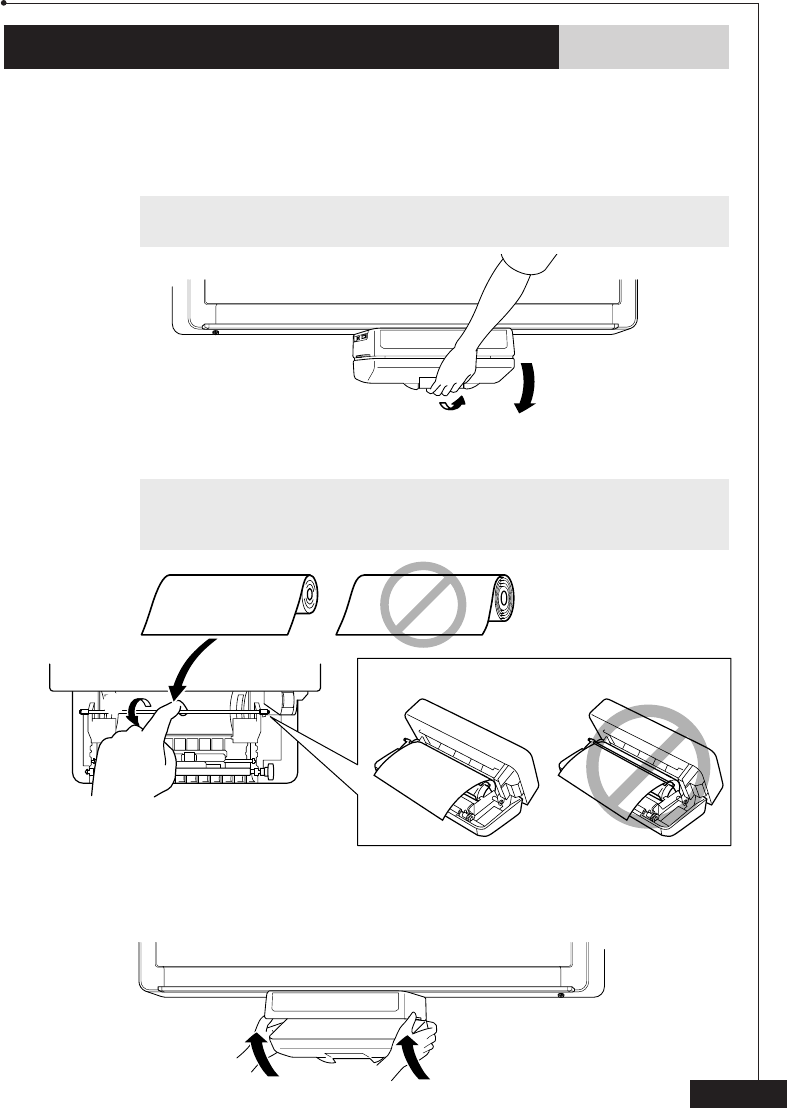
Loading the paper
In order to print out what is written on the copyboard, paper must first be loaded in the
printer. The maximum diameter of the paper roll that can be installed in the copyboard is
2.6 in. (66 mm).
1Open the paper compartment by pulling up its latch.
bDo not open the paper compartment while the unit is printing.
2While gently pressing down on the center of the paper guide bar, insert
the roll of paper into the paper compartment.
+The paper should unroll from the top and enough paper (about 8 in. (20 cm))
should be pulled out to allow it to be torn off easily.
If there is slack in the paper, tighten it by holding the core and pulling on the paper.
3Release the bar while making sure that the paper feeds over it, and then
lift the paper compartment cover with both hands and firmly close it.
1
2
Be sure to pass the paper over the guide bar.
3. Operation
12
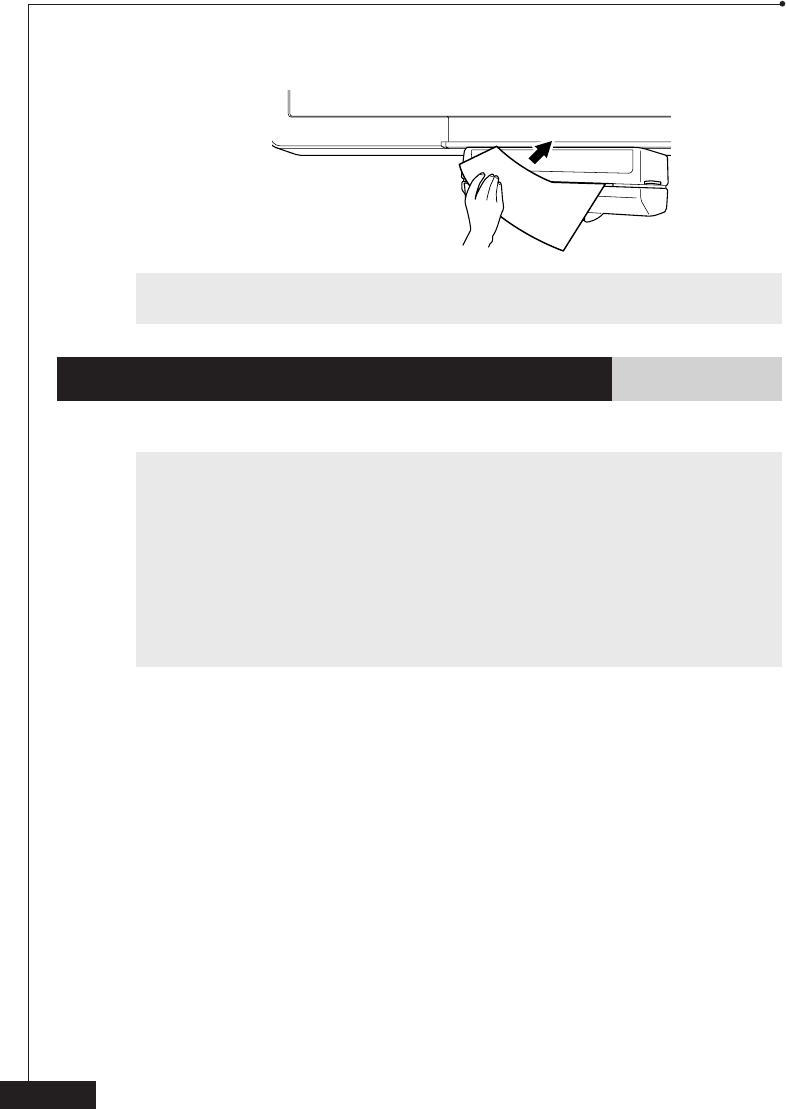
4Tear off the excess paper by holding the side of the paper and pulling it
upward and across.
bRemove the roll of paper before transporting the copyboard, otherwise it may
come unrolled in the printer and cause a paper jam.
Power supply
Follow the precautions below to reduce the risk of electric shock or fire.
aIf the unit will not be used for a long period of time, disconnect the AC adaptor
from the wall outlet.
Do not use the AC adaptor outdoors. It can only be used indoors.
Do not allow any objects to come into contact with the AC adaptor or its cords.
The AC adaptor must not be serviced by the user. If repairs are required, contact
the nearest authorized Brother Service Center or the Brother Service Center
indicated in the warranty documentation.
If the AC adaptor requires cleaning, use only a dry cloth. Never use water or
cleaning fluids, since this is extremely dangerous.
Use only enclosed AC adaptor. Use of other AC adaptor will void the warranty.
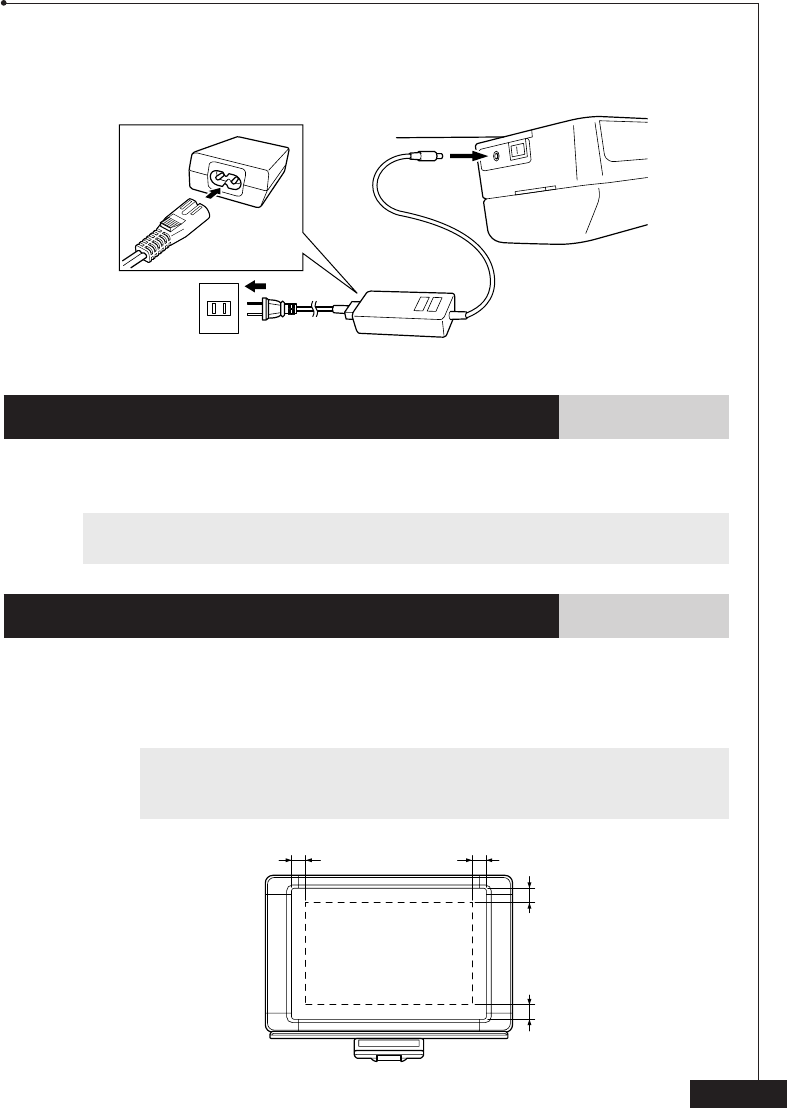
1Connect the AC cord to the AC adaptor.
2Connect the AC adaptor cord to the DC jack on the left side of the printer
3Connect the AC cord to an electrical wall outlet.
3. Operation
13
4Set the power supply switch on the left side of the printer to “|” to turn on
the copyboard.
Feeding the copyboard
The copyboard has two writing surface areas. When you wish to use the other writing
surface area, press f to scroll the writing surface without printing.
bDo not try to erase or touch the writing surface while it is moving.
Do not touch the paper being fed out of the printer until it has finished feeding.
Writing & printing
1Make sure that the power supply switch on the left side of the printer is
set to “|”.
2Write within the scannable area shown in the illustration below.
bOnly use the enclosed Dry Erase markers or markers of the same type. The
use of non-erasable markers will void the warranty.
Do not allow the seam of the writing surface to become dirty.
0.44 in.
(11 mm)
0.44 in.
(11 mm)
0.12 in.
(3 mm)
0.12 in.
(3 mm)
1
3
2
4
3. Operation
14
3. Operation
3Press e. The writing surface begins scrolling after 1 to 2 seconds, and then
the front writing surface is printed.
OR
Press d. The writing surface begins scrolling after 1 to 2 seconds, and
then both writing surfaces are printed at the same time.
bDo not try to erase or touch the writing surface while it is moving.
Do not try to scan and print pages affixed to the writing surface.
+Depending on the type of markers used, some colors may not be printed.
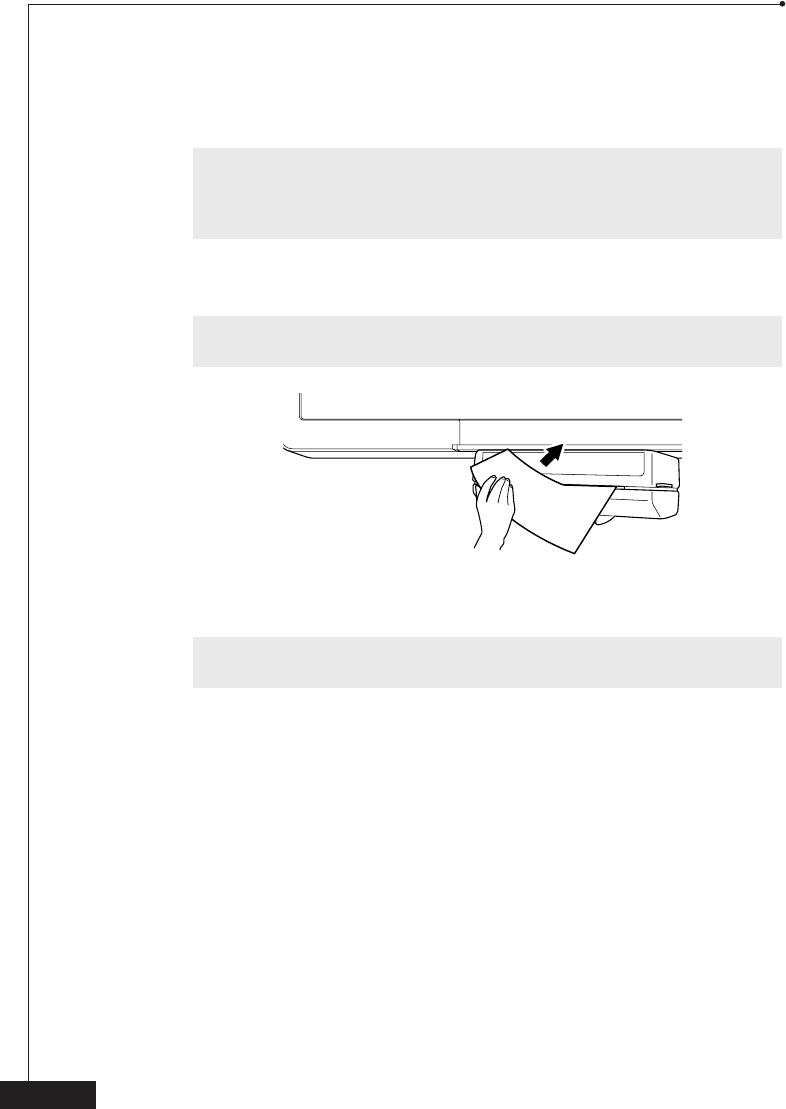
4Tear off the printout by holding the side of the paper and pulling it upward
and across.
bDo not touch the paper being fed out of the printer until it has finished
printing.
5To erase the writing surface, use the enclosed eraser.
bAlways keep the writing surface clean. However, do not wipe the writing
surface with paint thinner, alcohol, benzene, or paper towels.
15
Problem
The POWER indicator does
not light up.
Ee, Dd, or Ff is
pressed, but the writing
surface does not move.
Nothing is printed out after
Ee or Dd is pressed.
Paper does not feed from
the printer.
The writing on the writing
surface of the copyboard
cannot be removed with
the eraser.
The writing is not printed
out clearly.
Solution
•Check that the AC adaptor cord is correctly plugged
into the DC jack on the left side of the printer and
that the AC cord is correctly plugged into both the AC
adaptor and the electrical wall outlet.
➯ Power supply (page 12)
•Check that the power supply switch on the left side of
the printer is set to “|”.
•Check that the printer cable plugs are correctly
connected.
•Check if the PAPER indicator is lit. If it is lit, replace the
roll of paper in the paper compartment.
➯ Loading the paper (page 11)
•Check that the paper compartment cover is closed.
•Open the paper compartment and remove the paper.
Then, use scissors to cut off the wrinkled portion of
paper from the roll and load the paper again.
➯ Loading the paper (page 11)
•Check that only the specified Dry Erase markers are
used. Carefully wipe the writing surface with a soft
cloth dampened with water and a mild detergent.
•Use a Dry Erase marker to write over the writing that
cannot be erased, and then try erasing the writing
with the enclosed eraser.
•Clean off the writing surface. Use a soft damp cloth to
wipe off hard-to-remove spots.
•Check that the printer cable plugs are correctly
connected.
•Clean the print head.
➯ Cleaning the print head (page 16)
•Adjust the scanner.
➯ Adjusting the scanner (page 17)
4. Maintenance
Troubleshooting
If you can't solve a difficulty with your copyboard using this manual, please see page 19
for Brother numbers to call for assistance.
16
Problem
The paper that is fed out
is curled.
The ERROR indicator lights
up.
The printout is either too
dark or too light.
Paper does not feed out
when printing. The
printout is reduced in size.
The printout is completely
black.
Solution
•Check that the paper feeds over the paper guide bar
in the paper compartment.
➯ Loading the paper (page 11)
•The recording head has overheated. Unplug the
machine and wait 30 minutes for it to cool.
•Adjust the print contrast.
➯ Adjusting the print contrast (page 18)
•Clean the black bar.
➯ Cleaning the black bar (page 17)
•Check that the printer cable plugs are correctly
connected.
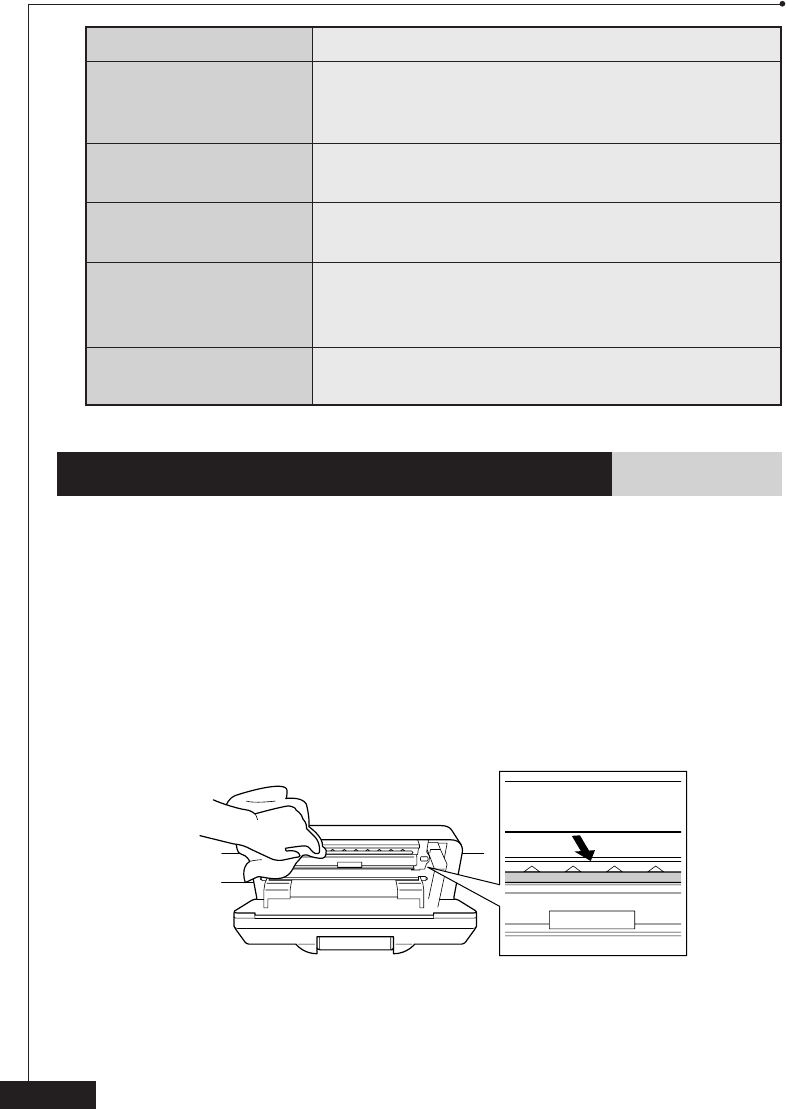
Cleaning the print head
1Turn off the unit, unplug the AC adaptor, and then position the copyboard
so that it is standing up mounted on the partition or the wall.
2Open the paper compartment by pulling up its latch.
3While gently pressing down on the paper guide bar, remove the roll of
paper.
4Using a lint-free cloth that is either dry or lightly moistened with isopropyl
alcohol, gently wipe the print head (around the black line shown in the
illustration at the right).
4. Maintenance
17
Adjusting the scanner
+Before adjusting the print contrast, check that the roll paper is installed,
and that both the ERROR and PAPER indicator lights are off.
1With your hand, lightly scroll the writing surface down approx. 11.8 in. (30
cm), and then clean the writing surface well.
2Hold down both d and f until the PAPER indicator begins flashing. The
writing surface will scroll to its correct starting position.
bIf the ERROR indicator lights up or is flashing, turn off the unit. Make sure
the roll paper is installed, turn the power on and repeat this procedure
from step 1.
3Wait until the PAPER indicator goes off. If a page is printed with the “ERR =
XX” message, repeat this procedure from step 1.
4If the problem persists, clean the scanner as explained in Cleaning the
scanner on page 18.
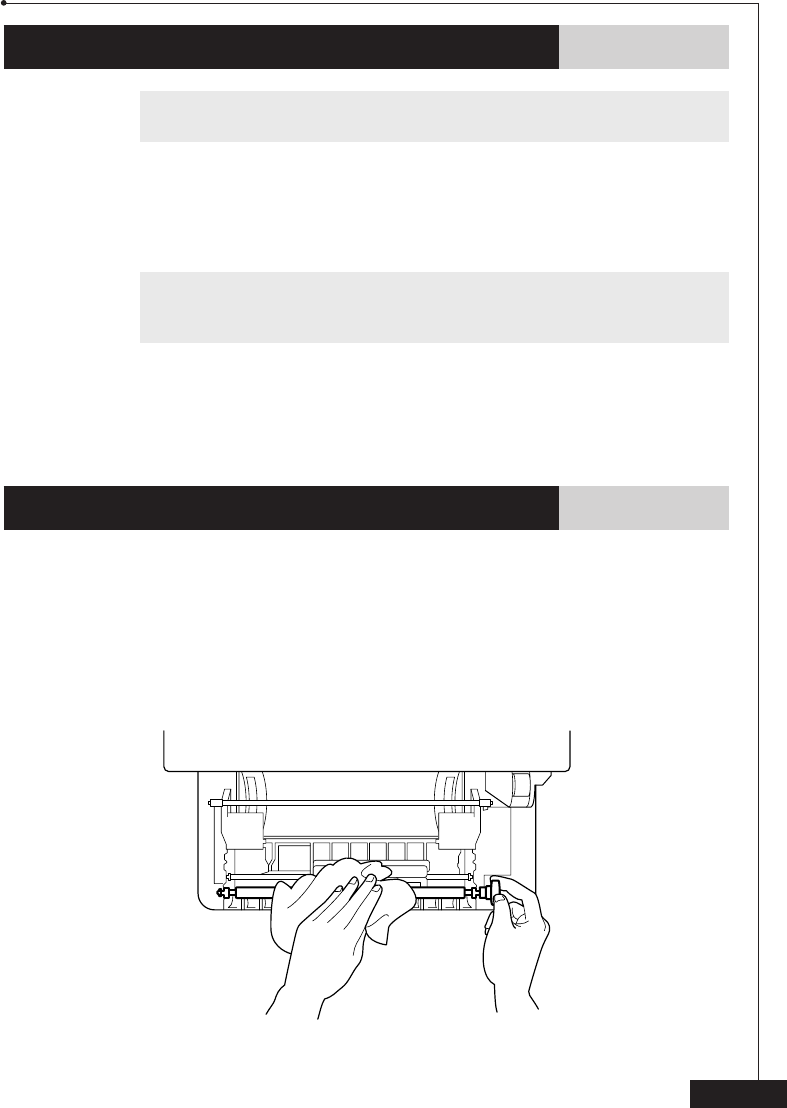
Cleaning the black bar
1Turn off the unit, unplug the AC adaptor, and then position the copyboard
so that it is standing up mounted on a partition or the wall.
2Open the paper compartment by pulling up its latch.
3Using a lint-free cloth that is either dry or lightly moistened with isopropyl
alcohol, gently wipe the black bar while turning the gear at the right.
4. Maintenance
18
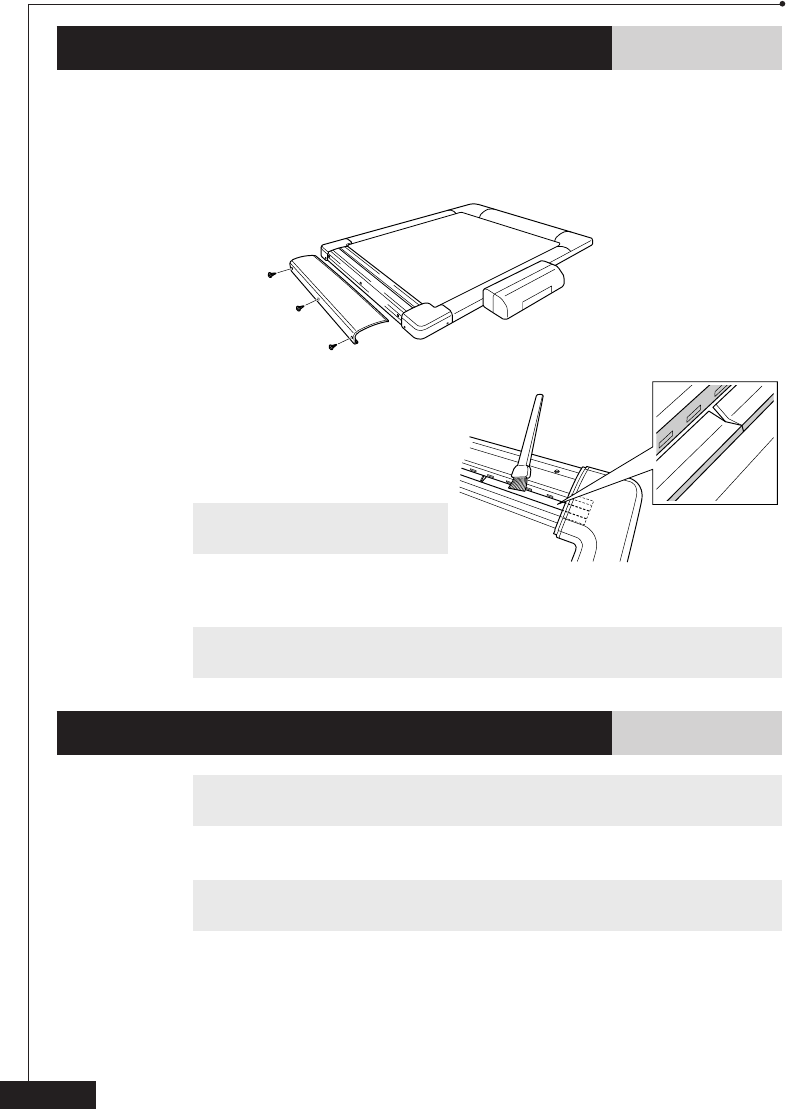
Cleaning the scanner
1Turn off the unit, unplug the AC adaptor, and then position the copyboard
so that it is either lying on the floor facing up or standing up mounted on
the partition or the wall.
2Remove the left panel by removing the three screws on the end of the unit.
3Use a soft-bristle brush to gently
clean the areas shaded in the
illustration at the right. Also, clean
out the areas at both ends of the
scanner under the side covers.
bDo not exert pressure on the
clear plastic.
4Slide the panel back onto the end of the copyboard, and then re-attach it
with the three screws.
bNever use chemicals to clean the scanner.
Adjusting the print contrast
+Before adjusting the print contrast, check that the roll paper is installed,
and that both the ERROR and PAPER indicator lights are off.
1Hold down both e and f for three seconds.
+If the ERROR indicator lights up or is flashing, turn off the unit. Make sure
the roll paper is installed and repeat this procedure from step 1.
2To make the print contrast lighter, press d.
To make the print contrast darker, press Ff.
3A page is printed with the current contrast setting.
If further adjustment is necessary, follow the above steps from 1.
4. Maintenance
19
Service information
Service Center Locations
If your machine requires repairs, call 1-800-284-HELP (4357) to locate the authorized
Service Center nearest you.
Note: Call the Service Center before your visit. Service Centers do not provide opera-
tional assistance. (See Operational Assistance below.)
Operational Assistance
For technical and operational assistance, call Brother Customer Service at:
1-800-276-7746
Accessories and Supplies
To order Brother accessories or supplies by Visa, MasterCard, Discover, or American
Express, call toll-free 1-888-879-3232, or complete the enclosed order form and fax it
to 1-800-947-1445 (available 24 hours).
To order by mail or pay by check, complete the enclosed order form and send it along
with payment to:
Brother International Corporation
Attn: Consumer Accessory Division
P.O. Box 341332
Bartlett, TN 38184-1332
Brother on the Internet
For product information, visit us at:
http://www.brother.com
For purchasing accessories and other Brother products, visit us at:
http://www.brothermall.com
Fax-Back System
Brother Customer Service has installed an easy-to-use fax-back system, which allows
you to get instant answers to common technical questions on product information for
all Brother products. This system is available 24 hours a day, 7 days a week. You can
use the system to receive answers at any fax machine, not just the one from which you
are calling.
Call 1-800-521-2846 and follow the voice prompts to receive faxed instructions on
how to use the system and an index of fax-back subjects.
4. Maintenance

20
Dimensions: 45.2 × 5.8 × 33.3 in. (1147 × 147 × 846 mm)
Weight: 26 lb (11.8 kg)
Operating Temperature: 50 to 95 ºF (10 to 35 ºC)
environment: Humidity: 45% to 80% (no condensation)
Power source: Supplied AC adaptor: 120 V AC, 50/60 Hz
Power consumption: Standby: 5 W
Copy: 30 W
Copyboard writing
surface area: 23.6 × 35.4 in. (600 × 900 mm)
Scanning method: Contact image sensing
Scannable area: 23.4 × 34.6 in. (594 × 878 mm)
Printing area: 7.0 × 9.6 in. (178 × 243 mm)
Printer type: Thermal print head
Printing speed: 18 sec./page
Paper roll size: Width: 8.5 in. (216 mm)
Diameter: maximum 2.6 in. (66 mm)
5. Specifications
21
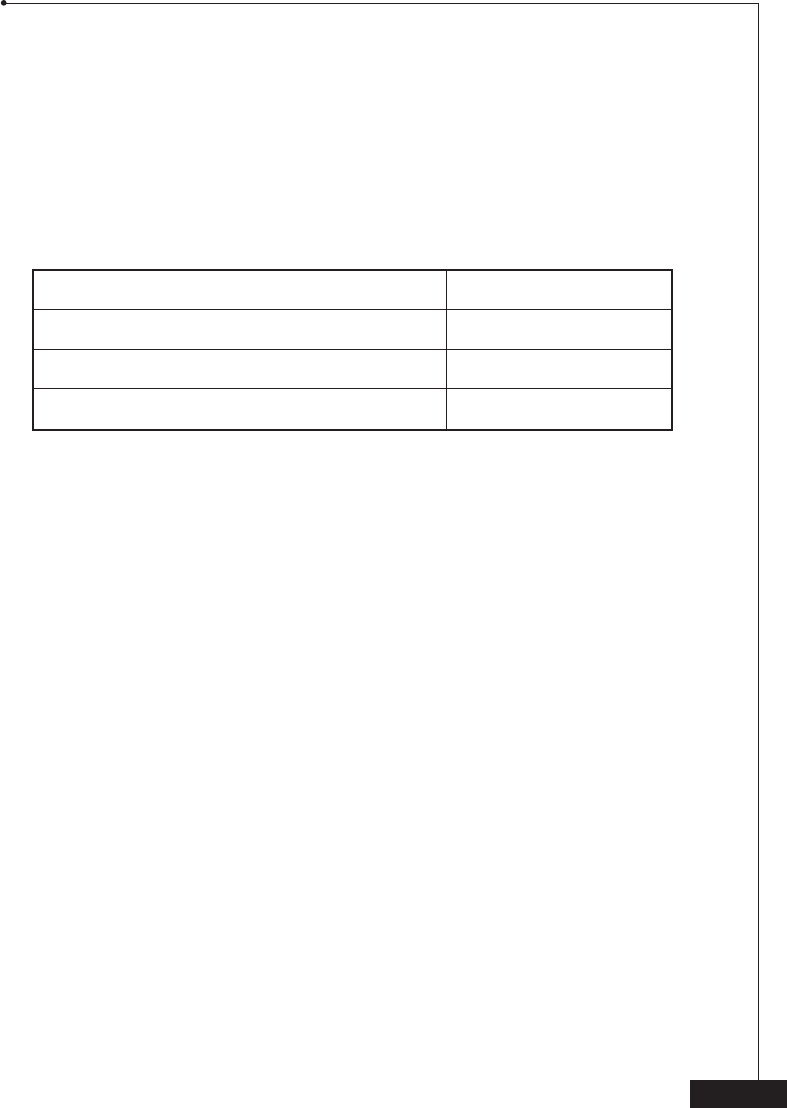
For best quality results, use only genuine Brother accessories, available at most Brother
retailers. If you cannot find the accessory you need, you can order accessories directly from
Brother using your Visa, MasterCard, Discover, or American Express credit card. You can
visit us on-line for a complete selection of Brother accessories and supplies available for
purchase.
USA: 1-888-879-3232 (voice)
1-800-947-1445 (fax)
http://www.brothermall.com
Description Item number
Therma PLUS paper (two 98-ft. rolls) 6890
Therma PLUS paper (four 98-ft. rolls) 6840
Copy Point PC Link PCICP2
6. Accessories

22
BROTHER LIMITED WARRANTY
1 Year Parts, 90 Days Labor, Immediate Conditional Exchange Option
This warranty gives you certain rights and you may also have other rights that may vary from state to
state.
This warranty is given only to the end-use purchaser of the accompanying white board product (referred
to in this warranty as “this Product”).
What is covered: Brother warrants to you for a period of one year from the date you purchased this
Product (the “Warranty Period”) that there are no defects in the materials, workmanship or Year 2000
compliance of this Product. To cure defects in this Product during this year Brother will provide free parts
for one year and free labor for 90 days after the date of purchase on the conditions described below. For
consumable items supplied with this Product, such as Dry Erase Markers or Eraser, the Warranty Period is
90 days from the date of your purchase, or the rated life of the Consumable item, which ever is shorter.
What is NOT covered: This warranty is VOID — that is, this Product has no warranty — if: (1) you did
not purchase this Product from an authorized Brother reseller within the United States, (2) this Product has
been serviced, modified or tampered with by anyone other than an Authorized Service Representative of
Brother, (3) the serial number has been modified, defaced or removed from this Product, (4) this Product
has been abused or damaged, (5) non Brother®-brand or non Brother approved parts, supplies, power
supplies or other accessories have been used with this Product, or (6) damage caused by improper
hanging or use of non-erasable markers.
What to do if you think your Product is defective: Call our Customer Service Hotline at 1-800-276-
7746, or if you suspect a defect in materials or workmanship in this Product, you must report it to a
Brother Authorized Service Center during the Warranty Period and supply Brother’s representative with a
copy of your dated bill of sale showing that this Product was purchased within the United States. For the
name of your Brother Authorized Service Center, call 1-800-521-2846. After contacting the Brother
Authorized Service Center, you may be required to deliver or send the Product properly packaged, freight
prepaid, to the Authorized Service Center together with a photocopy of your bill of sale.
What Brother will do: Upon receiving your Product, Brother (or its Authorized Service Center) will
evaluate your report of a possible defect to determine whether a defect exists; and if it does exist, Brother
(or its Authorized Service Center) will repair this Product or (at Brother’s option) replace this Product with a
product that performs the same functions and performs as well as the original Product. Brother reserves
the right to supply refurbished or remanufactured replacement products or parts provided that the
replacement products or parts conform to the manufacturer’s specifications for new products or parts. If
your eligibility for 90 days of free labor has expired, you may be required to pay in advance for the labor
charges for repairing the Product. Following this procedure, the repaired or replacement product (or if no
defect exists, the original Product) will be returned to you at no cost. The returned product will be covered
by the balance of the limited warranty period remaining on the original Product, plus an additional thirty
(30) days.

23
Immediate Conditional Exchange Option: You have the option of following a procedure which allows
you to receive expedited shipment of a replacement product before this Product is examined by Brother
for possible defects. To take advantage of this option, however, you must accept responsibility in advance
for charges not covered by this warranty by allowing Brother to charge your credit card. The procedure is
as follows:
If you elect this option, Brother will ship to you at Brother’s cost by next business day delivery courier
service, a refurbished or remanufactured product that conforms to the manufacturer’s specifications,
performs the same functions and performs as well as the original Product. The refurbished or
remanufactured product you receive will be covered by the balance of the limited warranty period
remaining on the original Product, plus an additional thirty (30) days. You will keep the replacement
product that is sent to you and must return (or be billed up to the cost of a new product) the original
Product, which shall become the property of Brother. To qualify for this option, you must call Brother
Customer Service and if the representative cannot correct the Product’s malfunction over the telephone
and you elect the exchange option, you must provide information pertaining to this Product and you must
also provide a valid major credit card number. Your credit card will be charged up to the cost of a new
Product if: (i) you do not return your original Product to Brother within five (5) business days; (ii) the
malfunctions of your original Product are not covered by this limited warranty; (iii) the proper packaging
instructions for returning the Product are not followed and result in damage to the Product; or (iv) the
warranty period on your original Product has expired or has not been sufficiently validated with a copy of
the proof of purchase (bill of sale). The Brother Customer Service Representative will ship the exchange
product via next business day delivery courier service, with return instructions and prepaid return airbill.
Follow the return instructions. You must return the original Product in the same shipping carton in which
the exchanged Product was received and include a copy of proof of purchase (bill of sale). Retain your
original accessory items and a copy of the return airbill, signed by the courier.
Limitations: Repair or replacement as described above is your sole and exclusive (that is, your only)
remedy if this Product is defective. Brother is not responsible for damage to or loss of any equipment,
media, programs or data related to the use of this Product. Except for that repair or replacement, Brother
shall not be liable for any direct, indirect, incidental or consequential damages or specific relief. Because
some states do not allow the exclusion or limitation of consequential or incidental damages, the above
limitation may not apply to you.
THIS WARRANTY IS GIVEN IN LIEU OF ALL OTHER WARRANTIES, WRITTEN OR ORAL, WHETHER EX-
PRESSED BY AFFIRMATION, PROMISE, DESCRIPTION, DRAWING, MODEL OR SAMPLE. ANY AND ALL
WARRANTIES OTHER THAN THIS ONE, WHETHER EXPRESS OR IMPLIED, INCLUDING IMPLIED
WARRANTIES OF MERCHANTABILITY AND FITNESS FOR A PARTICULAR PURPOSE, ARE HEREBY
DISCLAIMED.
This Limited Warranty is the only warranty that Brother is giving for this Product. It is the final expression
and the exclusive and only statement of Brother’s obligations to you. It replaces all other agreements and
understandings that you may have with Brother or its representatives.
This Limited Warranty (and Brother’s obligation to you) may not be changed in any way unless you and
Brother sign the same piece of paper in which we (1) refer to this Product and your bill of sale date, (2)
describe the change to this warranty and (3) agree to make that change.

24
Product Support: Toll-free customer service and technical support is available for hardware operational
assistance at 1-800-276-7746. At any time, free technical support in the form of Frequently Asked
Questions, troubleshooting tips and service center locator is available through our fax back system at 1-
800-521-2846 or Brother’s Internet Web Site (www.brother.com). We recommend using only genuine
Brother Accessories and Supplies. You can visit us on-line at (www.brothermall.com), your complete
source for genuine Brother Accessories and Supplies.
Brother International Corporation
100 Somerset Corporate Blvd.
Bridgewater, New Jersey 08807-0911
At the front of this manual, there is a place to record the serial number and the date and location of
purchase for your records. Keep this information with your proof of purchase (bill of sale) in case your
Product is lost, stolen or requires service.
Important: We recommend that you keep all original packing materials, in the event that you may need
to ship this product.
© 1999 Brother International Corporation

Brother International Corporation
100 Somerset Corporate Boulevard
P.O. Box 6911
Bridgewater, NJ 08807-0911 USA
Visit us on the World Wide Web at:
http://www.brother.com
This machine is made for use in the USA only. We cannot
recommend using it overseas because the power requirements
of your copyboard may not be compatible with the power
available in foreign countries. Using USA models overseas
is at your own risk and will void the warranty.
LE3110001
Printed in Japan
