Brother Xl 3500T Quick Start Guide
2014-07-05
: Brother Brother-Xl-3500T-Quick-Start-Guide brother-xl-3500t-quick-start-guide brother pdf
Open the PDF directly: View PDF ![]() .
.
Page Count: 66
- Appliqué Station
- Introduction
- Contents
- 1 Before You Start
- 2 Overview and Patterns
- 3 Making an Embroidered Appliqué
- 4 Additional Operations
- Selecting a pattern from a Design cassette
- Saving a pattern
- Retrieving a saved pattern
- Editing the text in a saved pattern
- Stopping and continuing embroidering
- Removing the design frame
- Pulling the thread end out of the cartridge
- Changing the contrast of the LCD display
- If the safety mechanism was activated
- 5 Appendix
- 6 Quick Reference Guide
Operation manual
Manuel d’instructions
Manual de instrucciones

IMPORTANT SAFETY INSTRUCTIONS
When using this machine, basic safety precautions should always be taken,
including the following:
Please read all instructions before using.
DANGER -
To reduce the risk of electric shock:
The machine should never be left unattended while plugged in. Always unplug the
machine from the electrical outlet immediately after using and before cleaning.
WARNING -
To reduce the risk of burns, fire, electric shock, or personal injury:
1. This product should be used only for its intended purpose. Caution is necessary
when the machine is used by or near children.
2. Operate this machine only for its intended use as described in this manual. Use
only accessories recommended by the manufacturer as contained in this manual.
3. Never operate this machine or AC adapter if it has a damaged cord or plug, if it is
not working properly, if it has been dropped or damaged, or dropped into water.
Return the machine to the nearest authorized dealer or service center for
examination, repair, electrical or mechanical adjustment.
4. Never operate the machine with any air openings blocked. Keep ventilation
openings of the machine free from the accumulation of lint, dust, and loose cloth.
5. Never drop or insert any object into any opening.
6. Do not use outdoors.
7. Do not operate where aerosol (spray) products are being used or where oxygen is
being administered.
8. Do not unplug by pulling on the cord. To unplug, grasp the plug, not the cord, and
carefully remove from the electrical wall outlet.
9. Keep fingers away from all moving parts.
SAVE THESE INSTRUCTIONS
This machine is intended for household use.
ENGLISH
FOR USERS IN THE UK, EIRE, MALTA
AND CYPRUS ONLY
If this machine is fitted with a three-pin non-rewireable BS plug, then please read the
following.
IMPORTANT
If the available socket outlet is not suitable for the plug supplied with this equipment,
it should be cut off and an appropriate three-pin plug fitted. With alternative plugs, an
approved fuse must be fitted in the plug.
NOTE
The plug served from the main lead must be destroyed as a plug with bared flexible
cords is hazardous if engaged in a live socket outlet. In the event of replacing the plug
fuse, use a fuse approved by ASTA to BS 1362, i.e., carrying the mark, rating as
marked on the plug.
Always replace the fuse cover, never use plugs with the fuse cover omitted.
WARNING
DO NOT CONNECT EITHER WIRE TO THE EARTH TERMINAL WHICH IS MARKED
WITH THE LETTER ‘E’, BY THE EARTH SYMBOL OR COLOURED GREEN OR
GREEN AND YELLOW.
The wires in this main lead are coloured in accordance with the following code:
Blue Neutral
Brown Live
As the colours of the wiring in the main lead of this appliance may not correspond
with the coloured markings identifying the terminals in your plug, proceed as follows.
The wire which is coloured blue must be connected to the terminal which is marked
with the letter ‘N’ or coloured black or blue.
The wire which is coloured brown must be connected to the terminal which is marked
with the letter ‘L’ or coloured red or brown.
Important (in the United Kingdom)
- Mains Supply (AC 230/240V, 50Hz only)
- DO NOT cut off the mains plug from equipment. If the plug fitted is not suitable
for the power point in your home or the cable is too short to reach a power point,
then obtain an appropriate safety-approved extension lead or consult your dealer.
- BE SURE to replace the fuse only with an identical approved type, as originally
fitted, and to replace the fuse cover.
- If nonetheless the mains plug is cut off, be sure to remove the fuse and dispose of
the plug immediately, to avoid a possible shock hazard by inadvertent connection
to the mains supply.
CONGRATULATIONS ON CHOOSING
OUR MACHINE
Your machine is the latest addition to the exciting world of home embroidery.
To fully enjoy all the features, we suggest that you read the manual before using.
PLEASE READ BEFORE USING THIS MACHINE
For safe operation
1. Do not touch the thread cartridge or design frame while embroidering.
2. Remember to unplug the AC adapter:
• after each use
• when a power failure occurs during use
• when maintaining the machine
• when leaving the machine unattended
3. Do not use an AC adapter other than the models specified for this machine.
4. Plug the AC adapter directly into the wall outlet. Do not use extension cords.
5. Always be sure to turn off the power switch when inserting and removing the
embroidery design cassette. Do not remove the embroidery design cassette from
the slot while the machine is running. (Please follow the instructions outlined in
this instruction manual.)
For a longer service life
1. When storing this machine, avoid direct sunlight and high humidity locations. Do
not use or store the machine near a space heater, iron, halogen lamp, or other hot
objects.
2. Use only neutral soaps or detergents to clean the outer case. Benzene, thinner, and
scouring powders can damage the case and machine, and should never be used.
3. Use caution in order to avoid dropping or hitting the machine or AC adapter.
For repair or adjustment
In the event a malfunction occurs or adjustment is required, first follow the
troubleshooting table in the back of this manual to inspect the machine yourself. If the
problem persists, please contact your nearest authorized service center.
• Please note that specifications and external appearance are subject to change
for improvement without notice.
i
● ● ● ● ● ● ● ● ● ● ● ● ● ● ● ● ● ● ● ● ● ● ● ● ● ● ● ● ● ● ● ● ● ● ● ● ● ● ● ● ● ● ● ● ● ● ● ● ● ● ● ● ● ● ● ● ●
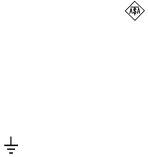
INTRODUCTION
Congratulations on choosing this embroidery machine!
With your new machine, you can quickly and easily embroider appliqués for your clothes, book bags, or
anything else you can imagine. Using the wide range of thread colors available, you can sew embroidery
from any of the built-in patterns. There are also many other patterns available on design cassettes sold
separately.
After embroidering the appliqué, you can cut it out and iron it onto anything made of fabric, using the
enclosed iron-on adhesive film. You can also attach it to other objects, using commercially available
double-sided tape. There are many washable fabric adhesives available at your local craft retailer.
Visit www.brother.com for more project ideas.
ii
CONTENTS Chapter 1 Chapter 2 Chapter 3 Chapter 4 Chapter 5 INDEX Chapter 6
1
Contents
Chapter 1
Before You Start....................................................1
Unpacking ................................................................................................. 1
Supplies ..................................................................................................... 2
Basic supplies ................................................................................................................... 2
Optional supplies.............................................................................................................. 2
Important parts.......................................................................................... 3
Machine ........................................................................................................................... 3
Operation keys ................................................................................................................. 3
LCD display ...................................................................................................................... 4
Design frame ....................................................................................................................4
Thread cartridge................................................................................................................4
Useful vocabulary...................................................................................... 5
Chapter 2
Overview and Patterns..........................................7
Overview................................................................................................... 7
Types of patterns ....................................................................................... 8
Reading the pattern list.............................................................................. 8
Chapter 3
Making an Embroidered Appliqué.........................9
Making an embroidered appliqué from a one-point pattern ...................... 9
Step 1
Getting ready .................................................................................. 9
Step 2
Starting up the machine ................................................................ 11
Step 3
Selecting the pattern ..................................................................... 11
Step 4
Inserting the thread cartridge and design frame............................ 13
Step 5
Embroidering the appliqué ............................................................ 17
Step 6
Selecting the next operation.......................................................... 20
Step 7
Finishing the appliqué ................................................................... 21
Step 8
Attaching the appliqué .................................................................. 23
Chenille embroidery................................................................................ 25

iii
● ● ● ● ● ● ● ● ● ● ● ● ● ● ● ● ● ● ● ● ● ● ● ● ● ● ● ● ● ● ● ● ● ● ● ● ● ● ● ● ● ● ● ● ● ● ● ● ● ● ● ● ● ● ● ● ●
CONTENTS Chapter 1 Chapter 2 Chapter 3 Chapter 4 Chapter 5 INDEX Chapter 6
Working with text (when a frame or template pattern is selected).......... 27
Entering text.................................................................................................................... 28
Changing the text............................................................................................................ 31
Checking the text ............................................................................................................ 32
Chapter 4
Additional Operations......................................... 33
Selecting a pattern from a Design cassette .............................................. 33
Saving a pattern....................................................................................... 34
If a pattern has not yet been saved in the selected pocket: .............................................. 35
If a pattern has already been saved in the selected pocket:.............................................. 35
Retrieving a saved pattern ....................................................................... 37
Checking the text in a saved pattern................................................................................ 39
Editing the text in a saved pattern ........................................................... 40
Stopping and continuing embroidering.................................................... 41
Continuing embroidering after your machine is turned off .............................................. 43
Removing the design frame ..................................................................... 44
Pulling the thread end out of the cartridge.............................................. 45
Changing the contrast of the LCD display ............................................... 47
If the safety mechanism was activated..................................................... 48
Chapter 5
Appendix............................................................. 49
Cleaning precautions............................................................................... 49
Troubleshooting....................................................................................... 49
Error screens............................................................................................ 50
Specifications .......................................................................................... 52
Index ....................................................................................................... 53
Chapter 6
Quick Reference Guide.......................................55
1
Chapter
1
CONTENTS Chapter 1 Chapter 2 Chapter 3 Chapter 4 Chapter 5 INDEX Chapter 6
1
Before You Start
Before using your machine, read the information in this chapter to fully understand how to use it.
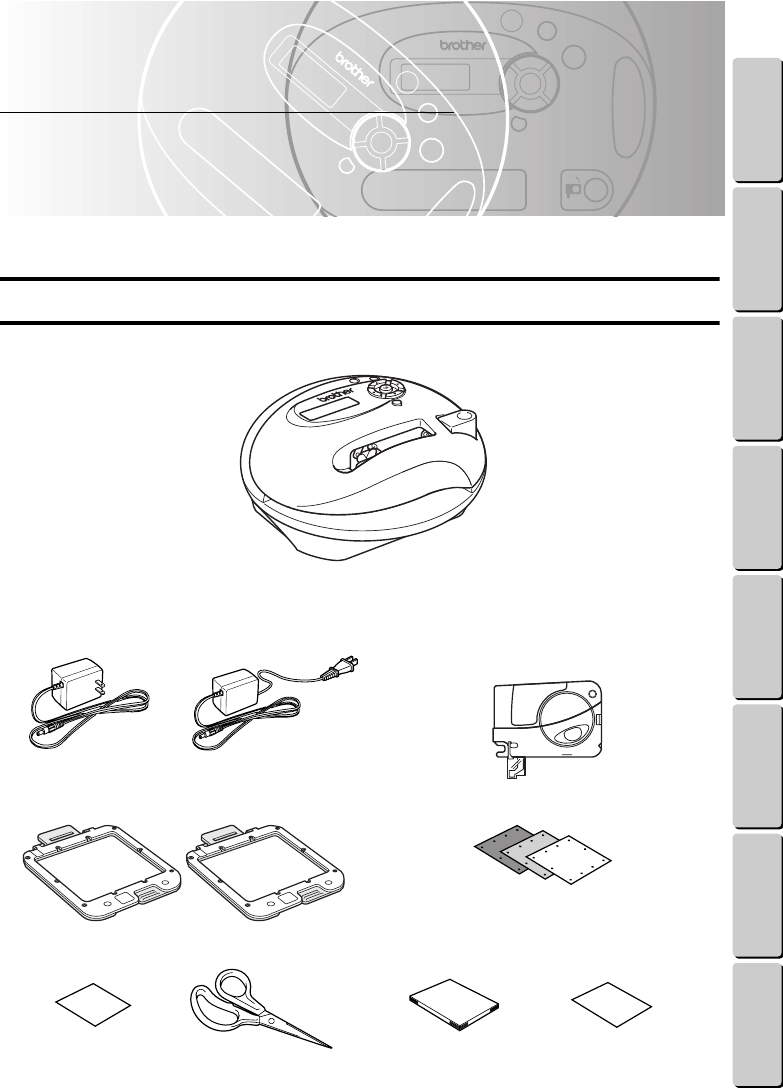
UNPACKING
Machine
Included accessories
AC adapter
For 120 V areas For 230 V areas 15 Pre-filled thread cartridges
(15 individual thread colors)
2 Design frames
10 Pre-cut design fabrics (4 white, 3 beige & 3 gray)
10 Iron-on adhesives Scissors Operation manual Pattern list
2
● ● ● ● ● ● ● ● ● ● ● ● ● ● ● ● ● ● ● ● ● ● ● ● ● ● ● ● ● ● ● ● ● ● ● ● ● ● ● ● ● ● ● ● ● ● ● ● ● ● ● ● ● ● ● ● ●
SUPPLIES
CONTENTS Chapter 1 Chapter 2 Chapter 3 Chapter 4 Chapter 5 INDEX Chapter 6
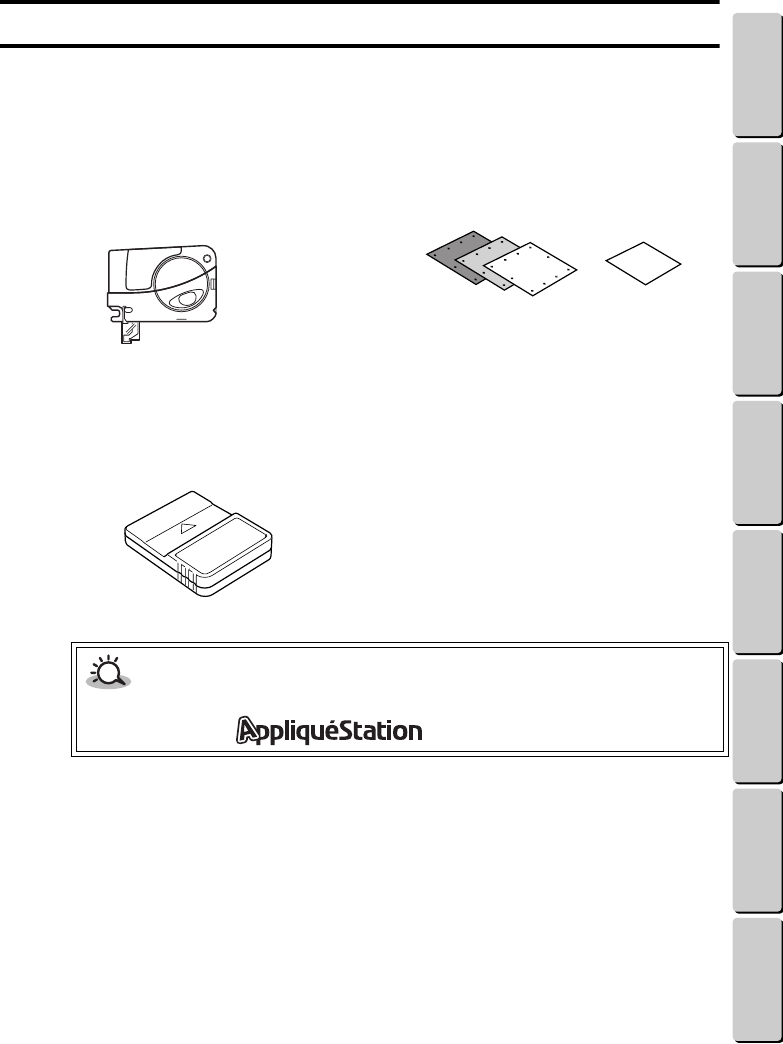
SUPPLIES
Additional pre-cut design fabrics and thread cartridges can be purchased at your nearest Brother
retailer. The optional design cassettes that are also available provide a large selection of embroidery
patterns.
●●
Basic supplies
●●
Optional supplies
Pre-filled thread cartridges
(Visit www.brother.com for a complete listing.)
Pre-cut design fabrics with iron-on adhesives
Design cassettes
(Visit www.brother.com for a complete listing.)
CAUTION
• Only use Brother “AppliquéStation” supplies with this machine. Check to be sure that the
supplies have the mark or “for AppliquéStation” on them.
3
● ● ● ● ● ● ● ● ● ● ● ● ● ● ● ● ● ● ● ● ● ● ● ● ● ● ● ● ● ● ● ● ● ● ● ● ● ● ● ● ● ● ● ● ● ● ● ● ● ● ● ● ● ● ● ● ●
IMPORTANT PARTS
CONTENTS Chapter 1 Chapter 2 Chapter 3 Chapter 4 Chapter 5 INDEX Chapter 6
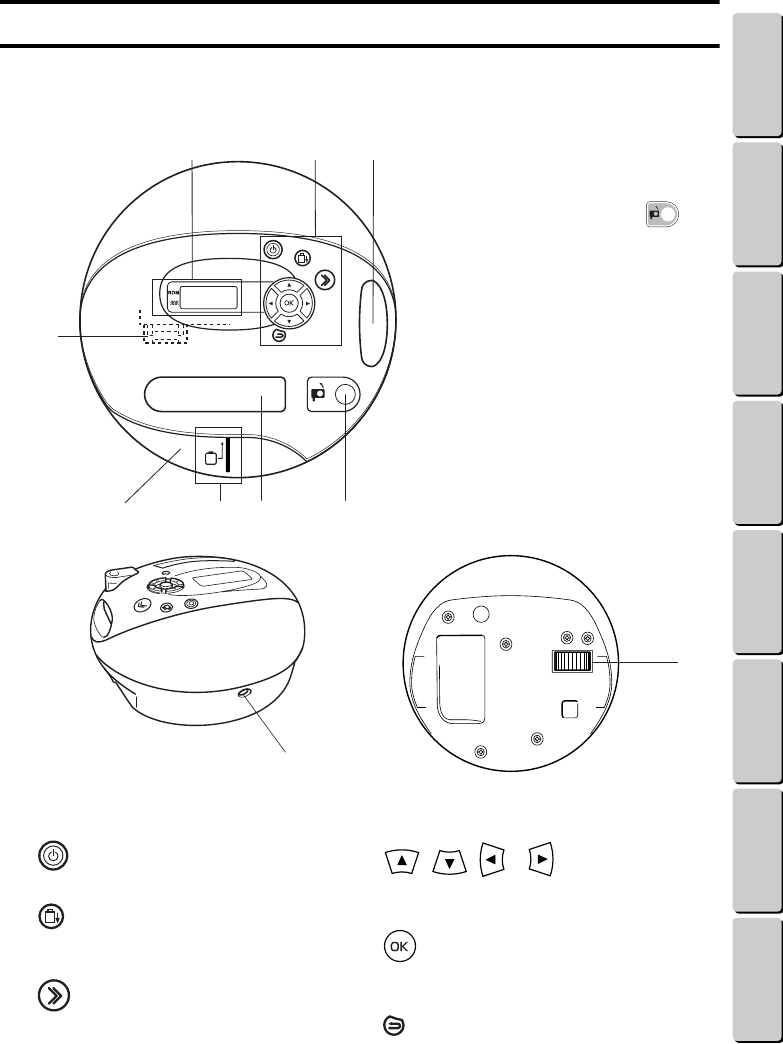
IMPORTANT PARTS
●●
Machine
●●
Operation keys
Top
1
LCD display
2
Operation keys
3
Slot for an optional design cassette
4
Thread cartridge release button ( )
5
Thread cartridge slot
6Design frame mounting bracket (inside the
machine)
7Design frame slot
8Design frame positioning line
9AC adapter connector
0Needle position adjustment dial
Back Bottom
key
Press this key to turn the machine on or off.
key
Press this key to set the design frame for removal
from the machine.
key
Press this key to start or stop embroidering.
, , & keys
Press these keys to make a choice (for example,
to find the pattern or letter that you want).
key
Press this key to confirm the choice (for
example, to select the chosen pattern or letter).
key
Press this key to return to the previous screen.
23
4
58
1
6
7
9
0
4
● ● ● ● ● ● ● ● ● ● ● ● ● ● ● ● ● ● ● ● ● ● ● ● ● ● ● ● ● ● ● ● ● ● ● ● ● ● ● ● ● ● ● ● ● ● ● ● ● ● ● ● ● ● ● ● ●
IMPORTANT PARTS
CONTENTS Chapter 1 Chapter 2 Chapter 3 Chapter 4 Chapter 5 INDEX Chapter 6
●●
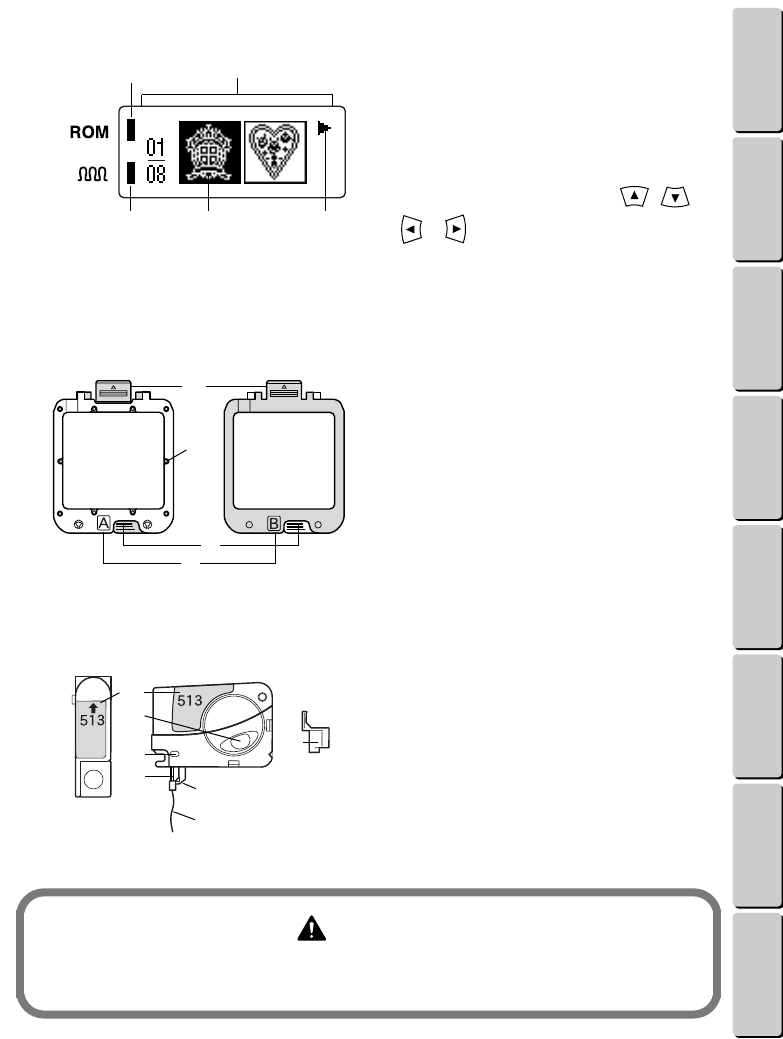
LCD display
●●
Design frame
The A side of the design frame is white, and the B side is gray.
●●
Thread cartridge
1This indicator light appears when a category or
pattern from the design cassette is selected.
2This indicator light appears when the part of the
pattern that is displayed or being sewn will have a
chenille texture. (For more details, see page 25.)
3Patterns and instructions appear in this part of the
LCD display.
4The chosen pattern or letter is highlighted.
5If , , or appears, press the , ,
or key to display more information,
patterns or letters.
1Design frame mount
2Pre-cut design fabric pins
3Frame-opening tabs
4Frame side marks
1Thread color ID number (The color of the label
corresponds to the color of the thread.)
2Look in this window to see how much thread is left
in the cartridge.
3Guide
4Needle
5Presser foot
6Thread (Normally 3/4” to 1” (2 to 3 cm) of thread
should hang out of the bottom of the cartridge.)
7Needle guard cap
WARNING
To prevent injuries, keep the needle guard cap over the needle when the thread cartridge is
not being used. Also, do not try to disassemble the thread cartridges.
1 3
24 5
1
2
3
4
1
2
3
4
7
5
6

5
● ● ● ● ● ● ● ● ● ● ● ● ● ● ● ● ● ● ● ● ● ● ● ● ● ● ● ● ● ● ● ● ● ● ● ● ● ● ● ● ● ● ● ● ● ● ● ● ● ● ● ● ● ● ● ● ●
USEFUL VOCABULARY
CONTENTS Chapter 1 Chapter 2 Chapter 3 Chapter 4 Chapter 5 INDEX Chapter 6
USEFUL VOCABULARY
Below is a handy reference list of terms used in this manual.
Character A letter, number or symbol
Font A style of characters
Highlight The darker part of the screen that shows a selection
Jump stitches Stitches that connect the ending point of one part of the pattern to the starting
point of another part of the pattern when sewing different parts of the pattern
with the same color
Chenille Embroidery made of looped threads, similar to a terry cloth towel
Pocket Computer memory area in the machine where a pattern can be stored
Right side The front of the embroidery
ROM Readable Optic Memory
Wrong side The back of the embroidery

7
Chapter 2
CONTENTS Chapter 1 Chapter 2 Chapter 3 Chapter 4 Chapter 5 INDEX Chapter 6
2
Overview and Patterns
This chapter gives a simple overview on how to embroider an appliqué, and describes the different types
of patterns that can be embroidered.
OVERVIEW
The following is a general description of how to make an embroidered appliqué.
1From the pattern list, select which pattern to embroider.
2Connect the AC adapter. Place the pre-cut design fabric in the design frame.
3Start up this machine.
4Use the operation keys to select the pattern.
5Insert the thread cartridge and design frame following the on-screen instructions.
6Embroider the appliqué, changing the thread cartridge for each color.
7After the embroidery is finished, remove the thread cartridge.
8Remove the design frame from the mounting bracket, and then take the appliqué out of the frame.
9Use the iron-on adhesive film to secure the threads in the appliqué fabric.
0Cut off any extra threads, and then cut out the appliqué in any shape you want.
AAttach the appliqué to your favorite garment.
NOTE
• Each item listed above is described in greater detail in Chapter 3 Making an Embroidered
Appliqué. Follow the instructions in Chapter 3 to learn how to make an embroidered
appliqué.
8
● ● ● ● ● ● ● ● ● ● ● ● ● ● ● ● ● ● ● ● ● ● ● ● ● ● ● ● ● ● ● ● ● ● ● ● ● ● ● ● ● ● ● ● ● ● ● ● ● ● ● ● ● ● ● ● ●
TYPES OF PATTERNS
CONTENTS Chapter 1 Chapter 2 Chapter 3 Chapter 4 Chapter 5 INDEX Chapter 6
TYPES OF PATTERNS
This machine can embroider three types of patterns. Check the enclosed pattern list for samples and
thread color ID numbers.
READING THE PATTERN LIST
The pattern list shows you samples of the embroidery patterns. It also shows you where you can find the
pattern you want and helps you decide if you have all the thread colors needed. The symbols and numbers
in the pattern list are explained below.
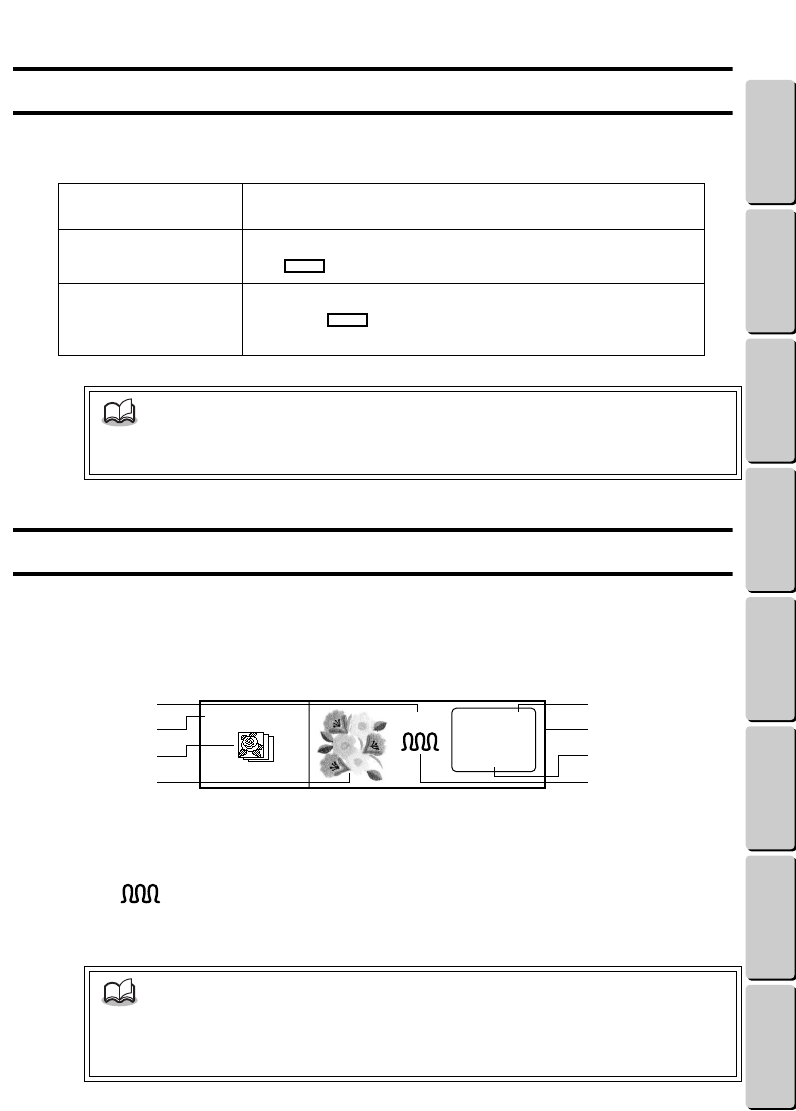
Pattern list (example)
1Category icon shown in the LCD display
2Type of patterns in the category
3Sample of the embroidery
4Pattern number
5“ ” means that part of the pattern is embroidered with the chenille texture. (See page 25.)
6Thread color ID numbers in the sewing order
7Side of design frame used with the thread color
8Total number of patterns in the category
One-point patterns These patterns are small designs that can be embroidered as they
appear.
Frame patterns These patterns are made up of a frame and text that you can enter.
The mark in the pattern shows where text can be added.
Template patterns These patterns are made up of 1 to 4 lines of text that you can
enter. The mark in the pattern shows where text can be
added.
NOTE
• The number of letters that can be entered into frame and template patterns depends on
the pattern and the selected font. Also, some patterns can only be used with certain fonts.
NOTE
• A pattern list is included with each optional design cassette.
• The layout and contents of the pattern list may change without notice. (Check our Web
site for the latest updates: www.brother.com)
1: 800 (A)
2: 085 (B)
3: 513 (A)
One-point patterns No.01
1
3
2
47
6
8
5
● ● ● ● ● ● ● ● ● ● ● ● ● ● ● ● ● ● ● ● ● ● ● ● ● ● ● ● ● ● ● ● ● ● ● ● ● ● ● ● ● ● ● ● ● ● ● ● ● ● ● ● ● ● ● ● ●
TYPES OF PATTERNS/READING THE PATTERN LIST
9
Chapter 3
CONTENTS Chapter 1 Chapter 2 Chapter 3 Chapter 4 Chapter 5 INDEX Chapter 6
3
Making an Embroidered Appliqué
This chapter gives details on each step that you should follow to embroider an appliqué and how to iron
it on. In the section Making an embroidered appliqué from a one-point pattern, we will practice making
an appliqué from a one-point pattern. Since text can be added to frame and template patterns, the section
Working with text (when a frame or template pattern is selected) explains how to enter the text.
MAKING AN EMBROIDERED APPLIQUÉ FROM A ONE-POINT PATTERN
As an example, the following procedure describes how to embroider (pattern number 03) of the
built-in pattern category . For pattern numbers and samples, refer to the pattern list.
●●
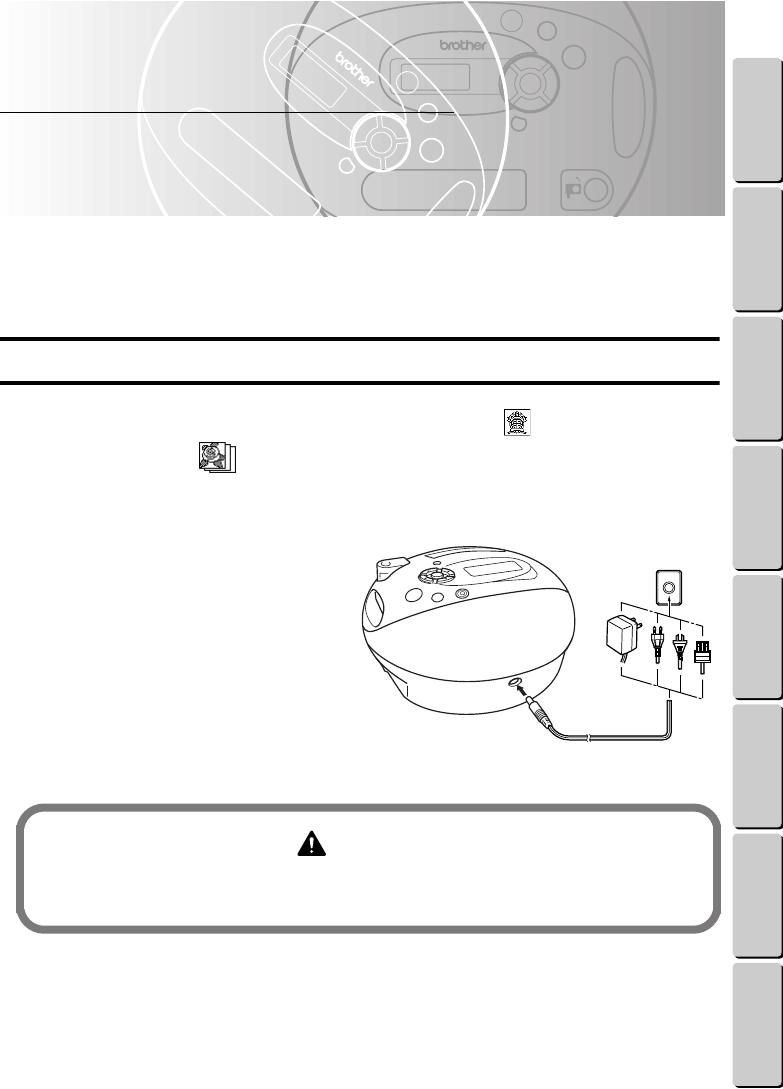
1. Getting ready
1
Insert the plug on the AC
adapter cord into the
connector on the back of the
machine.
2
Plug the adapter into an
electrical wall outlet.
WARNING
Use only the enclosed AC adapter, designed exclusively for this machine. If the machine will
not be used for a long time, disconnect the AC adapter.
1
2
10
● ● ● ● ● ● ● ● ● ● ● ● ● ● ● ● ● ● ● ● ● ● ● ● ● ● ● ● ● ● ● ● ● ● ● ● ● ● ● ● ● ● ● ● ● ● ● ● ● ● ● ● ● ● ● ● ●
MAKING AN EMBROIDERED APPLIQUÉ FROM A ONE-POINT PATTERN
CONTENTS Chapter 1 Chapter 2 Chapter 3 Chapter 4 Chapter 5 INDEX Chapter 6
3
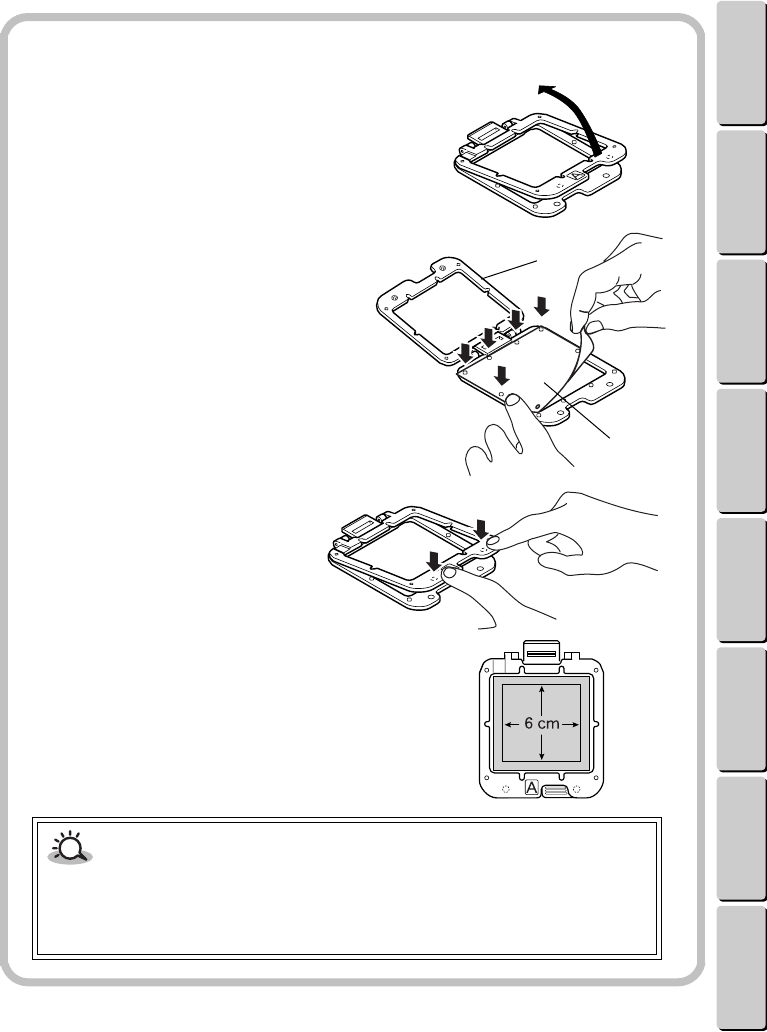
Place the pre-cut design fabric in the design frame.
Putting the pre-cut design fabric in the design frame
11
11Lift up side A of the design frame.
22
22Place the pre-cut design fabric in the
design frame so the side that will be the
front of the embroidery faces up.
Either side of the pre-cut design fabric can
used as the front of the embroidery.
Hook the holes in the design fabric onto the
pins on side B of the design frame.
1Side A (white)
2Side that will be the front of the embroidery
33
33Snap the design frame closed at the
two places shown.
The maximum embroidering area is
6 6 cm. However, the actual size of the
embroidery will depend on the pattern selected.
1
2
CAUTION
• Do not embroider onto anything other than the pre-cut design fabrics designed
exclusively for this machine.
• The smoother (leather-like) side of the pre-cut design fabric may shrink or become
wrinkled if it gets wet.

11
● ● ● ● ● ● ● ● ● ● ● ● ● ● ● ● ● ● ● ● ● ● ● ● ● ● ● ● ● ● ● ● ● ● ● ● ● ● ● ● ● ● ● ● ● ● ● ● ● ● ● ● ● ● ● ● ●
MAKING AN EMBROIDERED APPLIQUÉ FROM A ONE-POINT PATTERN
CONTENTS Chapter 1 Chapter 2 Chapter 3 Chapter 4 Chapter 5 INDEX Chapter 6
●●
2. Starting up the machine
1
Press the key to turn on the machine.
The screen shown at the right appears on the LCD
display.
2
Press the key.
The design frame holder moves to its starting point.
Next, the start-up animation appears on the LCD
display. Then, a screen showing the various
pattern categories appears. (The icons in the
screens that appear may be slightly different than those shown in this manual.)
●●
3. Selecting the pattern
1
The pattern categories are displayed.
As long as or appears, more pattern
categories can be displayed.
2
Press the or key until the
category for the pattern that you want is
highlighted.
For this example, highlight .
Key information
• To skip the animation, press any key.
NOTE
• The design frame holder will make an obvious noise while moving. This is normal and
does not mean that the machine is broken.
• If it is hard to read the screen, change the contrast of the LCD display. (For more details,
see page 47.)
• To turn the machine off, press the key again.
12
● ● ● ● ● ● ● ● ● ● ● ● ● ● ● ● ● ● ● ● ● ● ● ● ● ● ● ● ● ● ● ● ● ● ● ● ● ● ● ● ● ● ● ● ● ● ● ● ● ● ● ● ● ● ● ● ●
MAKING AN EMBROIDERED APPLIQUÉ FROM A ONE-POINT PATTERN
CONTENTS Chapter 1 Chapter 2 Chapter 3 Chapter 4 Chapter 5 INDEX Chapter 6
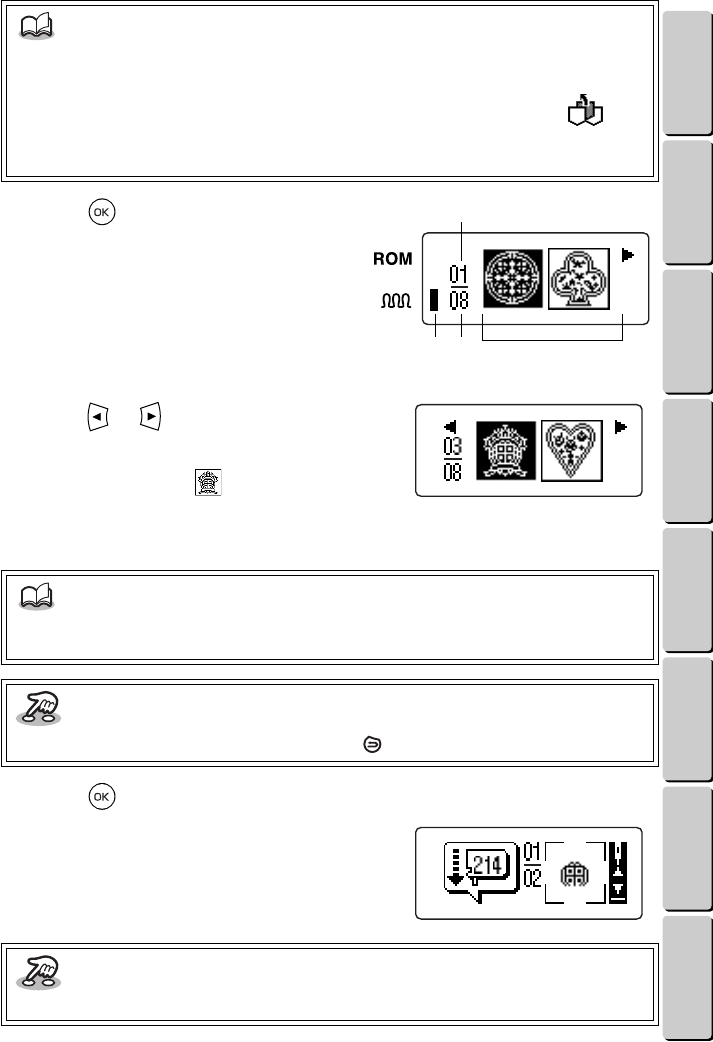
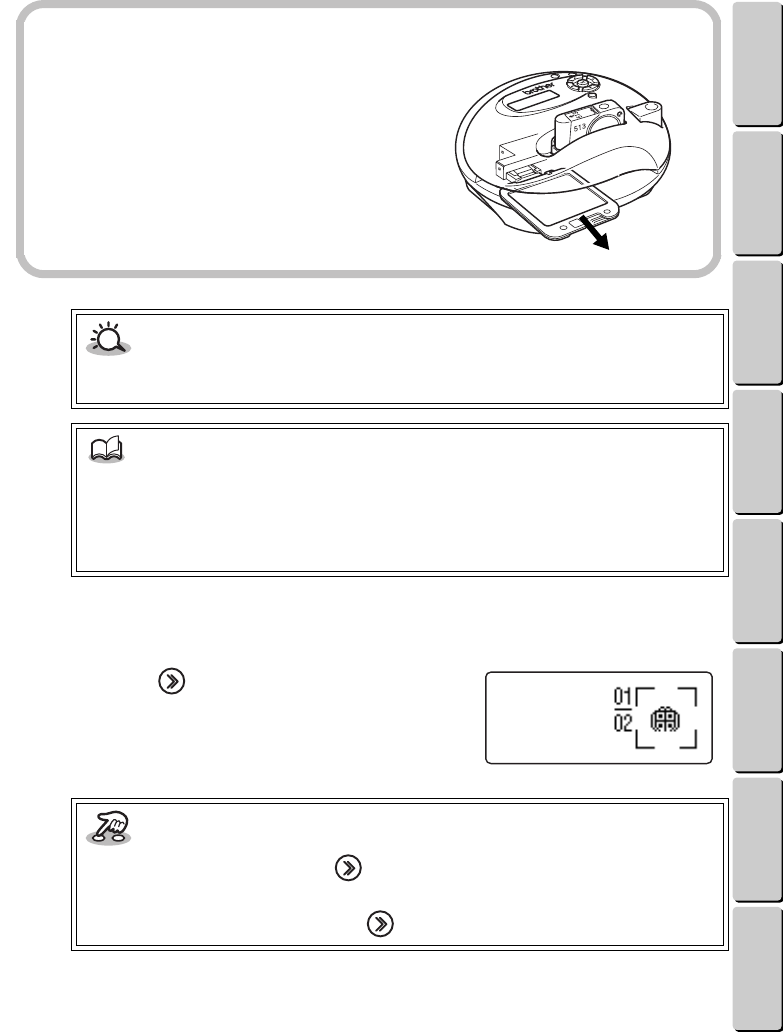
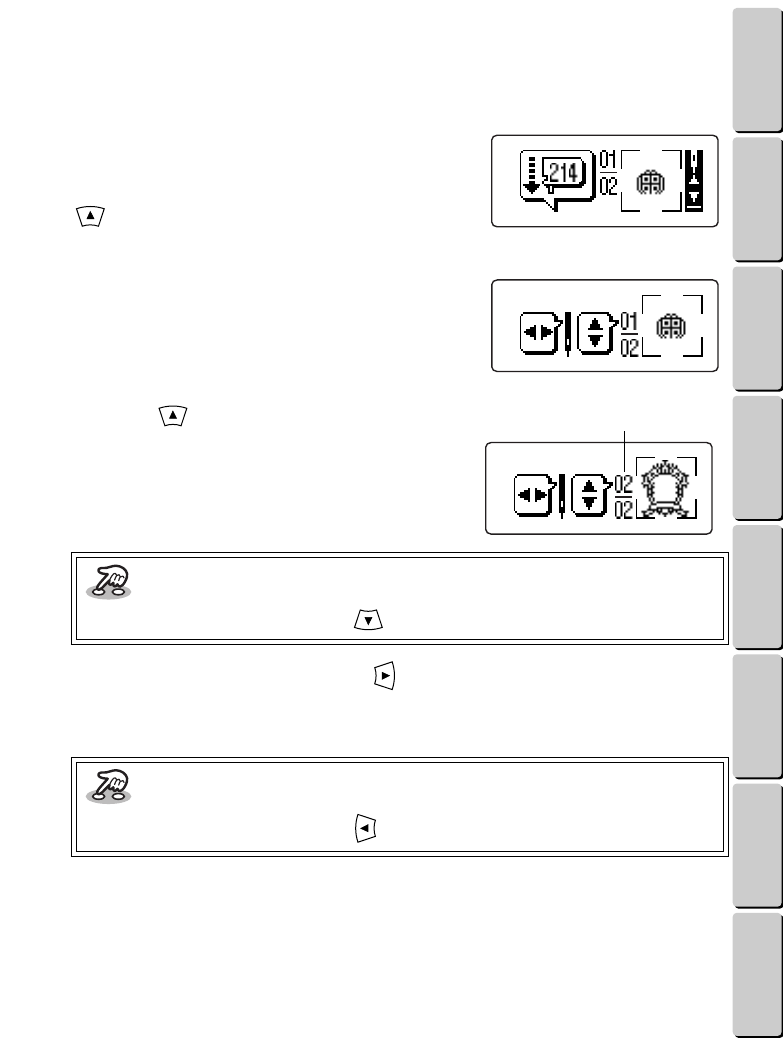
3
Press the key.
The patterns in the category chosen in step 2
appear.
1Total number of patterns in the category
2Number of the highlighted pattern
3This indicator appears if the selected pattern is
embroidered with the chenille texture.
4Patterns in the chosen category
4
Press the or key until the pattern
that you want is highlighted.
For this example, highlight (pattern number
03). (The pattern icons and total number of
patterns that appear may be slightly different than
the one shown at the right.)
5
Press the key.
The embroidering animation appears on the LCD
display. Then, the screen shown at the right
appears.
NOTE
• For details about the patterns, check the pattern list, and see the section Overview and
Patterns on page 7.
• To select a pattern that was previously saved to a memory pocket, highlight . For
details, see the section Retrieving a saved pattern on page 37.
• To select a pattern from a design cassette, see page 33.
NOTE
• For details about the patterns, check the pattern list, and see the section Overview and
Patterns on page 7.
Key information
• To go back to the pattern categories, press the key.
Key information
• To skip the animation, press any key.
2
31 4
13
● ● ● ● ● ● ● ● ● ● ● ● ● ● ● ● ● ● ● ● ● ● ● ● ● ● ● ● ● ● ● ● ● ● ● ● ● ● ● ● ● ● ● ● ● ● ● ● ● ● ● ● ● ● ● ● ●
MAKING AN EMBROIDERED APPLIQUÉ FROM A ONE-POINT PATTERN
CONTENTS Chapter 1 Chapter 2 Chapter 3 Chapter 4 Chapter 5 INDEX Chapter 6
●●
4. Inserting the thread cartridge and design frame
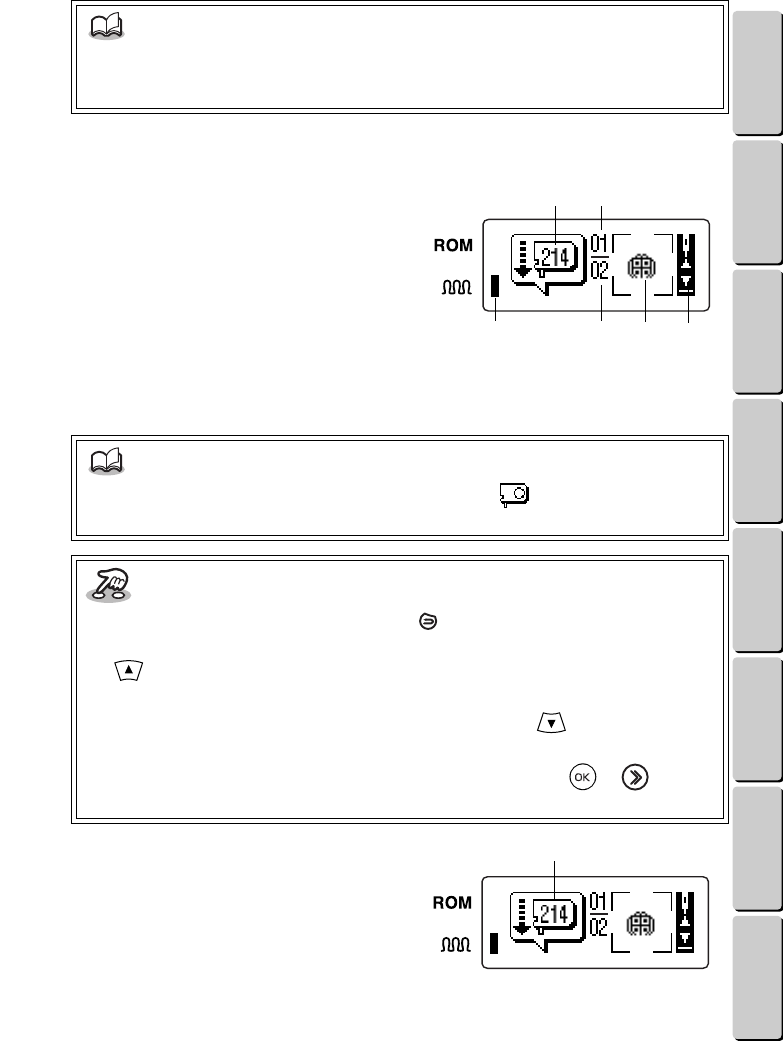
1
The first thread color ID number and
the first part of the pattern that will be
embroidered are shown in the LCD
display.
1Thread color ID number
2Total number of thread colors used in the pattern
3Number showing the order of the thread color being
used
4The part of the pattern that will currently be
embroidered
5This indicator appears if the part of the pattern that is displayed will be embroidered with the chenille
texture.
6See Key information below.
2
Insert the thread cartridge with the
corresponding color ID number shown
in the LCD display.
1Thread color ID number
NOTE
• If a frame or template pattern was selected, you would now select the font and type in
the text. For details, see the section Working with text (when a frame or template pattern
is selected) on page 27.
NOTE
• When embroidering text in frame or template patterns, “ ” appears instead of the
thread color ID number. This means that you can use any thread color.
Key information
• To go back to the previous screen, press the key.
• To skip or move around within a stitch area or advance to the next thread color, press the
key. (For details, see the section Stopping and continuing embroidering on
page 41.)
• To stop embroidering and move forward to the end, press the key. (For details, see
the section Selecting the next operation on page 20.)
• To advance to the step where the design frame is inserted, press the or key. (For
details, see the section Inserting the design frame on page 16.)
1
524
3
6
1
14
● ● ● ● ● ● ● ● ● ● ● ● ● ● ● ● ● ● ● ● ● ● ● ● ● ● ● ● ● ● ● ● ● ● ● ● ● ● ● ● ● ● ● ● ● ● ● ● ● ● ● ● ● ● ● ● ●
MAKING AN EMBROIDERED APPLIQUÉ FROM A ONE-POINT PATTERN
CONTENTS Chapter 1 Chapter 2 Chapter 3 Chapter 4 Chapter 5 INDEX Chapter 6
Inserting a thread cartridge
11
11Hold the thread cartridge as shown in the
diagram, and then align the guide on the thread
cartridge with the groove in the thread cartridge
slot.
1Guide
2Groove
22
22Slide the thread
cartridge into the
thread cartridge slot.
33
33Swing down the back end of the thread cartridge
until it locks in place.
1
2
NOTE
• Be sure to take the needle guard cap off the
needle before inserting the thread cartridge.
• Check that about 3/4” to 1” (2 to 3 cm) of
thread hangs out of the bottom of the
cartridge. If it does not, see the section
Pulling the thread end out of the cartridge on
page 45.
CAUTION
• Insert the thread cartridge after selecting the pattern and when the screen showing
the thread ID number appears.
• Before inserting the thread cartridge, make sure there is enough thread in it. Plan
ahead when sewing chenille texture embroidery, since it uses more thread than
standard embroidery.
15
● ● ● ● ● ● ● ● ● ● ● ● ● ● ● ● ● ● ● ● ● ● ● ● ● ● ● ● ● ● ● ● ● ● ● ● ● ● ● ● ● ● ● ● ● ● ● ● ● ● ● ● ● ● ● ● ●
MAKING AN EMBROIDERED APPLIQUÉ FROM A ONE-POINT PATTERN
CONTENTS Chapter 1 Chapter 2 Chapter 3 Chapter 4 Chapter 5 INDEX Chapter 6
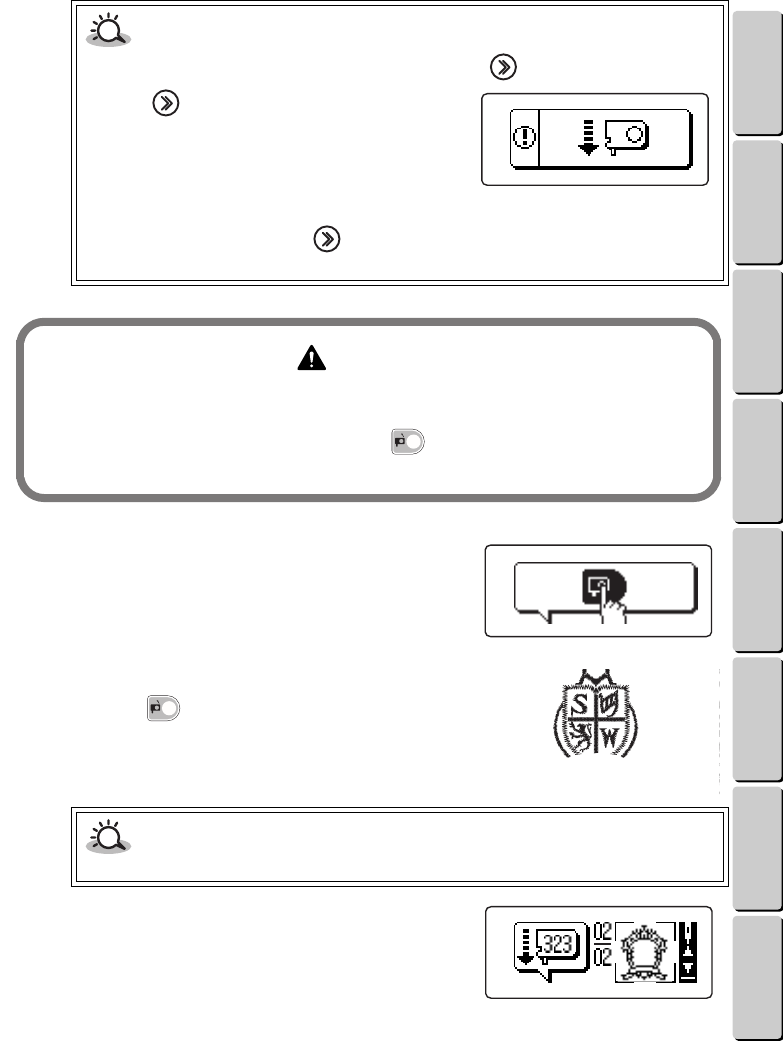
3
A screen appears, showing which side
of the design frame should face up.
Removing the thread cartridge
11
11Press the thread cartridge release button ( ).
The thread is automatically cut and the back end of the thread cartridge pops up.
22
22Slide out the thread cartridge.
NOTE
• If chenille texture embroidery is being sewn,
the screen shown at the right appears. (See
the section Chenille embroidery on
page 25.)
Key information
• To go back to the previous screen, press the key.
CAUTION
• Be sure to press the thread cartridge release button ( ) before trying to take out
the thread cartridge. Do not try removing the thread cartridge without pressing the
thread cartridge release button ( ) first, otherwise the cartridge may be damaged.

16
● ● ● ● ● ● ● ● ● ● ● ● ● ● ● ● ● ● ● ● ● ● ● ● ● ● ● ● ● ● ● ● ● ● ● ● ● ● ● ● ● ● ● ● ● ● ● ● ● ● ● ● ● ● ● ● ●
MAKING AN EMBROIDERED APPLIQUÉ FROM A ONE-POINT PATTERN
CONTENTS Chapter 1 Chapter 2 Chapter 3 Chapter 4 Chapter 5 INDEX Chapter 6
4
Insert the design frame with the side shown in the screen facing up.
Inserting the design frame
11
11Check the screen to see which side of the design frame should face up.
22
22Line up the right side of the design frame
with the line on the machine at the design
frame slot.
1Line
33
33Insert the mount on the design frame into the
design frame mounting bracket inside the
machine.
2Design frame mount
3Design frame mounting bracket
4Frame side marks (A or B)
When the screen shown above appears,
insert the design frame with side A facing
up.
When the screen shown above appears,
insert the design frame with side B facing
up.
1
2
3
4
CAUTION
• Make sure that the design frame is
inserted correctly, otherwise the
embroidery may not be sewn correctly or
thread cartridge may break.
17
● ● ● ● ● ● ● ● ● ● ● ● ● ● ● ● ● ● ● ● ● ● ● ● ● ● ● ● ● ● ● ● ● ● ● ● ● ● ● ● ● ● ● ● ● ● ● ● ● ● ● ● ● ● ● ● ●
MAKING AN EMBROIDERED APPLIQUÉ FROM A ONE-POINT PATTERN
CONTENTS Chapter 1 Chapter 2 Chapter 3 Chapter 4 Chapter 5 INDEX Chapter 6
●●
5. Embroidering the appliqué
Before embroidering, check that the thread cartridge and design frame are correctly inserted.
1
Press the key.
The part of the pattern shown on the LCD display
is embroidered.
Removing the design frame
11
11Pull the design frame straight out.
CAUTION
• Before pulling out the design frame, remove the thread cartridge, and make sure that the
design frame has moved to its starting point so it can be taken out.
NOTE
• When embroidering is finished or while sewing chenille embroidery, the design frame
automatically moves so that it can be taken out after the thread cartridge is removed. (See
the section Chenille embroidery on page 25.) If you want to stop embroidering and take
out the design frame, follow the instructions in the section Removing the design frame on
page 44.
Key information
• To stop embroidering, press the key. After sewing a few stitches, the machine will
stop.
• To continue embroidering, press the key.
18
● ● ● ● ● ● ● ● ● ● ● ● ● ● ● ● ● ● ● ● ● ● ● ● ● ● ● ● ● ● ● ● ● ● ● ● ● ● ● ● ● ● ● ● ● ● ● ● ● ● ● ● ● ● ● ● ●
MAKING AN EMBROIDERED APPLIQUÉ FROM A ONE-POINT PATTERN
CONTENTS Chapter 1 Chapter 2 Chapter 3 Chapter 4 Chapter 5 INDEX Chapter 6
2
When the machine is finished
embroidering the part of the pattern
shown on the LCD display, it
automatically stops and the screen
shown at the right appears.
3
Press the thread cartridge release
button ( ), and then remove the
thread cartridge.
(See the section Removing the thread cartridge on
page 15.)
4
The next thread color ID number and
the next part of the pattern are shown in
the LCD display.
CAUTION
• Be sure to insert the design frame before pressing the key.
• If the key is pressed without a thread
cartridge inserted, the warning screen
shown at the right appears. Insert the thread
cartridge.
• If the thread cartridge runs out of thread or
the thread breaks, embroidering will not
automatically stop. Press the key, and then fix the problem. (See Stopping and
continuing embroidering on page 41.)
WARNING
The thread cartridge and design frame move while the embroidery is being sewn. For that
reason, do not touch the thread cartridge or design frame, prevent them from moving in any
way, or press the thread cartridge release button ( ) while embroidering; otherwise, the
machine or thread cartridge may break.
CAUTION
• Be sure to wait until embroidering is finished before removing the thread cartridge.
First color to be embroidered
19
● ● ● ● ● ● ● ● ● ● ● ● ● ● ● ● ● ● ● ● ● ● ● ● ● ● ● ● ● ● ● ● ● ● ● ● ● ● ● ● ● ● ● ● ● ● ● ● ● ● ● ● ● ● ● ● ●
MAKING AN EMBROIDERED APPLIQUÉ FROM A ONE-POINT PATTERN
CONTENTS Chapter 1 Chapter 2 Chapter 3 Chapter 4 Chapter 5 INDEX Chapter 6
5
Insert the next thread cartridge.
A screen appears, showing which side of the
design frame should face up.
6
Check that the design frame is inserted
with the side shown in the screen facing
up, and then press the key.
The part of the pattern shown on the LCD display
is embroidered.
If the pattern uses many thread colors, repeat steps 2 through 6 until all parts of the pattern are
embroidered.
NOTE
• If chenille embroidery is being sewn, the
screen shown at the right appears.
• If the screen changes as shown below:
1. After the thread cartridge is removed, the design frame automatically moves to its
starting point so that it can be taken out.
2. Pull out the design frame, and then insert it with the side shown in the screen facing
up. (See the section Chenille embroidery on page 25.)
When the screen changes as
shown above, insert the design
frame with side A facing up
.
When the screen changes as
shown above, insert the design
frame with side B facing up
.
20
● ● ● ● ● ● ● ● ● ● ● ● ● ● ● ● ● ● ● ● ● ● ● ● ● ● ● ● ● ● ● ● ● ● ● ● ● ● ● ● ● ● ● ● ● ● ● ● ● ● ● ● ● ● ● ● ●
MAKING AN EMBROIDERED APPLIQUÉ FROM A ONE-POINT PATTERN
CONTENTS Chapter 1 Chapter 2 Chapter 3 Chapter 4 Chapter 5 INDEX Chapter 6
7
When the machine is finished
embroidering, it automatically stops and
the screen shown at the right appears.
8
Remove the thread cartridge.
The design frame moves back to its starting point
so it can be removed. After the final animation is
displayed, the screen shown at the right appears.
9
Pull out the design frame. Then, take the
pre-cut design fabric out of the frame.
●●
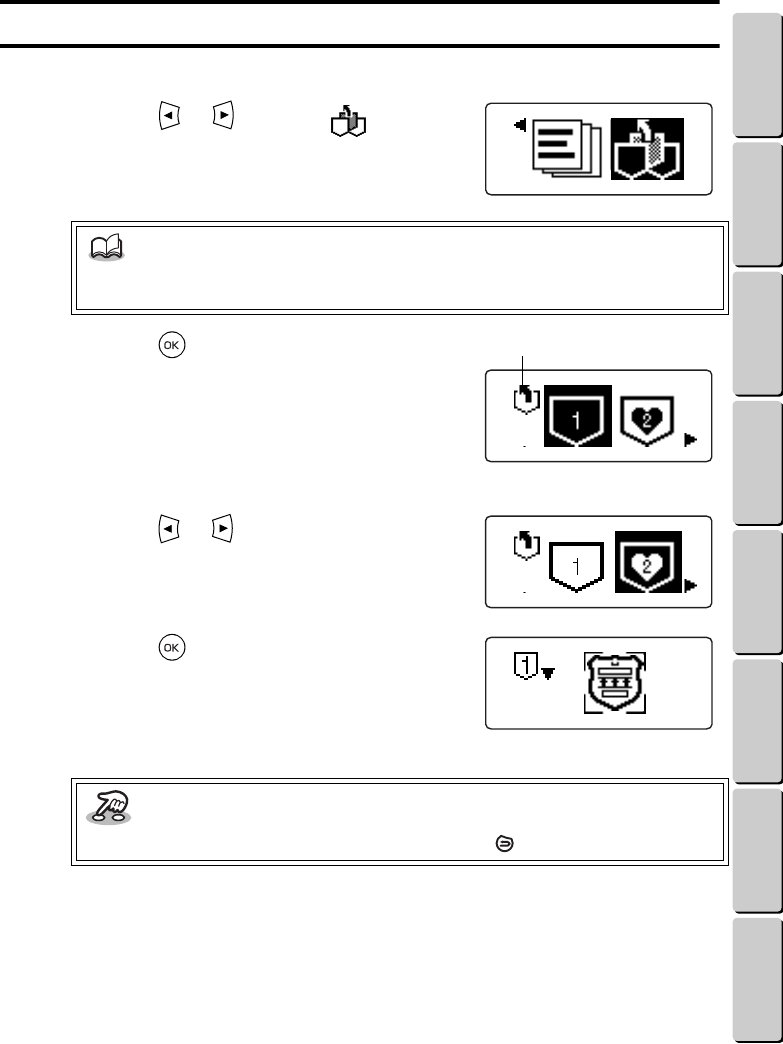
6. Selecting the next operation
To embroider the same pattern again
Press the key until is highlighted, and then press the key. The screen shown on
page 13 under Inserting the thread cartridge and design frame appears. Repeat the steps to
embroider the same pattern.
To save the pattern
Press the or key until is highlighted, and then press the key. For more details,
see the section Saving a pattern on page 34.
To embroider a different pattern
Press the key until is highlighted, and then press the key. The screen shown on
page 11 under Selecting the pattern appears. Repeat the steps to embroider a different pattern.
To finish using the machine
Press the key.
Key information
• To skip the animation, press any key.
CAUTION
• Be sure to follow the correct procedure for removing the thread cartridge before
removing the design frame, otherwise the stitching may be damaged. (See the section
Removing the thread cartridge on page 15 and Removing the design frame on page 17.)
Finished embroidery

21
● ● ● ● ● ● ● ● ● ● ● ● ● ● ● ● ● ● ● ● ● ● ● ● ● ● ● ● ● ● ● ● ● ● ● ● ● ● ● ● ● ● ● ● ● ● ● ● ● ● ● ● ● ● ● ● ●
MAKING AN EMBROIDERED APPLIQUÉ FROM A ONE-POINT PATTERN
CONTENTS Chapter 1 Chapter 2 Chapter 3 Chapter 4 Chapter 5 INDEX Chapter 6
●●
7. Finishing the appliqué
In order to prevent threads from being pulled out, attach the iron-on adhesive film to the wrong side
of the embroidery. Then, cut the embroidery into any shape you want.
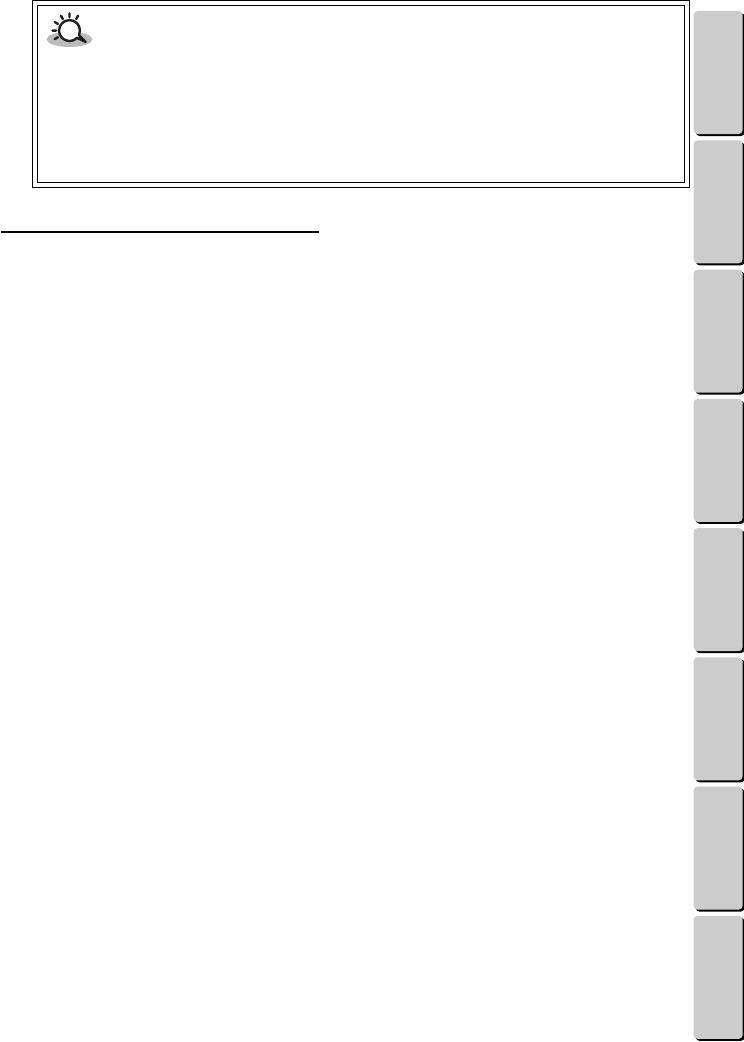
1
Place the right side of the embroidery face
down. Then, completely cover the threads
with the iron-on adhesive, making sure that
the printed backing paper faces up.
Make sure that the backing paper is on the top.
1Ironing board
2Pre-cut design fabric (wrong side facing up)
3Iron-on adhesive (printed backing paper facing up)
2
Be sure to heat the iron to a medium
temperature of 285 to 320 F (140 to 160
C) and not to use the steam setting. Then,
press the iron down for 30 to 40 seconds on
the backing paper of the iron-on adhesive.
CAUTION
• Before the iron-on adhesive film is attached, the embroidery threads can easily be pulled
out. Be careful not to pull them out.
NOTE
• A reference line of stitching is sewn around the
pattern so the pattern can be cut out more easily.
1Reference line of stitching (line that shows how to
cut out the embroidery)
• The reference line may not be sewn around all
patterns.
• If you do not want to cut out the embroidery
along the reference line, carefully take out the reference line threads before ironing on
the adhesive film.
NOTE
• If some of the adhesive melts onto the iron, wait until the iron cools down, and then peel
off the adhesive.
1
1
2
3
22
● ● ● ● ● ● ● ● ● ● ● ● ● ● ● ● ● ● ● ● ● ● ● ● ● ● ● ● ● ● ● ● ● ● ● ● ● ● ● ● ● ● ● ● ● ● ● ● ● ● ● ● ● ● ● ● ●
MAKING AN EMBROIDERED APPLIQUÉ FROM A ONE-POINT PATTERN
CONTENTS Chapter 1 Chapter 2 Chapter 3 Chapter 4 Chapter 5 INDEX Chapter 6
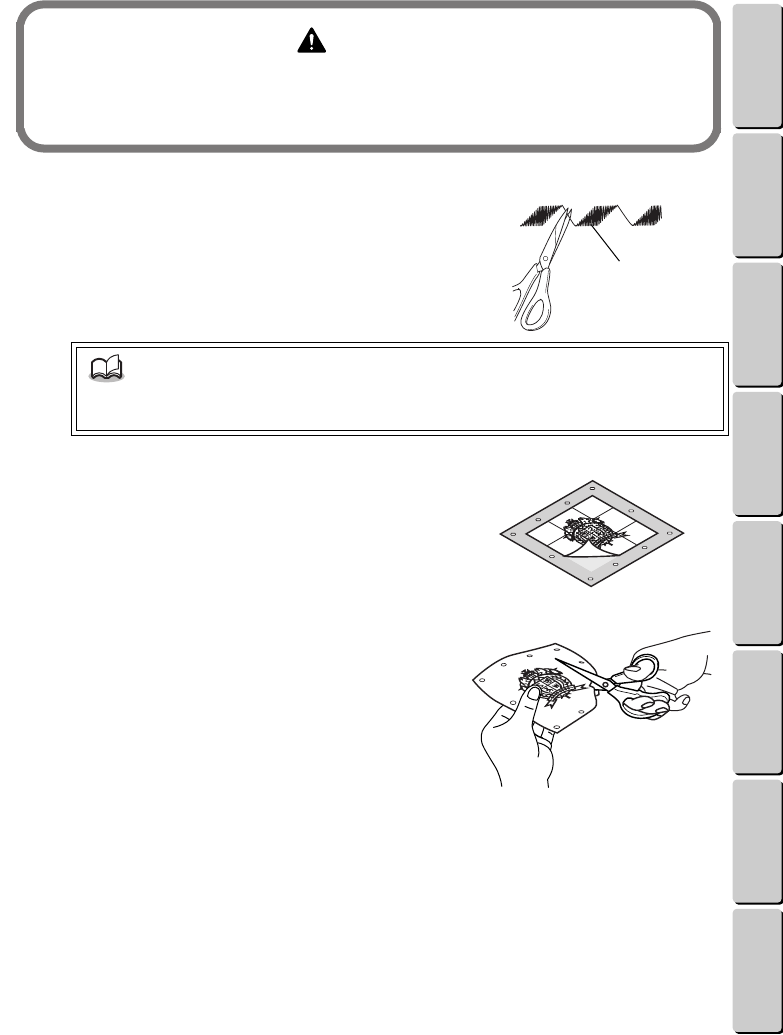
3
After the design fabric cools down
completely, cut off any extra threads.
1Extra thread
4
Peel the backing paper off the back of the
appliqué.
5
Cut out the appliqué.
Cut out the embroidery either along the reference line
or in any shape you want.
WARNING
• Be very careful when using the iron since it is very hot and can cause burns.
• During or after ironing the pre-cut design fabric, wait until the fabric has cooled down
before touching it.
NOTE
• The extra threads can be cut off before attaching the iron-on adhesive. But, since the
embroidery threads can easily be pulled out, be careful not to pull them out.
1

23
● ● ● ● ● ● ● ● ● ● ● ● ● ● ● ● ● ● ● ● ● ● ● ● ● ● ● ● ● ● ● ● ● ● ● ● ● ● ● ● ● ● ● ● ● ● ● ● ● ● ● ● ● ● ● ● ●
MAKING AN EMBROIDERED APPLIQUÉ FROM A ONE-POINT PATTERN
CONTENTS Chapter 1 Chapter 2 Chapter 3 Chapter 4 Chapter 5 INDEX Chapter 6
●●
8. Attaching the appliqué
To ensure that an iron-on appliqué will not come off after repeated washings, sew it to the fabric
either by hand or with a sewing machine.
To iron on the appliqué:
1
Place the appliqué right side up on the
fabric at the place where you want to attach
it. Then, place an extra piece of cloth over
the embroidery to protect it.
Be sure to iron on a hard surface, like an ironing board.
1Ironing board
2Fabric
3Appliqué
4Extra piece of cloth
2
Be sure to heat the iron to a medium
temperature of 285 to 320 F (140 to 160
C) and do not use the steam setting. Then, use both hands to press the iron
down hard for 20 to 30 seconds on the extra piece of cloth covering the
appliqué.
If the appliqué did not attach well to the fabric, iron it from the back.
CAUTION
• When cutting out the embroidery in any shape you want, cut at least 3/16” (5 mm) away
from the edge of the embroidery. If you cut too close to the embroidery, you might cut
the embroidery threads.
• When cutting along the reference line, cut outside of the reference line. Do not cut inside
the reference line.
• If the iron-on adhesive film did not completely attach to the appliqué and must be ironed
on again, make sure that the film is covered by the backing paper. Place the backing
paper on top of the film with the printed side of the backing paper facing up.
WARNING
• Be very careful when using the iron since it is very hot and can cause burns.
• During or after ironing the pre-cut design fabric, wait until the fabric has cooled down
before touching it, otherwise you may be burned.
• After ironing on the appliqué, wait until it cools down completely (about 20 minutes)
before folding it or pulling on it.
1
2
3
4
24
● ● ● ● ● ● ● ● ● ● ● ● ● ● ● ● ● ● ● ● ● ● ● ● ● ● ● ● ● ● ● ● ● ● ● ● ● ● ● ● ● ● ● ● ● ● ● ● ● ● ● ● ● ● ● ● ●
MAKING AN EMBROIDERED APPLIQUÉ FROM A ONE-POINT PATTERN
CONTENTS Chapter 1 Chapter 2 Chapter 3 Chapter 4 Chapter 5 INDEX Chapter 6
To attach the appliqué like a sticker:
Attach a piece of commercially available double-sided tape to the back of the applique. Then, attach
it to anything you want.
CAUTION
• Do not attach the appliqué to fabric that may be damaged when ironed at a medium
temperature for a certain amount of time.
• Do not attach the appliqué to water-proofed, stretch or furry fabric.
• The appliqué will not attach to wet or damp fabric. Be sure to dry the fabric first.
• Do not dry clean the appliqué.
• Sew the appliqué onto sweaters and other knitted items.
25
● ● ● ● ● ● ● ● ● ● ● ● ● ● ● ● ● ● ● ● ● ● ● ● ● ● ● ● ● ● ● ● ● ● ● ● ● ● ● ● ● ● ● ● ● ● ● ● ● ● ● ● ● ● ● ● ●
CHENILLE EMBROIDERY
CONTENTS Chapter 1 Chapter 2 Chapter 3 Chapter 4 Chapter 5 INDEX Chapter 6
CHENILLE EMBROIDERY
This section gives additional details on chenille embroidery.
Parts of certain patterns that can be embroidered with the
machine are designed to be sewn with a chenille texture.
The chenille texture is made of looped threads and looks
like a terry cloth towel. When sewing chenille
embroidery, be sure to insert the design frame with side B
facing up.
When a chenille pattern is selected:
When sewing chenille embroidery, the side of the design frame facing up will have to be changed
from side B to side A or from side A to side B. After replacing the thread cartridge, check that the
design frame is installed correctly.
For the sample pattern list information at the right, the
embroidery would be sewn as described below.
1
Insert the thread cartridge for the first
color (800). After the screen shown at
the right appears, insert the design
frame with side B facing up, and then
press the key.
2
After the first color is embroidered and the machine stops automatically,
press the thread cartridge release button ( ) to cut the thread, and then
remove the thread cartridge. (See the section Removing the thread
cartridge on page 15).
NOTE
• In this manual, “chenille embroidery” is embroidery with sections that are sewn with a
chenille texture.
• In the pattern list, “ ” means that part of the pattern is embroidered with the
chenille texture.
Chenille embroidery
1: (800)B
2: (124) A
3: (323)B
Example:
26
● ● ● ● ● ● ● ● ● ● ● ● ● ● ● ● ● ● ● ● ● ● ● ● ● ● ● ● ● ● ● ● ● ● ● ● ● ● ● ● ● ● ● ● ● ● ● ● ● ● ● ● ● ● ● ● ●
CHENILLE EMBROIDERY
CONTENTS Chapter 1 Chapter 2 Chapter 3 Chapter 4 Chapter 5 INDEX Chapter 6
3
Insert the thread cartridge for the second color
(124). After the screen shown at the right
appears, insert the design frame with side A
facing up, and then press the key.
4
After the second color is embroidered and the machine automatically
stops, remove the thread cartridge.
5
Insert the thread cartridge for the third color
(323). After the screen shown at the right appears,
insert the design frame with side B facing up, and
then press the key.
6
After the third color is embroidered and the machine automatically stops,
continue with the steps in the section Finishing the appliqué on page 21 to
finish making the appliqué.
NOTE
• The parts of the patterns that will be sewn with the chenille texture are pre-set. Also, the
built-in fonts cannot be sewn with the chenille texture.
• Sewing chenille embroidery uses a lot of thread. Make sure that there is enough thread
left in the cartridge before sewing chenille embroidery.
27
● ● ● ● ● ● ● ● ● ● ● ● ● ● ● ● ● ● ● ● ● ● ● ● ● ● ● ● ● ● ● ● ● ● ● ● ● ● ● ● ● ● ● ● ● ● ● ● ● ● ● ● ● ● ● ● ●
WORKING WITH TEXT (WHEN A FRAME OR TEMPLATE PATTERN IS SELECTED)
CONTENTS Chapter 1 Chapter 2 Chapter 3 Chapter 4 Chapter 5 INDEX Chapter 6
WORKING WITH TEXT (WHEN A FRAME OR TEMPLATE
PATTERN IS SELECTED)
With frame and template patterns, you can enter text and select the font that will be used for
embroidering. The mark in the pattern list and on the LCD display shows where text can be
added. The number of lines and characters that can be entered depends on the pattern selected.
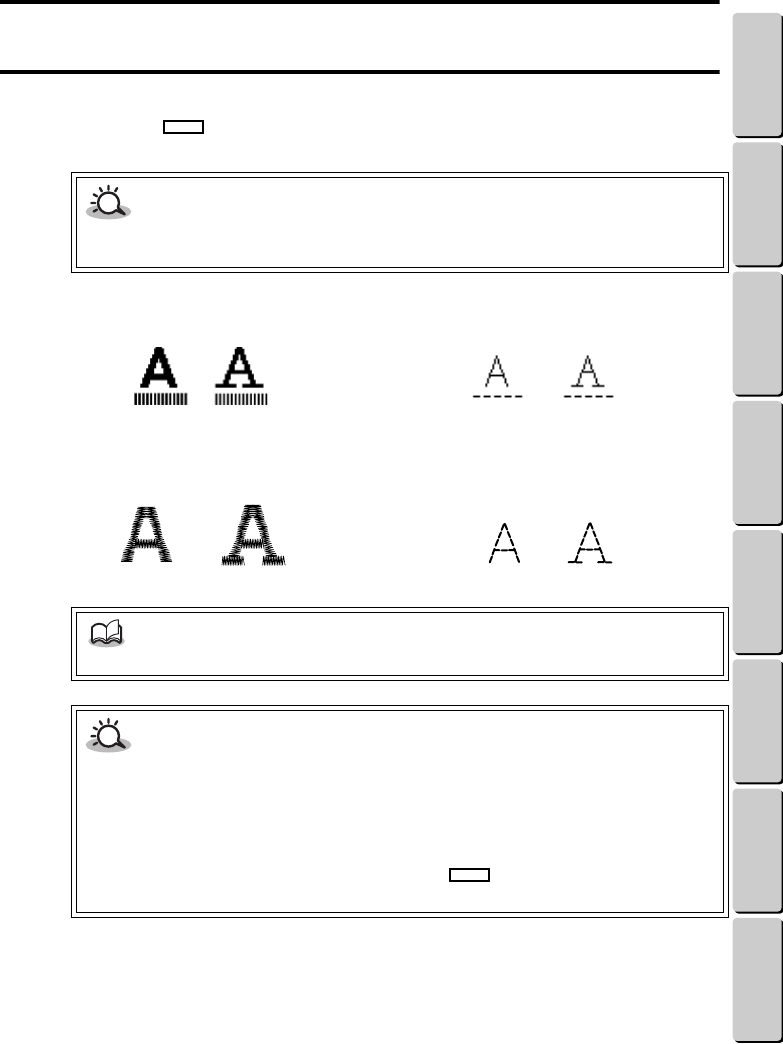
The following two fonts are available in two sizes.
CAUTION
• Template patterns are embroidery that have only text. If no text is entered, the embroidery
cannot be sewn.
Large (about 10 mm high)
Satin stitches
Small (about 7 mm high)
Straight stitches
(Sewn image) (Sewn image)
NOTE
• For a list of characters that can be entered, see page 29.
CAUTION
• All text appearing in the same line must have the same font. But, each line in a template
with more than one line can have different fonts.
• All text appearing in the same line must have the same size. But, each line in a template
with more than one line can have different sizes.
• With some patterns, the large fonts cannot be chosen.
• The number of letters that can be entered within depends on the pattern and the
selected font and text size.
28
● ● ● ● ● ● ● ● ● ● ● ● ● ● ● ● ● ● ● ● ● ● ● ● ● ● ● ● ● ● ● ● ● ● ● ● ● ● ● ● ● ● ● ● ● ● ● ● ● ● ● ● ● ● ● ● ●
WORKING WITH TEXT (WHEN A FRAME OR TEMPLATE PATTERN IS SELECTED)
CONTENTS Chapter 1 Chapter 2 Chapter 3 Chapter 4 Chapter 5 INDEX Chapter 6
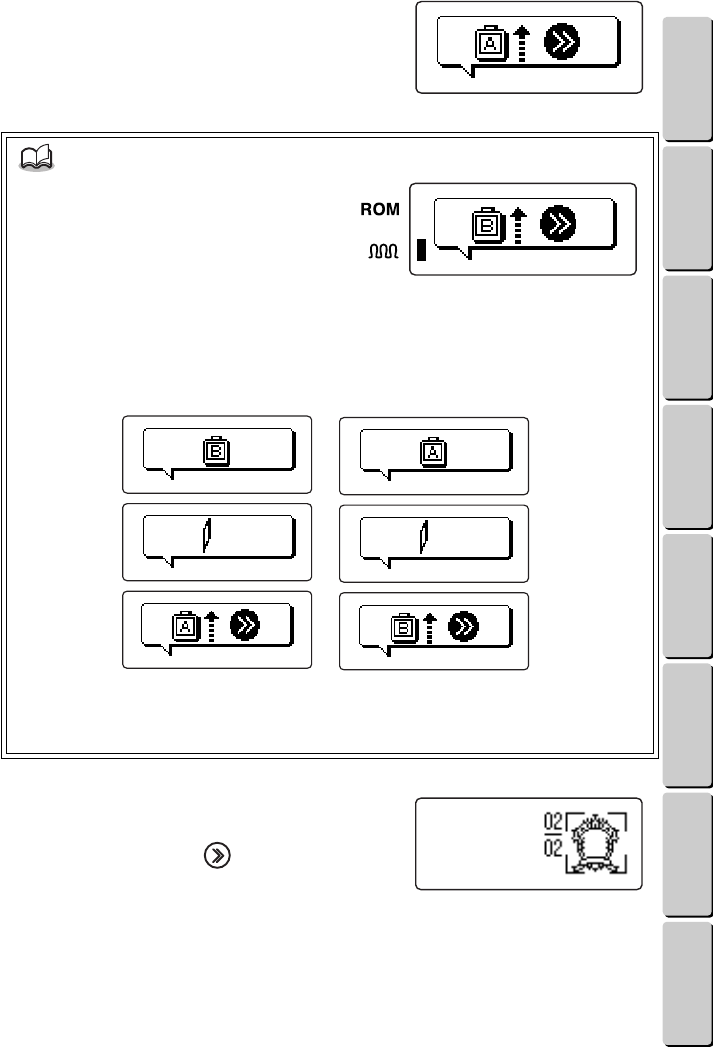
●●
Entering text
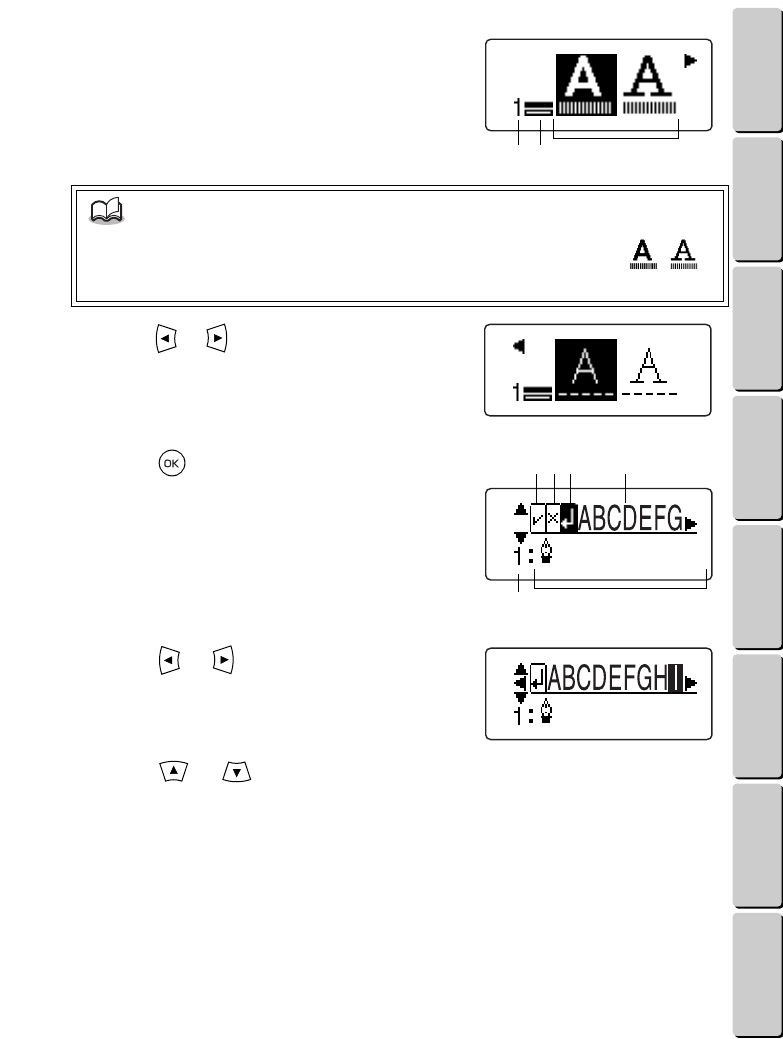
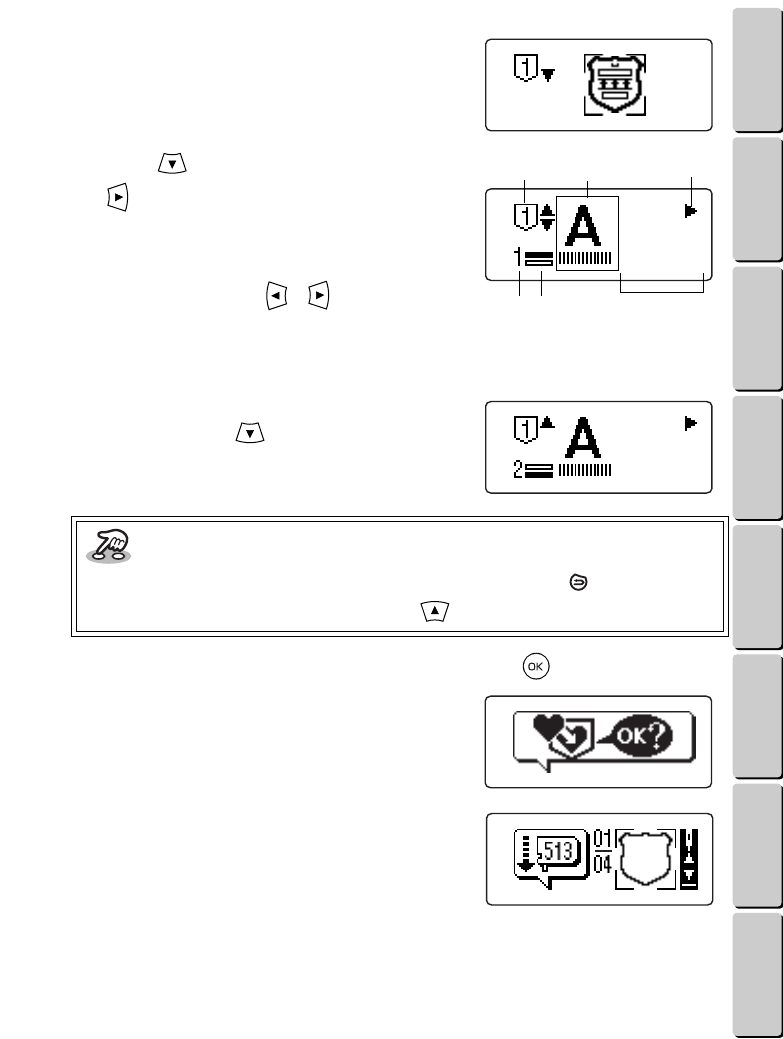
After a template pattern is selected, the screen
shown at the right appears so that you can choose
the font and text size.
1Number of the line of text being entered
2Shows which line of the total number of lines of text is
being entered
3Fonts and text sizes that are available
1
Press the or key until the font and
text size that you want is highlighted.
2
Press the key.
The screen shown at the right appears.
1Select this icon to check the entered text. (For details,
see the section Checking the text on page 32.)
2Select this icon to delete a character. (For details, see
the section Changing the text on page 31.)
3Select this icon to quit entering the text.
4Characters that are available
5Number of the line of text being entered
6Text that has been entered
3
Press the or key until the
character that you want to enter is
highlighted.
To select another set of characters,
press the or key until the
characters you want appear.
NOTE
• The large fonts cannot be chosen with some patterns. With those patterns,
will not appear.
132
6
1 23 4
5
29
● ● ● ● ● ● ● ● ● ● ● ● ● ● ● ● ● ● ● ● ● ● ● ● ● ● ● ● ● ● ● ● ● ● ● ● ● ● ● ● ● ● ● ● ● ● ● ● ● ● ● ● ● ● ● ● ●
WORKING WITH TEXT (WHEN A FRAME OR TEMPLATE PATTERN IS SELECTED)
CONTENTS Chapter 1 Chapter 2 Chapter 3 Chapter 4 Chapter 5 INDEX Chapter 6
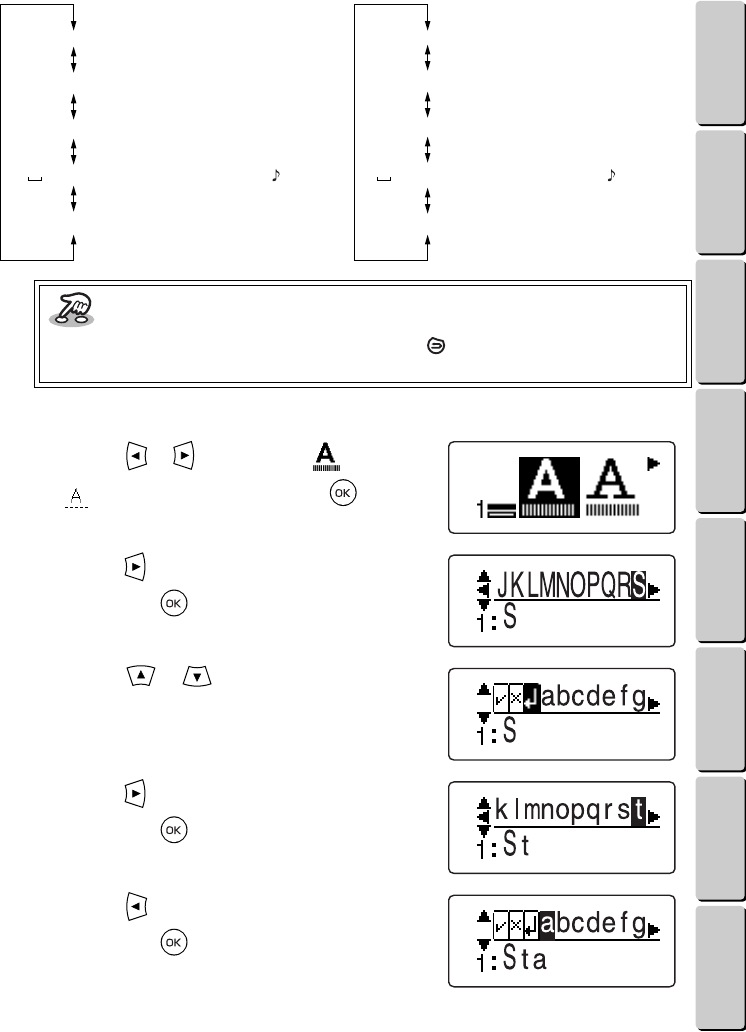
The following are the sets of available characters in the two fonts shown below.
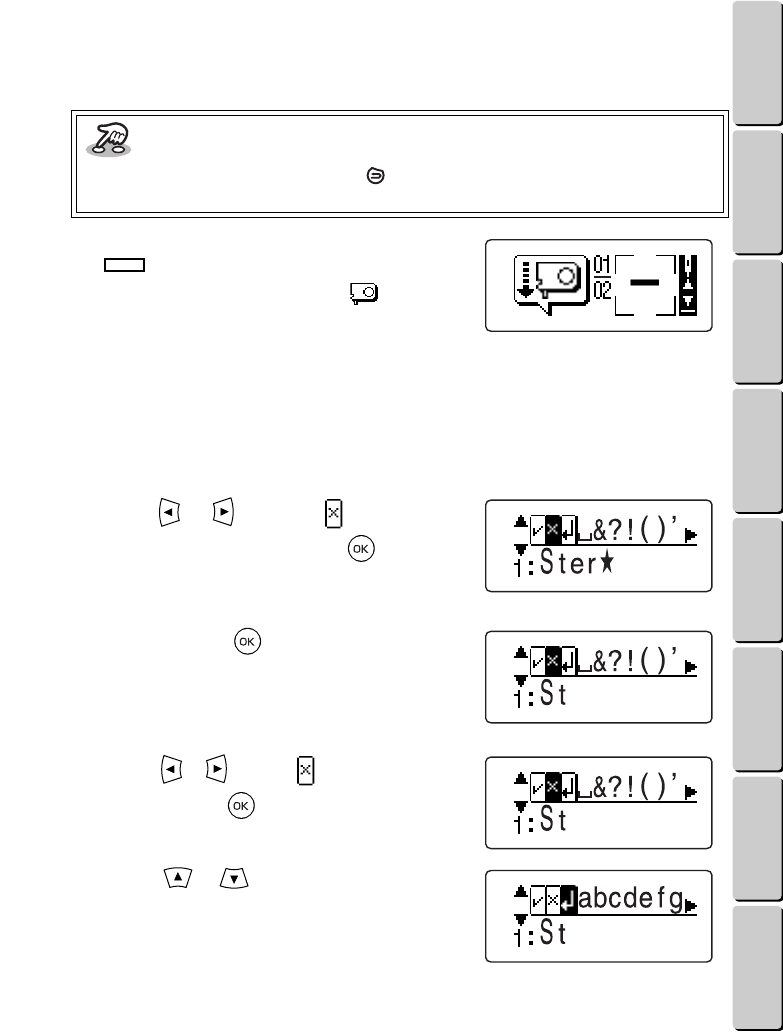
Example: To enter “Star ”
1Press the or key until either or
is highlighted, and then press the
key.
2Press the key until “S” is highlighted, and
then press the key.
3Press the or key until the lowercase
letters appear.
4Press the key until “t” is highlighted, and
then press the key.
5Press the key until “a” is highlighted, and
then press the key.
Key information
• To go back to change the font or text size, press the key. If any text has been entered,
it is erased when you change the font and text size.
ABCDEFGHIJKLMNOPQRSTUVWUXYZ
abcdefghijklmnopqrstuvwuxyz
0123456789
(space) & ? ! ( ) ’, . – / _ @
ÄÅÂÆÑÖØÇÜäàåâæëèéêñöòøìçüùß
ABCDEFGHIJKLMNOPQRSTUVWUXYZ
abcdefghijklmnopqrstuvwuxyz
0123456789
(space) & ? ! ( ) ’, . – / _ @
ÄÅÂÆÑÖØÇÜäàåâæëèéêñöòøìçüùß
30
● ● ● ● ● ● ● ● ● ● ● ● ● ● ● ● ● ● ● ● ● ● ● ● ● ● ● ● ● ● ● ● ● ● ● ● ● ● ● ● ● ● ● ● ● ● ● ● ● ● ● ● ● ● ● ● ●
WORKING WITH TEXT (WHEN A FRAME OR TEMPLATE PATTERN IS SELECTED)
CONTENTS Chapter 1 Chapter 2 Chapter 3 Chapter 4 Chapter 5 INDEX Chapter 6
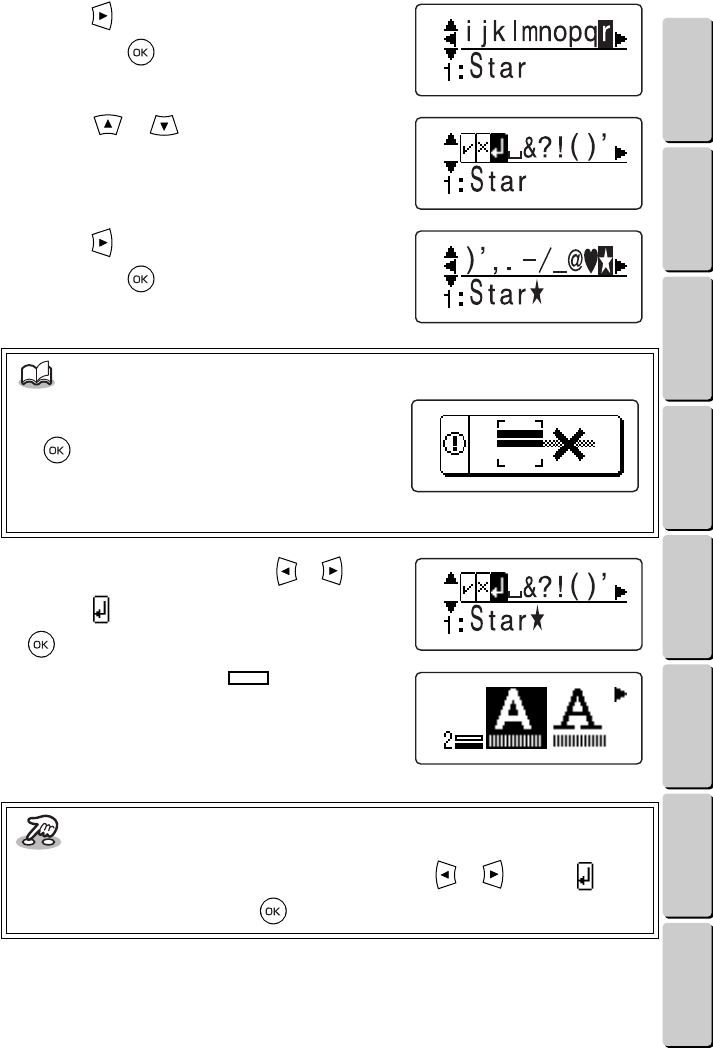
6Press the key until “r” is highlighted, and
then press the key.
7Press the or key until the symbols
appear.
8Press the key until “” is highlighted, and
then press the key.
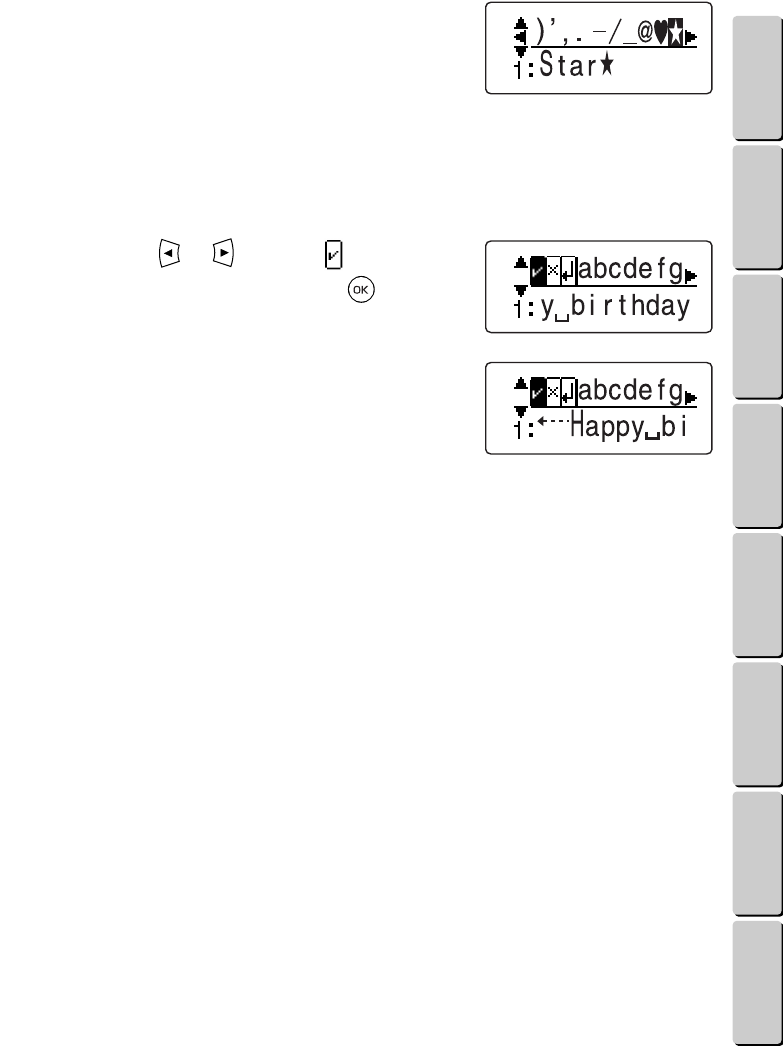
9After all the text is entered, press the or
key until is highlighted, and then press the
key.
0If the pattern has two or more marks, the
screen shown at the right appears. Repeat steps
1 to 9 to enter the next line of text.
NOTE
• If the screen shown at the right appears, no
more characters can be entered. Press the
key to go back to the text. Then, change
the text to make it shorter (see the section
Changing the text on page 31), select a
smaller text size, or quit entering text.
Key information
• If you do not want to enter another line of text, press the or key until is
highlighted, and then press the key.
31
● ● ● ● ● ● ● ● ● ● ● ● ● ● ● ● ● ● ● ● ● ● ● ● ● ● ● ● ● ● ● ● ● ● ● ● ● ● ● ● ● ● ● ● ● ● ● ● ● ● ● ● ● ● ● ● ●
WORKING WITH TEXT (WHEN A FRAME OR TEMPLATE PATTERN IS SELECTED)
CONTENTS Chapter 1 Chapter 2 Chapter 3 Chapter 4 Chapter 5 INDEX Chapter 6
AAfter all of the text is entered, the embroidering
animation appears on the LCD display. Then,
the screen shown on page 13 under Inserting
the thread cartridge and design frame appears.
Continue in same way that a one-point pattern
is embroidered.
When it is time to embroider a line of text
( ), the machine stops and a screen like
the one shown at the right appears. “ ”
appears instead of the thread color ID number.
This means that you can use any thread color
that you would like for the text.
The text is embroidered starting from the top line.
●●
Changing the text
If you would like to edit the text, you will have to delete the characters that you have entered, starting
from the last one, until you reach the point where your editing should begin. Then, enter the text.
1
Press the or key until is
highlighted, and then press the key.
The last entered character is deleted.
2
Keep pressing the key until you
reach the place in the text that you want
to change.
Example: To change “Ster ” to “Star ”
1Press the or key until is highlighted,
and then press the key three times to
delete “er”.
2Press the or key until the lowercase
letters appear.
Key information
• To go back to edit the text, press the key. (See the section Changing the text on
page 31.)
32
● ● ● ● ● ● ● ● ● ● ● ● ● ● ● ● ● ● ● ● ● ● ● ● ● ● ● ● ● ● ● ● ● ● ● ● ● ● ● ● ● ● ● ● ● ● ● ● ● ● ● ● ● ● ● ● ●
WORKING WITH TEXT (WHEN A FRAME OR TEMPLATE PATTERN IS SELECTED)
CONTENTS Chapter 1 Chapter 2 Chapter 3 Chapter 4 Chapter 5 INDEX Chapter 6
3 Enter “ar ” as described on pages 29 and 30.
●●
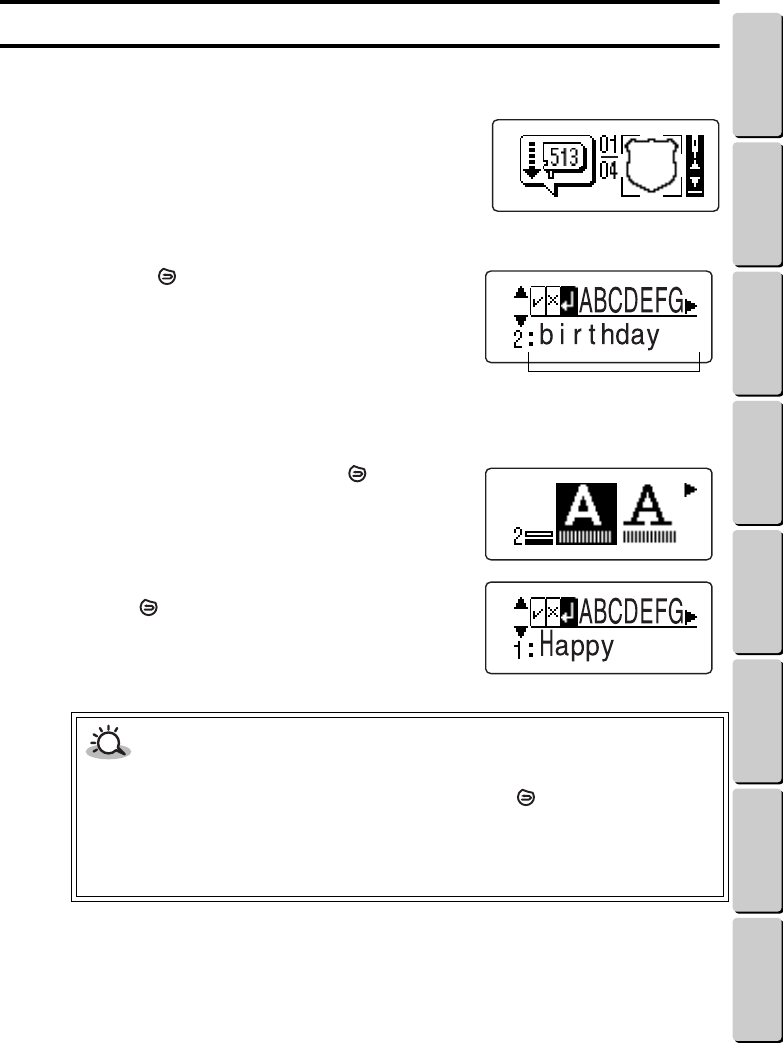
Checking the text
If the line of text that has been entered is too long to fit in the LCD display, you can scroll it from the
beginning to the end.
1
Press the or key until is
highlighted, and then press the key.
The whole line of text, starting from the beginning,
scrolls to the left at the bottom of the LCD display.

33
Chapter 4
CONTENTS Chapter 1 Chapter 2 Chapter 3 Chapter 4 Chapter 5 INDEX Chapter 6
4
Additional Operations
This chapter explains some of the other functions available with this machine.
SELECTING A PATTERN FROM A DESIGN CASSETTE
In addition to the many patterns built into the machine, there are a variety of optional design cassettes
containing other patterns.
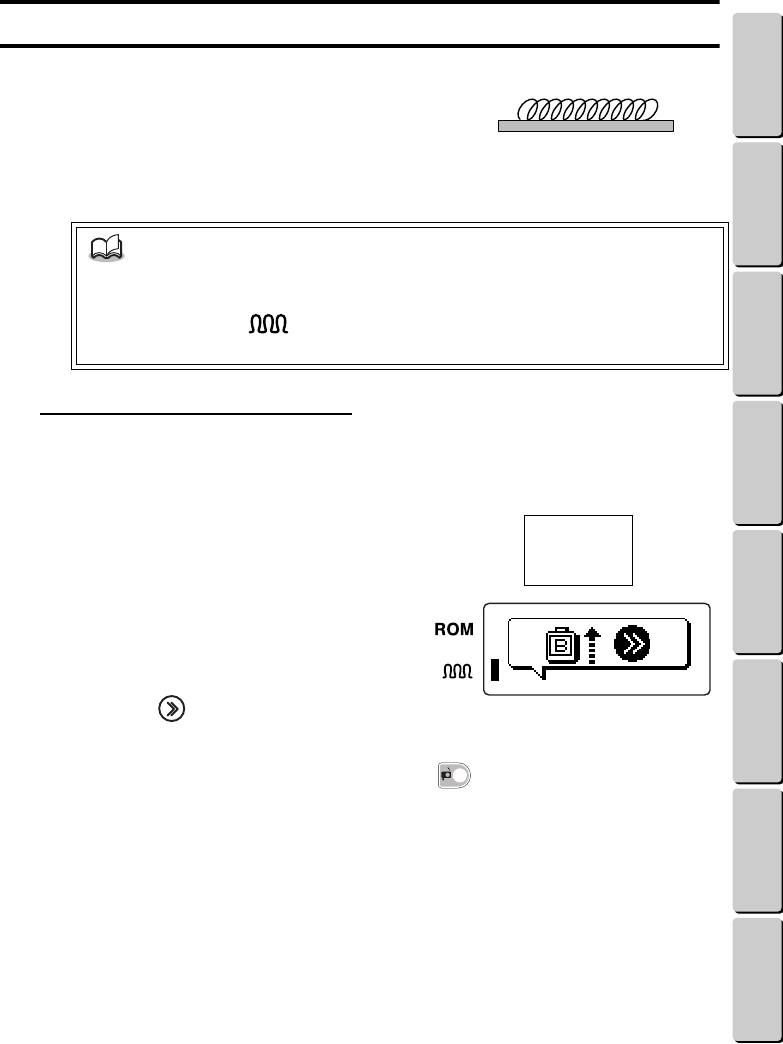
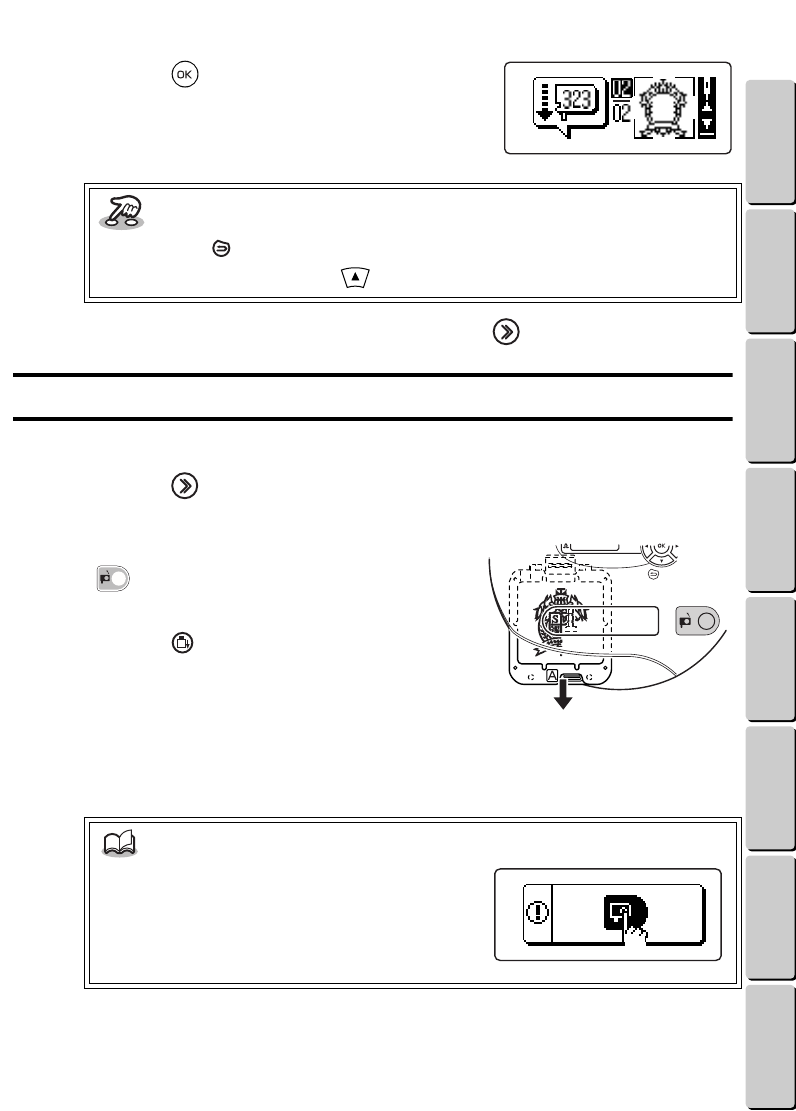
1
Before turning on the machine, insert the
design cassette into the slot for an optional
design cassette.
Make sure that the arrow mark on the design cassette
faces up. Then, insert the design cassette straight into
the slot as far as possible.
If the machine is on, press the key to turn it off.
2
Press the key, and then press
key.
After the start-up animation appears on the LCD
display, a screen like the one shown at the right
appears. The icons of the categories on the design
cassette appear in front of the icons for the built-in
pattern categories.
1The mark means that pattern category is on
the design cassette.
CAUTION
• Be sure to turn off the machine before removing the design cassette.
• Be sure to insert the optional design cassette correctly. Also, be sure not to insert anything
other than the design cassette into the slot, otherwise the machine may break.
• Do not try to disassemble the design cassette. Also, do not touch the connectors of the
design cassette.
1

34
● ● ● ● ● ● ● ● ● ● ● ● ● ● ● ● ● ● ● ● ● ● ● ● ● ● ● ● ● ● ● ● ● ● ● ● ● ● ● ● ● ● ● ● ● ● ● ● ● ● ● ● ● ● ● ● ●
SAVING A PATTERN
CONTENTS Chapter 1 Chapter 2 Chapter 3 Chapter 4 Chapter 5 INDEX Chapter 6
3
Select the pattern, enter the text, and
sew the embroidery in the same way
that you would with a built-in pattern.
1This indicator appears when a pattern from the design
cassette is selected.
SAVING A PATTERN
Patterns that you use often or patterns with text that you entered can be saved so you can quickly select
them to be used again. Up to four patterns can be saved.
1
Press the or key until is
highlighted.
2
Press the key.
A screen like the one shown at the right appears.
1This indicates that this screen is for saving patterns.
2This means that a pattern has not yet been saved in this
pocket. The number refers to the pocket that the
information will be saved in.
3“” indicates that a pattern has already been saved in
this pocket.
4This indicator appears if the pattern saved in the
selected pocket will be embroidered with a chenille texture.
If patterns from a design cassette have been saved,
a screen like the one shown at the right appears.
5The mark means that the pattern saved in
that pocket is from the inserted design cassette.
6The mark means that the pattern saved in
that pocket is not from the inserted design cassette in
place at this time.
7This indicator appears if the pattern saved in a pocket
with the or mark is selected or a
design cassette is inserted.
NOTE
• The design cassettes may contain more than one pattern category.
• For more information about the patterns, check the pattern list included with each
optional design cassette.
NOTE
• This is the same screen that appears after embroidering is finished or when the key
is pressed while the screen shown on page 13 of the section Inserting the thread cartridge
and design frame is displayed.
1
1 2 3
4
5 6
7
● ● ● ● ● ● ● ● ● ● ● ● ● ● ● ● ● ● ● ● ● ● ● ● ● ● ● ● ● ● ● ● ● ● ● ● ● ● ● ● ● ● ● ● ● ● ● ● ● ● ● ● ● ● ● ● ●
SELECTING A PATTERN FROM A DESIGN CASSETTE / SAVING A PATTERN
35
● ● ● ● ● ● ● ● ● ● ● ● ● ● ● ● ● ● ● ● ● ● ● ● ● ● ● ● ● ● ● ● ● ● ● ● ● ● ● ● ● ● ● ● ● ● ● ● ● ● ● ● ● ● ● ● ●
SAVING A PATTERN
CONTENTS Chapter 1 Chapter 2 Chapter 3 Chapter 4 Chapter 5 INDEX Chapter 6
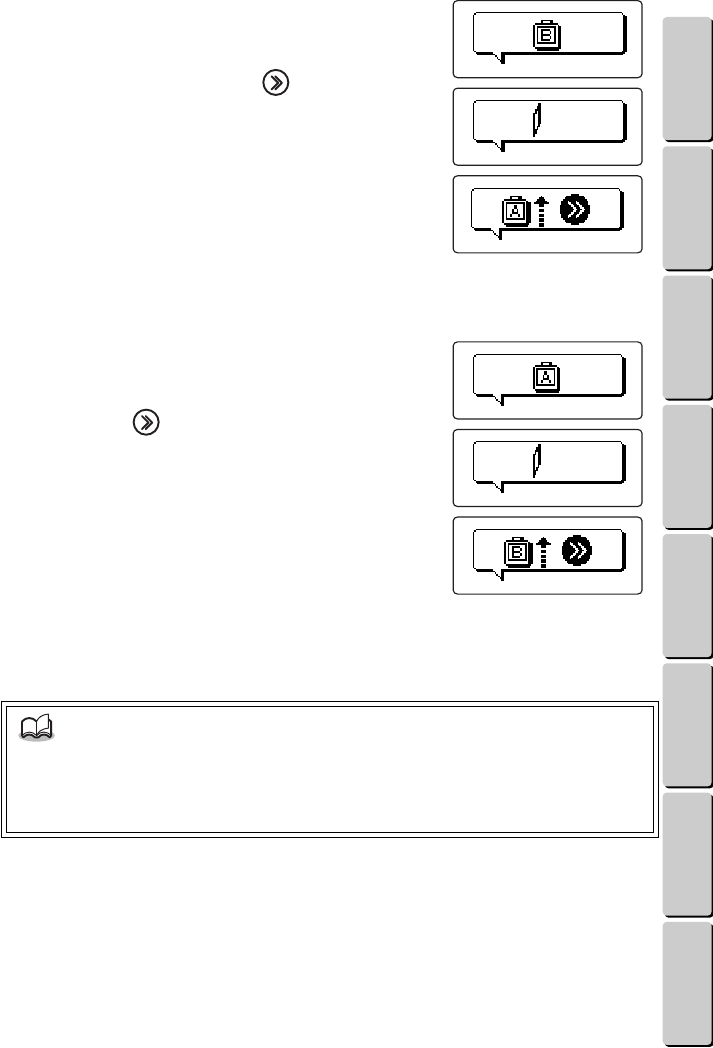
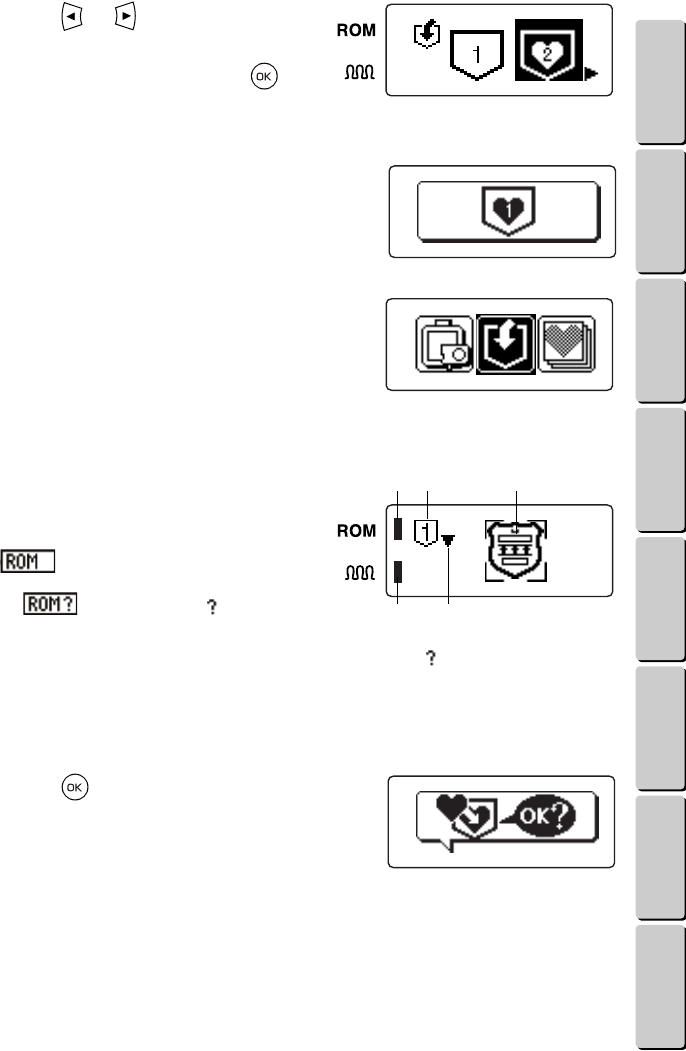
3
Press the or key until the pocket
where you want to save the pattern is
highlighted, and then press the key.
If a pattern has not yet been saved in the selected pocket:
4
The pattern is saved and a screen like
the one shown at the right appears.
(The number indicated will be the number of the
selected pocket.)
5
Then, the screen shown at the right
appears.
If a pattern has already been saved in the selected pocket:
4
A screen showing the saved pattern
appears.
1Number of the selected pocket
2Sample of the saved pattern (If a pocket with the
mark was selected, the pattern is displayed
at 2, and the indicator at 5 appears. If a pocket with
the mark was selected, “ ” appears at 2,
and the indicator at 5 appears. To check the saved
pattern, turn off the machine, insert the design cassette
for the saved pattern, and then start again from the beginning. (Even if “ ” is displayed, the new pattern
can be saved.)
3This indicator appears if the pattern saved in the selected pocket will be embroidered with a chenille
texture.
4If appears, the pattern saved in the selected pocket is a frame or template pattern. (For details on
checking the text, see the section Checking the text in a saved pattern on page 39.)
5This indicator appears if the pattern saved in the selected pocket is from a design cassette.
5
Press the key.
An animation like the one shown at the right
appears.
2
3
5 1
4
36
● ● ● ● ● ● ● ● ● ● ● ● ● ● ● ● ● ● ● ● ● ● ● ● ● ● ● ● ● ● ● ● ● ● ● ● ● ● ● ● ● ● ● ● ● ● ● ● ● ● ● ● ● ● ● ● ●
SAVING A PATTERN
CONTENTS Chapter 1 Chapter 2 Chapter 3 Chapter 4 Chapter 5 INDEX Chapter 6
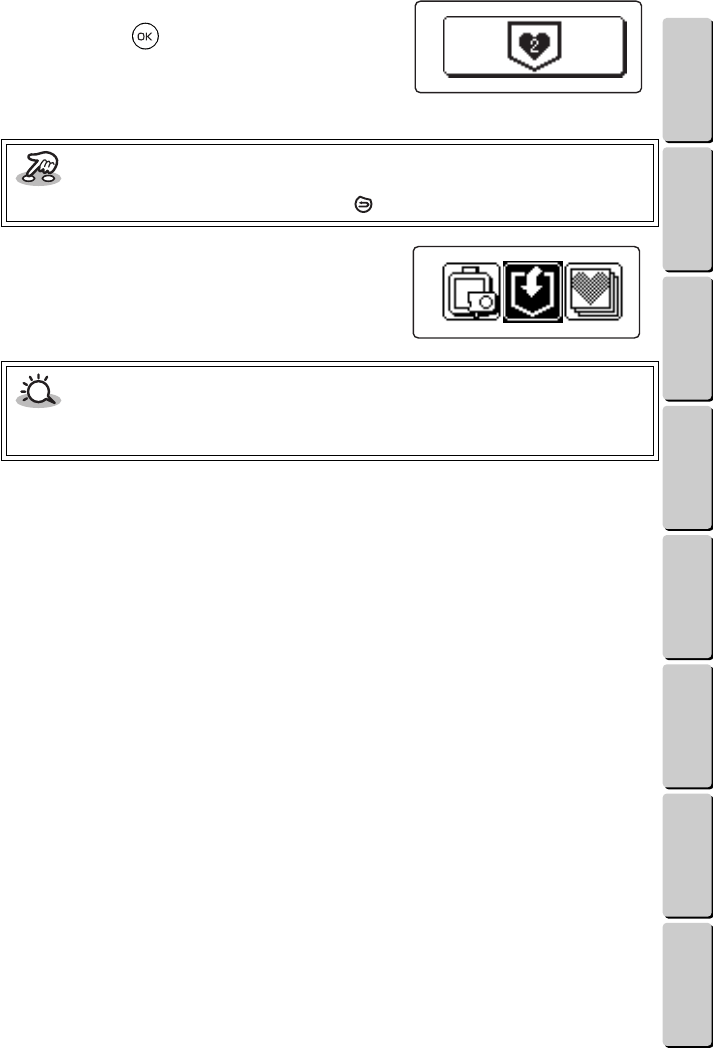
6
To replace the old pattern with the new
one, press the key.
The pattern is saved and a screen like the one
shown at the right appears.
7
Then, the screen shown at the right
appears.
Key information
• If you want to keep the old pattern, press the key.
CAUTION
• Do not turn off the machine or disconnect the AC adapter from it or from the electrical
outlet while a pattern is being saved, otherwise the pattern will not be saved correctly.
37
● ● ● ● ● ● ● ● ● ● ● ● ● ● ● ● ● ● ● ● ● ● ● ● ● ● ● ● ● ● ● ● ● ● ● ● ● ● ● ● ● ● ● ● ● ● ● ● ● ● ● ● ● ● ● ● ●
RETRIEVING A SAVED PATTERN
CONTENTS Chapter 1 Chapter 2 Chapter 3 Chapter 4 Chapter 5 INDEX Chapter 6
RETRIEVING A SAVED PATTERN
Saved patterns can quickly be retrieved to be used again.
1
Press the or key until is
highlighted.
2
Press the key.
A screen like the one shown at the right appears.
1Indicates that this screen is for retrieving saved
patterns
(For details about the other symbols, see page 34.)
3
Press the or key until the pocket
with the pattern that you want is
highlighted.
4
Press the key.
A screen like the one shown at the right appears.
(For details about the other symbols, see page 35.)
NOTE
• If the saved pattern that you want to retrieve is from a design cassette, be sure that the
design cassette is inserted before turning on the machine.
Key information
• If you want to select a different saved pattern, press the key.
1

38
● ● ● ● ● ● ● ● ● ● ● ● ● ● ● ● ● ● ● ● ● ● ● ● ● ● ● ● ● ● ● ● ● ● ● ● ● ● ● ● ● ● ● ● ● ● ● ● ● ● ● ● ● ● ● ● ●
RETRIEVING A SAVED PATTERN
CONTENTS Chapter 1 Chapter 2 Chapter 3 Chapter 4 Chapter 5 INDEX Chapter 6
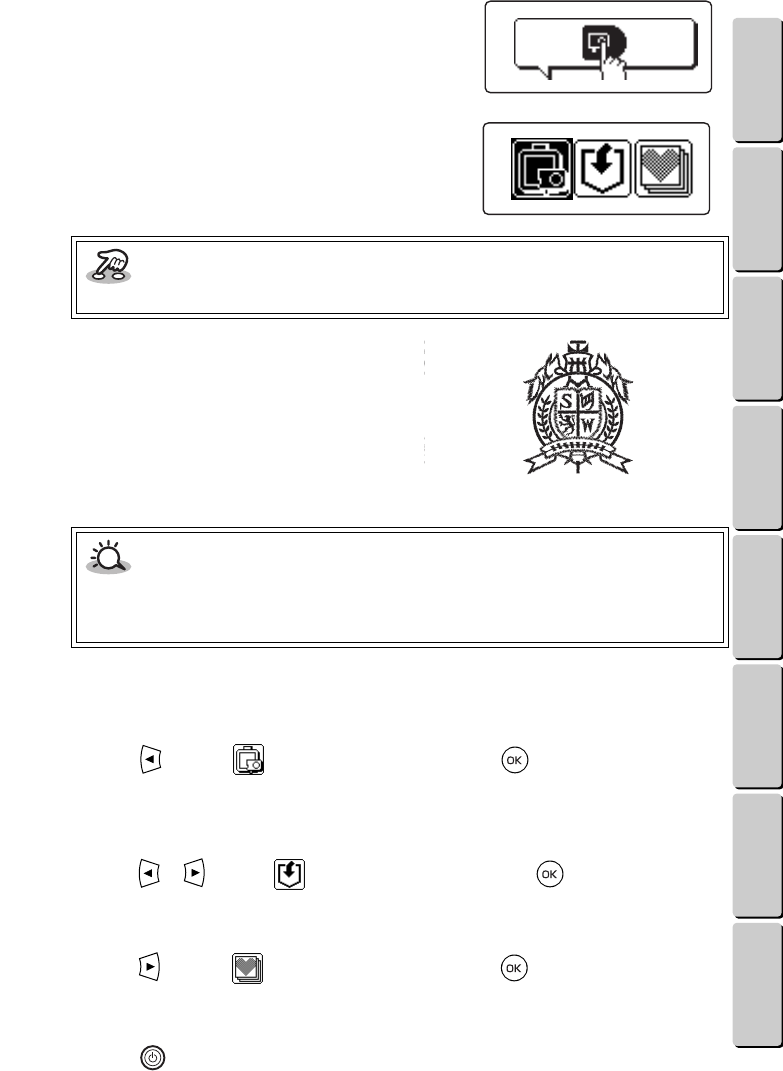
5
To retrieve the saved pattern, press the
key.
The embroidering animation appears on the LCD
display, and then a screen like the one shown at
the right appears. Go back to the section Inserting
the thread cartridge and design frame on page 13 to start embroidering.
NOTE
• If the screen shown at the right appears, a
design cassette is not currently inserted.
• If the screen shown at the right appears, the
design cassette for the pattern saved in the
selected pocket is not currently inserted.
If either of these error screens appear, turn off the machine, insert the correct design cassette
for the saved pattern, and then start again from the beginning.
Key information
• If a saved one-point pattern was selected, press the key to go to the screen where you
can select a pattern.
If a saved frame or template pattern was selected, press the key to go to the screen
where you can enter the text for the last line.
• To select a different saved pattern, do one of the following:
- Press the key, highlight , and then press the key.
- Press the key, and then turn on the machine again.
This will take you back to the screen where you can select a pattern category. Then, start
again from step 1.
39
● ● ● ● ● ● ● ● ● ● ● ● ● ● ● ● ● ● ● ● ● ● ● ● ● ● ● ● ● ● ● ● ● ● ● ● ● ● ● ● ● ● ● ● ● ● ● ● ● ● ● ● ● ● ● ● ●
RETRIEVING A SAVED PATTERN
CONTENTS Chapter 1 Chapter 2 Chapter 3 Chapter 4 Chapter 5 INDEX Chapter 6
●●
Checking the text in a saved pattern
If the saved pattern is a frame or template pattern with
text, appears to show that you can check the text. (See
the section Saving a pattern on page 34 and the section
Retrieving a saved pattern on page 37.)
1
Press the key. If appears, press
the key to check the rest of the text.
A screen like the one shown at the right appears.
1Number of the selected pocket
2Selected font and text size (stitch)
3If or appears, press the or key to display
more characters.
4Number of the line of text being checked
5Shows which line of the total number of lines of text is being checked
6Text that has been entered
2
If more than one line of text has been
entered, press the key.
A screen like the one shown at the right appears for
the next line of text.
3
When you are finished checking the text, press the key.
If you were saving a pattern, an animation like the
one shown at the right appears. Go back to step 5
on page 35.
If you were selecting a saved pattern, an animation
appears, and then a screen like the one shown at
the right appears. Go back to the section Inserting
the thread cartridge and design frame on page 13
to start embroidering.
Key information
• To go back to the screen where you can select a pocket, press the key.
• To go back to the previous screen, press the key.
ABCDE
1 2 3
564
abcde
40
● ● ● ● ● ● ● ● ● ● ● ● ● ● ● ● ● ● ● ● ● ● ● ● ● ● ● ● ● ● ● ● ● ● ● ● ● ● ● ● ● ● ● ● ● ● ● ● ● ● ● ● ● ● ● ● ●
EDITING THE TEXT IN A SAVED PATTERN
CONTENTS Chapter 1 Chapter 2 Chapter 3 Chapter 4 Chapter 5 INDEX Chapter 6
EDITING THE TEXT IN A SAVED PATTERN
After a saved template pattern is selected, the text can be changed. This is convenient if you want to
use the same pattern and change the text.
1
Select the saved frame or template
pattern.
(See the section Retrieving a saved pattern on
page 37.)
2
Press the key.
3
A screen like the one shown at the right
appears for the last line of text.
1Text that has been entered
4
Change the text, font or text size.
To change the text, go to the section Changing the text on page 31.
To change the font or text size, press the key. A
screen like the one shown at the right appears so
that you can choose the font and text size. (See the
section Entering text on page 28.)
If more than one line of text has been entered,
press the key. A screen showing the previous
line of text appears.
5
Repeat steps 2 through 4 for each line of
text that you want to change.
CAUTION
• If the font or text size is changed, the complete line of text will be deleted.
• If the font screen for the first line of text is displayed and the key is pressed, the screen
for selecting the pattern appears. From here, you will have to select a new pattern and
enter the text in its entirety again.
• Even after retrieving a saved pattern and changing the text, the original saved text does
not change. If you want to keep the new text, you will have to save it.
1
41
● ● ● ● ● ● ● ● ● ● ● ● ● ● ● ● ● ● ● ● ● ● ● ● ● ● ● ● ● ● ● ● ● ● ● ● ● ● ● ● ● ● ● ● ● ● ● ● ● ● ● ● ● ● ● ● ●
STOPPING AND CONTINUING EMBROIDERING
CONTENTS Chapter 1 Chapter 2 Chapter 3 Chapter 4 Chapter 5 INDEX Chapter 6
STOPPING AND CONTINUING EMBROIDERING
If the thread breaks or the cartridge runs out of thread, stop embroidering, fix the thread, and then go
back to the point in the pattern where sewing stopped.
If the thread cartridge ran out of thread:
Get a new thread cartridge.
If the thread broke:
Pull the thread out of the cartridge. For details on pulling the thread out from the cartridge, see the
section Pulling the thread end out of the cartridge on page 45.
1
Press the key to stop embroidering.
After sewing a few stitches, the machine stops, and
a screen like the one shown at the right appears.
1The highlighted number is the number of the thread
color that was being embroidered.
2
Press the thread cartridge release button ( ), and then remove the
thread cartridge.
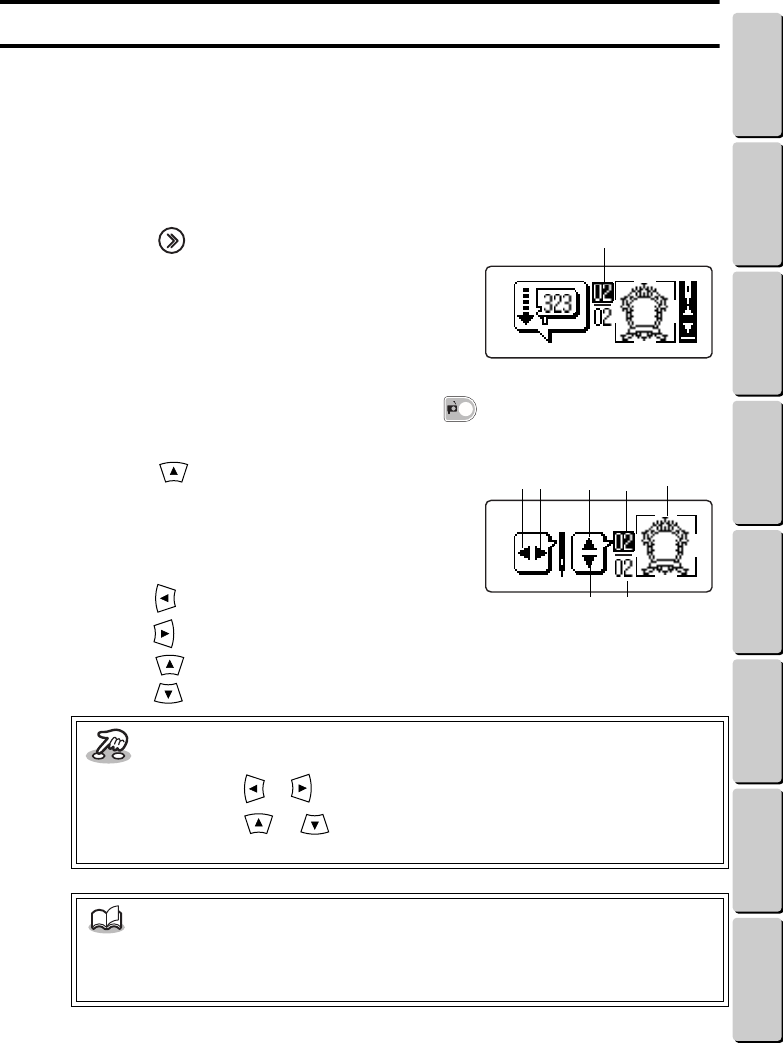
3
Press the key.
A screen like the one shown at the right appears.
1Total number of thread colors used in the pattern
2Number indicating the order of the thread color being
embroidered
3The part of the pattern that is being embroidered
4Press the key to go back 11 stitches.
5Press the key to skip ahead 11 stitches.
6Press the key to skip ahead one thread color. (The number at 5 increases by 1.)
7Press the key to go back one thread color. (The number at 6 decreases by 1.)
Key information
• Holding down the or key moves forward or backward 31 stitches.
• Holding down the or key moves forward or backward through the thread
colors.
NOTE
• If the number at 2 is highlighted, embroidering for that thread color was stopped. If
stitching is moved back to the beginning for that thread color or if another thread color
is selected, the highlighting at 2 disappears.
1
4 6 35 2
7 1

42
● ● ● ● ● ● ● ● ● ● ● ● ● ● ● ● ● ● ● ● ● ● ● ● ● ● ● ● ● ● ● ● ● ● ● ● ● ● ● ● ● ● ● ● ● ● ● ● ● ● ● ● ● ● ● ● ●
STOPPING AND CONTINUING EMBROIDERING
CONTENTS Chapter 1 Chapter 2 Chapter 3 Chapter 4 Chapter 5 INDEX Chapter 6
4
Press the key to go back to the point
where sewing stopped.
Align the hole in the thread cartridge slot (shown by the
arrow at the right) with the point where sewing stopped.
Go back a little before the point where sewing stopped
so the stitches will overlap a little.
5
Press the key.
The screen displayed in step 1 appears again.
6
Insert the thread cartridge, and then press the key to continue sewing.
Key information
• If you go back too far, press the key.
NOTE
• If the screen shown at the right appears, the
thread cartridge was not removed. Remove
the thread cartridge.
• If it is difficult to find the point where sewing
stopped, insert the thread cartridge, and then
align the needle with the desired position.
Key information
• Pressing the key goes back to step 1.
• To go back to step 3, press the key.
NOTE
• If embroidering is stopped and restarted, some extra needle holes may be punched in the
pre-cut design fabric, but it can still be used.
• If you wish to remove the design frame, press the key, and then pull it out. (See the
section Removing the design frame on page 44.) Before continuing embroidering, be sure
to insert the design frame with the correct side facing up.
43
● ● ● ● ● ● ● ● ● ● ● ● ● ● ● ● ● ● ● ● ● ● ● ● ● ● ● ● ● ● ● ● ● ● ● ● ● ● ● ● ● ● ● ● ● ● ● ● ● ● ● ● ● ● ● ● ●
STOPPING AND CONTINUING EMBROIDERING
CONTENTS Chapter 1 Chapter 2 Chapter 3 Chapter 4 Chapter 5 INDEX Chapter 6
●●
Continuing embroidering after your machine is turned off
If the machine was turned off, restart embroidering as explained below.
Example: To continue embroidering from the second color
1
Turn on the machine and insert the design frame.
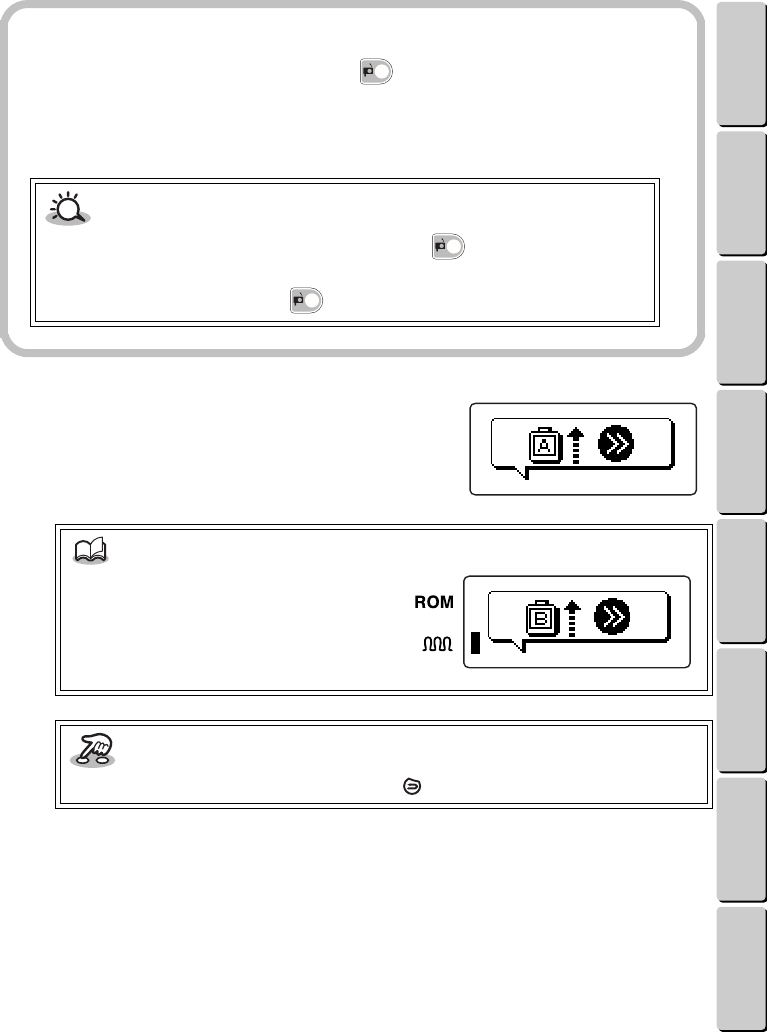
2
Select the pattern that you wish to
finish. When a screen like the one
shown at the right appears, press the
key.
3
A screen like the one shown at the right
appears.
4
Press the key until “02” appears at
1.
5
Like in step 4 on page 42, press the key to go forward to the point where
sewing stopped.
Go back a little before the point where sewing stopped so the stitches will overlap a little.
Key information
• If you go forward too far, press the key.
Key information
• If you go forward too far, press the key.
1
44
● ● ● ● ● ● ● ● ● ● ● ● ● ● ● ● ● ● ● ● ● ● ● ● ● ● ● ● ● ● ● ● ● ● ● ● ● ● ● ● ● ● ● ● ● ● ● ● ● ● ● ● ● ● ● ● ●
REMOVING THE DESIGN FRAME
CONTENTS Chapter 1 Chapter 2 Chapter 3 Chapter 4 Chapter 5 INDEX Chapter 6
6
Press the key.
The screen displayed at the right appears again.
7
Insert the thread cartridge, and then press the key to continue sewing.
REMOVING THE DESIGN FRAME
If you want to stop embroidering and take out the design frame, follow the steps below.
1
Press the key to stop embroidering.
After sewing a few stitches, the machine stops.
2
Press the thread cartridge release button
( ), and then remove the thread
cartridge.
3
Press the key. After the design frame
moves to its starting point, pull it straight
out.
Key information
• Pressing the key displays the screen shown at the right.
• To go back to step 4, press the key.
NOTE
• If the screen shown at the right appears, the
thread cartridge was not removed. Remove
the thread cartridge.
● ● ● ● ● ● ● ● ● ● ● ● ● ● ● ● ● ● ● ● ● ● ● ● ● ● ● ● ● ● ● ● ● ● ● ● ● ● ● ● ● ● ● ● ● ● ● ● ● ● ● ● ● ● ● ● ●
STOPPING AND CONTINUING EMBROIDERING / REMOVING THE DESIGN FRAME
45
● ● ● ● ● ● ● ● ● ● ● ● ● ● ● ● ● ● ● ● ● ● ● ● ● ● ● ● ● ● ● ● ● ● ● ● ● ● ● ● ● ● ● ● ● ● ● ● ● ● ● ● ● ● ● ● ●
PULLING THE THREAD END OUT OF THE CARTRIDGE
CONTENTS Chapter 1 Chapter 2 Chapter 3 Chapter 4 Chapter 5 INDEX Chapter 6
PULLING THE THREAD END OUT OF THE CARTRIDGE
If the thread breaks or is not feeding out of the cartridge, the embroidery will not be sewn correctly.
Follow the steps below to pull the end of the thread out from the cartridge.
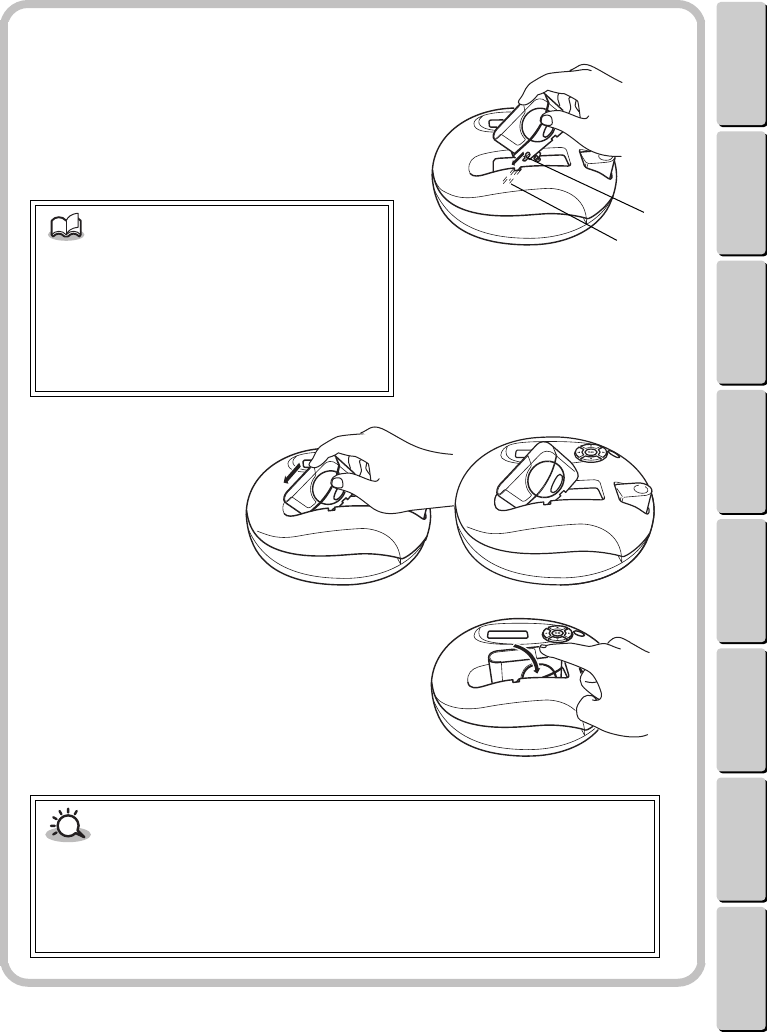
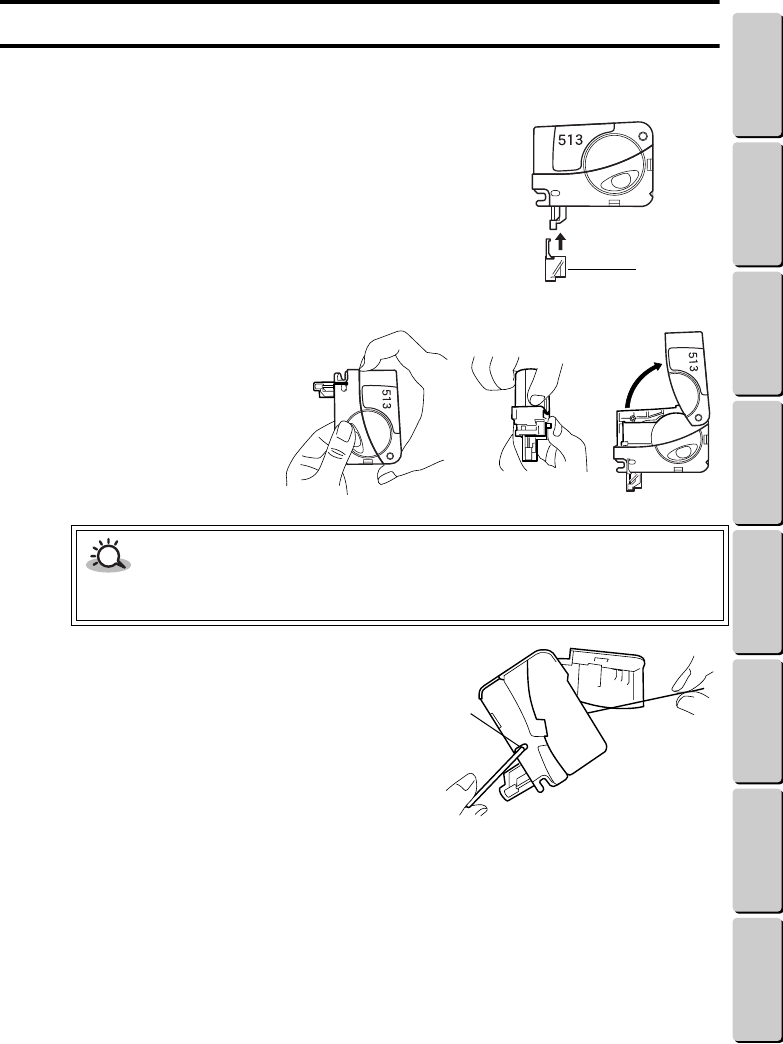
1
Put the needle guard cap over the needle.
1Needle guard cap
2
Swing open the cover
of the thread
cartridge.
3
Use a thin object to depress the thread
release button. Now, pull out about 6”
(15 cm) of thread.
1Thread release button
CAUTION
• Do not open the cover too far. Also, do not open it with excess force, otherwise the thread
cartridge may break.
1
1
46
● ● ● ● ● ● ● ● ● ● ● ● ● ● ● ● ● ● ● ● ● ● ● ● ● ● ● ● ● ● ● ● ● ● ● ● ● ● ● ● ● ● ● ● ● ● ● ● ● ● ● ● ● ● ● ● ●
PULLING THE THREAD END OUT OF THE CARTRIDGE
CONTENTS Chapter 1 Chapter 2 Chapter 3 Chapter 4 Chapter 5 INDEX Chapter 6
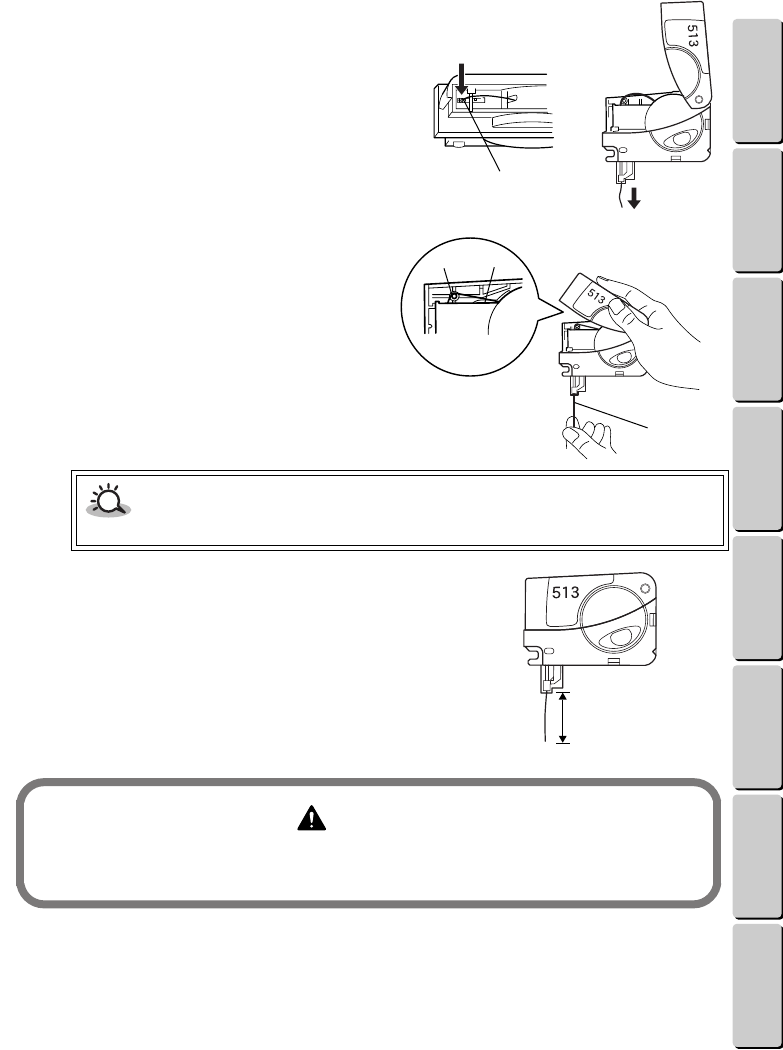
4
Use scissors to cut off the end of the
thread that was pulled out. Then, insert
the end of the thread into the red hole,
and while twisting it, guide it through
the cartridge until it comes out at the
bottom of the cartridge.
1Red hole
5
After the thread is fed out of the
bottom of the cartridge, check that
the thread is hooked over the pin
shown at the right. Then, while
pulling on the thread feeding out
the bottom of the cartridge, close
the cover.
1Pin
2Thread
3Thread pulled out of the cartridge
6
Trim the thread at the bottom of the
cartridge so it is 3/4 to 1” (2 to 3 cm) long.
13/4 to 1” (2 to 3 cm)
CAUTION
• If the thread is not hooked over the pin, the machine cannot embroider.
WARNING
Keep the needle guard cap over the needle while guiding the thread through the cartridge.
If the needle sticks out, it could cause injuries.
1
3
12
1
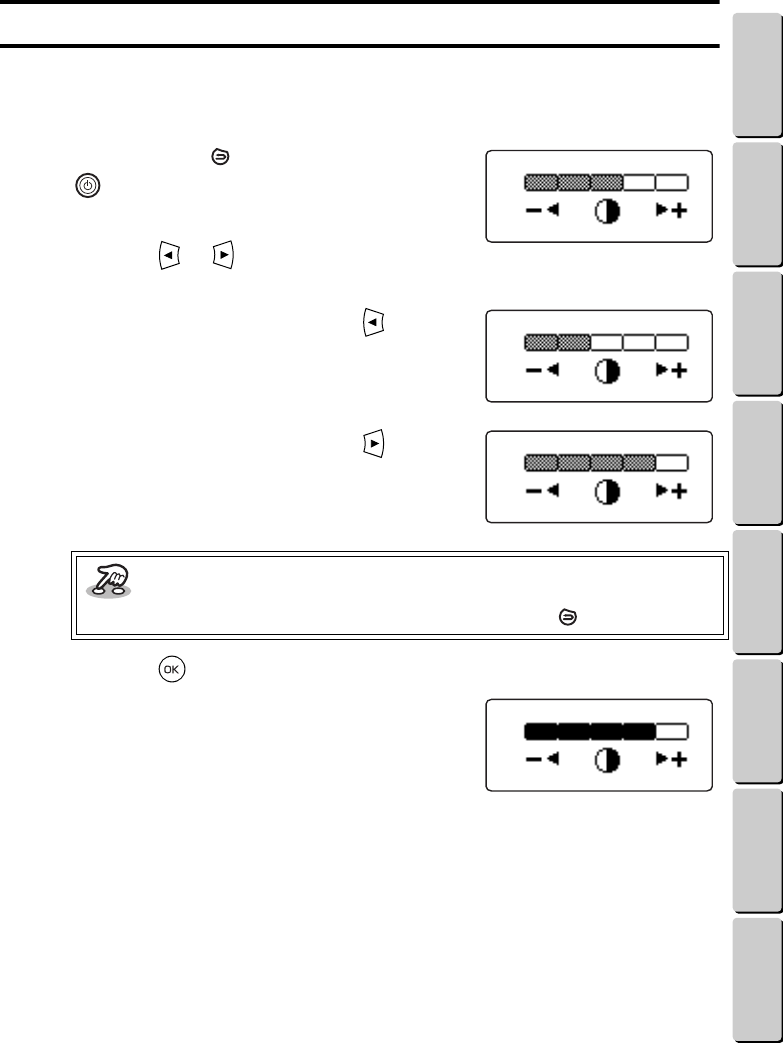
47
● ● ● ● ● ● ● ● ● ● ● ● ● ● ● ● ● ● ● ● ● ● ● ● ● ● ● ● ● ● ● ● ● ● ● ● ● ● ● ● ● ● ● ● ● ● ● ● ● ● ● ● ● ● ● ● ●
CHANGING THE CONTRAST OF THE LCD DISPLAY
CONTENTS Chapter 1 Chapter 2 Chapter 3 Chapter 4 Chapter 5 INDEX Chapter 6
CHANGING THE CONTRAST OF THE LCD DISPLAY
If the LCD display is hard to read, it can be made either lighter or darker.
1
Turn off the machine.
2
Hold down the key, and press the
key to turn the machine on again.
The screen shown at the right appears.
3
Press the or key to change the
contrast.
To make the LCD display lighter, press the key.
To make the LCD display darker, press the key.
4
Press the key.
The LCD display becomes darker, and then the
machine goes off automatically.
Key information
• If you do not want to change the LCD display contrast, press the key.
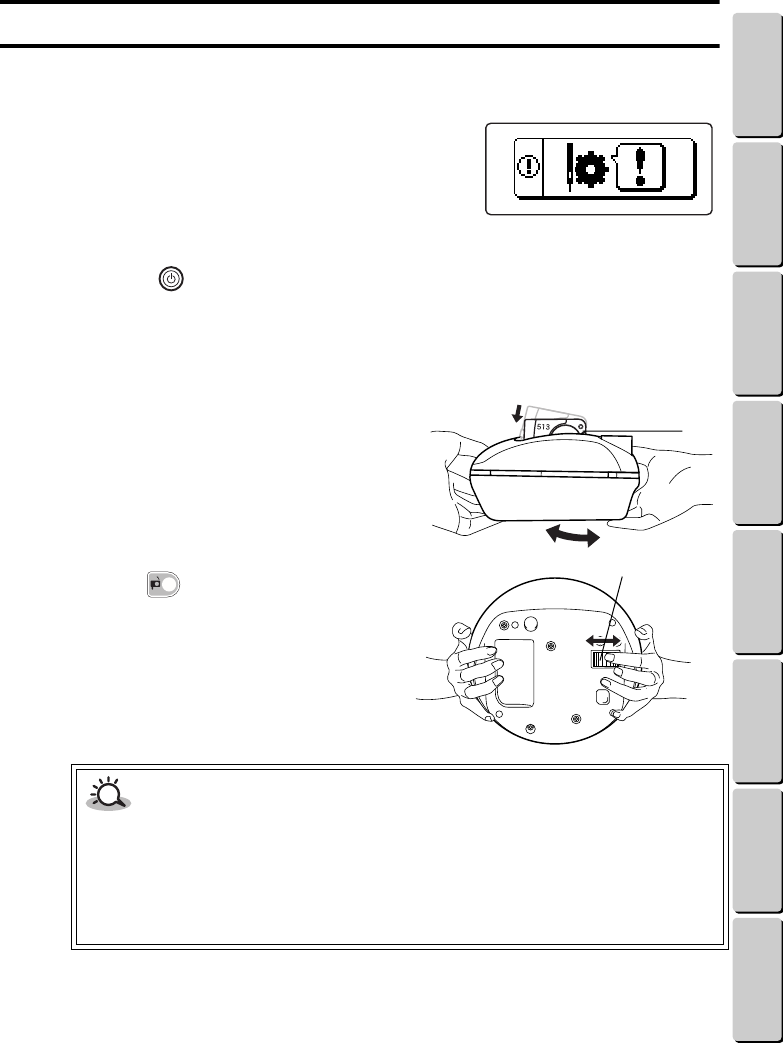
48
● ● ● ● ● ● ● ● ● ● ● ● ● ● ● ● ● ● ● ● ● ● ● ● ● ● ● ● ● ● ● ● ● ● ● ● ● ● ● ● ● ● ● ● ● ● ● ● ● ● ● ● ● ● ● ● ●
IF THE SAFETY MECHANISM WAS ACTIVATED
CONTENTS Chapter 1 Chapter 2 Chapter 3 Chapter 4 Chapter 5 INDEX Chapter 6
IF THE SAFETY MECHANISM WAS ACTIVATED
If the safety mechanism is activated and this machine automatically stops, follow the steps below to
reset the machine.
1
If the safety mechanism is activated, the
screen shown at the right appears.
2
Press the key to turn off the machine.
3
Disconnect the AC adapter from the machine and from the electrical
outlet.
4
Turn the needle position adjustment
dial (at the bottom of the machine) in
either direction as shown until the
thread cartridge is level.
1Level position
2Needle position adjustment dial
5
Press the thread cartridge release
button ( ), and then remove the
thread cartridge.
6
Turn on the machine and finish
embroidering.
CAUTION
• After the safety mechanism has been activated, check that the thread cartridge, design
frame and pre-cut design fabric are not damaged.
- If the thread cartridge that was removed is broken or has a bent needle, dispose of the
cartridge. Use a new thread cartridge.
- If the design frame is damaged, use a different frame.
- If the pre-cut design fabric is damaged, use a new design fabric.
1
2
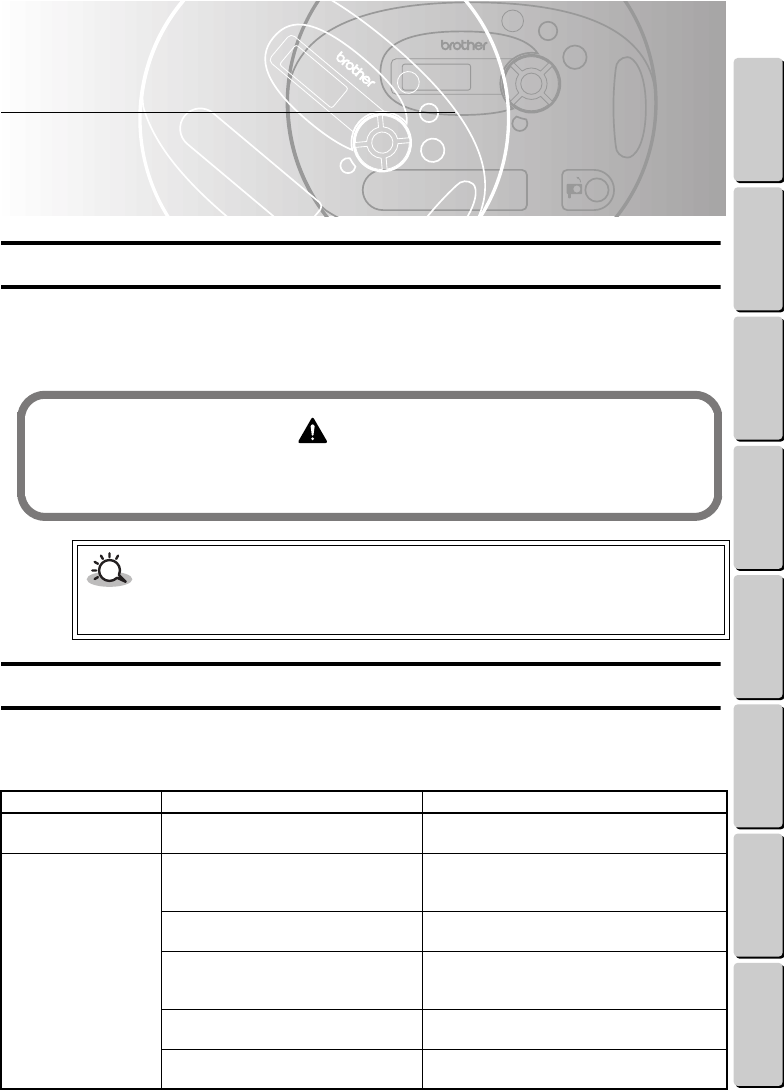
49
Chapter 5
CONTENTS Chapter 1 Chapter 2 Chapter 3 Chapter 4 Chapter 5 INDEX Chapter 6
5
Appendix
CLEANING PRECAUTIONS
Cleaning the surface of this machine
Using a soft, dry cloth, wipe off any dust and dirt from the surface of the machine. Dirt that is hard to
remove can be cleaned off using a damp cloth.
TROUBLESHOOTING
If this machine is not working correctly, check the following table for details on how to fix it. If the machine
is still not working correctly, contact your Brother retailer or visit www.brother.com for the name of your
nearest authorized service center.
WARNING
Before cleaning, disconnect the AC adapter from the electrical outlet, otherwise injuries or
electric shock may occur.
CAUTION
• Do not use solvents such a benzene, thinner or alcohol to clean the surface of the
machine, otherwise it may become discolored or damaged the surface.
Symptom Cause Solution
The machine cannot
be turned on.
The AC adapter is not connected
correctly.
Make sure that the AC adapter is connected
correctly. (page 9)
The embroidery
cannot be sewn. The
pattern is not sewn
correctly.
1The pre-cut design fabric is not
correctly placed in the design
frame.
Make sure that the pre-cut design fabric is
correctly placed in the design frame. (page
10)
2The design frame is not correctly
inserted into the machine.
Make sure that the design frame is correctly
inserted into the machine. (page 16)
3The specially designed pre-cut
design fabric was not used.
Use only the pre-cut design fabrics
designed exclusively for this machine.
(page 10)
4The thread cartridge has run out
of thread.
Insert a new thread cartridge. (page 14)
5The thread is not feeding out of
the cartridge.
Make sure that the thread feeds correctly
from the thread cartridge. (page 45)
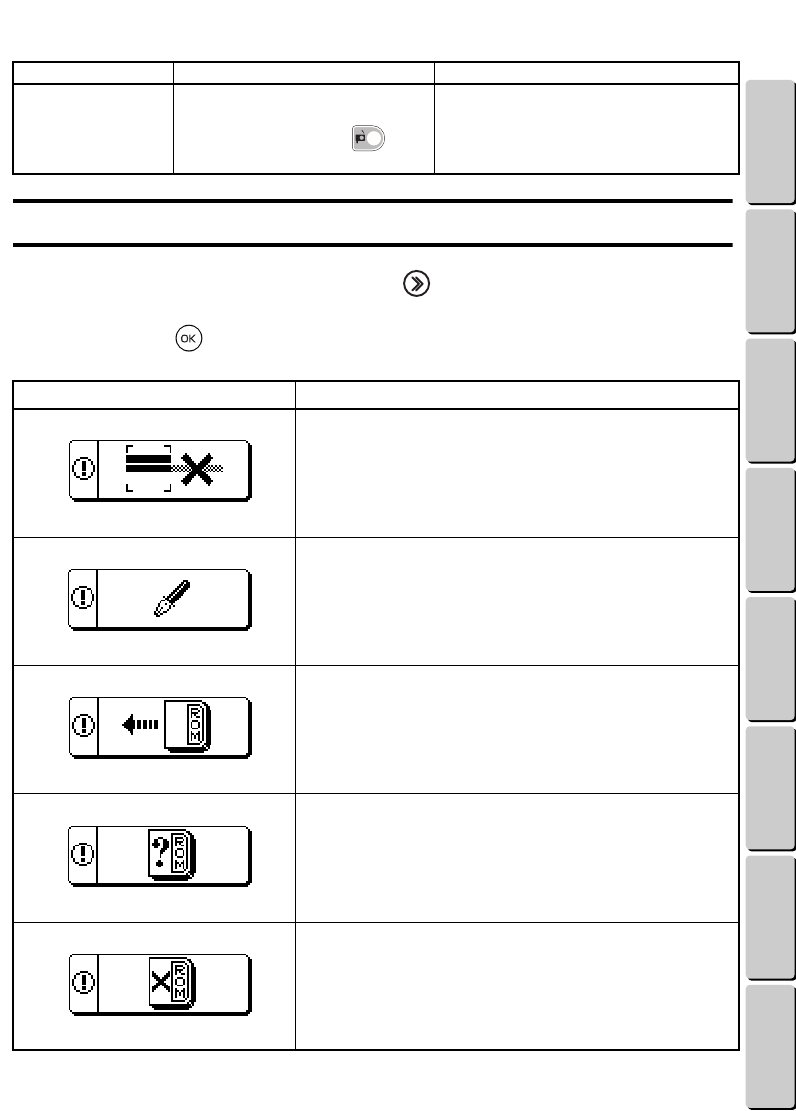
50
● ● ● ● ● ● ● ● ● ● ● ● ● ● ● ● ● ● ● ● ● ● ● ● ● ● ● ● ● ● ● ● ● ● ● ● ● ● ● ● ● ● ● ● ● ● ● ● ● ● ● ● ● ● ● ● ●
ERROR SCREENS
CONTENTS Chapter 1 Chapter 2 Chapter 3 Chapter 4 Chapter 5 INDEX Chapter 6
ERROR SCREENS
If wrong operation is performed, such as pressing the key while the thread cartridge is incorrectly
inserted, an error screen appears. When an error screen appears, follow the instructions given in the
screen or press the key to continue operation.
The thread is not cut
when the cartridge is
being removed.
The thread cartridge was being
pressed down while the thread
cartridge release button ( ) was
pressed.
Follow the precautions for removing the
thread cartridge (page 15).
Error screen Remedy
No more characters can be entered.
The maximum number of characters that can be entered in
the template pattern has been reached. Change the text to
make it shorter (page 31), select a smaller text size (page
28), or quit entering text.
No text has been entered.
No text has been entered in a template pattern. Enter the
text. (page 28)
No design cassette is inserted.
The design cassette for the pattern saved in the selected
pocket is not inserted. Turn off the machine before inserting
the design cassette. (page 33)
The wrong design cassette is inserted.
The selected pattern is not on the design cassette that is
inserted. Turn off the machine before inserting the correct
design cassette. (page 33)
This design cassette cannot be used.
The design cassette that is inserted cannot be used with this
machine. Remove the design cassette and check with your
Brother retailer.
Symptom Cause Solution
● ● ● ● ● ● ● ● ● ● ● ● ● ● ● ● ● ● ● ● ● ● ● ● ● ● ● ● ● ● ● ● ● ● ● ● ● ● ● ● ● ● ● ● ● ● ● ● ● ● ● ● ● ● ● ● ●
TROUBLESHOOTING / ERROR SCREENS
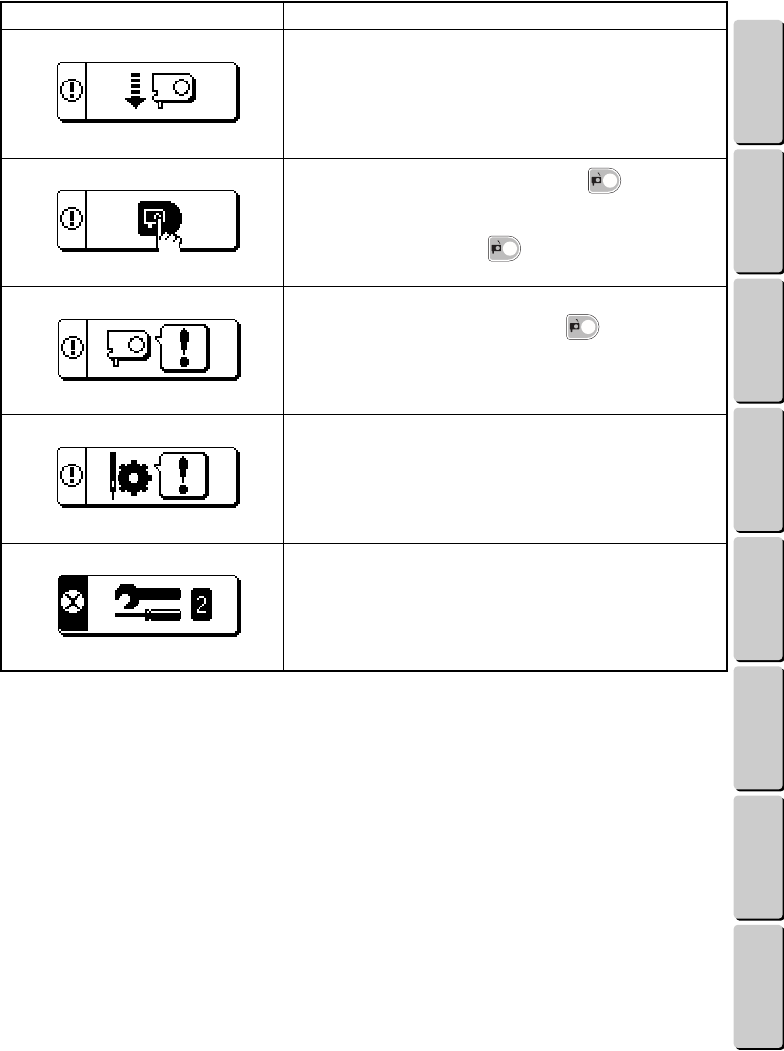
51
● ● ● ● ● ● ● ● ● ● ● ● ● ● ● ● ● ● ● ● ● ● ● ● ● ● ● ● ● ● ● ● ● ● ● ● ● ● ● ● ● ● ● ● ● ● ● ● ● ● ● ● ● ● ● ● ●
ERROR SCREENS
CONTENTS Chapter 1 Chapter 2 Chapter 3 Chapter 4 Chapter 5 INDEX Chapter 6
No thread cartridge is inserted.
Insert the thread cartridge. (page 14)
Press the thread cartridge release button ( ).
This screen appears when an operation was performed
without removing the thread cartridge. Press the thread
cartridge release button ( ) and remove the thread
cartridge.
The thread cartridge was removed.
The thread cartridge release button ( ) was pressed
while embroidering. Turn off the machine, remove the
thread cartridge, and then continue embroidering from the
point where sewing was stopped. (page 14)
The safety mechanism has activated.
Follow the instructions in the section If the safety
mechanism was activated on page 48. If the error is not
corrected, turn off the machine and contact your Brother
retailer.
System error
Disconnect the machine and contact your Brother retailer
or visit www.brother.com for the name of your nearest
authorized service center.
Error screen Remedy
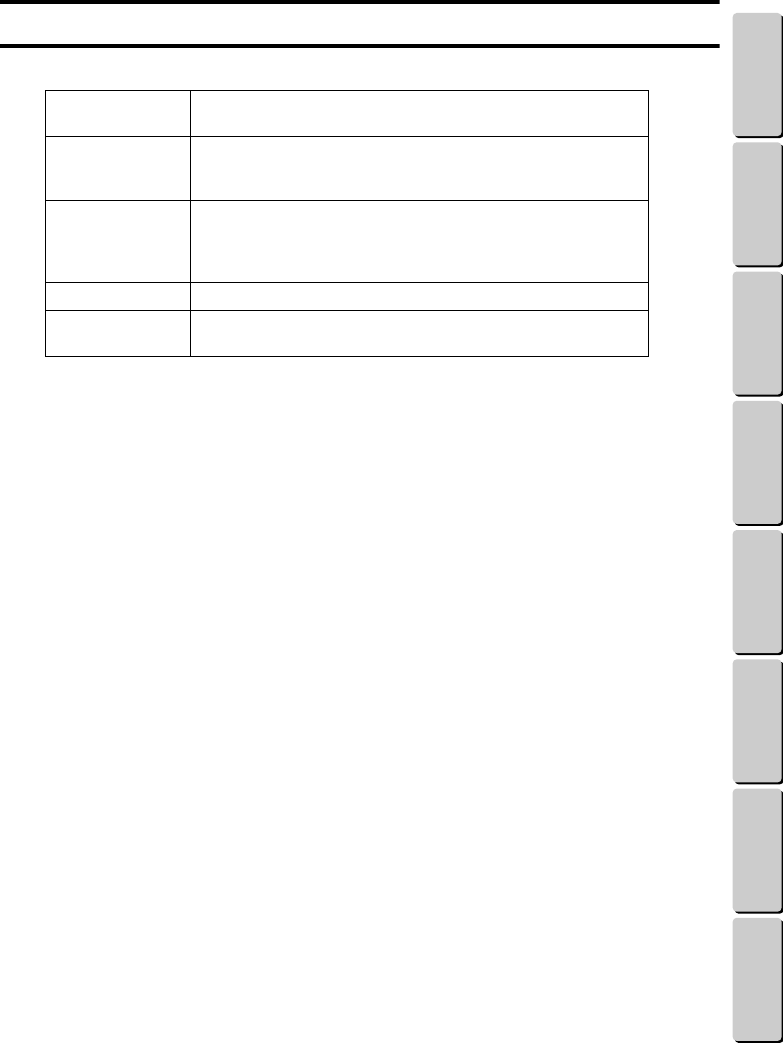
52
● ● ● ● ● ● ● ● ● ● ● ● ● ● ● ● ● ● ● ● ● ● ● ● ● ● ● ● ● ● ● ● ● ● ● ● ● ● ● ● ● ● ● ● ● ● ● ● ● ● ● ● ● ● ● ● ●
SPECIFICATIONS
CONTENTS Chapter 1 Chapter 2 Chapter 3 Chapter 4 Chapter 5 INDEX Chapter 6
SPECIFICATIONS
Input Solid rubber keyboard
Number of keys: 9 (8 + power key)
LCD display Dot matrix LCD
Size: 32 × 96 dots
Indicators: 2
Embroidering Thread insertion method (using specially designed thread
cartridges)
Maximum embroidering area: 60 × 60 mm
Maximum embroidering speed: 300 stitches/minute
Power supply Specially designed AC adapter
Size Dimensions: 220 (W) × 220 (D) × 110 (H) mm
Weight: Approx. 1.1 kg (main unit only)

● ● ● ● ● ● ● ● ● ● ● ● ● ● ● ● ● ● ● ● ● ● ● ● ● ● ● ● ● ● ● ● ● ● ● ● ● ● ● ● ● ● ● ● ● ● ● ● ● ● ● ● ● ● ● ● ●
INDEX
53
CONTENTS Chapter 1 Chapter 2 Chapter 3 Chapter 4 Chapter 5 INDEX Chapter 6
INDEX
A
AC adapter ....................................................1, 9
AC adapter connector ....................................3, 9
accessories ........................................................1
arrow keys .........................................................3
B
built-in characters ............................................29
built-in fonts ....................................................27
C
chenille embroidery .........................................25
chenille indicator ...............................................4
cleaning ...........................................................49
continuing embroidering .................................43
D
design cassette .................................................33
design cassette indicator ..............................4, 34
design frame ............................................1, 4, 19
inserting ....................................................16
removal position .......................................44
removing .............................................17, 44
design frame key ..........................................3, 44
design frame mount .....................................4, 16
design frame mounting bracket ....................3, 16
design frame slot ................................................3
E
embroidering ...................................................17
embroidering area ...........................................10
error screens ....................................................50
F
finishing ...........................................................21
fonts ................................................................27
frame patterns ....................................................8
frame-opening tabs ............................................4
G
groove .............................................................14
guide ...........................................................4, 14
H
highlighting .......................................................4
I
inserting
design cassette ..........................................33
design frame ..............................................16
pre-cut design fabric ..................................10
thread cartridge ......................................... 14
iron-on adhesive ..........................................1, 21
K
keys ...................................................................3
N
needle position adjustment dial ................... 3, 48
O
OK key .............................................................. 3
On/off key ......................................................... 3
one-point patterns .............................................8
operation keys ................................................... 3
P
parts ..................................................................3
pattern categories ........................................ 8, 11
pattern list .........................................................8
pattern number ............................................ 8, 12
pattern types ...................................................... 8
patterns ...........................................................11
power key .........................................................3
pre-cut design fabric .................................... 1, 10
pre-cut design fabric pins ............................4, 10
R
reference line ..................................................21
removing
design frame ........................................17, 44
thread cartridge ......................................... 15
retrieving saved patterns .................................. 37
return key .......................................................... 3

● ● ● ● ● ● ● ● ● ● ● ● ● ● ● ● ● ● ● ● ● ● ● ● ● ● ● ● ● ● ● ● ● ● ● ● ● ● ● ● ● ● ● ● ● ● ● ● ● ● ● ● ● ● ● ● ●
INDEX
54
CONTENTS Chapter 1 Chapter 2 Chapter 3 Chapter 4 Chapter 5 INDEX Chapter 6
S
safety mechanism ......................................48, 51
saving patterns .................................................34
screens
contrast .....................................................47
description ..................................................4
error ..........................................................50
quick reference guide ................................55
selecting
characters ..................................................28
patterns .....................................................11
slot for design cassette .................................3, 33
specifications ...................................................52
start/stop key ......................................................3
supplies .............................................................2
T
template patterns .........................................8, 27
text
checking .............................................32, 39
editing .................................................31, 40
entering .....................................................28
fonts ..........................................................27
size ...........................................................27
thread amount check window ...........................4
thread cartridge ...........................................1, 45
inserting ....................................................14
removing ...................................................15
thread cartridge release button ...............3, 15, 41
thread cartridge slot .....................................3, 14
thread color ID number ...............................4, 13
thread cutting ............................................15, 50
troubleshooting ................................................49
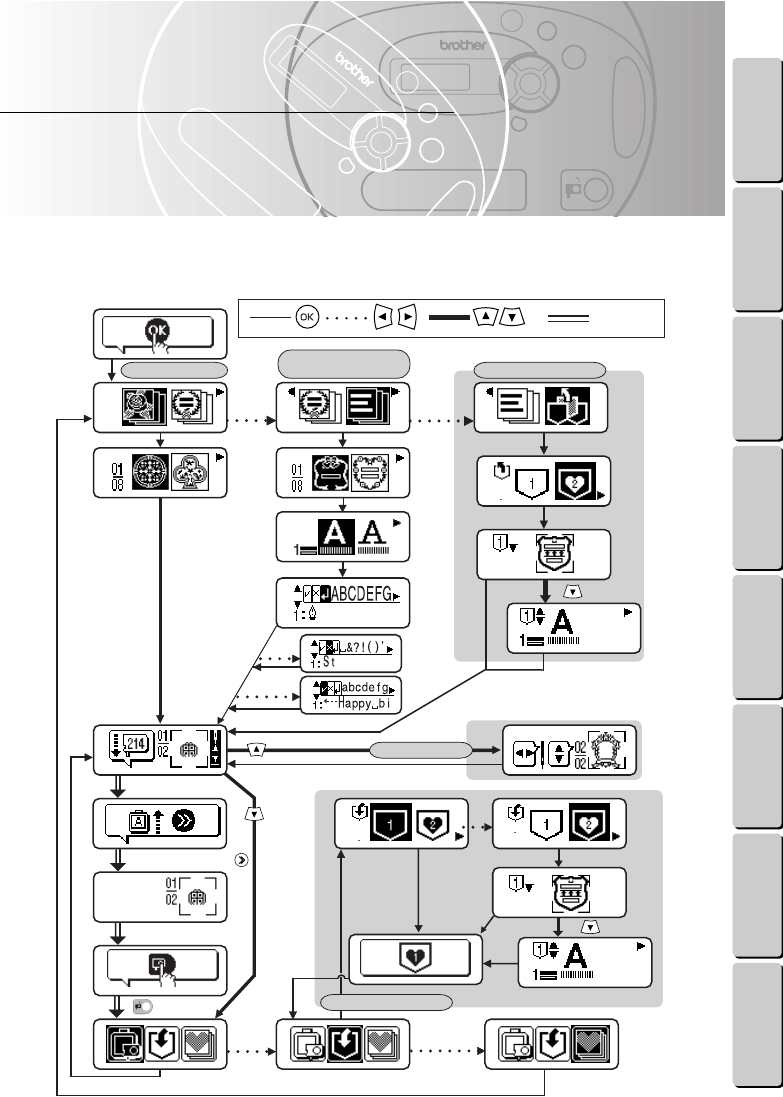
55
Chapter 6
CONTENTS Chapter 1 Chapter 2 Chapter 3 Chapter 4 Chapter 5 INDEX Chapter 6
6
Quick Reference Guide
This chapter shows which screens appear when the different functions are used. For information on each
screen, check the table on pages 56 to 58. For more details on each function, check the page number listed
in the table.
ABCDE
ABCDE
To select a saved pattern
Template patterns
(Typing in text)
One-point patterns
To save the pattern
1
2
3
4
5
6
7
8
22
9
0
A
B
C
88
DD
E
F
G
K
H
I
J
While embroidering
Insert the thread cartridge.
Embroidering finishes
Other
Insert the design frame. Then, .
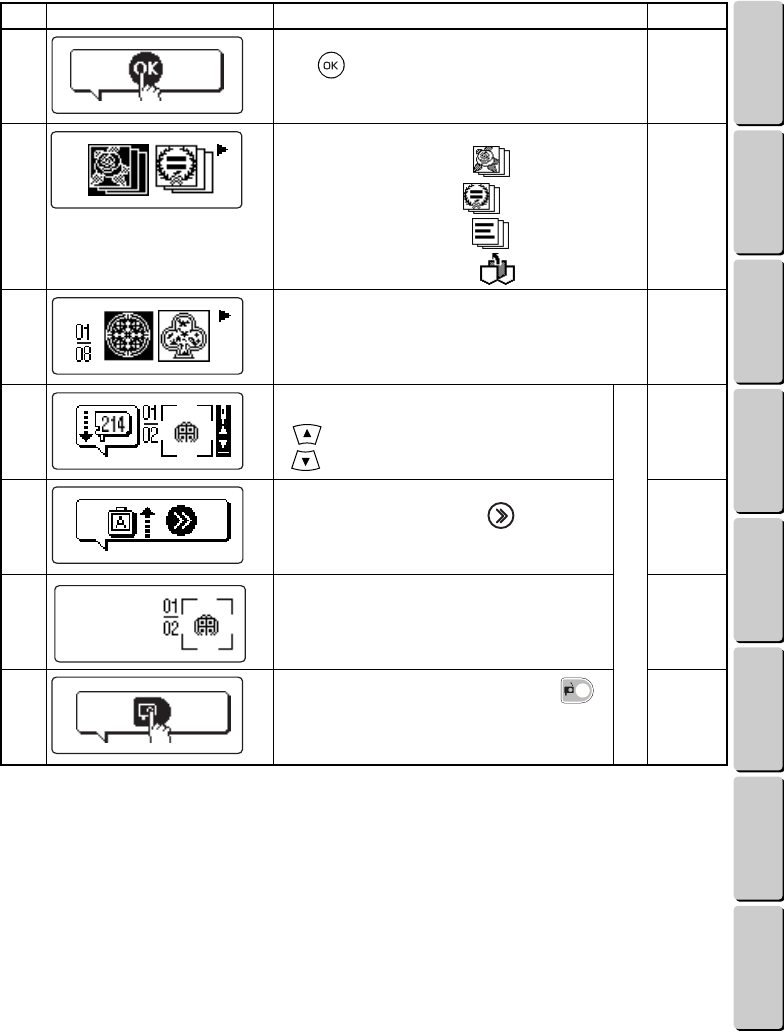
56
● ● ● ● ● ● ● ● ● ● ● ● ● ● ● ● ● ● ● ● ● ● ● ● ● ● ● ● ● ● ● ● ● ● ● ● ● ● ● ● ● ● ● ● ● ● ● ● ● ● ● ● ● ● ● ● ●
CONTENTS Chapter 1 Chapter 2 Chapter 3 Chapter 4 Chapter 5 INDEX Chapter 6
No. Screen Details
See page
1Appears when the machine is turned on.
Press .
p. 11
2Select the pattern category.
For a one-point pattern, select . (Continue with 3.)
For a frame pattern, select . (Continue with 9.)
For a template pattern, select . (Continue with 9.)
To select a saved pattern, select . (Continue with H.)
p. 11
3Select the pattern. p. 12
4Insert the thread cassette with the number that is
displayed.
If is pressed, continue with K.
If is pressed, continue with 8.
Repeat for each color.
p. 13
5Insert the design frame with the side shown in the
display facing up. Then, press .
p. 16
6The embroidery is being sewn. p. 17
7Press the thread cartridge release button ( ),
and then remove the thread cartridge.
p. 20
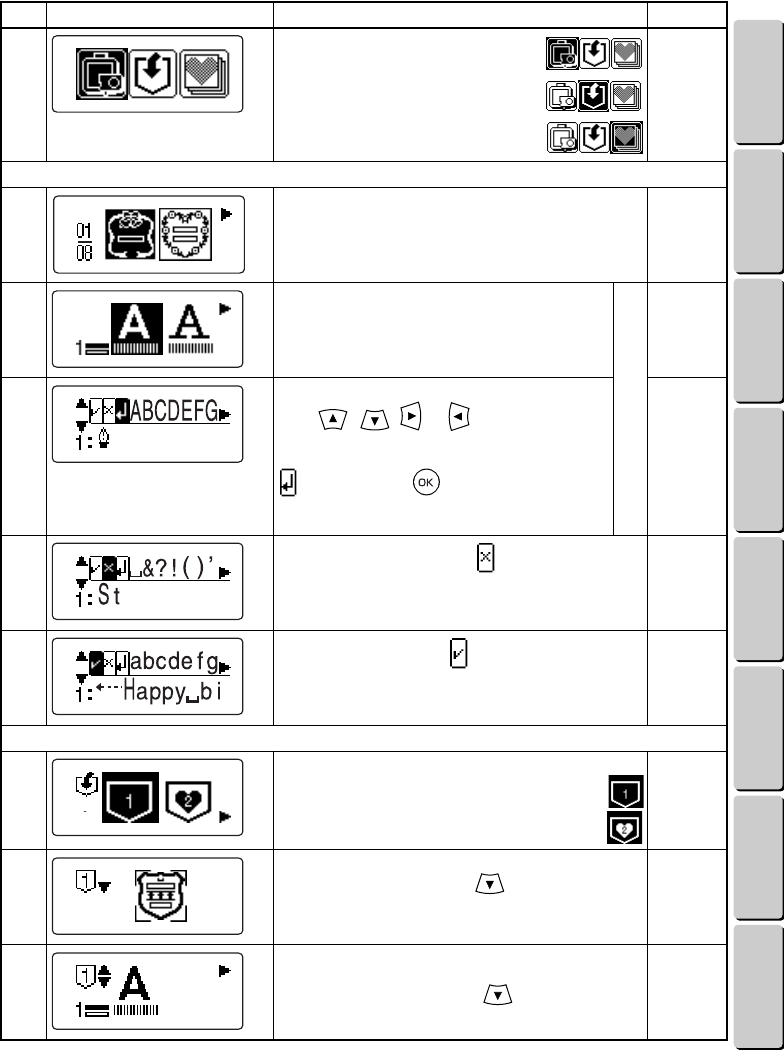
57
● ● ● ● ● ● ● ● ● ● ● ● ● ● ● ● ● ● ● ● ● ● ● ● ● ● ● ● ● ● ● ● ● ● ● ● ● ● ● ● ● ● ● ● ● ● ● ● ● ● ● ● ● ● ● ● ●
CONTENTS Chapter 1 Chapter 2 Chapter 3 Chapter 4 Chapter 5 INDEX Chapter 6
8To sew the same pattern again (Then,
continue with 4.):
To save the pattern (Then, continue
with D.):
To select a different pattern (Then,
continue with 2.):
p. 20
To type in text (for a template text):
9Select the pattern. p. 12
0Select the font and text size.
Repeat for each line of text.
p. 28
AEnter the text.
Press , , or to select the
character.
When you are finished entering the text, select
, and then press . (If you are finished
entering all lines of text for the pattern, continue
with 4.)
p. 28
BTo delete a character, select . p. 31
CTo check the text, select . p. 32
To save a pattern:
DSelect a pocket.
To select a pocket where a pattern is not saved
yet (Then, continue with G.):
To select a pocket where a pattern is already
saved (Then, continue with E.):
p. 35
ECheck the saved pattern. (Then, continue with G.)
For a template pattern, press , and then continue
with F.
p. 35
FCheck the text in a saved pattern. (Then, continue
with G.)
For more than one line, press to check the next
line.
p. 39
No. Screen Details
See page
ABCDE
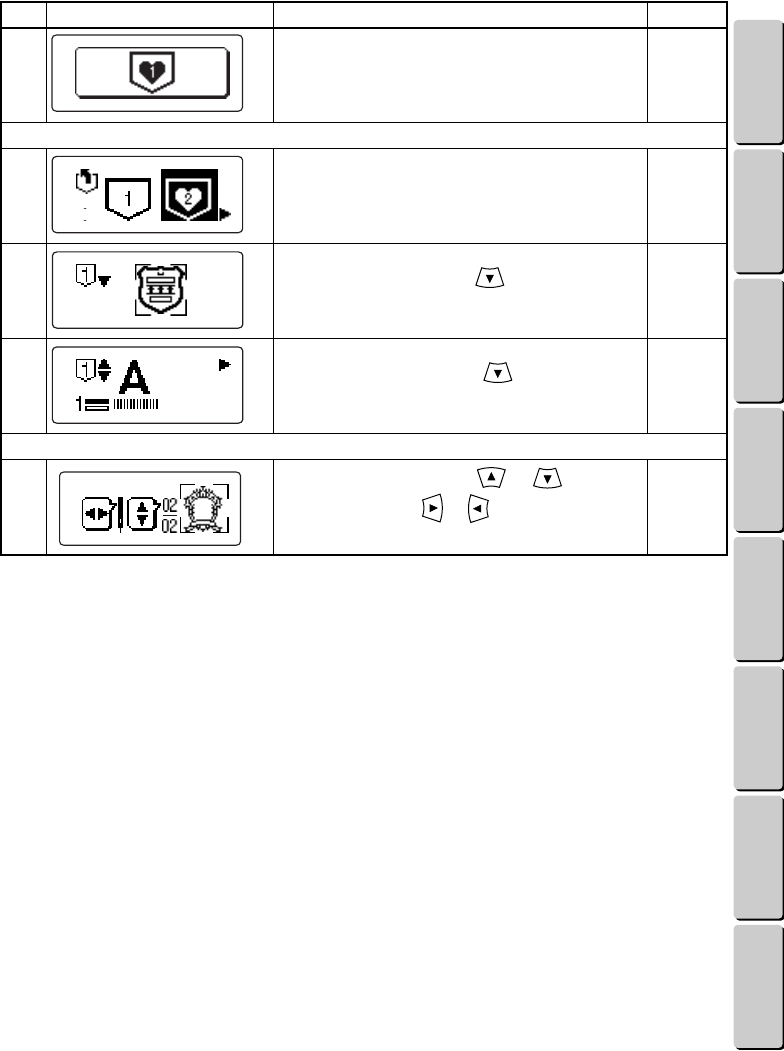
58
● ● ● ● ● ● ● ● ● ● ● ● ● ● ● ● ● ● ● ● ● ● ● ● ● ● ● ● ● ● ● ● ● ● ● ● ● ● ● ● ● ● ● ● ● ● ● ● ● ● ● ● ● ● ● ● ●
CONTENTS Chapter 1 Chapter 2 Chapter 3 Chapter 4 Chapter 5 INDEX Chapter 6
GThe pattern is saved. (Then, continue with 8.) p. 35
To retrieve a saved pattern:
HSelect a pocket. p. 37
ICheck the pattern. (Then, continue with 4.)
For a template pattern, press , and then continue
with K.
p. 37
JCheck the text in the pattern. (Then, continue with 4.)
For more than one line, press to check the next
line.
p. 39
While embroidering:
KTo find a thread color, press or .
To find a stitch, press or . (Then, continue with
4.)
p. 43
No. Screen Details
See page
ABCDE
ENGLISH
FRANÇAIS
ESPAÑOL
885-311
194311-014
0202
Printed in China
