Bryton orporation BA1204 GPS SPORTS WATCH User Manual USERS MANUAL
Bryton Incorporation GPS SPORTS WATCH USERS MANUAL
USERS MANUAL
40/60
Us
er’
s
G
u
i
d
e
AM
FCC Regulations:
§ 15.19 (a)(3)
This device complies with part 15 of the FCC Rules. Operation is subject to the following two conditions: (1)
This device may not cause harmful interference, and (2) this device must accept any interference received,
including interference that may cause undesired operation.
§ 15.21
Changes or modications not expressly approved by the party responsible for compliance could void the user‘s
authority to operate the equipment.
**************************************************************************************************************
§ 15.105 (b)
This equipment has been tested and found to comply with the limits for a Class B digital device, pursuant to
part 15 of the FCC Rules. These limits are designed to provide reasonable protection against harmful interfer-
ence in a residential installation. This equipment generates, uses and can radiate radio frequency energy and, if
not installed and used in accordance with the instructions, may cause harmful interference to radio communi-
cations. However, there is no guarantee that interference will not occur in a particular installation. If this equip-
ment does cause harmful interference to radio or television reception, which can be determined by turning the
equipment o and on, the user is encouraged to try to correct the interference by one or more of the following
measures:
—Reorient or relocate the receiving antenna.
—Increase the separation between the equipment and receiver.
—Connect the equipment into an outlet on a circuit dierent from that to which the receiver is connected.
—Consult the dealer or an experienced radio/TV technician for help.
***************************************************************************************************************
FCC RF Exposure Compliance
This device is designed and manufactured not to exceed the emission limits for exposure to radio frequency
(RF) energy set by the Federal Communications Commission for an uncontrolled environment.
IC Regulations:
This device complies with Industry Canada license-exempt RSS standard(s). Operation is subject to the follow-
ing two conditions:
(1) this device may not cause interference, and
(2) this device must accept any interference, including interference that may cause undesired operation of the
device.
Le présent appareil est conforme aux CNR d'Industrie Canada applicables aux appareils radio exempts de
licence. L'exploitation est autorisée aux deux conditions suivantes:
(1) l'appareil ne doit pas produire de brouillage, et
(2) l'utilisateur de l'appareil doit accepter tout brouillage radioélectrique subi, même si le brouillage est suscep-
tible d'en compromettre le fonctionnement."
***************************************************************************************************************
CAN ICES-3(B)/NMB-3(B)
***************************************************************************************************************
IC RF Exposure Compliance
This equipment complies with IC RSS-102 RF exposure limits set forth for an uncontrolled environment.

Cardio 40/60 User’s Manual
2
Getting Started ................ 4
Your Cardio 40/60........................ 4
Accessories .................................. 5
Initial Setup ...................... 5
Step 1: Charge the Battery ......... 5
Using the Power Adapter .......................... 5
Using the Computer ................................... 6
Step 2: Turn On the Device ......... 6
Turn On/O (Cardio 40) ............................. 6
Turn On/O (Cardio 60) ............................. 6
Step 3: Initial Setup ..................... 7
Step 4: Acquire Satellite
Signals .......................................... 7
Step 5: Share Your Records to
Brytonsport.com ........................ 8
Status Page ...................... 9
Icon Description .......................... 9
Receiving GPS Signals .............. 10
Clock View ...................... 11
Display Screen ........................... 11
Auto Time Calibration by GPS .. 11
Manually Set Time ..................... 11
Set Alarm (Time1) ..................... 11
Exercises ......................... 12
Starting an Exercise .................. 12
Running/Cycling ........................................12
Triathlon (Cardio 60 only) .......................12
Multisport (Cardio 60 only) ....................13
Outdoor Swim (Cardio 60 only) ............13
Pause/ Stop Exercising .............. 14
Switch the Meter Page .............. 14
Smart Pause ............................... 14
Lap .................................. 15
Smart Lap................................... 15
Mark Lap .................................... 15
Train & Test ..................... 16
To Plan ........................................ 16
Simple Workouts ........................................16
Interval Workouts ......................................17
My Workout ............................... 18
Bryton Workout ......................... 18
Bryton Test ................................. 19
Start Training ............................. 20
Pause/Stop Training .................. 20
View History ................... 21
View History .............................. 21
View Summary .......................... 21
Delete Exercise Records ........... 21
Table of Contents
Cardio 40/60 User’s Manual 3
ENGLISH
Settings .......................... 22
Exercises Settings ..................... 22
Customize the Display Settings ............22
...............23
Set Exercise Reminder .............................23
Enable Triathlon Transition Time
(Cardio 60 only) ..........................................24
Multisport Sequence Setup
(Cardio 60 only) ..........................................24
Watch Settings .......................... 25
Adjust Date ..................................................25
Change Clock View ...................................25
General Settings ........................ 25
..............25
Enable Auto Key Lock
(Cardio 60 only) ..........................................26
Enable Key Vibrate (Cardio 60 only) ....26
Enable Key Tone .........................................26
Enable Vibrate (Cardio 60 only) ............26
.........................27
Specify Unit ..................................................27
Specify the On-Screen Display (OSD)
Language ......................................................27
Set GPS Mode .............................................27
Enable Race Mode ....................................28
(Cardio 60 only) .........................................28
Enable File Saving Mode .........................28
Adjust Contrast Level ..............................29
View Memory Usage ................................29
About .............................................................29
Sensors ....................................... 30
Link Heart Rate Sensor ............................30
Link Other Sensors (Cardio 60 only) ...30
............ 31
...................................................31
...................31
Pace Calculator .............. 32
Troubleshooting ............ 33
Getting More Information ........ 33
Reset Cardio 40/60 .................... 33
Appendix ........................ 34
Glossary and Customizable Data
Fields Selection ......................... 34
Installing the Bike Mount
(Cardio 60 only) ......................... 37
Installing the Heart Rate
Monitor ...................................... 38
Wheel Size and
Circumference ........................... 41
Heart Rate Zones ....................... 42
Basic Care For Your
Cardio 40/60 .............................. 42
............................ 43
WARNING
Australian Consumer Law
Our goods come with guarantees that can not be excluded under the New Zealand and Australian Consumer
Laws. You are entitled to a replacement or refund for a major failure and for compensation for any other
reasonably foreseeable loss or damage. You are also entitled to have the goods repaired or replaced if the
goods fail to be of acceptable quality and the failure does not amount to a major failure.
Always consult your physician before you begin or modify any training program. Please read the details
in Warranty and Safety Information guide in the package.
4Cardio 40/60 User’s Manual
Your Cardio 40/60
Getting Started
This section will guide you on the basic preparations before you start using your device.
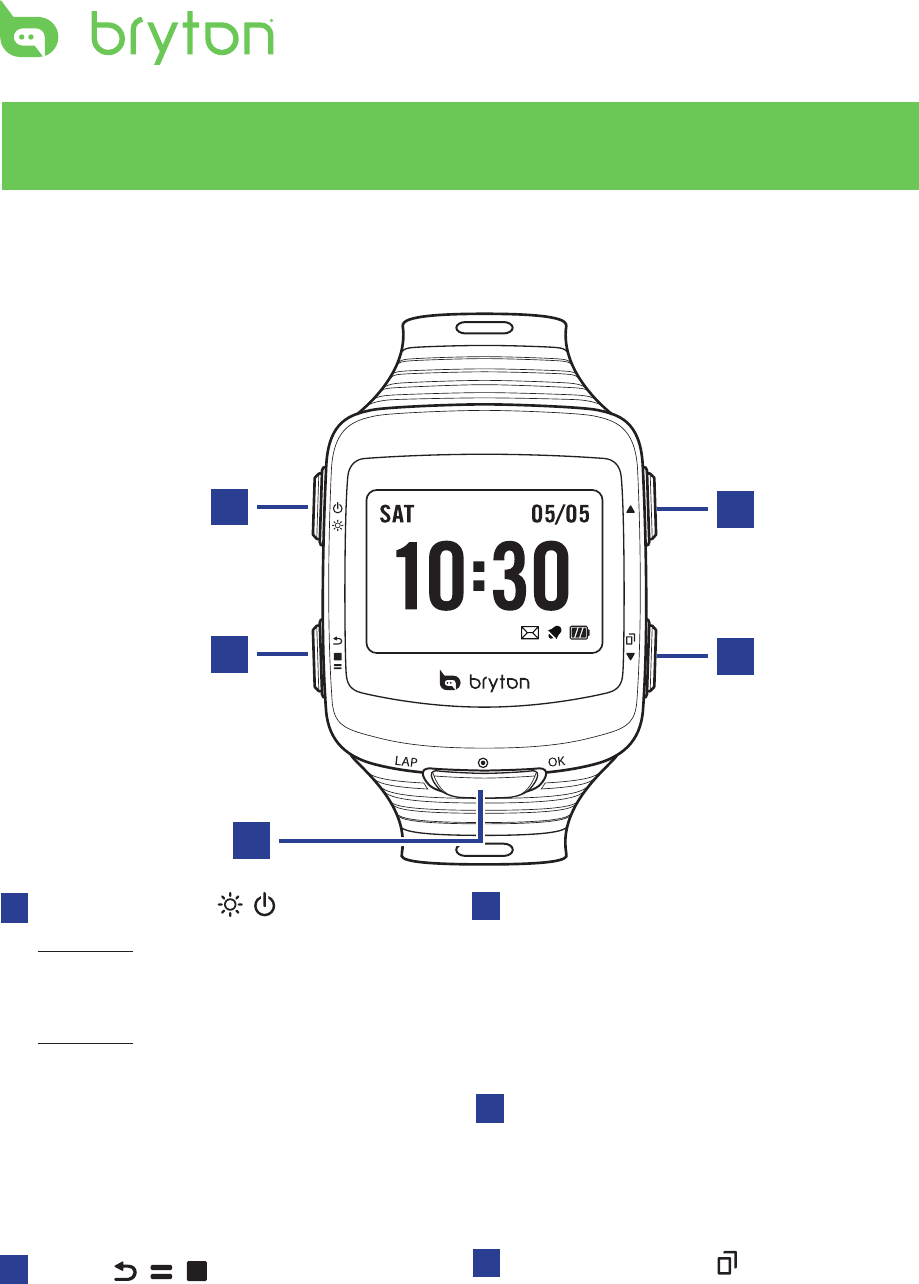
1Light / Power ( / )
Cardio 40
Press and hold to turn on/o device.•
Press to turn on the backlight.•
Cardio 60
Press and hold to turn the device on.•
T• o turn o device, press and hold to
enter the sub menu, and use up and
down key to scroll between key lock
and power o. Press OK to select
“Power O”.
Press to turn on the backlight.•
2Back ( / / )
Press to return to the previous page or •
cancel an operation.
In Meter mode, press to pause log. •
While the recording is paused, press
again to stop.
In training mode, press to stop •
recording log.
5Down / Page (q/ )
In Menu, press to move down to scroll •
through menu options. Press and hold
to fast scroll down through menu
options.
In meter view, press to switch meter •
screen page.
3OK (OK)
In Clock view, press to enter the menu •
mode.
In Menu, press to enter or conrm a •
selection.
When recording, press to mark the lap.•
AM
1
3
25
4
4Up (p)
In Menu, press to move up to scroll •
through menu options. Press and
hold to fast scroll up through menu
options.
5
ENGLISH
Cardio 40/60 User’s Manual
Accessories
The Cardio 40/60 comes with the following accessories:
Cardio 40 Cardio 60
In the box
Device 3 3
USB Charging Clip Cable 3 3
Quick Start Guide 3 3
Optional items
Speed & Cadence Dual Sensor 8 3
Heart Rate Monitor Set 3 3
Heart Rate Belt 3 3
Bike Mount 8 3
Adaptors 3 3
NOTE: For more information about purchasing optional accessories, please go to Bryton
Eshop http://www.brytonsport.com/eshop or contact your Bryton dealer.
Initial Setup
Step 1: Charge the Battery
Using the Power Adapter
Charge the device for at least 3 hours before you start using it.
Warning:
This product contains a lithium-ion battery. See the Warranty and Safety Information guide
in the package for important battery safety information.
AM
1
2
3
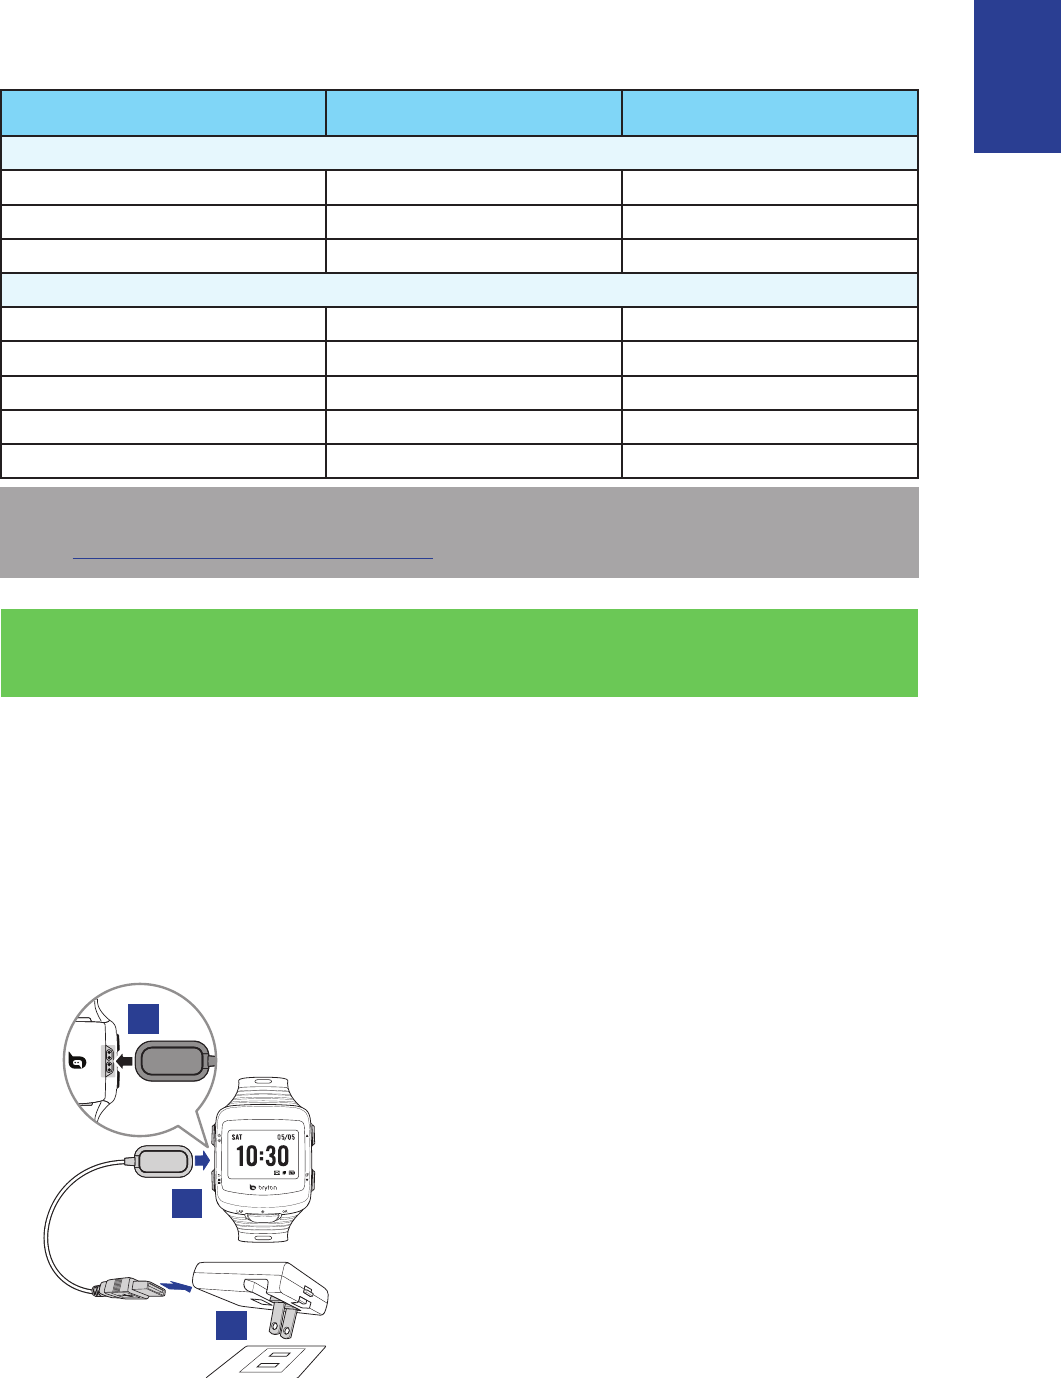
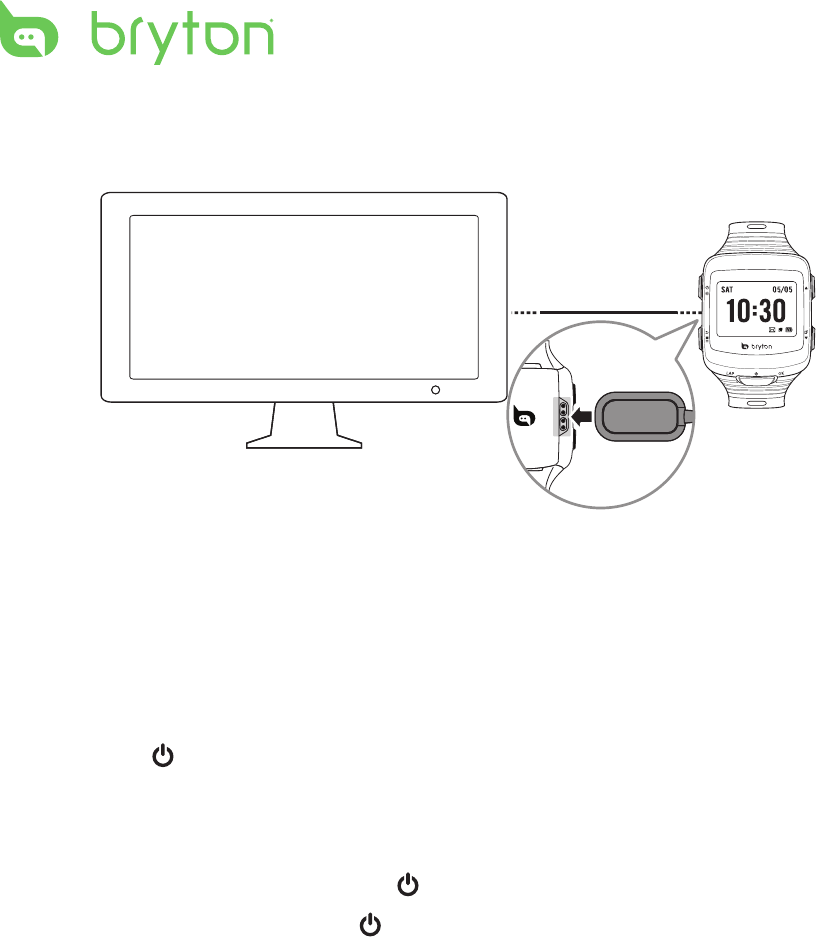
1. Attach the USB charging clipper onto the
device.
2. Connect the other end of the USB
charging clipper to the power adapter.
Be sure the pin on the charging clipper is
properly attached to the charging contact
on the back of the device.
3. Plug the power adapter to a wall outlet.
6Cardio 40/60 User’s Manual
Using the Computer
1. Attach the USB charging clipper onto the device.
AM
2. Plug the other end of the USB charging clipper to a computer.
Step 2: Turn On the Device
Turn On/O (Cardio 40)
Press and hold to turn the device on or o.
Turn On/O (Cardio 60)
To turn on the device, press and hold • .
To turn o device, press and hold • to enter the sub menu, and use up and down key to
scroll between key lock and power o. Press OK to select “Power O”.
7
ENGLISH
Cardio 40/60 User’s Manual
Step 3: Initial Setup
When turning the device on for the rst time, the setup wizard appears on screen. Follow
the instructions to complete setup.
1. Select the display language.
2. Select the unit of measurement.
3. Enter your “user prole”.
It is recommended to input the data since data accuracy will highly aect your training
analysis.
4. Read and accept the Safety Agreement.
Press • p and q key to read the Safety Agreement.
Press • OK to accept the Safety Agreement.
Step 4: Acquire Satellite Signals
Once the Cardio 40/60 is turned on, it will automatically search for satellite signals. While the
device is searching for satellite signals, the screen may display:
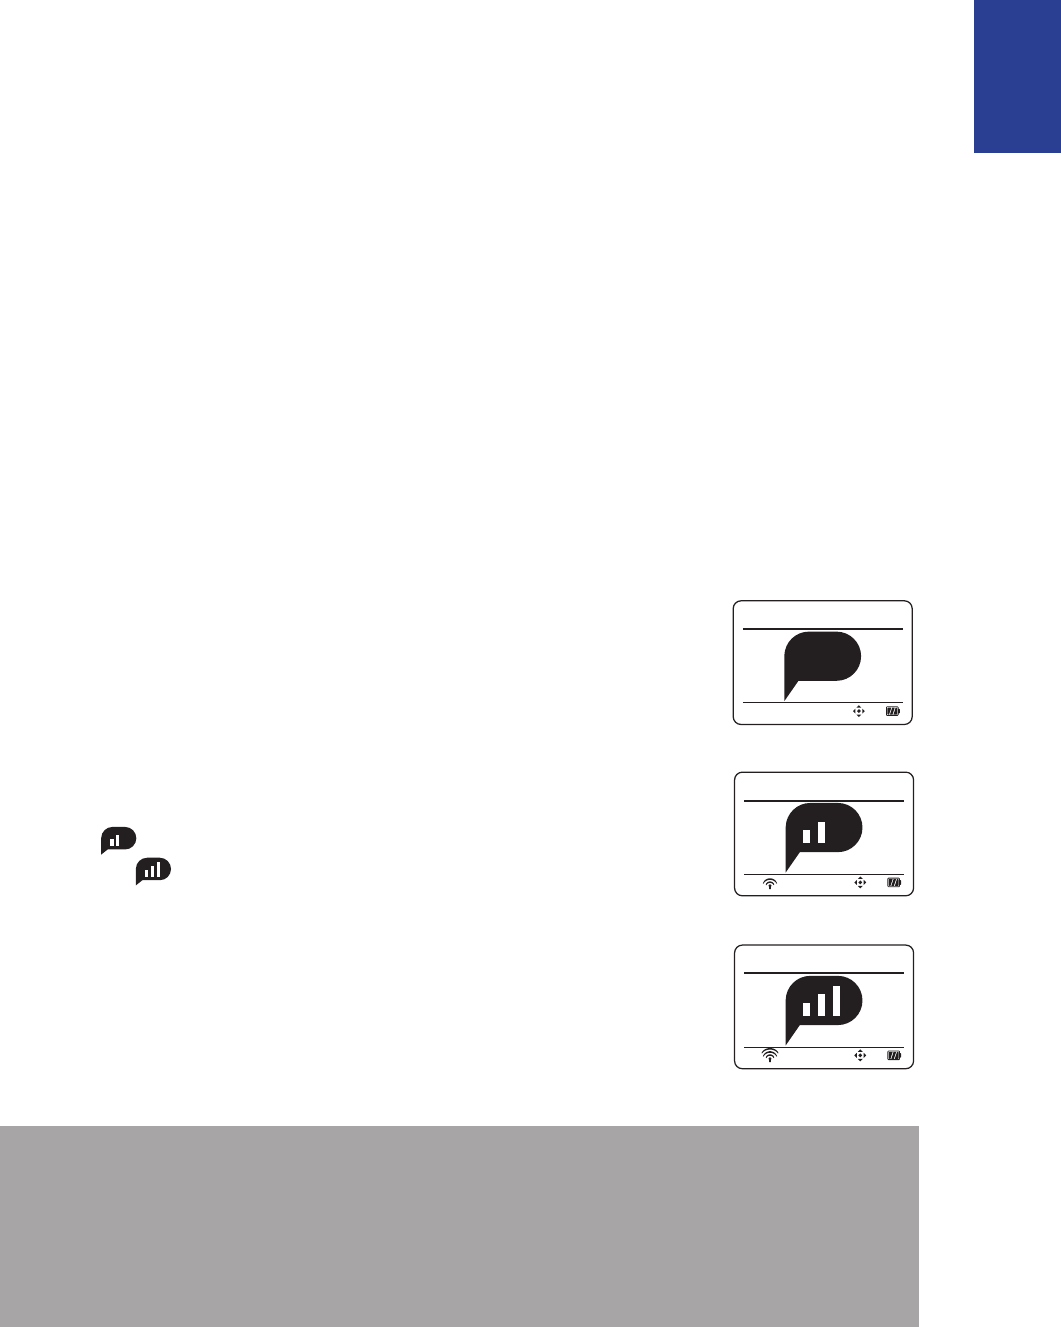
Pls Reposition•
No GPS signal or GPS signal is weak. Under this environment,
it is very dicult to get GPS position x. This status usually
happens when you’re in urban area or close to buildings.
Please move to an open area to acquire better GPS reception.
Searching•
GPS should be able to acquire position in few minutes.
When ( ) appeared, it is recommend to move to an open
area until ( ) is displayed to acquire as many satellites as
possible.
Fixed•
GPS position is xed. The screen will automatically enter meter
page.
NOTE:
For a more accurate measurement the rst time you use the device, please stay outdoor for •
at least 15 minutes with no obstructions overhead before performing a GPS search.
If you are unable to get the GPS reception after three minutes or more, try again at another •
location.
For more information on receiving GPS signals, refer to • “Receiving GPS Signals” on page 10.
Pls Reposition
Searching
Fixed

8Cardio 40/60 User’s Manual
Step 5: Share Your Records to
Brytonsport.com
1. Download Bryton Bridge 2
a. Go to http://www.brytonsport.com/help/start and download Bryton Bridge 2.
b. Follow the on-screen instructions to install Bryton Bridge 2.
2. Register an Account
Go to http://www.brytonsport.com and register an account.
3. Connect to PC
Turn on your Cardio 40/60 and connect it to your computer by using USB charging clipper.
4. Share Your Records With Other People
When My Device Manager window starts up, do one of the following:
a. Click “Manage My Tracks” button. Then, click “Save Tracks to Computer” button to save
your data to computer.
OR
b. Click “Visit Brytonsport.com” button. Then, click “Upload Files” to share your rides to the
Brytonsport website.
NOTE:
Do not unplug the USB charging clipper during the les transferring process. Otherwise, the •
les may be damaged or corrupted.
After you have installed Bryton Bridge, “My Device Manager” will automatically launch when •
the device is connected to the computer. If not, click Bryton ( ) icon that is shown at the
top or bottom of your computer’s toolbar, and then select “Open my device manager”.
For more instructions, please go to • corp.brytonsport.com > Support > Tutorial.
9
ENGLISH
Cardio 40/60 User’s Manual
Status Page
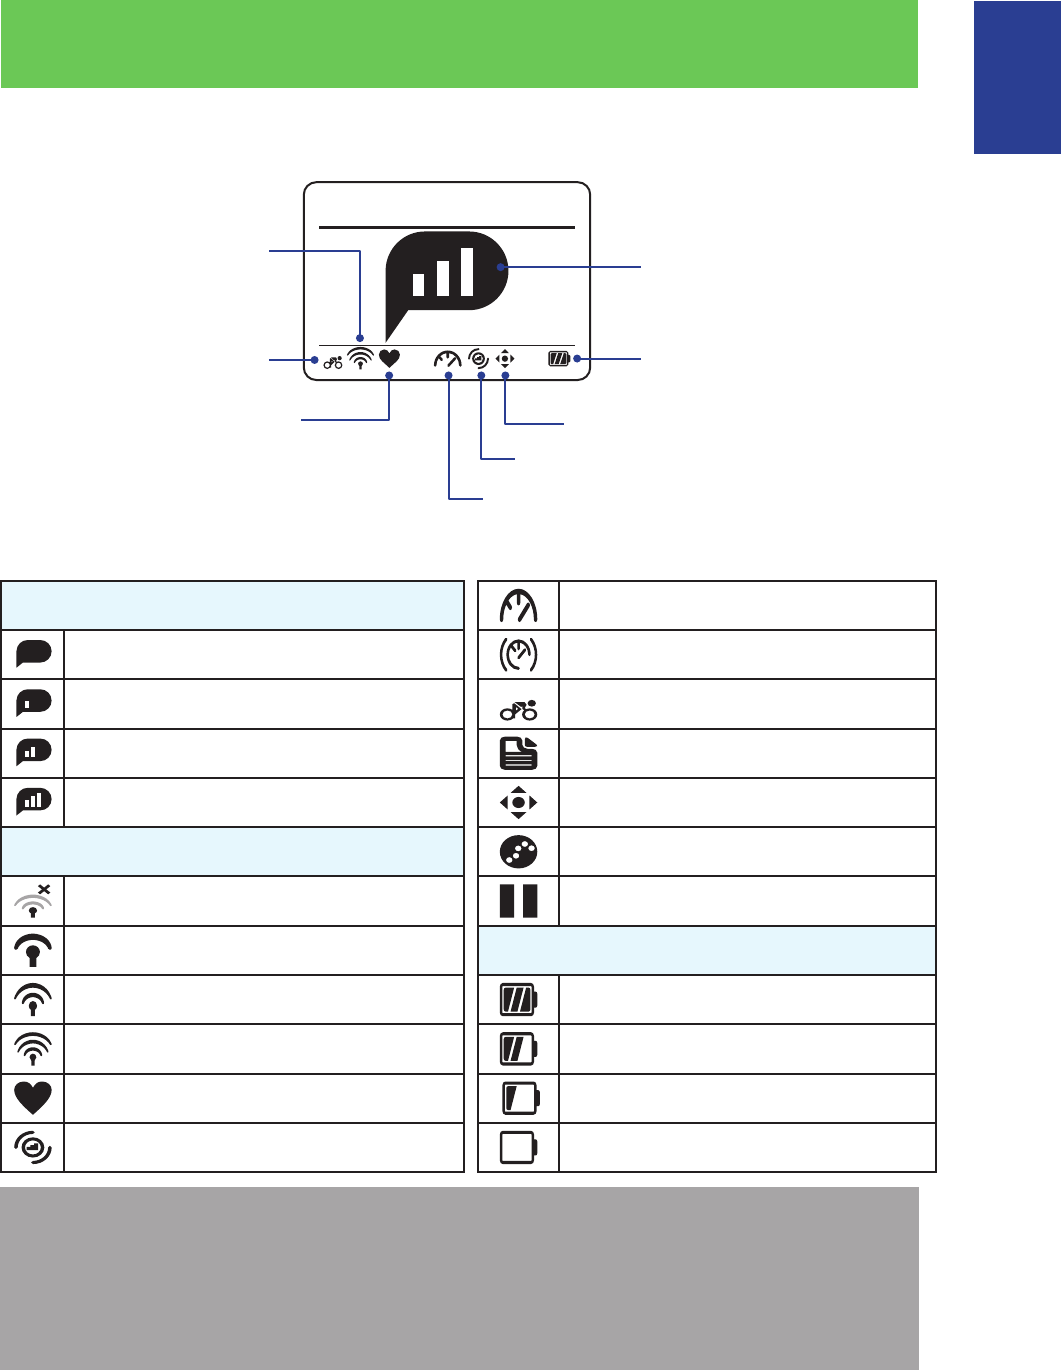
1
Fixed
Battery level
Bike Type (Cardio 60 only)
Meter mode
Heart rate sensor
indicator Cadence sensor indicator (Cardio 60 only)
GPS positioning
status GPS signal status
Speed sensor indicator (Cardio 60 only)
Icon Description
GPS Signal Status Speed sensor active (Cardio 60 only)
No Signal Dual sensor active (Cardio 60 only)
Poor *
1
Bike type (Cardio 60 only)
Fair ** Training mode
Good ** Meter mode
GPS Positioning Status Log record in progress
No signal (not xed) Recording is paused.
Weak Power Status
Normal Full battery
Good Half batteiry
Heart rate sensor active Low battery
Cadence sensor active (Cardio 60 only) Battery depleted
NOTE:
Only the active icons are displayed on the screen.•
When the speed & cadence dual sensor is activated, the sensor icon will appear at the speed •
sensor icon position.
* Please go to an open area for better reception.
** When blinking, this indicates the device is still searching for the GPS signal.
10 Cardio 40/60 User’s Manual
Receiving GPS Signals
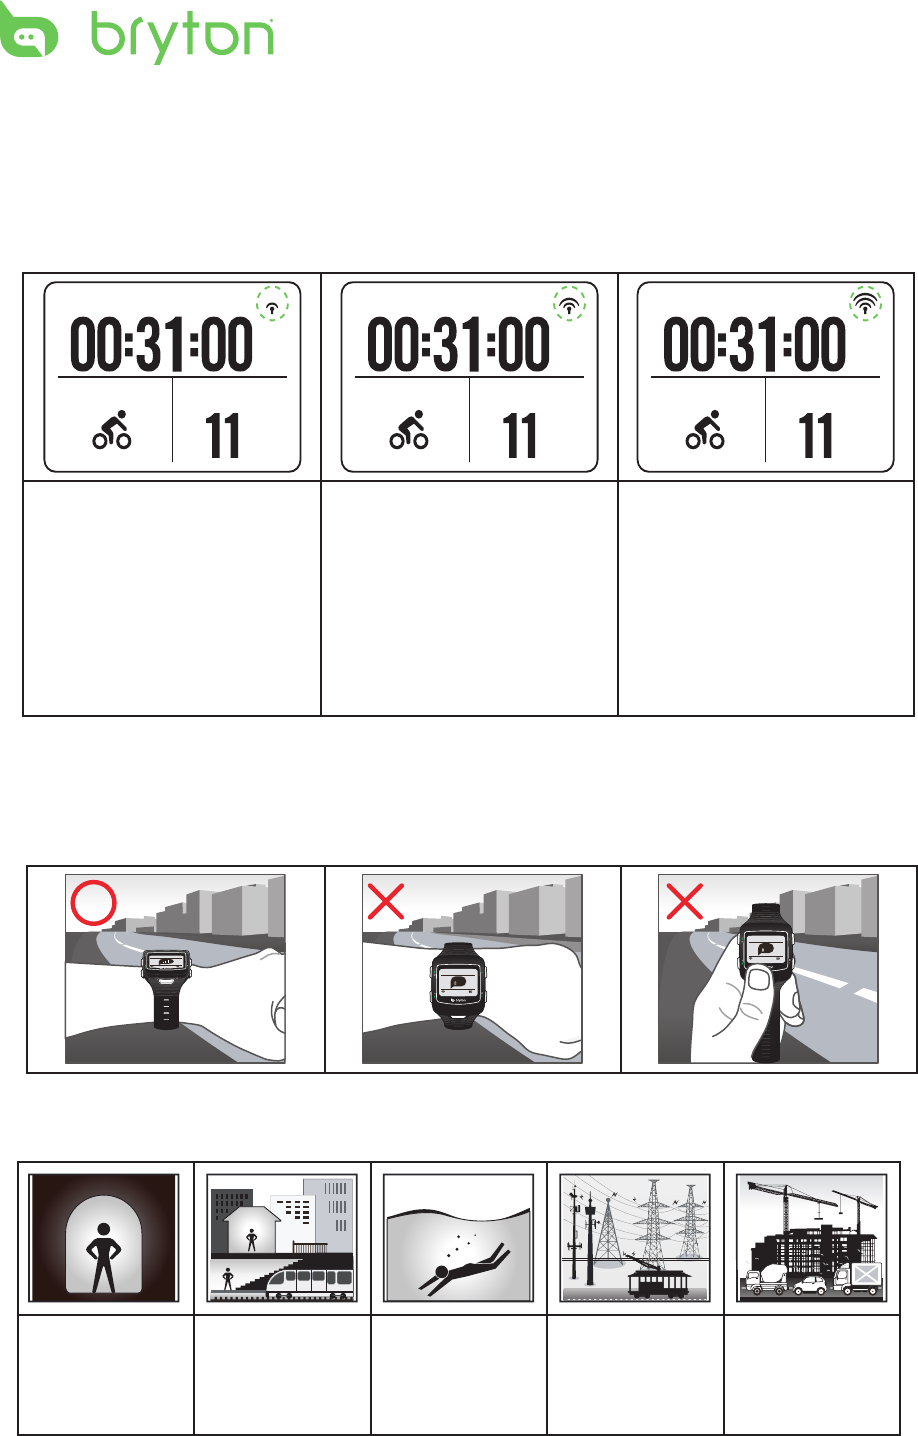
Cardio implements a status page to indicate current GPS signal strength. After position-•
x is done, you can still check GPS status at meter page by inspecting the icon located at
up-right corner.
Trip Time
Cycling Total Dist.
m
Trip Time
Cycling Total Dist.
m
Trip Time
Cycling Total Dist.
m
GPS signal is weak.
The satellite condition is
only sucient for position-
x. This situation may
not be sustained if your
sky-view changes, such as
going to the obstructed
environments.
GPS signal is normal.
Adequate for normal use.
GPS signal is good.
The best way to allow GPS get your position is to wear the watch on your wrist, with the •
watch surface facing up. Since GPS antenna is located near the OK key, please do not let
the antenna facing down or cover it with hand.
GPS Fixed
Searching
Searching
Please avoid the obstructed environments since they might aect the GPS reception.•
Tunnels Inside rooms,
building, or
underground
Under water High-voltage
wires or
television
towers
Construction
sites and heavy
trac
11
ENGLISH
Cardio 40/60 User’s Manual
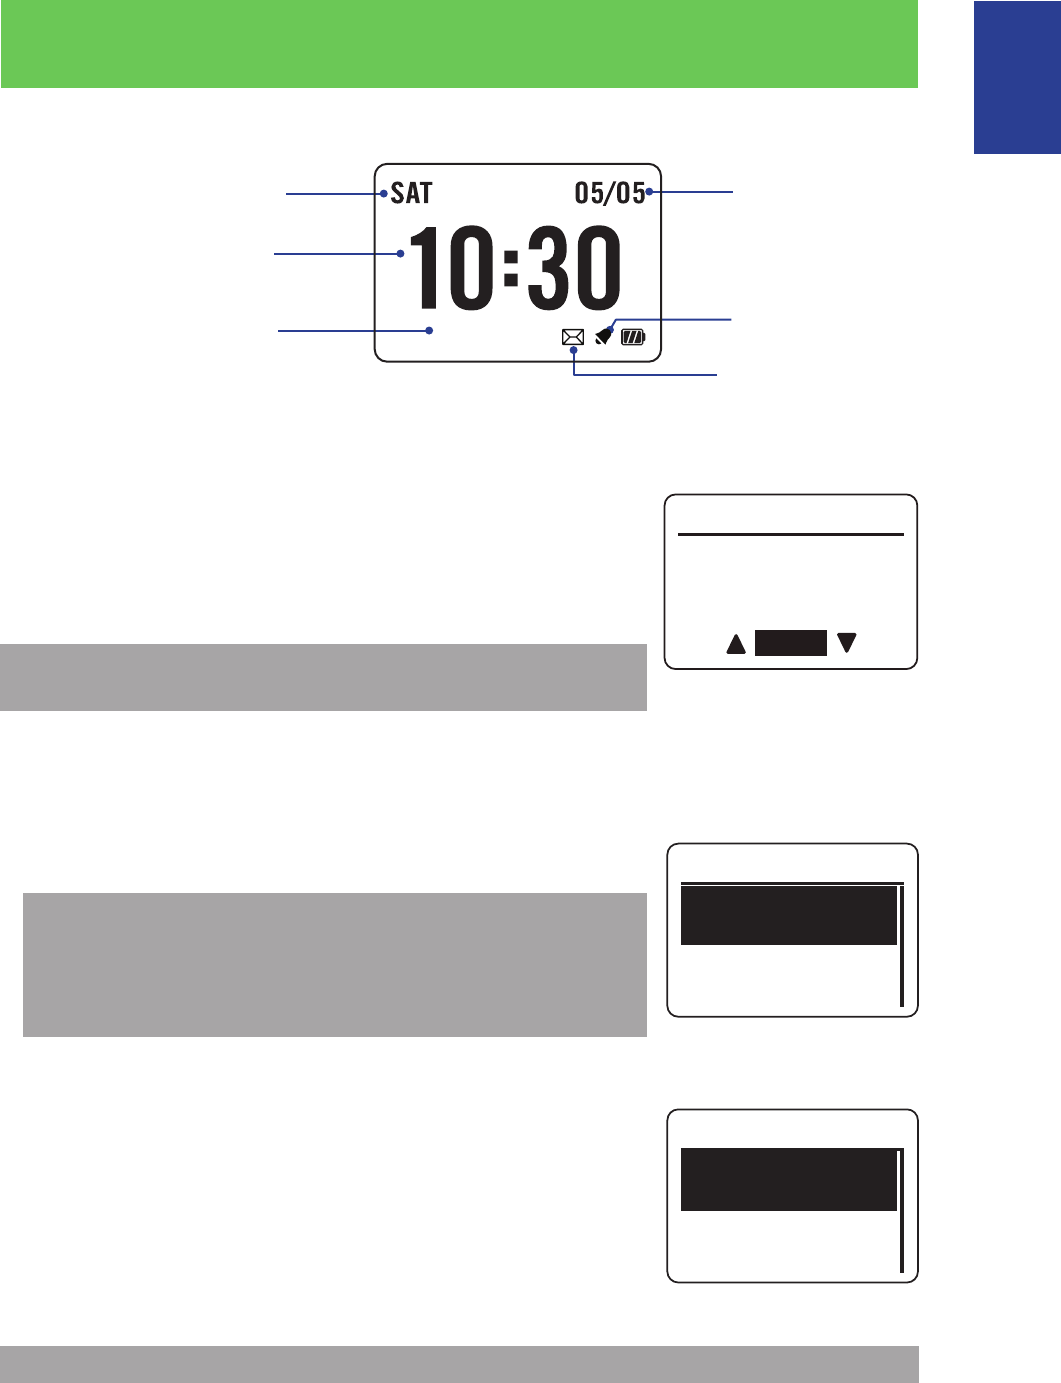
Clock View
Display Screen
Current date
Time 1
(local time)
Time 2
(alternate time)
Current day
Reminder icon
Alarm icon
AM
04:30 AM
Auto Time Calibration by GPS
1. Press q to enter the menu mode.
2. Press p/q to select Settings > Watch > Time > By GPS and
press OK to enter its submenu.
3. Press p/q to set the daylight saving time and press OK to
conrm.
NOTE: Please go outdoors to acquire GPS signal when you see
“No GPS signal” on the screen.
Manually Set Time
1. Press q to enter the menu mode.
2. Press p/q to select Settings > Watch > Time > Manual >
Set Time 1 or Set Time 2 and press OK to enter its submenu.
NOTE:
To enable the Time 2, select • Settings > Watch > Time > Manual
> Set Time 2 > Switch > On.
To change the time format, select • Settings > Watch > Time >
Time Format.
3. Press p/q to select the desired setting and press OK to conrm.
Set Alarm (Time1)
1. Press q to enter the menu mode.
2. Press p/q to select Settings > Watch > Alarm > Set Alarm
and press OK to enter its submenu.
3. Pressp/q to select the desired setting and press OK to
conrm.
NOTE: To enable the alarm, select Settings > Watch > Alarm > Switch > On.
Off
Time
Set Time1
Set Time2
Alarm
Set Alarm
Switch
On
AM 08:00
Current Time
Running
08:24
Drylight Saving
0 1 : 0 0
12 Cardio 40/60 User’s Manual
Exercises
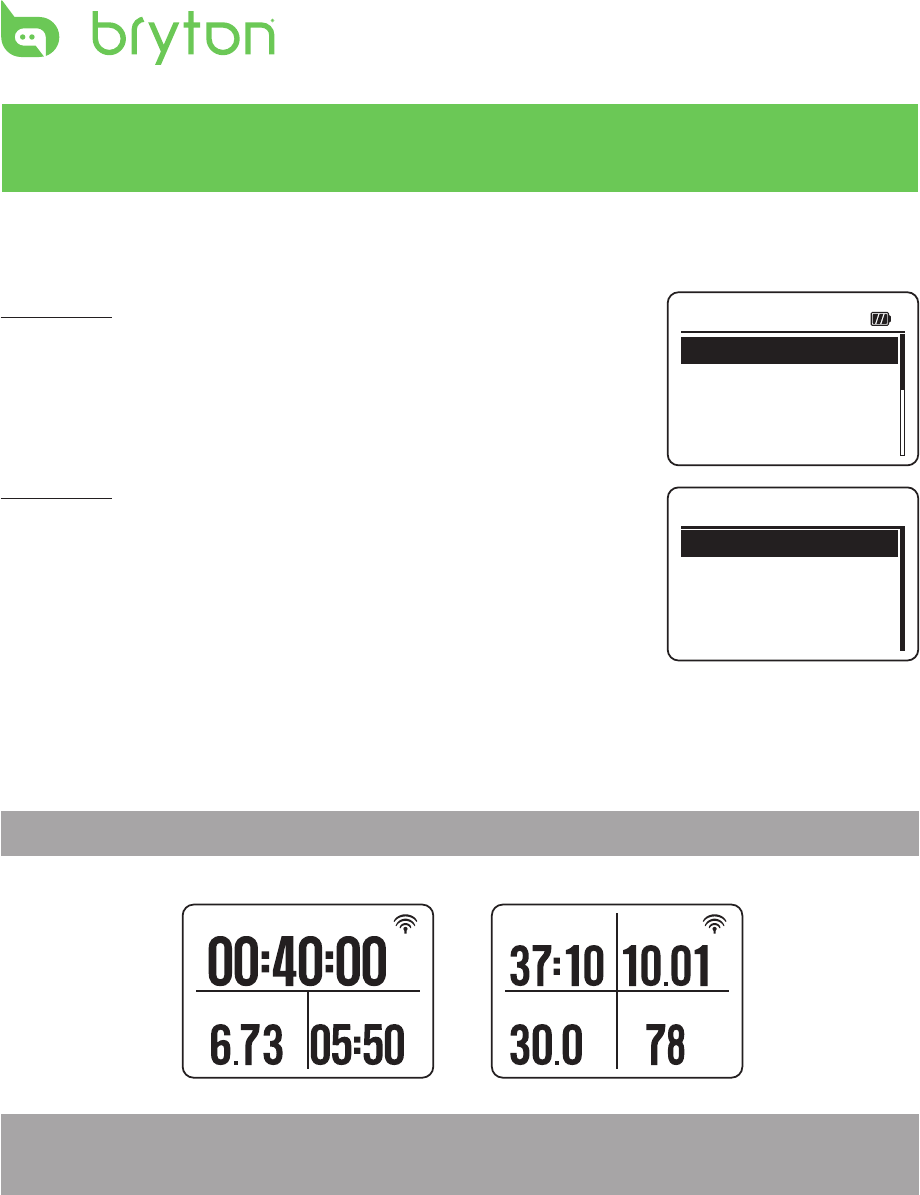
Starting an Exercise
Cardio 40
To start an exercise, press p/q to select Running. Then press OK
to start.
Cardio 60
To start an exercise, press p/q to select Exercises > Running,
Cycling, Triathlon, Multisport, Outdoor Swim, or Others. Then
press OK to start.
Running/Cycling
Select Running/Cycling and press OK to start exercise.
NOTE: Cycling option is only available on Cardio 60.
Run Time
Distance Pace
m
/
k
m
Trip Time
Speed
Distance
CAD
m
r
h
k
m
p
m
NOTE: Displayed information varies on exercise mode and user preference. Refer to
“Customize the Display Settings” on page 23 for more information.
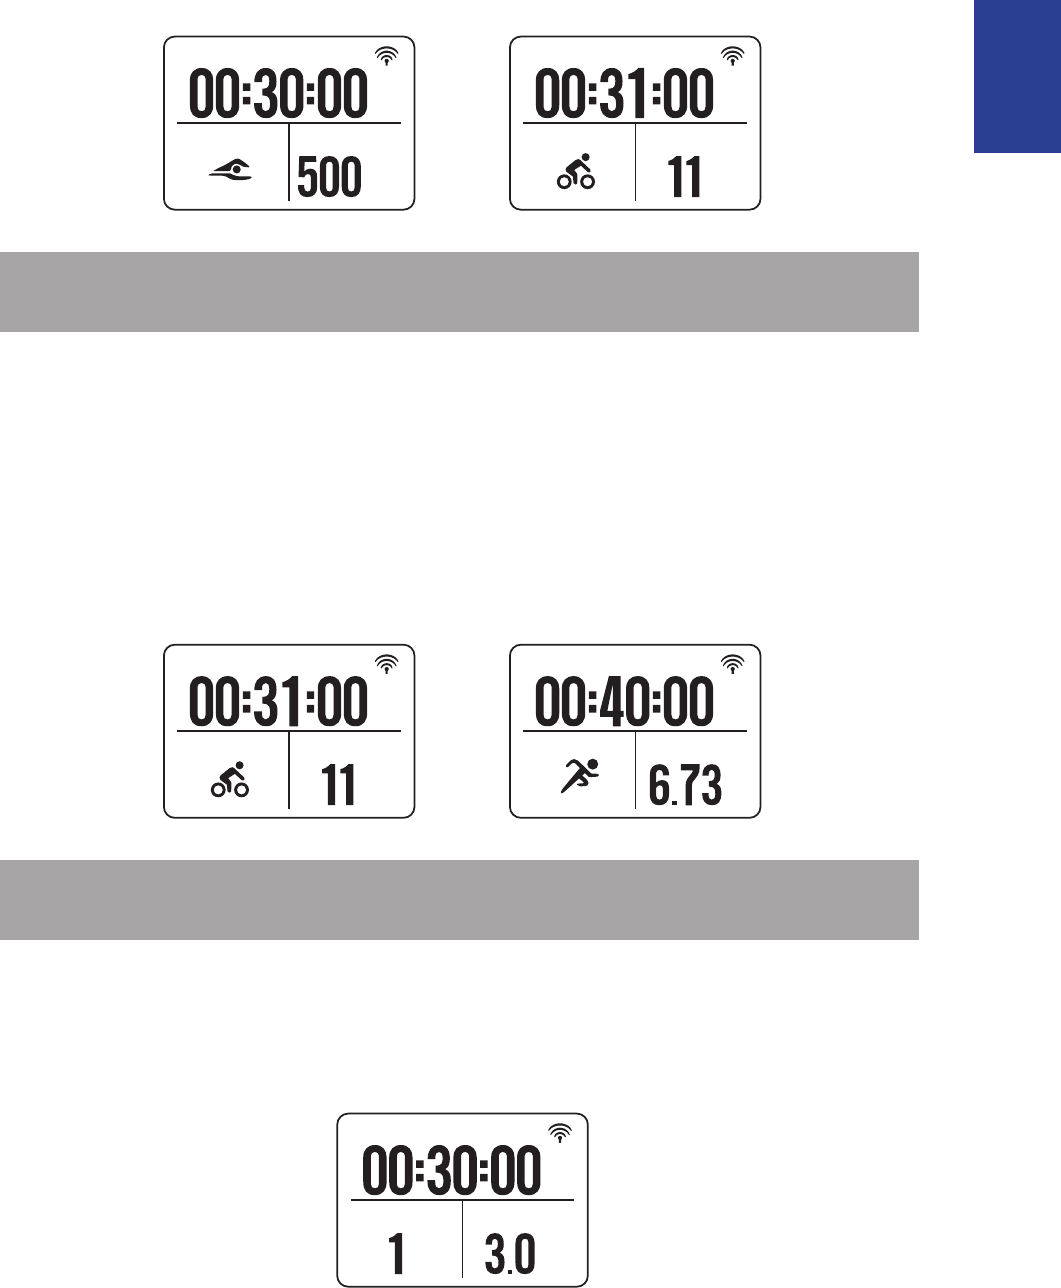
Triathlon (Cardio 60 only)
The exercise information will be displayed as following order: • Swimming > Cycling >
Running. Press OK to switch to the second or third sport.
To add the transition time, refer to • “Enable Triathlon Transition Time “ on page 27.
03:48 PM 01/04
Running
Train & Test
View History
Exercises
Running
Cycling
Triathlon
13
ENGLISH
Cardio 40/60 User’s Manual
Trip Time
Swimming Total Dist.
m
Trip Time
Cycling Total Dist.
m
NOTE: Displayed information varies on exercise mode and user preference. Refer to
“Customize the Display Settings” on page 23 for more information.
Multisport (Cardio 60 only)
During the Multisport exercise and the mode setting is set to • Manual, press p/q select
the desired sport (Running, Cycling, or Swimming) and press OK to conrm. Then press
OK to start exercise.
To switch to the second sport, press • OK to display the menu option. To customize the
sports sequence in Multisport mode, refer to “Multisport Sequence Setup“ on page 26.
Trip Time
Cycling Total Dist
m
Trip Time
Running Total Dist.
m
M
P
NOTE: Displayed information varies on exercise mode and user preference. Refer to
“Customize the Display Settings” on page 23 for more information.
Outdoor Swim (Cardio 60 only)
Select Outdoor Swim and press OK to start exercise.
Ex. Time
Distance Speed
m
h
k
m
14 Cardio 40/60 User’s Manual
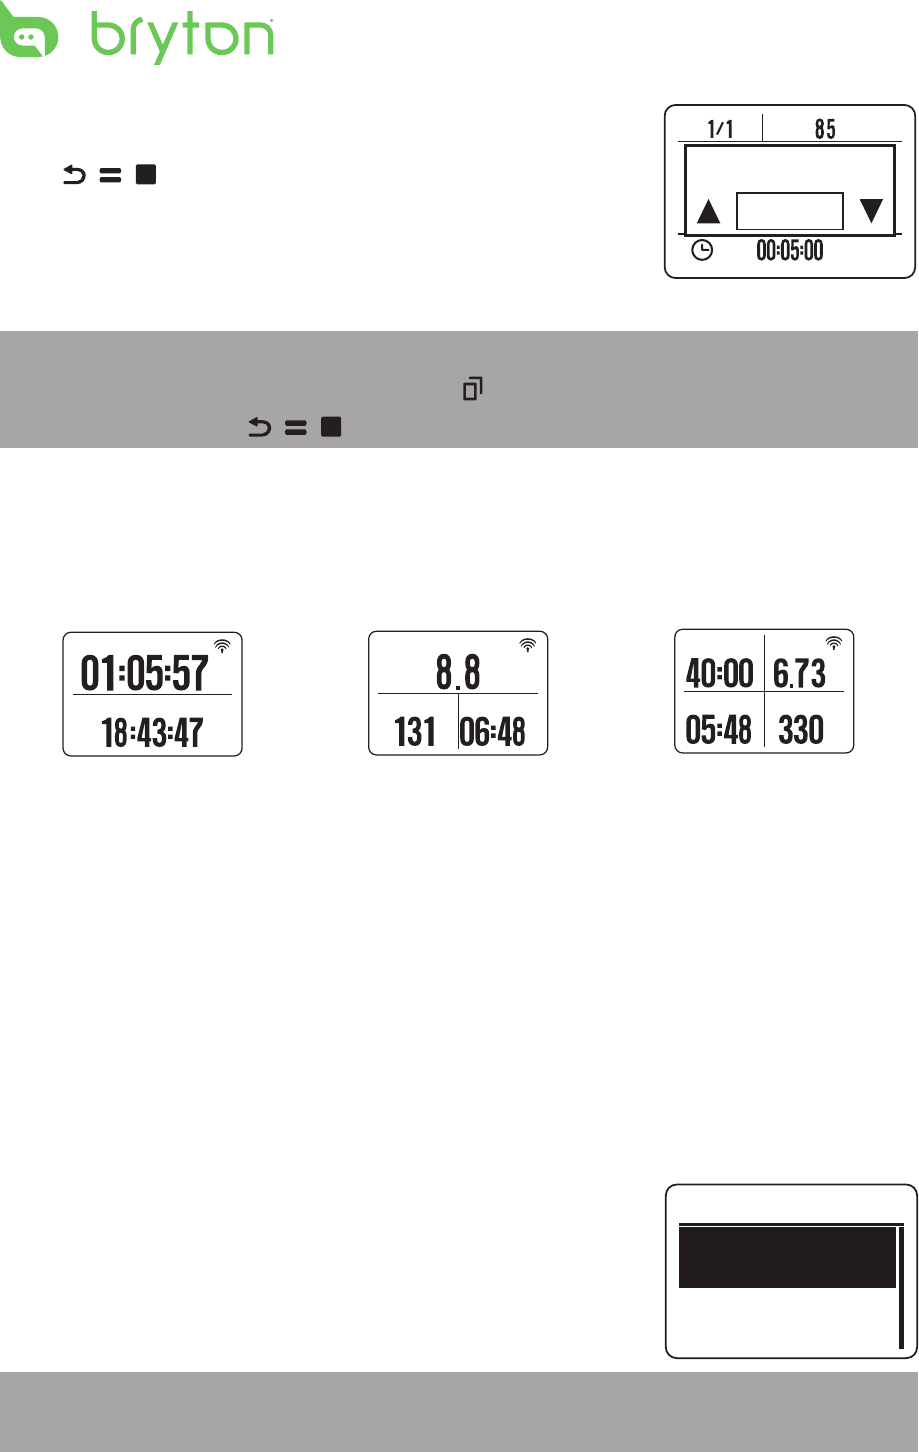
Pause/ Stop Exercising
Press / / to pause the recording and press again to stop
the recording.
NOTE:
During exercising/training, press and hold• q/ to enter Shortcut menu.
When recording, press• / / twice to stop recording.
Switch the Meter Page
When you start an exercise, the meter view appears on the screen. The Meter Page displays
information varies based on your personal setting.
Ride Time
Sunset
Avg SPD
h
k
m
Avg HR AvgPace
m
/
k
m
b
p
Run Time
Pace
Distance
Calories
m
/
k
m
L
K
C
A
2-grid display 3-grid display 4-grid display
To customize the meter page, refer to “Customize the Display Settings“ section on page 23.
Press q to switch meter screen page. However if the Auto Scroll feature is enabled, the
meter view will automatically switch pages at the preset time. To enable the Auto Scroll
feature, refer to “Congure Auto Scroll “ section on page 31.
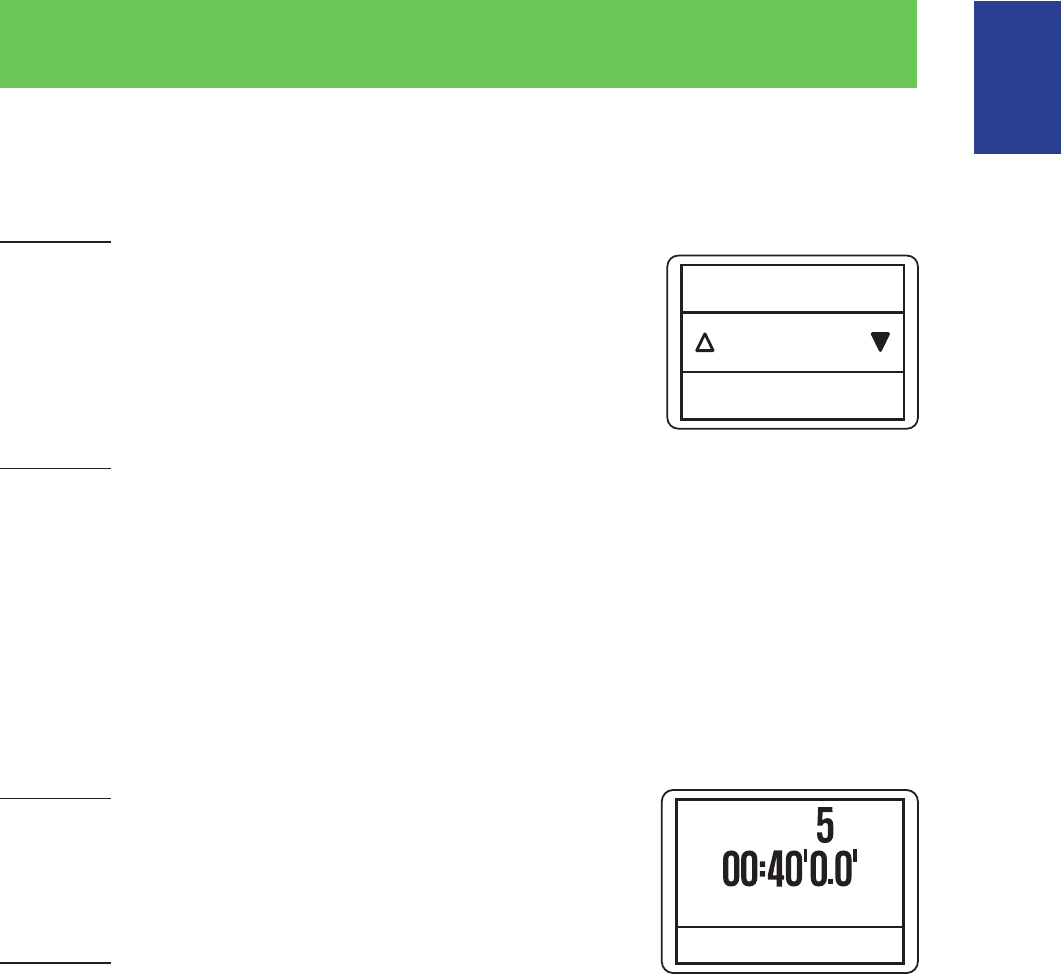
Smart Pause
When you have a lot of obstacles along your route such as trac lights, crosswalk, etc.,
this can really impact your recorded data. When the function is activated, the time and
distance will automatically pause once you stop moving and resume once you start riding to
enhance your data eciency.
1. Press q to enter the menu mode.
2. Press p/q to select Settings > Exercises > Running, Cycling,
Outdoor Swim, or Others > Smart Pause and press OK to
enter its submenu.
3. Select Yes to enable the function.
NOTE: On Cardio 40, select Settings > Exercises > Smart Pause and press OK to enter its
submenu.
r
p
m
Yes
Do you want
to stop?
Smart Pause
Enable
Yes
15
ENGLISH
Cardio 40/60 User’s Manual
Lap
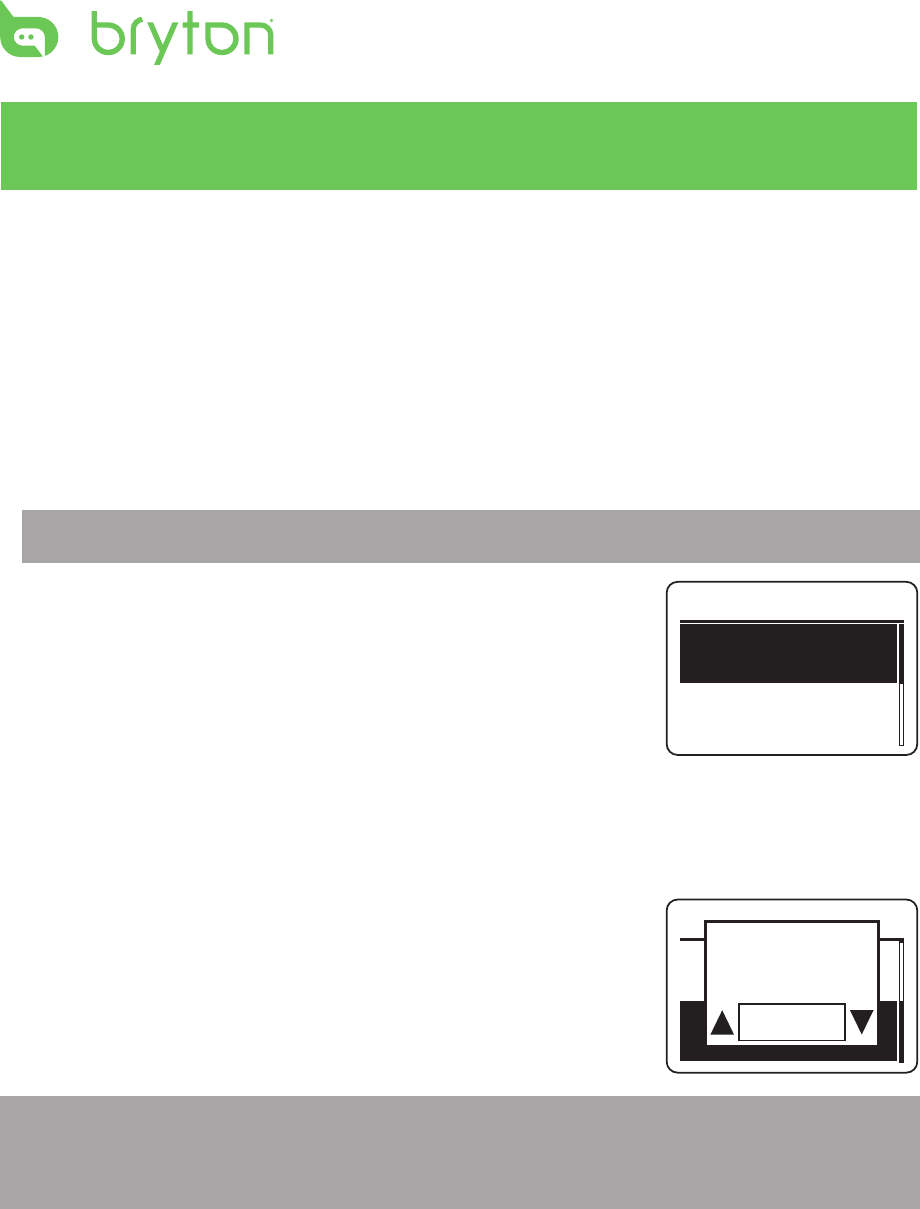
Smart Lap
To start a Lap workout, do the following:
Cardio 40
1. Press q to enter the menu mode.
2. Press p/q to select Settings > Exercises > Smart Lap >
Distance or Location and press OK to enter its submenu.
3. Set the training target and press OK to conrm.
Cardio 60
1. Press q to enter the menu mode.
2. Press p/q to select Settings > Exercises > Running, Cycling, or Others > Smart Lap >
Distance or Location and press OK to enter its submenu.
3. Set the training target and press OK to conrm.
Mark Lap
To mark a lap, do the following:
Cardio 40
AvgPace 05:50/km
Total 03:18:57
Lap
Start an activity rst by pressing OK. While recording, press OK
to mark lap. When using Lap, the Lap screen will be displayed
while you are doing exercise or training.
Cardio 60
1. Press q to enter the menu mode.
2. Press p/q to select Settings > Exercises > Running, Cycling, or Others and press OK
to enter its submenu.
3. While recording, press OK to mark lap. When using Lap, the Lap screen will be displayed
while you are doing exercise or training.
Location
Smart Lap
16 Cardio 40/60 User’s Manual
Train & Test
To Plan
The device oers you with two types of workouts: Simple and Interval.
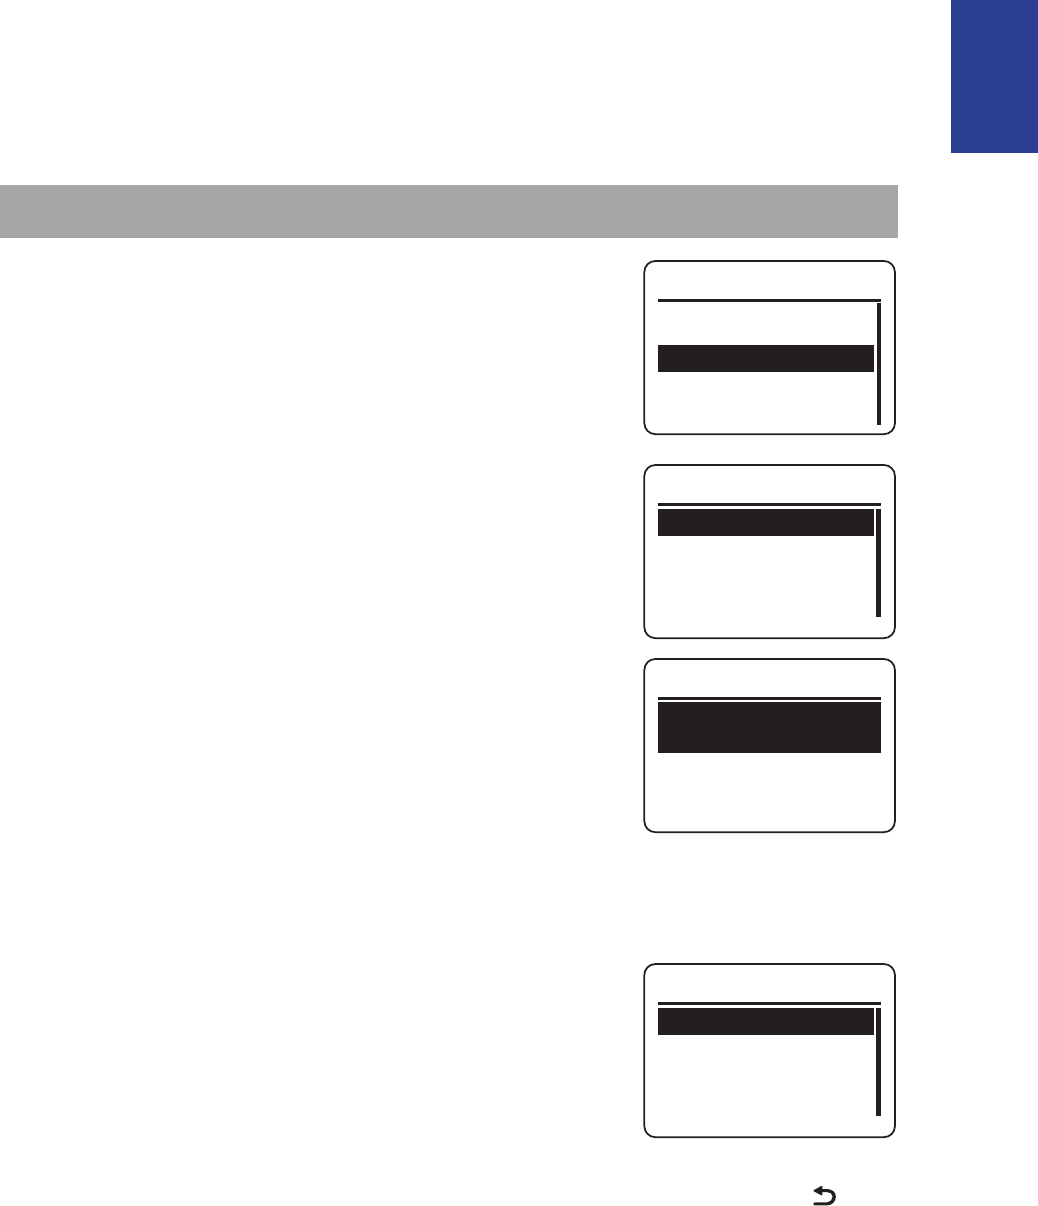
Simple Workouts
There are three types of simple workouts: By Time, By Distance, and By Calories.
1. Press q to enter the menu mode.
2. Press p/q to select Train & Test and press OK to enter Training menu.
NOTE: On Cardio 60, select Train & Test > Running or Cycling.
3. To set a simple workout, select To Plan > Simple > Warm Up,
Work, or Cooldown.
Warm Up• :
Duration (manual, calorie,time, distance), Target (pace, LTHR).
Work• :
Duration (calorie, time,distance), Target (pace, MHR%, LTHR%,
HR, MHR, LTHR).
Cooldown• :
Duration (manual, calorie,time, distance), Target (pace, LTHR).
4. Set the training target and press OK to conrm.
5. Choose Save and press p/q to enter the workout name.
When nishing the name, choose Back to save the workout
name.
NOTE: To perform the workout, go to
Cardio 60• : Train & Test > Running or Cycling >My Workout >View.
Cardio 40• : Train & Test> My Workout > View.
Simple
Warm Up
10’0” 8’0”~7’0”
Work
6’0” 148~160bpm
Simple
Cooldwn
10’0” 93~110bpm
Save Yes
Save to my
Workout?
17
ENGLISH
Cardio 40/60 User’s Manual
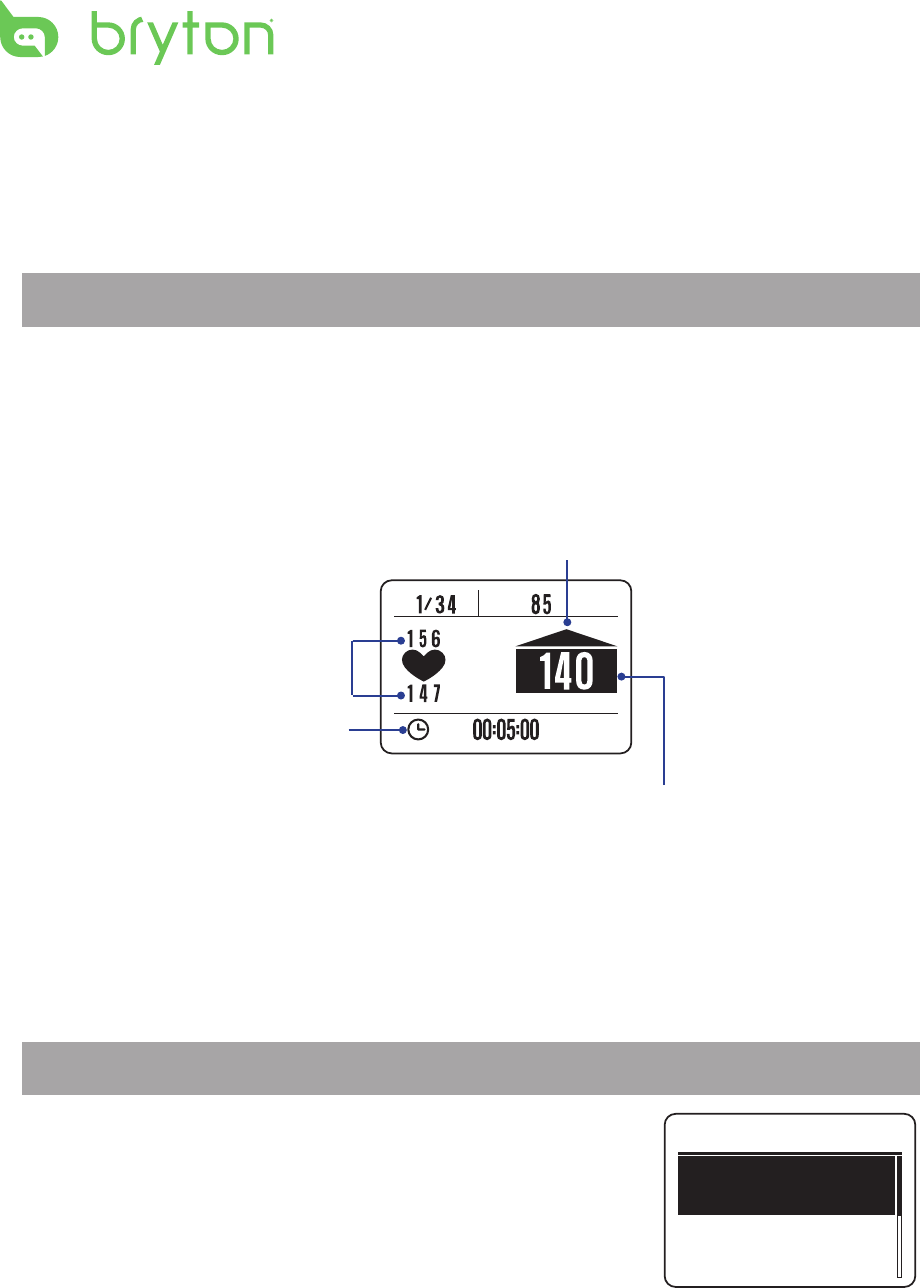
Interval Workouts
With the Interval training feature, you can use your device to customize interval workouts
which include the warm up and cool down sections.
1. Press q to enter the menu mode.
2. Press p/q to select Train & Test and press OK to enter Training menu.
NOTE: On Cardio 60, select Train & Test > Running or Cycling.
3. To set an interval workout, select To Plan > Interval.
4. A “Set warm up?” message appears on the screen. Select Yes
to set the “Warm up”. After the settings are complete, select
OK and press OK to continue.
5. Set the interval workout settings (Work, Recovery, and
Repeat Time). When nished, press p/q to select Next and
press OK to continue.
6. A “Create a new main set?” message appears on the screen.
To create another set of interval workout, select Yes and press OK to conrm.
7. A “Set cool down?” message appears on the screen. Select Yes
Duration
Target
OK
Cooldown
to set the “Cool down” settings. After the settings are complete,
select OK and press OK to continue.
8. A “Save to My Workout” message appears on the screen. Select Yes and press OK to
continue. Press p/q to enter the workout name. When nishing the name, press key
and press OK to save the workout.
Simple
Interval
To Plan
Duration
Target
OK
Warm Up
Work 1
Work
6’ 00” 158~170bmp
2’ 00” 137~149bmp
Recovery
18 Cardio 40/60 User’s Manual
My Workout
You can start a workout using your planned workouts on Cardio 40/60.
1. Press q to enter the menu mode.
2. Press p/q to select Train & Test and press OK to enter Training menu.
NOTE: On Cardio 60, select Train & Test > Running or Cycling.
3. Press p/q to select My Workout > View.
4. Select your desired training plan.
5. The selected workout details appear on the screen. Press OK to start exercise.
Bryton Workout
Bryton Workout has preloaded on Cardio 40/60. If you don’t have it on your device, please
download from brytonsport.com.
1. Press q to enter the menu mode.
2. Press p/q to select Train & Test and press OK to enter Training menu.
NOTE: On Cardio 60, select Train & Test > Running or Cycling.
3. Press p/q to select Bryton WKT.
4. Select your desired training plan.
5. The selected workout details appear on the screen. Press OK
to start exercise.
Bryton WKT
20' in Z 1-2
20' Z3
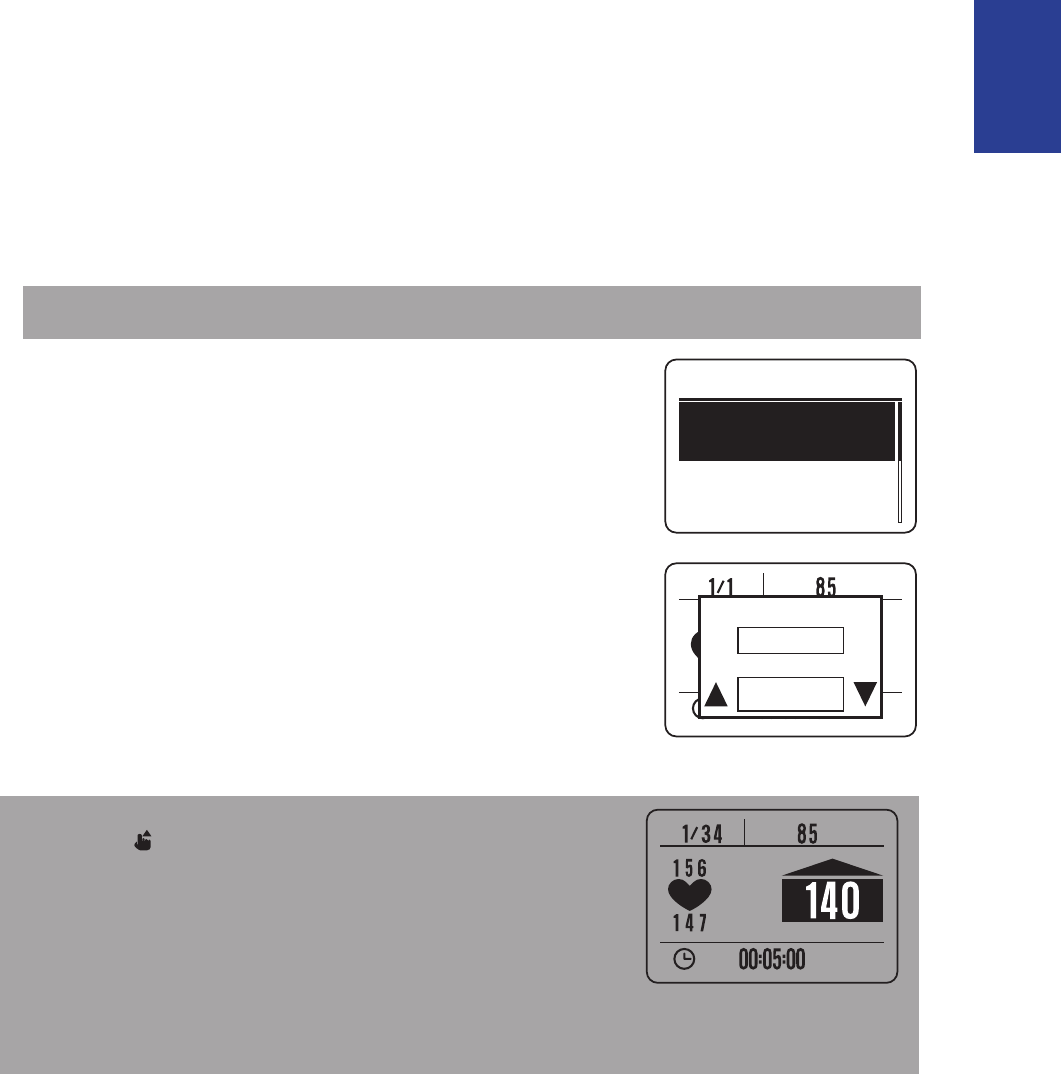
r
p
m
Exercise time
Target training zone
Heart rate is slower than your target
training zone, please speed up.
Current performance
19
ENGLISH
Cardio 40/60 User’s Manual
Bryton Test
Bryton Test has preloaded on Cardio 40/60. If you don’t have it on your device, please
download from brytonsport.com. Bryton Test includes two test courses to help you
measuring your MHR and LTHR to allow Bryton workout use these data to create target
training zone. Knowing your MHR and/or LTHR gives you a benchmark of your overall
eciency. It also help you to judge progress over time and measure your exercise intensity.
1. Press q to enter the menu mode.
2. Press p/q to select Train & Test and press OK to enter Training menu.
NOTE: On Cardio 60, select Train & Test > Running or Cycling.
3. Press p/q to select Bryton Test.
4. Select your desired test workout.
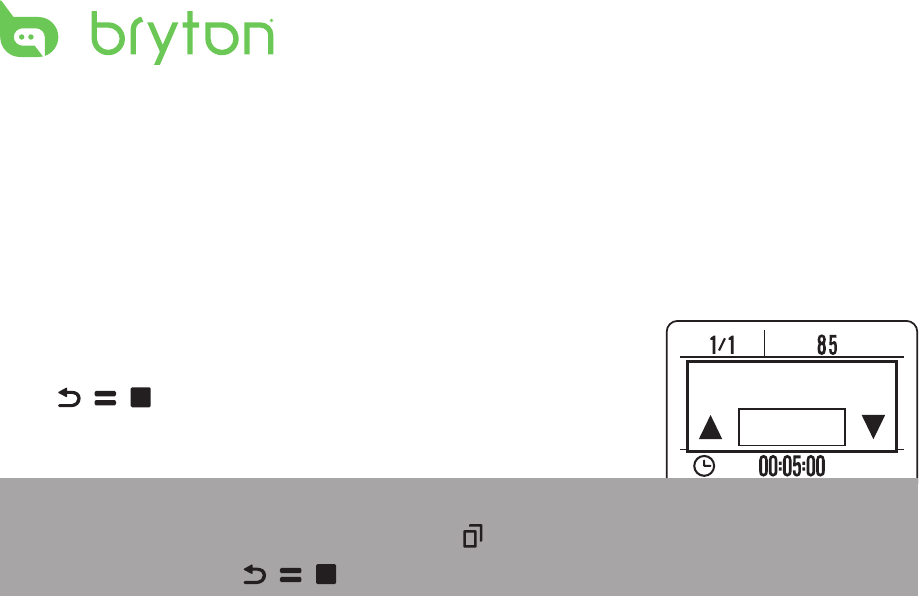
5. The selected workout details appear on the screen. Press OK
to start exercise.
6. When nished the Bryton Test, press p/q to save the result.
NOTE:
When the • icon appears on the screen, press p to skip
the current Interval.
It is highly recommend to implement the Bryton Test and save the test results to •
enhance your training eciency.
Bryton Test
LTHR
MHR
r
p
m
Yes
LTHR
Save ?
165 bpm
r
p
m
20 Cardio 40/60 User’s Manual
r
p
m
Yes
Do you want
to stop?
Start Training
Press OK to start recording the log.
Pause/Stop Training
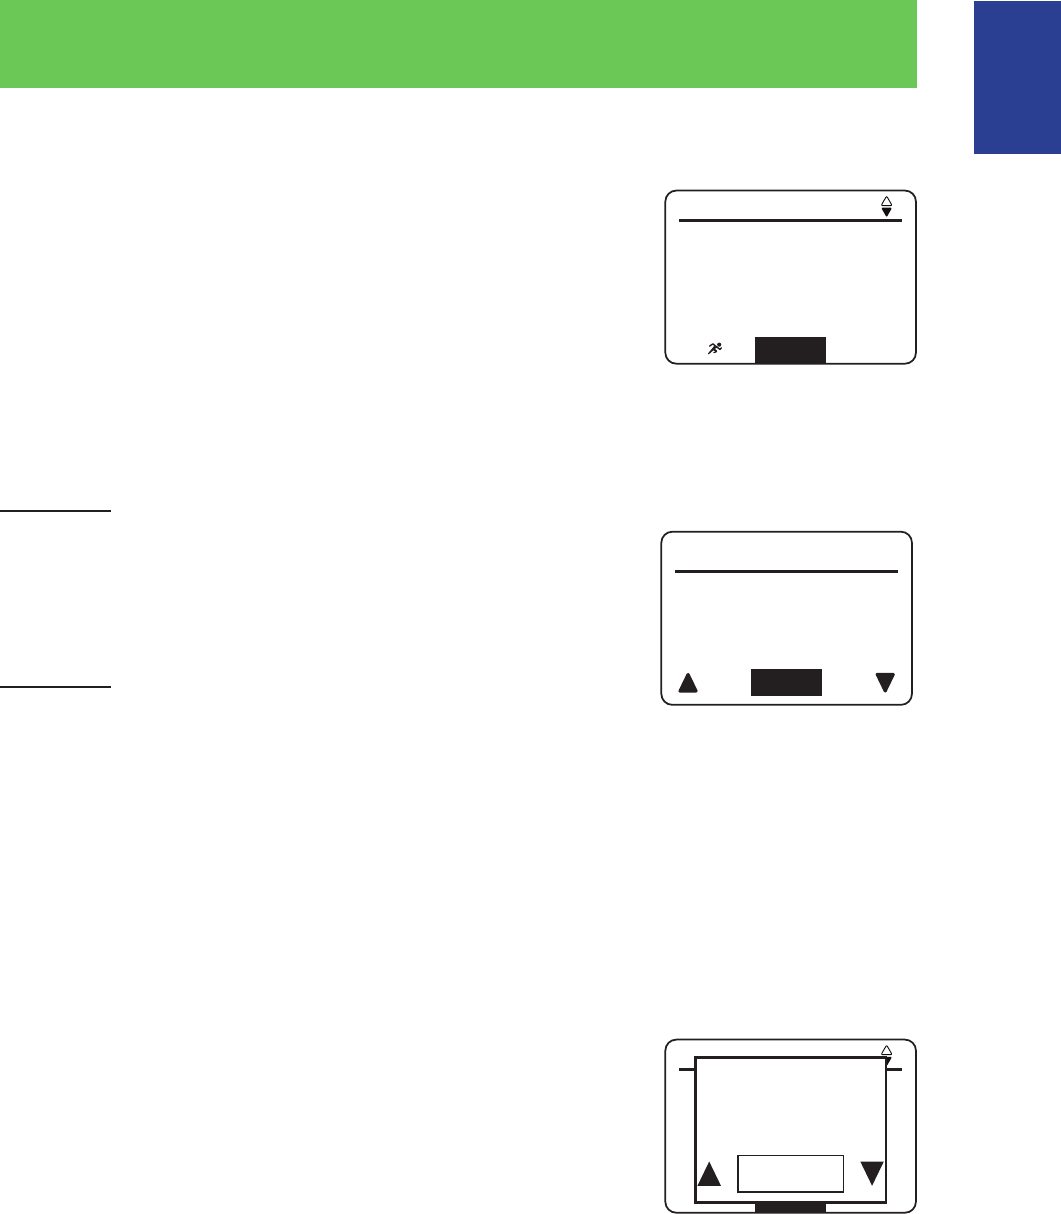
You can stop the current training after you have reached your
goal.
Press / / to stop the recording.
NOTE:
During exercising/training, press and hold• q/ to enter Shortcut menu.
When recording, press• / / to stop recording.
21
ENGLISH
Cardio 40/60 User’s Manual
View History
View History
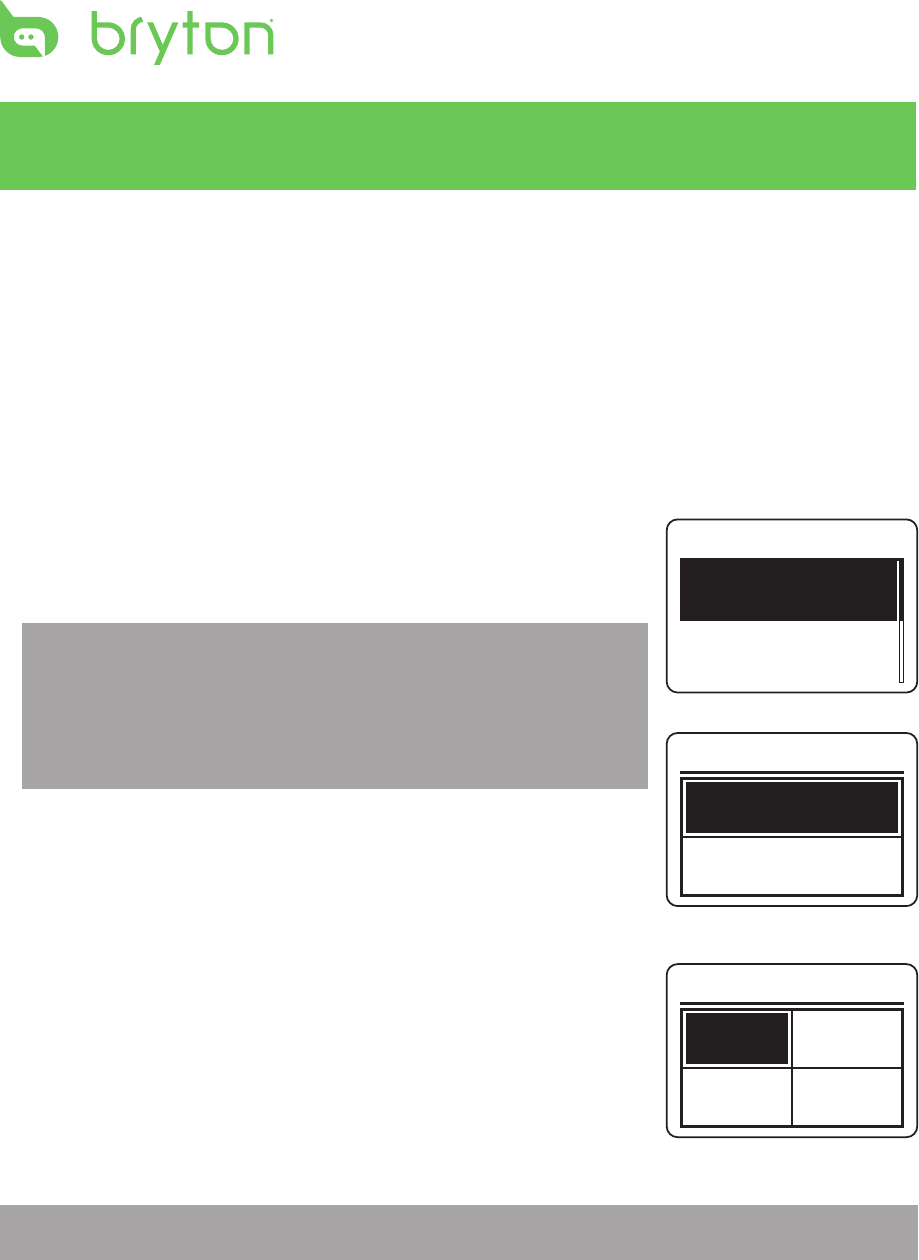
To view your history, do the following:
1. Press q to enter the menu mode.
2. Press p/q to select View History > View and press OK to
conrm.
3. Use p/q to view your history. Choose More for more details.
View Summary
To view the summary, do the following:
Cardio 40
1. Press q to enter the menu mode.
2. Press p/q to select View History > Summary and press OK
to conrm.
3. Use p/q to view the activities summary.
Cardio 60
1. Press q to enter the menu mode.
2. Press p/q to select View History > Summary > Running, Cycling, Outdoor Swim, or
Others and press OK to conrm.
3. Use p/q to view the activities summary.
Delete Exercise Records
To delete one record, do the following:
1. Press q to enter the menu mode.
2. Press p/q to select View History > Delete and press OK to conrm.
3. Press p/q to select the record that you want to delete and
press OK to conrm.
4. A “Please backup data rst. Erase?” message appears on the
screen. To delete the data, press p/q to select Yes and press
OK to conrm.
To delete all records, do the following:
1. Press q to enter the menu mode.
2. Press p/q to select View History > Delete All and press OK to conrm.
3. A “Please backup data rst. Erase?” message appears on the screen. To delete the data,
press p/q to select Yes and press OK to conrm.
150:00 min/km
00:06:00 Run Time
1.00 km
512 kcal
5 laps
2/5
More
12/25 12:23
150:00 min/km
00:06:00 Run Time
1.00 km
512 kcal
5 laps
2/5
Delete
12/25 12:23
No
Please
backup data
first. Erase?
Cal 376
Time 68:07
Dist 10.68
kcal
km
Close
Total
22 Cardio 40/60 User’s Manual
Settings
With the Settings feature, you can customize exercises settings, watch settings, general
settings, sensor settings, and user prole and/or bike prole.
Exercises Settings
Customize the Display Settings
1. Press q to enter the menu mode.
2. Press p/q to select Settings and press OK to enter Settings menu.
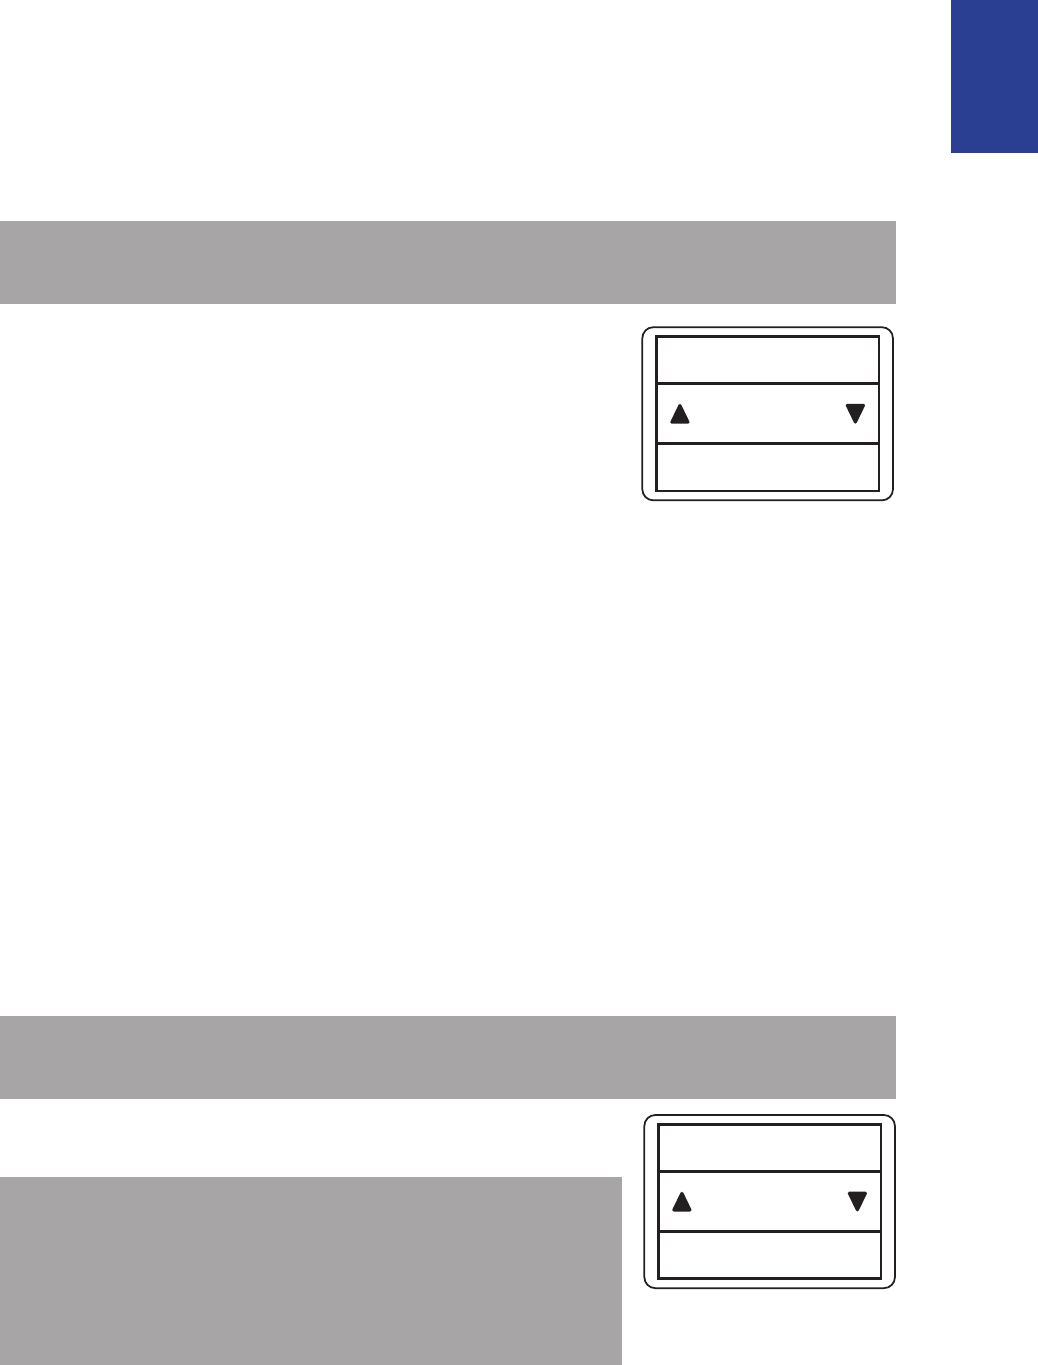
3. Press p/q to select Exercises > Meter > Meter > Meter1,
Meter2, Meter3, or Meter4 and press OK to enter its
submenu.
NOTE:
On Cardio 60, select • Exercises > Running, Cycling, Outdoor
Swim, or Others > Meter > Meter > Meter1, Meter2,
Meter3, or Meter4 and press OK to enter its submenu.
Lap only has Meter 1 and Meter 2 for personalized settings.•
4. Press p/q to select the number of data elds and press OK
to conrm.
5. Press p/q to select the item eld that you want to
customize, and press OK to conrm the selection.
6. Press p/q to select the desired setting and press OK to
conrm. You can customize your meter page/lap page
by selecting from the various items. Refer to page 34 on
Appendix for the full list of personalized items.
NOTE: After the setting is complete, the Lap screen appears only when Lap function starts.
Run Meter
Meter1
Meter2
On
On
Meter
Run Time
Distance
2-grid display
Meter
Time
Pace
Distance
Heart Rate
4-grid display
23
ENGLISH
Cardio 40/60 User’s Manual
Congure Smart Lap Settings
With Smart Lap feature, you can use your device to automatically mark the lap at a specic
location or after you have traveled a specic distance.
1. Press q to enter the menu mode.
2. Press p/q to select Settings and press OK to enter Settings menu.
3. Press p/q to select Exercises > Smart Lap and press OK to enter its submenu.
NOTE: On Cardio 60, select Exercises > Running, Cycling, or Others > Smart Lap and
press OK to enter its submenu.
4. Select the desired option and congure the necessary settings.
Location: set your current location as the lap point. Upon •
reaching the lap point, the device will automatically mark the
lap.
Distance: specify the distance of each lap.•
O: disable Lap feature.•
5. Press p/q to select the desired setting and press OK to conrm.
Set Exercise Reminder
With the Exercise Reminder feature, the device beeps and displays a message to notify you
if:
your heart rate exceeds or drops below a specic number of beats per minute (bpm).•
you exceed or drop below a custom speed setting during your ride.•
your cadence speed exceeds or drops below a specic number of revolutions of the crank •
arm per minute (rpm).
you reach a certain amount of distance for the long workouts.•
you reach a certain amount of time for the long workouts.•
1. Press q to enter the menu mode.
2. Press p/q to select Settings and press OK to enter Settings menu.
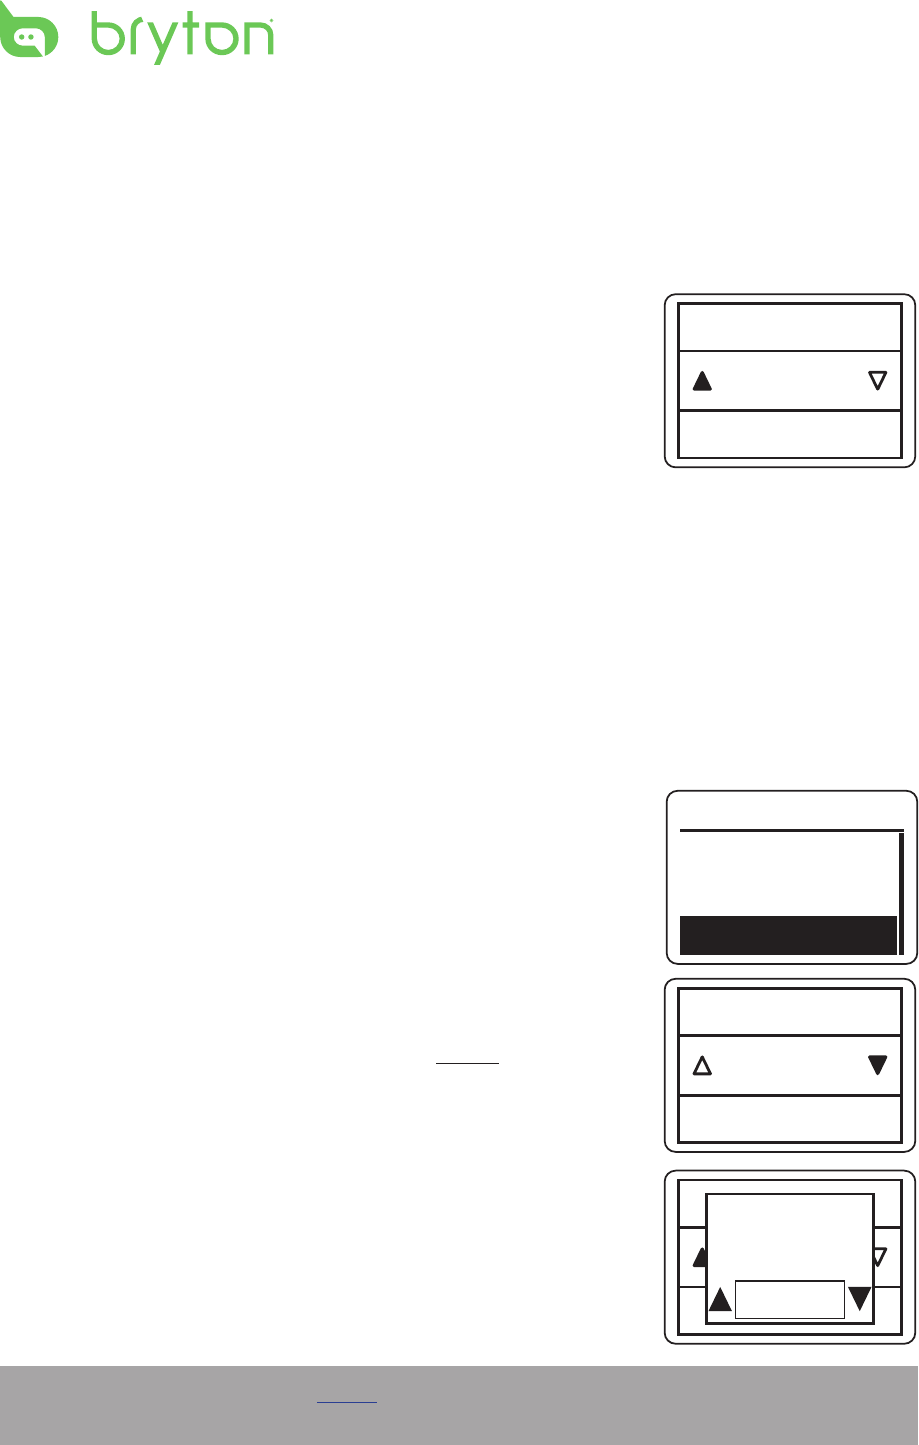
3. Press p/q to select Exercises > Exer. Remind and press OK to enter its submenu.
NOTE: On Cardio 60, select Exercises > Running, Cycling, Outdoor Swim, or Others >
Exer. Reminder and press OK to enter its submenu.
4. Select Time, Distance, Stride Rate, HR, or Pace and press OK
to congure the necessary settings.
NOTE: On Cardio 60, the available options vary depending
on the selected mode:
- Running mode: O/Time/Distance/StrideRate/HR/Pace
- Cycling mode: O/Time/Distance/Speed/HR/Cadence
- Outdoor Swim mode: O/Time/Distance
- Others mode: O/Time/Distance
Distance
Smart Lap
Distance
Exer. Remind
24 Cardio 40/60 User’s Manual
5. Press p/q to select the desired setting and press OK to conrm.
Enable Triathlon Transition Time (Cardio 60 only)
With Triathlon Transition Time feature, you can add a transition time before starting the next
sport.
1. Press q to enter the menu mode.
2. Press p/q to select Settings and press OK to enter Settings
menu.
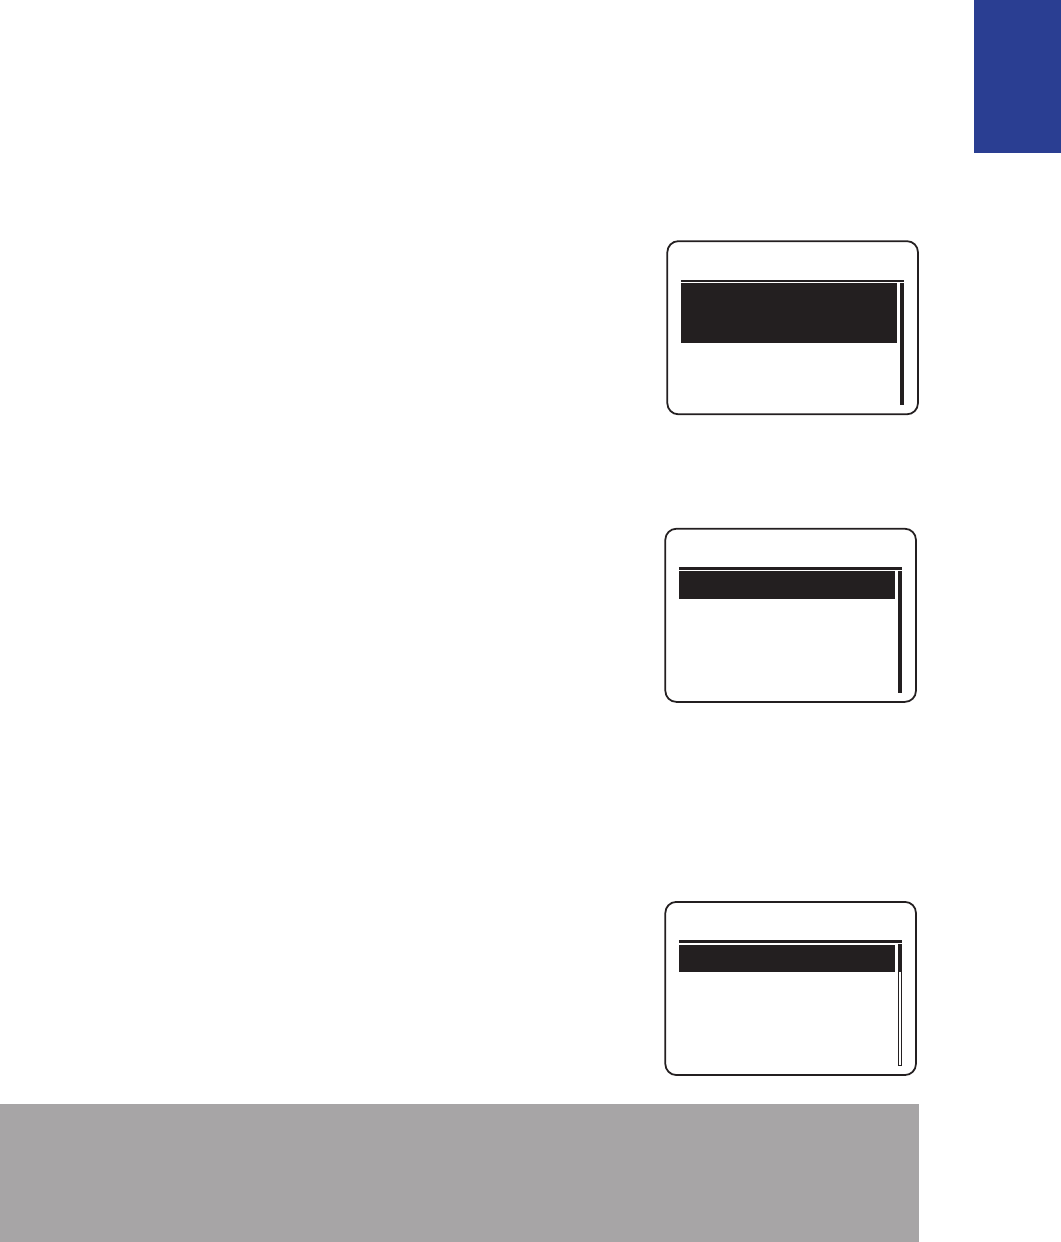
3. Press p/q to select Exercises > Triathlon and press OK to
enter its submenu.
4. Press p/q to select On and press OK to conrm.
Multisport Sequence Setup (Cardio 60 only)
With Multisport Sequence feature, you can use your device to arrange the sports sequence.
1. Press q to enter the menu mode.
2. Press p/q to select Settings and press OK to enter Settings menu.
3. Press p/q to select Exercises > Multisport > Manual and press OK to enter its
submenu.
4. Press p/q to select Preset and press OK.
5. Press p/q to select Create New and press OK to edit the
sports sequence.
6. Press p/q to select the desired sport and press OK to conrm.
7. To add more sports, press OK and repeat Step 6.
8. After the setup is complete, press p/q to select Save and
press OK to enter the transition time submenu.
Then press p/q to select Yes and press OK to add transition
time.
NOTE: If you select Manual on step 4, you need to press OK to switch to another sport
after you start the exercise.
On
Trans Time
Multisport
Preset
View
Create New
Running
Multisport
Running
Multisport
Yes
Add transition
Time?
25
ENGLISH
Cardio 40/60 User’s Manual
Watch Settings
Adjust Date
Adjust the date and specify the date format.
1. Press q to enter the menu mode.
2. Press p/q to select Settings > Watch > Date and press OK to enter its submenu.
3. Select the desired option and congure the necessary settings.
Set Date: adjust the date. •
Date format: specify the date format.•
4. Press p/q to select the desired setting and press OK to
conrm.
Change Clock View
Specify the clock view.
1. Press q to enter the menu mode.
2. Press p/q to select Settings > Watch > Clock Mode and
press OK to enter its submenu.
3. Press p/q to select Digital or Analog and press OK to
conrm.
General Settings
Change Backlight O Settings
Specify the backlight time.
1. Press q to enter the menu mode.
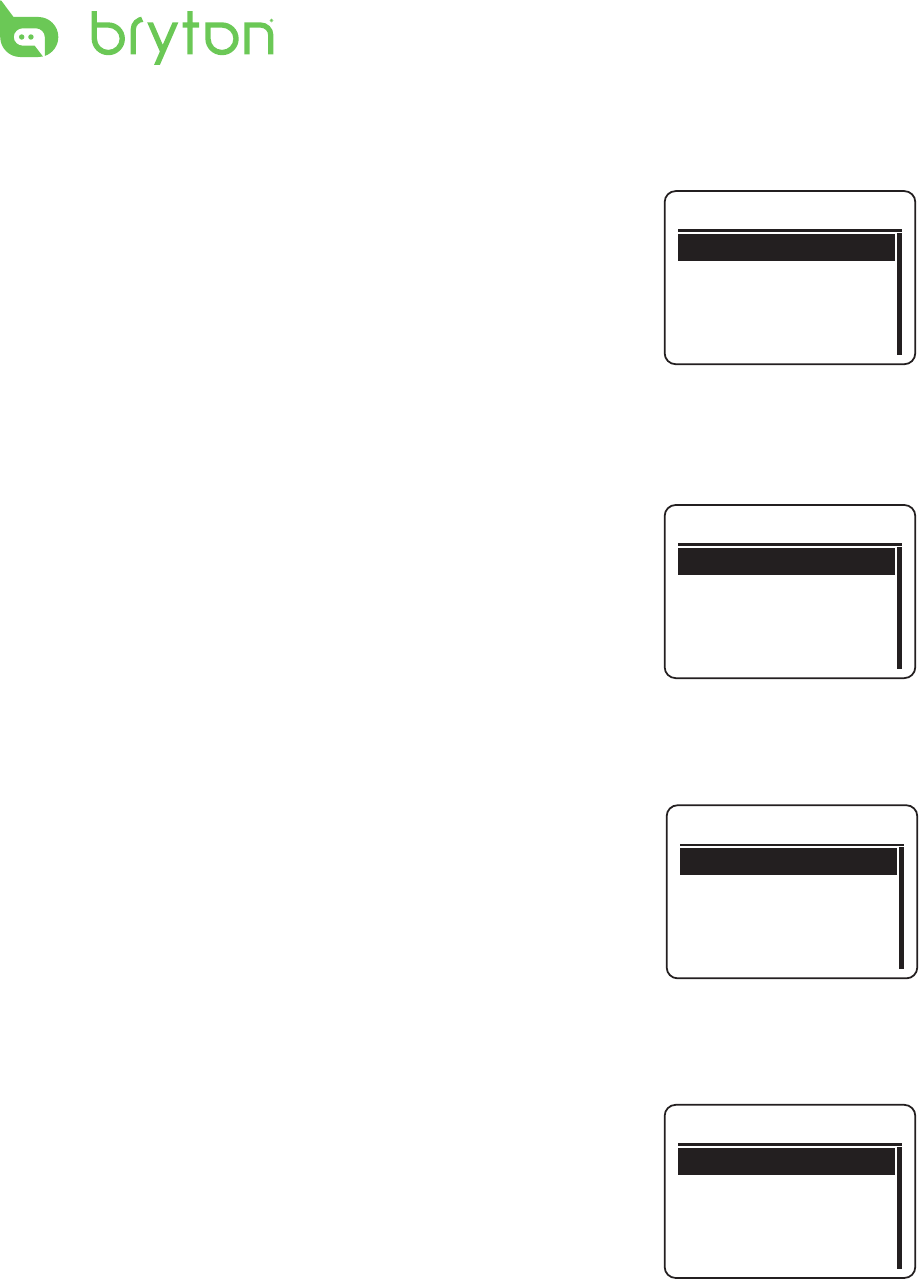
2. Press p/q to select Settings > General > System >
Backlight O and press OK to enter its submenu.
3. Press p/q to select the desired setting and press OK to
conrm.
NOTE: The auto mode is based upon the current date and GPS position by which this
navigator calculates the exact sunrise and sunset times on the particular day at the
particular location. Using this information, the device can automatically turn on the
backlight a few minutes after sunset before the sky gets dark.
Date
Set Date
Date format
dd/mm/yyyy
Clock Mode
Digital
Analog
5 Sec
15 Sec
30 Sec
Backlight Off
26 Cardio 40/60 User’s Manual
Enable Auto Key Lock (Cardio 60 only)
When the feature is enabled, the key will be automatically locked after 10 seconds.
1. Press q to enter the menu mode.
2. Press p/q to select Settings > General > System > Auto Key
Lock and press OK to enter its submenu.
3. Press p/q to select the desired setting and press OK to
conrm.
Enable Key Vibrate (Cardio 60 only)
When the feature is enabled, the key will vibrate whenever you click a button.
1. Press q to enter the menu mode.
2. Press p/q to select Settings > General > System >
Key Vibrate and press OK to enter its submenu.
3. Press p/q to select On and press OK to conrm.
Enable Key Tone
When the feature is enabled, the device will play sounds whenever you click a button.
1. Press q to enter the menu mode.
2. Press p/q to select Settings > General > System >
Key Tone and press OK to enter its submenu.
3. Press p/q to select On and press OK to conrm.
Enable Vibrate (Cardio 60 only)
When the feature is enabled, the device will vibrate once you miss your targeted goal.
1. Press q to enter the menu mode.
2. Press p/q to select Settings > General > System >
Vibrate and press OK to enter its submenu.
3. Press p/q to select On and press OK to conrm.
Key Vibrate
On
Off
Key Tone
On
Off
Vibrate
On
Off
Auto Key Lock
On
Off

27
ENGLISH
Cardio 40/60 User’s Manual
Alert
On
Off
Enable Alert Notication
When the feature is enabled, the device will play sounds to remind you once you miss your
targeted goal.
1. Press q to enter the menu mode.
2. Press p/q to select Settings > General > System > Alert
and press OK to enter its submenu.
3. Press p/q to select On and press OK to conrm.
Specify Unit
Specify the measurement unit.
1. Press q to enter the menu mode.
2. Press p/q to select Settings > General > System > Unit
and press OK to enter its submenu.
3. Press p/q to select the desired setting and press OK to
conrm.
Specify the On-Screen Display (OSD) Language
Specify the OSD language.
1. Press q to enter the menu mode.
2. Press p/q to select Settings > General > System > Language and press OK to enter its
submenu.
3. Press p/q to select the desired language and press OK to conrm.
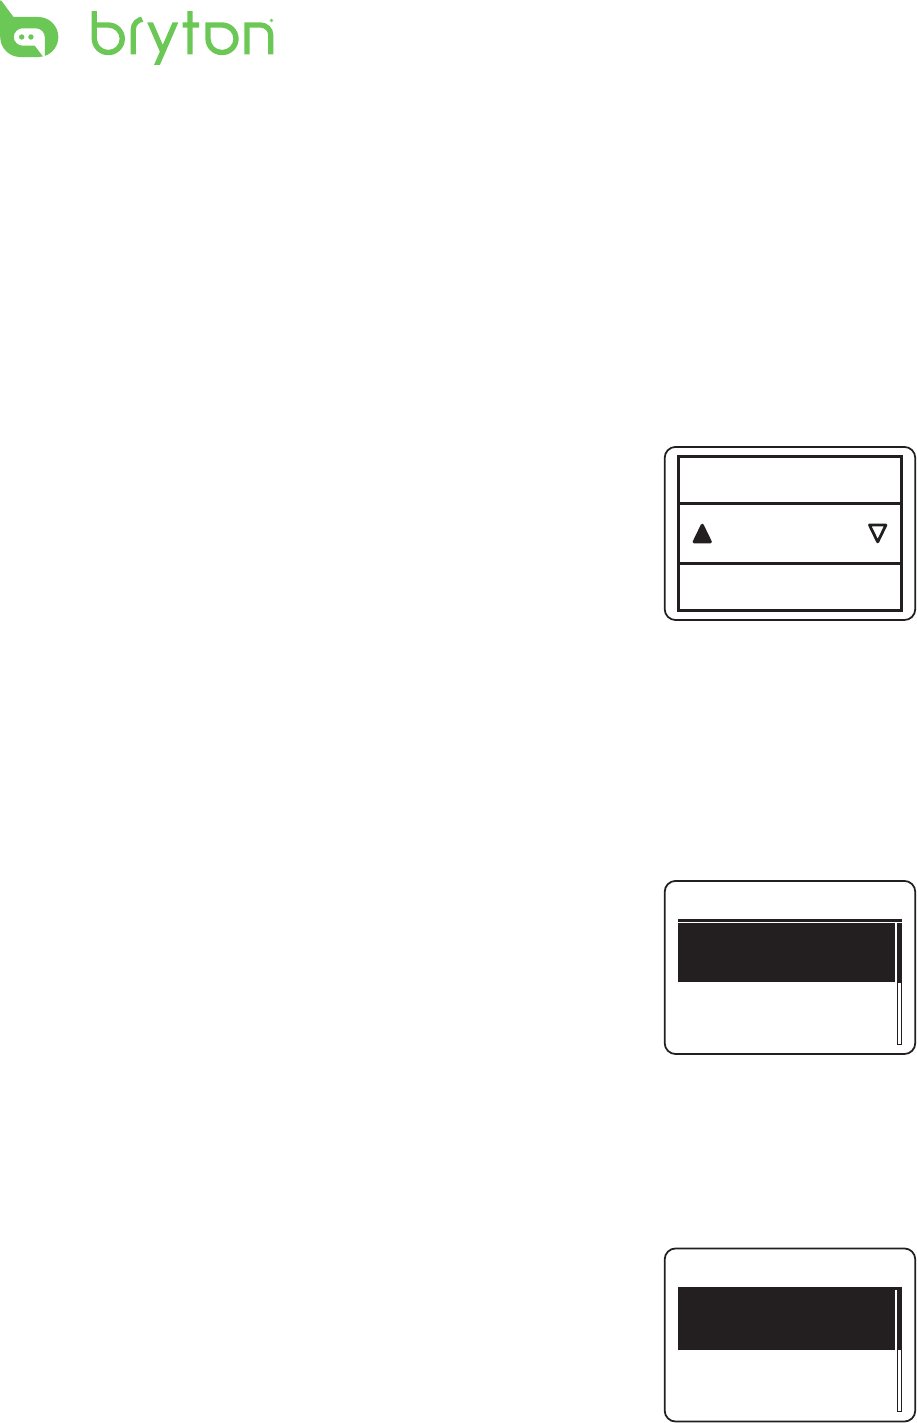
Set GPS Mode
Set the GPS operating mode.
1. Press q to enter the menu mode.
2. Press p/q to select Settings > General > GPS and press OK to enter its submenu.
3. Set the desired setting.
O• : Disable the GPS. Please use this mode for indoor
activities..
Full Power• : GPS is set on to provide more accurate
position but consume more power. The full power mode is
recommended for the following conditions:
- Environments with limited sky view, such as forest or urban area.
- In small, repeated path, such as track elds.
- If your exercise time is lower than the specied battery hour, choose Full Power mode to
maximize GPS accuracy.
Unit
KM, KG
MI, LB
GPS
Off
Full Power
PowerSaving
28 Cardio 40/60 User’s Manual
• PowerSaving: The GPS positioning will be less accurate but battery hours can last
longer. When exercising in environments with good sky view, such as in country side or
along the river, there will be no dierences between power saving mode and full power
mode. In these cases, choose power saving mode to maximize the battery life.
4. Press OK to conrm.
Enable Race Mode
When the feature is enabled, the screen will remain at the meter page and the GPS will stay
active. In this mode, you can press OK immediately once your race starts.
1. Press q to enter the menu mode.
2. Press p/q to select Settings > General > Race mode and
press OK to enter its submenu.
3. To enable this feature, press p/q to select Yes and press OK
to conrm.
Congure Auto Scroll (Cardio 60 only)
When the feature is enabled, the meter view will automatically switch pages at the preset
time.
1. Press q to enter the menu mode.
2. Press p/q to select Settings > General > Auto Scroll and press OK to enter its
submenu.
3. Select the desired option and congure the necessary settings.
Auto Scroll: enable/disable the feature. •
Interval: specify the time interval.•
4. Press p/q to select the desired setting and press OK to
conrm.
Enable File Saving Mode
When the feature is enabled, the device will automatically overwrite from your oldest
records when memory storage is full.
1. Press q to enter the menu mode.
2. Press p/q to select Settings > General > File Saving and
press OK to enter its submenu.
3. To enable this feature, press p/q to select Yes and press OK
to conrm.
Yes
Enable
Auto Scroll
Auto Scroll
Interval
5 sec
On
File Saving
Overwrite
Yes

29
ENGLISH
Cardio 40/60 User’s Manual
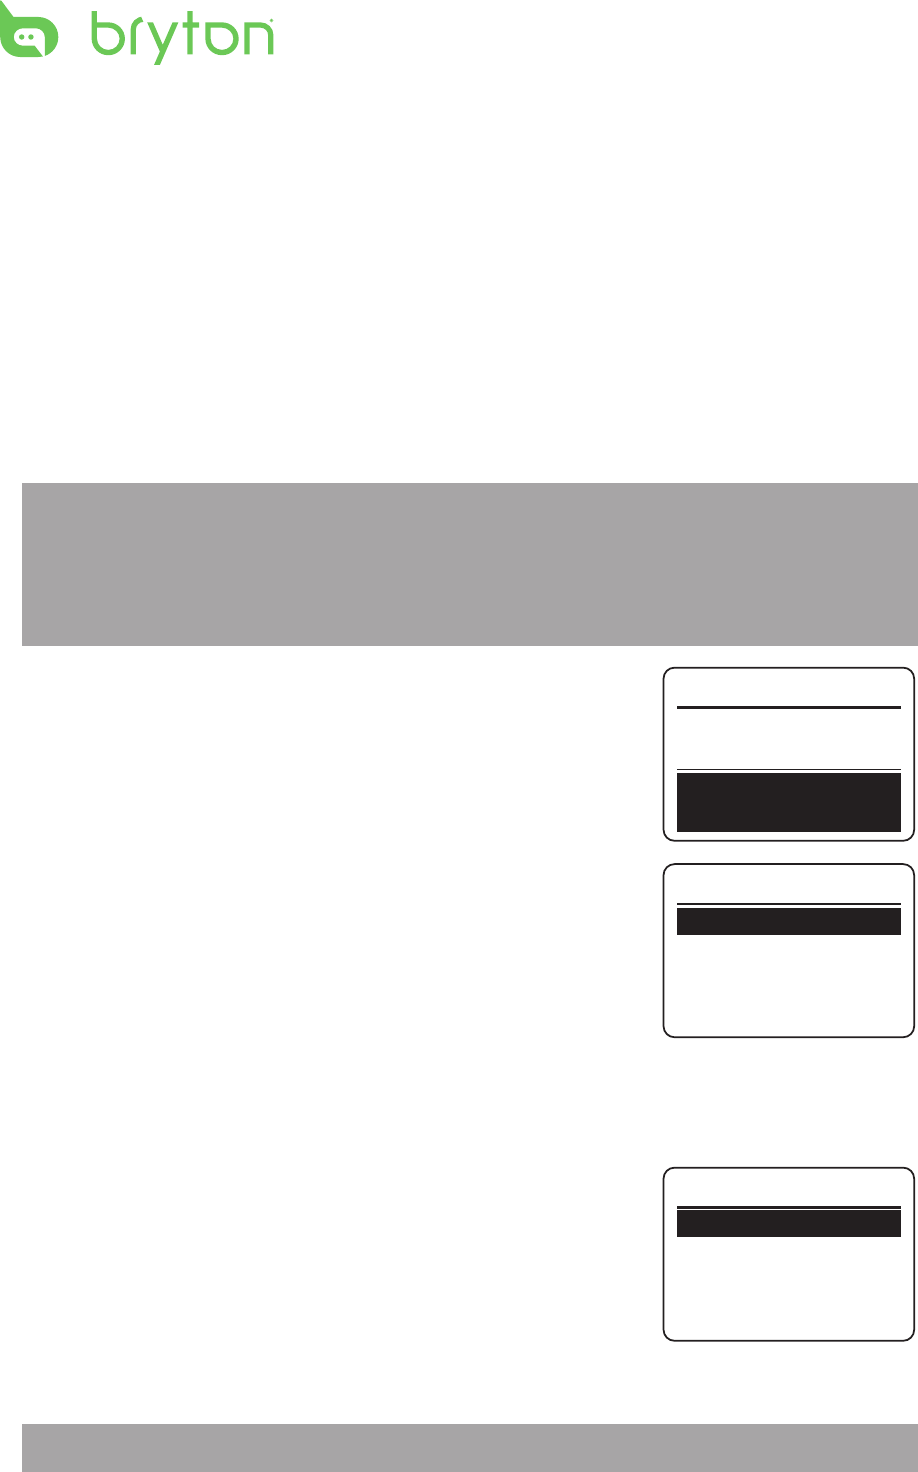
Adjust Contrast Level
Set your desired contrast level of the display.
1. Press q to enter the menu mode.
2. Press p/q to select Settings > General > Contrast and
press OK to enter its submenu.
3. Press p/q to select the desired setting and press OK to
conrm.
View Memory Usage
View the storage status of the device.
1. Press q to enter the menu mode.
2. Press p/q to select Settings > General > Mem Usage and
press OK to conrm.
The storage status is displayed on the screen.
NOTE: On Cardio 60, select Settings > General > Memory %
and press OK to conrm.
About
You can view the device current rmware version.
1. Press q to enter the menu mode.
2. Press p/q to select Settings > General > About and press OK to conrm.
The current rmware version is displayed on the screen.
Contrast
Memory %
50%
30 Cardio 40/60 User’s Manual
Sensors
You can customize the sensor settings such as enable/disable the function or rescan the
sensor.
Link Heart Rate Sensor
1. Press q to enter the menu mode.
2. Press p/q to select Settings > Sensors > Heart Rate and press OK to enter its
submenu.
3. Cardio 40/60 has paired the heart rate sensor for you. It will automatically detect the
sensor when the sensor is activated and functioning correctly.
NOTE:
If you purchase a heart rate sensor separately, you must pair it with your Cardio 40/60 in •
order to connect your sensor with the device.
The information of the sensor ID are included in the package. Please verify the sensor ID is •
correct.
4. Select More and press OK to enter the selected sensor
submenu.
5. Press p/q to select the desired option and press OK to
conrm.
Rescan: rescan to detect the heart rate sensor. (only required •
when you want to pair your Cardio 40/60 with other heart
rate sensor)
Turn O: disable the sensor. (only required when your •
Cardio 40/60 has paired with the heart rate sensor.)
Link Other Sensors (Cardio 60 only)
1. Press q to enter the menu mode.
2. Press p/q to select Settings > Sensors > Speed, Cadence,
or Speed/CAD and press OK to enter its submenu.
3. Press p/q to select More and press OK to enter the selected
sensor submenu.
4. When the sensor is successfully connected, the sensor ID will be displayed on the screen.
Verify that the sensor ID is correct.
NOTE: The information on the sensors ID are included in the package.
Heart Rate
Rescan
Turn Off
Heart Rate
Status: Active
ID: xxxxxxxx
More
Heart Rate
Speed
Cadence
Sensors

31
ENGLISH
Cardio 40/60 User’s Manual
5. Press p/q to select the desired option and press OK to conrm.
Rescan: rescan to detect the sensor.•
Turn O (*only if the device has paired with the sensor): disable the sensor.•
Personalize User Prole
User Prole
You can change your personal information.
1. Press q to enter the menu mode.
2. Press p/q to select Settings > Prole > User Prole and press OK to enter its submenu.
3. Select the desired option and congure the necessary settings.
Gender: select your gender.•
Birthday: enter your birthday.•
Height: set your height.•
Weight: set your weight.•
Max HR: set your maximum heart rate.•
LTHR: set your lactate threshold heart rate.•
Race Time: set the distance and time for the race settings.•
NOTE: It is highly recommend to implement the Bryton Test (LTHR, MHR, 3km Race, or 5km
Race) and save the test results to device since these data will be used to create training
zone (MHR zone, LTHR zone, and Pace zone) to maximize your training eciency.
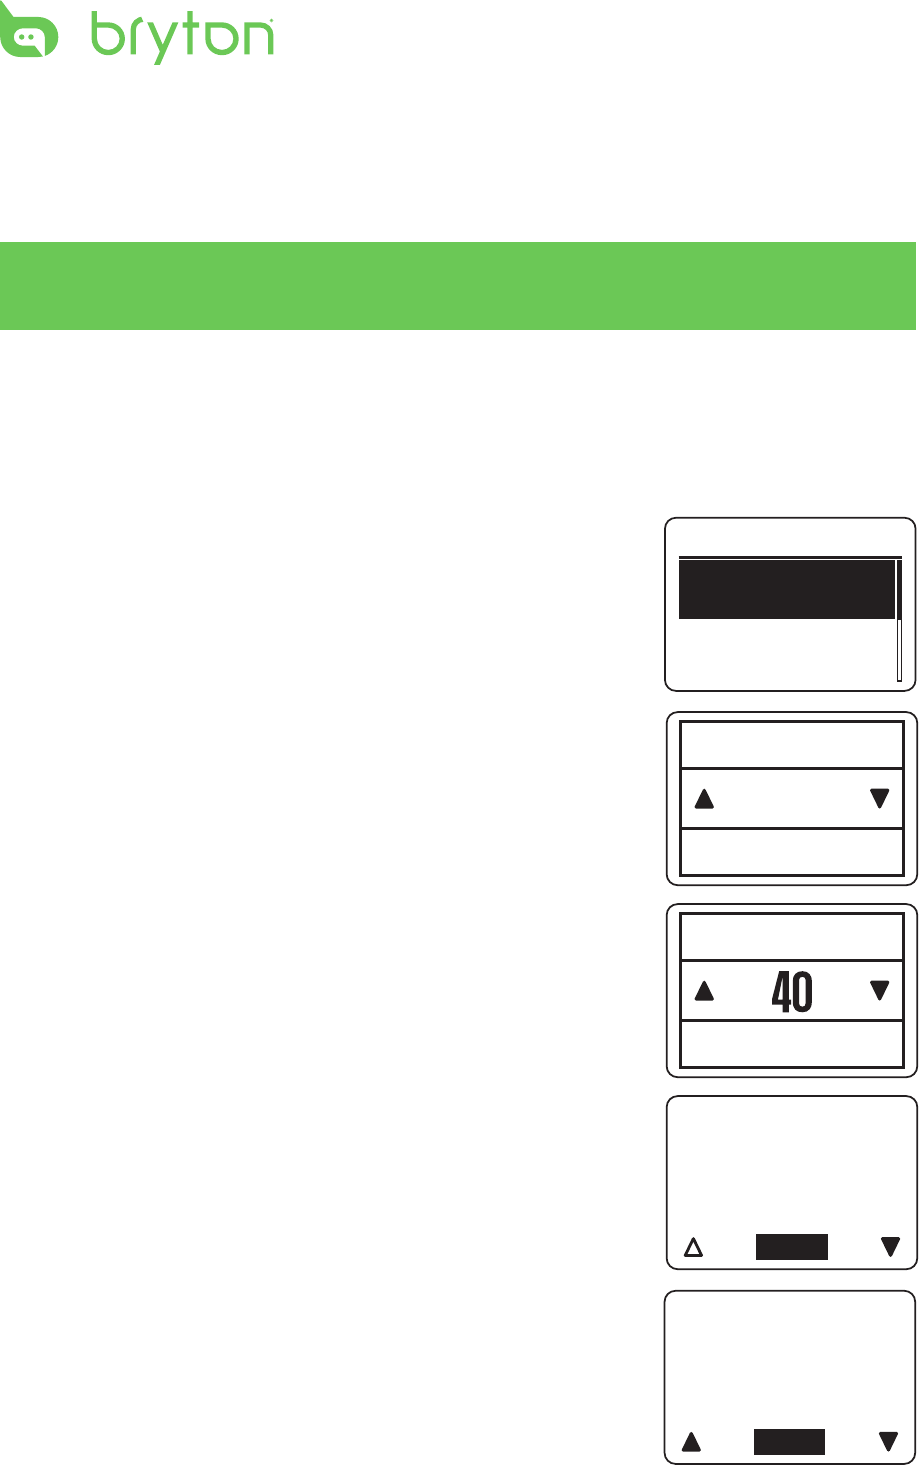
Bike Prole (Cardio 60 only)
To customize your bicycle(s) prole, do the following:
1. Press q to enter the menu mode.
2. Press p/q to select Settings > Prole > Bike Prole > Bike 1 or Bike 2 and press OK to
enter its submenu.
3. Select the desired option and congure the necessary settings.
Bike Type: select the bike type.•
Weight: set the bike weight.•
Wheel: set the bike wheel size.•
NOTE: Please make sure you enter a correct value since it will
aect the data calculation while you use speed sensor. For
details on wheel size, refer to Wheel Size and Circumference
section on page 41.
Active: select to activate the selected bike.•
To view the bike prole, do the following:
1. Press q to enter the menu mode.
User Profile
Gender
Birthday
1980/01/01
Female
Bike 1
Bike Type
Weight
6 kg
City Bike
32 Cardio 40/60 User’s Manual
Pace Cal.
Race Time
View Info
5 km 0:40:00
5km
Distance
Minute
5km 00:40:00
08:00 min/km
3km 00:23:16
07:45 min/km
Close
Race Time
Yasso 17:40
Speed 06:55
Vmax 07:26
Close
Training Pace
2. Press p/q to select Settings > Prole > Bike Prole > Overview and press OK to enter
its submenu.
3. Press p/q to select the desired bike that you want to view and press OK to conrm.
4. Press p/q to view more data of the selected bike.
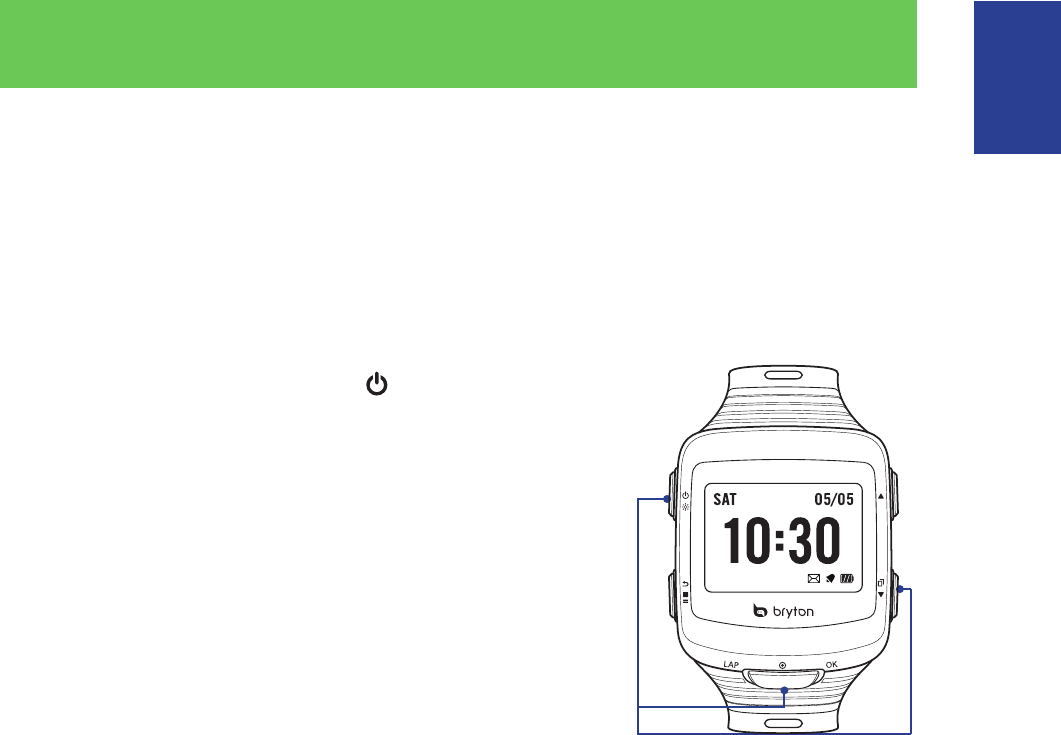
Pace Calculator
With the pace calculator function, enter the distance you ran and the length of time you
were running. It will estimate in how long it would take you to complete a variety of
dierent races. (3km, 5km, 5mi, 10km, 10mi, half marathon, marathon). Besides, it will also
predict what your personal pace should be when you are doing a Speed Form, Maximum
Oxygen, Yasso, Tempo, Easy, or Long run.
1. Press q to enter the menu mode.
2. In main menu, press q to select Pace Cal. and press OK to
enter sub menu.
3. Press Race Time to enter the run distance and run time.
4. Press p/q to select the run distance and press OK to
conrm.
5. Select the run time (Hour, Minute, and Second) and
press OK to conrm.
6. The estimate of dierent race time and training pace are
displayed on the screen.
Press p/q to view more information or press OK to exit the
screen.
33
ENGLISH
Cardio 40/60 User’s Manual
Troubleshooting
Getting More Information
Go to http://corp.brytonsport.com > Support for more detailed information.
Reset Cardio 40/60
Press and hold the three buttons ( /OK/q) at the same
time until the device restarts.
Press and hold these 3 keys
to force a system RESET.
AM
34 Cardio 40/60 User’s Manual
Appendix
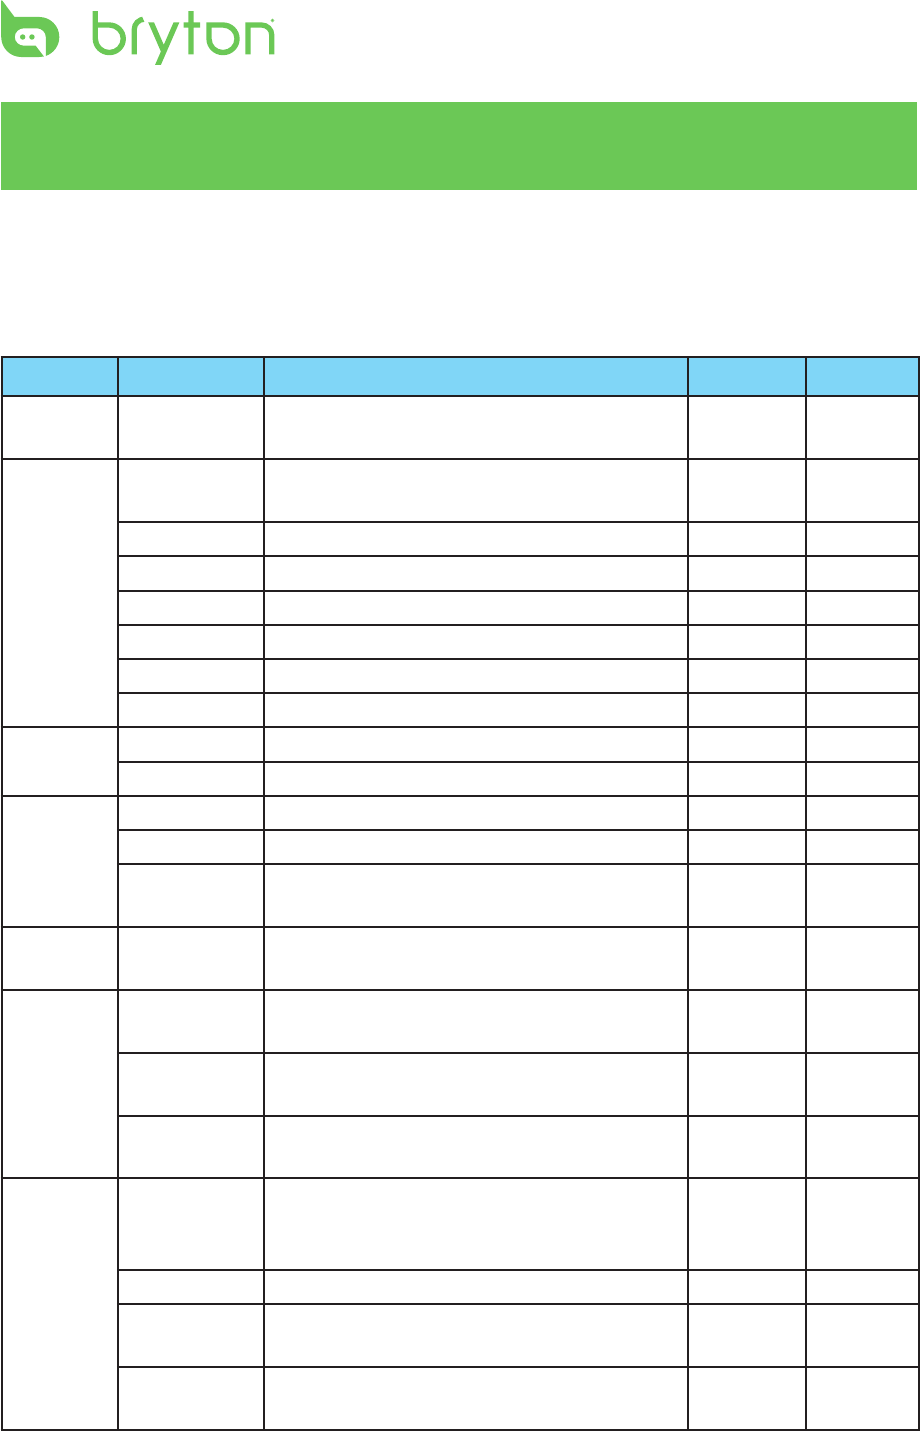
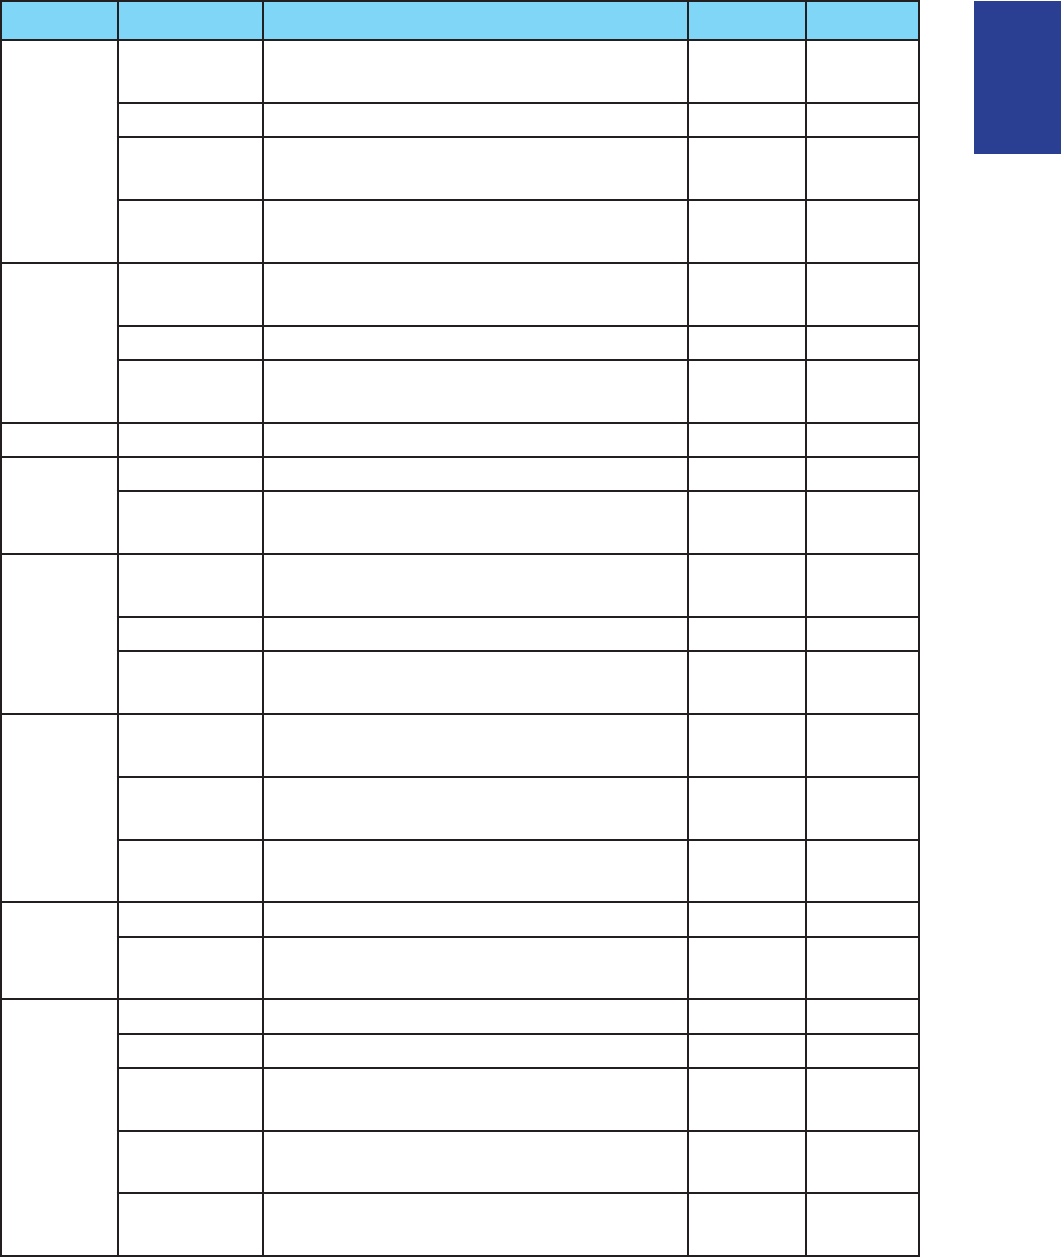
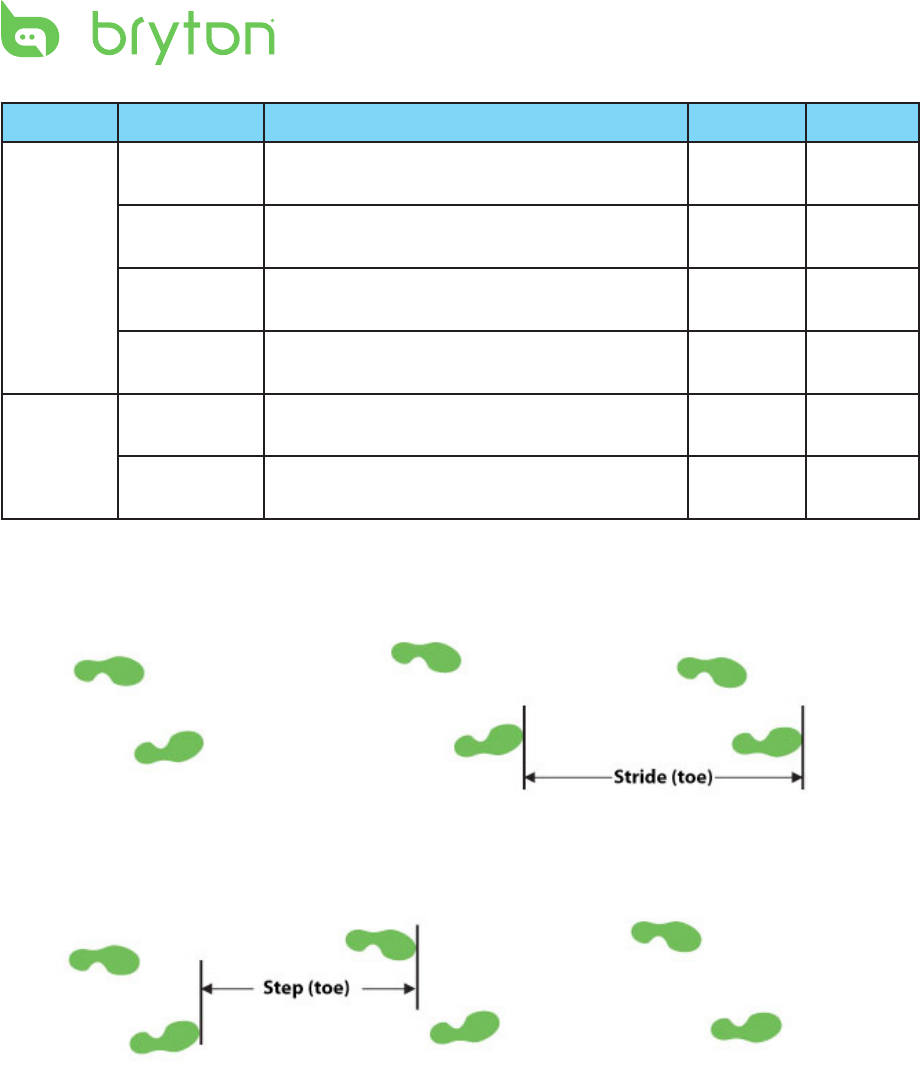
Glossary and Customizable Data Fields
Selection
Category Items Description Cardio 40 Cardio 60
Calories Calories Calories burned during the current
activity
3 3
Time Time Current time of day based on your time
settings
3 3
Run Time Amount of time at running 3 3
Ride Time Amount of time at riding 3 3
Exercise Time Amount of time at exercising 3 3
Trip Time Total time elapsed 3 3
Sunrise Sunrise time based on your GPS position 3 3
Sunset Sunset time based on your GPS position 3 3
Pace Pace Current pace 3 3
Avg Pace Average pace of the current activity 3 3
Speed Speed Current speed 3 3
Avg Speed Average speed of the current activity 3 3
Max Speed Maximum speed achieved during the
current activity
3 3
Distance Distance Traveled distance during the current
activity
3 3
HR Heart Rate Current heart rate in beats per minute
(bpm)
3 3
Avg Heart
Rate
Average heart rate of the current activity 3 3
Max Heart
Rate
Maximum heart rate achieved during the
current activity
3 3
HR Heart Rate
Zone (MHR
Zone)
Current heart rate ranges based on
maximum heart rate (MHR)
3 3
MHR% Percentage of maximum heart rate 3 3
LTHR Zone Current heart rate ranges based on
lactate threshold heart rate (LTHR)
3 3
LTHR% Percentage of lactate threshold heart
rate (LTHR)
3 3
35
ENGLISH
Cardio 40/60 User’s Manual
Category Items Description Cardio 40 Cardio 60
Stride *Stride Rate Current number of strides per minute
(spm)
3 3
Avg Stride Average stride rate of the current activity 3 3
Max Stride Maximum stride rate achieved during the
activity
3 3
*Avg Stride
Length
Average length of one step 3 3
Cadence Cadence Number of revolutions of the crank arm
per minute (rpm)
8 3
Avg Cadence Average cadence of the current activity 8 3
Max Cadence Maximum cadence achieved during the
current activity
8 3
Count Lap Count Number of laps completed 3 3
Time Lap Time Amount of time during the current lap 3 3
Last Lap
Time
Amount of time recorded in the last
completed lap
3 3
Pace Last 1km
Pace
Average pace of the last one kilometer
completed
3 3
Lap Avg Pace Average pace of the current lap 3 3
Last Lap Avg
Pace
Average pace of the last completed lap 3 3
Speed Lap Avg
Speed
Average speed of the current lap 3 3
Lap Max
Speed
Maximum speed of the current lap 3 3
Last Lap Avg
Speed
Average speed of the last completed lap 3 3
Distance Lap Distance Traveled distance of the current lap 3 3
Last Lap
Distance
Traveled distance of the last completed
lap
3 3
HR Lap Avg HR Average heart rate of the current lap 3 3
Lap Max HR Maximum heart rate of the current lap 3 3
Last Lap Avg
HR
Average heart rate of the last completed
lap
3 3
Lap MHR% Percentage of maximum heart rate of the
current lap
3 3
Lap LTHR% Percentage of lactate threshold heart
rate of the current lap
3 3
36 Cardio 40/60 User’s Manual
Category Items Description Cardio 40 Cardio 60
Stride Lap Avg
Stride Rate
Average stride rate of the current lap 3 3
Last Lap Avg
Stride Rate
Average stride rate of the last completed
lap
3 3
Lap Avg
Stride Length
Average stride length of the current lap 3 3
Last Lap Avg
Stride Length
Average stride length of the last
completed lap
3 3
Cadence Lap Avg
Cadence
Average cadence of the current lap 8 3
Last Lap Avg
Cadence
Average cadence of the last completed
lap
8 3
* A Stride means the distance between the toe of two subsequent footprints of the same
foot. Stride rate means how many strides per minute.
* A Step means the distance between the toe of two subsequent feet. Stride length means
the length of one step.
37
ENGLISH
Cardio 40/60 User’s Manual
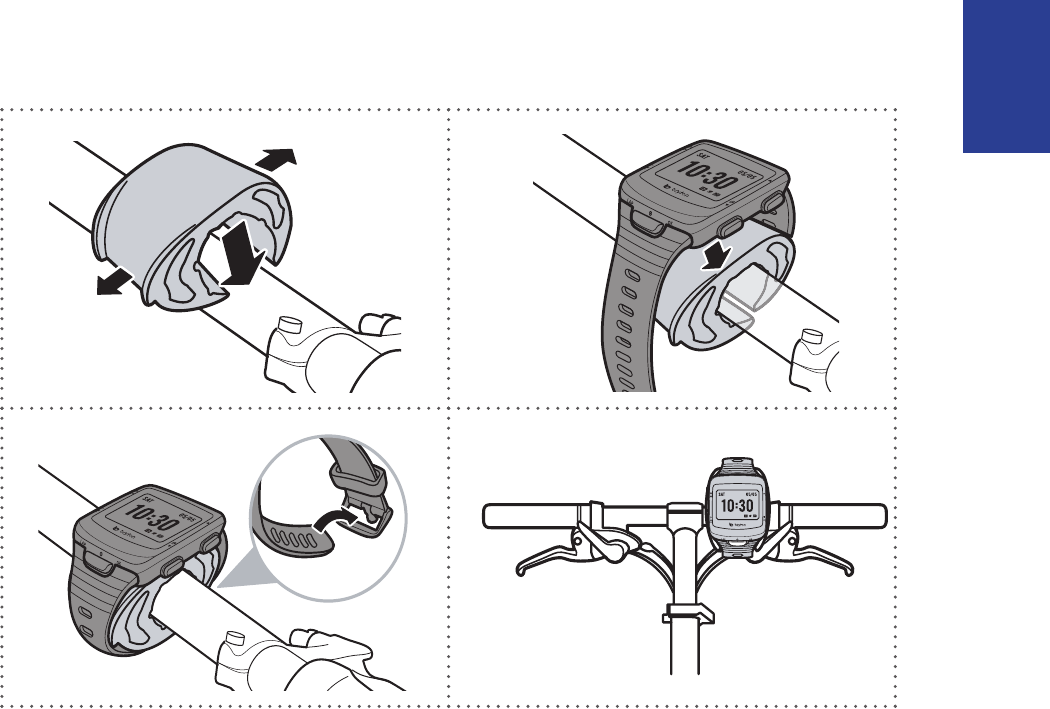
Installing the Bike Mount (Cardio 60 only)
To mount Cardio 60 onto your bike, do the following:
AM
1
2
AM
AM
3
4
38 Cardio 40/60 User’s Manual
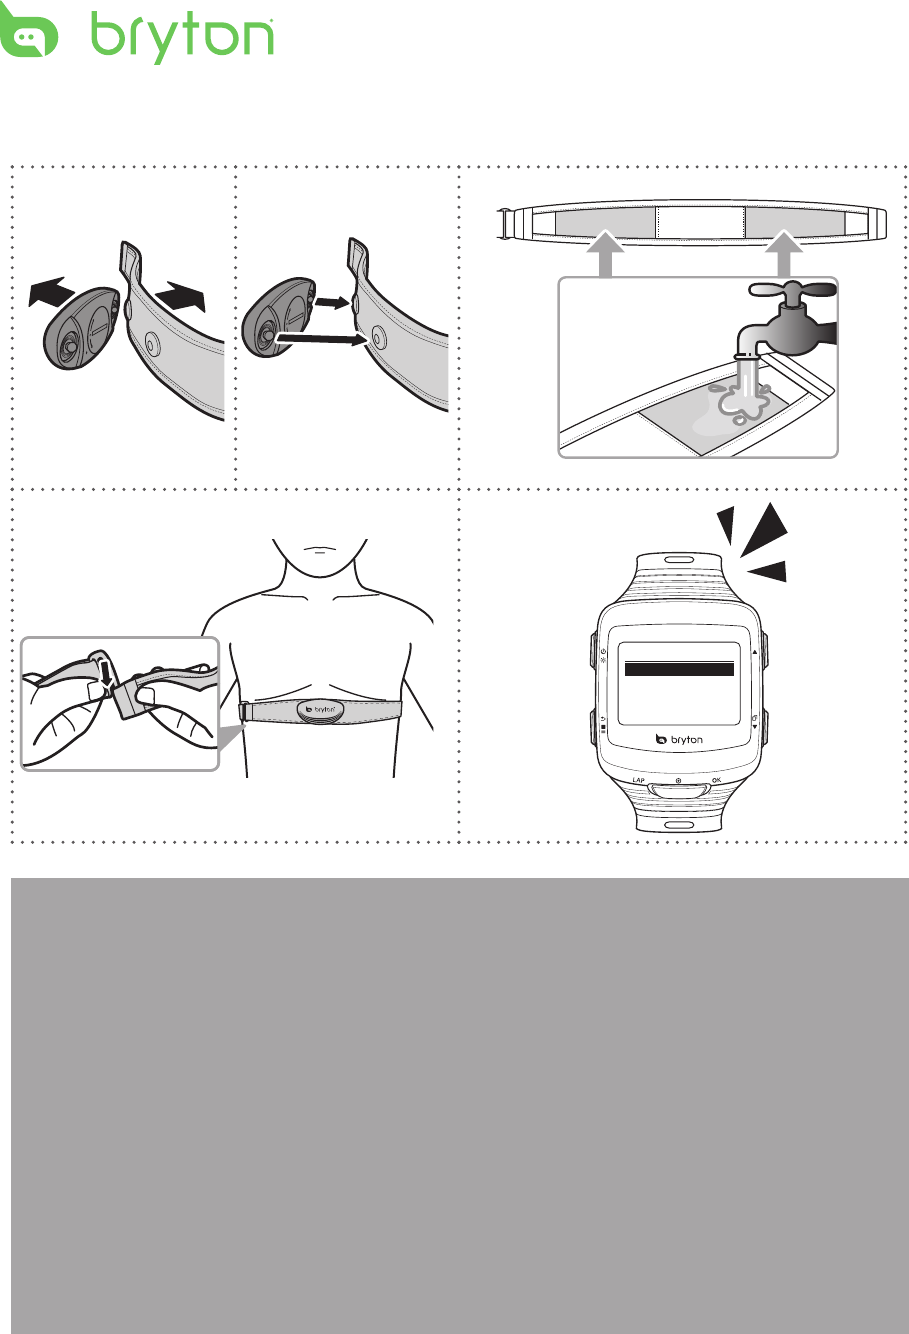
Installing the Heart Rate Monitor
C
L
O
S
E
O
P
E
N
2
C
L
O
S
E
O
P
E
N
1
4
3
5
Sensors
Heart Rate
NOTE:
Adjust the sensor position to the middle part of the body. The belt should be worn •
under the chest and directly on your body. The Bryton logo shown on the sensor should
be facing upward. Tighten the elastic belt rmly so that it will not turn loose during the
exercise.
In cold weather, wear appropriate clothing to keep the heart rate belt warm.•
If the sensor cannot be detected or the reading is abnormal, please wet the electrodes area •
with water as shown in the step 3 or warm up the heart rate sensor for about 5 minutes.
If the heart rate belt is not used for a period of time, remove the sensor from the heart rate •
belt to prevent the battery from running at.
Heart rate sensor does not work under water. This is common to all ANT+ sensors.•
For triathlon, it is recommended to wear Heart rate belt after swimming as water will •
reduce the strength of heart beat signal. If the heart rate belt is wore before swimming,
heart rate data may not be properly recorded after leaving the water for a period of time.
39
ENGLISH
Cardio 40/60 User’s Manual
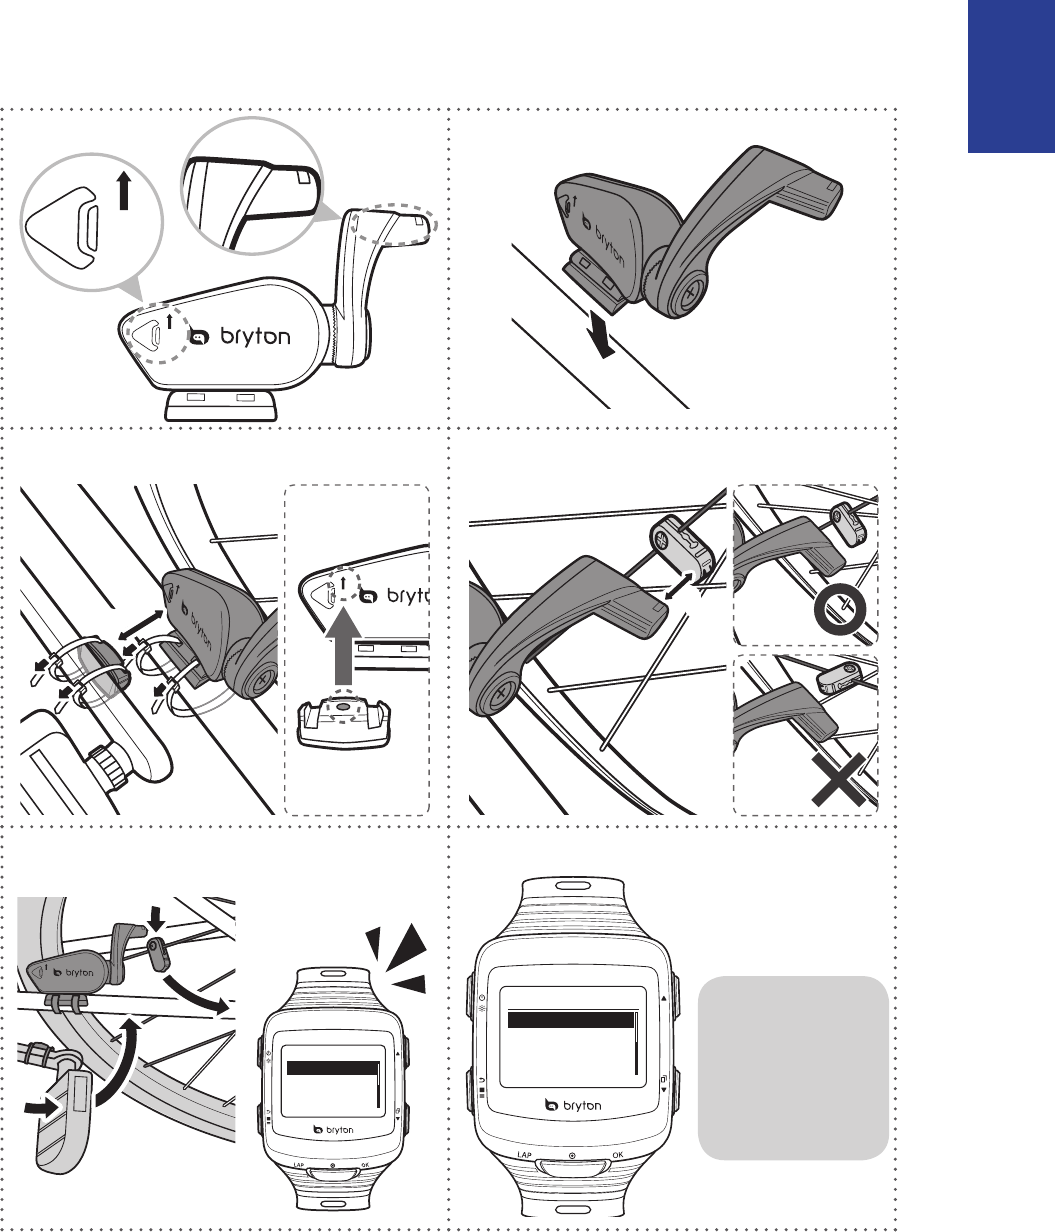
Installing the Speed/Cadence Dual Sensor
(Cardio 60 only)
CAD
SPD
CAD
SPD
1
2
SPD
CAD
3
4
CAD
3
mm
CAD
5
6
Rescan
Turn Off
Speed/CAD
CAD
SPD
Speed/CAD
Sensors
SPD
3
mm
Rescan: rescan •
to detect the
sensor.
Turn O: •
disable the
sensor.

40 Cardio 40/60 User’s Manual
NOTE:
Align both sensor and magnet as shown in the illustration (3) and (4). Pay attention on the •
alignment points.
Ensure the distance between the sensor and the magnet is within 3 mm.•
On the initial usage, do the following:•
1. Press the button. The LED blinks from red to green, indicating the sensor is working.
2. Start pedaling.
3. When the cadence magnet comes across the sensor, the red LED blinks. When the speed
magnet comes across the sensor, the green LED blinks.
4. The LED blinks only for the rst 10 passes after pressing the button.
5. If you want to check the alignment status after 10 passes, just press the button and
repeat step 1to 4.
41
ENGLISH
Cardio 40/60 User’s Manual
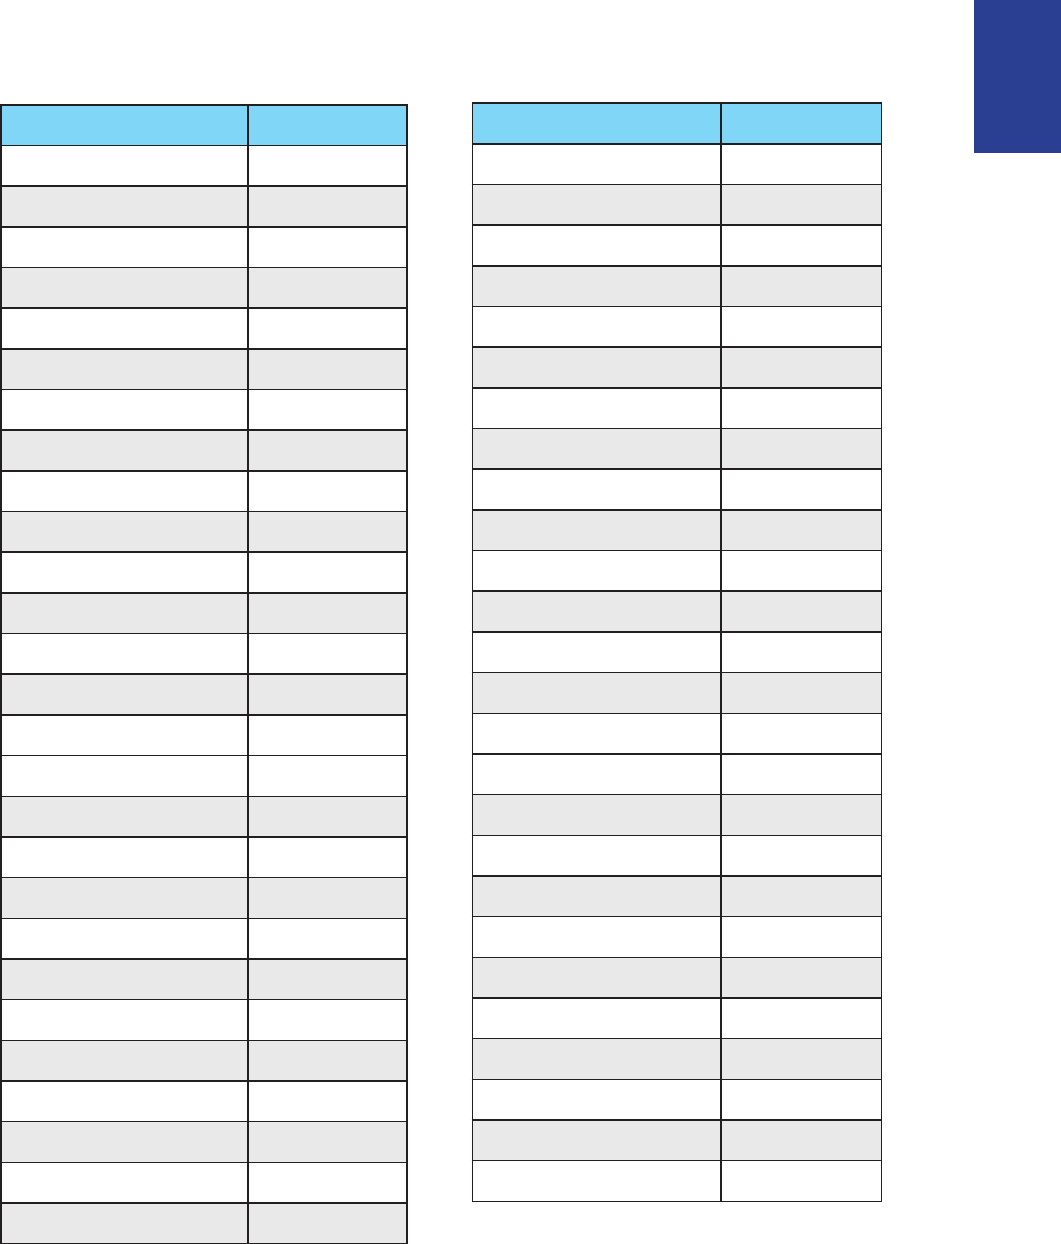
Wheel Size and Circumference
The wheel size is marked on both sides of the tires.
Wheel Size L (mm)
24 x 1.75 1890
24 x 2.00 1925
24 x 2.125 1965
26 x 7/8 1920
26 x 1(59) 1913
26 x 1(65) 1952
26 x 1.25 1953
26 x 1-1/8 1970
26 x 1-3/8 2068
26 x 1-1/2 2100
26 x 1.40 2005
26 x 1.50 2010
26 x 1.75 2023
26 x 1.95 2050
26 x 2.00 2055
700 x19C 2080
700 x 20C 2086
700 x 23C 2096
700 x 25C 2105
700 x 28C 2136
700 x 30C 2170
700 x 32C 2155
700C Tubular 2130
700 x 35C 2168
700 x 38C 2180
700 x 40C 2200
Wheel Size L (mm)
12 x 1.75 935
14 x 1.5 1020
14 x 1.75 1055
16 x 1.5 1185
16 x 1.75 1195
18 x 1.5 1340
18 x 1.75 1350
20 x 1.75 1515
20 x 1-3/8 1615
22 x 1-3/8 1770
22 x 1-1/2 1785
24 x 1 1753
24 x 3/4 Tubular 1785
24 x 1-1/8 1795
24 x 1-1/4 1905
26 x 2.10 2068
26 x 2.125 2070
26 x 2.35 2083
26 x 3.00 2170
27 x 1 2145
27 x 1-1/8 2155
27 x 1-1/4 2161
27 x 1-3/8 2169
650 x 35A 2090
650 x 38A 2125
650 x 38B 2105
700 x 18C 2070
42 Cardio 40/60 User’s Manual
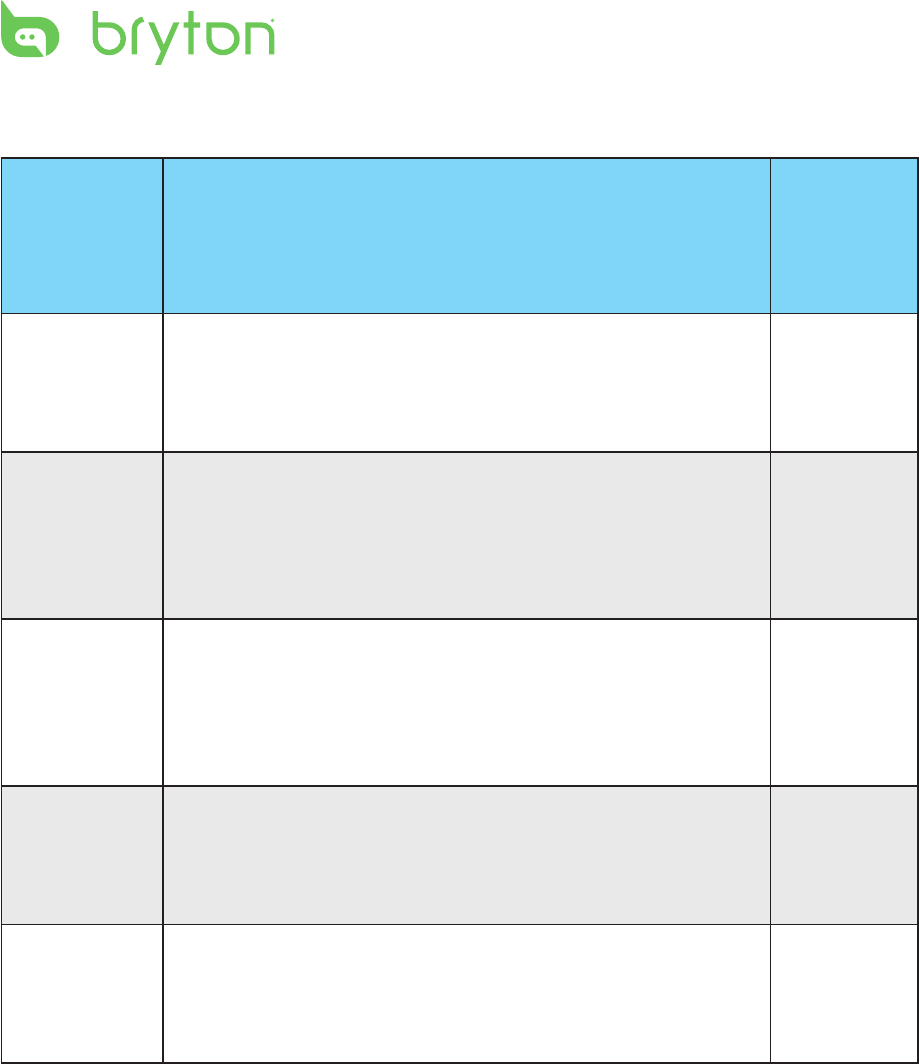
Heart Rate Zones
Zone What it does % of
Heart
Rate
Reserve
1: Very Light
Great for beginners, those in extremely poor condition
and those primarily interested in exercising for weight
loss because the body burns a higher blend of fat calories
than carbohydrate calories for its fuel.
50-60%
2: Light
Weight management & strengthening your heart, giving
it the opportunity to work at its optimum level. Also
known as the “aerobic tness threshold” because from
this point forward, your body begins to reap the positive
eects of aerobic exercise.
60-70%
3: Moderate
Benets not only your heart but also your respitory
system. Increases your endurance and enhances your
aerobic power, which is the ability to transport oxygen
to, and carbon dioxide away from sport-specic muscles.
Increases your MET (Metabolic Equivalent) output.
70-80%
4: Hard
High performance training benets. Increase your
body’s ability to metabolize lactic acid, allowing you to
train harder before crossing over into the pain of lactate
accumulation and oxygen debt.
80-90%
5: Max
Only extremely t athletes work at this zone on a limited
frequency and duration. Operating in oxygen debt to
train metabolic pathways of fast twitch muscle bers, not
endurance pathways or enzymes.
90-100%
Basic Care For Your Cardio 40/60
Taking good care of your Cardio 40/60 will reduce the risk of damage to your device.
Do not drop your Cardio 40/60 or subject it to severe shock.•
Do not expose your Cardio 40/60 to extreme temperatures and excessive moisture.•
The screen surface can easily be scratched. Use the non-adhesive generic screen •
protectors to help protect the screen from minor scratches.
Use diluted neutral detergent on a soft cloth to clean your Cardio 40/60.•
Do not attempt to disassemble, repair or make any modications to your device. Any •
attempt to do so will make the warranty invalid.
43
ENGLISH
Cardio 40/60 User’s Manual
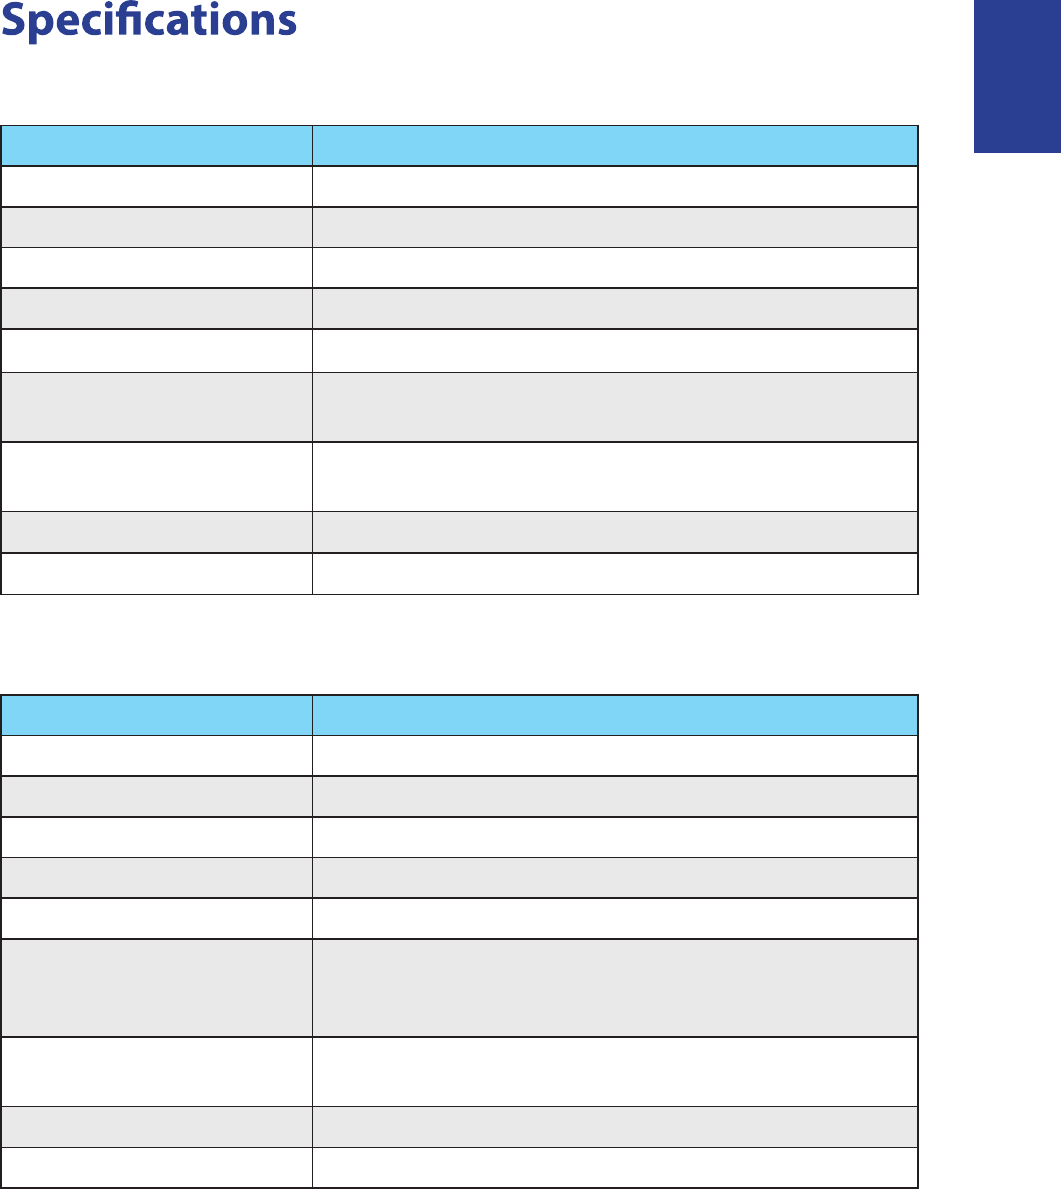
Cardio 40
Item Description
Display 1.4” Mono LCD
Dimensions 42.9 x 48.4 x 11.7 mm
Weight 48 g
Operating temperature -10°C ~ 50°C
Battery charge temperature 0°C ~ 40°C
Battery life Up to 14 days in clock mode
Up to 8 hours in training mode in open-sky environment
GPS Integrated high-sensitivity receiver with embedded
antenna
RF receiver 2.4 GHz ANT+ receiver with embedded antenna
G-Sensor 3-axis acceleration sensor
Cardio 60
Item Description
Display 1.4” Mono LCD
Dimensions 42.9 x 48.4 x 13.95 mm
Weight 54 g
Operating temperature -10°C ~ 50°C
Battery charge temperature 0°C ~ 40°C
Battery life
Up to 28 days in clock mode
Up to 16 hours in training mode at open-sky
environment
GPS Integrated high-sensitivity receiver with embedded
antenna
RF receiver 2.4 GHz ANT+ receiver with embedded antenna
G-Sensor 3-axis acceleration sensor
44 Cardio 40/60 User’s Manual
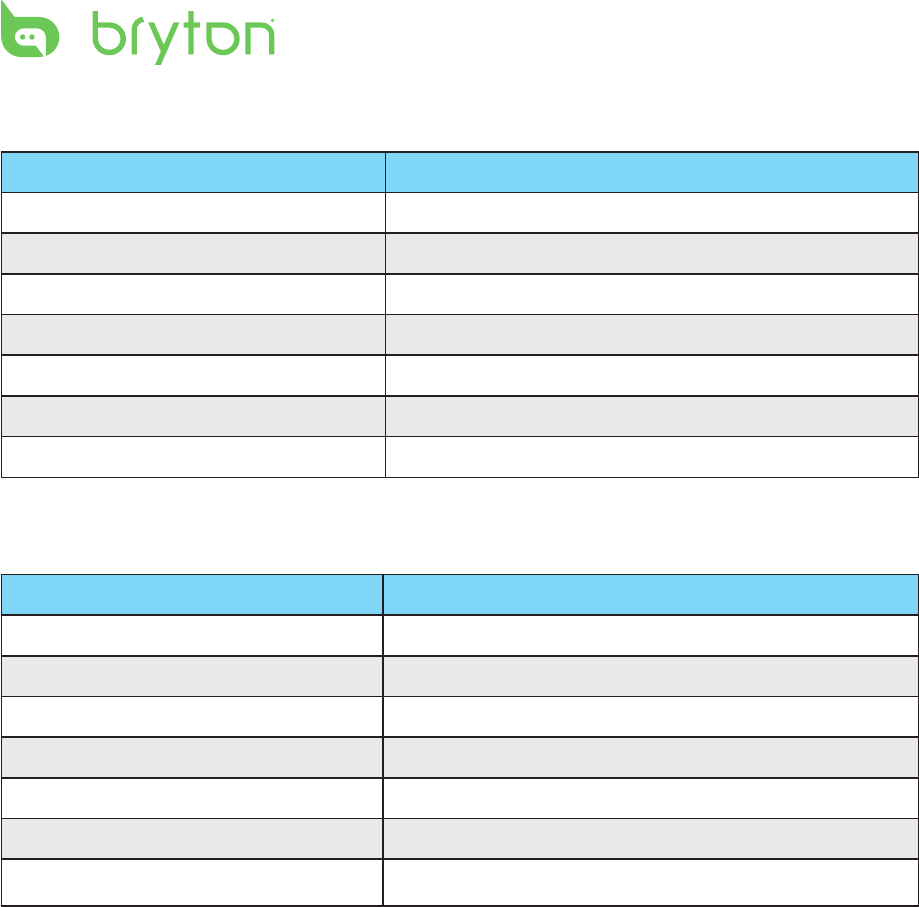
Heart Rate Monitor Set
Item Description
Physical size 67~100 x 26 x 15 mm
Weight 14 g (sensor) / 35g (strap)
Water Resistance 20m
Transmission range 5m
Battery life 1 hour per day for 24 months
Operating temperature 5°C ~ 40°C
Radio frequency/protocol 2.4GHz ANT+ wireless communication protocol
Speed & Cadence Dual Sensor
Item Description
Physical size 32.5 x 20.2 x 60mm (body)
Weight 30g
Water Resistance 20m
Transmission range 5m
Battery life 1 hour per day for 1.4 years
Operating temperature -10°C ~ 60°C
Radio frequency/protocol 2.4GHz ANT+ wireless communication protocol
Accuracy may be degraded by poor sensor contact, electrical interference, and receiver
distance from transmitter.

Cardio 40/60 UM_R005_JAN