Building Robotics SU3E00 Enlighted Compact Sensor User Manual Compact Sensor Installation 6
Enlighted, Inc. Enlighted Compact Sensor Compact Sensor Installation 6
Users Manual
Enlighted Compact Sensor Installation Instructions September, 2013
Enlighted Compact
Sensor Installation
Instructions
Shipped Components
The following components are shipped with the Enlighted Compact Sensor Unit:
• Enlighted Compact Sensor Unit
•Compact Nut
Tools You May Need
• Whole Saw
• 11/16 Drill Bit
Installing the Enlighted Compact Sensor
This section provides step-by-step instructions on how to install the
Enlighted Compact Sensor.
Before You Begin
Before you begin the installation of the Enlighted Compact Sensor,
be sure to review the following cautionary steps to ensure a safe
installation:
1. Disconnect all power before installation or service.
2. Installation and maintenance must be performed by qualified
personnel.
3. Installations and maintenance must be performed in accordance
with state, local, and national electrical codes and requirements.
To Install the Enlighted Compact Sensor
To install the Enlighted Compact Sensor Unit, perform the following
steps:
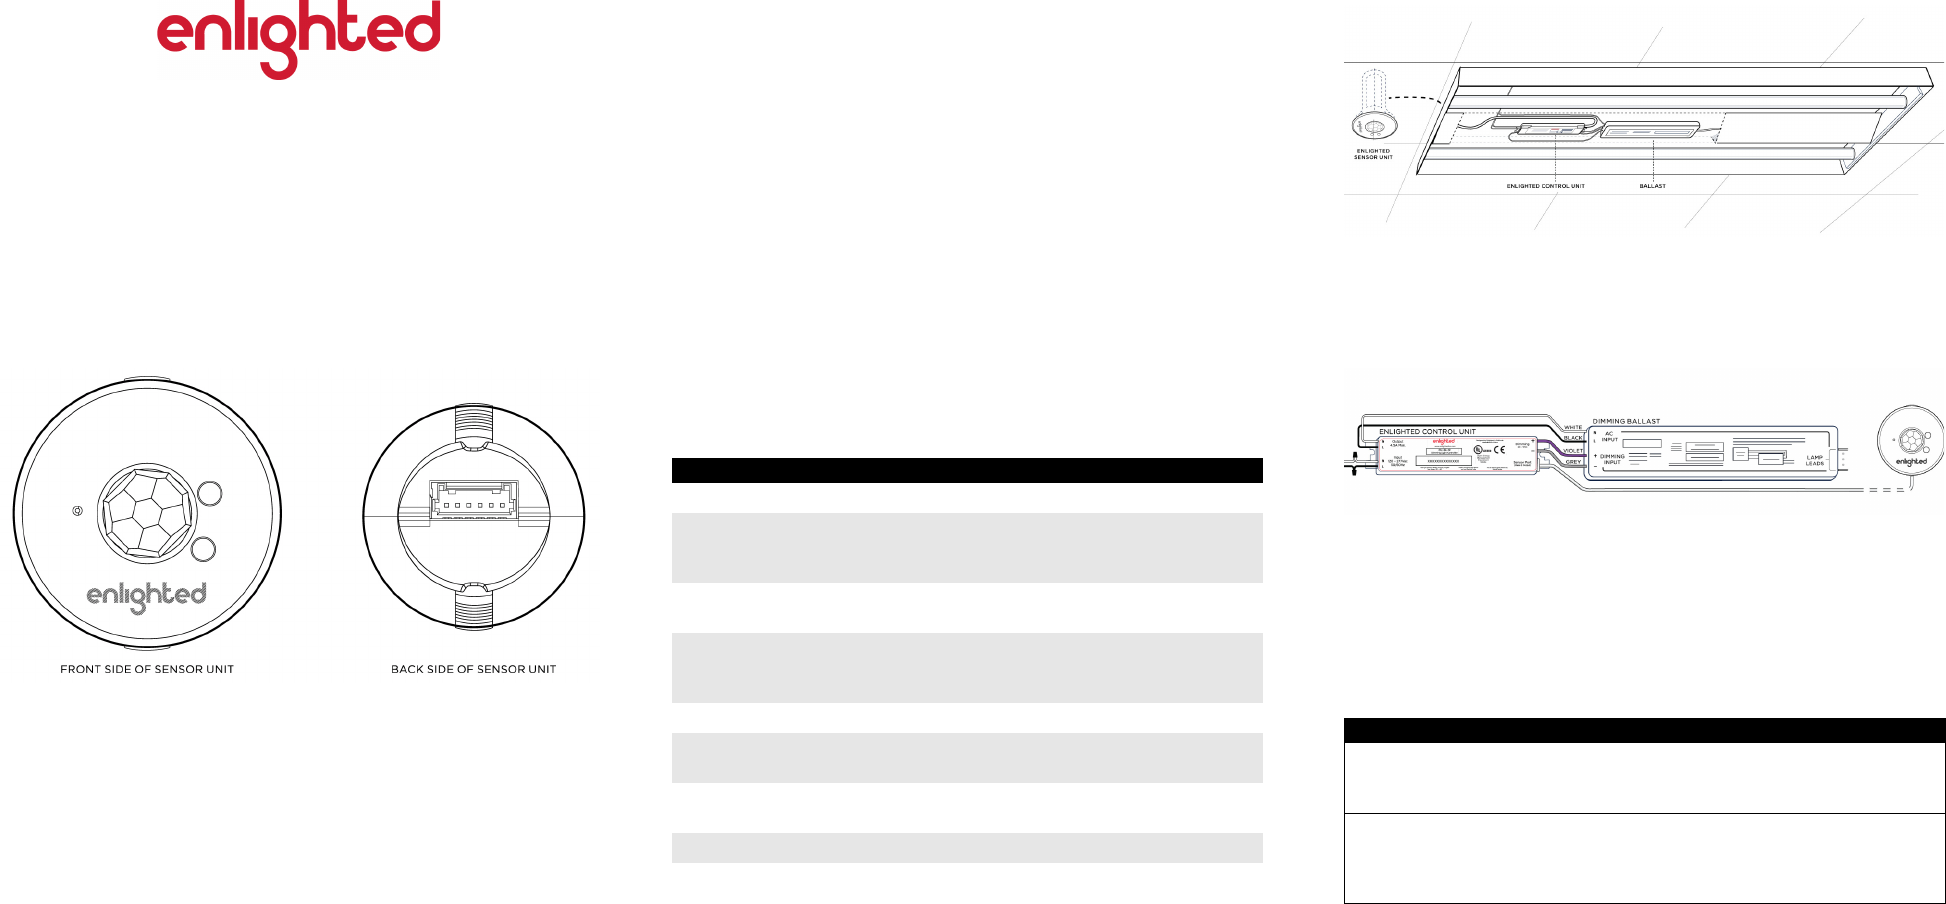
Figure 1: Fixture Combo
Figure 2: Wiring Diagram
Troubleshooting the Enlighted Compact Sensor
Step Action
1. Turn off all power to the light fixture by switching off the circuit breaker.
2.
Ensure the RJ12 data cable is installed and connected to the Enlighted
Control Unit mounted in the ballast cavity of the fixture or mounted in a UL-
approved enclosure. (See Figure 1)
3. Ensure the Enlighted Compact Sensor is mounted within a few feet of the
lighting fixture and over the service area of light or on adjacent tile.
4.
Select a location for the RJ12 data cable to exit the plenum and make a
small circular cut (roughly 11/16th) in the tile or fixture for the sensor at
specified distance.
5. Insert Enlighted Compact Sensor into hole.
6. Use Compact Sensor Nut to fasten Compact Sensor (optional –
depending on installation type).
7. Connect linear 6pin connector to the Enlighted Compact Sensor. (See
Figure 2)
8. Replace ceiling tile.
Problem Solution
There are no green flashing LED lights.
Verify Enlighted Compact Sensor cable
is plugged into the Enlighted Compact
Sensor.
Red blinking LED.
Possible solutions:
• replace Enlighted Compact Sensor
cable
• replace Enlighted Control Unit

Enlighted Compact Sensor Installation Instructions Document ID 94-00552-01 September, 2013
Technical Support
For questions regarding the installation or operation of this product, contact Enlighted
Technical Support: support@enlightedinc.com.
FCC and Industry Canada Compliance Information
Note: This equipment has been tested and found to comply with the limits for a Class
A digital device, pursuant to part 15 of the FCC Rules. These limits are designed to
provide reasonable protection against harmful interference when the equipment is
operated in a commercial environment. This equipment generates, uses, and can
radiate radio frequency energy and, if not installed and used in accordance with the
instruction manual, may cause harmful interference to radio communications. Opera-
tion of this equipment in a residential area is likely to cause harmful interference in
which case the user will be required to correct the interference at his own expense.
USA
This device complies with Part 15 of the FCC Rules. Operation is subject to the fol-
lowing two conditions:
• this device may not cause harmful interference, AND
• this device must accept any interference received, including interference that-
may cause undesired operation.
Changes or modifications not expressly approved by Enlighted Inc. could void the
user's authority to operate the equipment.
Canada
This device complies with Industry Canada license-exempt RSS standard(s). Opera-
tion is subject to the following two conditions:
• this device may not cause harmful interference, AND
• this device must accept any interference received, including interference that-
may cause undesired operation.
Changes or modifications not expressly approved by Enlighted Inc. could void the
user's authority to operate the equipment.
Le présent appareil est conforme aux CNR d'Industrie Canada applicables aux appa-
reils radio exempts de licence. L'exploitation est autorisée aux deux conditions suiva-
ntes:
• l'appareil ne doit pas produire de brouillage, ET
• l'utilisateur de l'appareil doit accepter tout brouillage radioélectrique subi, même
si le brouillage est susceptible d'en compromettre le fonctionnement.
FCC ID: AQQ-SU3E00
Industry Canada: 10138A-SU3E00
Copyright © 2013 Enlighted Inc., 930 Benecia Ave., Sunnyvale, CA,94085 U.S.A.
All rights reserved. All other brand or product names are trademarks of their
respective companies or organizations.