Bukh Dv36 48 Workshop Manual 1003418 009W2329_SECTION Any User
2017-02-23
User Manual: Bukh Bukh-Dv36-48-Workshop-Manual-1003418
Open the PDF directly: View PDF ![]() .
.
Page Count: 196 [warning: Documents this large are best viewed by clicking the View PDF Link!]
- Contents
- A: Introduction and technical data
- B: List of tools
- C: Cylinder head
- D: Flywheel
- E: Front end cover
- G: Rear end cover and hand start
- H: Fuel system
- IJ: Piston, connecting rod and cylinder liner
- L: Crankcase, crank, bearings and oil sump
- M: Camshaft
- N: Lubricating system
- O: Cooling water system
- P: Electrical system
- R: ZF gear - BW7
- S: Sail drive
- T: Irregular operation, causes and remedies
- V: Maintenance
009W2329-R01
Publ. No.
009W2329
Work shop Manual
for
BUKH diesel engine
TYPE DV36/48
Aabenraavej 13-17, DK - 6340 Krusaa, Denmark
Tel: +45 74 62 20 88
Fax +45 74 62 74 07
E-mail: bukh@bukh.dk – Internet: www.bukh.dk

009W2329-R01
Contents
Section A … Introduction and technical data
Section B … List of tools
Section C … Cylinder head
Section D … Flywheel
Section E … Front end cover
Section G … Rear end cover and hand start
Section H … Fuel system
Section IJ … Piston, connecting rod and cylinder liner
Section L … Crankcase, crankshaft, main bearings and oil sump
Section M … Camshaft
Section N … Lubricating oil system
Section O … Cooling water system
Section P … Electrical system
Section R … Gearbox ZF, BW7
Section S … Sail drive
Section T … Irregularities in operation - causes and remedies
Section V … Maintenance
A1
009W2329
SECTION A
INTRODUCTION AND TECHNICAL DATA

A2
009W2329
CONTENTS
Introduction ................................................................................ page A 3
Technical Data ........................................................................... page A 4
Torques ..................................................................................... page A 5
Spare Part Nos. for Service Parts .............................................. page A 6
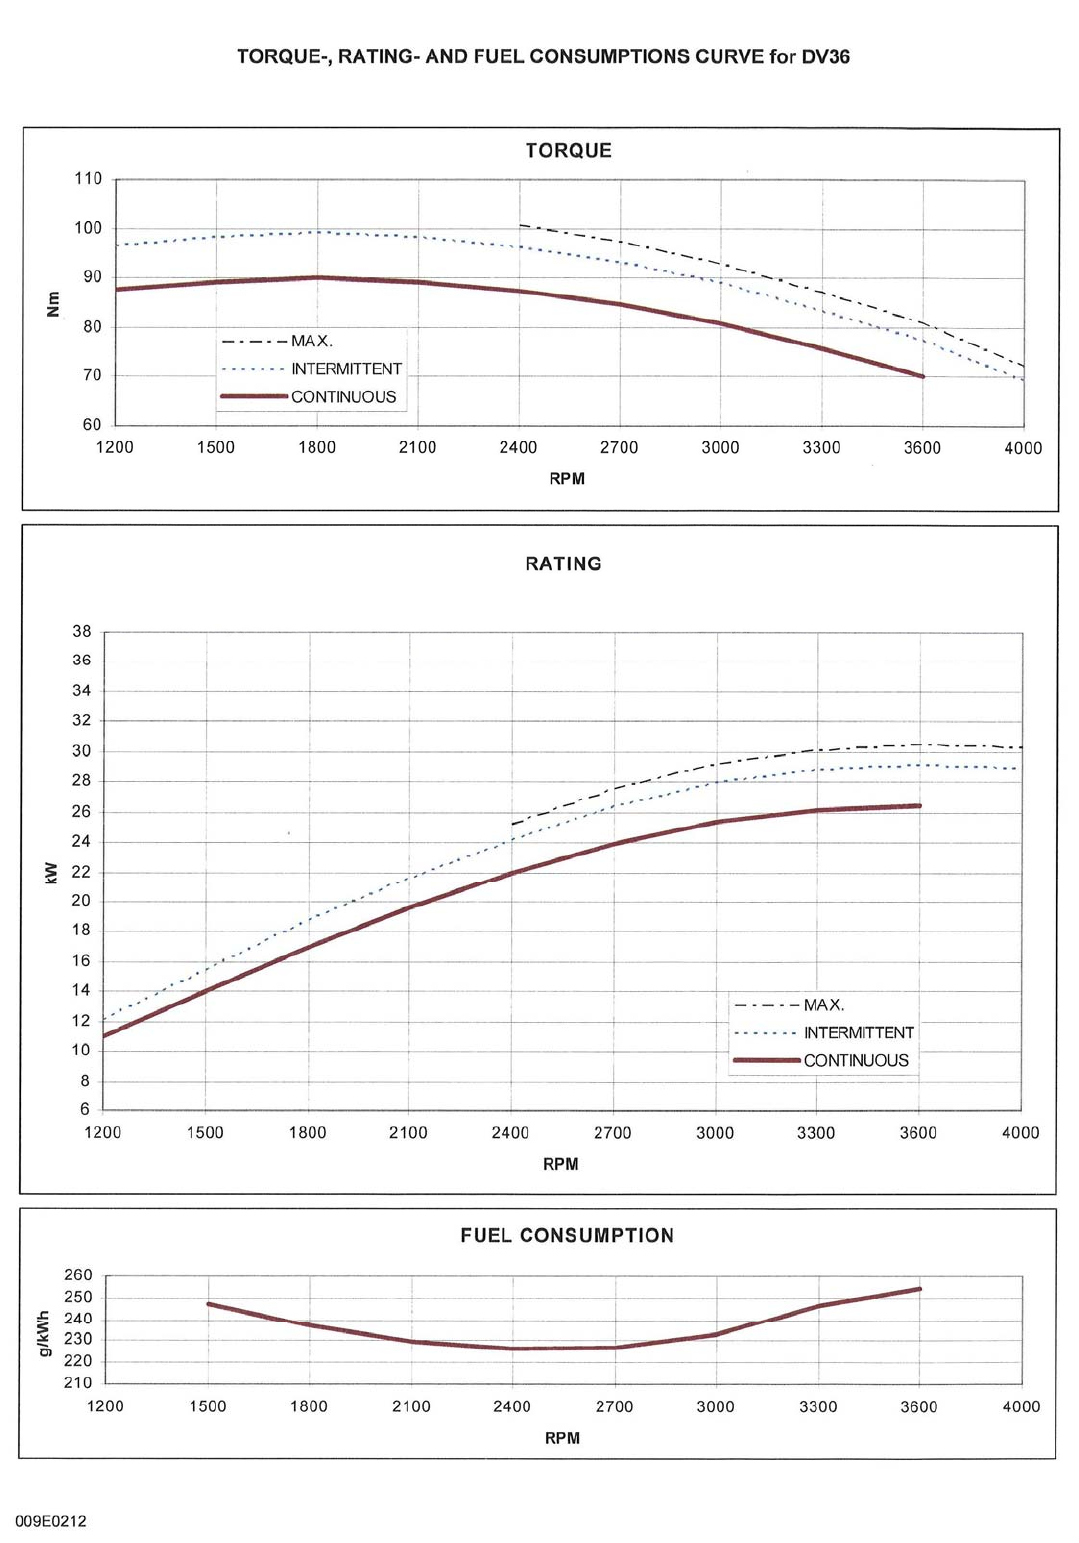
Torque and Rating Curves ......................................................... page A 7
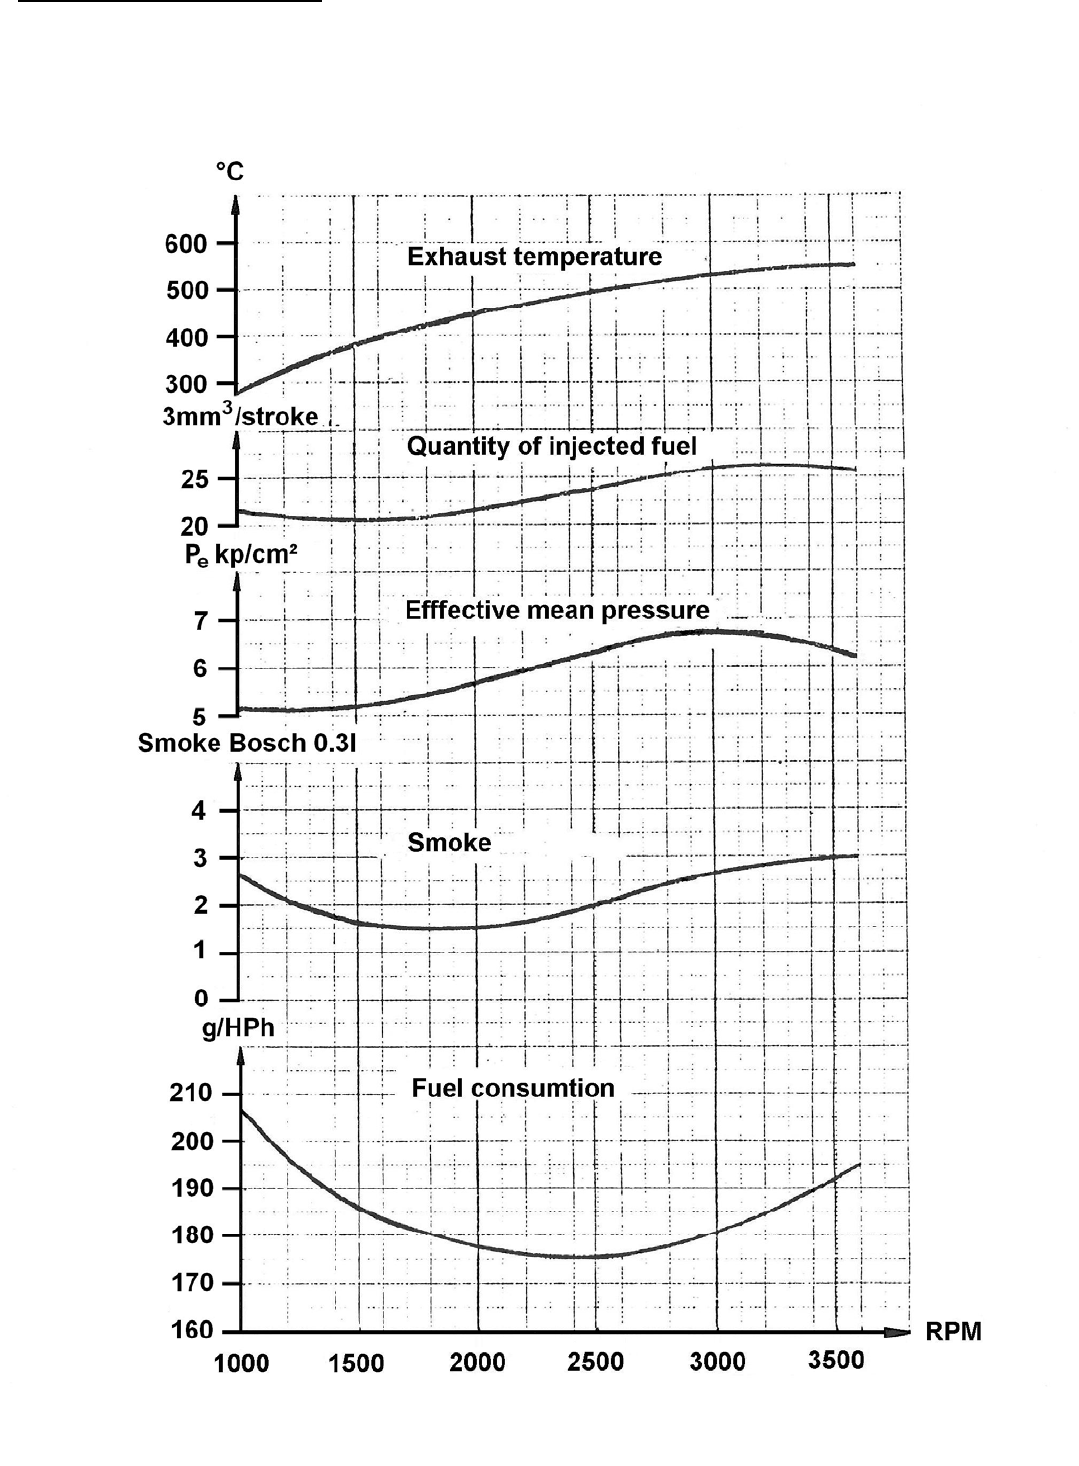
Results of Measurement ............................................................ page A 8
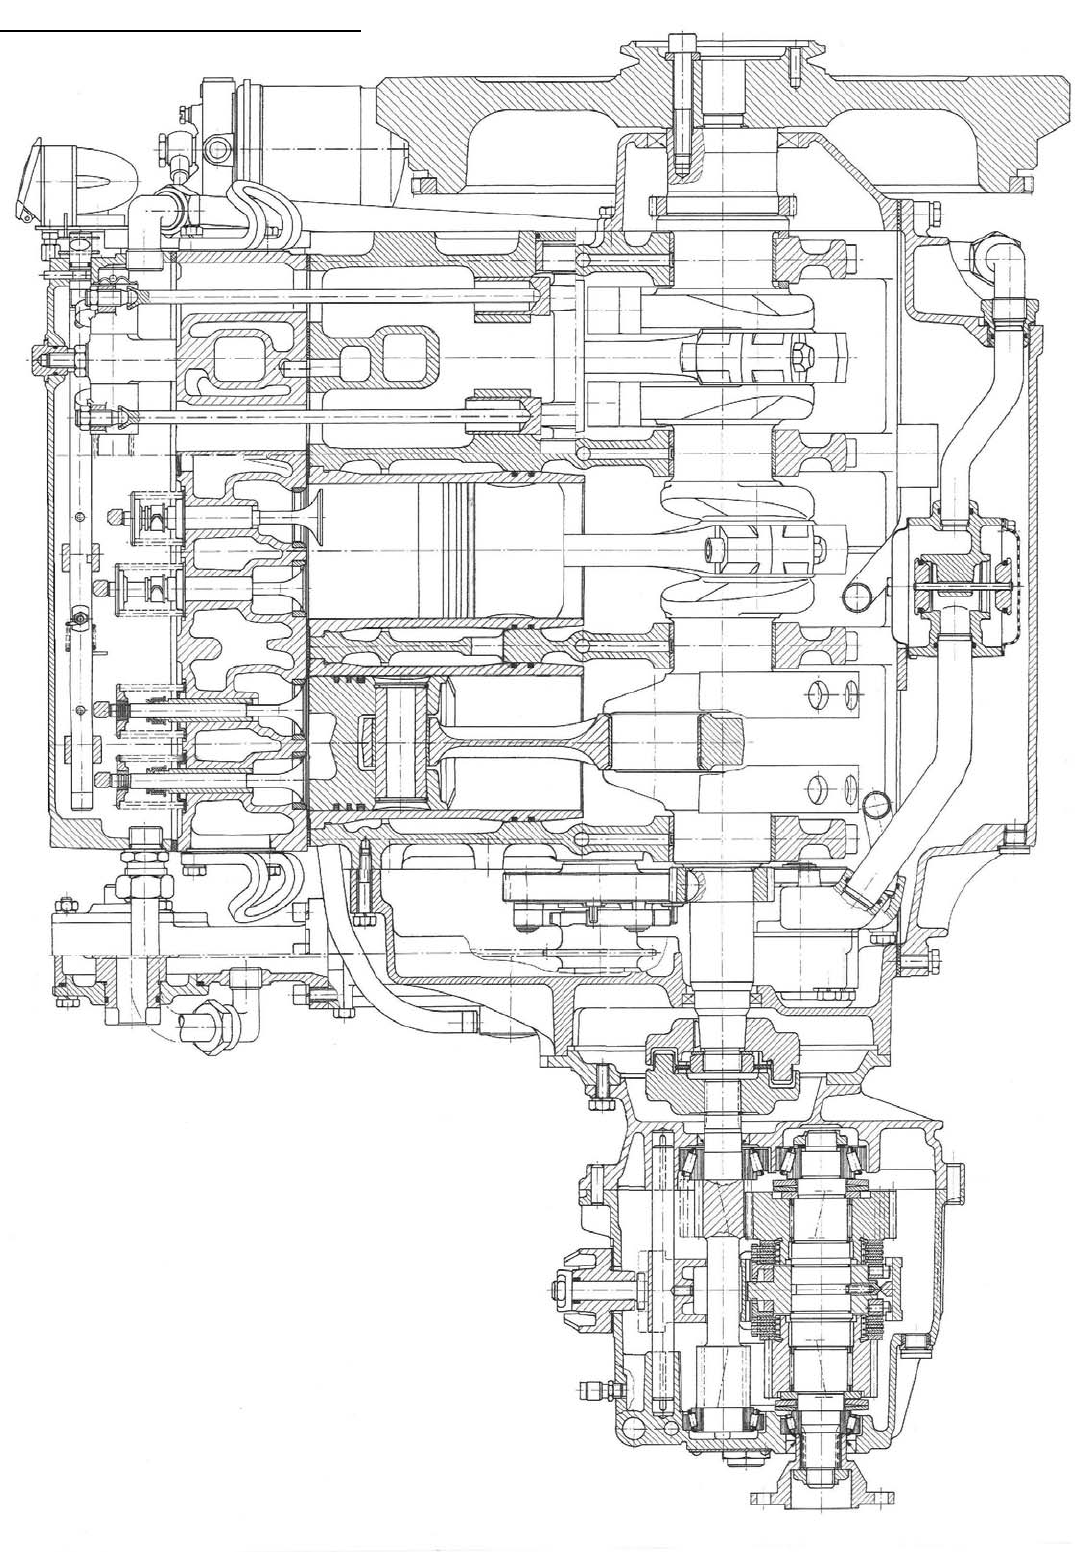
Longitudinal Section of DV36 .................................................... page A 9
Cross Section of DV36 .............................................................. page A 10
Diagram of the Relation between the Total Weight,
Speed and Horse Power of the Boat ......................................... page A 11

A3
009W2329
Introduction
The engines are specially designed to comply with the heavy demands made on stability,
safety and environment now.
The technical structure of the engine with components and systems appears from the
individual sections of this workshop manual and therefore this introduction contains no
descriptions of this.
DV36 is designed with small installation dimensions compared to corresponding engine
outputs on the market. This applies to both height, length and width. At the same time the
weight of the engine is comparatively low and the proportion weight/horse power is in fact only
7.36 compared to corresponding engine outputs on the market with a corresponding factor of
8.28 and 8.48.
Being a 3-cylinder engine, DV36 is a naturally low level of vibration compared to 1- and 2-
cylinder engines, but in order to obtain a further improvement of the vibration level, the rotating
weight system has been continued on DV36 as it is known with great success from DV10 and
DV20. DV36 with the anti-vibration system is thus free from unpleasant vibrations and may
correctly be described as the less vibrating engine on the market.
DV36 is supplied either with sail-drive (type DV36SME) or with BW7 gear (type DV36ME). The
type description S = saildrive, M = marine gear and E = with electric start.
The temperature of the exhaust gas is for DV36 max. 550°C, which is about 100°C below
corresponding engine outputs on the market.
DV36 is delivered as standard with direct seawater cooling but may be alternatively be
delivered with heat exchanger built integral with water cooled exhaust, keel cooler or radiator
cooler.
BUKH DV36 is a 3-cylinder, water cooled, 4-stroke diesel engine with direct injection, giving
an easy start at low temperatures, a low consumption of fuel and a low thermic load of the
cylinder head.
A4
009W2329
TECHNICAL MAIN DATA
WORKING PRINCIPLE……………………………………………………… ... 4-STROKE
BORE/STROKE ...................... ................................ ................................... 85 mm / 85 mm
CYLINDER VOLUME ............. ................................ ................................... 1.447 Litres
COMPRESSION RATIO ......... ................................ ................................... 18,5:1
COMPRESSION PRESSURE …. ................. at 1800-3600 rpm………… .. 46 Bar
OUTPUT, CONTINOUS RATING.…. ............ at 2400 rpm………..……… .. 29.8 BHP - 21.9 kW
ACCORDING TO ISO 3046……. .................. at 3000 rpm…………………..34.5 BHP – 25.4 kW
.............. at 3600 rpm…………………. 36.0 BHP - 26.5 kW
OUTPUT, INTERMITENT RATING BHP ....... at 4000 rpm ......................... 39.3 BHP – 28.9 kW
MAX. TORQUE Kp*m ............. ...................... at 1800 rpm .......................... 9.2 Kpm – 90 Nm
MAX. AIR CONSUMPTION .... ................................ ................................... 2214 Litres/min.
ENGINE ROTATING, LOOKING AT FLYWHEEL .. ................................... CLOCWISE
IDLING SPEED ....................... ................................ ................................... 800 – 1000 RPM
MAX INCLINATION, FORE AND AFT ..................... ................................... 15o
HEEL, MAX. CONTINOUS ..... ................................ ................................... 30o
NET WEIGHT INCL. ZF MARINEGEAR ................. ................................... 265 Kg
NET WEIGHT INCL. SAILDRIVE ............................ ................................... 290 Kg
LOCATION OF ENGINE SERIAL NUMBER ........... ................................... ON CRANKCASE NEAR FUEL THE PUMP
EXHAUST TEMP. MAX / NORMAL ......................... ................................... 600oC – 580oC
VALVE TIMING AND INJECTION POINT
FLYWHEEL DIAMETER ......... ................................ ................................... 370 mm
INLET VALVE OPENS .................. BEFORE TDC . ................................... 32o (arc measure: 103 mm)
INLET VALVE CLOSES ............... AFTER BDC .... ................................... 64o (arc measure: 207 mm)
EXHAUST VALVE OPENS ............ BEFORE BDC . ................................... 64o (arc measure: 207 mm)
EXHAUST VALVE CLOSES ......... AFTER TDC .... ................................... 32o (arc measure: 103 mm)
INJECTION STARTS……… .......... BEFORE TDC……………………… ..... 6.2o (arc measure: 20 mm)
VALVE CLEARANCES (COLD ENGINE) INLET/EXHAUST ...................... 0.30 mm
FUEL SYSTEM ...................... ................................ ................................... DIRECT INJECTION
INJECTOR OPENING PRESSURE ........................ ................................... 210 Bar
INJECTION TIMING .............. ................................ ................................... AUTOMATIC VARIABLE
FUEL LIFT PUMP ................... ................................ ................................... CAM SHAFT DRIVEN DIAPHRAGM PUMP
STATIC PRESSURE OF FUEL LIFT PUMP ........... ................................... 153 - 285 mBar
FUEL FILTER ......................... ................................ ................................... THROW AWAY FILTER INSERT
FUEL QUALITY GAS OIL ....... ................................ ................................... BS 2869 CLASS A
LUBRICATING SYSTEM
TYPE OF LUBRICATING OIL PUMP ...................... ................................... ROTARY VANE PUMP
LUBRICATING OIL PRESSURE: WARM ENGINE / MINIMUM ................. 2-4.5 Bar / 1 Bar
LUBRICATING OIL QUALITY ................................ ................................... SERVICE CC or CD
LUBRICATING OIL VISCOSITY .... BELOW +5oC ...................................... SAE 10 or SAE 10W-30
BETWEEN +5oc and +25oC ................ SAE 20 or SAE 15W-40
ABOVE +25oC . ................................... SAE 30 or SAE 15W-40
LUBRICATING OIL CONTENT INCL. FILTER ........ ................................... 4.9 Litres
LUBRICATING OIL FILTER .. ................................ ................................... THROW AWAY FILTER INSERT
ZF BW7 MARINEGEAR
LUBRICATING OIL QUALITY ................................ ................................... API CC or CD, MILL-L-46152
LUBRICATING OIL VISCOSITY .............................. ................................... SAE 30 or SAE 15W-40
LUBRICATING OIL TEMPERATURE...................... ................................... MAX. 120oC
LUBRICATING OIL CONTENT ............................... ................................... 1.1 Litres
NEWAGE PRM120 MARINEGEAR
LUBRICATING OIL QUALITY ................................ ................................... Automatic Transmission Fluid (ATF)
LUBRICATING OIL TEMPERATURE...................... ................................... MAX. 120oC
LUBRICATING OIL CONTENT ............................... ................................... 0.8 Litres
A5
009W2329
BAYSAN M60 MARINEGEAR
LUBRICATING OIL QUALITY ................................ ................................... Automatic Transmission Fluid (ATF)
LUBRICATING OIL TEMPERATURE...................... ................................... MAX. 120oC
LUBRICATING OIL CONTENT ............................... ................................... 0.5 Litres
STERN TUBE (FLEXIBLE) LUBRICANT ................ ................................... OUTBOARD GEAR OIL
COOLING WATER SYSTEM – DIRECT SEAWATER COOLING
COOLING WATER TEMPERATURE ...................... ................................... 50 – 65oC
TYPE OF CIRCULATING PUMP / CAPACITY AT 3600 rpm ..................... CENTRIFUGAL / 24-30 Litres/min
CAM HEIGHT ......................... ................................ ................................... 2.0 mm
MAX. PUMP COUNTER PRESSURE ..................... ................................... 0.6 Bar
MAX. PUMP SUCTION PRESSURE....................... ................................... 0.3 Bar
COOLING WATER SYSTEM – INDIRECT COOLING WITH FRESHWATER
COOLING WATER TEMPERATURE ...................... ................................... 70 – 95oC
TYPE OF FRESHWATER PUMP / CAPACITY AT 3600 rpm ..................... CENTRIFUGAL / 135 Litres/min
PUMP PRESSURE ................. ................................ ................................... 1.1 Bar
TYPE OF SEAWTAER PUMP / CAPACITY AT 3600 rpm .......................... CENTRIFUGAL / 36-42 Litres/min
CAM HEIGHT ......................... ................................ ................................... 3.1 mm
MAX. PUMP COUNTER PRESSURE ..................... ................................... 0.6 Bar
MAX. PUMP SUCTION PRESSURE....................... ................................... 0.3 Bar
ELECTRICAL SYSTEM
BATTERY VOLTAGE / CAPACITY ............................................................ 12 VOLT / 88 Ah
STARTER TYPE / OUTPUT ....................................................................... GEAR DRIVEN / 1.0 KW
ALTERNATOR TYPE/ OUTPUT ................................................................ BELT DRIVEN / 700 W
ENGINE STOP ........................................................................................... SOLONOID / MANUAL
RELAY ........................................................................................................ ELECTRONIC, BUILT ON
TORQUES
CYLINDER HEAD BOLTS/BEARING TOP SECTION ................................ 118 +/- 5 Nm (12 +/- 0.5 Kpm)
CONNECTING ROD BOLTS . .................................................................... 69 +/- 3 Nm (7 +/- 0.3 Kpm)
FLYWHEEL/COUNTERWEIGHTS ... .......................................................... 147 +/- 7 Nm (15 +/- 0.7 Kpm)
FLEX. COUPLING .................. .................................................................... 61 +/- 3 Nm (6.3 +/- 0.3 Kpm)
ASSEMBLY OF FUEL VALVE .................................................................... 59 +/- 3 Nm (6.0 +/- 0.3 Kpm)
BRACKET FOR ENGINE SUPPORTS ....................................................... 69 +/- 3 Nm (7 +/- 0.3 Kpm)
GEARBOX .............................. .................................................................... 25 +/- 5 Nm (2.5 +/- 0.5 Kpm)

A6
009W2329
Spare Part Numbers for Service Parts
In this manual we have maintained on the drawings some numbers which are also spare part
numbers. However, this manual is not to be regarded as a spare parts catalogue but only as
helping guidance for correct identification of parts.
In the daily service work, some of the parts must be replaced after the number of hours stated
in the owner´s manual and in this book, and therefore we have made the following table:
610J0200 Lubricating oil filter
610D0201 Fuel filter
020D4326 Air filter
000E0450 Sacrificial zinc anode
610G0506 Impeller
542A0602 V-belt 10*1035 (seawater cooling)
542A0609 V-belt 10*1100 (freshwater cooling)
A7
009W2329
A8
009W2329
Results of Measurement
The below curves indicate results of measurements at 762 mm Hg and a room temperature of 26 °C.
A9
009W2329
Longitudinal Section of DV36
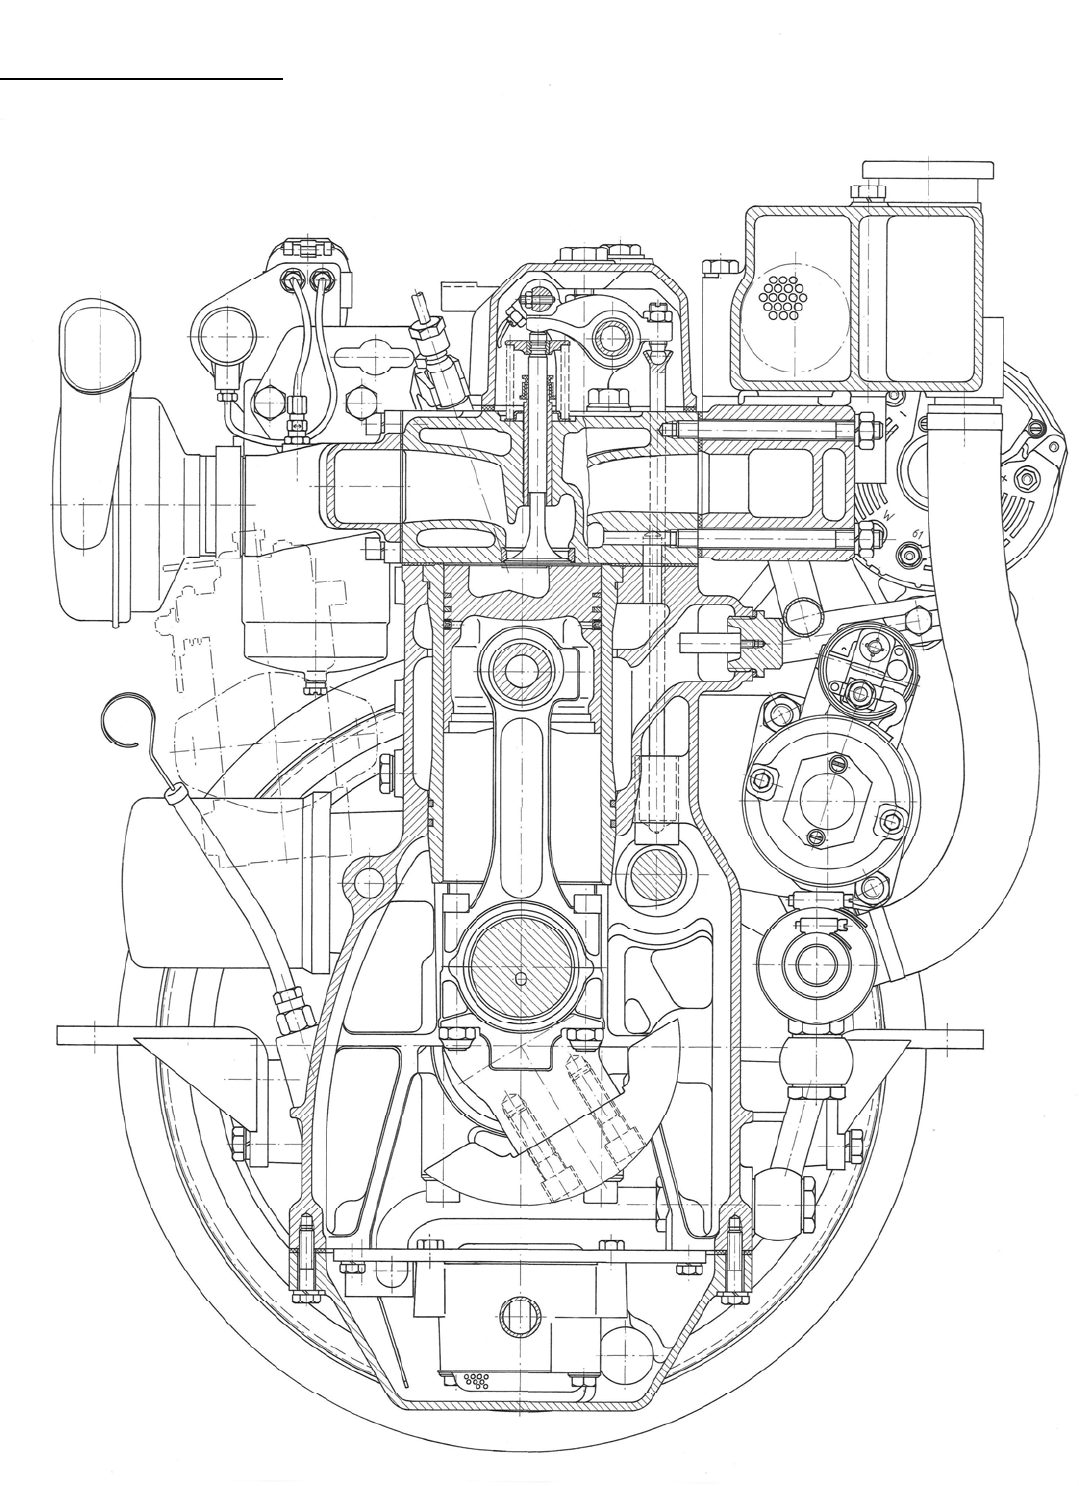
A10
009W2329
Cross Section of DV36
A11
009W2329
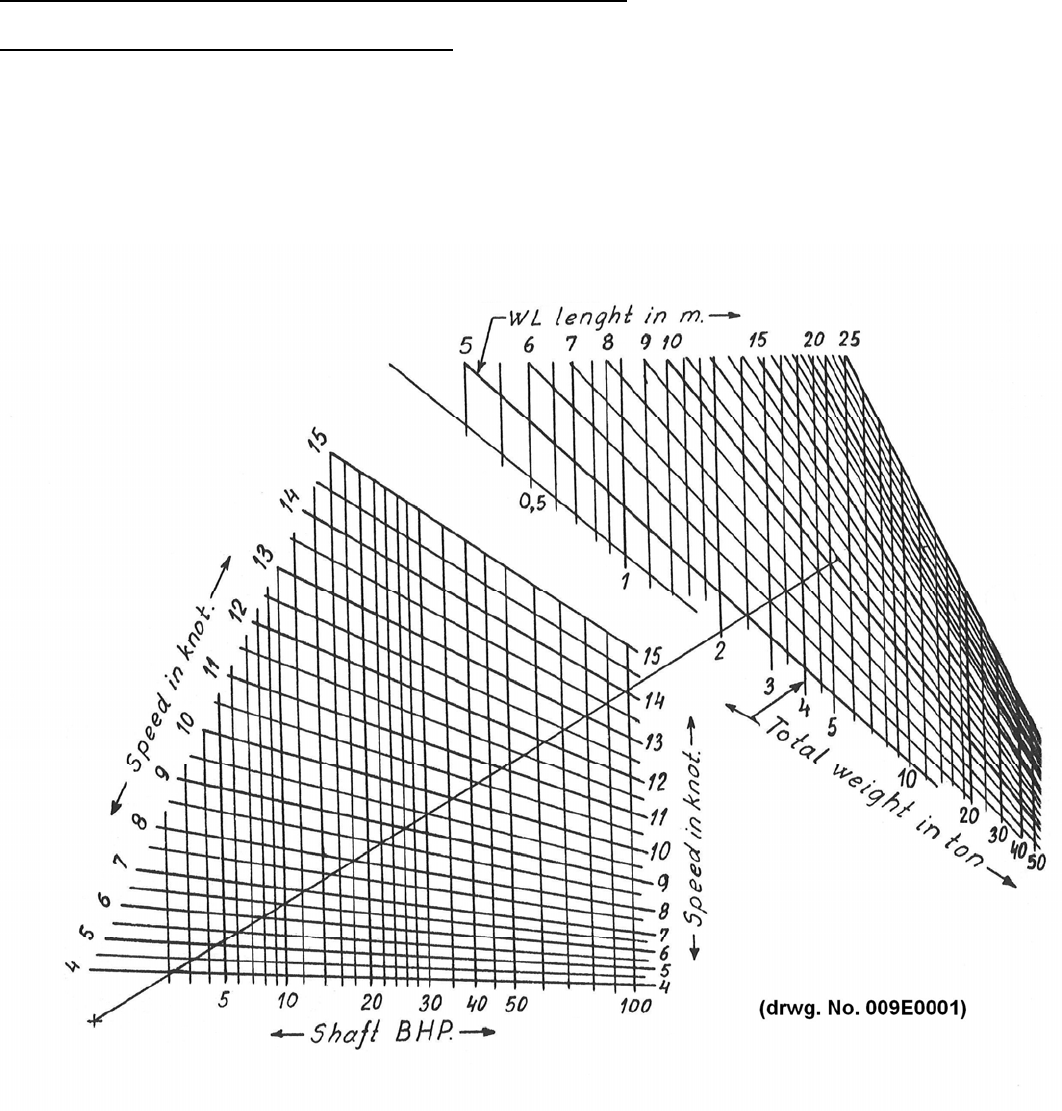
Diagram of the Relation between the Total Weight,
Speed and Horse Power of the boat
The below diagram is normative and not binding in any way as many different circumstances
influence the result, especially the type and shape of the boat, the propeller and its placing as
well as the horse power of the engine.
Seek the scheme to the right of the intersection between the actual length in the waterline of the
ship and the total weight.
Draw a straight line between this point (the intersection) and the fixed point in the bottom left corner.
Where the line of the desired speed crosses the straight line, you can read the required horse
power vertically below.
If you know three of the specifications, you can by means of these schemes find the fourth one.

B1
009W2329-R01
SECTION B
LIST OF TOOLS

B2
009W2329-R01
CONTENTS
Tools for repairs on DV36 .......................................................... page B 3
Dimensions of mounting punches ............................................. page B 6

B3
009W2329-R01
Tools for repairs on DV36
The below mentioned tools are necessary to make the engine repairs described in this
manual.
Part of the tools are special tools which can be ordered from the spare parts department at
BUKH.
We have indicated the fields of application for the special tools in this manual.
Designation of tools Fields of application Spare part No.
Slip-on ring for mounting of
pistons
Section IJ
Puller for cylinder liner
Section IJ
009P2235
Punch for rear seal ring
Section G
009P3177
Punch for front seal ring
Section E
009P3178
Punch for mounting of
camshaft bearing in block
Section M and L
009P3179
Punch for journal for
intermediate wheel
Section G
009P3180
Punch for journal for front and
rear rotating weight
Section E and G
009P3181
Punch for mounting of valve
guide
Section C
009P3175
Punch for mounting of inlet
valve seat
Section C
009P3173
Punch for mounting of exhaust
valve seat
Section C
009P3174
Punch for mounting of expan-
sion discs in the cylinder head
Section C
009P3176

B4
009W2329-R01
Designation of tools Fields of application Spare part No.
36 mm socket spanner
19 mm socket spanner for
fastening of cylinder head
Section C
19 mm crowfoot wrench for
tightening up of cyl. head
Section C
009P3225
10 mm Allen top for faste-ning of
bearing top section
Section L
5 mm Allen key
-
6 mm Allen key
-
7 mm Allen key
-
Open-end spanner/ring spanner,
8/10/12/13/14/15/17/19/22/24/27
30 and 32 mm
-
Dismantling tool for valve
springs
Section C
009P3115
Tachometer
Generally
009P3106
Testing set for fuel nozzles
Section H
009P3100
Cleaning for fuel nozzles
Section H
009P3101
Bosch dial indicator for
adjustment of fuel pump
Section H
Bosch dial indicator “holder with
extension” for adjustment of the
fuel pump (KDEP1085)
Section H
529W0002

B5
009W2329-R01
Designation of tools Fields of application Spare part No.
Flanging tools for nozzle holder
insert
Section C
009P2565
Torque wrench
(Stahlwille 73/6 1.5-6.5)
Generally
009P3108
Torque wrench
(Stahlwille 73/25 8-26)
Generally Section C, D,
IJ and L
009P3109
Circlip tongs (external)
A1, 10-28 mm
-
Circlip tongs (internal)
J2, 19-75 mm
-
Puller for gear wheel
(Kukko 20/10)
Generally
Puller for flexible coupling
Section R
T 41069
Compression gauge
Section C
529W0000
Adapter for compression gauge
Section C
009P3123
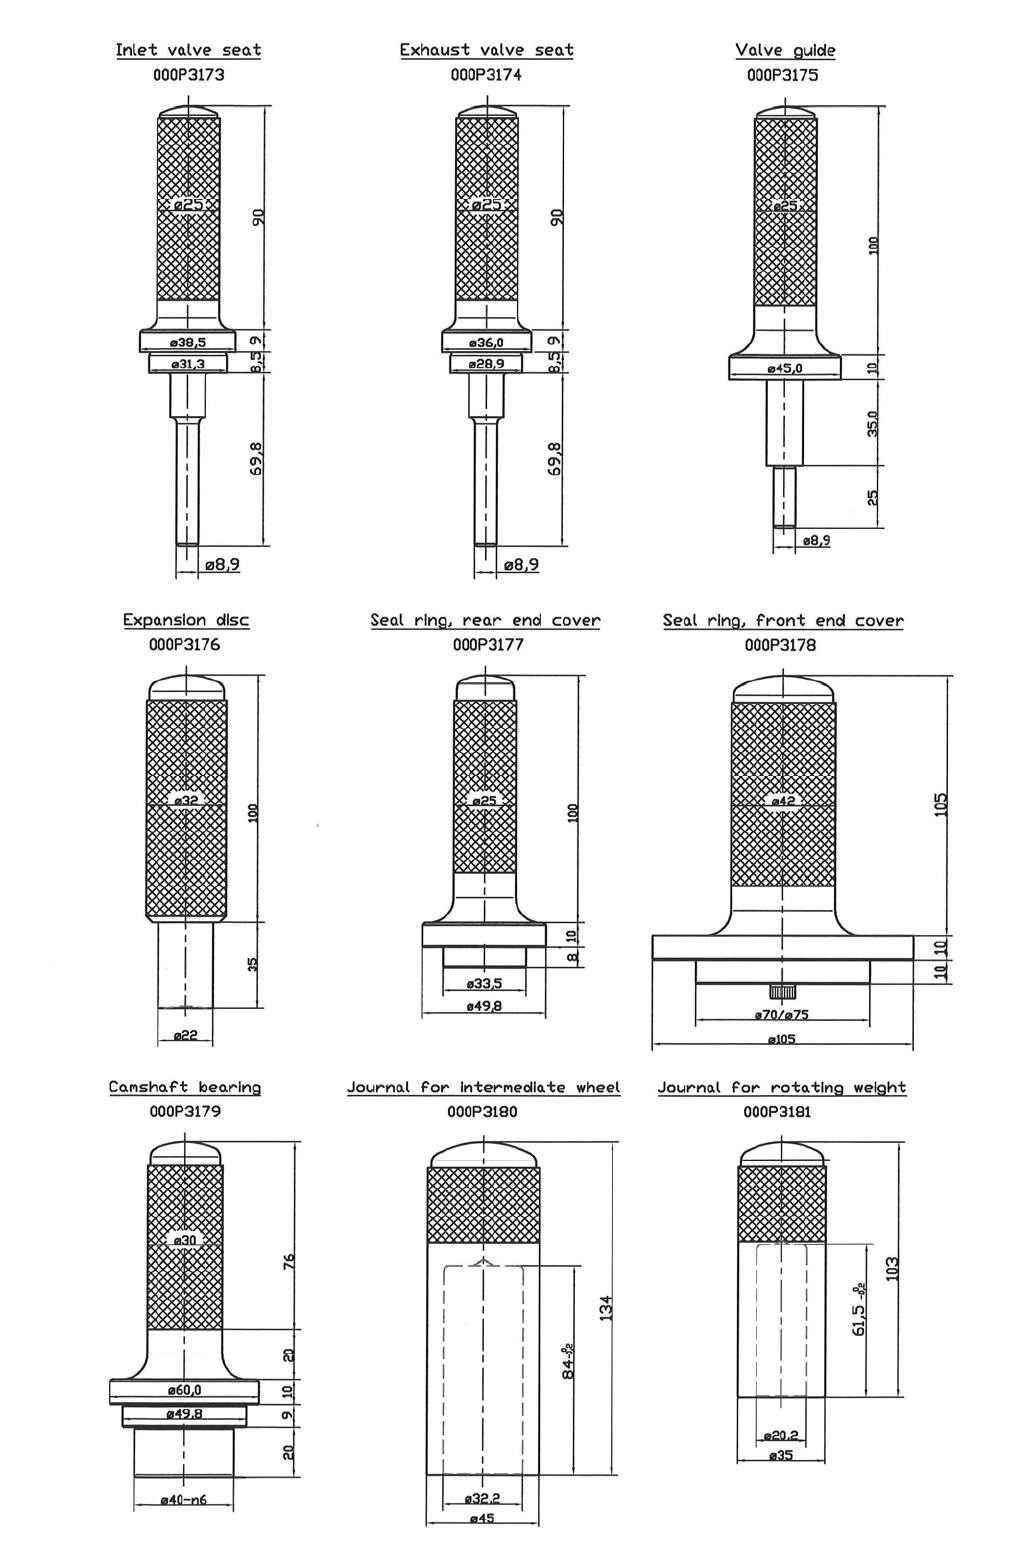
Part of the mentioned special tools can be manufactured without too much trouble at the
dealer´s workshopin periods outside the boat season. Therefore we have made sketches at
page B6 of each individual mounting punch with dimensions.
Slip-on ring for mounting of pistons is not illustrated but is manufactured of a worn out
cylinder liner or another piece of work pipe. Cut the cylinder liner so that you get a piece
being about 100 mm high, the turn it conical inside the liner or pipe.
B6
009W2329-R01
009W2329-R01
C1
SECTION C
CYLINDER HEAD

009W2329-R01
C2
CONTENTS
Exploded view of cylinder head complete ................................. page C 3
Valve adjustment ...................................................................... page C 4
Removal and refitment of cylinder head ................................... page C 5
Replacement of rocker arm or rocker shaft .............................. page C 6
Adjustment of valve lifter arrangement ..................................... page C 6
Replacement of rocker arm bushing ......................................... page C 7
Removal of fuel valves ............................................................. page C 8
Nozzle holder insert .................................................................. page C 9
Fitting measures for fuel nozzle insert ...................................... page C 10
Valve springs ............................................................................. page C 11
Replacement of valve guides .................................................... page C 12
Pressing-in dimensions for valve guide ..................................... page C 13
Valve guide stuffing box ............................................................ page C 14
Repair or replacement of inlet and exhaust valves .................... page C 15
Exhaust valve ............................................................................ page C 16
Inlet valve .................................................................................. page C 17
Grinding of valves ...................................................................... page C 18
Measures for new valves ........................................................... page C 18
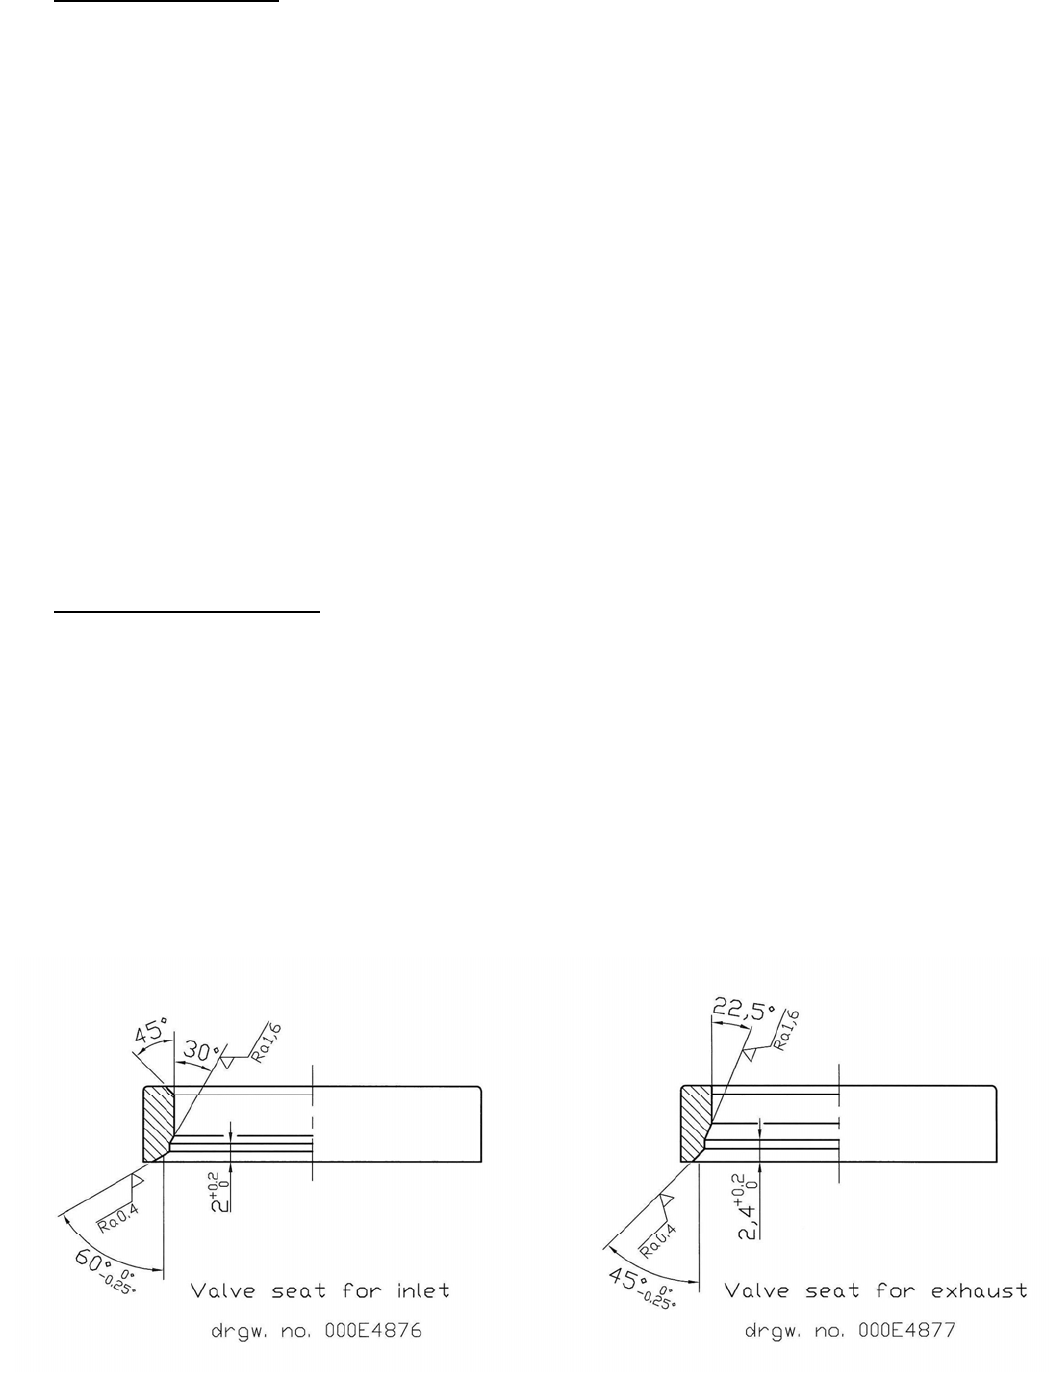
Replacement of valve seats ..................................................... page C 19
Cylinder head gasket ................................................................ page C 20
Air inlet manifold arrangement ................................................... page C 21
Exhaust manifold arrangement .................................................. page C 22
009W2329-R01
C3
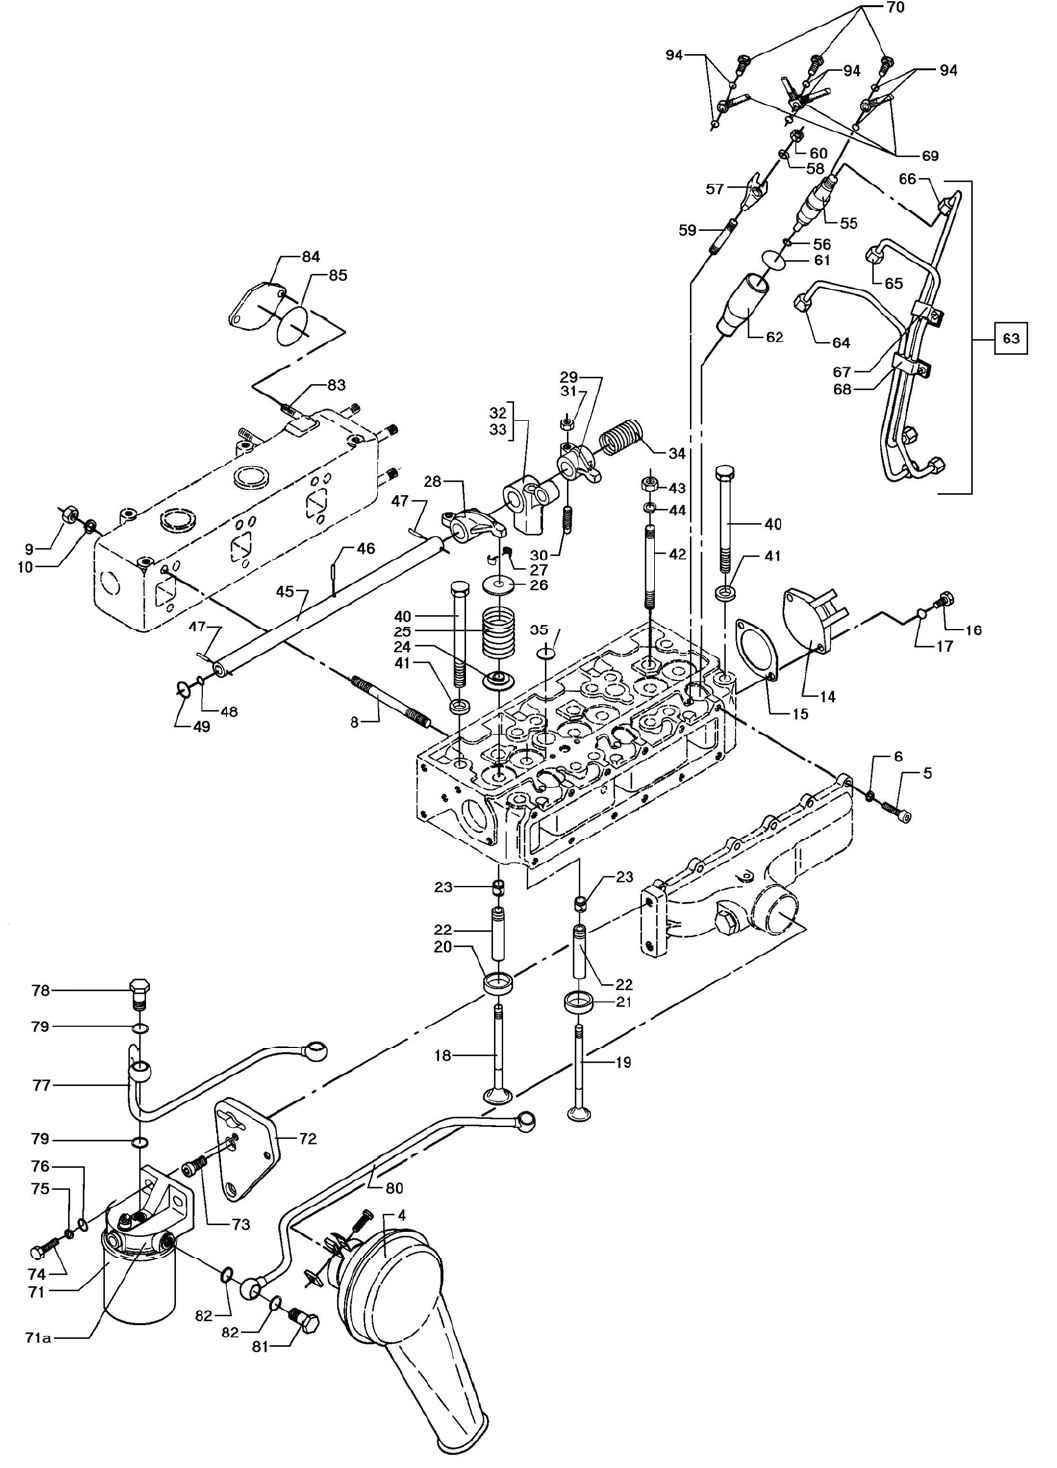
Exploded view of cylinder head
009W2329-R01
C4
Valve adjustment
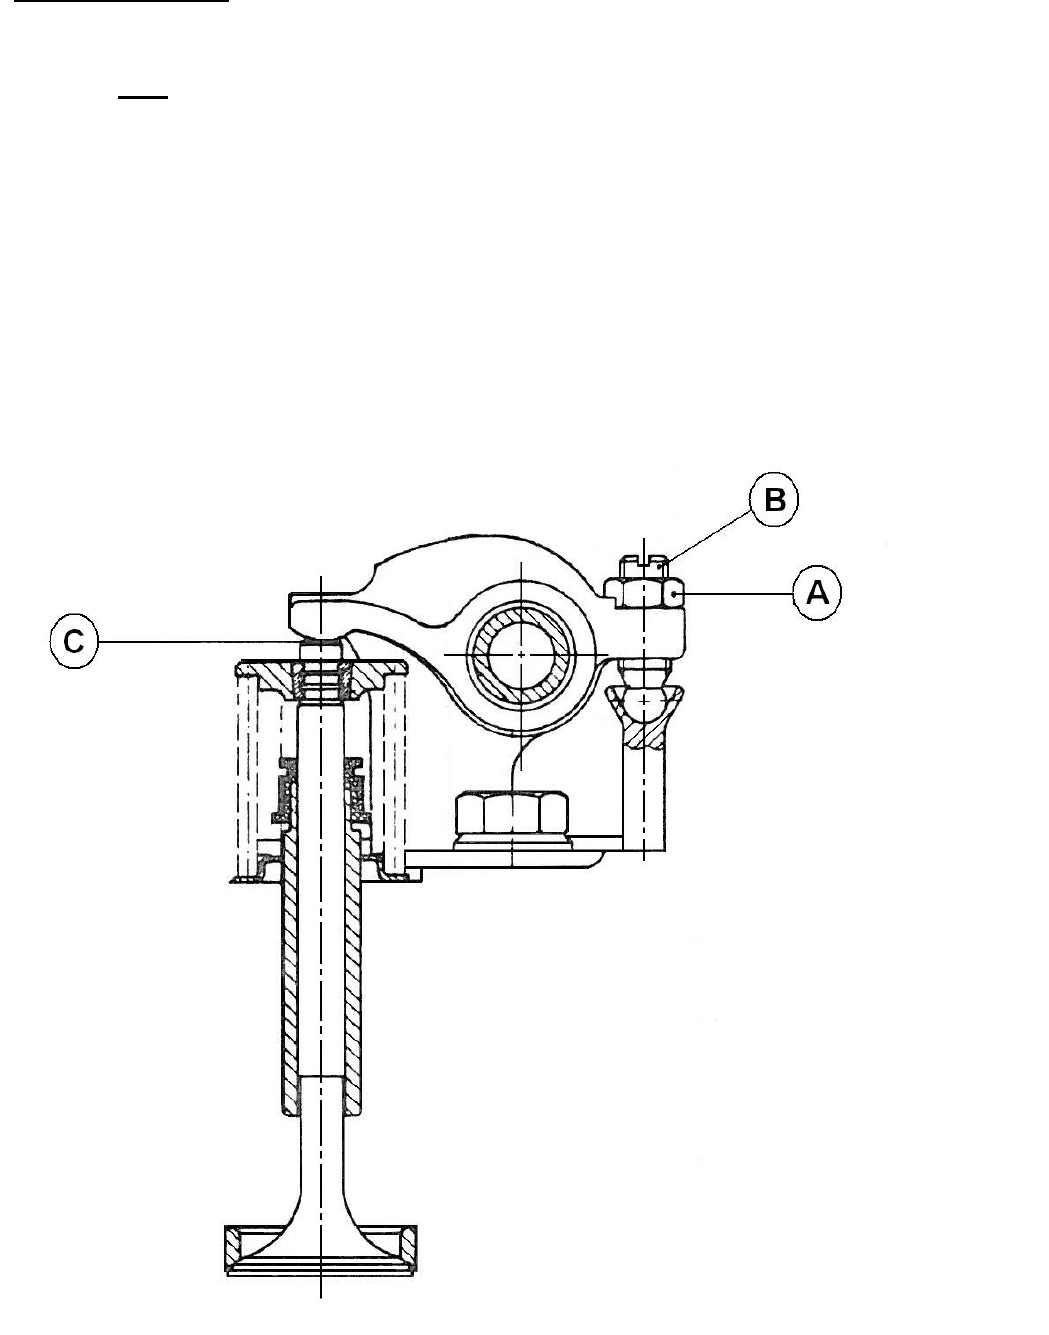
Adjust the valves by loosening the counter nut A which makes it possible to adjust the
clearance by means of the adjusting screw B.
Measure the clearance with a feeler gauge at C.
The clearance of the inlet and exha ust valves should be adjusted at 0.3 mm w hen the
engine is cold and the clearance of the valves should always be checked after tightening-
up of the c ylinder head. The valv es are adjusted when the pisto ns are alternately at their
highest point in the working stroke.
009W2329-R01
C5
Removal and refitment of cylinder head
1. Drain off the cooling water.
2. Remove the top cover.
3. Remove valve rocker arms.
4. Remove the inlet and return pipes of the fuel valves.
5. Remove the charging alternator.
6. Remove the exhaust and inlet manifold.
7. Loosen the top bolts, after which the cylinder head can be lifted out of the engine block.
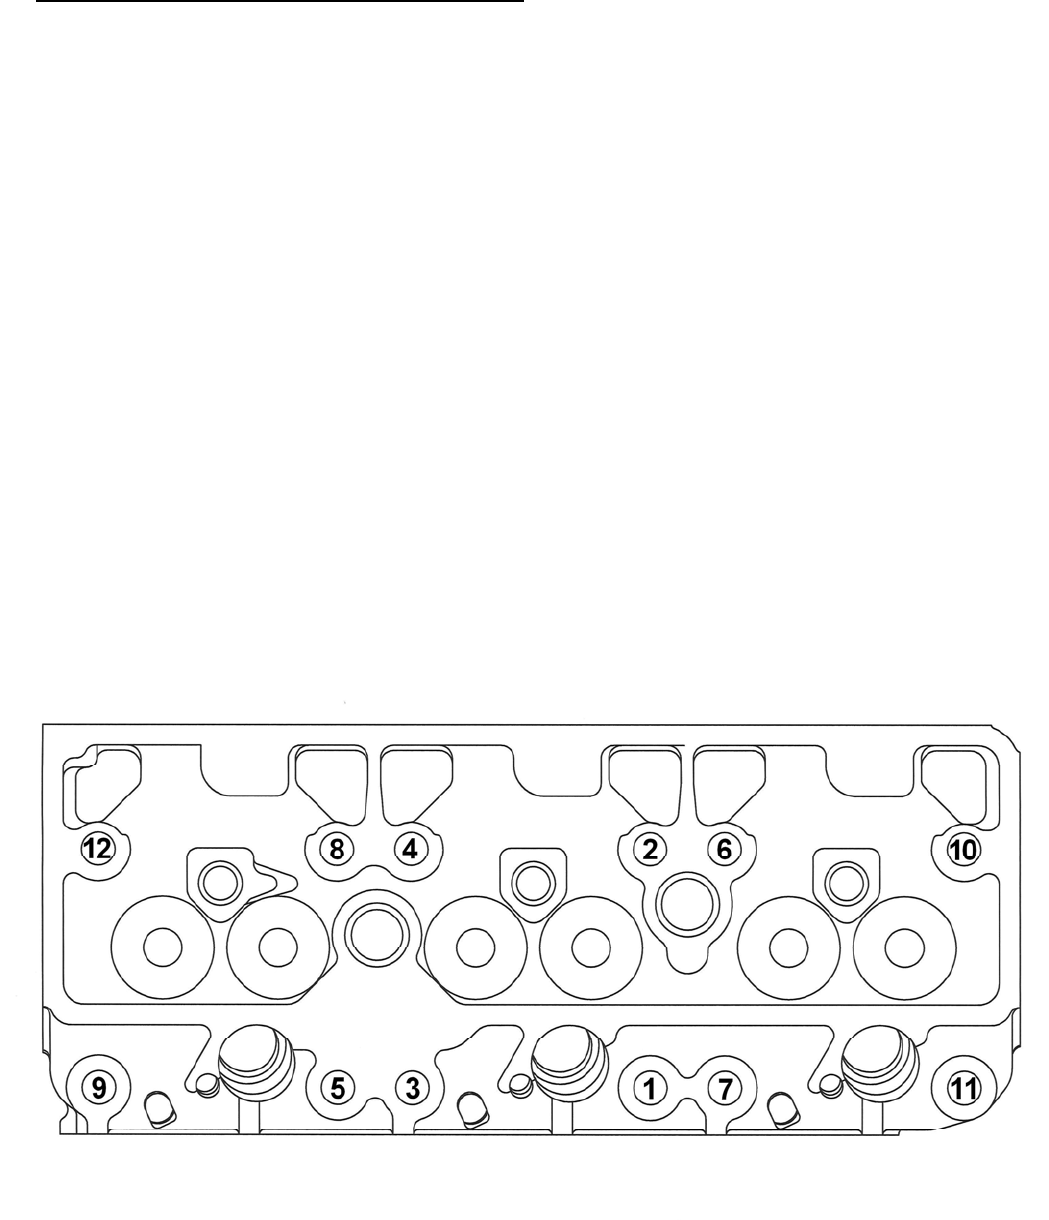
8. Refitment of the cylinder head is made in reverse order and the bolts are tightened
evenly at a torque of 118±5 Nm (12±0.5 kpm). Tighten in the order shown on the
skeleton diagram below.
009W2329-R01
C6
Replacement of rocker arm or rocker shaft
For each cylinder, a rocker arm column wit h two rocker arms for inlet valve and exhaust
valve, respectively, is fitted on a common shaft with corresponding rocker arm columns and
rocker arms for the two other cylinders.
1. Remove the top cover.
2. Unscrew the three central nuts on the rocker arm columns.
3. Lift off the shaft arrangement.
4. Knock out the tube pin and washer in one of the shaft ends.
5. Then the rocker arms and the intermediate springs can be taken out.
Reassembly is a reversal of the dismantling procedure.
Adjustment of valve lifter arrangement
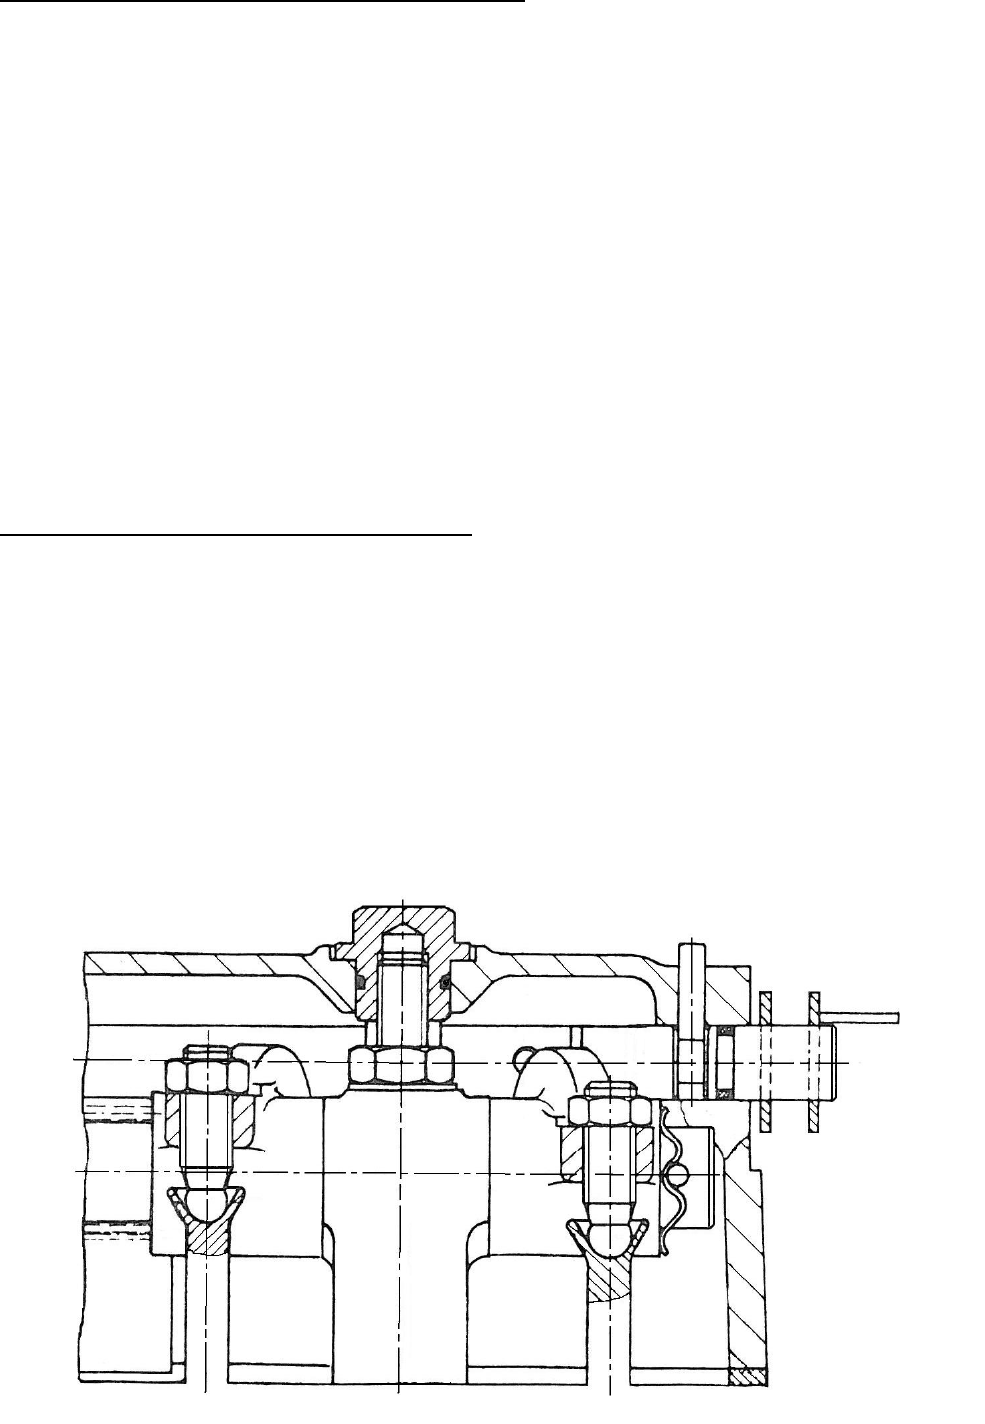
Furthermore, a common shaft for decompression is fitted on the three rocker arm
columns.
For a possible removal of the shaft, remove first the pins going down on the rocker arms
at decompression, after which the shaft can be pulled out.
When adjusting, adjust the pins so that you faintly see a single groove of the pin thread
(about 1.5 mm free pin) just on the side facing the rocker arms.
When fitting the top cover, ensure that the slot in the decompression handle in the top
cover mesh with the corresponding pin on the decompression shaft.
009W2329-R01
C7
Replacement of rocker arm bushing
1. Remove the rocker arm as indicated on page C5 and check it as to wear and tear
as well as fracture.
2. Press out the defective bushing with an adequate tool.
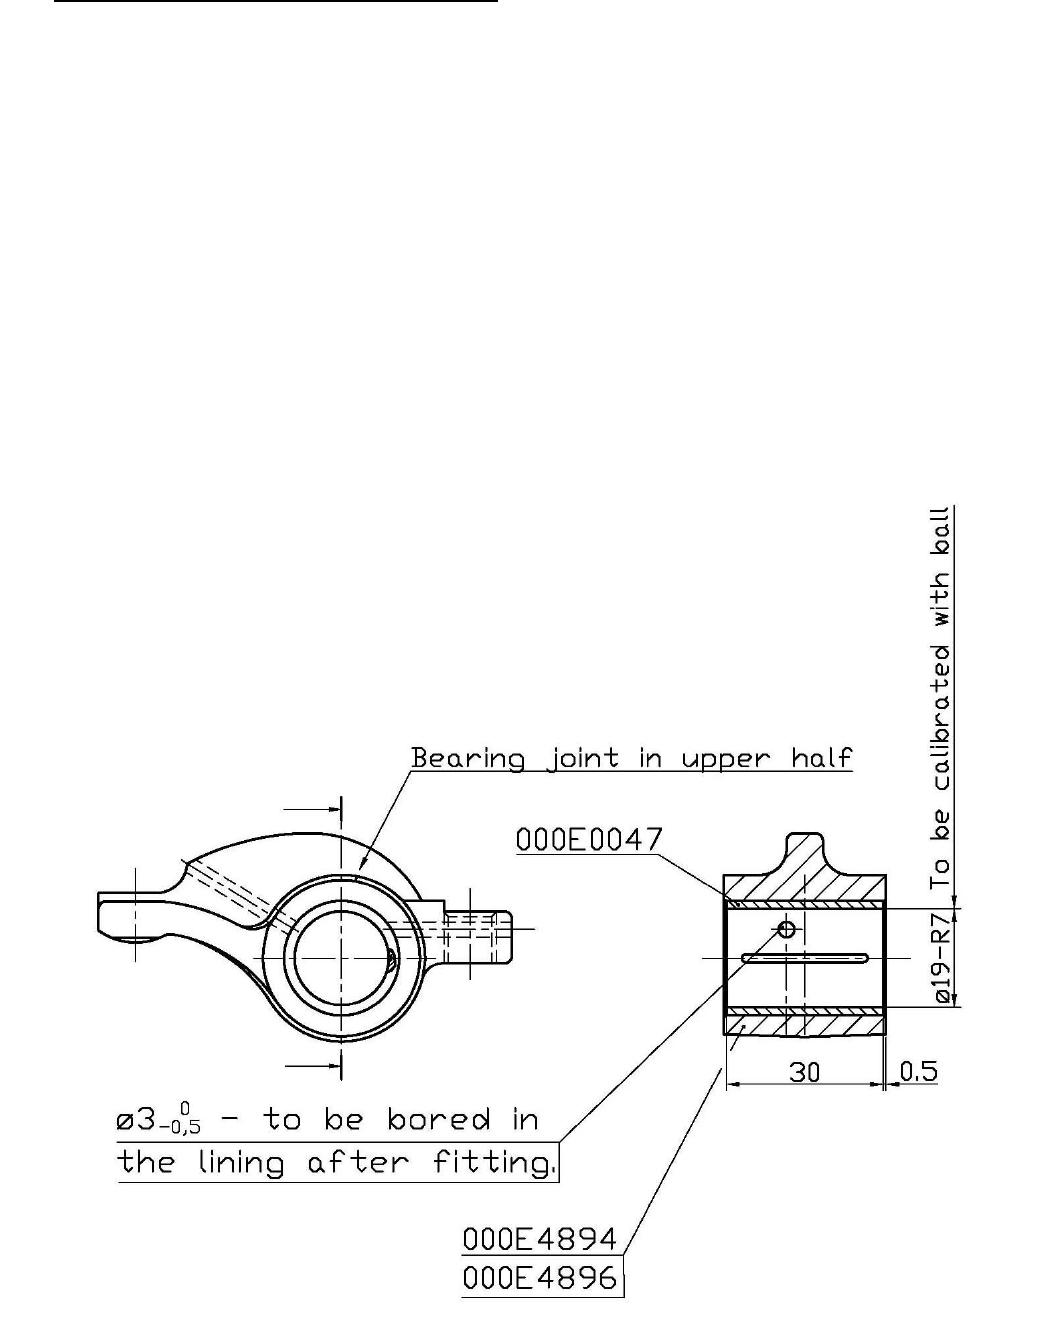
3. Fit the new bushing as shown below paying special attention to the position of the
bearing joint and the oil grooves.
4. When fitted, calibrate the bearing bush so that the tolerance ø19-R7 is observed.
Do this either with a calibration ball or with a reamer having the mentioned tolerance.
5. After refitting the rocker arm, check the axial play with a feeler gauge. The axial
play may be 0.1 – 0.2 mm.
6. Finish refitting the rocker arm arrangement.
drwg. No. 008E4893
009W2329-R01
C8
Removal of fuel valves
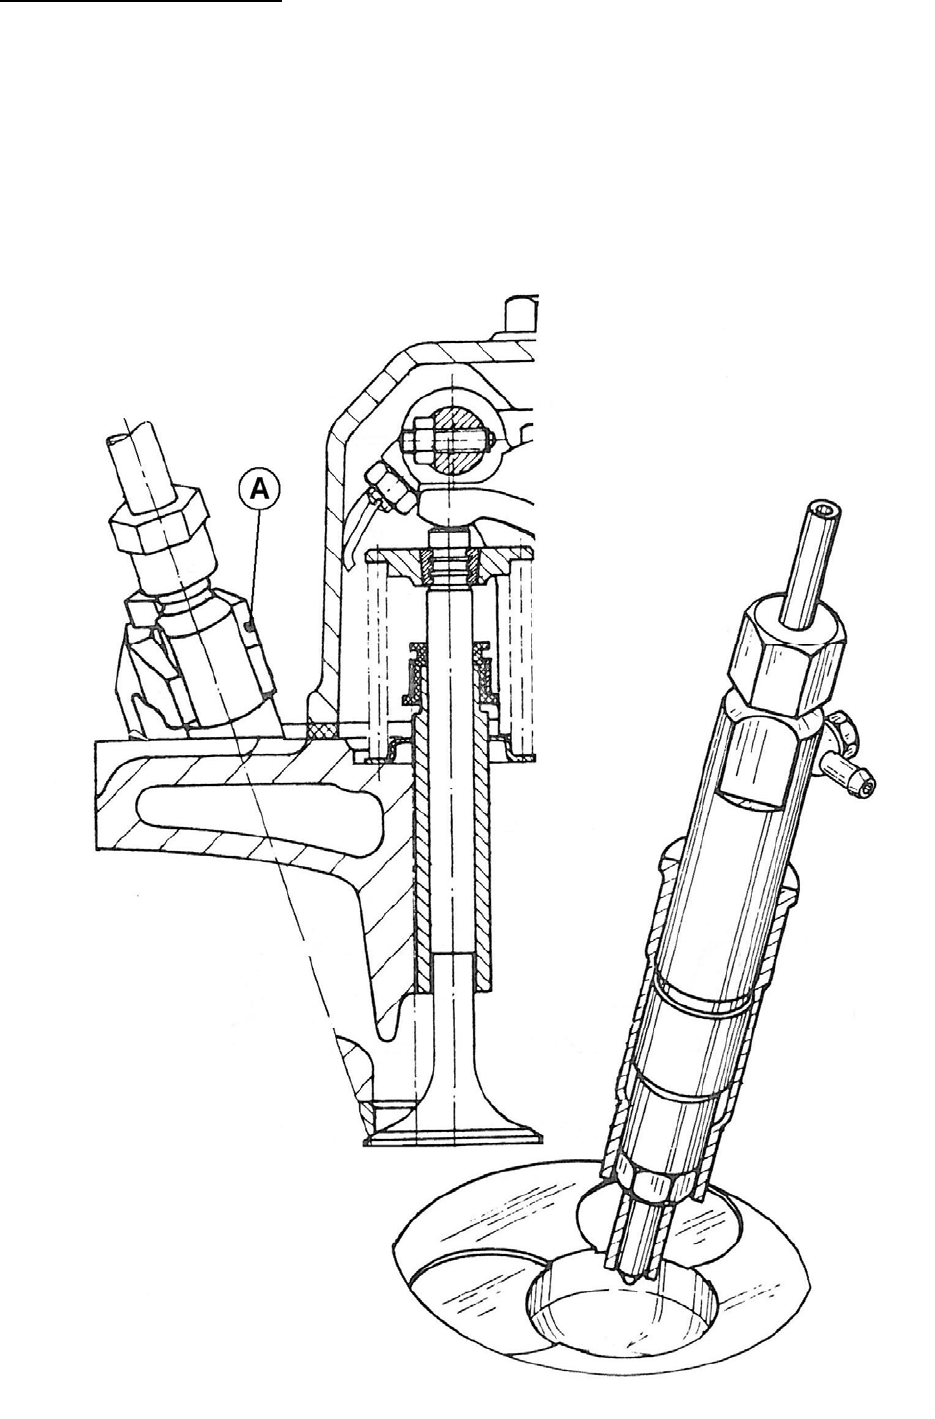
The fuel valves are removed by loosening the clamping nuts for the flanges A as indicated on
the sketch below after removal of the inlet and return pipes of the fuel valves.
The drawing at the bottom right-hand side indicates the placing of the fuel valve in proportion
to the piston.
For repair of the fuel valves, we refer to section H.
009W2329-R01
C9
Nozzle holder insert
The nozzle holder inserts are placed in the cylinder head and form – a the name indicates –
an insert for the placing of the fuel valves in the cylinder head.
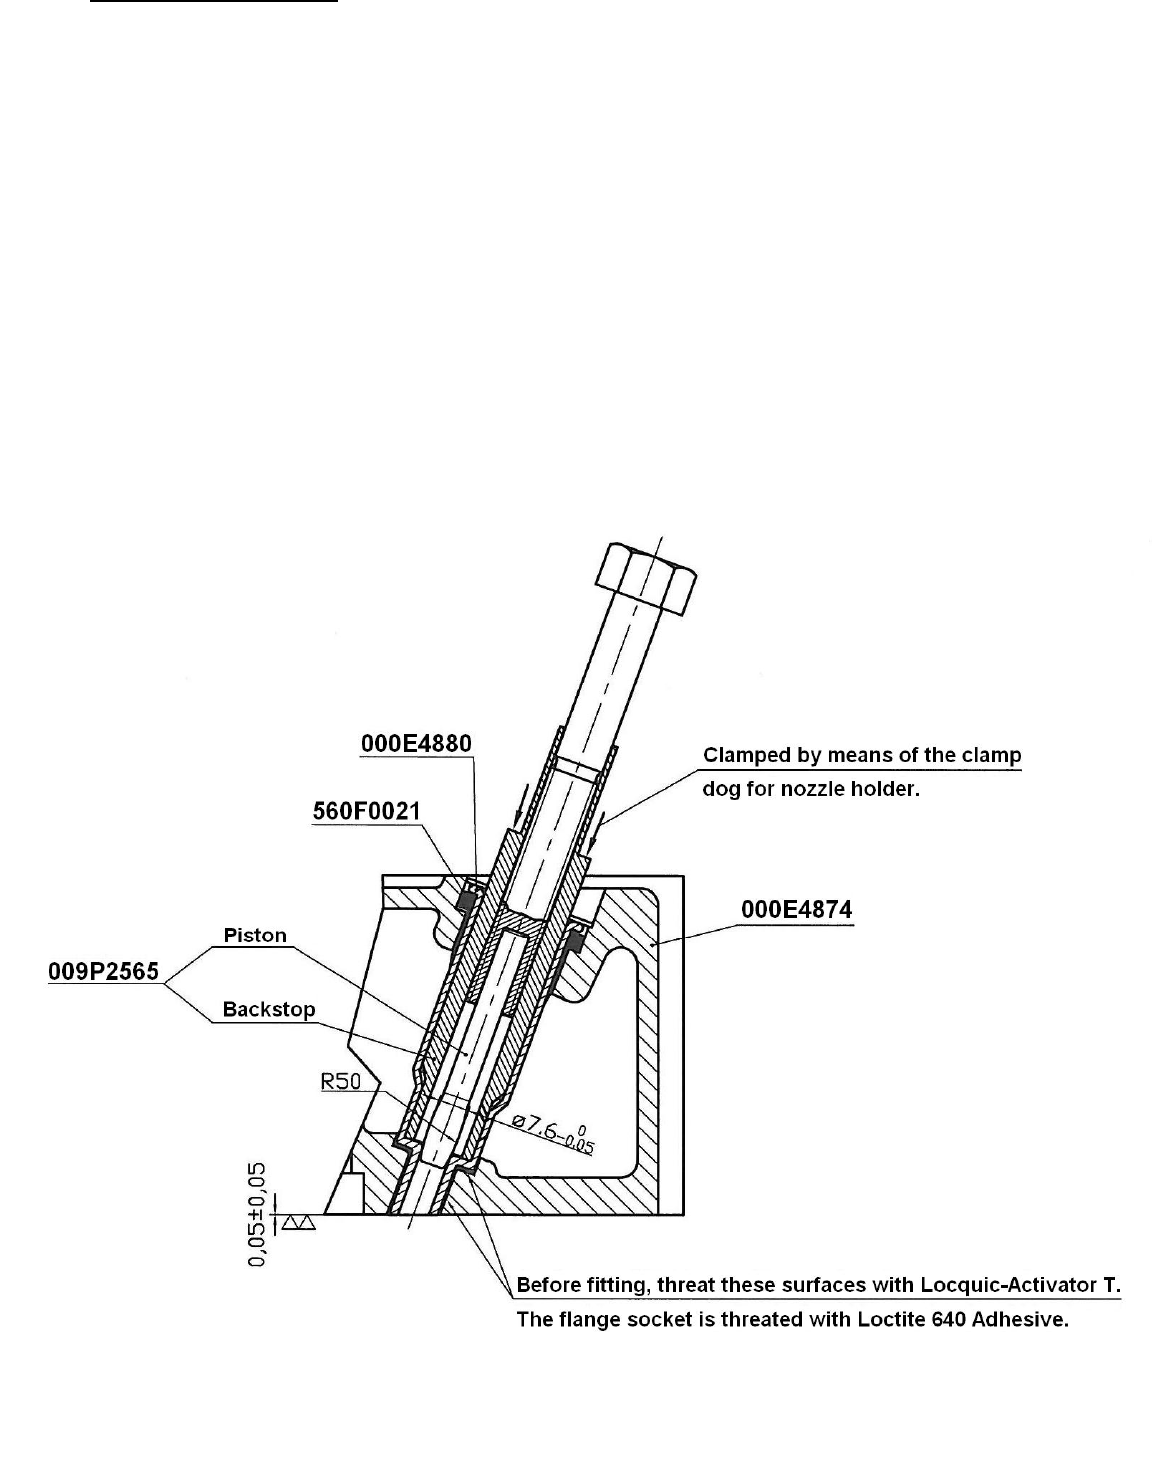
The nozzle holder inserts can be replace d, which demands that the sp ecial tools below for
flanging (piston and backstop) are used and that t he surfaces are treated as indicated on the
drawing.
Remove the old nozz le holder inserts by bor ing-up the flanged end of the nozzle holder
inserts with a ø8 – ø9 mm drill, and then k nock out the nozzle h older inserts with a 10 mm
punch.
After having fitted the new nozz le holder insert s, test the cylinder head for pressure with
water in order to check the flanged seals.
drwg. No. 008E4881
009W2329-R01
C10
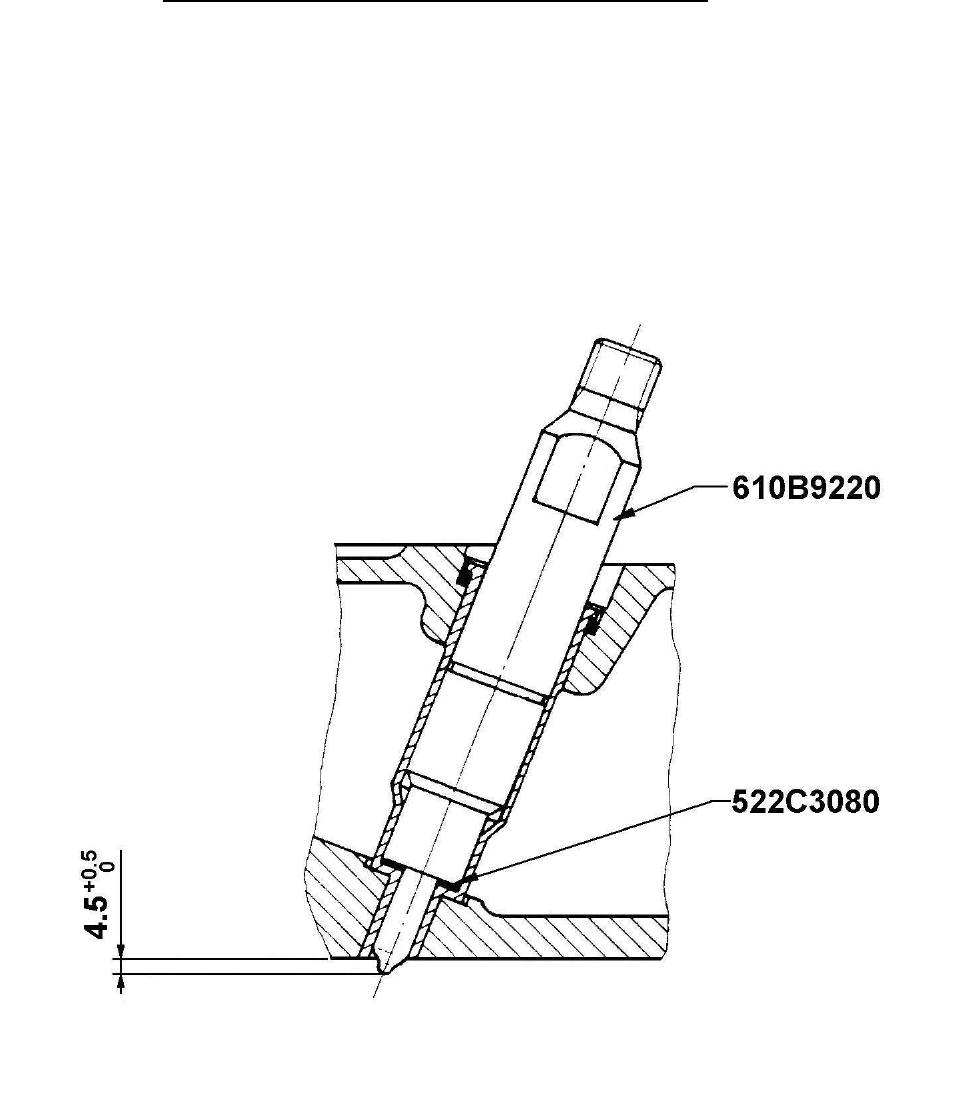
Fitting measurements for the fuel nozzle into insert.
009W2329-R01
C11
Valve springs
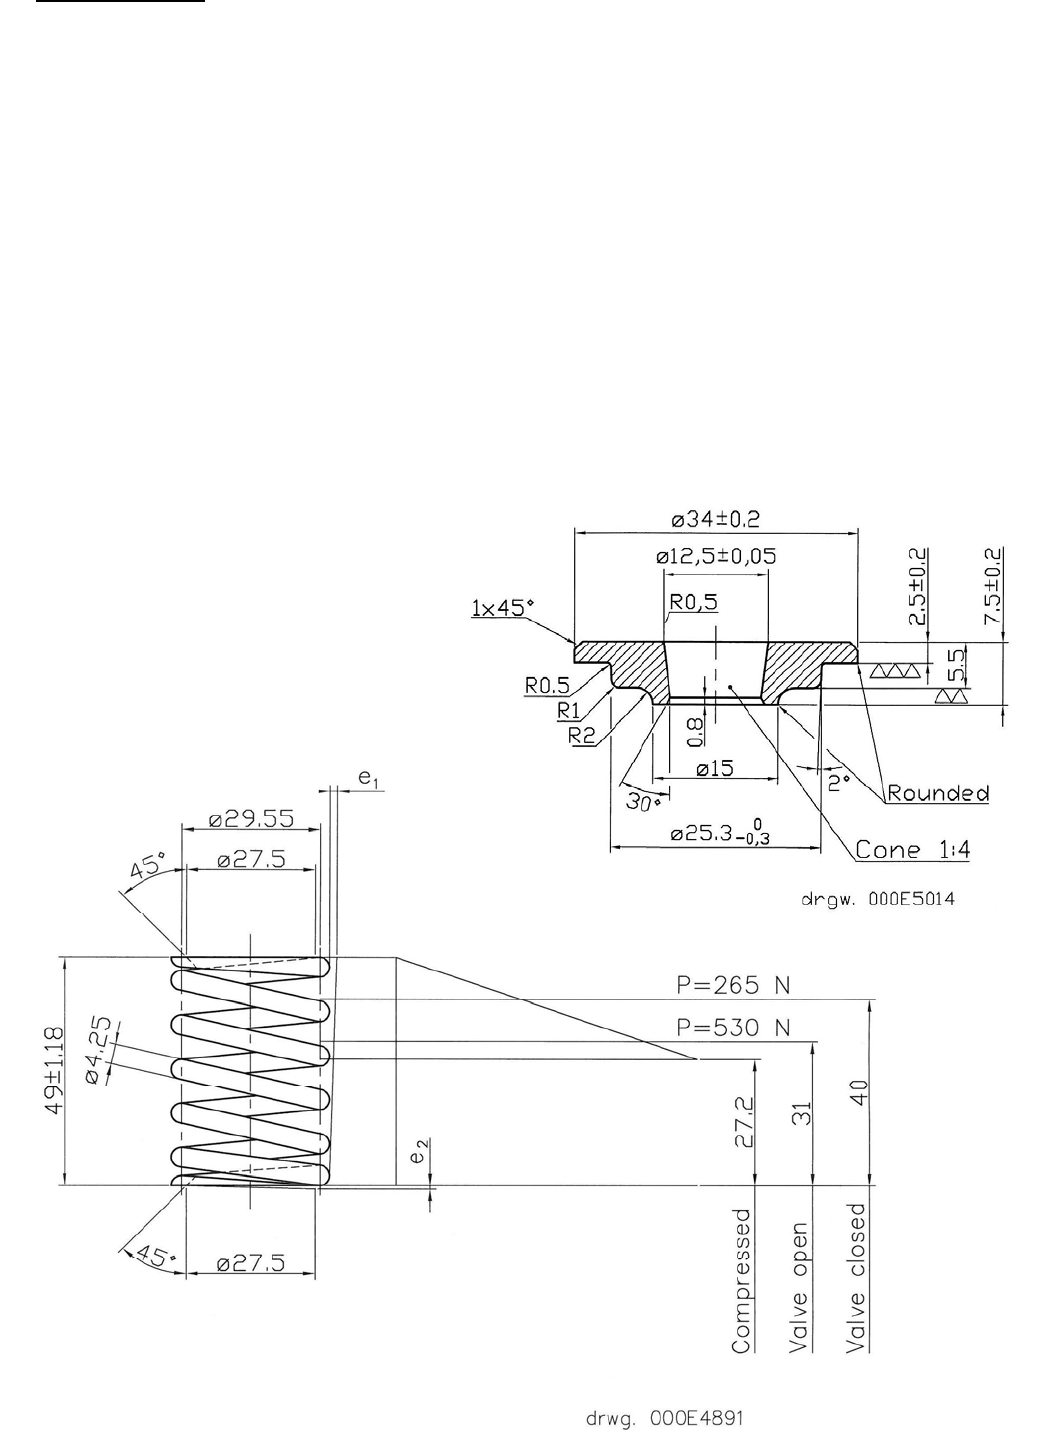
Six identical springs for inlet and exhaust valves, respectively, are fitted in the cylinder head.
The springs are identical in both ends, and therefore fitting up or down is of no importance.
The springs are locked in their position in proportion to the valve stems by means of two
conical halves for each valve spring and guided by a guide for valve spring and a
corresponding disc, respectively.
The valve springs are removed by compressi ng the valve springs and removing the c onical
locking halves with s pecial tools or the like so the valves are cut off fro m following the
movement of the springs.
When refitting the valve springs, make sure t hat the conical loc king halves are correctly
placed in their trace on the va lve stems. This can be done by knocking gently with a plastic
hammer on top of the valve stem while the cylinde r head is lifted from the file bench so that
the valve heads can move so as to be clear of the valve seats.
009W2329-R01
C12
Replacement of valve guides
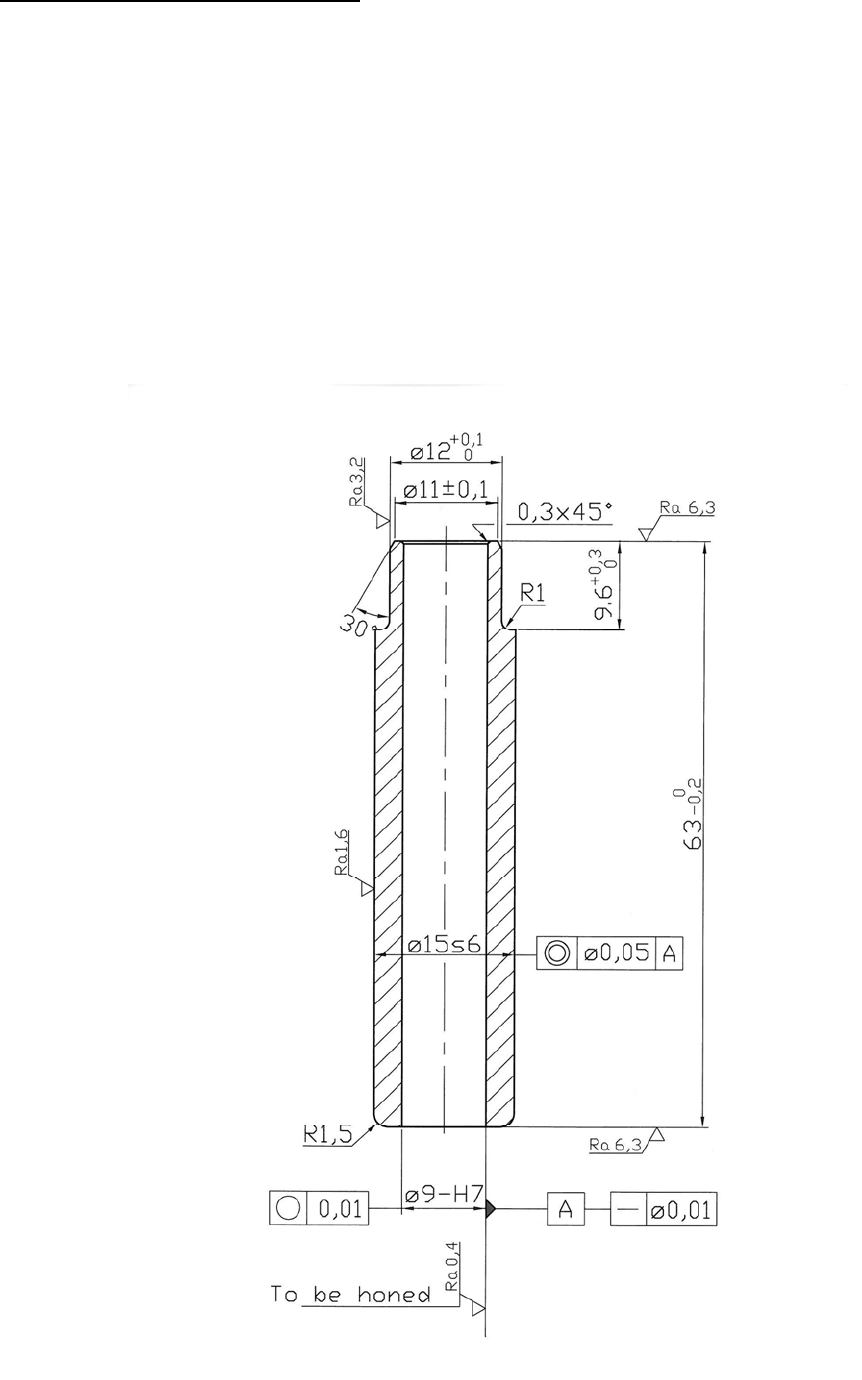
Replace the valve guides whic h are pressed into the cylinder head if the tolerance is
exceeded because of wear and tear by 0.05 mm. Check the measure with a ø9 – H7 internal
gauge according to the drawing below of the valve guide.
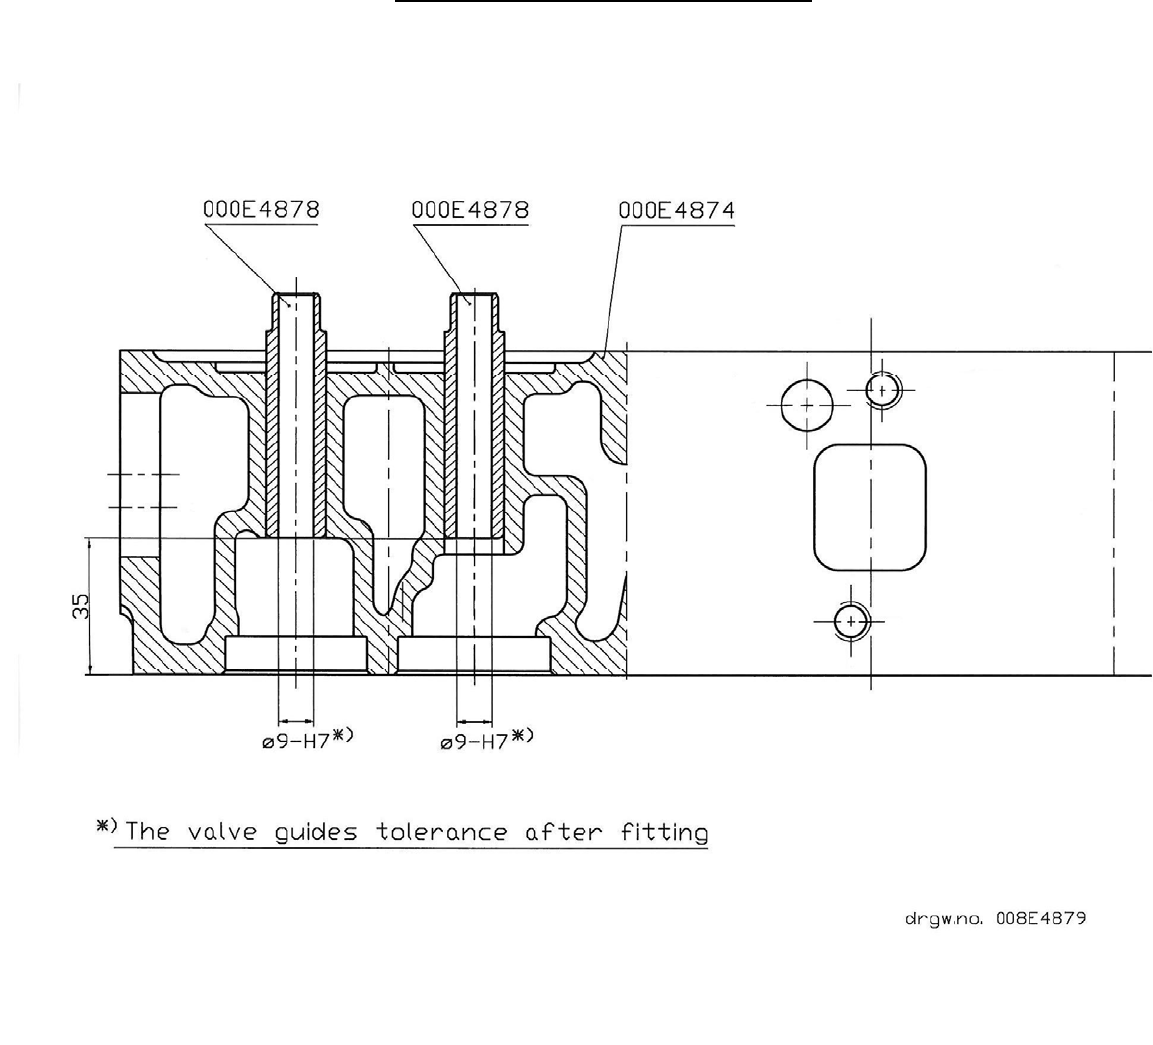
Fit new valve guides according to the drawing on page C13. Before fitment, heat the cylinder
head in an oven or heat it in boiling water and cool down t he valve guides in a deep freezer
or otherwise.
After fitment of new valve guides, broach the bore of the valve guides with a broach in order to
remove possible ups ettings from the fitti ng. Use a broach ø 9 – H7 for the broaching.
009W2329-R01
C13
Pressing-in dimensions for valve guide.
009W2329-R01
C14
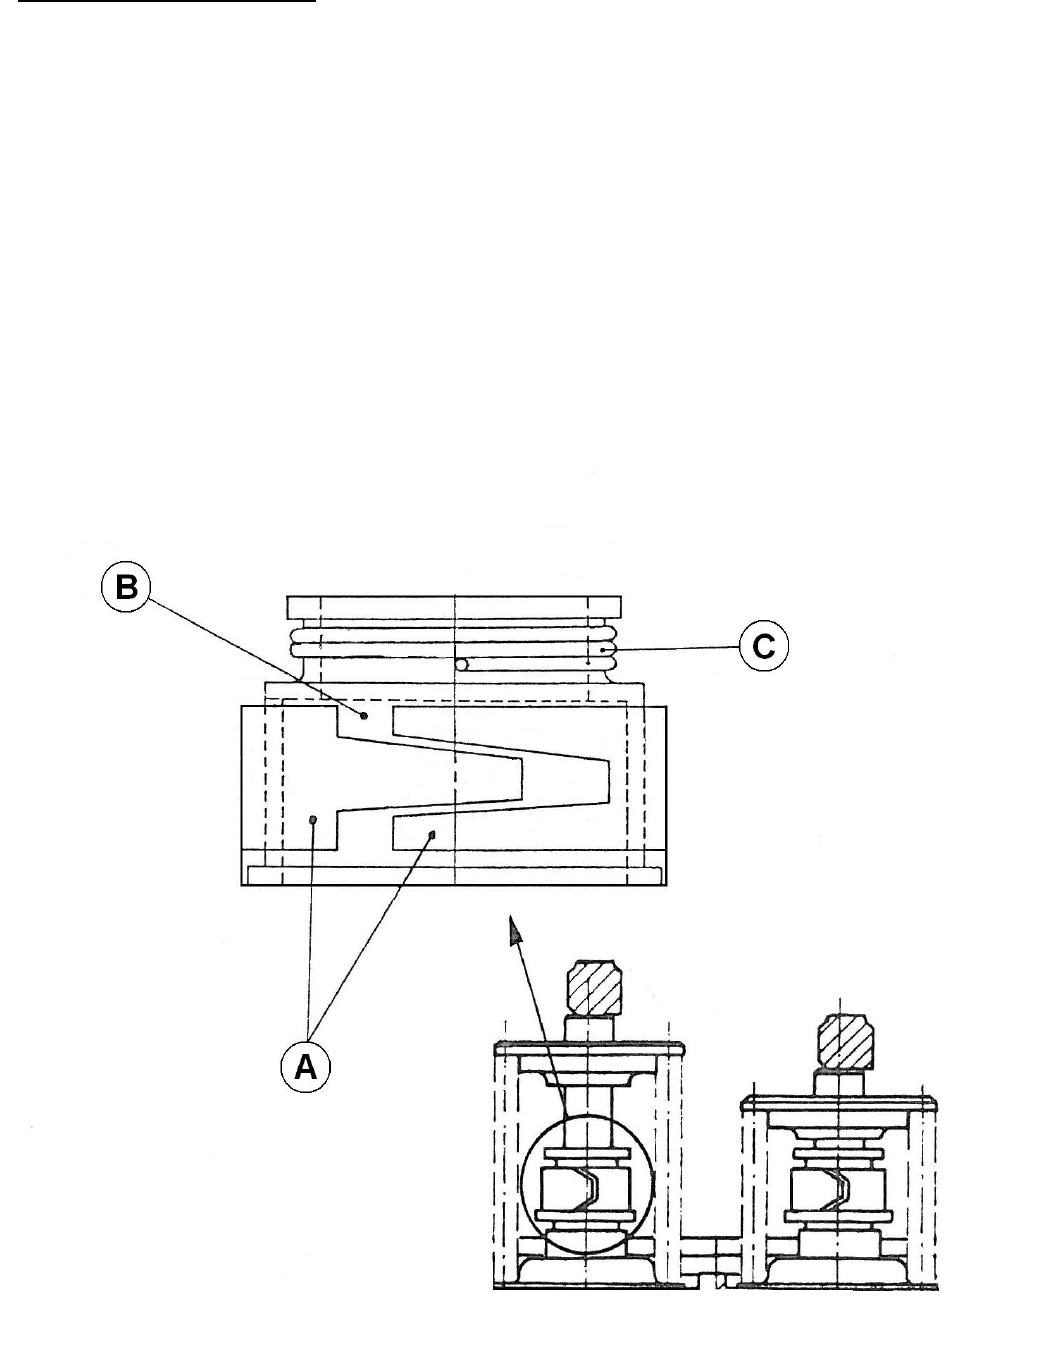
Valve guide stuffing box
In order to avoid lubricating oil consumption because of lubricating oil passing between valve
guide and valve stem causing the valves to be burnt or to be carbonized, a stuffing box has
been mounted on the upper end of the valve guides.
The stuffing box is as shown schematically on the drawing below and consists of:
A: Metal spring coat
B: Plastic bushing
C: Spring wire
The stuffing box compensates for wear and tear of the valve guides so that the lubricating oil
consumption because of leaky valve guides is reduced to a minimum.
The stuffing box cannot be repaired but has to be replaced if necessary.

009W2329-R01
C15
Repair or replacement of inlet and exhaust valves
1. Remove the cylinder head from the engine (page C5).
2. Then place the cylinder head on a file bench or the
like with the valve seats at the bottom.
3. Compress the valve springs with a special tool or the
like and remove the conical valve locking halves.
4. Then place the cylinder head upright and remove the
valves from the cylinder head.
Refitment is a reversal of removal procedure.
Note! Refit the valves in the same valve guides again.
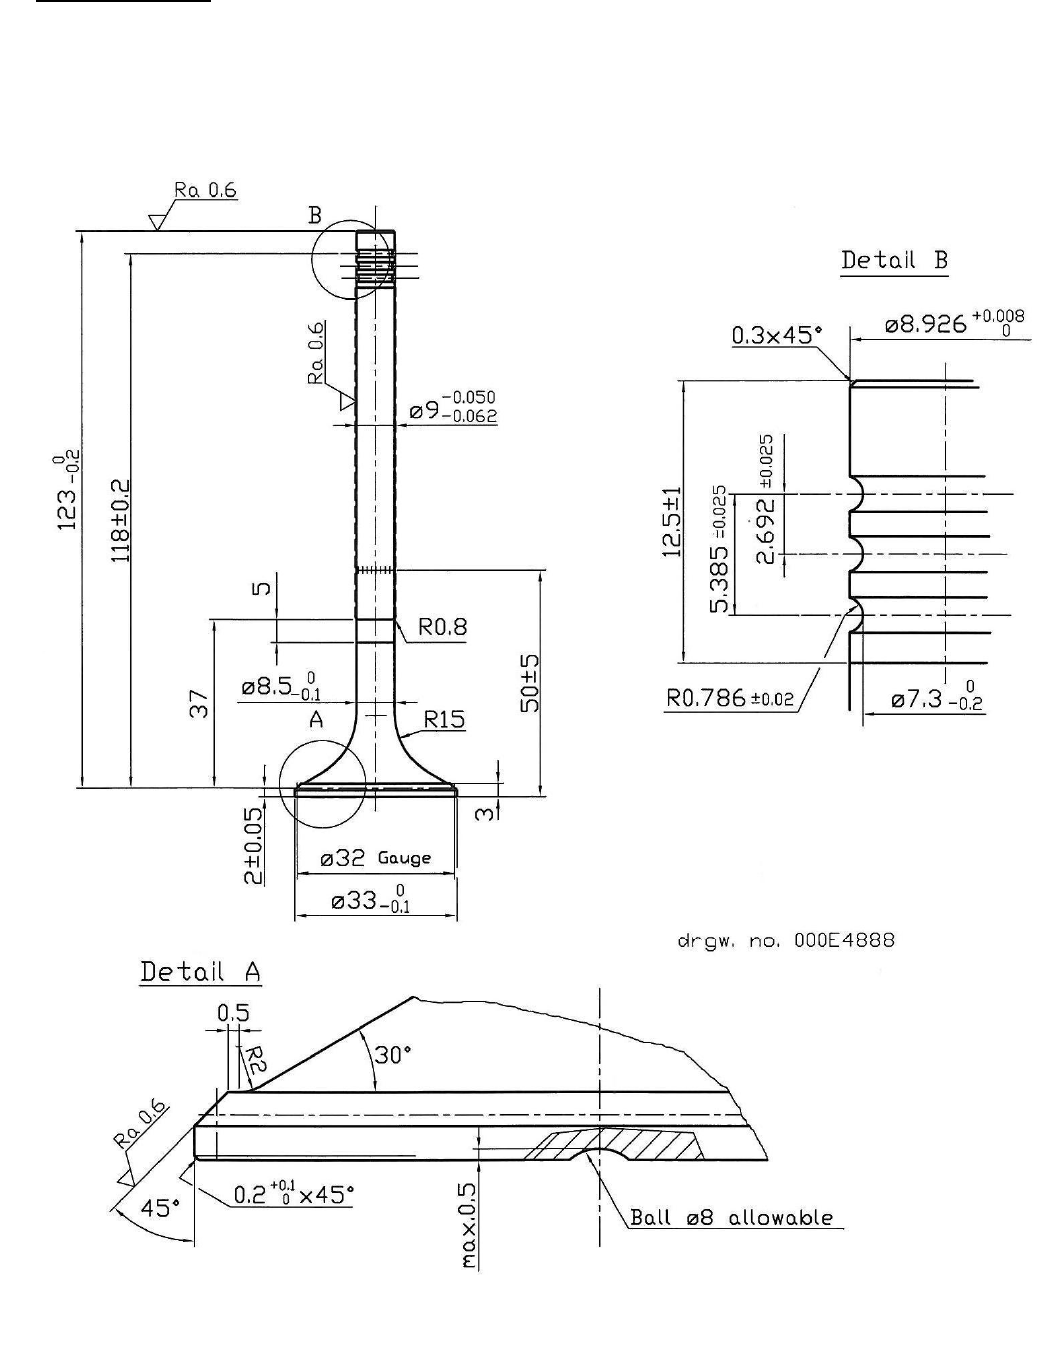
Replace the valves if they are so damaged that a refacing with special tools and subsequent
grinding are impossible without exceeding the tolerances indicated on page C18 and C19.
A refacing of the valve seats with fixed guide should always be made if the valve does not
function satisfactorily.
After replacement of valve or valve seat, grind together with abrasive compound seat and valve
so that total tightness is obtained. It is an indispensable condition for the compression of the
engine that this work is performed carefully.
Grinding of valves is made as described on page C18.
009W2329-R01
C16
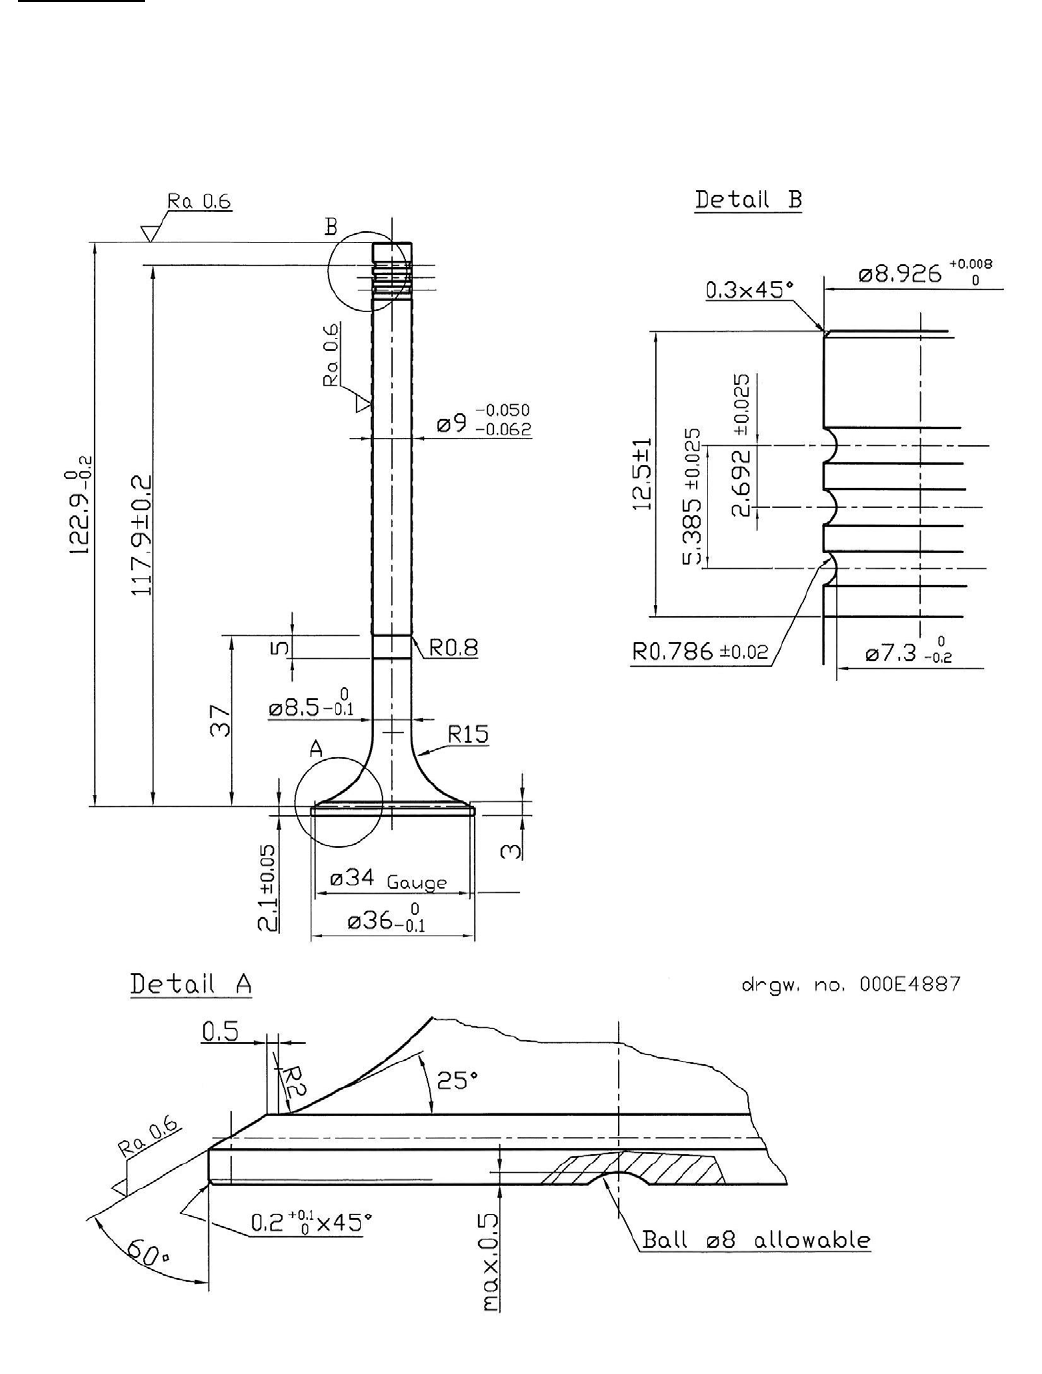
Exhaust valve
Tolerances and repair measures.
009W2329-R01
C17
Inlet valve
Tolerances and repair measures.
009W2329-R01
C18
Grinding of valves
1. Place the cylinder head with the valve seats upwards. Block the cylinder head so that
the valves fit tightly against the seats and can be turned freely by means of a rubber
suction disc or the like.
2. Apply abrasive compound to valve and seat, after w hich grinding can tak e place.
3. When grinding, turn the valve by means of the rubber suction disc in various directions
while fitting it at the same time with an equal pressure against the seat. When
grinding, lift frequently the va lve and spread all over the seat the abrasive c ompound
applied.
4. You can c heck whether the valve is ti ght by cleaning off the abrasive compound
carefully by for exam ple cleaning liquid. Then make 4 pencil m arks staggered 90
degrees from each ot her on the c ontact face of the valve. Insert the valv e and turn it
about 20 degrees. If the valve is tigh t, the marks will have disappeared.
5. Before refitment in the cylinder head, cl ean the valve carefully for abrasive compound
and apply a thin coat of oil to it. Do the same with regard to the valve seat.
Measures for new valves
Valve stem diameter ................................................... ø9 -0.050 / -0.062
Valve guide bore ......................................................... ø9 – H7
Clearance between valve stem and valve guide ......... 0.050 – 0.077 mm
The valve stems have been specially treated and therefore they must not be ground.
009W2329-R01
C19
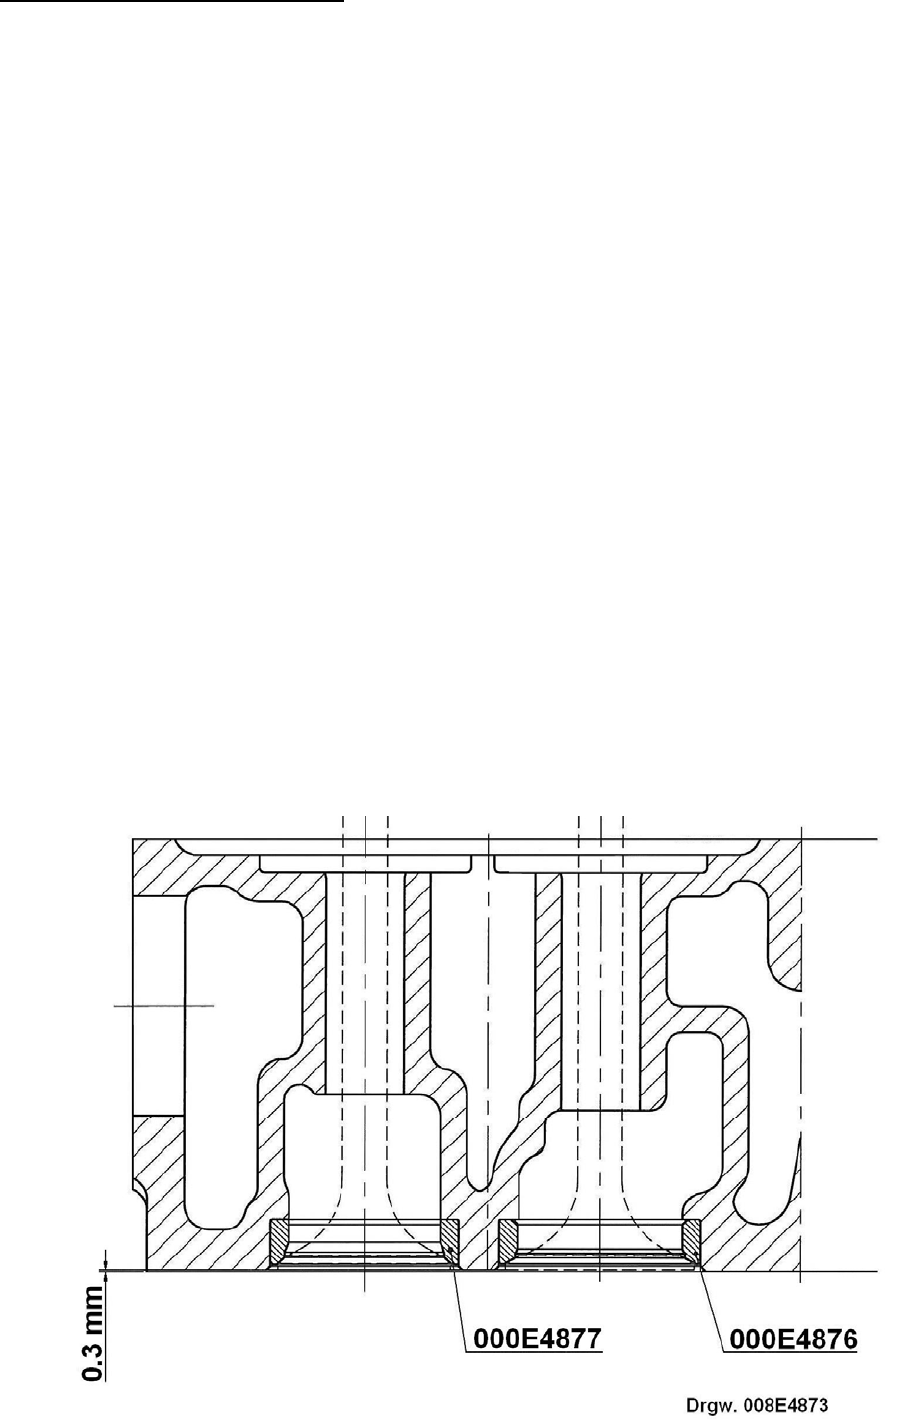
Replacement of valve seats
The valve seat rings should be replaced when, after repeated millings and grindings, they
have been milled so far down that the valv e heads are more than 0.3 mm belo w the face of
joint of the cylinder head (see the sketch below).
1. Remove the valve springs an d valves as indicated previously in this section.
2. Place a lead plate or an annealed copper plate between the cylinder head and a bent
chisel and knock out the valve s eat ring with this (crowbar princ iple) by sticking one
end of the chisel under the rear edge of the valve seat ring.
IT IS IMPORTANT THAT THE FILLING PIECE IS USED BETWEEN CYLINDER HEAD
AND CHISEL IN ORDER TO AVOID DAMAGING THE CYLINDER HEAD.
Before fitting new valve seat rings, clean the bores in the cylinder head for same and check
that the holes are not oval.
Then warm up the cylinder head in hot water to about 100° C (212° F), after which fit, by
means of a punch, the valve seat rings having been cooled down beforehand in nitrogen or
carbon dioxide.
When fitting the valve seat rings, the difference of temperature between cylinder head and
valve seat ring is to be 220 – 250° C (430 – 480° F).
DO NOT KNOCK IN THE VALVE SEAT RING VIOLENTLY. ONLY ACTIVATE THE
PUNCH WITH A RATHER GENTLE BLOW IN ORDER TO FIT THE VALVE SEAT RING.
009W2329-R01
C20
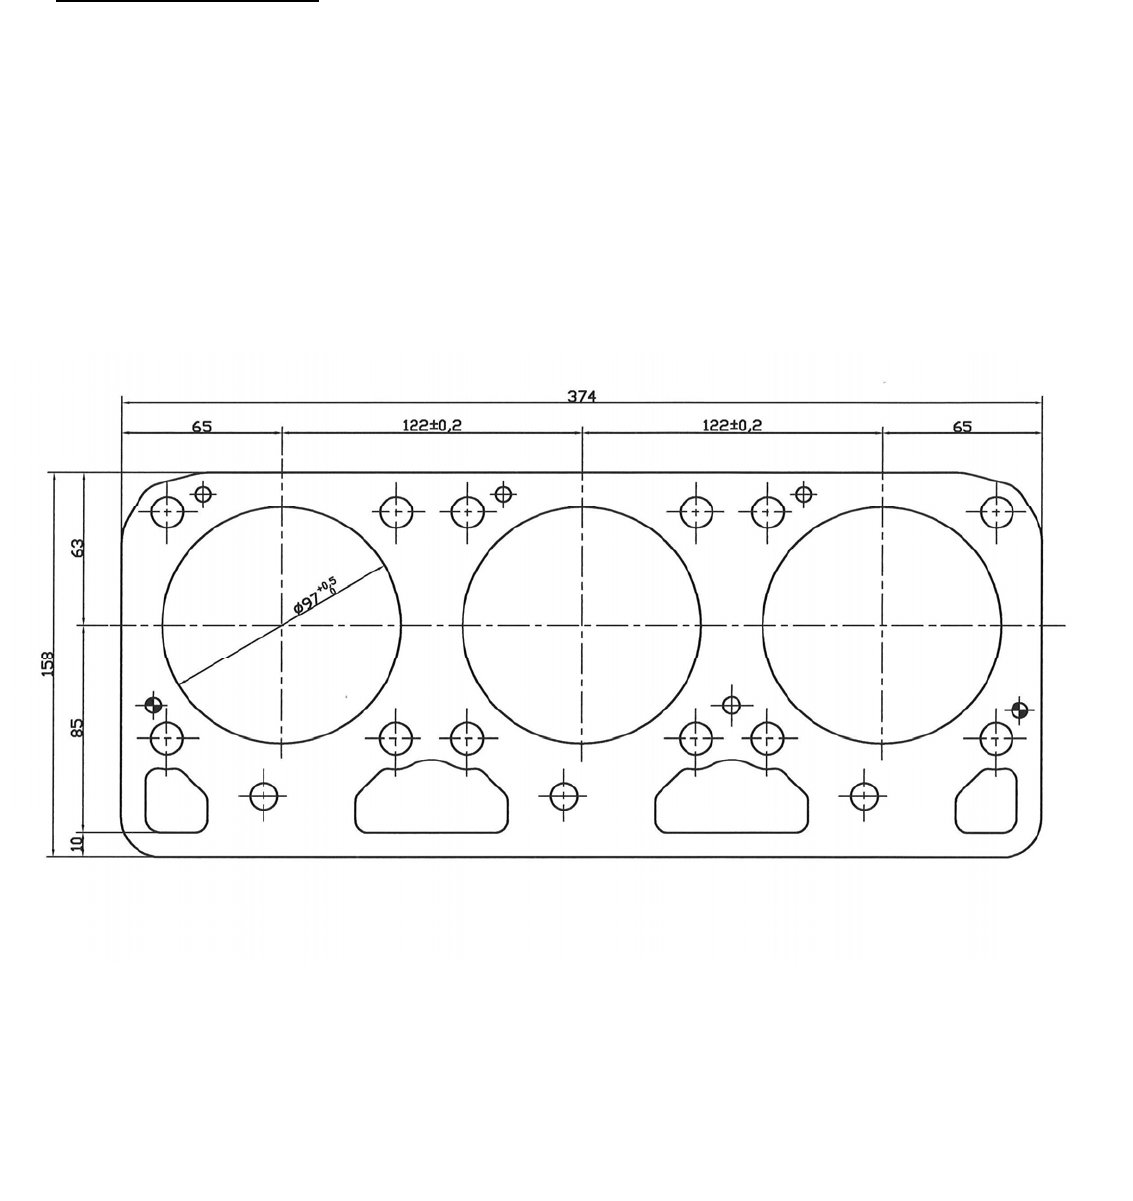
Cylinder head gasket
The cylinder head gasket is made from “Grafos eal” (Asbestos free) which is an expanded
graphite which is strengthened with a special 0.2 mm carbon steel inlay.
When replacing the cylinder head gasket, the grooves in the cylinder head must be
completely clean to obtain tightness.
If the cylinder head has been removed several time s, the metal around the studs may have
risen which can be checked by m eans of a straight-edge. If the me tal has risen, it must be
planned.
Drwg. 000E4789
009W2329-R01
C21
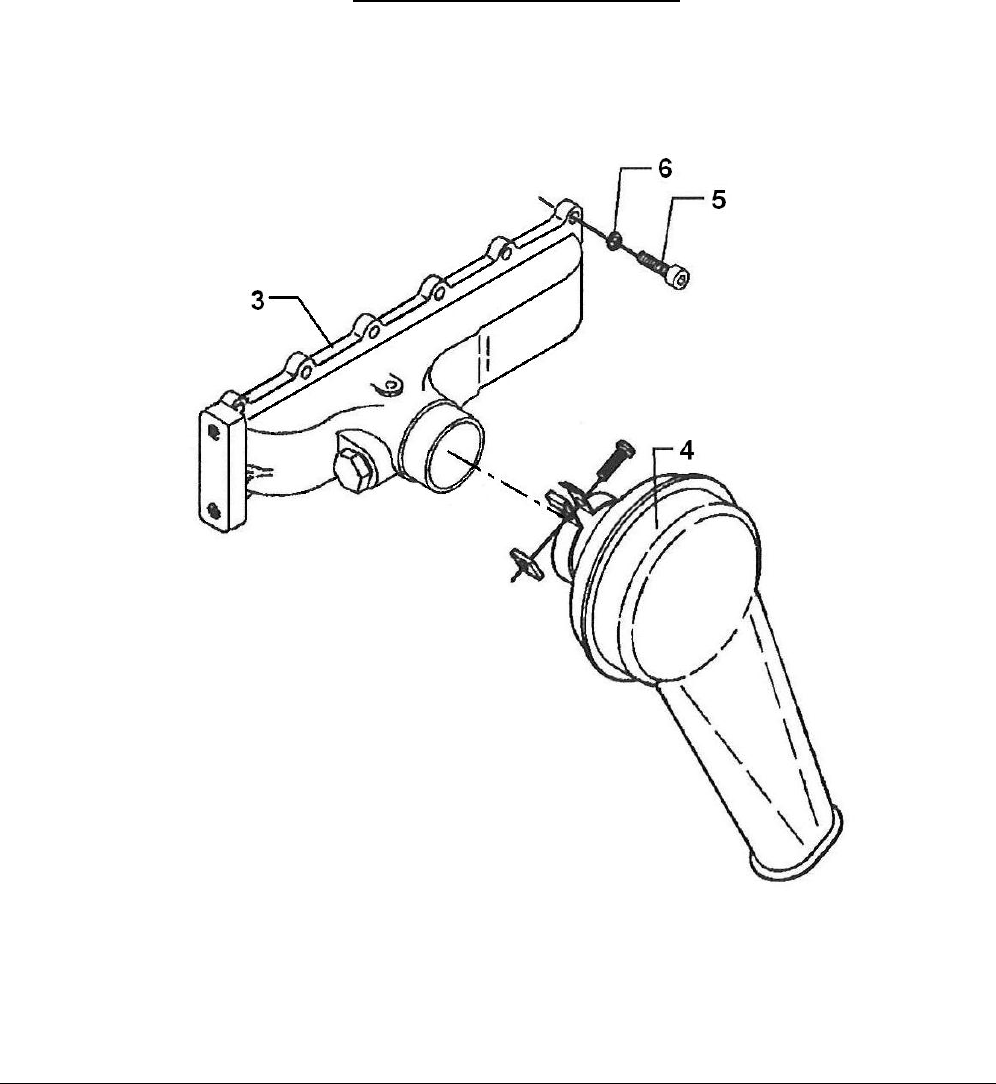
Air inlet manifold arrangement.
Pos. Part No. Qty. Beskrivelse Description Benennung
3 000E4923 1 Indsugningsmanifold Inlet manifold Einlasssammelrohr
4 008E7310 1 Luftfilter Air filter Luftfilter
5 501A2363 12 Cylinderskrue Unbraco screw Unbracoschraube
6 522E0521 12 Låseskive Locking washer Arretierungsscheibe
009W2329-R01
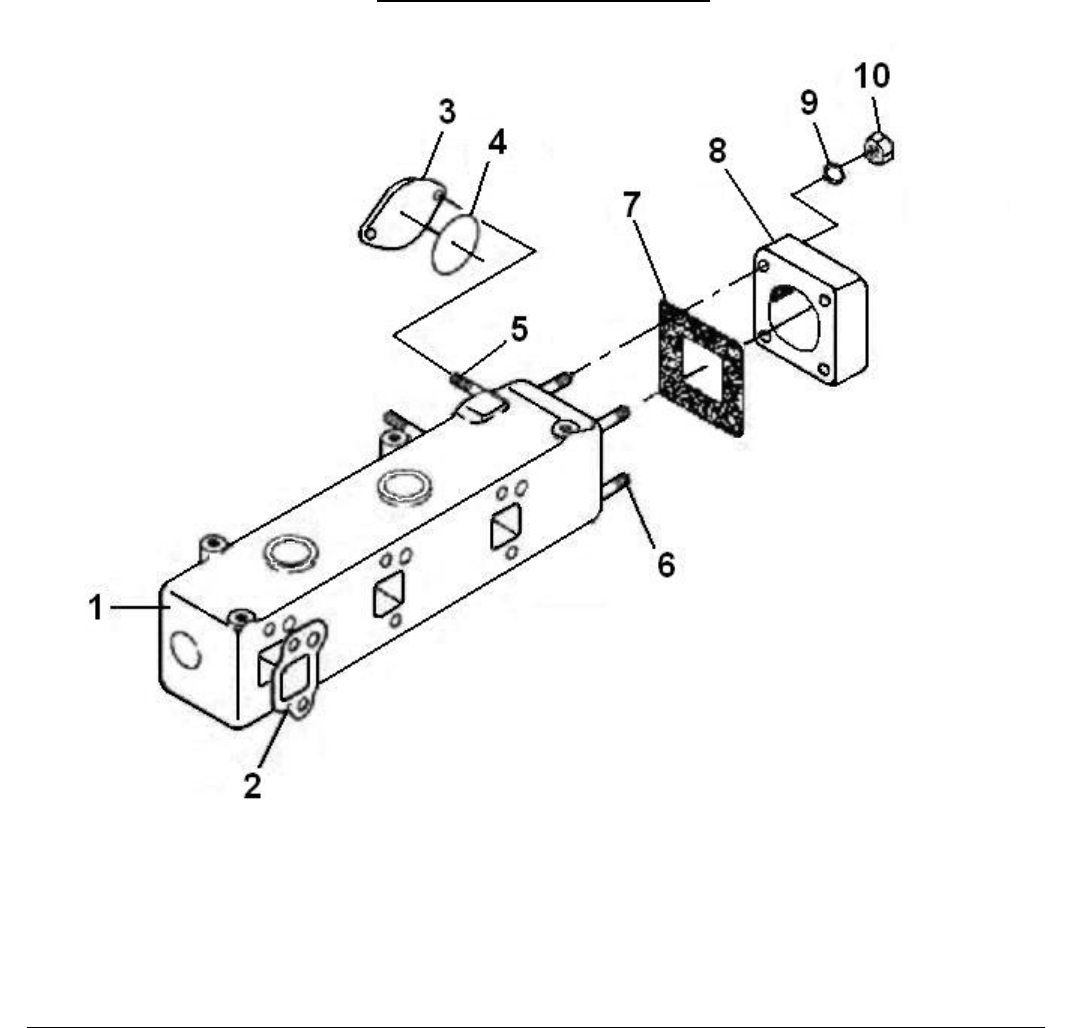
C22
Exhaust manifold arrangement.
Pos. Part No. Qty. Beskrivelse Description Benennung
1 000E7434 1 Vandkølet udstødningsmanifold Water-cooled exhaust manifold Wassergekühltes Auspuffsammelrohr
2 000E5028 3 Pakning for udstødningsmanifold Gasket for exhaust manifold Dichtung für Auspuffsammelrohr
3 008E9239 1 Flange Flange Flansch
4 560F1031 1 O-ring O-ring Abdichtung
5 500C2363 2 Sætskrue M8x20 Set screw M8x20 Setzschraube M8x20
6 503N2367 2 Tapskrue M8x35 Stud M8x35 Stiftschraube M8x35
7 000E5360 1 Udstødningspakning Exhaust gasket Auspuffdichtung
8 000E7788 1 Udstødningsflange Exhaust flange Auspuffflansch
9 522F1020 4 Fjederskive Spring washer Federscheibe
10 510A3208 4 Møtrik M8 Nut M8 Mutter M8
009W2329-R01
D1
SECTION D
FLYWHEEL

009W2329-R01
D2
CONTENTS
Removal and refitment of flywheel ............................................ page D 3
V-belt pulley fitted on flywheel ................................................... page D 3
Replacement of gear rim ........................................................... page D 4
009W2329-R01
D3
Removal and refitment of flywheel
1. Mark the flywheel in propor tion to the crankshaft out of consideration for the other
marking of the outer diameter of the flywheel.
2. Slacken the V-belt for the charging alternat or and take it clear of the V-belt pulley of
the flywheel.
3. Remove the six bolts securing the flywheel to the crankshaft.
4. Lift off the flywheel.
Refitment is to be carried out in reverse or der. Smear the bolts with some Loctite or
something similar and tighten them with a torque of 147±7 Nm (15.0±0.7 kpm).
When dismounting the flywheel please note to fit the flywheel in the same position as before.
This only due to the timing marks on the flywheel and not due to the balance of the flywheel.
V-belt pulley fitted on flywheel.
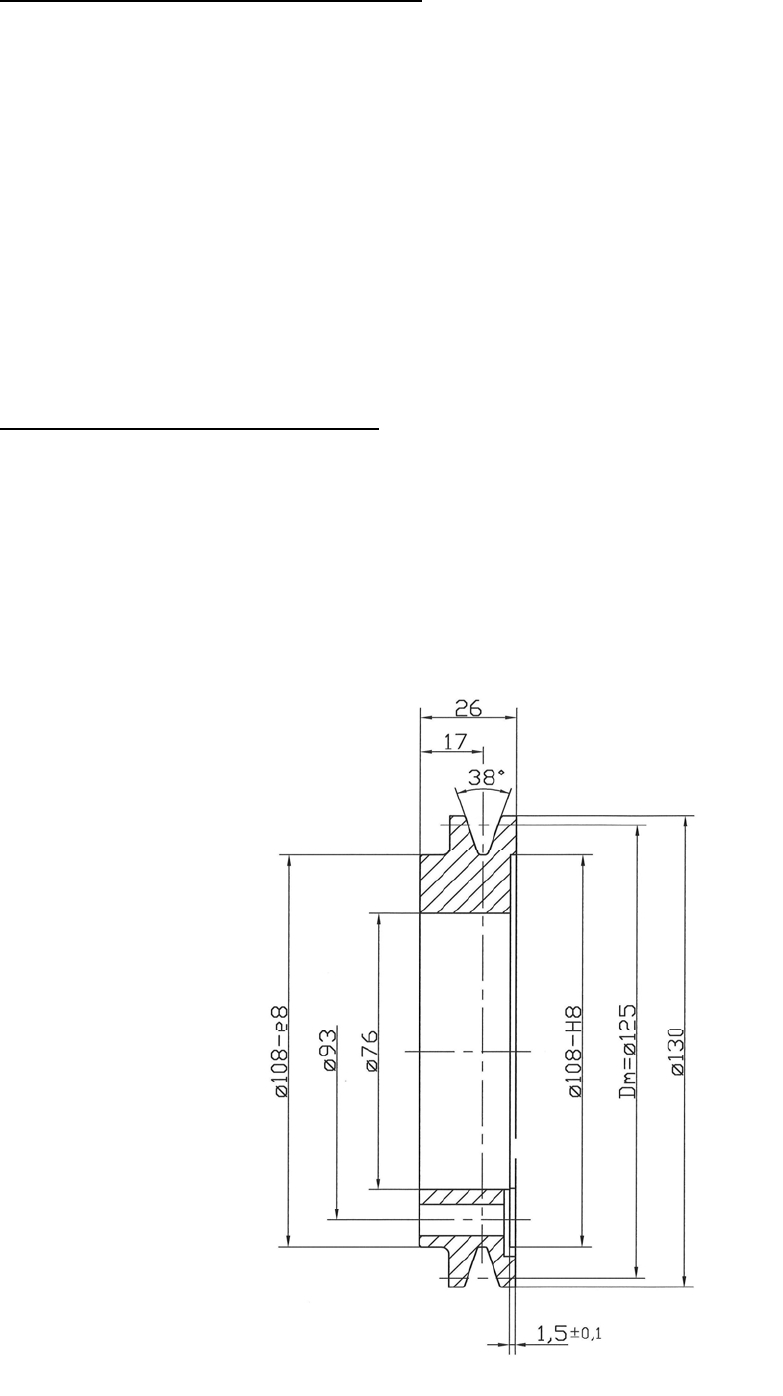
A V-belt pulley, as indicated on the drawing below, is fitted on the front end of the flywheel.
This V-belt pulley can be replaced by thr ee “A” grooves and diam eter 125 mm for operation
of e.g. bilge pump, winch or t he like. However, only max. 10 HP must be loaded from the
front of the engine.
The V-belt pulley may be ordered against number 023D2801.
Drwg. 000E4931
009W2329-R01
D4
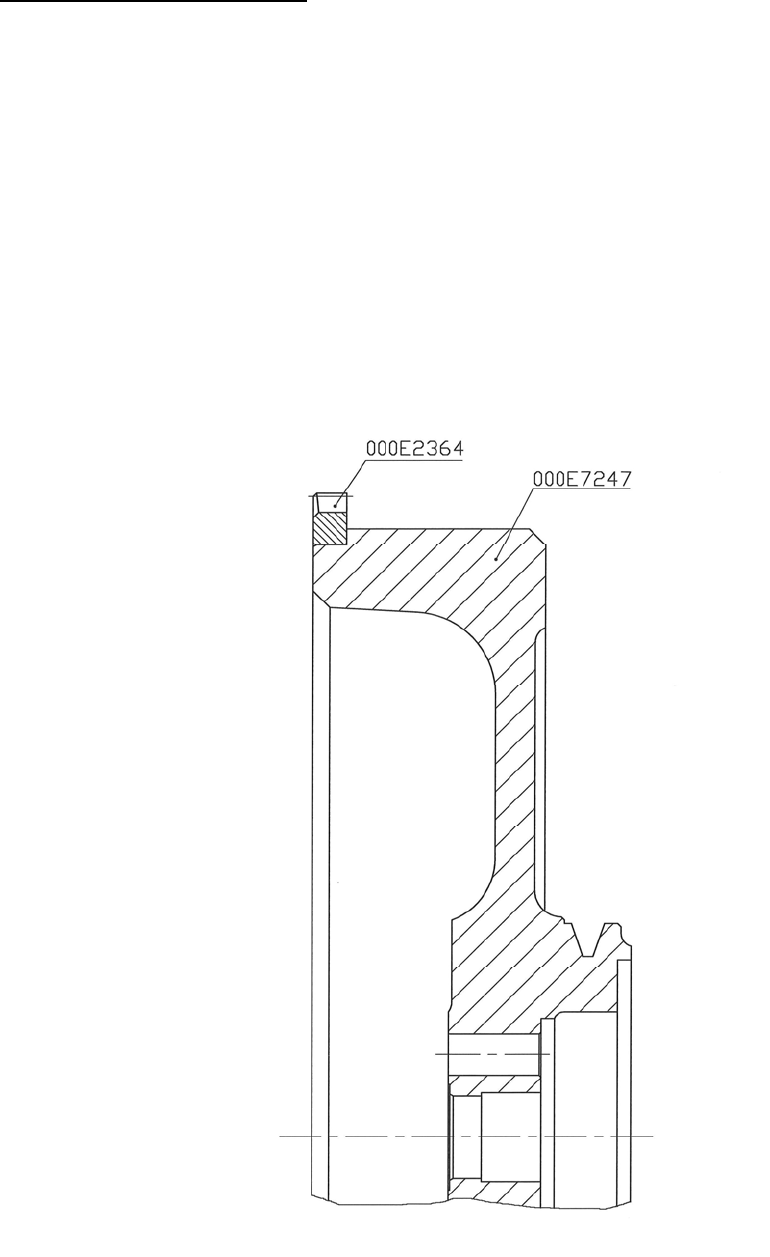
Replacement of gear rim
1. Remove the flywheel.
2. Saw with a hacksaw as far int o the gear rim as possible without damaging the
flywheel.
3. Split the gear rim in the sawed slot with a chisel.
4. Clean the recess on the flywheel.
5. Heat the new gear rim gradually to about 225°C (dark blue) and fit it. Make sure at the
fitting that the gear rim lies true against th e recess and that the chamfered edge turns
towards the starter engine.
Drwg. 008E7312
009W2329-R01
E1
SECTION E
FRONT END COVER

009W2329-R01
E2
CONTENTS
Dismounting of front end cover .................................................. page E 3
Mounting of front end cover ....................................................... page E 3
Front rotating weight .................................................................. page E 3
Replacement of front oil seal ring .............................................. page E 4
Replacement of bushes in the front rotating weight ................... page E 4
009W2329-R01
E3
Dismounting of front end cover
1. Dismount the flywheel (see page D3).
2. Slacken the attachment of the end cover in engine block as well as in oil sump.
3. Dismount the tightening arrangement for shaft for rotating weight.
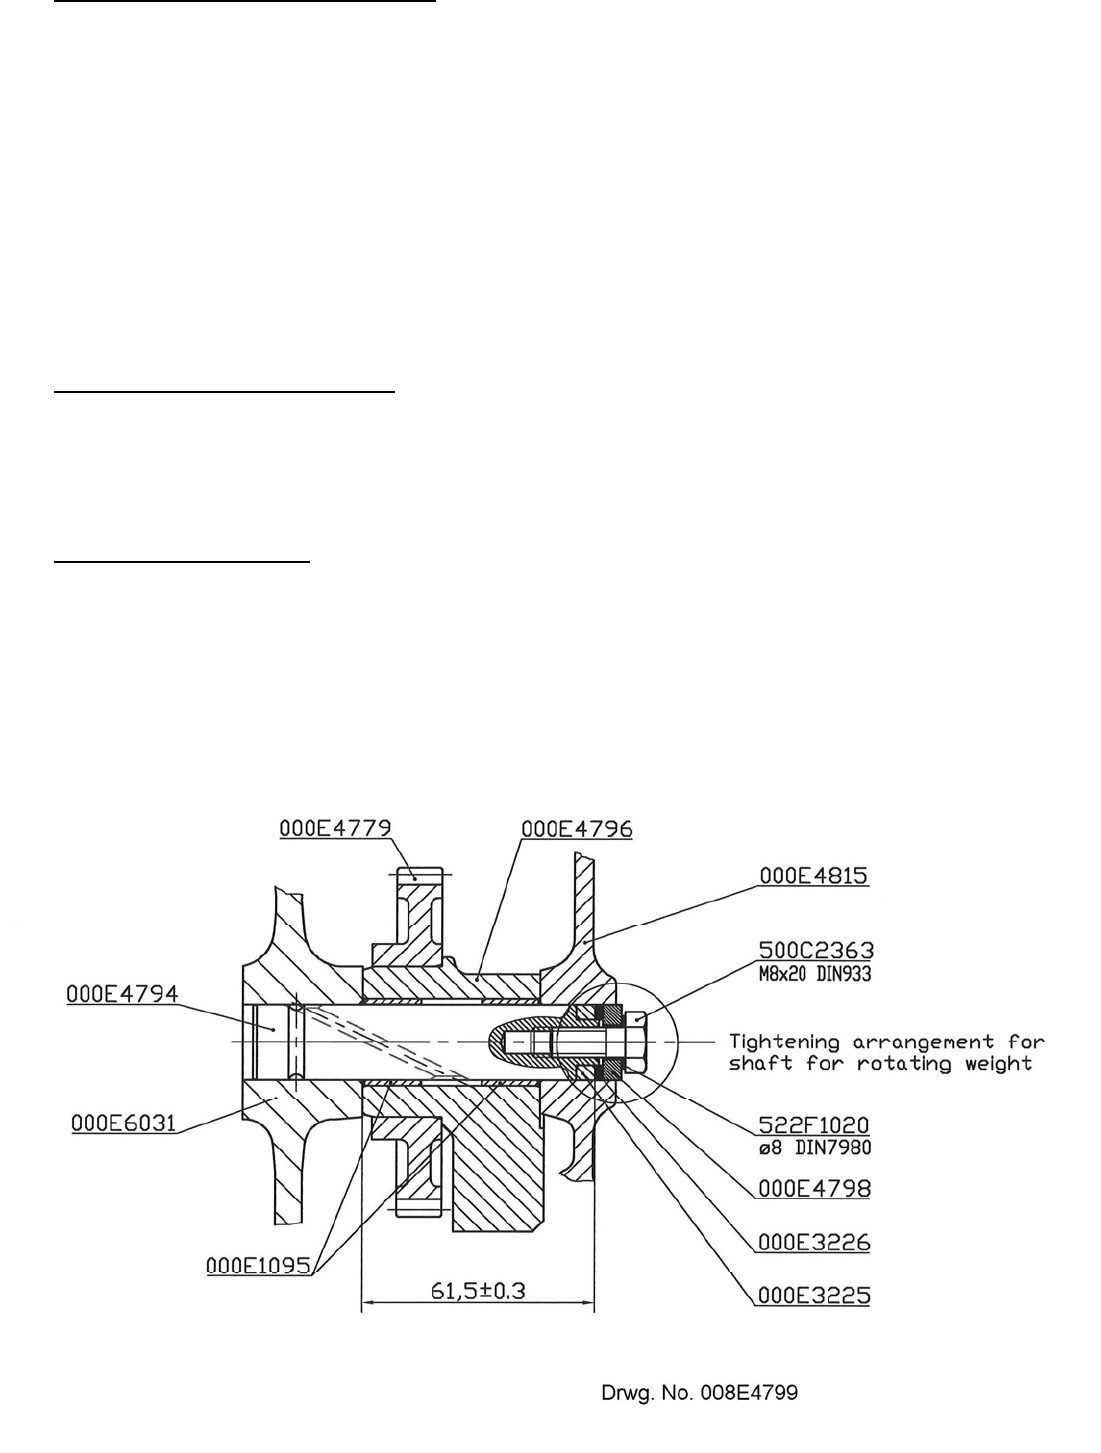
The tightening consists of two washers of different thickness and a fibre washer
assembled by a 8 mm screw.
4. Remove the end cover considering the guide spindles of the cover.
.
Mounting of front end cover
The mounting is carried out in reverse order of the dismounting, i.e. the tightening arrangement for
shaft for rotating weight is to be mounted last.
Front rotating weight
The front rotating weight is mounted below the front end cover, as shown on the drawing below
and overleaf.
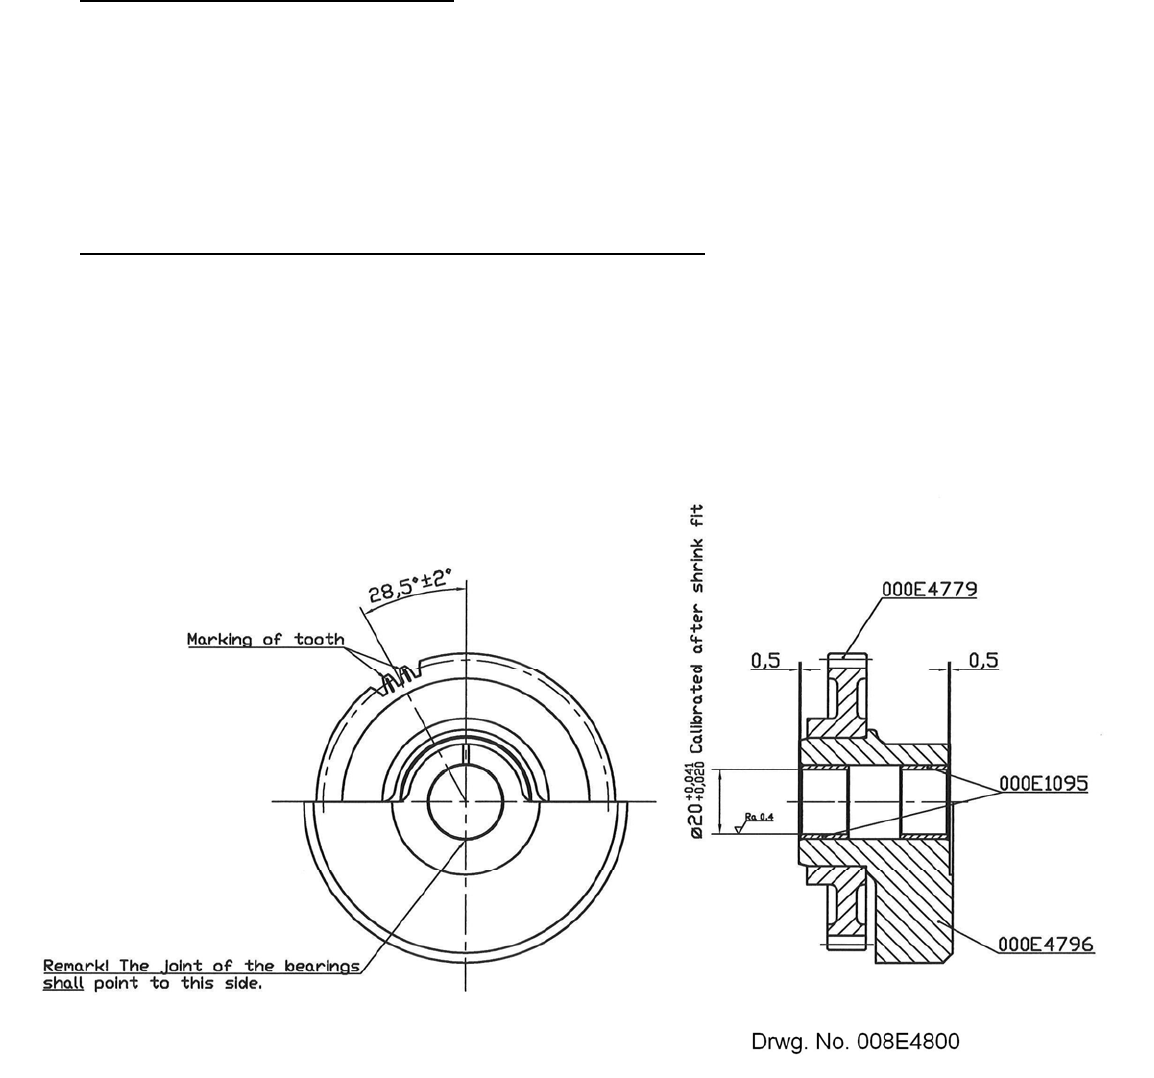
As will appear from the drawing overleaf the weight is marked in relation to a corresponding mark
on the gear wheel of the crank.
009W2329-R01
E4
Replacement of front seal ring
A seal ring is mounted in the front end cover in order to avoid lubricating oil waste at the end of the
crank through the front end cover.
The seal ring can be replaced without dismounting the front end cover. It is, however, necessary to
dismount the flywheel.
Replacement of bushes in the front rotating weight
When replacing the bushes in the front rotating weight the new bushes must be calibrated with a
ball or reamed, with clearance and measures as indicated on the drawing.
G1
009W2329-R01
SECTION G
REAR END COVER AND HAND START

G2
009W2329-R01
CONTENTS
Rear end cover .......................................................................... page G 3
Dismounting of rear end cover .................................................. page G 3
Mounting of intermediate wheel and chain wheel ...................... page G 4
Tightening for shaft for intermediate wheel ................................ page G 4
Intermediate wheel .................................................................... page G 5
Rear of rotating weight (drawing) .............................................. page G 6
Mounting of rear of rotating weight ............................................ page G 7
Replacement of bush in the rear rotating weight
and intermediate wheel ............................................................. page G 8
Replacement of seal ring in rear end cover ............................... page G 8
Mounting of the rear end cover .................................................. page G 8
Chain adjuster ........................................................................... page G 9
Hand start .................................................................................. page G 10
G3
009W2329-R01
Rear end cover
The rear end cover contains gear-wheel for crank, cam shaft, fuel pump,hand start,
lubricating oil pump, cooling water pump and rear rotating weight.
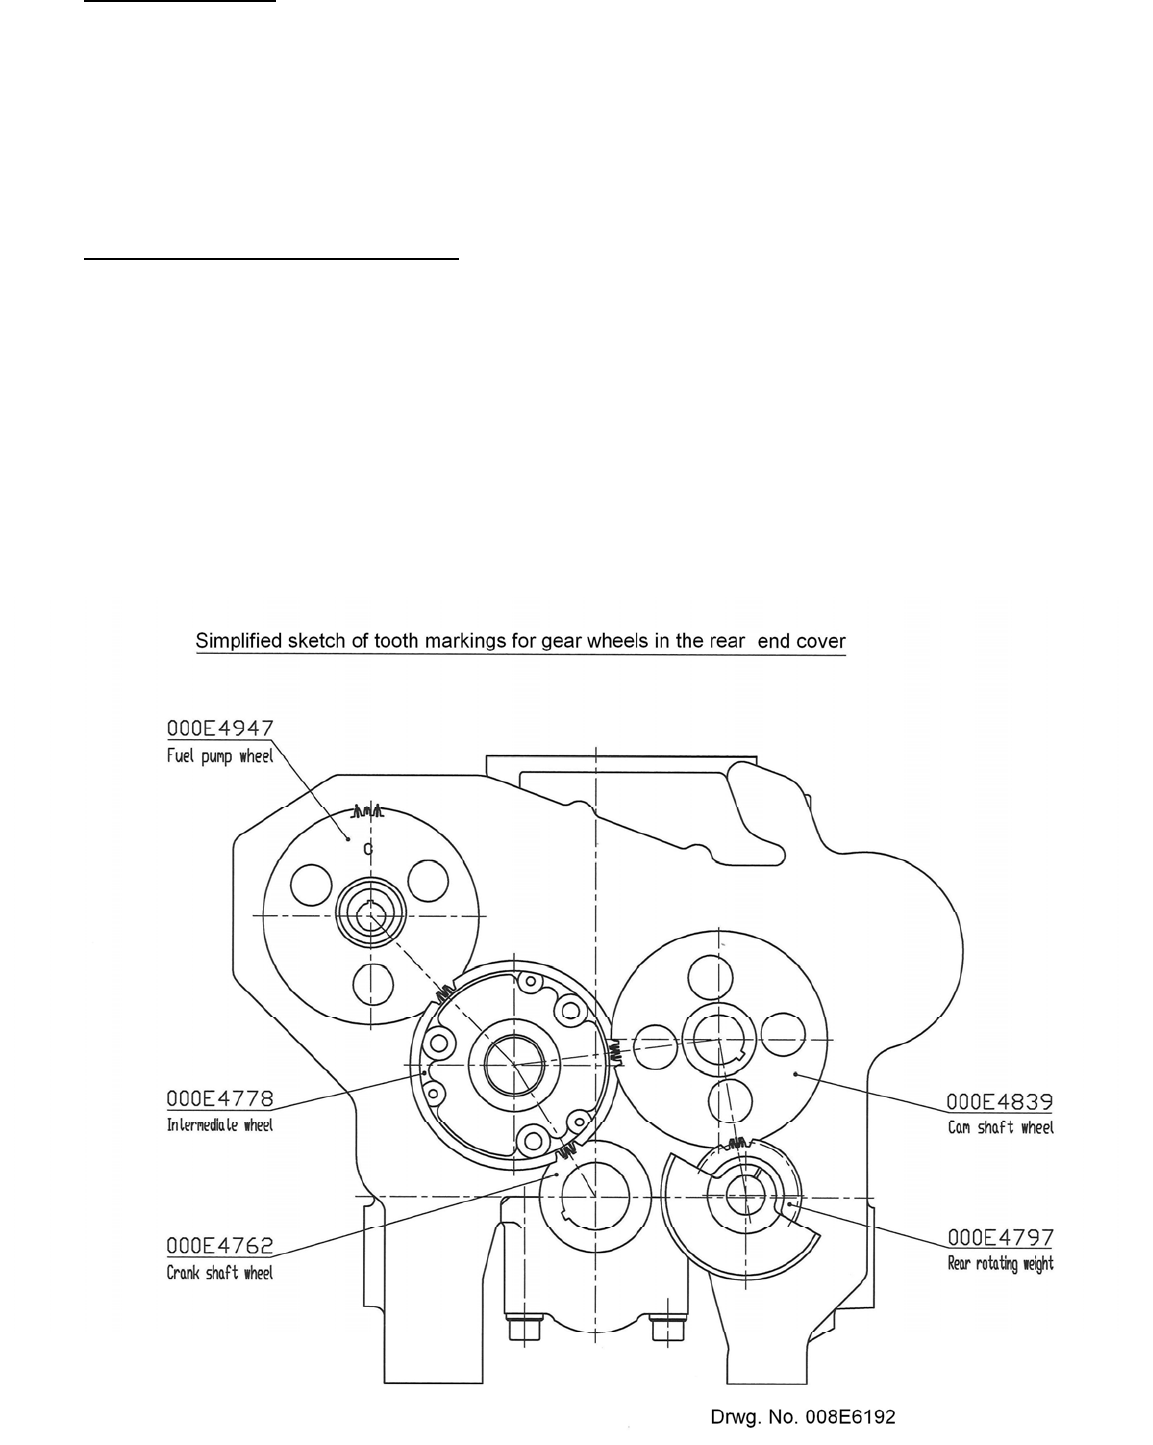
The gear-wheels are in the gear with each other through an intermediate wheel. The sketch
below indicates the marking of the gear-wheels which have been marked in relation to each
other so that their position to each other may easily be observed when being repared.
Dismounting of rear end cover
1. Dismount the gear from the engine.
2. Dismount the flexible coupling half on the crank.
3. Slacken the attachment of the end cover on engine block and oil sump.
4. Dismount the hand start and lower the chain into the end cover (see page G10).
5. Slacken the shaft seals for intermediate wheel and rear rotating weight and remove
the end cover.
6.
7.
8.
G4
009W2329-R01
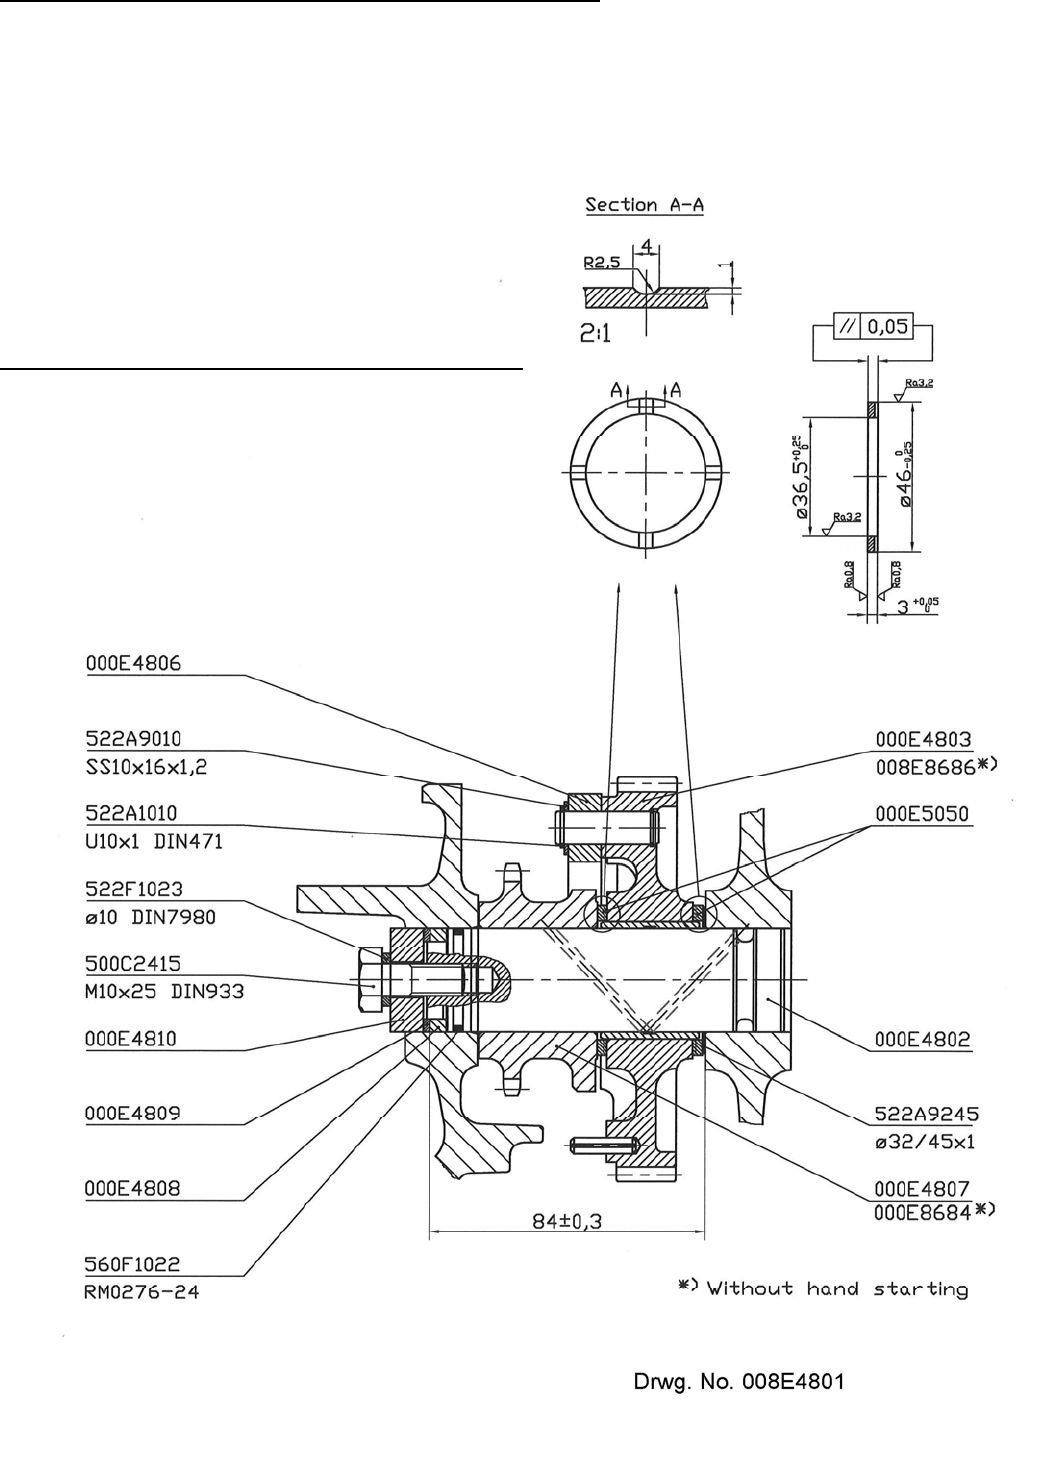
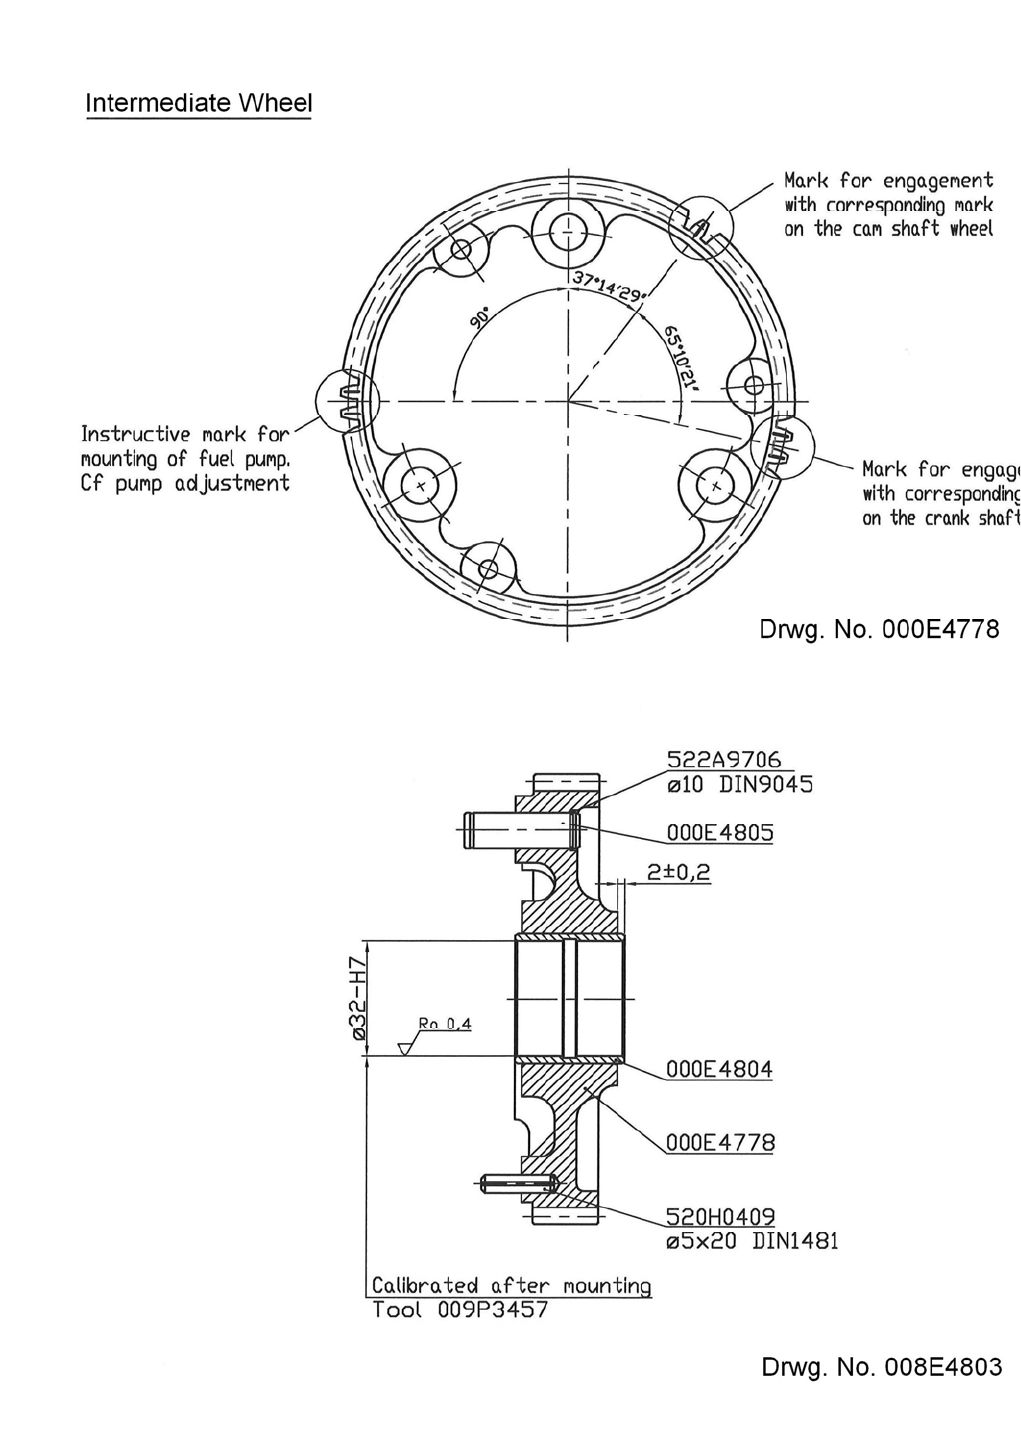
Mounting of intermediate wheel and chain wheel
After the intermediate wheel has been placed on the shaft, and after the timing marks – as
indicated overleaf – have been adapted for the corresponding marks, the chain wheel for
hand start should be mounted on the same shaft.
The two thrust collars shown form part of the arrangement.
It is necessary – when mounting – to lubricate the
washer between block and thrust washers with
grease in order to secure that it keeps its position
during the mounting and that it does not slide down.
Tightening for shaft for intermediate wheel
The tightening consists of two washers and
a fibre ring as indicated below.
G5
009W2329-R01
G6
009W2329-R01
G7
009W2329-R01
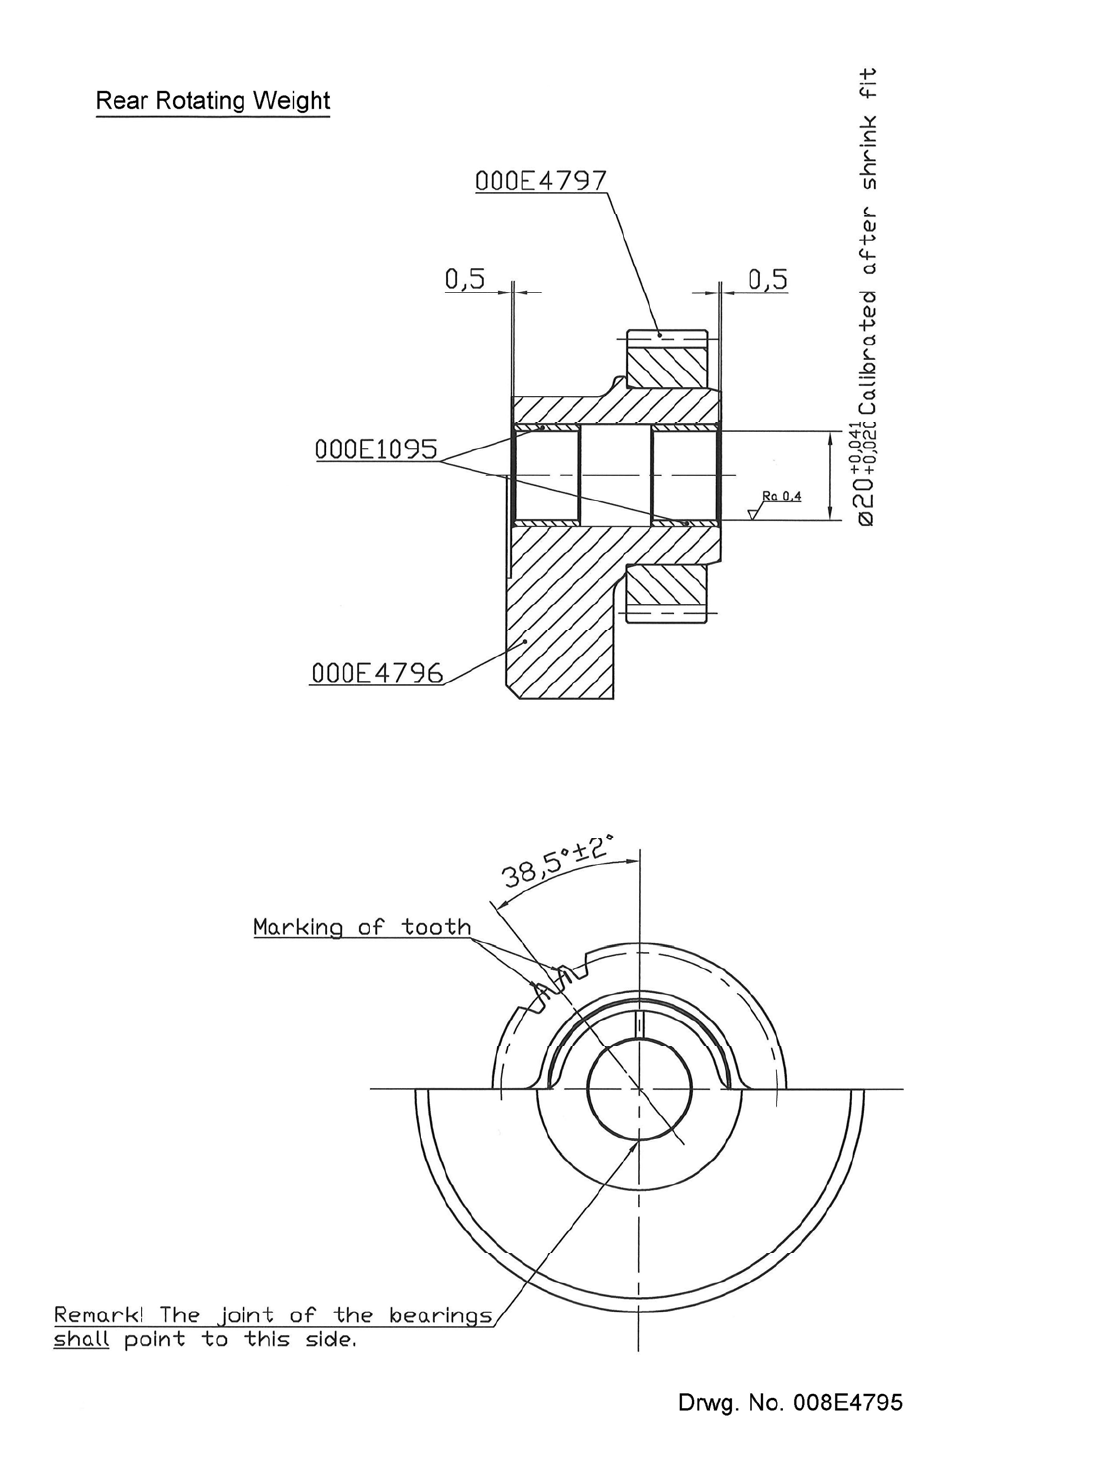
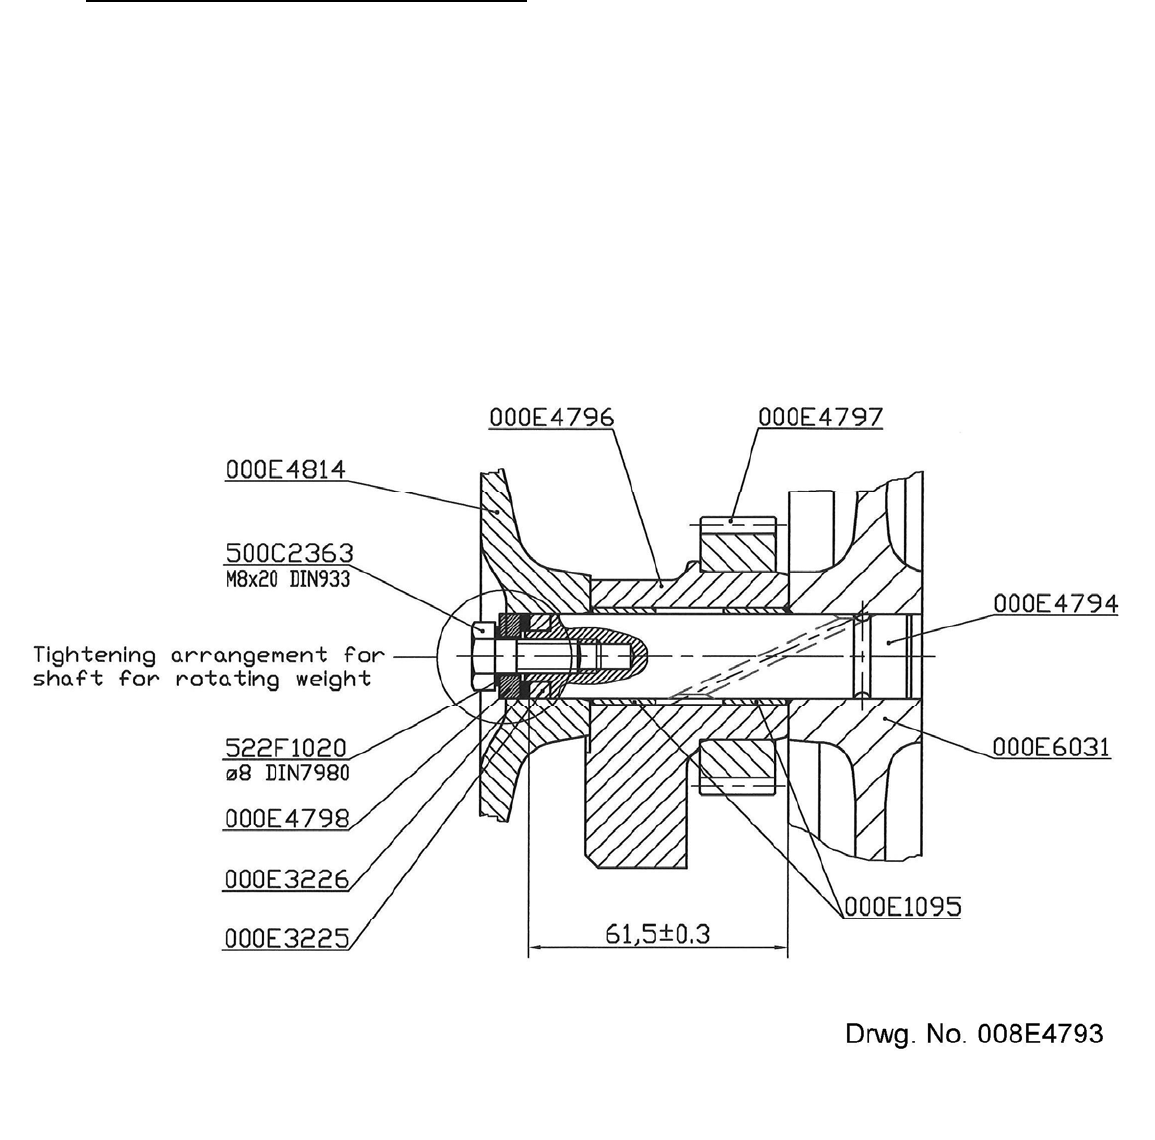
Mounting of the rear rotating weight
Mount the rotating weight on the shaft pressed into the engine block and the tooth marking in
relation to the intermediate wheel should be observed.
After the end cover has been mounted, the tightening for shaft should be mounted in
accordance with the drawing below.
The tightening consists of two washers of different thickness and a fibre ring.

G8
009W2329-R01
Replacement of bush in the rear rotating weight and intermediate wheel
Bushes have been mounted in both rear rotating weights as well as in the intermediate wheel.
These bushes can be replaced in case of wear and tear.
After the new bushes have been pressed in these should be calibrated with a ball or be reamed
with the correct measures and clearances as indicated on the drawings on page G5 and G6 for
rear rotating weight and intermediate wheel respectively.
Replacement of seal ring in rear end cover
A seal ring is mounted in the rear end cover in order to avoid leak of lubricating oil at the outlet
of the crank through the rear end cover.
It is possible to replace the seal ring without dismounting the end cover after the gearbox with
intermediate guard has been dismounted.
Mounting of the rear end cover
The mounting is carried out in reverse order of the dismounting, as the chain for hand start is to
be mounted on the chain wheel and then to be pulled up through the hole in the end cover with
a piece of string or the like, and here the hand start is to be ready-mounted later.
G9
009W2329-R01
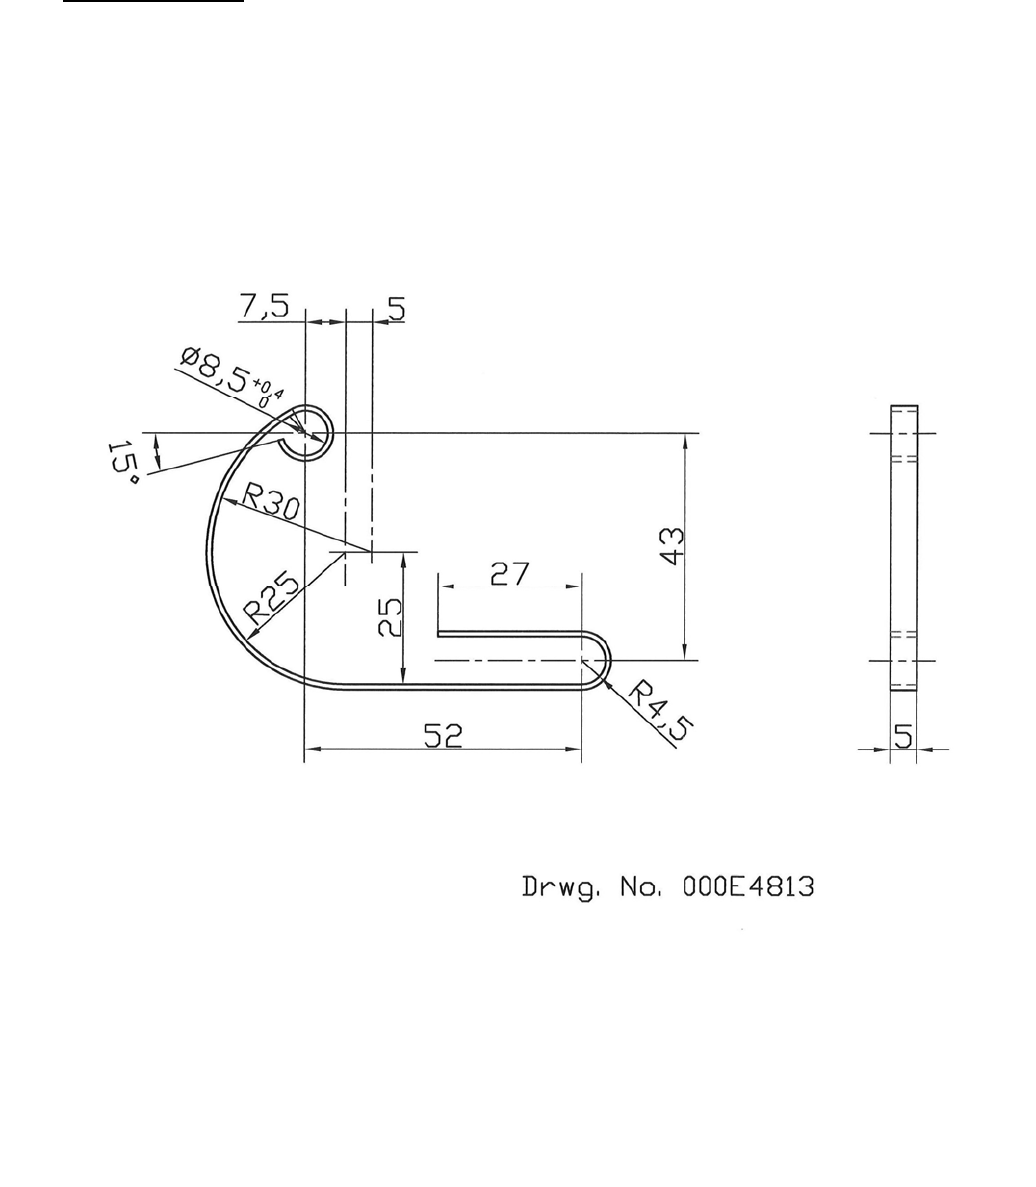
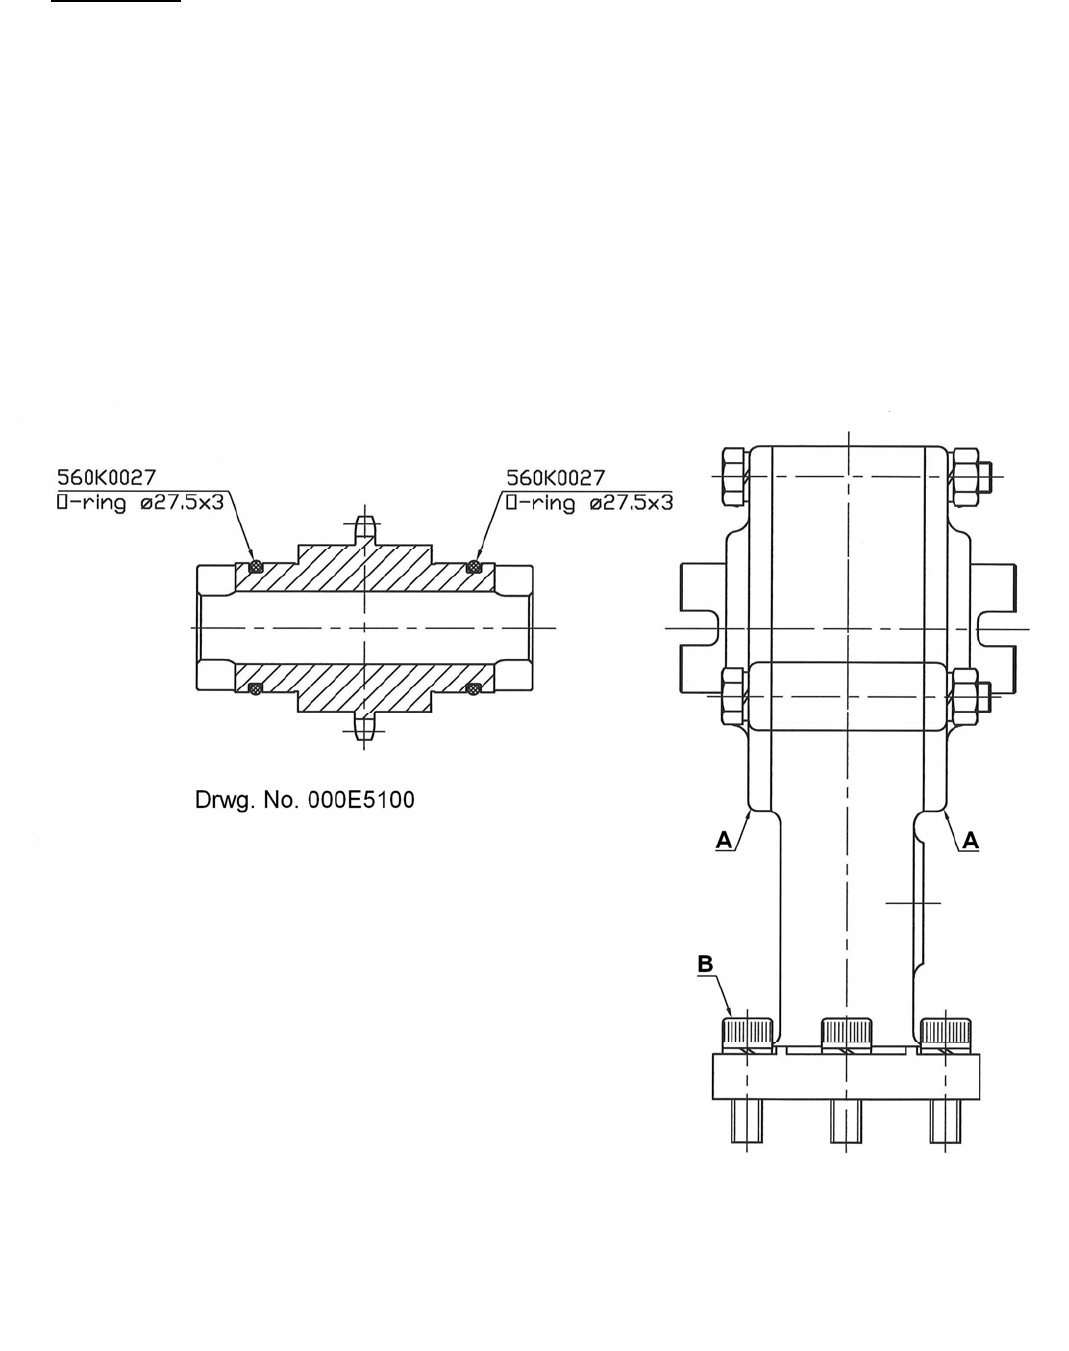
Chain adjuster
The chain adjuster is mounted on two pins in the engine block.
The chain adjuster is self-adjusting and thus it does not require any adjustments in connection
with repairs in the end cover during which the chain is to be dismounted.
G10
009W2329-R01
Hand start
The chain case is bolted on to the rear end cover, as indicated on the drawing below.
When dismounting remove the covers “A”, and this results in the chain being slackened and
then the chain wheel and shaft can be taken out.
Mounting is carried out in reverse order and it should be taken care that the O-rings for oil-
tightness are correctly placed in the grooves on the chain wheel shaft.
Dismount the chain case from the end cover by removing the bolts “B”.
009W2329.XLS
H1
SECTION H
FUEL SYSTEM

009W2329.XLS
H2
CONTENTS:
Dismounting of the fuel pump ......................................................... page H 3
Mounting and Adjustment for fuel pump ......................................... page H 4
Specification of Numbers to Fig. 1 and 2 ........................................ page H 6
Fuel System ................................................................................... page H 7
Centrifugal Governor ...................................................................... page H 8
Function of the Centrifugal Governor .............................................. page H 9
Fuel Lift Pump ................................................................................ page H10
Fuel Filter ....................................................................................... page H11
Fuel Valve ...................................................................................... page H12
Causes and Remedies of the Fuel Pump ....................................... page H13
009W2329.XLS
H3
Dismounting of the fuel pump
1. Dismount the bilge pump for lubricating oil from engine and gear.
2. Dismount the flange opposite of the fuel pump.
3. Take off the gear-wheel of the pump by slackening the clamping nut on the shaft of the
pump and pull off the gear-wheel.
4. Slacken the nuts in the flange of the pump and take out the pump.
REPAIRS OF THE PUMP SHOULD ONLY BE CARRIED OUT BY AUTHORIZED BOSCH
WORKSHOPS
009W2329.XLS
H4
1. Turn piston No. 3 (rear) to TOP in the working stroke.
2. Mark the flywheel in this position in relation to the arrow mounted on the front edge of
the engine.
3. Measure 86 mm. arc measure from the TOP mark (to the right, when the flywheel faces
you).
009W2329.XLS
H5
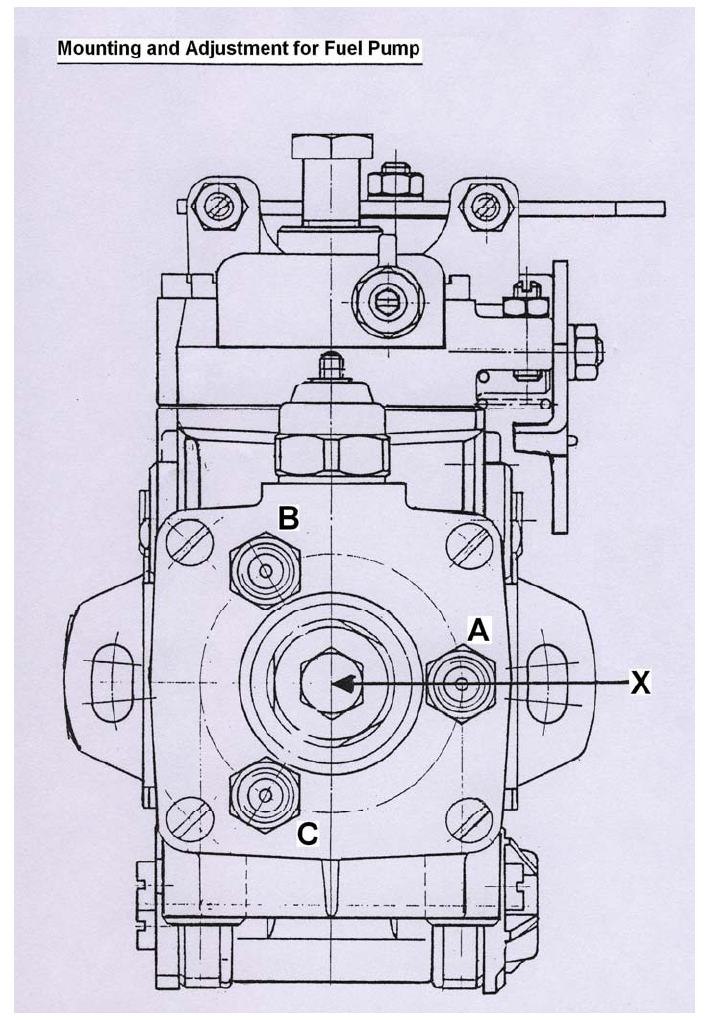
4. The pump should be adjusted for correct injection timing:
a. Adjust the key on the conical shaft of the pump so that it flushes with the outlet hole
B to the fuel valve for cylinder No. 3.
b. Remove the screw X and mount a dial indicator with a special sensing element
instead by means of a special holder for dial indicator.
c. Push in the dial indicator 2.0 mm.
d. Mount the flywheel for the pump loosely and turn it to the left, seen from the gear-
wheel side until the dial just indicates within the range of 0.01 mm.
5. Mount the pump on the engine by means of two nuts with washers and spring washers
so that the nuts are placed about the middle of the oblong holes in the flange of the
pump.
6. Mount the gear-wheel for the pump through the hole on the opposite side of the pump.
Fasten the gear-wheel on the conical pump shaft by means of a nut.
7. Mount the flange above the hole for mounting of the gear-wheel of the pump.
8. Mount the dial indicator again at the same place and in the same way and push it 2.0
mm in.
9. Turn the flywheel back from the 86 mm arc measure to 6 mm*) arc measure before the
TOP mark. The indicator is then to show 1.0 mm variation (1 turn).
If this is not so, fine-adjust either by moving the gear-wheel one tooth in relation to the
intermediate wheel (when indicating more than 0.7 mm) or by adjusting the placing of
the clamping nuts in the oblong holes in the flange of the pump (when indicating less
than 0.7 mm).
*) According to the Service information SI0601, the arc measure has been changed
from 6 mm. to 20 mm. from engine no. 8395.

009W2329.XLS
H6
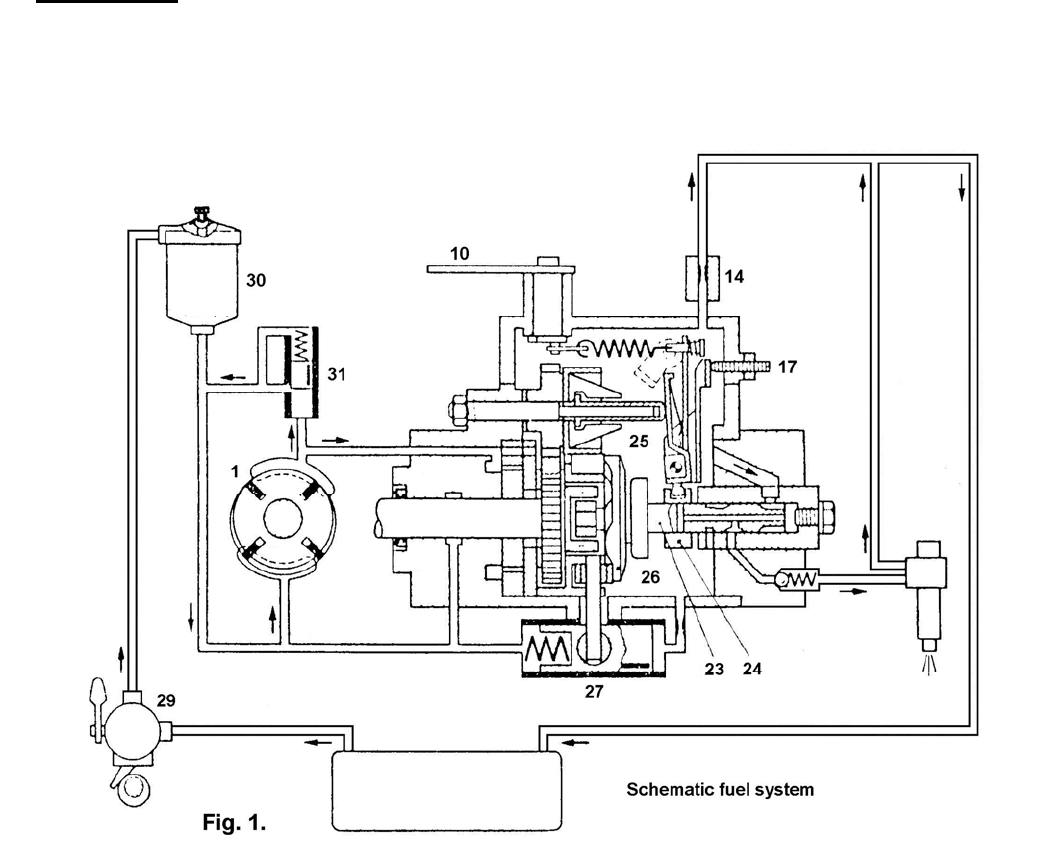
Specification of Numbers to Fig. 1 and 2
1. Feed pump
2. Drive shaft
3. Gear-wheel
4. Thrust washer
5. Governor shaft
6. Governor bush
7. Holder
8. Governor weight
9. Governor spring
10. Timing lever
11. Adjusting screw (idling)
12. Adjusting screw (max. r.p.m.)
13. Stop lever
14. Overflow throttle
15. Correcting lever
16. Bolt
17. Adjusting screw (full load)
18. Idle spring
19. Clamping arm
20. Starter spring
21. Starting lever
22. Delivery valve holder
23. Distributor piston
24. Governor slide
25. Fuel chamber
26. Cam disc
27. Injection timing piston
28. Roller cage
29. Lift pump
30. Fine filter
31. Pressure control valve
009W2329.XLS
H7
Fuel System
The fuel is pumped by a lift pump (29 from the tank via a fine filter (30) to the internal wing
feed pump. This feed pump gives a constant quantity/revolution.
Through the pressure control valve (31), after the feed pump, a pressure is produced. Most
of the fuel flows through the pressure control valve back to the suction side. The remaining
part of the fuel flows through the inner chamber of the pump (fuel chamber) (25) to the high
pressure chamber of the distributor head and then it is led to cooling and bleeding and then
back to the tank through the overflow throttle (14).
The distributor piston (23) is activated by the drive shaft (2). By means of the cam disc (26)
and the rollers in the roller cage (28) the piston obtains an axial motion besides the rotary
motion.
The delivery (high pressure) takes place by means of the axial motion of the piston. The
distribution to the individual outlets (22) is through a slit in the distributor piston.
The injection stops when the governor slide (24) disengages the transversing hole in the
distributor piston. The fuel flows back into the fuel chamber of the pump (25).
The governor slide (24) is controlled by the centrifugal governor.
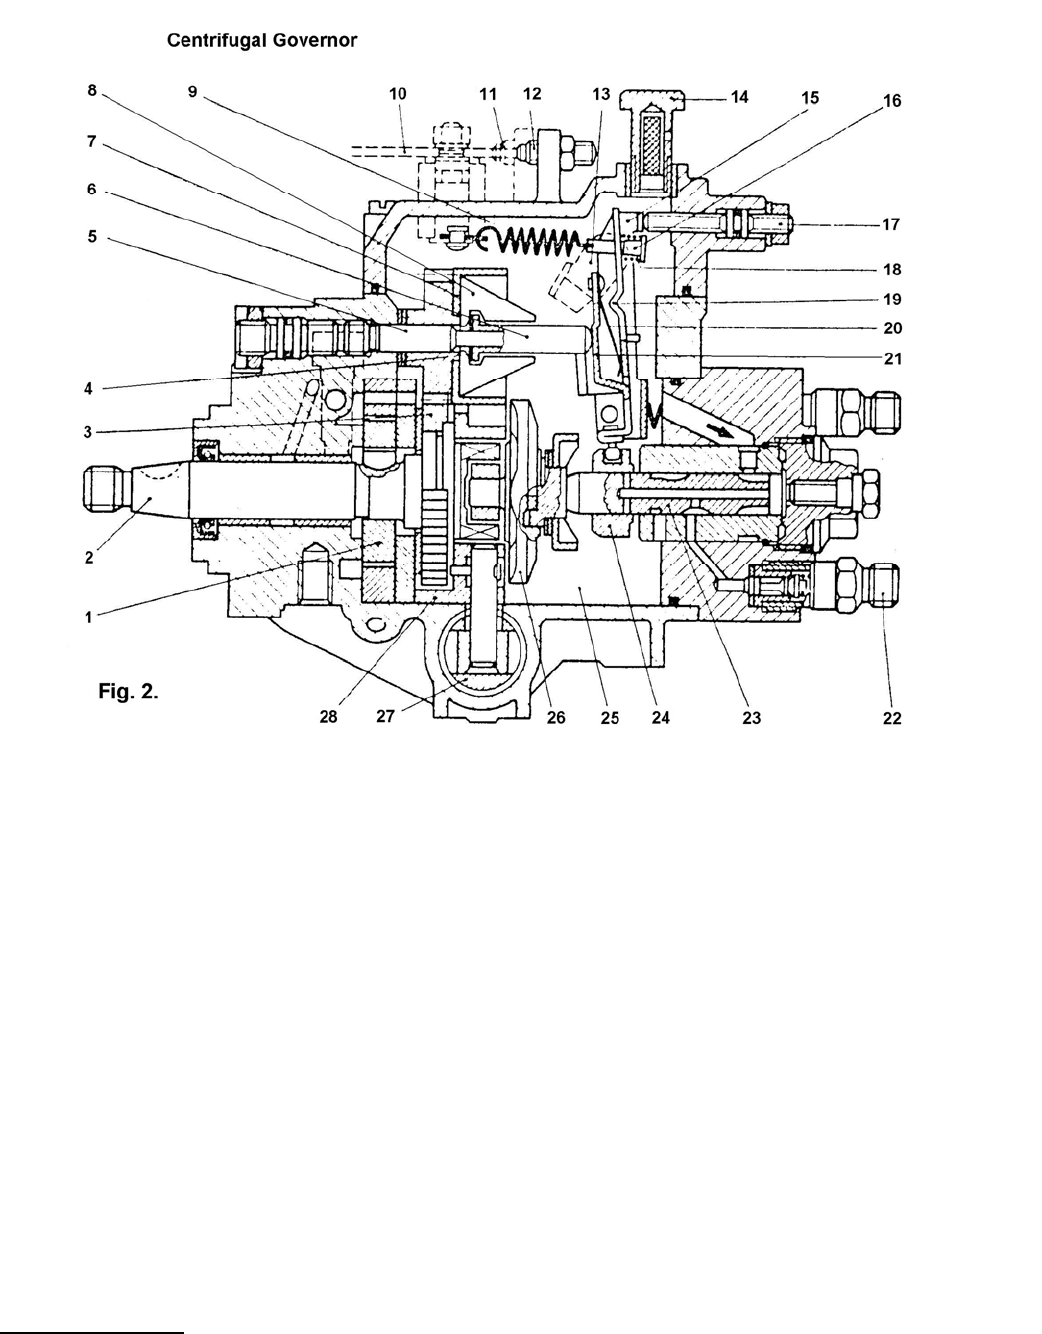
009W2329.XLS
H8
The centrifugal governor is placed in the upper part of the fuel pump.
The holder (7) with gear-wheel is placed on the governor shaft (5) and is driven by the drive
shaft (2) via the gear-wheel (3) and a rubber shock absorber (vibration damper).
Four weights (8) are mounted in the centrifugal weight holder. They press on the axially
displaceable governor bush (6) via a thrust washer (4) with their pressure arms.
The governor arm group consists of starting lever (21), clamping arm (19) and correcting lever
(15). Starting lever and clamping arm are placed in the pump housing. In this way it is possible
to adjust the full load quantity by the adjusting screw (17) without influencing th adjustment of
the revolutions.
A leaf spring is placed on the starting lever (21) and it works as a starter spring. An axially
displaceable bolt (16) with idle spring (18) is placed in the upper part of the clamping arm (19).
The governor spring (9) is fixed in this bolt. The tension of the governor spring can be changed
by the timing lever (10). The starting lever (21) has a ball in the lower part connected with the
governor slide (24).
Injection Timing
On the under side of the fuel pump, at right angles in proportion to the longitudinal axis, the
spring-loaded injection timing piston (27) is. The roller cage (28) is turned influenced by the
feed pump pressure and via a mechanism. The injection timing is thus adjusted depending on
the revolutions.

009W2329.XLS
H9
Function of the Centrifugal Governor
The revolutions of the engine are transmitted by the drive shaft (2) through gear-wheel to the
governor weights (8) and are transformed into centrifugal force there.
With stopped fuel pump, the starting lever (21) and the governor slide (24) are pressed into start
position by the starter spring (20). Through this automatic ful volume, when starting, is obtained.
When the r.p.m. of the engine goes up after start the function of the weak starter spring (20) is
taken over by the pressure from the governor bush (6). By this the starting lever (21) is pressed
against the clamping arm (19) and the starting volume is automatically declutched as the governor
slide (24) is displaced.
At low idling the governor spring (9) is not working.
The regulation is controlled by the idle spring (18).
By setting the governor spring (9) more or less with the timing lever (10) a lower or higher r.p.m.
is adjusted. The idle spring is pressed together.
The idling volume is adjusted by the adjusting screw (11) and the full load volume by the adjusting
screw (17).
Max. r.p.m. is adjusted by the adjusting screw (12).
The pump is stopped by means of a stop magnet built on to the fuel pump (not shown on the
sketch). This magnet closes the inlet port to the high pressure chamber in the distributor head at
electrical activation resulting in a dead stop magnet.
009W2329.XLS
H10
Fuel Lift Pump
The fuel lift pump is a diaphragm type and is placed at the upper side of the rear end cover.
The pump is sealed and cannot be dismantled for repair or cleaning. It is driven by the
camshaft.
Workpressure is 35 – 55 kPa.
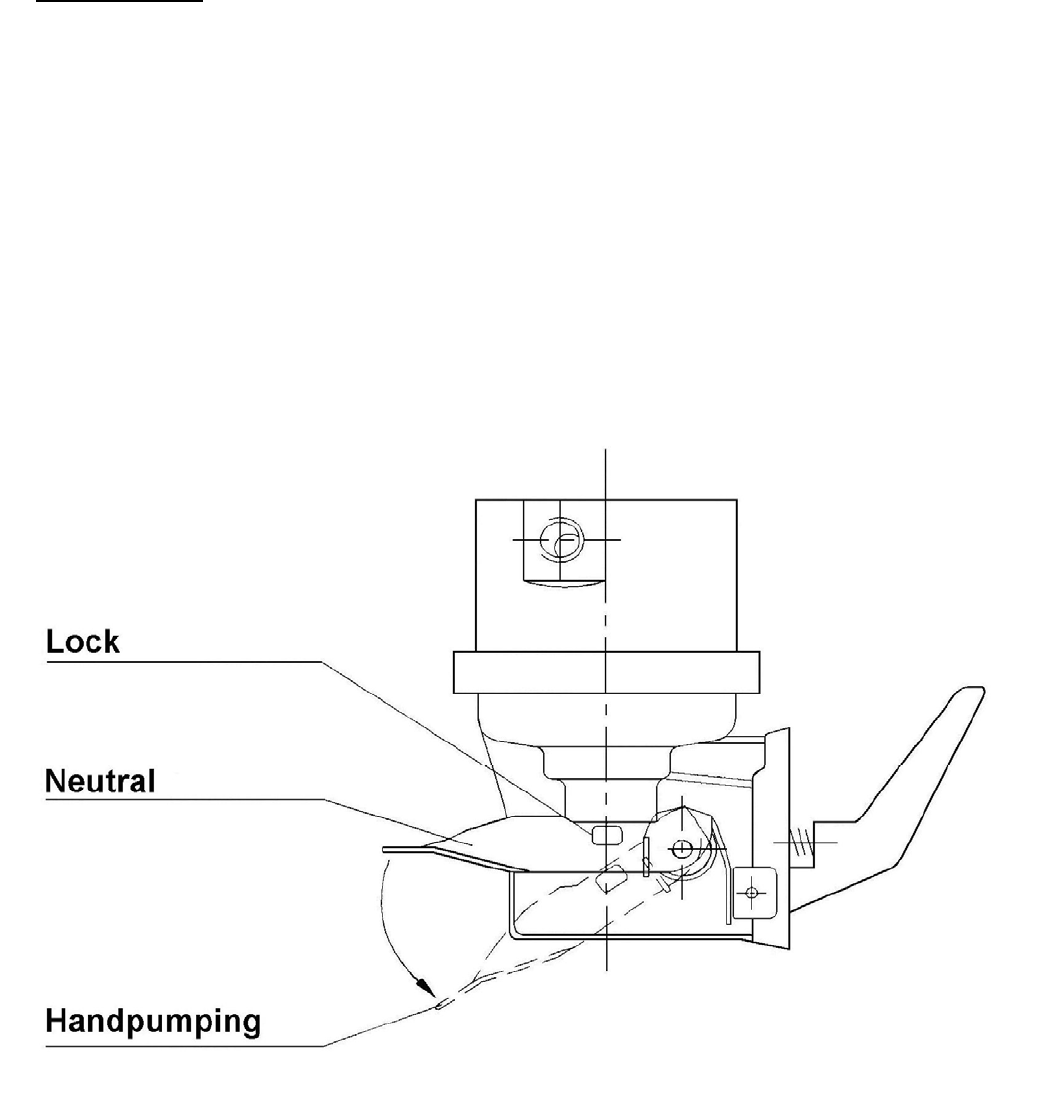
A hand pump is fitted, which can be used for priming and bleeding by standing engine.
After priming the lever must be put in neutral position, where it is locked. If priming
not is effective, it may be caused by the driving cam being in top position. The engine must
be turned to bring the cam in bottom position.

009W2329.XLS
H11
Fuel Filter
The fuel filter used is a Bosch disposable one mounted to the port side on the front of the
engine.
The filter cannot be cleaned, but has to be changed every 300 operating hours, or if water
contamination is suspected.
Unscrew the filter casing by hand after the filter casing has been emtied for fuel via the
drain screw in the bottom of the filter casing.
Before fitting of a new filter the sealing surface of the filter casing should be cleaned. The
filter casing should now be filled with clea fuel before it is screwed on and tightened about
half a turn after the sealing surface fits tightly.
After changing the filter bleed the fuel system by actuating the manual handle on the fuel lift
pump and pump until the fuel, free from bubbles, runs out at the vent screw on the top of
the fuel filter. Tighten the screw and loosen the fuel pressure pipes at their connection on
the fuel valves and pump again with the fuel lift pump until fuel, free from bubbles, runs out
from the fuel pressure pipes.

009W2329.XLS
H12
The fuel valves are mounted in the cylinder head and are
secured here with tightening bars which are loosened when
dismounting the fuel valves.
Disassemble the fuel valves after the sketch beside and so
the nozzle can be exchanged and the pressure can be
adjusted at the washers (541).
Adjust the fuel valves by means of a pressure test apparatus
at 184 Kp/cm² *) opening pressure.
When using Bosch pressure testapparatus for nozzles you
are referred to Bosch infor-mation WPP 320/2 DK (500.8.76)
and this states test procedure and measures in detail.
The nozzle (548) is a Bosch nozzle DLLA 150P 34 combined
with a nozzle holder KBEL 78P 10/13 and this combination
makes the fuel valve (Item no. 610B9120) *).
The adjusting filling pieces for injection pressure are
obtainable from 1 mm to 1.975 mm thickness with 0.05 mm
from washer to washer.
When exchanging the nozzle the new nozzle has to be
cleaned in petrol as it has been prepared with a protective
oil. Both nozzle needle and nozzle housing should be
carefully cleaned.
When assembling the fuel valve tighten with 6 – 8 Kpm.
*) According to Service information SI0601 the fuel valve has
been changed from 610B9120 (opening pressure 184 Bar)
to 610B9250 (opening pressure 230 Bar) from engine no.
8395 and again changed according to SI1102 from
610B9250 (opening pressure 230 Bar) to 610B9220
(opening pressure 210 Bar) from engine no. 8845.
009W2329.XLS
H13
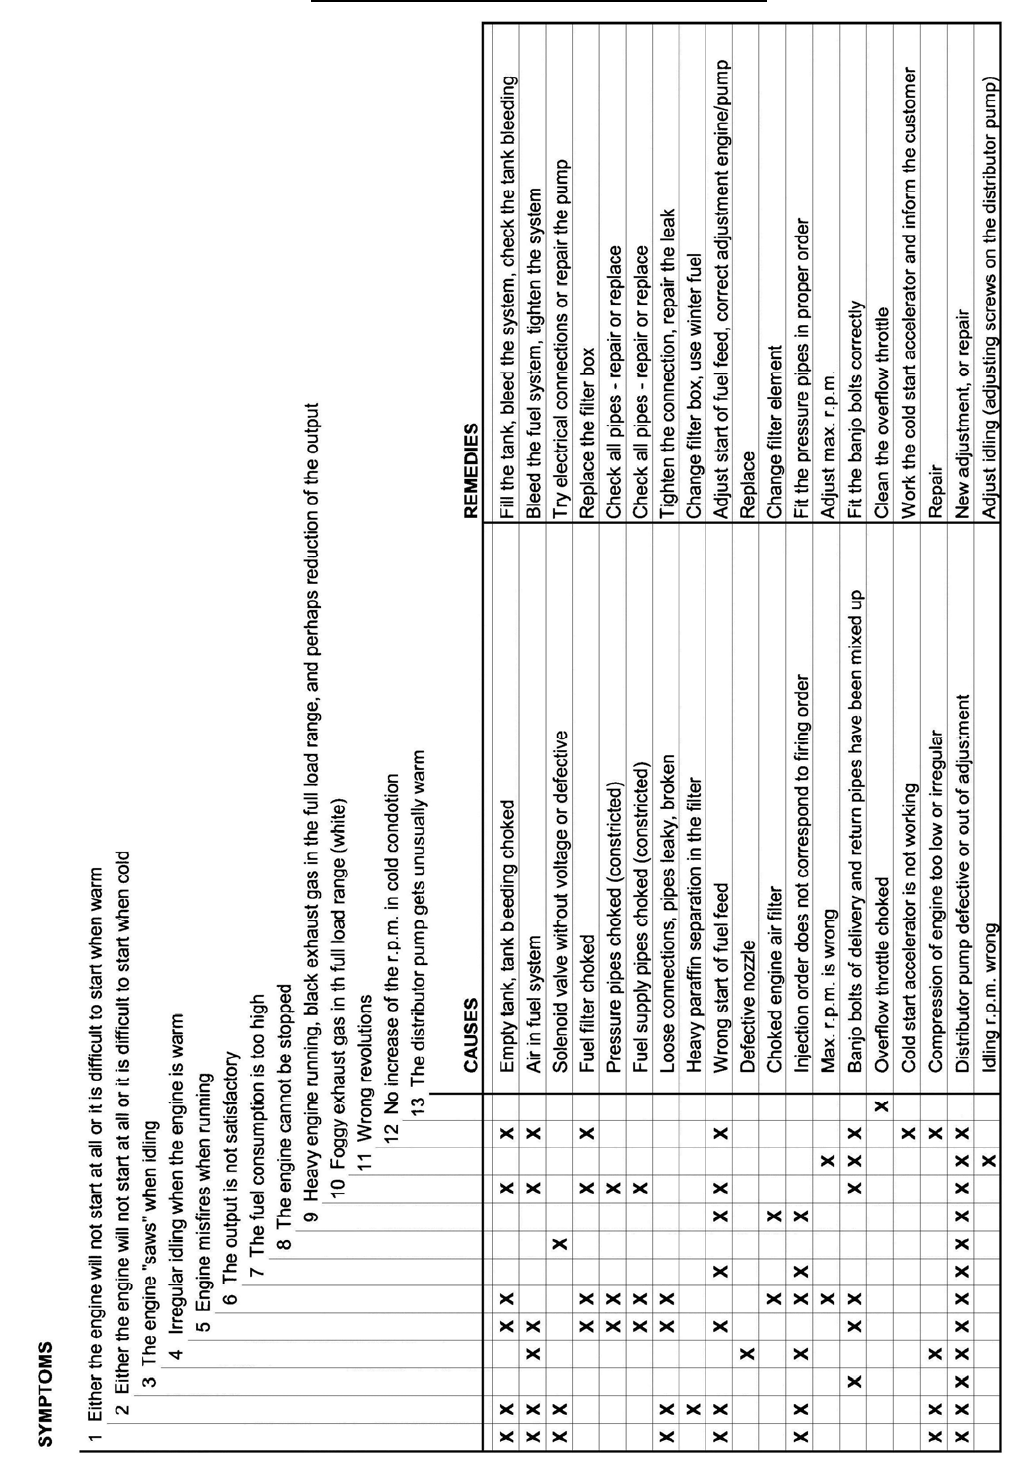
Causes and Remedies of the Fuel Pump

IJ1
009W2329-R01
SECTION IJ
PISTON, CONNECTING ROD AND CYLINDER LINER

IJ2
009W2329-R01
CONTENTS
Disassembling of pistons and connecting rods .......................... page IJ 3
Assembling of pistons and connecting rods .............................. page IJ 3
Exchange of pistons .................................................................. page IJ 4
Measurement of piston .............................................................. page IJ 5-6
Piston rings ................................................................................ page IJ 7-8
Exchange of piston rings ........................................................... page IJ 9
Exchange of piston pin bearing in connecting rod ..................... page IJ 9
Arrangement of connecting rod (drawing) ................................. page IJ 10
Connecting rod bearings ........................................................... page IJ 11
Cylinder liner ............................................................................. page IJ 12
Measuring of cylinder wear ........................................................ page IJ 12
Dismounting of cylinder liner ..................................................... page IJ 12
Mounting of cylinder liner........................................................... page IJ 12
Test measurement of cylinder liner (drawing) ............................ page IJ 13

IJ3
009W2329-R01
Disassembling of Pistons and Connecting Rods
1. Drain off the cooling water and the lubricating oil from the engine.
2. Dismount the cylinder head (see section C).
3. Remove any wear or soot edge which may be at the top of the cylinder liner with a scraper.
4. Turn the engine “upside down”.
5. Remove the oil pan.
6. Unscrew the connecting rod nuts and remove the bearing cap from the connecting rod.
7. Fit the connecting rod bolts with protective caps (soft plastic hose or the like) in order
to avoid the crank being damaged.
8. Turn the piston in top position and press out the piston and the connecting rod of the
cylinder liner. The crank must be in the exact top position.
Note! On later engines the connecting rod nuts have been replaced by unbraco
screws and therefore item 7 can be omitted.
Assembling of Pistons and Connecting Rods
1. Put a slip ring over the cylinder liner.
(The slip ring may be made from a worn out cylinder liner , of which 2/3 should be re-
moved and the remaining 1/3 should be turned weakly conical in the top end wanted.)
2. Place the crank in the top position.
3. Fit the connecting rod bolts with protective caps.
4. Lower the piston and the connecting rod down into the cylinder liner by means of the slip
ring and do observe that the piston ring gaps are staggered. It should further be checked
that the recess in the piston head is turned towards the fuel valve. Before fitting the
pistons and connecting rods lubricate the crank journals abundantly with lubricating oil.
5. Place the engine on the side or turn it “upside down”.
6. Remove the protective caps.
7. Fit the bearing cap with the bottom bearing shells.
8. Tighten the connecting rod nuts with a torque of 69 +/- 3 Nm (7 +/- 0.3 kpm). Use self-
locking nylon nuts for the connecting rod bolts and replace the nuts after each
disassembling of the connecting rod.
Note! The numbers on the connecting rod must be placed as before the disassembling
of the engine and the numbers on the connecting rod and bearing cap must fit.
The bearing cap and the connecting rod are guided by two balls which you must have
in mind when assembling.
IJ4
009W2329-R01
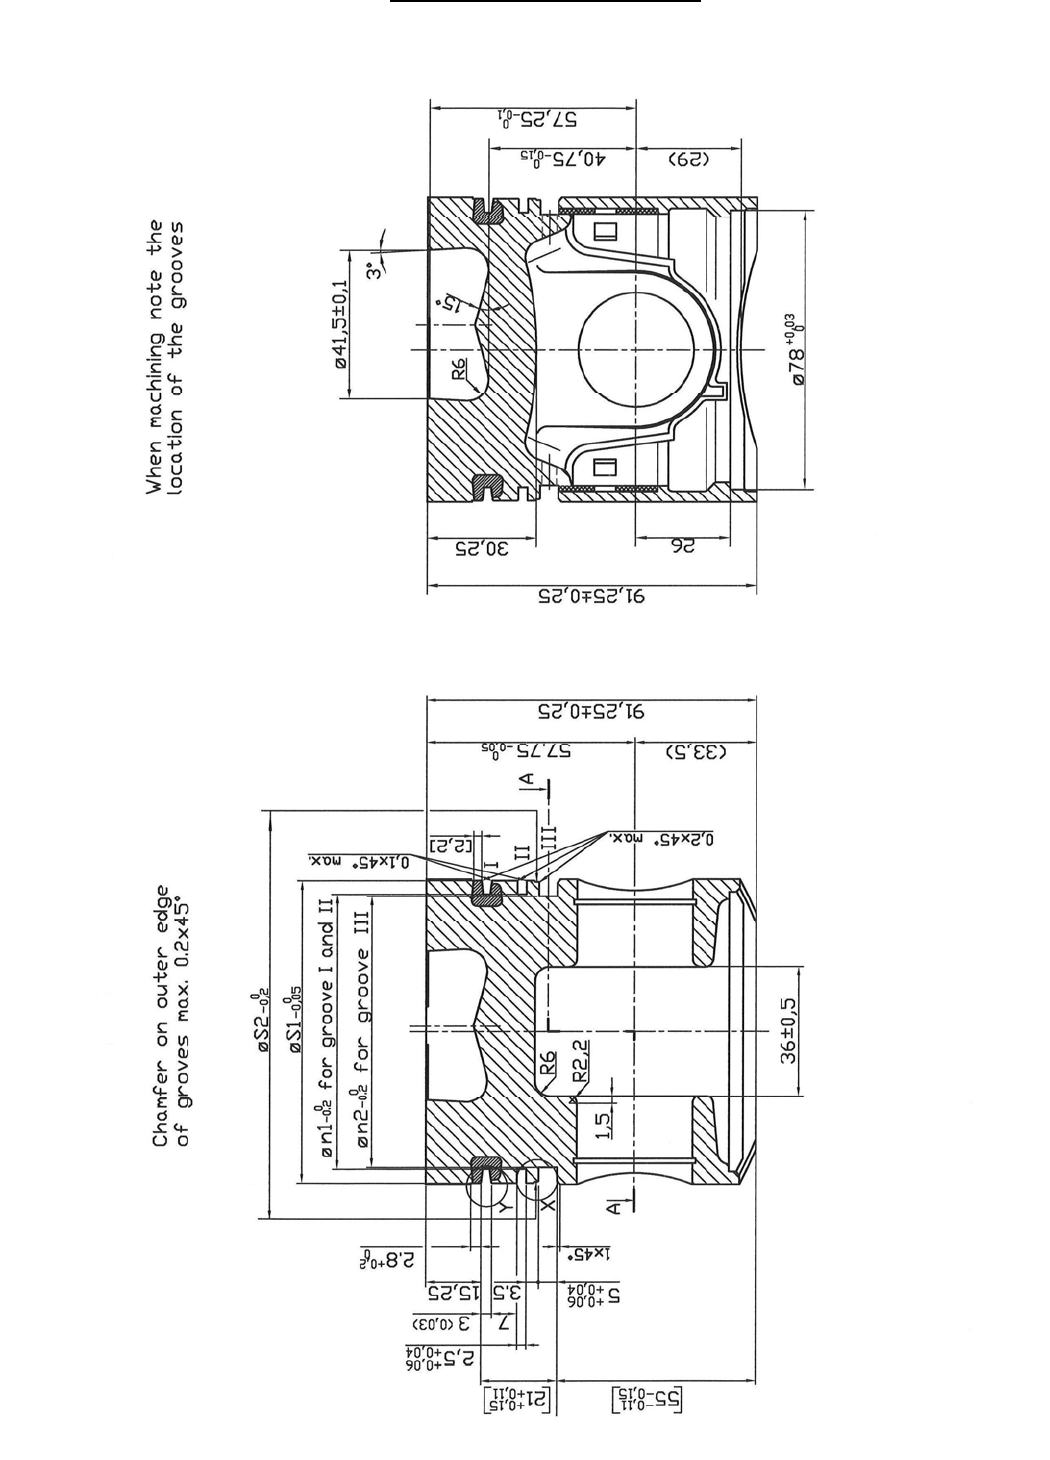
Exchange of Pistons
If the pistons are scored or very worn, exchange them for new ones.
This is carried out as follows:
1. Remove the pistons with connecting rods as stated on page IJ 3.
2. Take off one of the locking rings at the gudgeon pin.
3. Knock out the gudgeon pin with a punch.
4. Place the new pistons upside down. Pour a little spirit into them and light it.
The heating can also take place on a boiling plate.
5. When the piston has reached a temperature of about 100°C, smother the fire. Place the
connecting rod in the piston before the oiled gudgeon pin is pushed in.
It is recommended to cool down the gudgeon pin first, e.g. in a deep freezer or by means
of nitrogen or carbonic acid, if it is possible.
6. Relock the gudgeon pin with the locking ring.
Carefully observe that the piston is placed correctly in proportion to the numbering on the
connecting rod.
Weight of piston complete: 1,088 grams ± 7 grams.
IJ5
009W2329-R01
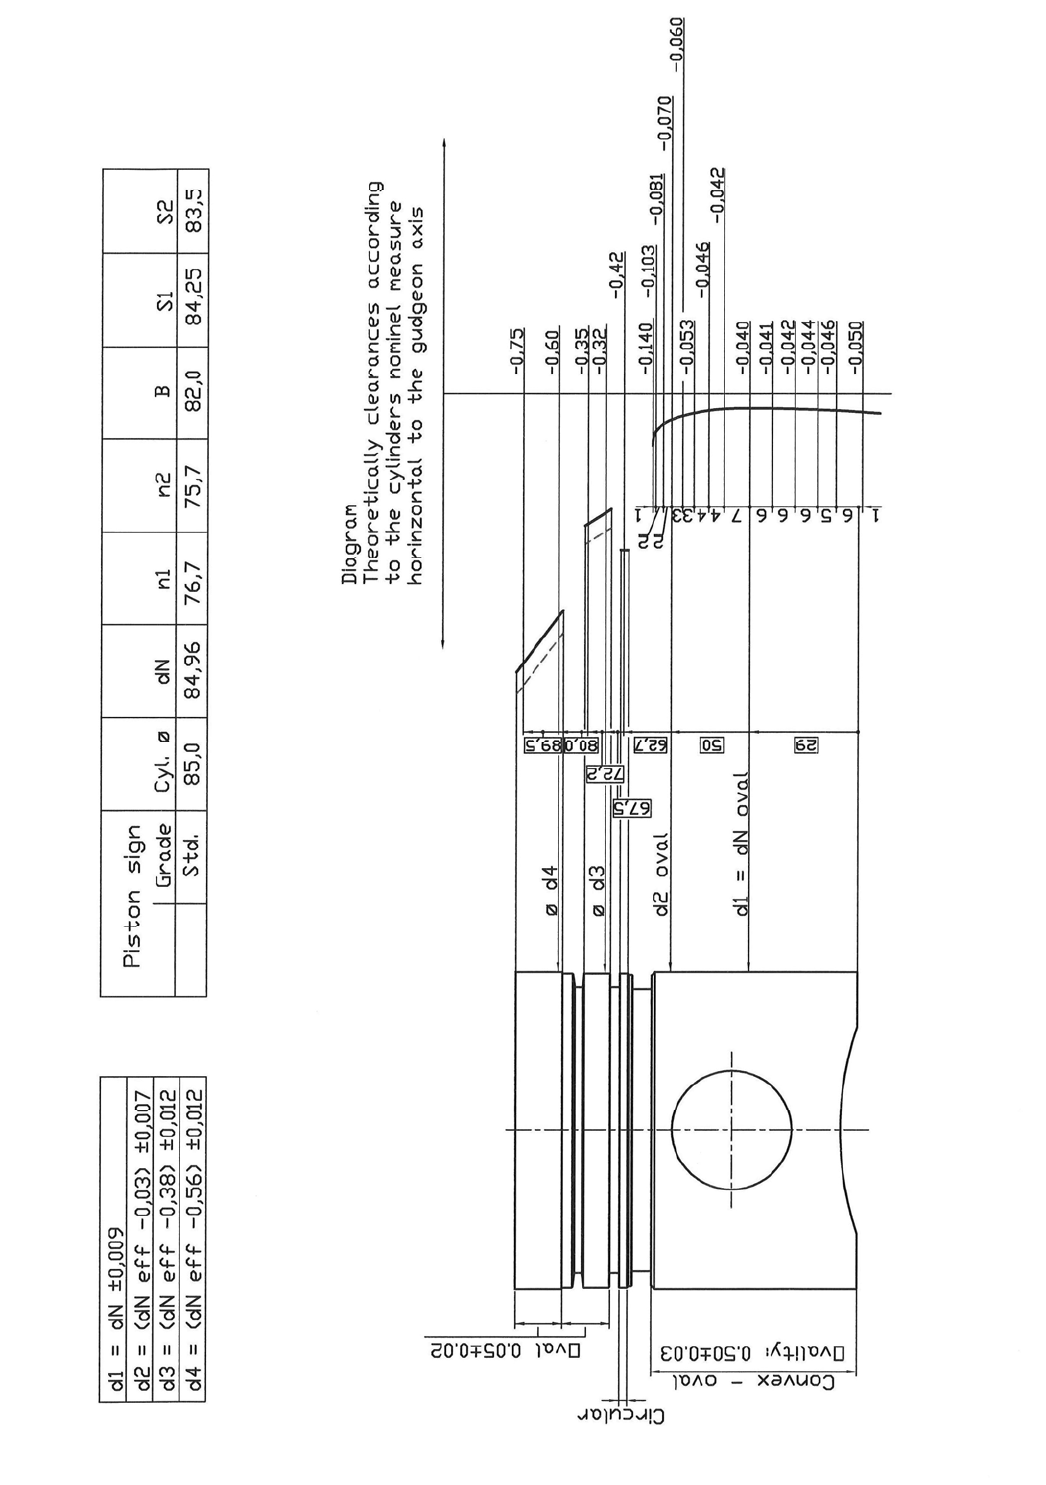
Measurements for Piston
IJ6
009W2329-R01
IJ7
009W2329-R01
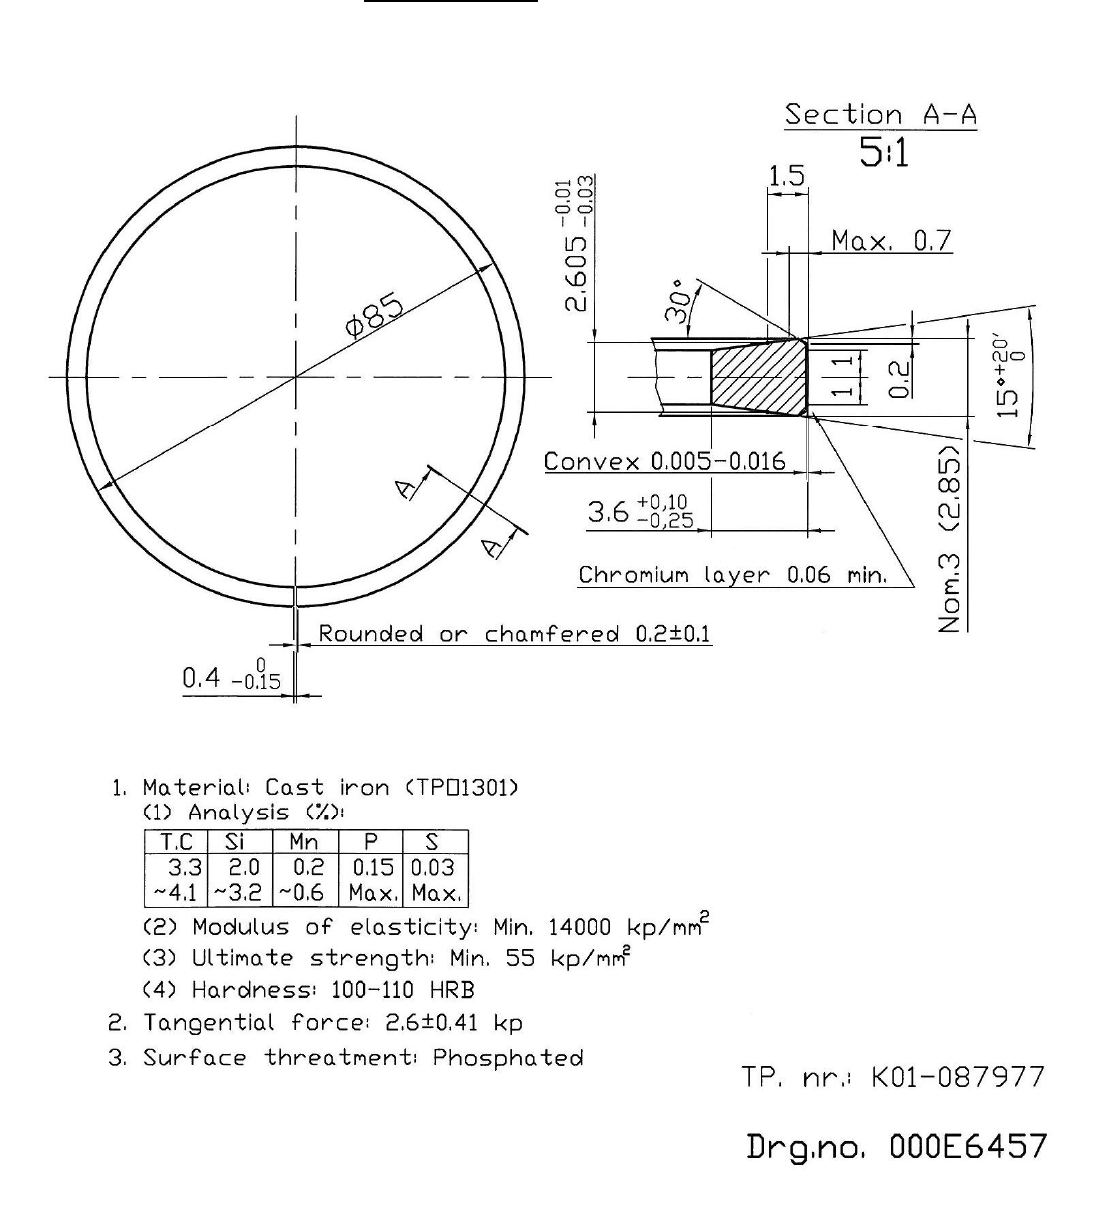
Piston Ring 1 (Please note page IJ4)
IJ8
009W2329-R01
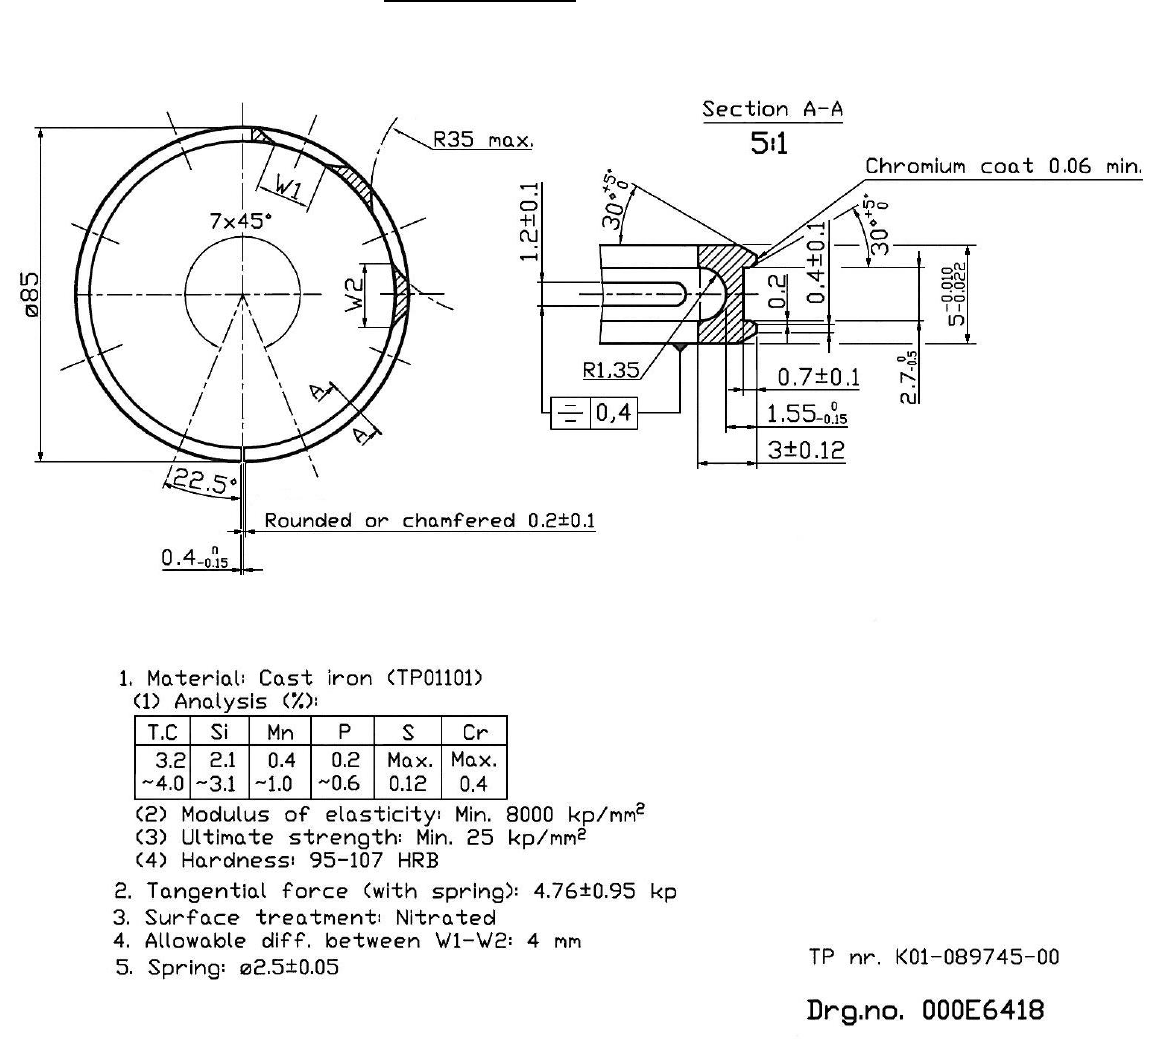
Piston Ring 3 (Please note page IJ4)

IJ9
009W2329-R01
Exchange of Piston Rings
The piston ring gap is 0.3 – 0.45 mm (0.0118 - 0.0177 inch) in a new engine.
The wear of the piston rings ca n be seen by measuring the piston ring gap, and the piston rings
must be changed when this is max. 2.0 mm (0.0787 inch).
This is done as follows:
1. Take out the piston with connecting rod as stated on page IJ 3.
2. Remove the piston rings either by a spec ial pair of tongs or by m eans of two piec es of
string which have been folded. With the clos ed ends around the ends of the piston rin g,
the piston ring is extended and can be lifted clear of the piston.
The mounting is carried out in the reverse order after the piston ring grooves have been
cleaned. Rotary steel brushes or a steel scrapers should not be used as cleaning tools.
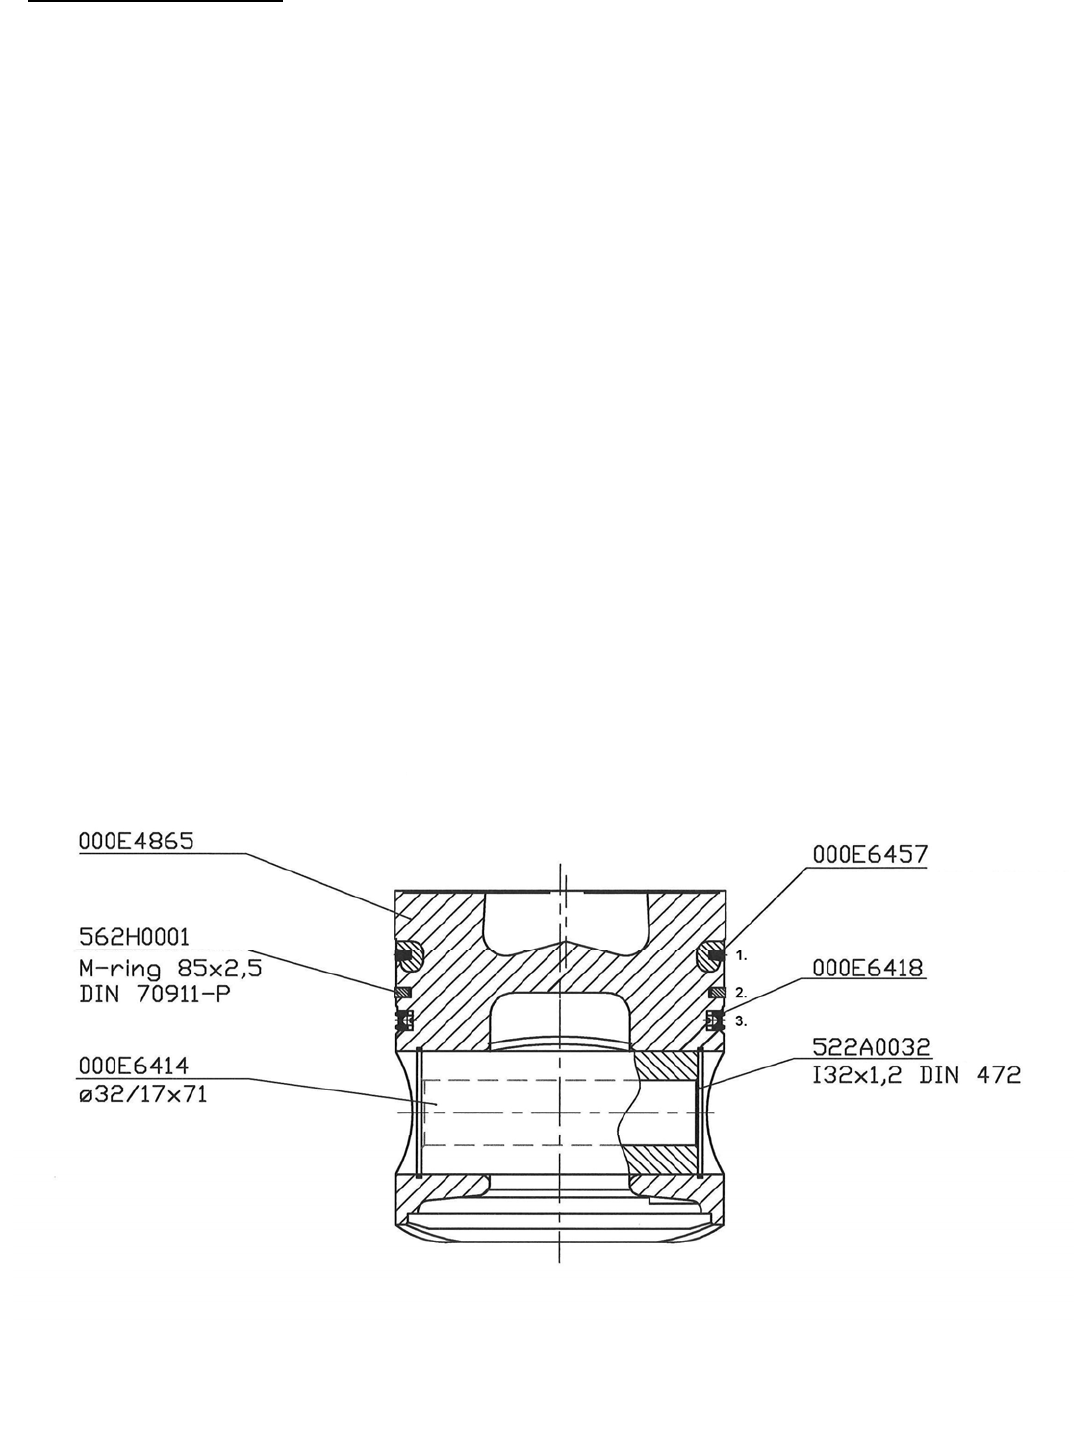
Each piston has three piston rings: two compre ssion rings and one oil scraper ring as shown
on the drawing page IJ4. The upper compre ssion ring are shown on page IJ 7 the lower
compression ring is a so called M-ring and the oil scraper ring is shown on page IJ8.
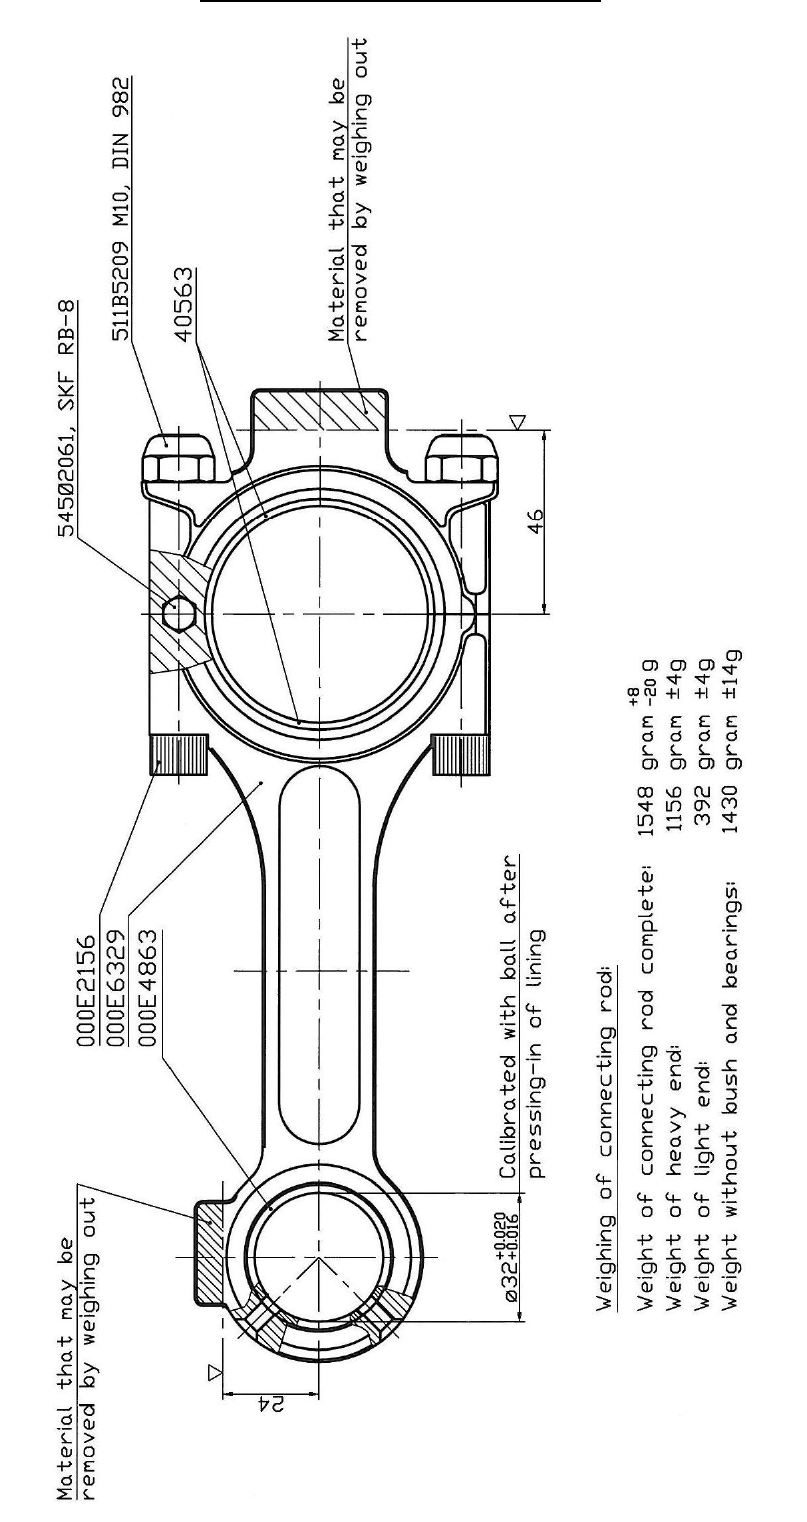
Exchange of Piston Pin Bearing in connecting rod
If heavy wear of the piston pin bearing in the connecting rod is found, it may be necessary to
exchange it. Particular attention should be paid when exchanging, as the bearing must be calibrated
to correct roundness and clearance after the fitting. This is either done with a calibration ball, as
indicated on page IJ10, or with a reamer with the tolerance mentioned.
IJ10
009W2329-R01
Arrangement of Connecting Rod

IJ11
009W2329-R01
Connecting Rod Bearings
The connecting rod bearings are in two parts and consists of two steel shells in which a thin layer of
bearing metal is cast.
The connecting rod bearings must be exchanged if they are scratched or if the “red” layer between
the bearing metal and the steel shell can be seen faintly.
When grinding the crank journal, connecting rod bearings can be supplied in following undersize:
0.6 mm (0.02362inch) (see section L).

IJ12
009W2329-R01
Cylinder liner
The bore of the cylinder liner is 85.000 – 85.020 mm (3.3464 – 3.3472 inch). The cylinder liner must
be exchanged when it is worn max. 0.3 mm (0.012 inch).
Measuring of Cylinder Wear
Place a new piston ring in the upper end of the liner where this is not worn. Measure the piston ring
gap with a feeler gauge. This will be e.g. 0.3 mm (0.012 inch). Place the piston ring lower in the liner
where it is worn and measure the piston ring gap again which is now e.g. 0.9 mm (0.0354 inch).
The wear of the liner is then (0.9 – 0.3) / 3 = 0.2 mm. That is: Largest measure less smallest measure
divided by 3 (approximate value for ¶).
The cylinder liner can also be measured with a cylinder template gauge.
Dismounting of Cylinder Liner
1. Remove the cylinder head (see section C page 7).
2. Take out the pistons (see page IJ 3).
3. Cover the connecting rod journals with a piece of oil paper or plastic.
4. Pull out the cylinder liners with a special tool or place the engine block on the side and knock out
the cylinder liners carefully with a wooden block as filling piece. Knock the liners from the bottom
and upwards.
Mounting of Cylinder Liner
There is no gasket between cylinder liner and the engine block at the top. The joint faces must
therefore be completely clean and without burrs. Grind with abrasive compound, if required.
The rubber rings of the lower edge of the cylinder liner must be renewed at each disassembly and
they must not be twisted when mounting.
The rubber rings and the collar may be supplied with a thin coat of jointing paste at the mounting.
When the above things are in order put back the cylinder liner in the engine block – by means of a
wooden block.
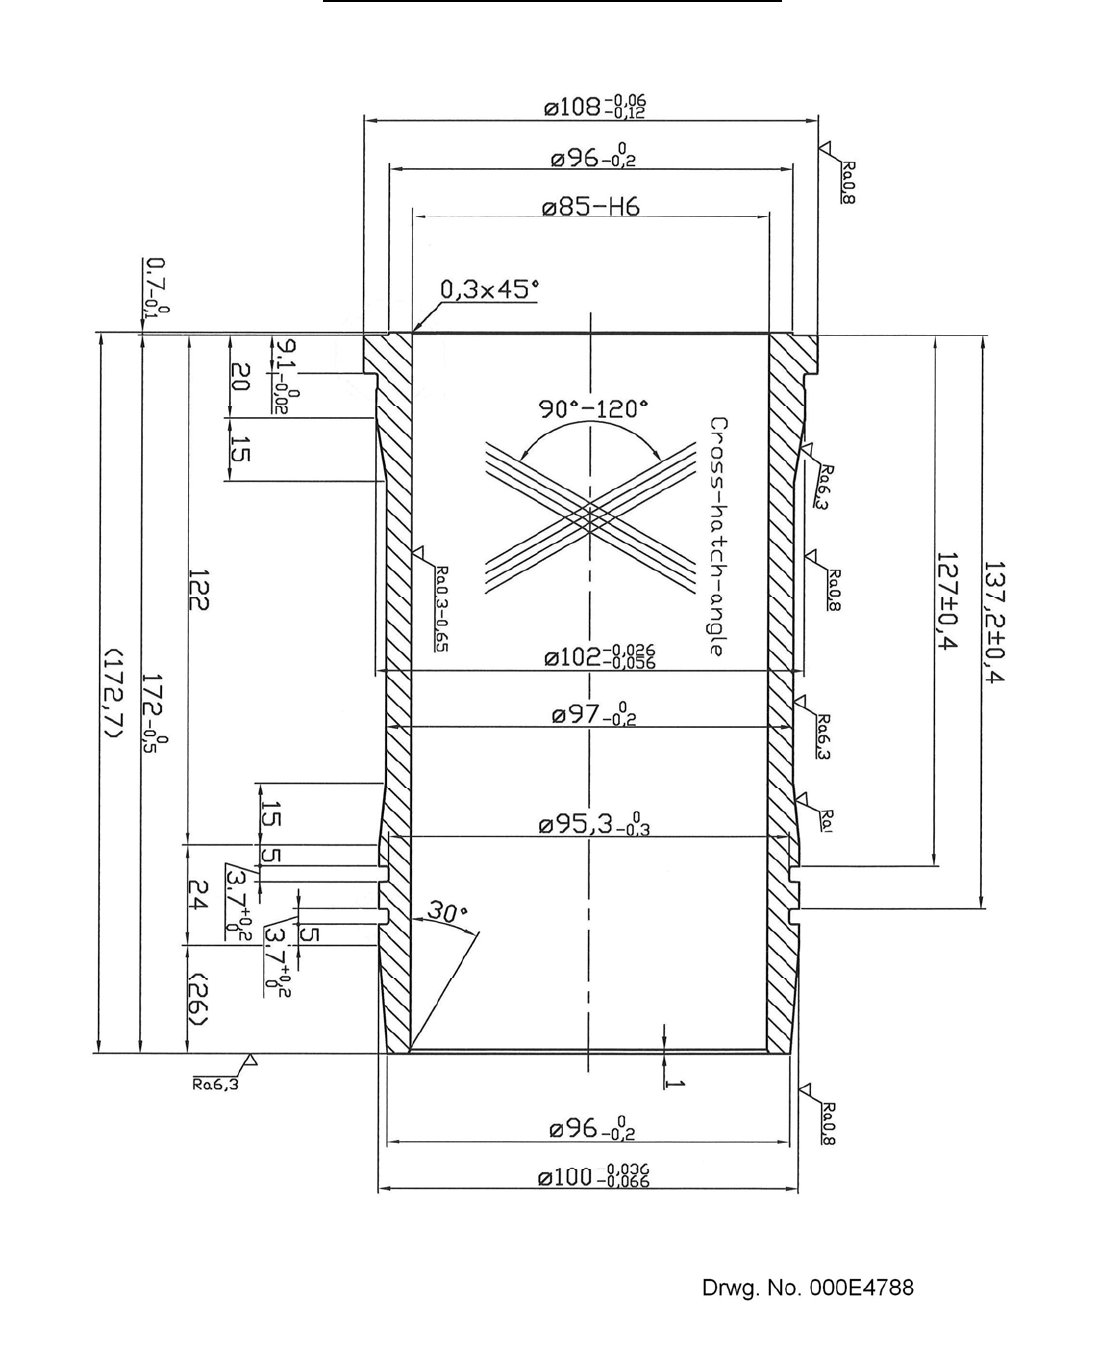
After the mounting you must check the clearance of the liner above the engine block. This clearance
must be 0.10 – 0.20 mm (0.0039 – 0.0079 inch).
IJ13
009W2329-R01
Test Measurements of Cylinder Liner

L1
009W2329-R01
SECTION L
CRANKCASE, CRANKSHAFT,
MAIN BEARINGS AND OIL SUMP

L2
009W2329-R01
CONTENTS
Dismounting of crankshaft ......................................................... page L 3
Change of main bearings .......................................................... page L 3
Rear part of crank ...................................................................... page L 4
Rear gear-wheel and rear part of crank ..................................... page L 5
Marking of front gear-wheel on crank ........................................ page L 6
Front part of crank ..................................................................... page L 7
Repair dimensions of crakshaft ................................................. page L 8
Connecting rod journals ............................................................ page L 8
Main bearing journals ................................................................ page L 8
Main bearings ............................................................................ page L 8
Oil sump .................................................................................... page L 9
L3
009W2329-R01
Dismounting of crankshaft
1. Remove the cylinder head with manifold (see section C page 4).
2. Dismount the flywheel (see section D page 3).
3. Dismount the gear (see section R page 3).
4. Dismount the rear end cover (see section G page 3).
5. Turn the engine upside down.
6. Remove the oil sump.
7. Dismount the pistons and the connecting rods (see section IJ page 3).
8. Dismount the front end cover (see section E page 3).
9. Remove the bearing caps and lift out the crank.
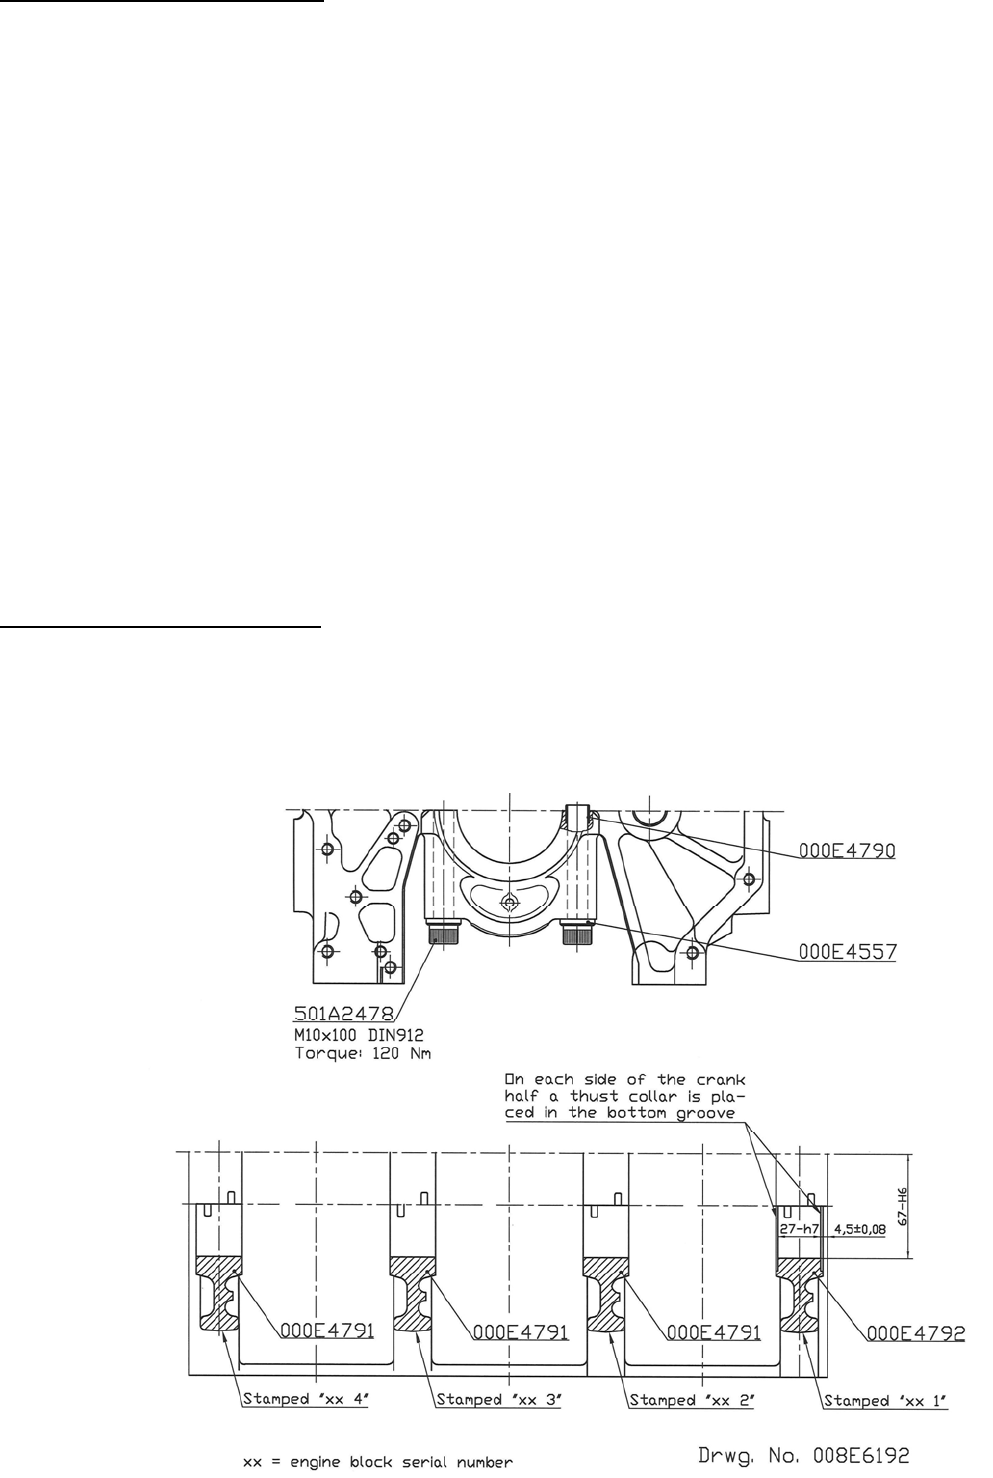
The mounting of the crankshaft takes place in reverse order, the bearing caps being fastened
at a torque of 12 kpm (86.8 ft.lbf). Further make sure that the two thrust collars are correctly
fitted in accordance with the drawing below.
Change of main bearings
Proceed in the same way as when dismounting the crankshaft.
As will appear from the drawing below, the caps are stamped in proportion to corresponding
part of the engine block. Observe this marking when disassembling.
L4
009W2329-R01
Rear part of crank
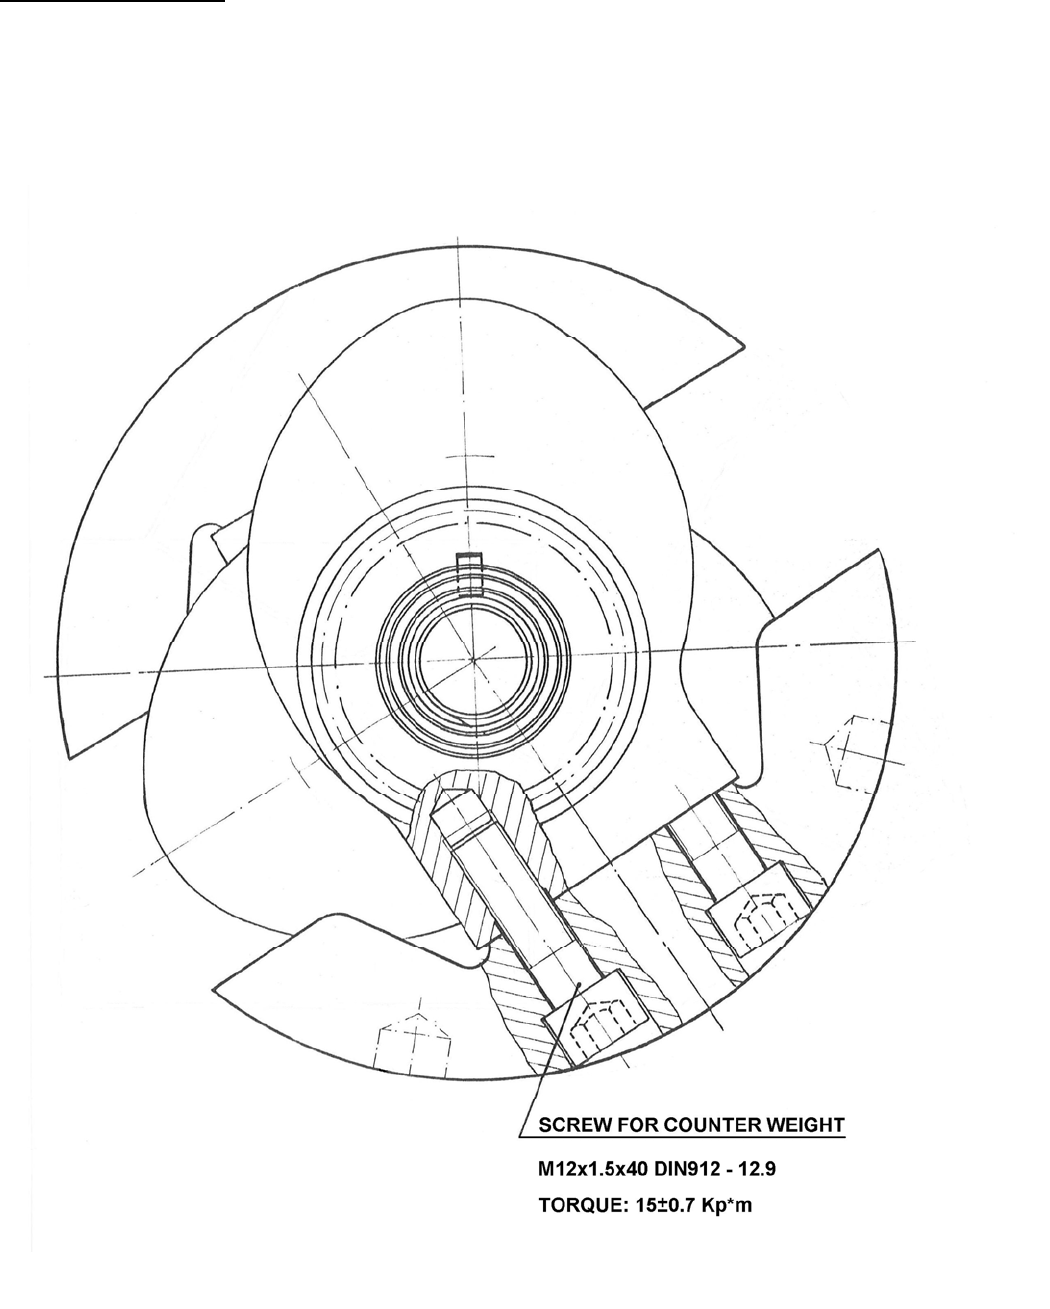
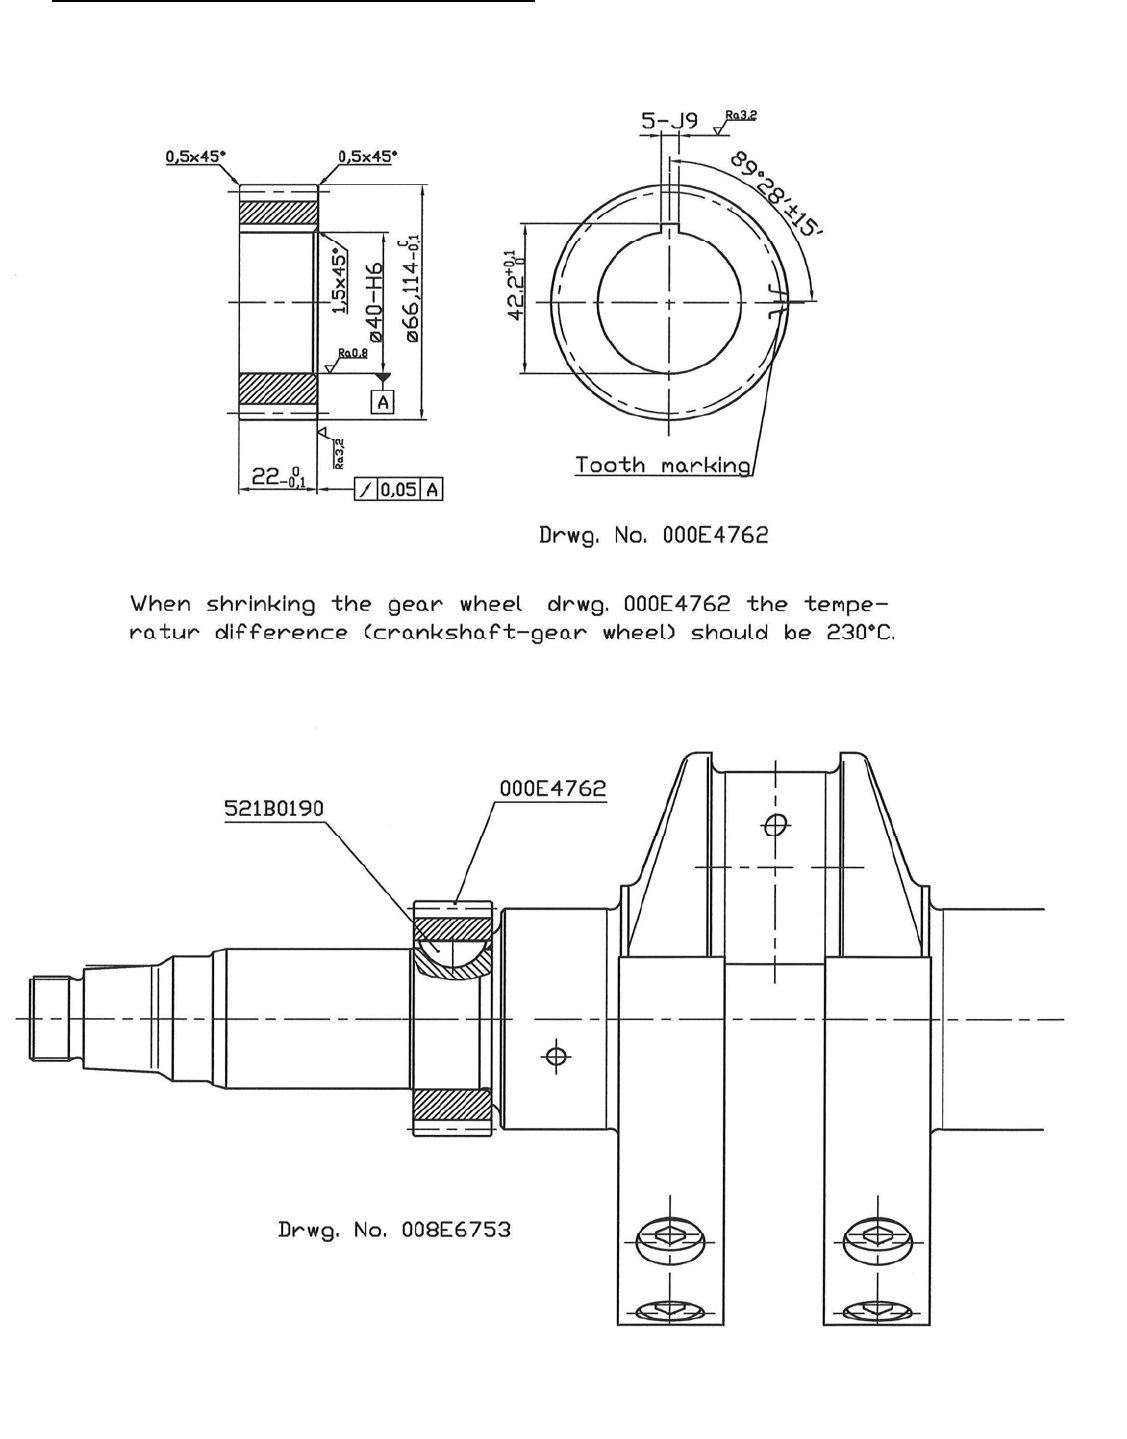
The drawing below shows the rear part of the crank with screwing-on of the counter weights of
the crankshaft.
Drwg. No. 008E4757
L5
009W2329-R01
Rear gear-wheel and rear part of crank
L6
009W2329-R01
Marking of front gear-wheel on crank
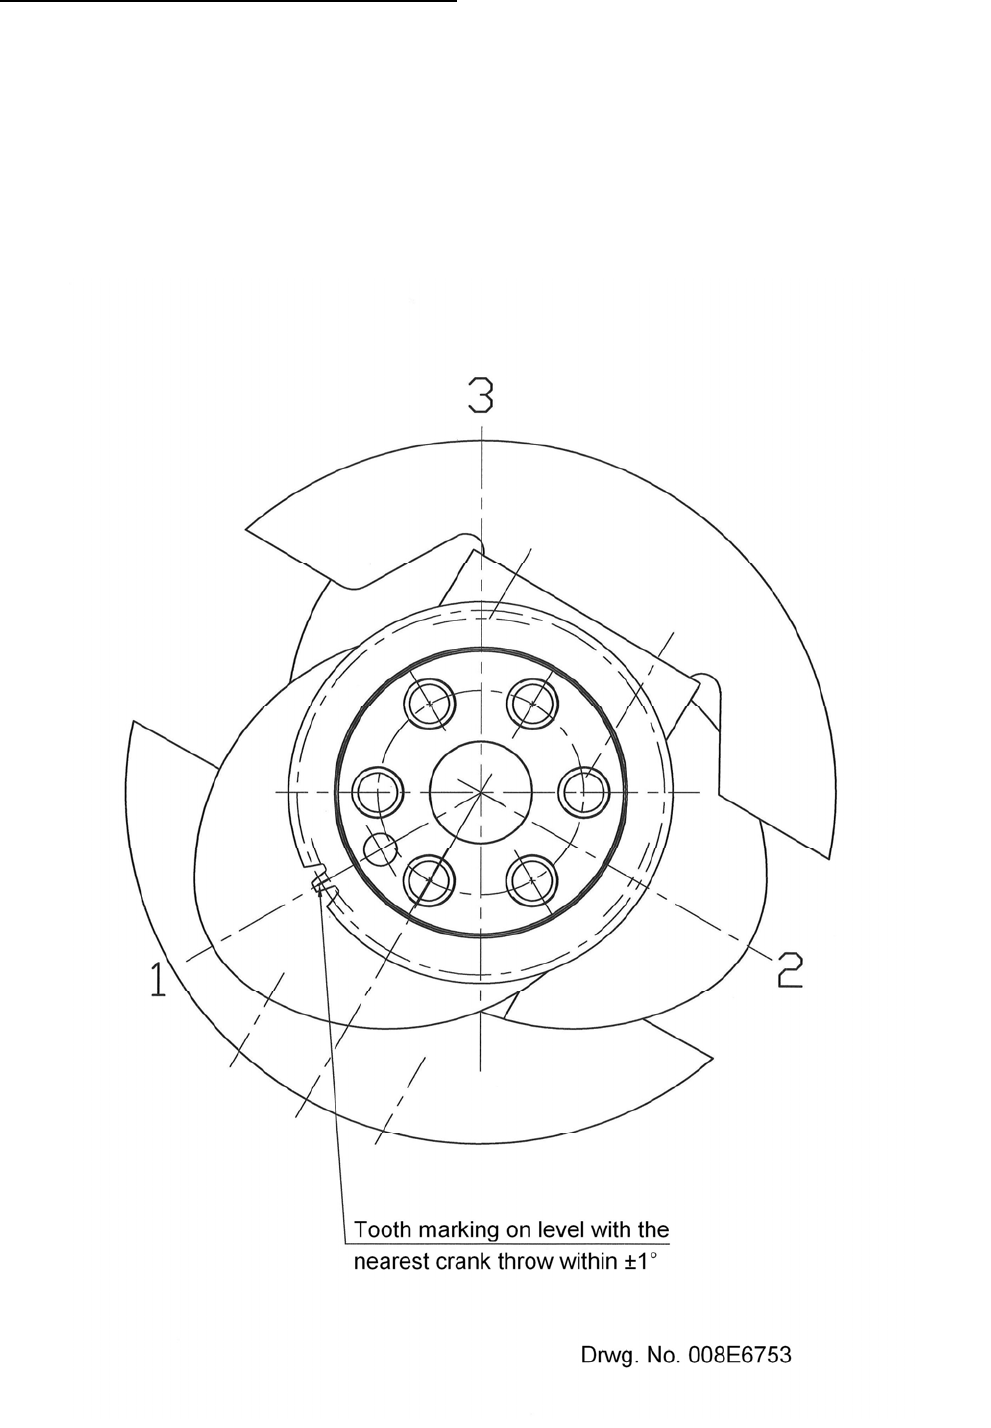
The front gear-wheel on the crank drives the front rotating weight and is marked in proportion to
this and in accordance with the drawing below.
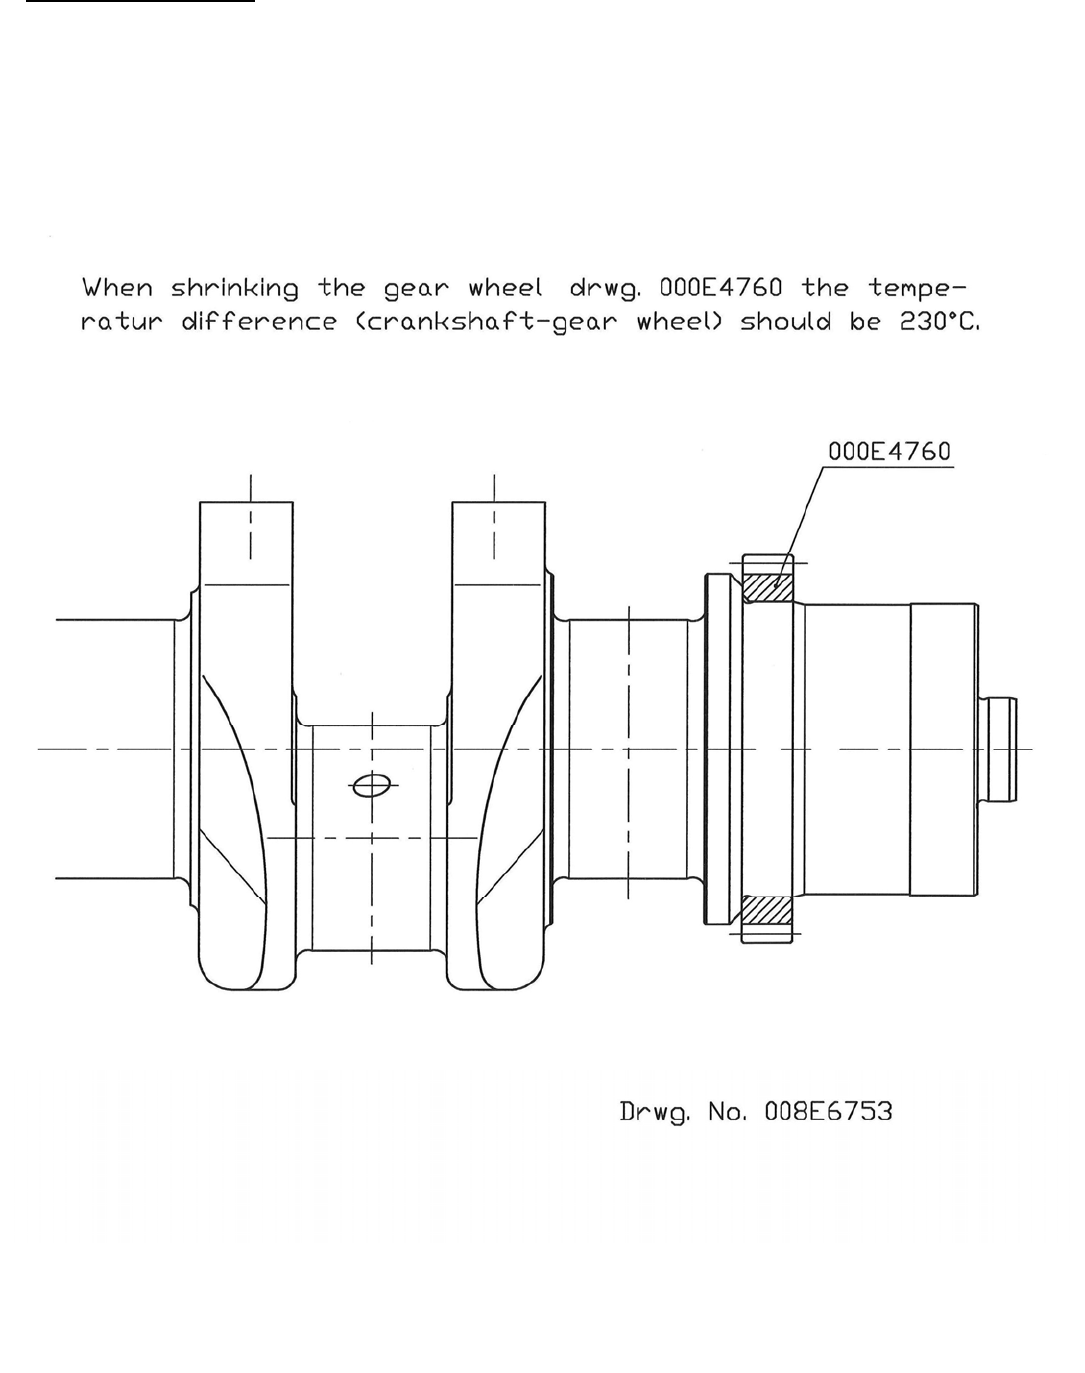
The gear-wheel has been shrinked on the shaft. When shrinking on a new gear-wheel there
should be a difference of temperature between the crankshaft and the gear-wheel of 231 C.
Further see the drawing overleaf.
L7
009W2329-R01
Front part of crank
L8
009W2329-R01
Repair dimensions of crankshaft
The crankshaft is made of drop-forged, heat-treated steel. Thus it is possible to gring the
crankshaft without subsequent surface treatment.
The crankshaft must never be repaired with hard chromium-plate or metal feeding, but only by
grinding in accordance with the below mentioned measures and tolerances to which we supply
undersize bearings.
The crankshaft should be ground, if it is oval and the smallest diameter is 0.05 mm (0.002 inch)
below the diameter it had when leaving the factory.
Connecting rod journals
Standard .................................................................. 53.987 – 54.000 mm (2.1255 – 2.1260”)
0.6 mm undersize .................................................... 53.387 – 53.400 mm (2.1019 – 2.1024”)
Clearance between bearing and journal…………..…..0.028 – 0.068 mm (0.0011 – 0.0027”)
Main bearing journals
Standard .................................................................. 61.981 – 62.000 mm (2.4402 – 2.4409”)
0.6 mm undersize .................................................... 61.381 – 61.400 mm (2.4166 – 2.4173”)
Clearance between bearing and journal .................. ..0.048 – 0.112 mm (0.0019 – 0.0044”)
Main bearings
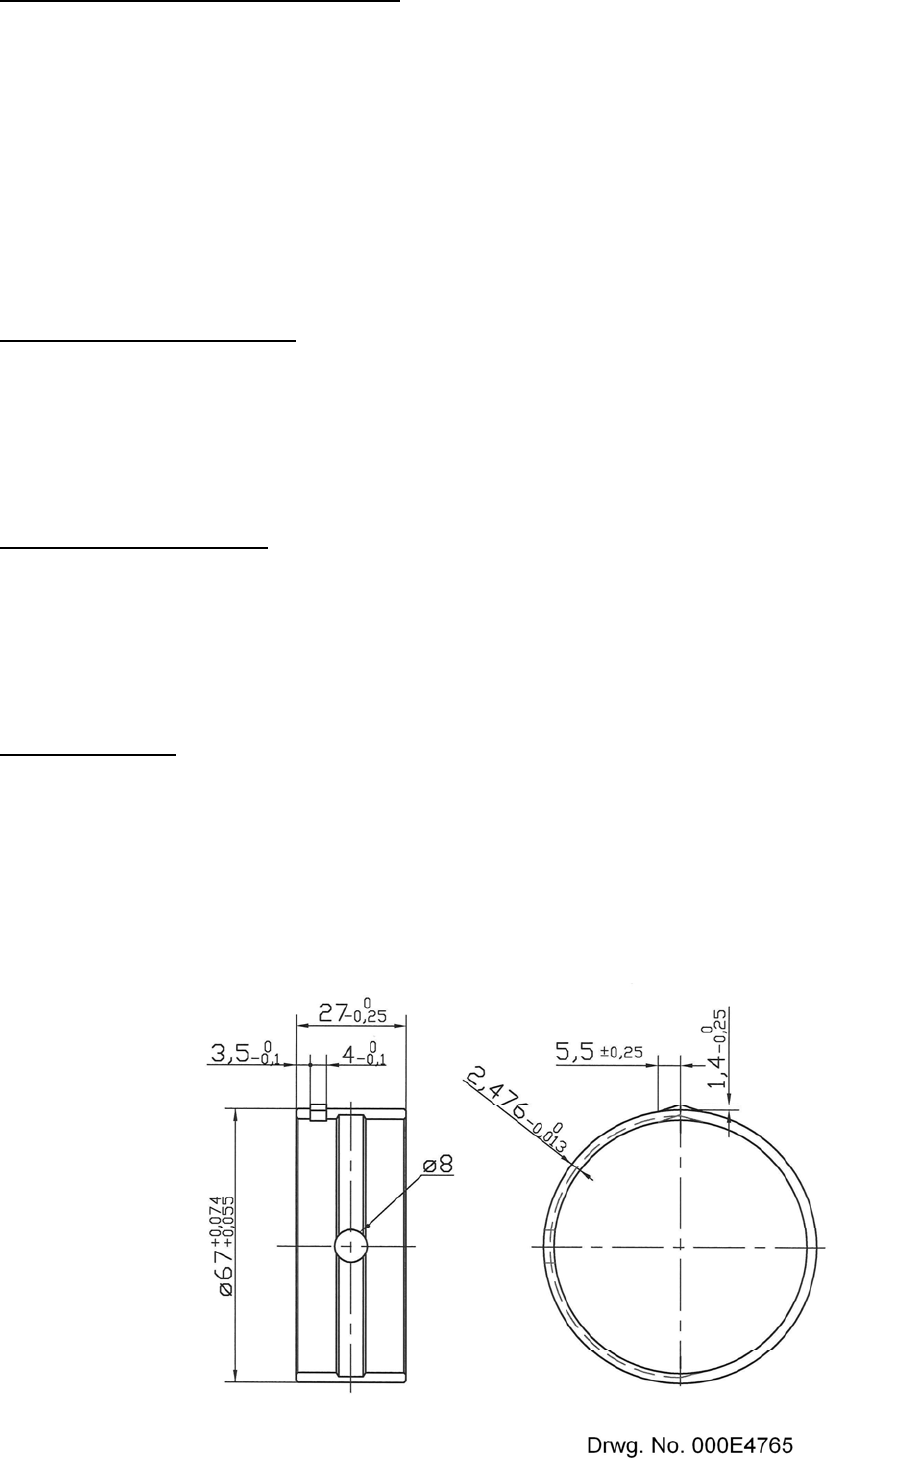
The engine is fitted with four two-piece main bearings as shown on the drawing below.
The bearings must be changed when the “red” layer under the bearing metal can be seen
faintly, or if the bearings are much scratched.
Bearing shell: C10 2.1 mm thick
Bearing material: tin aluminium with net structure
External surface: tinned 0.001 mm thick
L9
009W2329-R01
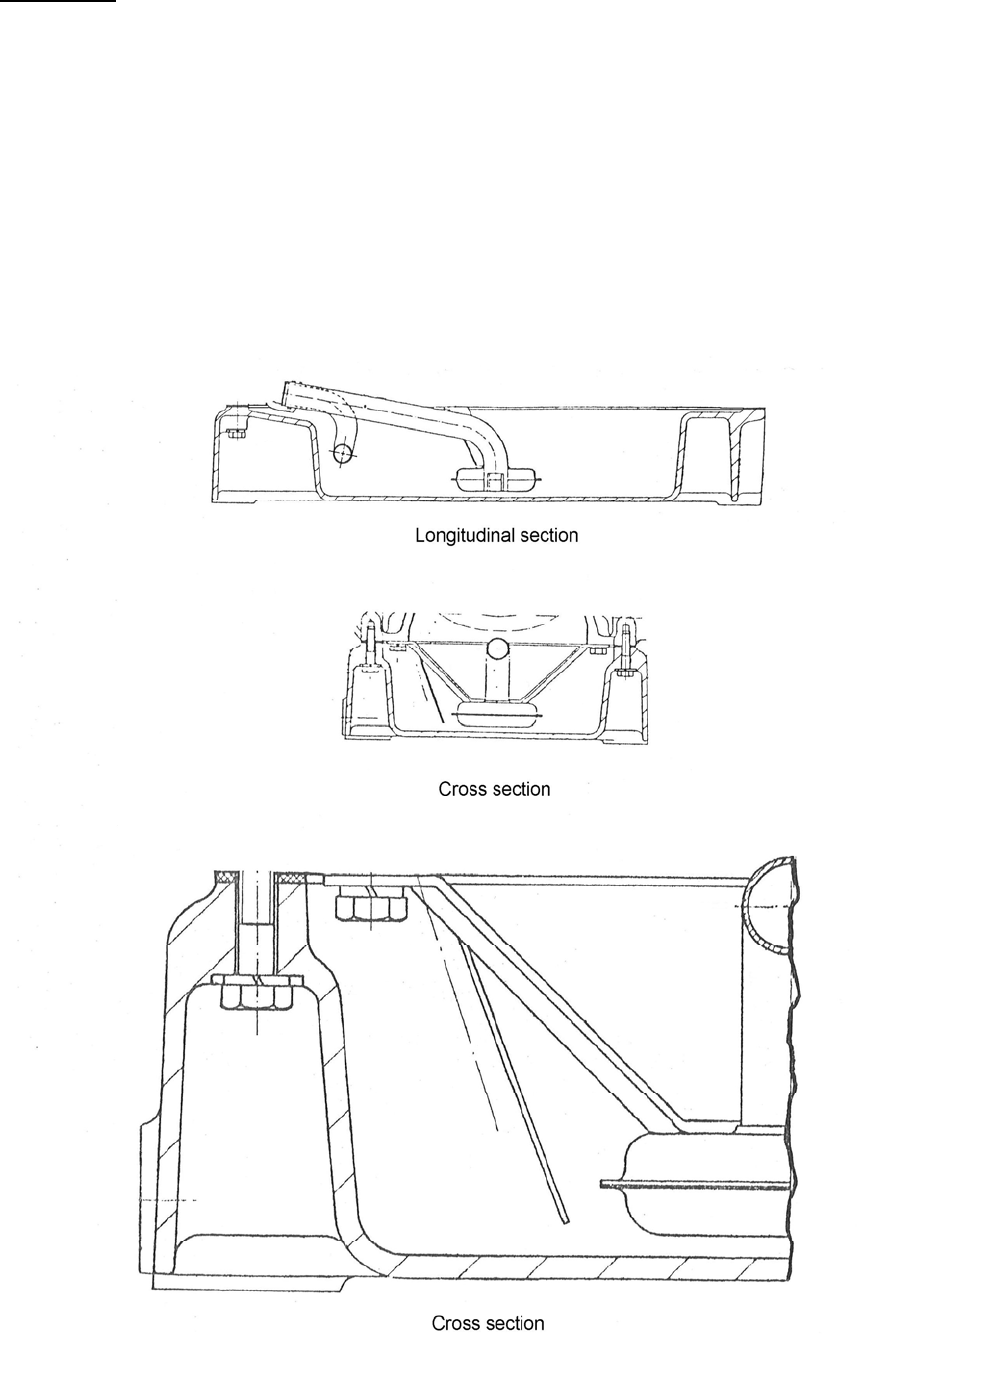
Oil Sump
The engine is fitted with an oil sump of cast iron. The oil sump is fixed to the crankcase and is
ensured correct position to this by means of guide pins.
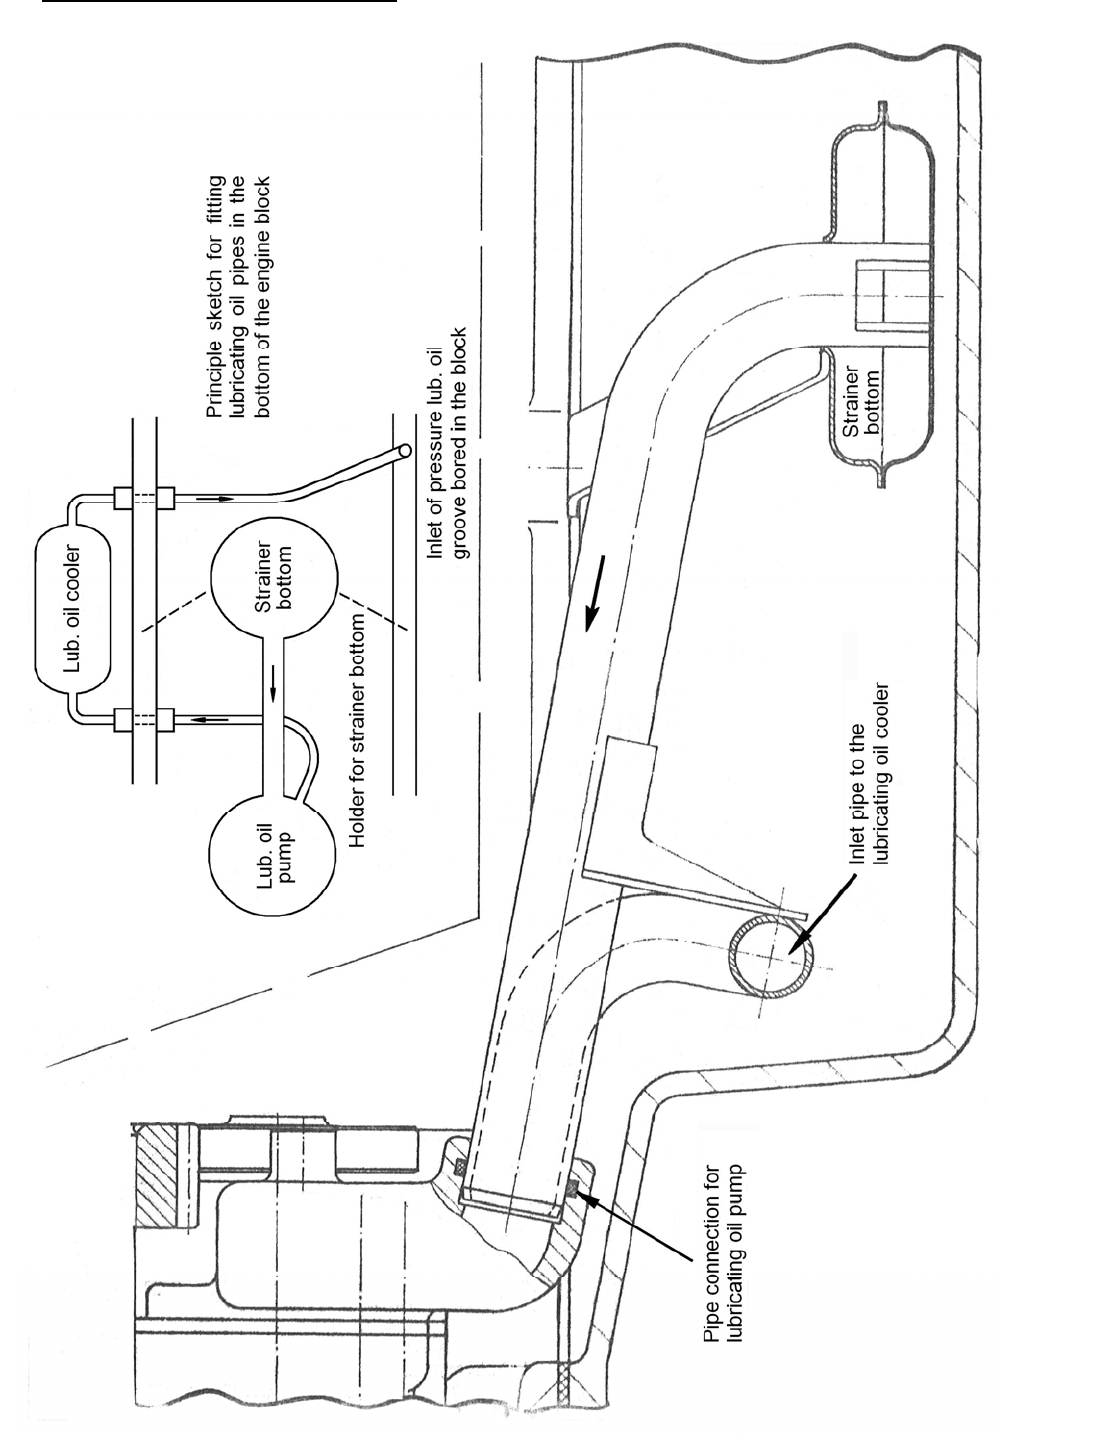
Under the oil sump the suction strainer for the lubricating oil system is placed and pipe
connections for it.
The oil sump with pipe arrangement for lubricating oil system is shown on the drawing below.

M1
009W2329-R01
SECTION M
CAMSHAFT, COMPLETE

M2
009W2329-R01
CONTENTS
Camshaft ................................................................................... page M 3
Valve timings ............................................................................. page M 4
Guide for push rod ..................................................................... page M 4
Gear-wheel of camshaft ............................................................ page M 5
Drawing of push rod .................................................................. page M 6
Drawing of push rod guide ......................................................... page M 7
M3
009W2329-R01
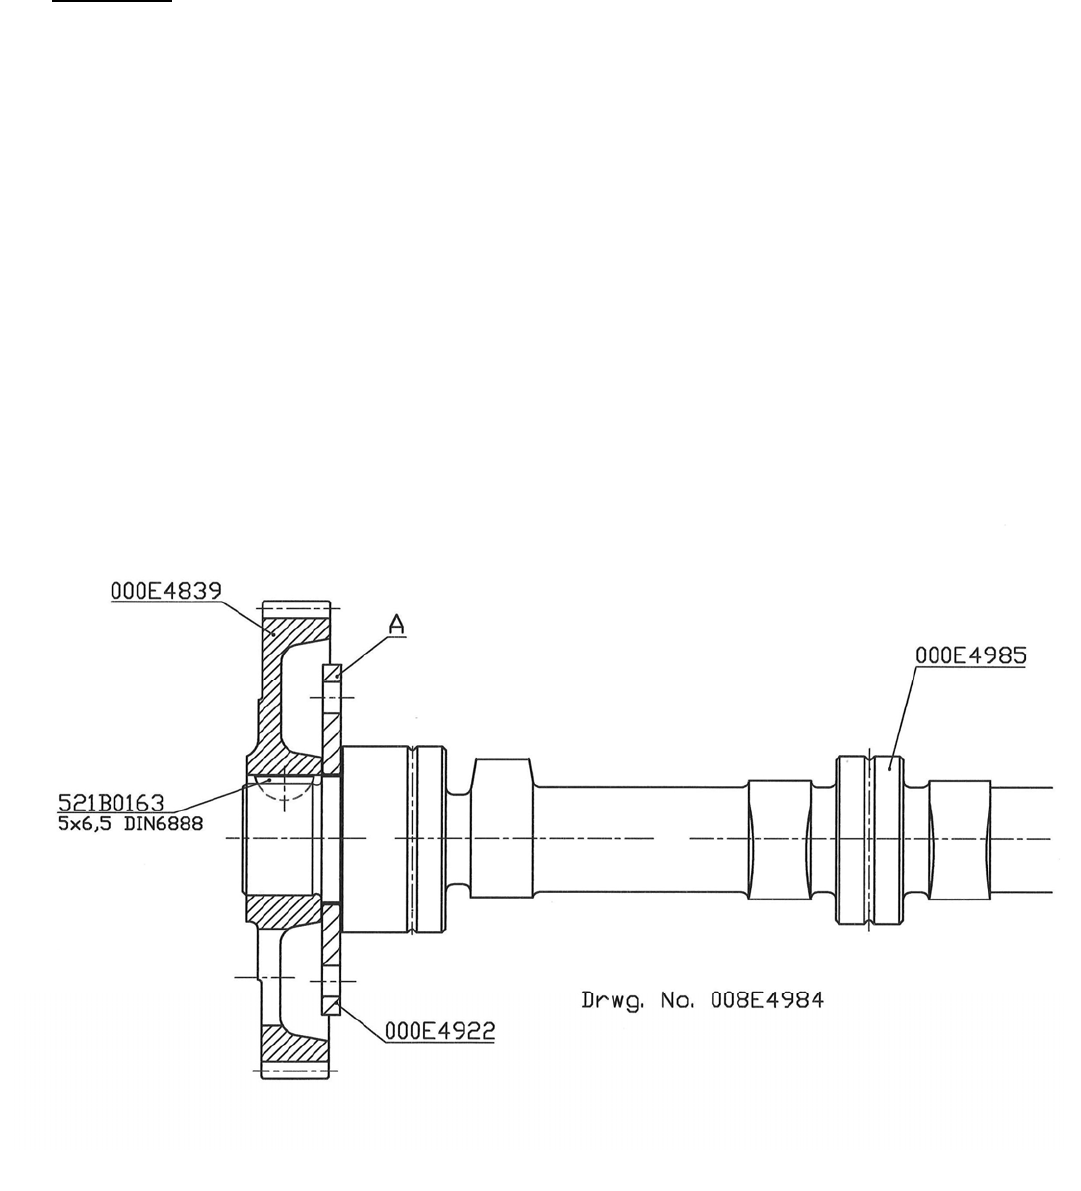
Camshaft
The camshaft runs in borings in the engine block, and it has been forced-lubricated through
grooves bored in the engine block.
A bush for the camshaft is fitted in the front end of the engine block. There is a hole for lubricating
oil inlets in this bush.
The camshaft is fixed on to the engine block at the flange “A” on the sketch below.
The cams which are casted together with the camshaft are made of hardened steel.
The camshaft is driven via a gear-wheel from the crankshaft.
When dismantling the camshaft remove gear and rear end cover as stated in sections R and G.
Then loosen the camshaft at the flange “A” on the sketch below and take it out.
M4
009W2329-R01
Valve timings and injection point
Flywheel diameter ........................................... 370 mm
Inlet valve opens ......................... before TDC: 32° (arc measure: 103 mm (4.07”))
Inlet valve closes ......................... after BDC: 64° (arc measure: 207 mm (8.14”))
Exhaust valve opens ................... before BDC: 64° (arc measure: 207 mm (8.14”))
Exhaust valve closes ................... after TDC: 32° (arc measure: 103 mm (4.07”))
Injection starts ............................ before TDC: 6.2° (arc measure 20 mm (0.79”))
Valve clearances (cold engine) .. inlet: 0.30 mm (0.01180”)
exhaust: 0.30 mm (0.01180”)
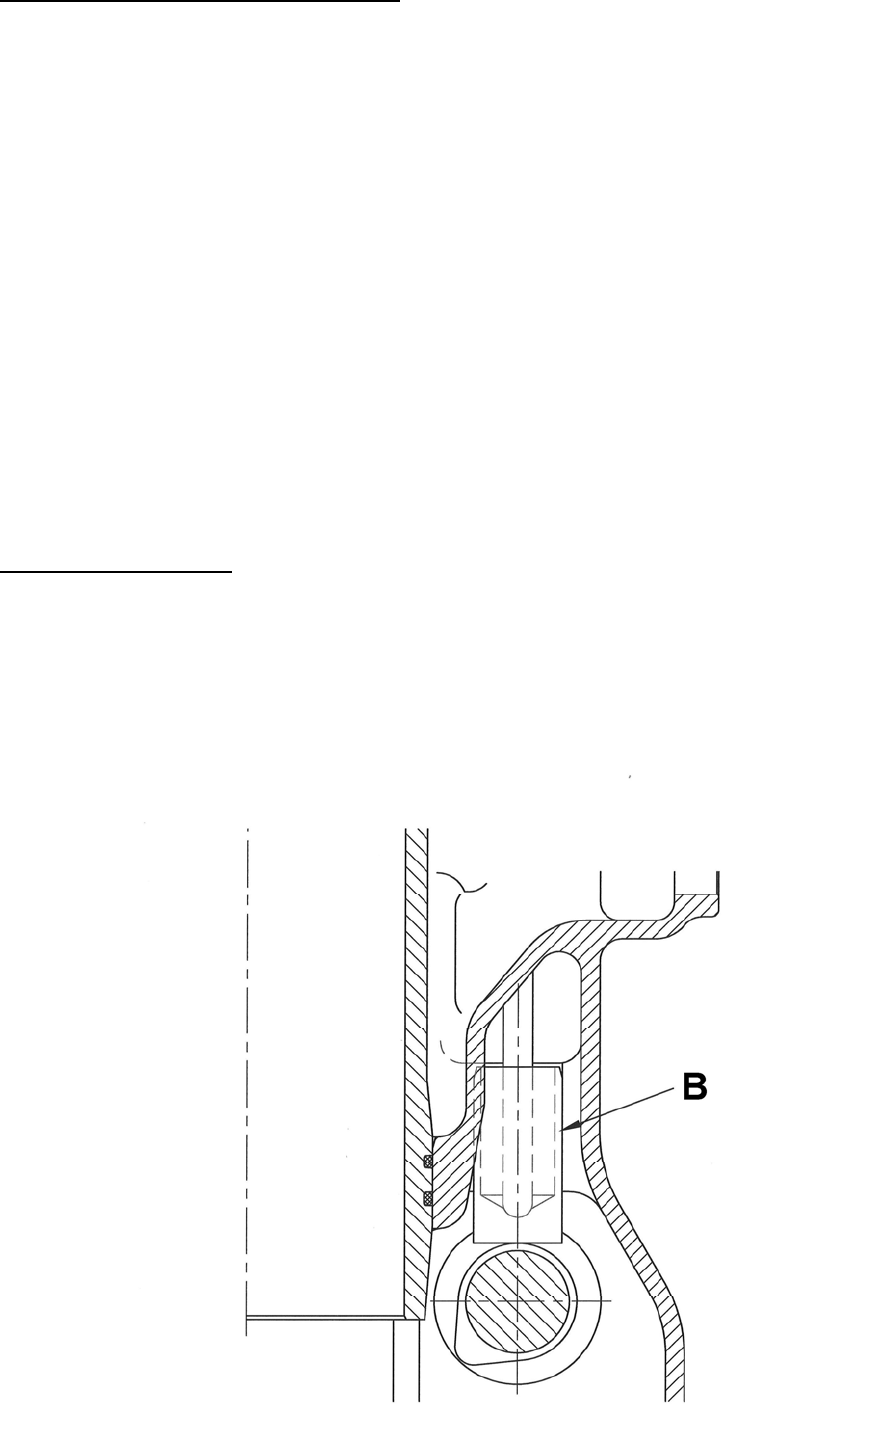
Guide for push rod
On the picture below the guide for push rod is shown in position “B”.
When removing the camshaft the guide for push rod should be kept up in its pilot hole in the
engine block by means of grease or by means of magnets.
The guides for push rod may be fitted from under side or from top side of the engine block.
M5
009W2329-R01
Gear-wheeI of camshaft
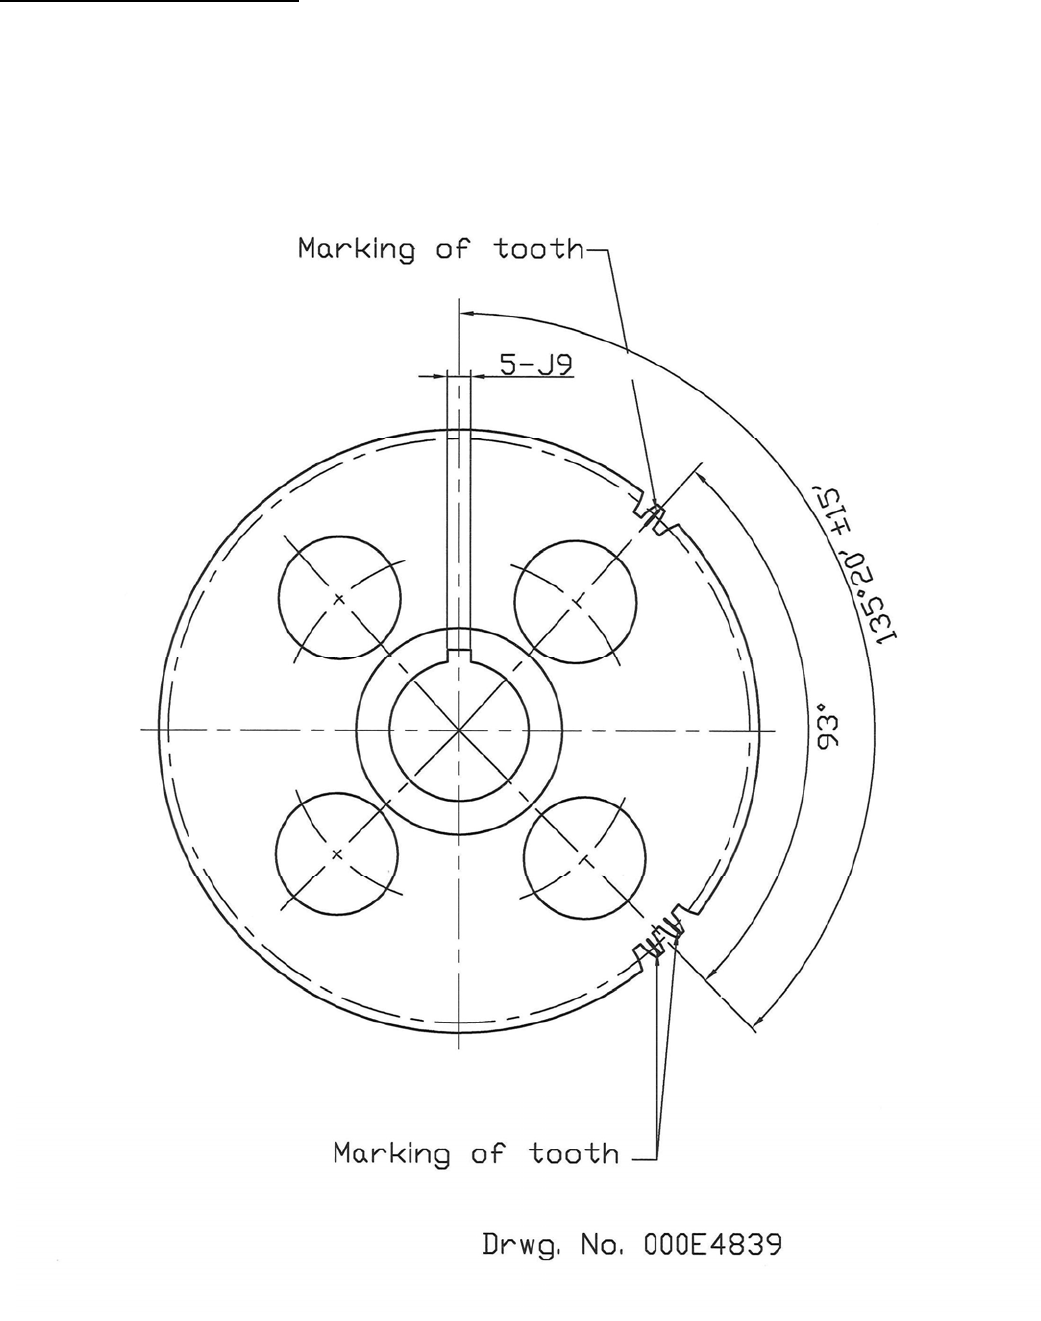
The camshaft gear-wheel is equipped with a single mark for its correct position in relation to
the rear rotating weight and a double mark in relation to intermediate wheel (see instructions
in section G page 3).
M6
009W2329-R01
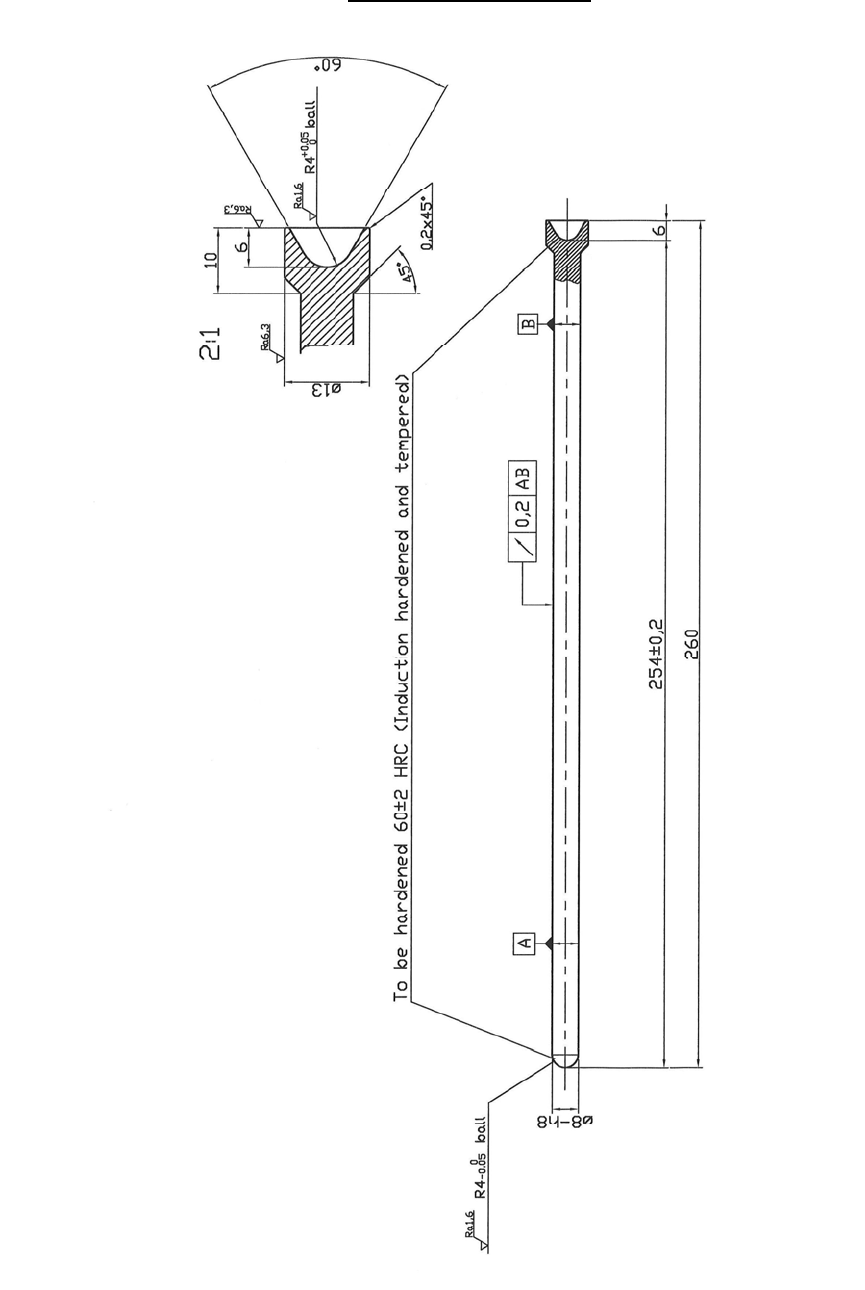
Drawing of pushrod
Drwg. No. 000E9455
M7
009W2329-R01
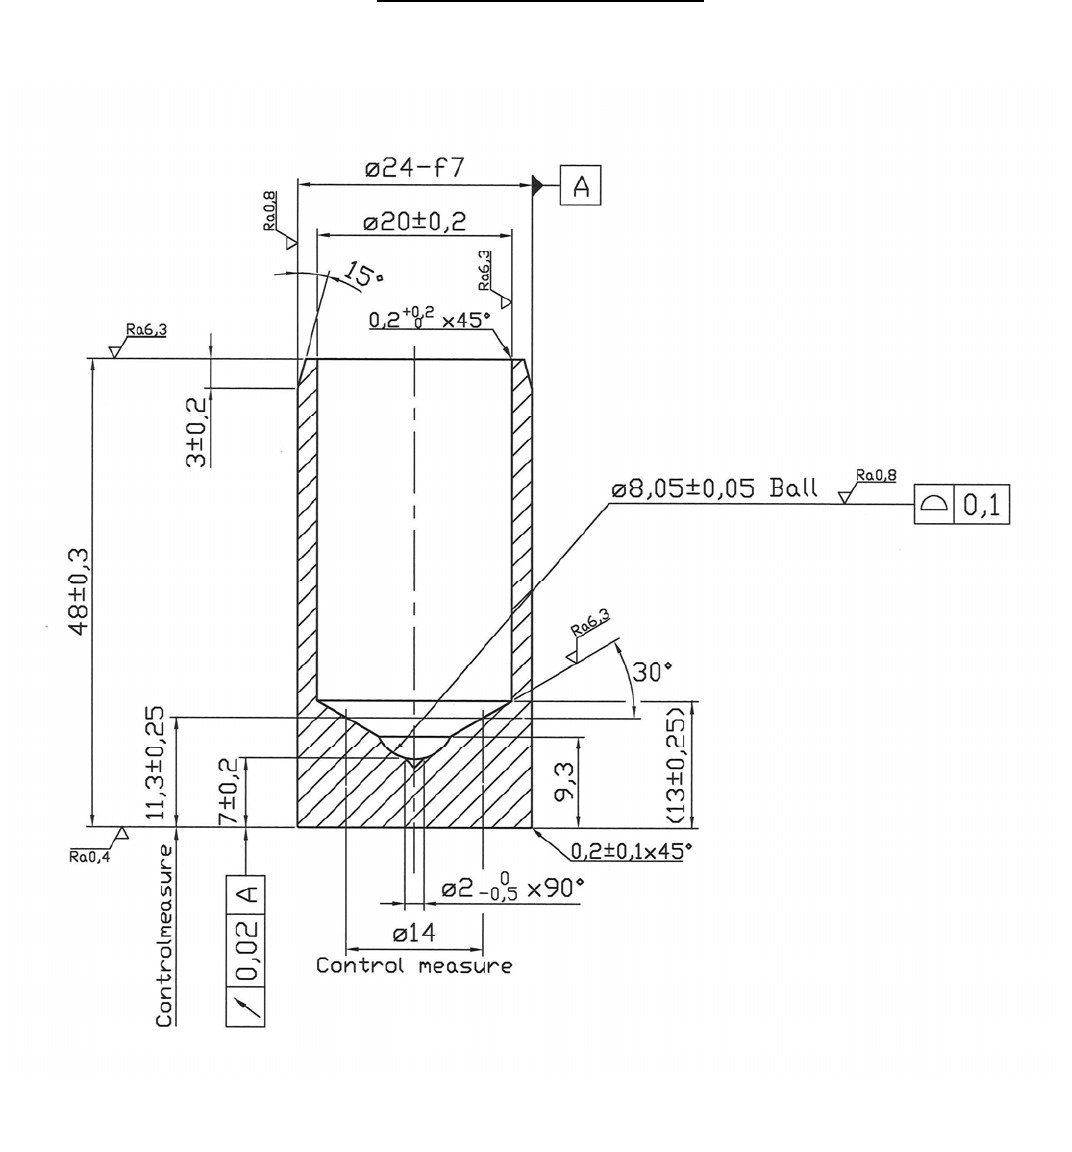
Drawing of push rod guide

N1
009W2329-R01
SECTION N
LUBRICATING OIL SYSTEM

N2
009W2329-R01
CONTENTS
Lubricating oil system ................................................................ page N 3
Pressure relief valve .................................................................. page N 3
Fitting of dip stick ....................................................................... page N 4
Pipe connections in oil sump ..................................................... page N 5
Lubricating oil pump .................................................................. page N 6
Removal of lubricating oil pump ................................................ page N 6
Lubricating oil cooler ................................................................. page N 7
Removal of lubricating oil cooler ................................................ page N 7
Change and quality of lubricating oil .......................................... page N 8
Lubricating oil filter .................................................................... page N 9
N3
009W2329-R01
Lubricating oil system
The engine is lubricated through a pressure l ubrication system. The lubricating pump driven
by the camshaft sucks oil from the oil sump th rough a strainer. From the lubricating pump
the oil is pressed through a fine filter to the respective lubr icating points through oil ducts
bored in the goods. A reduction valve in the lubric ating system secures that the oil pres sure
is kept between 2.0 and 4.0 Bar at hot engine and max. revolutions.
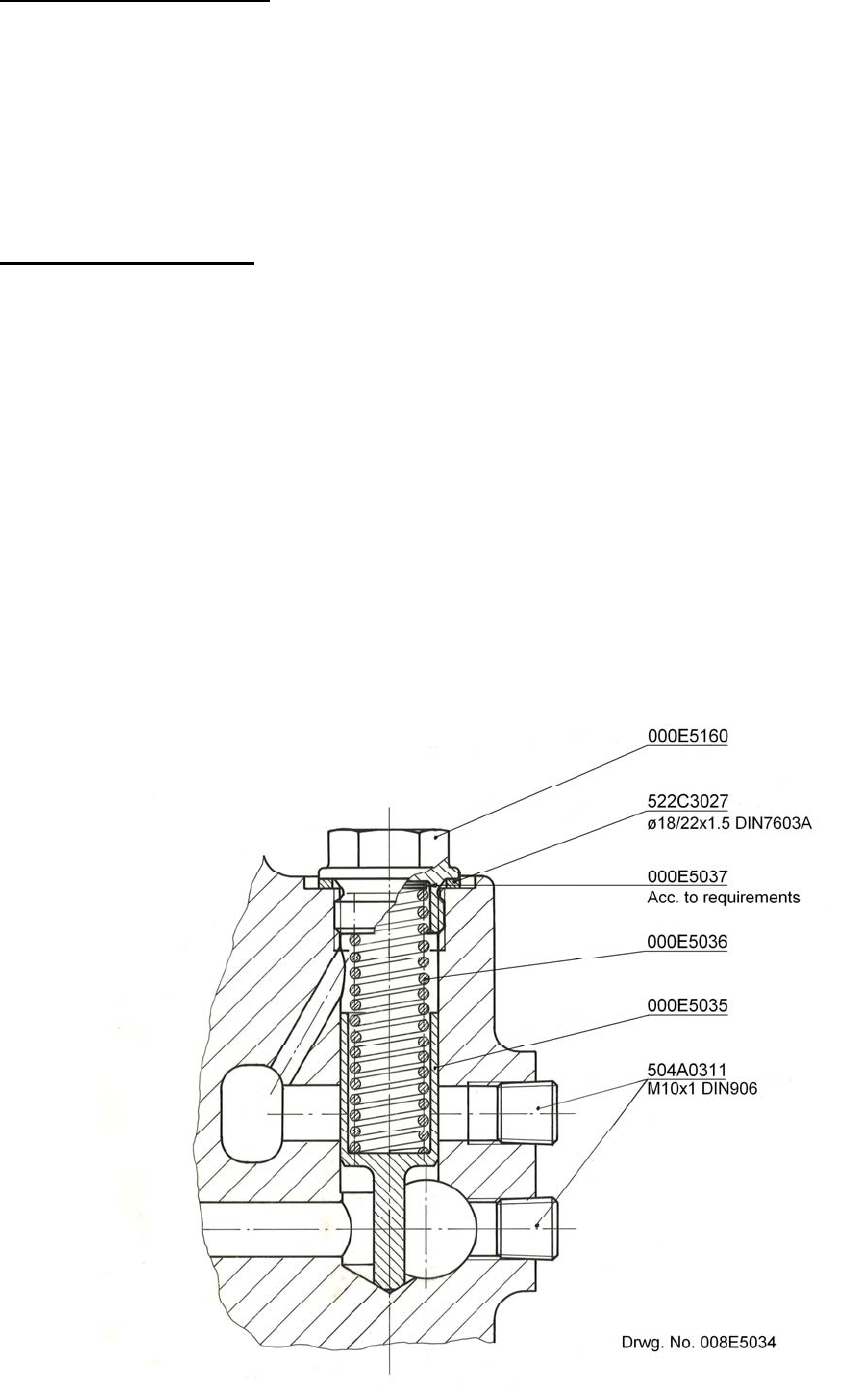
Pressure relief valve
The pressure relief valve is fitted on the front of the engine in bore in the engine block in vertical
position in the same side as the lubricating oil filter. The valve is built up as shown on the drawing
below, and the purpose of this valve is to reduce the lubricating oil pressure to 2-4 Bar before this
goes out into the system.
Min. lubricating oil pressure at idling and with warm engine is 1.0 Bar.
The lubricating oil pressure can be adjusted by means of intermediate washers as shown on the
drawing.
Removal of washers gives lower lubricating oil pressure.
Dirt in the pressure relief valve may result in a low lubricating oil pressure and thus the piston
000E5035 should be taken out and cleaned if necessary.
N4
009W2329-R01
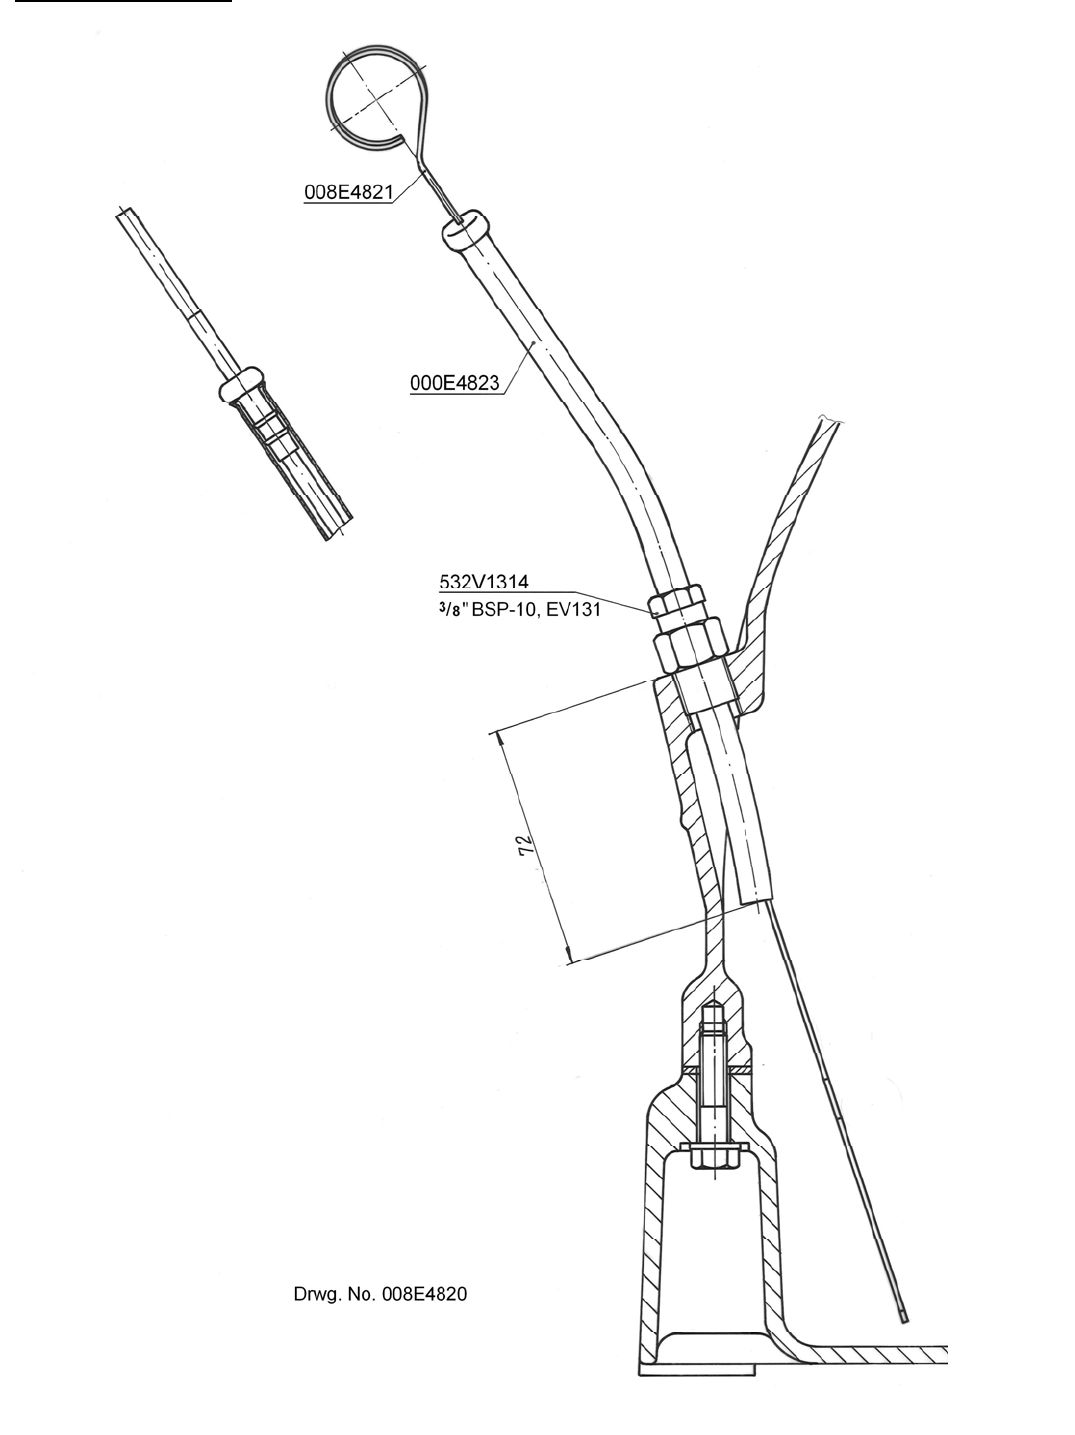
Fitting of dip stick
N5
009W2329-R01
Pipe connections in oil sump
N6
009W2329-R01
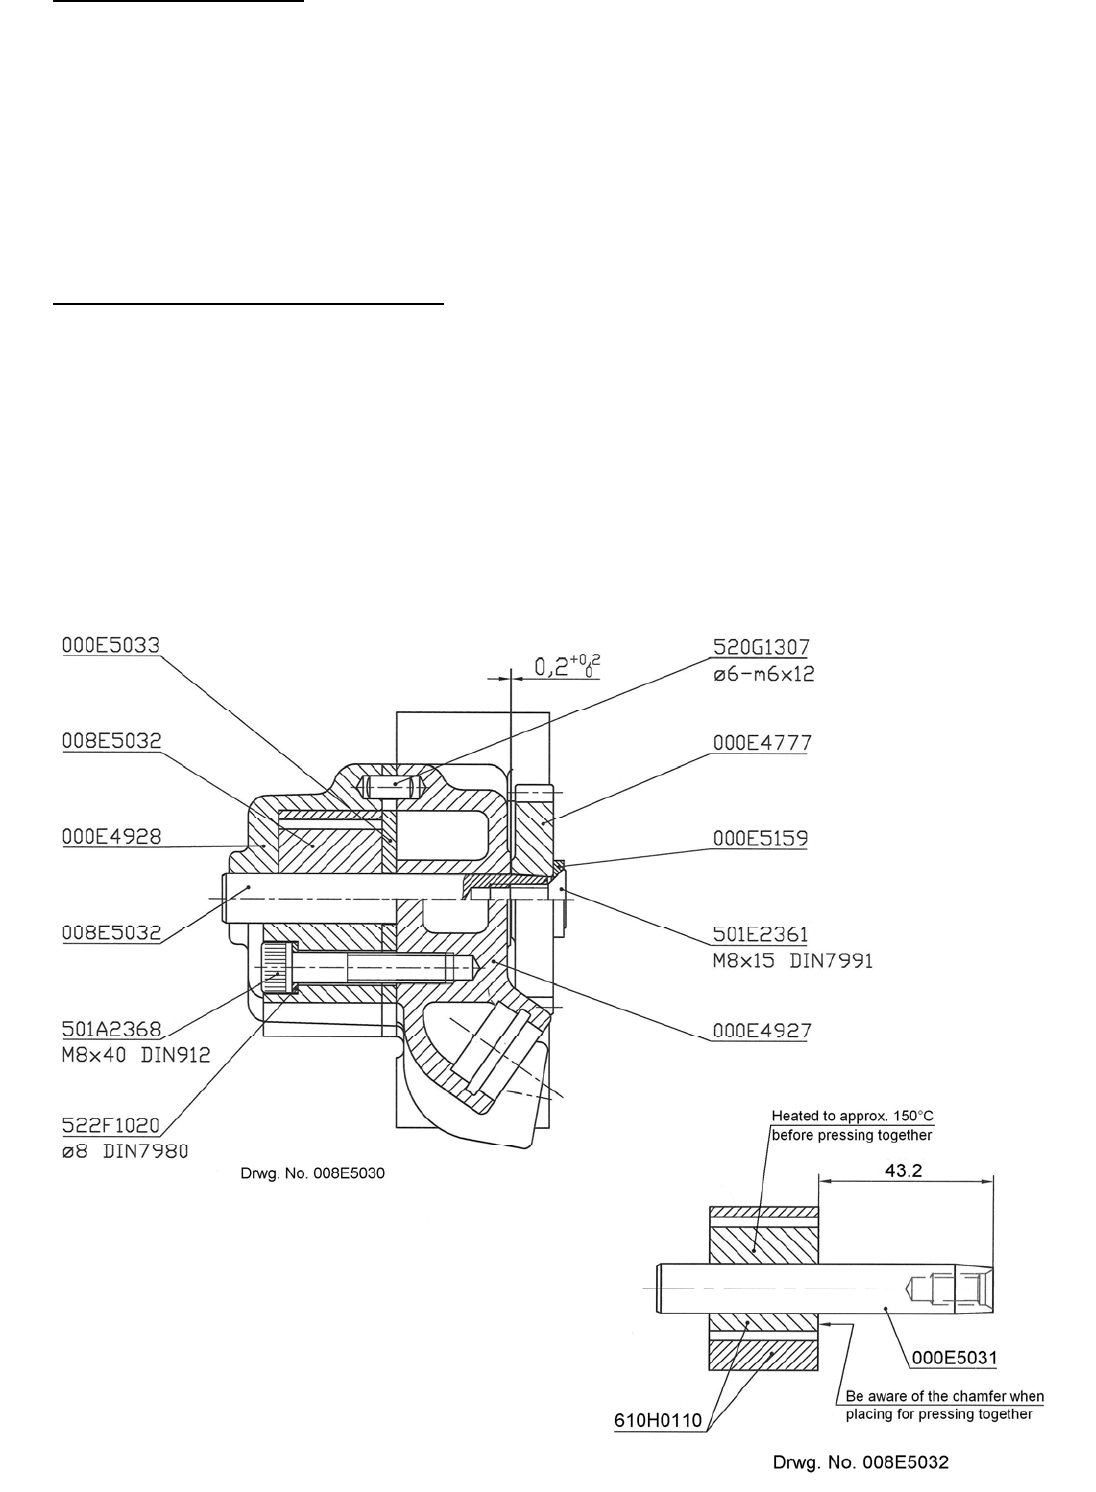
Lubricating oil pump
The lubricating oil pump is placed below the rear end cover and actuated via the rear gear-wheel
of the crank and a gear-wheel fixed to the shaft of the pump.
The pump is an Eaton pump with star rotor and life ring.
When the engine runs at full speed, the pump runs 4000 r.p.m. and thus supplies 33.15 litres
lubricating oil per minute to the lubricating oil system.
Removal of lubricating oil pump
1. Remove the gear (see section R page 8).
2. Remove the rear end cover (see section G page 3).
3. Loosen the three fixing bolts of the lub. oil pump frfom the engine block.
4. Pull the free lub. oil pump from the pipe connections in the oil sump and lift it clear.
5. Loosen the bolts on the front cover of the lub. oil pump and then it can be dismantled.
N7
009W2329-R01
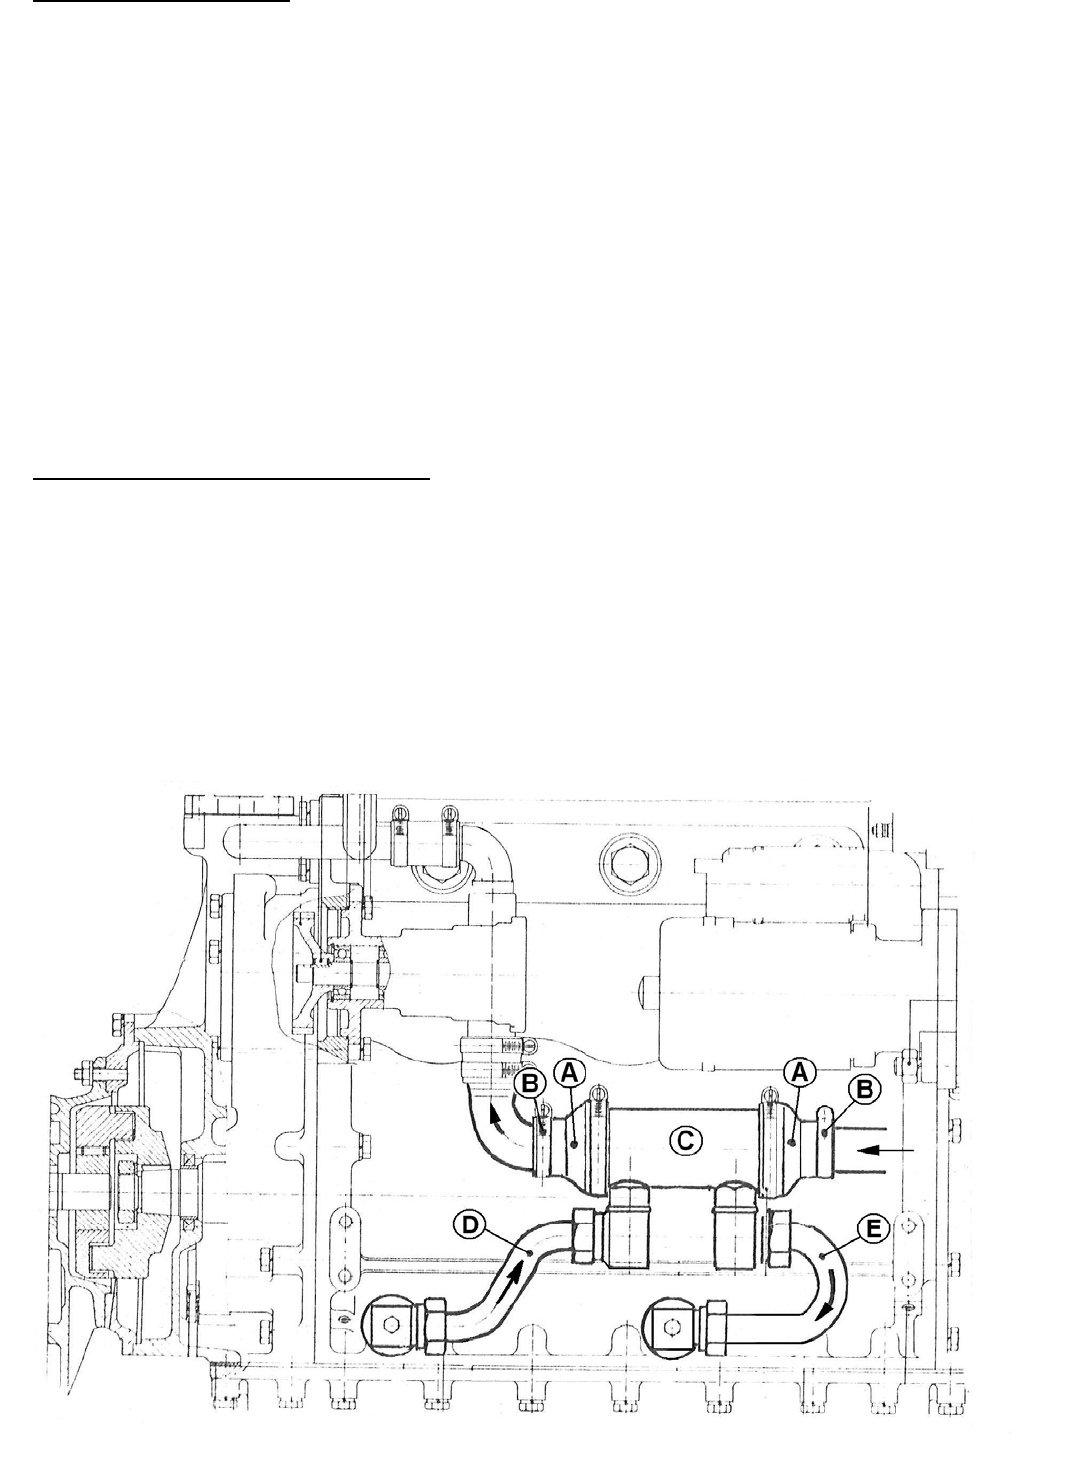
Lubricating oil cooler
The standard engine is equipped with a lubricating oil cooler, fitted as shown on the drawing below.
On the water side the cooler is connected between the cooling water pump and the cooling water
suction hose, and on the oil side it is connected to the outlet of the lubricating oil pump to the
lubricating oil system.
The end pieces “A” of the cooler consists of two profile-cast rubber tubes fastened to the cooler and
the cooling water pipes with clips “B”. The cooler “C” consists of a nest of pipes through which the
cooling water passes, whereas the lubricating oil runs round the pipes.
As the lubricating oil pressure is higher than the cooling water pressure, the cooler should be
examined by pressure testing and inspected for corrosions in case of loss of lubricating oil without
external visible leaks.
Removal of lubricating oil cooler
1. Remove the lub. oil pipes “D” and “E”..
2. Loosen the cooler from its attachment to the engine block.
3. Loosen the clips “B” on the inlet and outlet water pipes of the oil cooler.
4. Take off the cooler and dismantle it further by removing the profile-cast end pieces
fastened by clips.
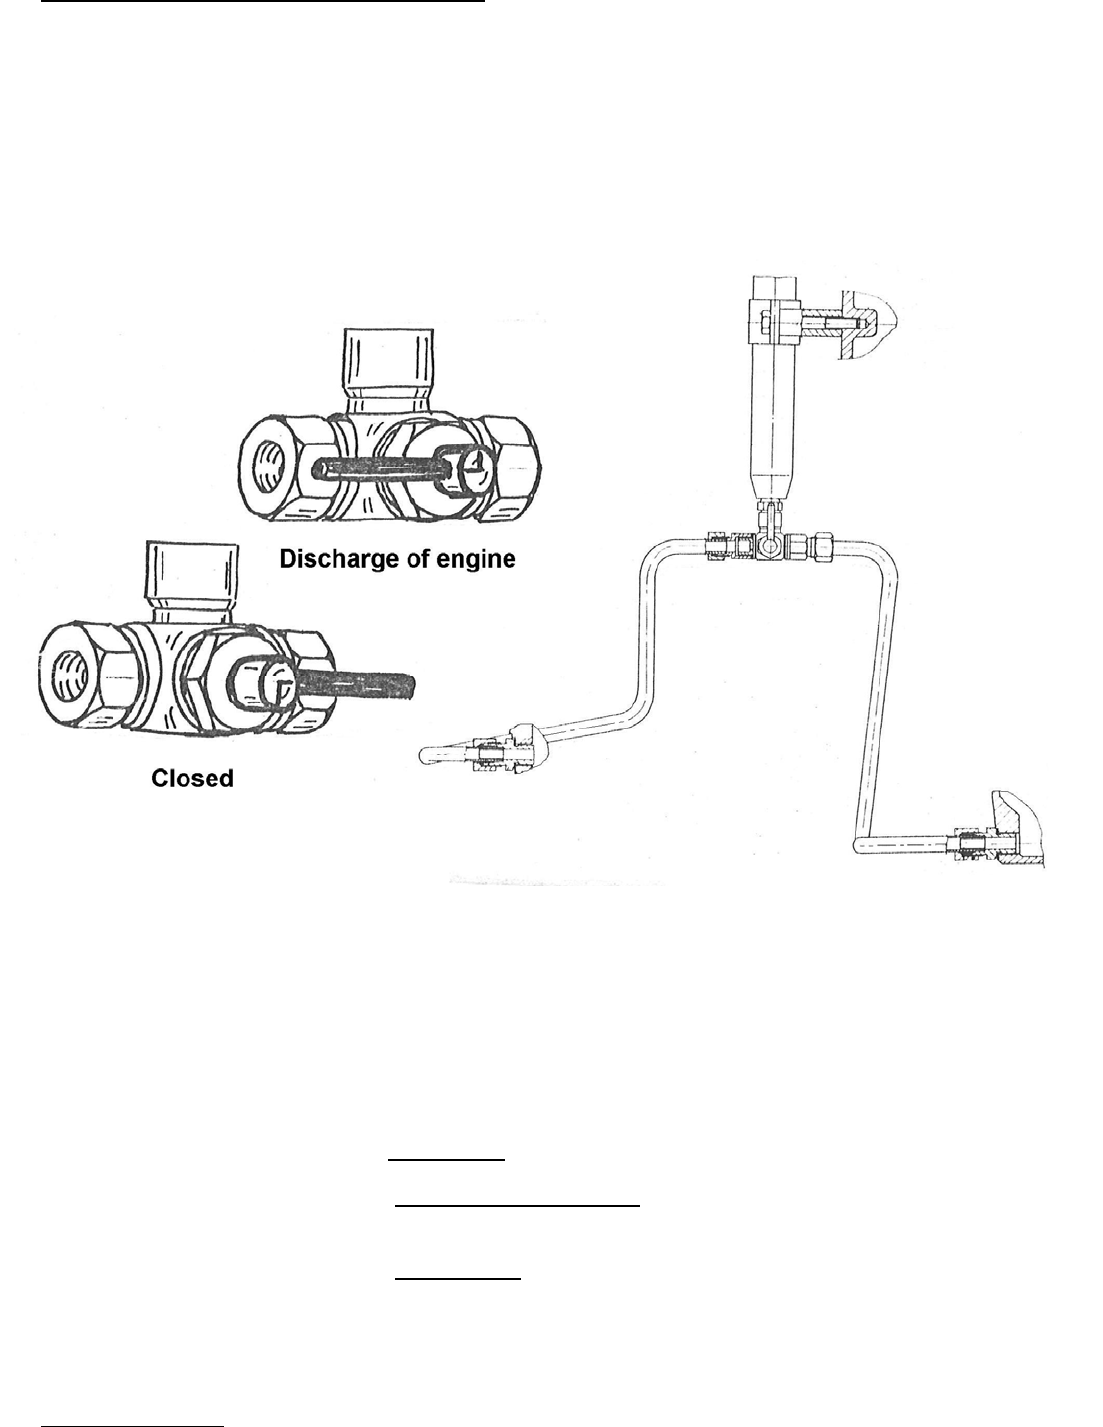
N8
009W2329-R01
Change and quality of lubricating oil
Exchange the lub. oil every 150 operating hours or once a year.
This is done with a bilge pump, fitted on the engine. This pump can be set for emptying the
engine or gearbox of lub. oil by means of the three-way cock.
Lub. oil content inclusive of filter is 4.9 Litres.
Pour fresh oil through the filling hole in the top cover.
Normally a lubricating oil quality mark “Service CC” must be used, but for operation under
difficult conditions, i.e. frequent cold starting, short working periods, very varying load,
quality marked “Service CD” must be used.
Besides, quality marked “Service CD” must be used if the sulphur content of the fuel is
higher than 1 per cent.
The chosen viscosity of oil depends on the air temperature at the engine.
In air temperatures at the engine below 5°C viscosity SAE 10 is used or 5W/30 multigrade.
In air temperatures at the engine between 5°C and 25°C viscosity SAE 20 is used or
10W/30 multigrade.
In air temperatures at the engine above 25°C viscosity SAE 30 is used or 15W/40 multigrade.
As many lubricating oils today are multigrade the above should be used as a guidance for
choosing an oil with the correct spectrum of viscosity.
For lifeboat engines where cold start is required down to minus 15°C within 2 minutes
MOBIL OIL NO 1 or similar must be used for the engine as well as for the gearbox.

N9
009W2329-R01
Lubricating oil filter
The lubricating oil filter is a disposable one which cannot be cleaned.
Exchange the filter every 150 operating hours or once a year.
Remove the filter by hand and discard it.
Tighten the new filter by hand too.
When changing the filter clean the sealing surface on the engine block, if necessary, and
lubricate the rubber gasket of the filter with a little clean oil.
After changing the filter start up and check that the filter and the sealing surface towards the
engine are tight.
A difference valve is fitted in the filter, and this valve shuts out the lubricating oil from the filter so
that the oil is not cleaned any longer if the difference pressure is getting too high over the filter.
Various makes of oil filters can be used as e.g. the motor-car industry uses the filter type used,
as standard.
The BUKH filter used is of make Mann & Hummel type W9.30.

009W2329-R01
O1
SECTION O
COOLING WATER SYSTEM

009W2329-R01
O2
CONTENTS
Cooling water systems .............................................................. page O 3
Johnson cooling-water pump type F5B9 ................................... page O 4
Removal of pump ...................................................................... page O 4
Dismantling of pump .................................................................. page O 4
Dismantling of intermediate housing ......................................... page O 4
Reassembly of pump ................................................................. page O 5
Refitment of pump ..................................................................... page O 5
Circulation pump for freshwater ................................................. page O 6
Removal of pump ...................................................................... page O 6
Dismantling of pump .................................................................. page O 6
Reassembly of pump ................................................................. page O 6
Circulation pump ....................................................................... page O 7
Zinc rod protection ..................................................................... page O 8
Thermostate .............................................................................. page O 9
Header tank and heat exchanger .............................................. page O 10
Dismantling of heat exchanger .................................................. page O 10
Filling up of anti freeze solution ................................................. page O 10
Keel cooler arrangement ........................................................... page O 12
009W2329-R01
O3
The engine can be c ooled by direct seawater cooling which is supplied as standard cooling
system. Alternatively freshwater cooling can be supplied as extra equipment and this c an be
arranged in three different ways: either with heat exchanger, keel cooler or with radiator
cooling. However, the latter will n ot be of i mmediate importance when using the engine as
marine engine and therefore it is not dealt with separately in this section.
Generally the basic design of engine as a marine engine does that indirect cooling will not be
benefitial unless the engine is us ed for more than 500 hours of r unning per year. However
other circumstances like use in proluted rive r and narrow waters can do that i.e. a keel
cooling system is recommended. Keel cooling is always used for Lifebo at Engines due to
SOLAS requirements.
In case of direct seawater cooling the seawater is drawn through the external strainer and the
lubricating oil cooler to the cooling water pump (Johnson type F5B9) from where the water is fed
through the cooling jackets of the engine before it – via the thermostate – is lead overboard
through the exhaust system.
In case of freshwater cooling with heat exchanger the engine is cooled by the freshwater which is
circulating in a closed system. The freshwater is cooled in the heat exchanger by seawater. With
freshwater cooling with heat exchanger it is necessary – out of considerationfor the capacity of the
seawater pump – to equip the exhaust system with a by-pass hose, as stated in section Y,
pages 8 and 9.
In case of freshwater cooling with keel cooler the freshwater also circulates in a closed system.
The freshwater is cooled by the freshwater cooling pipes being led out somewhere through the
bottom of the boat and fitted on the outside of the hull. Thus the pipes are cooled by the seawater.
The seawater is always circulated by a Johnson pump type F5B9, whereas the freshwater is
always circulated by a circulation pump with metal rotor. The Johnson pump must never be used
for circulating the freshwater as the temperature can be considerably higher when using freshwater
cooling than in case of seawater cooling. This causes braking down of and damage to the impeller
of the Johnson pump, the impeller being made from neoprene.
The advantages of freshwater cooling are:
A higher operating temperature can be reached, having the effect that the running parts of the
engine will be less worn.
The engine has a somewhat better economy.
The engine block is not exposed to the corrosive actions of the seawater.
It is possible to add an anti-freeze solution to the freshwater in winter periods where you want to
use the engine.
The reason why the engine is not run at a higher temperature when seawater cooled is that the
salt in the seawater starts crystallizing at 70°C and this salt will settle in the engine block round the
cylinder liners and result in bad heat conduction and corrosions.

009W2329-R01
O4
Johnson cooling water pump type F5B9
The cooling water pump is used for direct s eawater cooling with a cam height 0f 2.0 mm and
for freshwater cooling with heat exchanger to the seawater si de with a cam height of 3.1 mm
(see technical data page A5).
Removal of the pump
1. Loosen the three screws in the flange marked A.
2. Remove the cooling water pipes going to and from the pump.
3. Lift the pump free in one piece from its attachment in the engine block.
Dismantling of the pump
1. Loosen the three screws marked B in the front cover of the pump and remove the
front cover.
2. Withdraw the neoprene impeller which is fitted on a multiple spline shaft.
3. The cam determining the characteristic of the pump can be exchanged now by
loosening the screw marked C.
4. Take out the washer and locking ring behind the impeller. Then loosen the bolt D in
the mounting flange.
5. Press the pump free of the cast intermediate housing (610G0250) with two
screwdrivers in the gap E. Take out the carbon ring stuffing box in the pump.
Dismantling of the intermediate housing
1. Proceed as when dismantling the pump.
2. Pull out the gear-wheel F with a special tool. The gear-wheel is shrinked onto the shaft
and secured by a drilled-in tube pin. When fitting a new gear-wheel the diference of
temperature should be in accordance with the drawing overleaf. Bore in thethe tube
pin after fitting of the gear-wheel.
3. Remove the locking ring marked G.
4. Knock out the shaft with ball bearings facing the gear-wheel side with a punch or a
wooden block as intermediate piece. Now the ball bearings and the seal ring in the
bottom of the intermediate housing can be exchanged.
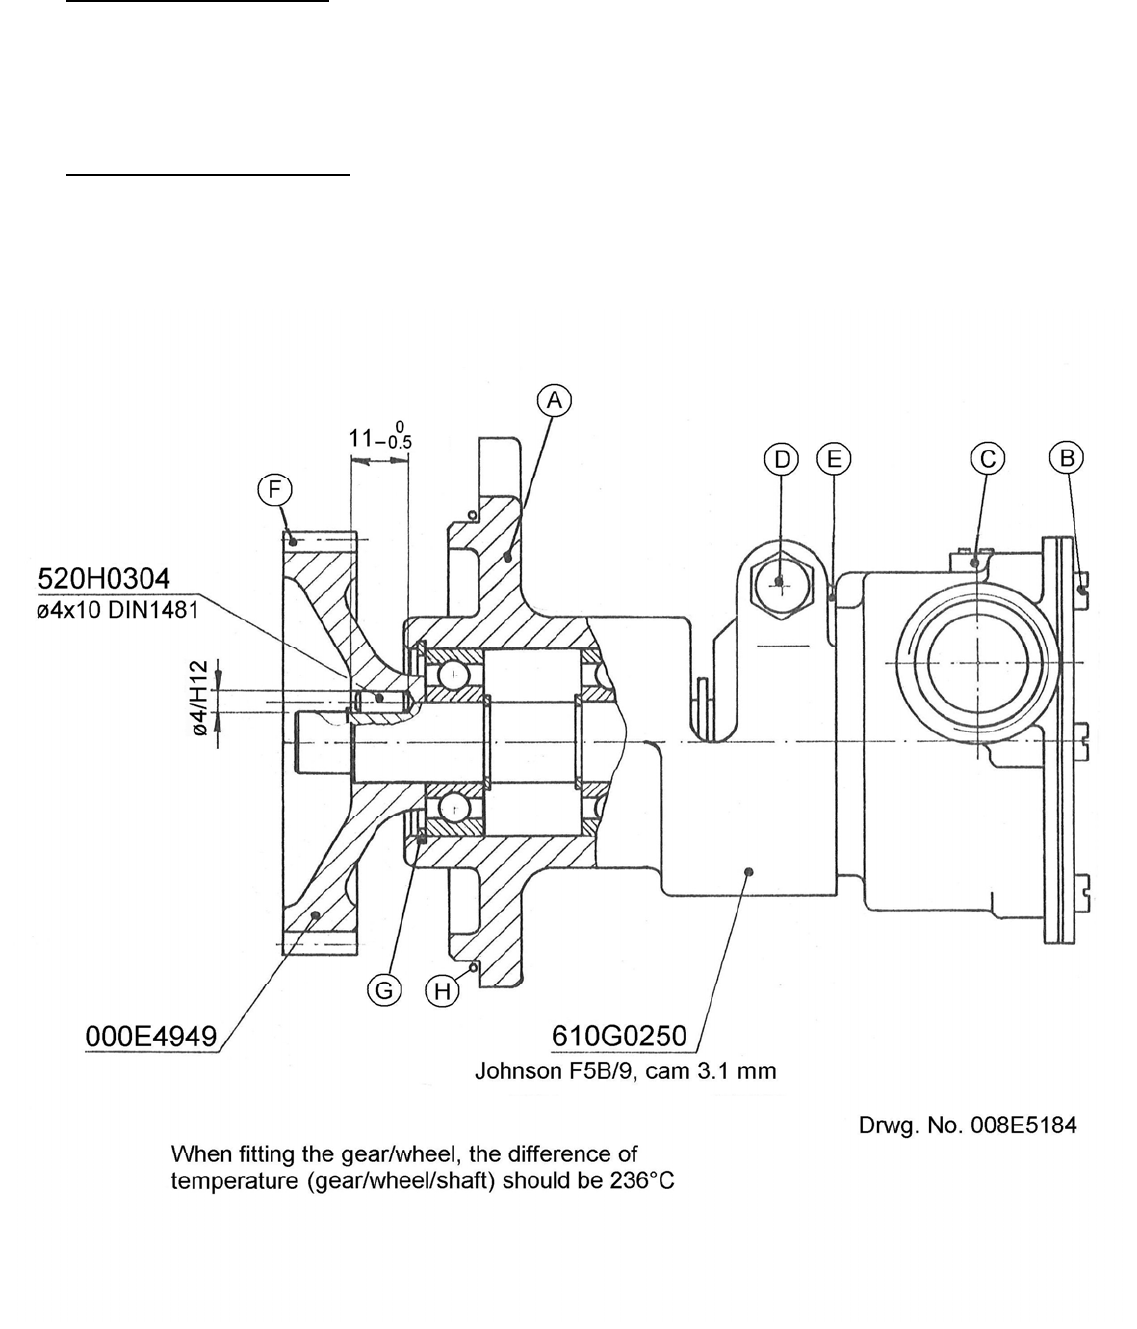
009W2329-R01
O5
Reassembly of pump
The pump should be assembled in the reverse order of the dismantling. Observe that the ball
bearings of the intermediate housing are filled with grease free from acid.
Refitment of the pump
Fit the pump in the reverse order of the removal and check that the rubber gasket ring
marked H fits tightly.
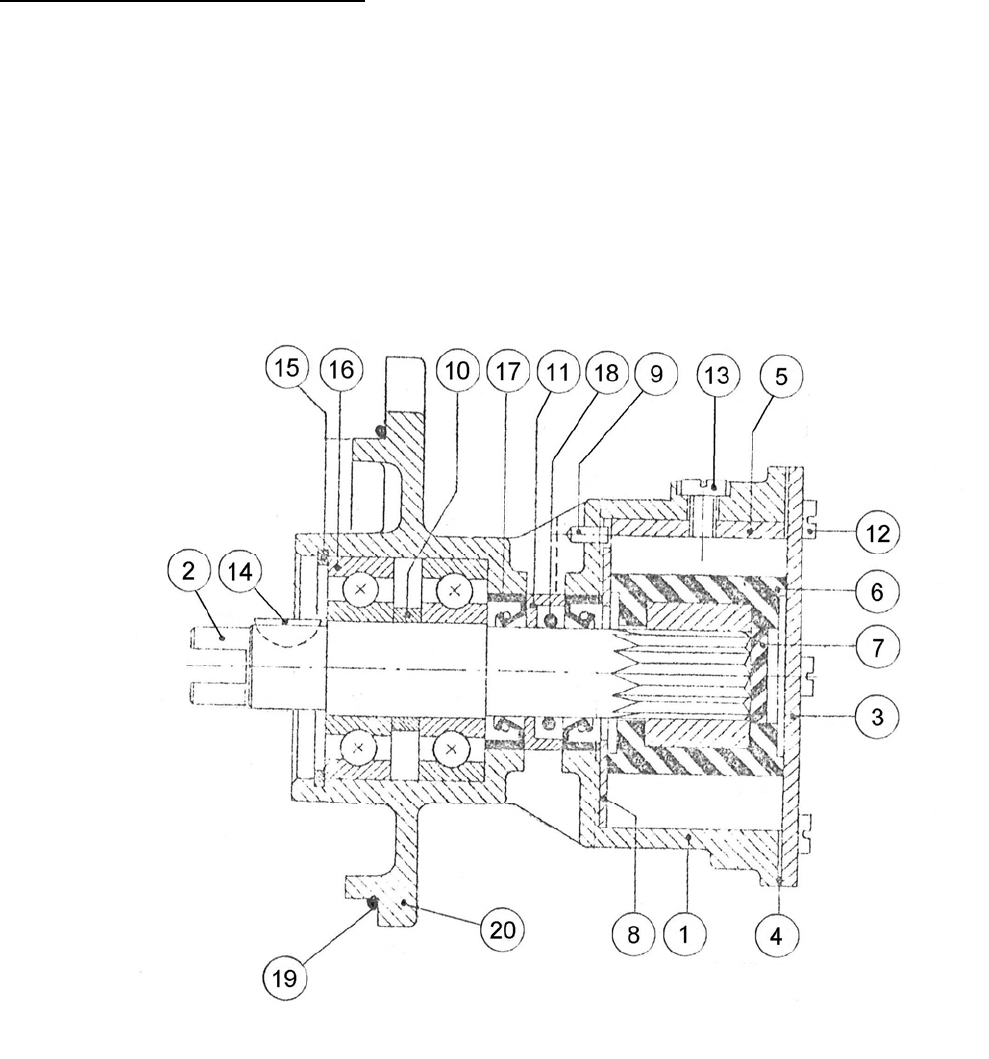
009W2329-R01
O5A
Johnson cooling water pump:
After DV36 serial No. 1051 the outer dimensi ons of the Johnson cooling water pump have
been changed and the pump has been par tly simplified at the same ti me, as e.g. the carbon
ring stuffing box has been left out.
The type and the technical data of the pum p and height of the cam in ca se of direct seawater
cooling and indirect freshwater cooling respectively are the same for the new pump as for the
one previously used. Further the impeller is the same as t hat used on the previous pu mp. The
new pump can be used by excha nging the previous one if the pipe connections are changed
too.
1. Pump housing 11. Washer
2. Pump shaft 12. Screw
3. Pump cover 13. Screw for cam
4. Gasket 14. Key/pin
5. Adjusting cam 15. Locking ring
6. Impeller 16. Ball bearing
7. Neoprene washer 17. Sealing ring
8. Wear washer 18. O-ring
9. Pin 19. O-ring gasket
10. Distance ring 20. Pump flange

009W2329-R01
O5B
Removal of the pump
4. Loosen the three screws in the flange marked 20.
5. Remove the cooling water pipes going to and from the pump.
6. Lift the pump free in one piece from its attachment in the engine block.
Dismantling of the pump
5. Loosen the three screws marked 12 in the front cover and remove the front cover
marked 3.
6. Withdraw the neoprene impeller which is mounted on a multiple spline shaft.
7. The cam marked 5 determining the characteristic of the pump can be exchanged now
by loosening the screw marked 13.
8. Remove the wear washer marked 8.
9. Remove the locking ring marked 15.
10. Press out the pump shaft marked 2 of the pump housing with ball bearings marked 16
and gear-wheel.
11. Now the sealing rings marked 17 and the O-ring marked 18 and the washer marked
11 can be exchanged/removed.
Dismantling and reassembly of gear-wheel
For operation of the pump a gear-wheel ha s been shrinked ont o the pump shaft. The gear-
wheel is secured by key and tongue.
The gear-wheel can be pulled off the shaft by means of a special tool.
When fitting a gear-wheel there s hould be a difference of temper ature between the shaft and
gear-wheel of 236°C.
Reassembly of pump
The pump is assembled in the reverse order of the dismantling.
Refitment of the pump
To be carried out in the reverse order of the dismantling and it should be checked that the
rubber ring marked 19 fits tightly aga inst the be aring surface of the flange marked 20.
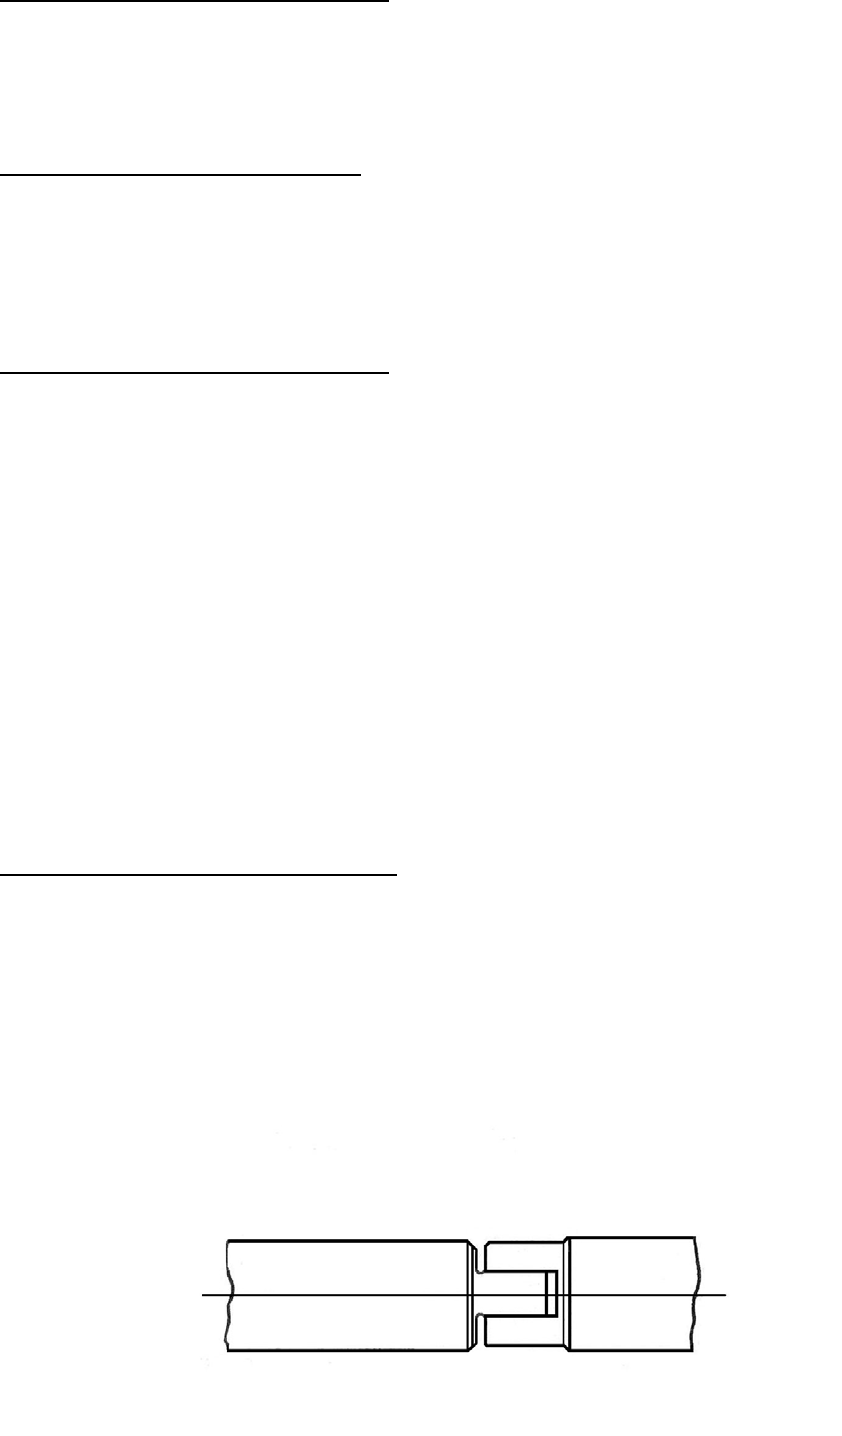
009W2329-R01
O6
Circulation pump for freshwater
The circulation pump shown on page O7 is used for freshwater cooling, both when cooled by
heat exchanger and by keel cooling.
Removal of circulation pump
1. Remove the inlet and outlet pipes from the pump.
2. Loosen the pump from its fixing on the rear end cover and lift it out.
Dismantling of circulation pump
1. Loosen the screws 500C2363 in the cover 000E4934 of the pump and remove the
cover and gasket 560K1119.
2. Pull out the circulation wheel 000E4933 with a special tool and now the washer
530Q9973 and the stuffing box 530Q9972 can be changed. The flexible stuffing box
cannot be repaired but has to be exchanged, if the contact face shows signs of
scratches or fractures.
3. Remove the locking ring 522A0042.
4. Take out the washer 522A9022.
5. Press out the shaft 000E5283 towards the open side. Now the individual ball bearings
and the seal ring 561B0201 can be changed.
Reassembly of circulation pump
Assemble the pump in the reverse order of the dismantling.
Fill the ball bearings with grease free from acid.
When assembling and fitting the circulating pump there must only be used original gaskets.
The plug in the bottom of the pump is intended for draining off the water in the pump and the
pipes in case of periods of frost.
The pump is driven through connection with the shaft end from the Johnson pump.
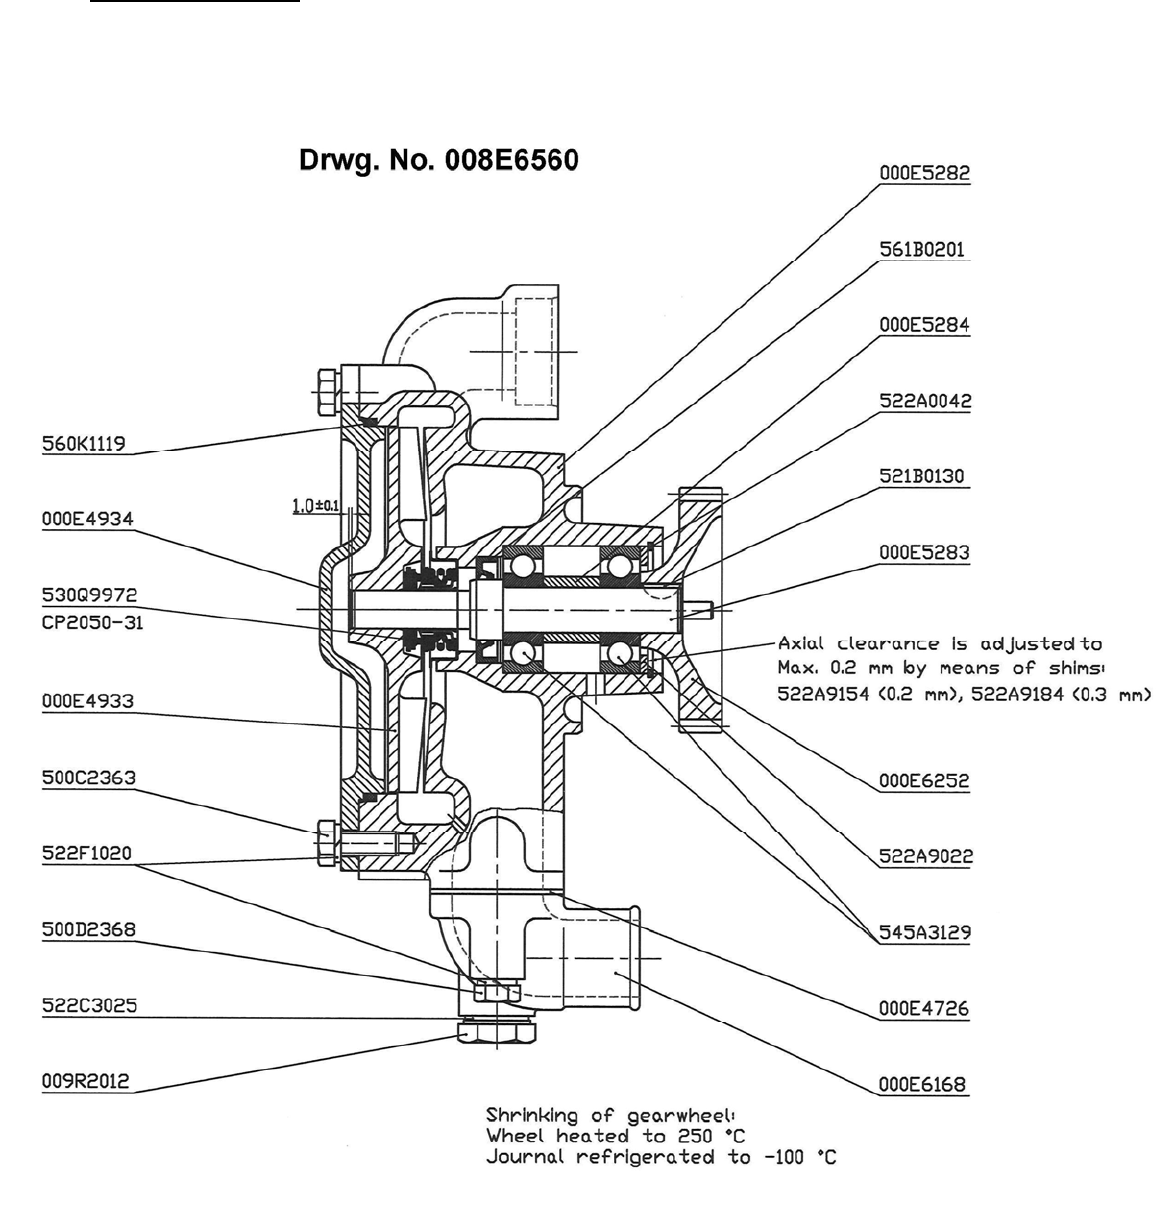
009W2329-R01
O7
Circulation pump
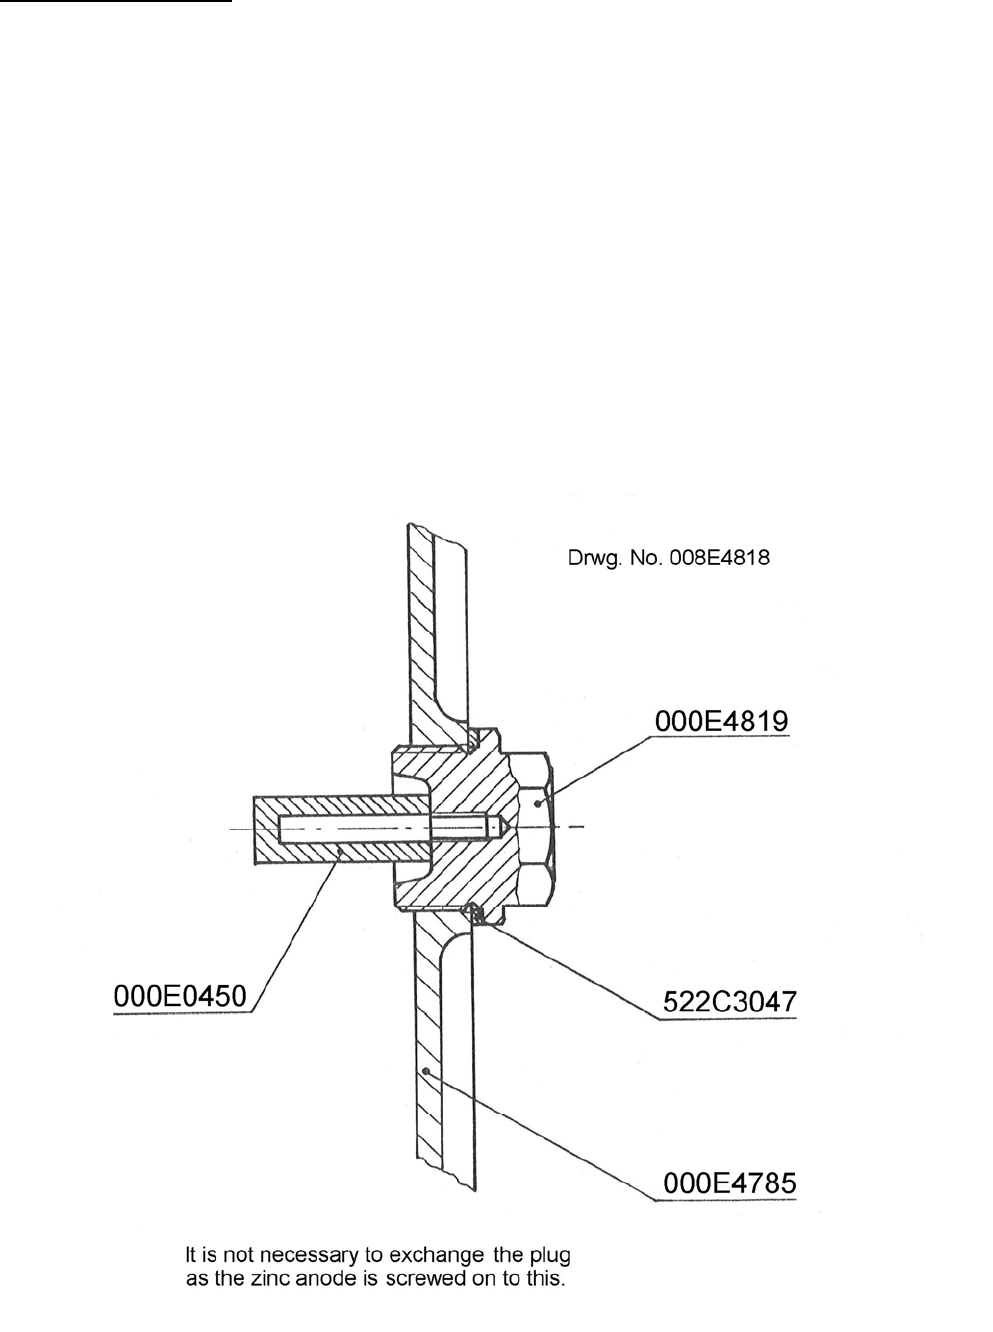
009W2329-R01
O8
Zinc rod protection
For seawater-cooled engines it is necessary to fit zinc anodes in the cooling water system in
order to protect against corrosion of the engine block.
On the starboard side of the engine under the exhaust manifold there therefore are three
mounting holes for zinc anodes. As standard for seawater cooling zinc anodes have been
screwed into the two back holes as shown on the drawing below. There is no zinc anode in the
third hole as – due to the placing of the starter – there is no easy access to this plug during the
day-to-day running.
Change the zinc anodes as according to requirements which are influenced by the water in
which you are normally sailing. Usually it will be necessary to change the zinc anodes once a
year just before the first spring sail.
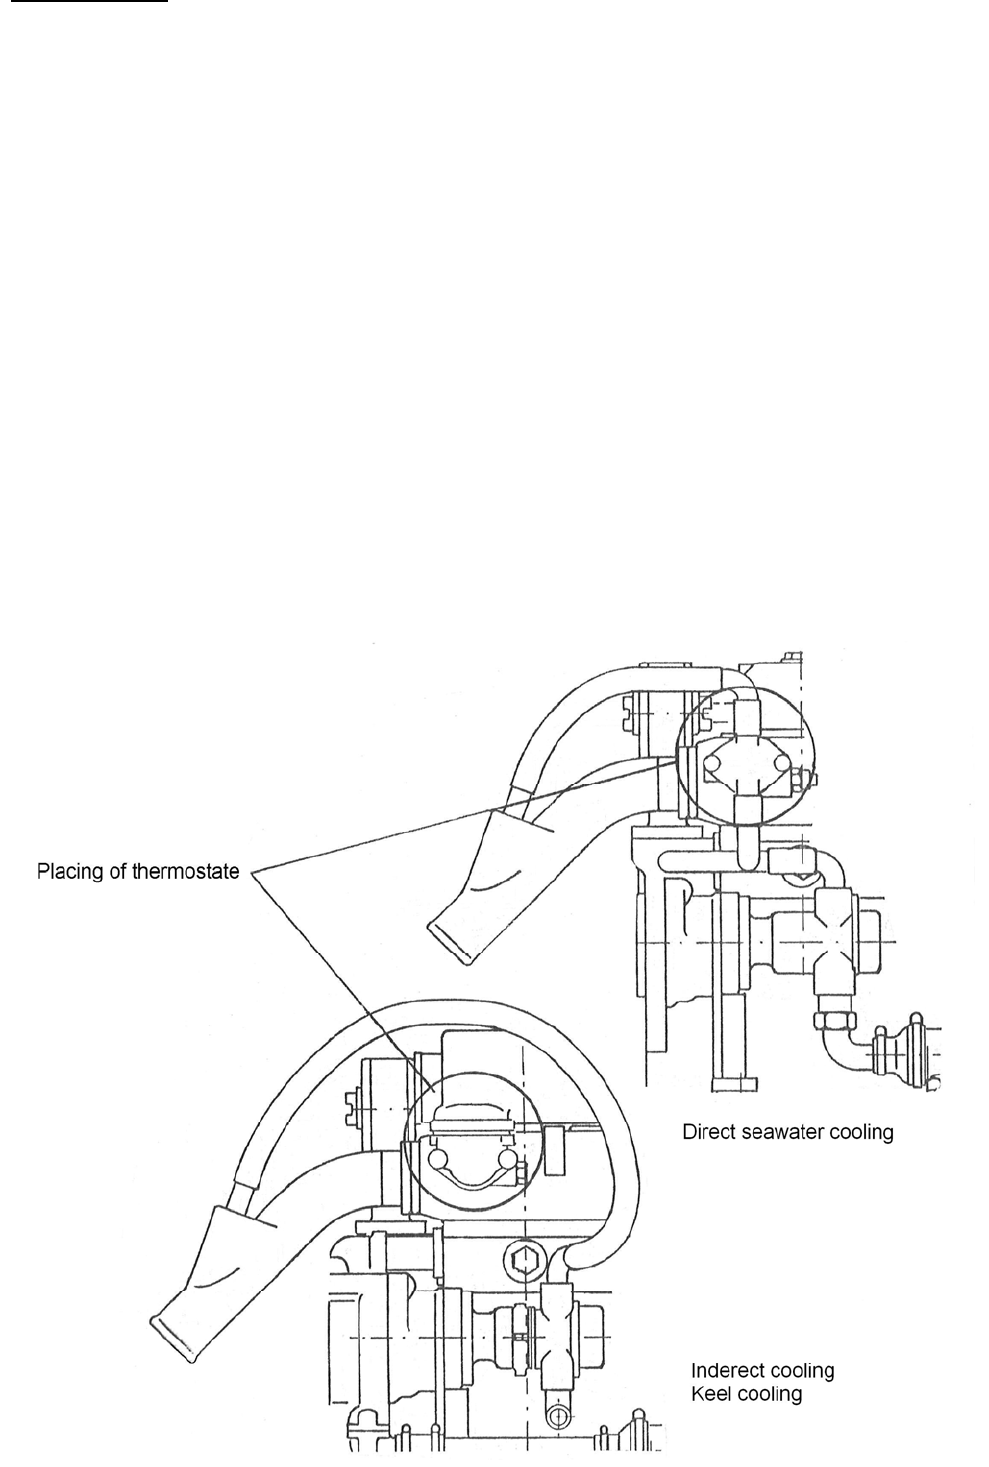
009W2329-R01
O9
Thermostate
For controlling the cooling water temperature the cooling water system is fitted with a
thermostate.
Dependent on the cooling principle the thermostate has different opening temperatures.
In case of direct seawater cooling the thermostate has an opening temperature of 50°C.
In case of freshwater cooling the thermostate has an opening temperature of 80°C.
In case of freshwater cooling with keel cooler the thermostate has an opening temperature
of 80°C.
Direct seawater cooling thermostate No. 008E6587.
Freshwater cooling with heat exchanger thermostate No. 033D1202.
Freshwater cooling with keel cooler thermostate No. 030G6601.
In all three cases the thermostate is placed at the exhaust manifold astern in starboard side of
the engine.
009W2329-R01
O10
Header tank and heat exchanger
The arrangement of header tank and heat exchanger fitted on the top of the water cooled
exhaust manifold is shown on page O11.
In case of keel cooling the arrangement only serves as header tank and from the factory it has
been prepared for this by changes in proportion to the use as heat exchanger/ header tank,
and directly it will not be possible to change the function from keel cooling into heat exchanger
cooling without buying a new header tank or heat exchanger/header tank prepared for the
purpose.
Dismantling of heat exchanger
In order to clean the heat exchanger element or in order to test it for pressure, remove the
profile-cast rubber tubes on the inlet and outlet side of the seawater connection and take out
the element.
Further, exchange the element in case of corrosion or leaks, as it can not be recommended to
plug leaky pipes because of reduced heat conductivity.
Filling of anti-freeze solution
If you want to continue to use the boat in periods of frost pour water/anti-freeze solution
through the cap of the header tank, depending on what temperature you want protection
against.
Before doing so drain off the freshwater from the engine through the drain plug in the
crankcase and through the drain plug of the circulation pump.
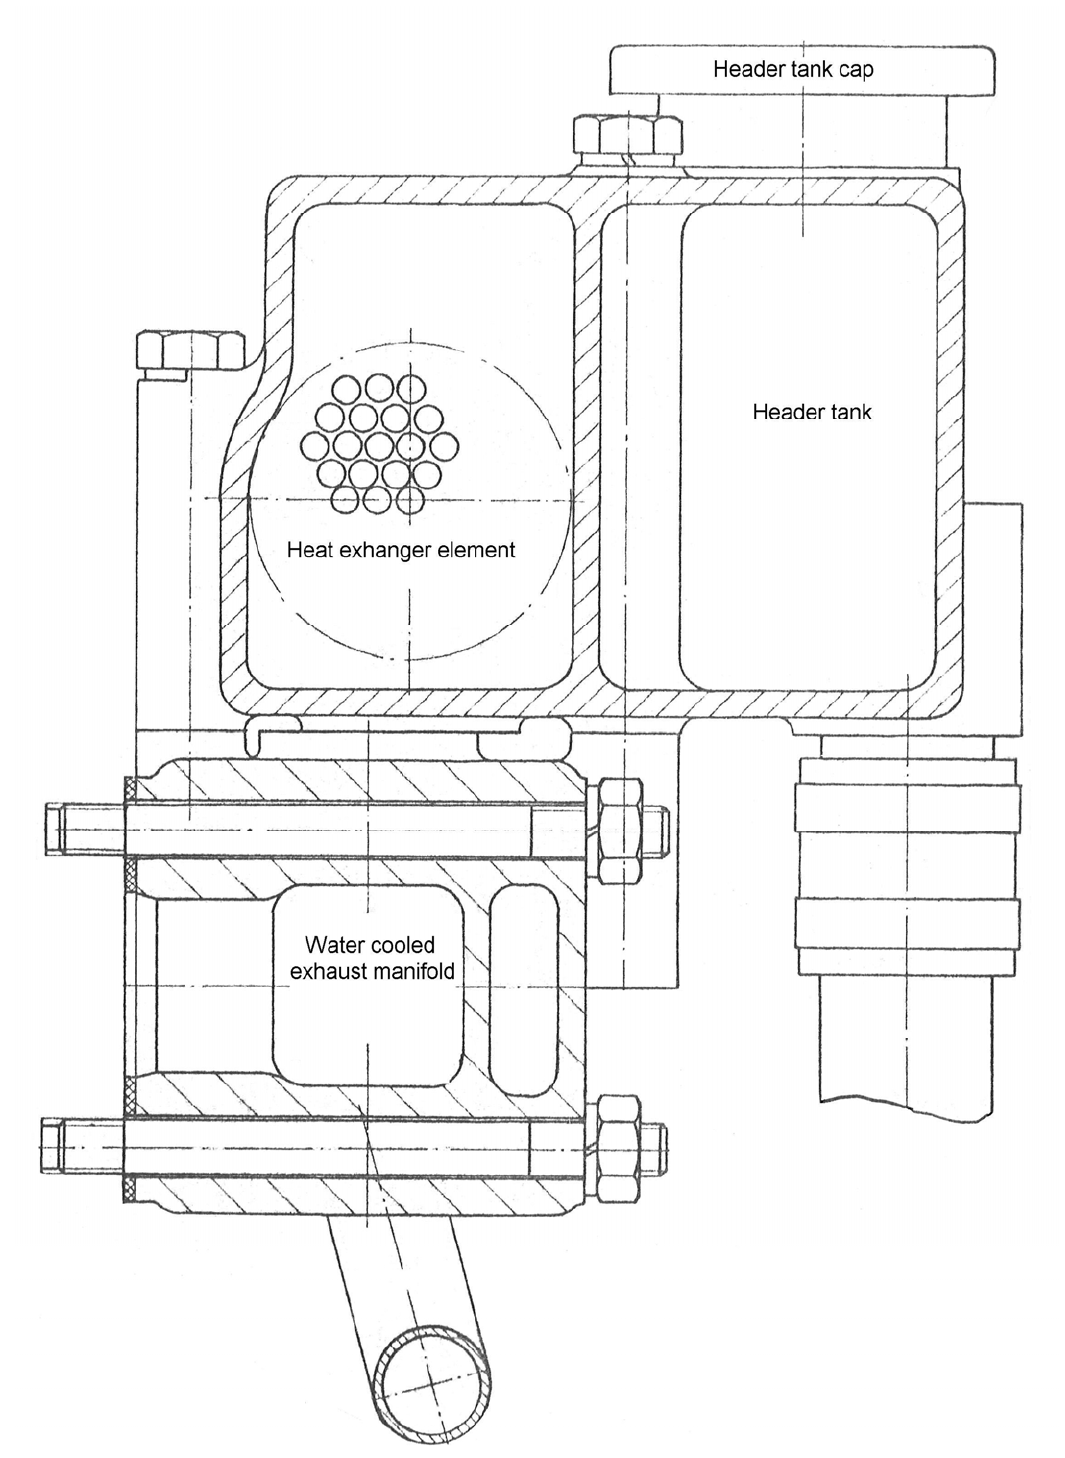
009W2329-R01
O11
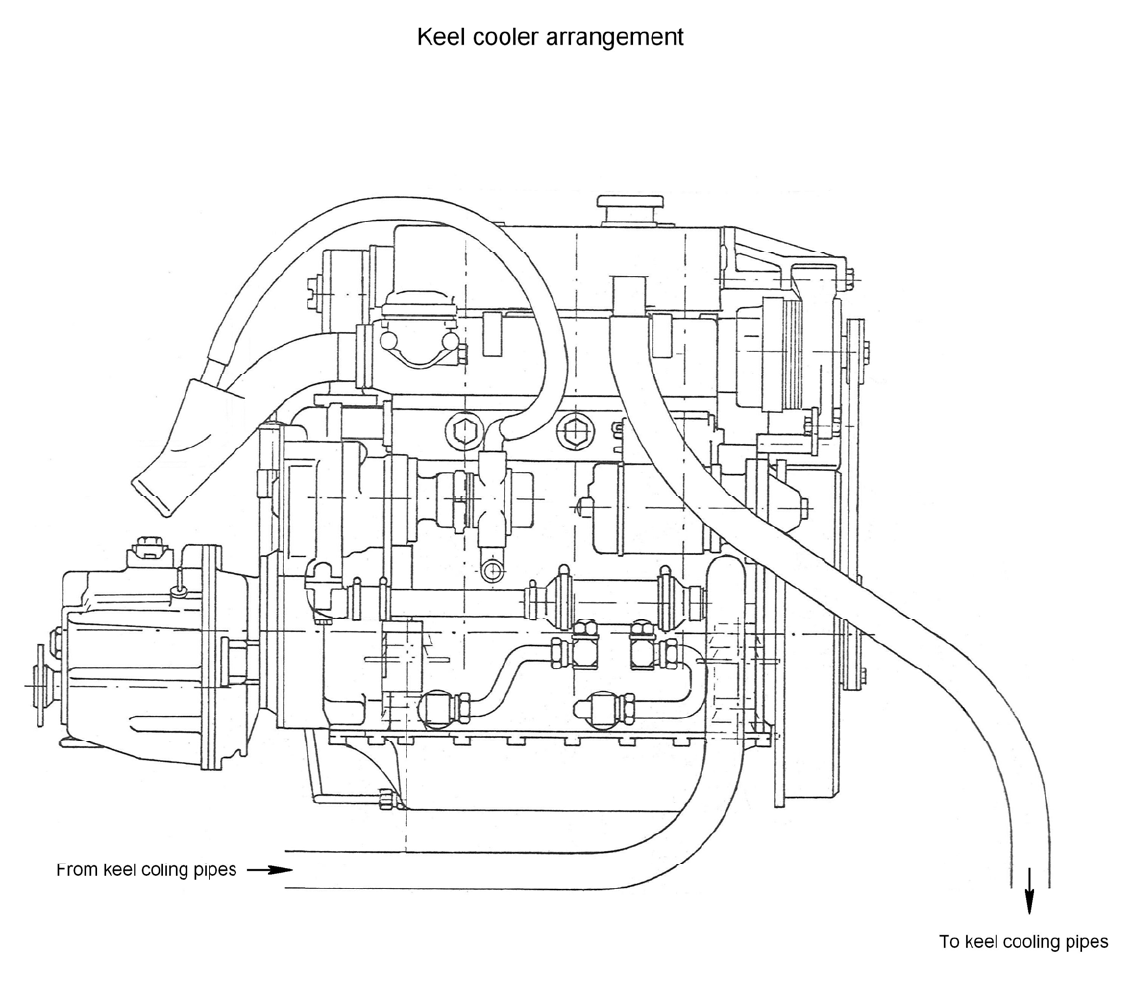
009W2329-R01
O12
P1
009W2329-R01
SECTION P
ELECTRICAL SYSTEM

P2
009W2329-R01
CONTENTS
Wiring diagram (key switch) ...................................................... page P 3
Wiring diagram (key switch) – 2 battery starting system............ page P 4
Wiring diagram (push button) .................................................... page P 5
Wiring diagram (push button) – 2 battery starting system ......... page P 6
Generator with double charging diodes ..................................... page P 7
Key switch start panel ............................................................... page P 8
Push button start panel ............................................................. page P 9
Instrument panel ........................................................................ page P 10
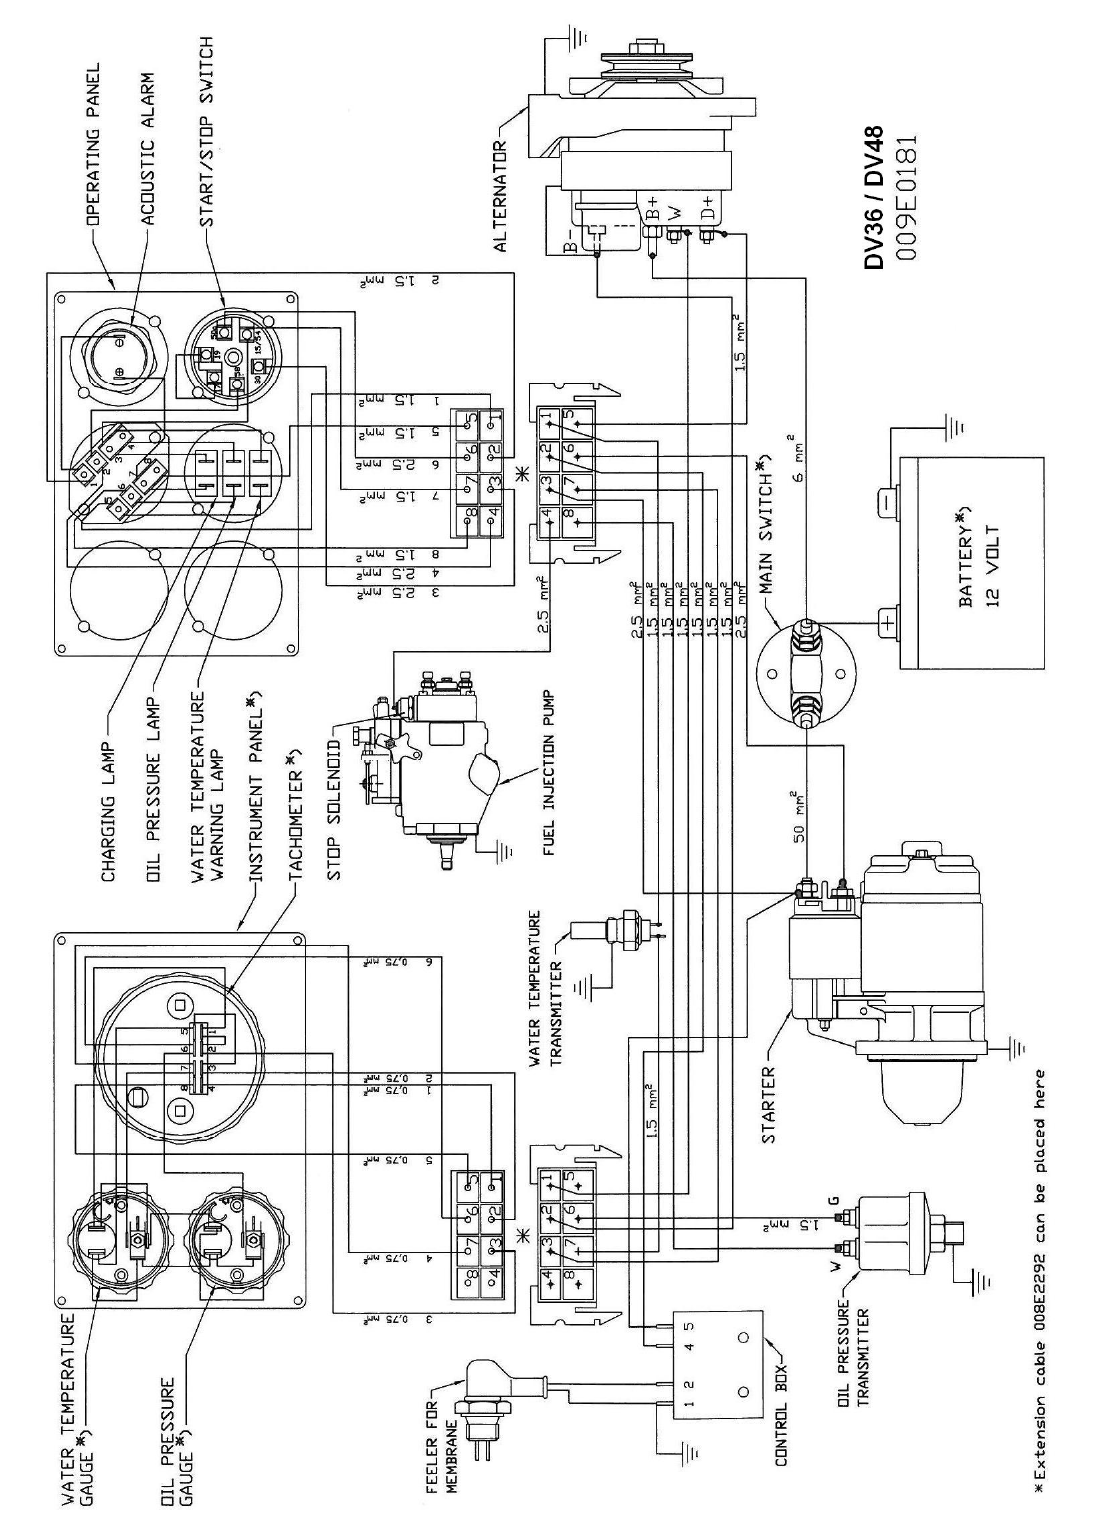
P3
009W2329-R01
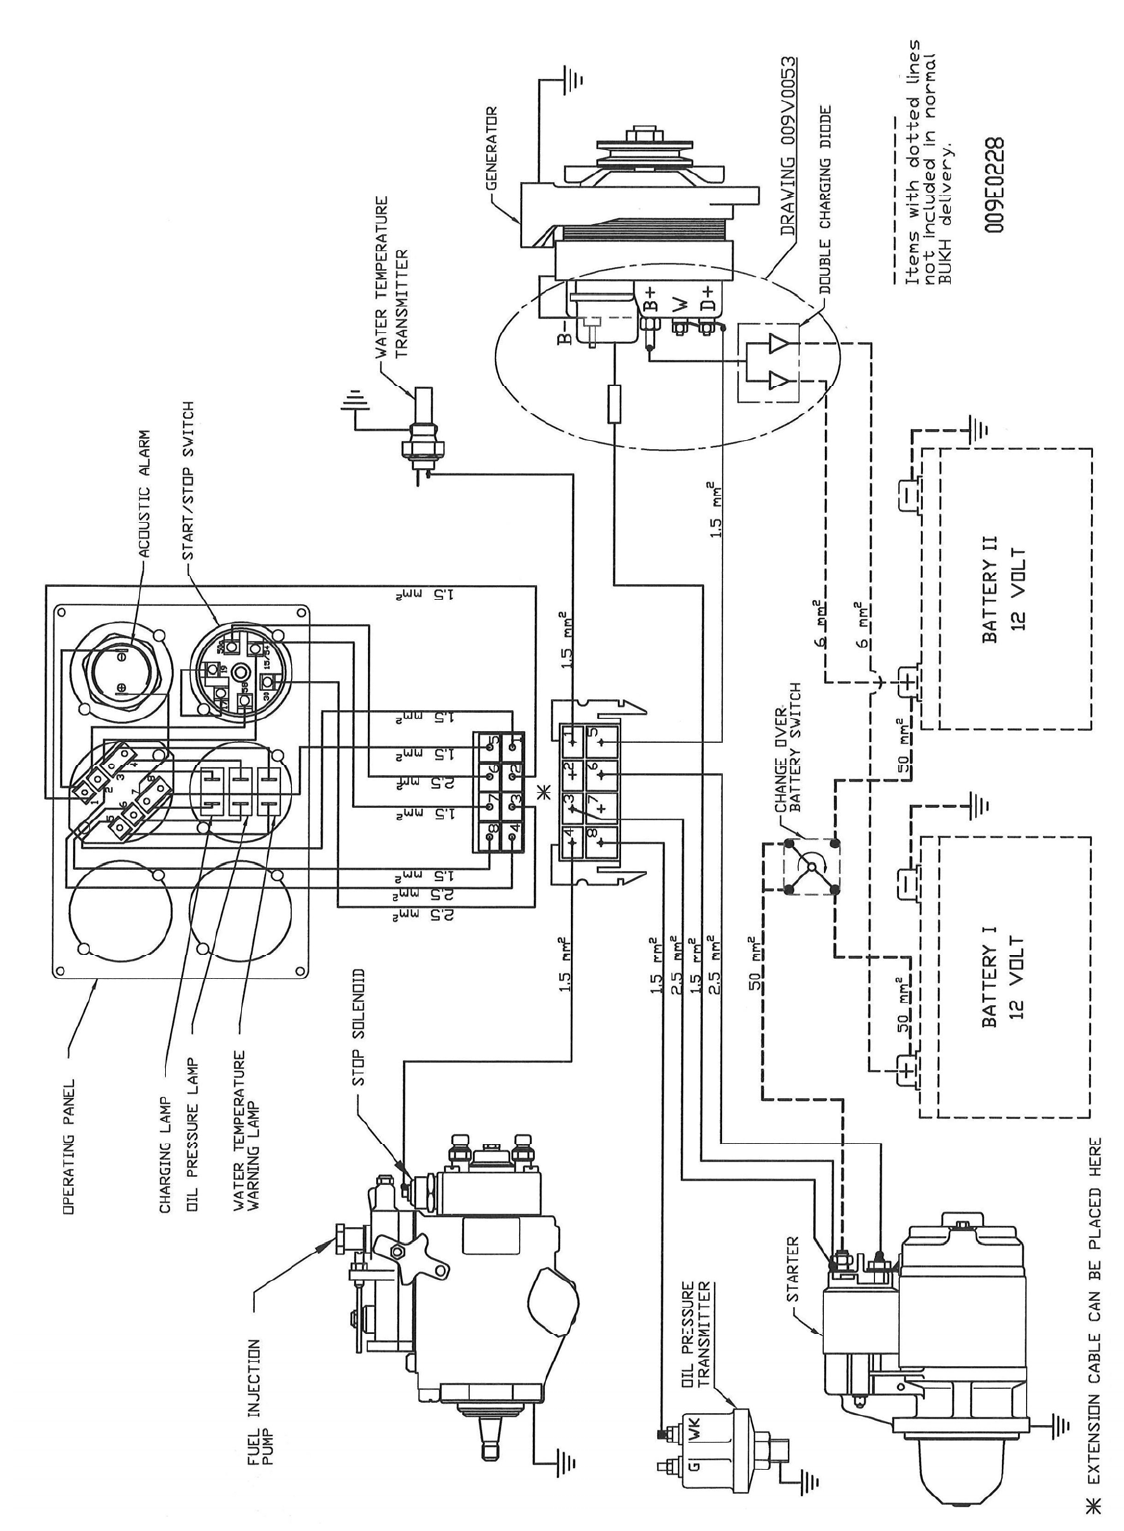
P4
009W2329-R01
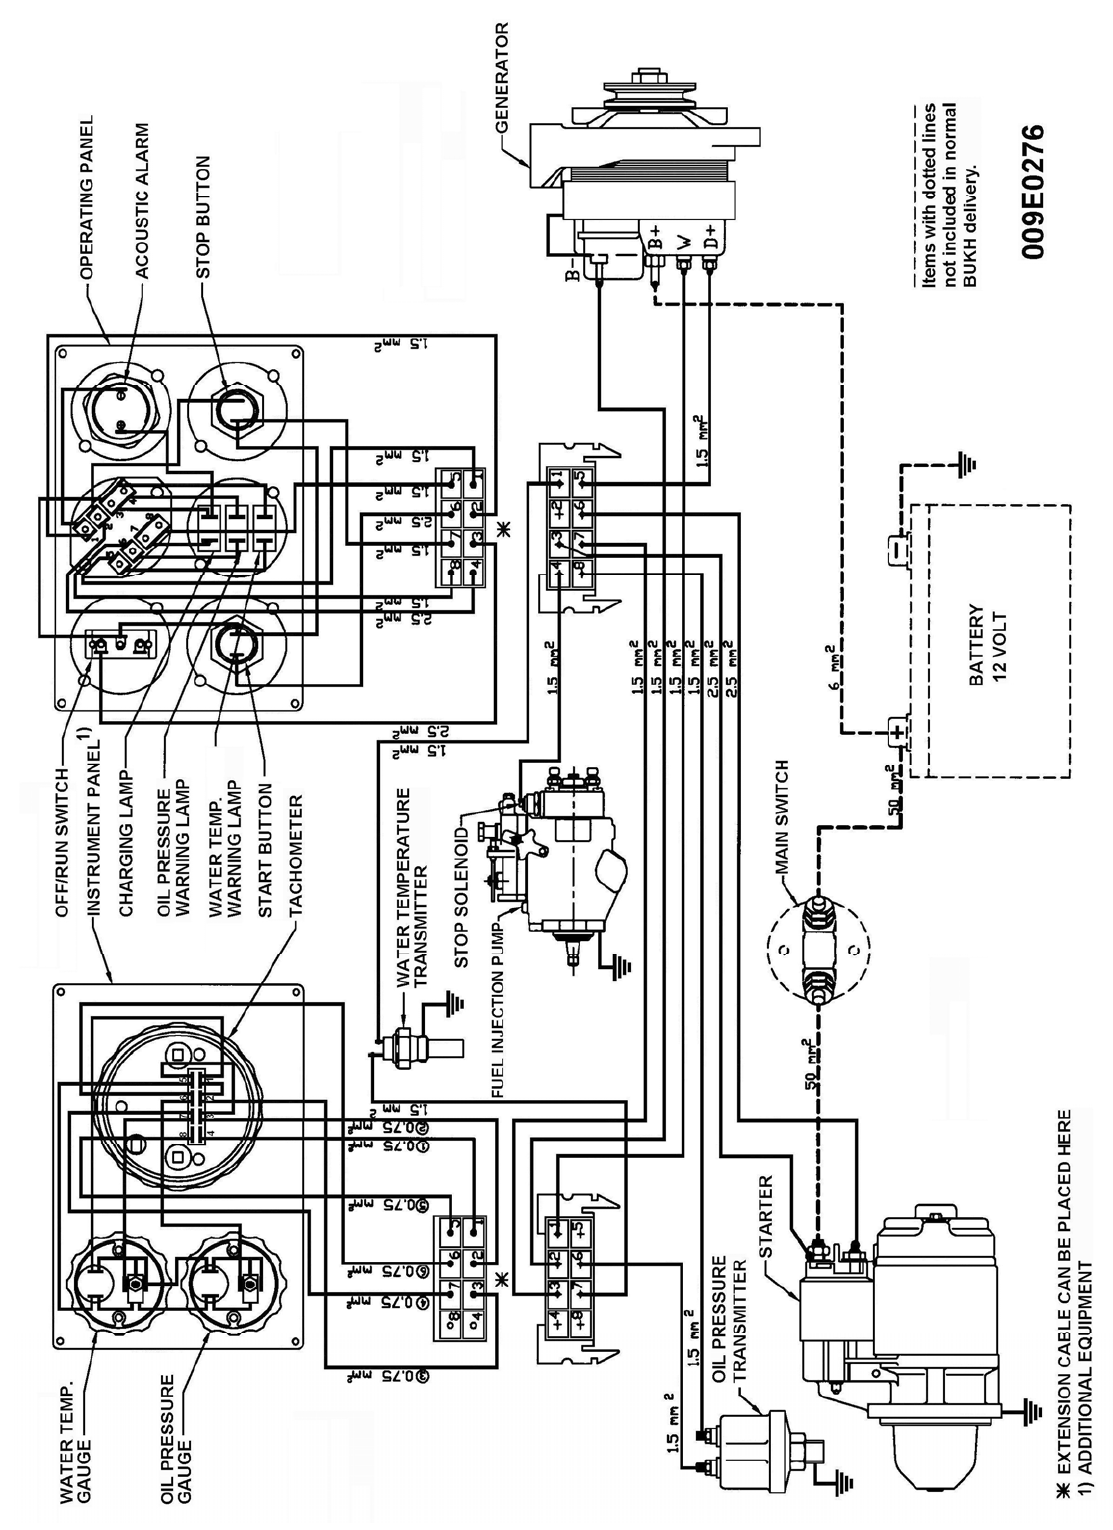
P5
009W2329-R01
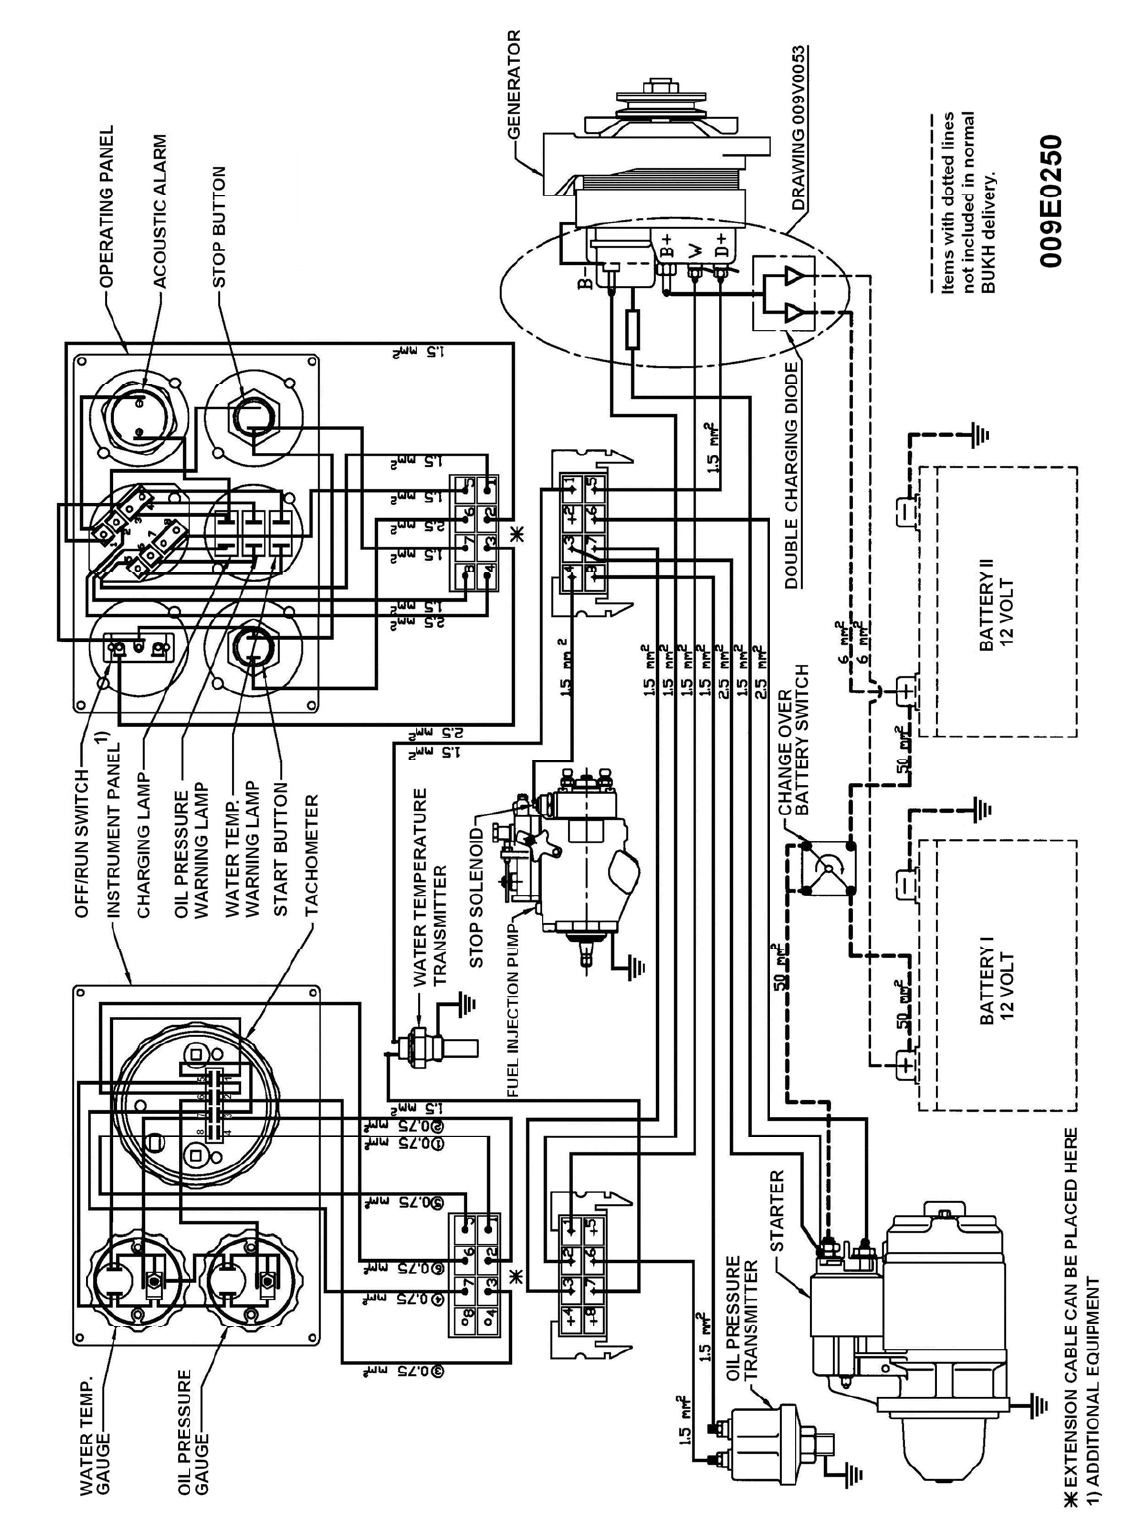
P6
009W2329-R01
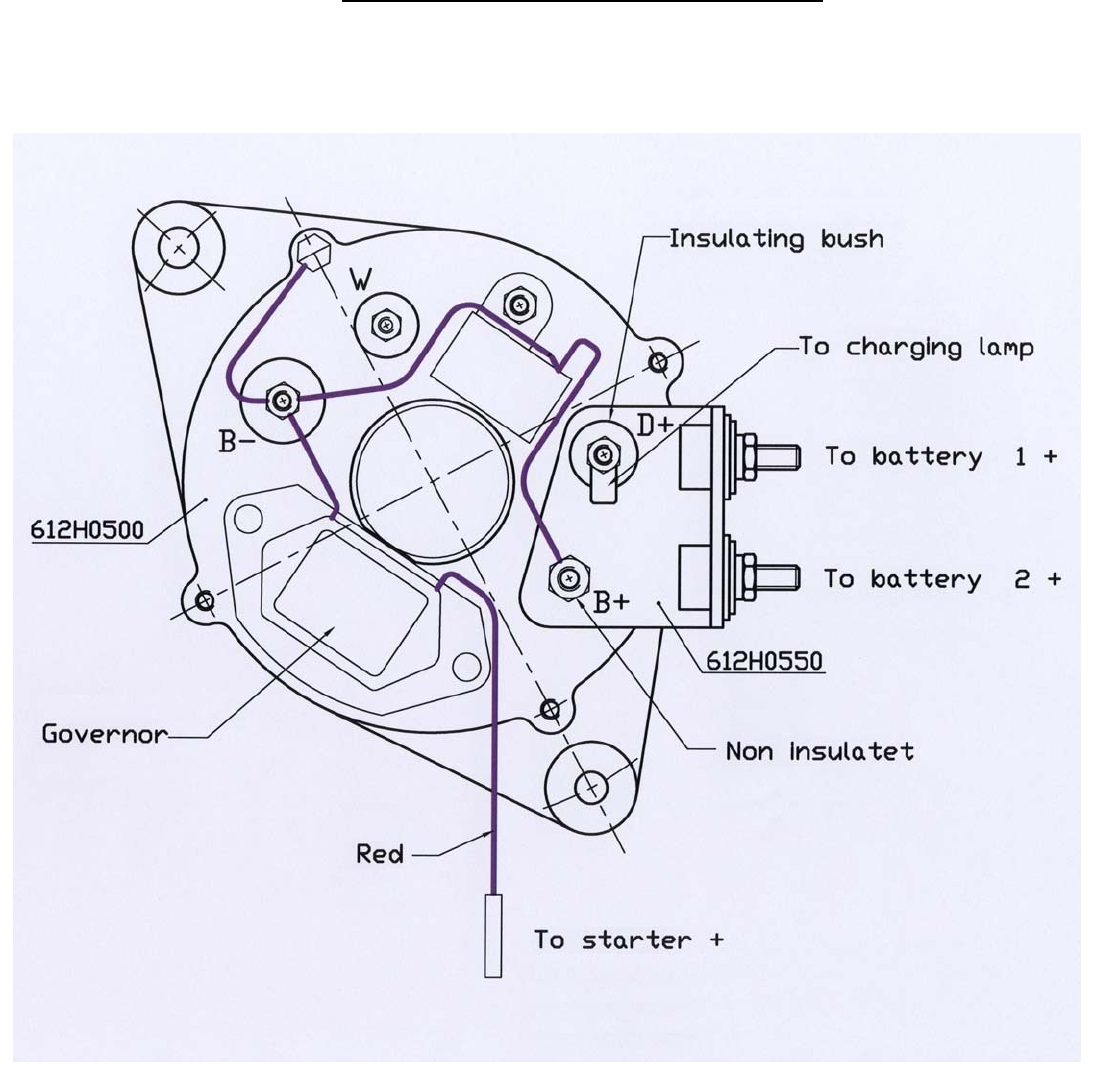
P7
009W2329-R01
Generator with double charging diodes
Drg.no. 009V0053
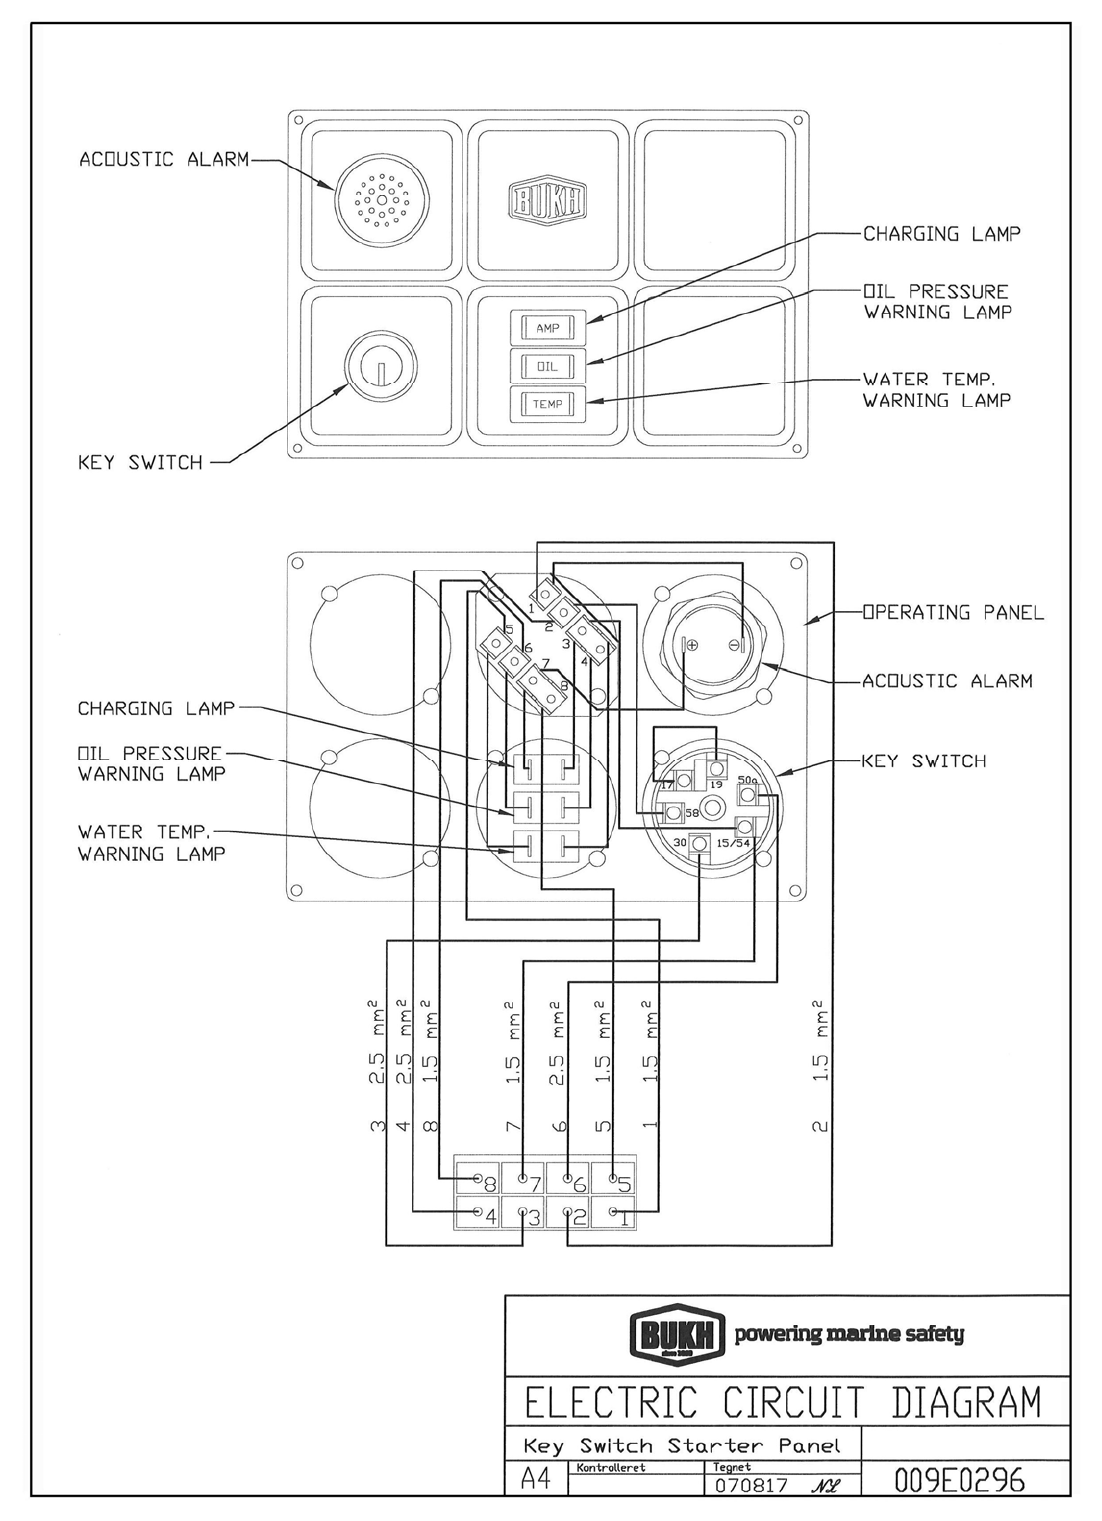
P8
009W2329-R01
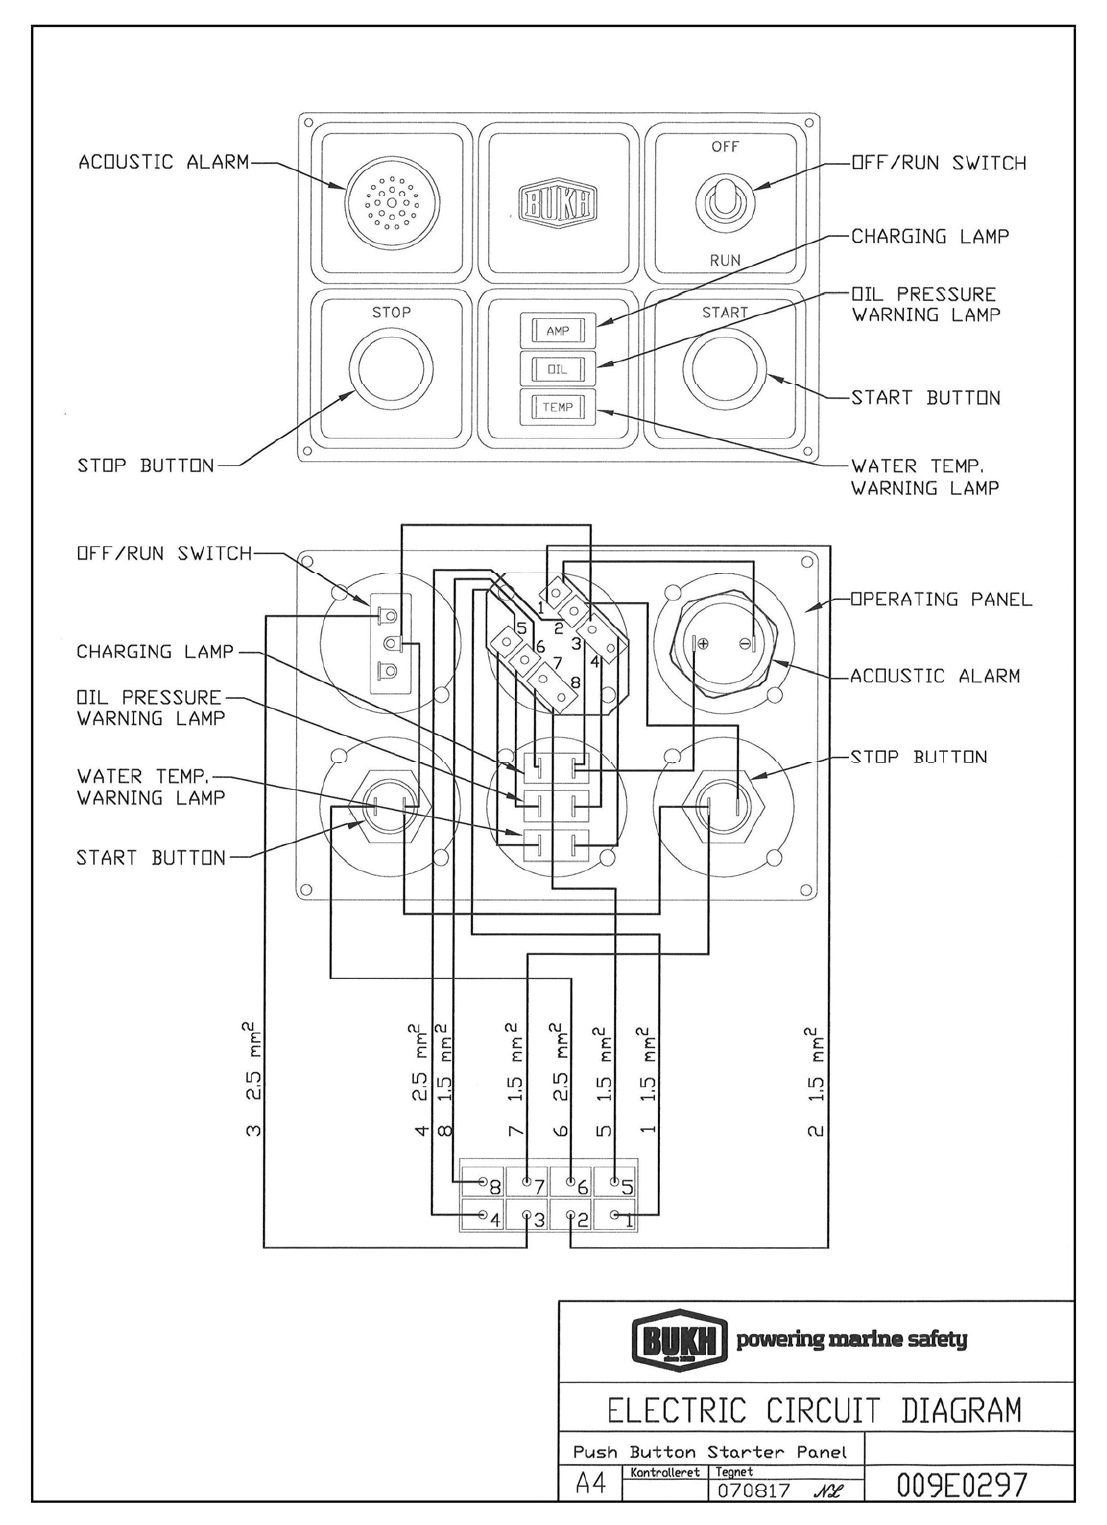
P9
009W2329-R01
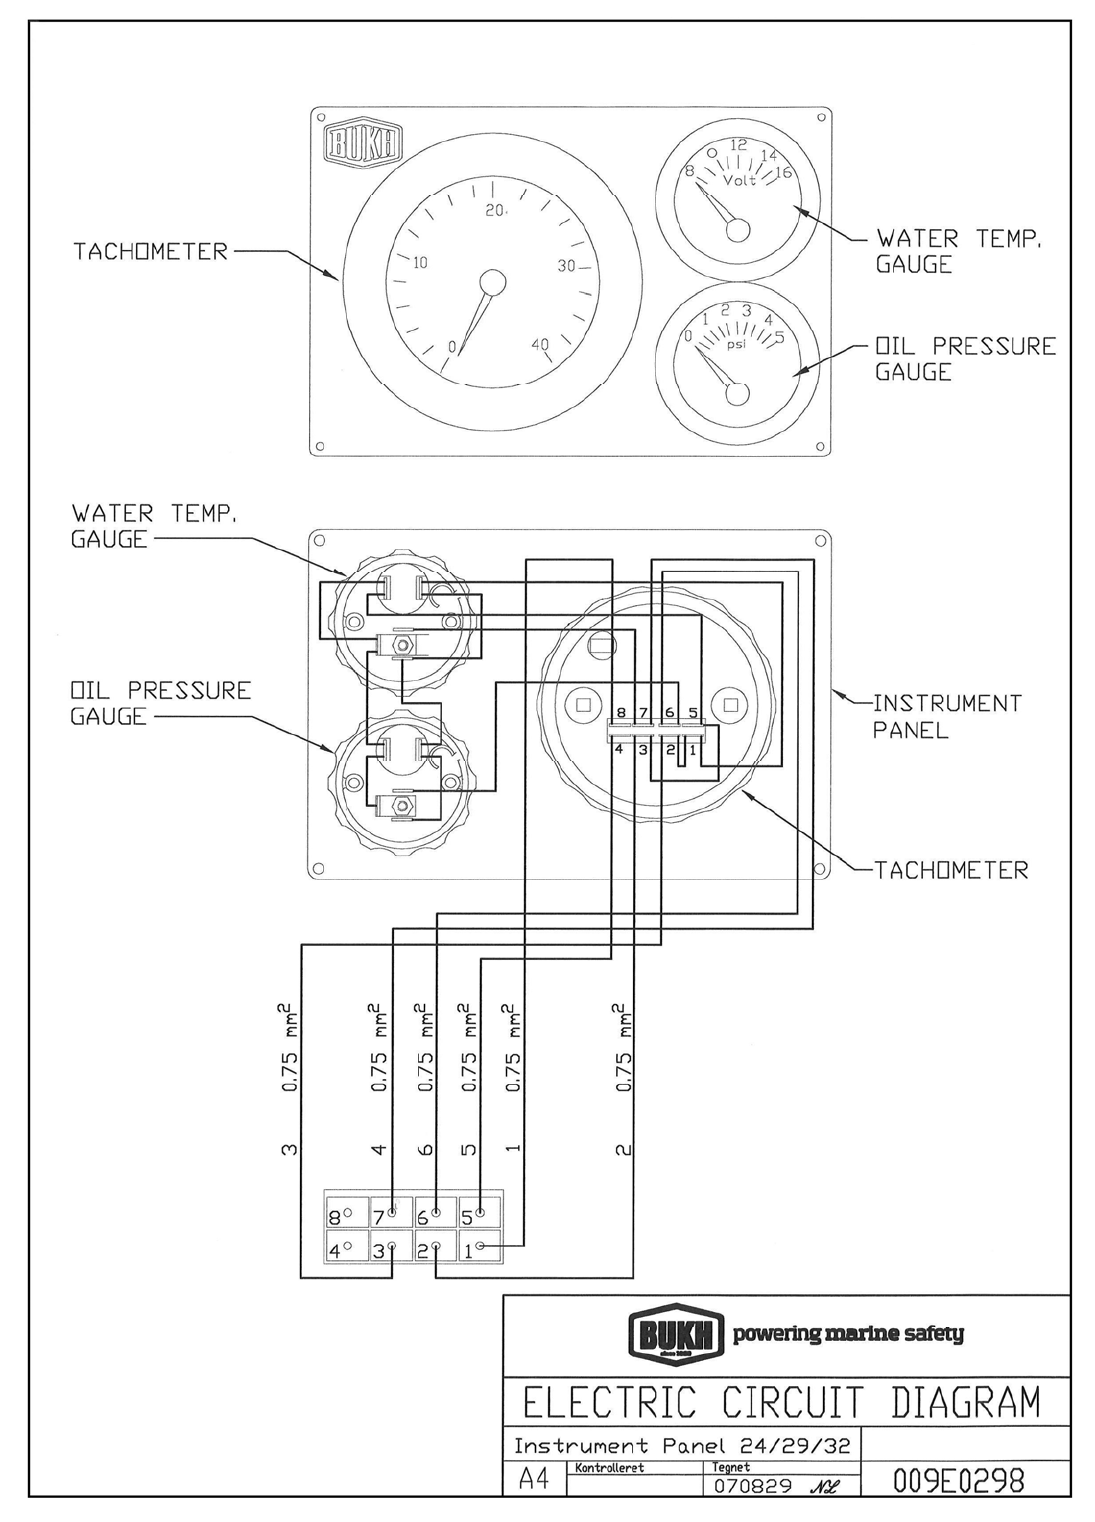
P10
009W2329-R01
R1
009W2329-R01
SECTION R
ZF GEAR – BW7

R2
009W2295
CONTENTS
Gear ratio .................................................................................. page R 3
Oil change ................................................................................. page R 3
Special tools .............................................................................. page R 5
Adjusting measures and torques for BW7 ................................. page R 6
General information for work with the gear ................................ page R 8
Removal of gear from engine .................................................... page R 8
Dismantling of BW7 gear ........................................................... page R 9
Removal of input and output shafts ........................................... page R 11
Dismantling of shifting fork ........................................................ page R 12
Dismantling of output shaft ........................................................ page R 12
Dismantling of input shaft .......................................................... page R 14
Dismantling of lower gearbox part ............................................. page R 14
Dismantling of upper gearbox part ............................................ page R 14
Refitment of BW7 gear .............................................................. page R 15
Fitting of input shaft ................................................................... page R 20
Measuring of tightening and tapered roller bearing on input
and output shafts with measuring gauge ................................... page R 21
Measuring of tightening and tapered roller bearing on input
and output shafts without measuring gauge .............................. page R 23
Premounting of shifting fork ....................................................... page R 24
Fitting of bolts in gearbox .......................................................... page R 26
Fitting of input and output shafts with shifting fork in gearbox ... page R 27
Fitting of shaft seal rings............................................................ page R 30
Supplement to fitting of shaft seal rings ..................................... page R 31
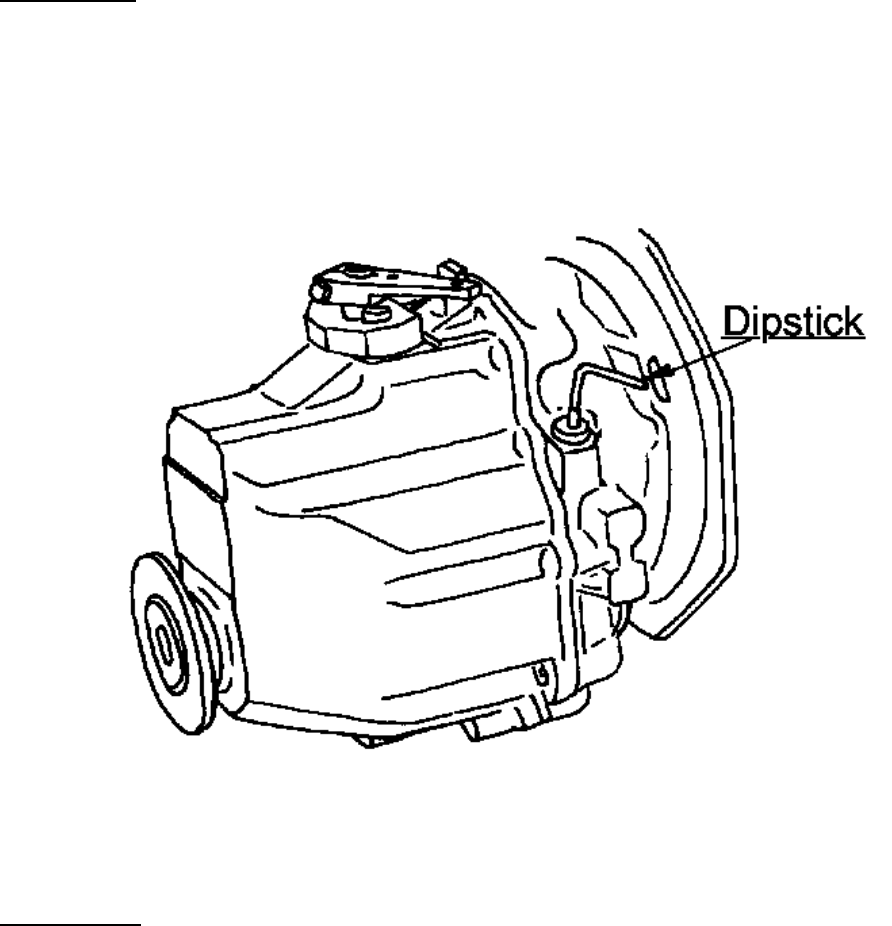
R3
009W2329-R01
Gear Ratio
The BW7 gear which is used on DV36 has normally a reduction ratio of 3.0:1 for AHEAD and
2.36:1 for REVERSE.
For special purposes it can be delivered with a reduction ratio of 2.47:1 for AHEAD and
2.36:1 for REVERSE.
Oil Change
The gear will need no other attendance than regular change of oil. This to be carried out after
the first 25 hours of operation and then every 150 hours or once a year.
The oil change is carried out by means of the hand bilge pump which is delivered together with
the tools for the engine.
Refill fresh oil to the quantity of 1.1 litres.
Quality of lubricating oil marked Service CC or CD with a viscosity of SAE 30 or SAE15W-40
is used. Oils covering more viscosity numbers must not be used.
R4
009W2229
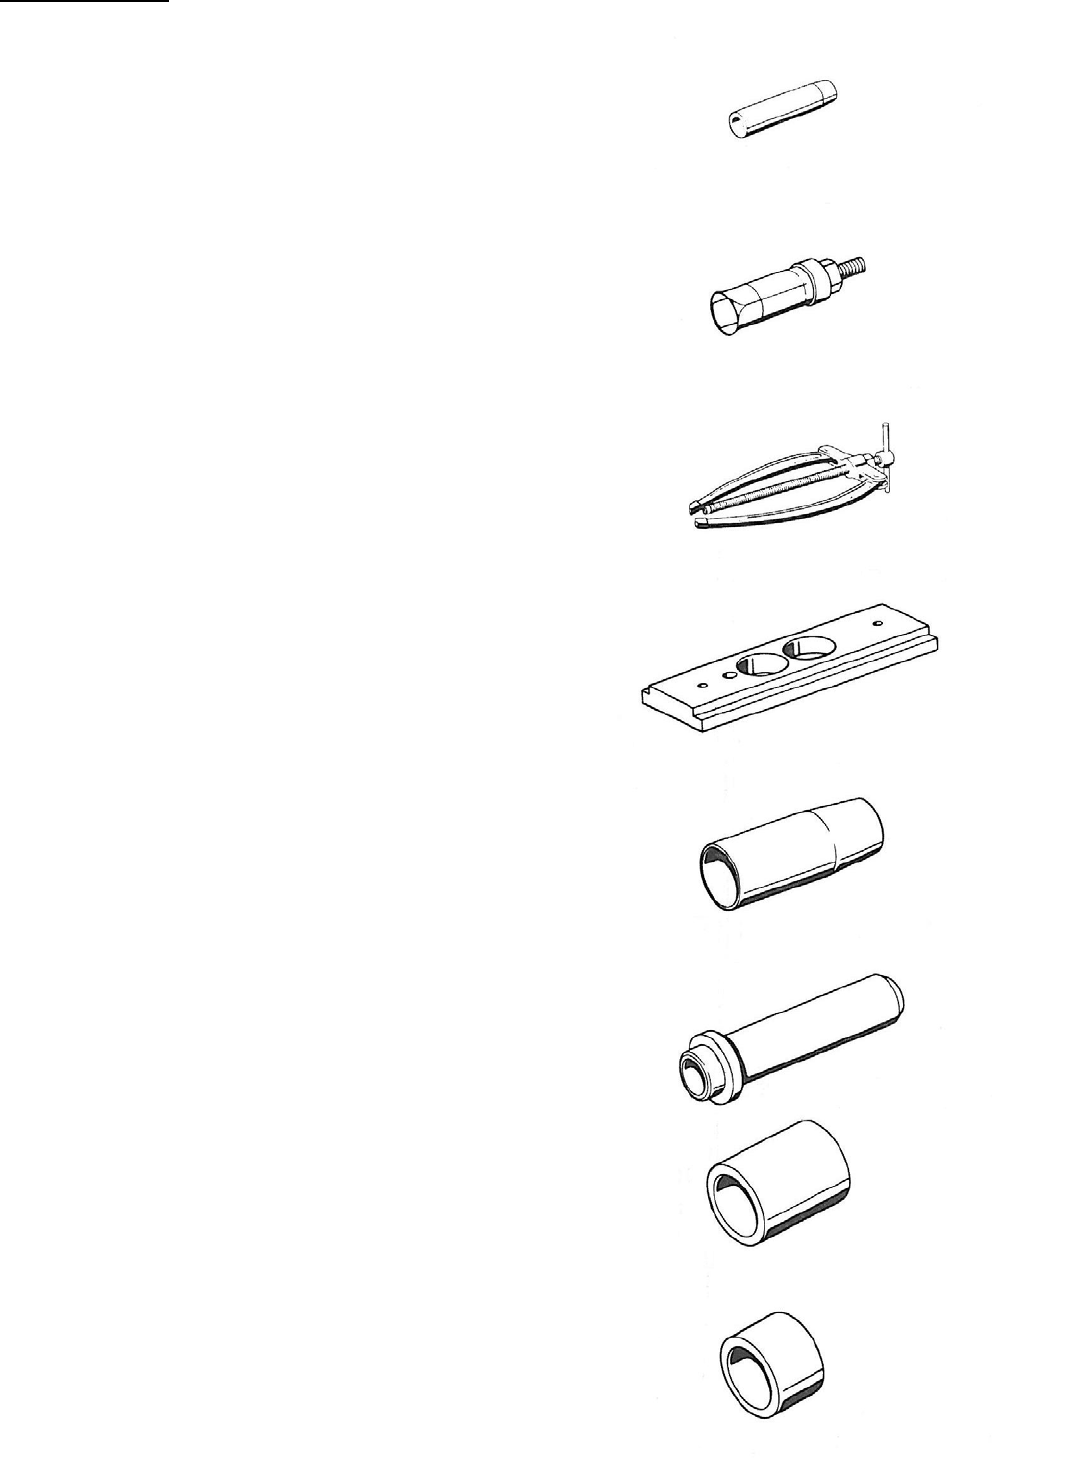
R5
009W2329-R01
Special Tools
Order No. 009P3187
Mounting punch for seal ring 25x33x6 at input shaft
Order No. 009P3188
Internal puller for tapered roller bearings / outer ring
Order No. 009P3189
For fitting of tapered roller bearings / outer ring in
connection with 009P3188
Order No. 009P3190
Measuring instrument for adjustment of tapered roller
bearings
Order No. 009P3191
Protective sleeve for seal ring 25x33x6 at input shaft
Order No. 009P3192
Mounting punch for seal ring 32x45x7 at output shaft
Order No. 009P3193
Bush for stiffening of disc springs “AHEAD”
Order No. 009P3193
Bush for stiffening of disc springs “ASTERN”

R6
009W2229
Adjusting Measures and Torques for BW7
Designition
Statement of
dimensions
Gauge
Remarks
Axial tightening of tapered
roller bearings on input
and output shafts
0.03 – 0.08 mm
With a load of
30 N (3 Kp)
Dial indicator
or
Depth
micrometer
Adjusted by means of washer (s)
under bearing outer ring in the
housing.
The bearings are fitted with
Loctite 601
Axial clearance
Sliding sleeve in
shifting fork
0.1 – 0.4 mm
Feeler gauge
New gear
Axial clearance
Sliding sleeve in
shifting fork incl.
permissible wear
Max. 0.8 mm
Feeler gauge
Clearance + wear limit
Axial clearance
“AHEAD” and “ASTERN”
wheels
0.1 – 0.4 mm
Depth
measure
“AHEAD”: Clearance appears
when fitting and is examined
at control.
“ASTERN”: Clearance can be
Adjusted by means of a thrust
washer
Disc / plate clearance
per disc clutch
0.9 – 1.0 mm
Feeler gauge
To be measured two places
opposite one another.
To be adjusted by washer
Disc / plate clearance
per disc clutch with max.
wear
1.5 mm
Feeler gauge
To be measured two places
opposite one another.
To be adjusted by washer
Tightening of disc springs
Min. 1.1 mm
Depth
measure
Measured on disc springs
when slack on the output shaft
Testing indication for
pressure
spring 0732 041 225 in
star bolts
L = 15.5 mm
P = 38.9±2.4 N
(3.89±0.24 Kp)
Depth
measure
Weight
L = length of loaded spring
P = spring power

R7
009W2329-R01
Adjusting Measures and Torques for BW7
Designition
Statement of
dimensions
Gauge
Remarks
Testing indication for
pressure spring 0732 041
008 for shift pins
L = 11.4 mm
P = 46±5 N
(4.6±0.5 Kp)
Depth
measure
Weight
L = length of loaded spring
P = spring power
Torque of hexagon nut
M20x1.5 on output shaft
on the output side
100 Nm
(10 Kpm)
Torque
wrench
Secure after having packed with
liquid jointing on the contact face
Torque of hexagon nut
M20x1.5 on output shaft
on the input side
100 Nm
(10 Kpm)
Torque
wrench
Secure after tightening
Torque of hexagon nut
M20x1.5 on the gear-
wheel bolts
50 Nm
(5 Kpm)
Torque
wrench
Secure after having packed with
liquid jointing on the contact face
Torque of M8 screws in the
halves of the gearbox
17 Nm
(1.7 Kpm)
Torque
wrench
Add U-washers
Torque of M8x25 screws at
the gear wheel bolts
17 Nm
(1.7 Kpm)
Torque
wrench
Secure with Loctite 241
Torque of vent valve
10 Nm
(1.0 Kpm)
Depth
measure
Seal ring for input shaft:
Depth of compression
Binding with
surface of
casting of half of
gearbox
Ruler
Shaft seal rings inserted
with sealing compound
(unhardening)
Output shaft seal ring
Depth of compression
Measured from front
of output shaft to front
of shaft seal ring
22.5±0.5 mm
Depth
measure
Shaft seal ring inserted
with sealing compound
(unhardening)

R8
009W2229
General Information for Work with the Gear
Show cleanliness when repairing the gear and before the gear is opened it must be
carefully cleaned.
Use special tools as stated earlier in this section when removing and fitting the gear.
The seal face between the two parts of the housing is tightened with liquid jointing.
When dismantling the halves of the gearbox from each other, loosen the screws in the
flanged joint first and push/press back the fitting pins.
Press the two halves of the gearbox from each other by means of two rods or the like.
Do not use chisels.
Use special tools for loosening parts fixed to the shafts such as bearings, gear-wheels etc.
When assembling the gear and fitting the bearings it is necessary to heat the cylinder
bearings in oil bath before fitting them. The temperature must not exceed 120°C.
When fitting the bearing outer rings the housing should be heated and the bearing outer
rings should be fitted with Loctite.
Removal of Gear from Engine
Before the gear can be dismantled it must be removed from the engine:
1. Loosen the propeller shaft flange and push the propeller shaft a little backwards.
2. Loosen the gear from the engine by removing the bolts of the intermediate flange
between the engine and gear.
3. Lift clear the gear of the engine.
4. Dismantle the flexible coupling by loosening the central nut and pulling off the
coupling half from the input shaft of the gear with special tool No. T 41069.
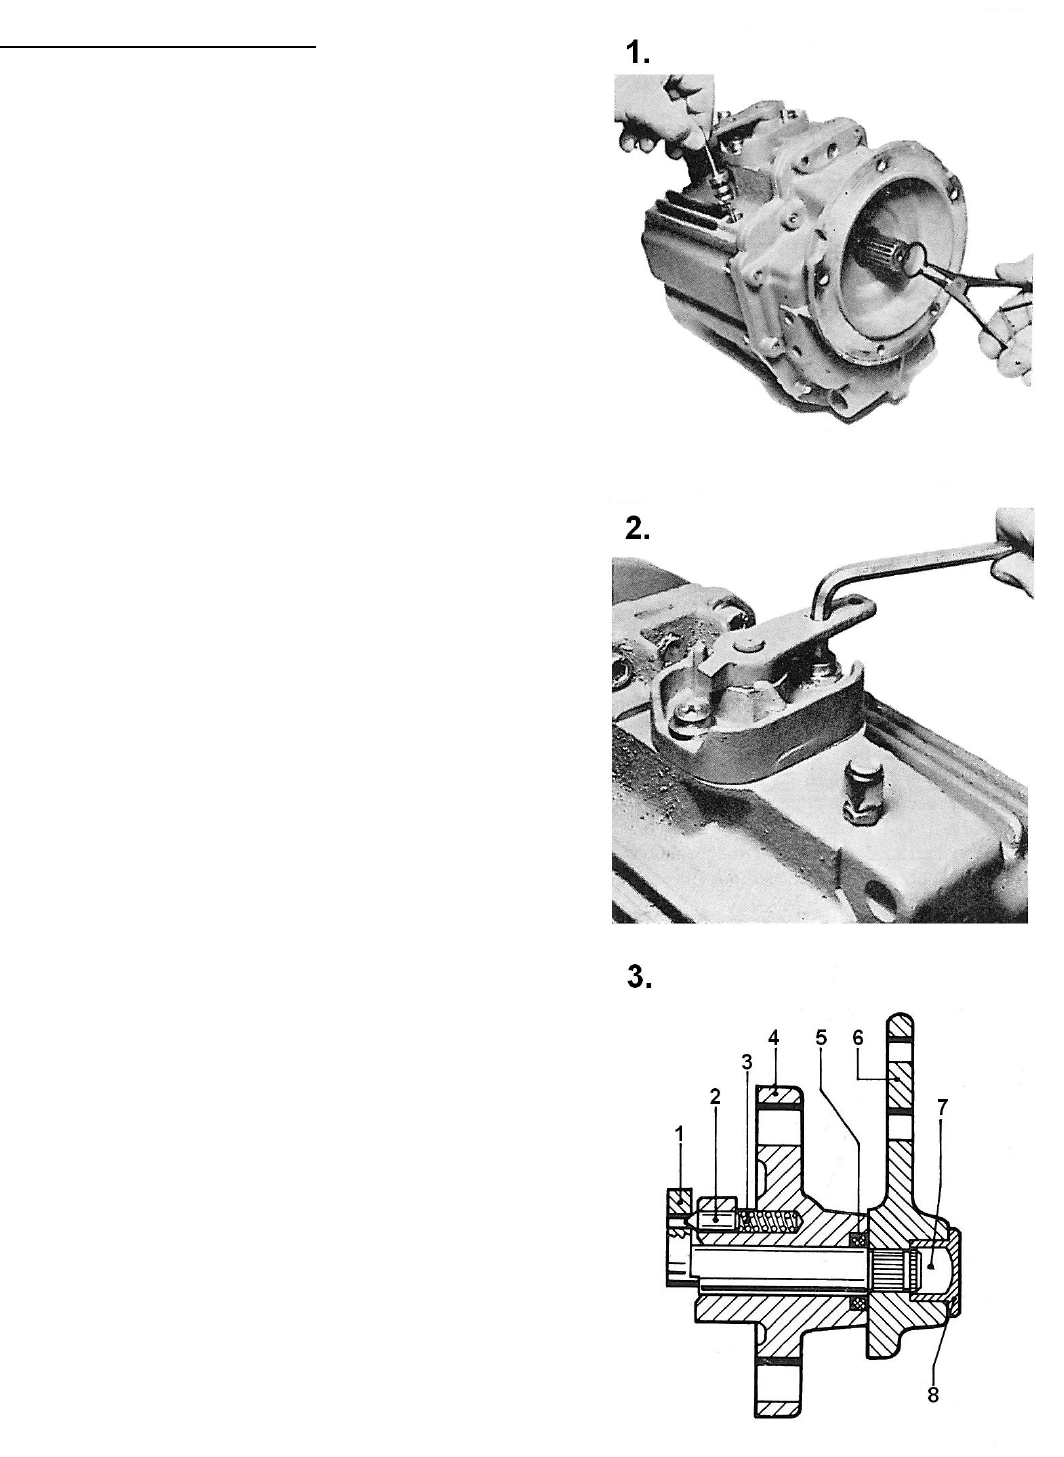
R9
009W2329-R01
Dismantling of BW7 Gear
Pull the dip stick of the housing.
Remove the locking ring on the input shaft.
Remove the shifting arrangement with gasket.
There are two different shifting levers which,
however, can be built in without any problems
in either cases.
Press the shifting lever out of the shifter shaft
and take out the O-ring 12x2.4 and the pin and
the pressure spring.
Before the shifting lever is pressed out it should
be marked in proportion to the shaft out of con-
sideration for the later assembling of the
arrangement.
1. Shifter shaft
2. Pin
3. Pressure spring
4. Shifting housing
5. O-ring
6. Shifting lever
7. Grease lubricating
8. Screw cap
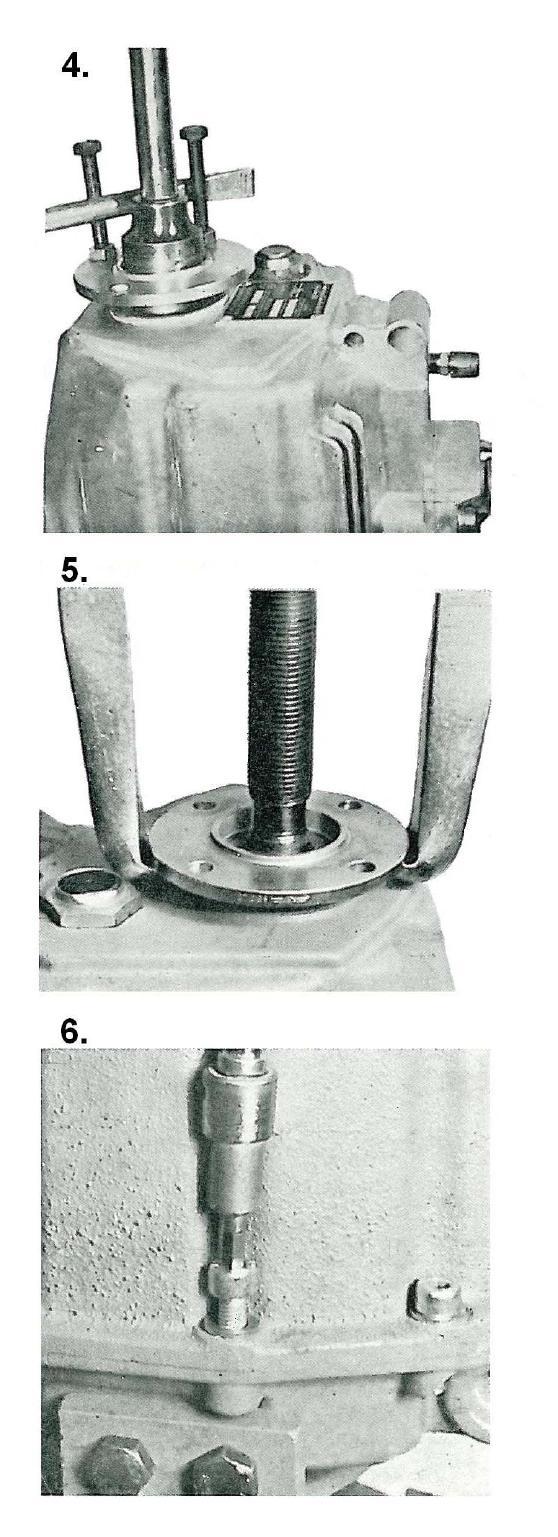
R10
009W2229
Unscrew the nut of the output shaft flange.
Pull off the output shaft flange.
Screw off the fixing screws which hold
the halves of the gearbox together.
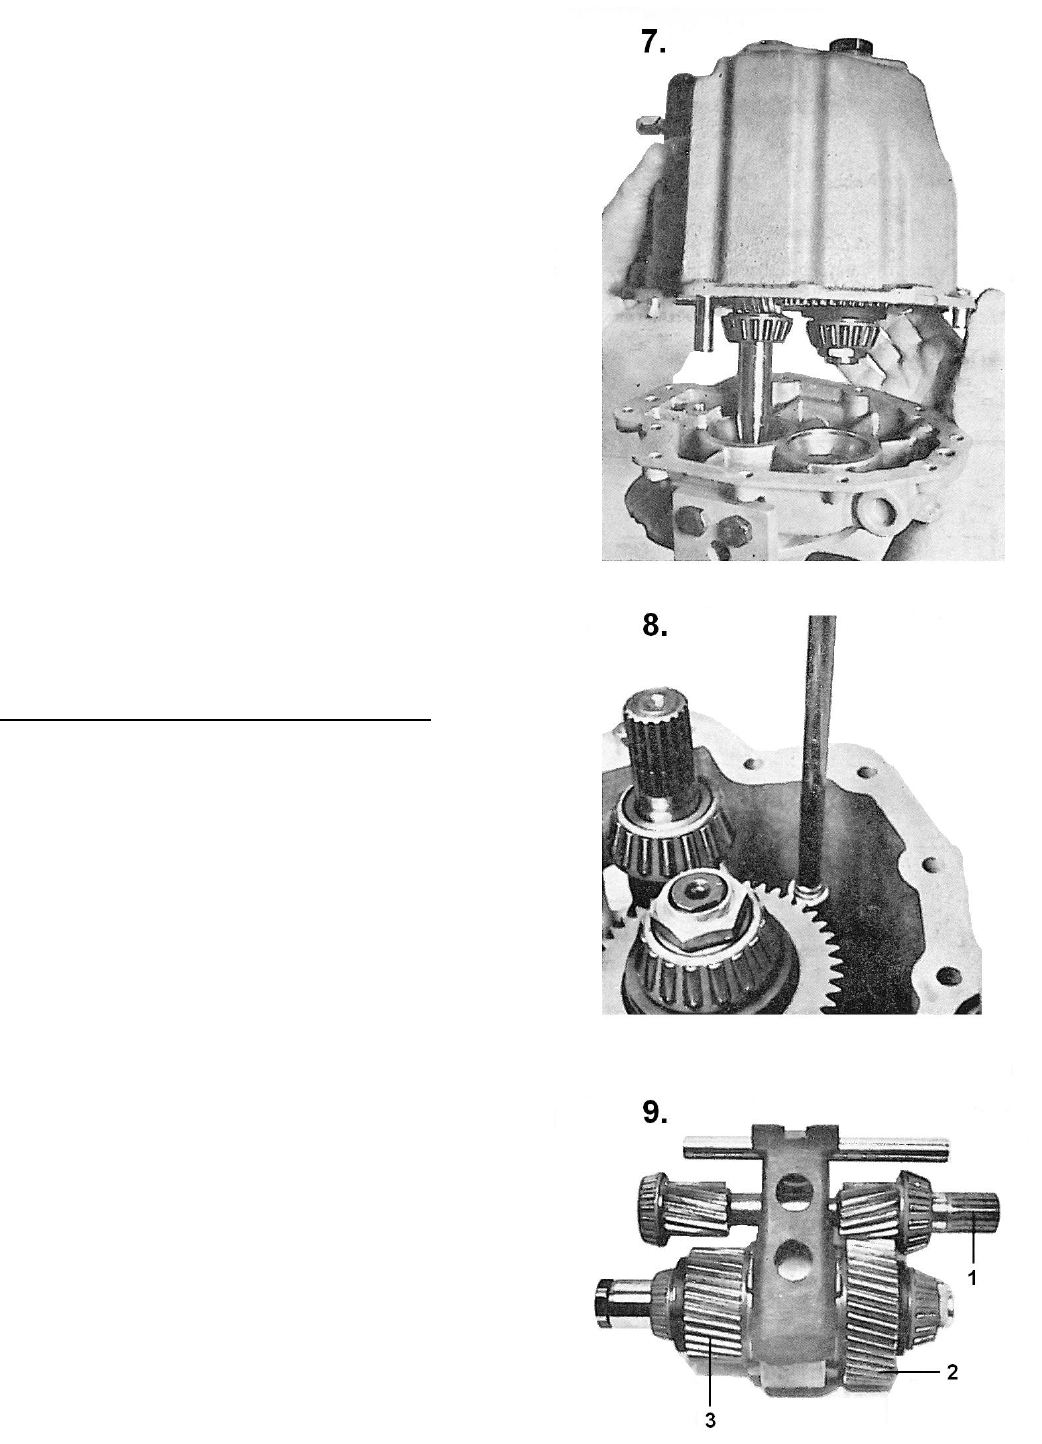
R11
009W2329-R01
Drive back the fitting pins 2 – 3 mm in the
gearbox and lift one gearbox half with reversing
shaft, input and output shafts free of the other
gearbox half.
Protective sleeve 1 x 56 136 992 may be
fitted on the input shaft before the dismantling.
Removal of Input and Output Shaft
ProTake out the screws M8x25 and the gear-
wheel bolts and remove the washer plate.
At the fitting the screws have been smeared with
Loctite and consequently it may be necessary to
heat before they are loosened.
Loctite No. 241 has been used.
Lift the complete arrangement with input and
output shafts and shifting fork out of the housing.
Now the arrangement can be lifted free of each
other.
1. Input shaft
2. Wheel “ASTERN”
3. Wheel “AHEAD”
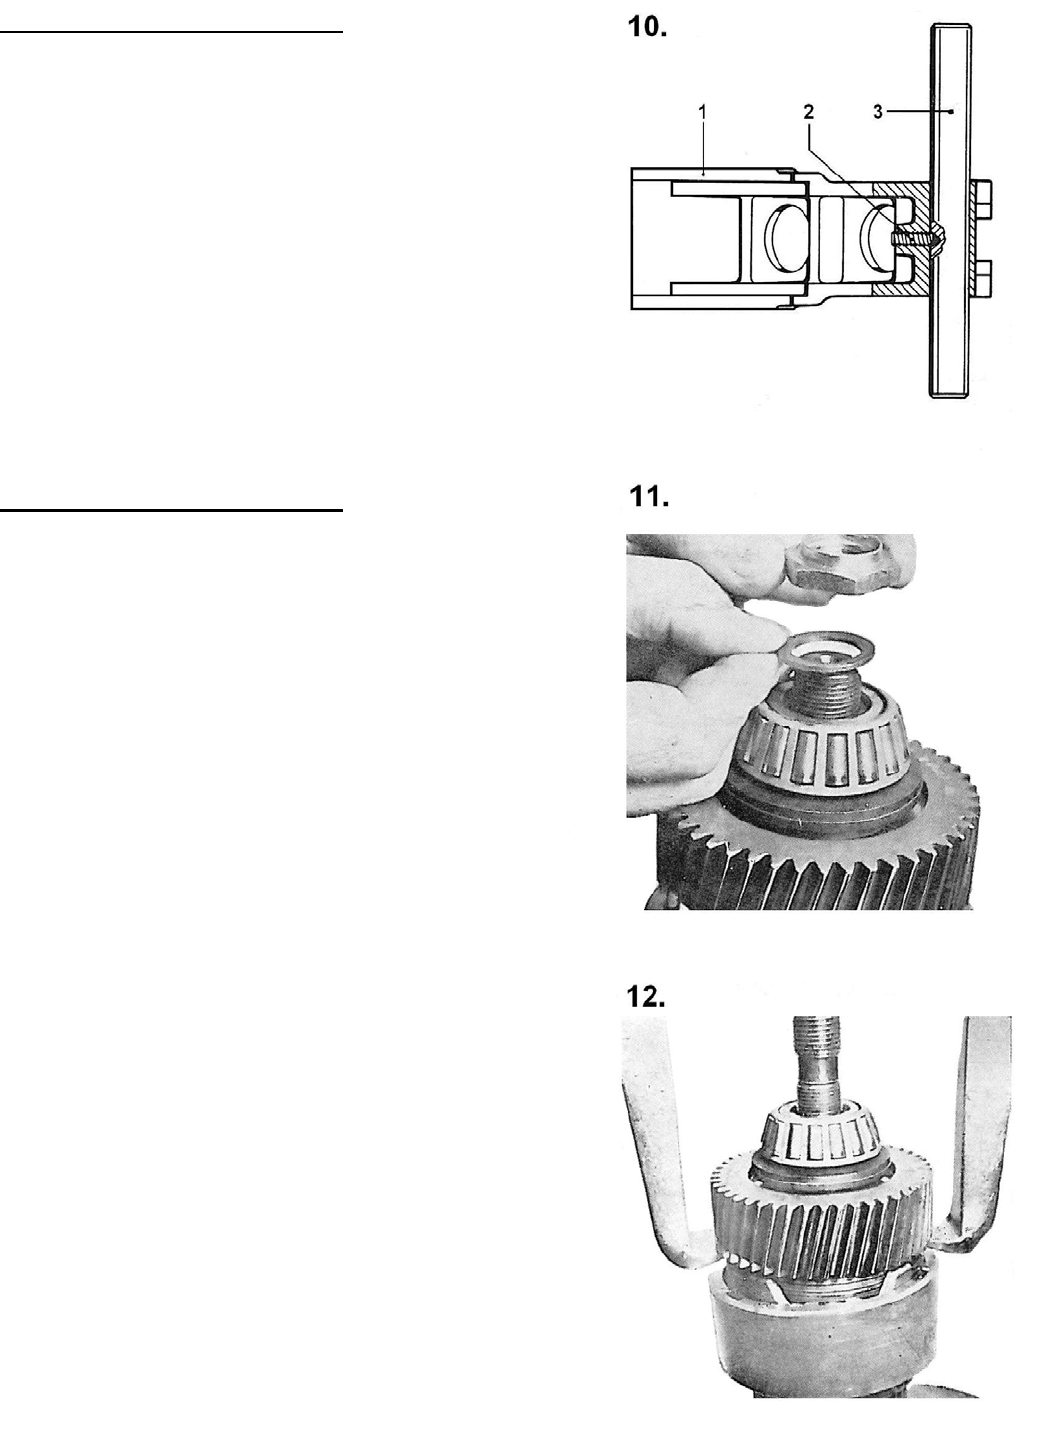
R12
009W2229
Dismantling of Shifting Fork
Screw out the pin M6x12 of the shifting fork and
press out the reversing shaft of the shifting fork.
At the fitting the threaded pin has been smeared
with Loctite No. 241 and so it may be necessary
to heat.
1. Shifting fork
2. Threaded pin
3. Reversing shaft
Dismantling of Output Shaft
Remove nut with washer “ASTERN”
Pull off the wheel “ASTERN” with a special tool
and take up washer, disc springs and tapered
roller bearing inner collar.
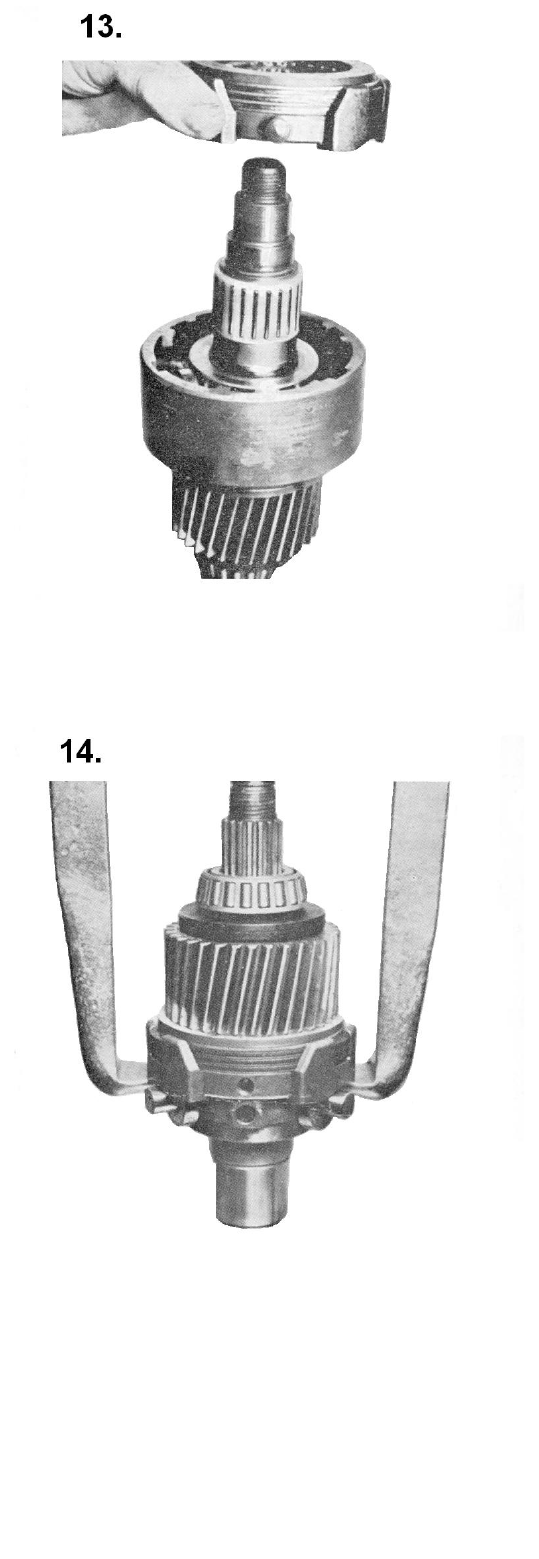
R13
009W2329-R01
Remove the thrust collar wuth bolts and
washers together wuth needle bearing
bushing, sliding sleeve and pressure spring.
Remove the wheel “AHEAD” with a special tool
and take off all parts “AHEAD”.
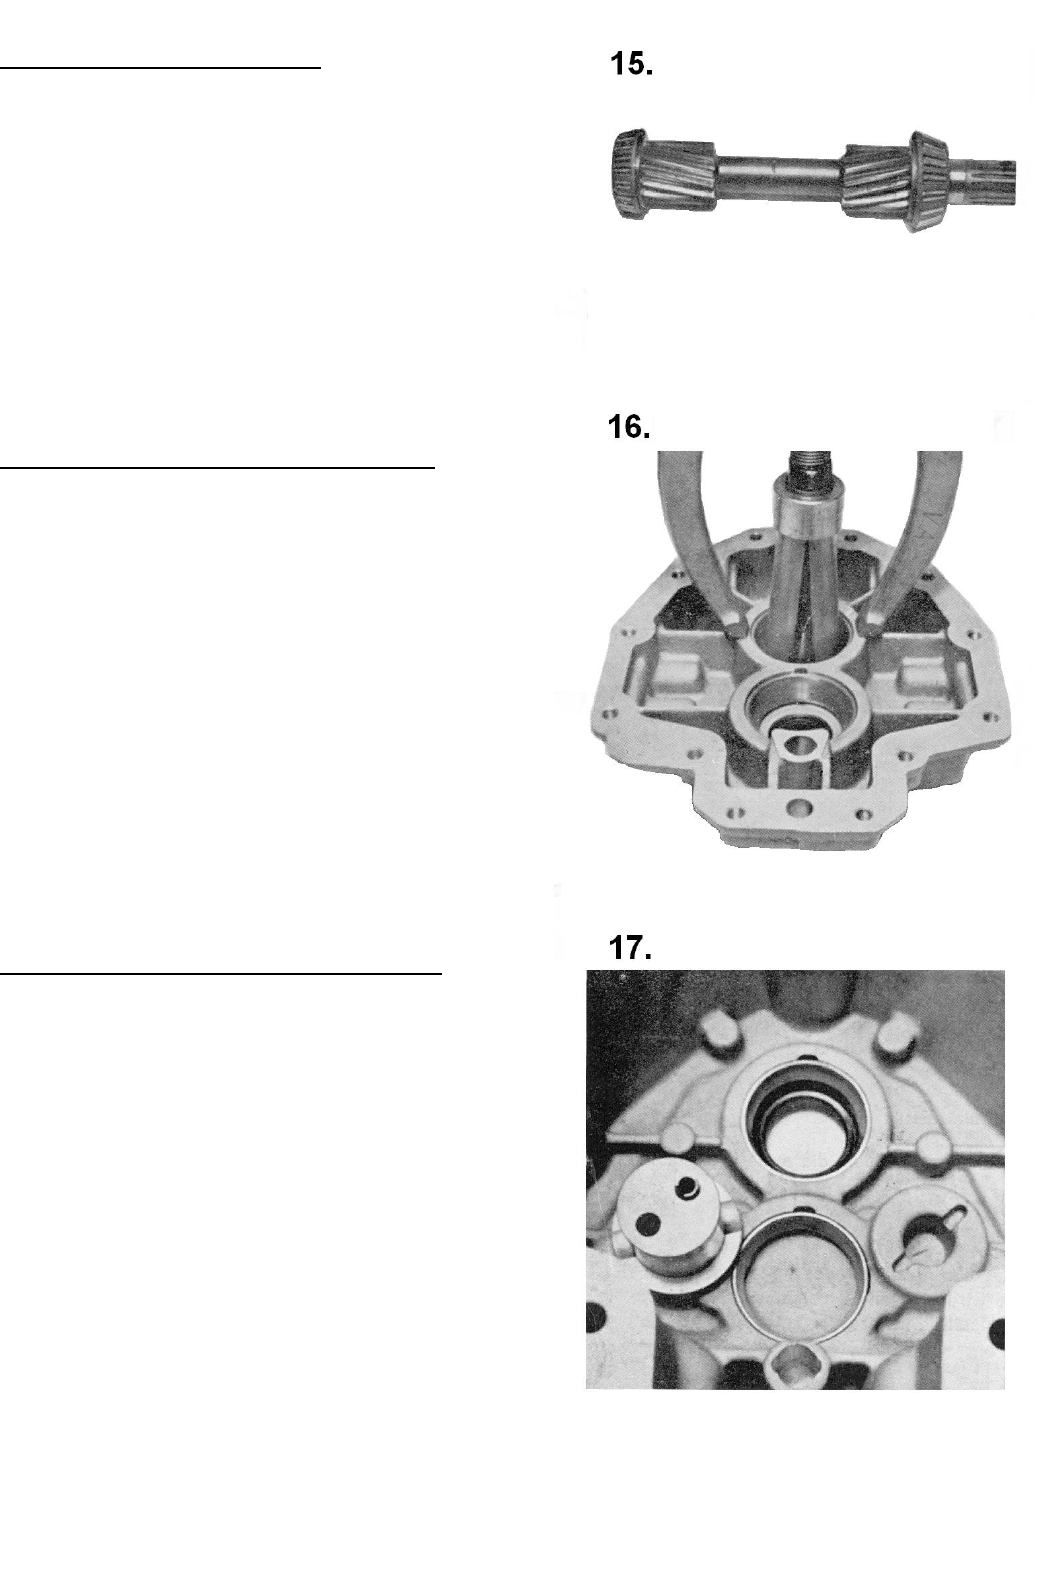
R14
009W2229
Dismantling of Input Shaft
Squeeze off the tapered roller bearing
inner collar.
Dismantling of Lower Gearbox Half
Pull out the tapered roller bearing outer collars
of the lower gearbox with an inner puller
No. 1 x 56 122 208 and auxiliary tool
No. 1 x 56 122 227 and take up the washers.
At the fitting the tapered roller bearing outer
collars have been smeared with Loctite 601
and so heating may be necessary.
At the dismantling: Mark the adjusting washer(s)
which lie below the bearing rings in proportion to
the bore.
Dismantling of Upper Gearbox Half
Pull off the tapered roller bearings outer collars
as described under picture No. 16 above.
Loosen the nuts at the wheel and press out the
bolt of the housing.
Remove slotted pin and washer.
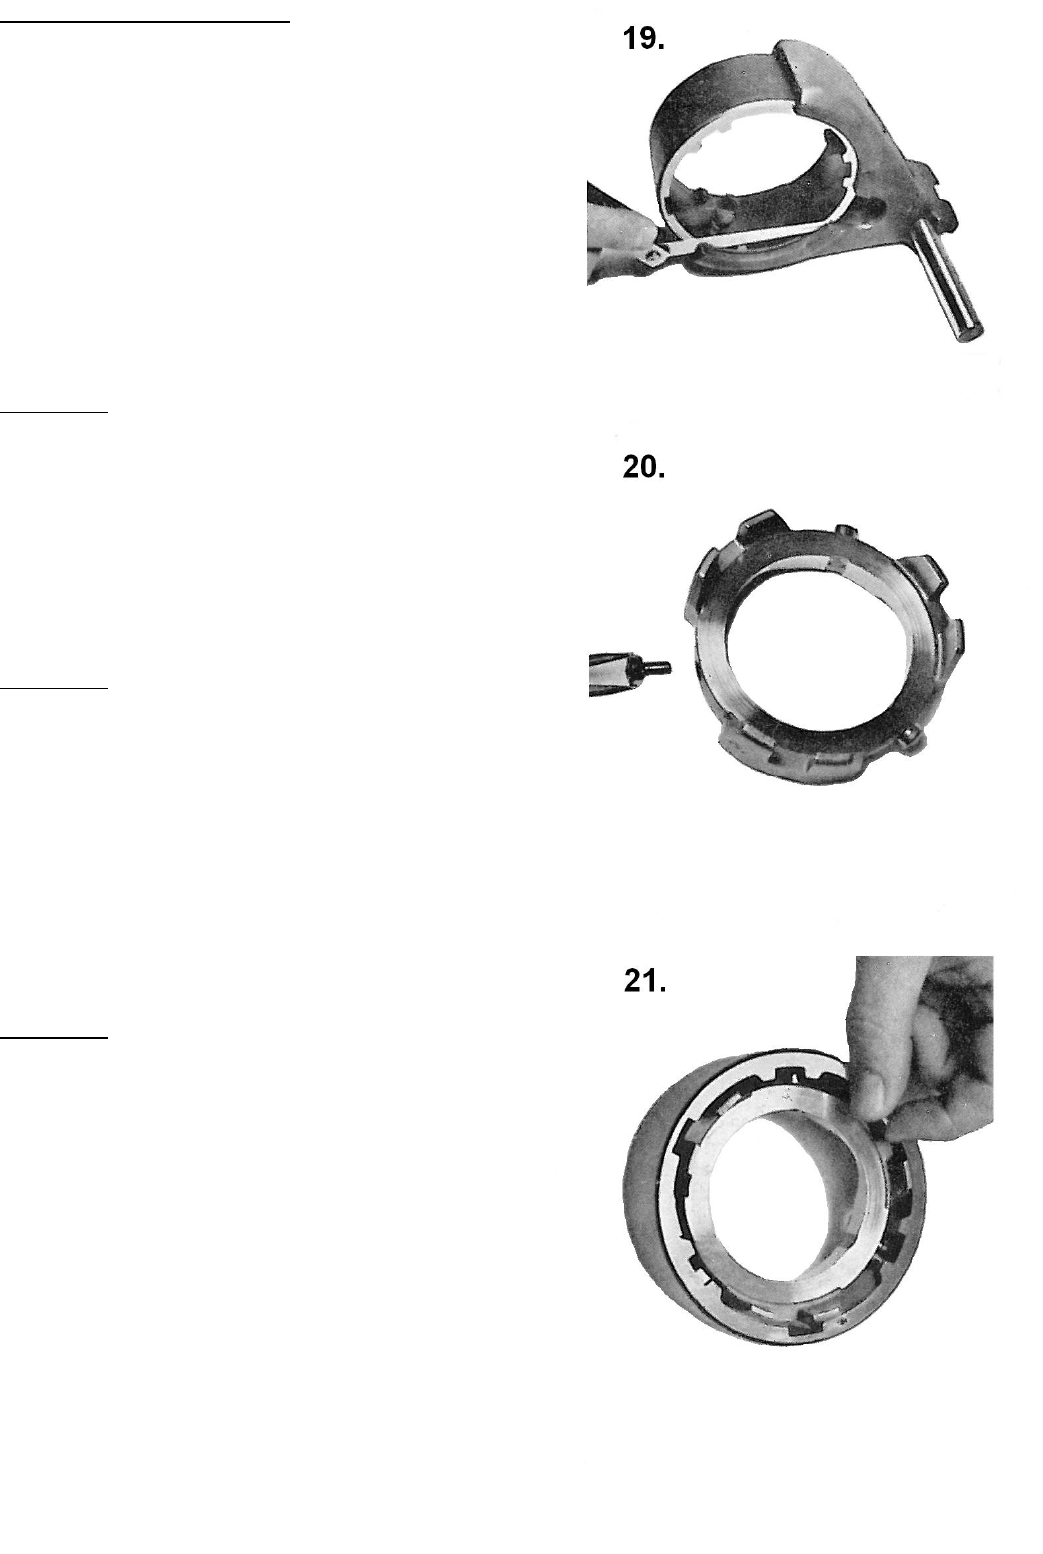
R15
009W2329-R01
Refitment of BW7 Gear
Before refitment of the gear examine the
different components for cracks and wear.
In the following description only the fitting of
output shaft for “AHEAD” is described as the
fitting for “ASTERN” is chiefly corresponding.
If it is necessary reference will be made to the
paragraph marked “Note”.
Picture 19
Insert the sliding sleeve in the shifting fork and
measure the axial clearance of the sliding
sleeve.
The axial clearance below the wear limit must
be 0.1 – 0.4 mm.
Picture 20
Insert the locking bolt in the thrust collar. The
locking bolt should be able to turn easily in its
bore in the thrust collar.
The head of the locking bolt must adjoin the
thrust collar.
Picture 21
Insert thrust collar with locking bolt in sliding
sleeve.
Check torsion in sliding sleeve.
The locking bolts must not pinch by this.
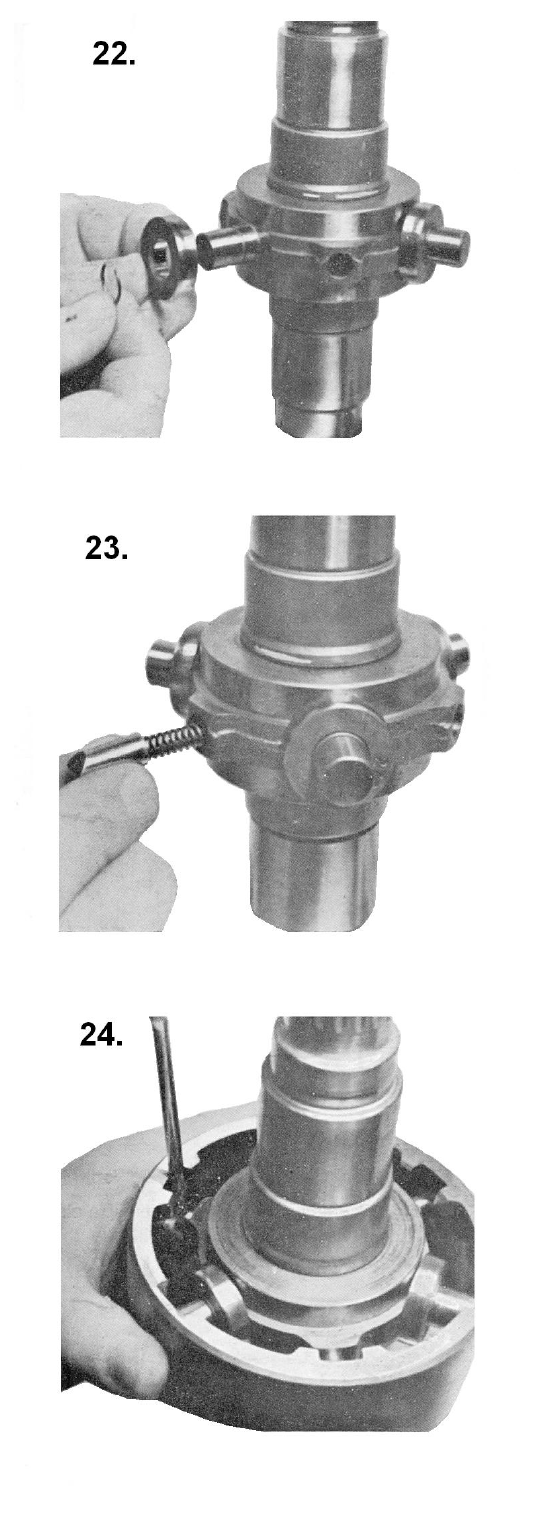
R16
009W2229
Fit the tension rollers on the shafts for
suspension by rollers.
“Note”: The tension rollers must be placed
so that the big surface lies outwards.
Fit the pressure springs in the check bolts.
Fit the check bolts in the corresponding
bores.
The point of the check bolts should turn so
that it is horizontal.
Press the sliding sleeve from the bottom
against the check bolts.
Press the check bolts back with a screw-
driver and at the same time press the
sliding sleeve upwards.
The bolts should rest in the points of rest of
the sliding sleeve.
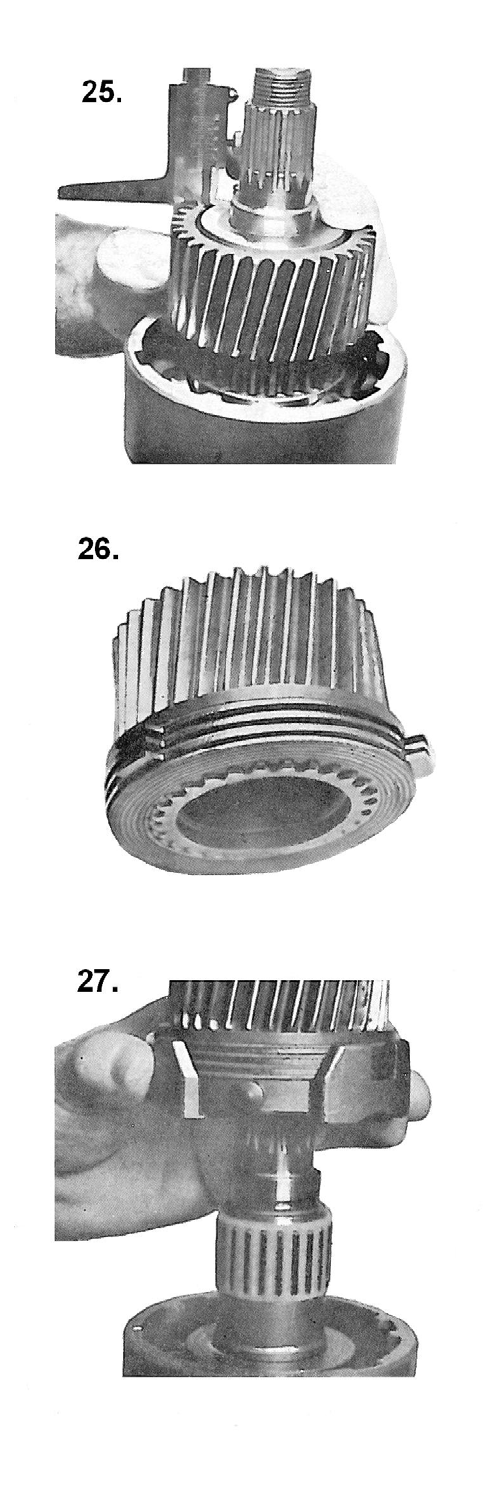
R17
009W2329-R01
Fit needle bearing housing, wheel for “AHEAD”
and washer.
Check the axial clearance of wheel for “AHEAD”.
It should be 0.1 – 0.4 mm.
“Note”: For “ASTERN” the axial clearance can be
adjusted by fitting an intermediate washer (thrust
washer).
First fit a washer. Then fit an inner disc and the an
outer disc.
Fit 4 inner and 3 outer discs in this order.
Fit wheel for “AHEAD” with clutch discs on the
thrust collar.
First fir the driving pins through the thrust collar
and the fit the thrust collar with clutch discs and
wheel for “AHEAD” over the needle case on the
input shaft in the sliding sleeve.
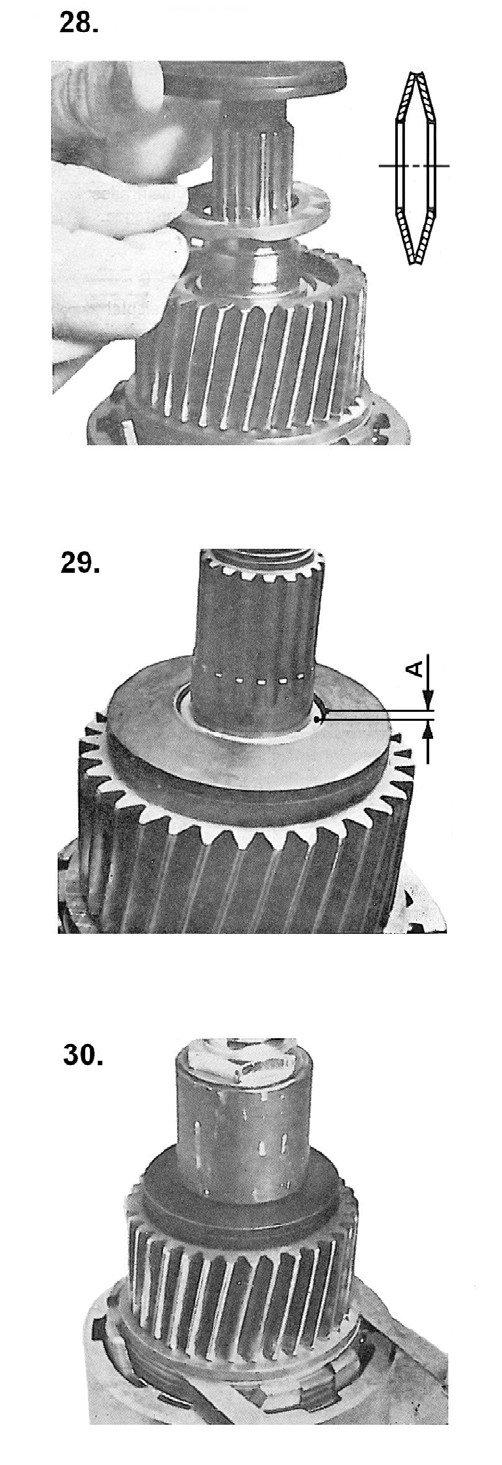
R18
009W2229
Fit thrust washer, the oil pockets of which should
turn towards the wheel for “AHEAD”.
Fit the disc springs which should touch with the
outside diameter.
Check the tightening of the disc springs.
The inside diameter of the disc springs must,
when slack, in proportion to the front be
min. 1.1 mm (measure A).
Tighten the disc springs with bush 1 x 56 136 994.
Measure disc clearance between inner disc and
washer with a feeler gauge in two places which
are opposite one another.
The disc clearance to be 0.75 – 0.85 mm.
Deviations should be adjusted with washer
available in different thicknesses.
“Note”: Tighten the disc springs on the side for
“ASTERN” with bush No. 1 x 56 136 995.
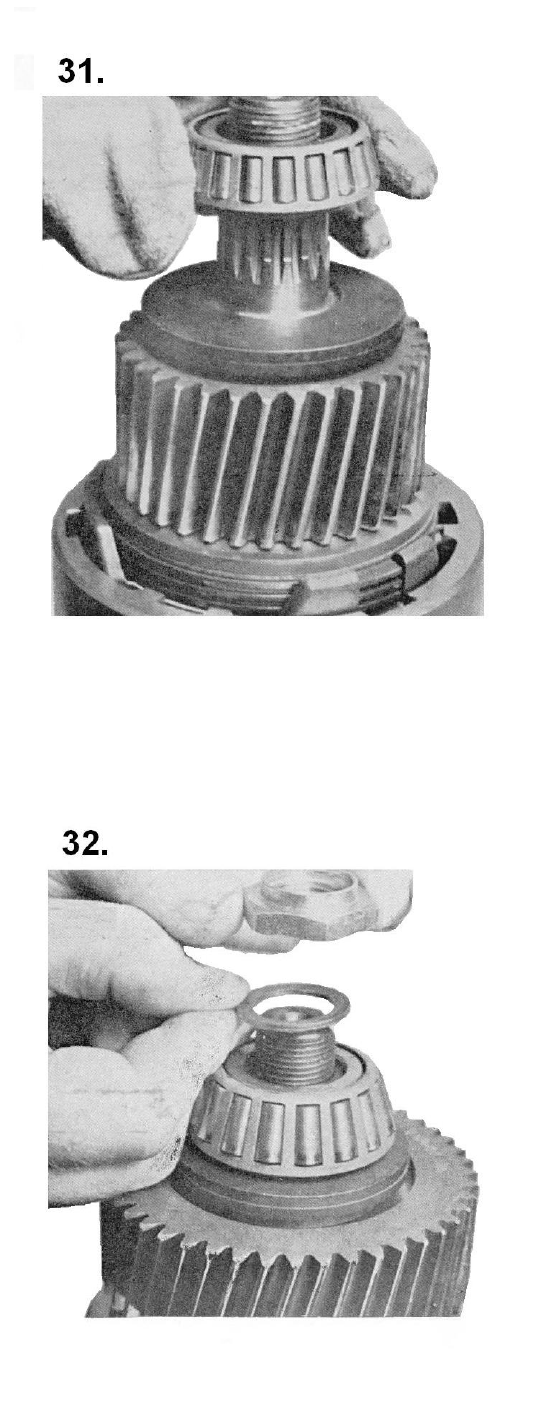
R19
009W2329-R01
Heat the tapered roller bearing inner collar to
about 85°C and fit it with the thin end of the
taper roller facing the shaft end of the output
shaft until it fits tightly against the disc
springs.
Tighten the tapered roller bearing with bush
No. 1 x 56 136 995 and original hexagon nut
until it fits tightly against the shaft assembly.
See picture No. 33 overleaf too).
“Note”: Fix the tapered roller bearing for
“ASTERN” with supporting washer and
original hexagon nut.
The torque of the nut is 100 Nm (10.0 kpm).
Secure the nut.
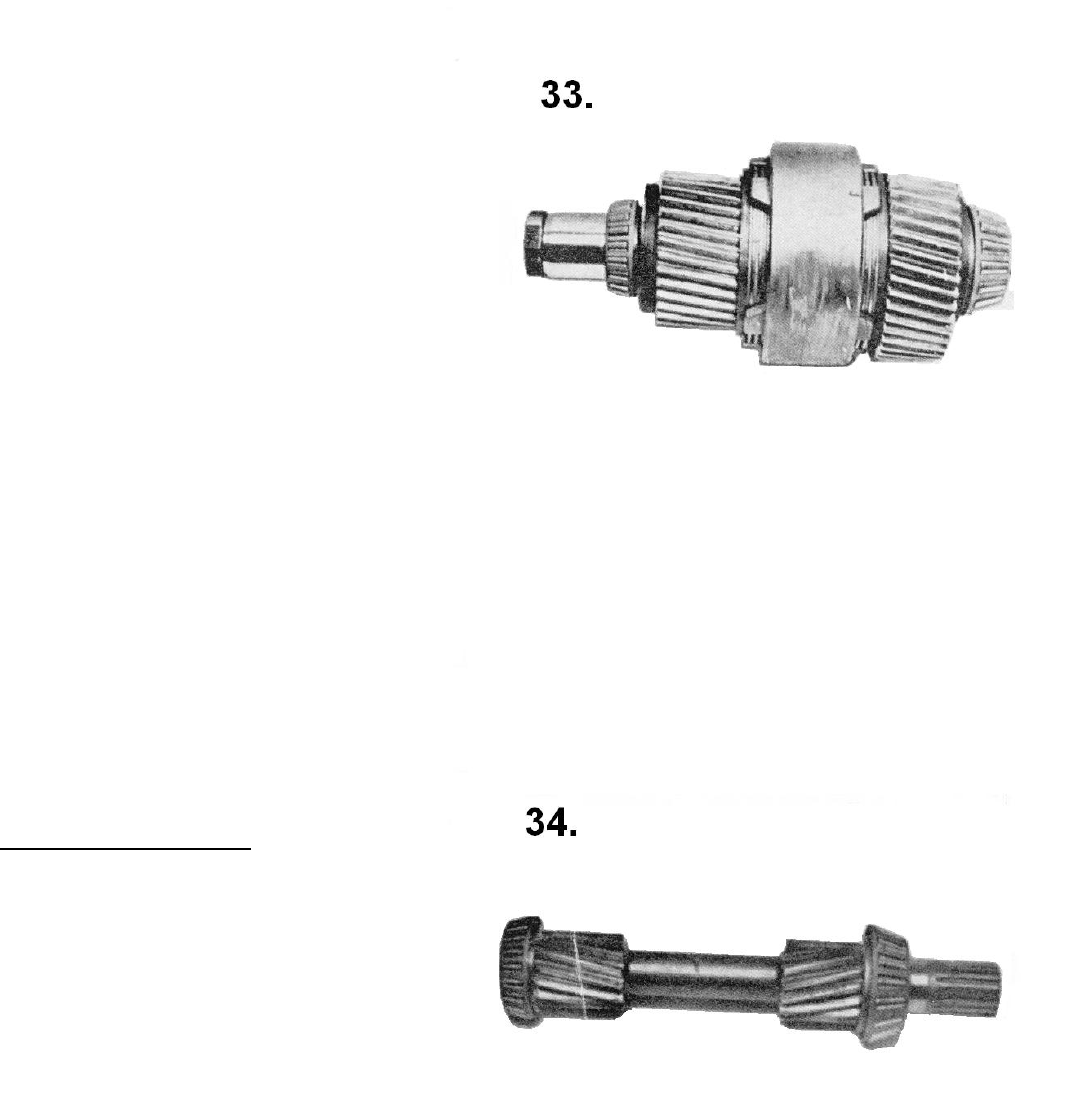
R20
009W2229
The picture shows the ready-mounted
output shaft.
Fitting of Input Shaft
Heat the tapered roller bearing inner
collars to about 85°C and fit it with the
thin end of the bearings towards the
shaft ends.
“NOTE”: Fit wide tapered roller bearing
on the input side.
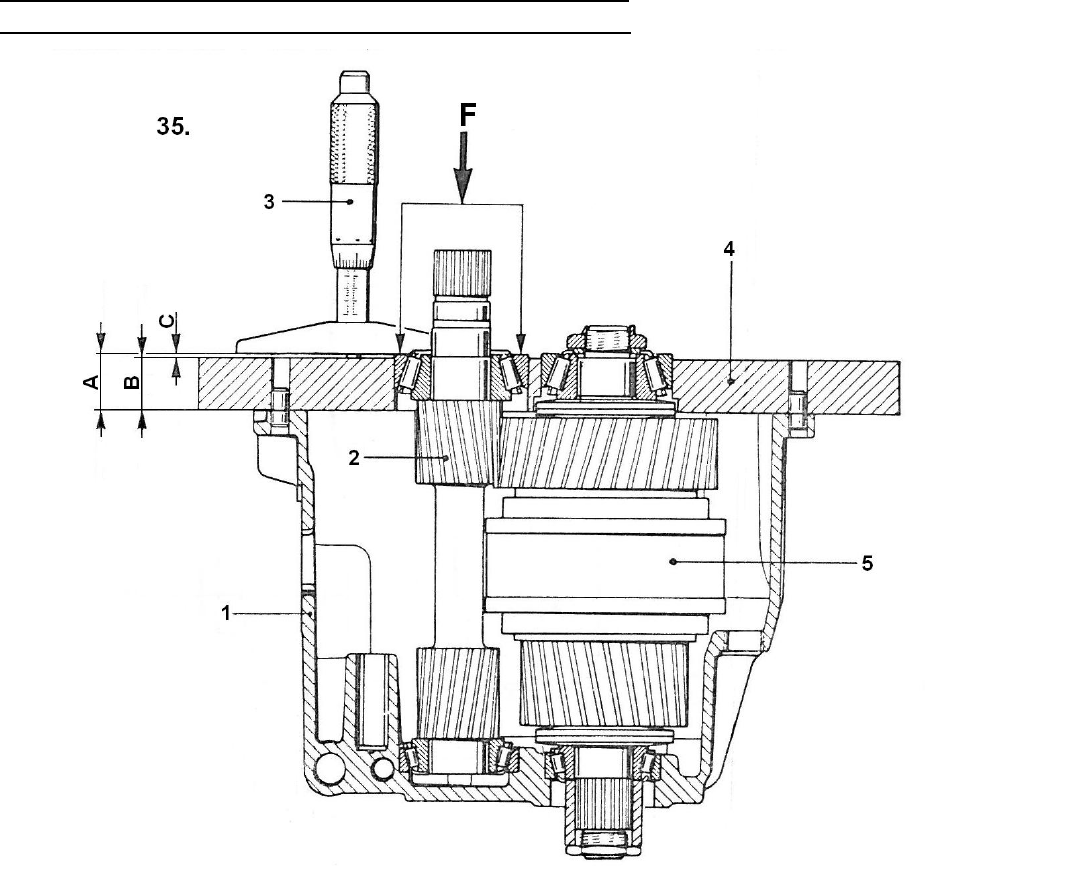
R21
009W2329-R01
Measuring of Tightening of Tapered Roller Bearing
on Input and Output Shafts with Measuring Gauge.
1 = Housing 3 = Depth micrometer 5 = Output shaft
2 = Input shaft 4 = Measuring gauge 1 x 56 136 978
Heat the bearing bores in the housing to about 85°C and fit the tapered bearing outer
collars with Loctite No. 601.
Build in the tapered roller bearings of input and output shafts with the tightening of 0.03 to
0.08 mm after the cooling.
Measure the tightening as shown on the pictures 35, 36 and 37 and adjust it with adjusting
washers (measure G). Measure G: measure F (difference measure) plus tightening.
Fit the input and output shafts in the housing and fit the measuring gauge on the housing by
means of the pins.
Fit the tapered roller bearing outer collars in the measuring gauge until they fit tightly
against the tapered rollers while constantly turning the input and output shafts with a
pressure of F = 30 N (3.0 kp) on the bearing outer collars.
Measure A = B + C, B = thickness of measuring gauge, C = bearing outer collar above
measuring gauge.
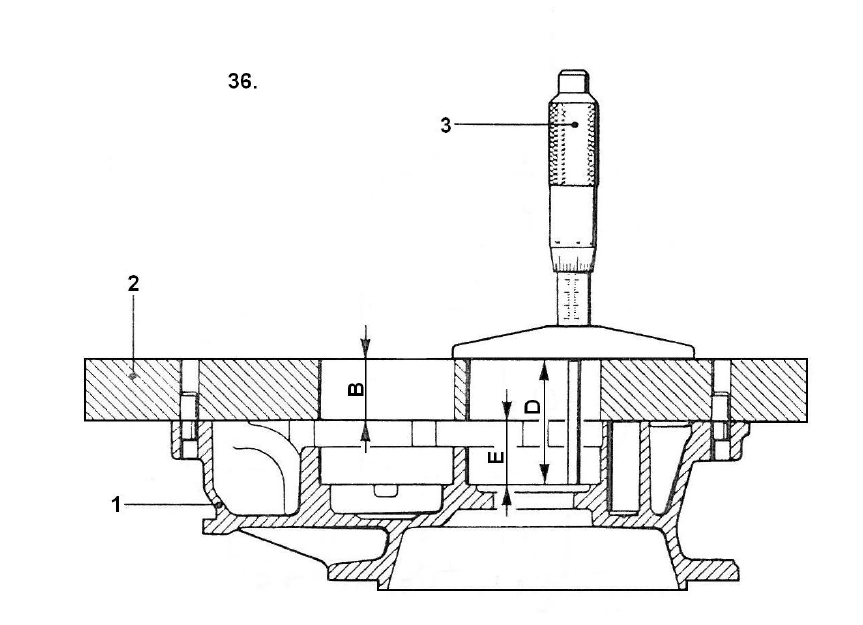
R22
009W2229
1 = Bearing bushing
2 = Measuring gauge
3 = Depth micrometer
Fit the measuring gauge on lower gearbox half.
Calculate the thickness of the intermediate washer G as follows:
Establish measure E as D minus B (thickness of measuring gauge).
Calculate the difference measure F as E minus A (See picture No. 35 on last page).
Calculate intermediate washer G for the input shaft as F plus tightening 0.03 – 0.08 mm.
At the calculations the thickness of the liquid jointing, when compressed, should be included
and an empirical value of 0.02 mm should be considered.
Then fit the necessary intermediate washers in the bearing bores (max. 2 washers per
bore) and heat the bearing bores to about 85°C and fit the roller bearing outer collars with
Loctite No. 601.
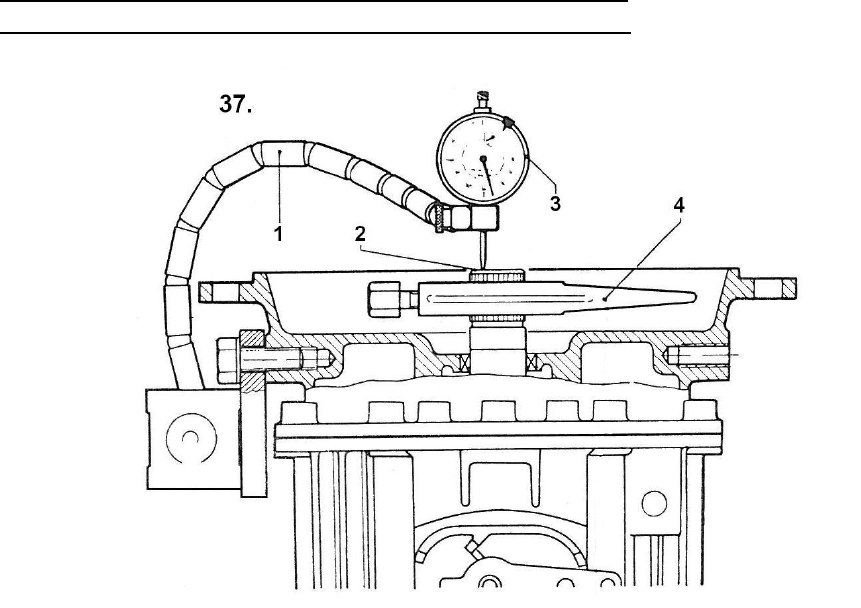
R23
009W2329-R01
Measuring of Tapered Roller Bearing tightening on
Input and Output Shafts without Measuring Gauge.
1 = Dial indicator holder 2 = Input shaft 3 = Dial indicator 4 = Driving arrangement
It would be an advantage, if the input shaft and the output shaft are measured individually for
the adjusting of the tapered roll er bearing tightening. The measur ing procedure is the same
both for input as well as for output. Howeve r, only the procedure for the input sh aft is
described here. When measuring the output shaft it should be as described at picture no. 31.
Turn the shafts when measuring in order to compensate for possible deviations, and a fixed
point of measuring should be chosen for marking of the axial clearance.
Heat the bearing bore to about 85°C and fit the outer collar of the tapered roller bearing with
Loctite no. 601.
In order to be able to adjust the tightening of the roller bearing it is necessary that the shafts
show axial clearance. This is obtained by fitting intermediate washers wh ich are 0.2 mm
thinner than those which were removed and marked as described at picture no. 16.
Heat the bearing bor e to about 85°C and fit t he bearing outer collar without Loctite in the
bore.
Place the input shaft in the hous ing after the cooling and fit the lower gearbox half without
any packing and drive in the guide pins.
Fit the contact point of the dial micrometer on the fr ont of the input shaft and turn the shaft
backwards and forwards. During this the shaft should show axial clearance.
If there is no clearance shown. fit thinner washers under the bearing outer collar.
Add the roller bearing tightening of 0.03 – 0.08 mm plus further 0.02 mm (liquid jointing com-
pressed) to the measured axial clearance and thus we get the thickness of the intermediate
washer.
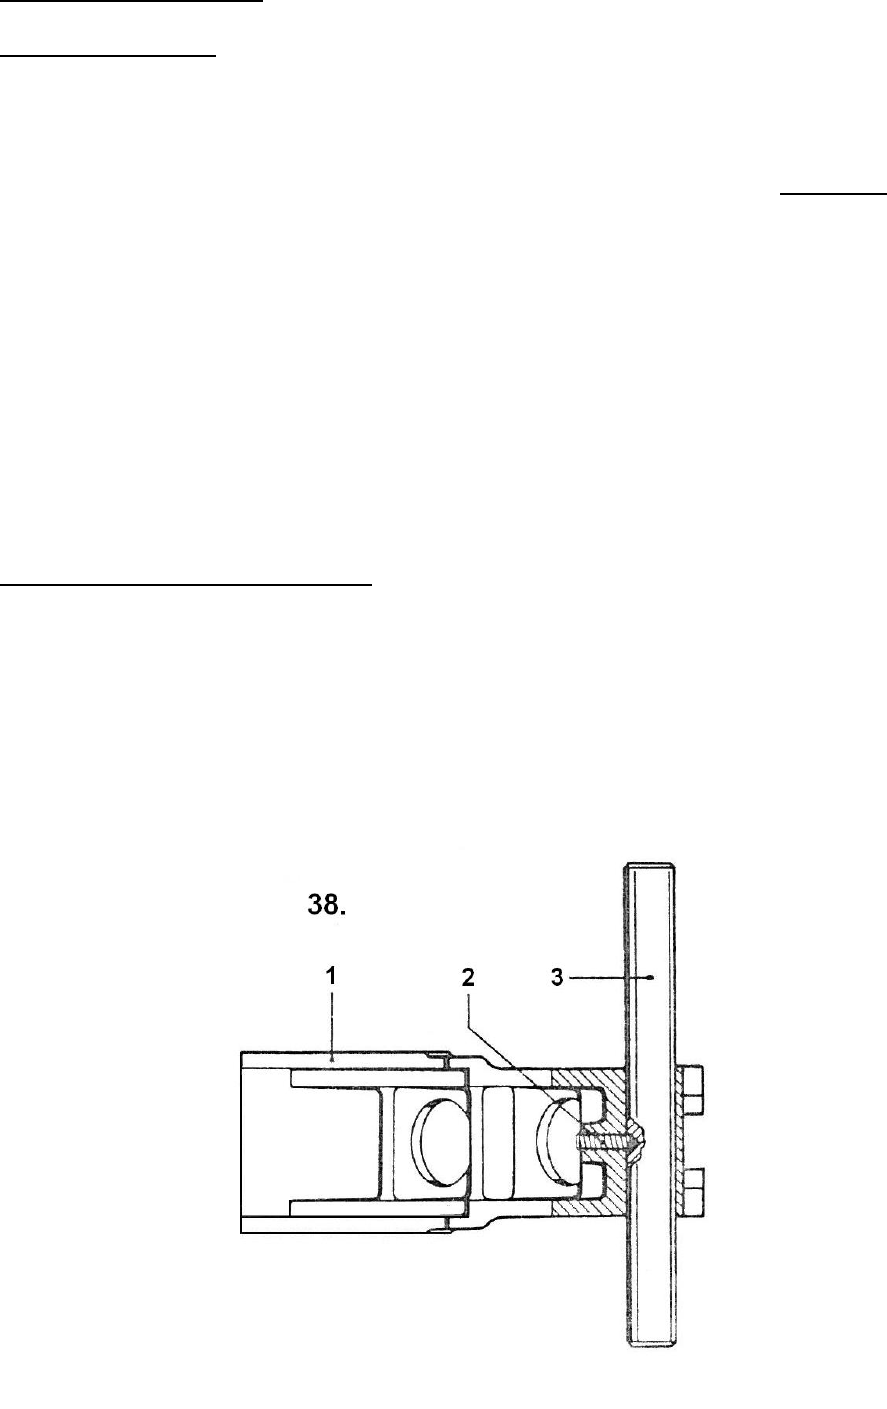
R24
009W2229
Picture No. 37 continued
Measuring example:
Thickness of intermediate washer during the measuring procedure: 0.60 mm
Measured axial clearance of shaft: 0.08 mm
Correct tightening 0.03 – 0.08 mm (average value): 0.055 mm
Thickness of compressed liquid jointing: 0.02 mm
Theoretical thickness of intermediate washer: 0.755 mm
In practice the intermediate washer will be 0.73 – 0.78 mm.
Then insert the correct intermediate washers in the bores (max. 2 washers in each bore)
and fit the bearing outer collars after heating with Loctite No. 601.
Pre-Mounting of Shifting Fork.
Place the reversing shaft in the shifting fork and secure it with the threaded pin and smear it
with Loctite No. 241.
“NOTE”: the long side of the reversing shaft points to the left when the position of the
shifting fork is as shown on the drawing.
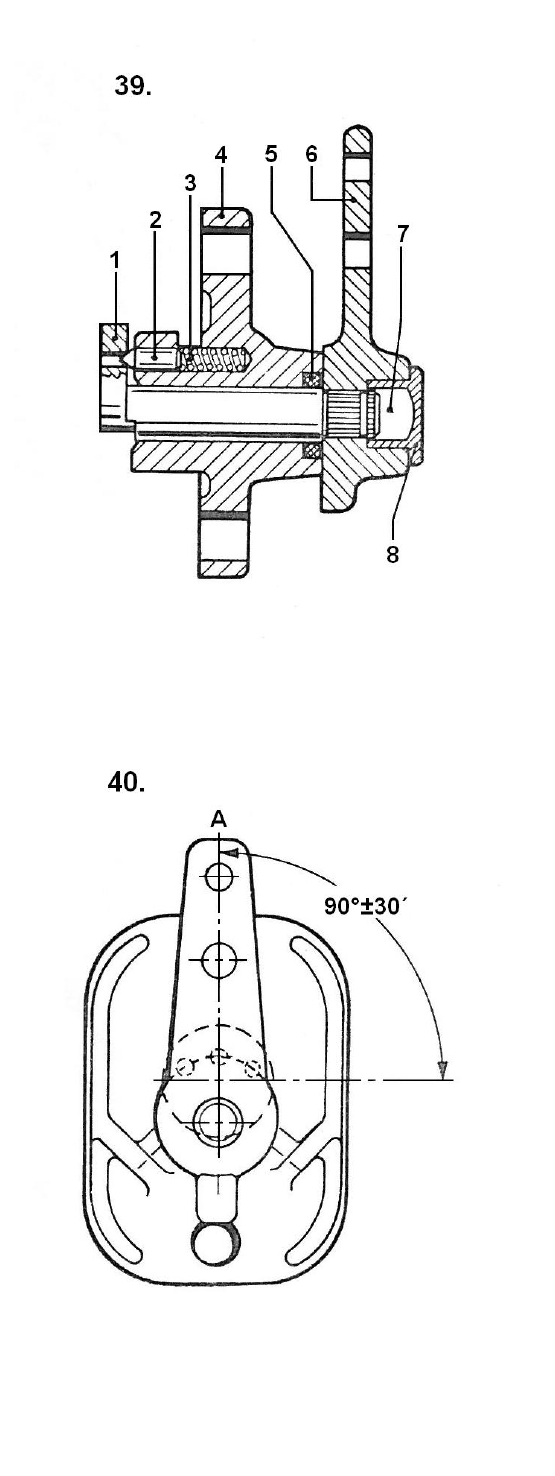
R25
009W2329-R01
1 = Shifter shaft
2 = Shift pin
3 = Pressure spring
4 = Gearbox
5 = O-ring
6 = Shift control lever
7 = Grease lubrication
8 = Screw cap
Insert pressure spring, shift pin, oiled
shifter shaft and O-ring in the gearbox.
Press the shift control lever on to
theshifter shaft so tha t shift control
leveris placed in neutral position at
90°±30’to the gear shaft length.
Fit the screw cap with grease
lubrica-ting after the pressing on.
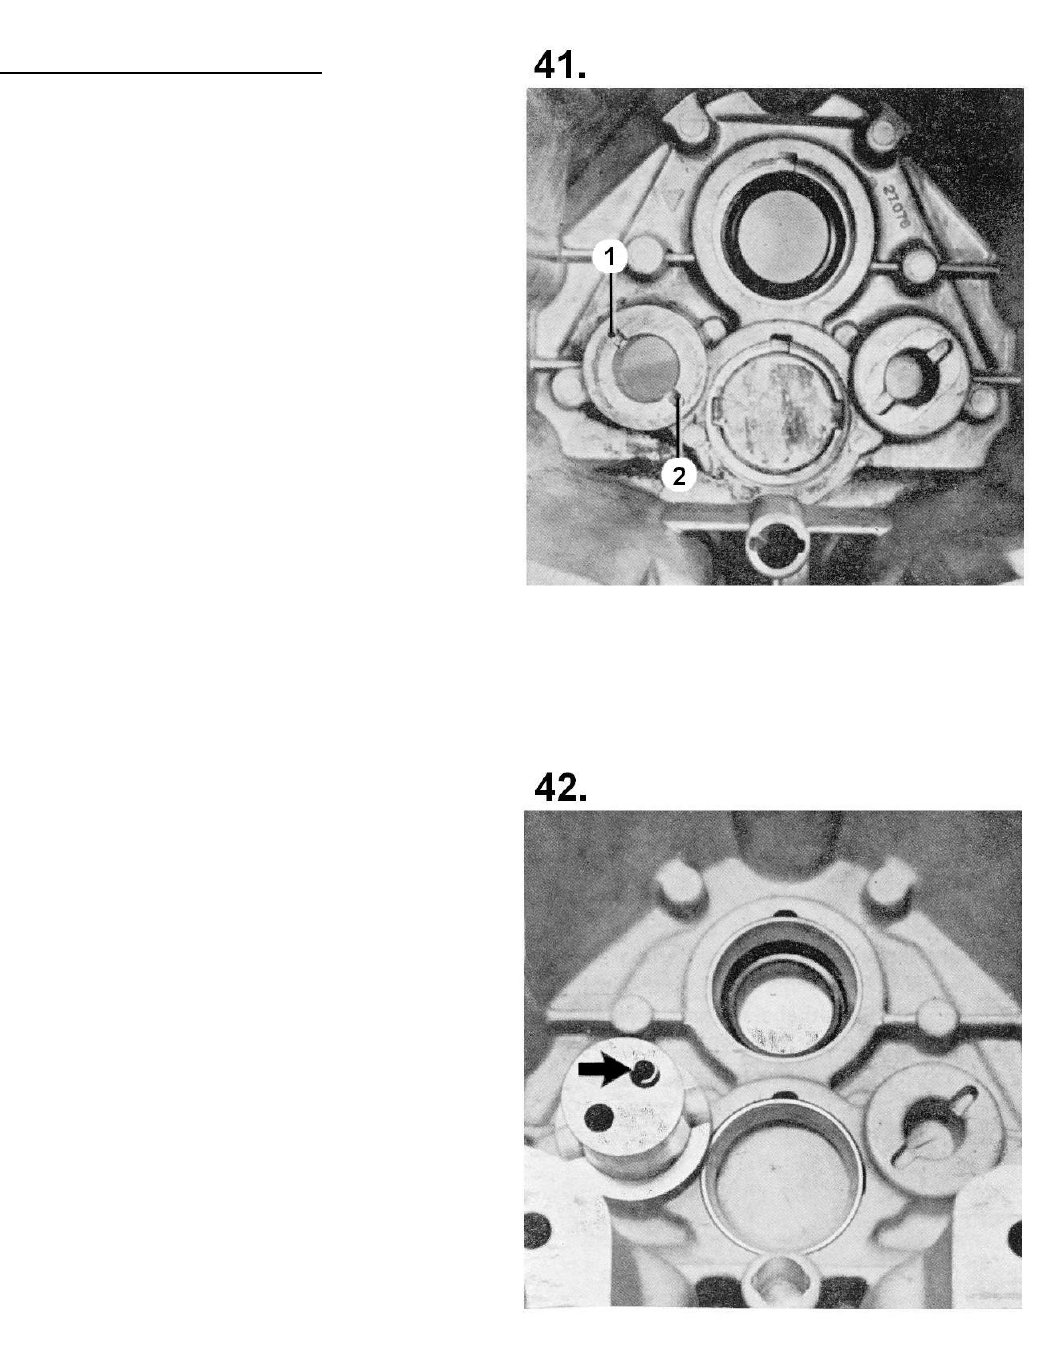
R26
009W2229
Fitting of Bolts in Gearbox
Drive in t he slotted pins 4x16 in
thebolts and fit the washers on the
bolts so that the lubricating groove
in them point to the wheel.
“NOTE”: The bolt must be fitted in
pos. 1 or 2 all depending
on the transmission.
Transmission:
GLL = AHEAD
GGL = ASTERN
Heat the gearbox and fit the bolts
with slotted pins in pos. 1 or 2 all
depending on the transmission.
Fit the hexagon nut and tight en it
with 100 Nm (10 kpm).
Fit the sleeve in the bolt bore
nearest the centre of the gear (s ee
the arrow).
Smear the hexagon nut with
unhardening packing material
before the fitting.
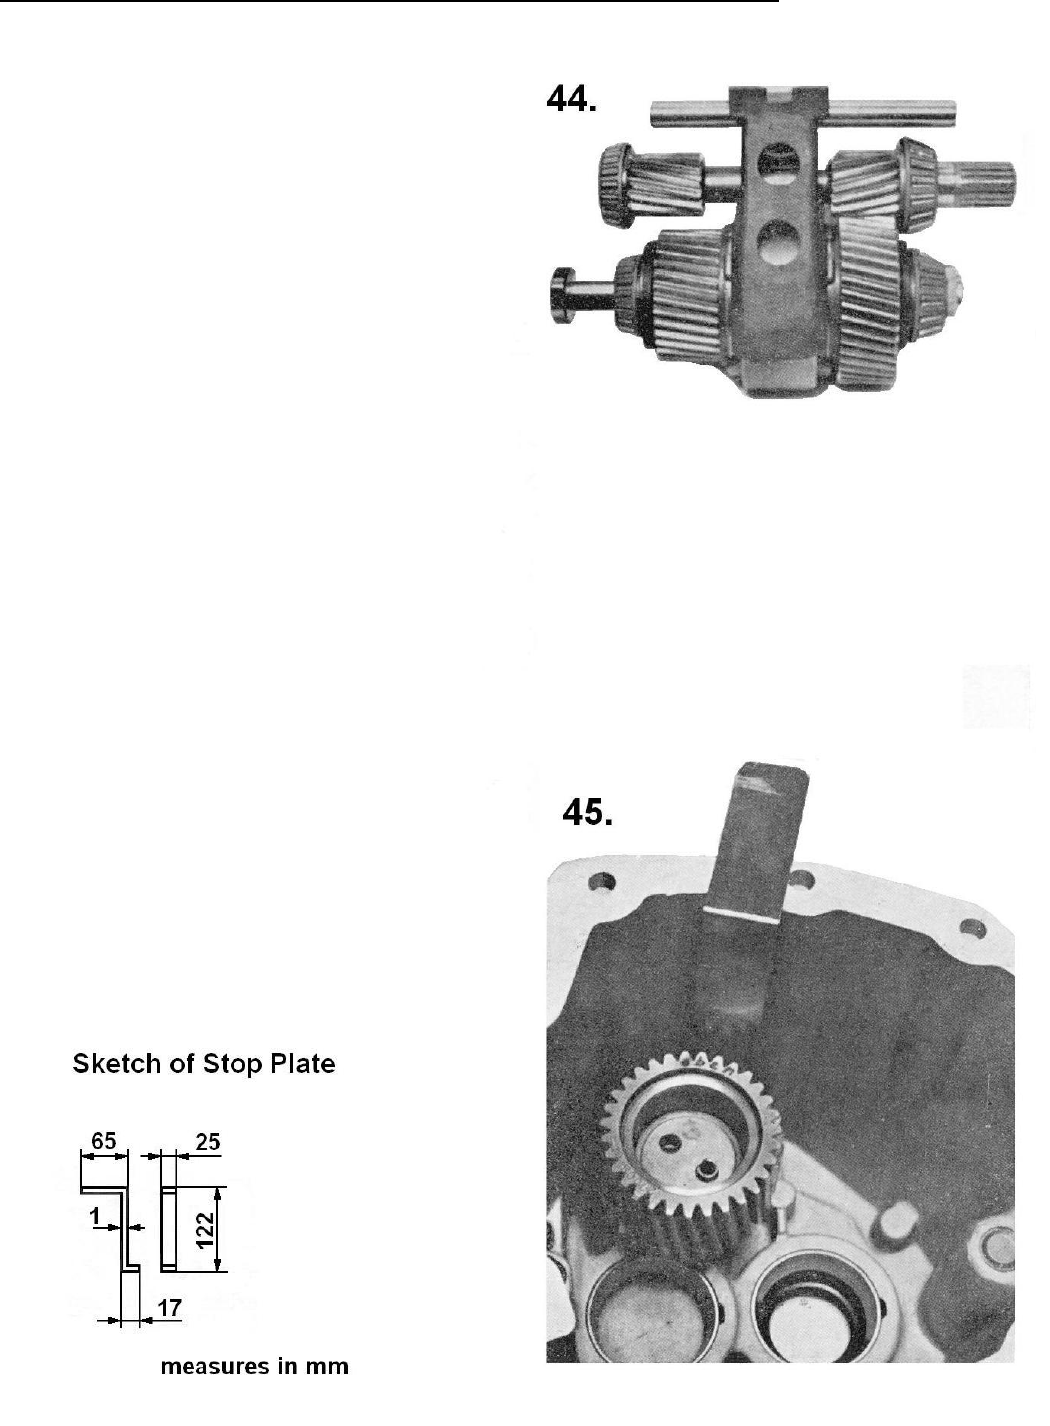
R27
009W2329-R01
Fitting of Input and Output Shafts with Shifting Fork in Gearbox
Place the shaft arrangement as
shown on the picture.
“NOTE”: The long side of the
reversing shaft faces the
input side.
Fit the intermediate wheel and
needle bearing.
Lift intermediate wheel with s top
plate (see illustration).
The intermediate wheel should be
lifted about 25 mm, otherwise fitting
is not possible.
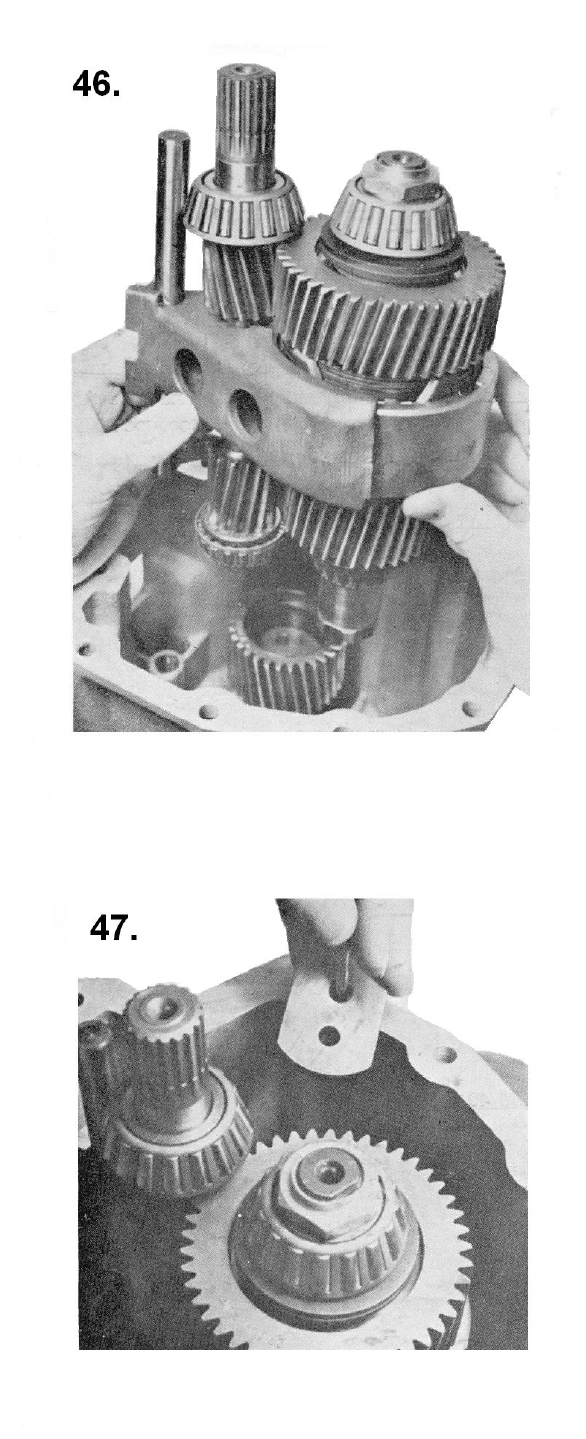
R28
009W2229
Place the housing so that the
opening of it turns upwards.
Oil the roller bearings and reversing
shaft and fit them together in the
housing.
Remove the stop plate.
“NOTE”: The long side of the
reversing shaft points
upwards to the input
side.
Fit retaining plate for intermediate
wheel and before that smear the
screws M8x25 with Loctite No. 241.
Torque: 17 Nm (1.7 Kpm).
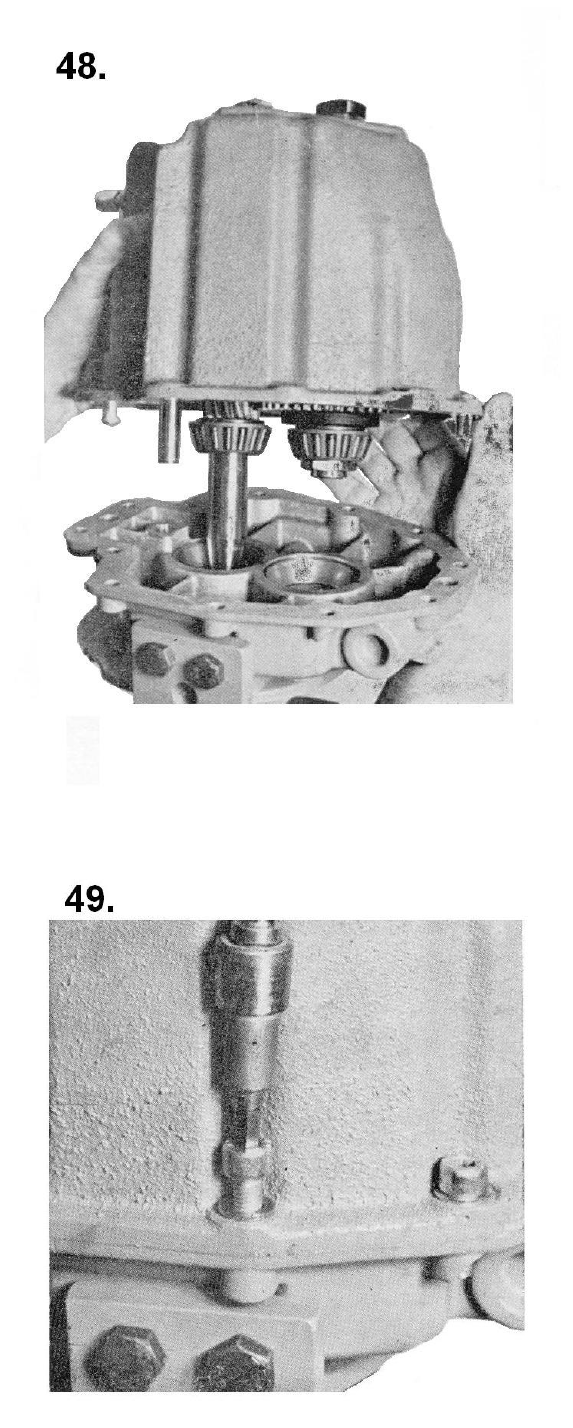
R29
009W2329-R01
Smear the seal f aces of the
gearbox halves wit h permanently
plastic liquid jointing.
Oil the bearings on the input and
output shafts.
Assemble the gearbox and drive in
the guide pins.
Tighten the screws M8x25 with a
torque of 17 Nm (1.7 Kpm).
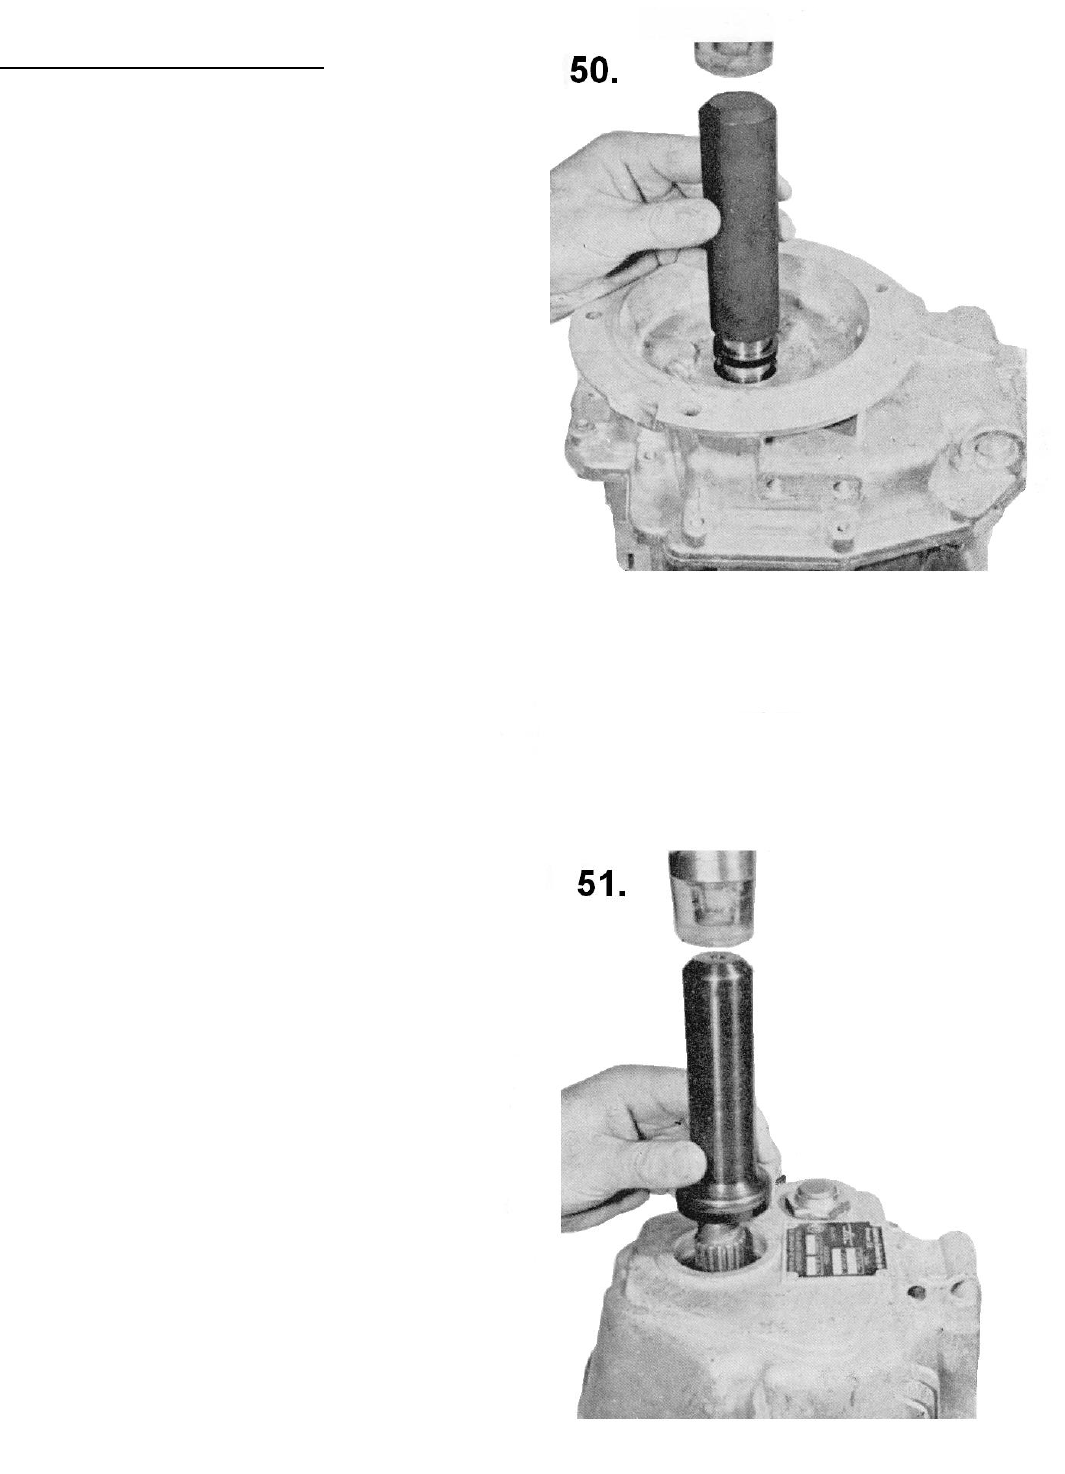
R30
009W2229
Fitting of Shaft Seal Rings
Fit the protective cap No. 1 x 56
136 992 over the input shaft.
Smear the seal ring 25 x 33 x 6 with
a thin layer of grease on the lip ring
and smear with a thin lay er of
plastic liquid jointing on the outside.
Fit the seal ring with punch No. 1 x
56 199 916 so that it fits tightly
against the bore of the housing.
Smear the similar seal ring 32 x 45
x 7 for the output shaf t in the same
way as the seal ring for the input
shaft and fit it by means of punch
No. 1 x 56 136 993 in the housing
so that it fits tightly against the
tapered roller bearing inner collar.
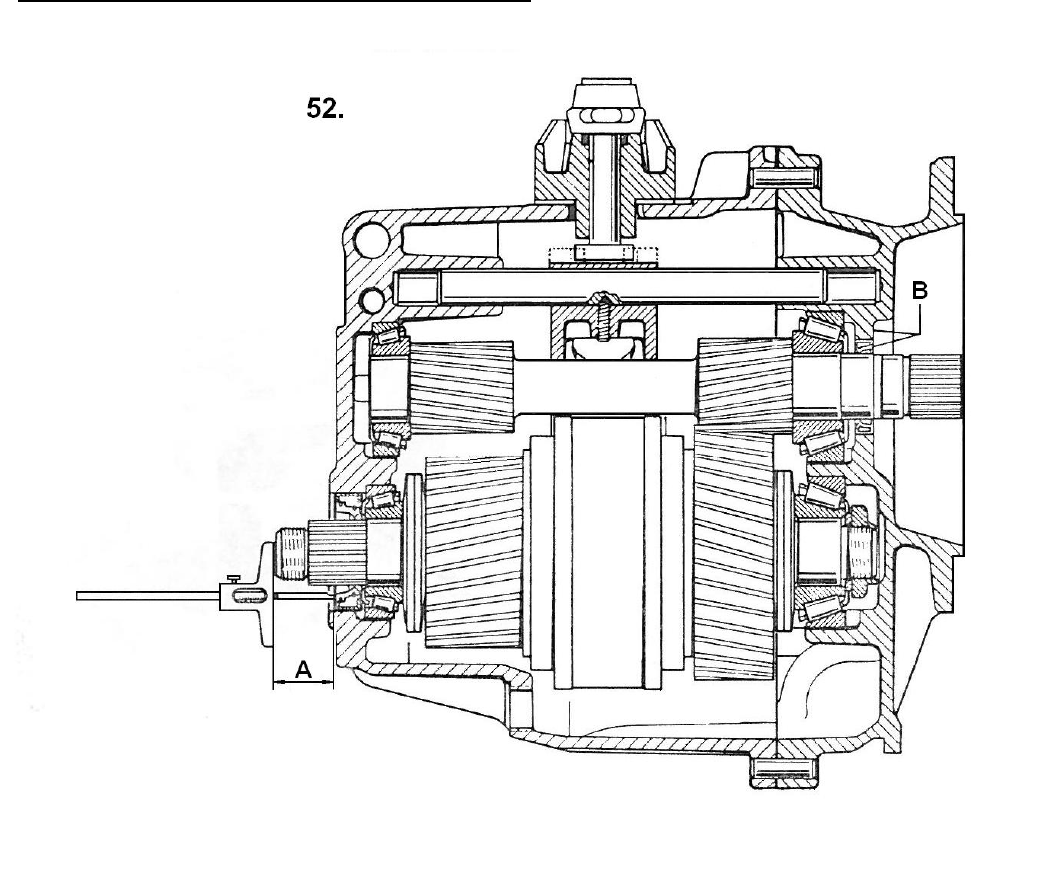
R31
009W2329-R01
Supplement to Fitting of Shaft Seal Rings
A = Distance to shaft seal ring: 22.5 ±0.5 mm.
B = Shaft seal ring binding with surface of casting on the lower gearbox half.
The picture shows the necessary mounting dimensions for the shaft seal rings on the
input and output shafts.
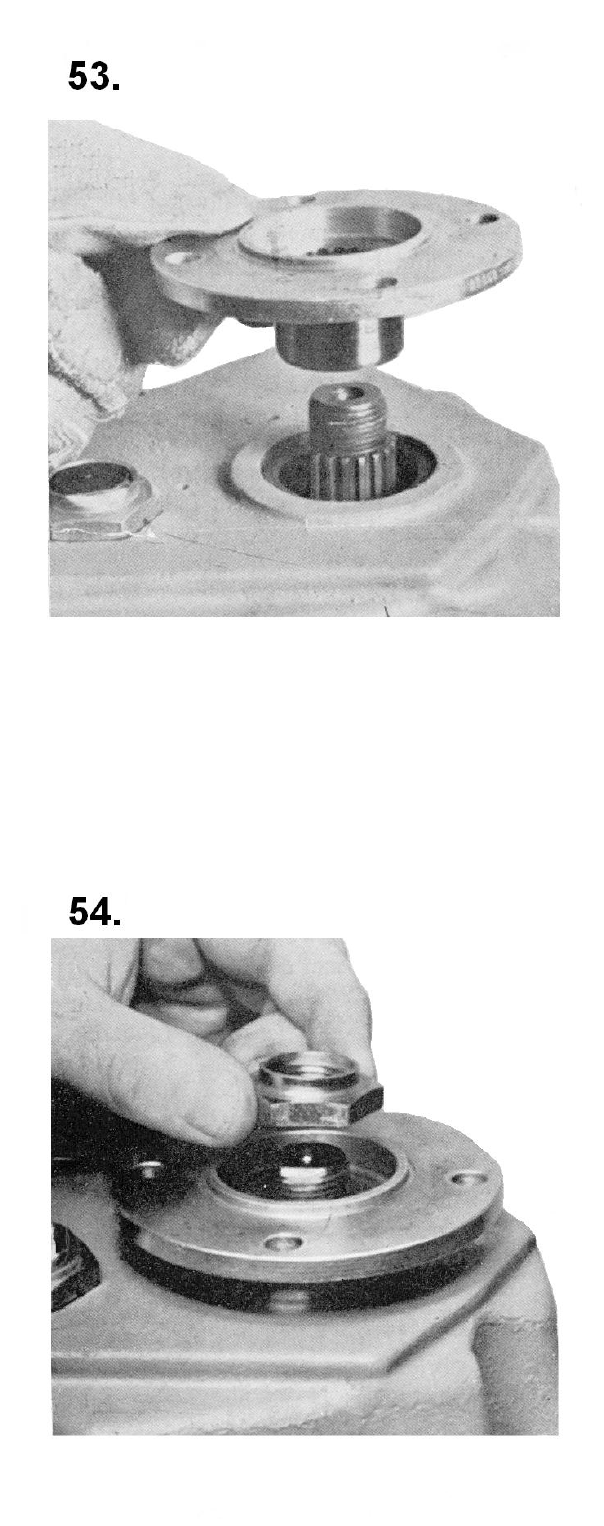
R32
009W2229
Heat the output flange to about
85°C and fit it on the output shaft.
Smear the nut with permanently
plastic liquid jointing and secure it
with a torque of 100 Nm ( 10 Kpm).
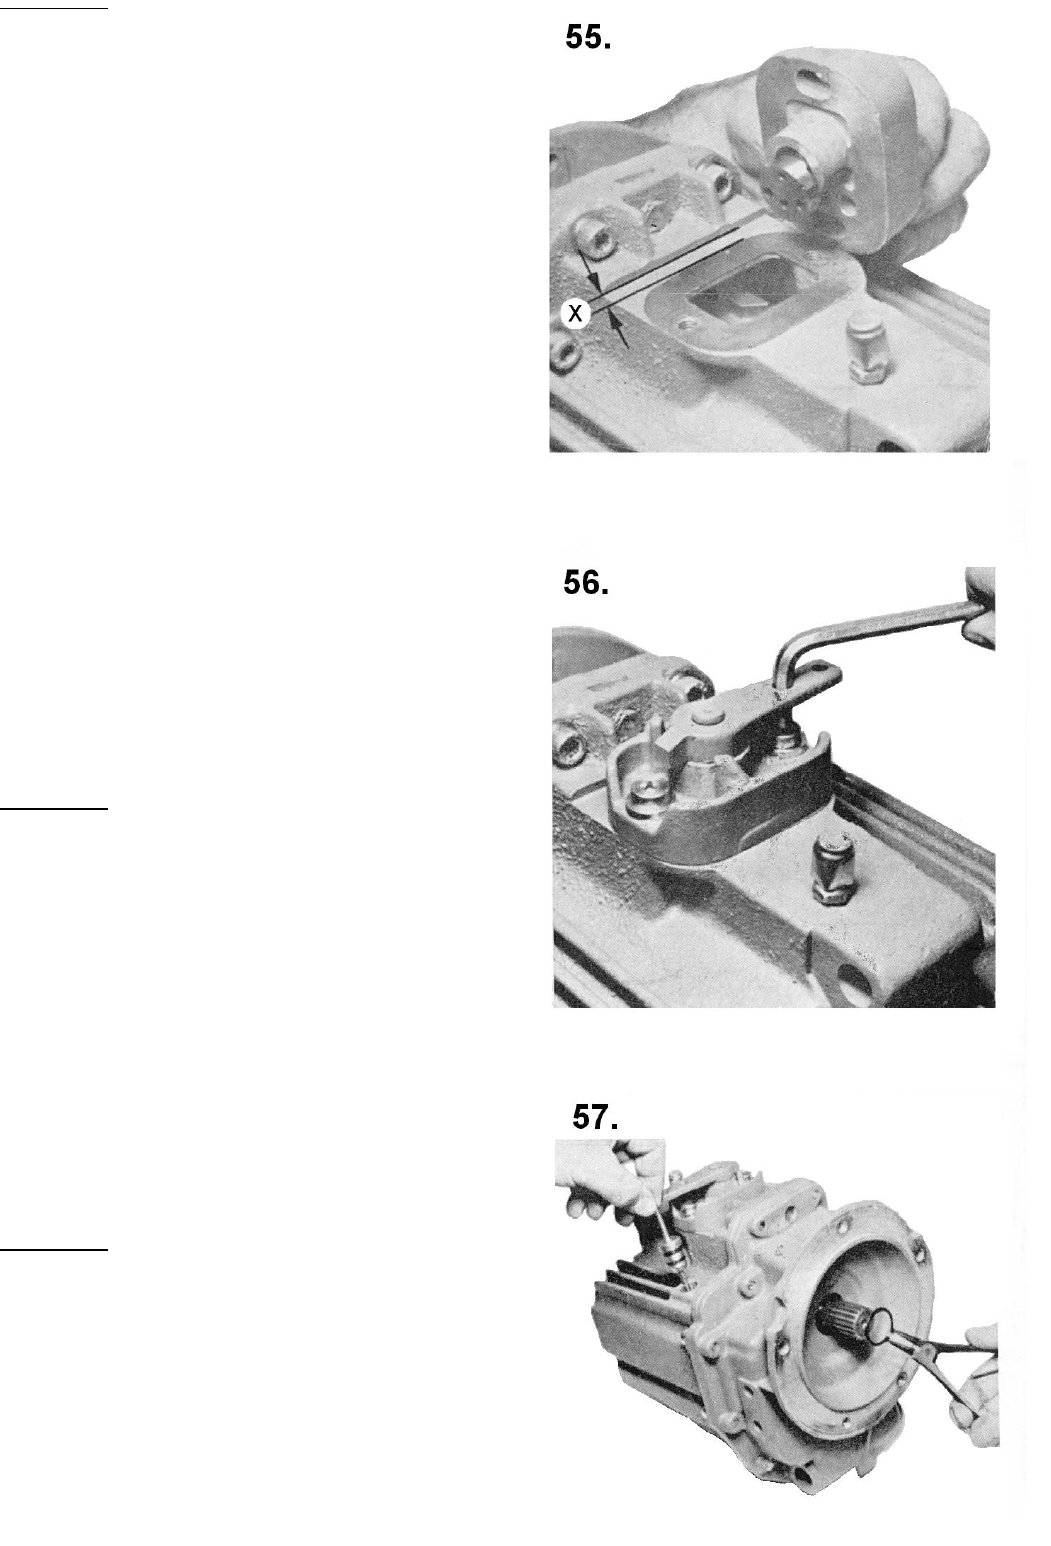
R33
009W2329-R01
Picture 55
Fit the screws M8x25 with washers in the
gearbox. Put the gear shift lever in
“neutral” (the sliding sleev e is also in
“neutral” position).
Place the gearbox with gask et in the
opening of the housing and pr ess the
shifting eccentric down into the shifting
fork. In connection with this check at the
same time with a ligh t pressure of the
eccentric pointing to the assembly the
axial clearance between the sliding sleeve
and the shifting fork.
Secure the shifter housing in this position.
“NOTE”: When checking the axial
clearance it must be checked
whether the fixing screws hit
against the walls of the gearbo x
because of the slots which may
lead to wrong adjustments.
Adjustment can be c arried out by axial
displacement (angle 90° m ust be
maintained, see picture 40).
Picture 56
Tighten the shifter housing with a torque
of 17 Nm (1.7 Kpm).
Shift the shift control lever in both
directions and check the function of the
reversing.
The sliding sleeve s hould be connected
(click) in both directions when the angles
of engagement are as equal as possible.
Besides, it must always be possible t o
turn the shift control lever 37° in either
direction without much resistance.
Picture 57
At last fit the dip stick and the loc king ring
at the end of the input shaft when fitted.
Fill oil in the ge arbox to a quantit y
corresponding to the upper mark on the
dip stick.

009W2329-R01
S1
SECTION S
SAIL DRIVE TYPE Z-7

009W2329-R01
S2
CONTENTS
Oil change and gear ratio .......................................................... page S 3
Zinc anode ................................................................................. page S 3
Outside maintenance ................................................................ page S 3
Removal of sail drive from engine and boat .............................. page S 3
Alarm function of double membrane .......................................... page S 5
General (for assembly and dismantling of sail drive) ................. page S 6
Assembling procedure for sail drive .......................................... page S 7
Intermediate housing and intermediate shaft (drawing) ............. page S 12
009W2329-R01
S3
Oil Change and Gear Ratio
As an alternative to the BW7 gear the DV36 can be equipped with a sail drive.
The reduction ratio is 2.25:1 for “AHEAD” and 2.25:1 for “REVERSE”.
The sail drive will need no other attendance than regular change of oil. This to be carried out after
the first 25 hours of operation and then every 150 hours or once a year.
Carry out the oil change when the boat is on land by loosening the drain screw in the bottom of the
sail drive enabling the oil to run out.
Refill with fresh oil through the filler hole at the top of the sail drive to a quantity of 3.3 litres
corresponding to the upper mark on the dip stick.
Use the same quality of oil as for the BW7 gear.
Zinc Anode
A replaceable zinc anode is fitted at the propeller. Check this anode twice a year or as required all
depending on the waters you are sailing in.
Outside Maintenance
Do not grind thoroughly when careening the boat. Damage to the surface treatment should be
treated as soon as possible with special BUKH paint.
The sail drive should be coated with the same bottom paint as the rest of the bottom of the boat.
Removal of Sail Drive from Engine and Boat
(see drawing page S4)
1. Beach the boat.
2. Loosen the bolts marked A in the flange at the double membrane.
3. Loosen the bolts marked B on the flange towards the engine.
4. Loosen the sensing element marked D for water in the double membrane.
5. Lift the sail drive clear of the foundation.
It may be necessary in point 2 to loosen the engine mountings from the foundation and to lift the
engine a little in order to loosen all the bolts marked B.
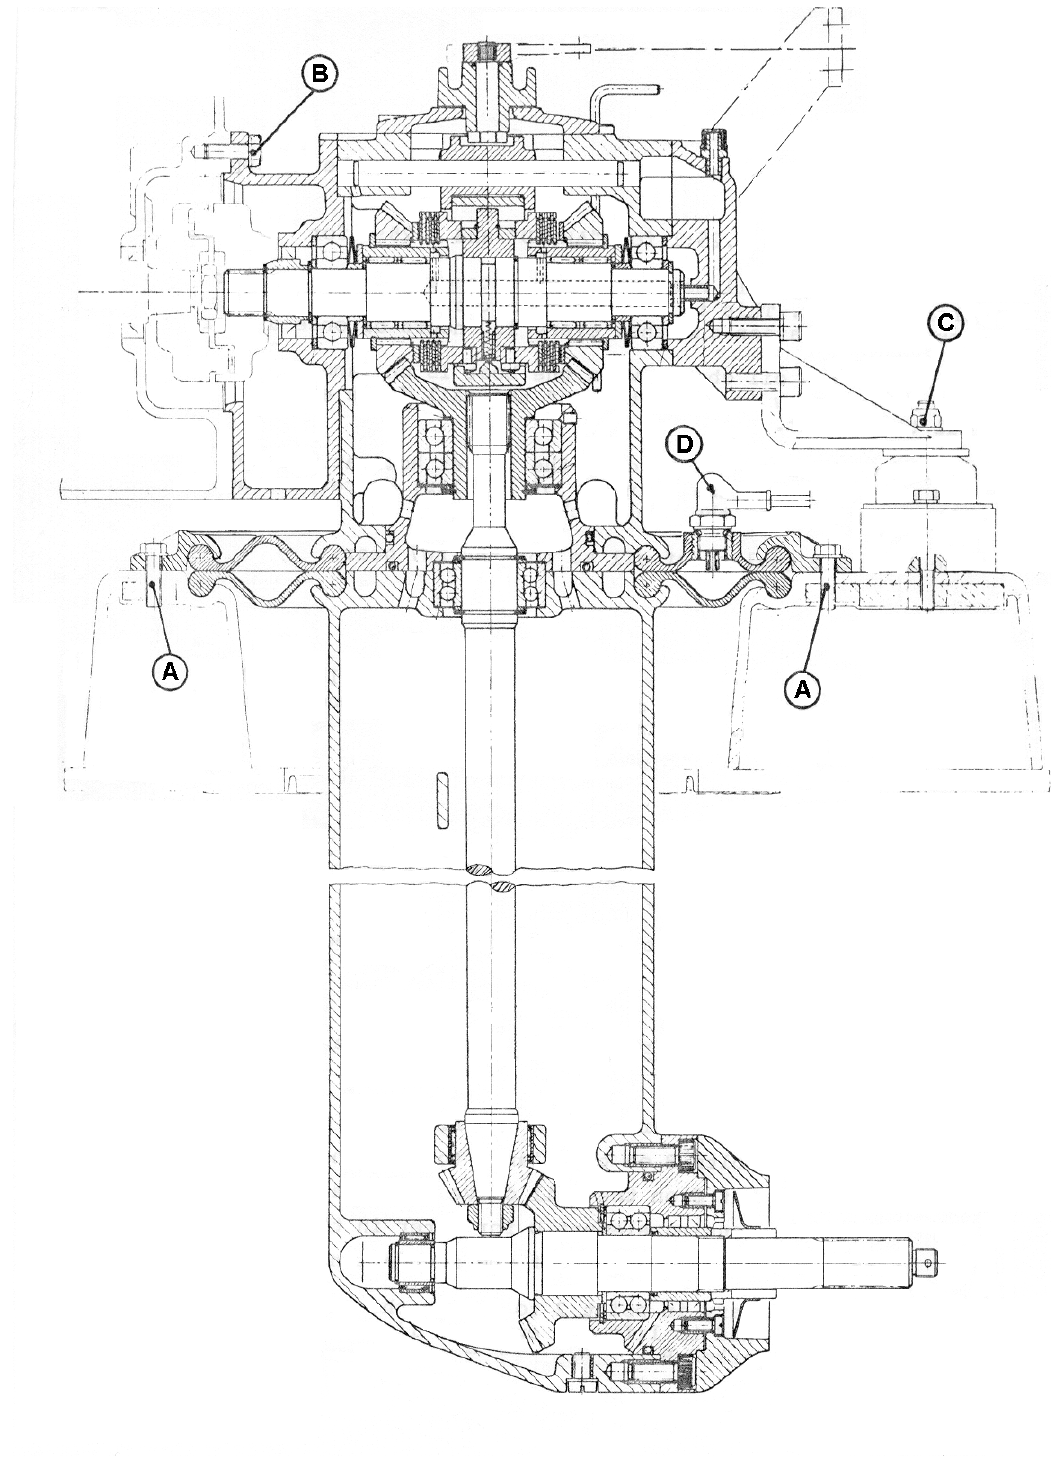
009W2329-R01
S4
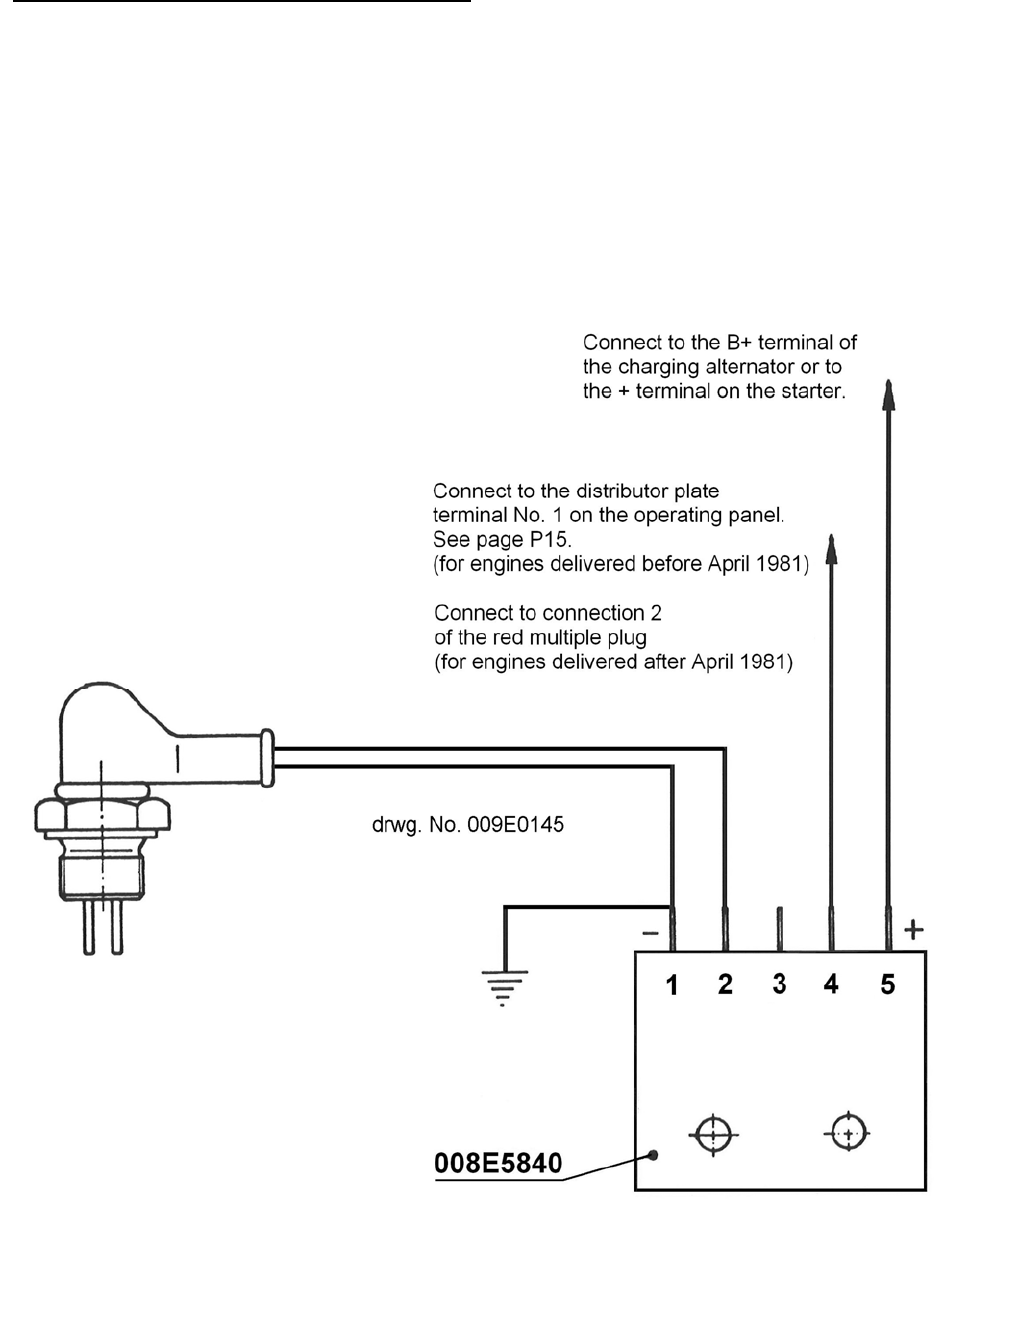
009W2329-R01
S5
‘
Alarm Function of Double Membrane
A sensing element is fitted in the double membrane. The element is shown on the diagram below.
The sensing element is connected to the the operating panel and if water penetrates into the
double membrane it will release an acoustic alarm.
As a precaution the alarm function should be checked once or twice a year by short-circuiting the
connections 1 and 2 on the plastic box No. 008E5840 placed on the engine next to the multiple
plugs.

009W2329-R01
S6
The instruction below is stated for assembling of sail drives as broadly the disassembly
procedure is to be carried out in reverse order noting the thickness and the placing of the
different intermediate washers.
General
At the assembly all parts must be clear, burred and free from grease.
In order to prevent wrong measuring when adjusting, the parts should normally not be oiled when
being assembled.
Heat the mounting houses with a hot-air blower, an oven or the like to 80°C when fitting the
bearings in accordance with the procedure. However, the temperature must not exceed 140°C.
When replacing gear-wheels, change them two and two, i.e. do not change one single gear-wheel,
but one connected set of gear-wheels.
When replacing the coupling arrangement at the top of the sail drive, replace the whole
arrangement without repairs of single components of it. This should be seen in the light of the fact
that a correct repair of the coupling arrangement demands a very advanced measuring equipment
which only very few have at their disposal.
The special tools mentioned in this instruction are not numbered, but can be ordered with
reference to this section of the workshop manual through BUKH´s spare parts department.
Both distance measure and flange clearance are always marked on the wheels, and they apply to
the wheel on which they are written.
The sail drive comprises 11 filling pieces each consisting of an intermediate washer at the least.

009W2329-R01
S7
Assembling Procedure for Sail Drive
1. Measure the intermediate piece (between engine and clutch housing), the clutch housing
and the end cover for the same, and then the “K” measure can be worked out.
2. Up-end the clutch shaft so that any clearance is equalized. (about 2 kg compression, if it is
not possible to up-end the shaft). At the same time the gear-wheel should be engaged.
Measure the “J” measure now. Measure the “C” measure for use later on under point 10.
3. Measure the “H” measure in order to find the centre of the vertical intermediate shaft.
Measure the “G” measure as “F” measure + “A” measure, as the “A” measure is written on
the gear-wheel.
Measure the “F” measure while the shaft still stands on its edge, so that any clearance is
equalized.
Calculate the thickness of the intermediate washer “IIv” as: “H” measure minus “G” measure.
4. Calculate the thickness of the intermediate washer “IIr” as: “K” measure minus sum of “J”
measure and intermediate washer “IIv”.
5. Fit the intermediate piece on the clutch housing with liquid jointing as filling piece.
6. Fit the reversing part at the top of the clutch housing as follows:
a. Put the reversing lever in “Neutral” position and the pipe collar too.
b. Lead the reversing house with gasket into the opening of the clutch housing and press the
shifting eccentric into the wedge-shaped groove of the shifting fork. In order to equalize the
axial clearance between the shifting fork and the pipe collar the shifting eccentric should be
fitted with the groove in the shifting fork with a light pressure.
c. Tighten the reversing house in this position.
NOTE: The clearance of the angle between the longitudinal shaft of the gear and the
one of the reversing lever must be observed. The angle is to be 90°±30`.
Use a reference gauge for this purpose.
When adjusting the reversing house the fixing screws must not encounter the wall of the
slots of the reversing house as this would lead to wrong adjustment.
d. Shift the reversing lever in both directions and test the shifting function. In both shifting
positions the pipe collar be connected (click), when the angles of engagement measured
on the reversing lever are as equal as possible.
Besides, it must always be possible to turn the reversing lever 37°. The adjustment is
corrected by axial displacement of the reversing house, the angle of 90° being observed.
e. In order to test the function of both clutches turn the input shaft (clutch shaft) round by hand
and brake the output shaft by hand when engaged.
The upper part of the sail drive is now temporarily ready.
009W2329-R01
S8
Measure on the intermediate wheel as follows:
7. 1.0 mm is chosen as thickness of the intermediate washer “III” as starting point.
8. Freeze the gear-wheel and measure the stagger between the inner collar and outer collar
of the bearing. Fit the bearing with the ball filler hole facing the adjusting washer “IV”.
Fit the next bearing correspondingly. Punch the inner collar when fitting it to secure that
the two inner collars touch each other.
Measure the intermediate bearing housing for the measures “D” and “E”.
9. Measure the “M” measure for use later on.
10. Calculate the thichness of the intermediate washer “IV” now, the intermediate washer = “C”
measure minus the sum of “D” measure and “B” measure.
“B” measure is written on the gear-wheel.
11. Measure the “L” measure, then calculate the thickness of the intermediate washer “V”,
this washer being = “L” measure minus the sum of “E” measure and the intermediate
washer “IV”.
12. Fit the intermediate wheel in the bearings and secure it with a Seeger circlip in accordance
with the drawing for it.
13. Fit the bearing housing with intermediate wheel in the gearbox with O-rings.
14. Remove the end cover in the clutch housing together with the shifting fork arrangement for
the test described in the next point (15) to be carried out.
15. Mount the clamping tools for fixing of the big gear-wheel. Mount a dial indicator on the gear-
wheel of the clutch shaft through the upper opening at the reversing handle of the clutch
housing, so that the indicator meets the following requirements.
a. Point of contact about in the middle of the tooth flank and of the pitch circle.
b. The indicator should be vertical in the longitudinal and height direction of the tooth flank.
With the bigger gear-wheel (z=45) fastened, measure the flank clearance. Measure both
the wheels of the clutch shaft in this way.
If occasion should arise, adjust the clearance to the one stamped which is correct by
changing the washers “IV” and “V”.
16. Refit the end cover and the reversing arrangement as stated under point 6.
17. Measure the propeller house for “O” measure, “W” measure and “U” measure.
18. Fit the bottom conical gear-wheel marked “X” at a torque of 125 Nm±5 Nm (13 ±0.5 Kpm)
on the intermediate shaft of the propeller house.
19. The intermediate washer “VI” normally is 1.5 mm and must never be used smaller. Fit the
intermediate washer “VI” on the shaft together with the bearing, the ball filling opening of
which should turn up.
20. Measure the intermediate washer “VII” with a feeler gauge and fit the correct thickness
together with the upper locking ring.
009W2329-R01
S9
21. Calculate the “T” measure. The “S” measure is stamped on the gear-wheel whereas the
“R” measure has to measure. “T” measure = “S” measure minus “R” measure.
22. The intermediate washer ”VIIIB” should be: the sum of “T” measure and “Q” measure
minus the difference of “U” measure and “O” measure.
23. Find the thickness of the intermediate washer “VIIIA” by measuring the bearing outer collar
“N” measure, after which the washer should be: the sum of “M” measure and “O” measure
minus the sum of intermediate washer “VIIIB” and “N” measure.
24. Having finished the measuring of the intermediate shaft remove the gear-wheel marked
“X” again and fit the needle bearings “Z” and “Y” after the house has been heated.
25. Fit the intermediate shaft with bearings in the propeller housing.
26. Refit the gear-wheel marked “X” and tighten it with the same torque as indicated in point
18.
27. Check whether the distance measures of the small gear-wheel are correctly adjusted with
the fitted washers (“T” measure) with special tools.
28. Measure the “V” measure.
29. Heat the bearing housing “Æ” and fit the bearing with the ball filling opening facing the
gear-wheel side.
30. Measure the thickness of the washer “X” with a feeler gauge (between locking ring and
outer collar of the bearing ).
31. Calculate the intermediate washer “IX”. The “W1” measure is indicated on the gear-wheel.
The intermediate washer = “W” measure minus the sum of “V” measure and “W1” measure.
32. Fit the output shaft with gear-wheel in the cover for propeller house with seals.
33. Fit cover with shaft and gear-wheel in the propeller housing.
34. Check the flank clearance at the output shaft.
The intermediate shaft is blocked and on the propeller shaft a lever is placed, on which
should be measured at difference radius R=40 mm. The shaft nut must be tightened.
The correct flank clearance is indicated on the gear-wheel and is corrected at the
intermediate washer “IX” if necessary.
On pages S10, S11, S12 and S13 longitudinal sections of the sail drive with places of measuring
drawn in are shown, partly by a general drawing and partly by detail drawings.
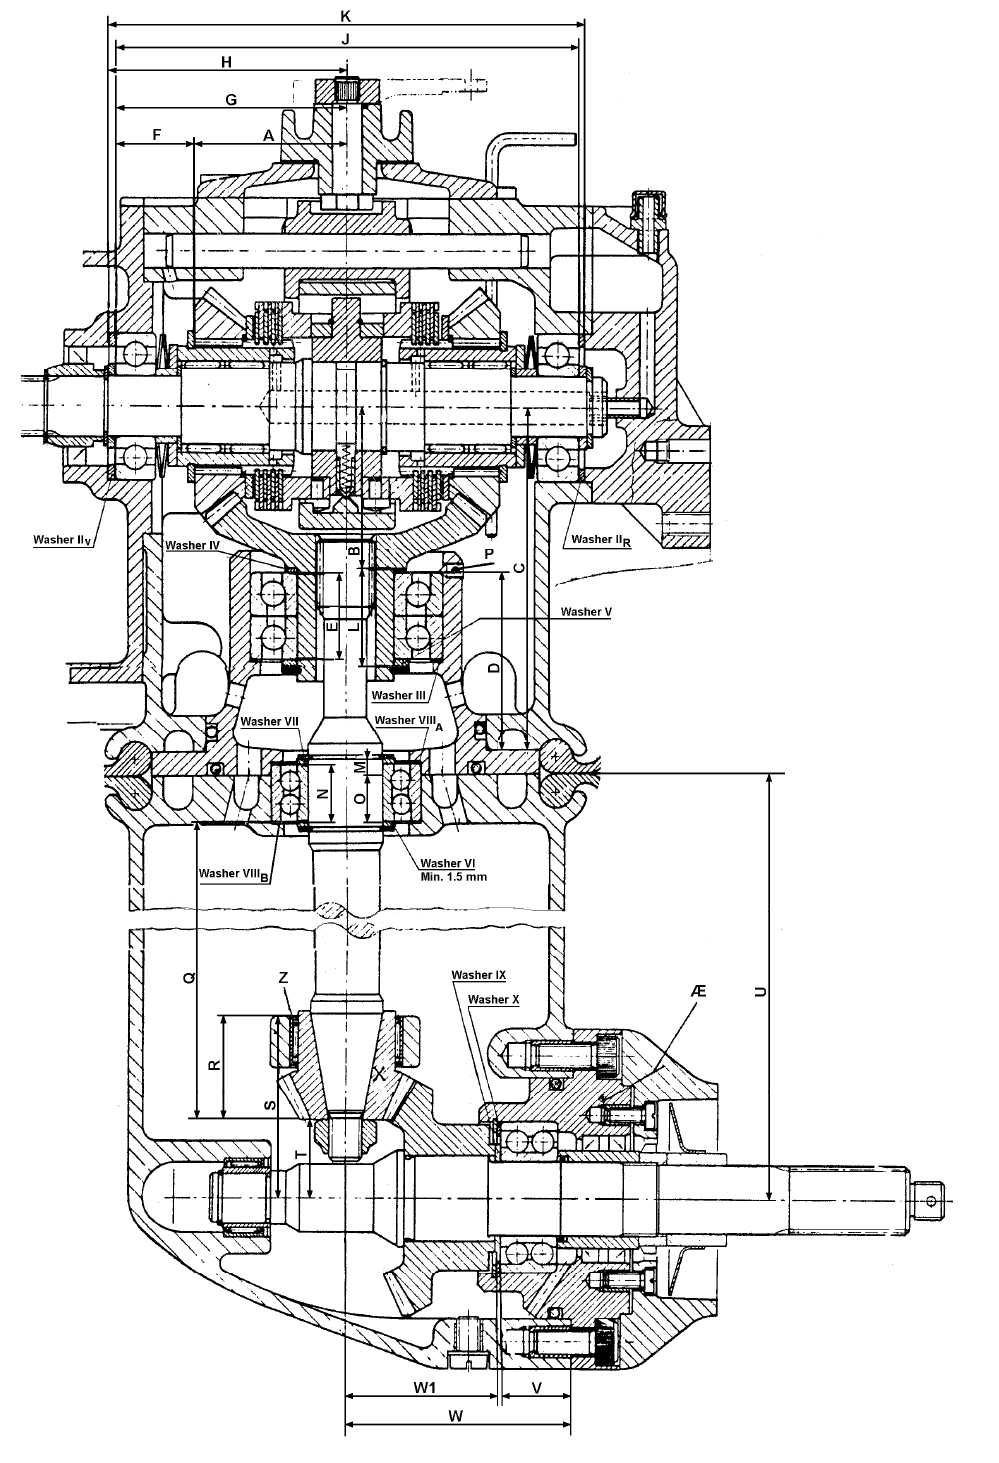
009W2329-R01
S10
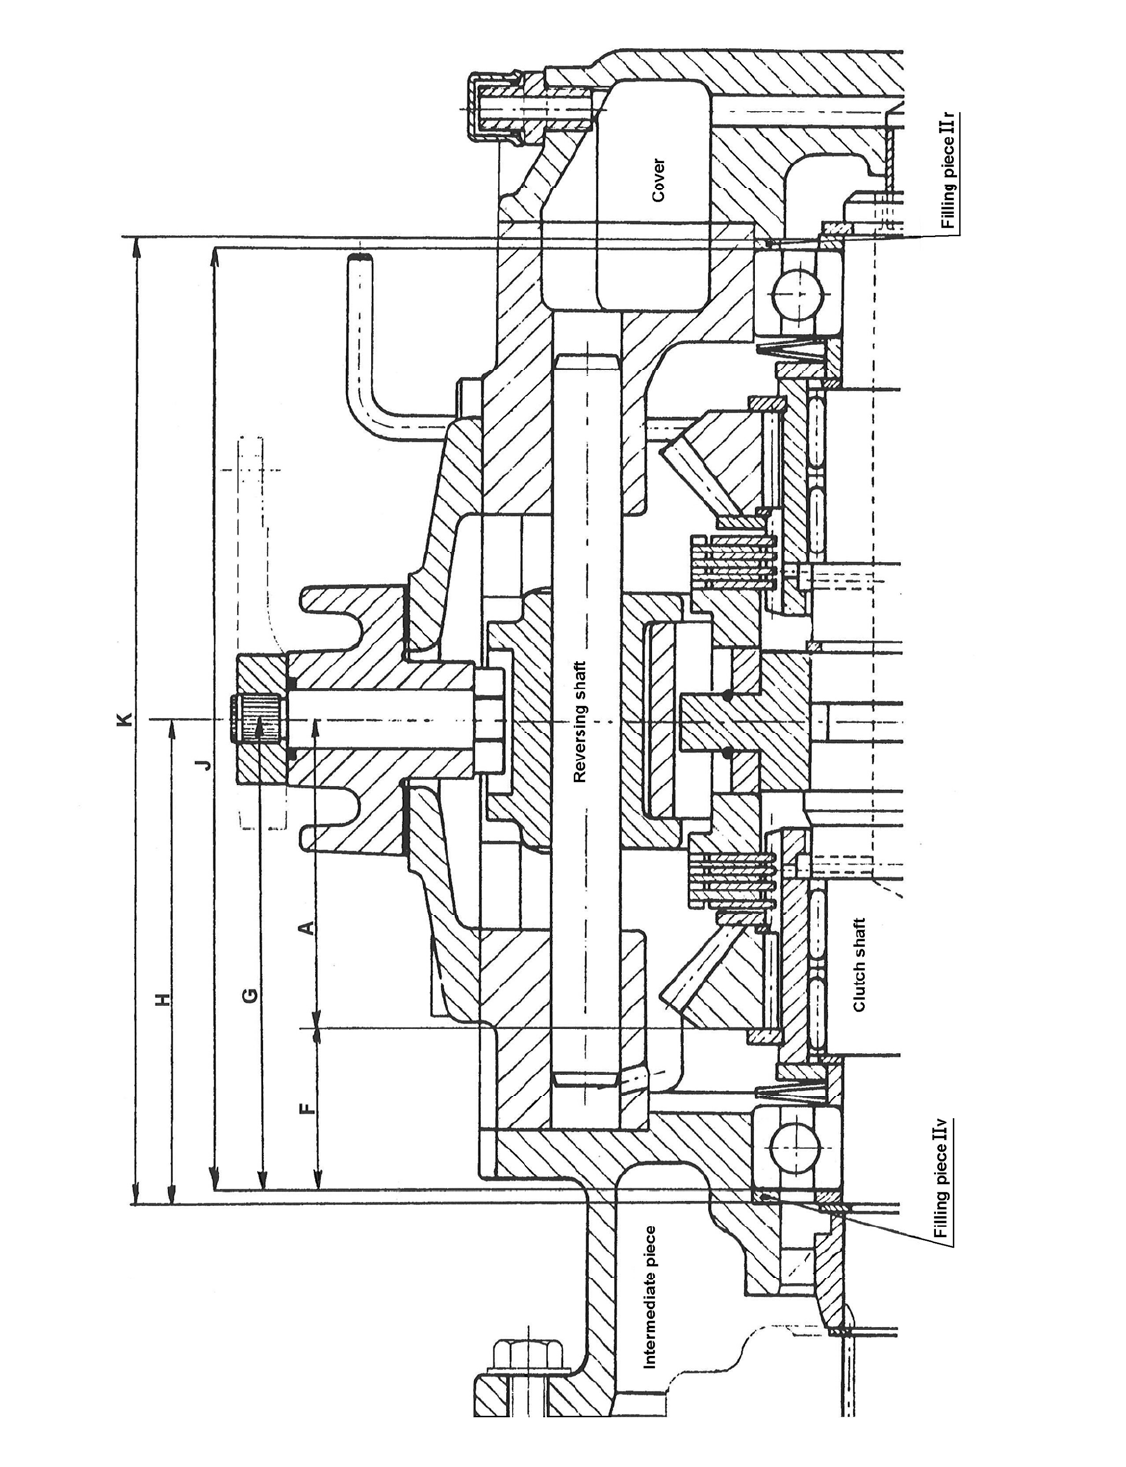
009W2329-R01
S11
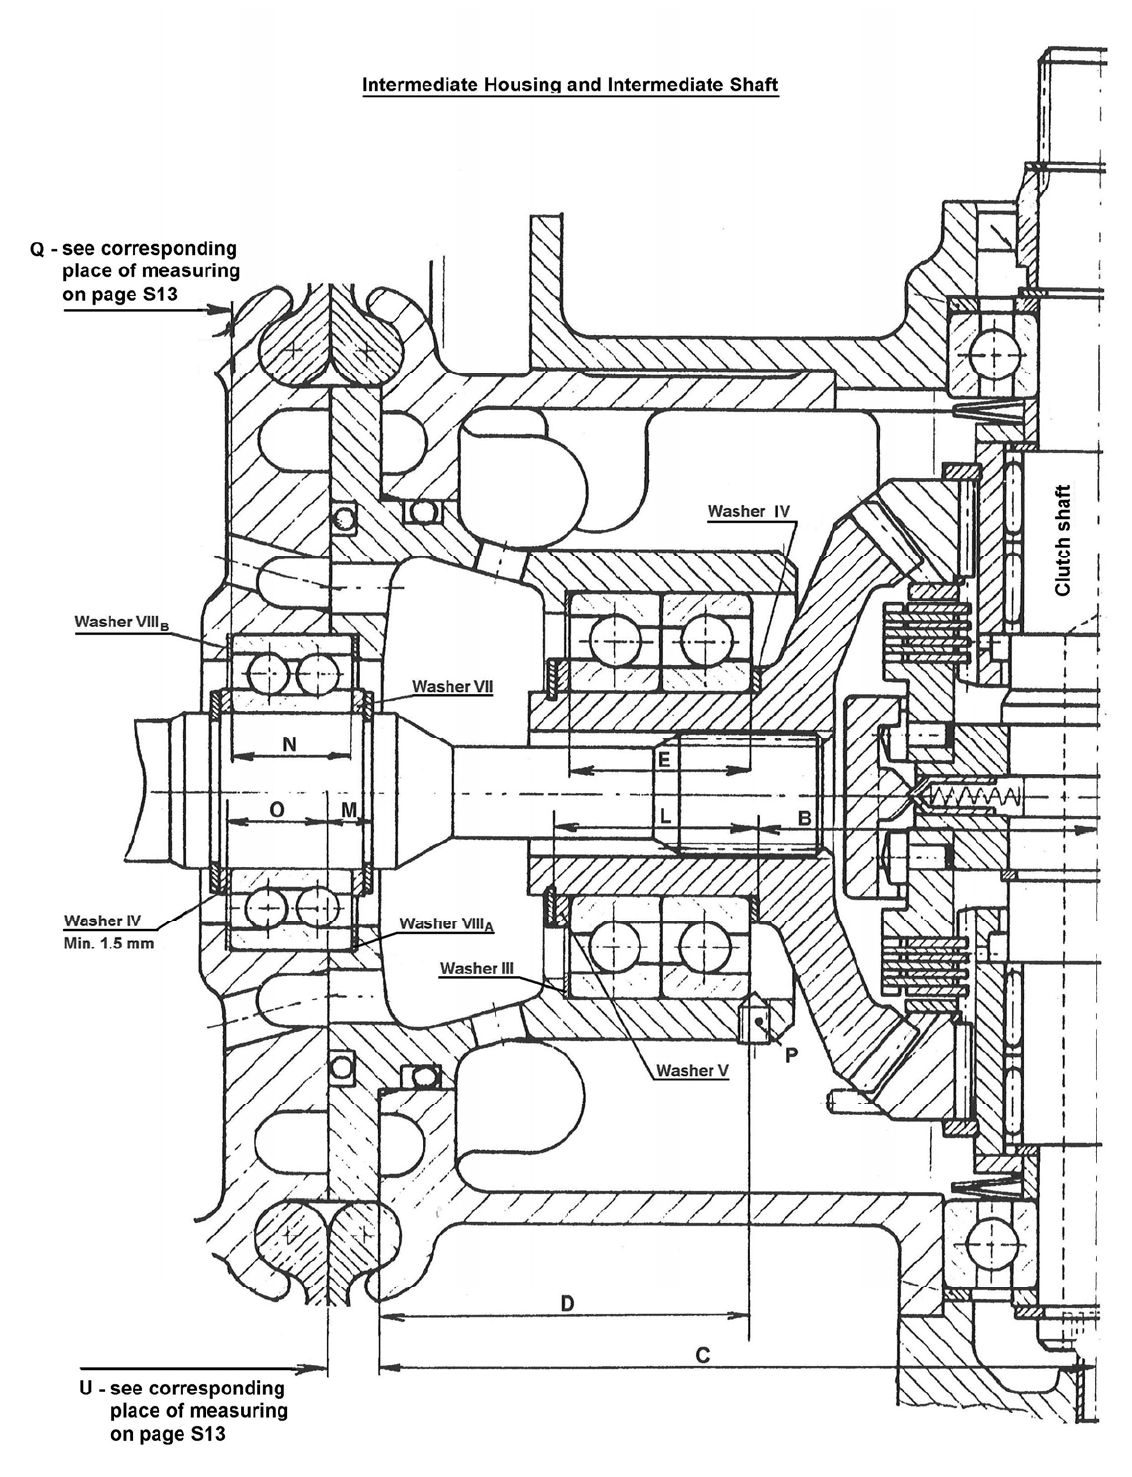
009W2329-R01
S12
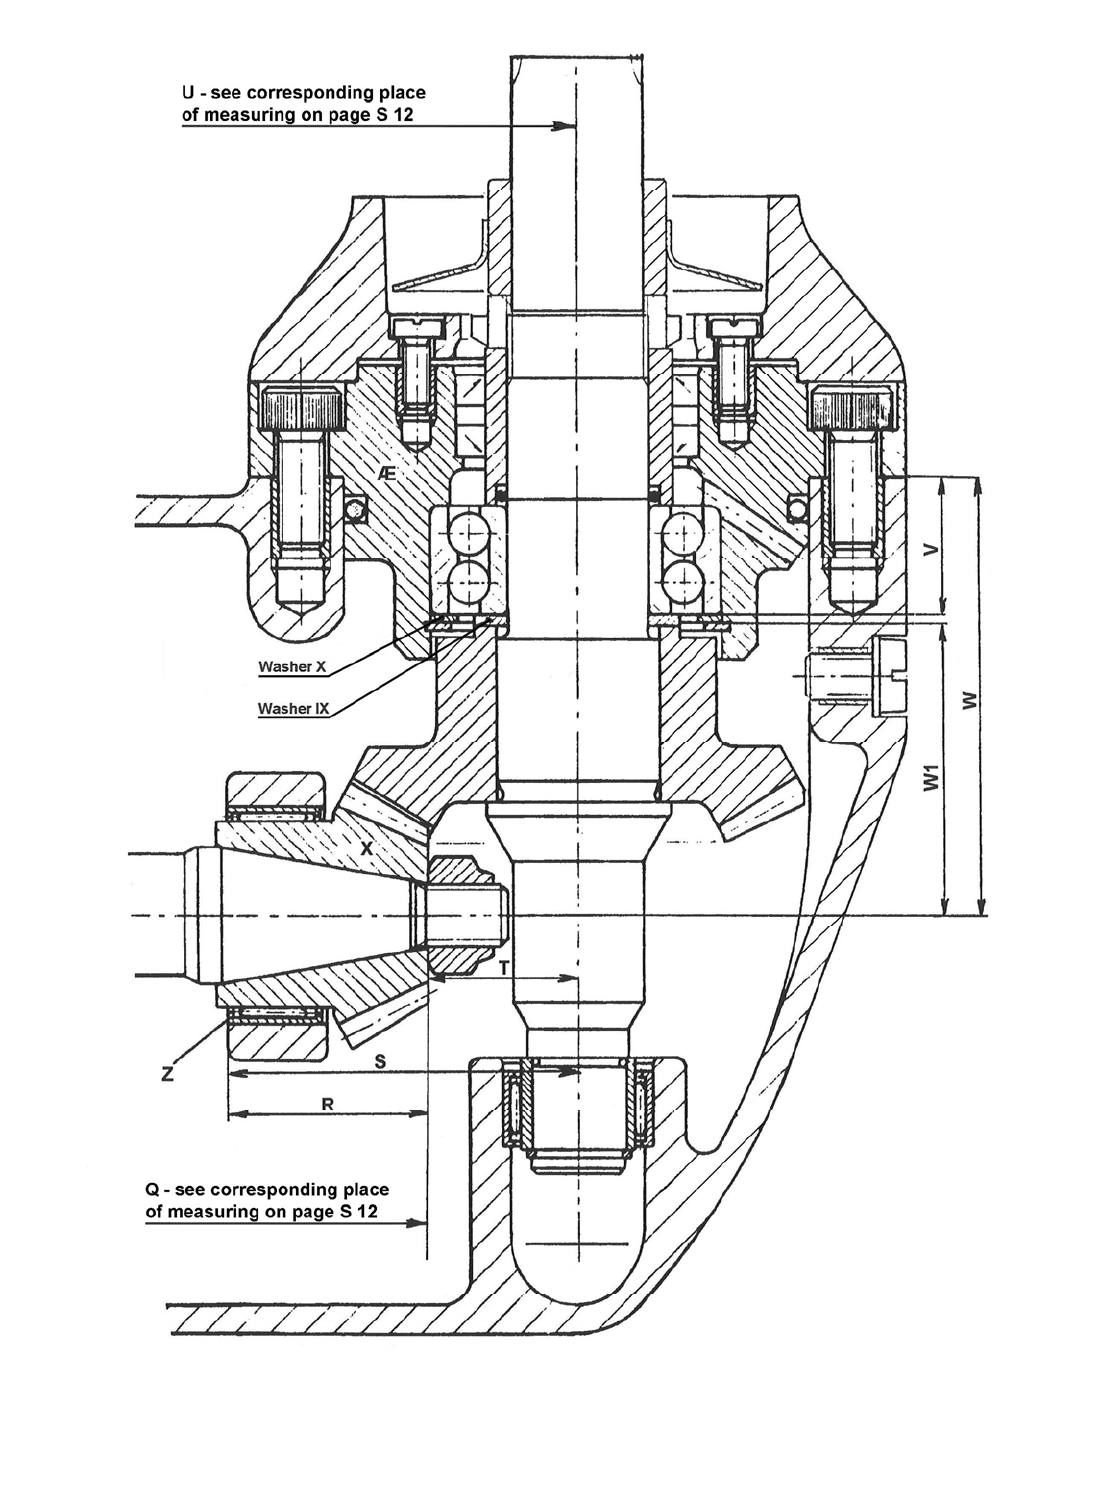
009W2329-R01
S13

009W2329.R01
T1
SECTION T
IRREGULAR OPERATION, CAUSES AND REMEDIES

009W2329.R01
T2
CONTENTS
Engine does not start ................................................................ page T 3
The engine starts, but stops soon after ..................................... page T 3
The engine does not reach maximum output ............................ page T 3
Knocking operation of engine .................................................... page T 3
Engine speed too high ............................................................... page T 3
The engine knocks .................................................................... page T 3
The engine smokes ................................................................... page T 3
Excessive consumption of lubricating oil ................................... page T 3
Excessive fuel oil consumption .................................................. page T 3
The engine gets too warm or too cold ....................................... page T 3
Insufficient or no lub. oil pressure .............................................. page T 3

009W2329.R01
T3
1. Engine does not start
SYMPTOM CAUSE REMEDY
Insufficient or very little compression Inlet and/or exhaust valves leaking Grind or replace the valves, mill the seats
Inlet and/or exhaust valves sticking
Grease valve stems with 2/3 gas oil and 1/3 lub.
Oil. If necessary clean the valves.
Insufficient rocker arm clearance
Adjust to 0.25 mm inlet and 0.3 mm exhaust when
engine is cold (turn left)
Piston rings stuck in grooves or are worn Replace piston rings
Valve springs broken or are weak Replace springs
Insufficient or no pressure from fuel pump Air in fuel system or nozzles sticking Bleed or renew nozzles
Thermo start out of order No fuel (valve leaking) Fill up (renew thermo-start)
Electric supply out of order
Check and/or replace switch and connections.
Chech fuse
Engine does not reach normal revs Unloaded battery or defective Battery to be charged or renewed
Starter motor turns engine too slowly Loose or corroded connections Tighten or clean connections
2. The engine starts, but stops soon after
The engine starts, but stops soon after Empty fuel tank Refill and bleed
Air in fuel system Bleed
Nozzle sticking Replace nozzle
Fuel filter clogged Replace filter element. Clean the tank
3. The engine does not reach maximum output
Difficult to start None or insufficient compression See ”engine does not start”
The engine revs. Is reduced considerably
when loaded
Fuel supply choked up.
Air/water in fuel system
Check fuel system thoroughly
Governor incorrectly adjusted or something
in the system works sluggishly
Adjust the governor. Check governor system and
correct the error
Hot engine (smell of heat) Insufficient cooling water supply Stop engine. Check cooling water pump
Damaged cylinder liner or bearings Check bearings, piston and cylinder, if necessary
replace them
4. Knocking operation of engine
The engine runs unevenly Air/water in fuel system
Fuel filter clogged
Bleed see ”engine does not start”
Replace filter element. Clean the tank
5. Engine speed too high
Governor not working properly Governor spindle is bent or works sluggish Repair or replace spindle
Governor not properly adjusted Governor arm has turned on the spindle Adjust arm
Engine runs too fast during idling Idler spring too tight Repair or replace spring
6. Engine knocks
Hard knocking sound at the combustion Incorrect adjustment of the injection time Adjust timing
Knocking sound from engine Loose connecting rod bolts
Worn or burnt bearings
Piston and cylinder liner highly worn
Tighten bolts
Replace bearing shells
Replace piston/cylinder liner
7. The engine smokes
Black smoke Clogged air inlet filter Clean filter
Insufficient compression See ”engine does not start”
Blue smoke The lube oil passes piston and oil rings an
penetrates into combustion chamber, or
vacuum valve defective
Replace oil rings and possibly the piston rings.
Clean vacuum valve
Grey smoke Thermostart valve is leaking Replace
8. Excessive consumption of lubricating oil
Blue smoke Oil- and piston rings are worn Replace oil- and piston rings, if required
Piston and cylinder liner highly worn Replace
Defective vacuum valve Replace
Lub. oil leaks out of crankshaft bearings Worn oil seal ring Replace
9. Excessive fuel oil consumption
Lubricating oil thinned with fuel oil Leakages at the fuel lift pump Check lift pump and replace if necessary
Fuel pipes or hoses leaking Check fuel line
10. The engine gets too warm or too cold
Cooling water temperature too high
(smell of heat)
Unsufficient cooling water supply caused
by:defective water pump, choked strainer or
a defective thermostat
Investigate pump rotor for broken wings or lost
driver screw. Clean strainer. Clean or replace
thermostat
Cooling water temperature too low Defective thermostat Clean or replace thermostat
11. Insufficient or no lubrication oil pressure
Oil warning lamp lights up. Oil pressure
gauge indicates abnormally low oil pressure
Insufficient lube oil in the engine Check and refill
Leakage in lube oil system Tighten and refill
Relief valve sticking or spring too weak Clean bore and valve, stretch or replace the spring
As to defects of the fuel pump see special section on this page H13.

009W2329-R01
V1
SECTION V
MAINTENANCE

009W2329-R01
V2
CONTENTS
Recommended maintenance and check list .............................. page V 3
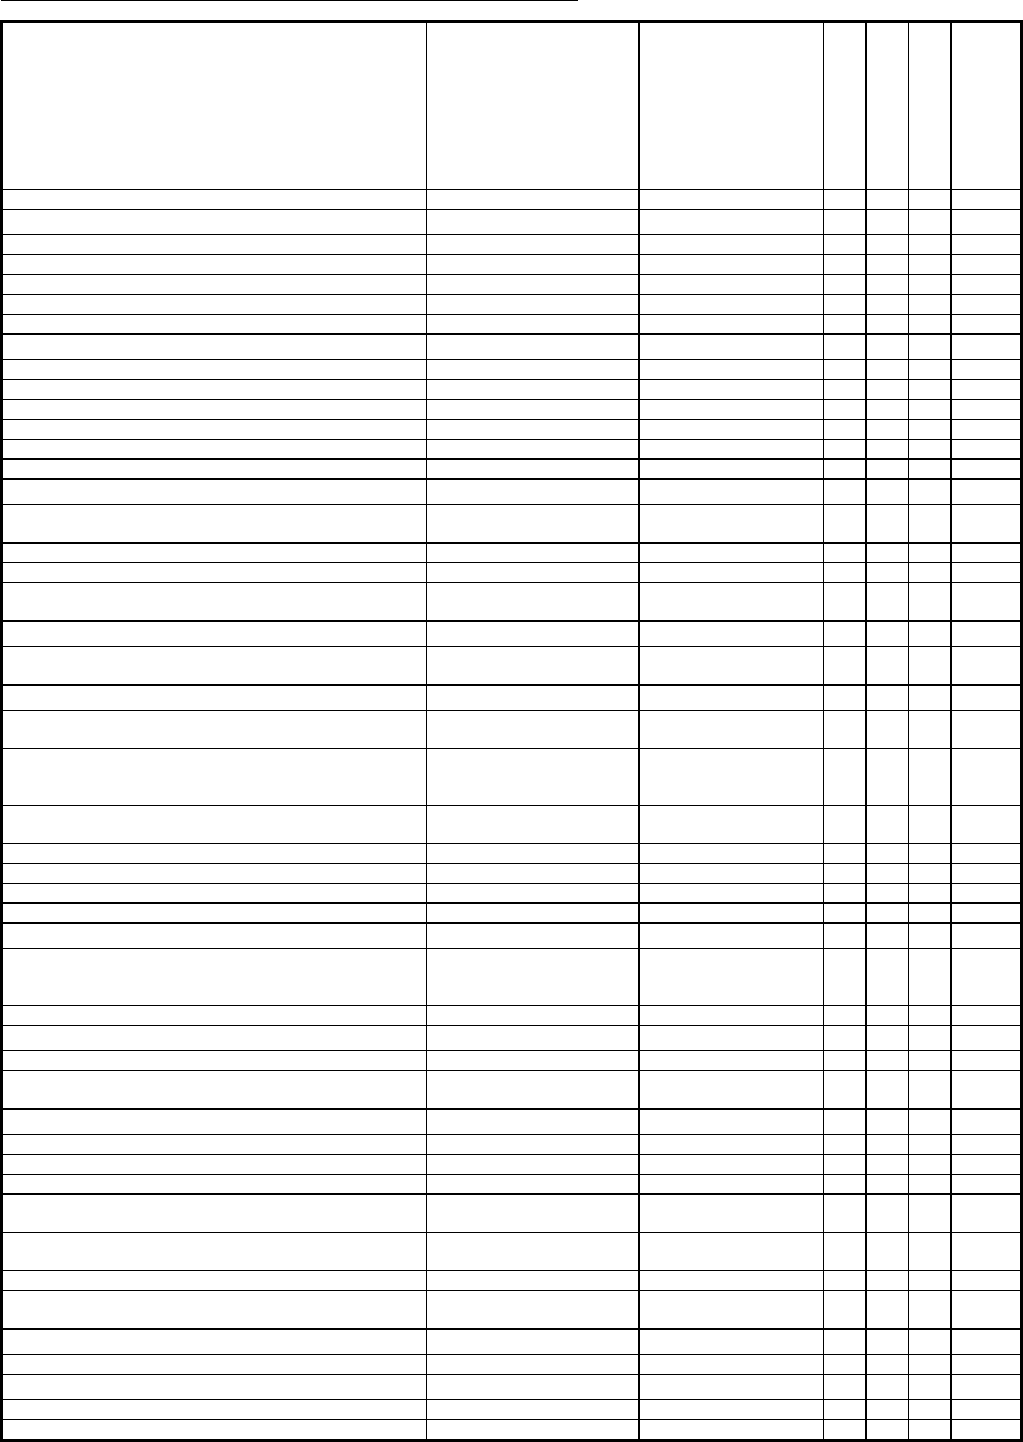
009W2329-R01
V3
RECOMMENDED MAINTENANCE AND A CHECK LIST FOR BUKH ENGINES
1. Tightness of connections through hull:
CHECK
RECTIFY IF NEEDED
W
E
E
K
L
Y
M
O
N
T
H
L
Y
Y
E
A
R
L
Y
EVERY
5
YEARS
1.1 stern tube hull connection change sealing X
2. Check of lubricating oil:
2.1 a engine change oil - X X
2.1.b engine check oil level - X
2.2.a gearbox change oil - X
2.2.b gearbox check oil level - X
2.3 lubricating oil filter change - X
3. Check of cooling watersystem:
3.1 system system to be full fill up X
3.2 anti freeze liquid check for minus 25°C. refill anti freeze liquid X
3.3 cooling water connections tightness for leaks renew if leaking X
3.4 condition of rubber hoses cracks and leaks renew X
3.5 V-belt for cooling water pump adjust or renew - X
3.6 thermostat renew after 5 years - X
4. Check of fuel system:
4.1 supply line clean water/fuel separa-tor
and check line bends repair if damaged or
renew
X
4.2 fuel tank drain for water - X
4.3 fuel filter change - X
4.4 return line check for bends & damages repair if damaged or
renew
X
5. Check of remote control cables:
5.1 cables check easy operation and
stroke sufficient
adjust cables X
6. Check of propeller shaft arrangement:
6.1 rear stern tube bearing check clearance for bearing
insert renew insert X
6.2 sufficient water flow to rear stern tube bearing check that water holes in
bearing housing are not
blocked
clean holes X
6.3 alignment of gear flange and prop.shaft flange alignment to be within 0.05-
0.01mm realign the engine X
6.4 stuffing box seals tightness renew all three seals X
6.5 condition of rubber tube for stuffing box cracks renew X
6.6 Out-Board gearoil. oillevel refill X
6.7 propeller check size and condition renew if damaged X
7. Starting of the engine:
7.1 start with electrical start engine start within 2
minutes
if malfunctions -the
engine must be ser-
viced by a mechanic
X
7.2 start with handstart same same X
8. Engine maintenance
8.1 valve clearance clearance adjust X
8.2 electric starter rust protection of starter
drive
spray rust protection
spray
X
9. Running with engine - check:
9.1 Idling speed to be 900-1200 RPM 900-1200 RPM adjust RPM X
9.2 Full speed unload / min. 3700 RPM min. 3700 RPM adjust RPM X
9.3 Full speed loaded with propeller 3300-3600 RPM adjust RPM X
9.4 Cooling water temp. to be max. 75
degr. Celcius
max. 75°C change termostat X
9.5 Audible and visual alarms check function change senders, lamps
or switch X
9.6 Lubricating oil pressure min. 1.5 kg/cm² at idling adjust oil relief valve X
9.7 Gearbox change from FW to Neutral to
ASTERN check cables adjust X
10. Air supply:
10.1 air inlet filter renew - X
11. Bateries:
11.1 level of liquid check, refill renew X X X X
11.2 voltage conditon charge renew X
