Bullitt Group B10 3G Mobile Phone User Manual
Bullitt Group 3G Mobile Phone
User Manual
FCC ID:ZL5B10

Get more app-tipps at apps.utano-outdoor.com
ANDROID MARKET
APPS FOR YOUR OUTDOOR LIFE
We found some amazing apps for your best outdoor experience.
ANDROZIC
OziExplorer maps for Android. Tracking,
waypoints, routes, navigation.
Navigation client that uses OziExplorer
maps (ozf2, ozfx3). Great for hiking, geo-
caching, off-roading, sailing, boating and
other outdoor activities.
FREE
ORIENTEER
Now you can show the boy-scout how to
Orienteering the next generation. Great App
for Geocaching!
FREE
GPS
ESSENTIALS
The Swiss army knife of GPS navigation!
Navigate, manage waypoints, tracks, routes,
build your own dashboard from 45 widgets
FREE
FIREPLACE For the outdoor feeling at home. If you have
no freetime to go on a excursion, built up
your tent and grap your android phone.
0,89 €

EN
YOUR MOBILE PHONE
Mobile Phone View
1 Power key
2 Earpiece
3 Front Camera
4 Proximity sensors
5 Volume control keys
6 Capture key
7 End key
8 Home key
9 Send key
10 Menu key
11 Search key
12 Back key
13 Headset jack
14 Charging/Data interface
15 Camera
16 Speaker
EN
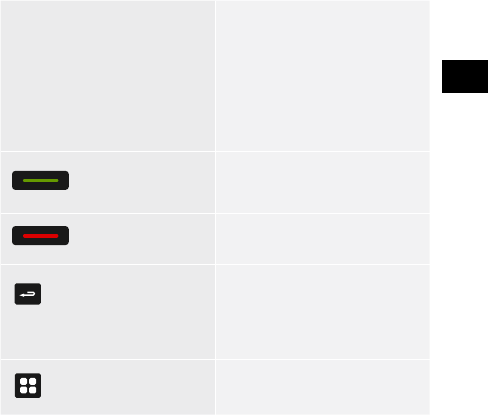
Key functions
Power key • Press to turn on your
mobile phone
• Press and hold to open
the Phone Options menu.
• Press to lock the screen
when your mobile phone
is on.
Send key Press to go to the
Call log screen
End key Press to end a call
Back key • Press to return to the
previous screen.
• Press to exit any applica-
tion you are running.
Menu key Press to open the menu on
an active screen.
EN
GETTING STARTED WITH YOUR MOBILE PHONE
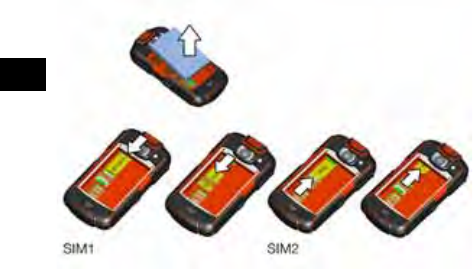
Installing the SIM Card
1. Remove the battery cover carefully. Use a screwdriver to
loosen the screws.
2. Insert the SIM card as shown in the diagram and close the
battery door.
3. Use the Screwdriver carefully and do not overwind the
screws.
Note: When inserting the SIM card, ensure that the golden con-
tact faces downward. Card slot 1 supports WCDMA and GSM
networks while card slot 2 supports only GSM networks. If you
want to use a SIM card supporting WCDMA networks on your
phone, insert the card in card slot 1 for better services.
EN
NOTIFICATIONS AND STATUS INFORMATION
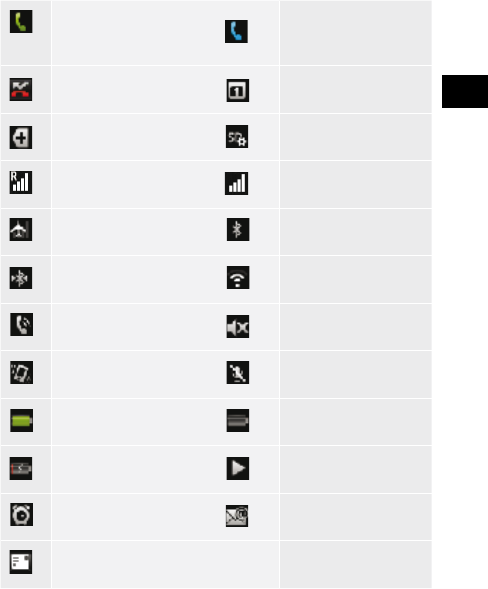
Notication and Status Icons
Call in progress Call in progress
using Bluetooth
device
Missed call New calendar
reminder
More undisplayed
notications
Preparing
microSD card
Roaming Signal strength
Airplane mode Bluetooth on
Connected to another
Bluetooth device
Connected to a
Wi-Fi network
Speaker on Sound off
Vibrate mode Microphone off
Battery full Battery very low
Battery is charing Music playing
Alarm set New email
New message
EN
USING A MICROSD CARD
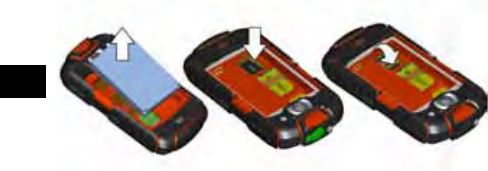
Installing the microSD Card
1. Remove the battery cover carefully. Use a screwdriver to
loosen the screws.
2. Insert the microSD card as shown in the diagram and close
the battery door.
3. Use the Screwdriver carefully and do not overwind the
screws.
Note: When inserting the microSD card, make sure that the gold
contacts face towards the front of the phone.
USING THE MICROSD CARD AS USB MASS STORAGE
To transfer all your favorite music and pictures from your PC
onto your mobile phone’s microSD card, set the microSD card
as USB mass storage.
1. Connect your mobile phone to your PC with the USB cable.
2. Touch Mount microSD card to your computer in the dialog
boxthatopenstoconrmthatyouwanttotransferles.
Your PC will detect the microSD card as a removable disk.
YoucannowtransferlesfromyourPCtoyourmicroSD
card.
EN
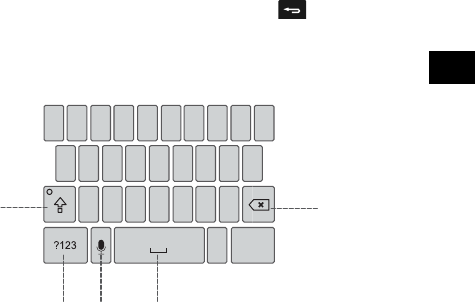
USING THE ONSCREEN KEYBOARD
Displaying the Keyboard Panel
Open the keyboard as follows: Touch the space where you want
to write text to display the keyboard. Press to hide the
keyboard.
Using the Android Keyboard
.:-)
DEL
QWERTYU IO
P
ASDFGHJKL
ZXCVBNM
11
1
23 4
5
1 Touch to change from uppercase to lowercase.
2 Touch to change from text mode to symbol/ number mode.
Touch again to change back.
3 Touch to turn on voice input.
4 Touch to insert a space in your text.
5 Touch to delete a character to the left of the cursor. Touch
and hold to delete all characters to the left of the cursor.
EN
Taking Photos and Recording Videos
The camera is a combination of camera and camcorder that you
can use to shoot and share pictures and videos.
Opening Your Camera
1. Touch > Camera to open the camera. The camera
opens in landscape mode, ready to take a picture or
shoot a video.
2. Press on the picture capture screen to close
the camera.
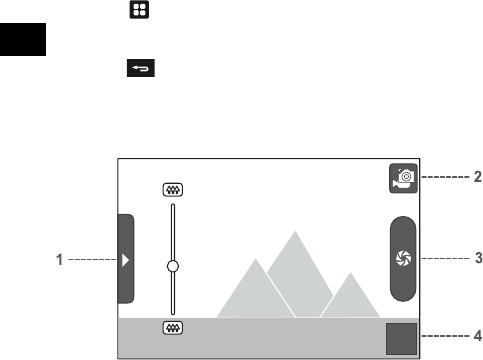
Capture Screen
1.1x
On the capture screen, touch the screen to show the zoom in or
out controls.
1 Touch to open the settings panel.
2 Touch to take a photo or shoot a video.
3 Touch to shoot videos (camcorder mode) or take photos
(camera mode).
4 Thumbnail of last photo. Touch to preview the photos or
videos.
EN
Taking a Photo
1. Open your camera and switch to the camera mode.
2. If necessary, open the settings panel to change the camera
settings. The preview changes as you change the settings.
3. Compose your photo within the photo capture screen.
4. Touch and hold to take your photo.
Viewing Your Photos
1. After taking a photo, a thumbnail of the photo you have just
taken is shown in the bottom right corner of the Capture
screen. Touch the thumbnail to view it.
2. Touch the onscreen button to do any of the following:
•Touch Delete to delete the photo.
•Touch Share to send the photo in a message or post it
online.
•Touch More > Set as to set the photo as a wallpaper or a
contact icon.
3. If you want to view more photos, touch the screen, and
thenickrightorleft.
Making a Video
1. Open the camera, and then switch to camcorder mode.
2. If necessary, open the settings panel to change the cam-
corder settings.
3. Frame the scene which you want to start your video.
4. Touch to start recording a video. The camcorder starts
shooting the video.
5. Touch to stop shooting. You can shoot another video or
preview your videos.
Creating a Google Account
If you do not have a Google account, you can create one:

EN
1. After reading the setup information, touch next.
2. Touch Create.
3. Enterarstname,lastname,andusernameforyourGoog-
le account, and then touch Next. The mobile phone will
connect to the Google server to check whether the user-
name is available. If the username you entered is already in
use, you will be prompted to choose another one or select
one from a list.
4. EnterandconrmyourGoogleaccountpassword.
5. Select a security question from the drop down menu, and
then enter the answer.
6. Touch Create.
7. When the Google Terms of Service screen appears, touch
I agree, Next.
8. Enter the characters that appear on the screen, and then
touch Next.
Using Gmail
GmailisGoogle’sweb-basedemailservice.Whenyourstset
upyourphone,youmayhaveconguredittouseanexisting
Gmailaccountorcreateanewaccount.Thersttimeyouopen
the Gmail application on your phone; your Inbox will contain the
messages from your Gmail account on the web.
Opening Gmail
Touch > Gmail. The Inbox mail list appears. Any
emails you decide to keep on your mobile phone will go to
EN
your Inbox folder.
Switching Between Accounts
1. In the mail list, press , and then touch Accounts.
2. Touch the account that contains the email you want to read.
Creating and Sending an Email
1. In the mail list, press , and then touch Compose.
2. Enter the message recipient’s email address in the “To”
eld.Ifyouaresendingtheemailtoseveralrecipients,
separate the email addresses with commas. You can add
as many message recipients as you want. If you want to
send a copy (Cc) or a blind copy (Bcc) of the email to other
recipients, press , and then touch Add Cc/Bcc.
3. Enter the email subject and write your message. If you want
to add a picture attachment, press, and then touch Attach
to select the picture you want to attach.
4. After composing your email, touch Send.
Replying To or Forwarding an Email
1. In the mail list, touch the email that you want to reply to or
forward, and then touch on the upper right.
2. Touch Reply, Reply all, or Forward.
3. Do one of the following:
•IfyouselectedReply or Reply all, enter your message.
•IfyouselectedForward, specify the message recipients
and add any additional text you want to include with the
forwarded message.
4. Touch Send.
Using Market
Android Market provides direct access to applications and
EN
games which you can download and install on your phone.
Opening Market
1. Touch > Market.
2. When you open Marketforthersttime,theAndroid
Market Terms of Service window will appear. Touch Accept
to continue.
Searching for Applications
Thereareafewdifferentwaystondapplicationsonthe
Market home screen, including:
• Featured applications: Scroll horizontally to view more.
• List of applications by category: Includes subcategories,
which you can sort by popularity.
• List of games.
• Search function.
• Downloads:
Installing an Application
If you want to install a non-Market application, touch > Set-
tings > Applications, and then select the Unknown sources
check box to allow installation of the non-Market application.
1. In the Market, touch Apps.
2. Touch a category, and then touch the item you want to
download.
3. On the item details screen, read more about the application,
including its cost, overall rating, and user comments. If you
scroll down to the Developer Info section, you can see
other applications from the same developer or link to the
developer‘s website.
4. To install the item, touch Free and then touch OK, whiche-

EN
ver is displayed.
5. Tochecktheprogressofadownload,openthenotication
panel. Most applications are installed within seconds. To
stop an item from downloading, touch Cancel.
6. After the application has been downloaded and installed on
your mobile phone, the content download icon appears in
thenoticationbar.
Uninstalling an Application
1. On the Market screen, touch My apps.
2. Touch the application you want to uninstall, and then touch
Uninstall.
3. When prompted, touch OK to remove the application from
your mobile phone.
4. Choose the reason for removing the application, and then
touch OK.
SYNCHRONIZING
Some applications on your mobile phone give you access to the
same personal information that you can add, view, and edit on
your computer. If you add, change, or delete your information in
any of these applications on the web, the updated information
also appears on your mobile phone.
This is made possible through over-the-air data synchronization.
The process occurs in the background and does not interfere
with use of your mobile phone. When your phone is synchroni-
zing,adatasynchronizationiconwillbeshowninthenotica-
tion bar.

FCC RF EXPOSURE INFORMATION:
WARNING!! Read this information before using your phone
In August 1986 the Federal Communications Commission (FCC) of the United States with its action in
Report and Outer FCC ZL5B10 adopted an updated safety standard for human exposure to radio
frequency (RF) electromagnetic energy emitted by FCC regulated transmitters. Those guidelines are
consistent with the safety standard previously set by both U.S. and international standards bodies. The
design of this phone complies with the FCC guidelines and these international standards. Use only the
supplied or an approved antenna. Unauthorized antennas modifications, or attachments could impair
call quality, damage the phone, or result in violation of FCC regulations. Do not use the phone with a
damaged antenna. If a damaged antenna comes into contact with the skin, a minor burn may result.
Please contact your local dealer for replacement antenna.
BODY-WORN OPERATION:
This device was tested for typical body-worn operations with the back of the phone kept 1.5cm from the
body. To comply with FCC RF exposure requirements, a minimum separation distance of 1.5cm must be
maintained between the user's body and the back of the phone, including the antenna, whether
extended or retracted. Third-party belt-clips, holsters and similar accessories containing metallic
components shall not be used. Body-worn accessories
that cannot maintain 1.5cm separation distance between the user’s body and the back of the phone, and
have not been tested for typical body-worn operations may not comply with FCC RF exposure limits
and should be avoided.
For more information about RF exposure, please visit the FCC website at www.fcc.gov
Your wireless handheld portable telephone is a low power radio transmitter and receiver. When it is
ON, it receives and also sends out radio frequency (RF) signals. In August, 1996, the Federal
Communications Commissions (FCC) adopted RF exposure guidelines with safety levels for hand-held
wireless phones. Those guidelines are consistent with the safety standards previously set by both U.S.
and international standards bodies:
<ANSIC95.1> (1992) / <NCRP Report 86> (1986) / <ICIMIRP> (1996)
Those standards were based on comprehensive and periodic evaluations of the relevant scientific
literature. For example, over 120 scientists, engineers, and physicians from universities, government
health agencies, and industry reviewed the available body of research to develop the ANSI Standard
(C95.1). Nevertheless, we recommend that you use a hands-free kit with your phone (such as an
earpiece or headset) to avoid potential exposure to RF energy. The design of your phone complies with
the FCC guidelines (and those standards).
Use only the supplied or an approved replacement antenna. Unauthorized antennas, modifications, or
attachments could damage the phone and may violate FCC regulations.
NORMAL POSITION:
Hold the phone as you would any other telephone with the antenna pointed up and over your shoulder.
RF
Exposure Information:
FCC RF Exposure requirements: The highest SAR value reported under this standard during product
certification for use next to the body with the minimum separation distance of 1.5cm is
0.561
W
/
kg
, next to the head is
0.738
W/kg.
This transmitter must not be collocated or
operating in conjunction with any other antenna or transmitter.
This device is acting as slave and operating in the 2.4 GHz (2412 – 2462 MHz) band.
Ad Hoc function is supported but not able to operate on non-US frequencies.
This device complies with part 15 of the FCC rules. Operation is subject to the following two conditions:
(1) this device may not cause harmful interference, and
(2) this device must accept any interference received, including interference that may cause
undesired operation.
NOTE: The manufacturer is not responsible for any radio or TV interference caused by unauthorized
modifications to this equipment. Such modifications could void the user’s authority to operate the
equipment.
NOTE: This equipment has been tested and found to comply with the limits for a Class B digital device,
pursuant to part 15 of the FCC Rules. These limits are designed to provide reasonable protection against
harmful interference in a residential installation. This equipment generates uses and can radiate radio
frequency energy and, if not installed and used in accordance with the instructions, may cause harmful
interference to radio communications. However, there is no guarantee that interference will not occur in
a particular installation. If this equipment does cause harmful interference to radio or television
reception, which can be determined by turning the equipment off and on, the user is encouraged to try
to correct the interference by one or more of the following measures:
- Reorient or relocate the receiving antenna.
- Increase the separation between the equipment and receiver.
-Connect the equipment into an outlet on a circuit different from that to which the receiver is connected.
-Consult the dealer or an experienced radio/TV technician for help
Do not use the device with the environment which below minimum -10℃ or maximum over 50℃,
the device may not work.
Changes or modifications to this unit not expressly approved by the party responsible for compliance
could void the user’s authority to operate the equipment.