Bury and Co KG CC9040-51 Bluetooth Handsfree Carkit User Manual
Bury GmbH & Co KG Bluetooth Handsfree Carkit
User Manual

www.bury.com
FREISPRECHEINRICHTUNG / HANDS-FREE CAR KIT
Bury GmbH & Co. KG
Robert-Koch-Str. 1-7
D-32584 Löhne
Hotline Tel: +49 (0)180 - 584 24 68*
Hotline Fax: +49 (0)180 - 584 23 29*
E-Mail: infoline@bury.com
* 0,14 €/Min. aus dem Festnetz der Deutschen Telekom AG / from Deutsche Telekom AG landlines
59-0710-0-01-280507
CC 9050 / CC 9051
Bedienungsanleitung
Operating manual
Mode d‘emploi
Gebruiksaanwijzing
D
GB
F
NL
FREISPRECHEINRICHTUNG / HANDS-FREE CAR KIT
www.bury.com

Inhalt
Einleitendes 2
1. Allgemeine Hinweise 2
2. Sicherheitshinweise 2
Montage der Freisprecheinrichtung 4
3. Lieferumfang CC 9050 / 9051 4
4. Platzierung und Befestigung 5
5. Anschluss der Elektronikbox 7
6. Installation der Sicherungen 9
Bedienungsanleitung 10
7. Einschalten 10
8. Herstellen einer Bluetooth-Verbindung 11
9. Trennung einer Bluetooth-Verbindung 12
10. Menüführung 12
11. Serviceleistungen 17
CC 9050 / CC 9051
2
3
Einleitendes
1. Allgemeine Hinweise
Sehr geehrte Kundin, sehr geehrter Kunde,
Sie haben eine Freisprecheinrichtung der Marke BURY erworben und
sich so für ein Produkt mit hoher Qualität sowie höchstem Bedienungs-
komfort entschieden. Einkauf, Produktion sowie Service und Vertrieb
unterliegen bei Bury einem strengen Qualitätsmanagement nach DIN
EN ISO 9001. Alle Bury-Freisprechanlagen entsprechen den Sicher-
heitsnormen CE und e1. Außerdem geben wir auf alle Komponenten
zwei Jahre Gewährleistung.
Damit Sie den vollen Komfort Ihrer Bury-Freisprechanlage genießen
können, lesen Sie sich die Bedienungsanleitung bitte sorgfältig durch.
Falls Sie zusätzlich Fragen zum Einbau oder Betrieb haben, wenden Sie
sich bitte an Ihren Händler. Er berät Sie gerne und zuverlässig und leitet
Ihre Erfahrungen und Anregungen an den Hersteller weiter.
Oder wenden Sie sich an unsere Hotline. Die Telefon- und Faxnummern
finden Sie unter dem Stichwort Service.
Wir wünschen Ihnen eine gute Fahrt.
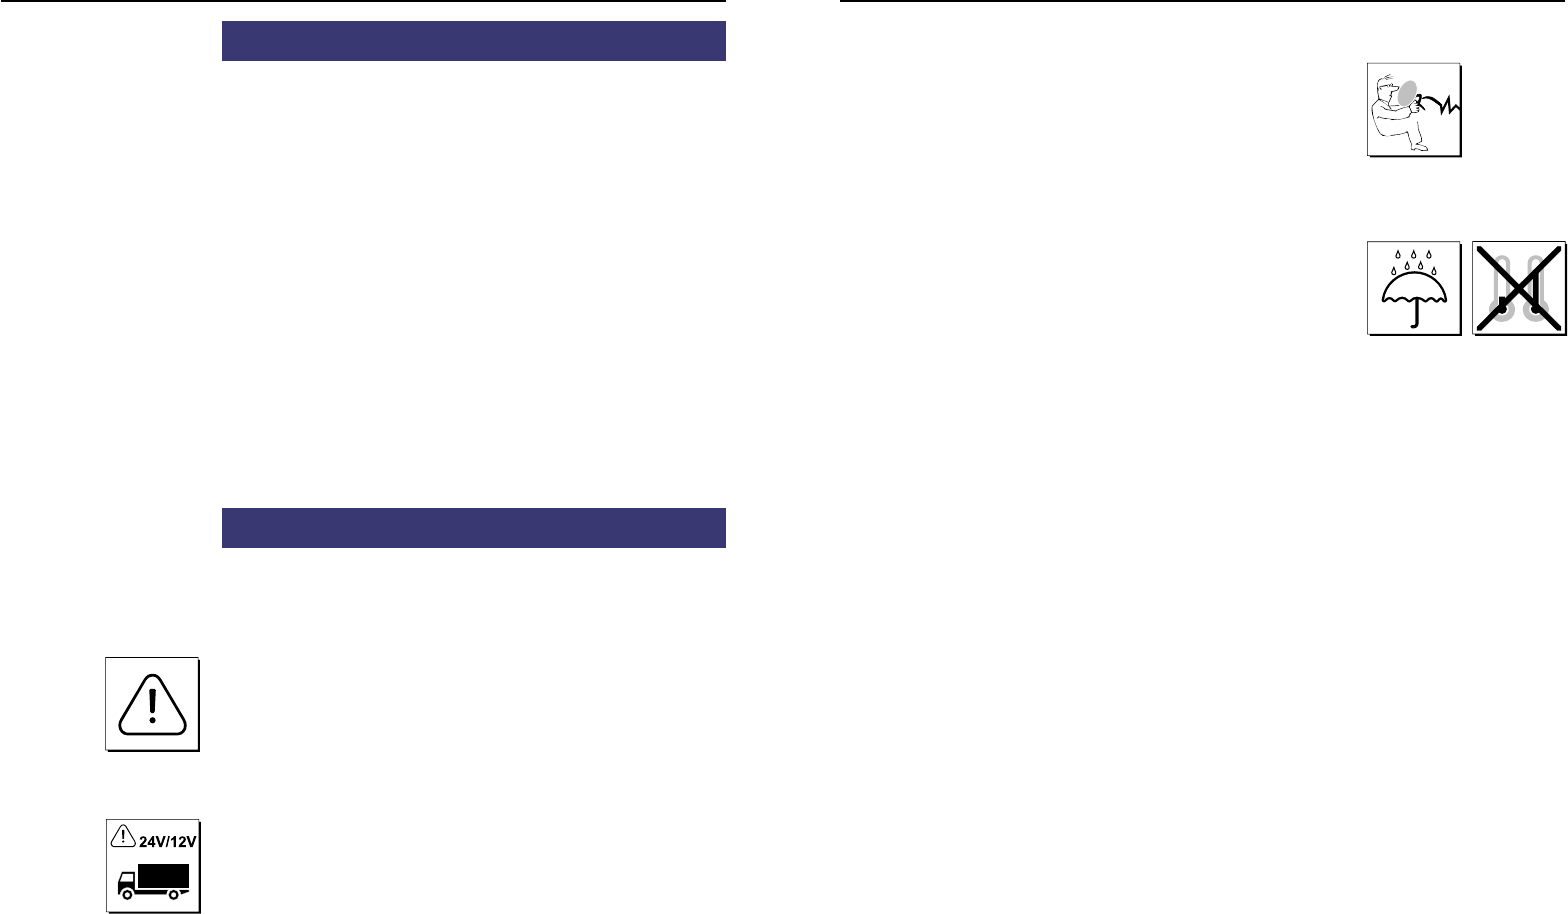
2. Sicherheitshinweise
Einbau – wer und wo
Der Einbau des Navigationssystems kann durch Sie vorgenommen wer-
den, beachten Sie aber bitte die Einbauvorgaben des Kfz-Herstellers
(VAS 1978) und stellen Sie dazu das Fahrzeug an einem Ort ab, an dem
es den Straßenverkehr nicht behindert. Wir empfehlen Ihnen, den Ein-
bau durch eine Fachwerkstatt durchführen zu lassen.
Stromversorgung
Dieses Navigationssystem ist für den Einsatz in Kraftfahrzeugen mit
einem Bordnetz von 12 Volt (PKW) ausgelegt. Beabsichtigen Sie, das
Gerät in ein Kraftfahrzeug mit einem Bordnetz von 24 Volt (LKW) ein-
zubauen, benutzen Sie bitte einen Spannungswandler. Fragen zu die-
sem Thema beantwortet Ihnen gerne unsere Hotline.
Platzierung, Lautstärke
Installieren Sie die Komponenten des Gerätes so im Fahrzeug, dass
Ihre Sicht nicht beeinträchtigt wird und die Komponenten nicht in einer
Personenaufprallzone der Fahrgastzelle oder in Entfaltungsbereichen
von Airbags montiert sind. Zum Herauslösen von Verkleidungen (mit
und ohne Airbags) oder Komponenten des Armaturenbretts sind in ei-
nigen Fällen spezielles Werkzeug und spezielle Kenntnisse erforder-
lich.
Sachgemäße Handhabung
Für Beschädigungen und Störungen durch unsachgemäße Installation
und Handhabung des Systems übernehmen wir keine Haftung. Setzen
Sie deshalb das Gerät weder Nässe, extremen Temperaturen oder Er-
schütterungen aus und befolgen Sie genau die in der Einbau- und Be-
dienungsanleitung vorgegebenen Arbeitsschritte.
Bedienung im Straßenverkehr
Bedienen Sie das System nur in Situationen, in denen es Ihnen die
Verkehrslage erlaubt und Sie dabei andere Verkehrsteilnehmer nicht
gefährden, schädigen, behindern oder belästigen. Die Lautstärke des
Geräts ist so einzustellen, dass Außengeräusche weiterhin wahrgenom-
men werden können.
Im Störungsfall
Nehmen Sie das Gerät nicht in Betrieb, wenn Sie einen Defekt bemer-
ken bzw. vermuten. Suchen Sie einen Bury Fachhändler auf oder stellen
Sie Kontakt zur Bury Hotline her. Unsachgemäße Reparaturversuche
können für Sie gefährlich sein. Deshalb darf nur qualifiziertes Personal
Überprüfungen vornehmen.
Wichtig:
Der Fahrer ist jederzeit für die sichere Führung und Kon-
trolle seines Fahrzeugs verantwortlich. Sie sollten während
des Fahrens kein Mobiltelefon - und besonders nicht die
Funktionen SMS / MMS schreiben oder lesen - nutzen.
Untersuchungen ergaben, das es ein Risiko für Ihre Si-
cherheit darstellt, abgelenkt zu sein. Die Nutzung eines Mo-
biltelefons während der Fahrt kann die Ursache einer sol-
chen Ablenkung sein.
Der Hersteller weist hiermit ausdrücklich darauf hin, dass
Sie während der Fahrt eine Freisprecheinrichtung nutzen
sollten.
4
5
Montage der Freisprecheinrichtung
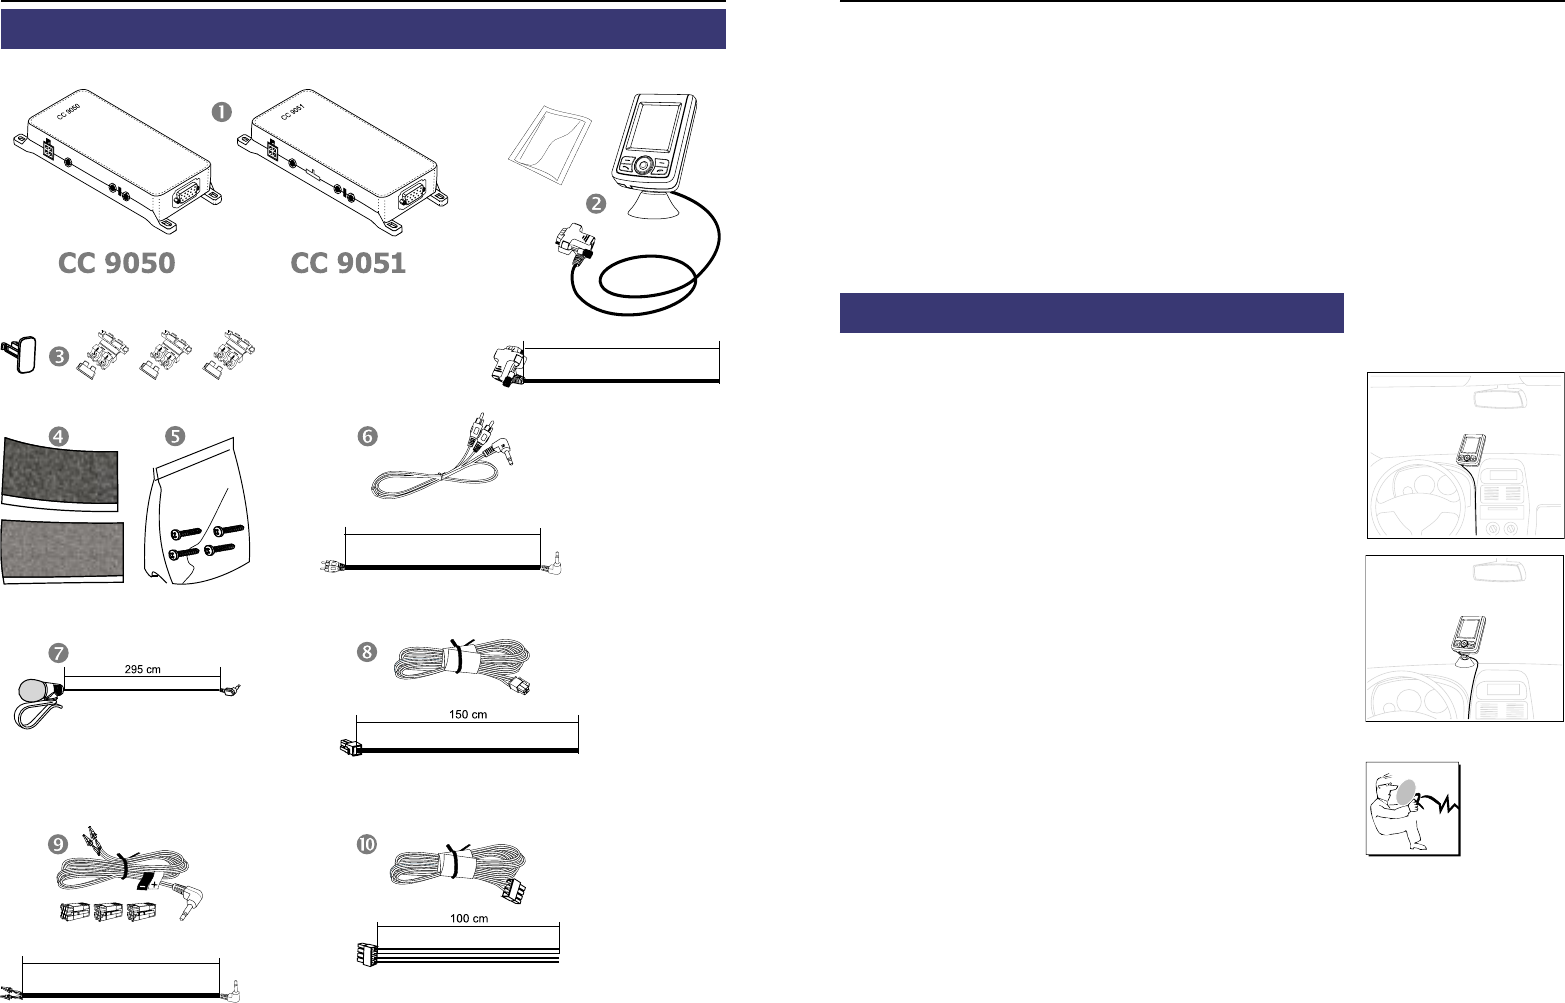
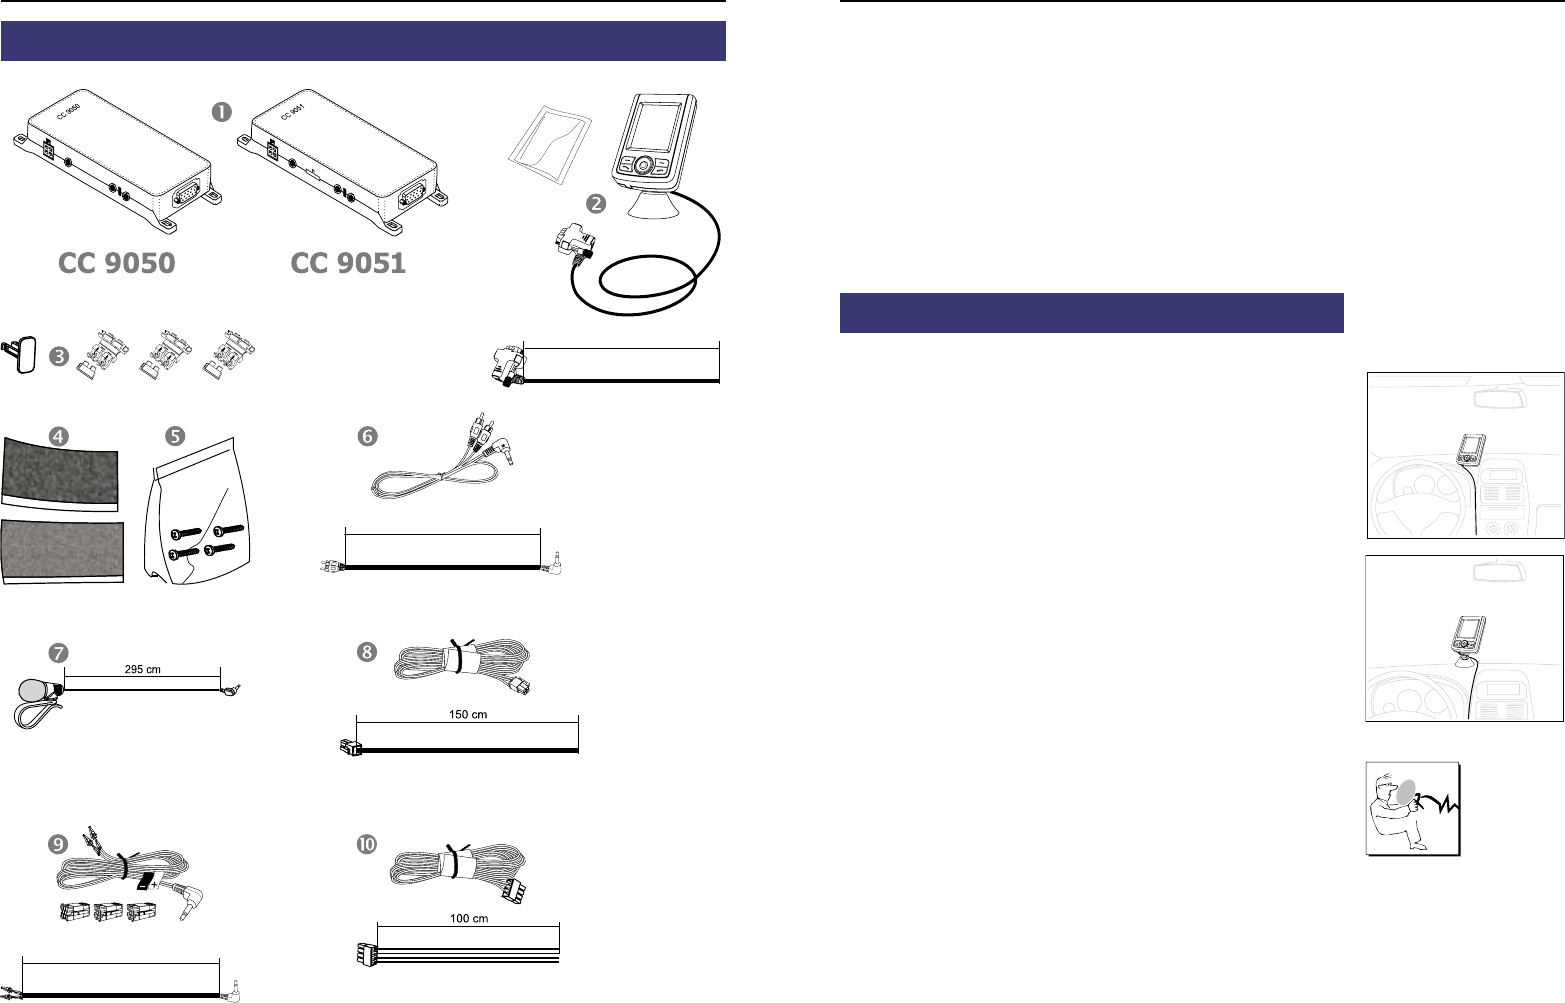
3. Lieferumfang CC 9050 / 9051
110 cm
100 cm
200 cm
Beschreibung der Komponenten:
1) Elektronikbox (CC 9051 mit integrierter Lautsprecher-Umschaltbox)
2) Monitor auf Montagefuß, Säuberungstuch
3) Sicherungen
4) Klettverschluss
5) Befestigungsschrauben für Elektronikbox
6) AUX-Kabel
7) Mikrofon
8) Stromversorgungskabel
9) Phone-In Kabel
10) Lautsprecherkabel (CC 9051)
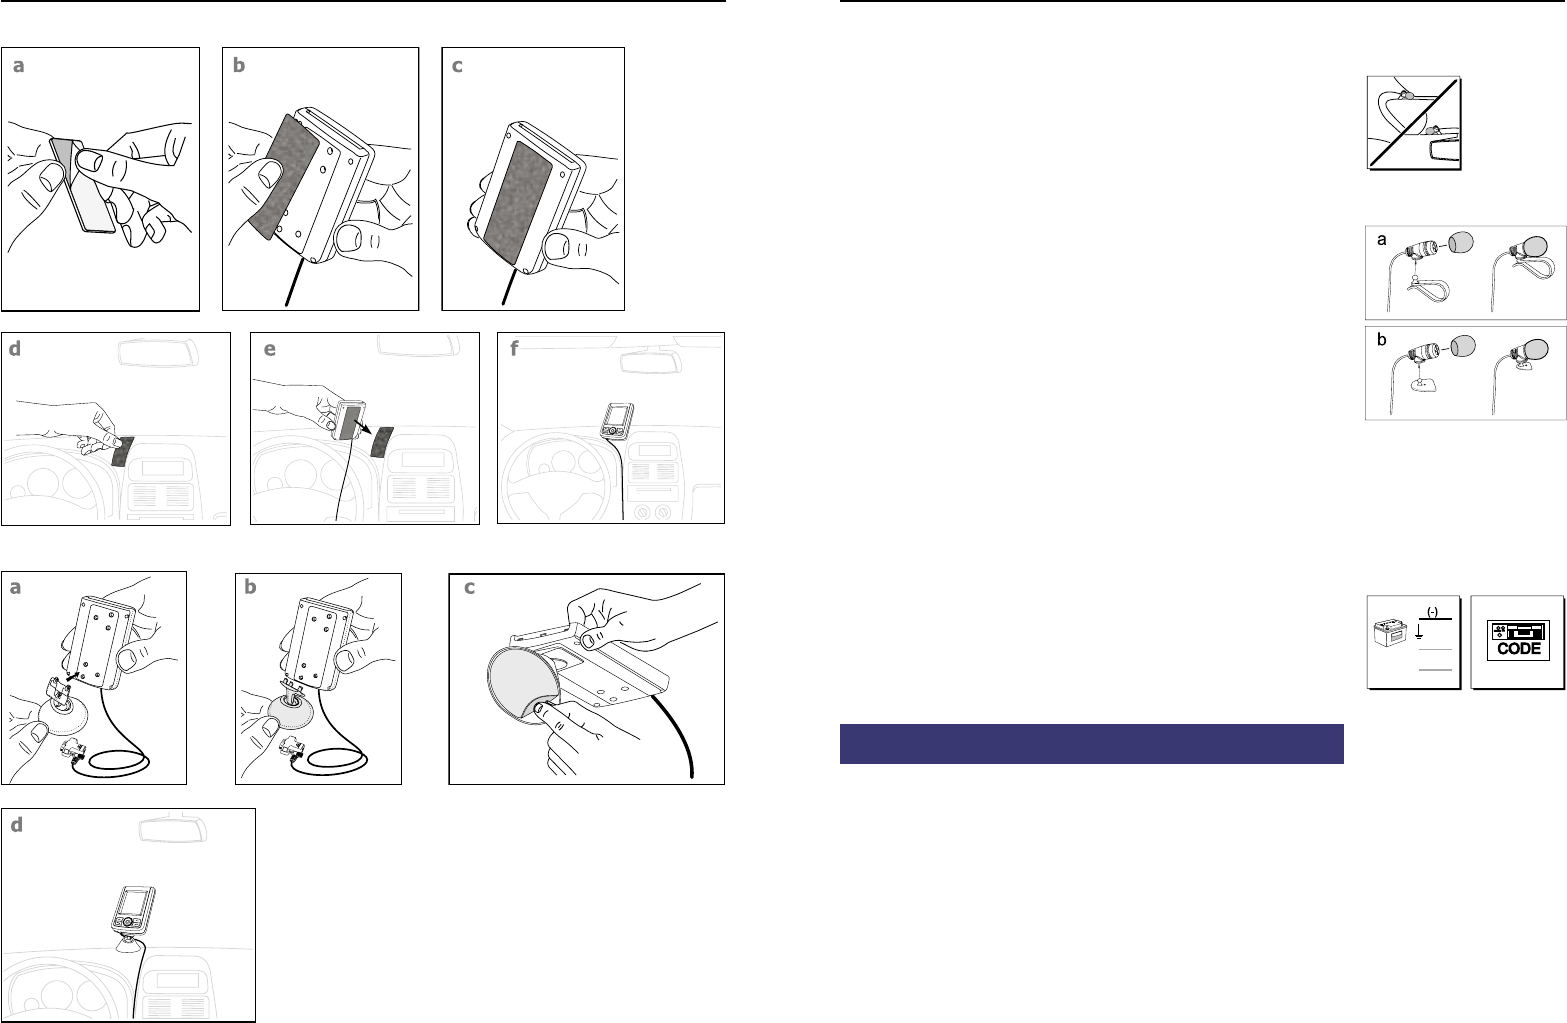
4. Platzierung und Befestigung
Schritt 1:
Wählen Sie bitte zuerst den für Sie in Ihrem Fahrzeug am besten geeig-
neten Standort für den Monitor samt Montagefuß aus, indem Sie den
Monitor an verschiedenen Positionen im Fahrzeug einmal anhalten,
bzw. positionieren.
Haben Sie eine geeignete Position für den Monitor im Fahrzeug gefun-
den, können Sie nun den Montagefuß / Klettverschluss entsprechend
anbringen / befestigen. Nutzen Sie bitte das beiliegende Säuberungs-
tuch zum Entfetten der Oberflächen, auf die Sie den Montagefuß an-
bringen möchten. Bitte beachten Sie, dass es bei starken Temperatur-
schwankungen während der späteren Nutzung je nach Struktur und
Beschaffenheit zu Entfärbungen der Oberflächen kommen kann.
Wichtig:
Achten Sie bei der Platzierung, dass der Monitor die Sicht
auf die Straße nicht behindert, nicht in Personenaufprallzo-
nen (unter anderem Airbagbereiche) angebracht wird und
dass Kabel möglichst einfach verlegt werden können.
Der Montagefuß/Klettverschluss kann nur einmal aufge-
klebt werden, beim Entfernen kann es zur Beschädigung
der Klebefläche kommen. Außerdem ist es möglich, dass
sich die Oberfläche je nach Struktur und Beschaffenheit bei
starken Temperaturschwankungen während der späteren
Nutzung entfärbt.
6Montage der Freisprecheinrichtung 7
Installationsbeispiel 1:
Installationsbeispiel 2:
Schritt 2:
Je nach Fahrzeugtyp und dessen Ausstattung (z. B. Airbags) ist es sinn-
voll, das Mikrofon entweder an der A-Säule, an der Sonnenblende oder
am Dachhimmel zu installieren. Hinweise zu den Ausstattungsmerkma-
len entnehmen Sie bitte aus den Fahrzeugunterlagen. Beachten Sie
bitte weiterhin die in der Einbauanleitung dargestellten Entfernungshin-
weise zu anderen Komponenten und zu dem Fahrzeugführer bzw. Spre-
cher.
Schritt 3:
Verlegen Sie bitte die Kabel möglichst so, dass sie nicht unbefestigt im
Fahrzeug liegen/hängen und keinen Einfluss auf das Führen des Fahr-
zeugs ausüben können. Achten Sie beim Verlegen eines Kabels darauf,
das es nicht auf Zug beansprucht wird sondern noch Spiel besitzt. Ver-
meiden Sie Kabelquetschungen, die zu Beschädigungen der Isolierun-
gen durch Reibung/Scheuern entstehen können.
Schritt 4:
Installieren Sie die Elektronikbox an geeigneter Stelle im Fahrzeug. Dies
kann z. B. hinter dem Radio, im Handschuhfach oder in der Mittelkon-
sole sein. Achten Sie darauf, dass Sie ohne Probleme an die Anschlüsse
der Box kommen. Bevor Sie Komponenten an der Elektronikbox an-
schließen, sollten Sie zur Sicherheit die Batterie abklemmen. Achten Sie
hierbei auf eine eventuelle Radiokodierung (siehe Radio-Handbuch).
Wichtig:
Installieren Sie die Elektronikbox hinter einer Verkleidung
bzw. an einer Stelle, an die Sie nur nach Öffnen / Lösen
eines Schutzes / einer Abdeckung herankommen. Die An-
schlussbox darf nicht offen im Fahrzeug herumhängen.
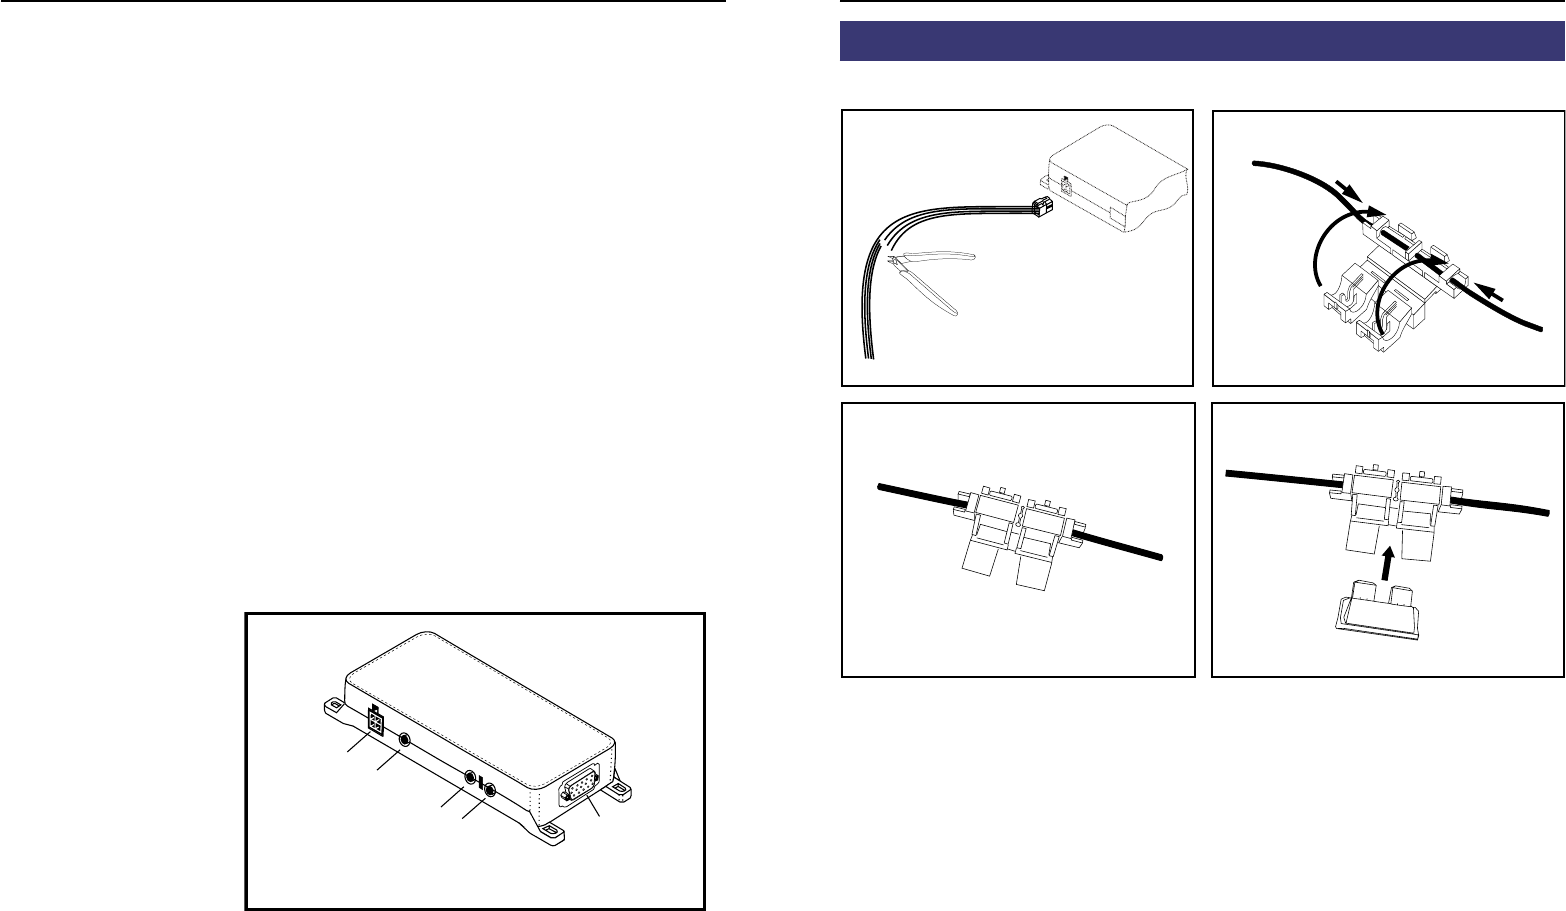
5. Anschluss der Elektronikbox
Die Stromversorgung der Freisprecheinrichtung wird über ein 4adriges
Kabel hergestellt. Schliessen Sie das schwarze (Klemme 31 - Minus),
das rote (Klemme 30 - Dauerplus) und das blaue Kabel (Klemme 15 -
Zündungsplus) an die Stromversorgung Ihres Radios (ggf. über Zigaret-
tenanzünder oder Sicherungskasten) an. Das gelbe Kabel dient nach
Anschluss am Gegenstück zur Stummschaltung des Radios bei einem
Telefongespräch. Den weißen Molex Stecker verbinden Sie bitte mit
Anschluss 1 (siehe nächste Zeichnung).
8Montage der Freisprecheinrichtung 9
Achtung:
Schliessen Sie das blaue Kabel ebenfalls an Klemme 30 an,
dann wird die Freisprecheinrichtung permanent mit Strom
versorgt. Dies könnte bei längerem Stillstand des Fahrzeugs
zur Entladung der Autobatterie führen.
Schließen Sie nun das Mikrofon (Anschluss 4) und den Stecker des Mo-
nitors (Anschluss 5) an die Elektronikbox an.
Über den Anschluss 3 gibt die Freisprecheinrichtung die Sprachausgabe
des Gesprächspartners während eines Telefonats wieder. An diesen An-
schluss können Sie einen separaten Lautsprecher (BURY Zubehör) oder
den Phone-In Eingang Ihres Radios (falls vorhanden) über einen Phone-
In Adapter anschließen. Der Anschluss einer Lautsprecherumschaltbox
(BURY Zubehör, in CC 9051 integriert) ist ebenfalls möglich. Bei den
beiden letzteren Varianten nutzen Sie das fahrzeuginterne Soundsys-
tem zur Sprachausgabe.
Musik in Stereoqualität wird am Anschluss 2 ausgegeben. Hier können
Sie den Aux-In Eingang Ihres Radios (falls vorhanden) über im Fach-
handel erhältliche Adapter anschliessen. Der Adapter muss für den An-
schluss an der Freisprecheinrichtung eine 3,5 mm Stereoklinkenbuchse
besitzen. Je nach Autoradio ist das andere Ende verschieden zu wählen.
Falls Ihr Radio nicht über einen Aux-In verfügt, können Sie den Car
CD/MP3-Adapter aus dem BURY Zubehörprogramm nutzen, um die Mu-
sikwiedergabe über Ihr Radio zu ermöglichen.
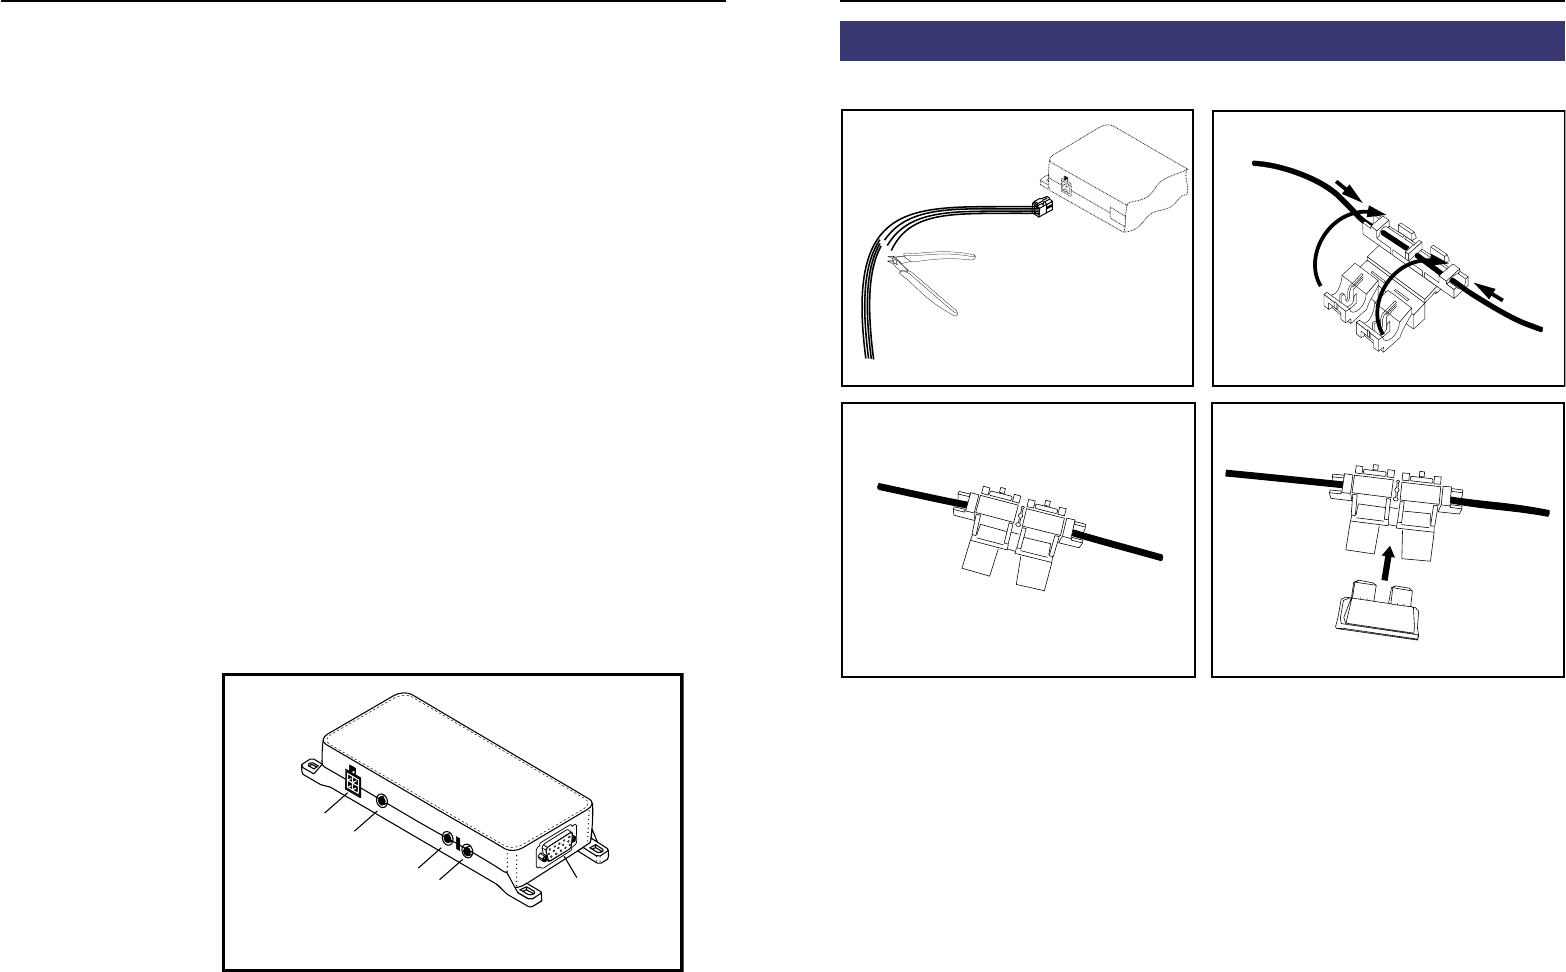
6. Installation der Sicherungen
CC 9050
12
345
Durchtrennen Sie bitte mit einem Seitenschneider oder einer Schere das rote, schwarze und blaue
Kabel. Legen Sie nun die beiden Enden des roten Kabels, die sich durch den Schnitt ergeben, in einen
der Klemmverbinder ein. Klappen Sie diesen nun zu. Hören Sie zweimal ein Knacken, ist die Klemme
korrekt eingerastet. Setzen Sie nun eine der Sicherungen ein und wiederholen Sie dann den Vorgang
für die anderen Kabel.
10
11
8. Herstellen einer Bluetooth-Verbindung
Möchten Sie zum ersten Mal eine Bluetooth-Verbindung herstellen,
müssen Sie die Bluetooth-Funktion bei Ihrem Mobiltelefon aktivieren
und nach Bluetooth-Geräten suchen lassen. In diesem Fall nach einem
Gerät mit der Bezeichnung „CC 9050...“ oder „CC 9051...“. Falls mehrere
Geräte entdeckt worden sind, wählen Sie bitte die FSE aus und geben
die PIN-Nummer 1234 ein. Die Bluetooth-Verbindung (Kopplung) wird
anschließend zwischen Ihrem Mobiltelefon und der FSE hergestellt. Die
FSE unterstützt die Profile „Freisprechen“ und „A2DP“. Bitte stellen Sie
Ihr Mobiltelefon entsprechend ein, bzw. prüfen Sie, ob diese Profile
unterstützt werden.
Läßt sich keine Verbindung aufbauen, überprüfen und aktualisieren Sie
bitte den Stand der Software (Firmware) auf Ihrem Mobiltelefon oder
bei der FSE. Eine Übersicht zu dieser Thematik finden Sie im Internet
unter www.bury.com. Weiterhin ist es möglich, dass Sie erst die Liste
der gekoppelten Geräte in Ihrem Telefon löschen müssen, damit die
FSE richtig erkannt und eine Verbindung aufgebaut werden kann. Lesen
Sie sich die Bedienungsanleitung Ihres Mobiltelefons durch, falls Sie
Fragen zu dessen Menüführung, Funktionen und Bedienung haben soll-
ten. Diese weicht je nach Hersteller und Typ stark voneinander ab.
Hinweis:
Ist der Akku Ihres Mobiltelefons fast leer, läßt sich in vie-
len Fällen ebenfalls keine Bluetooth-Verbindung aufbauen.
Die FSE besitzt einen Speicher, in dem die Kennungen von bis zu 10
Mobiltelefonen abgespeichert werden. Wird ein elfstes Mobiltelefon ge-
koppelt, wird der jeweils älteste Speichereintrag in der FSE gelöscht.
Nach Inbetriebnahme der FSE versucht diese automatisch, sich mit ei-
nem bereits gespeicherten Mobiltelefon im Profile „Freisprechen“ zu
verbinden.
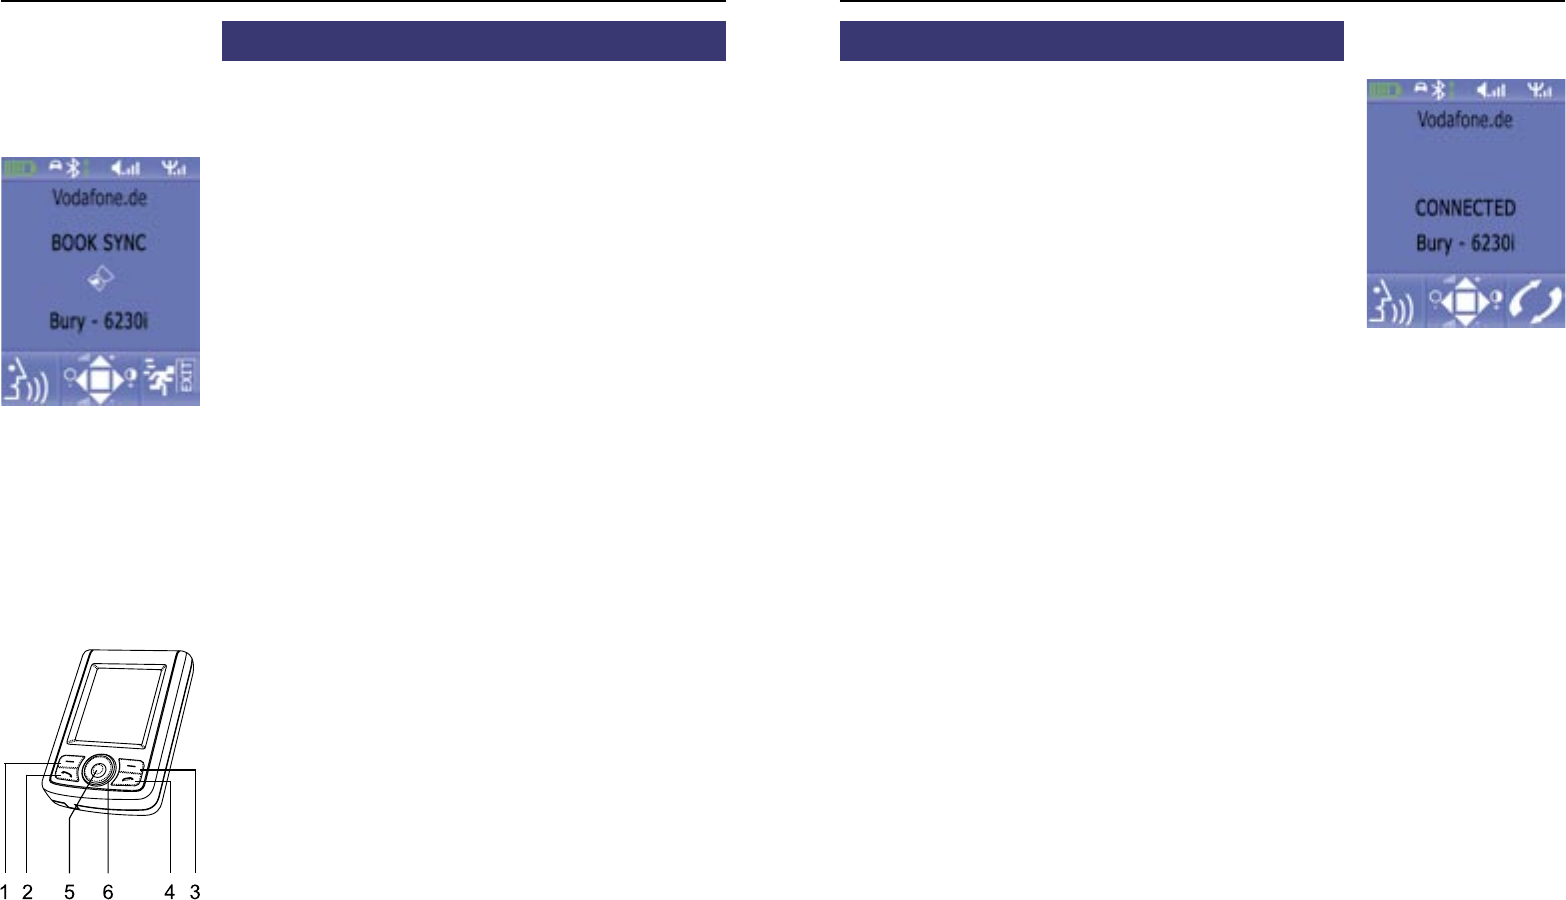
Display mit englischer Menüführung
Bedienungsanleitung
7. Einschalten
Falls die Stromversorgung der Freisprecheinrichtung (FSE) ordnungs-
gemäß angeschlossen wurde, aktiviert sich die FSE, nachdem Sie die
Zündung eingeschaltet haben. Das Display schaltet sich ein und ein
kurzer hoher Ton erklingt.
Die FSE versucht sich nun automatisch mit einem Mobiltelefon zu ver-
binden. Im Auslieferungszustand ist noch keine Kennung eines Mobilte-
lefons gespeichert (siehe Kapitel: Herstellen einer Bluetooth-Verbin-
dung). Es erscheint kurz der Hinweis „Leere Liste“ und anschließend
„Unterbrochen“ auf dem Display.
Falls schon einmal Mobiltelefone verbunden waren, erscheinen die Ken-
nungen / Namen der Mobitelefone im Display. Diese werden nacheinan-
der von der FSE abgefragt. Falls kein Mobiltelefon automatisch via Blue-
tooth mit der FSE verbunden wurde, ertönt hinweisend darauf in gleich-
mässigen Abständen ein tiefer Ton. Diese automatische Suche können
Sie durch Drücken auf die Taste 3 abbrechen.
Bei erfolgreich hergestellter Verbindung ertönt ein langer hoher Ton.
Der Name des gekoppelten Mobiltelefons wird angezeigt und Daten aus
dem Telefonbuch (SIM-Karte) und dem Adressbuch (Speicher des Tele-
fons) werden zur FSE übertragen. Dies kann, je nach Anzahl der gespei-
cherten Daten, einige Sekunden in Anspruch nehmen. Wird die Syn-
chronisation des Telefonbuchs durch z. B. Drücken der Taste 3 oder
eines eingehenden Anrufes unterbrochen, kann es vorkommen, dass
nicht alle Einträge übermittelt wurden. Hier sollte des Telefonbuch
nochmals manuell synchronisiert werden (siehe Kapitel: Menüfüh-
rung).
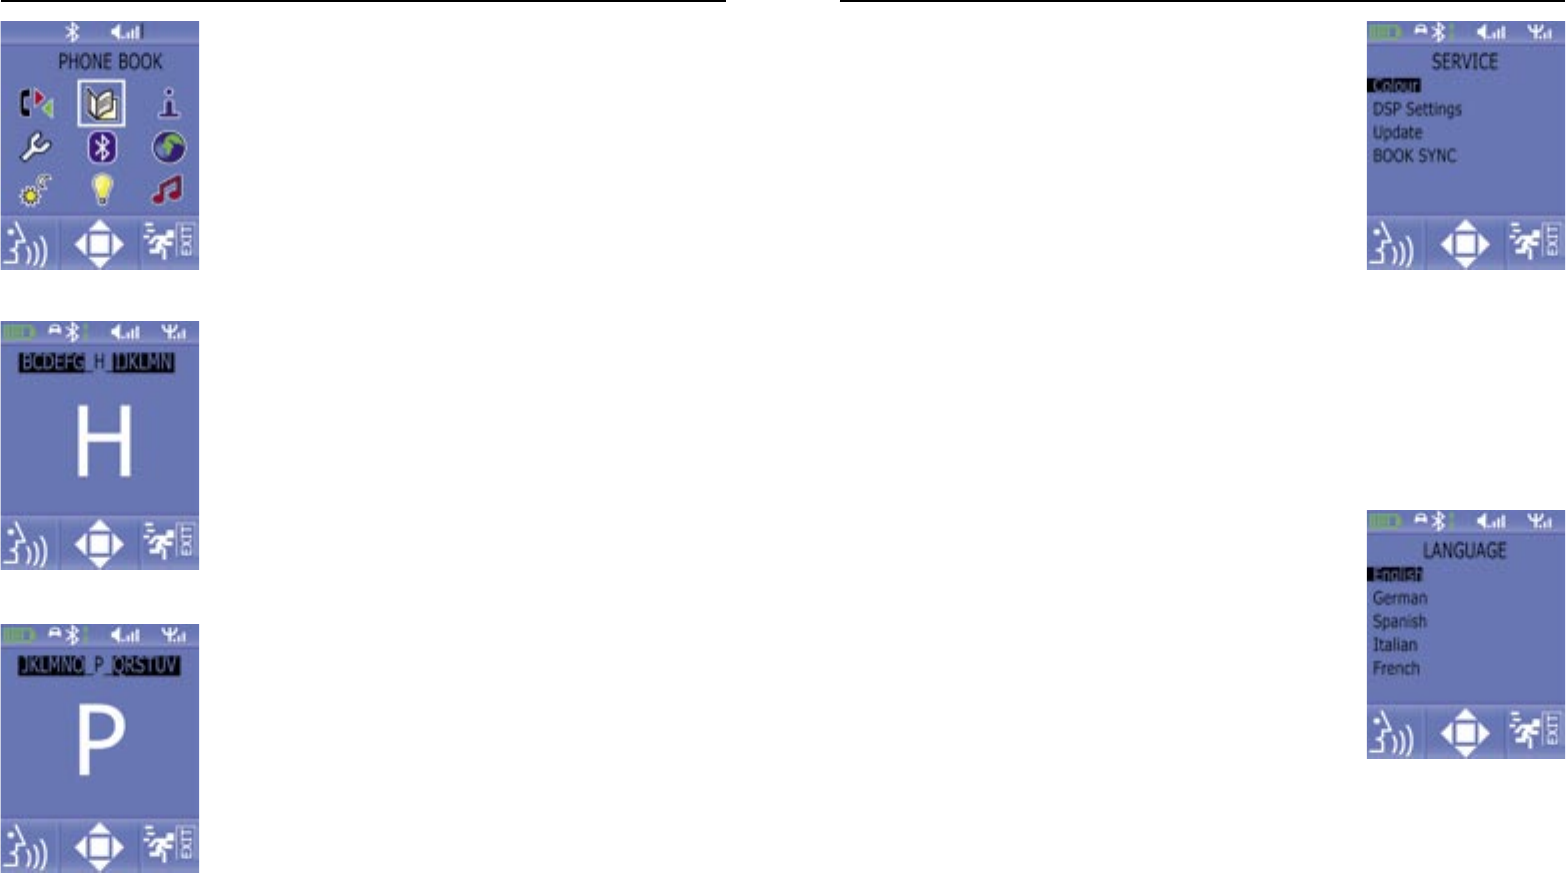
Beschreibung der Tasten:
1 = linke Funktionstaste
2 = Anrufannahmetaste
3 = rechte Funktionstaste
4 = Anrufbeendigungstaste
5 = Auswahltaste
6 = Scrolltaste (links/oben/rechts/unten)
Display mit englischer Menüführung

12 Bedienungsanleitung 13
9. Trennung einer Bluetooth-Verbindung
Möchten Sie eine Bluetooth-Verbindung aufheben, besteht die Möglich-
keit, diese komfortabel an der FSE oder von Ihrem Mobiltelefon aus zu
unterbrechen. Des weiteren wird die Verbindung unterbrochen, wenn
Sie sich samt Mobiltelefon zu weit vom Fahrzeug und damit vom Emp-
fangsradius der FSE entfernen. Nach 15 Minuten ohne aktive Bluetooth-
Verbindung (Anzeige im Display: Unterbrochen) schaltet sich die FSE
automatisch aus, falls diese noch mit Spannung versorgt wird. Dies
dient der Schonung der Fahrzeugbatterie. Kommen Sie innerhalb die-
ses Zeitraumes zum Fahrzeug zurück, können Sie manuell eine Kopp-
lung initiieren, indem Sie die Taste 5 für drei Sekunden drücken.
Hinweis:
Beachten Sie bitte, dass die Kapazität des Akkus Ihres
Mobiltelefons bei aktivierter Bluetooth-Funktion schnell
abnehmen kann. Möchten Sie die Bluetooth-Funktion nicht
mehr nutzen, z. B. beim längeren Verlassen des Fahrzeugs,
so sollten Sie diese deaktivieren.
10. Menüführung
Hinweis:
Beachten Sie bitte, das einige der nachfolgend beschrie-
benen Funktionen/Anzeigen nur möglich sind, falls diese
durch das Mobiltelefon unterstützt werden!
Nach dem Einschalten der FSE erscheint die Hauptmaske. Diese infor-
miert Sie, ob ein Mobiltelefon per Bluetooth verbunden ist oder nicht.
Hier haben Sie unabhängig vom Verbindungsstatus, durch Drücken der
Taste 5, die Möglichkeit das Hauptmenü aufzurufen. Der jeweils um-
rahmte Eintrag kann durch erneutes Drücken der Taste 5 ausgewählt
werden. Mit den Scrolltasten gelangen Sie in die gewünschte Richtung.
Mit der Taste 3 kann die Menüführung abgebrochen werden, bzw. ein
Schritt zurückgegangen werden.
Menüstruktur:
-> Anrufliste
-> Verpasste
-> Angerufene
-> Telefonbuch
-> Info
-> Software (Anzeige der Softwarestände der FSE)
-> Hardware (Anzeige der Hardwarestände der FSE)
-> DSP Info (Aktivierungsstatus der Sprachverbesserung
für Mobiltelefon und FSE)
-> Service
-> Farbe
-> Hintergrund
-> Text
-> DSP Setup
-> DSP im Handy (an / aus)
-> DSP im Gerät (an / aus)
-> Update (Durchführen von Firmwareupdates der FSE)
-> Telefonbuch synchronisieren
-> Bluetooth
->Kopplungsliste (Anzeige der schon einmal gekoppelten Geräte)
> Sprache
-> Englisch / Deutsch / Spanisch / Italienisch / Französisch /
Portugiesisch / US Englisch / Niederländisch / Slowakisch/
Polnisch
-> Tag / Nacht
-> Sleep Mode
-> Musik
Anruflisten
Das Menü Anrufliste ist ähnlich der Menüführung aufgebaut, wie Sie
es von Mobiltelefonen gewohnt sind. So lässt sich nachverfolgen wel-
che Nummern Sie gewählt und welche Anrufe Sie verpasst haben.
Telefonbuch
Im Menüpunkt Telefonbuch werden Ihnen die Speichereinträge des
Telefonbuches und des Adressbuches des Mobiltelefons angezeigt. Die
Einträge sind alphabetisch geordnet. Mit der oberen und unteren Scroll-
taste können Sie zu einem Eintrag scrollen. Sind sehr viele Kontakte
gespeichert, ist es sinnvoll, mit der linken oder rechten Scrolltaste die
Suchfunktion nach Buchstaben zu aktivieren.
Display mit englischer Menüführung

14 Bedienungsanleitung 15
Sie haben zwei Möglichkeiten um in das Alphabet zu gelangen:
Die weiter vorne liegenden Buchstaben erreichen Sie über die linke
Scrolltaste ausgehend vom Buchstaben „H“. Mit der rechten Scrolltaste
beginnen Sie Ihre Suche vom Buchstaben „P“ aus. Wählen Sie einen
Buchstaben (links/rechts) aus und bestätigen Sie diesen mit der Aus-
wahltaste. Die Anzeige der Einträge beginnt dann mit diesem Buchsta-
ben.
Info
Im Menü Info erhalten Sie Informationen über die installierte Software
und Hardware Ihrer Freisprecheinrichtung. Diese Daten sollten Sie no-
tieren, falls Sie Probleme in der Nutzung der FSE mit Ihrem Mobiltelefon
haben und diesbezüglich mit der Bury Hotline Kontakt aufnehmen oder
Sie z. B. die Firmware (das Betriebssystem der FSE) aktualisieren möch-
ten.
Die Aufspielung einer aktuellen Firmware (Infos unter www.bury.com)
kann nützlich sein bei Handywechsel oder wenn neue Funktionen imp-
lementiert worden sind. Die Versionsnummer der Firmware finden Sie
hinter der Bezeichnung der FSE, z. B. „CC 9050 V3.0a“.
Im Unterpunkt <DSP Info> können Sie erkennen, ob der ‚Digitale Sig-
nalprozessor‘ (DSP) in der FSE und im Mobiltelefon (falls vorhanden)
aktiviert ist. Dies ermöglicht eine Verbesserung der Wiedergabe der
gesprochenen Sprache und unterstützt die Rauschunterdrückung.
Service
Im Menü Service können Sie die Farbeinstellungen für den Hinter-
grund und den Text einstellen. Weiterhin läßt sich im nächsten Unter-
punkt die DSP-Funktion im Mobiltelefon und in der FSE an- und aus-
schalten. Über den Unterpunkt Update können Sie die Firmware der
FSE aktualisieren. Eine genaue Beschreibung hierzu und die entspre-
chende Firmware finden Sie im Internet unter www.bury.com. Der
nächste Unterpunkt ermöglicht Ihnen die erneute Synchronisation des
Telefonbuches mit Ihrem Mobiltelefon.
Bluetooth
Im Menüpunkt Bluetooth finden Sie eine Liste mit den Mobiltelefonen,
die schon einmal erfolgreich mit der FSE gekoppelt worden sind. Die
hier gespeicherten Einträge werden nach dem Einschalten der FSE ab-
gefragt, um eine Bluetooth-Verbindung aufzubauen. Aus der Liste kön-
nen Sie Mobiltelefone löschen, falls diese definitiv nicht mehr zum Ein-
satz kommen. Steuern Sie dazu mit den Scrolltasten auf den entspre-
chenden Eintrag und drücken Sie dann die Taste 5. Wählen Sie dann
bitte die Funktion „Löschen“ aus.
Aus diesem Menü heraus können Sie die Freisprecheinrichtung aber
auch mit Ihrem Mobiltelefon koppeln. Wählen Sie dazu bitte die Funkti-
on „Verbinden“ aus. Ein kleines Icon zeigt Ihnen an, in welchen Profil
das Mobiltelefon zuletzt mit der FSE verbunden war. Ein Auto signali-
siert das Profil „Freisprechen“ und ein Notenschlüssel das Profil „A2DP“.
Sind beide Symbole abgebildet, werden Sie anschließend gefragt, in
welchem Profil Sie das Handy erneut verbinden möchten.
Sprache
Im Menüpunkt Sprache stellen Sie die Menüsprache um. Scrollen Sie
dazu auf die gewünschte Sprache und betätigen Sie dann die Auswahl-
taste. Nach wenigen Sekunden ist die neue Menüsprache geladen.
Tag/Nacht
Je nach aktuellen Lichtverhältnissen haben Sie im Menüpunkt Tag /
Nacht die Möglichkeit, die Helligkeit herab- bzw. heraufzusetzen. Das
ermöglicht eine bessere Ablesemöglichkeit der Daten auf dem Display.
Sleep Mode
Im Menüpunkt Sleep Mode können Sie einen Bildschirmschoner akti-
vieren. Dieser setzt ein, falls Sie 15 Sekunden keine Eingabe bzw. keine
Taste am Monitor betätigt haben. Das Display verdunkelt sich dabei
langsam bis keine Inhalte mehr zu sehen sind. Dies ist unabhängig da-
von, ob ein Mobiltelefon mit der FSE verbunden ist oder nicht. Bei ei-
nem aktiven Telefongespräch ist der Bildschirmschoner deaktiviert.
Musik
Viele Mobiltelefone übertragen den eigenen Klingelton bei einem einge-
henden Anruf auch auf die FSE. Aber es gibt Ausnahmen. Für diesen
Fall können Sie im Menüpunkt Musik einen Signalton festlegen, wel-
cher wiedergegeben werden soll.
Display mit englischer Menüführung Display mit englischer Menüführung
Display mit englischer Menüführung

16 Bedienungsanleitung 17
Weitere Informationen
Folgende Bedienung ist möglich:
Funktionen bei inaktiver Bluetooth-Verbindung:
Ist kein Mobiltelefon mit der FSE verbunden, erscheint die Meldung
„Unterbrochen“ im Display.
(4) = Herstellung einer Verbindung mit dem zuletzt gekoppelten
Mobiltelefon, Abbruch der Menüführung
(5) = Aktivierung des Menüs / Aufrufen eines Menüpunktes
(6) = Scrollen zwischen den Menüpunkten, Veränderung der Display
helligkeit (links / rechts) wenn Menü inaktiv
Funktionen bei aktiver Bluetooth-Verbindung - Profil HF:
Ist ein Mobiltelefon mit der FSE verbunden, erscheint dessen BT-Iden-
tifikationsname, die Feldstärke (der Empfang) und die Akkukapazität
des Mobiltelefons sowie der Netzbetreibername und der Lautstärkepe-
gel der FSE auf dem Display (dies ist handyabhängig).
(1) = Nummer wählen (Eingabe der Rufnummer durch Auswahl der
entsprechenden Ziffern über Scroll- und Auswahltaste)
(2) = Aufrufen von Voice-Tags (Sprachwahlfunktion)
(4) = Bluetooth Verbindung unterbrechen
Um die Sprachwahlfunktionen Ihres Mobiltelefons mit der FSE nut-
zen zu können, müssen Sie vorab Rufnummern in Ihrem Mobiltelefon
entsprechend gekennzeichnet haben. Meistens können Sie Voice-Tags
nur für gespeicherte Rufnummern im Adressbuch Ihres Mobiltelefons
aufnehmen.
Funktionen bei aktiver Bluetooth-Verbindung - Profil A2DP,
MP3 Musikwiedergabe:
Verfügt Ihr Mobiltelefon über das Bluetooth Profil A2DP, dann lassen
sich Musiktitel (z. B. MP3 Dateien) über die FSE in Stereoqualität ab-
spielen. Wichtig ist, das Sie den jeweils angewählten Musiktitel über die
Funktion „Abspielen über...“ auf der FSE wiedergeben. Da die Menüfüh-
rung der Mobiltelefonhersteller sehr unterschiedlich ist, kann die Be-
zeichnung der Auswahl „...Bluetooth-Stereo-Headset“ voneinander ab-
weichen. Nehmen Sie diese Einstellung vor, so wird die Musikwiederga-
be über das an die FSE angeschlossene Soundsystem wiedergegeben.
(2) = Start / Stop der Wiedergabe
(6) = Wechseln der Titel (links = zurück, rechts = vor),
Lautstärkeeinstellung (lauter = oben, leiser = unten)
Anruf bei Musikwiedergabe
Sollte während der Wiedergabe eines Musiktitels ein Anruf eingehen, so
wird das Abspielen unterbrochen und graphisch wie akustisch auf den
Anruf hingewiesen. Mit der Taste 1 können Sie das Gespräch anneh-
men, mit der Taste 3 das Gespräch ablehnen. Nach Gesprächsende
wird die Wiedergabe des Musiktitels fortgesetzt. Sollte Ihr Mobiltelefon
diese Funktion nicht automatisch unterstützen, starten Sie bitte die
Wiedergabe des Titels erneut bei Ihrem Mobiltelefon.
11. Serviceleistungen
Bei allgemeinen oder technischen Fragen, Anregungen und Kritiken
steht Ihnen unser Team jeder Zeit zur Verfügung:
BURY GmbH & Co. KG
Robert-Koch-Straße 1-7
32584 Löhne
Hotline: +49(0)180 5 - 842 468*
Faxline: +49(0)180 5 - 842 329*
* 0,14 €/Min. aus dem Festnetz der Deutschen Telekom AG
E-Mail: hotline@bury.com
Serviceannahme
Wenn Sie Ihr Gerät oder Zubehör aus Reklamationsgründen einschi-
cken möchten, senden sie das Produkt am besten direkt an unser Ser-
viceteam:
BURY GmbH & Co. KG
Im Hause DPD Depot 103
Robinienweg
D-03222 Lübbenau
Wir sind für Ihre Vorschläge und Bemerkungen offen.
Hinweise zur Entsorgung von Elektrogeräten
Mit der Umsetzung des Elektro- und Elektronikgesetzes dürfen alte
Elektrogeräte seit dem 24. März 2006 nicht mehr zusammen mit dem
Hausmüll entsorgt werden. Als Besitzer eines Altgerätes sind Sie ver-
pflichtet, dieses zu den vorgesehenen Annahme- oder kommunalen
Sammelstellen zu bringen. Elektroaltgeräte werden dort kostenlos an-
genommen.

18
19
Index
Introductory information 20
1. General 20
2. Security guidelines 20
Installation of the hands-free car kit 22
3. Scope of supply CC 9050 / CC 9051 22
4. Positioning and mounting 23
5. Connecting the Electronic box 25
6. Installation instructions for the fuses 27
Operating guidelines 28
7. Switch-on 28
8. Establishing a Bluetooth connection 29
9. Disconnect a Bluetooth connection 30
10. Menu navigation 30
11. Service 35
CC 9050 / CC 9051
Stand 05/2007
25.0983.0-01-300507
Irrtum und Änderungen vorbehalten
20
21
Introductory information
1. General
Dear customer,
Congratulation on purchasing a Bury hands-free car kit. You have cho-
sen a high quality product that is extremely easy to use. All aspects of
Bury production through to sales and service are subject to strict qua-
lity management according to DIN EN ISO 9001. All Bury hands-free car
kits meet CE and e1 security standards. Furthermore, we provide a
two-year warranty on all components.
Please read the operating manual carefully so that you can fully enjoy
your Bury hands-free car kit. If you have any further questions concer-
ning installation or operation of your car kit, please contact your dealer.
He will be happy to give you reliable advice. You can also contact our
hotline. Our phone and fax numbers are listed in the chapter Service at
the end of the operating instructions.
Have a good trip!
2. Security guidelines
Installation – who and where
The installation of this system can be carried out by yourself but please
observe the installation requirements of the automotive manufacturer
(VAS 1978). During the installation, park the car at a place where the
road traffic is not impaired. We recommend to let a specialised work-
shop perform the installation.
Power supply
This system has been designed for the use in vehicles with an on-board
supply system of 12 volts (passenger car). If you intend to install the
device in a vehicle with an on-board supply system of 24 volts (lorry),
please use a voltage converter. If you have queries regarding this sub-
ject, please contact our hotline.
Position, volume
Install the components of the device in the vehicle so that your field of
vision is not impaired and the components are not mounted in the im-
pact zone of the passenger compartment or in the airbag inflation zo-
nes. The removal of coverings (with and without airbags) or compon-
ents of the dashboard requires – in some cases – special tools and
special knowledge.
Intended use
We shall not be liable for damages or malfunctions due to improper use
of the navigation system. Therefore, do not expose the device to mois-
ture, extreme temperatures or shocks and carefully follow the procedu-
re described in the installation and operating guidelines.
Use while driving
Operate the system only when the situation allows it and when you do
not endanger, harm, constrain, or annoy other road users. The volume
of the device has to be set in a way that exterior noise is still audible.
Faults
Do not commission the device if you detect or assume a defect. In this
case, contact a Bury specialised dealer or our hotline. Improper repair
efforts can be dangerous for you. Therefore, only skilled personnel may
perform inspections.
Important:
The driver is ultimately responsible for the safe operation
and control of their vehicle at all times. You should never
use a hand held phone, including sending or reading text or
picture messages, while driving.
Research indicates that there is a risk to safety when the
driver of a motor vehicle is distracted and using a mobile
phone while driving can be a distriction.
The manufacturer strongly recommends that you use a
hands-free solution when driving.
22
23
3. Scope of supply CC 9050 / CC 9051
Installation of the hands-free car kit
110 cm
100 cm
200 cm
Description of the components:
1) Electronics box (CC 9051 with integrated loudspeaker switch-box)
2) Monitor on installation pad, cleaning cloth
3) Fuses
4) Hook-and-loop fastener
5) Fixing screws for electronics box
6) Aux cable
7) Microphone
8) Power supply cables
9) Phone-In cable
10) Loudspeaker cable (CC 9051)
4. Positioning and mounting
Step 1:
First of all, please choose the most convenient position for the monitor
and the installation pad in your vehicle by attaching the monitor / hook-
and-loop fastener to the pad and checking different positions in the
vehicle. After having found a suitable position for the monitor in the
vehicle you can mount / attach the installation pad / hook-and-loop
fastener accordingly. Please use the enclosed cleaning cloth for degre-
asing the surfaces you want to attach the installation pad to. Please
note that in case of high variations in temperatures - depending on the
structure and the features - decolourisations of the surfaces can occur
during the subsequent utilisation.
Important:
When positioning the monitor please take care that the
monitor does not impair the view onto the road, that it will
not be installed in the impact zone of the passenger com-
partment (amongst others in the airbag inflation zones) and
that cables may be laid without any problems.
The installation pad / hook-and-loop fastener can be af-
fixed just once, removing could damage the adhesive area.
In case of high variations in temperatures - depending on
the structure and the features - decolourisations of the sur-
faces can occur during the subsequent utilization.
24 Installation of the hands-free car kit 25
Example of installation 1:
Example of installation 2:
Step 2:
Depending on the vehicle type and its equipment (e.g. airbags), it is
reasonable to install the microphone either at the A-pillar, at the sun
shield or at the roof interior. For details about the equipment features
please refer to the vehicle documents. Please also observe the notes on
distances to other components and to the driver / speaker, as specified
in the installation manual.
Step 3:
Please lay the cables in a way that they do not lie/hang unsecured in
the vehicle and that they may not influence the conducting of the ve-
hicle. When laying a cable, please take care that it is not under traction
stress but that it has some tolerance. Avoid crushing the cable as da-
mages of the insulation can be caused by friction/rubbing.
Step 4:
Install the electronics box at a convenient place in the vehicle. This can
e.g. be behind the radio, in the glove box, or in the centre console.
Please mind that you can access the connections of the box without
difficulty. Before connecting the components to the electronics box you
should branch off the battery for safety reasons. In doing so, take into
account that there might be a radio coding (confer radio manual).
Important:
Please install the electronics box behind a cover or so-
mewhere you can only reach by opening or unfastening a
protective cover/ a cover. The terminal box must not hang
loosely in the vehicle.
5. Connecting the Electronic box
The power supply of the hands-free car kit is established via a 4-core
cable. Connect the black (clamp 31 – minus), the red (clamp 30 – stea-
dy plus) and the blue cable (clamp 15 – ignition plus) to the power
supply of your radio (where required via the cigarette lighter or the fuse
box). After connection to the counterpart, the yellow cable provides for
radio muting during a phone conversation. Please connect the white
Molex connector with connection 1.
26 Installation of the hands-free car kit 27
CC 9050
12
345
ATTENTION:
If you also connect the blue cable to clamp 30, the hands-
free car kit will be permanently supplied with power. If the
vehicle is not running for a longer period, this could lead to
a discharge of the car battery.
Now connect the microphone (connection 4) and the monitor plug (con-
nection 5) to the electronics box.
The hands-free car kit reproduces the interlocutor‘s voice output during
a phone conversation via connection 3. You can connect a separate
loudspeaker (Bury accessories) or the phone-in input of your radio (if
available) to this connection via a phone-in adapter. The connection of
a loudspeaker switch box (Bury accessories integrated in CC 9051) is
also possible. The last two models use the vehicle‘s sound system for
voice output.
Stereo music is output at connection 2. Here you can connect the aux-
in input of your radio (if existent) via adapters available at local retai-
lers. For the connection to the hands-free car kit, the adapter must
have a 3.5 mm stereo jack. Depending on the car radio, the other end
must be selected otherwise. If your radio does not have an aux-in, you
can use the car CD/MP3 adapter from the Bury accessories programme
to enable the reproduction of music via your radio.
6. Installation instructions for the fuses
Please cut through the red, the black and the blue cable by means of a wire cutter or scissors. Now
insert the two endings of the red cable resulting from the cut into one of the binders, then close it. If
you hear two clicking noises, the clamp snapped in properly. Now insert one of the fuses and then
repeat the procedure with the other cables.
28
29
Operating guidelines
7. Switch-on
If the power supply of the hands-free car kit (HFCK) is connected pro-
perly, the HFCK is activated after having started the ignition. The dis-
play is switched on and a short high sound is audible.
The HFCK now tries to connect automatically to a mobile phone. In the
delivery status an identification of a mobile phone has not been saved.
(cf. chapter: Establishing a Bluetooth connection). The note „empty
list“ and then „disconnected“ are displayed shortly.
If mobile phones were already connected, the identifications / names of
the mobile phones will appear on the display. These are queried by the
HFCK successively. If no mobile phone was connected to the HFCK
automatically via Bluetooth, a deep sound is audible in regular intervals
indicating this. You can stop this automatic search by pressing key 3.
In case of a successfully established connection, a long high sound is
audible. The name of the connected mobile phone is displayed and data
from the phone book (SIM-card) and from the address book (telephone
directory) are then transmitted to the HFCK. Depending on the number
of data stored, this could take some seconds. If the synchronisation of
the phone book is interrupted, e.g. by pressing key 3 or by an incoming
call, it may occur that not all entries have been transmitted. In this
case, the phone book should be synchronised manually (cf. chapter:
menu navigation).
Key specifications:
1 = left function key
2 = call answering key
3 = right function key
4 = call termination key
5 = selection key
6 = scroll key (left/top/right/bottom)
8. Establishing a Bluetooth connection
If you wish to establish a Bluetooth connection for the first time, you
have to activate the Bluetooth function of your mobile phone and
search for Bluetooth devices. In this case, search for a device labelled
„CC 9050...“ or „CC 9051...“. If several devices were identified, please
select the HFCK and enter the PIN number 1234. The Bluetooth con-
nection (pairing) will then be established between your mobile phone
and the HFCK. The HFCK supports the profiles „hands-free operation“
and „A2DP“. Please set your mobile phone accordingly or check whe-
ther these profiles are supported.
If it is not possible to establish a connection, please check and update
the software release (firmware) of your mobile phone or of the HFCK.
You will find an overview dealing with this subject on the Internet at
www.bury.com. In addition it is possible that you must delete all de-
vices connected to your mobile phone first in order to enable a correct
identification of the HFCK and the establishment of a connection. If you
have queries regarding the menu navigation, functions and operation of
your mobile phone, please refer to the operating guidelines of your
mobile phone. Depending on the manufacturer and type, this can differ
considerably between phones.
Note:
If the rechargeable battery of the mobile phone is low,
it is sometimes not possible to establish a Bluetooth con-
nection.
The HFCK has a memory for the storage of the identification of up to 10
mobile phones. In case an eleventh mobile phone is connected, the
oldest entry in the HFCK memory will be cancelled. After the commis-
sioning of the HFCK it automatically tries - „hands-free operation“ pro-
file - to connect with a mobile telephone already saved.
Display with English menu navigation
Display with English menu navigation

30 Operating guidelines 31
9. Disconnect a Bluetooth connection
If you wish to cancel a Bluetooth connection, you can either disconnect
it conveniently at the HFCK or at your mobile phone. In addition, the
connection is disconnected, if you move too far away from the vehicle
while taking your mobile phone with you and thus leave the reception
radius of the HFCK. After 15 minutes without active Bluetooth connec-
tion (information on the display: interrupted), the HFCK automatically
disconnects if it is still supplied with power. This is to save the vehicle
battery. If you return to the vehicle within this time, you can manually
initialise a pairing by pressing key 5 for 3 seconds.
Please note that the capacity of your mobile phone‘s storage battery
can quickly decrease when the Bluetooth function is active. If you do
not want to use the Bluetooth function anymore, e.g. if you leave the
vehicle for a longer period, it is recommended to deactivate this func-
tion.
10. Menu navigation
Please note that some of the functions/displays specified subsequently
are only possible if they are supported by the mobile phone!
After switching on the HFCK the main menu is displayed. It informs you
whether a mobile telephone is connected via Bluetooth or not. Regard-
less of the connection state, you can call the main menu here by pres-
sing key 5. The entry, marked with a bar, can be selected by pressing
key 5 once more. The scroll keys enable you to select the desired direc-
tion. With key 3 you can interrupt the menu navigation or return to the
previous step.
Menu structure:
-> Call list
-> missed
-> dialled
-> Phone book
-> Info
-> software (display of the HFCK‘s software status)
-> hardware (display of the HFCK‘s hardware status)
-> DSP info (activation status of the voice improvement
for mobile telephone and HFCK)
-> Service
-> colour
-> background
-> text
-> DSP setup
-> DSP in the mobile telephone (on / off)
-> DSP in the device (on / off)
-> update (performance of firmware updates of the HFCK)
-> synchronise telephone book
-> Bluetooth
-> pairing list (display of the devices already connected before)
-> Language
-> English / German / Spanish / Italian / French /
Portuguese / US English / Dutch / Slovak /
Polish
-> Day / Night
-> Sleep Mode
-> Music
Call Lists
The structure of the menu Call List is similar to the structure of the
menu navigation, as you are used to from mobile telephones. It is thus
possible to trace the numbers dialled and the calls missed.
Phone book
In the menu item Phone book the memory entries of the mobile
telephone‘s phone book and address book are displayed. The entries
are in alphabetical order. With the upper and lower scroll keys you can
scroll to an entry. If many contacts are stored, it makes sense to acti-
vate the search function with the left or right scroll key according to
characters. Select a character (left/right) and confirm it with the selec-
tion key. The entries are displayed starting with this character.
Display with English menu navigation
32 Operating guidelines 33
Display with English menu navigation Display with English menu navigation
Display with English menu navigation
You have two possibilities to access the alphabet:
The characters at the beginning can be accessed via the left scroll key
starting from character „H“. With the right scroll key you start sear-
ching at character „P“. Select a character (left/right) and confirm this
with the selection key. Entries are then displayed starting from this
character.
Info
In the menu Info you receive information on the installed software and
hardware of your hands-free car kit. You should write down these data
if you have problems in using the HFCK with your mobile telephone and
contact the Bury hotline or if you e.g. wish to update the firmware (the
operating system of the HFCK).
It can be useful to update the firmware (information at www.bury.com)
in case of a mobile phone change or when new functions have been
implemented. You can find the version number of the firmware after
the name of the HFCK, e.g. „CC 9050 V3.0a“. In the sub-menu <DSP
Info> you can see whether the ‚digital signal processor‘ (DSP) in the
HFCK and in the mobile telephone (if available) is activated. This enab-
les an improvement of the reproduction of the spoken language and
supports the noise suppression.
Service
In the menu Service you can set the colours for the background and
the text. Furthermore, the next sub-item enables you to switch on and
off the DSP-function in the mobile telephone as well as in the HFCK.
You can update the firmware of the HFCK via the sub-item update. A
detailed description and the corresponding firmware can be had on the
Internet at www.bury.com. The next sub-item enables you to again
synchronise the phone book with your mobile phone.
Bluetooth
Under the menu item Bluetooth you will find a list of the mobile tele-
phones which have already been successfully paired with the HFCK.
After switching on the HFCK, the entries saved here are scanned for
establishing a Bluetooth connection. You can delete mobile telephones
from the list if they are definitively no longer used. Select the respecti-
ve entry with the scroll keys and then press key 5. Please select the
function ‚delete‘.
This menu enables you to connect the hands-free car kit to your mobi-
le telephone. Please select the function ‚connect‘. A small icon indicates
the profile the mobile telephone was connected to the HFCK last. A car
signalises the profile „hands-free“ and a grading key the profile „A2DP“.
If both symbols are displayed, you will be subsequently asked to select
the profile you want to connect the mobile telephone again.
Language
In the menu item Language you can change the menu language.
Therefore scroll to the required language and then press the selection
key. After a few seconds the new menu language is loaded.
Day/Night
As the lighting conditions vary according to the time of the day, you
have the possibility to reduce or increase the brightness under the
menu item Day / Night. This enables a better legibility of data on the
display.
Sleep Mode
In the menu item Sleep Mode you can activate a screen saver. It ap-
pears if you have not made any entry or pressed any key at the monitor
for 15 seconds. The display thereby darkens slowly until no contents
are visible, regardless if a mobile telephone is connected to the HFCK
or not. During an active phone call, the screen saver is deactivated.
Music
In case of an incoming call many mobile telephones transmit the proper
ring tone to the HFCK, but there are also exceptions. In this case, you
can configure a signal tone to be reproduced under the menu item
Music.

34 Operating guidelines 35
Further Information
The following operation is possible:
Functions while Bluetooth connection is inactive:
If no mobile telephone is connected to the HFCK, the notice ‚disconnec-
ted‘ appears on the display.
(4) = Establishment of a connection with the mobile telephone connec
ted last, interrupt the menu navigation
(5) = Activation of the menu / calling up a menu item
(6) = Scrolling between the menu items, modification of the display
brightness (left / right) when menu inactive
Other keys = no function
Functions while Bluetooth connection is active – profile HF:
If a mobile telephone is connected to the HFCK, its BT identification
name is displayed. The field strength equally appears (the reception) as
well as the capacity of the storage battery, the name of the network
provider and the volume level of the HFCK.
(1) = select number (enter the telephone number by selecting the re
spective figures via scroll and selection key)
(2) = calling of voice tags (voice tag function)
(4) = interrupt Bluetooth connection
In order to be able to use the voice tag functions of your mobile te-
lephone with the HFCK, you must have marked the telephone numbers
in your mobile telephone accordingly beforehand. In most cases you
can only adopt voice tags for numbers memorised in the address book
of your mobile telephone.
Functions while Bluetooth connection is active - profile A2DP,
Play MP3:
If your mobile telephone possesses the Bluetooth profile A2DP, you can
play music (e.g. MP3 files) in stereo quality via the HFCK. It is important
to play the music title selected respectively on the HFCK via the func-
tion ‚play via...‘. As the menu navigation of the manufacturers of mobile
telephones differs considerably, the designation of the selection ‚...
Bluetooth-stereo-headset‘ may vary. If you establish this setting, the
music is played via the sound system connected to the HFCK.
(2) = start / stop the reproduction
(6) = change the title (left = back, right = forward),
volume adjustment (louder = top, lower = bottom)
Receiving a call while playing MP3
If a call is received while music is played, the reproduction is interrup-
ted and the call is indicated graphically and acoustically. With key 1 you
can accept the call, with key 3 you can reject the call. After termination
of the call, the reproduction of music is continued. If your mobile tele-
phone does not automatically support this function, please restart the
reproduction of the music title at your mobile phone.
11. Service
In case of general or technical queries, suggestions and comments,
please do not hesitate to contact our team at any time:
Bury GmbH & Co. KG
Robert-Koch-Straße 1-7
32584 Löhne
Hotline: +49(0)180 5 - 842 468*
Faxline: +49(0)180 5 - 842 329*
* 0.14 €/min. Deutsche Telekom AG landline
E-Mail: hotline@bury.com
Service desk:
In case of complaints, please return the product directly to our service
desk:
Bury GmbH & Co. KG
Im Hause DPD Depot 103
Robinienweg
D-03222 Lübbenau
Suggestions and feedback are always welcomed.
Notes on the disposal of electronic devices
In compliance with the German law on electric and electronic devices,
old electric and electronic devices must not be disposed of together
with domestic garbage in Germany, beginning March 24, 2006. If you
want to dispose of an old electric or electronic device you are required
to take it to a designated collection point (“point of acceptance” or
“communal collection point”). There old electric and electronic devices
are taken back free of charge.