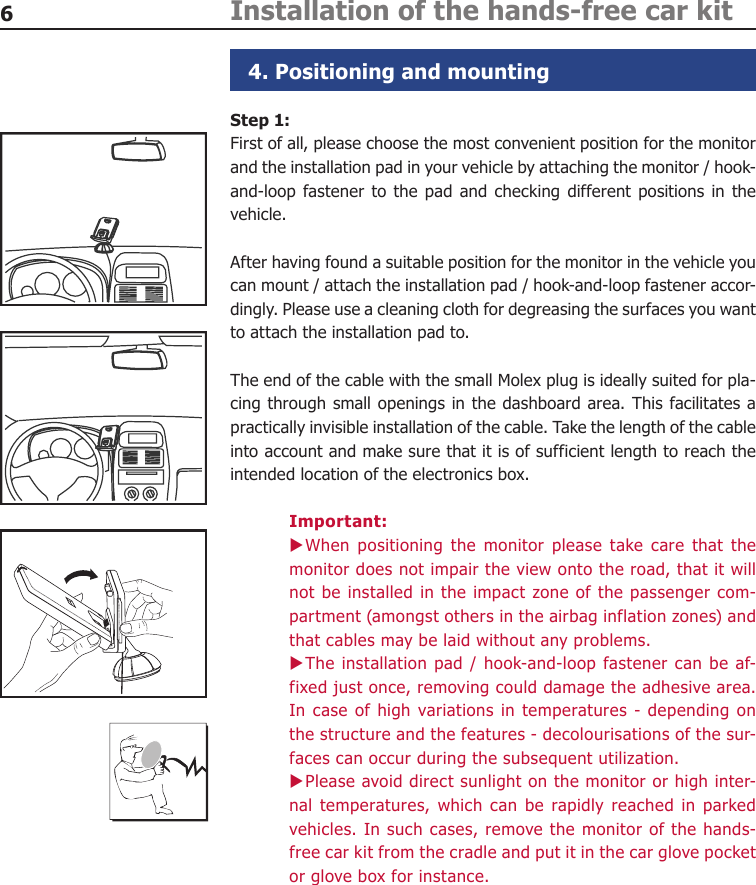
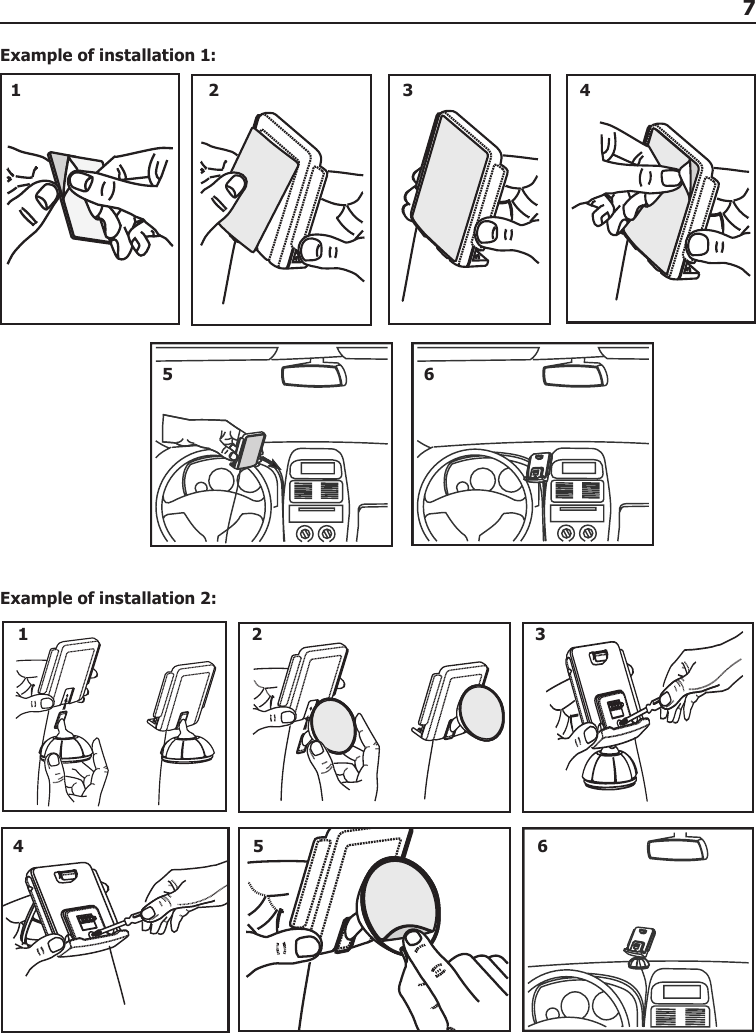
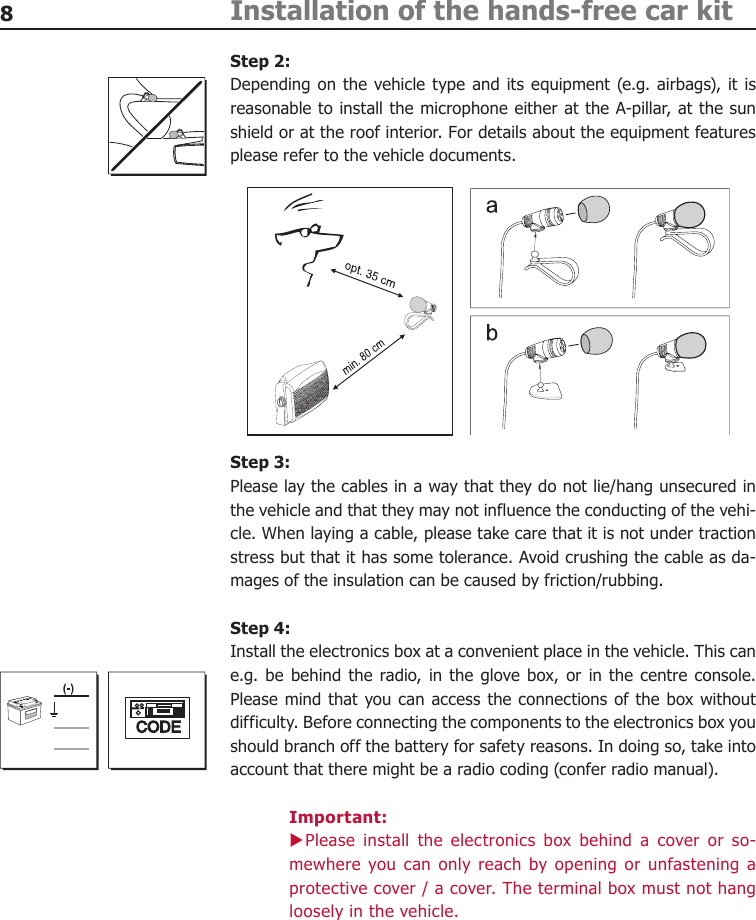
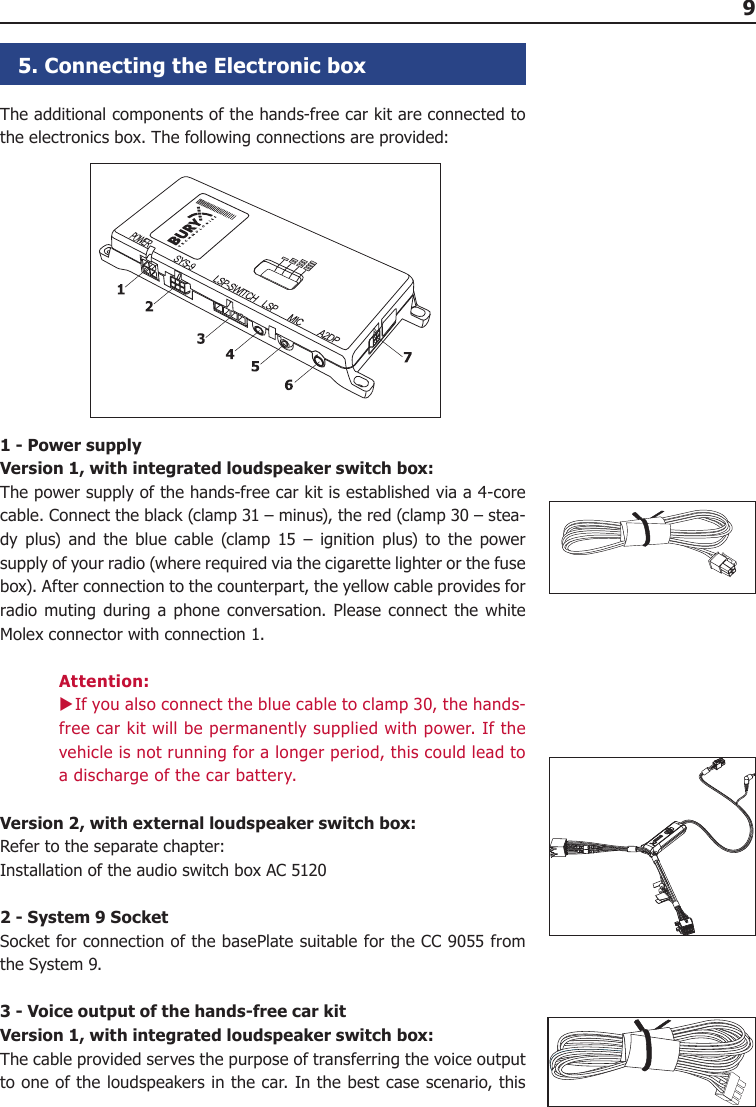
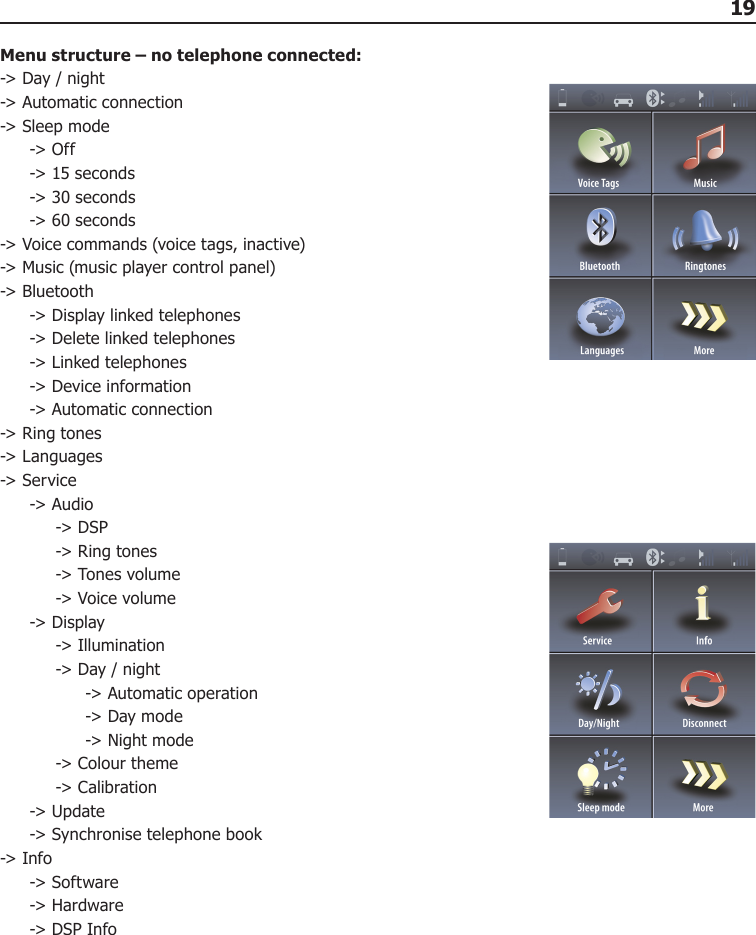
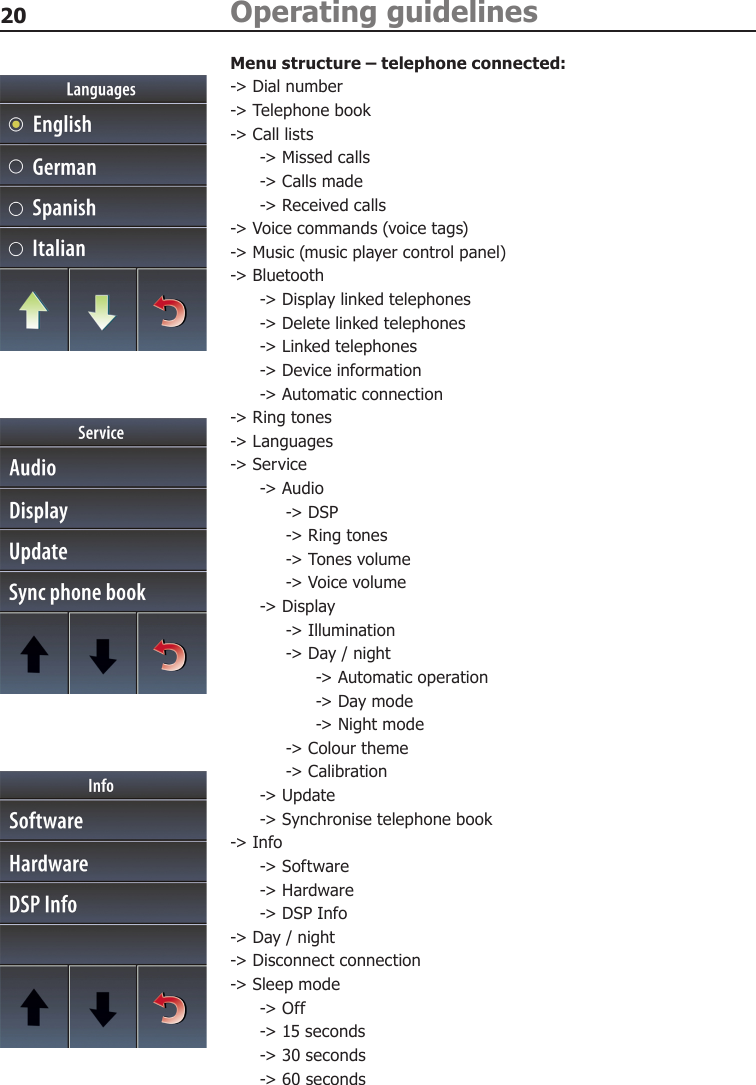
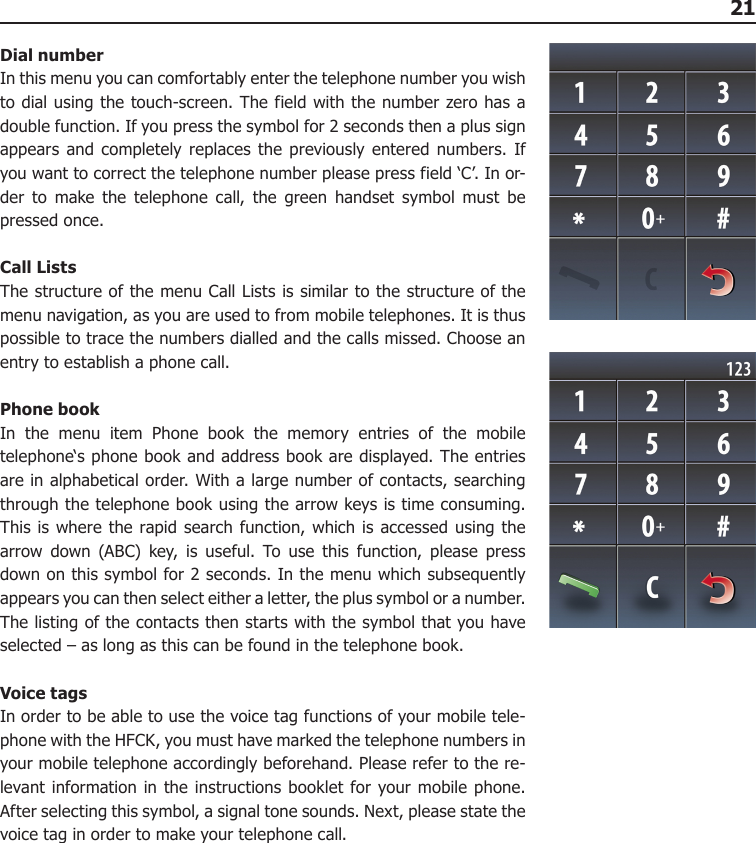
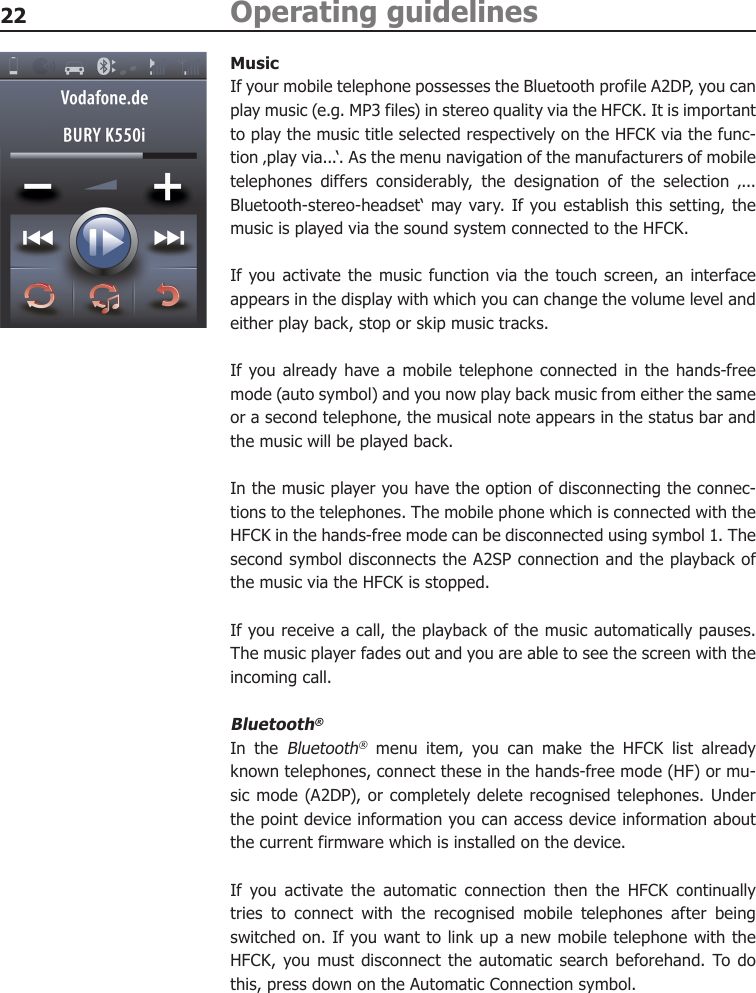
Bury and Co KG CC9055 Hands Free Car Kit User Manual

Bury GmbH & Co KG Hands Free Car Kit Users Manual

Users Manual

CC 9055IndexIntroductory information  2 1. General  2 2. Security guidelines  2Installation of the hands-free car kit  4 3. Scope of supply  4 4. Positioning and mounting  6 5. Connecting the Electronic box  9 6. Installation of the audio switchbox AC 5120  11 7. Installation instructions for the fuses  15Operating guidelines  16 8. Switch-on  16 9. Establishing a Bluetooth® connection  1610. Disconnect a Bluetooth® connection  1811. Menu navigation  18Further Information  2512. Service  25
2Introductory information 1. GeneralDear customer,Congratulation on purchasing a BURY hands-free car kit. You have cho-sen a high quality product that is extremely easy to use. All aspects of BURY production through to sales and service are subject to strict qua-lity management according to DIN EN ISO 9001. All BURY hands-free car kits meet CE and e1 security standards. Furthermore, we provide a two-year warranty on all components.Please read the operating manual carefully so that you can fully enjoy your BURY hands-free car kit. If you have any further questions concer-ning installation or operation of your car kit, please contact your dealer. He will be happy to give you reliable advice. You can also contact our hotline. Our phone and fax numbers are listed in the chapter Service at the end of the operating instructions.Have a good trip! 2. Security guidelinesInstallation – who and whereThe installation of this system can be carried out by yourself but please observe the installation requirements of the automotive manufacturer (VAS 1978). During the installation, park the car at a place where the road traffic is not impaired. We recommend to let a specialised work-shop perform the installation.Power supplyThis system has been designed for the use in vehicles with an on-board supply system of 12 volts (passenger car). If you intend to install the device in a vehicle with an on-board supply system of 24 volts (lorry), please use a voltage converter. If you have queries regarding this sub-ject, please contact our hotline.
3Position, volumeInstall the components of the device in the vehicle so that your field of vision is not impaired and the components are not mounted in the im-pact  zone  of  the  passenger  compartment  or  in  the  airbag  inflation zones. The removal of coverings (with and without airbags) or compo-nents of the dashboard requires – in  some cases  – special tools and special knowledge.Intended useWe shall not be liable for damages or malfunctions due to improper use of the navigation system. Therefore, do not expose the device to moi-sture, extreme temperatures or shocks and carefully follow the proce-dure described in the installation and operating guidelines.Use while drivingOperate the system only when the situation allows it and when you do not endanger, harm, constrain, or annoy other road users. The volume of the device has to be set in a way that exterior noise is still audible.FaultsDo not commission the device if you detect or assume a defect. In this case, contact a Bury specialised dealer or our hotline. Improper repair efforts can be dangerous for you. Therefore, only skilled personnel may perform inspections.Important:The driver is ultimately responsible for the safe operation  Xand  control  of  their  vehicle  at  all  times.  You  should  never use a hand held phone, including sending or reading text or picture messages, while driving.Research indicates that there is a risk to safety when the  Xdriver  of a  motor  vehicle  is  distracted  and  using  a  mobile phone while driving can be a distriction.The  manufacturer  strongly  recommends  that  you  use  a  Xhands-free solution when driving.
4 3. Scope of supplyInstallation of the hands-free car kit
5Description of the components:1) Electronics box   (with or without an internal switch box, depending on version)2) Monitor on installation pad3) Microphone4) Installation and Operating manual on CD5) Fixing screws for electronics box, rider,    adhesive pad, cleaning clothVariant 1:6) External loudspeaker switch-box AC 5120Variant 2:6) Power supply cable with fuses7) Cable for internal loudspeaker switch boxPlease note:If certain components are added or omitted you will recei- Xve the corresponding information on a separate enclosure.
6Installation of the hands-free car kit 4. Positioning and mountingStep 1:First of all, please choose the most convenient position for the monitor and the installation pad in your vehicle by attaching the monitor / hook-and-loop  fastener  to  the  pad  and  checking  different  positions  in  the vehicle.After having found a suitable position for the monitor in the vehicle you can mount / attach the installation pad / hook-and-loop fastener accor-dingly. Please use a cleaning cloth for degreasing the surfaces you want to attach the installation pad to.The end of the cable with the small Molex plug is ideally suited for pla-cing  through  small  openings in the dashboard area. This facilitates  a practically invisible installation of the cable. Take the length of the cable into account and make sure that it is of sufficient length to reach the intended location of the electronics box.Important:When  positioning  the  monitor  please  take  care  that  the  Xmonitor does not impair the view onto the road, that it will not be installed in the impact zone of the passenger com-partment (amongst others in the airbag inflation zones) and that cables may be laid without any problems. The installation pad / hook-and-loop fastener can be af- Xfixed just once, removing could damage the adhesive area. In  case  of  high  variations in  temperatures  -  depending  on the structure and the features - decolourisations of the sur-faces can occur during the subsequent utilization.Please avoid direct sunlight on the monitor or high inter- Xnal  temperatures,  which  can  be  rapidly  reached  in  parked vehicles. In such cases, remove the monitor of the hands-free car kit from the cradle and put it in the car glove pocket or glove box for instance.
7Example of installation 1:Example of installation 2:1 2 3 45 61 2 34 5 6
8Installation of the hands-free car kitStep 2:Depending  on  the vehicle type and  its  equipment (e.g. airbags), it is reasonable to install the microphone either at the A-pillar, at the sun shield or at the roof interior. For details about the equipment features please refer to the vehicle documents.Step 3:Please lay the cables in a way that they do not lie/hang unsecured in the vehicle and that they may not influence the conducting of the vehi-cle. When laying a cable, please take care that it is not under traction stress but that it has some tolerance. Avoid crushing the cable as da-mages of the insulation can be caused by friction/rubbing.Step 4:Install the electronics box at a convenient place in the vehicle. This can e.g. be  behind  the  radio,  in  the  glove box,  or  in  the  centre  console. Please  mind  that  you  can access the  connections of the  box  without difficulty. Before connecting the components to the electronics box you should branch off the battery for safety reasons. In doing so, take into account that there might be a radio coding (confer radio manual).Important:Please  install  the  electronics  box  behind  a  cover  or  so- Xmewhere  you  can  only  reach  by  opening  or  unfastening  a protective cover / a cover. The terminal box must not hang loosely in the vehicle.
9 5. Connecting the Electronic boxThe additional components of the hands-free car kit are connected to the electronics box. The following connections are provided:1 - Power supplyVersion 1, with integrated loudspeaker switch box:The power supply of the hands-free car kit is established via a 4-core cable. Connect the black (clamp 31 – minus), the red (clamp 30 – stea-dy  plus)  and  the  blue  cable  (clamp  15  –  ignition  plus)  to  the  power supply of your radio (where required via the cigarette lighter or the fuse box). After connection to the counterpart, the yellow cable provides for radio  muting  during  a  phone  conversation. Please  connect  the  white Molex connector with connection 1.Attention:If you also connect the blue cable to clamp 30, the hands- Xfree car kit will be permanently supplied with power. If the vehicle is not running for a longer period, this could lead to a discharge of the car battery.Version 2, with external loudspeaker switch box:Refer to the separate chapter:Installation of the audio switch box AC 51202 - System 9 SocketSocket for connection of the basePlate suitable for the CC 9055 from the System 9. 3 - Voice output of the hands-free car kitVersion 1, with integrated loudspeaker switch box:The cable provided serves the purpose of transferring the voice output to one of the loudspeakers in the car. In the best case scenario, this
10 Installation of the hands-free car kitspeaker should be on the passenger side of the vehicle in order to pro-vide sufficient distance from the microphone and to prevent possible echoes from occurring. The jack plug remains unused during the use of the internal loudspeaker switch box.Version 2, with external loudspeaker switch box:Refer to separate chapter:Installation of the audio switch box AC 51204 - Speaker outputPlease connect the 3.5 mm jack plug of the external BURY loudspeaker (available as an accessory) to this socket.5 - Microphone inputThis is where you plug in the microphone jack. After connection 3 has already been occupied use the rider. This ensures that neither of the jacks is able to loosen as a result of vibrations.  6 - AUX-Out connectionStereo music is output at connection 2. Here you can connect the AUX-In input of your radio (if existent) via adapters available at local retai-lers.  For  the  connection  to  the  hands-free  car  kit,  the  adapter  must have a 3.5 mm stereo jack. Depending on the car radio, the other end must be selected otherwise. If your radio does not have an AUX-In, you can use the car CD/MP3 adapter from the BURY accessories programme to enable the reproduction of music via your radio.7 - Monitor jackPlease plug the 9 pole plug of the monitor connection cable into this jack. Tighten at least one of the two fixing screws hand-tight so that this plug cannot become unplugged as a result of vibrations.RRFLRLFRRRFLRLFR
11 6. Installation of the audio switchbox AC 5120With the AC 5120 speaker switchbox, you get the possibility of being able to mute the feedback of your car radio / CD player etc. and to transfer the voice output of your conversation partner during a tele-phone call to your vehicle’s speakers. This means that the installation of additional speakers isn‘t re-quired. If your radio has a mute function, then the vehicle speakers are turned onto mute using the radio. If your car radio doesn‘t have this function, then the signals will be suppressed by the speaker switchbox. You can use the AC 5120 through the connections that your BURY hands free car kit offers, which guarantee voltage supply via molex plugs and also have a speaker output.If you want to make a telephone call in the hands-free mode, your car radio will be automatically swit-ched on to mute (for the exact operation of your hands free car kit, please read your HFCK user ma-nual). The Audio switchbox now uses one or two loudspeakers in your car for the telephone conversa-tion, even if your radio is switched off. This function will be automatically activated after the installati-on of the unit, there are no subsequent manual settings required.Some mobile phones do not support a radio mute function. Please read your telephone user manual for more details. You can find out more detailed information at your specialist retailer, in the internet under www.bury.com, or over our telephone hotline.After checking that all the cable lengths are sufficient, decide where you are able to attach the Audio switchbox. Now secure the Audio switchbox so that it isn’t able to flap about and/or rattle against other parts of your vehicle.Connect the white power out cable connector (1) of your Audio switchbox to the power supply socket of your hands-free kit. Now connect the audio switchbox plug (3) to the hands-free car kit. (The other, smaller box is used by the plug for the microphone.)13
12 Installation of the hands-free car kitNow  disconnect  the  (a)  and/or  the  (b)  loudspeaker  connector  from  the  speaker  socket  on  the radio at the back. Connect this connector with the suitable socket (3) on the AC 5120. Now con-nect the plug (4) with the radio.Depending on the switcher position (5), the voice of your conversation partner will be fed back through either the front right speaker, the front left speaker, or through both of the front loudspeakers. The ‘OFF’ position is to be selected if you connect the switchbox to the radio using the ‘Phone-IN’ cable (6).The  two  ‘Phone-In’  cables  are  marked  accordingly  and  must  be  plugged  into  the  appropriate connections on the radio (blue, green or yellow). In this regard, please refer to the instructions concerning the connection configuration of your car radio in your car radio handbook. In lots of radios, the volume level (feedback of your conversation partner) can be controlled via the phone input and the selection of the loudspeaker.
13Different connections of the ISO plug on the radioThe layout of the pins on the ISO plug used in a car depends on the type of car. Before using the switchbox, you should make sure that the connections are correct in order to prevent possible damage to the device.Configuration IIf the assignment of pin 7 of the ISO plug is connected to the DC Power Supply, and pin 4 is connected to the ignition, you should check if the connection looks like the connection presented on the drawing below.Configuration IIIf the assignment of pin 7 of the ISO plug is connected to the ignition, and pin 4 is connected to the DC power supply, the connection of the cables should look like the connection presented on the draw-ing below.Switchbox Vehiclered 7 (red)blue 4 (blue)red 7 (red)blue 4 (blue)Switchboxred 7 (red)blue 4 (blue)SwitchboxVehicleVehicle
14 Installation of the hands-free car kitIn the operating manual of the radio device, you can find the pin assignment for the “mute” signal. This signal can occur on one of three cables marked with “mute1”, “mute2”, or “mute3”.Connect the yellow “mute” cable to the switchbox using the correct cable from the car radio: “mute 1”, “mute 2” or “mute3”.Attention:The  positive  wires  and  ignition  wires  are  protected  in  the  casing  of  the  switchbox  Xwith  3A  fuses.  For  this  reason  a  separate  fuse,  as  shown  in  the  next  chapter,  is  not necessary.mute 1radio device Switchboxmute 2mute 3mute (yellow)
15 7. Installation instructions for the fusesIf you install the CC 9055 without the AC 5120 switch box then the power supply must be secured with a fuse in the way described below.Please cut through the red, the black and the blue cable by means of a wire cutter or scissors. Now insert the two endings of the red cable resulting from the cut into one of the binders, then close it. If you hear two clicking noises, the clamp snapped in properly. Now insert one of the fuses and then repeat the procedure with the other cables.
16Operating guidelines 8. Switch-onIf the power supply of the hands-free car kit (HFCK) is connected pro-perly, the HFCK is activated after having started the ignition. The dis-play is switched on and a short high sound is audible.In the delivery status an identification of a mobile phone has not been saved. (cf. chapter: Establishing a Bluetooth® connection).In case of a successfully established connection, a long high sound is audible. The name of the connected mobile phone is displayed and data from the phone book (SIM-card) and from the address book (telephone directory) are then transmitted to the HFCK. Depending on the number of data stored, this could take some seconds. If the synchronisation of the phone book is interrupted by an incoming call, it may occur that not all entries have been transmitted. In this case, the phone book should be synchronised manually (cf. chapter: menu navigation). 9. Establishing a Bluetooth® connectionIf you wish to establish a Bluetooth® connection for the first time, you have  to  activate  the Bluetooth® function  of  your  mobile  phone  and search for Bluetooth® devices. In this case, search for a device labelled „CC 9055“. If several devices were identified, please select the HFCK and enter the PIN number 1234. The Bluetooth® connection (pairing) will then be established between your mobile phone and the HFCK. The HFCK supports the profiles „hands-free operation“ and „A2DP“. Please set your mobile phone accordingly or check whether these profiles are supported.
17If it is not possible to establish a connection, please check and update the software release (firmware) of your mobile phone or of the HFCK. You will find an overview dealing with this subject on the Internet at www.bury.com.Please note:In  the  internet  you  can  find  an  overview  with  a  large  Xnumber of mobile telephones which have been tested with this  hands-free  car  kit.  Please  note,  however,  the  use  of firmware which deviates from the  list and is installed  on a listed mobile telephone can lead to the fact that certain dis-plays and functions are no longer possible or only possible to a limited extent.In addition it is possible that you must delete all devices connected to your mobile phone first in order to enable a correct identification of the HFCK and the establishment of a connection. If you have queries regar-ding  the  menu  navigation,  functions  and  operation  of  your  mobile phone, please refer to the operating guidelines of your mobile phone. Depending on the manufacturer and type, this can differ considerably between phones.Please note:If  the  rechargeable  battery  of  the  mobile  phone  is  low,  Xit is sometimes not  possible  to  establish a Bluetooth® con-nection.The HFCK has a memory for the storage of the identification of up to 10 mobile phones. In case an eleventh mobile phone is connected, the oldest entry in the HFCK memory will be cancelled.
18 Operating guidelines10. Disconnect a Bluetooth® connectionIf you wish to cancel a Bluetooth® connection, you can either discon-nect it conveniently at the HFCK or at your mobile phone. In addition, the connection is disconnected, if you move too far away from the ve-hicle while taking your mobile phone with you and thus leave the recep-tion  radius  of  the  HFCK.  After  15 minutes  without  active Bluetooth® connection (information on the display: interrupted), the HFCK automa-tically disconnects if it is still supplied with power.Please note that the capacity of your mobile phone‘s storage battery can quickly decrease when the Bluetooth® function is active. If you do not want to use the Bluetooth® function anymore, e.g. if you leave the vehicle for a longer period, it is recommended to deactivate this func-tion.11. Menu navigationPlease note:Some of the functions/displays specified subsequently are  Xonly possible if they are supported by the mobile phone!After switching on the HFCK the main menu is displayed. It informs you whether a mobile telephone is connected via Bluetooth® or not.
19Menu structure – no telephone connected:-> Day / night-> Automatic connection-> Sleep mode  -> Off  -> 15 seconds  -> 30 seconds  -> 60 seconds-> Voice commands (voice tags, inactive)-> Music (music player control panel)-> Bluetooth  -> Display linked telephones  -> Delete linked telephones  -> Linked telephones  -> Device information  -> Automatic connection-> Ring tones-> Languages-> Service  -> Audio       -> DSP       -> Ring tones       -> Tones volume       -> Voice volume  -> Display       -> Illumination       -> Day / night      -> Automatic operation      -> Day mode      -> Night mode       -> Colour theme       -> Calibration  -> Update  -> Synchronise telephone book-> Info  -> Software  -> Hardware  -> DSP Info
20 Operating guidelinesMenu structure – telephone connected:-> Dial number-> Telephone book-> Call lists  -> Missed calls  -> Calls made  -> Received calls-> Voice commands (voice tags)-> Music (music player control panel)-> Bluetooth  -> Display linked telephones  -> Delete linked telephones  -> Linked telephones  -> Device information  -> Automatic connection-> Ring tones-> Languages-> Service  -> Audio       -> DSP       -> Ring tones       -> Tones volume       -> Voice volume  -> Display       -> Illumination       -> Day / night      -> Automatic operation      -> Day mode      -> Night mode       -> Colour theme       -> Calibration  -> Update  -> Synchronise telephone book-> Info  -> Software  -> Hardware  -> DSP Info-> Day / night-> Disconnect connection-> Sleep mode  -> Off  -> 15 seconds  -> 30 seconds  -> 60 seconds
21Dial numberIn this menu you can comfortably enter the telephone number you wish to dial using the touch-screen. The field with the number zero has a double function. If you press the symbol for 2 seconds then a plus sign appears  and  completely  replaces  the  previously  entered  numbers.  If you want to correct the telephone number please press field ‘C’. In or-der  to  make  the  telephone  call,  the  green  handset  symbol  must  be pressed once.Call ListsThe structure of the menu Call Lists is similar to the structure of the menu navigation, as you are used to from mobile telephones. It is thus possible to trace the numbers dialled and the calls missed. Choose an entry to establish a phone call.Phone bookIn  the  menu  item  Phone  book  the  memory  entries  of  the  mobile telephone‘s phone book and address book are displayed. The entries are in alphabetical order. With a large number of contacts, searching through the telephone book using the arrow keys is time consuming. This  is  where  the rapid search function, which  is  accessed using  the arrow  down  (ABC)  key,  is  useful.  To  use  this  function,  please  press down on this symbol for 2 seconds. In the menu which subsequently appears you can then select either a letter, the plus symbol or a number. The listing of the contacts then starts with the symbol that you have selected – as long as this can be found in the telephone book.Voice tagsIn order to be able to use the voice tag functions of your mobile tele-phone with the HFCK, you must have marked the telephone numbers in your mobile telephone accordingly beforehand. Please refer to the re-levant  information in the  instructions  booklet  for your  mobile  phone. After selecting this symbol, a signal tone sounds. Next, please state the voice tag in order to make your telephone call.
22 Operating guidelinesMusicIf your mobile telephone possesses the Bluetooth profile A2DP, you can play music (e.g. MP3 files) in stereo quality via the HFCK. It is important to play the music title selected respectively on the HFCK via the func-tion ‚play via...‘. As the menu navigation of the manufacturers of mobile telephones  differs  considerably,  the  designation  of  the  selection  ‚...Bluetooth-stereo-headset‘ may vary.  If you  establish this setting, the music is played via the sound system connected to the HFCK.If you  activate the  music  function  via the  touch screen, an interface appears in the display with which you can change the volume level and either play back, stop or skip music tracks.If you  already  have a mobile  telephone  connected  in the  hands-free mode (auto symbol) and you now play back music from either the same or a second telephone, the musical note appears in the status bar and the music will be played back.In the music player you have the option of disconnecting the connec-tions to the telephones. The mobile phone which is connected with the HFCK in the hands-free mode can be disconnected using symbol 1. The second symbol disconnects the A2SP connection and the playback of the music via the HFCK is stopped.If you receive a call, the playback of the music automatically pauses. The music player fades out and you are able to see the screen with the incoming call.Bluetooth®In  the Bluetooth®  menu  item,  you  can  make  the  HFCK  list  already known telephones, connect these in the hands-free mode (HF) or mu-sic mode (A2DP), or completely  delete  recognised telephones. Under the point device information you can access device information about the current firmware which is installed on the device.If  you  activate  the  automatic  connection  then  the  HFCK  continually tries  to  connect  with  the  recognised  mobile  telephones  after  being switched on. If you want to link up a new mobile telephone with the HFCK,  you must  disconnect  the  automatic  search  beforehand. To  do this, press down on the Automatic Connection symbol.
23Ring tonesMany mobile telephones also transfer their own ring tone to the HFCK during  an  incoming  call.  There  are  exceptions,  however.  In  such  in-stances you can specify a signal tone here which you want to be played back.LanguagesThe menu language setting you can choose here.ServiceIn the DSP sub-item, it is possible to activate and deactivate the back-ground noise and echo filtering for the HFCK and the mobile telephone. You  are  also  able  to  choose  one  from  a  possible  five  different  ring tones. You can also specify here how loud the ring tone should be. In the voice volume menu you are able to set the sound level of your con-versation partner.DisplayYou can set the background illumination of the display in the first sub-menu. Specially adjusted day / night settings allow for better readabili-ty in the next menu item depending on the light conditions. You can actuate the switching either manually or automatically – the light sen-sor at the top of the monitor is then activated.If you want to adapt the display colours to the colours within your ve-hicle better, then you can make a change under the colour theme cate-gory. You should only initiate a fresh calibration of the display subse-quently,  however,  if  you  experience big  problems  with  the ease with which the symbols may be selected. Plus symbols then appear at diffe-rent places on the touch screen which you must then touch appropria-tely.UpdateIf you activate this menu item you can equip the HFCK with new ope-rating system software via Bluetooth. The latest information about this is available on our homepage.
24 Operating guidelinesSynchronise telephone bookIf you change a telephone number in your telephone or you save a new contact  then  you  must  subsequently  manually  synchronise  the  tele-phone book with the data which is saved in the HFCK. The telephone book will only be automatically reloaded or synchronised when restar-ting the HFCK.InfoIn the menu Info you receive information on the installed software and hardware of your hands-free car kit. You should write down these data if you have problems in using the HFCK with your mobile telephone and contact the Bury hotline or if you e.g. wish to update the firmware (the operating system of the HFCK).It can be useful to update the firmware (information at www.bury.com) in case of a mobile phone change or when new functions have been implemented. You  can find the version number of the firmware after the  name  of  the  HFCK,  e.g. „CC  9055  V07h. In  the  sub-menu  <DSP Info> you can see whether  the  ‚digital signal processor‘ (DSP) in the HFCK and in the mobile telephone (if available) is activated.Day/NightAs  the lighting  conditions  vary according  to  the time of the  day,  you have the possibility to reduce or increase the brightness here.Disconnect connectionIf you want to disconnect a connected mobile phone from the HFCK, simply press down on this symbol briefly.Sleep ModeThe sleep mode of the display in standby operation is a useful function, especially with night driving. The display thereby darkens slowly until no  contents  are  visible,  regardless  of  whether  a  mobile  telephone  is connected to the HFCK or not. During an active phone call, the screen saver is deactivated.
25Further Information12. ServiceIn  case  of  general  or  technical  queries,  suggestions  and  comments, please  do not  hesitate  to  contact our team at any time. Suggestions and feedback are always welcomed:BURY GmbH & Co. KGRobert-Koch-Straße 1-732584 LöhneHotline:   +49(0)180 5 - 842 468*Faxline:  +49(0)180 5 - 842 329** 0.14 €/min. Deutsche Telekom AG landlineE-Mail:   hotline@bury.comService desk:In case of complaints, please return the product directly to our service desk:BURY GmbH & Co. KGIm Hause DPD Depot 103RobinienwegD-03222 LübbenauNotes on the disposal of electronic devicesIn compliance with the German law on electric and electronic devices, old  electric  and  electronic  devices  must  not  be  disposed  of  together with domestic garbage in Germany, beginning March 24, 2006. If you want to dispose of an old electric or electronic device you are required to  take  it  to  a  designated  collection  point  (“point  of  acceptance”  or “communal collection point”). There old electric and electronic devices are taken back free of charge.Version 12/200925.1118.0-04-071209Subject to change. Errors and omissions excepted.
26Federal  Communications  Commission  (FCC)  Compliance  Statement  - United StatesThis device complies with part 15 of the FCC Rules. Operation is subject to the following two conditions:1 This device may not cause harmful interference, and2 the device must accept any interference received, including interfe-rence that may cause undesired operation. Changes  or modifications not expressly approved by the party responsible for compliance could void the user‘s authority to operate the equipment.This equipment has been tested and found to comply with the limits for a Class B digital device, pursuant to Part 15 of the FCC Rules. These limits  are  designed  to  provide  reasonable  protection  against  harmful interference  in  a  residential  installation.  This  equipment  generates, uses and can radiate radio frequency energy and, if not installed and used in accordance with the instructions, may cause harmful interfe-rence  to  radio  communications.  However,  there is  no guarantee  that interference will not occur in a particular installation. If this equipment does cause harmful interference to radio or television reception, which can  be determined  by turning the  equipment  off  and  on, the  user  is encouraged  to try  to  correct  the interference  by  one or  more  of  the following measures:-- Reorient or relocate the receiving antenna.-- Increase the separation between the equipment and receiver.-- Connect the equipment into an outlet on a circuit different from that    to which the receiver is connected.-- Consult the dealer or an experienced radio/TV technician for help.FCC ID: QZ9-CC9055Remark:The CC9055 FCC Label mark is placed on to the electronics box.Industrie Canada (IC) Compliance StatementThis device complies with RSS-210 of Industry Canada.Operation is subject to the following two conditions:1 This device may not cause harmful interference, and2 the device must accept any interference received, including interfe-rence that may cause undesired operation of the device.Canadian ICES-003 (Interference-Causing Equipment Standard)This Class B digital apparatus complies with Canadian ICES-003.IC: 5927A-CC9055

Navigation menu