Bushnell 71 3510 Users Manual
Bushnell-Bdc-Banner-New-Version-Owner-S-Manual bushnell-bdc-banner-new-version-owner-s-manual
71-3510 10151082
71-3946 to the manual 5716038b-0fa8-4e98-85c3-8f51d9dd84ee
2015-01-21
: Bushnell Bushnell-71-3510-Users-Manual-353288 bushnell-71-3510-users-manual-353288 bushnell pdf
Open the PDF directly: View PDF ![]() .
.
Page Count: 14

BULLET DROP COMPENSATOR BDC
INSTRUCTION MANUAL
RÉGLAGE DU COMPENSATEUR DE CHUTE DE
BALLE
ZÉROTAGE DE L’ARME SUR LE CHAMP DE TIR
INSTRUCCIONES DEL BDC
AJUSTE DE PUNTERÍA DE UN RIFLE EN EL CAMPO
DE TIRO CON BDC
EINSCHIESSEN DES GEWEHRS MIT DER
BALLISTISCHEN
ABSEHENVERSTELLUNG BDC
ISTRUZIONI PER L’USO DEL BDC
PUNTAMENTO DEL FUCILE
CON IL BDC
INSTRUÇÕES BDC
ACERTAR A DISTÂNCIA DA
PONTARIA DO FUZIL COM BDC
Lit. #: 98-1040/05-08
FOR BANNER RIFLESCOPE
MODEL #s 713510 / 713946
ENGLISH
USING THE BDC DIALS WITH YOUR BANNER RIFLESCOPE
1. SIGHT-IN YOUR RIFLE AT THE RANGE WITH THE BDC SCOPE (71-3510 and 71-3946)
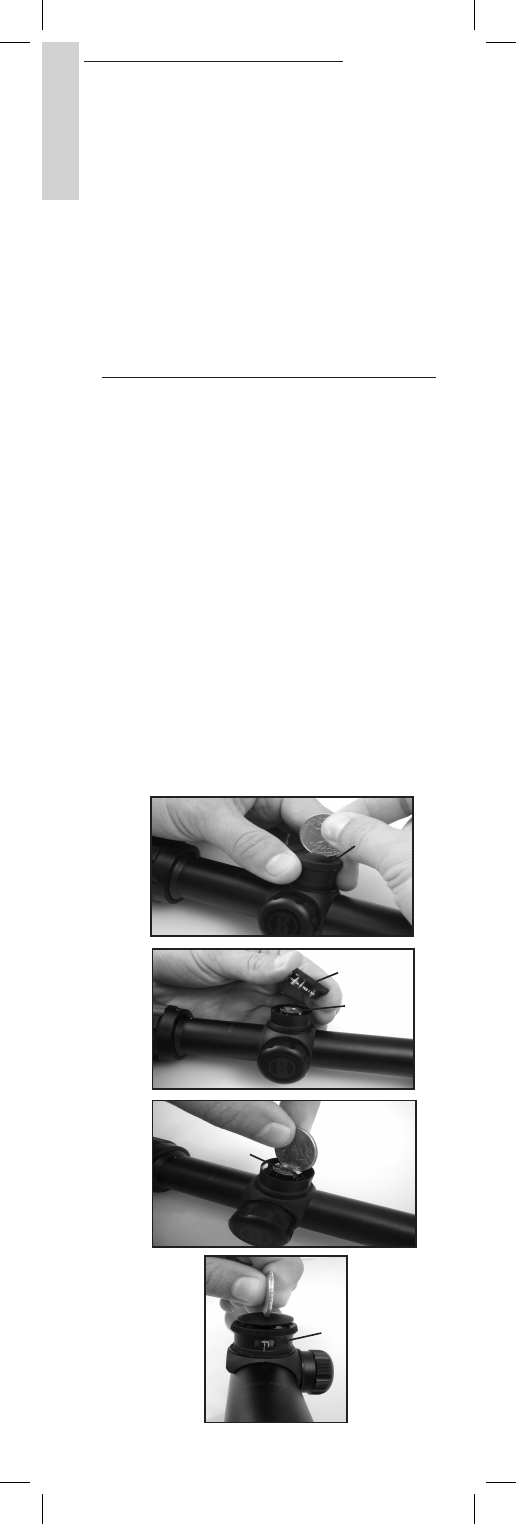
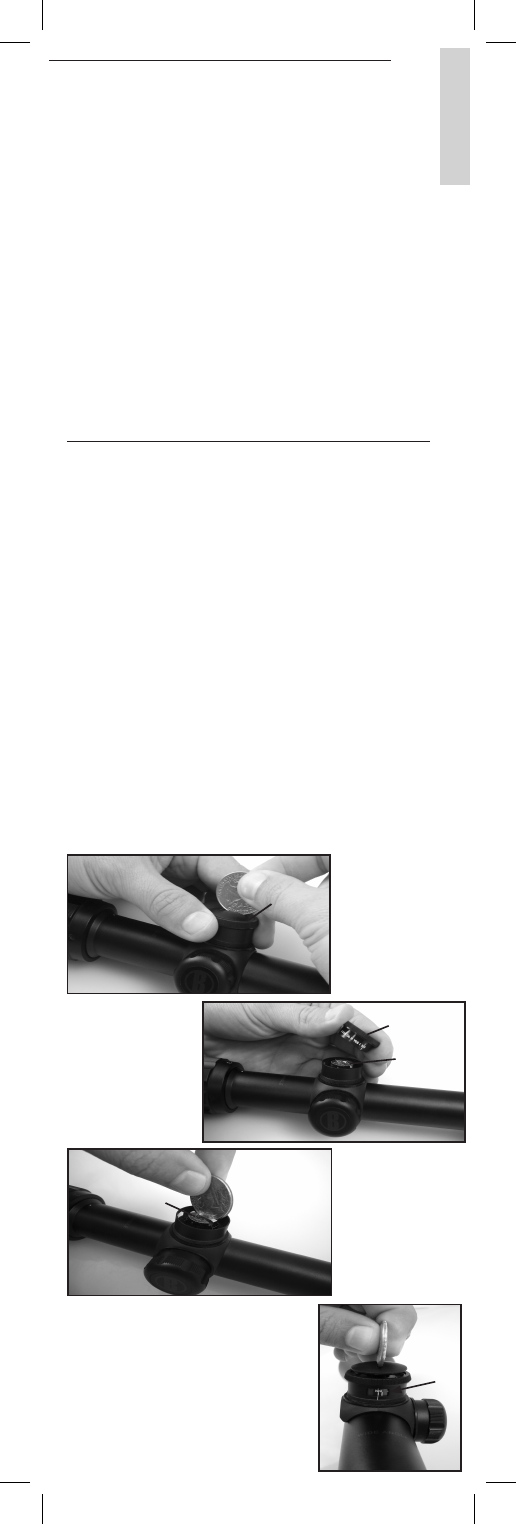
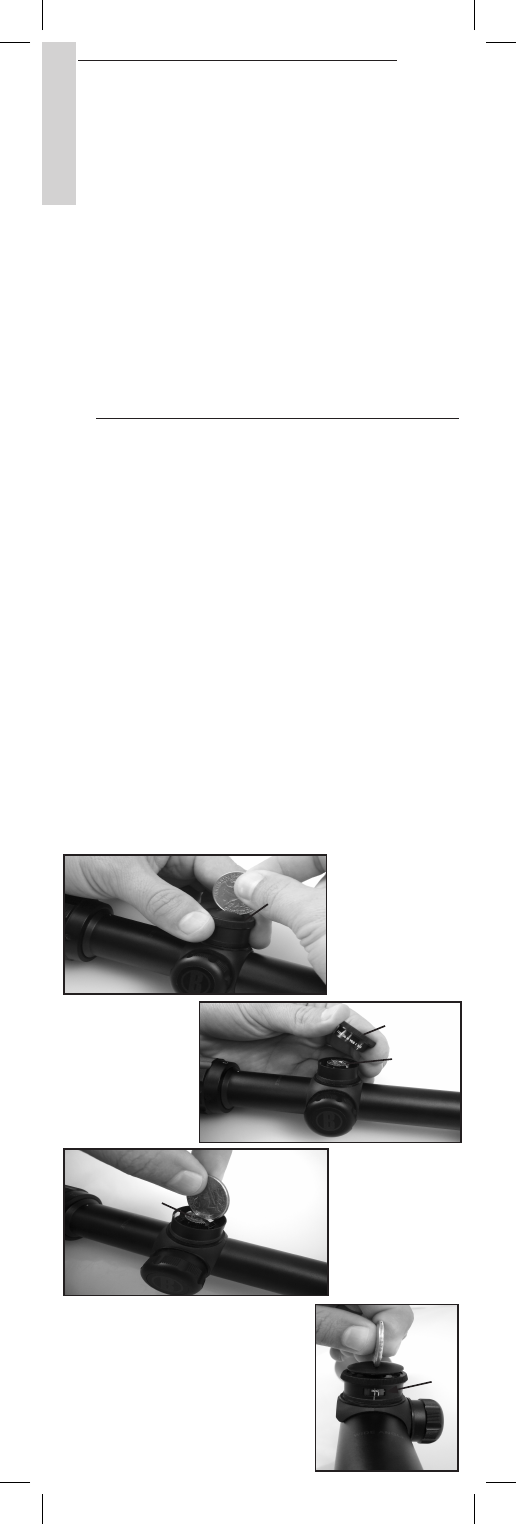
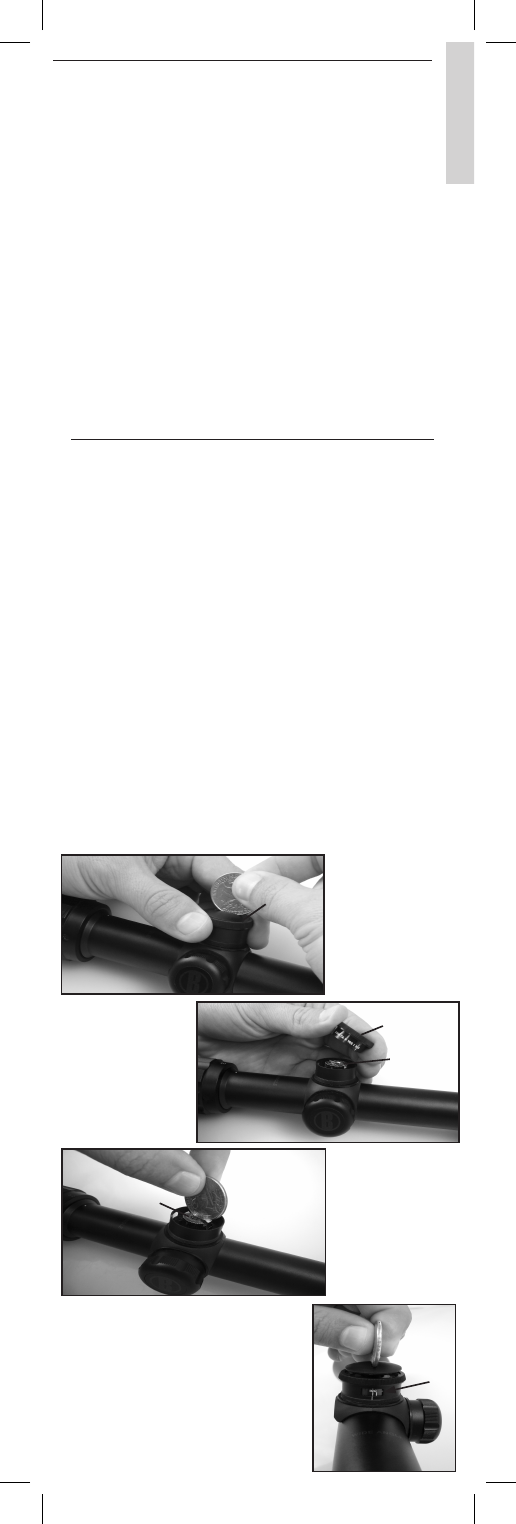
A. With the riescope mounted on the rie, remove the elevation cap. If there is a BDC dial in place of the cap,
remove the screw and dial using a coin (see Fig A and Fig A). (Grasp the knurled section at the top of the BDC
dial, (Fig A, Part # 2), and lift upward, disengaging the dial from the elevation adjustment).
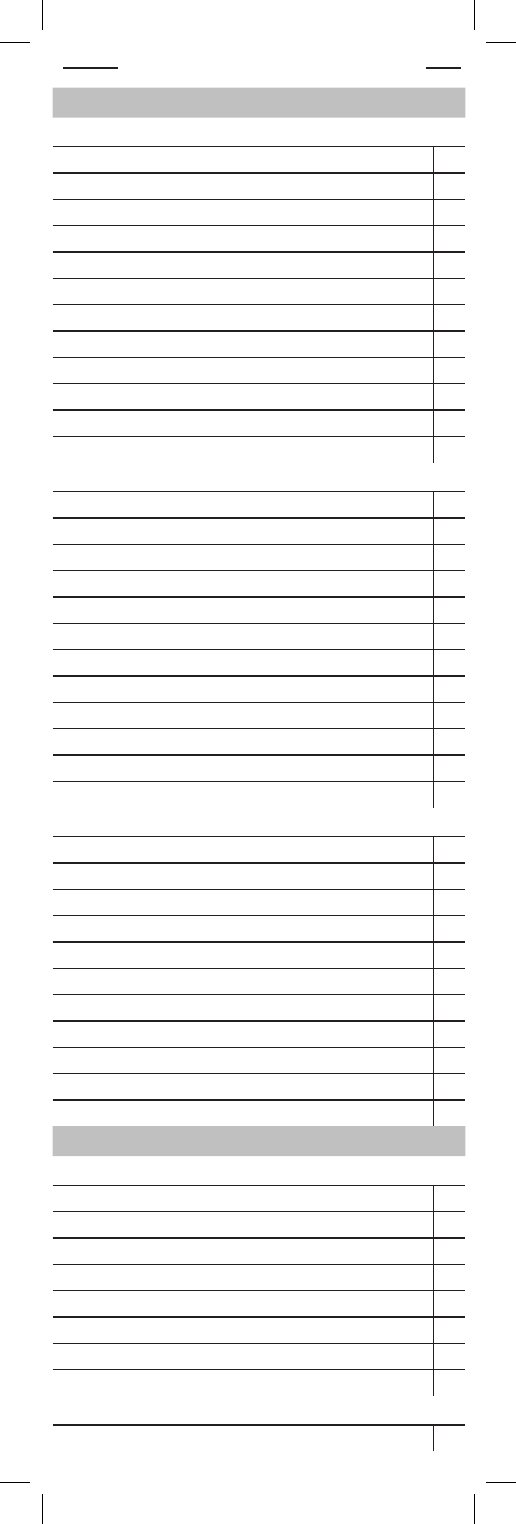
B. Sight-in your rie, ring a group of at least three shots at a 100 yard target (for sighting in at another range,
see note below). Note the point of impact in relation to the center of the target. Using a coin inserted in the
top of the elevation adjustment, (Fig C, Part #3), turn the adjustment the required number of clicks to make
the necessary point of impact move. Make appropriate adjustments to the windage knob to bring the point of
impact to the center of the target. Fire another group to see if the proper adjustment has been made. Repeat
as necessary until the center of the group is in the center of the target.
2. SELECT AND INSTALL THE DIAL
Once the rie is zeroed-in, select and install the proper BDC dial for your caliber and bullet weight in the following
manner:
A. From the Dial Chart select the proper dial for use with your caliber and bullet weight combination. The
3-9x40 scope (model# 713946) comes with 10 interchangeable, calibrated dials and one blank dial. The
3.5-10x36 scope (model# 713510) comes with 5 interchangeable, calibrated dials and one blank dial. The
blank dial has a special surface which allows you to make your own distance markings for any cartridge
not included on the full Dial Chart. Due to the wide amount of cartridges which are available, we have only
included a few of the most popular ones in this guide. The full Dial Chart is available at:
http://www.bushnell.com/customer_service/manuals/riescopes/BannerBDCDialChartFullList.pdf
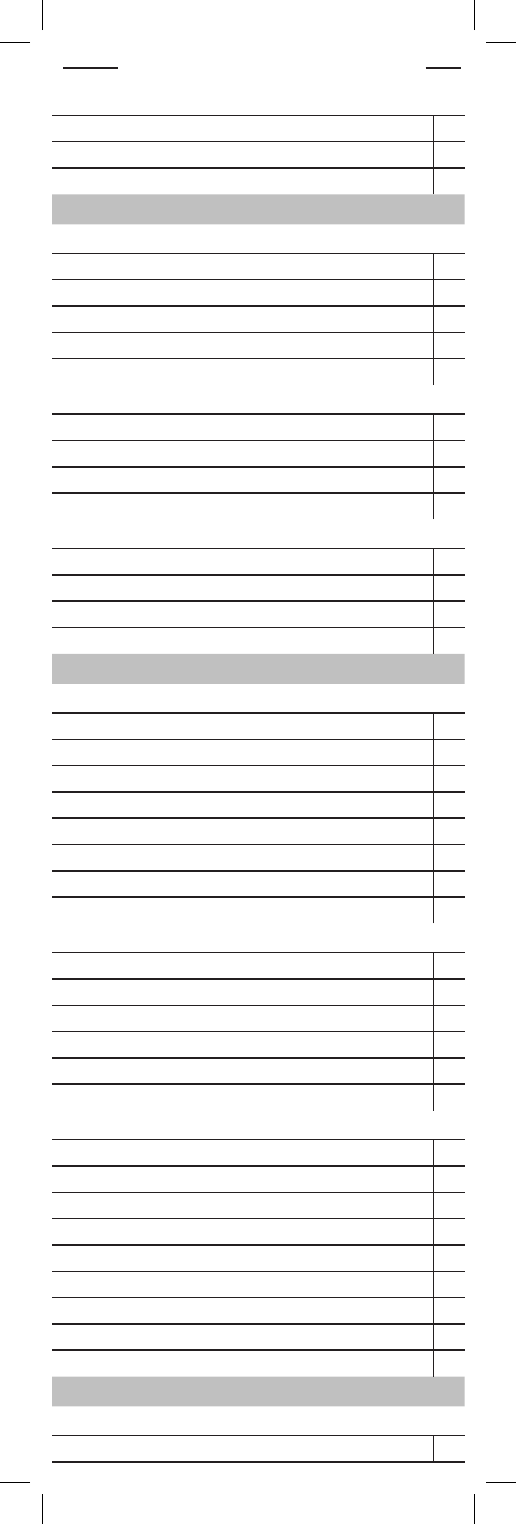
B. Once you have selected the proper dial, install it in the reverse order of Fig A and B, being careful to align
the 100 yd mark with the tick mark below the window on the elevation control (see Fig D). Tighten the screw
making sure you have not rotated the knob and that it is still on 100 yds.
3. USING THE BDC RIFLESCOPE
The BDC dial (bullet drop compensator) automatically adjusts elevation to take into account bullet hold over for
distances beyond the sight-in distance. Once you know the distance to the target adjust the BDC dial to that
distance. You have now corrected for bullet drop.
SPECIAL NOTES:
1. If you are using special or wildcat loads not covered by the Chart, it will be necessary to sight-in your scope by
following the sight-in procedure above. The desired point of impact at a given distance will have to be determined
by actual ring until zero-in is achieved. Using the blank BDC dial, mark the desired distance in yards or meters
on the dial with an indelible pen. Each increment or change in distance will have to be determined by the same
sight-in procedure. Reinstall the retaining screw (Part #1) and tighten securely. The rie and scope are now ready
for eld use. As long as the same (or a ballistically identical) cartridge is used, you may re at any distance without
hold-over up to the distance indicated on the dial, simply by turning the dial until that distance marking is centered
in the clear window.
2. Sighting in at a range dierent than 100 yds – although the dials are set to a 100 yd sight-in, it is still possible
to use them with a dierent sight-in distance. For example, suppose you would like to sight-in at a distance of
200 yds. Proceed as outlined above using a 200 yd distance. When you install the BDC dial, put the dial on the 200
yd mark instead of the 100 yd mark.
3. Model 71-3510 only – although the scope can be used for any caliber, it is ideal for the 17 caliber loads. A
special chart has been included for the 17 caliber loads.
Fig. D
Fig. C
Part #3
Fig. B
Part #2
Part #3
Fig. A
Part #1
ESpañoL
USO DE LOS CUADRANTES BDC CON EL TELESCOPIO BANNER® DE SU RIFLE
1. AJUSTE LA MIRA DE SU RIFLE EN EL POLíGONO DE TIRO CON LA MIRA TELESCÓPICA CON
COMPENSADOR DE TRAYECTORIA DE PROYECTIL (BDC) (71-3510 Y 71-3946) INSTALADA
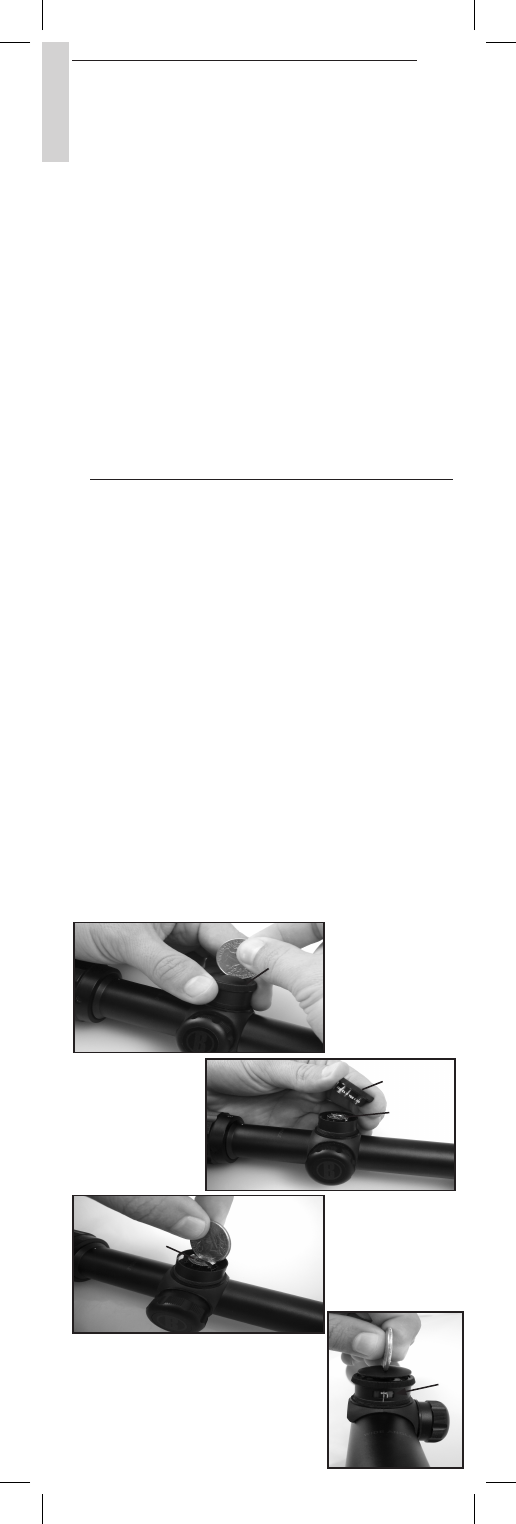
A. Con la mira telescópica montada en el rie, desmonte la tapa de elevación según se indica en la Fig
A. Si hay un cuadrante BDC en lugar de la tapa, retire el tornillo y el cuadrante usando una moneda
(consulte la Fig B y la Fig C). (Sujete la sección moleteada de la parte superior del cuadrante BDC (Fig. C,
Pieza 2) y levántela verticalmente para desenganchar el cuadrante del ajuste de elevación).
B. Ajuste la mira de su rie disparando una serie de al menos tres tiros a un blanco situado a 100
yardas (91 m) (para ajustar en otra distancia consulte la nota a continuación). Observe el punto de
impacto en relación con el centro del blanco. Con una moneda insertada en la parte superior del ajuste
de elevación (Fig. D, Pieza 3) gire el ajuste la cantidad de pasos (clics) que se requieran para lograr que
se mueva el punto de impacto como sea necesario. Efectúe los ajustes apropiados a la perilla del ajuste
lateral para hacer coincidir el punto de impacto con el centro del blanco. Efectúe otra serie de disparos
para ver si se logró efectuar el ajuste correcto. Repita el procedimiento según sea necesario hasta que
el centro de la serie de disparos coincida con el centro del blanco.
2.
SELECCIONE E INSTALE EL CUADRANTE
Una vez que el rie es puesto en cero, seleccione e instale el cuadrante de BDC correspondiente a su calibre
y al peso de la bala, de la siguiente manera:
A.
Desde la Tabla de Cuadrantes, seleccione el cuadrante correspondiente para usar con la combinación
de su calibre con el peso de la bala. La mira telescópica de 3-9x40 (modelo Nº 713946) viene con 10
cuadrantes calibrados e intercambiables y con un cuadrante en blanco. La mira telescópica de 3,5-
10x36 (modelo Nº 713510) viene con 5 cuadrantes calibrados e intercambiables y con un cuadrante
en blanco. El cuadrante en blanco posee una supercie especial y se lo incluye para permitirle a usted
realizar sus propias marcaciones de distancia para cualquier cartucho no comprendido en la Tabla
de Cuadrantes completa. Debido a la gran cantidad de cartuchos disponibles, sólo hemos incluido
algunos de los más populares en esta guía. La Tabla de Cuadrantes completa puede obtenerse en:
http://www.bushnell.com/customer_service/manuals/riescopes/BannerBDCDialChartFullList.pdf
B.
Una vez que haya seleccionado el cuadrante apropiado, instálelo en el orden inverso al de las Fig
B y C, teniendo cuidado de alinear la marca de 100 yardas (91 m) con la marca de vericación situada
debajo de la ventana del dispositivo de control de elevación (consulte la Fig E). Apriete el tornillo
asegurándose de no haber girado la perilla y que todavía está en 100 yardas (91 m).
3. USO DE LA MIRA TELESCÓPICA DE RIFLE BDC
El cuadrante BDC (compensador de trayectoria de proyectil) ajusta la elevación automáticamente para
tener en cuenta el ajuste vertical necesario por encima del punto de impacto para distancias superiores a
la distancia de ajuste de la mira. Una vez que conozca la distancia al objetivo ajuste el cuadrante BDC para
dicha distancia. Ahora usted ha hecho la corrección para la trayectoria del proyectil.
NOTAS ESPECIALES:
1. Si está utilizando cargas especiales o no comerciales que no están incluidas en la tabla, será necesario
ajustar la puntería de la mira telescópica siguiendo el procedimiento indicado anteriormente. El punto de
impacto deseado a una distancia dada tendrá que determinarse mediante disparos reales hasta lograr el
ajuste en cero. Utilizando el cuadrante BDC en blanco, marque la distancia deseada en yardas o metros en
el cuadrante con una pluma indeleble. Cada incremento o cambio de distancia tendrá que determinarse
mediante el mismo procedimiento de ajuste de la mira. Vuelva a instalar el tornillo retenedor (Parte 1)
y apriételo rmemente. El rie y la mira telescópica ya están listos para el uso en el campo. Siempre y
cuando se use el mismo cartucho (o uno balísticamente idéntico), puede disparar a cualquier distancia sin
tener que efectuar ajustes verticales hasta a la distancia indicada en el cuadrante; sólo tendrá que girar el
cuadrante hasta que la marca que corresponde a la distancia quede centrada en la ventana.
2. Ajuste vertical a una distancia diferente de 100 yardas (91 m): Aunque los cuadrantes estén jos a un
ajuste de 100 yardas, aun es posible usarlos con una distancia de puntería diferente. Por ejemplo: suponga
que le gustaría ajustar la puntería a una distancia de 200 yardas (183 m). Realice lo anterior usando una
distancia de 200 yardas. Cuando instale el cuadrante BDC, coloque el cuadrante en la marca de 200 yardas
(183 m) en lugar de la marca de 100 yardas (91 m).
3. Para el modelo 71-3510 solamente – aunque la mira telescópica se puede usar para cualquier calibre, es
ideal para las cargas de calibre 17. Se incluye un cuadro especial para las cargas de calibre 17.
Fig. C
Pieza 3
Fig. A
Pieza 1
Fig. B
Pieza 2
Pieza 3
Fig. D
DEutScH
BENUTZUNG DER BDC-EINSTELLSKALA MIT DEM BANNER®-ZIELFERNROHR
1. MIT DEM ZIELFERNROHR ANS GEWEHR MONTIERT AM SCHIESSPLATZ DAS VISIER MIT DEM
BALLISTISCHEN KOMPENSATOR (BDC) EINSTELLEN (71-3510 Y 71-3946)
A.
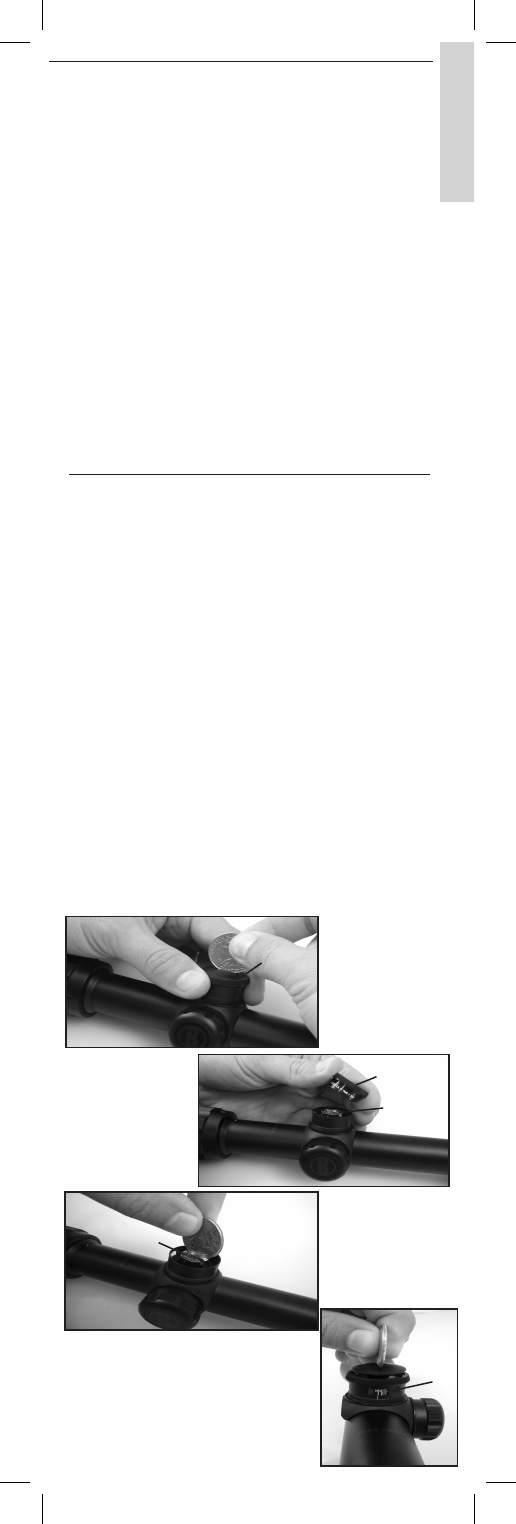
Mit dem Zielfernrohr aufs Gewehr montiert die Kappe der Höheneinstellung wie in Abb. A gezeigt
entfernen. Wenn sich eine Kappe an der Stelle der BDC-Einstellskala bendet, Schraube und Einstellskala
mit Hilfe einer Münze entfernen (s. Abb. B und C). (Das gerändelte Teil auf der Oberseite der BDC-
Einstellskala (Abb. C, Teil 2) ergreifen und hochziehen; dabei die Einstellskala aus der Höhenverstellung
ausklinken.
B.
Justieren Sie das Visier Ihres Gewehr, indem Sie eine Serie von mindestens drei Schüssen auf ein 100
Yard (91 m) entferntes Ziel abgeben (bez. Einstellung auf eine andere Distanz, bitte die Notiz unten
lesen). Notieren Sie den Punkt des Einschlags in Bezug auf die Mitte des Ziels. Stecken Sie eine Münze
oben in den Schlitz der Höhenverstellung (Abb. D, Teil 3); drehen Sie dann mehrmals von Klick zu Klick, bis
der Einschlagpunkt wunschgemäß verschoben ist. Machen Sie die erforderlichen Seitenverstellungen,
bis der Einschlagpunkt inmitten des Ziels liegt. Geben Sie eine weitere Serie von Probeschüssen ab, um
sich zu vergewissern, dass die Einstellung richtig ist. So oft, wie erforderlich, wiederholen, bis die Mitte
der Einschlagpunkte aus dieser Gruppe in die Mitte des Ziels fällt.
2. SKALENSCHEIBE AUSWÄHLEN UND INSTALLIEREN
Sobald das Gewehr eingeschossen ist, die für Ihr Kaliber und Geschossgewicht passende Skalenscheibe für
die Absehen-Verstellung wählen und folgendermaßen installieren:
A. Wählen Sie von der Skalenscheiben-Tabelle die für die Verwendung der Kombination Ihres Kalibers
und Geschossgewichts passende Skalenscheibe aus. Das 3-9x40-Zielfernrohr (Modell Nr. 713946)
wird mit 10 auswechselbaren, kalibrierten Skalenscheiben und einer unmarkierten Skalenscheibe
geliefert. Das 3,5-10x36-Zielfernrohr (Modell Nr. 713510) wird mit 5 auswechselbaren, kalibrierten
Skalenscheiben und einer unmarkierten Skalenscheibe geliefert. Die unmarkierte Skalenscheibe
verfügt über eine Spezialoberäche, die Ihen ermöglicht, Ihre eigenen Entfernungsmarkierungen für
eine Patrone anzubringen, die nicht in der kompletten Skalenscheiben-Tabelle aufgeführt ist. Aufgrund
der großen Anzahl an verfügbaren Patronen haben wir in diese Anleitung nur einige der beliebtesten
aufgenommen. Die vollständige Skalenscheiben-Tabelle ist verfügbar bei:
http://www.bushnell.com/customer_service/manuals/riescopes/BannerBDCDialChartFullList.pdf
B. Wenn Sie die richtige Einstellskala ausgewählt haben, bauen Sie diese in der entgegengesetzten
Richtung von Abb. B und C ein; achten Sie dabei darauf, dass die Markierung für 100 Yard (91 m) richtig
mit der Strichmarkierung unter dem Fenster der Höhenverstellung ausgerichtet ist (s. Abb. E). Ziehen
Sie die Schraube an, und achten Sie dabei darauf, dass der Knopf nicht verdreht wird weiterhin auf 100
Yard (91 m) steht.
3. BENUTZUNG DES BDC-ZIELFERNROHRS
Die BDC-Einstellskala (ballistischer Kompensator) justiert automatisch die Höheneinstellung und
berücksichtigt dabei die vertikale Justierung über dem Einschlagpunkt, die für Entfernungen über die
Visiereinstellung hinaus erforderlich ist.
Wenn Sie die Zieldistanz wissen, stellen Sie die BDC-Einstellskala auf diese Entfernung ein. Die ballistische
Kompensation ist jetzt abgeschlossen.
BESONDERE NOTIZEN:
1.
Wenn Sie besondere oder selbst fabrizierte Patronenladungen benutzen, die nicht in der Tabelle
aufgeführt sind, müssen Sie das Visier des Zielfernrohrs nach dem oben beschriebenen Verfahren einstellen.
Der gewünschte Einschlagpunkt in einer gegebenen Entfernung muss durch Probeschüsse bestimmt werden,
bis die Einstellung für den Volltreer erzielt ist. Markieren Sie die Entfernung in Yards oder Metern mit einem
unauslöschbaren Stift auf der nicht kalibrierten BDC-Einstallskala. Jede Veränderung der Entfernung muss
mit Hilfe der gleichen Visiereinstellungsmethode festgelegt werden. Die Feststellschraube (Teil Nr. 1) wieder
einsetzen und fest anziehen. Gewehr und Zielfernrohr sind jetzt feldeinsatzbereit. Vorausgesetzt, dass Sie
die gleichen (bzw. ballistisch identischen) Patronen benutzen, können Sie ohne vertikale Verstellung in
jede Entfernung bis zu der auf der Einstellskala angezeigten Distanz schießen, indem Sie einfach an der
Einstellskala drehen, bis die gewünschte Distanz zentriert im Fenster erscheint.
2.
Visiereinstellung auf eine andere Distanz als 100 Yard (91 m): Obwohl die Skalen auf 100 Yard (91 m)
eingestellt sind, ist es möglich, sie mit anderen Visierentfernungen zu benutzen. Wenn Sie beispielsweise
das Visier auf eine Entfernung von 200 Yard (183 m) einstellen wollen, gehen Sie wie oben vor, benutzen aber
200 Yard als Distanz. Wenn Sie die BDC-Einstallskala installieren, setzen Sie die Skala auf die Markierung für
200 Yard (183 m) statt auf die für 100 Yard (91 m).
3.
Nur für Modell 71-3510 – Obwohl das Zielfernrohr für jedes Kaliber benutzt werden kann, ist es ideal für
Ladungen des Kalibers 17.Eine Spezialtabelle für Ladungen des Kalibers 17 wird mitgeliefert.
Abb. C
Teil#3
Abb. B
Teil#2
Teil#3
Abb. A
Teil#1
Abb. D
FraNçaIS
UTILISATION DES CADRANS DE BDC AVEC LA LUNETTE DE VISÉE BANNER® DU FUSIL
1. RÉGLEZ LA HAUSSE DE VOTRE ARME AU PAS DE TIR AVEC LA LUNETTE DE VISÉE À COMPENSATEUR DE
TRAJECTOIRE DE PROJECTILE (BDC) (71-3510 ET 71-3946) INSTALLÉE
A. Avec la lunette montée sur le fusil, déposez le capuchon du réglage de hauteur comme le montre
la Fig A. Si un cadran de BDC est posé en remplacement du capuchon, déposez la vis et le cadran à
l’aide d’une pièce de monnaie (voir Fig B et Fig C). (Saisissez la section moletée à la partie supérieure
du cadran du BDC (Fig C, Pièce n° 2) et tirez vers le haut pour dégager le cadran du mécanisme de
réglage en hauteur.)
B. Réglez la hausse de votre fusil en tirant un groupe d’au moins trois coups sur une cible placée à 100
yards/verges (91 m) (pour régler la hausse à une portée diérente, consultez la note ci-dessous). Notez
le point d’impact par rapport au centre de la cible. À l’aide d’une pièce de monnaie insérée sur le dessus
du mécanisme de réglage en hauteur (Fig. D, pièce n° 3), faites tourner le mécanisme de réglage du
nombre de crans requis pour réaliser le déplacement nécessaire du point d’impact. Eectuez les
ajustements appropriés du bouton de réglage en dérive pour amener le point d’impact au centre de la
cible. Tirez un autre groupe pour voir si le réglage approprié a été eectué. Répétez selon les besoins
jusqu’à ce que le centre du groupe se trouve au centre de la cible.
2. SELECTIONNER ET INSTALLER LE CADRAN
Une fois que le le fusil est réglé, selectionnez et installez le cadran de compensateur de trajectoire de
projectile (BDC) qui correspond à votre calibre et à votre poids de balle de la manière suivante:
A. Avec le tableau des cardans selectionnez le cardan approprié pour la combinaison entre votre calibre
et le poids de balle. La lunette 3-9x40 (modèle# 713946) est fournie avec 10 cadrans interchangeables,
calibrés et un cadran non calibré. La lunette 3.5-10x36 (modèle# 713510) est fournie avec 5 cadrans
interchangeables, calibrés et un cadran non calibré. Le cadran non calibré possède une surface spéciale
et vous permet d’inscire vos propres marquages de distance pour toute cartouche non couverte par le
Tableau complet des Cardans. En raison de la grande quantité de cartouches disponibles, nous n’avons
inclus que quelques-unes des plus courantes dans ce guide. Le tableau complet des cadrans est
disponible à l’adresse :
http://www.bushnell.com/customer_service/manuals/riescopes/BannerBDCDialChartFullList.pdf
B. Une fois que vous avez sélectionné le cadran approprié, posez-le dans l’ordre inverse des étapes
décrites aux gures B et C, en veillant à aligner la marque des 100 yards/verges (91 m) avec la
graduation placée sous la fenêtre du contrôle de hauteur (voir g. E). Serrez la vis en vous assurant que
vous n’avez pas fait tourner le bouton et qu’il est toujours placé sur 100 yards/verges (91 m).
3. UTILISATION DE LA LUNETTE À BDC
Le cadran du BDC (compensateur de trajectoire de projectile) règle automatiquement la hauteur pour
prendre en compte la compensation verticale nécessaire au-dessus du point d’impact pour des distances
supérieures à la distance de réglage de la hausse. Une fois que vous connaissez la distance à la cible, réglez
le cadran du BDC sur cette distance. Vous avez maintenant corrigé la trajectoire du projectile.
NOTES SPÉCIALES :
1. Si vous utilisez des charges spéciales ou non commerciales qui ne sont pas couvertes par le tableau, il
sera nécessaire de régler la hausse de votre lunette en suivant la procédure de réglage ci-dessus. Le point
d’impact souhaité à une distance donnée devra être déterminé au moyen de tirs réels jusqu’à ce que le
réglage du zéro soit accompli. En utilisant le cadran de BDC vierge, marquez la distance souhaitée en yards
(verges) ou en mètres sur le cadran à l’aide d’un stylo indélébile. Chaque changement de distance devra
être déterminé par la même procédure de réglage. Replacez la vis de retenue (pièce n° 1) et serrez-la
fermement. Le fusil et la lunette sont maintenant prêts à être utilisés sur le terrain. Tant que la même
cartouche (ou une cartouche ayant les mêmes caractéristiques balistiques) est utilisée, vous pouvez tirer à
n’importe quelle distance sans l’ajustement vertical jusqu’à la distance indiquée sur le cadran, en tournant
simplement le cadran jusqu’à ce que ce marquage de distance apparaisse dans la fenêtre.
2. Réglage de la hausse à une portée diérente qui ne soit pas de 100 yards/verges (91 m) – bien que les
cadrans soient prévus pour un réglage de hausse à 100 yards, il est toujours possible de les utiliser avec
une distance de réglage diérente. Par exemple, supposons que vous souhaitiez régler la hausse pour une
distance de 200 yards/verges (183 m). Procédez de la façon dénie ci-dessus en utilisant une distance de
200 yards. Lorsque vous posez le cadran du BDC, placez le cadran sur la marque des 200 yards (183 m) au
lieu de celle des 100 yards (91 m).
3. Modèle 71-3510 uniquement – bien que la lunette puisse être utilisée avec un calibre quelconque, elle
est idéale pour les charges de calibre 17. Un tableau spécial a été inclus pour les charges de calibre 17.
Fig. C
Pièce n°3
Fig. D
Fig. A
Pièce n°1
Fig. B
Pièce n°2
Pièce n°3
portuGuêS
UTILIZAÇÃO DOS QUADRANTES BDC COM SEU RIFLESCÓPIO BANNER®
1. AJUSTE A MIRA DO RIFLE NO GALPÃO DE TIRO COM O RIFLESCÓPIO A COMPENSADOR DE TRAJETÓRIA
DE PROJÉTEIS (BDC) (71-3510 E 71-3946) INSTALADO
A. Com o riescópio montado sobre o rie, retire a tampa da elevação como mostra a Figura A. Caso
haja um quadrante BDC no lugar da tampa, retire o parafuso e o quadrante usando uma moeda (veja a
Figura B e a Figura C). (Prenda a seção saliente na parte superior do quadrante BDC (Figura C, Parte nº
2) e levante para cima, soltando o quadrante do ajuste da elevação).
B. Ajuste a mira do rie, disparando uma série mínima de pelo menos três tiros contra um alvo a 100
jardas (91 m) de distância (para ajustar a outra distância, veja a observação abaixo). Observe o ponto
de impacto em relação ao centro do alvo. Usando uma moeda inserida no alto do ajuste da elevação
(Figura D, Parte nº 3), gire o ajuste o número de cliques necessário para mudar o ponto de impacto.
Faça os ajustes necessários no botão de deslocamento do projétil para que o ponto de impacto coincida
com o centro do alvo. Dispare outra série de tiros para vericar se foi feito o ajuste correto. Repita tantas
vezes quantas necessárias até o centro do ponto de impacto dos tiros coincidir com o centro do alvo.
2. SELECIONE E INSTALE O DIAL
Quando o rie estiver descarregado, selecione e instale o dial BDC apropriado para o calibre e peso da
munição da seguinte maneira:
A. No Gráco do dial, selecione o dial que será utilizado com a combinação de calibre e peso da
munição. O visor 3-9x40 (modelo # 713946) possui 10 dials intercambiáveis e um dial vazio. O visor
3.5-10x36 (modelo # 713510) possui 5 dials intercambiáveis e um dial vazio. O dial vazio possui uma
superfície especial e é incluído para permitir a criação de seus próprios indicadores de distância, para
qualquer cartucho que não esteja incluído do Gráco completo do dial. Devido a ampla quantidade de
cartuchos disponíveis, somente incluímos os cartuchos mais populares neste guia. O Guia completo
do dial está disponível em:
http://www.bushnell.com/customer_service/manuals/riescopes/BannerBDCDialChartFullList.pdf
B. Uma vez que você tenha escolhido o quadrante adequado, instale-o na ordem inversa da Figura B e
C, tomando cuidado para alinhar a marca de 100 jardas (91 m) com a marca de vericação abaixo da
janela no dispositivo de controle de elevação (ver Figura E). Aperte o parafuso assegurando-se de que
o botão não tenha girado e ainda está em 100 jardas (91 m).
3. UTILIZAÇÃO DO RIFLESCÓPIO BDC
O quadrante do BDC (compensador de trajetória de projéteis) ajusta automaticamente a elevação para
tomar em consideração o ajuste vertical necessário acima do ponto de impacto para distâncias maiores
do que a distância de visada. Uma vez que você saiba a distância para o alvo, ajuste o quadrante BDC para
aquela distância. A trajetória do projétil está correta agora.
OBSERVAÇÕES ESPECIAIS:
1. Caso você esteja utilizando projéteis especiais ou não comerciais não relacionados na Tabela, será
necessário ajustar a mira do riescópio seguindo o procedimento de ajuste de mira acima. O ponto de
impacto desejado em uma determinada distância deverá ser determinado com disparos reais até se obter
o alinhamento. Usando o quadrante BDC em branco, marque a distância desejada em jardas ou metros no
quadrante com uma caneta permanente. Cada aumento ou mudança na distância deverá ser determinado
pelo mesmo procedimento de alinhamento da mira. Reinstale o parafuso de retenção (Peça nº 1) e aperte
bem. O rie e o riescópio agora estão prontos para o uso em campo. Contanto que seja usado o mesmo
cartucho (ou outro de balística idêntica), pode-se disparar em qualquer distância sem ajuste vertical até a
distância indicada no quadrante, bastando virar o quadrante até a marca de distância estar centrada na
janela.
2. Ajuste da mira para uma distância diferente de 100 jardas (91 m) : embora os quadrantes estejam
congurados para um ajuste de 100 jardas, é possível também utilizá-los com uma distância de visada
diferente. Por exemplo, caso queira ajustá verticalmente a uma distância de 200 jardas (183 m), proceda
como indicado acima utilizando uma distância de 200 jardas. Quando instalar o quadrante BDC, coloque o
quadrante na marca de 200 jardas (183 m) ao invés da marca de 100 jardas (91 m).
3. Somente para o modelo 71-3510 – embora o riescópio possa ser utilizado para qualquer calibre, o ideal
é a carga de calibre 17. Uma tabela especial foi incluída para as cargas de calibre 17.
Fig. C
Parte nº3
Fig. A
Parte nº1
Fig. B
Parte nº2
Parte nº3
Fig. D
ItaLIaNo
UTILIZZO DEI QUADRANTI BDC CON IL MIRINO TELESCOPICO BANNER® DEL FUCILE
1. REGOLARE L’ALZO DEL FUCILE NEL POLIGONO CON IL MIRINO TELESCOPICO CON COMPENSATORE DI
TRAIETTORIA DI PROIETTILI (BDC) (71-3510 e 71-3946) INSTALLATO
A. Con il mirino telescopico montato sul fucile, rimuovere il tappo dell’elevazione, come mostrato in
Fig. A. Se invece del tappo c’è un quadrante BDC, rimuovere la vite ed il quadrante utilizzando una
moneta (vedere le Figg. B e C): (Aerrare la sezione zigrinata superiore del quadrante BDC (Fig. C, Parte
n. 2) e sollevarla, sganciandola dalla regolazione dell’elevazione).
B. Aggiustare l’alzo del fucile sparando una serie di almeno tre colpi ad un bersaglio distante 100
yd (91 m) (per l’azzeramento ad una distanza dierente, vedere la nota successiva). Osservare il
punto d’impatto rispetto al centro del bersaglio. Utilizzando una moneta inserita di taglio nella parte
superiore della regolazione dell’elevazione (Fig. D, Parte n. 3), farla ruotare il numero di scatti necessari
per spostare opportunamente il punto d’impatto. Eettuare le necessarie regolazioni con la manopola
della deriva per portare il punto d’impatto al centro del bersaglio. Sparare un’altra serie di colpi per
confermare la regolazione eettuata. Ripetere questa procedura no a far coincidere il centro della
rosa dei tiri con il centro del bersaglio.
2. SELEZIONE E INSTALLAZIONE DEL QUADRANTE
Una volta eseguito l’azzeramento, selezionare e installare il quadrante di BDC adatto al calibro e al peso dei
proiettili utilizzati, procedendo come di seguito indicato:
A. Usando l’apposita tabella, scegliere il quadrante corretto in base alla combinazione di peso e calibro
dei proiettili utilizzati. La dotazione del mirino telescopico 3-9x40 (modello # 713946) comprende 10
quadranti intercambiabili calibrati e un quadrante non calibrato. La dotazione del mirino telescopico
3,5-10x36 (modello # 713510) comprende di 5 quadranti intercambiabili calibrati e un quadrante non
calibrato. Il quadrante non calibrato presenta una supercie speciale sulla quale è possibile apporre
i propri contrassegni di distanza per le cartucce non riportate nella tabella completa dei quadranti.
Dato il grandissimo numero di cartucce disponibili, in questa guida ne sono incluse solo alcune tra le
più diuse. La tabella completa dei quadranti è disponibile su:
http://www.bushnell.com/customer_service/manuals/riescopes/BannerBDCDialChartFullList.pdf
B. Una volta scelto il quadrante giusto, installarlo eseguendo all’inverso la procedura illustrata
nelle Figg. B e C, facendo attenzione ad allineare il contrassegno da 100 yd (91 m) al contrassegno
corrispondente sotto la nestrella del dispositivo di controllo dell’elevazione (vedere la Fig. E). Serrare
la vite vericando di non aver fatto ruotare la manopola e che la distanza segnata sia ancora 100
yd (91 m).
3. USO DEL MIRINO TELESCOPICO BDC
Il quadrante BDC (compensatore di traiettoria di proiettili) regola automaticamente l’elevazione in modo
da realizzare la compensazione verticale necessaria al di sopra del punto d’impatto su distanze maggiori
rispetto a quella di taratura dell’alzo. Una volta conosciuta la distanza del bersaglio, regolare il quadrante
BDC su tale valore. A questo punto la traiettoria del proiettile è corretta.
NOTE SPECIALI:
1. Se si intende utilizzare proiettili speciali o non commerciali non riportati in tabella, è necessario
eettuare la regolazione dell’alzo del mirino telescopico seguendo la procedura indicata in precedenza.
Il punto di impatto desiderato a una data distanza dovrà essere determinato mediante una serie di tiri di
prova no a ottenere l’azzeramento.
Utilizzando un pennarello indelebile, segnare sul quadrante BDC non calibrato la distanza desiderata in iarde
o metri. Ogni cambiamento della distanza dovrà essere determinato ripetendo la procedura di azzeramento.
Riposizionare e serrare a fondo la vite di ssaggio (Parte n. 1). Il fucile e il mirino telescopico sono ora pronti
per l’uso. Finché si utilizza lo stesso tipo (o un tipo balisticamente identico) di cartucce, è possibile sparare
da qualsiasi distanza senza compensazione verticale no alla distanza indicata sul quadrante, facendolo
semplicemente ruotare no a centrare il contrassegno della distanza nella nestrella.
2. Regolazione verticale per distanze di tiro dierenti da 100 iarde (91 m): sebbene i quadranti siano
calibrati a 100 yd (91 m), è comunque possibile utilizzarli ad una distanza di azzeramento dierente.
Ad esempio, supponiamo di voler utilizzare una distanza di azzeramento di 200 yd (183 m). Procedere
come sopra indicato utilizzando una distanza di 200 yd. Quando si installa il quadrante BDC, regolarlo sul
contrassegno da 200 yd (183 m) invece che su quello da 100 yd (91 m).
3. Solo per il modello 71-3510: sebbene il mirino telescopico sia utilizzabile con qualsiasi calibro, è l’ideale
per cartucce calibro 17. È allegata una tabella speciale per le cartucce calibro 17.
Fig. C
Parte n.3
Fig. A
Parte n.1
Fig. B
Parte n.2
Parte n.3
Fig. D
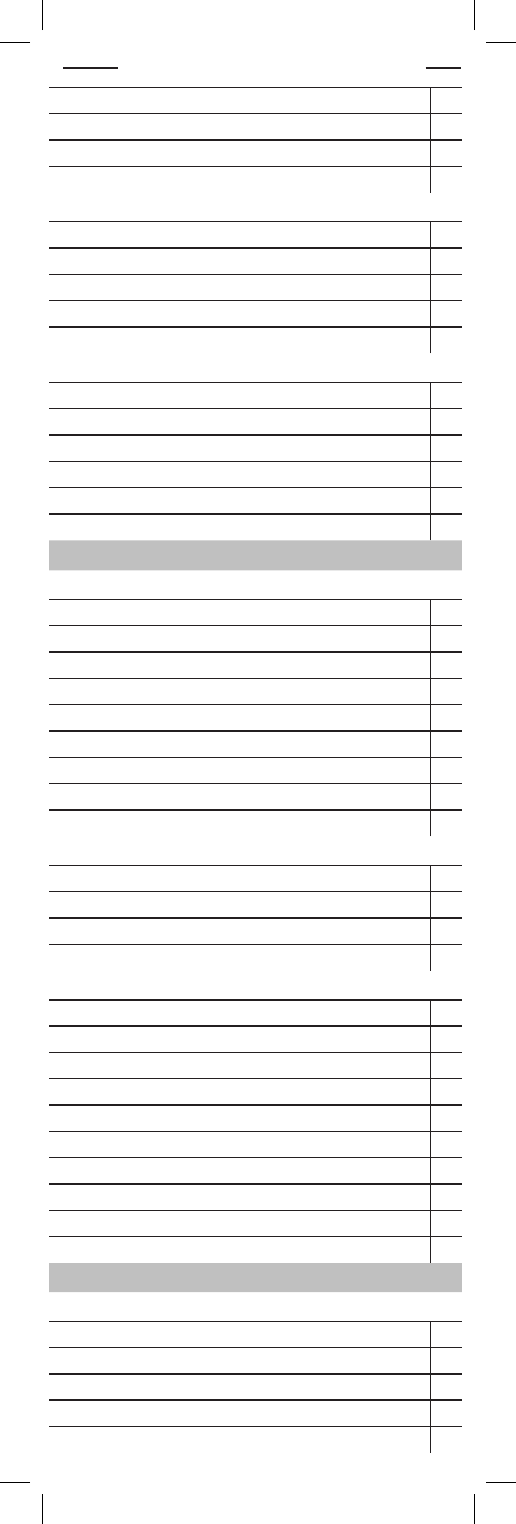
.30-06 Springeld
Winchester Loads
Winchester .308 dia. 30-06 Sprg, 125 gr. PSP at 3140 fps F
Winchester .308 dia. 30-06 Sprg, 150 gr. ST at 2910 fps E
Winchester .308 dia. 30-06 Sprg, 150 gr. PP at 2920 fps D
Winchester .308 dia. 30-06 Sprg, 150 gr. FailSafe at 2920 fps E
Winchester .308 dia. 30-06 Sprg, 150 gr Partition Gold at 2960 fps E
Winchester .308 dia. 30-06 Sprg, 165 gr. PSP at 2800 fps D
Winchester .308 dia. 30-06 Sprg, 165 gr. FailSafe at 2800 fps D
Winchester .308 dia. 30-06 Sprg, 168 gr. Ballistic Silvertip at 2790 fps E
Winchester .308 dia. 30-06 Sprg, 180 gr. PP at 2700 fps D
Winchester .308 dia. 30-06 Sprg, 180 gr. FailSafe at 2700 fps D
Winchester .308 dia. 30-06 Sprg, 180 gr. Partition Gold at 2750 fps D
Winchester .308 dia. 30-06 Sprg, 180 gr. PP-Plus at 2770 fps D
Remington Loads
Remington Arms .308 dia. 30-06 Springeld, 125 gr. PSP at 3140 fps E
Remington Arms .308 dia. 30-06 Springeld, 150 gr. PSPCL at 2910 fps E
Remington Arms .308 dia. 30-06 Springeld, 150 gr. BRPT at 2910 fps E
Remington Arms .308 dia. 30-06 Springeld, 180 gr. SPCL at 2700 fps C
Remington Arms .308 dia. 30-06 Springeld, 180 gr. PSPCL at 2700 fps D
Remington Arms .308 dia. 30-06 Springeld, 180 gr. BRPT at 2700 fps D
Remington Arms .308 dia. 30-06 Springeld, 220 gr. SPCL at 2410 fps B
Remington Arms .308 dia. 30-06 Springeld, 165 gr. PSPCL at 2800 fps D
Remington Arms .308 dia. 30-06 Springeld, 180 gr. A-Frame at 2700 fps D
Remington Arms .308 dia. 30-06 Springeld, 165 gr. PSPBT at 2800 fps E
Remington Arms .308 dia. 30-06 Springeld, 165 gr. AccuTip BT at 2800 fps E
Remington Arms .308 dia. 30-06 Springeld, 150 gr. AccuTip BT at 2910 fps E
Federal Loads
Federal Cartridge .308 dia. 30-06 Spring, 180 gr. Partition at 2880 fps F
Federal Cartridge .308 dia. 30-06 Spring, 150 gr. SBT GameKing at 2910 fps E
Federal Cartridge .308 dia. 30-06 Spring, 180 gr. SBT GameKing at 2700 fps D
Federal Cartridge .308 dia. 30-06 Spring, 150 gr. Ballistic Tip at 2910 fps F
Federal Cartridge .308 dia. 30-06 Spring, 165 gr. Ballistic Tip at 2800 fps E
Federal Cartridge .308 dia. 30-06 Spring, 165 gr. Bear Claw at 2800 fps D
Federal Cartridge .308 dia. 30-06 Spring, 180 gr. Bear Claw at 2700 fps D
Federal Cartridge .308 dia. 30-06 Spring, 180 gr. Hi-Shok SP at 2700 fps D
Federal Cartridge .308 dia. 30-06 Spring, 168 gr. HPBT MatchKing at 2700 fps D
Federal Cartridge .308 dia. 30-06 Spring, 150 gr. FMJBT at 2910 fps F
Federal Cartridge .308 dia. 30-06 Spring, 180 gr. XLC Coated X-Bullet at 2700 fps D
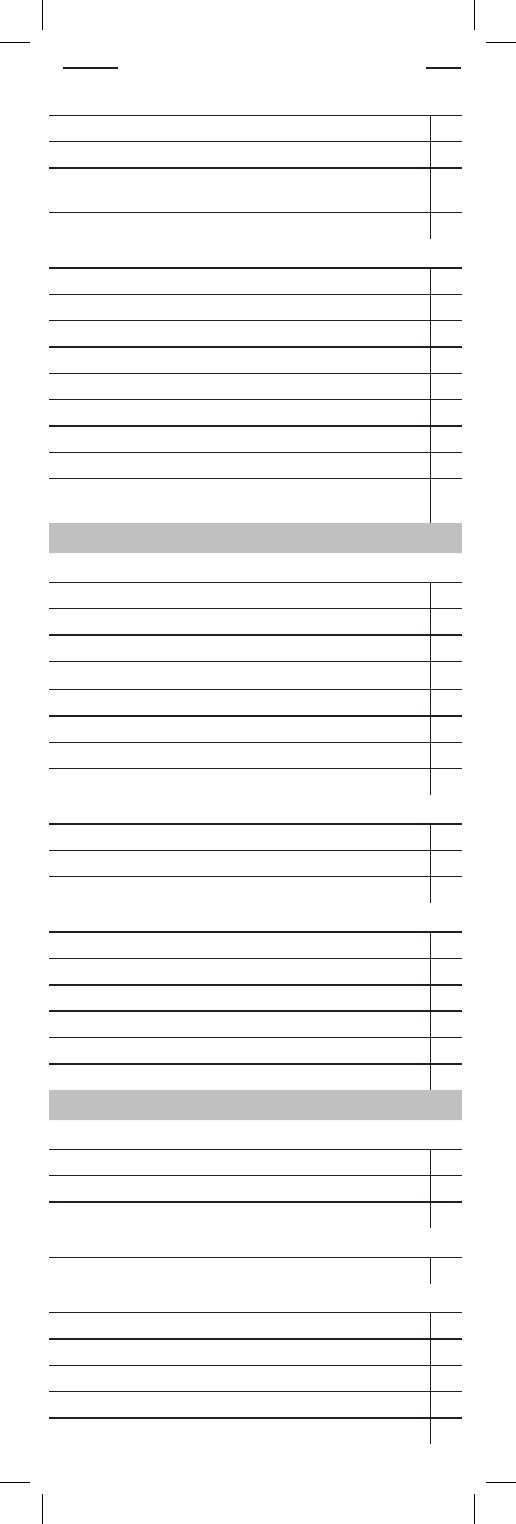
.223 Remington
Winchester Loads
Winchester .224 dia. 223 Rem, 53 gr. HP at 3330 fps F
Winchester .224 dia. 223 Rem, 55 gr. PSP at 3240 fps D
Winchester .224 dia. 223 Rem, 64 gr. PP-Plus at 3090 fps E
Winchester .224 dia. 223 Rem, 40 gr. Ballistic Silvertip at 3700 fps G
Winchester .224 dia. 223 Rem, 50 gr. Ballistic Silvertip at 3410 fps F
Winchester .224 dia. 223 Rem, 45 gr. JHP at 3600 fps F
Winchester .224 dia. 223 Rem, 64 gr. PP at 3020 fps D
Winchester .224 dia. 223 Rem, 55 gr. FMJ at 3240 fps F
Remington Loads
Remington Arms .224 dia. 223 Remington Arms , 50 gr. V-Max at 3140 fps E
Ammo Selected Dial Charts Dial
Federal Loads
Federal Cartridge .224 dia. 223 Rem, 55 gr. Ballistic Tip at 3240 fps F
Federal Cartridge .224 dia. 223 Rem, 55 gr. Hi-Shok SP at 3240 fps D
Federal Cartridge .224 dia. 223 Rem, 55 gr. FMJBT at 3240 fps D
.30-30 Winchester
Winchester Loads
Winchester .308 dia. 30-30 Win, 150 gr. HP at 2390 fps A
Winchester .308 dia. 30-30 Win, 150 gr. PP at 2390 fps A
Winchester .308 dia. 30-30 Win, 170 gr. PP at 2200 fps A
Winchester .308 dia. 30-30 Win, 170 gr. ST at 2200 fps A
Winchester .308 dia. 30-30 Win, 150 gr. PP-Plus at 2480 fps B
Remington Loads
Remington Arms .308 dia. 30-30 Win, 55 gr. Accelerator at 3400 fps D
Remington Arms .308 dia. 30-30 Win, 150 gr. SPCL at 2390 fps A
Remington Arms .308 dia. 30-30 Win, 170 gr. SPCL at 2200 fps A
Remington Arms .308 dia. 30-30 Win, 170 gr. HPCL at 2200 fps A
Federal Loads
Federal Cartridge .308 dia. 30-30 Win, 170 gr. Partition at 2200 fps A
Federal Cartridge .308 dia. 30-30 Win, 170 gr. Hi-Shok SPFN at 2200 fps A
Federal Cartridge .308 dia. 30-30 Win, 170 gr. Hi-Shok RN at 2200 fps A
Federal Cartridge .308 dia. 30-30 Win, 125 gr. Hi-Shok HP at 2570 fps A
.270 Winchester
Winchester Loads
Winchester .277 dia. 270 Win, 130 gr. PP at 3060 fps F
Winchester .277 dia. 270 Win, 130 gr. ST at 3060 fps F
Winchester .277 dia. 270 Win, 150 gr. PP at 2850 fps D
Winchester .277 dia. 270 Win, 130 gr. Ballistic Silvertip at 3050 fps F
Winchester .277 dia. 270 Win, 140 gr. FailSafe at 2920 fps E
Winchester .277 dia. 270 Win, 130 gr PPP at 3150 fps F
Winchester .277 dia. 270 Win, 150 gr. Partition Gold at 2930 fps E
Winchester .277 dia. 270 Win, 150 gr. PP-Plus at 2950 fps E
Remington Loads
Remington Arms .277 dia. 270 Win, 100 gr. PSP at 3320 fps F
Remington Arms .277 dia. 270 Win, 130 gr. PSPCL at 3060 fps F
Remington Arms .277 dia. 270 Win, 130 gr. BRPT at 3060 fps F
Remington Arms .277 dia. 270 Win, 150 gr. SPCL at 2850 fps D
Remington Arms .277 dia. 270 Win, 140 gr. A-Frame at 2925 fps E
Remington Arms .277 dia. 270 Win, 140 gr. PSPBT at 2960 fps F
Federal Loads
Federal Cartridge .277 dia. 270 Win, 150 gr. SBT GameKing at 2850 fps E
Federal Cartridge .277 dia. 270 Win, 150 gr. Partition at 3000 fps F
Federal Cartridge .277 dia. 270 Win, 150 gr. Ballistic Tip at 3060 fps F
Federal Cartridge .277 dia. 270 Win, 140 gr. Bear Claw at 2940 fps E
Federal Cartridge .277 dia. 270 Win, 130 gr. Trophy Bonded B.C. at 3060 fps F
Federal Cartridge .277 dia. 270 Win, 130 gr. Hi-Shok SP at 3060 fps F
Federal Cartridge .277 dia. 270 Win, 150 gr. Hi-Shok RN at 2850 fps D
Federal Cartridge .277 dia. 270 Win, 130 gr. Ballistic Tip at 3060 fps F
Federal Cartridge .277 dia. 270 Win, 130 gr. XLC Coated X-Bullet at 3060 fps F
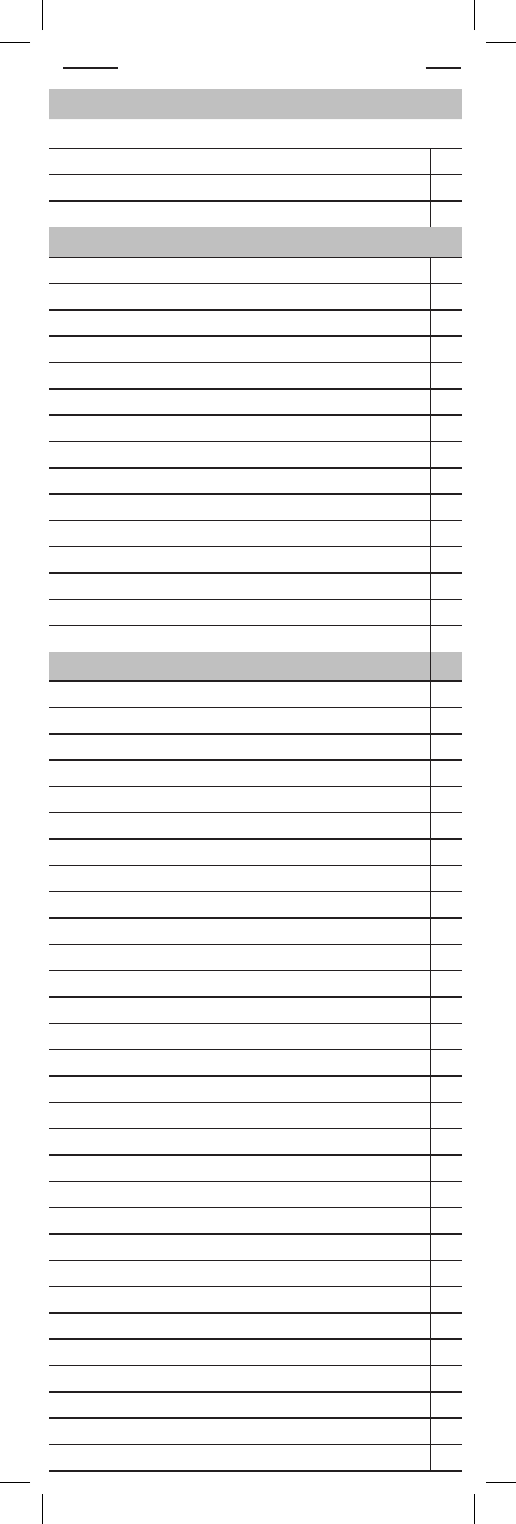
.243 Winchester
Winchester Loads
Winchester .243 dia. 243 Win, 80 gr. PSP at 3350 fps F
Ammo Selected Dial Charts Dial
Winchester .243 dia. 243 Win, 100 gr. PP at 2960 fps E
Winchester .243 dia. 243 Win, 55 gr. Ballistic Silvertip at 3910 fps H
Winchester .243 dia. 243 Win, 95 gr. Ballistic Silvertip at 3100 fps F
Winchester .243 dia. 243 Win, 100 gr PP-Plus at 3090 fps F
Remington Loads
Remington Arms .243 dia. 243 Win, 80 gr. PSP at 3350 fps F
Remington Arms .243 dia. 243 Win, 80 gr. HPPL at 3350 fps G
Remington Arms .243 dia. 243 Win, 100 gr. PSPCL at 2960 fps E
Remington Arms .243 dia. 243 Win, 75 gr. V-Max at 3375 fps G
Remington Arms .243 dia. 243 Win, 100 gr. PSPBT at 2960 fps E
Federal Loads
Federal Cartridge dia. 243 Win, 100 gr. SBT GameKing at 2960 fps F
Federal Cartridge dia. 243 Win, 85 gr. HPBT GameKing at 3320 fps G
Federal Cartridge dia. 243 Win, 70 gr. Ballistic Tip at 3400 fps G
Federal Cartridge dia. 243 Win, 100 gr. Hi-Shok SP at 2960 fps E
Federal Cartridge dia. 243 Win, 70 gr. TNT HP at 3400 fps G
Federal Cartridge dia. 243 Win, 100 gr. Partition at 2960 fps E
0.308 Winchester
Winchester Loads
Winchester .308 dia. 308 Win, 150 gr. PP at 2820 fps D
Winchester .308 dia. 308 Win, 180 gr. PP at 2620 fps C
Winchester .308 dia. 308 Win, 180 gr. Silvertip at 2620 fps C
Winchester .308 dia. 308 Win, 150 gr. Ballistic Silvertip at 2810 fps E
Winchester .308 dia. 308 Win, 168 gr. Ballistic Silvertip at 2670 fps D
Winchester .308 dia. 308 Win, 150 gr. FailSafe at 2820 fps D
Winchester .308 dia. 308 Win, 150 gr. Partition Gold at 2900 fps E
Winchester .308 dia. 308 Win, 168 gr. HPBT at 2680 fps D
Winchester .308 dia. 308 Win, 150 gr. PP-Plus at 2900 fps D
Remington Loads
Remington Arms .308 dia. 308 Win, 150 gr. PSPCL at 2820 fps D
Remington Arms .308 dia. 308 Win, 180 gr. SPCL at 2620 fps C
Remington Arms .308 dia. 308 Win, 180 gr. PSPCL at 2620 fps C
Remington Arms .308 dia. 308 Win, 168 gr. BTHP Match at 2680 fps D
Federal Loads
Federal Cartridge .308 dia. 308 Win, 165 gr. SBT GameKing at 2700 fps D
Federal Cartridge .308 dia. 308 Win, 180 gr. Partition at 2740 fps D
Federal Cartridge .308 dia. 308 Win, 150 gr. Ballistic Tip at 2820 fps E
Federal Cartridge .308 dia. 308 Win, 165 gr. Bear Claw at 2700 fps D
Federal Cartridge .308 dia. 308 Win, 150 gr. Hi-Shok SP at 2820 fps D
Federal Cartridge .308 dia. 308 Win, 180 gr. Hi-Shok SP at 2620 fps D
Federal Cartridge .308 dia. 308 Win, 168 gr. HPBT MatchKing at 2600 fps D
Federal Cartridge .308 dia. 308 Win, 175 gr. HPBT MatchKing at 2600 fps D
Federal Cartridge .308 dia. 308 Win, 150 gr. FMJBT at 2820 fps E
Federal Cartridge .308 dia. 308 Win, 155 gr. HPBT Palma MatchKing at 2950 fps G
7mm Remington Magnum
Winchester Loads
Winchester .284 dia. 7mm Rem Mag, 160 gr. Partition Gold at 2950 fps F
Winchester .284 dia. 7mm Rem Mag, 150 gr PP-Plus at 3130 fps F
Winchester .284 dia. 7mm Rem Mag, 140 Fail Safe at 3150 fps F
Winchester .284 dia. 7mm Rem Mag, 150 Ballistic Silvertip at 3100 fps G
Winchester .284 dia. 7mm Rem Mag, 160 Fail Safe at 2920 fps E
Ammo Selected Dial Charts Dial
Remington Loads
Remington Arms .284 dia. 7mm Remington Arms Mag, 150 gr. PSPCL at 3110 fps F
Remington Arms .284 dia. 7mm Remington Arms Mag, 140 gr. PSPCL at 3175 fps G
Remington Arms .284 dia. 7mm Remington Arms Mag, 160 gr. A-Frame PSP at
2900 fps E
Remington Arms .284 dia. 7mm Remington Arms Mag, 175 gr. PSPCL at 2860 fps E
Federal Loads
Federal Cartridge .284 dia. 7mm Rem Mag, 150 gr. SBT GameKing at 3110 fps G
Federal Cartridge .284 dia. 7mm Rem Mag, 165 gr. SBT GameKing at 2950 fps F
Federal Cartridge .284 dia. 7mm Rem Mag, 160 gr. Partition at 2950 fps F
Federal Cartridge .284 dia. 7mm Rem Mag, 140 gr. Partition at 3150 fps G
Federal Cartridge .284 dia. 7mm Rem Mag, 150 gr. Ballistic Tip at 3110 fps G
Federal Cartridge .284 dia. 7mm Rem Mag, 175 gr. Bear Claw at 2860 fps E
Federal Cartridge .284 dia. 7mm Rem Mag, 160 gr. Bear Claw at 2940 fps E
Federal Cartridge .284 dia. 7mm Rem Mag, 175 gr. Hi-Shok SP at 2860 fps E
Federal Cartridge .284 dia. 7mm Rem Mag, 160 gr. XLC Coated X-Bullet at 2940
fps F
.300 Winchester Magnum
Winchester Loads
Winchester .308 dia. 300 Winchester Mag, 150 gr. PP at 3290 fps F
Winchester .308 dia. 300 Winchester Mag, 180 gr. PP at 2960 fps F
Winchester .308 dia. 300 Winchester Mag, 180 gr. Ballistic Silvertip at 2950 fps F
Winchester .308 dia. 300 Winchester Mag, 165 gr. FailSafe at 3120 fps F
Winchester .308 dia. 300 Winchester Mag, 150 gr. FailSafe at 3260 fps F
Winchester .308 dia. 300 Winchester Mag, 180 gr. Partition Gold at 3070 fps F
Winchester .308 dia. 300 Winchester Mag, 180 gr. FailSafe at 2960 fps F
Winchester .308 dia. 300 Winchester Mag, 180 gr. PP-Plus at 3070 fps F
Remington Loads
Remington Arms .308 dia. 300 Win Mag, 150 gr. PSPCL at 3290 fps F
Remington Arms .308 dia. 300 Win Mag, 180 gr. PSPCL at 2960 fps F
Remington Arms .308 dia. 300 Win Mag, 200 gr. A-Frame PSP at 2825 fps E
Federal Loads
Federal Cartridge .308 dia. 300 Win Mag, 200 gr. SBT GameKing at 2830 fps E
Federal Cartridge .308 dia. 300 Win Mag, 150 gr. Bear Claw at 3280 fps G
Federal Cartridge .308 dia. 300 Win Mag, 180 gr. Partition at 2960 fps F
Federal Cartridge .308 dia. 300 Win Mag, 200 gr. Bear Claw at 2800 fps D
Federal Cartridge .308 dia. 300 Win Mag, 180 gr. XLC Coated X-Bullet at 2960 fps F
Federal Cartridge .308 dia. 300 Win Mag, 190 gr. HPBT MatchKing at 2900 fps F
.22-250 Remington
Winchester Loads
Winchester .224 dia. 22-250 Rem, 40 gr. Ballistic Silvertip at 4150 fps H
Winchester .224 dia. 22-250 Rem, 50 gr. Ballistic Silvertip at 3810 fps H
Winchester .224 dia. 22-250 Rem, 45 gr. JSP at 4000 fps G
Remington Loads
Remington Arms .224 dia. 22-250 Remington Arms , 55 gr. PSP at 3680 fps G
Federal Loads
Federal Cartridge .224 dia. 22-250 Rem, 55 gr. HPBT GameKing at 3680 fps G
Federal Cartridge .224 dia. 22-250 Rem, 55 gr. Bear Claw at 3600 fps G
Federal Cartridge .224 dia. 22-250 Rem, 40 gr. HP Varminter at 4000 fps G
Federal Cartridge .224 dia. 22-250 Rem, 55 gr. Hi-Shok SP at 3680 fps G
Federal Cartridge .224 dia. 22-250 Rem, 55 gr. BlitzKing at 3680 fps H
Ammo Selected Dial Charts Dial
.300 Winchester Short Magnum
Winchester Loads
Winchester .308 dia. 300 WSM, 150 gr. Ballistic Silvertip at 3300 fps G
Winchester .308 dia. 300 WSM, 180 gr. PP at 2970 fps F
Winchester .308 dia. 300 WSM, 180 gr. Fail Safe at 2970 fps F
17 CAL-all brands
Berger .172 dia. (17 cal) 15 gr. MEF at 3800 fps D
Berger .172 dia. (17 cal) 18 gr. MEF at 3800 fps E
Berger .172 dia. (17 cal) 20 gr. at 3750 fps H
Berger .172 dia. (17 cal) 20 gr. MEF at 3750 fps G
Berger .172 dia. (17 cal) 22 gr. at 3700 fps G
Berger .172 dia. (17 cal) 22 gr. MEF at 3700 fps G
Berger .172 dia. (17 cal) 25 gr. at 3850 fps H
Berger .172 dia. (17 cal) 25 gr. MEF at 3850 fps G
Berger .172 dia. (17 cal) 30 gr. at 3600 fps H
Berger .172 dia. (17 cal) 30 gr. MEF at 3600 fps G
Berger .172 dia. (17 cal) 37 gr. VLD at 3400 fps H
Hornady .172 dia. 20 gr. V-Max at 3600 fps G
Hornady .172 dia. 25 gr. HP at 3400 fps G
Remington .172 dia. 17 Rem, 20 gr. AccuTip at 4250 fps H
Remington .172 dia. 17 Rem, 25 gr. HPPL at 4040 fps H
Rimre-All Mfgrs (Listed Alphabetically by Brand)
DIAL
CCI Rimre .17 HMR, 17 gr. TNT JHP at 2525 fps J
CCI Rimre .17 HMR, 20 gr. JSP Gamepoint at 2375 fps J
CCI Rimre .17 HMR, 17 gr. V-Max at 2550 fps J
CCI Rimre .17 Mach 2, 17 gr. V-Max at 2010 fps I
CCI Rimre .22 Long, 29 gr. GLRN High Speed at 1215 fps L
CCI Rimre .22 LR, 32 gr. GLHP Stinger at 1640 fps K
CCI Rimre .22 LR, 32 gr. SHP QuikShok at 1640 fps K
CCI Rimre .22 LR, 36 gr. Mini-Mag at 1260 fps M
CCI Rimre .22 LR, 40 gr. GLHP Velocitor at 1435 fps K
CCI Rimre .22 LR, 40 gr. GLRN Silhouette at 1235 fps M
CCI Rimre .22 LR, 40 gr. LHP SubSonic at 1050 fps L
CCI Rimre .22 LR, 40 gr. LRN Green Tag at 1070 fps L
CCI Rimre .22 LR, 40 gr. LRN Pistol Match at 1070 fps L
CCI Rimre .22 LR, 40 gr. LRN Standard Velocity at 1070 fps L
CCI Rimre .22 LR, 40 gr. Mini-Mag at 1235 fps M
CCI Rimre .22 LR, 40 gr. SGB (Small Game) at 1235 fps M
CCI Rimre .22 Short, 27 gr. GLHP High Speed at 1105 fps L
CCI Rimre .22 Short, 29 gr. GLRN High Speed at 1080 fps L
CCI Rimre .22 Short, 29 gr. LRN CB at 710 fps I
CCI Rimre .22 WM, 30 gr. GLHP - Maxi-Mag +V at 2200 fps I
CCI Rimre .22 WM, 30 gr. TNT JHP at 2200 fps I
CCI Rimre .22 WM, 40 gr. TMJ Maxi-Mag at 1875 fps I
CCI Rimre .22 WRF, 45 gr. JHP at 1300 fps M
CCI Rimre .22 WM, 40 gr. JHP Maxi-Mag at 1875 fps I
Eley Rimre .22 LR, 40 gr. HV Solid (Hunting) at 1312 fps K
Eley Rimre .22 LR, 37.5 gr. HV HP (Hunting) at 1312 fps K
Eley Rimre .22 LR, 40 gr. Subsonic HP Xtra + (Hunting) at 1085 fps L
Eley Rimre .22 LR, 40 gr. Silhouex (Rie Silhouette) at 1085 fps L
Eley Rimre .22 LR, 40 gr. Tenex Ultimate EPS (Rie Olympic) at 1085 fps L
Eley Rimre .22 LR, 40 gr. Match EPS (Rie Olympic) at 1085 fps L
Ammo Selected Dial Charts Dial
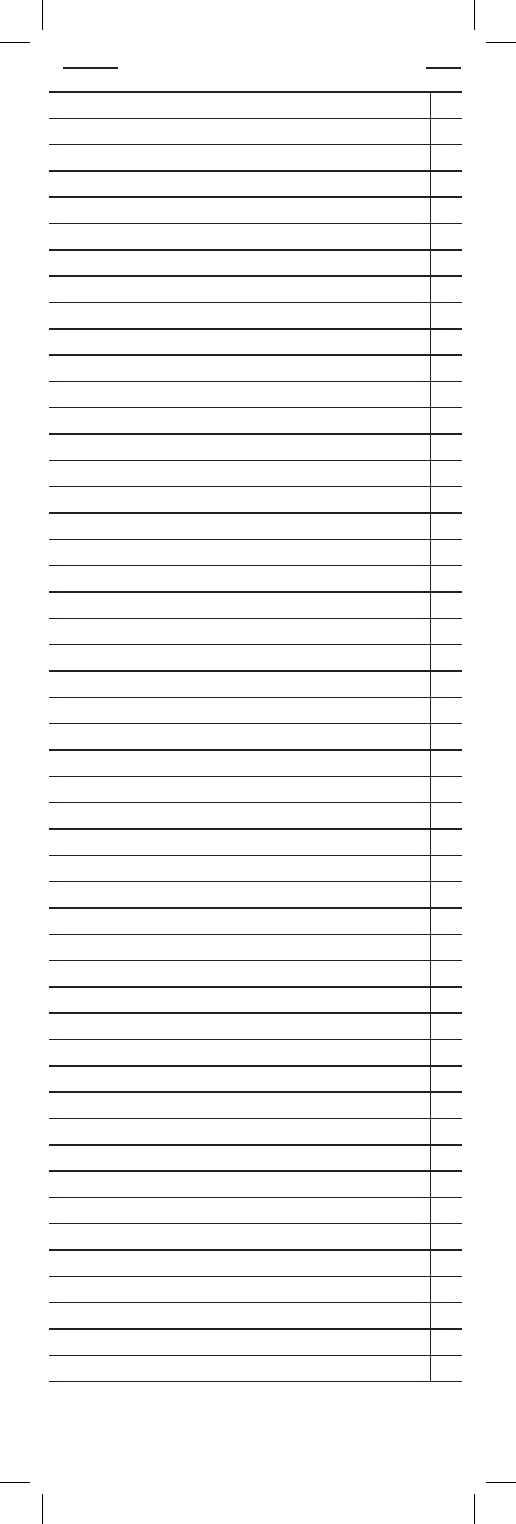
Eley Rimre .22 LR, 40 gr. Club Xtra (Rie Olympic) at 1085 fps L
Eley Rimre .22 LR, 40 gr. Target Rie (Rie Olympic) at 1085 fps L
Eley Rimre .22 LR, 40 gr. Standard (Rie Olympic) at 1085 fps L
Eley Rimre .22 LR, 40 gr. Pistol Xtra (Pistol Olympic) at 1030 fps L
Eley Rimre .22 LR, 40 gr. Target Pistol (Pistol Olympic) at 1030 fps L
Eley Rimre .22 LR, 40 gr. Pistol Standard (Pistol Olympic) at 1030 fps L
Eley Rimre .22 LR, 40 gr. Pistol Match (Pistol Olympic) at 1030 fps L
Federal Rimre .17 HMR, 17 gr. TNT at 2550 fps J
Federal Rimre .17 HMR, 17 gr. V-Max at 2550 fps J
Federal Rimre .17 Mach 2, 17 gr. V-Max at 2010 fps I
Federal Rimre .22 LR, 31 gr. Copper Plated HP at 1550 fps K
Federal Rimre .22 LR, 36 gr. Copper Plated HP at 1255 fps M
Federal Rimre .22 LR, 36 gr. HP at 1255 fps M
Federal Rimre .22 LR, 38 gr. Copper Plated HP at 1280 fps M
Federal Rimre .22 LR, 40 gr. Solid at 1080 fps L
Federal Rimre .22 LR, 40 gr. Solid Copper Plated at 1260 fps M
Federal Rimre .22 LR, 40 gr. Solid UltraMatch at 1140 fps M
Federal Rimre .22 WM, 30 gr. JHP at 2200 fps I
Federal Rimre .22 WM, 30 gr. TNT JHP at 2200 fps I
Federal Rimre .22 WM, 40 gr. FMJ at 1910 fps I
Federal Rimre .22 WM, 50 gr. JHP at 1650 fps I
PMC Rimre .22 LR, 38 gr. HP High Velocity Copper Clad at 1280 fps M
PMC Rimre .22 LR, 38 gr. HP Moderator SubSonic at 1000 fps L
PMC Rimre .22 LR, 40 gr. Solid High Velocity Copper Clad at 1255 fps M
PMC Rimre .22 LR, 40 gr. Solid Scoremaster at 1135 fps L
PMC Rimre .22 LR, 40 gr. Solid Sidewinder at 1250 fps M
PMC Rimre .22 LR, 40 gr. Solid Target (rie) at 1050 fps L
Remington Rimre .17 HMR, 17 gr. AccuTip at 2550 fps J
Remington Rimre .22 LR, 29 gr. Lead Golden at 1095 fps L
Remington Rimre .22 LR, 29 gr. Lead Golden at 1095 fps L
Remington Rimre .22 LR, 36 gr. Hollow Point Golden at 1280 fps M
Remington Rimre .22 LR, 36 gr. HP Cyclone at 1280 fps M
Remington Rimre .22 LR, 36 gr. Truncated Cone Solid at 1410 fps M
Remington Rimre .22 LR, 38 gr. HP Subsonic at 1050 fps L
Remington Rimre .22 LR, 40 gr. Lead Golden at 1055 fps L
Remington Rimre .22 LR, 40 gr. Lead Round Nose at 1085 fps L
Remington Rimre .22 LR, 40 gr. Lead Thunderbolt at 1055 fps L
Winchester Rimre .17 HMR, 17 gr. at 2550 fps J
Winchester Rimre .22 LR, 36 gr. Xpert LHP at 1255 fps M
Winchester Rimre .22 LR, 40 gr. Super X LRN Standard Veloctiy at 1150 fps M
Winchester Rimre .22 LR, 40 gr. Super X PowerPoint LHP at 1280 fps M
Winchester Rimre .22 LR, 40 gr. Wildcat LRN at 1255 fps M
Winchester Rimre .22 LR, 47 gr. Super X LRN at 1280 fps M
Winchester Rimre .22 Short, 29 gr. LRN at 1095 fps L
Winchester Rimre .22 WM, 34 gr. Supreme JHP at 2120 fps I
Winchester Rimre .22 WM, 40 gr. Super X FMJ at 1910 fps I
Winchester Rimre .22 WM, 40 gr. Super X JHP at 1910 fps I
Winchester Rimre .22 WM, 45 gr. Super X Dyna Point - plated at 1550 fps K
Winchester Rimre .22 WRF, 45 gr. Super X LFN at 1300 fps M
Ammo Selected Dial Charts Dial

www.bushnell.com
©2008 Bushnell Outdoor Products
