C H Systems RF-MDWS-ITI-S Door/window and garage sensors used by security systems User Manual
Cinch Systems, Inc Door/window and garage sensors used by security systems
User Manual

Mini DW Sensor—Installaon Instrucons
Micro Wireless Sensor and Accessories
1 - RF-MDWS Sensor 1- Mounng Tape 1 - RF-MDWS Magnet 2 - Baeries ( 2- 3VDC CR 2032) Instrucons
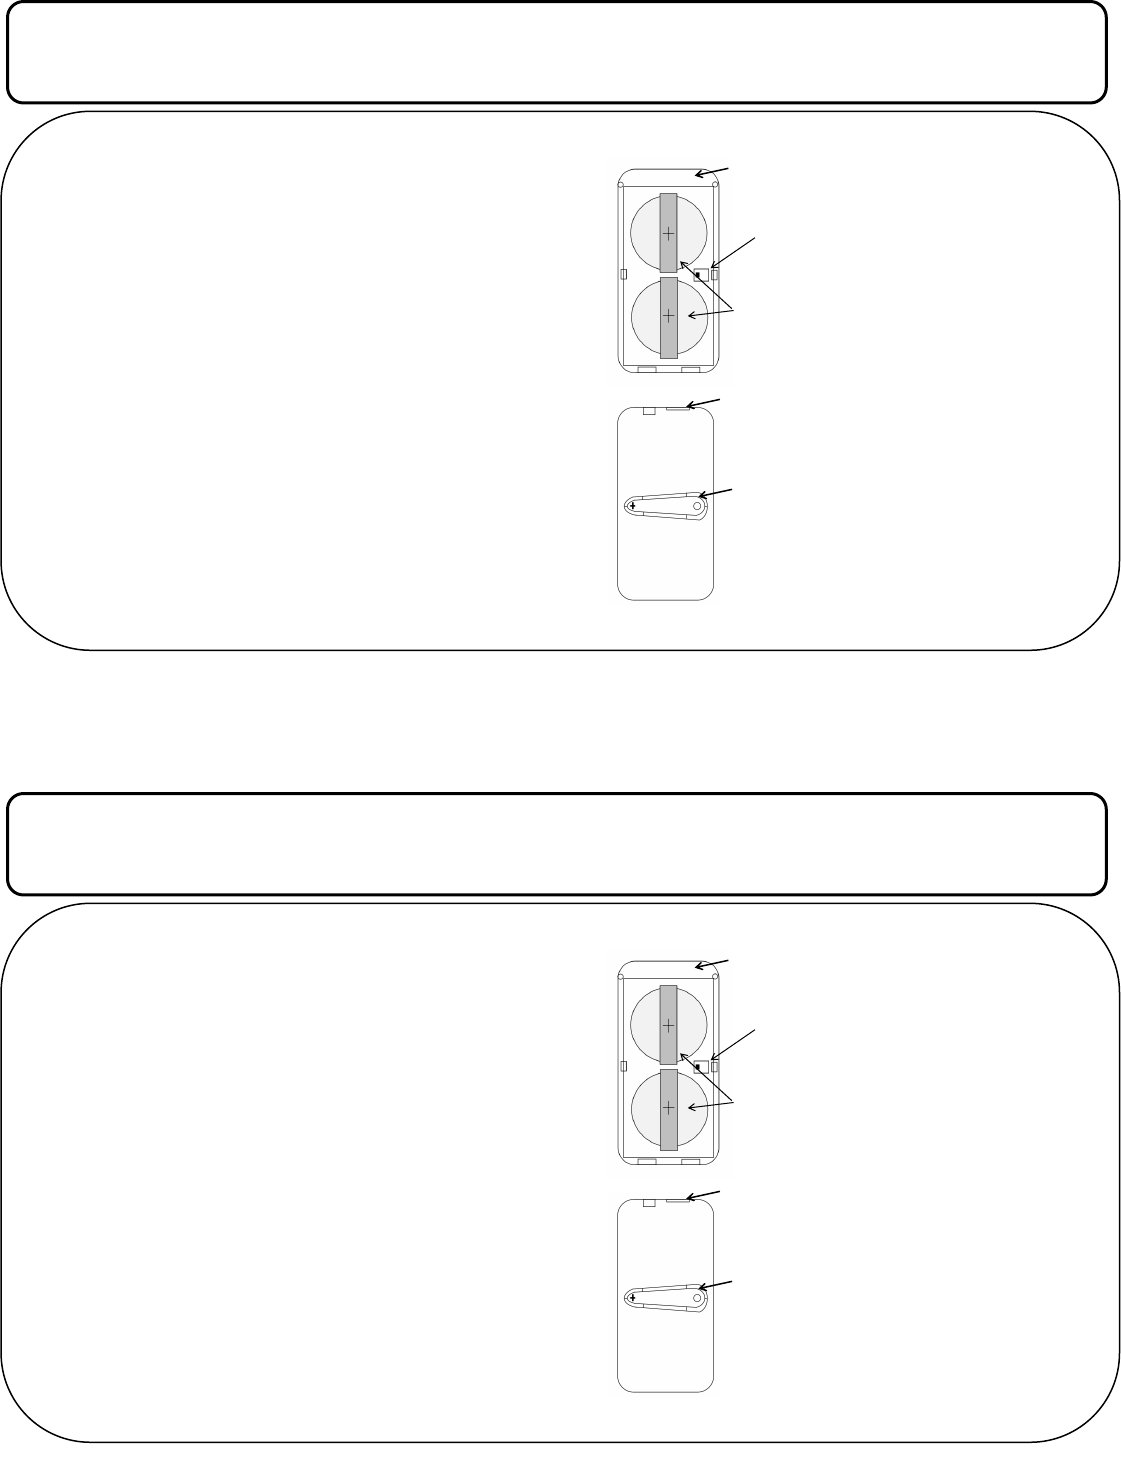
Tamper
switch
Doc # I-RF-MDWS Rev. A Sep 2014
Installaon
1. Remove the transmier’s cover by pressing in on the
small rectangular latch on the end of the cover and
li up
2. Mount the sensor base directly to the surface using
the mounng tape provided. Make sure to align the
mounng tape with the tamper pull put area on the
boom of the sensor to insure proper tamper opera-
on.
3. Mount the magnet next to the sensor and align the
magnet with the mark on the side of the sensor,
using the mounng tape provided
4. Remove the baery isolator tabs from both baeries
on the sensor
5. Replace the cover on the transmier
6. Enroll the senor into the control panel according the
instrucons
Note: Mounng the transmier onto metal surfaces may
impact the eecve range of the transmier
Cover
Latch
Cover
Latch
Tamper
Base
Note: Baery Safety
Observe polarity when inserng
replacement baeries to avoid
damaging the sensor.
Risk of re, burns and explosion.
Do not recharge, disassemble, burn
or expose baeries to tempera-
tures above 100C (212F)
Dispose of used baeries properly
and in accordance with all local
laws
Keep baeries away from children
Baeries

FCC label statement:
“This device complies with part 15 of the FCC Rules. Operation is subject to the
following two conditions: (1) This device may not cause harmful interference, and
(2) this device must accept any interference received, including interference that
may cause undesired operation.”
“Note: This equipment has been tested and found to comply with the limits for a
Class B digital device, pursuant to part 15 of the FCC Rules. These limits are
designed to provide reasonable protection against harmful interference in a
residential installation. This equipment generates, uses and can radiate radio
frequency energy and, if not installed and used in accordance with the instructions,
may cause harmful interference to radio communications. However, there is no
guarantee that interference will not occur in a particular installation. If this equip-
ment does cause harmful interference to radio or television reception, which can be
determined by turning the equipment off and on, the user is encouraged to try to
correct the interference by one or more of the following measures:
—Reorient or relocate the receiving antenna.
—Increase the separation between the equipment and receiver.
—Connect the equipment into an outlet on a circuit different from that to which the
receiver is connected.
—Consult the dealer or an experienced radio/TV technician for help.”
“Changes or modifications not expressly approved by the party responsible for
compliance could void the user's authority to operate the equipment”
“RF Exposure Guidance: This equipment complies with FCC radiation exposure
limits set forth for an uncontrolled environment. This equipment should be installed
and operated with a minimum distance of 1.5cm between the radiator and persons.
This transmitter must not be co-located or operating in conjunction with any other
antenna or transmitter, except in accordance with FCC multi-transmitter product
procedures.”
ISED RSS-Gen Notice:
IC: 11817A-RFMDWSITIS
“(1) This device may not cause interference; and (2) This device must accept any
interference, including interference that may cause undesired operation of the
device.
(1) l’appareil ne doit pas produire de brouillage; 2) l’appareil doit accepter tout
brouillage radioélectrique subi, même si le brouillage est susceptible d’en
compromettre le fonctionnement”
Under Industry Canada regulations, this radio transmitter may only operate using
an antenna of a type and maximum (or lesser) gain approved for the transmitter by
Industry Canada. To reduce potential radio interference to other users, the antenna
type and its gain should be so chosen that the equivalent isotropically radiated
power (e.i.r.p.) is not more than that necessary for successful communication.
Conformément à la réglementation d'Industrie Canada, le présent émetteur radio
peut fonctionner avec une antenne d'un type et d'un gain maximal (ou inférieur)
approuvé pour l'émetteur par Industrie Canada. Dans le but de réduire les risques
de brouillage radioélectrique à l'intention des autres utilisateurs, il faut choisir le
Mounng
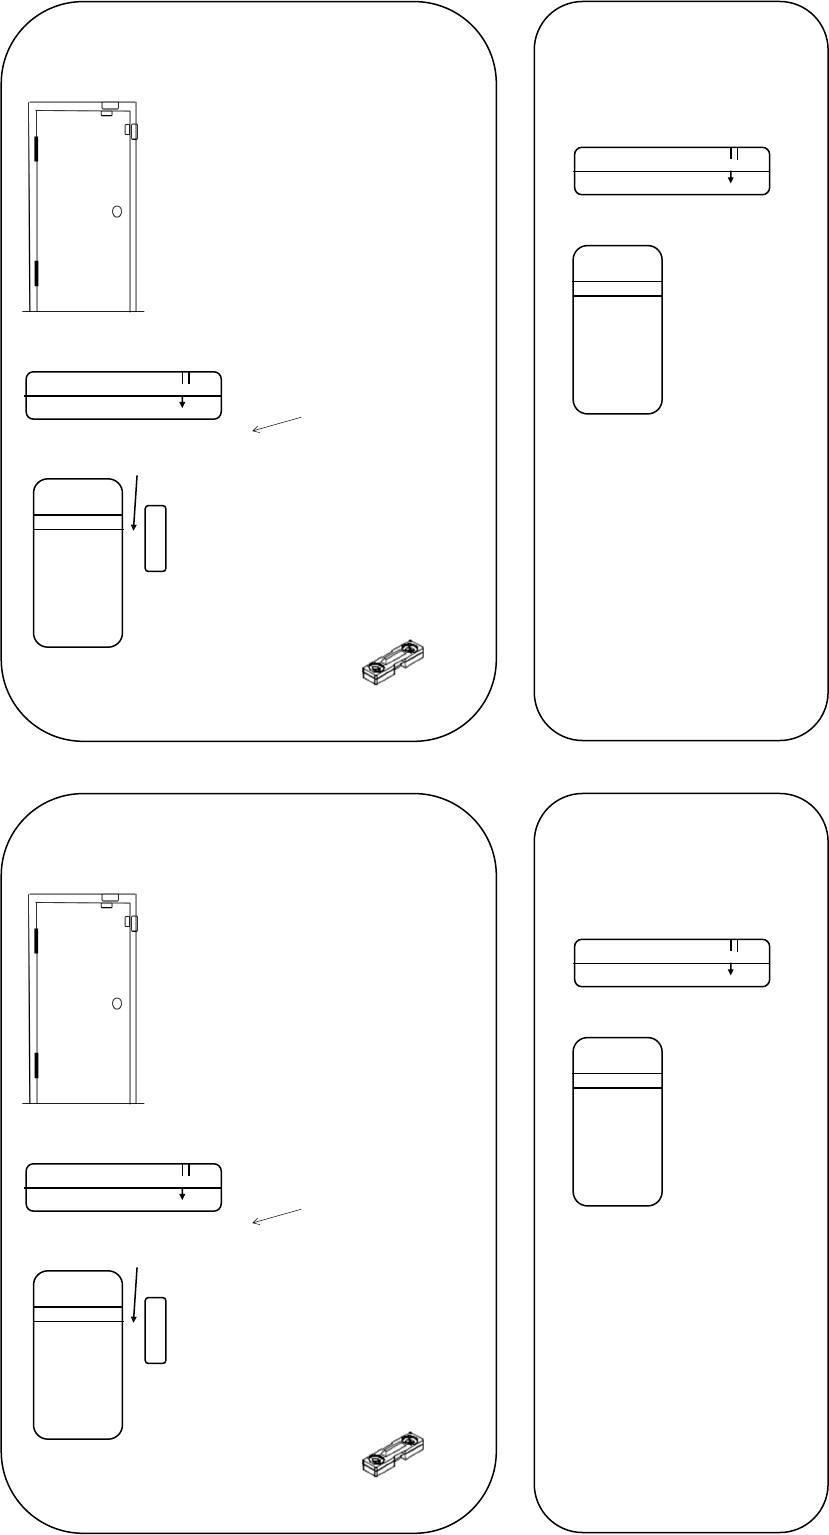
Using pre-cut tape, mount the sen-
sor on the non-moving frame and
the magnet on the door or window
Magnet locator mark
Magnet gap should not exceed
5/8” if needed use magnet spacers
to align magnet to sensor
Magnet spacers can be stacked
under the magnet
5/8”
Doc # I-RF-MDWS Rev. A Sep 2014
Specicaons:
Dimensions: 2.25 X 1 X .5
Baeries:
(2) - Panasonic CR2032
Energizer CR2032
Duracell DL2032
2.25”
.5”
1”