C and A CUBEPLUS Digital Camera User Manual
C&A; Marketing Inc. Digital Camera
UserManual.wiki
>
C and A
>
CUBEPLUS User Manual
User Manual
Navigation menu
Upload a User Manual
Namespaces
Wiki Guide
HTML
PDF
Info
Views
User Manual
Discussion / Help
Navigation

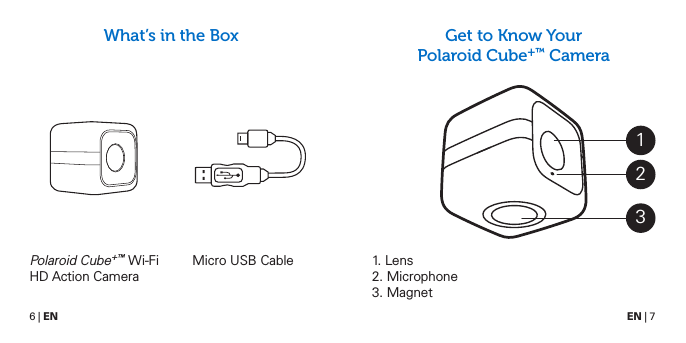
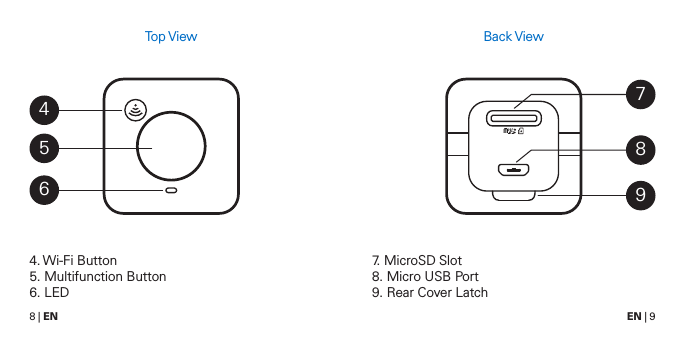
![ENWhat’s in the Box Get to Know Your Polaroid Cube+ Camera Using Your Polaroid Cube+ CameraFRQue trouve-t-on dans la boîte Découvrez votre caméra Polaroid Cube+ Utilisation de votre caméra Polaroid Cube+ITCosa c’è nella confezione Impara a conoscere la tua Fotocamera Polaroid Cube+ Utilizzare la tua Fotocamera Polaroid Cube+DEWas ist in der Box Deine Polaroid Cube+ Kamera Bedienung Deiner Polaroid Cube+ KameraESQué hay en la caja Conozca su cámara Polaroid Cube+ Usando su cámara Polaroid Cube+PTO que há dentro da caixa Conheça a sua câmara Polaroid Cube+ Usar a sua câmara Polaroid Cube+ 6 7 10 XX XX XX XX XX XX XX XX XX XX XX XX XX XX XXOverview [only EN chapter has been updated]](https://usermanual.wiki/C-and-A/CUBEPLUS/User-Guide-2738559-Page-3.png)
![18 | EN EN | 19720p at 30 or 60fps.00:00:00 Video Time: Displays video length.[slow motion icon] Slow Motion[Icon 3.2A.2 Still & Photoburst] Tap once to begin slow-motion capture. [icon 3.2B.5 Video] Tap once to end slow-motion capture.[icon 3.2B.4 & 5 Time-lapse & Slow Motion] Resolution: Slow motion is captured at 720p/120fps. For more details, see page 189. Video Tap once to begin recording video. Tap once to stop recording video. Tap to capture a still image while continuing to record video (no interruption to video).1080 Video Setting: Tap this number at the top of the screen to choose between available resolution options: 1440p at 30fps 1080p at 30 or 60fps](https://usermanual.wiki/C-and-A/CUBEPLUS/User-Guide-2738559-Page-10.png)
![20 | EN EN | 21[time-lapse icon] Time-Lapse[icon 3.2A.2 Still & Photoburst] Tap once to begin time-lapse capture. [icon 3.2B.5 Video] Tap once to end time-lapse capture.[icon 3.2A.2 Time-lapse, Slow Motion] Time-Lapse Settings: Tap this icon at the top of the screen to choose between 1 second or 3 seconds time-lapse.[icon 3.2A.1 Time-lapse, Slow Motion] Recording Time: Displays total length of time-lapse video. Still Photo Tap once to take photo.8MP Megapixel Settings: Tap this icon at the top of the screen to choose between available settings: 8 megapixel (8MP), 6 megapixel (6MP), or 3 megapixel (3MP) sized images. Timer Settings: Tap this icon at the top of the screen to choose between available timer settings: Off, 3 seconds or 10 seconds.](https://usermanual.wiki/C-and-A/CUBEPLUS/User-Guide-2738559-Page-11.png)
![22 | EN EN | 23[photo burst icon] Photo Burst[Icon 3.2A.2 Still & Photoburst] Tapping and holding the still photo capture button will allow you to create a photo burst. Bursts capture at 10 frames per second, up to 100 photos at a time.[icon 3.2A.3 Still & Photoburst] The Burst Counter shows how many photos have been captured in photo burst mode.3MP is the only resolution available for photobursts. Your Cube+ will automatically set to this resolution without affecting settings for other capture modes.Editing Video, Time-Lapse and Slow MotionFor any of these functions, first select the video you’d like to edit and view it on playback mode. Then follow the directions below.Trim Start and End FramesTap and drag the end points to the preferred start and stop points. Trimmed frames will grey out. Tap ‘Trim’ from upper right of screen to finalize edit. [image 3.6b - being removed?]Slow Motion Start & End PointsTap and drag the triangles to adjust slow motion start and end points[image 3.3b]](https://usermanual.wiki/C-and-A/CUBEPLUS/User-Guide-2738559-Page-12.png)
![24 | EN EN | 25Capture Stills from Video, Time-Lapse and Slow MotionTap any section of the video timeline to zoom into that section. Tap the image below the timeline to save it as a still image.[image 3.7b]Adjusting Other SettingsYou can adjust many of your Cube+ settings from the Camera Detail screen. To access, tap or swipe down the bar located at the top of the viewfinder screen.Tap icon [1] to edit camera name and icon.Tap icon [2] to turn off camera from app. This will not disconnect your camera from Wi-Fi, it just puts the camera into sleep mode. This allows you to save battery power and easily switch the camera on and off while it’s mounted to a helmet, bike or other out-of-arms-length location.[need HiRes]](https://usermanual.wiki/C-and-A/CUBEPLUS/User-Guide-2738559-Page-13.png)
![26 | EN EN | 27Advanced Camera SettingsTap the information icons to learn more.Tap settings to view options.Battery and ChargingTo charge your Polaroid Cube+, plug one end of the included microUSB cable into the micro USB port and the other into either a computer or into a wall plug using a wall adaptor. (The camera can still be used when charging from the wall.)While charging, the LED will blink orange.When battery reaches 10% the LED will glow orange. Your camera will automatically shut down if battery level reaches 0%.Understanding the LED FunctionsStatic GreenCamera is on, with sufficient battery power and SD memory to capture imagery.Single Red Flash with Short BeepPhoto captured.Rapid Red Flash with Two Short BeepsRecording video.[need HiRes]](https://usermanual.wiki/C-and-A/CUBEPLUS/User-Guide-2738559-Page-14.png)