C and A HOOP-100 Hoop Camera User Manual rev 2
C&A; Marketing Inc. Hoop Camera Users Manual rev 2
C and A >
Users Manual rev 2.pdf
SMART HOME CAMERA
QUICK START GUIDE

2
Download the detailed user manual at www.meetpolaroid.com
To enhance your experience, download the free mobile App.
for iOS™ and Android™ on App store.

3
TABLE OF CONTENTS
Get to Know Your Camera............................................................................................ 4
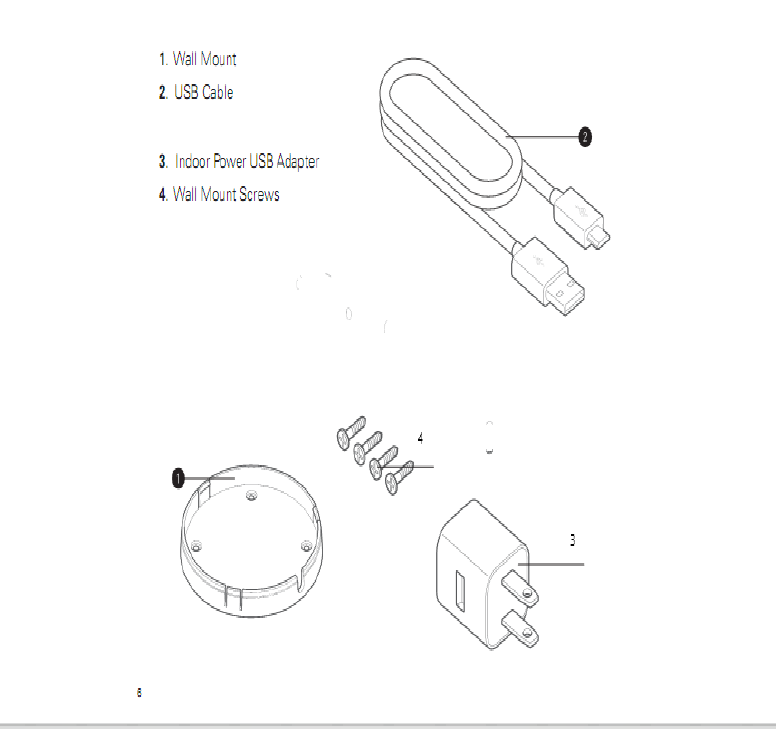
What’s in the Box.......................................................................................................... 6
Using Your Camera........................................................................................................ 7
4
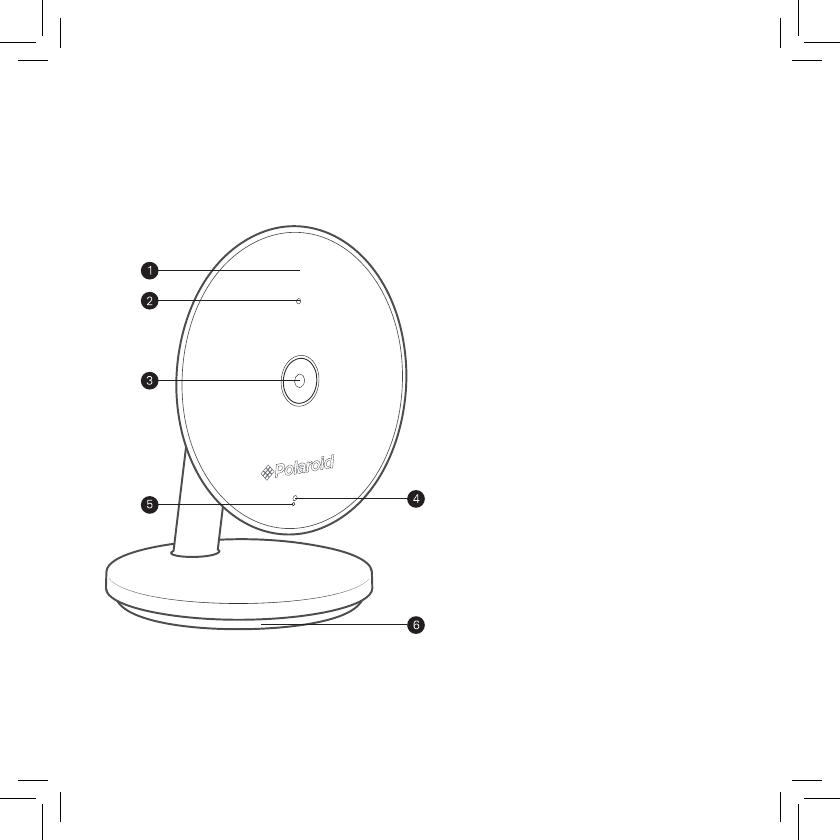
1. Scratch Resistant Front Cover
2. Night Vision Light Sensor
3. Camera lens
4. Status Light
5. Microphone
6. Table Mount
GET TO KNOW YOUR CAMERA
5
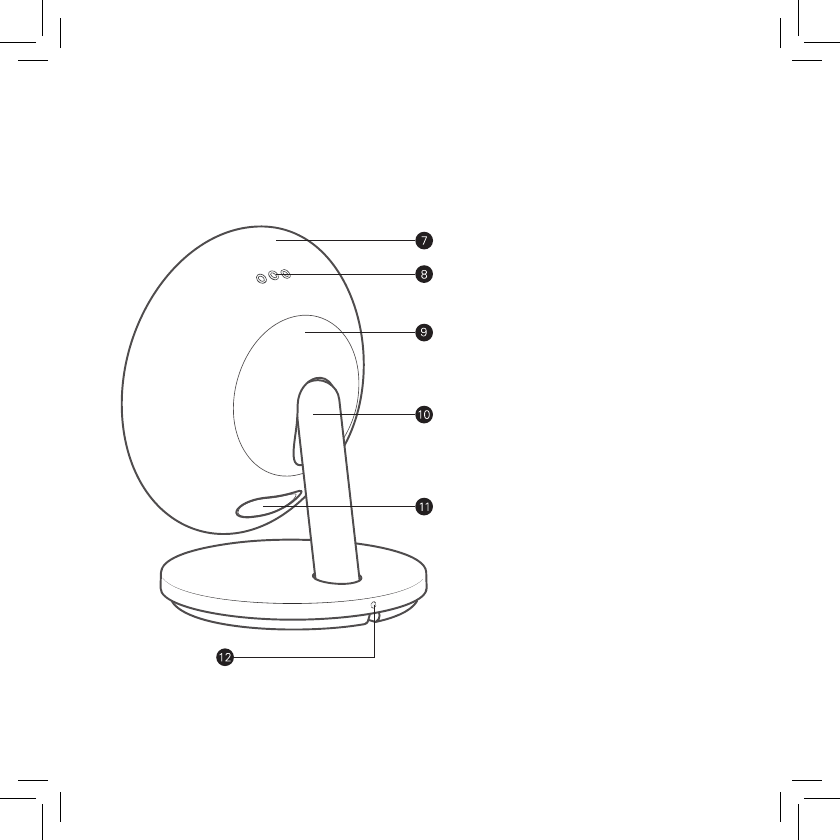
1. Scratch Resistant Front Cover
2. Night Vision Light Sensor
3. Camera lens
4. Status Light
5. Microphone
6. Table Mount
7. Die - Cast Aluminum Body
8. Speaker
9. Weather Seal
10. Stand
11. SD™ Card Slot & reset button
12. Security Lock wall mount
7
USING YOUR CAMERA
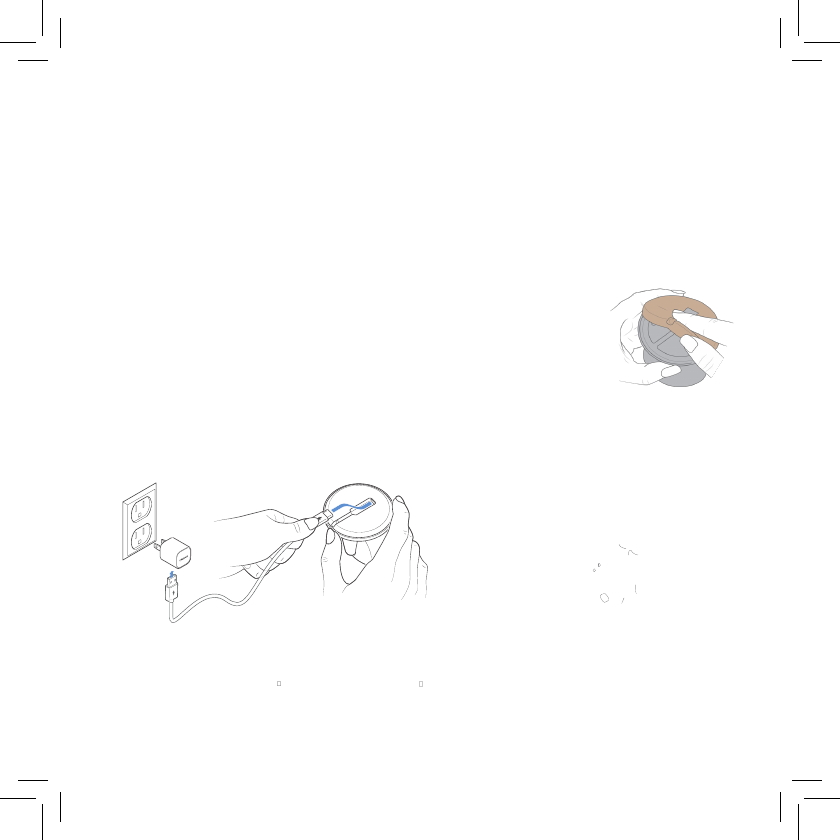
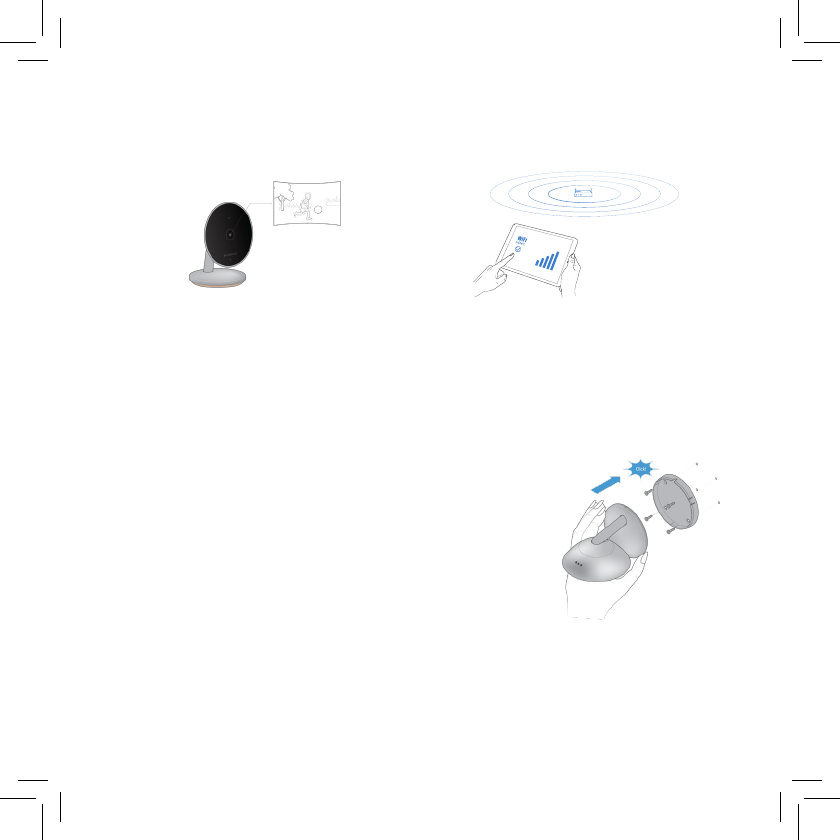
Once you take your camera out of the packaging, remove the plastic film
from your camera lens.
How to connect your camera
Connect included USB cable to the power adapter, and then plugging the adapter
into a power outlet.
Indoor
Remove rubber pad first and scan QR code to connect pairing.
8
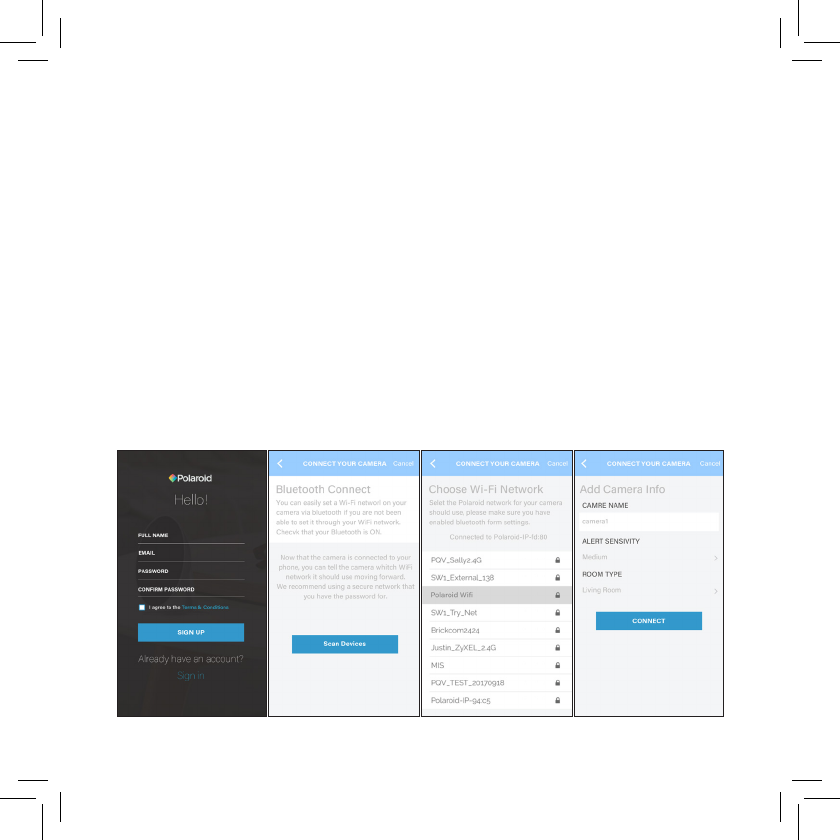
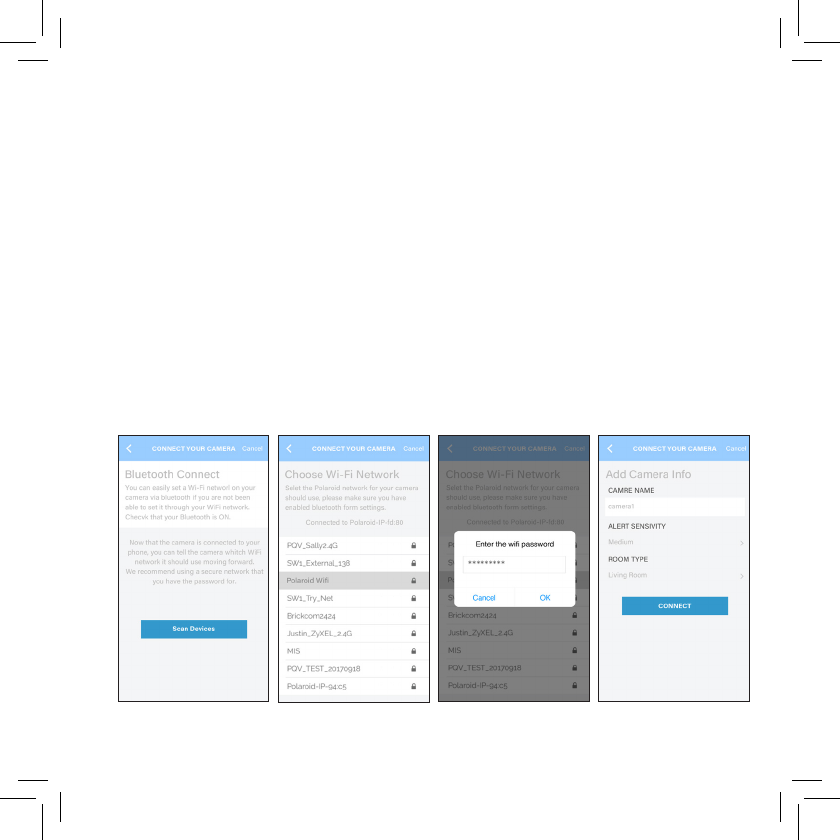
Initialize HOOP/add camera
1. Download Polaroid HOOP App. for iOS or Android™.
2. Create a login for your HOOP App.
3. Once you have logged in, tap on Scan Devices. Make sure your phone’s
bluetooth is turned on.
4. The App. will start looking for nearby HOOP.
a. If you have connected more than 1 camera than, select the HOOP
you want to connect.
6. Choose your desired Wi-Fi® network and provide the password.
7. Enter the name of the camera name and Room type.
8. Press connect.
9
You should be able to view your streaming video from your phone once you
have successfully connected your camera.
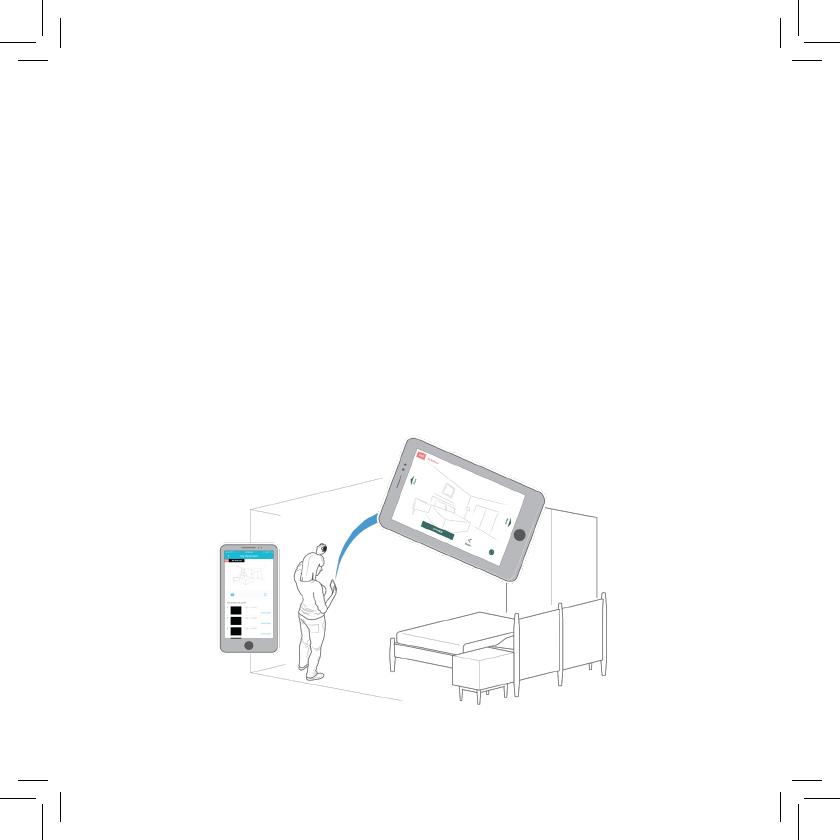
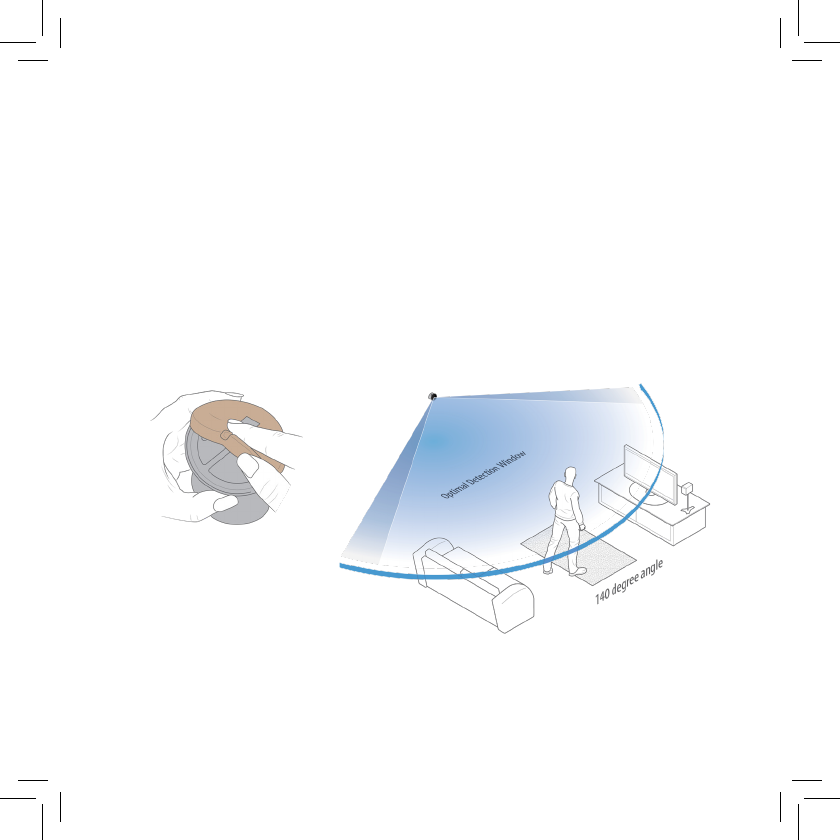
How to mount your camera
After pairing up your camera, select a location with the desired vantage point.
1. Choose the mounting location of the camera and plug the power adapter
to a nearby outlet.
2. Verify that there is a good Wi-Fi® connection in that area.
10
A good Wi-Fi® connection will assure a steady video stream.
For wall/ceiling placement:
1. Place the wall mount in your desired location and attach it with the
provided screws.
2. Remove the rubber padding beneath the camera base.
3. Connect your USB cable to your camera and snap your
camera onto the mount.
4. Use a key to attach the secure screw to the camera.
Note: To remove and reposition, tilt the camera down and pull.
Remove the screws from the wall and reattach to another location.
11
A good Wi-Fi® connection will assure a steady video stream.
For wall/ceiling placement:
1. Place the wall mount in your desired location and attach it with the
provided screws.
2. Remove the rubber padding beneath the camera base.
3. Connect your USB cable to your camera and snap your
camera onto the mount.
4. Use a key to attach the secure screw to the camera.
Note: To remove and reposition, tilt the camera down and pull.
Remove the screws from the wall and reattach to another location.
For table/shelf placement:
1. Make sure that your rubber pad is attached to the base of your camera.
2. Connect your USB cable, covering the rubber pad.
3. Verify Wi-Fi® connection and check for a steady stream.
4. Place your camera in a secure location where it cannot be knocked over.
12
Your Hoop is now ready to use!
Share camera
1. To share your camera with another a friend of family member, tap on
your desired camera.
2. Tap on the settings icon in the top right corner.
3. Scroll down to the “Authorized Users” section and press on “Add User”.
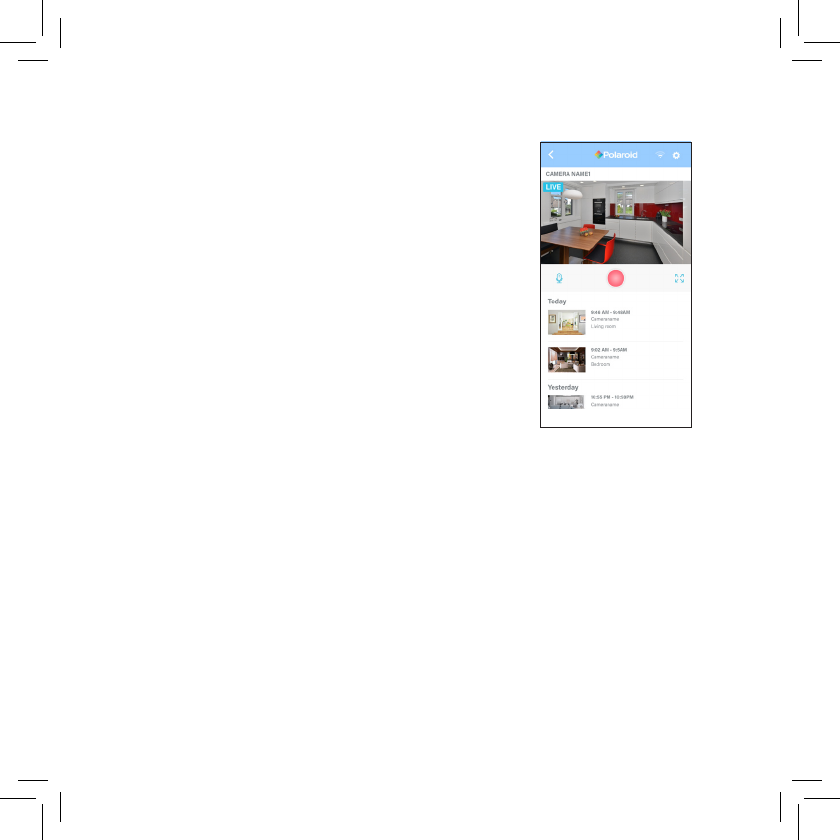
2- Way audio
This feature allows 2 -way audio communication
between your phone and camera in real time.
You will be able to hear what's going on around
your camera; and when you speak into your
phone, the camera’s speaker will play your
live message. Press the mic button to speak.

13
4. If the user doesn’t have his/her email registered with Hoop, they will
receive an email prompting him/her to register an account with the
Polaroid HOOP App. Once registered, the new user will be able to see
the camera that you have shared with them.
5. If you want to stop sharing a camera with someone, press and hold the
name in the “Authorized Users”section. A red “x” should appear
on the name.
a. Enter the recipient’s name and email and tap “Add Another.”
b. Tap "Send Invitation.”
c. If the user already has his/her email registered with the HOOP App.
she/he will receive an email informing him/her that your camera
has been shared with him/her.
14
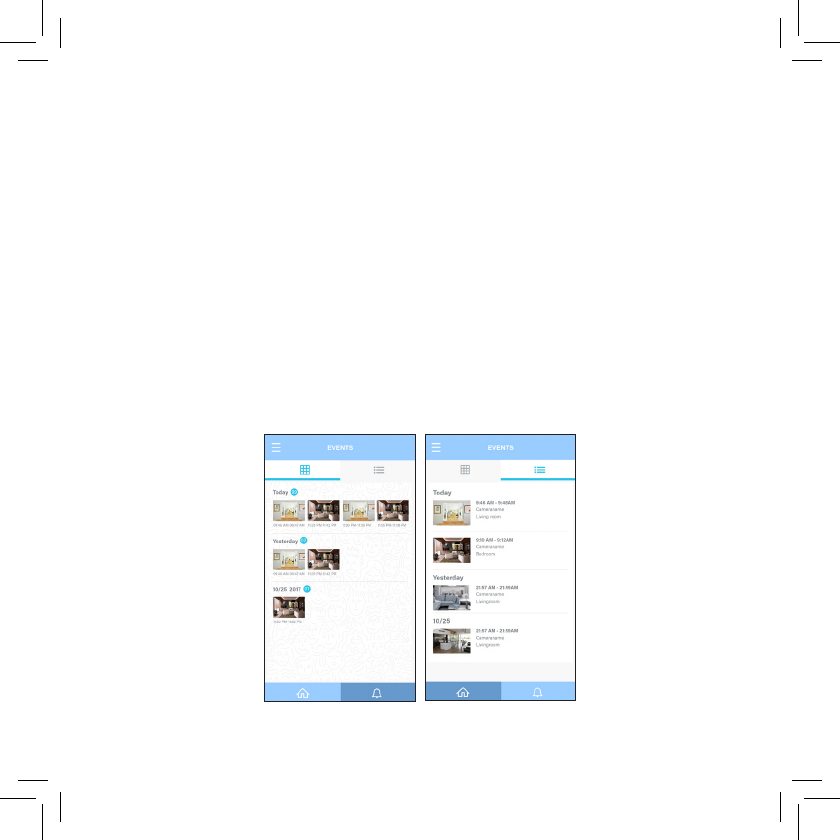
Events
1. Events are motion capture snapshots. To view your events, tap the
alert icon (bell) in the bottom right corner of your screen.
2. The Events page features two convenient ways to look through events:
a. To view your events as grid press the grid option [image]
b. To view your events as list press the list option [image]
6. If someone has shared a camera with you, you can add the camera in the
shared tab on the dashboard screen.
15
Add camera
1. Click on Add Camera on the dashboard screen.
2. Tap on “Scan HOOP”.
3. Make sure your bluetooth is turned on in phone settings.
4. The App. will start looking for near by HOOP.
5. Select the HOOP you want to connect.
6. Select WiFi network.
7. Provide password.
8. Fill the name of the camera name, Sensitivity and Room type.
9. Press connect.

16
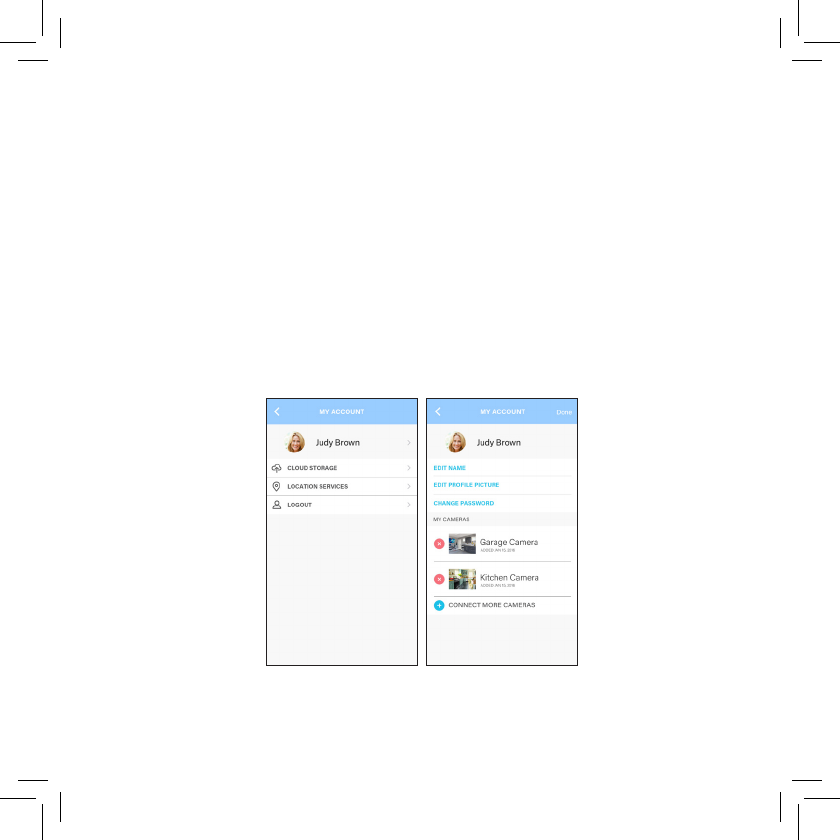
Account settings
1. Tap the settings menu icon in the top left corner of the screen
and tap on your account name.
a. To change your Data storage plan click “Cloud Storage”
b. To change location, click “Location Services”
c. To Logout press Logout button.
2. Select your account name again to be directed to your account
page where you will be able to:
a. Edit your profile picture, click on “Edit Profile Picture”and select
an image from your phone gallery or click image from camera.
3. Change your password.
a. Tap on change password.
b. Enter your old password and new password and press OK.
c. View all your connected cameras, you can add all your connect
cameras in My camera.
17
4. Delete camera / Edit Camera Name / Add more cameras.
a. Tap the camera to edit name.
b. Press the red cross button to delete the camera.
c. If you have more cameras to connect you can either press
“Connect More Cameras” or follow the Add Camera flow.
18
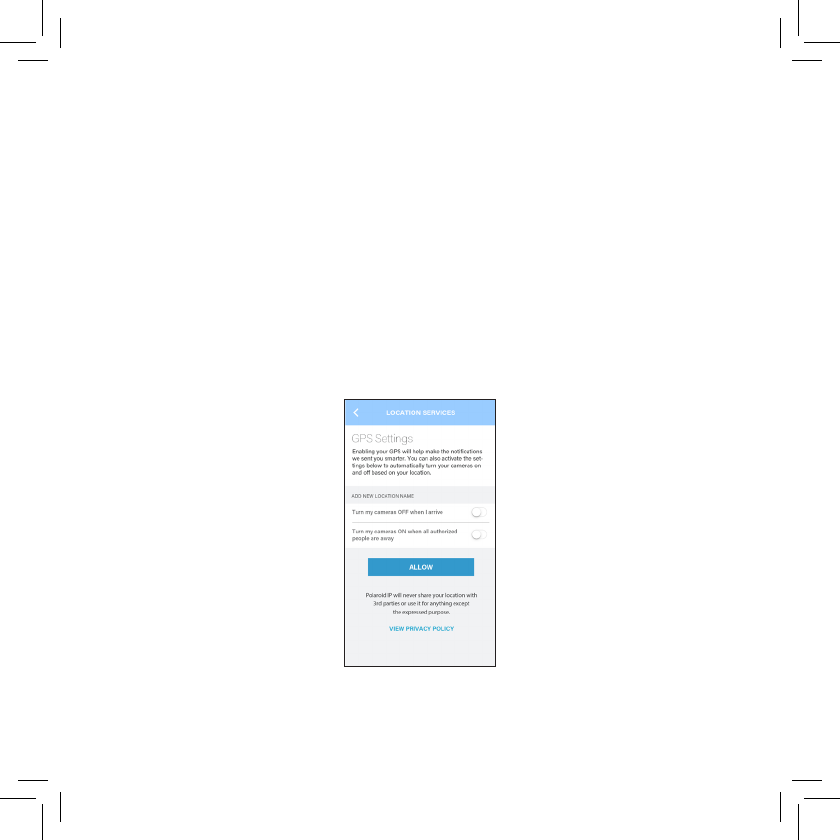
Add location ( only Android)
1. To add a location, tap the settings menu icon at the top left corner of
the App. screen.
2. Select “Add New Location”.
19
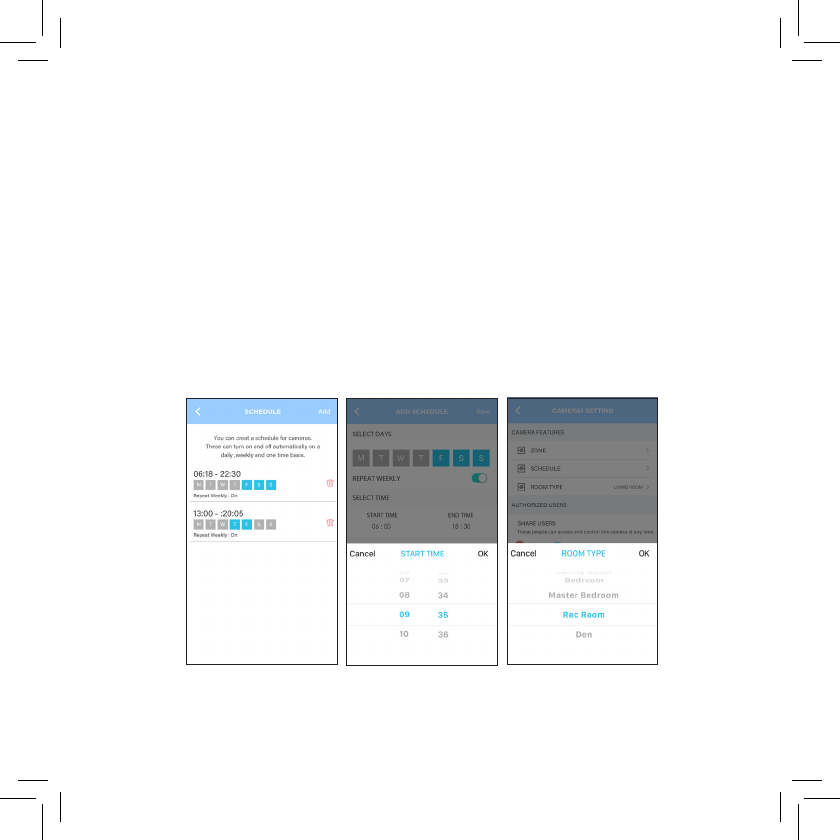
Scheduling
1. To schedule when you want a specific camera to turn on and off, first tap
on the desired camera.
2. Tap the settings icon in the top right corner of the screen to open up
your camera settings.
3. Scroll down to “Camera Features” and tap “Schedule.” Tap “Add” in
the top right corner.
4. Select the days and times you want your camera to turn on and off.
Then tap "Save" to finish scheduling your recording times.

20
Zones
1. To add a zone for an alert, start by tapping on your desired camera.
2. Tap the settings icon in the top right corner of the screen to open up
your camera settings.
3. Scroll down to “Camera Features” and tap “Zones”.
4. Select “Add Zone” and pinch to resize the box and select the area for
alerts to be activated.
5. User can add maximum 3 alert zones or one non alert zone.
6. Once you have selected your zone, tap “Save” and your alarm will be
activated. You will now be alerted if something happens in that zone.

21
Zones
1. To add a zone for an alert, start by tapping on your desired camera.
2. Tap the settings icon in the top right corner of the screen to open up
your camera settings.
3. Scroll down to “Camera Features” and tap “Zones”.
4. Select “Add Zone” and pinch to resize the box and select the area for
alerts to be activated.
5. User can add maximum 3 alert zones or one non alert zone.
6. Once you have selected your zone, tap “Save” and your alarm will be
activated. You will now be alerted if something happens in that zone.
If you want to edit the settings of your zone, press and hold the area
you selected.
A red menu will appear on your screen that will allow you to disable, enable
or delete alerts in your zone.

22
Federal Communication Commission Interference Statement
This device complies with Part 15 of the FCC Rules. Operation is subject to the following
two conditions: (1) This device may not cause harmful interference, and (2) this device
must accept any interference received, including interference that may cause undesired
operation.
This equipment has been tested and found to comply with the limits for a Class B digital
device, pursuant to Part 15 of the FCC Rules. These limits are designed to provide
reasonable protection against harmful interference in a residential installation. This
equipment generates, uses and can radiate radio frequency energy and, if not installed
and used in accordance with the instructions, may cause harmful interference to radio
communications. However, there is no guarantee that interference will not occur in a
particular installation. If this equipment does cause harmful interference to radio or
television reception, which can be determined by turning the equipment off and on, the
user is encouraged to try to correct the interference by one of the following measures:
- Reorient or relocate the receiving antenna.
- Increase the separation between the equipment and receiver.
- Connect the equipment into an outlet on a circuit different from that
to which the receiver is connected.
- Consult the dealer or an experienced radio/TV technician for help.

23
FCC Caution: Any changes or modifications not expressly approved by the party responsible
for compliance could void the user's authority to operate this equipment.
This transmitter must not be co-located or operating in conjunction with any other antenna
or transmitter.
FOR MOBILE DEVICE USAGE (>20cm/low power)
Radiation Exposure Statement:
This equipment complies with FCC radiation exposure limits set forth for an uncontrolled
environment. This equipment should be installed and operated with minimum distance
20cm between the radiator & your body.
FOR COUNTRY CODE SELECTION USAGE (WLAN DEVICES)
Note: The country code selection is for non-US model only and is not available to all US
model. Per FCC regulation, all WiFi product marketed in US must fixed to US operation
channels only.

24
Industry Canada statement:
This device complies with ISED’s licence-exempt RSSs. Operation is subject to the
following two conditions: (1) This device may not cause harmful interference, and (2)
this device must accept any interference received, including interference that may cause
undesired operation.
Le présent appareil est conforme aux CNR d’ ISED applicables aux appareils radio exempts
de licence. L’exploitation est autorisée aux deux conditions suivantes : (1) le dispositif
ne doit pas produire de brouillage préjudiciable, et (2) ce dispositif doit accepter tout
brouillage reçu, y compris un brouillage susceptible de provoquer un fonctionnement
indésirable.
FOR MOBILE DEVICE USAGE (>20cm/low power)
Radiation Exposure Statement:
This equipment complies with ISED radiation exposure limits set forth for an uncontrolled
environment. This equipment should be installed and operated with minimum distance
20cm between the radiator & your body.
Déclaration d'exposition aux radiations:
Cet équipement est conforme aux limites d'exposition aux rayonnements ISED établies
pour un environnement non contrôlé. Cet équipement doit être installé et utilisé avec un
minimum de 20 cm de distance entre la source de rayonnement et votre corps.
25
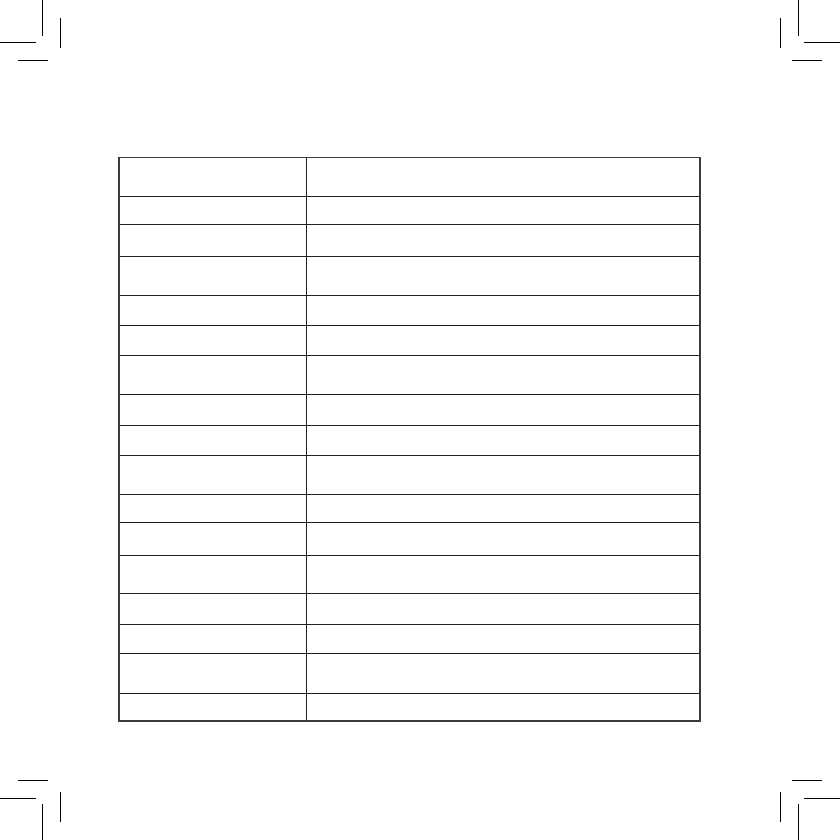
Model : POLSHP Product Specification
Wireless
RF IEEE 802.11b/g/n,(2.412~2.462GHz)
Bluetooth BLE 4.0 (2402MHz~2480MHz)
Antenna Internal Antenna (PCB)
Infrared LED Ye s
LEDWavelength 850nm
Power
Pin Type US
Input voltage 100-240V
Output Voltage PSU 5V / 2A
Power Jack Micro-USB
Cord Length 3m
Environmental
Temperature Operating: 0°C ~ 50°C
Humidity Operating: 10% - 90% relative humidity
Certifications
EMI FCC