C and A IVAGLOW GLOW by Ivation User Manual IVAGLOW
C&A; Marketing Inc. GLOW by Ivation IVAGLOW
C and A >
Manual

Glow by Ivation
Product Information Guide
Welcome to your Glow by Ivation alarm lamp
This guide contains helpful information that
enables you to enjoy all of the features of your alarm lamp
Congratulations
Thank you for purchasing this alarm lamp!
To fully enjoy this product please read the following instructions carefully.
Care and Maintenance
1. Do not attempt to service the product yourself. Opening or removing covers may expose you to
dangerous voltages or other hazards, please contact your dealer.
2. Do not use the product in temperatures that exceed the standard. Extreme temperature will lead
to damage to product.
3. Keep the product out of the reach of children.
4. Do not use the product close to other wireless devices or radiators.
5. Do not drop the product into fire or water.
6. Use the product in proper volume. Extremely high volume can be harmful to your ears.
Contents
PG
Care and Maintenance 1
Feature List 3
Layout 4
Alarm Hardware Controls 6
Connecting 7
Charging Mobile Devices 7
Operations: how to operate your alarm lamp 8
Troubleshooting 18
Specifications 19
Features List
1. Superior audio quality
2. Stereo audio output
3. Capacitive touch interface with hard switch light and alarm modes
4. Bluetooth connection (Bluetooth V4.0)
5. Multiple audio input options: Bluetooth and auxiliary
6. Dimmable LED clock display
7. Adjustable date and time
8. Dual alarm function with custom audio and light alarm modes
9. Lamp with adjustable light brightness and color
10. USB for charging mobile devices
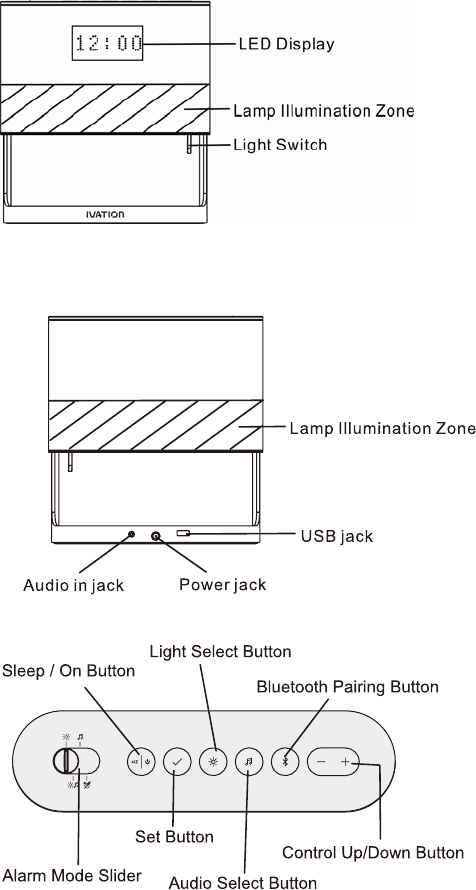
Layout
Front View
Rear View
Top View
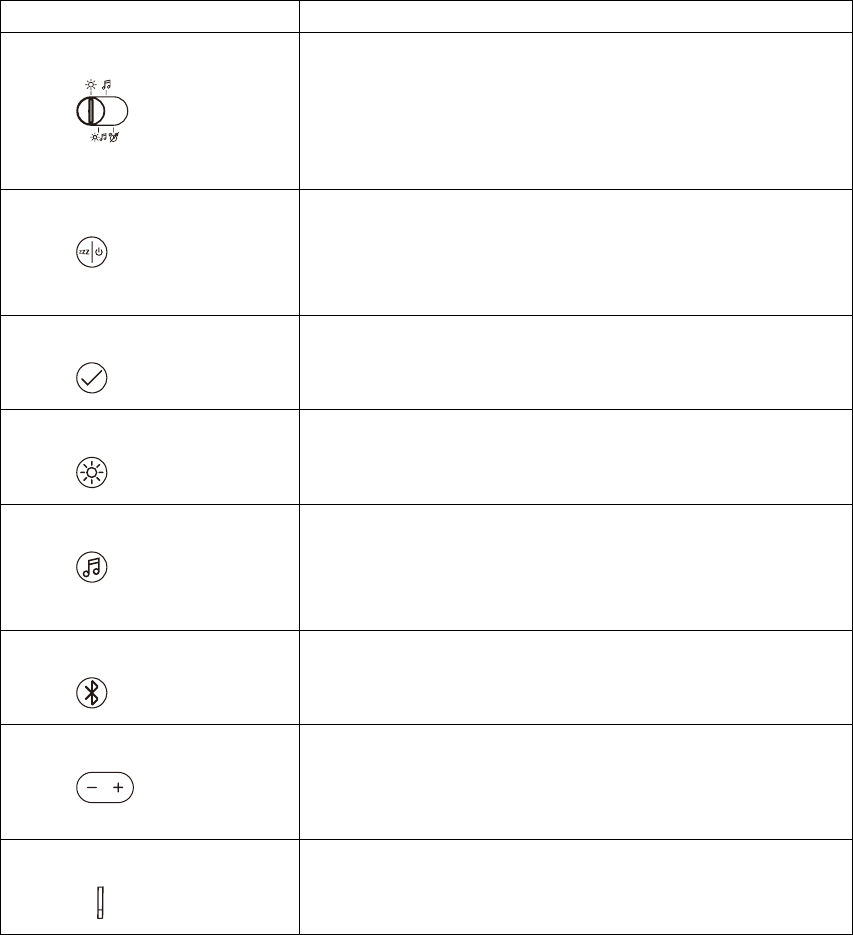
Alarm Hardware Controls
Function Key Function
Alarm Mode Slider
Slider allows you to select between four alarm mode types:
1. Light
2. Audio
3. Light and Audio
4. Off
Sleep / On Button
Turns audio on and off.
Turns the alarm off, or sets the alarm to sleep mode.
View clock, date and year
Set Button
Long press to enter Alarm/Clock settings. Sets selection within
functions. Single press to show current audio method playing.
Light Select Button
Single press activates lighting mode, allowing light brightness
and color to be changed.
Audio Select Button
Single press to show current audio method playing and enter
Audio settings.
Bluetooth Paring Button
Press and hold to pair Bluetooth. Single press to reconnect to
old device.
Control Up/Down Button
Increases and decreases values for light and sound, and toggles
through modes within their respective functions.
Light Switch
Toggle the light switch to turn the lamp on/off.
Connecting
Connect the plug of the power supply to the power jack of the alarm lamp, and then plug the
power DC12V, 3A into a standard AC wall outlet.
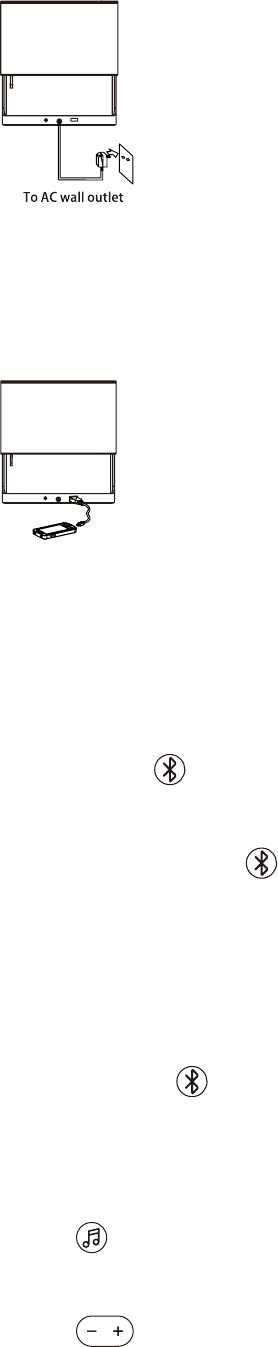
Charging Mobile Devices
To charge some mobile devices, plug the connector in the USB port on the base, then plug the
other connector in the port of your mobile phone.
Operations: how to operate your alarm lamp
Pair Bluetooth
1. Press and hold , BT and the arrow animation will turn on in the front display and BT
button will light up.
2. The blue backlight on the key will be flashing during pairing. The blue indicator will be
off when the Bluetooth has been successfully paired.
3. Repeat steps 1, 2 to connect another device.
4. After paired successfully,the device will back to Clock Screen and time shows steady.
Notes: Single Press will connect with previous device.
Change FM
1. Press button. Current audio mode will appear on screen.
2. Press to toggle through audio modes between AUX, BT and RADIO.

3. RADIO will appear on screen, single press to confirm.
4. Current tuning will appear on screen. In tuner use to tune up and down with a single
touch, or long press to scan ahead or backwards the tuning, and SCN>-SCN>>will flash
on screen.
5. Single Press or wait 3 seconds, the device will save current settings and back to Clock
Screen and time shows steady.
Notes: When you plug in the audio cable, it will be an antenna for FM and enhance the receiving
signal.
Audio In
1. Press button. Current audio mode will appear on screen.
2. Press to toggle through audio modes between AUX, BT and RADIO.
3. AUX will appear on screen, single press to confirm.
Play Music (BT Mode)
1. Pair and connect your Bluetooth device with the speaker.
2. Long Press on the alarm lamp to play, Long press it again to pause.
3. Press ,BT will appear on screen. Press , SONG will flash. Press to play
next or previous song, and NEXT or PREV will appear on screen.
Press and hold to fast forward or rewind through the song, and FF or REW will appear
on screen.
4. Press or wait 3 seconds and the device will bring back to Clock Screen and time shows
steady

Change and/or Set Volume
1. Single press to increase or decrease the volume. Press and hold to keep
increasing or decreasing the volume.
2. Press or wait 3 seconds, the device will save current settings and back to Clock Screen
and time shows steady.
Set Clock and Date
1. Slide Alarm Mode Slider to position, the OFF will show on screen.
2. Long press . Screen will flash Hour.
3. Single press to change the hour. Press and hold to keep changing the hour.
when reaching the PM hours the screen will show PM and Bottom left side should have a dot lit
up when in AM hours displays AM and the bottom left side dot is off.
4. Single press . Screen will flash Minute.
5. Single press to change the minute. Press and hold to keep changing the
minute.
6. Single press . Screen will flash Month.
7. Single press to change the month. Press and hold to keep changing the
month.
8. Single press . Screen will flash Date.
9. Single press to change the date. Press and hold to keep changing the date.
10. Single press . Screen will flash Year.
11. Single press to change the year. Press and hold to keep changing the year.
12. Single press , screen will appear BEEP,then ON flash on screen. Press to
select ON or OFF.
13. Single press , screen will show BRI steady. This function allows you adjust screen
LCD brightness. Wait 350ms, screen will flash HIGH and lettering very bright. Single press
to select from HIGH, MED and LOW.
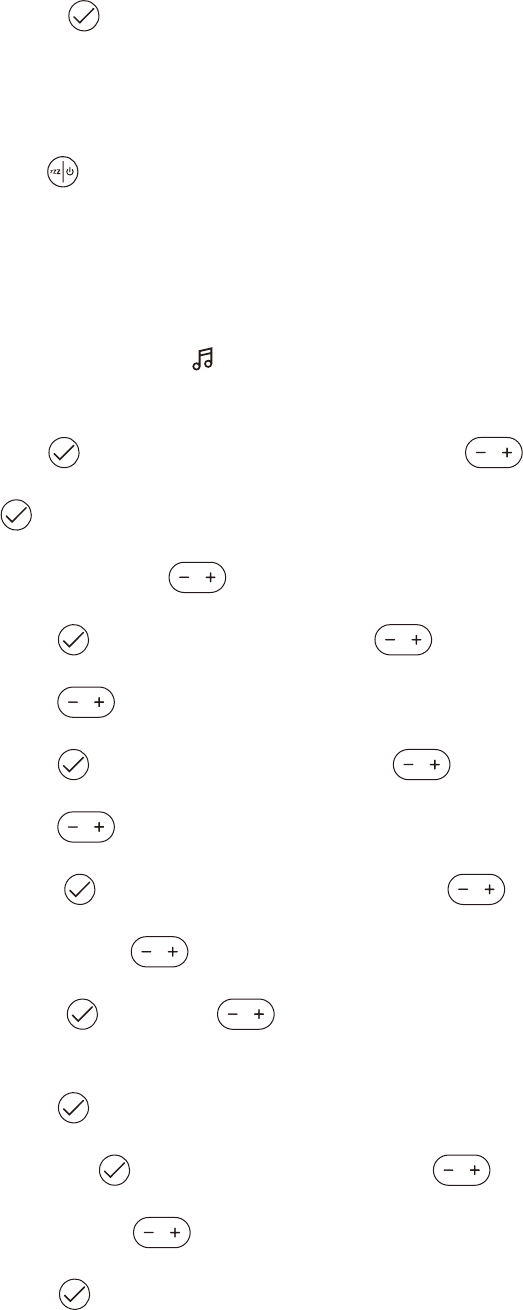
14. Single press , the device will save current settings and back to Clock Screen and time
shows steady.
View Clock and Date
Single press to toggle between time, date and year.
Set Alarm Mode and Time
Music Alarm Mode
1. Slide Alarm Mode Slider to Music, MUSIC will appear on screen, if ALR1 and/or ALR 2
are set ON, the screen will show them and its time.
2. Long press , screen will show ALR 1 or ALR 2. Press to select alarm.
3. Press to set Alarm, screen will flash ON with top 2 dots for ALR 1 and middle 2 dots for
ALR 2 lit on left side. Press to select ON or OFF.
4. Single press , screen will flash Hour, press to select hour.
Press and hold to keep changing the hour.
5. Single press , screen will flash Minute, press to select minute.
Press and hold to keep changing the minute.
6. Single press , screen will flash VOL, single press to increase or decrease the
volume. Press and hold to keep increasing or decreasing the volume.
7. Single press , then press to select Alarm Source between BELL 1, BELL 2,
BELL 3, BT and RADIO.
8. Single press to select BELL 1, BELL 2, BELL 3, BT.
9. Or single press to select RADIO, single press to increase or decrease one
channel. Press and hold to scan ahead or backwards.
10. Long press ,the device will save current settings and back to Clock Screen and time
shows steady.

11. Repeat the steps to set ALR 2. Screen will flash ON with middle 2 dots lit on left side.
Light Alarm Mode
1. Slide Alarm Mode Slider to , LIGHT will appear on screen, if ALR1 and/or ALR 2 are set
ON, the screen will show them and its time.
2. Long press , screen will show ALR 1 or ALR 2. Press to select alarm.
3. Press to set Alarm, screen will flash ON with top 2 dots for ALR 1 and middle 2 dots for
ALR 2 lit on left side. Press to select ON or OFF.
4. Single press , screen will flash Hour, press to select hour. Press and hold
to keep changing the hour.
5. Single press , screen will flash Minute, press to select minute.
6. Single press , screen will flash BRI.
7. Use to adjust brightness up and down to desired level. Press and hold to
move through brightness upwards and bar will move toward the right or will move through
brightness downwards and bar will move towards the left. Level bar appears on the screen as
brightness is adjusted.
8. Single press to set color. COL appears on screen.
9. Use to adjust color up and down to desired level. Press and hold to move
through color upwards and bar will move toward the right or move through color towards yellow
and bar will move towards the left. Level bar appears on the screen as brightness is adjusted.
10. Long press ,the device will save current settings and back to Clock Screen and time
shows steady.
11. Repeat the steps to set ALR 2. Screen will flash ON with middle 2 dots lit on left side.
Light and Audio Alarm Mode
1. Slide Alarm Mode Slider to , A+L will appear on screen, if ALR1 and/or ALR 2 are set
ON, the screen will show them and its time.

2. Long press , screen will show ALR 1 or ALR 2. Press to select alarm.
3.Press to set Alarm, screen will flash ON with top 2 dots for ALR 1 and middle 2 dots for
ALR 2 lit on left side. Press to select ON or OFF.
4. Single press , screen will flash Hour, press to select hour. Press and hold
to keep changing the hour.
5. Single press , screen will flash Minute, press to select minute. Press and hold
to keep changing the minute.
6. Single press , screen will flash VOL, single press to increase or decrease the
volume. Press and hold to keep increasing or decreasing the volume.
7. Single press , then press to select Alarm Source between BELL 1, BELL 2,
BELL 3, BT and RADIO.
8. Single press to select BELL 1, BELL 2, BELL 3, BT.
9. Or single press to select RADIO, single press to increase or decrease one
channel. Press and hold to scan ahead or backwards.
10. Single press , screen will flash BRI.
11. Use to adjust brightness up and down to desired level. Press and hold to
move through brightness upwards and bar will move toward the right or will move through
brightness downwards and bar will move towards the left. Level bar appears on the screen as
brightness is adjusted.
12. Single press to set color. COL appears on screen.
13. Use to adjust color up and down to desired level. Press and hold to move
through color upwards and bar will move toward the right or move through color towards yellow
and bar will move towards the left. Level bar appears on the screen as brightness is adjusted.
14. Long press ,the device will save current settings and back to Clock Screen and time
shows steady.
15. Repeat the steps to set ALR 2. Screen will flash ON with middle 2 dots lit on left side.

Alarm Management(while the alarm is ringing)
1. To stop your alarm from sounding, and to switch off the alarm light, long press , OFF will
show on screen.
2. To snooze your alarm single press , -SNZ- will show on screen.
3. To switch off your alarm completely move slider to position, OFF will show on screen.
NOTE! If you do not turn off your alarm:
The alarm will sound at 10-minute intervals, for 1 minute, for 1 hour. The alarm sound will turn
off automatically after 1 hour.
Set Lamp Light Brightness and Color
1. Single press , the Light will be turn on and BRI will flash on screen.
2. Use to adjust brightness up and down to desired level. Press and hold to
move through brightness upwards and bar will move toward the right or will move through
brightness downwards and bar will move towards the left. Level bar appears on the screen as
brightness is adjusted.
3. Single press a second time to set color. COL appears on screen.
4. Use to adjust color up and down to desired level. Press and hold to move
through color upwards and bar will move toward the right or move through color towards yellow
and bar will move towards the left. Level bar appears on the screen as brightness is adjusted.
5. Long press or wait 3 seconds,the device will save current settings and back to Clock
Screen and time shows steady.
6. Slide Light Switch to turn off the lamp.
Reset the Default Settings
Long press 8 seconds to reset the device to the default settings.
Troubleshooting
Volume Is Not High Enough
·Increase the volume of Bluetooth device or alarm lamp volume.
·Ensure that the Bluetooth device has been charged.
·Ensure that alarm lamp has been connected to power.
Sound Distortion
·Lower alarm lamp, Bluetooth device volume slightly.
·Ensure that the Bluetooth device has been charged.
·Ensure that alarm lamp has been connected to power.
·Ensure that the alarm lamp is in operating range with your Bluetooth device.
Cannot Pair With Bluetooth Device
·Make sure that your device is compatible with Bluetooth.
·Turn off your alarm lamp and Bluetooth device, then power on and reconnect.
Signal Loss Or Distortion
·Move Alarm Lamp closer to the Bluetooth device.
·Ensure it's charged up.
·Turn off your alarm lamp and Bluetooth device, then power on and reconnect.

FCC Statement:
This equipment has been tested and found to comply with the limits for a Class B digital
device, pursuant to part 15 of the FCC Rules. These limits are designed to provide
reasonable protection against harmful interference in a residential installation. This
equipment generates, uses and can radiate radio frequency energy and, if not installed and
used in accordance with the instructions, may cause harmful interference to radio
communications.
However, there is no guarantee that interference will not occur in a particular installation. If
this equipment does cause harmful interference to radio or television reception, which
can be determined by turning the equipment off and on, the user is encouraged to try to
correct the interference by one or more of the following measures:
• Reorient or relocate the receiving antenna.
• Increase the separation between the equipment and receiver.
• Connect the equipment to an outlet on a circuit different from that to which the
receiver is connected.
This device complies with part 15 of the FCC rules. Operation is subject to the following two
conditions: (1) This device may not cause harmful interference, and (2) this device must
accept any interference received, including interference that may cause undesired operation.
Note: Modifications to this product will void the user’s authority to operate this equipment.