C and S Technology CIP-4500 Video Phone User Manual
C&S; Technology Inc. Video Phone
User Manual
Appendix 6. User Manual CIP-4500 User manual1
NOTICES TO USER
This device complies with Part 15 of the FCC Rules.
Operation is subject to the following two conditions:
(1) this device may not cause harmful interference, and
(2) this device must accept any interference received,
including interference that may cause undesired operation.
One or more of the following statements may be applicable:
FCC WARNING
CAUTION : Any changes or modifications in construction of this device which are not expressly
approved by the party responsible for compliance could void the user’s authority to operate the
equipment
C&S Technology Inc.
Video Phone CIP-4500

CIP-4500 User Manual 2
Contents
Safety Instructions...............................................................................................................5
1. Installing IP Videophone..................................................................................................7
Components...................................................................................................................7
Name of parts and functions.........................................................................................7
Installing IP Videophone .............................................................................................10
Network Configuration – Using Wizard......................................................................11
① What is Wizard?.....................................................................................11
② Starting Wizard......................................................................................11
2. IP Videophone-based Calling........................................................................................18
Making a Call...............................................................................................................18
① Making a call using dialpad...................................................................18
② Making a call in waiting mode ..............................................................18
③ Making a call using redial.....................................................................18
④ Making a call from the latest calling list ..............................................19
⑤ Speed dialing.........................................................................................19
⑥ One Click Call from the PhoneBook.....................................................19
⑦ One Click Call from the Call Log..........................................................19
Receiving a Call...........................................................................................................20
Rejecting a Call ...........................................................................................................20
Dropping a Call............................................................................................................20
Call Forward................................................................................................................21
Auto Answering Mode.................................................................................................22
① What is Auto Answering mode?............................................................22
② Setting Auto Answering mode..............................................................22
③ Monitoring Function..............................................................................22
Useful Functions during a Call....................................................................................23
① Display...................................................................................................23
② Mute.......................................................................................................23
③ Privacy ..................................................................................................24
④ Volume Control .....................................................................................24
⑤ Video Quality Control ...........................................................................24
⑥ Audio/Video Input Path Setting ............................................................25
⑦ Speakerphone Mode..............................................................................26
⑧ Short Message Service (SMS) (Optional).............................................27

CIP-4500 User Manual 3
3. Public Phone-based Calling (Optional) .........................................................................29
Making a Call...............................................................................................................29
① Making a call using dialpad...................................................................29
② Making a call using redial.....................................................................29
③ Speed dialing.........................................................................................29
④ One Click Call from the PhoneBook.....................................................30
⑤ One Click Call from the Call Log..........................................................30
Receiving a Call...........................................................................................................30
Dropping a Call............................................................................................................31
Useful Functions during a Call....................................................................................31
① Volume Control .....................................................................................31
4. User Configuration.........................................................................................................32
Using Keypad in User Configuration..........................................................................32
How to Enter a Character...........................................................................................32
Main Menu...................................................................................................................34
PhoneBook ..................................................................................................................35
① View phone number list........................................................................35
② Making an entry ....................................................................................36
③ Searching phone number ......................................................................37
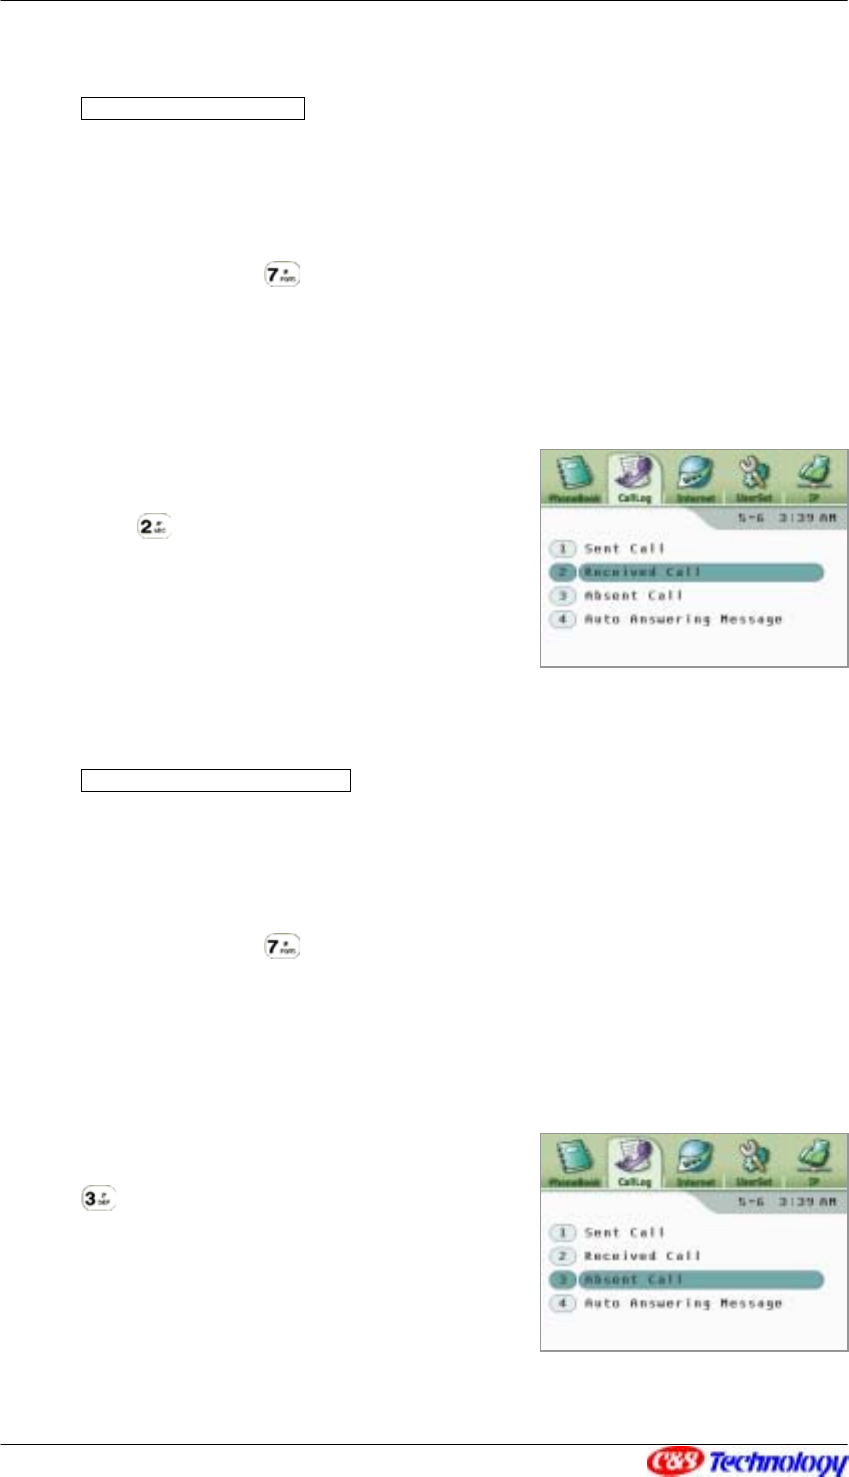
CallLog ........................................................................................................................39
① Sent Call................................................................................................39
② Received Call ........................................................................................40
③ Absent Call............................................................................................40
④ Saving a CallLog entry..........................................................................41
⑤ Deleting a CallLog entry.......................................................................41
⑥ Checking auto answer message ...........................................................42
⑦ Retrieving auto answer message..........................................................43
Internet (Optional).......................................................................................................43
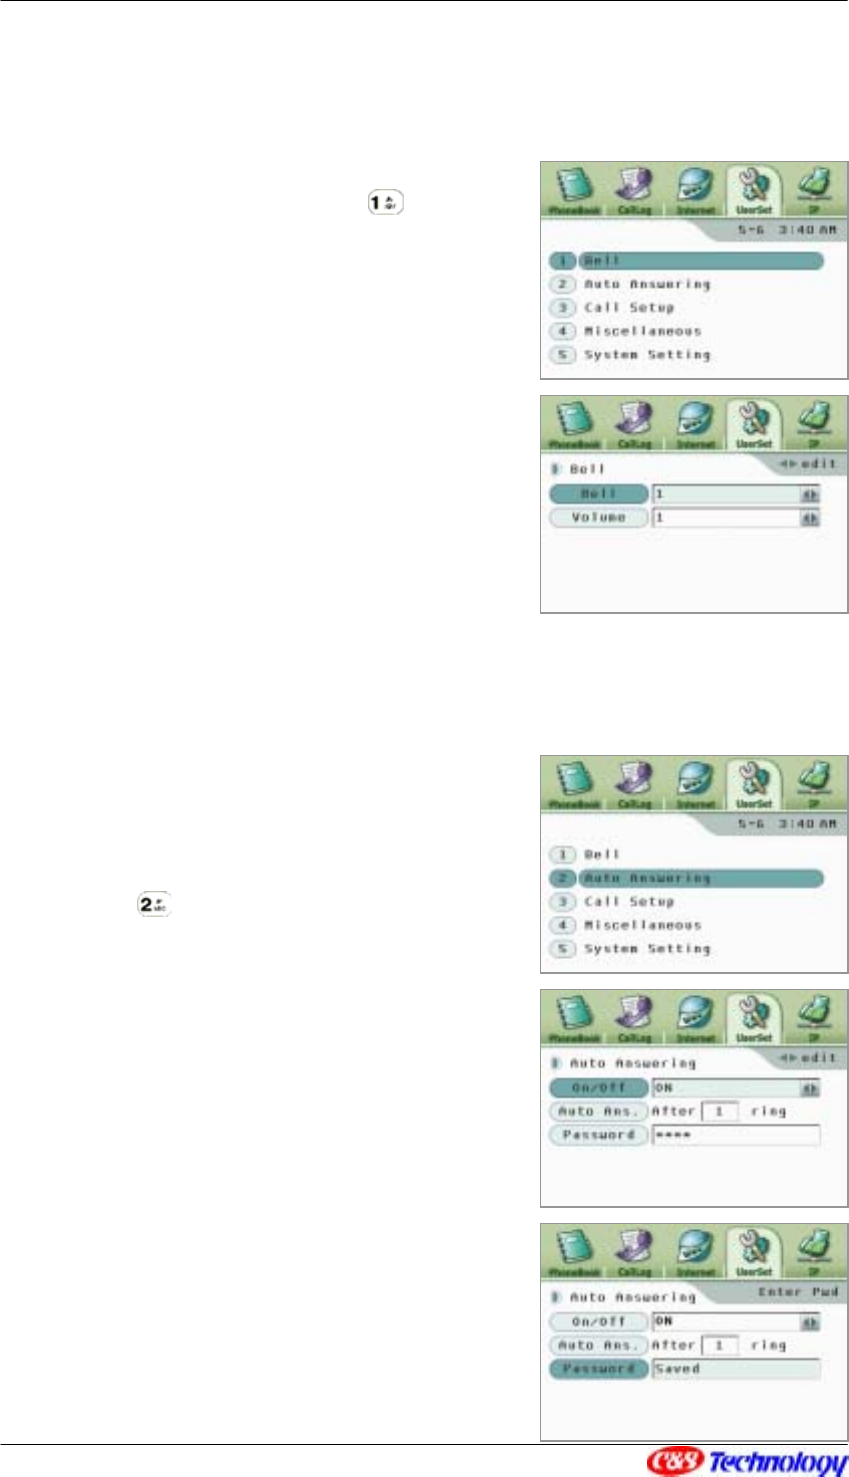
UserSet........................................................................................................................44
① Bell setting............................................................................................45
② Auto answering mode ...........................................................................45
③ Call setup ..............................................................................................46
④ A/V Input Path Setting..........................................................................47
⑤ Time/Date Setting.................................................................................48
⑥ Wizard Setting.......................................................................................49
⑦ Program Version/Upgrade....................................................................49

CIP-4500 User Manual 4
⑧ System Init. ...........................................................................................49
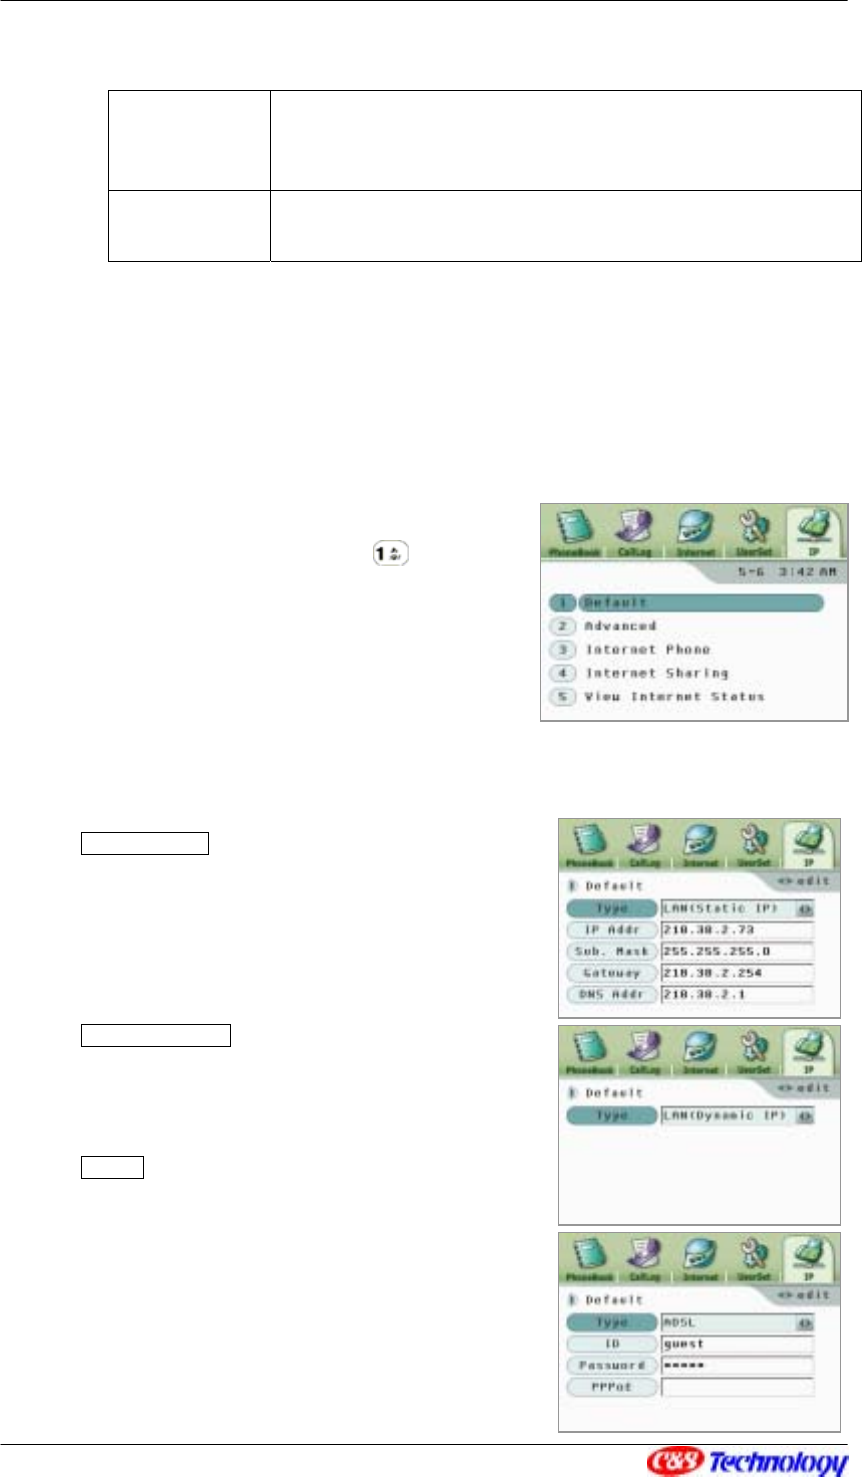
IP .................................................................................................................................50
① Default Internet Configuration..............................................................51
② Advanced Internet Configuration..........................................................52
③ Internet Phone Configuration (H.323) ..................................................52
④ Internet Phone Configuration (SIP) ......................................................53
⑤ Internet Sharing Configuration .............................................................55
⑥ View Internet Status .............................................................................56
5. Using Browser (Optional)..............................................................................................58
Getting Started............................................................................................................58
Keypads in a Web Browser ........................................................................................59
Type URL....................................................................................................................59
View Browsers............................................................................................................60
Using Bookmark..........................................................................................................61
6. Mail Services (Optional) ................................................................................................63
Setting Mail User Configuration .................................................................................63
Logging into the Mail Server......................................................................................64
Reading Mail................................................................................................................65
① View Mail List.......................................................................................65
② View Mail ..............................................................................................66
③ Send Reply ............................................................................................66
④ Delete Mail............................................................................................67
Writing Mail.................................................................................................................67
Checking Mail Notice Window....................................................................................69
7. Software Upgrading.......................................................................................................70
What is remote upgrade ?...........................................................................................70
Connecting to Server..................................................................................................70
Program Downloading.................................................................................................71
8 Appendix.........................................................................................................................73
Use NAT function .......................................................................................................73
① Connecting IP Videophone in the Private Network .............................73
② Using ‘ Share’ function embedded in IP videophone........................76
Before Requesting Help..............................................................................................81
Warning Messages ......................................................................................................83

CIP-4500 User Manual 5
Safety Instructions
Please read the following instructions carefully to ensure correct use and to prevent unexpected
accident and damage caused by incorrect use.
Do not disassemble or modify the IP videophone or power adapter
by anyone other than the authorized personnel.
The warranty will not cover any defect that occurs due to such mishandling.
Install the unit on a stable and flat surface to ensure safe operation.
Do not install the unit in such a location where the unit can be affected by dust or gas.
Do not install the unit in a place subject to direct sunlight, or near heat sources such as
radiators.
Do not install the unit near humid location to avoid any defect, heat and electric shock.
Do not touch the electric adapter when it is thundering and lightning to avoid electric shock.
Keep the unit safe from sudden shock to prevent defect. And do not apply excessive force
especially to the LCD screen and the camera.
Clean the camera and the LCD screen with soft and clean clothes. Do not use coarse material
to avoid damage.
Make sure to turn off the power switch before disconnecting the mains lead.
Disconnecting the mains with the power switch on will cause defect of the unit.
Do not apply sudden change of temperature. Installing in a place with severe temperature
change may cause defect of the unit.

CIP-4500 User Manual 6
Make sure to use the exclusive power adapter.
Disconnect the power cable when the unit is not in use for a long time.

CIP-4500 User Manual 7
1. Installing IP Videophone
Components
The following parts are included in the product package. Be sure that you received all the
parts.
• Main body of IP Videophone
• Handset
• Power adaptor
• Power cable
• User manual
• Network cable
• Telephone cable
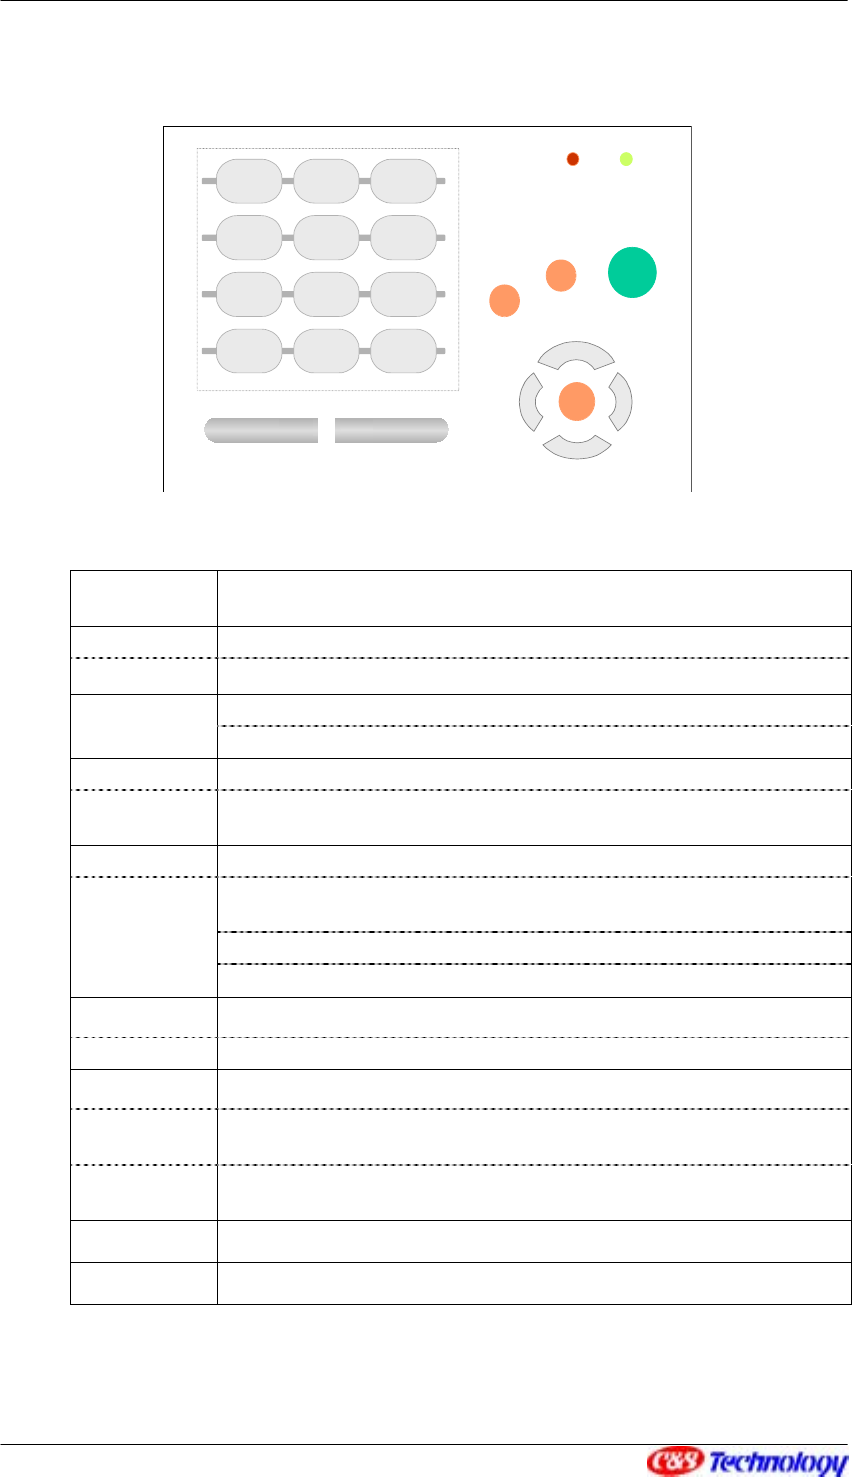
Name of parts and functions
1 Handset : Handset of IP Videophone
2 Speaker : rings bell or sounds off the voice of
the other party in the speakerphone mode.
3 Camera : captures your image to send to the
other party.
4 LCD screen : displays images of yours and the
other party during the call.
5 Microphone : receives voice in the
speakerphone mode.
Keypad : the buttons operate the functions of
the IP Videophone
12 3
4
5
CIP-4500 User Manual 8
Numeric keys Enters phone number in the dialing mode or the letters in the User
Configuration menu.
* Enters ‘*’.
SMS Sends a short message during a call.
Enters ‘.’ or ‘#’.
# Rejects the incoming call.
FLASH Forwards the call to others during the Internet mode.
1aA Selects the type of letters in the input mode.
(Numeric/Lowercase/Capital)
DISPLAY Changes the display mode during a call.
Shifts between the URL links and the URL input windows displayed on
the browser.
Moves to the submenus when retrieving the mail.
TAB
Moves to the submenus when the auto answer list is displayed.
PRIVACY Stops transmitting the video data during a call.
TEL Changes the call mode to public phone mode.
REDIAL Makes a call to the last dialed number.
MUTE Cuts off the voice transmission and sends the melody.
EXIT Moves to the previous menu from the User Configuration menu or the
Setup menu during a call.
SPEAKER Activates or deactivates the speakerphone mode.
POWER Indicates if the IP Videophone is switched on.
1 2 3
4 5 6
7 8 9
*SMS 0# .
T
WX
S
ENT
ABC DEF
GHI JKL MNO
PQRS TUV WXYZ
-. _
TEL
FLASH/1aA
EXIT
DISPLAY/TAB
POWER REGISTER
PRIVACY
MUTE
:@/
SPEAKER
REDIAL
CIP-4500 User Manual 9
REGISTER
Green LED is on when the IP Videophone registered to the Internet
phone service.
Greed LED blinks fast in auto answer mode.
Green LED blinks slowly when the IP Video phone is registered to the
Internet phone service and is in auto answer mode.
Makes a call to the dialed number.
Moves to the User Configuration menu.
ENT
Saves the setting in User Configuration menu.
Moves between the User Configuration menus.
Arrow Key
( ST XW ) Moves between the items in the edit mode of PhoneBook or CallLog in
User Configuration menu.
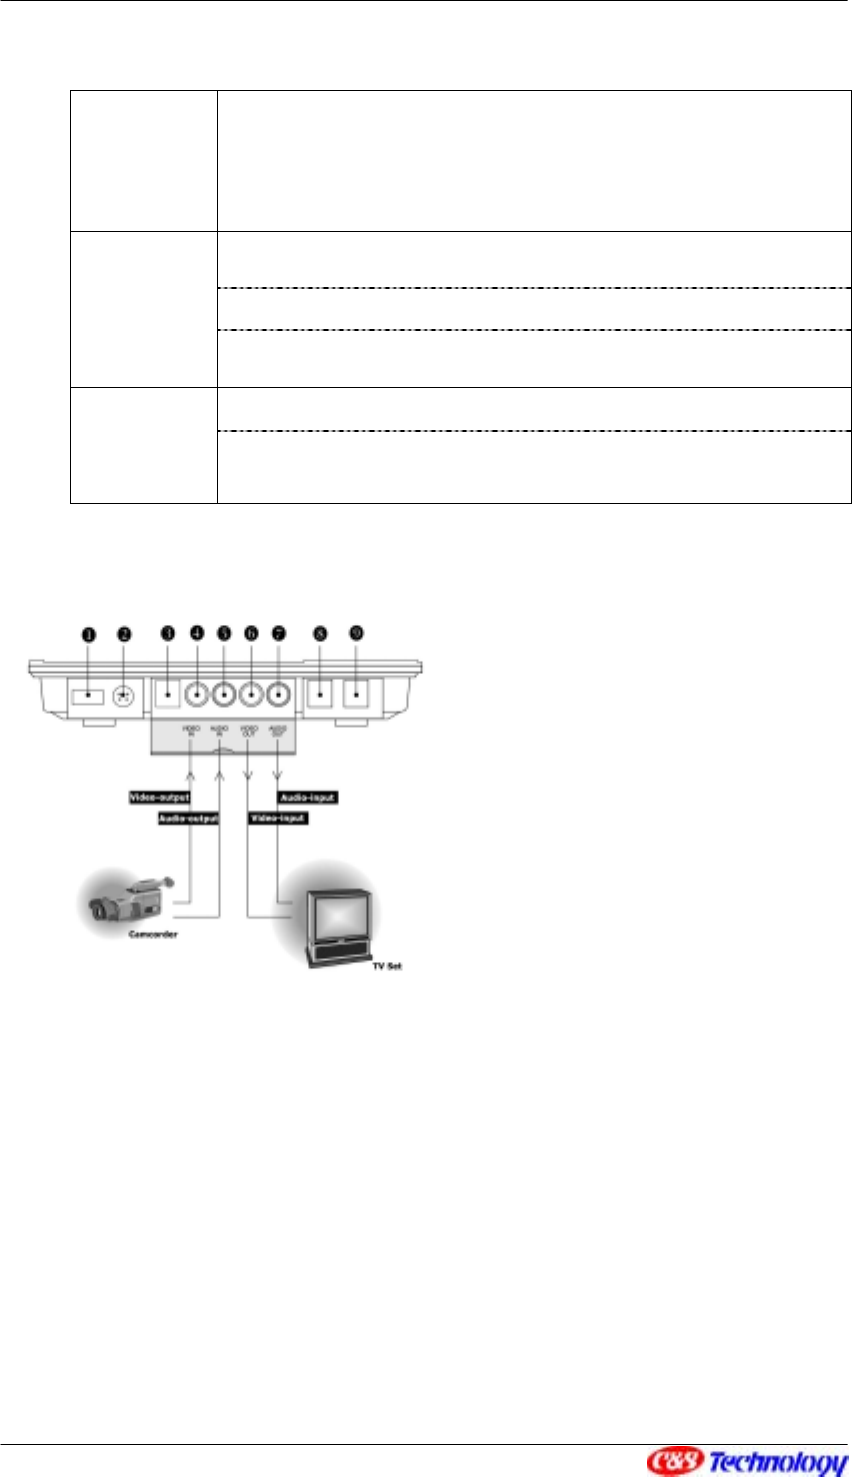
ON/OFF : Turns on/off the power
POWER : Connects the power adapter
LINE : Connects to the telephone line
VIDEO IN : Receives external video data
AUDIO IN : Receives external audio data
VIDEO OUT : Sends out video data
AUDIO OUT : Sends out audio data
PC : Connects to the computer with LAN
cable
WAN : Connects to Internet
NOTE. A/V cable for audio/video input/output is not included in the package.
NOTE. When connecting TV to VIDEO OUT, the LCD screen of IP Videophone may not be fully
displayed depending on the model of TV.
CIP-4500 User Manual 10
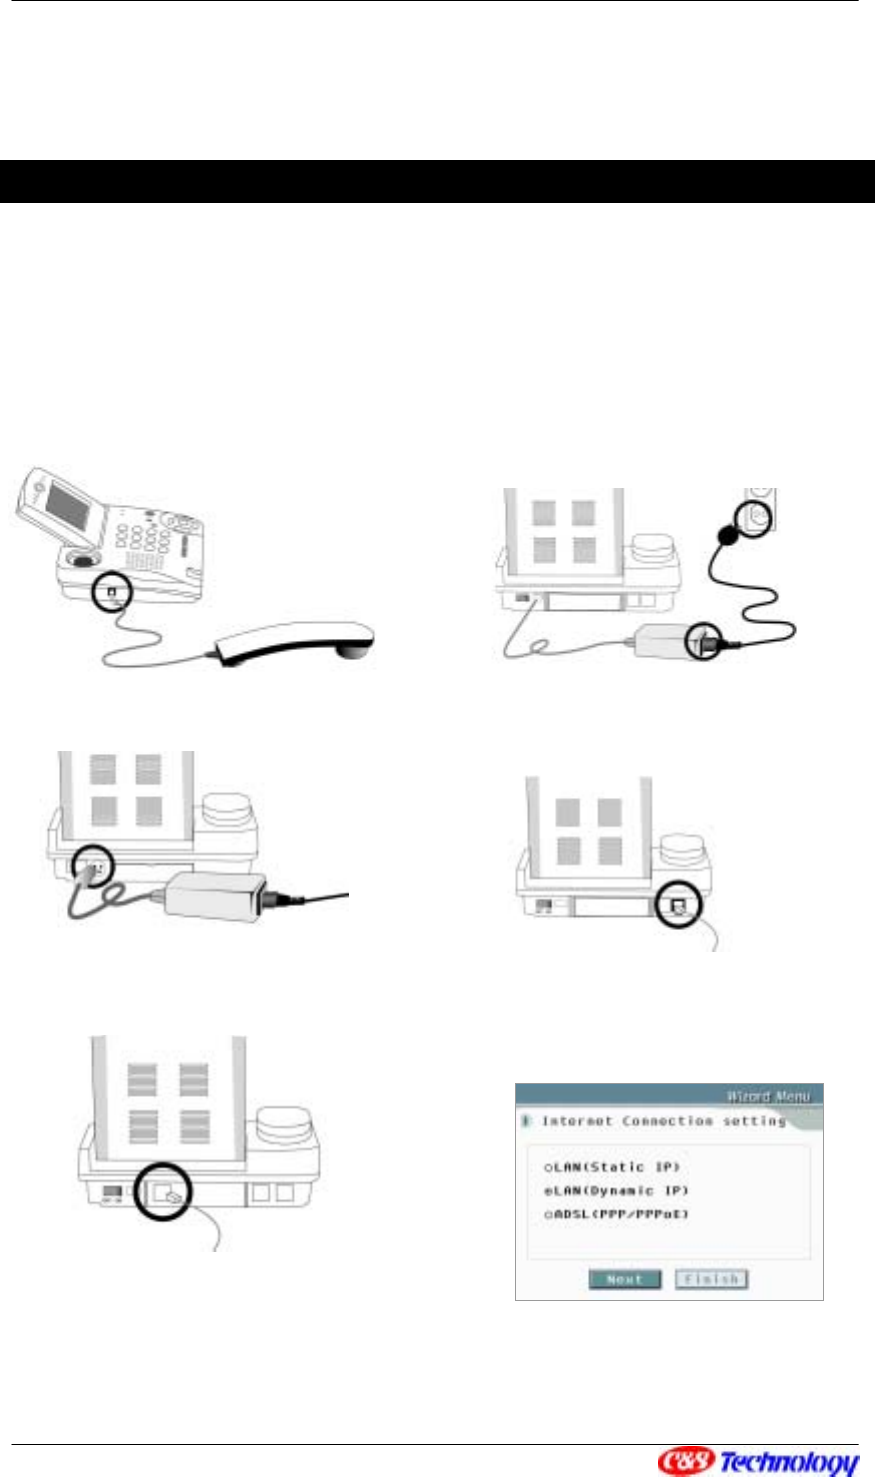
Installing IP Videophone
Please check the components before installing the IP Videophone. For the best result, please follow
the installation procedures.
1) Plug in the handset line to the body.
2) Connect the power cable to the power
adapter.
3) Connect the power adapter to the body of
IP Videophone.
4) Connect the ADSL modem cable, cable
modem or LAN cable to the IP
Videophone.
5) Connect the phone line. 6) Turn on the power. The network
configuration wizard is displayed. Set up
the appropriate network configuration.

CIP-4500 User Manual 11
Network Configuration – Using Wizard
① What is Wizard?
You must set up IP to use video call through the IP Videophone. The unit provides the
wizard menu so that you can easily set up Internet. The menu provides you with the step-
by-step guide to set up the IP part of the Personal Information Management System (PIMS)
menu. It is executed when you first turn on the IP Videophone or when the system is
rebooted with Wizard of UserSet being set to ‘ON’.
② Starting Wizard
Select ‘Yes’ for Wizard and turn on the IP Videophone to start the Wizard menu. The Wizard
menu provides the following configuration functions.
Dynamic IP
ADSL IP
Static IP
Secondary DNS Address
NTP Server Address
IP Setup
Internet phone setup
- Server address
- Authentication information
- User information
Internet Phone
Own NAT
Inside the NAT/Firewall
NAT Setup
CIP-4500 User Manual 12
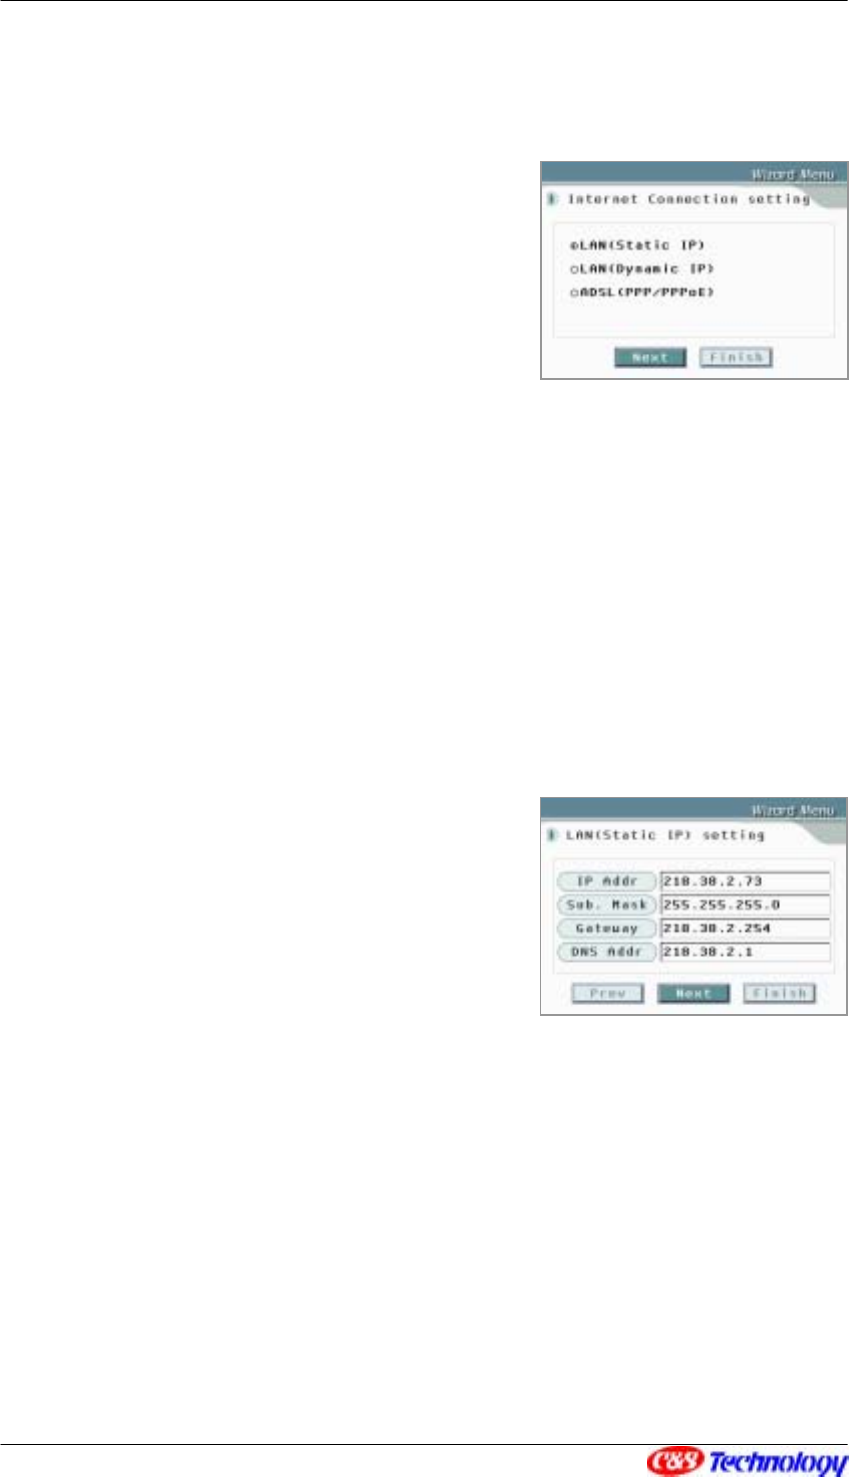
A. Internet Connection setting
• In the Wizard Menu main window, the current values are
displayed, and the cursor is on the Next button.
• In Internet Connection setting, use ST to move
between the connection method, and use XW or ‘ENT’ to
select an item.
• In order to proceed, click Next, or to finish the function, click Finish.
NOTE. When connecting the IP Videophone to LAN or the cable network, select ‘LAN(Static IP)’ if the address of
the IP Videophone is already fixed, or select ‘LAN(Dynamic IP)’ if the IP address is dynamically allocated. If you
have subscribed to the ADSL network, select ‘ADSL (PPP/PPPoE)’.
NOTE. Click Next will display the LAN(Static IP) setting window if you select ‘LAN(Static IP)’, the Secondary
DNS setting window if you select ‘LAN(Dynamic IP)’, or ADSL setting if you select ‘ADSL(PPP/PPPoE)’.
B. LAN(Static IP) setting
• This menu window is displayed if you selected
‘LAN(Static IP)’ in Internet Connection setting. The
window displays the current values. You can change
the value as described in ‘LAN(Static IP)’ configuration
in <Default Internet Configuration(51p)>.
• In order to proceed to the next menu, use ST XW to
move to the menu button, and then click Next, or if you want to finish Wizard, click Finish.
NOTE. In order to move to Secondary DNS setting, click Prev, move to Internet Connection setting, and
then, click Next.
NOTE. If you use the IP Videophone on the network with Firewall, you can only communicate with the IP
Videophone inside the firewall but not with the one outside the firewall. It is because the firewall blocks the
Internet packet used by the IP Videophone.
C. ADSL Configuration
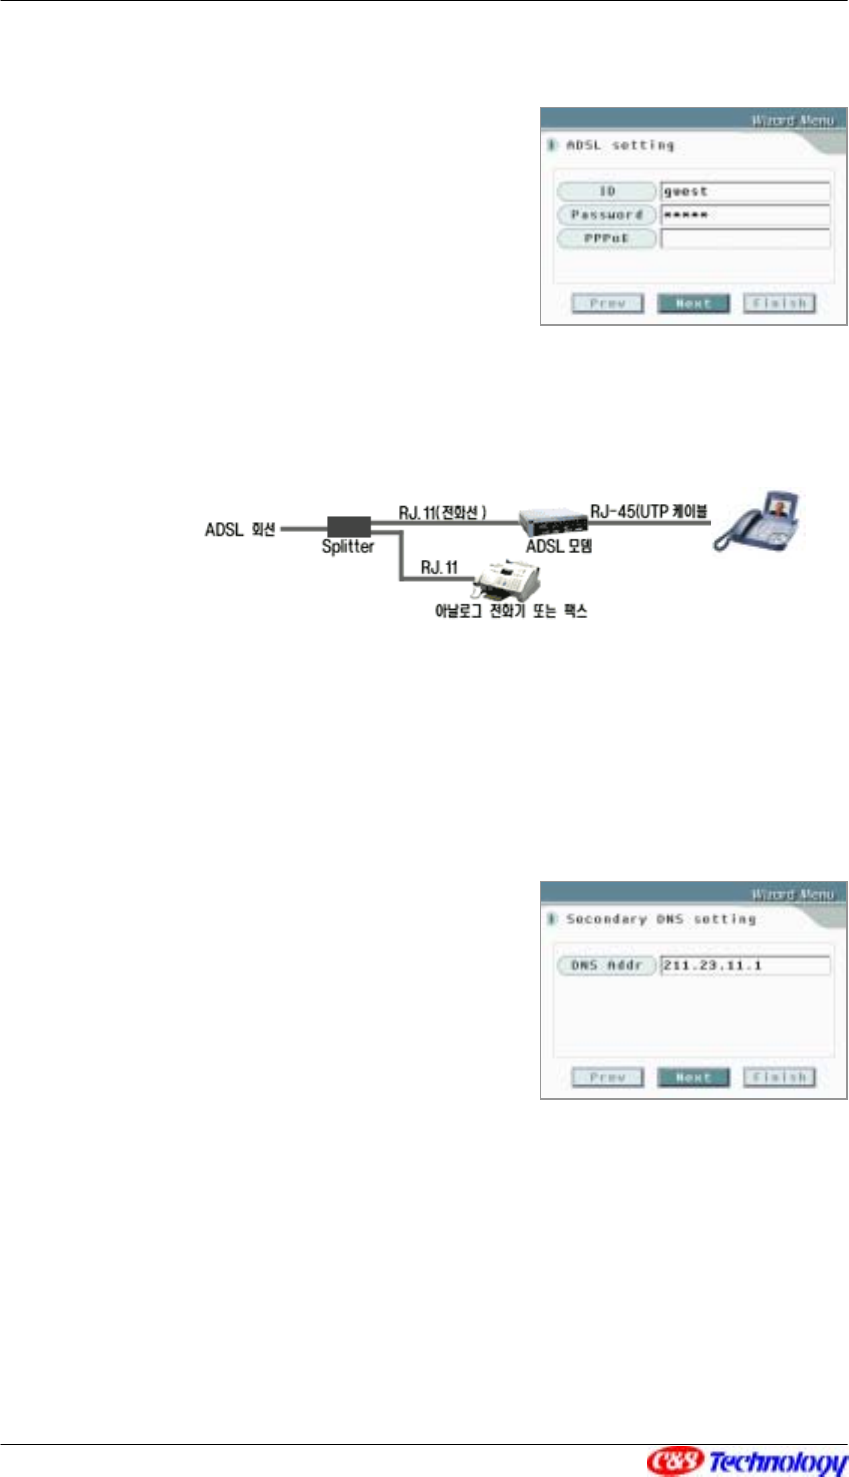
CIP-4500 User Manual 13
• This menu window is displayed if you selected
‘ADSL(PPP/PPPoE)’ in Internet Connection setting.
The window displays the current values. You can
change the value as described in ‘ADSL’ configuration
in <Default Internet Configuration(51p)>.
• In order to proceed to the next menu, use ST XW to
move to the menu button, and then click Next, or if you want to finish Wizard, click Finish.
NOTE. In order to connect the IP Videophone to ADSL, you should use the external ADSL modem. Connect
the Internet line from the ADSL modem to the IP Videophone as illustrated in the following figure.
NOTE. In order to move to Secondary DNS Setting, click Prev, move to Internet Connection setting, and
then, click Next.
D. Secondary DNS setting
• This menu enables you to set up the secondary DNS
address in preparation for malfunction of the primary
DNS set in Internet Connection setting. You can
change the value as described in < Advanced Internet
Configuration(52p)>.
• In order to proceed to the next menu, use ST XW to
move to the menu button, and then click Next, or if you want to finish Wizard, click Finish.
NOTE. Click Prev, move to LAN(Static IP) setting / Internet Connection setting / ADSL setting depending
on the selection in Internet Connection setting, and click Next to move to Time Server setting.
E. Time Server setting
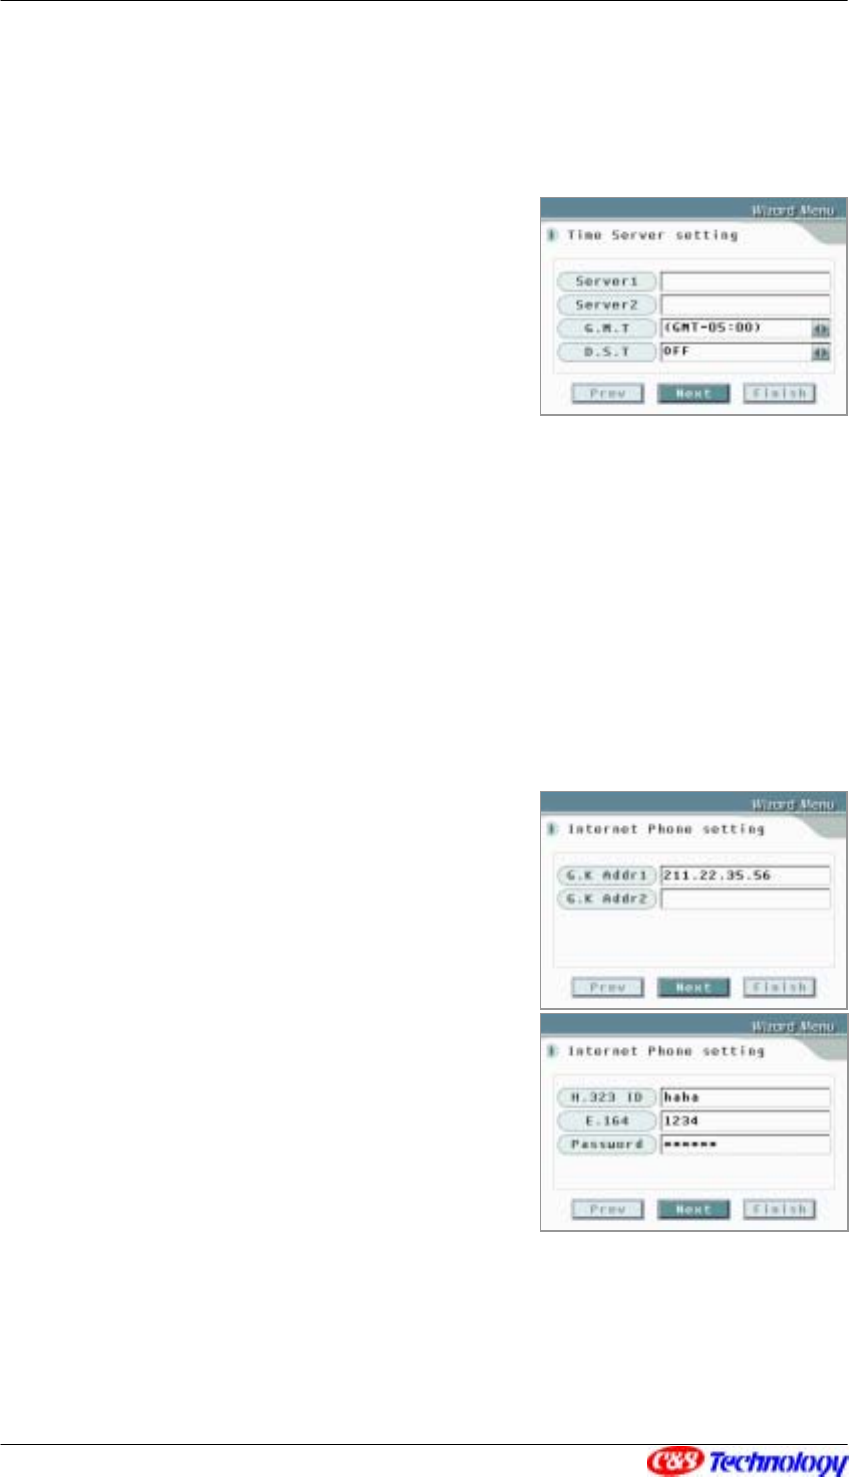
CIP-4500 User Manual 14
• This menu enables you configure the timeserver to acquire time information used in the IP
Videophone.
• Enter the server addresses in ‘Server1’ and ‘Server 2’.
NOTE. If you leave the TimeServers 1 and 2 empty, the IP
Videophone acquires the current time from the default time server.
• In ‘G.M.T’ and ‘D.S.T’ field, set the appropriate standard
time and summer time option, using XW.
• The setup in this menu is as described in < Time/Date Setting(48p)> of UserSet.
• In order to proceed to the next menu, use ST XW to move to the menu button, and then click
Next, or if you want to finish Wizard, click Finish.
NOTE. Click Prev, move to Secondary DNS setting, and then, click Next to move to Internet Phone setting.
F1. Internet Phone setting (For H.323 protocol)
• This menu is used when you register the IP Videophone
to the Internet phone service. The menu consists of two
windows. The first one is the menu on which you shall
enter the Internet phone server address, and the second
one is the menu on which you shall enter H.323 ID /
E.164 / Password.
• Changing the value is as defined in <Internet Phone
Configuration (H.323) (52p)>.
• In order to proceed to the next menu, use ST XW to
move to the menu button, and then click Next, or if you
want to finish Wizard, click Finish.
NOTE. Because the IP Videophone conforms to H.323 international video communication standard, you can
register the unit to the Internet phone service. In order to connect the phone to the Internet phone service network,
you should set the H.323 ID to be used in the server address and authentication process, and the ID in the format
CIP-4500 User Manual 15
of phone number (E.164). Therefore, make sure to check them when you subscribing the phone to the IP phone
service network.
NOTE. If you click Prev in the first Internet Phone setting, you will move to Time Server setting menu. If you
click Next you will move to the second Internet Phone setting menu. In the second Internet Phone setting, if
you click Prev, you will move to the first Internet Phone setting, and if you click Next, you will move to Internet
Sharing setting.
NOTE. If you have not subscribed to the Internet phone service, leave the blank empty, and click Next to move to
Internet Sharing setting.
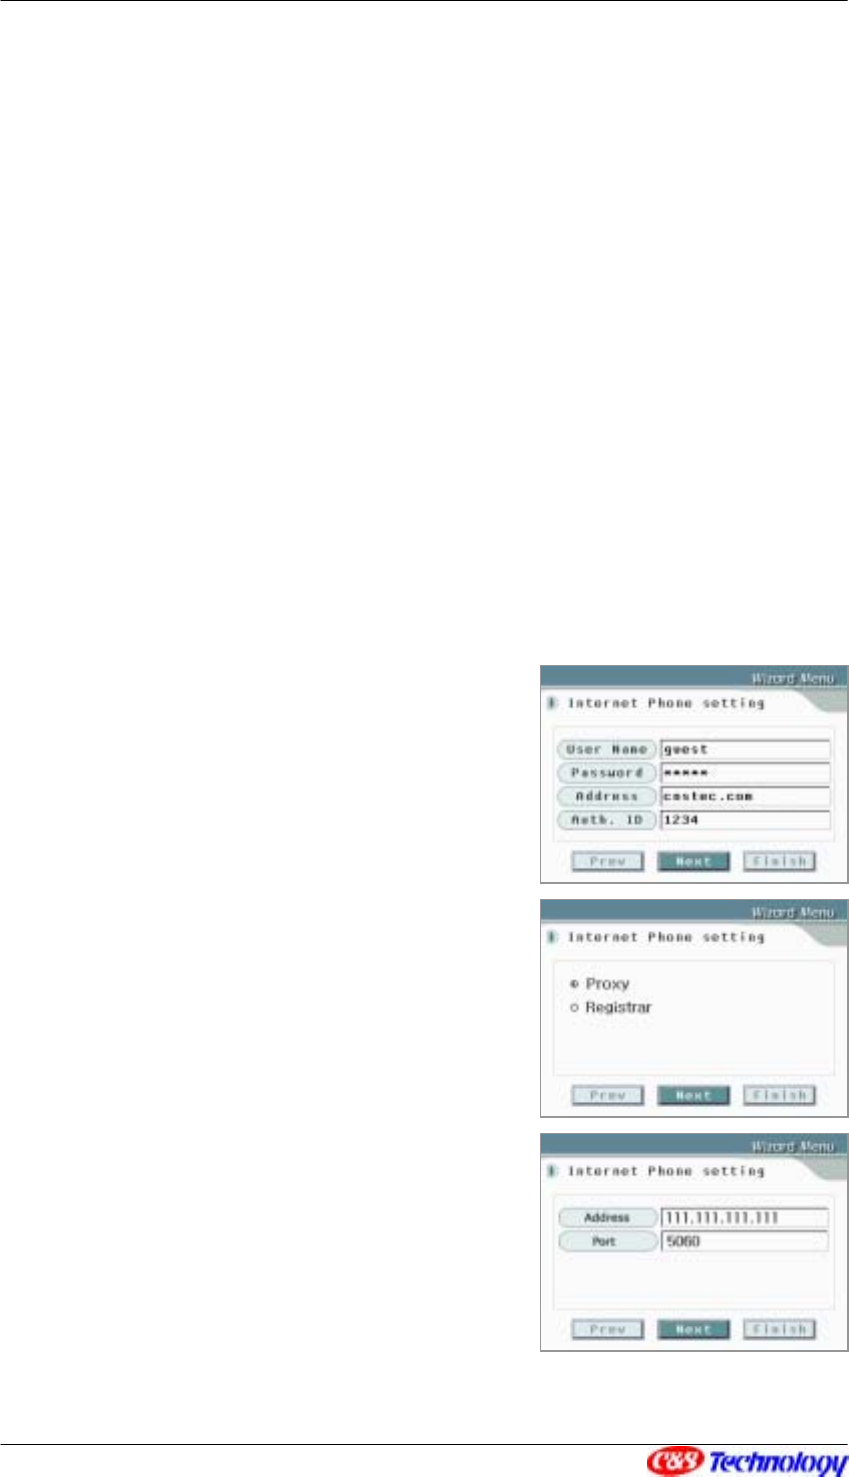
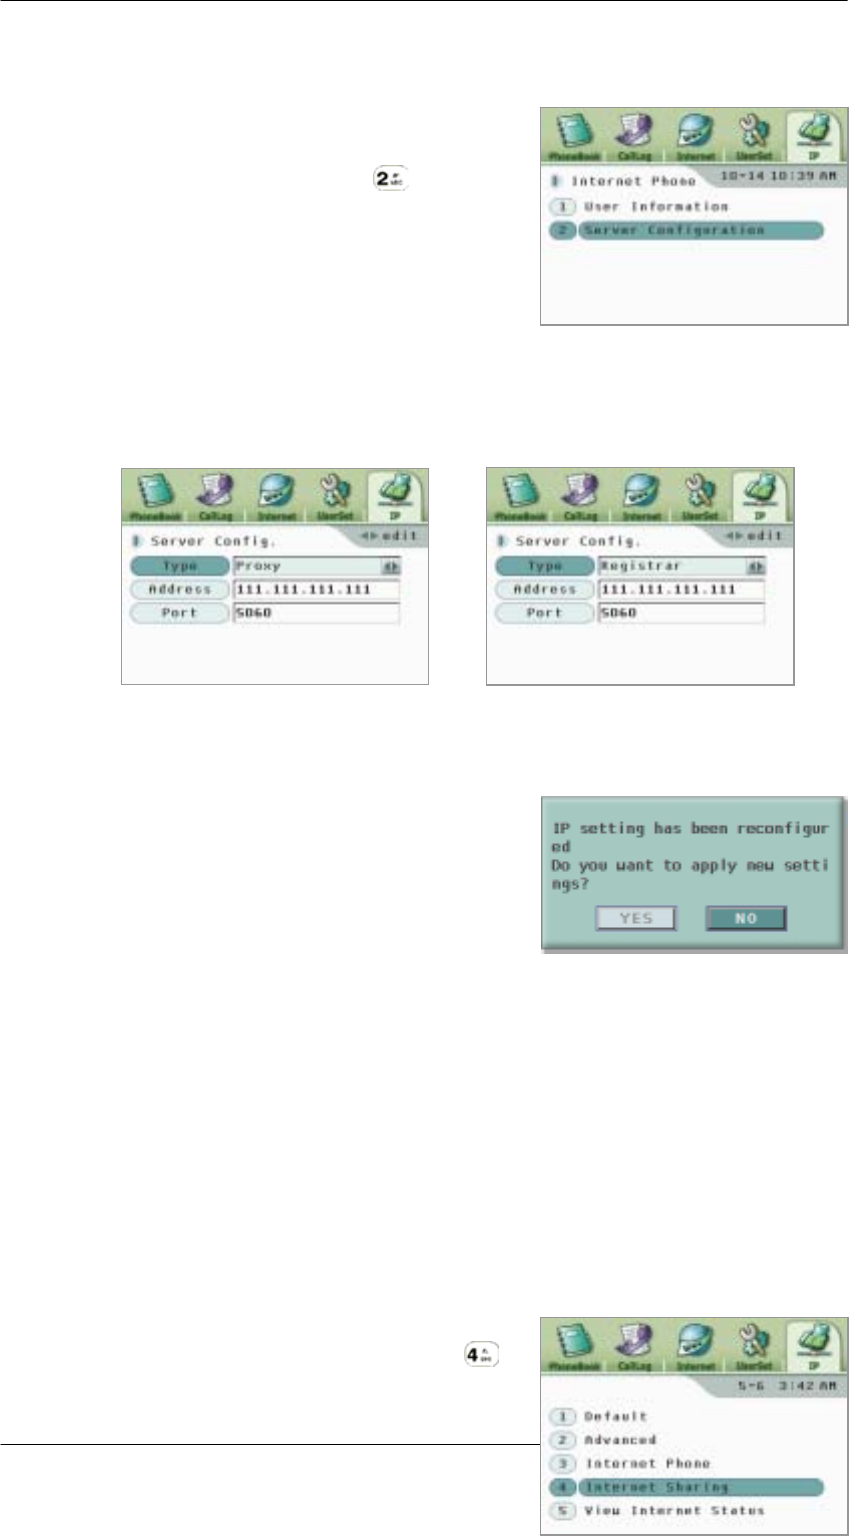
F2. Internet Phone setting (For SIP protocol)
• This menu is used when you register the IP Videophone to the Internet phone service. The menu
consists of three windows. The first one is the menu on which you shall enter the user information,
and the second and the third are the menus on which you shall set up the Internet phone server.
• The Internet Phone setting is the menu on which you
register the IP Videophone to the server or you enter the
user information for communication with the other party.
In this window, enter the user name, password, address
and alias. You can change the value as described in <
Internet Phone Configuration (SIP) (53p)>.
• Use ST to select Next, and press ‘ENT’, and then
register the Internet phone server. You may select either
Proxy or Registrar. Use ST to move between the items,
and use XW or ‘ENT’ to select an item.
• If you select Next using ST, and press ‘ENT’, the server
and port entering menu is displayed. You can change the
value as described in < Internet Phone Configuration
(SIP) (53p)>.
• In order to proceed to the next menu, use ST XW to
move to the menu button, and then click Next, or if you
want to finish Wizard, click Finish.
CIP-4500 User Manual 16
NOTE. Because the IP Videophone conforms to H.323 international video communication standard, you can
register the unit to the Internet phone service. In order to connect the phone to the Internet phone service network,
you should set the H.323 ID to be used in the server address and authentication process, and the ID in the format
of phone number (E.164). Therefore, make sure to check them when you subscribing the phone to the IP phone
service network.
NOTE. If you click Prev in the first Internet Phone setting, you will move to Time Server setting menu. If you
click Next you will move to the second Internet Phone setting menu. In the second Internet Phone setting, if
you click Prev, you will move to the first Internet Phone setting, and if you click Next, you will move to Internet
Sharing setting.
NOTE. If you have not subscribed to the Internet phone service, leave the blank empty, and click Next to move to
Internet Sharing setting.
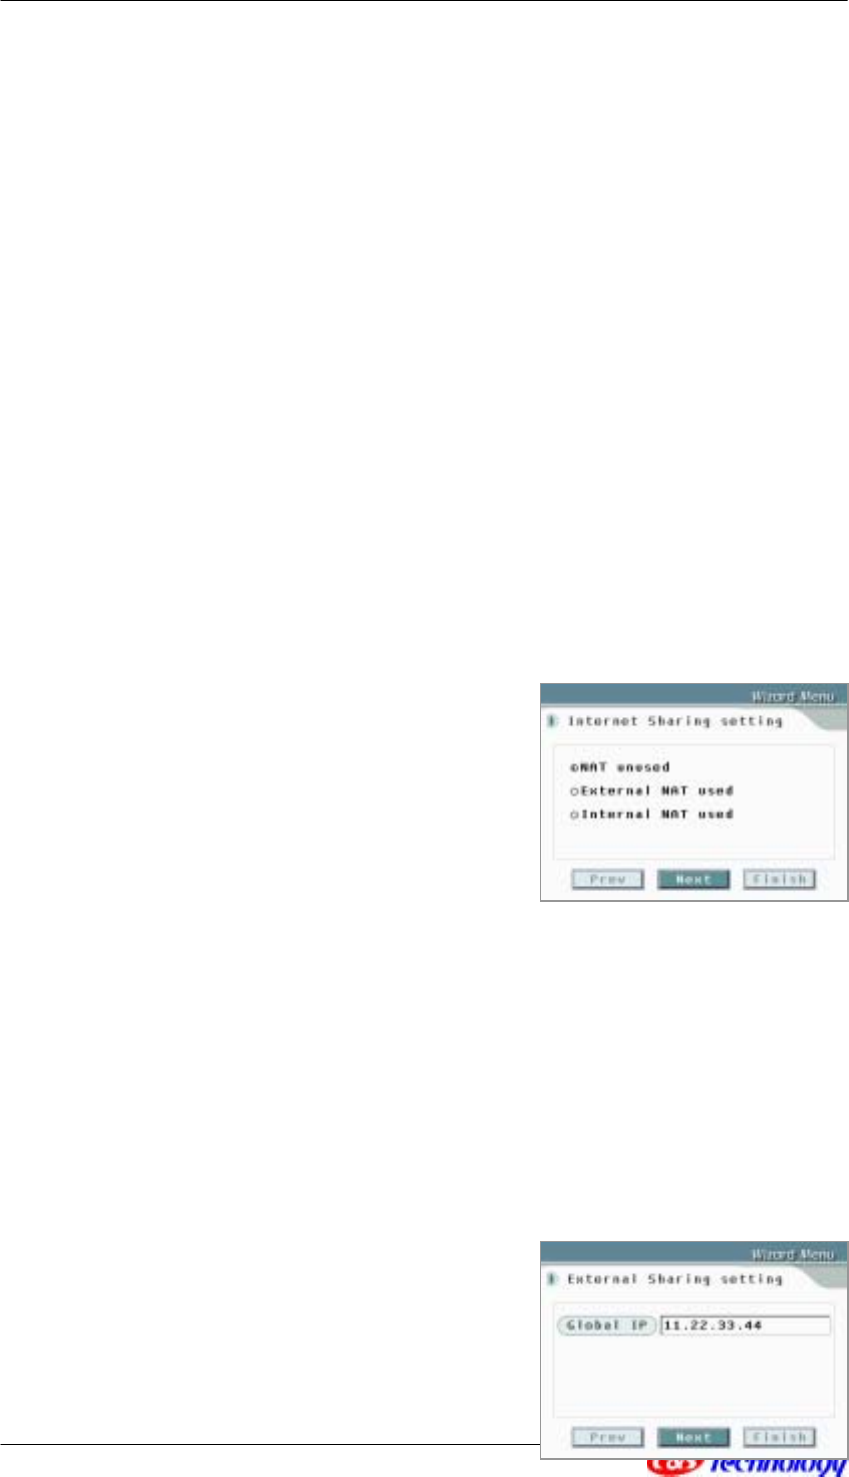
G. Internet Sharing setting
• Select the Internet sharing method to be applied to IP
Videophone.
• Use ST to move between the items, and use XW or
‘ENT’ to select an item.
• In order to proceed to the next menu, use ST XW to
move to the menu button, and then click Next, or if you want to finish Wizard, click Finish.
NOTE. If you click Prev, you will move to the second Internet Phone setting. If you click Next, you will move to
Finish Wizard setting/External Sharing setting/Internal Sharing setting depending on the selected sharing
mode.
H. External Sharing setting
• The menu is used to set up the Global IP address when
you have selected ‘External NAT used’ in the Internet
Sharing setting. Refer to < Internet Sharing
Configuration (55p)> for details.
CIP-4500 User Manual 17
• Enter the global IP address of the external sharer in ‘Global IP’.
• In order to proceed to the next menu, use ST XW to move to the menu button, and then click
Next, or if you want to finish Wizard, click Finish.
NOTE. Click Prev to move to Internet Sharing setting, and click Next to move to Finish Wizard setting.
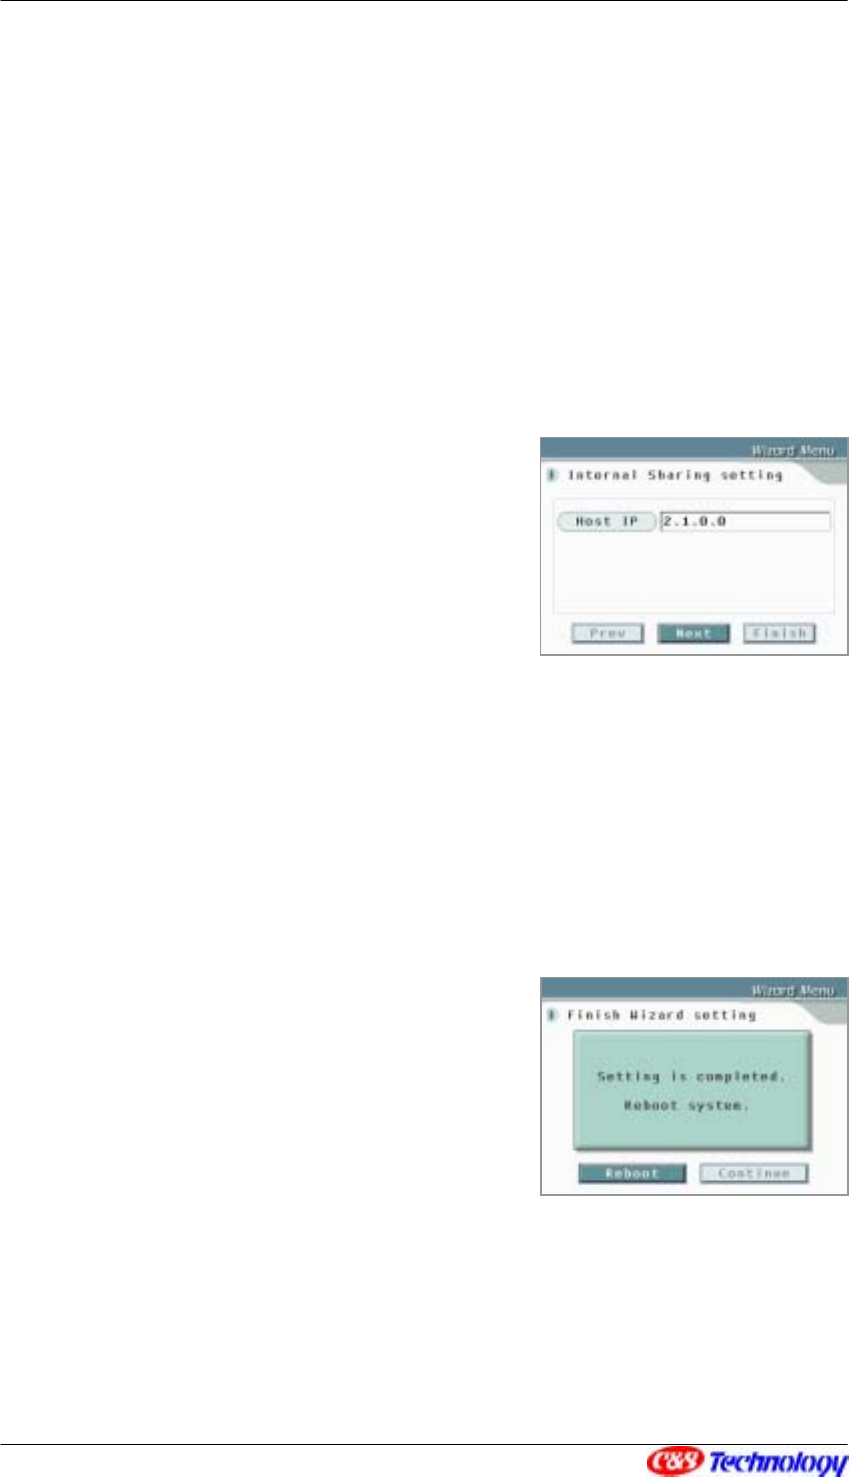
I. Internal Sharing setting
• This menu is used to set up the Host IP address when
you have selected ‘Internal NAT used’ at Internet
Sharing setting. Refer to < Internet Sharing
Configuration (55p)> for details.
• Type the Host IP address of the IP Videophone to be
used in the internal private network on ‘Host IP’.
• In order to proceed to the next menu, use ST XW to move to the menu button, and then click
Next, or if you want to finish Wizard, click Finish.
NOTE. Click Prev to move to Internet Sharing setting, and click Next to move to Finish Wizard setting.
J. Finish Wizard setting
• The window indicates that the wizard is finished.
• If you click ‘Reboot’, the IP Videophone is rebooted. If you
click ‘Continue’, the IP Videophone becomes in the
standby mode.
NOTE. In order that Configuration Wizard is safely applied to the IP
Videophone, you are recommended to select ‘Reboot’ to reboot the IP Videophone.
CIP-4500 User Manual 18
2. IP Videophone-based Calling
Making a Call
There are seven ways to make a videophone call.
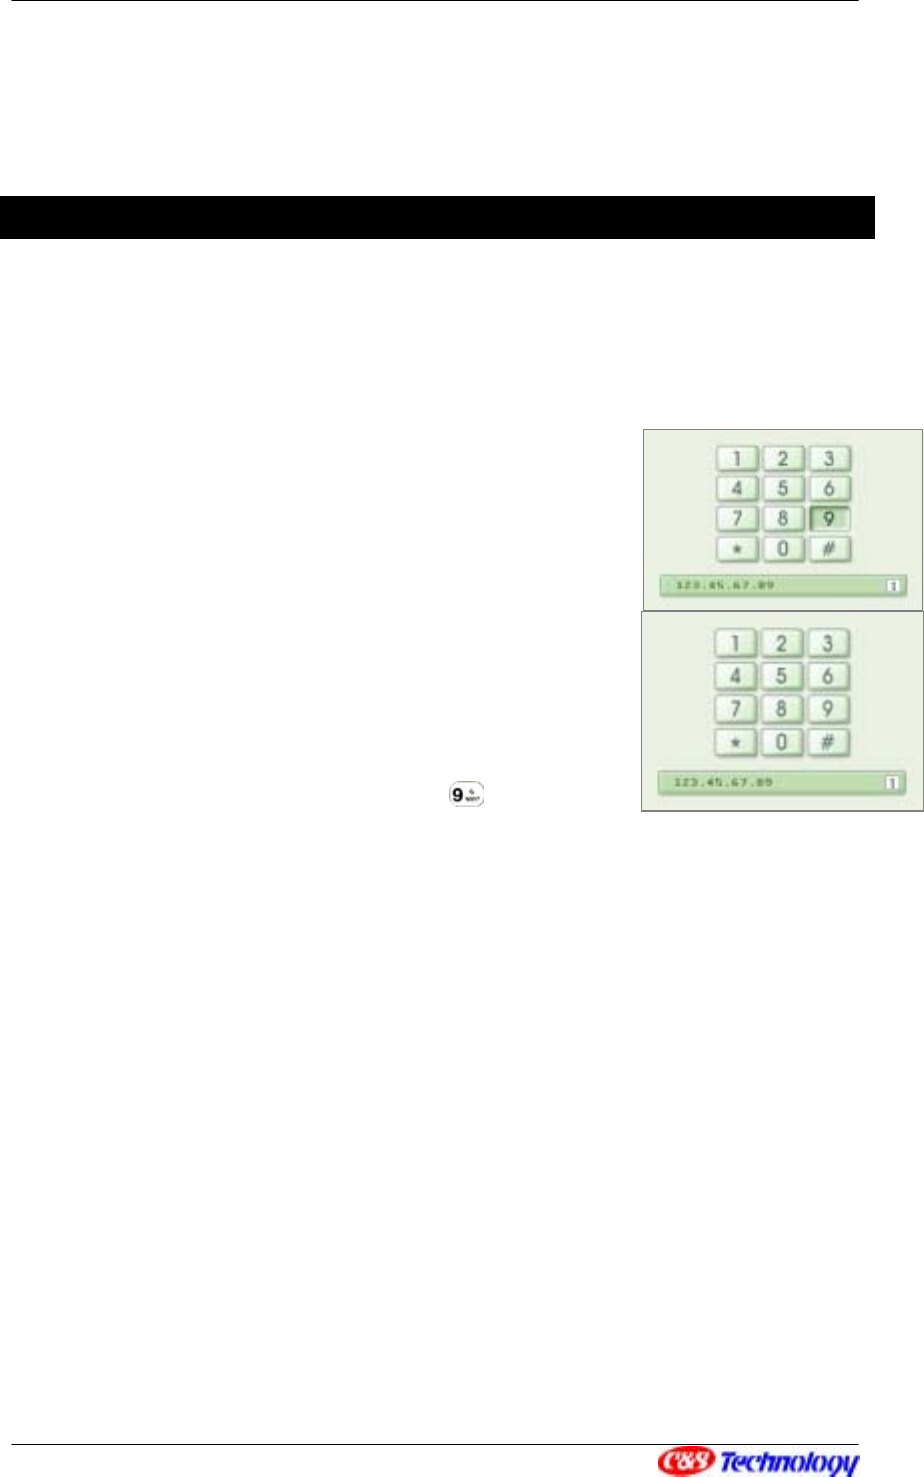
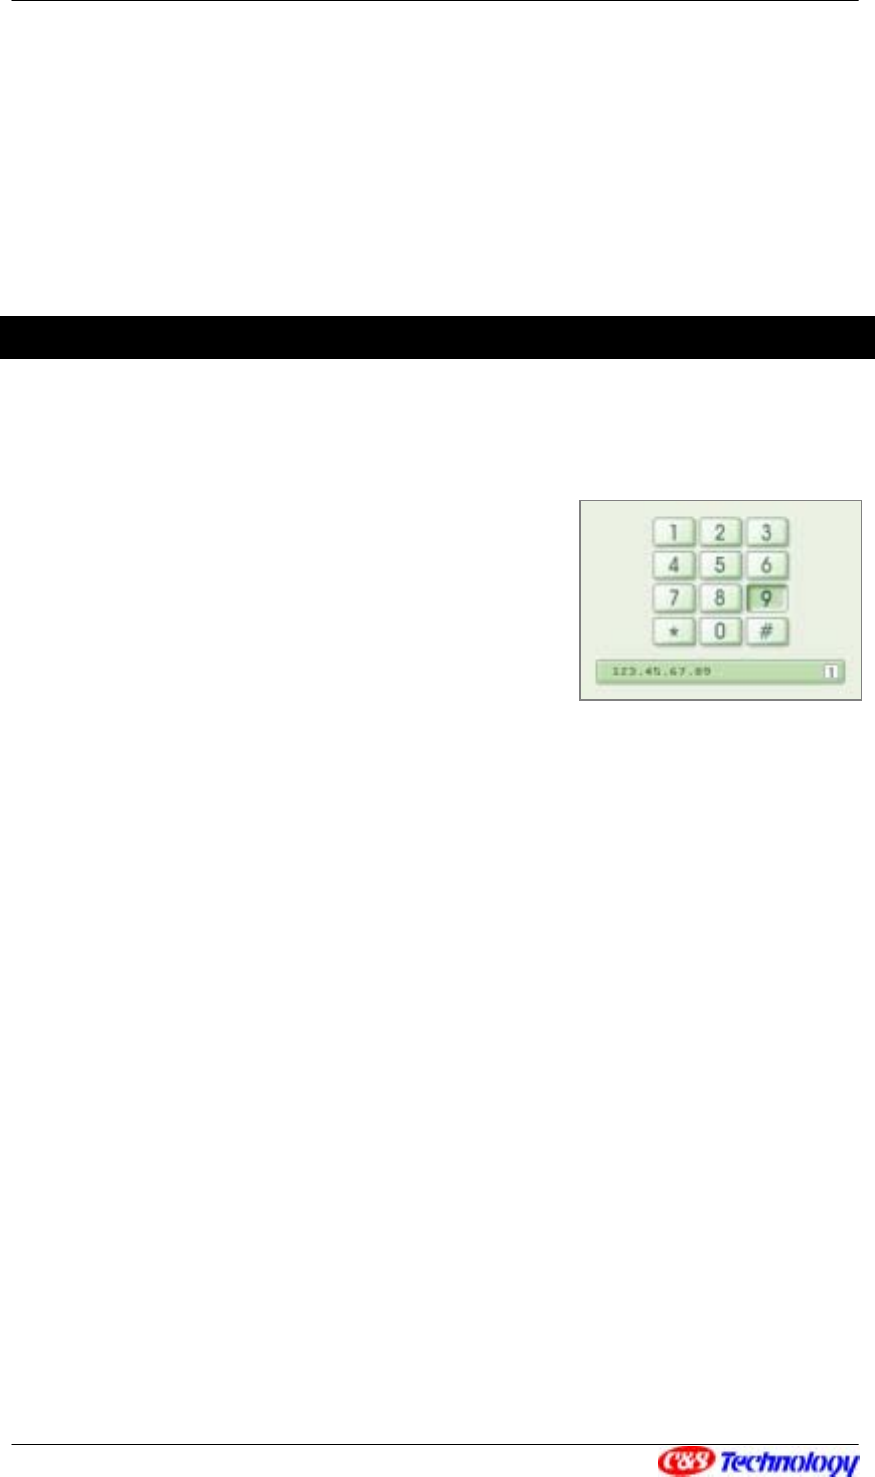
① Making a call using dialpad
• Pick up your handset or press ‘SPEAKER’.
• Press the IP address or phone number you want to make a
call. For character input, refer to <How to Enter a Character
(32p)>.
• After pressing the number, press ‘ENT’.
• When the dialing is started, the right figure is displayed.
NOTE. You can also make a call by pressing the last digit of the
phone number for a while. For example, if you try to make a call at
123.45.67.89, press ‘123.45.67.8’ and then for a moment.
② Making a call in waiting mode
• In waiting mode (when LCD is turned off), if you enter the IP address or the first digit of
the call number of the person you want to make a call, LCD is turned on, activating the
dialpad with the input number.
• Making a call by pressing remaining call number is the same process as <① Making a
call using dialpad>.
③ Making a call using redial
• Pick up your handset or press ‘SPEAKER’ .
• Press ‘REDIAL’ to make a call at the number lastly connected.

CIP-4500 User Manual 19
NOTE. If IP videophone is in waiting mode, it is possible to make a call by pressing ‘REDIAL’
directly without picking up your handset.
④ Making a call from the latest calling list
• Pick up your handset or press ‘SPEAKER’ .
• Press S or T to display the latest calling list.
Select the number you want using ST.
• Press ‘ENT’ to make a call.
⑤ Speed dialing
• Pick up your handset or press ‘SPEAKER’ .
• Enter the hot key you want from your PhoneBook and press ‘ENT’.
NOTE. If the speed dial number is for ‘Internet’, you shall make a call on the Internet, and for
‘Mobile’ or ‘Public’, make a call using a normal phone.
NOTE. If you press the speed dial number for a while, you can make a call without pressing
‘ENT’.
⑥ One Click Call from the PhoneBook
• While browsing your PhoneBook, select the destination you want to call and press
‘ENT’.
NOTE. For detailed call process, refer to < PhoneBook(35p)>.
⑦ One Click Call from the Call Log
• While browsing your CallLog, select the destination you want to call and press ‘ENT’.
CIP-4500 User Manual 20
NOTE. For detailed call process, refer to <CallLog ( 39p)>.
Receiving a Call
If an incoming call is arrived, videophone begins ringing and the following animation is
shown on the LCD screen.
A. Picking up handset
Pick up your handset as usual.
B. Answering a call in Speakerphone mode
Press ‘SPEAKER’, in which case you get into the speakerphone mode.
Rejecting a Call
Press ‘ ’ to reject the incoming call.
Dropping a Call
To disconnect a call, hang up your handset.
CIP-4500 User Manual 21
If you are in speakerphone mode and the handset has already put on the phone, press
‘SPEAKER’.
NOTE. Your call data is stored in CallLog.
Call Forward
Call Forward allows you to forward a call from your phone to any other phone.
• Press ‘FLASH’ to display dialpad on the screen.
• Click phone number or IP address of the person to
whom you want to forward a call and press ‘ENT’.
NOTE. If a call is successfully transferred, the previous call is
automatically disconnected. If not, the previous call is returned.
NOTE. Call forward is successful only between CIP-4500.

CIP-4500 User Manual 22
Auto Answering Mode
① What is Auto Answering mode?
In auto answering mode, an incoming call is automatically received after ringing the
predefined times, and an absent message is delivered. In this case, if a caller leaves a
message, such the message is stored so that you can verify it in Auto Answering
Message of CallLog.
NOTE. In auto answering mode, you are recommended not to transmit image and voice data.
NOTE. If a called party answers a call while an absence message is delivered or a caller leaves a
message, the call may be connected.
NOTE. If there is not enough memory space to store messages, an absence message is delivered and
a call is disconnected automatically.
② Setting Auto Answering mode
You can set auto answering mode in Configuration.
NOTE. For detailed information, refer to <UserSet( 45p)>.
③ Monitoring Function
You can use monitoring function of IP videophone by assigning the number of ringing times
to “0” when setting auto answering mode in UserSet. With this function, you are able to
monitor the local situation at the remote place.
Even though a caller makes a call, IP videophone seems not to operate and an absent
message is delivered to a called party. In this case, if the caller sends the password via
SMS while hearing the voice message, the IP videophone begins to send local video and
audio data. If the password is not matched with yours, the call is disconnected immediately.

CIP-4500 User Manual 23
NOTE. For use of this monitoring function, the IP videophone of a caller shall be able to send a
numeric information.
NOTE. How to send your password using IP videophone is described in <Short Message Service
(SMS)(27p)>.
Useful Functions during a Call
You can use some useful functions even being on the line.
① Display
Press ‘DISPLAY’ to change display mode of the picture on your LCD screen. The
display mode may be changed in the following sequence:
② Mute
Press ‘MUTE’ to prevent the other party from hearing your voice. “MUTE” message is
displayed on LCD screen and melody instead of your voice is sent to the other party.
If you want to release mute, press ‘MUTE’ again.
Dual Screen Mode
Full Screen Mode (of the
other party)
PIP(Picture-in-Picture)
PIP(Picture-in-Picture)

CIP-4500 User Manual 24
③ Privacy
Press ‘PRIVACY’ to keep your image from delivering to the other side. Instead of your
image, a logo image is displayed on the other party’s screen in the privacy mode.
If you want to release privacy mode, press ‘PRIVACY’ again.
④ Volume Control
1 You can control volume by pressing S T during a call. The volume value icon is shown at
the bottom of LCD screen.
2 You can control volume in Setup menu during a call.
Press ‘ENT’ to display the control menu.
Select the Volume Control menu using ST. Then, press ‘ENT’ to display phone
volume menu.
Select the volume using W X and press ‘ENT’.
If you want to return to previous menu, press ‘EXIT’.
⑤ Video Quality Control
If video quality of the other side is not good or speed is too slow during videophone calling,
you can control video quality or speed of the other party so that you can get better images
and speeds.
Press ‘ENT’ to display the control menu.
Select the Image Control menu using ST. Then, press ‘ENT’ to display detailed menu
items.
VOLUME CONTROL
QUALITY CONTROL
INPUT SELECT
[ OPTION SETTING ]
111.123.111.123 I-HAND
VOLUME CONTROL
111.123.111.123 I-HAND
3

CIP-4500 User Manual 25
Select the item you want using ST, and then control the value using W X.
NOTE. You are not allowed to control image quality if only voice connection is made between you
and the other party.
1 RECEIVING SPEED : As you select the higher value, you can use more bandwidth,
which guarantees enhanced image quality and better screen display.
NOTE. When the receiving speed is high with bad network connection, the image may be broken.
In this case, the receiving speed needs to be lowered.
NOTE. If the other party’s IP videophone model is different from yours, you have to control sending
speed instead of receiving speed.
2 SENDING SPEED : As you select the higher value, you can use more bandwidth, which
guarantees enhanced image quality and better screen display.
NOTE. When the sending speed is high with bad network connection, the image may be broken. In
this case, the sending speed needs to be lowered.
After setting all the items you need to control, if you want to return to previous menu,
press ‘EXIT’.
⑥ Audio/Video Input Path Setting
You can change the input path of audio and video during a call.
Press ‘ENT’ to display the control menu.
Select the Input menu using ST. Then, press ‘ENT’ to display detailed menu items.
Select the item you want using ST, and then control the value using W X.
RECEIVING SPEED
L M H
SENDING SPEED
L M H
111.123.111.123 I-HAND
VOLUME CONTROL
QUALITY CONTROL
INPUT SELECT
[ OPTION SETTING ]
111.123.111.123 I-HAND

CIP-4500 User Manual 26
111.123.111.123 I-HAND
VOLUME CONTROL
QUALITY CONTROL
INPUT SELECT
[ OPTION SETTING ]
1 VIDEO INPUT: If you select ‘INT’ from A/V Input menu, you can insert an image
through the camera of IP videophone, but if you choose ‘EXT’, an image is inserted from
the external camera connected to video input terminal of backside of the videophone
body.
NOTE. If you select ‘EXT’ when the external camera is not connected to the videophone, the receiving
image may look unclear. For the external video output, what you see on the current LCD screen is
also displayed on any external device such as TV or LCD monitor only when an external display is
connected to ‘VIDEO OUT’ port without special setting.
NOTE. When TV is connected to IP videophone, certain images may not be displayed according to
TV model.
2 AUDIO INPUT: If you select ‘INT’ from A/V Input menu, you can insert audio through the
camera of IP videophone, but if you choose ‘EXT’, audio is inserted from the external
camera connected to audio input terminal of backside of the videophone body.
NOTE. If you connect the external speaker to ‘AUDIO OUT’ port, you can hear the same audio via
speaker. If you select ‘EXT’ when the external microphone is not connected, voice communication
may be impossible.
NOTE. If audio input is set to ‘EXT’, volume control is not available.
After setting all the items you want, if you want to return to previous menu, press ‘EXIT’.
⑦ Speakerphone Mode
INT EXT
VIDEO INPUT
111.123.111.123 I-HAND
INT EXT
AUDIO INPUT
CIP-4500 User Manual 27
Press ‘SPEAKER’ to change into the speakerphone mode while calling using a handset.
If you want to release the speakerphone mode, press ‘SPEAKER’ again.
NOTE. Even when you hang up your handset in speakerphone mode, the call may not be
disconnected maintaining speakerphone mode.
NOTE. If you press ‘SPEAKER’ in speakerphone mode after hanging up your handset, the call
may be disconnected.
⑧ Short Message Service (SMS) (Optional)
You can exchange short messages during a call.
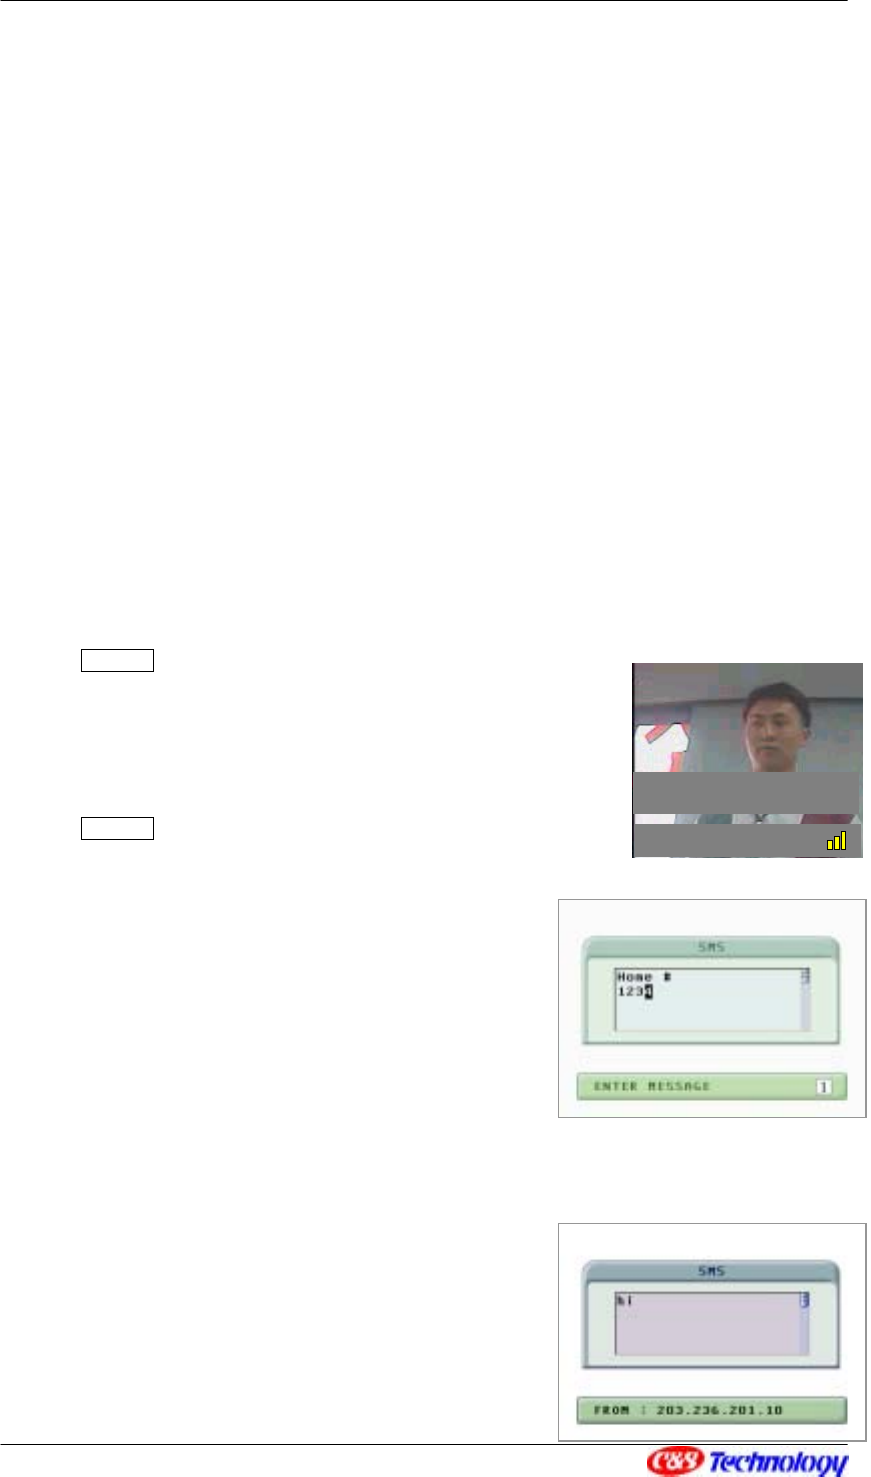
1 Sending SMS
You can send a short message during a call in the following two manner:
Method 1
In order to send simple numbers,
press the number you want using numeric key.
Method 2
Press ‘∗(SMS)’ to display the following LCD
screen for input.
Enter a short message. For character input, refer
to
<How to Enter a Character( 32p)>.
After input, press ‘ENT’ to send a message.
If you do not want to send any input message,
press ‘EXIT’.
NOTE. While you entering a message, image of such message continues to be delivered to the other
party even though it is not displayed on the screen.
2 Receiving SMS
SENT: 123
111.123.111.123 I-HAND

CIP-4500 User Manual 28
If you receive a short message from the other party, the right screen is displayed on
which you can view the message.
After message check, if you want to exit this mode, press
any button except ST.

CIP-4500 User Manual 29
123 I-HAND
DIAL
123
3. Public Phone-based Calling (Optional)
Making a Call
There are five ways to make a general call using an IP videophone:
① Making a call using dialpad
• Pick up your handset or press ‘SPEAKER’ .
• Press ‘TEL’ to change into public phone mode. In
public phone mode, you can see yourself.
• If you press the telephone number you want to make
a call, dialing is started.
② Making a call using redial
• Pick up your handset or press ‘SPEAKER’ .
• Press ‘TEL’ to change into public phone mode. In public phone mode, you can see
yourself.
• Press ‘REDIAL’ to make a call at the number lastly connected.
③ Speed dialing
• Pick up your handset or press ‘SPEAKER’ .
• Enter the hot key you want from your PhoneBook and press ‘ENT’.
NOTE. If the speed dial number is for ‘Internet’, you shall make a call on the Internet, and for
‘Mobile’ or ‘Public’, make a call using a normal phone.

CIP-4500 User Manual 30
NOTE. If you press the speed dial number for a while, you can make a call without pressing
‘ENT’.
④ One Click Call from the PhoneBook
• While browsing your PhoneBook, select the destination you want to call and press
‘ENT’.
NOTE. For detailed call process, refer to <PhoneBook (35p)>.
⑤ One Click Call from the Call Log
• While browsing your CallLog, select the destination you want to call and press ‘ENT’.
NOTE. For detailed call process, refer to <CallLog (39p)>.
Receiving a Call
If an incoming call is arrived, videophone begins ringing and the following animation is
shown on the LCD screen.
A. Picking up handset
Pick up your handset as usual.
B. Answering a call in Speakerphone mode

CIP-4500 User Manual 31
Press ‘SPEAKER’, in which case you get into the speakerphone mode.
NOTE. CID function of IP videophone enables you to identify caller’s phone number.
Dropping a Call
To disconnect a call, hang up your handset.
If you are in speakerphone mode and the handset has already put on the phone, press
‘SPEAKER’.
NOTE. Your call data is stored in CallLog. However, the numbers pressed within 10 seconds after
dialing may be stored.
Useful Functions during a Call
You can use the following useful function in PSTN mode.
① Volume Control
You can control volume by pressing S T during a call. The volume value icon is shown
at the bottom of LCD screen.
CIP-4500 User Manual 32
4. User Configuration
Using Keypad in User Configuration
Numeric key Used for character input
1aA Enables you to select the type of characters in entering characters
(Numeric/Lowercase/Capital)
Allows you to move among the URL links and URL input window on
the browser screen.
Enables you to go to the View menu for e-mail
TAB
Enables you to go to the View menu for auto answering list
EXIT Allows you to return the previous menu
ENT Enables you to go to Edit mode or to set an appropriate value of
each item
Used for menu change
Arrow Key Enables you to go to Edit mode or to set an appropriate value of
each item
How to Enter a Character
Press ‘1aA’ to choose the input mode (Numeric/Lowercase/Capital) you want to use. The
current input type is indicated on right top of LCD screen.
English
Mode
Key
Small Capital
Numeric
:@/ :@/ 1
abc ABC 2
def DEF 3
ghi GHI 4
jkl JKL 5
mno MNO 6
pqrs PQRS 7

CIP-4500 User Manual 33
tuv TUV 8
wxyz WXYZ 9
-._ -._ 0
* * *
# # . #
Numeric input
Example : In case of entering “123”
Press ‘1aA’ to set input mode to .
Press , , successively.
English input
Example : In case of entering “SKY”
Press ‘1aA’ to set input mode to .
Press ‘S’, ‘K’, ‘Y’ successively. ( ,,,-> ,-> ,,,)
Mixed input
Example : In case of entering “123.com”
Press ‘1aA’ to set input mode to .
Press , , successively.
Enter ‘.’. ( )
Press ‘1aA’ to set input mode to .
Press ‘c’, ‘o’, ‘m’ successively.( ,,,,,, X, )

CIP-4500 User Manual 34
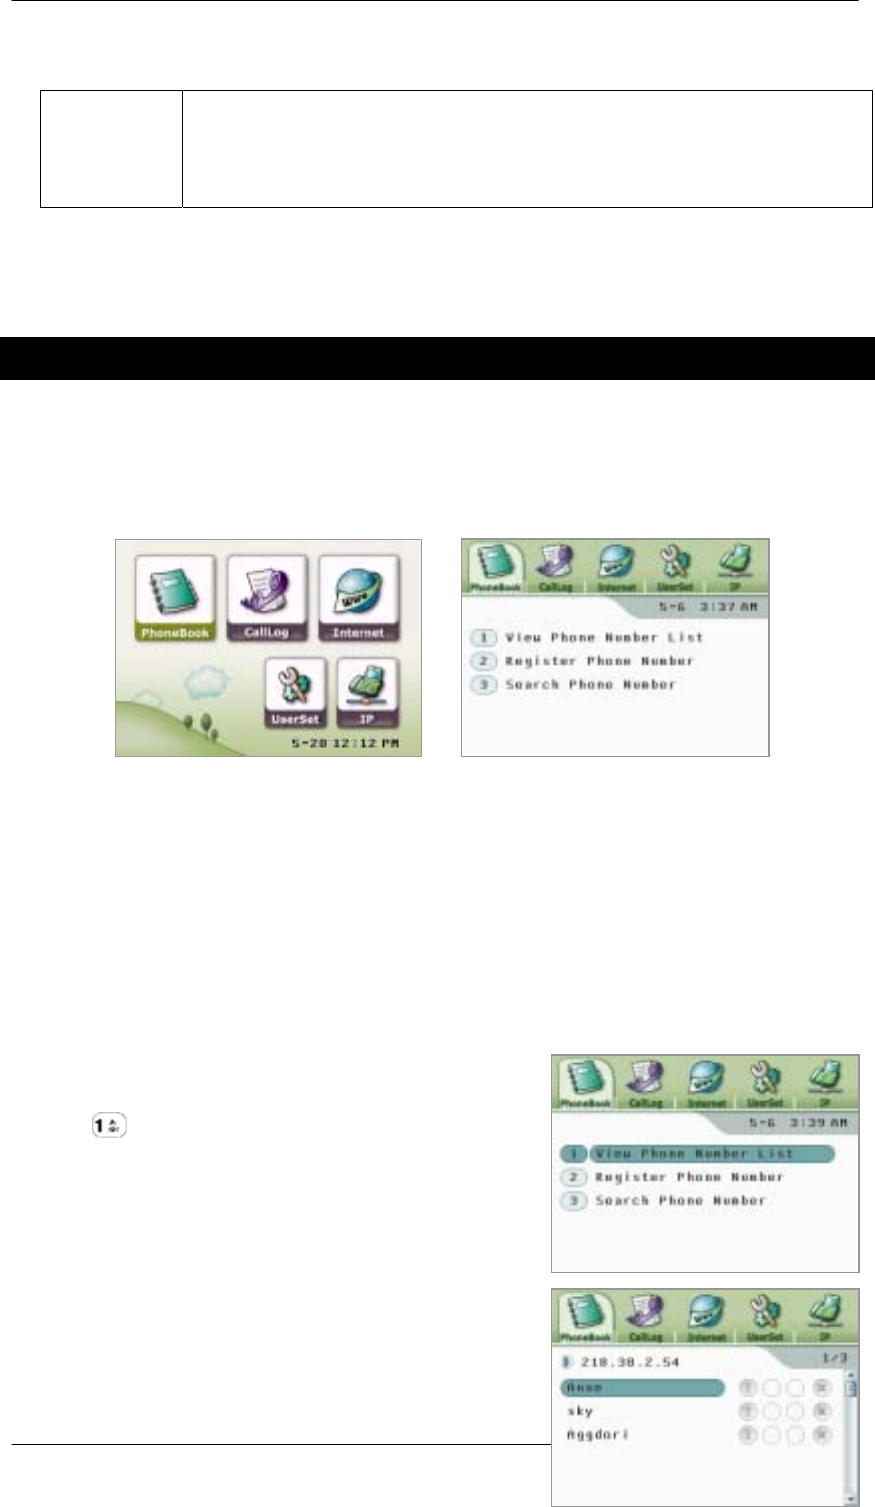
Main Menu
During power off, or in dialing mode (when there is no any input number), press ‘ENT’ to
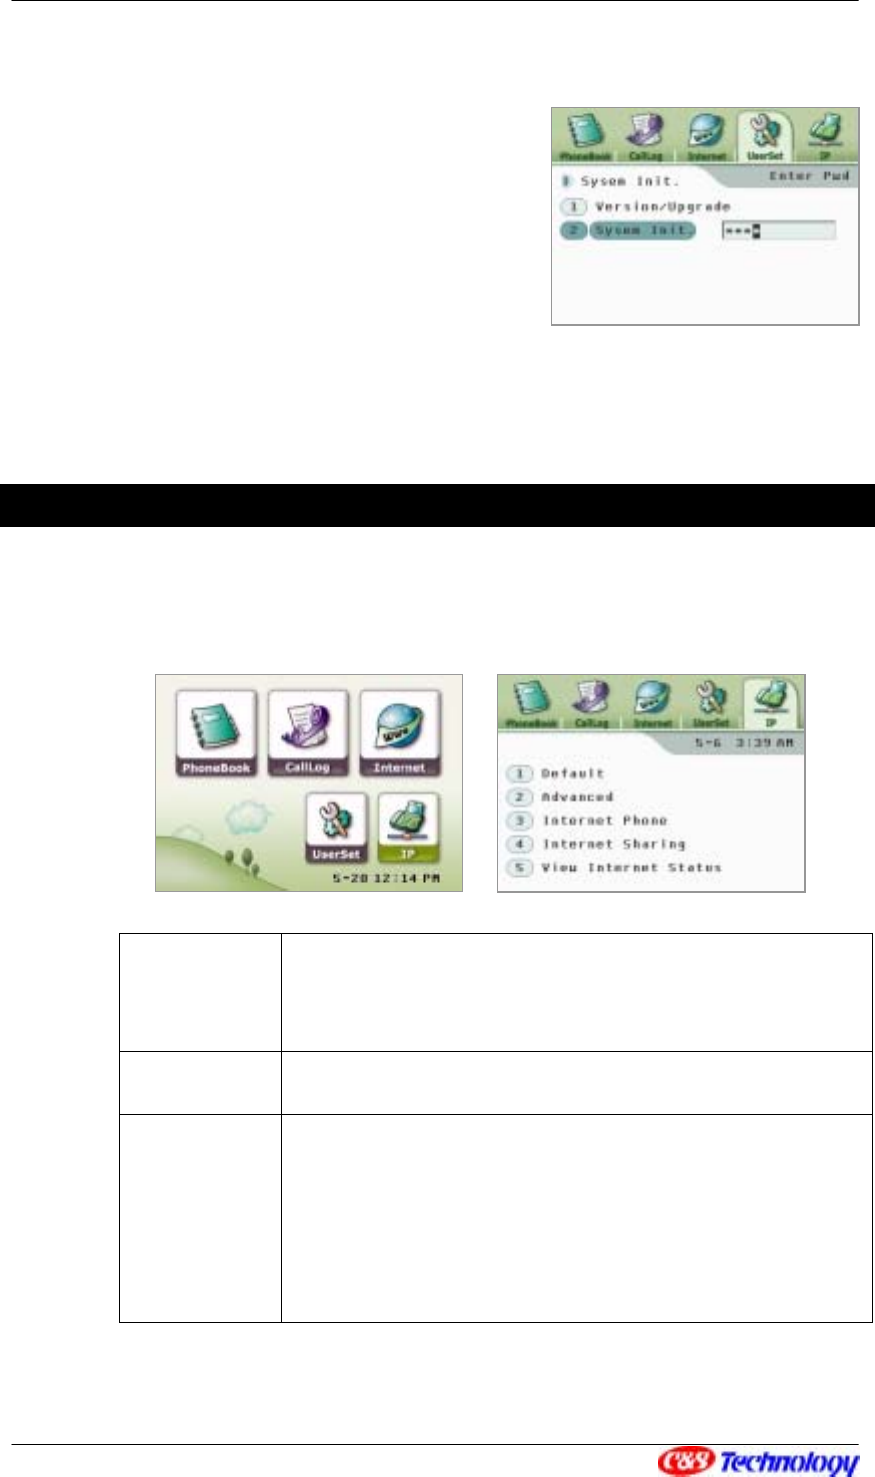
display the User Configuration main menu. The main menu consists of five submenus:
PhoneBook, CallLog, Internet, UserSet, IP.
You can change among menus (PhoneBook CallLog Internet UserSet IP (or
reversely) using XW. Press ‘ENT’ to go into configuration mode of the current main menu.
To finish the User Configuration menu, press ‘EXIT’.
PhoneBook
Provides user-specific phone number.
Enables you to search the registered phone number by name, short
number or phone number.
You can make a call at the registered phone number.
CallLog
Allows you to check the recent phone numbers made/received.
Enables you to check an absent message recorded in ARS (Auto
Response System).
You can make a call directly at the numbers recorded in call log.
Internet
You can search cHTML website.
Allows you to write/read e-mails.
You can set up your e-mail account.
UserSet
Sets bell types and volume.
Sets ARS.
Sets an option during a call.
Sets audio/video input path.
Sets system time.
Sets whether to use Setting Wizard when system booting up.
Upgrades software version.
Initializes a system.
IP
Sets the network configuration.
Sets DNS address.
Sets Internet Tele
p
hon
y
Service o
p
tions
CIP-4500 User Manual 35
H.323 – server address, H.323 ID, phone number(E.164), password.
SIP – user information, server(proxy/registrar) information.
Sets Internet Sharing function.
Shows IP information registered with IP videophone and the current
network connection status.
PhoneBook
PhoneBook enables you to save the frequently used phone numbers and make direct
phone call while you search the menu. An IP Videophone may store up to 100 items, and
store the phone numbers of ‘Internet’, ‘Mobile’ and ‘Public’ in each item.
Use , to select PhoneBook menu and press ‘ENT’ to start PhoneBook function.
NOTE. SIP Videophone may store up to 70 items.
① View phone number list
In PhoneBook, use ST to select View Phone
Number List, and press XW or ‘ENT‘ (or press
) to display all the numbers registered in the
PhoneBook.
NOTE. View Phone Number List is performed only when
the numbers are in the PhoneBook.
You can select an item with ST. The selected
item becomes to be in bluish green, and the
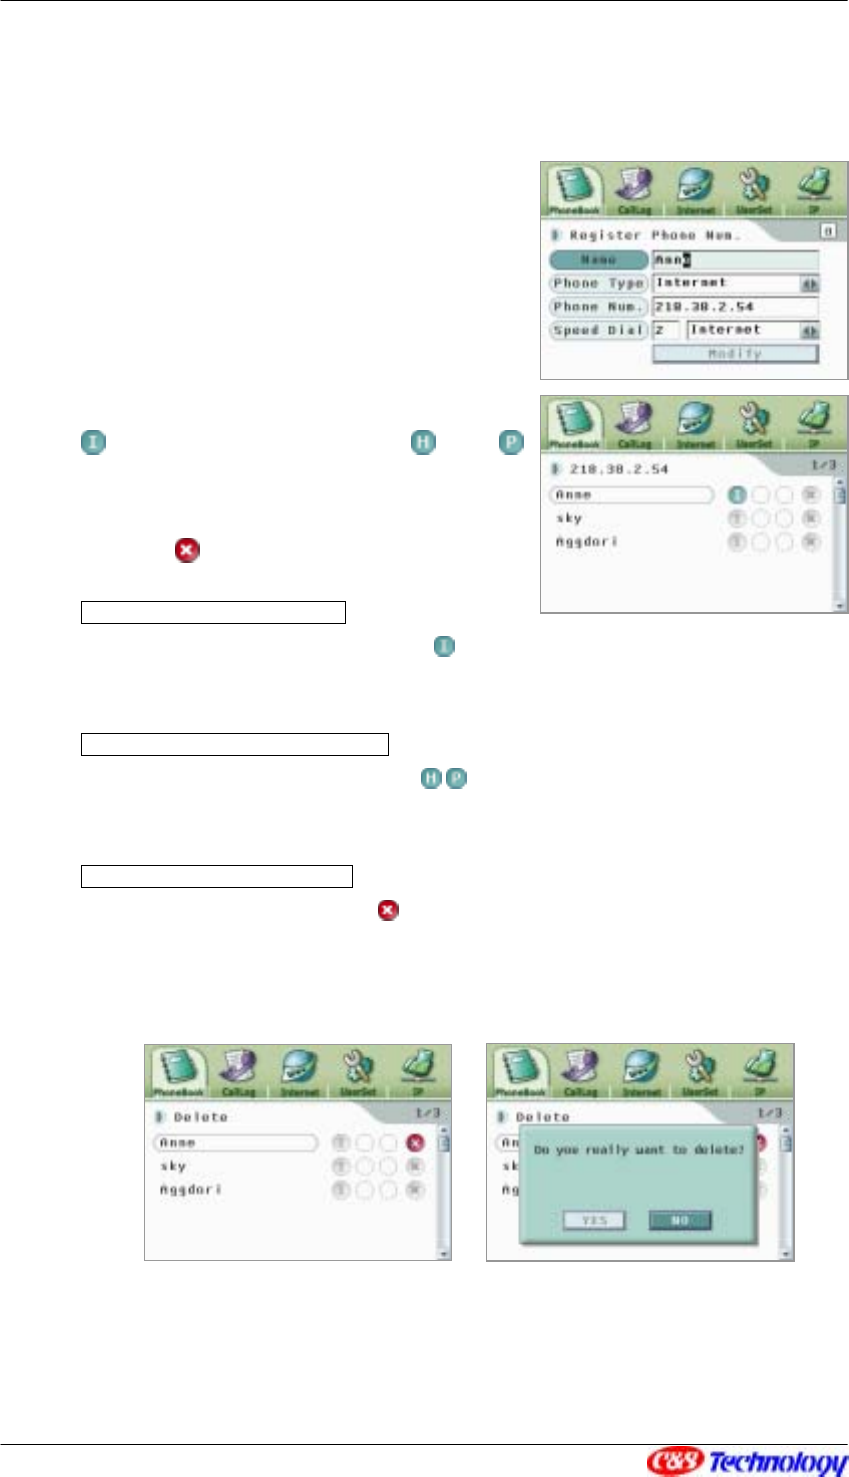
CIP-4500 User Manual 36
representative number is displayed on the top of the list.
If you press ‘ENT’ as the item list is selected, the
window on which you can modify the item is
displayed as in the right figure. You can move
between the items with ST, and after modifying
each item, click ‘Modify’ to save the modification.
Press XW as the item is selected to move to the
icon that indicates the phone number of each type.
indicates Internet phone and and
indicate mobile phone and public phone. On the top
of the list, the phone number of the selected type is
displayed. deletes the selected item.
Calling from PhoneBook to Internet
If you press ‘ENT’ as the Internet phone icon ( ) is selected, you can make a call in the Internet call
mode and talk through the speaker phone. If you want to talk though the handset, pick up the handset.
Calling from PhoneBook to Public Phone
If you press ‘ENT’ as the public phone icon ( ,) is selected, you can make a call in the public call
mode and talk through the speaker phone. If you want to talk though the handset, pick up the handset.
Deleting a number from PhoneBook
If you press ‘ENT’ as the delete icon ( ) is selected, a message ‘Do you really wish to delete?” is
displayed. If you select ‘YES’ with
XW
and press ‘ENT’, the selected item is deleted and a new phone
number list is displayed.
② Making an entry
CIP-4500 User Manual 37
In PhoneBook, use ST to select Register
Phone Number, and press XW or ‘ENT‘ (or press
). The phone number entry window is displayed,
and the available items are displayed in sky blue.
NOTE. If 100 items are registered in the PhoneBook, you
cannot perform registration of phone numbers.
After entering the ‘Name’, press T to select
‘Phone Type”. Select the phone type with XW
(Internet phone / mobile phone / public phone)
To enter the ‘Phone Num.’, press T.
In order to set ‘Speed Dial’ for the number, press
T.
You can set the representative number after entering the ‘Speed Dial’. Press T to move to
‘Rep.Num’ field, and set the ‘Rep.Num’ with XW. (Internet Phone / Mobile Phone / Public
Phone)
After finish entering data, move the cursor with ST to ‘Register’. The message
“Registered” appears on the screen, and then, the upper menu is displayed.
Click ‘EXIT’ if you want to stop entering data or to move to the previous menu.
NOTE. If you make a call to a speed dial number, the phone originates a call to the representative of
the speed dial number.
NOTE. If you select the speed number that is already in use, when you enter the ‘Register’ button, the
error message ‘Speed dial number in use. Enter, again.’ is displayed.
③ Searching phone number
You can search the numbers that meet the search
conditions. The conditions used in searching the
phone number include name, phone number and
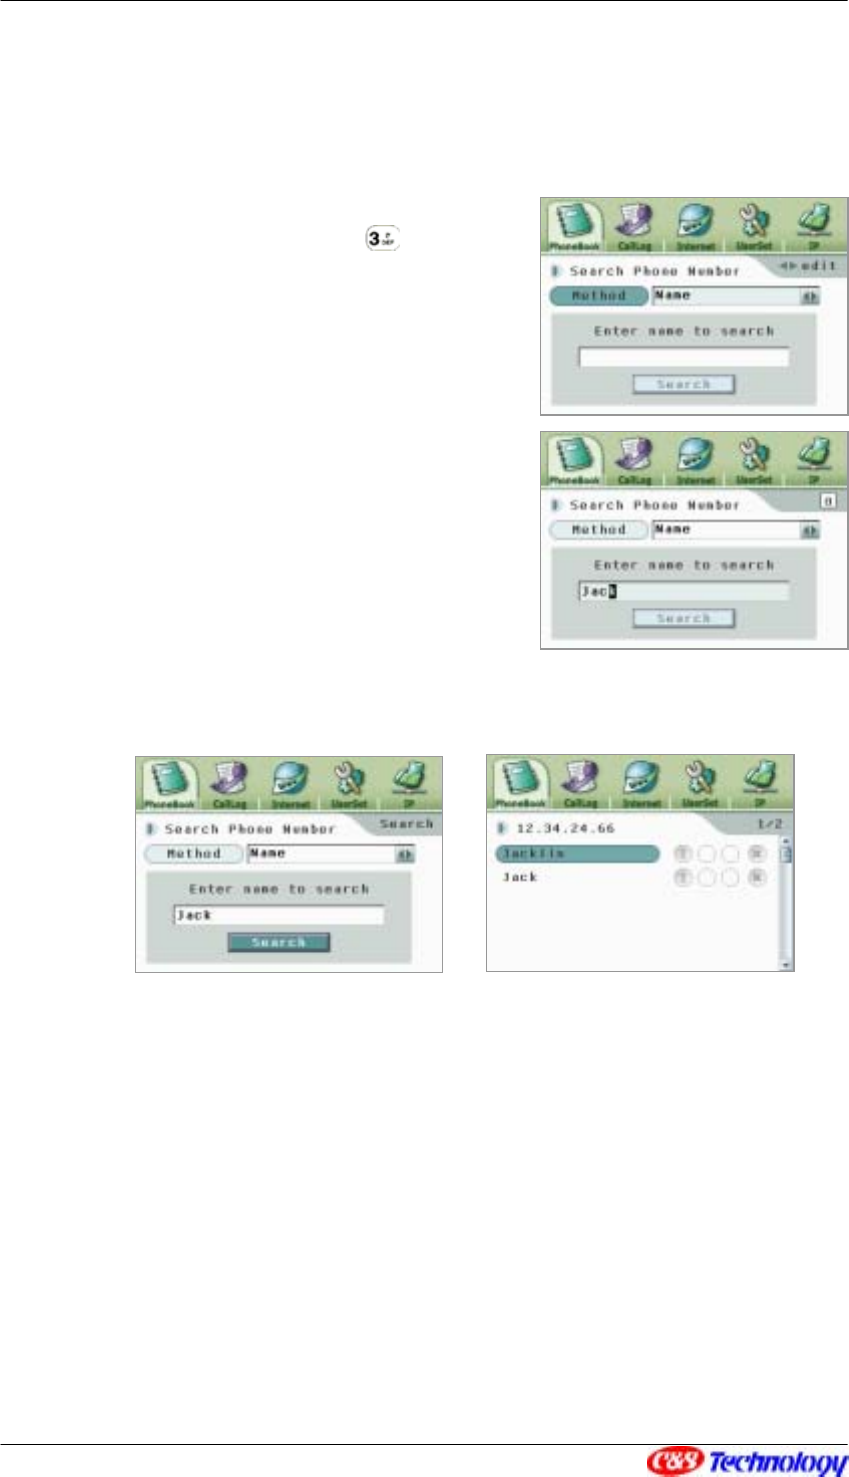
CIP-4500 User Manual 38
speed dial number. The phone numbers that meet the conditions are displayed in the list in
the order of registration.
In PhoneBook, select Search Phone Number
with ST, press XW or ‘ENT’ (or ) .
In order to enter conditions, move the cursor to
‘Method’, and select the conditions (Name/Phone
number/Speed dial number).
In order to enter name or number, move the cursor
with ST to the condition entry window.
In order to start search, move the cursor to
‘Search’ with ST, and press ‘ ENT’.
The number of items that match with the conditions
and the list are displayed on the window. Actions in
the list of search result are the same with View Phone Number List.
In order to stop entering or to return to the previous menu, press ‘EXT’.
NOTE. When searching a phone number with ’Name’, all the partially matching names are found.
NOTE. When searching a phone number with ’Phone Num.’, the window displays the matching phone
number.
NOTE. When searching a phone number with ‘Speed Dial’, any item that is bigger than the entered
speed dialing number is searched.
CIP-4500 User Manual 39
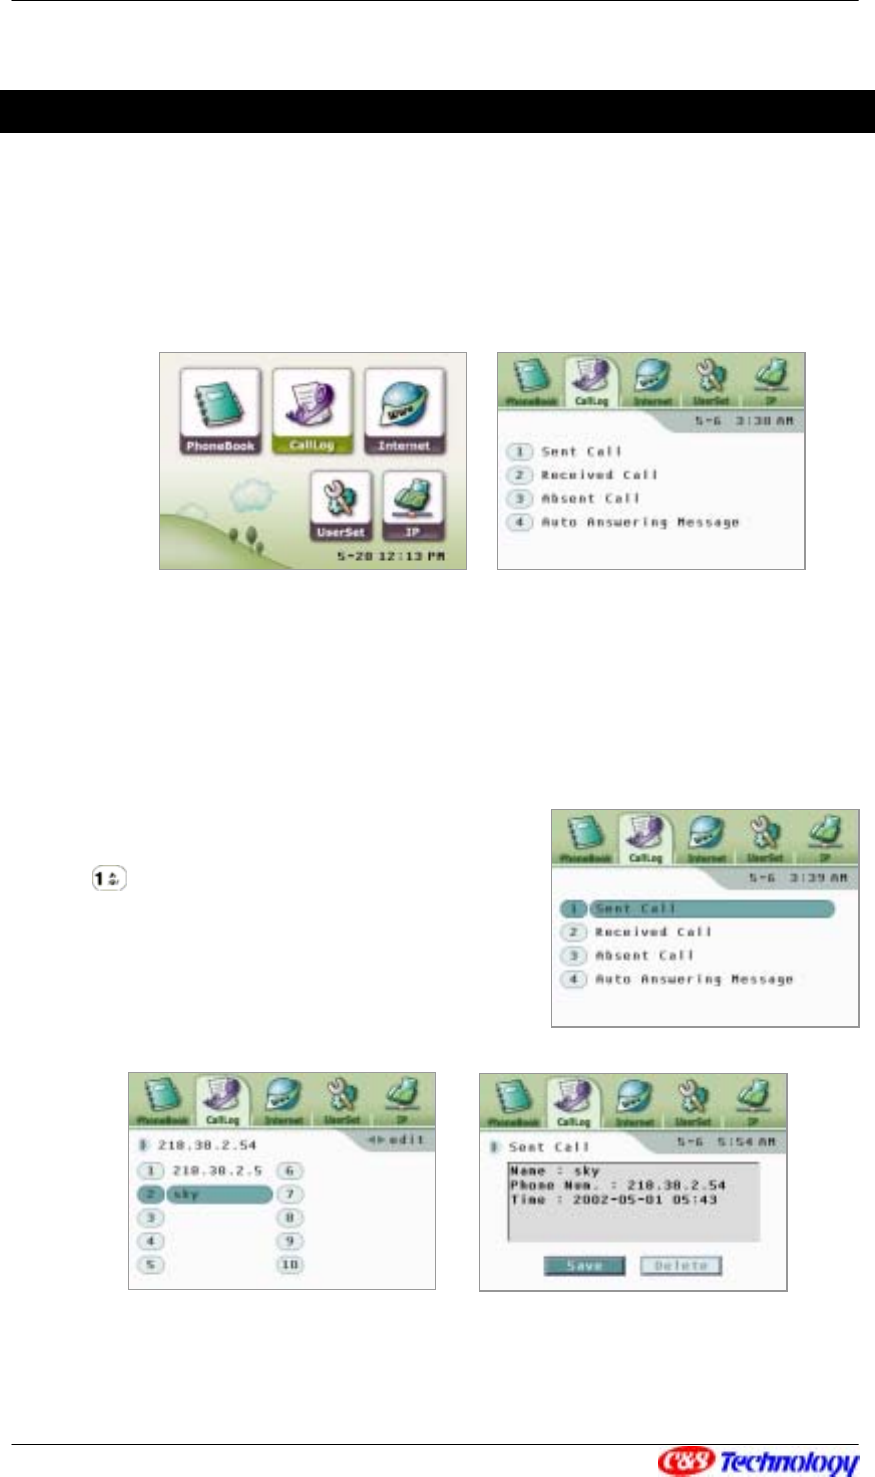
CallLog
The phone numbers of the recent calls are listed in CallLog. The IP Videophone has up to
10 calls in Sent Call, Received Call and Absent Call respectively. You can also read the
auto answering message.
Use XW to select CallLog menu and press ‘ENT’.
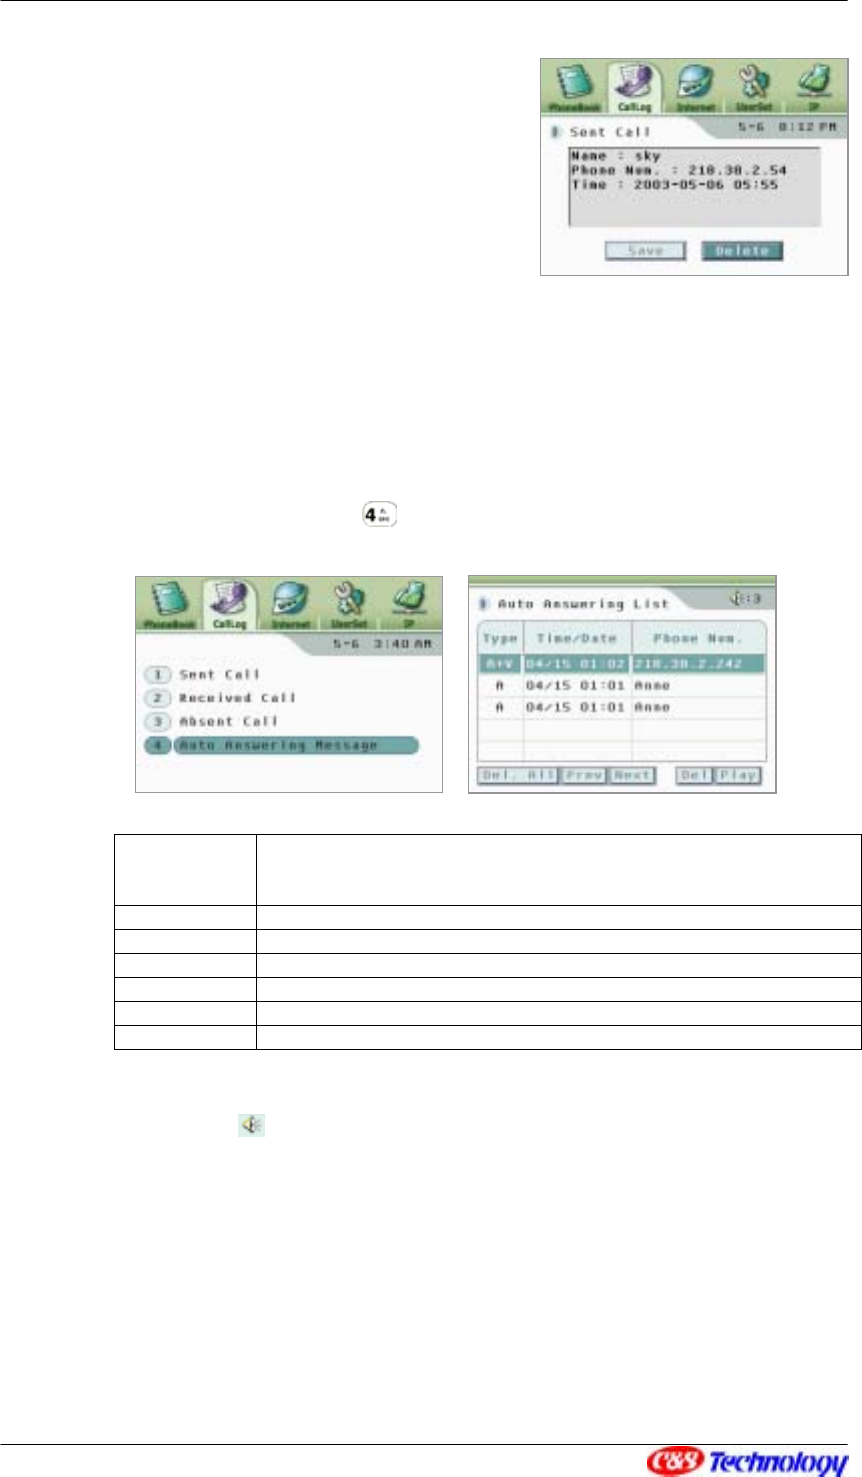
① Sent Call
Select Sent Call by using ST. Pressing XW or
‘ENT’ brings the call lists made recently. (Or press
.)
In order to see the detailed information of each
entry, press XW. Then you can check the name, the
phone number and the time.
Press ‘EXIT’ to exit the menu and return to the previous menu.
CIP-4500 User Manual 40
Calling from the Set Call list
Select the number with
ST
. You can make a call and talk through the speaker phone. If you want to
talk though the handset, pick up the handset.
NOTE. You can also make a call by pressing and holding the index. For example, if 1234567 is in
Index 7, press and hold to make a call.
② Received Call
Select Received Call by using ST. Pressing XW
or ‘ENT’ brings the call lists received recently. (Or
press .)
In order to see the detailed information of each
entry, press XW. Then you can check the name, the
phone number and the time.
Press ‘EXIT’ to exit the menu and return to the previous menu.
Calling from the Received Call list
Select the number with
ST
. You can make a call and talk through the speaker phone. If you want to
talk though the handset, pick up the handset.
NOTE. You can also make a call by pressing and holding the index. For example, if 1234567 is in
Index 7, press and hold to make a call.
③ Absent Call
Select Absent Call by using ST. Pressing XW or
‘ENT’ brings the call lists made recently. (Or press
.)
In order to see the detailed information of each
entry, press XW. Then you can check the name, the
phone number and the time.
Press ‘EXIT’ to exit the menu and return to the previous menu.

CIP-4500 User Manual 41
Calling from the Absent Call list
Select the number with
ST
. You can make a call and talk through the speaker phone. If you want to
talk though the handset, pick up the handset.
NOTE. You can also make a call by pressing and holding the index. For example, if 1234567 is in
Index 7, press and hold to make a call.
④ Saving a CallLog entry
In the detailed call log entry menu, you can add it into the PhoneBook.
Select ‘Save’, using XW, and press ‘ENT’.
In the Register Phone Number window, modify
the items.
Use ST to select ‘Modify’, and press ‘ENT’ to
register the modification in the PhoneBook.
NOTE. If the phone number has been already stored in
PhoneBook, “There is the same name or phone number. Do you wish to modify?” will be displayed. In
case you select ‘YES’, the Register Phone Number menu is displayed.
NOTE. In case that there is no room in PhoneBook, “There is no room to save in phone book.” will
be displayed.
⑤ Deleting a CallLog entry
In the detailed call log entry menu, you can delete it from the CallLog.
CIP-4500 User Manual 42
Select ‘Delete’ with XW, and press ‘ENT’.
After the message box with “Deleting…” is
appeared, the updated call log will be displayed.
⑥ Checking auto answer message
In Auto Answer mode, the IP Videophone saves the message of the called party. You can
check the auto answer message as below.
Select Auto Answering Message with ST. Pressing XW or ‘ENT’ brings the auto
answer message lists. (Or press .)
Type
Media type of the auto answer message.
A : Voice only, V : Video only
A+V : Voice and Video together
Time/Date Date and time of the received auto answer message.
Phone Num. Phone number of the called party.
Del. All Delete all the auto answer messages in the list.
Prev, Next Display previous or next page of the list.
Del Delete the selected auto answer message.
Play Play the selected auto answer message.
The number by on the upper right of the window indicates the total number of auto
answer messages.
Use XW to move the cursor between the menus.
Use ST to select an auto answer message. The selected auto answer message
becomes in bluish green.
Press ‘EXIT’ to go back to the previous menu.
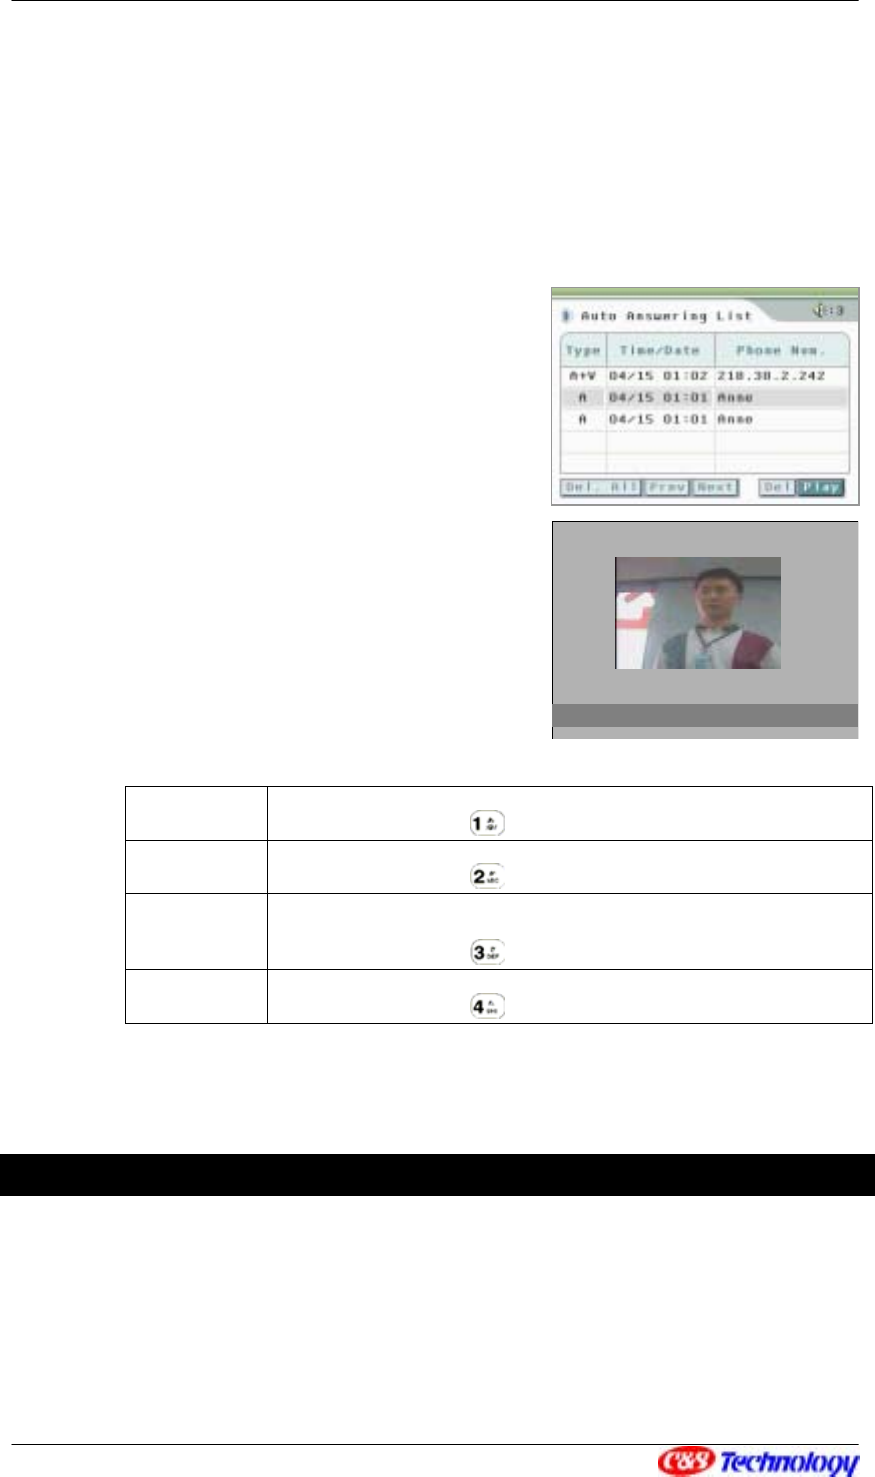
CIP-4500 User Manual 43
NOTE If no auto answer message is stored, the “No Saved Auto Answering” message is displayed.
⑦ Retrieving auto answer message
Select an auto answer message with ST and
press ‘ENT’, or select ‘Play’ with XW and press
‘ENT’.
If both video and voice are saved, the video is
displayed in the center of the window while the voice
is heard. If the voice is received without video, the
video screen remains black while the voice is heard.
You can use the following menus while retrieving
auto answer messages.
1: Review The auto answer message is played from the first.
You can also press to play the message.
2: Pause Stop playing the message.
You can also press to stop playing.
3: Del
Delete the auto answer message and display the auto answer
message list.
You can also press to delete a message.
4: Exit Return to the auto answer message list.
You can also press to exit the menu.
Internet (Optional)
The cHTML web browser and mail client are embedded in the videophone. You can access
the web with the cHTML browser, and can read and send mails with the mail client.
Auto Answering
|>>>>>>>>>>>>>> |
1:Review 2:Pause 3:Del 4:Exit
CIP-4500 User Manual 44
For the detailed instruction, refer to the <5. Using Browser (58p)> and <6. Mail
Services(63p)>
UserSet
You can choose the User Configuration to your preference. The settings are a Bell option,
Auto Answering options, a Time/Date setup, a Video/Audio Input path option, a wizard setup,
software upgrade and download, and a system initialization.
In the PIMS menu, select UserSet with XW, and press ‘ENT’.
Bell Select the type of bell.
Select the volume of bell.
Auto Answering Set the auto answering mode
Set the password for monitoring.
Call Setup
Set up the call bandwidth.
Set up the mute detection function.
Set the video transmission function.
Set the size of the video to be transmitted.
Set the rate of movement of video to be
transmitted.
A/V Input
Path Select the video input path.
Select the audio input path.
Time/Date
Set the network time server.
Determine whether to use the summer time, and
select the standard time.
Miscellaneous
Wizard Determine whether to use Wizard for network
setup at system booting.
Version
/Upgrade
Check the latest version of the software from the
server.
Download the new software.
System Setting System
Init. Initialize the system information.
CIP-4500 User Manual 45
① Bell setting
Use ST to select Bell in the UserSet menu and
press XW or ‘ENT’.(Or just press .)
In ‘Bell’, select one among 4 different kinds of
ringing sounds by using XW. Move down to
‘Volume’ with T or ‘ENT’.
Select the volume of the ringing sound in ‘Volume’
by using XW. The volume can be one of 5 levels.
Press ‘EXIT’ to exit the menu or go back to the
upper menu.
NOTE. In case that the volume is set as ‘0’, no
ringing sound is played.
② Auto answering mode
Use ST to select Auto Answering in the
UserSet menu and press XW or ‘ENT’. (Or just
press .)
If you want to turn on the auto answering mode,
set ‘ON’ in ‘On/Off’ with XW and move down to
‘Auto Ans.’ with T or ‘ENT’. Otherwise, select ‘OFF’
for ‘On/Off’ field.
In ‘Auto Ans.’, select the ringing count using XW or
input the number between 0 and 5. Move down to
‘Password’ with T or ‘ENT’.
‘Password’ is required to set up the monitoring
function for the auto answering mode. Enter 4 digits
of password. “Enter, again” is displayed to confirm
CIP-4500 User Manual 46
the password. If the two passwords are matched, “Saved” is displayed.
Press ‘EXIT’ to exit the menu or go back to the upper menu.
NOTE. ‘If ‘On/Off’ set ‘OFF’, the ‘Auto Ans.’ field and
‘Password’ will be deactivated.
NOTE. If Bell of ‘Auto Ans.’ is set to 0, the monitoring
function is activated automatically. ‘Password’ is
meaningful only when the monitoring function is on.
NOTE. If the second password is not matched with the first password, then ‘Incorrect !’ message will be
displayed.
NOTE. If the auto answering function is on, the REGISTER lamp on the phone blinks.
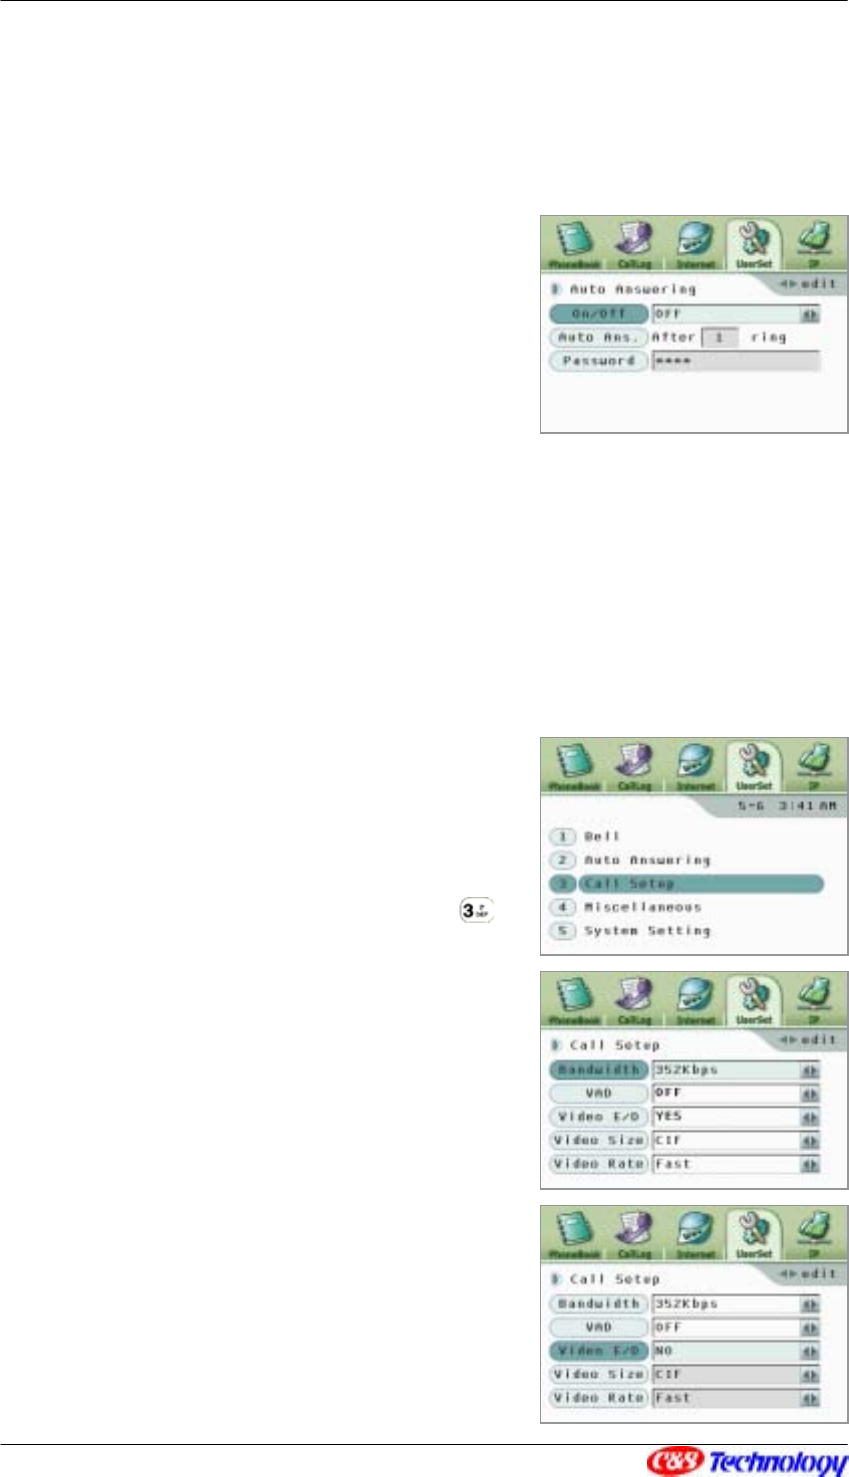
③ Call setup
Set up the options to be applied to IP video call.
Use ST to select Call Setup in the UserSet
menu and press XW or ‘ENT’.(Or just press .)
In ‘Bandwidth’, select the value with XW
(128,192,256,352,512,752 Kbps). This bandwidth is
applied to both voice and video data transmission.
To move to ‘VAD’ use T or ‘ENT’.
The mute detection function detects the mute
section during the call, and stops transmitting the
voice data to the other party. Use XW to select On
or Off. To move to ‘Video E/D’, use T or ‘ENT’.

CIP-4500 User Manual 47
Set ‘ON’ or ‘OFF’ of Video transmission with XW. If
it is set to Off, no video can be transmitted/received
during a call, and ‘Video Size’ and ‘Video Rate’ are
disabled. If ‘Video E/D’ is set to ‘YES’, use T or
‘ENT’ to move to ‘Video Size’.
In ‘Video Size’, select the video size with XW.
Video size is either QCIF or CIF. QCIF is the small sized screen and CIF is the large sized
screen. Use T or ‘ENT’ to move to ‘Video Rate’.
In ‘Video Rate’ select the video rate with XW. In ‘Video Rate’ you can select the speed of
movement; Fast/Normal/Slow. Press ST or ‘ENT’ to save the setting.
Press ‘EXIT’ to exit the menu or go back to the upper menu.
NOTE. The faster the video rate, the picture quality becomes coarser. On the contrary, the slower the
video rate, the picture quality becomes finer.
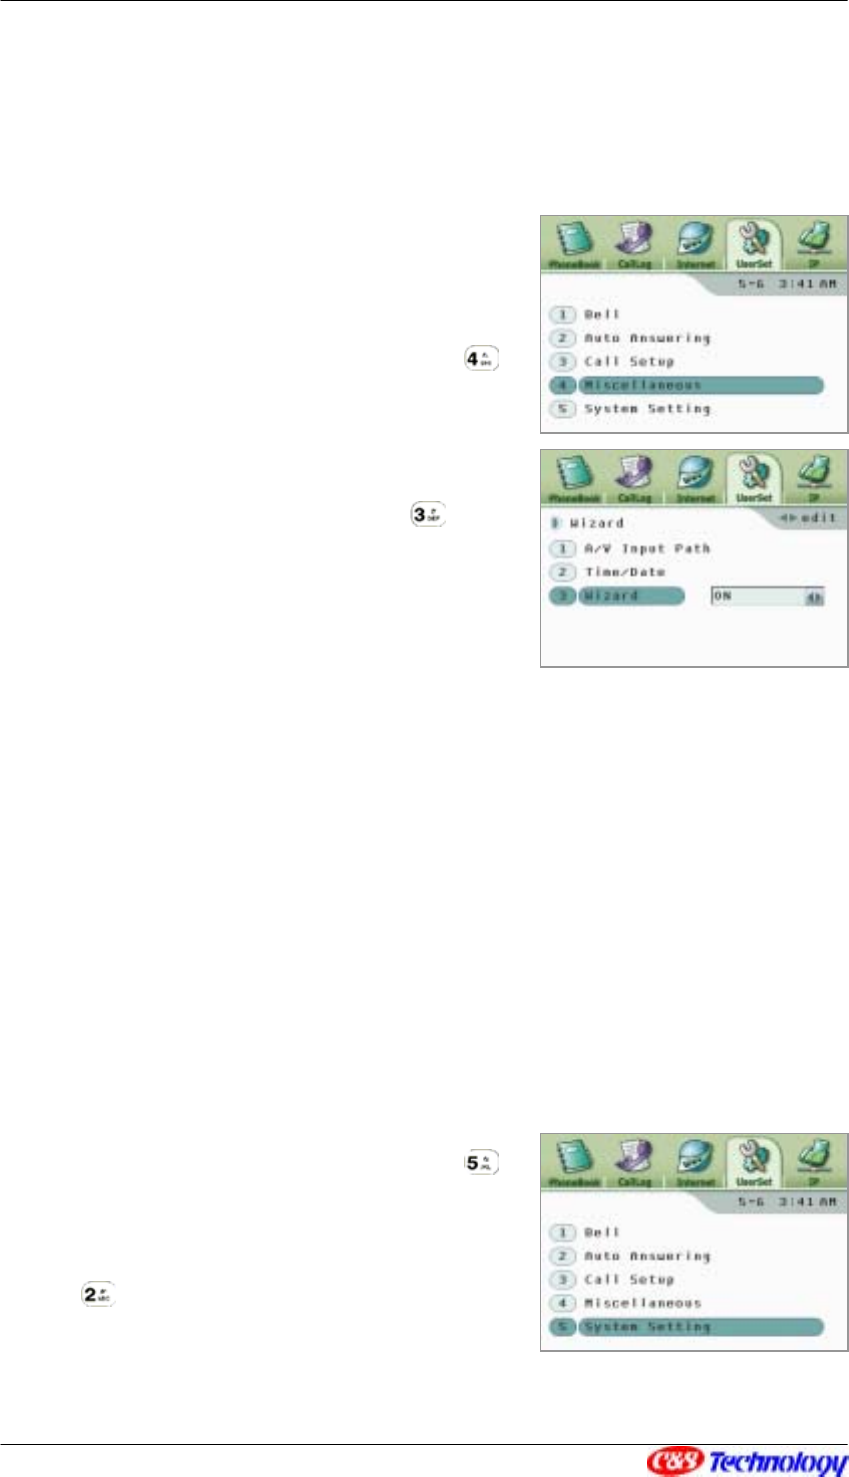
④ A/V Input Path Setting
Use ST to select Miscellaneous in the UserSet
menu and press XW or ‘ENT’. (Or just press .)
Press ST to select A/V Input Path in the
Miscellaneous and press XW or ‘ENT’. (Or just
press .)
In ‘Video In’, use XW to select internal camera
(Internal) or external camera (External). Use T or
‘ENT’ to move to ‘Audio In’.
In ‘Audio In’, use XW to select internal audio
system (Internal) or external audio system (External).
Press ‘EXIT’ to exit the menu or go back to the
upper menu.

CIP-4500 User Manual 48
⑤ Time/Date Setting
The IP Videophone receives the current time from the
Internet time server. In this menu, you can set the
options to be applied to the time of the Internet time
server.
Use ST to select Miscellaneous in the UserSet
menu and press XW or ‘ENT’. (Or just press .)
Press ST to select Time/Date in the
Miscellaneous and press XW or ‘ENT’. (Or just press
.)
In ‘D.S.T’, use XW to select whether to apply the
summer time. Use T or ‘ENT’ to move to ‘G.M.T’.
In ‘G.M.T’, use XW to select the standard time of the zone where the IP Videophone is
installed.
In ‘Server1’, enter the address of the network time server. The IP Videophone has the
default network time server information. You can designate the time server to which the IP
Videophone will access. Use T or ‘ENT’ to move to ‘Server2’ if you want to enter another
time server.
Press ‘EXIT’ to exit the menu or go back to the upper menu.
NOTE. You can enter IP or domain name of the time server.
NOTE. If ‘Server1’ and ‘Server2’ are left blank, the IP Videophone receives time information from the
default time server.
CIP-4500 User Manual 49
⑥ Wizard Setting
The IP Videophone provides the wizard menu for
network setting when the system is rebooted.
Use ST to select Miscellaneous in the UserSet
menu and press XW or ‘ENT’. (Or just press .)
Press ST to select Wizard in the Miscellaneous
and press XW or ‘ENT’. (Or just press .)
Use XW to selected ‘ON’/’OFF’ of wizard function.
Press ‘EXIT’ to exit the menu or go back to the
upper menu.
NOTE. If the Wizard is set to ‘ON’, the wizard menu is started when the system is rebooted. Once the
wizard function is used, it is automatically set to ‘OFF’.
⑦ Program Version/Upgrade
NOTE. For details of software upgrade, refer to <7. Software Upgrading (70 p)>.
⑧ System Init.
Use ST to select System Setting in the UserSet
menu and press XW or ‘ENT’. (Or just press .)
Press ST to select System Init. in the System
Setting and press XW or ‘ENT’. (Or just press
.)
Enter the password, and press ‘ENT’.
CIP-4500 User Manual 50
If the password is correct, the “System is being
initialized” is displayed. If the password is incorrect
the “Incorrect password. Enter, again.” is displayed.
Press ‘EXIT’ to exit the menu or go back to the
upper menu.
NOTE. Initializing the system will initialize the system
information.
IP
In User Configuration main menu, use XW to select IP menu and press ‘ENT’.
Default
Basic network configuration required to connect the IP Videophone
to Internet.
• Select the Internet access method (LAN with stationary IP, LAN
with dynamic IP, and ADSL)
Advanced Set the additional information for connection to Internet.
• Set the secondary DNS address.
Internet Phone
Set the information required for registration to Internet phone
service.
Set the server address.
Set the H.323 ID and E.164 formatted phone number for
registration of the phone to the Internet phone service.(H.323)
Set the information of server (Proxy/Registrar). (SIP)
Set the password for authentication to the Internet phone service.
Set the emergency server.
Set the prefix for connection to the Internet phone service.
CIP-4500 User Manual 51
Internet
Sharing
Select whether to use the Internet sharing function.
Set the external Internet sharer information.
Set the Internet sharing information in the IP Videophone.
View Internet
Status
In this menu, the current IP configuration of videophone is shown –
IP address, Subnet mask, Gateway address, DNS address, MAC
address.
NOTE. This menu necessary to use the videophone.
① Default Internet Configuration
Use ST to select Default in the IP menu and
press XW or ‘ENT’. (Or just press .)
In ‘Type’, using XW, select the Internet access
type to be used in IP Videophone ; Static IP,
Dynamic IP and ADSL. If the type is set to
‘LAN(Static IP)’, you may go to sub-items with T.
LAN(Static IP)
In ’Type’, use
ST
to select IP Addr’, ‘Sub. Mask’, ‘Gateway’,
‘DNS Addr’, and set the values.
LAN(Dynamic IP)
The phone, using DHCP, is assigned with IP Addr’, ‘Sub.
Mask’, ‘Gateway’, ‘DNS Addr' dynamically from the server.
ADSL
In ‘Type’, use
ST
to move to ‘ID’, ‘Password’, ‘Service
PPPoE’
NOTE. If authentication is required, enter the service name in
the ‘PPPoE’ field.
CIP-4500 User Manual 52
Press ‘EXIT’ to exit the menu or go back to the
upper menu. If the IP setting is changed, the
message in the right is displayed. If you want to
change IP configuration, click ‘YES’ and press ‘ENT’.
NOTE. If the access type is changed, reboot the system to apply new IP information.
NOTE. Most of the sites to be visited on Internet are expressed in the domain names. In order to
access to those sites successfully, the domain name should be resolved by the DNS server. For this,
you have to input IP address of the DNS server in this menu. If you are connected to the ADSL, Cable
Network or LAN with dynamic IP, the DNS address will be given by the server.
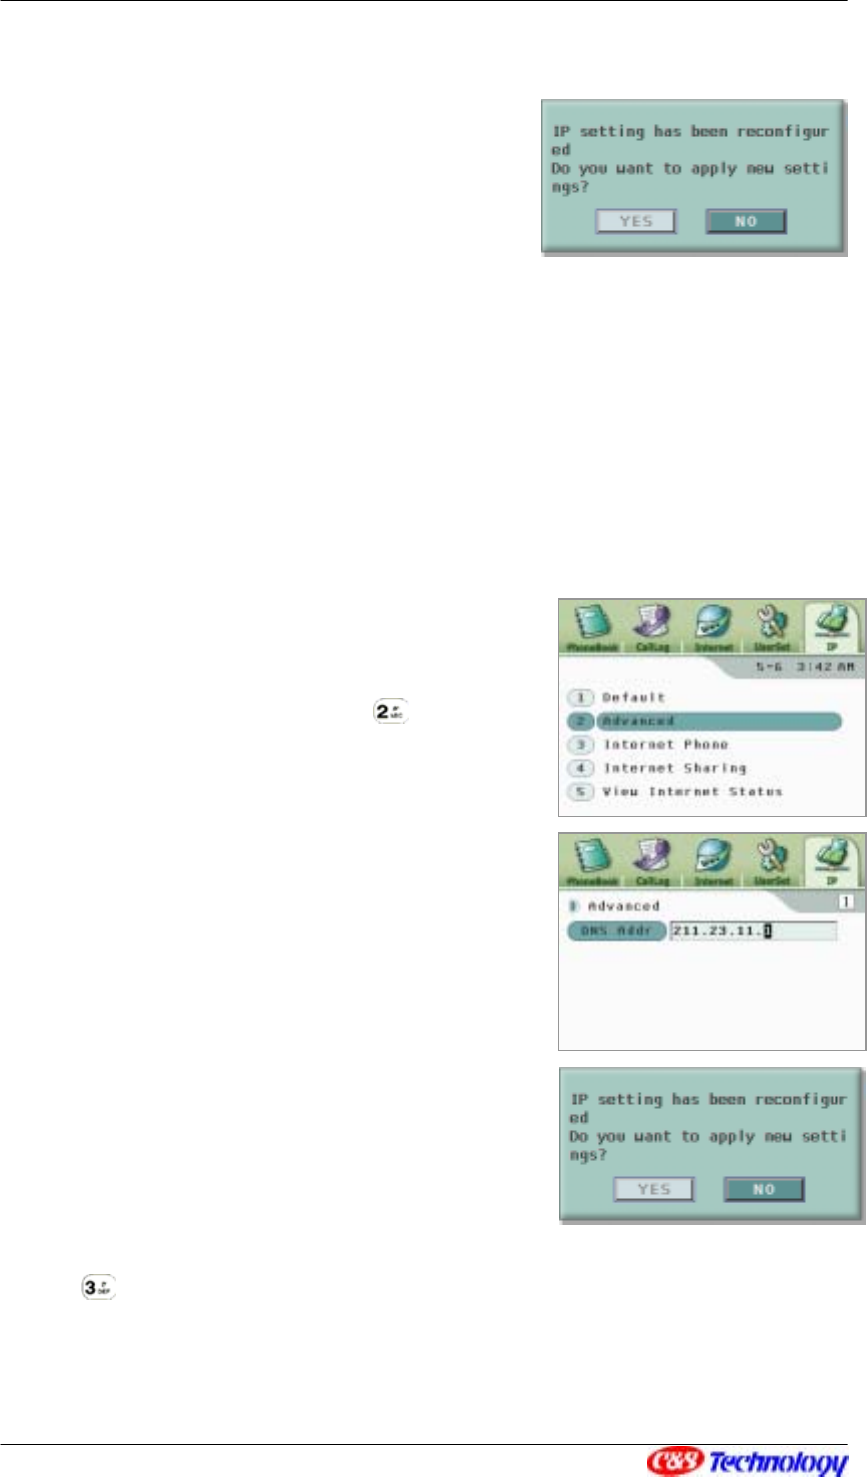
② Advanced Internet Configuration
Use ST to select Advanced in the IP menu and
press XW or ‘ENT’. (Or just press .)
In ‘DNS Addr’, enter IP address of the DNS server to
be used in emergency.
Press ‘EXIT’ to exit the menu or go back to the upper
menu. If the IP setting is changed, the message in the
right is displayed. If you want to change IP
configuration, click ‘YES’ and press ‘ENT’.
NOTE The secondary DNS is used when the main DNS
server is in defect.
③ Internet Phone Configuration (H.323)
Use ST to select Internet Phone in the IP menu and press XW or ‘ENT’. (Or just press
.)
In ‘G.K Addr1’ enter the server address of the Internet phone service provider’s network.
To move to ‘H.323 ID’, press T or ‘ENT’.
CIP-4500 User Manual 53
In ‘H.323 ID’, set H.323 ID to be used in
authentication for access to Internet phone service.
Press T or ‘ENT’ to move to ‘E.164’.
In ‘E.164’, enter the phone number to be used in
authentication for access to Internet phone service.
Press T or ‘ENT’ to move to ‘Password’.
In ‘Password’, enter the password to be used in
authentication for access to Internet phone service.
Press T or ‘ENT’ to move to ‘G.K Addr2’. ‘
In ‘G.K Addr2’, enter the address of the server to
which the phone is to access when the Internet
phone service network server is abnormal. Press T
or ‘ENT’ to move to ‘Area Code’.
In ‘Area Code’, enter the prefix to be used in
access to the Internet phone service network.
Press ‘EXIT’ to exit the menu or go back to the
upper menu. If the IP setting is changed, the
message in the right is displayed. If you want to
change IP configuration, click ‘YES’ and press ‘ENT’.
NOTE. All the items must have the values given by the
service provider when the phone is registered to the
Internet phone service. If any of the item is not received from the service provider, it must be left blank.
NOTE. If the IP Videophone is successfully registered to the Internet phone service, the REGISTER
lamp is on.
④ Internet Phone Configuration (SIP)
You must set the basic user information for SIP call.
If the phone is subscribed to the Internet phone
service, the server information must be set up.
CIP-4500 User Manual 54
User Information
Use ST to select Internet Phone in the IP menu
and press XW or ‘ENT’. (Or just press .)
In order to enter user information, select User
Information with ST in Internet Phone, and press
XW or ‘ENT’. (Or just press .)
In ‘User Name’, enter user ID. Press T or ‘ENT’ to
move to Password.
In ‘Password’, set the password used for
authentication for access to Internet phone server.
The password is displayed as ‘*’. Press T or ‘ENT’
to move to Password ‘Address’.
In ‘Address’, enter domain name or IP address of SIP used for access to Internet phone
service. Press T or ‘ENT’ to move to ‘Auth. ID’.
In ‘Auth. ID’, enter authentication id used for access to Internet phone service. Press T or
‘ENT’ to move to ‘Realm’.
In ‘Realm’, show the realm information given by Internet phone server.
Press ‘EXIT’ to exit the menu or go back to the upper menu. If the IP setting is changed,
the following message box is displayed.
NOTE. You must enter ‘User Name’ and ‘Address’ for SIP call.
NOTE. All the items must have the values given by the service provider when the phone is
registered to the Internet phone service. If any of the item is not received from the service
provider, it must be left blank.
Server Configuration
Use ST to select Internet Phone in the IP menu and press XW or ‘ENT’. (Or just press
.)
CIP-4500 User Manual 55
In order to enter server information, select Server
Configuration with ST in Internet Phone, and
press XW or ‘ENT’. (Or just press .)
Use XW to select the type of server to be used in
SIP. (Proxy/Registrar) Press T or ‘ENT’ to move to
‘Address’.
In ‘Address’, enter IP address or domain name of the Internet phone service. Press T or
‘ENT’ to move to ‘Port’.
In ‘Port’, enter the port number of the Internet phone server.
Press ‘EXIT’ to exit the menu or go back to the
upper menu. If the IP setting is changed, the
following message box is displayed. If the IP setting
is changed, click ‘YES’ and press ‘ENT’.
NOTE. All the items must have the values given by the service provider when the phone is registered
to the Internet phone service. If any of the item is not received from the service provider, it must be left
blank.
NOTE. If the IP Videophone is successfully registered to the Internet phone service, the REGISTER
lamp is on.
⑤ Internet Sharing Configuration
Use ST to select Internet Sharing in the IP
menu and press XW or ‘ENT’. (Or just press .)
CIP-4500 User Manual 56
In ‘Type’ use XW to set the sharer type to be used in IP Videophone. You can select ‘OFF’
(No Internet sharer is used.), ‘External NAT’ (external sharer) or ‘Internal NAT’ (Internal
Internet sharer). If you select ‘External NAT’ or ‘Internal
NAT’, press T to set the sub-item.
External NAT
In ’Type’, press
ST
to go to ‘Global IP’, and set the external
sharer IP address. Refer to <Connecting IP Videophone in
the Private Network (73p)> for details.
Internal NAT
In ’Type’, press
ST
to go to ‘Host IP’, and set the external
sharer IP address. Refer to <Using ‘Share’ function
embedded in IP videophone (76 p)> for details.
Press ‘EXIT’ to exit the menu or go back to the
upper menu. If the IP setting is changed, the
following message box is displayed. If you want to
change IP configuration, click ‘YES’ and press ‘ENT’
NOTE If the sharer type is changed, you must reboot the
system.
⑥ View Internet Status
Use ST to select View Internet Status in the IP
menu and press XW or ‘ENT’. (Or just press .)
The window shows IP address, Subnet Mask,
Gateway, DNS address and MAC address.
Press ‘EXIT’ to exit the menu or go back to the
upper menu.
NOTE. In case that the DNS server or the gate
way router doesn't respond to the ping request of
the IP videophone, it may be represented as disc
onnected from Internet even though the IP video

CIP-4500 User Manual 57
phone works correctly.
CIP-4500 User Manual 58
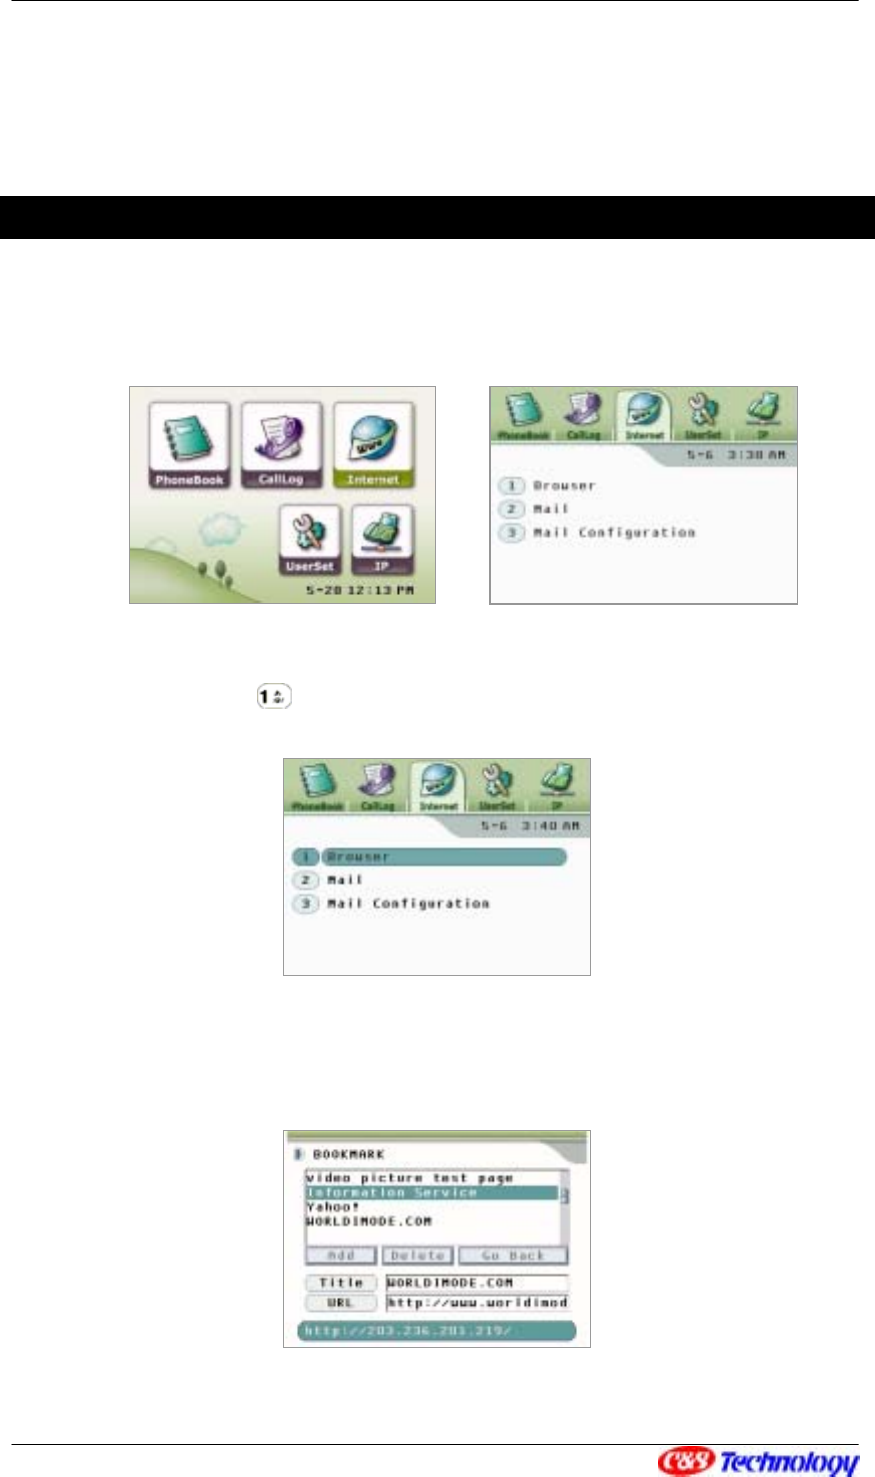
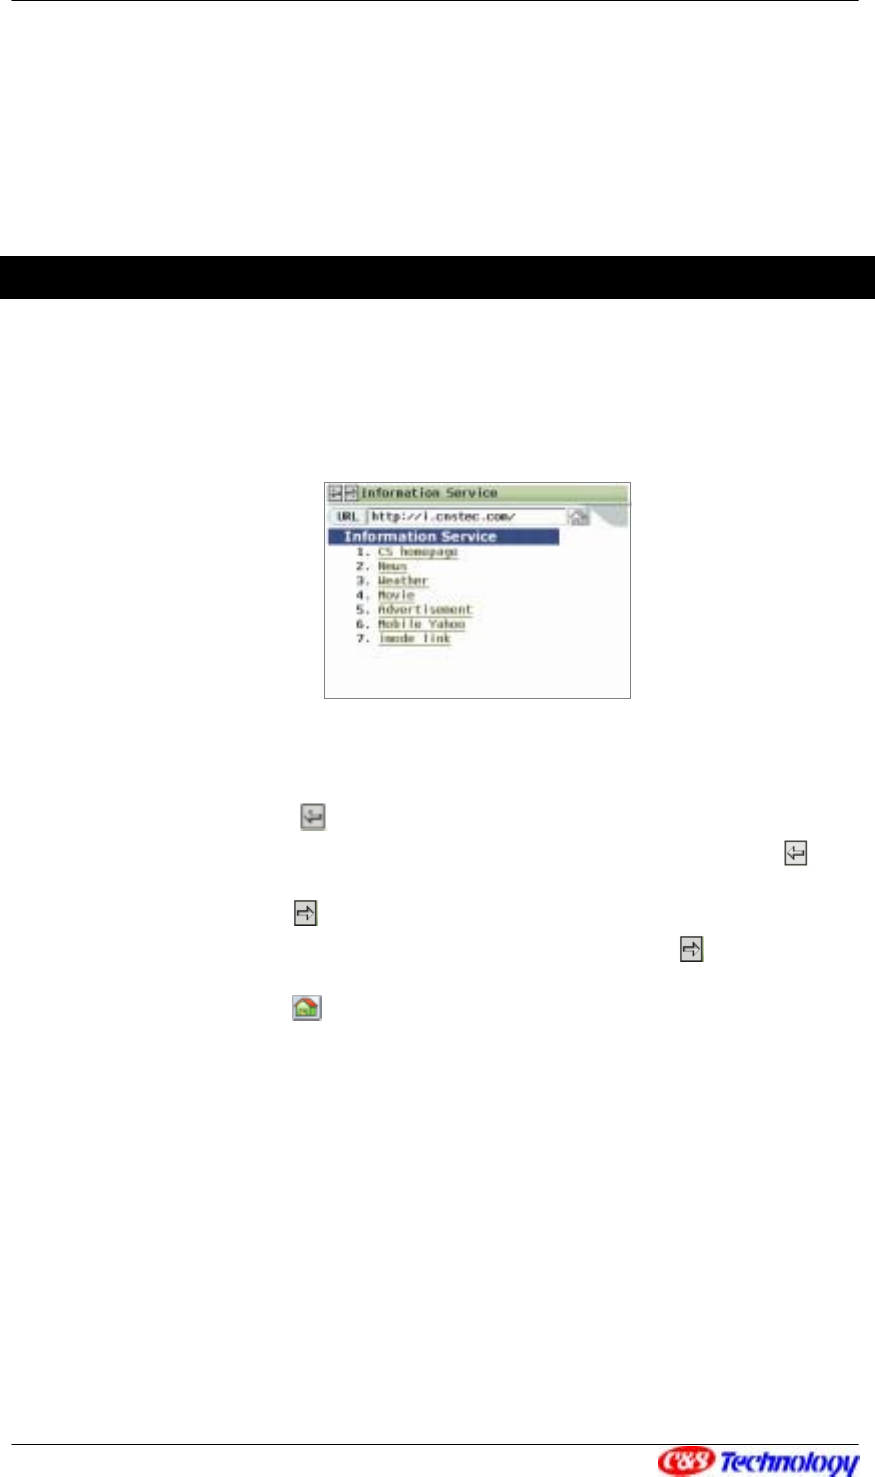
5. Using Browser (Optional)
Getting Started
• Move to Internet menu from Personal Information Setting menu using ◀▶.
• Press ‘ENT’ in Internet menu, and select Brower using ST, and then press ‘ENT’.
(or press .)
• Type URL directly or connect to Web page using Bookmark that is already saved.
If you get information on how to type URL, refer to <Type URL (59p)>.
CIP-4500 User Manual 59
Keypads in a Web Browser
The followings are keypads used in a web browser.
Number key Enables you to enter numbers.
1aA Enables you to change character input mode in order of Numeric,
Lowercase, Capital.
TAB Provides a shortcut for moving between items that you can select or
input in a web browser.
EXIT Enables you to exit a web browser and go to Internet menu.
ENT Enables you to execute the selected item.
▲ ▼ – Enable you to scroll up/down if a web page exceeds one
screen.
Arrow Keys ◀ ▶ - Enable you to scroll to the left/right if the size of web page
exceeds one screen .
Type URL
If you open a web page, enter the address in a
following procedure.
• Press ‘TAB’ and go to ‘URL’ input window.
• Press ‘1aA’ and change to Numeric or
English mode.
• Enter a web page address.
Ex) www.vizufon.com
->▶-> ->▶-> -> -> ->
w w w . v i
-> -> ->…
z u
CIP-4500 User Manual 60
• Press ‘ENT’ to move.
View Browsers
If you are successfully connected to the site that corresponds to the URL, the web page
appears as shown below.
• If you press ‘TAB’, you can skip between icons, URL windows and links on a page.
• If you move to and press ‘ENT’, you can go to the previous page. If current
page is the site you visited first after executing browser, you cannot go to .
• If you move to and press ‘ENT’, you can go to the next page. If current page is
your latest site after executing the browser, you cannot go to .
• If you move to and press ‘ENT’, you can go to Bookmark screen.
• If you move to URL window using ‘TAB’ key, you can directly type URL of the
corresponding site. For information on how to type URL, refer to <Type URL (60p)>.
• If you move to links on a web page using ‘TAB’ and press ‘ENT’, you can go to the
appropriate web page. If any number is attached to the link, enter the number
directly and move to the page to which the appropriate link refers.
• If a web page is bigger than IP videophone screen, scroll to the left/right using ◀▶
or scroll up/down using ST.
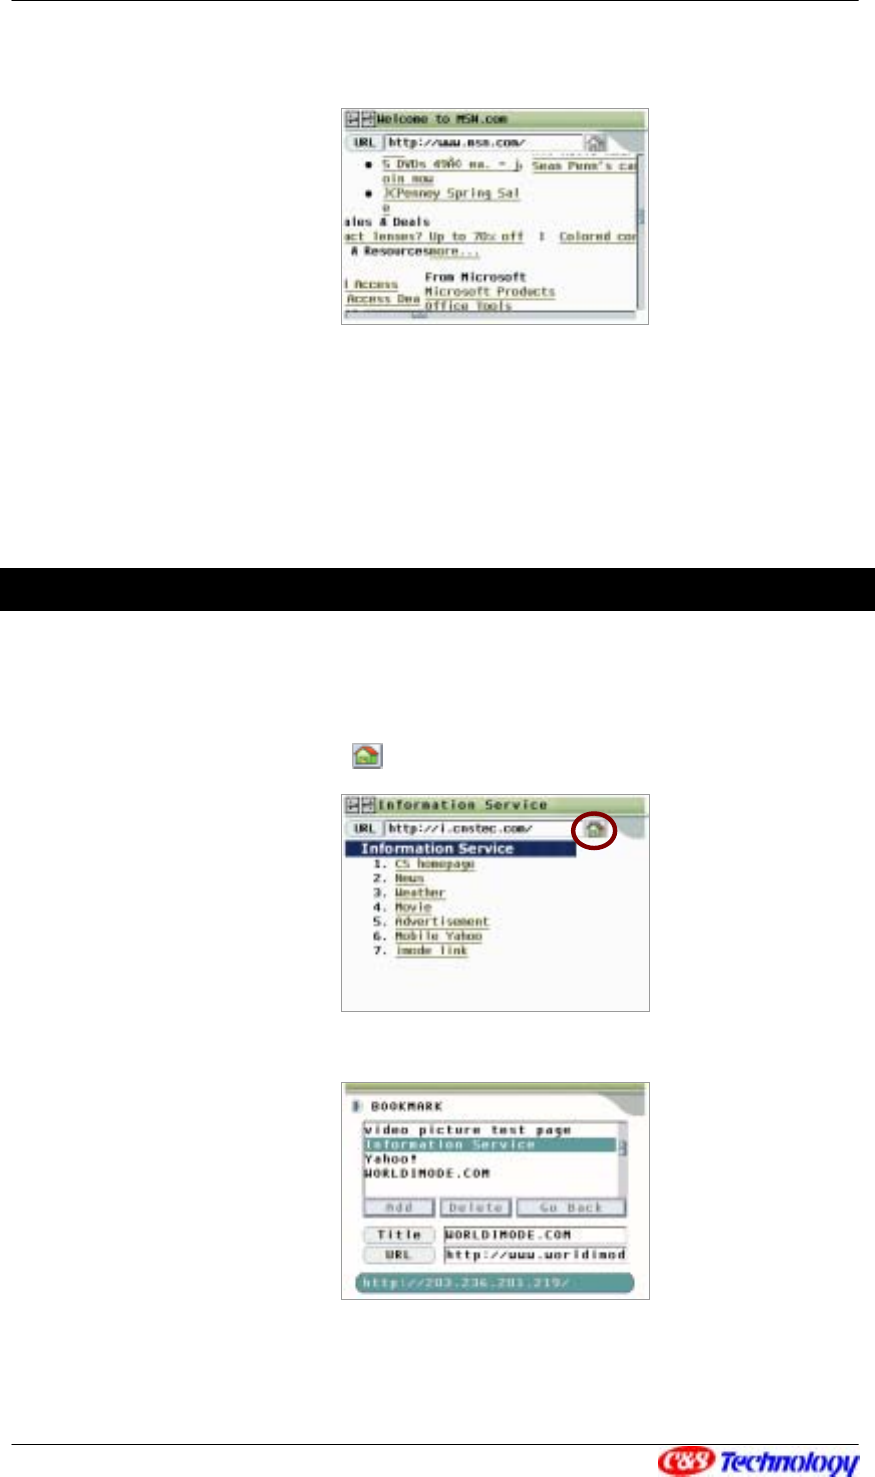
CIP-4500 User Manual 61
NOTE. IP videophone browser supports a compatible HTML. Thus, it correctly displays web pages
made in a compatible HTML. Simplified general web pages can be shown and some of them are not
correct.
Using Bookmark
Move to Bookmark as follows:
• Press ‘TAB’ to select .
• Press ‘ENT’ and move to Bookmark menu.
1 Move to Bookmark
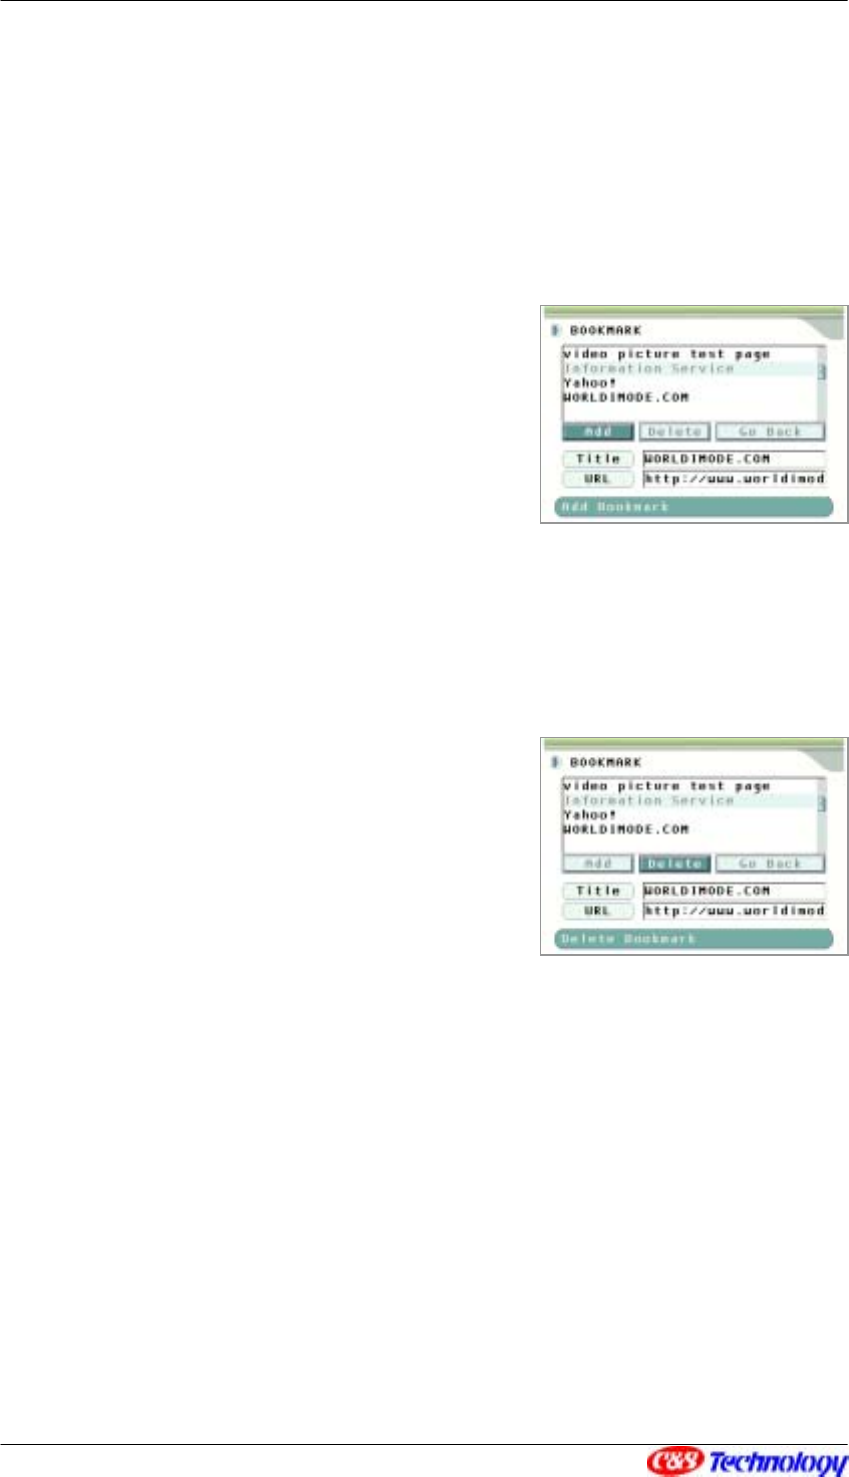
CIP-4500 User Manual 62
• Select your target web page using ▲▼ if you want to move. Then, the URL that
corresponds to currently selected item appears on the status bar of Bookmark.
• Press ‘ENT’ to move to the selected web page.
2 Add Bookmark
• In ‘Title’/URL’ columns on a Bookmark
page, there appears title and address of the
web page you will add.
• If you change the information, press ‘TAB’
and move to ‘Title’/’URL’ input window.
• Select ‘Add’ using ‘TAB’ and press ‘ENT’ to
save.
NOTE. Web browser’s bookmark feature lets you store up to 5 addresses.
3 Delete Bookmark
• Move to Bookmark List using ‘TAB’.
• Use ▲▼ to select target web pages you
will delete. The bookmarked URLs appear
on the status bar of Bookmark.
• Press ‘TAB’, and move to ‘Delete’ using
XW if focused on ‘Add’.
• If you press ‘ENT’, the web page is deleted
from Bookmark List.
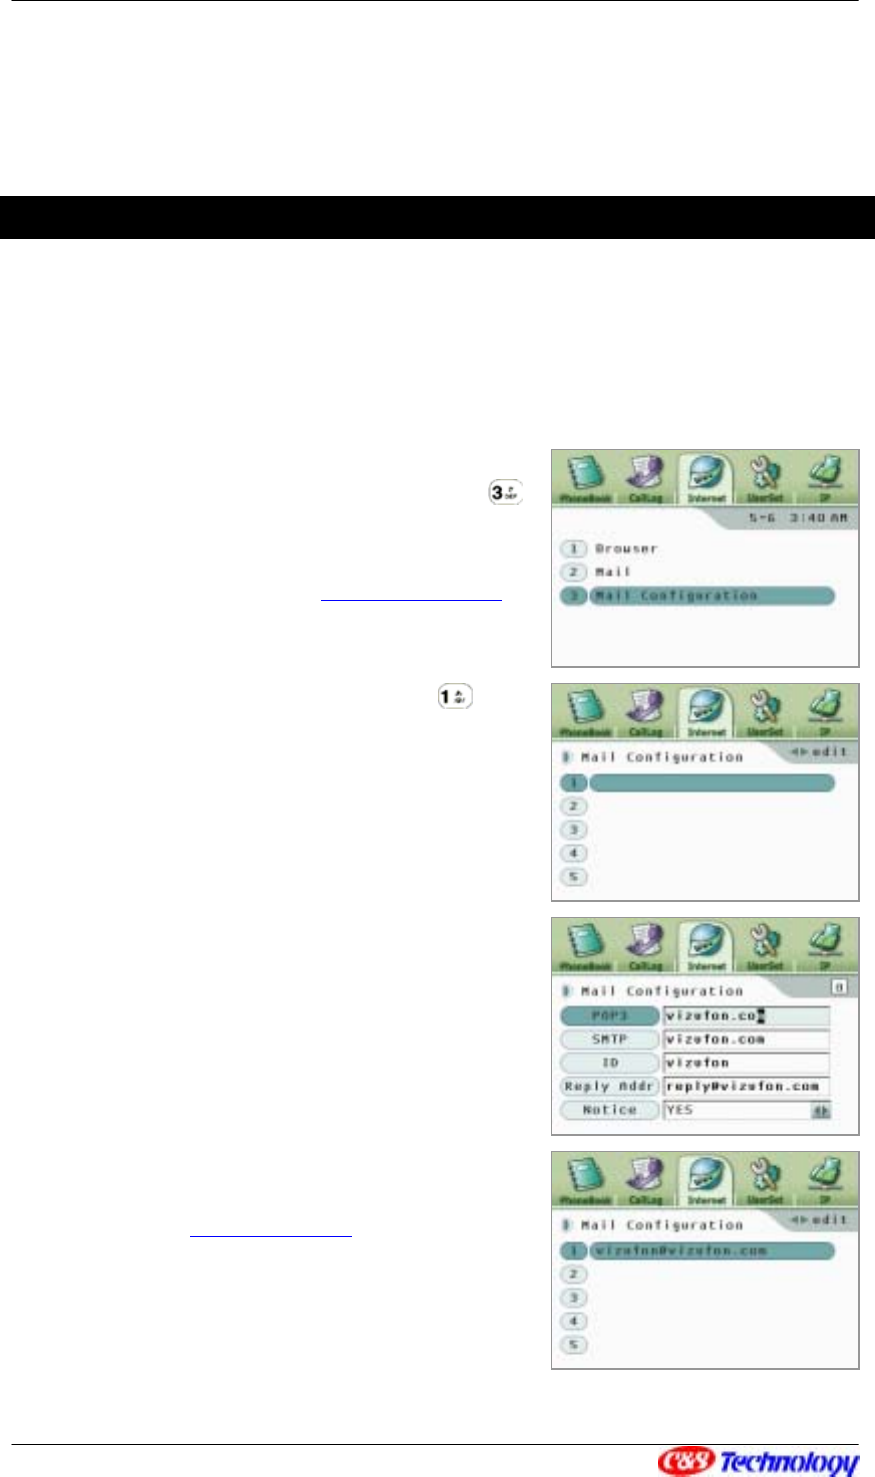
CIP-4500 User Manual 63
6. Mail Services (Optional)
Setting Mail User Configuration
Mail of Internet menu supports POP3 and SMTP protocols. Mail Configuration is a menu
that sets POP3 server address, SMTP server address and mail ID information required for
mail function and saves up to 5 IDs in IP videophones.
Select Mail Configuration from Internet menu
using ST, and press XW or ‘ENT’. (or press .)
Press XW or ‘ENT’ at a target position using ST.
If you want to enter NO. 1 vizufon@vizufon.com, for
example, press ‘ENT’ when NO. 1 is highlighted,
and then you can enter POP3 server address,
SMTP server address and ID. (or press .)
Enter POP3 server address to receive mails at
‘POP3’. You can move to ‘SMTP’ menu by clicking
on T.
Enter SMTP server address to send mails at
‘SMTP’. You can move to ‘ID’ menu by clicking on
T.
Type mail ID in ‘ID’ menu. You can go to ‘Reply
Addr’ by clicking on T.
Enter such an email address as to be received in
‘Reply Addr’. At this time, make sure you enter both
ID and SMTP address to be received. If the reply
address is reply@vizufon.com, in other words, enter
complete address in ‘Reply Addr’ menu. You can go
to ‘Notice’ by clicking on T.
If a new mail arrives at the appropriate ID in
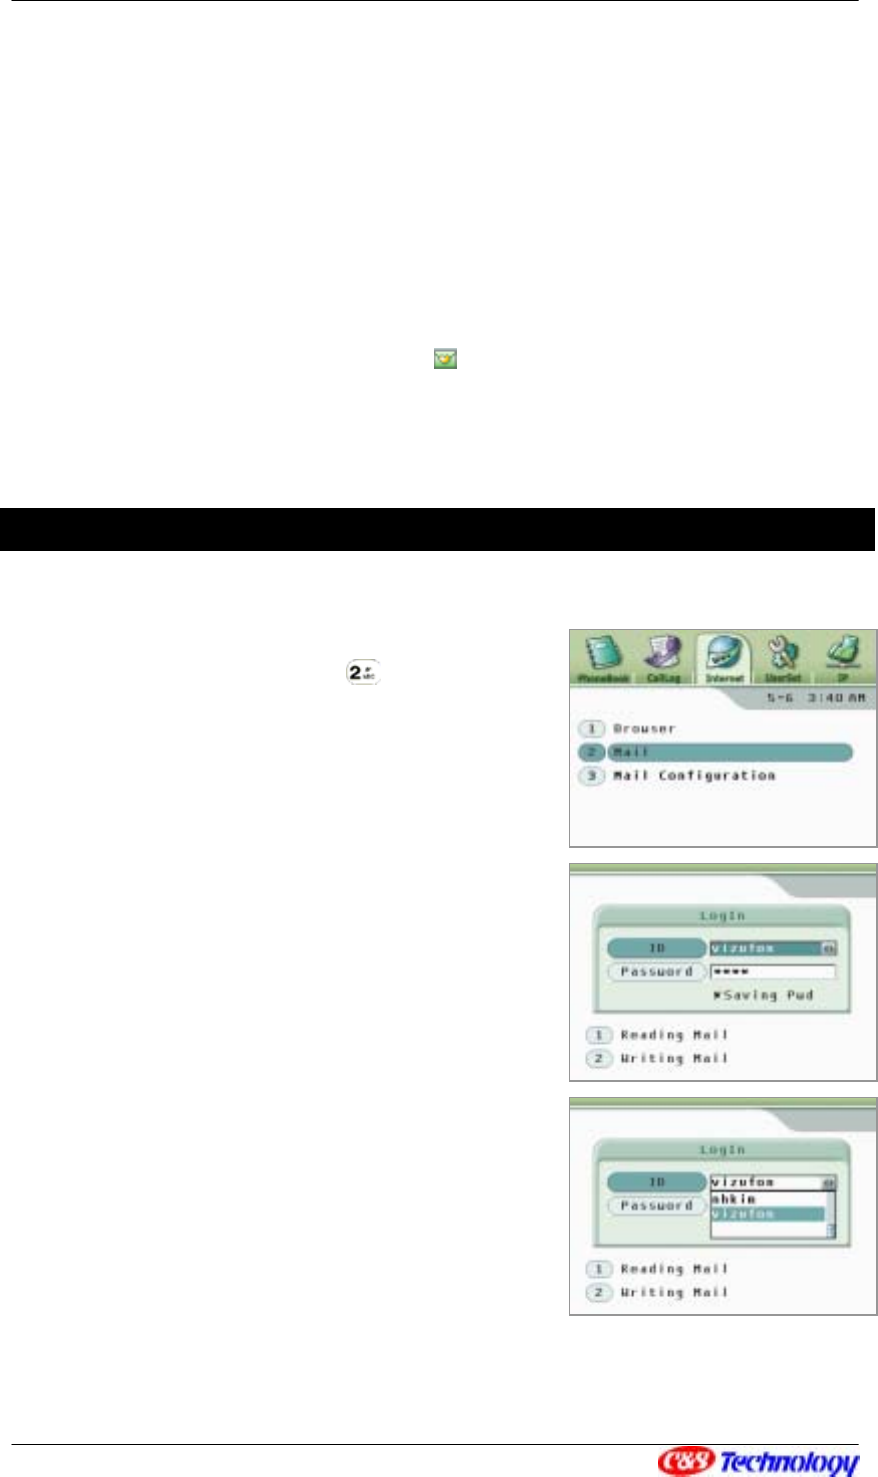
CIP-4500 User Manual 64
‘Notice’, select whether to use ‘Notice’ function using XW.
If you want to stop typing or move to previous menu, press ‘EXIT’.
NOTE. Values entered in ‘Reply Addr’ are automatically inserted to receiver’s address when
performing ‘Reply’ of ‘Reading Mail’ menu. If ‘Reply Addr’ remains blank, write Reply Address referring
to values entered in SMTP.
NOTE. If you select Mail Notice function, appears on GUI main screen when a new mail
arrives at the appropriate mail account.
Logging into the Mail Server
Select Mail from Internet menu using ST, and
press XW or ‘ENT’. (or press .)
If you press XW or ‘ENT’ in ‘ID’, the entered ID list is
shown in Mail Configuration. Select the desired mail
ID using ST and press ‘ENT’. If you want to move to
‘Password’, press T.
Enter password at ‘Password’ item and move to
‘Saving Pwd’ by clicking on T.
Decide if you will save password typed in ‘Password’
in ‘Saving Pwd’ using XW. If you want to move to
‘Reading Mail’, click on T.
NOTE If you save password, you need not enter password
again to access to the server later.
If you want to stop typing or move to previous menu,
click on ‘EXIT’.
NOTE. Mails in mail server are maintained even after you
checked them.
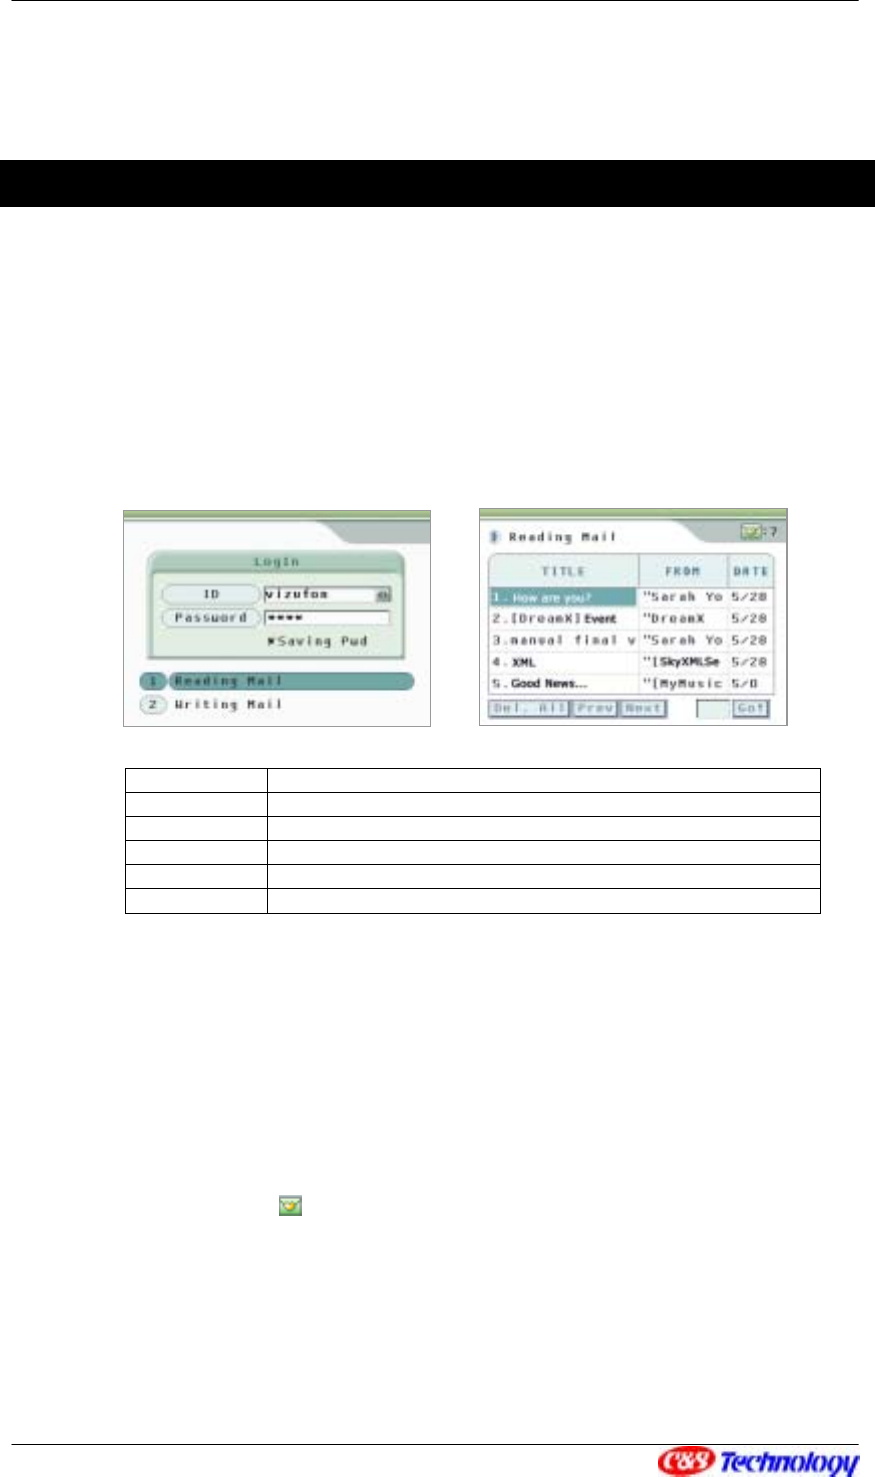
CIP-4500 User Manual 65
Reading Mail
NOTE. Mail function is available only if POP3, SMTP and ID information are configured in Mail
Configuration.
① View Mail List
Select Reading Mail from LogIn using ST, and press XW or ‘ENT’.
TITLE The title of mail.
FROM Sender’s mail address.
DATE Date when mail is delivered.
Del.All Move to menu for deleting all the mails.
Prev, Next Read previous/next list of current mail by pages.
Go Read designated mails directly from total mails.
If you press ‘ENT’ in ‘Prev’ or ‘Next’ using XW, you can see previous/next list of current
mails by pages.
Move from mail to mail using ST.
Move between mail lists and menus using ‘TAB’ key.
The number next to on the right top means total number of mails.
If you want to move to previous menu, press ‘EXIT’.
NOTE If there are no previous or next page lists, a message window “There is no desired information”
appears when you press ‘Prev’ or ‘Next’.
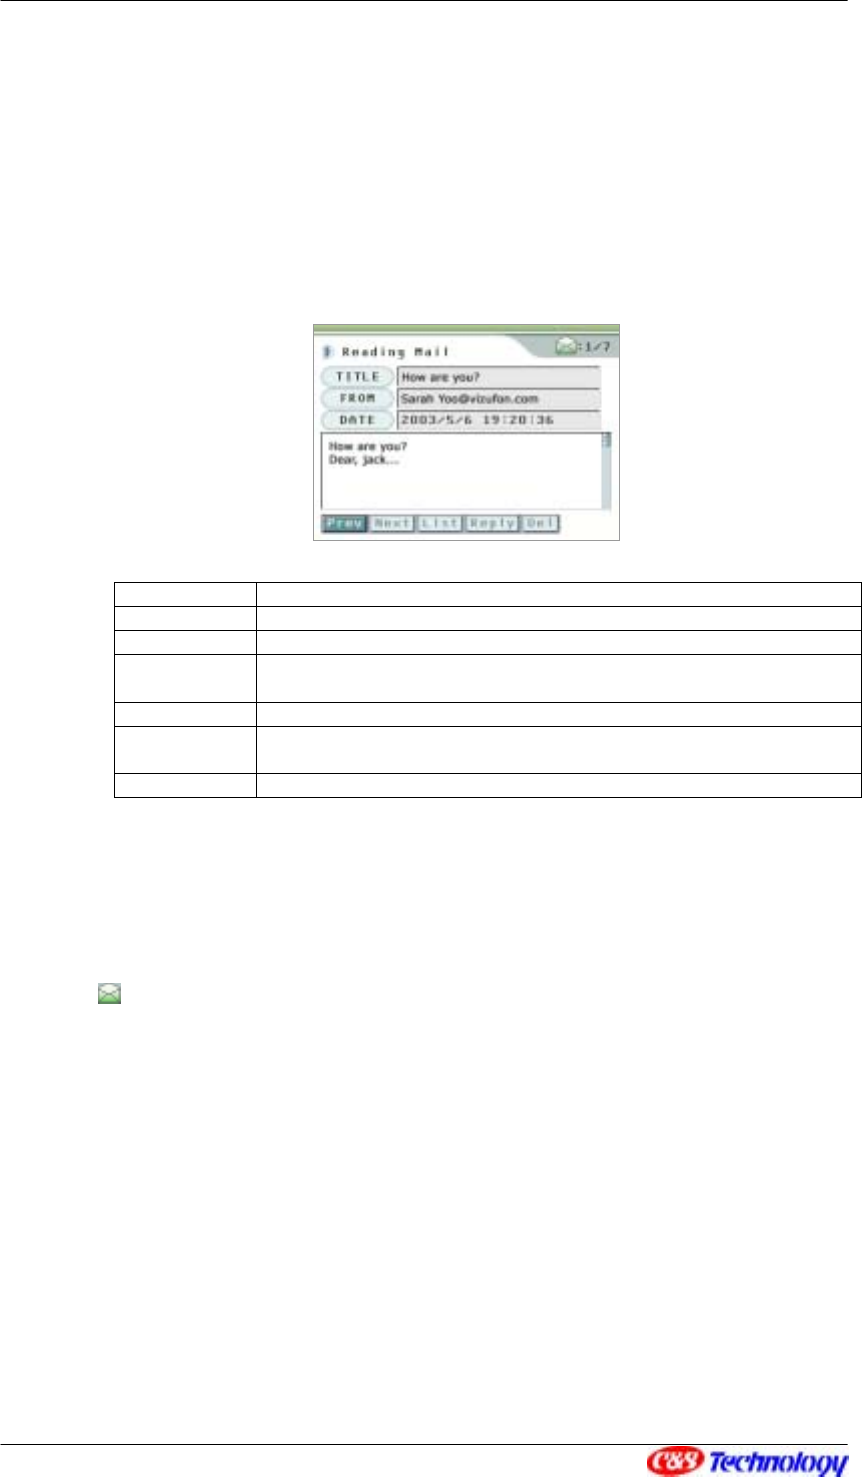
CIP-4500 User Manual 66
② View Mail
Select your mail item from Mail List using ST, and press ‘ENT’ or enter the number of
appropriate mail. Click on ‘ENT’ when ‘Go’ is selected.
TITLE The tile of mail
FROM Sender’s mail address
DATE Date when mail is delivered
Prev/
Next
Read previous/next mail of current mail
List Move to mail list menu.
Reply Reply to current mail.
Move to ‘Mail Write’ screen.
Del Move to menu for deleting current mail.
Move between menus (Prev, Next, List, Reply, Del) in View Mail using XW.
Scroll mail contents using ST.
on the right top means ‘current mail number/total number of mails’.
If you want to move to previous menu, press ‘EXIT’.
NOTE. You cannot see ‘Previous’ mail at the first mail and you cannot either see ‘Next’ mail at the last
mail.
③ Send Reply
Select ‘Reply’ from View Mail using XW and press ‘ENT’.
Move from item to item in ‘Reply’ using ‘TAB’.
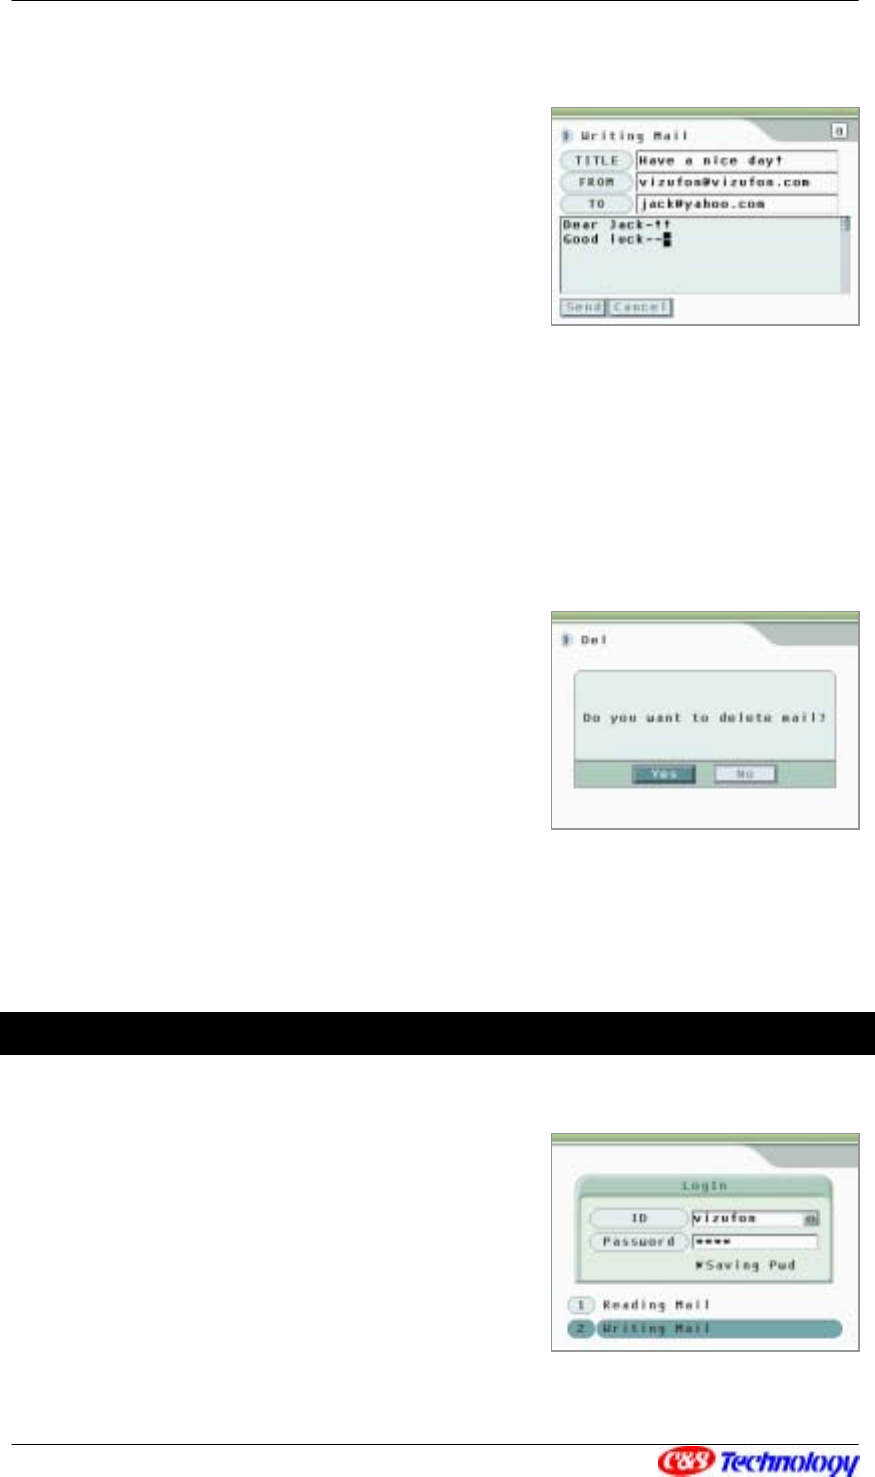
CIP-4500 User Manual 67
Move to Mail Edit window with ‘TAB’ key and then
write a mail.
After that, move to ‘Send’ using ‘TAB’ key and
press ‘ENT’. Then, the mail will be delivered to ‘TO’s
mail address.
If you stop typing or move to previous menu, press
‘EXIT’.
NOTE. ‘Title’, ‘Sender’ and ‘Receiver’ are set by default.
④ Delete Mail
Select ‘Del’ from View Mail using XW and press
‘ENT’.
If you select ‘YES’ and press ‘ENT’, the mail is
deleted.
If you cancel Delete Mail, select ‘NO’ and press
‘ENT’ or press ‘EXIT’.
NOTE. If you execute ‘Del. All’ from View Mail List, all mails are deleted.
Writing Mail
Select Writing Mail from Login using ST, and
press XW or ‘ENT’.
Enter ‘TITLE’. If you want to move to ‘FROM’,
press ‘TAB’.
‘FROM’ is set by default to login mail address. If
you want to move to ‘TO’, press ‘TAB’.

CIP-4500 User Manual 68
Enter sender’s e-mail address in ‘TO’ item. If you
want to write Mail, press ‘TAB’.
Write a mail.
If you move to ‘Send’ or ‘Cancel’ using ‘TAB’ and
press ‘ENT’, you can send mail or cancel Write Mail.
If you stop typing or move to previous menu, press ‘EXIT’.
NOTE, You can attempt to send mail by clicking on ‘ENT’.
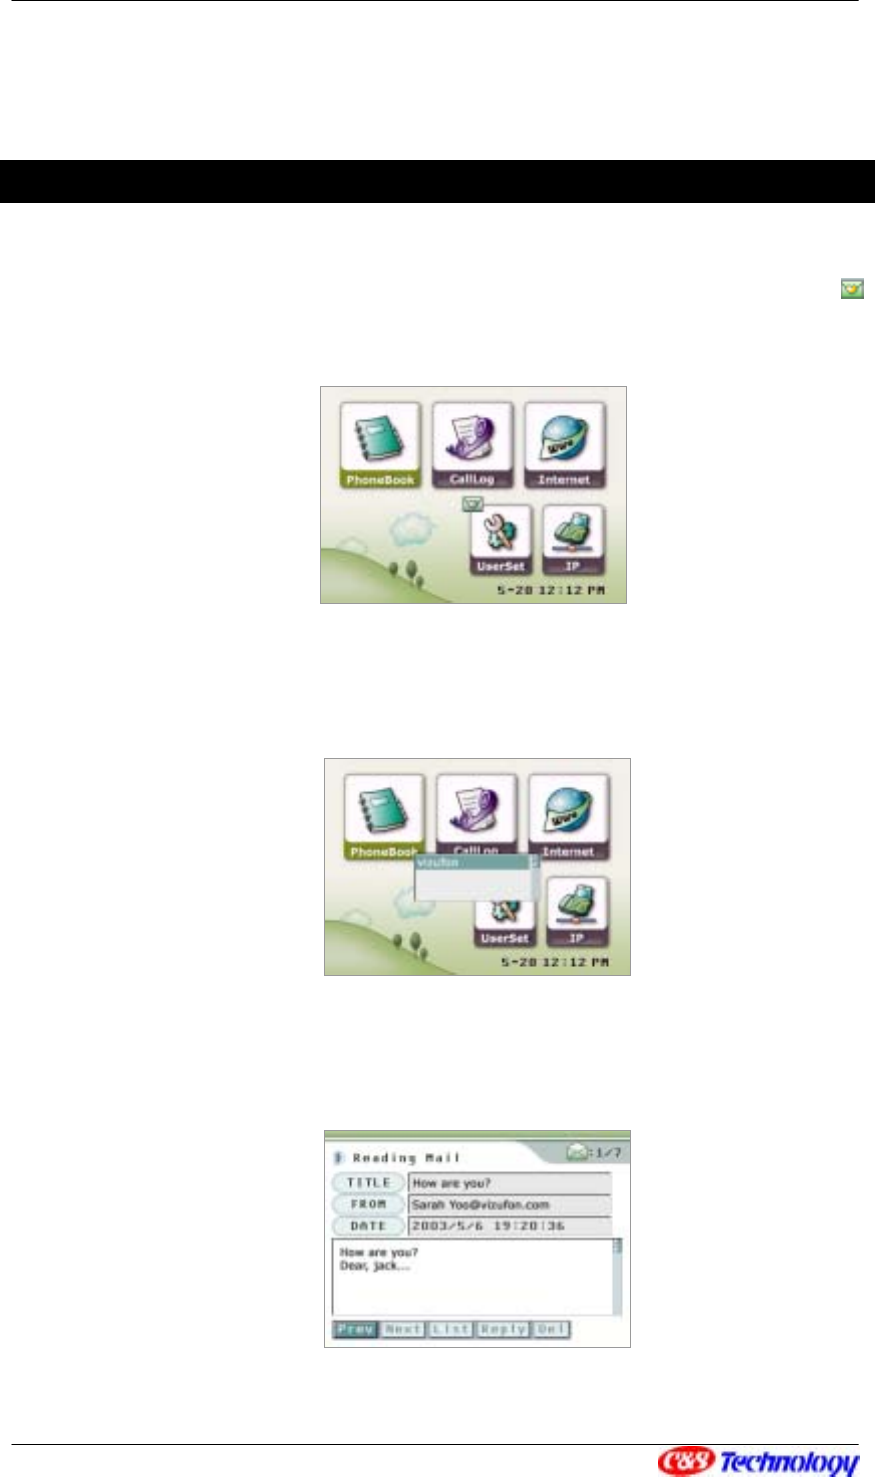
CIP-4500 User Manual 69
Checking Mail Notice Window
If a new mail arrives at the account where mail notice function is set in Setting mail properties,
appears on PIMS main screen.
At this time, press ‘ENT’ button. Then, a list of accounts at which mails are delivered
appears.
Select an account for checking mails using ST and press ‘ENT’. It directly moves to
‘Reading Mail’ of the appropriate account.
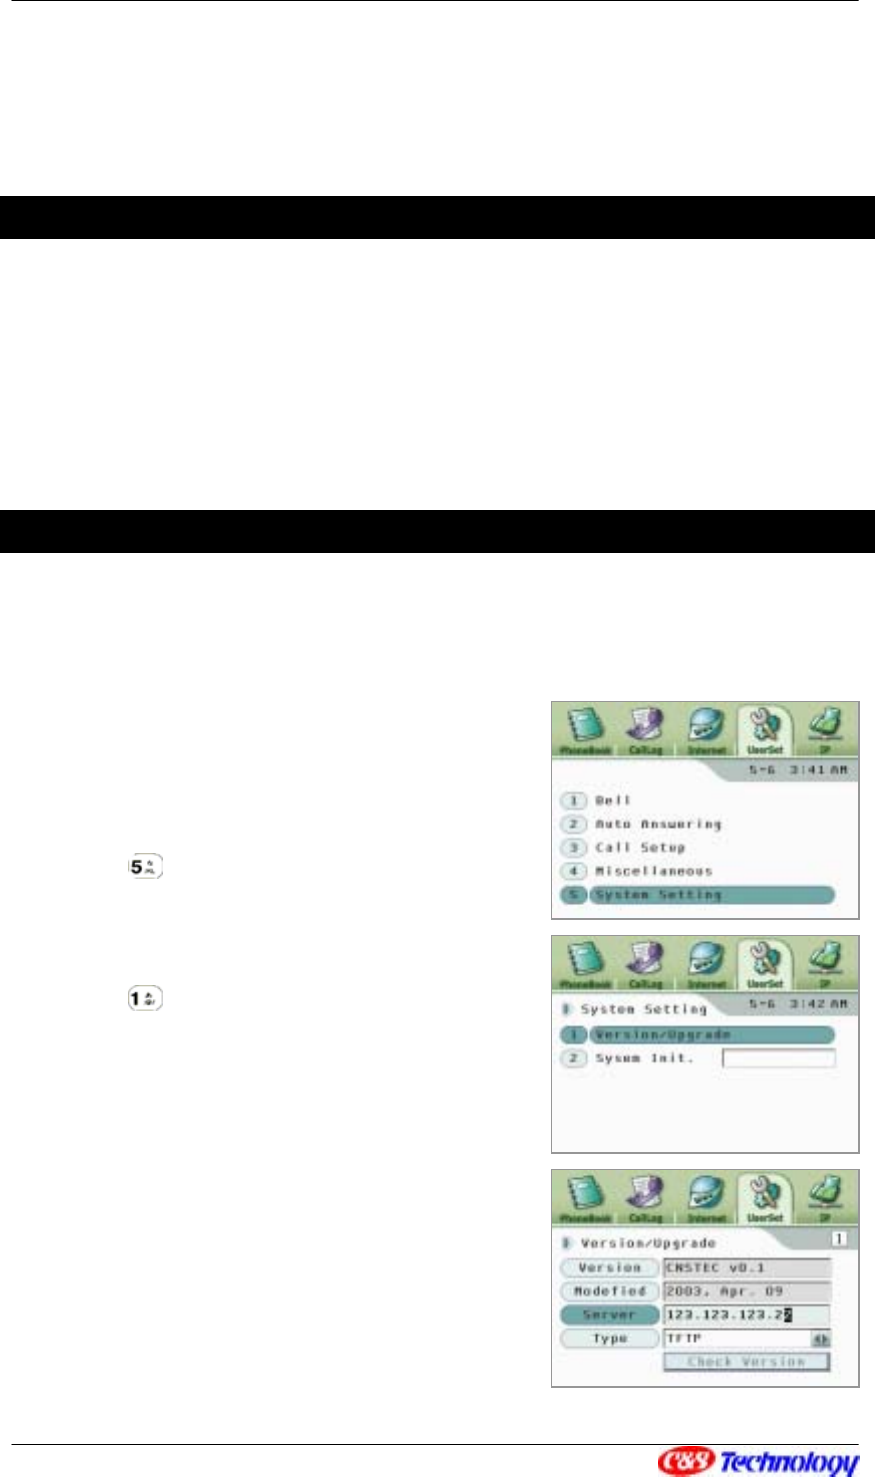
CIP-4500 User Manual 70
7. Software Upgrading
What is remote upgrade ?
IP videophone can download the latest software version by connecting to a remote server
through the Internet. For further information on latest IP videophone software version,
please contact software supplier.
Connecting to Server
Connect to the server from IP videophone and check the latest software version.
• Select UserSet from Personal Information
Setting menu.
• Select System Setting from UserSet menu
using ST and press XW or ‘ENT’. (or press
.)
• Select Version/Upgrade from System Setting
using ST and press XW or ‘ENT’. (or press
.)
• ‘Version’ indicates current software version of IP
videophone.
• ‘Modified’ indicates the date when current IP
videophone software is manufactured.
• Enter server address in ‘Server’ item to check
latest software version of IP videophone. You
can substitute IP address or domain name for
server address.
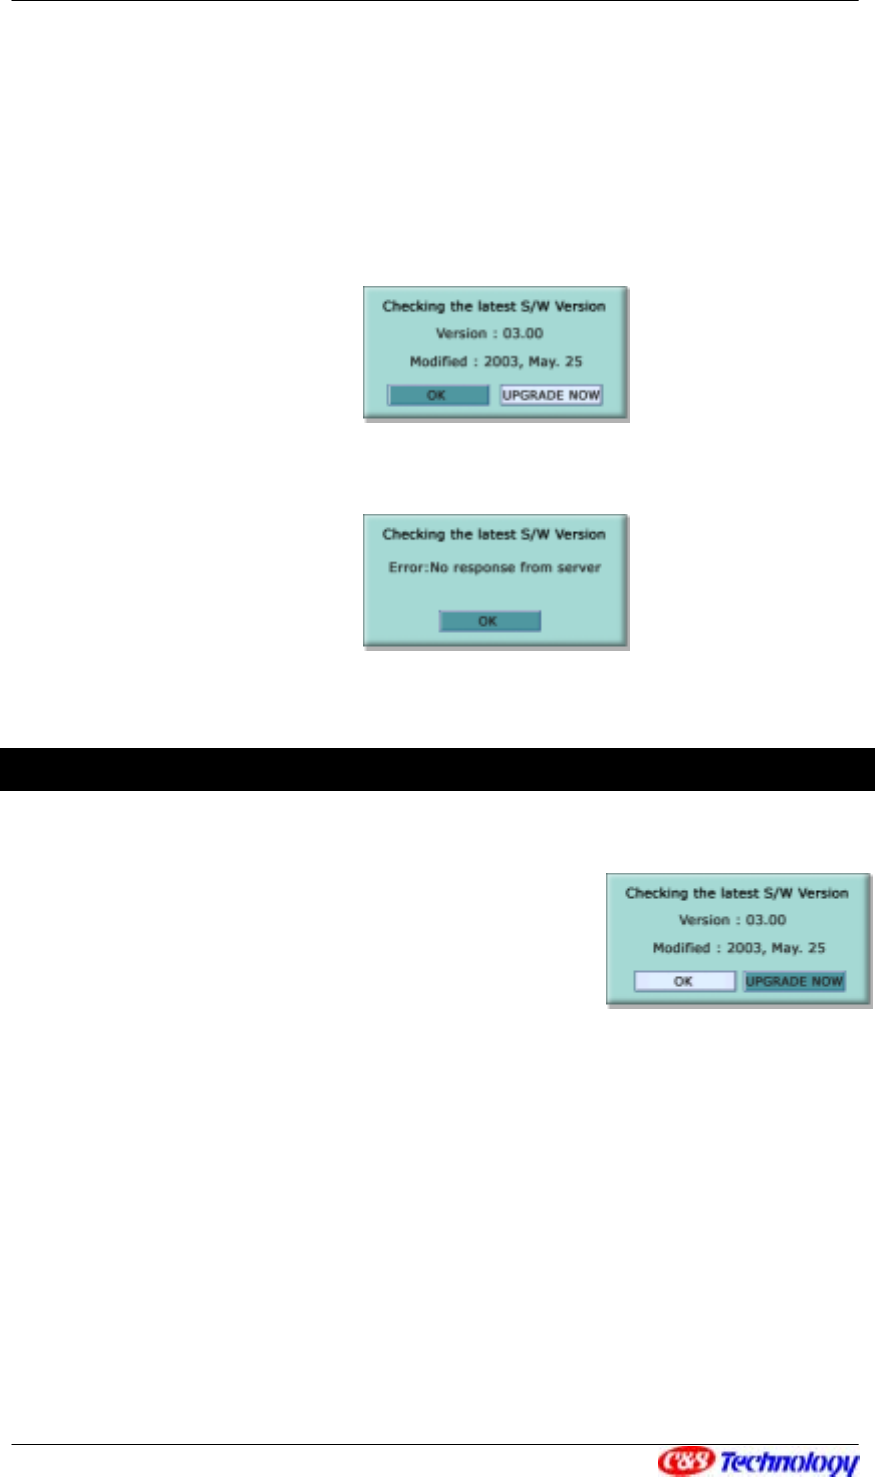
CIP-4500 User Manual 71
• IP videophone supports TFTP and HTTP methods when it connects to the server. Select
one of two methods in ‘Type’ item using W X.
• If you select ‘Check Version’ and press ‘ENT’, it connects to the server and gets
information on the latest software version.
NOTE. If it fails in connecting to the server, the following error message is displayed.
Program Downloading
Download the latest software version from the server.
• When you check the latest software version after
connecting to the server, the following message is
displayed. If the server software version is higher than
current IP videophone version, the following message
appears.
• If you want to download the latest software version, at this time, select ‘UPGRADE
NOW’ using W X and press ‘ENT’.
• Three messages appear by turns as shown below, and software upgrade is performed.
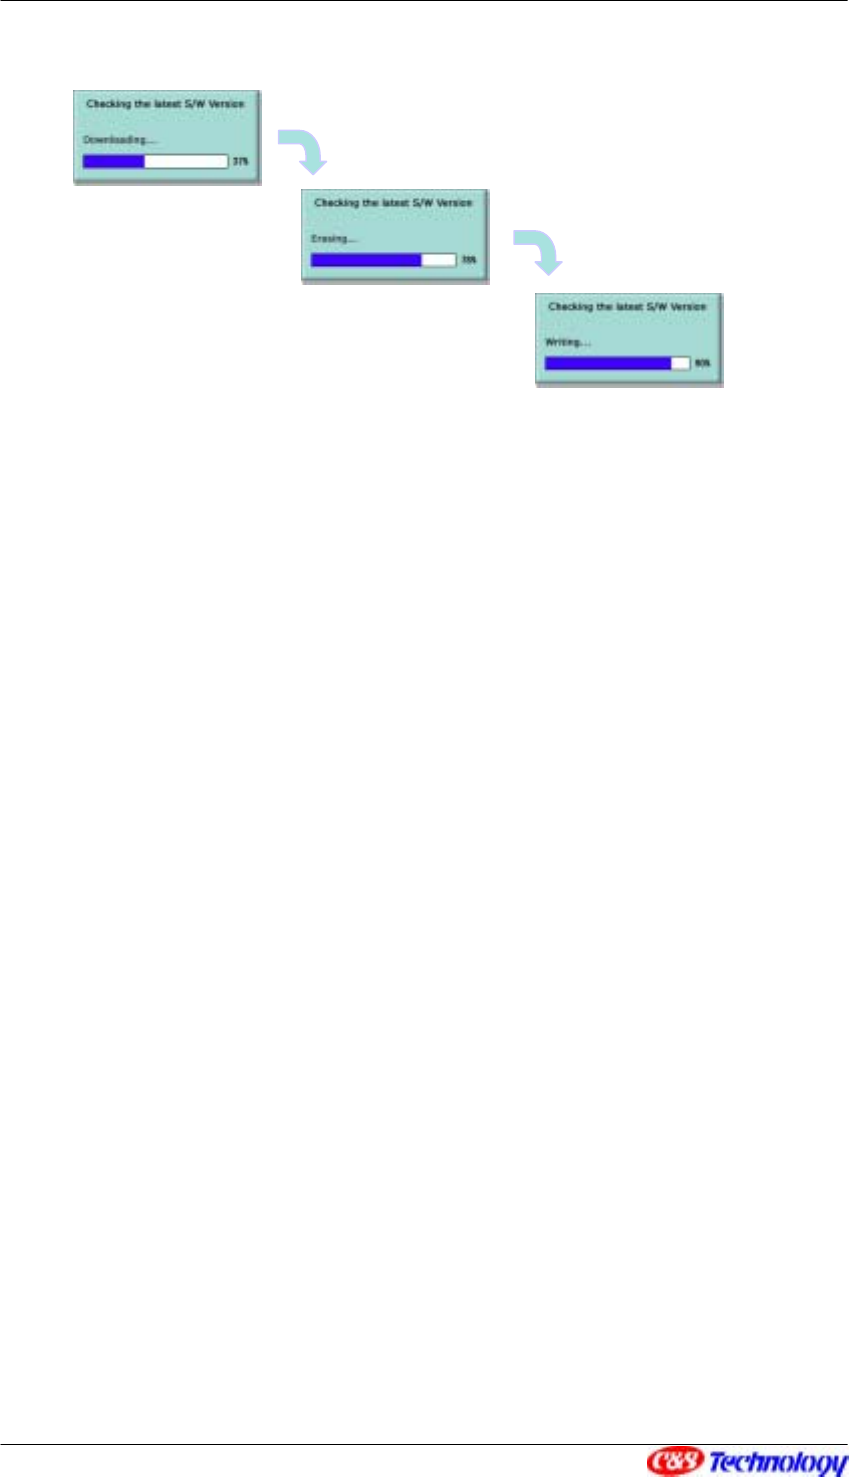
CIP-4500 User Manual 72
NOTE. Make sure that software upgrade should not be stopped. In other words, do not cut off power
in the course of upgrading. If the procedure of upgrading stops, the existing software is deleted and
not normally operated. If something goes wrong, do not turn off power and attempt upgrading again. If
it continues to fail, please contact with Post Sales Service center.

CIP-4500 User Manual 73
8 Appendix
Use NAT function
① Connecting IP Videophone in the Private Network
This describes procedures of setting an IP videophone and external sharers if installation of
IP videophone is required in a private network configured with an external sharer.
A. Check internal/external IP address
First, check an IP videophone’s IP address and external sharer IP address (WAN, Global
or Public) before setting an IP videophone and external sharer.
View Internet Status menu enables you to check IP videophone’s IP address. If
connected to the private network, IP address is usually set to the following values:
192.168.xxx.xxx ~ 192.168.255.255
10.xxx.xxx.xxx ~ 10.255.255.255
172.16.xxx.xxx ~ 172.31.xxx.xxx
You can check an external sharer IP address through Sharer Status of each sharer. For
further information, refer to user’s manual on each sharer.
The figure below shows screen on which you can check set in external sharer IP address
at your computer.
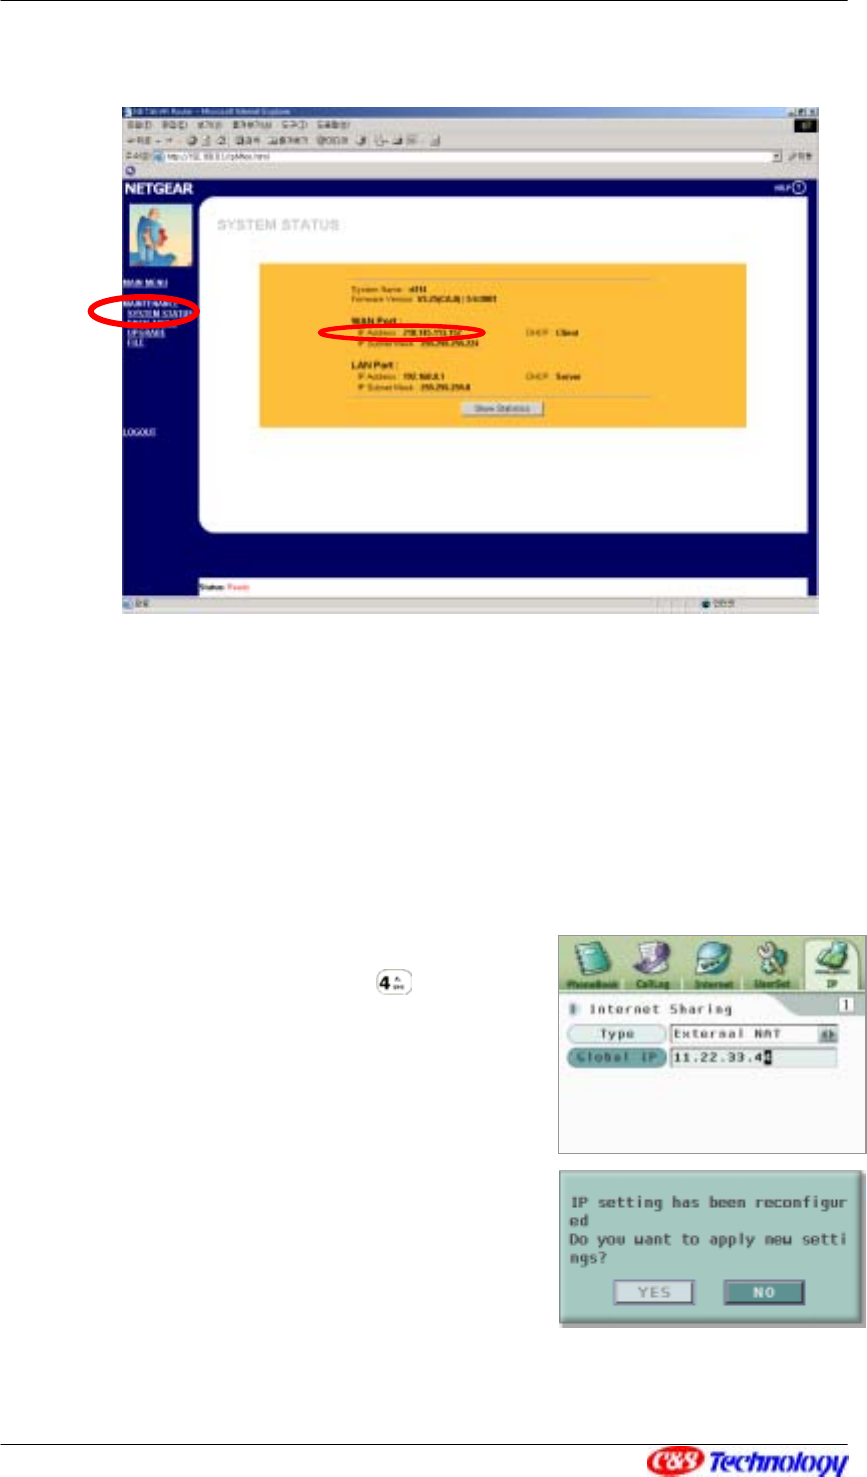
CIP-4500 User Manual 74
< Checking external sharer IP address>
B. Set IP videophone
Be sure to enter external sharer’s IP address in IP videophone. Set IP videophone by
checking the external IP address of external sharer.
Select Internet Sharing from IP menu using ST,
and press XW or ‘ENT’. (Or press .)
Select ‘External NAT’ from ‘Type’ item using XW.
Press T in ‘Type’ and move to ‘Global IP’, and then
set IP address of external sharer.
If you want to stop typing or move to previous menu,
press ‘EXIT’. If you select a different one from current
IP setting method, the following message window
appears. If you want to change IP Setting, click on
‘Yes’ and press ‘ENT’.

CIP-4500 User Manual 75
NOTE If the mode of a sharer to be used is changed, be sure to reboot the system.
C. Set external sharer
Move to Sharer Configuration menu through Web browser such as Internet Explorer in PC
connected to external sharer.
Move to “DMZ Host’ or “DMZ server” setting menu among sharer properties. Enter IP
videophone IP address in DMZ Server Address Input Window, and save the settings.
For further information of menus and methods related to sharer setting, see each sharer
manual. The figure below shows how to set DMZ server in an external sharer.
< Setting DMZ Server in an External Sharer>
NOTE If server setting is normally performed through the procedures above, you can make a call and
answer the phone using external sharer IP address or IP videophone phone number.
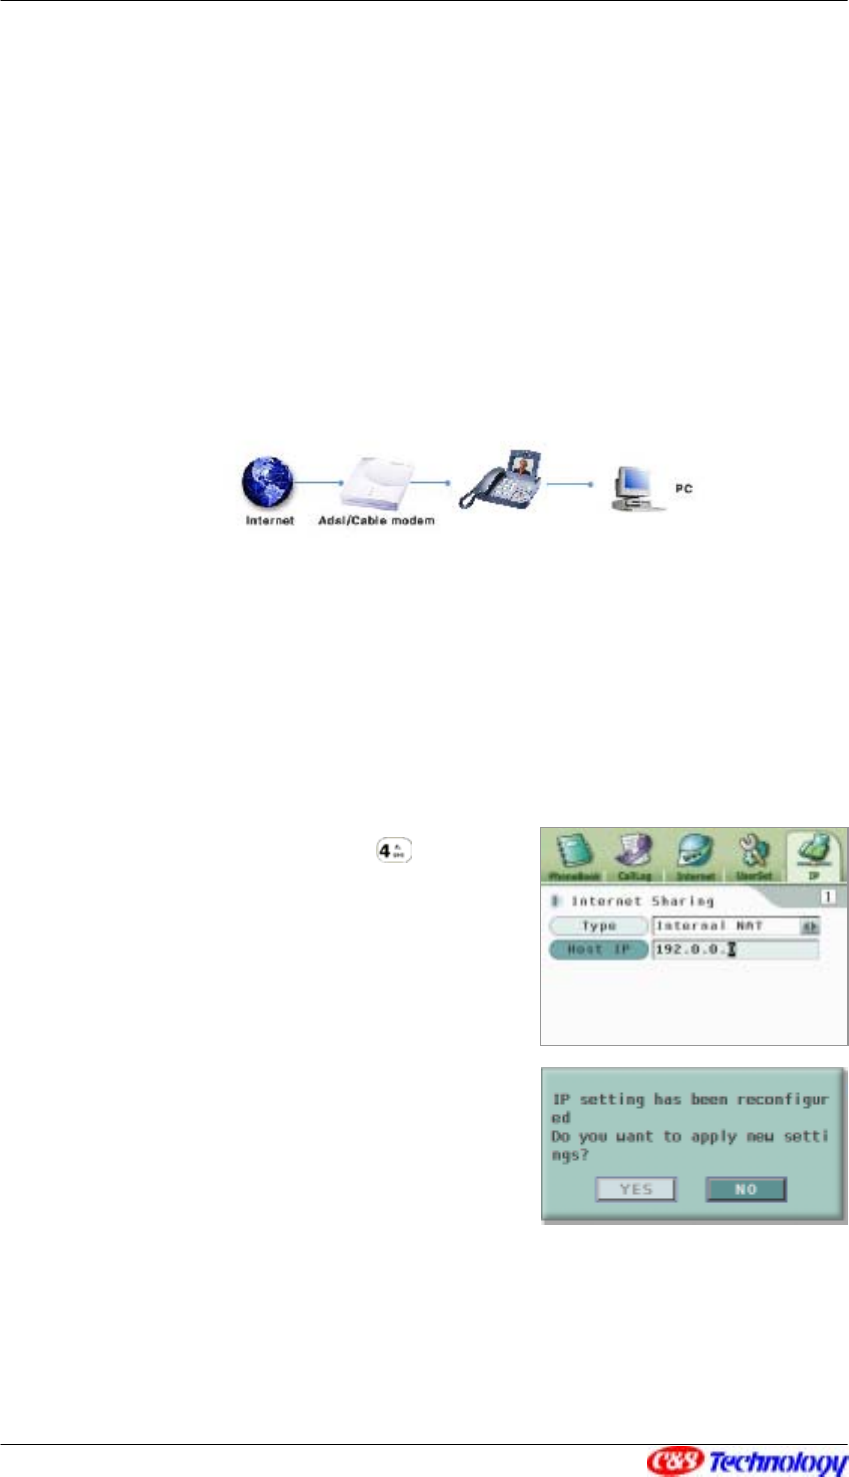
CIP-4500 User Manual 76
② Using ‘Share’ function embedded in IP videophone
Using ‘Internet share’ function embedded in IP videophone, you can connect one computer
to the Internet.
If you use ‘Internet share’ function in IP videophone, connect computer to IP videophone as
shown in the figure below. In order to connect computer with IP videophone, at this time,
connect LAN port (PC) at the back of IP videophone to computer LAN card using LAN
cables.
A. Set IP videophone
If you use ‘Internet Share’ function embedded in IP videophone, set an IP videophone IP
address in a private network.
Select Internet Sharing from IP menu using ST,
and press XW or ‘ENT’. (Or press .)
Select ‘Internal NAT’ from ‘Type’ using XW.
Move to ‘Host IP’ from ‘Type’ using T, and set
built-in sharer IP address.
If you want to stop typing or move to previous
menu, press ‘EXIT’. If you select a different one from
current IP setting method, the following message
window is displayed. If you want to change IP setting,
click on ‘Yes’ and press ‘ENT’.
NOTE If the mode of a sharer to be used is changed, be sure to reboot the system.
B. Setting IP related information in computer

CIP-4500 User Manual 77
If IP videophone host IP is set to 192.168.2.1 as example above, set computer IP
information as follows:
Items Setting values
IP address 192.168.2.2
(IP videophone host IP address +1)
Subnet mask 255.255.255.0
Gateway 192.168.2.1
(IP videophone host IP address)
DNS server address DNS server address set in IP
videophone
NOTE. IP videophone can support up to 2M bps for Internet sharing. For the best
performance, connection of more than 4M bps is recommended.
NOTE. Only one PC could be connected by using Internet sharing. Under this configuration,
some applications like network games, messenger, P2P may not be used.
NOTE. 2Mbps is the maximum using Internet sharing. This may cause the degradation of PC
Internet performance. In this case, it is recommended using external Internet router.
NOTE. Some ISP (Internet Service Provider) restricts Internet connection after check the MAC
address of each computer. In this case, be sure to register the MAC address of the IP videophone
to the ISP. Please contact the ISP you are subscribing for the MAC address registration.
For further information on setting IP in computer OS, refer to each OS manual. The
following example shows how to set IP information in operating systems such as Windows
98 or Windows ME.
C. IP setting in Windows98 or Windows ME
Select [Start]->[Set]->[Control Panel]. Execute [Network] of “Control Panel” items.
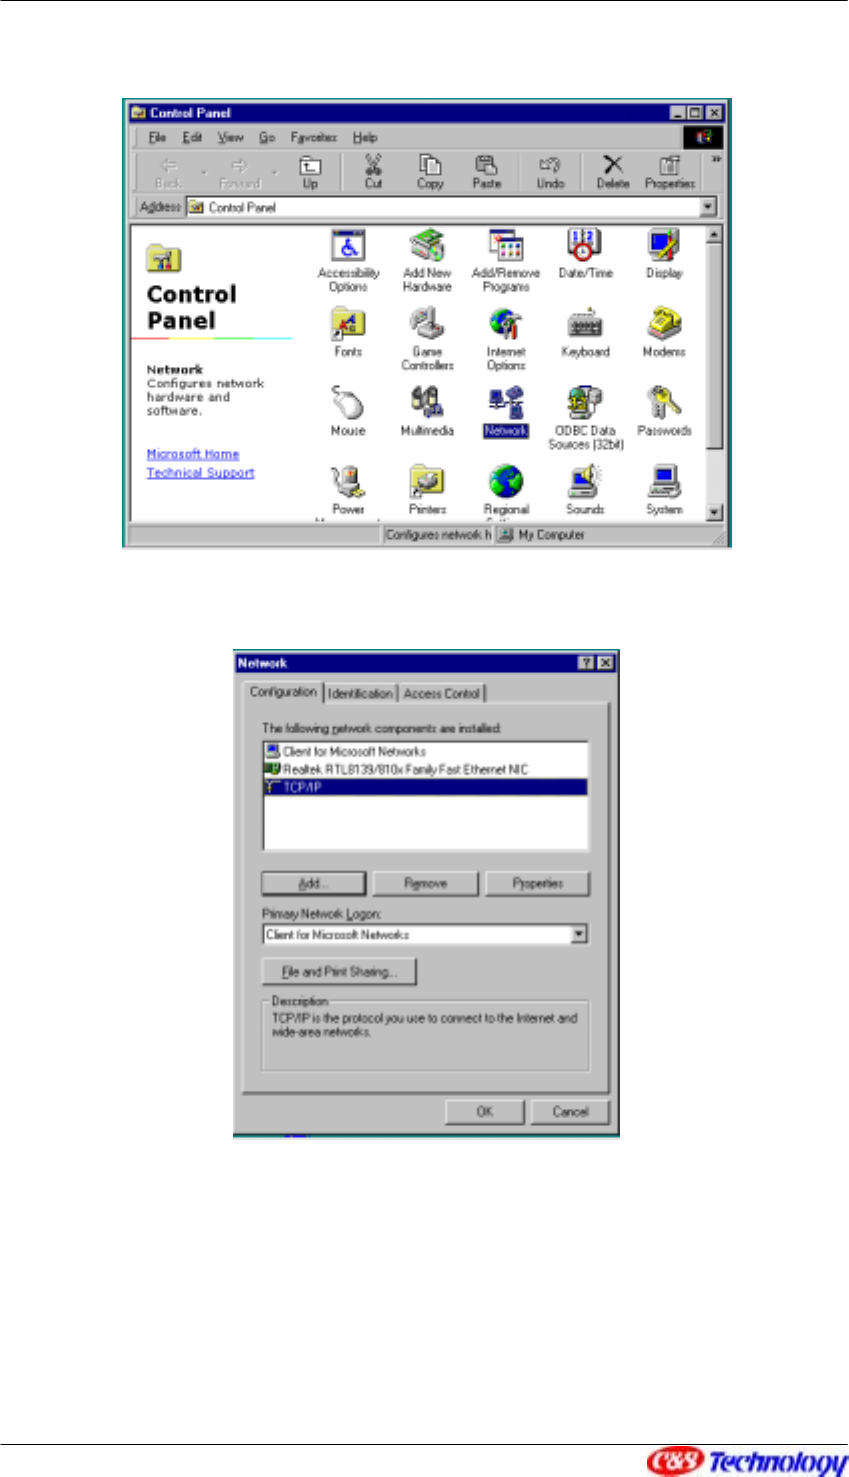
CIP-4500 User Manual 78
Select “TCP/IP” on the screen after executing [Network], and select [Properties].
Select “Specify an IP address” of [IP Address] items, and enter IP address and subnet
mask as follows:

CIP-4500 User Manual 79
Move to [Gateway] TAB, and enter “192.168.2.1” in a “New gateway”, and select [Add],
and then it is saved in “Installed gateways”.
Move to [DNS Configuration] TAB and select “Enable DNS”. Enter alphanumerical name
in [Host]. Enter Internet address of very high-speed network in [Domain]. For example,
type kornet.net for KT, and type hanaro.com for HANAFOS, and thrunet.com for
CIP-4500 User Manual 80
THRUNET. Enter IP videophone DNS address in [DNS Server Search Order], and click
[Add] and save it.
If you click [OK] after setting, and click OK again on “Network” window, the following
[System Setting Change] window appears. If you select [Yes] to start the system again,
you can connect your computer to the Internet through Internet share function of IP
videophone.
CIP-4500 User Manual 81
Before Requesting Help
Problem Troubleshooting
I cannot turn on the power Check if the power cable is correctly connected.
LCD screen is not turned on Check if the power cable is correctly connected.
I cannot hear any call connection
signal from handset. Check if the handset is connected to the left port of the videophone.
Check if the Internet line is connected
Check if the handset is connected to Internet. Refer to < View
Internet Status (57p)>.
If it is connected to ITSP (Internet Telephony Service Provider)’s
network, check if the registration lamp turns on. If not, check if the
server and user information are correct.
If it is connected to ITSP’s network, the called party may not be
registered with the same network.
If you are calling with IP address, check if the IP address is correct.
If you are using speed dialing, check if it is correctly registered with a
PhoneBook.
I cannot make a call.
If a called party uses IP videophone installed in a private network or
firewall system, it may not be connected.
Check if the normal phone line is correctly connected.
I cannot make a general call in
PSTN mode. If you are using speed dialing, check if it is correctly registered with a
PhoneBook.
Someone calls me but I cannot
receive the call.
If the IP videophone is installed in a private network or a firewall
system, you may not receive a call.
When I receive a call, the screen is
turned on but any ring sound cannot
be heard.
Check if the bell sound level is set to more than ‘0’ in User
Configuration menu.
If the videophone is installed in private network or on firewall, you
may not be received the other party’s screen.
The call is connected, but the other
party’s screen is dark and the sound
is very bad. Check if a camera is connected to the other party’s IP videophone.
Check if the other party’s microphone works well.
The call is connected, I can see the
screen, but cannot hear any voice. Volume up the handset.
The call is connected and I can see
the screen and hear the voice, but
Check if the other party’s videophone is installed in a private network
or a firewall system.

CIP-4500 User Manual 82
Check if the audio/video input path is correctly configured in the
Setup menu during a call.
the other party cannot see and hear
me.
Check if the other party’s audio/video device works properly.
Check if the audio input path is configured is correctly configured in
the Setup menu during a call.
The call is connected, and I can see
the screen and hear the voice, and
the other party can see me but
cannot hear me. Check if the other party’s audio device works properly.
Check if the video input path is configured is correctly configured in
the Setup menu during a call.
The call is connected, and I can see
the screen and hear the voice, and
the other party can hear me but
cannot see me. Check if the other party’s video device works properly.
Check if the videophone is connected to Internet properly.
The other party’s screen stops
suddenly and the voice is not heard
any more. Check if the other party’s videophone has gotten disconnected from
Internet before the call is completed.
Check if IP setting is correct.
Check if the DNS server address is correct.
The browser is not connected to the
site I want.
Your desired site may not be in service.
Check the Internet environment is correctly configured.
Check if the DNS server address is correct.
Check if mail ID and address of POP3 server and SMTP server are
entered correctly.
Check if mail ID and Password are correct.
I cannot connect to a mail server.
The mail server may not be in service.
When the IP videophone is
connected to TV set, the images
displayed on both screen are
different.
When external video output port is connected to TV, a certain image
is not displayed on LCD screen of IP videophone.

CIP-4500 User Manual 83
Warning Messages
The following table describes warning messages and their meanings.
Warning message Description
System initialization System is being initialized.
Unpacking Image Data… Image data for GUI is being decompressed.
Loading DB... Personal data settings are being loaded.
Power On
Network Setting Error !!
Please check setting and reboot. IP address is not successfully allocated.
DHCP Server not Found !!
Connection Time Out DHCP server cannot be found in the network.
Connecting to a DHCP Server... Data is being exchange with DHCP server.
Configuring
DHCP
Fail to get IP address. I fail to receive IP address from a DHCP
server.
Connecting to ADSL Server... Connection to ADSL server is being made.
ADSL Connection Error
No response from Server
I try to connect to ADSL server, but any
response is not received.
Configuring
ADSL
ADSL Connection Error !!
Invalid Username/Password
I cannot log in to ADSL server.
Check user ID and password
Gatekeeper rejects a call. Gatekeeper of ITSP’s network does not permit
call connection, so a call cannot be made.
Call connection to the other party is
not available. The other party’s phone cannot be found.
The other party rejects a call. The other party sends call refusal signal.
Gatekeeper is unreachable. Gatekeeper of ITSP’s network cannot be
found.
Gateway refuses a call. Gateway ITSP’s network refuses call
connection.
The other party’s phone number is not
correct. The telephone number is not managed by
gatekeeper of ITSP’s network.
The called party’s line is busy. The called party is on another line.
Unknown Error Connection to ITSP’s network is not available
due to unknown error.
Destination is not registered. The called party is not registered with
gatekeeper of ITSP’s network.
You are not registered. You are not registered to gatekeeper with
gatekeeper of ITSP’s network.
This call is disconnected. A call is disconnected by the other party or
due to server failures.
Attempting to
make a call
Wrong Number You entered a wrong number.

CIP-4500 User Manual 84
Call connection is failed. The other party’s phone cannot be found.
Audio/Video Connecting... A call is being connected.
MUTE You are in Mute mode.
During a call
session
PRIVACY You are in Private mode.
After
completing
a call
Call log is being recorded. A recent call log is being recorded.
Please Wait... User Configuration being loaded or menu
being changed.
Incorrect!
Please enter, again. Your password is not correct.
Initialize system. All personal information already configured is
being initialized.
Setting User
Configuration
Wrong IP Address !! IP address is not suitable for current input
mode.