CAEN RFID srl CAENRFID026 R11701 - qIDmini Keyfob Bluetooth UHF RFID Reader User Manual SLATE Technical Information Manual Rev 01
CAEN RFID srl R11701 - qIDmini Keyfob Bluetooth UHF RFID Reader SLATE Technical Information Manual Rev 01
Contents
- 1. User Manual 1
- 2. User Manual 2
- 3. User Manual 3
User Manual 3
TECHNICAL INFORMATION MANUAL
Revision 0.2 - 27 April 2017
R1170I
Keyfob Bluetooth UHF RFID Reader

Scope of Manual
The goal of this manual is to provide the basic information to work with the qIDmini R1170I Keyfob Bluetooth UHF RFID
Reader.
Change Document Record
Date Revision Changes Pages
23 June 2014 00 Preliminary release -
13 February 2017 0.1 Updated FCC compliance declaration 51
27 April 2017 0.2
Added note for RF power of FCC compliant models 42, 44
Changed RF power level for FCC compliant models 47
Updated FCC compliance declaration 51
Reference Document
[RD1] EPCglobal: EPC Radio-Frequency Identity Protocols Class-1 Generation-2 UHF RFID Protocol for Communications
at 860 MHz – 960 MHz, Version 1.1.0 (December 17, 2005).
CAEN RFID srl
Via Vetraia, 11 55049 Viareggio (LU) - ITALY
Tel. +39.0584.388.398 Fax +39.0584.388.959
info@caenrfid.com
www.caenrfid.com
© CAEN RFID srl – 2017
Disclaimer
No part of this manual may be reproduced in any form or by any means, electronic, mechanical, recording, or
otherwise, without the prior written permission of CAEN RFID.
The information contained herein has been carefully checked and is believed to be accurate; however, no responsibility
is assumed for inaccuracies. CAEN RFID reserves the right to modify its products specifications without giving any
notice; for up to date information please visit www.caenrfid.com.
Preliminary Product Information
This document contains information for a new product. CAEN RFID reserves the right to modify this product without
notice.
“Preliminary” product information describes products that are ready for production, but for which full characterization
data is not yet available. CAEN RFID believes that the information contained in this document is accurate and reliable.
However, the information is subject to change without notice and is provided “AS IS” without warranty of any kind
(Express or implied). You are advised to obtain the latest version of relevant information to verify, before placing
orders, that information being relied on is current and complete. All products are sold subject to the terms and
conditions of sale supplied at the time of order acknowledgement, including those pertaining to warranty, patent
infringement, and limitation of liability. No responsibility is assumed by CAEN RFID for the use of this information,
including use of this information as the basis for manufacture or sale of any items, or for infringement of patents or
other rights of third parties.
Visit qIDmini R1170I web page, you will find the latest revision
of data sheets, manuals, certifications, technical drawings, software and firmware.
All you need to start using your reader in a few clicks!

Federal Communications Commission (FCC) Notice
This device was tested and found to comply with the limits set forth in Part 15 of the FCC Rules. Operation is subject to
the following conditions: (1) this device may not cause harmful interference, and (2) this device must accept any
interference received including interference that may cause undesired operation. These limits are designed to provide
reasonable protection against harmful interference when the equipment is operated in a commercial environment.
This device generates, uses, and can radiate radio frequency energy. If not installed and used in accordance with the
instruction manual, the product may cause harmful interference to radio communications. Operation of this product in
a residential area is likely to cause harmful interference, in which case, the user is required to correct the interference
at their own expense. The authority to operate this product is conditioned by the requirements that no modifications
be made to the equipment unless the changes or modifications are expressly approved by CAEN RFID.
Disposal of the product
Do not dispose the product in municipal or household waste. Please check your local regulations for
disposal/recycle of electronic products.

Index …
Scope of Manual......................................................................................................................................................................... 2
Change Document Record..........................................................................................................................................................2
Reference Document..................................................................................................................................................................2
Index …..........................................................................................................................................................................................4
List of Figures.................................................................................................................................................................................5
List of Tables..................................................................................................................................................................................5
1 INTRODUCTION...................................................................................................................................................................6
Product Description.................................................................................................................................................................... 6
Front panel..................................................................................................................................................................... 7
Charging......................................................................................................................................................................... 8
USB connector................................................................................................................................................................8
Accessories................................................................................................................................................................................. 8
Development Kit......................................................................................................................................................................... 9
Ordering Options...................................................................................................................................................................... 10
2 GETTING STARTED.............................................................................................................................................................11
Introduction.............................................................................................................................................................................. 11
Bluetooth Communication Setup using the Easy Controller for Android..................................................................................11
3 QIDMINI EASY2RD PROFILE...............................................................................................................................................16
Introduction.............................................................................................................................................................................. 16
Android devices........................................................................................................................................................................17
Bluetooth Communication Setup using the Easy Controller for Android......................................................................17
Windows PCs............................................................................................................................................................................ 22
Bluetooth Communication Setup.................................................................................................................................22
USB Communication Setup...........................................................................................................................................24
Connecting the qIDmini using the Easy Controller for Windows..................................................................................26
iOS devices................................................................................................................................................................................28
Bluetooth Communication Setup.................................................................................................................................28
4 QIDMINI HID PROFILE........................................................................................................................................................31
Introduction.............................................................................................................................................................................. 31
Android devices........................................................................................................................................................................31
Bluetooth Communication Setup.................................................................................................................................31
Windows PCs............................................................................................................................................................................ 33
Bluetooth Communication Setup.................................................................................................................................33
USB Communication Setup...........................................................................................................................................36
iOS devices................................................................................................................................................................................38
Bluetooth Communication Setup.................................................................................................................................38
5 RESET THE QIDMINI READER..............................................................................................................................................40
6 QIDMINI CONFIGURATION MENU......................................................................................................................................41
Introduction.............................................................................................................................................................................. 41
PROFILE..................................................................................................................................................................................... 43
BEEP.......................................................................................................................................................................................... 43
VIBRATE....................................................................................................................................................................................44
POWER...................................................................................................................................................................................... 44
7 QIDMINI FIRMWARE UPGRADE.........................................................................................................................................45
Firmware Upgrade....................................................................................................................................................................45
8 QIDMINI TECHNICAL SPECIFICATIONS................................................................................................................................47
Technical Specifications Table...................................................................................................................................................47
Reader – Tag Link Profiles.........................................................................................................................................................48
Radiation Patterns....................................................................................................................................................................49
Model R1170IE (ETSI version).......................................................................................................................................49
Model R1170IU (FCC version).......................................................................................................................................50
9 QIDMINI REGULATORY COMPLIANCE................................................................................................................................51
4

List of Figures
Fig. 1.1: qIDmini R1170I Keyfob Bluetooth UHF RFID Reader.................................................................................................................6
Fig. 1.2: qIDmini R1170I Front Panel...................................................................................................................................................... 7
Fig. 1.3: qIDmini R1170I Accessories......................................................................................................................................................8
Fig. 1.4: R1170IDK – qIDmini Keyfob Bluetooth UHF RFID Reader Development Kit..............................................................................9
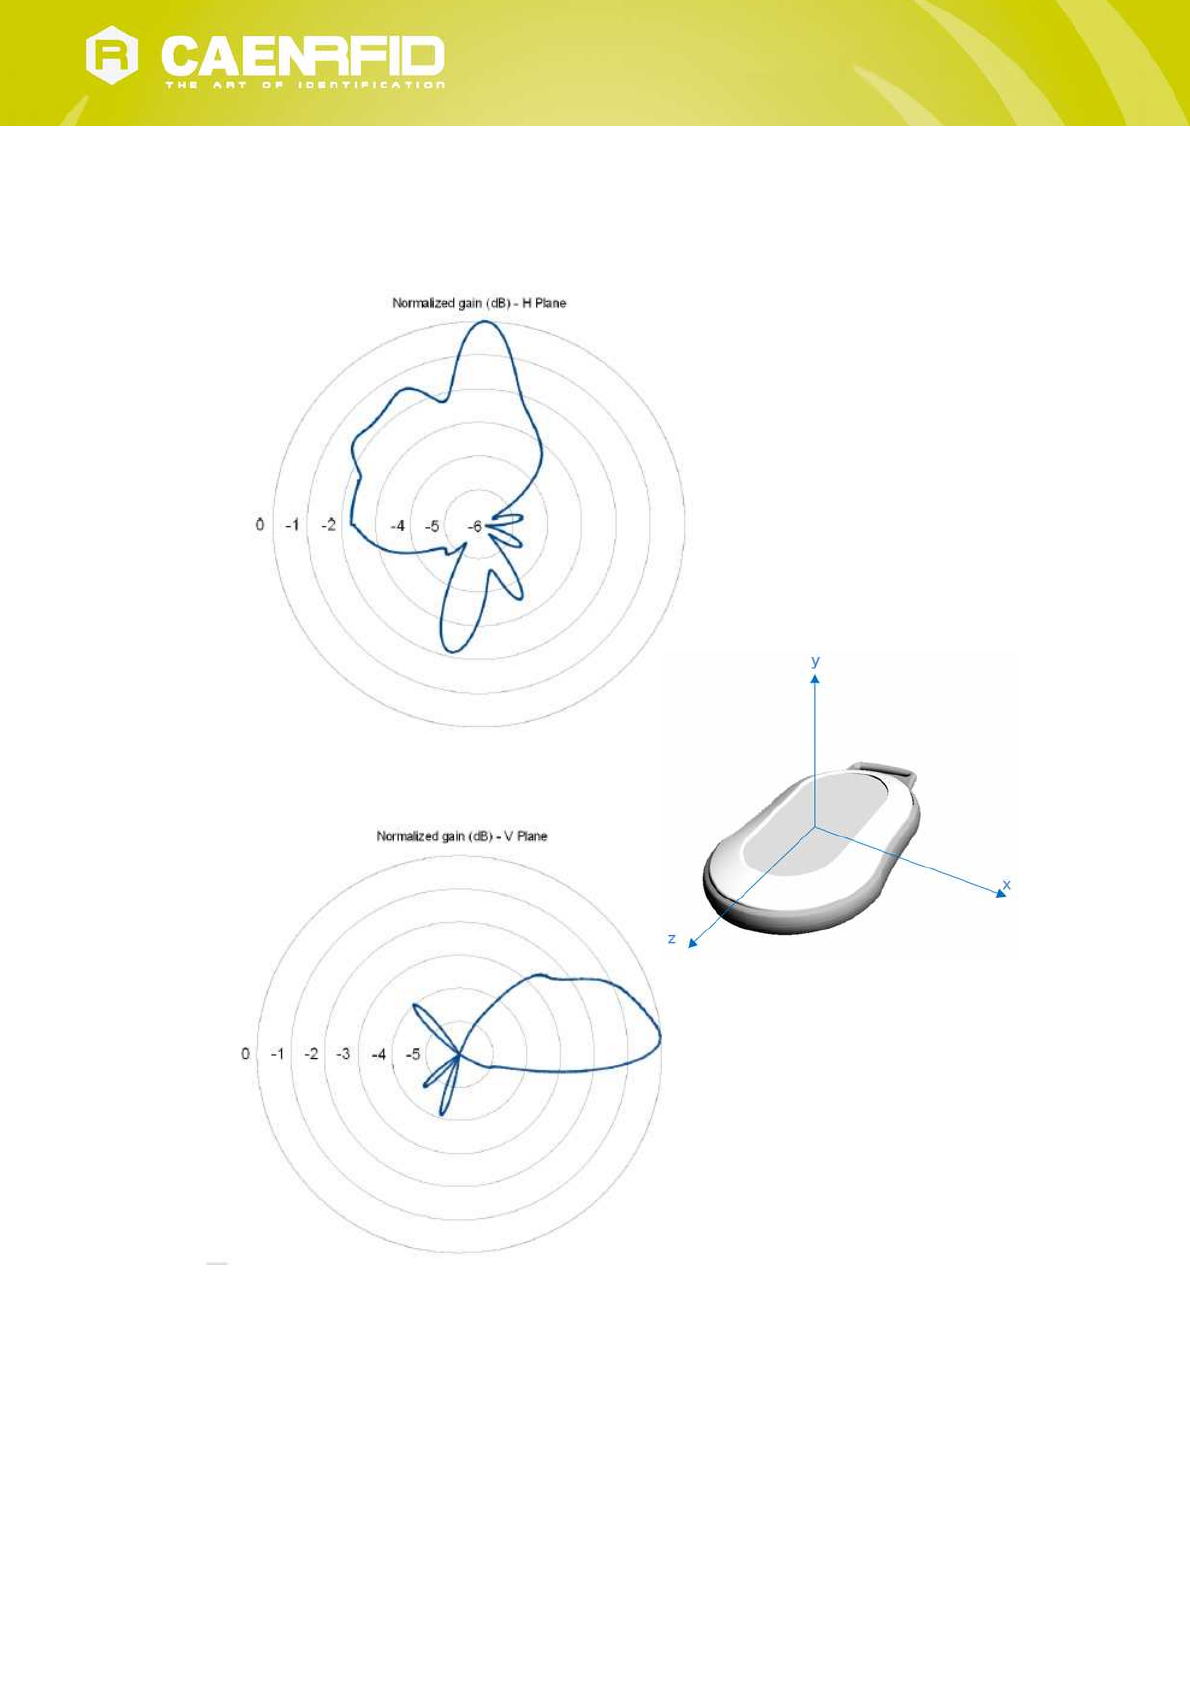
Fig. 8.1: qIDmini R1170IE Radiation pattern H plane...........................................................................................................................49
Fig. 8.2: qIDmini R1170IE Radiation pattern V plane............................................................................................................................49
Fig. 8.3: qIDmini R1170IU Radiation pattern H plane...........................................................................................................................50
Fig. 8.4: qIDmini R1170IU Radiation pattern V plane...........................................................................................................................50
List of Tables
Tab. 1.1: qIDmini R1170I Front Panel LEDs and Buttons........................................................................................................................7
Tab. 1.2: qIDmini R1170I Power LED Status Table..................................................................................................................................8
Tab. 1.3: qIDmini R1170I Bluetooth LED status table.............................................................................................................................8
Tab. 1.4: Compatibility table between the Apple/HID models and different OS..................................................................................10
Tab. 3.1: Compatibility table between the Apple/HID models and different OS in the EASY2RD profile.............................................16
Tab. 4.1: Compatibility table between the Apple/HID models and different OS in the HID profile......................................................31
Tab. 8.1: qIDmini R1170I Technical Specifications Table......................................................................................................................47
Tab. 8.2: qIDmini R1170I Reader to tag link profiles............................................................................................................................48
5

1 INTRODUCTION
Product Description
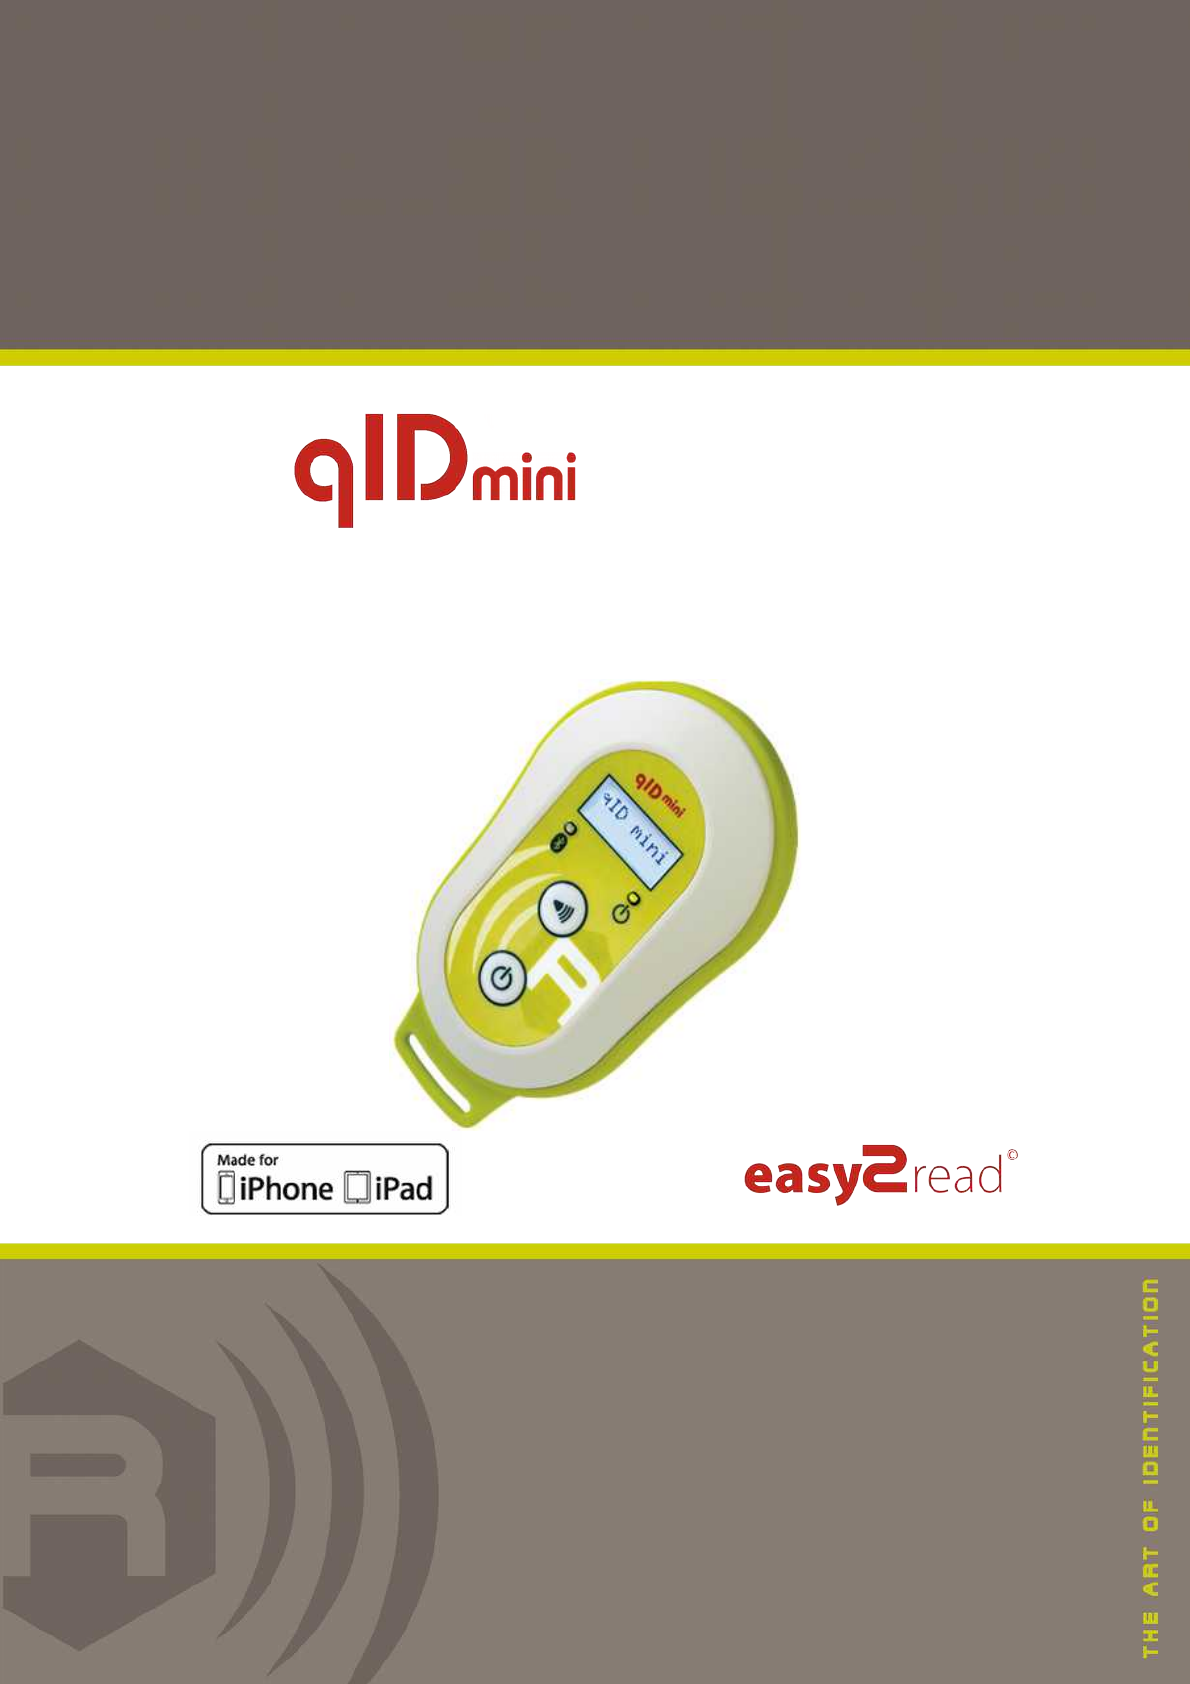
The qIDmini (Model R1170I) is a handheld reader of the easy2read© product family, compliant with UHF RFID ISO
18000-6C/EPC C1G2 standards.
The qIDmini has an integrated antenna suited for short to medium range applications and, thanks to the Bluetooth®
communication interface, it is a perfect UHF RFID add-on for any Bluetooth® enabled host such as a PC, a smartphone,
a PDA or a tablet. The reader is compatible with Windows XP/7, Windows CE/Mobile, Android, iPhone and iPad.
The HID version supports native keyboard emulation allowing to interact directly with legacy application, office
automation SW or any other generic solution requiring manual input.
When paired to a smartphone or a tablet, the qIDmini is a cost effective alternative to more expensive handheld
devices.
Designed for mobile operators in indoor or outdoor areas, the qIDmini is ideal for in-store inventory management, field
sales mobility, service and maintenance applications.
Fig. 1.1: qIDmini R1170I Keyfob Bluetooth UHF RFID Reader
The reader is available either in ETSI or FCC version (see § Ordering Options page 10):
865.600÷867.600 MHz (ETSI EN 302 208 v. 1.4.1) (Mod. R1170IEHIDP and R1170IEAPLP)
902÷928 MHz (FCC part 15.247) (Mod. R1170IUHIDP and R1170IUAPLP)
Introduction - qIDmini Technical Information Manual 6
The reader is available in two models: APPLE or HID (see § Ordering Options page 10):
APPLE model
EASY2RD profile: the reader can be connected to all the devices supporting the Bluetooth SPP profile
and to iOS devices.
HID profile: not supported.
HID model
EASY2RD profile: the reader can be connected to all the devices supporting the Bluetooth SPP profile
but not to iOS devices.
HID profile: the reader can be connected to all the devices supporting the Bluetooth HID profile
(keyboard emulation), including iOS devices.
For more information about EASY2RD and HID profiles, please refer to § PROFILE paragraph page 43.
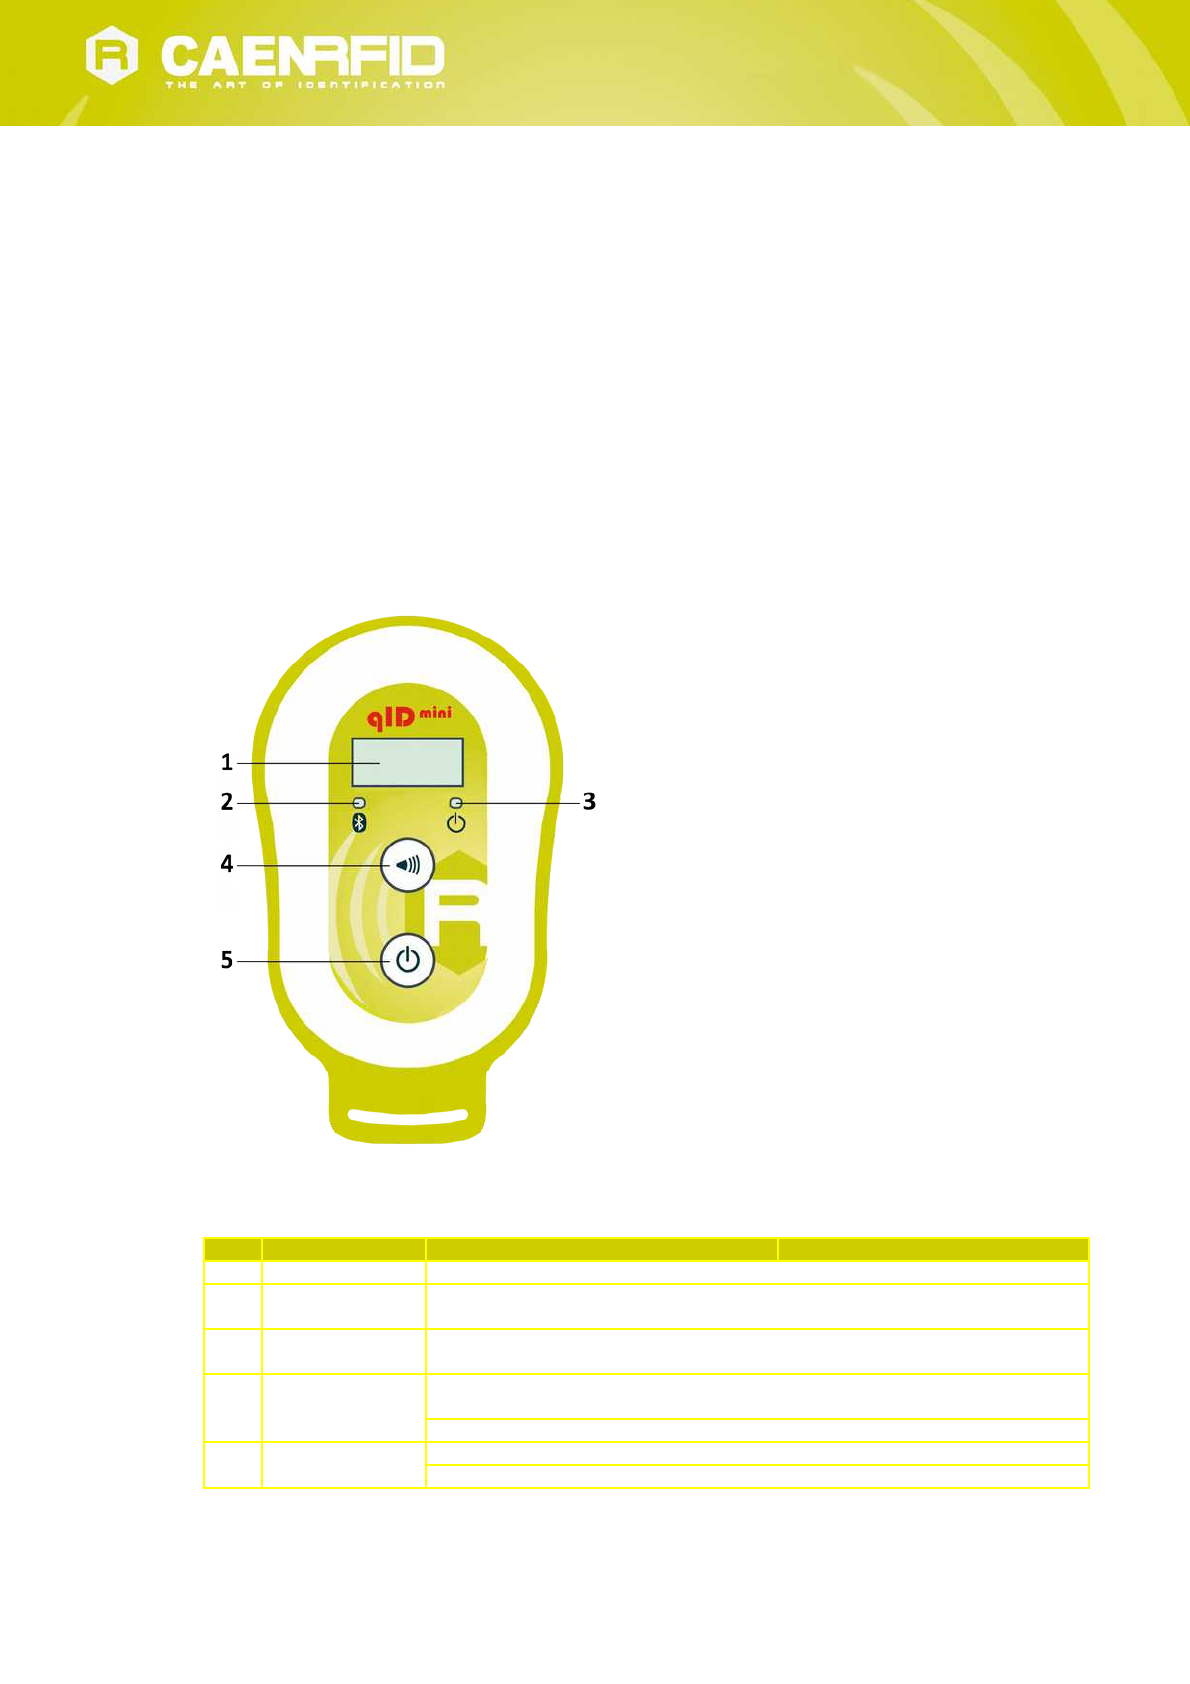
Front panel
The qIDmini R1170I front panel houses the following LEDs and buttons (see figure below):
Fig. 1.2: qIDmini R1170I Front Panel
No. Name Description
1 Display LCD Alphanumeric (8 chars x 2 lines)
2 Link LED Indicates the Bluetooth and USB/charger connection (see § Tab. 1.3: qIDmini R1170I
Bluetooth LED status table)
3 Power LED Indicates the reader status and battery level (see § Tab. 1.2: qIDmini R1170I Power LED
Status Table)
4 Trigger button
Inventory mode: press to perform an inventory cycle (hold down the button to repeat
inventory cycles)
Menu mode: quick press to scroll, hold down for a few seconds to activate an option
5 Power button Press the button to switch on the reader, press for at least 2 seconds to switch it off
Menu mode: press to return to the main menu
Tab. 1.1: qIDmini R1170I Front Panel LEDs and Buttons
Introduction - qIDmini Technical Information Manual 7
Status Description
Green Reader is active and the battery charge is in the range 35÷100%
Orange Reader is active and the battery charge is in the range 15÷35%
Red Reader is active and the battery charge is in the range 0÷15%
Tab. 1.2: qIDmini R1170I Power LED Status Table
Status Description
OFF No connection established
Orange USB cable connected (both to a PC or to the AC power adapter)
Blue Bluetooth connected
Tab. 1.3: qIDmini R1170I Bluetooth LED status table
Charging
The qIDmini R1170I is supplied with an USB cable and a power supply for charging (see § Accessories page 8).
When you put the reader in charge, the display lights up and shows the blinking charge indicator. The fixed indication
"charge 100%" informs you that the charging is complete.
USB connector
A micro USB Type B socket connector is located in the bottom side of qIDmini R1170I and can be used to connect the
reader to an USB host port or to an AC/DC battery charger.
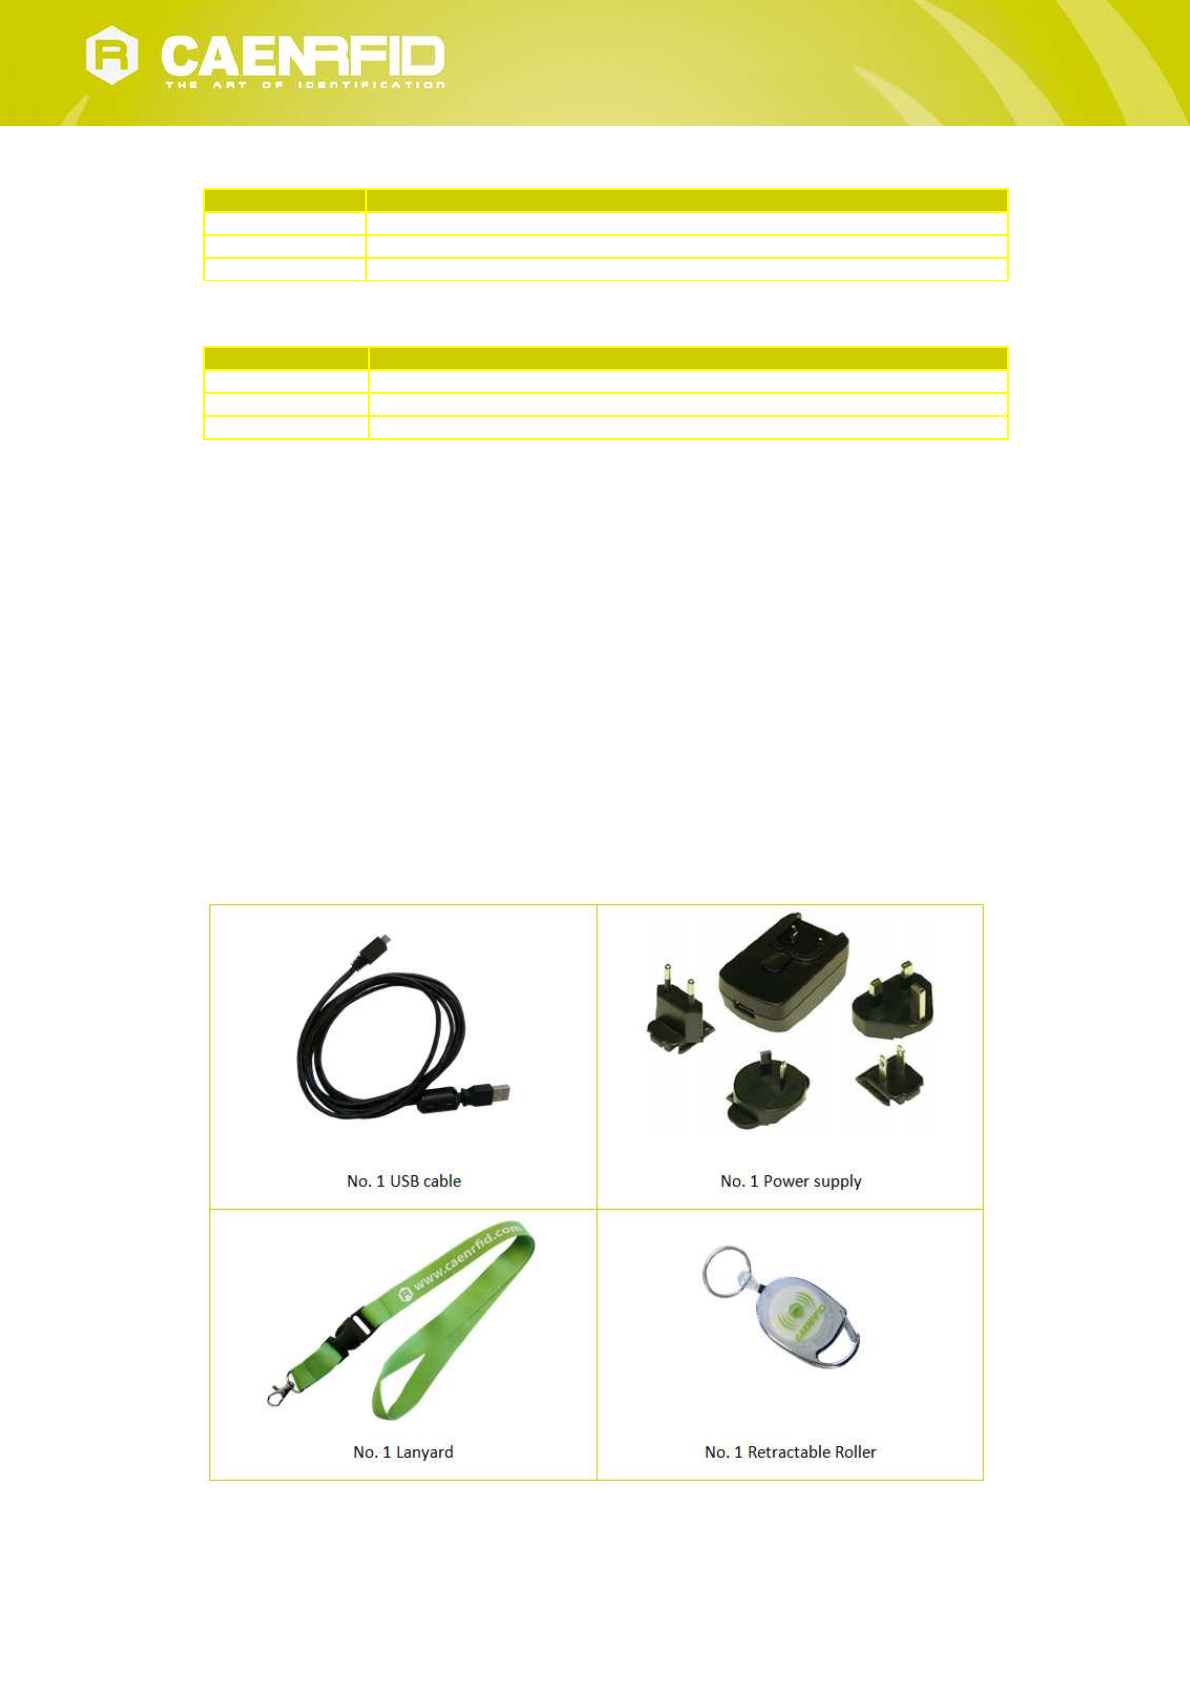
Accessories
Check for the supplied accessories below:
Fig. 1.3: qIDmini R1170I Accessories
Introduction - qIDmini Technical Information Manual 8

Development Kit
R1170IDK – Keyfob Bluetooth UHF RFID Reader Development Kit is available:
Fig. 1.4: R1170IDK – qIDmini Keyfob Bluetooth UHF RFID Reader Development Kit
The qIDmini R1170IDK development kit is a complete RFID set up, for a quick implementation of RFID solutions. It
includes:
n. 1 R1170I qIDmini Keyfob Bluetooth UHF RFID Reader
n. 1 Set of Labels
n. 1 A927Z Temperature Logger Tag
n. 1 RT0005 Temperature Logger Tag
n. 1 Lanyard
n. 1 Retractable Roller
n. 1 Power supply
n. 1 USB cable
Introduction - qIDmini Technical Information Manual 9
Ordering Options
Code Description
Reader
WR1170IEAPLP R1170IEAPLP - qIDmini Keyfob Bluetooth UHF RFID Reader (ETSI)
with Apple profile
WR1170IEHIDP R1170IEHIDP - qIDmini Keyfob Bluetooth UHF RFID Reader (ETSI)
with HID profile
WR1170IUAPLP R1170IUAPLP - qIDmini Keyfob Bluetooth UHF RFID Reader (FCC)
with Apple profile
WR1170IUHIDP R1170IUHIDP - qIDmini Keyfob Bluetooth UHF RFID Reader (FCC)
with HID profile
Development kit
WR1170IDKEAP R1170IDKEAP - Development kit with qIDmini R1170I Reader
(ETSI with Apple profile) and demo tags
WR1170IDKEHI R1170IDKEHI - Development kit with qIDmini R1170I Reader
(ETSI with HID profile) and demo tags
WR1170IDKUAP R1170IDKUA - Development kit with qIDmini R1170I Reader (FCC
with Apple profile) and demo tags
WR1170IDKUHI R1170IDKUA - Development kit with qIDmini R1170I Reader (FCC
with HID profile) and demo tags
In the following table it is shown the compatibility between the Apple/HID models and different Operating Systems
(Android, PC and iOS):
APPLE MODEL1PROFILES
EASY2RD HID
ANDROID √ -
PC √ -
iOS √ -
HID MODEL2PROFILES
EASY2RD HID
ANDROID √ √
PC √ √
iOS - √
Tab. 1.4: Compatibility table between the Apple/HID models and different OS
1 APPLE Model Ordering Options: WR1170IEAPLP, WR1170IUAPLP, WR1170IDKEAP, WR1170IDKUAP
2 HID Model Ordering Options: WR1170IEHIDP, WR1170IUHIDP, WR1170IDKEHI, WR1170IDKUHI
Introduction - qIDmini Technical Information Manual 10

2 GETTING STARTED
Introduction
This quickstart guide will help you to get started with your qIDmini (Model R1170I) reader.
The qIDmini R1170I has two communication interfaces: USB and Bluetooth. The last one is the preferred
communication interface using the SPP profile (Serial Port Profile).
After powering on the reader, the Bluetooth interface is available to accept incoming connection requests
(discoverable) from Bluetooth enabled hosts like PCs, PDAs, Tablets, Smartphones and so on.
In the qIDmini Configuration Menu you can choose between two different profile options:
EASY2RD (factory default): choosing this option you select the CAEN RFID easy2read communication
protocol. Select this option in order to control the reader using the CAEN RFID Easy Controller Application or
the SDK (Software Development Kits) library. For details on the use with the EASY2RD profile please refer to
§ qIDmini EASY2RD Profile chapter page 16.
HID3: choosing this option you select the keyboard emulation protocol. For details on the use on the HID
profile please refer to § qIDmini HID profile chapter page 31.
The reader is sold with the factory profile set to EASY2RD. This guide helps you to getting started with your reader
using the EASY2RD profile.
Bluetooth Communication Setup using the Easy Controller for
Android
1. Download the CAEN RFID Easy Controller for Android App from the qIDmini R1170I web page, by clicking on the
Android APP on Google Play icon.
2. Launch the CAEN RFID Easy Controller for Android App.
3 HID profile is not available for qIDmini R1170I with APPLE profile (ordering options: WR1170IEAPLP, WR1170IUAPLP, WR1170IDKEAP,
WR1170IDKUAP)
Getting Started - qIDmini Technical Information Manual 11

3 QIDMINI EASY2RD PROFILE
Introduction
Choosing the EASY2RD profile option you select the CAEN RFID easy2read communication protocol. Select this option
in order to control the reader using the CAEN RFID Easy Controller Application or the SDK (Software Development Kits)
library.
For details on the available profiles and on the activation method please refer to § PROFILE paragraph page 43.
Note that the APPLE model reader (see § Ordering Options page 10) can be connected to all devices using the EASY2RD
profile, while the HID model reader can be connected through the EASY2RD profile to all devices except the iOS ones.
In the following table it is shown the compatibility between the Apple/HID models and different Operating Systems
(Android, PC and iOS) in the EASY2RD profile:
ANDROID PC iOS
APPLE MODEL4√ √ √
HID MODEL5√ √ -
Tab. 3.5: Compatibility table between the Apple/HID models and different OS in the EASY2RD profile
4 APPLE Model Ordering Options: WR1170IEAPLP, WR1170IUAPLP, WR1170IDKEAP, WR1170IDKUAP
5 HID Model Ordering Options: WR1170IEHIDP, WR1170IUHIDP, WR1170IDKEHI, WR1170IDKUHI
qIDmini EASY2RD Profile - qIDmini Technical Information Manual 16

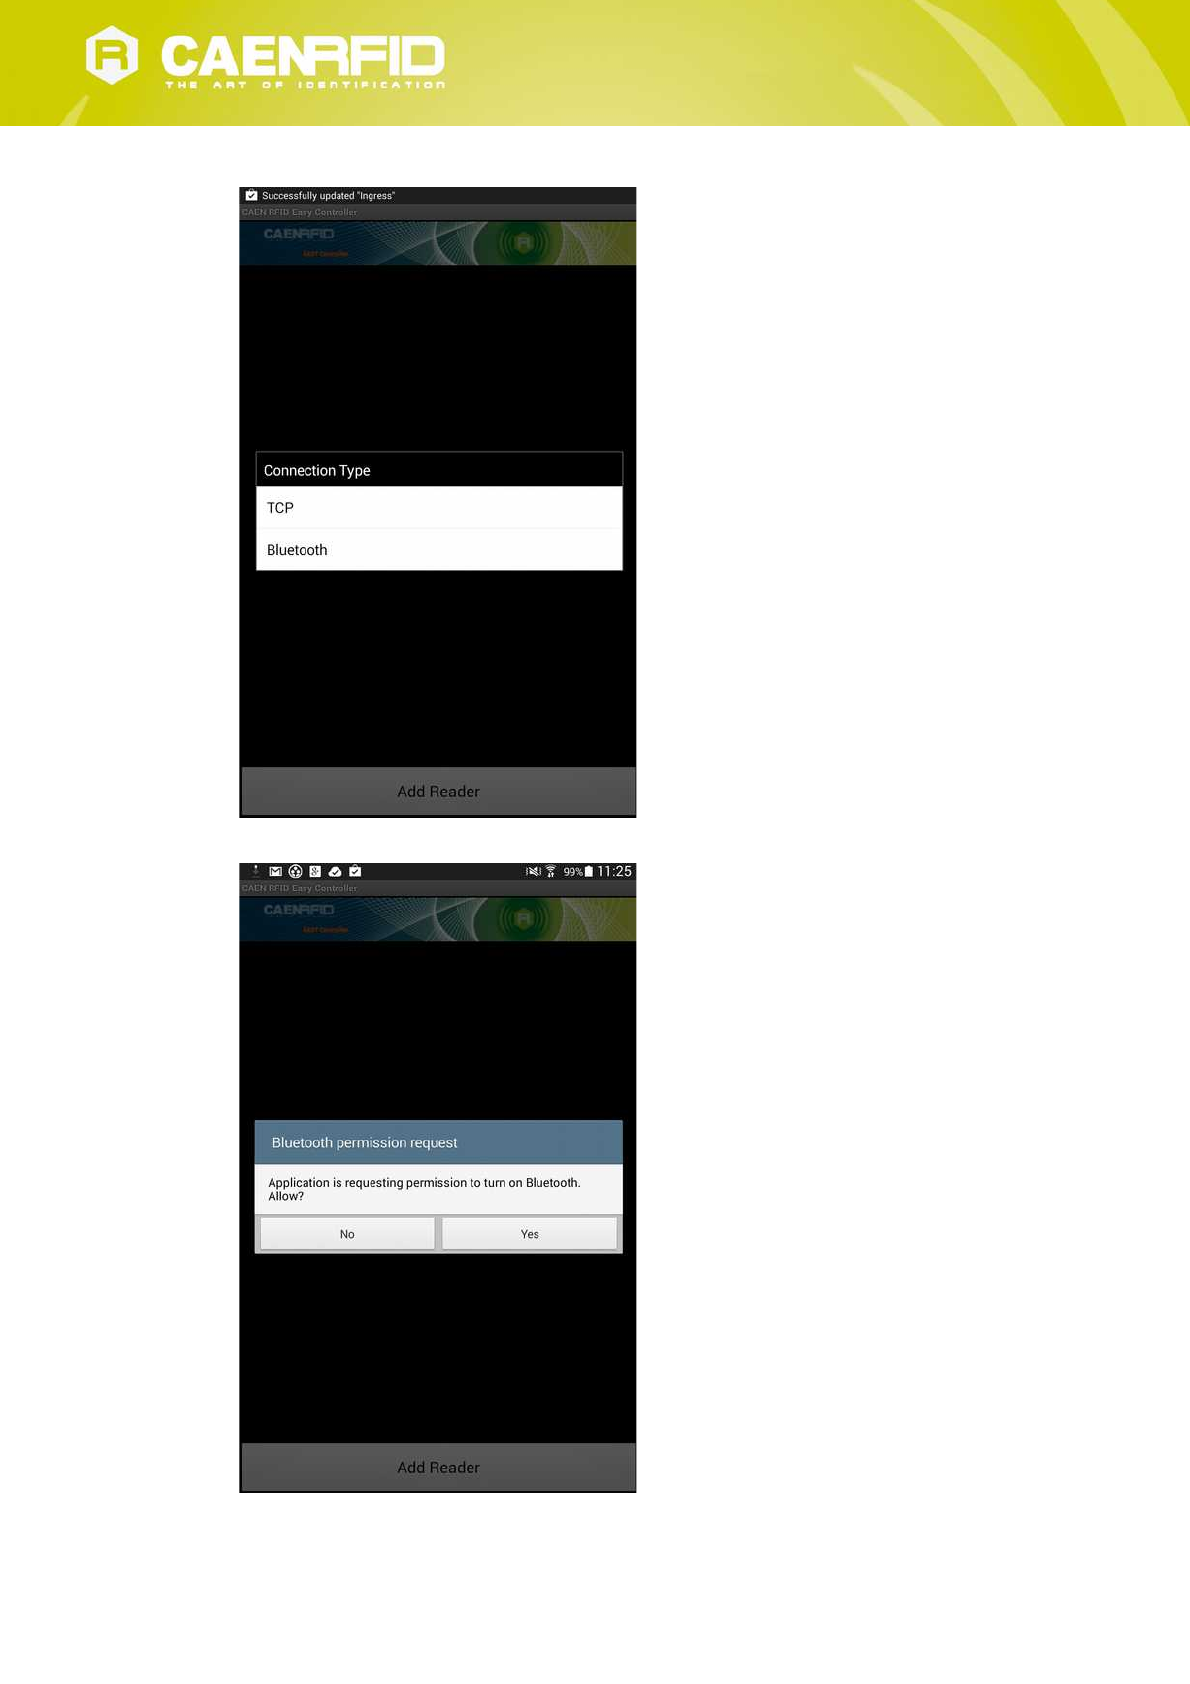
Android devices
Bluetooth Communication Setup using the Easy Controller for Android
1. Download the CAEN RFID Easy Controller for Android App from the qIDmini R1170I web page, by clicking on the
Android App on Google Play icon.
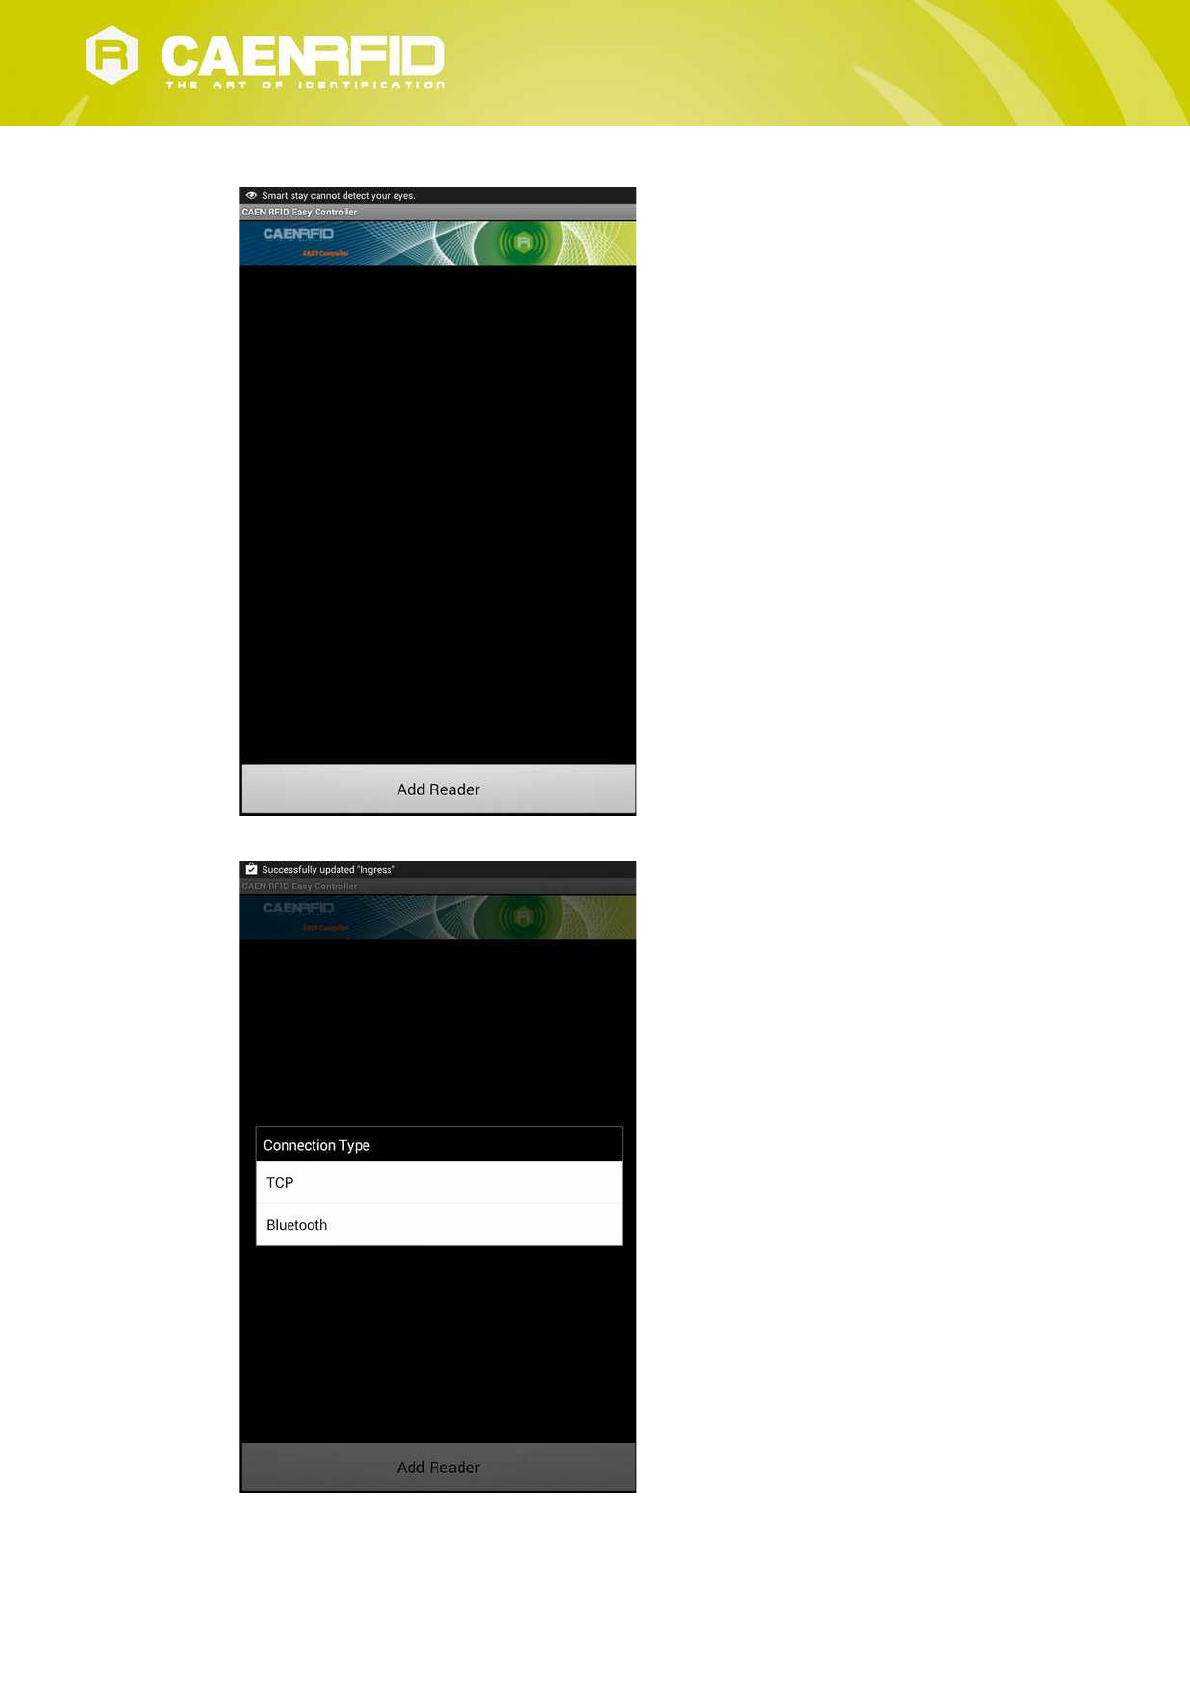
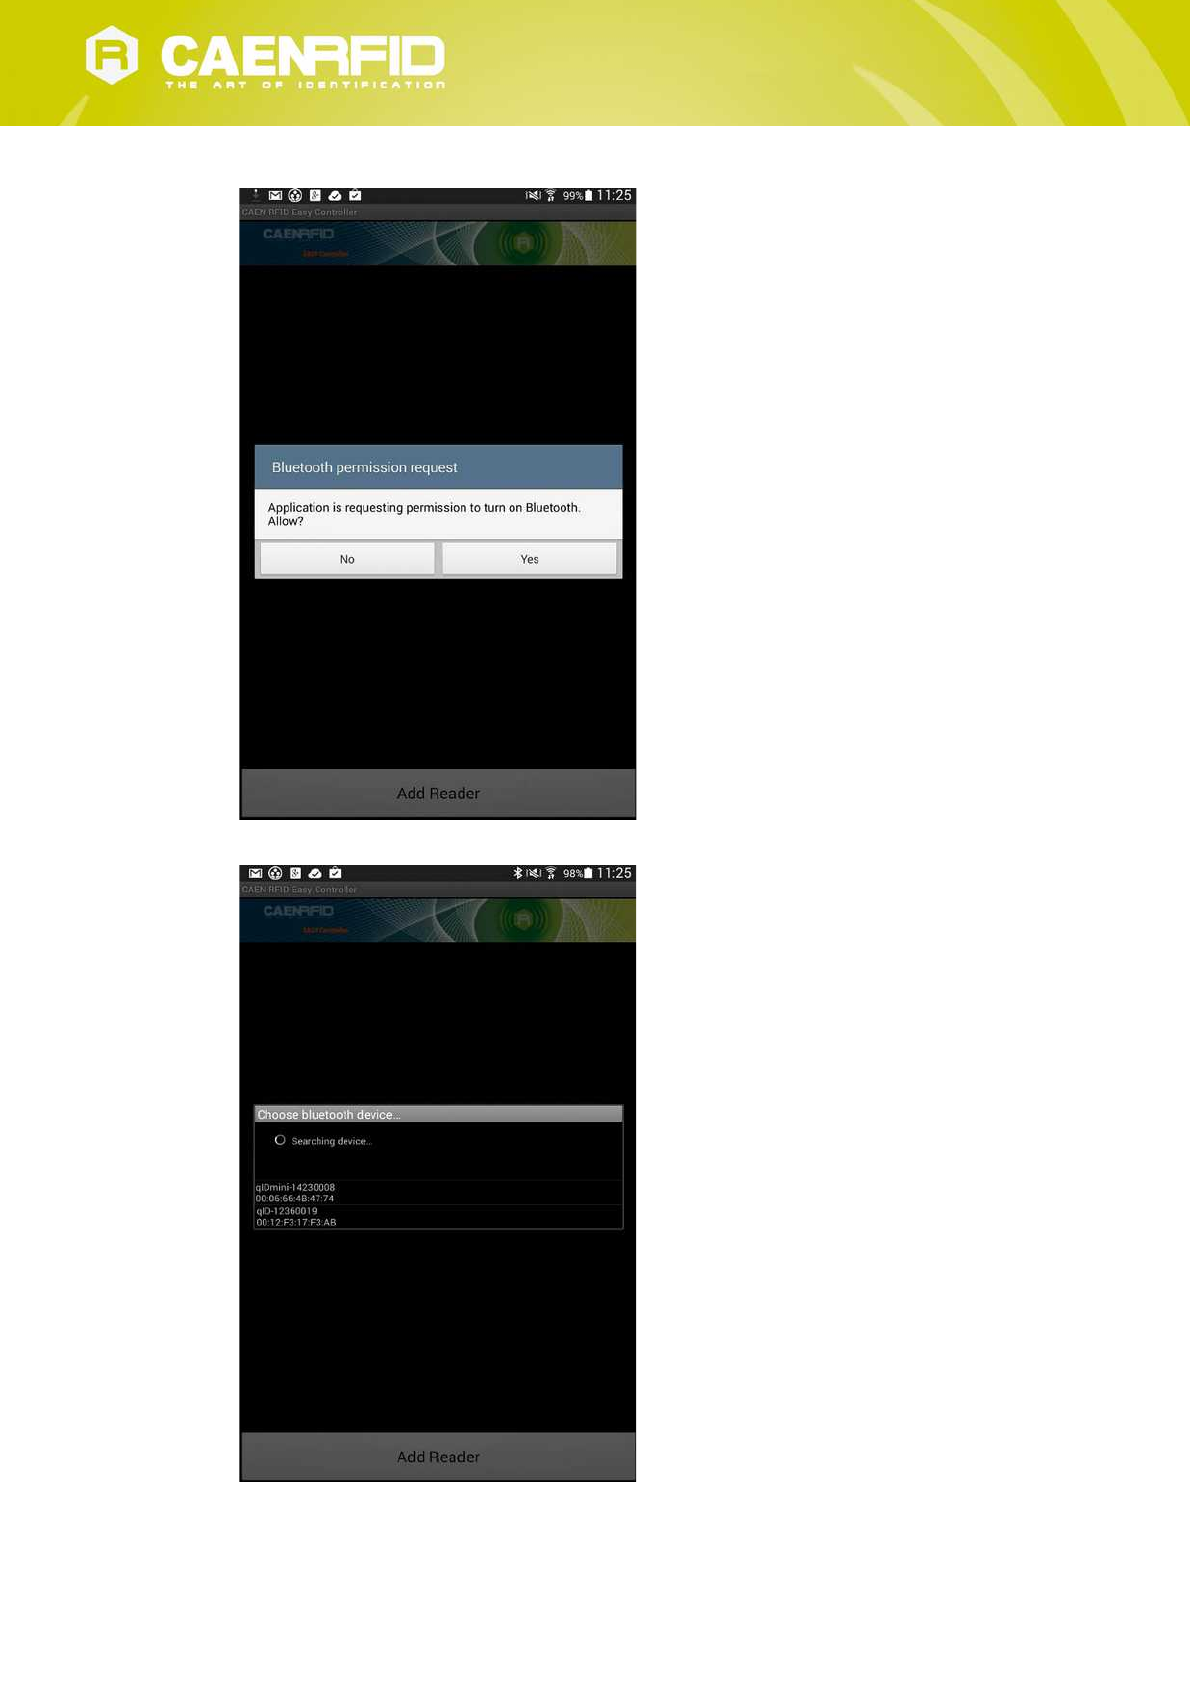
2. Launch the CAEN RFID Easy Controller for Android App.
3. Click on “Add reader”:
qIDmini EASY2RD Profile - qIDmini Technical Information Manual 17
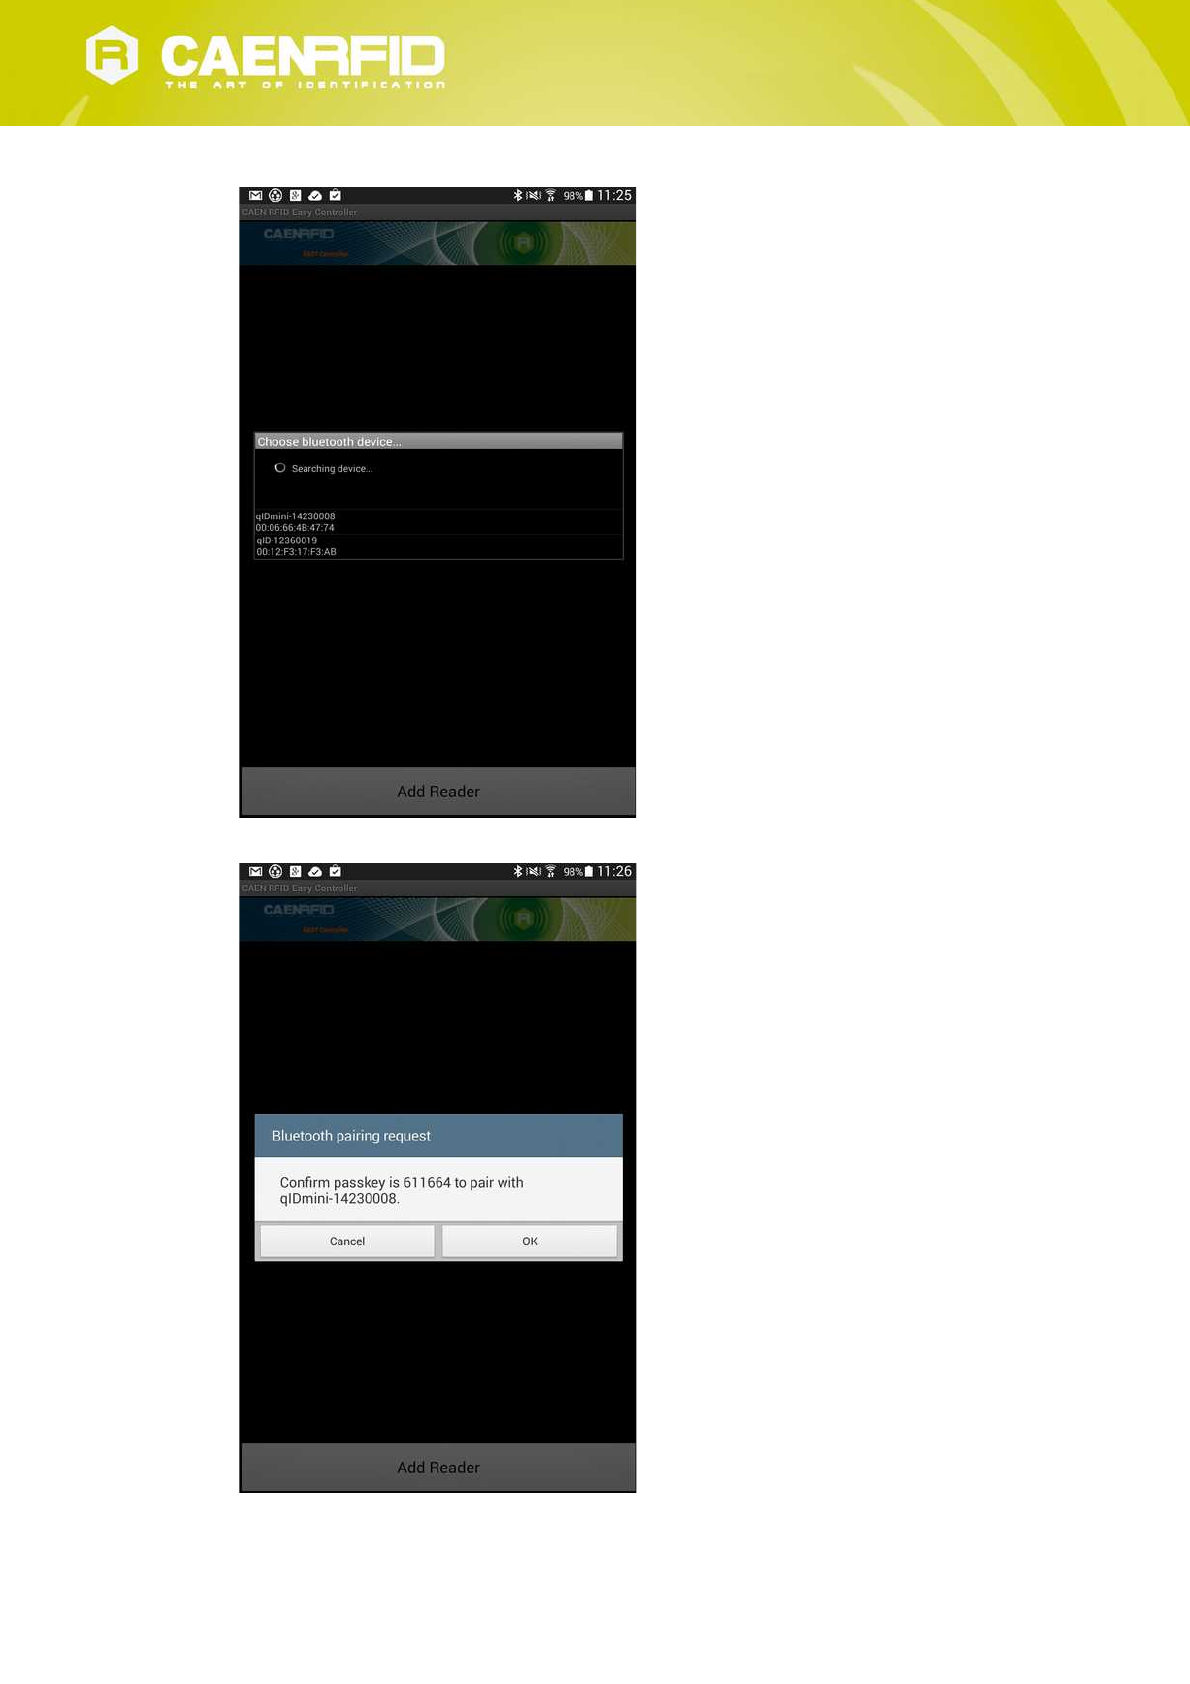
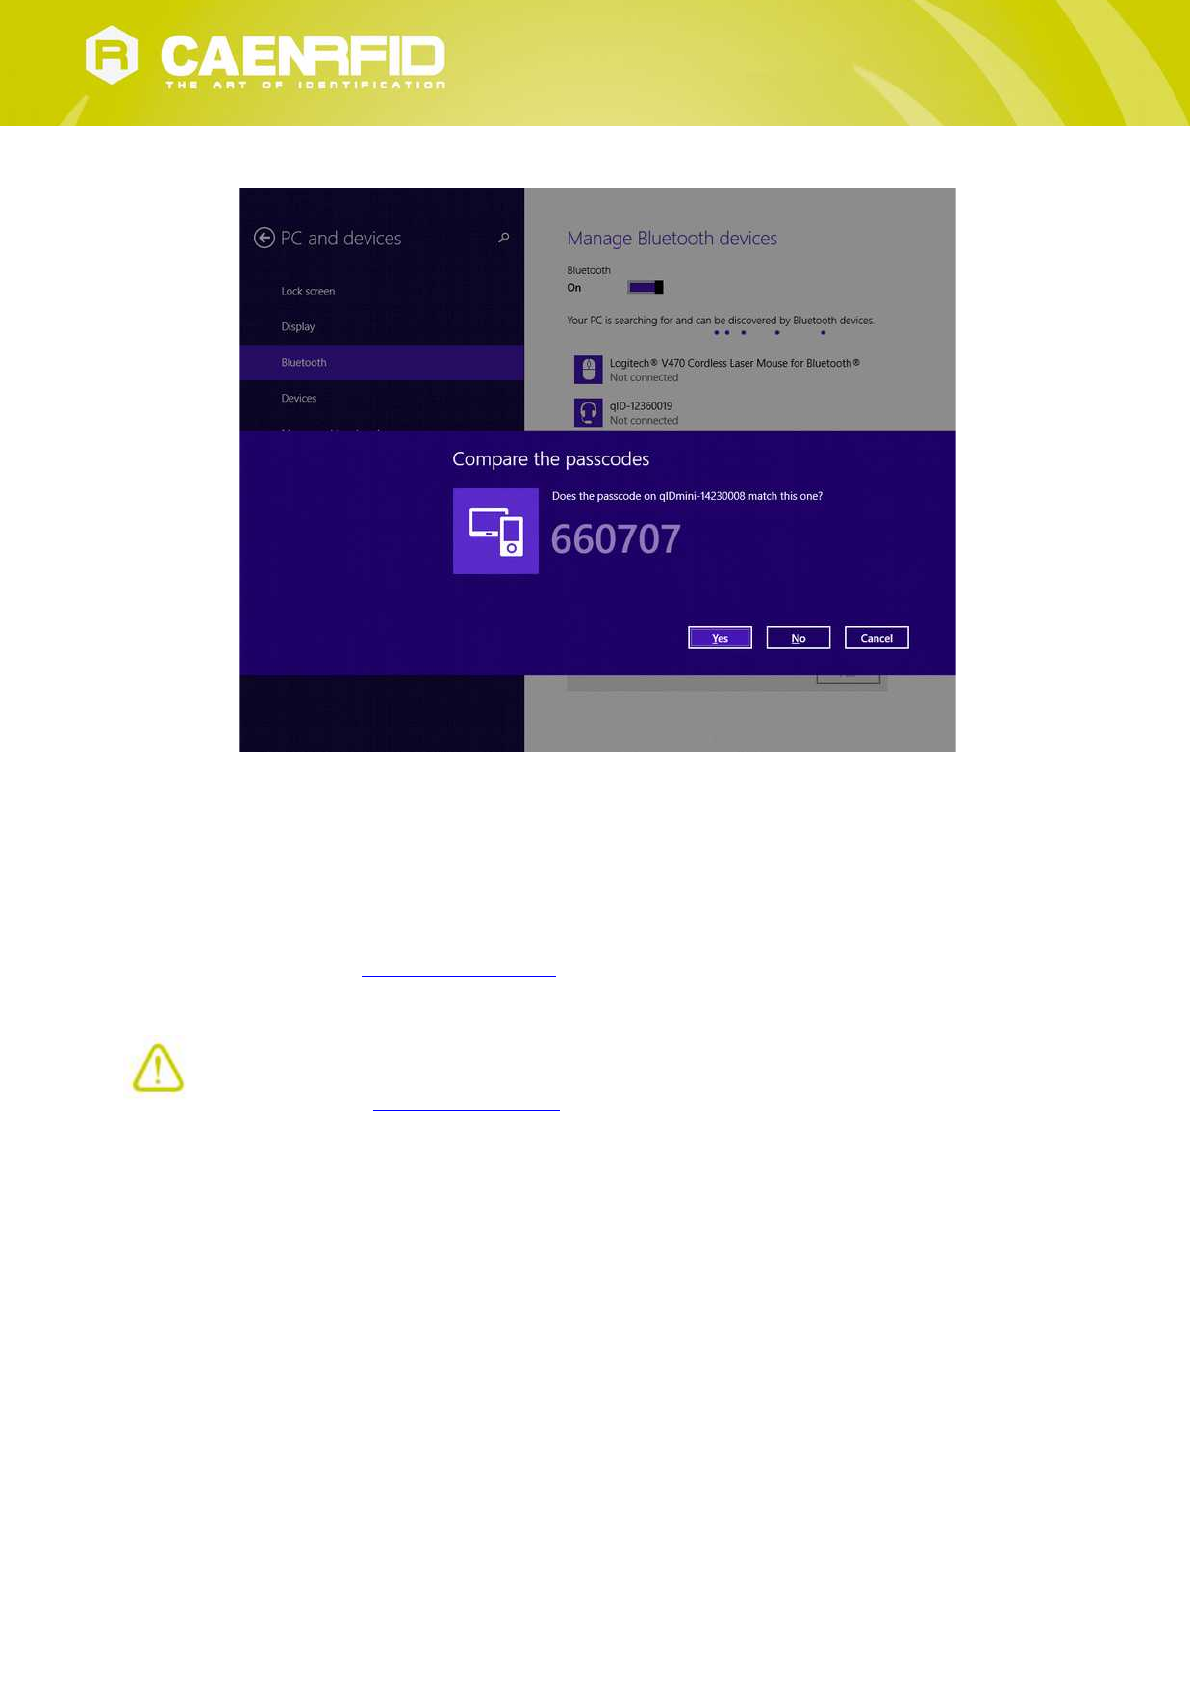
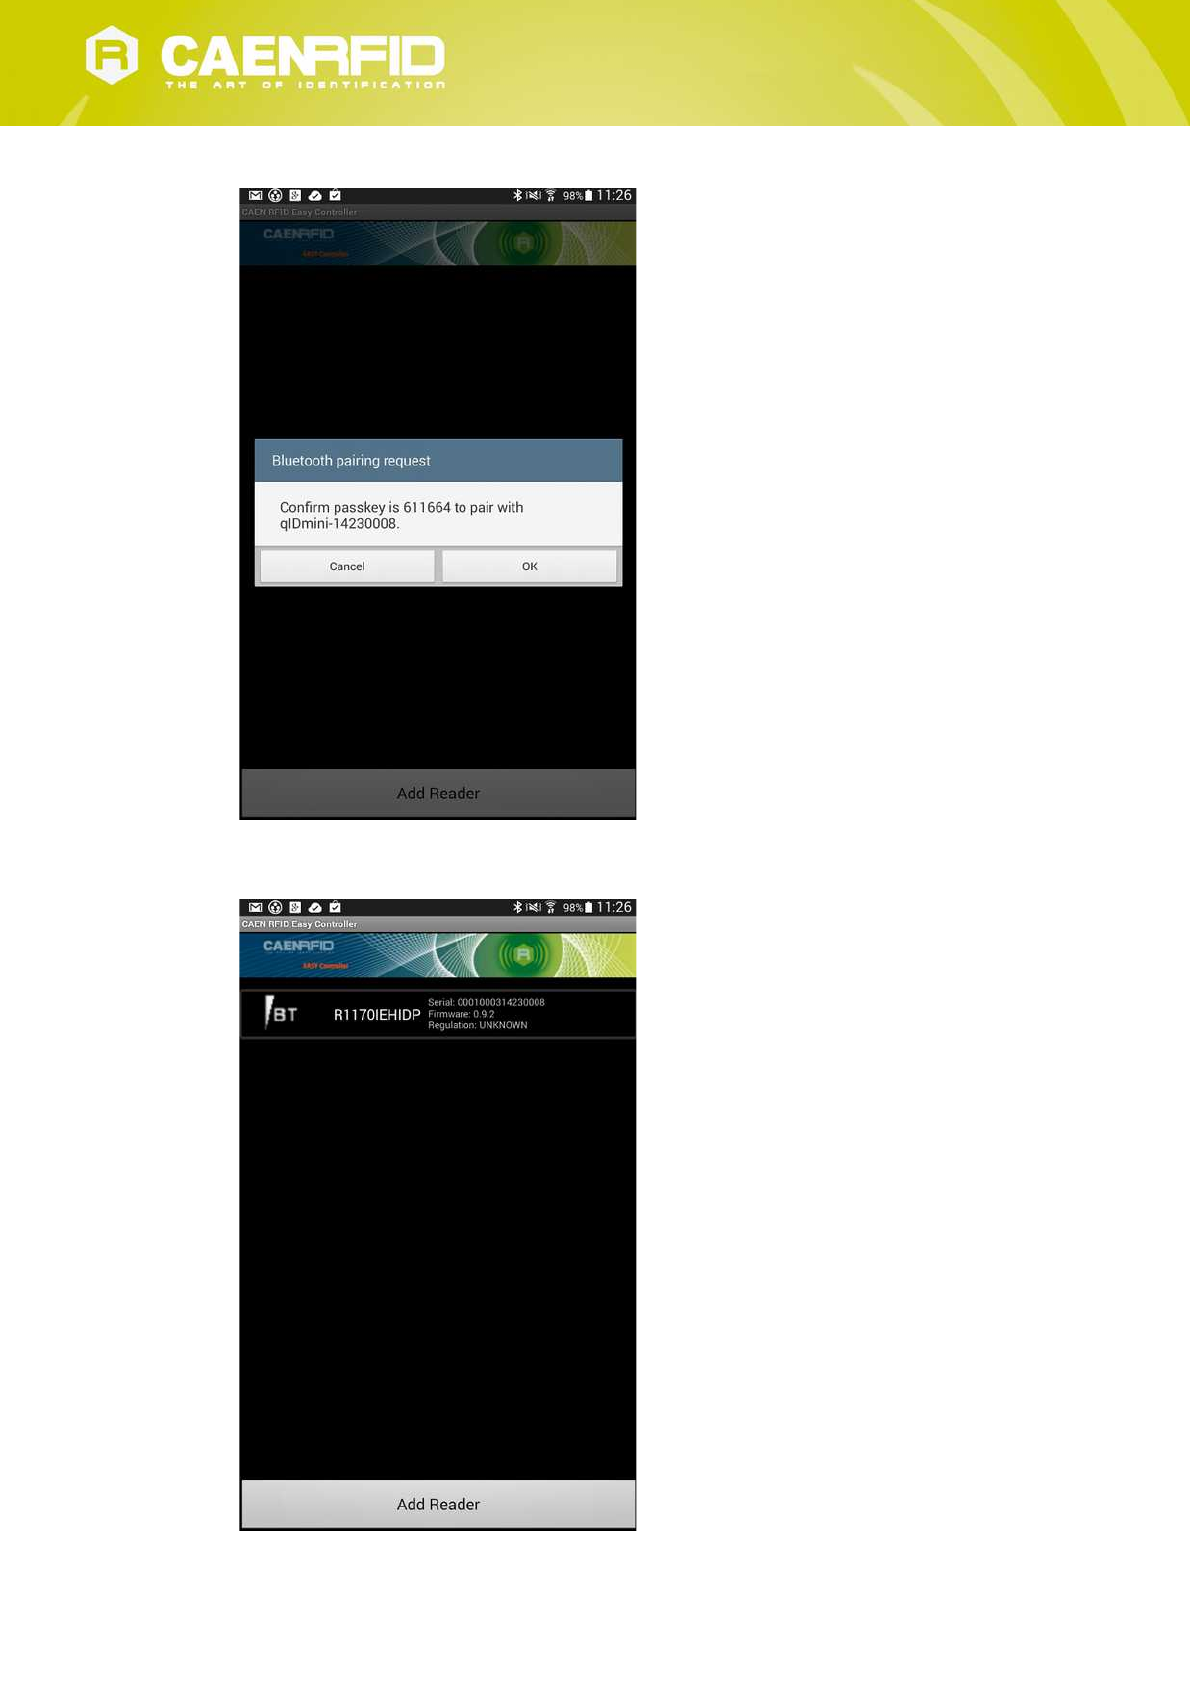
Click on “yes” to confirm the passcode:
In case of Windows XP Operating System, when discovered by the host, the qIDmini reader can be identified by
its Bluetooth device name and paired using the pass-key; both parameters are provided below:
Bluetooth device name: “qIDmini“ + device serial number
Pass-key: 1234
2. Once the connection is established the Bluetooth blue light turns on.
Now you can use the CAEN RFID Easy Controller Application to control the reader. For details refer to § Connecting the
qIDmini using the Easy Controller for Windows page 26.
Warning: Note that, in the EASY2RD profile, holding down the trigger button activates the tag inventory only if the
continuous mode is active (see the function EventInventoryTag Method in the CAEN RFID API Reference Manual that
can be download from qIDmini R1170I web page, Documents section).
qIDmini EASY2RD Profile - qIDmini Technical Information Manual 23
USB Communication Setup
The qIDmini reader can be connected to a PC using the provided USB cable and it is detected by the PC as an emulated
serial port. In order to correctly operate with the reader you need to install a driver.
1. Power ON the reader and plug the USB cable into the qIDmini USB port.
2. In order to connect the qIDmini reader to the PC you need to install the VCP (Virtual Com Port) drivers for your
operating system. You can download VCP drivers for Windows based systems from the CAEN RFID Web Site from
the qIDmini R1170I web page, SW/FW section or from the Software and Firmware download area.
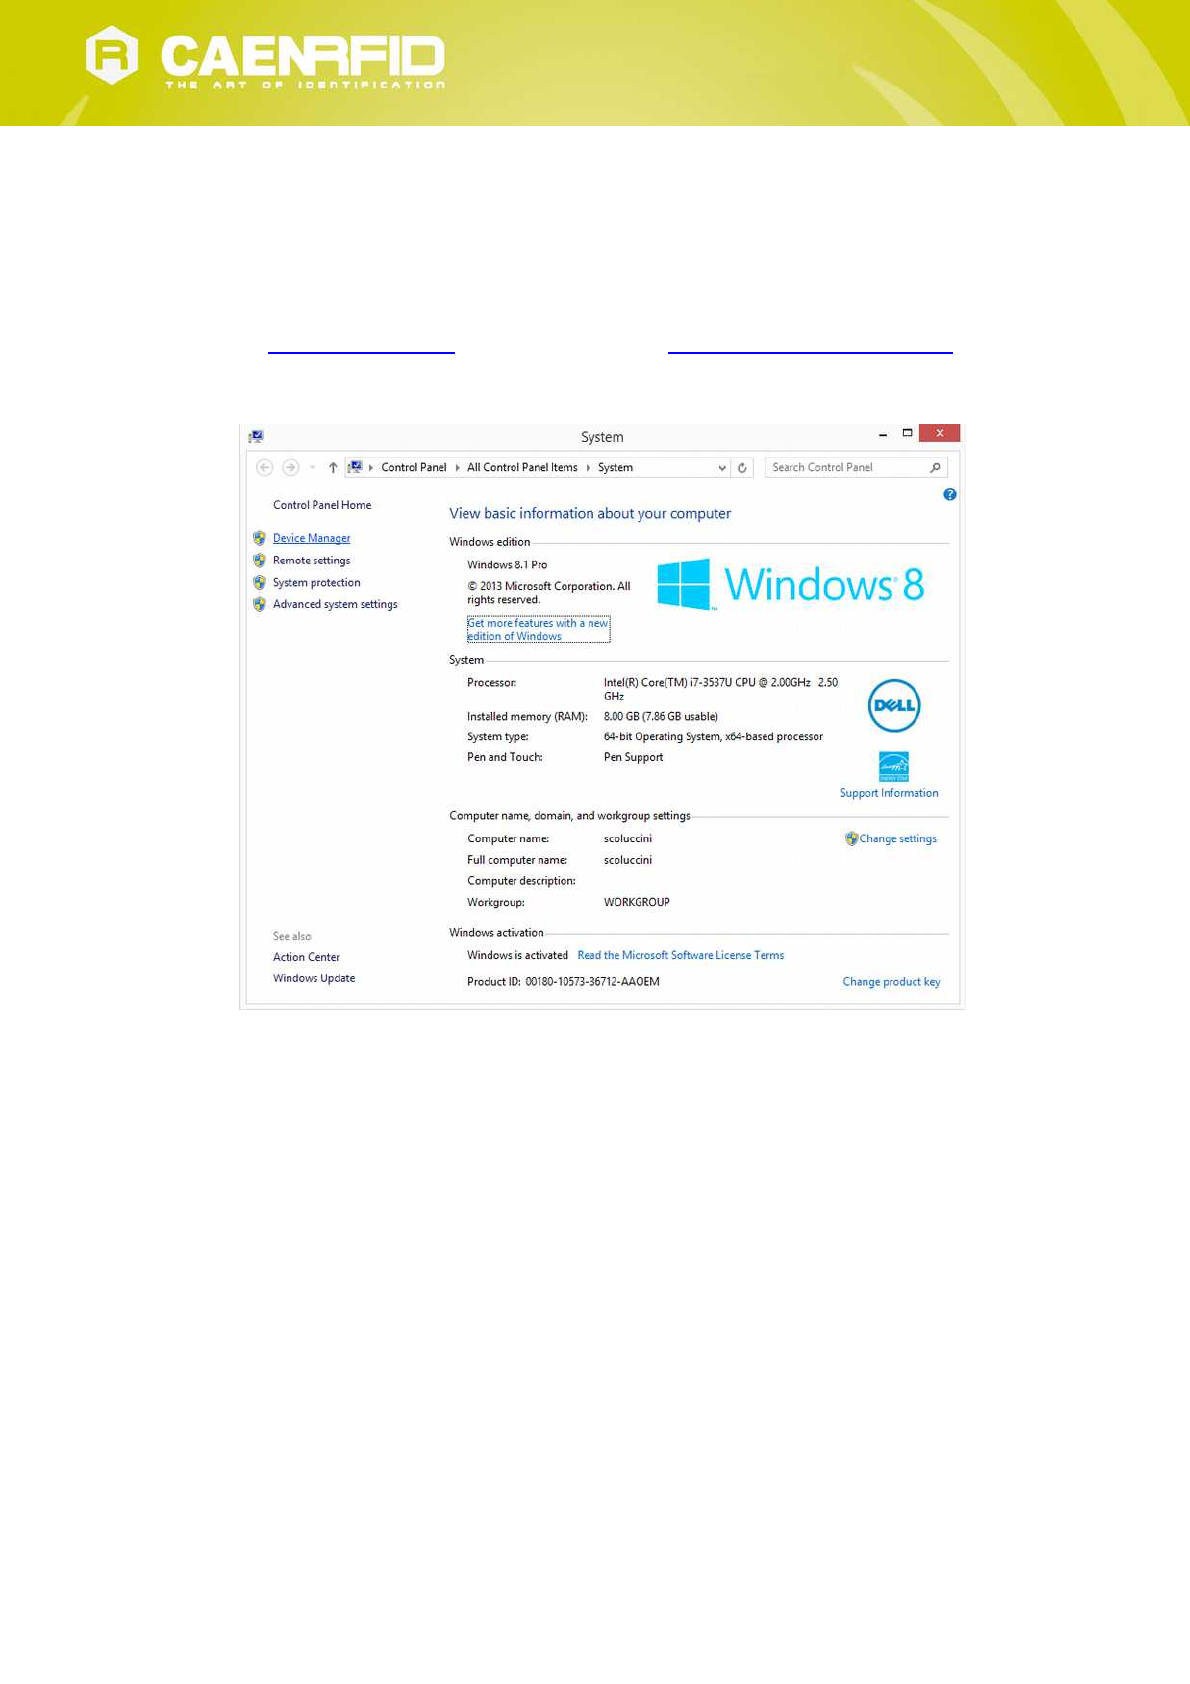
3. Open the System properties: go to Control Panel → All Control Panel Items → System and click on Device
Manager.
qIDmini EASY2RD Profile - qIDmini Technical Information Manual 24
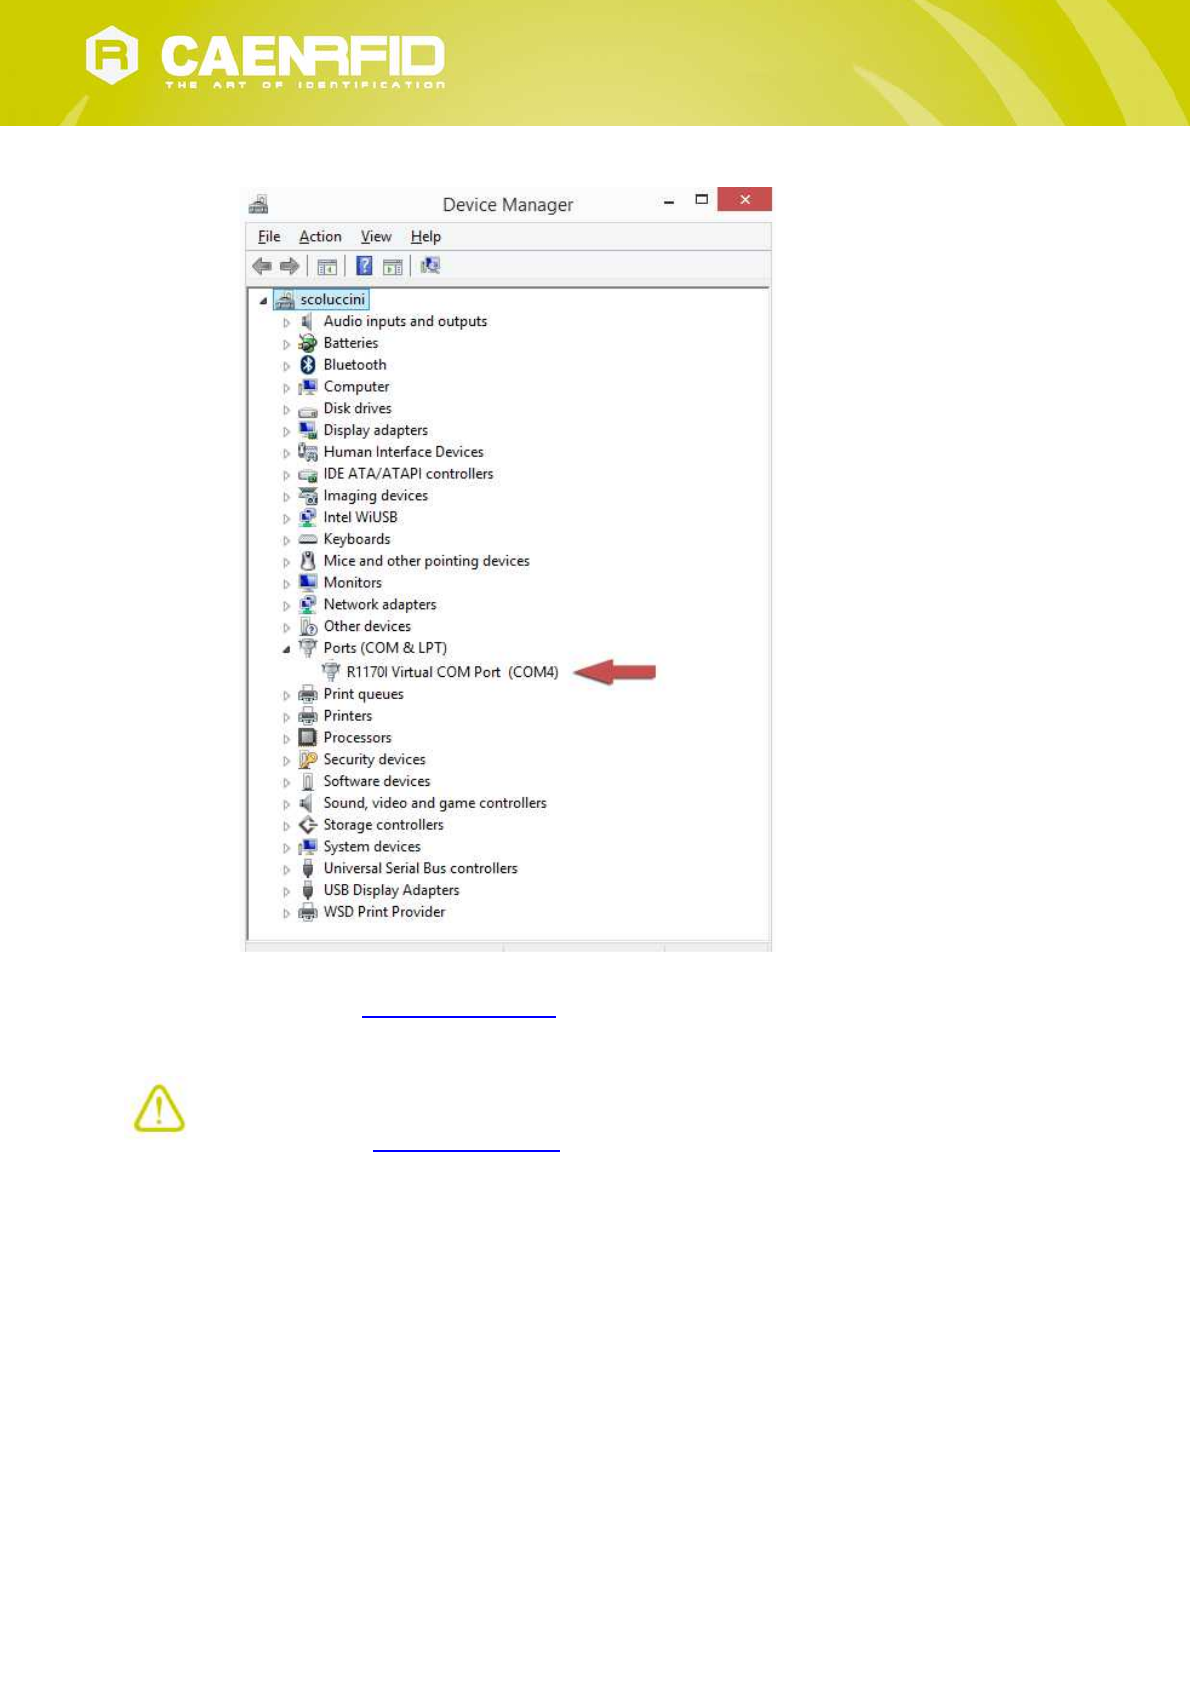
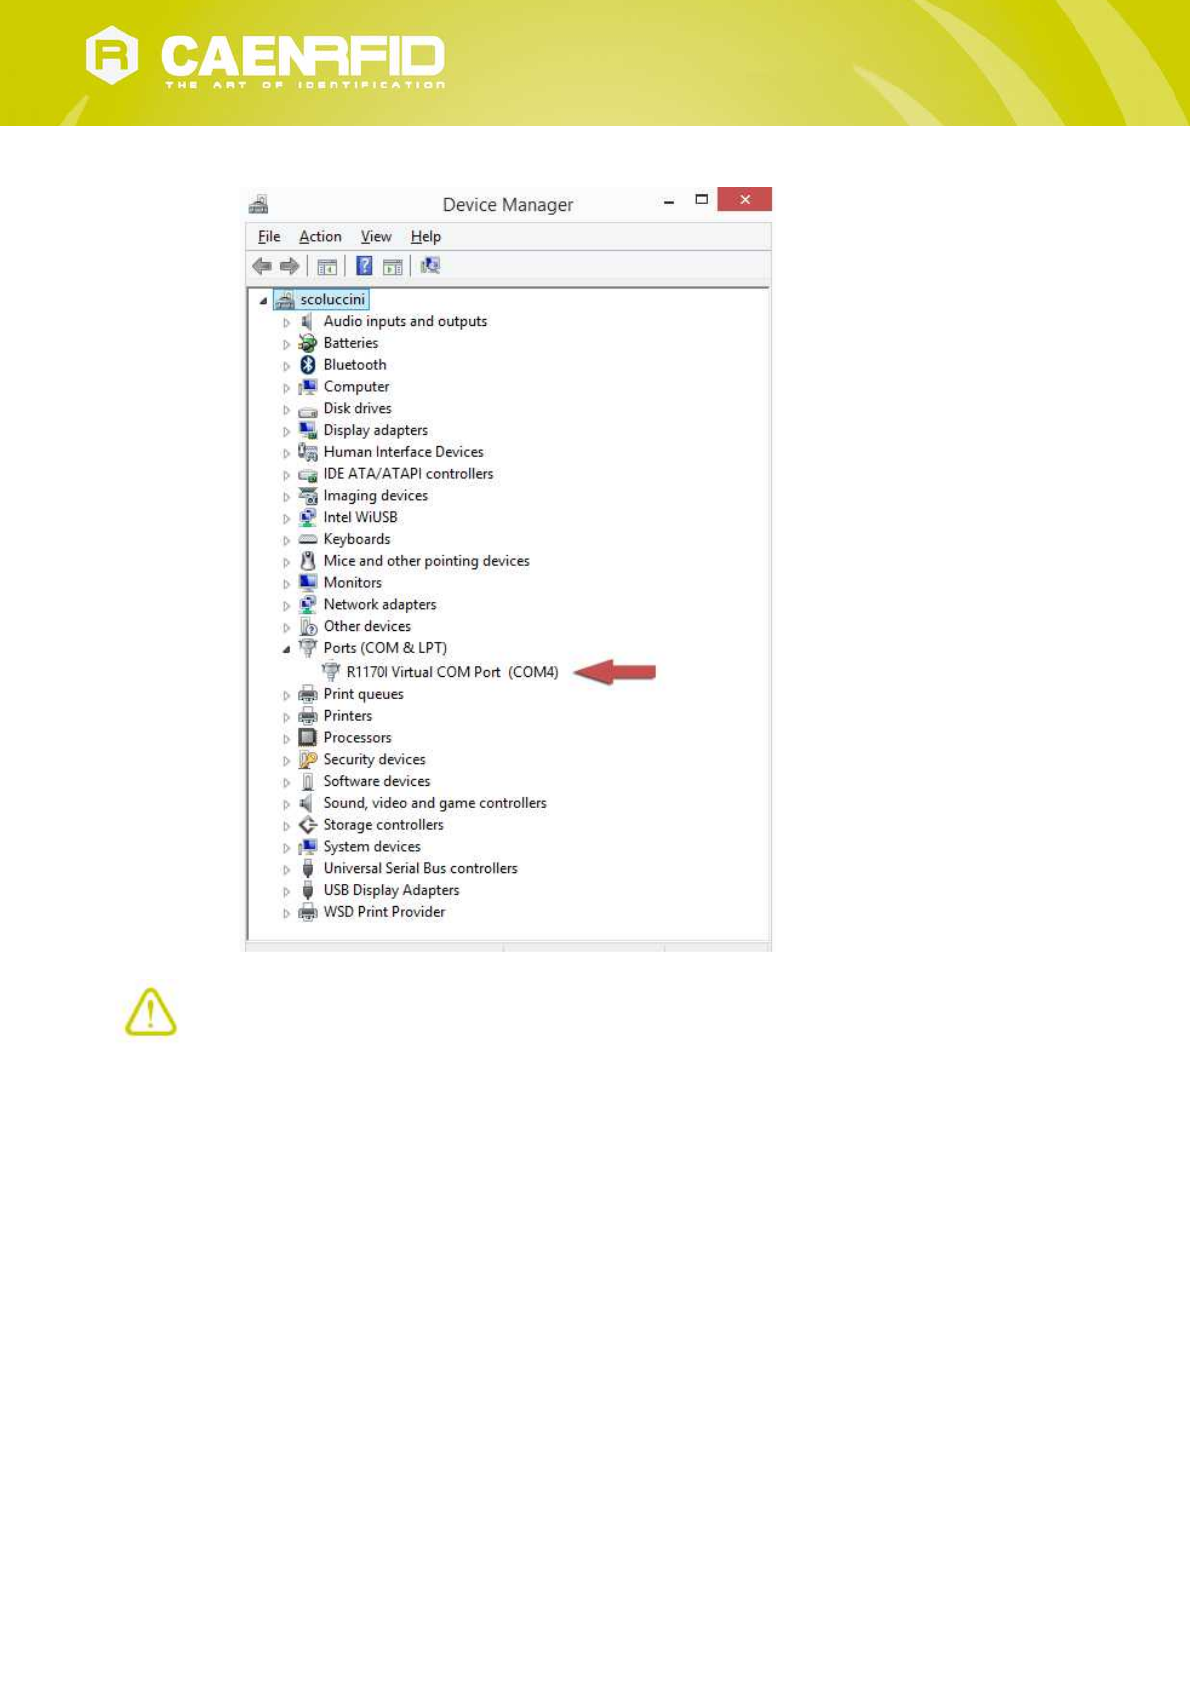
4. After having installed the driver, the reader is detected by the PC as an emulated serial port (VCP):
Now you can use the CAEN RFID Easy Controller Application to control the reader. For details refer to § Connecting the
qIDmini using the Easy Controller for Windows page 26.
Warning: Note that, in the EASY2RD profile, holding down the trigger button activates the tag inventory only if the
continuous mode is active (see the function EventInventoryTag Method in the CAEN RFID API Reference Manual that
can be download from qIDmini R1170I web page, Documents section).
qIDmini EASY2RD Profile - qIDmini Technical Information Manual 25
Connecting the qIDmini using the Easy Controller for Windows
Both USB and Bluetooth interface creates virtual COM ports on the host PC that can be used to connect to the reader
with the CAEN RFID Easy Controller application.
The activation of the EASY2RD profile is required to connect the qIDmini using the Easy Controller application for
Windows.
Follow the steps below to connect the qIDmini reader using the Easy Controller for Windows via Bluetooth:
1. Download from the CAEN RFID web site the latest version of the CAEN RFID Easy Controller for Windows
software and install it.
2. Connect the qIDmini reader to your PC using either the USB or the Bluetooth connection.
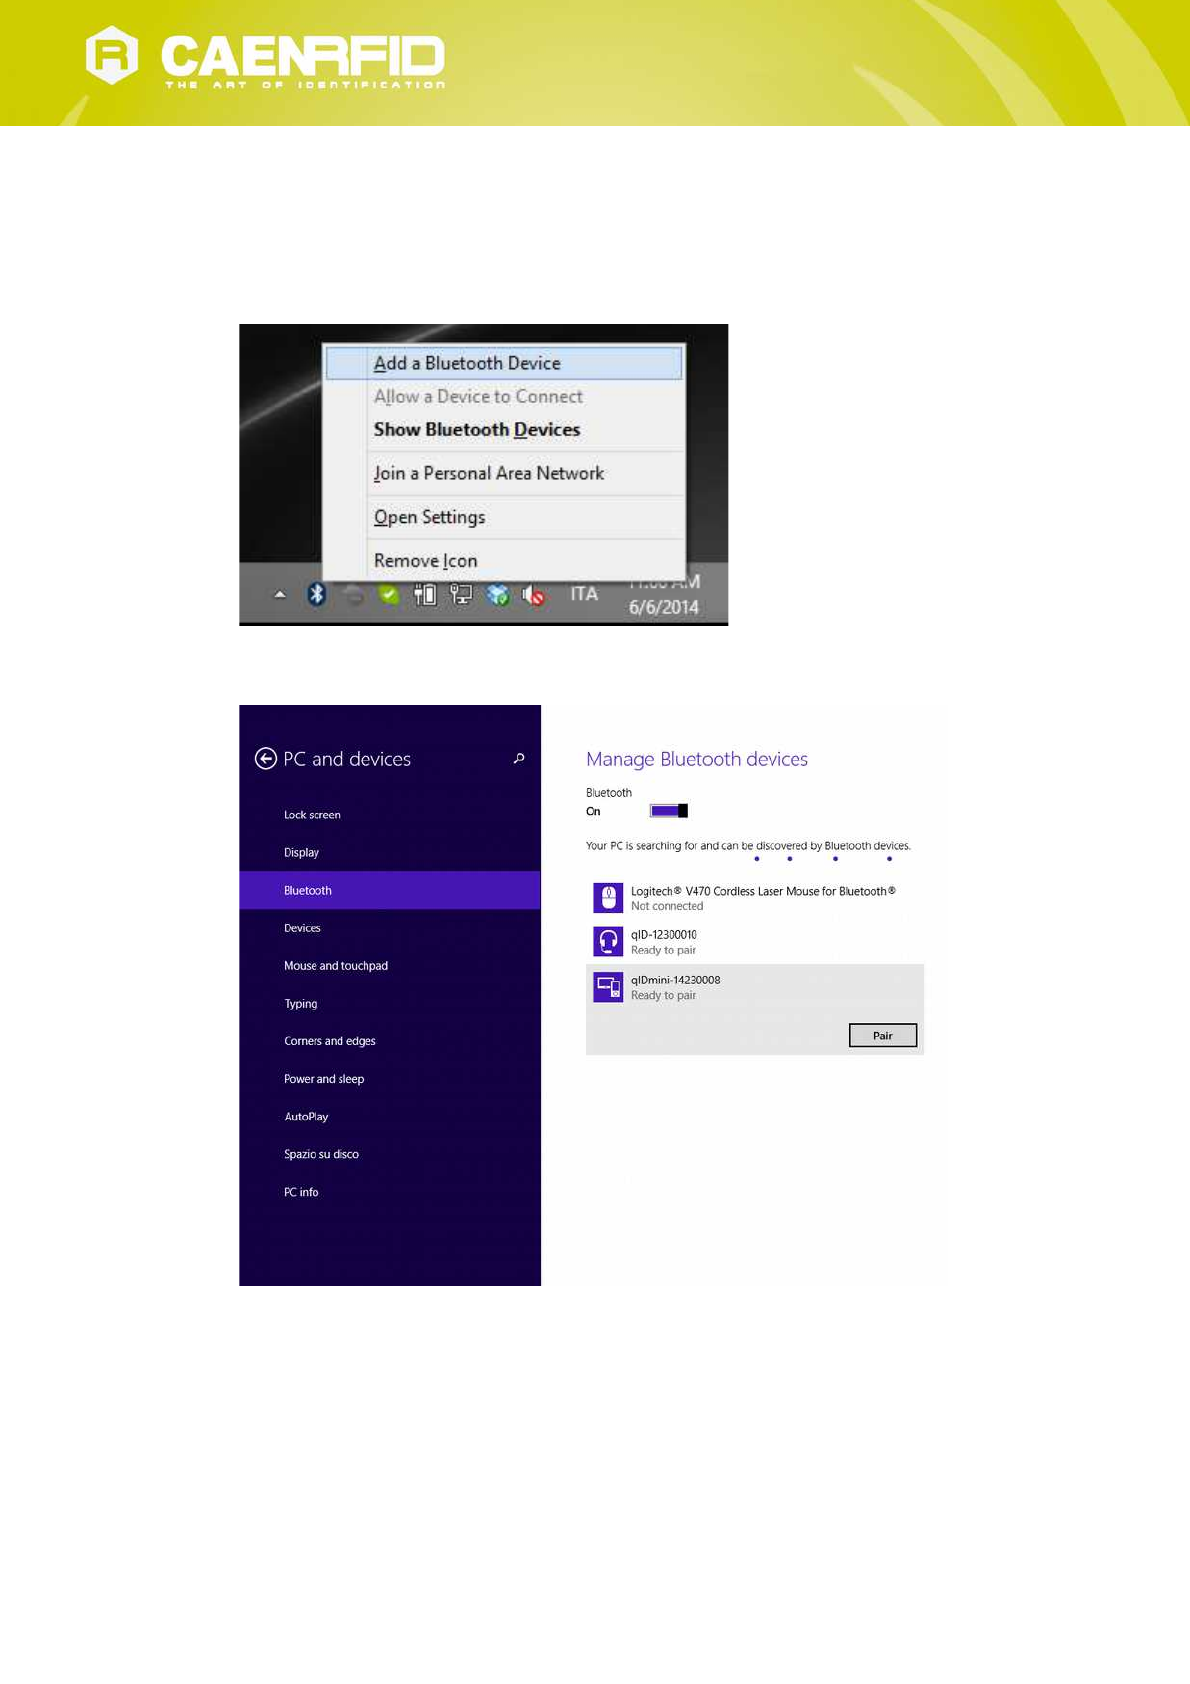
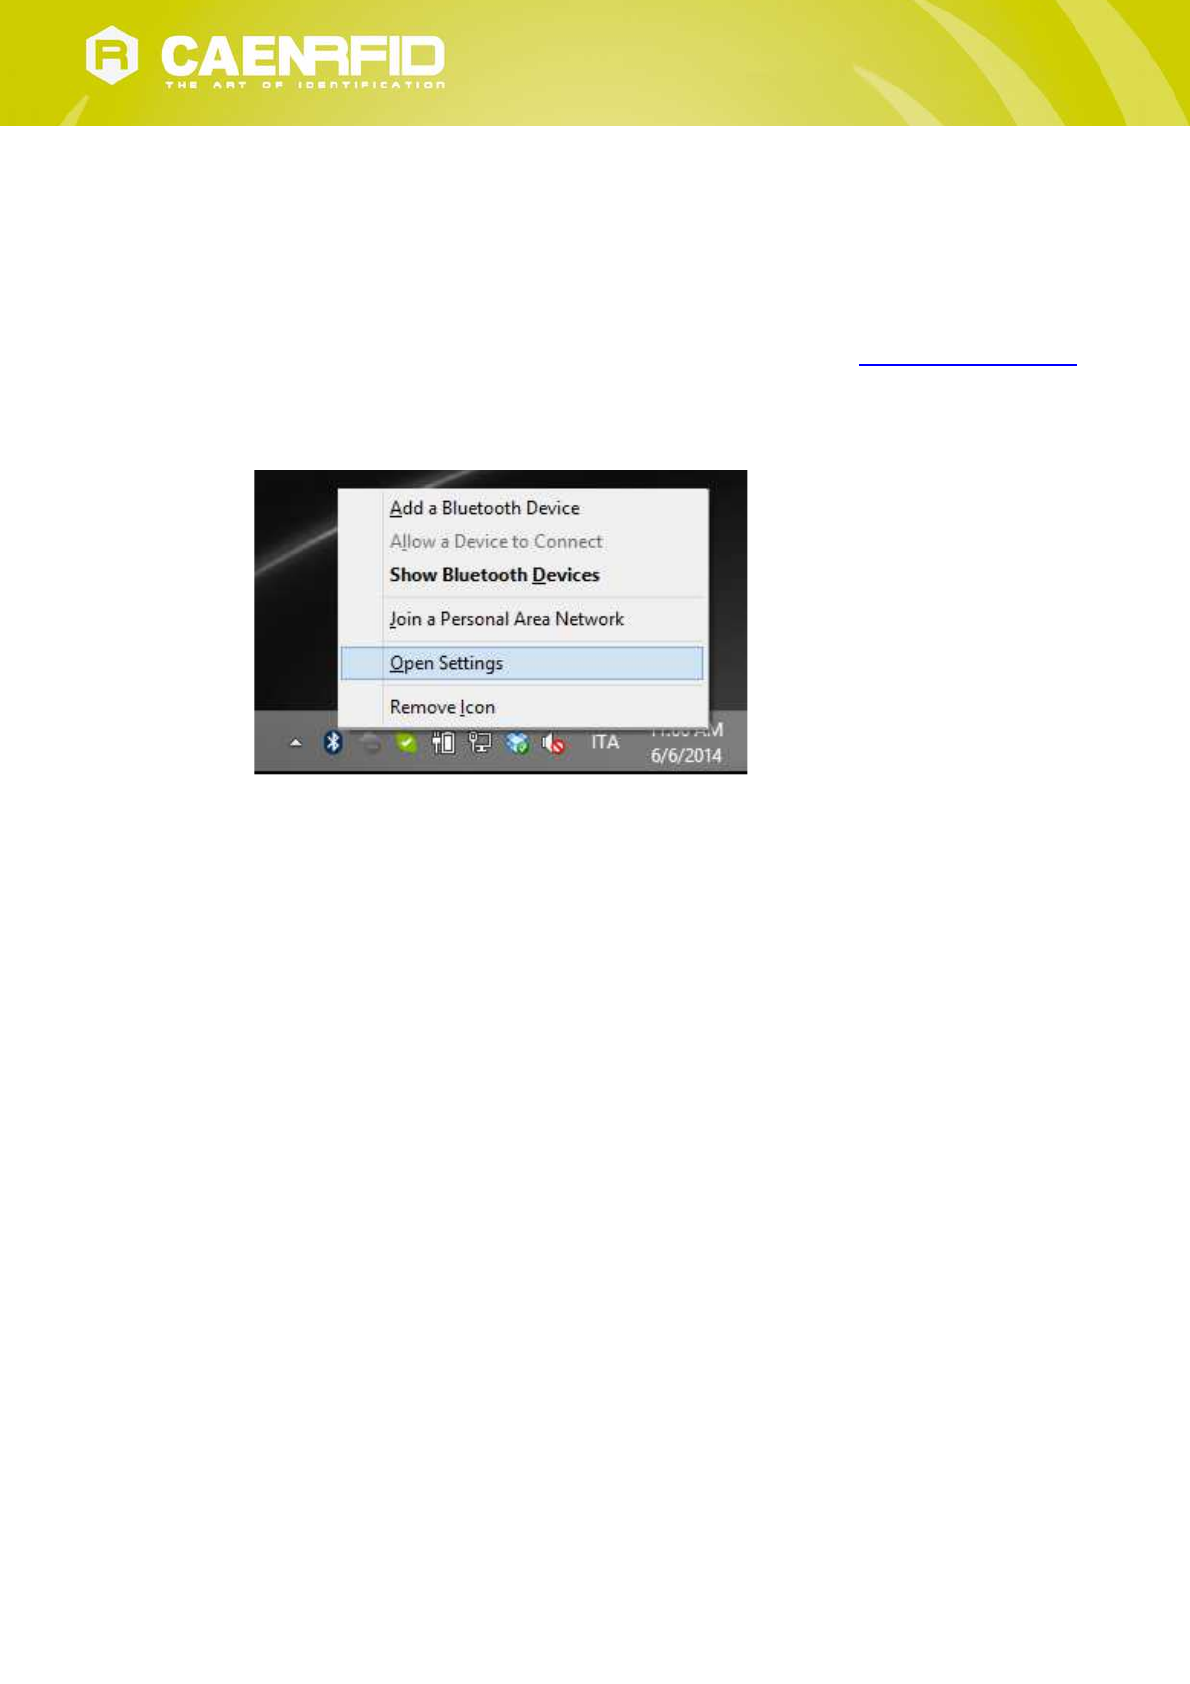
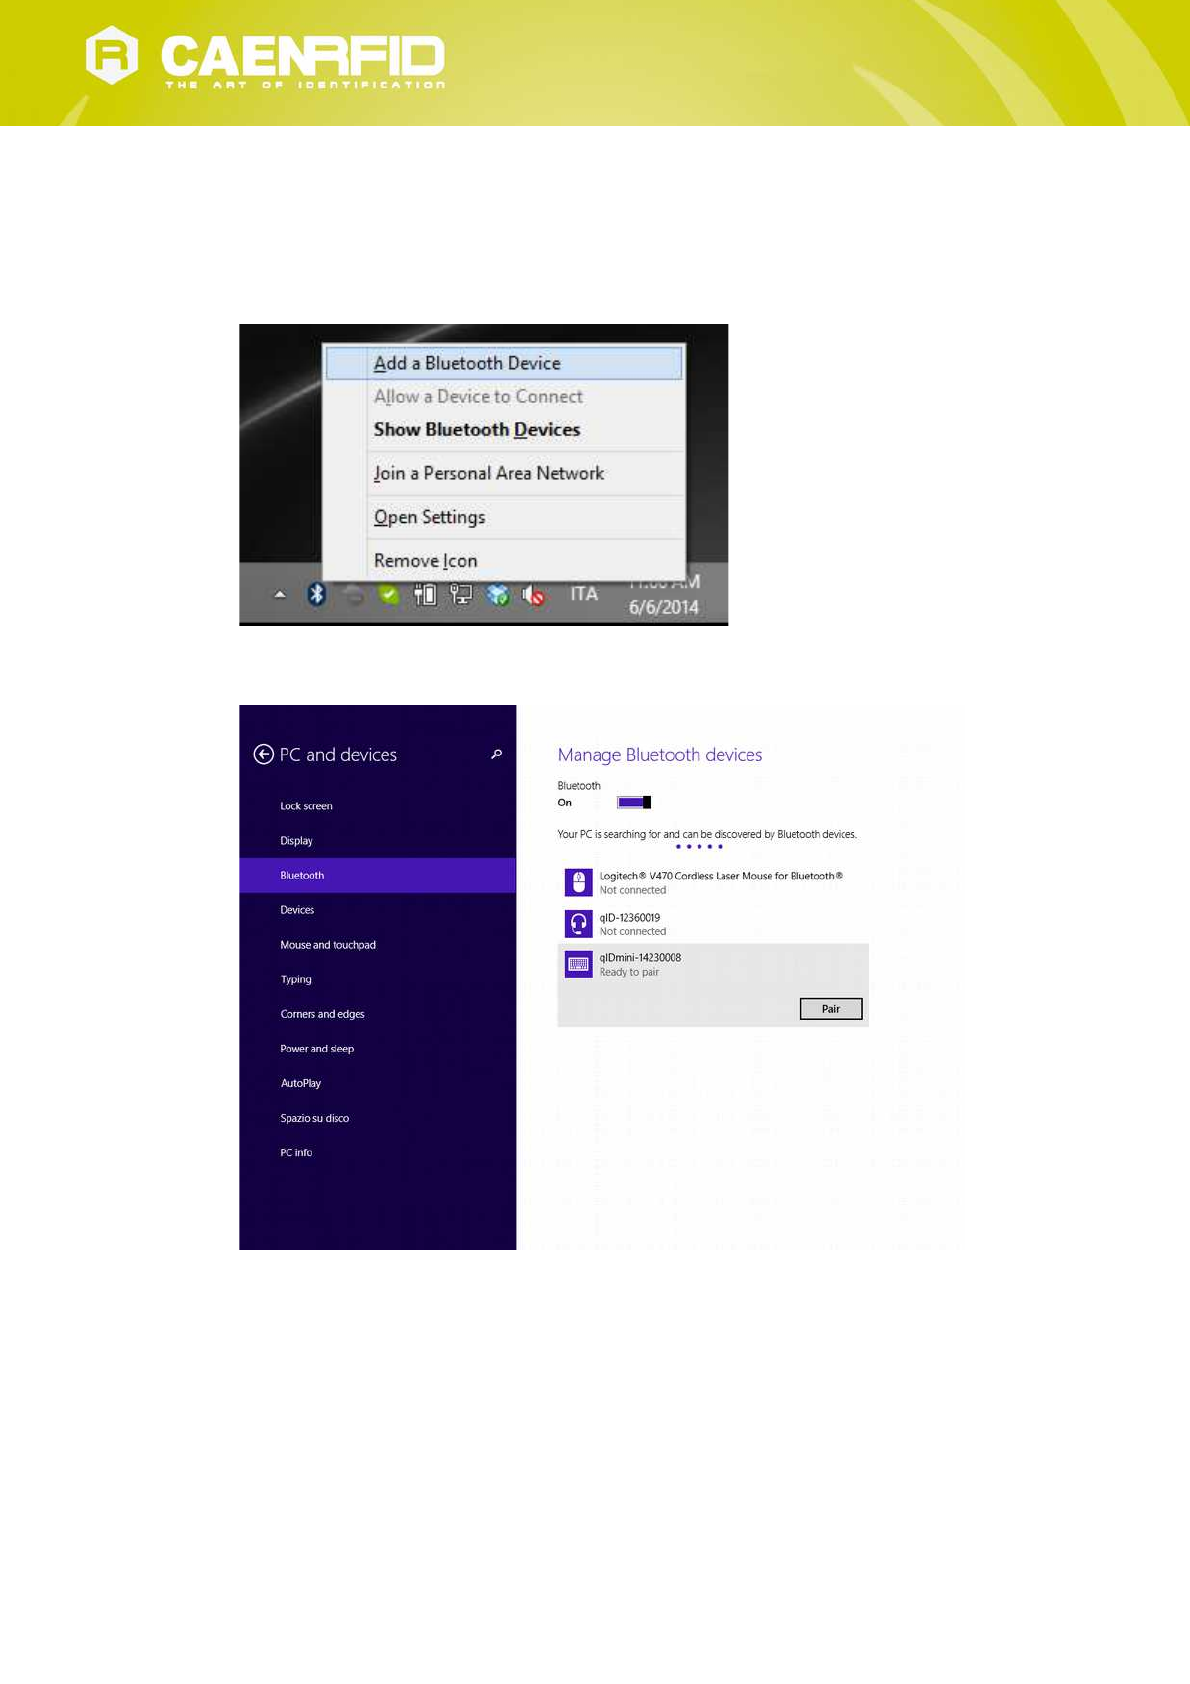
3. Right click on the Bluetooth icon in the taskbar -> Open Settings:
qIDmini EASY2RD Profile - qIDmini Technical Information Manual 26
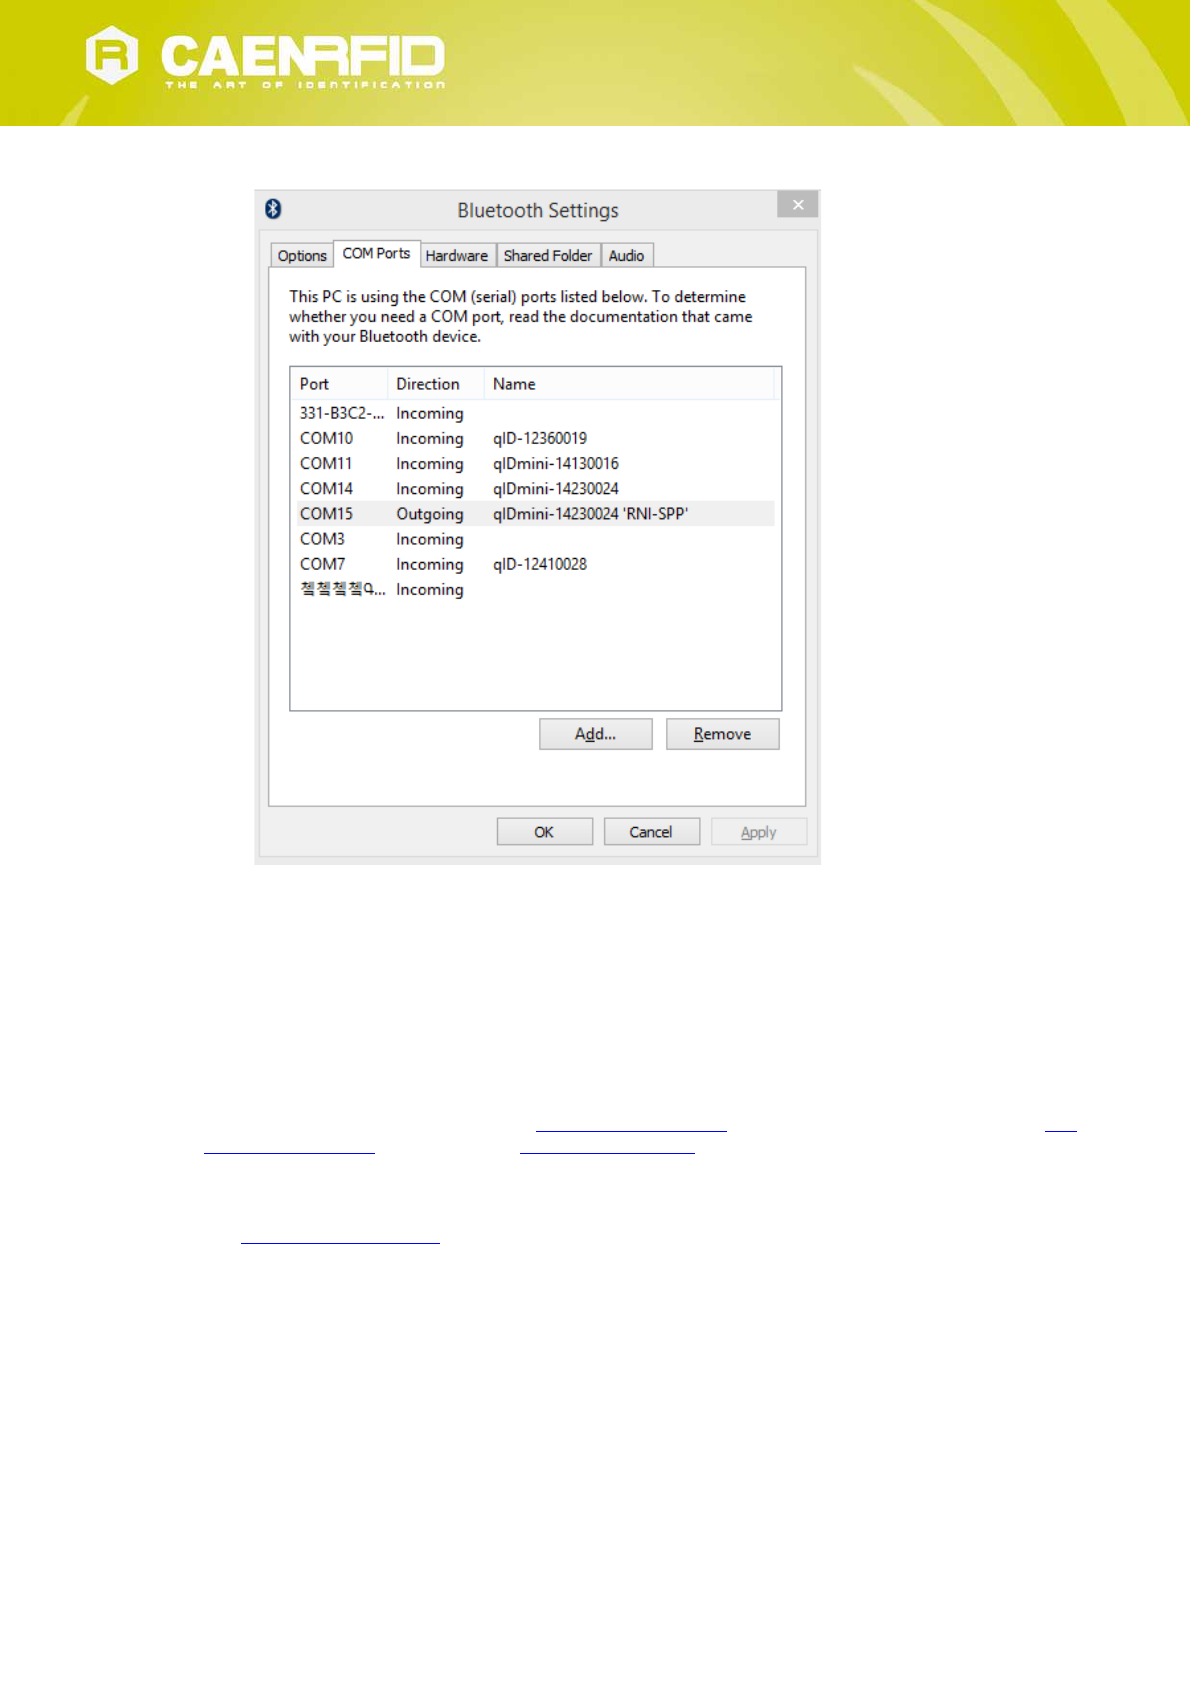
4. Look for the emulated serial port in the “Bluetooth Settings”:
5. Launch the CAEN RFID Easy Controller application.
6. On the main application window click on File → Connect; the connection dialog box will appear.
7. Select RS232 from the Connection Type combo box and the right COM port number from the RS232 Port combo
box.
8. Click on Connect.
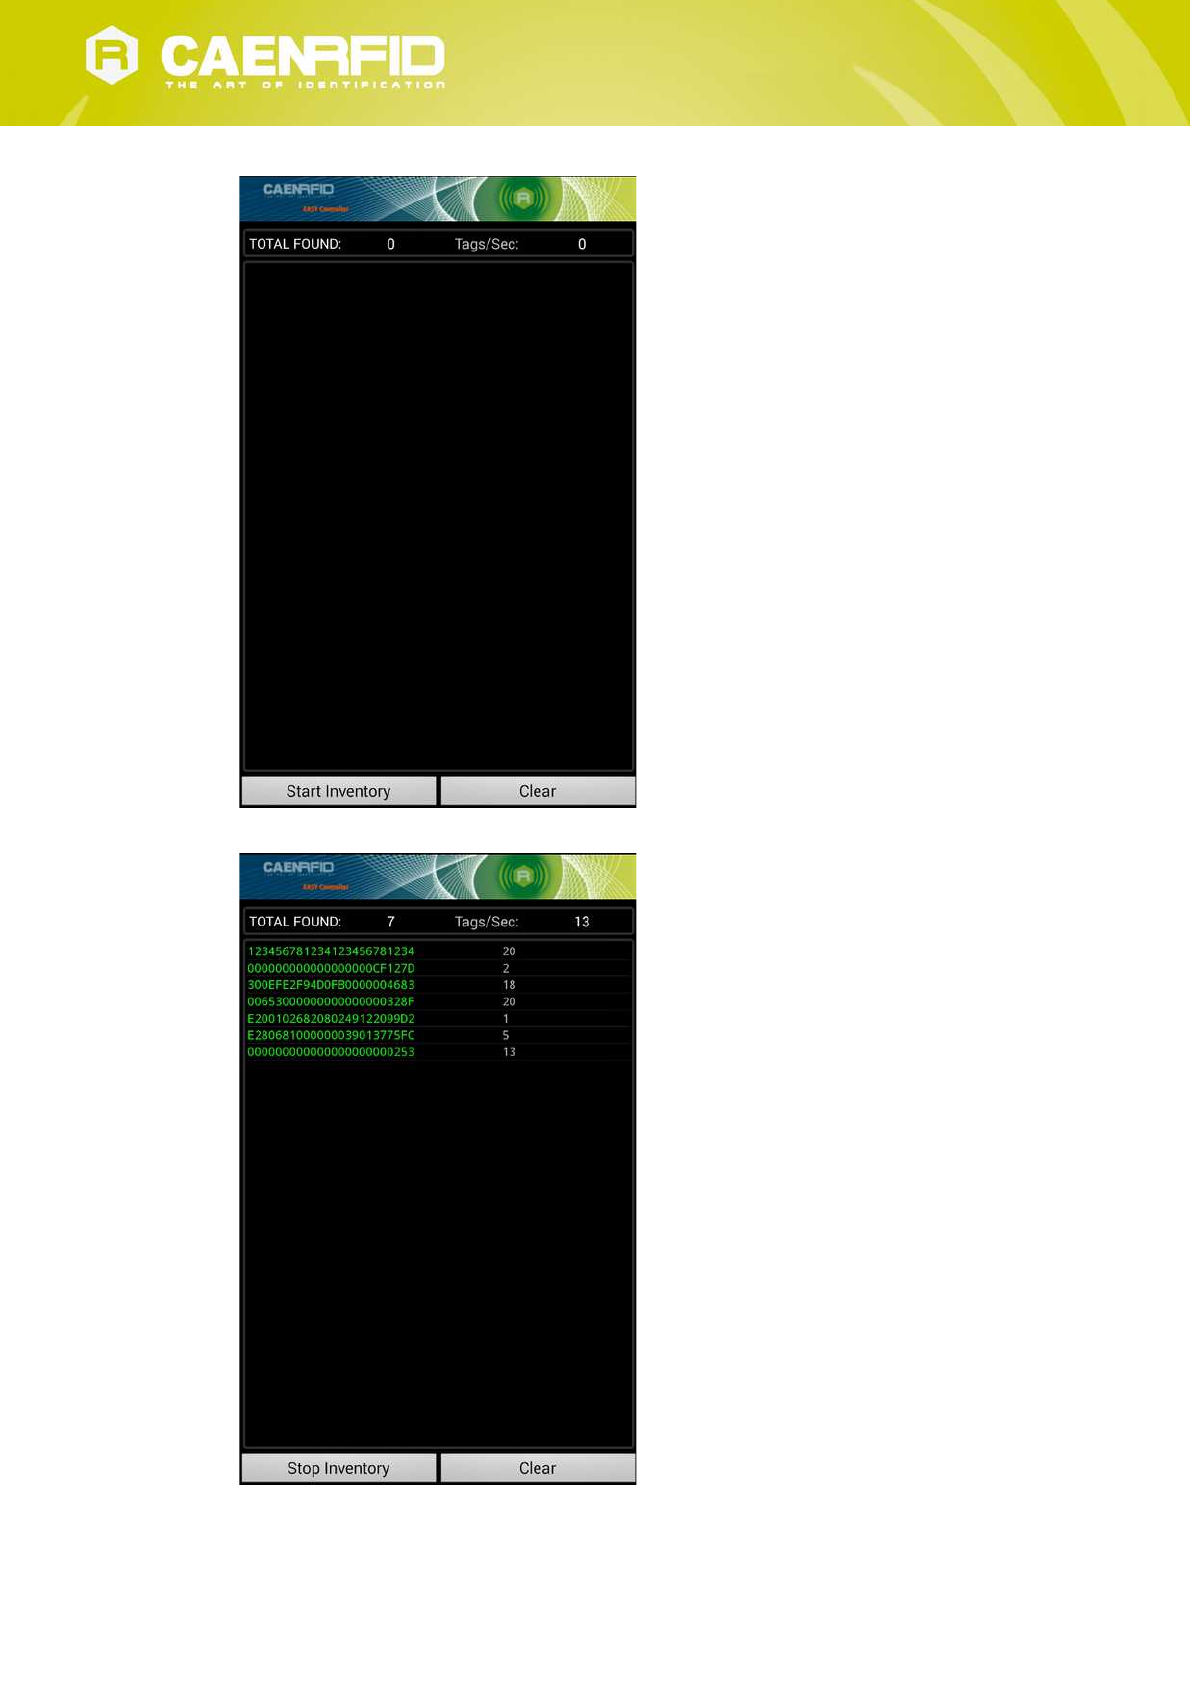
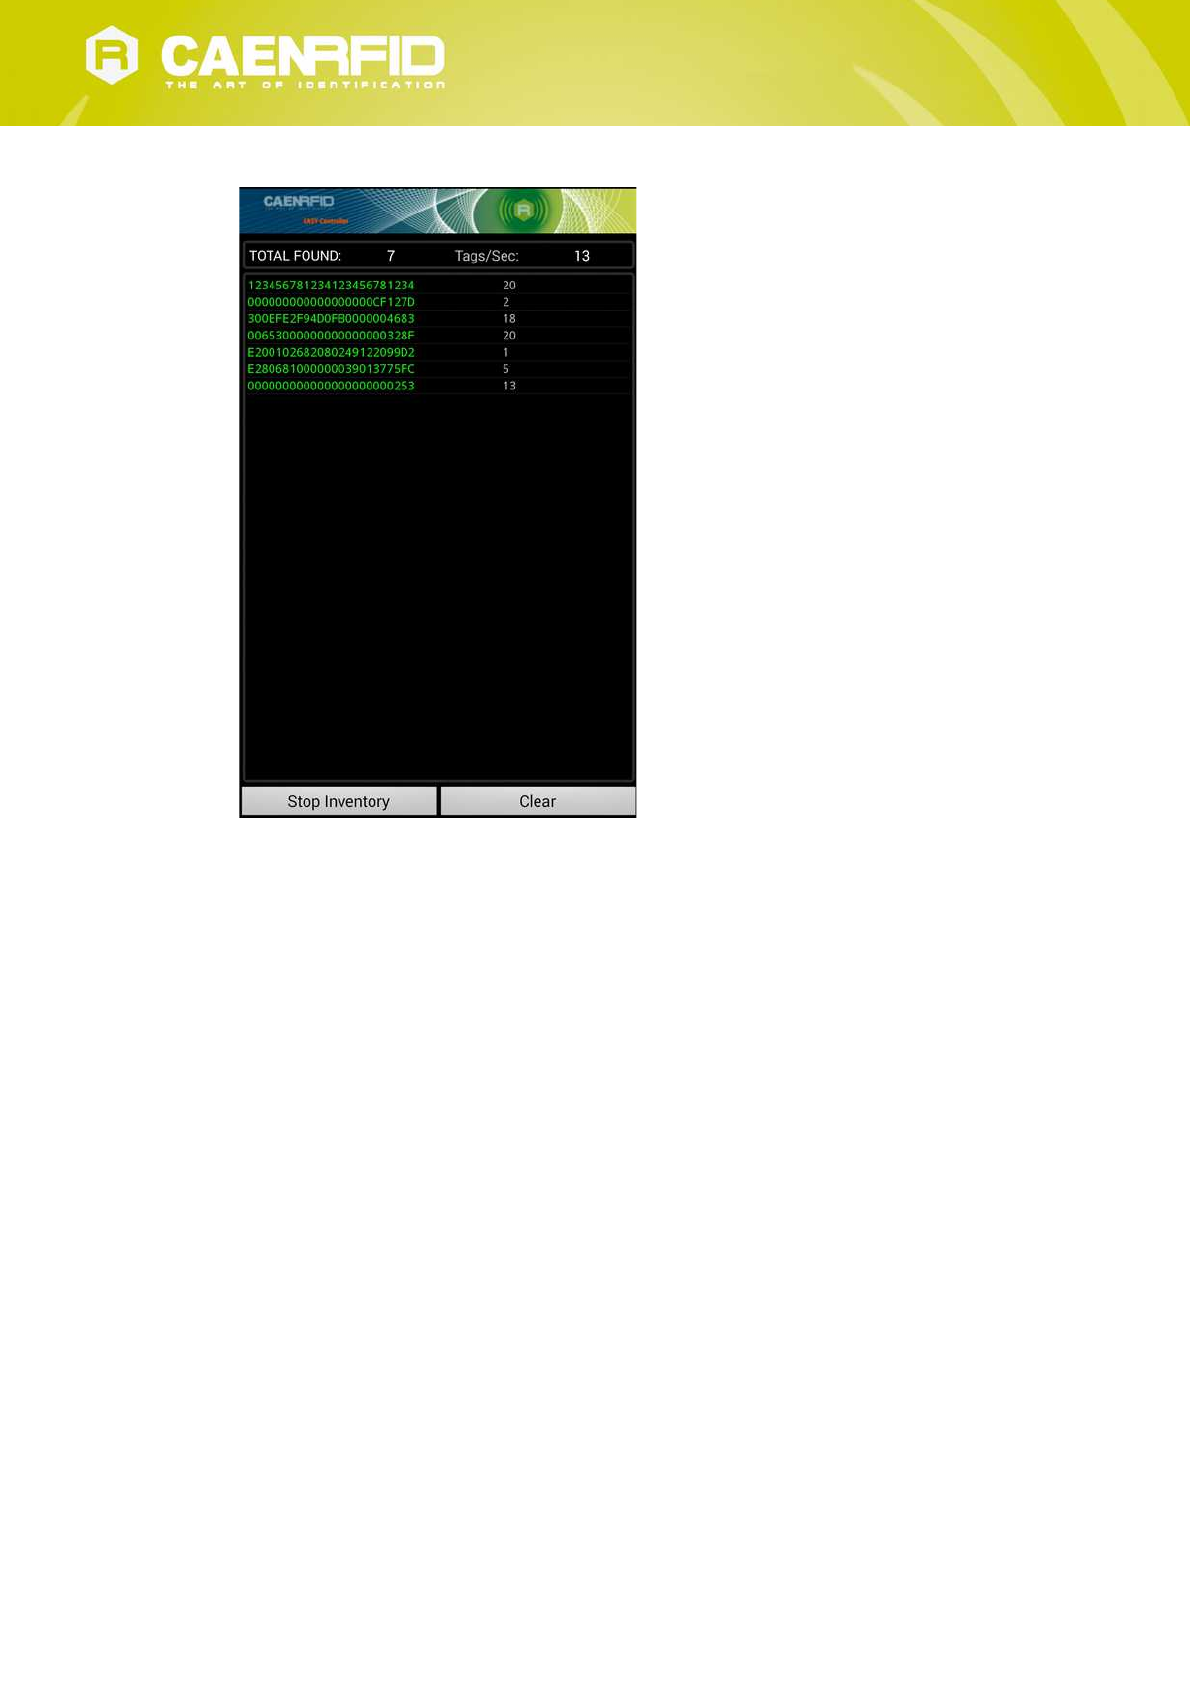
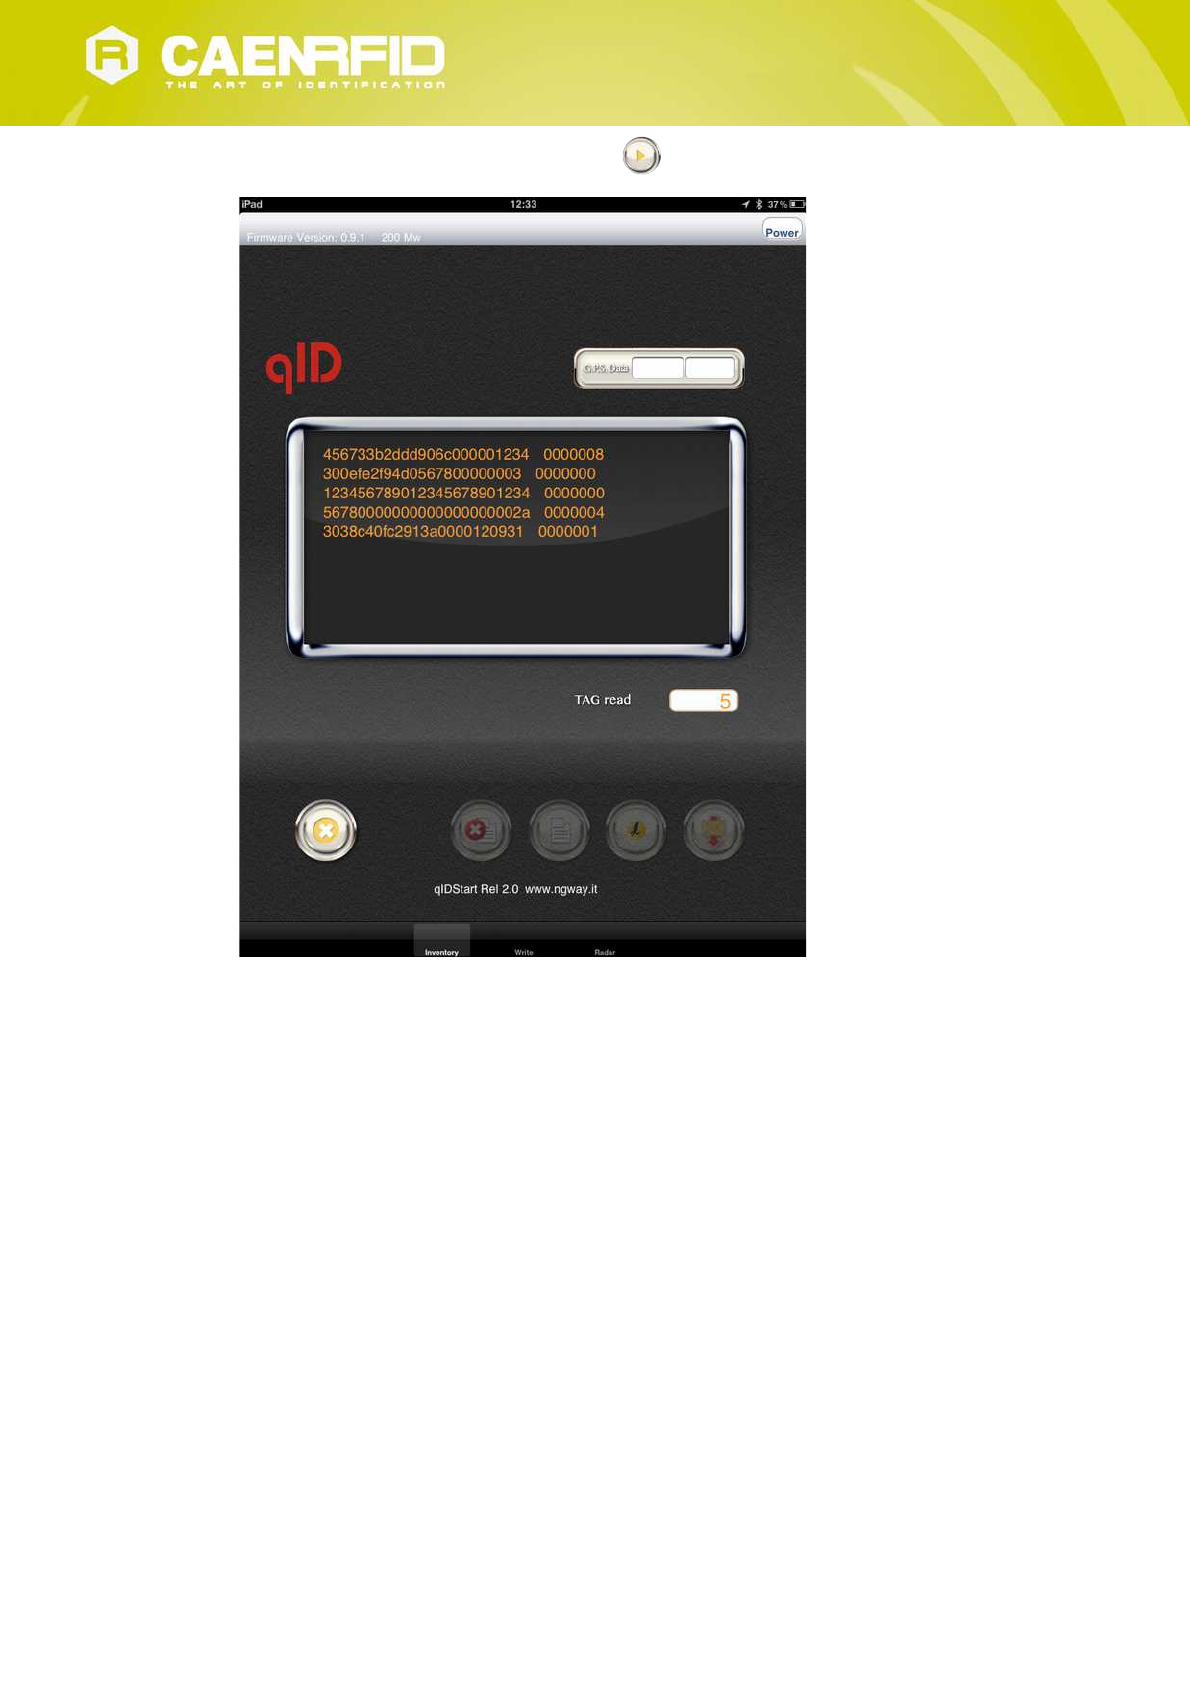
9. Place a tag in front of the reader and click on Start Inventory to see the tag information displayed on the main
window.
For more information on the CAEN RFID Easy Controller for Windows application usage, please refer to the relevant
user manual: you can download it from the qIDmini R1170I web page, Documents Section, from the CAEN RFID Easy
Controller for Windows web page or in the Manual and Documents web area.
A CAEN RFID Easy Controller for Android application is also available. For more information please refer to the CAEN
RFID Easy Controller for Android web page.
qIDmini EASY2RD Profile - qIDmini Technical Information Manual 27

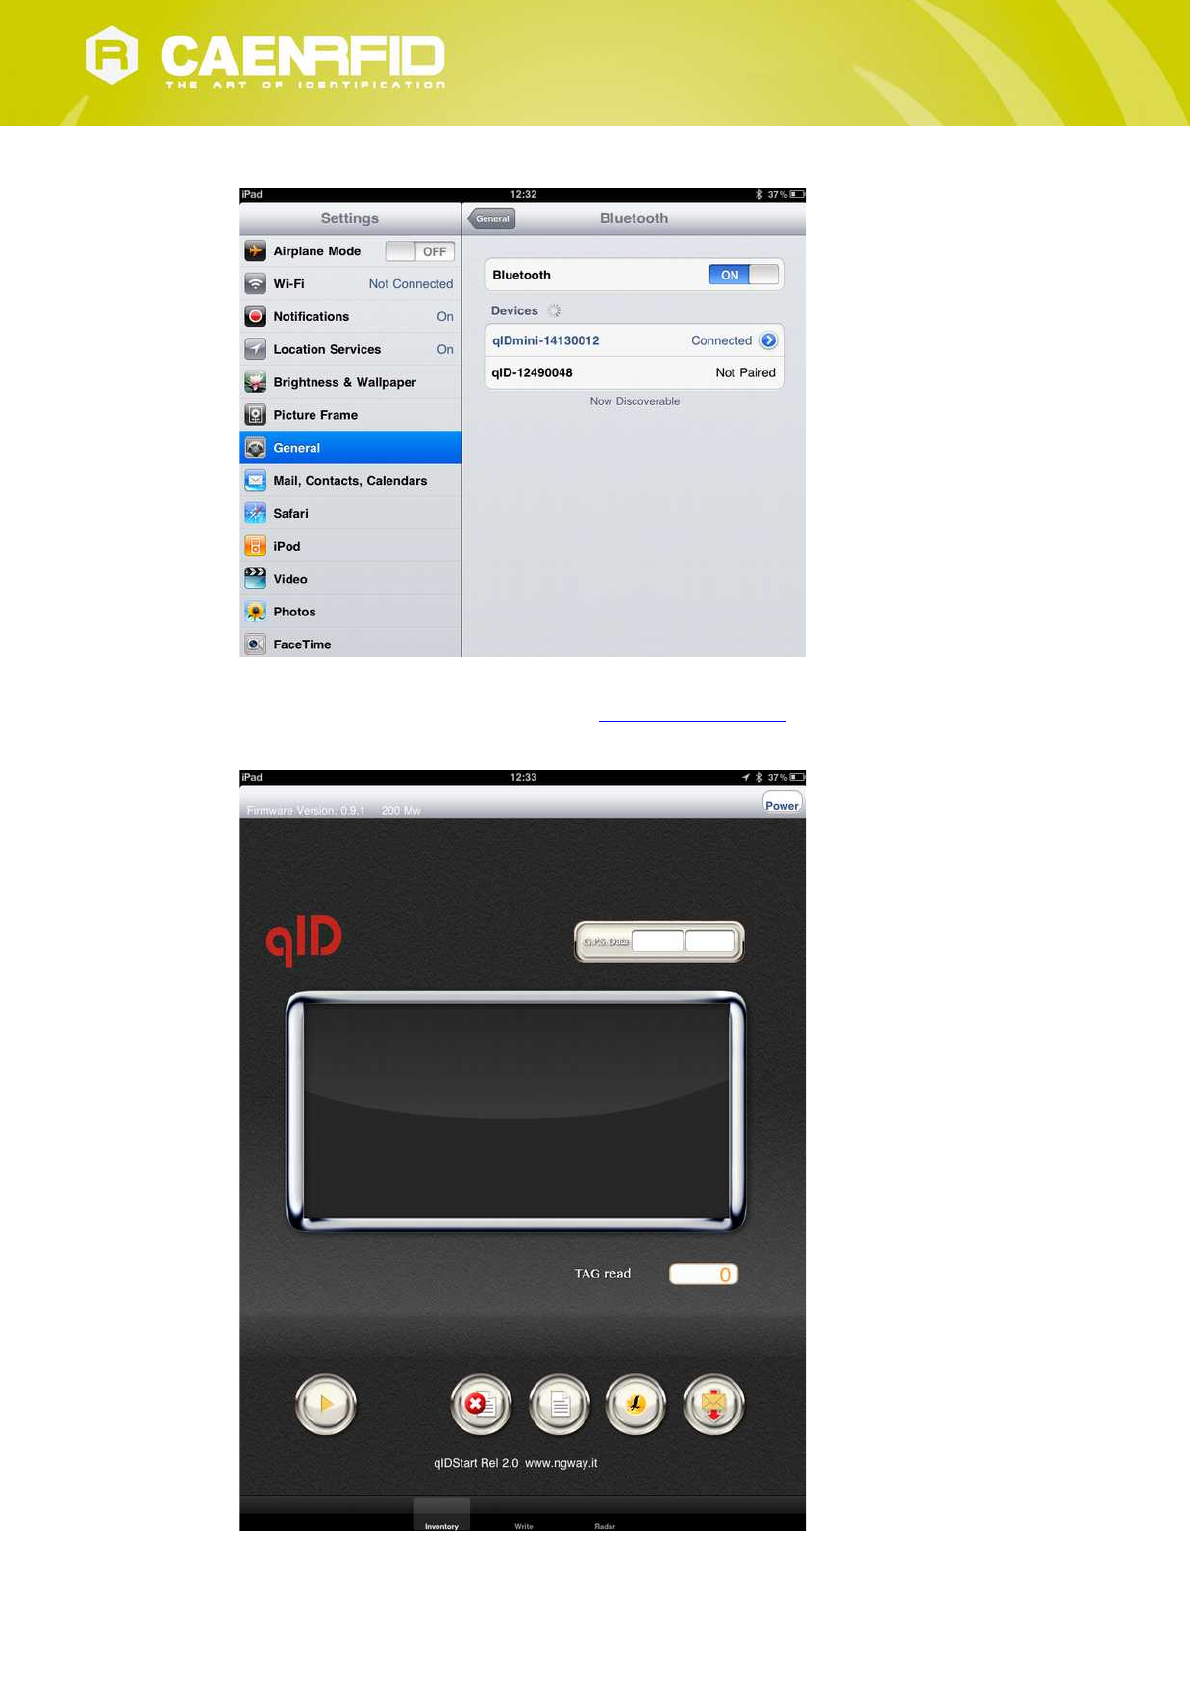
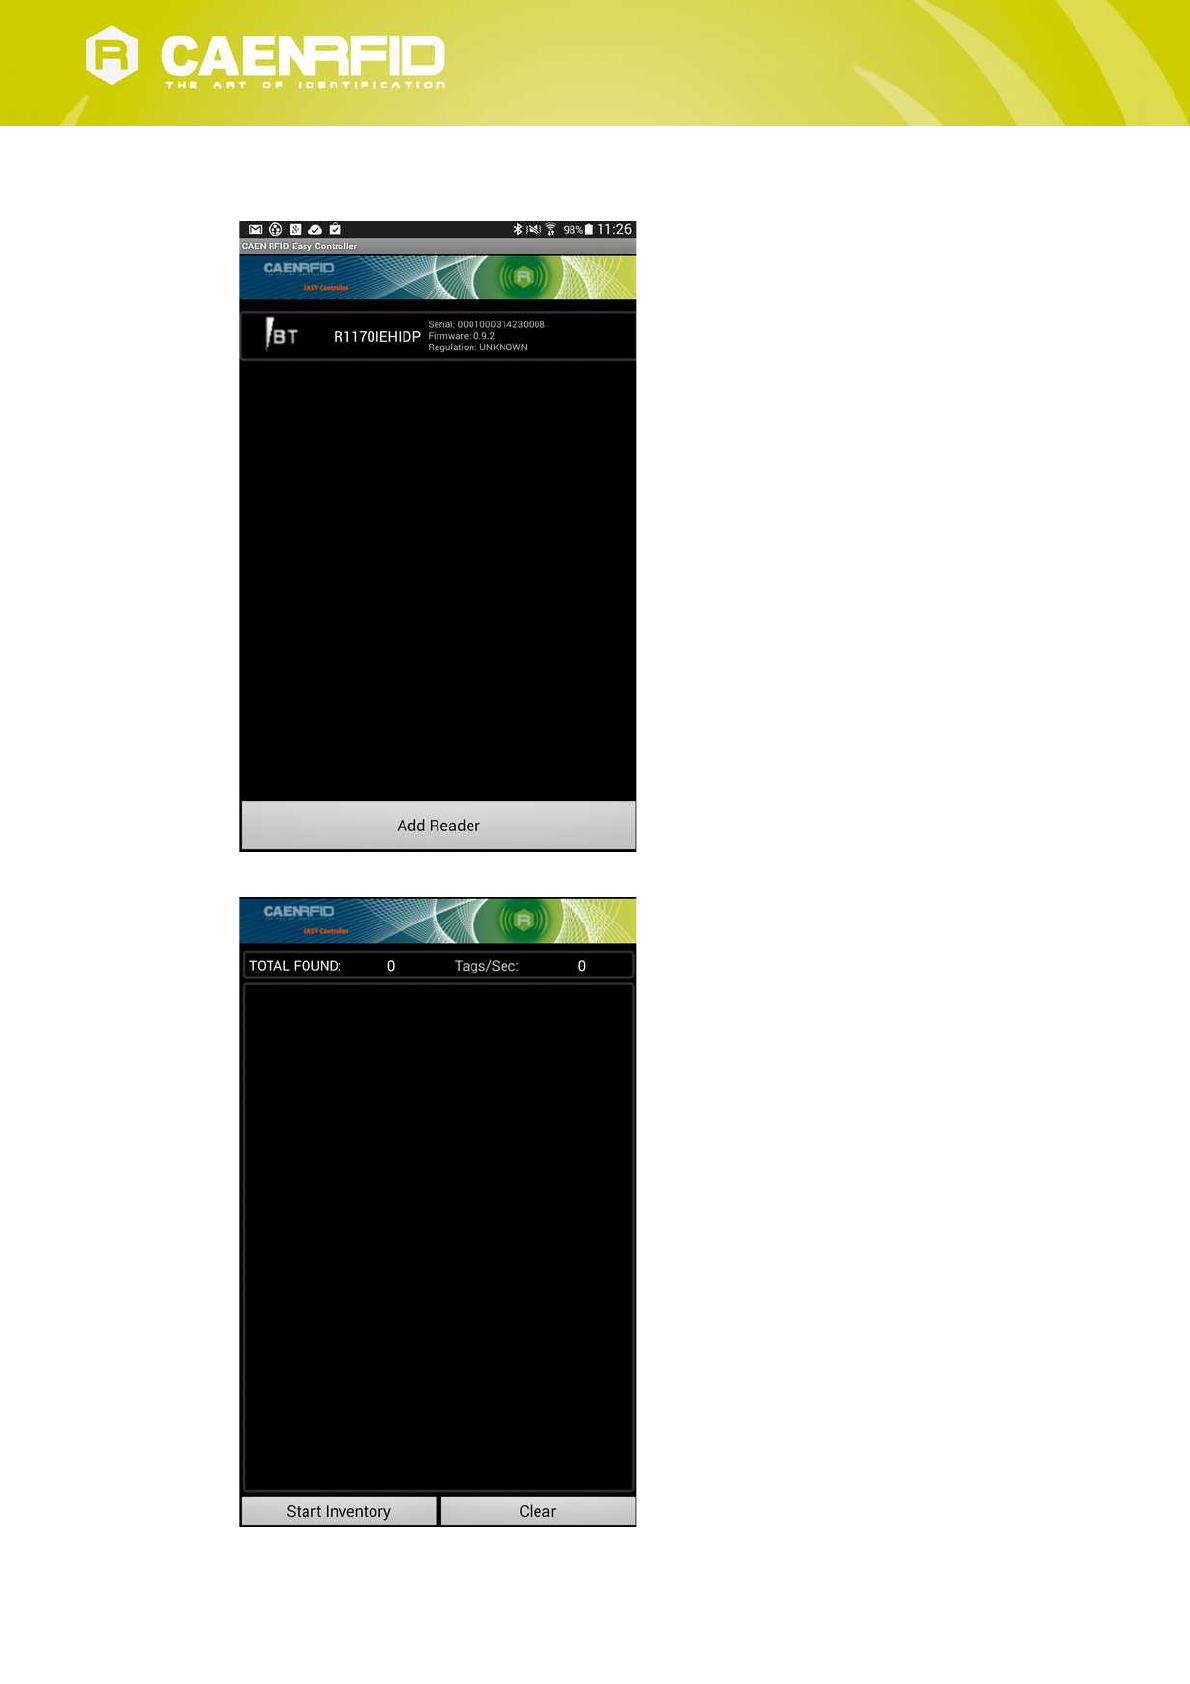
3. Click on the qIDmini R1170I reader and wait while the pairing is completed:
4. Once the connection is established the Bluetooth blue light turns on.
5. Download the CAEN RFID qID Start App from the qIDmini R1170I web page, by clicking on the App Store icon.
6. Launch the qID Start App:
qIDmini EASY2RD Profile - qIDmini Technical Information Manual 29
4 QIDMINI HID PROFILE
Introduction
Choosing the HID profile option you select the keyboard emulation protocol.
For details on the available profiles and on the activation method please refer to § PROFILE paragraph page 43.
Note that the APPLE model reader (see § Ordering Options page 10) does not implement the Bluetooth HID profile,
while the HID model reader can be connected through the HID profile to all the devices, including the iOS ones.
In the following table it is shown the compatibility between the Apple/HID models and different Operating Systems
(Android, PC and iOS) in the HID profile:
ANDROID PC iOS
APPLE MODEL6- - -
HID MODEL7√ √ √
Tab. 4.6: Compatibility table between the Apple/HID models and different OS in the HID profile
Android devices
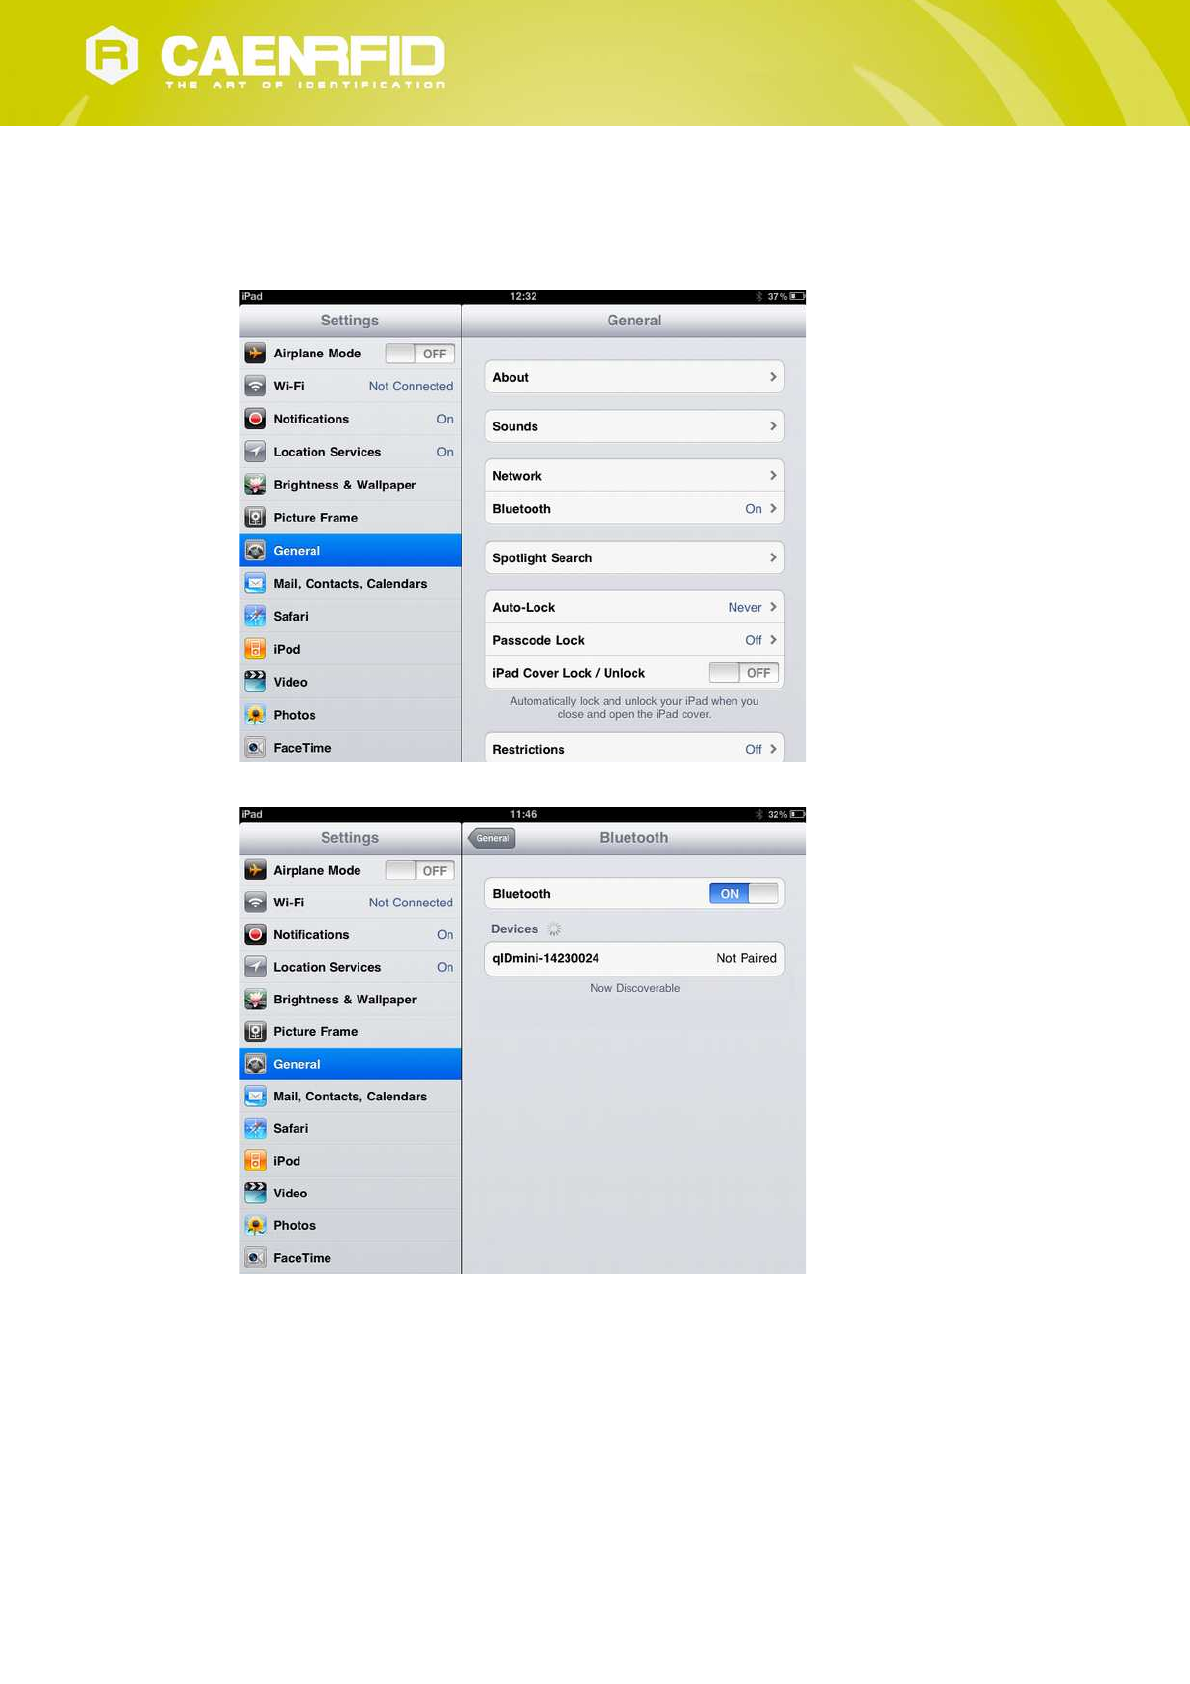
Bluetooth Communication Setup
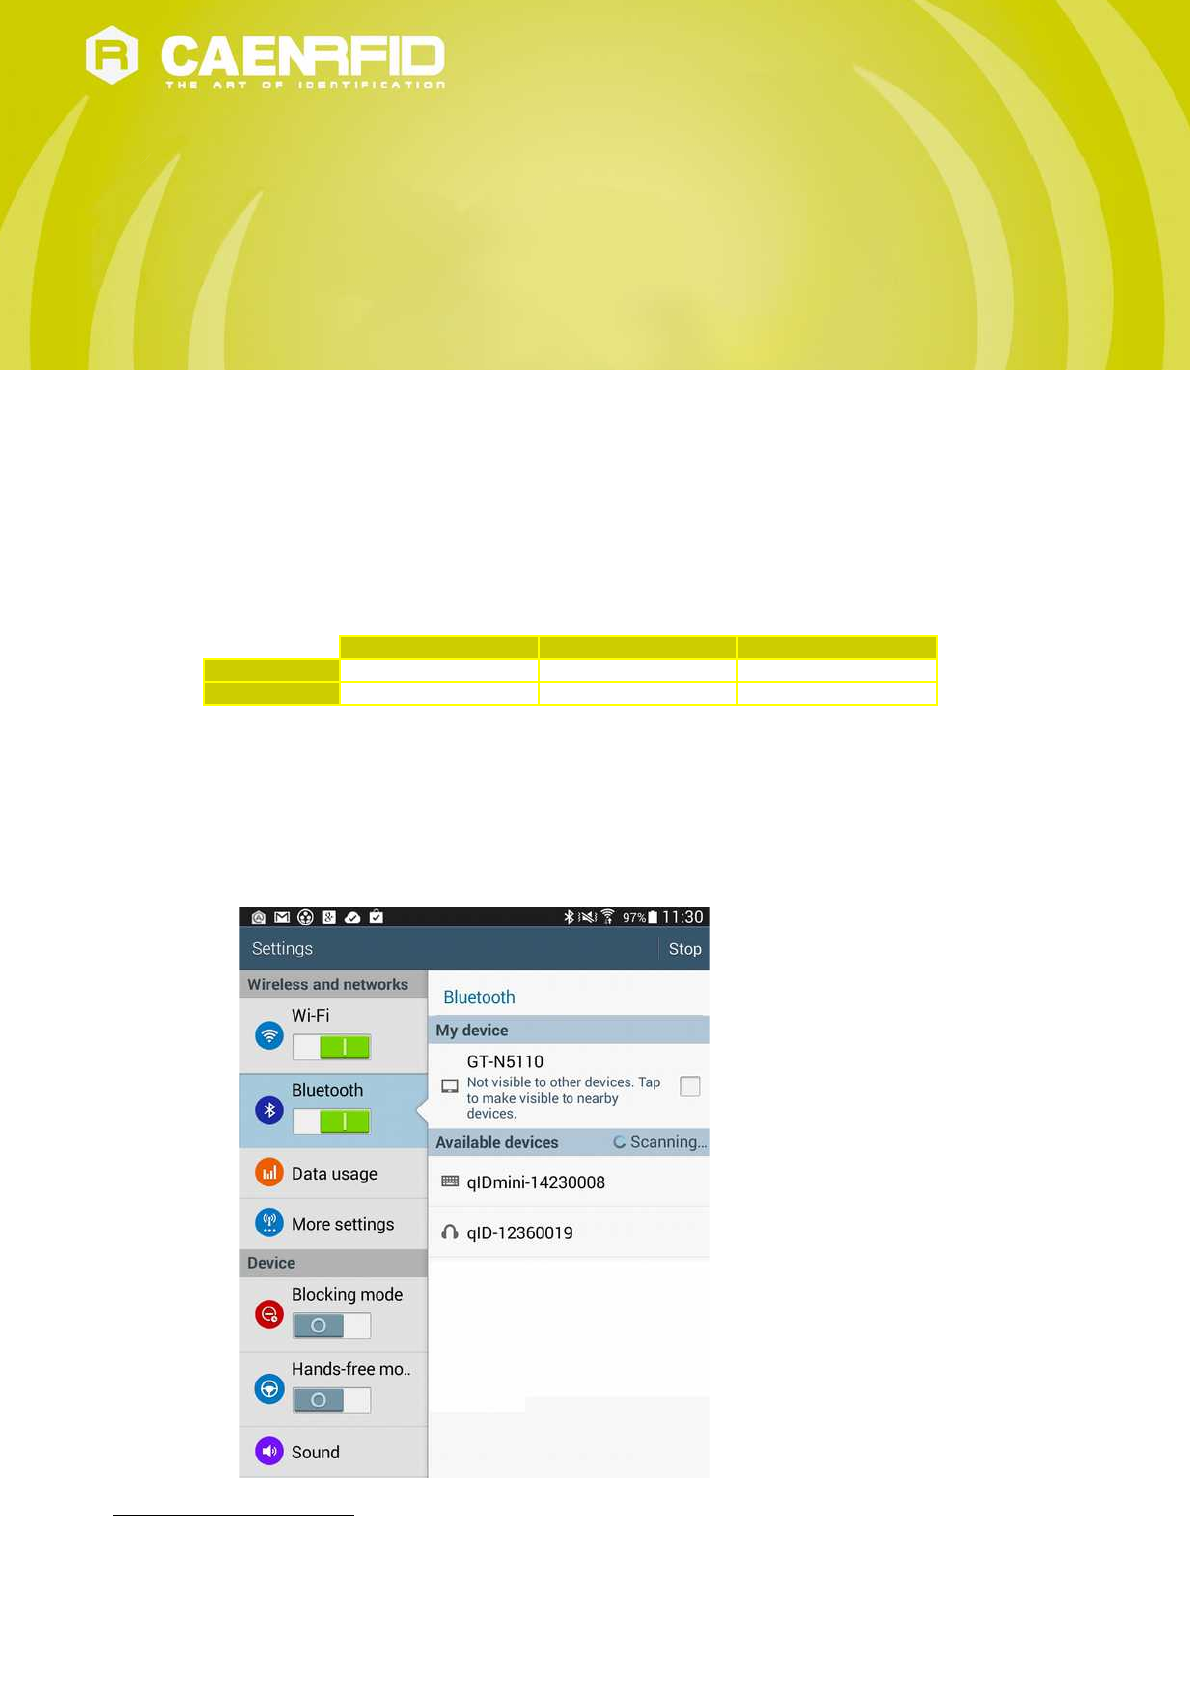
1. On your Android device, go to Setting and enable the Bluetooth. A list of the Bluetooth available devices is shown:
6 APPLE Model Ordering Options: WR1170IEAPLP, WR1170IUAPLP, WR1170IDKEAP, WR1170IDKUAP
7 HID Model Ordering Options: WR1170IEHIDP, WR1170IUHIDP, WR1170IDKEHI, WR1170IDKUHI
qIDmini HID profile - qIDmini Technical Information Manual 31
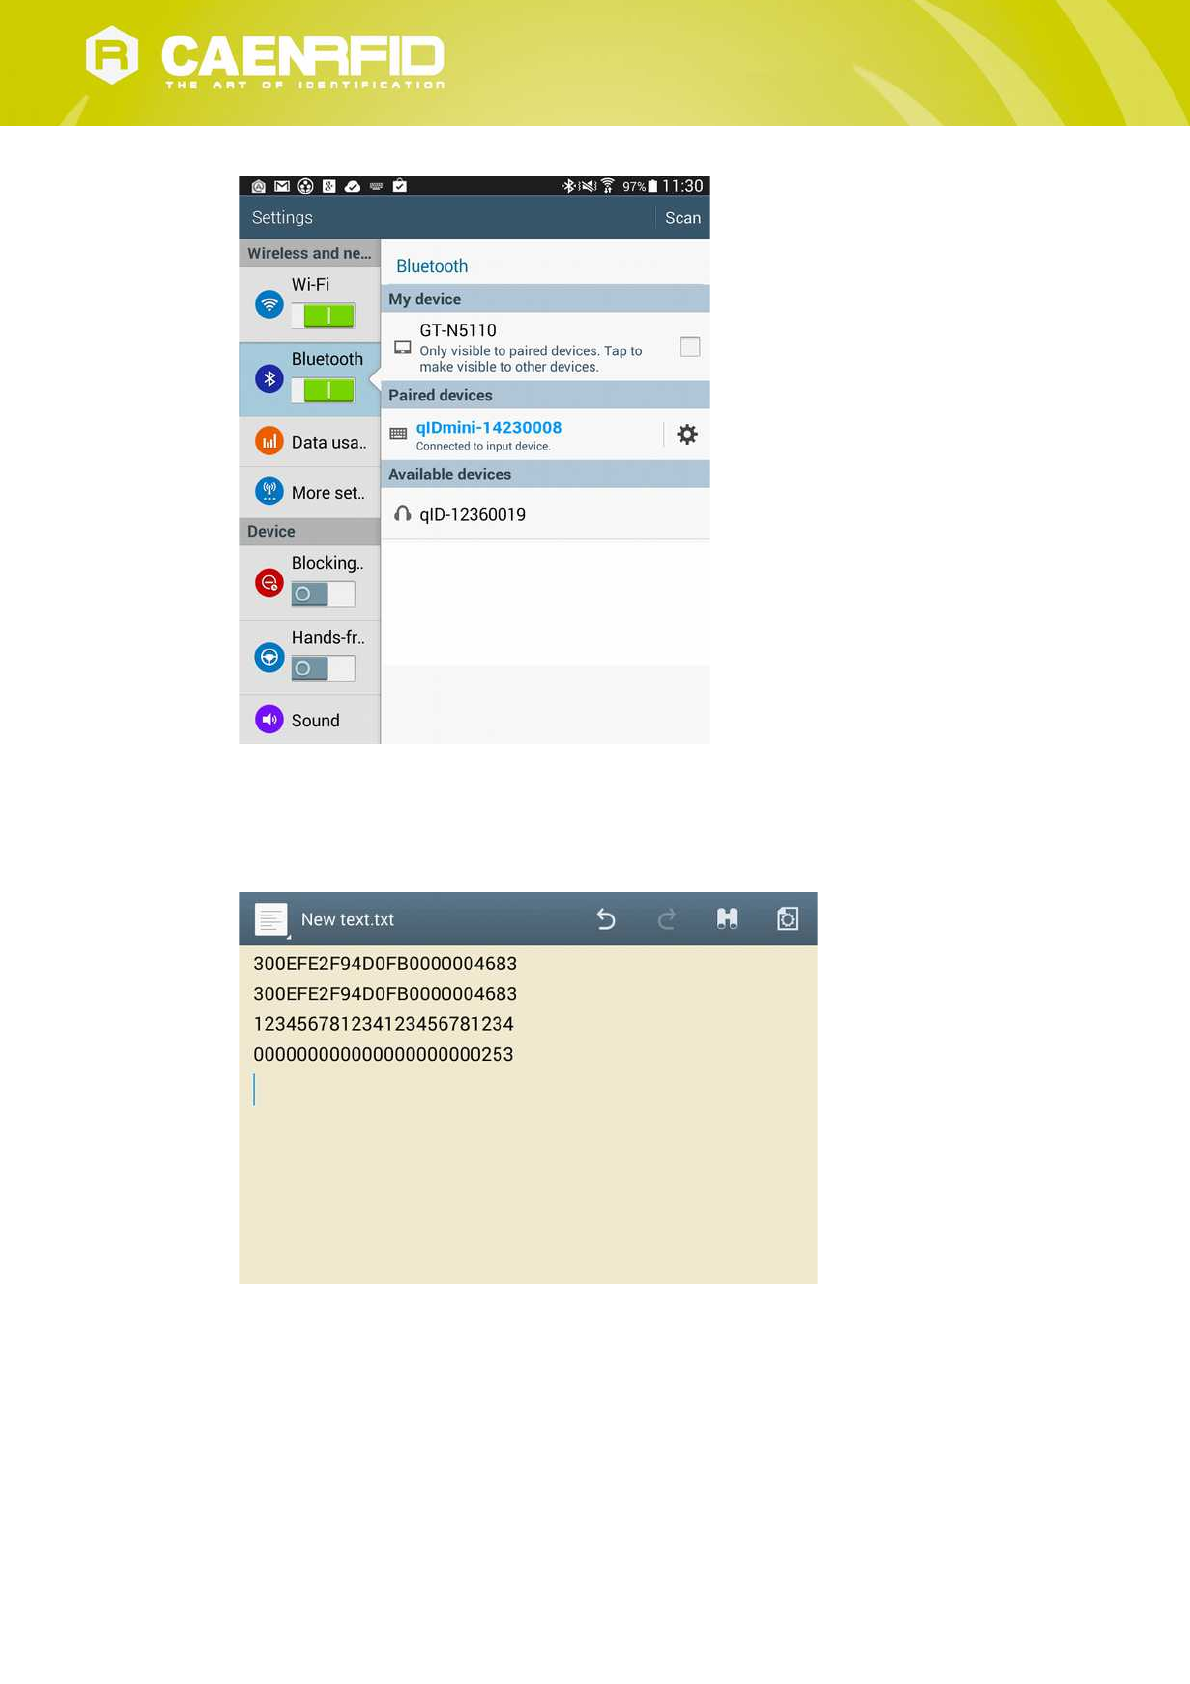
2. Click on the qIDmini R1170I reader and wait while the pairing is completed:
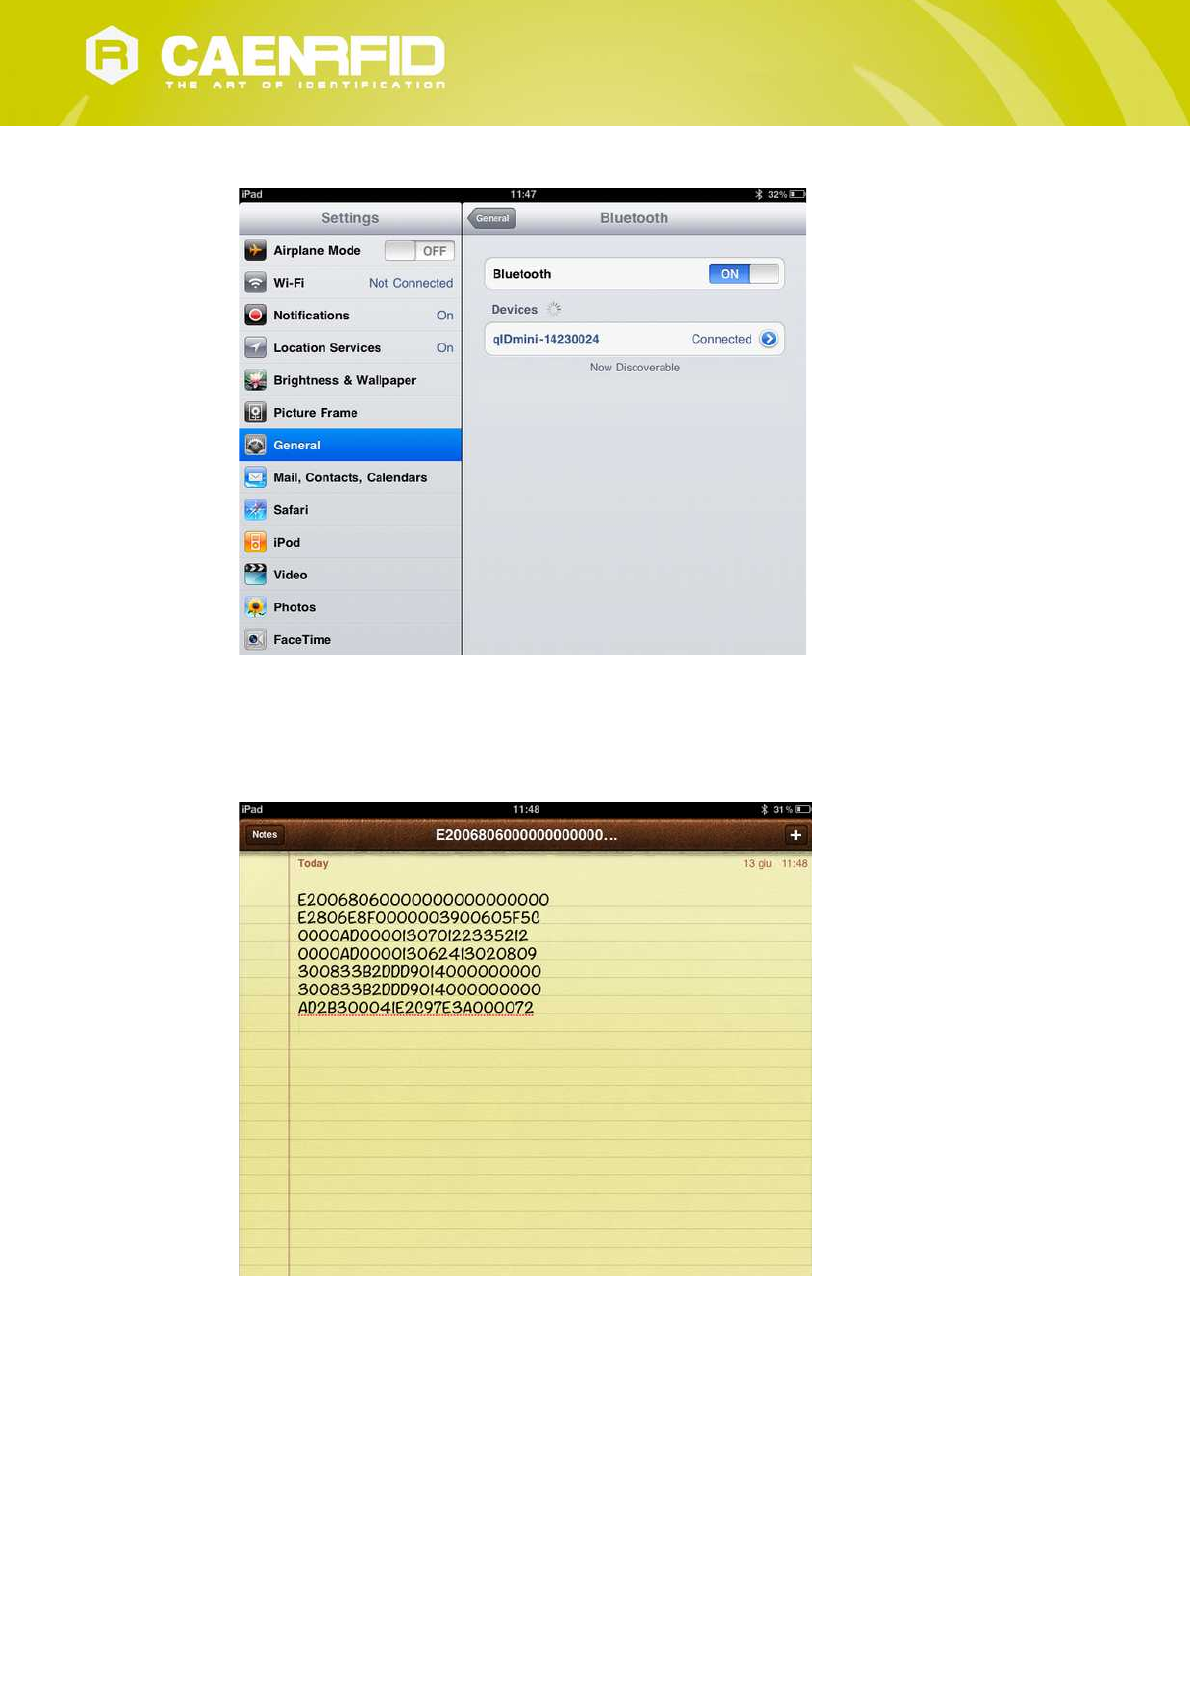
3. Once the connection is established the Bluetooth blue light turns on.
4. Launch a text editing App (or any other App accepting keyboard input).
5. Start an inventory cycle by pressing the trigger button.
6. On the text editing App window you will see the EPCs of the tags:
Note that, when configured in HID profile and paired to a device, the qIDmini will automatically reconnect to the
same device every time the Bluetooth link is active (qIDmini switched ON and Bluetooth activated on the host).
You can verify this behaviour looking at the blue LED that, in this case, turns ON automatically as soon as you
switch on the qIDmini.
qIDmini HID profile - qIDmini Technical Information Manual 32

Click on “yes” to confirm the passcode:
In case of Windows XP Operating System, when discovered by the host, the qIDmini reader can be identified by
its Bluetooth device name and paired using the pass-key; both parameters are provided below:
Bluetooth device name: “qIDmini“ + device serial number
Pass-key: 1234
2. Once the connection is established the Bluetooth blue light turns on.
3. Launch a text editing App (or any other App accepting keyboard input).
4. Start an inventory cycle by pressing the trigger button.
5. On the text editing window you will see the EPCs of the tags:
Example with a .txt file:
qIDmini HID profile - qIDmini Technical Information Manual 34
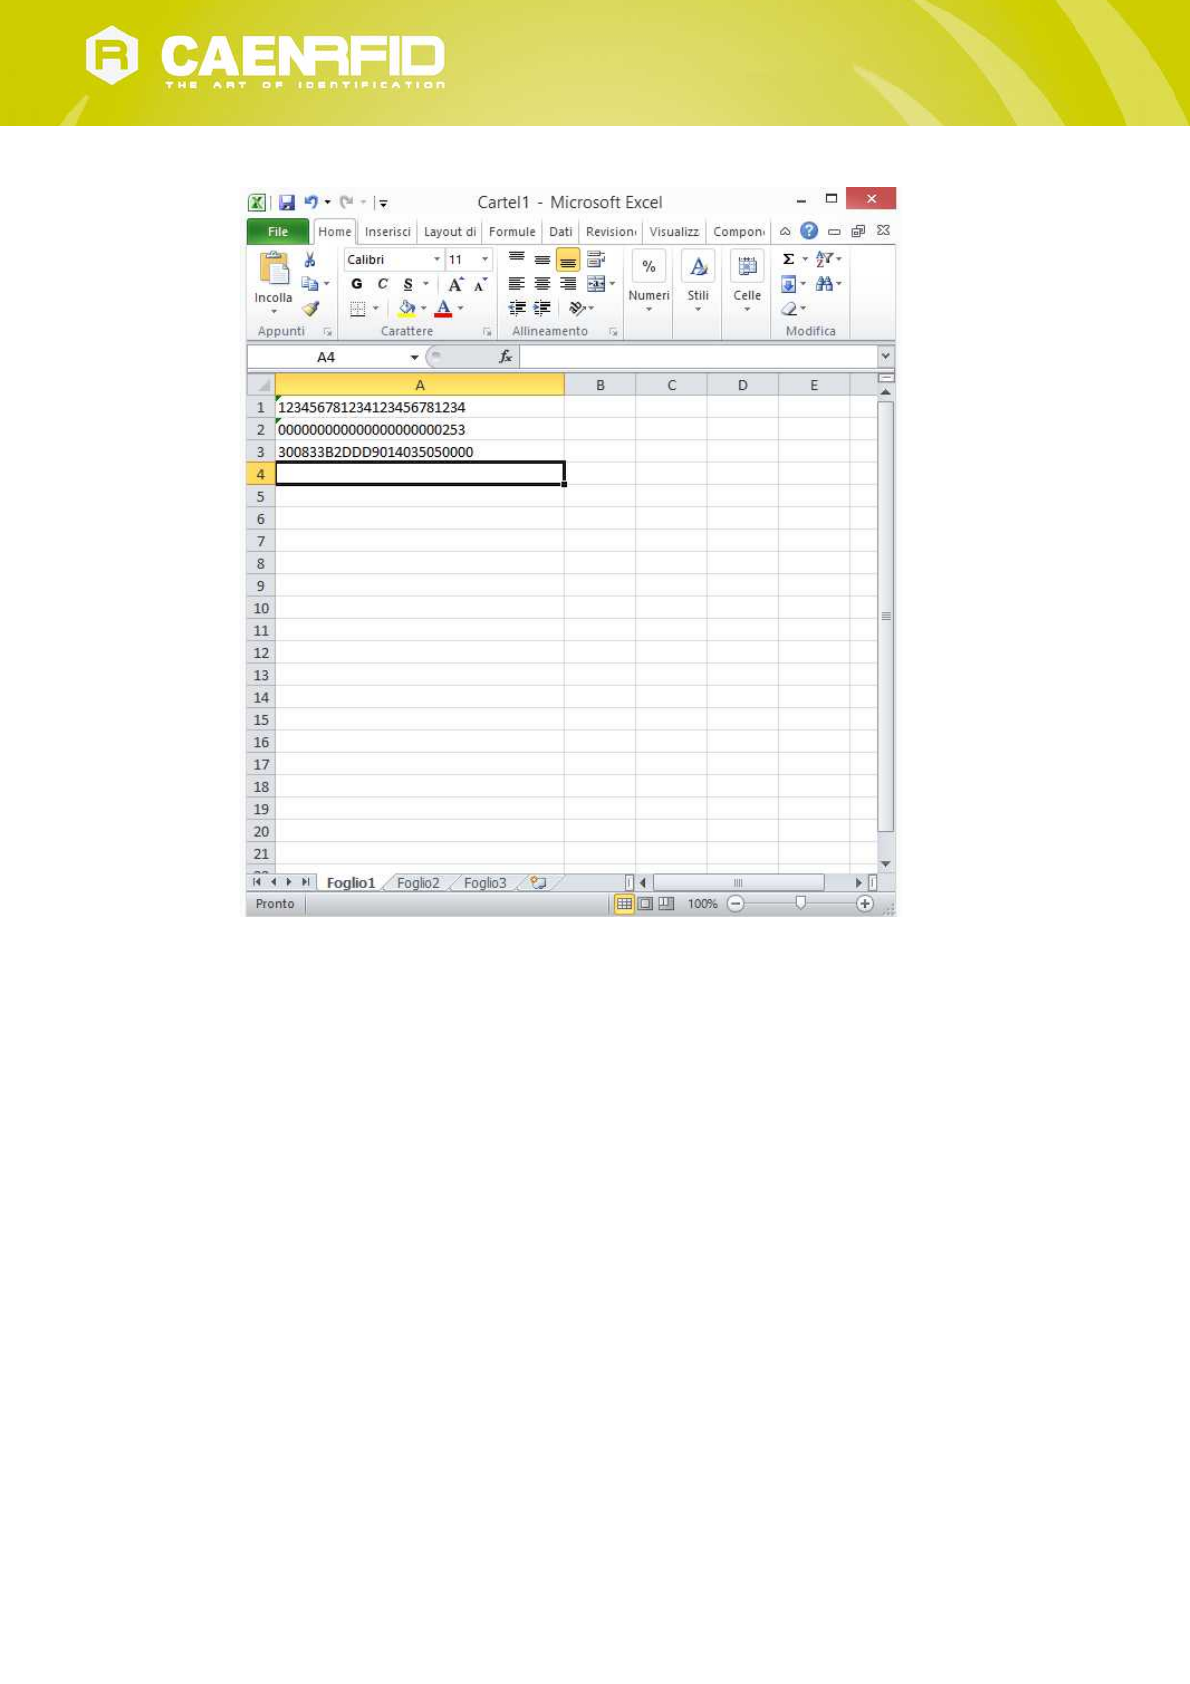
Example with Microsoft Excel:
Note that, when configured in HID profile and paired to a device, the qIDmini will automatically reconnect to the same
device every time the Bluetooth link is active (qIDmini switched ON and Bluetooth activated on the host). You can
verify this behaviour looking at the blue LED that, in this case, turns ON automatically as soon as you switch on the
qIDmini.
qIDmini HID profile - qIDmini Technical Information Manual 35

USB Communication Setup
The qIDmini reader can be connected to a PC using the provided USB cable and it is detected by the PC as an emulated
serial port. In order to correctly operate with the reader you need to install a driver.
1. Power ON the reader and plug the USB cable into the qIDmini USB port.
2. In order to connect the qIDmini reader to the PC you need to install the VCP (Virtual Com Port) drivers for your
operating system. You can download VCP drivers for Windows based systems from the CAEN RFID Web Site from
the qIDmini R1170I web page, SW/FW section or from the Software and Firmware download area.
3. Open the System properties (right click on My computer icon) → All Control Panel Items → System and click on
Device Manager.
qIDmini HID profile - qIDmini Technical Information Manual 36
4. After having installed the driver, the reader is detected by the PC as an emulated serial port (VCP):
Warning: Note that, when configured in the HID profile, the qIDmini reader cannot be controlled using the CAEN RFID
Easy Controller Application.
The qIDmini reader, when configured in the HID profile and connected via USB to a PC, sends the EPCs of the detected
tags on the serial port as ASCII characters. So, in order to operate with the reader in this configuration, follow these
steps:
1. Launch a terminal emulator application (e.g Hyperterminal)
2. Connect the terminal emulator application to the virtual COM port assigned to the qIDmini reader
3. Press the trigger button to perform an inventory cycle (hold down the button to repeat inventory cycles)
4. The EPCs are displayed on the terminal emulator window
qIDmini HID profile - qIDmini Technical Information Manual 37
3. Click on the qIDmini R1170I reader and wait while the pairing is completed:
4. Once the connection is established the Bluetooth blue light turns on.
5. Launch a text editing App (or any other App accepting keyboard input).
6. Start an inventory cycle by pressing the trigger button.
7. On the text editing App window you will see the EPCs of the tags:
qIDmini HID profile - qIDmini Technical Information Manual 39

5 RESET THE QIDMINI READER
To reset the reader, press the power and the trigger buttons (see § Fig. 1.2: qIDmini R1170I Front Panel page 7)
simultaneously for about six seconds and then release the buttons. The reader restarts by itself.
Warning: Note that the reader SHALL NOT be connected to the USB port or to the battery charger during the reset,
otherwise the reader enters in the firmware upgrade state. If, by mistake, you entered in the firmware upgrade state,
in order to restore the normal reader operation, disconnect the USB cable and repeat the reset procedure.
Reset the qIDmini reader - qIDmini Technical Information Manual 40

6 QIDMINI CONFIGURATION MENU
Introduction
To access the main menu, turn on the device and hold down the trigger button within two second.
To scroll through the main menu, press quickly the trigger button.
The qIDmini R1170I menu options are the following:
PROFILE
BEEP
VIBRATE
POWER
To select a menu option, hold down the trigger button.
qIDmini Configuration Menu - qIDmini Technical Information Manual 41
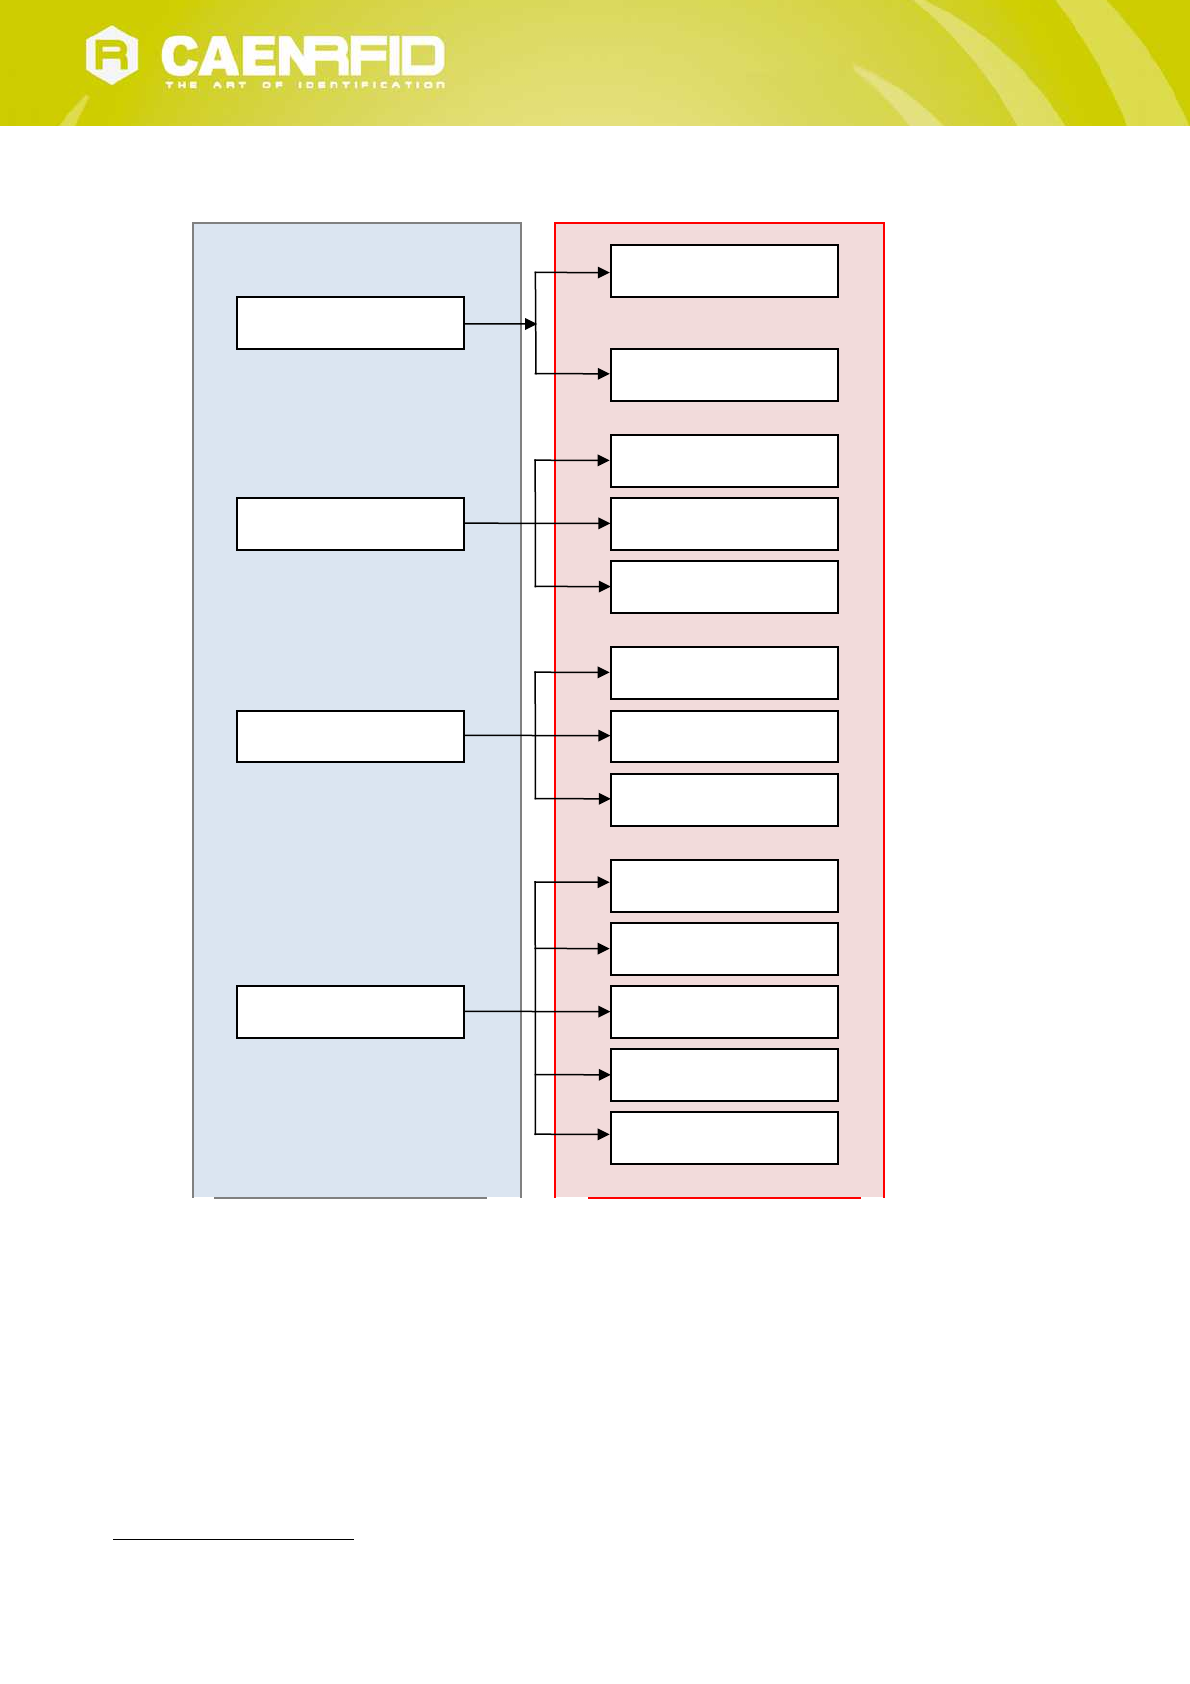
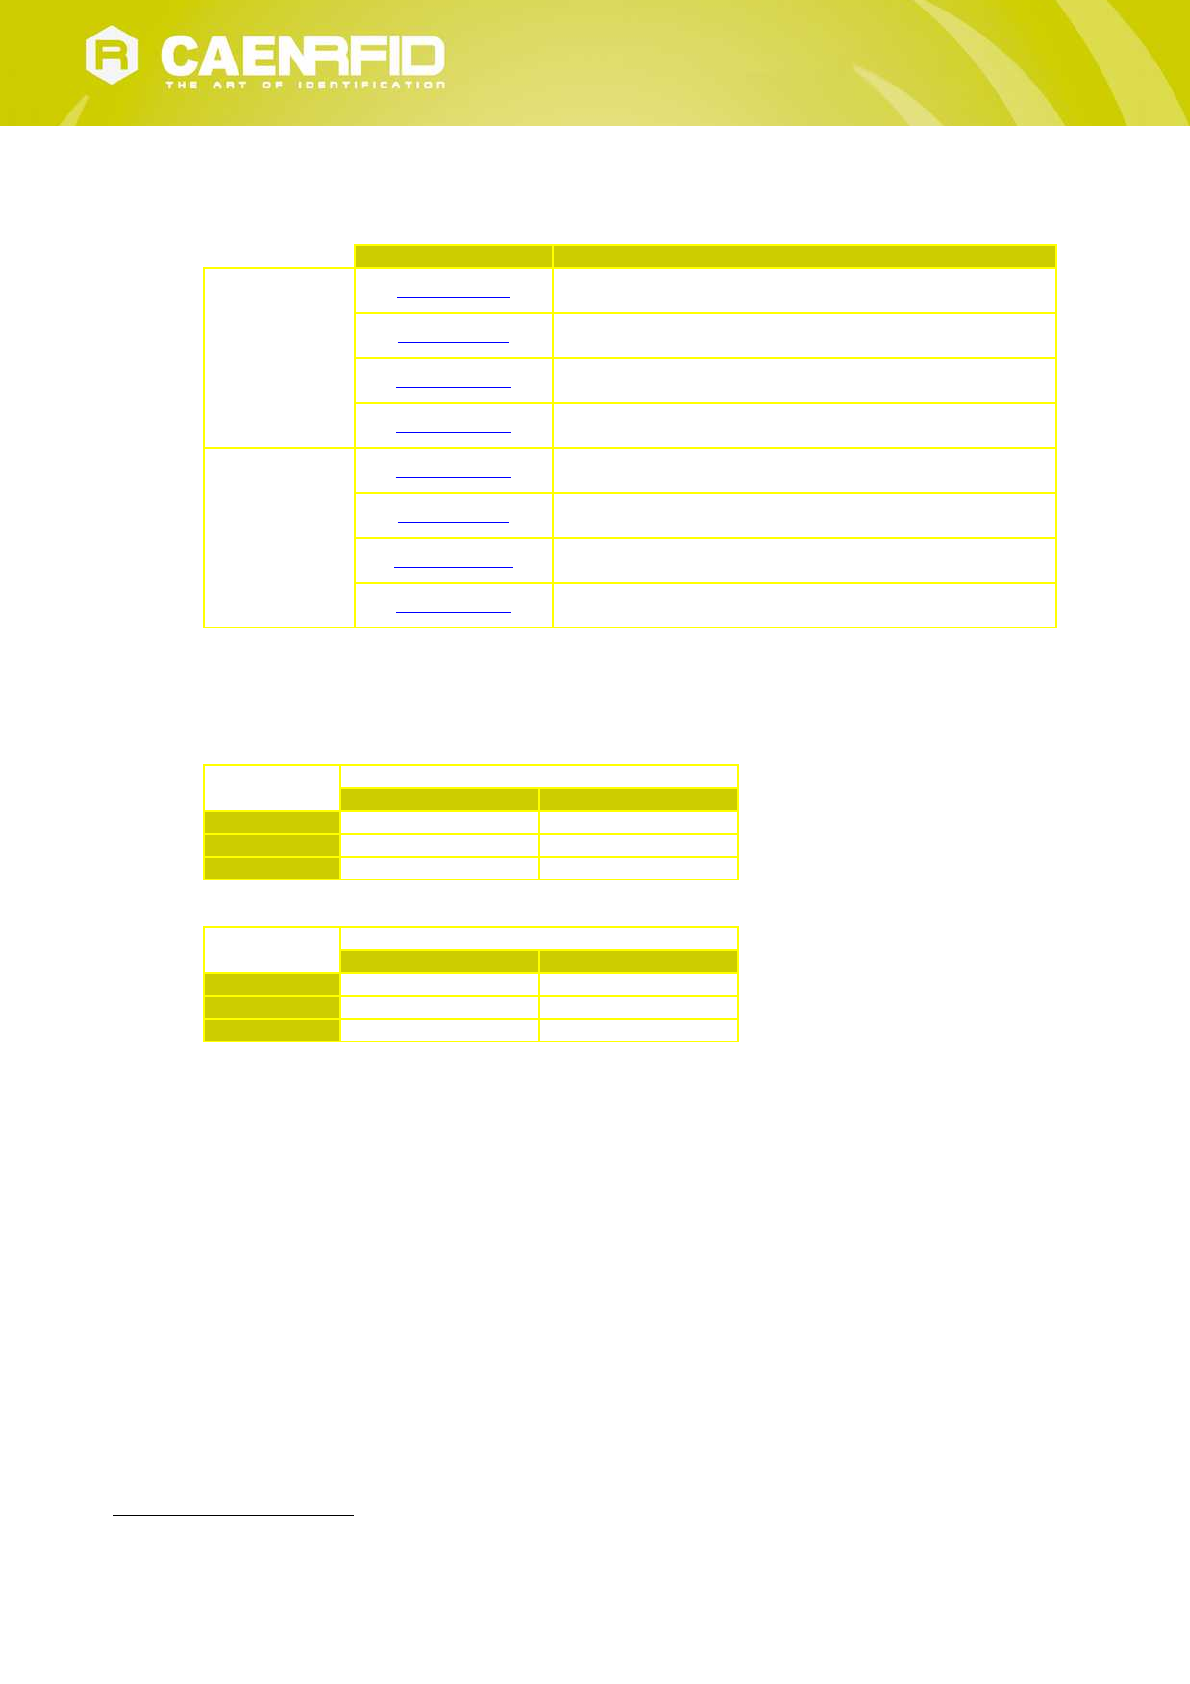
The complete structure of the qIDmini R1170I menu is the following:
EASY2RD
PROFILE
HID
PWR UP
BEEP PWR DOWN
SCAN TAG
PWR UP
VIBRATE PWR DOWN
SCAN TAG
25 mW
50 mW
POWER 100 mW
200 mW
500 mW8
8 500mW is not available for FCC compliant models (R1170IUAPLP and R1170IUHIDP)
qIDmini Configuration Menu - qIDmini Technical Information Manual 42

PROFILE
Access the configuration menu as explained in the Introduction paragraph page 41.
The PROFILE menu is the first option of the main menu. To select it, hold down the trigger button.
To scroll through the PROFILE options, press quickly the trigger button.
The PROFILE submenu options are the following:
EASY2RD (factory default): choosing this option you select the CAEN RFID easy2read communication
protocol. Select this option in order to control the reader using the CAEN RFID Easy Controller Application or
the SDK (Software Development Kits) library. For details on the use with the EASY2RD profile please refer to
§ qIDmini EASY2RD Profile chapter page 16.
HID9: choosing this option you select the keyboard emulation protocol. For details on the use on the HID
profile please refer to § qIDmini HID profile chapter page 31.
To return to the main menu, quickly press the power button.
The currently active profile is marked with an asterisk.
You can activate only one profile at a time.
To activate a different profile, scroll through the PROFILE options by pressing quickly the trigger button until the
desired profile is displayed. Hold down the trigger button for a few seconds: the name of the profile will begin to flash.
Once activated, the device returns to the main menu.
When you turn on the reader, the display shows the currently active profile and then the message "ready" to inform
you that the reader is ready to operate.
Warning: Note that if the reader is in the HID profile you must disconnect it from any connected device before to
select another profile.
BEEP
Access the configuration menu as explained in the Introduction paragraph page 41.
To scroll through the menu options, press quickly the trigger button.
The BEEP menu is the second option of the menu. To select it, hold down the trigger button.
The BEEP submenu options are the following:
PWRUP: beep at the power on of the reader
PWRDOWN: beep at the power off of the reader
SCANTAG: beep at the identification of a tag
To enable/disable the submenu options, scroll through the BEEP options menu by pressing quickly the trigger button
until the desired BEEP option and then hold down the trigger button for a few seconds.
Scroll through enable and disable options by pressing quickly the trigger button and hold down the trigger button for a
few seconds to activate one of them. The enable (or disable) option will begin to flash. Once activated, the device
returns to the main menu.
The currently active state is marked with an asterisk. By default, all the BEEP options are disabled.
Note that you can enable or disable the beeper for any option independently so that the beeper can be active on more
than one option simultaneously.
To return to the main menu, quickly press the power button.
9 HID profile is not available for qIDmini R1170I with APPLE profile (ordering options: WR1170IEAPLP, WR1170IUAPLP, WR1170IDKEAP,
WR1170IDKUAP)
qIDmini Configuration Menu - qIDmini Technical Information Manual 43

VIBRATE
Access the configuration menu as explained in the Introduction paragraph page 41.
To scroll through the menu options, press quickly the trigger button.
The VIBRATE menu is the third option of the menu. To select it, hold down the trigger button.
The VIBRATE submenu options are the following:
PWRUP: vibration at the power on of the reader
PWRDOWN: vibration at the power off of the reader
SCANTAG: vibration at the identification of a tag
To enable/disable the submenu options, scroll through the VIBRATE options menu by pressing quickly the trigger
button until the desired VIBRATE option and then hold down the trigger button for a few seconds.
Scroll through enable and disable options by pressing quickly the trigger button and hold down the trigger button for a
few seconds for the activation of one of them. The enable (or disable) option will begin to flash. Once activated, the
device returns to the main menu.
The currently active state is marked with an asterisk. By default, all the VIBRATE options are disabled.
Note that you can enable or disable the vibration for any option independently so that the vibration can be active on
more than one option simultaneously.
To return to the main menu, quickly press the power button.
POWER
Through the POWER menu you can set the conducted RF power level transmitted by RFID section.
Note that, when the reader is configured in the EASY2RD profile, to set the power you can also use the CAEN RFID Easy
Controller Application or the SetPower function of the SDK (Software Development Kits) library.
Access the configuration menu as explained in the Introduction paragraph page 41.
To scroll through the menu options, press quickly the trigger button.
The POWER menu is the fourth option of the menu. To select it, hold down the trigger button.
The POWER submenu options are the following:
25 mW
50 mW
100 mW
200 mW
500 mW10
To scroll through the POWER options, press quickly the trigger button.
To return to the main menu, quickly press the power button.
The currently active power is marked with an asterisk. By default, the 200 mW power level is active.
You can activate only one power level at a time.
To activate a different power level, scroll through the POWER options by pressing quickly the trigger button until the
desired power level is displayed. Hold down the trigger button for a few seconds: the power level option will begin to
flash. Once activated, the device returns to the main menu.
10 Maximum power setting for FCC compliant models (R1170IUAPLP and R1170IUHIDP) is internally limited via FW to 200mW
qIDmini Configuration Menu - qIDmini Technical Information Manual 44
7 QIDMINI FIRMWARE UPGRADE
Firmware Upgrade
The qIDmini R1170I firmware upgrade can be managed via USB by using the SW upgrade program. The qIDmini
Upgrade Tool is available for free at the qIDmini R1170I web page of the CAEN RFID Web Site, SW/FW section.
In order to upgrade the firmware follow the steps described below:
1. Connect the qIDmini reader to the USB port of the PC.
2. Press simultaneously the trigger and the power button for about six seconds.
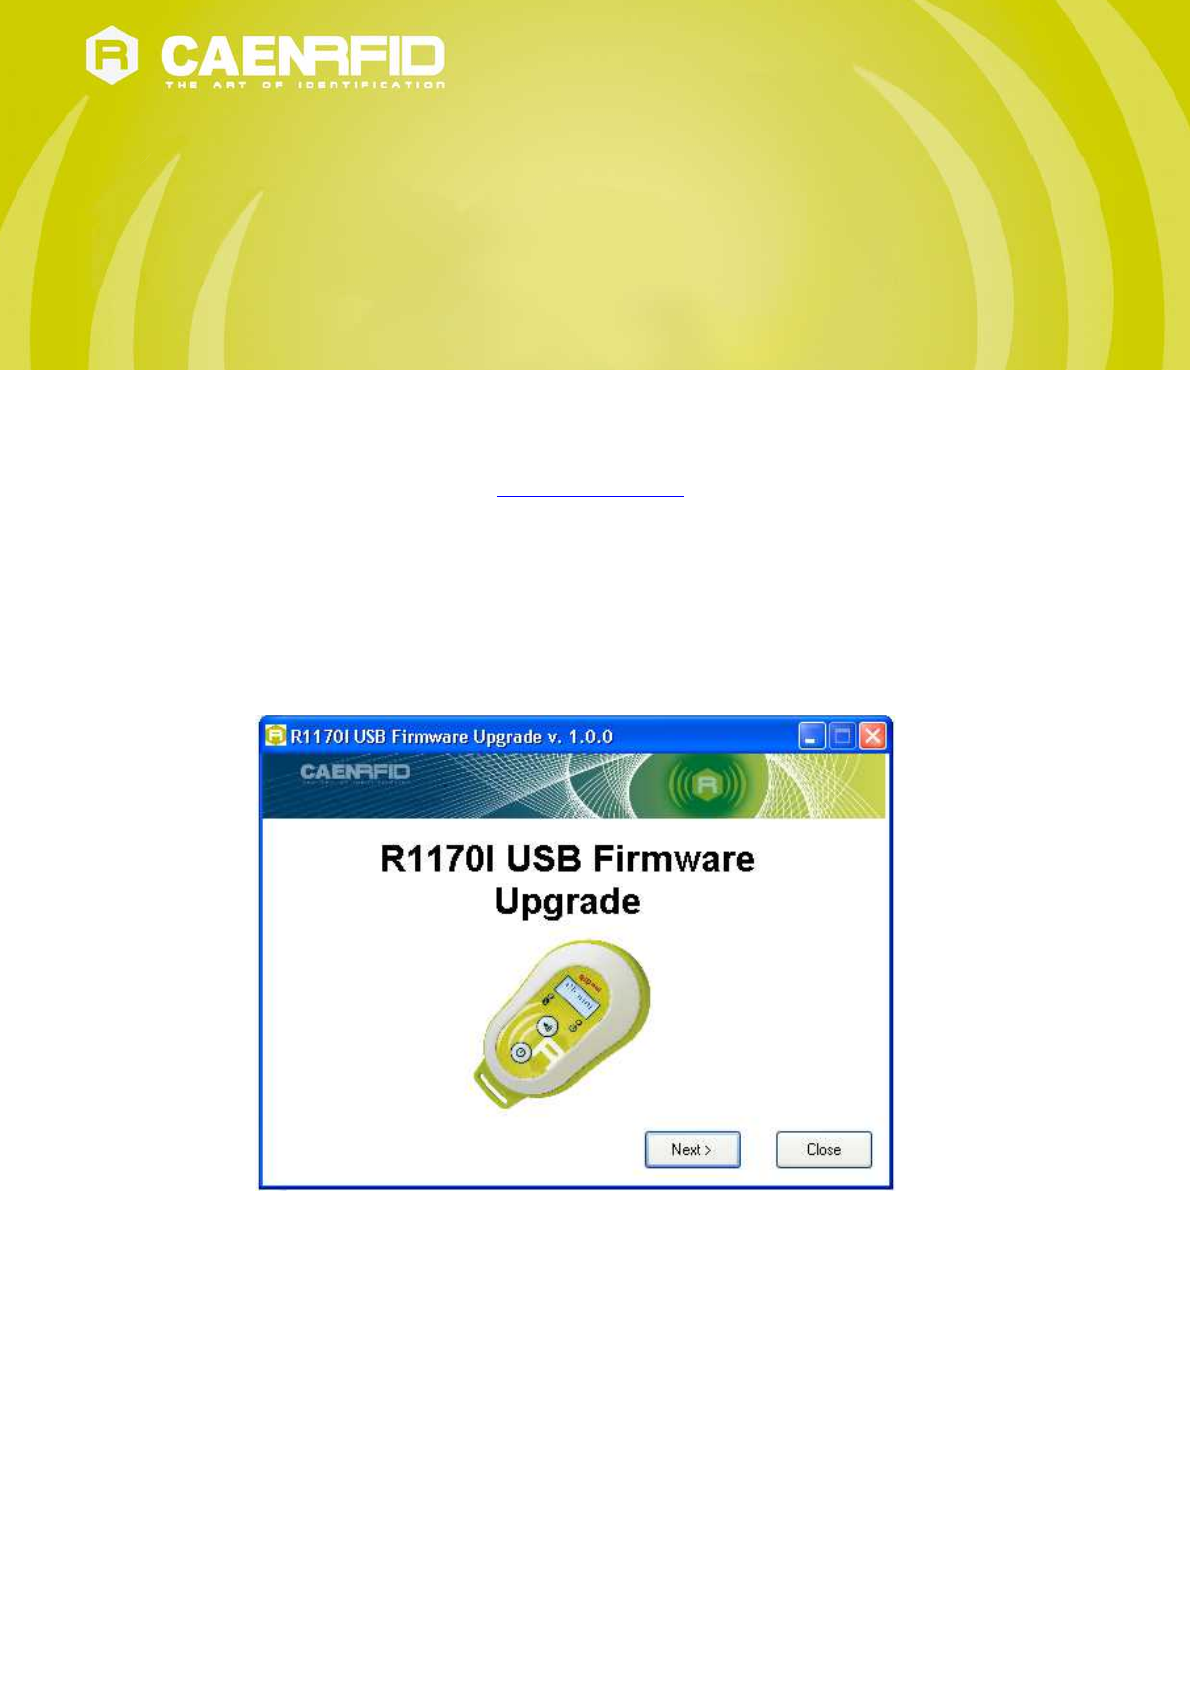
3. Open the FW upgrade program.
4. Click on Next button:
5. In the window you will see the message “Found 1 device” (if the message is “No device connected” repeat the
points 2,3, 4 and 5).
qIDmini Firmware Upgrade - qIDmini Technical Information Manual 45
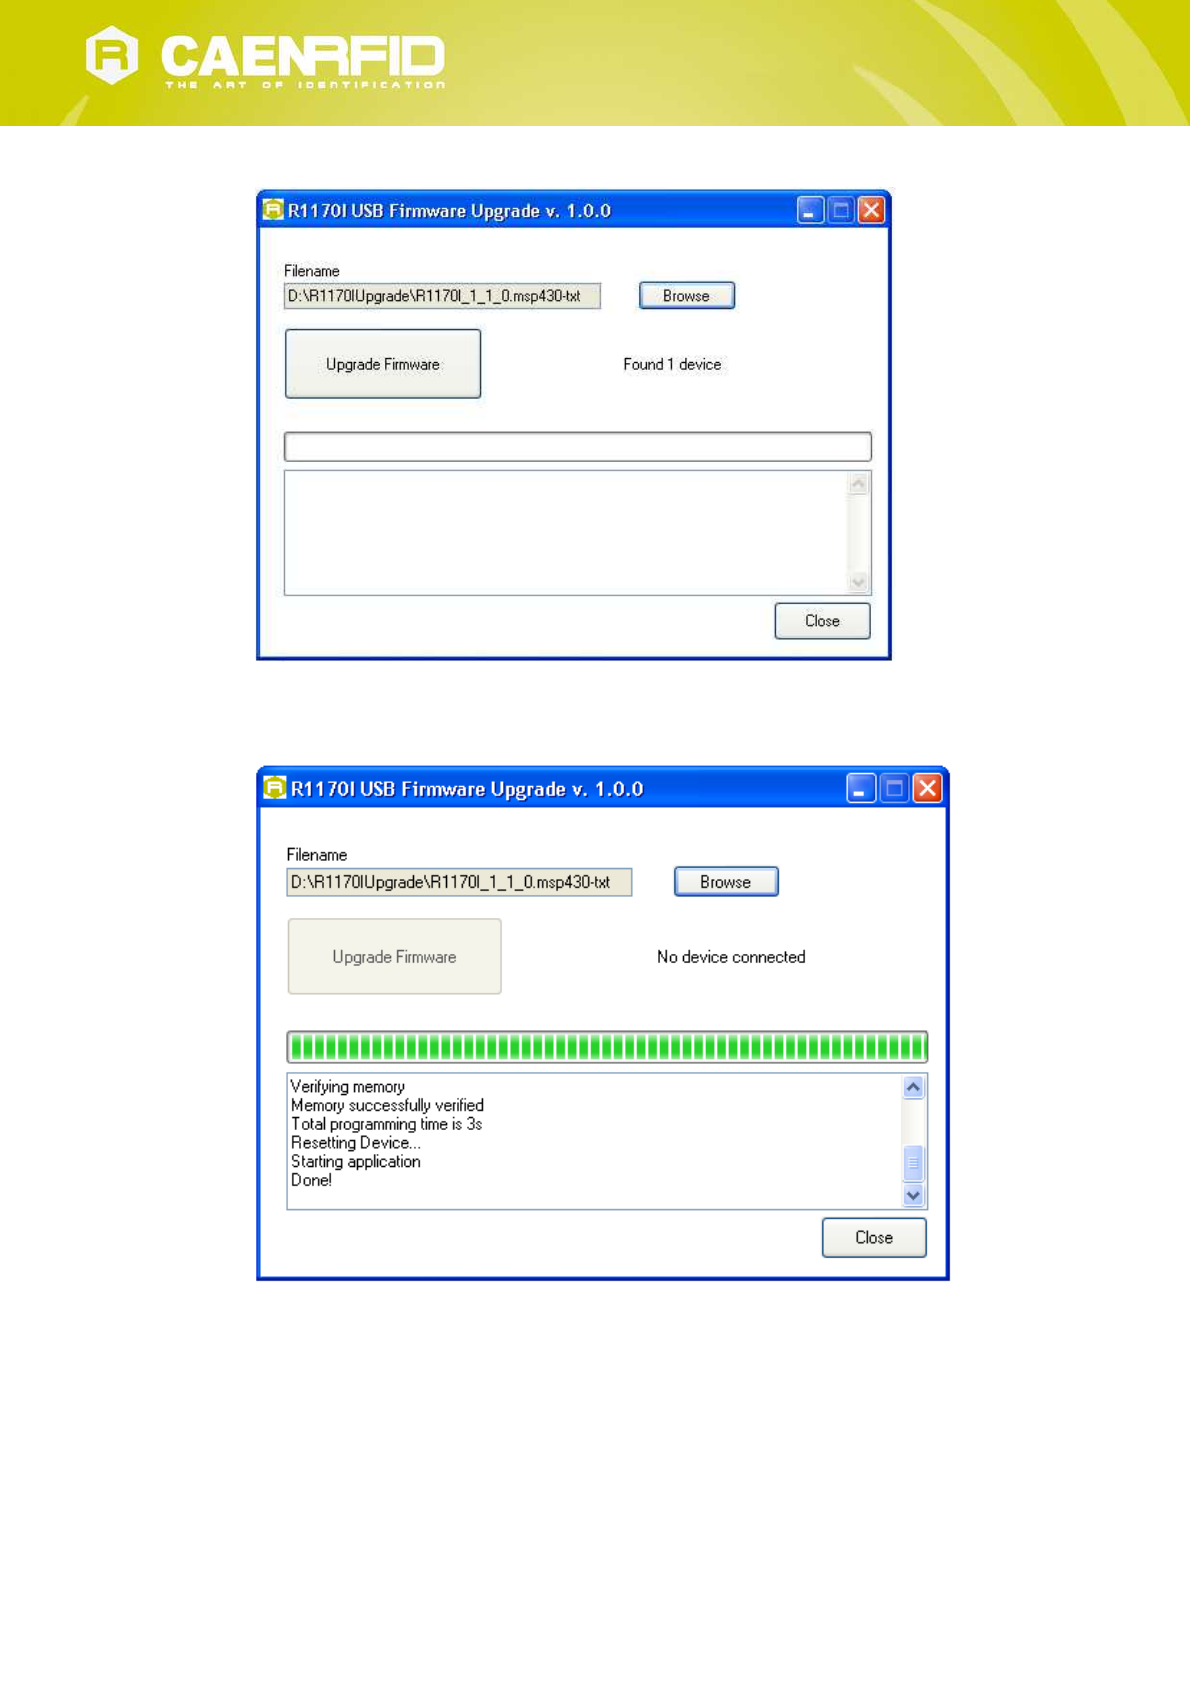
6. Select the FW image file by clicking on the “Browse” button:
7. Click on the “Upgrade Firmware” button and wait for the upgrade process to be completed.
8. At the end of procedure, if the upgrade has been successfully performed, you will see the messages reported in
the image below and the module is ready for normal operation.
qIDmini Firmware Upgrade - qIDmini Technical Information Manual 46

8 QIDMINI TECHNICAL SPECIFICATIONS
Technical Specifications Table
Frequency Band
865.600÷867.600 MHz (ETSI EN 302 208 v. 1.4.1) (Mod. R1170IEHIDP and
R1170IEAPLP)
902÷928 MHz (FCC part 15.247) (Mod. R1170IUHIDP and R1170IUAPLP)
RF Power
Programmable in 18 levels from 5dBm e.r.p. (3mW e.r.p.) to 22dBm e.r.p. (150mW
e.r.p.); (Mod. R1170IEHIDP and R1170IEAPLP)
Programmable in 13 levels from 5dBm e.r.p. (3mW e.r.p.) to 18dBm e.r.p. (60mW
e.r.p.); (Mod. R1170IUHIDP and R1170IUAPLP)
Antenna Integrated linear (horizontal)
Number of Channels
4 channels (compliant to ETSI EN 302 208 v. 2.1.1.)(Mod. R1170IEHIDP and
R1170IEAPLP)
50 hopping channels (compliant to FCC part 15.247)(Mod. R1170IUHIDP and
R1170IUAPLP)
Standard Compliance ISO 18000-6C/EPC C1G2
Read Range up to 90cm (typical)
Connectivity
USB Interface: USB 2.0 Full Speed (12 Mbit/s) device port
Bluetooth Interface: Class 2 with output power 4dBm e.i.r.p.
Virtual COM port parameters:
- Baudrate: up to 230.400kbps
- Databits: 8
- Stopbits: 1
- Parity: none
- Flow control: none
HID profile available (mod. R1170IEHIDP and R1170IUHIDP)
Apple compatibility available (mod. R1170IEAPLP and R1170IUAPLP)
User Interface
Button #1:ON/OFF
Button #2: Trigger
Led #1: power indication and battery status (green: high; red: low)
Led #2: communication activity (blue: Bluetooth; orange: USB)
Buzzer: bitonal for events signalling
Vibration: for events signalling
Display: LCD Alphanumeric (8 chars x 2 lines)
Internal Buffer Size 48kByte (equivalent to 4096 EPC codes@96bit) (TBC)
Battery Type Li-Ion 3.7V, 570mAh
Battery Life Operating: > 12h with 40.000 tag readings
Standby: > 15 days
Battery Charging Time 2h (typical)
IP Rating IP 32
Dimensions (W)99 x (L)54 x (H)20 mm3 max.
(3.9 x 2.1 x 0.8 in3)
Length of USB cable 1.5 m
Operating Temperature -10 °C to +55 °C
Weight 57 g
Tab. 8.7: qIDmini R1170I Technical Specifications Table
Warning: The RF settings must match the country/region of operating to comply with local laws and regulations.
qIDmini Technical Specifications - qIDmini Technical Information Manual 47

The usage of the reader in different countries/regions from the one in which the device has been sold is not allowed.
Reader – Tag Link Profiles
The qIDmini R1170I reader supports different modulations and return link profiles according to EPC Class1 Gen2
protocol 1.
All profiles that have been tested for the compliance with ETSI and FCC regulations are reported in the following table:
Link profile # Regulation Modulation Return Link
0 ETSI - FCC PR–ASK; f=40kHz FM0; f = 40kHz
1 ETSI - FCC PR–ASK; f=40kHz Miller (M=4); f = 256kHz11
2 ETSI - FCC PR–ASK; f=40kHz Miller (M=4); f = 320kHz
Tab. 8.8: qIDmini R1170I Reader to tag link profiles
11 Default value.
qIDmini Technical Specifications - qIDmini Technical Information Manual 48


9 QIDMINI REGULATORY COMPLIANCE
FCC Compliance
This equipment has been tested and found to comply with the limits for a Class B digital device, pursuant to Part 15 of
the FCC Rules. These limits are designed to provide reasonable protection against harmful interference in a residential
installation.
This equipment generates uses and can radiate radio frequency energy and, if not installed and used in accordance
with the instructions, may cause harmful interference to radio communications. However, there is no guarantee that
interference will not occur in a particular installation. If this equipment does cause harmful interference to radio or
television reception, which can be determined by turning the equipment off and on, the user is encouraged to try to
correct the interference by one of the following measures:
a. Reorient or relocate the receiving antenna.
b. Increase the separation between the equipment and receiver.
c. Connect the equipment into an outlet on a circuit different from that to which the receiver is connected.
d. Consult the dealer or an experienced radio/TV technician for help.
This device complies with Part 15 of the FCC Rules. Operation is subject to the following two conditions: (1) This device
may not cause harmful interference, and (2) this device must accept any interference received, including interference
that may cause undesired operation.
Any changes or modification not approved by CAEN RFID could void the user’s authority to operate the equipment.
qIDmini Technical Specifications - qIDmini Technical Information Manual 51