CANON Fax Machines Manual L0903356
User Manual: CANON CANON Fax Machines Manual CANON Fax Machines Owner's Manual, CANON Fax Machines installation guides
Open the PDF directly: View PDF ![]() .
.
Page Count: 383 [warning: Documents this large are best viewed by clicking the View PDF Link!]
CallOfl
COLOR BUBBLE JETTM PRINTER MULTIPASS TM
FAX•SCANNER •COPIER C530/C560
User's Manual
< iiil;i]iZ; ii iiiii ,iii!i!i!iii! iiiiii!i!!!iiiiili!ii!iiiii!i!ii i¸
This manual is copyrighted by Canon Computer Systems, Inc. (CCSI) with all rights reserved.
Under the copyright laws, this manual may not be reproduced in any form, in whole or part,
without prior written consent of CCSI.
©1999 Canon Computer Systems, Inc.
Canon Computer Systems, Inc. has reviewed this manual thoroughly in order to make it an
easy to use guide for your Canon MultiPASS system. All statements, technical information, and
recommendations in this guide and in any guides or related documents are believed reliable, but
the accuracy and completeness thereof are not guaranteed or warranted, and they are not intended
to be, nor should they be understood to be, representations or warranties concerning the products
described.
Your MultiPASS and the software media included with your system have been sold to you
subject to the limited warranties set forth in the warranty and license agreement enclosed with the
respective products. All software is licensed AS IS, as described in the license agreement enclosed
with the software media. Further, CCSI reserves the right to make changes in the specifications of
the products described in this guide at any time without notice and without obligation to notify
any person of such changes.
Preface ii
Canon, BCI, BJ, Bubble Jet, MultiPASS, ScanGear, and UHQ are trademarks and SelectExchange is
a service mark of Canon Inc.
All other product and brand names are trademarks or service marks of their respective owners.
ENERGYSTAR®COMPLIANT
As an ENERGYSTAR® Partner, Canon U.S.A., Inc. has determined that this product meets the
ENERGYSTAR® guidelines for energy efficiency.
Preface iii
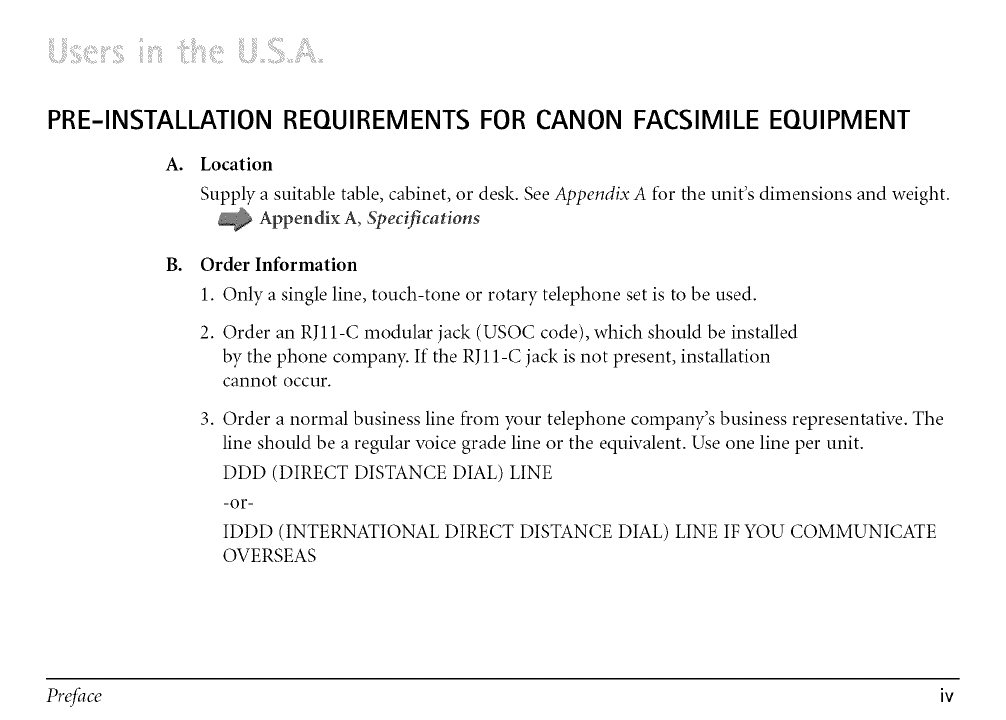
PRE-INSTALLATION REQUIREMENTS FOR CANON FACSIMILE EQUIPMENT
A°
B°
Location
Supply a suitable table, cabinet, or desk. See Appendix A for the unit's dimensions and weight.
Appendix A, Specifications
Order Information
1. Only a single line, touch-tone or rotary telephone set is to be used.
2. Order an RJ11-C modular jack (USOC code), which should be installed
by the phone company. If the RJ11-C jack is not present, installation
cannot occur.
3. Order a normal business line from your telephone company's business representative. The
line should be a regular voice grade line or the equivalent. Use one line per unit.
DDD (DIRECT DISTANCE DIAL) LINE
-or-
IDDD INTERNATIONAL DIRECT DISTANCE DIAL) LINE IF YOU COMMUNICATE
OVERSEAS
Preface iv
Canon recommends an individual line following industry standards, e.g. the 2500 (Touch Tone)
or 500 (Rotary/Pulse Dial) telephones. A dedicated extension off a PBX unit without "Call
Waiting" can be used with your MultiPASS. Key telephone systems are not recommended because
they send non-standard signals to individual telephones for ringing and special codes, which may
cause a fax error.
C° Power Requirements
This equipment should be connected to a standard 120 volt AC, three-wire grounded outlet
only. Do not connect this unit to an outlet or power line shared with other appliances that
cause "electrical noise". Mr conditioners, electric typewriters, copiers, and machines of this
sort generate electrical noise which often interferes with communications equipment and the
sending and receiving of documents.
CONNECTION OF THE EQUIPMENT
This equipment complies with Part 68 of the FCC rules. On the rear panel of this equipment is a
label that contains, among other information, the FCC Registration Number and Ringer
Equivalence Number (REN) for this equipment. If requested, this information must be given to
the telephone company. This equipment may not be used on coin service provided by the
telephone company. Connection to party lines is subject to state tariffs.
Prcfacc V
An FCC compliant telephone cord and modular jack is provided with this equipment. This
equipment is designed to be connected to the telephone network or premises wiring using a
compatible modular jack which is Part 68 compliant. See Installation instructions for details.
The REN is used to determine the quantity of devices which may be connected to the telephone
line. Excessive RENs on the telephone line may result in the devices not ringing in response to an
incoming call. In most, but not all areas, the sum of the RENs should not exceed five (5.0). To be
certain of the number of devices that may be connected to the line, as determined by the total
RENs, contact the telephone company to determine the maximum REN for the calling area.
IN CASE OF EQUIPMENT MALFUNCTION
Should any malfunction occur which cannot be corrected by the procedures described in this
User'sManual, disconnect the equipment from the telephone line or unplug the power cord. The
telephone line should not be reconnected or the power cord plugged in until the problem is
completely resolved. Users should contact Canon Authorized Service Facilities for servicing of
equipment. Information regarding Authorized Service Facility locations can be obtained by calling
the Canon Computer Systems Customer Care Center. (See page 1=14for details.)
Preface vi
RIGHTS OF THE TELEPHONE COMPANY
Should the equipment cause harm to the telephone network, the telephone company may
temporarily disconnect service. The telephone company also retains the right to make changes in
facilities and services which may affect the operation of this equipment. When such changes are
necessary, the telephone company is required to give adequate prior notice to the user.
WARNING
Do not make any changes or modifications to the equipment unless otherwise specified in this
manual. If such changes or modifications should be made, you could be required to stop
operation of the equipment.
MultiPASS C530: Facsimile Transceiver, Model H 12159
This device complies with Part 15 of the FCC Rules. Operation is subject to the following two
conditions:
(1) This device may not cause harmful interference, and
(2) this device must accept an interference received, including interference that may cause
undesired operation.
Preface vii
This equipment has been tested and found to comply with the limits for a class Bdigital device,
pursuant to Part 15 of the FCC Rules. These limits are designed to provide reasonable protection
against harmful interference in a residential installation. This equipment generates, uses and can
radiate radio frequency energy and, if not installed and used in accordance with the instructions,
may cause harmful interference to radio communications. However, there is no guarantee that
interference will not occur in a particular installation. If this equipment does cause harmful
interference to radio or television reception, which can be determined by turning the equipment
off and on, the user is encouraged to try to correct the interference by one or more of the following
measures:
Reorient or relocate the receiving antenna.
Increase the separation between the equipment and receiver.
Connect the equipment into an outlet on a circuit different from that to which the receiver is
connected.
Consult the dealer or an experienced radio/TV technician for help.
Use of shielded cable is required to comply with class B limits in Subpart B of Part 15 of FCC
Rules. Do not make any changes or modifications to the equipment unless otherwise specified in
this manual. If such changes or modifications should be made, you could be required to stop
operation of the equipment.
Preface viii
The Telephone Consumer Protection Act of 1991 makes it unlawful for any person to use a
computer or other electronic device to send any message via a telephone fax machine unless such
message clearly contains in a margin at the top or bottom of each transmitted page or on the first
page of the transmission, the date and time it is sent and an identification of the business or other
entity, or other individual sending the message and the telephone number of the sending machine
or such business, other entity, or individual.
To automatically enter this information into your MultiPASS, follow the instructions in your
Quick Start Guide.
Preface ix
PRE-INSTALLATION REQUIREMENTS FOR CANON FACSIMILE EQUIPMENT
A. Location
Supply a suitable table, cabinet, or desk. See Appendix A for the unit's dimensions and weight.
Appendix A, Specifications
B. Order Information
1. Provide only a single-line to touch-tone or rotary telephone set terminated with a standard
4-pin modular phone plug. (Touch-tone is recommended if available in your area.)
2. Order an RJ11-C modular jack (USOC code), which should be installed by the phone
company. If the RJ11-C jack is not present, installation cannot occur.
3. Order a normal business line from your telephone company's business representative. The
line should be a regular voice grade line or equivalent. Use one line per unit.
DDD (DIRECT DISTANCE DIAL) LINE
-or-
IDDD INTERNATIONAL DIRECT DISTANCE DIAL) LINE IF YOU COMMUNICATE
OVERSEAS
P_'efa ce X

Canon recommends an individual line following industry standards [e.g., the 2500 (touch tone)
or 500 (rotary/pulse dial) telephones]. A dedicated extension off a PBX without "Camp On"
signals is also permissible with your MultiPASS. Key telephone systems are not recommended
because they send non-standard signals to individual telephones for ringing and special codes,
which may cause a fax error.
NOTICE
C° Power Requirements
The power outlet should be a three-prong grounded receptacle (Single or Duplex). It should
be independent from copiers, heaters, air conditioners or any electric equipment that is
thermostatically controlled. The rated value is 120 volts and 15 amperes. The RJll-C
modular jack should be relatively close to the power outlet to facilitate installation.
The Industry Canada label identifies certified equipment. This certification means that the
equipment meets telecommunications networks protective, operational and safety requirements
as prescribed in the appropriate Terminal Equipment Technical Requirements document(s). The
Department does not guarantee the equipment will operate to the user's satisfaction.
Preface xi
CAUTION
Before installing this equipment, users should ensure that it is permissible to be connected to the
facilities of the local telecommunications company. The equipment must also be installed using an
acceptable method of connection. The customer should be aware that compliance with the above
conditions may not prevent degradation of service in some situations.
Repairs to certified equipment should be coordinated by a representative designated by the
supplier. Any repairs or alterations made by the user to this equipment, or equipment
malfunctions, may give the telecommunications company cause to request the user to disconnect
the equipment.
Users should ensure for their own protection that the electrical ground connections of the power
utility, telephone lines and internal metallic water pipe system, if present, are connected together.
This precaution may be particularly important in rural areas.
Users should not attempt to make such connections themselves, but should contact the
appropriate electric inspection authority, or electrician, as appropriate.
This Class B digital apparatus meets all requirements of the Canadian Interference-Causing
Equipment Regulations.
Cet appareil num0rique de la classe B respecte toutes les exigences du R_glement sur le mat0riel
brouilleur du Canada.
Preface xii
The Ringer Equivalence Number (REN) assigned to each terminal device provides an indication
of the maximum number of terminals allowed to be connected to a telephone interface. The
termination on an interface may consist of any combination of devices subject only to the
requirement that the sum of the Ringer Equivalence Numbers of all the devices does not exceed 5.
The REN of this product is 0.3.
CANON CANADA INC.
1-800-263-1121
24 HOURS A DAY,SEVEN DAYSA WEEK
Preface xiii
Chapter 1 : mntroduction
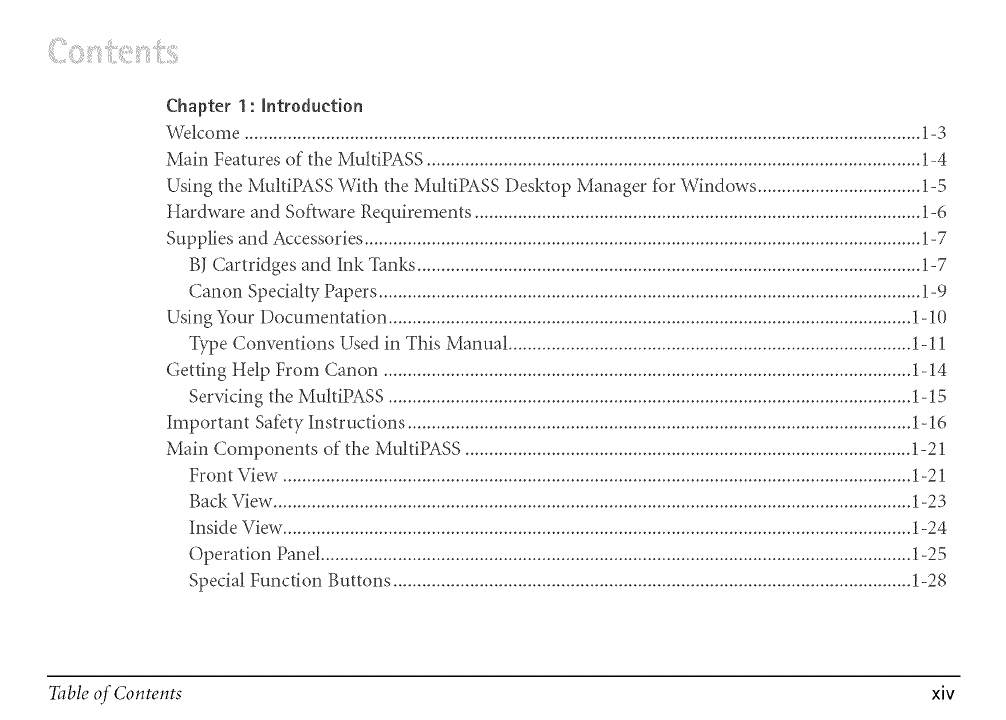
%relcome ............................................................................................................................................. 1-3
Main Features of the MultiPASS ....................................................................................................... 1-4
Using the MultiPASS With the MultiPASS Desktop Manager l_r Windows .................................. 1-5
Hardware and Software Requirements ............................................................................................. 1-6
Supplies and Accessories .................................................................................................................... 1-7
BJ Cartridges and Ink Tanks ......................................................................................................... 1-7
Canon Specialty Papers ................................................................................................................. 1-9
Using _VourDocumentation ............................................................................................................. 1-10
Type Conventions Used in This Manual .................................................................................... 1-11
Getting Help From Canon .............................................................................................................. 1-14
Servicing the MultiPASS ............................................................................................................. 1-15
Important Safety Instructions ......................................................................................................... 1-16
Main Components of the MultiPASS ............................................................................................. 1-21
Front View ................................................................................................................................... 1-21
Back View ..................................................................................................................................... 1-23
Inside View ................................................................................................................................... 1-24
Operation Panel ........................................................................................................................... 1-25
Special Function Buttons ............................................................................................................ 1-28
Table of Contents xiv
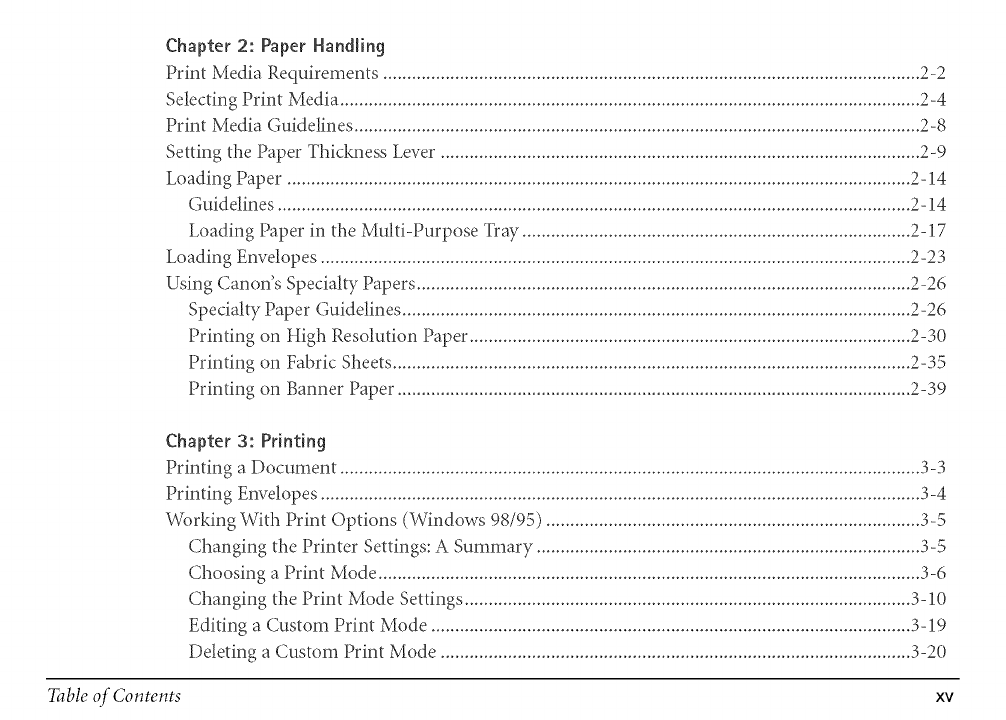
Chapter 2: Paper Handling
Print Media Requirements ...................................................................................................................
Selecting Print Media ......................................................................................................................... 2-4
Print Media Guidelines ...................................................................................................................... 2-8
Setting the Paper Thickness Lever .................................................................................................... 2-9
Loading Paper .................................................................................................................................. 2-14
Guidelines .................................................................................................................................... 2-14
Loading Paper in the Multi-Purpose Tray ................................................................................. 2-17
Loading Envelopes ........................................................................................................................... 2-23
Using Canon's Specialty Papers ....................................................................................................... 2-26
Specialty Paper Guidelines .......................................................................................................... 2-26
Printing on High Resolution Paper ............................................................................................ 2-30
Printing on Fabric Sheets ............................................................................................................ 2-35
Printing on Banner Paper ........................................................................................................... 2-39
Chapter 3: Printing
Printing a Document ......................................................................................................................... 3-3
Printing Envelopes ............................................................................................................................. 3-4
Working With Print Options (Windows 98/95) .............................................................................. 3-5
Changing the Printer Settings: A Summary ................................................................................ 3-5
Choosing a Print Mode ................................................................................................................. 3-6
Changing the Print Mode Settings ............................................................................................. 3-10
Editing a Custom Print Mode .................................................................................................... 3-19
Deleting a Custom Print Mode .................................................................................................. 3-20
Table of Contents xv

SavingaCustomPrintModeasaFile.......................................................................................3-21
SettingPaperOptions.................................................................................................................3-23
SettingOtherPrintFeatures.......................................................................................................3-28
Creatingor(;hangingaStamp...................................................................................................3-31
SettingDefaultPrinterOptions................................................................................................3-40
DisplayingPrinterDriverIntbrmation......................................................................................3-40
WorkingWithPrintOptions(WindowsNT)................................................................................3-41
ChangingthePrinterSettings:A Summary..............................................................................3-41
ChoosingaPrintMode...............................................................................................................3-42
ChangingthePrintModeSettings.............................................................................................3-45
EditingaCustomPrintMode....................................................................................................3-54
DeletingaCustomPrintMode..................................................................................................3-55
SavingaCustomPrintModeasaFile.......................................................................................3-56
SettingPaperOptions.................................................................................................................3-58
SettingDefaultPrintingOptions...............................................................................................3-64
DisplayingPrinterDriverIntbrmation......................................................................................3-66
SharingthePrinterInstallation.......................................................................................................3-66
SettingUp_ourMultiPASSforSharing.....................................................................................3-67
InstallingthePrinterDriveronaClientSystem.......................................................................3-69
Table of Contents xvi
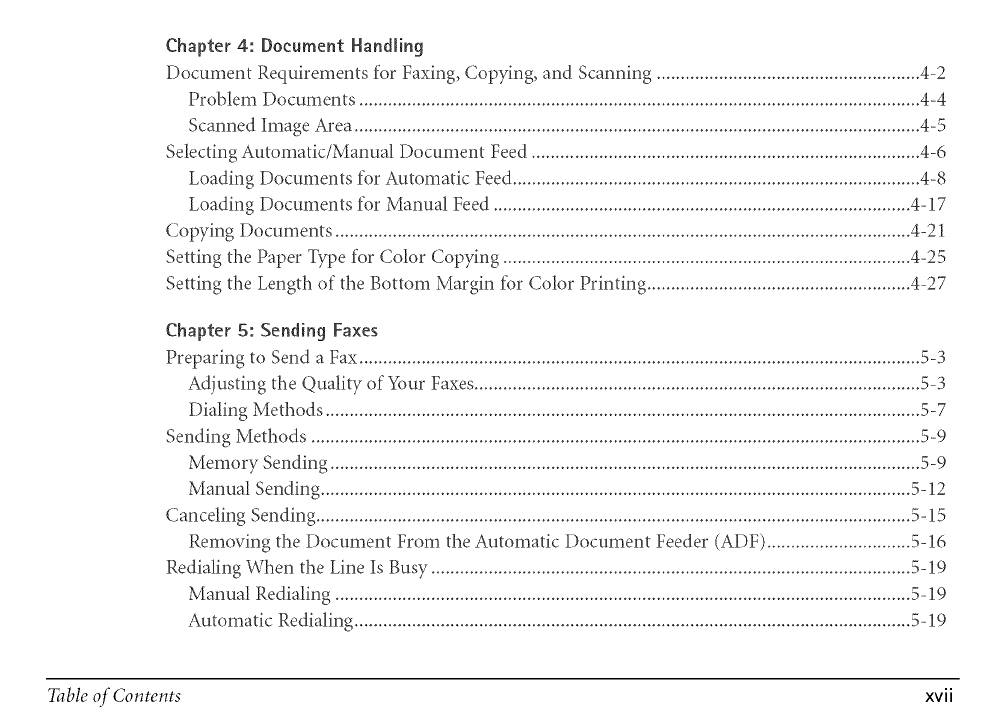
Chapter 4: Document Handling
Document Requirements for Faxing, Copying, and Scanning ....................................................... 4-2
Problem Documents ..................................................................................................................... 4-4
Scanned Image Area ...................................................................................................................... 4-5
Selecting Automatic/Manual Document Feed ................................................................................. 4-6
Loading Documents for Automatic Feed ..................................................................................... 4-8
Loading Documents for Manual Feed ....................................................................................... 4-17
Copying Documents ........................................................................................................................ 4-21
Setting the Paper Type for Color Copying ..................................................................................... 4-25
Setting the Length of the Bottom Margin tBr Color Printing ....................................................... 4-27
Chapter 5: Sending Faxes
Preparing to Send a Fax ..................................................................................................................... 5-3
Adjusting the Quality of _our Faxes ............................................................................................. 5-3
Dialing Methods ............................................................................................................................ 5-7
Sending Methods ............................................................................................................................... 5-9
Memory Sending ........................................................................................................................... 5-9
Manual Sending ........................................................................................................................... 5-12
Canceling Sending ............................................................................................................................ 5-15
Removing the Document From the Automatic Document Feeder (ADF) .............................. 5-16
Redialing When the Line Is Busy .................................................................................................... 5-19
Man ual Redialing ........................................................................................................................ 5-19
Automatic Redialing .................................................................................................................... 5-19
Table of Contents xvii
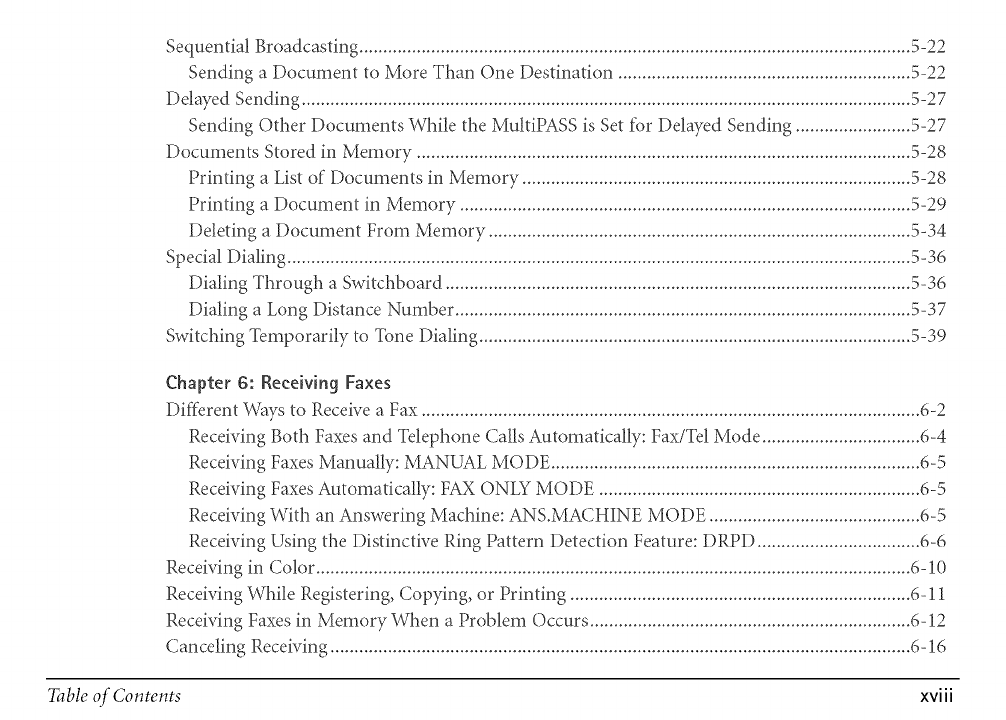
Sequential Broadcasting ................................................................................................................... 5-22
Sending a Document to More Than One Destination ............................................................. 5-22
Delayed Sending ............................................................................................................................... 5-27
Sending Other Documents While the MultiPASS is Set tbr Delayed Sending ........................ 5-27
Documents Stored in Memory ....................................................................................................... 5-28
Printing a List of Documents in Memory ................................................................................. 5-28
Printing a Document in Memory .............................................................................................. 5-29
Deleting a Document From Memory ........................................................................................ 5-34
Special Dialing .................................................................................................................................. 5-36
Dialing Through a Switchboard ................................................................................................. 5-36
Dialing a Long Distance Number ............................................................................................... 5-37
Switching Temporarily to Tone Dialing .......................................................................................... 5-39
Chapter 6: Receiving Faxes
Different Ways to Receive a Fax ............................................................................................................
Receiving Both Faxes and Telephone Calls Automatically: Fax/Tel Mode ................................. 6-4
Receiving Faxes Manually: MANUAL MODE ............................................................................. 6-5
Receiving Faxes Automatically: FAX ONLY MODE ................................................................... 6-5
Receiving With an Answering Machine: ANS.MACHINE MODE ............................................ 6-5
Receiving Using the Distinctive Ring Pattern Detection Feature: DRPD .................................. 6-6
Receiving in Color ............................................................................................................................ 6-10
Receiving While Registering, Copying, or Printing ....................................................................... 6-11
Receiving Faxes in Memory When a Problem Occurs ................................................................... 6-12
Canceling Receiving ......................................................................................................................... 6-16
Table of Contents xviii
Chapter 7: Maintenance
MukiPASS Guidelines ...........................................................................................................................
Periodic Cleaning ............................................................................................................................... 7-4
Cleaning the Outside of the MukiPASS ....................................................................................... 7-4
Cleaning the Interior of the MukiPASS ....................................................................................... 7-5
BJ Cartridges and Ink Tanks............................................................................................................ 7-14
Maintenance ................................................................................................................................ 7-16
Using Ink ...................................................................................................................................... 7-17
Testing and Cleaning the BJ Cartridge Print Head ................................................................... 7-18
When to Replace the BJ Cartridge ............................................................................................. 7-21
Replacing the BJ Cartridge ......................................................................................................... 7-23
Replacing an Ink Tank in the BC-21e Color BJ Cartridge ........................................................ 7-33
Storing a BJ Cartridge ................................................................................................................. 7-41
Transporting the MuItiPASS ............................................................................................................ 7-43
Chapter 8: Troubleshooting
If You Cannot SoNe the Problem ...................................................................................................... 8-2
Clearing Jams ..................................................................................................................................... 8-4
Jams in the Automatic Document Feeder (ADF) ........................................................................ 8-4
Jams in the Multi-Purpose Tray ................................................................................................... 8-7
LCD Messages ..................................................................................................................................... 8-9
Printing Problems ............................................................................................................................ 8-18
Table of Contents xix
Print Quality Problems .................................................................................................................... 8-24
Color Printing and Copying Problems ........................................................................................... 8-26
Paper Feeding Problems .................................................................................................................. 8-30
Faxing Problems ............................................................................................................................... 8-33
Telephone Problems ......................................................................................................................... 8-40
Copying Problems ............................................................................................................................ 8-42
General Problems ............................................................................................................................. 8-43
If the Power Goes Out ..................................................................................................................... 8-45
MultiPASS Hardwware Cannot Initialize ....................................................................................... 8-47
Appendix A: Specifications
Printing Specifications ...................................................................................................................... A-2
BJ Cartridges ...................................................................................................................................... A-7
Facsimile ............................................................................................................................................. A-8
Copier ............................................................................................................................................ A- 11
Scanner ............................................................................................................................................ A- 13
MultiPASS Desktop Manager/br Windows ................................................................................... A-18
General Specifications ..................................................................................................................... A- 19
Table of Contents xx
This chapter introduces you to your MultiPASS and briefly describes the main features. It
describes the supplies available for use with your MultiPASS, and explains how to use your
documentation.
_relcome ..................................................................................................................................... 1-3
Main Features of the MultiPASS .............................................................................................. 1-4
Using the MultiPASS With the MultiPASS DesMop Manager _br Windows ......................... 1-5
Hardware and Software Requirements .................................................................................... 1-6
Supplies and Accessories ........................................................................................................... 1-7
® BJ Cartridges and Ink Tanks ................................................................................................ 1-7
o Canon Specialty Papers ........................................................................................................ 1-9
Using Your Documentation .................................................................................................... 1-10
o Type Conventions Used in This Manual ........................................................................... 1-11
Getting Help From Canon ...................................................................................................... 1-14
o Servicing the MultiPASS .................................................................................................... 1-15
Important Safety Instructions ................................................................................................ 1-16
Chapter 1 Introduction 1- 1
Main Components of the MultiPASS .................................................................................... 1-21
® Front View ........................................................................................................................... 1-21
® Back View ............................................................................................................................ 1-23
® Inside View .......................................................................................................................... 1-24
® Operation Panel .................................................................................................................. 1-25
® Special Function Buttons ................................................................................................... 1-26
Chapter 1 Introduction 1-2
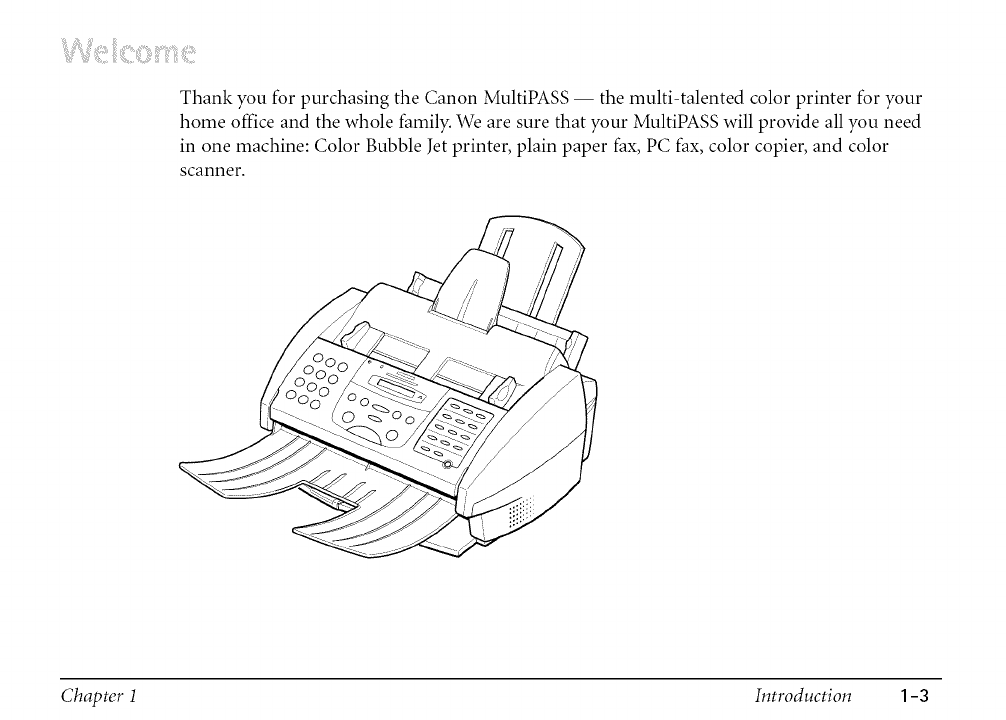
Thank you for purchasing the Canon MultiPASS -- the multi-talented color printer for your
home office and the whole family. We are sure that your MultiPASS will provide all you need
in one machine: Color Bubble Jet printer, plain paper fax, PC fax, color copier, and color
scanner.
Chapter 1 Introduction 1-3
iii!i!i!_dlii!i!i!_i!ii!ili_iiilii_!!!i!_i!!!!!i::_ii!i:!!_i171!i!i171iii_ii_>_ii!i:!!!!iiill_::>!iiii¸¸¸:i!i!_i_)i!__:i:!i!:_iii!i!i!_dlii!i!i!!!ii_ii{iiliii!i!ii_iiiiii!J?711_!!_iiii!i!!!!!iiiiiiii:iiii!i!!i!!!!!iiiiiill
The MultiPASS is a complete multifunction system for your home or small office. The
MultiPASS combines the following essential office machines into a single, convenient
desktop unit:
Color Printer
Color Fax Machine
Plain Paper Fax Machine
PC Color Fax (reception only)
Color Copier
Color Scanner
In addition, you can attach a telephone and/or an answering machine to your MultiPASS.
Your MultiPASS includes the MultiPASS Desktop Manager for Windows ®software, version
3.10. This exclusive Canon software package provides you with a "PC Fax"-- you can print,
fax, scan, and use the telephone from within your computer's Windows environment.
The PC faxing capabilities of the MultiPASS Desktop Manager provide for PC black and white
fax transmission and reception. PC color fax is reception only.
Chapter 1 Introduction 1-4
The multitasking ability of your MultiPASS enables you to perform a number of operations
simultaneously. For example, you can print, scan a document, or make copies at the same
time you are sending a fax or receiving a fax into memory.
The compact size of the MultiPASS makes it ideal for desktop use, and lets you use it in places
where other machines might not fit.
iii!i!i!__iii!i!i!ii!iiii!iiii_iiii!_!!i!_!_iiii!iiiiiii_i!i!!!iiiiiili!ii!iiii_iiii_!iiii_iii!_!!_'_iii!i!ii::_!_iiiiiiiii_i_,iii!_!!_'_ilili__ii!!'__{_iiiiiiii!_!!i!_!__!iii_iii_!_iiiii_!_iiiiiiiii_i_,_,_i_i!!ill
Canon's MultiPASS Desktop Manager for Windows allows you to use the printing, faxing,
scanning, and telephone functions of your MultiPASS directly from your computer.
For more details on using your MultiPASS with the MultiPASS Desktop Manager, refer to the
MultiPASS Desktop Manager Software Guide. This manual is in Adobe ®Acrobat ®PDF format
on your Install Me First CD. You can open the Software Guide from your CD or from the
MultiPASS Program List. If you do not have Adobe Acrobat loaded, simply follow the
instructions to load it on your system.
The MultiPASS Desktop Manager is designed to operate with Windows 98, 95, and NT 4.0.
Chapter 1 Introduction 1-S
i!!!}iiiiiii!iii!ii!iiii_iiii!_!_!¸¸_¸¸¸¸_!iiiii_!_iiiiii_,_i_¸¸¸ii!ii!iiii_iiii!_!_!¸¸_¸¸¸¸!iii!i:!!_ii!ii!iiii_iiii!_!_!i!_!__!iiiii_!_iiiiiiii!i!!i!!!i!i!iiiiiill_!_iiiiiii_i_,ili!iiii:i!i!iT_,__iii!ii!iiii_iiii!_!_!¸¸_¸¸¸¸!iii!i:!!_i!iii_!i_iiiiiiiii_ii:i:!i!:i__i!ill_iiii!i!i_!i,ii_iiiiiliiiii!_!_!¸¸_¸¸¸¸!iii!i:!!_iii!_!_!i_!__i!_ii:i::!i!:i_iii!_!_!i!_!_i!i!iiT_i!!i!i¸II_
Before you start, make sure you have the following computer setup. These are the minimum
requirements.
IBM®or compatible computer with a Pentium ®90 processor or higher. An Intel ®
Pentium processor is recommended.
Microsoft Windows 98, 95, or NT 4.0
For Microsoft Windows NT 4.0, Service Pack 3 or later
32 megabytes (MB) of RAM; 64 MB of RAM recommended
60 MB of available hard disk space; 150 MB recommended
CD-ROM drive, or access to one over a network connection
256-color SVGA monitor or better
Bi-directional shielded IEEE-1284-compatible parallel cable 6.6 feet (2 meters) in length
or shorter. (For help purchasing the correct cable, contact your Canon dealer.)
Chapter 1 Introduction 1-6
iii!ii!i!!!_iii_iill_!_!!!,ii_iiiii!i!i!iii!i_iii!i!i!iii!i_{iiliiiiilii_ii:i::!i!:i_:!!iii:ilii!ii!iiii_iiii!_!_!i!_!_i!iiiiii!_iiiii_S__!iii!!_!___iiiiiiiiiii__iiiiiiii_ii:i::!i!:i_:!!iii:ii::!!iii:i;_ii!iiiiiiii_i_,iii!_!_!¸¸_¸¸¸¸iiiiii_ii:i::!i!:i_:!!iii:il
Your MultiPASS supports excellent and unique print media options that will allow you to
produce dazzling, professional, and fun presentations. All of these print media are specially
designed and manufactured to work with your Canon MultiPASS so you can produce the
finest output possible.
Canon has an extensive dealer network equipped to offer you supplies as you need them.
To find a dealer near you, call the Canon Referral Service at 1-800-OK-CANON
(1-800-652-2666).
If supplies are not available from your local dealer, you can order directly from Canon by
calling 1-800-385-2155.
BJ Cartridges and Ink Tanks
Your MultiPASS comes with:
One BC-21e Color BJ®Cartridge
One SB-21 Ink Cartridge Storage Box
One extra BCI-21 Black Ink Tank
You can also purchase the following BJ cartridges for use with the MultiPASS:
BC-20 Black BJ Cartridge
BC-22e Photo BJ Cartridge
Introduction
Chapter 1 1-7
You can purchase the following ink tanks for use in the BC-21e Color BJ Cartridge:
BCI-21 Black Ink Tank (one extra ink tank comes with the printer)
BCI-21 Color Ink Tank
BJ cartridges contain the Bubble Jet print head and ink, while ink tanks contain ink only. Some
BJ cartridges, like the BC-2 le Color BJ Cartridge, contain replaceable ink tanks; when you run
out of ink, you can replace the empty tank. Some BJ cartridges, like the BC-20 Black BJ
Cartridge, contain both the print head and ink; when you run out of ink, you replace the
entire BJ cartridge. See Chapter 7, Maintenance, for details on replacing BJ cartridges and ink
tanks.
Canon has more engineers dedicated to creating quality ink for providing the best results for
output on Bubble Jet products than any other organization. Canon does not prohibit the use
of third-party inks and the use of third-party inks does not invalidate the product's limited
warranty. However, Canon cannot guarantee the quality or performance of your MUltiPASS
when you are using inks from other suppliers.
Canon's limited warranty does not cover damage caused to Canon's Bubble Jet products that
is attributable to the use of third party parts or supplies, including inks. The limited warranty
remains in effect for its life once that particular damage has been properly repaired.
For optimum printing results, Canon recommends that you use only Canon ink cartridges.
Chapter 1 Introduction 1-8
Canon Specialty Papers
Canon manufactures numerous specialty papers, including:
Glossy Photo Paper
Banner Paper
Brilliant White Paper
High Resolution Paper
T-Shirt Transfers
Greeting Cards
Bubble Jet Paper (water resistant
Fabric Sheet
Transparencies
Back Print Film
High Gloss Film
See Chapter 2, Paper Handling, for details on Canon's Specialty Papers.
Chapter 1 Introduction 1-9
You can also purchase the optional Canon BC-22e Photo Kit, which includes everything you
need to produce photo-realistic images:
BC-22e Photo BJ Cartridge
SB-21 Ink Cartridge Storage Box
Canon High Resolution Paper (60 sheets)
ii!iiiii!iiiiiili:!!iii:iliiiliiiii!_!_!i!_!__ii_i!_i_!ii_i_i_!i_!_iiiiiii_i_,_!!!,ii_iiiii!_!_!¸¸_¸¸¸¸iii!iii3iiii!ii!ii!__!_iiiiiii_i_,_iiiiii_¸_!_!,ii_iiiii!_!_!i_!__i!__ii:i::!i!:i_iii!_!_!i!_!_i!i!iiTi!iliiii_i¸¸¸i¸!i!117i_iiii_!_iiiiiii_i_,iii!_!_!i!_!_
Your MultiPASS includes the following documentation to help you learn how to use your unit
quickly and easily:
Quick Start Guide
This foldout sheet describes how to unpack and set up your new MultiPASS unit. It
includes instructions on how to install the software that comes with the MultiPASS,
including the MultiPASS Desktop Manager for Windows, ScanGear TM for MultiPASS, and
the MultiPASS Printer Driver. This software enables you to use all the features of the
MultiPASS -- color printing, color copying, color faxing, PC faxing, and color scanning.
MultiPASS C530/C560 User's Manual
This online manual (in Adobe Acrobat format) offers detailed information on how to
operate your new MultiPASS. It describes how to use the MultiPASS as a monochrome
or color printer and covers the basics on how to send and receive faxes. It also includes
maintenance, troubleshooting, and specifications.
Chapter 1 Introduction 1- 10
Type
MultiPASS Desktop Manager Software Guide
This online manual (in Adobe Acrobat format) describes how you use the MultiPASS
Desktop Manager, which is a software application that provides all the PC faxing and
scanning capabilities of your MultiPASS. If you plan to use the PC faxing and scanning
features of the MultiPASS, you must install the MultiPASS Desktop Manager software.
You can then use the Desktop Manager to define and control all of the features of the
MultiPASS.
MultiPASS C530/C560 Stand-alone Fax Manual
This online manual (in Adobe Acrobat format) describes how you use the operation panel
on the MultiPASS to control all your faxing and receiving functions. If you decide not to
install the MultiPASS Desktop Manager, you can still use many of the features of the
MultiPASS. In this case, you will define and control the features of the MultiPASS through
the operation panel.
Conventions Used in This Manual
Please read the list below of symbols, terms, and abbreviations used in this manual, and make
sure you know what they mean. A complete glossary of terms is included at the end of this
manual.
CAUTION
Cautions tell you how to avoid actions that could injure you or damage your MultiPASS.
In order to use your unit safely, always pay attention to these cautions.
Chapter 1 Introduction 1-11
Notes provide advice on using the MultiPASS more effectively, describe operating restrictions,
and tell you how to avoid minor difficulties. Reading these is recommended to make the most
of your unit and its functions.
default
document or
fax
menu
V and A buttons
transaction number
TX/RX NO.
RX
TX
A setting that remains in effect unless you change it.
A document or fax is the original sheet(s) of paper you send or
receive on the unit.
A menu is a list of settings or features from which you select an item to
set up or change. A menu has a title which appears in the LCD display.
The V and A buttons are used to select an item in a menu. Press V
to select the next item, and press A to select the previous item.
When you send or receive a document, your unit automatically
assigns the document a unique transaction number. A transaction
number is a four-digit number that will help you keep track of
documents you send and receive.
On the LCD display, TX/RX NO. is the abbreviation used for
transaction number.
Denotes receiving:
Denotes sending:
Chapter 1 Introduction 1-12
In addition, this manual uses distinctive typefaces to identify the buttons you press, the lights
on the operation panel, and any commands you enter at your computer.
The names of buttons and lights you see appear in this typeface: Alarm.
What you see in the LCD display appears in this typeface: REGISTRATION.
Chapter 1 Introduction 1-13
i !iiiiiTiiiii!i!ii¢!i!ii i¸i iiii
Canon Computer Systems, Inc. offers a full range of customer technical support* options
including:
24-hour, 7-day-a-week, toll-free automated support for troubleshooting issues on most
current products (1-800-423-2366)
Speak to a technician free of service charge (currently Monday-- Friday 8:00 a.m. to 10:00
p.m. and Saturday 12:00 p.m. to 6:00 p.m. EST, excluding holidays) for products still under
warranty** (1-757-413-2848)
Speak to a technician (currently $24.99 per call) during holidays and days/hours not listed
above regarding urgent product questions or for products no longer under warranty
(1-800-423-2366)
Or for a charge of $2.50 per minute, to a maximum of $25.00 per call (1-900-246-1200)
To find out about all Canon products and accessories, to download the latest drivers, and
to explore all your technical support options incuding e-mail support, visit the Canon
Computer Systems, Inc. Web site (www.ccsi.canon.com)
24-hour, toll-free Fax Retrieval System (1-800-526-4345)
To download the latest drivers using your modem, 24-hour Bulletin Board Service
(1-757-420-2000)
Within Canada, 24 hours a day, 7 days a week* (1-800-263-1121)
Support program specifics subject to change without notice.
Refer to individual product information for warranty details.
Chapter 1 Introduction 1- 14
Servicing the MultiPASS
The Canon MultiPASS is designed with the latest technology to provide trouble-flee
operation. The warranty card that comes with your MultiPASS describes CanoNs limited
warranty. Be sure to read the warranty information to find out about the different service
options available to you.
Save your sales receipt for proof of purchase. In the event that your printer needs service, you
will need your proof of purchase to obtain warranty service.
Be sure to fill out the Registration card and send it in. This will help Canon give you better
support service.
If you seem to have a problem, try to solve it by referring to the troubleshooting information
in Chapter 8, Troubleshooting. If you cannot solve the problem, contact the Canon Computer
Systems Customer Care Center.
If you feel your MultiPASS needs servicing, contact Canon on the World Wide Web to locate
the Canon Authorized Service Facility (ASF) nearest you. If you do not have access to the Web,
you can call Canon.
Getting Help From Canon
Chapter 1 Introduction 1-1 S
i!!!!!iii!_!!i_!__i!_iii!i!i!iii!__!_iiiiiii_i_,iii!_!!¸¸_¸¸¸¸i!i!iTi!;iii_iiii!_!!i!_!_¸¸¸i¸!i!117iiiii!!!!!ii_!iiiilliii!iiiii_iiii!i!i!_:!iii!i:!!_i!i!iiT'_!!!ili_yi!!!!iiii!_!!i!_!_:!!iii;i!i!iillfilial:_¸¸¸¸¸!!i;ii_ii_ii171!i!i17i_iiii_!_iiil;i_,iii!_!!i!_!_:!!iii;
Read these safety instructions thoroughly before using your MultiPASS, and refer to them later
if you have any questions.
CAUTION
Except as specifically described in this manual, do not attempt to service the MultiPASS
yourself. Never attempt to disassemble the unit: opening and removing its interior covers
will expose you to dangerous voltages and other risks. Refer all servicing to a Canon
Authorized Service Facility (ASF). Call the Canon Customer Care Center for details.
Follow all warnings and instructions marked on the MuItiPASS.
Place the MultiPASS on a level surface. To avoid serious damage from falling, never place
the unit on an unstable cart, stand, or table.
Do not use the MultiPASS near water. Make sure that no wet or humid objects come into
contact with the unit.
ii!_i_!i_!i!!i!!i!!i!ii!iil
Do not use or store the unit outdoors.
To ensure reliable operation of the MultiPASS and to protect it from overheating
(which can cause it to operate abnormally and create a fire risk), never block or cover any
openings on the unit by placing it on a bed, sofa, rug, or other similar surface. Do not
place the unit in a closet or built-in installation, or near a radiator or other heat register
unless proper ventilation is provided.
Chapter 1 Introduction 1-16
ii!i_!i_!i!!i!!i!!i!ii!iil
ii!i_!i_!i!!i!!i!!i!ii!iil
ii!i_!i_!i!!i!!i!!i!ii!iil
ii!i_!i_!i!!i!!i!!i!ii!iil
ii!i_!i_!i!!i!!i!!i!ii!iil
ii!i_!i_!i!!i!!i!!i!ii!iil
ii!i_!i_!i!!i!!i!!i!ii!iil
Only operate the MultiPASS from the type of power source indicated on the unit's label.
If you are not sure of the type of power available, consult your dealer or local power
company.
The MultiPASS is equipped with a three-prong, grounding-type plug provided with a
third (grounding) pin. This plug will only fit into a grounding-type outlet. This is a safety
feature. If you are unable to insert the plug into your outlet, contact an electrician to
replace your outlet. Do not defeat the safety purpose of the grounding-type plug by
breaking off the third prong or using a 3-to-2 adapter.
Do not allow anything to rest on the power cord, and do not locate the unit where the
cord will be walked on. Make sure the cord is not knotted or kinked.
If you use an extension cord with the MultiPASS, make sure that the total of the ampere
ratings on the products plugged into the extension cord does not exceed the extension
cord ampere rating. Also make sure that the total ampere rating of all products plugged
into the wall outlet does not exceed the current amperage of the circuit breaker.
Do not push objects of any kind into the slots or openings on the cabinet as they may
touch dangerous voltage points or short out parts. This could result in fire or electric
shock.
Do not allow small objects (such as pins, paper clips, or staples) to fall into the MultiPASS.
If something does fall into it, unplug the unit immediately and call the Canon Customer
Care Center.
To avoid spillage in or around the unit, do not eat or drink near the unit. If you spill
liquid or if any substance falls into the unit, immediately unplug the unit and call the
Canon Customer Care Center.
Chapter 1 Introduction 1-17
ii!_i_!i_!i!!i!!i!!i!ii!iil
ii!i_!i_!i!!i!!i!!i!ii!iil
ii!i_!i_!i!!i!!i!!i!ii!iil
ii!i_!i_!i!!i!!i!!i!ii!iil
ii!i_!i_!i!!i!!i!!i!ii!iil
ii!i_!i_!i!!i!!i!!i!ii!iil
ii!i_!i_!i!!i!!i!!i!ii!iil
Always unplug the MultiPASS before moving or cleaning it.
Whenever you unplug the MultiPASS, wait at least five seconds before you plug it
in again.
During electrical storms, disconnect the power cord from the power outlet. (Please note
that any documents stored in the unit's memory will be deleted when you unplug the
unit.)
Do not install the MultiPASS near devices that contain magnets or generate magnetic
fields, such as speakers.
Do not stack boxes or furniture around the power outlet. Keep the area open so you can
reach the outlet quickly. If you notice anything unusual (smoke, strange odors, noises)
around the MultiPASS, unplug the unit immediately and call the Canon Customer Care
Center.
To avoid paper jams, never unplug the power cord, open the printer cover, or remove
paper from the multi-purpose tray while printing.
Keep the MultiPASS away from direct sunlight, as this may damage the unit. If you have
to place it near a window, install heavy curtains or blinds.
Locate the MultiPASS in a cool, dry, clean, well ventilated place. Do not expose the
MultiPASS to extreme temperature fluctuations. Install the unit in a place with
temperatures in the 50°-90.5°F (10°-32.5°C) range.
Chapter 1 Introduction 1-18
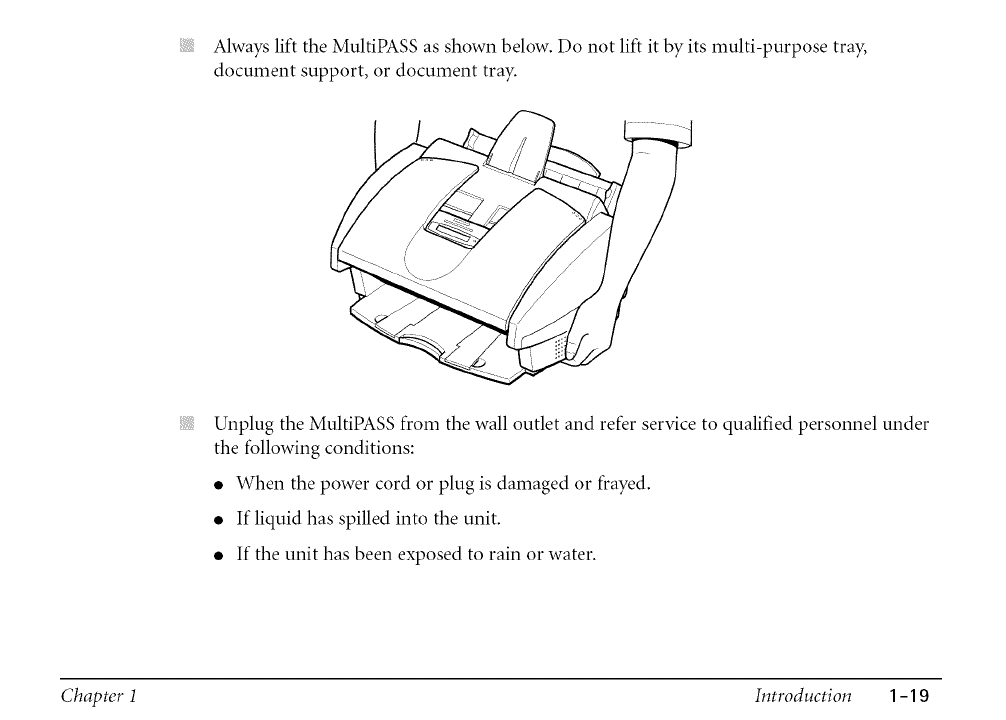
Always lift the MultiPASS as shown below. Do not lift it by its multi-purpose tray,
document support, or document tray.
ii!i_!i_!i!!i!!i!!i!ii!iil
Unplug the MultiPASS from the wall outlet and refer service to qualified personnel under
the following conditions:
• When the power cord or plug is damaged or frayed.
• If liquid has spilled into the unit.
• If the unit has been exposed to rain or water.
Chapter 1 Introduction 1- 19
CAUTION
If the unit does not operate normally when you have followed the instructions in this
manual. Adjust only those controls that are covered by the operating instructions in
this manual. Improper adjustment of other controls may result in damage and may
require extensive work by a qualified technician to restore the product to normal
operation.
If the unit has been dropped or the cabinet has been damaged.
If the unit exhibits a distinct change in performance, indicating a need for service.
ii!i_!i_!i!!i!!i!!i!ii!iil
ii!i_!i_!i!!i!!i!!i!ii!iil
Plug the MultiPASS into a standard 120 V AC power outlet. Do not attempt to use it
outside of the country where you purchased it.
Do not plug the MultiPASS into the same circuit as an appliance such as an air
conditioner, electric typewriter, television, or copier. Such devices generate electrical
noise that can interfere with your MultiPASS sending and receiving faxes.
Check the plug frequently and make sure that it is firmly plugged into the socket.
This product emits low level magnetic flux.
If you use a cardiac pacemaker and feel abnormalities, please move away from this product
and consult your doctor.
Chapter 1 Introduction 1-20
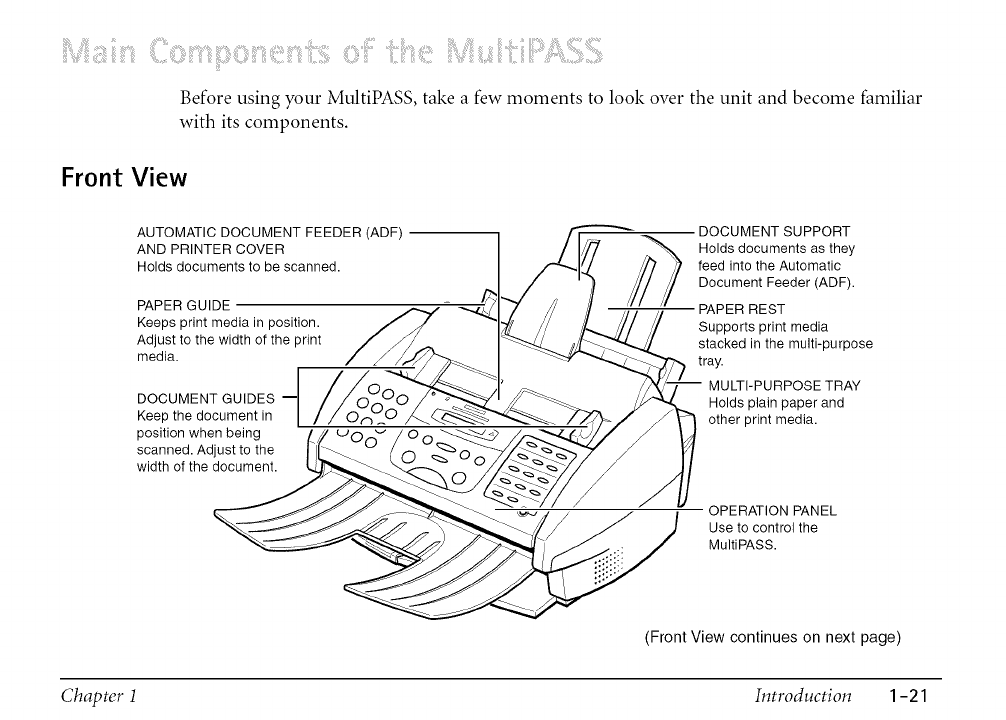
Before using your MultiPASS, take a few moments to look over the unit and become familiar
with its components.
Front View
AUTOMATIC DOCUMENT FEEDER (ADF)
AND PRINTER COVER
Holds documents to be scanned.
PAPER GUIDE
Keeps print media in position.
Adjust to the width of the print
media.
DOCUMENT GUIDES m
Keep the document in
position when being
scanned. Adjust to the
width of the document.
DOCUMENT SUPPORT
Holds documents as they
feed into the Automatic
Document Feeder (ADF).
PAPER REST
Supports print media
stacked in the multi-purpose
tray.
MULTI-PURPOSE TRAY
Holds plain paper and
other print media.
OPERATION PANEL
Use to control the
MultiPASS.
(Front View continues on next page)
Chapter 1 Introduction 1-21
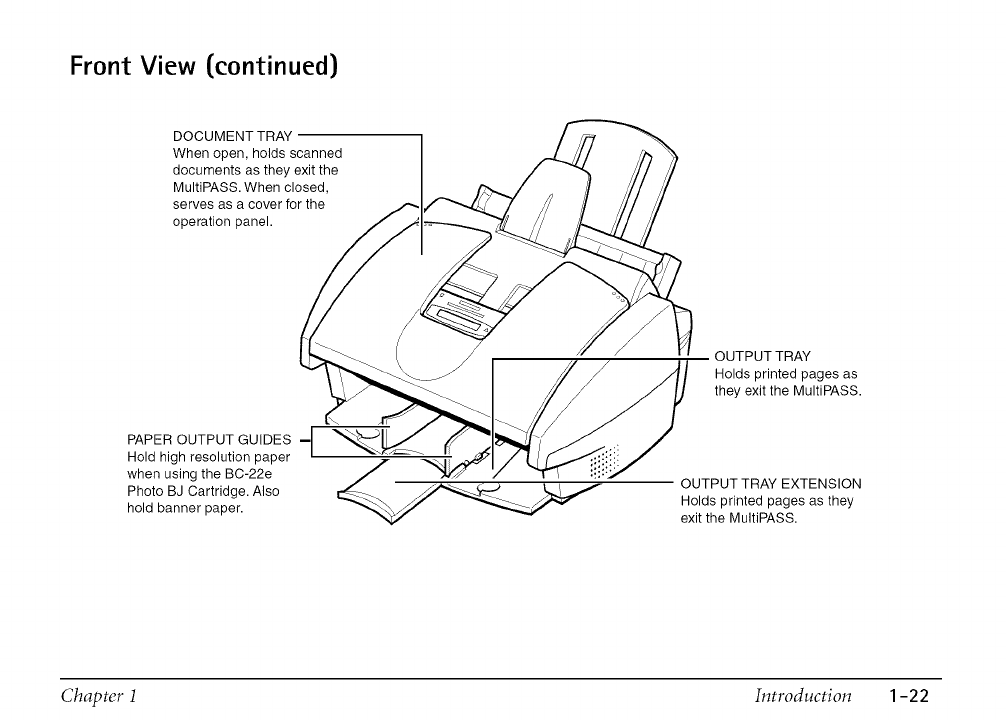
Front View (continued)
DOCUMENT TRAY
When open, holds scanned
documents as they exit the
MultiPASS. When closed,
serves as a cover for the
operation panel.
PAPER OUTPUT GUIDES --
Hold high resolution paper
when using the BC-22e
Photo BJ Cartridge. Also
hold banner paper.
OUTPUT TRAY
Holds printed pages as
they exit the MultiPASS.
OUTPUT TRAY EXTENSION
Holds printed pages as they
exit the MultiPASS.
Chapter 1 Introduction 1-22
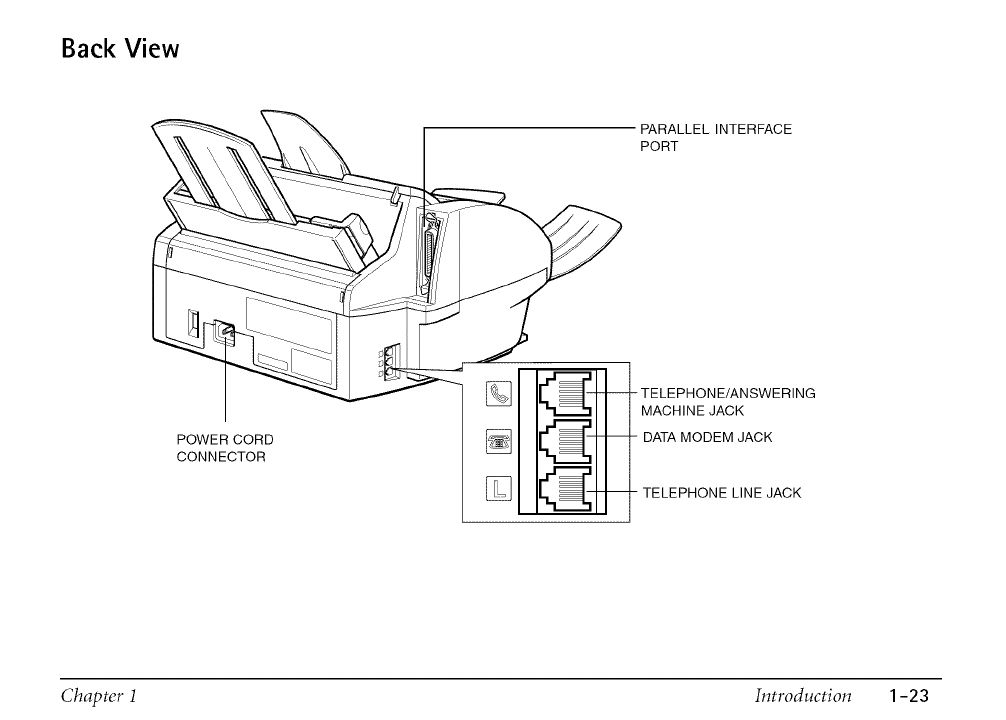
Back View
PARALLEL INTERFACE
PORT
POWER CORD
CONNECTOR
TELEPHONE/ANSWERING
MACHINE JACK
DATA MODEM JACK
TELEPHONE LINE JACK
Chapter 1 Introduction 1-23
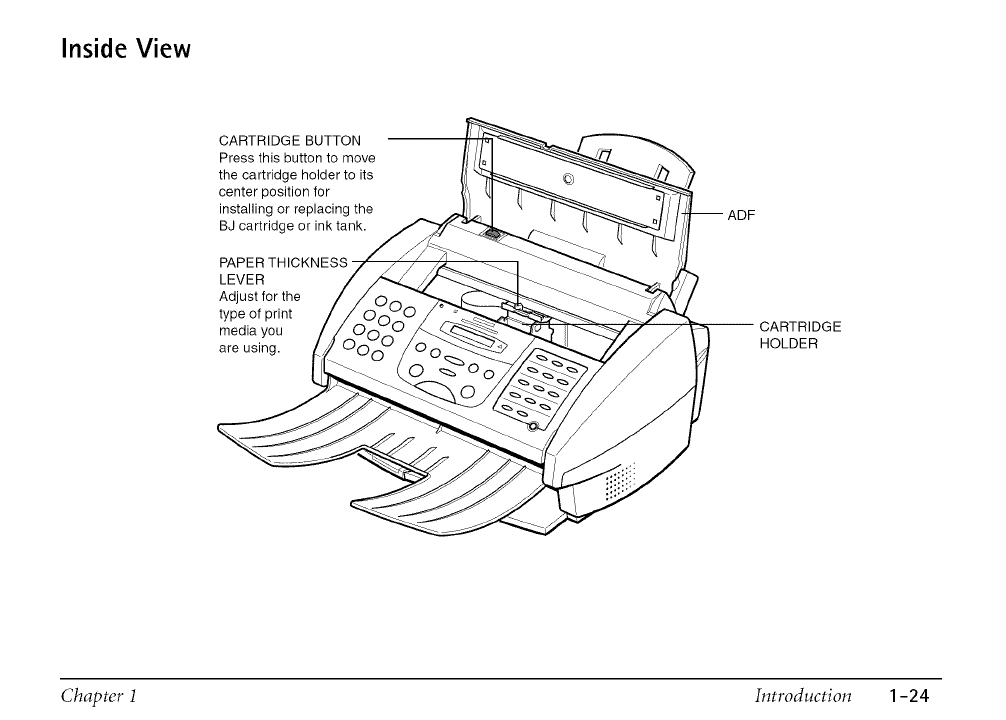
Inside View
CARTRIDGE BUTTON
Press this button to move
the cartridge holder to its
center position for
installing or replacing the
BJ cartridge or ink tank._ _-4 _f_._ ADF
LEvERPAPERTHICKNESS/" J'/" /t_ ___/.i_"--
Adjust for the / / Orb _'*"_2_.
type of print / / Of.,_ /
media you //,mO0_ O _---......_ _ _--4L_"Or_ "_
areusing. _/(".""O O- //O_ _ _
CARTRIDGE
HOLDER
Chapter 1 Introduction 1-24
Operation Panel
O LCD DISPLAY
O Color/B&W BUTTON
O DOCUMENT FEED LEVER --
Receive Mode BUTTON
Alarm LIGHT
_ONE-TOUCH SPEED
DIALING/SPECIAL
FUNCTION BUTTONS
....... &_.... _ ....
bG@
P R(_ TUV(_ WX(_
OPER SYMBOLS
G@@
"[one
ONUMERICBUTTONS
O Redial/Pause BUTTON
O H00k BUTTON
Coded Dial BUTTON
01 02 03
OOO
Da_a Regist_tion A
04 05 06
<O O O>
Memo_ Reference SNce
07 08 09
OOO
Report V
10 11 12
OOO
Cleaning Clear
--I_ Copy BUTTON
--.I_ Stop BUTTON
,Resolution BUTTON
O Start/Scan BUTTON
Chapter 1 Introduction 1-25
_[_ Document Feed Lever
Sets the Automatic Document Feeder (ADF) to _ (automatic document feed) for feeding
multipage documents or to _] (manual document feed) for feeding single sheets.
O Color/B&W Button
Sets the unit for color or black & white transmission or copying. For color transmission or
color copying, press this button to turn on its light.
LCDDisplay
Displays messages and prompts during operation, and displays selections, text, numbers, and
names when registering information.
_]_ Receive Mode Button
Selects the receive mode.
Alarm Light
Flashes when an error occurs, or when the MultiPASS is out of paper or ink.
One-Touch Speed Dial/Special Function Buttons
Dial fax/telephone numbers registered for one-touch speed dialing. Also used to perform
special functions.
Numeric Buttons
Enter numbers when dialing or registering numbers. Also enter letters when registering names.
Chapter 1 Introduction 1-26
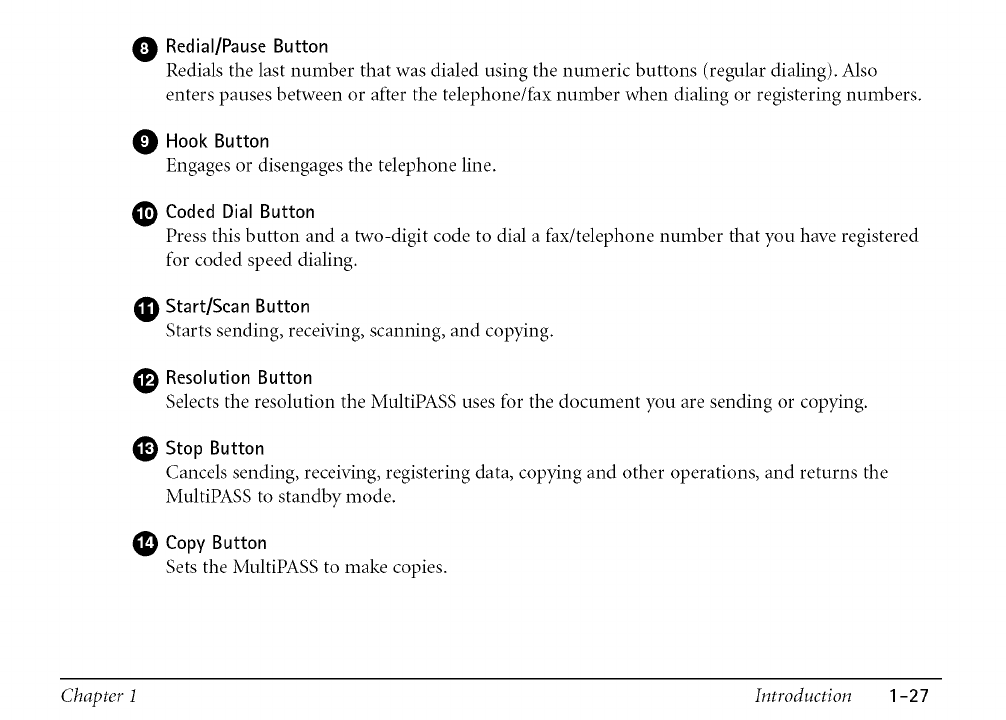
O Redial/Pause Button
Redials the last number that was dialed using the numeric buttons (regular dialing). Also
enters pauses between or after the telephone/fax number when dialing or registering numbers.
Hook Button
Engages or disengages the telephone line.
1_t Coded Dial Button
Press this button and a two-digit code to dial a fax/telephone number that you have registered
for coded speed dialing.
_I Start/Scan Button
Starts sending, receiving, scanning, and copying.
Resolution Button
Selects the resolution the MuItiPASS uses for the document you are sending or copying.
Stop Button
Cancels sending, receiving, registering data, copying and other operations, and returns the
MultiPASS to standby mode.
Copy Button
Sets the MuItiPASS to make copies.
Chapter 1 Introduction 1-27
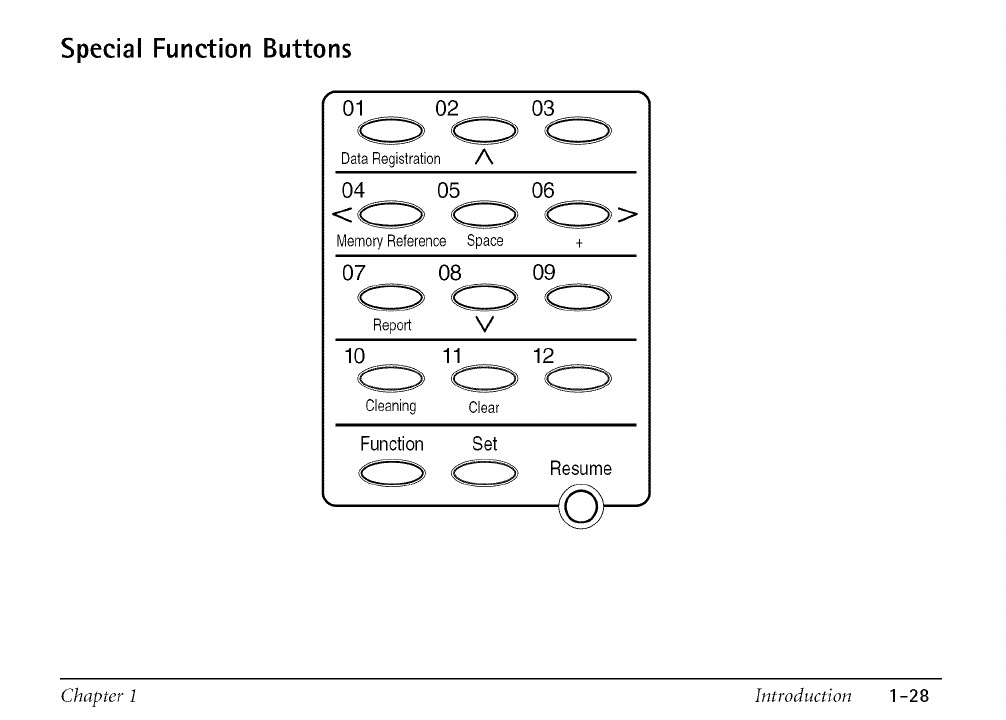
Special Function Buttons
01 02 03
DataRegistration /_
04 05 06
<0 O>
MemoryReference Space +
07 08 09
Report V
10 11 12
Cleaning Clear
Function Set
0Resume
Chapter 1 Introduction 1-28
ii!i_!i_!i!!i!!i!!i!ii!iil
ii!i_!i_!i!!i!!i!!i!ii!iil
ii!i_!i_!i!!i!!i!!i!ii!iil
ii!i_!i_!i!!i!!i!!i!ii!iil
ii!i_!i_!i!!i!!i!!i!ii!iil
ii!i_!i_!i!!i!!i!!i!ii!iil
ii!i_!i_!i!!i!!i!!i!ii!iil
Data Registration Button
Accesses the different menus for setting speed dialing, user preferences, sending and
receiving options, and many other important settings.
V A Buttons
Scroll through the settings so you can see other selections in the menus during data
registration.
Memory Reference Button
Performs operations with documents currently stored in memory, including printing a
list of documents, printing a document, and deleting a document.
Space Button
Enters a space between letters and numbers when registering information.
+ Button
Enters a plus sign (+) when registering your unit telephone/fax number.
<>Buttons
Move the cursor left or right when registering data.
Report Button
Prints reports containing information registered in the unit and information on
transactions.
Chapter 1 Introduction 1-29
ii!i_!i_!i!!i!!i!!i!ii!iil
ii!i_!i_!i!!i!!i!!i!ii!iil
ii!i_!i_!i!!i!!i!!i!ii!iil
ii!i_!i_!i!!i!!i!!i!ii!iil
ii!i_!i_!i!!i!!i!!i!ii!iil
Cleaning Button
Prints the nozzle check and performs cleaning operations for the BJ cartridge print head
and unit rollers.
Clear Button
Clears an entire entry when registering information.
Function Button/light
Accesses the special function buttons. To use the special function buttons, press this
button to turn on its light. To use the one-touch speed dialing buttons, press to turn off
its light.
Set Button
Selects a menu setting and registers information during data registration.
Resume Button
Form-feeds paper when printing, and resumes printing after an error is corrected.
Chapter 1 Introduction 1-30
This chapter describes how to select, prepare, and load print media for the different functions
your MultiPASS can perform.
Print Media Requirements ....................................................................................................... 2-2
Selecting Print Media ............................................................................................................... 2-4
Print Media Guidelines ............................................................................................................ 2-8
Setting the Paper Thickness Lever ........................................................................................... 2-9
Loading Paper ......................................................................................................................... 2-14
® Guidelines .......................................................................................................................... 2-14
® Loading Paper in the Multi-Purpose Tray........................................................................ 2-17
Loading Envelopes .................................................................................................................. 2-23
Using Canon's Specialty Papers ............................................................................................. 2-26
® Specialty Paper Guidelines ................................................................................................ 2-26
® Printing on High Resolution Paper .................................................................................. 2-30
® Printing on Fabric Sheets .................................................................................................. 2-35
® Printing on Banner Paper ................................................................................................. 2-39
Chapter 2 Paper Handling 2-1
iiiii?iii! !!iiiiiiiii! !!i! ! i!i!iill¸ iii!i!i! iiii!i!i!ii:i:!i!:i !i; !i;iiiiiiiiiiii!iiiiil
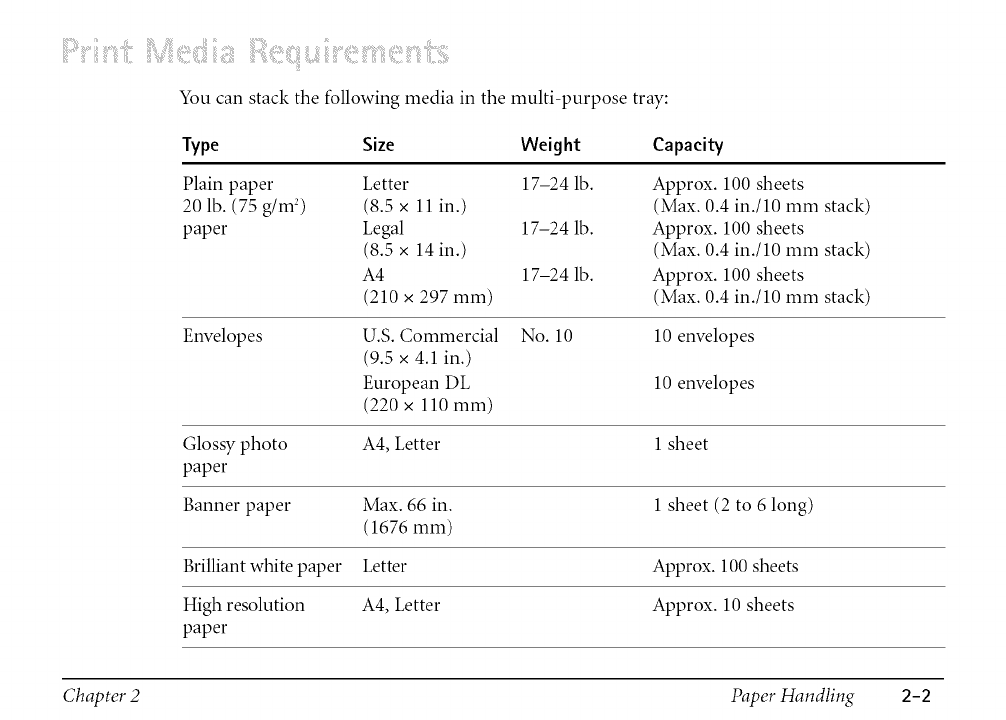
You can stack the following media in the multi-purpose tray:
Type Size Weight
Plain paper Letter 17-24 lb.
20 lb. (75 g/m 2) (8.5 x 11 in.)
paper Legal 17-24 lb.
(8.5 x 14 in.)
A4 17-24 lb.
(210 x 297 mm)
Capacity
Approx. 100 sheets
(Max. 0.4 in./10 mm stack
Approx. 100 sheets
(Max. 0.4 in./10 mm stack
Approx. 100 sheets
(Max. 0.4 in./10 mm stack
Envelopes U.S. Commercial No. 10 10 envelopes
(9.5 x 4.1 in.)
European DL 10 envelopes
(220 x 110 mm)
Glossy photo A4, Letter 1 sheet
paper
Banner paper Max. 66 in. 1 sheet (2 to 6 long)
(1676 mm)
Brilliant white paper Letter Approx. 100 sheets
High resolution A4, Letter Approx. 10 sheets
paper
Chapter 2 Paper Handling 2-2
Type Size Weight Capacity
T-shirt transfers Letter 1 sheet
Greeting cards Regular, half-fold 1 card
Bubble Jet A4, Letter Approx. 100 sheets
paper (Max. 0.4 in./10 mm stack)
Fabric sheets 9.5 x 14 in. 1 sheet
(241.3 x 355.6 mm)
Transparencies A4, Letter 50 sheets
Back print film A4, Letter 10 sheets
High gloss film A4, Letter 1 sheet
For specifications on the printable area of papers and envelopes, see AppendixA,
Specifications.
Chapter 2 Paper Handling 2-3
This section describes the different print media you can use with your MultiPASS. To achieve
the best possible printing performance, be sure to select the correct print media.
Be sure to test print media before purchasing a large quantity. If you have any questions on
whether a particular medium is suitable for your MultiPASS, please contact your local Canon
dealer.
Plain Paper
The MultiPASS supports paper sizes of letter, legal, and A4 in portrait orientation. You can use
regular copier paper, cotton bond paper, and typical letterhead. Your unit does not require
special ink jet paper, and produces letter quality print on most plain bond paper, including
cotton bond and photocopy paper. Always use paper without curls, folds, staples, or damaged
edges. Copier paper has a preferred side for printing. Look at the label on the package to see
which side to print on.
The MultiPASS can print on U.S. Commercial No. 10 envelopes and European DL envelopes.
The following envelopes are not recommended because they may cause jams or smears, or may
damage your unit:
Envelopes with windows, holes, perforations, cutouts, and double flaps.
Envelopes made with special coated paper or deeply embossed paper.
Chapter 2 Paper Handling 2-4
Envelopesusingpeel-offsealingstrips.
Envelopesin whichlettershavebeenenclosed.
You may be able to stack envelopes of other sizes in the multi-purpose tray. However, Canon
cannot guarantee consistent performance on envelope sizes other than U.S. Commercial
No. 10 or European DL.
61ossy Photo Paper
Canon Glossy Photo Paper is a high gloss, thick paper that produces the look and feel of a
photograph. Use this paper with the BC-22e Photo BJ Cartridge to produce photo-realistic
prints from your MultiPASS.
Banner Paper
This paper is specifically designed for printing one continuous sheet in a banner format. The
connected sheets are divided by a perforation. You can print from two to six sheets at one time.
Canon's Banner Paper is specially designed for use with Bubble Jet printers and to produce
bright and vivid color images.
Brilliant White Paper
Canon's unique paper formulation gives you a bright white printing surface that produces
incredibly brilliant colors and dark, crisp black text. This paper works great for proposals, color
presentations, color charts/graphs, flyers, and newsletters. You can print on both sides of the
sheet.
Chapter 2 Paper Handling 2-5
High Resolution Paper
Canon High Resolution Paper is designed to produce near-photographic quality print output
with sharp and vivid graphics. For best results, use Canon High Resolution Paper with the
optional BC-22e Photo BJ Cartridge to produce images comparable to your favorite
photographs. When using this paper, be sure to print on the whiter side of the sheets, and after
printing a pack of this paper, use the cleaning sheet provided with it to clean the unit's rollers.
T-Shirt Transfers
Use Canon's popular T-Shirt Transfers to create and personalize T-shirts, sweatshirts, aprons,
tablecloths, napkins, tote bags, and anything else your imagination allows! Use on any cotton
or cotton/poly blend fabric. Your image is printed in mirror image (when you select T-Shirt
Transfer for the Media Type in the MultiPASS printer driver) so when you iron it on the
T-shirt, the image is viewed correctly.
Greeting Cards
Get the most out of your Canon Creative or other card-making software with Canon Greeting
Cards. These cards give your unique, personalized cards the look and feel of professional cards.
You can create cards, invitations, announcements, and more. The cards come in regular size
and half-fold.
Bubble Jet Paper (water resistant)
Canon Bubble Jet Paper has been developed for high quality printing with minimal or no
smearing or running when in contact with water or damp surfaces, making it a good choice
for damp environments. Images printed on this paper are bright and vivid and will not run if
liquid is spilled on them. This paper also stands up to normal office highlighters, unlike images
printed on other paper. The paper is specially coated and printable on both sides. Select Plain
Paper for the Media Type when using this paper.
Chapter 2 Paper Handling 2-6
Fabric Sheets
Use the white cotton Fabric Sheet for Canon BJ color printers to print pillow covers, scarves,
flags, and other textile items. Use these sheets for appliquOs, cross stitch, and other craft and
sewing projects.
Transparencies
Canon Transparencies are recommended. These transparencies produce excellent contrast,
sharpness, and color to produce crisp and professional overhead presentations. Do not use
normal transparencies in the MultiPASS, as they do not absorb ink and may cause ink to run.
Back Print Film
Canon Back Print Film has been specially developed for Canon Color Bubble Jet printers and
MultiPASS products. The unique mylar-based translucent sheet is designed to deliver sharp,
brilliant, high-intensity color images suitable for business presentations, design work, or
professional reports. Back print film is printed on the back (non-glossy) side of the film in
mirror image and then viewed from the front (glossy) side using a backlit device, such as a
light box. For more details, ask your Canon dealer or refer to the manual supplied with the
film.
High Gloss Film
The Canon High Gloss Film features a bright white finish that lends striking visual power to
charts, graphs, and photographic images. It creates a sharper and more vivid color output than
is possible with coated paper. Use of this film gives your presentation materials and graphics a
professional look. This film provides the best color print quality for the BC-2 le Color BJ
Cartridge and is recommended when printing at 720 x 360 dpi.
Chapter 2 Paper Handling 2-7
Assorted Paper Starter Kit
If you would like to try some of the papers described above, look for Canon's Starter Kit. It
contains an assortment of five paper types.
Canon Photo Kit
Canon's Photo Kit includes the BC-22e Photo BJ Cartridge, the SB-21 Ink Cartridge Storage
Box, and 60 sheets of Canon High Resolution Paper.
Follow these guidelines when selecting or loading print media:
Attempting to print on damp, curled, wrinkled, or torn print media can cause jams and
poor print quality.
Use cut-sheet paper only. You cannot use multipart paper.
When using graph paper, the lines may not match because the l/6-inch (4 mm) line
spacing of the printer is slightly less than that of graph paper.
If the print density of your page is very high, light paper stock may curl slightly due to the
large amount of ink. If you need to print dense graphics, try printing on heavier stock.
Chapter 2 Paper Handling 2-8

Do not use thicker paper than meets the specifications for this unit. Printing with paper
that is thick enough to come in contact with the print head nozzles may damage the BJ
cartridge.
Many media have a "right" side for printing. If you are using such a medium, make sure
you set it in the multi-purpose tray with the print side facing upward.
CAUTION
¸¸¸ ¸¸.....
Before loading paper or other print media in the multi-purpose tray, set the paper thickness
lever. The paper thickness lever adjusts the gap between the print head and the print paper to
suit the paper's thickness.
Set to the left ([7])for paper and most other print media.
Set to the right (rYe) for envelopes and Canon Fabric Sheet.
If the paper thickness lever is not set correctly before printing, smudging and poor print
quality may result.
To avoid paper jams, smearing, and other problems, never open the printer cover to set the
paper thickness lever while the MultiPASS is printing.
Chapter 2 Paper Handling 2-9
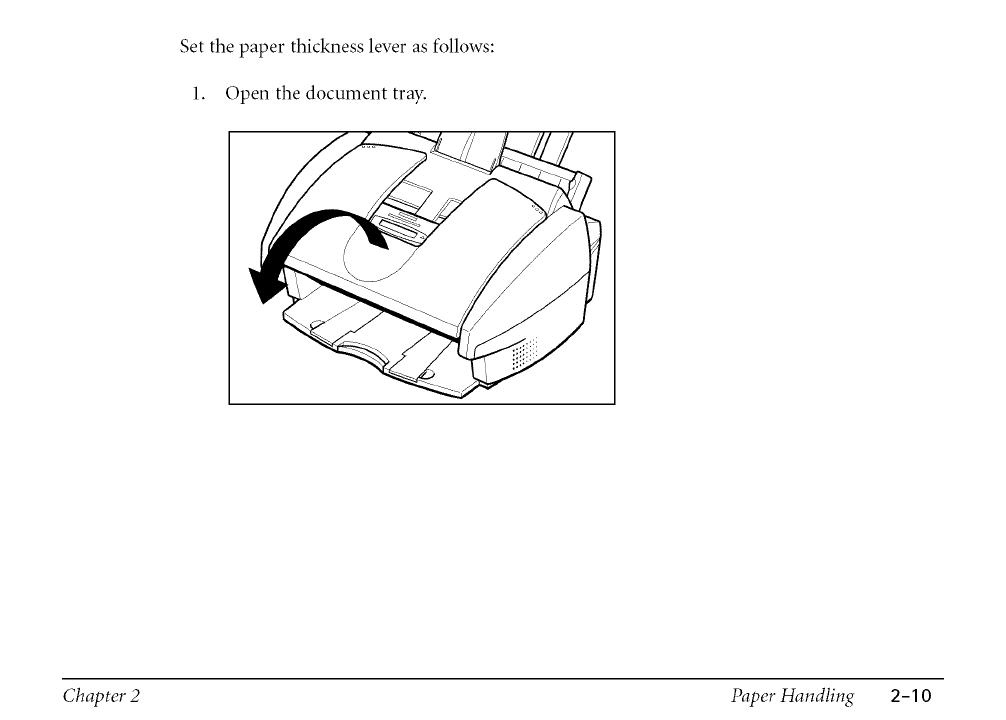
Set the paper thickness lever as follows:
1. Open the document tray.
Chapter 2 Paper Handling 2-10
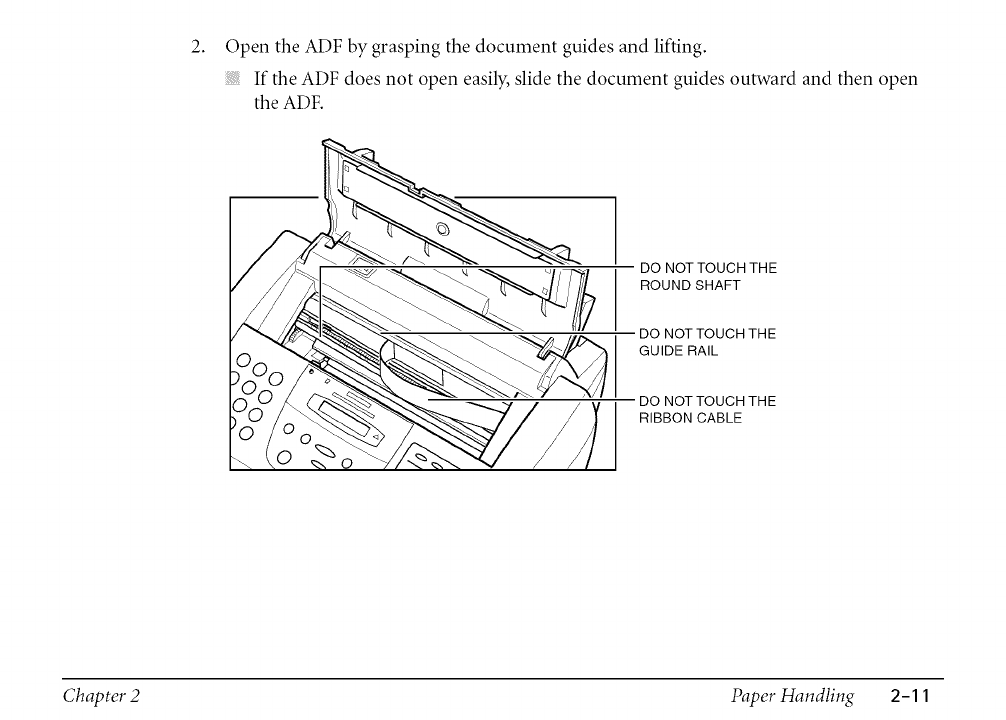
2. Open the ADF by grasping the document guides and lifting.
If the ADF does not open easily, slide the document guides outward and then open
the ADF.
DO NOT TOUCH THE
ROUND SHAFT
DO NOT TOUCH THE
GUIDE RAIL
DO NOT TOUCH THE
RIBBON CABLE
Chapter 2 Paper Handling 2-11
CAUTION
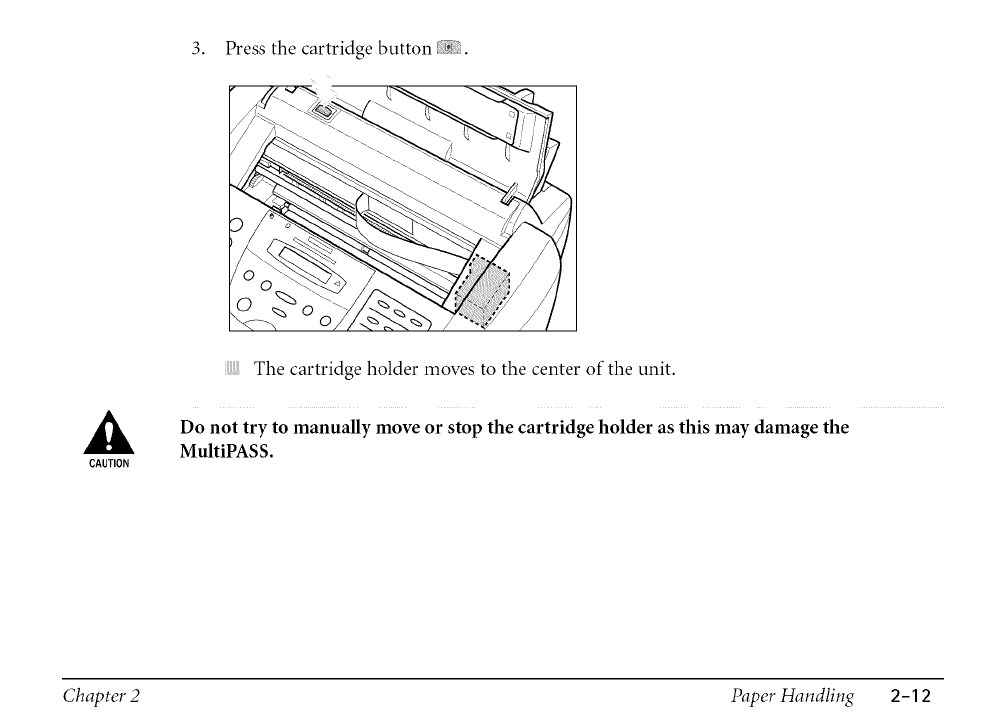
3. Press the cartridge button I_J_.
5
The cartridge holder moves to the center of the unit.
Do not try to manually move or stop the cartridge holder as this may damage the
MultiPASS.
Chapter 2 Paper Handling 2-12
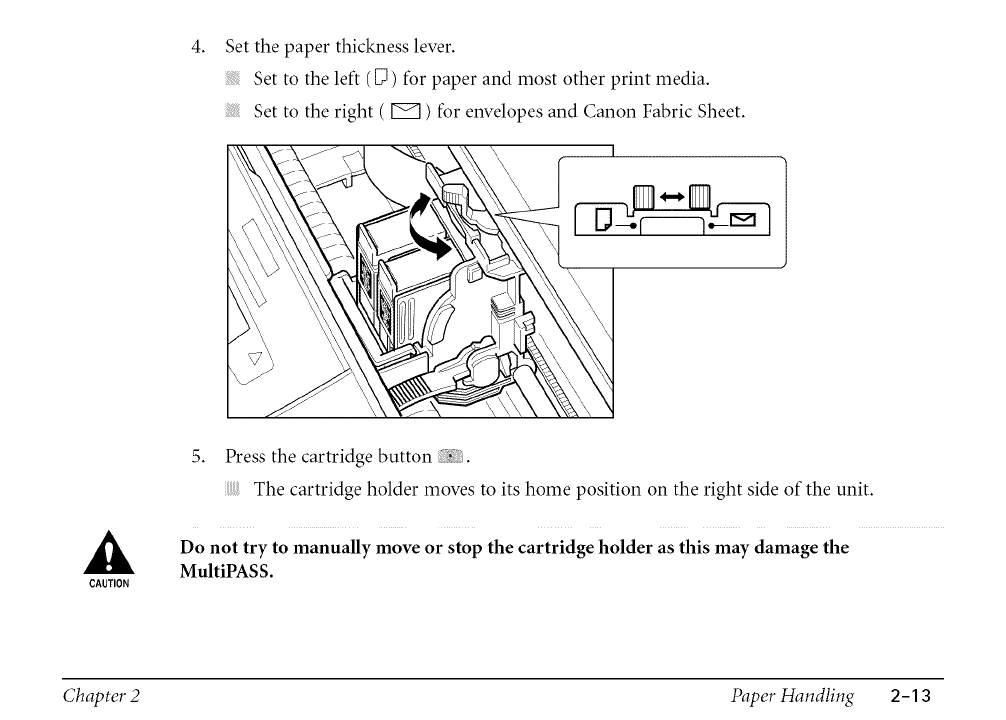
4. Set the paper thickness lever.
Set to the left (D) for paper and most other print media.
Set to the right ( U:_ ) for envelopes and Canon Fabric Sheet.
1
CAUTION
5. Press the cartridge button ?;.
The cartridge holder moves to its home position on the right side of the unit.
Do not try to manually move or stop the cartridge holder as this may damage the
MultiPASS.
Chapter 2 Paper Handling 2-13
6. Close theADF.
7. Close the document tray.
iii!ilij_i>iiii!iiii_i_!iiiii_!i;iliiiiliiiii!_!!i!_!_!!!_i_iiiii!ii!ii!ii!!!{!?:ii!ii!iiii_iiii!i!i!i>iiii!i:_iii!_!!¸¸.....
You can stack paper in the multi-purpose tray to feed it automatically into the MultiPASS.
Certain environmental conditions, such as extreme temperatures or humidity, can cause some
print media to feed incorrectly in the multi-purpose tray. If you have trouble with print media
becoming skewed or multiple sheets being fed, do not stack them in the multi-purpose tray,
but feed them one sheet at a time.
Guidelines
When automatically feeding a stack of paper in the multi-purpose tray, follow these guidelines:
To avoid paper jams and poor print quality, never try to print on damp, curled, wrinlded,
or torn paper.
Do not try to load paper into the multi-purpose tray beyond the paper limit mark (1_) or
beyond the tabs on the multi-purpose tray. Stacking too much paper may cause paper
feeding or printing problems.
Chapter 2 Paper Handling 2-14
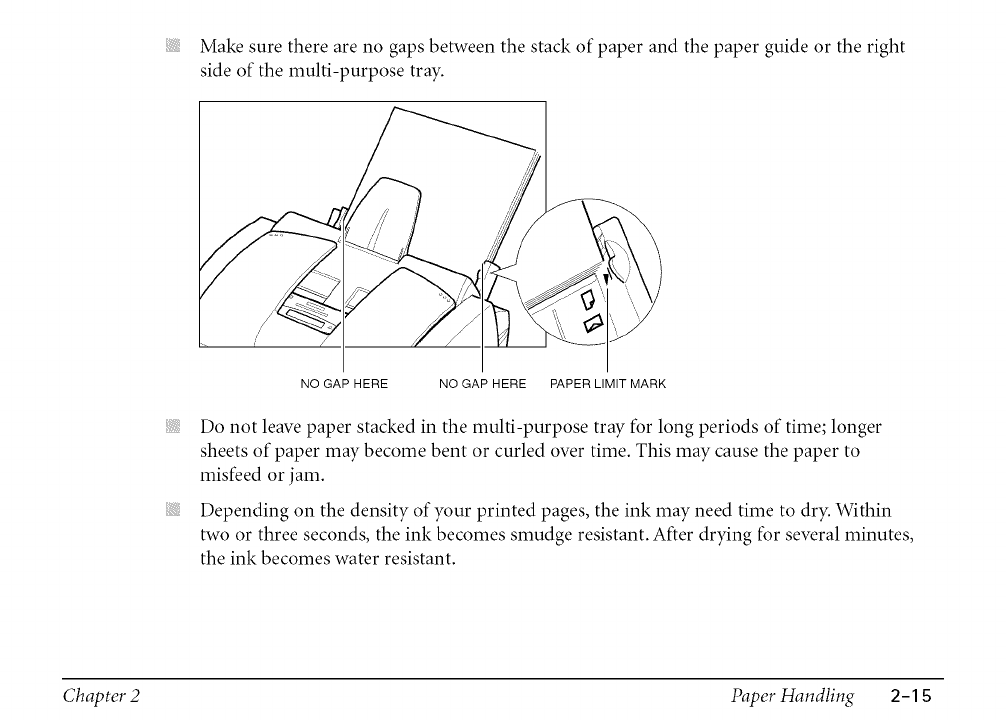
Make sure there are no gaps between the stack of paper and the paper guide or the right
side of the multi-purpose tray.
NO GAP HERE NO GAP HERE PAPER LIMIT MARK
Do not leave paper stacked in the multi-purpose tray for long periods of time; longer
sheets of paper may become bent or curled over time. This may cause the paper to
misfeed or jam.
Depending on the density of your printed pages, the ink may need time to dry. Within
two or three seconds, the ink becomes smudge resistant. After drying for several minutes,
the ink becomes water resistant.
Chapter 2 Paper Handling 2-1S
ii!i_!i_!i!!i!!i!!i!ii!iil
ii!i_!i_!i!!i!!i!!i!ii!iil
ii!_i_!i_!i!!i!!i!!i!ii!iil
ii!i_!i_!i!!i!!i!!i!ii!iil
ii!_i_!i_!i!!i!!i!!i!ii!iil
ii!i_!i_!i!!i!!i!!i!ii!iil
If your printed page contains a large amount of graphics, the ink on the page may be
damp due to the print density. Leave the page in the output tray for 30 to 60 seconds to
allow the ink to dry. Then remove the page being careful not to touch the document tray
(if it is open). Should you dirty the document tray when removing the page, wipe it clean
with a clean, soft, lint-free cloth moistened with water or diluted dishwashing detergent
solution.
The capacity of the paper output tray is 50 sheets of paper. To reduce paper jams, remove
paper from the output tray before the count reaches 50.
If paper curls after printing, remove it immediately; otherwise paper jams may occur.
The platen (a roller on the inside of the unit) may become inked if you print data beyond
the width of the page. If this happens, clean the platen with a soft cloth (see page 7-8).
Let the paper run out before you refill the multi-purpose tray. Avoid mixing "new" paper
with paper remaining in the tray.
Use cut-sheet paper only, not paper that comes on a roll.
Do not use paper that is thicker than specified for the MultiPASS. Printing with paper
that is thick enough to come in contact with the print head nozzles may damage the
BJ cartridge.
Store paper and other media on a flat surface, and leave it in its wrapper until you are
ready to use it. Store unused paper from opened packs in the original packing in a cool,
dry location.
Store paper at 64.4°-75.2°F (18°-24°C), 40%-60% relative humidity.
Chapter 2 Paper Handling 2-16
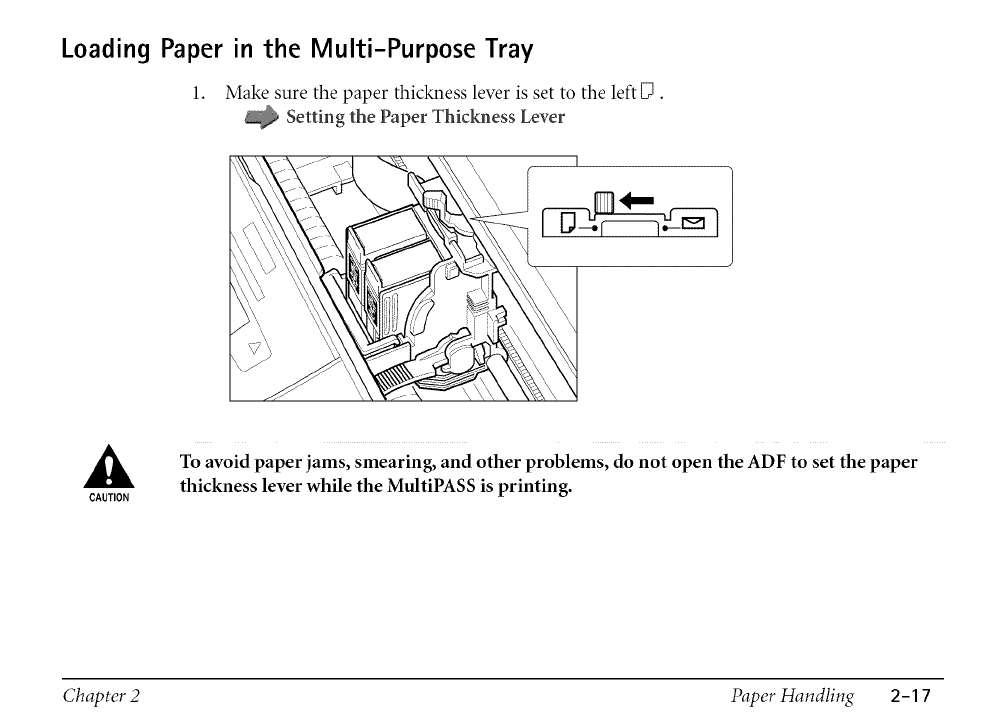
Loading Paper in the Multi-Purpose Tray
1. Make sure the paper thickness lever is set to the left [_.
Setting the Paper Thickness Lever
I
CAUTION
To avoid paper jams, smearing, and other problems, do not open the ADF to set the paper
thickness lever while the MultiPASS is printing.
Chapter 2 Paper Handling 2-17

2. Pull the paper rest up until it stops.
Chapter 2 Paper Handling 2-18
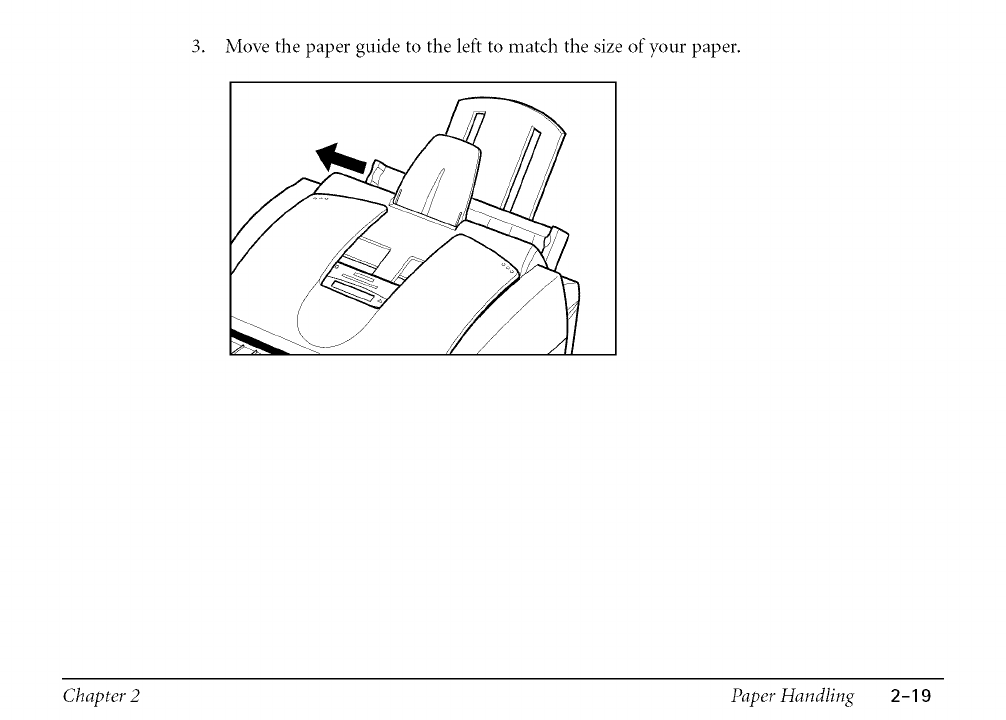
3. Move the paper guide to the left to match the size of your paper.
Chapter 2 Paper Handling 2-19
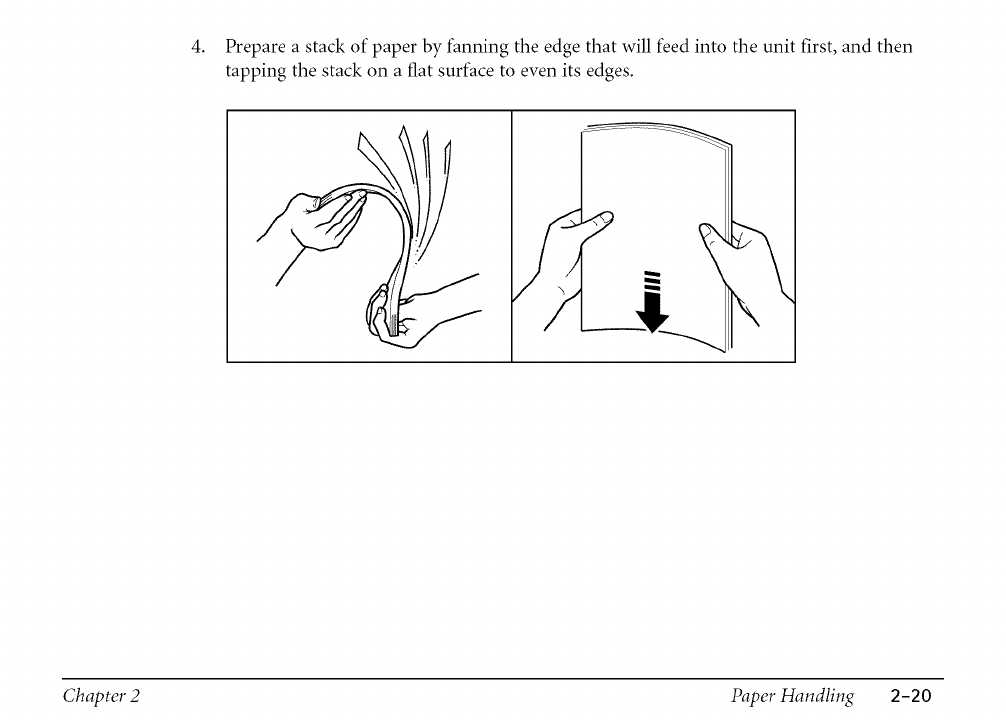
4. Prepare a stack of paper by fanning the edge that will feed into the unit first, and then
tapping the stack on a fiat surface to even its edges.
Chapter 2 Paper Handling 2-20

5. Insert the stack into the multi-purpose tray until it stops, so that the right edge of the
stack is aligned with the right side of the multi-purpose tray.
The multi-purpose tray holds up to 100 sheets of plain paper --20 lb. (75 g/m 2)
paper.
Make sure the top of the stack is below the paper limit mark (1_).
Chapter 2 Paper Handling 2-21
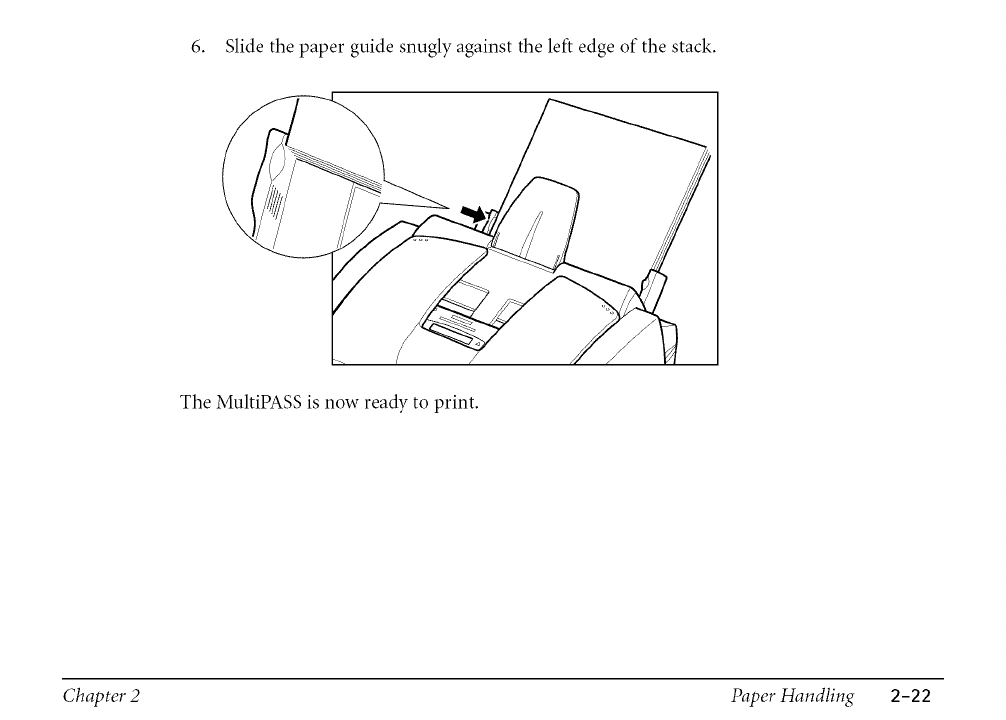
6. Slide the paper guide snugly against the left edge of the stack.
The MultiPASS is now ready to print.
Chapter 2 Paper Handling 2-22
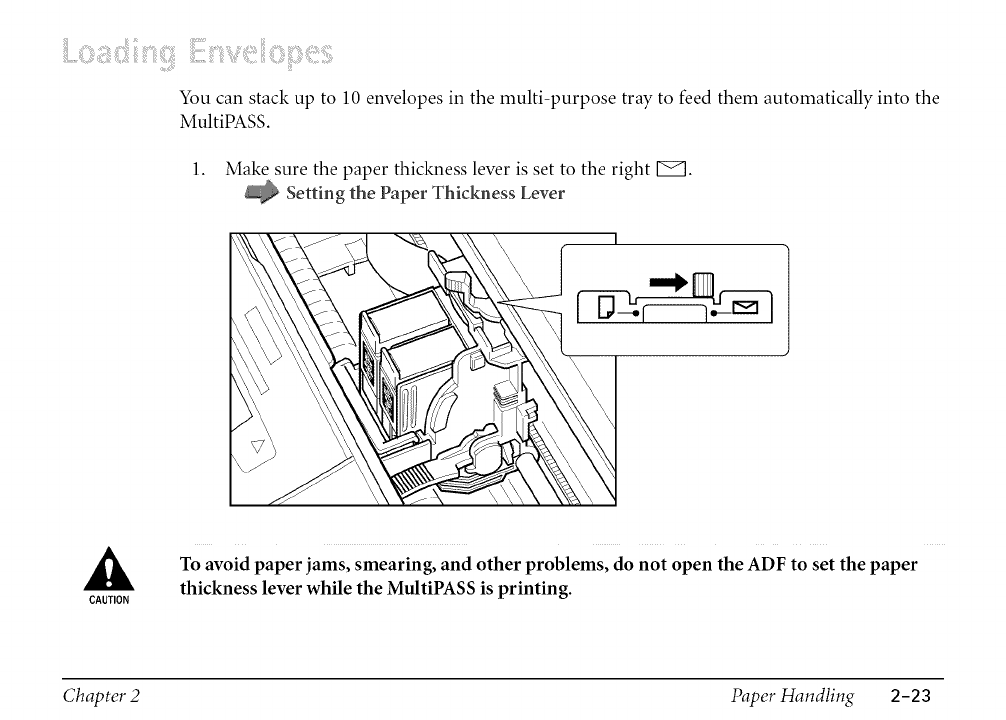
You can stack up to 10 envelopes in the multi-purpose tray to feed them automatically into the
MultiPASS.
1. Make sure the paper thickness lever is set to the right rye].
Setting the Paper Thickness Lever
CAUTION
To avoid paper jams, smearing, and other problems, do not open the ADF to set the paper
thickness lever while the MultiPASS is printing.
Chapter 2 Paper Handling 2-23
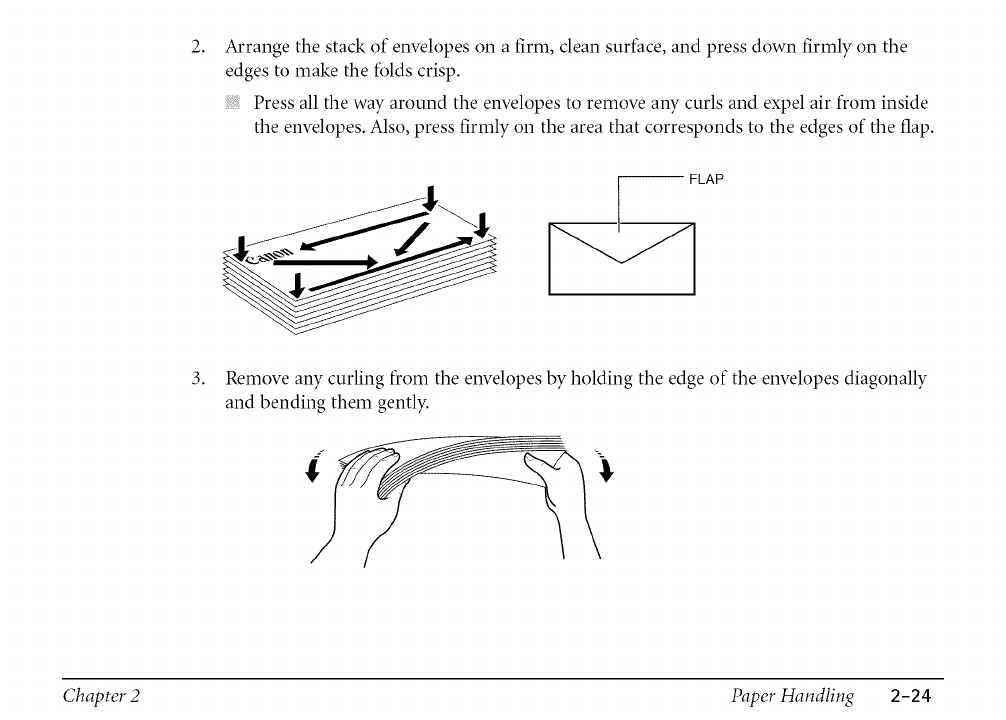
2.
3.
Arrange the stack of envelopes on a firm, clean surface, and press down firmly on the
edges to make the folds crisp.
Press all the way around the envelopes to remove any curls and expel air from inside
the envelopes. Also, press firmly on the area that corresponds to the edges of the flap.
FLAP
Remove any curling from the envelopes by holding the edge of the envelopes diagonally
and bending them gently.
Chapter 2 Paper Handling 2-24
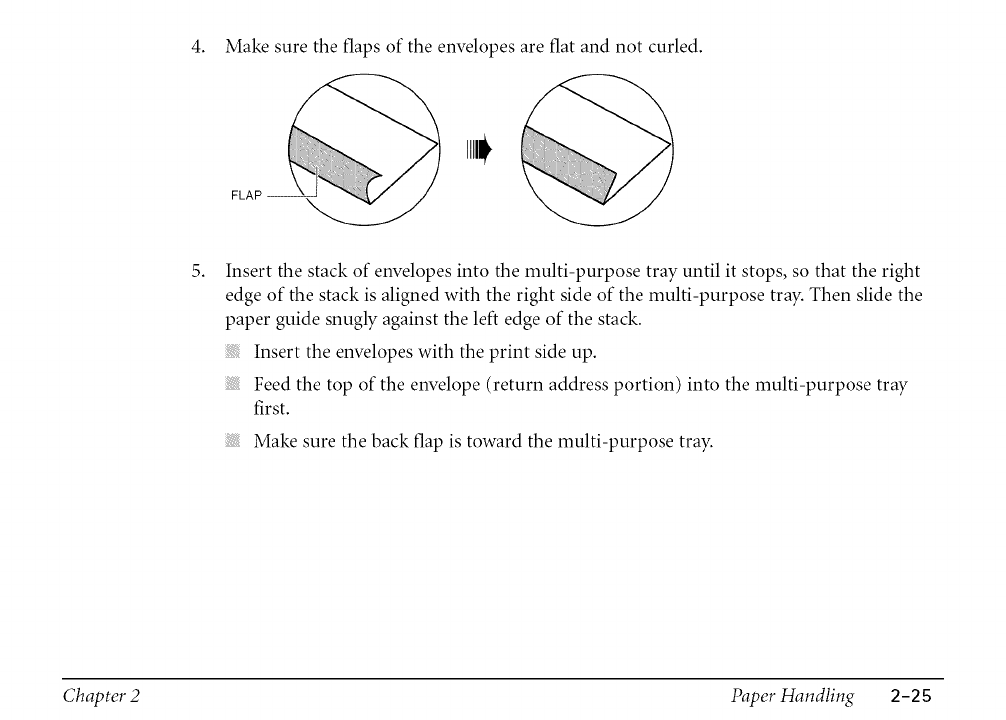
4. Make sure the flaps of the envelopes are fiat and not curled.
FLAF
IIII1
5. Insert the stack of envelopes into the multi-purpose tray until it stops, so that the right
edge of the stack is aligned with the right side of the multi-purpose tray. Then slide the
paper guide snugly against the left edge of the stack.
Insert the envelopes with the print side up.
Feed the top of the envelope (return address portion) into the multi-purpose tray
first.
Make sure the back flap is toward the multi-purpose tray.
Chapter 2 Paper Handling 2-2S
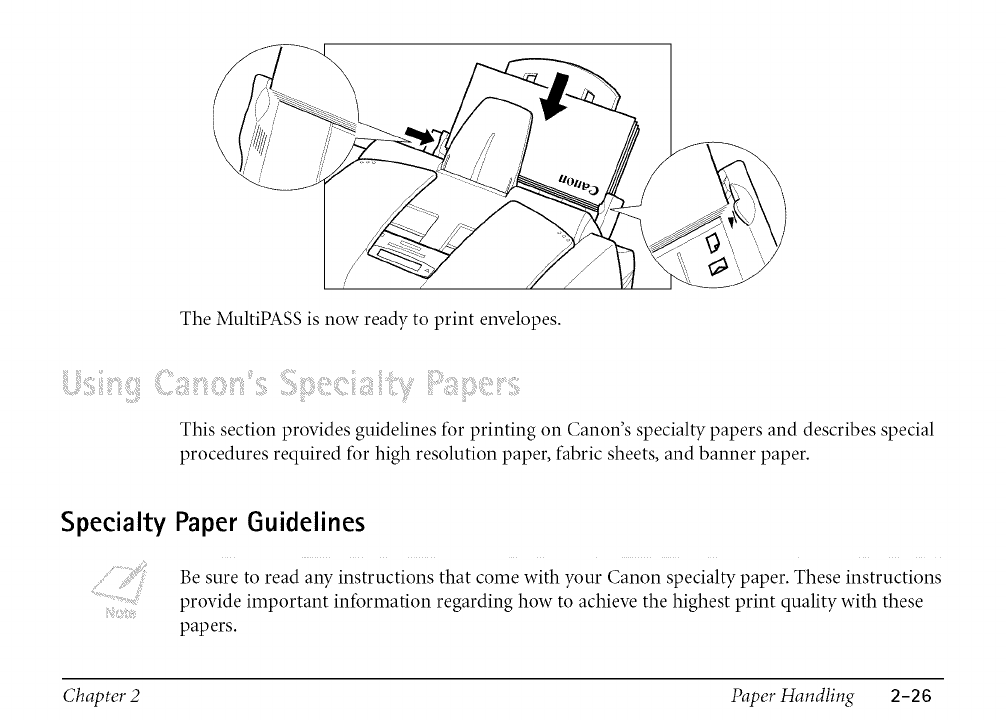
The MultiPASS is now ready to print envelopes.
_iiiiiill_iiiii_iii!_iiiii_iiii!_!_!"i!_!_,,_,_!_iiiiiii_i_,iii!_!_!"i!_!_":_!!iii_:;ii_iii!i!!i!!!i!i!iiiiiiil,iii!i!i!iii!_,_ii:i::!i!:i_'_iiiiiii_¸iiiiii,ii_!ii!iiii_i{iiliii!i!i17'_,_!,iii_i,_,_iiiii_!!?_:',ii_!ii!iiii_iiii!i!i!iii!_,_ii:i::!i!:i_iii!_!_!¸¸_¸¸¸¸_!!iii_:;ii_
This section provides guidelines for printing on Canon's specialty papers and describes special
procedures required for high resolution paper, fabric sheets, and banner paper.
Specialty Paper Guidelines
Be sure to read any instructions that come with your Canon specialty paper. These instructions
.............................provide important information regarding how to achieve the highest print quality with these
}: papers.
Chapter 2 Paper Handling 2-26
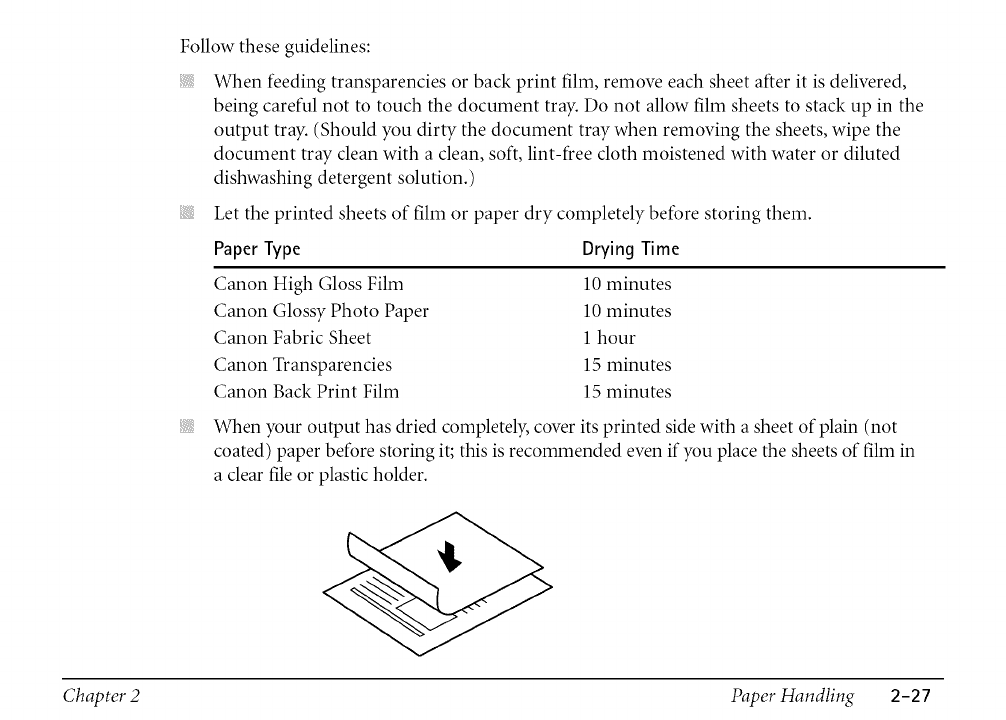
Follow these guidelines:
ii!i_!i_!i!!i!!i!!i!ii!iil
When feeding transparencies or back print film, remove each sheet after it is delivered,
being careful not to touch the document tray. Do not allow film sheets to stack up in the
output tray. (Should you dirty the document tray when removing the sheets, wipe the
document tray clean with a clean, soft, lint-free cloth moistened with water or diluted
dishwashing detergent solution.)
Let the printed sheets of film or paper dry completely before storing them.
Paper Type Drying Time
Canon High Gloss Film
Canon Glossy Photo Paper
Canon Fabric Sheet
Canon Transparencies
Canon Back Print Film
10 minutes
10 minutes
1 hour
15 minutes
15 minutes
When your output has dried completely, cover its printed side with a sheet of plain (not
coated) paper before storing it; this is recommended even if you place the sheets of film in
a clear file or plastic holder.
Chapter 2 Paper Handling 2-27
ii!i_!i_!i!!i!!i!!i!ii!iil
When loading transparencies or back print film, insert one sheet of plain paper as the last
sheet in the stack.
Do not leave film in the multi-purpose tray for long periods of time. Dust and dirt may
accumulate on the film resulting in spotty printing.
To avoid smudging caused by fingerprints, use a pair of thin cloth gloves while loading and
handling film.
To avoid fading, do not expose printed film to prolonged sunlight.
Store unused papers and films fiat. Do not remove papers from their protective packaging
until you are ready to use them.
Store unused film at temperatures between 59°F and 86°F (15°C and 30°C). The relative
humidity should be between 10% and 70%.
Chapter 2 Paper Handling 2-28
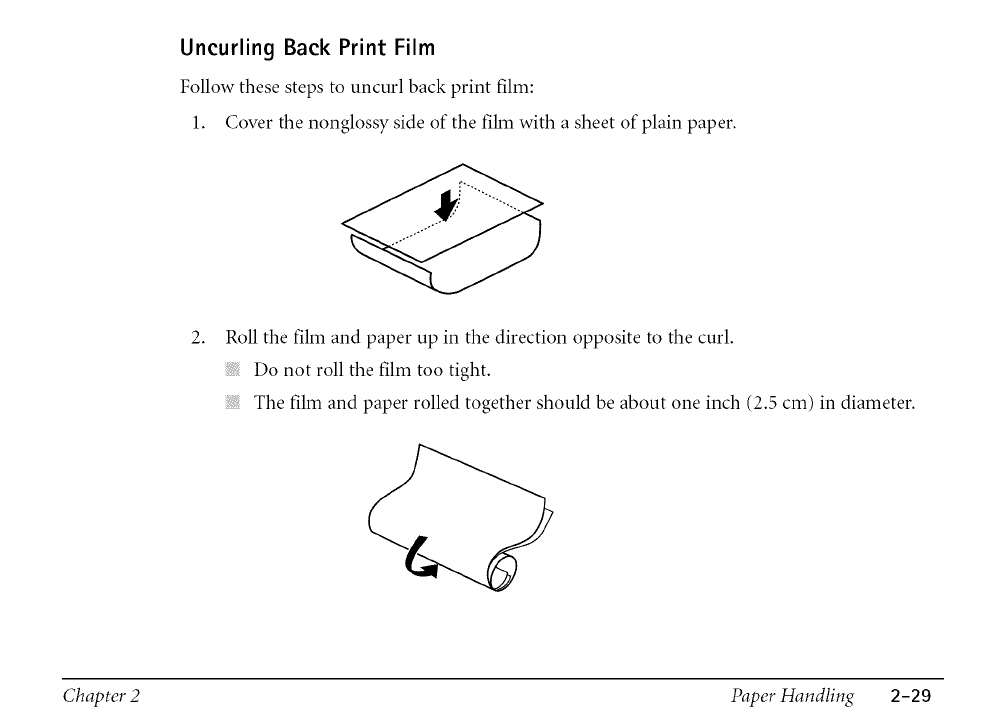
Uncurling Back Print Film
Follow these steps to uncurl back print film:
1. Cover the nonglossy side of the film with a sheet of plain paper.
2. Roll the film and paper up in the direction opposite to the curl.
Do not roll the film too tight.
The film and paper rolled together should be about one inch (2.5 cm) in diameter.
Chapter 2 Paper Handling 2-29
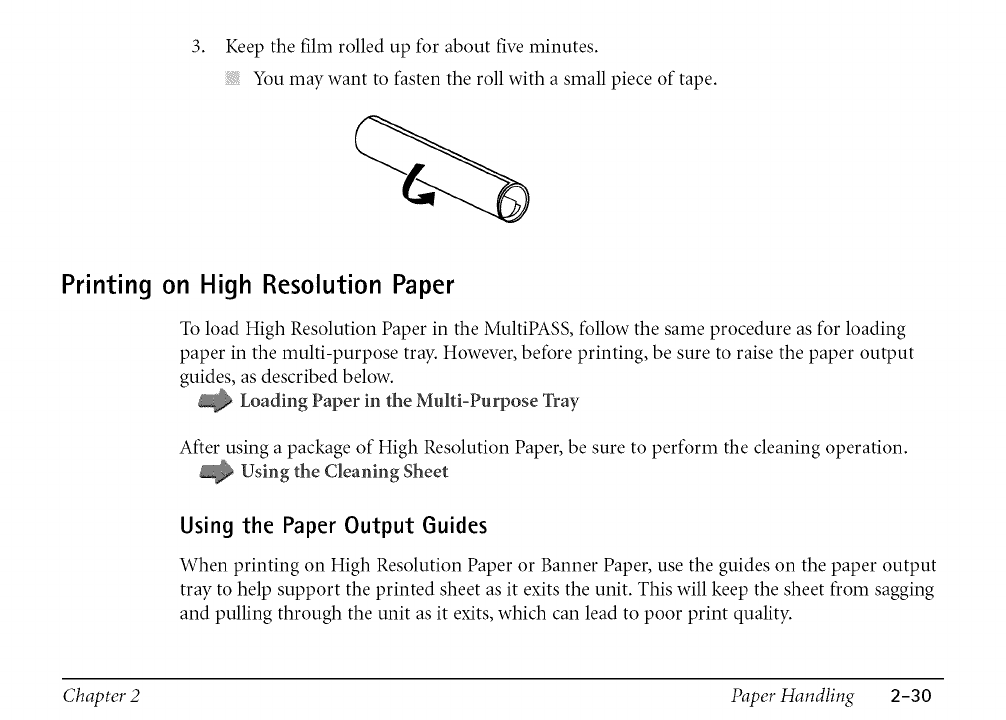
3. Keepthefilmrolledupforaboutfiveminutes.
Youmaywanttofastentherollwithasmallpieceoftape.
Printing on High Resolution Paper
To load High Resolution Paper in the MultiPASS, follow the same procedure as for loading
paper in the multi-purpose tray. However, before printing, be sure to raise the paper output
guides, as described below.
Loading Paper in the Multi-Purpose Tray
After using a package of High Resolution Paper, be sure to perform the cleaning operation.
Using the Cleaning Sheet
Using the Paper Output Guides
When printing on High Resolution Paper or Banner Paper, use the guides on the paper output
tray to help support the printed sheet as it exits the unit. This will keep the sheet from sagging
and pulling through the unit as it exits, which can lead to poor print quality.
Chapter 2 Paper Handling 2-30
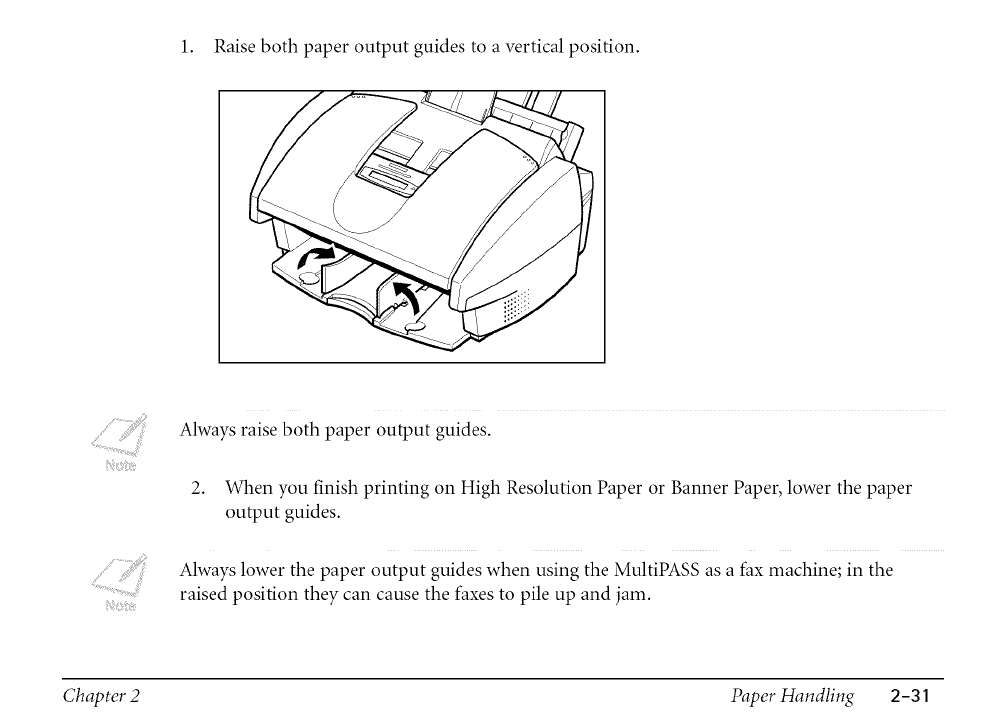
1. Raise both paper output guides to a vertical position.
Always raise both paper output guides.
2. When you finish printing on High Resolution Paper or Banner Paper, lower the paper
output guides.
Always lower the paper output guides when using the MultiPASS as a fax machine; in the
raised position they can cause the faxes to pile up and jam.
Chapter 2 Paper Handling 2-31
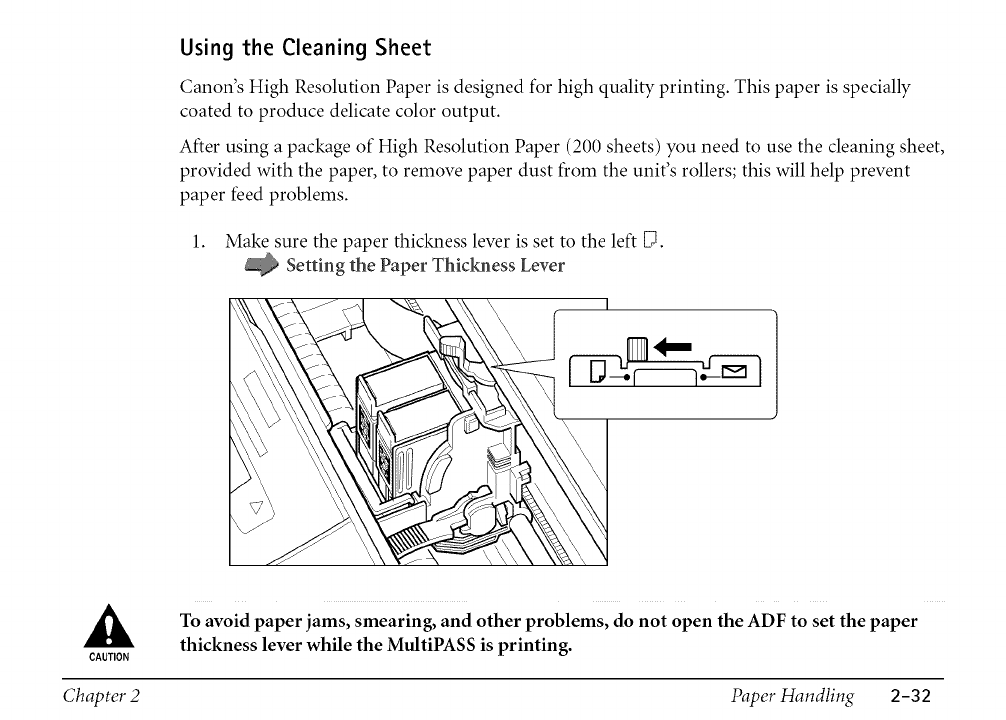
Using the Cleaning Sheet
Canon's High Resolution Paper is designed for high quality printing. This paper is specially
coated to produce delicate color output.
After using a package of High Resolution Paper (200 sheets) you need to use the cleaning sheet,
provided with the paper, to remove paper dust from the unit's rollers; this will help prevent
paper feed problems.
1. Make sure the paper thickness lever is set to the left D.
Setting the Paper Thickness Lever
CAUTION
To avoid paper jams, smearing, and other problems, do not open the ADF to set the paper
thickness lever while the MultiPASS is printing.
Chapter 2 Paper Handling 2-32
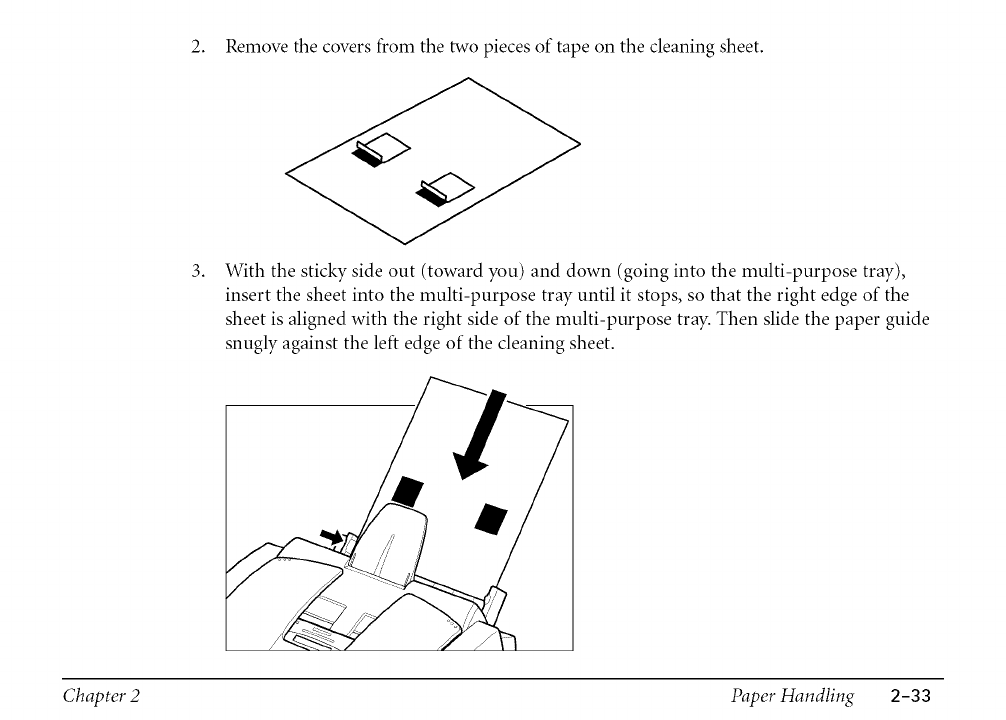
2. Remove the covers from the two pieces of tape on the cleaning sheet.
3. With the sticky side out (toward you) and down (going into the multi-purpose tray),
insert the sheet into the multi-purpose tray until it stops, so that the right edge of the
sheet is aligned with the right side of the multi-purpose tray. Then slide the paper guide
snugly against the left edge of the cleaning sheet.
Chapter 2 Paper Handling 2-33
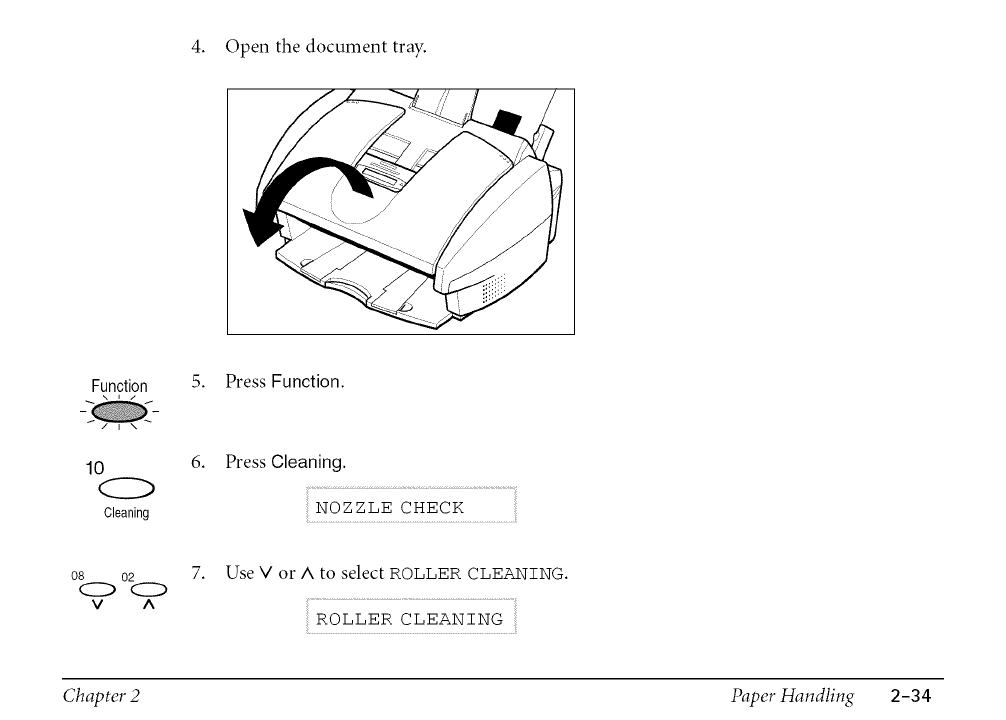
4. Open the document tray.
Function 5. Press Function.
lO
Cleaning
6. Press Cleaning.
NOZZLE CHECK
08 02
CZ_O
v A
7. Use V or ^ to select ROLLER CLEANING.
ROLLER CLEANING
Chapter 2 Paper Handling 2-34
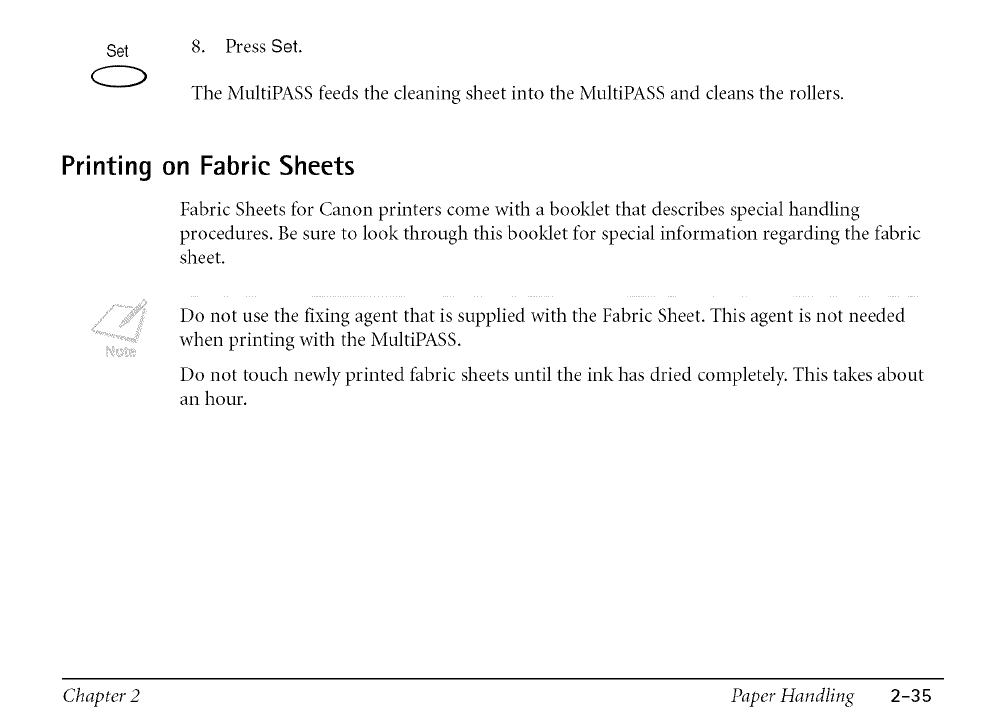
Set 8. Press Set.
The MultiPASS feeds the cleaning sheet into the MultiPASS and cleans the rollers.
Printing on Fabric Sheets
Fabric Sheets for Canon printers come with a booklet that describes special handling
procedures. Be sure to look through this booklet for special information regarding the fabric
sheet.
Do not use the fixing agent that is supplied with the Fabric Sheet. This agent is not needed
when printing with the MultiPASS.
Do not touch newly printed fabric sheets until the ink has dried completely. This takes about
an hour.
Chapter 2Paper Handling 2-35
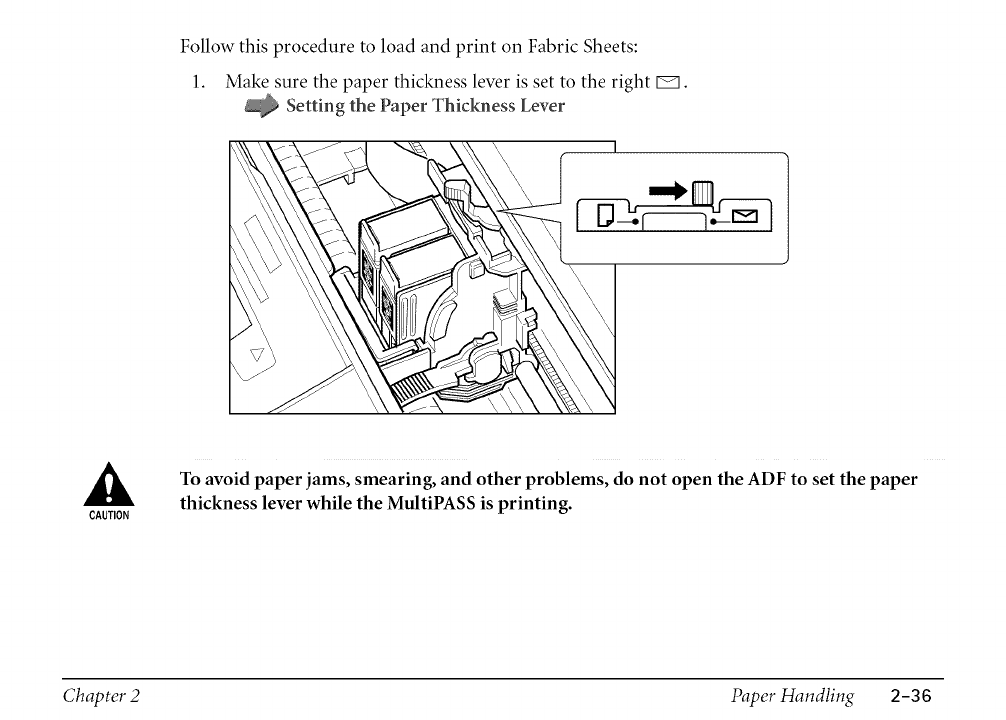
Follow this procedure to load and print on Fabric Sheets:
1. Make sure the paper thickness lever is set to the right r_.
Setting the Paper Thickness Lever
I
CAUTION
To avoid paper jams, smearing, and other problems, do not open the ADF to set the paper
thickness lever while the MultiPASS is printing.
Chapter 2 Paper Handling 2-36
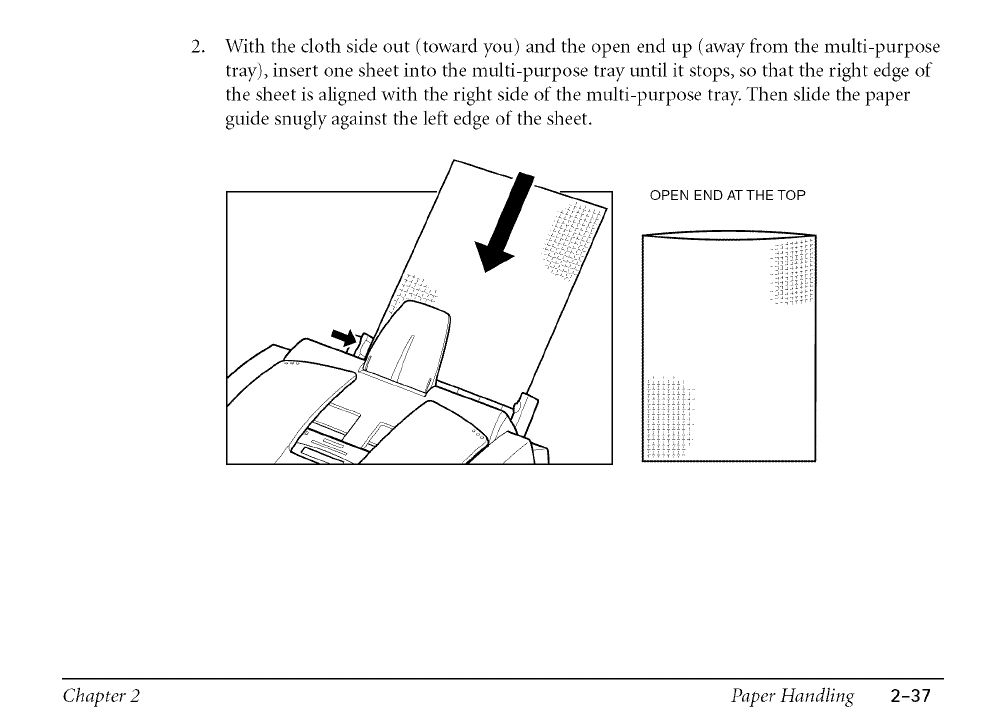
2. With the cloth side out (toward you) and the open end up (away from the multi-purpose
tray), insert one sheet into the multi-purpose tray until it stops, so that the right edge of
the sheet is aligned with the right side of the multi-purpose tray. Then slide the paper
guide snugly against the left edge of the sheet.
OPEN END AT THE TOP
Chapter 2 Paper Handling 2-37
3. Your MultiPASS is now ready to print. Set your PC to print on the fabric sheet.
4. When the fabric sheet is printed, let it dry for about one hour to allow the ink to dry
completely.
5. When dry, peel the film backing from the printed fabric sheet.
6. Wash the printed fabric sheet for about three minutes under lukewarm running water to
remove extra ink.
7. Hang the fabric sheet up to dry it again.
8. Iron the dried fabric sheet with a clothes iron.
See the booklet that comes with the Fabric Sheet for details on drying and washing.
Chapter 2 Paper Handling 2-38
Printing on Banner Paper
Banner paper is a continuous sheet of paper with perforations at equal distances along its
length, where it can be cut to the length required. For best results, use Canon's Banner Paper.
To set up a print job on banner paper, you must decide on the number of sheets you need. The
banner can be a maximum of five actual printed pages (for a total of six pages, including the
first sheet on which the banner cannot be printed).
Always leave an extra sheet at the end of the banner -- just in case the type runs over.
Printing on banner paper requires quite a bit of ink. If you think your BJ cartridge may run
out of ink, use a new BJ cartridge.
For best print results on banner paper, use light design patterns.
To prevent ink from running over the edges of the sheet, print within the margins.
Appendix A, Specifications
Chapter 2 Paper Handling 2-39
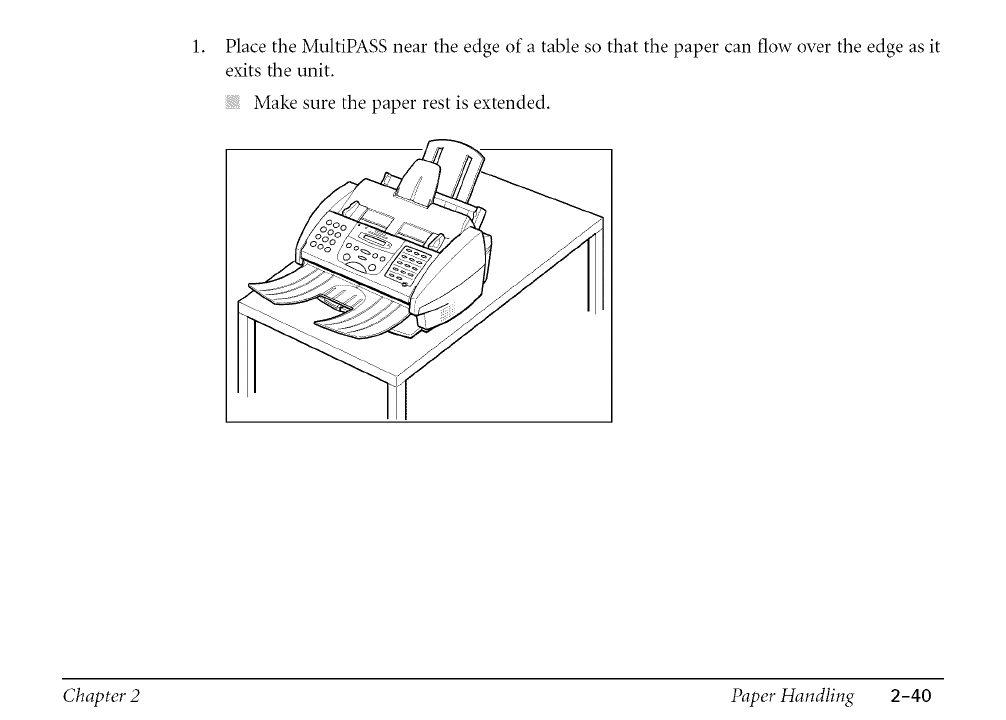
1. Place the MultiPASS near the edge of a table so that the paper can flow over the edge as it
exits the unit.
Make sure the paper rest is extended.
Chapter 2 Paper Handling 2-40
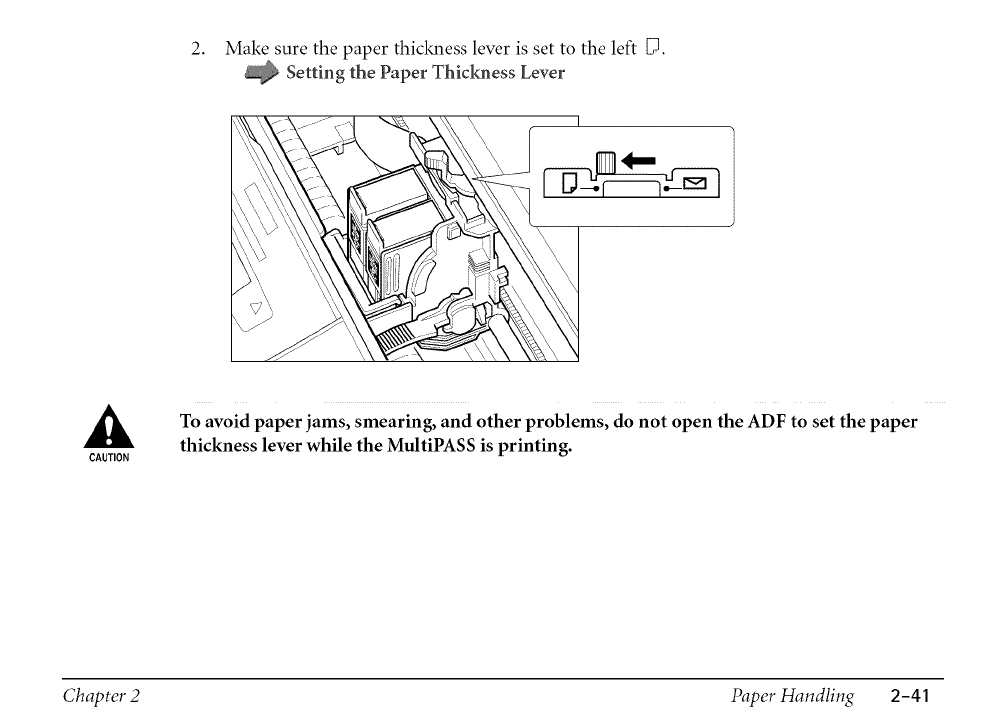
2. Make sure the paper thickness lever is set to the left D.
Setting the Paper Thickness Lever
CAUTION
To avoid paper jams, smearing, and other problems, do not open the ADF to set the paper
thickness lever while the MultiPASS is printing.
Chapter 2 Paper Handling 2-41

3. Raise both paper output guides to a vertical position.
Chapter 2 Paper Handling 2-42

4. Cut the banner paper along one of the perforations to the length required.
Your banner can be up to six sheets (66 inches/1676 mm) long.
Chapter 2 Paper Handling 2-43
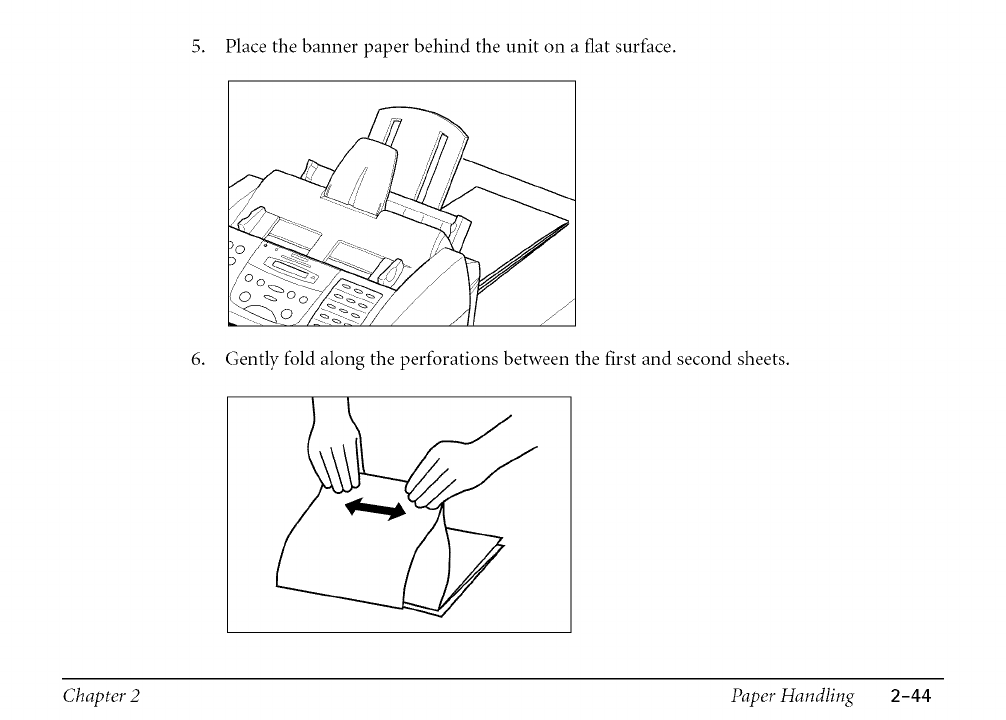
5. Place the banner paper behind the unit on a flat surface.
6. Gently fold along the perforations between the first and second sheets.
Chapter 2 Paper Handling 2-44
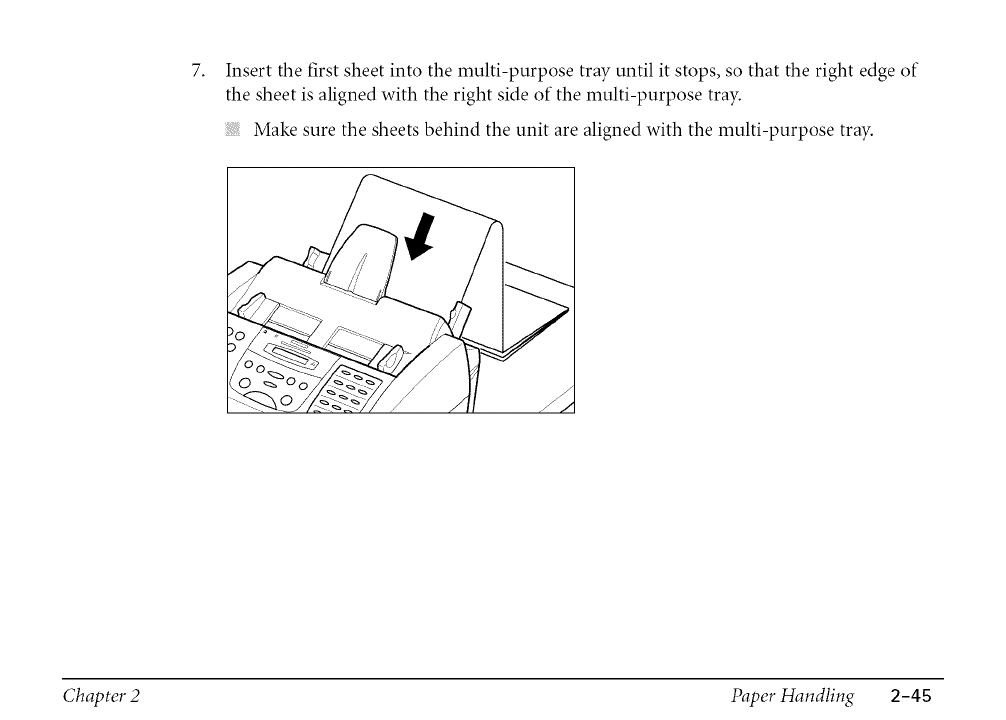
7. Insert the first sheet into the multi-purpose tray until it stops, so that the right edge of
the sheet is aligned with the right side of the multi-purpose tray.
Make sure the sheets behind the unit are aligned with the multi-purpose tray.
Chapter 2 Paper Handling 2-4S
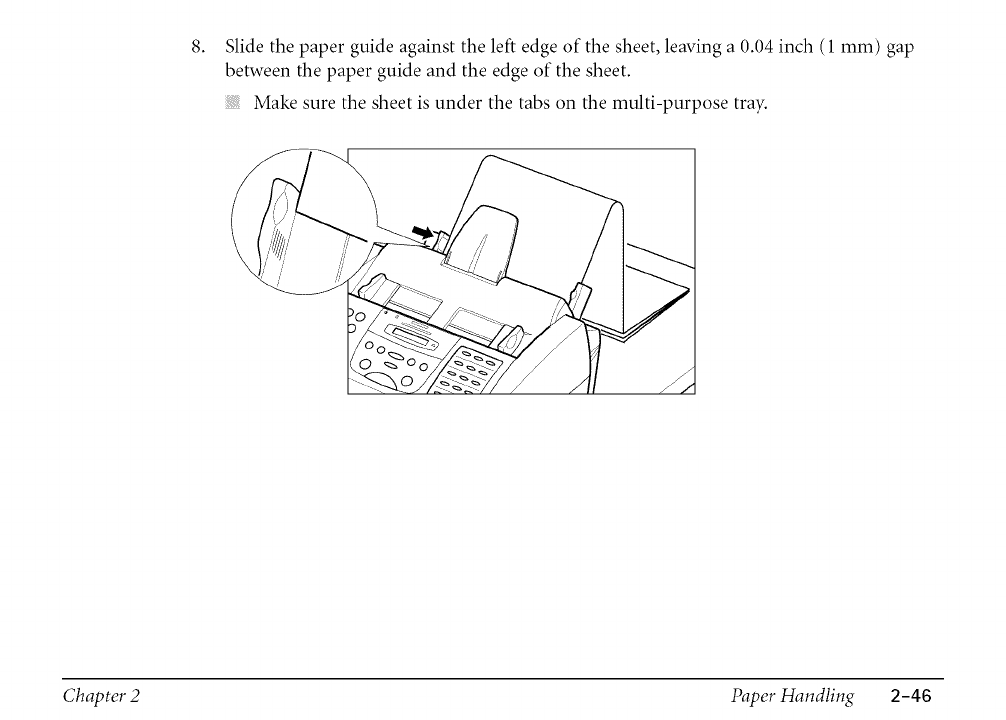
8. Slide the paper guide against the left edge of the sheet, leaving a 0.04 inch (1 mm) gap
between the paper guide and the edge of the sheet.
Make sure the sheet is under the tabs on the multi-purpose tray.
Chapter 2 Paper Handling 2-46
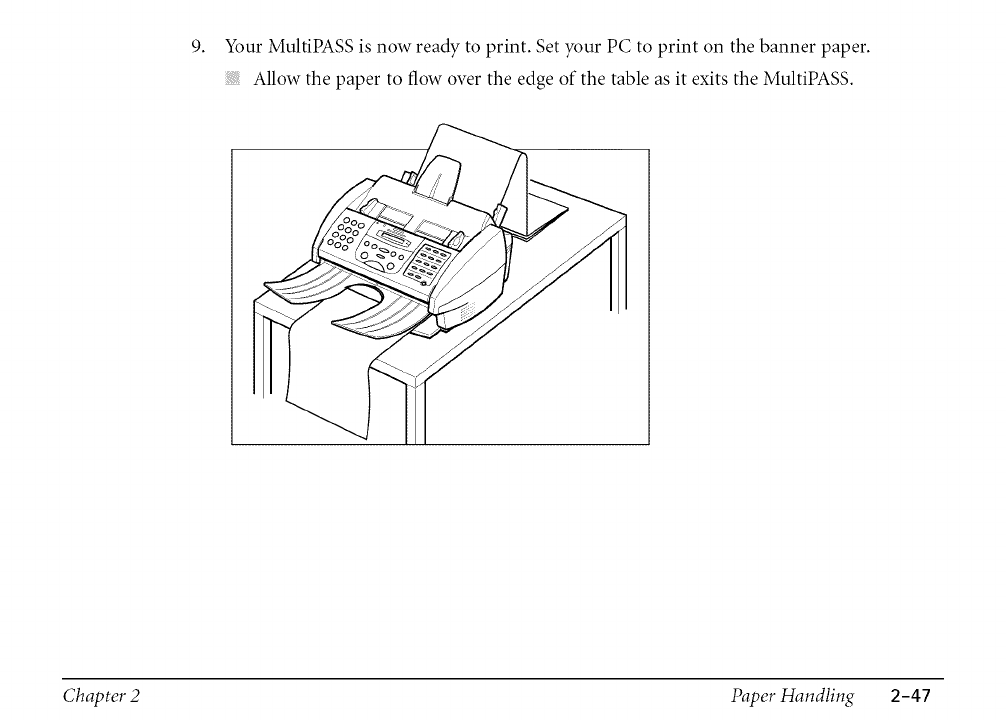
9. Your MultiPASS is now ready to print. Set your PC to print on the banner paper.
Allow the paper to flow over the edge of the table as it exits the MultiPASS.
Chapter 2 Paper Handling 2-47
This chapter provides instructions for printing a document from a Windows application with
your MultiPASS and for changing the printer settings.
Printing a Document ................................................................................................................. 3-3
Printing Envelopes ..................................................................................................................... 3-4
Working With Print Options (Windows 98/95) ...................................................................... 3-5
® Changing the Printer Settings: A Summary ....................................................................... 3-5
® Choosing a Print Mode ........................................................................................................ 3-6
® Changing the Print Mode Settings ..................................................................................... 3-10
® Editing a Custom Print Mode ............................................................................................ 3-19
® Deleting a Custom Print Mode .......................................................................................... 3-2(/
® Saving a Custom Print Mode as a File ............................................................................... 3-21
® Setting Paper Options ......................................................................................................... 3-23
® Setting Other Print Features ............................................................................................... 3-28
® Creating or (;hanging a Stamp ........................................................................................... 3-31
® Setting Default Printer Options ........................................................................................ 3-40
® Displaying Printer Driver Information ............................................................................. 3-40
Chapter 3 Printing 3-1
Worldng With Print Options (Windows NT) ..................................................................... 3-41
® Changing the Printer Settings: a Summary ..................................................................... 3-41
® Choosing a Print Mode .................................................................................................... 3-42
® Changing the Print Mode Settings .................................................................................. 3-45
® Editing a Custom Print Mode .......................................................................................... 3-54
® Deleting a Custom Print Mode ........................................................................................ 3-55
® Saving a Custom Print Mode as a File ............................................................................. 3-56
® Setting Paper Options ....................................................................................................... 3-58
® Setting Default Printing Options ..................................................................................... 3-64
® Displaying Printer DrNer Information ........................................................................... 3-66
Sharing the Printer Installation ............................................................................................ 3-66
® Setting Up Your MultiPASS for Sharing .......................................................................... 3-67
® Installing the Printer Driver on a Client System ............................................................. 3-69
Chapter 3 Printing 3-2
iilii?iiiiiii!i!ii i¸iiiii!i!!i!iiiiii!ii!iiii i!ii!ili
Once you have installed the MultiPASS software, you are ready to print a document using the
MultiPASS. You can print from any Windows application that supports printing, such as Word
for Windows.
Printer options are initially installed using default settings, enabling you to print immediately.
These options determine what your documents look like when printed. For example, they
define such settings as the paper size and page orientation.
Instructions for printing a document can vary somewhat for different Windows applications.
Therefore, for detailed instructions, see the user documentation for the specific application
from which you are printing.
The following instructions summarize the general procedures for printing a document.
To print a document:
1. With your document open, click the Print command. (In most Windows applications, the
print command is on the File menu or toolbar.)
2. In the Print dialog box, make sure the MultiPASS printer is selected in the Printer box.
The MultiPASS printer appears as the selected printer if you specified it as the default
printer when you installed the printer driver and Desktop Manager software during setup.
3. Click the command to print your document (usually OK or Print).
The document is printed to your MultiPASS.
Chapter 3 Printing 3-3
When printing envelopes, use the following guidelines for the best results.
Use the appropriate size envelope: U.S. Commercial size number 10 or European size DL.
Although other envelope sizes might fit in the paper tray, using them may not provide
consistent printing results.
Avoid using the following types of envelopes. They may cause jams or smears, or may
damage your printer:
• With windows, holes, perforations, cutouts, and double flaps
• Made with special coated or deeply embossed paper
• With peel-off sealing strips
• With letters enclosed in the envelope.
Be sure to place envelopes faceup when printing.
Stack up to 10 envelopes in the multi-purpose tray to feed the envelopes automatically for
printing.
Loading Envelopes
Chapter 3 Printing 3-4
%ii!!_J_:_ii:iiiii_,_!_!!iii!!!!i_iiiiiiiii_!_!!i_!i!!i:ilili!ii!_i_i %ii!!_Jiiiiiii!i!ii:)i!_i!iii?_!_!!iiiiii_!_!!i_i!i!ii:i¸ i_!iiiil)iii!i!i!iii!_:{:ii_iiii_:_iiiiii_!_!!i_:!!iiii__%_J_::_:_;_:_>_%__!_!!!!!_iiiii_!_i_i_!!!!i!!_iS!_!!!!_iiiiii_!_i:!_!!!!i!_:!_i_i_!_!!_!!i
This section provides information on setting and changing your printing options if you are
using Windows 98195. If you are using Windows NT, see the "Working With Print Options
(Windows NT)" section presented later in this chapter.
Changing the Printer Settings: ASummary
Print options are the settings that determine how your document looks when it is printed.
Print options are initially installed using default settings, allowing you to print documents
immediately. However, you may want to change these settings for certain documents.
The following instructions summarize the general procedures for changing printer settings.
For detailed information on specific printer options, refer to later sections in this chapter.
To change print options:
1. With your document open, click the Print command. (In most Windows applications, this
command is on the File menu or toolbar.)
2. In the Print dialog box, click Properties.
3. In the Printer Properties dialog box, on the Main, Paper, and Features tabs, specify the
desired printer options.
4. If you are dissatisfied with your changes on a particular tab and want to revert to the
default settings, click Defaults.
Chapter 3 Printing 3-S
5. To save the changes and close the Printer Properties dialog box, click OK.
To save the changes and leave the dialog box open, click Apply.
To close the dialog box without saving any changes, click Cancel.
Choosing a Print Mode
When printing a document, you choose a print mode. A print mode specifies print quality and
color settings. Initially when you first install the MultiPASS software, there are a number of
factory-defined print modes. You can temporarily change the settings for a predefined print
mode when printing a particular document. You can also save your changed settings as a new
print mode to use when printing future documents.
Chapter 3 Printing 3-6
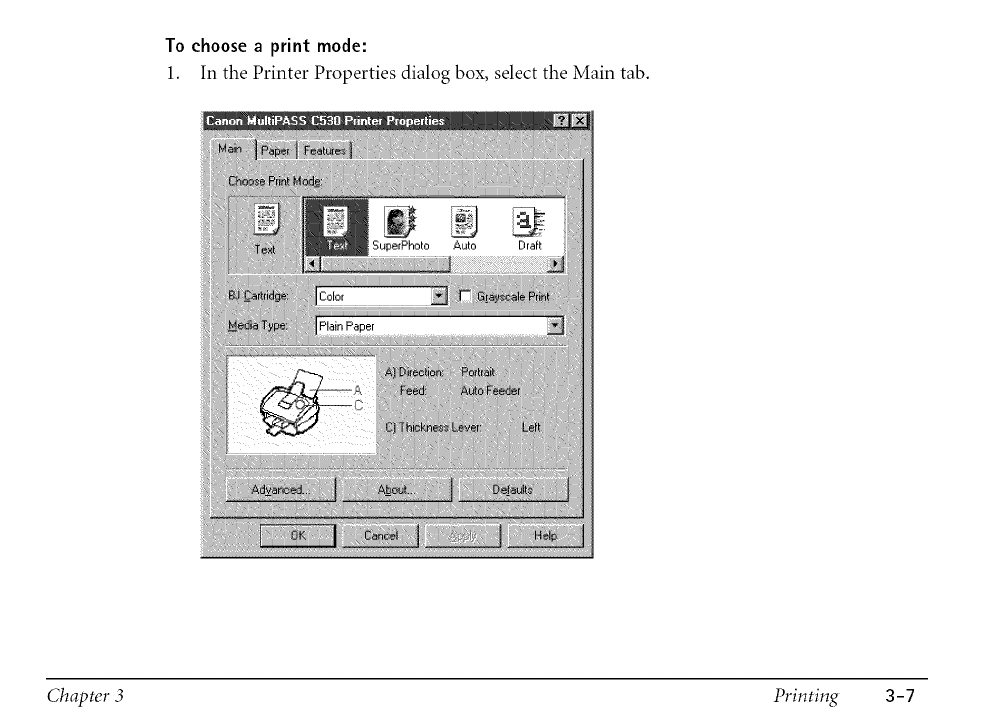
To choose a print mode:
1. In the Printer Properties dialog box, select the Main tab.
Chapter 3 Printing 3-7
2. Under Choose Print Mode, select the predefined print mode that best suits your
document.
With the initial installation of the software, the following factory-defined print modes are
available:
Text
Click if the majority of your document consists of text.
Auto
Click to have the system check the contents of the document. The appropriate color
processing is automatically selected, and the document is printed at a higher quality
than Text mode.
•Graphics
Click if you desire crisp and sharp border distinctions between the colors of your
illustrations.
Photo
Click if you want your images to appear smoother and lifelike in color. Because the
Photo print mode provides a high print quality, expect your print job to take longer to
complete.
Super Photo
Click when you want to make an exact replica of an original photo image. Super Photo
is most effective when used in conjunction with the Photo BJ cartridge and high
resolution or glossy photo paper.
Chapter 3 Printing 3-8
3.
•Draft
Click if you would like to print your document quickly but with a lower print quality.
The Draft print mode is ideal for longer documents and proofreading purposes.
• Camera
Click to print images taken with a digital camera.
The quality and color settings for the mode you select are displayed in the corresponding
boxes and illustration area below the Choose Print Mode option.
If you want to temporarily change the following settings for the predefined mode you
selected:
In the BJ Cartridge box, click the type of BJ cartridge you want to use for printing your
document (such as black or color).
Select Grayscale Print if you want color data in your document converted to grayscale
(monochrome) values.
In the Media Type box, click the medium on which you want to print your document
(such as plain paper or envelope).
Chapter 3 Printing 3-9
Changing the Print Mode Settings
You can temporarily change the settings for a factory-defined print mode, to print your
current document. You can also define and save a custom print mode to fit the needs of a
particular print job. Once saved, a custom print mode can be changed and resaved. If you do
not save a custom print mode, it is available only for the current print job.
The following instructions summarize the procedures for changing print mode settings.
To change print mode settings:
1. In the Printer Properties dialog box, on the Main tab, click the print mode you want to
change. Then click Advanced.
2. In the Properties dialog box, specify your desired print mode settings on the Quality and
Color tabs.
3.
4.
If you want to save your settings to print future documents, click the Save tab and save the
settings as a custom print mode.
| Saving a Custom Print Mode as a File
When you have completed your entries on the Quality and Color tabs (and optionally
Save tab), click OK or Cancel to close the dialog box.
If you did not save your settings as a print mode on the Save tab: Click OK to save your
settings temporarily to print only the current document; click Cancel to close the dialog
box without saving your changes.
Chapter 3 Printing 3-10
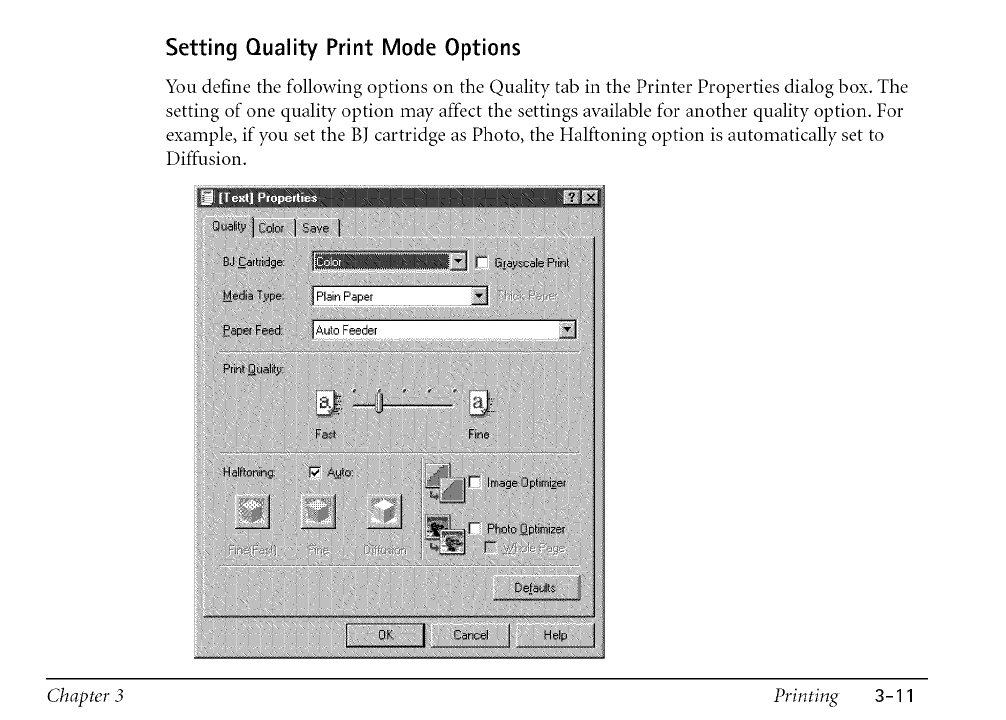
Setting Quality Print Mode Options
You define the following options on the Quality tab in the Printer Properties dialog box. The
setting of one quality option may affect the settings available for another quality option. For
example, if you set the BJ cartridge as Photo, the Halftoning option is automatically set to
Diffusion.
Chapter 3 Printing 3-11
BI Cartridge
Select the type of cartridge you want to use for printing (such as black, color, or photo).
Grayscale Print
Select if you want color data in your document converted to grayscale monochrome
values.
Media Type
Click the medium on which you want to print your document (such as plain paper or
envelope).
Paper Feed
If available, select the desired method for feeding paper into the printer.
Print Quality
Move the slider to set the desired balance between print speed and print quality. Generally,
the higher (or finer) the print quality, the slower the print speed.
Half toning
Select the desired halftoning method:
•Auto
Click to have the system automatically use the most appropriate halftoning method
based on the different types of image data in your document.
•Fine (Fast)
Click to simplify the halftoning process, and print text and tables at a higher speed.
Chapter 3 Printing 3-12
Fine
Click to use a small pattern of dots that creates a smooth appearance with an average
range of grayscales. This setting offers a faster printing speed and is best for printing
business graphics.
Diffusion
Click to place individual dots randomly to achieve subtle grayscale gradations. This
setting is best suited for documents with finely detailed graphics or photographic
images. The setting takes longer to print, but offers a higher quality of printed output.
Image Optimizer
Select to smooth the jagged appearance of an image when printing. This option is
particularly useful for low-resolution images such as Web pages. Optimization may not
work well with some applications, or with certain image resolutions. Selecting this option
may increase the print time.
Photo Optimizer
Select to adjust a digital camera image when printing. This option adjusts the color
balance if the printed image is unsatisfactory.
Whole Page
If you selected Photo Optimizer, select this option to adjust multiple graphic images
appearing on a single page.
Chapter 3 Printing 3-13
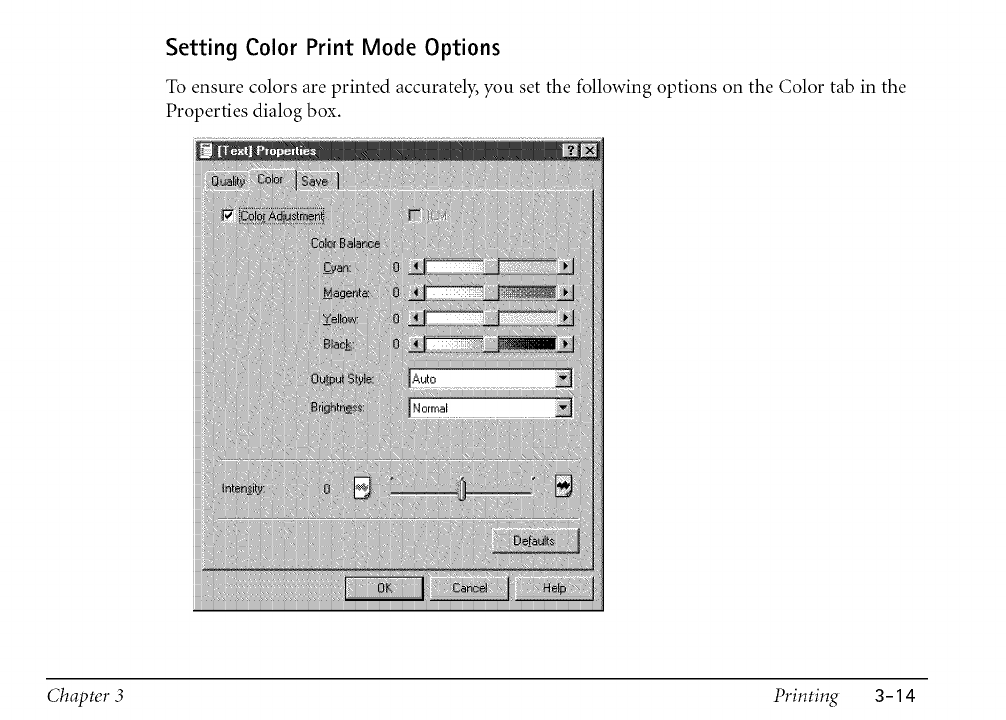
Setting Color Print Mode Options
To ensure colors are printed accurately, you set the following options on the Color tab in the
Properties dialog box.
Chapter 3 Printing 3-14
Color Adjustment
Select to adjust the differences between display colors and printed colors.
ICM
If available, select this option if you want to use the image color management (ICM)
system used by Windows.
Color Balance
Move the scroll box to adjust the balance for the listed colors. Move to the right for a
darker shade of color, to the left for a lighter shade of color.
The overall coloration is modified when you change the balance of the color inks. Since
color is generally adjusted from within your software application, use this option for fine
adjustments only.
Output Style
Select your desired output emphasis:
•Accurate
Click to emphasize accurate, natural-looking intermediate colors (such as skin tones, or
sky or natural green colors).
• Vivid
Click to emphasize vivid, brilliant primary colors (for example, for computer graphics
and illustrations).
•Auto
Click to have the system automatically use the appropriate style, based on your type of
image.
Chapter 3 Printing 3-1 S
Brightness
Adjust the overall darkness of the intermediate colors without changing the coloration for
pure white and pure black:
Light
Click Light if you do not want to adjust the brightness.
Normal, Dark, or Very Dark
Click for an overall darker appearance. The contrast of the bright areas is higher, and
the contrast of the dark areas is lower.
Intensity
Move the slider to increase or decrease the level of darkness or lightness of your
document.
Saving a Custom Print Mode
After you change the settings on the Quality and Color tabs, you can save the print mode for
future use. For example, one print mode may be appropriate when printing a Word document,
and another when printing a Photoshop graphic. To quickly set options for printing your next
document, you can select your saved print mode.
Chapter 3 Printing 3-16

! ?iiiiiiii !iiiiiiiiiii{iiiiiliiiiiiiii{iiiii iiiii!/iiiii!i!ii!iiiiiiiiiii!
iiiii!!ii_Iiiiiiiiiiiiiii!!iii_!i_!!_i:i_!ii!i_i_!!i!_i!i_i!!i_i_ii_iiii_i!:!_!i_i_!_i_i!i_!_!i_i!_!i_ii_!_ii!i_i_i_!_i_!_!!_i_i!i!_i_!_i!_i!i_i_ii_!_i_i_i_ii!!!_!iii_!_iiii!i!i!i_i_!i_!i_!i!ii!_i_!_i_!_i_ii_i_i_i_!!!i_!i_i_ii!_
Select_opti......t_ing_forp6ntinggraphicimages.
To save the custom print mode:
1. On the Save tab, enter a name for the new print mode in the Title box.
2. In the Icon Selection box, click an icon to illustrate your new print mode. The icon you
select for your custom print mode will then appear in the Choose Print Mode box on the
Main tab.
Chapter 3 Printing 3-17
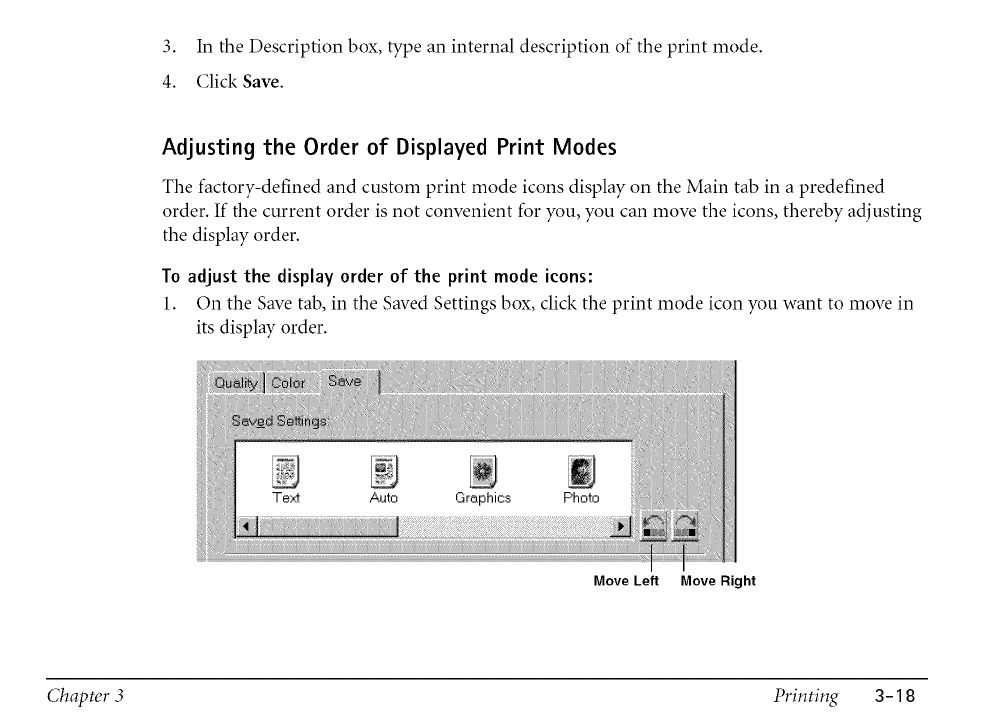
3. In the Description box, type an internal description of the print mode.
4. Click Save.
Adjusting the Order of Displayed Print Modes
The factory-defined and custom print mode icons display on the Main tab in a predefined
order. If the current order is not convenient for you, you can move the icons, thereby adjusting
the display order.
To adjust the display order of the print mode icons:
1. On the Save tab, in the Saved Settings box, click the print mode icon you want to move in
its display order.
Move Left Move Right
Chapter 3 Printing 3-18
2. Click Move Right or Move Left to move the icon as desired. Or, drag the selected icon to
the desired position.
The print mode icons display in the order you assign.
Editing a Custom Print Mode
You can change the settings of any saved custom print mode. For example, you may want to
define a different cartridge for a custom print mode you created earlier.
You cannot permanently change and save the settings for a factory-defined print mode.
To edit a custom print mode:
1. In the Printer Properties dialog box, on the Main tab, click the custom print mode that
you want to edit.
2. Click Advanced.
3. In the Properties dialog box, on the Quality and Color tabs, make your desired changes.
4. On the Save tab, make sure that the print mode that you specified in Step 1 is selected in
the Saved Settings list. Then click Save.
Your setting is saved with your new changes.
Chapter 3 Printing 3-19
Deleting a Custom Print Mode
When you decide that you no longer need one of your saved custom print modes, you can
delete it.
You cannot delete a factory-defined print mode.
To delete a custom print mode:
1. In the Printer Properties dialog box, on the Main tab, click the custom print mode that
you want to delete.
2. Click Advanced.
3. In the Properties dialog box, on the Save tab, make sure the print mode you clicked in
Step 1 is selected in the Saved Settings box. Then click Ddete.
4. When prompted, confirm that you want to delete the print mode.
Your custom print mode no longer appears.
Chapter 3 Printing 3-20
Saving a Custom Print Mode as a File
To keep the number of custom print modes stored on the Main tab to a minimum, you can
save a print mode as a file. Once a custom print mode is saved, you can delete the print mode
from the list of your saved settings.
Anytime you need the print mode, however, you can retrieve the file.
To saveacustom print modeas a file:
1. In the Printer Properties dialog box, on the Main tab, click Advanced.
2. In the Properties dialog box, select the Save tab.
3. In the Saved Settings list, click the print mode that you want to save as a file.
4. Click Save As.
5. In the Save File dialog box, click the folder where you want to save the file. Then type a
name for the file.
6. Click OK.
Your custom print mode is saved in the folder and with the file name you specified.
Chapter 3 Printing 3-21
Retrieving a Custom Print Mode File
When you need to print a document using a print mode you previously saved as a file, you can
retrieve the print mode file.
To retrieve a custom print mode file:
1. In the Printer Properties dialog box, on the Main tab, click Advanced.
2. In the Properties dialog box, click the Save tab and then click Open.
3. In the Open File dialog box, click the following: the folder where you saved your print
mode; the name of the file for your saved print mode that you want to retrieve; and the
corresponding icon for the saved print mode.
4. Click OK.
Your retrieved print mode appears in the Saved Settings box on the Save tab and in the Choose
Print Mode box on the Main tab.
Chapter 3 Printing 3-22
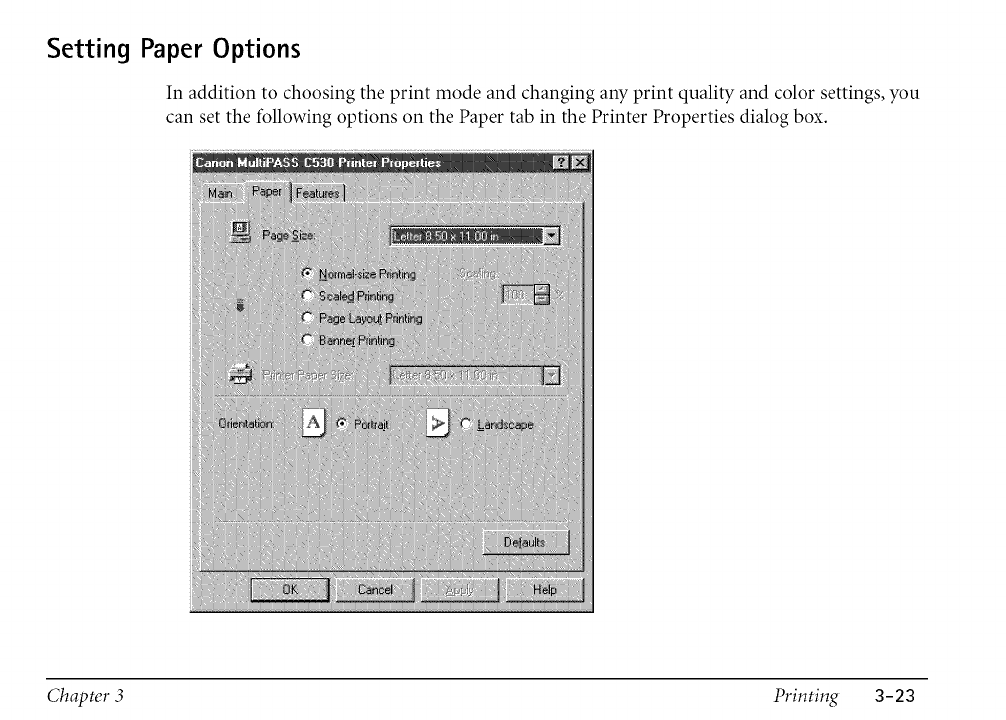
Setting Paper Options
In addition to choosing the print mode and changing any print quality and color settings, you
can set the following options on the Paper tab in the Printer Properties dialog box.
Chapter 3 Printing 3-23
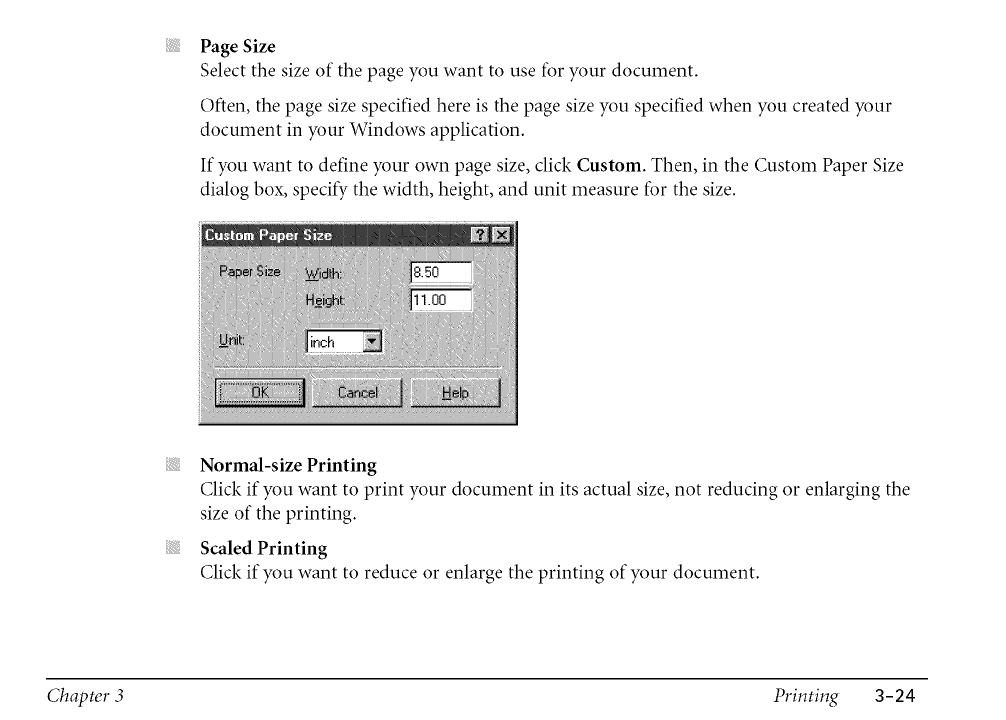
Page Size
Select the size of the page you want to use for your document.
Often, the page size specified here is the page size you specified when you created your
document in your Windows application.
If you want to define your own page size, click Custom. Then, in the Custom Paper Size
dialog box, specify the width, height, and unit measure for the size.
Normal-size Printing
Click if you want to print your document in its actual size, not reducing or enlarging the
size of the printing.
Scaled Printing
Click if you want to reduce or enlarge the printing of your document.
Chapter 3 Printing 3-24
Scaling
If you selected Scaled Printing, select the percentage of reduction or enlargement.
Page Layout Printing
Click if you want to print more than one page on a single sheet of paper. Then, on the
Features tab, you can specify the desired page layout options.
Setting Other Print Features
Banner Printing
Click if you want to print a banner.
Printing a Banner
Printer Paper Size
If you selected Scaled Printing or Page Layout Printing, select the size of the paper in your
printer on which you are printing.
If you want to define your own paper size, select Custom. Then, in the Custom Paper Size
dialog box, specify the width, height, and unit measure for the size.
Orientation
Click the orientation to determine how your document is printed on the page: Portrait to
print the contents of your document vertically on the page, or Landscape to print the
contents of your document horizontally on the page.
Chapter 3 Printing 3-25
Printing a Banner
Although your MuItiPASS printer is capable of printing a banner, there are some limitations to
the banner printing feature. These limitations are as follows:
The MultiPASS printer cannot print on the first sheet of banner paper. As a result, when
printing, you must always allocate one sheet more than the length of your actual banner.
The banner can be a maximum of five actual printed pages (for a total of sixpages,
including the first sheet on which the banner cannot be printed).
To prepare your MultiPASS printer for banner printing:
1. Make sure the paper rest is extended.
2. Make sure the paper thickness lever is set to the left.
3. Insert the banner paper into the printer. Make sure that you insert the first page so that
the fold between the first and second pages is facing up.
4. Verify that the side of the paper that is facing up is the side on which you want the banner
to appear.
5. Raise both paper output guides to a vertical position.
Chapter 3 Printing 3-26
To setyour banner printing options and print your banner:
1. From within the application that you used to create the banner, click the Print command.
2. In the Print dialog box, under Print Range, specify the range of the pages to print.
Remember that you cannot print on the first page of your banner paper. Thus, if you want
to print a banner that is the maximum length, under Print Range, specify printing from
page 2 to page 6 for a total of five actual printed pages.
3. Click Properties.
4. In the Printer Properties dialog box, on the Main tab, select the print mode.
5. Click Advanced.
6. In the Properties dialog box, on the Quality tab, select Plain Paper in the Media Type box.
Then click OK.
7.
8.
In the Printer Properties dialog box, on the Paper tab, select your banner paper size in the
Paper Size box. Then select Banner Printing.
In the MultiPASS printer message box, click OK. Then in the Printer Properties dialog
box, click OK.
9. In the Print dialog box, click the print command (usually OK or Print).
Your banner is printed by your MultiPASS printer.
Chapter 3 Printing 3-27
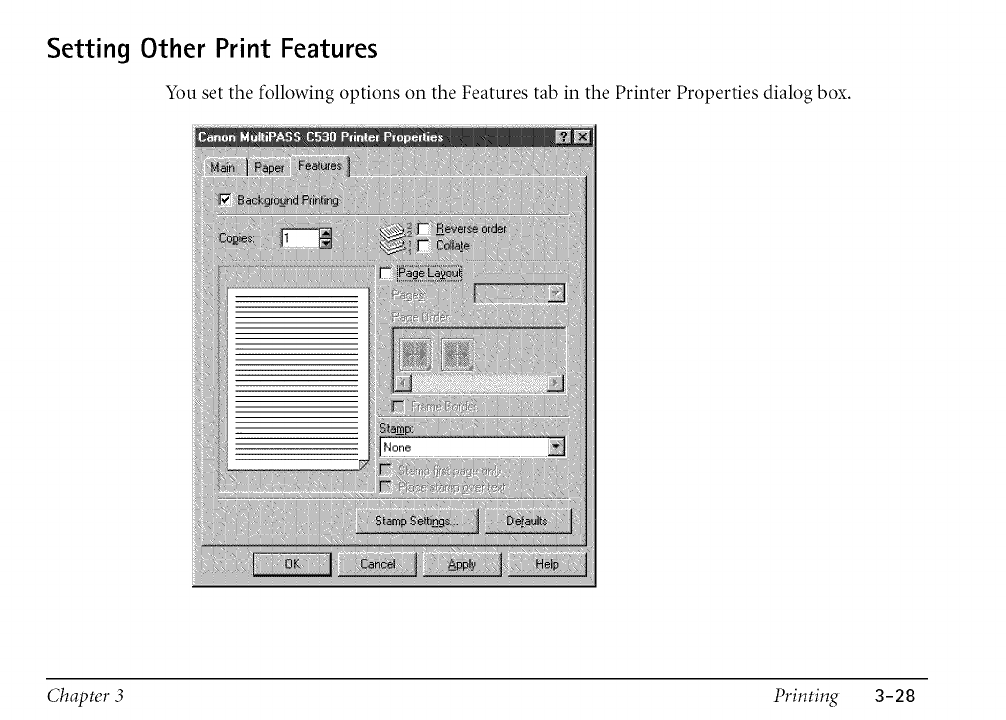
Setting Other Print Features
You set the following options on the Features tab in the Printer Properties dialog box,
Chapter 3 Printing 3-28
BackgroundPrinting
Clickif youwanttocontinueworkinginyourapplicationwhileyourdocumentis
printing.
Copies
Specifythenumberof copiesofthedocumentyouwanttoprint.
Reverse Order
If you are printing a multi-page document, click if you want to print the last page first.
Collate
If you are printing multiple copies of a multi-page document, click to have all pages of the
document print before the next copy of the document is printed. If this option is not
selected, each page in turn is printed the number of times needed for the number of
copies you specified.
Page Layout
Select if you want to print more than one page of your multiple page document on a
single sheet of paper. If you had selected Page Layout on the Paper tab, the option is
automatically selected on the Features tab.
If you select this option, you then choose the order in which the pages print on the sheet
of paper. You can also indicate whether you want a frame placed around each page, to
visually separate each page from one another.
The page graphic on the left illustrates your selected page layout.
Chapter 3 Printing 3-29

Pages
If you selected Page Layout, click the number of pages you want to print on a single sheet
of paper.
Page Order
If you selected Page Layout, click the order in which you want the pages of your document
to print on the single sheet of paper. The icons illustrate the available choices, based on the
number of pages you chose to print on a sheet of paper.
Frame Border
If you selected Page Layout, select if you want each page outlined with a border (a solid-
line flame around each page). The border helps to distinguish the different pages from one
another on the sheet of paper.
Stamp
If you want your document printed with a watermark stamp, click a predefined stamp. You
may want to print your document with a watermark stamp that designates the status of
the document. For example, you want to print your document with a stamp that marks the
document as confidential or a draft version. When you have selected a particular stamp,
you then select how you want the stamp to print:
• Stamp First Page Only
Select if you prefer to print the stamp only on the first page of your printed document,
rather than all the pages.
Chapter 3 Printing 3-30
Place Stamp Over Text
Select if you prefer to print the stamp over the text within your document. This setting,
however, may interfere with the readability of your printed document. Instead, clear
this option to print the stamp in back of the text within your document. In this case,
the text of your document prints over the stamp which may preserve the readability of
your printed document.
The page graphic on the left side of your screen illustrates your selected stamp (see screen on
page 3=28).
Creating or Changing a Stamp
When first installed, the software provides certain factory-defined stamps. You can change the
settings of a predefined stamp or create one of your own.
In creating or changing a stamp, you define its various characteristics, such as the text, font,
font size, color, and placement on the page.
Chapter 3 Printing 3-31
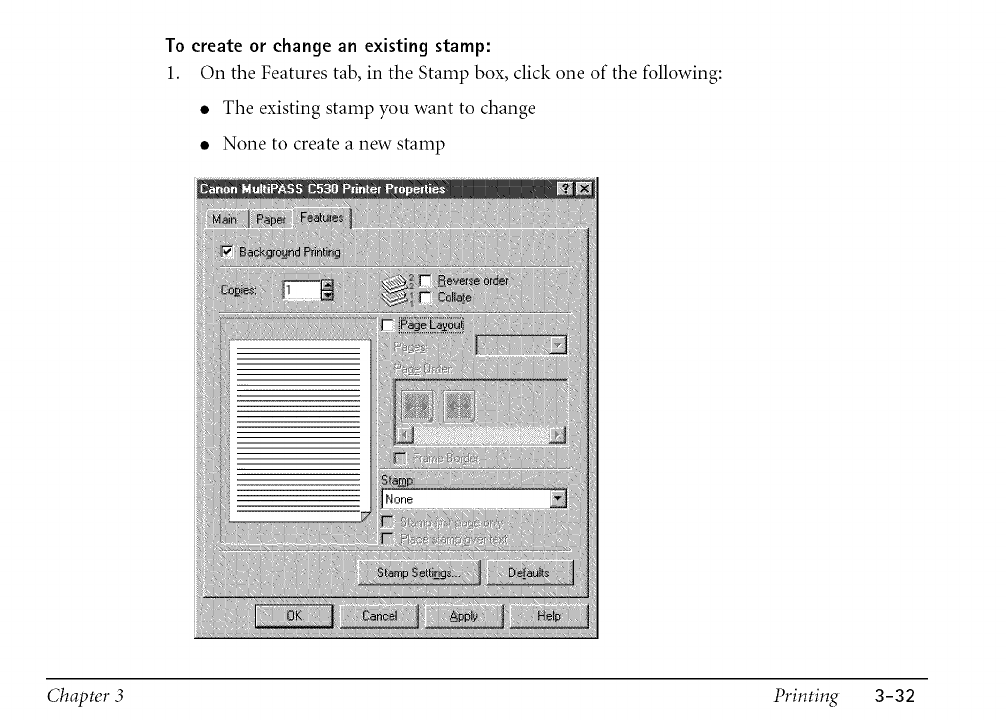
To create or change an existing stamp:
1. On the Features tab, in the Stamp box, click one of the following:
• The existing stamp you want to change
• None to create a new stamp
Chapter 3 Printing 3-32
2. Click Stamp Settings.
3. In the Stamp Settings Properties dialog box, specify the features of your stamp on the
Text, Color, and Placement tabs.
The graphic on the left side of your screen illustrates your selected stamp settings.
4. To save your stamp settings, click Save. When prompted, confirm that you want to save
your stamp.
To cancel your settings, click Cancel.
Chapter 3 Printing 3-33
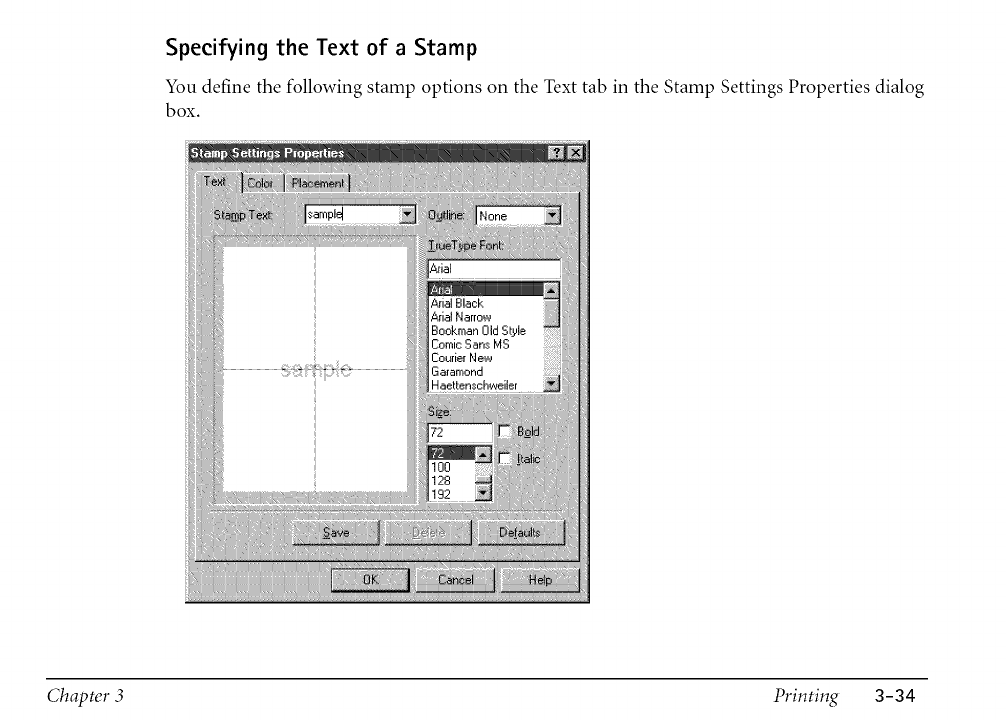
Specifying the Text of aStamp
You define the following stamp options on the Text tab in the Stamp Settings Properties dialog
box.
Chapter 3 Printing 3-34
Stamp Text
Type characters for your stamp.
Outline
Click the type of border you want around the stamp text, if any.
True Type Font
Click the type of font you want for your stamp text.
Size
Click the point size of the font you want for the stamp text.
Bold
Select if you want to make the stamp text boldfaced.
Italic
Select if you want to make the stamp text italicized.
Chapter 3 Printing 3-35
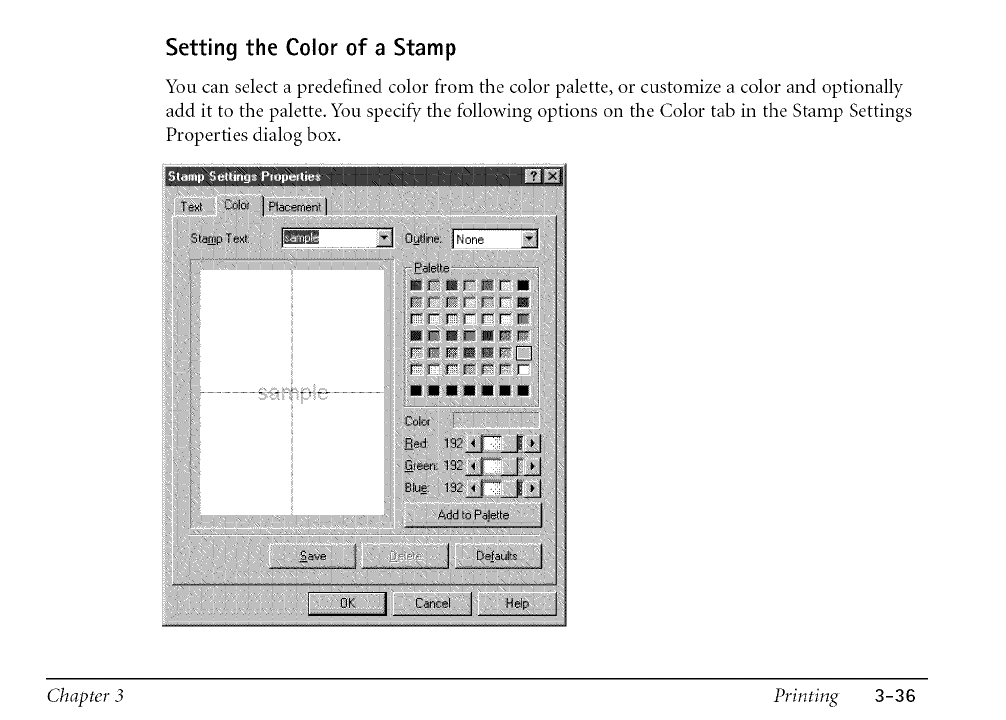
Setting the Color of aStamp
You can select a predefined color from the color palette, or customize a color and optionally
add it to the palette. You specify the following options on the Color tab in the Stamp Settings
Properties dialog box.
Chapter 3 Printing 3-36
To set the color of the stamp text:
Under Palette, select an available color shown in the color palette. The selected color is used
for the text of your stamp.
To customize a color:
Under Palette, select the color that is closest to your desired custom color.
1.
2.
3.
Under Color, move the scroll box for each of the listed colors until you've reached the
desired color mix for your custom color.
If you want to save your custom color in the palette, click Add to Palette. The newly
created color is added to the last row on the color palette. If the last row has been filled
with custom colors you created previously, you can choose to replace the oldest existing
custom color.
Chapter 3 Printing 3-37
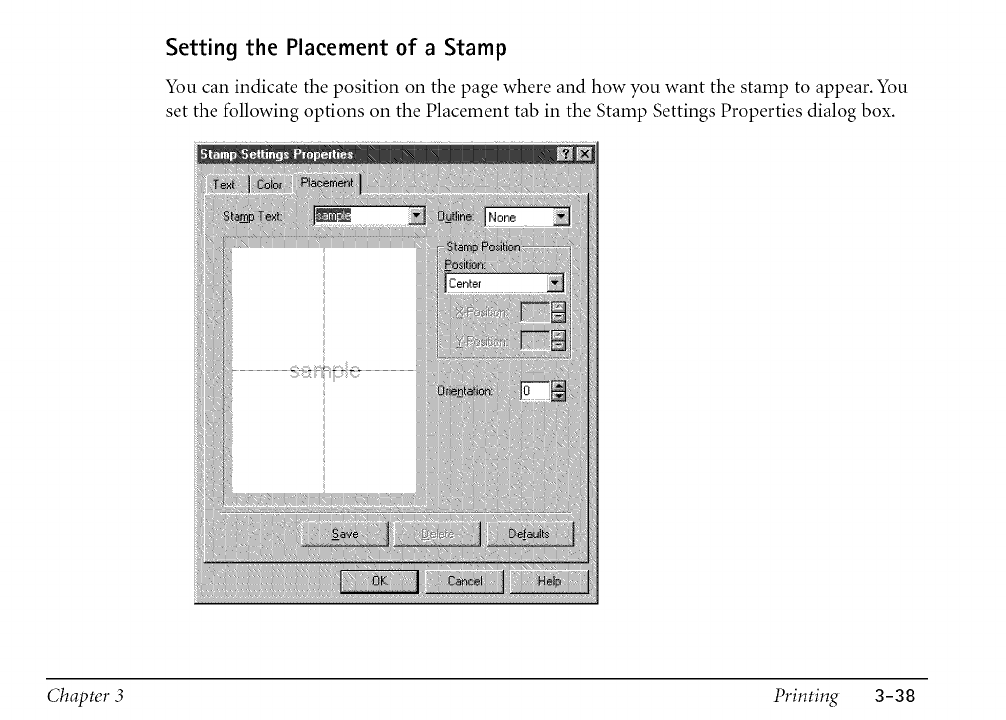
Setting the Placement of aStamp
You can indicate the position on the page where and how you want the stamp to appear. You
set the following options on the Placement tab in the Stamp Settings Properties dialog box.
Chapter 3 Printing 3-38
Position
Selectthedesiredplacementonthepage.If youwanttodefineyourownplacement,
clickCustom.Thenin theX-PositionandY-Positionboxes,selecttheX-axisandY-axis
coordinatesforthepositionofthestamp.
Youcanalsoclickthestampin thepageillustrationontheleftanddragthestamptothe
desiredpositiononthepage.
Orientation
Selectthenumberofdegreestospecifytheangleofrotationofyourstamp.Anegative
numberofdegreesrotatesthestampclockwise.
Deleting aStamp
If you decide you no longer use a particular stamp, you can delete it.
To delete a stamp:
1. In the Printer Properties dialog box, select the Features tab.
2. In the Stamp box, click the stamp you want to delete. Then click Stamp Settings.
3. In the Stamp Settings Properties dialog box, click Delete.
4. When prompted, confirm that you want to delete the selected stamp.
Chapter 3 Printing 3-39
Setting Default Printer Options
You can access printer driver options directly from the Windows desktop, before actually
printing a document, to change the default settings.
To set the default printer options:
1. On the Windows desktop, click Start, point to Settings, and then click Printers.
2. In the Printers window, select the MultiPASS printer icon.
3. On the File menu, click Properties.
4. In the Properties dialog box, specify your changes on the appropriate tabs and click OK.
The following tabs provide standard Windows options for your printer driver: General,
..............................Details, and Sharing tabs in Windows 98195, and Color Management tab in Windows 98.
For details about these options, see your Windows user documentation.
Displaying Printer Driver Information
You can review information about your printer driver, such as the version and copyright.
To do so, on the Main tab in the Printer Properties dialog box, click About.
Chapter 3 Printing 3-40
%ii!!_J_:_:ii:iiiii_,_!!!iii!!!!iiiiiiiiii_!!!i_!i!!i:ilili!ii!_i_i%11!!'_Jiiiliii!i!ii:!i!i!iilJ:i!_i!iii?_¸¸'_!!!iiiiii_!!!i_i!i!ii:i_!iiiil)_iii!i!i!iii!_i!i!_i:iiiii_:_:iiiiii_!!!i_!!iiii_ii!i!i%11!!'_Jiiilii_!!!i__!_i::_:!iiiii_:_:iiiiii_i_¸¸¸:i!!illiii!i!i!!!!iiiiiiii!iiiii¸¸¸¸_!ii!ii!i
This section provides information on setting and changing your printing options if you are
using Windows NT. If you are using Windows 98195, see the "Working With Print Options
(Windows 98195)" section presented earlier in this chapter.
Changing the Printer Settings: ASummary
Print options are the settings that determine how your document looks when it is printed.
Print options are initially installed using default settings, allowing you to print documents
immediately. However, you may want to change these settings for certain documents.
The following instructions summarize the general procedures for changing printer settings.
For detailed information on specific printer options, refer to later sections in this chapter.
To change print options:
1. With your document open, click the Print command. (In most Windows applications,
this command is on the File menu or toolbar.)
2. In the Print dialog box, click Properties.
Chapter 3 Printing 3-41
Choosing
3.
4.
5.
In the Printer Properties dialog box, on the Main and Paper tabs, specify the desired
printer options.
If you are dissatisfied with your changes on a particular tab and want to revert to the
default settings, click Defaults.
To save the changes and close the Printer Properties dialog box, click OK.
To close the dialog box without saving any changes, click Cancel.
a Print Mode
When printing a document, you choose a print mode. A print mode specifies print quality and
color settings. Initially when you first install the MultiPASS software, there are a number of
factory-defined print modes. You can temporarily change the settings for a predefined print
mode when printing a particular document. You can also save your changed settings as a new
print mode to use when printing future documents.
Chapter 3 Printing 3-42
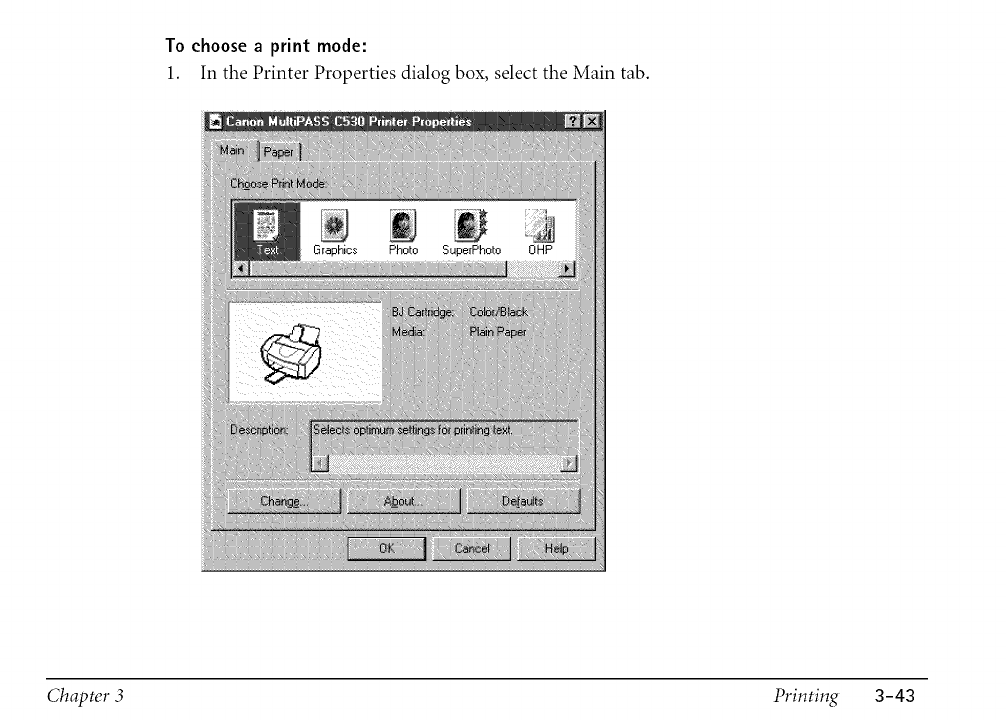
To choose a print mode:
1. In the Printer Properties dialog box, select the Main tab.
Chapter 3 Printing 3-43
2. Under Choose Print Mode, select the predefined print mode that best suits your
document. With the initial installation of the software, the following factory-defined
print modes are available:
• Text
Click Text if the majority of your document consists of text.
•Graphics
Click Graphics if you desire crisp and sharp border distinctions between the colors of
your illustrations.
Photo
Click Photo if you want your images to appear smoother and lifelike in color. Because
the Photo print mode provides a high print quality, expect your print job to take longer
to complete.
Super Photo
Click Super Photo when you want to make an exact replica of an original photo image.
Super Photo is most effective when used in conjunction with the Photo BJ cartridge
and high resolution paper.
•OHP
Click OHP if you want to print on transparencies.
Draft
Click Draft if you would like to print your document quickly but with a lower print
quality. The Draft print mode is ideal for longer documents and proofreading
purposes.
The Printer Illustration area shows the settings for the current print mode. The Description
box displays a simple explanation or note about the selected print mode.
Chapter 3 Printing 3-44
Changing the Print Mode Settings
You can temporarily change the settings of a factory-defined print mode, to print your current
document. You can also define and save a custom print mode to fit the needs of a particular
print job. Once saved, a custom print mode can be changed and resaved. If you do not save a
custom print mode, it is available only for the current print job.
The following instructions summarize the procedures for changing print mode settings.
To change print mode settings:
1. In the Printer Properties dialog box, on the Main tab, select the print mode you want to
change. Then click Change.
2. In the Properties dialog box, specify your desired print mode settings on the Quality and
Color tabs.
3.
4.
If you want to save your settings to print future documents, select the Save tab and save
your settings as a custom print mode.
When you have completed your entries on the Quality and Color tabs (and optionally the
Save tab), click OK or Cancel to close the dialog box.
If you did not save your settings on the Save tab: Click OK to save your settings
temporarily to print only the current document; click Cancel to close the dialog box
without saving your changes.
Chapter 3 Printing 3-45
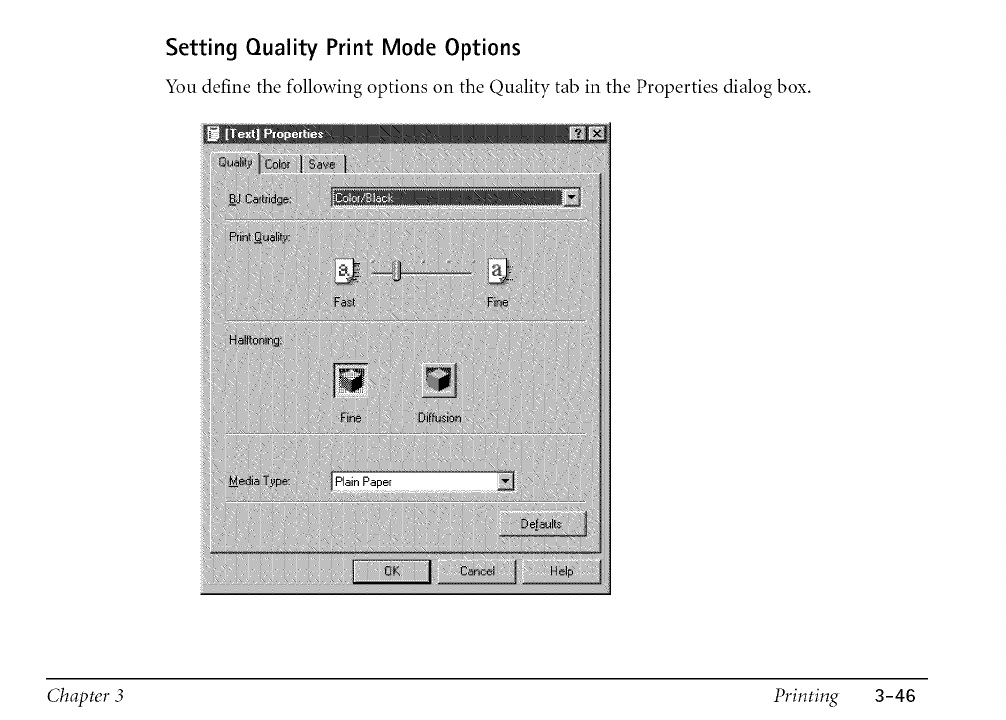
Setting Quality Print Mode Options
You define the following options on the Quality tab in the Properties dialog box.
Chapter 3 Printing 3-46
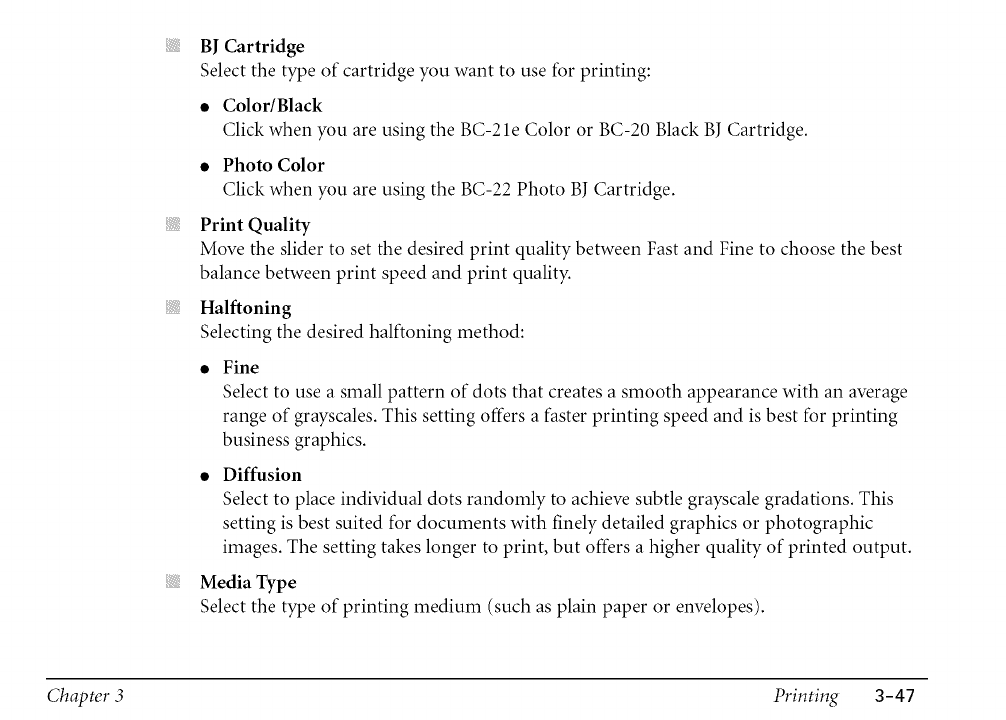
BI Cartridge
Select the type of cartridge you want to use for printing:
•Color/Black
Click when you are using the BC-21e Color or BC-20 Black BJ Cartridge.
• Photo Color
Click when you are using the BC-22 Photo BJ Cartridge.
Print Quality
Move the slider to set the desired print quality between Fast and Fine to choose the best
balance between print speed and print quality.
Half toning
Selecting the desired halftoning method:
Fine
Select to use a small pattern of dots that creates a smooth appearance with an average
range of grayscales. This setting offers a faster printing speed and is best for printing
business graphics.
Diffusion
Select to place individual dots randomly to achieve subtle grayscale gradations. This
setting is best suited for documents with finely detailed graphics or photographic
images. The setting takes longer to print, but offers a higher quality of printed output.
Media Type
Select the type of printing medium (such as plain paper or envelopes).
Chapter 3 Printing 3-47
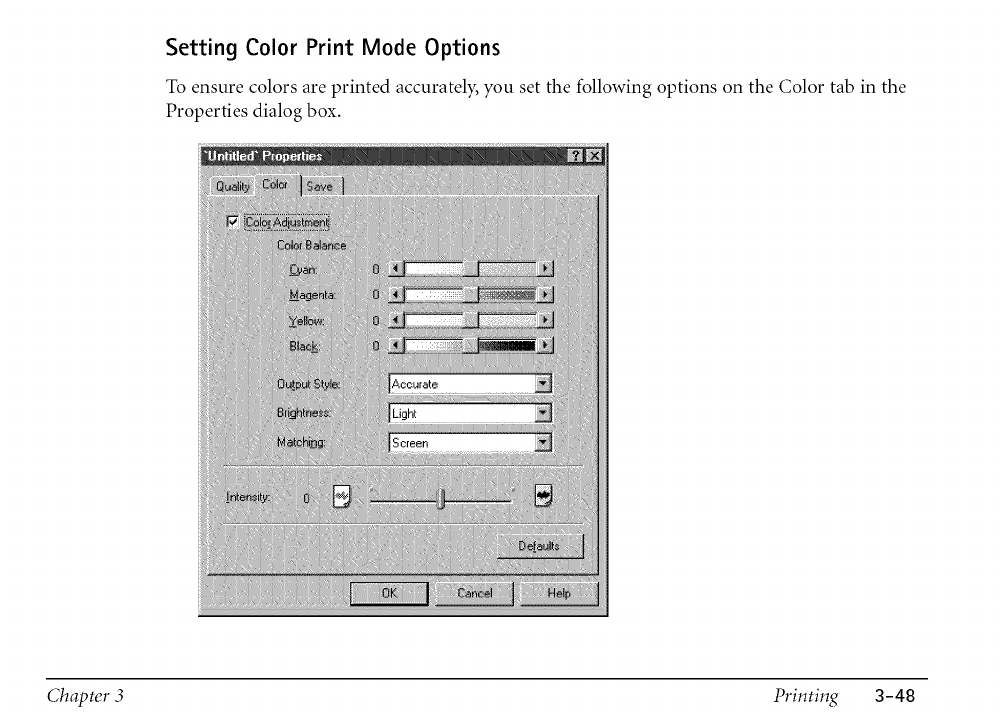
Setting Color Print Mode Options
To ensure colors are printed accurately, you set the following options on the Color tab in the
Properties dialog box.
Chapter 3 Printing 3-48
Color Adjustment
Select to adjust the differences between display colors and printed colors.
Color Balance
Move the slider to adjust the balance for the listed colors. Move the slider to the right for a
darker shade of color, to the left for a lighter shade of color.
The overall coloration is modified when you change the balance of the four color inks.
Since color is generally adjusted from within your software application, use this option for
fine adjustments only.
Output Style
Select whether to print accurate, natural-looking intermediate colors, or vivid, brilliant
primary colors.
Brightness
Adjust the overall darkness of the intermediate colors without changing the coloration for
pure white and pure black:
• Light
Click if you do not want to adjust the brightness.
• Normal, Dark, or Very Dark
Click for an overall darker appearance. The contrast of the bright areas is higher, and
the contrast of the dark areas is lower.
Chapter 3 Printing 3-49
Matching
Select the matching process to print colors as closely and as accurately as possible to the
original colors.
•None
Prints colors based on the CMYK percentage, or a color specified in a color sample.
•Scanner/Camera
Prints a scanned image as closely and accurately as possible to the original colors.
Screen
Prints images taken with a video camera, or images appearing on a monitor as closely
and accurately as possible to the original colors. Also select Screen when you want to
print scanned images, which have been processed with a software application.
Intensity
Move the slider to increase or decrease the level of darkness or lightness of your document.
Chapter 3 Printing 3-50

Saving a Custom Print Mode
After you change the settings on the Quality and Color tabs, you can save the print mode for
future use. For example, one print mode may be appropriate when printing a Word document,
and another when printing a Photoshop ®graphic. To quickly set print options for your next
document, you can select a saved mode.
Chapter 3 Printing 3-51
To savethe custom print mode:
1. In the Properties dialog box, on the Save tab, enter a name for the new print mode in the
Title box.
2. In the Icon Selection box, select an icon to illustrate your new print mode. The icon you
select for your custom print mode will then appear in the Choose Print Mode box on the
Main tab.
3. In the Description box, type a description of the print mode. This description appears on
the Main tab when your print mode is selected.
4. Click Save.
Chapter 3 Printing 3-52
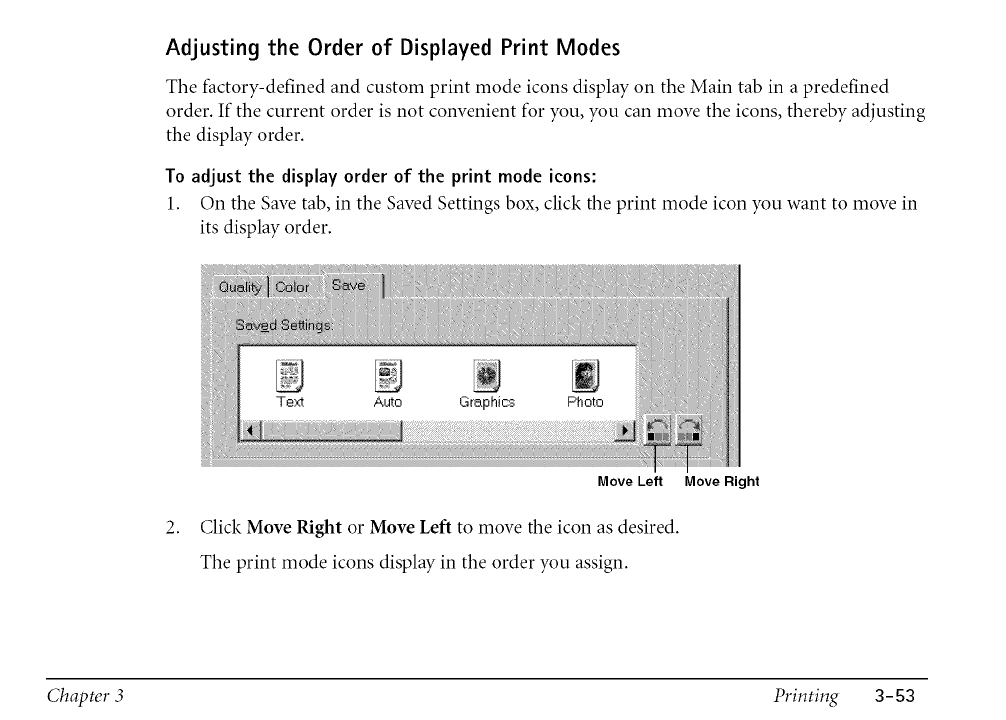
Adjusting the Order of Displayed Print Modes
The factory-defined and custom print mode icons display on the Main tab in a predefined
order. If the current order is not convenient for you, you can move the icons, thereby adjusting
the display order.
To adjust the display order of the print mode icons:
1. On the Save tab, in the Saved Settings box, click the print mode icon you want to move in
its display order.
2.
Move Left
Click Move Right or Move Left to move the icon as desired.
The print mode icons display in the order you assign.
Move Right
Chapter 3 Printing 3-53
Editing Custom Print Mode
You can change the settings of any saved custom print mode. For example, you may want to
define a different cartridge for a custom print mode you created previously.
You cannot permanently change and save the settings of a factory-defined print mode.
To edit acustom print mode:
1. In the Printer Properties dialog box, on the Main tab, select the custom print mode you
want to edit.
2. Click Change.
3. In the Properties dialog box, on the Quality and Color tabs, make your desired changes.
4. On the Save tab, make sure that the print mode that you specified in Step 1 is selected in
the Saved Settings list.
5. Click Save.
Your setting is saved with your new changes.
Chapter 3 Printing 3-54
Deleting a Custom Print Mode
When you decide that you no longer need one of your saved custom print modes, you can
delete it.
You cannot delete a factory-defined print mode.
To delete a custom print mode:
1. In the Printer Properties dialog box, on the Main tab, select the custom print mode that
you want to delete.
2. Click Change.
3. In the Properties dialog box, on the Save tab, make sure the setting that you specified in
Step 1 is selected.
4. Click Delete.
Your custom print mode no longer appears.
Chapter 3 Printing 3-55
Saving a Custom Print Mode as a File
To keep the number of custom print modes stored on the Main tab to a minimum, you can
save a print mode as a file. Once a custom print mode is saved, you can delete the print mode
from the list of your saved settings.
Anytime you need the print mode, however, you can retrieve the file.
To save a custom print mode as a file:
1. In the Printer Properties dialog box, on the Main tab, click Change.
2. In the Properties dialog box, select the Save tab.
3. On the Save tab, in the Saved Settings list, select the print mode that you want to save as a
file.
4. Click Save As.
5. In the Save File dialog box, select the folder where you want to save the file. Then type a
name for the file.
6. Click OK.
Your custom print mode is saved in the folder and with the file name you specified.
Chapter 3 Printing 3-56
Retrieving a Custom Print Mode File
When you need to print a document using a print mode you previously saved as a file, you can
retrieve the print mode file.
To retrieve a custom print modefile:
1. In the Printer Properties dialog box, on the Main tab, click Change.
2. In the Properties dialog box, select the Save tab.
3. On the Save tab, click Open.
4. In the Open File dialog box, click the following: the folder where you saved your print
mode; the name of the file for your saved print mode that you want to retrieve; and the
corresponding icon for the saved print mode.
5. Click OK.
Your retrieved print mode appears in the Saved Settings list on the Save tab and in the Choose
Print Mode box on the Main tab.
Chapter 3 Printing 3-57
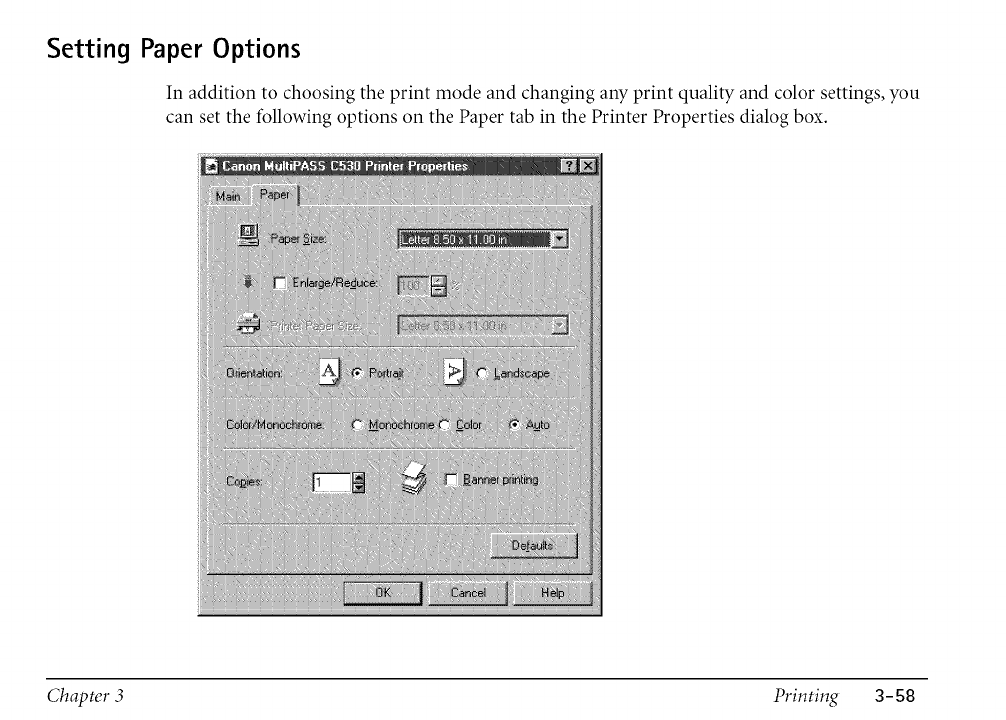
Setting Paper Options
In addition to choosing the print mode and changing any print quality and color settings, you
can set the following options on the Paper tab in the Printer Properties dialog box.
Chapter 3 Printing 3-58
Paper Size
Select the size of the paper or envelope you want to use. The selected paper should be
identical to the paper size specified within the Windows NT application from which you
want to print.
Enlarge/Reduce
Select to enlarge your document's printing size by up to 400 percent or reduce it to as low
as 10 percent of the original document size.
Using the Enlarge/Reduce Option
Printer Paper Size
Select a paper size for the enlarging and reducing option. When the Printer Paper Size
option is selected instead of the Paper Size option, the size of the document is
automatically enlarged or reduced to fit the printer paper size you selected.
Orientation
Select the type of orientation to determine how your document is printed on the page:
Portrait to print the contents of your document vertically on the page, or Landscape to
print the contents of your document horizontally on the page.
Color/Monochrome
Select whether you want to print in color or monochrome. You can also select to have this
setting automatically determined.
Copies
Select the number of copies you want to print.
Banner Printing
Select to activate the banner printing feature.
Printing a Banner
Chapter 3 Printing 3-89
Using the Enlarge/Reduce Option
You can use the Enlarge/Reduce option to increase your document printing size by up to 400
percent or reduce it to as low as 10 percent of the original document size. When you change
the enlarge or reduce rates, however, you also change the printable area of your document,
which may result in only a partial printing of your document.
There are two ways to enlarge or reduce your document. You can either specify a different
paper size from the one specified in the software application, or you can specify the rate of
enlargement or reduction of the document size.
To enlarge or reduce by changing the printing paper size:
1. In the Paper Size list, select the paper size specified in the software application (you can
usually find this by looking at the Page Setup option in the software application).
2.
3.
Click Enlarge/Reduce.
In the Printer Paper Size list, select the actual paper size that is in the printer. The percent
by which your document is enlarged or reduced automatically adjusts to the printer paper
size you specified.
4. Click OK.
Chapter 3 Printing 3-60
To enlarge or reduce by specifyingthe rate of enlargement or reduction:
1. In the Paper Size list, select the paper size specified in the software application (you can
usually find this by looking at the Page Setup option in the software application).
2. Click Enlarge/Reduce.
3. In the Enlarge Reduce list, select the desired rate of enlargement or reduction.
4. Click OK.
When you change the paper size in your software application, the rate of enlargement or
reduction automatically adjusts to reflect your change.
Printing a Banner
Although your MuItiPASS printer is capable of printing a banner, there are some limitations to
the banner printing feature. These limitations are as follows:
The MultiPASS printer cannot print on the first sheet of banner paper. As a result, when
printing, you must always allocate one sheet more than the length of your actual banner.
The banner can be a maximum of five actual printed pages (for a total of sixpages,
including the first sheet on which the banner cannot be printed).
Chapter 3 Printing 3-61
To prepareyour MultiPASS printer for banner printing:
1. Make sure the paper rest is extended.
2. Make sure the paper thickness lever is set to the left.
3. Insert the banner paper into the printer. Make sure that you insert the first page so that the
fold between the first and second pages is facing up.
4. Verify that the side of the paper that is facing up is the side on which you want the banner
to appear.
5. Raise both paper output guides to a vertical position.
To setyour banner printing options and print your banner:
1. From within the application that you used to create the banner, click the Print command.
2. In the Print dialog box, under Print Range, specify the range of the pages to print.
Remember that you cannot print on the first page of your banner paper. Thus, if you want
to print a banner that is the maximum length, under Print Range, specify printing from
page 2 to page 6 for a total of five actual printed pages.
3. Click Properties.
4. In the Printer Properties dialog box, on the Main tab, select the print mode.
5. Click Change.
Chapter 3 Printing 3-62
6. In the Properties dialog box, on the Quality tab, select Plain Paper in the Media Type list.
Then click OK.
7.
8.
In the Printer Properties or Printer Default dialog box, on the Paper tab, select your
banner paper size in the Paper Size list. Then select Banner Printing.
In the MultiPASS printer message box, click OK. Then in the Printer Properties or Printer
Default dialog box, click OK.
9. In the Print dialog box, click the print command (usually OK or Print).
Your banner is printed by your MultiPASS.
Chapter 3 Printing 3-63
Setting Default Printing Options
You can access printer driver options directly from the Windows desktop, before actually
printing a document, to change the default settings.
To set default print options:
1. On the Windows desktop, click Start, point to Settings, and then click Printers.
2. In the Printers window, select the MultiPASS printer icon.
3. On the File menu, click Document Defaults.
4. In the Document Defaults dialog box, on the appropriate tabs, specify your changes and
click OK.
To set the paper size associated with a paper tray:
1. On your Windows desktop, click Start, point to Settings, and then click Printers.
2. In the Printers window, select the MultiPASS printer icon.
3. On the File menu, click Properties.
Chapter 3 Printing 3-64
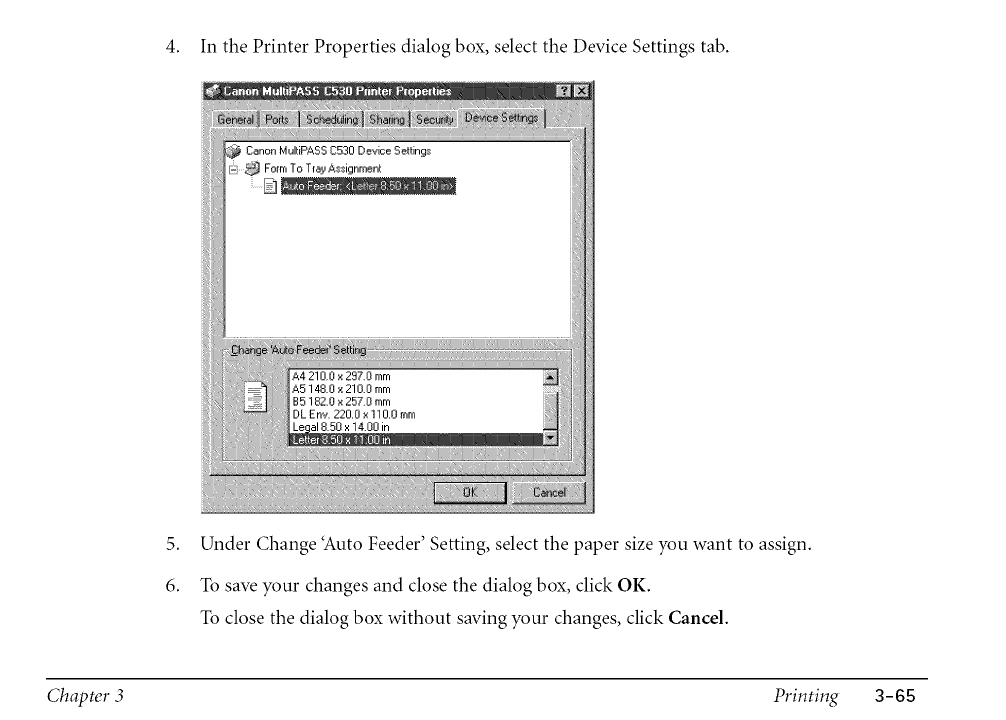
4. In the Printer Properties dialog box, select the Device Settings tab.
5. Under Change 'Auto Feeder' Setting, select the paper size you want to assign.
6. To save your changes and close the dialog box, click OK.
To close the dialog box without saving your changes, click Cancel.
Chapter 3 Printing 3-65
%¸>¸<¸¸><_>ii{i¸¸¸
ii¸¸! _i!!!
The General, Ports, Scheduling, Sharing, and Security tabs provide standard Windows options
for your printer driver. For details on these options, see your Windows user documentation.
Displaying Printer Driver Information
You can review information about your printer driver, such as the version and copyright.
To do so, on the Main tab in the Printer Properties dialog box, click About.
You may be using your computer and the MultiPASS connected to your computer in an
environment where multiple computers are connected by a network. In this case, you can
share the use of your MultiPASS with the other computers on the network.
If you choose to share the use of your MultiPASS, your computer acts as the host system or
server to the other computers (also referred to as remote or client systems).
Chapter 3 Printing 3-66
TouseyourMultiPASS,theclientsystemsmustinstalltheMultiPASSprinterdriverontotheir
systems.Theycandosodirectlyfromyoursystem.BasedonwhichWindowsoperatingsystem
youareusing,thefollowingclientsystemcanshareyourMultiPASS.
If your system (server) is:
Windows 98 or Windows 95
Windows NT
Install on client system:
Windows 98 or Windows 95
Windows 98, Windows 95, or Windows NT
When a document is printed by the client system on a shared MultiPASS, any printing
messages (status or error messages) display on the server system.
If you are using Windows NT for sharing your MultiPASS, it is recommended that Service
..............................Pack 4 or later is installed on your system. This ensures that the client systems can successfully
connect to your MultiPASS on the network.
Setting Up Your MultiPASS for Sharing
Before the client systems can install and use the MultiPASS printer driver, you must set up the
MultiPASS for sharing.
To set up the MultiPASS for sharing:
1. On the MultiPASS server system, on the Windows taskbar, click Start.
2. On the Start menu, point to Settings. Then click Printers.
3. In the Printers window, select the MultiPASS printer icon.
Chapter 3 Printing 3-67
4. On the File menu, click Sharing.
5. In the Properties dialog box, on the Sharing tab, click Shared or Shared As.
6. In Share Name box, type a name you want to assign to the shared MultiPASS.
If available, you may also want to assign a password, which would then be required by the
client systems when using the MultiPASS.
7. Click OK.
• If the Sharing command is not available (see Step 4 above), you need to set up printer
sharing in Windows. For details, see your Windows user documentation.
• If you are using Windows NT and expect Windows 98195 client systems to use your shared
MultiPASS, you need to set up an alternate driver for Windows 98195.With this procedure,
you may need to have the following installation disks available: Windows NT, Windows
98195, and MultiPASS Desktop Manager.
• To set up an alternate driver: On the Sharing tab, under Alternate Drivers, click Windows
95. Then click OK. Follow the on-screen instructions. For details, see your Windows NT
documentation.
Chapter 3 Printing 3-68
Installing the Printer Driver on a Client System
Once the MuItiPASS has been set up for sharing, the printer driver can be installed from the
MultiPASS server system to the appropriate client systems.
To install the printer driver on a client system:
1. On the client system, on the Windows taskbar, click Start.
2. On the Start menu, point to Settings. Then click Printers.
3. In the Printers window, double-click Add Printer.
4. Follow the on-screen instructions.
Install the printer driver as a network printer, based on the name assigned to the shared
printer.
You cannot install the MultiPASS printer driver on a client system that has a previous version
of a MultiPASS.
Chapter 3 Printing 3-69
This chapter gives details on the requirements for documents you can feed into your
MultiPASS. Whether you are faxing, copying, or scanning a document, read this chapter
carefully for information on the types of documents you can feed, and instructions on loading
documents for your specific needs. This chapter also describes how to use your MultiPASS to
make copies.
Document Requirements *Br Faxing, Copying, and Scanning ............................................. 4-2
® Problem Documents ........................................................................................................... 4-4
® Scanned ImageArea ............................................................................................................ 4-5
Selecting Automatic/Manual Document Feed ....................................................................... 4-6
® Loading Documents *BrAutomatic Feed .......................................................................... 4-8
® Loading Documents [Br Manual Feed ............................................................................. 4-17
Copying Documents .............................................................................................................. 4-21
Setting the Paper Type *Br Color Copying ........................................................................... 4-25
Setting the Length of the Bottom Margin for Color Printing ............................................. 4-27
Chapter 4 Document Handling 4-1
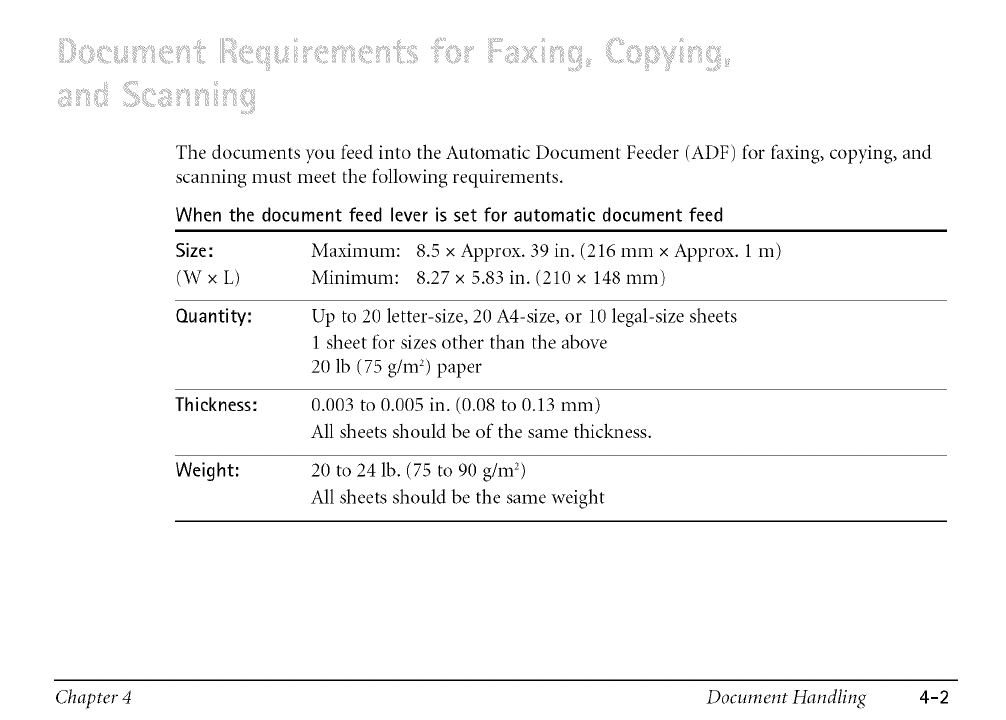
iiiiiiiiiiiiiiiiill¸ iiilii !!:i! !i!!!iiiiili!ii!iiii,
The documents you feed into the Automatic Document Feeder (ADF) for faxing, copying, and
scanning must meet the following requirements.
When the document feed lever is set for automatic document feed
Size: Maximum: 8.5 x Approx. 39 in. (216 mm x Approx. 1 m)
(W x L) Minimum: 8.27 x 5.83 in. (210 x 148 mm)
Quantity: Up to 20 letter-size, 20 A4-size, or 10 legal-size sheets
1 sheet for sizes other than the above
20 lb (75 g/m2) paper
Thickness: 0.003 to 0.005 in. (0.08 to 0.13 mm)
All sheets should be of the same thickness.
Weight: 20 to 24 lb. (75 to 90 g/m 2)
All sheets should be the same weight
Chapter 4 Document Handling 4-2
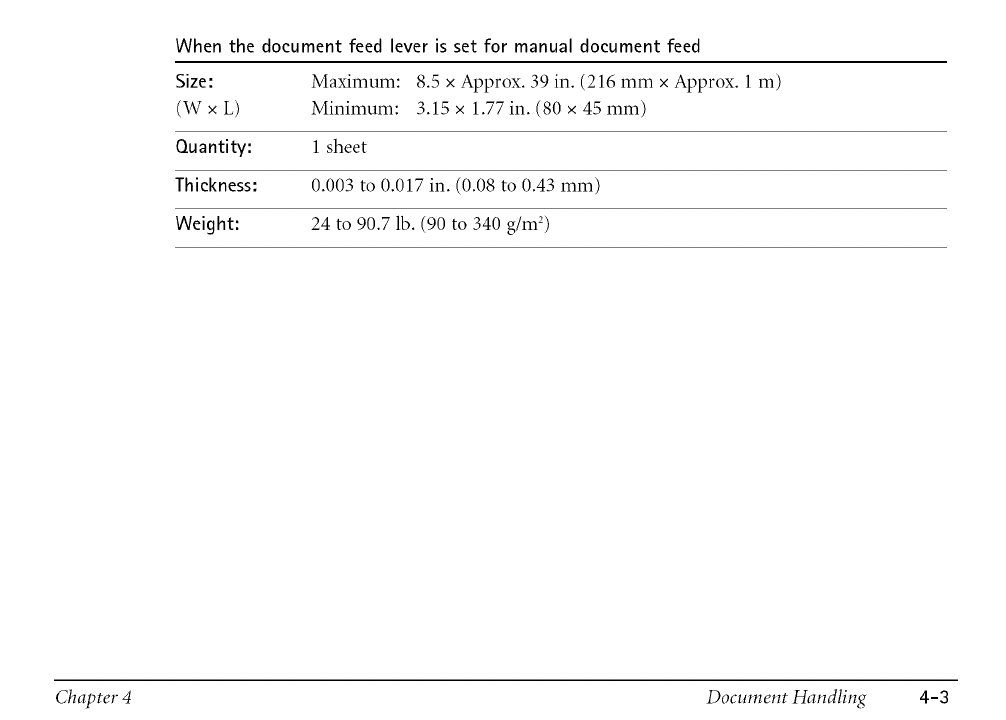
When the document feed lever is set for manual document feed
Size: Maximum: 8.5 x Approx. 39 in. (216 mm x Approx. 1 m)
(W x L) Minimum: 3.15 x 1.77 in. (80 x 45 mm)
Ouantity: 1 sheet
Thickness: 0.003 to 0.017 in. (0.08 to 0.43 mm)
Weight: 24 to 90.7 lb. (90 to 340 g/m 2)
Chapter 4 Document Handling 4-3
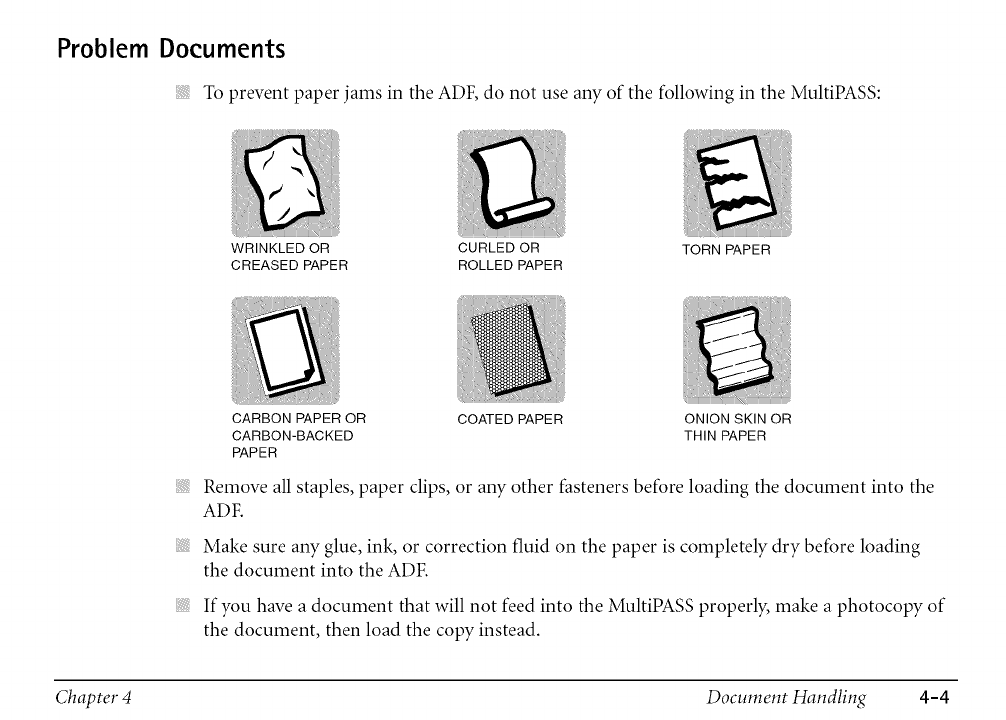
Problem Documents
To prevent paper jams in the ADF, do not use any of the following in the MultiPASS:
WRINKLED OR CURLED OR TORN PAPER
CREASED PAPER ROLLED PAPER
ii!i_!;!i!!i!!i!!i!ii!iil
ii!i_!;!i!!i!!i!!i!ii!iil
ii!i_!;!i!!i!!i!!i!ii!iil
CARBON PAPER OR COATED PAPER ONION SKIN OR
CARBON-BACKED THIN PAPER
PAPER
Remove all staples, paper clips, or any other fasteners before loading the document into the
ADF.
Make sure any glue, ink, or correction fluid on the paper is completely dry before loading
the document into the ADF.
If you have a document that will not feed into the MultiPASS properly, make a photocopy of
the document, then load the copy instead.
Chapter 4 Document Handling 4-4
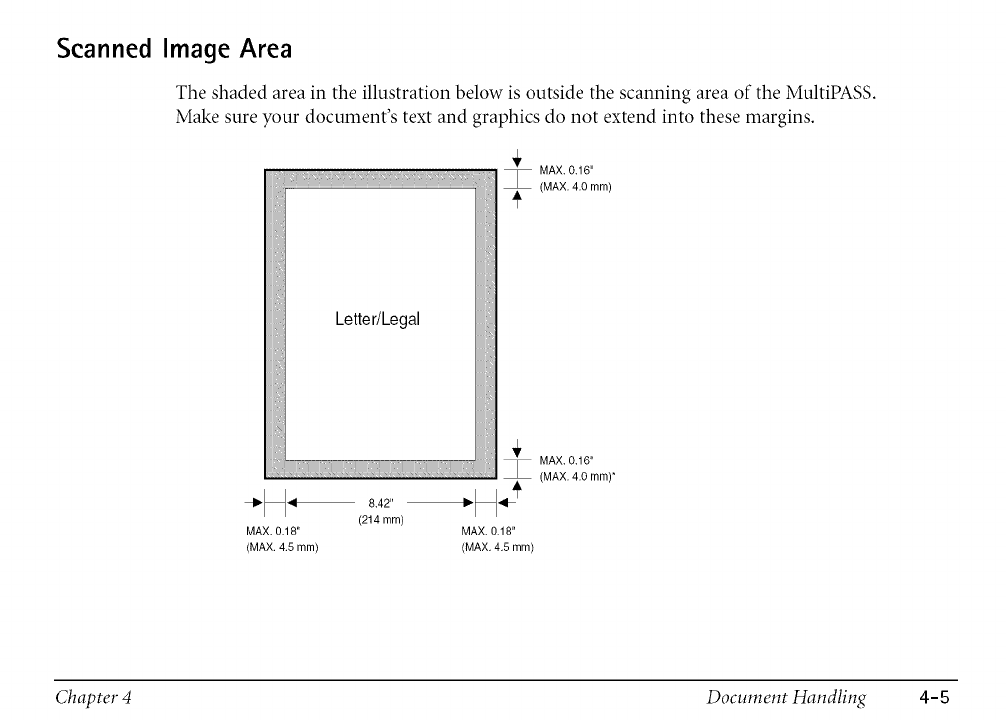
Scanned Image Area
The shaded area in the illustration below is outside the scanning area of the MultiPASS.
Make sure your document's text and graphics do not extend into these margins.
MAX. 0.16"
(MAX, 4.0 ram)
(214 ram)
MAX. 0.18" MAX. 0.18"
(MAX. 4.5 mm) (MAX. 4.5 mm)
Chapter 4 Document Handling 4-5
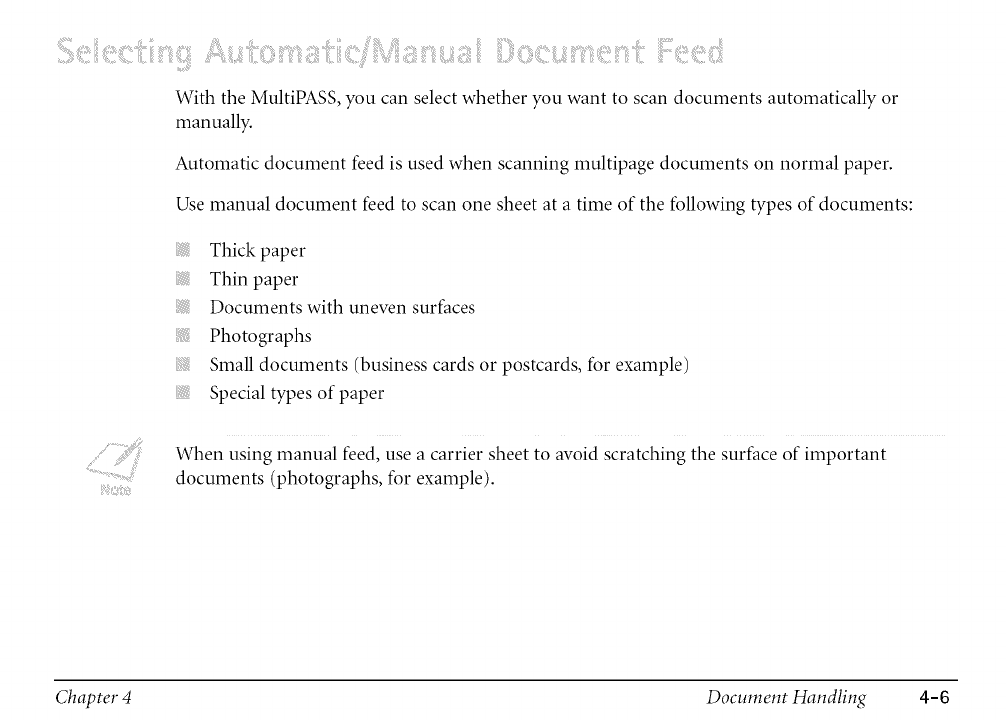
i
With the MultiPASS, you can select whether you want to scan documents automatically or
manually.
Automatic document feed is used when scanning multipage documents on normal paper.
Use manual document feed to scan one sheet at a time of the following types of documents:
Thick paper
Thin paper
Documents with uneven surfaces
Photographs
Small documents (business cards or postcards, for example)
Special types of paper
When using manual feed, use a carrier sheet to avoid scratching the surface of important
documents (photographs, for example).
Chapter 4 Document Handling 4-6
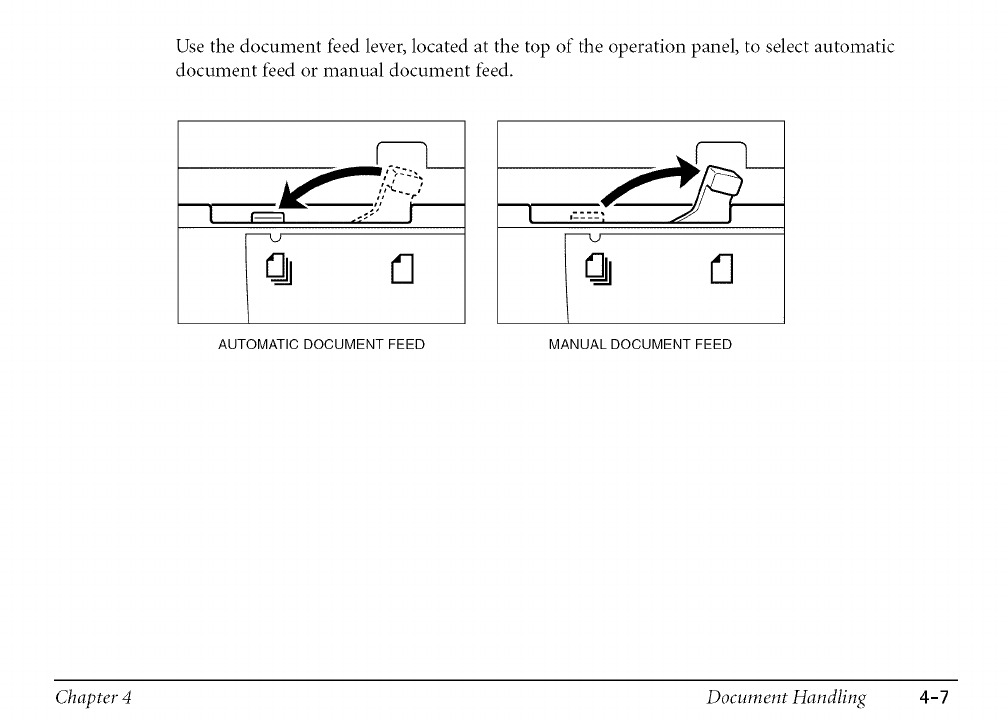
Use the document feed lever, located at the top of the operation panel, to select automatic
document feed or manual document feed.
r L__
AUTOMATIC DOCUMENT FEED
[ ,--------; _
MANUAL DOCUMENT FEED
Chapter 4 Document Handling 4-7
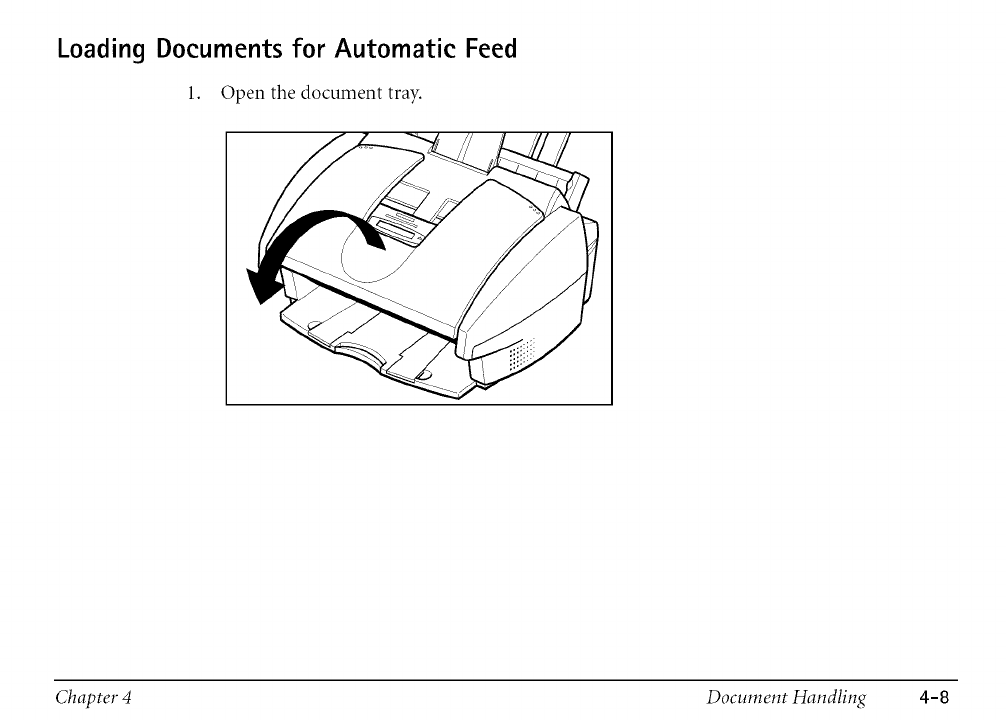
Loading Documents for Automatic Feed
l. Open the document tray.
Chapter 4 Document Handling 4-8
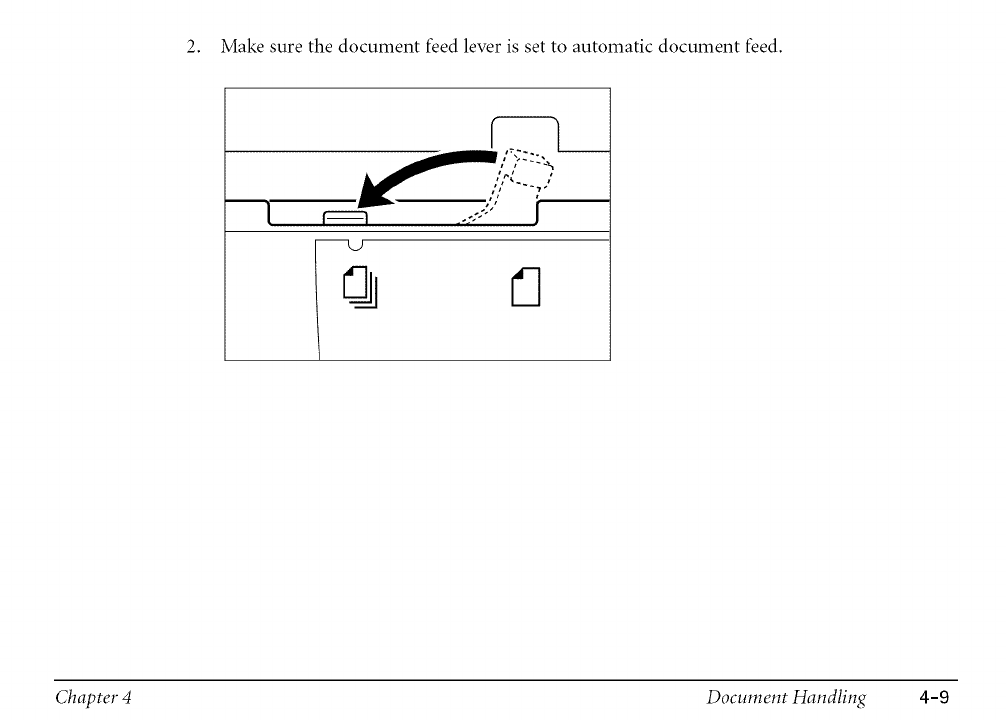
2. Make sure the document feed lever is set to automatic document feed.
Chapter 4 Document Handling 4-9
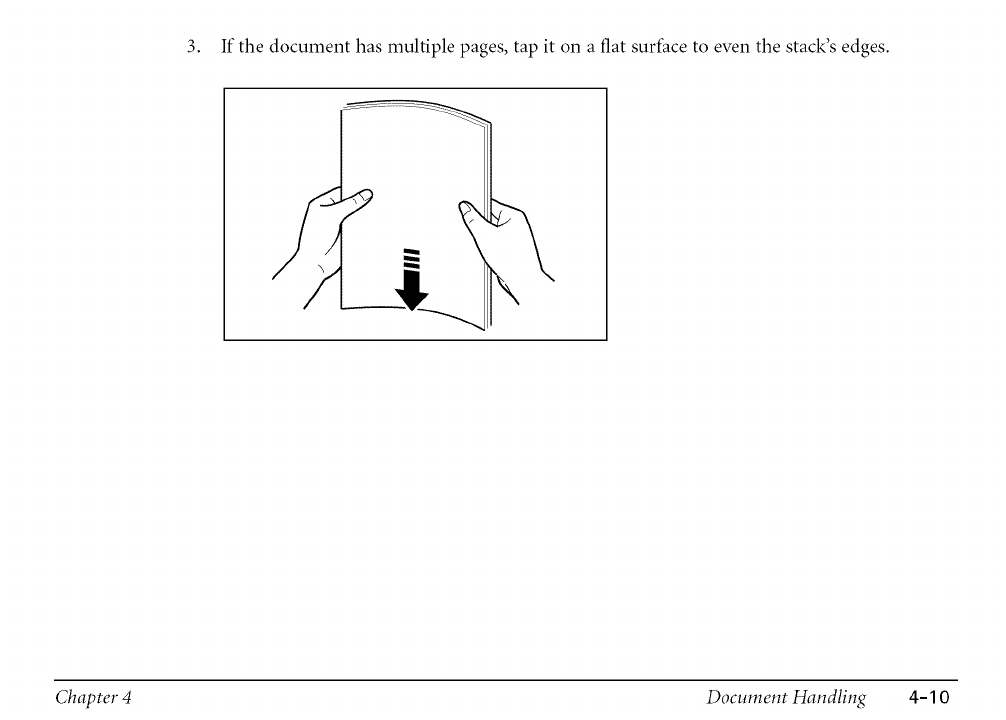
3. If the document has multiple pages, tap it on a fiat surface to even the stack's edges.
Chapter 4 Document Handling 4-10
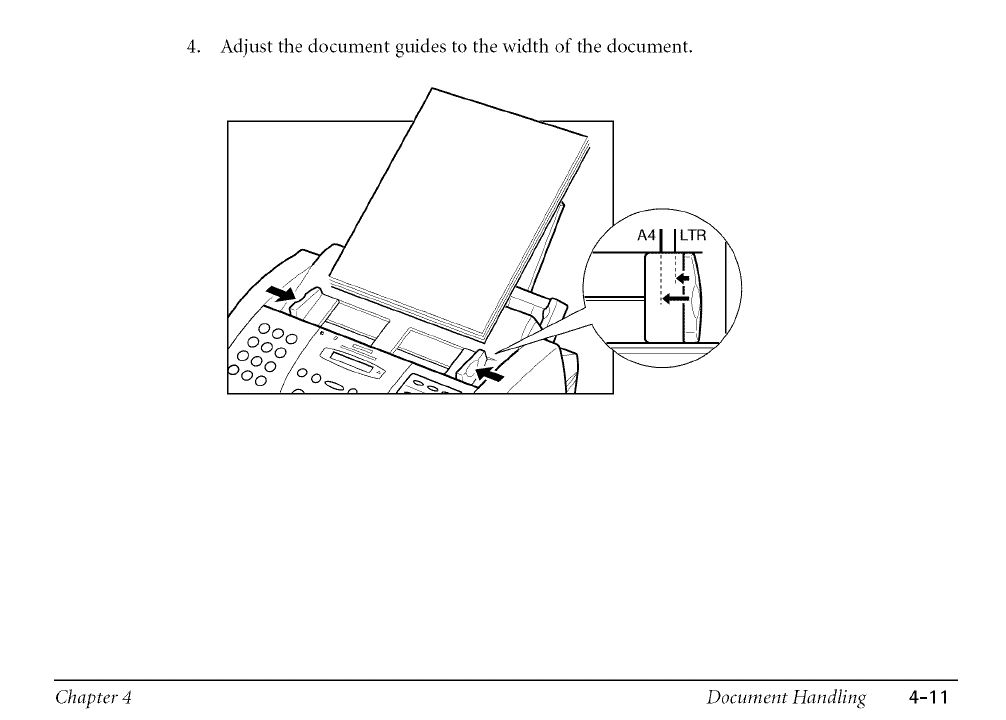
4. Adjust the document guides to the width of the document.
Chapter 4 Document Handling 4-11
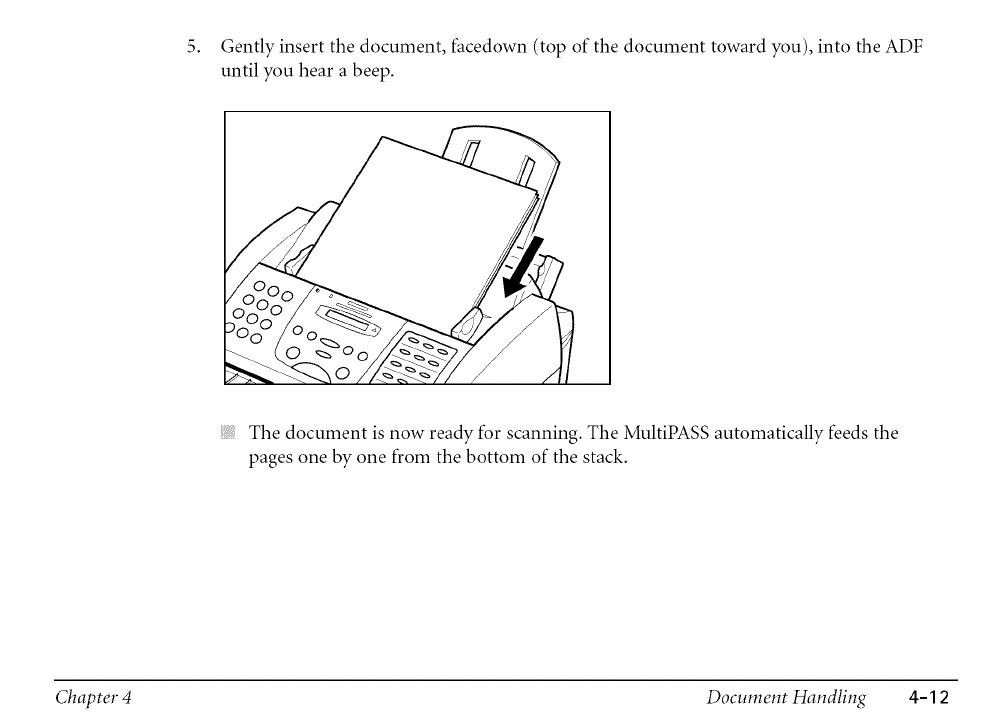
5. Gently insert the document, facedown (top of the document toward you), into the ADF
until you hear a beep.
The document is now ready for scanning. The MultiPASS automatically feeds the
pages one by one from the bottom of the stack.
Chapter 4 Document Handling 4-1 2
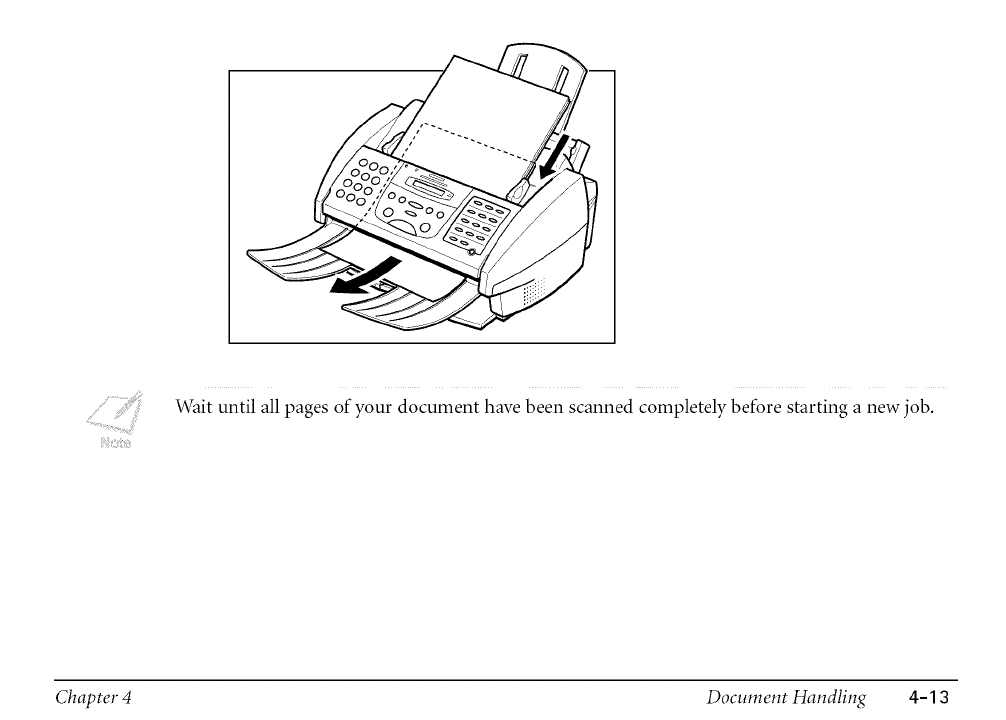
Wait until all pages of your document have been scanned completely before starting a new job.
Chapter 4 Document Handling 4-13
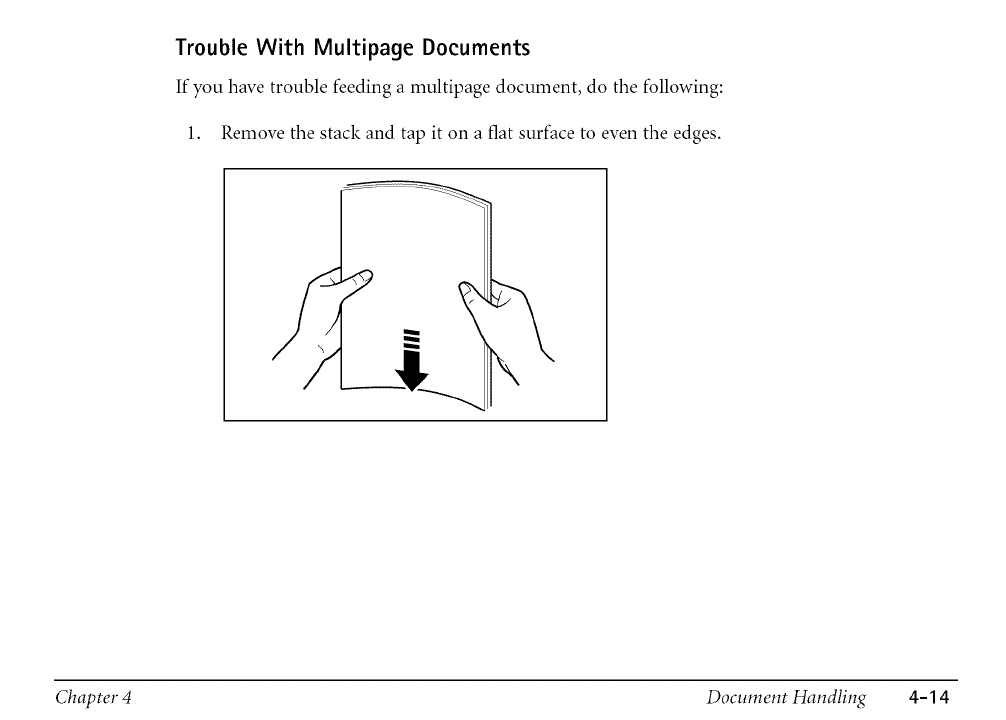
Trouble With Multipage Documents
If you have trouble feeding a multipage document, do the following:
1. Remove the stack and tap it on a fiat surface to even the edges.
Chapter 4 Document Handling 4-14
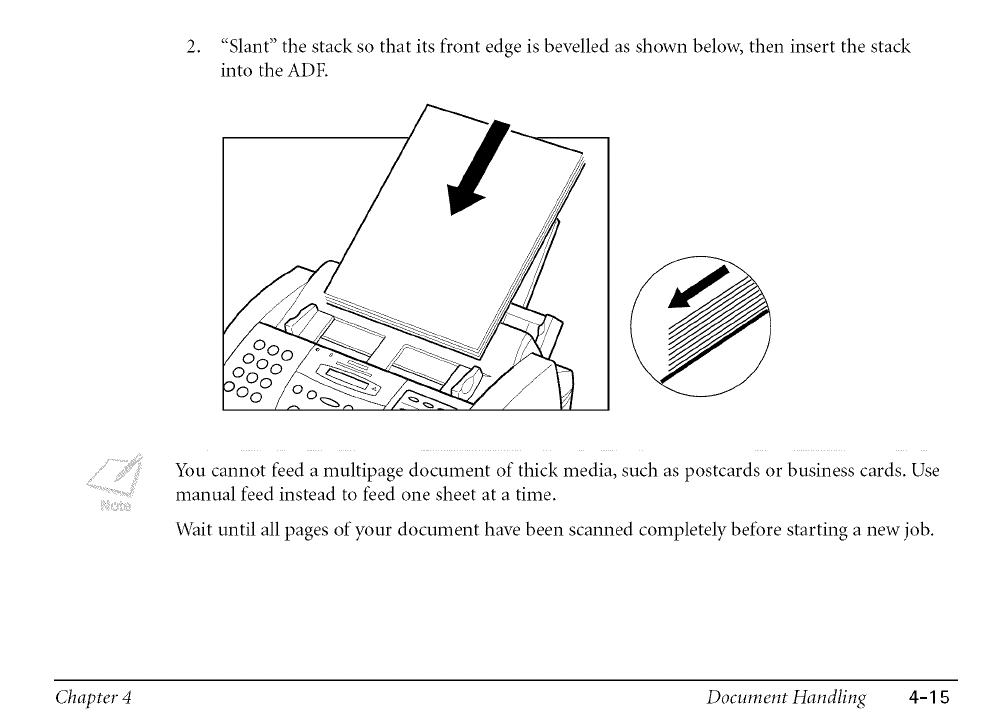
2. "Slant"thestacksothatitsfrontedgeisbevelledasshownbelow,theninsertthestack
intotheADF.
Youcannotfeedamultipagedocumentofthickmedia,suchaspostcardsorbusinesscards.Use
manualfeedinsteadtofeedonesheetatatime.
Waituntilallpagesofyourdocumenthavebeenscannedcompletelybeforestartinganewjob.
Chapter 4 Document Handling 4-1 S
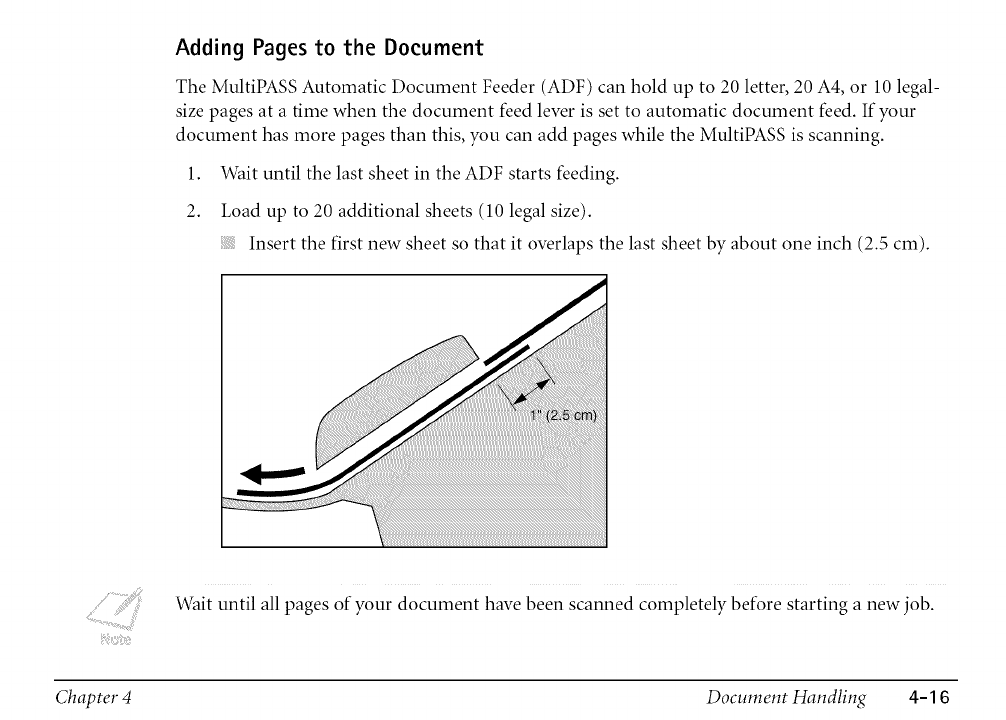
Adding Pages to the Document
The MultiPASS Automatic Document Feeder (ADF) can hold up to 20 letter, 20 A4, or 10 legal-
size pages at a time when the document feed lever is set to automatic document feed. If your
document has more pages than this, you can add pages while the MultiPASS is scanning.
1. Wait until the last sheet in the ADF starts feeding.
2. Load up to 20 additional sheets (10 legal size).
Insert the first new sheet so that it overlaps the last sheet by about one inch (2.5 cm).
Wait until all pages of your document have been scanned completely before starting a new job.
Chapter 4 Document Handling 4-1 6

Loading Documents for Manual Feed
1. Open the document tray.
Chapter 4 Document Handling 4-1 7
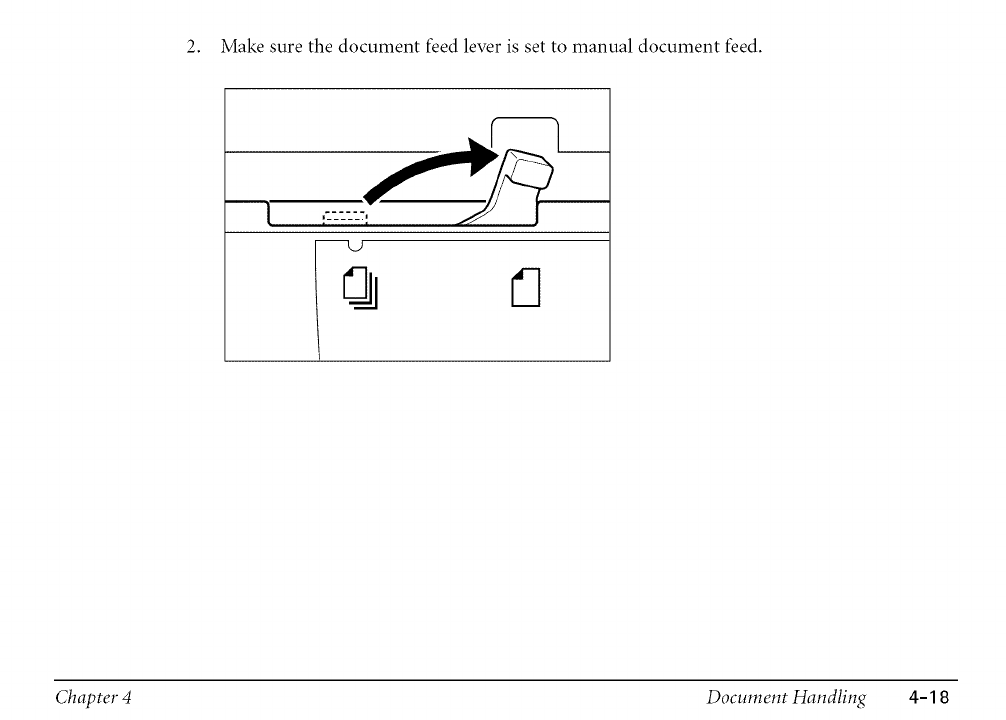
2. Make sure the document feed lever is set to manual document feed.
5]
Chapter 4 Document Handling 4-1 8
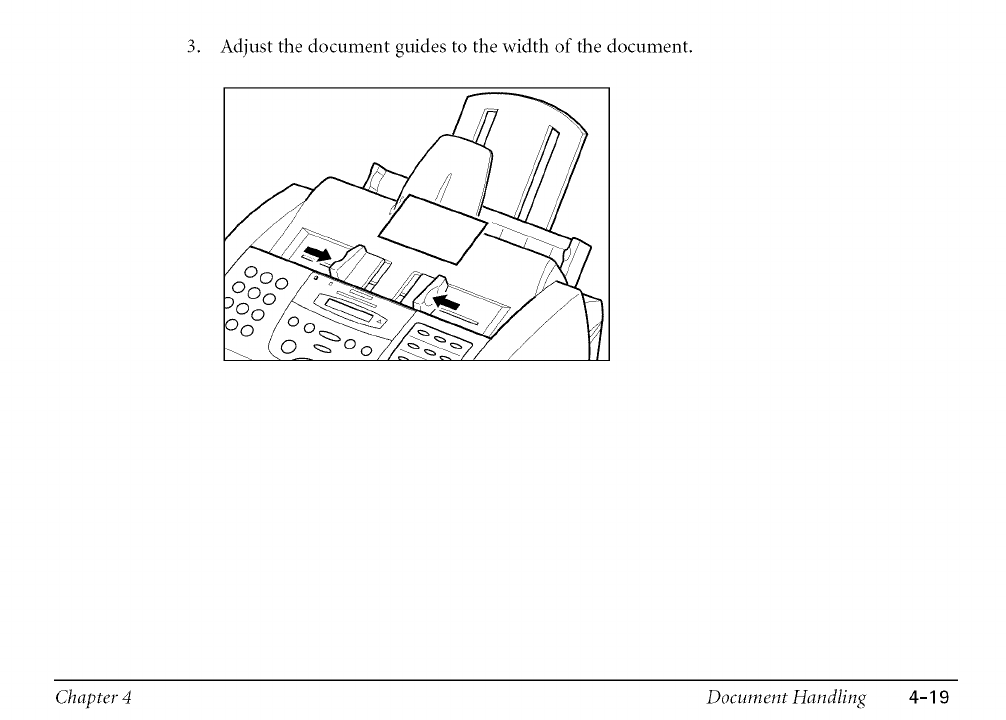
3. Adjust the document guides to the width of the document.
Chapter 4 Document Handling 4-19
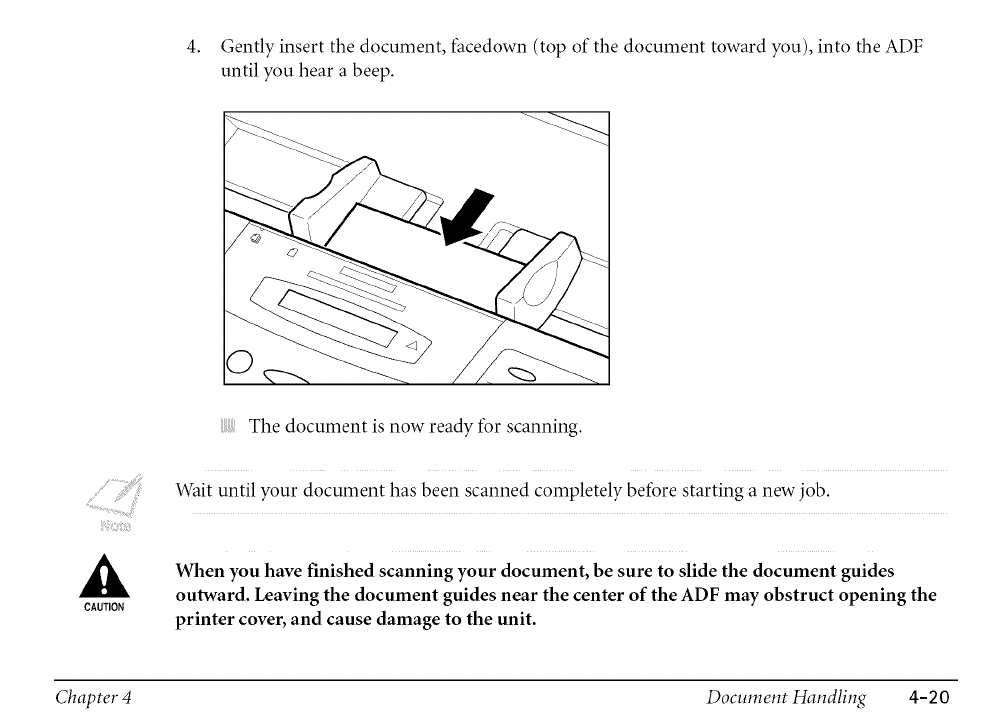
4. Gently insert the document, facedown (top of the document toward you), into the ADF
until you hear a beep.
CAUTION
The document is now ready for scanning.
Wait until your document has been scanned completely before starting a new job.
When you have finished scanning your document, be sure to slide the document guides
outward. Leaving the document guides near the center of the ADF may obstruct opening the
printer cover, and cause damage to the unit.
Chapter 4 Document Handling 4-20
One of the convenient features of your MultiPASS is its ability to make up to 99 high-quality
black & white copies. It can also make one color copy of a document at a time.
Be sure to adjust the document feed lever before loading your document.
Selecting Automatic/Manual Document Feed
1. Open the document tray.
2. Prepare the document and load it, facedown, in the ADF.
The LCD display shows the following:
Curre,,tlyu, edm mory: ..............
Standby to scan: Docu MENT READy .....
3. Select color or black & white copying.
"_'.'Oolor/B&W For color copying, press Color/B&W to turn on its light.
00olor /B&W For black & white copying, make sure the Color/B&W light is off. If the Color/B&W
light is on, press Color/B&W to turn it off.
Chapter 4 Document Handling 4-21
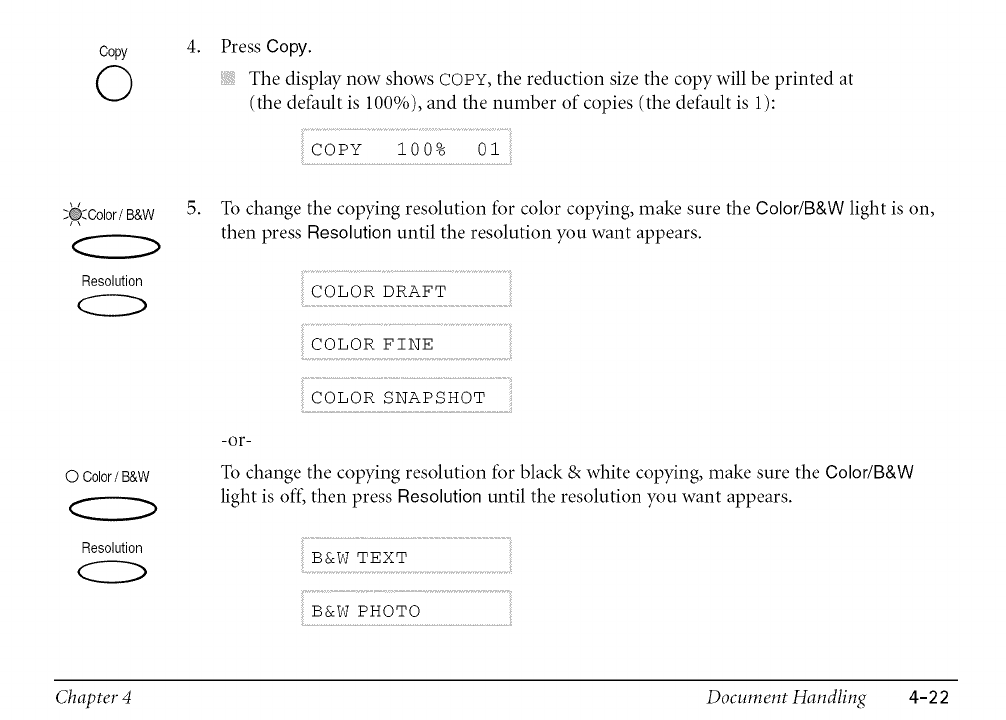
Copy
©
4. Press Copy.
The display now shows COPY, the reduction size the copy will be printed at
(the default is 100%), and the number of copies (the default is 1):
COPY 100% Ol
:_:Color /B&W
Resolution
0 Color/B&W
Resolution
5. To change the copying resolution for color copying, make sure the Color/B&W light is on,
then press Resolution until the resolution you want appears.
COLOR DRAFT
........................................................................................
COLOR FINE
COLOR SNAPSHOT
-or-
To change the copying resolution for black & white copying, make sure the Color/B&W
light is off, then press Resolution until the resolution you want appears.
B&W TEXT
B&W PHOTO
Chapter 4 Document Handling 4-2 2
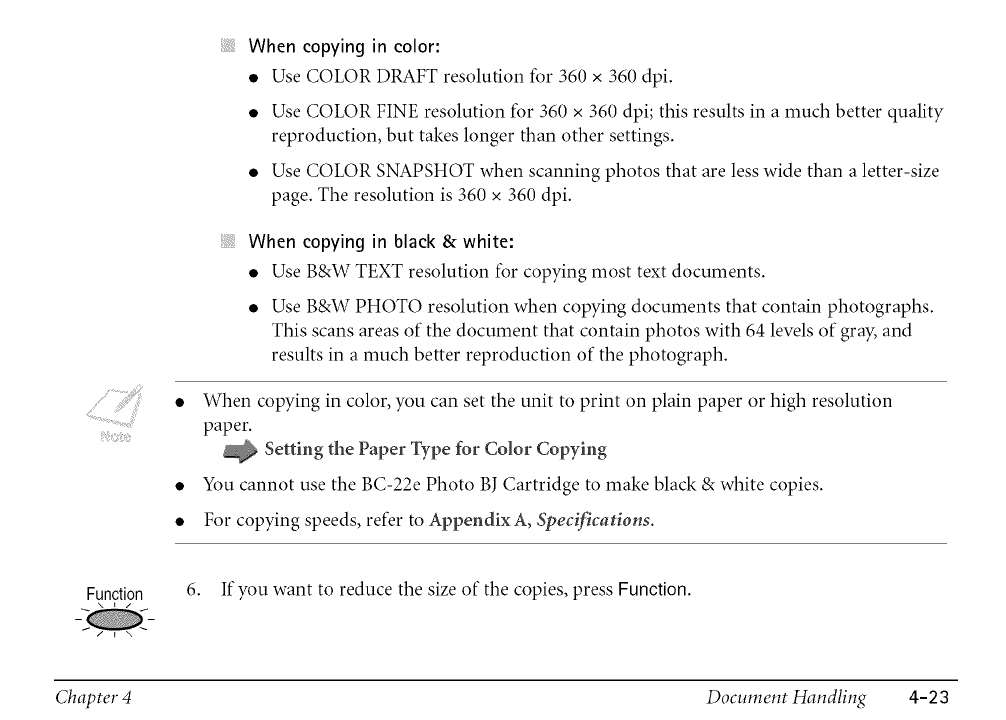
When copying in color:
•Use COLOR DRAFT resolution for 360 x 360 dpi.
• Use COLOR FINE resolution for 360 x 360 dpi; this results in a much better quality
reproduction, but takes longer than other settings.
• Use COLOR SNAPSHOT when scanning photos that are less wide than a letter-size
page. The resolution is 360 x 360 dpi.
When copying in black &white:
• Use B&W TEXT resolution for copying most text documents.
• Use B&W PHOTO resolution when copying documents that contain photographs.
This scans areas of the document that contain photos with 64 levels of gray, and
results in a much better reproduction of the photograph.
• When copying in color, you can set the unit to print on plain paper or high resolution
paper.
× Setting the Paper Type for Color Copying
• You cannot use the BC-22e Photo BJCartridge to make black & white copies.
• For copying speeds, refer to AppendixA, Specifications.
Function 6. If you want to reduce the size of the copies, press Function.
Chapter 4 Document Handling 4-23
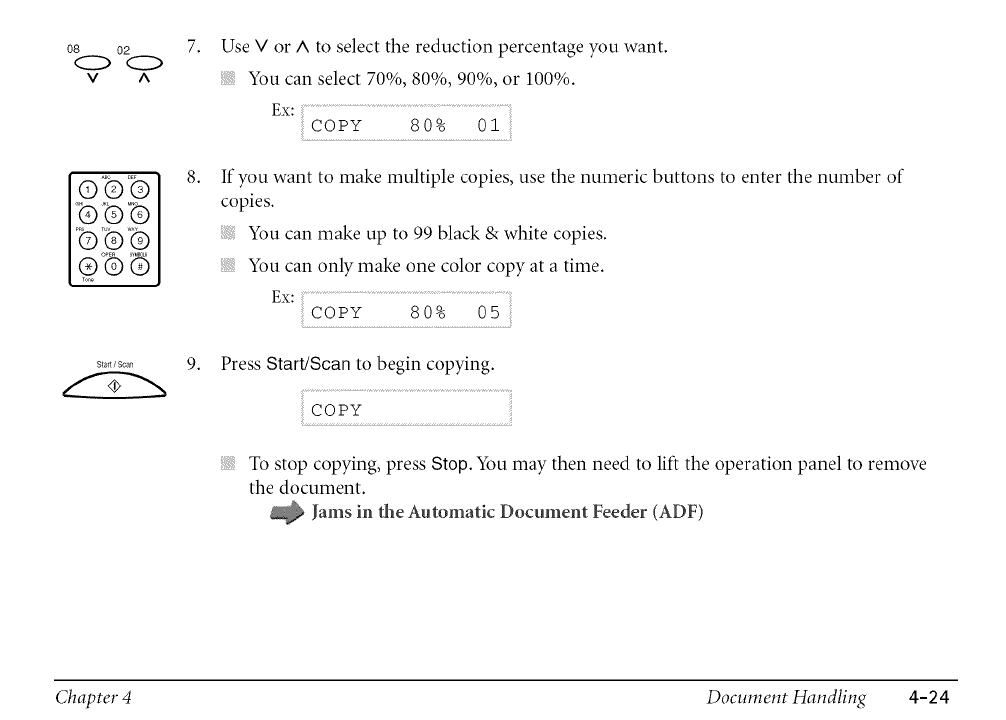
08 02
O0
v ^
ABO OEF
©©@
boPE_ sYMBo_
@®(])
7.
8.
9.
Start /Scan
Use Vor A to select the reduction percentage you want.
You can select 70%, 80%, 90%, or 100%.
tx: ...........................................................................
COPY 80% Ol
If you want to make multiple copies, use the numeric buttons to enter the number of
copies.
You can make up to 99 black & white copies.
You can only make one color copy at a time.
tx: .............................................................................
COPY 80% 05
Press Start/Scan to begin copying.
COPY
To stop copying, press Stop. You may then need to lift the operation panel to remove
the document.
Jams in the Automatic Document Feeder (ADF)
Chapter 4 Document Handling 4-24
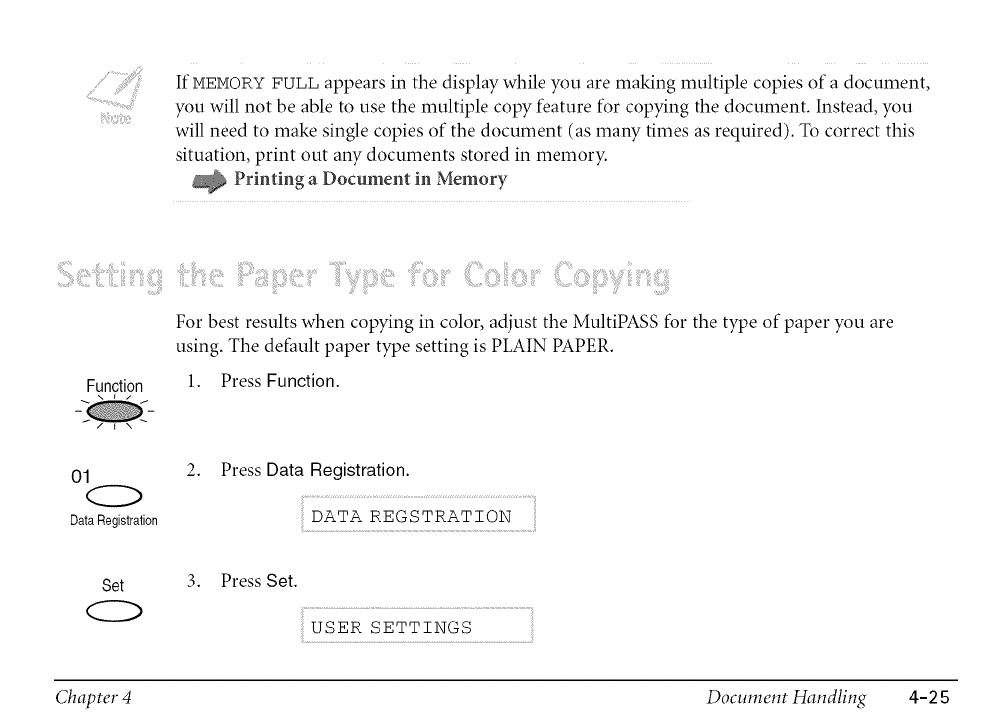
If MEMORYFULL appears in the display while you are making multiple copies of a document,
you will not be able to use the multiple copy feature for copying the document. Instead, you
will need to make single copies of the document (as many times as required). To correct this
situation, print out any documents stored in memory.
Printing a Document in Memory
Function
i!_k:9_:i_!_i_:i::::!::_i!iii?i%ii_p_i_:i::::!::_!_!_!¸¸_¸¸¸¸%!!ii_iip_i_i::!:_iii!i!ii%:x¸ iOi_,:::;i_,{iiiiio_!_!_!¸_¸¸¸¸iOi_,:::;i_,p':%_i_iiiiii_!_!_!"i!_:!i_!!iiiiii{!ii!iiii
For best results when copying in color, adjust the MultiPASS for the type of paper you are
using. The default paper type setting is PLAIN PAPER.
1. Press Function.
01
DataRegistration
2. Press Data Registration.
DATA REGSTRATION
Set 3. Press Set.
USER SETTINGS
Chapter 4 Document Handling 4-2 5
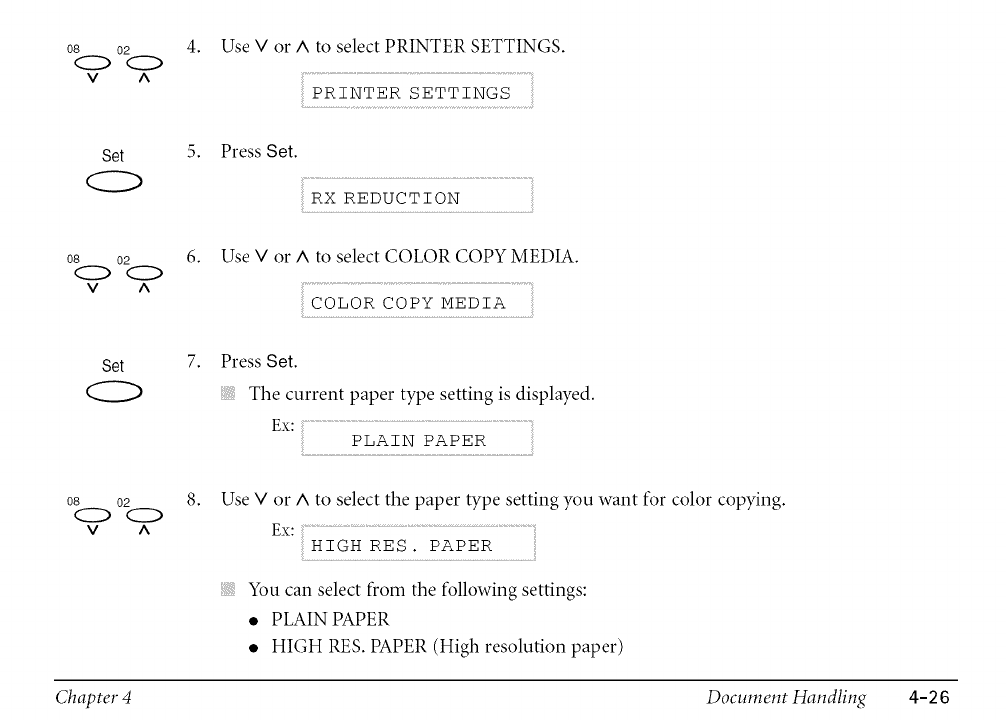
08 02
OO
v A
4. Use V or ^ to select PRINTER SETTINGS.
PRINTER SETTINGS
Set 5. Press Set.
RX REDUCTION
08 02
C::) <Z::)
v ^
6. Use V or A to select COLOR COPY MEDIA.
COLOR COPY MEDIA
Set 7. Press Set.
The current paper type setting is displayed.
tx: ..............................................................................
PLAIN PAPER
08 02
<2Z_O
v A
8. Use V or A to select the paper type setting you want for color copying.
tx: ...........................................................................................................
HIGH RES. PAPER
You can select from the following settings:
• PLAIN PAPER
• HIGH RES. PAPER (High resolution paper)
Chapter 4 Document Handling 4-2 6
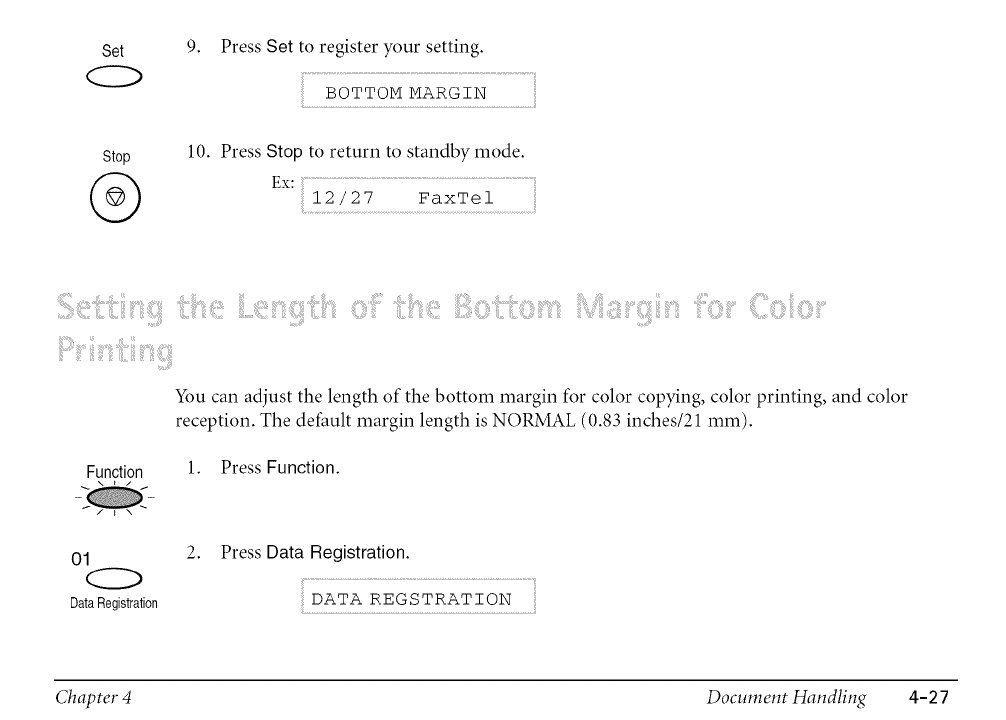
Set
Stop
@
9. Press Set to register your setting.
BOTTOM MARGIN
10. Press Stop to return to standby mode.
Ex: ...................................................................................
12/27 FaxTel
You can adjust the length of the bottom margin for color copying, color printing, and color
reception. The default margin length is NORMAL (0.83 inches/21 mm).
Function 1. Press Function.
01
DataRegistration
2. Press Data Registration.
DATA REGSTRATION
Chapter 4 Document Handling 4-2 7
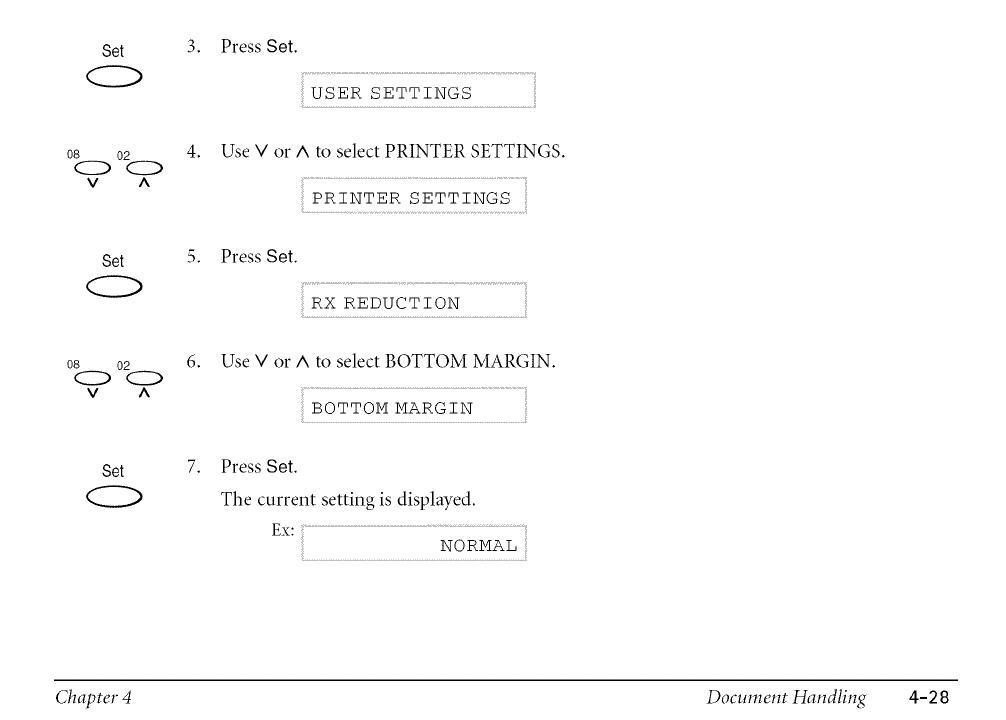
Set
08 02
oO
v A
Set
08 02
O0
v ^
Set
3. Press Set.
USER SETTINGS
4. Use V or A to select PRINTER SETTINGS.
PRINTER SETTINGS
5. Press Set.
RX REDUCTION
6. Use V or A to select BOTTOM MARGIN.
BOTTOM MARGIN
7. Press Set.
The current setting is displayed.
Ex: ......................................................................................
NORMAL
Chapter 4 Document Handling 4-2 8
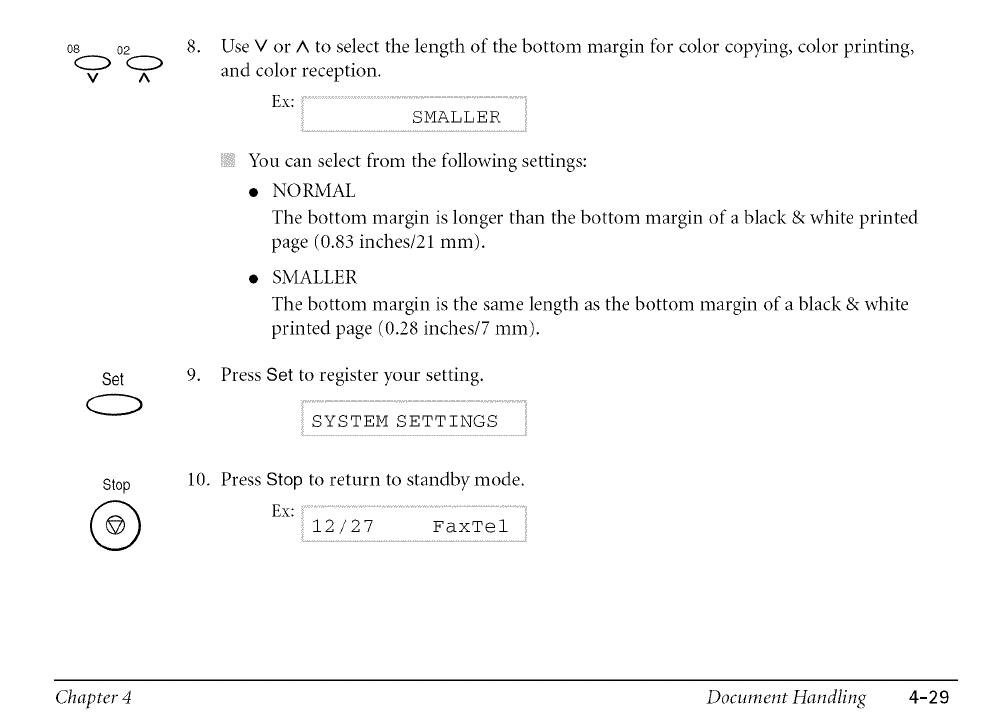
08 02
OO
v ^
Set
Stop
@
8.
9.
Use Vor A to select the length of the bottom margin for color copying, color printing,
and color reception.
Ex: ...........................................................................................
SMALLER
You can select from the following settings:
• NORMAL
The bottom margin is longer than the bottom margin of a black & white printed
page (0.83 inches/21 mm).
• SMALLER
The bottom margin is the same length as the bottom margin of a black & white
printed page (0.28 inches/7 mm).
Press Set to register your setting.
SYSTEM SETTINGS
10. Press Stop to return to standby mode.
tx: ...............................................................................
12/27 FaxTel
Chapter 4 Document Handling 4-29
iiii!!!i!!!i!iii!iiii_iiiii!!:!i¸!!_iii!_!iiiiiii_!!!!!i!iliiiiiiiii!!_iii!!!!!!!!iiiiiiii!i!i!ii!iiiiiiii:_::::iiii!ii;_i_i;_i::_iiiii!!:!i¸i!_!!;;
This chapter describes how to use your MultiPASS to send faxes and how to use the special dialing
features.
Preparing to Send a Fax .............................................................................................................. 5-3
® Adiusting the Quality of Your Faxes...................................................................................... 5-3
® Dialing Methods ..................................................................................................................... 5-7
Sending Methods ......................................................................................................................... 5-9
® Memory Sending .................................................................................................................... 5-9
® Manual Sending .................................................................................................................... 5-12
Canceling Sending ..................................................................................................................... 5-15
® Removing the Document From the Automatic Document Feeder (ADF) ....................... 5-16
Redialing When the Line Is Busy.............................................................................................. 5-19
® Manual Redialing .................................................................................................................. 5-19
® Automatic Redialing ............................................................................................................. 5-19
Sequential Broadcasting ............................................................................................................ 5-22
® Sending a Document to More Than One Destination ....................................................... 5-22
Chapter 5 Sending Faxes S-1
Delayed Sending ........................................................................................................................ 5-27
® Sending Other Documents While the MultiPASS Is Set t_r Delayed Sending ................ 5-27
Documents Stored in Memory ................................................................................................. 5-28
® Printing a List of Documents in Memory .......................................................................... 5-28
® Printing a Document in Memory ........................................................................................ 5-29
® Deleting a Document From Memory .................................................................................. 5-34
Special Dialing ........................................................................................................................... 5-36
® Dialing Through a Switchboard .......................................................................................... 5-36
® Dialing a Long Distance Number ........................................................................................ 5-37
Switching Temporarily to Tone Dialing ................................................................................... 5-39
Chapter 5Sending Faxes S-2
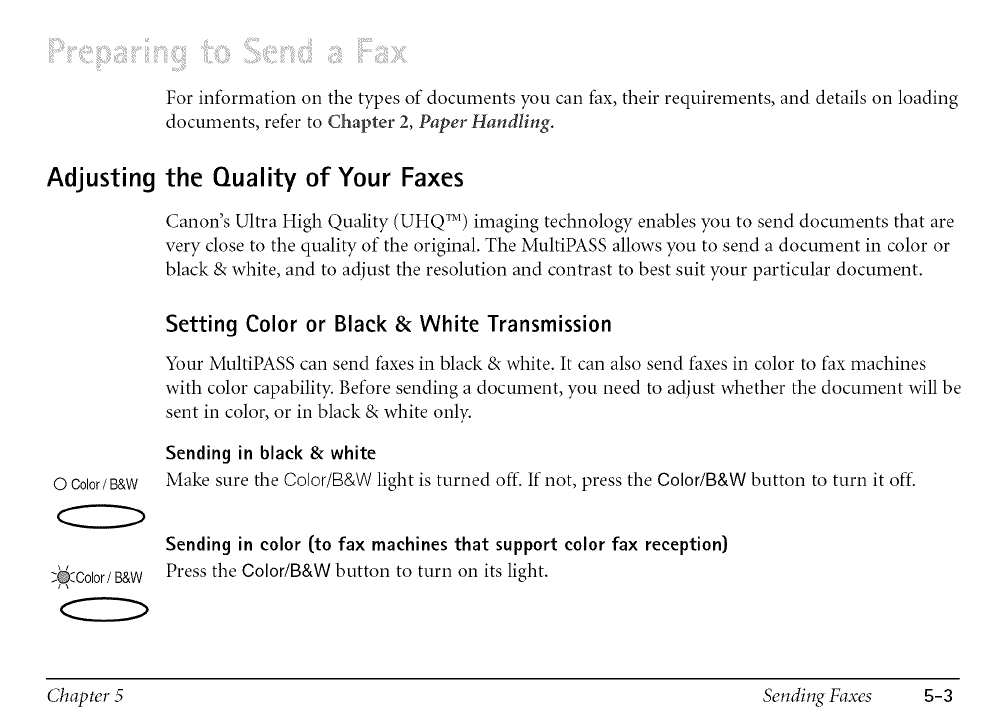
For information on the types of documents you can fax, their requirements, and details on loading
documents, refer to Chapter 2, Paper Handling.
Adjusting the Quality of Your Faxes
Canon's Ultra High Quality (UHQ TM) imaging technology enables you to send documents that are
very close to the quality of the original. The MultiPASS allows you to send a document in color or
black &white, and to adjust the resolution and contrast to best suit your particular document.
© Color /B&W
Setting Color or Black & White Transmission
Your MuItiPASS can send faxes in black & white. It can also send faxes in color to fax machines
with color capability. Before sending a document, you need to adjust whether the document will be
sent in color, or in black & white only.
Sending in black & white
Make sure the Color/B&W light is turned off. If not, press the Color/B&W button to turn it off.
Sending in color (to fax machines that support color fax reception}
:_:Color/B&W Press the Color/B&W button to turn on its light.
Chapter 5 Sending Faxes 5-3
If you send a color document to a fax machine that does not support color faxing, the document
will not be sent, and the LCD display will show this message: TRY AGAIN TN B/W. Try sending
again in black & white.
0 Color /B&W
Setting the Scanning Resolution
Resolution is a measure of the fineness or clarity of a printout and is usually expressed in
horizontal and vertical dots per inch (dpi). Low resolutions may cause text and graphics to have
a jagged appearance, while higher resolutions provide smoother curves and lines, crisp text and
graphics, and a better match to traditional typeface designs.
You can set the scanning resolution for the documents you send.
The higher the resolution, the higher the quality of output, but the slower the scanning speed.
Setting the resolution for black & white sending
1. Make sure the Color/B&W light is turned off.
If not, press the Color/B&W button to turn it off.
Chapter 5 Sending Faxes 5-4
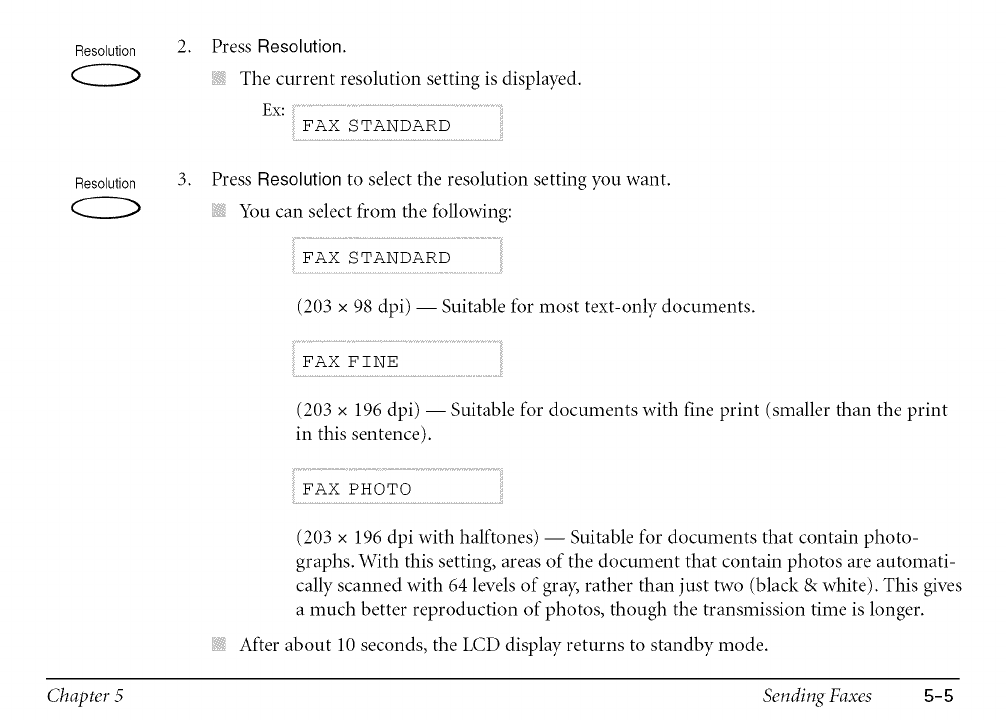
Resolution
Resolution
2. Press Resolution.
ii!!i_!_!!!!!{_i!iiiii_i{
The current resolution setting is displayed.
tx: ................................................................
FAX STANDARD
3. Press Resolution to select the resolution setting you want.
You can select from the following:
(203 x 98 dpi) -- Suitable for most text-only documents.
....FAX FINE ......................................
(203 x 196 dpi) -- Suitable for documents with fine print (smaller than the print
in this sentence).
FAX PHOTO
(203 x 196 dpi with halftones) -- Suitable for documents that contain photo-
graphs. With this setting, areas of the document that contain photos are automati-
cally scanned with 64 levels of gray, rather than just two (black & white). This gives
a much better reproduction of photos, though the transmission time is longer.
After about 10 seconds, the LCD display returns to standby mode.
Chapter 5 Sending Faxes 5-5
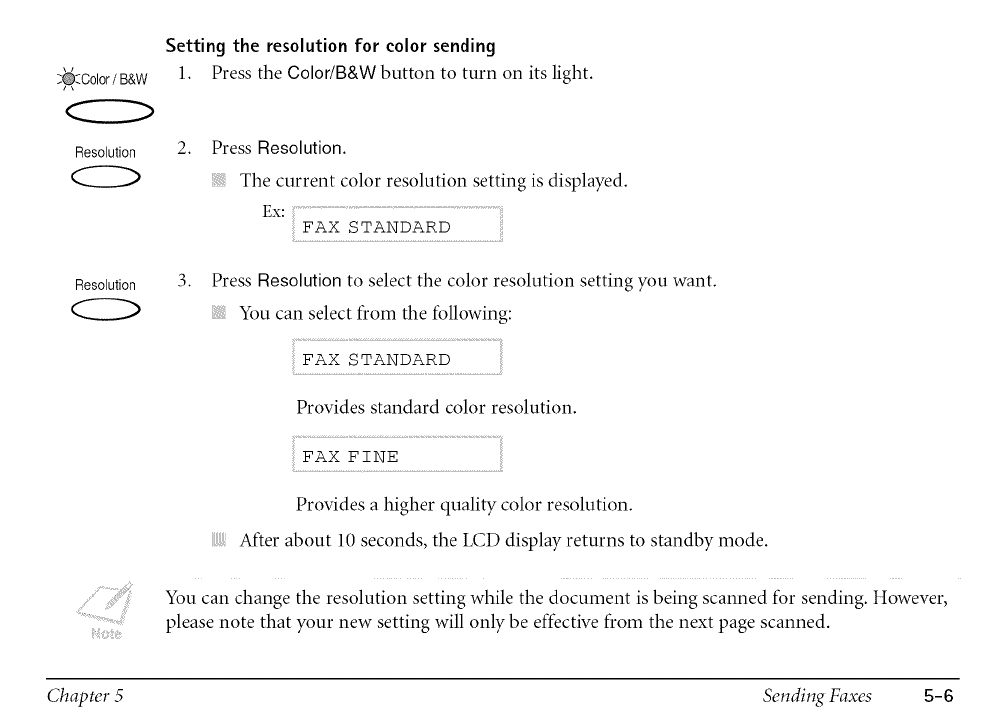
Setting the resolution for color sending
%_'2Color/B&W 1. Press the Color/B&W button to turn on its light.
Resolution 2. Press Resolution.
Resolution
ii!!i_!_!!!!!{_i!iiiii_i{
The current color resolution setting is displayed.
tx: ..........................................................................................
FAX STANDARD
3. Press Resolution to select the color resolution setting you want.
You can select from the following:
.... ANDARD.............
Provides standard color resolution.
Provides a higher quality color resolution.
After about 10 seconds, the LCD display returns to standby mode.
You can change the resolution setting while the document is being scanned for sending. However,
please note that your new setting will only be effective from the next page scanned.
Chapter 5 Sending Faxes 5-6
Setting the Scanning Contrast
Contrast is the difference in brightness between the lightest and darkest parts of a printed
document. You can adjust the contrast the MultiPASS uses to send faxes. Adjust the contrast
according to how light or dark your document is.
You can set the scanning contrast from the MultiPASS Desktop Manager. If you are using the
Desktop Manager, see the online MuttiPASS Desktop Manager SoftwareGuide for details.
If you are not using the Desktop Manager, you can set the contrast using the operation panel. See
the online Stand-atone Fax Manual.
Dialing Methods
There are several ways of dialing the number of the party you want to send to:
Regular Dialing
Dial a fax number by using the numeric buttons, just like dialing a telephone number.
One-Touch Speed Dialing
Dial a fax number by pressing the one-touch speed dialing button (01 to 12) that the number
is assigned to. For details on registering and using one-touch speed dialing, see the online
MuttiPASS Desktop Manager Software Guide. If you are using your MultiPASS as a standalone
fax, see the online Stand-alone Fax Manual.
Chapter 5 Sending Faxes 5-7
Coded Speed Dialing
Dial a fax number by pressing the Coded Dial button followed by the two-digit code (00 to 99)
that the number is assigned to. For details on registering and using coded speed dialing, see the
online MuttiPASS Desktop Manager Software Guide. If you are using your MultiPASS as a
stand-alone fax, see the online Stand-alone Fax Manual.
Group Dialing
Send a document to a predefined group of fax numbers. (The numbers must already be
registered under one-touch speed dialing buttons or coded speed dialing codes.) For details on
creating groups and using group dialing, see the online MuttiPASS Desktop Manager Software
Guide. If you are using your MultiPASS as a stand-alone fax, see the online Stand-alone Fax
Manual.
PC Dialing
Dial a fax number from your computer using the MultiPASS Desktop Manager. (See the online
MuttiPASS Desktop Manager Software Guide for details.)
Chapter 5 Sending Faxes 5-8
This section describes the methods and advantages of the two main sending methods.
Memory sending
Allows you to send a document easily and quickly.
Manual sending
Allows you to talk to the other party before you send the document.
Memory Sendin9
Memory sending is a quick and easy way to send a document. The MultiPASS scans the document
into its memory, and as the first page of a multipage document is being scanned, the unit begins
calling the other party and transmitting the information even as the remaining pages are being
scanned.
Because the MultiPASS is multitasking, you can even scan a document into memory while sending
another document, receiving a document, or printing a report.
The MultiPASS C560 has enough memory to store up to 80 pages.* The MultiPASS C530 has
enough memory to store up to 42 pages.* Fewer pages can be stored if the document contains
many graphics or particularly dense text. (*Based on ITU-T/CCITT No. 1 Chart, standard mode.)
Be sure to adjust the document feed lever before loading your document.
Selecting Automatic/Manual Document Feed
Chapter 5 Sending Faxes 5-9
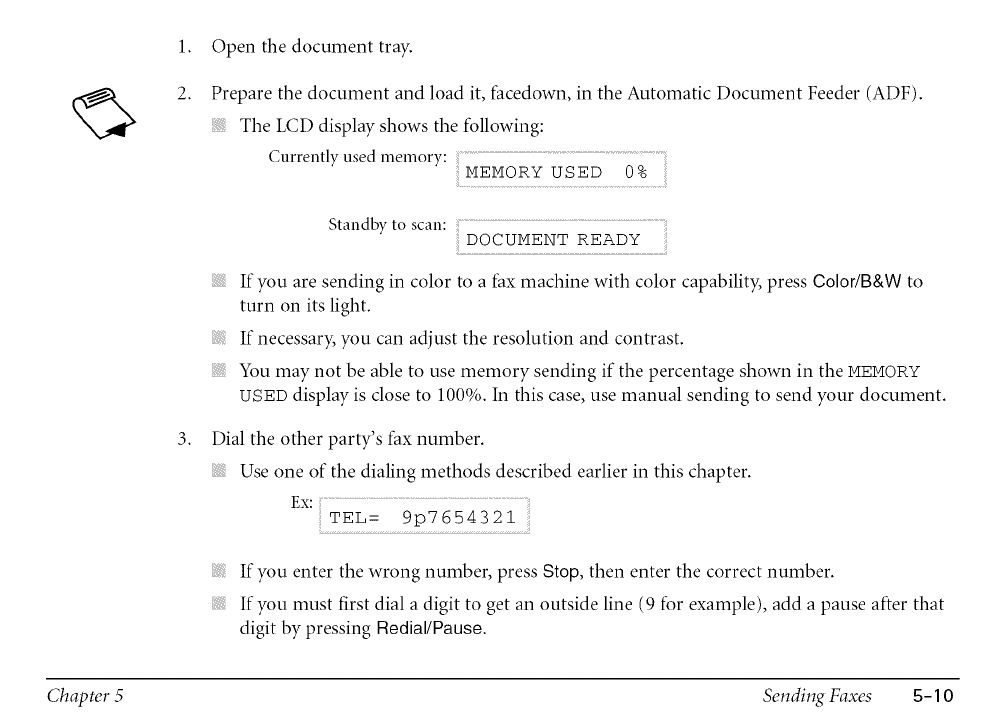
%
1.
2.
3.
Open the document tray.
Prepare the document and load it, facedown, in the Automatic Document Feeder (ADF).
The LCD display shows the following:
Currently used memory: ...........................................................................................
MEMORY USED 0%
Standby to scan: DOCUMENT READY
If you are sending in color to a fax machine with color capability, press Color/B&W to
turn on its light.
If necessary, you can adjust the resolution and contrast.
You may not be able to use memory sending if the percentage shown in the MEMORY
USED display is close to 100%. In this case, use manual sending to send your document.
Dial the other party's fax number.
Use one of the dialing methods described earlier in this chapter.
Ex: ...................................................................
TE ,: 9pV654721
If you enter the wrong number, press Stop, then enter the correct number.
If you must first dial a digit to get an outside line (9 for example), add a pause after that
digit by pressing Redial/Pause.
Chapter 5Sending Faxes 5-10
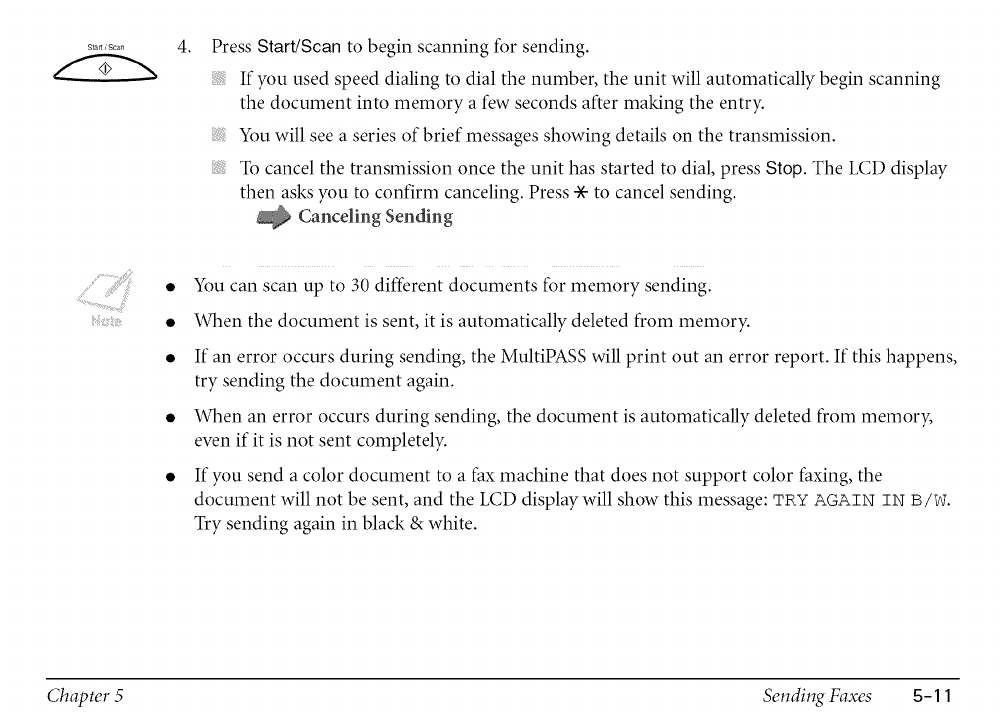
4. Press Start/Scan to begin scanning for sending.
If you used speed dialing to dial the number, the unit will automatically begin scanning
the document into memory a few seconds after making the entry.
You will see a series of brief messages showing details on the transmission.
To cancel the transmission once the unit has started to dial, press Stop. The LCD display
then asks you to confirm canceling. Press * to cancel sending.
÷Canceling Sending
• You can scan up to 30 different documents for memory sending.
• When the document is sent, it is automatically deleted from memory.
• If an error occurs during sending, the MultiPASS will print out an error report. If this happens,
try sending the document again.
• When an error occurs during sending, the document is automatically deleted from memory,
even if it is not sent completely.
• If you send a color document to a fax machine that does not support color faxing, the
document will not be sent, and the LCD display will show this message: TRY AGAIN IN B/W.
Try sending again in black & white.
Chapter 5 Sending Faxes 5-11
Manual Sending
Manual sending allows you to talk to the other party before you send the document. This method
is useful if the other party must manually set their fax machine to receive before they can receive a
fax.
To use this mode, you need to connect a telephone to your MultiPASS.
1. Open the document tray.
2. Prepare the document and load it, facedown, in the ADF.
The LCD display shows the following:
Currently used memory: ............................................................
MEMORY USED 0%
Standby to scan: ....................................................................................
DOCUMENT READY
If you are sending in color to a fax machine with color capability, press Color/B&W to
turn on its light.
If necessary, you can adjust the resolution and contrast.
Chapter 5 Sending Faxes 5-1 2

Hook
®3. Press Hook.
TEL=
4.
5.
You can also lift the handset of the telephone or extension phone connected to your unit
instead of pressing Hook.
You can adjust the volume of the speaker. If you are using the MultiPASS Desktop
Manager, see the online MuhiPASS Desktop Manager Software Guide. If you are using the
Operation panel, see the online Stand-alone Fax Manual.
Dial the other party's telephone/fax number.
tx: .............................................................................................
TEL: 7654321
Use one of the dialing methods described earlier in this chapter.
If you make a mistake during dialing, press Hook or put down the handset and start again
from step 3.
When you hear the other party answer the call, pick up the handset and you can talk.
If you pressed Hook in step 3 instead of lifting the handset, you will hear the other party's
voice but they will not be able to hear you through the speaker. Pick up the handset to
talk to the other party.
If you hear a high-pitched signal, instead of the other party's voice, press Start/Scan. If
you picked up the handset to dial, hang up the handset. The unit will begin sending the
document.
Chapter 5 Sending Faxes 5-13
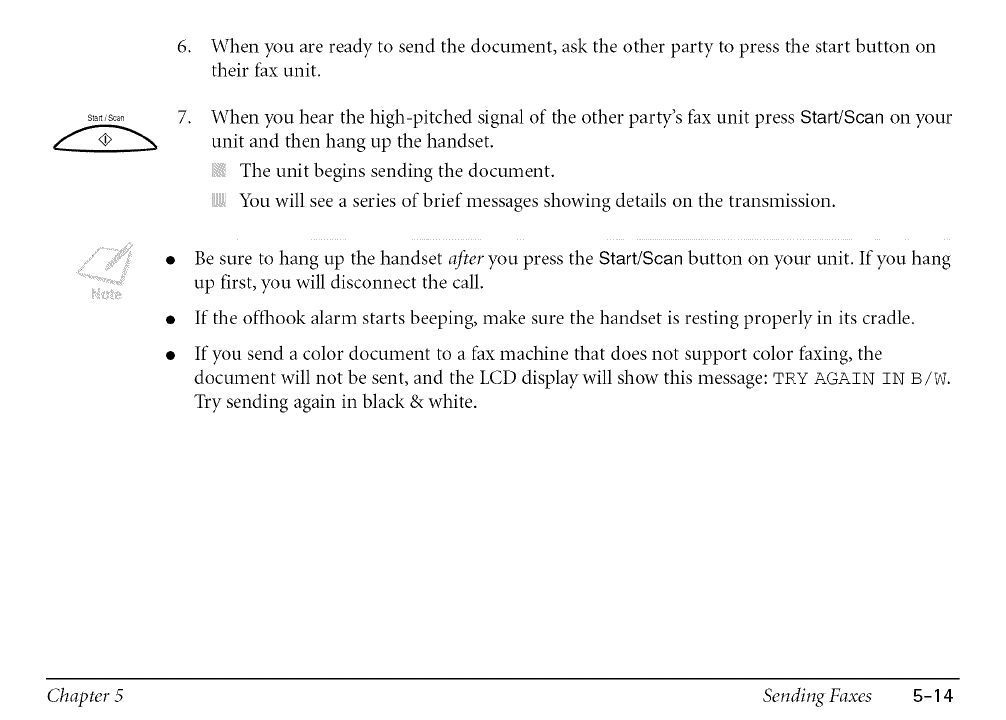
Stab/Scan
6. When you are ready to send the document, ask the other party to press the start button on
their fax unit.
7. When you hear the high-pitched signal of the other party's fax unit press Start/Scan on your
unit and then hang up the handset.
The unit begins sending the document.
You will see a series of brief messages showing details on the transmission.
Be sure to hang up the handset after you press the Start/Scan button on your unit. If you hang
up first, you will disconnect the call.
If the offhook alarm starts beeping, make sure the handset is resting properly in its cradle.
If you send a color document to a fax machine that does not support color faxing, the
document will not be sent, and the LCD display will show this message: TRY AGAIN IN B/W.
Try sending again in black & white.
Chapter 5 Sending Faxes 5-14
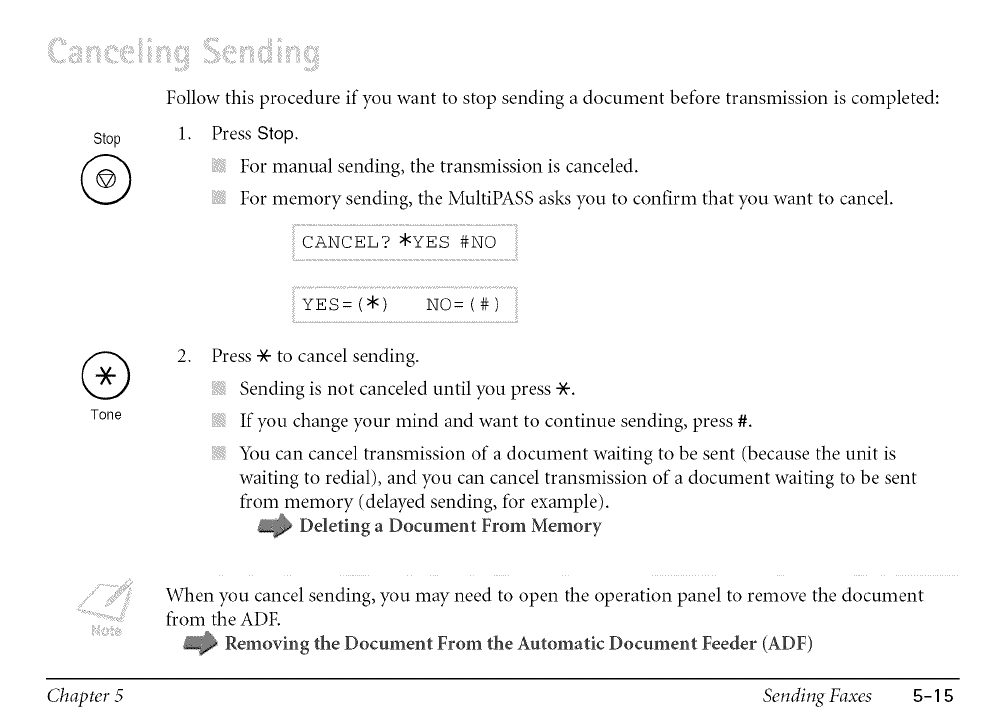
Follow this procedure if you want to stop sending a document before transmission is completed:
Stop 1. Press Stop.
For manual sending, the transmission is canceled.
For memory sending, the MultiPASS asks you to confirm that you want to cancel.
CANCEL? _YES #NO
YES:(9_) NO:(#)
®
Tone
2. Press -)(-to cancel sending.
Sending is not canceled until you press -)(-.
If you change your mind and want to continue sending, press #.
You can cancel transmission of a document waiting to be sent (because the unit is
waiting to redial), and you can cancel transmission of a document waiting to be sent
from memory (delayed sending, for example).
Deleting a Document From Memory
When you cancel sending, you may need to open the operation panel to remove the document
from the ADF.
Removing the Document From the Automatic Document Feeder (ADF)
Chapter 5 Sending Faxes 5-15
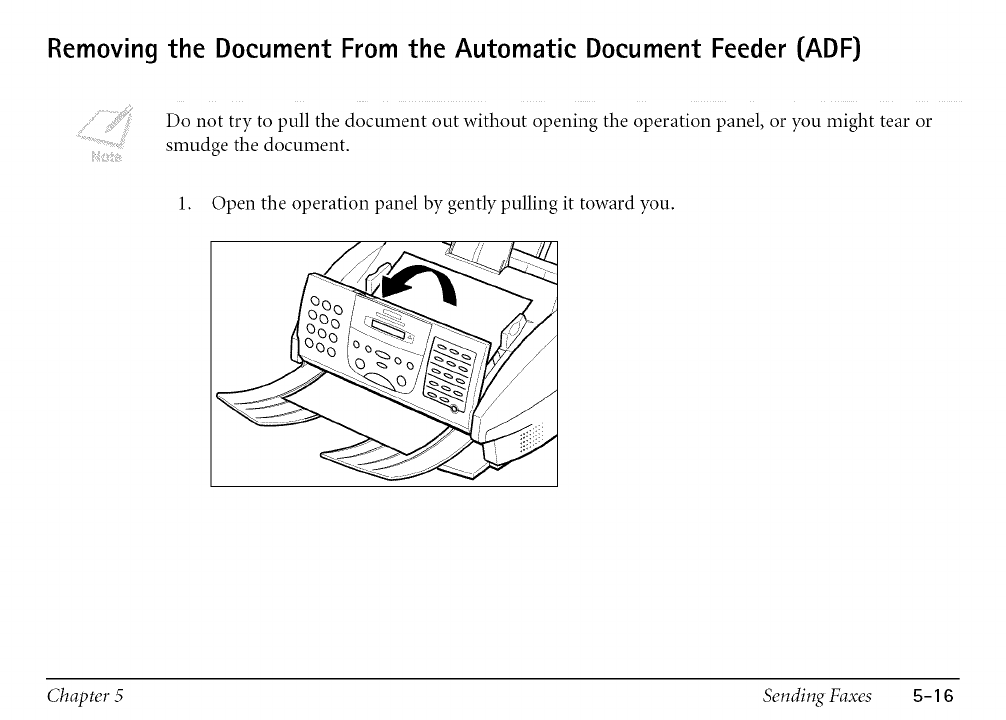
Removing the Document From the Automatic Document Feeder [ADF)
Do not try to pull the document out without opening the operation panel, or you might tear or
.............................smudge the document.
}:
1. Open the operation panel by gently pulling it toward you.
j
Chapter 5 Sending Faxes 5-16
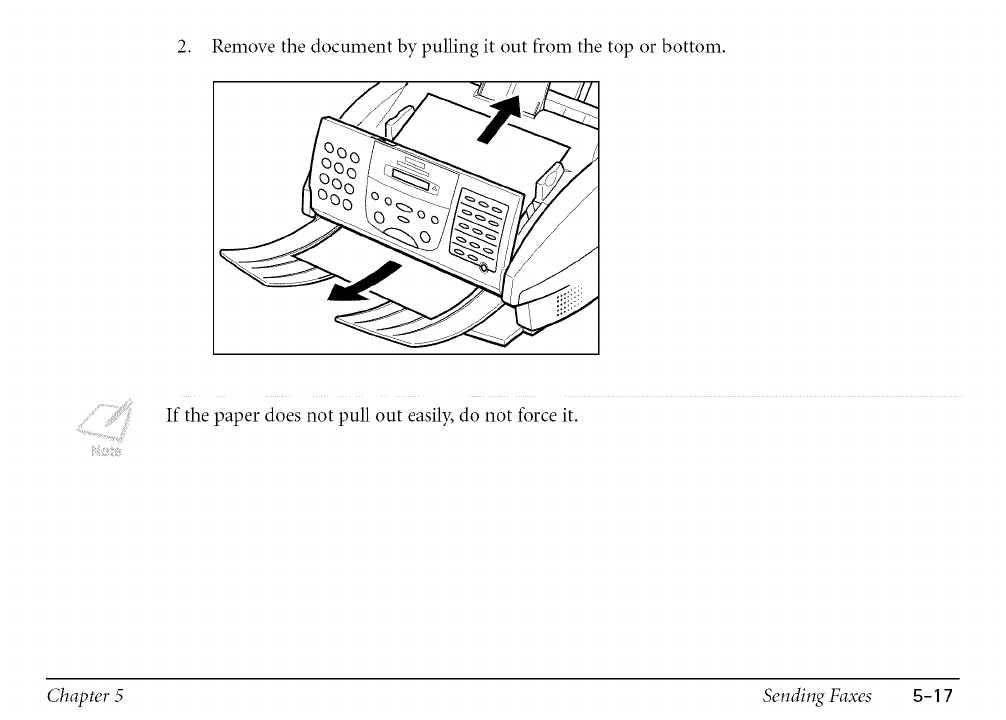
2. Remove the document by pulling it out from the top or bottom.
@
If the paper does not pull out easily, do not force it.
Chapter 5Sending Faxes S-17
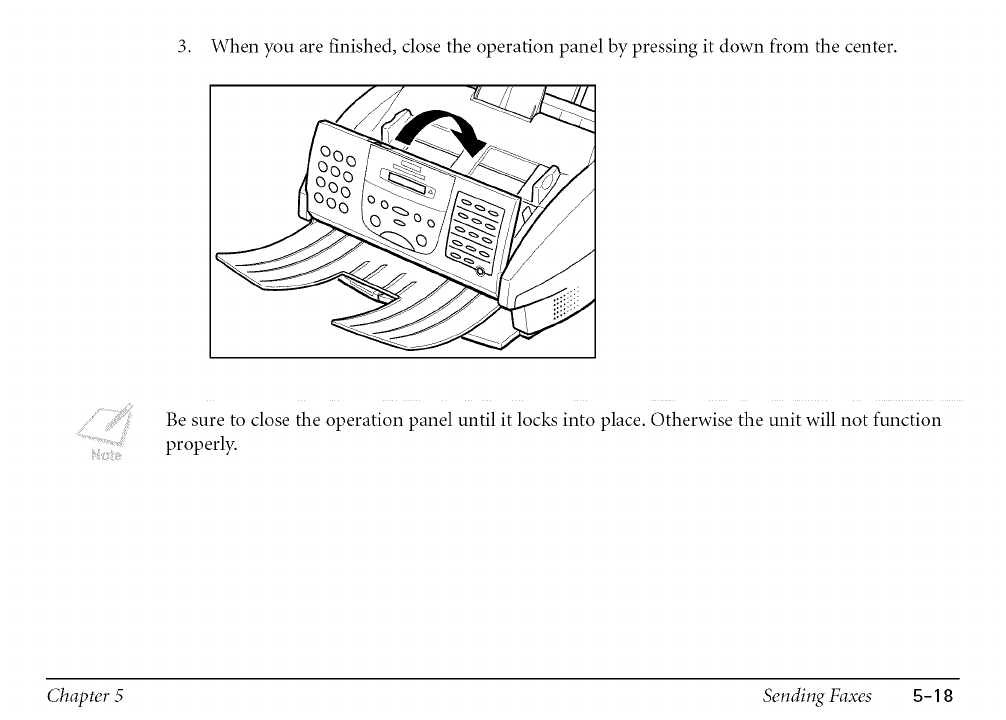
3. When you are finished, close the operation panel by pressing it down from the center.
Be sure to close the operation panel until it locks into place. Otherwise the unit will not function
properly.
Chapter 5 Sending Faxes S-18
iiiii!!i:¸_:i:iiiiiii:ii:i;:!i!:i__!ii:¸:!i;iliiiiliiii!ii!iiiil{iiliiiiiliiiii!_!!i!_!_!i;!i:ilili!ii!ii!iili;i_ii!!_iii!!!!!i!_!_ii:i:!i!:i_iii!_!!i!_!_i!;!ii:i¸!i!i!iilJ;i!_ii:i:!i!:i_iii!Liiiliiiii!_!!i!_!_ii:i:!i!:i_i!!!!i:!!ii;ili!!ili3!!iii_ii:!!ii;;ii:i!!ili_
There are two methods of redialing: manual redialing and automatic redialing.
Manual Redialin 9
Press the Redial/Pause button to dial the last number you dialed with the numeric buttons.
(This also starts redialing regardless of whether automatic redialing is enabled.)
Canceling Manual Redialing
To cancel manual redialing, press the Stop button.
Automatic Redialing
When you are using memory sending and the other party's line is busy, the unit waits a specified
time and then dials the same number again. You can set the MultiPASS to redial several times if the
previous attempts failed because the line was busy. This feature is called automatic redialing.
After the initial dial attempt, the default setting is to wait two minutes and try to dial again. If the
second attempt fails because the line was busy, the unit will again wait for two minutes and make a
final attempt to complete the call. (Even if the MultiPASS is set to redial several times, it will redial
only once if there is no tone or there is a ring back tone during the first attempt.)
You can turn automatic redialing off and on. Also, you can adjust the number of redialing attempts
and the time interval between attempts.
Chapter 5 Sending Faxes 5-19
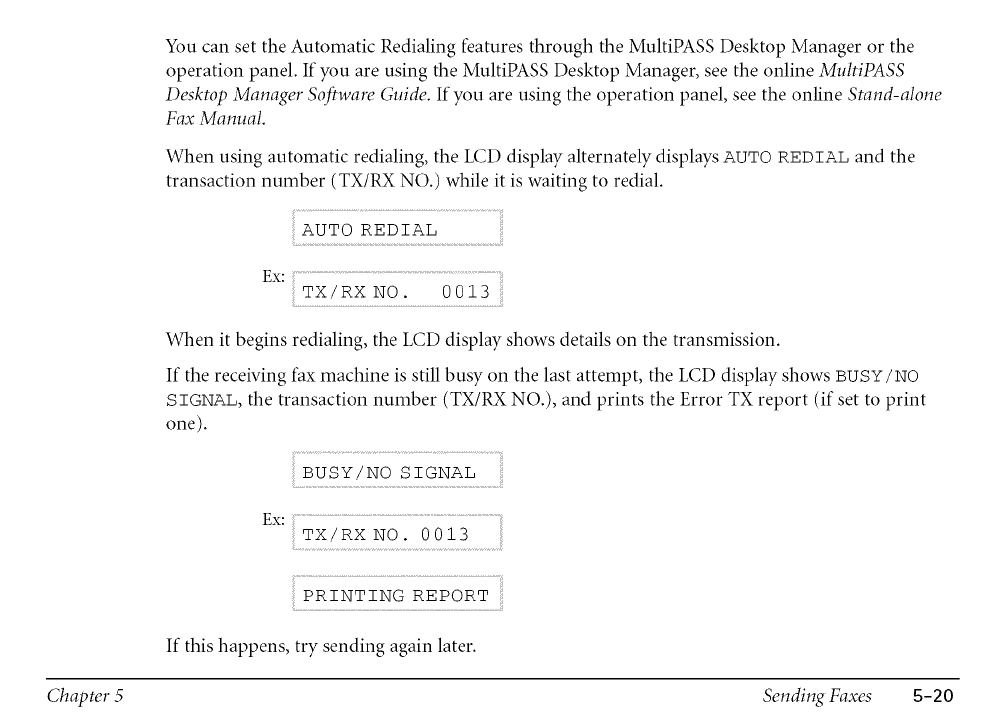
You can set the Automatic Redialing features through the MultiPASS Desktop Manager or the
operation panel. If you are using the MultiPASS Desktop Manager, see the online MuttiPASS
Desktop Manager Software Guide. If you are using the operation panel, see the online Stand-alone
Fax Manual.
When using automatic redialing, the LCD display alternately displays AUTO REDIAL and the
transaction number (TX/RX NO.) while it is waiting to redial.
AUTO REDIAL
EX: ...............................................................................................
TX!RX NO. 0013
When it begins redialing, the LCD display shows details on the transmission.
If the receiving fax machine is still busy on the last attempt, the LCD display shows BUSY/NO
SIGNAL, the transaction number (TX/RX NO.), and prints the Error TX report (if set to print
one).
BUSY!NO SIGNAL
Ex:6XiRxNOi00 .............
PRINTING REPORT
If this happens, try sending again later.
Chapter 5Sending Faxes 5-20
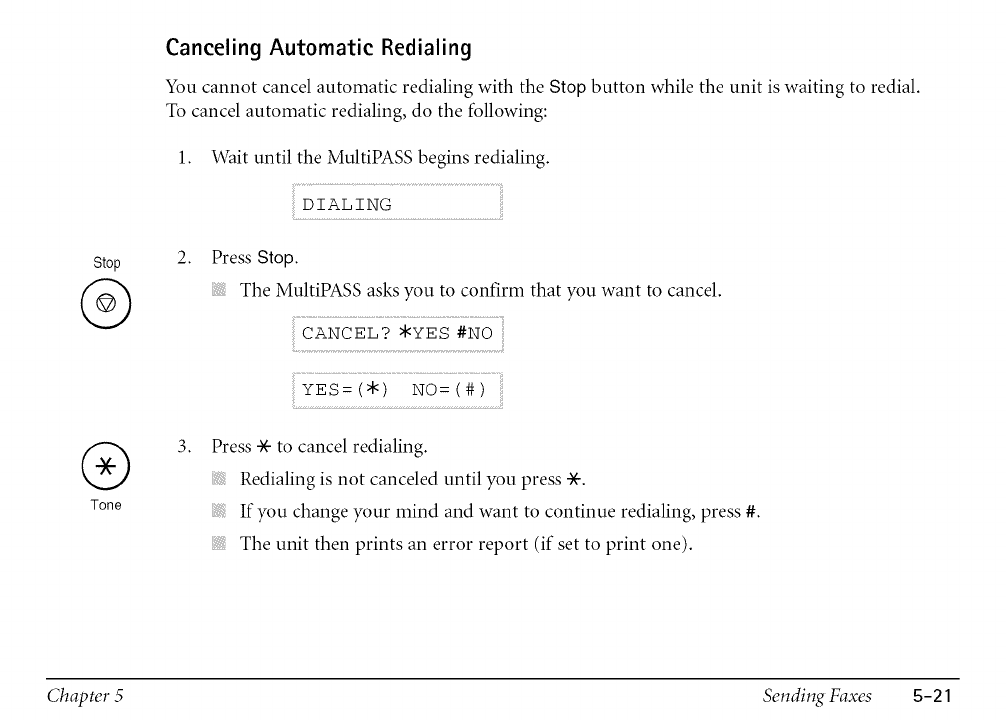
Stop
@
Canceling Automatic Redialing
You cannot cancel automatic redialing with the Stop button while the unit is waiting to redial.
To cancel automatic redialing, do the following:
1. Wait until the MultiPASS begins redialing.
DIALING
2. Press Stop.
The MultiPASS asks you to confirm that you want to cancel.
CANCEL? *YES #NO
YES=(*) NO=(#)
®
Tone
3. Press * to cancel redialing.
Redialing is not canceled until you press -X-.
If you change your mind and want to continue redialing, press #.
The unit then prints an error report (if set to print one).
Chapter 5 Sending Faxes 5-21
You control error reports through the MultiPASS Desktop Manager or the operation panel. If you
are using the MultiPASS Desktop Manager, see the online MultiPASS Desktop Manager Software
Guide. If you are using the operation panel, see the online Stand-alone Fax Manual.
You can cancel a transmission while the unit is waiting to redial.
Deleting a Document From Memory
iii!i!!i!!!i!_!iiiiiii<i!:_i!illiiii!i!i_!ii_ii_:i:!i!:__!_!!i!_i!i!ii:i¸i_iiii_ii!iiii_{iiliii!!iiii!!!!i!iiill_>_!_iiiiiiii_,_ili!ili__!ill¸ii_!i;ili_iiiii:ii__;i!ilili_:!!iiiii:i!i!iilli_iiii_!_!!i!_!i!!i_ilili!ii!_i_i
Sending a Document to More Than One Destination
Follow this procedure to scan a document once and send it to several destinations. With this
sending method, called sequential broadcasting, you can send the same document to a maximum
of 113 destinations.
This feature allows you to send a document to a number of destinations using a combination of
dialing methods as follows:
One-touch speed dialing: up to 12 destinations
Coded speed dialing: up to 100 destinations
Regular dialing (using the numeric buttons): one destination
Chapter 5 Sending Faxes 5-22
You can enter the one-touch speed dialing and coded speed dialing destinations in any order. You
can also include one destination which you dial using the numeric buttons. (Be sure to press Set
after you enter the destination with the numeric buttons.)
If you frequently send the same document to the same group of recipients, use group dialing. If
you are using the MultiPASS Desktop Manager, group dialing is described in the online MuttiPASS
Desktop Manager Software Guide. If you are using the MultiPASS as a stand-alone fax, group dialing
is described in the online Stand-None Fax Manual
Transmitting the Document
1. Open the document tray.
2. Prepare the document and load it, facedown, in the Automatic Document Feeder (ADF).
The LCD display shows the following:
Currently used memory: ...........................................................
MEMORY USED 0%
Standby to scan: DOCUMENT READY
If you are sending in color to a fax machine with color capability, press Golor/B&W to
turn on its light.
If necessary, you can adjust the resolution and contrast.
Chapter 5 Sending Faxes 5-23
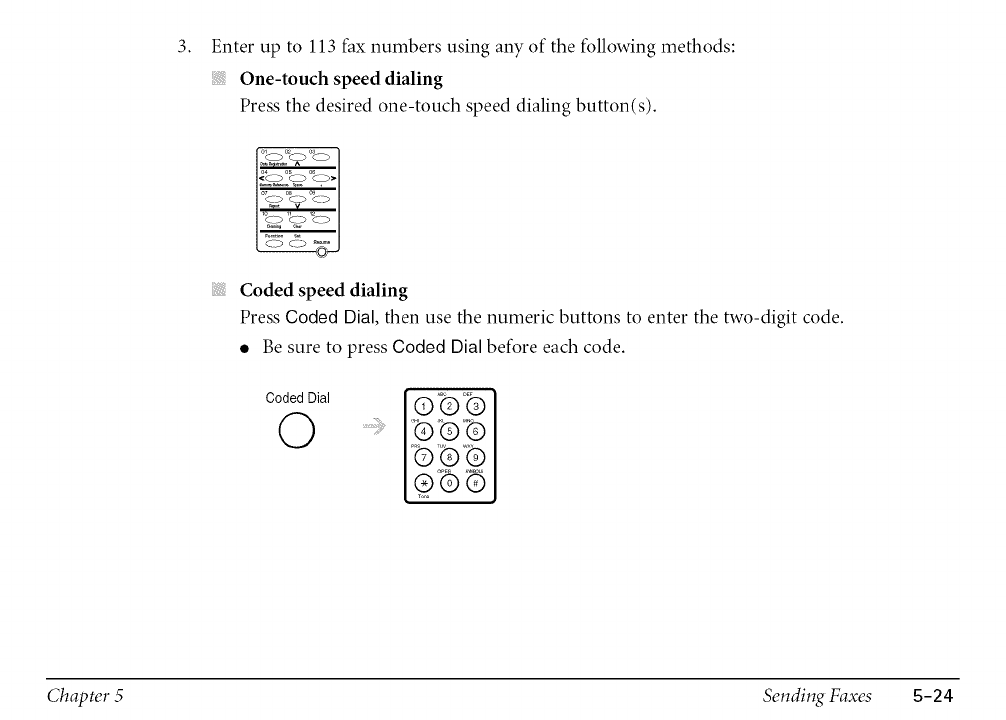
3, Enter up to 113 fax numbers using any of the following methods:
One-touch speed dialing
Press the desired one-touch speed dialing button(s).
°&_2_>°>*
Coded speed dialing
Press Coded Dial, then use the numeric buttons to enter the two-digit code.
• Be sure to press Coded Dial before each code.
Co_e_O,_,I,_P>>
0 ........IPoTPP
1®o9_
IQ®®
Chapter 5 Sending Faxes 5-24
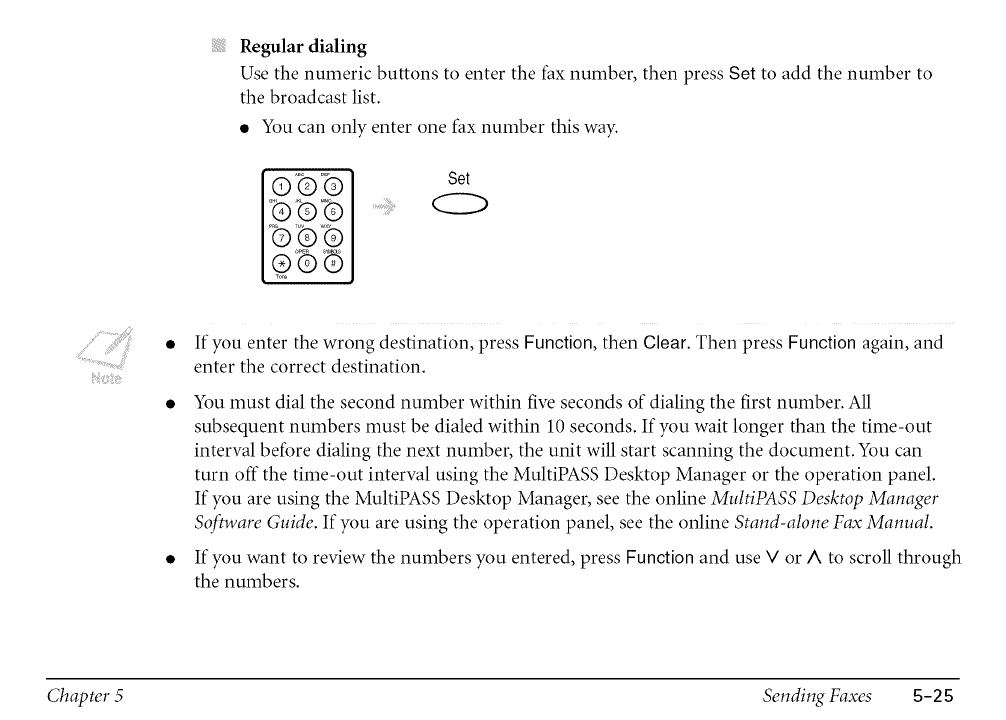
Regular dialing
Use the numeric buttons to enter the fax number, then press Set to add the number to
the broadcast list.
• You can only enter one fax number this way.
ABO OEF
©®®
@°@@
Set
If you enter the wrong destination, press Function, then Clear. Then press Function again, and
enter the correct destination.
You must dial the second number within five seconds of dialing the first number. All
subsequent numbers must be dialed within 10 seconds. If you wait longer than the time-out
interval before dialing the next number, the unit will start scanning the document. You can
turn off the time-out interval using the MultiPASS Desktop Manager or the operation panel.
If you are using the MultiPASS Desktop Manager, see the online MuttiPASS Desktop Manager
Software Guide. If you are using the operation panel, see the online Stand-alone Fax Manual.
If you want to review the numbers you entered, press Function and use V or A to scroll through
the numbers.
Chapter 5Sending Faxes B-2B
4. Press Start/Scan to begin scanning for sending, or wait a few seconds for the MultiPASS to
begin scanning automatically.
The MultiPASS then scans the document into memory, and begins sending it to the
destinations.
You will see a series of brief messages showing details on the transmission.
To cancel sending, press Stop. You will be asked to confirm canceling. Press * to cancel.
Sending to all destinations you specified in step 3 will be canceled. (You cannot cancel
only one destination.)
If a number is busy, the unit will continue sending to the other destinations and then redial the
number that was busy.
If the MultiPASS memory becomes full while scanning your document, MEMORYFULL
appears in the LCD display. If this happens, remove the remainder of the document from the
ADF (you may need to open the operation panel to do so), then divide the document into
several sections and send each section individually.
The document is automatically deleted from memory when sequential broadcasting is
completed.
Chapter 5 Sending Faxes 5-26
Your MultiPASS allows you to scan a document into its memory and send it automatically at a pre-
set time. This feature is called Delayed sending or Timer sending. By using this feature, you can take
advantage of lower long distance rates at night, for example.
You can only set this feature from the MultiPASS Desktop Manager. (See the online MuhiPASS
Desktop Manager Software Guide for details.)
Sending Other Documents While the MultiPASS Is Set for Delayed Sending
The MultiPASS is a multitasking unit, so you can send, receive, print, or copy other documents
even when you have set the MultiPASS for delayed sending.
To print, copy, or send other documents after setting the MultiPASS for delayed sending, simply
follow the procedures described in this manual.
Chapter 5 Sending Faxes 5-27

Printing aList of Documents in Memory
The MuItiPASS can print out a list of documents stored in memory, along with the transaction
number (TX/RX NO.) of each. Once you know the transaction number of a document in memory,
you can print it or delete it.
Function 1. Press Function.
O4
<0
MemoryReference
2. Press Memory Reference.
DOC. MEMORY LIST
Set 3. Press Set.
PRINTING REPORT
The MultiPASS begins printing a list of documents stored in memory.
Chapter 5 Sending Faxes 5-28
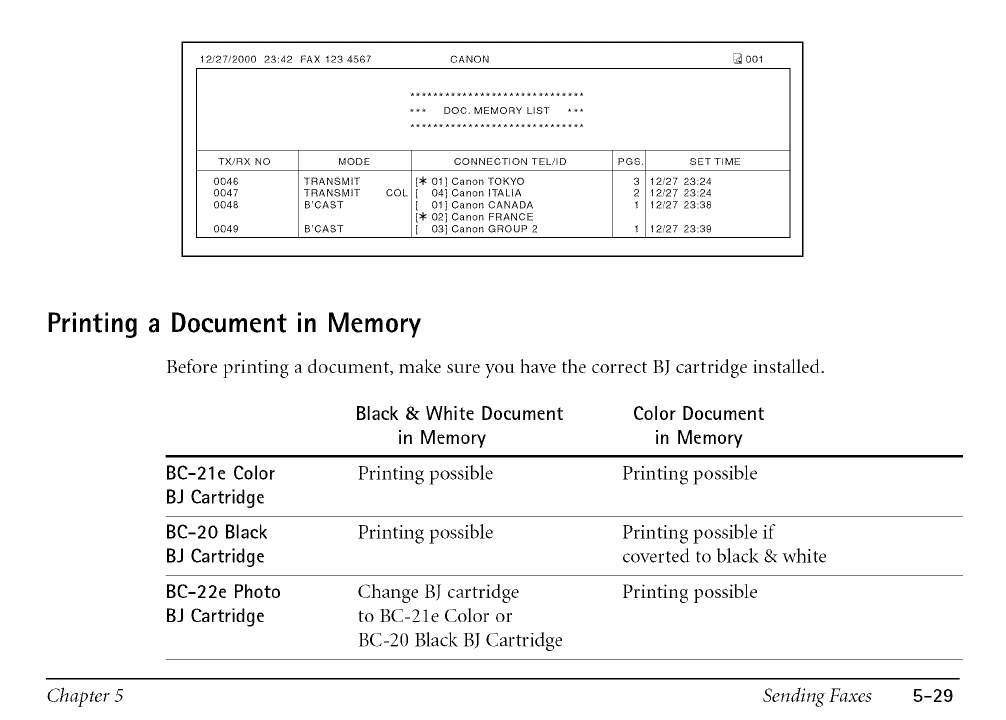
12/27/2000 23:42 FAX 123 4567 CANON _ 001
******************************
*** DOC, MEMORY LIST ***
******************************
TX/RX NO
0046
0047
0048
0049
MODE CONNECTION TEL/ID PGS, SET TIME
TRANSMIT [_< 01] Canon TOKYO 3 12/27 23:24
TRANSMIT COL 04] Canon ITALIA 2 12/27 23:24
B'CAST 01] Canon CANADA 1 12/27 23:38
[_< 02] Canon FRANCE
B'CAST 03] Canon GROUP 2 1 12/27 23:39
Printing a Document in Memory
Before printing a document, make sure you have the correct BJ cartridge installed.
Black & White Document Color Document
in Memory in Memory
BC-21e Color Printing possible Printing possible
BJ Cartridge
Be-20 Black Printing possible Printing possible if
BJ Cartridge coverted to black & white
BC-22e Photo Change BJ cartridge Printing possible
BJ Cartridge to BC-21e Color or
BC-20 Black BJ Cartridge
Chapter 5 Sending Faxes 5-29
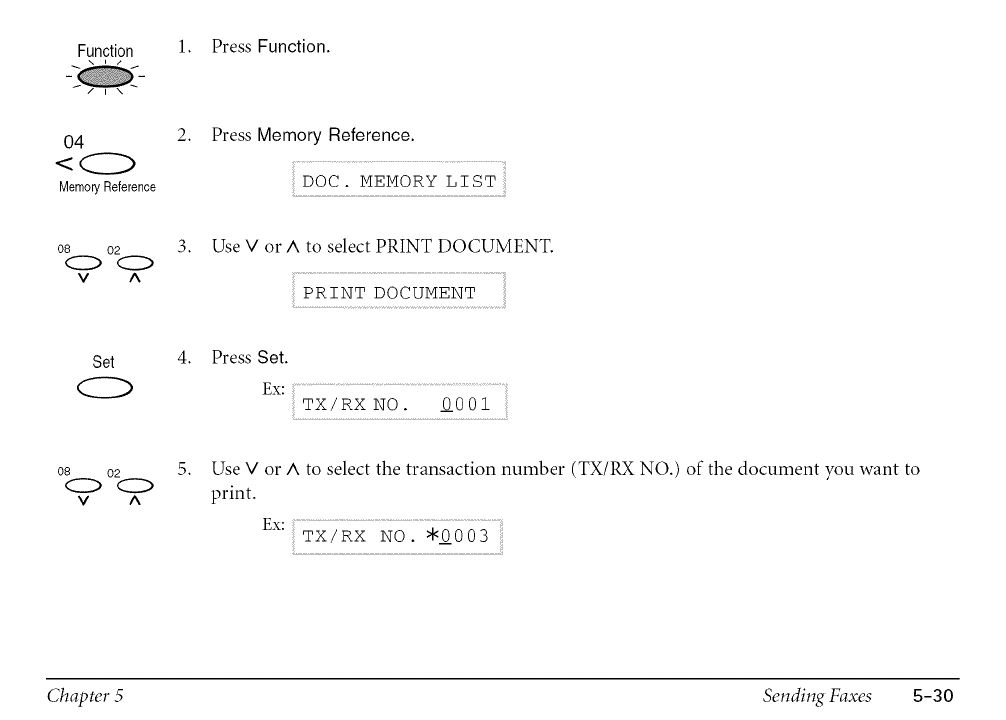
Function 1. Press Function.
O4
<
MemoryReference
2. Press Memory Reference.
DOC. MEMORY LIST
08 02 3. Use V or A to select PRINT DOCUMENT.
o o
v A
Set 4. Press Set.
tx: ................................................................................
TX!RX NO. O001
08 02
O0
v ^
5. Use V or A to select the transaction number (TX/RX NO.) of the document you want to
print.
Ex: ...............................................................
TX!RX NO. *0003
Chapter 5 Sending Faxes 5-30

Set 6.
The marks before the transaction number (TX/RX NO.) have the following meanings:
(No mark): The document is in black & white.
*: The document is in color.
#: The document is in black & white and is being sent or printed
automatically.
&: The document is in color and is being sent or printed automatically.
If you are unsure of the transaction number (TX/RX NO.) of the document you want to
print, you can print the list of documents stored in memory.
Printing a List of Documents in Memory
Use < or > to display the details of the transaction (destination, for example).
Press Set.
IST PG ONLY?
YES:(9_) NO:(#)
Chapter 5 Sending Faxes 5-31
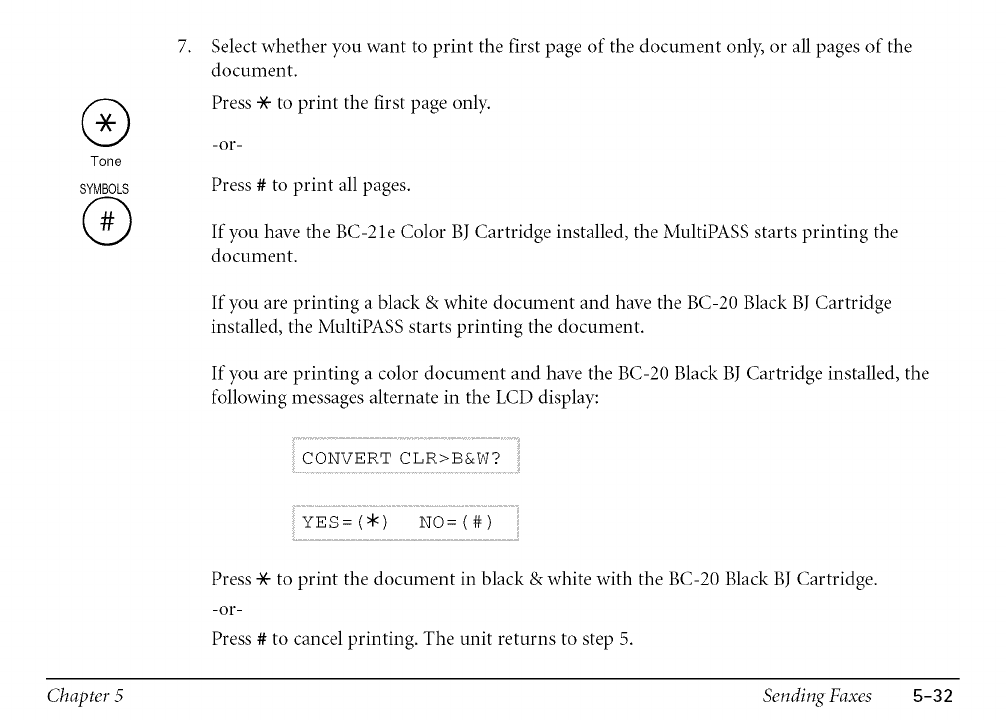
®
Tone
SYMBOLS
@
7. Select whether you want to print the first page of the document only, or all pages of the
document.
Press * to print the first page only.
-or-
Press # to print all pages.
If you have the BC-2 le Color BJ Cartridge installed, the MultiPASS starts printing the
document.
If you are printing a black & white document and have the BC-20 Black BJ Cartridge
installed, the MultiPASS starts printing the document.
If you are printing a color document and have the BC-20 Black BJ Cartridge installed, the
following messages alternate in the LCD display:
CONVERT CLR>B&W?
YES= (9_) NO=(#) ii
Press * to print the document in black & white with the BC-20 Black B] Cartridge.
-or-
Press # to cancel printing. The unit returns to step 5.
Chapter 5 Sending Faxes 5-32
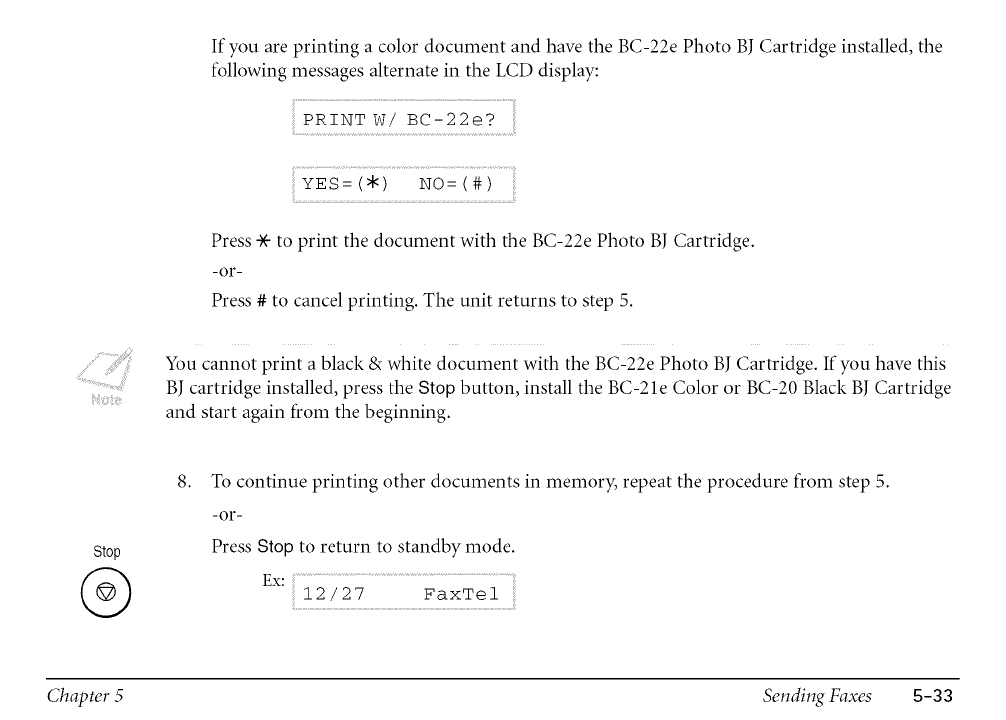
If you are printing a color document and have the BC-22e Photo BJ Cartridge installed, the
following messages alternate in the LCD display:
YES= (9_) NO=(#)
Press * to print the document with the BC-22e Photo BJ Cartridge.
-or-
Press # to cancel printing. The unit returns to step 5.
You cannot print a black & white document with the BC-22e Photo BJ Cartridge. If you have this
BJ cartridge installed, press the Stop button, install the BC-2 le Color or BC-20 Black BJ Cartridge
and start again from the beginning.
Stop
@
8. To continue printing other documents in memory, repeat the procedure from step 5.
-or-
Press Stop to return to standby mode.
Ex: .......................................................................
12/27 FaxTel
Chapter 5 Sending Faxes 5-33
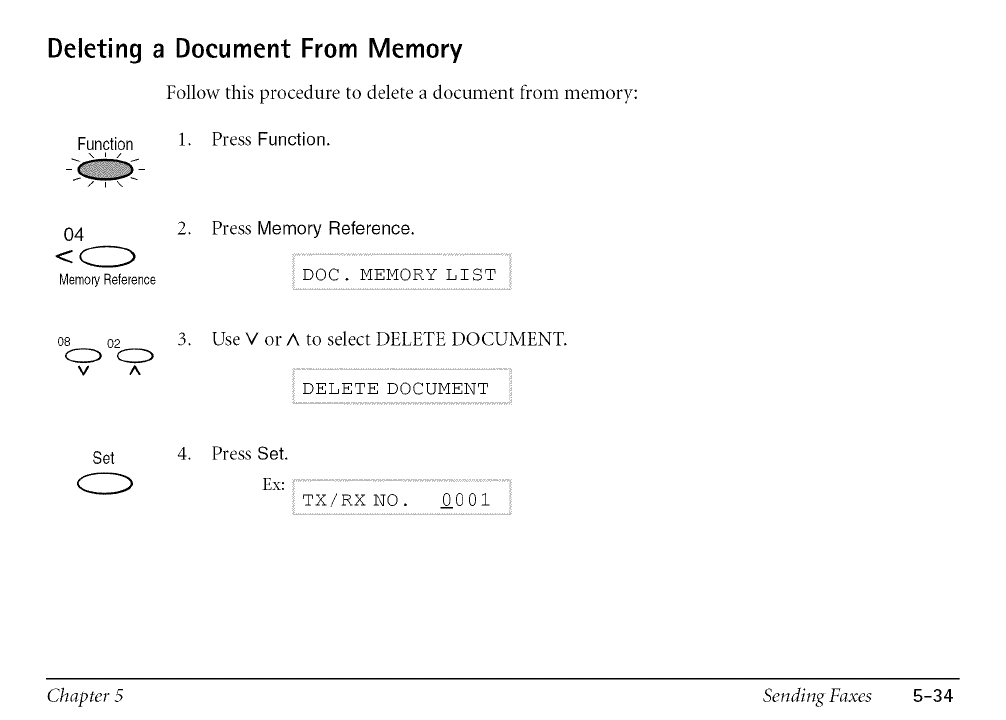
Deleting a Document From Memory
Follow this procedure to delete a document from memory:
Function 1. PressFunction.
04 2. Press Memory Reference.
MemoryReference
Set 4. Press Set.
Ex:xiRx ..............o001
Chapter 5 Sending Faxes 5-34
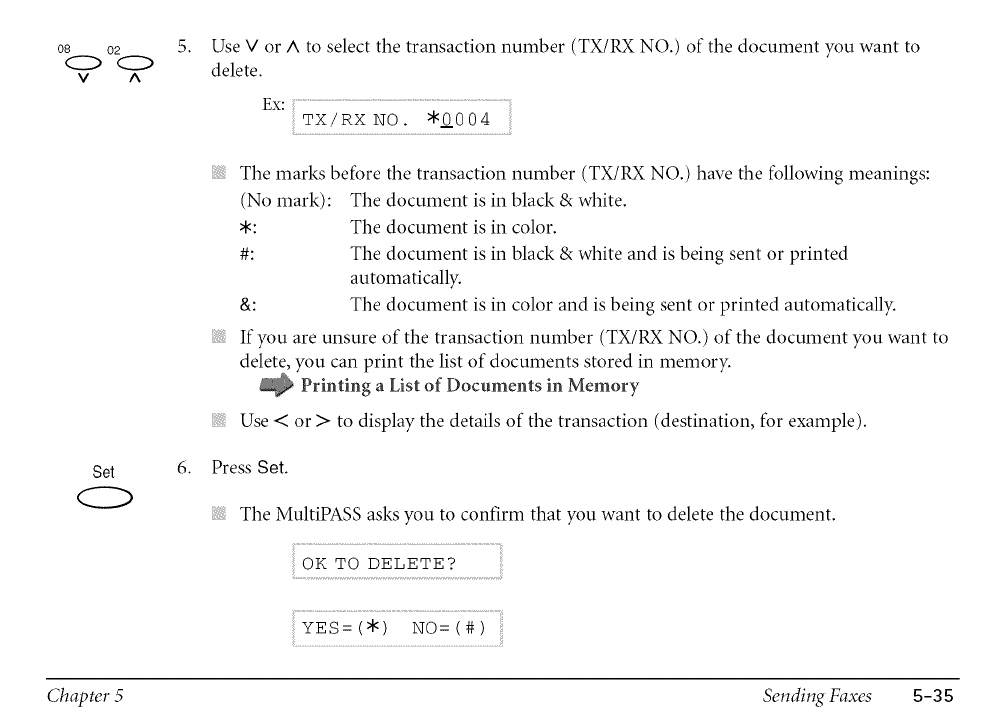
08 02 5. Use V or A to select the transaction number (TX/RX NO.) of the document you want to
CZD CZZ) delete.
v ^
Set
Ex:XiRxNoi ,a00;
The marks before the transaction number (TX/RX NO.) have the following meanings:
(No mark): The document is in black & white.
*: The document is in color.
#: The document is in black & white and is being sent or printed
automatically.
&: The document is in color and is being sent or printed automatically.
If you are unsure of the transaction number (TX/RX NO.) of the document you want to
delete, you can print the list of documents stored in memory.
Printing a List of Documents in Memory
Use < or > to display the details of the transaction (destination, for example).
6. Press Set.
The MultiPASS asks you to confirm that you want to delete the document.
OK TO DELETE?
YES=(*) NO=(#)
Chapter 5 Sending Faxes 5-35
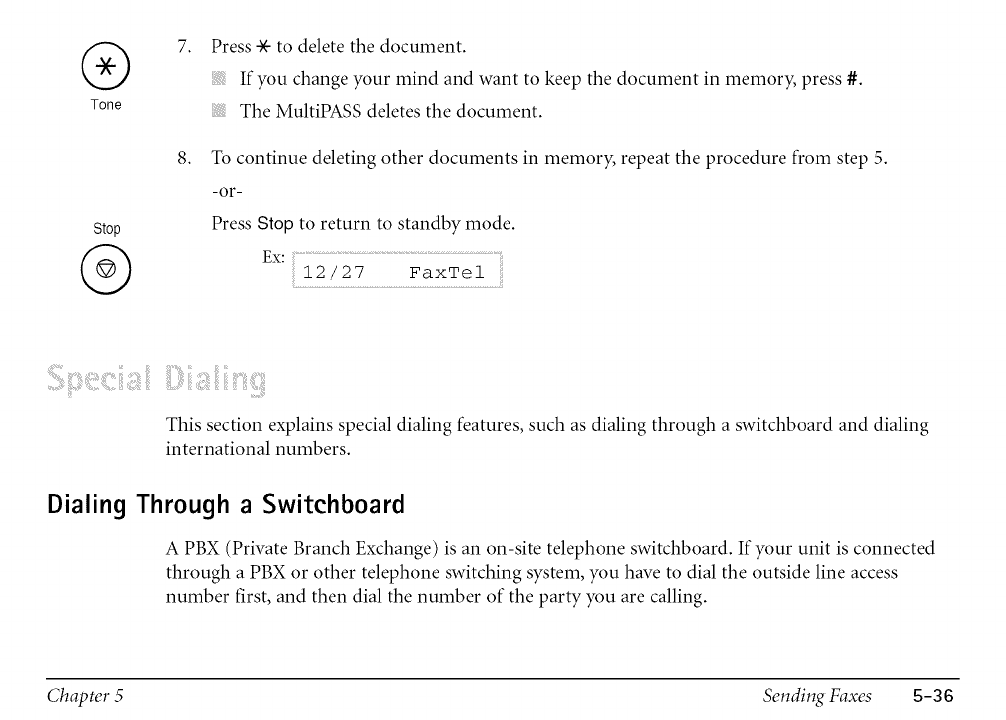
®
Tone
Stop
@
7.
8.
Press * to delete the document.
If you change your mind and want to keep the document in memory, press #.
The MultiPASS deletes the document.
To continue deleting other documents in memory, repeat the procedure from step 5.
-or-
Press Stop to return to standby mode.
Ex: ...........................................................................................
12/27 FaxTel
This section explains special dialing features, such as dialing through a switchboard and dialing
international numbers.
Dialing Through a Switchboard
A PBX (Private Branch Exchange) is an on-site telephone switchboard. If your unit is connected
through a PBX or other telephone switching system, you have to dial the outside line access
number first, and then dial the number of the party you are calling.
Chapter 5 Sending Faxes 5-36
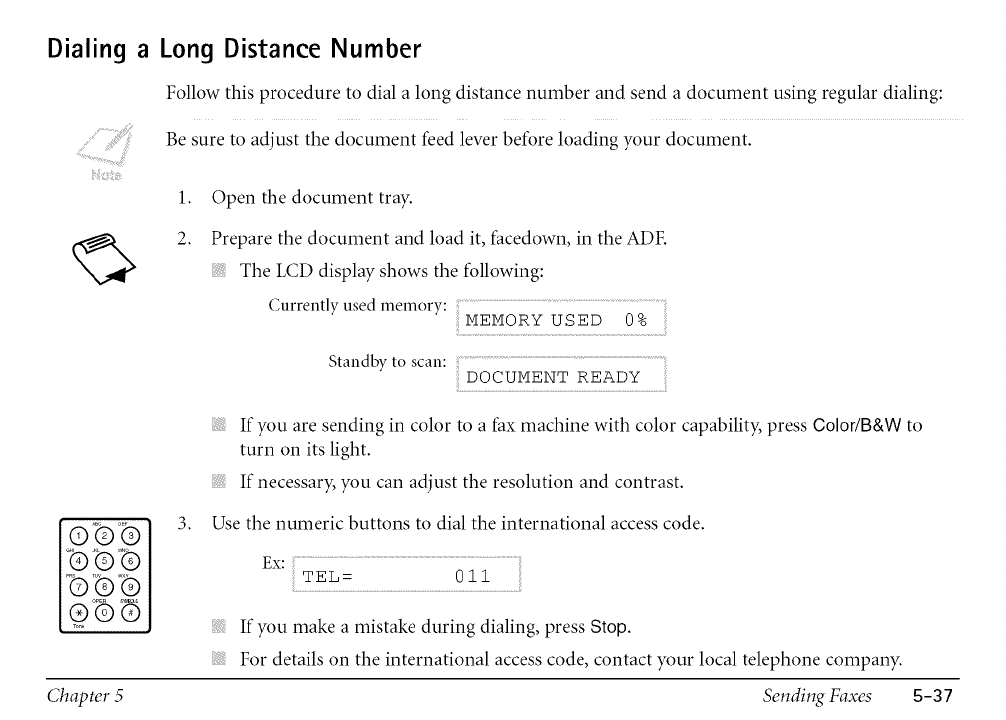
Dialing aLong Distance Number
Follow this procedure to dial a long distance number and send a document using regular dialing:
Be sure to adjust the document feed lever before loading your document.
1. Open the document tray.
2. Prepare the document and load it, facedown, in the ADF.
The LCD display shows the following:
Currently used memory: .....................................................................................................................
MEMORY USED 0%
Standby to scan: DOCUMENT READY
DEE
©®@
OPER S,_S
®®®
3.
turn on its light.
If necessary, you can adjust the resolution and contrast.
Use the numeric buttons to dial the international access code.
..........................................o{i..........
If you make a mistake during dialing, press Stop.
For details on the international access code, contact your local telephone company.
Sending Faxes
If you are sending in color to a fax machine with color capability, press Color/B&W to
Chapter 55-37
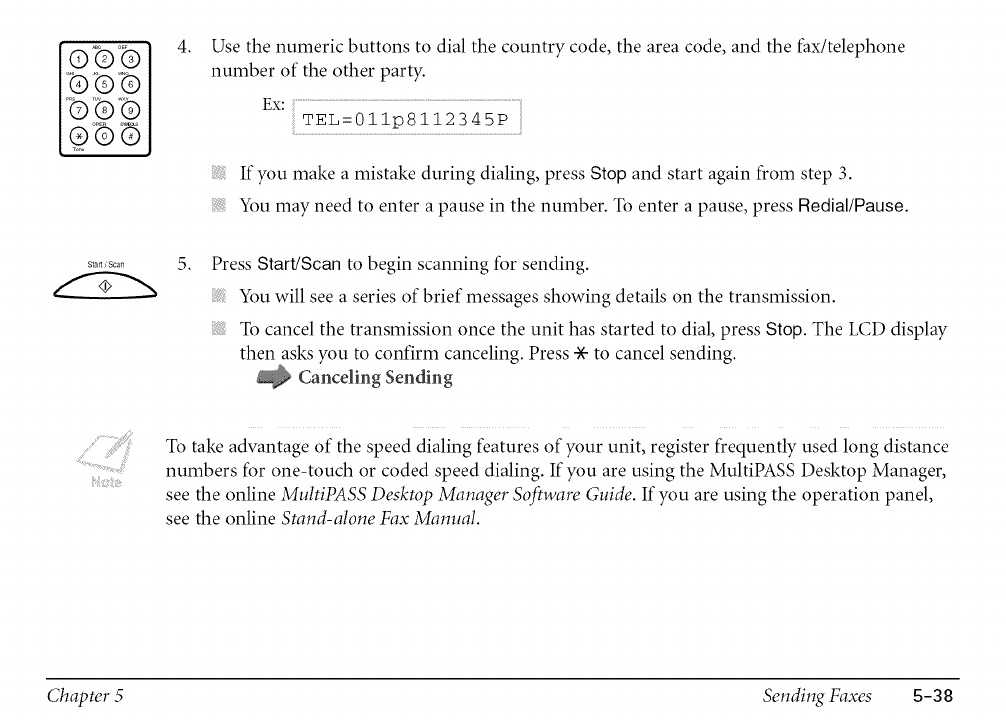
i_ _ DEE
©©®
®®
4. Use the numeric buttons to dial the country code, the area code, and the fax/telephone
number of the other party.
If you make a mistake during dialing, press Stop and start again from step 3.
You may need to enter a pause in the number. To enter a pause, press Redial/Pause.
Stab/Scan 5. Press Start/Scan to begin scanning for sending.
You will see a series of brief messages showing details on the transmission.
To cancel the transmission once the unit has started to dial, press Stop. The LCD display
then asks you to confirm canceling. Press * to cancel sending.
Canceling Sending
To take advantage of the speed dialing features of your unit, register frequently used long distance
numbers for one-touch or coded speed dialing. If you are using the MultiPASS Desktop Manager,
see the online MuttiPASS Desktop Manager Software Guide. If you are using the operation panel,
see the online Stand-alone Fax Manual.
Chapter 5 Sending Faxes 5-38

:ii!i!!i!!!i!_!iiiii:il,_:_::,_:_,',_,,:_i__¸¸¸iiiliii!i!iLx:!i!!i!ii:,ii_iiilii_!_!_!q_!i_!!_i_iIi}i!ii!_i_iL_II!I:!!__!_<i_!_<_i_iii!i!s"_'_!3i_:_,_!_!_!<_!ii!ili__!_<iiilii{iiliiy i!_ix}_,<ii!iiiii<<i_i_,_!_!_!q_<:!i!:_iii!iii31}_iiilii_i_!ii!ili_{iiliiiiilii_!_!_!q_!i_!!_i_ili}i!ii!_i_i
Many information services for banks, airline reservations, hotel reservations, etc., require tone
dialing for their services. If your unit is connected to a rotary pulse line, follow this procedure to
set the unit temporarily for tone dialing:
Hook
®1. Press Hook.
TEL=
You can also lift the handset of the telephone connected to your unit instead of pressing
Hook.
You can adjust the volume of the speaker. If you are using the MultiPASS Desktop
Manager, see the online MuhiPASS Desktop Manager Software Guide. If you are using the
operation panel, see the online Stand-alone Fax Manual.
©©@
b '9 _®
2. Use the numeric buttons to dial the telephone number of the information service.
tx: .....................................................................................
TEL: 7654321
The unit connects using the pulses required by your phone line.
Chapter 5 Sending Faxes 5-39
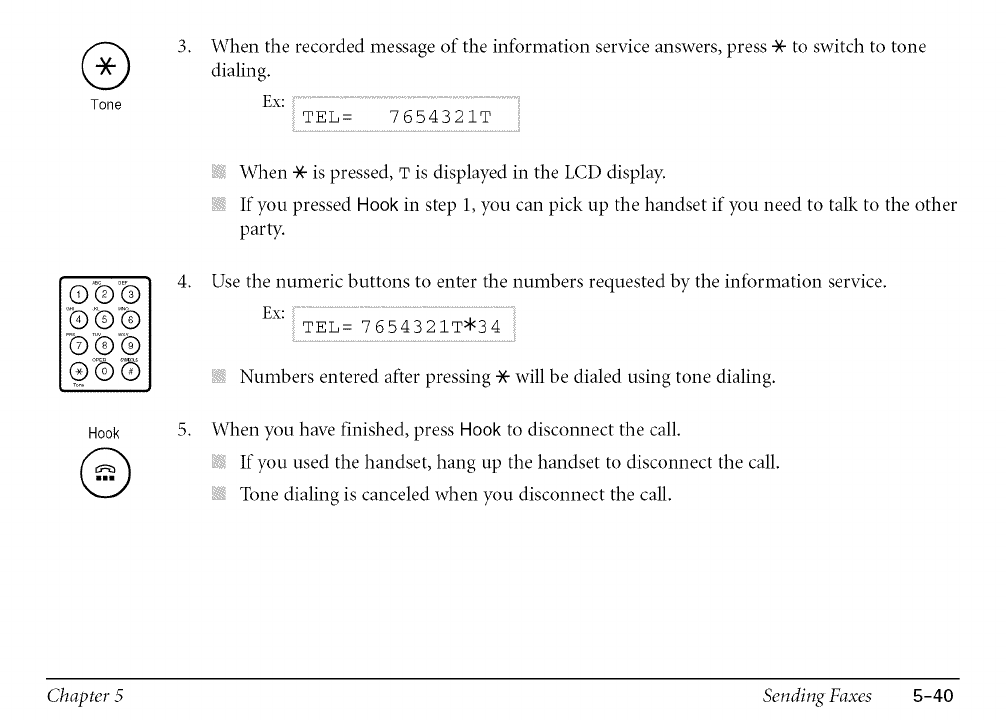
®
Tone
OEF
©©@
Pb
Hook
®
3.
4.
5.
When the recorded message of the information service answers, press * to switch to tone
dialing.
tx: ......................................................................................................
TEL= 7654321T
When * is pressed, Tis displayed in the LCD display.
If you pressed Hook in step 1, you can pick up the handset if you need to talk to the other
party.
Use the numeric buttons to enter the numbers requested by the information service.
tx: ..................................................................
TEL: 7654321T'34
Numbers entered after pressing * will be dialed using tone dialing.
When you have finished, press Hook to disconnect the call.
If you used the handset, hang up the handset to disconnect the call.
Tone dialing is canceled when you disconnect the call.
Chapter 5 Sending Faxes B-40
This chapter describes the different methods for receiving faxes. You will also find instructions on
setting the MultiPASS to receive color faxes.
Different Ways to Receive a Fax.................................................................................................... 6-2
® Receiving Both Faxes and Telephone Calls Automatically: Fax/Tel Mode ............................ 6-4
® Receiving Faxes Manually: MANUAL MODE ........................................................................ 6-5
® Receiving Faxes Automatically: FAX ONLY MODE ............................................................... 6-5
® Receiving With an Answering Machine: ANS.MACHINE MODE ....................................... 6-5
® Receiving Using the Distinctive Ring Pattern Detection Feature: DRPD ............................. 6-6
Receiving in Color ....................................................................................................................... 6-10
Receiving While Registering, Copying, or Printing ................................................................... 6-11
Receiving Faxes in Memory When a Problem Occurs .............................................................. 6-12
Canceling Receiving .................................................................................................................... 6-16
Chapter 6Receiving Faxes 6-1
The MultiPASS provides you with several modes for receiving faxes. You set the Receive Mode
during the MultiPASS installation procedure. (See your Quick Start Guide for details.) If you want
to change the Receive Mode, decide which mode will best suit your requirements by considering
how you want to use the MultiPASS.
Fax/Tel Mode
Use this mode if you will occasionally use the MultiPASS as a telephone. In this mode, if an
incoming call is from a fax machine, the MultiPASS receives the faxes automatically, without
ringing; if the call is from a person, the MultiPASS rings to alert you to pick up the telephone
(connected to your unit) to answer the call. This mode is economical, in that it allows you to
have phone and fax service without the expense of an additional phone line.
This mode also includes settings that let you control precisely how it handles incoming calls.
To adjust these settings from the MultiPASS Desktop Manager, see the online MuttiPASS
Desktop Manager Software Guide. To adjust these settings via the operation panel, refer to the
online Stand-alone Fax Manual.
MANUAL MODE
Use this mode if you will frequently use the MultiPASS as a telephone and want to answer
every call yourself, including fax calls. The MultiPASS rings for every call, whether phone or
fax, and you must press the Start/Scan button to begin receiving a fax.
Chapter 6 Receiving Faxes 6-2
FAX ONLY MODE
Use this mode if the MultiPASS will be connected to a separate telephone line used only for
faxing. The MultiPASS then answers all calls, and receives all faxes automatically.
ANS.MACHINE MODE
Use this mode if you plan to connect an answering machine to the MultiPASS to receive faxes
and phone messages. The MultiPASS then receives incoming faxes normally, and routes
incoming phone calls to the answering machine.
DRPD
Use this mode if you have subscribed to a Distinctive Ring Pattern Detection (DRPD) service
offered by some telephone companies. By subscribing to such a service, you can have several
fax and telephone numbers for your MultiPASS using only one telephone line.
Receiving Faxes to the MultiPASS Desktop Manager
The MultiPASS Desktop Manager allows you to receive faxes directly to your PC, where they
are stored as scanned images.
Once you have decided which mode you want, set the mode either through the Desktop Manager
(see the online MuttiPASS Desktop Manager Software Guide) or through the operation panel (see
the online Stand-alone Fax Manual). You can change the mode at any time.
Chapter 6 Receiving Faxes 6-3
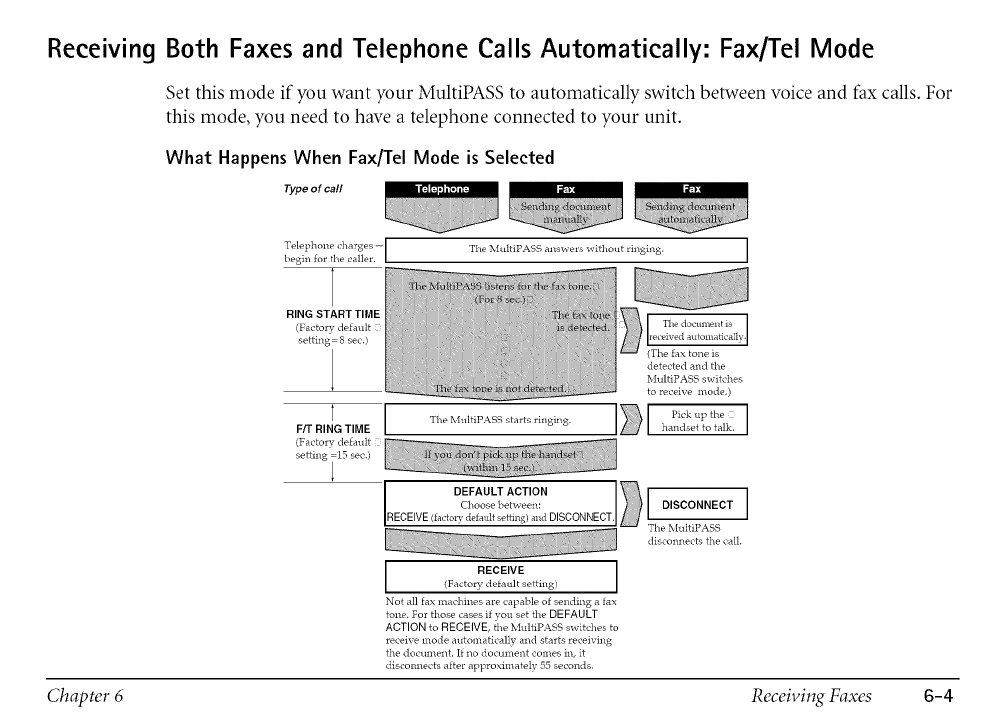
Receiving Both Faxes and Telephone Calls Automatically: Fax/Tel Mode
Set this mode if you want your MuItiPASS to automatically switch between voice and fax calls. For
this mode, you need to have a telephone connected to your unit.
What Happens When Fax/Tel Mode is Selected
Type of call
[Telephone charges--
begin for the caller. [
The MultiPASS answers without ringing.
RING START TIME
(Factor?, default
setting = 8 sec.)
T [
F/T RING TIME The MultiPASS starts ringing.
to receive mode.)
handset to talk.
DEFAULT ACTION ]
Cl.....b.......... / *IDISCONNECTJ
RECEIVE (factor?, default setting) and DISCONNECT. I Th_
disconnects the call.
[ (F ac to 2_ eOkaEl'V1t_ e tring ) ]
Not all fax machines are capable of sending a fax
tone. For those cases if you set the DEFAULT
ACTION to RECEIVE, the MultiPASS switches to
receive mode automatically and starts receiving
the document. It no document comes in, it
disconnects after approximately 55 seconds.
Chapter 6 Receiving Faxes 6-4
Receiving
You can select these options using the MultiPASS Desktop Manager or the operation panel. If you
are using the MultiPASS Desktop Manager, see the online MultiPASS Desktop Manager Software
Guide. If you are using the operation panel, see the online Stand-alone Fax Manual.
Faxes Manually: MANUAL MODE
In MANUAL MODE, if you connect a telephone to your unit, you can use the telephone to receive
normal telephone calls and also to activate your MultiPASS to start receiving a document. If you
place the extension phone away from the MultiPASS (on your desk, for example) and activate
receiving from this phone, this is called remote receiving:
Receiving Faxes Automatically: FAX ONLY MODE
When the MuItiPASS is set up for a dedicated line, set FAX ONLY MODE to automatically receive
documents whenever a call comes over the fax line.
Receiving With an Answering Machine: ANS.MACHINE MODE
Connecting an answering machine to the MultiPASS allows you to receive faxes and phone
messages while you are out of the office.
In ANS.MACHINE MODE, the MultiPASS allows the answering machine to answer incoming
calls, then listens for the fax tone and automatically receives the fax if it detects this tone.
Chapter 6Receiving Faxes 6-5
Using the MultiPASS With an Answering Machine
Follow these guidelines when using the MultiPASS with an answering machine.
Set the answering machine to answer on the first or second ring.
When recording the outgoing message on the answering machine:
• The entire message must be no more than 15 seconds long.
• In the message, tell your callers how to send a fax. For example:
"Hello. I can't answer the phone right now, but please leave a message after the beep.
I'll return your call as soon as possible. If you would like to send a fax, press the start
button on your fax machine after you leave your message. Thank you."
Receiving Using the Distinctive Ring Pattern Detection Feature: DRPD
Some telephone companies offer a Distinctive Ring Pattern (DRP) service whereby they assign two
or more telephone numbers with distinctive ring patterns to a single telephone line. If your phone
company offers such a service, you can have both a fax number(s) and a telephone number(s) for
your MultiPASS using only one telephone line.
Your MultiPASS will automatically monitor incoming calls and based on the distinctive ring
pattern, it will determine if the call is from a fax machine trying to send a document or from a
telephone trying to make a voice call.
Chapter 6 Receiving, Faxes 6-6
Use the information in this section to set up the MultiPASS for use with a DRP service. For more
details on the DRP service, contact your local telephone company. (Your telephone company may
have a different name for this service. Also, this service may not be offered in all areas.)
Types of Ring Patterns
Your telephone company will assign a distinctive ring pattern to each number when you order
the DRP service. The setting you make in the MultiPASS must match the setting assigned by the
telephone company.
You can set the MultiPASS for the following ring patterns:
NORMAL RING
Ring type of normal telephone line (recommended for voice calls)
DOUBLE RING
Two short rings at regular intervals (recommended for fax calls)
SHORT-SHORT-LONG (Triple ring)
Short-short-long at regular intervals
SHORT-LONG-SHORT (Triple ring)
Short-long-short at regular intervals
OTHER RING TYPE
Patterns other than those described above
FAX/TEL AUTO SW
Chapter 6 Receiving Faxes 6-7
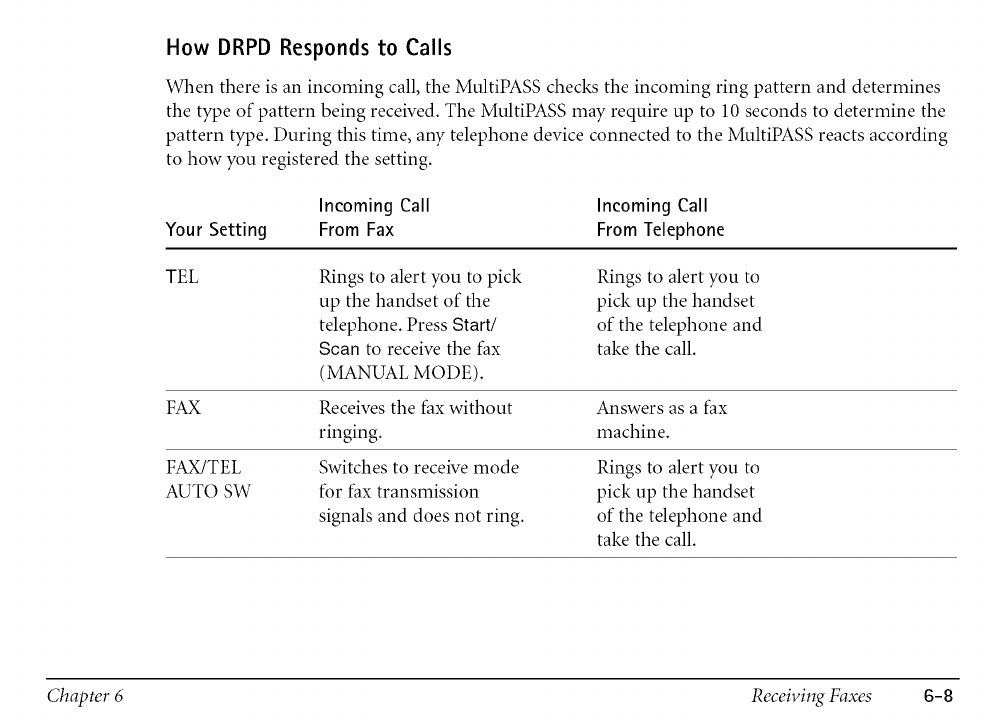
How DRPD Responds to Calls
When there is an incoming call, the MultiPASS checks the incoming ring pattern and determines
the type of pattern being received. The MultiPASS may require up to 10 seconds to determine the
pattern type. During this time, any telephone device connected to the MultiPASS reacts according
to how you registered the setting.
Incoming Call Incoming Call
Your Setting From Fax From Telephone
TEL
FAX
FAX/TEL
AUTO SW
Rings to alert you to pick
up the handset of the
telephone. Press Start/
Scan to receive the fax
(MANUAL MODE).
Receives the fax without
ringing.
Switches to receive mode
for fax transmission
signals and does not ring.
Rings to alert you to
pick up the handset
of the telephone and
take the call.
Answers as a fax
machine.
Rings to alert you to
pick up the handset
of the telephone and
take the call.
Chapter 6Receiving Faxes 6-8
Communicating Using the Distinctive Ring Pattern Detection (DRPD) Feature
Using the MuItiPASS with a DRP service is almost the same as using it with a normal telephone
line.
When you turn on DRPD, the receive mode defaults to DRPD.
When someone calls using the number assigned for telephone communication, the MuItiPASS
rings in the pattern you registered for telephone calls. When you hear this pattern, simply pick
up the telephone connected to the MultiPASS and talk. If you do not pick up the telephone, the
MultiPASS continues to ring until the other party hangs up.
When someone sends a fax using the number assigned for fax communication, the MultiPASS
does not ring. It receives the fax automatically.
Chapter 6 Receiving Faxes 6-9
iiiii_!!i_iiiiiiiii:ii:i:!i!:i__iiiiiii_¸ii:i:!i!:i_iiilii_ iiiiiiiiipi!_!_i;_i!i_!iiiiliiiiipi!_!_£ _!_iiiiiiii_,{iiiii_!_iiiiiiii_,iii!_!!¸¸.....
Your MultiPASS has been factory-set to receive faxes in color from fax machines with color
capability. When receiving a fax, your MultiPASS detects if the incoming fax is a color or
black &white transaction, and prints the fax accordingly.
For automatic printing of received color faxes, you need to have the BC-2 le Color BJ Cartridge
installed in your unit. If you have one of the optional BJ cartridges installed, the MultiPASS will
receive the color fax in memory. Once received, the LCD display will alternate the following
messages:
REC'D IN MEMORY
INSTALL BC-21e
Replace the optional BJ cartridge with the BC-2 le Color BJ Cartridge (see page 7-23). The unit
then automatically prints the color fax stored in memory.
You can print the color fax with a BJ cartridge other than the BC-21e Color BJ Cartridge.
Printing a Document in Memory
You can set the MultiPASS for color reception through the MultiPASS Desktop Manager (see the
online MuttiPASS Desktop Manager Software Guide) or through the operation panel (see the
online Stand-alone Fax Manual).
Chapter 6Receiving Faxes 6-10
As the MultiPASS is a multitasking device, it can receive faxes and phone calls while you are
entering your user information, making copies, or printing.
If you receive a fax while you are making copies or printing, the MultiPASS stores the
incoming fax in memory. Then, as soon as you finish making copies or printing, the
MultiPASS automatically prints the fax. If you are entering registration information, the
fax is printed as soon as it is received, and does not go into memory.
Chapter 6 Receiving Faxes 6-11
iiiii !!i%ii:iXii>ii:i:!i!:i {bj iiiiiiiii! !!q ! !i!!iiiiii{!ii!ii!ii!!!!!i%!ii!iiii ixli:i:!i!:iS{iiiiiiii! !!q ! ii!ii!iiii i
If the MultiPASS encounters a problem when it is receiving a fax, the unit will automatically store
the unprinted pages of the fax in memory, and the LCD display will show REC 'D IN MEMORYas
well as one or several of the following messages:
Unit has run out of paper
The MuItiPASS has run out of paper while printing.
LOAD PAPER
Load paper in the multi-purpose tray. Then press the Resume button to print the pages stored
in memory.
Loading Paper in the Multi-Purpose Tray
BCl-21 Color Ink Tank has run out of ink
The BCI-21 Color Ink Tank installed in the MuItiPASS has run out of ink while printing.
COLOR INK EMPTY
Change the BCI-21 Color Ink Tank in the BC-2 le Color BJ Cartridge. The unit automatically
prints the pages stored in memory.
Replacing an Ink Tank in the BC-21e Color BJ Cartridge
Chapter 6 Receiving Faxes 6-1 2
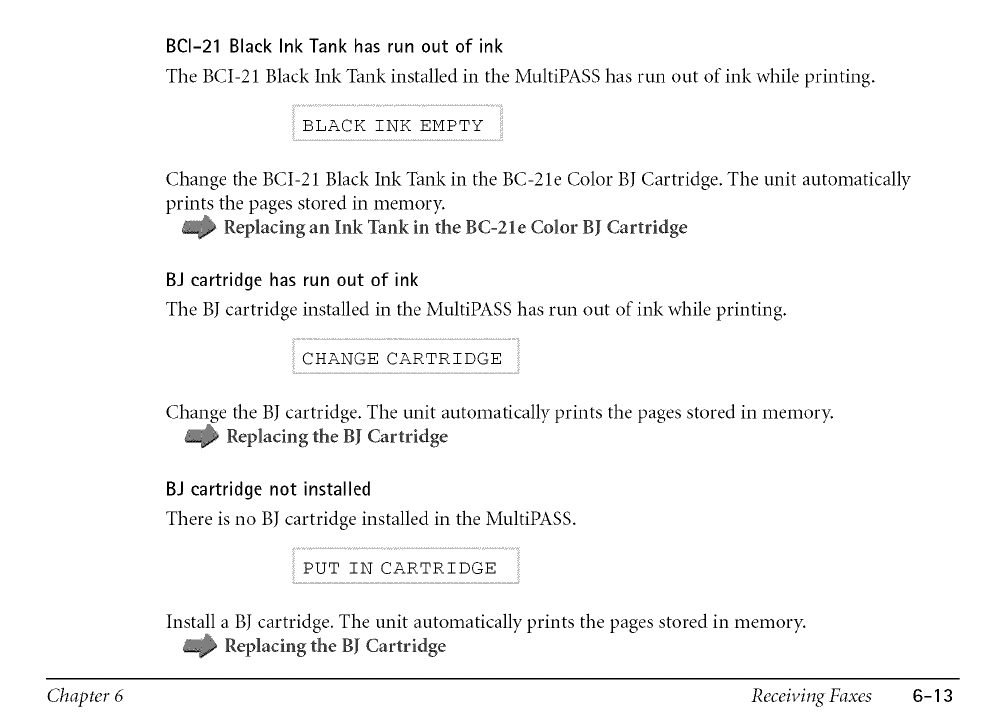
BCI-21 Black Ink Tank has run out of ink
The BCI-21 Black Ink Tank installed in the MultiPASS has run out of ink while printing.
BLACK INK EMPTY
Change the BCI-21 Black Ink Tank in the BC-2 le Color BJ Cartridge. The unit automatically
prints the pages stored in memory.
Replacing an Ink Tank in the BC-21e Color BJ Cartridge
BJ cartridge has run out of ink
The BJ cartridge installed in the MultiPASS has run out of ink while printing.
CHANGE CARTRIDGE
Change the BJ cartridge. The unit automatically prints the pages stored in memory.
Replacing the BJ Cartridge
BJ cartridge not installed
There is no BJ cartridge installed in the MultiPASS.
PUT IN CARTRIDGE
...............................................................................................
Install a BJ cartridge. The unit automatically prints the pages stored in memory.
Replacing the BJ Cartridge
Chapter 6Receiving Faxes 6-13
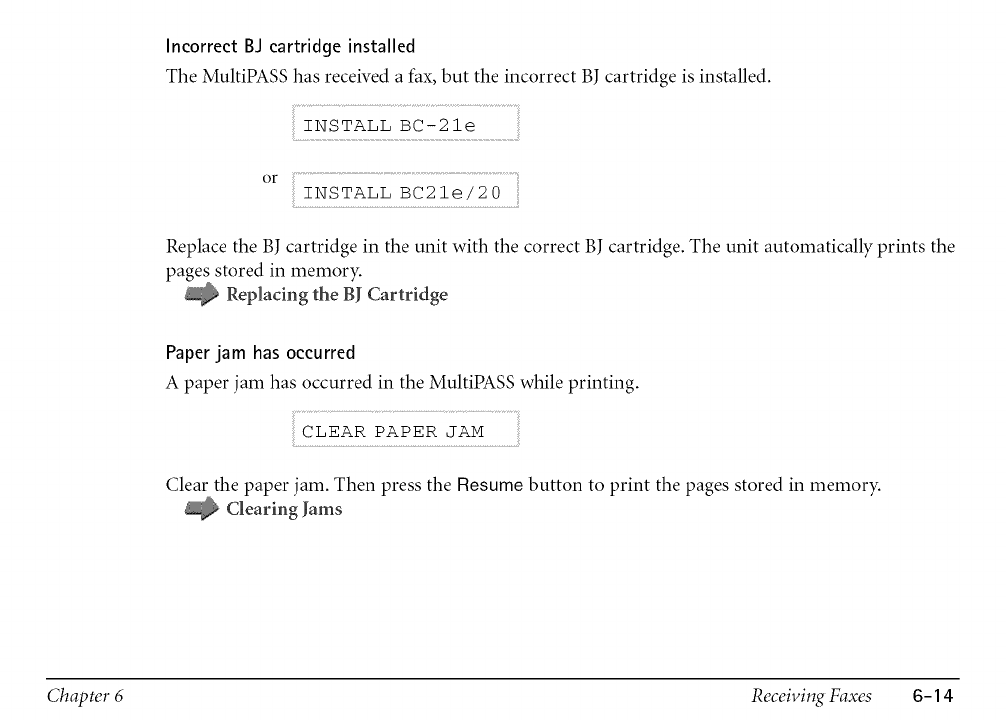
Incorrect BJ cartridge installed
The MuItiPASS has received a fax, but the incorrect BJ cartridge is installed.
...........................................................................iiii
INSTALL BC-21e
or ............................................................................................
....INSTALL BC2!e/20
Replace the BJ cartridge in the unit with the correct BJ cartridge. The unit automatically prints the
pages stored in memory.
Replacing the BJ Cartridge
Paper jam has occurred
A paper jam has occurred in the MultiPASS while printing.
...................................................................iiii
CLEAR PAPER JAM
.................................................
Clear the paper jam. Then press the Resume button to print the pages stored in memory.
Clearing Jams
Chapter 6Receiving Faxes 6-14
The MultiPASS C560 memory can store up to approximately 80 pages and MultiPASS C530
memory can store up to approximately 42 pages (based on ITU-T/CCITT No. 1 Chart,
standard mode).
You can set the MultiPASS not to store faxes in memory if a problem occurs during reception.
If you are using the MultiPASS Desktop Manager, see the online MuhiPASS Desktop Manager
Software Guide. If you are using the operation panel, see the online Stand-alone Fax Manual.
Once the pages are printed, they are deleted from memory.
If the memory becomes full, you will not be able to receive the remaining pages. Contact the
other party and request that they send the fax again.
Chapter 6Receiving Faxes 6-15
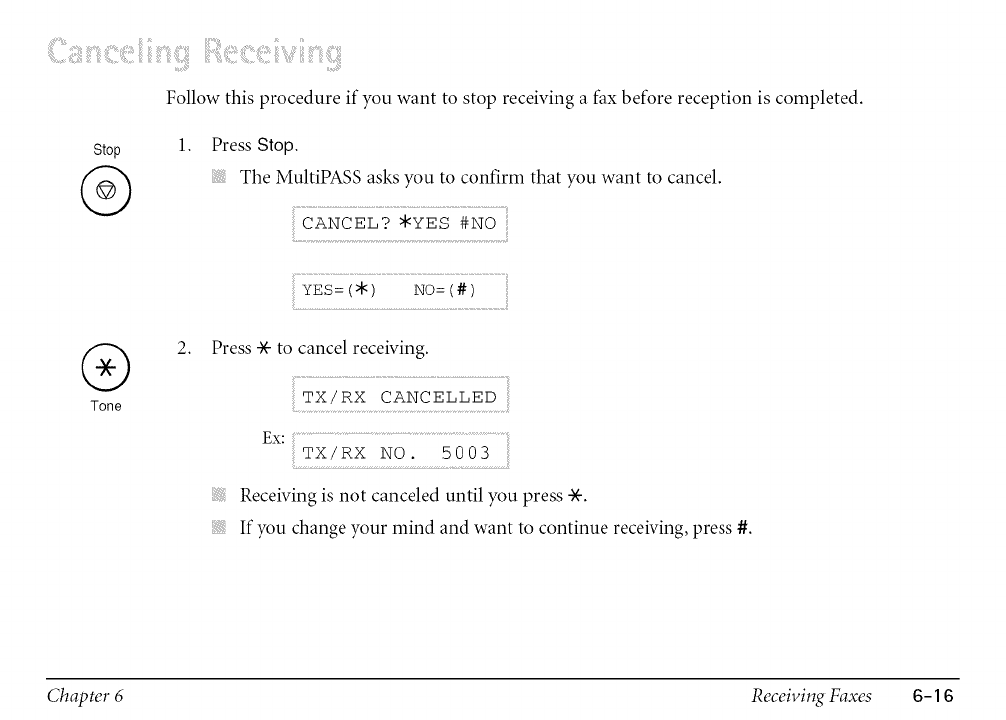
Follow this procedure if you want to stop receiving a fax before reception is completed.
Stop
@1. Press Stop.
The MultiPASS asks you to confirm that you want to cancel.
CANCEL? *YES #NO iii
YES:(*) NO:(#)
®
Tone
2. Press -)(-to cancel receiving.
.....TX cANe
tx:
Receiving is not canceled until you press -)(-.
If you change your mind and want to continue receiving, press #.
Chapter 6Receiving Faxes 6-16
iii!!!ii!_Siii!i!i!iiiii!ii!i!;i_;_i_iiiiiiiii!!_ii_i!iiiiiiiiiii_i_iiii!_!_:_!i_¸!!_ii_i!iiii!ii!i!;i_;_i_!!_ii_i!_iiiiiiiiii:__!i_iii_!!!!:i:
Your MultiPASS requires no maintenance other than periodic cleaning, and replacement of BJ
cartridges or ink tanks.
MultiPASS Guidelines .................................................................................................................... 7-2
Periodic Cleaning ........................................................................................................................... 7-4
® Cleaning the Outside of the MultiPASS ................................................................................... 7-4
® Cleaning the Interior of the MultiPASS ................................................................................... 7-5
BJ Cartridges and Ink Tanks ....................................................................................................... 7-14
® Maintenance ............................................................................................................................ 7-16
® Using Ink .................................................................................................................................. 7-17
® Testing and Cleaning the BJ Cartridge Print Head ............................................................... 7-18
® When to Replace the BJ Cartridge ......................................................................................... 7-21
® Replacing the BJ Cartridge ..................................................................................................... 7-23
® Replacing an Ink Tank in the BC-21e Color BJ Cartridge .................................................... 7-33
® Storing a BJ Cartridge ............................................................................................................. 7-41
Transporting the MultiPASS ........................................................................................................ 7-43
Chapter 7 Maintenance 7-1
iii!i!i! ,iiii!i!i!!!ilili{iiliii!i!ii:i¸iiiii!!!171iii!i!!!!!i;iiii!i!!i!!!!!i;
Chapter 7
Follow these guidelines to avoid damage to your MultiPASS and harm to you or others:
Place the MultiPASS on a stable surface. Do not use an angled stand. Avoid setting the unit in
direct sunlight.
Do not install the MultiPASS near devices that contain magnets or generate magnetic fields,
such as speakers.
Do not subject the MultiPASS to strong physical shock or vibration.
Make sure the area where you use the unit is free from dust.
Keep the MultiPASS clean. Dust accumulation can prevent the unit from operating properly.
To ensure proper electrical contact, make sure the unit is firmly plugged in.
Never pull on the cord to unplug the MultiPASS. Pull on the plug itself.
Do not overload the electrical outlet where the MultiPASS is plugged in.
For your safety, unplug the MultiPASS during electrical storms.
When the power cord is disconnected, the image memory is completely erased. Therefore,
before you begin cleaning the MultiPASS, be sure to print any faxes stored in its memory.
Printing a Document in Memory
Maintenance 7-2
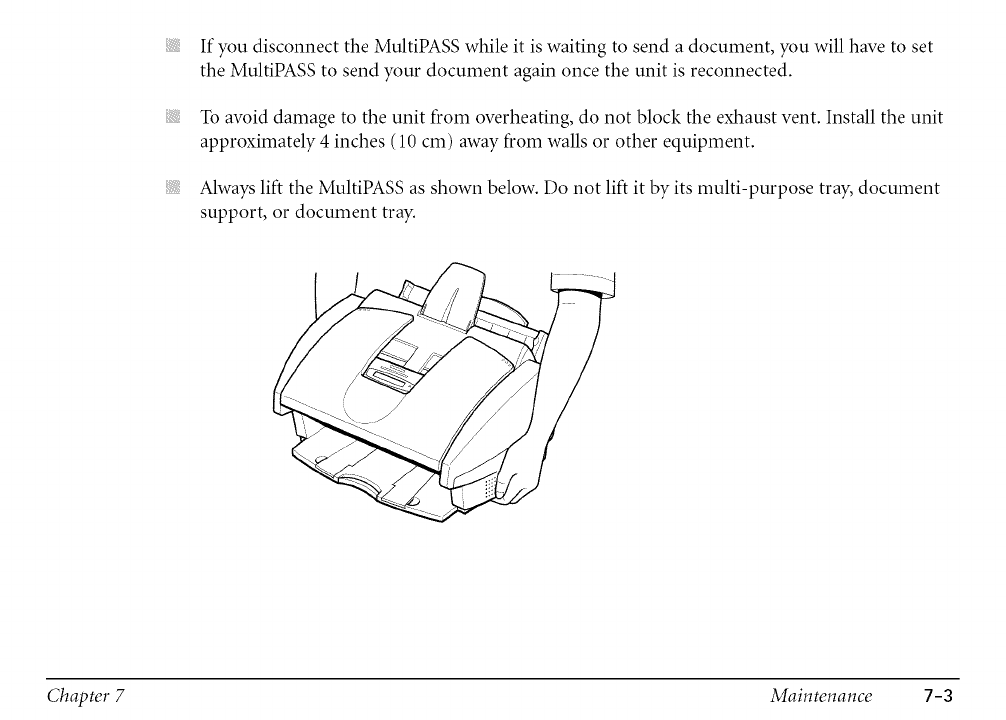
IfyoudisconnecttheMultiPASSwhileit iswaitingtosendadocument,youwillhavetoset
theMultiPASStosendyourdocumentagainoncetheunitisreconnected.
Toavoiddamagetotheunitfromoverheating,donotblocktheexhaustvent.Installtheunit
approximately4inches(10cm)awayfromwallsorotherequipment.
Alwayslift theMultiPASSasshownbelow.Donotliftit byitsmulti-purposetray,document
support,ordocumenttray.
Chapter 7 Maintenance 7-3
Your MultiPASS requires little periodic maintenance. Follow these guidelines to keep your
MultiPASS in good operating condition:
Before you clean the MultiPASS, be sure to print any faxes stored in memory.
Do not use tissue paper, paper towels, or similar materials for cleaning; they can stick to the
components or generate static charges.
Be sure to disconnect the power cord before cleaning the unit.
When the power cord is disconnected, the image memory is completely erased. Therefore,
before you begin cleaning the MultiPASS, be sure to print any faxes stored in its memory.
Printing a Document in Memory
CAUTION
Do not use volatile liquids such as thinners, benzene, acetone, or any other chemical cleaner to
clean the exterior or interior of the MultiPASS, as they can damage its components.
Cleaning the
1.
2.
3.
Chapter 7
Outside of the MultiPASS
Disconnect the power cord from the MultiPASS.
Wipe the exterior of the unit with a clean, soft, lint-free cloth moistened with water or
diluted dishwashing detergent solution.
Plug the power cord back in.
Maintenance 7-4
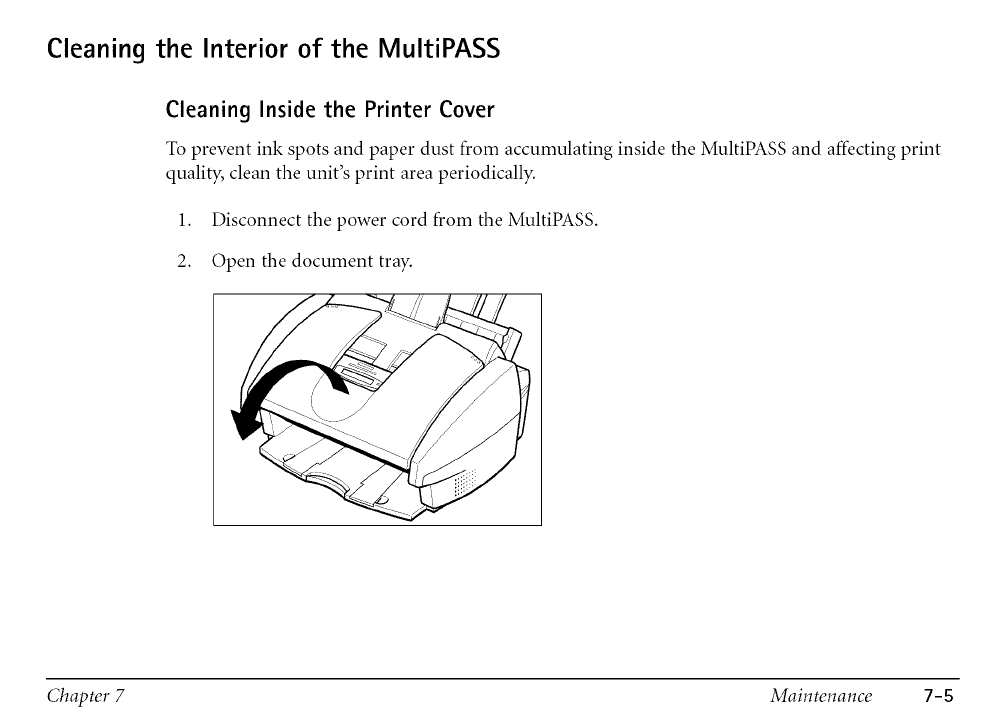
Cleaning the Interior of the MultiPASS
Cleaning Inside the Printer Cover
To prevent ink spots and paper dust from accumulating inside the MultiPASS and affecting print
quality, clean the unit's print area periodically.
1. Disconnect the power cord from the MultiPASS.
2. Open the document tray.
Chapter 7 Maintenance 7-5
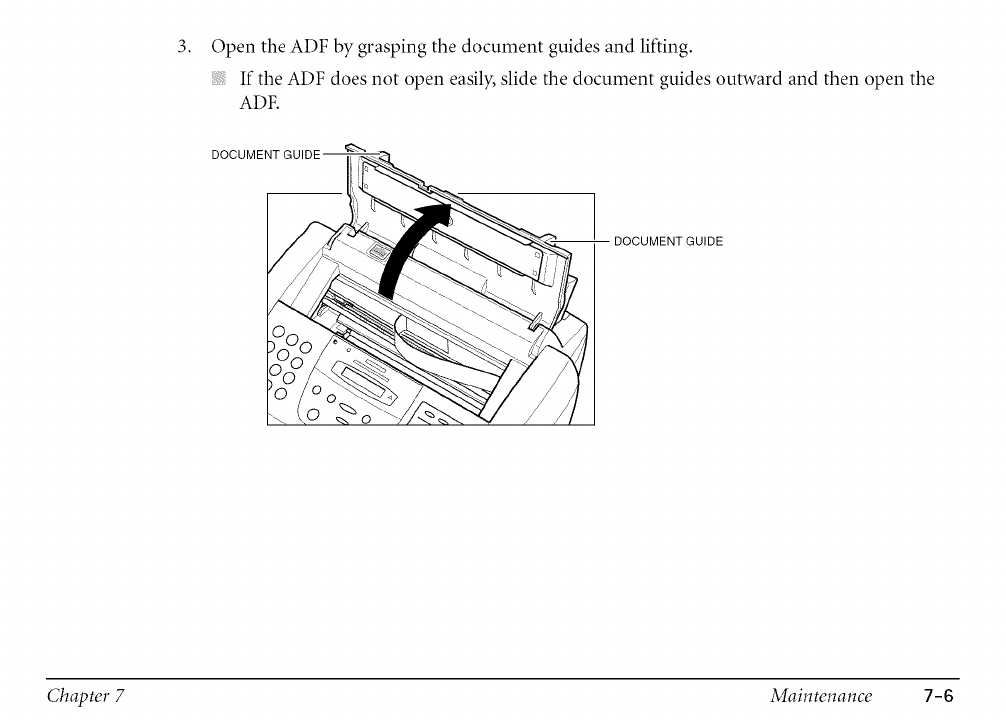
3. Open the ADF by grasping the document guides and lifting.
If the ADF does not open easily, slide the document guides outward and then open the
ADF.
DOCUMENTGUIDE
Chapter 7 Maintenance 7-6
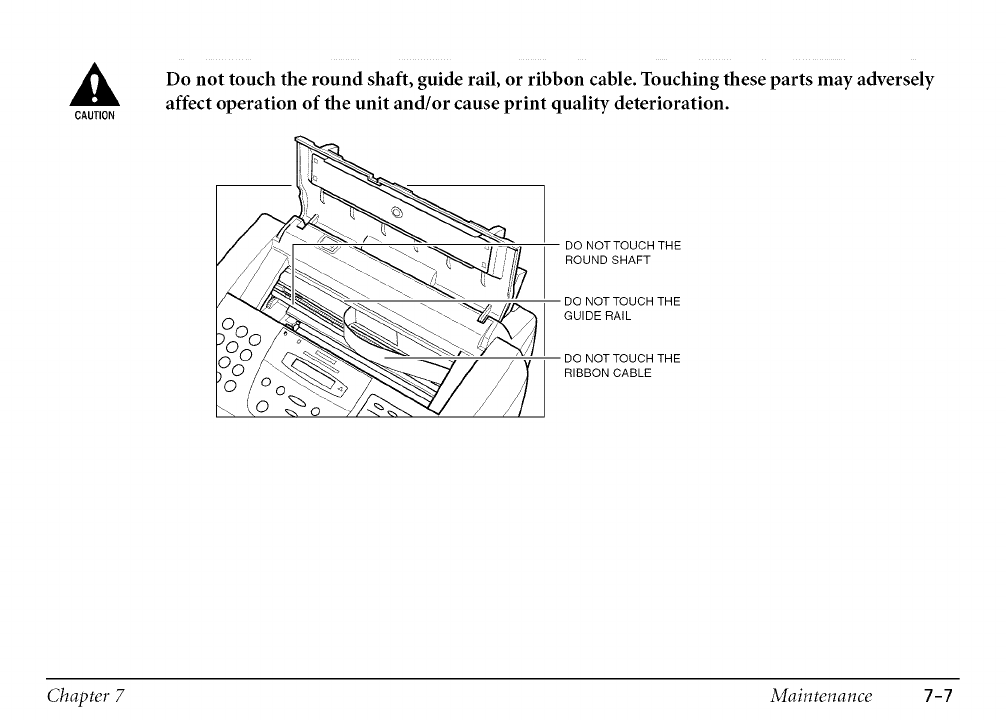
CAUTION
Do not touch the round shaft, guide rail, or ribbon cable. Touching these parts may adversely
affect operation of the unit and/or cause print quality deterioration.
DO NOT TOUCH THE
ROUND SHAFT
DO NOT TOUCH THE
GUIDE RAIL
DO NOT TOUCH THE
RIBBON CABLE
Chapter 7 Maintenance 7-7
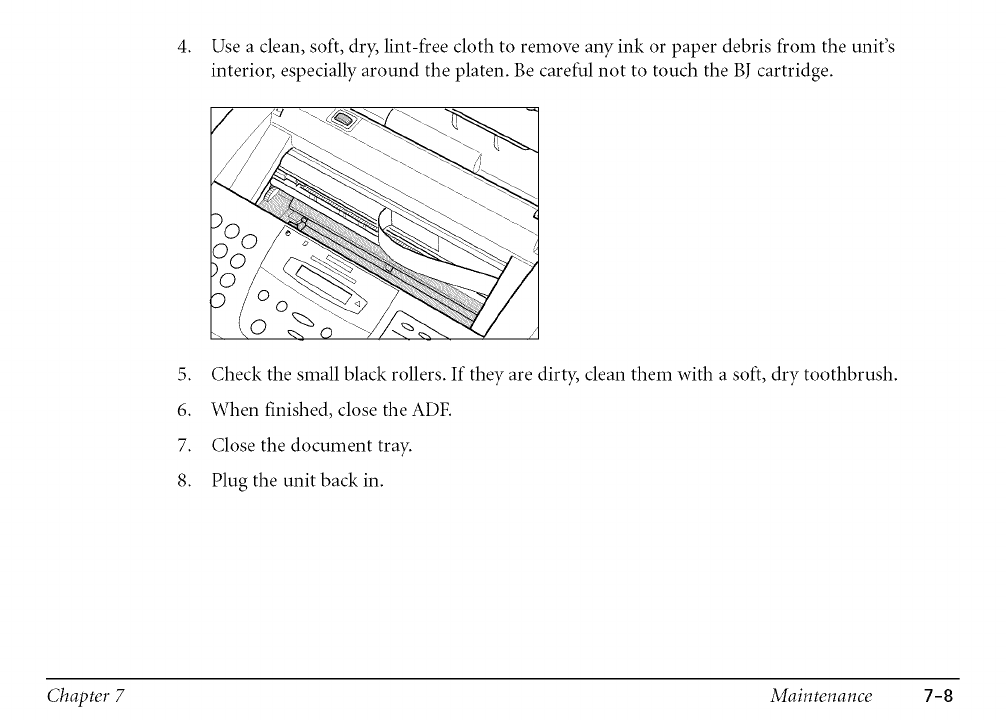
4. Use a clean, soft, dry, lint-free cloth to remove any ink or paper debris from the unit's
interior, especially around the platen. Be careful not to touch the BJ cartridge.
5. Check the small black rollers. If they are dirty, clean them with a soft, dry toothbrush.
6. When finished, close the ADE
7. Close the document tray.
8. Plug the unit back in.
Chapter 7 Maintenance 7-8
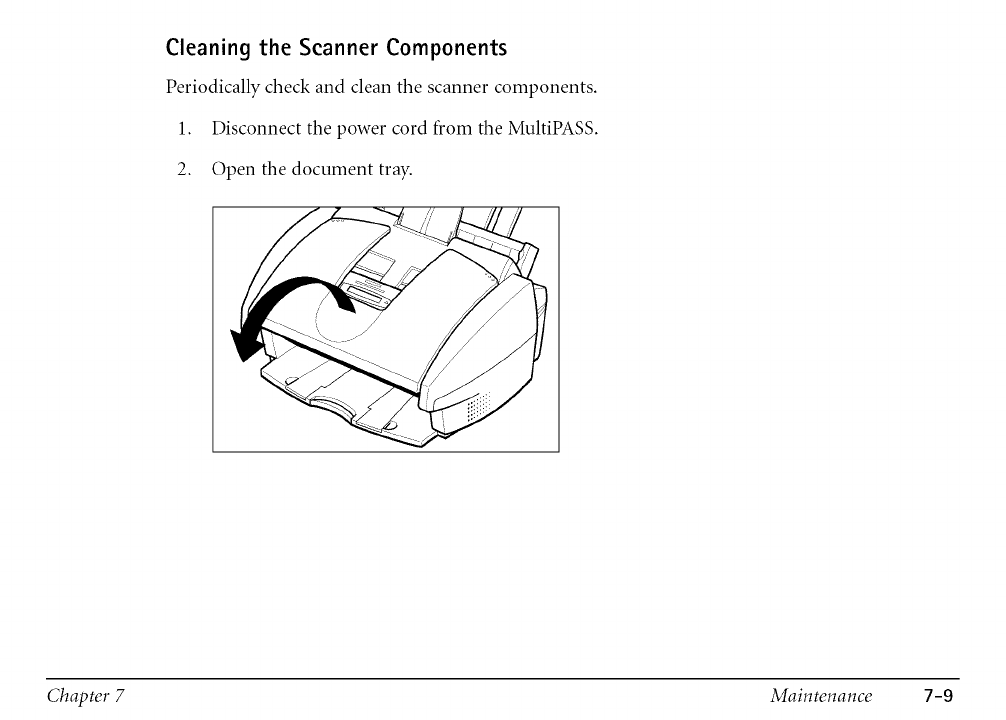
Cleaning the Scanner Components
Periodically check and clean the scanner components.
1. Disconnect the power cord from the MultiPASS.
2. Open the document tray.
Chapter 7 Maintenance 7-9
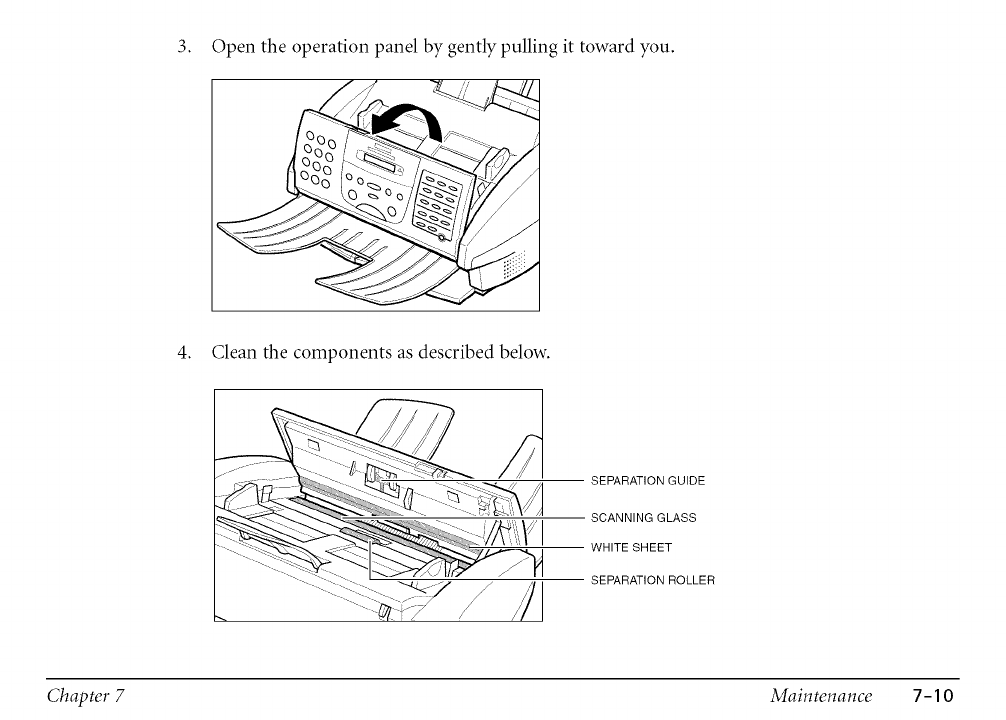
3. Open the operation panel by gently pulling it toward you.
4. Clean the components as described below.
SEPARATION GUIDE
SCANNING GLASS
IWHITE SHEET
SEPARATION ROLLER
Chapter 7 Maintenance 7-10
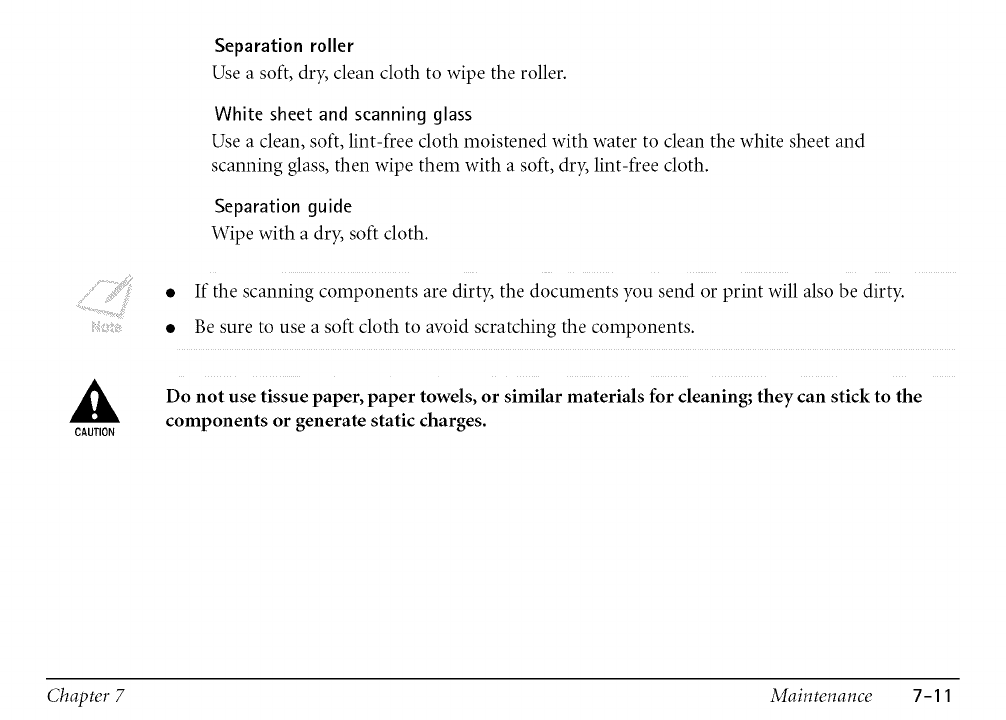
CAUTION
Separation roller
Use a soft, dry, clean cloth to wipe the roller.
White sheet and scanning glass
Use a clean, soft, lint-free cloth moistened with water to clean the white sheet and
scanning glass, then wipe them with a soft, dry, lint-free cloth.
Separation guide
Wipe with a dry, soft cloth.
• If the scanning components are dirty, the documents you send or print will also be dirty.
• Be sure to use a soft cloth to avoid scratching the components.
Do not use tissue paper, paper towels, or similar materials for cleaning; they can stick to the
components or generate static charges.
Chapter 7 Maintenance 7-11
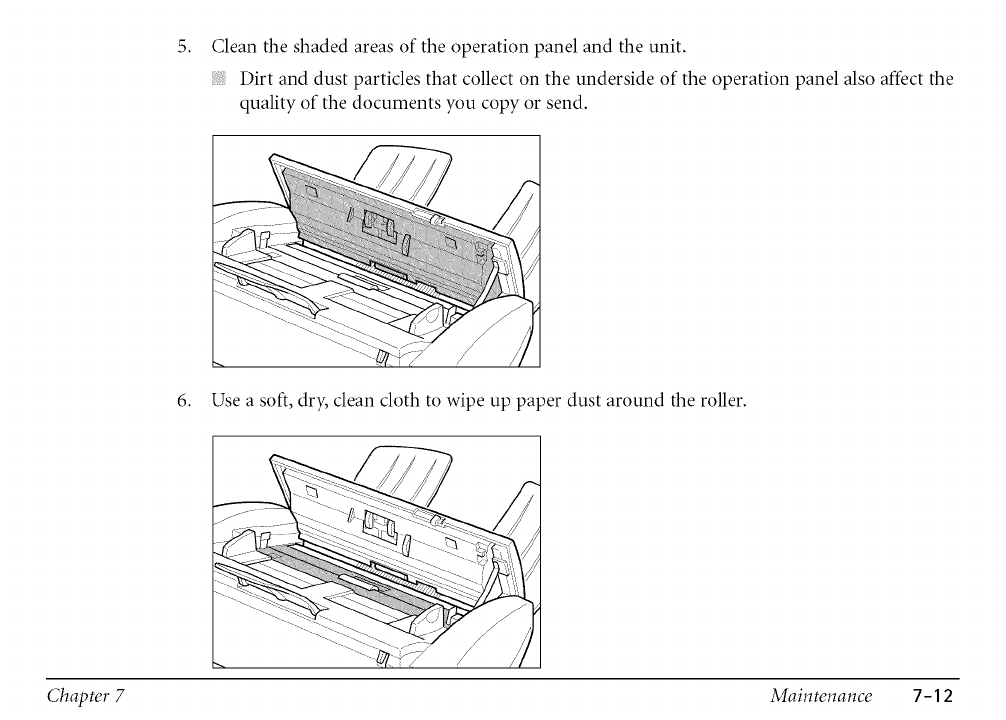
5. Clean the shaded areas of the operation panel and the unit.
Dirt and dust particles that collect on the underside of the operation panel also affect the
quality of the documents you copy or send.
6. Use a soft, dry, clean cloth to wipe up paper dust around the roller.
Chapter 7 Maintenance 7-12
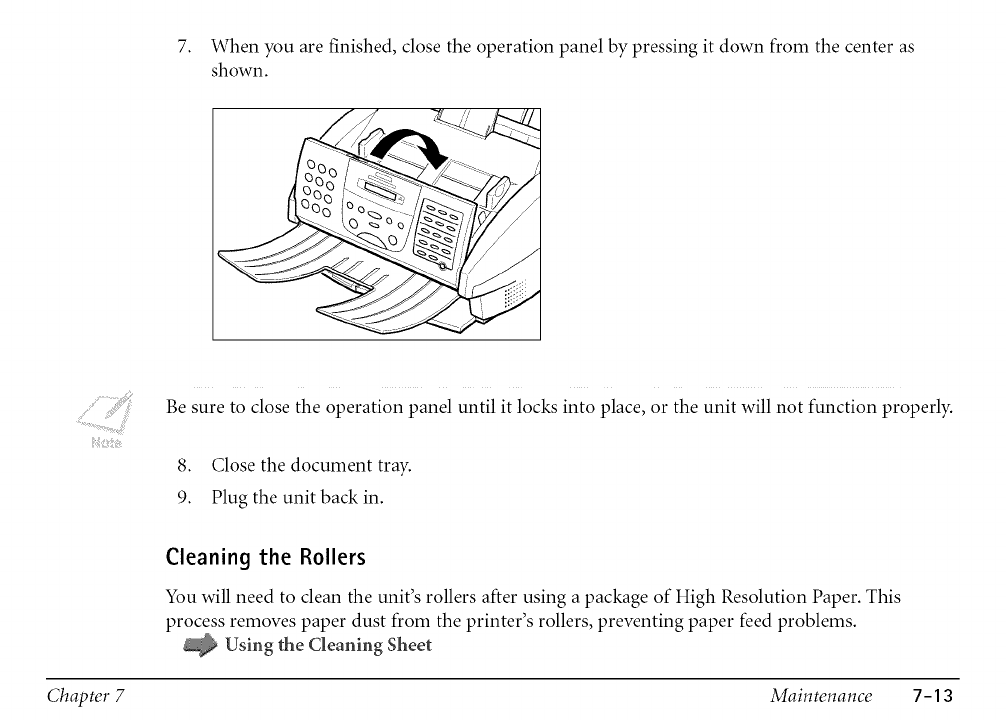
7. When you are finished, close the operation panel by pressing it down from the center as
shown.
Be sure to close the operation panel until it locks into place, or the unit will not function properly.
8. Close the document tray.
9. Plug the unit back in.
Cleaning the Rollers
You will need to clean the unit's rollers after using a package of High Resolution Paper. This
process removes paper dust from the printer's rollers, preventing paper feed problems.
Using the Cleaning Sheet
Chapter 7 Maintenance 7-13
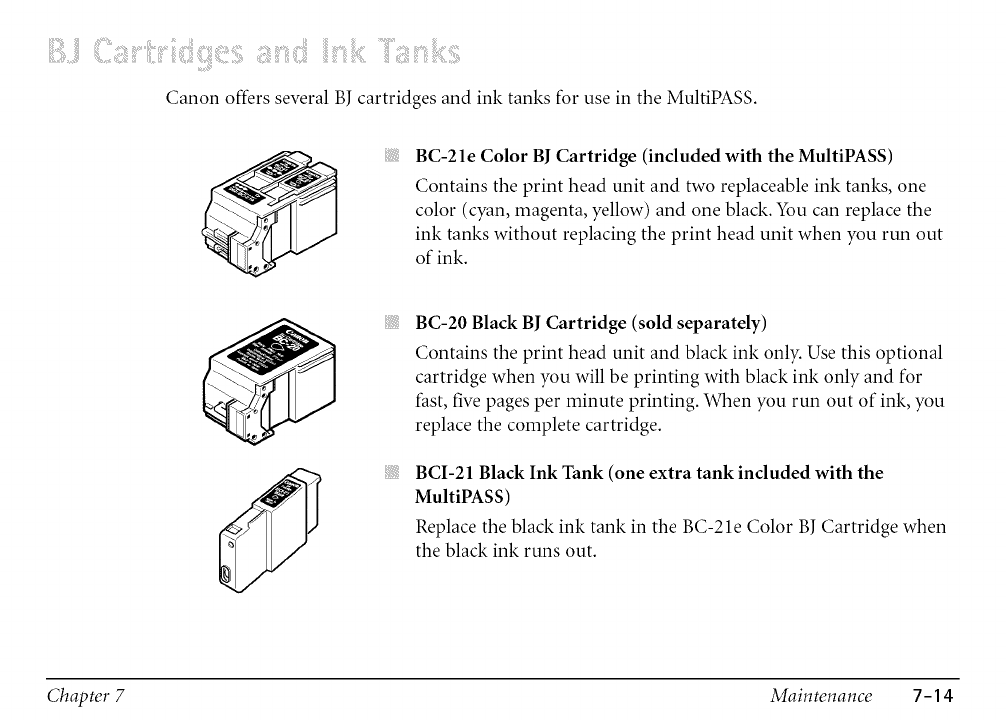
i!ZiiiiiiiiC _ii!iiii__!_!!i!i!i7¸¸iiilii_!iiiii_!i;ili!i!!!iiiiili!ii!iiii_ii_ii!i!:,:!!iiill_i!ii!ili__!_!!i!__!iiiii_!i;ilii!!!!i_!_!!i!_iii!!!!i_iii7 _i!ii!ili__!_!!i!_iii!!!!i_iii:!!iiill
Canon offers several BJ cartridges and ink tanks for use in the MultiPASS.
BC-2 le Color BI Cartridge (induded with the MultiPASS)
Contains the print head unit and two replaceable ink tanks, one
color (cyan, magenta, yellow) and one black. You can replace the
ink tanks without replacing the print head unit when you run out
of ink.
BC-20 Black BI Cartridge (sold separately)
Contains the print head unit and black ink only. Use this optional
cartridge when you will be printing with black ink only and for
fast, five pages per minute printing. When you run out of ink, you
replace the complete cartridge.
BCI-21 Black Ink Tank (one extra tank induded with the
MultiPASS)
Replace the black ink tank in the BC-2 le Color BJ Cartridge when
the black ink runs out.
Chapter 7 Maintenance 7-14
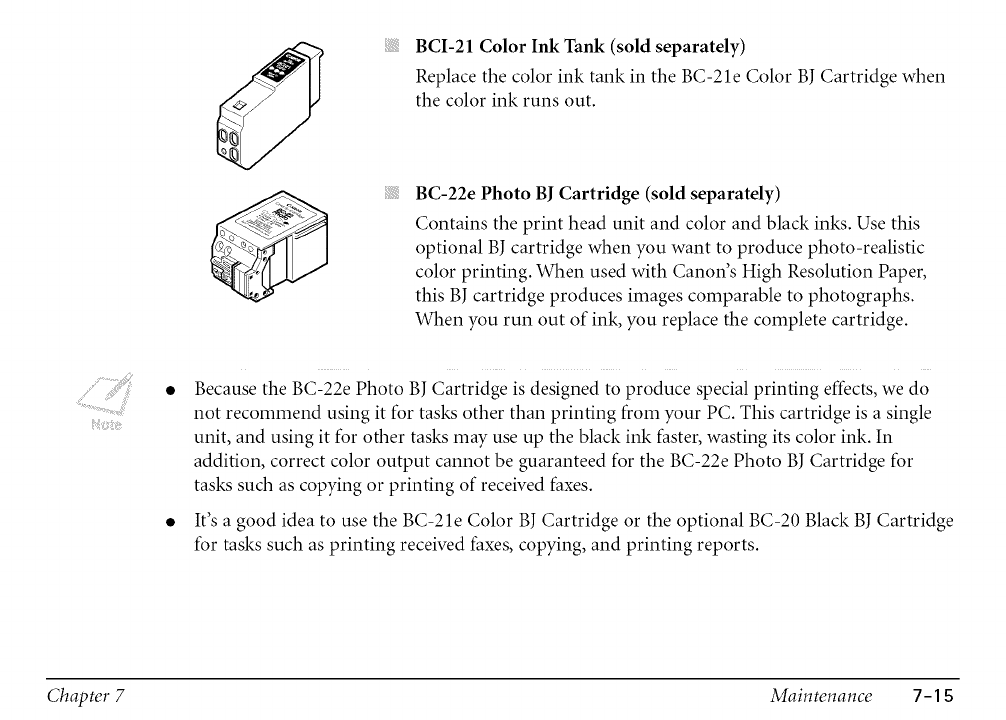
BCI-21ColorInkTank(soldseparately)
ReplacethecolorinktankintheBC-2leColorBJCartridgewhen
thecolorinkrunsout.
BC-22ePhotoBICartridge(sold separately)
Contains the print head unit and color and black inks. Use this
optional BJ cartridge when you want to produce photo-realistic
color printing. When used with Canon's High Resolution Paper,
this BJ cartridge produces images comparable to photographs.
When you run out of ink, you replace the complete cartridge.
Because the BC-22e Photo BJ Cartridge is designed to produce special printing effects, we do
not recommend using it for tasks other than printing from your PC. This cartridge is a single
unit, and using it for other tasks may use up the black ink faster, wasting its color ink. In
addition, correct color output cannot be guaranteed for the BC-22e Photo BJ Cartridge for
tasks such as copying or printing of received faxes.
It's a good idea to use the BC-21e Color BJ Cartridge or the optional BC-20 Black BJ Cartridge
for tasks such as printing received faxes, copying, and printing reports.
Chapter 7 Maintenance 7-1S
Maintenance
The most important thing you can do to extend the life of your MuItiPASS and to ensure
optimum print quality is to take care of the BJ cartridges.
CAUTION
Spilled ink can stain any surface. Open BJ cartridges and ink tanks carefully, and follow the
guidelines here to protect against spilled ink.
If you are using both the BC-21e Color BJ Cartridge and any of the optional BJ cartridges, be
sure to store the BJ cartridge not being used in the Ink Cartridge Storage Box provided with
your MultiPASS.
Keep BJ cartridges and ink tanks in their sealed containers until you are ready to use them.
Do not remove the ink tanks from the BC-2 le Color BJ Cartridge unnecessarily. This may
cause the ink to clog.
Make sure both ink tanks are installed in the BC-2 le Color BJ Cartridge. Attempting to use
the BC-21e Color BJ Cartridge with only one ink tank installed may cause the ink to clog.
If spilled, the ink is difficult to remove. Therefore, it's a good idea to keep the BJ cartridge and
ink tanks out of the reach of children.
Do not touch the print head area on the BJ cartridge. Ink may leak out and cause stains.
Chapter 7 Maintenance 7-16
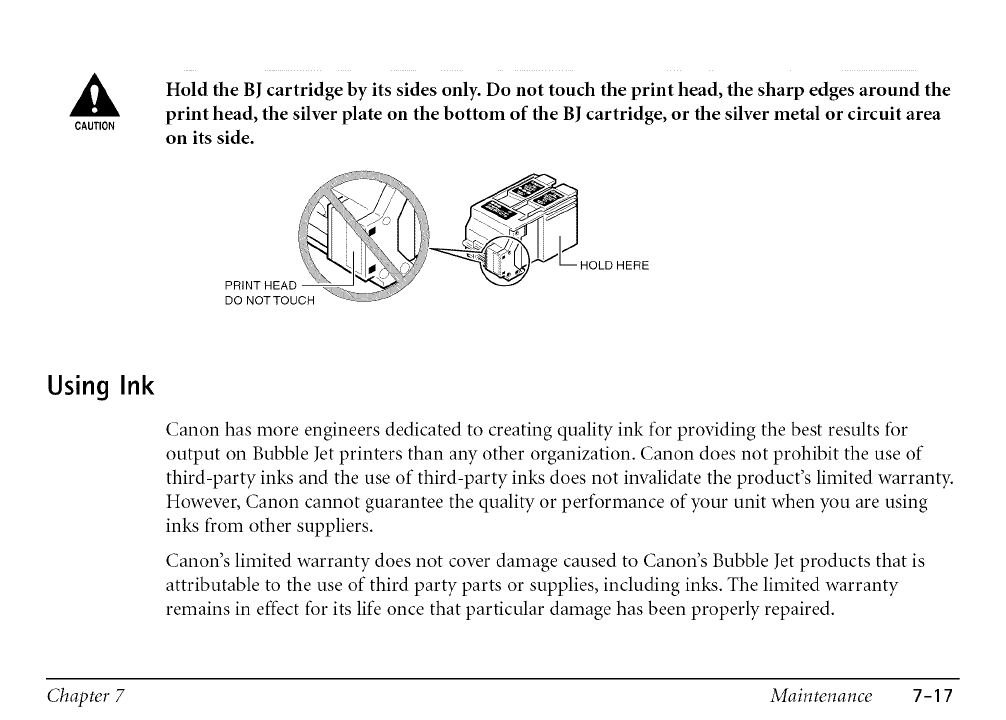
CAUTION
Hold the BJ cartridge by its sides only. Do not touch the print head, the sharp edges around the
print head, the silver plate on the bottom of the BJ cartridge, or the silver metal or circuit area
on its side.
HOLD HERE
PRINT HEAD
DO NOT TOUCH ;!-_-
Using Ink
Canon has more engineers dedicated to creating quality ink for providing the best results for
output on Bubble Jet printers than any other organization. Canon does not prohibit the use of
third-party inks and the use of third-party inks does not invalidate the product's limited warranty.
However, Canon cannot guarantee the quality or performance of your unit when you are using
inks from other suppliers.
Canon's limited warranty does not cover damage caused to Canon's Bubble Jet products that is
attributable to the use of third party parts or supplies, including inks. The limited warranty
remains in effect for its life once that particular damage has been properly repaired.
Chapter 7 Maintenance 7-1 7
For optimum printing results, Canon recommends that you use the Canon BC-2 le Color BJ
Cartridge or the optional Canon BC-20 Black or BC-22e Photo BJ Cartridge with your
MultiPASS.
When replacing ink tanks in the BC-2 le Color BJ Cartridge, Canon recommends that you use
the Canon BCI-21 Color and BCI-21 Black Ink Tanks.
Testing
Function
and Cleaning the BJ Cartridge Print Head
The print head in the BJ cartridge contains nozzles through which ink is propelled onto the paper.
To maintain the best possible print quality, these nozzles need to be cleaned from time to time.
Your MultiPASS is equipped with a print head cleaning function that does this.
Printing the Nozzle Check
Before cleaning the print head, you may want to print the nozzle check to test the BJ cartridge
installed in the MultiPASS. This test shows if each print head nozzle is operating properly.
Follow this procedure to print the nozzle check:
1. Press Function.
Chapter 7 Maintenance 7-18
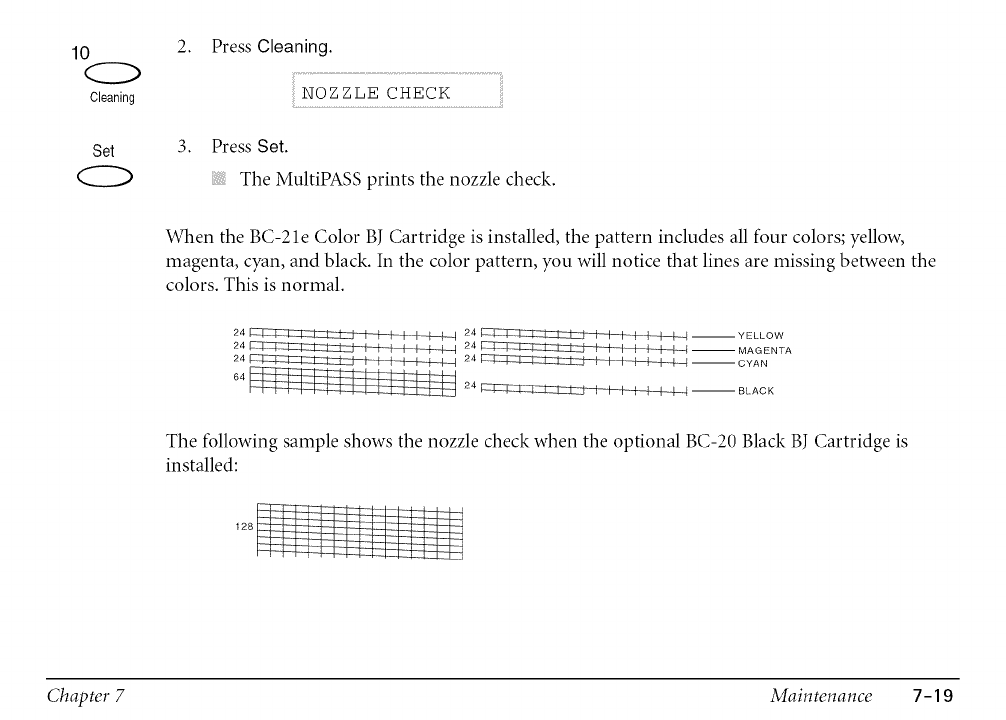
10
Cleaning
Set
2.
3.
Press Cleaning.
NOZZLE CHECK
Press Set.
The MuItiPASS prints the nozzle check.
When the BC-2 le Color BJ Cartridge is installed, the pattern includes all four colors; yellow,
magenta, cyan, and black. In the color pattern, you will notice that lines are missing between the
colors. This is normal.
24_ 24 --YELLOW
24_ 24 --MAGENTA
24 24 -- CYAN
64_ 24 --BLACK
The following sample shows the nozzle check when the optional BC-20 Black BJ Cartridge is
installed:
Chapter 7 Maintenance 7-19
CAUTION
Function
(:leaning the BJ (:artridge Print Head
If your printouts become faint or streaked, or if their quality otherwise decreases, clean the print
head. To maintain the best possible print quality, you need to clean the BJ cartridge print head
from time to time.
Cleaning the print head consumes a small amount of ink. Cleaning too often reduces the
amount of ink in the BI cartridge.
If your printing is faint, you can often correct the problem by adjusting the print contrast and
printing speed.
1. Press Function.
10
Cleaning
08 02
v A
2.
3.
Press Cleaning.
NOZZLE CHECK
Use V or A to select HEAD CLEANING.
HEAD CLEANING
Chapter 7 Maintenance 7-20
Set 4. Press Set.
The MuItiPASS cleans the print head.
When cleaning ends, the MultiPASS returns to standby mode.
You can perform the cleaning procedure up to five consecutive times if necessary.
If the problem persists, install a new BJ cartridge.
You can print the nozzle check to see if cleaning corrected the problem.
................................... -7_ Printing the Nozzle Check
!i!:ii!
When to Replace the BJ Cartridge
How frequently you need to replace your BJ cartridge or one of its ink tanks depends on how you
use your MultiPASS. If you print a good deal of graphics, halftones, or grayscales, you will need to
replace the BJ cartridge more often than if you print mainly text.
Specifications, BJ Cartridges
To help ensure the maximum life for your cartridges, always follow the guidelines for cartridge
maintenance.
Maintenance
Chapter 7 Maintenance 7-21
In general, you will need to replace the BJ cartridge in the following situations:
If you have been using the BC-21e Color BJ Cartridge for over six months, or a BC-20 Black
BJ Cartridge for over a year.
If your printed output is not crisp and clear or has gaps in the characters (missing dots), even
after you have cleaned the print head five times.
If your color printouts appear to be missing a color, even after you have cleaned the print
head five times.
If the message CHANGE CARTRIDGE appears in the LCD display.
In general, you will need to replace an ink tank in the BC-21e Color BJ Cartridge in the following
situations:
If your output is blank.
If your color printouts appear to be missing a color, even after you have cleaned the print
head five times.
If the message BLACK INK EMPTY or COLOR INK EMPTY appears in the LCD display.
Use the procedure on the following page to replace an old BJ cartridge or change a BJ cartridge
when switching between the BC-2 le Color BJ Cartridge and any other optional BJ cartridge.
You only need to replace the BC-21e Color BJ Cartridge when the print head is damaged (or after
printing approximately 2000 pages). If one of the ink tanks (either color or black) in your BC-2 le
Color BJ Cartridge runs out of ink, simply replace the ink tank.
Replacing an Ink Tank in the BC-21e Color BJ Cartridge
Chapter 7 Maintenance 7-22
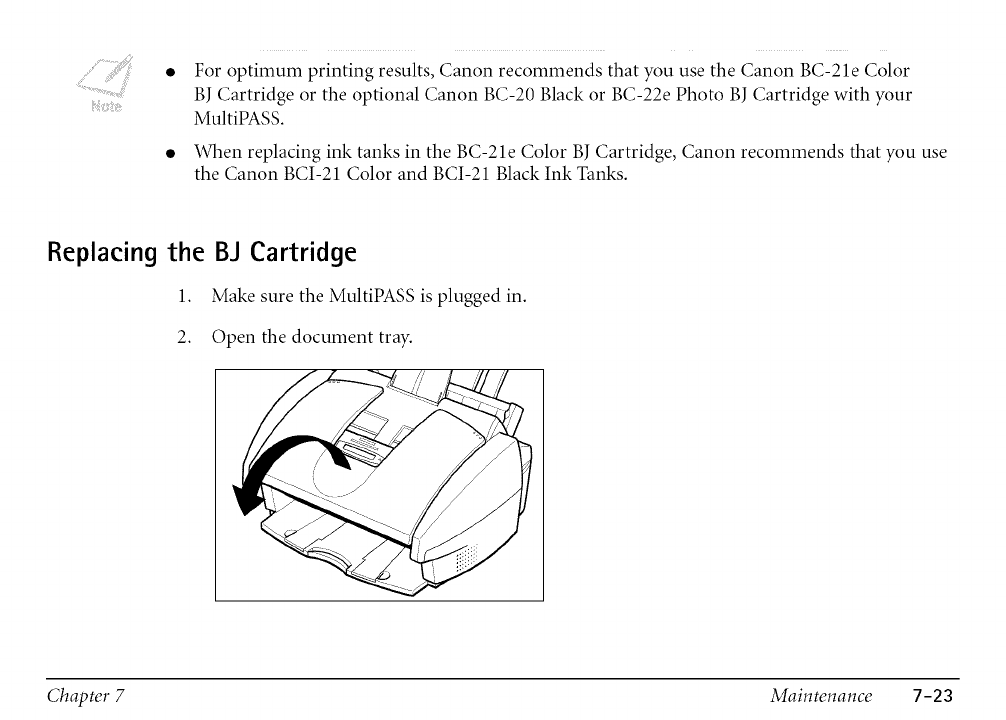
For optimum printing results, Canon recommends that you use the Canon BC-2 le Color
BJ Cartridge or the optional Canon BC-20 Black or BC-22e Photo BJ Cartridge with your
MultiPASS.
When replacing ink tanks in the BC-2 le Color BJ Cartridge, Canon recommends that you use
the Canon BCI-21 Color and BCI-21 Black Ink Tanks.
Replacing the BJ Cartridge
1. Make sure the MultiPASS is plugged in.
2. Open the document tray.
Chapter 7 Maintenance 7-23

3. Open the ADF by grasping the document guides and lifting.
If the ADF does not open easily, slide the document guides outward and then open the
ADF.
DOCUMENT GUIDE
Chapter 7 Maintenance 7-24
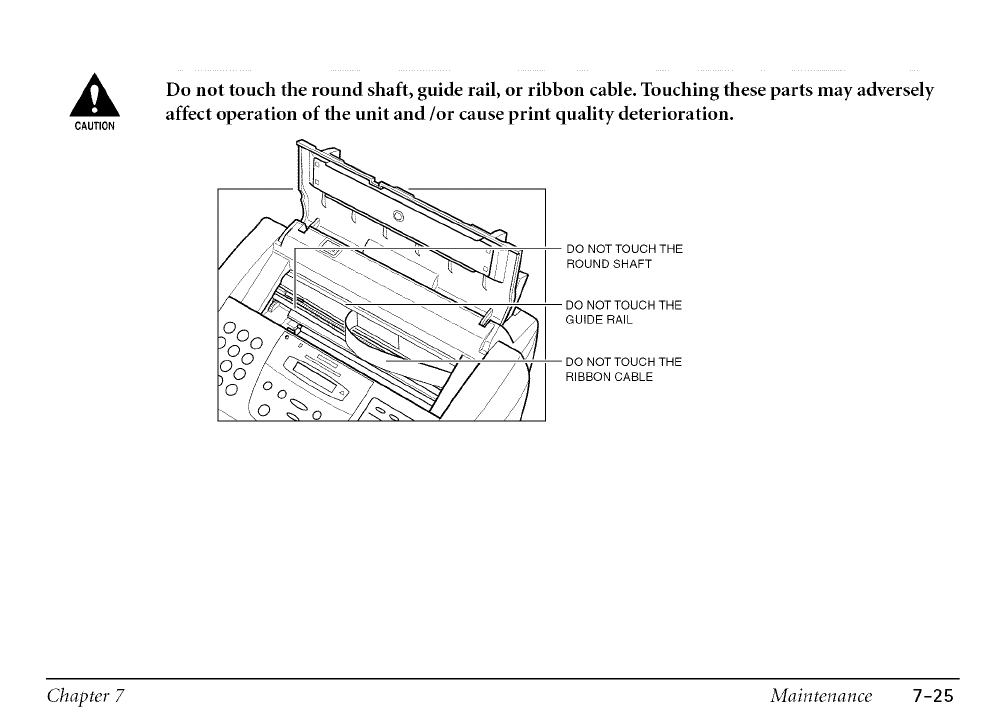
CAUTION
Do not touch the round shaft, guide rail, or ribbon cable. Touching these parts may adversely
affect operation of the unit and/or cause print quality deterioration.
DO NOT TOUCH THE
ROUND SHAFT
DO NOT TOUCH THE
GUIDE RAIL
DO NOT TOUCH THE
RIBBON CABLE
Chapter 7 Maintenance 7-25
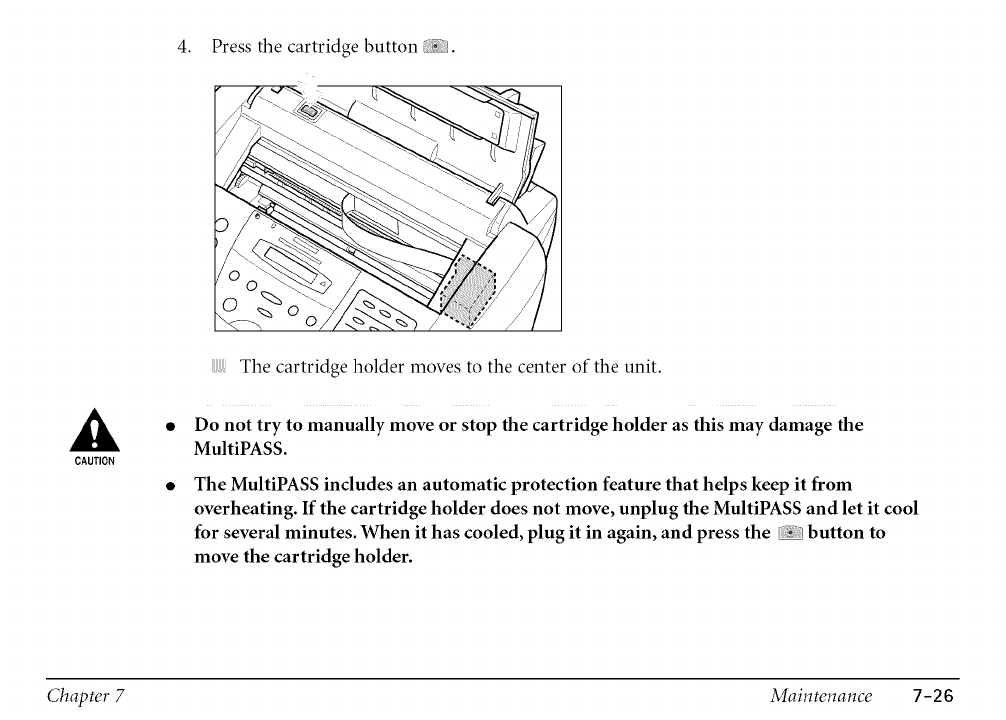
CAUTION
4. Press the cartridge button _iil.
The cartridge holder moves to the center of the unit.
Do not try to manually move or stop the cartridge holder as this may damage the
MultiPASS.
The MultiPASS indudes an automatic protection feature that helps keep it from
overheating. If the cartridge holder does not move, unplug the MultiPASS and let it cool
for several minutes. When it has cooled, plug it in again, and press the button to
move the cartridge holder.
Chapter 7 Maintenance 7-26
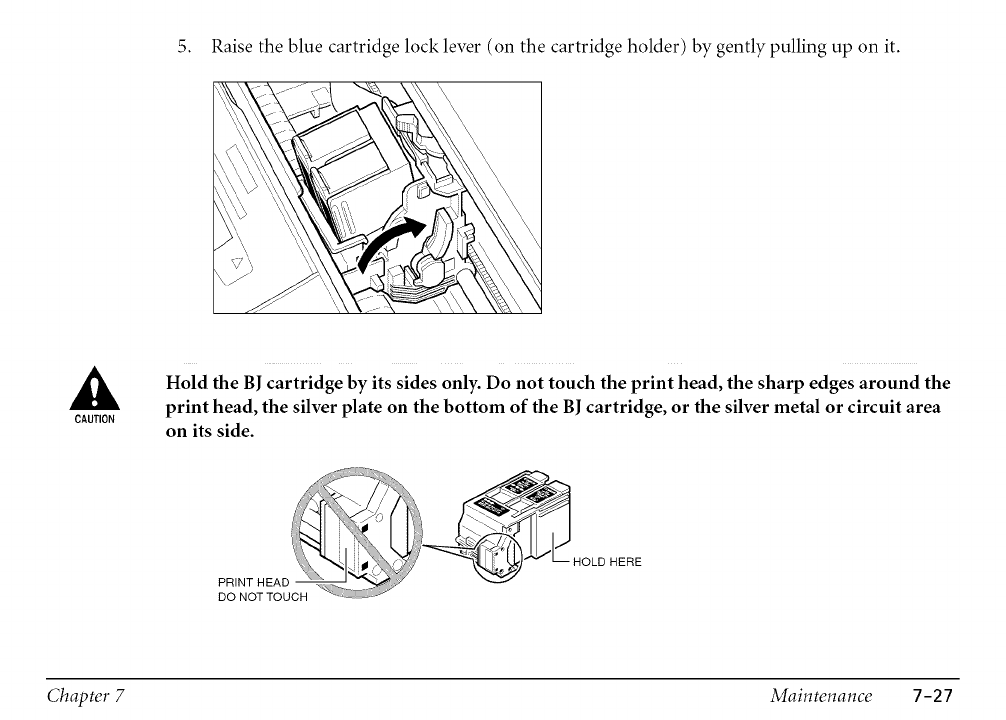
5. Raise the blue cartridge lock lever (on the cartridge holder) by gently pulling up on it.
CAUTION
Hold the BJ cartridge by its sides only. Do not touch the print head, the sharp edges around the
print head, the silver plate on the bottom of the BJ cartridge, or the silver metal or circuit area
on its side.
Chapter 7 Maintenance 7-27
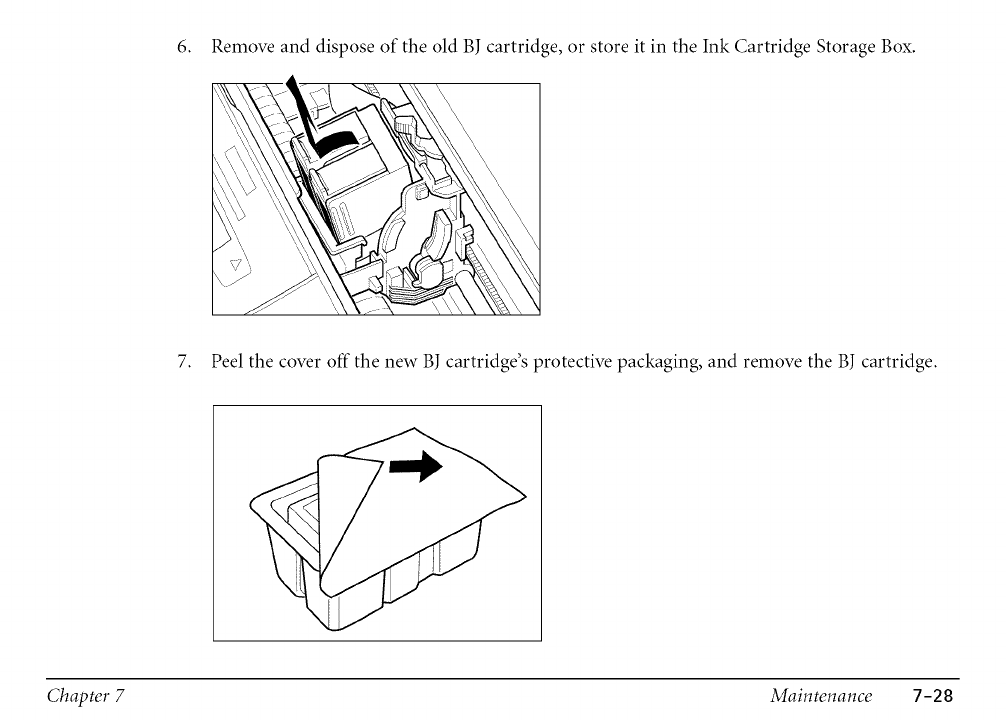
6. Remove and dispose of the old BJ cartridge, or store it in the Ink Cartridge Storage Box.
7. Peel the cover off the new BJ cartridge's protective packaging, and remove the BJ cartridge.
Chapter 7 Maintenance 7-28

CAUTION
Hold the BJ cartridge by its sides only. Do not touch the print head, the sharp edges around the
print head, the silver plate on the bottom of the BJ cartridge, or the silver metal or circuit area
on its side.
PRINT HEAD
DO NOT TOUCH
HERE
8, Lift the orange cap off the BJ cartridge's print head, then remove the orange tape.
] TAPE
Chapter 7 Maintenance 7-29
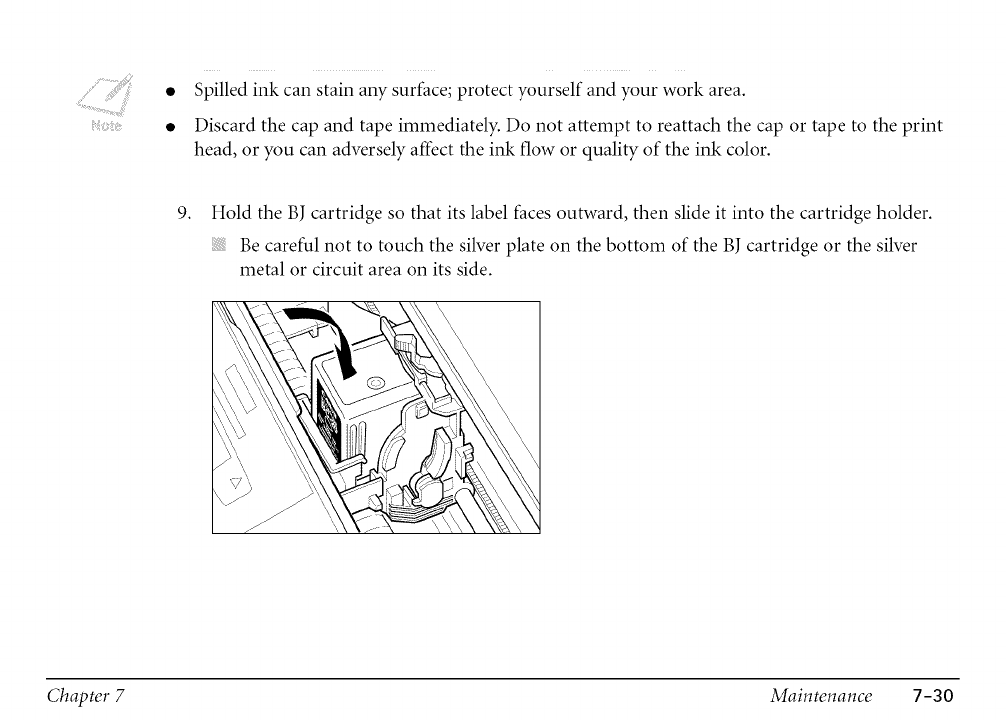
Spilled ink can stain any surface; protect yourself and your work area.
Discard the cap and tape immediately. Do not attempt to reattach the cap or tape to the print
head, or you can adversely affect the ink flow or quality of the ink color.
9. Hold the BJ cartridge so that its label faces outward, then slide it into the cartridge holder.
Be careful not to touch the silver plate on the bottom of the BJ cartridge or the silver
metal or circuit area on its side.
Chapter 7 Maintenance 7-30
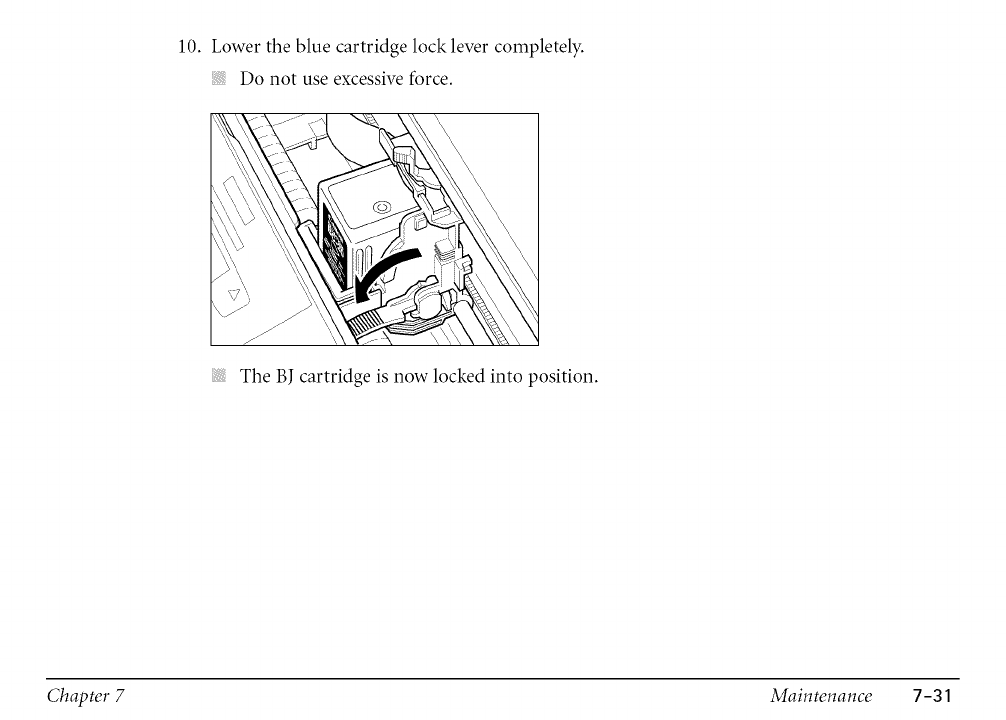
10.Lowerthebluecartridgelocklevercompletely.
Donotuseexcessiveforce.
TheBJcartridgeisnowlockedintoposition.
Chapter 7 Maintenance 7-31
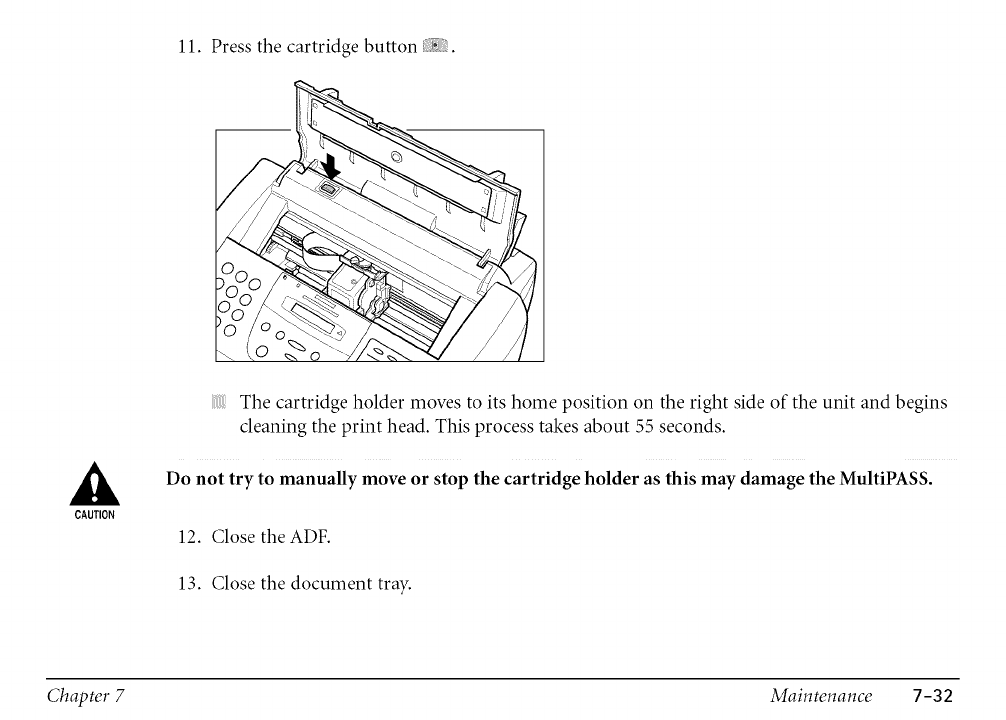
11. Press the cartridge button i i;_{.
CAUTION
The cartridge holder moves to its home position on the right side of the unit and begins
cleaning the print head. This process takes about 55 seconds.
Do not try to manually move or stop the cartridge holder as this may damage the MultiPASS.
12. Close the ADF.
13. Close the document tray.
Chapter 7 Maintenance 7-32
Unplug the MultiPASS only when it is in standby mode (date and Receive mode shown in the
LCD display), and the cartridge holder is in its home position on the right. If you unplug the unit
while it is printing, or move the cartridge holder from its home position, the BJ cartridge will not
be capped and can dry out.
Replacing an Ink Tank in the BC-21e Color BJ Cartridge
The LCD display will indicate which ink tank in the BC-2 le Color BJ Cartridge needs replacing.
Message
BLACK INK EMPTY
COLOR INK EMPTY
Action
Replace the BCI-21 Black Ink Tank (right tank).
Replace the BCI-21 Color Ink Tank (left tank).
Leave the BC-2 le Color BJ Cartridge in the MultiPASS when replacing an ink tank.
1. Make sure the MultiPASS is plugged in.
2. Open the document tray.
Chapter 7 Maintenance 7-33
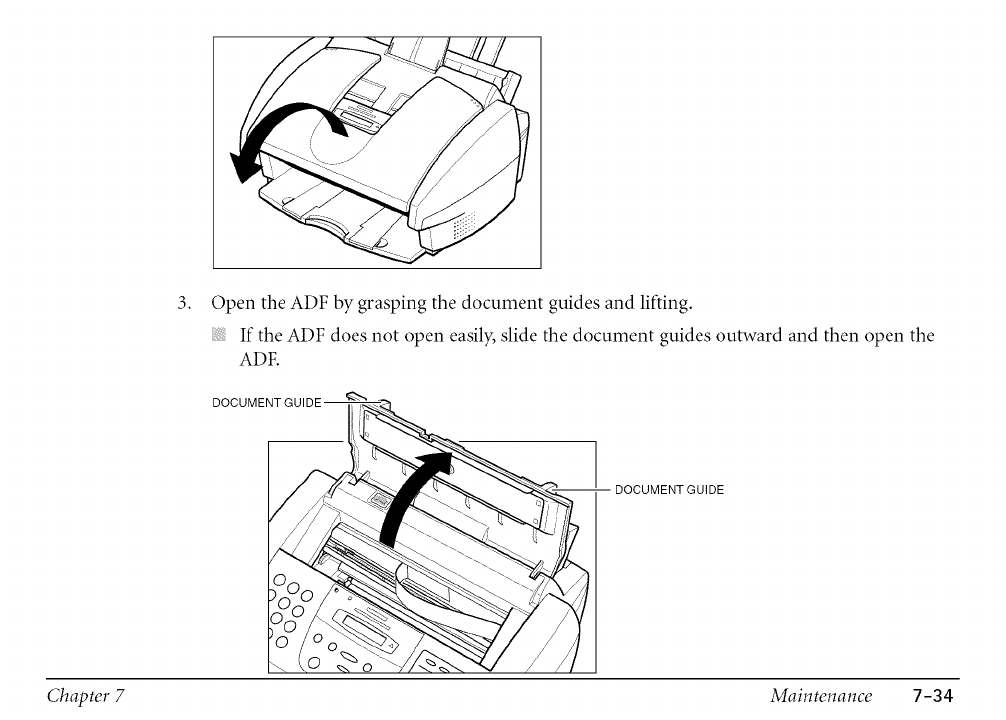
3. Open the ADF by grasping the document guides and lifting.
If the ADF does not open easily, slide the document guides outward and then open the
ADF.
DOCUMENTGUIDE
Chapter 7 Maintenance 7-34

CAUTION
Do not touch the round shaft, guide rail, or ribbon cable. Touching these parts may adversely
affect operation of the unit and/or cause print quality deterioration.
DO NOT TOUCH THE
ROUND SHAFT
DO NOT TOUCH THE
GUIDE RAIL
DO NOT TOUCH THE
RIBBON CABLE
Chapter 7 Maintenance 7-35
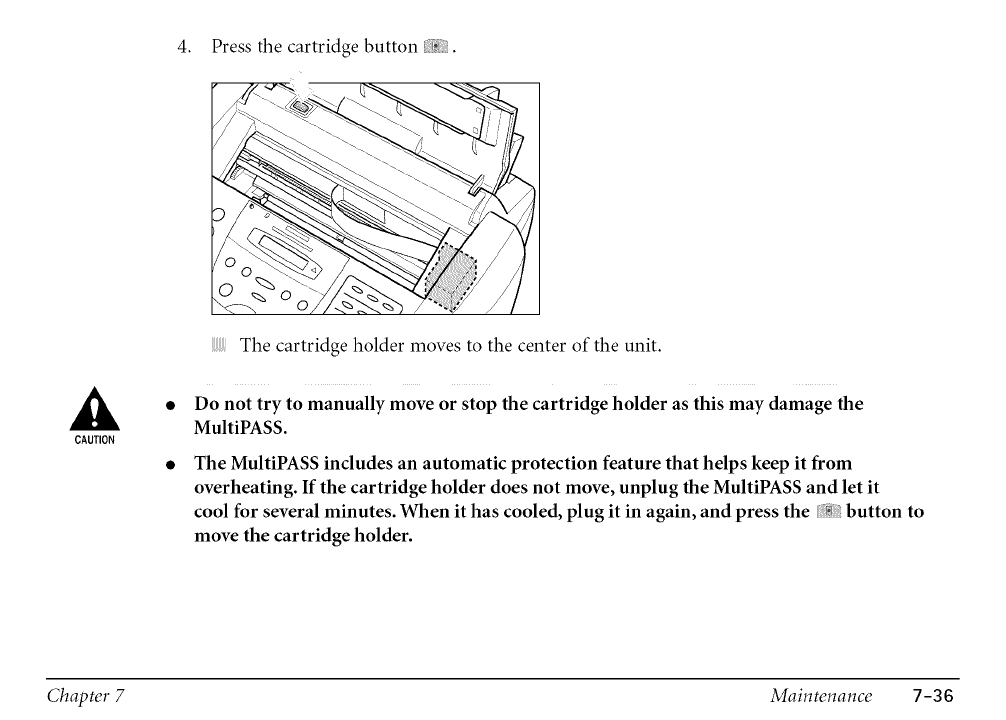
CAUTION
4. Press the cartridge button i:i_0.
The cartridge holder moves to the center of the unit.
Do not try to manually move or stop the cartridge holder as this may damage the
MultiPASS.
The MultiPASS indudes an automatic protection feature that helps keep it from
overheating. If the cartridge holder does not move, unplug the MultiPASS and let it
cool for several minutes. When it has cooled, plug it in again, and press the button to
move the cartridge holder.
Chapter 7 Maintenance 7-36
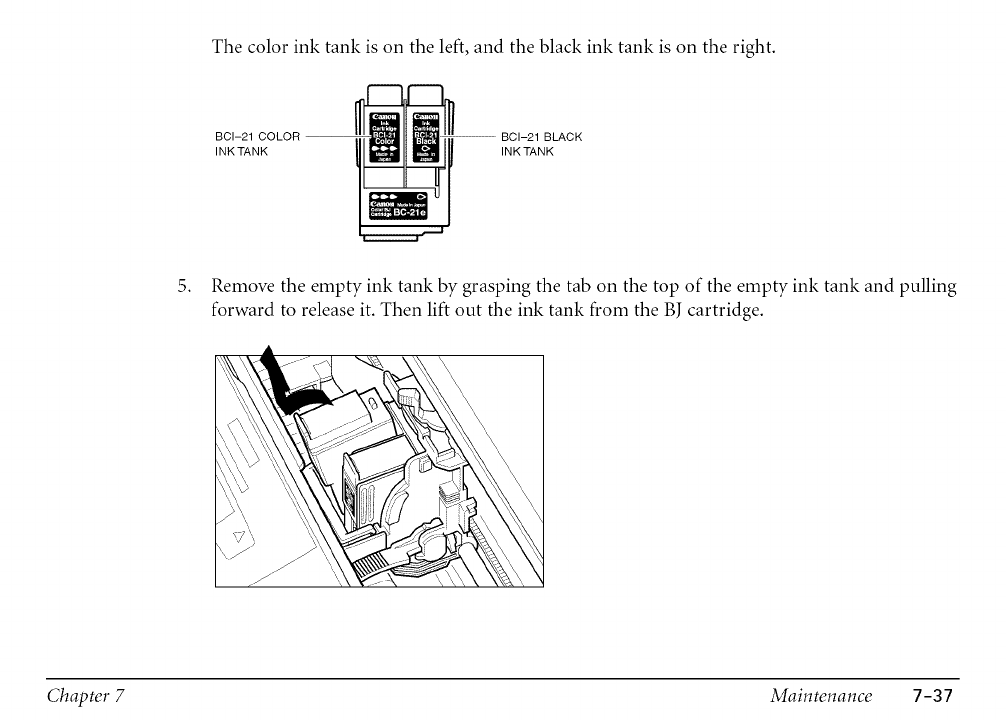
The color ink tank is on the left, and the black ink tank is on the right.
BCI-21 COLOR --
INKTANK 8 8-- ll-
BCI-21 BLACK
INK TANK
5. Remove the empty ink tank by grasping the tab on the top of the empty ink tank and pulling
forward to release it. Then lift out the ink tank from the BJ cartridge.
Chapter 7 Maintenance 7-37
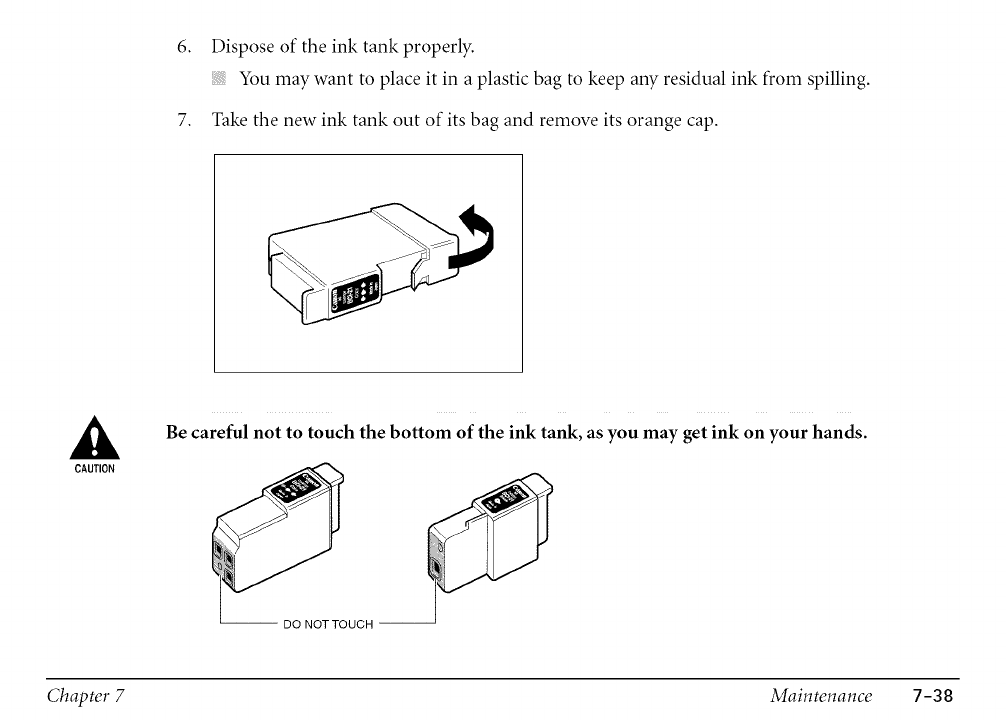
6. Disposeoftheinktankproperly.
Youmaywanttoplaceit inaplasticbagtokeepanyresidualinkfromspilling.
7. Takethenewinktankoutofitsbagandremoveitsorangecap.
CAUTION
Be careful not to touch the bottom of the ink tank, as you may get ink on your hands.
Chapter 7 Maintenance 7-38
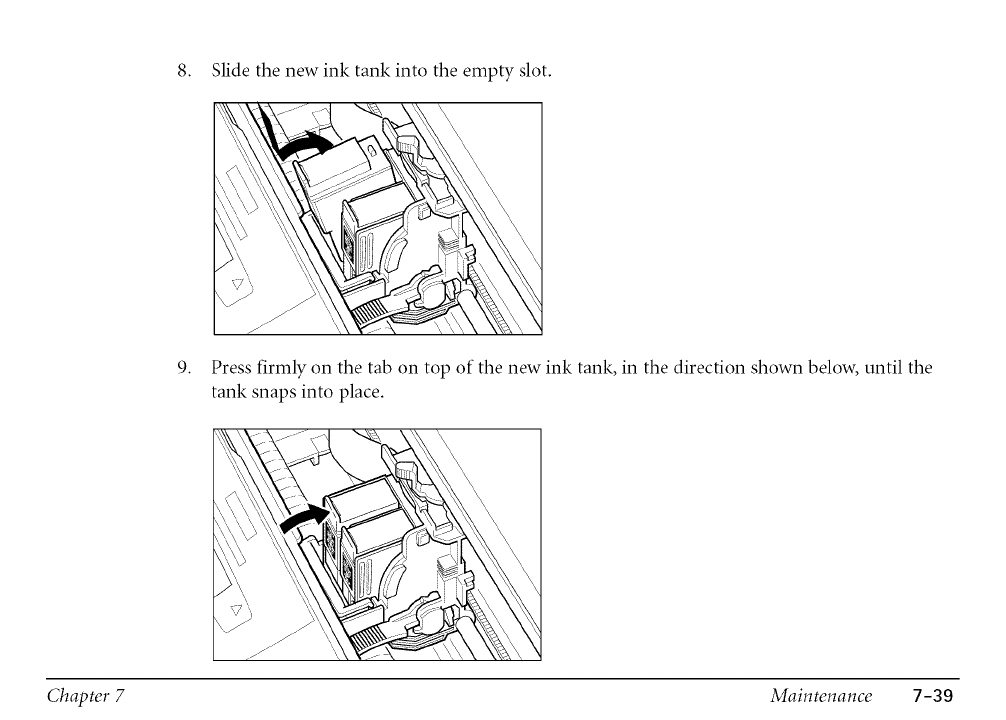
8. Slide the new ink tank into the empty slot.
9. Press firmly on the tab on top of the new ink tank, in the direction shown below, until the
tank snaps into place.
Chapter 7 Maintenance 7-39
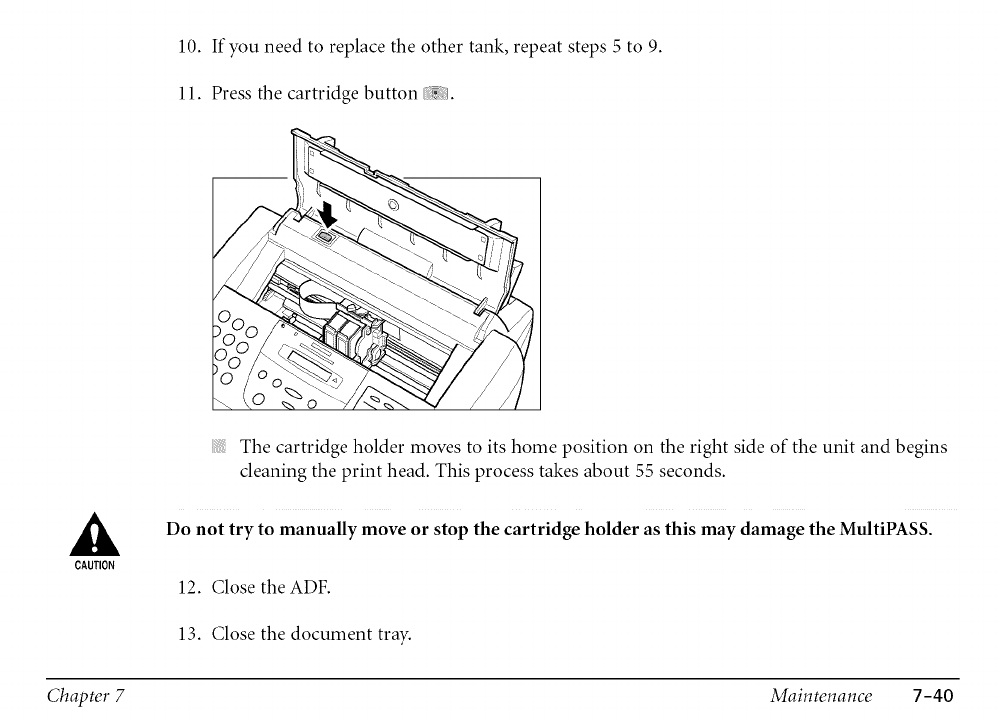
10. If you need to replace the other tank, repeat steps 5 to 9.
11. Press the cartridge button __-I.
CAUTION
The cartridge holder moves to its home position on the right side of the unit and begins
cleaning the print head. This process takes about 55 seconds.
Do not try to manually move or stop the cartridge holder as this may damage the MultiPASS.
12. Close the ADF.
13. Close the document tray.
Chapter 7 Maintenance 7-40
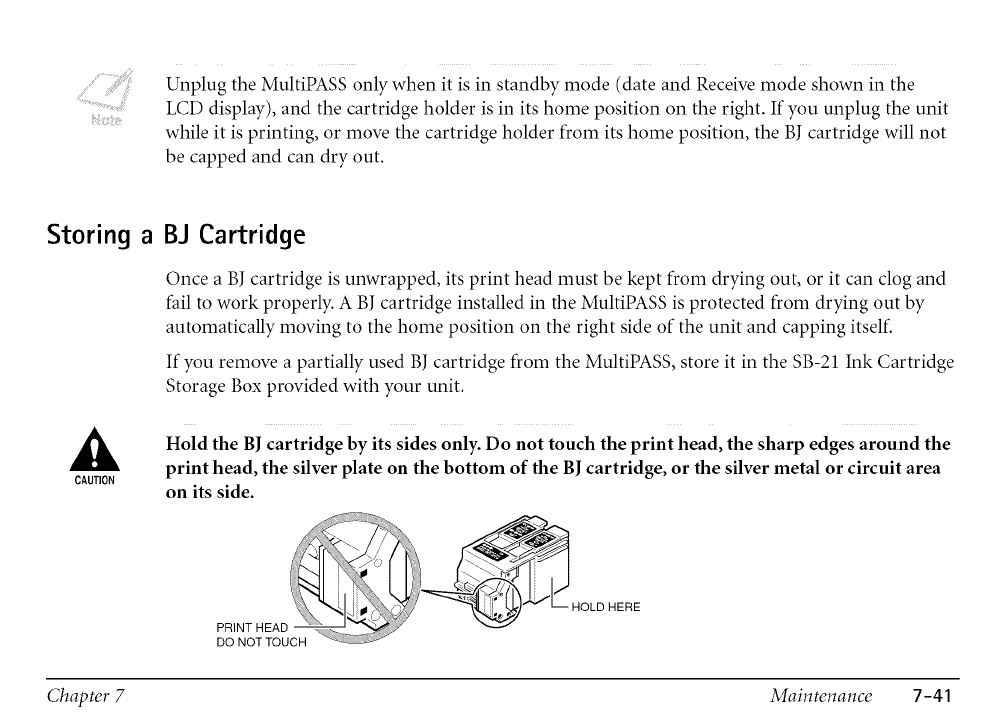
Unplug the MultiPASS only when it is in standby mode (date and Receive mode shown in the
LCD display), and the cartridge holder is in its home position on the right. If you unplug the unit
while it is printing, or move the cartridge holder from its home position, the BJ cartridge will not
be capped and can dry out.
Storing a
CAUTION
BJ Cartridge
Once a BJ cartridge is unwrapped, its print head must be kept from drying out, or it can clog and
fail to work properly. A BJ cartridge installed in the MultiPASS is protected from drying out by
automatically moving to the home position on the right side of the unit and capping itself.
If you remove a partially used BJ cartridge from the MultiPASS, store it in the SB-21 Ink Cartridge
Storage Box provided with your unit.
Hold the BJ cartridge by its sides only. Do not touch the print head, the sharp edges around the
print head, the silver plate on the bottom of the BJ cartridge, or the silver metal or circuit area
on its side.
HOLD HERE
Chapter 7 Maintenance 7-41
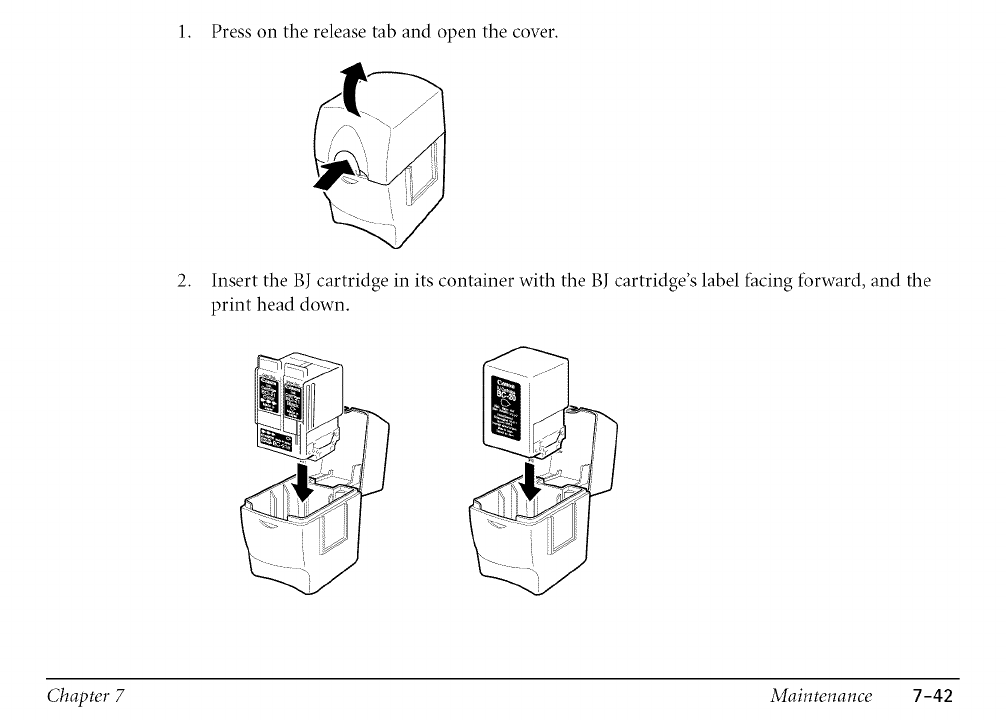
1. Press on the release tab and open the cover.
2. Insert the BJ cartridge in its container with the BJ cartridge's label facing forward, and the
print head down.
Chapter 7 Maintenance 7-42
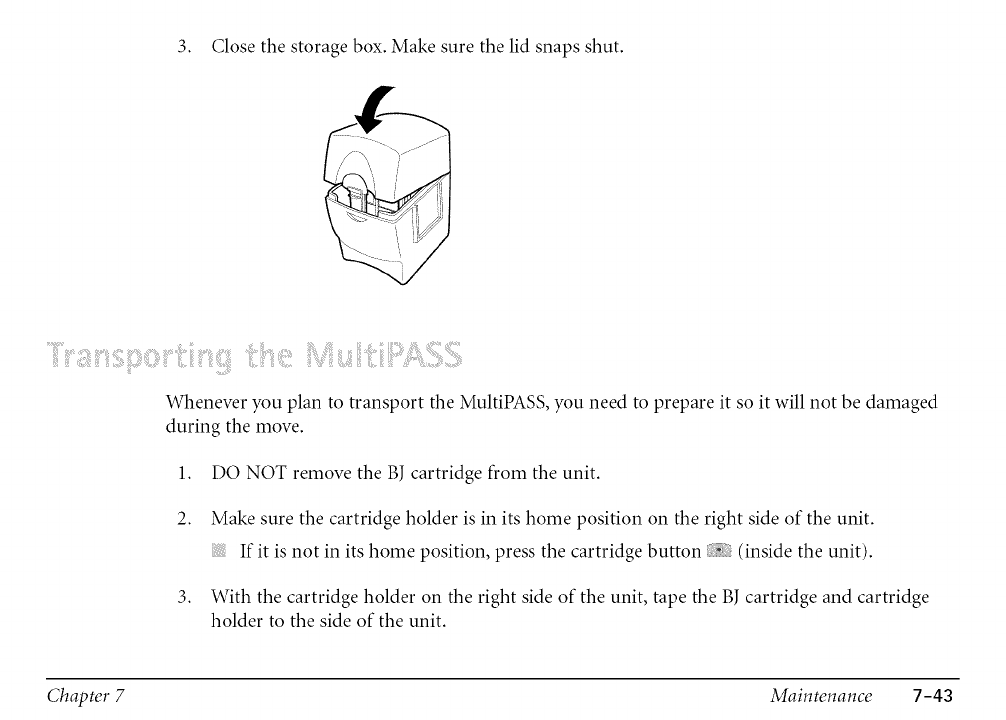
3. Close the storage box. Make sure the lid snaps shut.
Whenever you plan to transport the MultiPASS, you need to prepare it so it will not be damaged
during the move.
1. DO NOT remove the BJ cartridge from the unit.
2. Make sure the cartridge holder is in its home position on the right side of the unit.
If it is not in its home position, press the cartridge button (inside the unit).
3. With the cartridge holder on the right side of the unit, tape the BJ cartridge and cartridge
holder to the side of the unit.
Chapter 7 Maintenance 7-43
4.
5.
6.
7.
8.
Disconnect the power cord.
Disconnect the telephone, extension phone or answering machine (if using them), the
telephone line, and the parallel cable to the PC.
Remove the document support.
Make sure the document tray is closed.
Replace all tapes and shipping materials you removed when you first unpacked the
MultiPASS.
9. Pack the MultiPASS and all its components into its original shipping carton.
Do not remove the BJ cartridge from the MultiPASS or ship a BJ cartridge or an ink tank from
which you have removed the protective cap. An opened BJ cartridge or ink tank that is not
installed in the MultiPASS or the Ink Cartridge Storage Box may leak, and the print head may
dry out. Also, if you do not tape the BJ cartridge to the side of the unit, ink may spill into the
unit.
If you no longer have the shipping carton your MultiPASS came in, pack the unit in a suitably
sized, sturdy cardboard box, using bubble wrap or other suitable packing materials. (If you use
foam peanuts, be sure to wrap the unit in plastic first to prevent the packing materials from
entering any opening on the unit.)
Chapter 7 Maintenance 7-44

.......i¸ii!iilli'¸¸¸¸¸¸¸!!_i_iii_!i_ii!_!i_iii_!iii!!!i!iiiii_i!_iii!!!i!!__i_iiii!_!:!i¸__i!_!!!iiii_i!!!_ii_i!_i_iii_!i_i_iii_!iiiiililii_ii{¸il!!_ii_i!!!!!!!!iiilliii!i!_i!ii!i
If your MultiPASS is not operating properly, use the information and suggestions in this chapter to
try and resolve the problem.
If You Cannot Solve the Problem ................................................................................................. 8-2
Clearing Jams ................................................................................................................................ 8-4
® Jams in the Automatic Document Feeder (ADF) ................................................................... 8-4
® Jams in the Multi-Purpose Tray .............................................................................................. 8-7
LCD Messages ............................................................................................................................... 8-9
Printing Problems ....................................................................................................................... 8-18
Print Quality Problems ............................................................................................................... 8-24
Color Printing and Copying Problems ...................................................................................... 8-26
Paper Feeding Problems ............................................................................................................. 8-30
Faxing Problems .......................................................................................................................... 8-33
Telephone Problems .................................................................................................................... 8-40
Copying Problems ....................................................................................................................... 8-42
General Problems ........................................................................................................................ 8-43
It"the Power Goes Out ................................................................................................................ 8-45
MultiPASS Hardware Cannot Initialize ..................................................................................... 8-47
Chapter 8 Troubleshooting 8-1
CAUTION
If you have a problem with your MuItiPASS and you cannot resolve it by referring to the
information in this chapter, contact your local authorized Canon dealer sales or service
representative.
Canon's support personnel are trained in the technical support of Canon's products and should
be able to help you with your problem.
Attempting to repair the MultiPASS yourself may void the limited warranty as to that repair. See
the limited warranty card for details.
If the MultiPASS makes strange noises, emits smoke or strange smells, unplug it immediately
and call the Canon Customer Care Center. Do not attempt to disassemble or repair the unit
yourself.
Getting Help From Canon
If you need to contact Canon directly, make sure you have the following information:
Product name
MultiPASS C560 or MultiPASS C530
Chapter 8 Troubleshooting 8-2
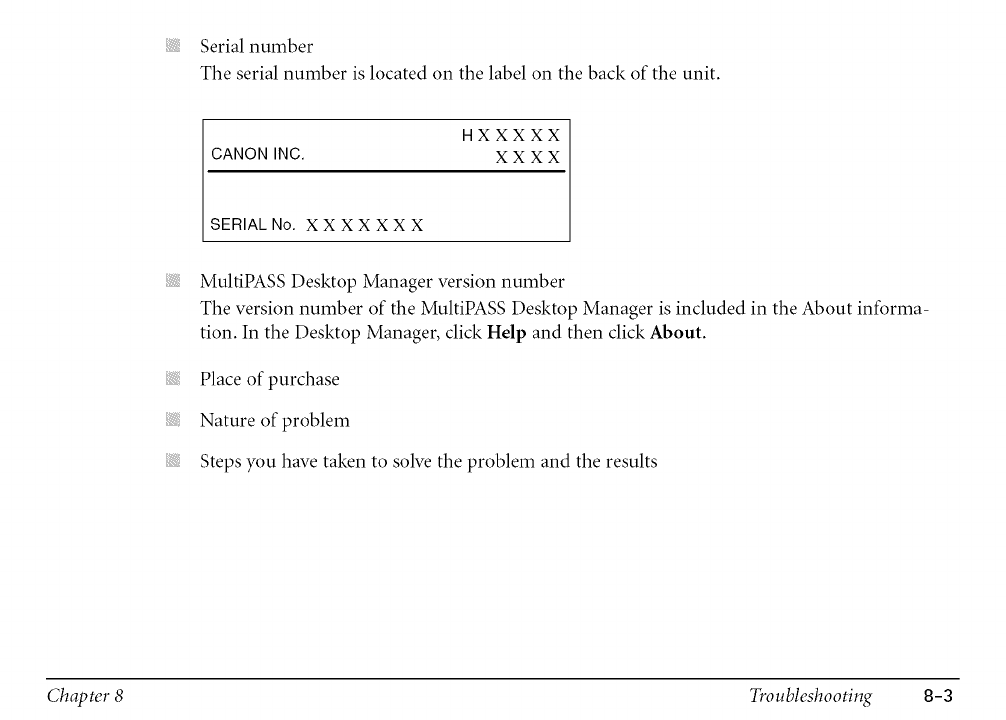
Serial number
The serial number is located on the label on the back of the unit.
HXXXXX
CANON INC. X X X X
SERIALNo. XXXXXXX
MultiPASS Desktop Manager version number
The version number of the MultiPASS Desktop Manager is included in the About informa-
tion. In the Desktop Manager, click Help and then click About.
Place of purchase
Nature of problem
Steps you have taken to solve the problem and the results
Chapter 8 Troubleshooting 8-3
On occasion, the document feeding into the Automatic Document Feeder (ADF) or the paper in
its multi-purpose tray may misfeed or jam. If this happens, you can usually fix the problem using
one of the following procedures.
You do not need to unplug the MultiPASS while clearing paper jams.
Jams in the Automatic Document Feeder (ADF)
Use this procedure if the document in the ADF jams or misfeeds. If this occurs, the message
CHECK DOCUEI>CNTappears in the LCD display.
Stop l.
@ 2.
Press Stop.
Open the operation panel by gently pulling it toward you.
It opens only slightly.
Do not try to pull the document out without opening the operation panel or you may
tear or smudge the document.
Chapter 8 Troubleshooting 8-4
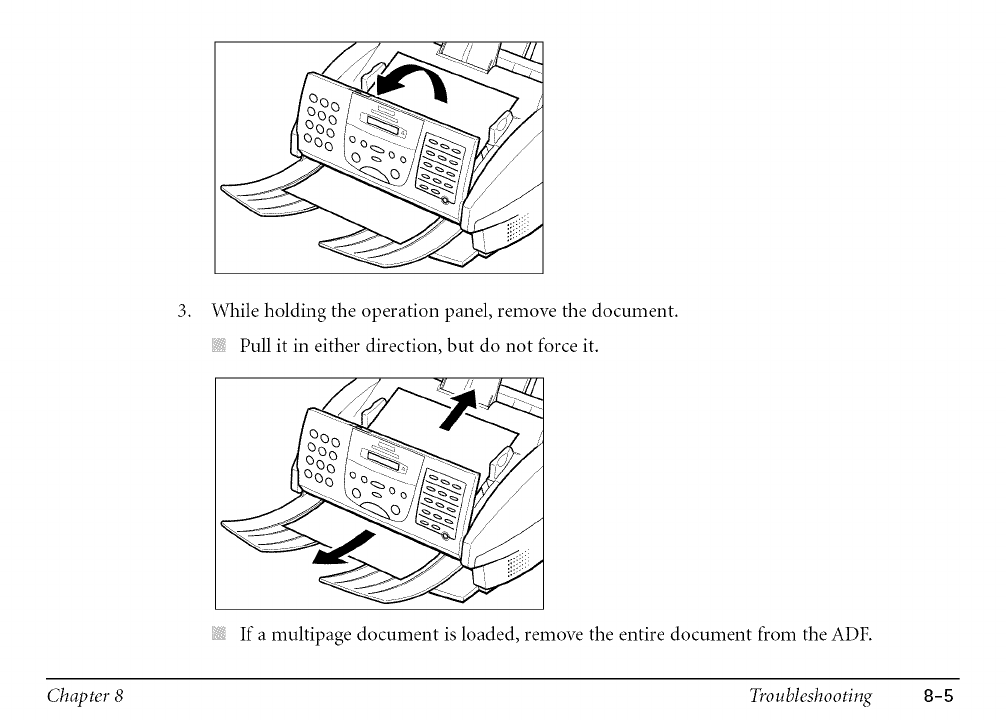
3. While holding the operation panel, remove the document.
Pull it in either direction, but do not force it.
If a multipage document is loaded, remove the entire document from the ADF.
TroubleshootingChapter 8 8-5
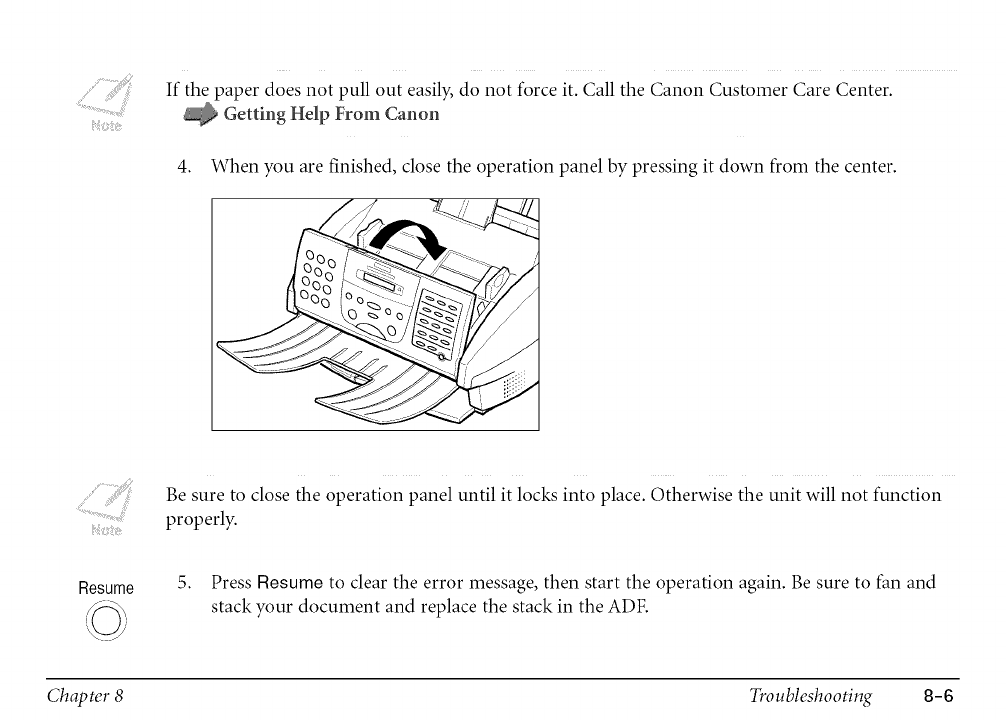
If the paper does not pull out easily, do not force it. Call the Canon Customer Care Center.
Getting Help From Canon
4. When you are finished, close the operation panel by pressing it down from the center.
->.
Be sure to close the operation panel untilitlocksinto place. Otherwise the unit will not function
properlT
Resume 5. Press Resume to clear the error message, then start the operation again. Be sure to fan and
stack your document and replace the stack in the ADF.
Chapter 8 Troubleshooting 8-6
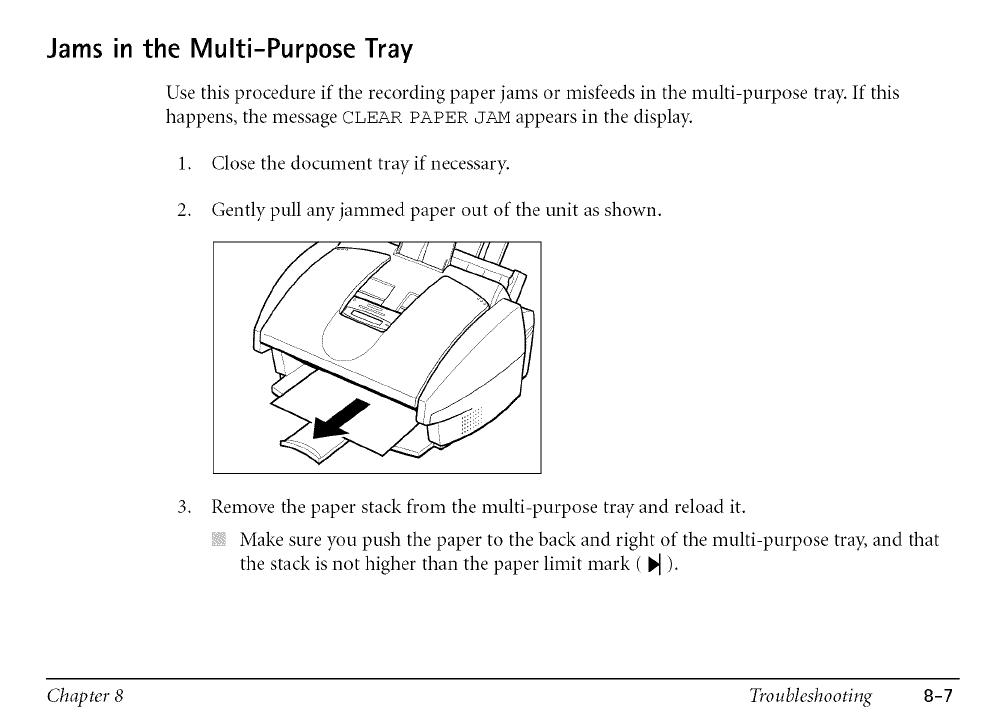
Jams in the Multi-Purpose Tray
Use this procedure if the recording paper jams or misfeeds in the multi-purpose tray. If this
happens, the message CLEAR PAPER JAM appears in the display.
1. Close the document trayif necessary.
2. Gently pull any jammed paper out of the unit as shown.
3. Remove the paper stack from the multi-purpose tray and reload it.
Make sure you push the paper to the back and right of the multi-purpose tray, and that
the stack is not higher than the paper limit mark ( _ ).
Chapter 8 Troubleshooting 8-7
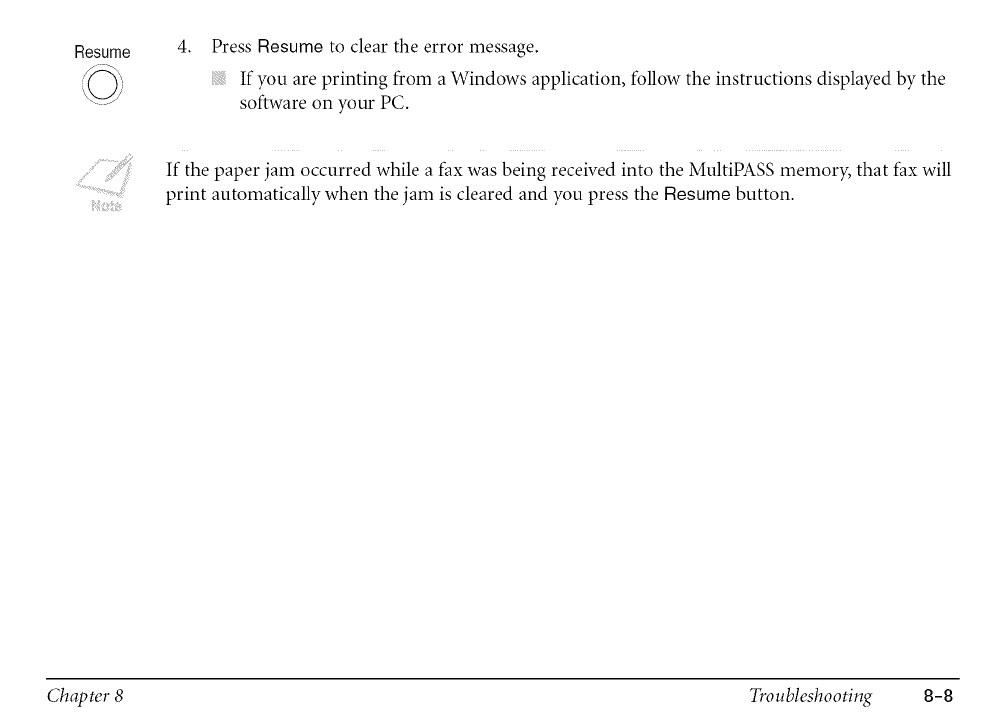
Resume 4. Press Resume to clear the error message.
If you are printing from a Windows application, follow the instructions displayed by the
software on your PC.
If the paper jam occurred while a fax was being received into the MultiPASS memory, that fax will
print automatically when the jam is cleared and you press the Resume button.
Chapter 8 Troubleshooting 8-8
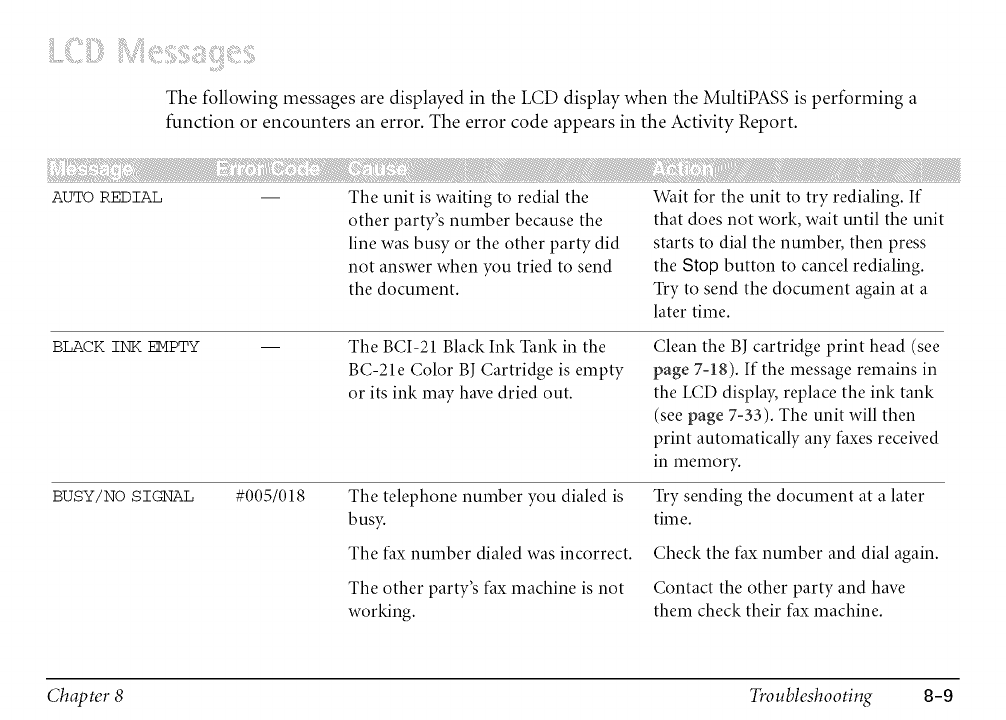
iii!ib<IIIZI¸
The following messages are displayed in the LCD display when the MultiPASS is performing a
function or encounters an error. The error code appears in the Activity Report.
AUTO REDIAL
BLACK INK EHPTY
BUSY/N0 SIGNAL
The unit iswaiting to redial the
other party's number because the
line was busy or the other party did
not answer when you tried to send
the document
Wait for the unit to try redialing. If
that does not work, wait until the unit
starts to dial the number, then press
the Stop button to cancel redialing.
Try to send the document again at a
later time.
#005/018
The BCI-21 Black Ink Tank in the
BC-21e Color BJ Cartridge is empty
or its ink may have dried out.
The telephone number you dialed is
busy.
The fax number dialed was incorrect.
The other party's fax machine is not
working.
Clean the B] cartridge print head (see
page 7-18). If the message remains in
the LCD display, replace the ink tank
(see page 7-33). The unit will then
print automatically any faxes received
in memory.
Try sending the document at a later
time.
Check the fax number and dial again.
Contact the other party and have
them check their fax machine.
Chapter 8 Troubleshooting 8-9
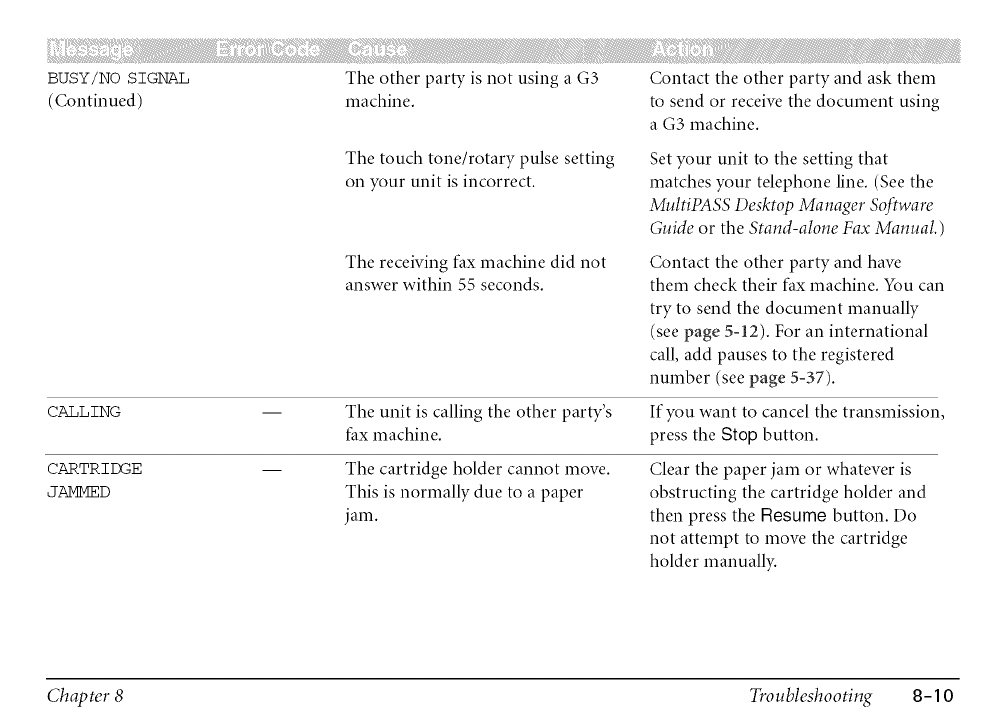
BUSY/NO SIGNAL
(Continued)
The other party is not using a G3
machine.
Contact the other party and ask them
to send or receive the document using
a G3 machine.
The touch tone/rotary pulse setting
on your unit is incorrect.
The receiving fax machine did not
answer within 55 seconds.
Set your unit to the setting that
matches your telephone line. (See the
MultiPASS Desktop Manager Software
Guide or the Stand-alone Fax Manual.)
Contact the other party and have
them check their fax machine. You can
try to send the document manually
(see page 5=12). For an international
call, add pauses to the registered
number (see page 5=37).
CALLING -- The unit is calling the other party's If you want to cancel the transmission,
fax machine, press the Stop button.
CARTRIDGE -- The cartridge holder cannot move. Clear the paper jam or whatever is
JAIVI_D This is normally due to a paper obstructing the cartridge holder and
jam. then press the Resume button. Do
not attempt to move the cartridge
holder manually.
Chapter 8 Troubleshooting 8-10
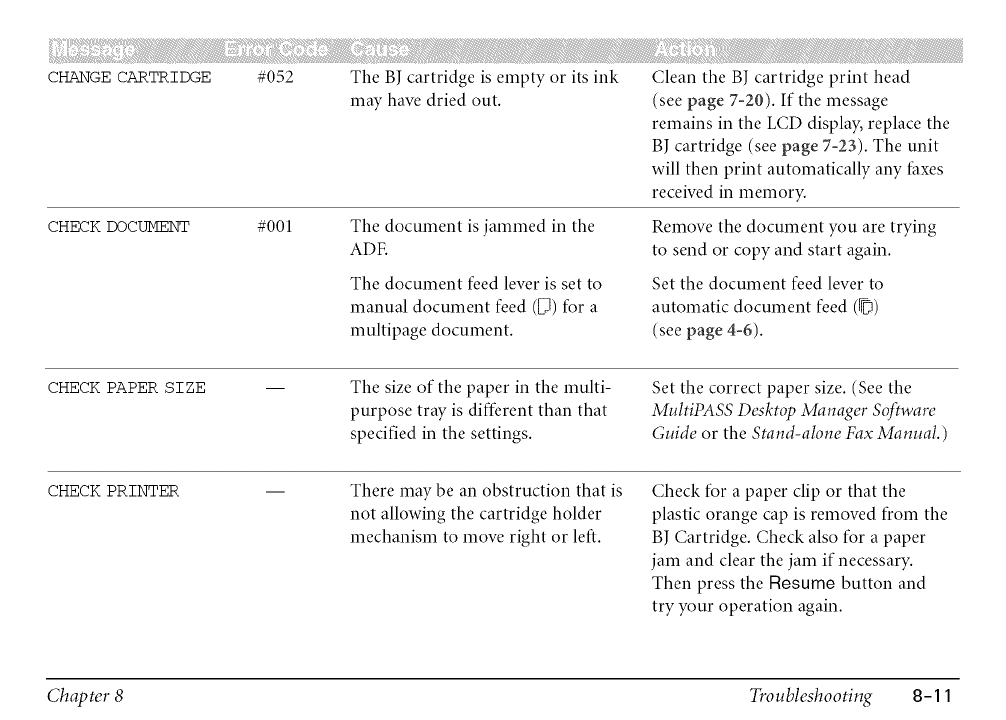
CHANGE CARTRIDGE
CHECK DOCUMENT
#052 The BJ cartridge is empty or its ink
may have dried out.
Clean the BJ cartridge print head
(see page 7-20). If the message
remains in the LCD display, replace the
BJ cartridge (see page 7-23). The unit
will then print automatically any faxes
received in memory.
#001 The document isjammed in the
ADE Remove the document you are trying
to send or copy and start again.
The document feed lever is set to
manual document feed ([71)for a
multipage document.
Set the document feed lever to
automatic document feed (©)
(see page 4-6).
CHECK PAPER SIZE The size of the paper in the multi-
purpose tray is different than that
specified in the settings.
Set the correct paper size. (See the
MultiPASS Desktop Manager S@ware
Guide or the Stand-alone Fax Manual.)
CHECK PRINTER There may be an obstruction that is
not allowing the cartridge holder
mechanism to move right or left.
Check for a paper clip or that the
plastic orange cap is removed from the
BJ Cartridge. Check also for a paper
jam and clear the jam if necessary.
Then press the Resume button and
try your operation again.
Chapter 8 Troubleshooting 8-11
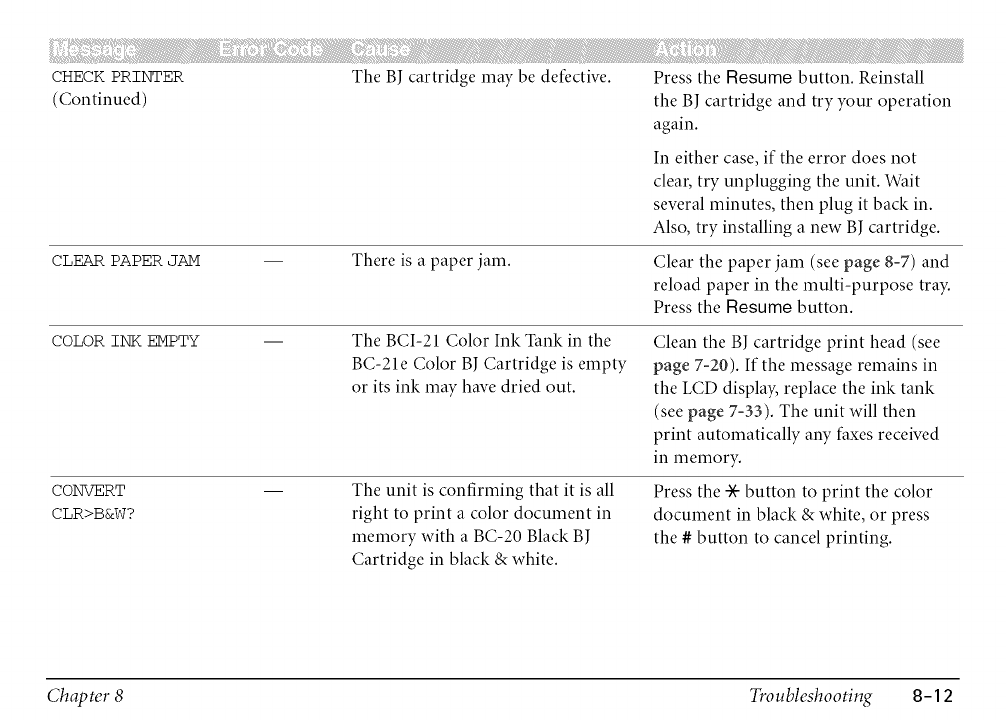
CHECK PRINTER
(Continued)
CLEAR PAPER JAM
COLOR INK EMPTY
CONVERT
CLR>B&W?
The BJ cartridge may be defective.
There is a paper jam.
Press the Resume button. Reinstall
the BJ cartridge and try your operation
again.
In either case, if the error does not
clear,try unplugging the unit. "Wait
several minutes, then plug it back in.
Also, try installing a new BJ cartridge.
Clear the paper jam (see page 8-7) and
reload paper in the multi-purpose tray.
Press the Resume button.
The BCI-21 Color Ink Tank in the
BC-21e Color BJ Cartridge is empty
or its ink may have dried out.
The unit is confirming that it is all
right to print a color document in
memory with a BC-20 Black B]
Cartridge in black & white.
Clean the BJ cartridge print head (see
page 7-20). If the message remains in
the LCD display, replace the ink tank
(see page 7-33). The unit will then
print automatically aW faxes received
in memory.
Press the * button to print the color
document in black &white, or press
the # button to cancel printing.
Chapter 8 Troubleshooting 8-12
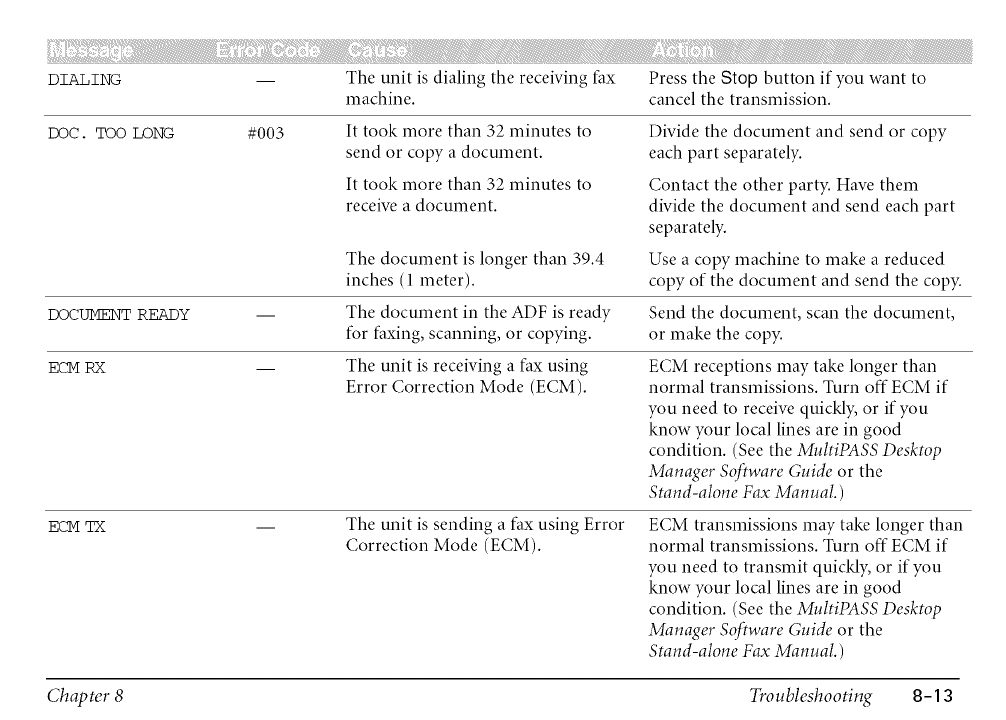
DIALING -- The unit is dialing the receiving fax Press the Stop button if you want to
machine, cancel the transmission.
DOC. TOO LONG #003
DOCUMENT READY
ECMRX
ECM TX
It took more than 32 minutes to
send or copy a document.
It took more than 32 minutes to
receive a document.
The document is longer than 39.4
inches (1 meter).
The document in the ADF is ready
for faxing, scanning, or copying.
The unit is receiving a fax using
Error Correction Mode (ECM).
Divide the document and send or copy
each part separately.
Contact the other party. Have them
divide the document and send each part
separately.
Use a copy machine to make a reduced
copy of the document and send the copy.
Send the document, scan the document,
or make the copy.
ECM receptions may take longer than
normal transmissions. Turn off ECM if
you need to receive quickly, or if you
know your local lines are in good
condition. (See the MultiPASS Desktop
Manager Software Guide or the
Stand-alone Fax Manual.)
The unit is sending a fax using Error
Correction Mode (ECM).
ECM transmissions may take longer than
normal transmissions. Turn off ECM if
you need to transmit quickly, or if you
know your local lines are in good
condition. (See the MultiPASS Desktop
Manager Software Guide or the
Stand-alone Fax Manual.)
Chapter 8 Troubleshooting 8-13
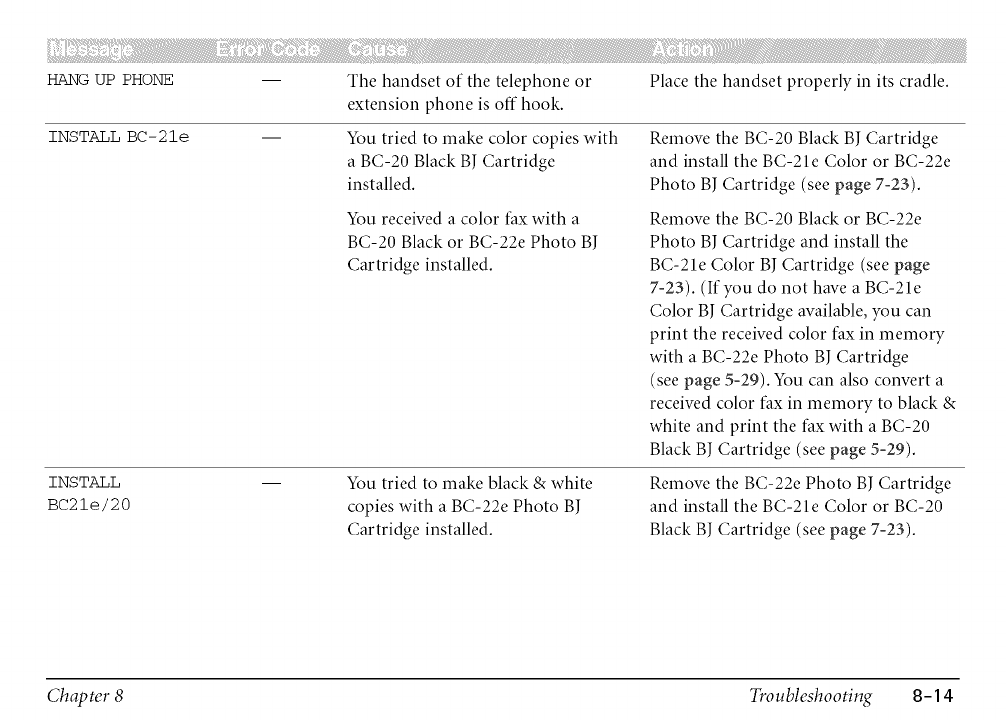
HANGUPPHONE -- Placethehandsetproperlyinitscradle.
INSTALL BC-21e
INSTALL
BC21e/20
The handset of the telephone or
extension phone is off hook.
You tried to make color copies with
a BC-20 Black BJ Cartridge
installed.
Remove the BC-20 Black BJ Cartridge
and install the BC-21e Color or BC-22e
Photo BJ Cartridge (see page 7-23).
You received a color fax with a
BC-20 Black or BC-22e Photo BJ
Cartridge installed.
Remove the BC-20 Black or BC-22e
Photo BJ Cartridge and install the
BC-21e Color BJ Cartridge (see page
7-23). (If you do not have a BC-21e
Color BJ Cartridge available, you can
print the received color fax in memory
with a BC-22e Photo BJ Cartridge
(see page 5-29). You can also convert a
received color fax in memory to black &
white and print the fax with a BC-20
Black BJ Cartridge (see page 5-29).
You tried to make black & white
copies with a BC-22e Photo BJ
Cartridge installed,
Remove the BC-22e Photo BJ Cartridge
and install the BC-21e Color or BC-20
Black BJ Cartridge (see page 7-23).
Chapter 8 Troubleshooting 8-14

INSTALL
BC21e/20
(Continued)
LINE IN USE
LOAD PAPER
MEMORY FULL
MEMORY FULL
PLEASE WAIT
(two messages
toggle)
You tried to print a received black &
white fax,print a report, or print a
black &white document in memory
with a BC-22e Photo BJ Cartridge
installed.
Remove the BC-22e Photo BJ
Cartridge and install the BC-21e Color
or BC-20 Black BJ Cartridge (see page
7=23).
#037
The unit is set for Fax/Tel Mode and
you are receiving a telephone call.
The multi-purpose tray is empty.
The unit's memory is full because it
has received too many documents,
or a very long or detailed document.
Memory is full because you tried to
send too many pages at once, or a
very long or detailed document
The unit is sending a document and
its memory is full.
Answer the call.
Load paper in the multi-purpose tray
(see page 2=17). Make sure the stack
does not exceed the paper limit mark
(_). Then press the Resume button.
Print out any documents that are
stored in memory (see page 5-29).
Then start the operation again.
Divide the document and send each
part separately. To free the unit's
memory, print or delete any faxes in
memory you no longer need (see pages
5-29 and 5-34).
If sending a document, the unit
continues to send the fax as memory
becomes available.
Chapter 8 Troubleshooting 8-1 S
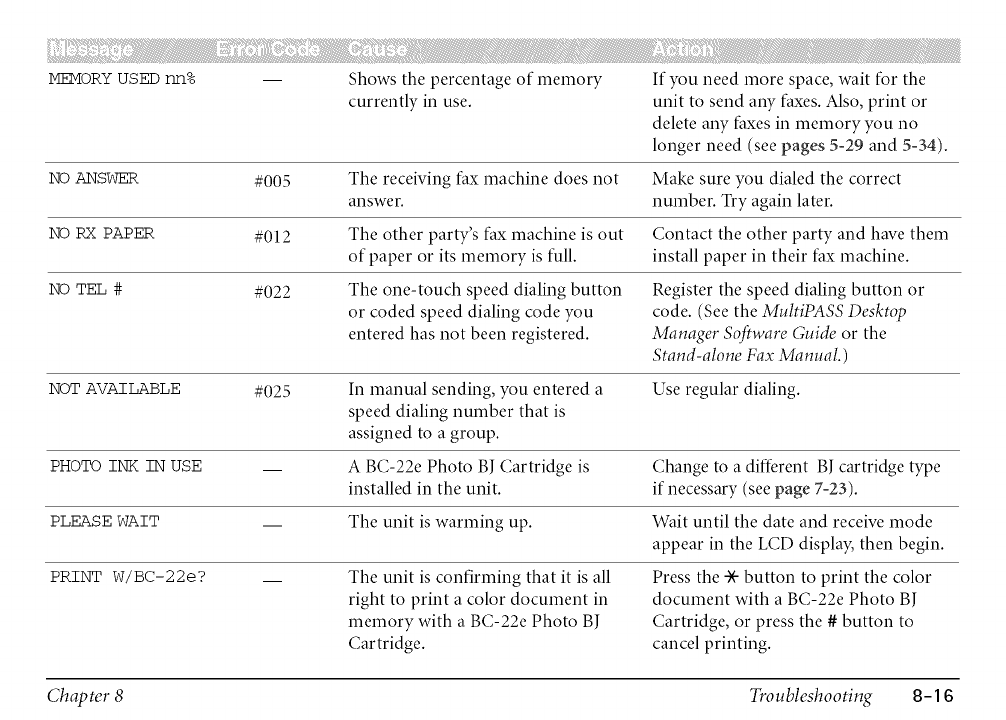
M]_dORYUSED nn% Shows the percentage of memory
currently in use.
If you need more space, wait for the
unit to send aW faxes. Also, print or
delete any faxes in memory you no
longer need (see pages 5-29 and 5-34).
NO ANSWER #005 The receiving fax machine does not Make sure you dialed the correct
answer, number. Try again later.
NO RX PAPER #012 The other party's fax machine is out Contact the other party and have them
of paper or its memory is full. install paper in their fax machine.
NO TEL # #022 The one-touch speed dialing button Register the speed dialing button or
or coded speed dialing code you code. (See the MultiPASS Desktop
entered has not been registered. Manager Software Guide or the
Stal_d-alolw Fax Mmmal.)
NOT AVAIL&_BLE #025 In manual sending, you entered a Use regular dialing.
speed dialing number that is
assigned to a group.
PHOTO INK IN USE __ A BC-22e Photo B] Cartridge is Change to a different B] cartridge type
installed in the unit. if necessary (see page 7-23).
PLEASE WAIT __ The unit is warming up. Wait until the date and receive mode
appear in the LCD display, then begin.
PRINT W/BC-22e? __ The unit is confirming that it is all Press the * button to print the color
right to print a color document in document with a BC-22e Photo B]
memory with a BC-22e Photo B] Cartridge, or press the # button to
Cartridge. cancel printing.
Chapter 8 Troubleshooting 8-16
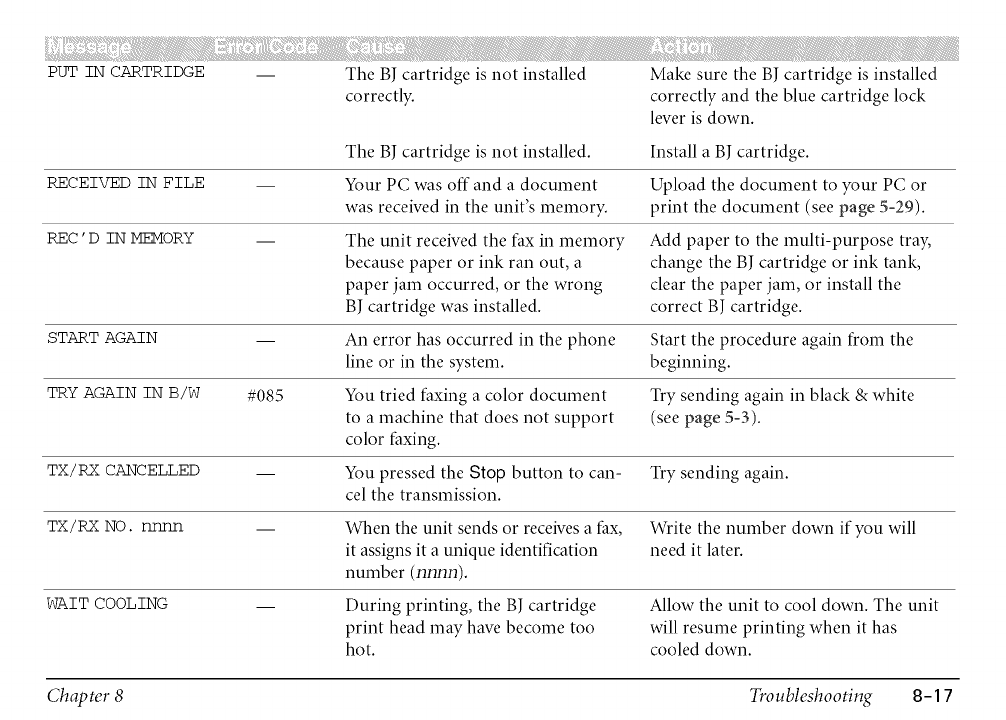
PUT IN CARTRIDGE
RECEIVED IN FILE
REC' D IN M]_4ORY
The B] cartridge is not installed
correctly.
Make sure the B] cartridge is installed
correctly and the blue cartridge lock
lever is down.
The B] cartridge is not installed.
Your PC was off and a document
was received in the unit's memory.
The unit received the fax in memory
because paper or ink ran out, a
paper jam occurred, or the wrong
B] cartridge was installed.
Install a B] cartridge.
Upload the document to your PC or
print the document (see page 5-29).
Add paper to the multi-purpose tray,
change the B] cartridge or ink tank,
clear the paper jam, or install the
correct B] cartridge.
START AGAIN -- An error has occurred in the phone Start the procedure again from the
line or in the system, beginning.
TRY AGAIN IN B/W #085 You tried faxing a color document Try sending again in black & white
to a machine that does not support (see page 5-3).
color faxing.
TX/R_XCANCELLED __ You pressed the Stop button to can- Try sending again.
cel the transmission.
TX/RX NO. rmnn __ When the unit sends or receives a fax, Write the number down if you will
it assigns it a unique identification need it later.
number (nnnn).
WAIT COOLING -- During printing, the B] cartridge Allow the unit to cool down. The unit
print head may have become too will resume printing when it has
hot. cooled down.
Chapter 8 Troubleshooting 8-17
iiiii_!!i>iii!_!_!¸¸_¸¸¸¸iiiiiiiii!_!_!i!_!_¸¸¸i¸!i!117i_iiiiiii!_!_!i!_!__i_iiii_i!_ii!ii!!!{!?_:'iii!_!_!¸¸_¸¸¸¸_ii!iiiiiiii_i_,iliiiiiiii_i_!,{iiliiii:i::!i!:i_iii!_!_!i!!__i!_:!!iiill
The Alarm light comes on and the unit beeps while printing.
The unit may have a paper jam.
Clear the paper jam (see page 8-4).
If the unit has no paper jam, unplug it, wait five seconds, then plug it in again. If the problem
is fixed, the Alarm light will turn off, the BJ cartridge will move to its home position on the
right side of the unit, and the LCD display will return to standby mode. If the Alarm light
remains lit, call the Canon Customer Care Center (see page 1-14).
Data from the PC is not printed.
The power cord may not be plugged in securely.
Check that the power cord is plugged securely into the unit and into the wall outlet. If the
unit is plugged into a power strip, make sure the power strip is plugged in and turned on.
The parallel cable may not be securely connected to the MultiPASS and the PC.
Check the parallel cable connection.
The parallel cable may not be the correct type.
Make sure the cable is a Centronics®-compatible parallel cable with bi-directional capability
(IEEE 1284-compliant) and is less than 6.6 feet (2 meters) in length.
Chapter 8 Troubleshooting 8-18
The unit may have been plugged in when you connected the parallel cable.
Unplug the unit and turn off the PC. Plug the unit back in and turn the PC back on again.
The orange tape may not be removed from the BJ cartridge.
Be sure to remove the orange tape from the BJcartridge before you install it (see page 7-29).
The BJ cartridge or an ink tank may not be installed properly.
Make sure the BJ cartridge and the ink tank(s) are installed properly (see page 7-23).
The BI cartridge print head may need cleaning.
Clean the BJ cartridge print head (see page 7-20).
The BI cartridge or the ink tank(s) may need to be replaced.
Replace the BJ cartridge or the ink tank(s) (see pages 7-23 and 7-33).
The application you are printing from may not be set up properly.
Check the PC and the application to make sure they are configured correctly.
Make sure your application has the MultiPASS selected as the printer.
The MultiPASS may not be set as the default printer or the sdected printer.
Make sure the MultiPASS is selected as the default or current printer.
Make sure the MultiPASS Status Monitor is running.
The printer driver may be configured with the wrong port.
Make sure the MultiPASS printer driver is configured to use the PC's parallel interface port.
Chapter 8 Troubleshooting 8-19
The PC's parallel interface port may be disabled.
Make sure your PC's CMOS has the primary parallel port set to LPT1. (Your PC should have
aSetup program that lets you do this.) See your PC's documentation.
Another hardware device or software application is attempting to communicate with the same
parallel interface port to which the MultiPASS is connected.
Disconnect the peripheral device and uninstall or remove any software associated with this
device and any software communicating with the parallel interface port.
The BJ cartridge moves, but ink does not appear.
The orange tape may not be removed from the BI cartridge.
Be sure to remove the orange tape from the BJ cartridge before you install it (see page 7-29).
The BI cartridge or an ink tank may not be installed properly.
Make sure the BJ cartridge and the ink tank(s) are installed properly (see pages 7-23 and
7-33).
The nozzles on the BI cartridge print head may be dogged.
Print the nozzle check to check the BJ cartridge print head (see page 7-18). Perform the BJ
cartridge print head cleaning procedure if necessary (see page 7-20).
An ink tank in the BC-21e Color BI Cartridge may be empty.
Replace empty ink tanks as necessary (see page 7-33).
Chapter 8 Troubleshooting 8-20

The printed output is not what you expected.
There may be a communication problem between the MultiPASS and your PC.
Make sure the PC and the application are configured correctly for communicating with the
MultiPASS.
The parallel cable may not be securdy connected to the MultiPASS and the PC.
Check the parallel cable connection.
The parallel cable may not be the correct type.
Make sure the cable is a Centronics-compatible parallel cable with bi-directional capability
(IEEE 1284-compliant) and is less than 6.6 feet (2 meters) in length.
The parallel cable may be too long.
Make sure you are using a parallel cable that is less than 6.6 feet (2 meters) long.
You may not be using the correct printer driver.
Make sure you have selected the MultiPASS printer in your application.
Another hardware device or software application is attempting to communicate with the same
parallel interface port to which the MultiPASS is connected.
Disconnect the peripheral device and uninstall or remove any software associated with this
device and any software communicating with the parallel interface port.
You may not have the best Print Mode Set selected.
Try selecting another print mode (see page 3-6).
Chapter 8 Troubleshooting 8-21
Previoussoftwaresettingsmay not be cleared.
Make sure the MultiPASS was cleared of the previous software settings before the print job
started. See the application's documentation.
Printout does not match paper size.
Paper may not be loaded and aligned correctly in the multi-purpose tray.
Make sure the paper is loaded and aligned correctly (see page 2=17).
The application's page size and margin settings may be incorrect.
Make sure the page size and margin set in your application are correct for the paper in the
multi-purpose tray.
The MultiPASS printer driver may not be selected.
Make sure the MultiPASS is selected as the default printer in your application.
If the BJ cartridge print head prints on the platen, clean the ink off the platen by launching
Notepad and setting the application to print 2 or 3 blank sheets of paper.
The MultiPASS suspends printing after each line.
The BJ cartridge print head may have become too hot. If this happens, the MultiPASS may be
slowing its printing speed at the end of each line to protect the BJ cartridge print head.
Stop your print operation and wait several minutes to allow the unit to cool. Then start your
operation again.
Chapter 8 Troubleshooting 8-22

Print jobs vanish or you are printing garbage.
Another Windows application on your PC may be trying to communicate with the printer port
the MultiPASS Status Monitor is using. This conflict can result in strange printing behavior.
Uninstall or remove the software application.
Make sure the MultiPASS Status Monitor is loaded.
If the MultiPASS Status Monitor icon does not appear on the bottom of your screen, turn on
the MultiPASS Status Monitor.
The printout curls.
Your page may indude a large amount of ink.
Leave the page in the output tray for 30 to 60 seconds to allow the ink to dry. Then remove
the page being careful not to touch the document tray (if it is open). Allow the page to dry
further, then roll it in the opposite direction of the curl. (Should you dirty the document tray
when removing the page, wipe it clean with a clean, soft, lint-free cloth moistened with water
or diluted dishwashing detergent solution.)
Your PC indicates a device time-out.
A device time-out occurs when the PC sends data to the MultiPASS, but the unit does not
respond. The MultiPASS may be unplugged, not connected to the PC, or have apaper jam.
Make sure the MultiPASS is plugged in, and that its parallel cable is securely attached to the
unit and to the PC. Clear any paper jams (see page 8=4), and make sure paper is loaded
properly in the multi-purpose tray (see page 2=17).
Chapter 8 Troubleshooting 8-23
iiiii!!?:iii!!:iiiiiiiii!!:i!! i!i!ii7Q!!!!iiiiiii!iiiiii{iiiii{iiiiii!i!ii? !!!ili iiiii!!?:iii!!:!iiiiiiii ,iliiiiiiiii!{iiiiiiii!i!i iii!!!i!; i!!!iii;
The print quality is not what you expect; print is not clear, is splashed, has missing dots or
white streaks.
The paper you are using may not be supported by the unit.
Make sure you are using the recommended paper (see pageA-4).
You may be printing on the wrong side of the paper.
Some papers have a "right" side for printing. If the print quality is not as clear as you would
like it to be, try turning the paper over and printing on the other side.
The nozzles on the BI cartridge print head may be dogged.
Print the nozzle check to check the BJ cartridge print head (see page 7-18). Perform the
BJ cartridge print head cleaning procedure if necessary (see page 7-20).
The BI cartridge or an ink tank may not be installed properly.
Make sure the BJ cartridge and the ink tank(s) are installed properly (see pages 7-23 and
7=33).
An ink tank in the BC-21e Color BI Cartridge may be empty.
Replace empty ink tanks as necessary (see page 7-33).
The BI cartridge print head may be worn out.
The BJ cartridge may need to be replaced. Replace as necessary (see page 7-23).
Chapter 8 Troubleshooting 8-24
Output appears jagged.
The resolution selected via the printer driver may be Draft.
Check your printer driver to see what Print Mode you have selected. Printing in Draft mode
will give the output a jagged look. Changing the Print Mode should correct this problem
(see page 3-8).
Fonts do not print as smoothly rounded characters.
Bitmapped fonts designed for dot matrix printers do not print smoothly rounded characters
when used with high resolution printers like the MultiPASS.
Make sure you installed an outline font manager, such as Adobe ®Type Manager or
Bitstream®Facelift, or that you are choosing a TrueType ® font.
Certain MS fonts, such as MS Serif, will print jagged.
Choose another font.
Output is faint.
You may be using Draft print mode.
Try changing the Print Mode (see page 3-8).
Printing takes too much time.
You may be using Fine mode.
Change Print Quality to Fast (see page 3-11).
Chapter 8 Troubleshooting 8-25
The printout contains blurred or smudged ink.
The print medium you are using may not be supported by the MultiPASS.
Try a different paper type. However, use only print media specified in this manual (see
page A4).
You may be printing on the wrong side of the sheet.
Some papers have a "right" side for printing. If the print quality is not as clear as you would
like it to be, try turning the paper over and printing on the other side.
iiiiiiiiil]iZi¸¸!i:iiiiii_{iilii!i:iiiiii_iii!!!¸¸_¸¸¸¸iiiii!!?iii!!!¸¸_¸¸¸¸iiiiiiiii!!!i!!_i!i!iill¸iiiiiiii!!!i!!_!i!!!iiiiili!ii!iiiiii!ii!iiiiliii!!!i!!_!il¸:i!i;iliiiiiiiiiil]iiiill!i:iiiiii_iii!i!i!ili!!!!i{¸iiiliiiii!!!i!!_!i!!iiiiii!ii!ii!ii!!!{!i::_:iii>!i:iiiiii_iliiiii:iiii!{iilii<i:i:!i!i_iii!!!i!_i!!!iiill
The MultiPASS prints only in black. (You are printing from an application that supports
color printing but your output is black ink only.)
The MultiPASS printer driver may not be selected.
Make sure the MultiPASS is selected as the default printer in your application.
The printer driver may not be selecting color.
Check that you selected one of the color Print Modes in the Main tab of the printer driver
(see page 3-8).
The BI cartridge or an ink tank may not be installed properly.
Make sure the BJ cartridge and the ink tank(s) are installed properly (see pages 7=23 and
7-33).
Chapter 8 Troubleshooting 8-26
The BI cartridge print head may need cleaning.
Clean the BJ cartridge print head (see page 7-20).
Colors are broken or uneven.
The print mode may be wrong.
Check your Print Mode setting on the Main tab of the printer driver (see page 3-8).
If you are printing a thin line with a nonprimary color, your software may be telling the unit to
place a color every other dot, with white in between.
Choose cyan, magenta, yellow, or black instead.
Colors print incorrectly.
The MultiPASS printer driver may not be selected.
Make sure the MultiPASS is selected as the default printer in your application.
The printer driver may not be selecting color.
Check that you selected one of the color Print Modes in the Main tab of the printer driver
(see page 3-8).
The printer driver may not be selecting the right media.
Make sure the correct paper type is set in the printer driver (see page 3-9).
Chapter 8 Troubleshooting 8-27

Some colors are impossible to match exactly, though the MultiPASS is designed to come as close
as possible.
Colors are missing.
The BJ cartridge print head may need cleaning.
Clean the BJcartridge print head (see page 7-20).
Colors in a line are uneven or different from previous lines.
The print settings may not be the best for the images you are printing.
Check your Print Mode setting on the Main tab of the printer driver (see page 3-8).
Be sure to experiment with different settings and different types of paper.
Hue changes.
The nozzles on the BJ cartridge print head may be dogged.
Print the nozzle check to check the BJ cartridge print head (see page 7-18). Perform the
BJ cartridge print head cleaning procedure if necessary (see page 7-20).
A BI tank may be empty.
Replace empty ink tanks as necessary (see page 7-33).
Chapter 8 Troubleshooting 8-28
Blue looks like purple.
Blue prints out as purple because of the difference in color technology used by the screen and
the MultiPASS; the screen uses RGB (Red, Green, Blue) color and the MultiPASS uses CMYK
(Cyan, Magenta, Yellow, Black) color. Due to the technology differences, when cyan and
magenta are mixed together, blue prints dark blue or purple compared to the screen.
Within the MultiPASS printer driver, select the appropriate Color Adjustment setting on the
Color tab (see page 3-14). If you are not using screen matching, decreasing the amount of
magenta by 30% produces a royal blue.
If you are just looking for a nice blue color, try cyan. It prints beautifully and fast, and is
available in almost all applications that support color.
Color images are missing some detail.
The print mode may be wrong.
Check your Print Mode setting on the Main tab of the printer driver (see page 3-8).
Chapter 8 Troubleshooting 8-29
iiiii_!!?:'ii!ii!iiii_iiii!i!i!i>ii:i:!i!:i_iii!_!!¸¸_¸¸¸¸i!!!!!i¸_:_:!iii!i:!!_ii:i:!i!:i_i!ii:¸iii!_iiiii{iiliiiii!_!!i!_!_!i!!illiiii!ii!ii!ii!!!{!i:¸:¸¸I:¸:_¸_:_:'iii>i!iiiiiiii_i_,iliiiii:iiii!{iiliiii:i:!i!:i_iii!_!!i!!__i!_:!!iiill
Paper does not load.
The multi-purpose tray may contain too many sheets.
Make sure the paper stack in the multi-purpose tray does not exceed the paper limit mark
( _ ) (see page 2-15).
Paper may not be loaded correctly.
Make sure the paper stack is loaded properly in the multi-purpose tray, and that the paper
guide is adjusted correctly (see page 2-22).
Paper is loaded skewed. (Printing is skewed.)
Paper may not be loaded correctly.
Make sure the paper stack is loaded properly in the multi-purpose tray, and that the paper
guide is adjusted correctly (see page 2-22).
Make sure the right edge of the paper stack is aligned with the right side of the multi-purpose
tray and the paper guide is aligned with the left edge of the stack.
Make sure the paper exit path is clear.
Chapter 8 Troubleshooting 8-30
Multiple sheets load into the unit at the same time.
Paper may not be loaded correctly.
Make sure the paper stack is loaded properly in the multi-purpose tray, and that the paper
guide is adjusted correctly (see page 2-22).
Sheets of paper may be sticking together.
Be sure to fan the paper stack before placing it in the multi-purpose tray (see page 2-20).
The multi-purpose tray may contain too many sheets.
Make sure the paper stack in the multi-purpose tray does not exceed the paper limit mark
( I_ ) (see page 2-21).
Do not load more than approximately 100 sheets -- 20 lb. (75 g/m 2) paper -- of plain paper
in the multi-purpose tray.
Do not force the paper stack into the multi-purpose tray.
Different types of paper may be loaded in the multi-purpose tray.
Load just one type of paper.
Make sure you are loading paper that meets the paper requirements for the unit (see
page 2-2).
Chapter 8 Troubleshooting 8-31
Transparencies or back print film do not feed correctly.
The transparencies or back print film may not be loaded correctly.
Make sure you load no more than 50 sheets of transparencies or 10 sheets of back print film
in the multi-purpose tray.
Repeated paper jams occur.
The paper you are using may be causing the jams.
Be sure to fan the paper stack before loading it in the multi-purpose tray (see page 2-20).
This keeps the sheets of paper from sticking together.
Check that the paper you are using and your printing environment are within the specifications
of the unit (see page 2-2).
Envelopes do not load.
Envelopes may not be loaded correctly.
Make sure the envelopes are loaded correctly (see page 2-23).
Make sure there are no more than 10 envelopes in the multi-purpose tray.
You may need to choose the envelope setting in your printer driver.
Make sure you select the correct envelope size in the Media Type setting on the Main tab in
your printer driver (see page 3-9).
The envelopes you are using may not meet the requirements for the unit.
Envelopes must be U.S. Commercial No. 10 or European DL envelopes.
Chapter 8 Troubleshooting 8-32
i!!!!!i¸¸¸¸_¸¸:¸_¸¸¸_:;;iiil?iiiiiiiliiiii!i!?i!!!_i;ii!ii!ii!!!{!i:¸:¸;¸'iii!i!!¸¸_¸¸¸¸ii!iiiiiiiii_,ilili9{iiliiiiii!i!iliii!i!!7;!i!!ii;;;
You cannot send a fax.
The MuItiPASS may have overheated.
Unplug the unit and let it cool for several minutes. Then plug the unit back in and try sending
again.
The MultiPASS may not be set for the type of telephone line in use (pulse/tone).
If you have a pulse line, make sure the MultiPASS is set for pulse dialing. (If you are using the
Desktop Manager, see the MuttiPASS Desktop Manager Software Guide. If you are using the
operation panel, see the Stand-alone Fax Manual.)
The document may not have been fed correctly into the Automatic Document Feeder (ADF).
Remove the document, stack it if necessary, and feed it into the ADF correctly (see page 4-8).
Check that the document feed lever is set for the type of document you are sending (see
page 4-6).
Make sure the operation panel is closed.
The one-touch speed dialing button or coded speed dialing code you entered may not be
registered for the feature you want to use.
Check the one-touch speed dialing button or coded speed dialing code and make sure it is
registered correctly. (If you are using the Desktop Manager, see the MuttiPASS Desktop
Manager S@ware Guide. If you are using the operation panel, see the Stand-alone Fax
Manual.)
Chapter 8 Troubleshooting 8-33
You dialed or have been provided with an incorrect number.
Dial the number again or check that you have the correct number.
The other party's fax machine may be out of paper.
Call the other party and ask them to make sure paper is loaded in their fax machine.
You may have sent a document in color to a fax machine that does not support color faxing.
Your MultiPASS can only send in color to other fax machines that have color faxing capability.
If the other party's fax machine does not support color faxing, try sending again in black &
white (see page 5-3).
There may be other documents being sent from memory.
Allow time for the current document to finish sending.
An error may have occurred during sending.
Print an activity report and check for an error. (If you are using the Desktop Manager, see the
MuttiPASS Desktop Manager Software Guide. If you are using the operation panel, see the
Stand-alone Fax Manual.)
The telephone line may not be working properly.
Make sure there is a dial tone when you lift the handset of the telephone or extension phone. If not,
contact your local telephone company.
The receiving fax machine may not be a G3 fax machine.
Make sure the receiving fax machine is compatible with the MultiPASS (which is a G3 fax
machine).
Chapter 8 Troubleshooting 8-34
Images on received faxes from the MultiPASS are spotted or dirty.
The receiving fax machine may not be working properly.
Check the MultiPASS by making a copy (see page 4-21). If the copy is clear,the problem may be in
the receiving fax machine.
Cannot send or receive using Error Correction Mode (ECM).
The other party's fax machine may not support ECM.
Some fax machines do not support ECM. If the other party's fax machine does not support
ECM, then the document is sent or received in normal mode without error checking.
ECM may be disabled.
Make sure ECM is on. (If you are using the Desktop Manager, see the MuhiPASS Desktop
Manager Software Guide. If you are using the operation panel, see the Stand-alone Fax
Manual.)
Chapter 8 Troubleshooting 8-35
Errors occur frequently while sending or receiving.
The telephone lines may be in poor condition, or you may have a poor connection.
Lower the transmission or reception speed. (If you are using the Desktop Manager, see the
MuttiPASS Desktop Manager Software Guide. If you are using the operation panel, see the
Stand-alone Fax Manual.)
The sending fax machine may not be functioning properly.
Transmit or receive to another fax machine. Call the sender and have them make sure the top
cover and scanning glass on their fax machine are clean.
Cannot receive a fax automatically.
The MultiPASS may not be set to receive automatically.
For the MultiPASS to receive faxes automatically, the receive mode must he set to FAX ONLY
MODE, Fax/Tel Mode, or ANS.MACHINE MODE. If you have set ANS.MACHINE MODE,
confirm that an answering machine is connected to the MultiPASS and that it is turned on
with an outgoing message properly recorded.
The MultiPASS may have a document stored in memory.
Print out any faxes stored in memory (see page 5-29).
The MultiPASS Desktop Manager may have received the fax.
Check the In Box of the Desktop Manager (see the MuttiPASS Desktop Manager Software
Guide).
Chapter 8 Troubleshooting 8-36

An error may have occurred during reception.
Check the LCD display for an error message (see page 8m9).
The multi-purpose tray may be empty.
Make sure paper is loaded in the multi-purpose tray (see page 2q7).
The telephone line may not be connected properly.
Make sure all line connections are secure (see your Quick Start Guide).
The MultiPASS does not switch automatically between telephone and fax reception.
The MultiPASS may not be set to switch automatically between telephone and fax reception.
For the MultiPASS to switch automatically, the receive mode must he set to Fax/Tel Mode or
ANS.MACHINE MODE. If you have set ANS.MACHINE MODE, confirm that an answering
machine is connected to the MultiPASS and that it is turned on with an outgoing message
properly recorded.
An error may have occurred during reception.
Check the LCD display for an error message (see page 8_9).
Print an activity report and check for an error. (If you are using the Desktop Manager, see the
MuttiPASS Desktop Manager Software Guide. If you are using the operation panel, see the
Stand-alone Fax Manual.)
The multi-purpose tray may be empty.
Make sure paper is loaded in the multi-purpose tray (see page 2q7).
Chapter 8 Troubleshooting 8-37
The sending fax machine may not send the CNG signal that tells the MultiPASS that the
incoming signal is a fax.
Some fax machines cannot send the CNG signal that tells your MultiPASS the incoming signal
is from a fax machine. In such cases, you will have to receive the fax manually.
Cannot receive a document manually.
You may have disconnected the call by pressing the Start/Scan button or dialing the remote
receiving ID for remote receiving after hanging up the handset of the telephone or extension
phone.
Always press the Start/Scan button or dial the remote receiving ID b@_re hanging up the
handset. Otherwise you will disconnect the call.
Print quality is poor.
You may not be using the correct type of paper.
Make sure you are using paper that meets the paper requirements for the unit (see page 2-2).
The B] cartridge print head may need cleaning.
Clean the BJ cartridge print head (see page 7=20).
The sending fax machine may not be functioning properly.
The sending fax machine usually determines the fax's quality. Call the sender and have them
make sure the top cover and scanning glass on their fax machine are clean.
Chapter 8 Troubleshooting 8-38
Error Correction Mode (ECM) may be disabled.
Make sure ECM is on. (If you are using the Desktop Manager, see the MuttiPASS Desktop
Manager Software Guide. If you are using the operation panel, see the Stand-alone Fax
Manual.)
Faxes do not print.
The orange tape may not be removed from the BJ cartridge.
Be sure to remove the orange tape from the BJ cartridge before you install it (see page 7-29).
The BJ cartridge or an ink tank may not be installed properly.
Make sure the BJ cartridge and the ink tank(s) are installed properly (see page 7-23).
The BJ cartridge print head may need cleaning.
Clean the BJ cartridge print head (see page 7-20).
The BJ cartridge or the ink tank(s) may need to be replaced.
Replace the B] cartridge or the ink tank(s) (see pages 7-23 and 7-33).
Fax images print blotched or uneven.
The telephone lines may be in poor condition, or you may have a bad connection.
Error Correction Mode (ECM) sending/receiving should eliminate such problems. However, if
the telephone lines are in poor condition, you may have to try again.
Chapter 8 Troubleshooting 8-39
The sending fax machine may not be functioning properly.
The sending fax machine usually determines the fax's quality. Call the sender and have them
make sure the top cover and scanning glass on their fax machine are clean.
Errors occur frequently while receiving.
The telephone lines may be in poor condition, or you may have a bad connection.
Lower the reception speed. (If you are using the Desktop Manager, see the MuttiPASS Desktop
Manager Software Guide. If you are using the operation panel, see the Stand-alone Fax
Manual.)
......iii!iiiii!ill!if!!ililiiiiiii!i!!i_iii!i!i!iii!iiii!!!!!i!!_ii!iiiiiiiii_,iii!!!i!!_iiiii!i!!i_i!iii!i¸¸¸¸¸I::iii!!!ii!iiiiiiilia,iliiiii:iiii!ililiiiiiii!i!!i_iii!!!i!!_i!!!iiill
You cannot dial.
The telephone line may not be connected properly.
Make sure the telephone line is connected properly to the MultiPASS.
The unit may not be getting power.
Make sure the power cord is connected to the MultiPASS and to an AC outlet (see your Quick
Start Guide). Make sure the AC outlet has power.
Chapter 8 Troubleshooting 8-40
TheMultiPASSmaynotbesetforthetypeoftelephonelineinuse(pulse/tone).
If you have a pulse line, make sure the MultiPASS is set for pulse dialing. (If you are using the
Desktop Manager, see the online MuttiPASS Desktop Manager Software Guide. If you are using
the operation panel, see the online Stand-alone Fax Manual.)
The phone disconnects while you are talking.
The phone cord may not be plugged in securely.
Check that the phone cord is connected securely to the unit and into the phone jack on the
wall. Then confirm that the phone is securely connected to the unit.
Chapter 8 Troubleshooting 8-41
iiiiiiiiil]iZi¸¸_!_iiiiiiii_,iii!i!i!iii!_!!!i{¸iiiliiiii!_!:i!_!_!i!!i_iiiii!ii!ii!ii!!!{!i::iii>_!_iiiiiiii_,iliiiii:iiii!{iilii<i:i::_iii!_!:i_!_i!_:!!iiill
The MultiPASS will not make a copy.
An ink tank in the BC-2le Color B] Cartridge may be empty.
Replace empty ink tanks as necessary (see page 7-33).
You may be trying to make copies with the incorrect BJ cartridge installed in the unit.
The MultiPASS cannot make copies in black & white while the BC-22e Photo B] Cartridge is
installed. Replace the B] cartridge with the BC-2 le Color B] Cartridge or a BC-20 Black B]
Cartridge.
The MultiPASS cannot make copies in color while a BC-20 Black B] Cartridge is installed.
Replace the B] cartridge with the BC-2 le Color B] Cartridge or if you want to copy using
photo ink, replace the B] cartridge with a BC-22e Photo B] Cartridge.
The handset of the telephone or extension phone may be off hook.
Make sure the handset is in its cradle.
The document may not have been fed correctly into the ADF.
Remove the document, stack it if necessary, and feed it into the ADF correctly (see page 4-8).
Make sure the operation panel is closed.
Check that the document feed lever is set for the type of document you are copying (see
page 4-6).
Chapter 8 Troubleshooting 8-42
TheBJcartridgeoran ink tank may not be installed properly.
Make sure the BJ cartridge and the ink tank(s) are installed properly (see page 7-23 and 7-33).
The MultiPASS may not be operating properly.
Try to print a document from your PC.
MEMORY FULL appears in the LCD display when making multiple copies.
The MultiPASS memory is full.
Print out any faxes stored in memory (see page 5-29), then start again.
The MultiPASS has no power.
The power cord may not be plugged in securely.
Check that the power cord is plugged securely into the unit and into the wall outlet. If the
unit is plugged into a power strip, make sure the power strip is plugged in and turned on.
The power cord may not be supplying power.
Check the power cord by substituting another, or by using a voltmeter to test it for continuity.
Chapter 8 Troubleshooting 8-43
The MultiPASS will not print reports.
The MultiPASS may have the BC-2Ie Color B] Cartridge installed, and its black ink tank may be
empty.
Replace the black ink tank (see page 7-33).
The MultiPASS may have a BC-22e Photo BI Cartridge installed.
The MultiPASS cannot print reports while a BC-22e Photo BJ Cartridge is installed. Replace
the BJ cartridge with the BC-21e Color BJ Cartridge or a BC-20 Black BJ Cartridge (see
page 7-23).
Nothing appears in the LCD display.
The power cord may not be plugged in securely.
Check that the power cord is plugged securely into the unit and into the wall outlet. If the
unit is plugged into a power strip, make sure the power strip is plugged in and turned on. If
the display remains blank, unplug the MultiPASS, wait five seconds, then plug it in again.
Chapter 8 Troubleshooting 8-44
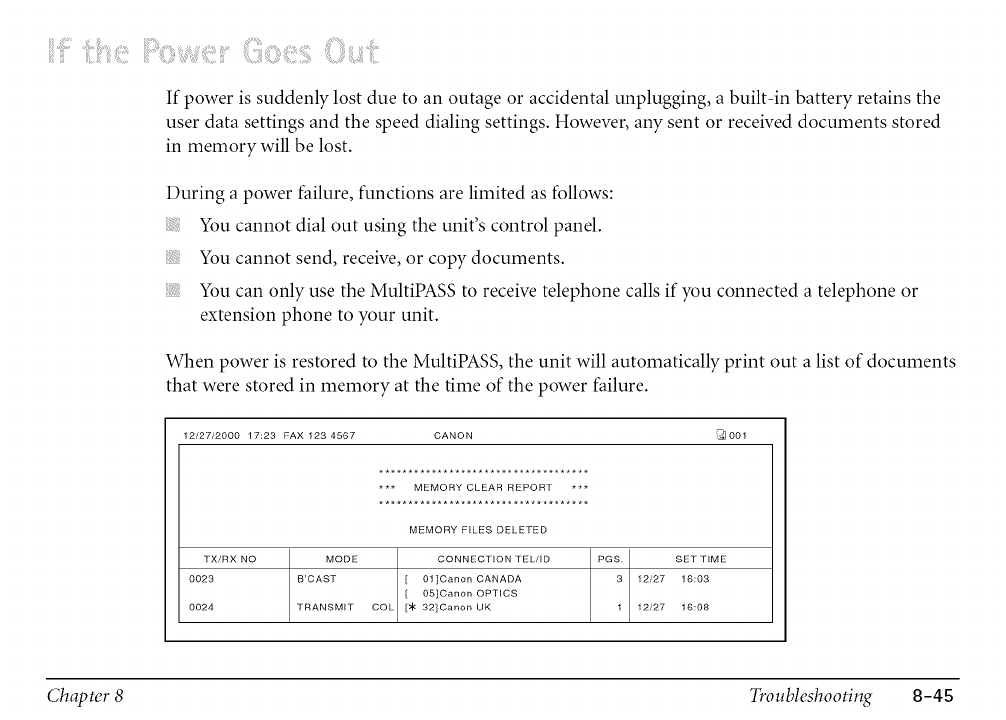
i!!!!!iii!i!i!¸_:¸i!i!ii::¸!i!i!iilJ;i!_ili:i:!:!:i_i!iii!?;0i_!_;iii:i;:!:!:i_iii!_!!ii!iiiii!!i!i_iii0 ili:i:!:!:i_:!!!!iil;i0 !!iii_ii11!11::¸
If power is suddenly lost due to an outage or accidental unplugging, a built-in battery retains the
user data settings and the speed dialing settings. However, any sent or received documents stored
in memory will be lost.
During a power failure, functions are limited as follows:
You cannot dial out using the unit's control panel.
You cannot send, receive, or copy documents.
You can only use the MultiPASS to receive telephone calls if you connected a telephone or
extension phone to your unit.
When power is restored to the MultiPASS, the unit will automatically print out a list of documents
that were stored in memory at the time of the power failure.
12/27/2000 17:23 FAX 1234567 CANON _ 001
TX/RX NO
0023
0024
MODE
B'CAST
TRANSMIT
************************************
*** MEMORY CLEAR REPORT ***
************************************
MEMORY FILES DELETED
CONNECTION TEL/ID
[ 01]Canon CANADA
[ 05]Canon OPTICS
COL [:4< 32]Canon UK
PGS SET TIME
3 12/27 16:03
1 12/27 16:08
Chapter 8 Troubleshooting 8-45

If there are one or more documents in the image memory when the power is cut off, the LCD
will display PRINTING REPORT when the power is restored. If there is no paper in the multi-
purpose tray at this time, the LCD will also display LOAD PAPER. If this happens, load paper in
the multi-purpose tray, press the Resume button and wait for the unit to print the Memory Clear
Report.
Chapter 8 Troubleshooting 8-46
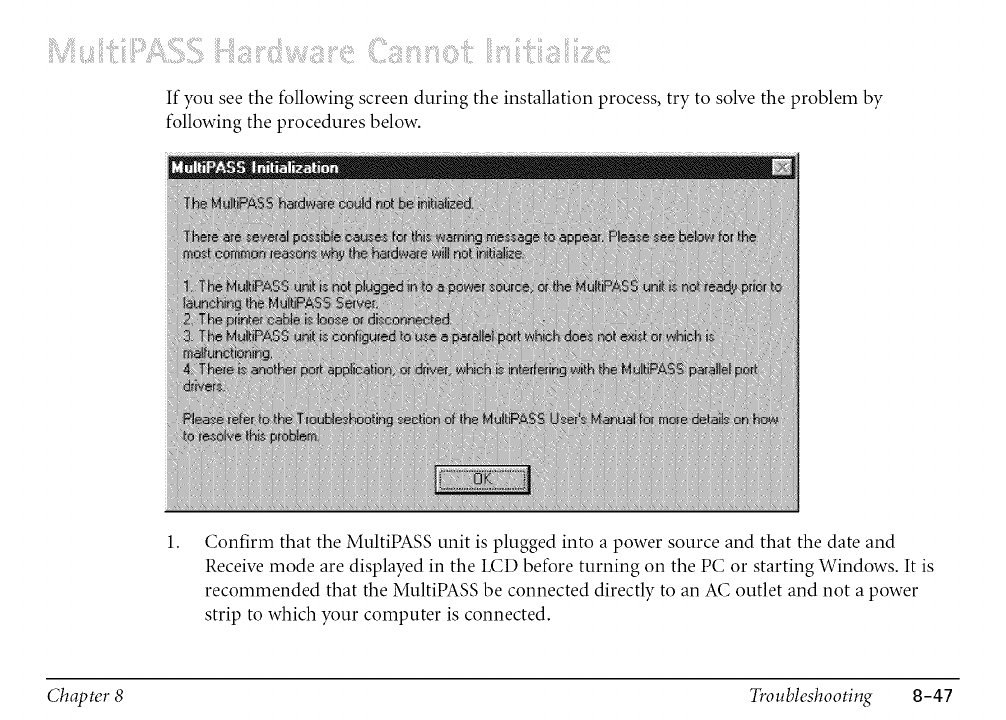
iii!i!i!_dlii!i!i!!!ii_ii{iiliii!i!ii_i¸iiiii!j?711_!!_iii!i!!!!!iiiiiilliiii!i!!i!!!!!iiiiiilli!!!i!!iiiiiii!i_i!ii!ili__>!iiiii_!iiiii_i_¸¸¸_i!ii!ili__>_ii!i:!!iiiiiiiiiiiiiiiiill_ii!iili__!!!i!__!!!i!__!_iiiiii,i!i!_i_i¸ i!!!!!i_!!!i!_iiiliii!i!ii_i¸iiiii_i!ii!ili_{iiliiiiilii>_:i:!i!:_
If you see the following screen during the installation process, try to solve the problem by
following the procedures below.
1. Confirm that the MultiPASS unit is plugged into a power source and that the date and
Receive mode are displayed in the LCD before turning on the PC or starting Windows. It is
recommended that the MultiPASS be connected directly to an AC outlet and not a power
strip to which your computer is connected.
Chapter 8 Troubleshooting 8-47
2.
3.
4.
5.
Check both ends of the printer cable -- at the computer and at the MultiPASS -- to confirm
that the cable is securely fastened.
Confirm that the MultiPASS is configured for the correct parallel port in the Details tab
(Windows 98 and Windows 95) or the Ports tab (Windows NT 4.0) of the Printer Properties.
In addition, for Windows 98 or Windows 95, confirm that there are no port conflicts in the
Device Manager tab of the Systems Properties.
Remove any pass-through devices, switch boxes, zip devices, tape backups, docking stations,
scanners, and any software associated with these products. The software drivers for these
products are customarily executed from the Load and Run lines of the computer's Win.ini or
the Startup Group. Please refer to the product's manufacturer for information on how to
properly remove the hardware and software.
If the above procedures do not resolve the problem, please call the Canon Customer Care
Center; see page 1=14 for details.
Chapter 8 Troubleshooting 8-48
The specifications for the MultiPASS are listed in this section.
Printing Specifications ................................................................................................................. A-2
BJ Cartridges ................................................................................................................................ A-7
Facsimile ....................................................................................................................................... A-8
Copier ......................................................................................................................................... A-11
Scanner ....................................................................................................................................... A-13
MultiPASS DesMop Manager tier Windows ............................................................................. A-18
General Specifications ............................................................................................................... A-19
Appendix A Specifications A- 1
Printing Method
Bubble Jet ink on-demand
Paper Handling
Automatic feed
Multi-Purpose Tray Capadty -Auto Feed Only
Maximum thickness of stacked paper: 0.4 in. (10 mm)
Plain paper--20 lb. (75 g/m2) paper
(Letter/Legal/A4)
Glossy photo paper
Banner paper
Brilliant white paper
High resolution paper
T-shirt transfers
Greeting cards
Bubble Jet paper
Fabric sheets
Transparencies
Back print film
Approx. 100 sheets (0.4 in./10 mm stack)
1 sheet
1 sheet (2 to 6 long)
Approx. 100 sheets
Approx. 10 sheets
1 sheet
1 card
Approx. 100 sheets (0.4 in./10 mm stack)
1 sheet
50 sheets
10 sheets
Appendix A Specifications A-2
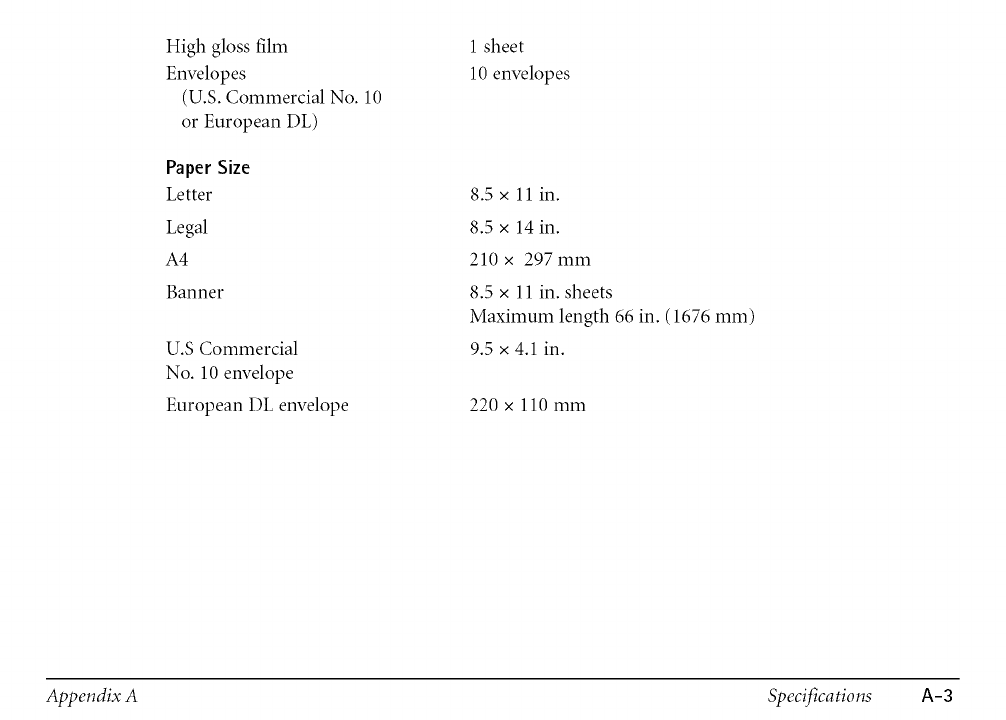
High gloss film
Envelopes
(U.S. Commercial No. 10
or European DL)
Paper Size
Letter
Legal
A4
Banner
U.S Commercial
No. 10 envelope
European DL envelope
1 sheet
10 envelopes
8.5 x 11 in.
8.5 x 14 in.
210 x 297 mm
8.5 x 11 in. sheets
Maximum length 66 in. (1676 mm)
9.5 x 4.1 in.
220 x 110 mm
Appendix A Specifications A-3

Recommended Media Type
Canon Glossy Photo Paper
Canon Banner Paper
Canon Brilliant White Paper
Canon High Resolution Paper
Canon T-Shirt Transfers
Canon Greeting Cards
Canon Bubble Jet Paper (water resistant)
Fabric Sheet for Canon Bubble Jet printers
Canon Transparencies
Canon Back Print Film
Canon High Gloss Film
Assorted Paper Starter Kit
U.S. Commercial No. 10 or European DL envelopes
Paper Weight
17 to 30 lb. (64 to 105 g/m 2)
Print Speed
BC-21e Color BJ Cartridge
BC-20 Black BJ Cartridge
Draft mode:
Standard mode:
Fine mode:
Draft mode:
Standard mode:
Print Width
Maximum 8 in. (203.2 mm)
Line Feed Speed
Approx. 150 ms/line at 2/6-inch line feeds
Up to 4.5 ppm
Up to 3.8 ppm
Up to 0.9 ppm
Up to 5 ppm
Up to 3.6 ppm
Appendix A Specifications A-4
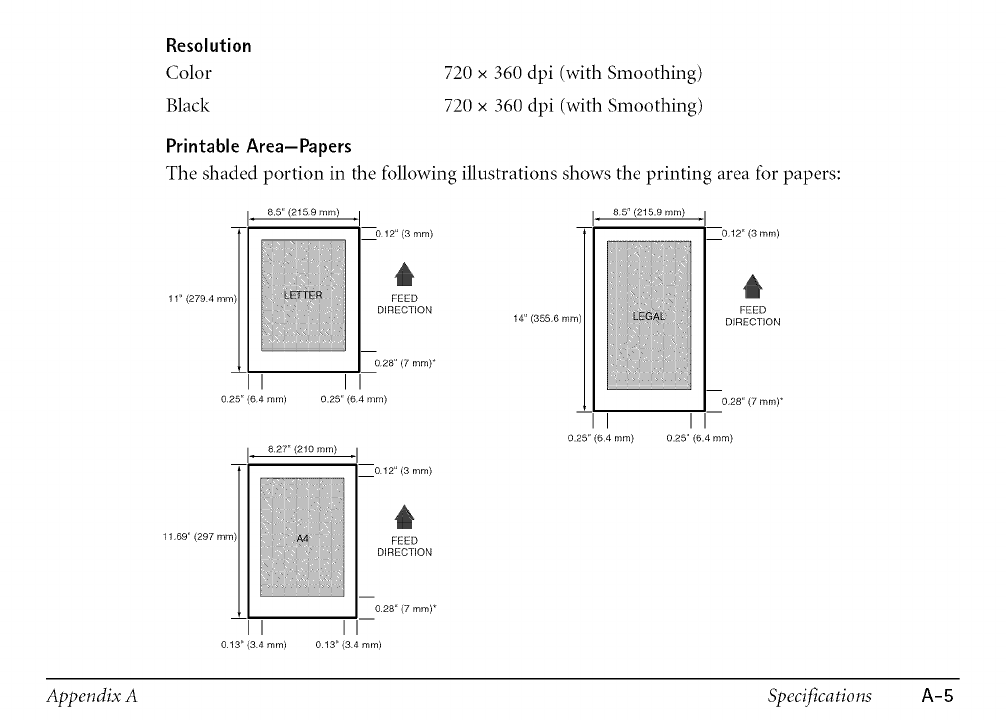
Resolution
Color
Black
720 x 360 dpi (with Smoothing)
720 x 360 dpi (with Smoothing)
Printable Area-Papers
The shaded portion in the following illustrations shows the printing area for papers:
], 8,5' (2159 ram)
11" (2794 mn
_0 12" (3 mm)
FEED
DIRECTION
m
028" (7 mm)*
I I
025" (64 ram) 0,25' (64 mm)
11,69' (297 mn
], 827" (210 ram) , ]
_0 12" (3 mm)
FEED
DIRECTION
m
028" (7 mm)*
I I
013" (34 ram) 013" (34 ram)
14" (355,6 mrr
] _ 85" (215,9 mm)
mI
0,25' (6,4 mm)
--0,12" (3 ram)
FEED
DIRECTION
m
0,28' (7 ram)*
I
0,25" (6,4 mm)
Appendix A Specifications A-5
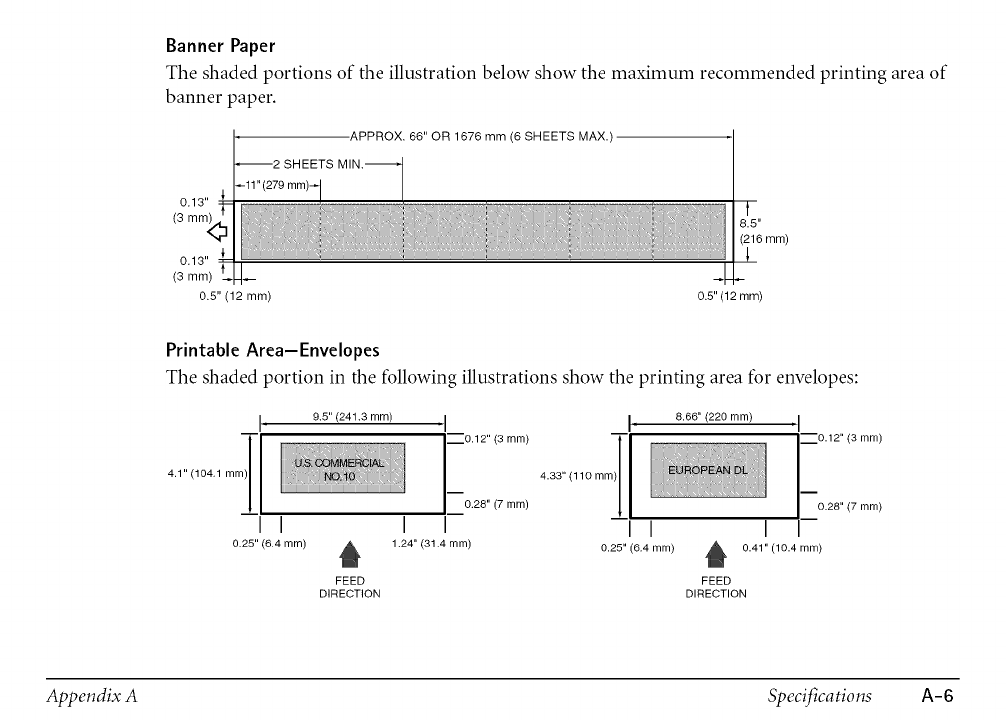
Banner Paper
Theshaded portions oftheillustration below show the ma_mumrecommended printing area of
bannerpaper.
APPROX. 66"OR 1676 mm (6 SHEETS MAX.)
SHEETS
0.13"
(3 mm)
0.13"
(3 mm)
0.5" (12 mm)
8.5"
(216 mm)
0.5" (12 mm)
Printable Area-Envelopes
The shaded portion in the following illustrations show the printing area for envelopes:
I
I I
0.25" (6.4 mm)
9.5" (241.3 mm) , ]
_0.12" (3 turn)
Z0.28" (7 mm)
I I
1.24" (31.4 mm)
FEED
DIRECTION
4.33" (110
,8.66" (220 mm)
I I
0.25" (6.4 mm)
,I
0.28" (7 mm)
I
,_ 0.41" (10.4 mm)
FEED
DIRECTION
Appendix A Specifications A-6
i!Ziiiiiiii
<_iiiiiiil]_ii!i_i__!!!i!i!i7¸¸iiilii_!_i::_!iiiii!i!!!iiiiili!ii!iiii_iii!ii_i_!!iiii_
BC-21e Color BJ Cartridge
Print head
Print head life
Ink tanks
Ink color
Ink tank yield
BCI-21 Color
BCI-21 Black
BC-20 Black BJ Cartridge
Print head
Ink color
Cartridge yield
BC-22e Photo BJ Cartridge
Print head
Ink color
Cartridge yMd
64 nozzles for black
24 nozzles for each color (cyan, magenta, yellow)
Approx. 2,000 color pages at 30% coverage.
BCI-21 Color (cyan, magenta, yellow)
BCI-21 Black
Black, cyan, magenta, yellow
Approx. 100 pages at 7.5% coverage
Approx. 225 pages at 5% coverage
128 nozzles
Black
Approx. 900 pages at 5% coverage
64 nozzles for black
24 nozzles for each color (cyan, magenta, yellow)
Black, cyan, magenta, yellow
Approx. 50 pages at 7.5% coverage
Appendix A Specifications A-7
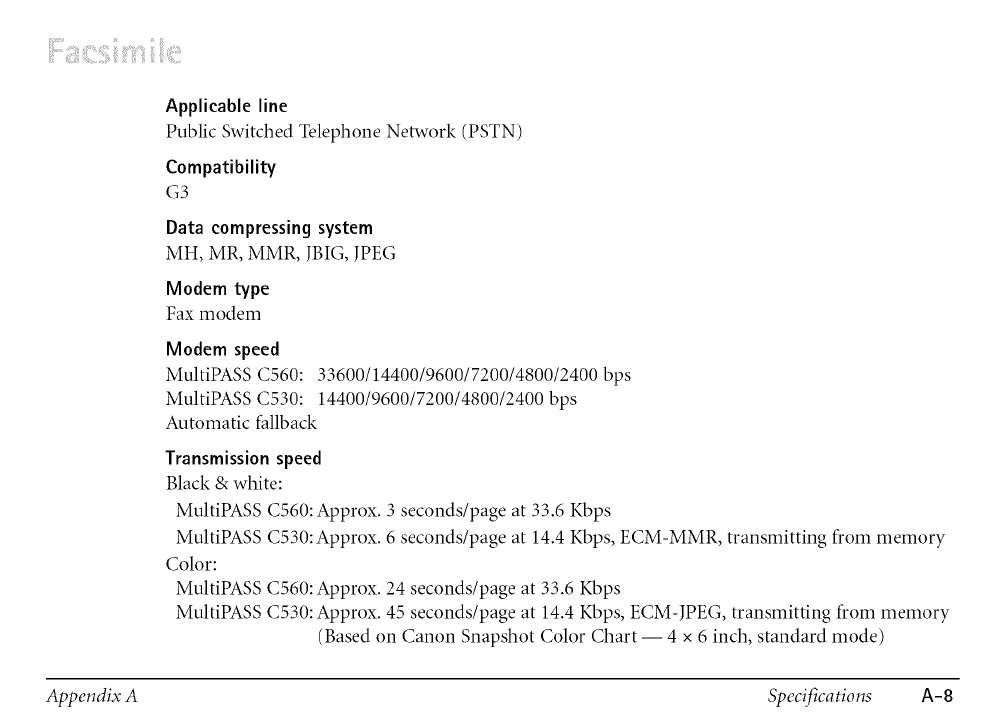
Applicableline
Public Switched Telephone Network (PSTN)
Compatibility
G3
Data compressing system
MH, MR, MMR, JBIG, JPEG
Modem type
Fax modem
Modem speed
MultiPASS C560:33600/14400/9600/7200/4800/2400 bps
MultiPASS C530:1440019600172001480012400 bps
Automatic fallback
Transmission speed
Black & white:
MultiPASS C560: Approx. 3 seconds/page at 33.6 Kbps
MultiPASS C530: Approx. 6 seconds/page at 14.4 Kbps, ECM-MMR, transmitting from memory
Color:
MultiPASS C560: Approx. 24 seconds/page at 33.6 Kbps
MultiPASS C530: Approx. 45 seconds/page at 14.4 Kbps, ECM-JPEG, transmitting from memory
(Based on Canon Snapshot Color Chart -- 4 x 6 inch, standard mode)
Appendix A Specifications A-8
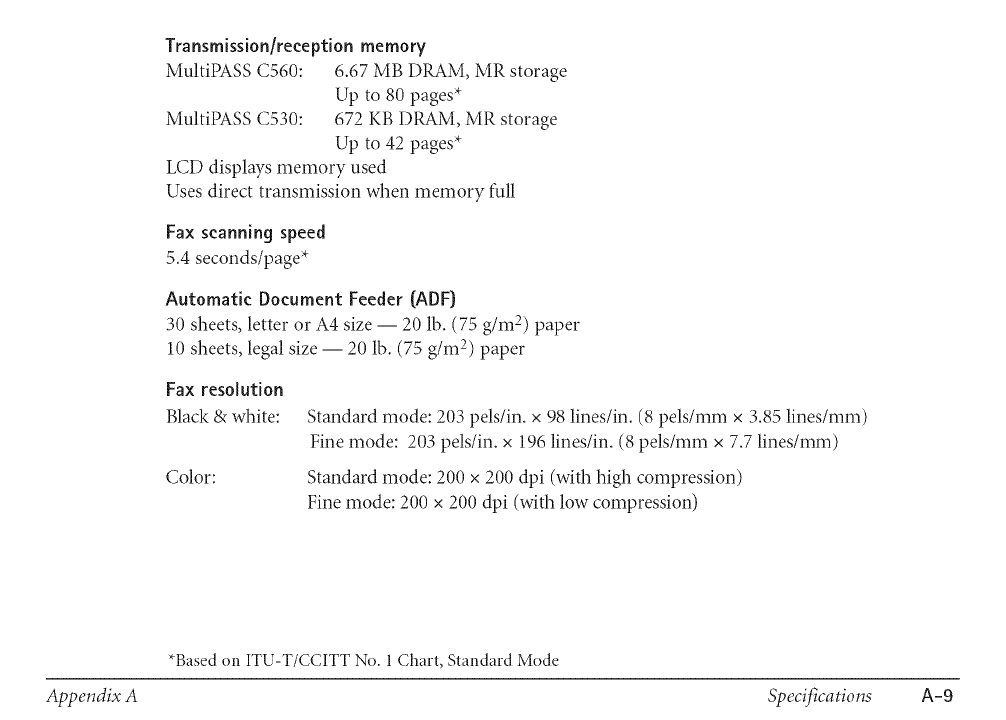
Transmission/reception memory
MultiPASS C560: 6.67 MB DRAM, MR storage
Up to 80 pages*
MultiPASS C530: 672 KB DRAM, MR storage
Up to 42 pages*
LCD displays memory used
Uses direct transmission when memory full
Fax scanning speed
5.4 seconds/page*
Automatic Document Feeder (ADF)
30 sheets, letter or A4 size -- 20 lb. (75 g/m 2) paper
10 sheets, legal size -- 20 lb. (75 g/m 2) paper
Fax resolution
Black & white:
Color:
Standard mode: 203 pels/in. × 98 lines/in. (8 pels/mm × 3.85 lines/ram)
Fine mode: 203 pels/in. × 196 lines/in. (8 pels/mm × 7.7 lines/mm)
Standard mode: 200 × 200 dpi (with high compression)
Fine mode: 200 × 200 dpi (with low compression)
*Based on ITU-T/CCITT No. I Chart, Standard Mode
Appendix A Specifications A-9
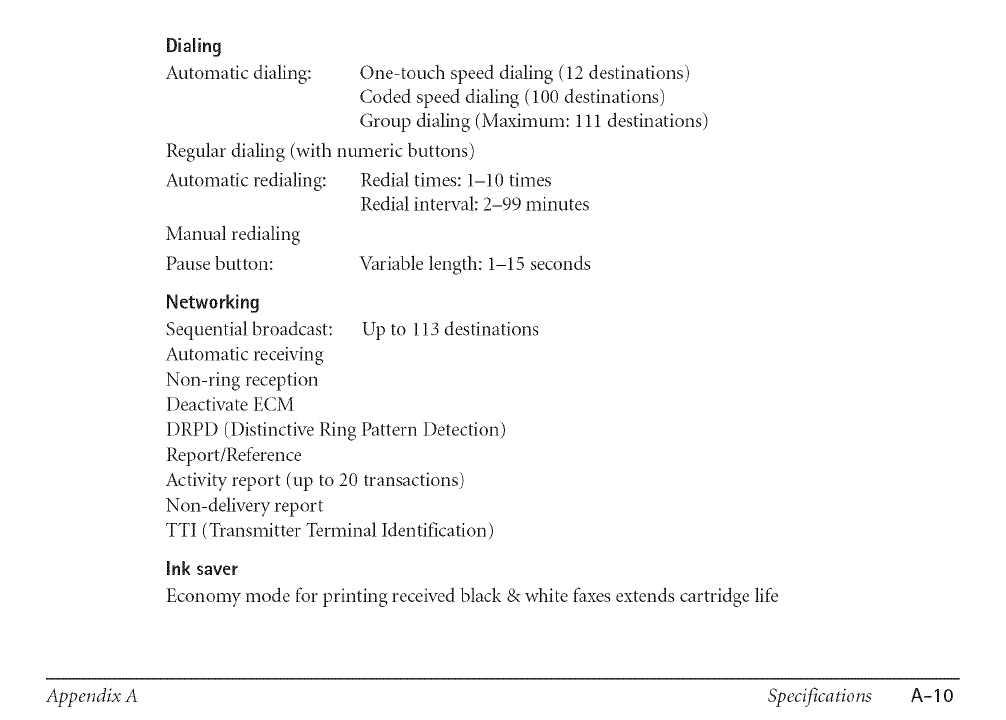
DiaRing
Automatic dialing: One-touch speed dialing (12 destinations)
Coded speed dialing (100 destinations)
Group dialing (Maximum: 111 destinations)
Regular dialing (with numeric buttons)
Automatic redialing: Redial times: 1-10 times
Redial interval: 2-99 minutes
Manual redialing
Pause button: Variable length: 1-15 seconds
Networking
Sequential broadcast: Up to 113 destinations
Automatic receiving
Non-ring reception
Deactivate ECM
DRPD (Distinctive Ring Pattern Detection)
Report/Reference
Activity report (up to 20 transactions)
Non-delivery report
TTI (Transmitter Terminal Identification)
Ink saver
Economy mode for printing received black & white taxes extends cartridge life
Appendix A Specifications A- 10
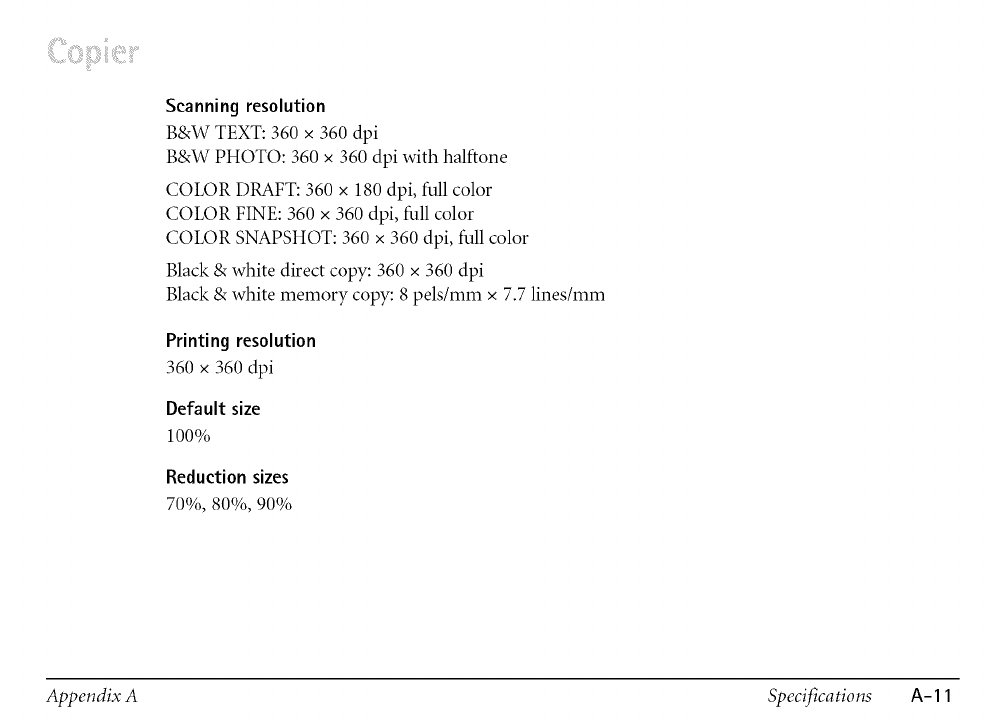
Scanning resolution
B&W TEXT: 360 x 360 dpi
B&W PHOTO: 360 x 360 dpi with halftone
COLOR DRAFT: 360 x 180 dpi, full color
COLOR FINE: 360 x 360 dpi, full color
COLOR SNAPSHOT: 360 x 360 dpi, full color
Black & white direct copy: 360 x 360 dpi
Black & white memory copy: 8 pels/mm x 7.7 lines/mm
Printing resolution
360 x 360 dpi
Default size
100%
Reduction sizes
70%, 80%, 90%
Appendix A Specifications A-1 1
Copy speed
Black &white copy
Letter size: Up to 3.1 pages/minute
Color copy
COLOR DRAFT mode, Letter size: Approx. 3 minutes
COLOR FINE mode, Letter size: Approx. 9 minutes
COLOR SNAPSHOT (4 x 6 in.): Approx. 3 minutes, 50 seconds
Multiple copies
Up to 99 copies of a black & white document
1 copy of a color document
Appendix A Specifications A-12
Scanning method
Solid-state electronic scanning by contact image sensor
Scanning image processing
UHQ TM (Ultra High Quality) image enhancement
Halftones: 256 levels of gray
Color: 16,777,216 colors
Automatic Document Feeder (ADF)
Automatic document feed
Size (W x L):
Quantity--20 lb. (75 g/m 2)paper:
Thickness:
Weight:
Manual document feed
Size (W x L):
Quantity:
Thickness:
Weight:
Maximum: 8.5 x Approx. 39 in. (216 mm x Approx. 1 m)
Minimum: 8.27 x 5.83 in. (210 x 148 mm)
Up to 30 letter-size, 30 A4-size, 10 legal-size sheets
0.003-0.005 in. (0.08-0.13 mm)
20-24 lb. (75-90 g/m2)
Maximum: 8.5 x Approx. 39 in. (216 mm x Approx. 1 m)
Minimum: 3.15 x 1.77 in. (80 x 45 mm)
1 sheet
0.003-0.017 in. (0.08-0.43 mm)
24-90.7 lb. (90-340 g/m2)
Appendix A Specifications A- 13
Resolution
Optical: 300 dpi
Enhanced: 30_500 dpi (set from within application)
Effective scanning width
8.42 in. (214 mm)
Compatibility
TWAIN
Scanning speed
B&W Text (30-150 dpi)
B&W Text (151-300 dpi)
B&W Text (301-600 dpi)
Grayscale (30-150 dpi)
Grayscale (151-300 dpi)
Grayscale (301-600 dpi)
Color (30-150 dpi)
Color (151-300 dpi)
Color (301-600 dpi)
5.4 seconds/page
10.9 seconds/page
21.7 seconds/page
5.4 seconds@age
10.9 seconds/page
21.7 seconds@age
16.3 seconds/page
32.6 seconds/page
65.2 seconds/page
Appendix A Specifications A-14
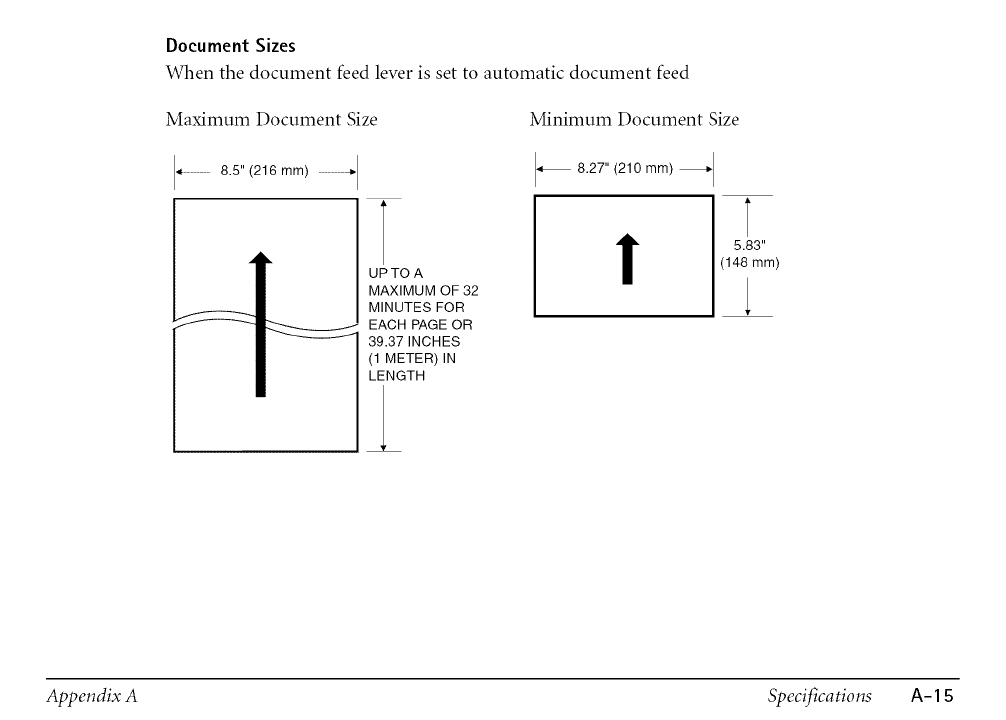
Document Sizes
When the document feed lever is set to automatic document feed
Maximum Document Size Minimum Document Size
4...........8.5" (216 mm) .........-_ 8.27" (210 mm)
UPTO A
MAXIMUM OF 32
MINUTES FOR
EACH PAGE OR
39.37 INCHES
(1 METER)IN
LENGTH
!5.83"
(148 mm)
l
Appendix A Specifications A- 1S

When the document feed lever is set to manual document feed -- Note that the scanning length
may be shorter than the actual document.
Maximum Document Size Minimum Document Size
•...............8.5" (216 mm)
UP TO A
MAXIMUM OF 32
MINUTES FOR
EACH PAGE OR
39.37 INCHES
(1 METER)IN
LENGTH
/
3.15" (80 mm) _1
1.77"
(45 ram)
Appendix A Specifications A- 16
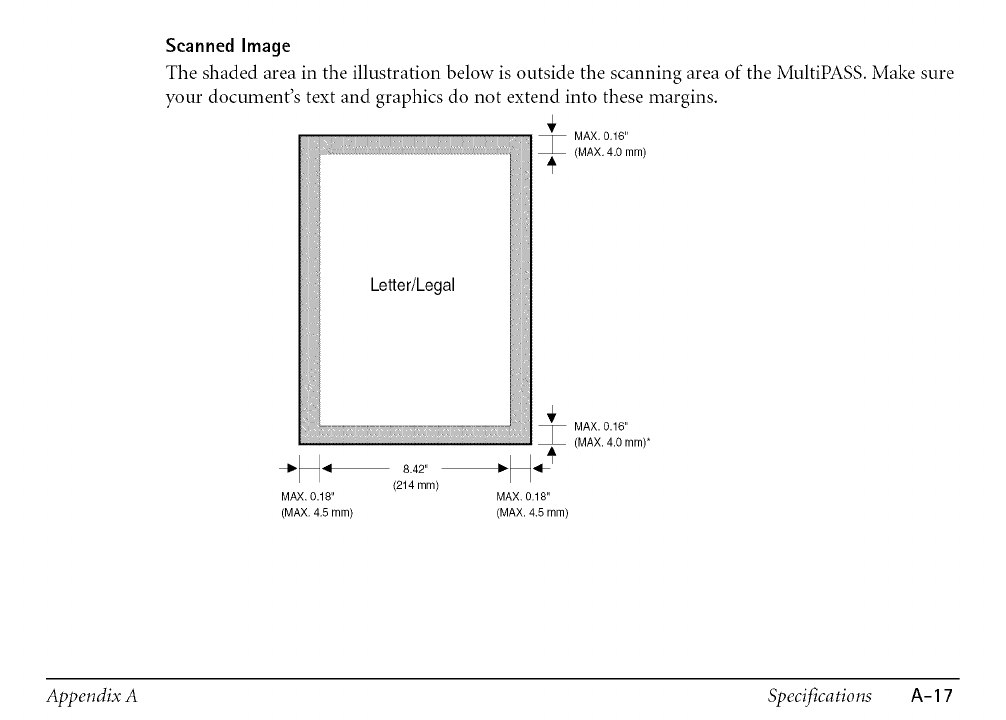
Scanned Image
The shaded area in the illustration below is outside the scanning area of the MultiPASS. Make sure
your document's text and graphics do not extend into these margins.
Letter/Legal
__ 8.42" __'_
(214 mm)
MAX. 0.18" MAX. 0.18"
(MAX. 4.5 mm) (MAX. 4.5 mm)
MAX. 0.16"
(MAX. 4.0 ram)
Appendix A Specifications A- 17
System Requirements
IBM®or compatible computer with a Pentium ®90 processor or higher (Intel ® Pentium
processor is recommended)
Microsoft Windows 98, 95, or NT 4.0
Microsoft Windows NT Service Pack 3 or later
32 megabytes (MB) of RAM (64 MB of RAM recommended)
60 megabytes (MB) of available hard disk space (150 MB of available hard disk space
recommended)
CD-ROM drive, or access to one over a network connection
256-color SVGA monitor or better
Bi-directional shielded IEEE-1284-compatible parallel cable 6.6 feet (2 meters) in length or
shorter
PC Fax
Canon proprietary MultiPASS Desktop Manager for Windows
Fax/Telephone address book
Fax Viewer
Fax Log
Fax distribution lists
Real-time MultiPASS hardware status available through PC
Appendix A Specifications A-18
Power Source
120 V/60 Hz
Power Consumption
Approx. 37.9 W (Maximum)
Approx. 6.1 W (Standby)
Dimensions (W x DxH)
14.4 x 12.8 x 8.2 in. (366 x 324 x 208 mm)
Main unit, no trays
Weight
11.2 lb. (5.1 kg)
Environmental Conditions
Temperature: 50°-90.5°F (10°-32.5°C)
Humidity: 20%-85%
Liquid Crystal Display (LED)
16xl
Display Languages
English/French/Spanish
Appendix A Specifications A- 19
Telephone
Automatic Fax/Tel switchover
DRPD (Distinctive Ring Pattern Detection)
Answering machine hook-up (CNG detecting signal)
Telephone hook-up
Remote reception by telephone
Remote receiving ID (Default): 25
Tone button
Pause button (variable length: 1-15 seconds)
Appendix A Specifications A-20
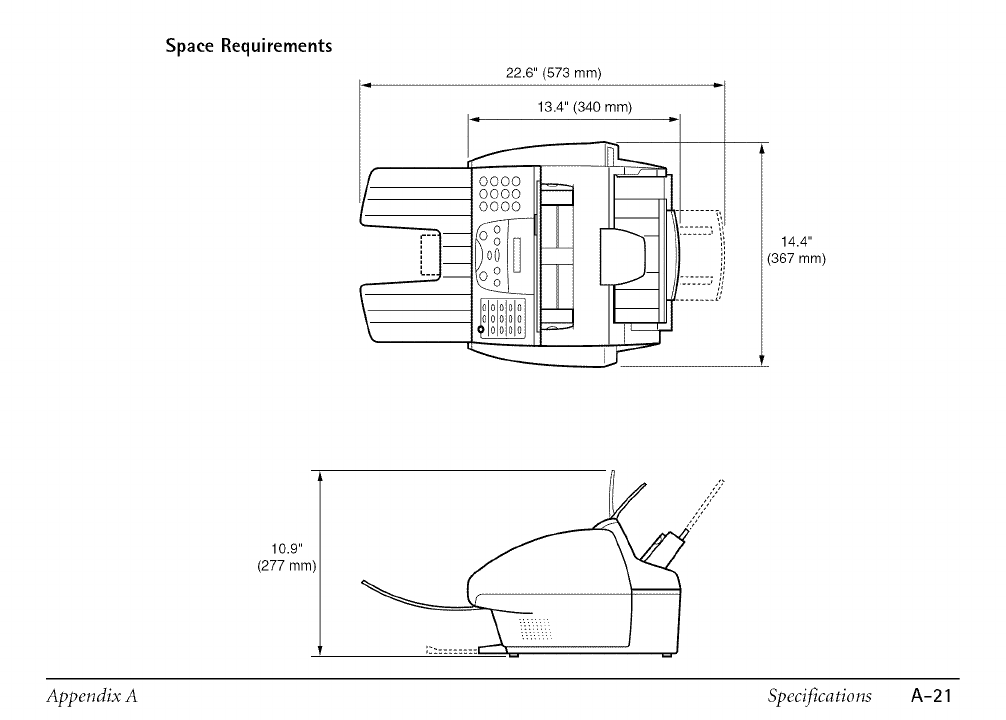
Space Requirements
22.6" (573 mm)
13.4" (340 mm)
14.4"
(367 mm)
10.9"
(277 mm
Appendix A Specifications A-21
A
AC
Alternating current. The type of electrical current available from a wall outlet.
Activity report
A journal of the MultiPASS fax transactions, both sent and received.
Application program
Software prepared for a specific function or set of functions. Examples include word-processing
programs and the MultiPASS Desktop Manager. Developers who make application programs
include drivers that support different types of printers.
Auto FAX/TEL switching
See FAX/TEL switching.
Automatic dialing
Dialing fax or telephone numbers by using a shortcut of pressing one or three buttons. To use
automatic dialing, you must register the numbers. See also One-touch speed dialing, Coded speed
dialing, and Group dialing:
Glossary G-1
Automatic Document Feeder (ADF)
The device included in the MultiPASS that automatically feeds the document being faxed, copied,
or scanned into the MultiPASS.
Automatic image reduction
The MultiPASS can print the date, time, name or company name, and a fax/telephone number at
the top of the faxes it receives. To prevent this information from crowding the faxed image on the
page and possibly lengthening the fax, the MultiPASS automatically reduces the size of the image
on the page.
Automatic redialing
When the receiving fax machine is busy, the MultiPASS waits a specified time and then
automatically redials the number. You define the number of times the unit redials and the length
of time between redialing.
B
Bi-directional paralld interface port
An interface connection that is capable of both sending and receiving. For example, when you
print or send a fax from your PC, data goes from your PC to the MultiPASS; when you scan or
receive a fax into your PC, data goes from the MultiPASS to your PC.
BI cartridge
The printing mechanism that contains the print head unit and ink(s).
Glossary G-2
bps
Bits per second. Refers to the speed with which a fax machine sends and receives data.
Broadcasting
Transmitting documents to more than one destination.
Bubble Jet (BJ) printing
An ink jet type printer that heats the ink to a boiling point in a nozzle to form a bubble. When the
bubble expands, there is no room left in the nozzle for the ink and the ink is projected onto paper.
C
CCITT/ITU-TS
Formerly known as CCITT, Consultative Committee for International Telegraph and Telephone.
CCITT has been replaced by the International Telecommunications Union-Telecommunications
Sector (ITU-TS), a committee created to set international standards for telecommunications.
Centronics
An interface standard for parallel data transmission. The interface on the MultiPASS is a
Centronics-type parallel interface.
CNG
Calling Tone. This is a signal sent by fax machines to identify the call as an incoming document.
When the receiving fax detects this signal, it automatically starts to receive the fax transmission.
The majority of fax machines in use today can send and detect CNG signals.
Glossary G-3
Coded speed dialing
An automatic dialing method that allows you to dial a fax or telephone number by pressing the
Coded Dial button and a two-digit code using the numeric buttons.
cps
Characters per second. A unit of measurement that indicates the printer's speed.
Cursor
The underline symbol you see in the LCD display when you register numbers and names in the
MultiPASS.
D
dB(A)
Stands for decibel level (a decibel being a unit of measurement for the intensity of the sound
coming from the unit), adjusted for background noise.
Delayed sending
The ability to send a document at a preset time in the future. You do not have to be in your office
to use delayed sending to one or more destinations. (You can only set up one delayed transmission
at a time with the MultiPASS Desktop Manager.)
Dialing methods
Ways of pressing one or more buttons to access a number to connect to an outside party or fax
machine. Dialing methods include one-touch, coded speed dialing, group dialing, and manual
(regular) dialing.
Glossary G-4
Document
The sheet of paper containing the data that you send to, or receive from a unit.
dpi
Dots per inch. A unit of measurement for indicating a printer's resolution.
DRPD
Distinctive Ring Pattern Detection. Allows you to assign different ring patterns to distinguish voice
and fax calls using your telephone company's special services.
Dual access (Multitasking)
Enables the MultiPASS to receive a fax, even if it is copying or printing a document. Also enables
you to scan other faxes into memory, make copies, print out reports, print documents or register
information while the MultiPASS sends a fax from memory.
E
ECM
Error Correction Mode. The ability of your MultiPASS to reduce system and line errors when
sending or receiving from another fax machine with ECM capability. ECM is most effective in
areas where the telephone lines are in poor condition or there is frequent interference on the line.
Glossary G-5
Factory default
The MultiPASS is preprogrammed in the factory with settings that we recommend. These are
known as facto Wdefault settings. You can customize your MultiPASS by programming settings
other than the factory default settings.
FAX/TEL switching
The ability of the MultiPASS to automatically detect whether a call is from a fax machine or
telephone. With this feature, one telephone line can be shared by both the telephone and the fax
machine.
FINE
The resolution setting for documents with very small characters and lines.
Font
A complete set of characters of the same size and type; a particular implementation of a typeface.
For example, 12-point Courier bold.
Form feed
A printer function that automatically ejects the current page and advances the printer to the top
of the next page.
Glossary G-6
G
G3, Group 3 fax machine
Defined by CCITT/ITU-T. Uses encoding schemes to transmit image data while reducing the
amount of data that needs to be transmitted, thus reducing transmission time. G3 fax machines
can transmit one page in less than one minute. Encoding schemes for G3 fax machines are
Modified Huffman (MH), Modified READ (MR), and Modified Modified READ (MMR).
Graphic
A written, printed, or electronically displayed symbol or drawing. Also, characters or text that have
been generated by a computer graphics application program.
Grayscale
Representing color in black & white as a result of different intensities of color. Different colors and
intensities of colors appear as different shades of gray.
Group dialing
A dialing method that enables you to dial up to 111 registered one-touch speed dialing or coded
speed dialing numbers together as a group. This means that you can press just one or three
buttons to enter numbers when sending the same document to many destinations.
Glossary G-7
H
Halftone
Using this method, the MultiPASS produces shades of gray or of colors by mapping dots to be
printed. For color printing, different colored dots of ink are placed closely together to create
illusions of other colors.
IEEE 1284
IEEE 1284 is the new specification standard for computer-to-peripheral bi-directional parallel
interface communications. The new standard was adopted by IEEE, Institute of Electrical and
Electronic Engineers, Inc., in 1993. Some of the benefits it provides are: bi-directional
communication between PCs and peripheral devices, a higher speed data transfer rate, and
protection against data loss due to noise interference.
Ink let printer
A nonimpact printer that ejects ink onto paper to form characters. The MultiPASS has a special
type of ink jet printer built in called a Bubble Jet printer.
Ink saver
You can enable or disable economy printing (ink saving feature) for black & white printing. By
enabling the ink saver feature, ink consumption can he decreased, resulting in a longer effective
cartridge life. You set the ink saver feature either in the MultiPASS Desktop Manager or by using
the operation panel.
Glossary G-8
Ink tank
The special type of ink container housed by the BJ cartridge. The BC-2 le Color BJ Cartridge
contains two ink tanks: one color -- BCI-21 Color (which includes cyan, magenta, yellow) and
one black -- BCI-21 Black.
Intensity
The amount of color. More intense or more saturated colors are more pure. Less intense or less
saturated colors are less vivid.
Interface port
The MultiPASS comes with one IEEE 1284, bi-directional parallel interface port, located on the
back of the unit. You attach the cable that connects your PC and the MultiPASS to this port.
ITU-T/CCITT No. 1 Chart
A test chart, defined by CCITT/ITU-TS, used to measure the transmission speed as well as the
transmitting and receiving memory capacity of a fax machine.
lack
The telephone receptacles (RJ11-C type) on your wall or in your MultiPASS used to connect the
MultiPASS to the telephone line, telephone, and answering machine, extension phone, or data
modem.
Glossary G-O
Landscape orientation
Refers to printing across the length of the page (as opposed to portrait orientation, which is
printing across the width of the page).
Line feed
Aprinter function that advances the paper one line.
M
Manual receiving
A method of receiving faxes in which you answer all incoming calls using a telephone.
Manual redialing
When you use regular dialing, you can redial a number "manually" by simply pressing the
Redial/Pause button on the operation panel. The last number dialed with the numeric buttons is
the number redialed.
Memory broadcast
Allows you to send ascanned fax to as many as 113 destinations, using a combination of
one-touch speed dialing, coded speed dialing, and regular dialing.
Memory sending
Scans a document into memory before the MultiPASS dials the number(s) and sends it. This
method allows you to retrieve your original document immediately after scanning.
Glossary G-10
Modem
A device that converts (MOdulates) digital data for transmission over telephone lines. At the
receiving end, this device converts the modulated data (DEModulates) to digital format that the
PC understands.
MultiPASS Desktop Manager for Windows software
Canon's exclusive software package that allows you to use the MultiPASS with your Windows
software applications. You must install the MultiPASS Desktop Manager to use your MultiPASS as
a printer, scanner, or PC fax.
bl
Noise
Aterm applied to a variety of problems that impair the operation of telephone lines used for
faxing.
Noise level
See dB(A).
Numeric buttons
The round, numbered buttons on the operation panel marked the same as a standard telephone
keypad. Press them to perform regular dialing. They are also used to enter numbers, letters, and
symbols when registering numbers and names, and for entering two-digit codes for coded speed
dialing.
Glossary G- 11

0
Off-line
The printer's communication status in which you cannot transfer data from your PC to the
printer.
On-line
The printer's communication status in which it is being controlled by your PC and is ready to
receive data.
One-touch speed dialing
An automatic dialing method that allows you to dial a fax or telephone number by pressing a
single one-touch speed dialing button. The MultiPASS can store up to 12 numbers for one-touch
speed dialing.
One-touch speed dialing buttons
The buttons numbered 01 to 12 on the operation panel, each of which may be registered as a fax
or telephone number. Once anumber is registered, you press one button to dial the entire
number.
Glossary G-12
P
Page orientation
Refers to the direction of print on the page. Printing across the width of a page is called portrait
orientation. Printing across the length of a page is called landscape orientation.
Pause
A timing entry required for registering certain long distance numbers and for dialing out through
some telephone systems or switchboards. Pressing the Redial/Pause button enters a pause between
digits of a fax/telephone number.
PC fax
An electronic way to send and receive faxes. A PC fax is sent from or received in a PC. Using the
MultiPASS allows you to send and receive PC faxes and the MultiPASS Desktop Manager lets you
save, sort, and print the PC faxes.
Photo
The document setting you use for sending or copying documents with intermediate tones, such as
photographs.
Platen
The printer component that holds the paper in position during ink transfer.
Portrait orientation
Refers to printing across the width of the page (letter style). This is the opposite of landscape
orientation, which is printing across the length of the page.
Glossary G-13
Printhead
Theprintingmechanismthatcontainsprintnozzlesandejectstheinkforprinting.
Print head capping
An automatic protection function that prevents the print head unit and ink cartridges from
drying out or becoming clogged with dust.
Printable area
The area of a sheet of paper on which a printer can reproduce text or graphics (the printing area
is smaller than the paper).
Printer driver
Software that sends printing instructions to a printer (in this case, the MultiPASS). The printer
driver keeps track of the attributes of a printer and the codes the program must send to access
those attributes.
Pulse
See Rotaw putse.
Glossary G-14
(1
Quick-on-line sending
Quick-on-line sending is the easiest and quickest way to send a document. After a document is set
in the Automatic Document Feeder (ADF), the MultiPASS begins to scan the entire document
into the memory. As the first page of a multiple page document is being scanned, your MultiPASS
will begin to call the other party, and transmit the information even as the remaining pages are
being scanned.
R
RAM
Random Access Memo W. Memory that is used for temporary storage of information such as:
documents you want to print, scanned and received documents, and downloaded fonts.
Receiving
Receiving transmission is also defined as RXor Recep6on. This refers to how theMultiPASS
receives a fax.
Reception
See Receiving:
Redialin g-automatic
See Automatic redialing.
Glossary G-1S
Redialing-manual
See Manual redialing:
Reduction mode
See Automatic image reduction.
Registering
A process by which you place fax or telephone numbers and names in the MultiPASS memory for
automatic dialing so that you can save time dialing frequently called destinations.
Regular dialing
Pressing the individual numeric buttons to dial a fax or telephone number.
Remote receiving ID
The two-digit code that enables you to manually activate a fax using a telephone or extension
phone connected to the MultiPASS. (The default code is 25.)
Remote reception
Activating a fax by answering a telephone or extension phone that is connected to the MultiPASS,
but that is not located near the MultiPASS. You need to dial the remote receiving ID to start
remote reception.
Reports
A document printed by the MultiPASS containing information about the faxes it has sent or
received.
Glossary G-16
Resolution
The density of dots for any given output device. Expressed in terms of dots per inch (dpi). Low
resolution causes font characters and graphics to have a jagged appearance. Higher resolution
means smoother curves and angles as well as a better match to traditional typeface designs.
Resolution values are represented by horizontal data and vertical data, for example, 360 x 360 dpi.
Rotary pulse
A telephone dialing system where a dial is rotated to send pulses to the telephone switching
system. When you pulse dial, you hear clicks. When you touch-tone dial, the most common
dialing system, you hear tones.
RX
See Receiving:
S
Scanning contrast
A setting that darkens or lightens the scanning of documents.
Sender ID
Information printed at the top of a fax (also called TTI or Transmit Terminal ID). This data
appears only if the sending fax machine has been programmed with the information.
Glossary G-17
Sending
SendingtransmissionisalsodefinedbyTX or Transmit. A fax document that has been scanned
by a fax machine and sent over telephone lines, in the form of electrical pulses, to another fax
machine is a sending transmission. The MultiPASS also allows you to send a black & white
document directly from your PC (PC faxing).
Sending speed
The rate at which faxes are transmitted through the phone line. See also bps (bits per second).
Smoothing mode
A printer mode in which the printer enhances the horizontal resolution of black ink.
Standby
The mode in which the MultiPASS is on and ready to use. All operations start from standby mode
when the LCD displays the date and reception mode.
Timed sending
See Delayed sending:
Tone/pulse setting
The ability to set the MultiPASS to match the telephone dialing system your telephone line uses:
touch-tone or rotary pulse.
Glossary G-18
Transaction number
Aunique number assigned to each document sent (TX NO.) or each fax received (RX NO.) by the
MultiPASS and used to identify that particular fax.
Transmit
See Sending.
TTI
Transmit Terminal ID. See Sender ID.
TWAIN
An industry standard that allows you to input image data directly from a scanner or other input
device. Because your MultiPASS supports TWAIN, you can use the scanning features of the
MultiPASS with any Windows @ application that also supports TWAIN.
TX
See Sending.
U
UHQ (Ultra High Quality)
An exclusive Canon digital image processing system that incorporates 64 shades of gray along
with a special edge enhancement feature which ensures that text and photos are transmitted with
ultimate clarity.
Glossary 6-19
