CATCHWELL CW20 GSM/WCDMA PDA with Bluetooth & WLAN User Manual
CATCHWELL, INC. GSM/WCDMA PDA with Bluetooth & WLAN
UserManual.wiki
>
CATCHWELL
>
CW20 User Manual
>
User Manual
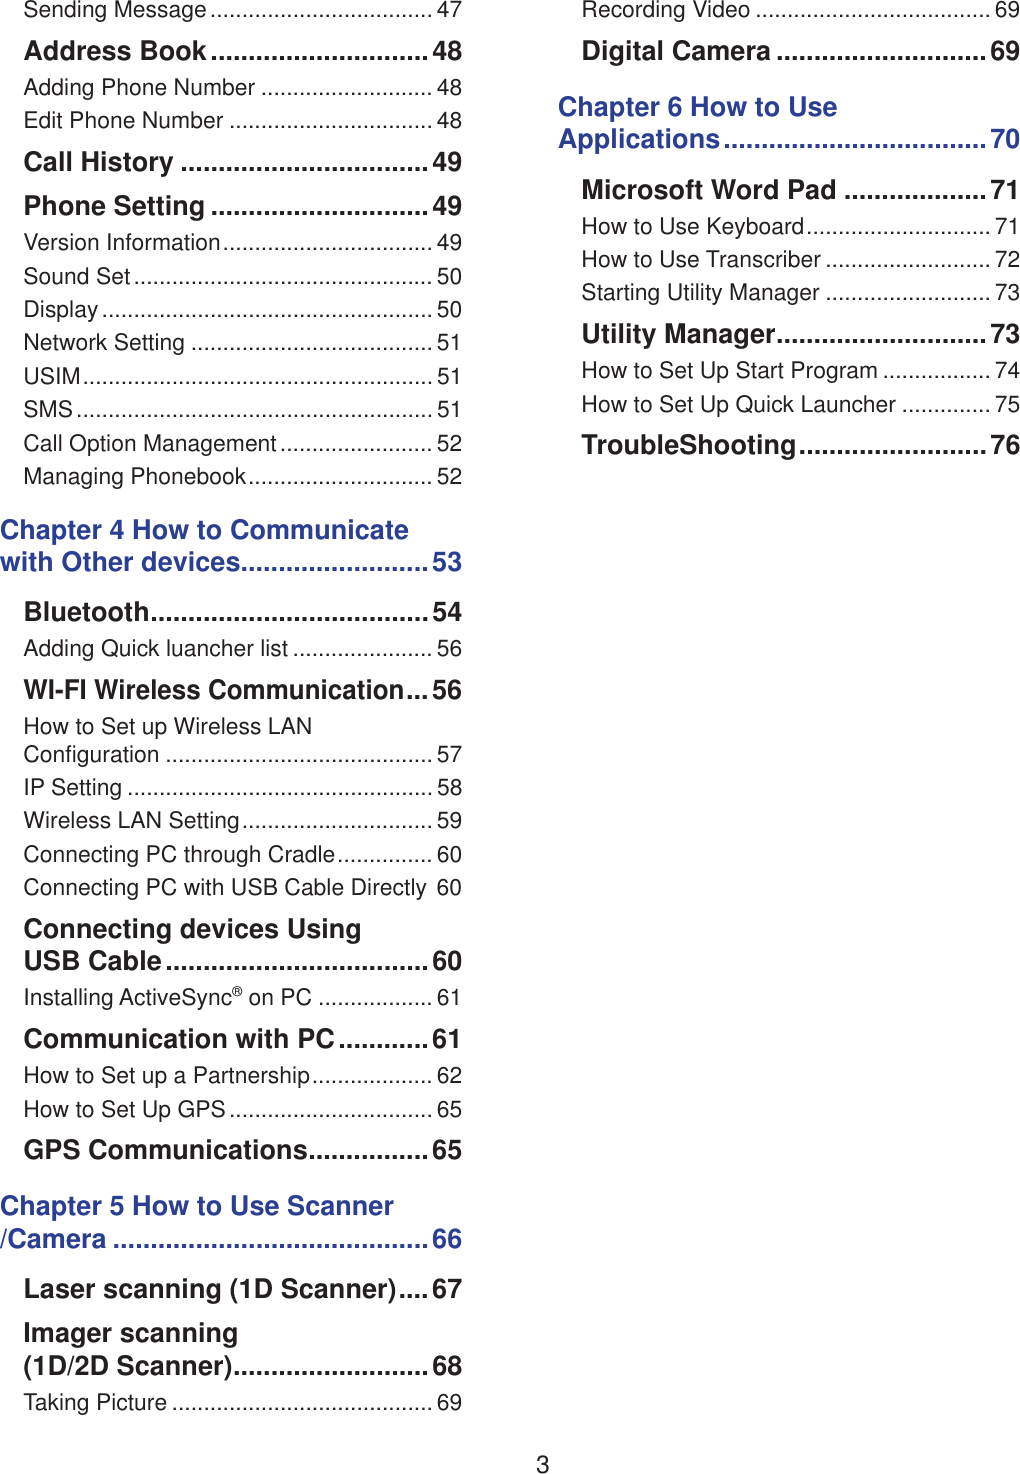
Contents
1.
User Manual
2.
User manual
3.
user manual
User Manual
Navigation menu
Upload a User Manual
Namespaces
Wiki Guide
HTML
PDF
Info
Views
User Manual
Discussion / Help
Navigation
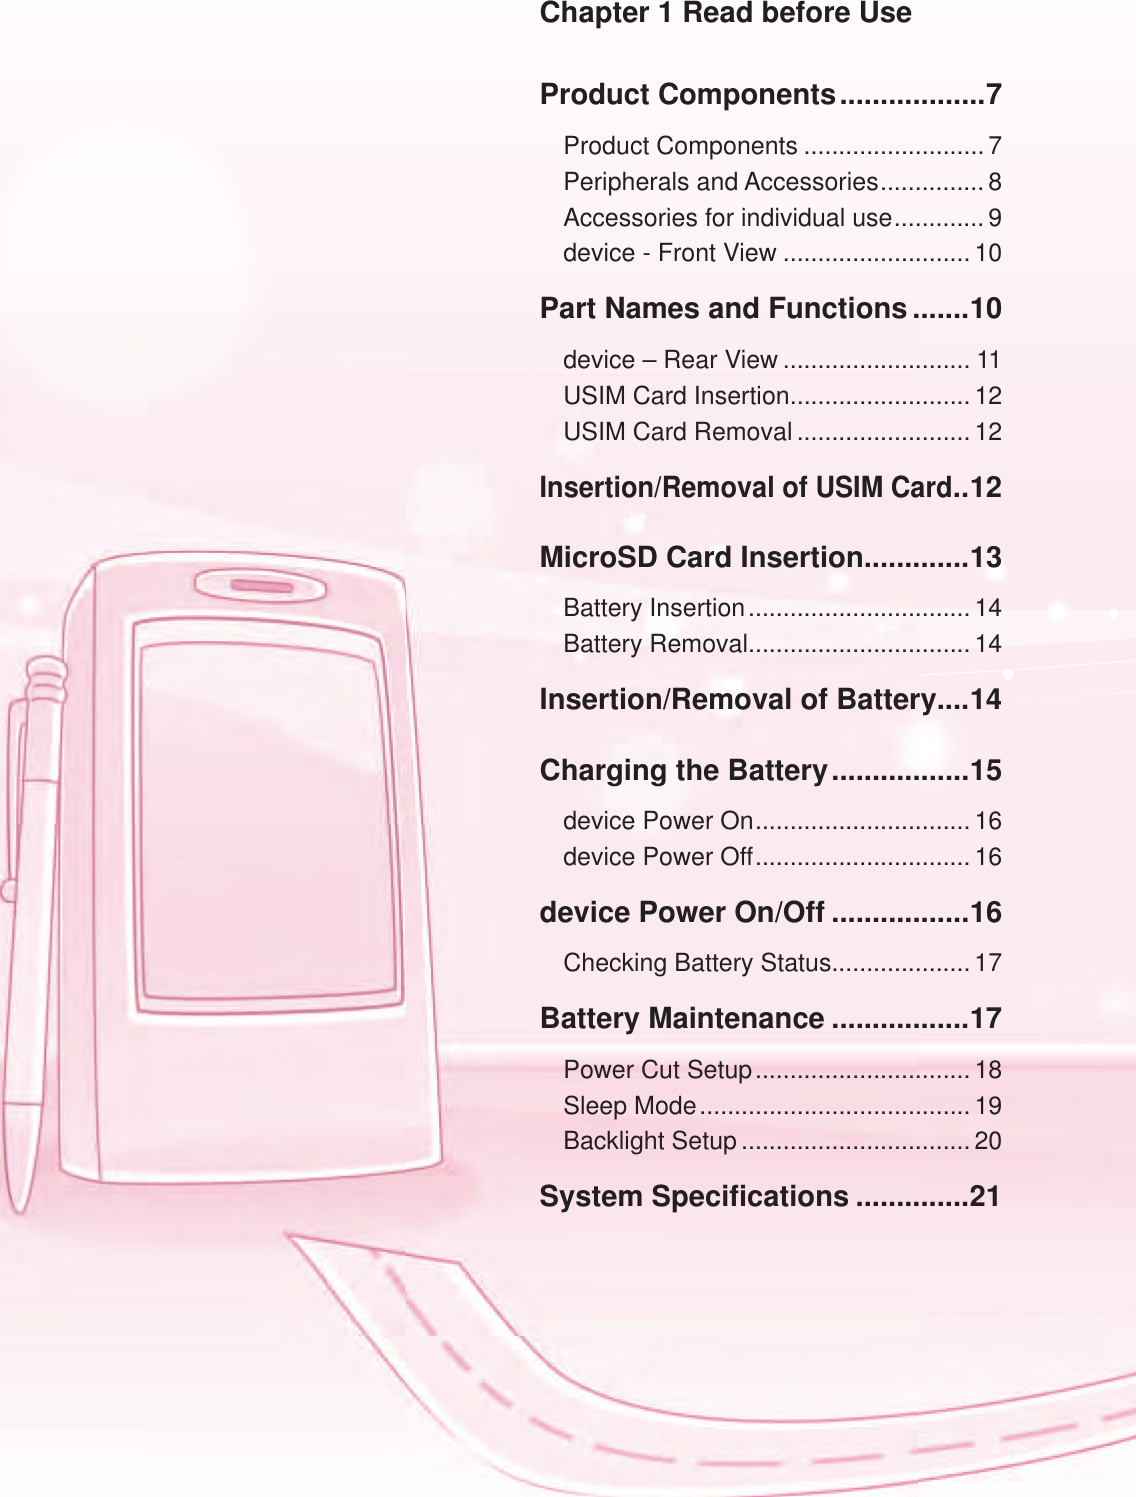
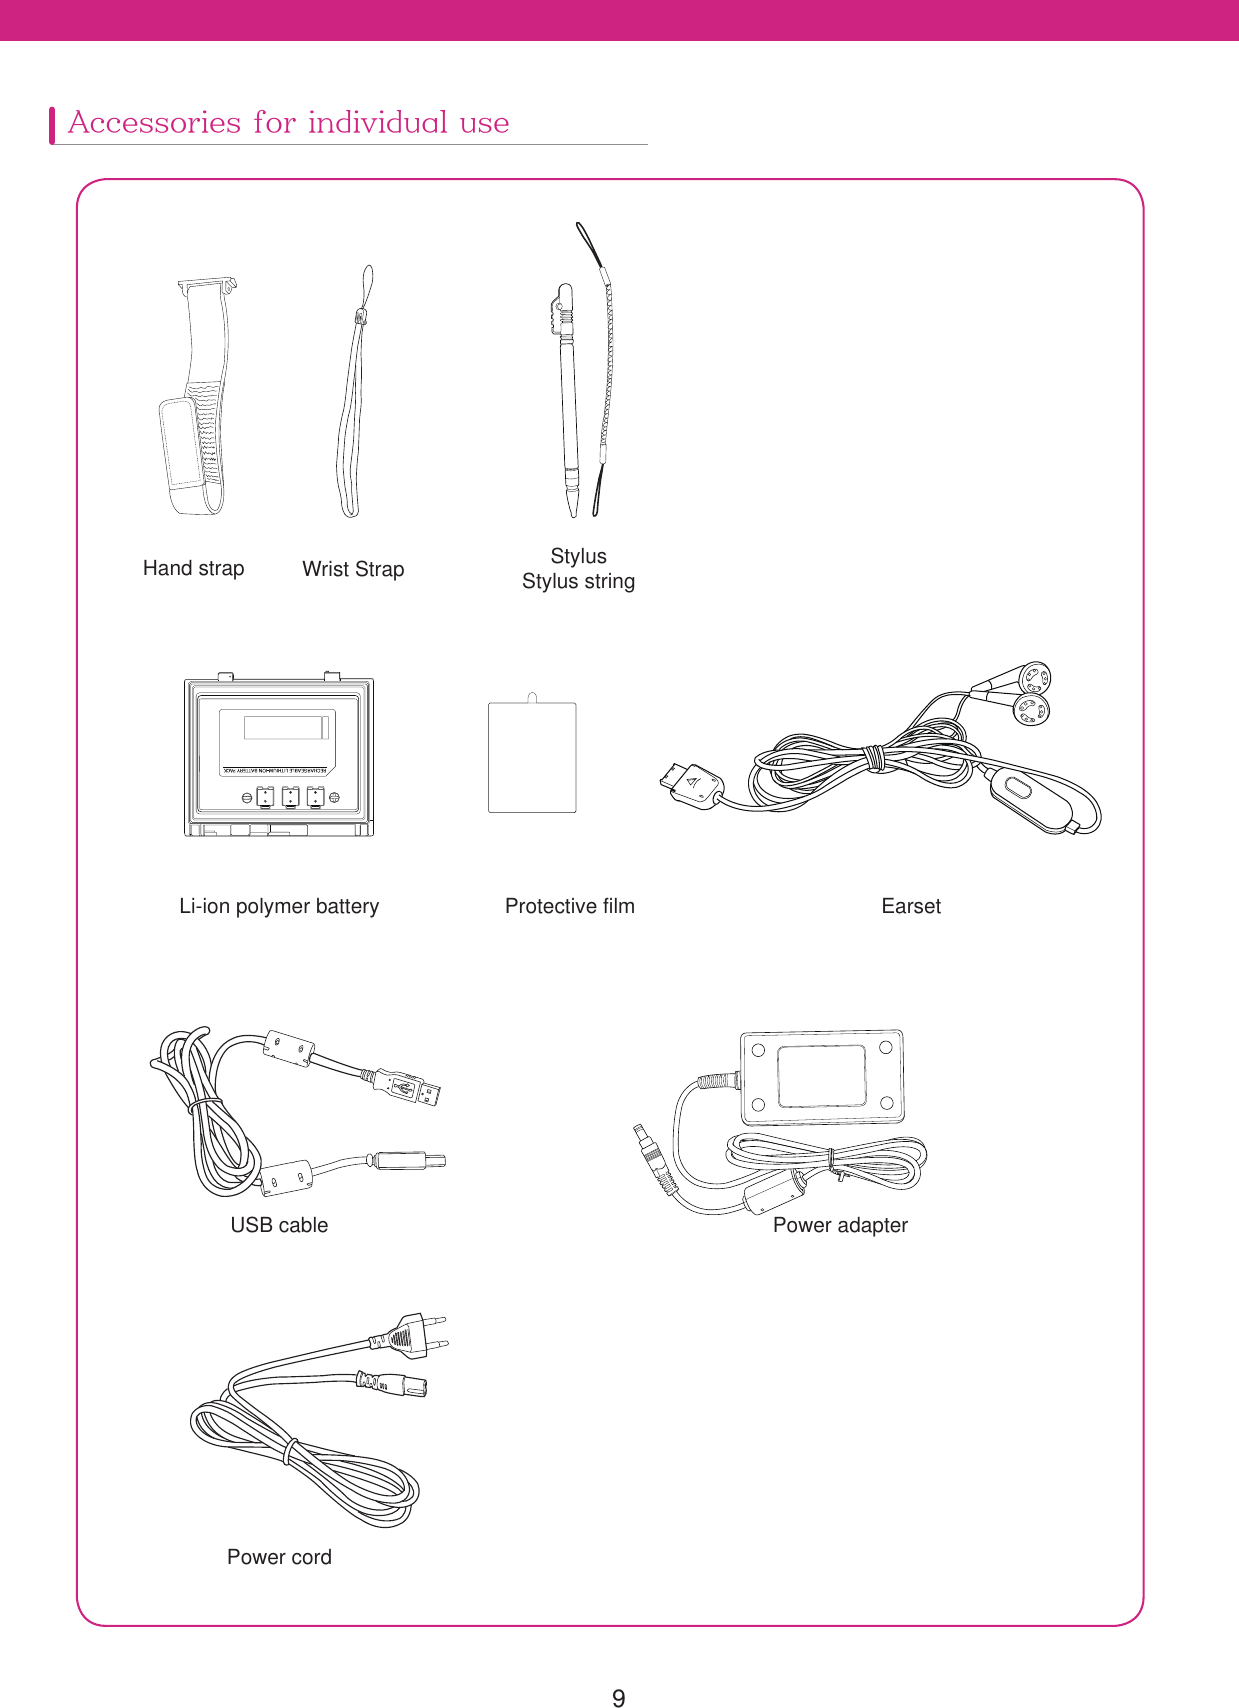
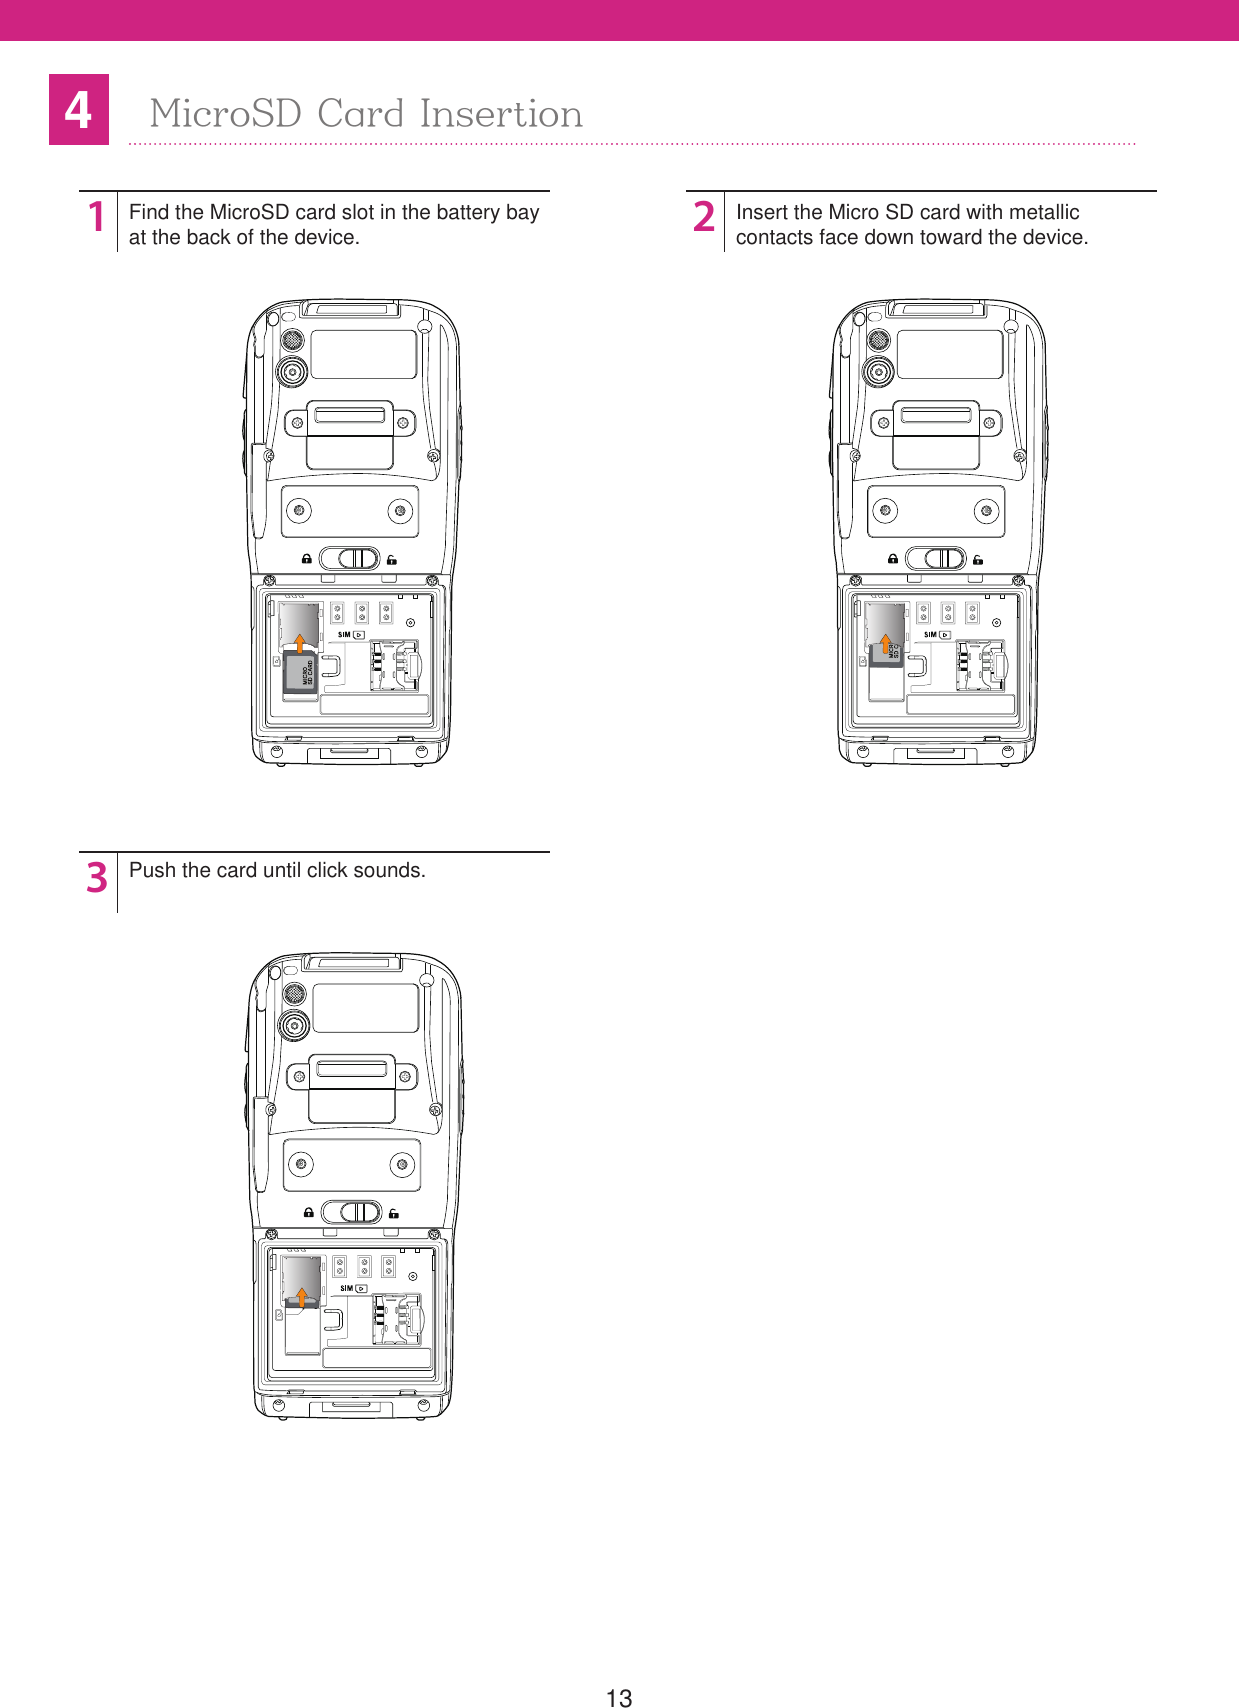
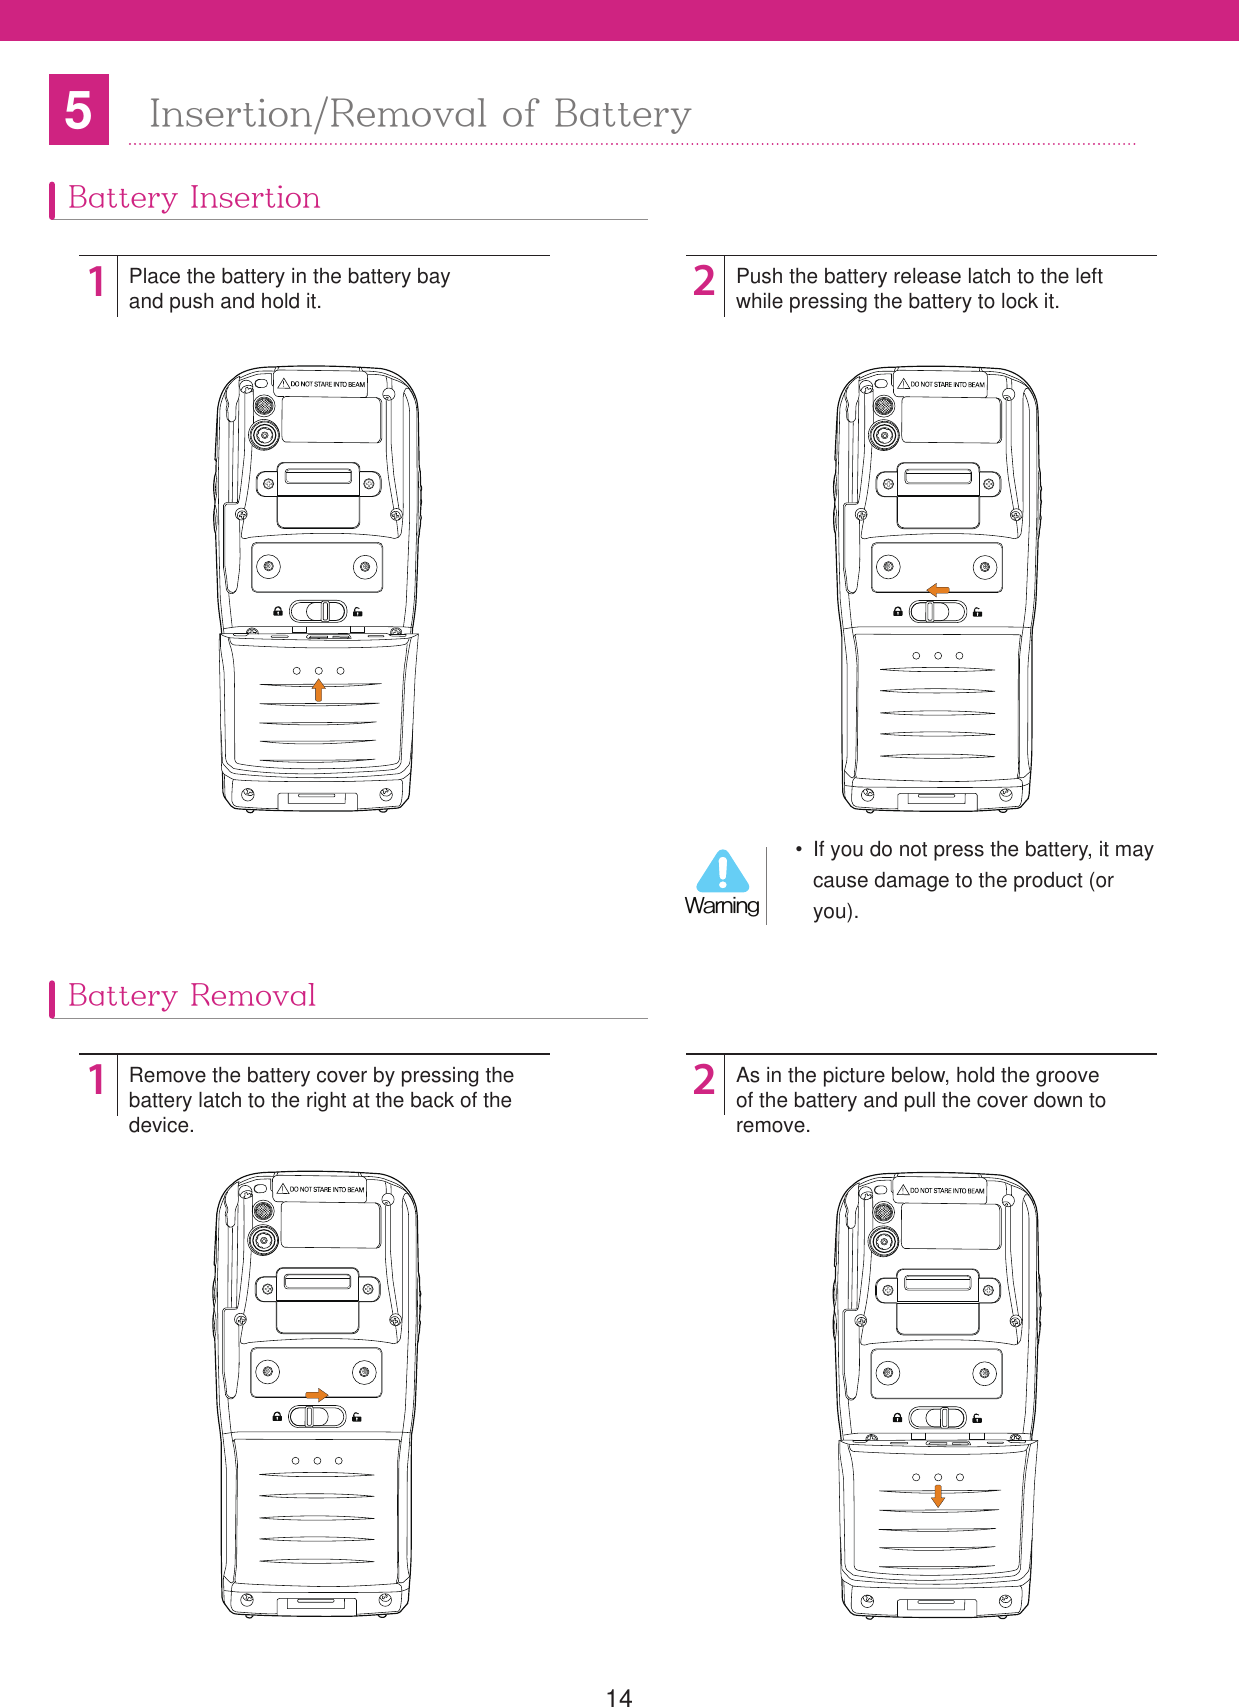
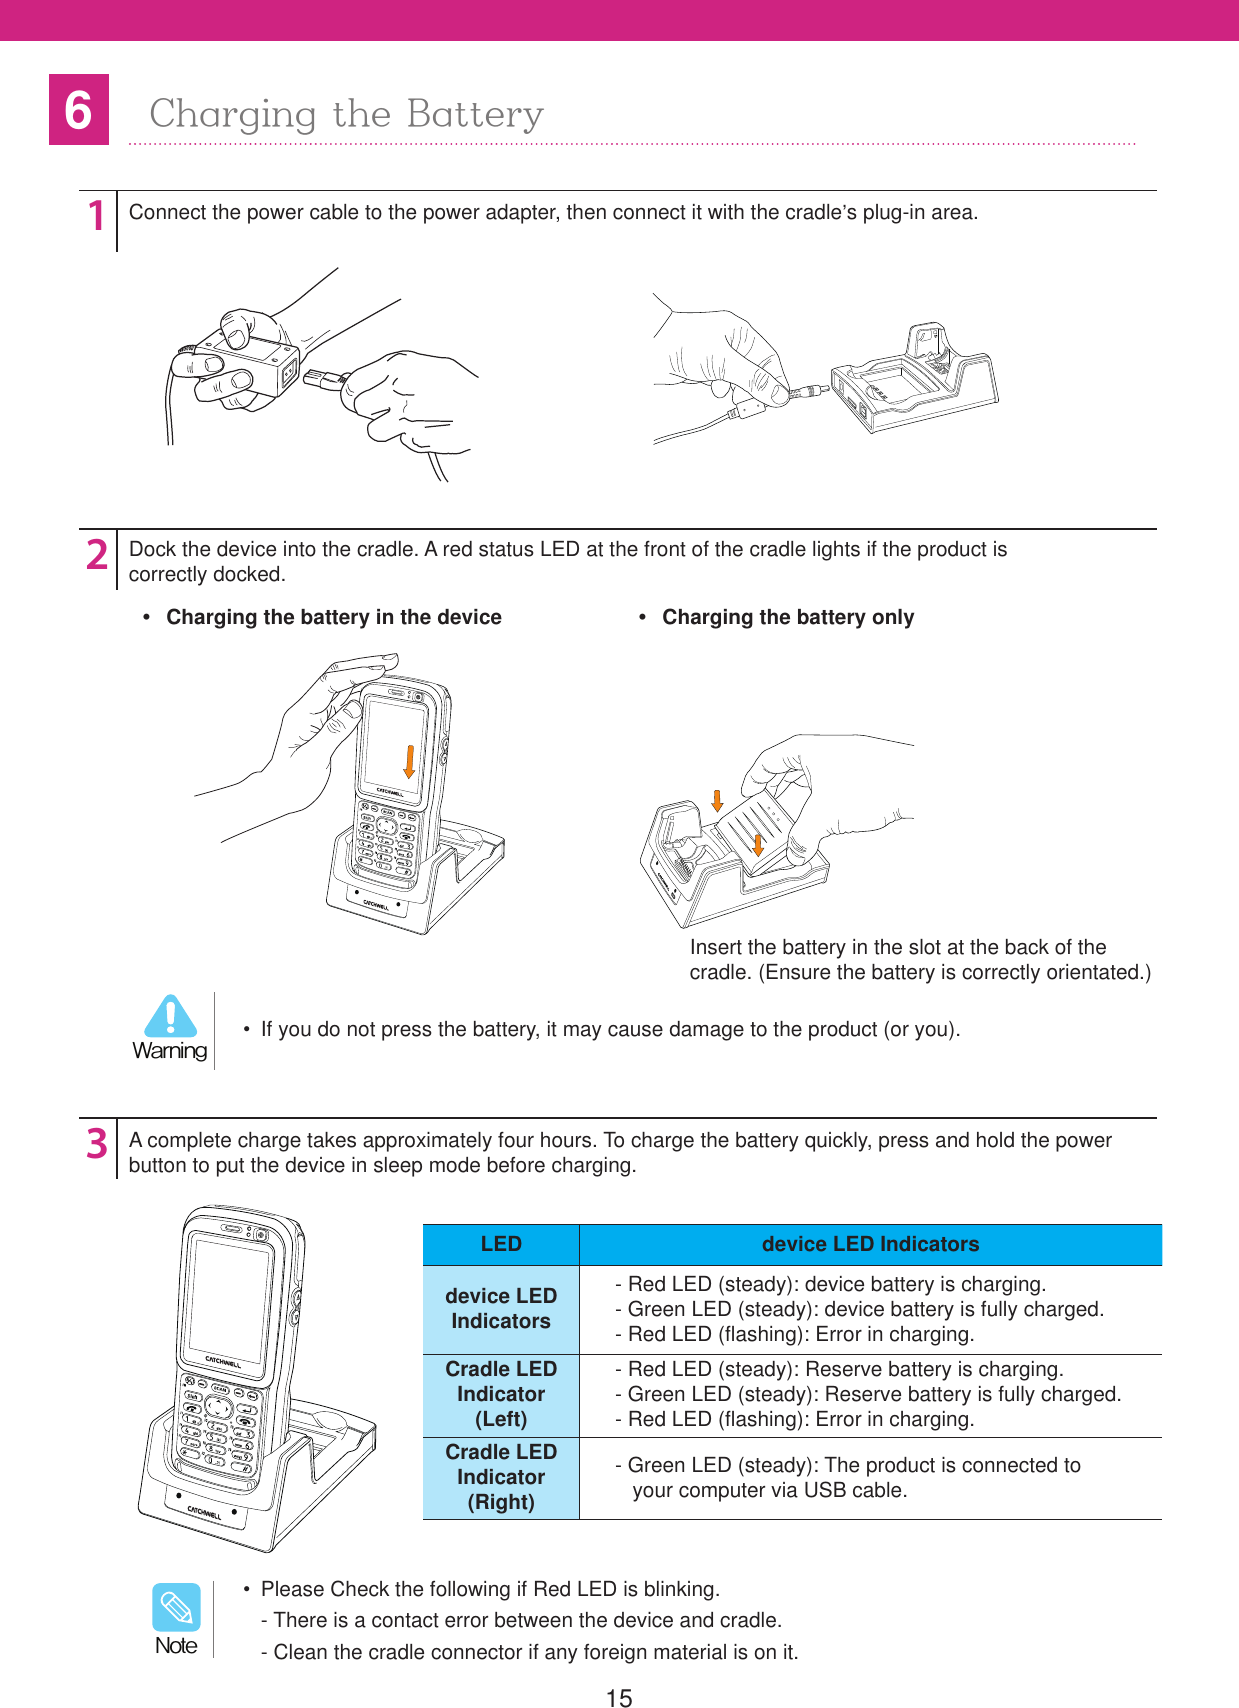
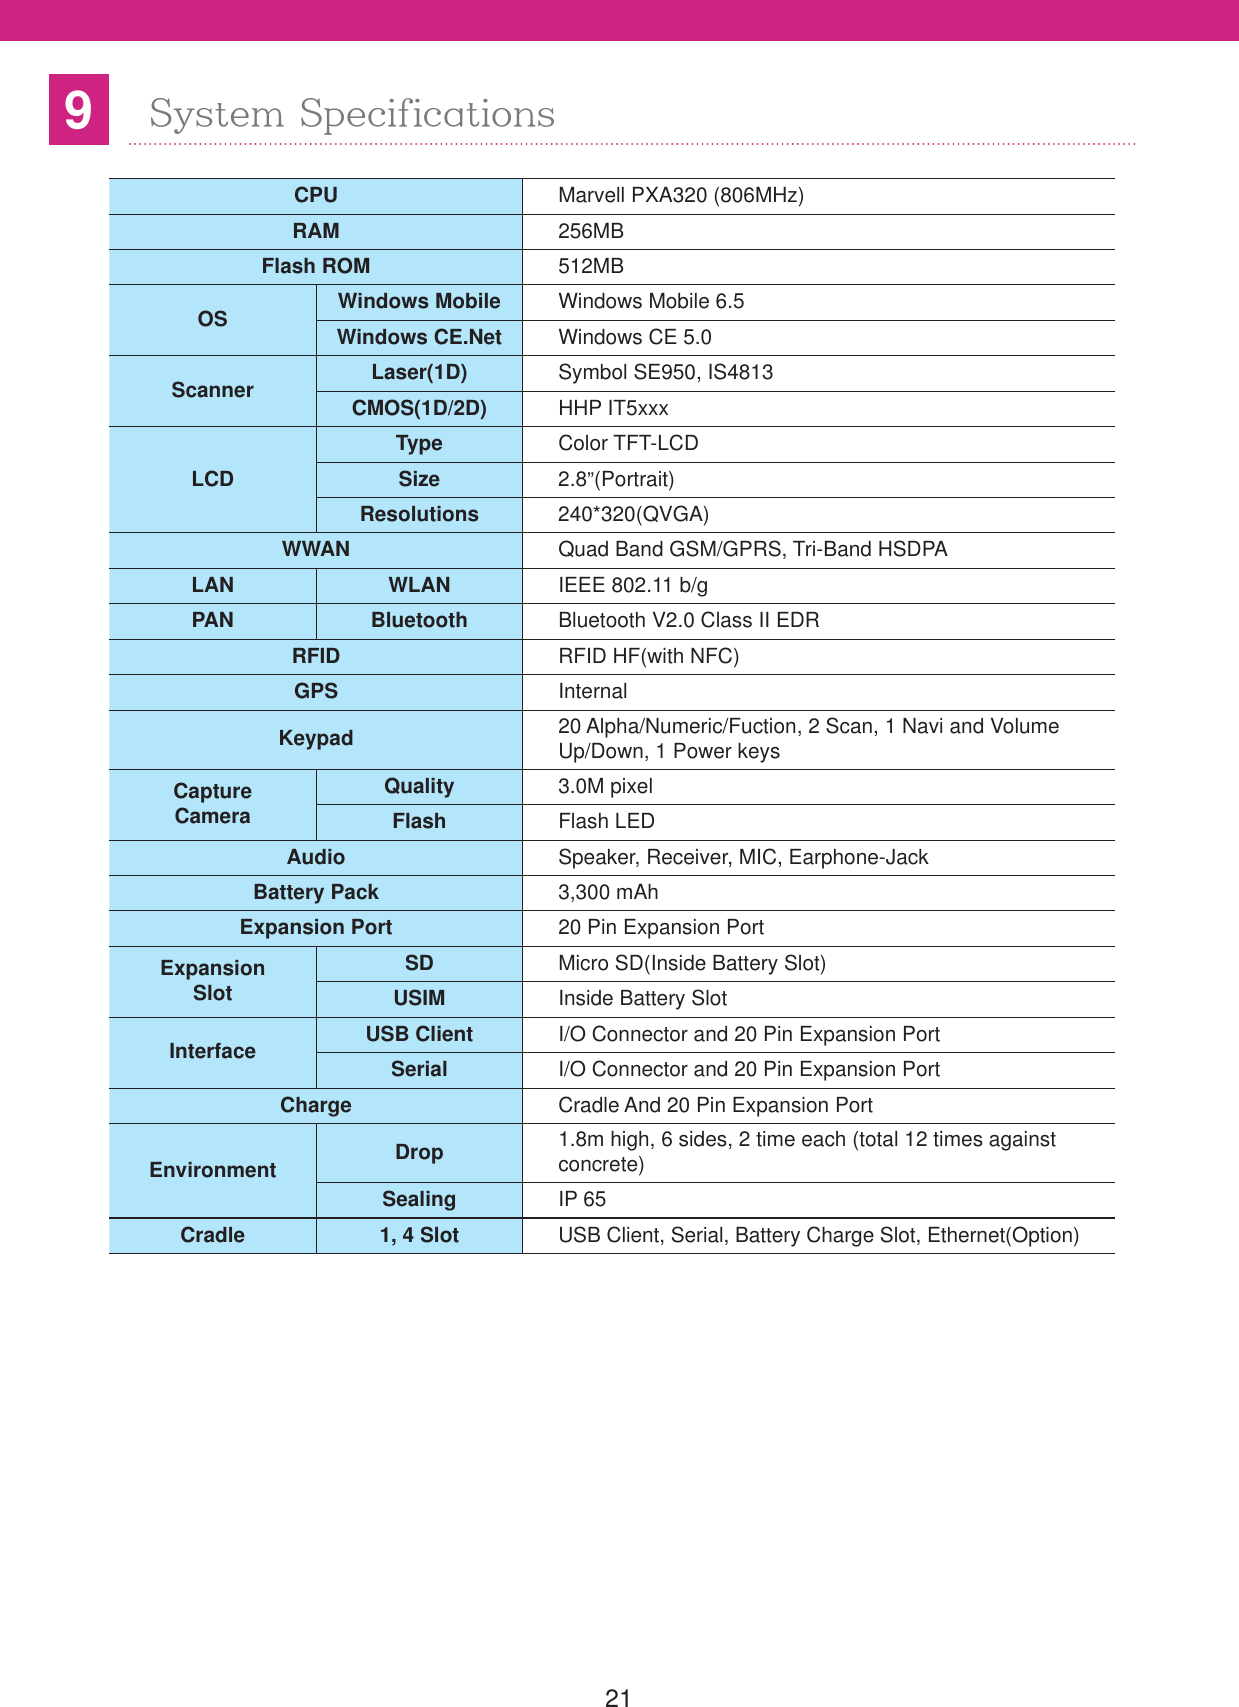
![2Table of ContentsTable of Contents ...................................... 2Safety Precautions .................................... 4Chapter 1 Read before Use.............6Product Components ...................7Product Components ................................ 7Peripherals and Accessories .................... 8Accessories for individual use .................. 9device - Front View ................................. 10Part Names and Functions ........10device – Rear View ................................. 11USIM Card Insertion ............................... 12USIM Card Removal ............................... 12Insertion/Removal of USIM Card ...12MicroSD Card Insertion .............13Battery Insertion ...................................... 14Battery Removal ..................................... 14Insertion/Removal of Battery ....14Charging the Battery ..................15device Power On .................................... 16device Power Off .................................... 16device Power On/Off ..................16Checking Battery Status ......................... 17Battery Maintenance ..................17Power Cut Setup ..................................... 18Sleep Mode ............................................. 19Backlight Setup ....................................... 20System Specifications ...............21Chapter 2 device Basic Usage .....22Start Screen ................................23Status Icon ..................................23Opening [Control Panel] ......................... 24Setting Up ...................................24Region and Language Settings .............. 25Date/Time ............................................... 25Network and Dial-Up Connections .......... 26Display .................................................... 28Volume and Sound ................................. 29Mouse ..................................................... 30Owner Properties .................................... 30Stylus ...................................................... 31System Properties .................................. 31Password ................................................ 32Certificates .............................................. 32Internet Options ...................................... 33Input Panel .............................................. 34Storage Manager .................................... 34Power Control Properties ........................ 35Dialing ..................................................... 35Backlight ................................................. 36Keyboard ................................................ 36Remove Programs .................................. 36Barcode .................................................. 37Bluetooth Manager ................................. 37Device Profile .......................................... 37KeyPad ................................................... 38PC Connection ........................................ 39Record Settings ...................................... 39Utility Manager ........................................ 40Screen Calibration ......................40Wireless Setting ...................................... 40Software Reset ....................................... 41Reconfiguration 5 (Reset) ..........41Hardware Reset ...................................... 42Using the Stylus .........................42Chapter 3 How to Use Phone .......43Data Capture .......................................... 44Device Buttons for the Phone Program ......................................44Turning Phone On/Off ................45Turning On .............................................. 45Turning Off .............................................. 45Phone Call / Receive ..................46Making a Phone Call ............................... 46Receiving a Phone Call ......................... 46SMS Message .............................46SMS message screen ............................. 46](https://usermanual.wiki/CATCHWELL/CW20.User-Manual/User-Guide-1574767-Page-2.png)
![167device Power On/Off If the device will not be used for a long time, remove and store the battery separately. Please use a fully charged battery when turning the device back on.8BSOJOH If the power button is pressed for more than 3 seconds, the device switches to the sleep mode (Suspend).8BSOJOH If the device does not start after pressing the power button, check if the battery is fully charged, and if the battery is charged, perform hardware reset (cold booting). For more information, please see “device basic usage” > “5. Reset.”/PUFdevice Power Ondevice Power Off1212Press the power button on the device shortly.Press and hold the device’s power button.- Alternatively, click Windows Start > [Pause].After start, Windows® logo appears. (The screen might differ depending on the model.)A moment later, device will turn off.](https://usermanual.wiki/CATCHWELL/CW20.User-Manual/User-Guide-1574767-Page-16.png)
![178Battery MaintenanceChecking Battery StatusCheck the current battery status, and set the low battery warning level.123To change the power property, select [Start] >[Settings] > [Control Panel].At the Battery tab in the Power ControlProperties window, the battery level can bechecked, and the Low Battery warning level can be set.Click the [Power Control] icon. The Low Battery warning level can be set as 5, 10, 20, and 30%./PUF](https://usermanual.wiki/CATCHWELL/CW20.User-Manual/User-Guide-1574767-Page-17.png)
![18Power Cut SetupTo increase the life span of the battery, you can set the device to turn off the power when it is not used for a certain amount of time.123To change the power property, select [Start]> [Settings] > [Control Panel].At the Power Control Properties screen, press Power Off tab, and set the device to turn off the power when it is idle for a certain time.Click the [Power Control] icon. See the Power section in Chapter 2 for more details./PUF To turn the device back on, press the Power button.8BSOJOH](https://usermanual.wiki/CATCHWELL/CW20.User-Manual/User-Guide-1574767-Page-18.png)
![19Sleep ModeThe sleep mode can be used when the device will not be used after a specified time. * Sleep Mode: Sleep Mode saves the battery power when the device is not used after a designated period of time by turning off LCD, keypad, and wireless LAN.123Press [Power] button for more than 3 seconds.- or select Windows [Start] > [Suspend].The device will switches to Sleep Mode.The device will switches to Sleep Mode.](https://usermanual.wiki/CATCHWELL/CW20.User-Manual/User-Guide-1574767-Page-19.png)
![20Backlight SetupTo increase the battery life span, set the value for the device’s backlight.123To change the power property, select [Start]> [Settings] > [Control Panel].At the Power Control Properties screen, press Power Off tab, and set the device to turn off the power when it is idle for a certain time.Click the [Power Control] icon.](https://usermanual.wiki/CATCHWELL/CW20.User-Manual/User-Guide-1574767-Page-20.png)
![Start Screen ...............................23Status Icon .................................23Opening [Control Panel] .................... 24Setting Up ...................................24Region and Language Settings ......... 25Date/Time .......................................... 25Network and Dial-Up Connections .... 26Display ..............................................28Volume and Sound ............................ 29Mouse ...............................................30Owner Properties .............................. 30Stylus ................................................31System Properties ............................. 31Password .......................................... 32Certificates ........................................ 32Internet Options................................. 33Input Panel ........................................ 34Storage Manager ..............................34Power Control Properties .................. 35Dialing ............................................... 35Backlight............................................ 36Keyboard ........................................... 36Remove Programs ............................ 36Barcode ............................................. 37Bluetooth Manager ............................ 37Device Profile .................................... 37KeyPad..............................................38PC Connection .................................. 39Record Settings................................. 39Utility Manager .................................. 40Screen Calibration .....................40Wireless Setting ................................ 40Software Reset.................................. 41Reconfiguration(Reset) .............41Hardware Reset ................................ 42Using the Stylus ........................42Chapter 2 device Basic Usage](https://usermanual.wiki/CATCHWELL/CW20.User-Manual/User-Guide-1574767-Page-22.png)
![243Setting UpSet the date/time, network, dsplay, volume, power, system, and others.Opening [Control Panel]1Select [Start] > [Settings] > [Control Panel].2[Control Panel] window appears. The viewing mode (Big icon, Small icon, Detailed, etc.) can be changed at the [View] option, and the icons can be sorted.Example) ‘By Name’ sorting](https://usermanual.wiki/CATCHWELL/CW20.User-Manual/User-Guide-1574767-Page-24.png)
![25Region and Language SettingsDate/TimeSet the locale, numbers, currency, time, and date.Set the device’s local date, time, time zone, and the clock.112Select [Start] > [Settings] > [Control Panel] > [Regional Settings].Select [Start] > [Settings] > [Control Panel] > [Date/Time]. At Time Zone (Z), press select bar to find the correct time zone. LocalSelect the country where the device is being used. InputSelect the device’s input language. Only the installed language appears, and for other language, please contact the service engineer. LanguageSelect the Windows language. Only English is installed so for the other languages, please contact the service engineer.](https://usermanual.wiki/CATCHWELL/CW20.User-Manual/User-Guide-1574767-Page-25.png)
![26Network and Dial-Up ConnectionsConnect the device to the network using various methods (Ethernet, Wireless LAN, and Modem). You can send or receive email, access network server files, and search them using Internet or Intranet via network connection.3546Use left/Right arrows to select year and month.Write the current time in the time box.Click the current date on the calendar to set the date.Press [Apply] button or [OK] button to savethe changes. Setting Internet via Modem (Only if the modem is installed)132Select [Date/Time] > [Network and Dial-up connections].Type a name for the connection, select Dial-Up Connection, and then press [Next ].Click the Make New Connection. Connect to the network using the modem if Wi-Fi or wireless Internet is not available./PUF](https://usermanual.wiki/CATCHWELL/CW20.User-Manual/User-Guide-1574767-Page-26.png)
![2746857Select a modem on the device and press [Next >].Press Call Options to set the special modem commands, and then press [OK] on the device Properties window.After typing in Phone number, press [Finish]. (Ask your telecommunication provider for the connection phone number).Press [Configure...] to open the screen and configure settings as shown below.- Contact the telecommunication provider for the Preference values.Through modem, the network has been established, and connections between networks can be used. The phone access number and connection setup method may differ depending on the telecommunication provider. Check with the provider for the setting method before using the connection.8BSOJOH](https://usermanual.wiki/CATCHWELL/CW20.User-Manual/User-Guide-1574767-Page-27.png)
![28DisplayTo change the background image or active window’s color, open the Display Properties window. (Right click menus appear when the stylus touches the screen for more than 1 second.) Background Follow the instructions below to change the background image. Appearance Set colors for window and text.1324Select [Start] > [Settings] > [Control Panel] >[Display].Press [Browse] and select an image for the background.Select the Background tab.To set the image like tiles, select ‘Tile image on the background’ menu.](https://usermanual.wiki/CATCHWELL/CW20.User-Manual/User-Guide-1574767-Page-28.png)
![29Volume and SoundSet the device’s volume and sound types.1Select [Start] > [Settings] > [Control Panel] > [Volume & Sound]. Volume Sounds1135224Press left/right arrow icons or move the slide bar to set the desired volume.Select Event from the list.To remove the Sound from the certain event, select [None].To remove the Scheme, select a Scheme and press [Delete].Select cases, like Events (warnings, system events), Applications, and Notifications (alarms, reminders), in which the sounds will be enabled).Select Sound from the list. Check the sound from Preview.To save the changes for the different scheme, press [Save As] and type the name for the scheme.](https://usermanual.wiki/CATCHWELL/CW20.User-Manual/User-Guide-1574767-Page-29.png)
![30MouseOwner PropertiesSet the double click sensitivity of your stylus.Set the device user information or network ID. Owner IdentificationType name, company, address, work phone number, and home phone number on the Identification tab. To display information on the start screen, check “Display owner identification.” Network IDSet the user name, password, and domain provided by the network administrator. NotesType additional information in the ‘Notes’ box.To display on the start screen, check “Display owner notes.”112Select [Start] > [Settings] > [Control Panel] > [Mouse].Select [Start] > [Settings] > [Control 1 Panel] > [Owner].Double click the check patterned picture. Press [OK] to auto-save the sensitivity speed.](https://usermanual.wiki/CATCHWELL/CW20.User-Manual/User-Guide-1574767-Page-30.png)
![31StylusSystem PropertiesSet the double tapping and calibration of the stylus.Display the device’s system information, memory status, and others.11Select [Start] > [Settings] > [Control Panel] > [Stylus Properties].Select [Start] > [Settings] > [Control Panel] > [System]. Double-TapDouble-tap the check patterned picture to auto-save thespeed. CalibrationCalibrate the stylus.(See “4. Screen Calibration.”) GeneralDisplays operating system, software version, and computer hardware information. Device NameSets the device name. MemorySelect sizes for data storage memory and program memory. CopyrightsCheck to see the information on the copyrights of the system.](https://usermanual.wiki/CATCHWELL/CW20.User-Manual/User-Guide-1574767-Page-31.png)
![32PasswordCertificatesSet the password.For trusted and safe communication, some programs require certificates.11Select [Start] > [Settings] > [Control Panel] > [Password].Select [Start] > [Settings] > [Control Panel] > [Certificates]. If you check the password enabling option on the system start screen, be sure to remember the specified password. Even if the hardware is reset, the password is not initialized. If you cannot remember the password, please contact the certified service center. After setting the password, the password window appears on the start screen when turning on the power or after soft reset. The device can be accessed only when the correct password is entered. To remove the password, delete the password in the Password Properties window.8BSOJOH/PUF Certificates are issued only from the official approval institute and valid for certain period of time. The Windows CE administrator manages various storage areas for certificates./PUF ImportTo add certificate or related key, press [Import] and select the method to Import the certificate or key. This can be selected from the file or smart card. ViewTo see extension code, expiration date, or othercertificate-related information, press [View]. RemoveTo delete the selected certificate, press [Remove].](https://usermanual.wiki/CATCHWELL/CW20.User-Manual/User-Guide-1574767-Page-32.png)
![33Internet OptionsSet the Internet connection, security, and other properties to use the Internet.1Select [Start] > [Settings] > [Control Panel] > [Internet Options]. GeneralSets the start page, search page, and others.Clear Cache: Deletes the saved system cashe.Clear History: Deletes the list of previouslyopened pages. SecuritySets security options. AdvancedSets advanced Internet options. ConnectionSets the proxy server address, port, and other Internet connection settings. PrivacySets the level of private information blocking. PopupSets webpage popup blocking options.](https://usermanual.wiki/CATCHWELL/CW20.User-Manual/User-Guide-1574767-Page-33.png)
![34Input PanelStorage ManagerChange the input method for Keyboard or Transcriber and set the case options (upper case/lower case).Use Storage Manager to set the flash ROM (Disk1). Disk1 is normally used to save data and files.11Select [Start] > [Settings] > [Control Panel] > [Internet Options] > [Input Panel].Select [Start] > [Settings] > [Control Panel] > [Storage]. FormatFormats the selected disk. DismountFormats the selected disk’s partition. NewCreates a new partition and gives it a name. PropertiesChecks the created partition’s properties. DeleteDeletes the desired partition. For this, select the partition, press Dismount, and then press Delete. For more details, see “Chapter 6 Using Applications.”/PUF If you format the disk, all the data including files and programs are deleted and they cannot be restored. Before use of this function, please consult your system administrator.8BSOJOH](https://usermanual.wiki/CATCHWELL/CW20.User-Manual/User-Guide-1574767-Page-34.png)
![35Power Control PropertiesDialingCheck the battery remaining amount, and set the warning level and power off time.Set the Dialing properties.1Select [Start] > [Settings] > [Control Panel] > [Dialing]. When the battery warning sounds, change the main battery immediately. Otherwise, a data loss, system error,or malfunction of specific parts can occur.8BSOJOH Power Off Sets the automatic power off setting.(See “Chapter 1 Battery Maintenance.”)/PUF Main BatteryShows the current amount of the main battery’s power. Low Battery Warning LevelSelect the level for battery warning sign (5%, 10%, 20%, 30%) in case of low battery.](https://usermanual.wiki/CATCHWELL/CW20.User-Manual/User-Guide-1574767-Page-35.png)
![36BacklightKeyboard Remove ProgramsSet the screen’s brightness, backlight turn off, backlight on time, and keypad backlight.Set the keyboard’s repeat delay and repeat rate. The Key repeat rate can be checked by testing a key repeat performance.You can remove installed programs. Select program to delete from the list and press [Remove].11 1Select [Start] > [Settings] > [Control Panel] > [Backlight].Select [Start] > [Settings] > [Control Panel] > [Keyboard]. Select [Start] > [Settings] > [Control Panel] > [Remove Program]. Please make sure what you are about to delete. Deleting some programs may cause a fatal system error. Please consult your system administrator before deleting any programs.8BSOJOH](https://usermanual.wiki/CATCHWELL/CW20.User-Manual/User-Guide-1574767-Page-36.png)
![37BarcodeThis section explains how to set up barcode program. Press [Admin] and enter the password to set up the barcode program. Please consult your administrator to change the properties.1Select [Start] > [Settings] > [Control Panel]> [Barcode]. If any program is deleted, the device may not work properly. Be sure to consult your system administrator in this case.8BSOJOHBluetooth Manager Device ProfileThis section explains how to connect Bluetooth or change the set up values. (Not recommended when using SPP Profile). See Chapter 4 1. Bluetooth (77p)This section explains how to display hardware and software’s device information. Click [Admin] and enter the password to re-load the information or to save as a file. (Please consult your administrator to change the properties.)1Select [Start] > [Settings] > [Control Panel]> [Barcode] > [device Profile].](https://usermanual.wiki/CATCHWELL/CW20.User-Manual/User-Guide-1574767-Page-37.png)
![38KeyPadThis section explains how to set up various keypad options.Press AP button on the keypad to change thekeymap.(Number) > (Upper Case) > (Lower Case) > (Number) repeated.KeyMap may vary depending on suppliers or regions.1Select [Start] > [Settings] > [Control Panel] > [Keypad]. HotkeyCheck list of hotkeys and can change them (Ex: FN+F1). MISCSet up keypad’s reading time and other related options. KeyMapChange or check currently using keys. VersionDisplays current program version of KeyPad.](https://usermanual.wiki/CATCHWELL/CW20.User-Manual/User-Guide-1574767-Page-38.png)
![39PC ConnectionRecord SettingsSet the PC connection properties to directly connect to the desktop computer. Select [Change Connection] to select the connection method to the desktop computer.Set the microphone, phone volume, and other extra volumes.1Select [Start] > [Settings] > [Control Panel] > [PC Connection]. Mic VolSets the device’s mainmicrophone or earmicrophone’s volume. Mic GainSets the loudness of the microphone volume during calls.](https://usermanual.wiki/CATCHWELL/CW20.User-Manual/User-Guide-1574767-Page-39.png)
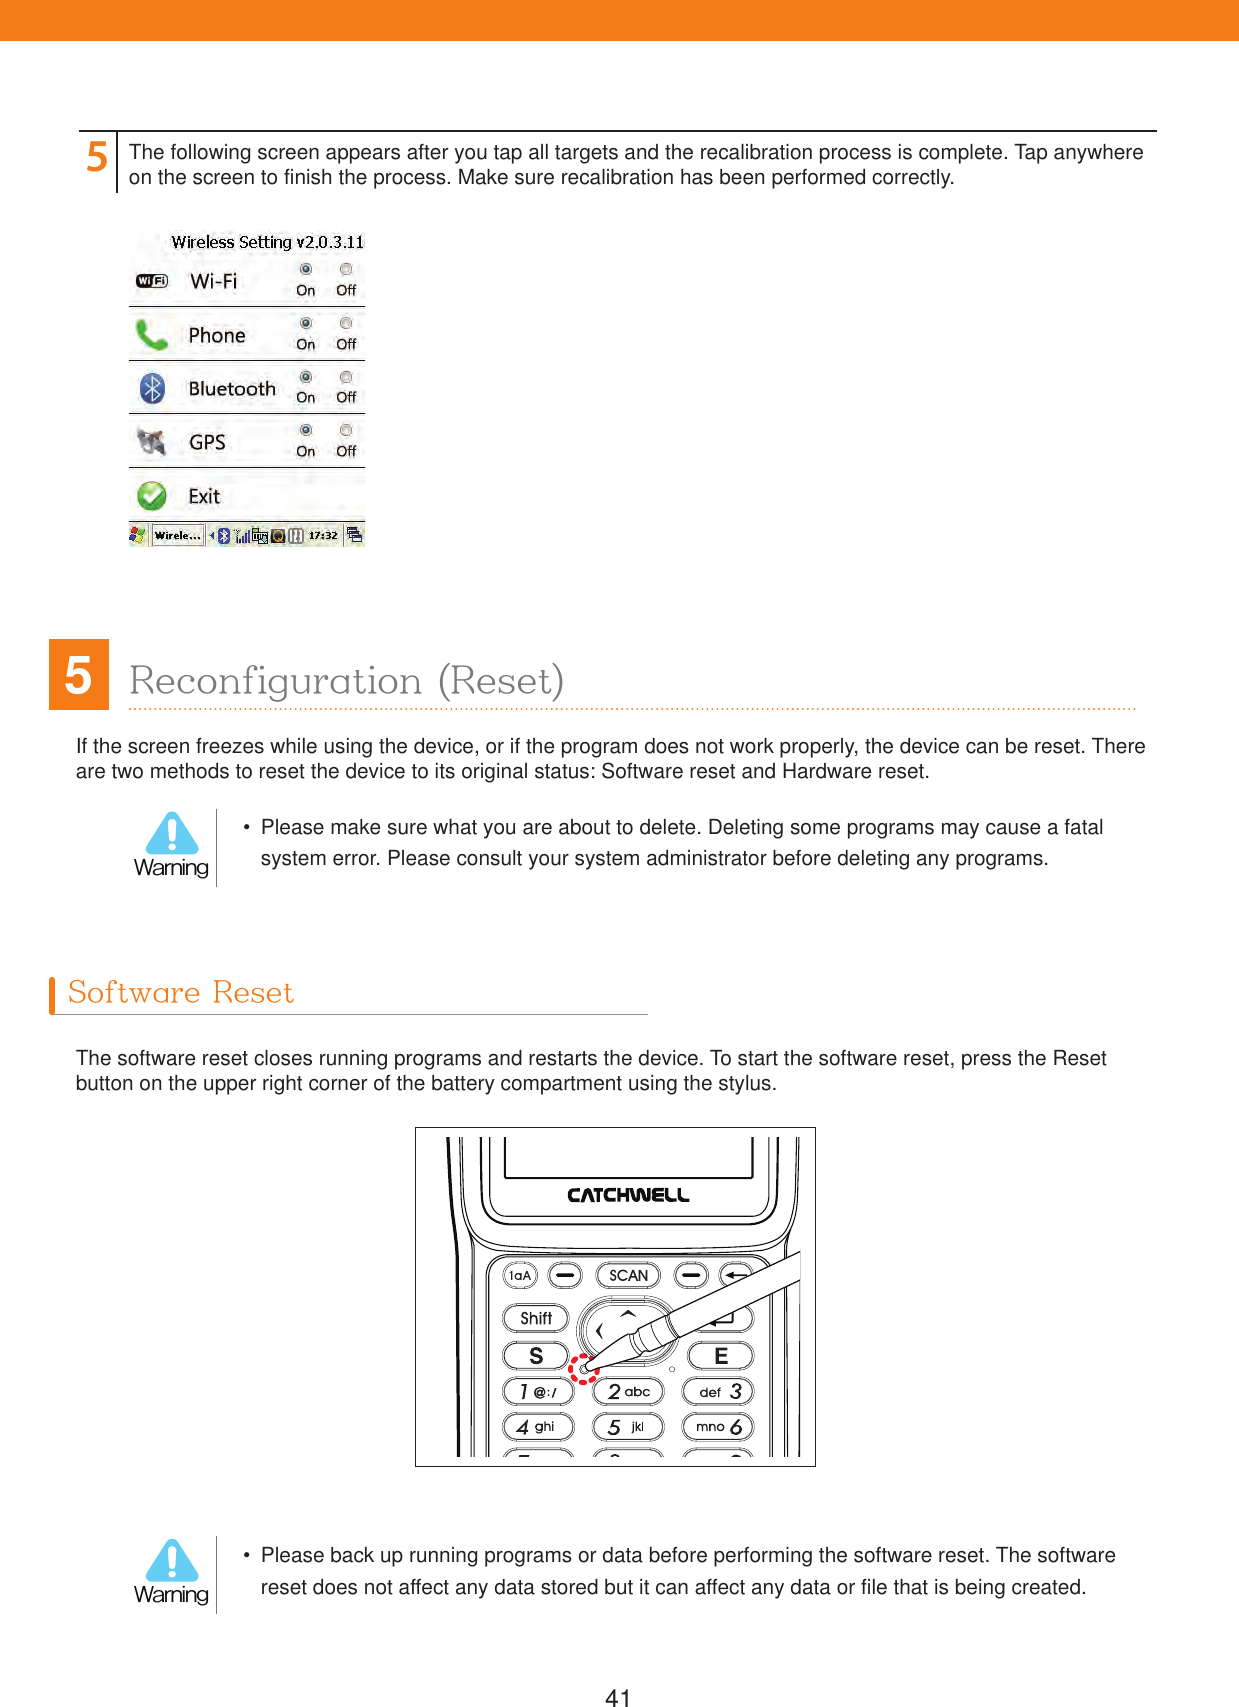
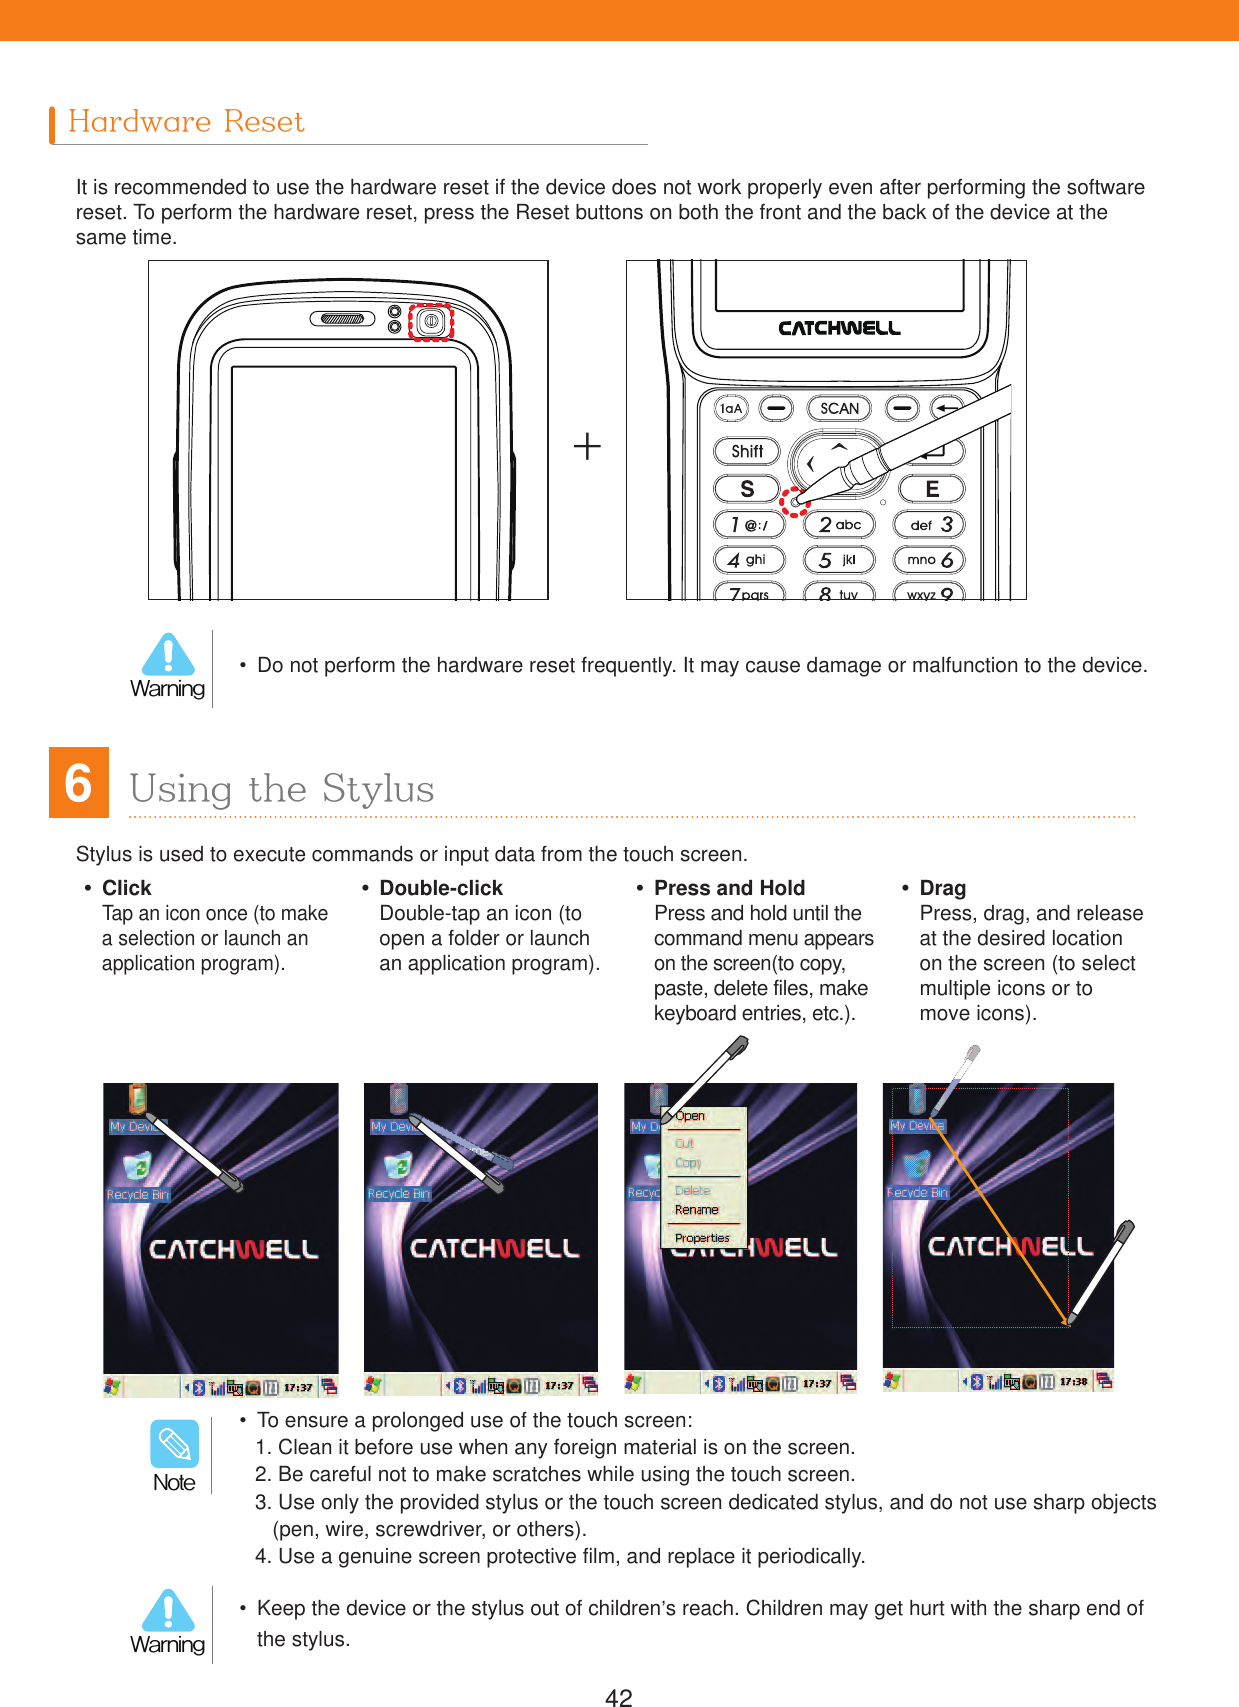
![40You may require recalibration if the device does not respond precisely to the stylus.Utility Manager Wireless SettingThrough Utility Manager, set the Start program and Quick Launcher. Press [Admin] and enter the password for Utility Manager.(Please consult your administrator to change the configuration.)Set the wireless connections. You can setthe status for Wi-Fi, phone, Bluetooth, andGPS to “On” or “Off.”11324Select [Start] > [Settings] > [Control Panel] > [Wireless Setting]Before screen calibration, put the device onhold, or place it on the secured place.Select [Calibration] tab > press [Recalibrate].Press [Start]> [Settings] > [Control Panel] > [Stylus].Tap on targets that appear on the screen with the stylus. For more information about Utility Manager, please see “How to use applications” in Chapter 6./PUF4Screen Calibration](https://usermanual.wiki/CATCHWELL/CW20.User-Manual/User-Guide-1574767-Page-40.png)
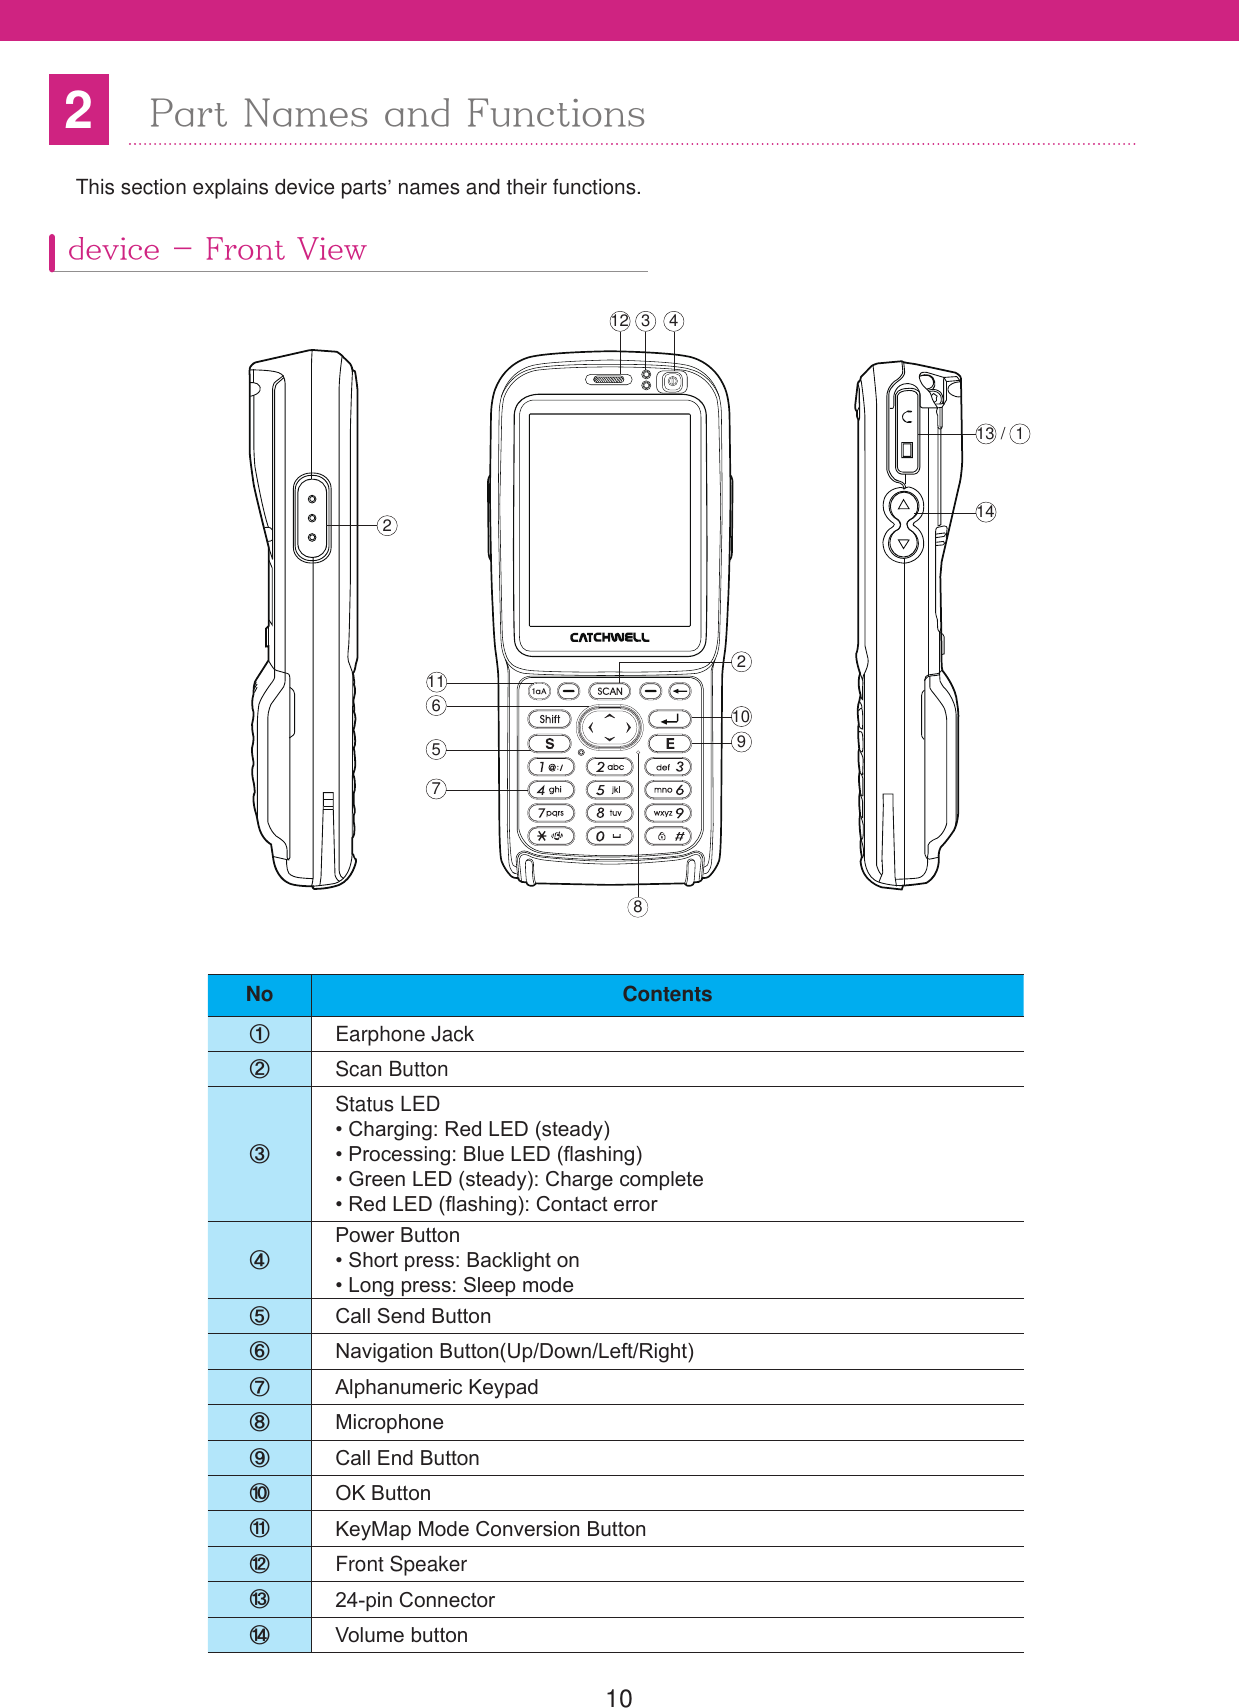
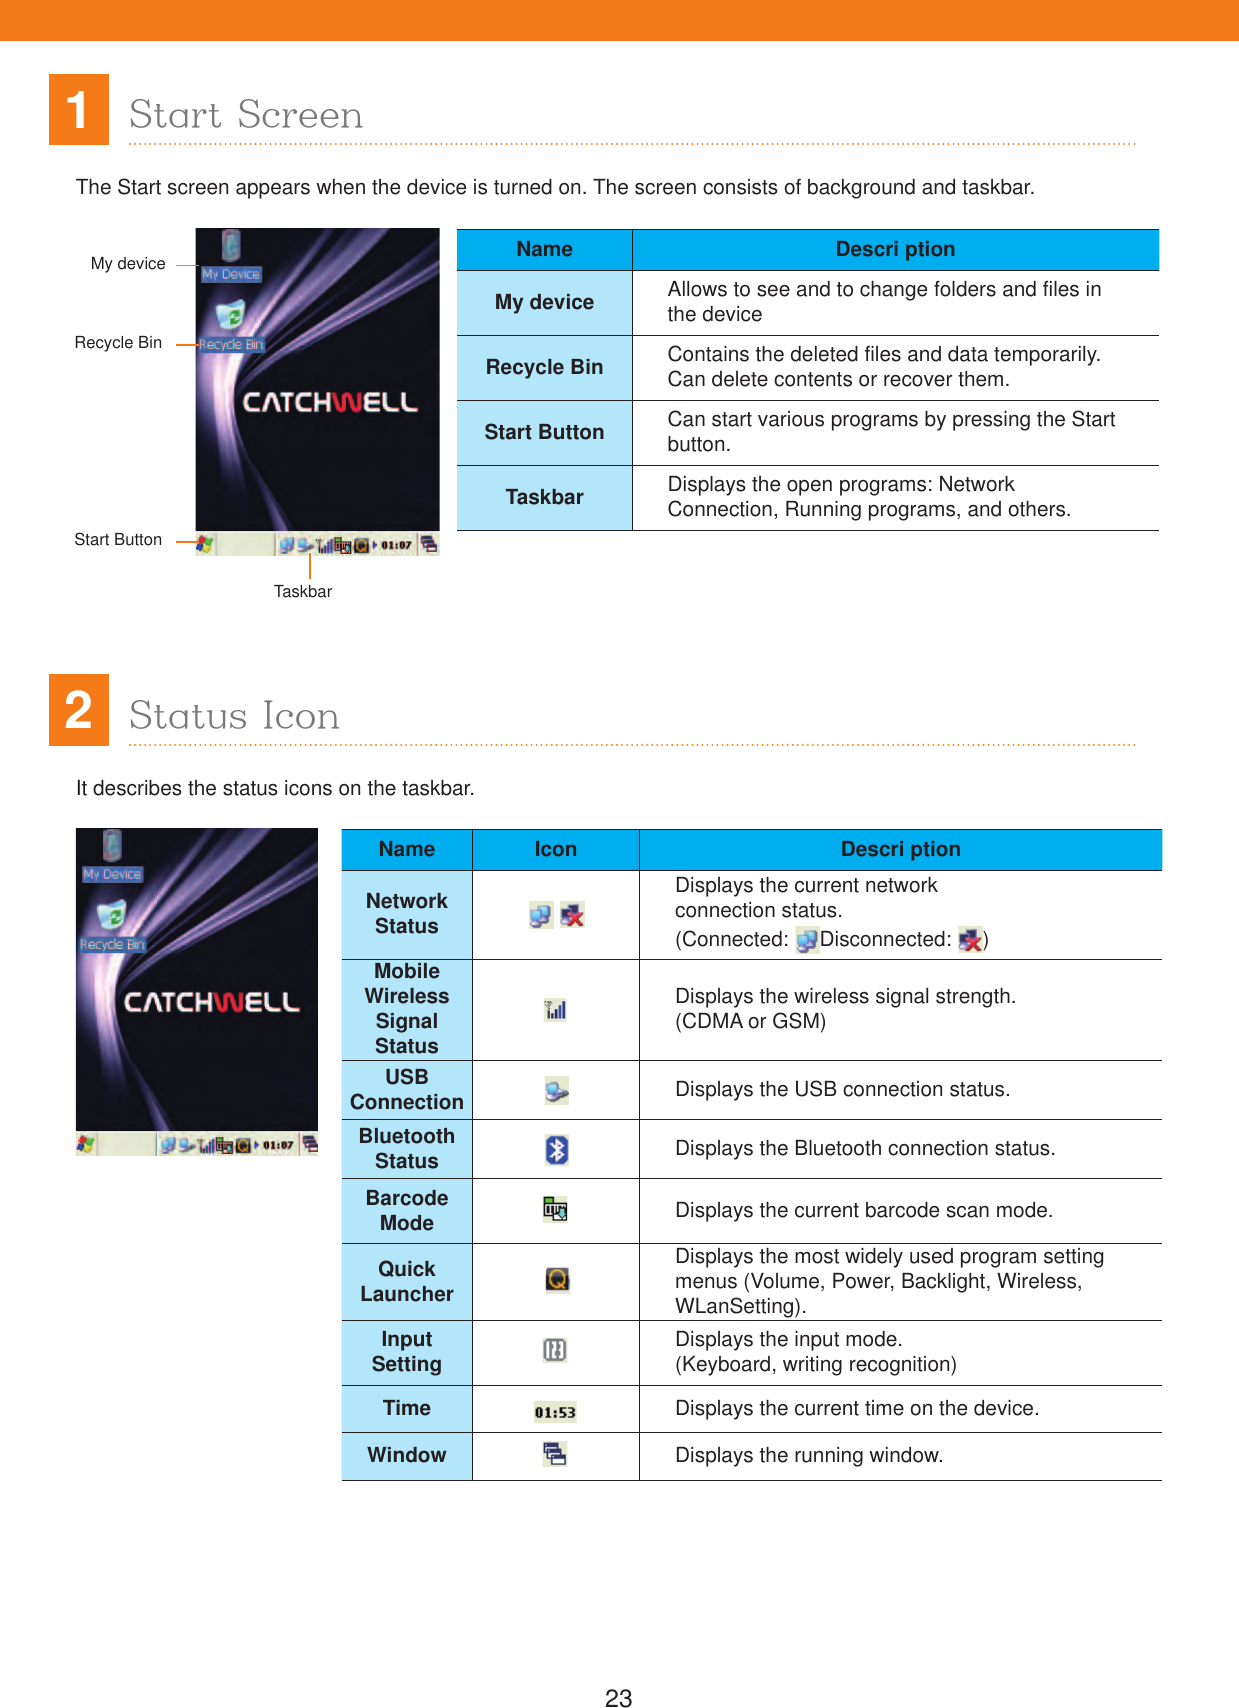
![441Data CaptureFor more details, see page 108 “Chapter 6 Using Application Program > 1 WordPad explanation.”No Part FunctionΗScan buttonΘBack space Erases a character backward.ΙEnter button Performs the line feedΚEnd Call button Ends a call.ΛMic Microphone holeΜ1~9 button Endters number or charactersΝCall button Makes a call.ΞShift button Shift fuctionΟ1aA button Change a chracter/ numberNo Part FunctionΗTaskbar Displays the signal strength, call volume, PHVVDJHFRQ¿UPDWLRQPDQQHUPRGHORFNand battery status.ΘHome Moves to the main screen.ΙPhone Number Address Tab Used to register, edit, and delete phone numbers.ΚCall History Checks the history of the received, sent, and missed calls.ΛMessage Inbox Creates a new message, or displays the list of the sent/received messages.Μ&RQ¿JXUDWLRQIncludes the setup information, volume ettings, screen properties, network settings, USIM environments, messages, phone settings, phone book management, SPAM blocking, and others.ΝHotkey Displays ( ) ( ) ( ) ( ) buttons.ΞCall Method and Signal Strength Displays the call method and signal strength.934812675 By clicking the phone tray icon, the main screen can be active (or inactive) - In active mode, pressing the left [ ] button changes to inactive.- In inactive mode, pressing the [ ] button changes to active./PUFDevice Buttons for the Phone Program ΗΘΙΚΛΜΞΝ](https://usermanual.wiki/CATCHWELL/CW20.User-Manual/User-Guide-1574767-Page-44.png)
![45112Press and hold the device’s [ ] button.While the modem is On, press and hold the device’s [ ] button.[] icon appears on the taskbar as shown below and the phone number entry screen appears.2Turning OnTurning OffTurn the phone function On or Off. When starting the phone program for the first time or restarting modem, modem goes through reset process and it takes time before the device is ready to use. Do not perform other task while modem is being reset. When turning phone modem, if the USIM is inserted, USIM is automatically recognized and phone function can be used./PUF While the modem power is off, the phone call/receive and message send/receive are not available. The caller is connected to the voice mail./PUFTurning Phone On/Off](https://usermanual.wiki/CATCHWELL/CW20.User-Manual/User-Guide-1574767-Page-45.png)
![4634Phone Call / ReceiveMaking a Phone Call Receiving a Phone Call Make and receive a phone call.You can type or check a message.Using the number pad, enter the phone number and press the Call button [ ].The SMS message screen consists of the following:When a call is coming, press the [Connect] or Call button [ ]. To adjust the volume, press up/down buttons on the keypad./PUFIcon Message FunctionSent Message Shows sent messagesRead Message Shows read messagesUnread Message Shows unread messagesSMS MessageSMS message screen](https://usermanual.wiki/CATCHWELL/CW20.User-Manual/User-Guide-1574767-Page-46.png)
![47Sending Message1324Select the Message tab on the right of the phone program, and select [New SMS].Enter the receiver’s phone number, then press the [Add] button to add the number to the list.Select the Message tab on the right of the phone program, and select [New SMS].Press the [ ] button and select [1. Send] to send the message. It can receive up to a maximum of 99 text messages. If a new text message is received when the number exceeds the limit, the first received message is deleted. Because it does not support MMS, it may not interoperate with the Device embedded camera and other devices./PUF](https://usermanual.wiki/CATCHWELL/CW20.User-Manual/User-Guide-1574767-Page-47.png)
![485Adding Phone NumberAdd a phone number in the Address Book or modify the entry.Address Book1122Press [Address] tab and select [New Phone Number].Press the [Address] tab and double click the number ( ]–Send, [ ]-Main Screen, []-Menu Popup, [ ]-Edit Address book).Enter the name, group, and phone number,then press the [ ] button for saving.After the number appears, edit the entries and press the [ ] button to save the change. A phone number can be added from the Call History list as well./PUFEdit Phone Number](https://usermanual.wiki/CATCHWELL/CW20.User-Manual/User-Guide-1574767-Page-48.png)
![4967Call HistoryPhone SettingIt displays recent 100 calls sent and received.Set the basic phone options. The icons in the Setting menu are as follows:It displays information of the telephone and modem, and their versions.Version Information *Button Description: [ ]-Send, [ ]-Main Screen, [ ]-Menu Popup, [ ]-Detail.* The call history only shows detailed information on the subscription of the caller identification service (CID). For information on how to start the service, contact the mobile company.*The numbers registered in the Address book appear with the name of the Address book./PUFIcon Type DescriptionSent Mark sent callsReceived Mark received callsMissed Mark missed calls](https://usermanual.wiki/CATCHWELL/CW20.User-Manual/User-Guide-1574767-Page-49.png)
![50Set the sound options. ( [ ]-Save Changes, [ ]-Main Screen).Set various options for the phone display.([ ]-Save Changes, [ ]-Main Screen)Can select the phone’s background. (Basic setting is 1. Sunset.jpg)Can select the language for the device on the Display setting screen.DisplaySound Set](https://usermanual.wiki/CATCHWELL/CW20.User-Manual/User-Guide-1574767-Page-50.png)
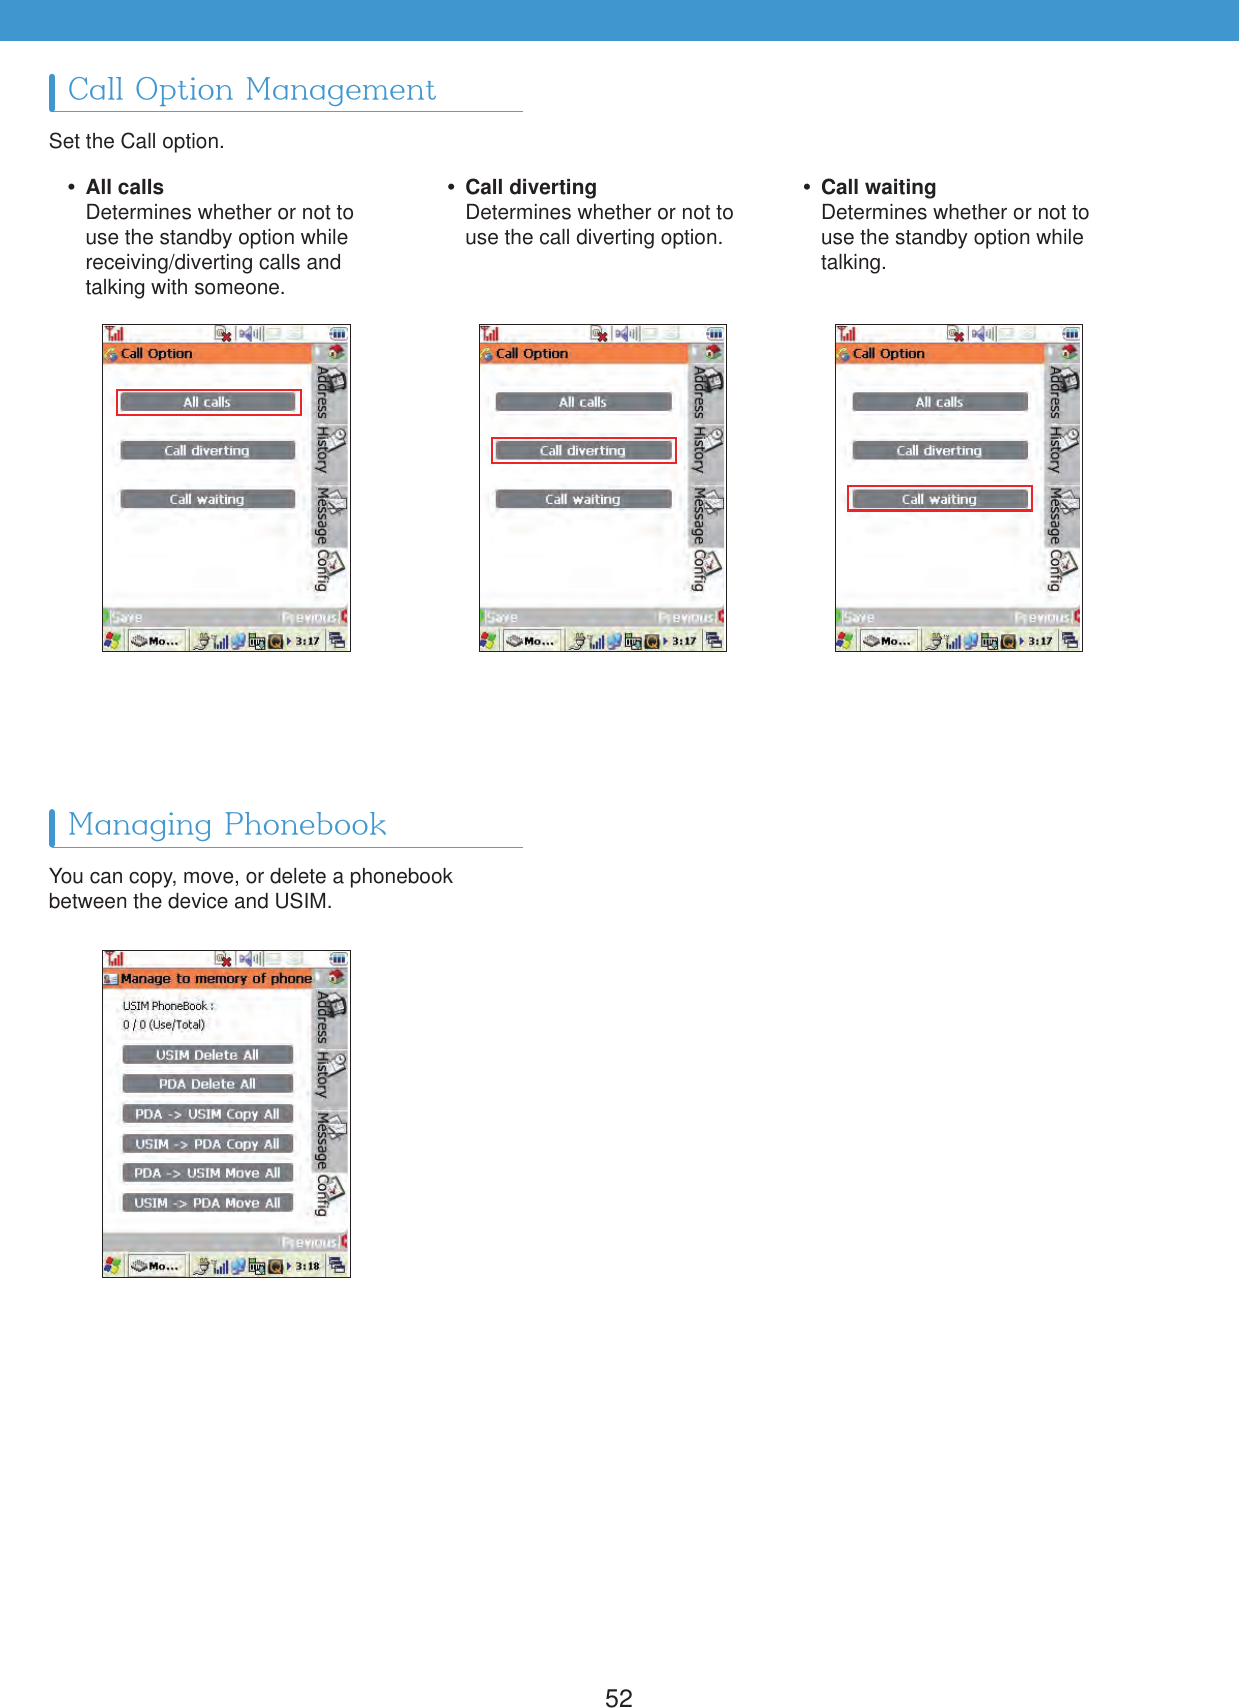
![51Configure the network settings and set the preferred network. Press [Select Band] to select a band from the list.Set the values for USIM PIN or edit them. Add an SMS Center manually. (Normally, information is obtained through the USIM card, so there is no need for setup) Determine whether or not to delete old SMS messages when memory is full.Network SettingUSIM SMS Communication might not be available if the network is set as Manual./PUF](https://usermanual.wiki/CATCHWELL/CW20.User-Manual/User-Guide-1574767-Page-51.png)
![541BluetoothConnect the device and a Bluetooth device. Before purchasing a Bluetooth printer, consult your administrator for compatibility.135246Turn the power of Bluetooth device (Bluetooth printer) on.From Wireless Setting, check ‘On’ for Bluetooth and press [Exit].When the next window appears, press [Inquiry] to search for any Bluetooth device.Select QuickLauncher from the taskbar or select [Wireless Setting] in Control Panel.Run SPPUI in \Storage\BTprinter.When a Bluetooth device appears, press [Connect] for connection.](https://usermanual.wiki/CATCHWELL/CW20.User-Manual/User-Guide-1574767-Page-54.png)
![55789Enter the PIN code and channel respectively (PIN:1234, Channel:1).The Bluetooth Status icon appears on the taskbar. To disconnect the Bluetooth device, select Bluetooth icon from the taskbar or [SPPUI] from [Programs] in the [Start] menu to open the window as shown below, and press [Exit] or [Stop] to disconnect the Bluetooth device. The PIN and channel number might differ depending on the Bluetooth device./PUF A Bluetooth can be turned On/Off from Wireless Setting./PUF](https://usermanual.wiki/CATCHWELL/CW20.User-Manual/User-Guide-1574767-Page-55.png)
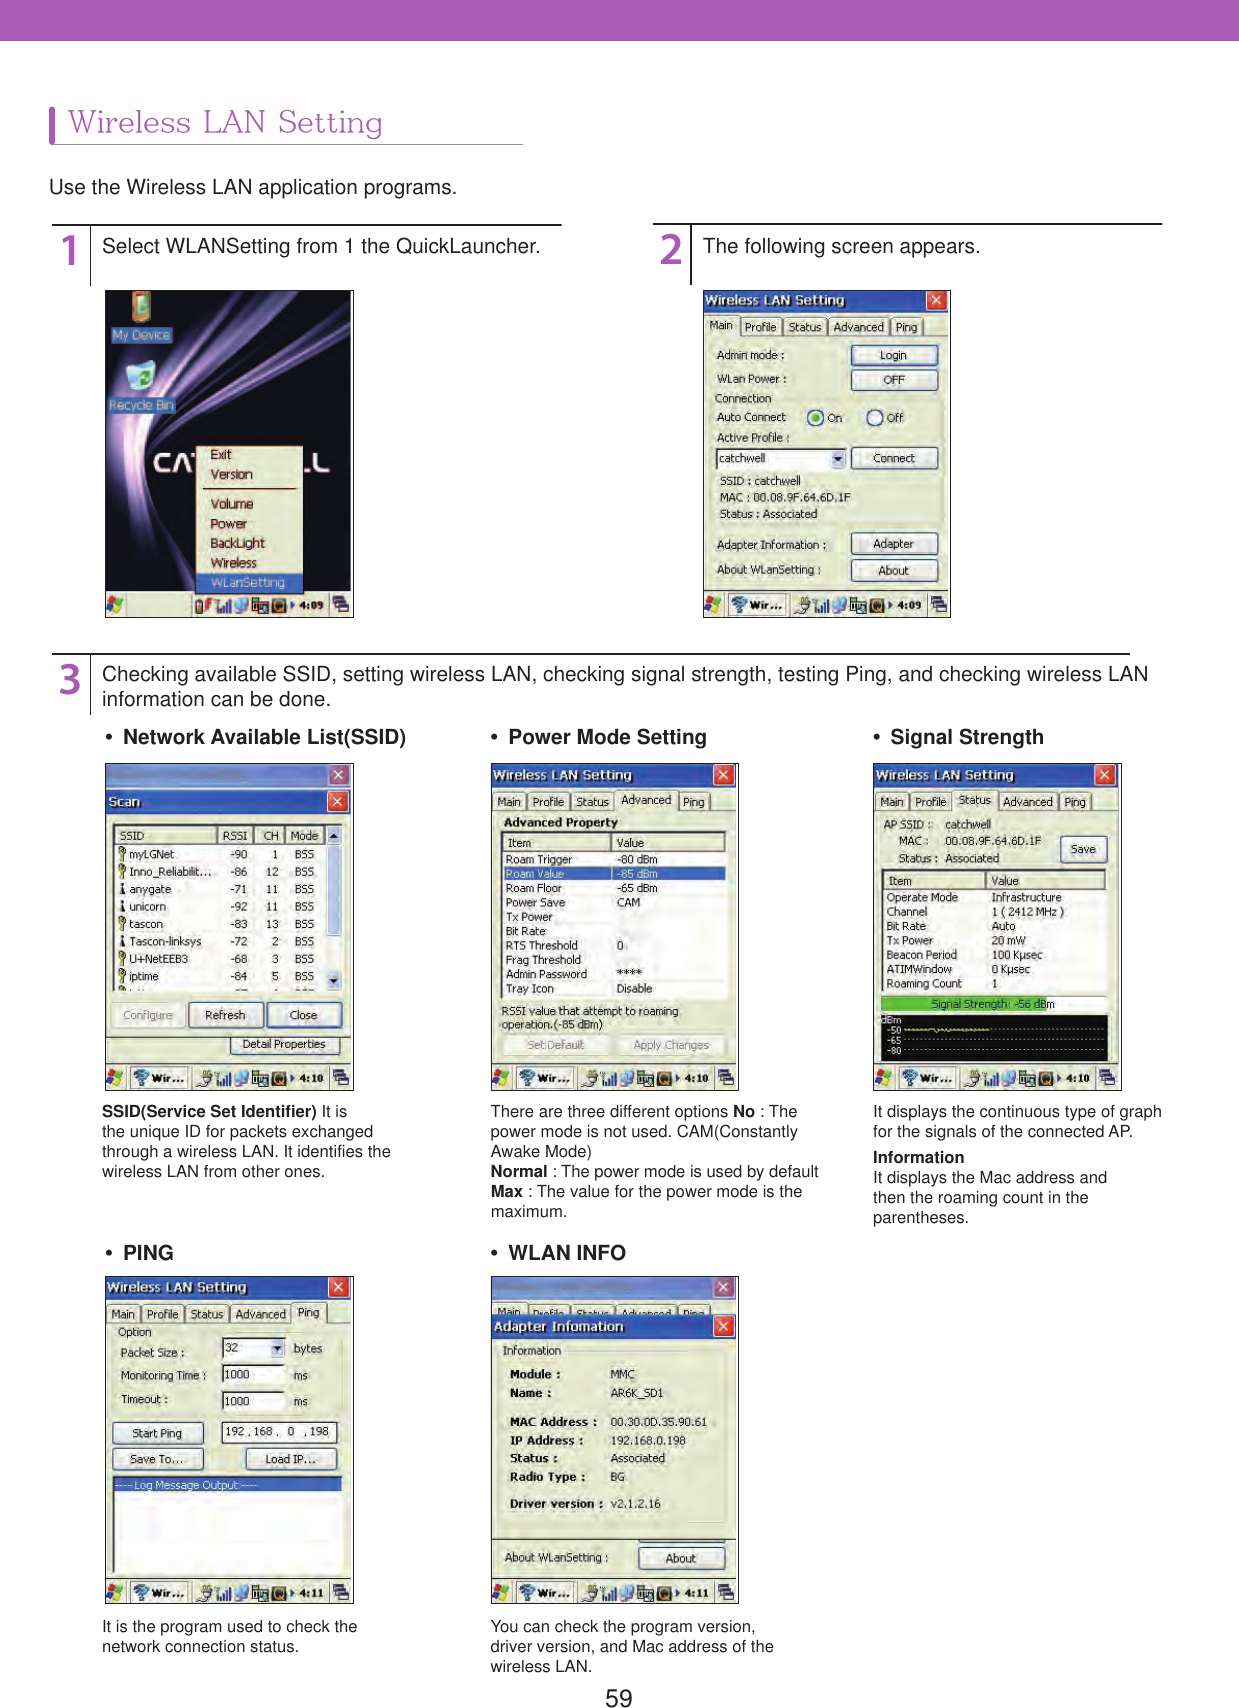
![562WI-FI Wireless CommunicationUse the device’s wireless LAN function.1342Select the Quick Launcher icon or [Wireless Setting] from the [Control Panel].Double click the Network icon in the taskbar.From the list of networks (Access Point device or Ad-hoc device), select one that you are using and press[Connect] to connect.(Network Key must be entered in case of secured wireless network).Select On for Wi-Fi in the Wireless Setting window and press [Exit].Adding Quick luancher list](https://usermanual.wiki/CATCHWELL/CW20.User-Manual/User-Guide-1574767-Page-56.png)
![57132Select On for Wi-Fi in the [Wireless Setting] window. Double click the Network icon in the taskbar.From the list of networks (Access Point device or Ad-hoc device), select one that you are using and press[Connect] to connect.(Network Key must be entered in case of secured wireless network).How to Set up Wireless LAN Configuration](https://usermanual.wiki/CATCHWELL/CW20.User-Manual/User-Guide-1574767-Page-57.png)
![5856Check if the network is connected correctly.If the desired network is not available, use [Add New] for setup and connection. In case of [Add New], the network name must be entered.12After turning Wi-Fi “On” from the [Wireless Setting], select [Start] > [Network and Dial-Up Connections], and click the icon as shown below (AR6K_SD1).When the following screen appears, enter the IP addresses for Fixed IP Address, Subnet ask, and Name Server.IP Setting](https://usermanual.wiki/CATCHWELL/CW20.User-Manual/User-Guide-1574767-Page-58.png)
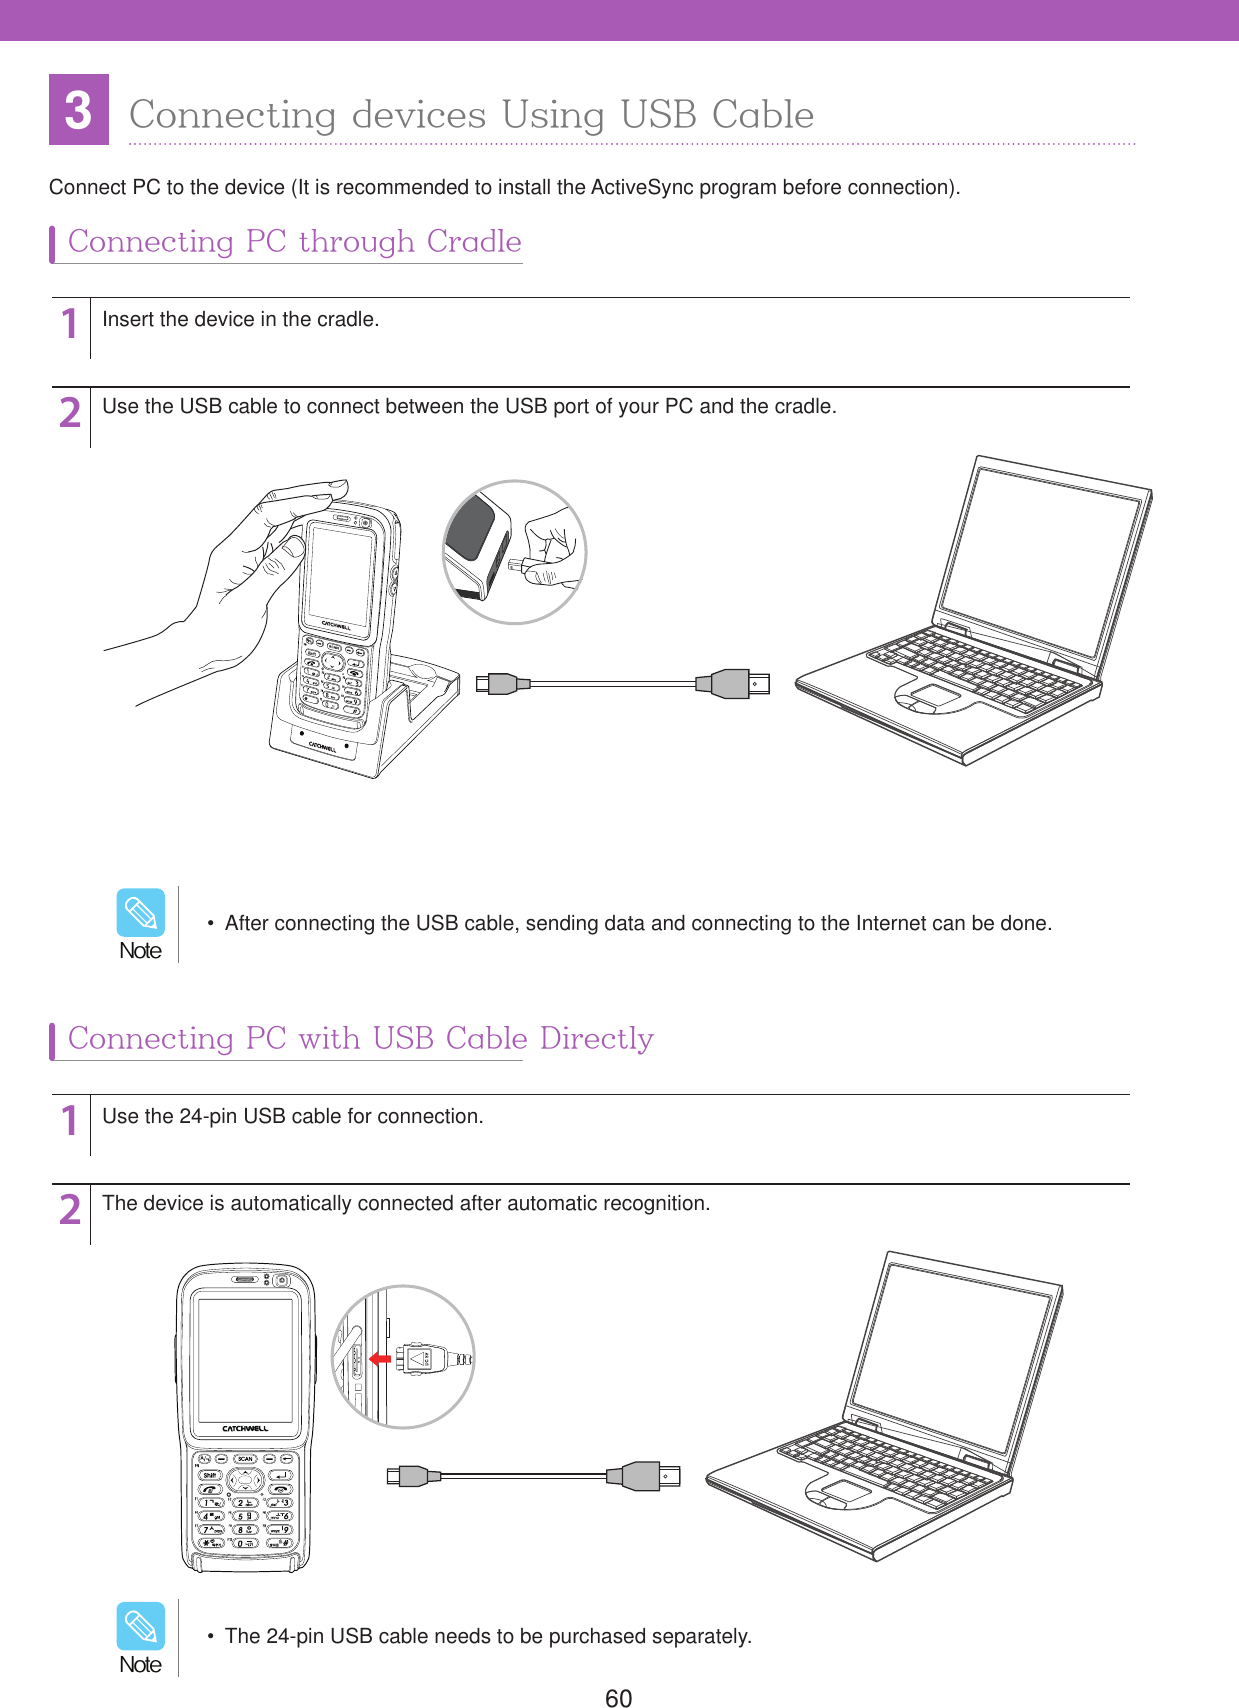
![614Communication with PCThrough the ActiveSync program, the data can be transferred between the device and PC.* What is ActiveSync?ActiveSync® is a communication program between PC and the device developed by Microsoft®, and it allows file transfer, deletion, content synchronization/modification, and other features.If any other device is connected to your PC before installation, please remove them before installation process.Use the provided CD or visit Microsoft® website (http://www.microsoft.com/downloads) to install ActiveSync program on your PC. It is recommended to install the latest version. If the PC has Microsoft® Windows Vista or the later version of Windows, instead of ActiveSync®, install Windows Mobile device Center® (http://www.microsoft.com/windowsmobile/ ko-kr/help/v6-5/ Windows-Mobile-device-Center-touch.aspx).12Download the ActiveSync program on your PC (based on ActiveSync 4.5). When the following screen appears, click [Install].Click the downloaded ActiveSync program to begin the installation process. Use either cradle or 24-pin USB cable for connection between the device and PC./PUFInstalling ActiveSync® on PC](https://usermanual.wiki/CATCHWELL/CW20.User-Manual/User-Guide-1574767-Page-61.png)
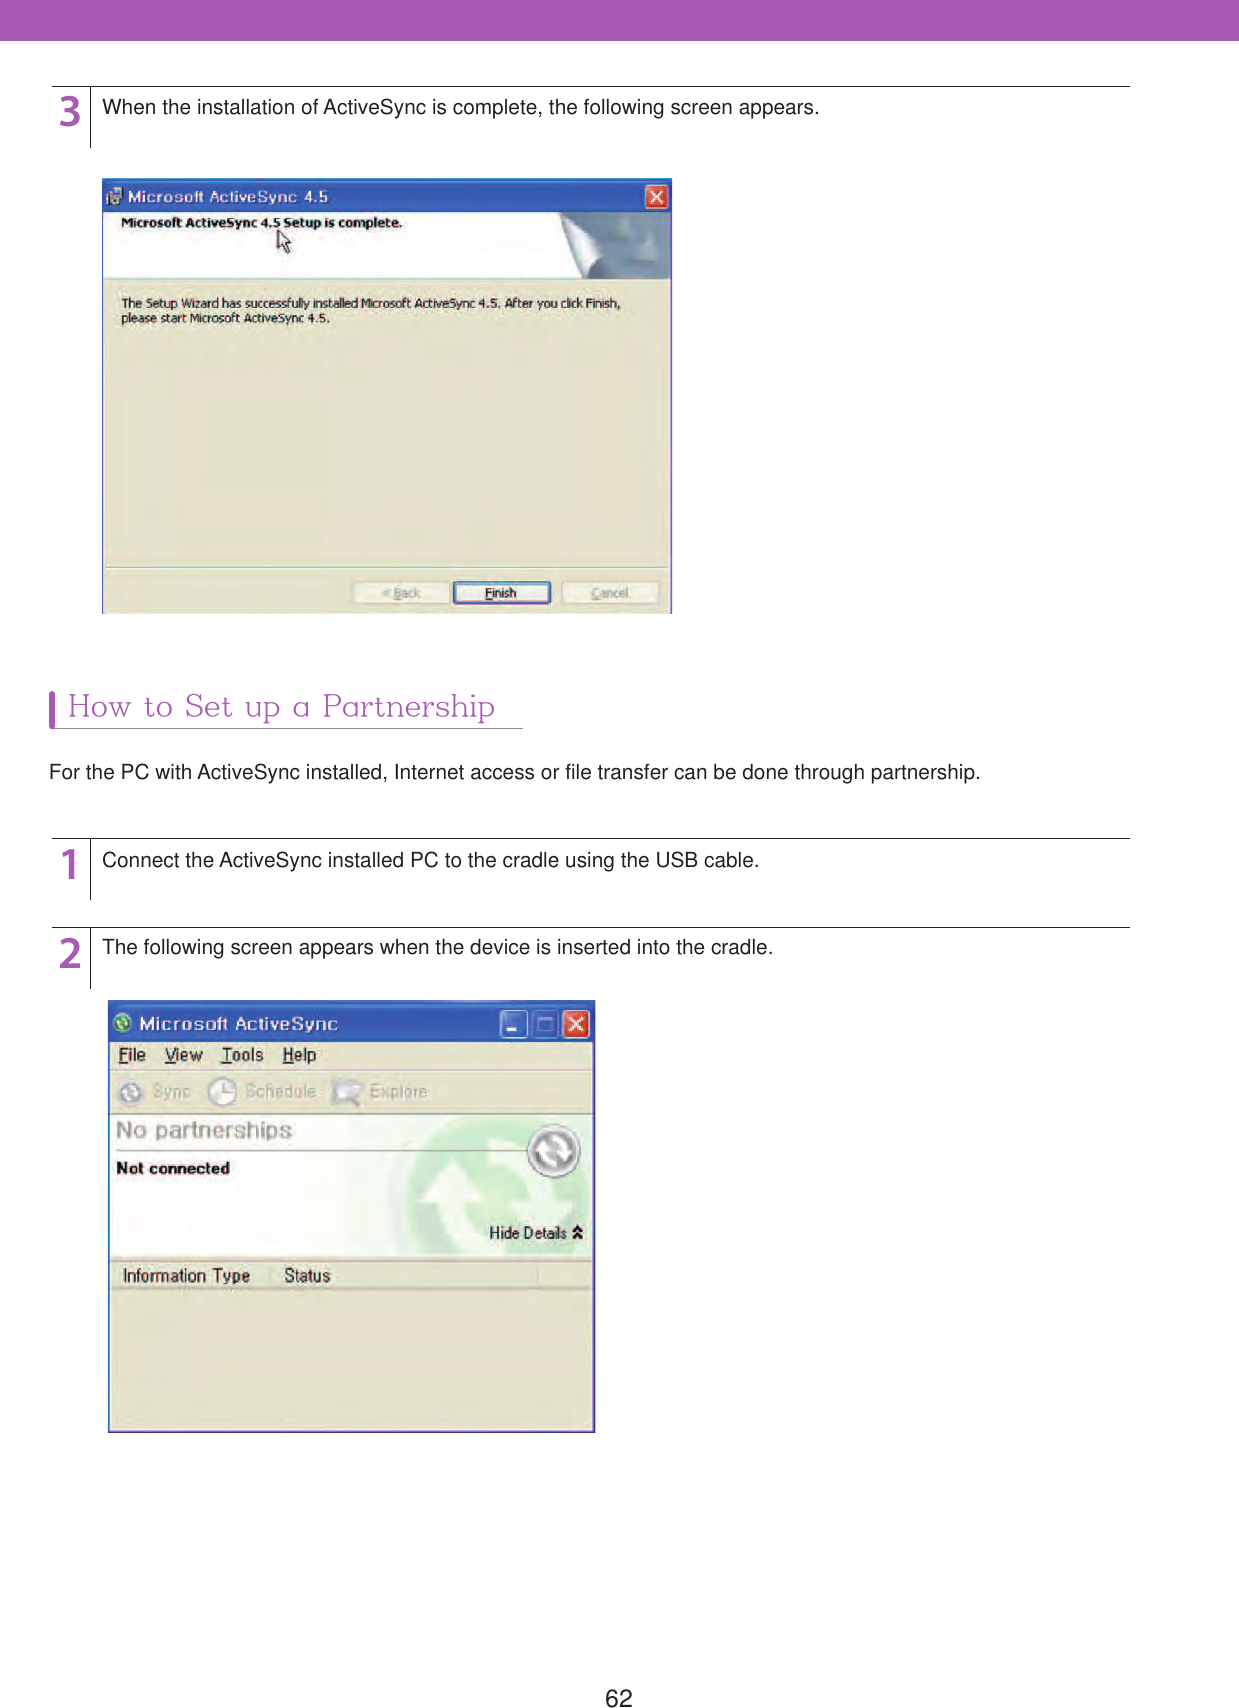
![6334If the connection is successful, the Set Up a Partnership screen appears. Select either Yes(Y) or No(N) then press [Next >].If Yes(Y) is selected, the screen below appears. Check the items for synchronization and press [Next >].](https://usermanual.wiki/CATCHWELL/CW20.User-Manual/User-Guide-1574767-Page-63.png)
![6456After synchronization, the Set up Complete screen appears as shown below. Press [Finish].When synchronization is complete, the connection window appears. The mobile device are automatically installed on My Computer after first synchronization./PUF After synchronization is established, the following tasks can be performed.1. Install a program for the work.2. Manage/Create backup for the work data.3. Manage the phonebook and other contact information./PUF](https://usermanual.wiki/CATCHWELL/CW20.User-Manual/User-Guide-1574767-Page-64.png)
![655GPS CommunicationsUse GPS (Built-in GPS is optional).How to Set Up GPS123Select VisualGPSce from [Start] > [Programs] or [My device] > [Storage] > [GPS].If the connection is good, the following screens appears with displaying the status of GPS.Strengths of each signal appear only when GPS signals are received properly. (In case proper signals are received: red light on the bottom disappears.)Satellites for each GPSsignal appear. Information on speed, altitude, and others appears. Statistical information of the position and DOP appears.On the bottom menu, select Serial Port(Comm Port) to open the following screens.- For built-in GPS: Set Port 1, 9600. - For other Bluetooth GPS: Set Port 7, 9600 (For more details, please refer to the GPS device manual) To use the Navigation function, the Navigation software needs to be installed separately. To purchase the software, contact your local distributor./PUF](https://usermanual.wiki/CATCHWELL/CW20.User-Manual/User-Guide-1574767-Page-65.png)
![671Laser scanning (1D Scanner)Use the barcode scanner or take digital photos.12Click the barcode icon on the taskbar to open the menu.(Show Barcode Info Mode, Tigger Off Mode)- Show Barcode Info Mode : Shows the barcode type and the value.- Tigger Off Mode : Stops barcode scanning.Press the scan button (Orange button [ ] on the center of the keypad, or the button on the side of the device).Scan method- Laser beam is projected when the scan button is pressed.- Align the horizontal laser beam with the center of the barcode.- Keep a distance of approximately 10 cm from the barcode and at a horizontal level. (The effective distance may vary depending on the type and size of the barcode.)(Correct) (Incorrect)](https://usermanual.wiki/CATCHWELL/CW20.User-Manual/User-Guide-1574767-Page-67.png)
![682Imager scanning (1D/2D Scanner)Scan 1D, 2D barcodes.12Click the barcode icon from the taskbar and select Scanning.( Decode only, Image &Decode, MultiScan Mode)Press the scan button (Orange button [ ] on the center of the keypad, or the button on the side of the device).Scan method- Aimer appears when the scan button is pressed.- Align the center of the aimer with the barcode.- Move the aimer to fit the barcode inside the square frame.- Keep a distance of approximately 10 cm from the barcode and at a horizontal level. (The effective distance may vary depending on the type and size of the barcode.)(Correct) (Incorrect)Aimer](https://usermanual.wiki/CATCHWELL/CW20.User-Manual/User-Guide-1574767-Page-68.png)
![693Digital CameraTake pictures and record videos.1122To take pictures, Select camera program (\Storage\camera). The screen below appears. Click the screen for preview.To record a video, select [Video] on the bottom of the screen.Set up Paths, Sound, Resolution and other options from Config tab and press the [ ] button to take a picture.Set up Paths, Sound, Resolution and other options from Config tab and press the Video tab. To record a video, press the [ ] button. While recording it, the recording time appears on the top.Taking PictureRecording Video Adjust the brightness in 5 level (1~5).Press [ ] to show focus while taking pictures.Supporting Resolutions are 640x480 / 800x600 / 1024x768 /1600x1200 / 2048x1536.The flash light can be turned on or off while taking pictures.While using the flash function, press the [BKSP] button on theNumeric pad to make the function active or not./PUF](https://usermanual.wiki/CATCHWELL/CW20.User-Manual/User-Guide-1574767-Page-69.png)

![711Microsoft Word PadHow to Use KeyboardThe device provides a basic writing program provided by Microsoft, and a document can be created using this program. User can select one of keyboard and transcriber for the input method. (The document created in your device can be uploaded to/downloaded from PC using MicrosoftActiveSync®).Use the virtual keyboard to create a document.132Click the WordPad icon in the main screen or by selecting [Start] > [Programs] to open the program as shown below.Adjust the location of the keyboard for convenience. Drag the keyboard to a different location using the stylus.Click the [ ] icon in the taskbar to show thekeyboard.Arrange of keys on the virtual keyboard may differ depending on the language setting or can be modified without notice./PUF](https://usermanual.wiki/CATCHWELL/CW20.User-Manual/User-Guide-1574767-Page-71.png)
![72How to Use TranscriberUse the stylus to write letters.1324Click the WordPad icon in the main screen or by selecting [Start] > [Programs] to open the program as shown below:The input menu appears on the bottom of the screen. Use the stylus to write characters, and it is automatically recognized.(The character type can be selected from Input Character Type on the writing area.)Click and hold the [ ] icon on the task bar to open the keyboard menu and select Transcriber.The position of writing can be moved in case of confusion. Drag the top of writing area to a different location using the stylus. Write a letter at a time for better recognition when using the transcriber. If the letter is not written in cursive and written in a different writing style, or more than two letters are written at a time, the writing might not be recognized correctly. To change from Transcriber to Keyboard, in Step 2, select Keyboard./PUF](https://usermanual.wiki/CATCHWELL/CW20.User-Manual/User-Guide-1574767-Page-72.png)
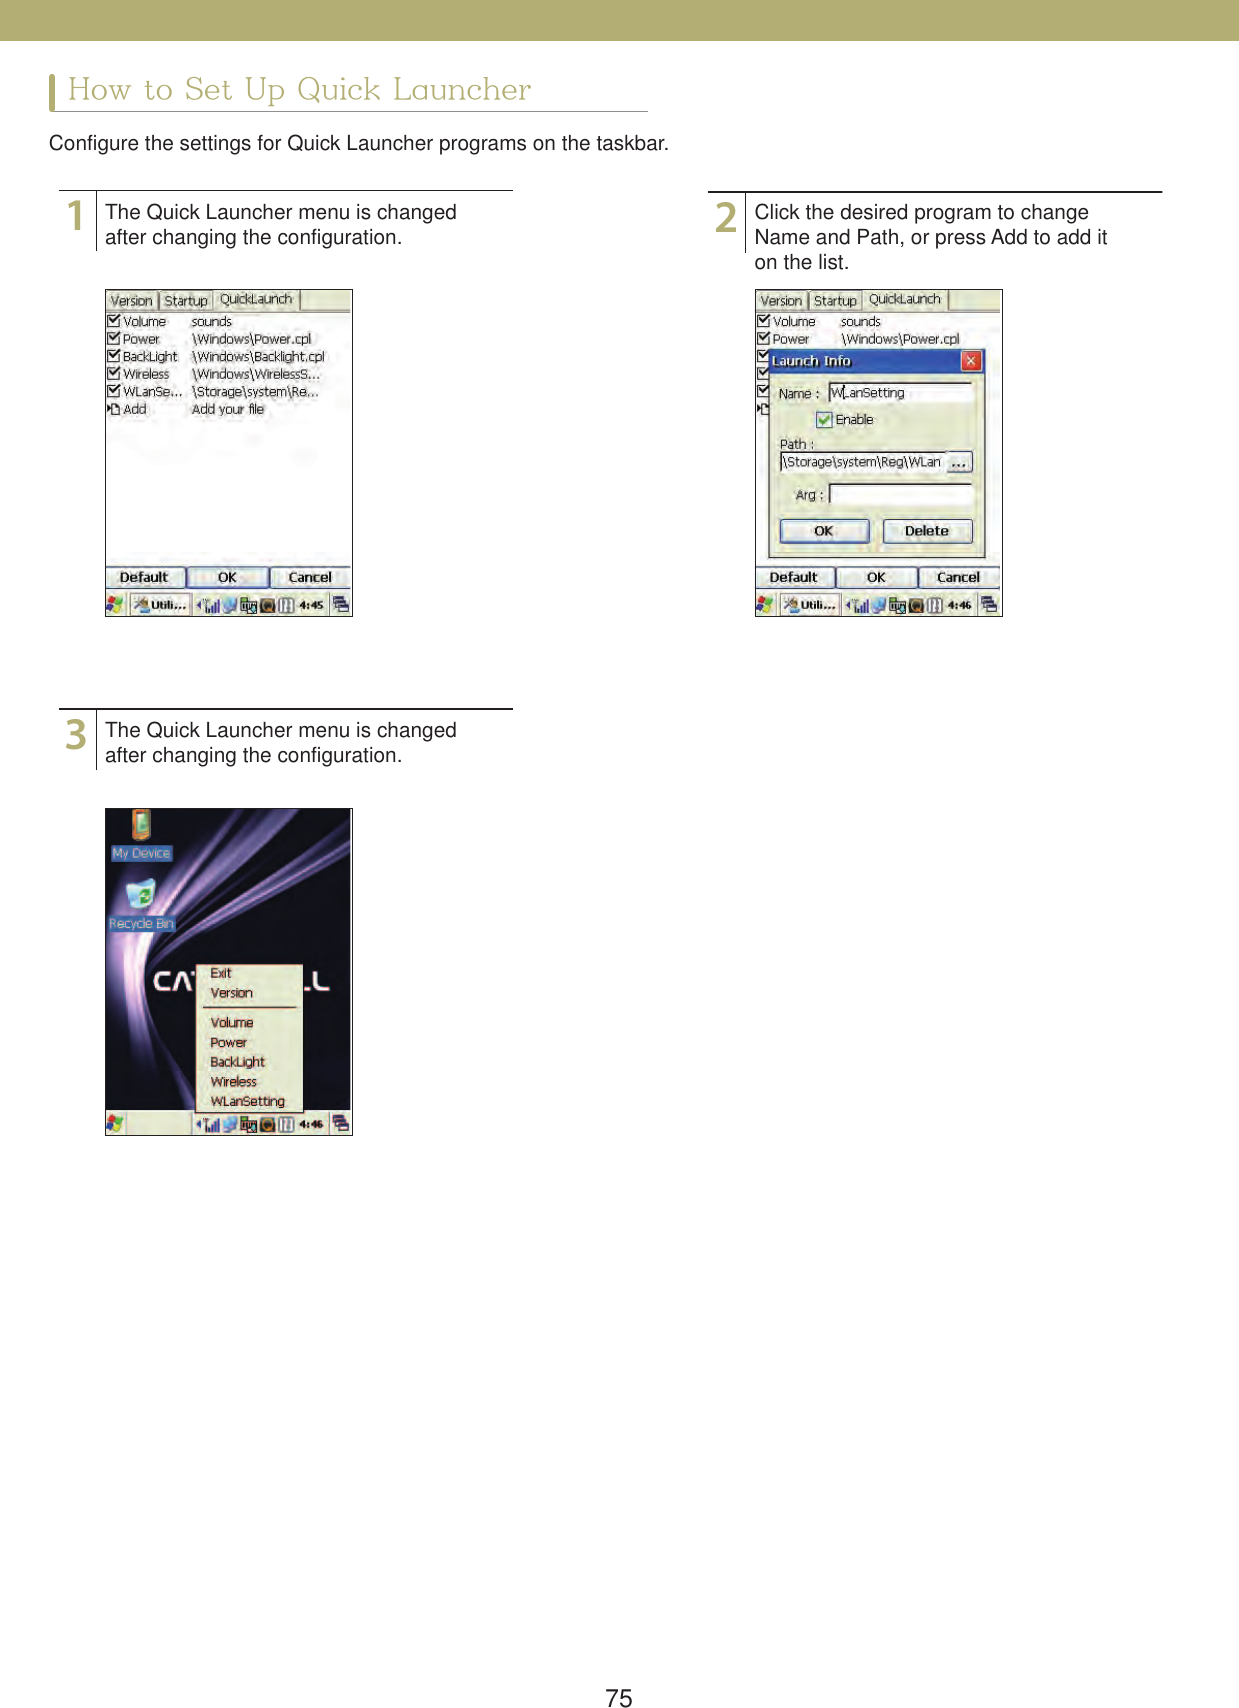
![732Utility ManagerConfigure the settings for the start program and Quick Launcher using Utility Manager. Faulty configuration can lead to a system malfunction. Please configure it after consulting your system administrator./PUFStarting Utility ManagerUse the stylus to write letters.12Select [Start] > [Settings] > [Control Panel] > [Utility Manager]. Press the [Admin] button and enter the password (admin password is 23646).](https://usermanual.wiki/CATCHWELL/CW20.User-Manual/User-Guide-1574767-Page-73.png)
![74How to Set Up Start ProgramSet the files that start automatically when the device boots up.12Select the Startup tab from the Utility Manager.Press Add to select a start program and enter Type, RunType, and Name, then press [OK].Type Description FunctionType System System ProgramUser User ProgramRunType WarmBoot / ColdBoot Start on BootingNone Do not ExecuteName Program NamePath File PathOption Option ParameterDescription User Description](https://usermanual.wiki/CATCHWELL/CW20.User-Manual/User-Guide-1574767-Page-74.png)